

Page 1
DYMO Label
Software
User Guide
Page 2
DYMO Corporation
44 Commerce Road
Stamford, CT 06902-4561
Phone: (203) 355-9000
Fax: (203) 355-9090
Copyright © 2003 DYMO Corporation. All rights reserved. Revised 4/03.
No part of this document or the Software may be reproduced or transmitted in any form or by any
means or translated into another language without the prior written consent of DYMO Corporation.
Trademarks LabelWriter is a registered trademark of DYMO Corporation. DYMO is a registered trademark of
Esselte Corporation. All other trademarks are the property of their respective holders.
ii
Page 3
Contents
Introduction . . . . . . . . . . . . . . . . . . . . . . . . . . . . . . . . . . . . . . . . . . . . . . . . . . . . . . . . . . . . . . . . . . . . . . . . . . . . . 1
Installing the LabelWriter . . . . . . . . . . . . . . . . . . . . . . . . . . . . . . . . . . . . . . . . . . . . . . . . . . . . . 1
Registering the Software . . . . . . . . . . . . . . . . . . . . . . . . . . . . . . . . . . . . . . . . . . . . . . . . . . . . . . 2
Getting Help. . . . . . . . . . . . . . . . . . . . . . . . . . . . . . . . . . . . . . . . . . . . . . . . . . . . . . . . . . . . . . . . 2
Chapter 1
Getting Started . . . . . . . . . . . . . . . . . . . . . . . . . . . . . . . . . . . . . . . . . . . . . . . . . . . . . . . . . . . . . . . . . . . . . . . . . 3
DYMO Label Window. . . . . . . . . . . . . . . . . . . . . . . . . . . . . . . . . . . . . . . . . . . . . . . . . . . . . . . . 3
Creating a New Label . . . . . . . . . . . . . . . . . . . . . . . . . . . . . . . . . . . . . . . . . . . . . . . . . . . . . . . . 4
Chapter 2
Using the Label Designer . . . . . . . . . . . . . . . . . . . . . . . . . . . . . . . . . . . . . . . . . . . . . . . . . . . . . . . . . . . . . 11
Starting the Designer . . . . . . . . . . . . . . . . . . . . . . . . . . . . . . . . . . . . . . . . . . . . . . . . . . . . . . . . 11
Design Objects . . . . . . . . . . . . . . . . . . . . . . . . . . . . . . . . . . . . . . . . . . . . . . . . . . . . . . . . . . . . . 11
Creating a New Label File . . . . . . . . . . . . . . . . . . . . . . . . . . . . . . . . . . . . . . . . . . . . . . . . . . . . 13
Opening an Existing Label File . . . . . . . . . . . . . . . . . . . . . . . . . . . . . . . . . . . . . . . . . . . . . . . . 13
Adding an Object . . . . . . . . . . . . . . . . . . . . . . . . . . . . . . . . . . . . . . . . . . . . . . . . . . . . . . . . . . . 14
Deleting Objects. . . . . . . . . . . . . . . . . . . . . . . . . . . . . . . . . . . . . . . . . . . . . . . . . . . . . . . . . . . . 14
Chapter 3
Working with Lists. . . . . . . . . . . . . . . . . . . . . . . . . . . . . . . . . . . . . . . . . . . . . . . . . . . . . . . . . . . . . . . . . . . . . 15
Using the Address Book . . . . . . . . . . . . . . . . . . . . . . . . . . . . . . . . . . . . . . . . . . . . . . . . . . . . . 15
Creating a New List . . . . . . . . . . . . . . . . . . . . . . . . . . . . . . . . . . . . . . . . . . . . . . . . . . . . . . . . . 17
Opening an Existing List . . . . . . . . . . . . . . . . . . . . . . . . . . . . . . . . . . . . . . . . . . . . . . . . . . . . . 18
Using Address Fixer (Windows) . . . . . . . . . . . . . . . . . . . . . . . . . . . . . . . . . . . . . . . . . . . . . . . 18
Printing Internet Postage (Windows) . . . . . . . . . . . . . . . . . . . . . . . . . . . . . . . . . . . . . . . . . . . . 18
Chapter 4
Printing Labels Using Smart Paste . . . . . . . . . . . . . . . . . . . . . . . . . . . . . . . . . . . . . . . . . . . . . . . . . . 19
About Smart Paste . . . . . . . . . . . . . . . . . . . . . . . . . . . . . . . . . . . . . . . . . . . . . . . . . . . . . . . . . . 19
Printing Multiple Labels Using Smart Paste . . . . . . . . . . . . . . . . . . . . . . . . . . . . . . . . . . . . . . 21
iii
Page 4
Chapter 5
Using the LabelWriter with Other Applications . . . . . . . . . . . . . . . . . . . . . . . . . . . . . . . . . . . 23
Add-In for Microsoft Word. . . . . . . . . . . . . . . . . . . . . . . . . . . . . . . . . . . . . . . . . . . . . . . . . . . 23
Additional Windows Application Add-Ins . . . . . . . . . . . . . . . . . . . . . . . . . . . . . . . . . . . . . . . 24
About the ACT! and GoldMine Add-Ins . . . . . . . . . . . . . . . . . . . . . . . . . . . . . . . . . . . . . . . . 25
Printing Directly from Other Applications . . . . . . . . . . . . . . . . . . . . . . . . . . . . . . . . . . . . . . . 26
Chapter 6
Maintenance and Troubleshooting. . . . . . . . . . . . . . . . . . . . . . . . . . . . . . . . . . . . . . . . . . . . . . . . . . 27
Caring for the LabelWriter Printer . . . . . . . . . . . . . . . . . . . . . . . . . . . . . . . . . . . . . . . . . . . . . 27
Performing a Printer Self-Test . . . . . . . . . . . . . . . . . . . . . . . . . . . . . . . . . . . . . . . . . . . . . . . . 27
Obtaining Technical Support . . . . . . . . . . . . . . . . . . . . . . . . . . . . . . . . . . . . . . . . . . . . . . . . . 28
Appendix A
Printer Specifications . . . . . . . . . . . . . . . . . . . . . . . . . . . . . . . . . . . . . . . . . . . . . . . . . . . . . . . . . . . . . . . . . 29
Developer and SDK Information . . . . . . . . . . . . . . . . . . . . . . . . . . . . . . . . . . . . . . . . . . . . . . 30
iv
Page 5
Introduction
Congratulations on purchasing the DYMO LabelWriter® printer. After just a short time, you will
realize how many of your daily tasks will be simplified by using the LabelWriter printer.
Your LabelWriter printer will help you to address letters; label file folders, CD/DVDs, video
cassettes, packages, and name tags; and print Internet postage. With a little imagination, you will
think of hundreds of ways to use the LabelWriter printer to make your job easier and more efficient.
This User Guide provides instructions for DYMO Label Software on the Windows and Macintosh
platforms. For the most part, the software operates in the same way on both platforms. Any
differences in features, procedures, or commands are noted within the text.
Software DYMO Label Software includes many features that make it flexible and easy to use. In addition,
DYMO has integrated the Label Software into Microsoft
quickly and easily from within Word. For Windows, the software has also been integrated with
Microsoft
®
Outlook®, Palm™ Desktop, GoldMine®, and ACT!™ software.
Hardware The LabelWriter printer uses advanced thermal printing technology to print on specially treated
labels. This means you will never have to replace toner, ink cartridges, or a ribbon to print labels.
Direct thermal printing works by transferring heat from a thermal print head to specially treated
labels. The thermal print head contains a row of miniature heating elements that press against the
treated label. As a heating element touches the specially treated label, a thermal reaction causes the
specific point on the label to turn black.
®
Word allowing you to print labels
Labels The only supplies you will ever need for this printer are the labels. We recommend you only use
DYMO-brand labels. Using labels other than DYMO-brand labels may void your warranty.
How long your labels will last depends on how the labels are used. Thermal labels are susceptible
to fading in two ways:
• Exposure to direct sunlight, to fluorescent light for an extended period of time, or to extreme
heat will cause fading.
• Contact with plasticizers (for example, labels placed on plastic ring binders) will cause fading.
In its original packaging, the label shelf life is 18 months. When labels are used for short-term
applications (envelopes, packages, and so on), fading is not a problem. When labels are used to
label files in a file cabinet, fading is very gradual over many years. Labels applied to the edge of a
notebook that is then placed on a shelf in the sun will show signs of fading within a few months.
To prolong label life when not in use, keep the labels stored in a cool, dry place and in the black bag
in which they were shipped.
Installing the LabelWriter
Your LabelWriter printer shipped with a Quick Start Guide in addition to this User Guide. Follow
the instructions in the Quick Start Guide to install your printer and DYMO Label Software.
1
Page 6
Introduction
Registering the Software
We highly recommend that you register your DYMO Label Software so that you can receive
customer support and product updates.
Macintosh users can register their software by selecting Register DYMO LabelWriter from the
Help menu.
Windows users can also register their software by selecting Register from the Help menu.
However, the first time Windows users start DYMO Label Software, you will be asked to register.
If you choose not to register the software at this time, you will be prompted the next several times
you start the program.
To register the software
1 Complete all of the required fields on the registration form.
2 Choose to register over the Internet or print the registration form for mail or fax registration.
If you register over the Internet, wait a few seconds while your information is sent to DYMO.
3 To register by mail or fax, print the completed registration form, and mail or fax the form to the
location printed on the form.
Getting Help
Before making labels, you should know about the various help resources available to you. DYMO
Label Software includes extensive online Help. At times in this manual you will be directed to the
online Help for more detail or instructions on various topics.
To access the online Help, do one of the following
➤ In DYMO Label Software, click Help Contents (Windows) or LabelWriter Help
(Macintosh) from the Help menu.
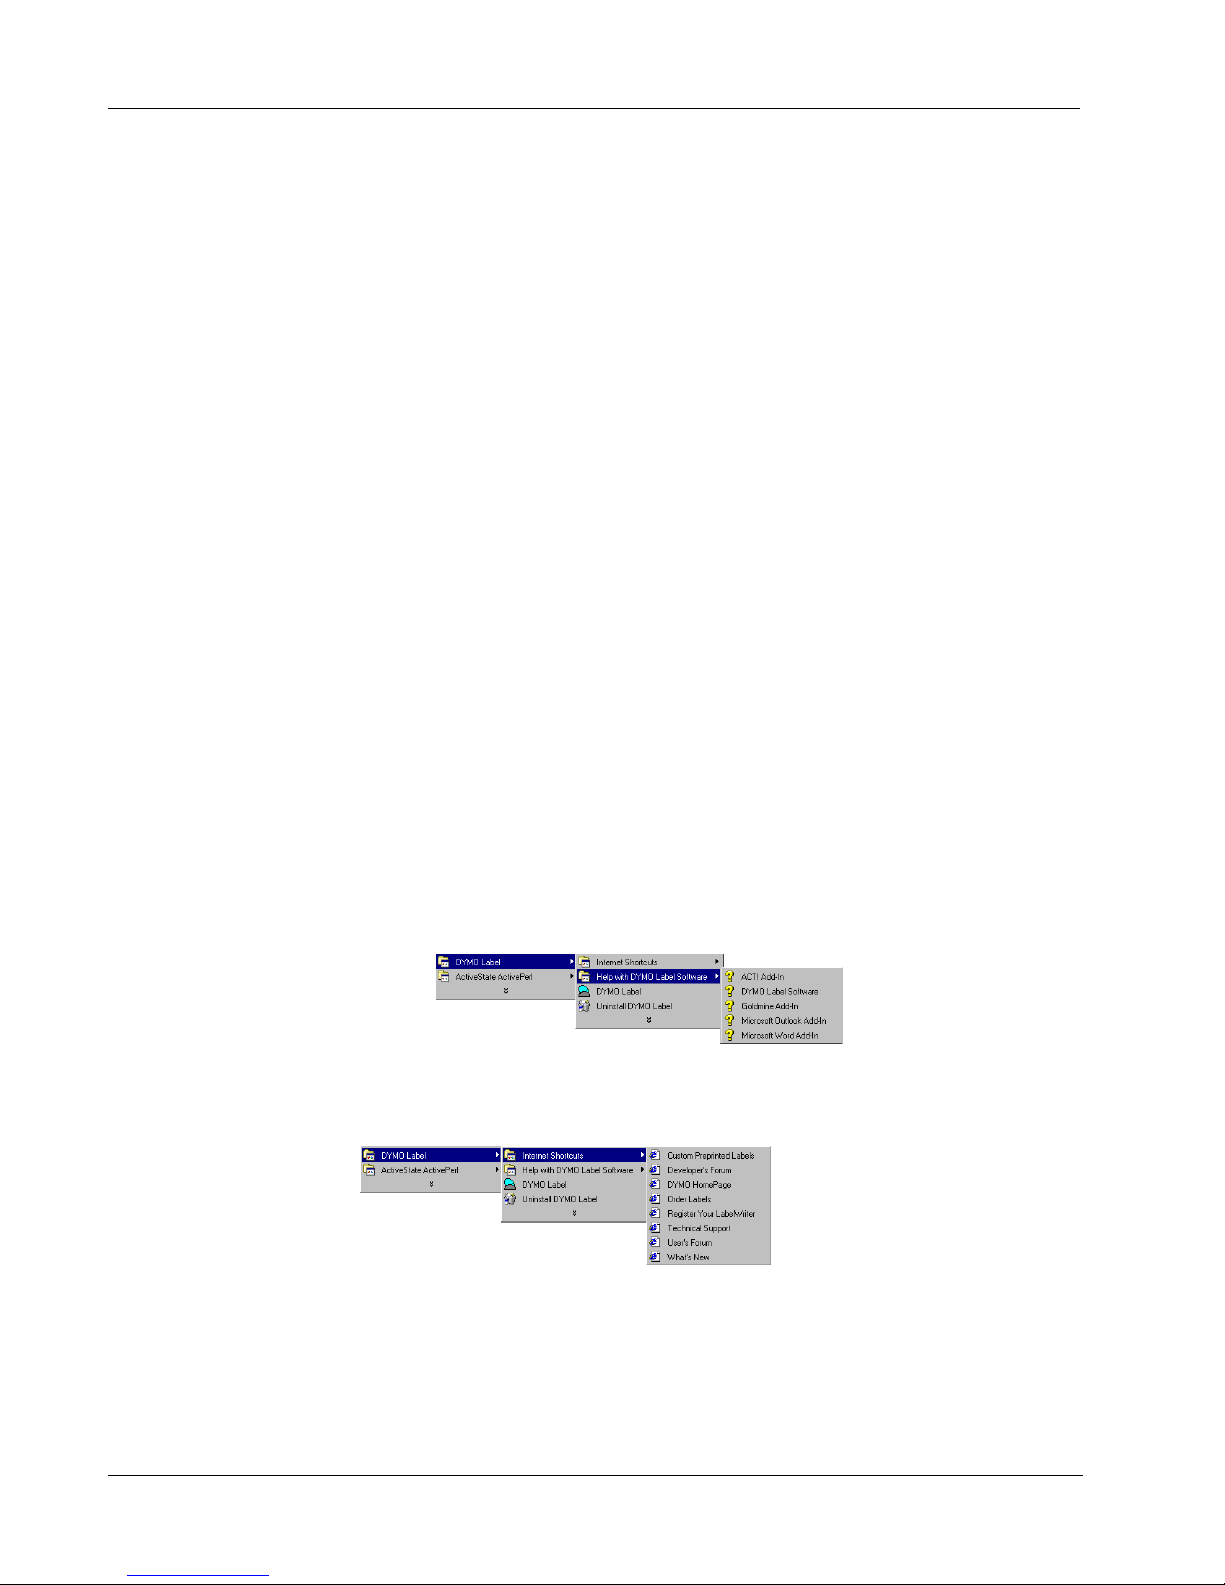
➤ (Windows) Click Start, point to Programs > DYMO Label, and then click Help with
DYMO Label Software.
➤ (Windows) Press F1 in most windows and dialog boxes for context-sensitive help.
(Windows) The DYMO Label menu also includes Internet Shortcuts that access specific areas of
the DYMO Web site, including label ordering, support, and more.
These shortcuts are also available from the Help menu in DYMO Label Software.
2
Page 7
Chapter 1
Getting Started
DYMO Label Software is a general-purpose label printing program that is specifically designed to
help you get the most benefit from your LabelWriter printer. The program includes:
• Many pre-designed labels for commonly used tasks
• A built-in Designer you can use to create your own label designs (see page 11)
• A built-in Address Book that lets you save addresses or other types of lists (see page 15)
• Add-ins to print directly from the following programs:
Microsoft Word
Microsoft Outlook (Windows only)
Palm Desktop (Windows only)
ACT! and GoldMine (Windows only)
Many of DYMO's partners have also integrated label printing into their software including
Corex CardScan, Sage Software’s TeleMagic, and eGrabber.
• A Smart Paste function allowing you to automatically print multiple labels by copying text
from other applications directly into the current label (see page 19)
• Database connectivity allowing you to print from an Access, Paradox, dBase, or Excel
database (see page 26) (Windows only)
• Integration with Stamps.com for printing Internet postage (Windows only)
DYMO Label Window
This section introduces some basic features available in DYMO Label Software.
To start the software in Windows
➤ Click Start, point to Programs > DYMO Label, and then click DYMO Label.
To start the software in Mac OS X
➤ Open the DYMO Label folder and double-click .
3
Page 8
Getting Started
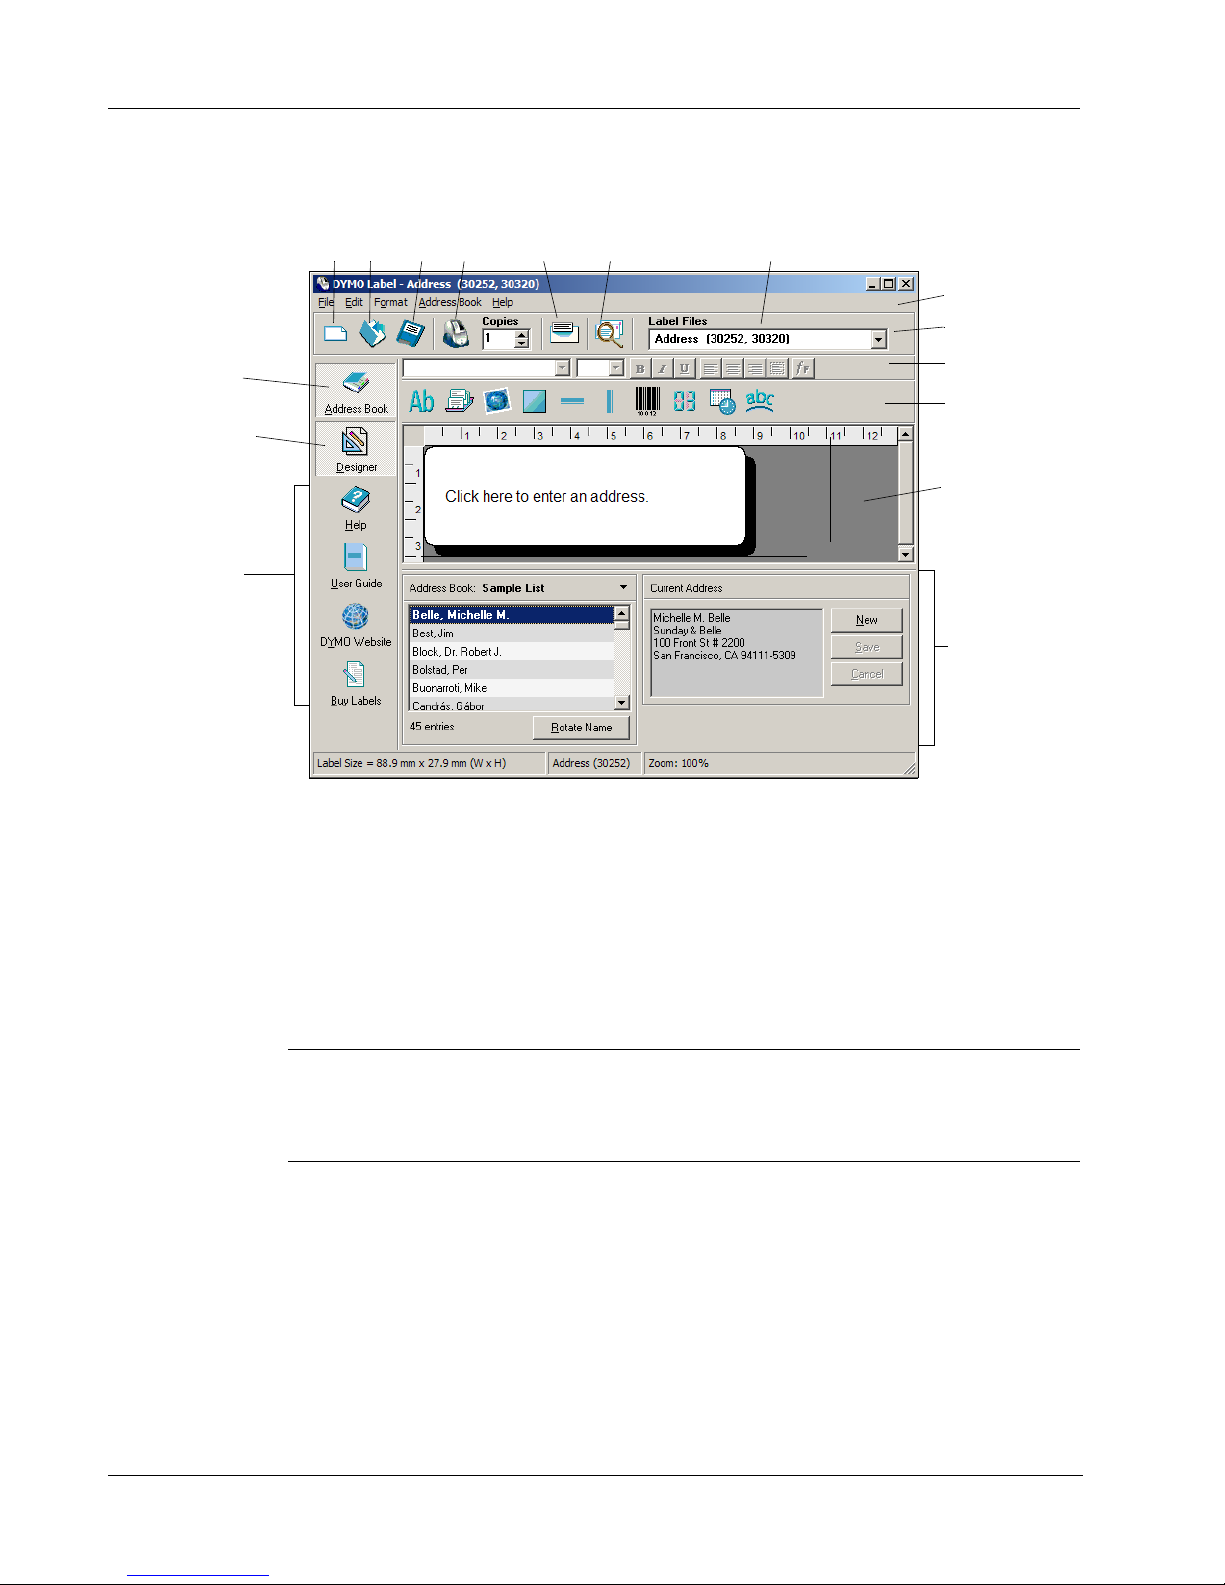
The DYMO Label Software window appears containing a blank label.
Address
Book
Label
Designer
Helpful
Links
New
SaveOpen Print Paste
Address Fixer
(Windows)
Label Files List
Menu Bar
Main
Toolb ar
Formatting
Toolb ar
Designer
Toolb ar
Label
Workspace
Rulers
Address
Book Panel
For Windows users, the first time you open DYMO Label Software, you are prompted to register
the software. See "Registering the Software" on page 2. All users are also asked to enter your return
address and select a default logo.
Creating a New Label
This tutorial guides you through the steps necessary to create, print, and save a customized label.
The best way to start is to learn how to modify one of the pre-designed labels included with the
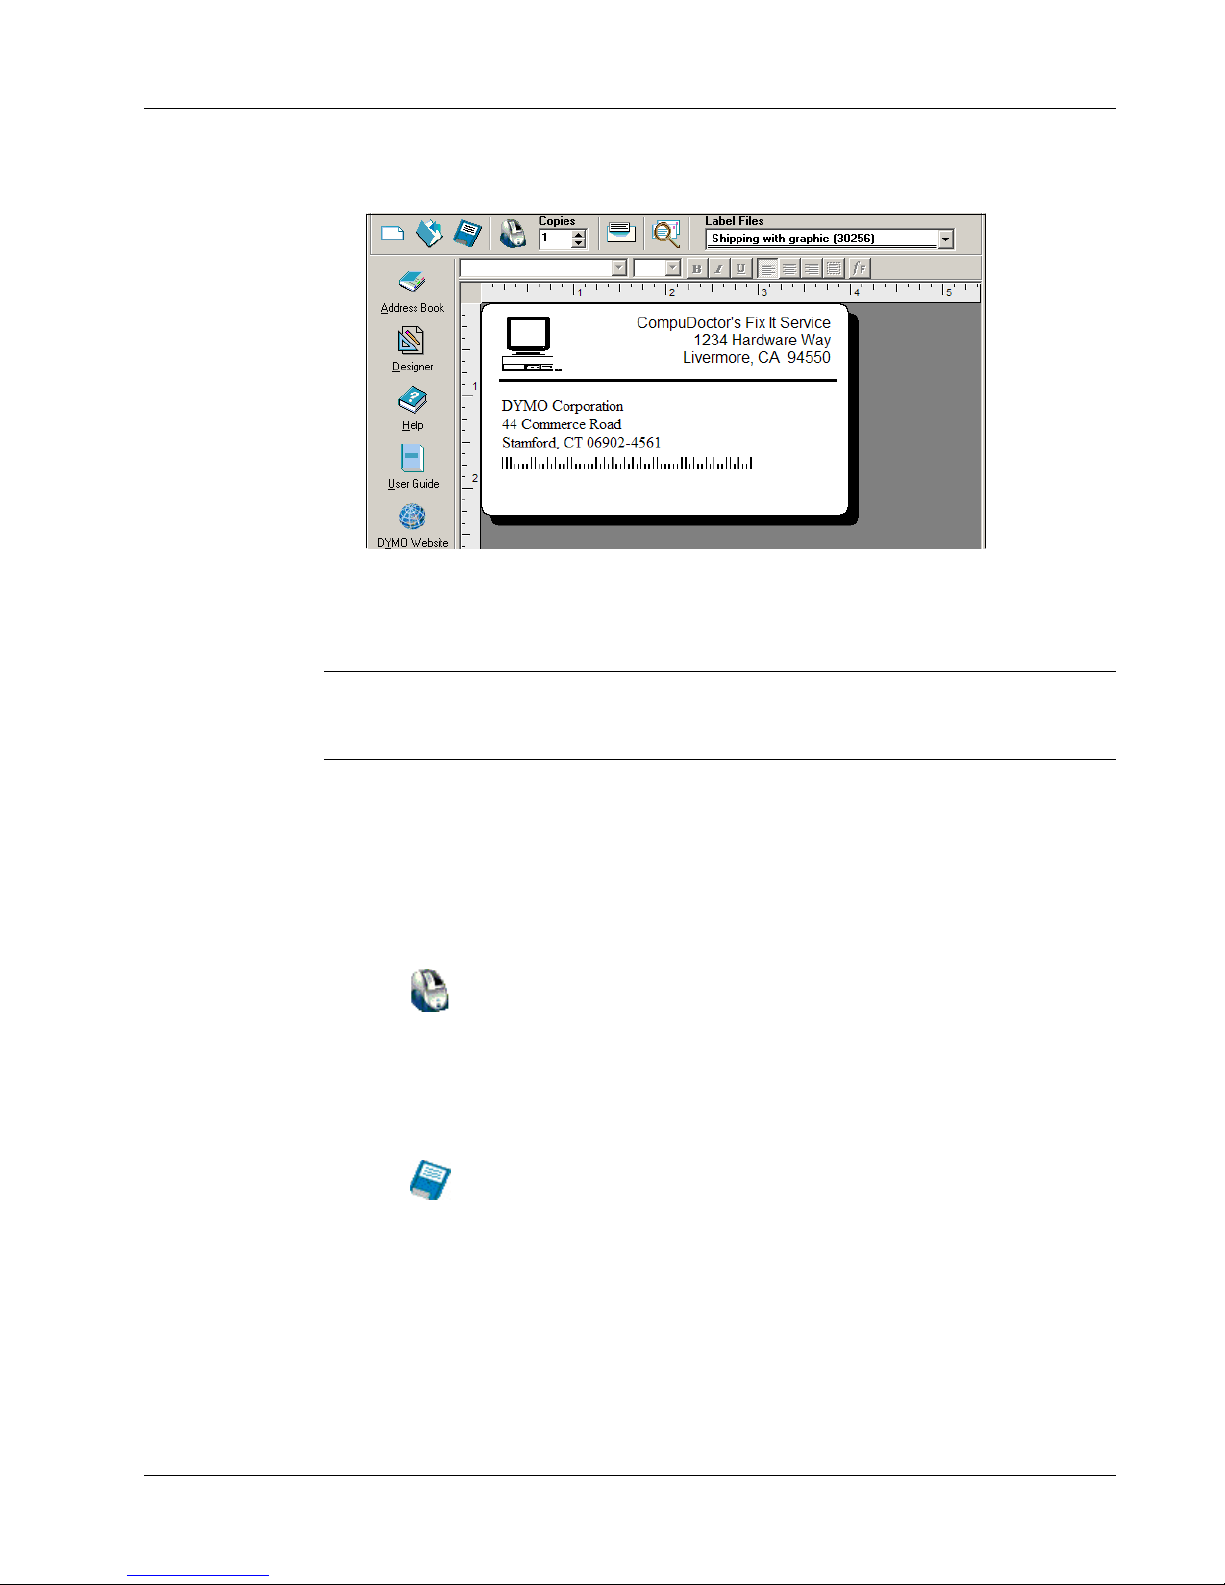
software. In this tutorial, you will customize a shipping label with a graphic.
NOTE You can only print the shipping label on the LabelWriter EL60, Turbo, 320, 330, and
330 Turbo printers. If you have a LabelWriter EL40, 300, 310, or 315 printer, select this shipping
label and follow the tutorial anyway. This tutorial will give you valuable information on how to
access the various text and design objects, and change their attributes.
4
Page 9
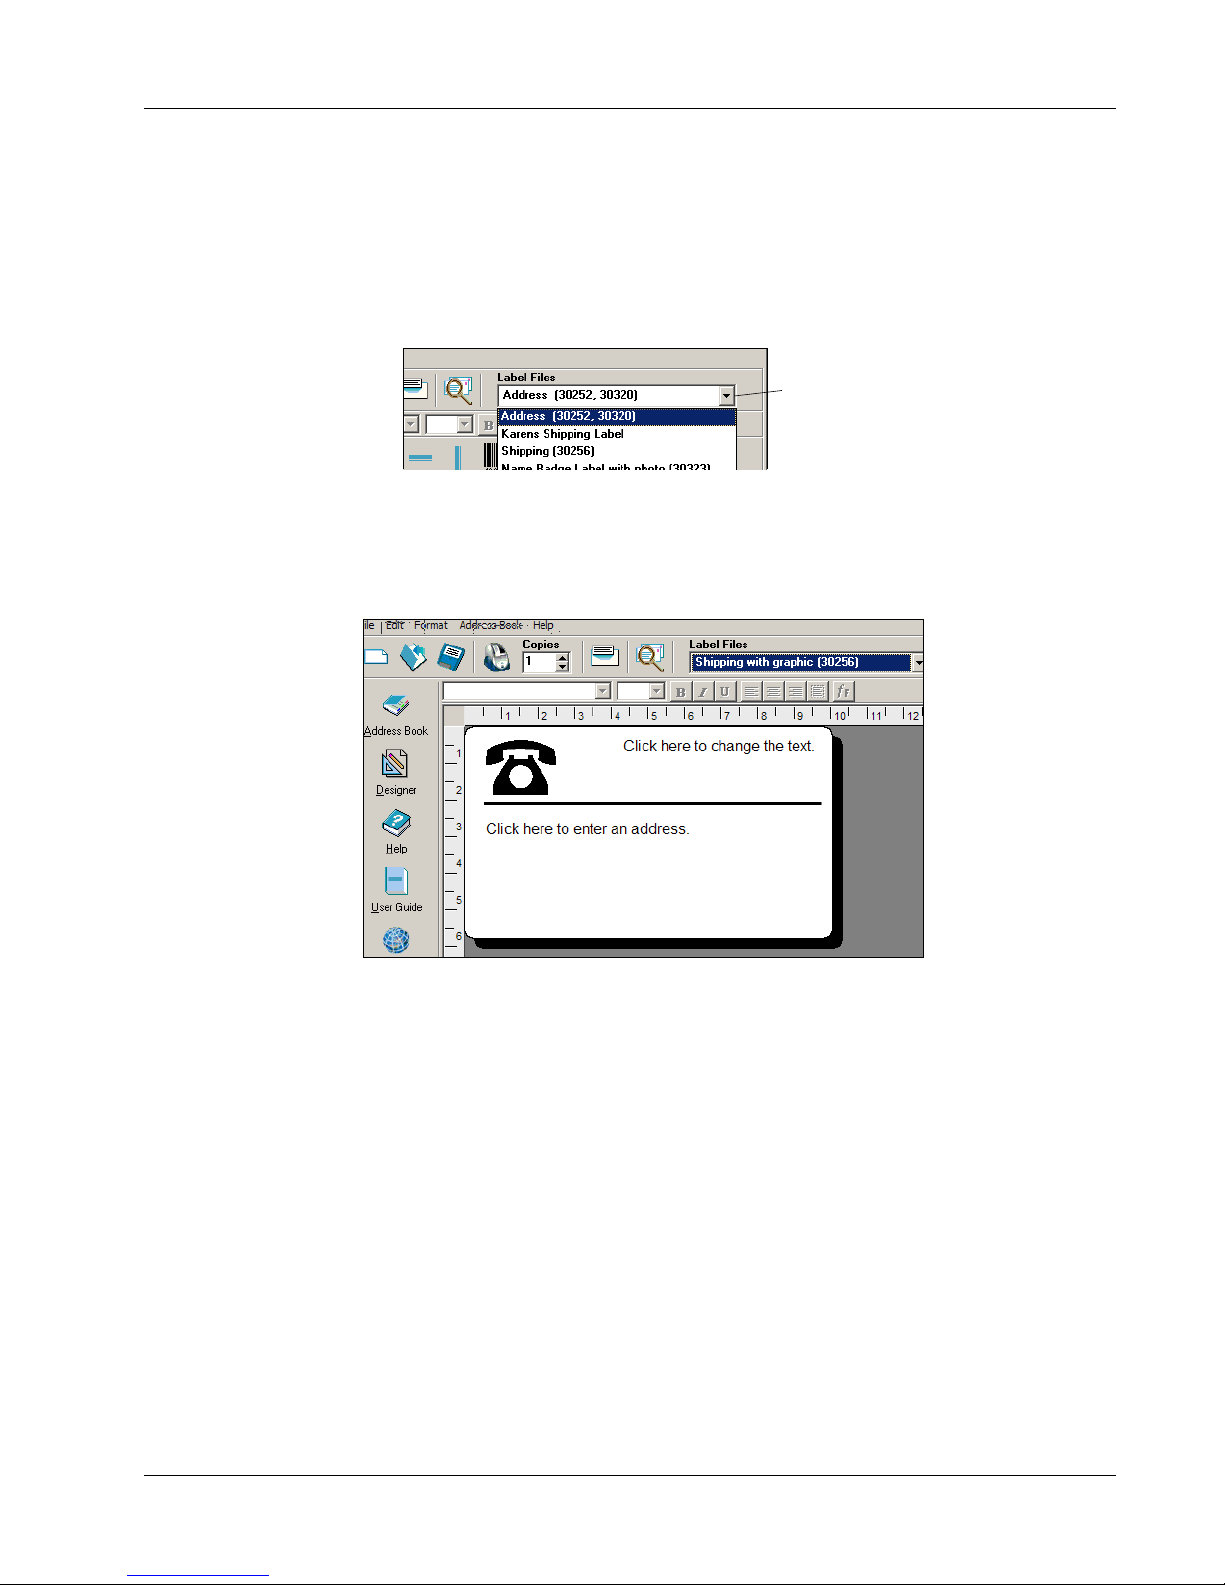
Choosing a Label File
The first step is to choose a label file as the basis for your new label.
To choose a label file
1 Select the arrow next to the Label Files drop-down list.
A list of the most recently used label files appears.
If necessary, click More to access all the pre-designed labels. Notice that all label files are
listed with the label type first, then any important objects on the label, and finally the part
number of the label.
2 Select the Shipping with graphic (30256) label.
The Shipping with graphic label appears in the main window.
Creating a New Label
Click here to display the list of
recently used labels.
Changing the Graphic
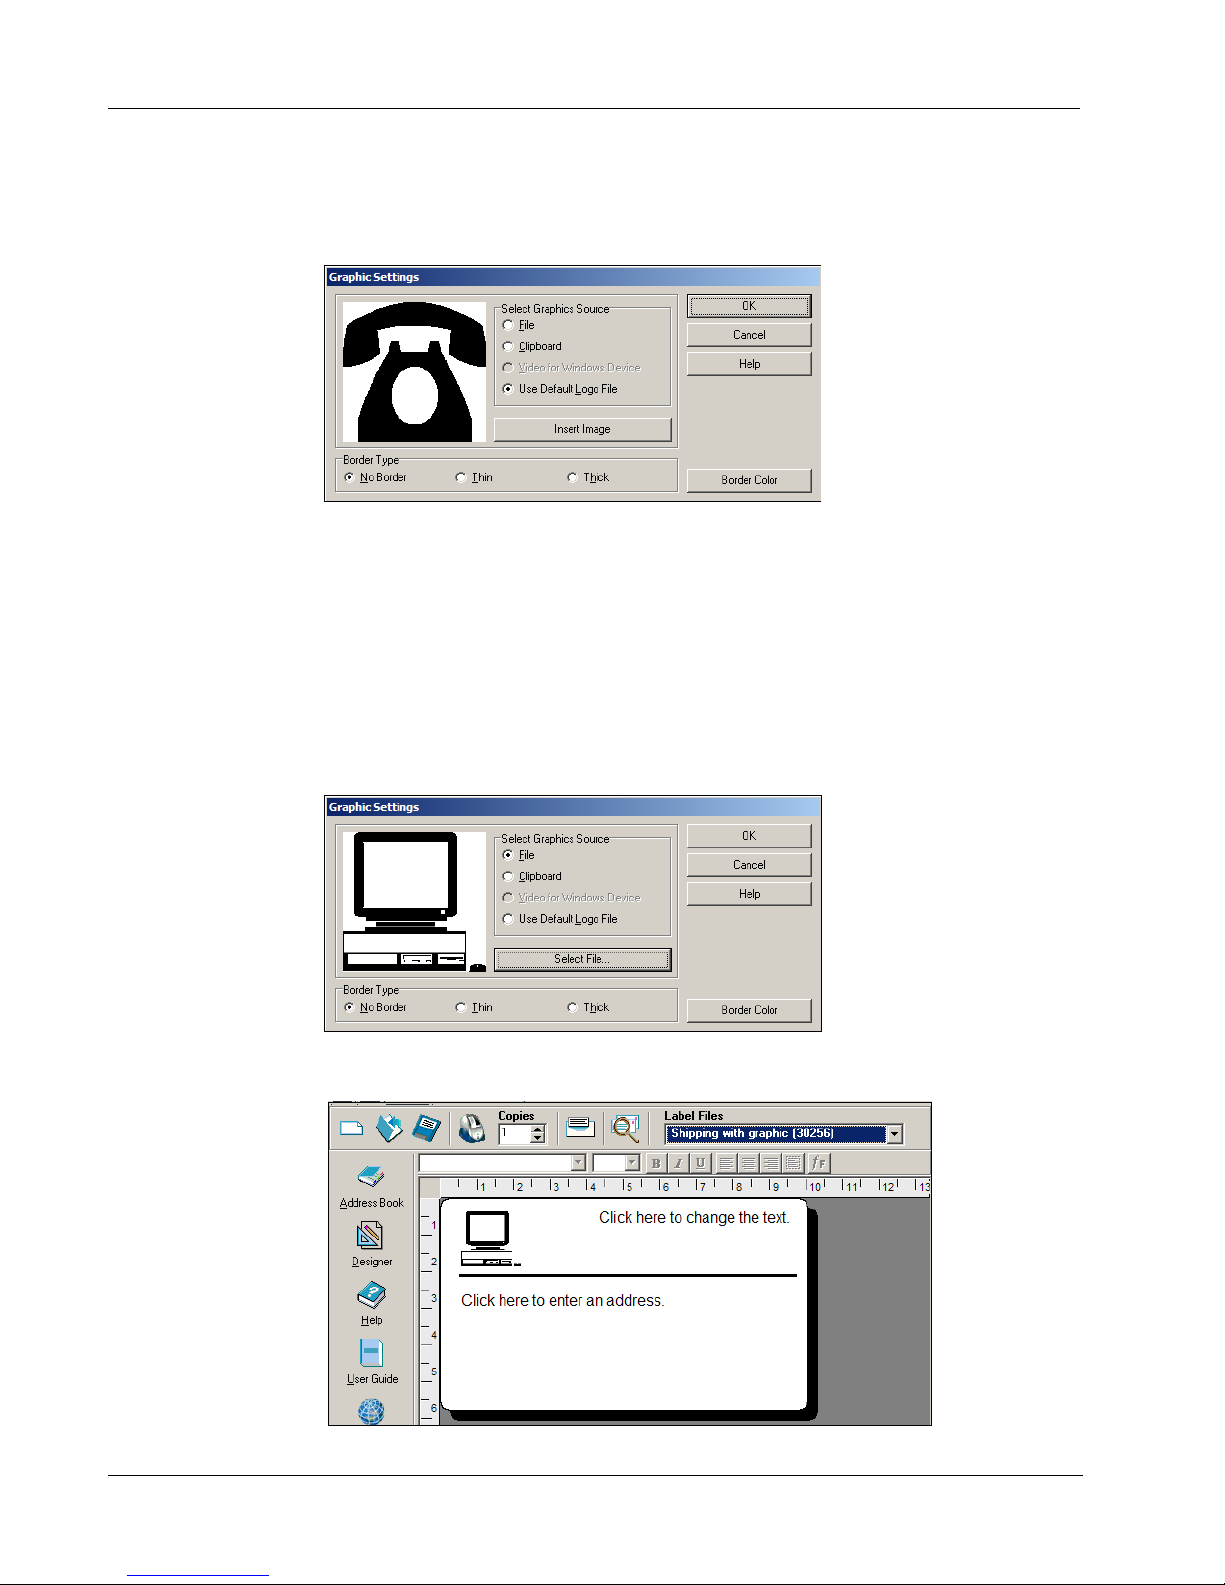
The next step is to customize the graphic. As you will see in this step, each piece of information on
a label is an object (for example, the return address, the recipient address, the line, and so on).
When you double-click an object, a Settings dialog box appears where you can change the object’s
attributes.
5
Page 10
Getting Started
To change the graphic
1 Double-click the graphic that appears on the label.
The Graphic Settings dialog box appears.
2 Select File under Select Graphics Source.
The Insert Image button changes to read Select File.
3 Click Select File.
The File open dialog box appears listing the contents of the default Clipart folder.
4 Select the Miscellaneous folder and click Open. The contents of the Miscellaneous folder
appear.
5 Select Comput1.bmp from the Miscellaneous folder.
A preview showing the contents of the Comput1.bmp graphic file appears in the dialog box.
6 Click Open.
The Comput1.bmp graphic appears in the Graphic Settings dialog box.
7 Click OK.
The computer graphic is placed on the label replacing the telephone graphic.
6
Page 11
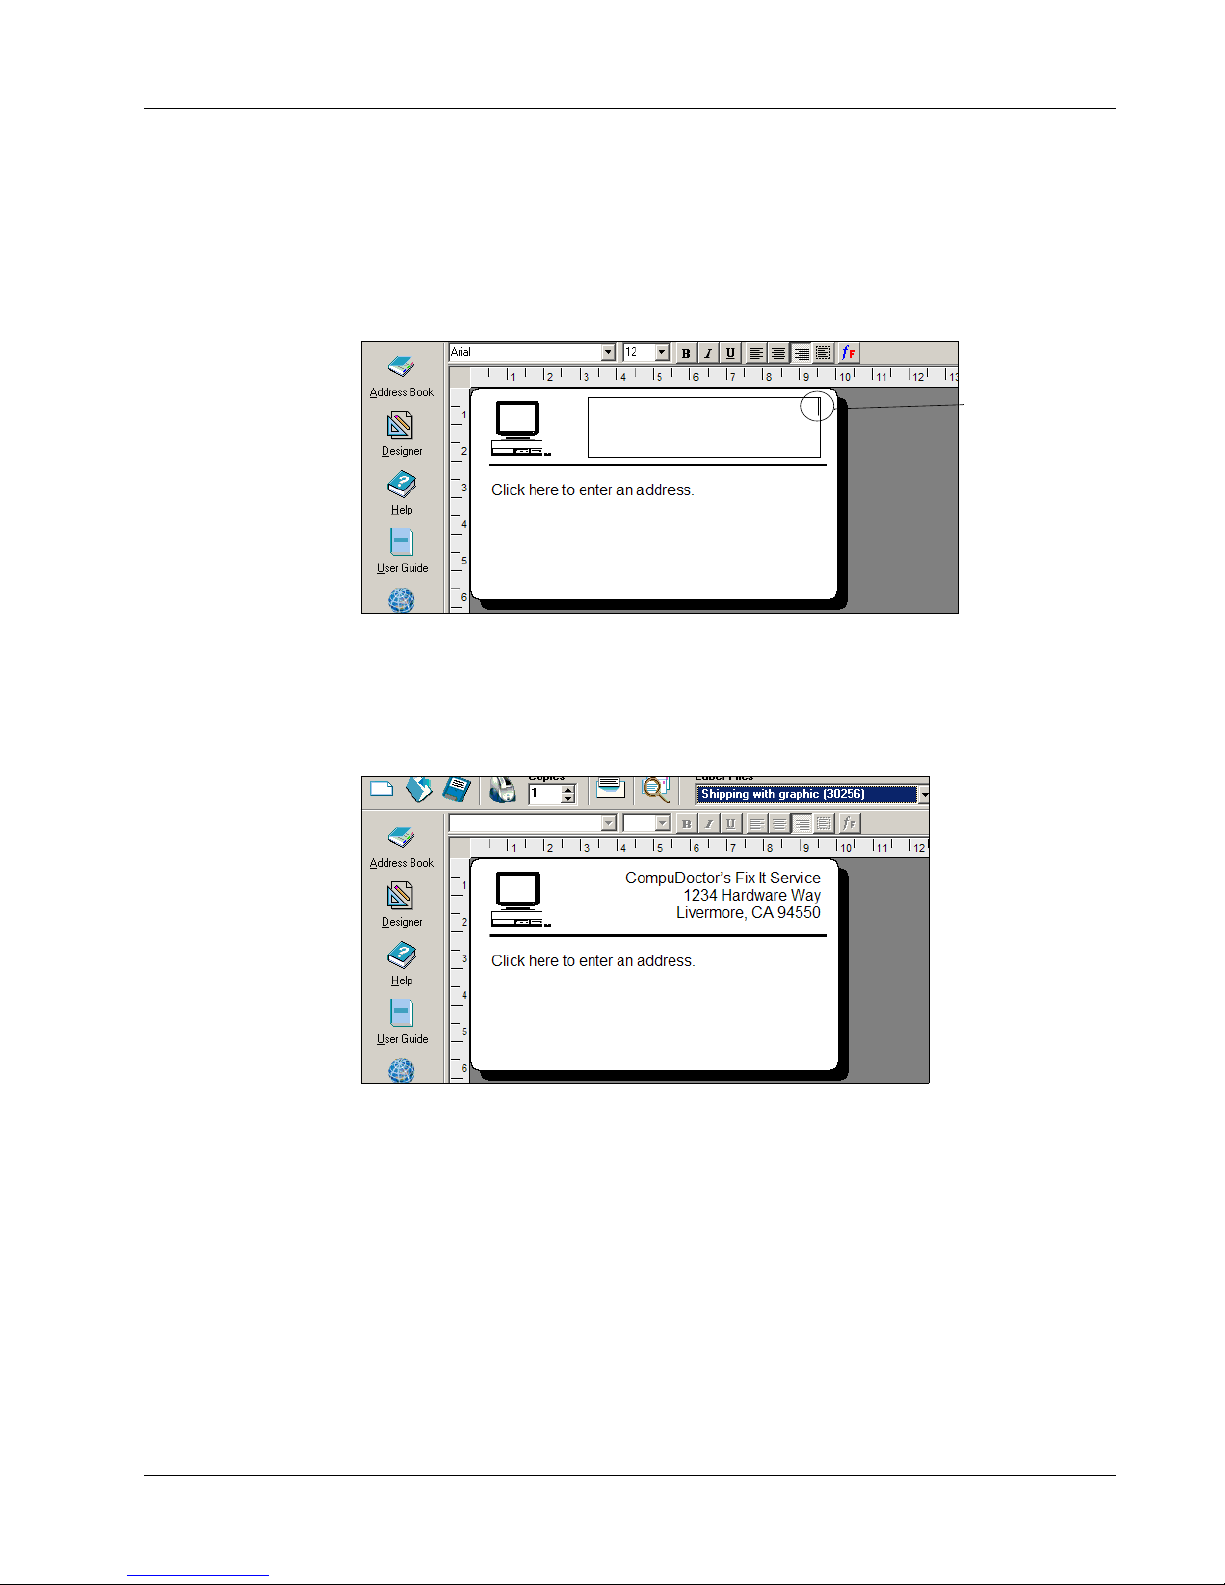
Changing the Return Address
Next, you change the return address.
To enter a return address
1 Click the text in the label’s upper-right corner.
The flashing cursor appears where the default text had been.
2 Enter the following text:
CompuDoctor’s Fix It Service
1234 Hardware Way
Livermore, CA 94550
3
Click anywhere outside the text object.
The new return address appears on the label.
Creating a New Label
Flashing
cursor
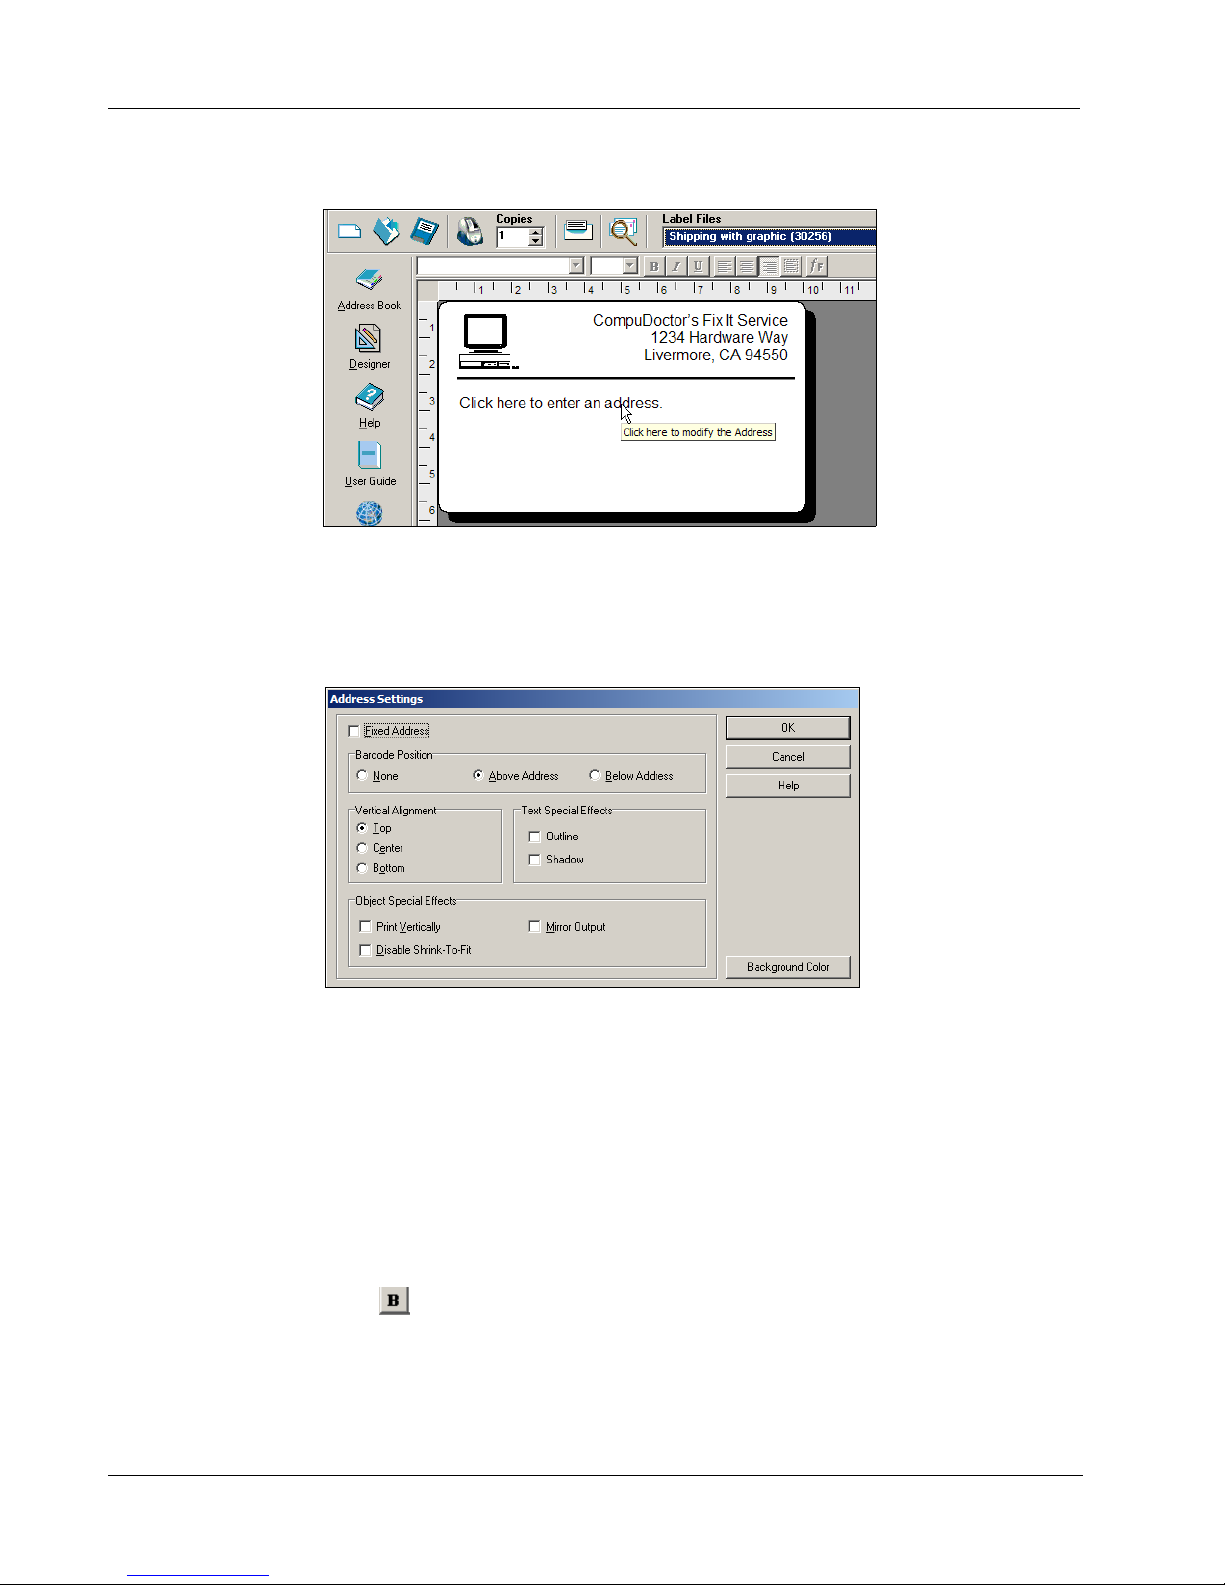
Changing the Recipient Address
Next, you enter a recipient’s address.
To enter the recipient’s address
1 Click once on the address object in the middle of the label. The flashing cursor appears where
the default text had been.
7
Page 12
Getting Started
(Windows) To help identify objects, a hint appears when you move the pointer over an object.
2 Enter the following address.
DYMO Corporation
44 Commerce Road
Stamford, CT 06902-4561
3
Double-click the address object.
The Address Settings dialog box appears.
4 Select Below Address under Barcode Position and then click OK.
DYMO’s address now appears as the recipient’s address on the label with a postal barcode
beneath the city, state, and ZIP code.
Changing the Font
You may want to modify the font used for the recipient address or return address.
To cha n g e t h e f o n t
1 Click the recipient address object. The address text is highlighted.
2 Select Times New Roman from the Font drop-down list.
3 Select from the Formatting toolbar.
8
Page 13
Printing the Label
Now that you have customized the label, you are ready to print.
Creating a New Label
The recipient address appears in the new font and style.
NOTE You can only print this shipping label on EL60, Turbo, 320, 330, and 330 Turbo printers. If
you have an EL40, 300, 310, or 315 printer, review this section even though you will not be able to
print the label.
Before you print the label, make sure:
To print the label
Saving the Label
Now that you have created your shipping label, you can save it as a label file. Saved labels will
automatically appear in the Label Files drop-down list.
To save the l a b e l
Notice that your new label file, DYMOShip, is added to the top of the Label Files drop-down list
as the most recently used label and also alphabetically in the list of labels below.
• The LabelWriter printer is connected to your computer and turned on.
• You have properly loaded shipping labels in the printer. If necessary, see the Quick Start Guide
for information on how to set up your printer and load the labels.
1 Enter the number of copies of this label to print in the Copies field on the Main toolbar.
2 Click on the Main toolbar.
1 Click on the Main toolbar. The Save File dialog box appears.
2 Enter DYMOShip as the new name for the file and click Save.
To use a label file you created, choose it from the Label Files drop-down list.
9
Page 14
Getting Started
NOTE To access your label files from the Label Files list, you must store them in the Label Files
folder. A default Label Files folder is created for you, under the DYMO Label installation folder,
when you first install the software.
Now that you can open, edit, print, and save a shipping label, you are ready to modify and use most
other label files.
10
Page 15
Using the Label Designer
DYMO Label Software allows you to easily design labels for your specific needs using a simple-touse Label Designer. You can also modify any of the pre-designed label files included with the
software.
The Designer allows you to change the appearance and content of labels. You can add or modify
text (including addresses), barcodes, sequential numbers, date-time stamps, lines, rectangles, and
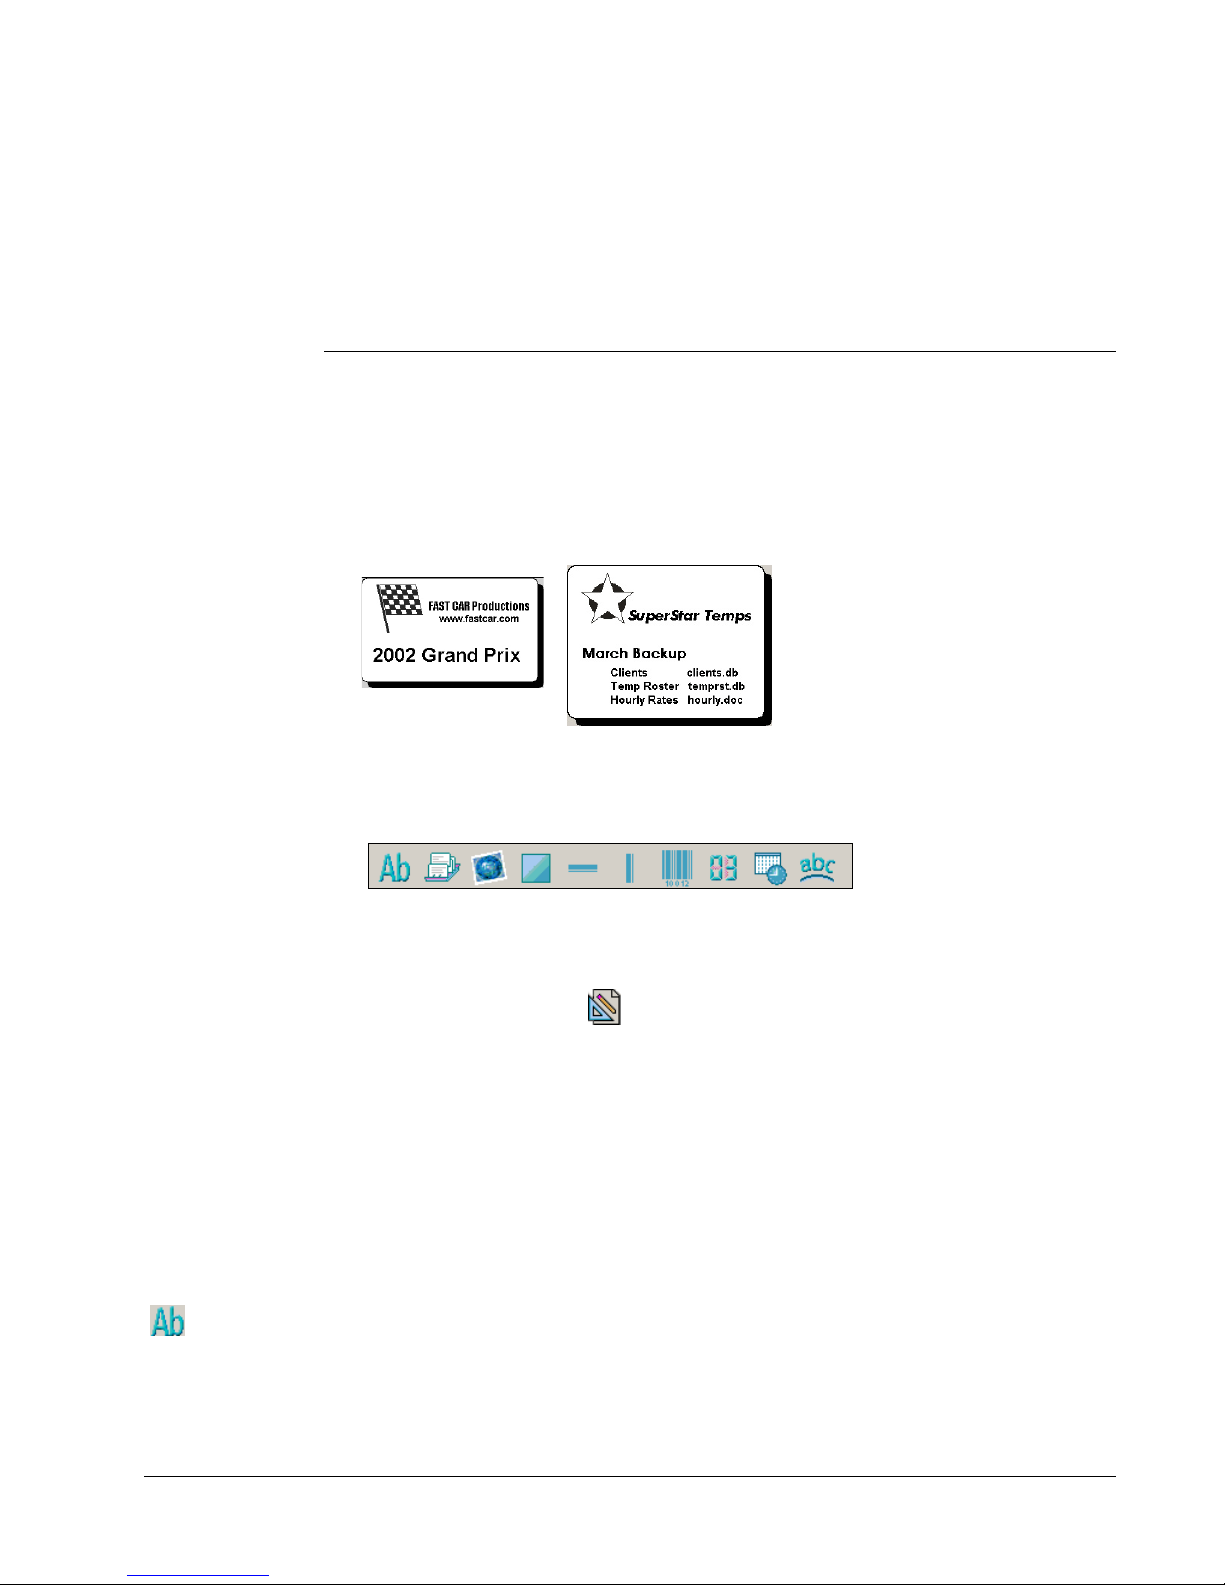
circles or ellipses (Macintosh). The following figures are examples of custom label designs.
Starting the Designer
When the Designer is active, the Designer toolbar appears below the Formatting toolbar.
Chapter 2
To start the Label Designer, do one of the following
• Create a new label file. See "Creating a New Label" on page 4.
The Designer toolbar automatically appears.
• With a label file open, click .
Design Objects
A label created in DYMO Label Software can contain various text and design objects. Each object
has certain attributes, such as size, position, font, and so on. You can select the attributes that you
want in the object’s Settings dialog box. For more information on modifying object attributes, see
the online Help.
This section describes each of the objects available on the Designer toolbar.
Text The text object is useful for displaying information that remains unchanged every time you print a
new label (for example, “Hello my name is” on name badges or your return address on shipping
labels).
Text objects can also be used for variable text (text that changes from label to label). This is useful
for part numbers, book titles, and many other non-address items you might save as a list in the
Address Book. For more information on variable text, see the online Help.
11
Page 16
Using the Label Designer
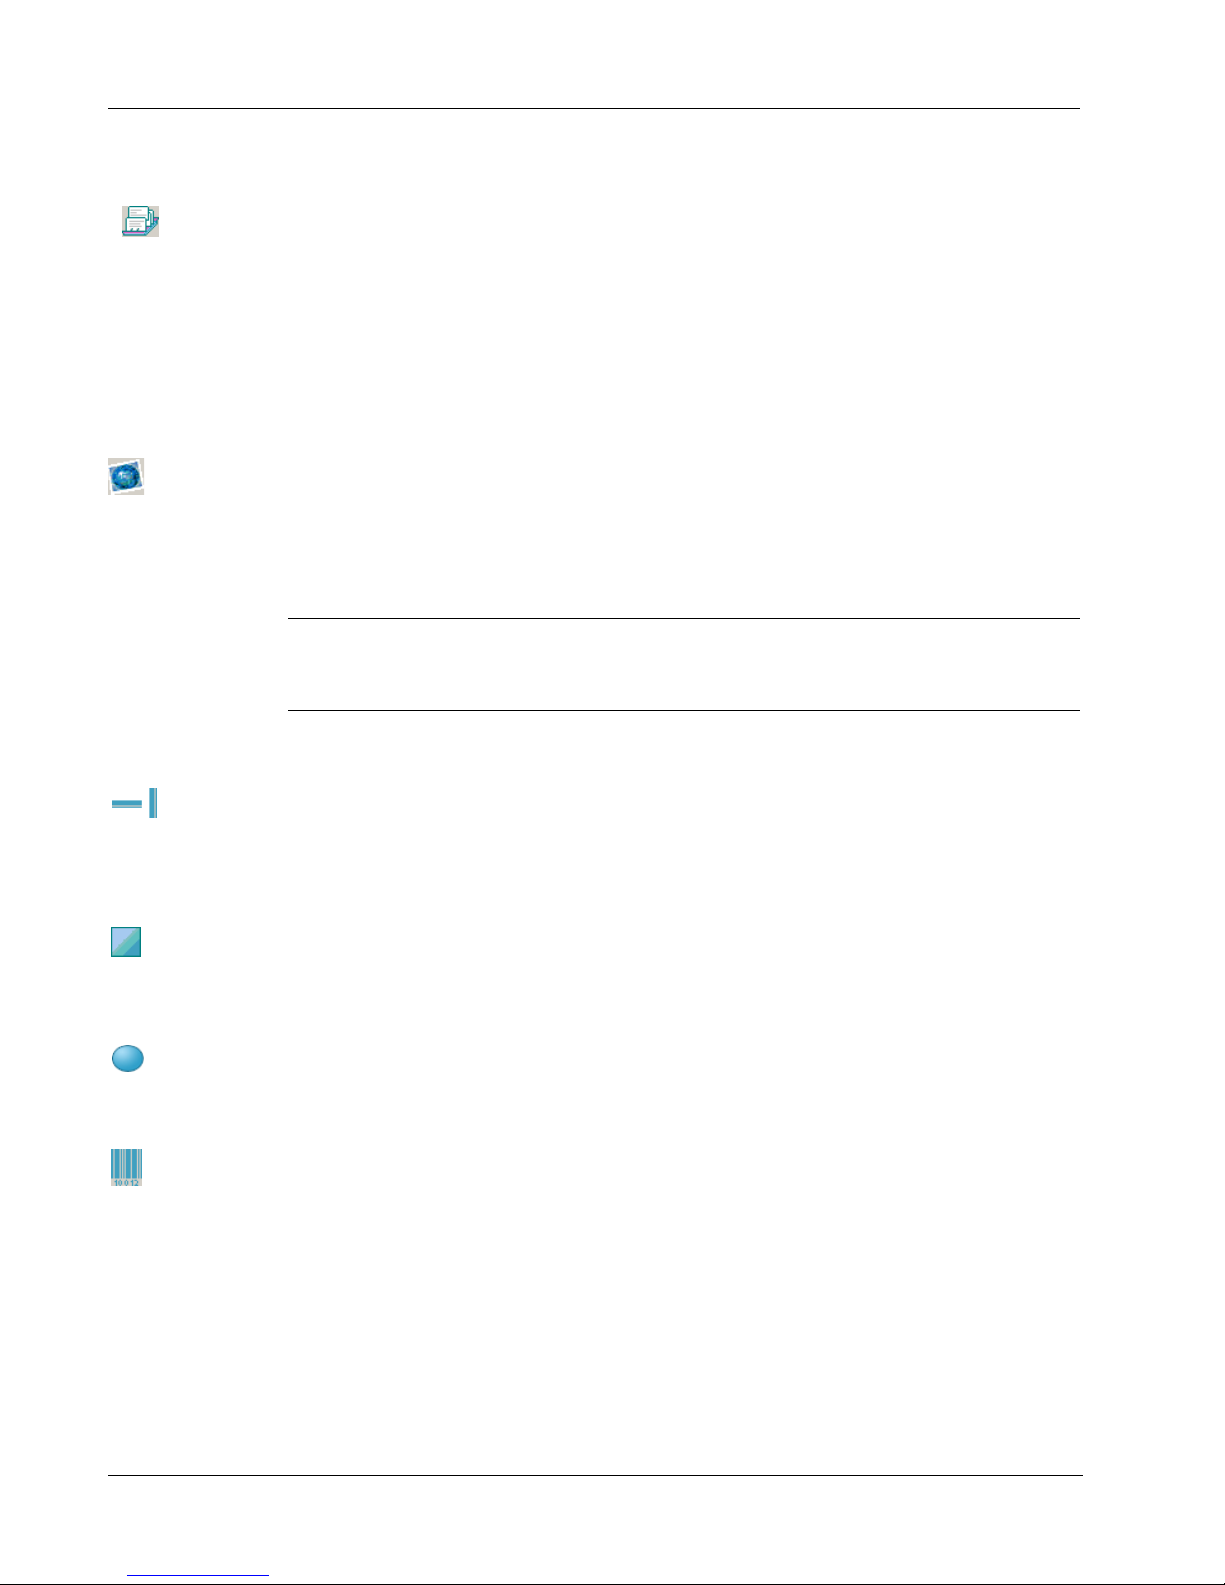
Address The address object is similar to the text object, but is designed to print information that changes
with each label printed, such as names and addresses. Address objects can also display POSTNET
barcodes. You can change the font settings (font, size, style, and so on) for text in address objects
and control the text’s position. You can also apply special effects to the text.
Address objects are by default variable text objects. Address objects can also be fixed text objects.
Address text is saved as part of the label in fixed text objects. The address is not saved with the
label in variable text address objects. (See "How the Address Book Works" on page 15 for more
information.)
Graphic The graphic object allows you to add your company logo and other favorite graphics to labels. You
can import many popular graphic formats, position them anywhere on the label, resize them, and
even specify one as the default graphic. You can also copy a graphic from a graphics application
(such as Microsoft Paint or CorelDRAW), and then paste it onto a label. You can import a graphic
directly from a file or (Windows only) capture an image from a video device connected to your
computer.
NOTE If you defined a default logo file, the graphic file you specified is automatically displayed
in any new graphic objects you add. See the online Help for information about defining a default
logo file.
Lines You can use the horizontal and vertical line objects to improve a label’s appearance. Horizontal
lines also function well as visual dividers on labels (for example, between the sender and recipient’s
address on shipping labels). You can specify the thickness of the lines, and you can also hide lines
that appear on labels.
Rectangle The rectangle object, like the line objects, is primarily used as a design element to enhance a label’s
appearance. A rectangle can be used to create a border around other objects. You can specify shades
of gray to fill the rectangle. You can also specify the thickness of the rectangle border.
Ellipse (Macintosh) The ellipse object, like the line objects, is primarily used as a design element to
enhance a label’s appearance. An ellipse can be used to create a border around other objects. You
can specify shades of gray to fill the ellipse. You can also specify the thickness of the border.
Barcode The barcode object displays and prints a barcode on your label. You can use a barcode object to
display fixed information that you enter or variable information obtained from another object.
When you link a barcode object to another object, the barcode object encodes the information
contained in the linked object. Furthermore, if you change the information in the linked object, the
barcode object automatically encodes the new information.
For example, you may want to link the barcode object to a part number text object on a label. When
you update the part number in the linked text object, the barcode object is automatically updated as
well.
12
Page 17
Creating a New Label File
You can choose from many standard barcode symbologies, including Code 39, Code 128, Codabar,
UPC A/E, EAN 8/13, ITF-14, POSTNET, PLANET, and Interleaved 2 of 5 barcodes.You can
choose to include or exclude human-readable text (alphanumeric information) and specify the font
settings for the text. You can also select the barcode size and position. See the online Help for more
information about the barcode symbologies supported.
Counter The counter object automatically numbers a series of labels. For example, you could use a counter
object to automatically serialize a bunch of raffle tickets. You can specify text you want to appear
before and after the counter (for example, “Disk # of ten”), as well as the starting number and the
increments for counting (1, 10, 100, and so on). You can also specify the font settings for the
counter information, as well as other attributes.
Date-Time The date-time object stamps the current date and/or time on labels using any one of several of pre-
defined formats. As with counter objects, you can specify the text you want to appear in front of
and behind the date-time (for example, “Today’s date is”). You can choose from a variety of date
formats, including European formats. You can include or exclude the time and use the 24-hour time
format (13:00, 22:00, and so on). You can control the font settings and other attributes for the datetime information.
Curved Text The curved text object is similar to the text object, but allows you to place the text along a curve.
This object can be used for placing text around the perimeter of a round CD label or for simply
adding text in an arc on any label. You can choose to display the text as a full circle or as a semicircle along the top or bottom of the label. You can also choose to mirror the text. As with the text
object, the curved text object can be used as a variable text object and you can control the font
settings and object position.
Creating a New Label File
DYMO Label Software includes a blank label file for every type of label available. When you
create a new label, you select one of these blank labels as a starting point.
To crea t e a n e w l a bel
1 Click . The New Label dialog box appears.
2 Select a label that most closely matches the type of label you wish to create and click OK.
The blank label opens in the label workspace and the Designer toolbar appears.
TIP You can filter the number of labels displayed by selecting Portrait or Landscape in the New
Label dialog box.
Opening an Existing Label File
To use a label file you have saved to disk, you simply open it. You can then print the label as is, or
modify it to suit your needs. For convenience, the most recently saved label files appear at the top
of the Label Files drop-down list.
To open an existing label file
1 Click . The Open File dialog box appears.
13
Page 18
Using the Label Designer
2 Select the file you wish to open and click Open.
The label opens in the label workspace.
Adding an Object
When you place a new object on a label, the new object displays certain default settings. For
example, new address and text objects display text describing how to modify the objects.
Although the various types of objects are different, the steps for placing the objects on a label are
nearly identical. The only difference is the tool button you select from the Designer toolbar to place
the desired object.
To add an object
1 Click the object that you wish to add on the Designer toolbar. The new object appears in the
upper-left corner of the label.
2 Resize and move the object where you want it on the label using the cursor.
NOTE If you defined a default logo file, the graphic file you specified appears in all new graphic
objects you place. See the online Help for information about defining a default logo file.
Deleting Objects
When you delete an object, the object’s contents (text, graphics, barcode, and so on) are also
deleted.
To delete an object
1 Select the object.
2 Select Cut from the Edit menu.
14
Page 19
DYMO Label Software includes a built-in Address Book that allows you to maintain lists of
addresses routinely used to generate labels.
You can also use the Address Book to store information other than addresses. This information (for
example, a list of product numbers or video titles) can be linked to a variable text object or barcode
object (for example, to print a barcode label for all your product numbers).
This chapter describes how to use the Address Book to create, edit, and print entries on labels.
Refer to the online Help for more detailed information on using the Address Book.
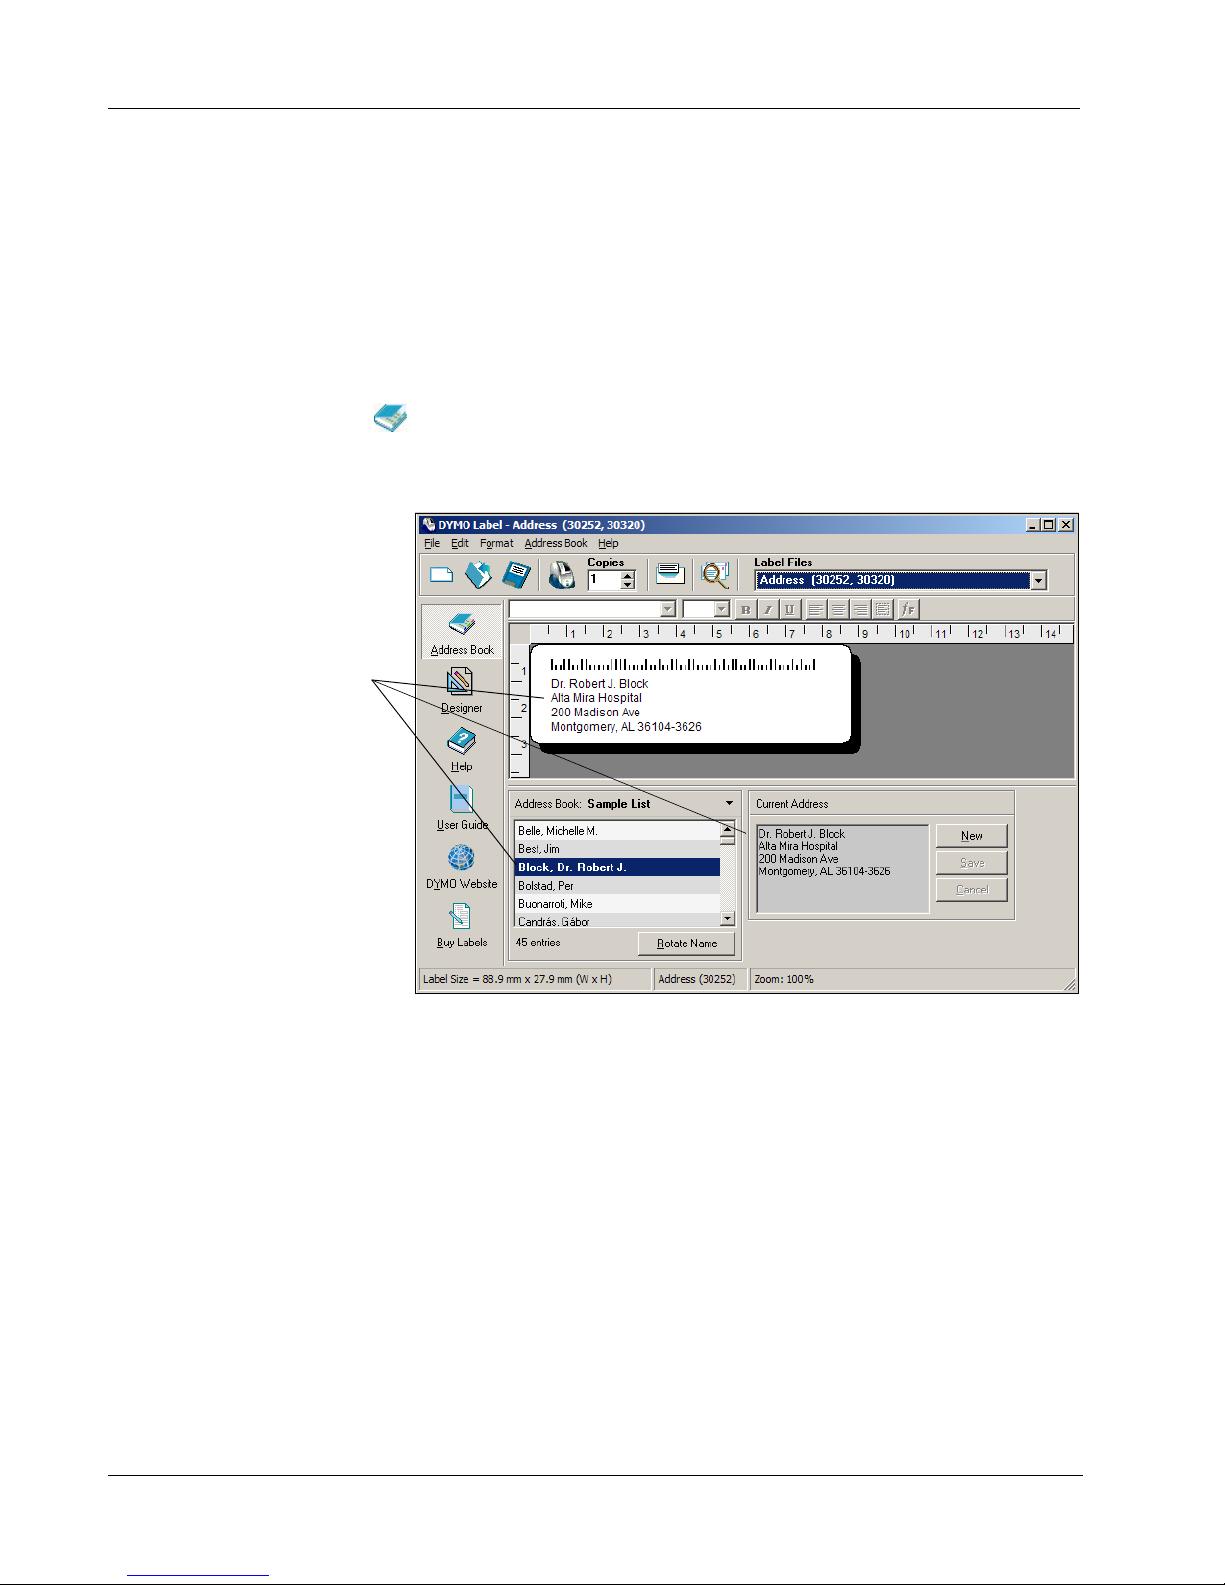
Using the Address Book
The Address Book allows you to create address or data list files. Address list entries are
automatically sorted using the first line of the address. If this line is a person’s name, the entry is
listed and sorted by the last name. However, if the first line is a company name, the entry is sorted
by the company name. Data lists are sorted by the first few characters of each entry’s first line.
How the Address Book Works
Chapter 3
Working with Lists
The Address Book allows you to easily use one or more list items to print labels. The Address Book
items can be used with address and variable text objects.
Address objects are by default variable text objects and the currently selected Address Book entry
is displayed in the object. This means that the actual content that prints in an address object is not
necessarily the same each time the label is printed. For example, if you select ten entries from the
Address Book and then click print with an address label open, ten address labels will print, one for
each selected entry in the Address Book. When you save an address label, only the formatting is
saved, not a specific address. When that address label is opened the next time, the then currently
selected Address Book entry appears in the address object.
You can, however, define an address object as a fixed address object, meaning that the actual
address that is currently in the object is saved as part of the label when you save and close the label.
The next time you open the label, the object contains the same address. The Fixed Address setting
allows you to create labels for a recipient that you use frequently, but still be able to print a
POSTNET barcode and check the address with Address Fixer.
A text object normally contains static text (text that is the same each time the label prints), but it
can become a variable text object by selecting the Function as Variable Text object setting. A
variable text object behaves in much the same manner as an address object, but without the Address
Fixer and barcode features. A variable text object can be used to print labels from list entries. For
example, you can print price tags from a parts list or name tags from an attendance list.
15
Page 20
Working with Lists
Notice the currently
selected list entry is
automatically inserted into
the variable address object
on the label.
When you open a label with a variable address object or variable text object, the currently selected
Address Book entry is automatically displayed. As you select different Address Book entries, each
newly selected entry is automatically displayed in the object. If you then decide you want to print
the currently selected address on a different label, just open the new label and the same address
appears in that label’s format (as long as the new label contains an address or variable text object).
The formatting from the previous label is not copied to the new label, only the text which takes on
the formatting of the new label.
To display the Address Book
➤ Click or select Open from the Address Book menu.
The last list file that was opened appears in the Address Book panel of the Main window. The
first time you open the Address Book, the Sample List entries appear.
Using Lists with Multiple Variable Objects
You can use the Address Book to enter information into variable objects (address, variable text, or
barcode) on the current label. If the current label contains more than one variable object, you need
to select the object into which you want the selected Address Book entry to appear.
16
Page 21
Creating a New List
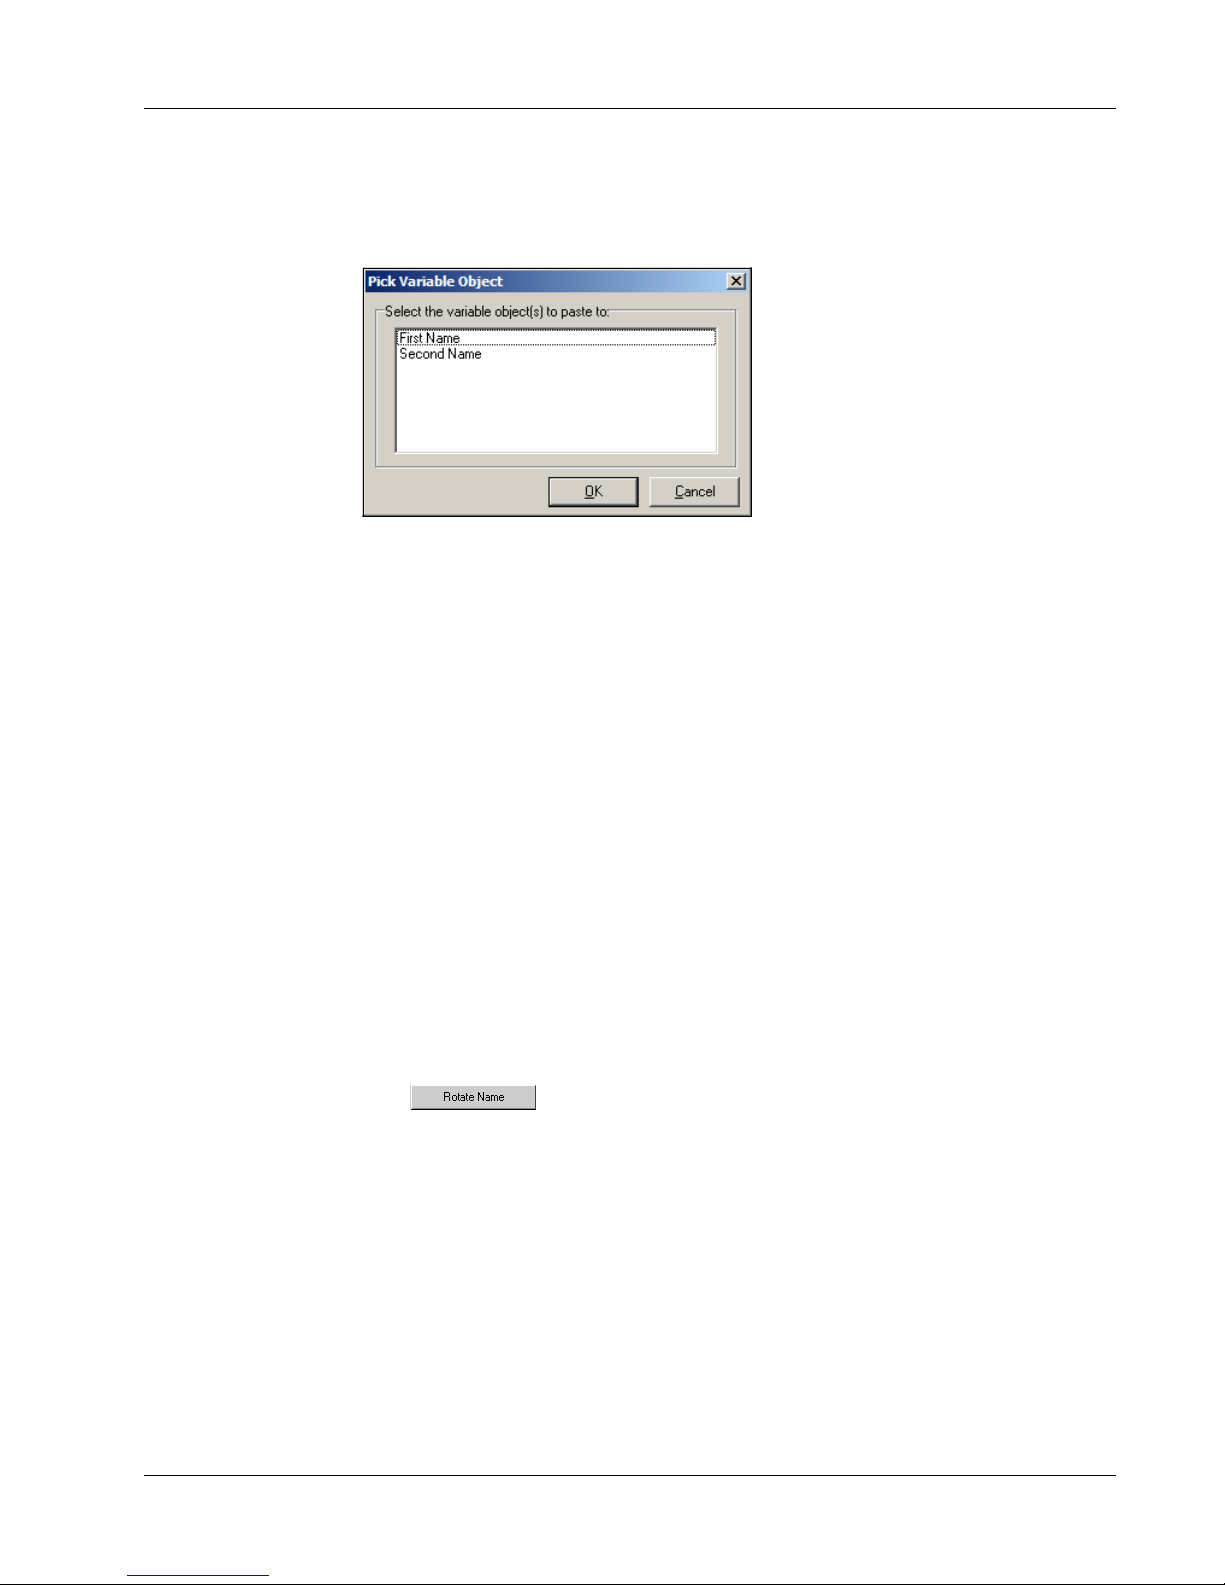
To insert address data into a label with multiple variable objects
1 Select the list entries you wish to print.
The Pick Variable Object dialog box appears listing the objects available on the current label.
2 Select the object you want to link to the Address Book and then click OK.
If the current label does not contain a variable object (address, variable text, or barcode), you are
prompted to open a label that does contain one of these objects. This prompt appears because the
program automatically links Address Book entries to these types of objects. You can still work in
Address Book without a variable object on the current label, but Address Book will not link to the
current label.
Rotating Names in Address Lists
The Address Book automatically sorts addresses by the last name. For example, if you enter the
following address:
Harrison Schreppel
5040 El Cantada
Berkeley, CA 94720-3828
The Address Book displays Schreppel, Harrison in the Entries list.
In some cases, Address Book incorrectly identifies which name is the last name or incorrectly
identifies a company name as a person’s name. This is easily fixed using Rotate Name.
To rotate the name
1 Select the entries that are displayed incorrectly.
2 Click to rotate the words in the entry’s first line so that they display correctly.
Creating a New List
When you create a new list file, Address Book gives you the option of importing addresses or data
(for new address lists or data list files, respectively) into the new file.
A new list file is created with the specified name and stored in the default list file folder. The new
file name appears at the top of the Address Book panel.
17
Page 22
Working with Lists
Opening an Existing List
If you have more than one address or data list file, you can select the list you want to use to create
labels. Also, if you want to import addresses or data into a file, you must first open the file into
which you want to import the data.
For information on importing and exporting list data, see the online Help.
Using Address Fixer (Windows)
Address Fixer allows you to check a recipient’s address against a database of US addresses, correct
any mistakes, and automatically add the complete nine-digit ZIP+4 code. Address Fixer corrects a
single address at a time, so you can only use it when printing a label for the current contact.
Address Fixer cannot check addresses when you print labels for multiple contacts. Address Fixer is
a separate utility available from DYMO and is included on your DYMO Label Software CD-ROM.
To check your address, do one of the following
➤ Click . The current address is checked.
➤ With a contact selected, click the Check Address button from the Word, Outlook, or Palm
Desktop Add-in.
Vis it www.dymo.com/addressfixer
for more information about the Address Fixer utility.
Printing Internet Postage (Windows)
The LabelWriter EL60, Turbo, 320, 330, and 330 Turbo printers are approved by the US Postal
Service to print Internet postage. Currently, these printers can be used in conjunction with
Stamps.com
To learn more about Internet Postage, visit www.stamps.com
you can print postage using the Stamps.com software from within DYMO Label Software. For
more information on printing postage, refer to the online Help.
™
Internet Postage software.
. If you are already a Stamps.com user,
18
Page 23
The Smart Paste command allows you to quickly print multiple labels from a list created in a word
processing, spreadsheet, or other similar program.
The text and address objects can be used to print text from other applications. For the text object,
you must select the Function as Variable Text Object setting on the Text Settings dialog box to copy
text into this object. The address object is ready to use with Smart Paste by default.
About Smart Paste
This section describes how text from different sources can be printed on labels using the
Smart Paste command.
Chapter 4
Printing Labels
Using Smart Paste
Spreadsheet
Text
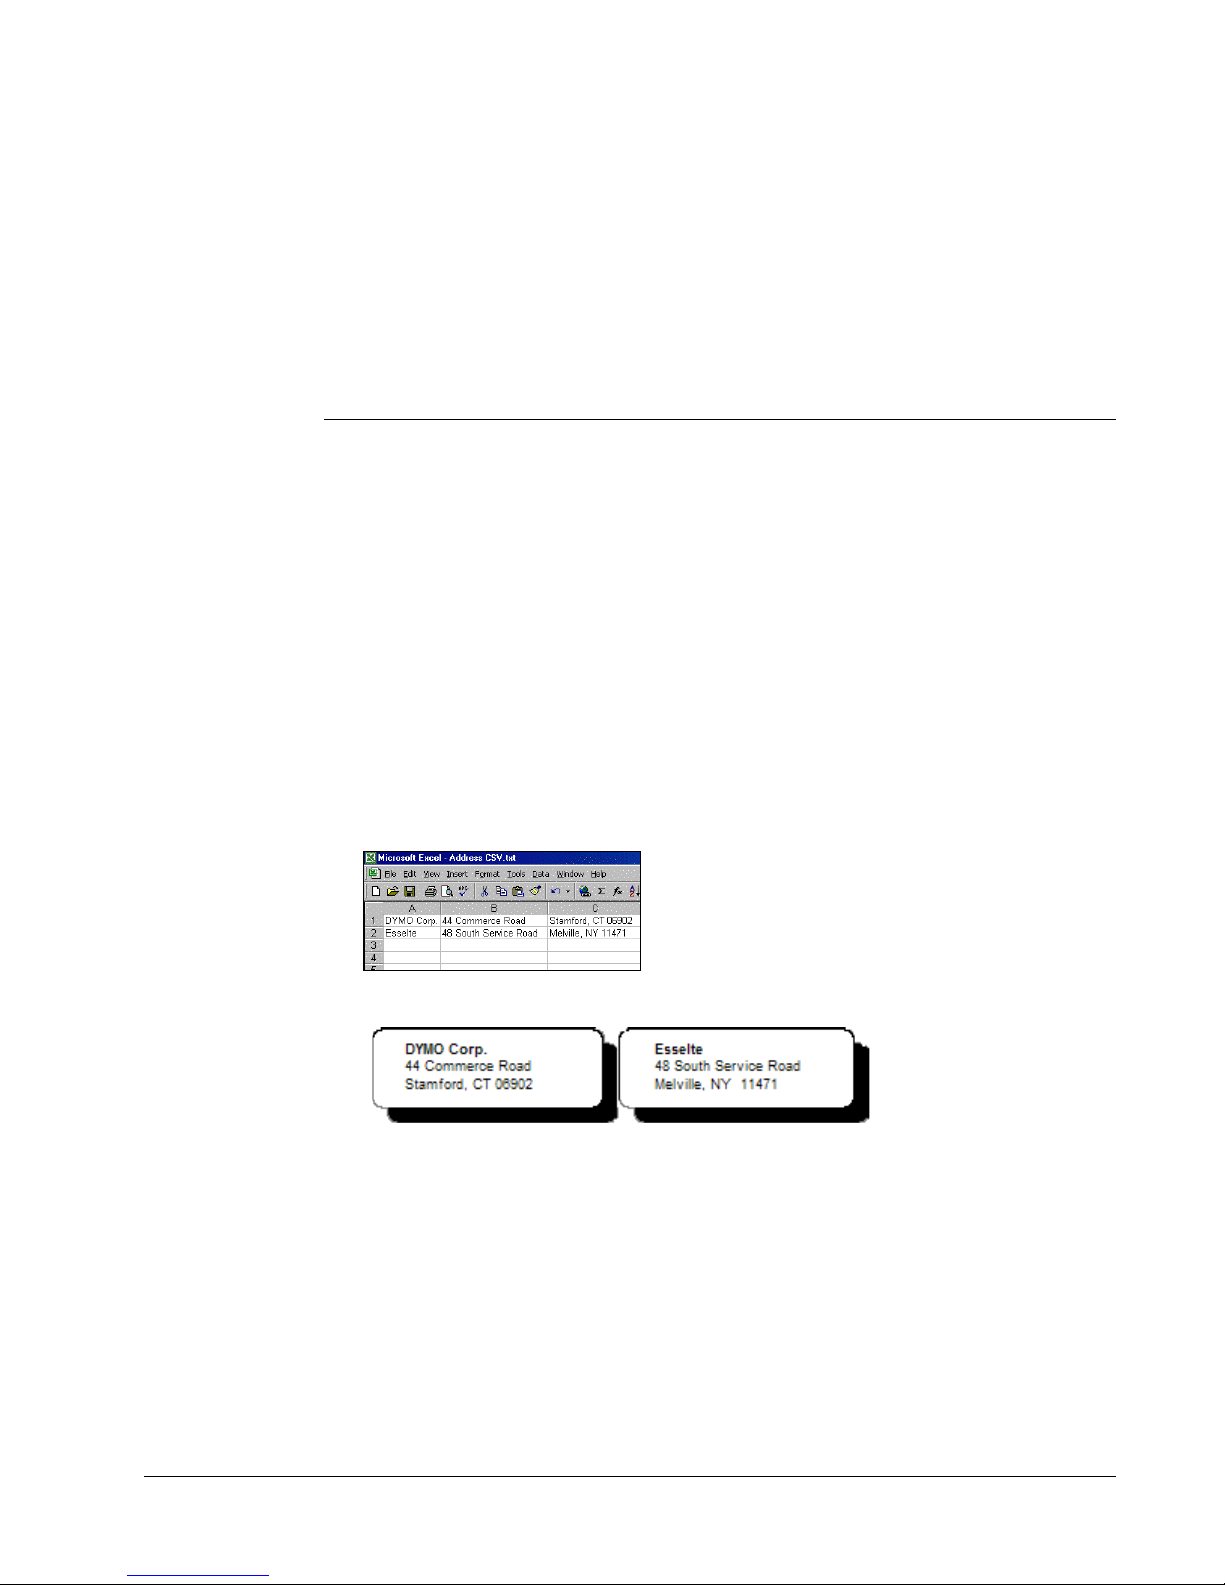
When copying and pasting rows of text from a spreadsheet program using Smart Paste, each row is
treated as a separate label and each cell in the row is treated as a separate line on the label.
For example, the rows in the following spreadsheet:
will print two three-line labels: one for DYMO and one for Esselte.
Text File Many programs can create a text file, such as a text editing program, a database application, and so
on. When you export text from a database, you usually create a delimited file with each entry
separated by comma or tab characters, and a carriage return/line feed at the end of each entry.
The Smart Paste command recognizes the delimiter characters and will insert a line break on the
label. When a comma is used as a delimiter, make sure the text that contains any commas that you
want to print on the label is enclosed in quotation marks. The carriage return/line feed will start a
new label.
19
Page 24
Printing Labels Using Smart Paste
NOTE The separator character may be different for countries other than the United States. When
using Smart Paste, the list separator character is based on the Windows list separator (or regional
setting) being used.
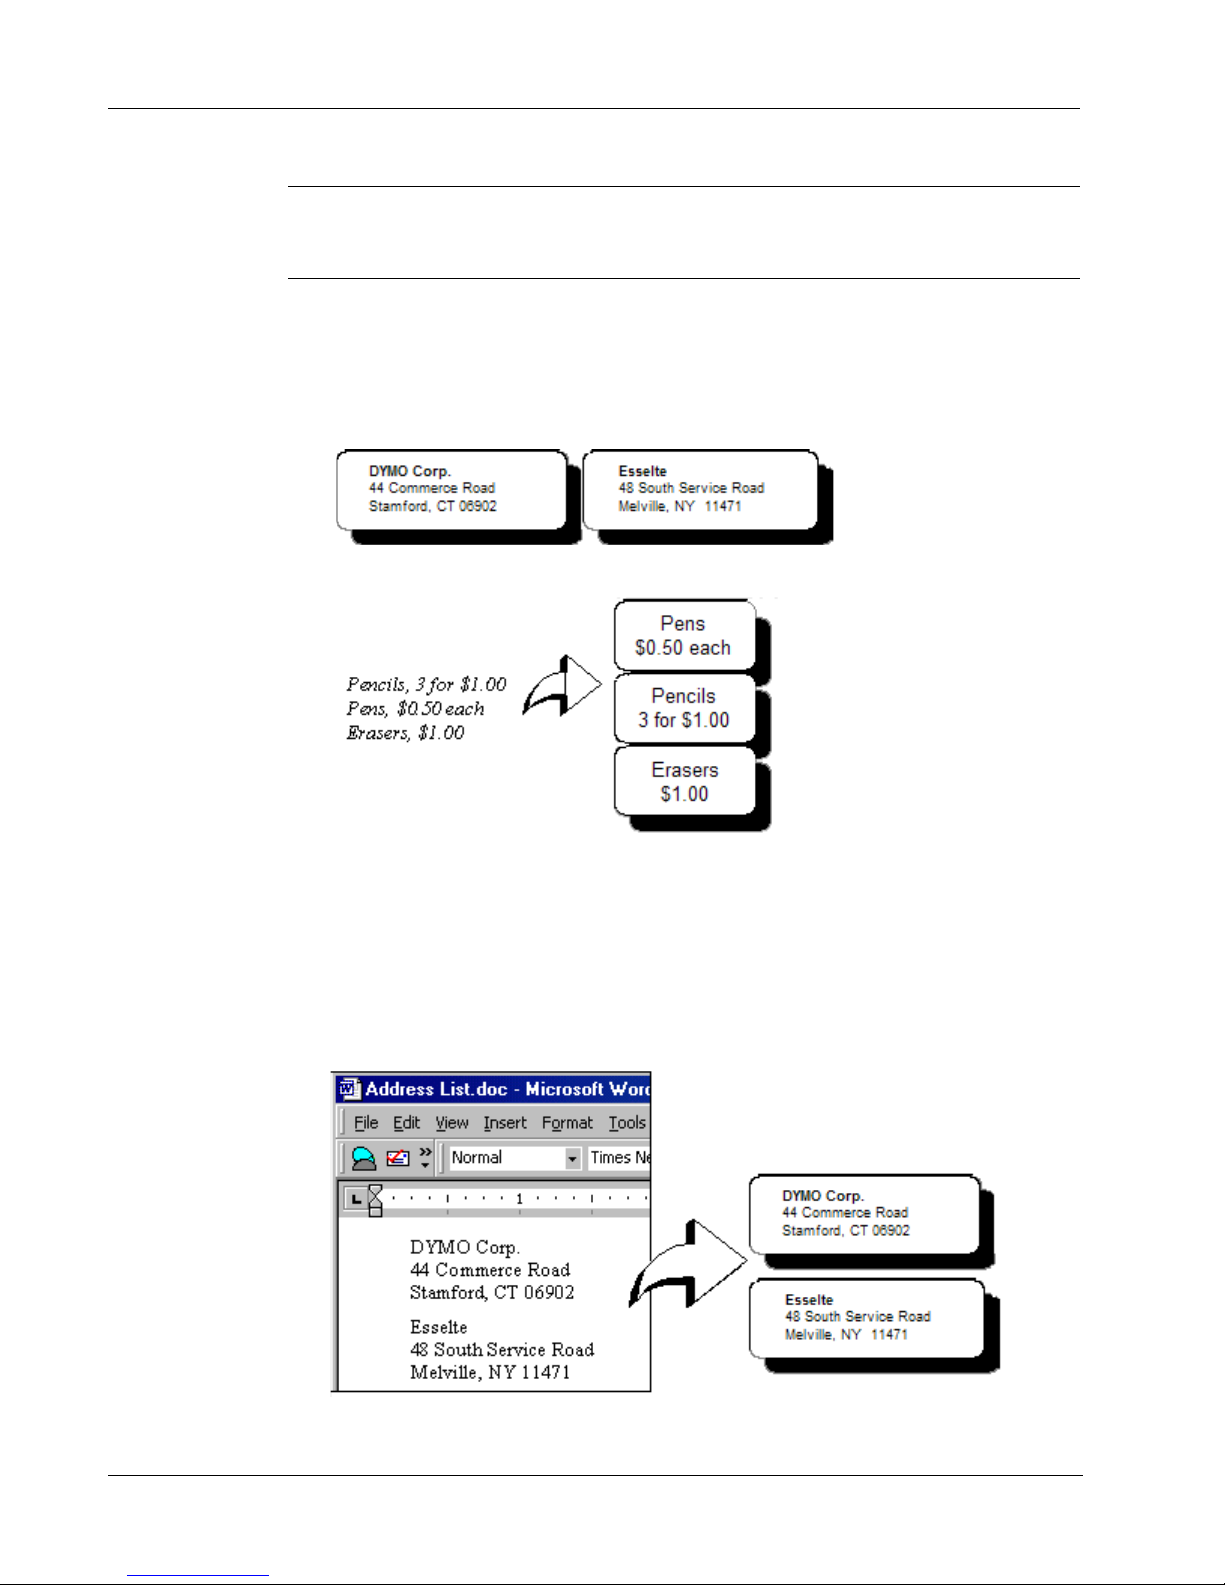
For example, the following lines of text (delimited using commas):
DYMO Corp., 44 Commerce Road, “Stamford, CT 06902”
Esselte, 48 South Service Road,“Melville, NY 11471”
will print two three-line labels: one for DYMO and one for Esselte.
In another example, the following three lines of text are printed as three two-line labels:
Multi-Line
Text from
a Word
Processor
When copying text from a word processor, you will typically have multi-line text. In this case, the
text for each label is separated by either a single blank line or a carriage return/line feed.
If a blank line is contained in the text, Smart Paste reads the text as multiple labels separated by a
single blank line. If no blank line is found, the text is read as multiple, one-line labels.
For example, the following two addresses are separated by a single blank line and Smart Paste will
print two three-line labels.
20
Page 25
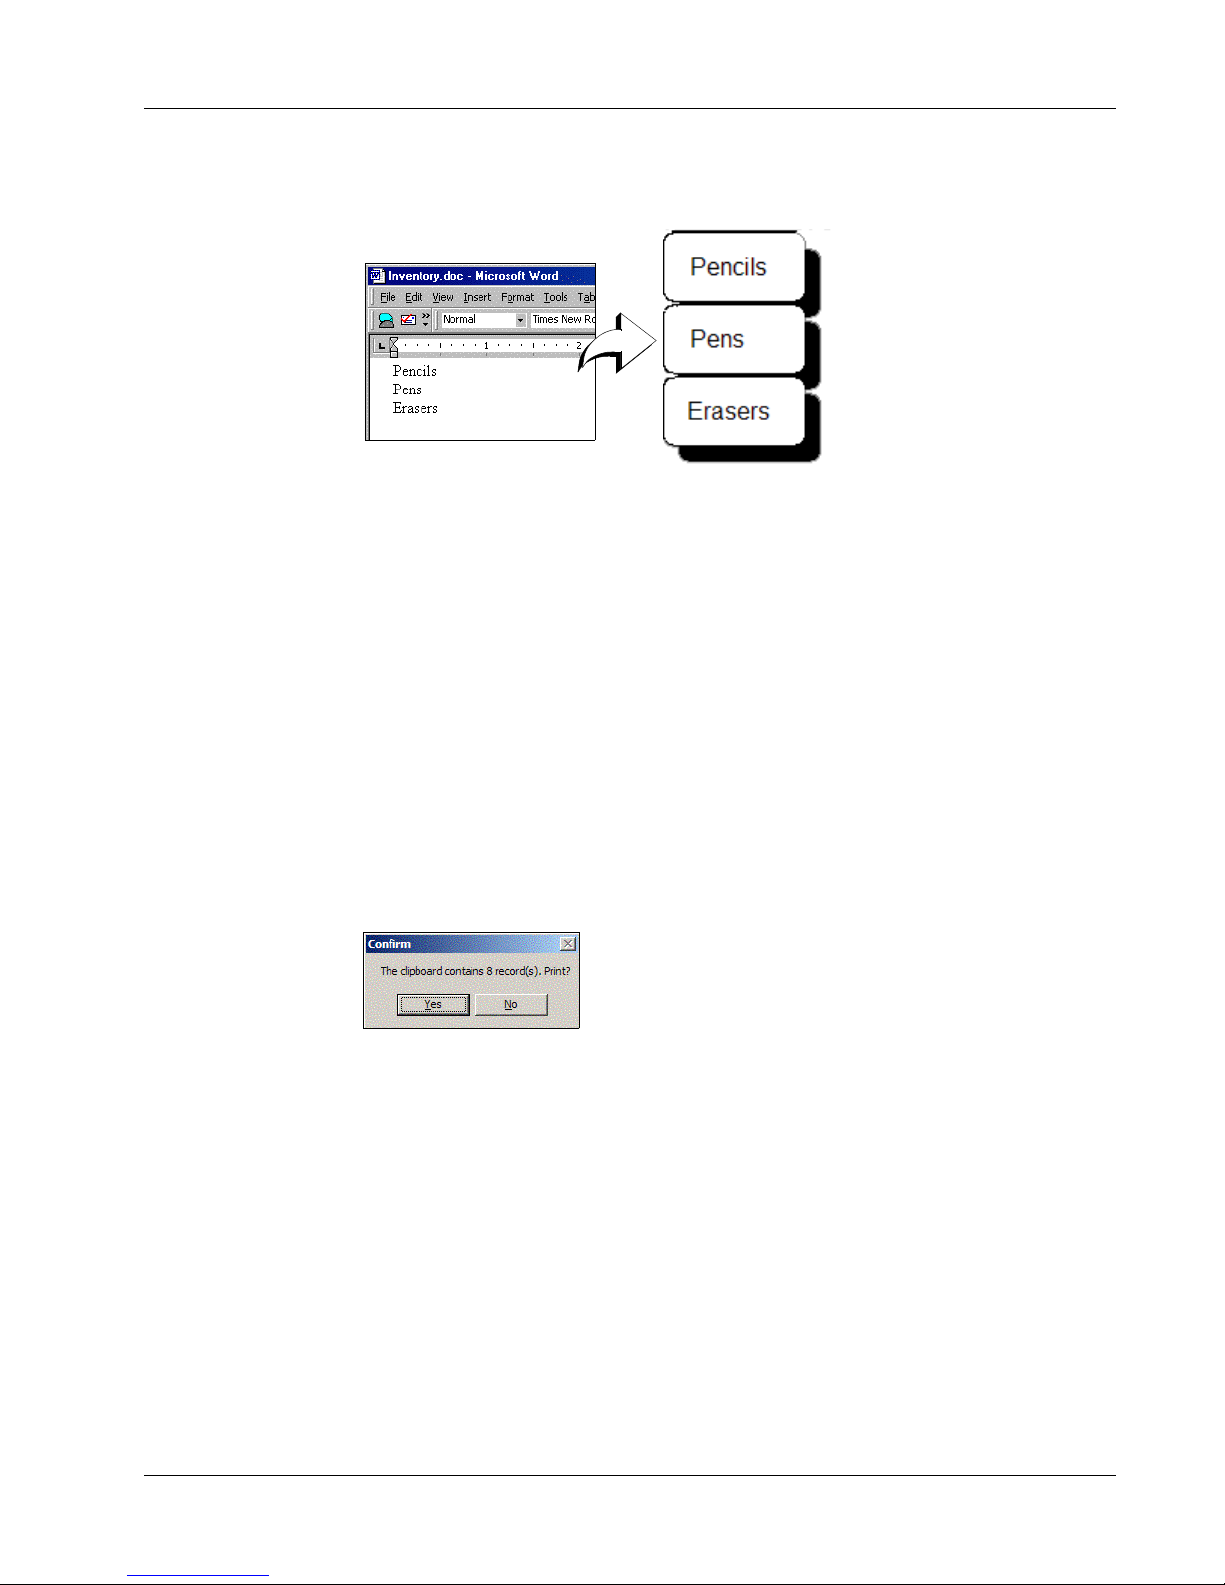
However, the following three lines of text contain no blank lines. So, Smart Paste will print three
one-line labels.
Printing Multiple Labels Using Smart Paste
When you use Smart Paste to print multiple labels, the labels will be formatted using the font, size,
and style currently selected for the text or address object receiving the text. You can use Smart
Paste to print text from the clipboard or a file.
Printing Multiple Labels Using Smart Paste
Printing from
the Clipboard
Printing from
a File
You can use Smart Paste to print labels using data copied to the clipboard.
To print multiple labels from the clipboard
1 Create a label as described in Chapter 1, Getting Started.
2 Make sure you have at least one text or address object on the label.
If using a text object for the paste, select Function as Variable Text Object on the Text
Settings dialog box.
3 Copy the text you wish to print as labels to the clipboard.
4 Select Smart Paste, and then From Clipboard from the Edit menu.
A dialog box appears telling you how many labels will be printed.
5 Click Yes. The labels begin printing.
You can use Smart Paste to print data saved in a CSV or text file.
To print multiple labels from a file
1 Save the data you wish to print as labels as a CSV or text file.
2 Create a label as described in Chapter 1, Getting Started.
3 Make sure you have at least one text or address object on the label.
If using a text object for the paste, select Function as Variable Text Object on the Text
Settings dialog box.
4 Select Smart Paste, and then From File from the Edit menu.
The File Open dialog box appears.
5 Navigate to and open the file you exported as CSV or text.
21
Page 26
Printing Labels Using Smart Paste
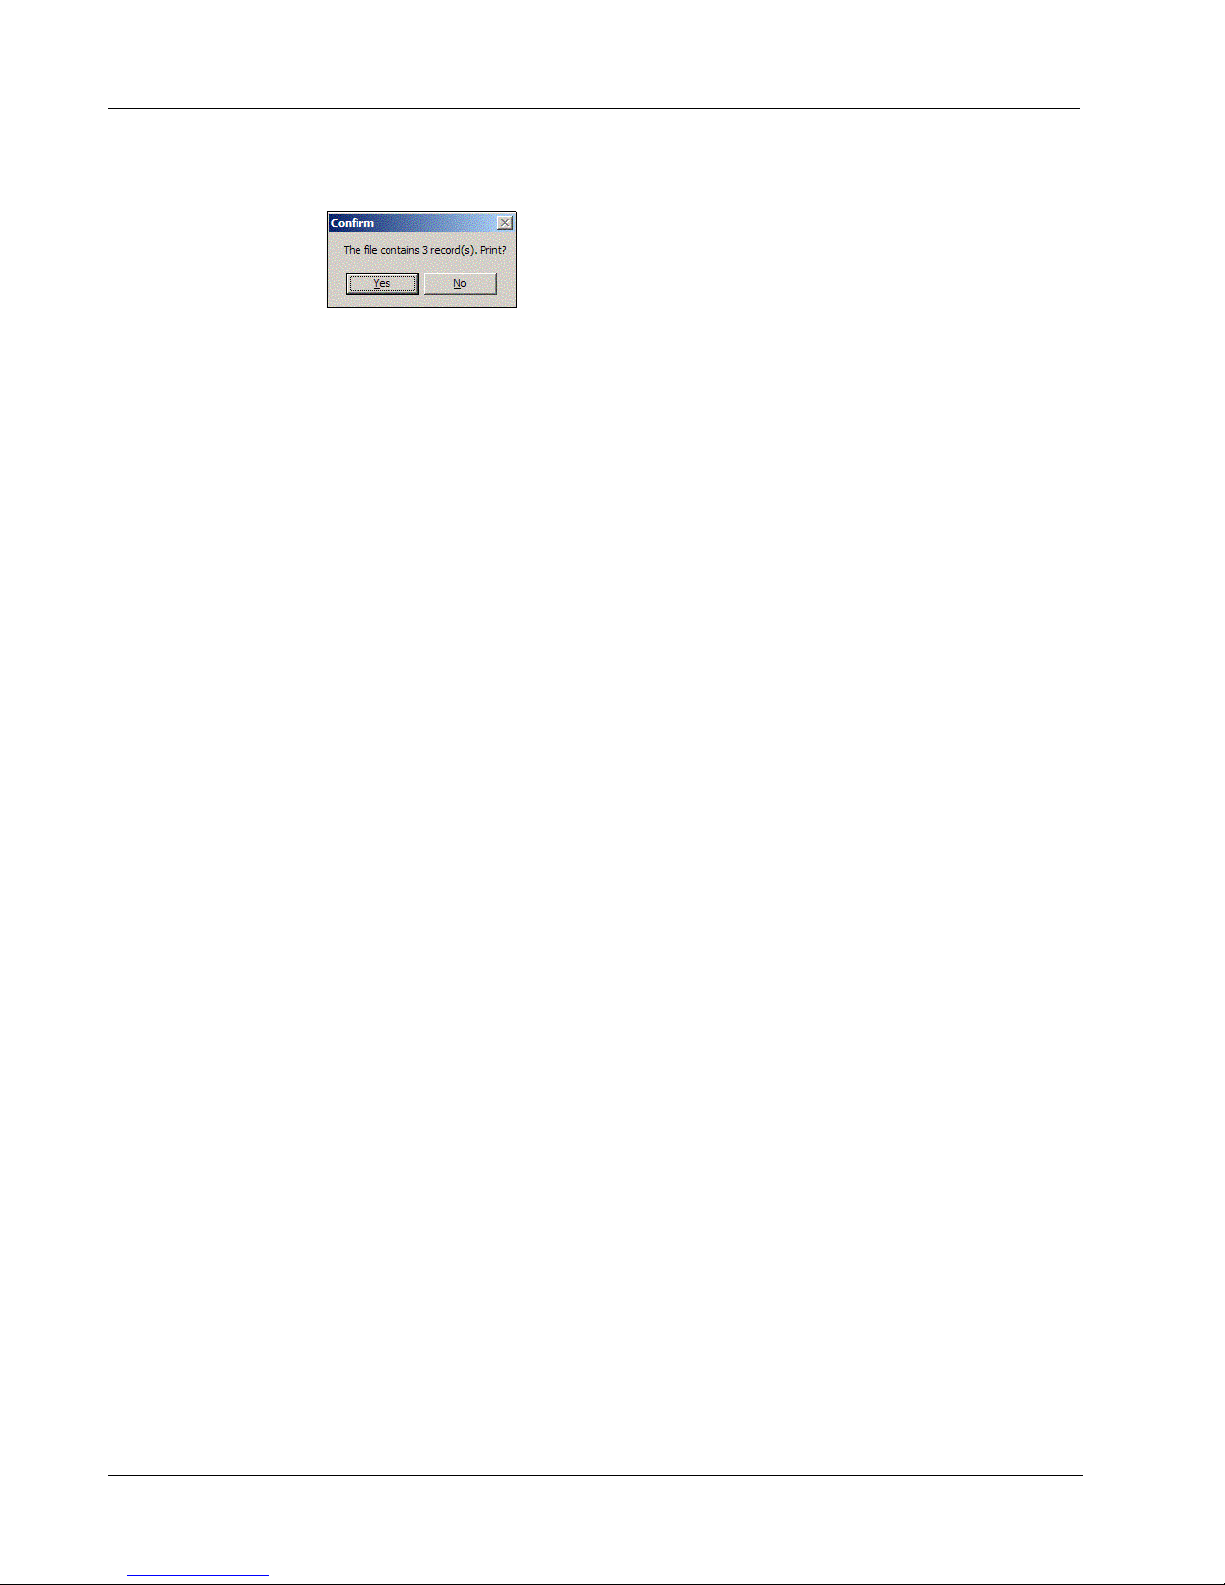
A dialog box appears telling you how many labels will be printed.
6 Click Yes. The labels begin printing.
22
Page 27
with Other Applications
This chapter describes how to use your LabelWriter printer with other application programs. The
chapter covers:
• Printing labels from Microsoft Word using the Word Add-In.
• Printing labels using other Add-Ins for Windows applications.
• Using Merge Print from Database for database connectivity.
• Using the LabelWriter printer driver to print labels directly from other programs.
Add-In for Microsoft Word
DYMO Label Software includes an add-in program that enables you to quickly print mailing labels
from a Microsoft Word document. The add-in works with Microsoft Word 97, 2000, and XP for
Windows and Microsoft Word XP for Macintosh.
The Word Add-in is automatically installed as part of the DYMO Label Software. When properly
installed, you will see a small LabelWriter printer button on the main toolbar of Microsoft Word. If
you don’t see this icon, you’ll need to reinstall your DYMO Label Software.
Chapter 5
Using the LabelWriter
Don’t worry, none of your existing files will be changed. Simply reinstall DYMO Label Software
from your DYMO Label Software CD-ROM.
CAUTION When you reinstall the DYMO LabelWriter Software, all of the pre-designed label
files are also reinstalled. If you have made any changes to the pre-designed label files and have not
saved the changes with a new file name, copy the changed label files to another location before you
reinstall the software so you don’t lose your changes. Then once the installation is complete, copy
the label files back into the Labels folder.
Using the Word Add-In
When the Word Add-in is properly installed, you will see the LabelWriter button in the main
toolbar of Microsoft Word.
NOTE When you start Word the first time after you install the Word Add-In, a macro warning
dialog box may appear asking if you wish to trust macros from DYMO Corporation. This dialog
box is displayed because of your Macro Security setting within Word. In the warning dialog box,
select the Always trust macros from this source check box, and then select the Enable Macros
check box. The Word Add-In will now work properly and you will not see this warning again.
23
Page 28
Using the LabelWriter with Other Applications
To start using the Word Add-in
1 Open Microsoft Word and type an address.
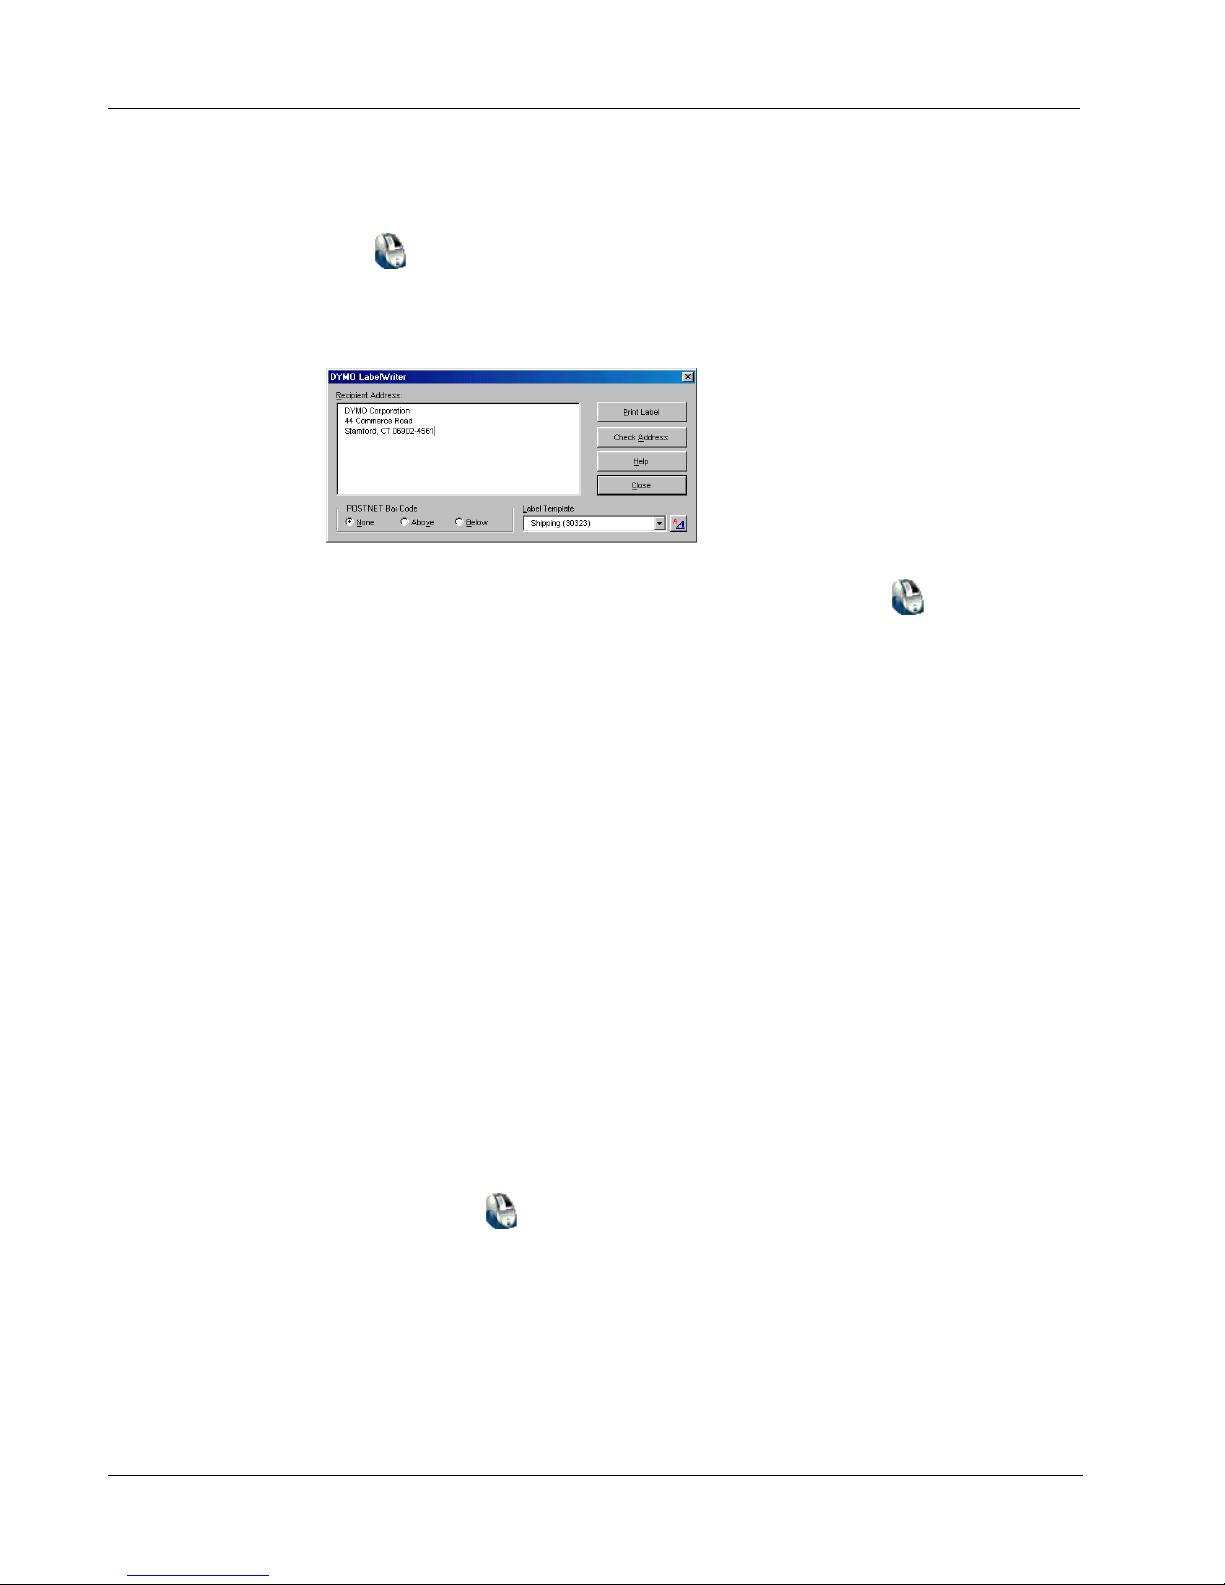
2 Click on the Word toolbar or select the DYMO LabelWriter command from the Tools
menu.
The DYMO LabelWriter dialog box appears with the address from your document
automatically placed in the Recipient Address field.
If your document contains more than one address and you want to make sure the Word Add-In uses
the correct one, select the address in your Word document before you click .
Printing the Address
Once the DYMO LabelWriter dialog box appears, you can select from a number of different
address and shipping label files, depending on how you want the label to look.
To print the label
1 Select the desired label file from the Label Files drop-down list.
2 To change the address, edit the address in the Recipient Address dialog box.
3 Click Print Label to print the label.
If you are printing a shipping label file, it will include the return address that’s already been defined
for the file.
Additional Windows Application Add-Ins
In addition to the Microsoft Word Add-In, you can install add-ins for several Windows-based
contact management applications. Each application is described in this section and full details for
installing and using the add-ins is included in the online Help.
About Microsoft Outlook and Palm Desktop Add-Ins
Similar to the Microsoft Word Add-In, the Microsoft Outlook and Palm Desktop Add-ins are
automatically installed at the same time as DYMO Label Software. When an add-in is installed
correctly, you will see a tool button in the main toolbar of the application. Microsoft Outlook
requires one additional step to enable the add-in from within Outlook. See “Enabling the Outlook
Add-In” later in this section.
If you don’t see this tool button, you will need to reinstall your DYMO Label Software.
24
Page 29
About the ACT! and GoldMine Add-Ins
CAUTION When you reinstall the DYMO LabelWriter Software, all of the pre-designed label
files are also reinstalled. If you have made any changes to the pre-designed label files and have not
saved the changes with a new file name, copy the changed label files to another location before you
reinstall the software so you don’t lose your changes. Then once the installation is complete, copy
the label files back into the Labels folder.
Enabling the Outlook Add-In
The Outlook Add-In works on Windows systems with Outlook 97, 98, 2000, and XP.
NOTE The Outlook Add-In does not work with Microsoft Outlook Express.
If the LabelWriter tool button appears in your Outlook toolbar automatically, you can begin using
the Add-In. If a tool button is not present, you’ll need to enable the Outlook Add-In from the
Outlook Add-In Manager.
To enable the Outlook Add-In
1 Choose the Options command from the Tools menu in Outlook.
The Options dialog box appears.
2 Select the Other tab and then click Advanced Options.
The Advanced Options dialog box appears.
For Outlook 97, also select the General tab.
3 Click Add-In Manager.
4 Check the DYMO LabelWriter item in the Add-In Manager list (you might have to scroll
down the list to display this item).
If DYMO LabelWriter does not appear, click the Install button and then select from the list of
files. Click OK.
5 Click OK in each of the dialog boxes you opened.
6 Exit from Outlook and then restart the program.
The Outlook Add-In automatically adds a LabelWriter printer button to the Outlook toolbar and
adds the DYMO LabelWriter command to the Tools menu.
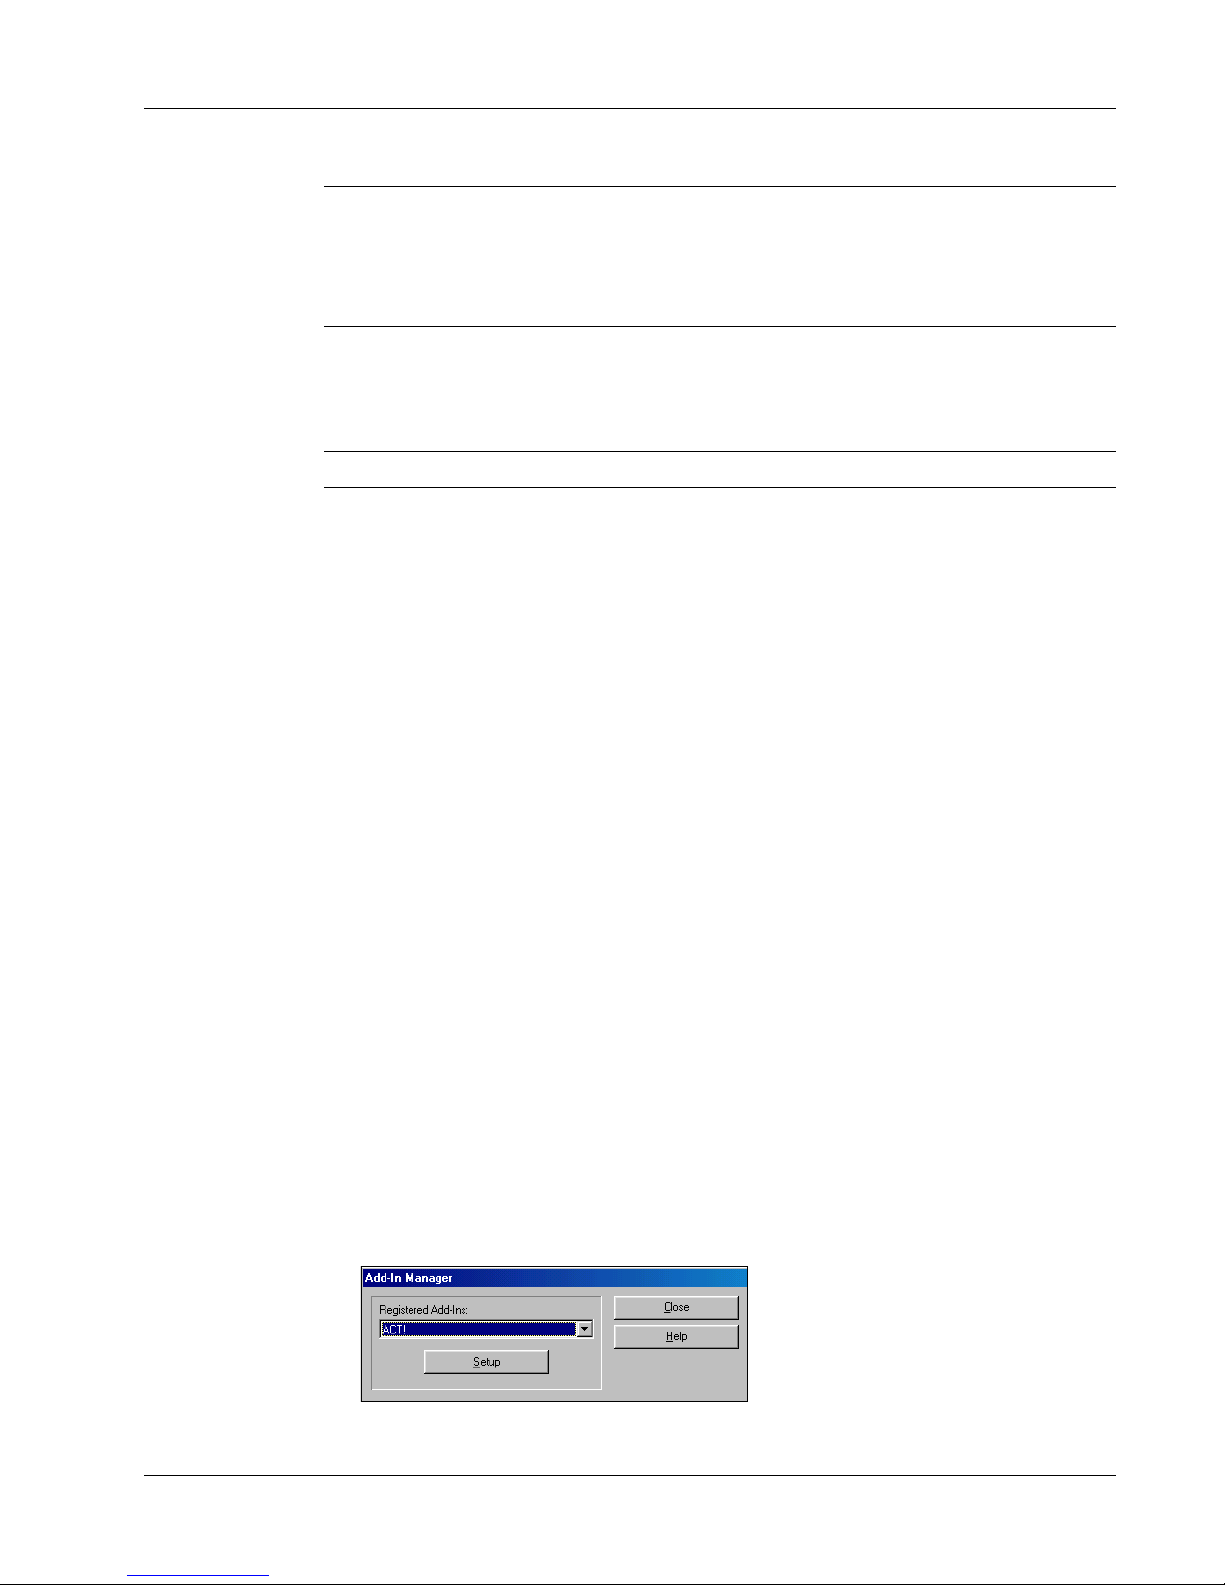
About the ACT! and GoldMine Add-Ins
DYMO Label Software includes add-ins for ACT! and GoldMine that enable you to print contact
information for your contact databases onto labels. Once you install the add-in, you can quickly
print address, shipping, file folder, and other labels for the current contact, the current lookup, or
for all contacts in your database.
These two Add-Ins are installed and managed through the Add-In Manager on the File menu.
Complete instructions for installing and using these add-ins is available in the online Help.
25
Page 30
Using the LabelWriter with Other Applications
About the Database Add-In
DYMO Label Software includes a database add-in that enables you to print information from a
variety of databases onto labels. Once you install the add-in, you can quickly print address,
shipping, file folder, and other labels from the data in your database.
When selected, the database add-in is automatically installed when the DYMO Label Software is
installed. You access the database add-in from the Merge Print from Database command on the
File menu in DYMO Label Software.
The complete instructions for using the database add-in are available in the online Help.
Printing Directly from Other Applications
At times you may want to print labels directly from another program to your LabelWriter printer,
without using DYMO Label Software or the LabelWriter add-ins. One example could be if you
maintain address lists within Microsoft Word or Access and want to print them all on labels without
importing the list to the DYMO Label Software Address Book.
Printing labels directly from applications like these is quite easy because the LabelWriter printers
come with standard Windows and Mac OS printer drivers that work with virtually any application.
Detailed instructions on printing directly from Microsoft Word can be found in the online Help.
Even if you are using a different application program than Word, reviewing the instructions in the
online Help will give you an understanding of how to use the LabelWriter printer driver with your
favorite program.
26
Page 31
Chapter 6
Maintenance and Troubleshooting
This chapter describes how to take care of your LabelWriter printer and offers suggestions for
identifying problems that can occur when you using the printer. If you can’t solve a problem, this
chapter also describes how to contact DYMO for technical support.
Caring for the LabelWriter Printer
The LabelWriter printer is designed to give you long and trouble-free service, while requiring very
little maintenance. You’ll get the best possible performance from your LabelWriter printer if you
follow the setup instructions that appear in the Quick Start Guide and the procedures described in
this section.
You can easily clean your LabelWriter printer using the following items:
• Lint-free cloth.
• Isopropyl alcohol, diluted dishwashing detergent, or diluted glass cleaner. (If you use glass
cleaner, make sure it does not contain ammonia.)
• Small, soft brush, such as a paint brush.
• LabelWriter cleaning card. One cleaning card (part number 60622) is included in your printer
package. To purchase additional cleaning cards, visit www.dymo.com
or call (800) 426-7827.
To keep your LabelWriter printer working properly, you should clean it from time to time. Dusting
the outside of the printer occasionally will help keep foreign matter from getting inside the printer.
However, it is still a good idea to periodically perform some basic interior maintenance.
To clean the exterior and interior of your printer
1 Turn off the printer and disconnect the power cord.
2 Use the lint-free cloth to wipe the exterior of the printer. Remove dirt and smudges with one of
the cleaning solutions mentioned above.
3 Open the top cover.
4 Use a small, soft brush/cotton swab to whisk away paper dust and other stray particles from the
inside of the printer.
5 Remove the roll of labels to clean under the roll.
6 If you have a LabelWriter cleaning card, follow the instructions printed on its packaging and
feed it through the printer mechanism.
7 Reconnect the power cord and turn on the printer.
8 Reload the roll of labels and close the top cover.
Performing a Printer Self-Test
If you experience problems with broken characters or other print quality issues, you should perform
a printer self-test. The self-test verifies that all elements of the print head are in working condition.
27
Page 32
Maintenance and Troubleshooting
To perform a self test for the LabelWriter EL40, EL60, Turbo, and 300
1 Turn off the printer using the switch on the back.
2 Press and hold down the form-feed button.
3 Turn on the printer and then release the form-feed button.
Your LabelWriter will print vertical lines along the width of the printer. To change the test
pattern being printed, press the form-feed button.
4 To stop the self test, turn the printer off.
To perform a self-test for LabelWriter 310, 315, and 320
1 Press and hold down the multi-function button on the front of the LabelWriter for 10 seconds.
The LED light begins flashing red and green, and starts printing vertical lines along the width
of the printer. The test pattern automatically changes every 3/4 inch (1.9 cm).
2 To stop the self-test, press and release the multi-function button.
To perform a self-test for the LabelWriter 330 and 330 Turbo
1 Press and hold down the multi-function button on the front of the printer for 10 seconds.
2 Release the multi-function button.
The printer will begin printing vertical lines along the width of the printer. The test pattern will
automatically change every 3/4 inch.
3 To stop the self-test, press and release the multi-function button.
Obtaining Technical Support
If you experience problems with the set up or use of your LabelWriter printer, carefully read this
manual and consult the online Help to make sure you have not missed something that is covered in
the documentation.
If you cannot resolve your problem by consulting the documentation, you can obtain additional
information and assistance from DYMO.
Contacting DYMO
DYMO maintains an Internet Web site, www.dymo.com, that offers support for each LabelWriter
printer. DYMO’s technical support department is also available by phone and fax between 9 A.M.
and 8 P.M. Eastern time.
Web site: www.dymo.com
Phone: (203) 588-2500
Fax: (203) 588-2560 or (203) 355-7060
Visit the Support section of our Web site at www.dymo.com
to contact us by e-mail.
28
Page 33
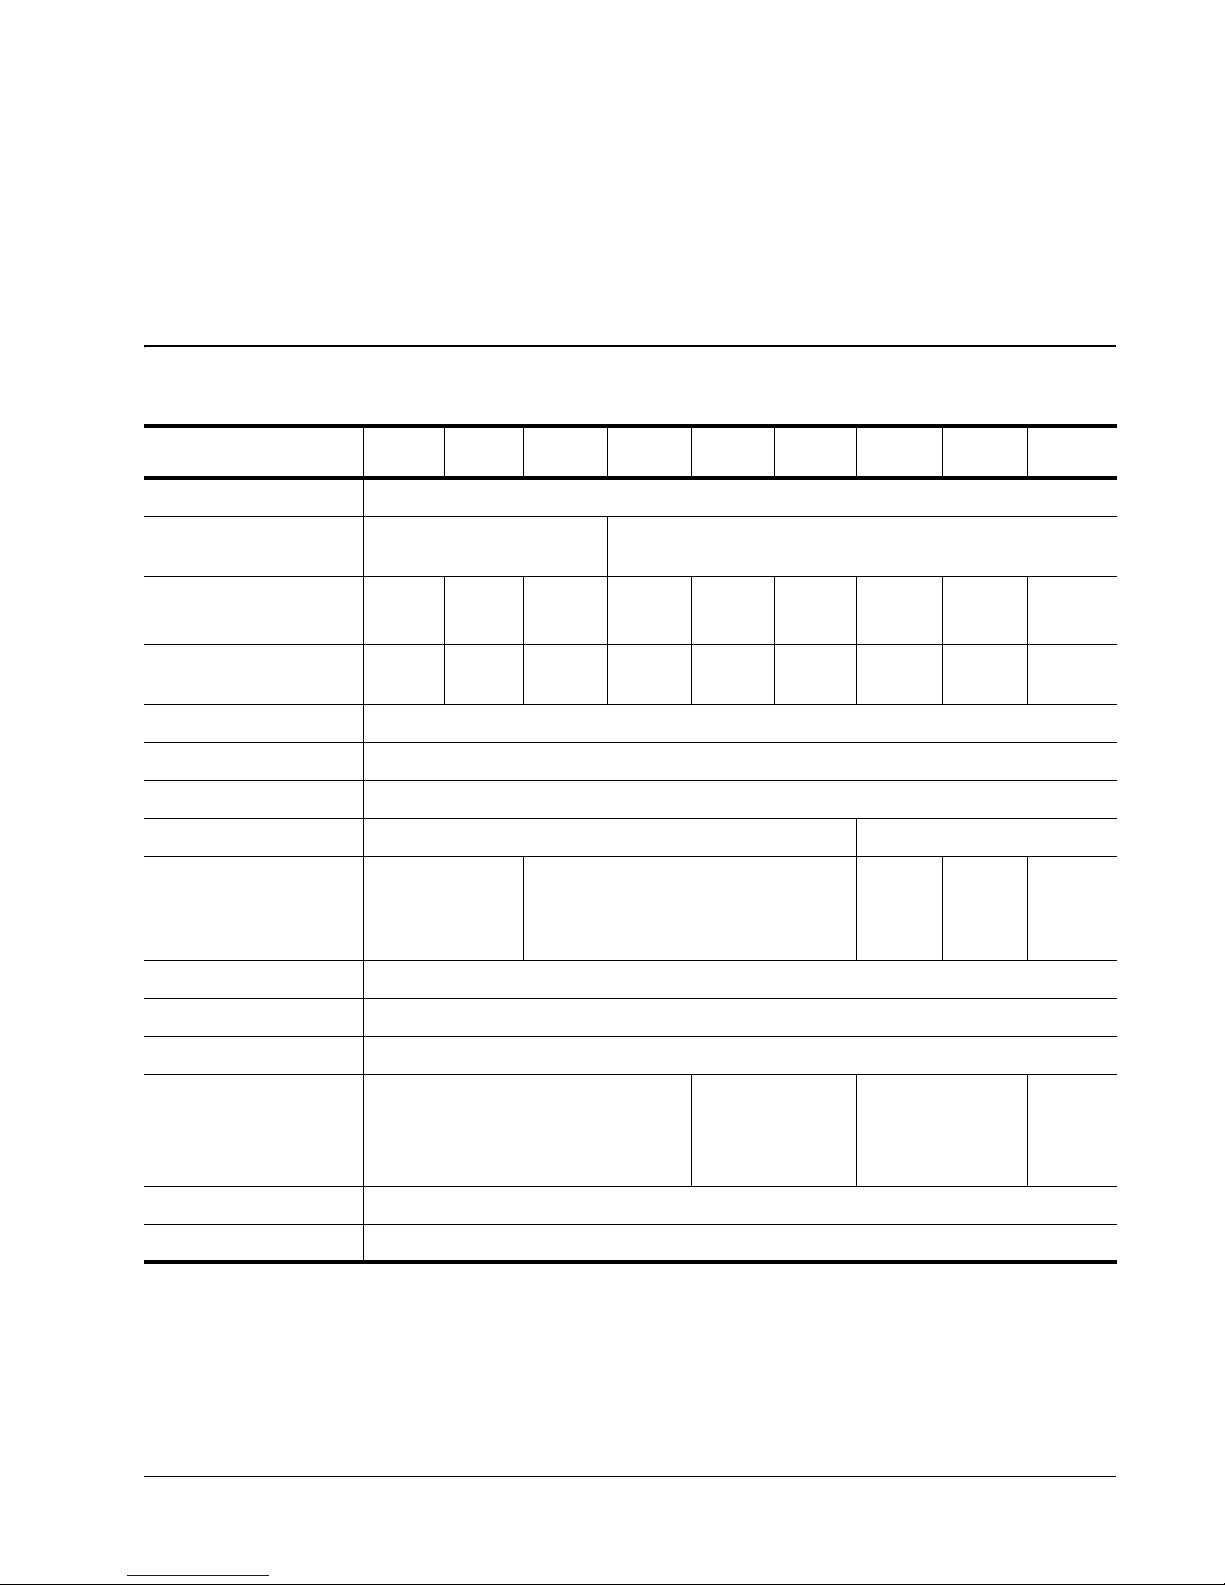
Appendix A
Printer Specifications
This section gives the printer specifications for all the LabelWriter printers.
Print Method
Print Resolution
Print Speed
(labels/min for 4-line
address label in text mode)
Maximum Print Width
Maximum Media Width
Maximum Label Length
Paper Handling
Interface
Serial Printer Settings
Dimensions
Weight
EL40 EL60 Turbo 300 330
Direct Thermal
203 dots per inch
(80 dots per mm)
12 12 32 16 16 32 8 8 16
1.57"
40 mm
2.44" (62 mm) in all printers
User-definable
Maximum 300 feet (91 meters) of thermal paper; 1200" (30 meters) of labels
USB (USB Spec 1.1 protocol); Serial (Bi-directional, RS232) USB (USB Spec 1.1 protocol)
19,200 baud,
8 data bits, no
parity, hardware
handshaking
4 7/8" (12.4 cm) x 5 3/4" (14.6 cm) x 7 1/4" (18.4 cm) (WHD)
1 1/2 pounds (0.68 kg)
2.25"
56 mm
2.25"
56 mm
115,200 baud, 8 data bits, no parity,
hardware handshaking
300 dots per inch (118 dots per mm)
1.57"
40 mm
2.25"
56 mm
330
Turb o
2.25"
56 mm
310 315 320
1.57"
40 mm
N/A N/A N/A
1.57"
40 mm
2.25"
56 mm
Average Print Head Life
Printer Power
Requirements
Regulatory Approvals
Warranty
2,000,000 linear inches (over 31 miles) 50800 linear meters
100-240 V ~ 850 mA 47-63 Hz, Class II
The LabelWriter printer’s internal power
supply allows you to use it Worldwide
with an appropriate adapter.
CE, FCC, cTUVus, GS and C-Tick
One Year Limited
24 VDC 1.0 A 24 VDC 0.63 A 24 VDC
1.0 A
29
Page 34
Printer Specifications
Developer and SDK Information
DYMO provides various types of information designed to help developers create products that
work with the LabelWriter printers and DYMO Label Software. Below are some notes for those
interested in developing products that work with LabelWriter printers.
• Keep in mind that LabelWriter printers use standard printer drivers. Therefore, printing to a
LabelWriter is no different than printing on a laser printer, except that the pages are smaller.
• In cases where you want to automate printing and take advantage of the label printing power
built into DYMO Label Software, a Software Developer’s Kit (SDK) is included in your
LabelWriter CD. The SDK provides OLE, direct DLL calls, and Dynamic Data Exchange
(DDE) interfaces. For more information, visit www.dymo.com/developers
.
You can check the Developer’s forum on the DYMO Web site at www.dymo.com/developers
the latest news. Also, you can join the Developer’s mailing list to obtain developer-specific news
and announcements.
for
30
Page 35
Declaration of Conformity
Equipment Information
Description: Direct Thermal Printer
Models: LabelWriter 300 (90791), 310 (90794), 315, 320 (90795), 330 (90891),
330 Turbo (90884), EL40 (90644), EL60 (90645), Turbo (90737)
This equipment has been tested and found to comply with the limits for a Class B digital device,
pursuant to Part 15 of the FCC (Federal Communications Committee) rules. These limits are
designed to provide reasonable protection against harmful interference in a residential installation.
This equipment generates, uses, and can radiate radio frequency energy, and, if not installed and
used in accordance with the instructions, may cause harmful interference to radio communications.
However, there is no guarantee that interference will not occur in a particular installation. If this
equipment does cause harmful interference to radio or television reception, which can be
determined by turning the equipment off and on, the user is encouraged to try correcting the
interference by one or more of the following measures:
• Reorient the receiving antenna.
• Increase the separation between the equipment and the receiver.
• Connect the equipment to an outlet on a circuit different from that to which the receiver is
connected.
• Use shielded cables to connect this device to computers.
• Consult the dealer or an experienced radio/TV technician for help.
NOTE Changes or modifications to this unit not expressly approved by the party responsible for
compliance could void the user’s authority to operate the equipment and void the manufacturer’s
warranty.
Certification
This device has been tested and complies with the requirements of:
UL 1950
EN60950: Low Voltage Directive Product Safety
FCC Part 15 Class B
EN55022: Radiated and Conducted Emissions B
EN50082-1: Generic Immunity ESD, RF, and Transient Susceptibility
31
Page 36
Limited Warranty
DYMO warrants the LabelWriter printer against defects in materials and workmanship for a period
of one (1) year from the date of original retail purchase. If DYMO receives notice of such defects
during the warranty period, DYMO will, at its option, either repair or replace printers that prove to
be defective.
CAUTION: Because DYMO LabelWriter printers use thermal printing technology, you must use
specially designed and manufactured labels. Do NOT use third-party labels. The thermal coating on
these labels has a different sensitivity than DYMO-brand labels. DYMO will not support the use of
labels other than those designed and manufactured by DYMO. Using labels other than DYMObrand labels may void your warranty.
Warranty
Exclusions
This warranty does not cover customer abuse or accidental damage. DYMO’s sole liability is
limited to supplying the parts and labor required to restore the warranted product to its normal
operating conditions. This warranty is in lieu of all other warranties, express or implied, and in no
event is DYMO Corporation liable for consequential or incidental damage incurred by the user.
Returning the LabelWriter for Service
To claim warranty coverage, a dated proof of purchase for the LabelWriter printer is required.
NOTE Please DO NOT send products to DYMO without first obtaining a Return Authorization
(RA) number. Packages shipped without an RA number will be returned to you. This applies to
both warranty and out-of-warranty repairs.
Obtaining an
RA Number
from DYMO
Shipping the
Printer to
DYMO
Contact DYMO’s technical support department at (203) 588-2500 between 9 A.M. and 8 P.M.
Eastern time. A technical support specialist will ask you to describe the problem and provide the
product’s serial number. Upon confirmation of the defect, the service representative will fax a
Return Authorization (RA) form to you to complete. Once the completed RA form is received by
DYMO, an RA number will be issued to you.
The RA number must be clearly written on the side of the shipping container in which you return
the LabelWriter. DYMO will not accept any return without an RA# marked on the outside of the
box. The product must be sent freight prepaid to the following repair center.
DYMO Service Center
RA#xxxxx (place your RA# here)
83 Harvard Avenue
Stamford, CT 06902-5506
DYMO will repair the defects covered under warranty at no charge in approximately three working
days. DYMO will return the repaired product to you using an equivalent shipping method.
The original warranty on the printer remains – it does not restart from the repair date.
Out-of-Warranty Repairs
Repairs to out-of-warranty printers are billable and will only be made after your authorization.
32
Page 37
Index
A
ACT! Add-In 25
Address Book
About
15
opening lists 18
Address Fixer 18
address objects 12
placing new 14
B
barcode objects 12
placing new 14
C
checking addresses 18
Codabar 13
Code 128 13
Code 39 13
contact managers
ACT!
25
GoldMine 25
counter objects 13
placing new 14
Creating a New List 17
curved text objects 13
D
Database Add-In 26
date-time objects 13
placing new 14
Default Logo File 4
Default Return Address 4
delimited files, printing 19
designer 11
designer toolbar 11
DYMO Label Software
starting
5
E
EAN 8/13 13
ellipse objects 12
G
GoldMine Add-In 25
graphic objects 12
placing new 14
H
help 2, 28
horizontal line objects 12
placing new 14
I
Interleaved 2 of 5 13
Internet Postage 18
ITF-14 13
L
Label Designer 11
starting 11
label files 11
opening 5
saving 9
labels 11
opening 13
printing 9
shelf life 1
storage 1
LabelWriter printer
taking care of
line objects 12
27
M
main toolbar 11
33
Page 38
Microsoft
Word
23
multi-line text 20
Smart Paste 19
spreadsheets, printing from 19
storing labels 1
O
objects
about
11
address 12
barcode 12
counter 13
curved text 13
date-time 13
ellipse 12
graphic 12
horizontal line 12
placing new 14
rectangle 12
text 11
vertical line 12
opening
Address Book lists
label files 5, 13
Outlook Add-In 23, 24
18
P
placing new objects on labels 14
PLANET 13
POSTNET 13
printer
maintenance
self-test 27
service 32
specifications 29
testing 27
printing
labels
multiple labels 21
Printing Internet Postage 18
27
9
T
technical support 28
text files, printing from 19
text objects 11
placing new 14
thermal printing 1
U
UPC A/E 13
using with other programs 23
V
variable
objects
text objects 16
vertical line objects 12
placing new 14
16
W
warranty 32
Word
Add-in
23
R
rectangle objects 12
placing new 14
register the software 2
return address 4
Rotate Name 17
S
saving
label files
self-test 27
service 32
9
34
 Loading...