

Page 1
DYMO Connect for Desktop
User Guide
Page 2
Copyright
© 2018 Sanford, L.P. All rights reserved. Revised 08/2025.
No part of this document or the software may be reproduced or transmitted in
any form or by any means or translated into another language without the prior
written consent of Sanford, L.P.
QR Code used in this application is under the GNU Lesser General Public License
2.1.
Trademarks
DYMO, LabelManager, and LabelWriter are registered marks in the US and other
countries. All other trademarks are the property of their respective holders.
ii
Page 3
Contents
What's New in DYMOConnect for Desktop
Version 1.5.1
Version 1.5
Version 1.4.9
Version 1.4.8
Version 1.4.7
Version 1.4.6
Version 1.4.5
Version 1.4.4
Version 1.4.3
Version 1.4.2
Version 1.3.2
Version 1.3.1
Version 1.2
Version 1.1
Introduction
Getting Started
1
1
1
1
1
1
1
1
1
2
2
2
2
2
2
3
4
Touring the Software
Selecting Labels
Printing a Simple Label
Creating a New Label
Opening an Existing Label
Frequently Asked Questions
Designing Labels
Adding Design Objects
Adding a Text Object
Adding an Address Object
Adding an Image Object
Adding a Shape Object
Adding a Line Object
Adding a Barcode Object
4
5
5
5
6
7
10
10
11
12
14
15
16
17
iii
Page 4
Adding a QR Code Object
Adding a Date and Time Object
Adding a Counter Object
Importing a PDF
Using Screen Grab
Selecting Objects
Working with Objects
Aligning Objects
Arranging Objects
Naming an Object
18
18
19
21
22
22
22
23
23
23
Using Contact Lists
Printing Contacts
Adding a Contact
Adding an Contact from a Label
Editing a Contact
Correcting a US Address
Deleting a Contact
Creating a New Contact List
Importing Data to a Contact List
Importing an Address Book from DYMO Label
Switching Contact Lists
Importing Data
Importing Contacts
Importing Spreadsheet or Database Data
Assigning Data Fields
About Label Printers
Don't See Your Printer?
LabelWriter Wireless Printers
Adding a Network Printer
MobileLabeler Label Maker
LabelWriter 450 Twin Turbo Printer
Adjusting the Print Quality
25
25
25
26
26
26
27
27
27
28
28
30
30
30
31
32
32
34
34
35
35
36
About Labels
LW Label Rolls
iv
37
37
Page 5
D1 Label Cassettes
Buying Labels
38
39
Setting Preferences
Keyboard Navigation
Getting Help
Software Updates
40
41
44
45
v
Page 6
This page intentionally left blank for double-sided printing.
vi
Page 7
Version 1.5.1
Version 1.5
Version 1.4.9
Version 1.4.8
Version 1.5.1
What's New in DYMOConnect for Desktop
n
Minor feature enhancements
n
Minor feature enhancements
n
Support for custom labels (US only).
n
Minor feature enhancements
Version 1.4.7
Version 1.4.6
Version 1.4.5
n
Minor feature enhancements
n
Support for LabelManager Executive 640CB label printer
n
Import data into "Text" type QR code object
n
New Medical and Veterinary templates
n
Support for GS1 DataMatrix barcodes
n
Support for Cryogenic labels
n
Disable/enable software update notifications
n
Disable/enable software update notifications
n
Minor feature enhancements
n
Fixed character issues in Chinese, Korean, and Japanese
n
Minor feature enhancements
Version 1.4.4
n
New and updated labels and templates
n
Support for VPAT
n
Import data from a spreadsheet to a contact list
1
Page 8
What's New in DYMOConnect for Desktop
n
Import PDF as an image object
n
Added Print DYMO Label Add-in to Microsoft Excel (Windows)
n
Support for Apple contacts (macOS)
n
Updated clip art
n
Custom object naming
n
Support for Intelligent Mail®barcodes
n
Support for PLANET barcodes
n
Support for POSTNETbarcodes
Version 1.4.3
n
Addition of DYMOcontact lists
n
Added Safety clip art category
Version 1.4.2
n
Support for LabelWriter 550, 550 Turbo, and 5XL label printers
n
Support for Authentic DYMO Labels with Automatic Roll Recognition™
n
Support for macOS v10.14 Mojave and later
n
Minor feature enhancements.
Version 1.3.2
Version 1.3.1
Version 1.2
Version 1.1
n
Added new colored name badge labels.
n
Minor feature enhancements.
n
Support for Korean language.
n
Improved method for assigning data fields when importing data.
n
Added screen grab feature to the Image object.
n
Added Print DYMO Label Add-in to Microsoft Word.
n
Software Developer's Kit (SDK) now available.
n
Support for additional languages: Simplified Chinese, Russian, Hindi,
Japanese, Thai, Vietnamese
n
Minor feature updates.
2
Page 9
Introduction
DYMOConnect for Desktop software allows you to quickly create and print
labels to your DYMOLabel printer. This user guide describes how to use the
software in detail. Start with the following sections:
n
Getting Started
n
Frequently Asked Questions
n
Designing Labels
n
Importing Data
This user guide contains the same information as the DYMOConnect for
Desktop software online help.
3
Page 10
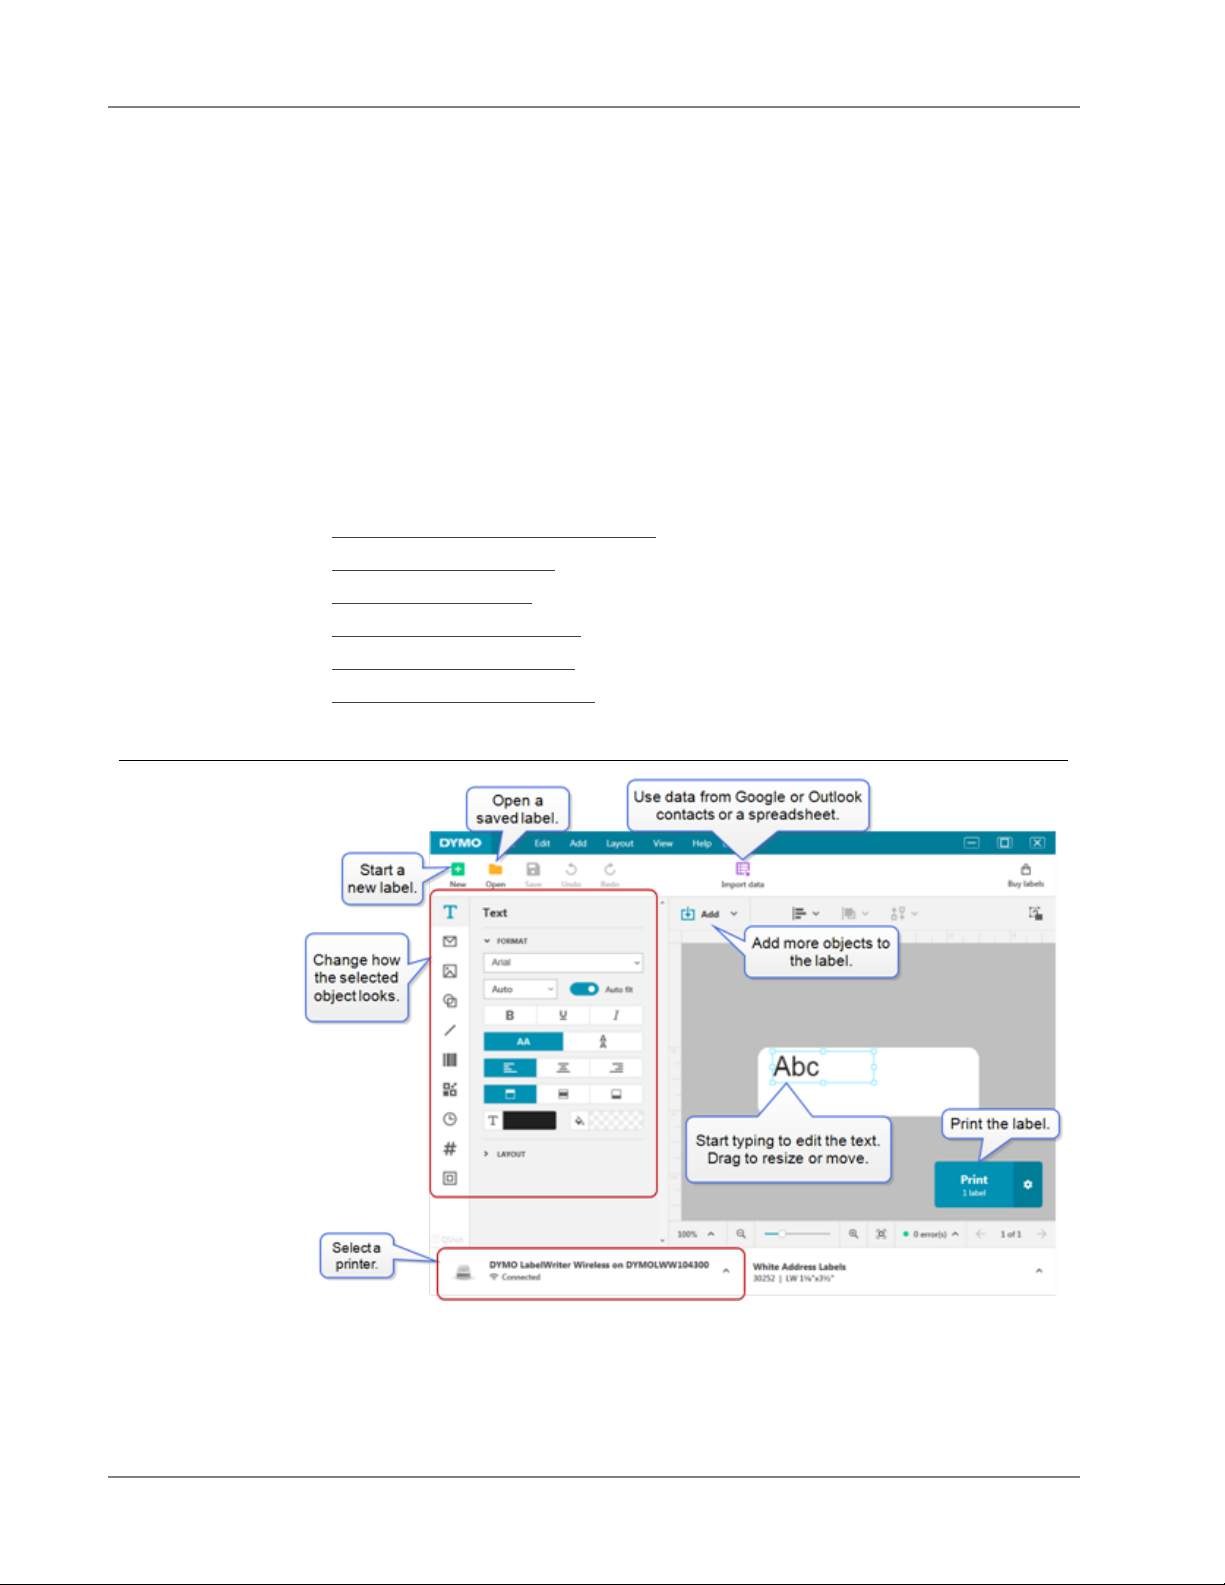
DYMO Connect software includes several options for quickly creating and
printing a label. Choose one of the following:
n
Chose a Simple label with a single Text object where you can type your text.
n
Select a pre-formatted label template based on your label application.
n
Create your own custom design from a blank label.
For more information, review the following sections:
Touring DYMO Connect software
Printing a Simple label
Creating a new label
Opening an existing label
Selecting your label type
Designing a custom layout
Touring the Software
Getting Started
4
Page 11
Selecting Labels
Labels are listed by type (LW labels or D1 tape labels) and size. LW type labels
are used in LabelWriter printers. D1 tape labels are used in LabelManager and
MobileLabeler label makers. Once you've selected the label type and size, that
label may have additional options for material and/or color. The labels available
in the list are based on the label printer currently selected. For example, if you
have a LabelWriter printer selected, you won't be able to choose a D1 tape label.
When a D1 tape labels have been changed in the printer to a different size or
type, you may receive a message asking you whether you wish to continue with
the currently selected label or you wish to change the label type. If you choose to
change the label to match the label roll in the printer, the objects on your current
label design will be resized to fit the new label. You can continue to work in the
current label size even though it does not match the label size in the printer.
However, you will need to insert labels that match before printing or you may get
unexpected print results.
Printing a Simple Label
The Simple label templates are set up with one text object where you can quickly
add text and print. Two versions of the Simple label are available: horizontal and
vertical.
To print a Simple label
1.
If the Simple label is not already displayed on the design page, click
New.
2.
Select either the horizontal or vertical Simple label template and click Open.
You can also double-click the template to open it.
3. Enter your text in the Text object on the label.
4. Format the text or change the layout using the options in the properties pane
to the left of the design area.
5.
Click Print.
Creating a New Label
You can create a new label starting with a blank label, or you can start by
selecting a template.
A number of formatted labels are available to get you started. These labels are
categorized by application. Within each application are several templates for you
to choose from. While you cannot change a template itself, you can use the
template as a starting point, make your changes, and then save the label for use
later.
5
Page 12
The label templates that are available depend on the printer and label type
selected.
Select the Blank label to design your own label.
To create a label using a template
1.
Select New.
2.
Make sure the label type matches the label in the printer. See Selecting
Labels.
3. Select a template from one of the label applications.
4.
Select Edit. the label appears in the design area.
You can now modify the label using label objects and properties. See Adding
Objects.
When finished with your new design, save the label to your local computer. Your
saved labels will appear in the Open page under Recent. You can also save this
file as a Favorite.
Opening an Existing Label
You can save your label designs and reuse them over and over again. You can
mark a file as a Favorite so it is easy to find.
Only labels files that are compatible with the currently selected label printer will
be available to open.
To open a saved label file
1.
Select Open.
2.
Select a file from the Recent or Favorites tab. Or, click Browse to locate a
label file on your device.
3.
Click Open.
6
Page 13
Frequently Asked Questions
How do I...
Print an address from Google/Outlook/Apple contacts?
1. Add or select an address object on the label.
2. Select Google, Outlook, or Apple (macOS) contacts from the
drop-down list under Manage contacts on the Address
properties pane.
3. Log in to your account when prompted. Your contacts appear in
the list below.
4. Select one or more contacts to use.
Labels are created for each of the contacts selected and the
number of labels that will print is shown on the Print button.
Import data from another application?
You can print a group of labels from your contacts or another
application such as a spreadsheet or database. See Importing Data
for more details.
You can also import an Address Book from DYMOLabel as a
contact list in DYMOConnect. See Importing an Address Book
from DYMOLabel.
Add a barcode/QRCode?
1.
Select Barcode or QR Code from the Add list.
A new barcode or QRCode object is added to your label.
2. Select the type and enter the data in the properties pane.
See Adding a Barcode Object or Adding a QR Code Object for
more details
Add an image or shape?
1.
Select Shape or Line from the Add list.
A new shape or line object is added to your label.
2. Change the shape or line to appear how you want it from the
properties pane.
See Adding a Shape Object or Adding a Line Object for more
details.
7
Page 14
Add a border?
To add a border to a single object on the label
n
Select the object and then turn on Show border on the
properties pane.
To add a border around the whole label
1.
Select the tab on the left side of the properties pane.
2.
Turn on Show border.
Select the correct label type?
For best printing results, the label type and size you are working on
should match the labels in your printer. You select the label type on
the New page.
1.
First, select the printer from the Printer list that you will print this
label to.
2.
Then, select the label type and size from the Label type list. For
some labels, you can also select material and color.
If you are do not know the type of labels you have, look for the
label description or part number on the label packaging.
See Selecting Labels or Creating a New Label for more details.
Find my printer?
All the label printers installed on your device will be listed in the
Printer list. Those that are installed but not currently connected will
show as disconnected.
If you have a wireless printer and it is not listed, make sure:
n
The printer is turned on.
n
The printer is connected to the same wireless network as your
computer.
If the printer is turned on and connected to your network, click Add
network printer from the File menu and follow the steps to add the
printer to the list.
If you still can't find your printer, refer to the Troubleshooting section
of the appropriate printer user guide or contact DYMO Customer
Support.
8
Page 15
Open a saved label?
1.
Click Open from the File bar.
2.
If the label you want to open does not appear in either Recent or
Favorites, click Browse to locate the label on your device.
3.
Select the label and click Open.
Get more labels?
n
Click Labels.
9
Page 16
Designing Labels
You can create a complex label with your own custom design. You can start
from a blank label or use one of the sample layouts as a starting point.
DYMO Connect software includes many sample layouts. These sample layouts
are arranged by label application and contain most of the design objects you
need for a particular label application.
The label application categories are:
Simple Address Price tag
File folder Shipping* Barcode
Storage/Shelving Name badge* Media*
*Only available when a LabelWriter printer is selected.
A blank label is also available.
Once you've designed your label, you can save it for use at any time.
Adding Design Objects
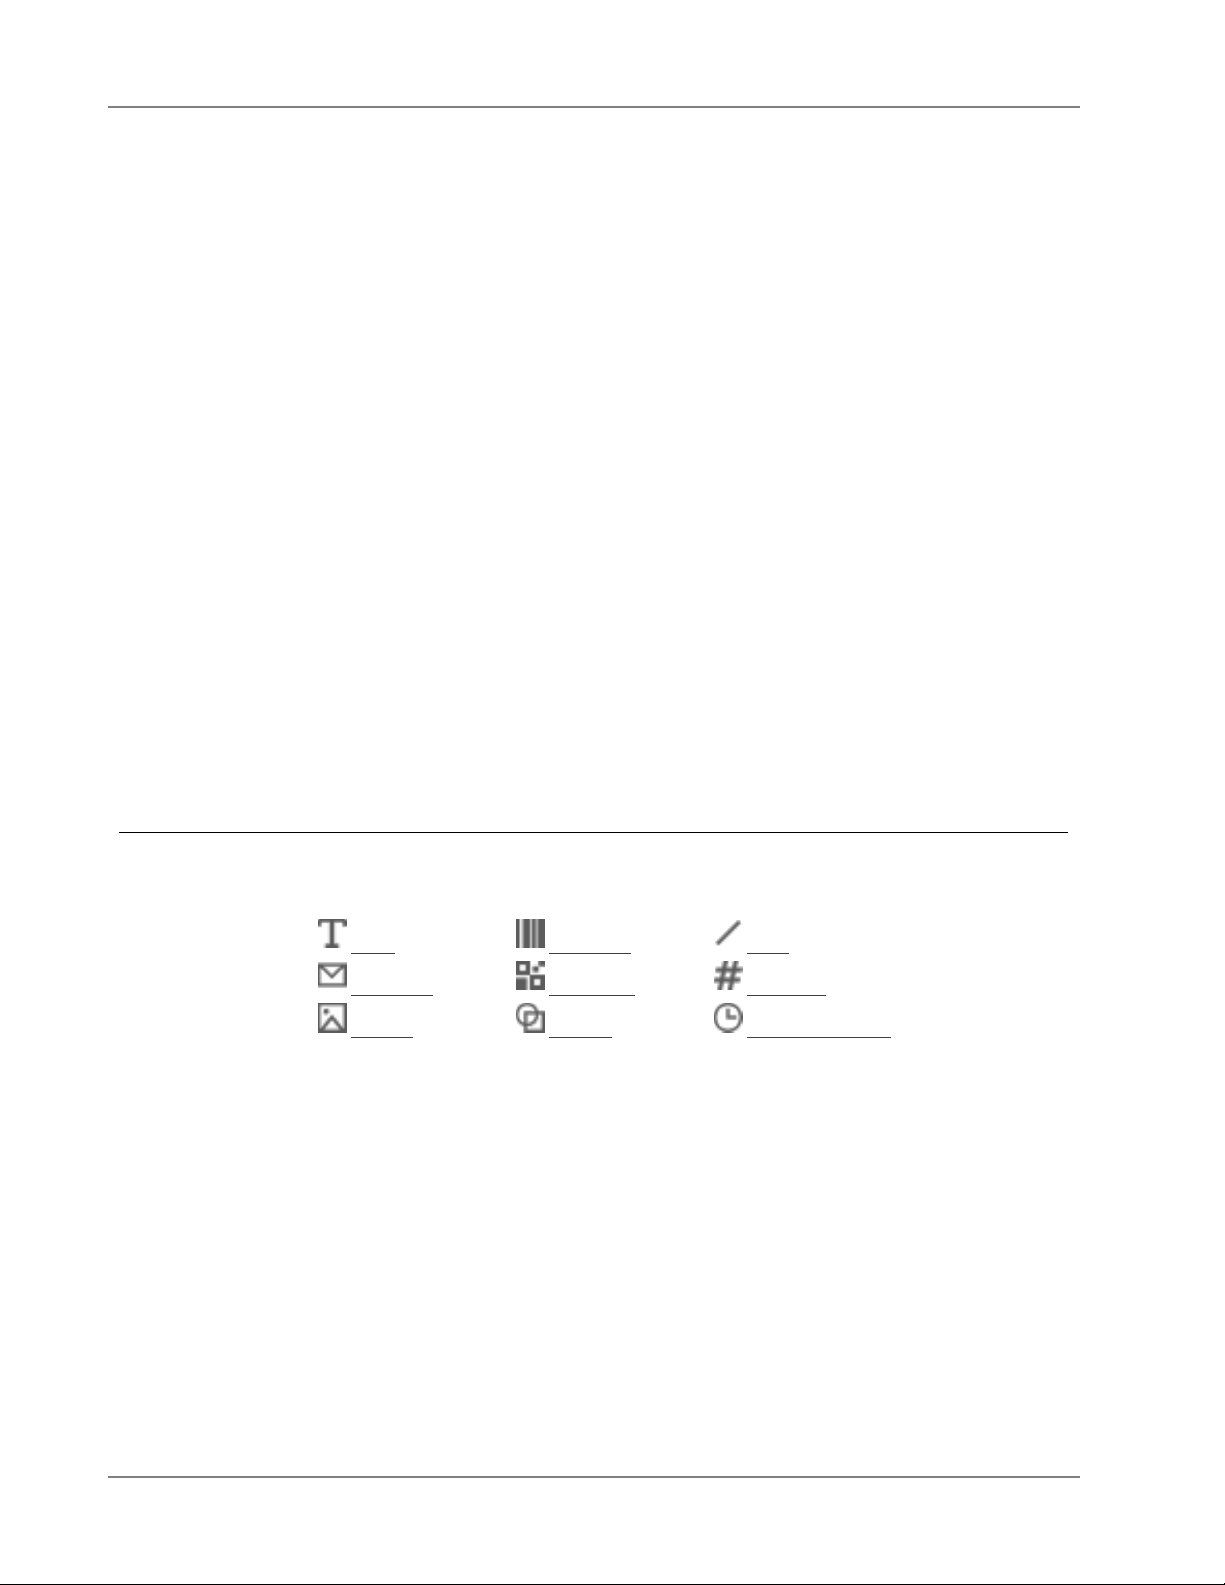
You create your own custom label layout by adding design objects to a label.
You can add the following types of objects to your label:
Text
Address
Image
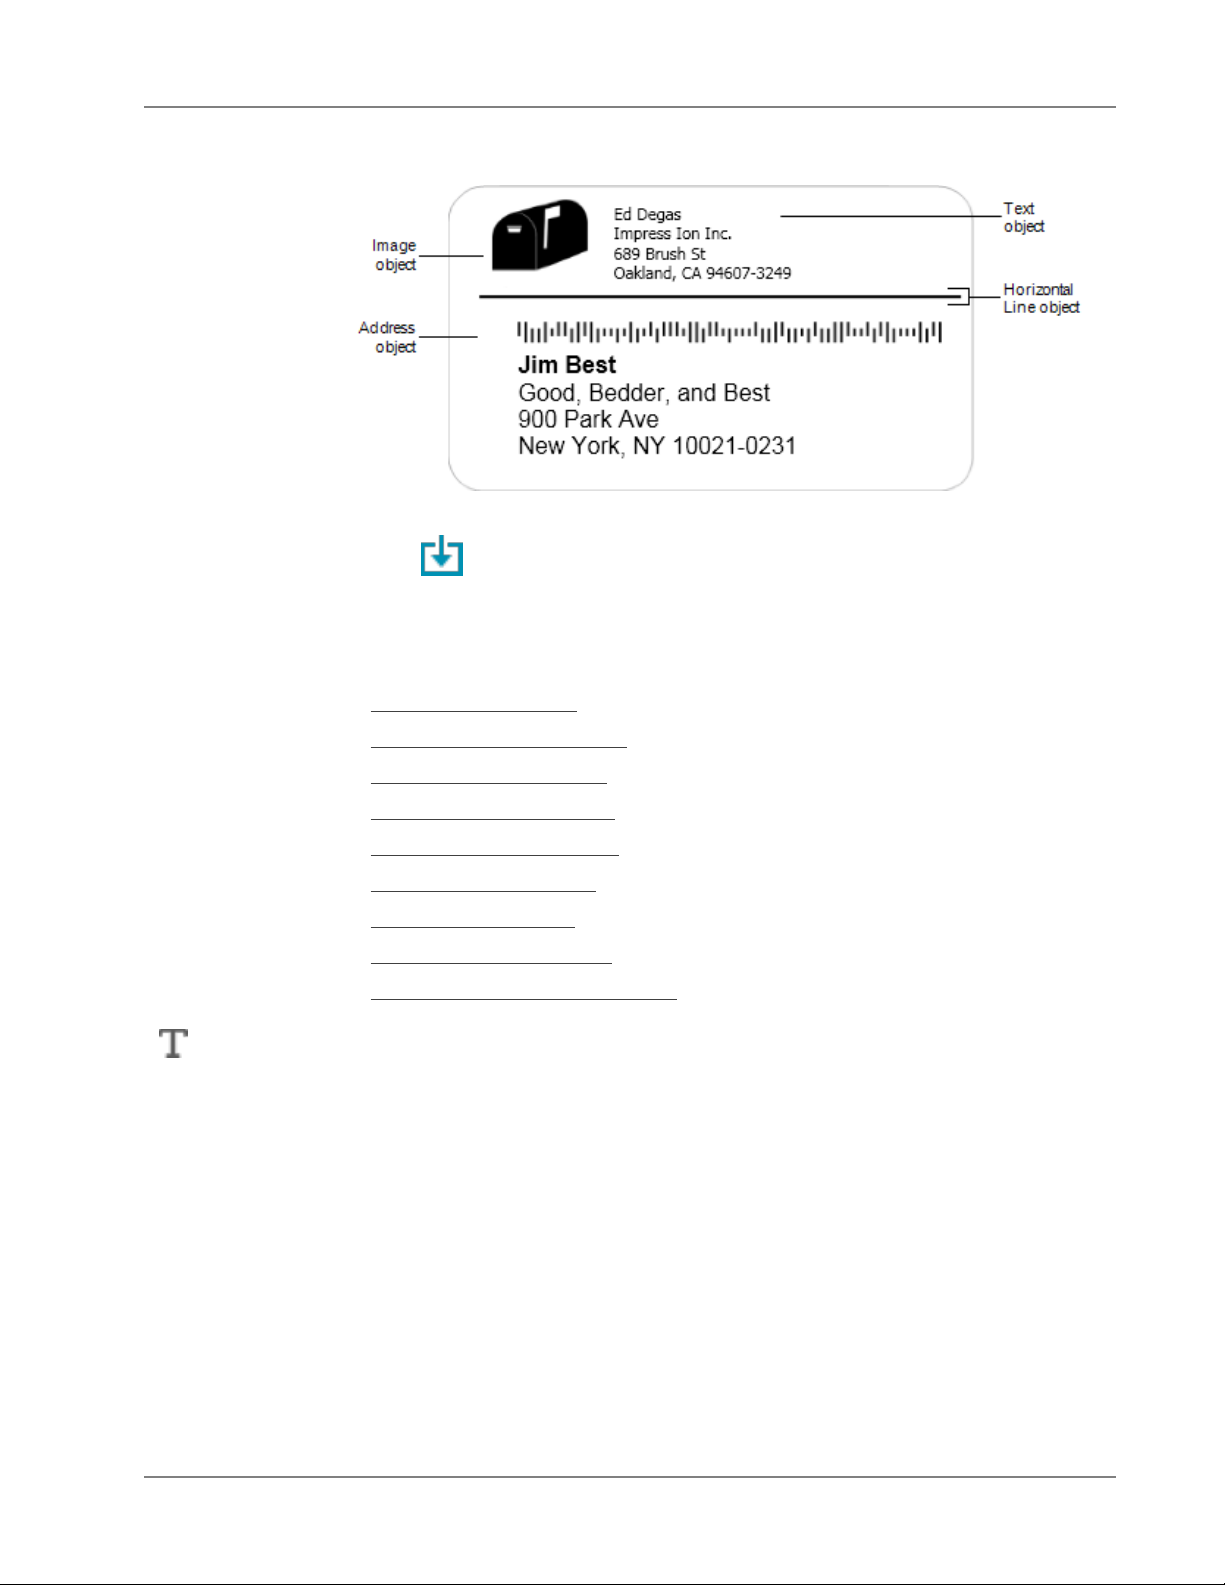
Each piece of information on a label is a separate object. For example, the Large
Shipping label below includes the following objects:
n
an Address object to hold the recipient’s address
n
a Text object to hold your return address
n
an Image object to hold your company logo or another image
n
a horizontal Line object used to separate the logo and return address from
the recipient’s address
Barcode
QR Code
Shape
Line
Counter
Date and Time
10
Page 17
To add an object
1.
Click Add and select the object type you want to add.
2. With the object selected on the label, change the options, format, or layout on
the properties pane.
For more information about the objects, see:
n
Adding a Text Object
n
Adding an Address Object
n
Adding an Image Object
n
Adding a Barcode Object
n
Adding a QRCode Object
n
Adding a Shape Object
n
Adding a Line Object
n
Adding a Counter Object
n
Adding a Date and Time Object
Adding a Text Object
Many labels you create will contain Text objects for text other than an address.
You can customize the appearance of the text, for example, change the font, font
size, and text justification. The properties apply to all the text in the selected label
object. To apply different styles to text on the label, you will need to add a
separate text object for each style.
11
Page 18
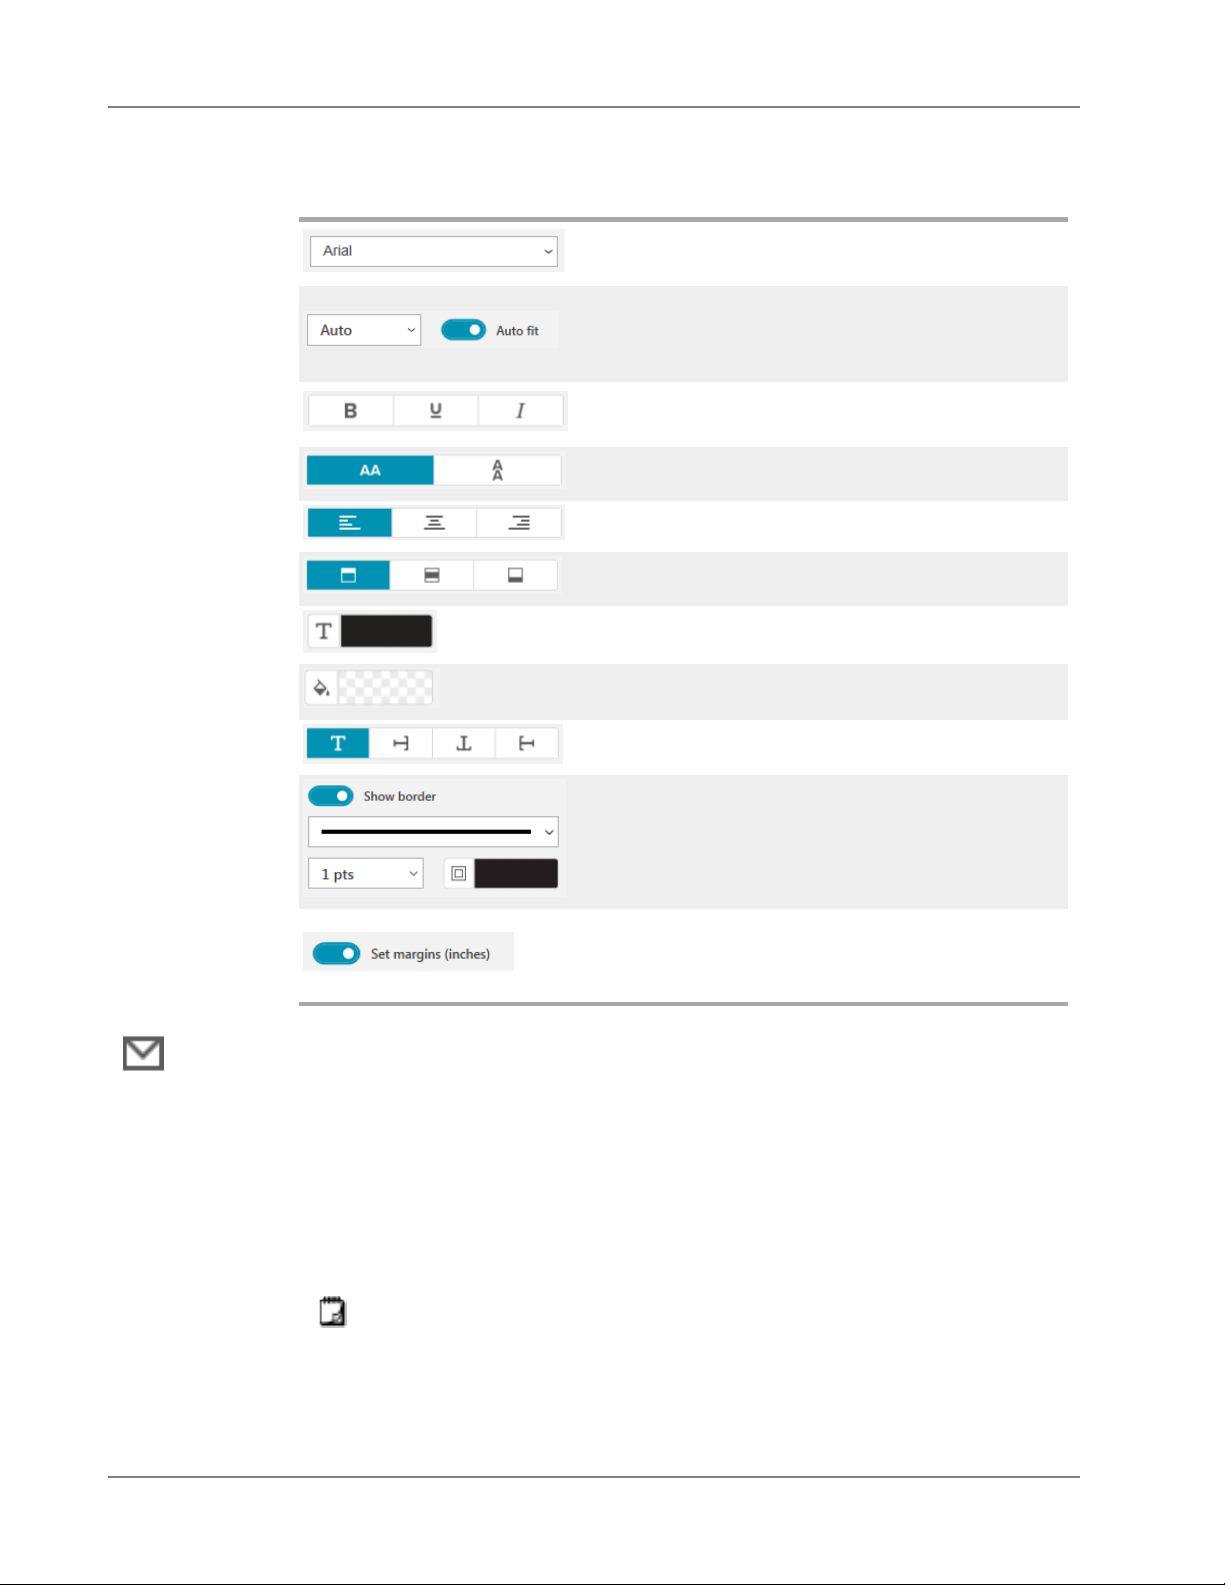
Format and Layout properties
Fonts available are those font families installed
on your device.
Font size in points. Auto fit automatically resizes
the font to fit within the size of the label object.
Turn Auto fit off to set a specific point size.
Font style - Bold, underline, or italic. (If available in
the font family.)
Orientation of the text within the object.
Horizontal alignment of the text within the object.
Vertical alignment of the text within the object.
Color of the text.
Background color of the object.
Rotation of the text within the object.
Adding an Address Object
An Address object is similar to a Text object, but is designed to print address
information from your Microsoft Outlook, Google, or Apple (macOS) contacts or
you can type an address into the object.
You can also make sure you are using a standard USPS address format by
selecting Fix US address. This feature checks a US address against a database
of US addresses, corrects any mistakes, and automatically adds the complete
nine-digit ZIP+4 code.
Addresses inserted into an Address object from a contact list can only be
corrected through Manage contacts.
Border around the object.
Applies to D1 labels only. Sets the amount of
space between the edge of the shape and border
of the object.
12
Page 19
To print more than one label from an address list, create your address label
layout and then import the list of address you wish to print. See Importing Data
for more information.
To add an Address object
1.
Select Address from the Add list.
A new, blank address object is added to your label.
2.
Click Insert contact and select a contact from one of the contact lists
available.
For Google, Outlook or Apple contacts, you will be asked to log in to your
account and then your contact list will be displayed.
3.
Select the contact you wish to use and click Insert.
4.
Optionally, select Fix US Address to check a US address.
5. Optionally, add an Intelligent Mail®barcode above or below the address.
6.
Format the address text using the Format and Layout properties.
13
Page 20
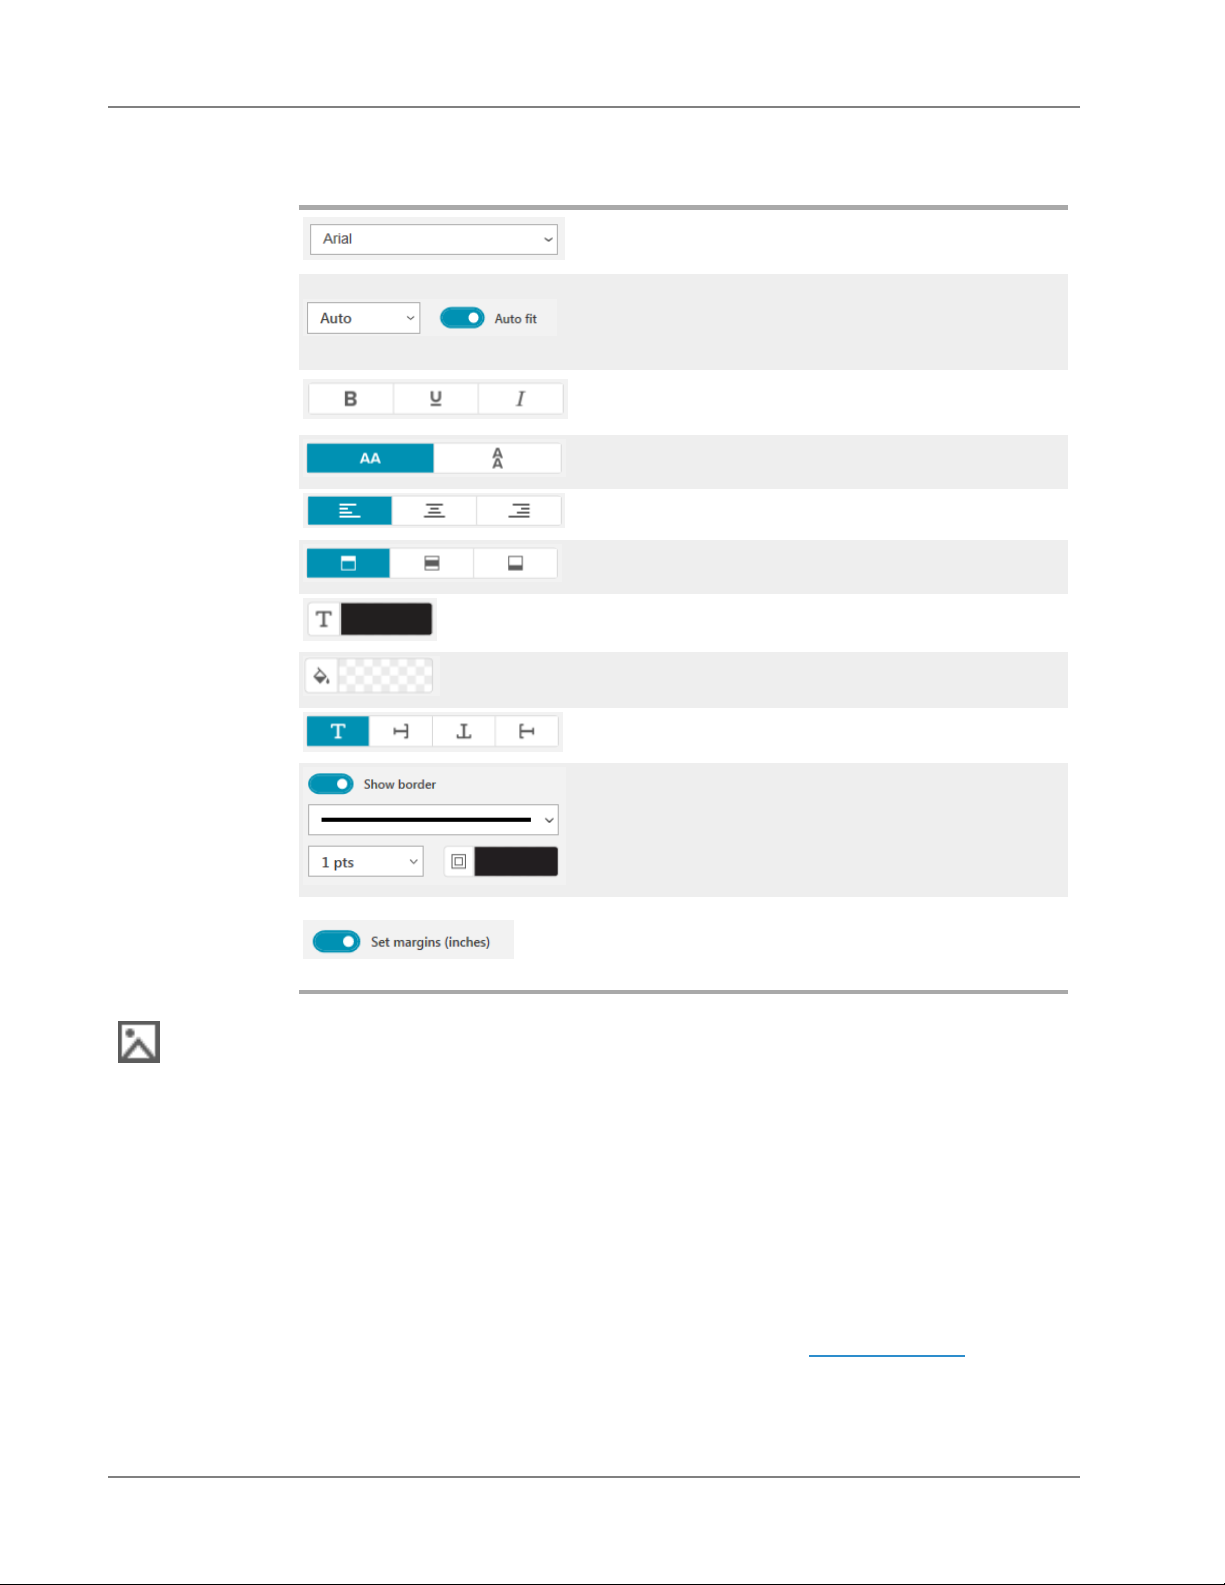
Format and Layout properties
Fonts available are those font families installed
on your device.
Font size in points. Auto fit automatically resizes
the font to fit within the size of the label object.
Turn Auto fit off to set a specific point size.
Font style - Bold, underline, or italic. (If available in
the font family.)
Orientation of the text within the object.
Horizontal alignment of the text within the object.
Vertical alignment of the text within the object.
Color of the text.
Background color of the object.
Rotation of the text within the object.
Adding an Image Object
You can use Image objects to add an image to any label type. You can choose to
add clip art, your default logo, insert an image from the clipboard or a file on your
device, capture an area of the desktop as an image, or take a photo using your
device's camera.
You can use the following types of image files:
BMP GIF PNG
You can also import a PDF file and then crop and rotate the portion of the file you
want to add as an image object on the label. For example, you might want to
print a return shipping label sent to you as a PDF. See Importing a PDF.
For best results, when you add one of your own images, make sure the image
you are inserting is close to the size of the image that will appear on the label.
Border around the object.
Applies to D1 labels only. Sets the amount of
space between the edge of the shape and border
of the object.
JPG TIF
14
Page 21
For example, if you want to print your company logo on a shipping label, you
should not import a logo image that is 5 x 7 inches. Also, take care when using a
color image. When the image is converted to grayscale during printing,
unexpected results may occur. Use black and white or grayscale images
whenever possible.
To add an Image object
1.
Select Image from the Add list.
A new Image object is added to your label.
2. In the properties pane, select one of the following to insert the image into an
image object on the label:
l
Browse - To locate an image on your device.
l
Screen grab - To capture an area of the desktop that is directly under the
DYMO Connect for Desktop software.
l
Clip Art - To select one of many clip art images included in the software.
l
Take a photo - To take a photo with your device's camera.
l
From clipboard - To paste an image you have copied to the clipboard.
3.
Change the layout of the image object using the Layout properties.
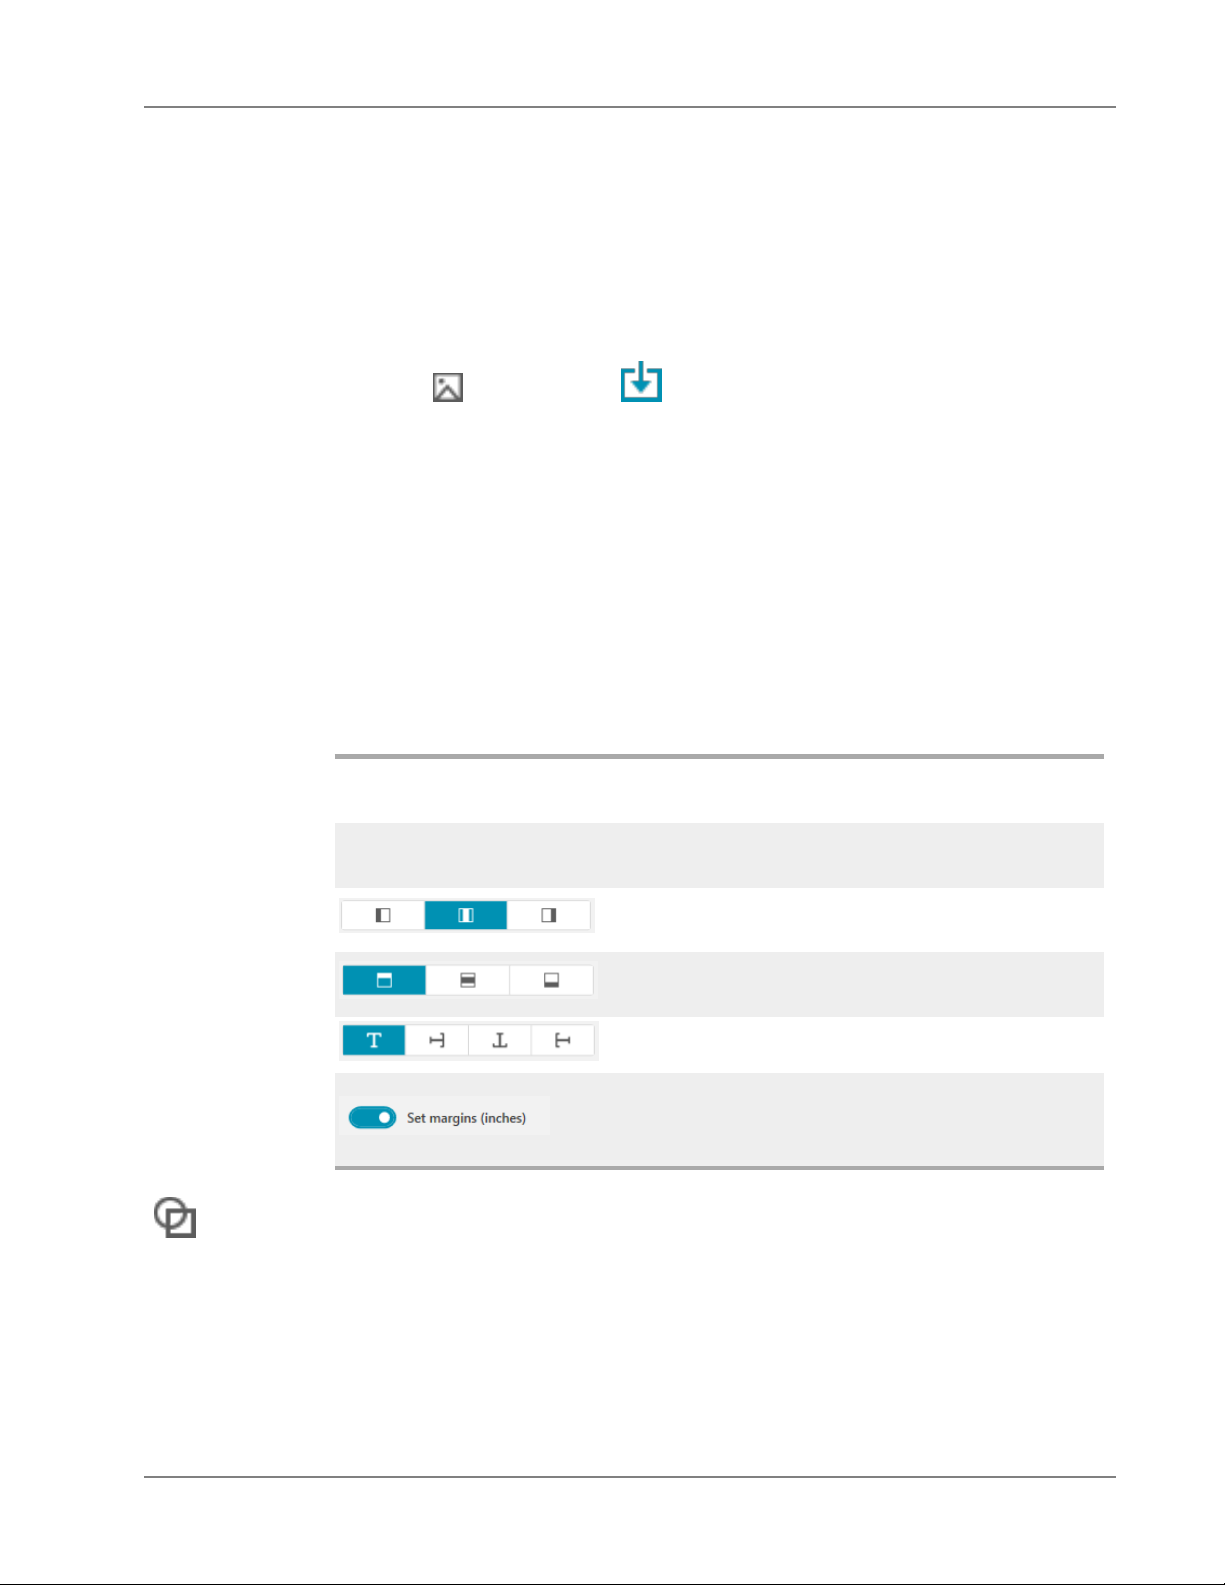
Layout properties
Fill
Stretch
Adding a Shape Object
You can add squares, rectangle, circles or ellipses to your label.
Resize the image to fill the object maintaining
the aspect ratio.
Resize the image to fill the object ignoring the
aspect ratio.
Horizontal alignment of the image within the
object.
Vertical alignment of the image within the
object.
Rotation of the image within the object.
Applies to D1 labels only. Sets the amount of
space between the edges of the image and the
border of the object.
15
Page 22
To add a Shape object
1.
Select Shape from the Add list.
A new shape object is added to your label. By default, the object contains a
circle that fills the size of the object.
2. Select the shape you want from the options in the properties pane.
3.
Resize the shape by resizing the object on the label. See Resizing Objects.
4.
Change the outline of the shape or the fill color using the Layout properties.
You can also double-click a shape to add it to the label.
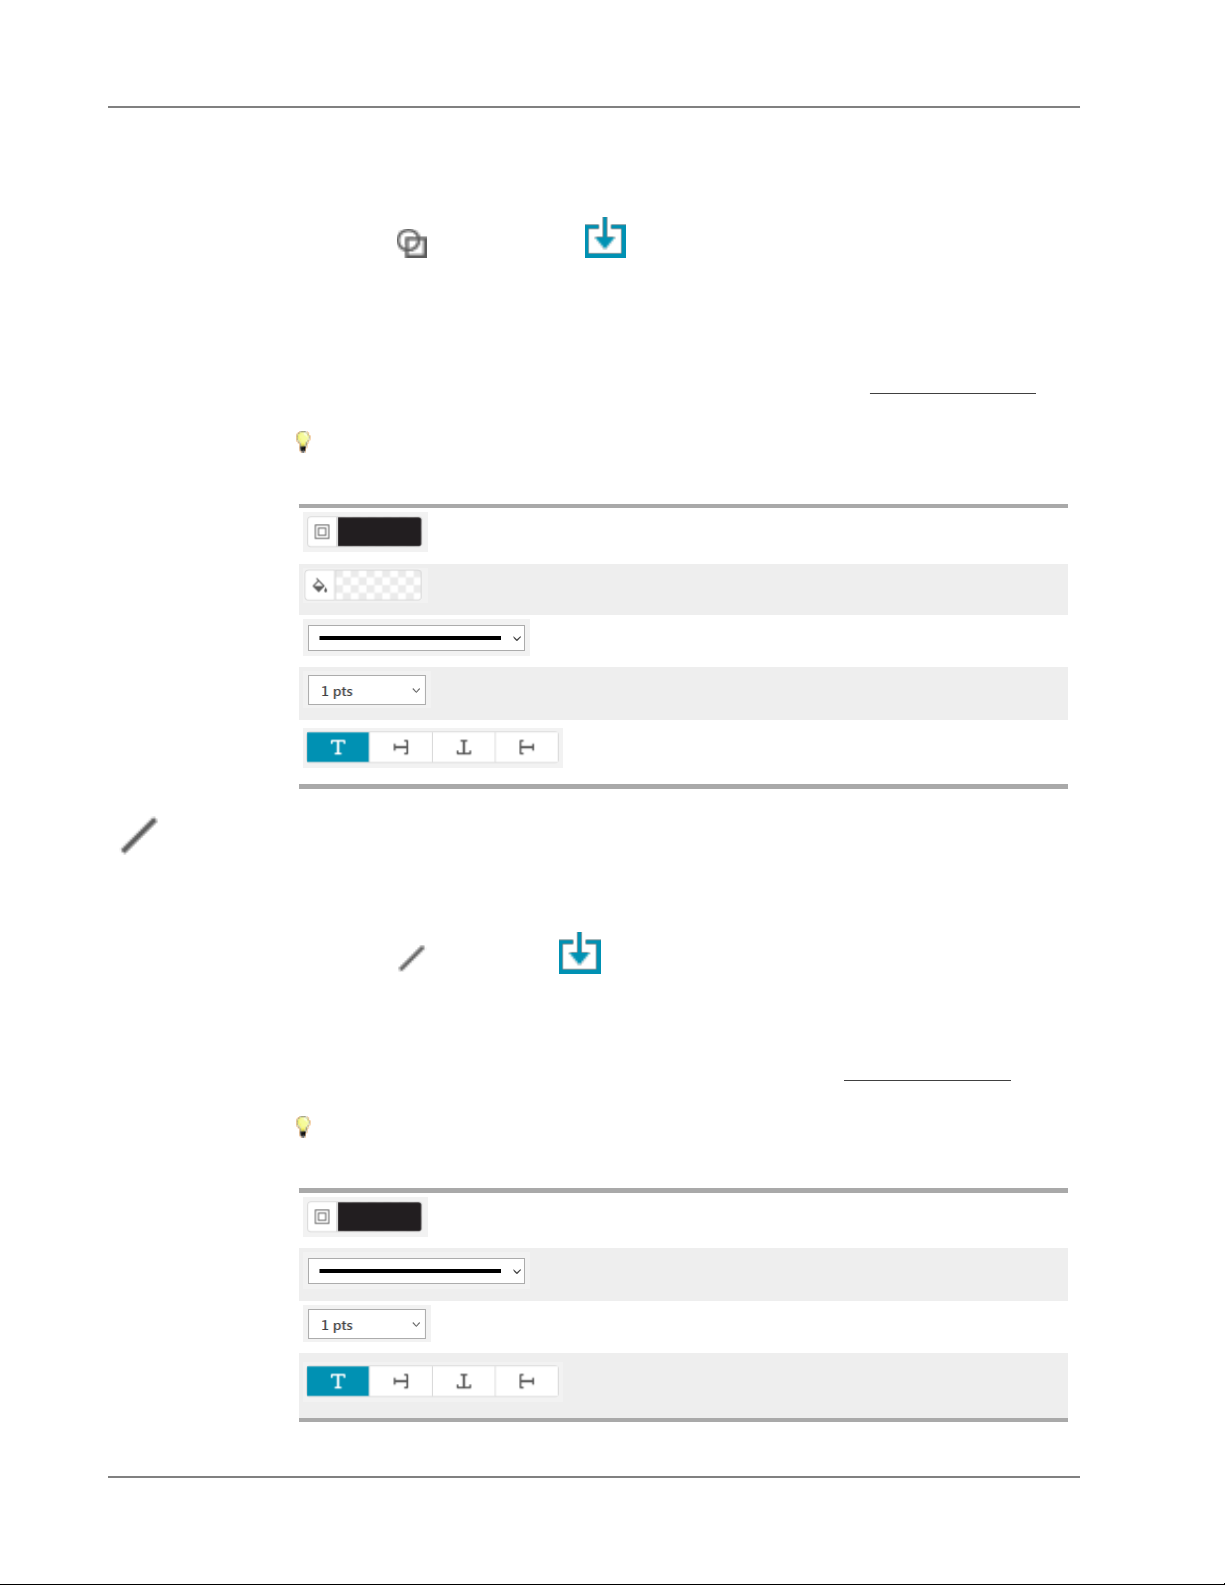
Layout properties
Line color.
Fill color.
Line style.
Line width.
Rotation of the shape within the object.
Applies to right and isosceles triangles only.
Adding a Line Object
You can add squares, rectangle, circles, or ellipses to your label.
To add a Shape object
1.
Select Line from the Add list.
A new line object is added to your label.
2. Select the line angle you want from the options in the properties pane.
3.
Resize the line by resizing the object on the label. See Resizing Objects.
4. Change the color or line style using the Layout properties.
You can also double-click a line option to add it to the label.
Layout properties
Line color.
Line style.
Line width.
Rotation of the line within the object. Applies to
diagonal lines only.
16
Page 23
Adding a Barcode Object
You can create labels that include barcodes based on many formats or types.
You can choose from Code 39 (also called "Code 3 of 9"), Code 128, Interleaved 2
of 5, UPC, EAN, UCC/EAN 128, ITF-14, Codabar, PLANET, POSTNET, GS1
DataMatrix, Intelligent Mail®, and PDF417 barcode types.
This documentation assumes that you already understand the differences
between barcode types and have a plan in place to incorporate barcodes
into your organization. If you need to learn more about barcodes, many
excellent how-to books are available online.
To add a barcode
1.
Select Barcode from the Add list.
A new barcode object is added to your label. By default, the barcode type is
Code 128 Auto.
2. Select the barcode type and enter the data in the properties pane.
3. Optionally, choose to show the barcode text above or below the barcode.
Applies to D1 labels only. Sets the amount of
space between the edges of the line and border
of the object.
4.
Change the size of the barcode in the Layout properties.
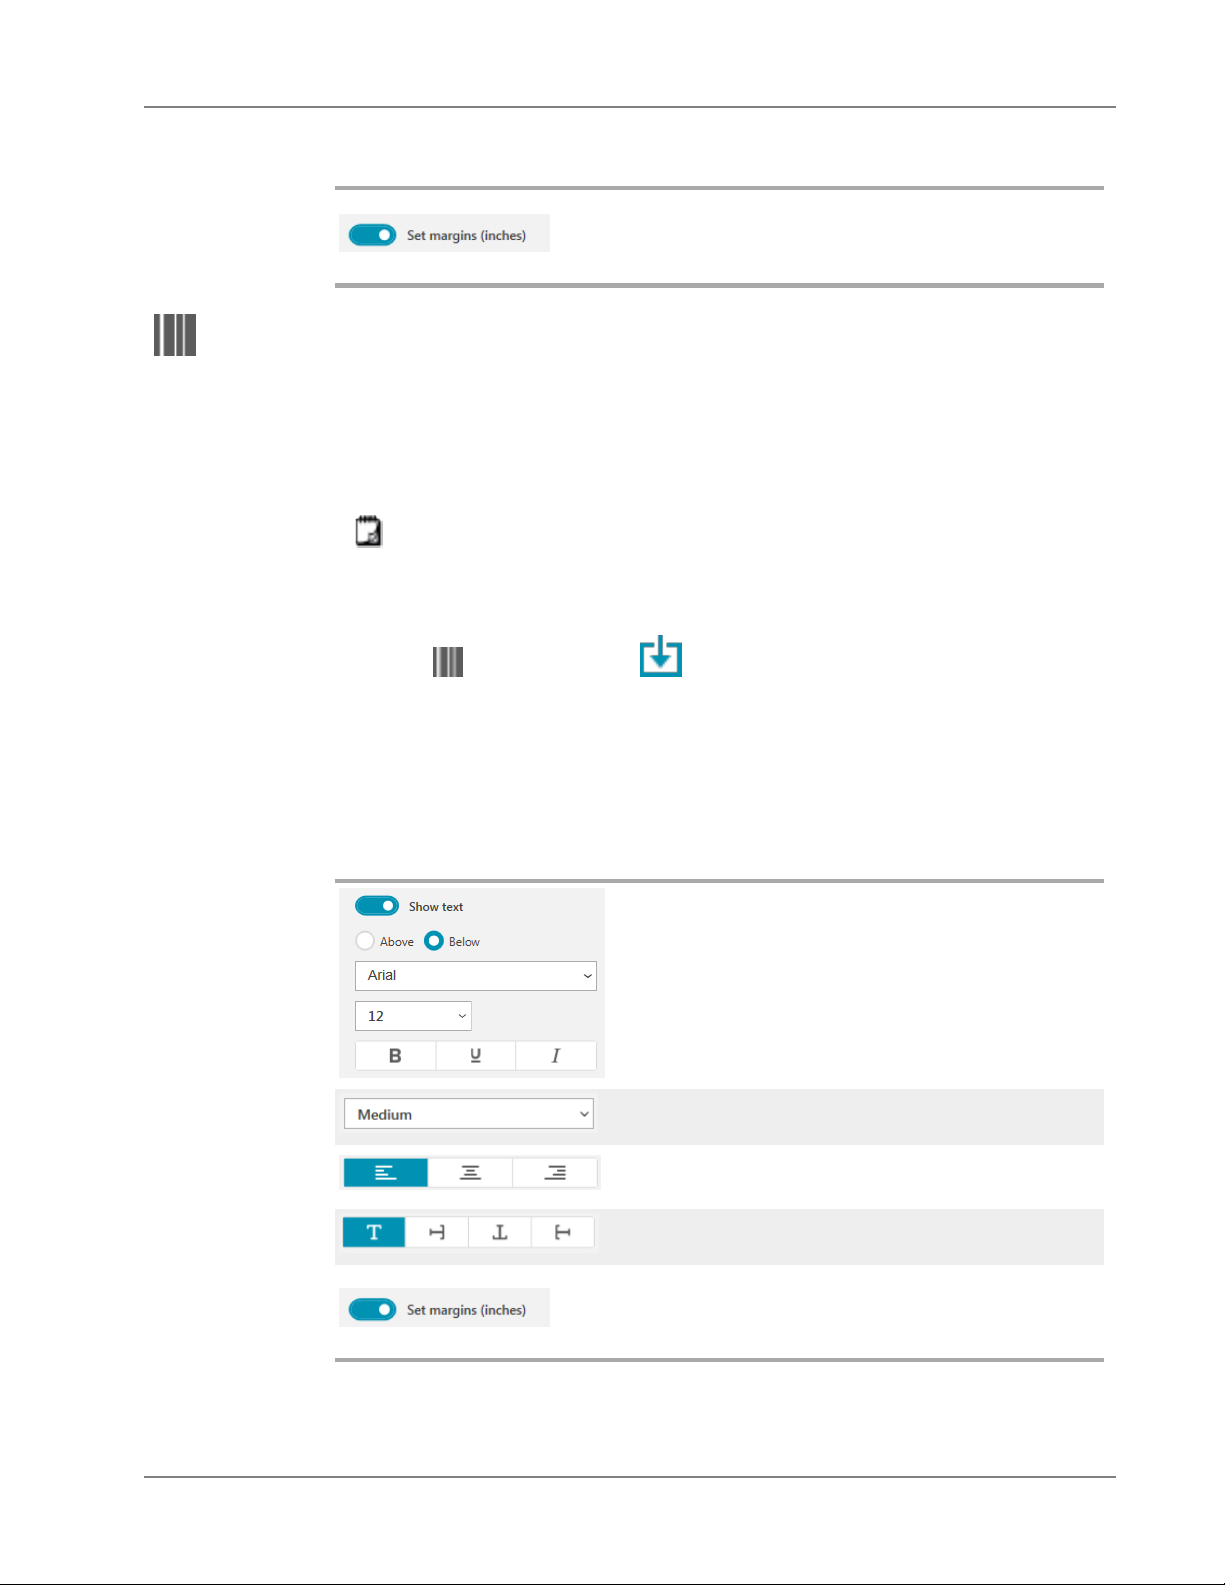
Format and Layout properties
If you choose to show the barcode text, you can
position the text above or below the barcode.
And, you can select the font, size, and style of the
text.
The barcode object size on the label.
Horizontal alignment of the barcode within the
object.
Rotation of the barcode within the object.
Applies to D1 labels only. Sets the amount of
space between the edge of the barcode and the
border of the object.
17
Page 24
Adding a QR Code Object
You can add a QR code to your label using the QR Code object. Text, phone
number, email address, SMS text message, vCard, or a URL data can be used in
the QR Code.
This documentation assumes that you already understand the differences
between QR Code types and have a plan in place to incorporate QR Codes
into your organization. If you need to learn more about QR codes, many
excellent How-To books are available online.
To add a QR code object
1.
Select QR Code from the Add list.
A new QR code object is added to your label. By default, the object contains a
circle that fills the size of the object.
2. Select the QR code type and enter the data in the properties pane.
3.
Change the size of the QR code in the Layout properties
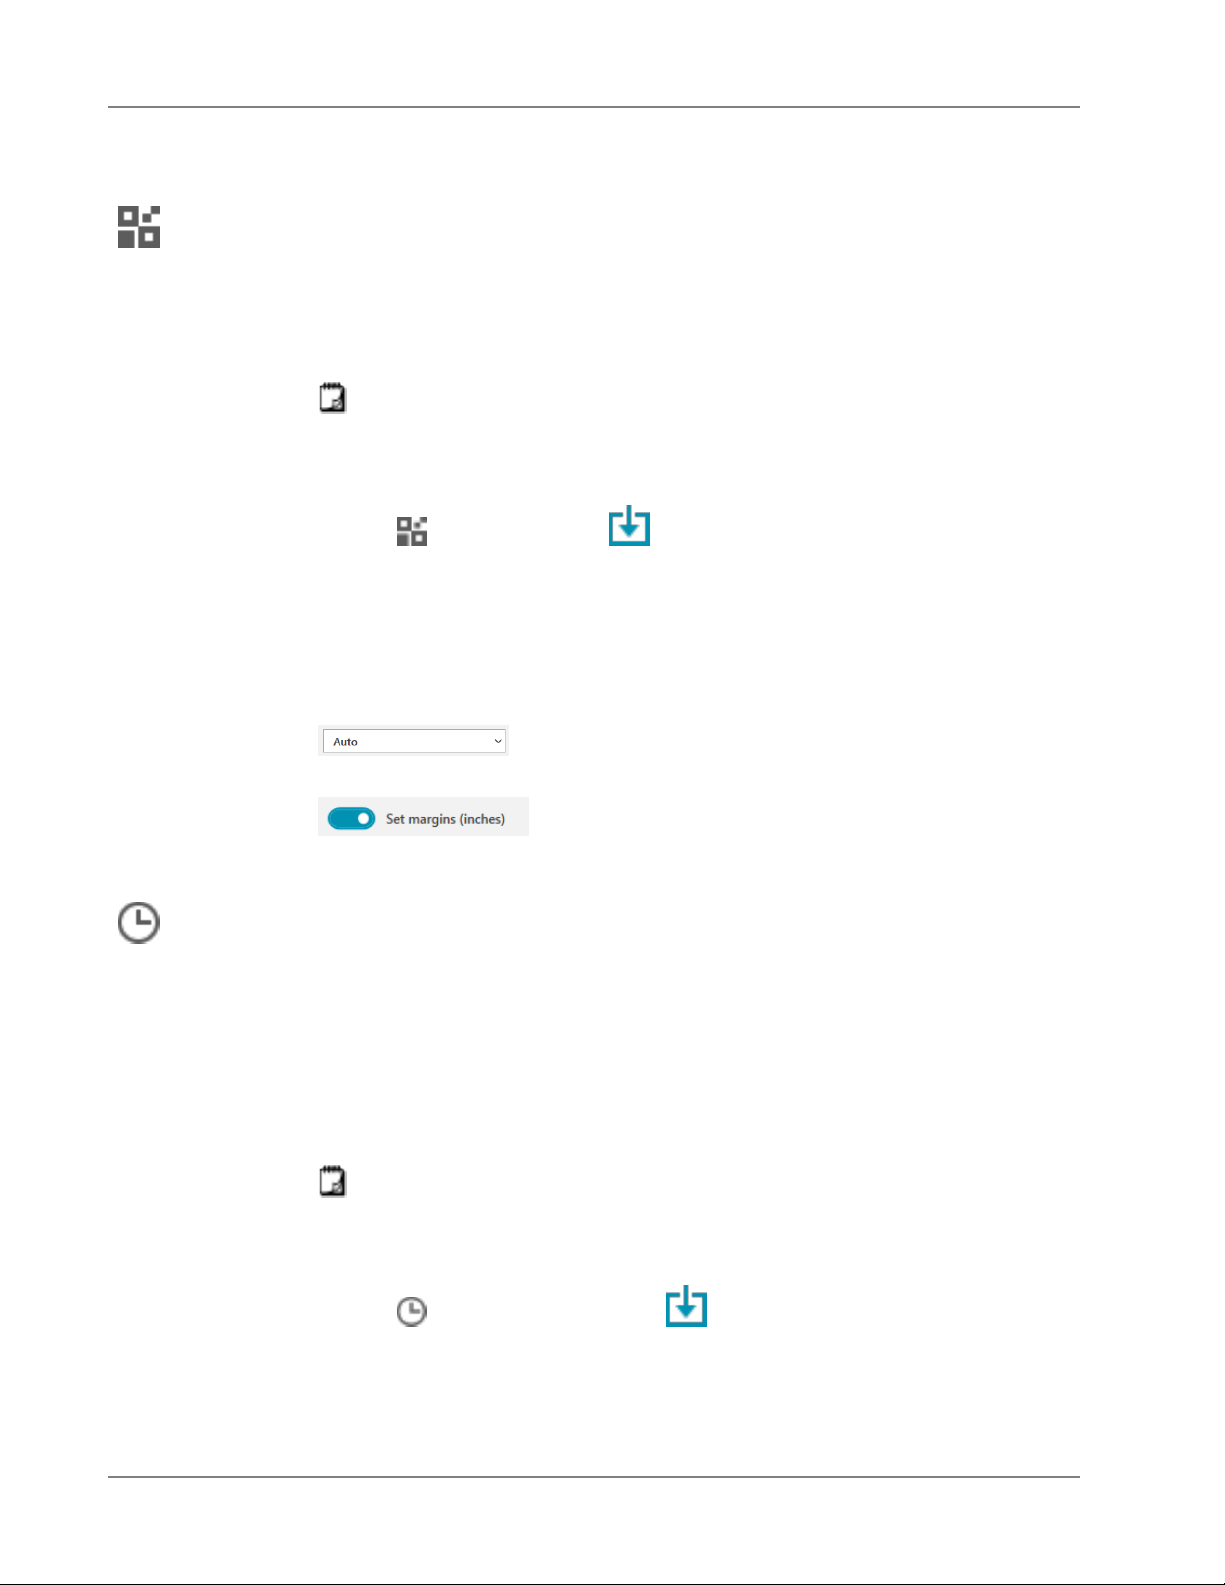
Layout properties
QR Code size. Auto is default.
Applies to D1 labels only. Sets the amount of
space between the edge of the shape and border
of the object.
Adding a Date and Time Object
You can automatically print the current date and/or time on labels that contain
Date and Time objects. The date and time are updated automatically.
You can choose to print only the date, only the time, or both, and choose to print
text before and after the date and time text. You can also modify the format used
for the date and time, and control the appearance and position of the date and
time on the label.
Only text before and after the date or time data can be edited directly on
the label. To change the date or time, use the properties. To delete the
date and time completely, you need to delete the entire Date and Time
object.
To add a Date and Time object
1.
Select Date and Time from the Add list.
A new Date and Time object is added to your label. By default, the object
contains the current day and date.
2. Select the Date and Time object on the label.
18
Page 25
3. On the properties pane, customize the options to display the date and time
the way you want.
4.
Format the text in the counter object using the Format and Layout
properties.
Format and Layout properties
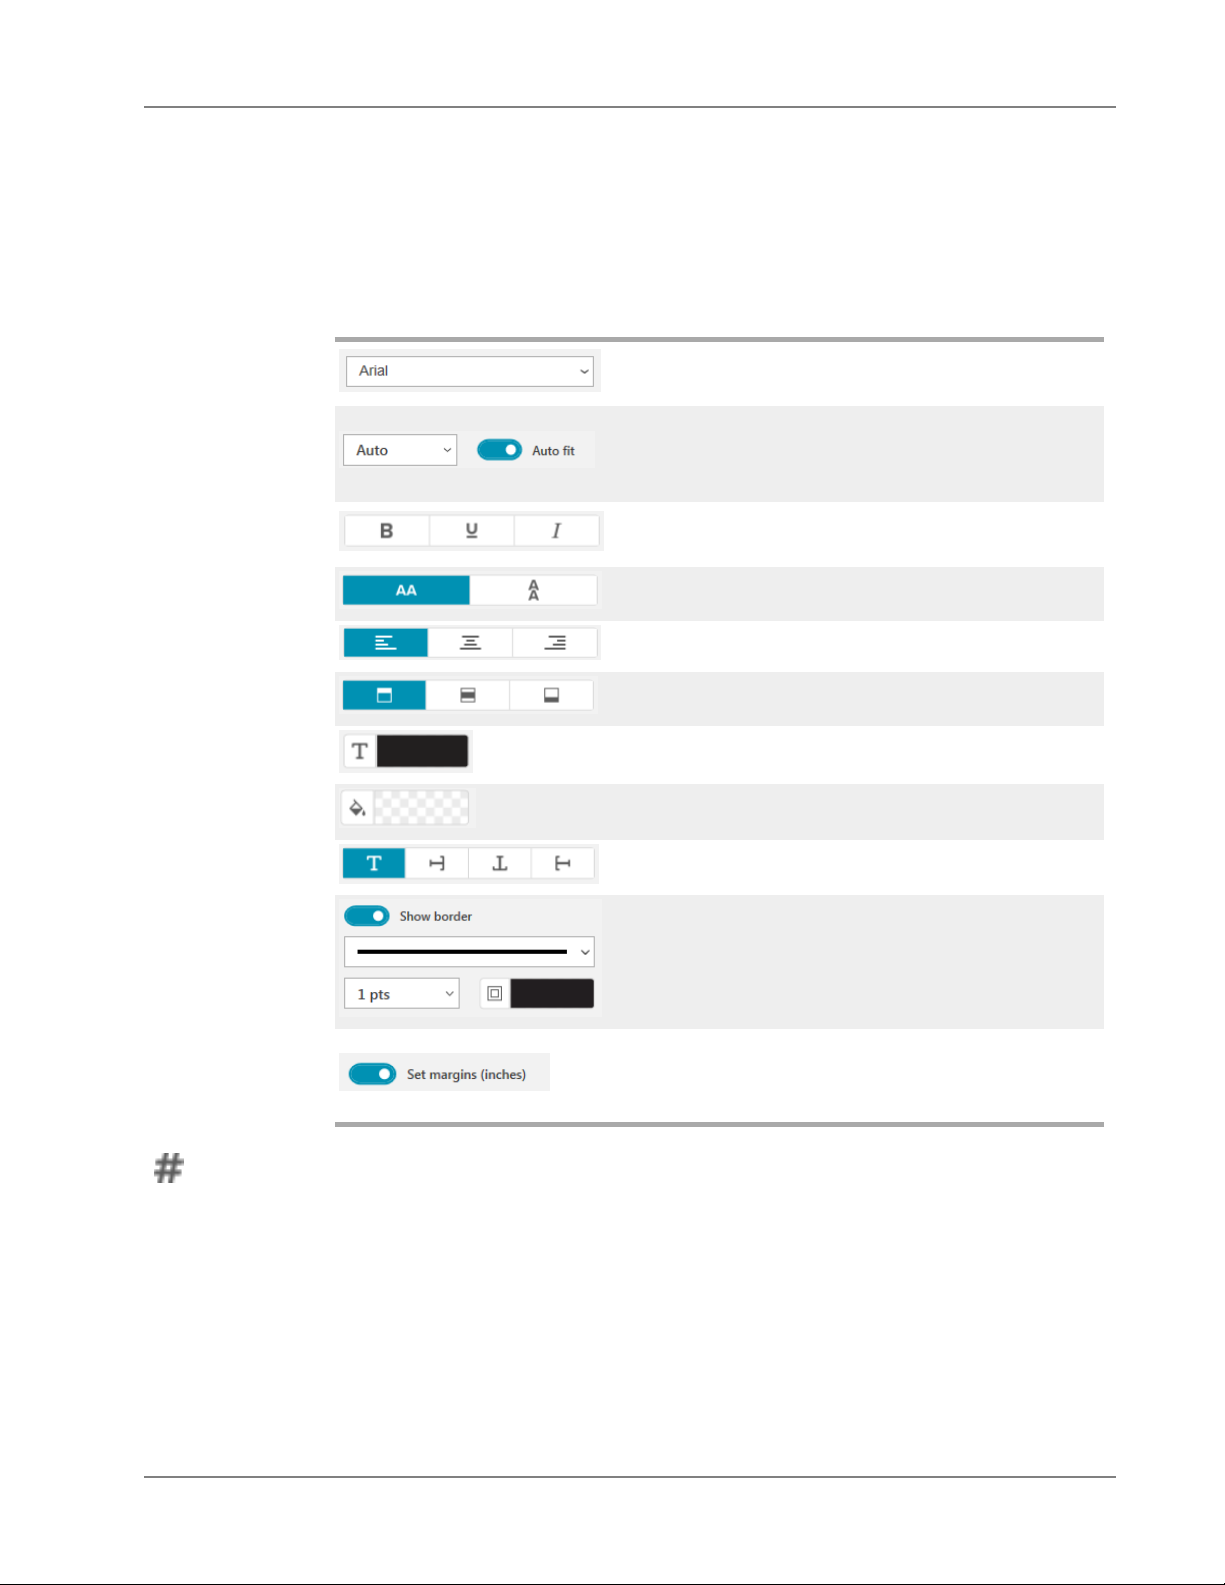
Fonts available are those font families installed
on your device.
Font size in points. Auto fit automatically resizes
the font to fit within the size of the label object.
Turn Auto fit off to set a specific point size.
Font style - Bold, underline, or italic. (If available in
the font family.)
Orientation of the text within the object.
Horizontal alignment of the text within the object.
Vertical alignment of the text within the object.
Color of the text.
Adding a Counter Object
The Counter object automatically and sequentially numbers a series of labels.
You can define text you want to appear before and after the counter numbers.
You can also specify the starting number, the increment to be used for counting
(1, 2, 10, and so on), the minimum width of the numbers, and include leading
zeros.
Background color of the object.
Rotation of the text within the object.
Border around the object.
Applies to D1 labels only. Sets the amount of
space between the edge of the shape and border
of the object.
19
Page 26
Change the font settings for the numbers and text, and change the horizontal
and vertical alignment of the text and numbers using the Format and Layout
properties.
Only text before and after the counter data can be edited directly on the
label. To change the counter data, use the properties. To delete the
counter data, you need to delete the entire Counter object.
To add a counter object
1.
Select Counter from the Add list.
2. Select the counter object on the label.
3.
On the properties pane, enter the Start number.
4.
Enter the Increment.
5.
Optionally, select Add prefix and/or Add suffix and enter the desired text.
6.
Optionally, select Add leading zeros and enter the number of digits.
7.
Format the text in the counter object using the Format and Layout
properties.
The format selections will apply to all the labels in your sequence.
8.
When you are ready to print the series, click next to Print and enter the
number of labels you want to include in the series.
20
Page 27
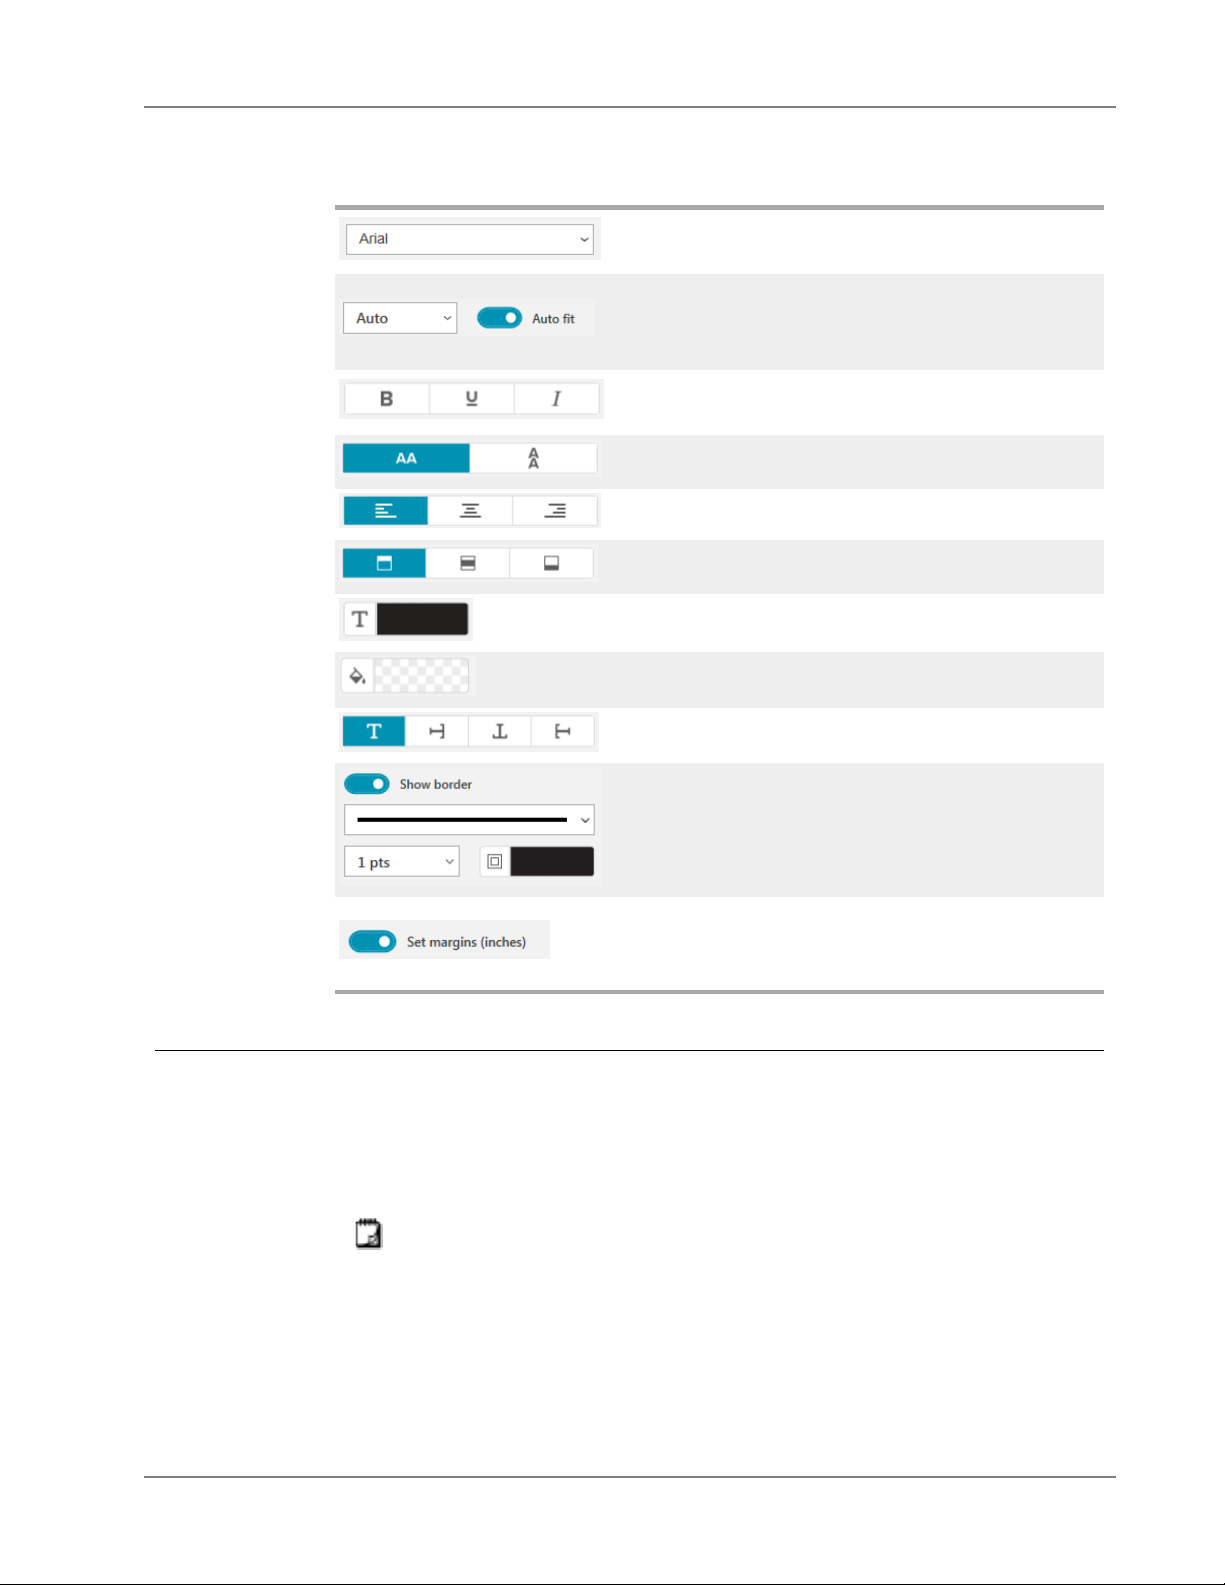
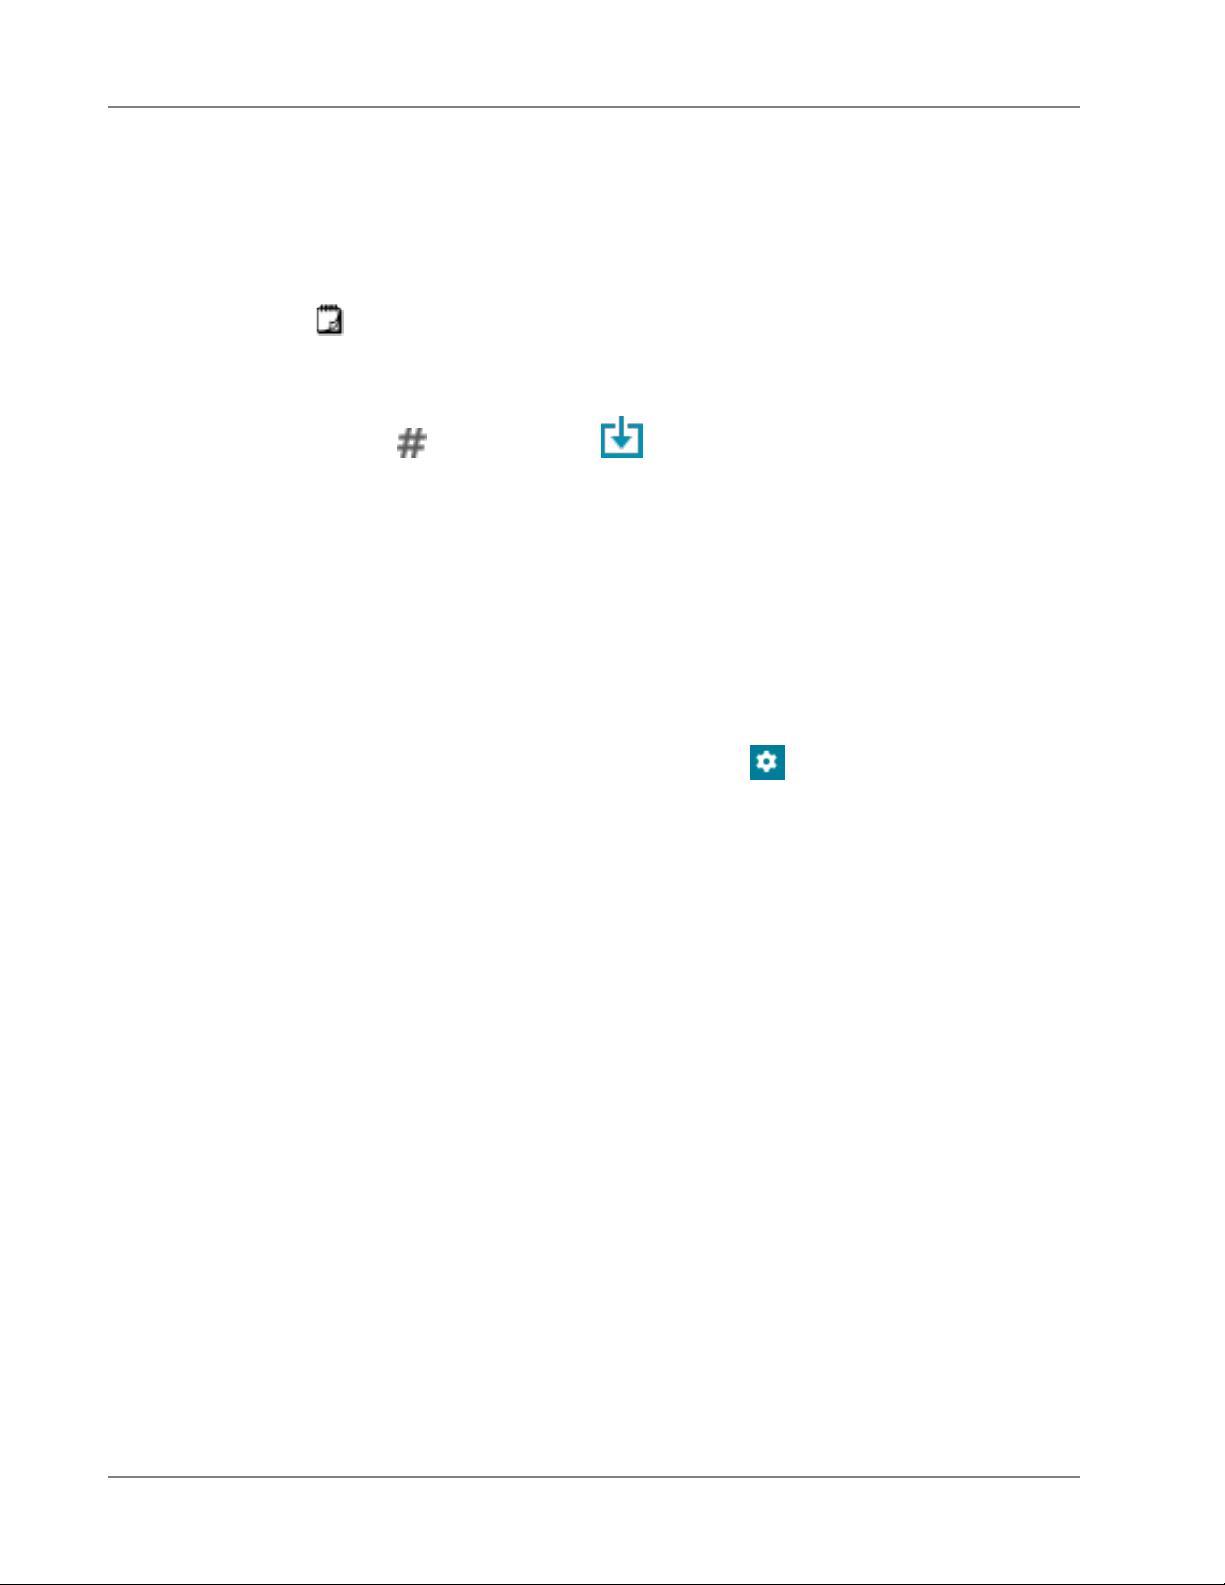
Format and Layout properties
Fonts available are those font families installed
on your device.
Font size in points. Auto fit automatically resizes
the font to fit within the size of the label object.
Turn Auto fit off to set a specific point size.
Font style - Bold, underline, or italic. (If available in
the font family.)
Orientation of the text within the object.
Horizontal alignment of the text within the object.
Vertical alignment of the text within the object.
Color of the text.
Background color of the object.
Rotation of the text within the object.
Importing a PDF
You can open a PDF file and then crop and rotate the portion of the file you want
to add as an image object on the label. For example, you might want to print a
return shipping label sent to you as a PDF onto a 4" x 6" label.
You can also use the Screen grab feature to capture an image in any open item
or your desktop.
To import a PDF
1.
2. Locate and open the PDF you wish to use.
Border around the object.
Applies to D1 labels only. Sets the amount of
space between the edge of the shape and border
of the object.
Resizing a barcode may impact its readability.
From the image object's properties pane, click Browse.
21
Page 28
3.
Select the page with the area you want to import and click Select.
4.
Crop or rotate the image from the page and click Add image.
The image is added to the label as an image object.
Using Screen Grab
The screen grab feature on the Image properties pane allows you to grab a
section of a document or your desktop and insert it as an image on a label.
To use screen grab
1.
From the Image properties pane, click Screen grab.
2. Drag the mouse to select the area of the screen you wish to grab as an
image.
3.
Verify the image is as you want it to appear and click Use image.
The image is added to the label as an image object.
Selecting Objects
You can select objects on the label in several ways.
To select a single object
Click the object.
To select multiple objects
1. Select the first object.
2.
While holding the Ctrl key, click additional objects.
To select objects that may be underneath other objects
1.
Right-click any object and click Select.
2.
Check one or more objects you wish to select or check Select all to select all
the objects on the label.
Working with Objects
You can move, resize, copy, or delete objects on the label.
To move an object
Select the object and drag it to a new position on the label.
To resize and object
Select the object and drag one of the handles to resize in any direction. Drag
a corner handle to resize the height and width proportionally.
To copy an object
1. Right-click on an object.
The context menu displays.
2.
Click Copy.
22
Page 29
To delete an object
1. Right-click on an object.
2.
Aligning Objects
You can accurately align multiple objects horizontally, vertically, or both. The
objects are aligned with each other using the side that is closest to the alignment
you are selecting. For example,if you select three text objects and then click Align
left, the objects' left sides will align with the object that is farthest left on the
label.
You can also align selected objects to a position relative to the edge of the label.
To align objects to each other
1. Select the objects that you want to align.
2.
The object is copied to the clipboard. You can paste the object on the same
label or on a new label.
The context menu displays.
Click Delete.
The object is deleted.
Click .
3. Select the horizontal and vertical alignment options that you want to apply.
The objects are aligned on the label according to your selections.
To align objects within the label
1. Select the objects that you want to align.
2.
3. Select the alignment options that you want to apply.
The objects are aligned on the label according to your selections.
Arranging Objects
You can move an object forward, backward, to the front, or to the back of the
other objects on the label.
To arrange objects
1.
2. Choose one of the options to move the selected object forward or backward
Naming an Object
Click .
Select an object and click .
relative to the other objects on the label.
You can give objects on a label a custom name. By default objects are name
TextObject1, TextObject2, etc. This feature is mostly for third party developers
23
Page 30
who use the SDK.
To change the object name
1.
Click … to open the label properties pane.
2. Check the box next to the object you wish to rename.
3.
Click the icon and edit the name.
24
Page 31
DYMO Connect software includes a contact list feature, which is similar to the
Address Book in DYMOLabel software. DYMOConnect contact lists allow you
can save addresses or other information that you commonly use. You can create
as many contact lists as you like.
You can do the following:
n
n
n
n
n
n
Printing Contacts
You can create labels using one or more of your contacts from a DYMOConnect
contact list or Google, Outlook, or Apple (macOS) contacts.
To create labels from a contact list
1. Select an Address object on your label.
2. From the Address objects pane, select the contact list to use from the drop-
Using Contact Lists
Insert information from your contact list to an address object on a label with
a click of the mouse.
Create as many contact lists as you want.
Print labels using addresses from your Outlook, Google, or Apple (macOS)
contacts.
Import a list of addresses from a DYMOLabel software address book.
Quickly find the addresses you want by searching a contact list.
Easily switch from one contact list to another.
down list under Manage contacts.
3.
A label will be created for each contact that you selected. The Print button will
show how many labels you have created and that will print.
Adding a Contact
You can add addresses to a DYMOcontact list individually by typing the
information or pasting the data from another source.
To add an entry to a DYMO contact list
1.
2.
3. Enter or paste the information for the new address into the text box.
Select the contacts you wish to print or click Select all.
Select Manage contacts.
Click New.
25
Page 32
4.
Click Add to list.
The new address appears in the list alphabetically.
Adding an Contact from a Label
When you enter an address on a label in the Edit area, you can choose to save
that address as a contact in a DYMO Connect contact list.
To add an address from a label to a contact list
1. Select the Address object that contains the address you want to add to a
contact list.
2. Click the icon in the lower right corner of the Address object and select the
contact list to add the address to.
The address is saved in the selected contact list.
Editing a Contact
You can edit the addresses in a contact list at any time.
Other than using Address Fixer, you cannot make changes to Outlook,
Google, or Apple (macOS) contacts from within DYMOConnect. Make any
edits to these contacts before using them in DYMOConnect.
To edit an address in the Address Book
1.
From the Address Object properties pane or the File menu, select Manage
contacts.
2. Select a contact list to edit.
3. Double-click on an address and make any changes that you want.
4. Click away from the address to save the changes.
Correcting a US Address
Using DYMO Address Fixer, you can check the US addresses in your contact list
against a database of US addresses and automatically add the complete ninedigit ZIP+4 code.
You can use Address Fixer to fix addresses in Outlook, Google, or Apple
(macOS) contacts from within DYMOConnect prior to printing, but the
changes cannot be saved back to Google, Outlook, or Apple contacts. Any
changes made in DYMOConnect are temporary. Make any edits to these
contacts before using them in DYMOConnect.
Addresses inserted into an Address object from a contact list can only be
corrected through Manage contacts.
To fix a single address on a label
1. Select the address object on a label that you want to fix.
2.
From the Address Object properties pane, click Fix US address.
26
Page 33
To correct addresses in a contact list
1.
From the Address Object properties pane or the File menu, select Manage
contacts.
2. Select one or more addresses that you want to correct from a contact list.
3.
Click Fixaddresses.
A icon appears next to addresses that have been fixed.
Deleting a Contact
You can delete one or more contacts from a contact list. When you delete a
contact, that contact is permanently removed from the list.
To delete a contact from a contact list
1.
From the Address Object properties pane or the File menu, select Manage
contacts.
2. Select the contacts you wish to delete.
3.
Click Delete.
A confirmation message appears.
4.
Click Delete again.
Creating a New Contact List
You can create multiple contact lists to hold addresses or other data. If you want
to import addresses or data into a contact list, you must first create the list into
which you want to import the information.
To create a new contact list
1.
From the Address Object properties pane or the File menu, select Manage
contacts.
2.
From the contact list drop-down, select Create new list.
3. Enter a name for the new list.
A new blank list is displayed. You can now add data directly or import an address
book from DYMO Label.
Importing Data to a Contact List
To use an address or data list already created in another application, you must
be able to export the list to an Excel file or a delimited file with each line of an
entry separated by a comma or tab character and each entry separated by a
carriage return/line feed. The file must be an Excel file or have a *.csv or *.txt
extension. Once you have exported your list, you can import the addresses or
data into either a new contact list or an existing contact list.
27
Page 34
The delimiter character may be different for countries other than the US.
When importing data, the list delimiter character is based on the Windows
list separator (or regional setting) being used.
During the import you will have a chance to lay out the information you are
importing as you want the information to appear in the contact list. You can
select the specific sheet in a spreadsheet to import. You can also scroll through
the data in the import file and choose to exclude the first header row from the
import if it's field labels.
To import data to a contact list
1.
From the Address object properties pane, click Manage contacts.
2.
Choose Import from spreadsheet>into new list or >into current listfrom the
contact list drop-down.
3.
Locate the file to import and click Open.
4. Move the fields listed on the left to the right pane using the -> arrow, inserting
punctuation and line feeds to format the address as you want it to appear.
5.
When finished, click Import.
The data is imported into the selected contact list.
Importing an Address Book from DYMO Label
You can open an address Book you previously created in DYMOLabel software.
To open a DYMOLabel address book
1.
From the Address Object properties pane or the File menu, select Manage
contacts.
2.
From the contact list drop-down, select Import from DYMOLabel.
3. Navigate to the DYMO Label address book file you wish to import and click
Open.
DYMOLabel Address Book files are located in the
Documents>DYMOLabel>Address Books folder on your computer.
A new DYMOConnect contact list is created using the same name as the
DYMOLabel Address Book file.
Switching Contact Lists
If you have created more than one contact list, you can choose the list that you
want to use to create labels.
28
Page 35
To switch contact lists
From the Address object pane, choose the list to open from the drop-down
list under Manage contacts.
The contacts in that list are now available for you to select for your labels.
From Manage contact page, choose the list to open from the drop-down list.
29
Page 36
To print a group of labels from an address list or other data file, you can import
the data and then assign each data field to objects on the label. You can assign
data to text, address, barcode, or text or URL type QR code objects.
Data can be imported from Microsoft Office or Google contacts. You can also
import data from a spreadsheet or database by exporting the data to a .csv file.
Importing data has five steps:
1.
Create your label layout. See Designing Labels.
2.
Select the data to import. See Importing Contacts or Importing Spreadsheet
or Database Data.
3.
Assign the data fields to objects on your label layout. See Assigning Data
Fields.
4. Print the labels.
5. Save the layout for future imports.
Importing Contacts
Importing Data
You can import all or a selection of contacts from Microsoft Outlook or Google
contacts to create and print a series of labels.
To select contacts
1.
Click Import.
2.
Select Google contacts or Outlook contacts.
3. Log in to your account when prompted.
The list of your contacts is displayed with all the contacts automatically
selected.
4.
Select the contacts you wish to import and click Import.
The next step is to assign the contact data to your label design. See Assigning
Data Fields.
Importing Spreadsheet or Database Data
You can import data from an Microsoft Excel spreadsheet or a Microsoft Access
database table. You can also import data that has been previously saves as a
.csv (comma separated value) file or a Universal Data Link (UDL) file. Refer to
your spreadsheet or database program documentation for instructions on how
30
Page 37
to export the data. Refer to the Microsoft documentation on Universal Data Link
(*.UDL) for more information.
To import data from a data file
1.
Click Import.
2.
Click Browse.
3.
Select the .csv file on your device and click Open.
The data is displayed with all the data fields automatically selected.
4.
Select the data fields you wish to import and click Import.
The next step is to assign the data fields to your label design. See Assigning
Data Fields.
Assigning Data Fields
You assign fields from your imported data to objects on the label by selecting the
fields you want to use from a list of all the fields in your data source.
You can position the data before or after other text already on the label. You can
also assign more than one field to the same object and add other text, spaces,
and punctuation. For example, select the first name field to place it on a text
object, enter a space, and then select the last name field which places it after the
space. Any text you place on the label in addition to the fields will appear on
every label.
To view the data you have selected, select View data. You can't change any of
the data in the data table. Changes to the data need to be made in the source file
and the data imported again.
To assign data fields
1. Select a text, address, barcode, or URLor text QR code object on the label.
The icon appears near the object.
2.
Click to show the list of fields, if not already displayed.
3. Select the first field to appear at the cursor position.
4. Optionally, enter any text you wish to appear on every label.
5. Select additional fields to appear in the same object.
6. Drag a field to move its position within an object.
31
Page 38
About Label Printers
DYMO Connect software supports two types of label printers: DYMO LabelWriter
printers and DYMO LabelManager D1 tape printers. The following specific
models are supported:
LabelWriter printers LabelManager printers
LabelWriter 550
LabelWriter 550 Turbo
LabelWriter 5XL
LabelWriter Wireless
LabelWriter 450/450 Turbo
LabelWriter 450 Twin Turbo
LabelWriter 4XL
LabelWriter 450 Duo
If you have not yet installed a label printer, the virtual label printers, D1
LabelManager Executive 640 CB
MobileLabeler
LabelManager 420P
LabelManager 280
LabelManager PnP
label printer or LabelWriter printer, let you design and save labels without
having that type of printer installed. Once you have a label printer of either type
installed, the virtual printer will no longer appear.
You will need to connect to and select an actual label printer before you
can print any labels designed while a virtual printer is selected.
Several of the printers have special features that can be accessed within the
software. Refer to the following topics for more information.
n
LabelWriter Wireless Advanced features
n
MobileLabeler features
n
LabelWriter 450 Twin Turbo features
Don't See Your Printer?
Many times issues you may have while trying to connect to the printer can be
solved very easily.
Check the following:
USB-connected printers
n
Make sure you install the software prior to connecting the printer to your
computer using the USB cable provided. This allows the correct printer
drivers to be installed the first time you connect the printer.
32
Page 39
LAN-connected printers
n
Make sure you install the software on each computer that will print to the
LabelWriter printer. Then add the printer to DYMOConnect for Desktop from
Add network printer on the File menu.
n
For locations using both Ethernet and a wireless network, make sure the
router is set to forward traffic between wired and wireless networks.
LabelWriter Wireless printer
n
Make sure the printer is turned on.
n
Make sure your router is turned on and the wireless network is operational.
n
Make sure the printer is connected to the same wireless network as your
computer or device.
n
Make sure the printer is not connected to a guest or public wireless network,
as these types of networks have additional restrictions that can cause
problems.
n
Move the printer closer to your wireless router. The printer works best when
there are no obstructions between the printer and your router. The closer the
printer is to the router the better.
n
Make sure any firewall or security programs on your computer are not
blocking communications between the printer and your computer.
n
Make sure you are not connected to a Virtual Private Network (VPN).
For more troubleshooting information for LabelWriter Wireless printers, view the
complete user guide. Select User Guides>LabelWriter Wireless from the Help
menu.
For configuration help, watch the video that will walk you through setting up
your LabelWriter Wireless printer on your network.
MobileLabeler Bluetooth®printer
Many connection issues can be resolved quickly by disconnecting the power
adapter, and removing and reinserting the battery.
For safety, all cables must be disconnected when handling the LiPO battery.
Review the following for MobileLabeler connection issues:
33
Page 40
Problem
Label maker status is Disconnected
or does not appear in the printer list
Paired label maker will not connect
in my device’s Bluetooth settings
For more troubleshooting information for MobileLabeler printers, view the
complete user guide. Select User Guides>MobileLabeler from the Help menu.
If you need further assistance, visit the Support section of the DYMO Web site at
http://support.dymo.com.
LabelWriter Wireless Printers
When the DYMO LabelWriter Wireless label printer is connected to your
computer through USB, you can change the mode of the printer's wireless radio.
To change the wireless mode
1. Select a LabelWriter Wireless printer.
Solution
n
Make sure the label maker power is
turned on.
n
Make sure the label maker is paired
in your device’s settings.
n
Quit DYMO Connect and restart the
application.
n
Make sure the label maker power is
turned on.
n
Unpair the label maker from your
device and then pair again.
2.
Click Printer status.
The LabelWriter Wireless Printer status page appears.
3. Select one of the following wireless connection options:
n
Client – Turn on client mode so that you can configure the printer for your
wireless network.
Refer to the LabelWriter Wireless User Guide for information on configuring
the printer on your network.
n
Turn on access point – Turn on the printer's access point to connect
directly.
If neither mode is checked, wireless mode is turned off.
4. Close the page.
Adding a Network Printer
To use a DYMO wireless label printer over a wireless network connection, you
must add the printer before it will be displayed in the Printer list.
34
Page 41
To add a wireless printer
1. Make sure the printer has been configured on your wireless network.
2.
Choose Add network printer from the File menu.
The Add network printer page appears.
3. Follow the instructions to add the printer to the software.
If you have trouble adding the printer to your computer, contact your network
administrator.
MobileLabeler Label Maker
When the DYMO MobileLabeler label maker is connected to your computer by
USB, you can change the discovery options for connecting the label maker using
Bluetooth® wireless technology.
To set the discovery mode
1. Select the DYMO MobileLabeler label maker from the printer list.
2.
Click Printer status.
The MobileLabeler Printer status page appears.
3. Select one of the following discovery options:
l
General – Always discoverable (default)
l
Limited – Discoverable for 2 minutes
l
Off – Not discoverable
4. Close the page.
LabelWriter 450 Twin Turbo Printer
The LabelWriter 450 Twin Turbo printer features two side-by-side label printers in
one, allowing you to have two types of labels loaded and ready for printing.
When you have a LabelWriter Twin Turbo printer installed on your computer,
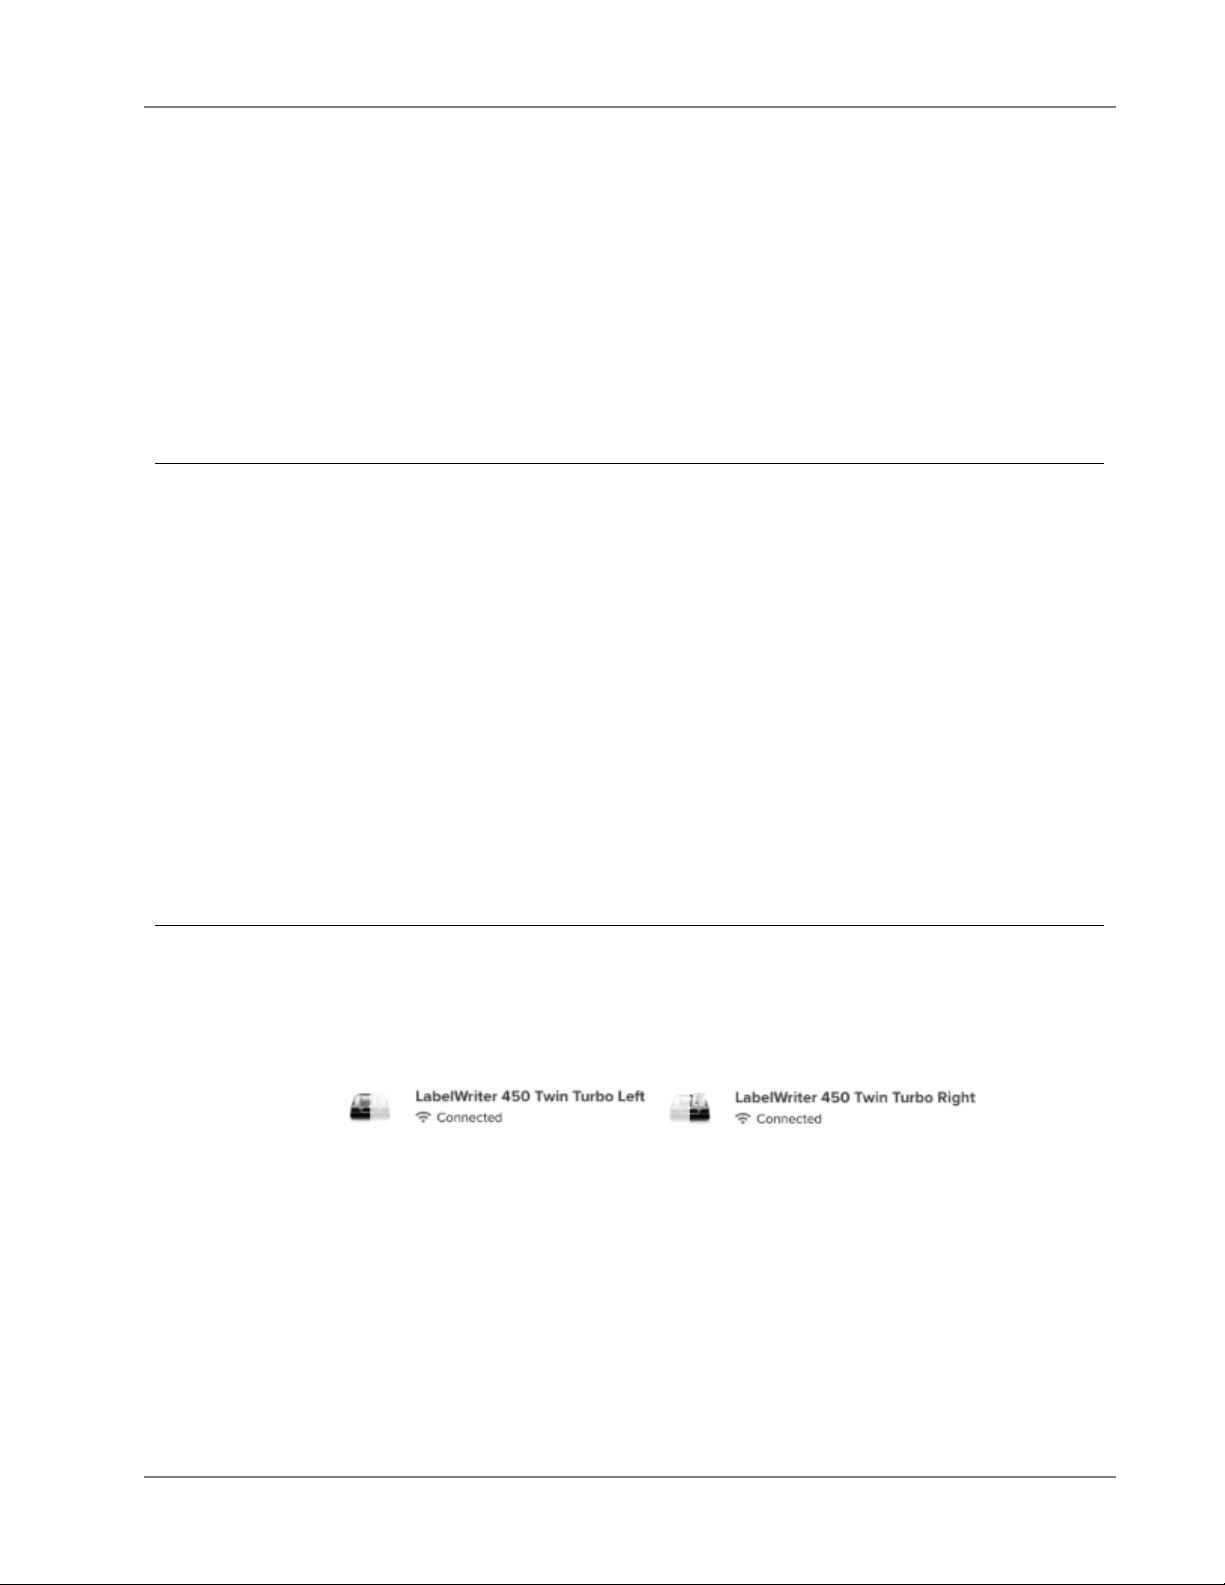
each label roll shows up in the printer list as a separate printer. For example:
When printing to a LabelWriter Twin Turbo printer, you must select the printer
that has the label roll you want to print to highlighted.
Using Both Label Rolls
The LabelWriter Twin Turbo printer can automatically switch from one label roll
to the other when you need to print more labels than are left on a roll. For
example, suppose you are printing a mailing list that contains 225 addresses and
the left label roll only contains about 100 labels. You can choose to use both
rolls, and when the printer runs out of labels on the left roll, the labels
automatically begin printing on the right roll until all the labels are printed.
35
Page 42
To use this selection, you must have the same type of labels loaded on each side
of the printer.
To use both rolls
1. Load the same type of labels on each side of the printer.
2.
With one of the Twin Turbo printers selected in the printer list, click Printer
status.
3.
Select the Use both rolls check box in the Print area.
When you select the Use both rolls check box, the selected printer image
changes to show that both sides of the printer will be used.
Adjusting the Print Quality
You can change the print quality setting that is used when printing labels to your
LabelWriter printer. This setting can be important when printing barcodes and
some images. The print quality setting can be changed when printing one label
or you can change the default setting for print quality from the Preferences page
and that quality setting will apply every time you print to a LabelWriter printer.
To choose the print quality
1.
When you are ready to print a label to a LabelWriter printer, click next to
the Print button.
2.
Select one of the following Print quality settings:
l
Text - to use the default print setting used for most labels.
l
Barcode and graphics - to optimize print quality for barcodes and images.
l
Auto - to automatically determine the print quality based on the label
contents.
3.
Click Print.
36
Page 43
About Labels
All DYMO label printers that are compatible with DYMO Connect software use
either Authentic DYMO LW LabelWriter label rolls or Authentic DYMO D1 label
cassettes.
The only supplies you will ever need for your printer are the labels. We
recommend you only useAuthentic DYMO Labels. Information about labels can
be found at www.dymo.com.
DYMO’s warranty does not cover malfunction or damage that may be
caused by the use of labels other than Authentic DYMO Labels. Because
DYMO label printers use thermal printing technology, you must use
specially designed and manufactured labels. The thermal coatings used
on labels other than Authentic DYMO Labels may not be compatible, and
may provide unsatisfactory printing or cause the printer to malfunction.
LW Label Rolls
LabelWriter labels are available in a variety of materials, colors, shapes, and
sizes; including address, shipping, and file folder labels.
The LabelWriter 550 series of printers work only with Authentic DYMO LW
Labels. Authentic DYMO LW Labels support Automatic Label Recognition™,
which allows
DYMO software to receive information about the labels, such as which size label
is
in your printer and how many labels remain on the roll.
D1 Label Cassettes
DYMO D1 label cassettes are available in a variety of colors, materials, and
widths.
The LabelManager and MobileLabeler label makers use DYMO D1 label
cassettes. The LabelWriter 450 Duo uses both LabelWriter label rolls and D1
label cassettes.
LW Label Rolls
DYMO LabelWriter printers use advanced direct thermal printing technology to
print on specially treated, heat-sensitive Authentic DYMO Labels labels. This
means you will never have to replace toner, ink cartridges, or a ribbon to print
labels.
Direct Thermal printing works by transferring heat from a thermal print head to
specially treated labels. The thermal print head contains a row of miniature
heating elements that press against the treated label. As a heating element
37
Page 44
touches the specially treated label, a thermal reaction causes the specific point
on the label to turn black.
The only supplies you will ever need for DYMO label printers are Authentic DYMO
Labels labels.
How long your labels will last depends on how the labels are used. LabelWriter
thermal labels are susceptible to fading in the following ways:
n
Exposure to direct sunlight or fluorescent light for an extended period of time
n
Exposure to extreme heat for an extended period of time
n
Contact with plasticizers (for example, labels placed on plastic ring binders)
In the original packaging, the shelf life for LabelWriter labels is 18 months. When
labels are used for short-term applications (envelopes, packages, and so on),
fading is not a problem. When labels are used to label files in a file cabinet, fading
is very gradual over many years. Labels applied to the edge of a notebook that is
then placed on a shelf in the sun will show signs of fading within a few months.
To prolong label life when labels are not in use, store the labels in a cool, dry
place and in the black bag in which they were originally packaged.
DYMO’s warranty does not cover malfunction or damage that may be
caused by the use of labels other than Authentic DYMO Labels. Because
DYMO label printers use thermal printing technology, you must use
specially designed and manufactured labels. The thermal coatings used
on labels other than Authentic DYMO Labels may not be compatible, and
may provide unsatisfactory printing or cause the printer to malfunction.
D1 Label Cassettes
The MobileLabeler, LabelWriter Duo, and LabelManager label makers use DYMO
D1 label cassettes.
D1 label cassettes come in a variety of colors and materials, and are available in
the following widths:
n
1/4 inch (6 mm)
n
3/8 inch (9 mm)
n
1/2 inch (12 mm)
n
3/4 inch (19 mm)
n
1 inch (24 mm)
The maximum width that you can use depends on your label printer. Refer to the
user guide that came with your printer for the label widths you can use.
Visit the DYMO Web site at www.dymo.com for a complete list of label
cassettes and the names of dealers who sell them in your area.
The only supplies you will ever need for your printer are the labels.
38
Page 45
Buying Labels
DYMO’s warranty does not cover malfunction or damage that may be
caused by the use of labels other than Authentic DYMO Labels. Because
DYMO label printers use thermal printing technology, you must use
specially designed and manufactured labels. The thermal coatings used
on labels other than Authentic DYMO Labels may not be compatible, and
may provide unsatisfactory printing or cause the printer to malfunction.
DYMO offers a full range of Authentic DYMO Labels for LabelWriter and
LabelManager printers, including labels suited for addressing envelopes,
shipping packages, naming file folders, labeling all sorts of media, printing name
badges, and much more. A complete list can be found at the DYMO Web site:
www.dymo.com.
To find more information about the currently selected label
Click Labels.
DYMO’s warranty does not cover malfunction or damage that may be
caused by the use of labels other than Authentic DYMO Labels. Because
DYMO label printers use thermal printing technology, you must use
specially designed and manufactured labels. The thermal coatings used
on labels other than Authentic DYMO Labels may not be compatible, and
may provide unsatisfactory printing or cause the printer to malfunction.
39
Page 46
You can change the following preferences:
Change the default printer settings for
Printer settings
number of copies, mirror print, collate, and
print quality (LabelWriter printers only).
Setting Preferences
Rulers and guides
Lock label layout
Units of measure
Language
Display settings
Restore factory defaults
Improve DYMOproducts
You can turn rulers and guides on and off.
When you lock the label layout, the position,
size, and orientation of objects on the label
cannot be changed. However, you can
change the content in some objects.
Set the units of measure shown in the
software to English (inches) or metric.
Set the language. When you change the
language, you will have to restart the
software for the change to take effect.
Set the display to 72 or 96 pixels per inch to
match your display. You will have to restart
the software for the change to take effect.
Restore the label properties and
preferences to the factory default settings.
The language will not change.
When turned on, the application will send
printer and label usage data to DYMO to
help us understand how our products are
used. No personal information will ever be
sent and you can stop sending this data any
time you wish.
Check for updates
When turned on, the software notifies you
of any recent software updates.
40
Page 47
Keyboard Navigation
41
Page 48
Interaction Keystrokes Action
Navigate Tab Navigate forward, left to right,
top to bottom
Shift+Tab Navigate backward
Link Enter Activate the item
Button EnterorSpacebar Activate the button
Checkbox/Toggle Spacebar Check/uncheck
Radio buttons Spacebar Select the option (if not
already selected)
↑/↓-
Tab Leave the group of radio
Select menu F4/Alt+↑/↓ Expand the menu
Enter Select an option
Tab/Shift Tab/↑>
Any printable keys Move to the selection
Esc Leave menu without selection
Search and select
result
Dialog Tab/Shift Tab/↑/↓ Navigate to an option
Type to begin filtering
Esc Clear typed characters
Tab Move through the search
↑
/↓
Enter/Space bar Select an option
/↓
Navigate between options
buttons
Previous/next menu option
matching the prefix letters
results
Navigate to an option
Slider
List with check
box
Enter/Space bar Select an option
Esc Close tootip
↑/↓or←/→
PgUp/PgDn Increase or decrease large
Home/End Move to beginning or end
↑/↓ Move to previous/next menu
Tab/Shift Tab Navigate to an item in one
42
Increase or decrease slider
value
step
option
Page 49
option
Tab panel Ctrl Tab/Ctrl Shift Tab Navigate to different tabs (for
example, properties pane)
Tab/Shift Tab Navigate to tab content
Object selection
and editing
Tab/Shift Tab Navigate to objects
Space bar/Shift Space bar Select or unselect object
Enter
After selecting a text-based
object, enter into edit mode
Tab
Exit
← → ↑ ↓ Move left, right, up, down
Ctrl+ ←
Ctrl+→
Ctrl+↑
Ctrl+↓
Decrease width
Increase width
Increase height
Decrease height
43
Page 50
Getting Help
Visit the Support area of our Web site at www.dymo.com to contact us by chat
or email.
In the United States, DYMO Technical Support is also available by phone from 9
am to 5 pm Eastern time.
Phone: (877) 724-8324
For International Support, choose your country below:
DYMO - Australia 800-633-868
DYMO - NewZealand 0800 396 669
DYMO - Hong Kong 852 3926 9831
DYMO - Canada 877-724-8324
DYMO - Austria +431206091919
DYMO - Belgium +3227007453
DYMO - Czech Republic +420239016817
DYMO - Denmark +4543314814
DYMO - Finland +358972519770
DYMO - France +33157324846
DYMO - Germany +4969999915354
DYMO - Hungary +3617789452
DYMO - International +442035648354
DYMO - Ireland +35315171856
DYMO - Italy +39 02 23 33 15 57
DYMO - Netherlands +31707703820
DYMO - Norway +4722310922
DYMO - Poland +48223060692
DYMO - Portugal +351213665376
DYMO - Russia +78005552676
DYMO - Slovakia +442035648353
DYMO - Spain + 34 91 177 61 24
DYMO - Sweden +46 (0)8 5936 6312
DYMO - Switzerland +41446545919
DYMO - UK +442035648354
44
Page 51
Software Updates
Periodically, DYMO Connect software will automatically check to see if you have
the most recent version of the software installed. If an update to your version of
the software is available, you will be asked to confirm that you want to update
the software. You can also manually check to see if an update is available.
You must be connected to the Internet to obtain software updates.
If you don't wish to receive notifications of updates, you can turn off automatic
updates in Preferences.
To manually check for software updates
1.
Choose Check for updates from the Help menu.
The update dialog box appears when an update is available. Otherwise, you
are notified that there are no updates available.
2. Follow the instructions in the update dialog box to download and install the
software update.
See Also
Setting Preferences
45
Page 52
This page intentionally left blank for double-sided printing.
46
 Loading...