Page 1

Bulletin E-43-DM
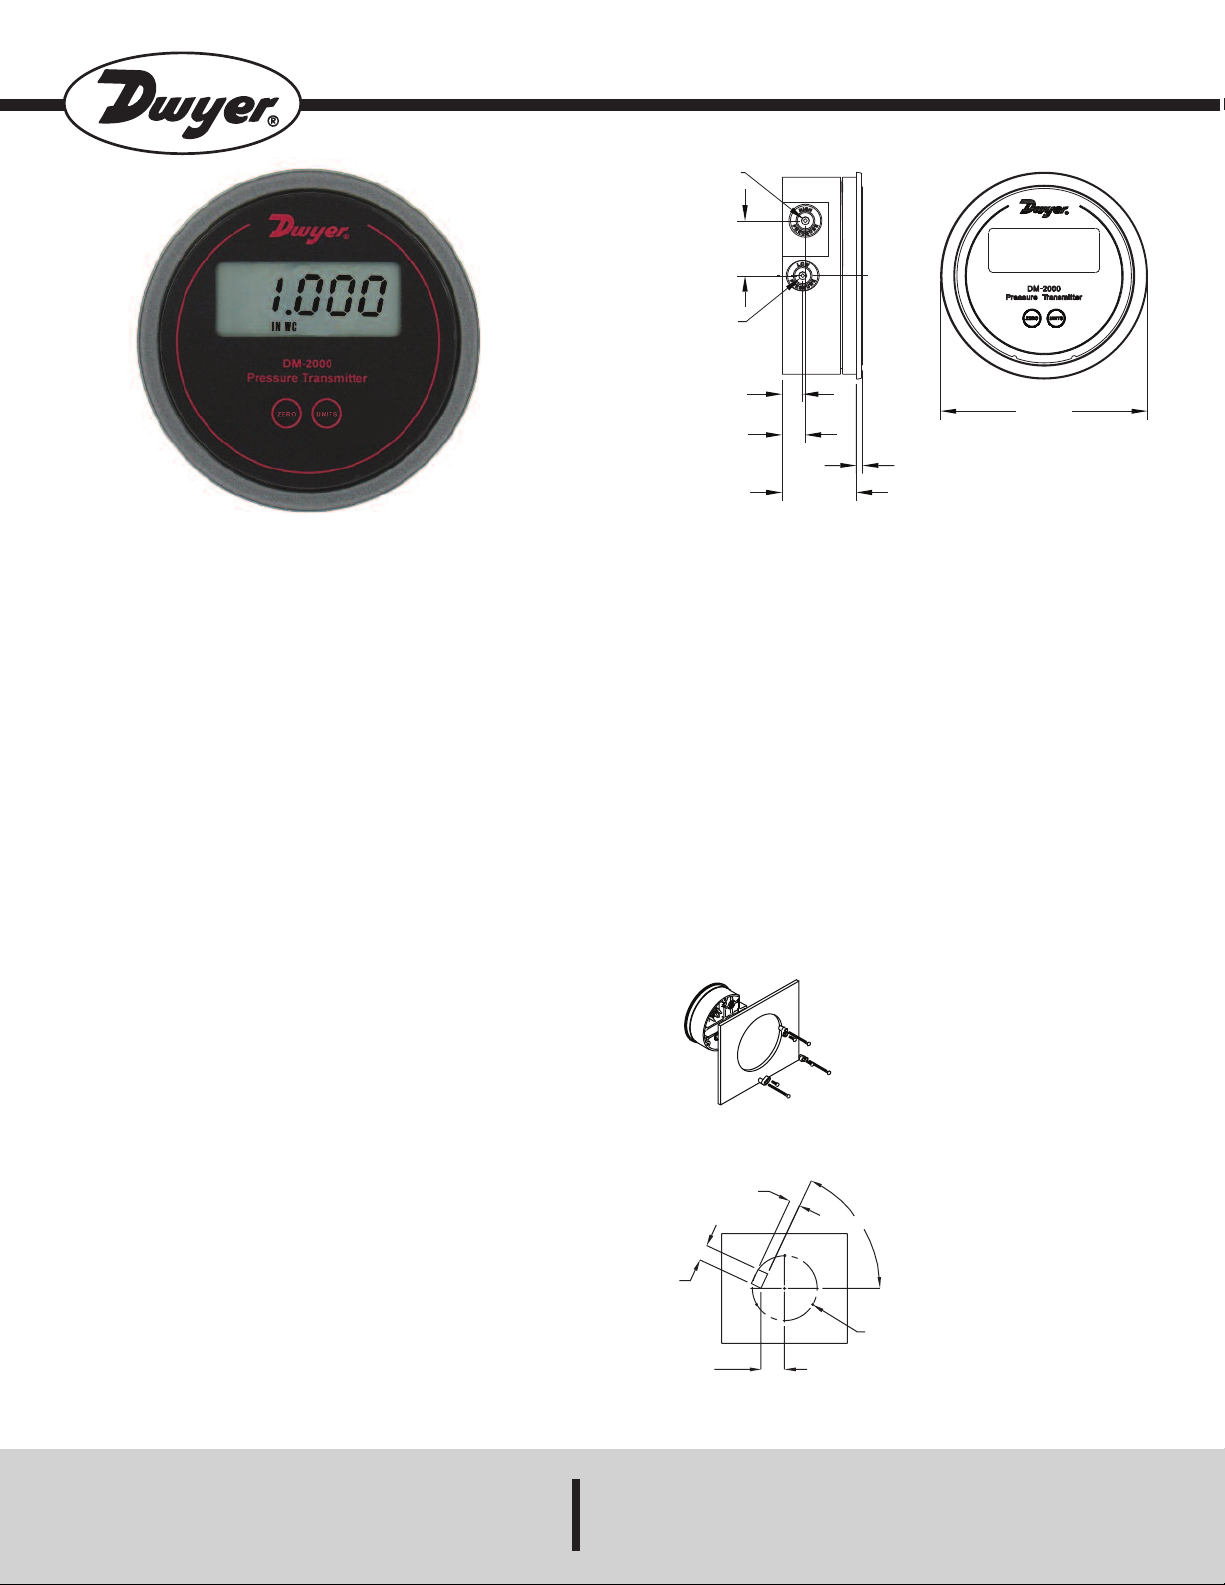
HIGH PRESSURE PORT
1-1/4
[31.75]
7
/16
[11.11]
17/32
[13.50]
1
-11/16
[42.86]
5/32
[3.97]
ø4-3/4
[120.65]
LOW PRESSURE PORT
1
(25.40)
11/16
(17.46)
65.000°
(3) HOLES FOR #6 SCREW
EQUALLY SPACED ON
4-1/8 (104.78) B.C.
1-1/2
(38.10)
Series DM-2000 Differential Pressure Transmitter
Specifications – Installation and Operating Instructions
The Dwyer Series DM-2000 Differential Pressure Transmitter senses
the pressure of air and compatible gases and sends a standard 4-20 mA
output signal. The DM-2000 housing is specifically designed to mount in
the same diameter cutout as a standard Magnehelic® differential gage. A
wide range of models are available factory calibrated to specific ranges.
Pressure connections are inherent to the glass filled plastic molded
housing making installation quick and easy. Digital push-button zero
simplifies calibration over typical turn-potentiometers. Single push button
allows field selection of 5 engineering units (LCD models only). An
optional 3.5 digit LCD shows process and engineering.
Accessories
Mounting Lugs
6-20 x 2˝ Screws - 3
6-19 x 1/2˝ Screws - 3
INSTALLATION
1. Location
Select a clean, dry mounting location free from excess vibration where
the temperature will remain between 20 and 120˚F (-6.7 and 48.9˚C).
Distance from the receiver is limited only by total loop resistance. See
Electrical Connections on next page. The tubing supplying pressure to
the instrument can be practically any length required, but long lengths
will increase response time slightly.
2. Position
A vertical position required. That is the position in which all standard
models are spanned and zeroed at the factory.
SPECIFICATIONS
Service: Air and non-combustible, compatible gases.
Wetted Materials: Consult Factory.
Accuracy: ±1% F.S. at 70°F.
Stability: ±1% F.S./yr.
Temperature Limits: 20 to 120°F (-6.67 to 48.9°C).
Pressure Limits: 10 psig (0.69 bar).
Thermal Effect: ±0.055% F.S./°F (0.099% F.S./°C).
Power Requirements: 10-35 VDC (2 wire).
Output Signal: 4 to 20 mA.
Zero and Span Adjustments: Digital push-button zero and span.
Loop Resistance: DC: 0-1250 ohms maximum.
Current Consumption: DC: 38 mA maximum.
Electrical Connections: Screw-type terminal block.
Process Connections: 1/8˝ I.D. tubing.
Mounting Orientation: Vertical.
Weight: 4.8 oz (136 g).
Agency Approvals: CE.
Panel
Pressure Connections
Two integral tubing connections are provided on the side of the gage.
Surface
They are sized to fit 1/8˝ (3.12 mm) I.D. tubing. Be sure the pressure
rating of the tubing exceeds that of the operating ranges.
Note: The tubing connections on the back of the gage are not to be used
as process connections.
3. Mounting
Panel - Provide a 4-9/16˝ diameter opening in panel. Insert gage and
secure in place with provided screws and adapters.
Surface - Provide three 3/16˝ diameter holes in panel on a 4-1/8˝
diameter bolt circle. Cut opening for terminal block as shown in diagram
to right.
DWYER INSTRUMENTS, INC.
P.O. BOX 373 • MICHIGAN CITY, INDIANA 46360, U.S.A. Fax: 219/872-9057 e-mail: lit@dwyer-inst.com
Phone: 219/879-8000 www.dwyer-inst.com
Page 2

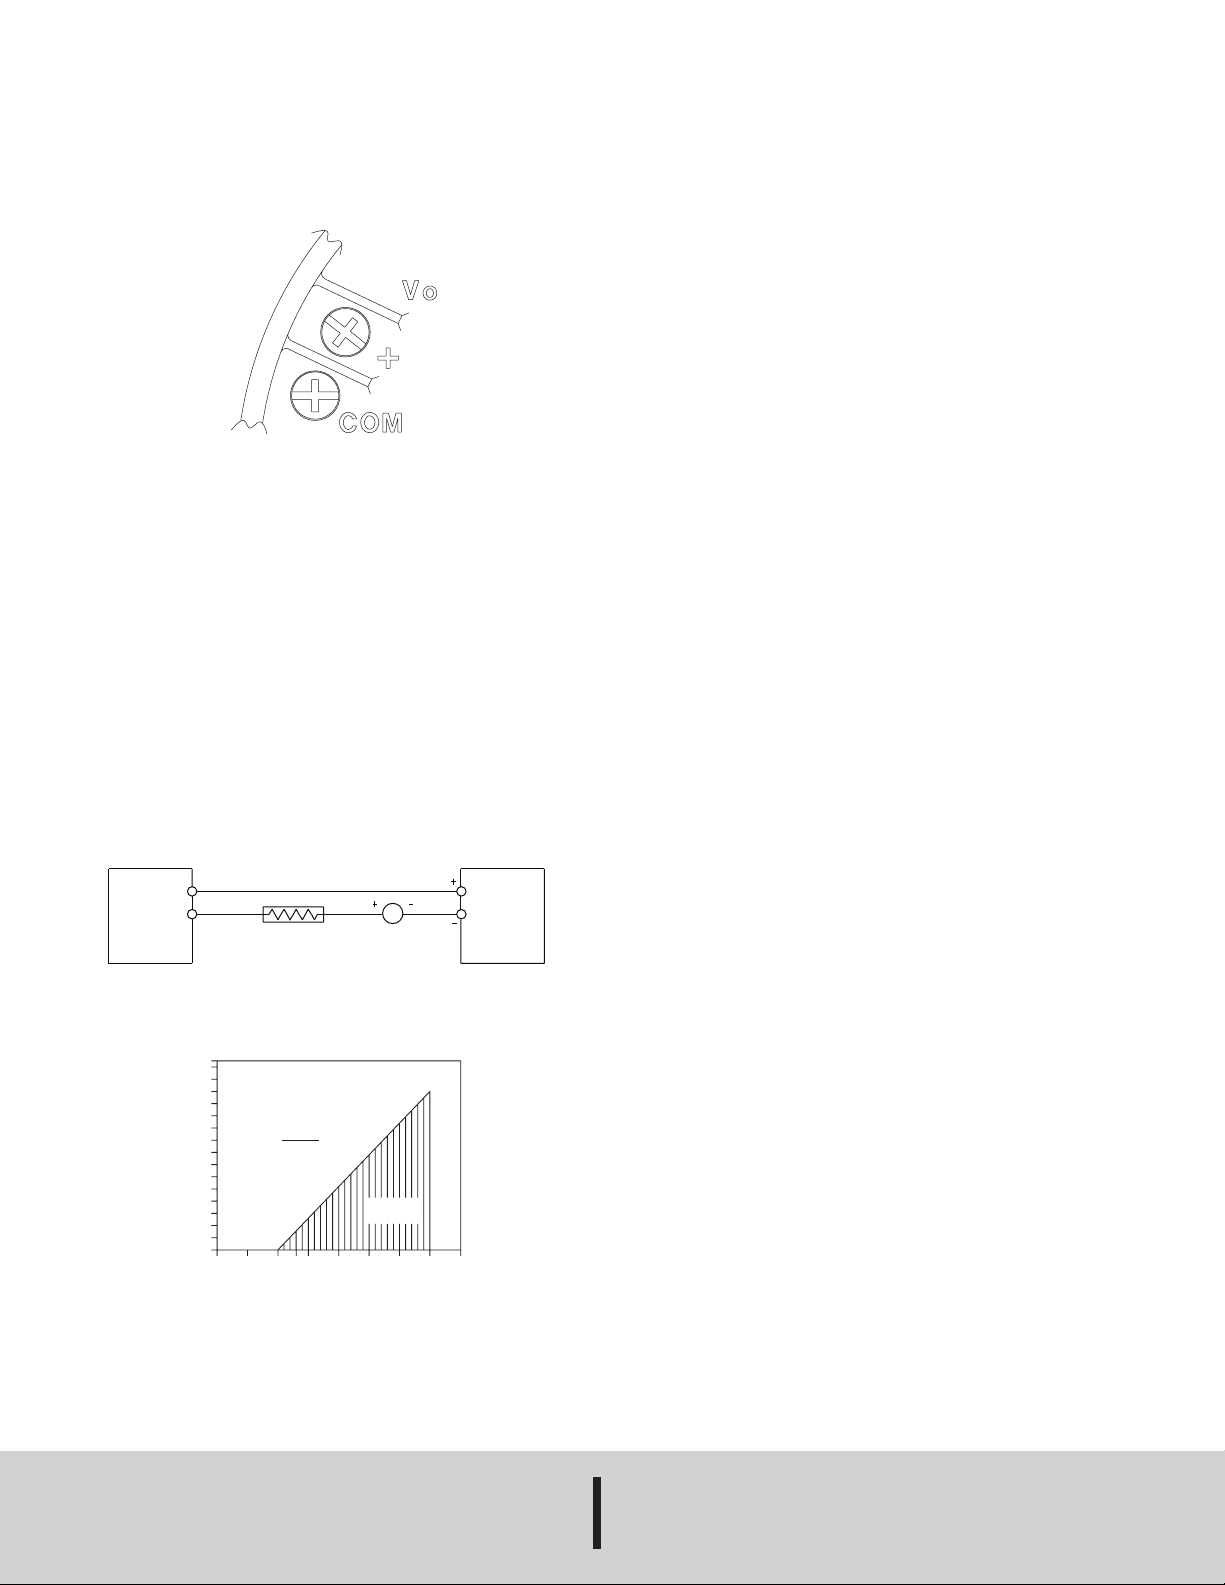
ELECTRICAL CONNECTIONS
RECEIVER
SERIES
DM-2000
PRESSURE
TRANSMITTER
1
2
POWER
SUPPLY
10-35 VDC
mA
1500
1400
1300
1200
1100
1000
900
800
700
600
500
400
300
200
100
50
Total Receiver Resistance (Ω)
Maximum Value (1250 Ω)
R Max. =
0 5 10 13 15 20 25 30 35 40
L
Vps–10.0
20mA DC
Operating
Region
CAUTION: Do not exceed specified supply voltage ratings.
Permanent damage not covered by warranty will result. This unit is
not designed for 120 or 240 volts AC line operation.
Electrical connections are made to the terminal block located in back of
the transmitter. Terminals are marked + and - (see Fig. B below).
Figure B
Wire Length
The maximum length of wire connecting transmitter and receiver is a
function of wire size and receiver resistance. Wiring should not
contribute more than 10% of the receiver resistance to total loop
resistance. For extremely long runs (over 1000 feet), choose receivers
with higher resistance to minimize size and cost of connecting leads.
Where wiring length is under 100 feet, hook-up wire as small as 22 AWG
can be used.
2-Wire Operation
An external power supply delivering 10-35 VDC with minimum current
capability of 40 mA DC (per transmitter) must be used to power the
control loop. See Fig. C for connection of the power supply, transmitter
and receiver. The range of appropriate receiver load resistance (RL) for
the DC power supply voltage available is expressed by the formula and
graph in Fig. D. Shielded two wire cable is recommended for control loop
wiring. If grounding is required, use the negative side of the control loop
after the receiver.
2-Wire Connections
USER CALIBRATION
The transmitter may be user calibrated with two buttons on the front. The
standard models have buttons labeled “ZERO” and “SPAN”. LCD models
have buttons labeled “ZERO” and “UNITS”. The “UNITS” button on the
LCD models has 2 functions. If pushed for less than 2 seconds and
released the pressure units that are displayed on the LCD will change
when the button is released. If pushed and held for 4 - 5 seconds the
“UNITS” button serves the same function as the “SPAN” button on the
standard models.
To calibrate the transmitter you will need three pieces of equipment. You
will need a calibrated pressure source capable of generating a stable
pressure value for the maximum range of the unit under test, an
instrument capable of validating the calibration pressure, and a
milliameter to measure the current output from the unit under test. The
transmitter is calibrated using the following procedure.
Preparation – Connect the Milliameter and power supply, being careful
to observe polarities. The transmitter must be calibrated in a vertical
position.
Calibrating Zero – Leaving the pressure connections vented, press and
hold the “ZERO” button for 4 – 5 seconds. The zero point will now be set
and the gage output will be 4 mA and if it is an LCD model the display
will read zero. This zero calibration is done first as it can affect the span
value.
Calibrating Span – Connect the pressure source and apply the high
range rated pressure. When the pressure has stabilized, press and hold
the “UNITS” button (for LCD models), or the “SPAN” button (on standard
models), for 4 – 5 seconds. The span point will now be set and the gage
output at full range will be 20 mA and if it is an LCD model will now read
the full range calibration pressure. The zero and span setting are slightly
interactive so recheck the zero calibration and repeat both zero and span
calibration if necessary.
Restoring Factory Calibration Coefficients:
The user calibration coefficients are stored in non volatile memory, which
retains its content indefinitely without external power or batteries.
Factory calibration can be easily restored if the user calibration must be
“erased”. To do this simultaneously press both buttons on the front and
hold them for 4 – 5 seconds. The factory calibration will now be restored.
MAINTENANCE
Figure C
Upon final installation of the Series DM2000 Differential Pressure
Transmitter and the companion receiver no routine maintenance is
required. A periodic check of the system calibration is recommended
following the procedures explained under Calibration Check. The Series
Power Supply Voltage – VDC (2-wire)
DM2000 Transmitter is not field serviceable and should be returned,
freight prepaid, to the factory if repair is required. Please enclose a
description of the problems encountered plus any available application
information.
Figure D
©Copyright 2013 Dwyer Instruments, Inc.
DWYER INSTRUMENTS, INC.
P.O. BOX 373 • MICHIGAN CITY, INDIANA 46360, U.S.A. Fax: 219/872-9057 e-mail: info@dwyer-inst.com
Printed in U.S.A. 12/13
Phone: 219/879-8000 www.dwyer-inst.com
FR# 01-443402-00 Rev. 3
 Loading...