


Professional Surveillance System User’s Manual
Version 4.06
Table of Contents
1 |
OVERVIEW AND ENVIRONMENT |
..................................................................... 1 |
|
1.1 |
|
Overview........................................................................................................................................... |
1 |
1.2 |
|
Environment ..................................................................................................................................... |
1 |
2 |
INSTALLATION AND UPGRADE ....................................................................... |
2 |
|
2.1 |
|
Installation......................................................................................................................................... |
2 |
2.2 |
|
Un-installation................................................................................................................................... |
5 |
2.2.1 |
Windows Menu ............................................................................................................................ |
5 |
|
2.2.2 |
Start Menu.................................................................................................................................... |
6 |
|
2.2.3 |
Resource CD ............................................................................................................................... |
6 |
|
2.3 |
|
Upgrade ............................................................................................................................................ |
6 |
2.3.1 Software of the same version..................................................................................................... |
6 |
||
2.3.2 |
Software of different version....................................................................................................... |
8 |
|
3 |
INTERFACE........................................................................................................ |
9 |
|
3.1 |
|
Login Interface.................................................................................................................................. |
9 |
3.2 |
|
Initialization Interface....................................................................................................................... |
9 |
3.3 |
|
Main Interface................................................................................................................................. |
10 |
3.4 |
|
Interface Button.............................................................................................................................. |
12 |
3.5 |
|
Video Control Zone........................................................................................................................ |
13 |
3.6 |
|
Screen Display Mode..................................................................................................................... |
14 |
|
|
|
i |
3.7 |
Function Button.............................................................................................................................. |
14 |
|
3.7.1 |
Task |
............................................................................................................................................ |
14 |
3.7.2 |
Alarm .............................................................................................................................Record |
15 |
|
3.7.2.1 .................................................................................................................... |
Alarm Record |
15 |
|
3.7.3 |
Playback..................................................................................................................................... |
18 |
|
3.7.3.1 .................................................................................................................. |
Device Record |
18 |
|
3.7.3.2 ...................................................................................... |
Link Record (Activation Record) |
19 |
|
3.7.3.3 ..................................................................................................................... |
Local Record |
21 |
|
3.7.3.4 .......................................................................................................................... |
Download |
22 |
|
3.7.3.5 .......................................................................................................................... |
Dav to Avi |
23 |
|
3.7.4 |
E-map......................................................................................................................................... |
24 |
|
3.7.5 |
Configuration.............................................................................................................................. |
28 |
|
3.7.5.1 ..................................................................................................... |
Password Modification |
28 |
|
3.7.5.2 ................................................................................................................................ |
Option |
29 |
|
3.7.6 |
Device ..................................................................................................Preview Output Config |
31 |
|
3.8 |
Right Tool ................................................................................................................................Bar |
34 |
|
3.8.1 |
Device ..................................................................................................................................List |
34 |
|
3.8.1.1 ................................................................................................. |
Device list main interface |
34 |
|
3.8.1.2 .................................................................................................................. |
NVD operation |
35 |
|
3.8.1.3 ................................................................................................. |
General device operation |
37 |
|
3.8.1.4 .................................................................................................................. |
NVD operation |
41 |
|
3.8.1.5 ............................................. |
Non - real - time channel node and real - time channel node |
41 |
|
3.8.1.6 ............................................................................................................. |
Real - time monitor |
46 |
|
3.8.2 |
PTZ ................................................................................................................Direction Control |
47 |
|
3.8.3 |
PTZ ...........................................................................................................................Advanced |
48 |
|
3.8.4 |
Tool ..........................................................................................................................................s |
51 |
|
3.8.4.1 .................................................................................................... |
Begin/Stop record plan |
51 |
|
3.8.4.2 ...................................................................................................................... |
NVD Control |
51 |
|
3.8.4.3 .................................................................................................................... |
Health Report |
56 |
|
3.8.4.4 ........................................................................................................................ |
Log Search |
57 |
|
3.8.4.5 ..................................................................... |
Alarm Link Video (Alarm Activation Video) |
58 |
|
3.8.4.6 ....................................................................................................... |
Alarm Output Control |
60 |
|
3.8.4.7 .......................................................................................................... |
Color Configuration |
60 |
|
3.8.4.8 .............................................................................................................................. |
Volume |
60 |
|
3.8.5 |
Setting ..........................................................................................................................Manage |
61 |
|
3.8.5.1 ............................................................................ |
Scheme and Task (Task and Project) |
61 |
|
3.8.5.2 ............................................................................................... |
Record Plan Configuration |
65 |
|
3.8.5.3 .................................................................................................................. |
Alarm Manage |
67 |
|
3.8.5.4 ........................................................................................................... |
Alarm Record Plan |
73 |
|
3.8.5.5 ................................................................................................................................ |
E - map |
75 |
|
3.8.5.6 ............................................................................................. |
Decode Card Configuration |
79 |
|
3.8.5.7 ............................................................................................................ |
User Management |
81 |
|
3.8.5.8 ................................................................................................................. |
Device Manage |
82 |
|
ii
|
3.8.5.9 |
|
NVD Manage .................................................................................................................... |
84 |
|
3.8.5.10 |
SNVD Manage.................................................................................................................. |
84 |
|
|
3.8.5.11 |
Extension Screen ............................................................................................................. |
85 |
|
|
3.8.5.12 |
User Configuration ........................................................................................................... |
90 |
|
3.9 |
Device Health Status ..................................................................................................................... |
90 |
||
3.10 |
Full Menu........................................................................................................................................ |
91 |
||
3.10.1 |
Modify Password................................................................................................................... |
91 |
||
3.10.2 |
Device.................................................................................................................................... |
91 |
||
3.10.3 |
Alarm...................................................................................................................................... |
92 |
||
3.10.4 |
Record Manage..................................................................................................................... |
92 |
||
3.10.5 |
Scheme Task ........................................................................................................................ |
93 |
||
3.10.6 |
E-map .................................................................................................................................... |
93 |
||
3.10.7 |
Configuration......................................................................................................................... |
93 |
||
3.10.8 |
Log Query.............................................................................................................................. |
94 |
||
3.10.9 |
Log out................................................................................................................................... |
94 |
||
3.10.10 |
Exit ......................................................................................................................................... |
94 |
||
3.11 |
Tray Menu....................................................................................................................................... |
95 |
||
3.11.1 |
Modify Password................................................................................................................... |
95 |
||
3.11.2 |
Alarm...................................................................................................................................... |
95 |
||
3.11.3 |
E-map View ........................................................................................................................... |
95 |
||
3.11.4 |
Color Default Setup .............................................................................................................. |
95 |
||
3.11.5 |
Scheme Task ........................................................................................................................ |
95 |
||
3.11.6 |
Begin/Stop Record Plan ....................................................................................................... |
96 |
||
3.11.7 |
Log Query.............................................................................................................................. |
96 |
||
3.11.8 |
Close Alarm Sound............................................................................................................... |
96 |
||
3.11.9 |
Log out................................................................................................................................... |
96 |
||
3.11.10 |
Exit ......................................................................................................................................... |
96 |
||
4 |
OPERATION INSTRUCTION............................................................................ |
97 |
||
4.1 |
Monitor Operation .......................................................................................................................... |
97 |
||
4.2 |
Monitor Task and Monitor Project................................................................................................. |
99 |
||
4.3 |
PTZ Control .................................................................................................................................... |
99 |
||
4.4 |
Playback ......................................................................................................................................... |
99 |
||
|
|
|
|
iii |
4.4.1 |
Device Record Playback........................................................................................................... |
99 |
4.4.2 |
Local Record Playback ........................................................................................................... |
100 |
4.4.3 |
Download ................................................................................................................................. |
100 |
4.4.4 |
Record Play Control ................................................................................................................ |
100 |
4.4.5 |
Others....................................................................................................................................... |
100 |
4.5 |
Snapshot and Manual Record .................................................................................................... |
100 |
4.6 |
E-map ........................................................................................................................................... |
100 |
4.7 |
Log out.......................................................................................................................................... |
101 |
5 PERIPHERAL DEVICE OPERATION |
............................................................. 102 |
||
5.1 |
Decode Card ................................................................................................................................ |
102 |
|
5.2 |
NVD |
............................................................................................................................................... |
102 |
5.2.1 |
Menu......................................................................................................................................... |
102 |
|
5.2.2 |
NVD .............................................................................................................Control Principle |
102 |
|
5.2.2.1 ........................................................................................................................ |
Operation |
103 |
|
5.2.2.2 .................................................................................................................... |
Decode tour |
104 |
|
|
............................................................................................... |
5.2.2.3 |
TV adjustment |
|
............................................................................................................................. |
|
105 |
iv
Welcome
Thank you for using our Professional Surveillance System (PSS)!
This user’s manual is designed to be a reference tool for operation of your system. Here you can find detailed operation information about PSS.
v
1 Overview and Environment
1.1 Overview
PSS is an abbreviation for Professional Surveillance System.
It is software to manage small quantity security surveillance devices. It releases with the device and does not support the products from other manufacturers.
It can view real-time video of several camera channels from various devices, and it can view the playback video files from various devices. PSS can support multiple scheduled arms to realize auto PC guard.
PSS supports e-map; you can clearly view all device locations.
It can create individual configuration files for each user, which allows you maintain your own habit and style.
Please note, there is only one running PSS in one PC.
The PSS can send out the device alarm information to the peripheral applications for extension use.
1.2 Environment
OS: Windows 2000 / Windows XP / Windows 2003/ Windows Vista/Windows 7.
CPU: 2.4GHz or higher.
Display card: Independent car and support directX 8.0c or higher.
Memory: 1GB or higher for XP OS.
Displayer: 1024*768 or higher.
1
2 Installation and Upgrade
2.1 Installation
Please check the installation CD and make sure it includes the following files: setup.exe Pro Surveillance System.msi
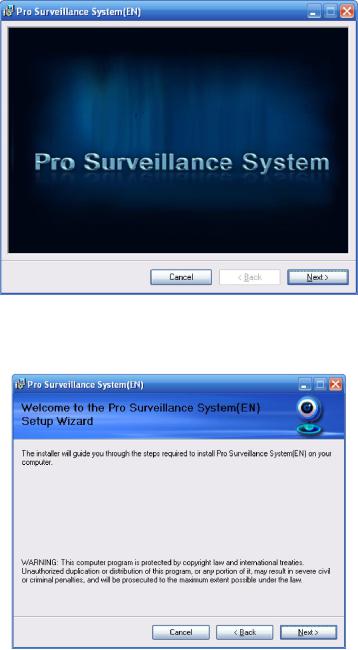
Double click the setup.exe to begin installation. See Figure 2-1.
Figure 2-1
Click next button to go to installation interface. See Figure 2-2.
Figure 2-2
Click next button, you can see an interface is shown as in Figure 2-3. Please input user name and organization name.
2

Figure 2-3
Click next button, you can see an interface is shown as below. Please select installation folder. Default folder is C:\Program Files\Pro Surveillance System\. See Figure 2-4.
Figure 2-4
Click next button, you can see there is an interface asking you to confirm the installation. See Figure 2-5.
3
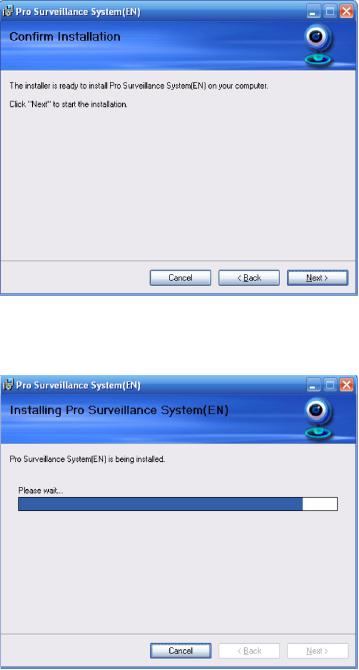
Figure 2-5
Click next button, system begins installation. The interface is shown as in Figure 2-6.
Figure 2-6
During the installation process, you can click cancel button to exit.
After installation, you can see an interface is shown as below. See Figure 2-7.
4
Figure 2-7
Click close button, you can complete the installation.
2.2 Un-installation
There are two ways for you to remove the PSS.
2.2.1 Windows Menu
From the control panel to the add/remove program, you can see an interface is shown as in Figure 2-8.
Figure 2-8
Click remove button, you can see a dialogue box is shown as in Figure 2-9.
5
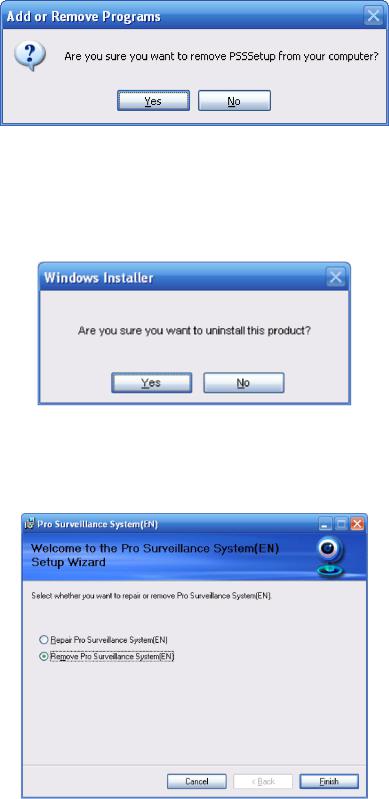
Figure 2-9
Click Yes button to remove PSS.
2.2.2 Start Menu
From Start menu-> All programs->PSS, select PSS uninstall item.
System pops up the following dialogue box. See Figure 2-10. Please click yes to remove PSS.
Figure 2-10
2.2.3 Resource CD
You can click the PSSSetup.ms in the installation CD, system pops up the following dialogue box. Please select remove PSS item to delete it. See Figure 2-11.
Figure 2-11
2.3Upgrade
2.3.1Software of the same version
6
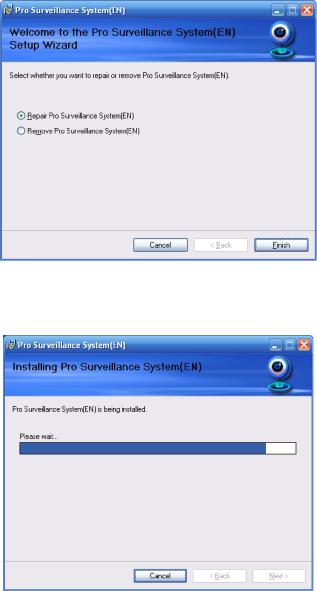
If there is PSS software of the same version in the PC, you can see a dialogue box is shown as in Figure 2-12. Please click repair PSS setup to update the PSS.
Figure 2-12
During the repair process, the interface is shown as in Figure 2-13.
Figure 2-13
During the process, you can click cancel button to exit.
After installation, you can see an interface is shown as below. See Figure 2-14.
7
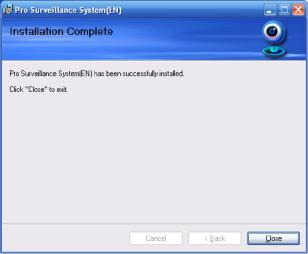
Figure 2-14
Click close button, you can complete the installation.
2.3.2 Software of different version
If your PC has installed different version, please uninstall the PSS first and then install the latest
version. For detailed installation steps, please refer to chapter 2.1 Installation.
8

3 Interface
Double click PSS icon , you can go to the login interface.
3.1 Login Interface
Login interface is shown as in Figure 3-1.
User name: Input the user account
Password: Please input corresponding password to log in.
OK: Click this button, system can verify the account and then enter the software main interface.
Cancel: Click this button to exit login interface.
Note:
If it is your first time to run the PSS program, default user name is admin and its password is admin too. Admin is a super administrator and can not be removed. It can add, modify or delete other user.
For security reason, please modify your password after first log in.
You can memory your password, so that when you can log in the next time, you do not need to input user name and password. Please note this function is for your convenient only. Do not enable this function in public PC.
Figure 3-1
3.2 Initialization Interface
Click OK button, system begins verifying user name and password and then go to the initialization interface. See Figure 3-2.
Please note it may take a little bit longer to initialize decode card, please be patient.
If it is your first time to use PSS, please go to chapter 3.7.5.2 Option to implement setup.
9
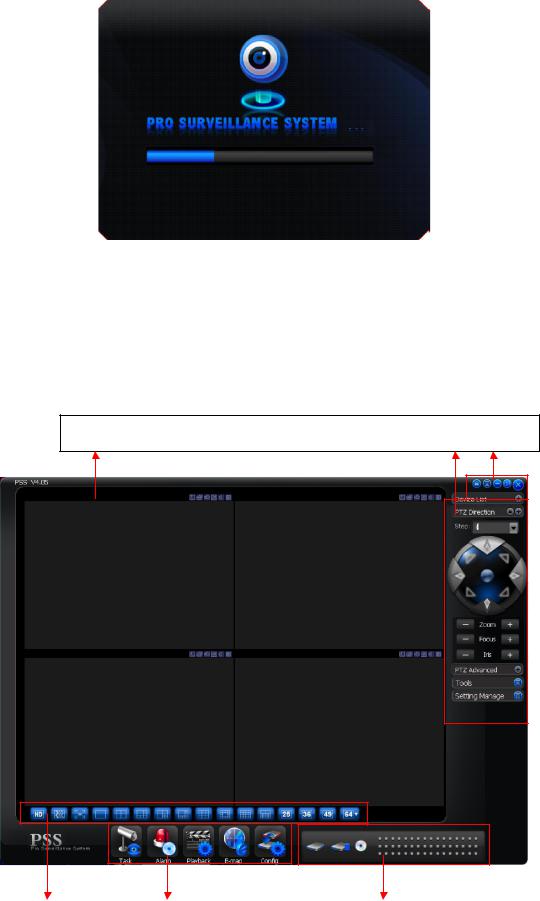
Figure 3-2
3.3 Main Interface
After initialization, system goes to the main interface. In the main interface, there are real-time monitor interface and other operation and function menu.
The main interface of the general version is shown as in Figure 3-3.
The main interface of the IVS version is shown as in Figure 3-4.
1 |
4 |
6 |
2 |
3 |
5 |
|
|
|
Figure 3-3
10

Figure 3-4
Section 1: Current display window. It is circled by a green boundary. For video control information, please refer to chapter 3.5 Video control zone.
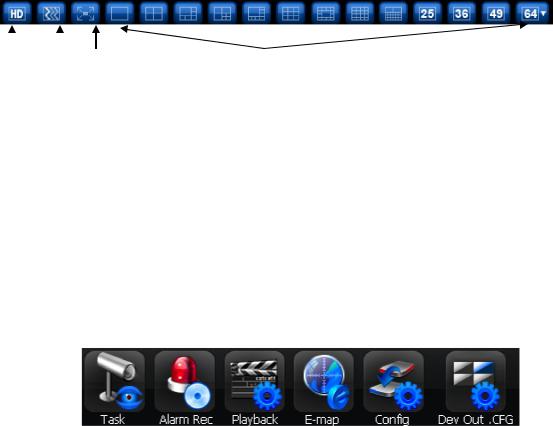
Section 2: Screen display mode. From the left to the right, there are video quality, realtime/fluency level, and full-screen and 1-64-window mode. Please refer to chapter 3.6 for detailed information.
Section 3: Function buttons. Here you can view the following buttons: Task (chapter 3.7.1), Alarm (chapter 3.7.2), Playback (chapter 3.7.3), E-map (chapter 3.7.4), Configuration (chapter 3.7.5) and Device preview video output configuration (Chapter 3.7.6.).
Section 4: Right tool bar. Here you can view the five buttons: Device list (chapter 3.8.1).PTZ direction (Chapter 3.8.2), PTZ advanced (chapter 3.8.3), Tool (chapter 3.8.4), Setting Manage (chapter 3.8.5).
Section 5: For general version, it is the device health status. System can update the device information, disk status information; decode alarm, record and other general alarm status. Double click to go to the alarm record interface. Please refer to chapter 3.9 for detailed information. For IVS version, it is the alarm information. You can view the brief information of the alarm record. System lists the three items of the intelligent alarm information. It includes the time and detailed alarm information.
Section 6: There are five buttons. Lock/Close/Minimize/Switch/Full menu. For Close/Minimize/Switch button information, please refer to chapter 3.4 interface button. Click full menu button; you can view a menu tree shown as in Figure 3-5. For detailed full menu information, please refer to chapter 3.10.
11
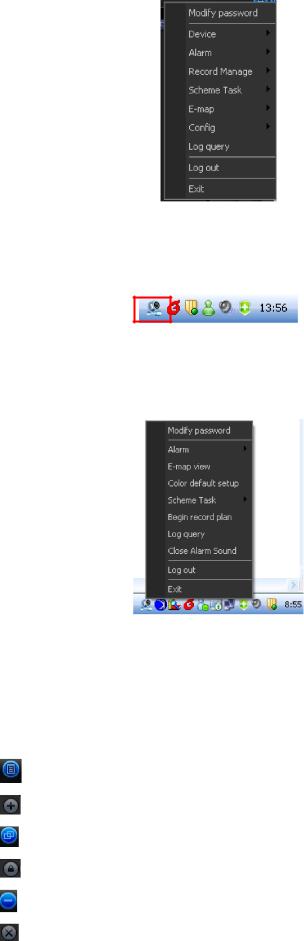
Figure 3-5
When PSS is running, you can also see there is a littlie icon on your right tray menu. See Figure 3-6.
Figure 3-6
Right click mouse, you can see an interface is shown as in Figure 3-7.
Please go to chapter 3.11 for detailed tray menu information.
Figure 3-7
3.4 Interface Button
Please refer to the following sheet for interface button information.
SN |
Icon |
Function |
|
||
|
|
|
1 |
|
Click it to display full menu. |
|
|
|
|
|
|
2 |
|
Display sub-window. |
|
|
|
|
|
|
3 |
|
Maximize/minimize, restore/switch button. |
|
|
|
|
|
|
4 |
|
Lock/unlock sub-window. |
|
|
|
|
|
|
5 |
|
Minimize |
|
|
|
6 |
|
Close current sub-window. |
|
|
|
12
7 |
|
Close current window. |
|
|
|
|
|
8 |
|
Tray menu button. |
|
|
|
|
|
9 |
Lock |
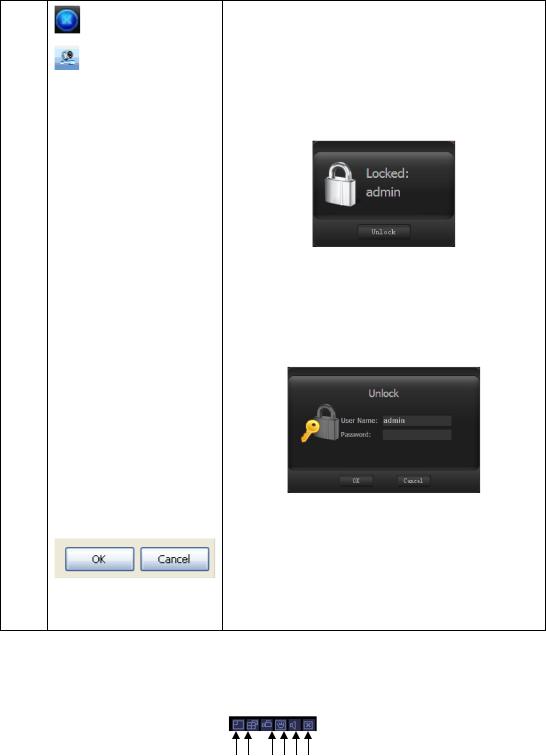
Click lock button, you can lock current application |
|
to avoid vicious operation. See Figure 3-8. |
|||
|
|
||
|
|
You can see admin has locked current |
|
|
|
application. |
Figure 3-8
Click the unlock button in Figure 3-8, system pops up the following dialogue box. See Figure 3-9.
You need to input the proper password to login again.
|
Figure 3-9 |
|
|
10 |
These two button are usually in user |
|
management or configuration interface. |
|
Click Ok to save current modification and then |
|
exit. Click Cancel to exit without saving current |
|
setup. |
3.5 Video Control Zone
On the video upper right, there are six icons. See Figure 3-10.
|
|
|
|
12 |
3 4 5 6 |
|
|
|
|
|
|
|
|
|
|
|
|
Figure 3-10 |
||
Please refer to the following sheet for detail information. |
||||||
|
1 |
Digital |
Click this button and then left drag the mouse in the zone to |
|||
|
zoom in. Right click mouse system restores original status. |
|||||
|
|
zoom |
||||
|
|
|
|
|
|
|
|
|
|
|
|
|
|
|
2 |
Change |
Resize or switch to full screen mode. You can double click |
|||
|
mouse to change the mode. |
|||||
|
|
show |
||||
|
|
mode |
|
|
|
|
|
|
|
|
|
|
|
13
3 |
Local |
When you click local record button, the system begins recording. |
|
The recorded file is saved to system folder. |
|||
|
record |
||
|
|
||
|
|
|
|
4 |
Capture |
You can snapshoot important video. All images are memorized in |
|
system folder. |
|||
|
picture |
||
|
|
||
|
|
|
|
5 |
Audio |
Turn on or off audio.(It has no relationship with system audio |
|
setup ) |
|||
|
|
||
|
|
|
|
6 |
Close |
Close video in current window. |
|
|
video |
|
|
|
|
|
3.6 Screen Display Mode
Screen display mode interface is shown as in Figure 3-11.
1 |
2 |
3 |
4 |
|
|
|
|
Figure 3-11
From the left to the right, there are video quality, real-time/fluent button, full-screen button and 1- 64 screen modes.
Note:
In full-screen mode or the window is maximized, sometimes you may notice the height and width of small window can adjust according to the displayer.
3.7 Function Button
Function button is show as in Figure 3-12.
It consists of the six buttons: Task/Alarm/Playback/E-map/Configuration/Device local preview output configuration.
Figure 3-12
3.7.1 Task
Click Task button, the interface is shown as below See Figure 3-13. Here you can enable/disable the task or project item.
Pause/restore button: Once you enabled one task/project, system display pause button. “√” means current task/project is in progress.
14
Figure 3-13
3.7.2 Alarm Record
3.7.2.1 Alarm Record
Click Task button, it will show the main interface of Alarm Record. The following Figure 3-14 and 3-15 are standing for the main interface of Alarm Record in the General Version and IVS Version.
Figure 3-14
15

|
|
Figure 3-15 |
|
Please refer to the following sheet for detail information. |
|
||
|
SN |
Name |
Function |
|
1 |
Alarm Type |
The alarm consists of six |
|
|
|
types: All alarms/External |
|
|
|
alarm/Motion detection/Video |
|
|
|
loss/Camera masking/other |
|
|
|
alarms. |
|
|
|
For IVS version, you can see |
|
|
|
there is an intelligent alarm |
|
|
|
item. |
|
2 |
All Devices |
You can select a device from |
|
|
|
the dropdown list. |
|
3 |
Search |
Here you can input the criteria |
|
|
|
to search the corresponding |
|
|
|
alarm record. |
|
|
|
You can view the searched |
|
|
|
results in pane 4. |
|
4 |
Alarm record |
You can see alarm time and |
|
|
|
alarm detailed information. |
|
|
|
|
Please go to chapter 3.7.5.2 Option to set “alarm record max amount”. Once the record is full, system automatically overwrites the previous one.
In chapter 3.7.5.2 Option, you can also set alarm information management operation.
Please go to chapter 3.8.5.3 Alarm manage to set alarm configuration information.
You can click the alarm type in pane 1 to view the alarm record in pane 4. You can also use the search function to view the detailed information of one alarm record. For example, in Figure 3-16,
16

though we click the motion detect item, we can still input the search criteria to get the intelligent alarm record.
Figure 3-16
When you are saving the intelligent alarm, system can save one picture when the activation alarm occurred. In Figure 3-, double click the option on the right pane, you can view the alarm picture and the detailed trace information and rule. See Figure 3-.
Figure 3-17
The following Figure 3-18 is Alarm Record’s epitome of the PSS main interface in the IVS Version, it shows the exact time and detailed information of intelligent alarm for the general version, it is the health status information. See Figure 3-18.
17
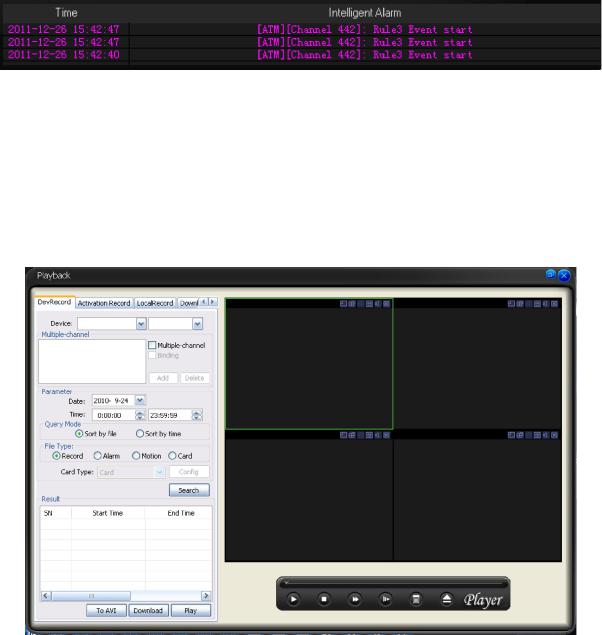
Figure 3-18
3.7.3 Playback
Here you can view the remote device you can control, and corresponding linkage (activation) record, local record playback and download.
Please note the play control button at the bottom of the interface is for current video window only.
3.7.3.1 Device Record
Device record interface is shown as in Figure 3-19.
Figure 3-19
In this interface, you can search and download the file(s) from the managed devices. You can specify the time to search the files and then double click the file to playback (Please makes sure you network bandwidth is OK and you have proper right to playback.) See Figure 3-20.
The system will search the file(s) by date and list all the file information on the time axis. There are time axis and day axis, you can drag to operate. Red stands for the alarm record. Green stands for the general record. Yellow stands for the motion detect record.
You can click the download button to add the checked file(s) to the download task list. You can go to the download interface (chapter 3.7.3.4) to view download process or cancel current download operation. Double click the serial number column, you can select /cancel all files.
18
Figure 3-20
You can refer to the following interface for detailed playback information. See Figure 3-21.
SN |
Name |
Function |
1 |
Pause /play |
Play or pause the record play in the |
|
|
specified window. |
2 |
Stop |
Stop the record play in the specified |
|
|
window. |
3 |
Fast play |
Play the record in the specified window in |
|
|
fast speed. |
4 |
Slow play |
Play the record in the specified window in |
|
|
slow speed. |
5 |
Time axis (1-60M) |
Here you can view the detailed play time |
|
|
information (0:00-60:00. Unit is minute.) . It |
|
|
is the indication information of the yellow |
|
|
icon in the day axis (Button 6) |
6 |
Day axis (0-24H) |
It is to display the searched results by time. |
|
|
All the files listed below are in one day |
|
|
(00:00-24:00. Unit is hour.) |
|
|
Red is the alarm record file. Green is the |
|
|
general record file. Yellow is the motion |
|
|
detect record file. |
7 |
Current play time |
The current play time of the file. |
Figure 3-21
3.7.3.2 Link Record (Activation Record)
19
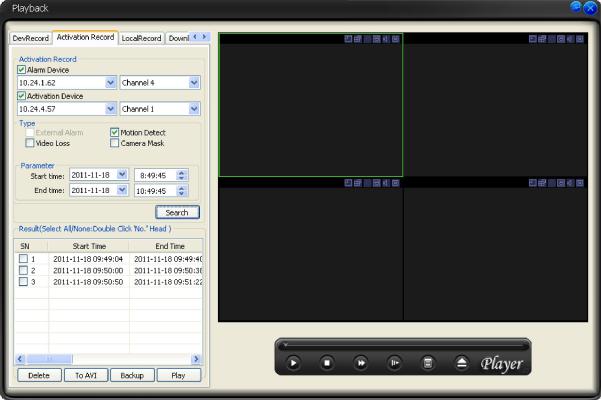
Activation record interface is shown as in Figure 3-22.
In this interface, you can search and playback the alarm activation record at the local-end. Double click the file you can playback the video in current window. Click delete button, you can remove the select file(s). Double click the serial number column, you can select /cancel all files.
Figure 3-22
For the IVS version, you can see there is an intelligent alarm item in the alarm type. See Figure 3-23. You can see when there is an intelligent alarm from the channel 4; it can activate the channel 3 to record. There are three alarm record files in the specified period. You can click the file name to playback.
20
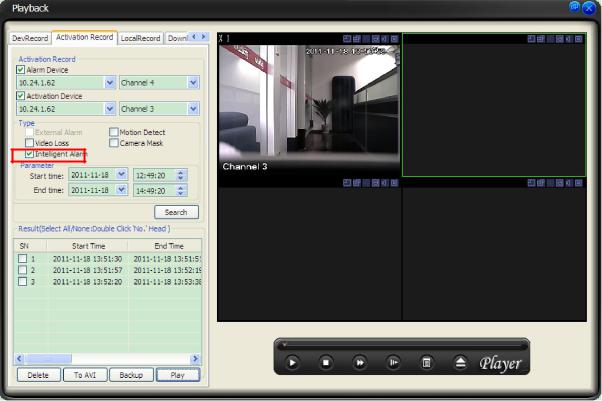
Figure 3-23
3.7.3.3 Local Record
Local record interface is shown as in Figure 3-24.
Here you can search and playback all files at the local-end. Double click the file name you can open the video in current window. If you select the image file, then system open the image. Click delete button, you can remove the select file(s). Double click the serial number column, you can select /cancel all files.
21
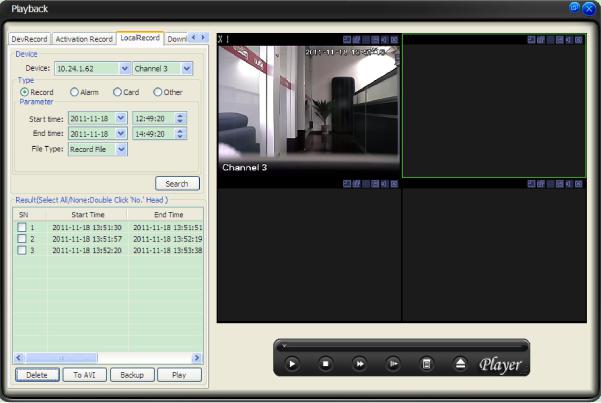
Figure 3-24
You can see the activation record in the activation record interface after you set the activation setup for one type of the alarm in the alarm record configuration interface. You can also search the activated channel record in the local record interface.
For example, when there is an intelligent alarm from the channel 4; it can activate the channel 3 to record. You can go to the activation record interface to search the intelligent alarm record. If you search the record of the channel 3 in the local record interface, system can still list the corresponding activation record. You can compare Figure 3-23 and Figure 3-24.
3.7.3.4 Download
Download interface is shown as in Figure 3-25.
In this interface you can see the download task process and record file information. You can click stop button to cancel current operation.
22

Figure 3-25
3.7.3.5 Dav to Avi
Dav to AVI interface is shown as in Figure 3-26.
In this interface, you can convert the Dav file to AVI file so that these recorded files can play in general player.
Figure 3-26
Please refer to the following sheet for detailed information.
23
Parameter |
Function |
|
|
Type |
Search general record, alarm record, motion detection |
|
record and card record. |
|
|
Alarm |
Search alarm record. |
|
|
Motion |
Search motion detection record. |
Detection |
|
|
|
Card |
Search card record. |
|
|
Start time |
Set the file start time. |
|
|
End time |
Set the file end time. |
|
|
Channel |
Select the channel from the dropdown list. |
|
|
Search |
Click this button you can view the recorded file matched |
|
your requirements. |
|
|
Playback |
Select the file first and then click playback button to view |
|
the video. |
|
Double click serial number (SN) column you can select t |
|
all files. |
|
|
Download |
Download by file: Select the file(s) and then click |
type |
download button. |
|
Download by time: Download the recorded file(s) within |
|
your specified period. |
|
|
Download |
Select the file you need (multiple choices) and then |
|
click download button, you can see system pops up a |
|
dialogue box, please specify file name and path to |
|
download the file(s) to your local pc. |
|
Input the downloaded file name, specify the path and |
|
then click OK button. You can see system begins |
|
download and the download becomes stop button. |
|
There is a progress bar for your reference. |
|
|
Linkage |
You can search the alarm activated record in the local |
record |
end. Double click the file name you can open the video in |
|
current window. |
|
|
Local |
Select local record to play. |
record |
Double click serial number (SN) column you can select |
|
all files. |
|
|
Important
Please note record save path and download save path are not the same. Please refer to chapter
3.7.5.2 Option.
3.7.4 E-map
Click E-map button, the interface is shown as in Figure 3-27.
24
 Loading...