


Stream
heating + cooling fan
user manual | gebruikershandleiding | manuel d’utilisation
manual de usuario | Bedienungsanleitung
1

Thank you for
choosing Duux.
We’re so glad you decided to read the instructions to your new Duux heating + cooling fan! Many users
casually dismiss instructions and seek to gure it out on their own. But studies show that people who read
instructions will get up to speed more quickly and eciently than those who poke around with trial and
error.
At Duux we believe in the importance of a comfortable and healthy living environment. Enhancing your
wellbeing by designing appealing, functional and eective products is the passion that drives us every day.
With our range of innovative air treatment products we aim to provide you the best possible indoor air
quality.
EN
Table of
Perfect comfort throughout every season. Stream can be used all year round with it’s 4 cooling speeds
and 2 heating settings. The activated carbon lter removes odors and smoke to ensure clean air output.
The sleek LED touch bar oers convenient operation while the compact remote control can be stored in
the back of the device. With 7 meters wind reach and 1200m³/hr air ow, Stream provides a very powerful
performance with extremely silent operation down to 30dBA. The natural wind and night modes adds
extra convenience for ultimate comfort during the day and night.
Read this manual carefully to get the most out of your Stream heating + cooling fan.
contents
1. Product overview 4
2. Installation & use 5
3. Functions 7
4. Maintenance 11
5. Technical specications 13
6. FAQ 14
32
1. Product overview 2. Installation and use
EN
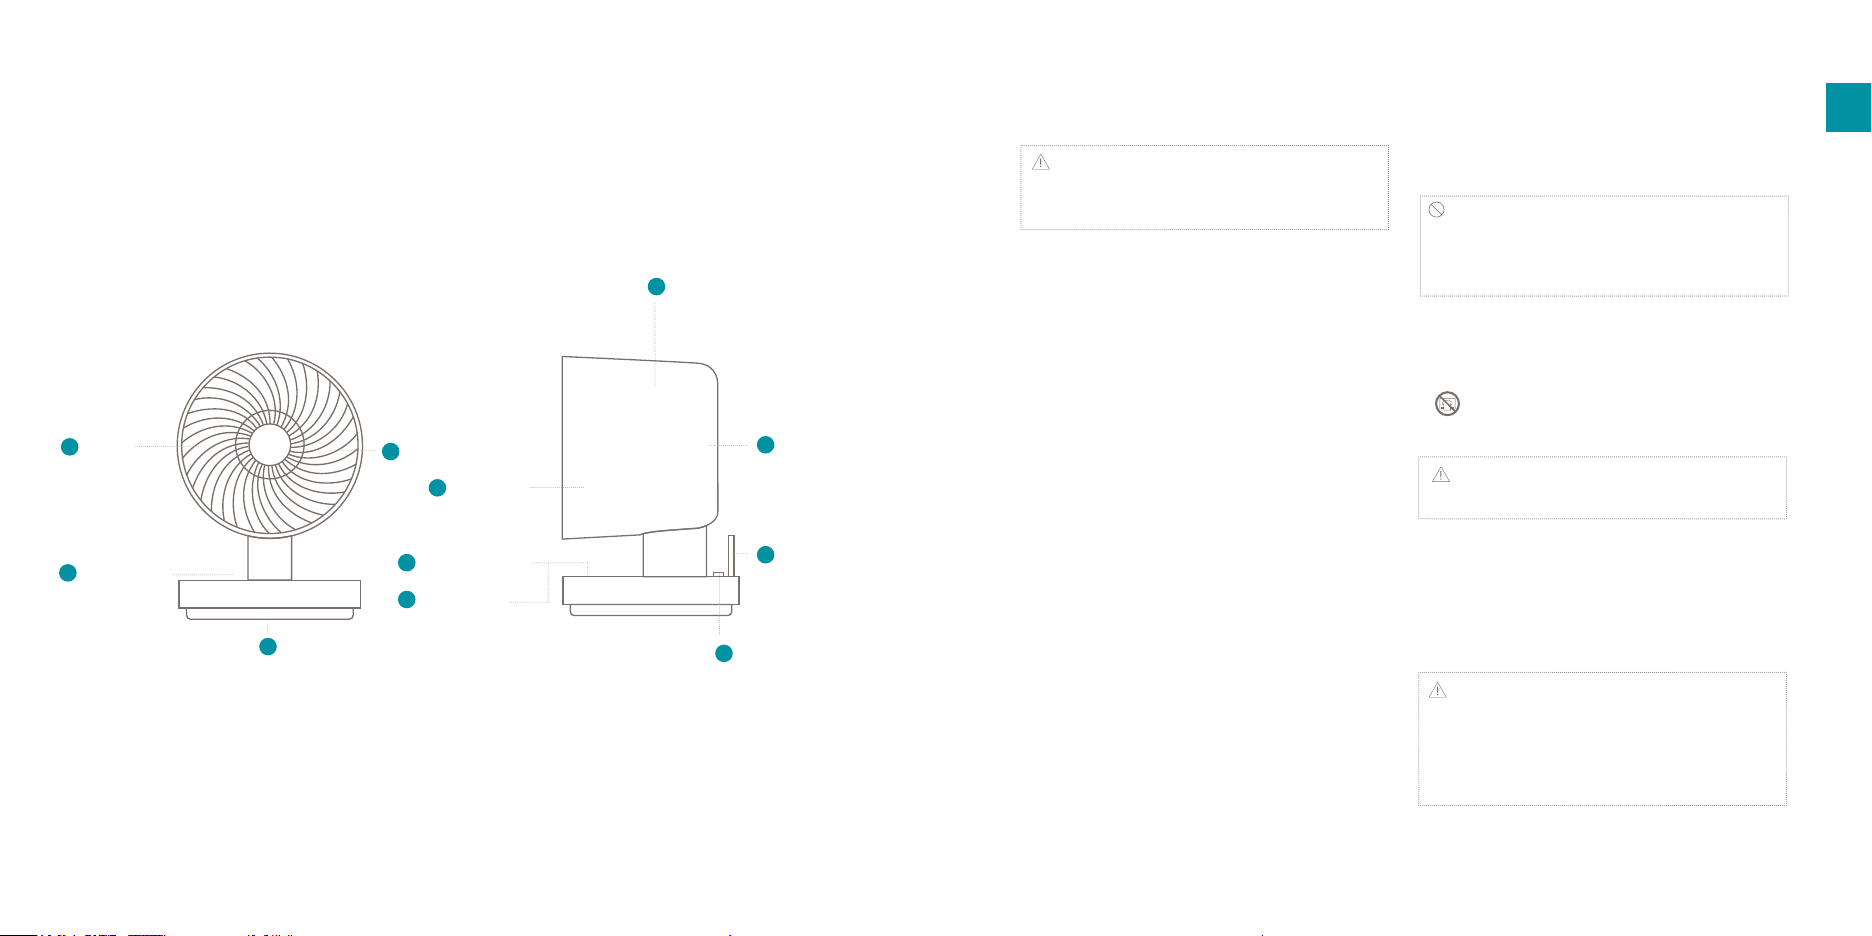
1
Front grill
2
Upper base
3
Oscillation platform
7
Fan blades
6
5
LED touch bar
4
Touch keys
Rear shell
8
Activated carbon lter
9
10
11
Stand-by switch
Rear cover
Remote
control
Note: Please take notice of below instructions
and the separately included warning sheet before
using the product.
Installation
• Before use, please check whether the voltage
used matches the indicated voltage on the rating
label.
• This device can be used by children aged from
8 years and above and persons with reduced
physical, sensory or mental capabilities or lack
of experience and knowledge if they have been
given supervision or instruction concerning use
of the device in a safe way and understand the
hazards involved. Children shall not play with
the device. Cleaning and user maintenance
should not be performed by children without
supervision.
• Children younger than 3 years should be kept
away from the device unless continuously
supervised.
• Children older than 3 years and younger than 8
years shall only switch on/o the device provided
that it has been placed or installed in its intended
normal operating position and they have been
given supervision or instruction concerning use
of the device in a safe way and understand the
hazards involved. Children aged from 3 years and
less than 8 years shall not plug in, regulate and
clean the device or perform user maintenance.
Caution: Some parts of this device can become
very hot and cause burns. Particular attention must
be given where children and vulnerable people are
present.
• If the power cord is damaged, it must be replaced
by the manufacturer, its service agent or similarly
qualied persons in order to avoid a hazard.
• This marking indicates that the product
cannot be covered with anything.
Warning: In order to avoid overheating, do not
cover the device.
• The device must not be located immediately
below a wall outlet.
• Do not use this device in the immediate
surroundings of a bath, a shower or a swimming
pool.
Warning: This device is not equipped with a
sensor to control the room temperature. Do not use
this device in small rooms when they are occupied
by persons not capable of leaving the room on their
own, unless constant supervision is provided.
• This product is only suitable for well insulated
spaces or occasional use.
54
Warning: Batteries contain materials that
are harmful to the environment and must be
removed from the device before disposal
and disposed properly.
• When the device is not in use, please turn o the
device by pushing the stand-by switch on the
base of the device or remove power plug. Do
not leave the device in stand-by mode for a long
period of time.
• Do not place the power cord under the item
or cover the power cord. Place the power cord
properly to prevent tripping over it.
• Place the device on a at and secure surface
before using the product.
• Remove the power plug when the device is not
in use. Never pull the power cord to remove the
plug.
• Please ensure that this product does not run into
any obstructions.
• Do not put your ngers or other objects into the
air inlet and outlet when the fan is running.
• When the product is operating, do not put any
soft items such as hairs, window/door curtains on
the device that might get caught between the fan
blades.
• Stop using the device when the power cord or
plug is damaged, or the device is damaged after
being dropped.
• Do not use this device outdoors. The device is
only for household and indoor use.
Do not use this device near a window or expose
to direct sunlight.
• This device cannot be used without a base and
should always be placed horizontally.
• Do not use this device in a place where gasoline,
paint or other ammable materials are stored.
• Remove the power plug before cleaning, repairing
or moving the device.
• Remove the power plug when the device is not in
use.
• Please use this device according to the
instructions provided in this manual.
• Do not disassemble the device yourself. If the
repair is required, please return it to your point of
purchase or service center.
• Products should be kept clean and regularly
maintained.
• Do not use extension cords.
Installing the device
1
Unpack the device and remove the packing
materials from the device. Store the packing
materials for possible future transportation.
2
Insert the power plug into a wall outlet and
press the safety switch to | position. You will
hear a double conrmation beep.
3
Press the power button to switch on the device
and the LED touch bar will illuminate and
operate in cooling mode at low speed.
3. Functions
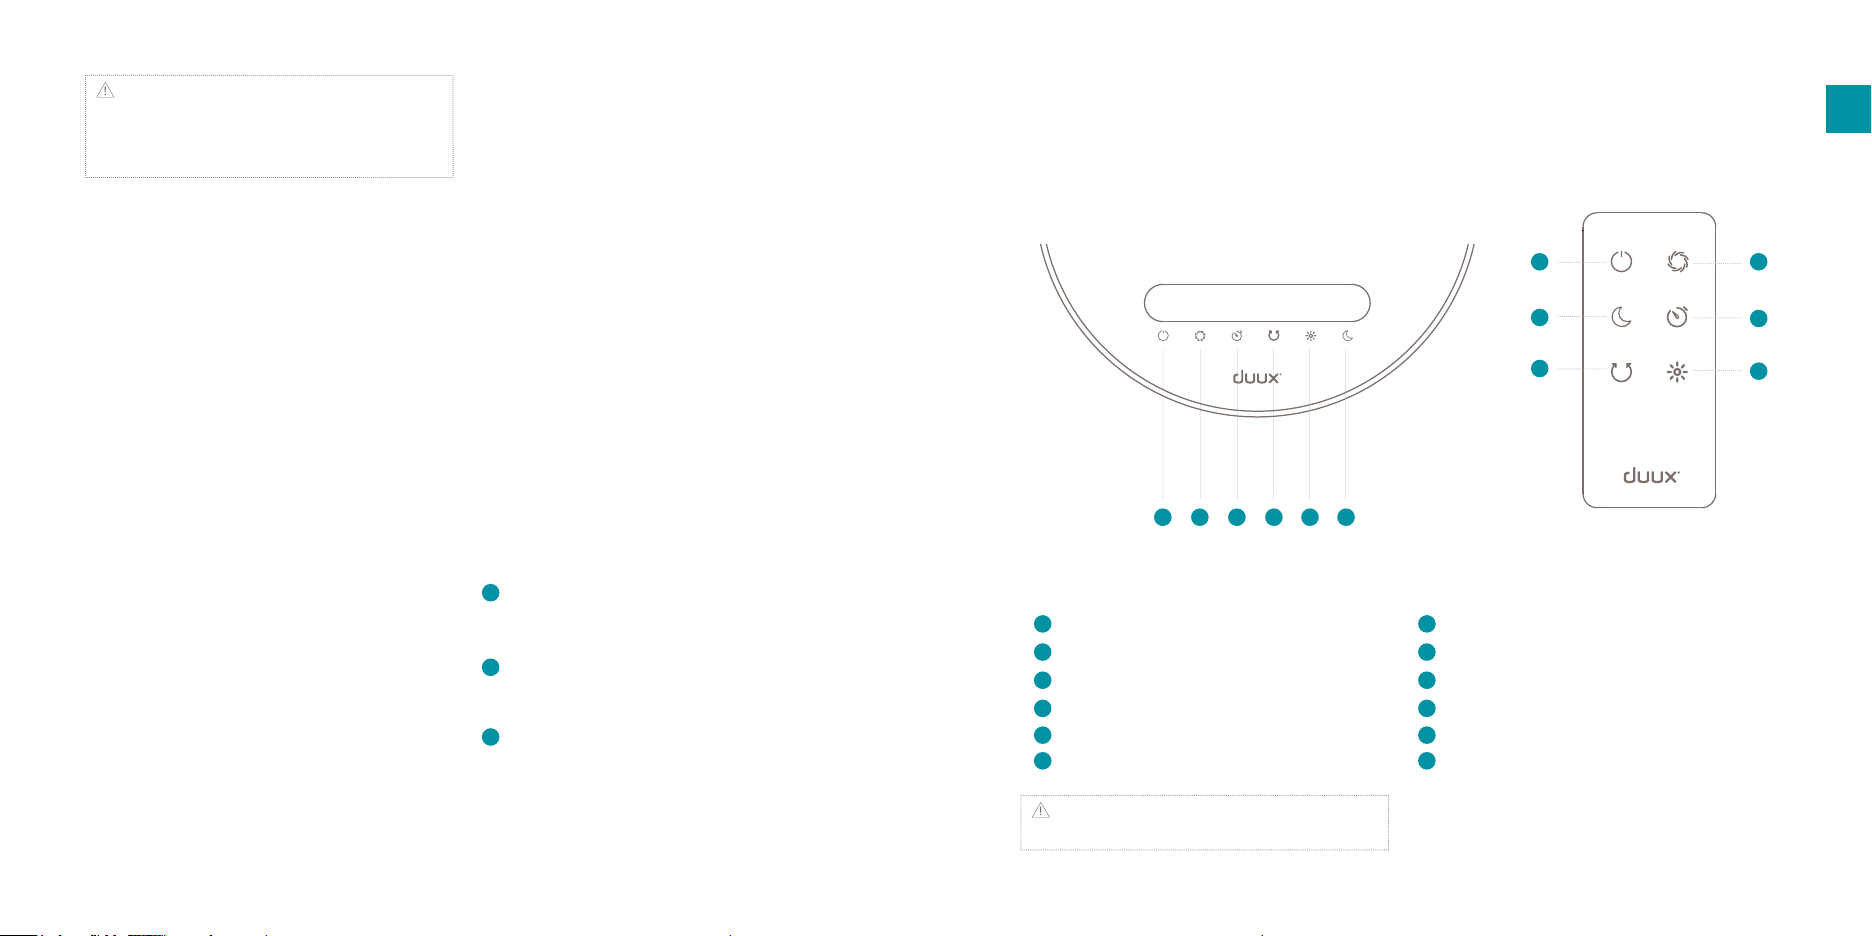
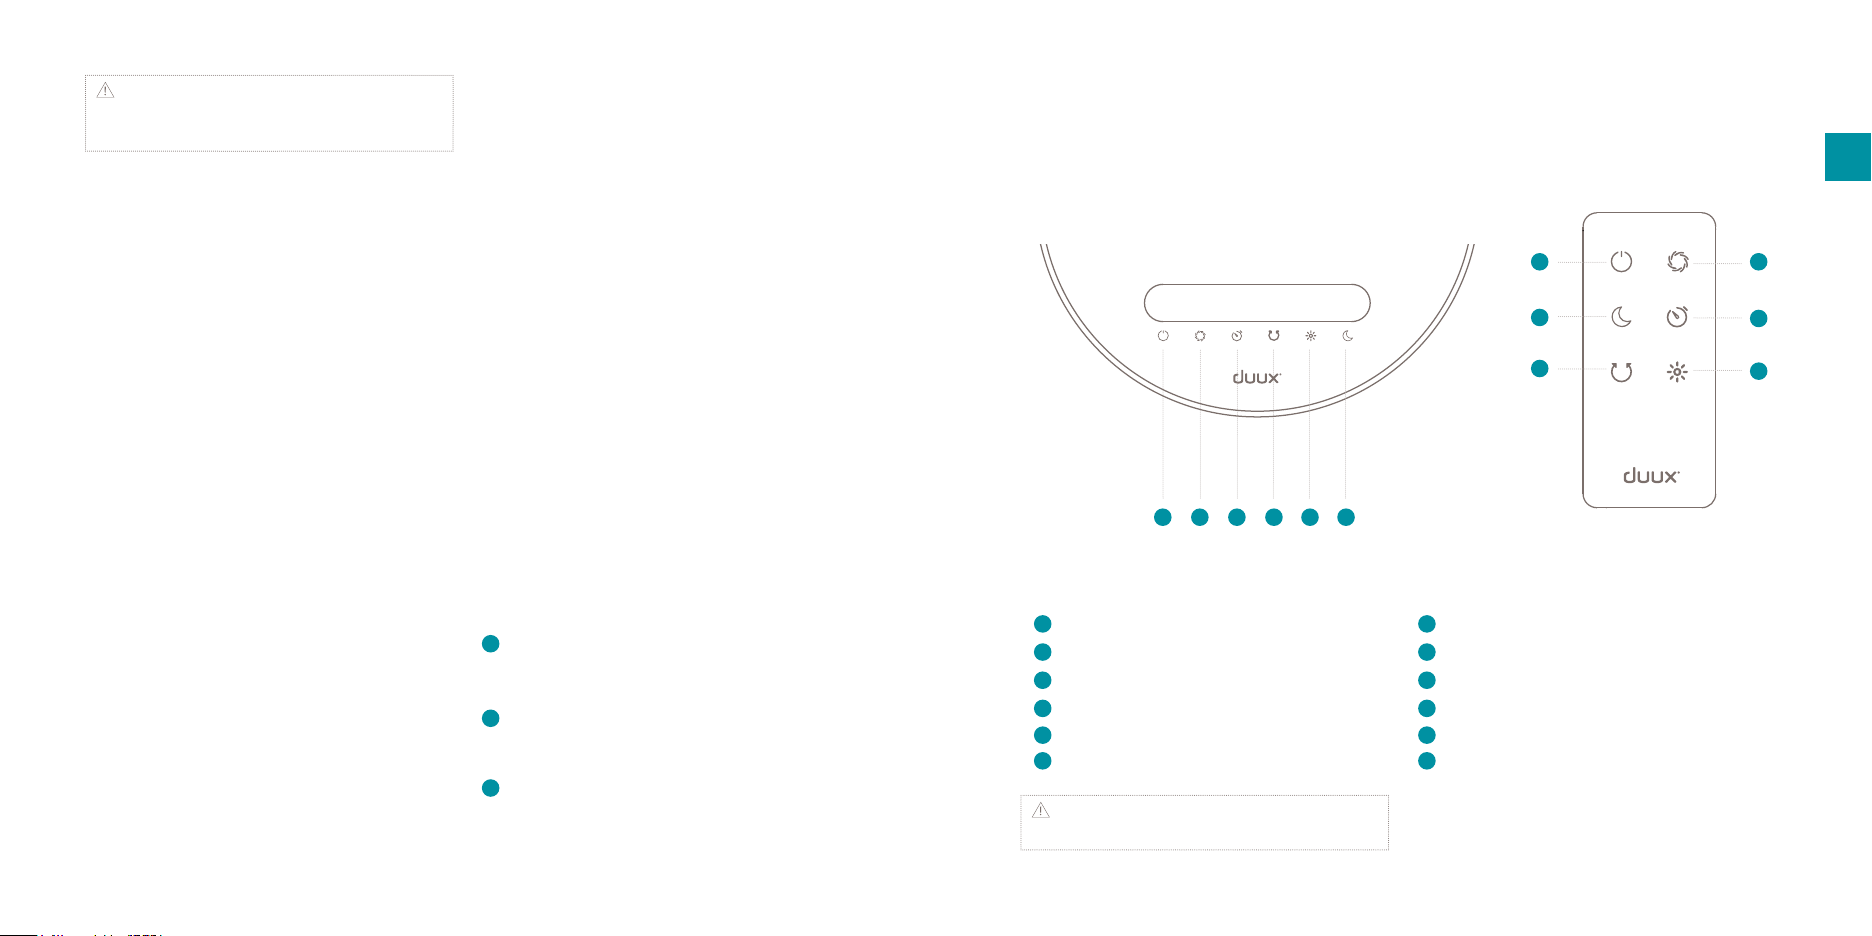
1 2 3 4
LED touch bar
1
Power
2
Change speed
3
Timer
Oscillation
4
5
Heating mode
6
Natural wind & night mode
Note: if the display has been inactive for 1
minute, the lights will be dimmed by 80%.
5 6
1 2
6
4
Remote control
1
Power
2
Change speed
3
Timer
Oscillation
4
5
Heating mode
6
Natural wind & night mode
EN
3
5
76
Power
Touch the key to switch on the device. The
display will illuminate and operate in cooling mode
at low wind speed by default. Press again to switch
o in stand-by mode.
Note: Make sure the stand-by switch is in |
position in order to switch on the device. If the
stand-by switch is in O position, all buttons are
disabled.
Change speed
Press the key to increase or decrease the wind
speed in the following sequence: Low (1) > Medium
(2) > High (3) > Strong (4). Default setting is Low
(1) speed. The icons of the LED display will change
accordingly.
Oscillation
Oscillation is deactivated when using the device for
the rst time. By pressing the key,
the device will automatically oscillate horizontally
up to 80 degrees. The indicator on the display will
illuminate accordingly. The verticale angle can be
adjusted manually in 4 positions, up to 90⁰.
Heating mode
Heating mode is deactivated when using the
device for the rst time. Press the key to turn
on the heating mode. Once pressed, the heating
mode will start in Medium (2) speed mode and
the corresponding indicator on the display will
illuminate. Pressing again will increase the heating
power to High (3) speed mode.
continue in cooling mode, switch on the fan by
pressing the button. Pressing this key for a 4th
time will return to cooling mode.
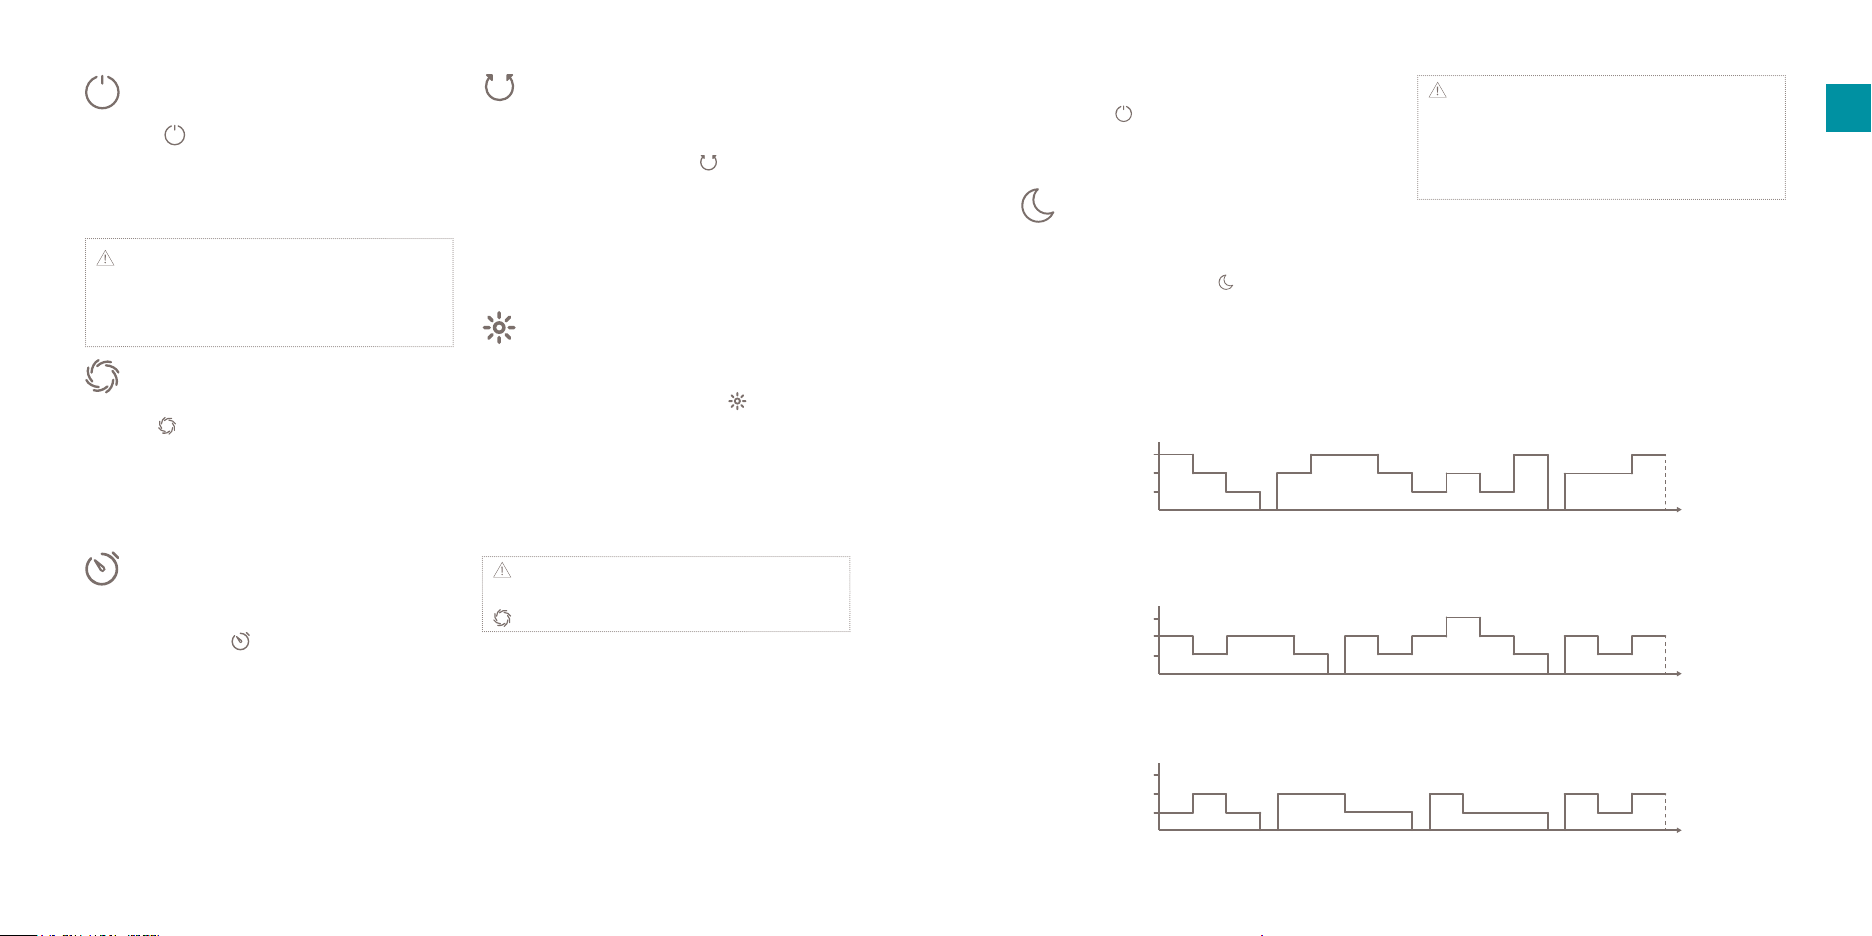
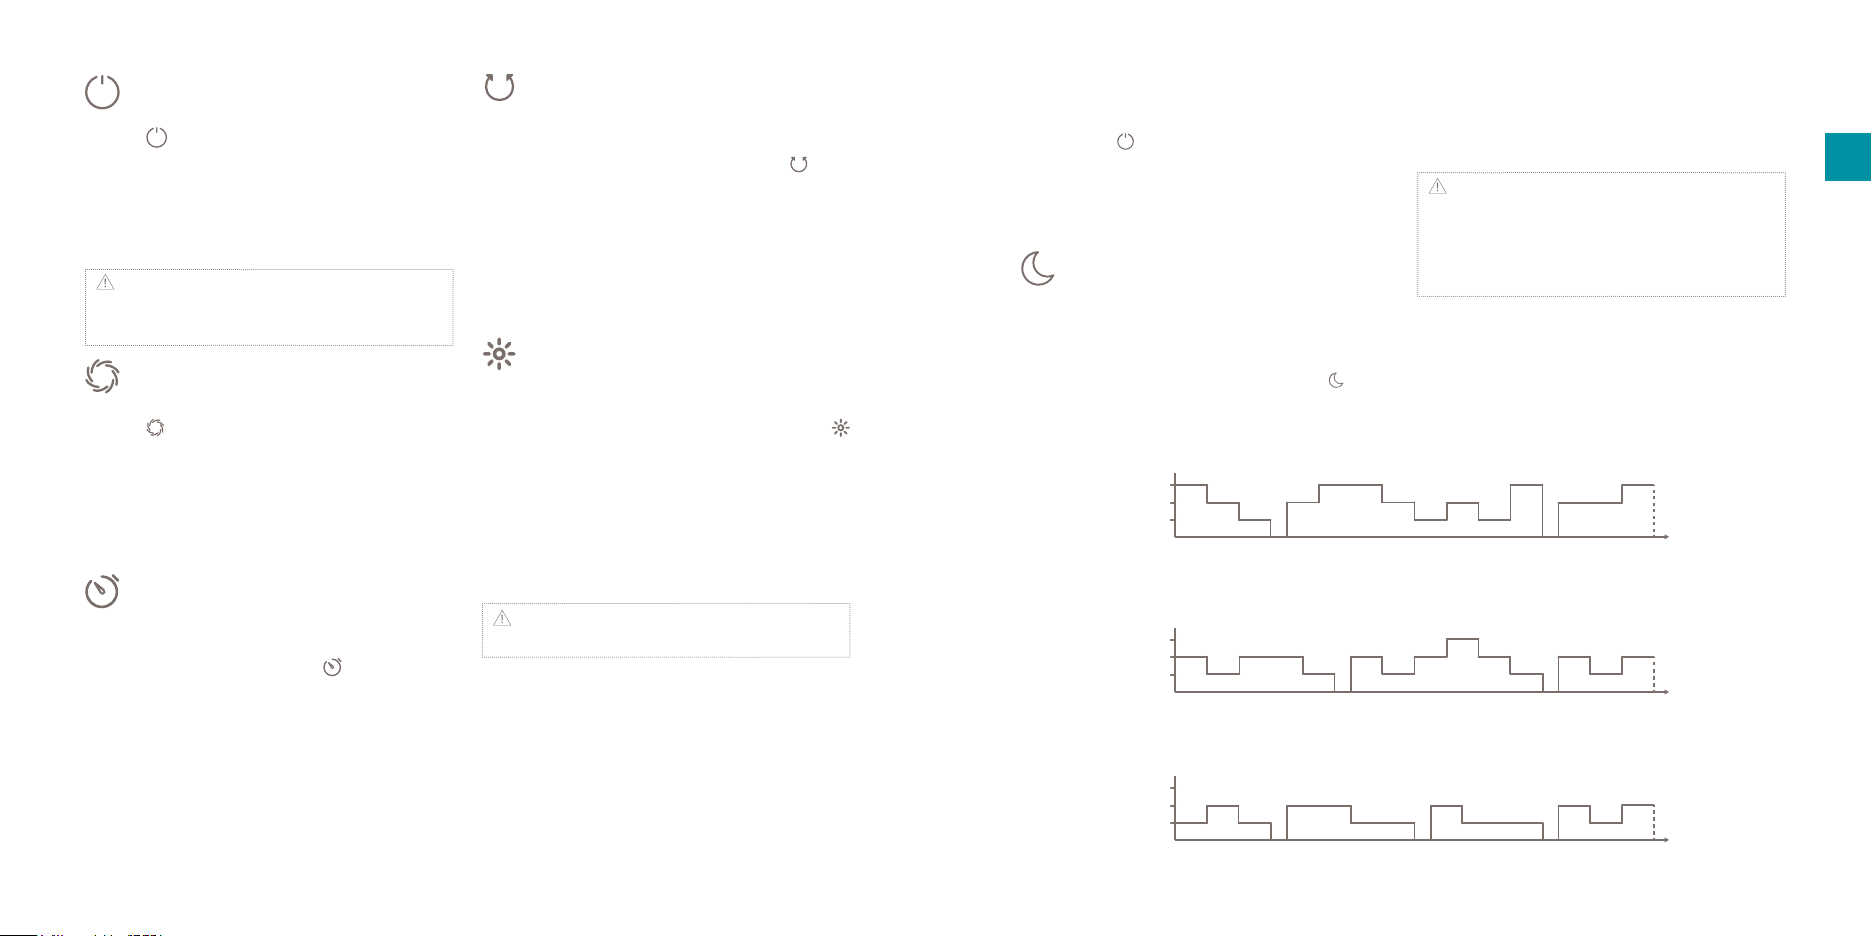
Natural wind & night mode
Night mode is deactivated when using the device
for the rst time. Press the key to activate
natural wind & night mode. The corresponding
indicator will illuminate on the display. Press again
to deactivate this mode.
Natural wind & night mode in HI speed
Hi
Mid
Low
6
6
6
3
12
6 6 6
Note: The natural wind & night mode cannot be
used in combination with the heating mode. Once
natural wind & night mode is activated, pressing the
heating mode key will automatically deactivate the
natural wind & night mode.
The natural wind & night mode works according to
the below programming:
6 6
12
6 6
3
Time (Sec) Time=90s
EN
Timer
Timer is deactivated when using the device for the
rst time. Press the key to activate the timer
mode. You can switch the timer in the following
order: 1h > 2h > 4h > 8h. The corresponding
indicators will illuminate on the display. You can
also read the timer count down on the display (e.g.
if 4h timer is activated, the display will change to 2h
after 2h, and so on). After the timer is completed,
the device will switch to stand-by mode.
Note: It’s not possible to manually adjust the
speed of the heating mode. When pressing the
key, the device will return in cooling mode.
Pressing this key again will activate ECO mode.
When the room temperature is below 18⁰C,
the High (3) speed heating mode will turn on
automatically. When the room temperature
is between 18⁰C and 22⁰C, the Low (2) speed
heating mode will be activated. When the room
temperature is above 22⁰C, the heating mode
will deactivate and the fan will stop working. To
Natural wind & night mode in MID speed
Hi
Mid
Low
6
12 6 6 6
6
6 6 6 6
3
Natural wind & night mode in LOW speed
Hi
Mid
Low
6 6 6 6 6
6 6 12 15
6
6 6
3
Time (Sec) Time=90s
6
3 33
Time (Sec) Time=90s
98
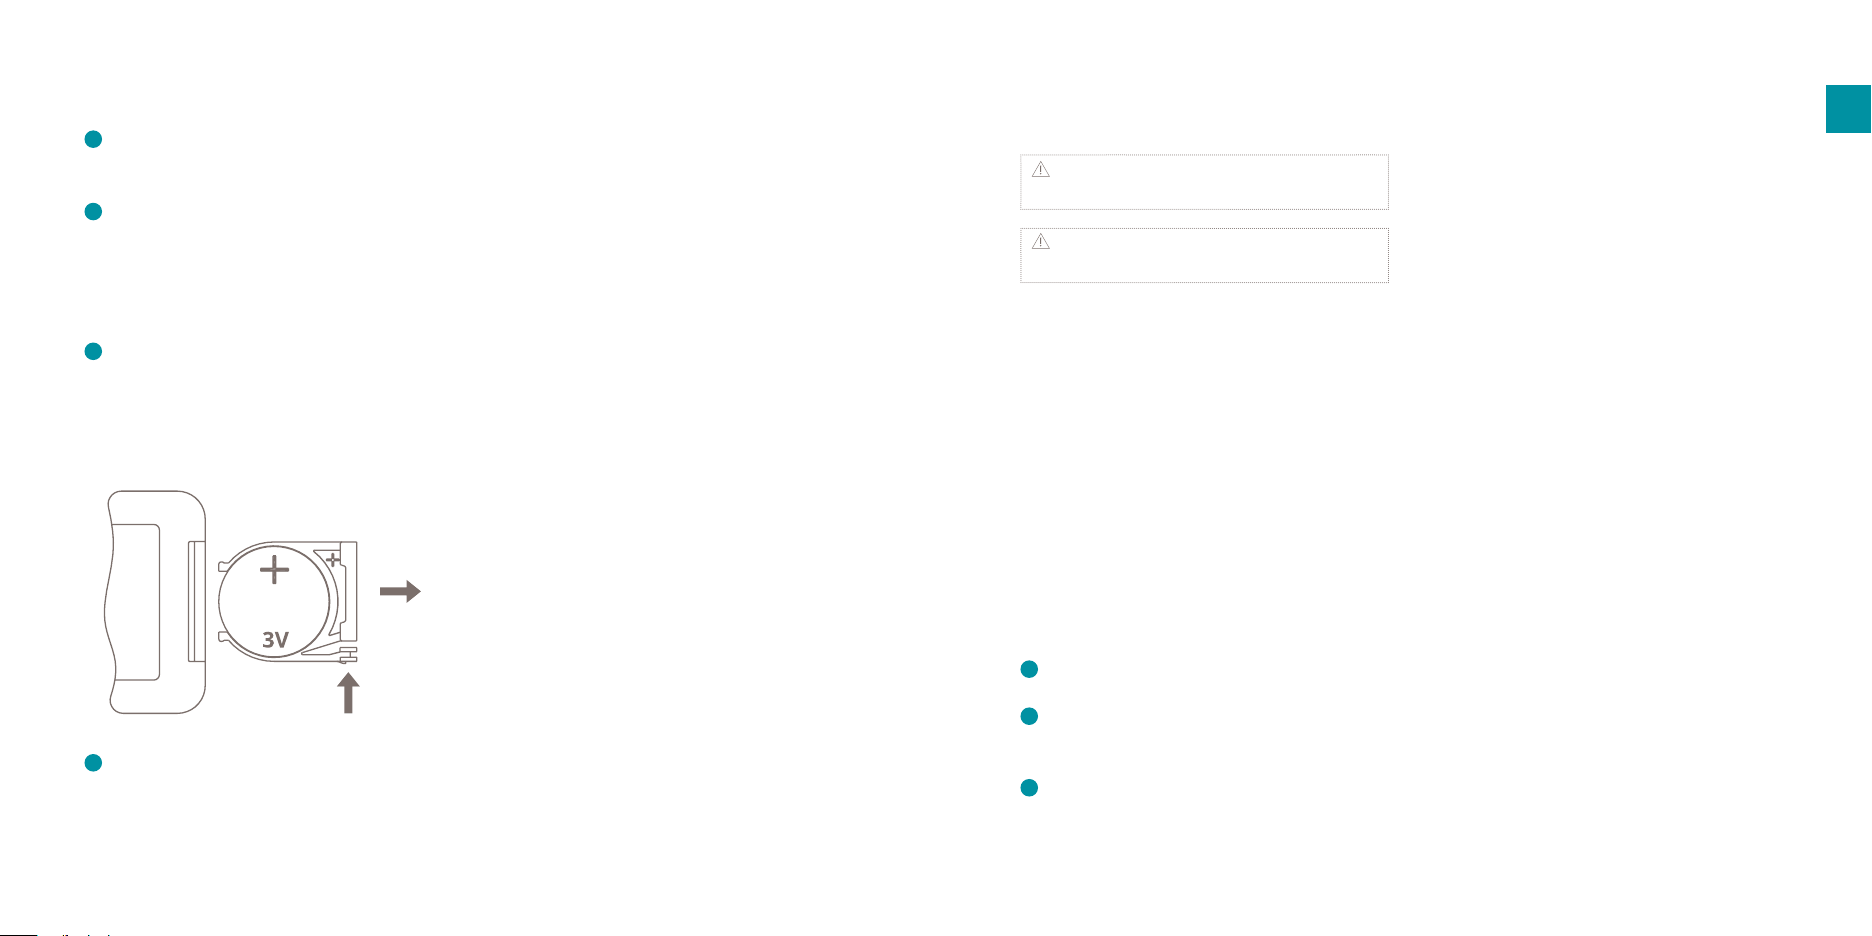
Installing the battery
1
Remove the battery cover of the remote
control, place the 3V CR2032 in the battery
compartment for use.
2
During use, point the remote control towards
infrared receiver. Obstructions along the
path will hinder the performance of the
remote control. When not used, the remote
control can be placed in the holder for easier
accessibility.
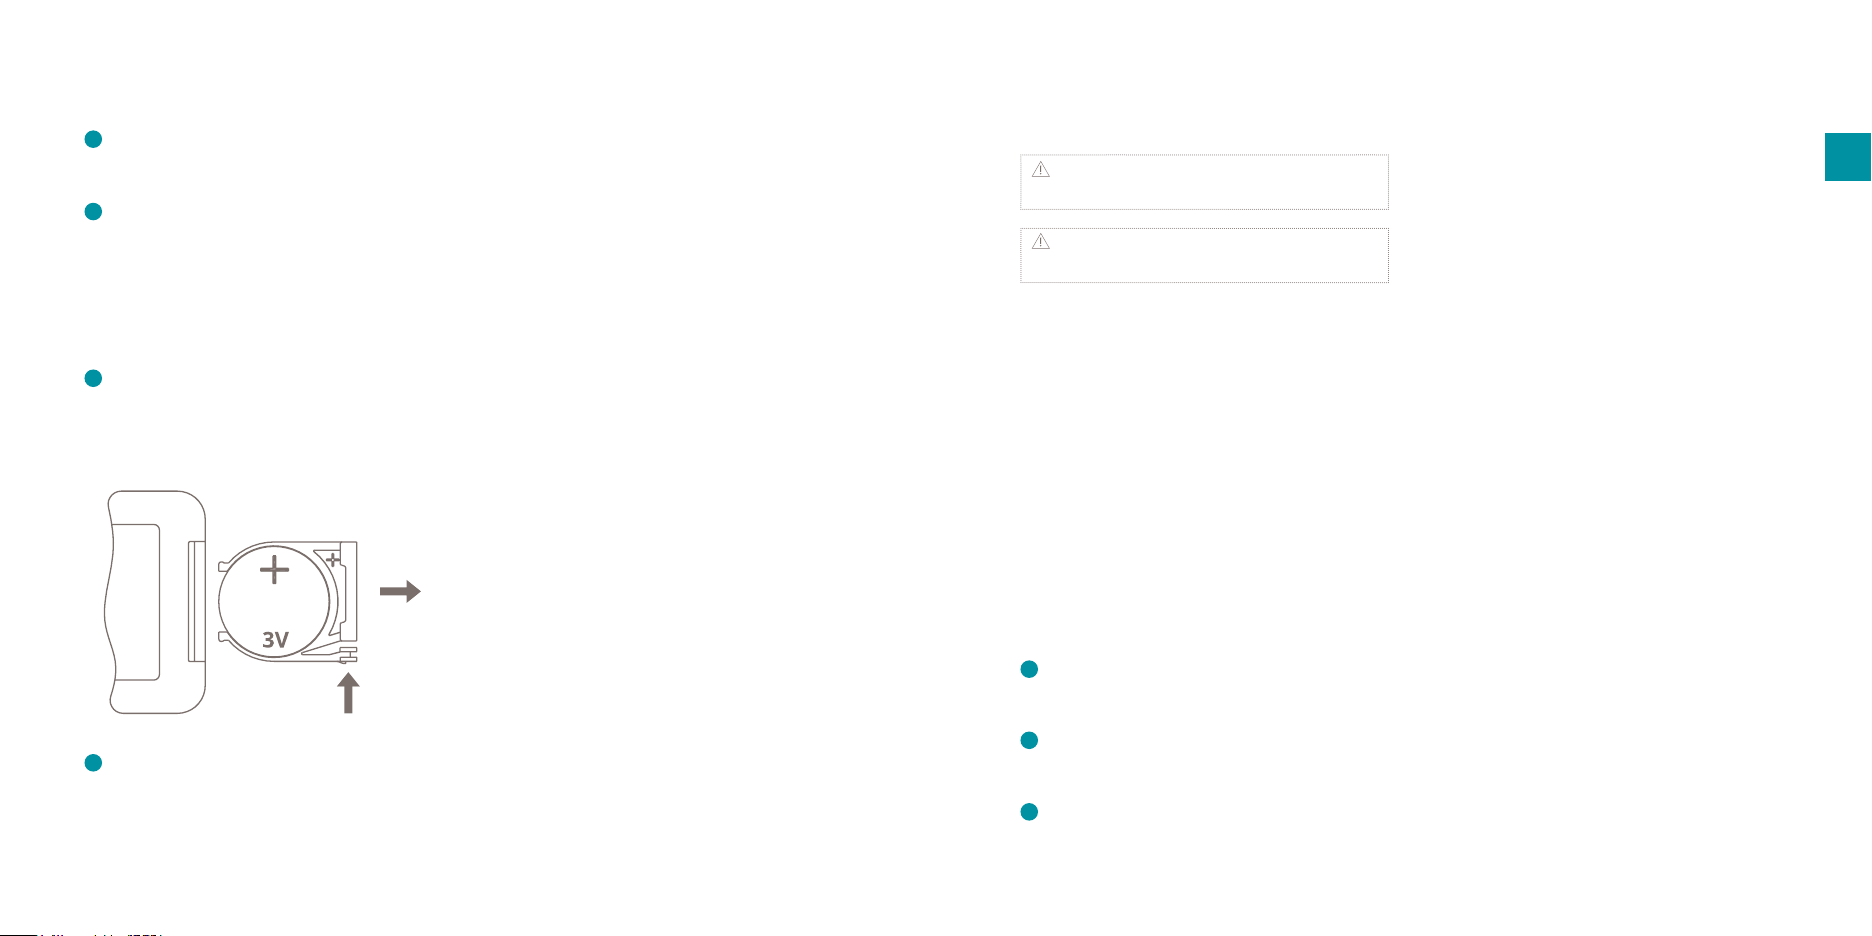
3
For battery replacement please refer to the
gure below. Press the button on the side and
pull out the battery tray. Please take notice of
the negative and positive symbols on the cover.
Vertical angle adjustment
The head of the device can be tilted in 4 dierent
positions to adjust the wind angle, in which the last
one is 90⁰ facing upwards.
4. Maintenance
Important: Be sure to remove the power plug
from the outlet before carrying out maintenance.
Important: Do not soak or immerse the power
plug or the device in water.
Cleaning
• Please use a soft cloth to wipe the dust on the
body; If the surface is too dirty, it is better to wipe
it clean with a damped cloth mixed with neutral
detergent.
• Don’t use gasoline, thinner and any others
chemical substances as it will easy damage the
surface.
EN
The carbon lter lifespan 3600 hours (approx. 1
year). Please check duux.com for replacement
carbon lters (art. no. DXHCFF01).
Spare parts
Spare parts and accessories can be requested at
the point of purchase or local distributor.
4
CR2032
PRESS
4
Batteries contain materials that are harmful to
the environment and must be removed from
the equipment before disposal and disposed
properly.
PULL
Carbon lter
If there is too much dust on the carbon lter it may
inuence the devices’ eciency. We recommend
cleaning the lter every month.
Unscrew the 3 screws from the rear cover and
1
remove it from the device.
Use a vacuum cleaner with soft brush
2
extension to clean the carbon lter. Never use
liquid cleaner or water to clean!
Insert the carbon lter back in the rear cover
3
and re-attach the rear cover to the rear shell
on the device.
1110
5. Technical specications
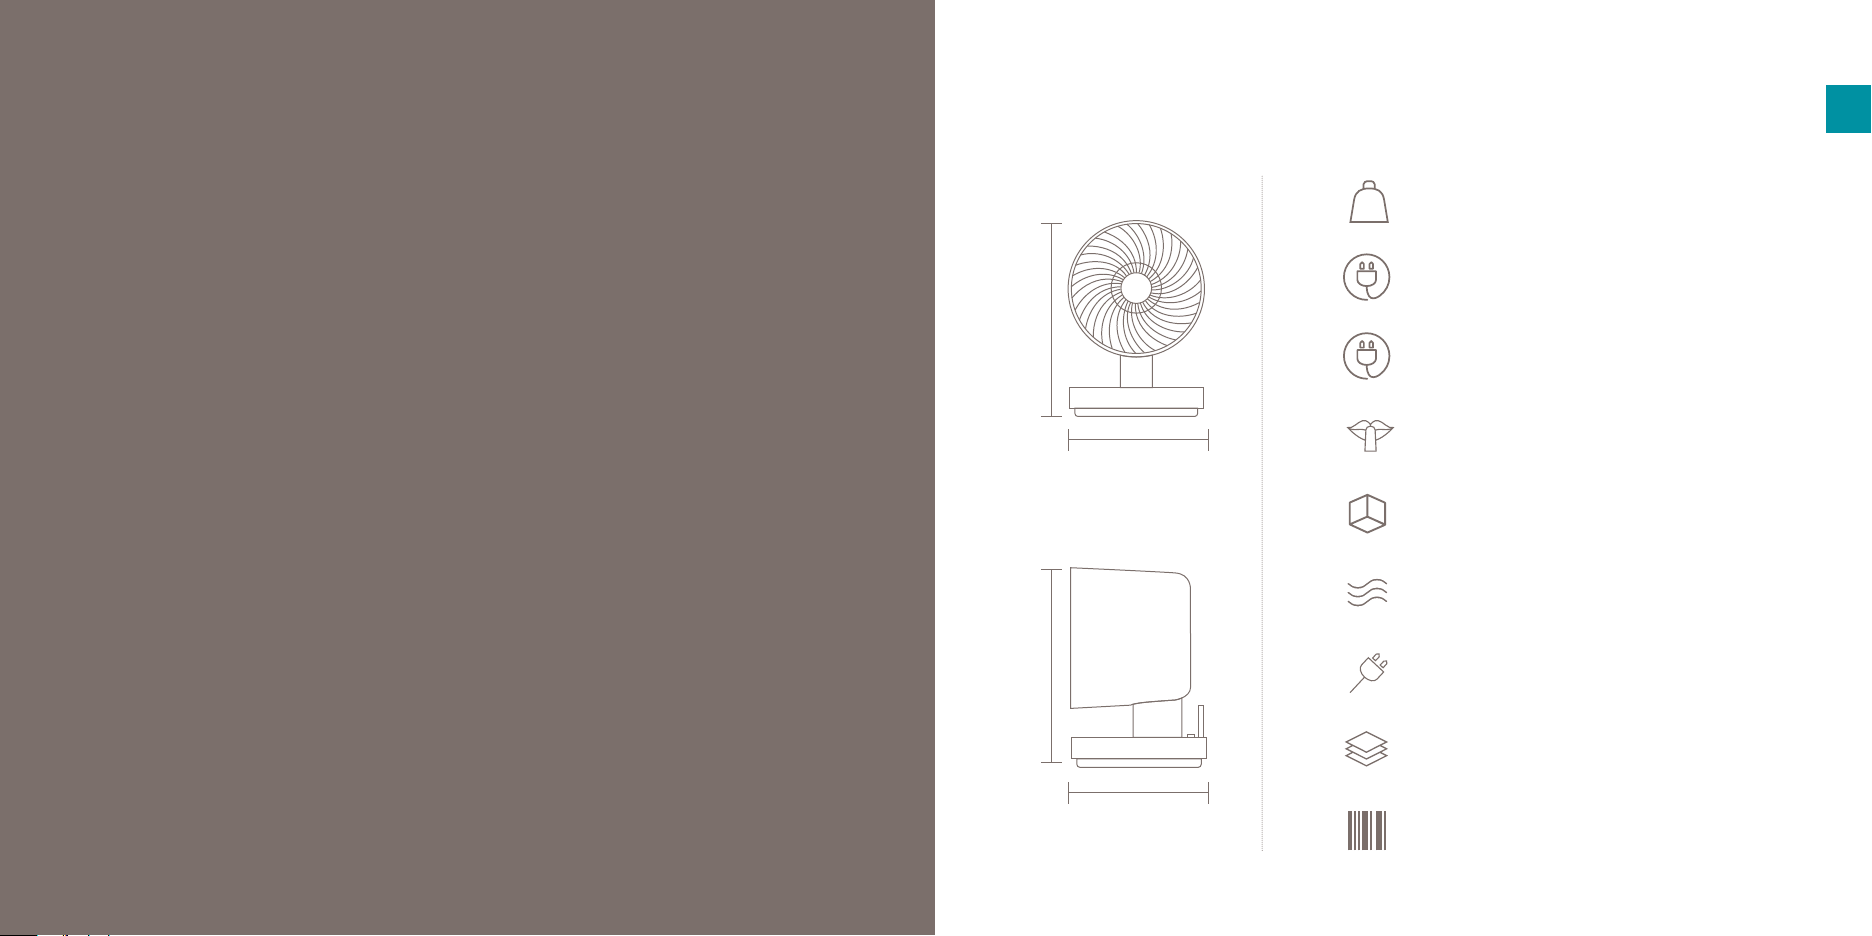
Weight:
3,6 kg
Power consumption (cooling):
45W
EN
Comfortable air
throughout every
season
37,6 cm37,6 cm
26 cm
25,1 cm
Power consumption (heating):
1500W
Noise level:
30-55dBA
Air ow:
1200m³/hr
Wind reach:
7m
Powercord length:
1,8m
Main materials:
ABS, PP
Model no.:
DXHCF01/02
The appearance
and specication of
the device may be
changed without
notice.
1312
6. FAQ
Q.
How often should I replace the carbon
lter?
A.
You don’t have to replace any of the lters.
See chapter 4 for maintenance instructions for
cleaning the carbon lter
Why can’t I manually adjust the wind
Q.
speed in heating mode?
The wind speeds in heating mode are xed to
A.
2 speeds: Medium (2) and High (3). This is to
assure safe usage of the heating element.
I smell a strange odor. Is this normal?
Q.
A.
This smell is generated by the heating element
when rst time use. This is normal and will
be reduced gradually during use. It can also
occur when dust accumulates on the heating
element.
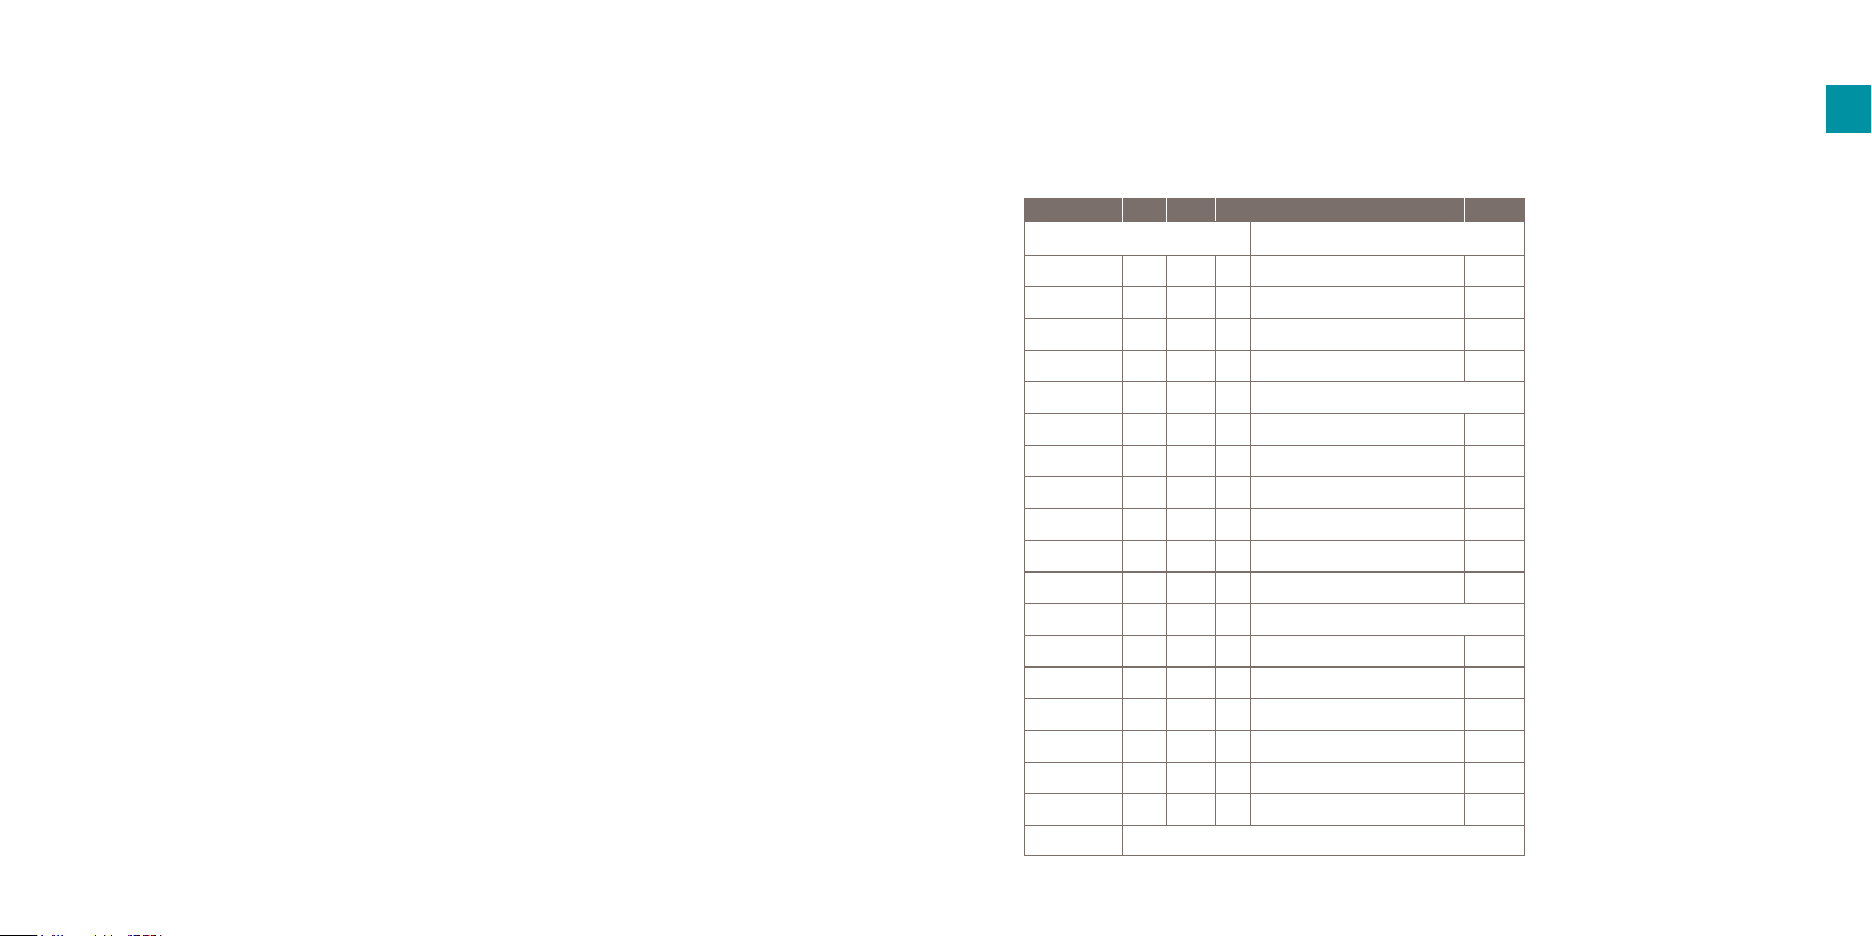
ERP table
Model identier(s):
Item Item
Heat output
Nominal heat
output
Minimum heat
output (indicative)
Maximum continuous heat output
Auxiliary
electricity
At nominal heat
output
At minimum heat
output
In standby mode
Contact details
Symbol Value Unit Unit
Type of heat input, for electric storage local
space heaters only (select one)
P
1.500
nom
P
0.828
min
P
1.531
max,c
el
NA
max
el
NA kW
min
el
0.00031 kW
SB
Duux BV - P.O. Box 145, 5400 AC, Uden, The Netherlands
Manual heat charge control, with
kW
integrated thermostat
Manual heat charge control with room
kW
and/or outdoor temperature feedback
Electronic heat charge control with room
kW
and/or outdoor temperature feedback
Fan assisted heat output
Type of heat output/room temperature
kW
control (select one)
Single stage heat output and no room
temperature control
Two or more manual stages, no room
temperature control
With mechanic thermostat room
temperature control
With electronic room temperature
control
Electronic room temperature control
plus day timer
Electronic room temperature control
plus week timer
Other control options (multiple selections
possible)
Room temperature control, with
presence detection
Room temperature control, with
open window detection
With distance control option
With adaptive start control
With working time limitation
With black bulb sensor
EN
NA
NA
NA
NA
No
No
No
Yes
No
No
No
No
No
No
Yes
No
1514

Bedankt dat je voor
Duux hebt gekozen.
We zijn blij dat je hebt besloten de handleiding bij je nieuwe verwarmings- en verkoelingsventilator van
Duux door te lezen! Veel gebruikers laten de handleiding links liggen en proberen er zelf achter te komen.
Uit onderzoek blijkt echter dat mensen die de handleiding lezen sneller en beter snappen hoe een
apparaat werkt dan mensen die er met vallen en opstaan achterkomen.
Bij Duux geloven we in het belang van een comfortabele, gezonde leefomgeving. Jouw welzijn verhogen
door aantrekkelijke, functionele en eectieve producten te ontwikkelen: dat is de passie die ons iedere
dag opnieuw drijft. Met ons aanbod aan innovatieve luchtbehandelingsproducten willen we je de best
denkbare luchtkwaliteit binnenshuis bieden.
NL
Inhouds
Optimaal comfort in elk seizoen: Stream kan met zijn vier koelsnelheden en twee verwarmingsinstellingen
het hele jaar worden gebruikt. Het actief koolstolter verwijdert geurtjes en rook voor een schone
luchtuitvoer. De slanke LED touchbalk is eenvoudig in gebruik, terwijl de compacte afstandsbediening
achter op het apparaat kan worden opgeborgen. Met 7 meter windbereik en 1200m³/u luchtstroom biedt
Stream oersterke prestaties bij een uiterst stille werking tot 30dBA. Zijn natuurlijke bries en nachtstand
bieden zowel overdag als ‘s nachts optimaal comfort.
Lees deze handleiding goed om alles uit je Stream verwarmings- en verkoelingsventilator te halen.
opgave
1. Productoverzicht 18
2. Installatie en gebruik 19
3. Functies 21
4. Onderhoud 25
5. Technische specicaties 27
6. Veelgestelde vragen 28
1716

1. Productoverzicht
2. Installatie en gebruik
Rooster voor
1
2
Bovenkant
standaard
3
Oscillatieplatform
7
Ventilatorbladen
6
Behuizing
achter
5
LED touchbalk
Touchbediening
4
8
Actief koolstolter
11
Stand-byschakelaar
9
Kap achter
10
Afstandsbediening
Let op: lees de onderstaande instructies en het
losse waarschuwingsvel goed door voordat je dit
product gebruikt.
Installatie
• Controleer vóór gebruik of het gebruikte voltage
overeenkomt met het voltage op het label van het
apparaat.
• Dit apparaat kan door kinderen vanaf acht jaar
en door mensen met verminderde fysieke,
sensorische of mentale vermogens of met een
gebrek aan ervaring en kennis worden gebruikt
onder toezicht of na uitleg over het veilige
gebruik van het apparaat en de risico’s. Laat
kinderen niet met dit apparaat spelen. Laat de
reiniging en het gebruikersonderhoud niet door
kinderen uitvoeren zonder toezicht.
• Houd kinderen jonger dan drie jaar uit de buurt
van het apparaat tenzij er voortdurend toezicht
is.
• Kinderen ouder dan drie jaar en jonger dan acht
jaar mogen het apparaat alleen aan- en uitzetten
indien het op zijn normale, beoogde positie staat,
er toezicht is op de kinderen en de kinderen zijn
geïnstrueerd over het veilige gebruik van het
apparaat en de risico’s begrijpen. Kinderen ouder
dan drie en jonger dan acht jaar mogen het
apparaat niet aansluiten, bedienen en reinigen of
gebruikersonderhoud uitvoeren.
Voorzichtig: sommige onderdelen van dit
apparaat kunnen zeer heet worden en brandwonden
veroorzaken. Let vooral goed op wanneer er
kinderen en kwetsbare personen aanwezig zijn.
• Indien de stroomkabel is beschadigd, dient dit
te worden vervangen door de fabrikant, een
servicemonteur van de fabrikant of vergelijkbare
gekwaliceerde persoon.
• Dit pictogram geeft aan dat het apparaat
niet mag worden afgedekt.
Waarschuwing: dek het apparaat niet af om
oververhitting te voorkomen.
• Plaats het apparaat niet direct onder een
stopcontact.
• Gebruik dit apparaat niet in de directe omgeving
van een bad, douche of zwembad.
Waarschuwing: dit apparaat is niet voorzien
van een sensor om de kamertemperatuur te
reguleren. Gebruik dit apparaat niet in kleine
ruimten waar mensen aanwezig zijn die de ruimte
niet zelfstandig kunnen verlaten, tenzij er constant
toezicht is.
• Dit product is uitsluitend geschikt voor goed
geïsoleerde ruimten of incidenteel gebruik.
NL
1918
Waarschuwing: batterijen bevatten materialen
die schadelijk zijn voor het milieu en dienen vóór
afvoer uit het apparaat te worden verwijderd
• Schakel het apparaat uit wanneer het niet wordt
gebruikt door op de stand-byschakelaar op
de standaard te drukken of de stekker uit het
stopcontact te trekken. Laat het apparaat niet
langdurig in de stand-bymodus staan.
• Plaats de stroomkabel niet onder het apparaat en
dek de kabel niet af. Plaats de kabel zodanig dat
er geen struikelgevaar is.
• Plaats het apparaat vóór gebruik op een platte,
solide ondergrond.
• Trek de stekker uit het stopcontact wanneer het
apparaat niet wordt gebruikt. Trek nooit aan de
stroomkabel zelf om de stekker te verwijderen.
• Zorg ervoor dat dit apparaat geen obstakels
tegenkomt.
• Steek geen vingers of andere voorwerpen in
de luchtinlaat en -uitlaat wanneer de ventilator
draait.
• Plaats geen zachte voorwerpen als haren en
gordijnen op het werkende apparaat; deze
kunnen tussen de ventilatorbladen komen.
• Staak het gebruik van het apparaat wanneer de
stroomkabel of stekker beschadigd is of wanneer
het apparaat door een val beschadigd is geraakt.
• Gebruik dit apparaat niet buitenshuis.
Dit apparaat is uitsluitend bedoeld voor
huishoudelijk gebruik binnenshuis. Gebruik dit
apparaat niet dicht bij een raam en stel het niet
bloot aan direct zonlicht.
• Dit apparaat is niet zonder standaard te
gebruiken en dient altijd horizontaal te worden
geplaatst.
• Gebruik dit apparaat niet op een plek waar
benzine, verf of overig brandbaar materiaal ligt
opgeslagen.
• Trek de stekker uit het stopcontact alvorens het
apparaat te reinigen, repareren of verplaatsen.
• Trek de stekker uit het stopcontact wanneer het
apparaat niet in gebruik is.
• Gebruik dit apparaat volgens de instructies in
deze handleiding.
• Demonteer het apparaat niet zelf. Breng
het indien er een reparatie nodig is naar het
verkooppunt of een servicecenter.
• Houd het apparaat schoon en zorg voor
regelmatig onderhoud.
• Gebruik geen verlengsnoeren.
Installatie
Pak het apparaat uit en verwijder al
1
het verpakkingsmateriaal. Bewaar het
verpakkingsmateriaal voor toekomstig vervoer.
Steek de stekker in een stopcontact en zet de
2
veiligheidsschakelaar op stand | . Je hoort een
dubbel piepje ter bevestiging.
Druk op de aan/uit-knop om het apparaat aan
3
te zetten. De LED touchbalk is verlicht en het
apparaat draait in de verkoelingsmodus op
lage snelheid.
3. Functies
1 2 3 4
LED touchbalk
1
Aanzetten
2
2Snelheid aanpassen
3
Timer
Oscillatie
4
5
Verwarmingsmodus
6
Natuurlijke bries en nachtstand
Let op: Als het scherm een minuut inactief is,
wordt het licht met 80% gedimd.
5 6
1 2
6
4
Remote control
1
Aanzetten
2
Snelheid aanpassen
3
Timer
Oscillatie
4
5
Verwarmingsmodus
6
Natuurlijke bries en nachtstand
NL
3
5
2120
Aanzetten
Druk op om het apparaat aan te zetten.
Het scherm wordt verlicht en het apparaat
draait standaard in de verkoelingmodus op lage
windsnelheid. Druk nogmaals om het apparaat in
stand-by te zetten.
Let op: Controleer of de stand-byschakelaar op
| staat om het apparaat aan te zetten. Indien deze
op O staat, zijn alle knoppen uitgeschakeld.
Snelheid aanpassen
Druk op om de bries als volgt te verhogen of
verlagen: Low (1) > Medium (2) > High (3) > Strong
(4). De standaard instelling is Low (1) snelheid. De
pictogrammen op het LED scherm veranderen
overeenkomstig.
Timer
De timer is uitgeschakeld wanneer je het apparaat
voor het eerst gebruikt. Druk op om de timer
te activeren modus. Je kunt de timer als volgt
aanpassen: 1h > 2h > 4h > 8h. De bijbehorende
lampjes op het scherm lichten op. Het schermt
toont ook de aftellende timer (bijv. indien 4h is
geactiveerd, verspringt het scherm na twee uur
naar 2h etc.). Zodra de tijd is verstreken, schakelt
het apparaat over op stand-bymodus.
Oscillatie
De oscillatie is uitgeschakeld wanneer je het
apparaat voor het eerst gebruikt. Door op te
drukken, oscilleert het apparaat automatisch
horizontaal tot 80 graden. De indicator op het
scherm gaat overeenkomstig verlicht. De verticale
hoek kan handmatig in 4 standen worden gezet,
tot 90⁰.
Verwarmingsmodus
De verwarmingsmodus is uitgeschakeld wanneer
je het apparaat voor het eerst gebruikt. Druk op
om de verwarmingsmodus aan te zetten. Hierna
begint deze modus modus begint op Medium (2)
snelheid. De bijbehorende indicator op het scherm
licht op. Door nogmaals op de toets te drukken,
wordt de verwarming verhoogd naar High (3)
snelheid.
Let op: het is niet mogelijk om handmatig de
snelheid van de verwarmingsmodus te wijzigen.
Door nogmaals op deze toets te drukken, activeer
je de ECO-modus. Wanneer de kamertemperatuur
lager is dan 18 ⁰C wordt automatisch de
verwarmingsmodus op hoge snelheid (3)
geactiveerd. Bij een kamertemperatuur tussen 18
⁰C en 22 ⁰C wordt de verwarmingsmodus op lage
snelheid (2) geactiveerd. Bij een kamertemperatuur
hoger dan 22 ⁰C schakelt de verwarmingsmodus uit
verder in de verkoelingsmodus. Zet de ventilator
aan door op te drukken. Door voor een vierde
keer op deze toets te drukken, keert je terug naar
de verkoelingsmodus
Natuurlijke bries en
nachtstand
De nachtmodus is uitgeschakeld wanneer je het
apparaat voor het eerst gebruikt. Druk op om
de natuurlijke bries en nachtstand te activeren.
Natural wind & night mode in HI speed
6
Hi
Mid
Low
6
6
3
Natural wind & night mode in MID speed
Hi
Mid
Low
6
12 6 6 6
6
Natural wind & night mode in LOW speed
Hi
Mid
Low
6 6 6 6 6
6 6 12 15
12
6 6 6
6 6 6 6
3
Op het scherm gaat de bijbehorende indicator
branden. Druk nogmaals om deze modus uit te
schakelen.
Let op: de natuurlijke bries en nachtstand kan
niet in combunatie met de verwarmingsmodus
worden gebruikt. De natuurlijke bries en nachtstand
word automatisch uitgeschakeld zodra op de toets
voor de verwarmingsstand wordt gedrukt.
De natuurlijke bries en nachtstand kan als volgt
worden geprogrammeerd:
6 6
6 6
Time (Sec) Time=90s
6
Time (Sec) Time=90s
3 33
Batterij plaatsen
Time (Sec) Time=90s
12
3
6 6
3
6
NL
2322
Verwijder het batterijdeksel van de
1
afstandsbediening en plaats de 3V CR2032 in
het batterijvak.
Richt de afstandsbediening tijdens het
2
gebruik op de infraroodontvanger. Obstakels
op de route belemmeren de werking
van de afstandsbediening. Wanneer de
afstandsbediening niet in gebruik is, kan
deze voor extra gebruiksgemak in de houder
worden geplaatst.
Zie onderstaande guur voor het vervangen
3
van de batterij. Druk op de knop aan de zijkant
en trek het batterijvak naar buiten. Let op de
symbolen voor de negatieve en positieve pool.
Aanpassing verticale hoek
De kop van het apparaat kan in vier verschillende
posities worden gekanteld om de windhoek aan te
passen, waarbij de laatste 90⁰ omhoog is gericht.
4. Onderhoud
Belangrijk: trek vóór ieder onderhoud de stekker
uit het stopcontact.
Belangrijk: dompel de stekker of het apparaat
nooit onder in water.
Reinigen
• Gebruik een zachte doek om stof van de
behuizing te vegen; Is het oppervlak te vuil,
gebruik dan een vochtige doek met een neutraal
reinigingsmiddel.
• Gebruik geen benzine, thinner of overige
chemicaliën. Deze beschadigen het oppervlak.
Het koolstolter heeft een levensduur van
3.600 uur (circa één jaar). Kijk op duux.com voor
vervangende koolstolters (art.nr. DXHCFF01).
Reserveonderdelen
Reserveonderdelen en accessoires kunnen worden
aangeschaft bij het verkooppunt of de plaatselijke
distributeur.
NL
4
CR2032
PRESS
Batterijen bevatten stoen die schadelijk zijn
4
voor het milieu en dienen uit het apparaat te
worden verwijderd en op juiste wijze te worden
afgevoerd.properly.
PULL
Koolstolter
Als zich te veel stof op het koolstolter ophoopt,
kan dit de werking van het apparaat beïnvloeden.
We raden aan het lter maandelijks te reinigen.
Draai de drie schroeven van de kap achterop
los en
1
verwijder deze van het apparaat.
Gebruik een stofzuiger met zachte borstelkop
om het koolstolter te reinigen. Nooit reinigen
2
met vloeibaar reinigingsmiddel of water!
Plaats het koolstolter terug in de kap
achterop en plaats de kap terug op de
3
behuizing.
2524

5. Technische specicaties
Gewicht:
3,6 kg
Stroomverbruik (verkoeling)::
45W
NL
Een aangename
omgeving in ieder
seizoen.
37,6 cm37,6 cm
26 cm
25,1 cm
Stroomverbruik (verwarming)::
1500W
Geluidsniveau:
30-55dBA
Luchtstroom:
1200m³/hr
Bereik windstroom:
7m
Lengte stroomkabel:
1,8m
Hoofdmaterialen:
ABS, PP
Modelnr.:
DXHCF01/02
Het uiterlijk en de
specicaties van het
apparaat kunnen
zonder voorafgaande
kennisgeving worden
gewijzigd.
2726

6. Veelgestelde vragen
V.
Hoe vaak moet ik het koolstolter
vervangen?
A.
Je hoeft geen van de lters te vervangen. Zie
hoofdstuk 4 voor onderhoudsinstructies voor
het reinigen van het koolstolter
V.
Waarom kan ik de windsnelheid niet
handmatig in de verwarmingsmodus?
A.
In de verwarmingsmodus heeft het apparaat
twee snelheden: Medium (2) en High (3).
Zo wordt het veilige gebruik van het
verwarmingselement gewaarborgd.
V.
Ik ruik een vreemde geur. Is dat normaal?
A.
Die geur wordt veroorzaakt door het
verwarmingselement
wanneer het apparaat voor het eerst wordt
gebruikt. Dit is normaal en neemt geleidelijk af
tijdens het gebruik. Hij treedt ook op wanneer
zich stof op het verwarmingselement ophoopt.
ERP-tabel
Modelnummer(s):
Item Item
Heat output
Nominal heat
output
Minimum heat
output (indicative)
Maximum continuous heat output
Auxiliary
electricity
At nominal heat
output
At minimum heat
output
In standby mode
Contact details
Symbol Value Unit Unit
Type of heat input, for electric storage local
space heaters only (select one)
P
1.500
nom
P
0.828
min
P
1.531
max,c
el
NA
max
el
NA kW
min
el
0.00031 kW
SB
Duux BV - P.O. Box 145, 5400 AC, Uden, The Netherlands
Manual heat charge control, with
kW
integrated thermostat
Manual heat charge control with room
kW
and/or outdoor temperature feedback
Electronic heat charge control with room
kW
and/or outdoor temperature feedback
Fan assisted heat output
Type of heat output/room temperature
kW
control (select one)
Single stage heat output and no room
temperature control
Two or more manual stages, no room
temperature control
With mechanic thermostat room
temperature control
With electronic room temperature
control
Electronic room temperature control
plus day timer
Electronic room temperature control
plus week timer
Other control options (multiple selections
possible)
Room temperature control, with
presence detection
Room temperature control, with
open window detection
With distance control option
With adaptive start control
With working time limitation
With black bulb sensor
NL
NA
NA
NA
NA
No
No
No
Yes
No
No
No
No
No
No
Yes
No
2928

Merci d’avoir
choisi Duux.
Nous sommes ravis que vous ayez décidé de lire les instructions relatives à votre nouveau ventilateur
chauant et rafraîchissant Duux ! De nombreux utilisateurs ne prêtent pas attention aux instructions
et veulent trouver eux-mêmes comment fonctionne l’appareil. Cependant, des études démontrent que
les personnes qui lisent les instructions pourront se familiariser avec l’appareil plus rapidement et plus
ecacement que celles qui procèdent par tâtonnements.
Chez Duux, nous sommes convaincus de l’importance d’un environnement de vie confortable et sain.
La passion qui nous anime jour après jour est d’améliorer votre bien-être en concevant des produits
attrayants, fonctionnels et ecaces. Grâce à notre gamme d’appareils de traitement de l’air innovants,
nous visons à vous fournir la meilleure qualité d’air intérieur possible.
Un confort parfait en toute saison. Stream peut être utilisé toute l’année avec ses 4 vitesses de
rafraîchissement et ses 2 réglages de chauage. Le ltre à charbon actif élimine les odeurs et la fumée
pour assurer un débit d’air pur. L’élégante barre tactile à LED permet une utilisation pratique tandis que la
télécommande compacte peut être stockée à l’arrière de l’appareil. Avec une portée du vent de 7 mètres
et un débit d’air de 1200 m³/h, Stream est puissant avec un fonctionnement extrêmement silencieux de
seulement 30 dBA. Les modes vent naturel et nuit orent une commodité supplémentaire pour un confort
ultime le jour et la nuit.
Lisez attentivement ce manuel pour tirer le meilleur parti de votre ventilateur chauant et rafraîchissant
Stream.
FR
Table des
matières
1. Aperçu du produit 32
2. Installation et utilisation 33
3. Fonctions 36
4. Maintenance 40
5. Spécications techniques 43
6. FAQ 44
3130

1. Aperçu du produit
2. Installation et utilisation
1
Grille avant
2
Base supérieure
5
3
Plateforme oscillante
7
Pales du ventilateur
6
Coque arrière
Barre tactile à LED
4
Touches tactiles
8
iltre à charbon actif
11
Interrupteur de veille
9
Couvercle arrière
10
Télécommande
Remarque: Veuillez prendre en compte les
instructions ci-dessous et la feuille d’avertissement
fournie séparément avant d’utiliser le produit.
Installation
• Avant l’utilisation, veuillez vérier que la tension
utilisée correspond à la tension indiquée sur
l’étiquette de classement.
• Cet appareil peut être utilisé par des enfants
âgés de 8 ans et plus et les personnes ayant des
capacités physiques, sensorielles ou mentales
réduites ou qui manquent d’expérience ou de
connaissances si on leur a fourni l’assistance ou
les instructions nécessaires pour utiliser l’appareil
en toute sécurité et s’ils comprennent les risques
potentiels. Les enfants ne doivent pas jouer
avec l’appareil. Le nettoyage et la maintenance
utilisateur ne doivent pas être eectués par des
enfants sans surveillance.
• Les enfants de moins de 3 ans doivent être
tenus à l’écart de l’appareil, sauf s’ils sont sous
constante surveillance.
• Les enfants âgés de plus de 3 ans et de moins
de 8 ans ne doivent allumer / éteindre l’appareil
que s’il a été placé ou installé en position de
fonctionnement normale et s’ils ont été assistés
ou ont reçu des instructions concernant
l’utilisation de l’appareil en toute sécurité et s’ils
comprennent les risques potentiels. Les enfants
âgés de 3 à 8 ans ne doivent pas brancher, régler
et nettoyer l’appareil ou eectuer la maintenance.
FR
Attention : Certaines pièces de cet appareil
peuvent devenir très chaudes et causer des brulures.
Une attention particulière doit être donné aux
enfants et aux personnes vulnérables
• Si le cordon d’alimentation est endommagé, il
doit être remplacé par le fabricant, son agent
de service ou des personnes de qualication
similaire pour éviter tout risque.
• Ce marquage indique que le produit
ne doit pas être couvert par quoi que ce soit.
Avertissement : an d’éviter toute surchaue,
ne pas couvrir l’apparei.
• L’appareil ne doit pas être placé juste en dessous
d’une prise murale.
• N’utilisez pas cet appareil à proximité immédiate
d’un baignoire, d’une douche ou d’une piscine.
Avertissement : Cet appareil n’est pas équipé
d’un capteur de température ambiante. N’utilisez
pas cet appareil dans de petites pièces lorsqu’elles
sont occupées par des personnes incapables de
quitter la pièce par elles-mêmes, sauf si elles sont
constamment surveillées.
3332

• Ce produit ne convient que pour des espaces
bien isolés ou pour une utilisation occasionnelle.
Avertissement :les piles contiennent des
matériaux nocifs pour l’environnement, doivent être
retirées de l’appareil avant sa mise au rebut et être
déposées dans un endroit prévu à cet eet.
• Lorsque l’appareil n’est pas utilisé, veuillez
l’éteindre en appuyant sur l’interrupteur de veille
situé sur la base de l’appareil ou en débranchant
la prise d’alimentation. Ne pas laisser l’appareil en
mode veille pendant une période prolongée.
• Ne pas placer le cordon d’alimentation sous
l’appareil et ne pas le couvrir. Placer le cordon
d’alimentation correctement pour éviter de
trébucher dessus.
• Placer l’appareil sur une surface plane et
sécurisée avant son utilisation.
• Débrancher le cordon d’alimentation lorsque
l’appareil n’est pas utilisé. Ne jamais tirer sur le
cordon d’alimentation pour retirer la che.
• Veuillez vous assurer que le fonctionnement de
cet appareil ne soit pas entravé.
• Ne mettez pas vos doigts ou d’autres objets dans
l’entrée et la sortie d’air lorsque le ventilateur est
en marche.
• Lorsque l’appareil est en marche, ne posez
pas sur l’appareil des objets souples tels
que des poils, des rideaux de fenêtre / porte
qui pourraient se coincer entre les pales du
ventilateur.
• Arrêtez d’utiliser l’appareil si le cordon
d’alimentation ou la che sont endommagés, ou
si l’appareil est endommagé suite à une chute.
• Ne pas utiliser cet appareil à l’extérieur. L’appareil
est uniquement destiné à un usage domestique
et intérieur. Ne pas utiliser cet appareil près
d’une fenêtre et ne pas l’exposer à la lumière
directe du soleil.
• Cet appareil ne peut pas être utilisé sans base et
doit toujours être placé à l’horizontale.
• Ne pas utiliser cet appareil dans un endroit où de
l’essence, de la peinture ou d’autres matériaux
inammables sont stockés.
• Débrancher le cordon d’alimentation avant de
nettoyer, de réparer ou de déplacer l’appareil.
• Débrancher le cordon d’alimentation lorsque
l’appareil n’est pas utilisé.
• Veuillez utiliser cet appareil conformément aux
instructions fournies dans ce manuel.
• Ne démontez pas l’appareil vous-même. Si une
réparation est nécessaire, veuillez renvoyer
l’appareil à votre point de vente ou à votre centre
de service.
• L’appareil doit être maintenu propre et
régulièrement entretenu.
• Ne pas utiliser de rallonge.
Installation de l’appareil
1
Déballer l’appareil et retirer les matériaux
d’emballage de l’appareil. Conserver les
matériaux d’emballage pour un éventuel
transport futur.
Insérer la che d’alimentation dans une
2
prise murale et appuyer sur l’interrupteur de
sécurité en position | . Vous entendrez un
double bip de conrmation.
3
Appuyer sur le bouton pour allumer l’appareil.
La barre tactile à LED s’illuminera et l’appareil
fonctionnera en mode rafraîchissement à
basse vitesse.
FR
3534

3. Functions
1 2 3 4
Barre tactile à LED
1
Mise en route
2
Changement de vitesse
3
Minuterie
Oscillation
4
5
Mode chauage
6
Mode vent naturel et nuit
Remarque: si l’écran est inactif pendant 1
minute, l’éclairage sera atténué de 80 %
5 6
1 2
6
4
Télécommande
1
Mise en route
2
Changement de vitesse
3
Minuterie
Oscillation
4
5
Mode chauage
6
Mode vent naturel et nuit
Mise en route
Appuyer sur la touche pour allumer l’appareil.
L’écran s’éclairera et l’appareil fonctionnera en
mode de rafraîchissement à vitesse faible par
défaut. Appuyer à nouveau pour éteindre et passer
en mode veille.
Remarque: assurez-vous que l’interrupteur de
3
5
veille est en position | pour allumer l’appareil. Si
l’interrupteur de veille est en position O, tous les
boutons sont désactivés.
minuterie sur l’écran (par exemple, si la minuterie
4 h est activée, l’achage passera à 2 h après 2
h, etc.). Une fois la minuterie terminée, l’appareil
passe en mode veille.
FR
Oscillation
L’oscillation est désactivée lorsque l’appareil est
utilisé pour la première fois. En appuyant sur la
touche , l’appareil oscillera automatiquement
à l’horizontale jusqu’à 80 degrés. L’indicateur sur
l’écran s’éclairera
Changement de vitesse
Appuyer sur la touche pour augmenter ou
diminuer la vitesse du vent selon la séquence
suivante : Faible (1) > Moyenne (2) > Élevée (3) >
Forte (4). Le réglage par défaut est la vitesse (1)
Faible. Les icônes de l’achage à LED changeront
en conséquence.
Minuterie
La minuterie est désactivée lorsque l’appareil est
utilisé pour la première fois. Appuyer sur
la touche pour activer le mode minuterie.
Vous pouvez modier la minuterie dans l’ordre
suivant : 1 h > 2 h > 4 h > 8 h. Les indicateurs
correspondants s’éclairent sur l’achage. Vous
pouvez également lire le compte à rebours de la
Mode chauage
Le mode chauage est désactivé lors de la
première utilisation de l’appareil. Appuyer sur la
touche pour activer le mode de chauage. Une
fois appuyé, le mode chauage démarre en mode
vitesse Moyenne (2) et l’indicateur correspondant
sur s’allume sur l’écran. Appuyer à nouveau pour
augmenter la puissance de chauage au mode
vitesse Élevée (3).
Remarque : Il n’est pas possible d’ajuster
manuellement la vitesse du mode de chauage. En
appuyant sur la touche
l’appareil retournera en mode de rafraîchissement.
3736

continuer en mode rafraîchissement, allumer le
ventilateur en appuyant sur le bouton . Il faut
appuyer 4 fois sur cette touche pour revenir au
mode rafraîchissement.
Mode nuit et vent naturel
Le mode nuit est désactivé lors de la première
utilisation de l’appareil. Appuyer sur la touche
pour activer le mode vent naturel et nuit.
L’indicateur correspondant s’allumera sur l’écran.
Appuyer à nouveau pour désactiver ce mode.
Natural wind & night mode in HI speed
Remarque: le mode vent naturel et nuit ne
peut pas être utilisé en combinaison avec le mode
chauage. Une fois que le mode vent naturel et
nuit est activé, une pression sur la touche mode
chauage désactive automatiquement le mode vent
naturel et nuit.
Le mode vent naturel et nuit fonctionne selon
la programmation suivante :
Installation de la pile
1
Retirer le couvercle du compartiment à piles de
la télécommande et placer la pile 3 V CR2032
dans le compartiment à piles.
2
Pendant l’utilisation, pointer la télécommande
vers le capteur infrarouge. Les obstacles
diminueront les performances de la
télécommande. Lorsqu’elle n’est pas utilisée,
la télécommande peut être placée dans le
support pour un accès plus facile.
3
Pour le remplacement de la pile, veuillez vous
reporter à l’illustration ci-dessous. Appuyer sur
le bouton sur le côté et sortir le tiroir de la pile.
Veuillez tenir compte des symboles négatifs et
positifs sur le couvercle.
Réglage de l’angle vertical
La tête de l’appareil peut être inclinée dans 4
positions diérentes pour régler l’angle du vent, le
maximum étant de 90 ° vers le haut.
FR
Mid
Low
6
Hi
6
6
3
12
6 6 6
Natural wind & night mode in MID speed
Mid
Low
Hi
6
12 6 6 6
6
6 6 6 6
3
Natural wind & night mode in LOW speed
Hi
Mid
Low
6 6 6 6 6
6 6 12 15
6 6
6 6
Time (Sec) Time=90s
6
Time (Sec) Time=90s
3 33
Time (Sec) Time=90s
12
3
6 6
3
6
4
CR2032
PRESS
4
Les piles contiennent des matériaux nocifs
pour l’environnement, doivent être retirées
de l’appareil avant sa mise au rebut et être
déposées dans un endroit prévu à cet eet.
PULL
3938

4. Maintenance
Important: assurez-vous de retirer le cordon
d’alimentation de la prise avant de procéder à la
maintenance.
Important: ne pas faire tremper ou immerger la
che d’alimentation ou l’appareil dans l’eau.
Nettoyage
• Veuillez utiliser un chion doux pour essuyer la
poussière sur l’extérieur de l’appareil. Si la surface
est trop sale, il est préférable de l’essuyer avec un
chion humide imbibé de détergent neutre.
• Ne pas utiliser d’essence, de diluant, ni aucune
autre substance chimique, cela endommagerait
très probablement la surface.
Filtre à charbon
S’il y a trop de poussière sur le ltre à charbon,
cela peut aecter l’ecacité de l’appareil. Nous
recommandons de nettoyer le ltre tous les mois.
3
Remettre le ltre à charbon dans le couvercle
arrière et replacer le couvercle arrière sur la
coque arrière de l’appareil.
La durée de vie du ltre à charbon est de 3 600
heures (environ 1 an). Veuillez consulter duux.com
pour le remplacement des ltres à charbon (n°
d’art. DXHCFF01).
Pièces de rechange
Les pièces de rechange et les accessoires peuvent
être commandés au point de vente ou chez un
distributeur local.
Les notes
FR
Dévisser les 3 vis du couvercle arrière et
1
le retirer de l’appareil.
Utiliser un aspirateur avec rallonge brosse
2
douce pour nettoyer le ltre à charbon. Ne
jamais utiliser de nettoyant liquide ou d’eau
pour nettoyer !
4140

5. Caractéristiques techniques
Poids:
3,6 kg
Consommation électrique (rafraîchissement) :
45W
FR
De l’air agréable en
toute saison
37,6 cm37,6 cm
26 cm
25,1 cm
Consommation électrique (chauage:
1500W
Niveau sonore:
30-55dBA
Flux d’air:
1200m³/hr
Portée du vent:
7m
Longueur du cordon électrique:
1,8m
Matériaux principaux:
ABS, PP
N° de modèle:
DXHCF01/02
L’apparence et les
spécications de
l’appareil peuvent
être modiées sans
préavis.
4342

6. FAQ
Q.
À quelle fréquence faut-il remplacer le
ltre àcharbon ?
R.
Vous n’avez pas besoin de remplacer de ltres.
Voir le chapitre 4 pour les instructions de
maintenance relatives au nettoyage du ltre à
charbon
Pourquoi est-ce que je ne peux pas régler
Q.
la vitesse du vent manuellement en mode
chauage ?
R.
Les vitesses du vent en mode chauage sont
limitées à 2 : moyenne (2) et élevée (3). Cela
garantit une utilisation sûre de l’élément
chauant.
Q.
Je sens une odeur étrange. Est-ce que c’est
normal ?
Cette odeur est causée par l’élément chauant
R.
lors de la première utilisation. Ceci est normal
et l’odeur diminuera progressivement par
l’utilisation. Cela peut également se produire
lorsque la poussière s’accumule sur l’élément
chauant.
ERP table
Model identier(s):
Item Item
Heat output
Nominal heat
output
Minimum heat
output (indicative)
Maximum continuous heat output
Auxiliary
electricity
At nominal heat
output
At minimum heat
output
In standby mode
Contact details
Symbol Value Unit Unit
Type of heat input, for electric storage local
space heaters only (select one)
P
1.500
nom
P
0.828
min
P
1.531
max,c
el
NA
max
el
NA kW
min
el
0.00031 kW
SB
Duux BV - P.O. Box 145, 5400 AC, Uden, The Netherlands
Manual heat charge control, with
kW
integrated thermostat
Manual heat charge control with room
kW
and/or outdoor temperature feedback
Electronic heat charge control with room
kW
and/or outdoor temperature feedback
Fan assisted heat output
Type of heat output/room temperature
kW
control (select one)
Single stage heat output and no room
temperature control
Two or more manual stages, no room
temperature control
With mechanic thermostat room
temperature control
With electronic room temperature
control
Electronic room temperature control
plus day timer
Electronic room temperature control
plus week timer
Other control options (multiple selections
possible)
Room temperature control, with
presence detection
Room temperature control, with
open window detection
With distance control option
With adaptive start control
With working time limitation
With black bulb sensor
FR
NA
NA
NA
NA
No
No
No
Yes
No
No
No
No
No
No
Yes
No
4544

Gracias por haber
escogido Duux.
¡Nos complace que haya decidido leer las instrucciones para su nuevo ventilador para frío y calor Duux!
Muchos usuarios se toman las instrucciones a la ligera y tratan de arreglárselas solos. Sin embargo, los
estudios nos indican que quienes leen las instrucciones se ponen al corriente de forma más rápida y
ecaz que los que lo intentan con el sistema de prueba y error.
En Duux creemos en la importancia de un ambiente cómodo y saludable. Mejorar su bienestar diseñando
productos atractivos, funcionales y ecaces es la pasión que nos mueve cada día. Con nuestra gama de
productos innovadores para el tratamiento del aire deseamos ofrecerle la mejor calidad posible de aire
interior.
Confort perfecto en todas las épocas del año. Stream puede usarse durante todo el año con sus 4
velocidades de enfriamiento y 2 ajustes de calefacción. El ltro de carbón activado elimina los olores y el
humo para garantizar una salida de aire limpio. La elegante barra táctil LED ofrece un funcionamiento
práctico, al tiempo que el mando a distancia compacto puede guardarse en la parte posterior del
dispositivo. Con sus 7 metros de alcance y su ujo de aire de 1200 m³/h, Stream proporciona un
rendimiento muy potente con un funcionamiento extremadamente silencioso de solo 30 dBA. El modo
nocturno y de brisa natural añade comodidad extra para permitir el máximo confort durante el día y la
noche.
ES
Índice
1. Descripción general del producto 48
2. Instalación y uso 49
3. Funciones 52
4. Mantenimiento 56
5. Especicaciones técnicas 59
6. Preguntas frecuentes 60
4746

1. Descripción general del producto
2. Instalación y uso
ni limpiar el dispositivo o realizar mantenimiento
como
Rejilla frontal
1
2
Base
superior
7
5
4
3
Plataforma de oscilación
Aspas del ventilador
6
Carcasa
posterior
Barra táctil LED
Botones táctiles
8
Filtro de carbón activado
9
Cubierta posterior
10
Mando a distancia
11
Interruptor stand-by
Nota: Antes de usar el producto, consulte las
instrucciones mostradas a continuación y la cha de
advertencias incluida por separado.
Instalación
• Antes de usar, compruebe si el voltaje utilizado
coincide con el indicado en la etiqueta.
• Este dispositivo puede ser usado por niños
de 8 años en adelante y por personas con
capacidades físicas, sensoriales o mentales
reducidas o sin experiencia ni conocimiento
si están bajo supervisión o se les ha instruido
sobre el uso del dispositivo de forma segura y
entienden los peligros que entraña. Los niños no
deben jugar con el dispositivo. La limpieza y el
mantenimiento no deben ser llevados a cabo por
niños sin supervisión.
• Los niños menores de 3 años deben mantenerse
lejos del dispositivo a menos que estén
continuamente supervisados.
• Los niños de más de 3 años y menores de 8 años
solo podrán encender o apagar el dispositivo en
el caso de que haya sido colocado o instalado en
su posición de funcionamiento normal y estén
supervisados o se les haya instruido acerca del
uso del dispositivo de forma segura y entiendan
los peligros que implica. Los niños mayores de 3
años y menores de 8 no deben enchufar, regular
Atención: Algunas partes de este dispositivo
pueden llegar a estar muy calientes y causar
quemaduras. Debe prestarse especial atención
cuando estén presentes niños y personas
vulnerables.
• Si el cable eléctrico está dañado, debe sustituirlo
el fabricante, su agente de servicio técnico o
personas de cualicación similar para evitar un
riesgo.
• Este marcado indica que el producto
no puede cubrirse con nada.
Advertencia: Para evitar un
sobrecalentamiento, no cubra el dispositivo.
• El dispositivo no debe estar ubicado
inmediatamente debajo de un enchufe.
• No use este dispositivo en el entorno inmediato
de un baño, una ducha o una piscina.
Advertencia: Este dispositivo no está equipado
con un sensor para controlar la temperatura de la
habitación. No use este dispositivo en habitaciones
pequeñas cuando estén ocupadas por personas que
no sean capaces de salir de la habitación por sus
propios medios, a menos que tengan supervisión
constante.
ES
4948

• Este producto solo es adecuado para espacios
bien aislados o para su uso ocasional.
Advertencia: Las pilas contienen materiales
nocivos para el medio ambiente y deben retirarse del
dispositivo antes de desecharlo
y ser correctamente desechadas.
• Cuando el dispositivo no está en uso, apáguelo
apretando el interruptor de puesta en
espera, situado en la base del dispositivo, o
desenchúfelo. No deje el dispositivo en el modo
en espera durante un largo periodo de tiempo.
• No ponga el cable de alimentación debajo
del dispositivo ni lo cubra. Coloque el cable
de alimentación adecuadamente para evitar
tropezar con él.
• Ponga el dispositivo en una supercie segura y
plana antes de utilizarlo.
• Desenchufe el dispositivo cuando no se
encuentre en uso. Nunca tire del cable de
alimentación para desenchufarlo.
• Asegúrese de que este producto no tenga
ninguna obstrucción.
• No ponga los dedos u otros objetos en la entrada
y salida de aire cuando el ventilador esté en
funcionamiento.
• Cuando el producto esté funcionando, no ponga
sobre el dispositivo ningún objeto blando,
como cabello o cortinas de ventanas/puertas,
que pueda engancharse entre las aspas del
ventilador.
• Deje de usar el dispositivo si el cable eléctrico o
el enchufe están dañados, o si el dispositivo está
dañado después de sufrir una caída.
• No use este dispositivo en exteriores. El
dispositivo está destinado únicamente para uso
doméstico y en interiores. No use este dispositivo
cerca de una ventana ni lo exponga a la luz solar
directa.
• Este dispositivo no puede usarse sin una base y
debe colocarse siempre de forma horizontal.
• No use este dispositivo en un lugar en el que se
almacene gasolina, pintura u otros materiales
inamables.
• Desenchufe el dispositivo antes de limpiarlo,
repararlo o moverlo.
• Desenchufe el dispositivo cuando no esté en uso.
• Utilice este dispositivo de acuerdo con las
instrucciones proporcionadas en este manual.
• No desmonte el dispositivo por su cuenta. Si
se requiere una reparación, llévelo al punto de
compra o al servicio técnico.
• Los productos deben limpiarse y pasar por un
mantenimiento regular.
• No use cables alargadores
Instalación del dispositivo
1
Desempaquete el dispositivo y retire los
materiales de embalaje del mismo. Guarde
los materiales de embalaje en previsión de un
posible transporte en el futuro.
2
Introduzca el enchufe en una toma de
corriente de la pared y coloque el interruptor
de seguridad en la posición | . Oirá un pitido
doble de conrmación.
3
Presione el botón de encendido para poner
en marcha el dispositivo; se iluminará la barra
táctil LED y el dispositivo funcionará en modo
enfriamiento a baja velocidad.
ES
5150

3. Funciones
1 2 3 4
Barra táctil LED
1
Encendido
2
Cambiar velocidad
3
Temporizador
Oscilación
4
5
Modo calefacción
6
Modo nocturno y de brisa natural
Nota: si la pantalla ha estado inactiva durante 1
minuto, las luces se atenuarán en un 80 %.
5 6
1 2
6
4
Mando a distancia
1
Encendido
2
Cambiar velocidad
3
Temporizador
Oscilación
4
5
Modo calefacción
6
Modo nocturno y de brisa natural
Encendido
Toque el botón para encender el dispositivo.
La pantalla se iluminará y el aparato funcionará
en modo enfriamiento a baja velocidad de forma
predeterminada. Presione de nuevo para dejarlo
apagado en modo en espera.
Nota: Asegúrese de que el interruptor de puesta
3
5
en espera está en la posición | para encender el
dispositivo. Si el interruptor de puesta en espera está
en posición O, todos los botones están desactivados.
si se activa el temporizador 4 h, la pantalla orden: 1
h > 2 h > 4 h > 8 h. Los indicadores
Oscilación
La oscilación se desactiva cuando se usa el
dispositivo por primera vez. Al presionar el
botón , el dispositivo oscilará de forma
automática horizontalmente hasta 80 grados.
El indicador de la pantalla se ilumina como
corresponde. El ángulo vertical ajustar
manualmente en 4 posiciones, hasta 90º.
ES
Cambiar velocidad
Modo calefacción
Presione el botón para aumentar o disminuir
la velocidad del aire en la siguiente secuencia:
Baja (1) > Media (2) > Alta (3) > Muy alta (4).
La conguración predeterminada es Baja (1).
Los iconos de la pantalla LED cambiarán en
consecuencia.
Temporizador
El temporizador está desactivado cuando se utiliza
el dispositivo por primera vez. Presione el botón
para activar el modo temporizador . Puede
alternar el temporizador en el siguiente orden: 1 h
> 2 h > 4 h > 8 h. Los indicadores correspondientes
se iluminarán en la pantalla. También puede leer la
cuenta atrás del temporizador en la pantalla (p. ej.,
El modo calefacción se desactiva cuando se
utiliza el dispositivo por primera vez. Presione el
botón para encender el modo calefacción. Una
vez presionado, el modo calefacción empezará
en modo de velocidad Media (2) y se iluminará
el indicador correspondiente en la pantalla. Si se
presiona de nuevo se aumentará la potencia de
calefacción al modo de velocidad Alta (3).
Nota: No es posible ajustar manualmente la
velocidad del modo calefacción. Al presionar el
botón, el dispositivo volverá al modo enfriamiento.
Si se presiona este botón de nuevo se activará
el modo ECO. Cuando la temperatura ambiente
5352

esté por debajo de 18 ⁰C, el modo calefacción a
velocidad Alta (3) se encenderá automáticamente.
Cuando la temperatura ambiente
oscile entre 18 ⁰C y 22 ⁰C, el modo calefacción
a velocidad Baja (2) se activará. Cuando la
temperatura ambiente esté por encima de
22 ⁰C, el modo calefacción se desactivará y el
ventilador dejará de funcionar. Para continuar en
modo enfriamiento, encienda el ventilador
presionando el botón Presione este botón 4
veces para volver al modo enfriamiento.
Modo nocturno y de brisa
natural
El modo nocturno se desactiva cuando se utiliza
el dispositivo por primera vez. Presione el botón
Natural wind & night mode in HI speed
6
Hi
Mid
Low
Mid
Low
Mid
Low
6
6
Natural wind & night mode in MID speed
Hi
6
6
Natural wind & night mode in LOW speed
Hi
6 6 6 6 6
6 6 12 15
12
6 6 6
3
12 6 6 6
6 6 6 6
3
para activar el modo nocturno y de brisa natural.
El indicador correspondiente se iluminará en la
pantalla. Presione de nuevo
para desactivar este modo.
Nota: El modo nocturno y de brisa natural
no pueden usarse en combinación con el modo
calefacción. Cuando está activado el modo nocturno
y de brisa natural, si se presiona el botón del modo
calefacción se desactivará el modo nocturno y de
brisa natural.
El modo nocturno y de brisa natural funciona
según la siguiente programación:
6 6
6 6
Time (Sec) Time=90s
6
Time (Sec) Time=90s
3 33
Time (Sec) Time=90s
12
3
6 6
3
6
Instalación de la batería
1
Retire la tapa de la pila del mando a
distancia, coloque la pila CR2032 de 3 V en el
compartimento para su uso.
2
Durante el uso, oriente el mando a
distancia hacia el receptor de infrarrojos.
Las obstrucciones en el camino impedirán
el funcionamiento del mando a distancia.
Cuando no se utiliza, el mando a distancia
puede colocarse en el soporte para mayor
accesibilidad.
3
Para cambiar la pila, consulte la siguiente
ilustración. Presione el botón situado en el
lateral y tire de la bandeja de la pila. Fíjese en
los símbolos del polo negativo y positivo en la
tapa.
4
CR2032
PRESS
4
Las pilas contienen materiales nocivos para
el medio ambiente y deben retirarse del
equipo antes de desecharlo y ser desechadas
correctamente.
Ajuste del ángulo vertical
El cabezal del dispositivo se puede inclinar en 4
posiciones diferentes para ajustar el ángulo del
aire, en el que el último está 90 grados dirigido
hacia arriba.
ES
PULL
5554

4. Mantenimiento
Notas
Importante: Asegúrese de retirar el enchufe
de la toma de corriente antes de llevar a cabo el
mantenimiento.
Importante: No moje ni sumerja en agua el
enchufe ni el aparato..
Limpieza
• Use un paño suave para limpiar el polvo del
cuerpo del aparato. Si la supercie está demasiado
sucia, es mejor limpiarla con un paño húmedo
mezclado con detergente neutro.
• No utilice gasolina, disolvente ni ninguna otra
sustancia química ya que dañaría fácilmente la
supercie.
Filtro de carbón
Si hay demasiado polvo en el ltro de carbón, esto
puede inuir en el rendimiento del dispositivo.
Recomendamos limpiar el ltro una vez por mes.
1
Desatornille los 3 tornillos de la tapa posterior
y extráigalo del dispositivo.
Utilice una aspiradora con extensión de cepillo
2
suave para limpiar el ltro de carbón. ¡Nunca
limpie con agua o limpiador líquido!
3
Introduzca de nuevo el ltro de carbón en la
cubierta posterior y vuelva a colocar la tapa
trasera al armazón posterior del dispositivo.
La duración del ltro de carbón es de 3600 horas
(aprox. 1 año). Consulte la página duux.com para
recambios de ltros de carbón (art. n.º DXHCFF01).
ES
Piezas de repuesto
Puede solicitar piezas de repuesto y accesorios al
punto de compra o a su distribuidor local.
5756

5. Especicaciones técnicas
Peso:
3,6 kg
Aire cómodo en
todas las épocas
del año
37,6 cm37,6 cm
26 cm
25,1 cm
Consumo de energía (enfriamiento):
45W
Consumo de energía (calefacción):
1500W
Nivel de ruido:
30-55dBA
Flujo de aire:
1200m³/hr
Alcance del aire:
7m
Longitud del cable eléctrico:
1,8m
Principales materiales de fabricación:
ABS, PP
Modelo n.º:
DXHCF01/02
ES
El aspecto y las
especicaciones
del dispositivo
pueden cambiar
sin previo aviso.
5958

6. Preguntas frecuentes
P.
¿Con qué frecuencia debo sustituir el ltro
de carbón?
R.
No tiene que cambiar ninguno de los ltros.
Consulte el capítulo 4 para ver las instrucciones
de mantenimiento para limpiar el ltro de
carbón.
¿Por qué no puedo ajustar manualmente
P.
la velocidad del aire
en el modo calefacción?
R.
Las velocidades del aire en el modo calefacción
están ajustadas a dos velocidades jas:
Media (2) y Alta (3). Esto es para garantizar la
utilización segura del elemento de calefacción.
P.
Huelo un olor extraño. ¿Es normal?
R.
Este olor es generado por el elemento de
calefacción
cuando se utiliza por primera vez. Esto es
normal y se irá reduciendo gradualmente
con el uso. También puede ocurrir cuando se
acumula polvo en el elemento de calefacción.
Tabla ERP
Identicador(es) del modelo:
Item Item
Heat output
Nominal heat
output
Minimum heat
output (indicative)
Maximum continuous heat output
Auxiliary
electricity
At nominal heat
output
At minimum heat
output
In standby mode
Contact details
Symbol Value Unit Unit
Type of heat input, for electric storage local
space heaters only (select one)
P
1.500
nom
P
0.828
min
P
1.531
max,c
el
NA
max
el
NA kW
min
el
0.00031 kW
SB
Duux BV - P.O. Box 145, 5400 AC, Uden, The Netherlands
Manual heat charge control, with
kW
integrated thermostat
Manual heat charge control with room
kW
and/or outdoor temperature feedback
Electronic heat charge control with room
kW
and/or outdoor temperature feedback
Fan assisted heat output
Type of heat output/room temperature
kW
control (select one)
Single stage heat output and no room
temperature control
Two or more manual stages, no room
temperature control
With mechanic thermostat room
temperature control
With electronic room temperature
control
Electronic room temperature control
plus day timer
Electronic room temperature control
plus week timer
Other control options (multiple selections
possible)
Room temperature control, with
presence detection
Room temperature control, with
open window detection
With distance control option
With adaptive start control
With working time limitation
With black bulb sensor
No
Yes
No
No
No
No
No
No
Yes
No
NA
NA
NA
NA
No
No
ES
6160

Danke, dass du dich
für Duux entschieden
hast.
Wir freuen uns sehr darüber, dass du dir die Anleitung für deinen neuen Duux Heiz- + Kühlventilator
durchlesen willst! Viele Nutzer verzichten auf das Lesen der Anleitung und versuchen, selbst
herauszunden, wie das Produkt verwendet wird. Studien haben allerdings gezeigt, dass Menschen,
die Anleitungen lesen, ein Produkt schneller und besser nutzen können, als diejenigen, die nach dem
Grundsatz „Versuch macht klug“ vorgehen.
Bei Duux glauben wir an die Bedeutung einer komfortablen und gesunden Wohnumgebung. Dein
Wohlbenden durch die Entwicklung ansprechender, funktionaler und eektiver Produkte zu verbessern:
das ist die Leidenschaft, die uns jeden Tag antreibt. Mit unserem Sortiment innovativer Produkte zur
Luftbehandlung wollen wir dir eine Raumluft von bestmöglicher Qualität bieten.
DE
Inhalts
Perfekter Komfort in jeder Jahreszeit. Der Luftstrom mit seinen 4 Kühlgeschwindigkeiten und 2
Heizeinstellungen kann das ganze Jahr über verwendet werden. Der Aktivkohlelter entfernt Gerüche
und Rauch und sorgt so für einen sauberen Luftausstoß. Die elegante LED-Touchleiste ermöglicht eine
praktische Steuerung, und die kompakte Fernbedienung kann an der Rückseite des Gerätes aufbewahrt
werden. Mit einer Windreichweite von 7 Metern und einem Luftdurchsatz von 1.200 m³/h sorgt der Stream
für eine besonders kraftvolle Leistung bei einem sehr leisen Betrieb mit gerade mal 30 dBA. Die natürliche
Windfunktion und der Nacht-Modus bringen zusätzlichen Annehmlichkeiten und sorgen sowohl tagsüber
als auch nachts für den ultimativen Komfort.
verzeichnis
1. Produktübersicht 64
2. Installation & Verwendung 65
3. Funktionen 68
4. Wartung 71
5. Technische Angaben 74
6. FAQ 75
6362

1. Produktübersicht
2. Installation & Verwendung
Frontgitter
1
2
Oberseite
3
Drehfuß
7
Ventilatorügel
6
Rückseitiges
Gehäuse
5
LED-Touchleiste
Touch-Schalter
4
8
Aktivkohlelter
11
9
Rückseitige
Abdeckung
10
Fernbedienung
tandby-Schalter
Achtung: Bitte lies dir vor der Verwendung des
Produkts die Anleitung und das separat enthaltene
Blatt mit den Warnhinweisen durch.
Installation
• Bitte überprüfe vor der Verwendung, ob die
verwendete Spannung mit der genannten
Spannung auf dem Etikett übereinstimmt
• Dieses Gerät kann von Kindern ab dem Alter
von 8 Jahren und Personen mit eingeschränkten
körperlichen, sensorischen oder geistigen
Fähigkeiten oder fehlender Erfahrung und Wissen
verwendet werden, wenn sie entweder bei der
Verwendung überwacht werden oder über
die sichere Verwendung des Geräts informiert
wurden und die möglichen Gefahren verstehen.
Kinder sollten nicht mit dem Gerät spielen. Die
Reinigung, Pege und Wartung des Geräts sollte
nicht von Kindern ohne Aufsicht durchgeführt
werden.
• Kinder unter 3 Jahren sollten vom Gerät
ferngehalten bzw. dauerhaft beaufsichtigt
werden.
• Kinder von 3 bis 8 Jahren sollten das Gerät
nur ein- und ausschalten, wenn es in seiner
beabsichtigten, normalen Verwendungsposition
aufgestellt oder installiert wurde und wenn sie
bei der Verwendung beaufsichtigt werden oder
ihnen gezeigt wurde, wie das Gerät sicher zu
verwenden ist und sie die möglichen Gefahren
verstehen. Kinder von 3 bis Jahren dürfen
den Stecker nicht in die Steckdose stecken,
Einstellungen nicht verändern und das Gerät
nicht reinigen oder Wartungsarbeiten daran.
Achtung: Einige Teile des Geräts können sehr
heiß werden und zu Verbrennungen führen. Wenn
Kinder und schutzbedürftige Personen anwesend
sind, ist besondere Aufmerksamkeit erforderlich.
• Wenn das Stromkabel beschädigt ist, muss es
vom Hersteller, seinem Kundendienst oder einer
ähnlich qualizierten Person ersetzt werden, um
Gefahren zu vermeiden.
• Diese Kennzeichnung gibt an, dass das
Produkt nicht abgedeckt werden darf.
Warnung: Um ein Überhitzen zu vermeiden,
darf das Gerät nicht abgedeckt werden.
• Das Gerät darf nicht unmittelbar unter einer
Steckdose stehen
• Verwende das Gerät nicht in der unmittelbaren
Umgebung einer Badewanne, einer Dusche oder
eines Schwimmbeckens.
DE
6564

Warnung: : Das Gerät ist nicht mit einem
Thermostat ausgestattet. Verwende das Gerät daher
nicht in kleinen Räumen, wenn sich darin Person
aufhalten, die nicht in der Lage sind, den Raum
eigenständig zu verlassen, außer wenn sie dauerhaft
beaufsichtigt werden.
• Dieses Produkt ist nur für gut isolierte Bereiche
oder die gelegentliche Verwendung geeignet.
Warnung: Batterien enthalten umweltschädliche
Stoe und müssen vor der Entsorgung aus dem
Gerät entfernt und ordentlich entsorgt werden.
• Wenn das Gerät nicht verwendet wird, schalte es
bitte mit einem Druck auf den Standby-Schalter
am Fuß des Geräts aus oder ziehe den Stecker
aus der Steckdose. Lasse das Gerät nicht für
längere Zeit im Standby-Betrieb laufen.
• Lege das Stromkabel nicht unterhalb des Geräts
entlang und decke das Stromkabel auch nicht
ab. Verlege das Stromkabel ordentlich, um
Stolpergefahren zu vermeiden.
• Stelle das Gerät auf eine ache und sichere
Oberäche, bevor du es verwendest.
• Zieh den Stecker aus der Steckdose, wenn das
Gerät nicht verwendet wird. Ziehe niemals am
Kabel, um den Stecker aus der Steckdose zu
ziehen.
• Bitte achte darauf, dass dieses Produkt nicht auf
Hindernisse stößt.
• Stecke keine Finger oder Gegenstände in den
Lufteinlass oder -auslass, wenn der Ventilator
läuft.
• Halte weiche Gegenstände wie z.B. Haare,
Fenster-/Türvorhänge usw. vom Gerät fern,
wenn es eingeschaltet ist, weil sie sich in den
Ventilatorügeln verfangen können.
• Verwende das Gerät nicht, wenn das Stromkabel
oder der Stecker beschädigt sind oder wenn das
Gerät nach einem Sturz beschädigt ist.
• Verwende das Gerät nicht im Freien. Das Gerät ist
nur für den Hausgebrauch und die Verwendung
in Innenräumen gedacht. Verwende dieses Gerät
nicht in der Nähe eines Fenster oder bei direkter
Sonneneinstrahlung.
• Das Gerät kann nicht ohne den Standfuß
verwendet werden und sollte immer waagerecht
aufgestellt werden.
• Verwende das Gerät nicht an Orten, an denen
Benzin, Farbe oder andere entzündliche
Materialien aufbewahrt werden.
• Ziehe den Stecker aus der Steckdose, bevor du
das Gerät reinigst, reparierst oder es bewegst.
• Ziehe den Stecker aus der Steckdose, wenn das
Gerät nicht verwendet wird.
• Bitte verwende das Gerät gemäß den in dieser
Anleitung enthaltenen Anweisungen.
• Zerlege das Gerät nicht selbstständig. Bringe
das Gerät bitte zu deinem Händler oder zum
Servicecenter, wenn es repariert werden muss.
• Die Produkte sollten regelmäßig gereinigt und
gewartet werden.
• Verwende keine Verlängerungskabel.
Installation des Geräts
1
Packe das Gerät aus und entferne das
Verpackungsmaterial vom Gerät. Bewahre
das Verpackungsmaterial für einen möglichen
zukünftigen Transport auf. Stecke den
2
Stecker in die Steckdose und setze den
Sicherheitsschalter in die richtige | Position.
Zur Bestätigung ertönt ein doppelter Piepton.
3
Drücke auf den Ein-/Aus-Schalter, um das
Gerät einzuschalten. Die LED-Touchleiste
leuchtet auf und das Gerät läuft im Kühlbetrieb
bei niedriger Geschwindigkeit.
DE
6766

3. Funktionen
1 2 3 4
LED-Touchleiste
1
Aanzetten
2
Snelheid aanpassen
3
Timer
Oscillatie
4
5
Verwarmingsmodus
6
Natuurlijke bries en nachtstand
Hinweis: Wenn das Display für 1 Minute lang
inaktiv war, wird die Helligkeit um 80 %
5 6
1 2
6
4
Fernbedienung
1
Leistung
2
Geschwindigkeit verändern
3
Timer
Rotation
4
5
Heizbetrieb
6
Naürlicher Wind- & Nacht-Modus
Leistung
Berühre die Taste, um das Gerät einzuschalten.
Das Display leuchtet auf, un das Gerät läuft
automatisch im Kühlbetrieb und bei geringer
Windgeschwindigkeit. Drücke die Taste erneut, um
das Gerät in den Standby-Modus abzuschalten.
Hinweis: Bitte achte darauf, dass der Standby-
3
5
Schalter auf der Position I steht, um das Gerät
einzuschalten. Wenn der Standby-Schalter auf der
Position 0 steht, sind alle Knöpfe ohne Funktion.
Geschwindigkeit verändern
Drücke auf die Taste, um die
Windgeschwindigkeit in folgender Reihenfolge zu
erhöhen oder zu senken: Low (1) > Medium (2) >
High (3) > Strong (4). Die Standardeinstellung ist
Low (1), die geringe Geschwindigkeit. Die Anzeigen
auf dem LED-Display verändern sich
entsprechend.
Timer
Der Timer ist deaktiviert, wenn das Gerät
zum ersten Mal verwendet wird. Drücke auf
die Taste, um den Timer einzuschalten. Modus
Reihenfolge einstellen: 1h > 2h > 4h > 8h. Du
kannst den Timer in folgender weit der Timer
schon abgelaufen ist (wenn z.B. ein Timer für 4h
aktiviert wurde, zeigt das Display nach 2 Stunden
nur noch 2h an und so weiter). Wenn der Timer
abgelaufen ist, schaltet das Gerät in den Standby-
Modus um.
Rotation
Die Rotation ist deaktiviert, wenn das Gerät zum
ersten Mal verwendet wird. Berühre die Taste,
und das Gerät beginnt automatisch, sich horizontal
um bis zu 80 Grad zu drehen. Die Anzeige auf
dem Display Um im Kühlbetrieb fortzufahren,
schalte den Ventilator durch Drücken der
entsprechenden Taste ein. Wenn du diese
Taste ein 4. Mal drückst, kehrt das Gerät in den
Kühlbetrieb zurück. Naürlicher Wind- & NachtModus leuchtet entsprechend auf. Der vertikale
Winkel kann von Hand auf 4 Positionen mit bis zu
90° eingestellt werden.
Heizbetrieb
der Heizbetrieb ist deaktiviert, wenn das Gerät
zum ersten Mal verwendet wird. Drücke auf
die Taste, um den Heizbetrieb einzuschalten.
Nachdem die Taste gedrückt wurde, beginnt der
Heizbetrieb auf Geschwindigkeitsstufe Medium (2),
und die entsprechende Anzeige auf dem Display
leuchtet auf. Durch ein erneutes Drücken der Taste
wird die Heizleistung auf die Geschwindigkeitsstufe
High (3) gestellt.
DE
6968
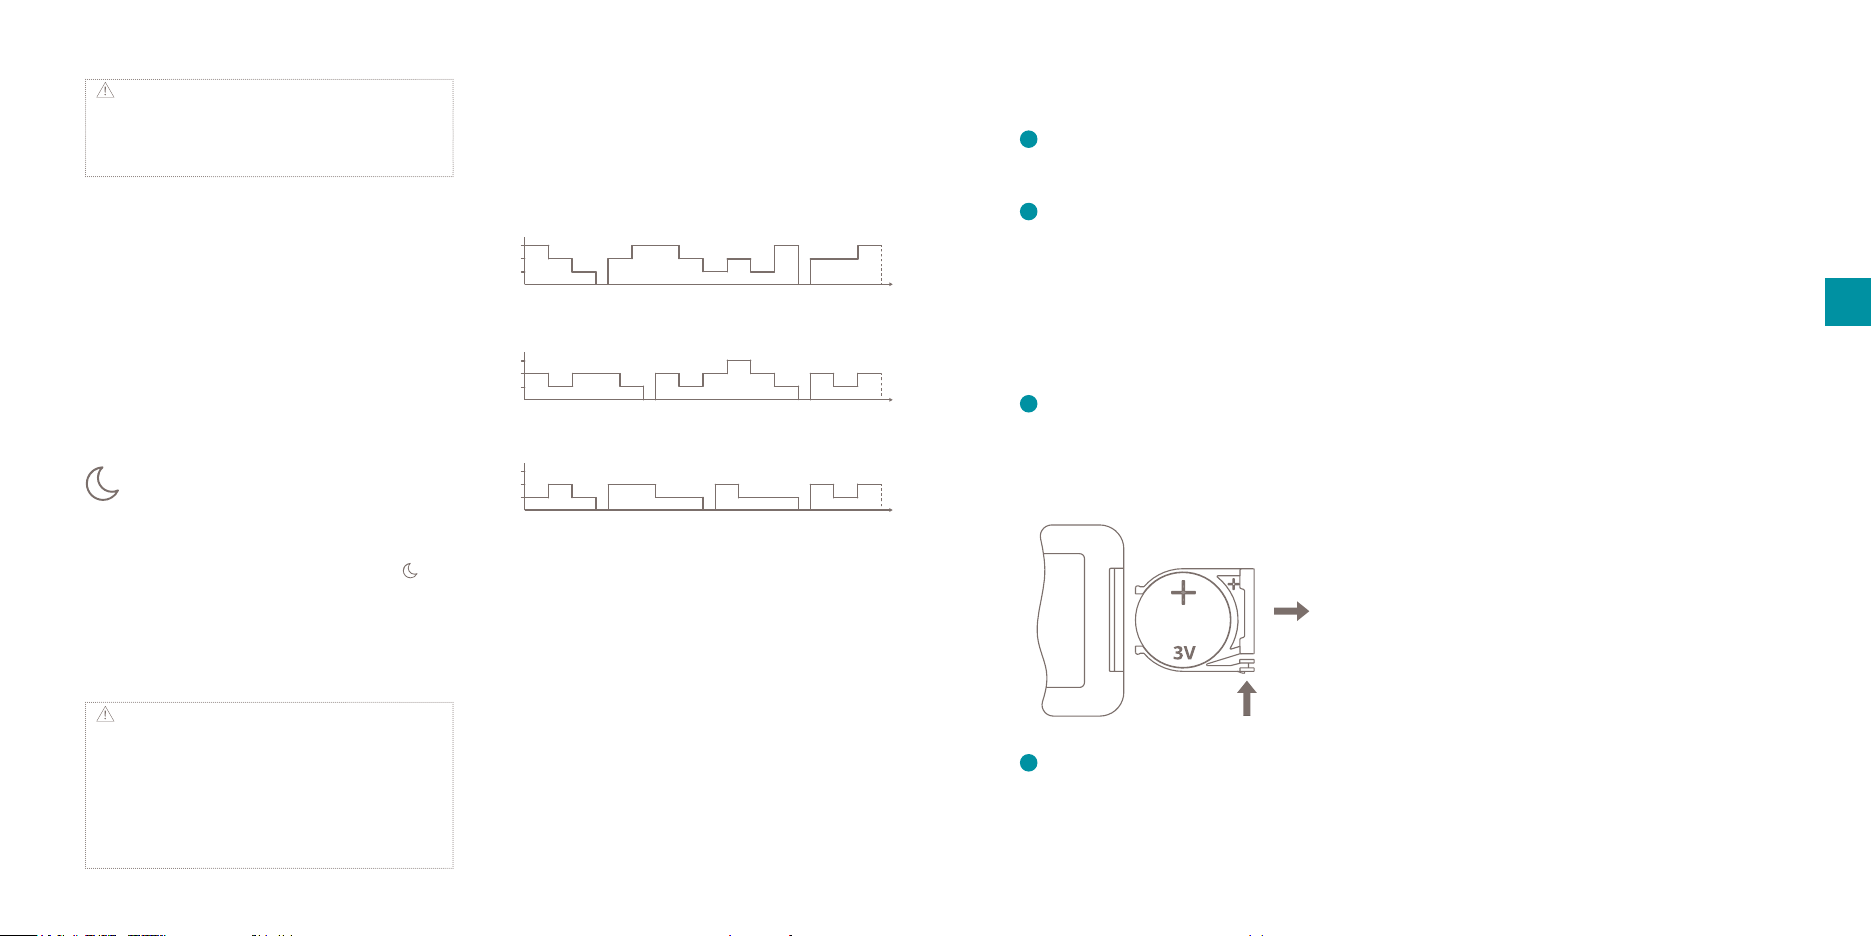
Hinweis: Es ist nicht möglich, die
Geschwindigkeit im Heizbetrieb manuell einzustellen.
Wenn die Taste gedrückt wird, kehrt das Gerät in den
Kühlbetrieb zurück.
Drücke erneut auf diese Taste, um den ECO-Modus
einzuschalten. Wenn die Raumtemperatur unter
18°C liegt, wird automatisch der Heizbetrieb
auf der Stufe HIGH (3) eingeschaltet. Wenn
die Raumtemperatur zwischen 18°C und 22°C
beträgt, wird der Heizbetrieb auf der Stufe Low (2)
eingeschaltet. Wenn die Raumtemperatur über
22°C beträgt, wird der Heizbetrieb deaktiviert und
der Ventilator schaltet sich ab.
Naürlicher Wind- & NachtModus
Der Nachtmodus ist deaktiviert, wenn das Gerät
zum ersten Mal verwendet wird. Drücke die
Taste, um die natürliche Wind-Funktion & den
Nacht-Modus zu aktivieren. Die entsprechende
Anzeige leuchtet auf dem Display auf. Drücke die
Taste erneut, um diesen Modus abzuschalten.
Die natürliche Wind-Funktion & der Nacht-Modus
funkionieren gemäß folgender Programmierung:
Natural wind & night mode in HI speed
6
Hi
Mid
Low
Mid
Low
Mid
Low
6
6
Natural wind & night mode in MID speed
Hi
6
6
Natural wind & night mode in LOW speed
Hi
6 6 6 6 6
6 6 12 15
12
6 6 6
3
12 6 6 6
6 6 6 6
3
6 6
Time (Sec) Time=90s
Time (Sec) Time=90s
3 33
Time (Sec) Time=90s
6
6 6
3
6 6
3
Die Batterie einlegen
Einstellung des vertikalen Winkels
Der Kopf des Geräts kann in 4 verschiedene
1
Entferne die Batterie-Abdeckung von der
Fernbedienung und lege die 3V CR2032Batterie in das Batteriefach ein, um die
2
Fernbedienung zu verwenden.
12
Richte die Fernbedienung während der
Verwendung auf den Infrarot-Empfänger.
Positionen geneigt werden, um die Windrichtung
einzustellen, wobei die letzte Postition 90° nach
oben zeigt.
Hindernisse dazwischen schränken die
Funktion der Fernbedienung ein. Wenn Sie
DE
nicht verwendet wird, kann die Fernbedienung
in den Halter eingesetzt werden, damit sie
immer gribereit ist.
Der Batteriewechsel wird auf der folgenden
3
Abbildung dargestellt. Drücke auf den Knopf
an der Seite und zieh das Batteriefach heraus.
6
Bitte achte auf das Minus- und das Plus-
Zeichen auf der Abdeckung.
4
CR2032
PULL
Hinweis: Die natürliche Wind-Funktion & der
Nacht-Modus können nicht in Kombination mit dem
Heizbetrieb verwendet werden. Wenn die natürliche
Wind-Funktion & der Nacht-Modus aktiviert sind,
führt das Drücken auf den Heizbetrieb automatisch
zum Abschalten der natürlichen Wind-Funktion &
des Nacht-Modus.
PRESS
4
Batterien enthalten umweltschädliche Stoe
und müssen vor der Entsorgung aus dem
Gerät entfernt und ordentlich entsorgt werden.
afgevoerd.properly.
7170

4. Wartung und Pege
Notes/notities/les notes/notas/Notitzen
Wichtig: Achte darauf, den Netzstecker vor der
Pege des Geräts aus der Steckdose zu ziehen.
Wichtig: Der Stecker und das Gerät selbst dürfen
nicht durchnässt oder in Wasser eingetaucht werden.
Reinigung
• Bitte verwende ein weiches Tuch, um auf dem
Gerät Staub zu wischen; Wenn die Oberäche
zu schmutzig ist, empehlt sich die Verwendung
eines feuchten Tuchs mit ein wenig neutralem
Reinigungsmittel.
• Verwende kein Benzin, Verdünnungsmittel oder
andere chemische Substanzen, weil dadurch die
Oberäche leicht beschädigt werden kann.
Kohlelter
Wenn der Kohlelter mit Staub verstopft ist, kann
die Leistung des Geräts dadurch beeinträchtigt
werden. Wir empfehlen eine monatliche Reinigung
des Filters.
1
Löse die 3 Schrauben auf der rückseitigen
Abdeckung und entferne die Abdeckung vom
Gerät.
Benutze einen Staubsauger mit einem weichen
2
Bürstenaufsatz, um den Kohlelter zu reinigen.
Niemals mit üssigem Reinigungsmittel oder
Wasser reinigen!
3
Setze den Kohlelter wieder in die rückseitige
Abdeckung ein und befestige diese wieder an
der Rückseite des Geräts
Der Kohlelter hat eine Lebensdauer von 3.600
Std. (etwa 1 Jahr). Ersatz-Kohlelter bekommst du
auf duux.com (Art.-Nr. DXAWF01).
Ersatzteile
Ersatzteile und Zubehör sind beim Händler oder
über den örtlichen Großhändler erhältlich.
DE
7372

5. Technische Angaben
Gewicht:
3,6 kg
Stromverbrauch (Kühlung):
45W
37,6 cm37,6 cm
26 cm
Stromverbrauch (Heizung):
1500W
Geräuschpegel:
30-55dBA
Luftdurchsatz:
1200m³/hr
Windreichweite:
7m
Länge des Stromkabels:
1,8m
DE
Angenehme Luft
in jeder Jahres
25,1 cm
auptsächlich verwendete Materialien:
ABS, PP
Modell-Nr.:
DXHCF01/02
Aussehen und
Spezikationen
dieses Geräts
können ohne
Vorankündigung
geändert werden.
7574

6. FAQ
F.
Wie häug sollte ich den Kohlelter
austauschen?
A.
Du musst die Filter nicht austauschen. In
Kapitel 4 ndest du Wartungsanweisungen zur
Reinigung des Kohlelters
F.
Warum kann ich die Windgeschwindigkeit im Heizbetrieb nicht
manuell einstellen?
A.
Im Heizbetrieb gibt es nur 2 Einstellungen für
die Windgeschwindigkeit: Medium (2) und High
(3). Damit wird die sichere Verwendung des
Heizelements garantiert.
F.
Ich nehme einen seltsamen Geruch wahr.
Ist das normal?
Der Geruch wird vom Heizelement verursacht,
A.
wenn das Gerät erstmals verwendet wird. Das
ist ganz normal und nimmt mit der weiteren
Verwendung des Geräts ab. Der Geruch kann
auch auftreten, wenn Staub sich auf dem
Heizelement ansammelt.
ERP-Tabelle
Modell-Indentikator(en):
Item Item
Heat output
Nominal heat
output
Minimum heat
output (indicative)
Maximum continuous heat output
Auxiliary
electricity
At nominal heat
output
At minimum heat
output
In standby mode
Contact details
Symbol Value Unit Unit
Type of heat input, for electric storage local
space heaters only (select one)
P
1.500
nom
P
0.828
min
P
1.531
max,c
el
NA
max
el
NA kW
min
el
0.00031 kW
SB
Duux BV - P.O. Box 145, 5400 AC, Uden, The Netherlands
Manual heat charge control, with
kW
integrated thermostat
Manual heat charge control with room
kW
and/or outdoor temperature feedback
Electronic heat charge control with room
kW
and/or outdoor temperature feedback
Fan assisted heat output
Type of heat output/room temperature
kW
control (select one)
Single stage heat output and no room
temperature control
Two or more manual stages, no room
temperature control
With mechanic thermostat room
temperature control
With electronic room temperature
control
Electronic room temperature control
plus day timer
Electronic room temperature control
plus week timer
Other control options (multiple selections
possible)
Room temperature control, with
presence detection
Room temperature control, with
open window detection
With distance control option
With adaptive start control
With working time limitation
With black bulb sensor
No
Yes
No
No
No
No
No
No
Yes
No
NA
NA
NA
NA
No
No
DE
7776

Notes/notities/les notes/notas/Notitzen Notes/notities/les notes/notas/Notitzen
7978

80
Designed in The Netherlands bij Duux BV. Made in P.R.C.
Duux BV, P.O. Box 145, 5400 AC Uden Netherlands, www.duux.com
© 2019 Duux. All rights reserved.
DUUX® is a trademark of Duux BV,
registered in the EU and other countries.
The brand cited belongs exclusively to the respective owners.
Specications are subject to modication without notice.
 Loading...