


Whisper Flex
portable fan
user manual | gebruikershandleiding | Bedienungsanleitung
Mode d’emploi | manual de instrucciones
1

Thank you for
choosing Duux.
We’re so glad you decided to read the instructions to your new Duux air purier! Many users casually dismiss
instructions and seek to gure it out on their own. But studies show that people who read instructions will
get up to speed more quickly and eciently than those who poke around with trial and error.
At Duux we believe in the importance of a comfortable and healthy living environment. Enhancing your well-
being by designing appealing, functional and eective products is the passion that drives us every day. With
our range of innovative air treatment products we aim to provide you the best possible indoor air quality.
Meet the cooling fan that surprises you with a gentle breeze, a vigorous gust of wind and everything in
between. The Duux Whisper Flex has no less than 26 settings. In this way you can always nd the perfect
airow environment. Thanks to the horizontal and vertical oscillation function, the Whisper Flex provides
a pleasant coolness throughout any room. Choose yourself, which mode you prefer: xed speed, ‘natural
wind’ or perhaps the night mode, by which you are lulled into sleep by the whispering breeze. The separately
available dock and battery pack allows you to freely move the device without wires.
Read the manual carefully to get the most out of your Whisper Flex fan.
2

Table of
contents
1. Product overview 4
2. Installation 5
3. Settings 7
4. Technical specications 11
EN
3

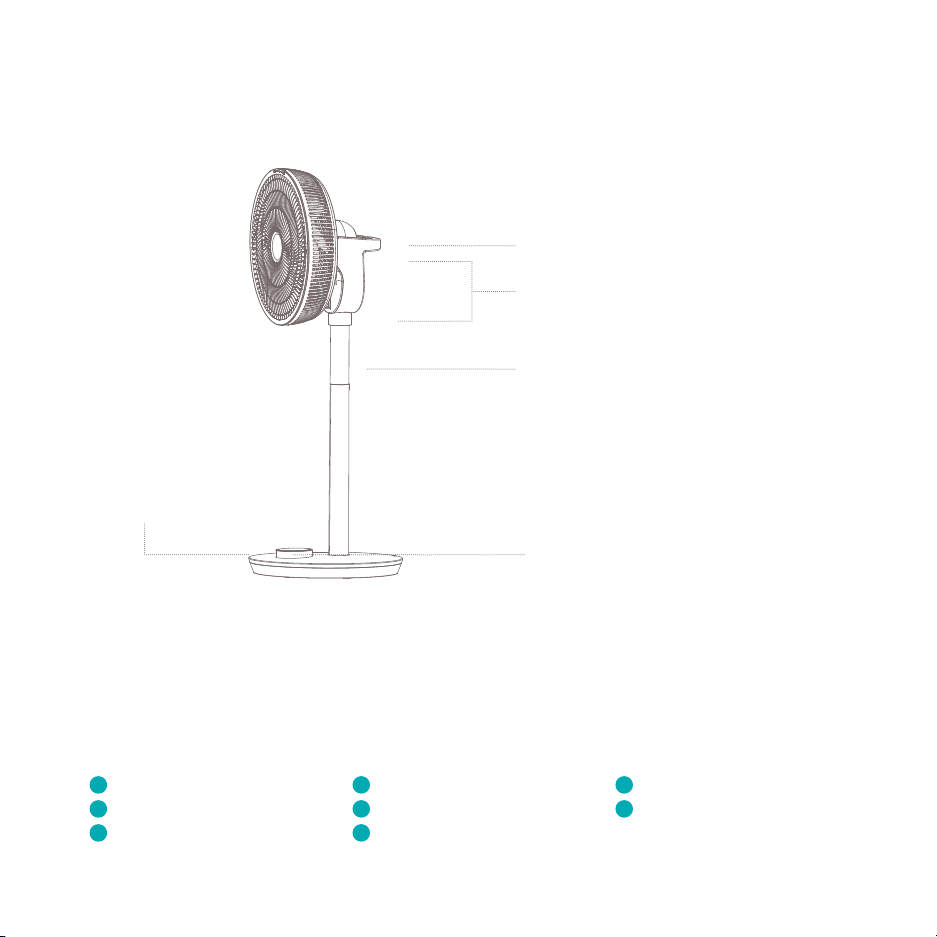
1. Product overview
h
Remote control receiver
Parts
Handle & Remote control holder
Oscillation mechanism
Adjustability of the mount
LED control panel
Each part is packed in a separate bag which is referred to in
the next chapter.
1
User manual
2
Base unit
3
Extension tube
4
4
Motor
5
Front grill
6
Tools
7
Power adapter
8
Remote control
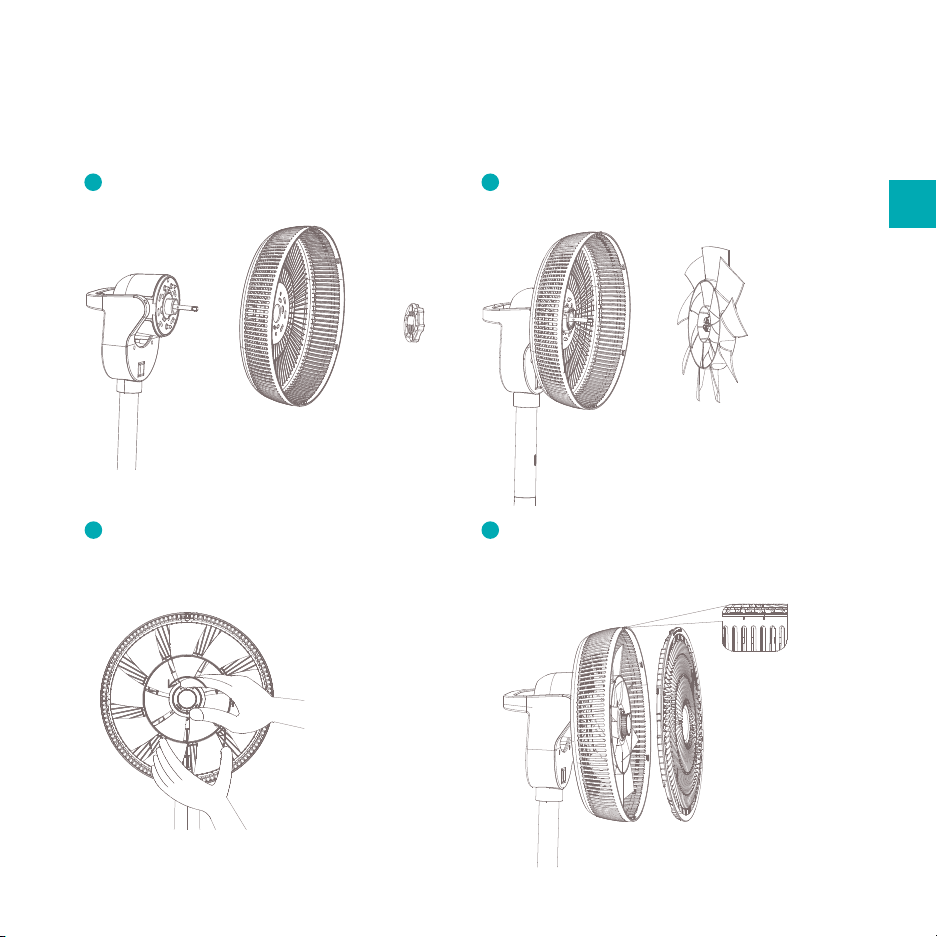
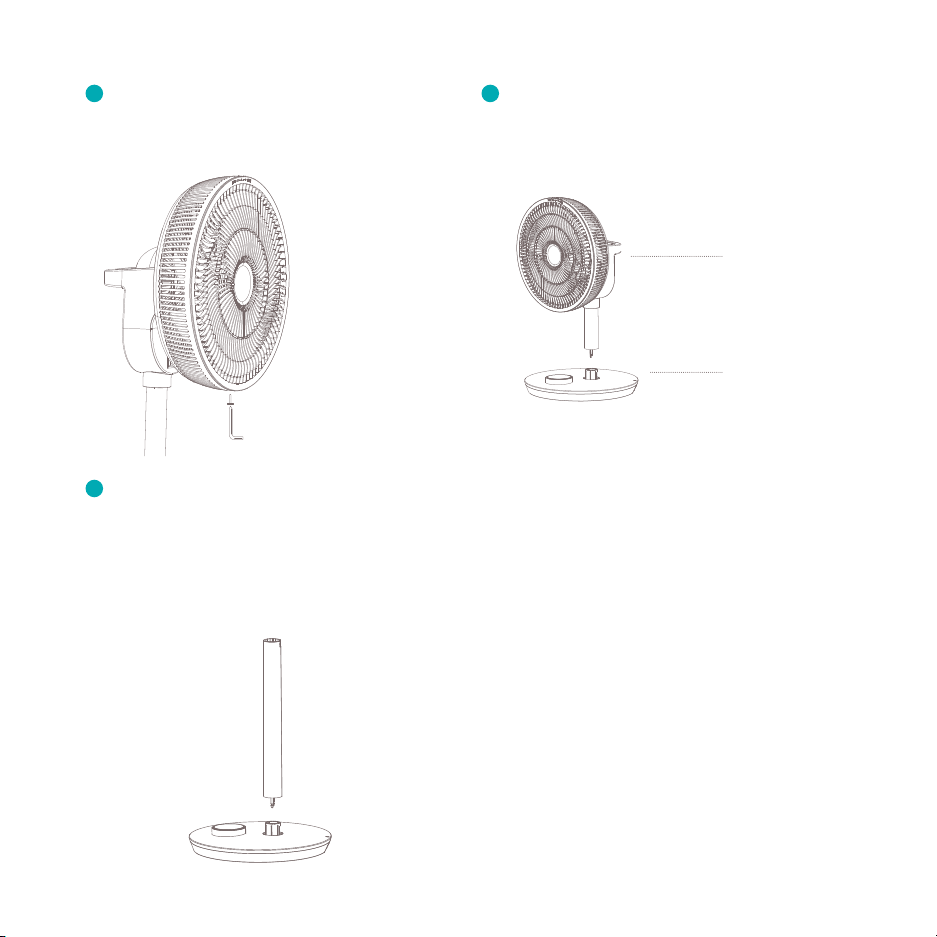
2. Installation
1
Place the rear grill over the motor and tighten
with the locking ring.
3
Use the plastic screw to secure the fan blades.
Note: turn the screw anticlockwise rmly to
secure it.
2
Attach the fan blades to the motor.
4
Fit the front grill and rotate it a little, clockwise,
until the arrow on the grill lines up with the
left-side marker.
EN
5
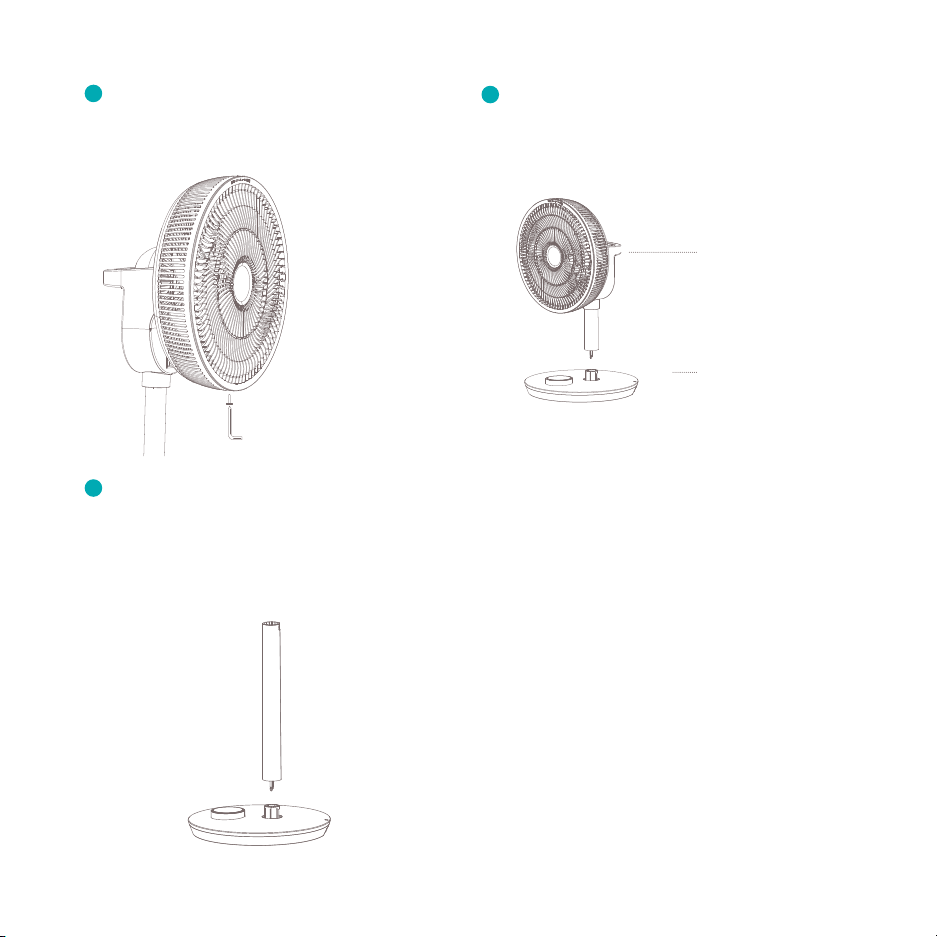
5
h
Fit the supplied screw to the underside of the
grill and connect the two halves rmly together.
7
(optional) To extend the height of the fan,
connect the male pins of the extension tube to
the female connectors on the base and lower
side of the motor. To release the tube, press
the buttons on the bottom and back side.
6
Attach the motor to the connector input on the
base unit. Refer to point 7 for attachment of
extension tube.
motor
base
6
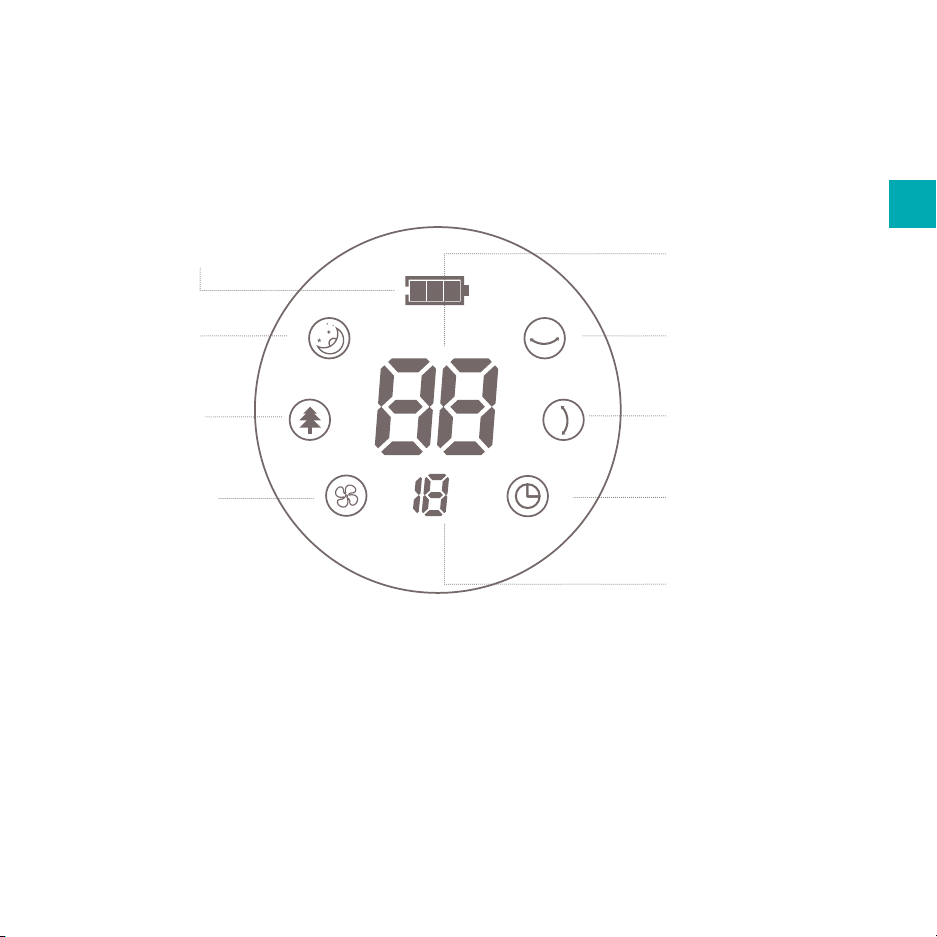
3. Settings
Battery life
(only visible when connected to dock –
sold separately)
Night mode
Natural wind
Set ventilation
speed
h
EN
Ventilation speed
Horizontal oscillation
Vertical oscillation
Set timer function
Timer
7

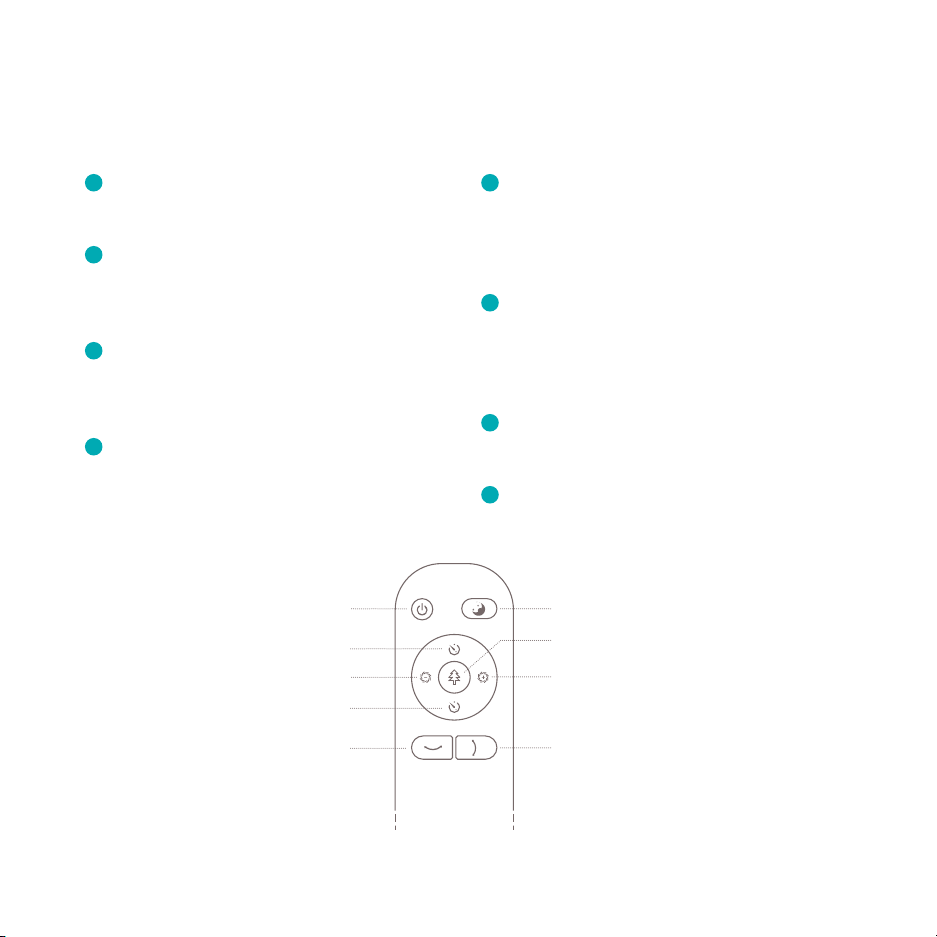
3.1 Instructions for use
Ventilation speed
The Duux Whisper Flex fan has 26 speed
settings. When the LED display shows ‘00’, the
device is switched o.
Horizontal oscillation
The fan swivels horizontally, 0 to 90 degrees,
from left to right.
Vertical oscillation
The fan swivels vertically, 0-100 degrees,
from top to bottom.
Timer
The timer can be set to switch the fan o
automatically. This can be set to between
0 and 12 hours from the time that the fan is
rst turned on.
Natural wind
The fan rotates at dierent speeds to simulate
natural wind conditions.
Night mode
By selecting this mode, the LED display will
automatically turn o after 10 seconds for an
undisturbed night’s sleep.
Battery mode
Detach the fan from the dock to operate on
battery mode.
8
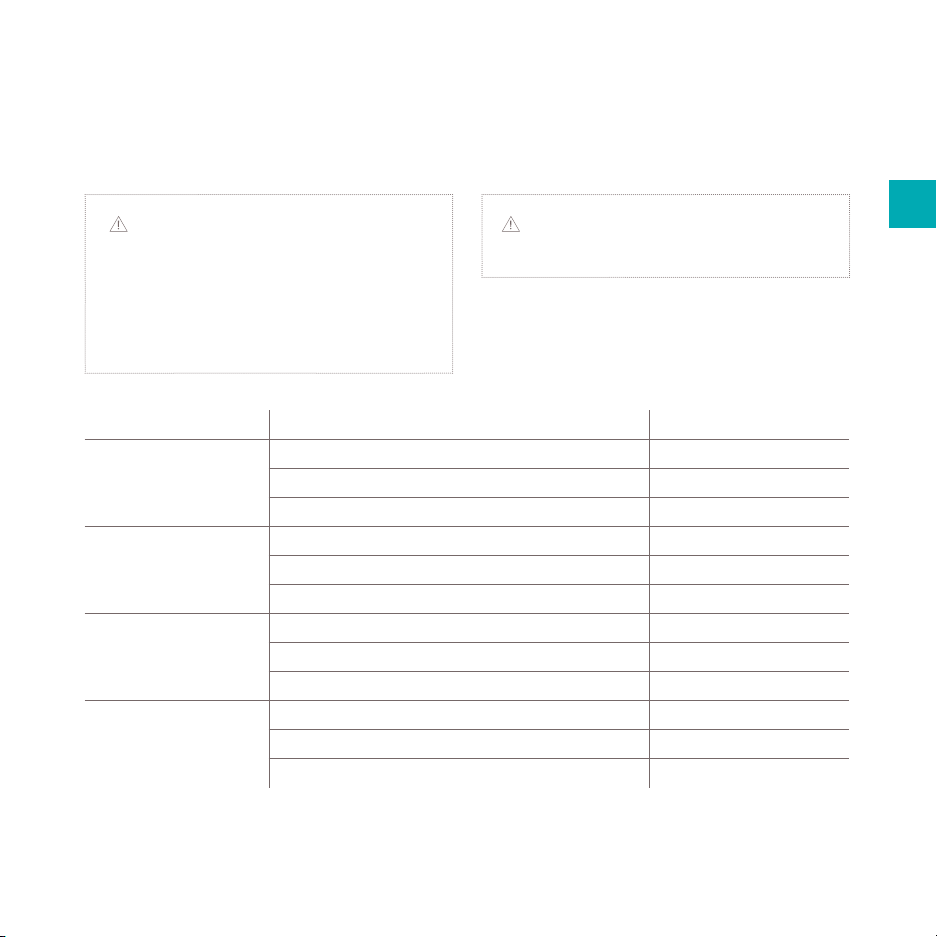
Note: In battery mode the fan speed is
limited to position 15. Depending on the
settings, the battery will last max.18 hours.
Lower the ventilation speed and activate
night mode to increase battery life. See below
comparison chart for reference:
Fan speed Oscillation Battery life*
1 O 18 H
Horizontal or Vertical 8 H
Horizontal & Vertical 5.5 H
5 O 15.5 H
Horizontal or Vertical 6.9 H
Horizontal & Vertical 4.7 H
10 O 11.8 H
Horizontal or Vertical 5.6 H
Horizontal & Vertical 3.9 H
15 O 8 H
Horizontal or Vertical 4.7 H
Horizontal & Vertical 3.1 H
Note: dock and battery pack are sold
separately.
EN
* For reference only. Test environment conditions: 18⁰C, 48% humidity.
9
h
3.2 Instructions for using the LED display
1
Remove the parts from the packaging
and assemble the device according to the
instructions in this manual.
2
Connect the power cable to the input terminal
in the base of the product. Then insert the
plug into the wall socket. The LED display will
light up and show ‘00’.
3
Press the control ring once, to turn the
product on. The fan springs into life and will
thereafter default to the most recent speed
setting.
4
Use the stainless steel exterior of the
aluminium control ring to switch between
settings.
Power
Timer Up
Ventilation speed down
Timer down
Horizontal oscillation
5
When a display icon is ashing, you can
set and adjust this setting by pressing the
control ring. When the desired position is
reached, press the control ring again to
conrm the selection.
6
When setting the fan speed and timer
function, the LED display will continue to ash
until the desired setting is selected. After this,
press the control ring again to conrm the
selection.
7
Once the function is set, the icon will stop
blinking and will remain visible in the display,
for as long as this function is set to on.
8
Press and hold the control ring to switch o
the device.
Night mode
Natural wind
Ventilation speed up
Vertical oscillation
10
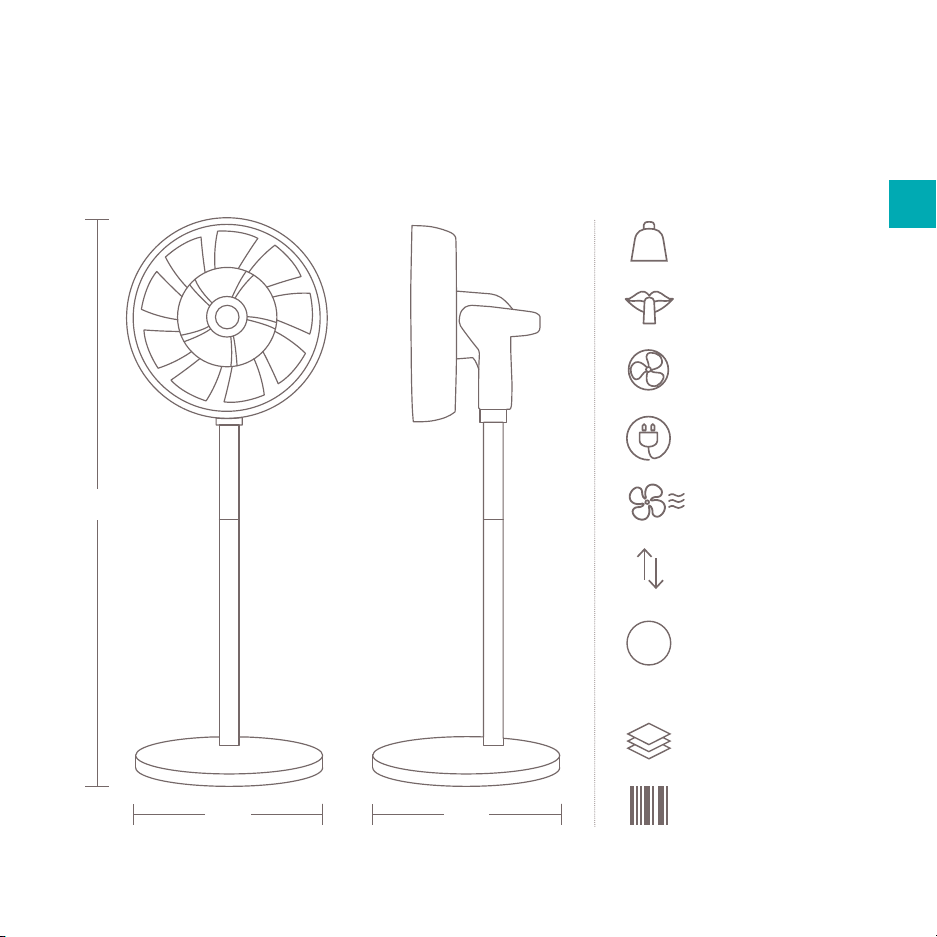
4. Technical specications
880 mm
330 mm
330 mm
LCD
Weight:
EN
5 kg
Noise level:
13-50dBa
Airow:
710 CBM/hr
Power consumption:
3-27W
Fan speed:
26 speeds
Adjustable height:
51-88 cm
Display:
Digital LCD
display
Main material types:
ABS, PP
Model no.
DXCF04/05
11

Bedankt dat
je voor Duux
hebt gekozen
We zijn blij dat je hebt besloten om de handleiding van je nieuwe Duux draagbare ventilator te lezen! Veel
gebruikers slaan de instructies over en gaan direct met het apparaat aan de slag. Echter verschillende
studies tonen aan dat mensen die eerst de gebruikershandleiding lezen, sneller en eciënter van start
kunnen dan mensen die zomaar wat proberen.
Bij Duux geloven we in een comfortabele en gezonde leefomgeving voor iedereen. Het verbeteren van
het binnenklimaat met aantrekkelijke, functionele en eectieve producten is onze dagelijkse passie. Met
onze reeks van innovatieve luchtbehandelingsproducten streven we er naar om jou van de best mogelijke
luchtkwaliteit te voorzien.
Ontmoet de ventilator die je verrast met een zacht briesje, een stevige windvlaag en alles daartussenin.
De Duux Whisper Flex kent maar liefst 26 standen. Zo vind je altijd de perfecte luchtstroomsterkte. Dankzij
de horizontaal- en verticaal-oscillerende functie geeft de Whisper Flex overal in de ruimte een aangename
koelte. Kies zelf welke stand jij het prettigst vindt: één snelheid, ‘natural wind’ of bijvoorbeeld de nachtmodus
waarbij je in slaap wordt gesust door het suizen van de wind. De afzonderlijk verkrijgbare docking station en
batterij maken het mogelijk om het apparaat vrij te verplaatsen zonder kabels.
Lees de handleiding goed door om het meeste uit je Whisper Flex ventilator te halen.
12

Inhoudsopgave
1. Productoverzicht 14
2. Installatie 15
3. Functionaliteiten 17
4. Technische specicaties 21
NL
13
1. Productoverzicht
h
Afstandsbediening
ontvanger
Onderdelen
Handgreep en Afstandsbediening houder
Oscillatiemechanisme
Verlengbuis
LED bedieningspaneel
Elk onderdeel is verpakt in een afzonderlijke zak, waarnaar in
het volgende hoofdstuk wordt verwezen.
14
1
Handleiding
2
Ventilator voet
3
Verlengbuis
4
Motor
5
Voorste rooster
6
Gereedschap
7
Voedingsadapter
8
Afstandsbediening

2. Installatie / assemblage
1
Plaats de achterzijde van de grill over de
motoraandrijving en draai vast met de
sluitingsring.
3
Gebruik de plastic schroef om de
ventilatorbladen vast te zetten. Let op: draai de
schroef stevig linkswaard om vast te draaien.
2
Plaats de ventilatorbladen over de
motoraandrijving.
4
Plaats de voorzijde van de grill en draai de grill
kort rechtswaard zodat het pijltje gelijk staat
aan het linker streepje.
NL
15
5
h
Draai de meegeleverde schroef aan de
onderzijde van de grill stevig vast om de twee
helften met elkaar te verbinden.
7
(optioneel) Om de ventilator hoger te
maken, moet u de mannelijke pinnen van de
verlengbuis in de vrouwelijke connectors op de
voet en onderzijde van de motor steken. Om
de buis te ontkoppelen, drukt u op de knoppen
aan de onderkant en achterzijde.
6
Bevestig de motor op de connectoringang van
de basiseenheid. Zie punt 7 voor de bevestiging
van de verlengbuis.
motor
basis
16

3. Functionaliteiten
Batterij levensduur
(alleen zichtbaar wanneer aangesloten
op het docking station – afzonderlijk
verkrijgbaar)
Ventilatie snelheid
NL
Nachtmodus
Natuurlijke wind
Instellen
ventilatiesnelheid
h
Horizontale oscillatie
Verticale oscillatie
Instellen timerfunctie
Timer
17

3.1 Uitleg functionaliteiten
Ventilatiesnelheid
De Duux Whisper ventilator heeft 26
ventilatiesnelheiden. Wanneer het LED display
‘00’ weergeeft staat het apparaat uit.
Horizontale oscillatie
De ventilator draait tussen 0-90 graden
horizontaal van links naar rechts.
Verticale oscillatie
De ventilator draait tussen 0-100 graden
verticaal van boven naar beneden.
Timer
Stel zelf in wanneer de ventilator automatisch
uitschakelt. Dit kan tussen de 0 en 12 uur zijn.
Natuurlijke wind
De ventilator draait met verschillende
snelheden om een natuurlijke wind na te
bootsen.
Nachtmodus
Door deze modus te selecteren, schakelt het
ledscherm na 10 seconden automatisch uit
voor een ongestoorde nachtrust.
Batterijmodus
Verwijder de ventilator van het docking station
om de batterijmodus te activeren.
18

Opmerking: In batterijmodus is de
ventilatorsnelheid beperkt tot stand 15.
Afhankelijk van de instellingen gaat de
batterij maximaal 18 uur mee. Verlaag de
ventilatiesnelheid en activeer de nachtmodus om
de levensduur van de batterij te verlengen. Zie
onderstaande vergelijkingstabel voor referentie:
Ventilator snelheid Oscillatie Batterij levensduur*
1 Uitgeschakeld 18 H
Horizontal of Vertical 8 H
Horizontal & Vertical 5.5 H
5 Uitgeschakeld 15.5 H
Horizontal of Vertical 6.9 H
Horizontal & Vertical 4.7 H
10 Uitgeschakeld 11.8 H
Horizontal of Vertical 5.6 H
Horizontal & Vertical 3.9 H
15 Uitgeschakeld 8 H
Horizontal of Vertical 4.7 H
Horizontal & Vertical 3.1 H
Opmerking: docking station en batterij
worden afzonderlijk verkocht.
NL
* Alleen voor referentie. Omstandigheden testomgeving: 18⁰C, 48% luchtvochtigheid.
19

3.2 Uitleg bediening LED display
h
1
Haal de onderdelen uit de verpakking
en assembleer het apparaat volgens de
instructies in deze handleiding.
2
Verbind de stroomkabel met de ingang in de
voet het product. Plaats daarna de stekker in
het stopcontact. Het LED display licht op en
geeft ‘00’ weer.
3
Druk één keer op de bedieningsring om het
apparaat in te schakelen. De ventilator gaat
aan en werkt vervolgens op de snelheid die
het meest recent is ingesteld.
4
Gebruik de aluminium bedieningsring van
het ledscherm om tussen instellingen te
schakelen.
Power
Timer omhoog
Ventilatiesnelheid omlaag
Timer omlaag
Horizontale oscillatie
5
Wanneer een icon knippert kunt u deze
functionaliteit aanpassen en instellen door
op het LED display te drukken. Wanneer de
gewenste stand bereikt is drukt u nogmaals
op het LED display op de keuze te bevestigen.
6
Bij het instellen van de ventilatiesnelheid en
timerfunctie blijft het LED display knipperen
totdat de gewenste instelling is gekozen.
Hierna drukt u nogmaals op het LED display
om de keuze te bevestigen.
7
Wanneer de functie ingesteld is stopt het icon
met knipperen en blijft zichtbaar zolang deze
functie aanstaat.
8
Houd de bedieningsring ingedrukt om het
apparaat uit te schakelen.
Nacht modus
Natuurlijke wind modus
Ventilatiesnelheid omhoog
Verticale oscillatie
20

4. Technische specicaties
Gewicht:
5 kg
Geluidsniveau:
13-50dBa
Luchtstroom:
710 CBM/hr
Stroomverbruik:
3-27W
NL
880 mm
330 mm
330 mm
LCD
Ventilatiesnelheid:
26 standen
Verstelbare hoogte:
55-88 cm
Display:
Digital LCD
display
Hoofdmaterialen:
ABS, PP
Model no.
DXCF04/05
21

Vielen Dank, dass Sie ein
Duux-Produkt gekauft haben.
Wir freuen uns, dass Sie sich entschieden haben, die Anleitung für Ihren neuen Duux-Ventilator zu
lesen. Viele Benutzer ignorieren Bedienungsanleitungen und versuchen, ohne sie klarzukommen.
Untersuchungen haben aber gezeigt, dass Menschen, die Bedienungsanleitungen lesen, schneller und
ezienter vorankommen als diejenigen, die nach dem Versuch-und-Irrtum-Prinzip vorgehen.
Wir von Duux glauben an die Wichtigkeit eines komfortablen und gesunden Wohnumfeldes. Die
Verbesserung Ihres Wohlbendens durch die Entwicklung ansprechender, funktionaler und eektiver
Produkte motiviert uns jeden Tag. Mit unserem Sortiment innovativer Produkte zur Luftbehandlung
möchten wir Ihnen die bestmögliche Luftqualität in Innenräumen bieten.
Dazu gehört auch dieser mobile Ventilator, der Sie von einer sanften Brise bis hin zu einer kräftigen
Windböe immer wieder überraschen wird. Der Duux Whisper Flex bietet beeindruckende 26 Einstellungen.
Deshalb können Sie immer den perfekten Luftstrom einstellen. Dank der horizontalen und vertikalen
Schwenkfunktion sorgt der Whisper Flex für angenehme Kühlung in jedem Raum. Wählen Sie selbst,
welchen Modus Sie bevorzugen: eine konstante Drehzahl, „natürlicher Wind” oder vielleicht den
Nachtmodus, bei dem Sie von der üsternden Brise in den Schlaf gewiegt werden. Das separat erhältliche
Docking- und Akkupack ermöglicht es Ihnen, das Gerät ohne Kabel frei zu bewegen.
Lesen Sie das Handbuch sorgfältig durch, um Ihren Whisper Flex-Ventilator optimal nutzen zu können.
22

Inhaltsverzeichnis
1. Produktübersicht 24
2. Installation 25
3. Einstellungen 27
4. Technische Daten 31
DE
23

1. Produktüberblick
h
Fernbedienungsempfänger
Teile
Handgri & Fernbedienungshalter
Schwenkmechanismus
Verstellbarkeit der
Halterung
LED-Steuerung
Jedes Teil ist in einem separaten Beutel verpackt, auf den im nächsten Kapitel Bezug genommen wird.
24
1
Bedienungsanleitung
2
Basiseinheit
3
Verlängerungsrohr
4
Motor
5
Frontgitter
6
Tools
7
Netzteil
8
Fernbedienung

2. Installation
1
Setzen Sie das hintere Gitter über den Motor
und ziehen Sie es mit dem Sicherungsring fest.
3
Verwenden Sie die Kunststoschraube, um die
Ventilatorügel zu sichern. Hinweis: drehen Sie
die Schraube gegen den Uhrzeigersinn fest, um
die Flügel zu sichern.
2
Befestigen Sie die Ventilatorügel am Motor.
4
Befestigen Sie das Frontgitter und drehen Sie
es leicht gegen den Uhrzeigersinn, bis der Pfeil
auf dem Gitter mit der Markierung auf der
linken Seite übereinstimmt.
DE
25

h
5
Befestigen Sie die mitgelieferte Schraube an der
Unterseite des Gitters, und verbinden Sie die
beiden Hälften fest miteinander.
7
(optional) Um die Höhe des Ventilators zu
vergrößern, verbinden Sie die Stifte des
Verlängerungsrohres mit den Buchsen an der
Basis und der Unterseite des Motors. Um das
Rohr zu lösen, drücken Sie die Knöpfe auf der
Unterseite und der Rückseite.
6
Befestigen Sie den Motor an der Steckerbuchse
der Basiseinheit. Die Befestigung des
Verlängerungsrohres wird in Punkt 7
beschrieben.
motor
basis
26

3. Einstellungen
Akkulaufzeit
(nur sichtbar, wenn an das Dock
angeschlossen – separat erhältlich)
Nachtmodus
Drehzahl
DE
Horizontale
Schwenkbewegung
Natürlicher Wind
Drehzahl
einstellen
h
Vertikale
Schwenkbewegung
Timerfunktion einstellen
Timer
27

3.1 Funktionen
Drehzahl
Der Duux Whisper Flex bietet beeindruckende
26 Einstellungen. Wenn das LED-Display „00”
anzeigt, ist das Gerät ausgeschaltet.
Horizontale Schwenkbewegung
Der Ventilator bewegt sich horizontal
(0 bis 90 Grad) von links nach rechts.
Vertikale Schwenkbewegung
Der Ventilator bewegt sich vertikal
(0 bis 100 Grad) von oben nach unten.
Timer
Mithilfe des Timers kann der Ventilator
automatisch ausgestellt werden. Der Timer
kann zwischen 0 und 12 Stunden ab dem
Zeitpunkt des ersten Einschaltens des
Ventilators eingestellt werden.
Natürlicher Wind
Der Ventilator dreht sich mit unterschiedlichen
Geschwindigkeiten, um natürliche Windverhältnisse zu simulieren.
Nachtmodus
Wenn Sie diesen Modus wählen, erlischt die
LED-Anzeige automatisch nach 10 Sekunden
für einen ungestörten Nachtschlaf.
Akkumodus
Trennen Sie den Ventilator von der
Dockingstation, um im Akkubetrieb zu
arbeiten.
28

Hinweis: Im Akkumodus ist die Drehzahl
bis Position 15 beschränkt. Je nach Einstellung
hält der Akku max. 18 Stunden. Verringern Sie
die Ventilatorgeschwindigkeit und aktivieren
Sie den Nachtmodus, um die Akkulaufzeit
zu verlängern (siehe untenstehende
Vergleichstabelle als Referenz).
Drehzahl Schwenkbewegung Akkulaufzeit*
1 Aus 18 H
Horizontal oder vertikal 8 H
Horizontal und vertikal 5.5 H
5 Aus 15.5 H
Horizontal oder vertikal 6.9 H
Horizontal und vertikal 4.7 H
10 Aus 11.8 H
Horizontal oder vertikal 5.6 H
Horizontal und vertikal 3.9 H
15 Aus 8 H
Horizontal oder vertikal 4.7 H
Horizontal und vertikal 3.1 H
Hinweis: la base y el paquete de pilas se
venden por separado.
DE
* Orientierungswerte Testbedingungen: 18 °C, 48 % Luftfeuchtigkeit.
29

3.2 Gebrauchsanweisung
h
1
Nehmen Sie die Teile aus der Verpackung
und montieren Sie das Gerät gemäß den
Anweisungen in dieser Anleitung.
2
Schließen Sie das Netzkabel an der
Eingangsbuchse an der Basiseinheit des
Produkts an. Stecken Sie dann den Stecker in
die Steckdose. Das LED-Display leuchtet auf
und zeigt „00“ an.
3
Drücken Sie den Steuerring einmal, um das
Gerät einzuschalten. Der Ventilator startet
und wird auf die zuletzt eingestellte Drehzahl
eingestellt.
4
Verwenden Sie den Aluminium-Steuerring der
LED-Anzeige, um zwischen den Einstellungen zu
wechseln.
Stromversorgung
Timer erhöhen
Ventilatordrehzahl verringern
Timer verringern
Horizontale oscillatie
5
Wenn im Display ein Symbol blinkt, können Sie
diese Einstellung durch Drücken des Steuerrings
einstellen und anpassen. Wenn die gewünschte
Position erreicht ist, drücken Sie den Steuerring
erneut, um die Auswahl zu bestätigen.
6
Bei der Einstellung der Ventilatordrehzahl
und der Timerfunktion blinkt die LED-Anzeige
weiter, bis die gewünschte Einstellung gewählt
ist. Drücken Sie anschließend erneut auf den
Kontrollring, um die Auswahl zu bestätigen.
7
Sobald die Funktion eingestellt ist, hört das
Symbol auf zu blinken und bleibt auf der Anzeige
sichtbar, solange diese Funktion aktiviert ist.
8
Halten Sie den Steuerring gedrückt, um das
Gerät auszuschalten.
Nachtmodus
Natürlicher Wind Nachtmodus
Ventilatordrehzahl erhöhen
Verticale oscillatie
30

4. Technische Daten
Gewicht:
5 kg
880 mm
330 mm
330 mm
LCD
Geräuschpegel:
13-50dBa
Luftstrom:
710 m3/St.
Stromverbrauch:
3 bis 27 W
Drehzahl:
26 velocidades
Höhenverstellung:
55-88 cm
Display:
Digital LCD
Hauptmaterialien:
ABS, PP
Modellnr.
DXCF04/05
DE
31

Merci pour avoir choisi
un article Duux.
Nous sommes très content que vous consultez les instructions de votre nouvel ventilateur portable Duux!
Beaucoup d’utilisateurs jettent les instructions et cherchent à comprendre le produit seul. Des études
montrent que ceux qui lisent les instructions utilisent l’article plus vite et plus ecace que ceux qui le font
sur base d’essais et erreurs.
Nous, chez Duux, nous croyons fortement à l’importance d’un environnement de vie confortable et saine.
Améliorer votre bien-être par des articles avec un design attractif, fonctionnels et eectifs; c’est notre
passion qui nous pousse tous les jours. Avec notre gamme de produits innovatrices de traitement d’air
notre objectif est de vous donner la meilleure qualité d’air possible.
Découvrez le ventilateur qui vous surprendra, soit avec une brise légère, soit avec une forte rafale de vent
ou toutes les variations possibles entre les deux. Le Duux Whisper Flex compte pas moins de 26 positions.
Cela vous permettra donc de toujours trouver l’intensité parfaite de débit d’air. Grâce à sa fonction
d’oscillation horizontale et verticale, le Whisper Flex diuse une agréable fraîcheur dans toute la pièce.
Choisissez la position que vous préférez : une vitesse, « vent naturel » ou, par exemple, le mode nuit où
vous êtes bercé par la brise. La station d’accueil et la batterie disponibles séparément vous permettent de
déplacer librement l’appareil sans l.
Veuillez lire attentivement le manuel pour tirer le meilleur parti de votre ventilateur Whisper Flex.
32

Table des
matières
1. Aperçu du produit 34
2. Installation 35
3. Fonctionnalités et fonctionnement 37
4. Spécications techniques 41
FR
33

1. Aperçu du produit
h
Récepteur de
télécommande
Pièces
Poignée, Support de télécommande
Mécanisme d’oscillation
Tube de rallonge
Panneau de contrôle LED
Chaque pièce est emballée dans un sac séparé auquel il est
fait référence dans le chapitre suivant.
34
1
Mode d’emploi
2
Unité de base
3
Tube de rallonge
4
Tube de rallonge
5
Grille de calandre
6
Outils
7
Adaptateur secteur
8
Télécommande

2. Installation / montage
1
Placez l’arrière de la grille sur l’entraînement
du moteur et serrez avec l’anneau de
fermeture. la xation du tube de rallonge.
3
Utilisez la vis en plastique pour le pales du
ventilateur. Remarque: serrez la vis fermement
dans le sens inverse des aiguilles d’une montre.
2
Placez les pales du ventilateur sur
l’entraînement du moteur.
4
Placez l’avant de la grille et tournez légèrement
la grille vers la droite de façon à ce que la èche
soit la même que sur la ligne gauche.
FR
35

5
h
Serrez fermement la vis fournie sur la face
inférieure de la grille pour relier les deux
moitiés ensemble.
7
(en option) Pour augmenter la hauteur du
ventilateur, connectez les broches mâles du tube
de rallonge aux connecteurs femelles sur la base
et le côté inférieur du moteur. Pour libérer le tube,
appuyez sur les boutons situés en bas et à l’arrière.
6
Reliez le moteur à l’entrée du connecteur sur
l’unité de base. Reportez-vous au point 7 pour.
barre
base
36

3. Fonctionnalités
Autonomie de la pile
(visible uniquement lorsqu’elle est
connectée à la station d’accueil - vendue
séparément)
Vitesse de ventilation
Mode nuit
Vent naturel
Réglage de la
vitesse de ventilation
h
Oscillation horizontale
FR
Oscillation verticale
Réglage de la fonction
de minuterie
Minuterie
37

3.1 Explication des fonctionnalités
Vitesse de ventilation
ventilateur Duux Whisper compte 26 vitesses
de ventilation. Lorsque l’achage LED indique
« 00 », l’appareil est éteint.
Oscillation horizontale
le ventilateur tourne horizontalement de
gauche à droite entre 0-90 degrés.
Vertical oscillation
le ventilateur tourne verticalement de haut en
bas entre 0-100 degrés.
Minuteur
se règle lui-même lorsque le ventilateur
s’arrête automatiquement. Cette durée peut
être comprise entre 0 et 12 heures.
Vent naturel
le ventilateur tourne à diérentes vitesses
pour imiter un vent naturel.
Mode nuit
En sélectionnant ce mode, l’achage LED
s’éteint automatiquement après 10secondes
pour une nuit de sommeil tranquille.
Mode batterie
Détachez le ventilateur de la station d’accueil
pour fonctionner en mode batterie.
38

Remarque : En mode batterie, la vitesse
du ventilateur est limitée à la position 15. En
fonction du réglage, la durée de vie de la pile
au maximum de 18 heures. Réduisez la vitesse
de ventilation et activez le mode nuit pour
augmenter la durée de vie de la batterie. Voir
le tableau de comparaison ci-dessous pour
référence :
Vitesse du ventilateur Oscillation Autonomie de la pile*
1 Désactivé 18 H
Horizontal ou Vertical 8 H
Horizontal & Vertical 5.5 H
5 Désactivé 15.5 H
Horizontal ou Vertical 6.9 H
Horizontal & Vertical 4.7 H
10 Désactivé 11.8 H
Horizontal ou Vertical 5.6 H
Horizontal & Vertical 3.9 H
15 Désactivé 8 H
Horizontal ou Vertical 4.7 H
Horizontal & Vertical 3.1 H
Remarque : la station d’accueil et la batterie
sont vendues séparément.
FR
* Pour référence seulement. Conditions d’environnement d’essai : 18°C, 48% d’humidité.
39

3.2 Explication du fonctionnement
h
de l’achage LED
1
Retirez les pièces de l’emballage et assemblez
l’appareil en suivant les instructions de ce
manuel.
2
Connectez le câble d’alimentation à l’entrée
sur la base du produit. Insérez ensuite la
che dans la prise de courant. L’achage LED
s’allume et indique « 00 ».
3
Appuyez une fois sur la bague de commande
pour allumer l’appareil. Le ventilateur s’anime
et passe ensuite par défaut au réglage de
vitesse le plus récent.
4
Utilisez l’anneau de commande en aluminium
de l’écran LED pour passer d’un réglage à
l’autre.
Power
Augmenter la minuterie
Réduire la vitesse
du ventilateur
Abaisser le minuteur
Oscillation horizontale
5
Lorsqu’une icône clignote, vous pouvez ajuster
et régler cette fonctionnalité en appuyant sur
l’achage LED. Lorsque la position souhaitée
est atteinte, appuyez à nouveau sur l’achage
LED pour conrmer la sélection.
6
Lors du réglage de la vitesse de ventilation et
de la fonction de minuterie, l’achage LED
continue de clignoter jusqu’à ce que le réglage
désiré soit sélectionné. Appuyez de nouveau
sur l’achage LED pour conrmer la sélection.
7
Lorsque la fonction est réglée, l’icône cesse
de clignoter et reste visible tant que cette
fonction est activée.
8
Maintenez la bague de commande enfoncée
pour éteindre l’appareil.
Mode nuit
Vent naturel
Augmenter la vitesse de ventilation
Oscillation verticale
40

4. Spécications techniques
Poids:
5 kg
Niveau sonore:
13-50dBa
880 mm
330 mm
330 mm
LCD
Flux d’air:
710 CBM/hr
Consommation:
3-27W
Vitesse de ventilation:
26 standen
Hauteur réglable:
51-88 cm
Display:
Digital LCD
display
Principaux matériaux:
ABS, PP
Model no.
DXCF04/05
FR
41

Gracias por haber
escogido Duux.
¡Nos complace que haya decidido leer las instrucciones para su nuevo ventilador portátil Duux! Muchos
usuarios se toman las instrucciones a la ligera y tratan de arreglárselas solos. Sin embargo, los estudios
nos indican que quienes leen las instrucciones se ponen al corriente más rápida y ecientemente que
aquellos que lo intentan por ensayo y error.
En Duux creemos en la importancia de un ambiente cómodo y saludable. Mejorar su bienestar diseñando
productos atractivos, funcionales y ecaces es la pasión que nos mueve cada día. Con nuestra gama de
productos innovadores para el tratamiento del aire deseamos ofrecerle la mejor calidad posible de aire
interior.
Descubra al ventilador portátil que le sorprenderá con una suave brisa, una intensa ráfaga de viento
y todas las modalidades intermedias. Duux Whisper Flex no ofrece menos de 26conguraciones. De
esta manera encontrará siempre el ambiente de ventilación perfecto. Gracias a la función de oscilación
horizontal y vertical, Whisper Flex proporciona una agradable sensación de frescor en cualquier
habitación. Elija usted mismo el modo que preera: una velocidad ja, «viento natural» o quizás el modo
nocturno, en el que la brisa susurrante lo adormezca. La base y el paquete de pilas, disponibles por
separado, le permiten mover libremente el dispositivo sin necesidad de cables.
Lea el manual cuidadosamente para sacar el máximo provecho de su ventilador Whisper Flex.
42

Índice
1. Vista general del producto 44
2. Instalación 45
3. Conguración 47
4. Datos técnicos 51
ES
43

1. Vista general del producto
h
Mango & Soporte del mando a distancia
Mecanismo de oscilación
Tubo de prolongación
Receptor de control remoto
Panel de control LED
Piezas
Cada pieza se empaqueta en una bolsa aparte a la que se
hace referencia en el capítulo siguiente.
44
1
Manual de instrucciones
2
Unidad base
3
Tubo de prolongación
4
Motor
5
Rejilla delantera
6
Herramientas
7
Adaptador de corriente
8
Mando a distancia

2. Instalación
1
Coloque la rejilla trasera sobre el motor y
apriételo con el anillo de bloqueo.
3
Utilice el tornillo de plástico para jar las aspas
del ventilador. Nota: para jarlo, gire el tornillo
rmemente en sentido contrario a las agujas
del reloj.
2
Fije las aspas del ventilador al motor.
4
Coloque la rejilla delantera y gírela un poco,
en sentido contrario a las agujas del reloj,
hasta que la echa de la rejilla se alinee con el
marcador del lado izquierdo.
ES
45

h
5
Coloque el tornillo suministrado en la parte
inferior de la rejilla y conecte rmemente las
dos mitades.
7
(opcional) Para ampliar la altura del ventilador,
conecte las clavijas macho del tubo de
prolongación a los conectores hembra de la
base y de la parte inferior del motor. Para soltar
el tubo, pulse los botones de la parte inferior y
posterior.
6
Conecte el motor a la entrada del conector
en la unidad base. Consulte el punto 7 para la
jación del tubo de prolongación.
barre
base
46

3. Conguración
Duración de la batería
(solo visible cuando está conectada a la
base, se vende por separado)
Velocidad de ventilación
Modo nocturno
Viento natural
Ajuste de la
velocidad de
ventilación
h
Oscilación horizontal
Oscilación vertical
Ajuste de la función de
temporizador
Temporizador
ES
47

3.1 Funciones
Velocidad de ventilación
Duux Whisper Flex tiene 26velocidades.
Cuando la pantalla LED muestra ‘00’, el
dispositivo se apaga.
Oscilación horizontal
el ventilador gira horizontalmente, de 0 a 90
grados, de izquierda a derecha.
Oscilación vertical
el ventilador gira verticalmente, 0-100grados,
de arriba hacia abajo.
Temporizador
el temporizador se puede ajustar para apagar
el ventilador automáticamente. Permite una
conguración de entre 0 y 12 horas desde el
momento en que se enciende el ventilador
por primera vez.
Viento natural
el ventilador gira a diferentes velocidades para
simular las condiciones naturales del viento.
Modo nocturno
seleccionando este modo, la pantalla LED se
apagará automáticamente a los 10segundos
para no interrumpir el sueño nocturno.
Modo de batería
desconecte el ventilador de la base para que
funcione en modo batería.
48

Note: En el modo de batería, la velocidad
del ventilador está limitada a la posición 15. En
función de la conguración, la batería durará
un máximo de 18 horas. Reduzca la velocidad
de ventilación y active el modo nocturno para
aumentar la duración de la batería. Vea la
siguiente tabla comparativa para referencia:
Velocidad del ventilador Oscilación Duración de la batería*
1 Discapacitado 18 H
Horizontal o Vertical 8 H
Horizontal & Vertical 5.5 H
5 Discapacitado 15.5 H
Horizontal o Vertical 6.9 H
Horizontal & Vertical 4.7 H
10 Discapacitado 11.8 H
Horizontal o Vertical 5.6 H
Horizontal & Vertical 3.9 H
15 Discapacitado 8 H
Horizontal o Vertical 4.7 H
Horizontal & Vertical 3.1 H
Nota: la base y el paquete de pilas se
venden por separado.
ES
* Solo por referencia. Condiciones ambientales de prueba: 18⁰C, 48% de humedad.
49

3.2 Explication du fonctionnement
h
de l’achage LED
1
Retire las piezas del embalaje y monte el
dispositivo de acuerdo con las instrucciones de
este manual.
2
Conecte el cable de alimentación al terminal
de entrada de la base del producto. A
continuación, inserte el enchufe en la toma
de corriente. La pantalla LED se encenderá y
mostrará ‘00’.
3
Pulse el anillo de control una vez para encender
el producto. El ventilador empieza a funcionar
y, a partir de ese momento, adopta de forma
predeterminada la conguración de velocidad
más reciente.
4
Utilice el anillo de control de aluminio de la
pantalla LED para pasar de una conguración a
otra.
Potencia
Más tiempo
Menos velocidad
de ventilación
Menos tiempo
5
Cuando un icono de la pantalla parpadea, puede
establecer y ajustar esta conguración pulsando
el anillo de control. Cuando obtenga la posición
deseada, pulse de nuevo el anillo de control para
conrmar la selección.
6
Cuando se ajusta la velocidad del ventilador
y la función de temporizador, la pantalla LED
continuará parpadeando hasta que se seleccione
la conguración deseada. A continuación, pulse
de nuevo el anillo de control para conrmar la
selección.
7
Una vez congurada la función, el icono dejará
de parpadear y permanecerá visible en pantalla,
mientras esta función esté activada.
8
Mantenga pulsado el anillo de control para
apagar el dispositivo.
Modo nocturno
Viento natural
Más velocidad de ventilación
50
Oscilación horizontal
Oscilación vertical

4. Datos técnicos
Peso:
5 kg
Nivel de ruido:
13-50dBa
Flujo de aire:
710 CBM/hr
Consumo de energía:
3-27W
ES
880 mm
330 mm
330 mm
LCD
Velocidad del ventilador:
26 velocidades
Altura ajustable:
51-88 cm
Pantalla:
LCD digital
Principales tipos de
material:
ABS, PP
Modelo n.º
DXCF04/05
51

52
Designed in The Netherlands bij Duux International BV. Made in P.R.C.
Duux International BV, P.O. Box 145, 5400 AC Uden Netherlands, www.duux.com
© 2019 Duux. All rights reserved.
DUUX® is a trademark of Duux International BV,
registered in the EU and other countries.
The brand cited belongs exclusively to the respective owners.
Specications are subject to modication without notice.
 Loading...