

Page 1

NINA, 1492
SCALE: 1/72
Length: 340mm
Width: 100mm
Height: 360mm
HISTORY:
The Nina was a ship in a fleet of Christopher Columbus on his voyage to America. Other ships were
flagship Santa Maria and Pinta. The voyage of the Christopher Columbus starts in August 1492 in
port Palos de la Frontera. After two months at 12 October sailors saw a land. There are no exact
drawings of the Nina but it is supposed that a length of hull of the ship was about 20 meters and
displacement about 100tons.
Recommended tool list:
1) Modeler’s knife or scalpel
2) Mini drilling machine
3) Drill bits
4) Selection of abrasive paper
5) Scissors
6) Pliers
7) Clothes pegs or crocodile clips
8) Pencil
9) Rule
10) Set of needle files
12) Sewing machine
13) Electric plank bender
Before you begin:
Before you begin to build the model it is necessary with a vengeance read building instructions and
plans. Also chronology of assembly steps is necessary to keep. You check if the parts go together
before you glue it respectively you make any corrections with sandpaper. During the gluing,
painting, lacquering and at work with another chemical materials is necessary well ventilated in
your working room. You cut the parts from sheet until actually required for fitting. You cut by knife
only in direction off ward your body so that you head to injury risk.
Coloring:
Medieval ships were protected against influence of salt water and woodworms by a mixture of tar
and thanks to it the hull of ships was a reddish-brown or brownish-black color. This effect it is
possible to get by staining of the wood by dark wood stain. It is recommended to use the wood stain
before gluing of the parts. Decks of the ships were probably in naturally color of wood. Anchors
and other metal parts were a black color.
Bending of wooden strips:
The Wooden strips will be more flexible if you will boil it in hot water about 10-15 minutes. You
can bend the strips along any cylindrical area but ideal is using of special plank bender (it would be
best to use electric plank bender). If you need to do very small radius so you must bend it in more
steps.
Work with photo etched parts:
Very carefully cut out parts by a pliers or scissors from a sheet. The photo etched parts glue by fastdrying adhesive.
Page 2
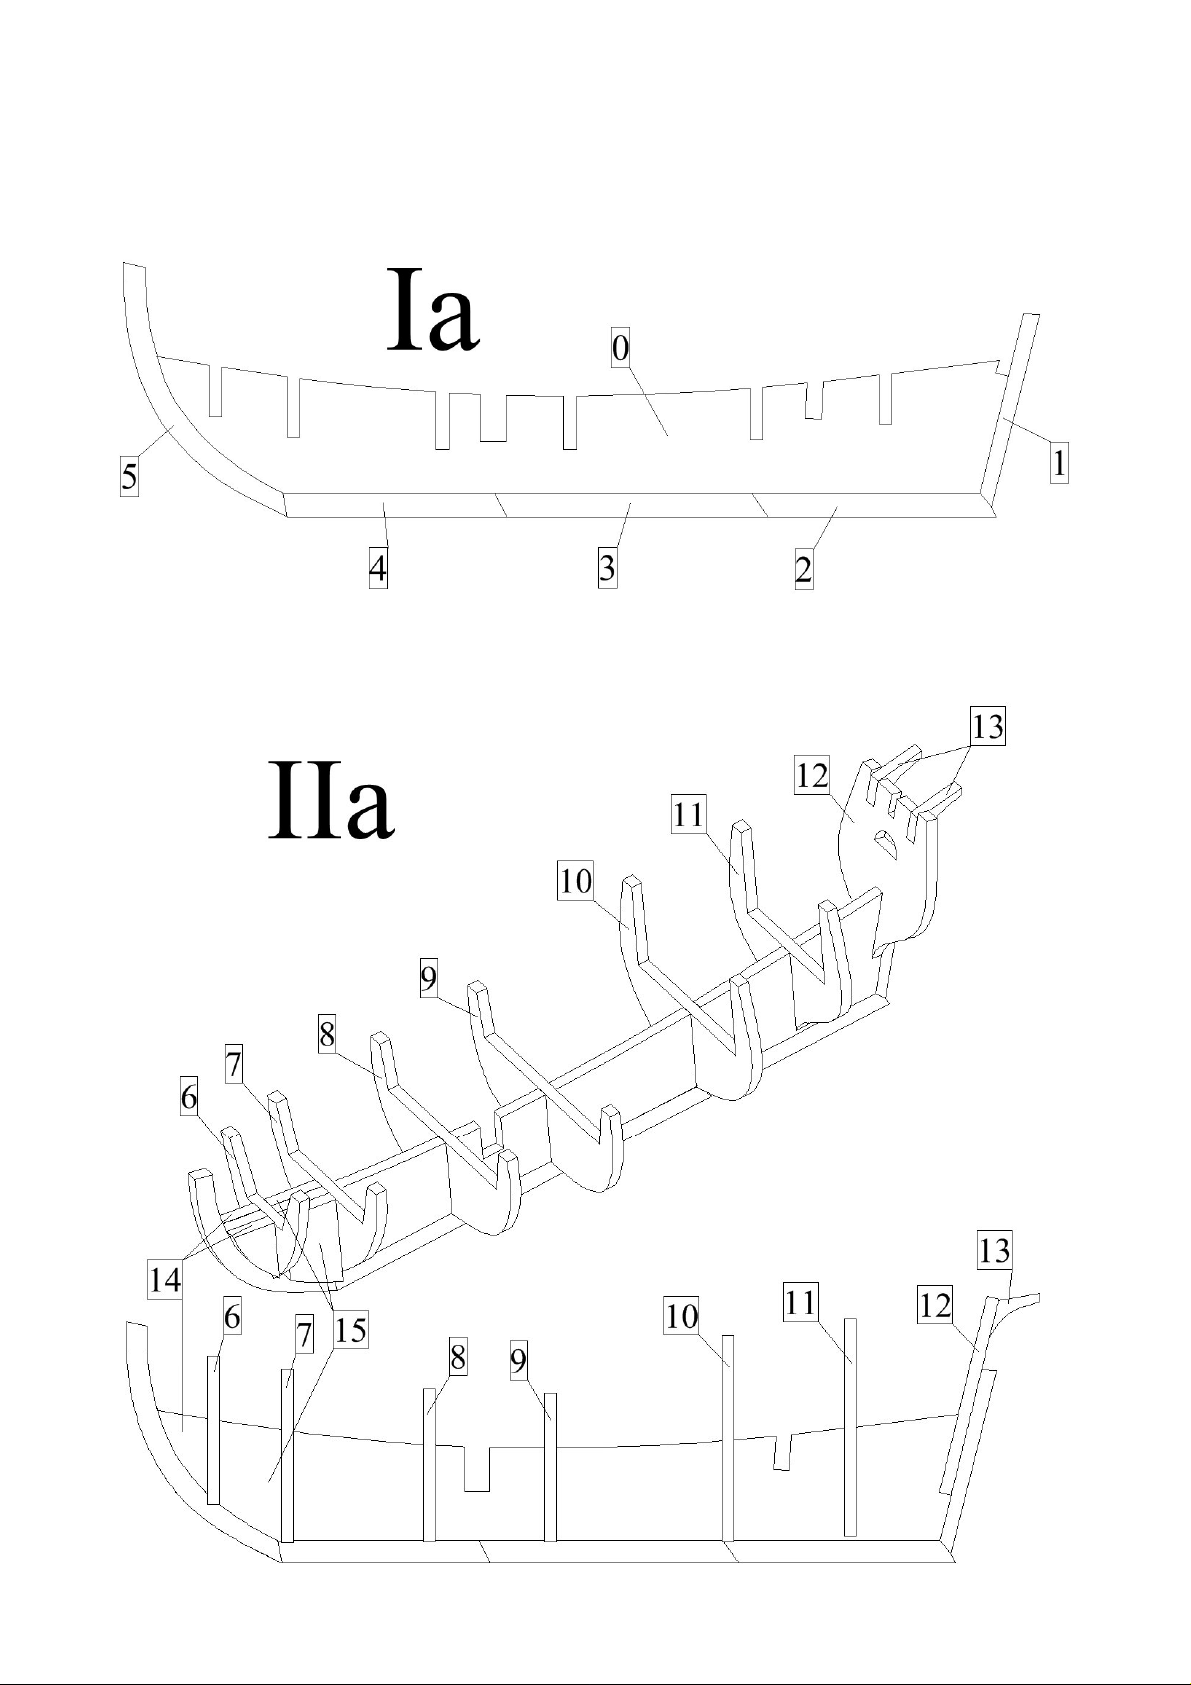
Model building process:
I) Keel:
a) First glue a keel which is compound from parts 0-5.
II) Framing of a hull:
a) First run frames 6-12 to the keel 0 but do not glue them yet! Then glue to the keel reinforcements
14 and 15 to the keel and reinforcements 13 to the frame 12.
Page 3
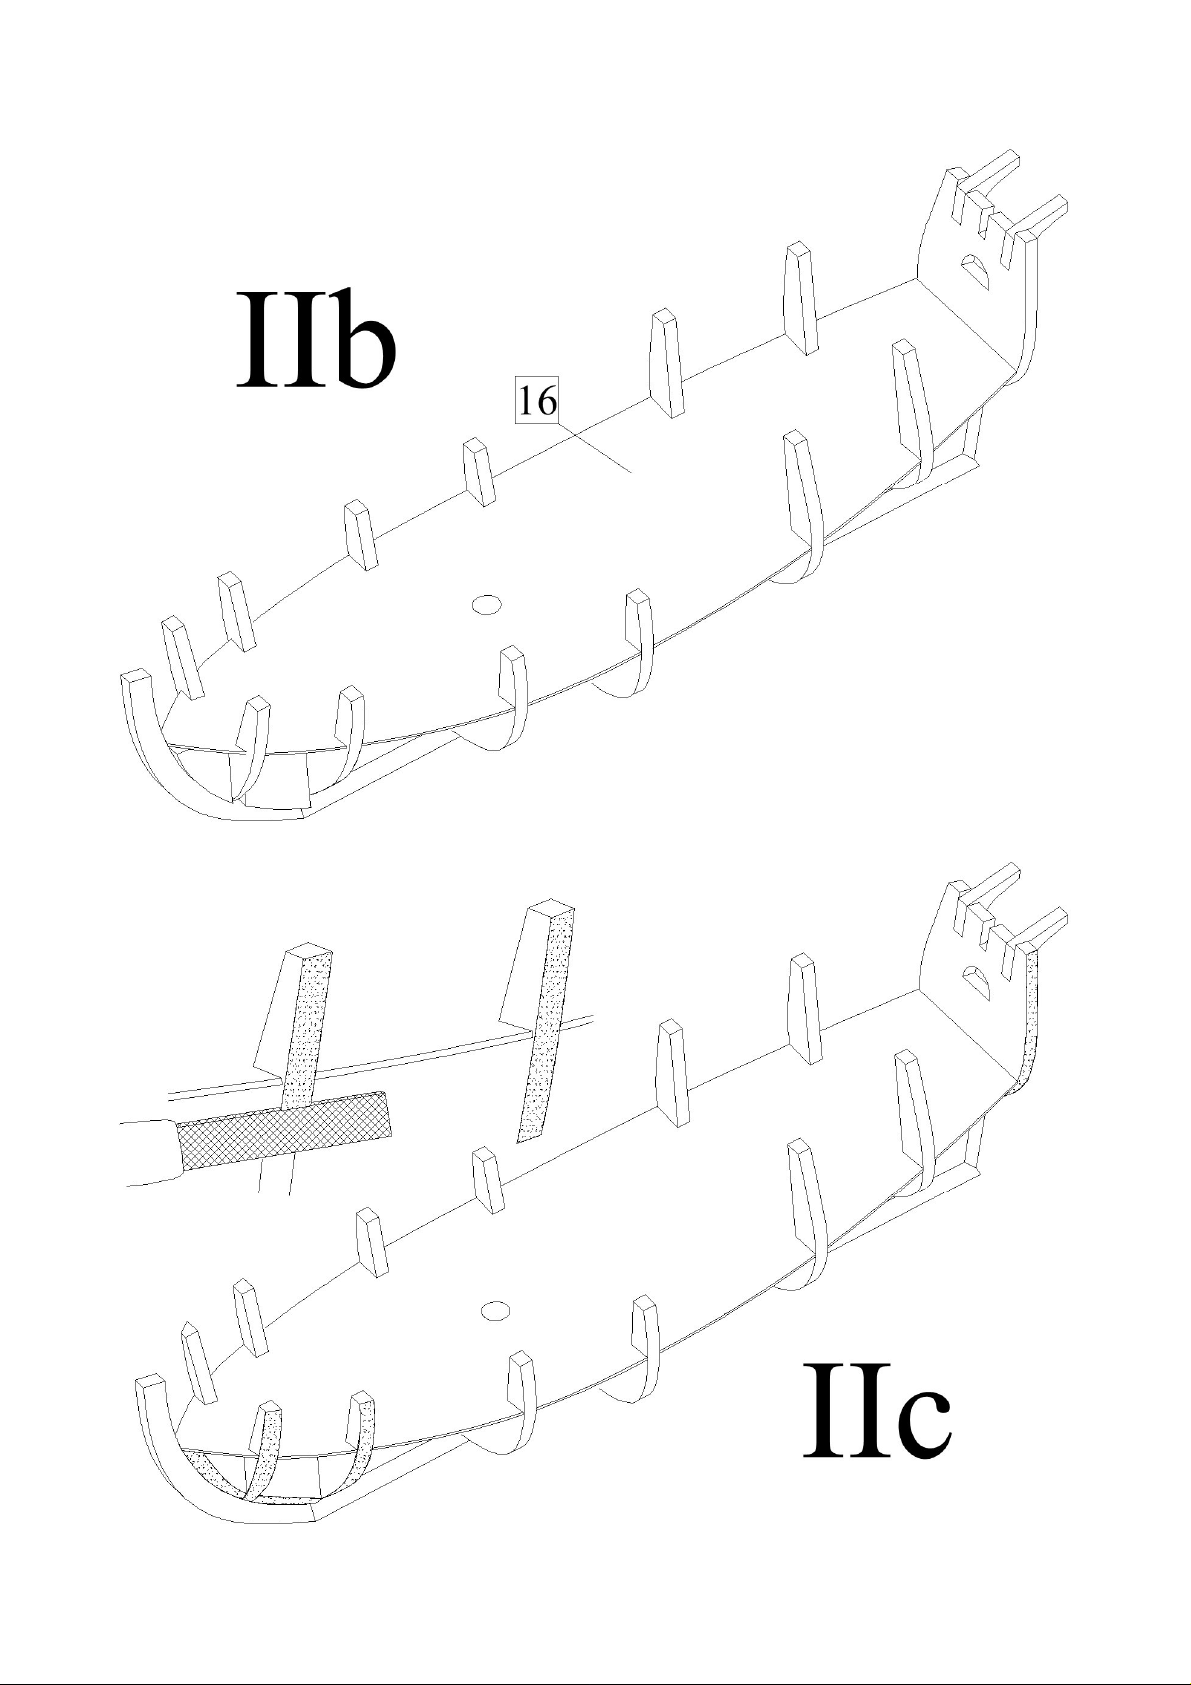
b) First run a deck 16 to the frames and then glue all frames, deck and keel together.
c) Sharpen frames and reinforcement as it is shown below.
Page 4
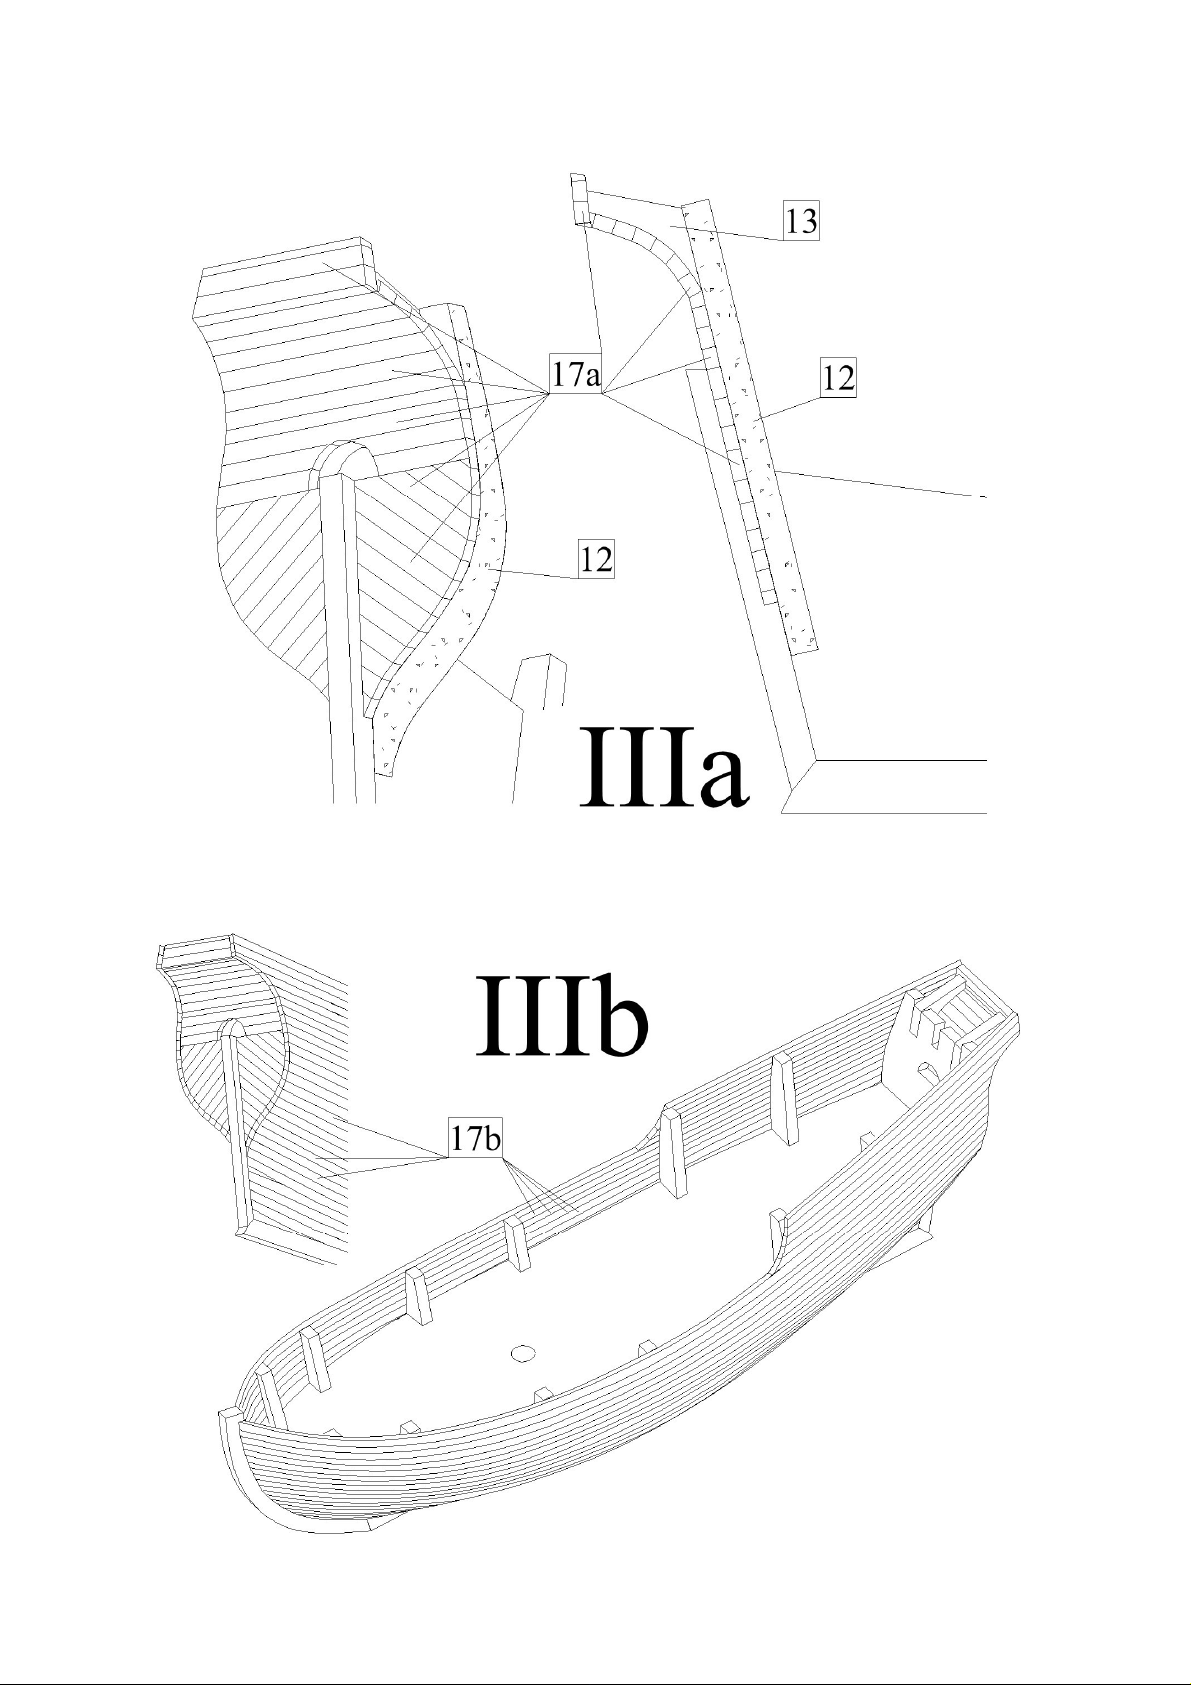
III) Hull planking:
a) First plank a stern of the ship by strips 17a.
b) Plank a hull of the ship by strips 17b. Before planking bend the strips into required shape (A
procedure of the strip bending is described in a start of this document). Start the planking from stem
with strips on upper edge of the hull. Then continue with planking to the stern.
Page 5
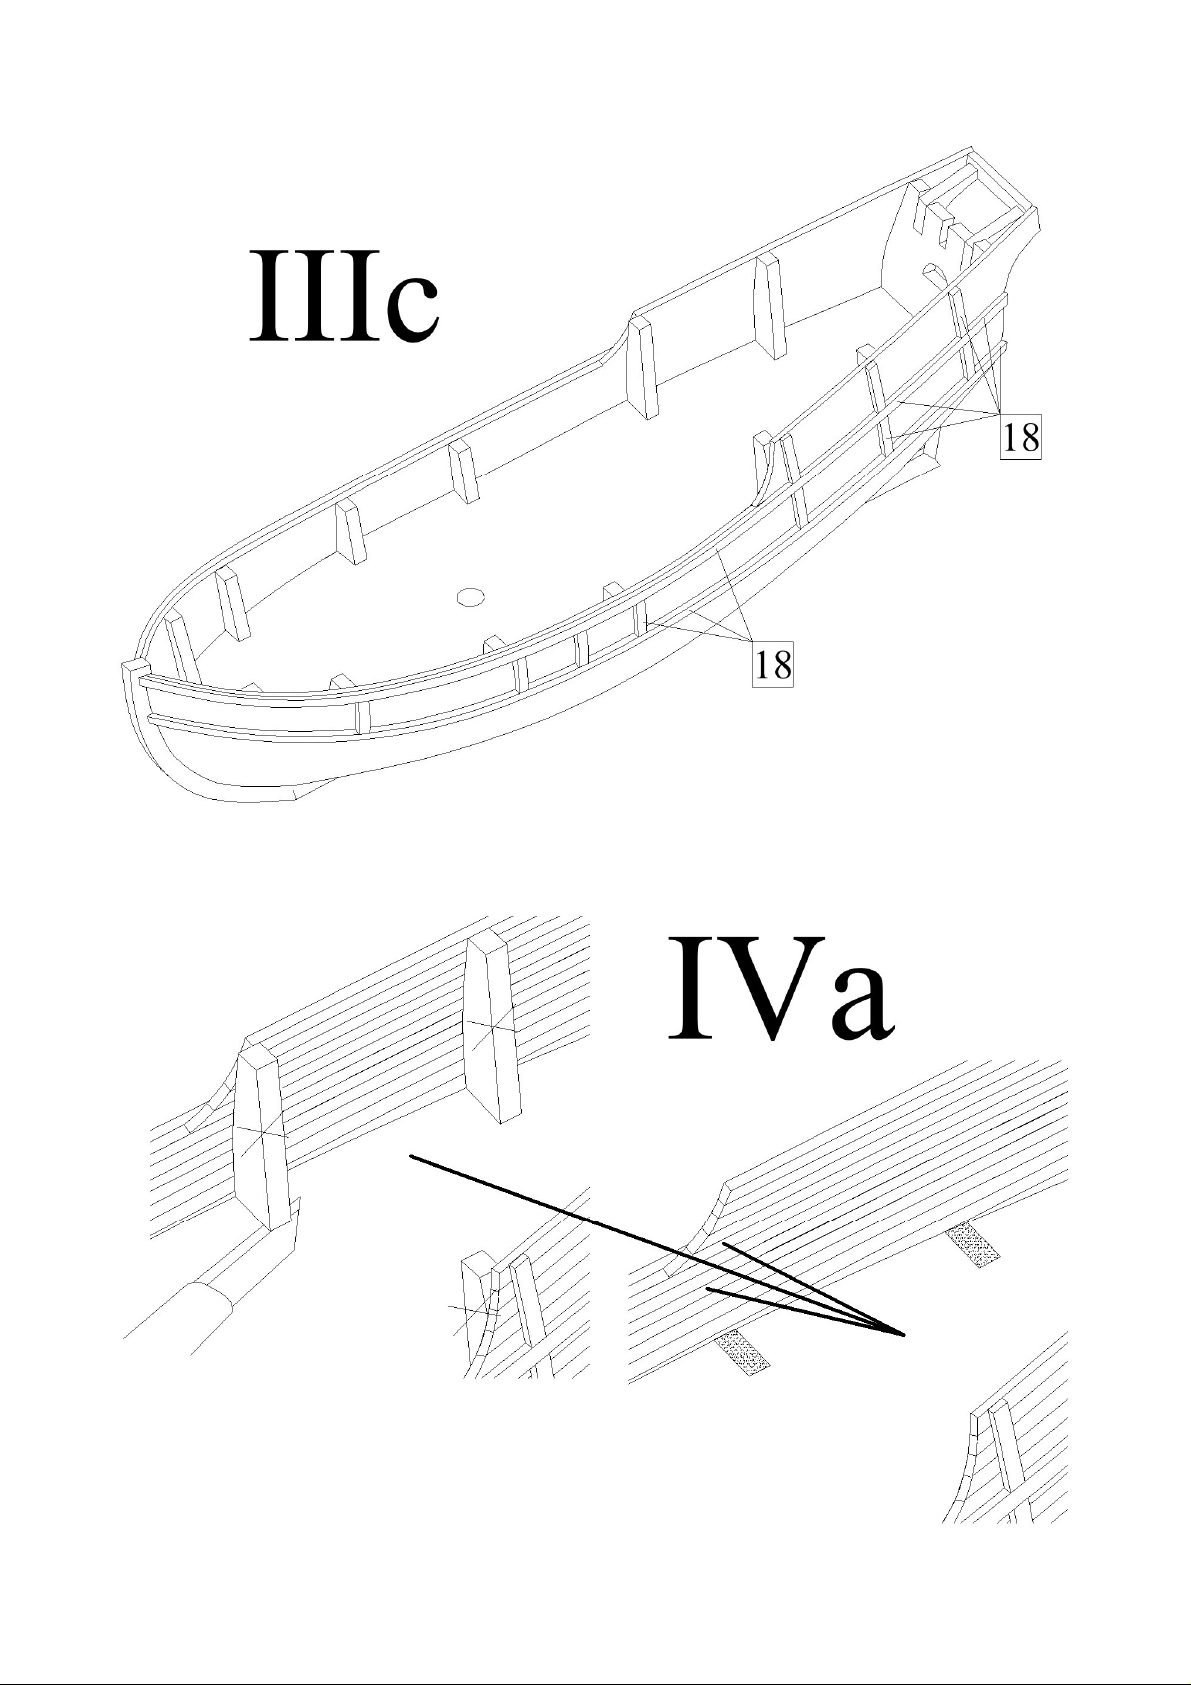
c) Glue wales 18 to the sides of the hull.
IV) Deck:
a) First cut out parts of the frames which stick out from the deck and then sand remains of them by
a sand paper.
Page 6
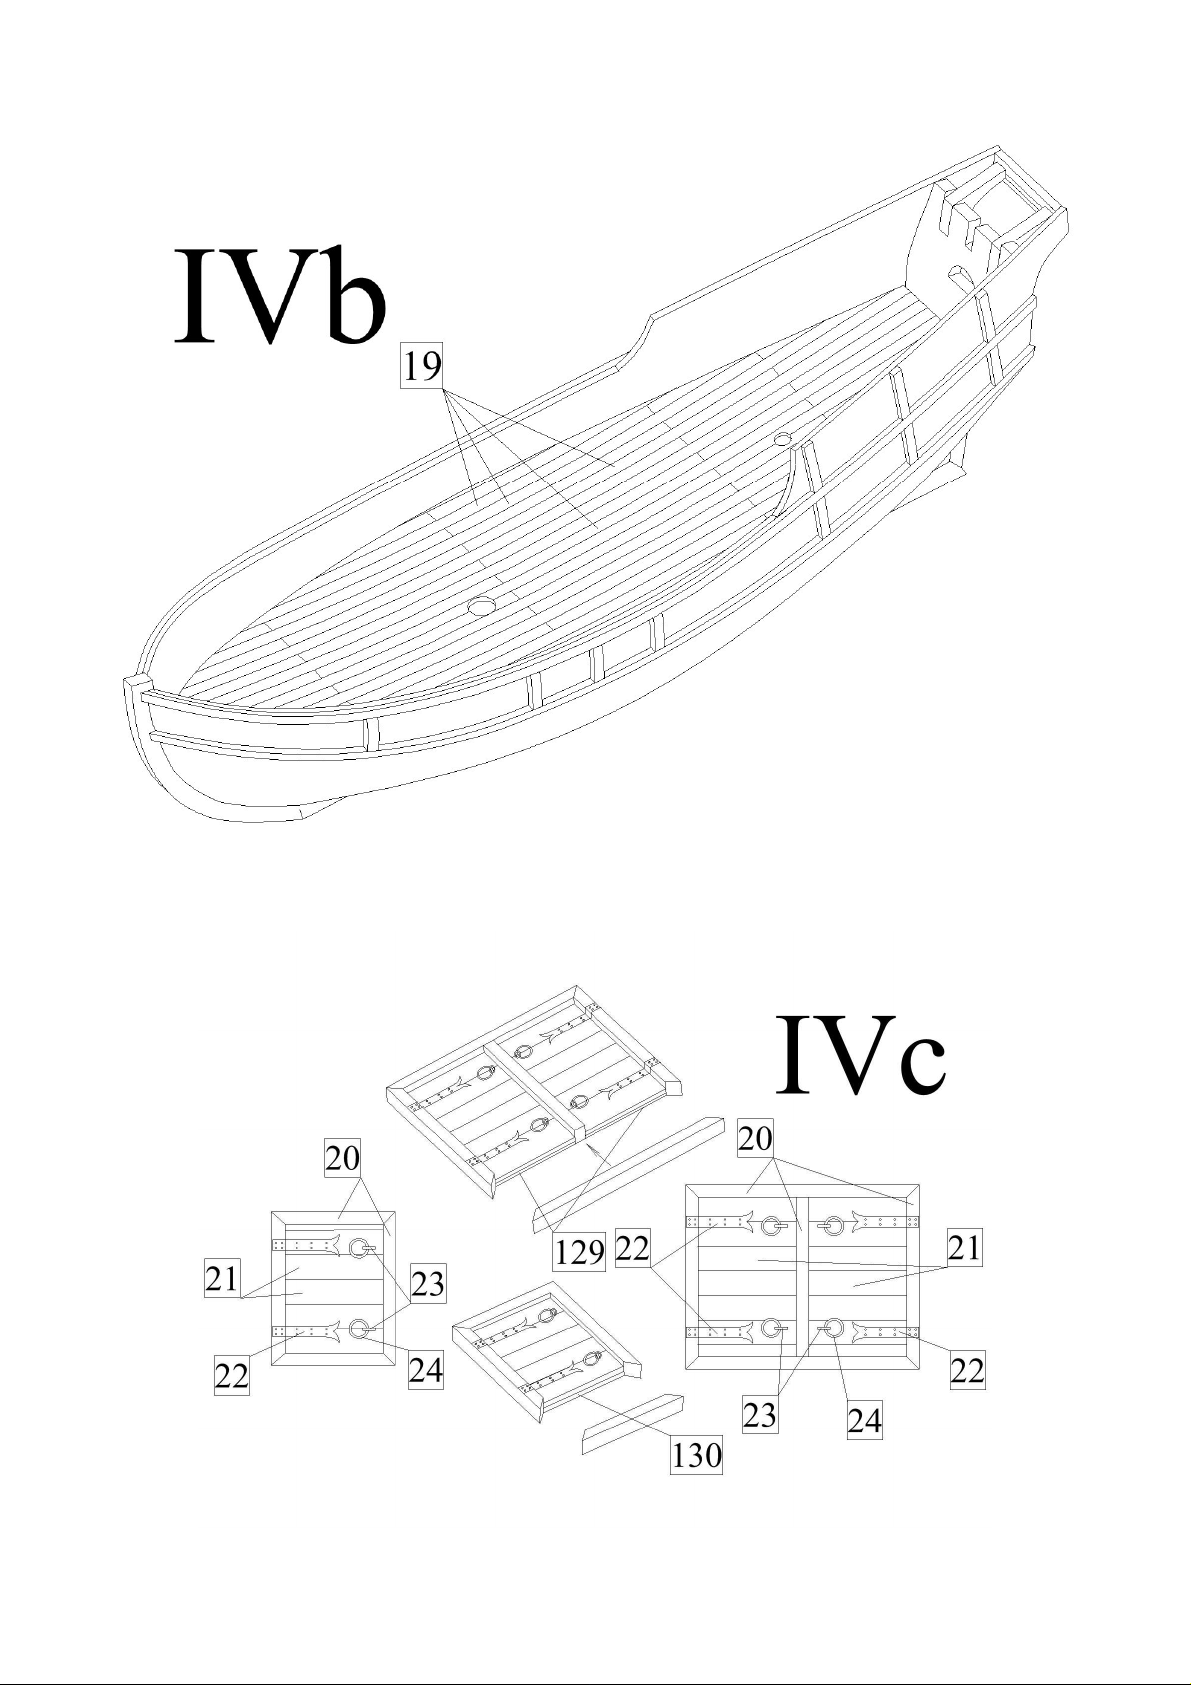
b) Plank the deck by part 19.
c) Make hatches on the deck. First glue frames of the hatches from parts 20, 129 and 130. Then glue
this frames to the deck. Then plank the hatches by strips 21. Finally glue parts 22-24 to the hatches.
The hatches are in 1:1 scale shown in the plan 4.
Page 7
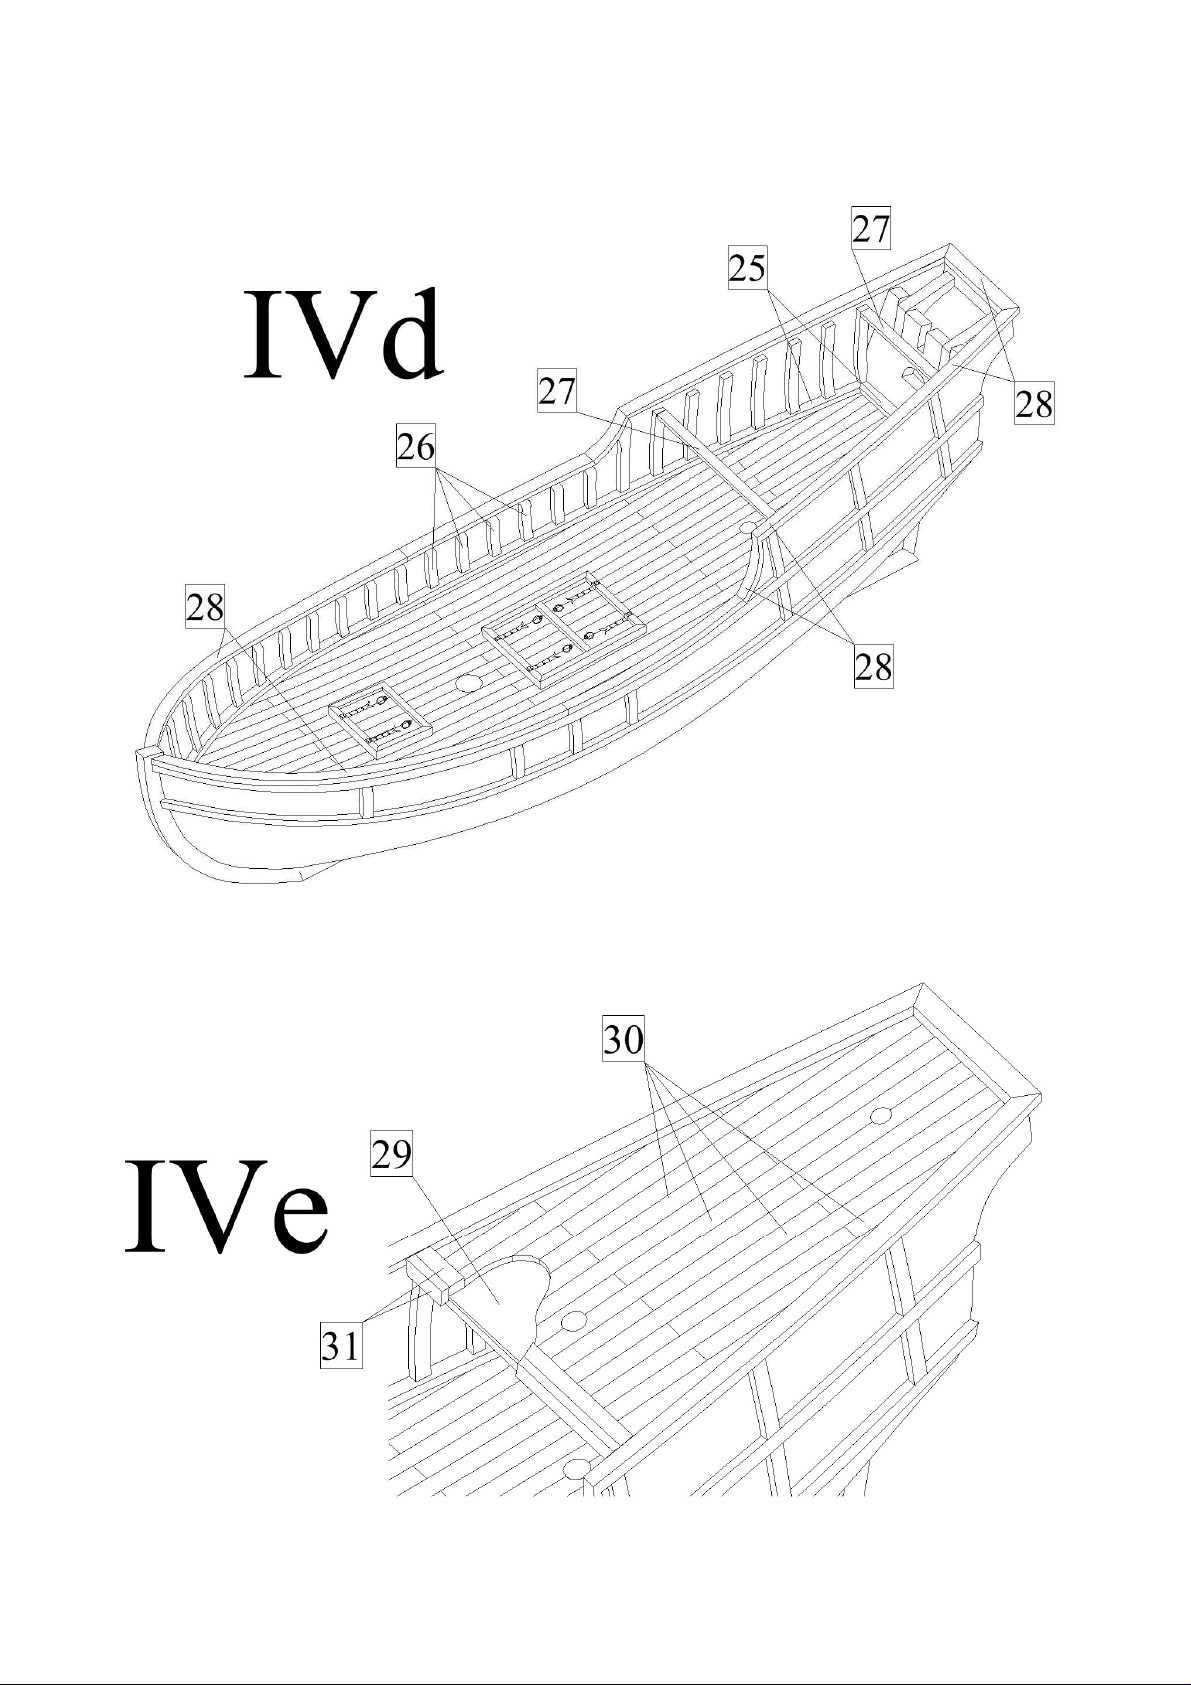
d) Edge the deck by waterways 25. Then glue to the inner sides of the hull frames 26. Then glue
transverse beams 27 to the stern. Finally glue edging 28 to the hull.
e) First glue a deck 29 to the transverse beams 27. Then plank the deck by strips 30 and then edge it
by strips 31.
Page 8
V) Details:
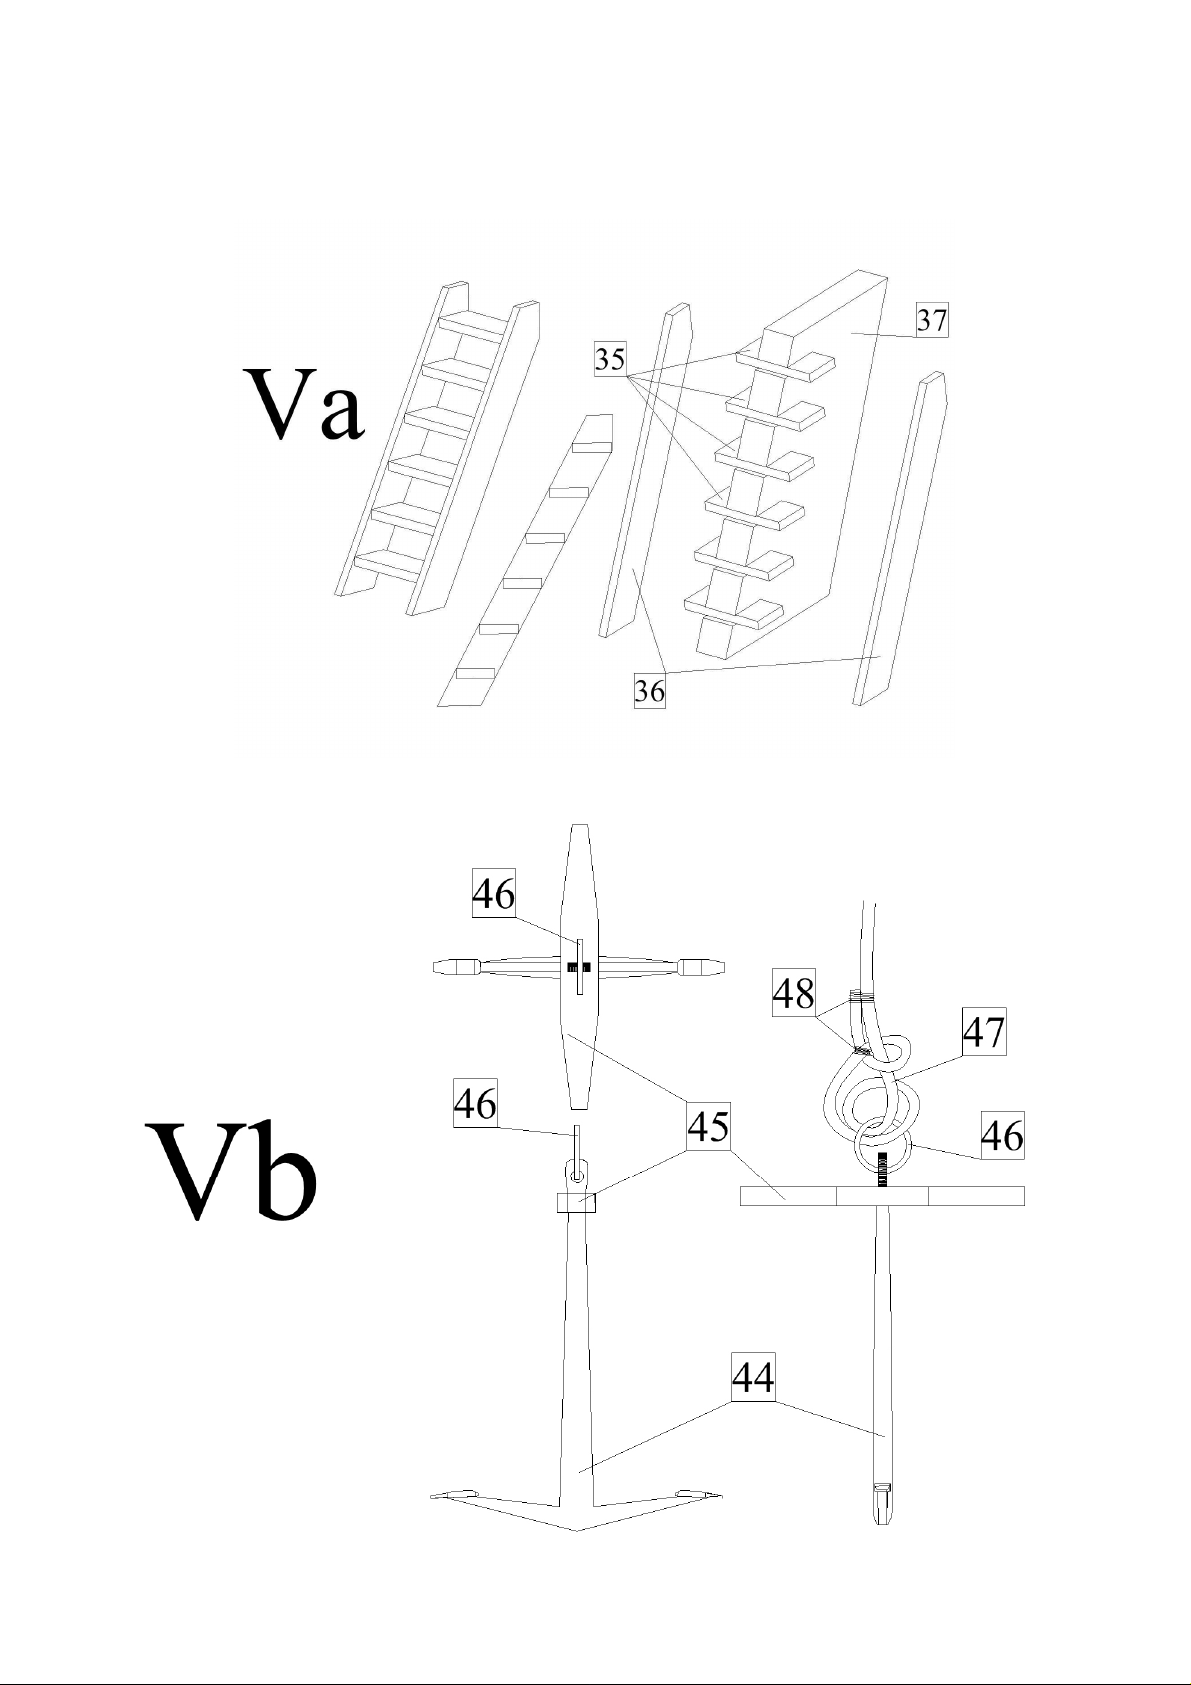
a) Make stairs. First run parts 35 into a preparation 37 but do not glue them! Then glue side parts 36
to the parts 35. Finally glue the stairs to the deck. An exact position of the stairs is in 1:1 scale
shown in the plan 1.
b) Make anchors. Glue together parts 44 and 45. Then run a ring 46 through the hole in the anchor.
Finally tie a rope 47 to the ring 46.
Page 9
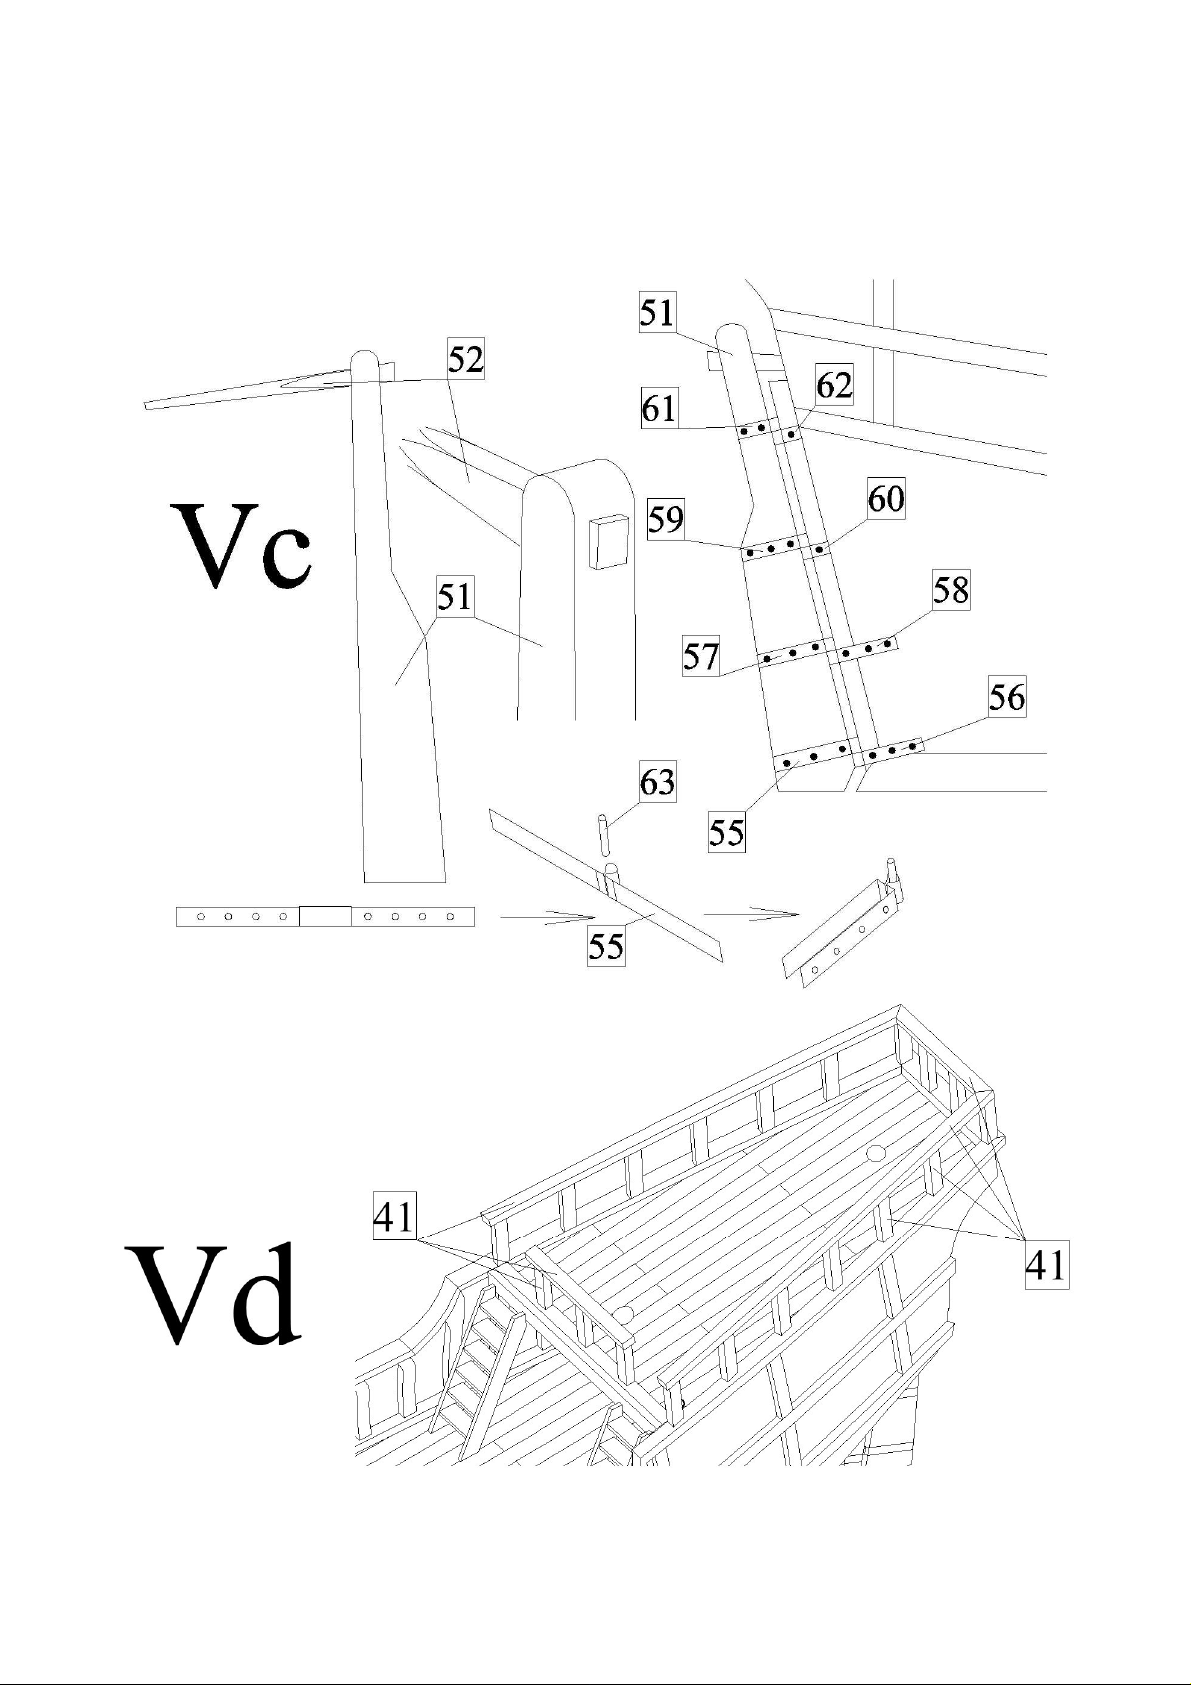
c) Make a rudder. By using of a sand paper make an arm of the rudder 52 from strips 2x2mm and
then glue it to the rudder 51. Then glue hinges of the rudder 56, 58, 60, 62 to the stern and hinges
55, 57, 59 and 61 to the rudder. Then glue pins 63 to the hinges 55, 57, 59 and 61 and then whole
rudder install to the stern.
d) Glue railing 41 to the poop deck.
Page 10
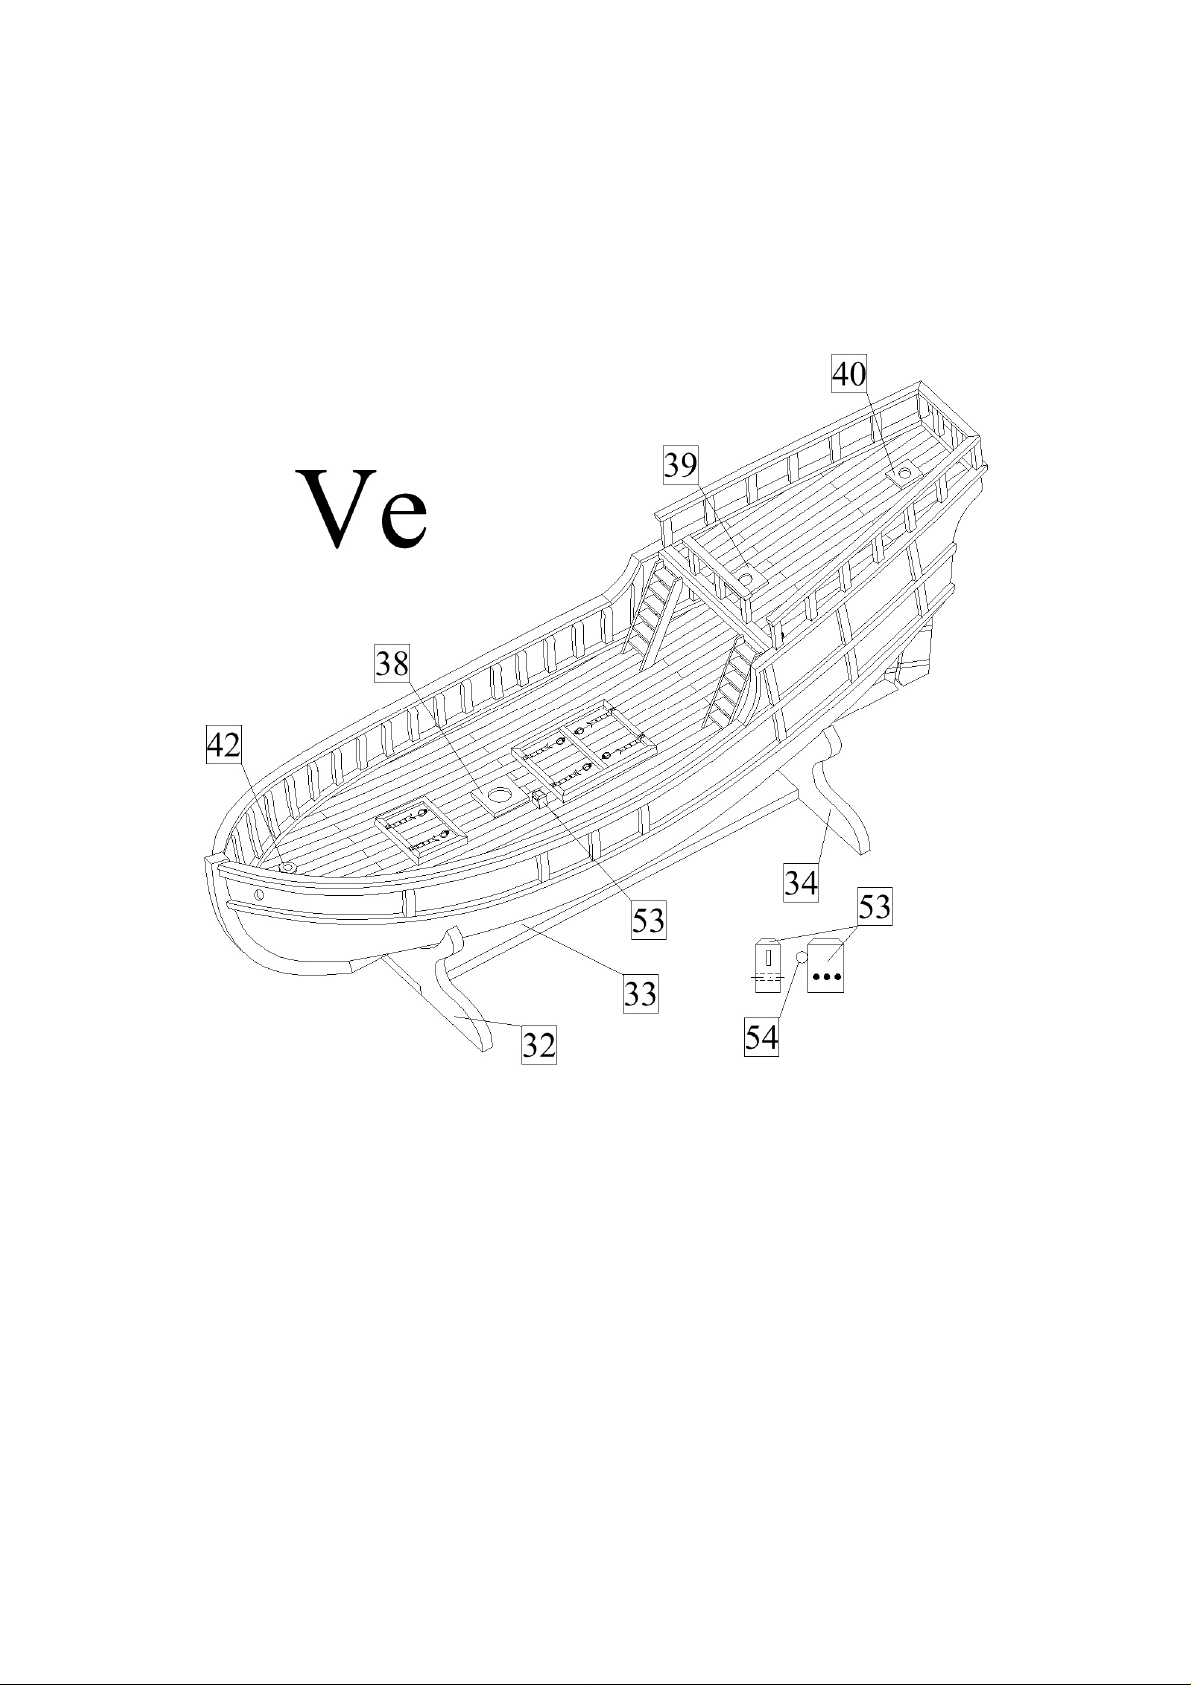
e) First glue parts 42 to the deck. Then drill 2mm hawse holes into the parts 42 and into the bow.
Then glue mast foots 38-40 to the decks. An exact position of the hawse holes and mast foots is in
1:1 scale shown in the plan 1. Then make a knighthead from parts 53 and 54. The knighthead is in
1:1 scale shown in the plan 4. Finally glue a stand from parts 32-34.
Page 11
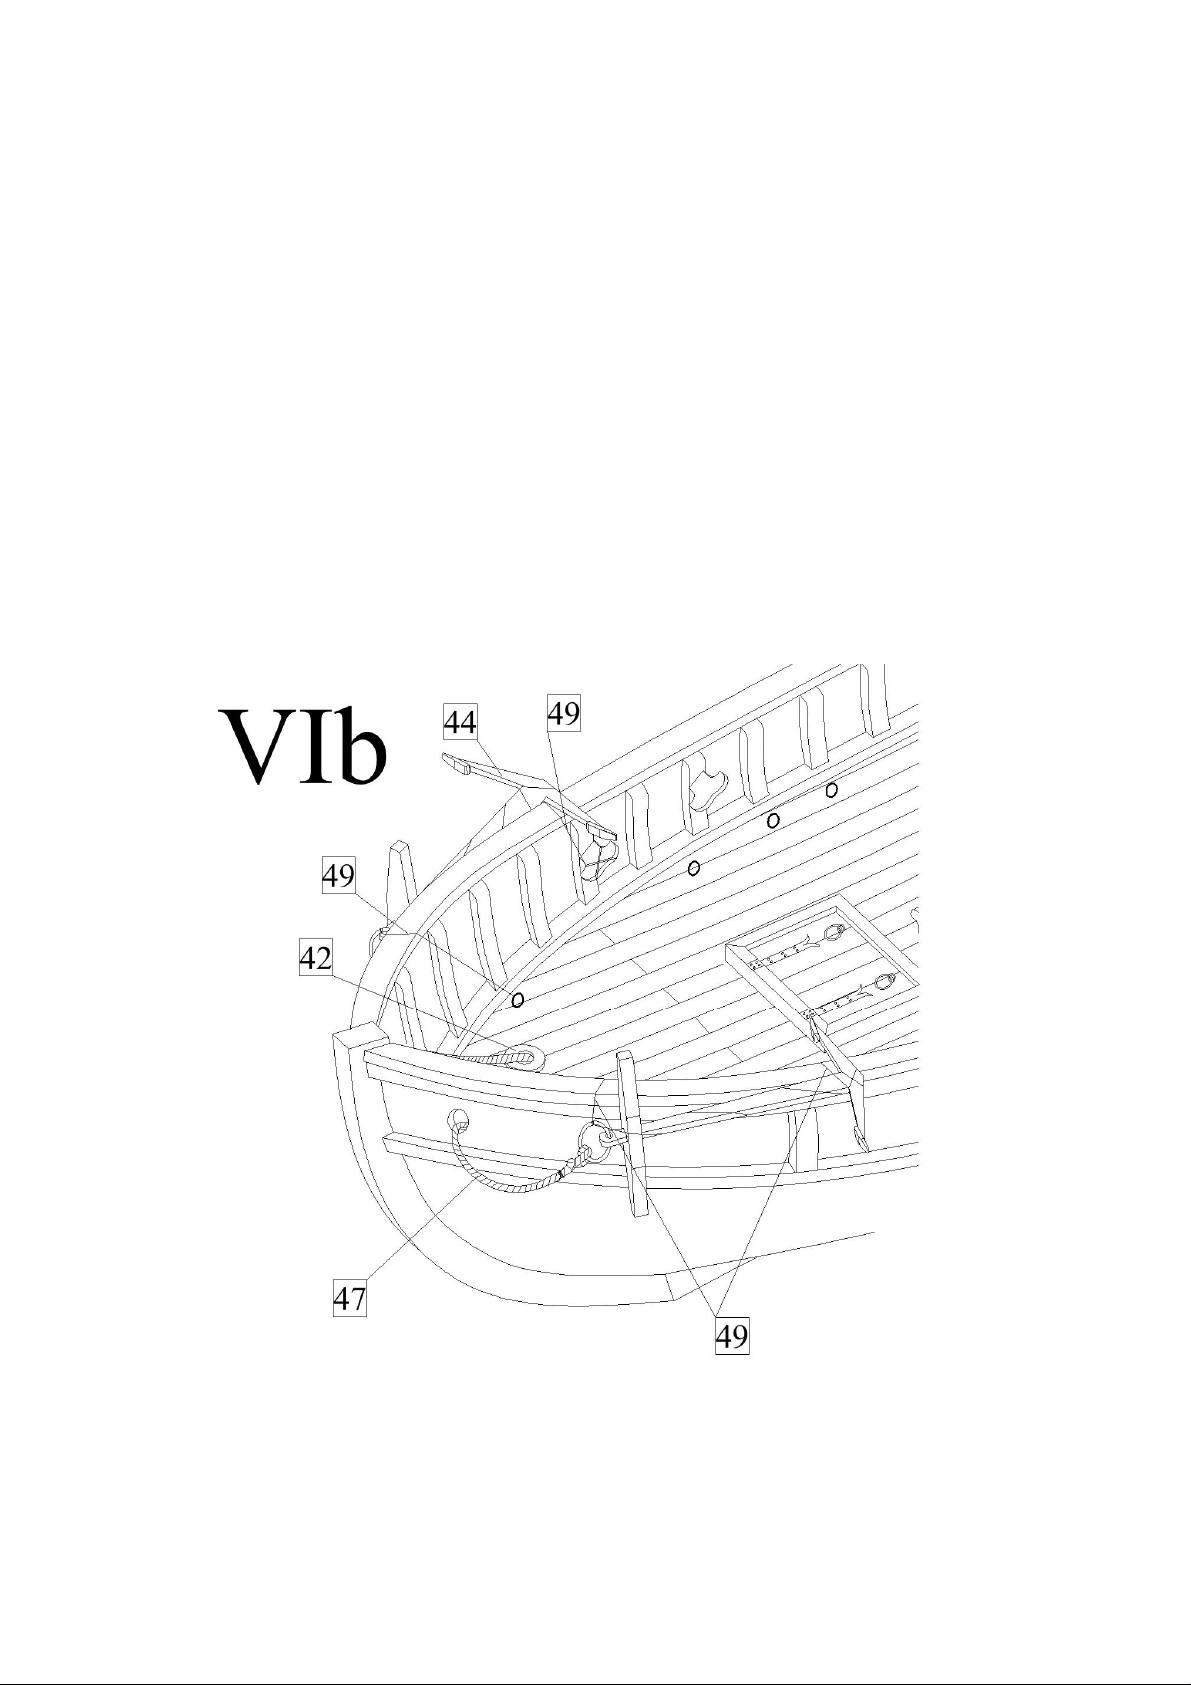
VI) Anchors and cleats:
a) First glue cleats and eyebolts to the deck and hull. An exact position of the cleats and eyebolts is
in 1:1 scale shown in the plan 1.
b) Install anchors to the hull. First run a hawse rope through hawse holes in the bow and in the parts
42. Then tie the anchor to the cleats and eyebolts by a rope 49.
VII) Masts and yards:
a) Make masts 64-66. First sharpen the mast by a sand paper into a conical shape. Then drill on a
top of the masts a 1mm holes. Then glue trees 70 to the masts. Finally make flag masts 73-75 and
tie them to the top of the masts 64-66. The masts are in 1:1 scale shown in the plan 4.
b) Make yards 67-69. First sharpen the yards by a sand paper into needed shape. The yards 67 and
68 are compound from two parts which are together glued and tied together with rope 49. Finally tie
blocks 72 and rollers 71 to the yards. The yards are in 1:1 scale shown in the plan 4.
Page 12
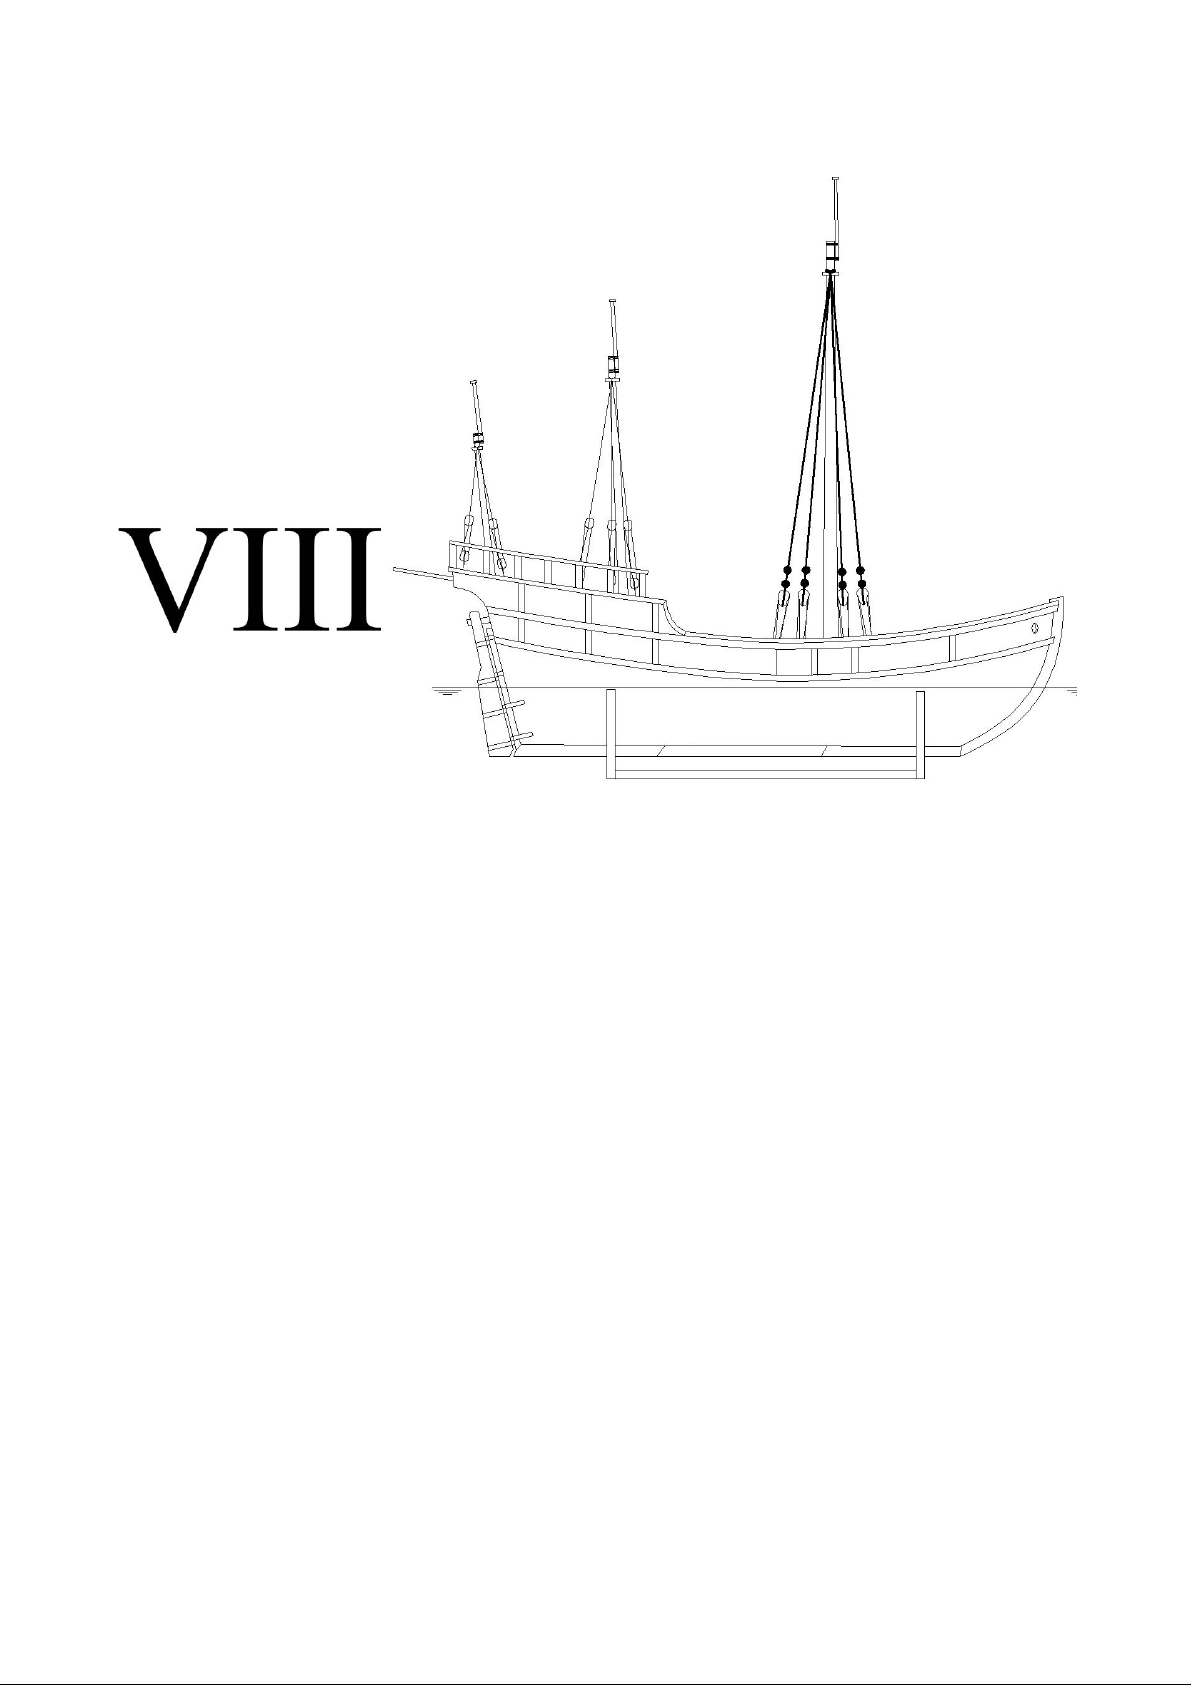
VIII) Standing rigging:
A scheme of the standing rigging is shown in the plan 2A.
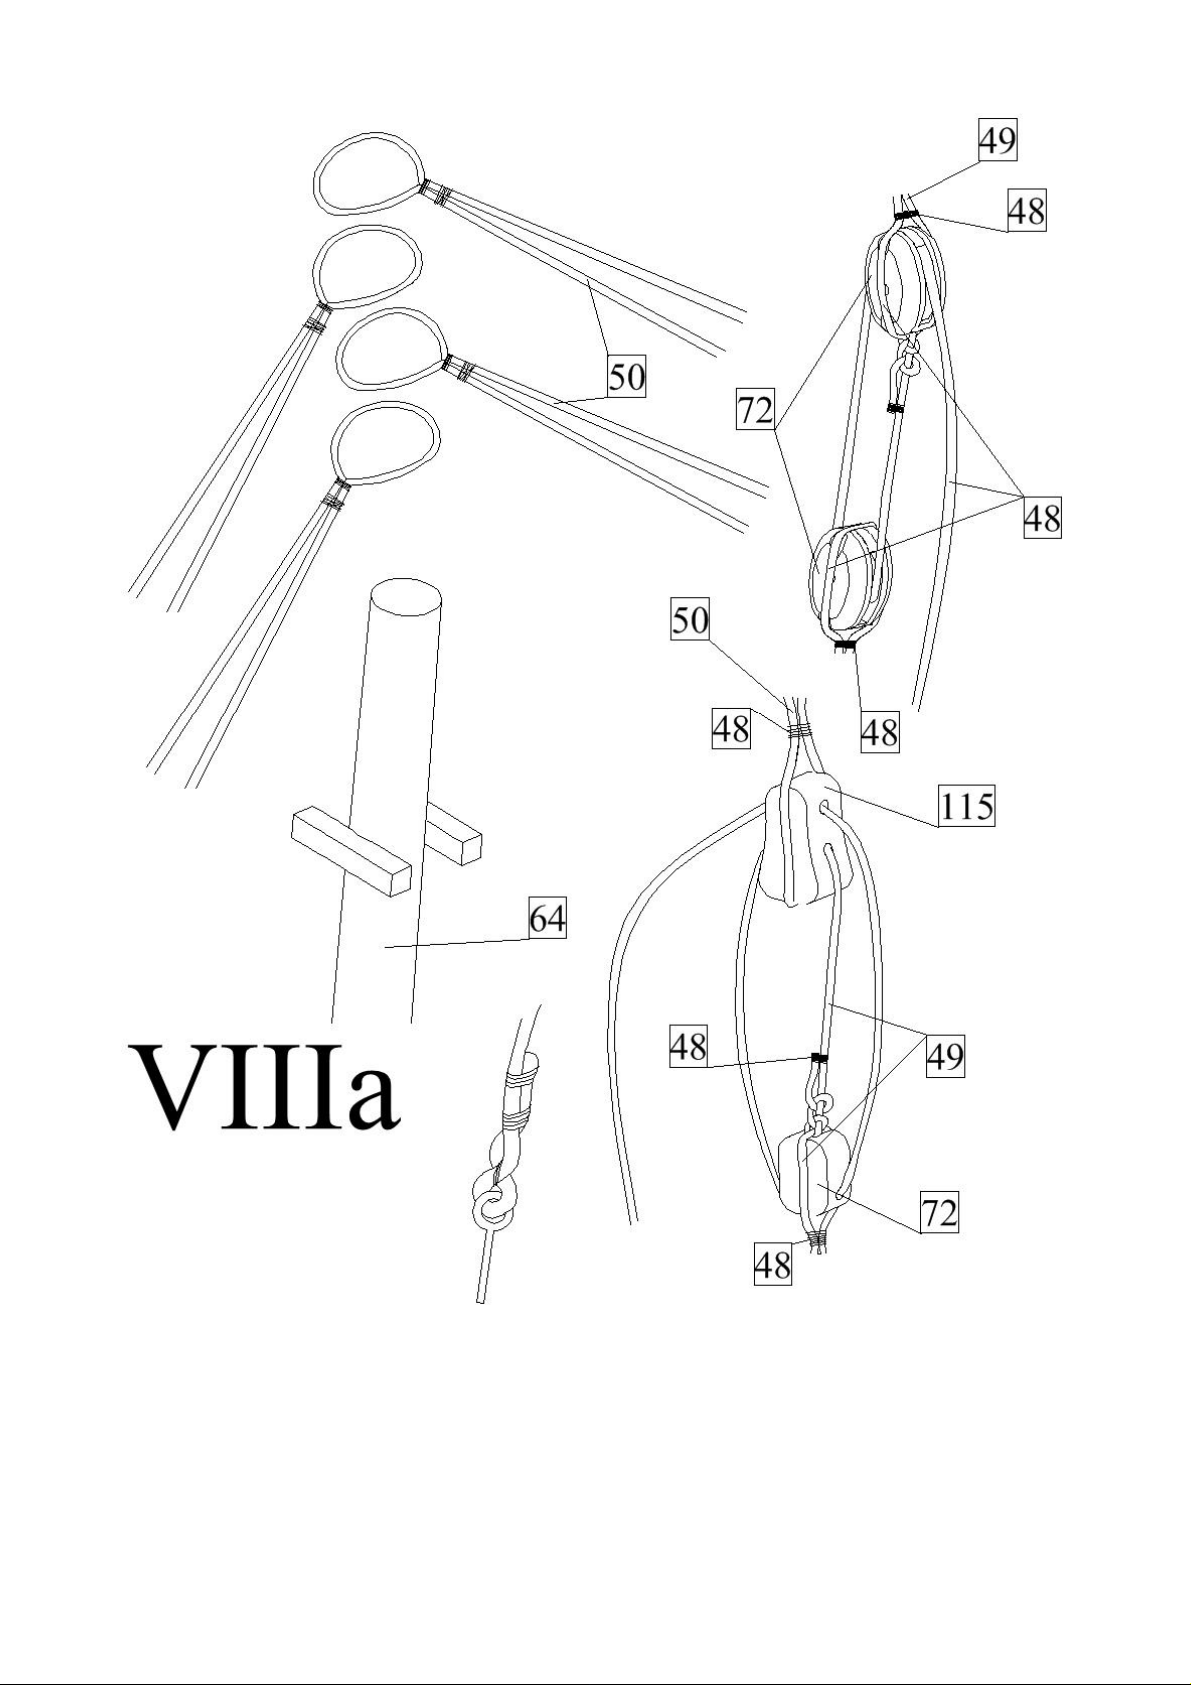
a) First glue masts 64-66 to the hull. Then tie shrouds 50 to the mast 64 and shrouds 49 to the masts
65 and 66. Tie violin blocks 115 to the end of the shrouds 50 and block 72 to the shrouds 49. Then
tie the shrouds by a rope 49 to the eyebolts. A scheme of tying of the shrouds is shown in the figure
below.
Page 13
Page 14
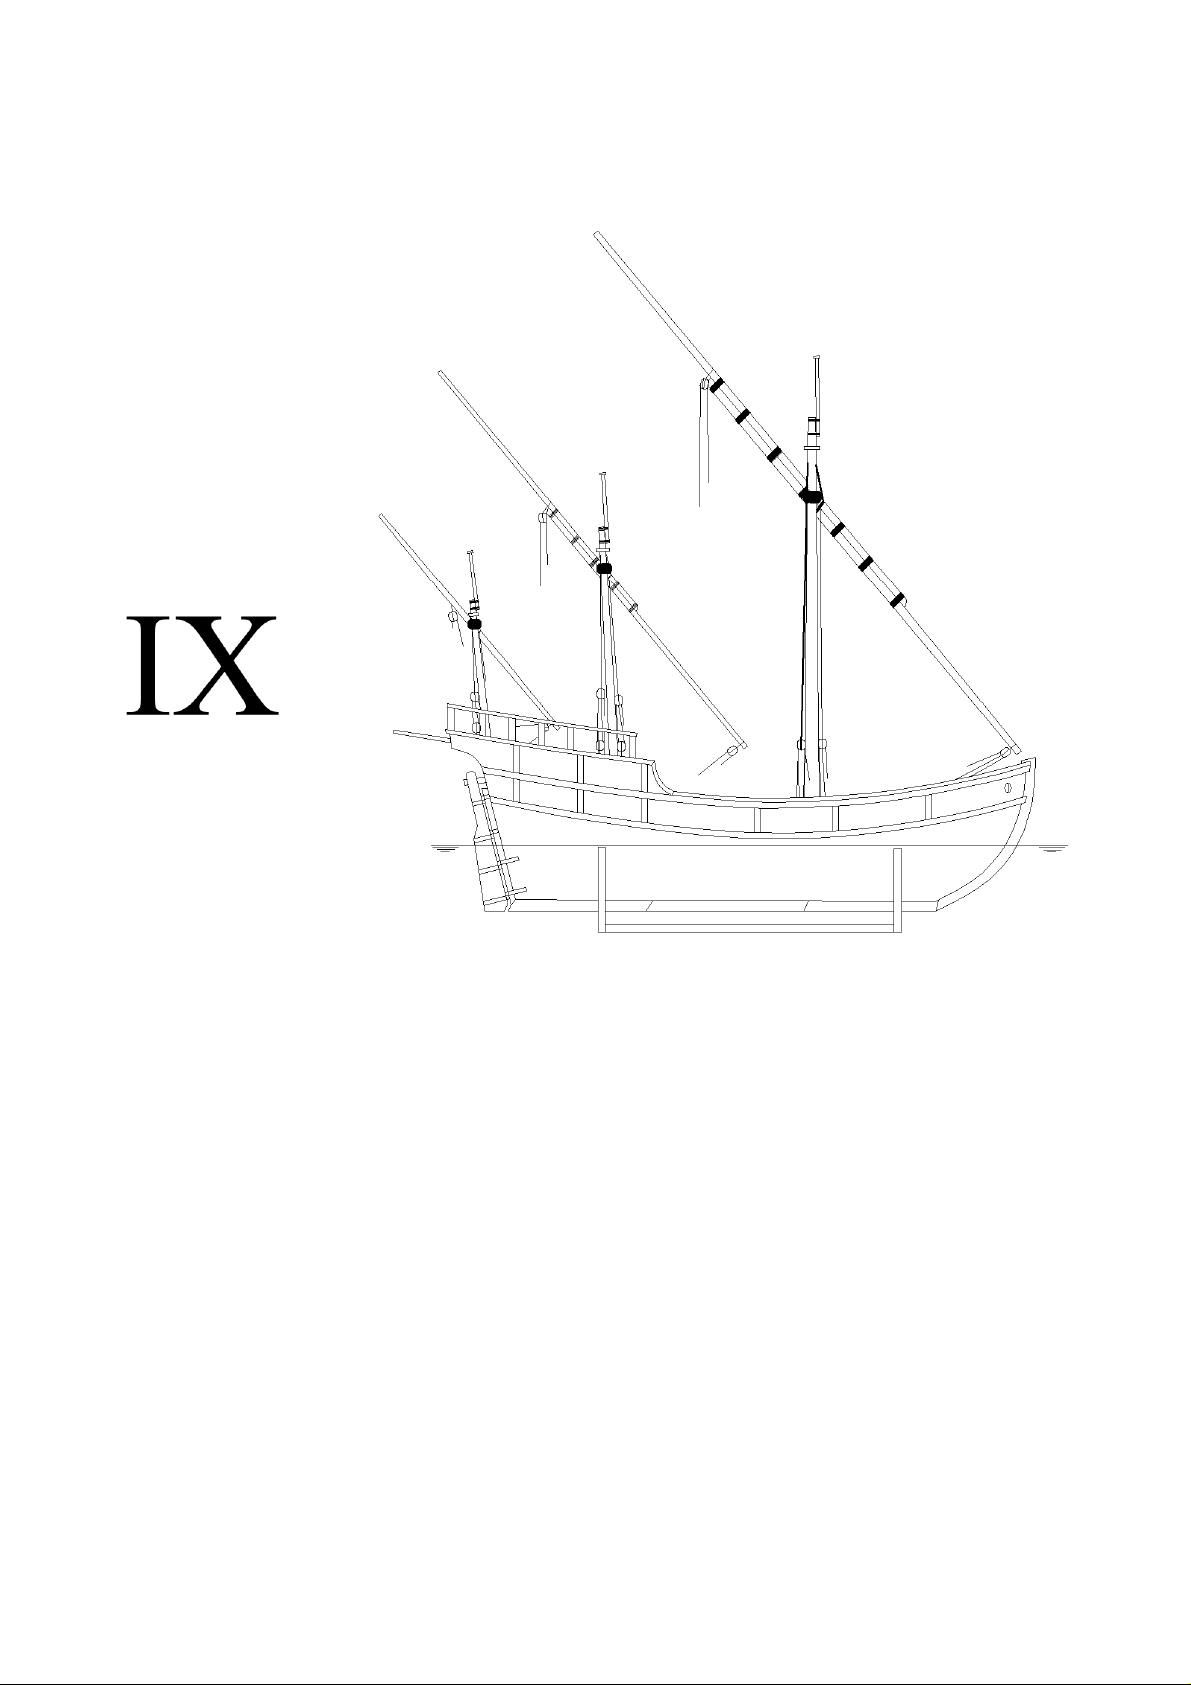
IX) Running rigging:
A scheme of the running rigging is shown in the plan 2B.
Page 15
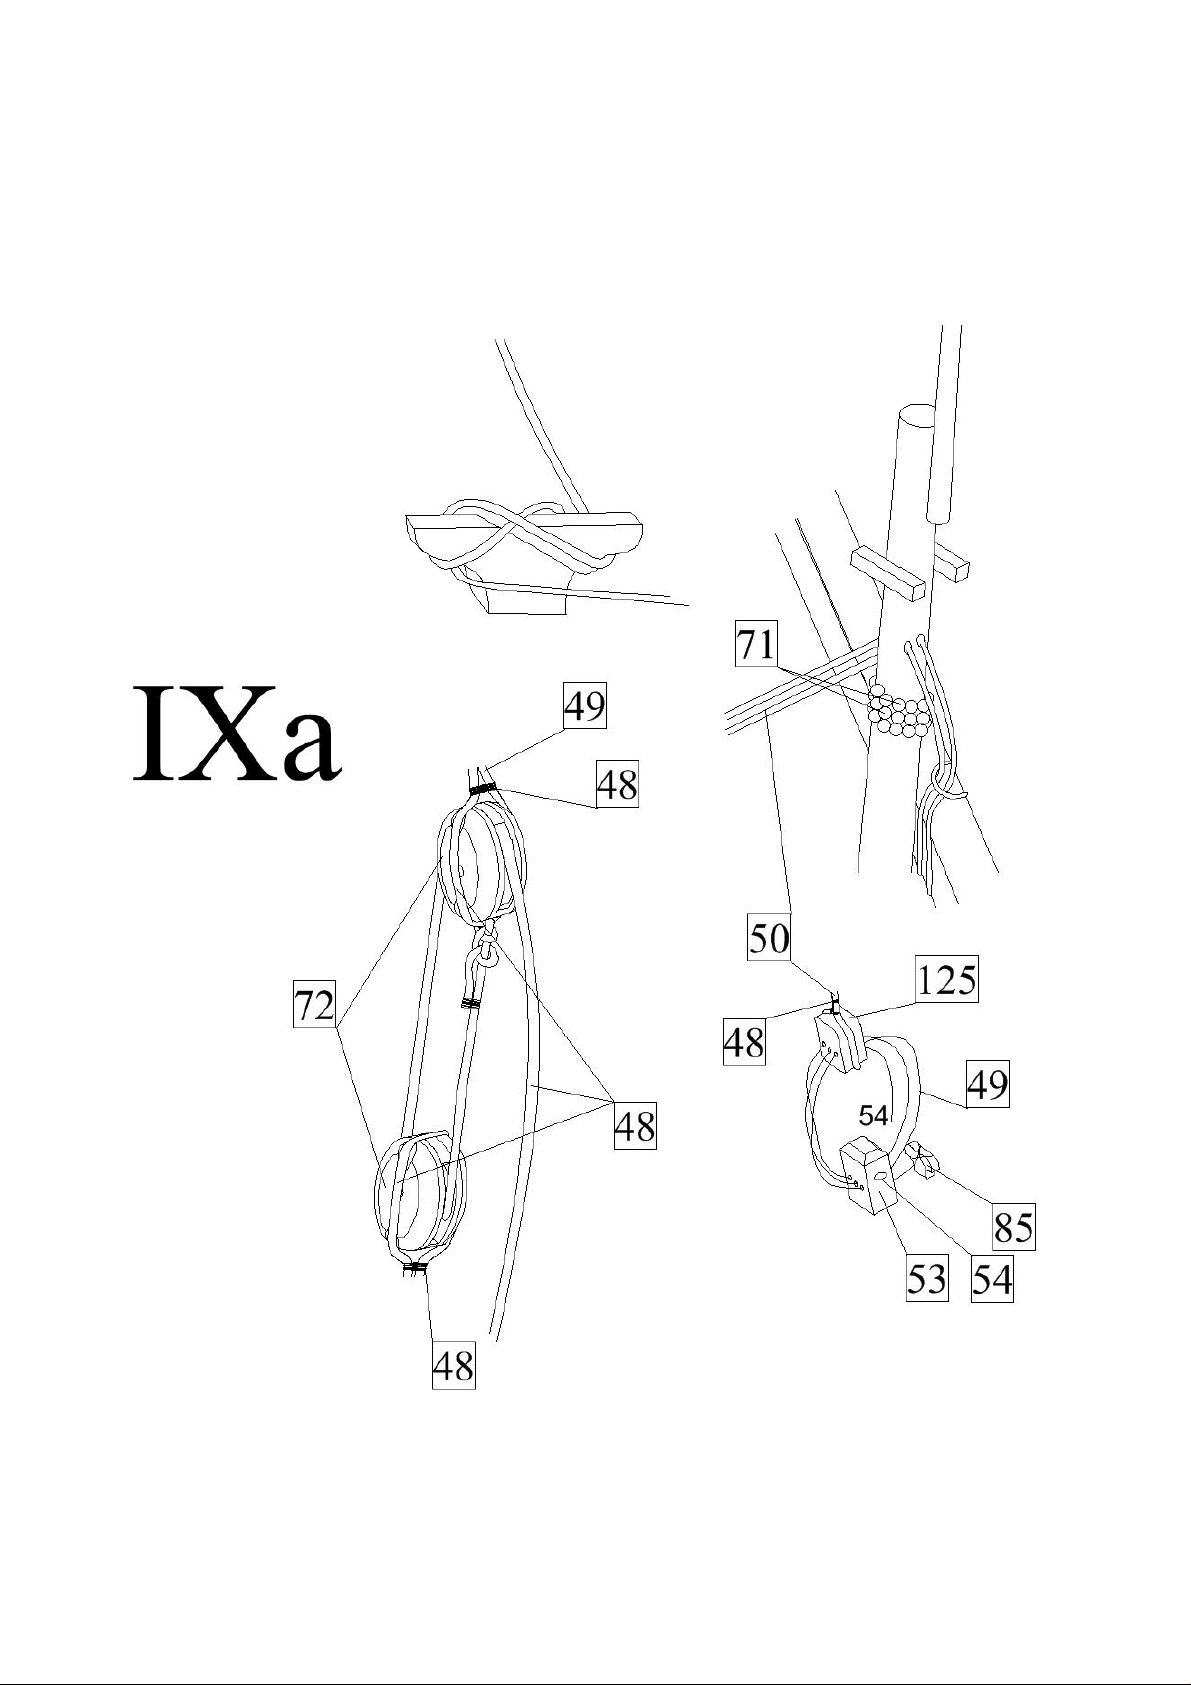
a) First tie yards to the masts. Then run the ropes for raising and lowering of the yards through
holes in the masts. Then tie a second end of the rope for raising and lowering of yard 67 through the
knighthead to a cleat 82 how it is shown in the figure below. Finally tie the ropes for raising and
lowering of yards 68 and 69 through blocks 72 to cleats 87 and 90.
b) Tie to the yards also rest of ropes for their control how it is shown in the plan 2B.
Page 16
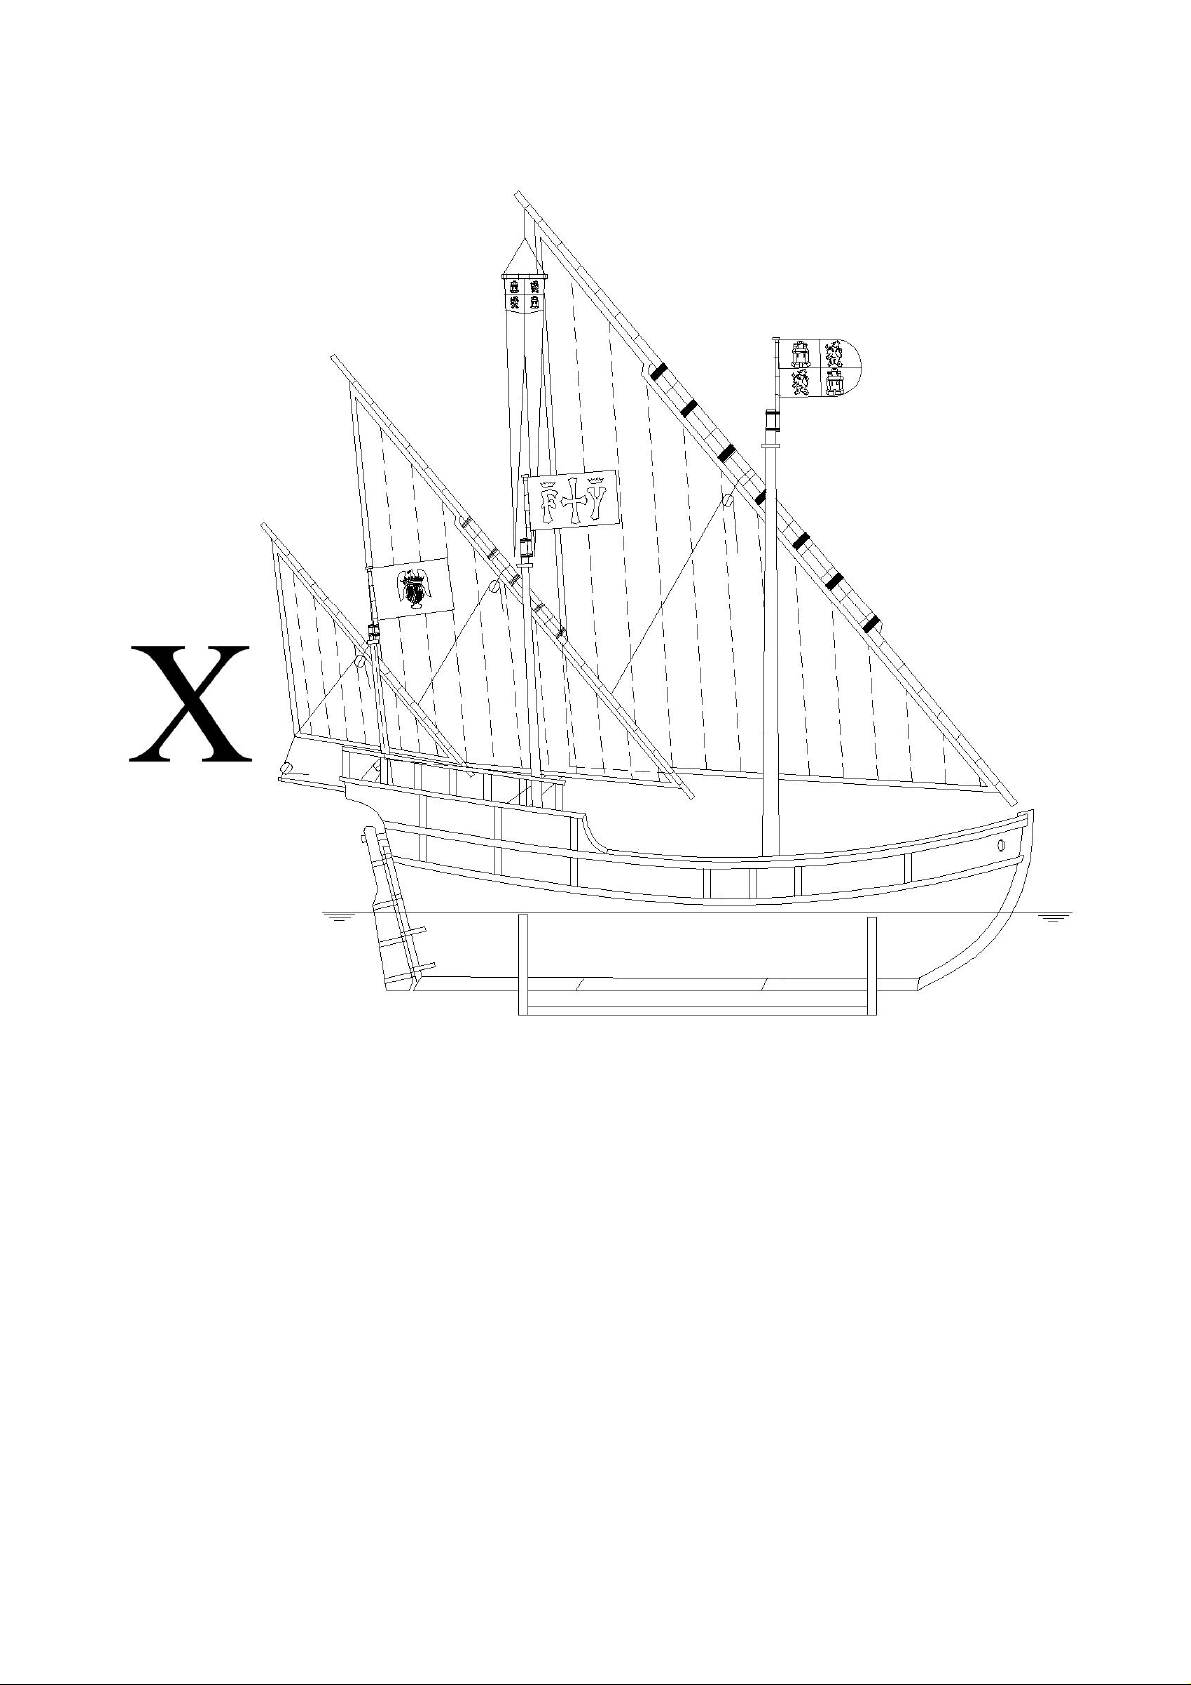
X) Flags and sails:
A scheme of position of the flags and sails is shown in the plan 3D.
Page 17
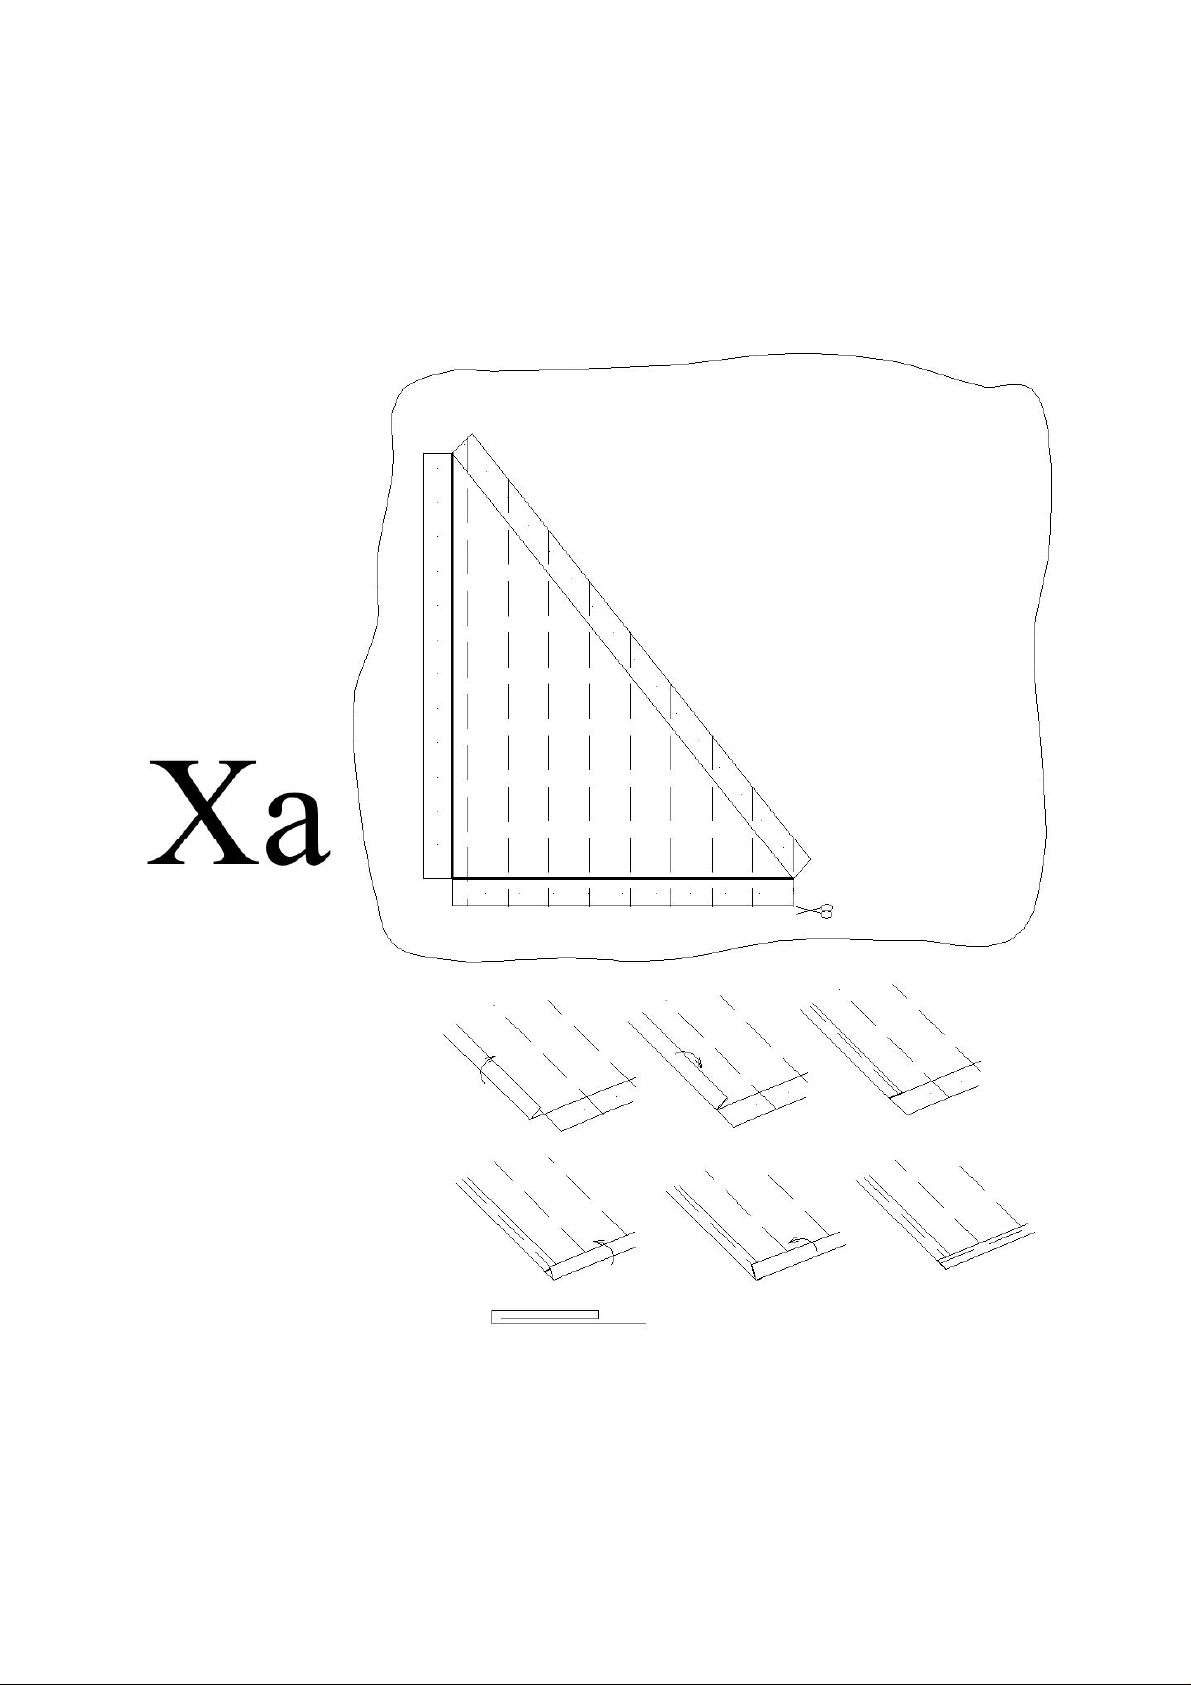
a) Make a sail 116-118. The sails are in 1:1 scale shown in the plan 1D. First draw by pencil
contours of the sail on the. To the border of the sails add about 10mm for fell. By the pencil draw
on the cloth also seams which divided the sail into simple segments. Then scissor the sail with fells
and sewn it like it is shown below.
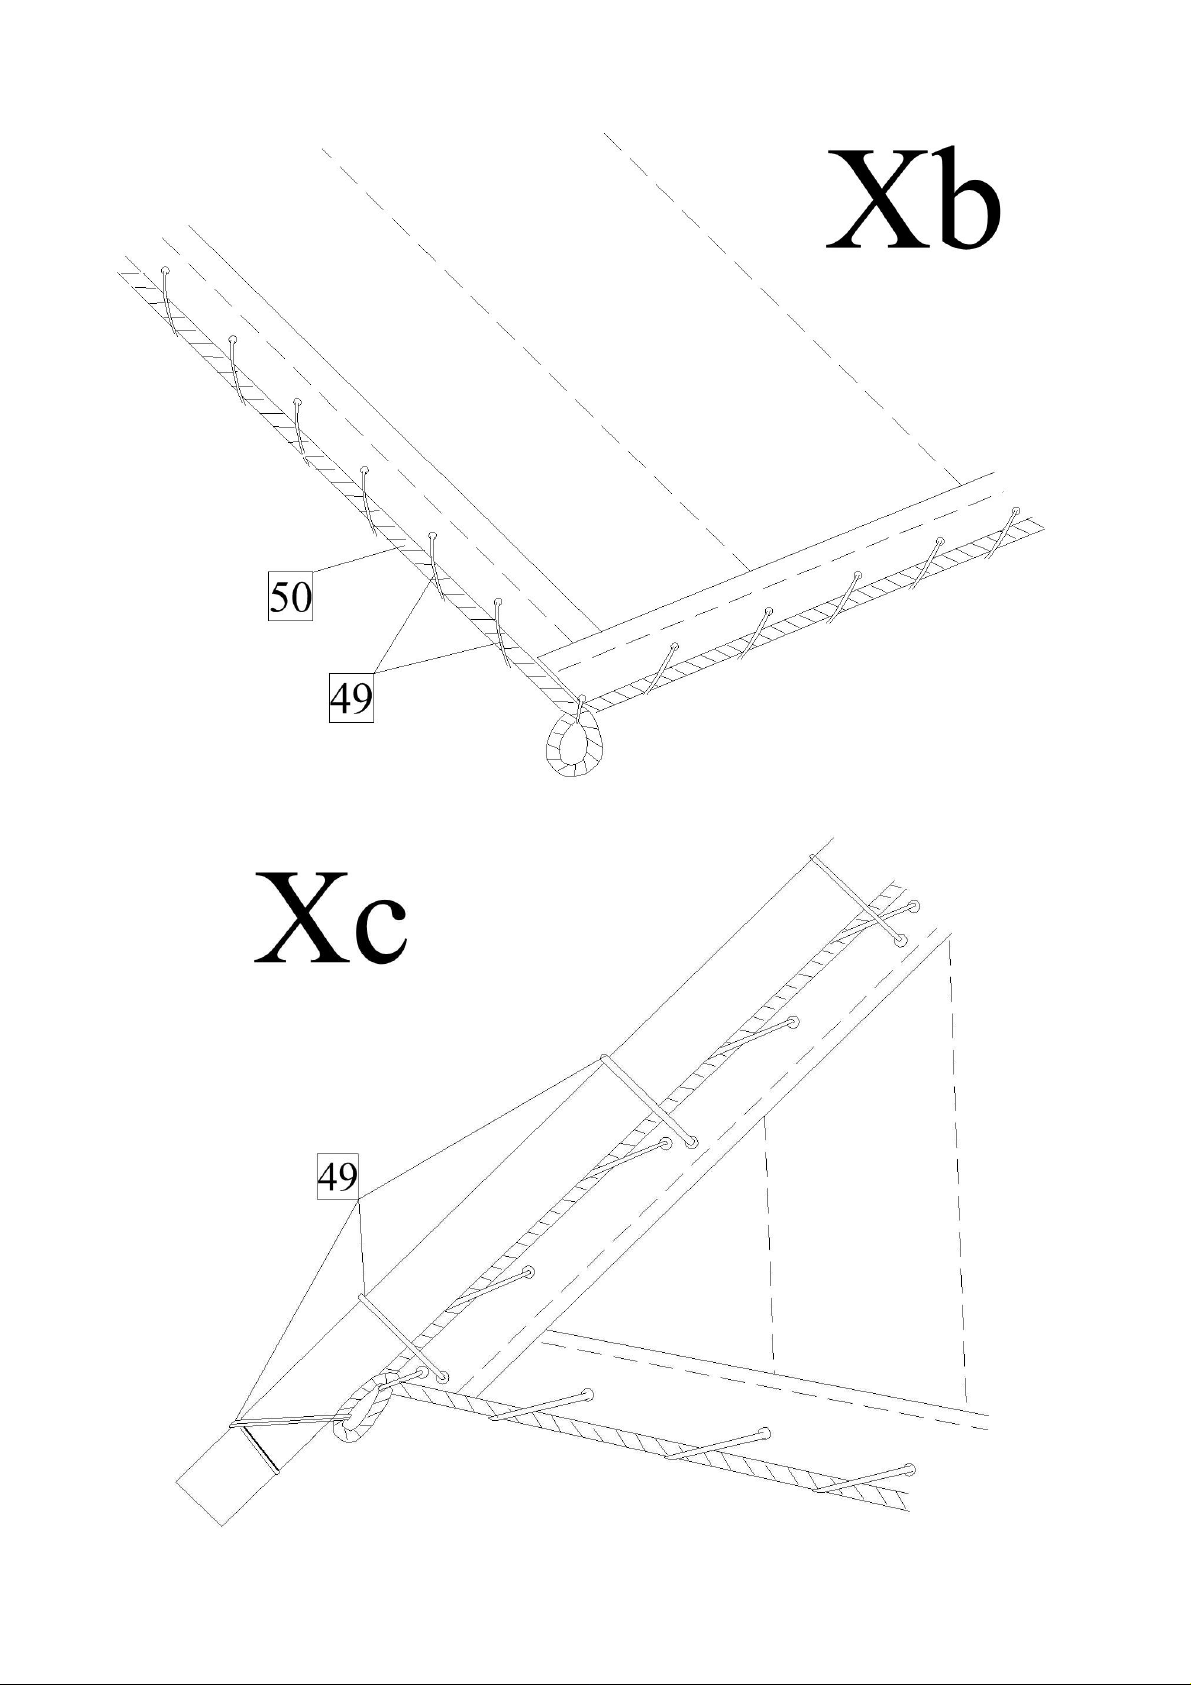
b) To the circumference of the sails sew on ropes 50 so that in the corner of the sail will eyes with
diameters about 3mm.
c) Tie the sails to the yards by ropes 49.
d) Tie fags 119-122 to the flag masts.
Page 18
Page 19

Part list:
0 Keel plywood 4mm 1pc
1-5 Keel wood 4mm 1pc
6-12 Frames plywood 4mm 1pc
13-15 Reinforcements plywood 4mm 2pcs
16 Deck plywood 1mm 1pc
17 Planking strip 2x3mm 65pcs
18 Wales strip 2x3mm 65pcs
19 Deck veneer 0,6mm 1pc
20 Hatches strip 2x2mm 2pcs
21 Hatches veneer 0,6mm 1pc
22 Hatches photo-etched parts 6pcs
23 Eyebolts eyebolt 40pcs
24 Rings ring 4mm 6pcs
25 Waterways strip 2x3mm 65pcs
26 Frames strip 2x3mm 65pcs
27 Beam strip 2x3mm 65pcs
28a-e Edging wood 2mm 2pcs
29 Deck plywood 1mm 1pc
30 Deck veneer 0,6mm 1pc
31 Edging strip 2x3mm 65pcs
32-34 Stand plywood 4mm 1pc
35 Stairs plywood 1mm 12pcs
36 Stairs plywood 1mm 4pcs
37 Preparation for stairs plywood 4mm 1pc
38-40 Mast foot wood 2mm 1pc
41 Railing strip 2x3mm 65pcs
42 Hawse holes wood 2mm 2pcs
43 Beam dowel 2mm 1pc
44 Anchor cast 2pcs
45 Anchor wood 2mm 2pcs
46 Ring ring 6mm 2pcs
47 Rigging rope 1.75mm 0.5m
48 Rigging rope 0.25mm 20m
49 Rigging rope 0.5mm 20m
50 Rigging rope 0.75mm 5m
51 Rudder wood 4mm 1pc
52 Rudder strip 2x3mm 65ks
53 Knighthead wood 4mm 1pc
54 Eyebolts eyebolt 40pcs
55-62 Rudder hinges photo-etched parts 1pc
63 Rudder hinges wire 1mm 0.1m
64 Mast dowel 8mm 1pc
65 Mast dowel 5mm 1pc
66 Mast dowel 4mm 3pcs
67 Yard dowel 4mm 3pcs
68 Yard dowel 3mm 2pcs
69 Yard dowel 3mm 2pcs
70 Trees strip 1x1mm 1pc
71 Rollers roller 2mm 100pcs
72 Blocks block 5mm, 1hole 55pcs
73-75 Flag masts dowel 2mm 1pc
76 Cap dowel 3mm 2pcs
Page 20

77-92 Cleats wood 2mm 30pcs
93-114 Eyebolts eyebolt 40pcs
115 Deck block 8mm, violin 8pcs
116-118Sail cloth 1pc
119-122Flags flag 1pc
123 Flag pole dowel 2mm 2pcs
124 Blocks block 5mm, 2 holes 2pcs
125 Block block 5mm, 3 holes 1pc
126-128Cleats wood 2mm 30pcs
129 Hatches plywood 1mm 2pcs
130 Hatches plywood 1mm 1pc
 Loading...