

Duracraft DW-627 User Manual
OWN ER’ S M A N U A L
TWIN WINDOW FAN
Model DW-627
DW-627

S A F ETY I N S T R U C T I O N S
READ AND SAVE THESE IMPORTANT
SAFETY INSTRUCTIONS BEFORE
USING THIS FAN.
WHEN USING ELECTRICAL APPLIANCES, BASIC SAFETY PRECAUTIONS
SHOULD ALWAYS BE FOLLOWED
INCLUDING THE FOLLOWING:
1. Use this fan only as described in
this manual. Other use not recommended may cause fire, electric shock
or injury.
2. This product is intended for household use ONLY and not for commer-
cial, industrial or outside use.
3. This fan is rated for use as a window fan. However, to protect against
electrical shock, do not immerse unit,
plug or cord in water or spray with
liquids.
4. This fan is equipped with a polarized alternating current line plug (a
plug having one blade wider than the
other). This plug will fit into the power
outlet only one way. This is a safety
feature. NEVER connect the fan to any
power source other than a 120 volt
alternating current polarized outlet. If
you are unable to insert the plug fully
into the outlet, try reversing the plug.
If the plug should still fail to fit, contact
an electrician to replace the obsolete
outlet. Do not defeat the safety purpose of the polarized plug.
5. Close supervision is necessary
when any appliance is used by or
near children.
6. Unplug the fan from the outlet when
not in use, when moving fan from one
location to another and before cleaning.
7. Do not operate the fan in the pre s e n c e
of explosive and/or flammable fumes.
8. Do not place the fan or any parts
near an open flame, cooking or other
heating appliance.
9. Do not operate the fan with a damaged cord, plug, after a malfunction
or if dropped or damaged in any
manner. (See warranty.)
10. Avoid contact with moving fan part s .
11. To disconnect, grip the plug and
pull it from the wall outlet. Never yank
the cord.
12. The use of attachments not recommended by the manufacturer may be
hazardous.
13. Always use on a dry level surface.
14. Do not hang or mount fan on a
wall or ceiling.
15. Do not operate if the fan housing
is removed or damaged.
16. A loose fit between the AC outlet
and plug may cause over heating of
the plug. Have a qualified electrician
replace the outlet.
17. This fan is rated for use as a window fan, however, we recommend
that during rain, the fan be removed
from the window.
WARNING: To reduce the risk of fir e
or electrical shock, DO NOT USE THIS
FAN with any SOLID STATE Speed
Control Device.
I N S TA L L AT I O N I N S T R U C T I O N S
Your fan comes fully
assembled and ready
for installation.
Casement and sliding
windows require a
mounting bracket for
installation which can
be found in the hardware packet provided.
Your window fan has
been designed to fit
double hung, casement
or sliding windows with
minimum openings of
56cm wide x 31cm
high (217/8” x 12”).
Casement or sliding
windows require mini-
DO U B LE H U N G W I N D O W S
• Identify the front and
back sides of the fan.
The back side has plastic tabs at each corner.
The front side has a
“pull-out” handle near
the top center.
• Open your window
at least 28cm (11”)
high.
• For FRESH AIR operation, (draws in fresh
air from the outside),
hold the fan so the
front side faces you.
• For EXHAUST opera-
tion (pulls indoor air
out of the room), turn
the fan so the back
side faces you.
• Position the bottom of
the fan in the window
sill, making sure that
the power cord is hanging inside your ro o m .
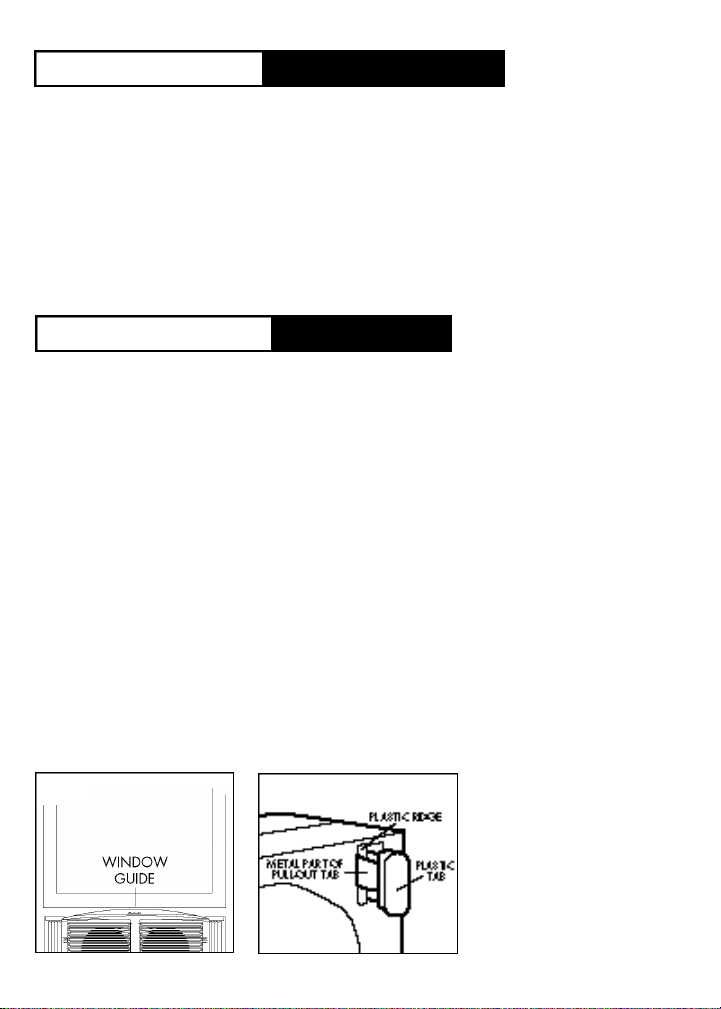
• Hold the fan in place
and lower the window
to the top of the fan.
Be sure that contact is
made with the window
guides on the top of
the fan (Fig. 1).
mum openings of
31cm wide x 56cm high
(12” x 217/8” ) .
• To push the side panels back into the fan,
pull out each plastic
tab on the back side of
the fan so that the
metal part of the pullout tab is hooked over
the plastic ridge (Fig. 2).
In this “pulled-out” position you can easily
slide the side panels
back into the fan. The
tabs should then be
returned to the normal
position to secure the
side panels in place.
FIG. 1
FIG. 2
CA S E ME NT O R S LI D I NG W I N D O W S
• Remove the four
“shoulder screws” supplied from the hardware packet.
• Screw two of the four
shoulder screws into
the holes on the bottom
back of the fan and
two into the holes on
the bottom front of the
fan.
• Remove the mounting
bracket from the kit
provided.
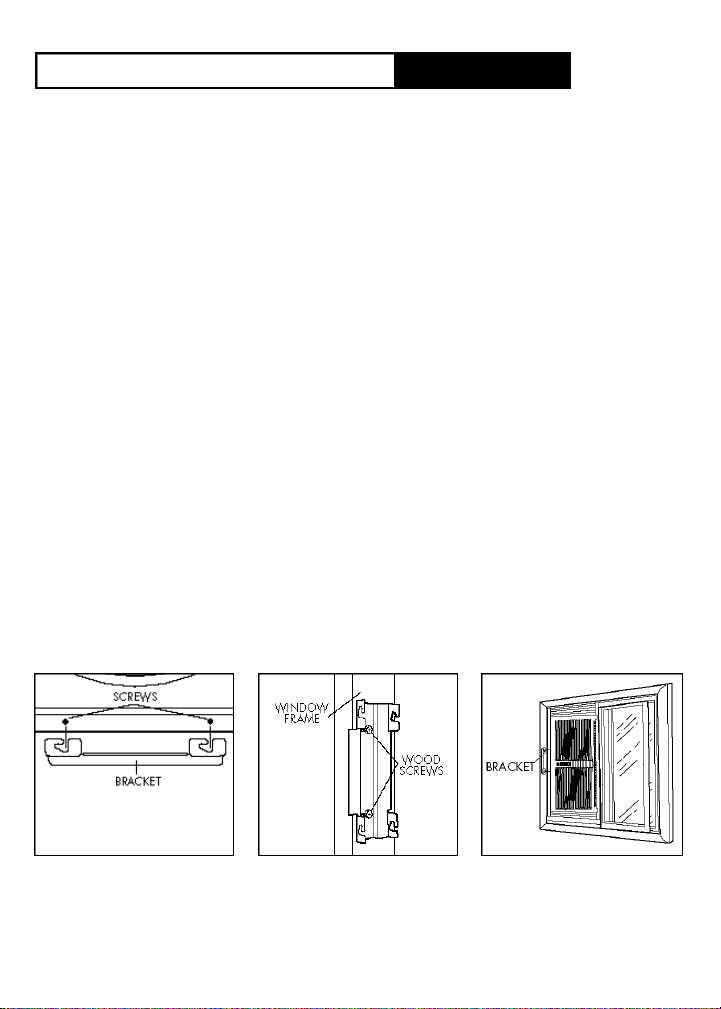
• Temporarily hook the
mounting bracket over
the four screws to hold
the bracket in place
(Fig. 3).
• Choose a suitable
mounting location on
the window frame
FIG. 3 FIG. 4 FIG. 5
where the fan can be
positioned to direct airflow through the open
window. Mark the location of the bracket with
a pencil for placement.
NOTE: Since the mounting bracket will remain
attached to the window
frame at the marked
location, be sure that
the bracket is posi tioned in a manner that
will allow the window
to be closed when the
fan is removed.
• Unhook the bracket
from the fan. Using the
long wood screws provided in the hardware
packet, mount the
bracket into the frame
at the marked location
(Fig 4). The fan can be
mounted onto the
bracket within the window and is ready for
use (Fig. 5).
• In rare instances during CASEMENT window installation, your
window screen may not
fit in its original position. In that event, it
may be necessary to
use an “alternate bracket” which will be provided free of charge.
This alternate bracket
will enable you to use
your window screen in
its original position.
Please refer to the
PARTS AVAILABLE section of this instruction
manual.
O P E R AT I O N
• Plug the fan into a
polarized 120 Volt AC
wall outlet.
• Set the Control
Switch either up or
down to your desired
fan speed: HI or LOW.
• To reverse the
air flow direction,
manually turn the fan
around in the window.
WARNING: To prevent
personal injury and/or
damage to the fan,
never lean or push on
fan while it is seated in
the window or during
operation. Do not lift
window while the fan
is operating. Be sur e
that the fan is fully
secured in the window
at all times.
CL E A NI NG AN D S T O R A G E
• Unplug the fan
before cleaning.
• Use only a soft,
damp cloth to gently
wipe the fan clean.
• DO NOT immerse
the fan in water and
never allow water to
enter the motor
housing.
• DO NOT use gasoline, paint thinner or
other chemicals to clean
the fan.
• For storage, clean
the fan as instructed
and store it in its original box or cover with
plastic to protect it from
dust. Store your fan in
a clean, dry place.
 Loading...