

Page 1
English
Quick Start GuideƔɄɪɚɬɤɨɟɪɭɤɨɜɨɞɫɬɜɨ
Manufactured under license from Dolby Laboratories.
Dolby and the double-D symbol are trademarks of Dolby Laboratories.
Manufactured under license under U.S. Patent Nos: 5,956,674; 5,974,380; 6,487,535
& other U.S.and worldwide patents issued & pending. DTS, the Symbol, & DTS and
the Symbol together are registered trademarks & DTS 2.0+Digital Out is a trademark
of DTS, Inc. Product includes software. © DTS, Inc. All Rights Reserved
Page 2
Dune HD Connect Quick Start Guide
Page 3
Table of Contents
Table of Contents
3
English
416
Quick Start Guide
• Introduction
• Key Features
• Extra Functions
• Package Contents
• Exterior
• Remote Control
• Getting Started
• Quick Setting of Video Output Mode
• Connecting USB Drives
• Accessing Network Drives
• Formatting HDD
• Switching the Player On and Off
• NAS (Network Attached Storage)
• Wi-Fi
• Limitations
• Updating Your Player and Getting More Information
Ɋɭɫɫɤɢɣ
Ʉɪɚɬɤɨɟ ɪɭɤɨɜɨɞɫɬɜɨ
• ȼɜɟɞɟɧɢɟ
• Ɉɫɧɨɜɧɵɟ ɨɫɨɛɟɧɧɨɫɬɢ
• Ⱦɨɩɨɥɧɢɬɟɥɶɧɵɟ ɮɭɧɤɰɢɢ
• ɋɨɞɟɪɠɢɦɨɟ ɤɨɪɨɛɤɢ
• ȼɧɟɲɧɢɣ ɜɢɞ
• ɉɭɥɶɬ ɭɩɪɚɜɥɟɧɢɹ
• ɇɚɱɚɥɨ ɪɚɛɨɬɵ
• Ȼɵɫɬɪɨɟ ɢɡɦɟɧɟɧɢɟ ɜɢɞɟɨɪɟɠɢɦɚ
• ɉɨɞɤɥɸɱɟɧɢɟ USB-ɧɚɤɨɩɢɬɟɥɟɣ
• Ⱦɨɫɬɭɩ ɤ ɫɟɬɟɜɵɦ ɞɢɫɤɚɦ
• Ɏɨɪɦɚɬɢɪɨɜɚɧɢɟ ɠɟɫɬɤɨɝɨ ɞɢɫɤɚ
• ȼɤɥɸɱɟɧɢɟ ɢ ɜɵɤɥɸɱɟɧɢɟ ɩɪɨɢɝɪɵɜɚɬɟɥɹ
• NAS (Network Attached Storage)
• Wi-Fi
• Ɉɝɪɚɧɢɱɟɧɢɹ
• Ɉɛɧɨɜɥɟɧɢɟ ɩɥɟɟɪɚ ɢ ɞɨɩ. ɢɧɮɨɪɦɚɰɢɹ
Page 4
4
Dune HD Connect Quick Start Guide
Introduction
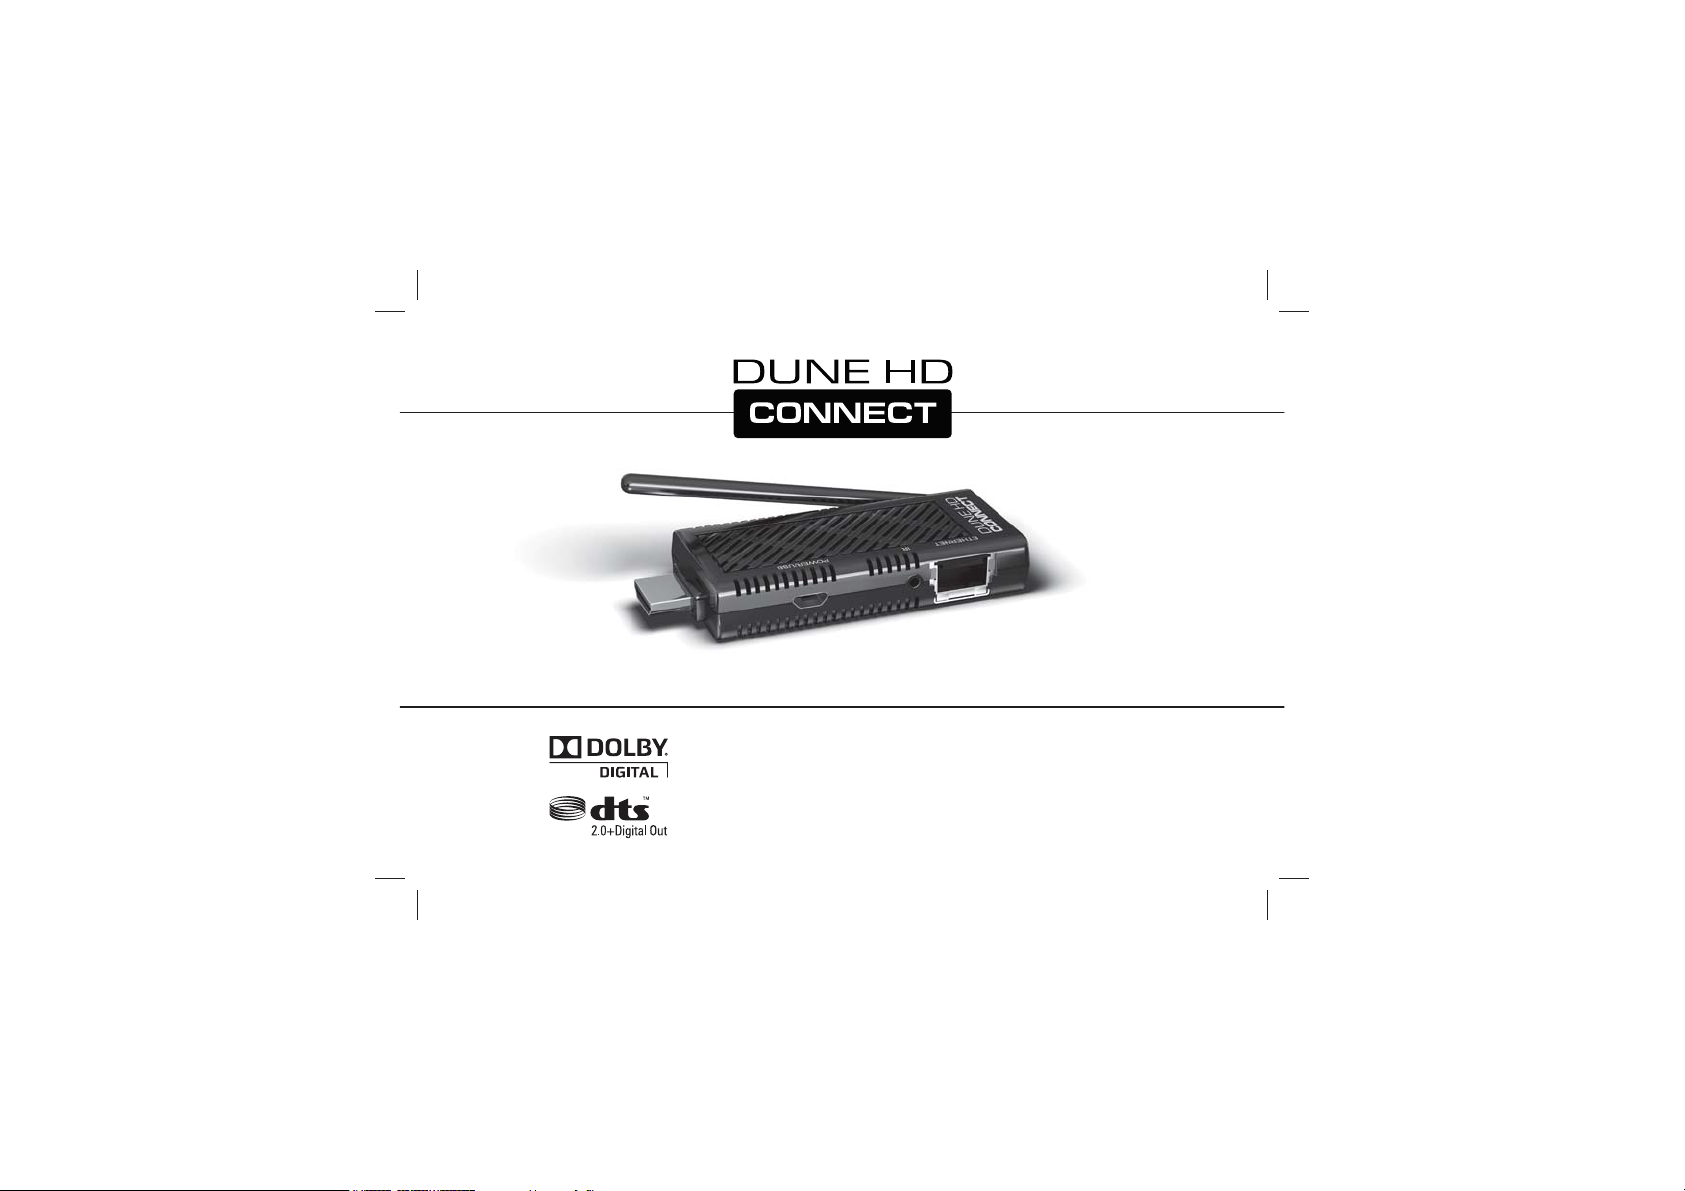
Dune HD Connect is an all-in-one solution for up to Full HD (1080p) video playback.
Key Features
Ɣ The newest Sigma Designs SMP8674/8675 media processor: enjoy excellent playback and performance of
interactive features.
Ɣ Network player: connect the player to a local network and play content directly from PC or NAS (UPnP, SMB, NFS).
Ɣ MKV player: play HD and SD video in a popular MKV format and other modern video file formats, including top
quality HD video with very high bitrate.
Ɣ USB port: conveniently connect HDDs, USB flash drives, USB card readers and other USB storage devices.
Ɣ HDMI port: ensure the best possible quality of HD video and HD audio.
Ɣ Micro SD card slot: easily play media files on micro SD memory cards from your camera or other devices.
Ɣ Video output flexibility: output video in any resolution and format (from SD to 1080p, 24p/PAL/NTSC).
Ɣ Upscaling: high quality upscaling of DVD and any other SD video content to Full HD (1080p) or other HD resolution.
Ɣ File browser: convenient file browser with powerful file management (copy, move, delete, rename, organize, sort).
Page 5
English
Extra Functions
Ɣ High-quality music playback: play very high-quality (up to 192 Khz / 24-bit) music files in various formats (FLAC,
Monkey’s Audio APE, WAV/PCM, etc).
Ɣ Playlists: build playlists from your folders, use your own playlists, use repeat and shuffle functions.
Ɣ NAS function: access files on storage devices (HDD, optical drive, etc) attached to the player from the local
network (using SMB or FTP).
Ɣ Customizable user interface: work with media collections using cover art and icon browsing (with Full HD graphics).
Ɣ Internet radio: playback and record various Internet radio stations (HTTP/MP3 and other formats).
Ɣ Digital TV: playback and record Digital TV channels (OTT/IPTV).
5
Page 6
6
Dune HD Connect Quick Start Guide
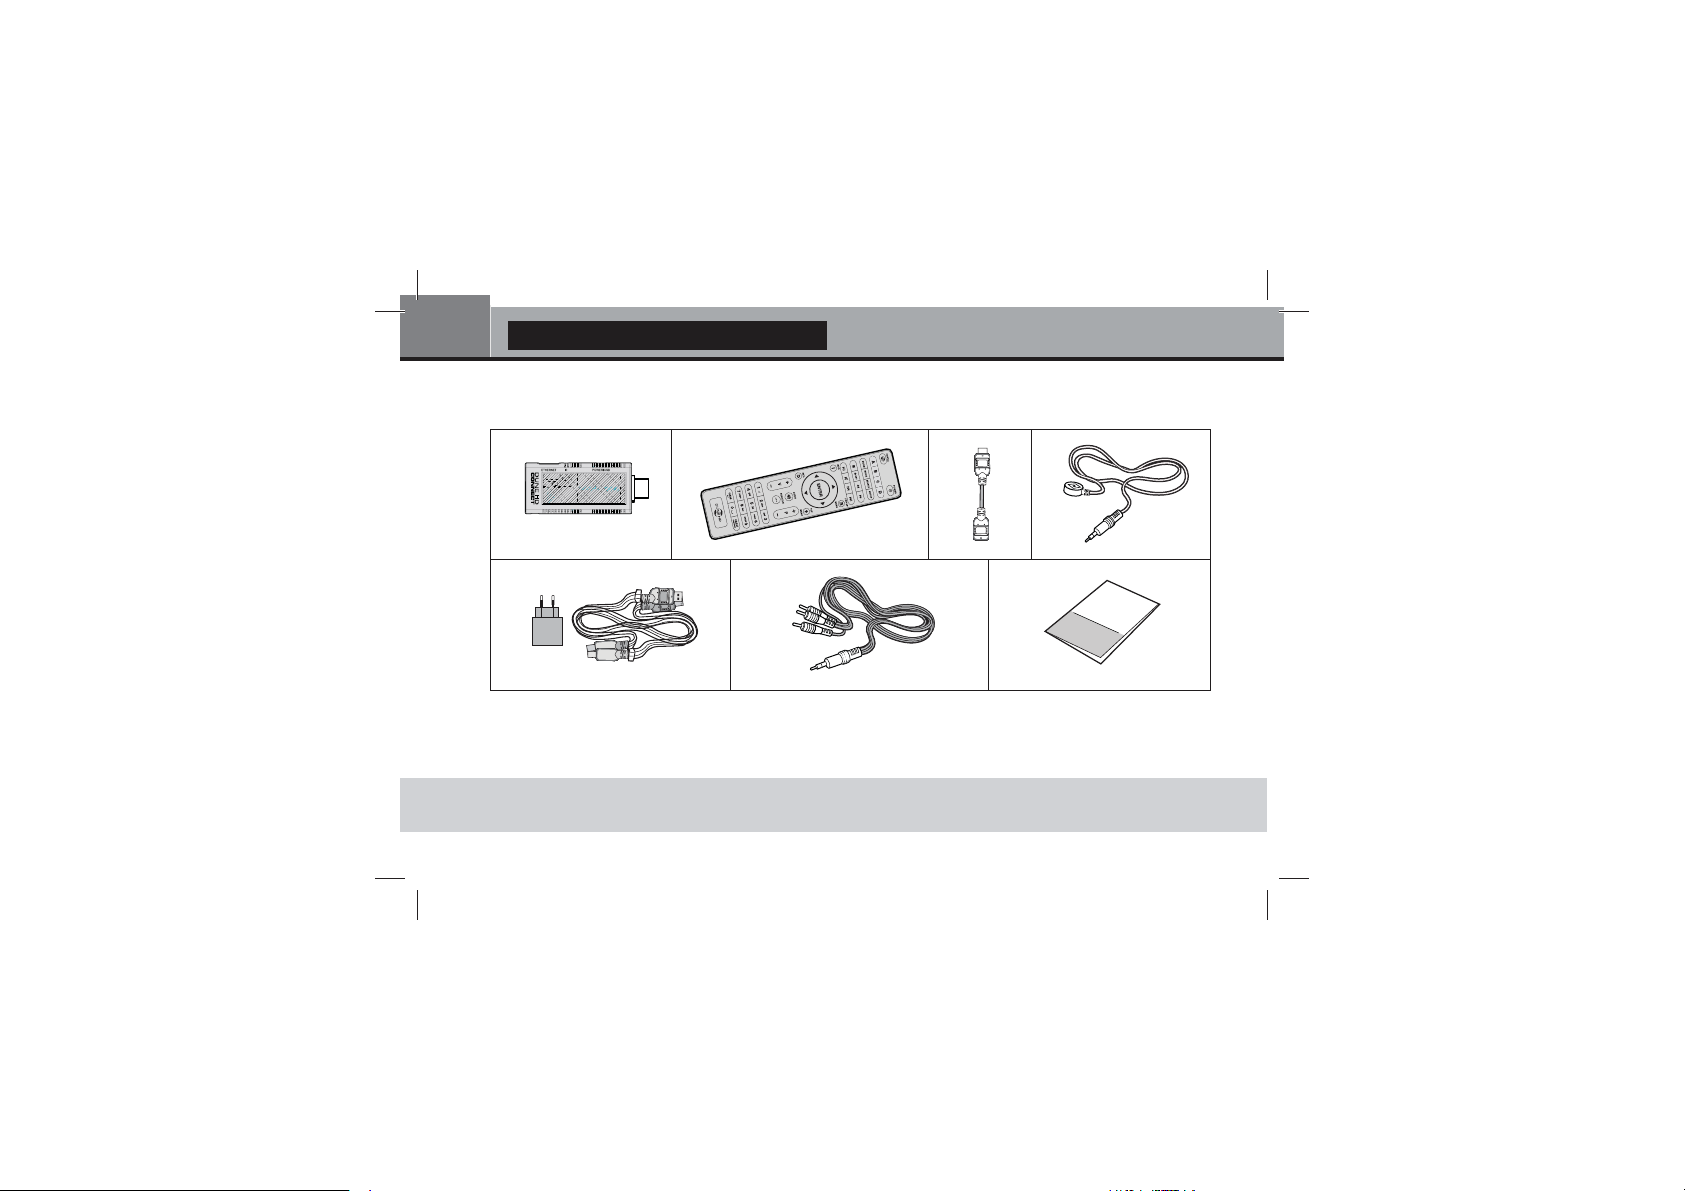
Package Contents
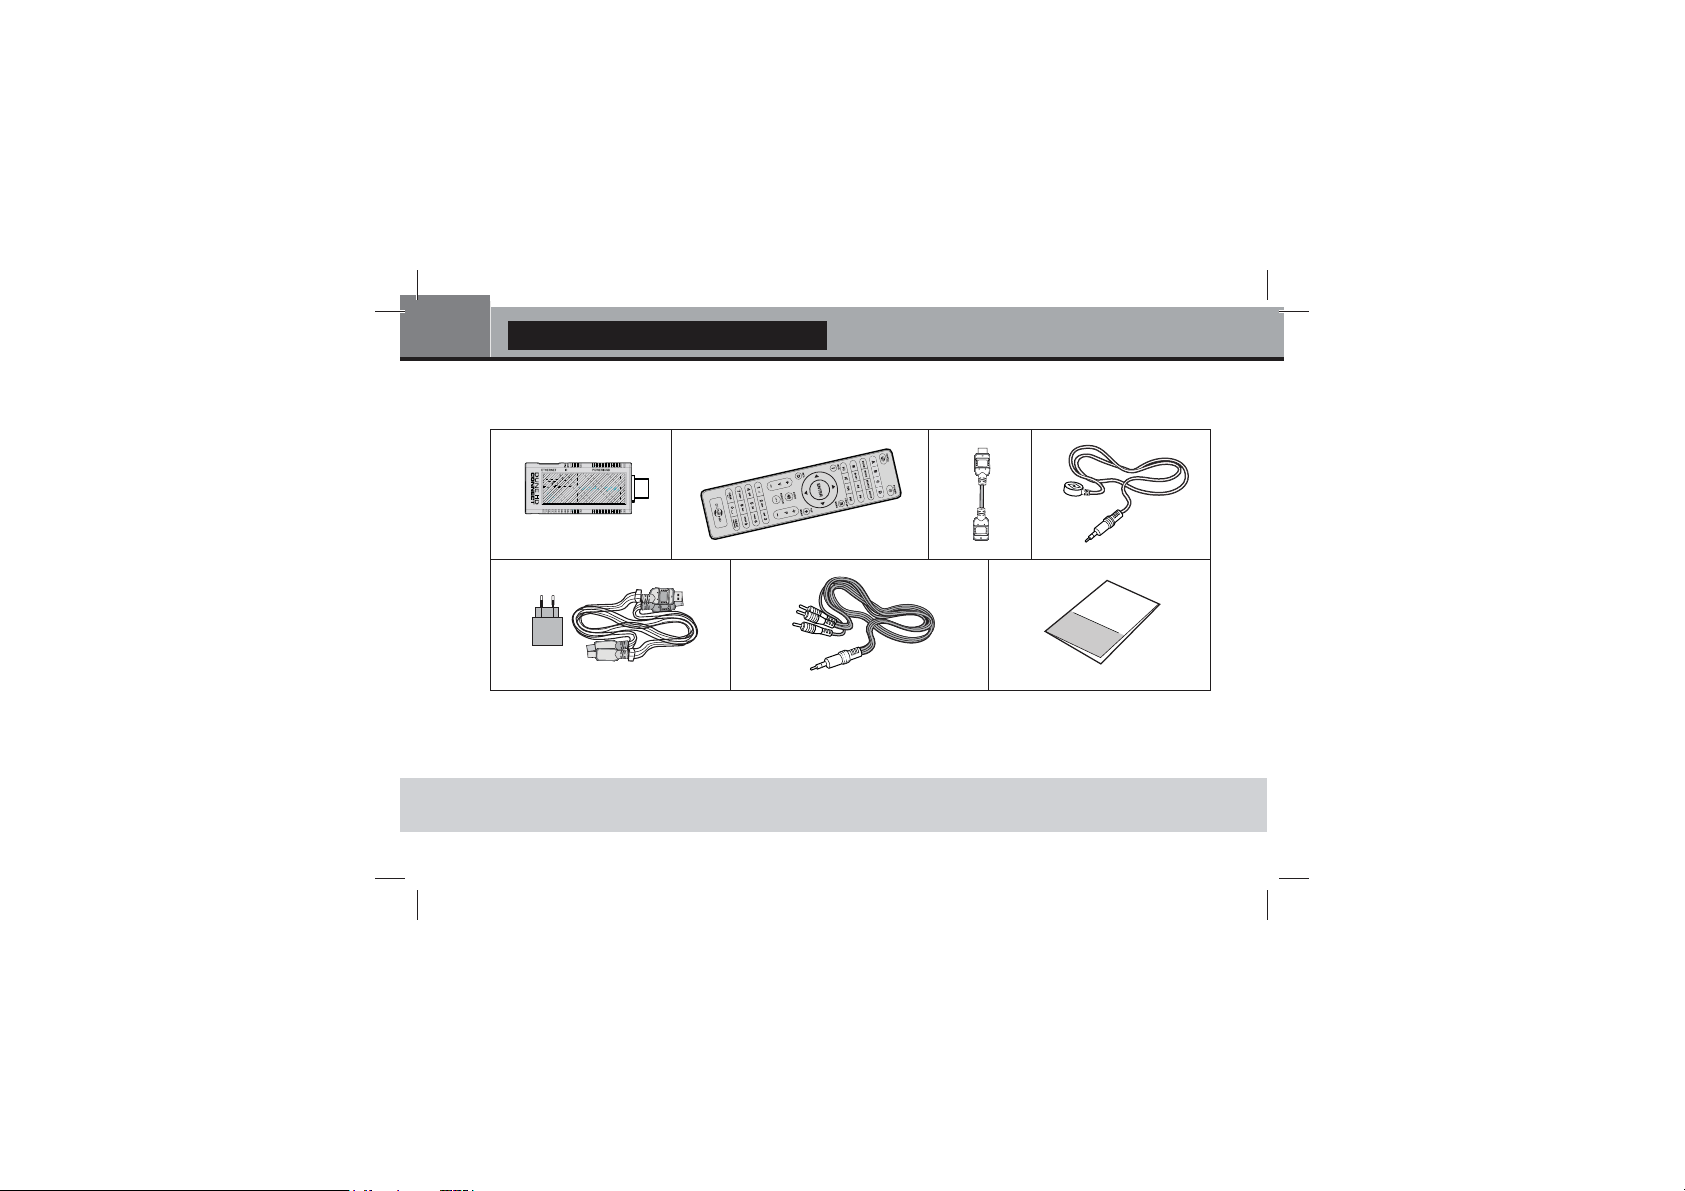
1
5
1. Dune HD Connect media player
2. Remote control (batteries may not
be included)
NOTE: Additional items (optional) may be included into the package, depending on player configuration, region, and
distributor.
3. HDMI Extender
4. IR extender
5. Power Supply with USB cable
2
3
6. AV cable (3xRCA)
7. Quick start guide
4
76
Page 7
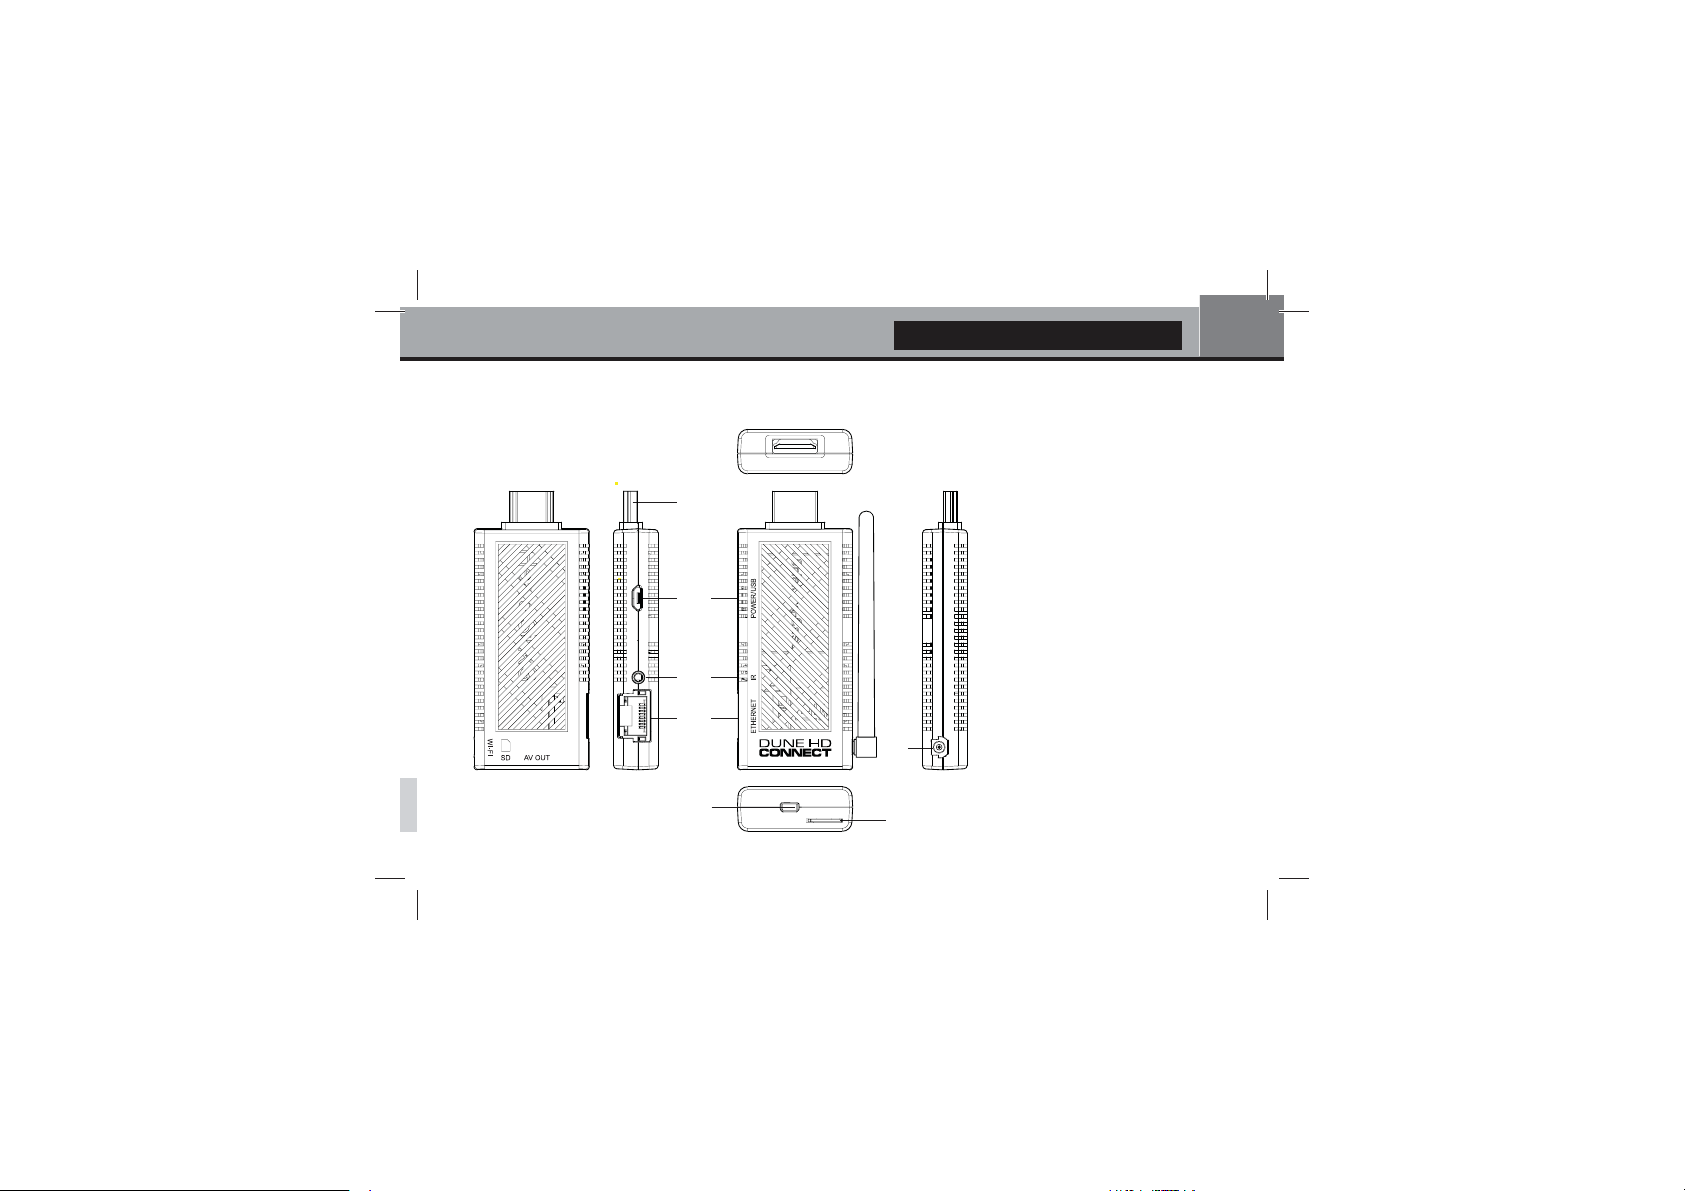
Exterior
English
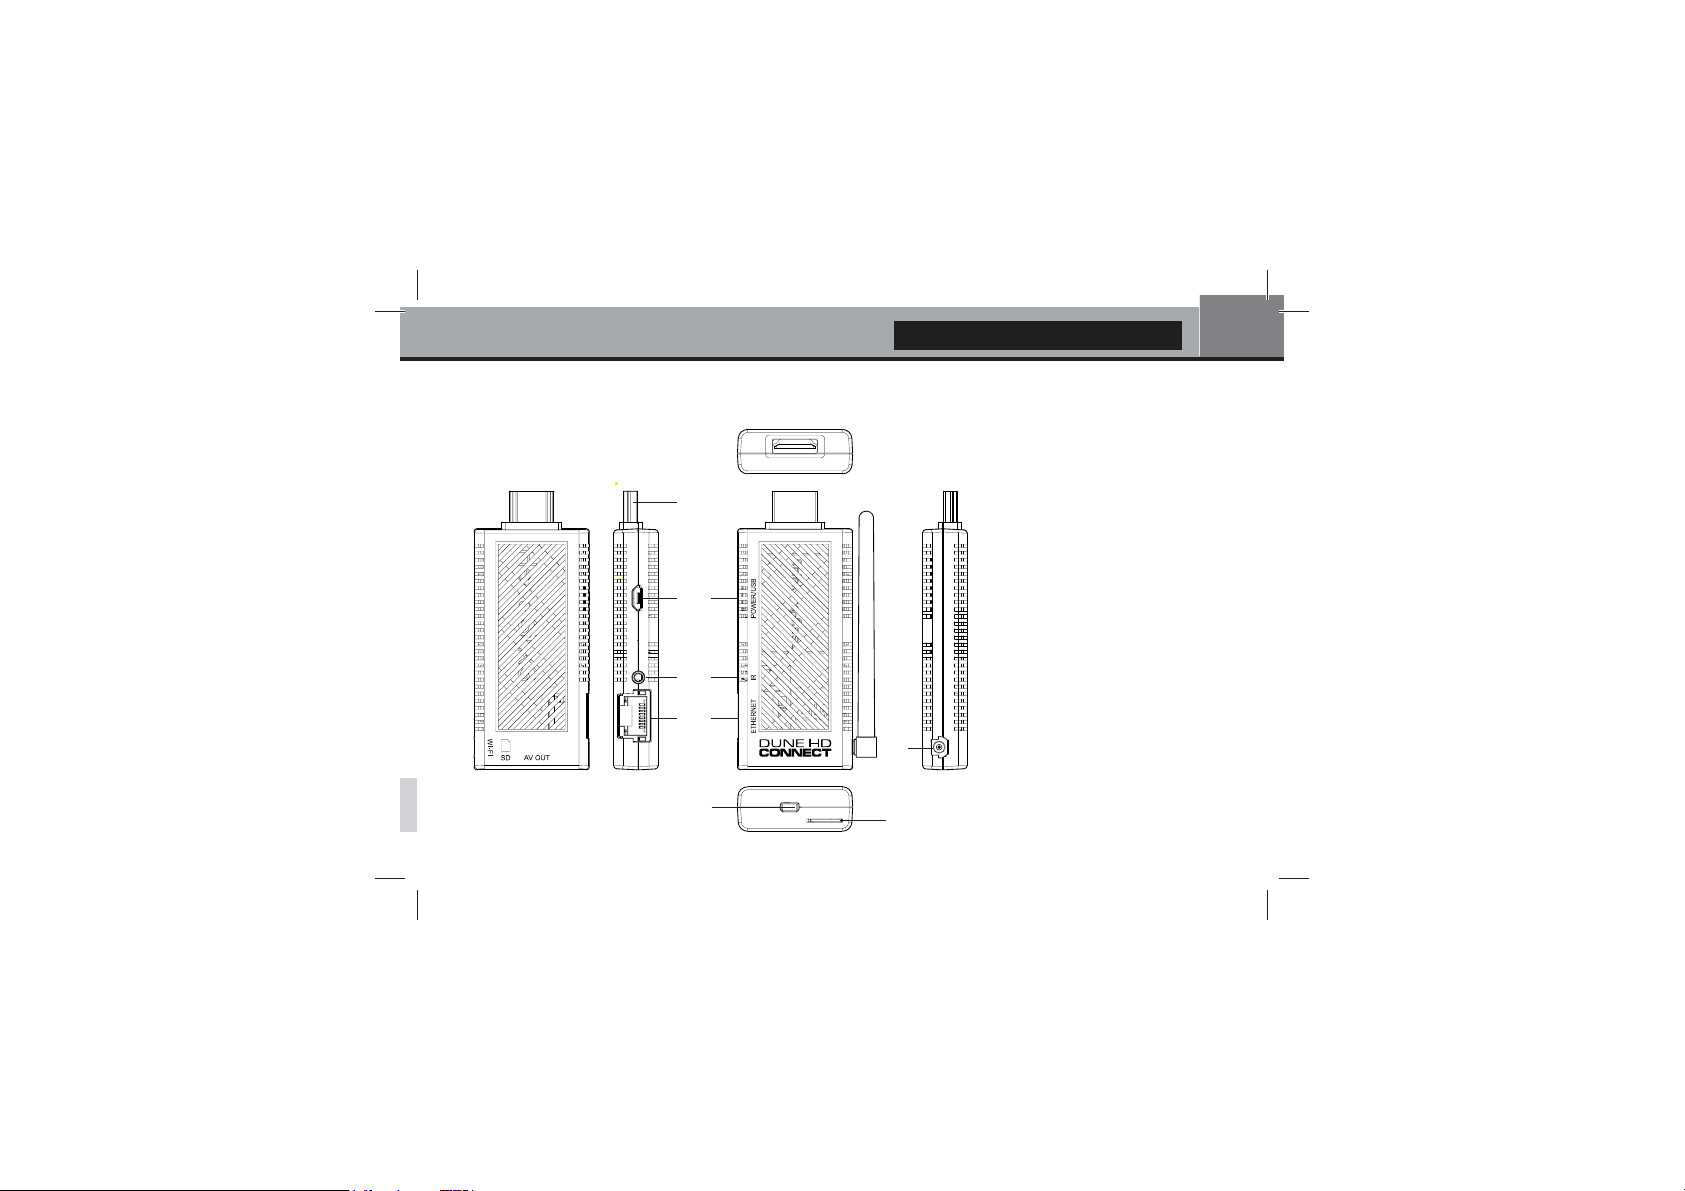
1
1. HDMI connector
2. Power/USB port
3. IR Extender port
2
3
4
5
4. LAN port (10/100 mbps)
5. Wi-Fi antenna port*
6. Micro SD Card slot
7. AV Out port
* - depends on configuration
7
7
6
Page 8
8
Dune HD Connect Quick Start Guide
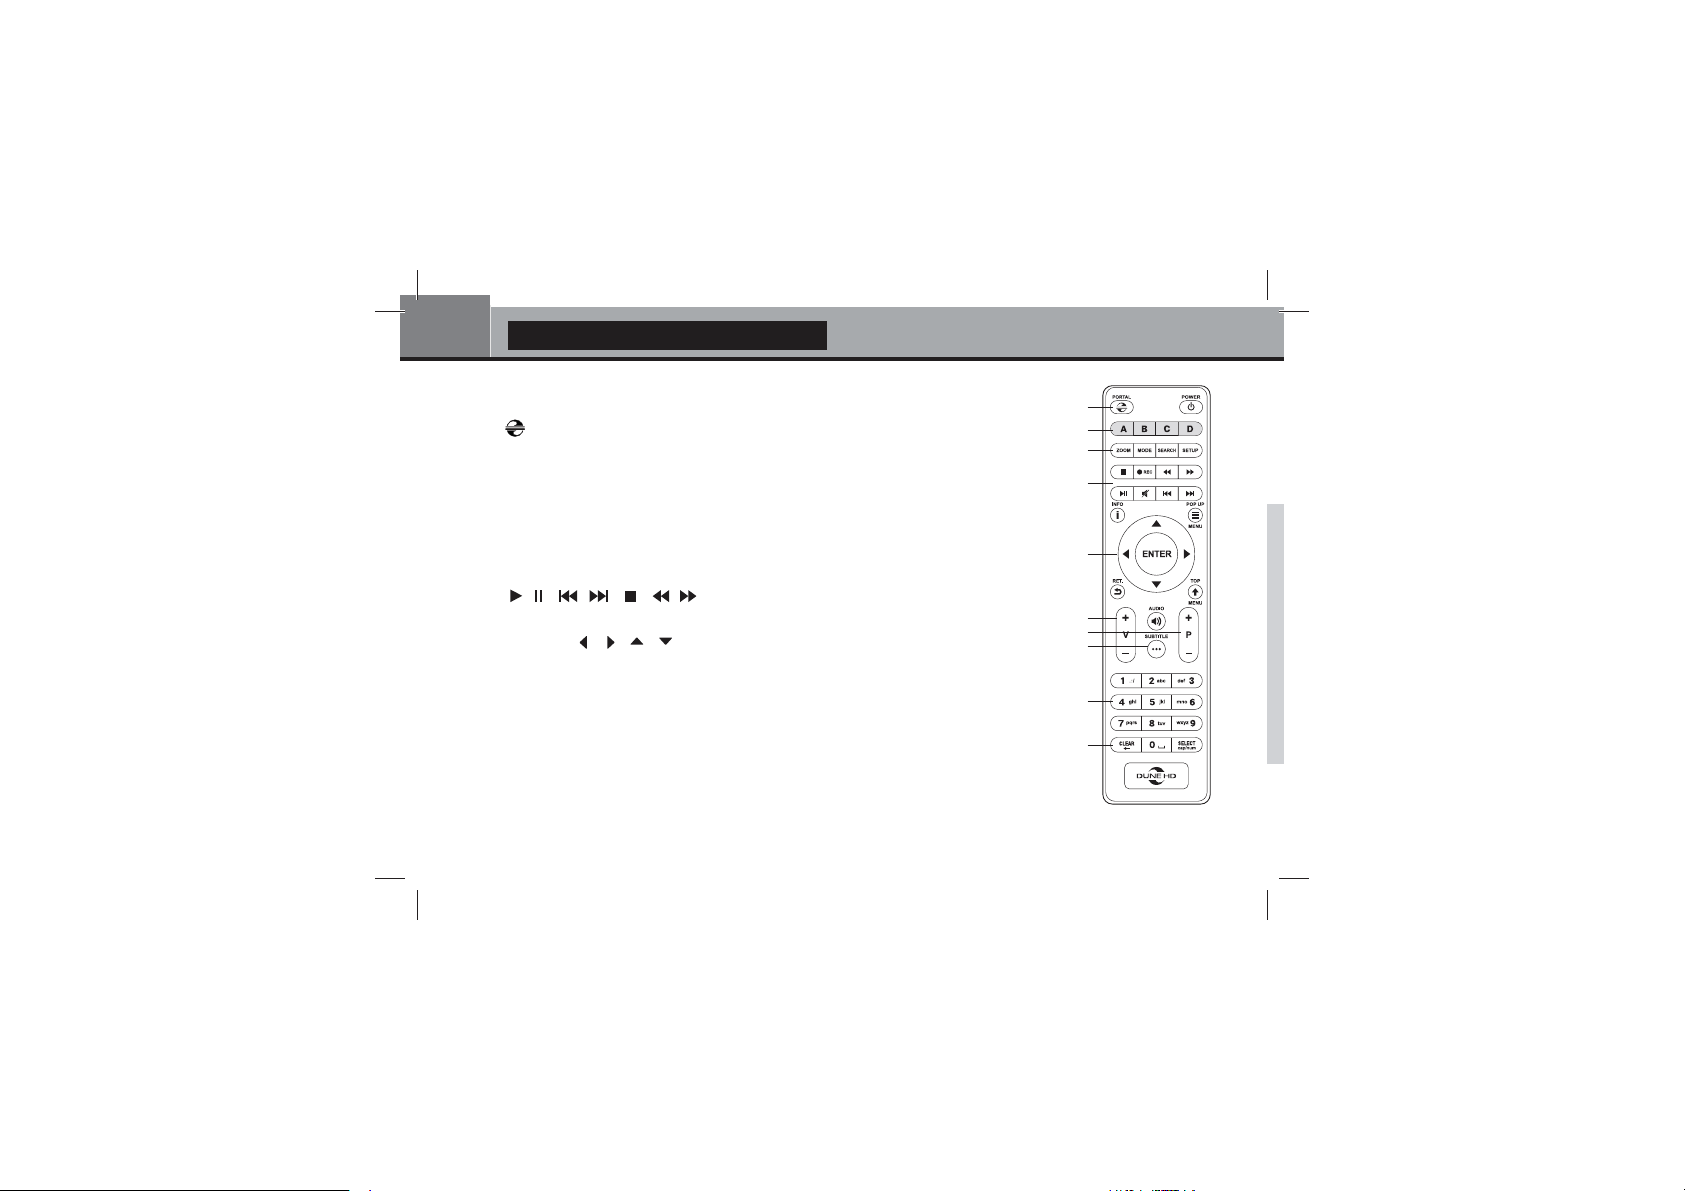
Remote Control
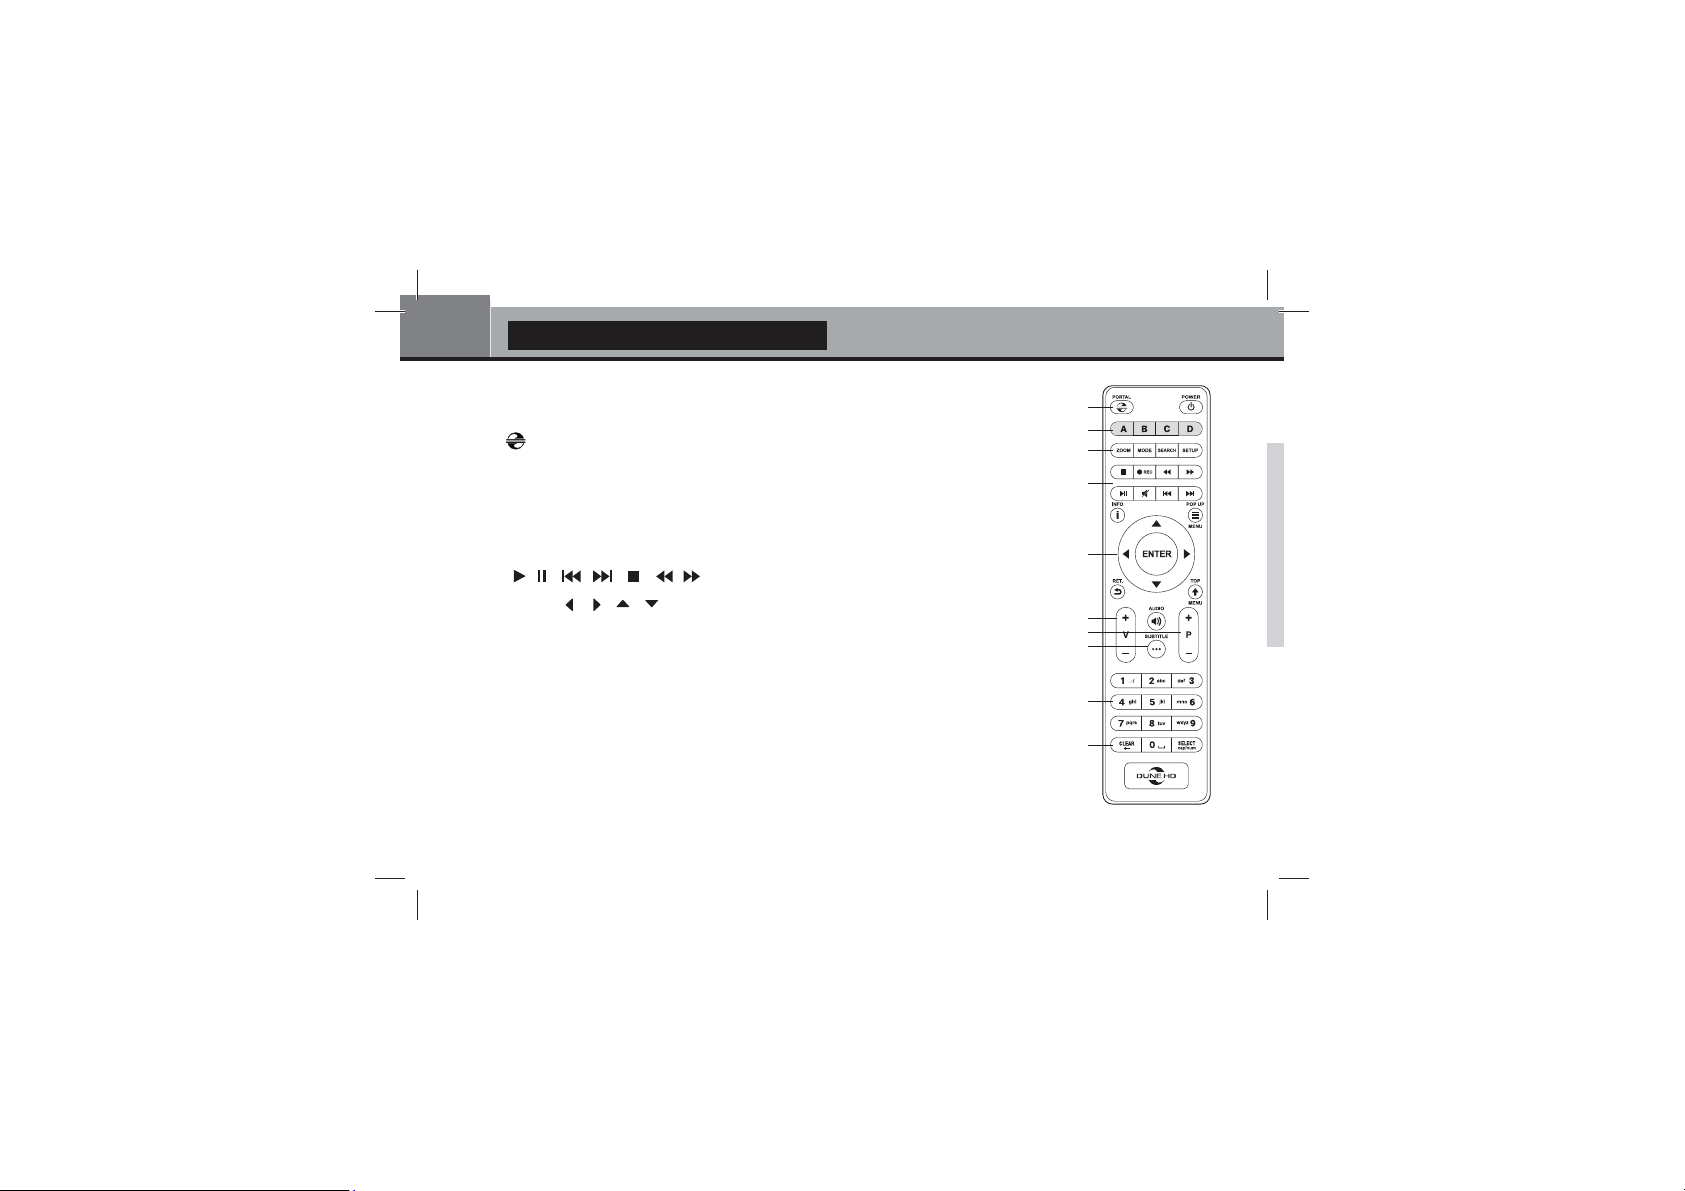
1. — reserved (optional), POWER — toggle the standby mode.
2. A (Red), B (Green), C (Yellow), D (Blue) — control some player functions.
3. ZOOM — change the zoom factor for the video content being played. MODE — switch
the video output mode; control some other player functions. SEARCH — jump to a
speci¿ed playback position. SETUP — enter/leave the setup menu; adjust playback
settings during playback. REC — start/stop TV channel recording.
4.
5. Arrows
INFO — main buttons for controlling the player (navigate across the items on the screen,
open/use the currently selected item, go back to the previous screen, go to main menu,
show popup menu with actions, show information, control some other player functions).
6. V+/V- (volume up / volume down) — adjust the volume.
7. P+/P- (page up / page down) — scroll up and down in various lists; control some other
player functions.
8.
SUBTITLE, AUDIO — choose an audio track or subtitles during playback (if presented)
— control the playback. MUTE — turn the sound on/off.
, ENTER, RETURN, TOP MENU, POP UP MENU,
1
2
3
4
5
6
7
8
9
10
Page 9

English
9. 0–9 — enter numbers and text; control some other player functions.
10.
CLEAR, SELECT — control some player functions.
NOTES:
Ɣ 8se alkaline AAA batteries
Ɣ 2bserYe polarity Zhen inserting batteries
Ɣ 'irect the remote control to the player 7here must be no obstacles betZeen the 5& and the player
Ɣ ,f 5& functions only at short distances or stops functioning, make sure to replace the batteries
Ɣ 6ome 5& buttons may haYe seYeral functions depending on the current player mode
Ɣ 6ome 5& buttons may be aYailable only in certain player modes or only during playback of a certain content
9
Page 10
10
Dune HD Connect Quick Start Guide
Getting Started
Ensure the RC has batteries installed.
Connect the player to your TV and to other A/V equipment in an appropriate way. Use HDMI connection to get the
best possible quality of video and audio. Make sure to switch off the player and all relevant A/V equipment before
connecting them. Ensure your TV and other A/V equipment are configured to use proper inputs.
Switch on the player. The player will perform its initial loading procedure, which may take up to about 1 minute. During
the loading procedure, "DUNE HD" logo is shown on the TV.
Ɣ If you do not see "DUNE HD" logo on the TV when you switch on the player, it may mean some problem with the
connection between the player and the TV or that a wrong video input is chosen in the TV or A/V receiver/switch. In
such a case, recheck the cables and the settings of the TV or A/V receiver/switch, or try to use different cables or a
different way of connecting the player to the TV.
Ɣ If you see "DUNE HD" logo on the TV when you switch on the player, but then the picture disappears and no other
picture appears during at least 10 seconds, it may mean that a wrong video output mode is configured in the player.
In such a case, press the "MODE" RC button, and then press one of the RC buttons "1", "2", "3", "4" or "5" to
switch to a different video output mode (see "Quick Setting of Video Output Mode").
Finally, you should see the main screen of the player menu. The main screen shows items allowing to use different
player functions and access all storage devices and network drives connected to the player.
Adjust the player settings as needed using "SETUP" item on the main screen of the player menu or «SETUP» RC
button. In particular, you may want to adjust video settings, audio settings, and network settings.
Page 11
English
To choose the language of the player menu, use “Setup / General / Language” setting.
Use the RC buttons "LEFT", "RIGHT", "UP", "DOWN", "ENTER", "RETURN" to navigate through the player menu.
Use the "POP UP MENU" RC button to show the list of available commands. Use the "INFO" RC button to show the
information about the selected item.
Quick Setting of Video Output Mode
The “MODE” RC button allows quick setting of video output mode without entering the player setup
menu. This way of video output con¿guration may be required if you see no picture on the screen after
connecting your player to a TV.
Press the “MODE” RC button and then one of the RC buttons “1”, “2”, “3”, “4”, or “5” to switch to one of the follow
ing video output modes respectively:
1. Composite PAL
2. Composite NTSC
3. HDMI, 480i, 60 Hz
4. HDMI, 720p, 60 Hz
5. HDMI, 1080i, 60 Hz
After you see a picture on the TV, press the “ENTER” RC button, and then go to the player setup menu to perform a
more precise con¿guration of the video output mode if needed.
NOTE: 7he procedure of Tuick setting of Yideo output mode can not be used during playback and in some other
cases 7o ensure this procedure can be used, sZitch the player off, then sZitch the player on, and Zait about minute
to ensure the player loading is ¿nished After that press ©6723ª 5& button to ensure playback is stopped 7hen use
©02'(ª 5& button
11
-
Page 12
12
Dune HD Connect Quick Start Guide
Connecting USB Drives
To connect a USB drive, ensure you are on the main screen of the player menu and connect the USB drive to an USB
port of the player. The player will recognize the USB drive, and will show an item corresponding to the USB drive on
the main screen.
When connecting a USB drive requiring signi¿cant power (such as USB HDD), use an external power supply for the
USB drive. Power provided by the USB ports of the player may not be enough for correct functioning of the USB drive.
Do not disconnect or switch off the USB drive when some write operation is in progress.
Accessing Network Drives
To connect a network drive using SMB or NFS protocol, ensure you are on the main screen of the player menu, press the
“MENU” RC button, and choose “Create Network Folder”, then ¿ll the parameters of the network drive as needed. The player
will show an item corresponding to the con¿gured network drive on the main screen.
To browse the list of network resources accessible via SMB or UPnP protocols, use “Network Browser” item on the
main screen of the player menu.
NOTE: ,f some netZork resources are not shoZn by the player, you may need to Zait some minutes and then retry (or
press the ³0(18´ 5& button and choose ³5efresh´ command)
Formatting HDD
To format a HDD attached to the player, select the HDD item on the main screen of the player menu, press
the “INFO” RC button and choose “Format Disk” (to format the entire disk) or “Format Partition” (or to
format an already existing disk partition only). The player will format the disk. To format an unformatted HDD, just
press the “ENTER” RC button on the HDD item.
NOTE: 7o use (;7(;7 disks formatted by the player on a :indoZs 3&, you may need to install additional soft
Zare on the 3&, such as ³(;7)6'´ (httpZZZe[tfsdcom)
-
Page 13
English
Switching the Player On and Off
To put the player into the standby mode, press the «POWER» RC button. To exit the standby mode, press this buttons
again.
In the «software standby» mode, the player produces no signal on the video output, but is still functioning. For
example, if you have some storage devices connected to the player, you may still access them from network («NAS»
function of the player). Exiting the «software standby» mode takes just a few seconds. When the player is in the
«software standby» mode, it still consumes significant power. To switch the player off completely, disconnect the
power plug.
NOTE: After sZitching off the player completely or putting the player into the ©hardZare standbyª mode, it is
recommended to Zait about minute before sZitching it on again
NAS (Network Attached Storage)
You can access storage devices connected to the player from the local network using FTP and SMB protocols. On a
Windows PC, just type «ftp://ip_address» or «\\ip_address» in the Windows explorer, where «ip_address» is the IP
address of the player.
Wi-Fi
If you player is equiped with built-in Wi-Fi adapter, you can use it to connect the player to the local network via Wi-Fi.
13
Page 14
14
Dune HD Connect Quick Start Guide
Limitations
Compatibility of the player with a particular hardware (A/V equipment, network equipment, disk drives, etc) may
depend on various factors (particular hardware model, speci¿cs of hardware installation and usage, con¿guration of
the player and the hardware, etc). If the player does not correctly work with a particular hardware, try to adjust the
con¿guration of the player or hardware, try to use the hardware in a different way, or try to use some other hardware.
Compatibility of the player with a particular media content (¿les, discs, etc) may depend on various factors (speci¿cs of
media content encoding, speci¿cs of the con¿guration of the player, etc). If the player does not play correctly a particu
lar media content, try to adjust the con¿guration of the player, or try to use media content encoded in a different way.
Updating Your Player and Getting More Information
Please check here for updated versions of player ¿rmware (which may improve player functioning and extend player
possibilities):
http://dune-hd.com/¿rmware/
NOTE: <ou can also connect the player to ,nternet and use the online ¿rmZare upgrade function, see 6etup 0isc
)irmZare 8pgrade
Please check here for more detailed and up-to-date documentation and information on player usage:
http://dune-hd.com/manuals/
http://dune-hd.com/support/
-
Page 15
English
15
Page 16
16
Dune HD Connect Ʉɪɚɬɤɨɟɪɭɤɨɜɨɞɫɬɜɨ
ȼɜɟɞɟɧɢɟ
Dune HD Connect ɩɪɟɞɫɬɚɜɥɹɟɬ ɫɨɛɨɣ ɪɟɲɟɧɢɟ «ɜɫɟ-ɜ-ɨɞɧɨɦ» ɞɥɹ ɜɨɫɩɪɨɢɡɜɟɞɟɧɢɹ ɜɢɞɟɨ ɜɩɥɨɬɶ ɞɨ Full HD
(1080p).
Ɉɫɧɨɜɧɵɟ ɨɫɨɛɟɧɧɨɫɬɢ
Ɣ ɇɨɜɟɣɲɢɣ ɩɪɨɰɟɫɫɨɪ 6LJPD 'HVLJQV 603 ɨɛɟɫɩɟɱɢɜɚɟɬ ɨɬɥɢɱɧɨɟ ɜɨɫɩɪɨɢɡɜɟɞɟɧɢɟ ɢ
ɜɵɫɨɤɭɸ ɫɤɨɪɨɫɬɶ ɪɚɛɨɬɵ ɫ ɢɧɬɟɪɚɤɬɢɜɧɵɦɢ ɜɨɡɦɨɠɧɨɫɬɹɦɢ.
Ɣ ɋɟɬɟɜɨɣ ɩɪɨɢɝɪɵɜɚɬɟɥɶ ɩɨɞɤɥɸɱɟɧɢɟ ɩɪɨɢɝɪɵɜɚɬɟɥɹ ɤ ɥɨɤɚɥɶɧɨɣ ɫɟɬɢ ɢ ɜɨɫɩɪɨɢɡɜɟɞɟɧɢɟ
ɫɨɞɟɪɠɢɦɨɝɨ ɧɚɩɪɹɦɭɸ ɫ ɉɄ ɢɥɢ NAS (UPnP, SMB, NFS).
Ɣ ɉɪɨɢɝɪɵɜɚɧɢɟɫɜɧɟɲɧɟɝɨɧɚɤɨɩɢɬɟɥɹ ɩɨɞɤɥɸɱɟɧɢɟ ɜɧɟɲɧɟɦɭ ɧɚɤɨɩɢɬɟɥɸ ɤ ɩɪɨɢɝɪɵɜɚɬɟɥɸ ɢ ɜɨɫɩɪɨ
ɢɡɜɟɞɟɧɢɟ ɫɨɞɟɪɠɢɦɨɝɨ ɧɟɩɨɫɪɟɞɫɬɜɟɧɧɨ ɫ ɧɟɝɨ.
Ɣ ɉɪɨɢɝɪɵɜɚɧɢɟ 0.9 ɜɨɫɩɪɨɢɡɜɟɞɟɧɢɟ HD ɢ SD ɜɢɞɟɨ ɜ ɩɨɩɭɥɹɪɧɨɦ ɮɨɪɦɚɬɟ MKV, ɚ ɬɚɤɠɟ ɜ ɞɪɭɝɢɯ
ɫɨɜɪɟɦɟɧɧɵɯ ɮɨɪɦɚɬɚɯ ɜɢɞɟɨɮɚɣɥɨɜ, ɜɤɥɸɱɚɹ HD-ɜɢɞɟɨ ɜɵɫɨɱɚɣɲɟɝɨ ɤɚɱɟɫɬɜɚ ɫ ɨɱɟɧɶ ɜɵɫɨɤɢɦ
ɛɢɬɪɟɣɬɨɦ
Ɣ 86%ɩɨɪɬɭɞɨɛɧɨɟ ɩɨɞɤɥɸɱɟɧɢɟ ɧɚɤɨɩɢɬɟɥɟɣ USB-Flash, ɤɚɪɞ-ɪɢɞɟɪɨɜ ɢ ɞɪɭɝɢɯ USB-ɭɫɬɪɨɣɫɬɜ ɯɪɚɧɟɧɢɹ
ɞɚɧɧɵɯ.
Ɣ +'0,ɩɨɪɬ ɨɛɟɫɩɟɱɢɜɚɟɬ ɧɚɢɥɭɱɲɟɟ ɤɚɱɟɫɬɜɨ HD-ɜɢɞɟɨ ɢ HD-ɚɭɞɢɨ.
Ɣ ɋɥɨɬɞɥɹɤɚɪɬɩɚɦɹɬɢ0LFUR6' ɜɨɫɩɪɨɢɡɜɟɞɟɧɢɟ ɦɟɞɢɚɮɚɣɥɨɜ ɫ ɤɚɪɬ ɩɚɦɹɬɢ micro SD ɢɡ ɜɢɞɟɨɤɚɦɟɪɵ/
ɮɨɬɨɚɩɩɚɪɚɬɚ ɢɥɢ ɞɪɭɝɢɯ ɭɫɬɪɨɣɫɬɜ.
-
Page 17
Ɋɭɫɫɤɢɣ
Ɣ Ƚɢɛɤɚɹɫɢɫɬɟɦɚɜɵɜɨɞɚɜɢɞɟɨ ɜɵɜɨɞ ɜɢɞɟɨ ɜ ɥɸɛɨɦ ɪɚɡɪɟɲɟɧɢɢ ɢ ɮɨɪɦɚɬɟ (ɨɬ SD ɞɨ 1080p, 24p/PAL/
NTSC).
Ɣ ɍɜɟɥɢɱɟɧɢɟɪɚɡɪɟɲɟɧɢɹXSVFDOLQJ ɜɵɫɨɤɨɤɚɱɟɫɬɜɟɧɧɨɟ ɩɨɜɵɲɟɧɢɟ ɪɚɡɪɟɲɟɧɢɹ ɥɸɛɵɯ ɜɢɞɟɨɦɚɬɟɪɢɚ
ɥɨɜ SD ɞɨ Full HD (1080p) ɢɥɢ ɞɪɭɝɨɝɨ HD-ɪɚɡɪɟɲɟɧɢɹ.
Ɣ Ɏɚɣɥɨɜɵɣɛɪɚɭɡɟɪ ɭɞɨɛɧɵɣ ɮɚɣɥɨɜɵɣ ɛɪɚɭɡɟɪ ɫ ɛɨɝɚɬɵɦɢ ɜɨɡɦɨɠɧɨɫɬɹɦɢ ɪɚɛɨɬɵ ɫ ɮɚɣɥɚɦɢ (ɤɨɩɢɪɨɜɚ
ɧɢɟ, ɩɟɪɟɦɟɳɟɧɢɟ, ɭɞɚɥɟɧɢɟ, ɩɟɪɟɢɦɟɧɨɜɚɧɢɟ, ɨɪɝɚɧɢɡɚɰɢɹ, ɫɨɪɬɢɪɨɜɤɚ).
Ⱦɨɩɨɥɧɢɬɟɥɶɧɵɟ ɮɭɧɤɰɢɢ
Ɣ ȼɨɫɩɪɨɢɡɜɟɞɟɧɢɟ ɚɭɞɢɨɮɚɣɥɨɜ ɫ ɧɚɢɜɵɫɲɢɦ ɤɚɱɟɫɬɜɨɦ ɞɨ 192 ɄȽɰ / 24-ɛɢɬ, ɜ ɮɨɪɦɚɬɚɯ FLAC,
Monkey’s Audio APE, WAV/PCM ɢ ɞɪɭɝɢɯ.
Ɣ ɉɥɟɣɥɢɫɬɵ ɫɨɡɞɚɧɢɟ ɩɥɟɣɥɢɫɬɨɜ ɢɡ ɩɚɩɨɤ, ɢɫɩɨɥɶɡɨɜɚɧɢɟ ɫɨɛɫɬɜɟɧɧɵɯ ɩɥɟɣɥɢɫɬɨɜ, ɮɭɧɤɰɢɢ ɩɨɜɬɨɪɚ ɢ
ɫɥɭɱɚɣɧɨɝɨ ɜɨɫɩɪɨɢɡɜɟɞɟɧɢɹ.
Ɣ Ɏɭɧɤɰɢɹ1$6ɞɨɫɬɭɩ ɤ ɮɚɣɥɚɦ ɧɚ ɧɚɤɨɩɢɬɟɥɹɯ (HDD, ɨɩɬɢɱɟɫɤɢɣ ɩɪɢɜɨɞ, ɢ ɬ.ɩ.), ɩɨɞɤɥɸɱɟɧɧɵɯ ɤ ɩɥɟɟɪɭ,
ɢɡ ɥɨɤɚɥɶɧɨɣ ɫɟɬɢ (ɩɨɫɪɟɞɫɬɜɨɦ SMB ɢɥɢ FTP).
Ɣ ɇɚɫɬɪɚɢɜɚɟɦɵɣɩɨɥɶɡɨɜɚɬɟɥɶɫɤɢɣɢɧɬɟɪɮɟɣɫ ɩɨɞɞɟɪɠɤɚ ɦɟɞɢɚɤɨɥɥɟɤɰɢɣ ɫ ɩɨɤɚɡɨɦ ɨɛɥɨɠɟɤ ɢ ɡɧɚɱɤɨɜ
(ɫ ɝɪɚɮɢɤɨɣ Full HD).
Ɣ ɂɧɬɟɪɧɟɬɪɚɞɢɨ ɜɨɫɩɪɨɢɡɜɟɞɟɧɢɟ ɢ ɡɚɩɢɫɶ ɪɚɡɥɢɱɧɵɯ ɢɧɬɟɪɧɟɬ-ɪɚɞɢɨɫɬɚɧɰɢɣ.
Ɣ Digital TV: ɜɨɫɩɪɨɢɡɜɟɞɟɧɢɟ ɢ ɡɚɩɢɫɶ ɬɟɥɟɩɪɨɝɪɚɦɦ (OTT/IPTV).
17
-
-
Page 18
18
Dune HD Connect Ʉɪɚɬɤɨɟɪɭɤɨɜɨɞɫɬɜɨ
ɋɨɞɟɪɠɢɦɨɟ ɤɨɪɨɛɤɢ
1
5
1. ɉɪɨɢɝɪɵɜɚɬɟɥɶ Dune HD Connect
2. ɉɭɥɶɬ ɭɩɪɚɜɥɟɧɢɹ (ɛɚɬɚɪɟɣɤɢ
ɦɨɝɭɬ ɧɟ ɜɯɨɞɢɬɶ ɜ ɤɨɦɩɥɟɤɬ)
ɉɊɂɆȿɑȺɇɂȿ: Ⱦɪɭɝɢɟ ɚɤɫɟɫɫɭɚɪɵ (ɨɩɰɢɨɧɚɥɶɧɨ) ɦɨɝɭɬ ɞɨɩɨɥɧɢɬɟɥɶɧɨ ɜɤɥɸɱɚɬɶɫɹ ɜ ɤɨɦɩɥɟɤɬ ɩɨɫɬɚɜɤɢ
ɜ ɡɚɜɢɫɢɦɨɫɬɢ ɨɬ ɤɨɧɮɢɝɭɪɚɰɢɢ ɩɪɨɢɝɪɵɜɚɬɟɥɹ, ɪɟɝɢɨɧɚ ɢ ɞɢɫɬɪɢɛɶɸɬɨɪɚ
3. HDMI ɭɞɥɢɧɢɬɟɥɶ
4. IR ɭɞɥɢɧɢɬɟɥɶ
5. Ȼɥɨɤ ɩɢɬɚɧɢɹ ɫ ɤɚɛɟɥɟɦ USB
2
3
6. Ⱥȼ-ɤɚɛɟɥɶ (3;RCA)
7. Ʉɪɚɬɤɨɟ ɪɭɤɨɜɨɞɫɬɜɨ
4
76
Page 19
ȼɧɟɲɧɢɣ ɜɢɞ
Ɋɭɫɫɤɢɣ
1
1. Ʉɨɧɧɟɤɬɨɪ HDMI
2. Ɋɚɡɴɟɦ ɩɢɬɚɧɢɹ (USB)
3. Ɋɚɡɴɟɦ ɂɄ-ɭɞɥɢɧɢɬɟɥɹ
2
3
4
5
4. Ɋɚɡɴɟɦ LAN (10/100 ɦɟɝɚɛɢɬ/ɫɟɤ)
5. Ɋɚɡɴɟɦ ɞɥɹ ɚɬɟɧɧɵ Wi-Fi*
6. Ʉɚɪɬɪɢɞɟɪ ɞɥɹ ɤɚɪɬ ɩɚɦɹɬɢ
micro SD
7. Ɋɚɡɴɟɦ ɞɥɹ Ⱥȼ-ɤɚɛɟɥɹ
* - ɧɚɥɢɱɢɟ ɡɚɜɢɫɢɬ ɨɬ ɦɨɞɢɮɢɤɚɰɢɢ
19
7
6
Page 20
20
Dune HD Connect Ʉɪɚɬɤɨɟɪɭɤɨɜɨɞɫɬɜɨ
ɉɭɥɶɬ ɭɩɪɚɜɥɟɧɢɹ
1.
— ɡɚɪɟɡɟɪɜɢɪɨɜɚɧɨ.
$ ɤɪɚɫɧɚɹ % ɡɟɥɟɧɚɹ & ɠɟɥɬɚɹ ' ɫɢɧɹɹ — ɭɩɪɚɜɥɟɧɢɟ ɧɟɤɨɬɨɪɵɦɢ
ɮɭɧɤɰɢɹɦɢ ɩɪɨɢɝɪɵɜɚɬɟɥɹ.
3. ZOOM — ɢɡɦɟɧɟɧɢɟ ɦɚɫɲɬɚɛɚ ɜɨɫɩɪɨɢɡɜɨɞɢɦɵɯ ɜɢɞɟɨɦɚɬɟɪɢɚɥɨɜ. MODE —
ɩɟɪɟɤɥɸɱɟɧɢɟ ɪɟɠɢɦɨɜ ɜɢɞɟɨɜɵɯɨɞɚ; ɭɩɪɚɜɥɟɧɢɟ ɧɟɤɨɬɨɪɵɦɢ ɞɪɭɝɢɦɢ ɮɭɧɤɰɢɹɦɢ
ɩɪɨɢɝɪɵɜɚɬɟɥɹ. SEARCH — ɩɟɪɟɯɨɞ ɤ ɡɚɞɚɧɧɨɣ ɩɨɡɢɰɢɢ ɜɨɫɩɪɨɢɡɜɟɞɟɧɢɹ.
SETUP — ɜɯɨɞ/ɜɵɯɨɞ ɜ ɦɟɧɸ ɧɚɫɬɪɨɟɤ; ɧɚɫɬɪɨɣɤɚ ɩɚɪɚɦɟɬɪɨɜ ɜɨɫɩɪɨɢɡɜɟɞɟɧɢɹ
ɜɨ ɜɪɟɦɹ ɜɨɫɩɪɨɢɡɜɟɞɟɧɢɹ.
4.
MUTE — ɜɵɤɥɸɱɟɧɢɟ ɢ ɜɤɥɸɱɟɧɢɟ ɡɜɭɤɚ.
ɋɬɪɟɥɤɢ
— ɨɫɧɨɜɧɵɟ ɤɧɨɩɤɢ ɭɩɪɚɜɥɟɧɢɹ ɩɪɨɢɝɪɵɜɚɬɟɥɟɦ (ɜɵɛɨɪ ɷɥɟɦɟɧɬɨɜ ɧɚ ɷɤɪɚɧɟ,
ɤ ɝɥɚɜɧɨɦɭ ɦɟɧɸ, ɜɵɜɨɞ ɤɨɧɬɟɤɫɬɧɨɝɨ ɦɟɧɸ ɫ ɞɟɣɫɬɜɢɹɦɢ, ɩɨɤɚɡ ɢɧɮɨɪɦɚɰɢɢ,
ɭɩɪɚɜɥɟɧɢɟ ɧɟɤɨɬɨɪɵɦɢ ɞɪɭɝɢɦɢ ɮɭɧɤɰɢɹɦɢ ɩɪɨɢɝɪɵɜɚɬɟɥɹ).
99ɭɜɟɥɢɱɟɧɢɟɝɪɨɦɤɨɫɬɢɭɦɟɧɶɲɟɧɢɟɝɪɨɦɤɨɫɬɢ— ɢɡɦɟɧɟɧɢɟ ɝɪɨɦɤɨɫɬɢ.
33ɫɬɪɚɧɢɰɚɜɜɟɪɯ ɫɬɪɚɧɢɰɚɜɧɢɡ — ɩɪɨɤɪɭɬɤɚ ɜɜɟɪɯ ɢ ɜɧɢɡ ɜ ɪɚɡɥɢɱɧɵɯ
ɫɩɢɫɤɚɯ; ɭɩɪɚɜɥɟɧɢɟ ɧɟɤɨɬɨɪɵɦɢ ɞɪɭɝɢɦɢ ɮɭɧɤɰɢɹɦɢ ɩɪɨɢɝɪɵɜɚɬɟɥɹ.
POWER — ɩɟɪɟɜɨɞ ɩɪɨɢɝɪɵɜɚɬɟɥɹ ɜ/ɢɡ ɪɟɠɢɦɚ ɨɠɢɞɚɧɢɹ.
REC — ɧɚɱɚɬɶ/ɡɚɤɨɧɱɢɬɶ ɡɚɩɢɫɶ Ɍȼ-ɤɚɧɚɥɚ.
— ɭɩɪɚɜɥɟɧɢɟ ɯɨɞɨɦ ɜɨɫɩɪɨɢɡɜɟɞɟɧɢɹ.
ENTER, RETURN, TOP MENU, POP UP MENU, INFO
1
2
3
4
5
6
7
8
9
10
Page 21

Ɋɭɫɫɤɢɣ
8. SUBTITLE, AUDIO — ɭɩɪɚɜɥɟɧɢɟ ɜɵɛɨɪɨɦ ɡɜɭɤɨɜɨɣ ɞɨɪɨɠɤɢ ɢ ɫɭɛɬɢɬɪɨɜ.
9. 0–9 ² ɜɜɨɞ ɰɢɮɪ ɢ ɬɟɤɫɬɚ ɭɩɪɚɜɥɟɧɢɟ ɧɟɤɨɬɨɪɵɦɢ ɞɪɭɝɢɦɢ ɮɭɧɤɰɢ ɹɦɢ ɩɪɨɢɝɪɵɜɚɬɟɥɹ
10. CLEAR, SELECT — ɭɩɪɚɜɥɟɧɢɟ ɧɟɤɨɬɨɪɵɦɢ ɮɭɧɤɰɢɹɦɢ ɩɪɨɢɝɪɵɜɚɬɟɥɹ.
ɉɪɢɦɟɱɚɧɢɹ
Ɣ ɂɫɩɨɥɶɡɭɣɬɟ ɳɟɥɨɱɧɵɟ (alkaline) ɛɚɬɚɪɟɣɤɢ ɬɢɩɚ AAA
Ɣ ɋɨɛɥɸɞɚɣɬɟ ɩɨɥɹɪɧɨɫɬɶ ɩɪɢ ɭɫɬɚɧɨɜɤɟ ɛɚɬɚɪɟɟɤ
Ɣ ɇɚɩɪɚɜɥɹɣɬɟ ɩɭɥɶɬ ɧɚ ɩɪɨɢɝɪɵɜɚɬɟɥɶ Ɇɟɠɞɭ ɩɭɥɶɬɨɦ ɢ ɩɪɨɢɝɪɵɜɚɬɟɥɟɦ ɧɟ ɞɨɥɠɧɨ ɛɵɬɶ ɩɪɟɩɹɬ-
ɫɬɜɢɣ
Ɣ ȿɫɥɢ ɩɭɥɶɬ ɪɚɛɨɬɚɟɬ ɬɨɥɶɤɨ ɫ ɧɟɛɨɥɶɲɨɝɨ ɪɚɫɫɬɨɹɧɢɹ, ɡɚɦɟɧɢɬɟ ɛɚɬɚɪɟɣɤɢ
Ɣ ɇɟɤɨɬɨɪɵɟ ɤɧɨɩɤɢ ɩɭɥɶɬɚ ɦɨɝɭɬ ɢɦɟɬɶ ɧɟɫɤɨɥɶɤɨ ɡɧɚɱɟɧɢɣ ɜ ɡɚɜɢɫɢɦɨɫɬɢ ɨɬ ɪɟɠɢɦɚ ɪɚɛɨɬɵ ɩɪɨɢɝɪɵ-
ɜɚɬɟɥɹ
Ɣ ɇɟɤɨɬɨɪɵɟ ɤɧɨɩɤɢ ɩɭɥɶɬɚ ɦɨɝɭɬ ɪɚɛɨɬɚɬɶ ɬɨɥɶɤɨ ɜ ɧɟɤɨɬɨɪɵɯ ɪɟɠɢɦɚɯ ɪɚɛɨɬɵ ɩɪɨɢɝɪɵɜɚɬɟɥɹ ɢɥɢ
ɩɪɢ ɜɨɫɩɪɨɢɡɜɟɞɟɧɢɢ ɦɚɬɟɪɢɚɥɨɜ ɨɩɪɟɞɟɥɟɧɧɨɝɨ ɬɢɩɚ
21
Page 22
22
Dune HD Connect Ʉɪɚɬɤɨɟɪɭɤɨɜɨɞɫɬɜɨ
ɇɚɱɚɥɨ ɪɚɛɨɬɵ
ɍɛɟɞɢɬɟɫɶ, ɱɬɨ ɜ ɩɭɥɶɬ ɜɫɬɚɜɥɟɧɵ ɛɚɬɚɪɟɣɤɢ.
ɉɨɞɤɥɸɱɢɬɟ ɩɪɨɢɝɪɵɜɚɬɟɥɶ ɤ ɬɟɥɟɜɢɡɨɪɭ ɢ ɞɪɭɝɨɦɭ ɚɭɞɢɨ-ɜɢɞɟɨɨɛɨɪɭɞɨɜɚɧɢɸ ɞɨɥɠɧɵɦ ɨɛɪɚɡɨɦ.
ɂɫɩɨɥɶɡɭɣɬɟ HDMI-ɩɨɞɤɥɸɱɟɧɢɟ ɞɥɹ ɩɨɥɭɱɟɧɢɹ ɦɚɤɫɢɦɚɥɶɧɨɝɨ ɤɚɱɟɫɬɜɨ ɜɢɞɟɨ ɢ ɡɜɭɤɚ. ɍɛɟɞɢɬɟɫɶ, ɱɬɨ
ɩɪɨɢɝɪɵɜɚɬɟɥɶ ɢ ɜɫɟ ɫɨɨɬɜɟɬɫɬɜɭɸɳɟɟ ɚɭɞɢɨ-ɜɢɞɟɨɨɛɨɪɭɞɨɜɚɧɢɟ ɜɵɤɥɸɱɟɧɨ ɩɪɢ ɩɪɨɜɟɞɟɧɢɢ ɩɨɞɤɥɸɱɟɧɢɣ.
ɍɛɟɞɢɬɟɫɶ, ɱɬɨ ɬɟɥɟɜɢɡɨɪ ɢ ɩɪɨɱɟɟ ɚɭɞɢɨ-ɜɢɞɟɨɨɛɨɪɭɞɨɜɚɧɢɟ ɧɚɫɬɪɨɟɧɨ ɧɚ ɢɫɩɨɥɶɡɨɜɚɧɢɟ ɧɭɠɧɵɯ
ɜɯɨɞɨɜ.
ȼɤɥɸɱɢɬɟ ɩɪɨɢɝɪɵɜɚɬɟɥɶ. Ɉɧ ɩɪɨɜɟɞɟɬ ɩɪɨɰɟɞɭɪɭ ɩɟɪɜɨɧɚɱɚɥɶɧɨɝɨ ɡɚɩɭɫɤɚ, ɤɨɬɨɪɚɹ ɡɚɣɦɟɬ ɨɤɨɥɨ
ɦɢɧɭɬɵ. ȼɨ ɜɪɟɦɹ ɷɬɨɣ ɩɪɨɰɟɞɭɪɵ ɧɚ ɷɤɪɚɧɟ ɬɟɥɟɜɢɡɨɪɚ ɛɭɞɟɬ ɩɨɤɚɡɚɧ ɥɨɝɨɬɢɩ «DUNE HD».
Ɣ ȿɫɥɢ ɜɵ ɧɟ ɜɢɞɢɬɟ ɥɨɝɨɬɢɩɚ «DUNE HD» ɧɚ ɷɤɪɚɧɟ ɬɟɥɟɜɢɡɨɪɚ ɩɨɫɥɟ ɜɤɥɸɱɟɧɢɹ ɩɪɨɢɝɪɵɜɚɬɟɥɹ, ɷɬɨ ɦɨɠɟɬ
ɨɡɧɚɱɚɬɶ ɩɪɨɛɥɟɦɭ ɫɨɟɞɢɧɟɧɢɹ ɩɪɨɢɝɪɵɜɚɬɟɥɹ ɢ ɬɟɥɟɜɢɡɨɪɚ, ɚ ɬɚɤɠɟ ɜɵɛɨɪ ɧɟɩɪɚɜɢɥɶɧɨɝɨ
ɜɢɞɟɨɜɯɨɞɚ ɜ ɬɟɥɟɜɢɡɨɪɟ ɢɥɢ ɚɭɞɢɨ-ɜɢɞɟɨɪɟɫɢɜɟɪɟ/ɪɚɡɜɟɬɜɢɬɟɥɟ. ȼ ɷɬɨɦ ɫɥɭɱɚɟ, ɩɟɪɟɩɪɨɜɟɪɶɬɟ
ɤɚɛɟɥɢ ɢ ɧɚɫɬɪɨɣɤɢ ɬɟɥɟɜɢɡɨɪɚ ɢɥɢ ɚɭɞɢɨ-ɜɢɞɟɨɪɟɫɢɜɟɪɚ/ɪɚɡɜɟɬɜɢɬɟɥɹ, ɢɥɢ ɢɫɩɨɥɶɡɭɣɬɟ ɞɪɭɝɢɟ ɤɚɛɟɥɢ ɢɥɢ
ɞɪɭɝɨɣ ɫɩɨɫɨɛ ɩɨɞɤɥɸɱɟɧɢɹ ɤ ɬɟɥɟɜɢɡɨɪɭ.
Ɣ ȿɫɥɢ ɜɵ ɜɢɞɢɬɟ ɥɨɝɨɬɢɩ «DUNE HD» ɧɚ ɷɤɪɚɧɟ ɬɟɥɟɜɢɡɨɪɚ ɩɨɫɥɟ ɜɤɥɸɱɟɧɢɹ ɩɪɨɢɝɪɵɜɚɬɟɥɹ, ɧɨ ɡɚɬɟɦ ɢɡɨɛɪɚ
ɠɟɧɢɟ ɢɫɱɟɡɚɟɬ ɢ ɧɢɱɟɝɨ ɧɟ ɩɨɹɜɥɹɟɬɫɹ ɜ ɬɟɱɟɧɢɟ ɯɨɬɹ ɛɵ 10 ɫɟɤɭɧɞ, ɷɬɨ ɦɨɠɟɬ ɨɡɧɚɱɚɬɶ, ɱɬɨ ɜ ɩɪɨɢɝɪɵɜɚɬɟɥɟ
ɜɵɛɪɚɧ ɧɟɜɟɪɧɵɣ ɜɢɞɟɨɪɟɠɢɦ. ȼ ɷɬɨɦ ɫɥɭɱɚɟ, ɧɚɠɦɢɬɟ ɤɧɨɩɤɭ ɩɭɥɶɬɚ «MODE», ɚ ɡɚɬɟɦ ɨɞɧɭ ɢɡ ɤɧɨɩɨɤ «1», «2»,
«3», «4» ɢɥɢ «5» ɞɥɹ ɜɤɥɸɱɟɧɢɹ ɞɪɭɝɨɝɨ ɜɢɞɟɨɪɟɠɢɦɚ (ɫɦ. "Ȼɵɫɬɪɨɟ ɢɡɦɟɧɟɧɢɟ ɜɢɞɟɨɪɟɠɢɦɚ").
ȼ ɪɟɡɭɥɶɬɚɬɟ, ɜɵ ɞɨɥɠɧɵ ɭɜɢɞɟɬɶ ɝɥɚɜɧɵɣ ɷɤɪɚɧ ɦɟɧɸ ɩɪɨɢɝɪɵɜɚɬɟɥɹ. ɇɚ ɝɥɚɜɧɨɦ ɷɤɪɚɧɟ ɩɨɤɚɡɚɧɵ
ɷɥɟɦɟɧɬɵ, ɩɪɟɞɨɫɬɚɜɥɹɸɳɢɟ ɞɨɫɬɭɩ ɤ ɨɫɧɨɜɧɵɦ ɮɭɧɤɰɢɹɦ ɩɪɨɢɝɪɵɜɚɬɟɥɹ ɢ ɤ ɫɨɞɟɪɠɢɦɨɦɭ ɜɫɟɯ
ɩɨɞɤɥɸɱɟɧɧɵɯ ɤ ɩɪɨɢɝɪɵɜɚɬɟɥɸ ɧɚɤɨɩɢɬɟɥɟɣ ɢ ɫɟɬɟɜɵɯ ɞɢɫɤɨɜ.
ɇɚɫɬɪɨɣɤɢ ɩɪɨɢɝɪɵɜɚɬɟɥɹ ɦɨɠɧɨ ɢɡɦɟɧɢɬɶ, ɜɨɫɩɨɥɶɡɨɜɚɜɲɢɫɶ ɷɥɟɦɟɧɬɨɦ «ɇɚɫɬɪɨɣɤɢ» ɧɚ ɝɥɚɜɧɨɦ ɷɤɪɚɧɟ ɦɟɧɸ
ɩɪɨɢɝɪɵɜɚɬɟɥɹ. ȼ ɱɚɫɬɧɨɫɬɢ, ɦɨɠɧɨ ɧɚɫɬɪɨɢɬɶ ɩɚɪɚɦɟɬɪɵ ɜɨɫɩɪɨɢɡɜɟɞɟɧɢɹ ɜɢɞɟɨ ɢ ɚɭɞɢɨ, ɚ ɬɚɤɠɟ ɩɚɪɚɦɟɬɪɵ
ɩɨɞɤɥɸɱɟɧɢɹ ɤ ɫɟɬɢ.
-
Page 23
Ɋɭɫɫɤɢɣ
23
Ⱦɥɹ ɜɵɛɨɪɚ ɹɡɵɤɚ ɦɟɧɸ ɩɪɨɢɝɪɵɜɚɬɟɥɹ, ɢɫɩɨɥɶɡɭɣɬɟ ɧɚɫɬɪɨɣɤɭ
ɂɫɩɨɥɶɡɭɣɬɟ ɤɧɨɩɤɢ ɩɭɥɶɬɚ ©ȼɅȿȼɈª ©ȼɉɊȺȼɈª ©ȼȼȿɊɏª ©ȼɇɂɁª ©(17(5ª ©5(7851ª ɞɥɹ
ɭɩɪɚɜɥɟɧɢɹ ɦɟɧɸ ɩɪɨɢɝɪɵɜɚɬɟɥɹ. Ʉɧɨɩɤɚ ɩɭɥɶɬɚ «POP UP MENU» ɩɪɟɞɧɚɡɧɚɱɟɧɚ ɞɥɹ ɩɨɤɚɡɚ ɫɩɢɫɤɚ
ɞɨɫɬɭɩɧɵɯ ɤɨɦɚɧɞ. Ʉɧɨɩɤɚ ɩɭɥɶɬɚ «INFO» ɜɵɜɨɞɢɬ ɢɧɮɨɪɦɚɰɢɸ ɨ ɜɵɛɪɚɧɧɨɦ ɷɥɟɦɟɧɬɟ.
“Setup / General / Language”
.
Ȼɵɫɬɪɨɟ ɢɡɦɟɧɟɧɢɟ ɜɢɞɟɨɪɟɠɢɦɚ
Ʉɧɨɩɤɚ ɩɭɥɶɬɚ «MODE» ɩɨɡɜɨɥɹɟɬ ɛɵɫɬɪɨ ɧɚɫɬɪɨɢɬɶ ɜɢɞɟɨɪɟɠɢɦ ɜɢɞɟɨɜɵɯɨɞɚ ɛɟɡ ɜɯɨɞɚ ɜ ɦɟɧɸ
ɧɚɫɬɪɨɟɤ ɩɪɨɢɝɪɵɜɚɬɟɥɹ. ɗɬɨɬ ɫɩɨɫɨɛ ɦɨɠɟɬ ɩɨɧɚɞɨɛɢɬɶɫɹ, ɟɫɥɢ ɜɵ ɧɟ ɜɢɞɢɬɟ ɢɡɨɛɪɚɠɟɧɢɟ ɧɚ
ɷɤɪɚɧɟ ɩɨɫɥɟ ɩɨɞɤɥɸɱɟɧɢɹ ɩɪɨɢɝɪɵɜɚɬɟɥɹ ɤ ɬɟɥɟɜɢɡɨɪɭ.
ɇɚɠɦɢɬɟ ɤɧɨɩɤɭ ɩɭɥɶɬɚ «MODE» ɢ ɡɚɬɟɦ ɨɞɧɭ ɢɡ ɤɧɨɩɨɤ «1», «2», «3», «4» ɢɥɢ «5» ɞɥɹ ɜɤɥɸɱɟɧɢɹ ɨɞɧɨɝɨ ɢɡ ɫɥɟ
ɞɭɸɳɢɯ ɜɢɞɟɨɪɟɠɢɦɨɜ:
1. Ʉɨɦɩɨɡɢɬɧɵɣ PAL
2. Ʉɨɦɩɨɡɢɬɧɵɣ NTSC
3. HDMI, 480i, 60 Ƚɰ
4. HDMI, 720p, 60 Ƚɰ
5. HDMI, 1080i, 60 Ƚɰ
ɉɨɫɥɟ ɬɨɝɨ, ɤɚɤ ɢɡɨɛɪɚɠɟɧɢɟ ɧɚ ɷɤɪɚɧɟ ɩɨɹɜɢɥɨɫɶ, ɧɚɠɦɢɬɟ «ENTER», ɚ ɡɚɬɟɦ ɡɚɣɞɢɬɟ ɜ ɦɟɧɸ
ɧɚɫɬɪɨɟɤ ɩɪɨɢɝɪɵɜɚɬɟɥɹ ɞɥɹ ɛɨɥɟɟ ɞɟɬɚɥɶɧɨɣ ɧɚɫɬɪɨɣɤɢ ɜɢɞɟɨɪɟɠɢɦɚ, ɟɫɥɢ ɷɬɨ ɧɟɨɛɯɨɞɢɦɨ.
ɉɊɂɆȿɑȺɇɂȿ: ɉɪɨɰɟɞɭɪɚ ɛɵɫɬɪɨɝɨ ɢɡɦɟɧɟɧɢɹ ɜɢɞɟɨɪɟɠɢɦɚ ɧɟɞɨɫɬɭɩɧɚ ɜɨ ɜɪɟɦɹ ɜɨɫɩɪɨɢɡɜɟɞɟɧɢɹ, ɚ
ɬɚɤɠɟ ɜ ɧɟɤɨɬɨɪɵɯ ɞɪɭɝɢɯ ɪɟɠɢɦɚɯ ɪɚɛɨɬɵ ɭɫɬɪɨɣɫɬɜɚ Ⱦɥɹ ɬɨɝɨ, ɱɬɨɛɵ ɝɚɪɚɧɬɢɪɨɜɚɧɧɨ ɜɵɩɨɥɧɢɬɶ ɷɬɭ
ɩɪɨɰɟɞɭɪɭ, ɜɵɤɥɸɱɢɬɟ ɩɪɨɢɝɪɵɜɚɬɟɥɶ, ɡɚɬɟɦ ɜɤɥɸɱɢɬɟ ɟɝɨ ɫɧɨɜɚ ɢ ɩɨɞɨɠɞɢɬɟ ɨɤɨɥɨ ɨɞɧɨɣ ɦɢɧɭɬɵ ɞɥɹ ɬɨɝɨ,
ɱɬɨɛɵ ɨɧ ɭɫɩɟɥ ɩɪɨɜɟɫɬɢ ɩɪɨɰɟɞɭɪɭ ɧɚɱɚɥɶɧɨɣ ɡɚɝɪɭɡɤɢ ɉɨɫɥɟ ɷɬɨɝɨ ɧɚɠɦɢɬɟ ɤɧɨɩɤɭ ɩɭɥɶɬɚ ©6723ª ɞɥɹ ɬɨɝɨ,
ɱɬɨɛɵ ɝɚɪɚɧɬɢɪɨɜɚɧɧɨ ɜɵɣɬɢ ɢɡ ɪɟɠɢɦɚ ɜɨɫɩɪɨɢɡɜɟɞɟɧɢɹ Ɂɚɬɟɦ ɭɠɟ ɢɫɩɨɥɶɡɭɣɬɟ ɤɧɨɩɤɭ ɩɭɥɶɬɚ ©02'(ª
-
Page 24
24
Dune HD Connect Ʉɪɚɬɤɨɟɪɭɤɨɜɨɞɫɬɜɨ
ɉɨɞɤɥɸɱɟɧɢɟ USB-ɧɚɤɨɩɢɬɟɥɟɣ
Ⱦɥɹ ɩɨɞɤɥɸɱɟɧɢɹ USB-ɧɚɤɨɩɢɬɟɥɹ ɭɛɟɞɢɬɟɫɶ, ɱɬɨ ɜɵ ɧɚɯɨɞɢɬɟɫɶ ɧɚ ɝɥɚɜɧɨɦ ɷɤɪɚɧɟ ɦɟɧɸ ɩɪɨɢɝɪɵɜɚɬɟɥɹ, ɩɨɞɤɥɸɱɢɬɟ USB-ɧɚɤɨɩɢɬɟɥɶ ɤ ɨɞɧɨɦɭ ɢɡ USB-ɩɨɪɬɨɜ. ɉɪɨɢɝɪɵɜɚɬɟɥɶ ɪɚɫɩɨɡɧɚɟɬ ɧɚɤɨɩɢɬɟɥɶ, ɢ ɧɚ ɝɥɚɜɧɨɦ ɷɤɪɚɧɟ ɩɨɹɜɢɬɫɹ ɫɨɨɬɜɟɬɫɬɜɭɸɳɢɣ ɷɥɟɦɟɧɬ. ɉɪɢ ɩɨɞɤɥɸɱɟɧɢɢ USB-ɧɚɤɨɩɢɬɟɥɹ, ɤɨɬɨɪɨɦɭ ɬɪɟɛɭɟɬɫɹ ɫɭɳɟɫɬɜɟɧɧɚɹ
ɦɨɳɧɨɫɬɶ ɩɨ ɩɢɬɚɧɢɸ (ɧɚɩɪɢɦɟɪ, ɠɟɫɬɤɢɣ ɞɢɫɤ), ɢɫɩɨɥɶɡɭɣɬɟ ɜɧɟɲɧɢɣ ɛɥɨ ɤ ɩɢɬɚɧɢɹ ɞɥɹ USB-ɧɚɤɨɩɢɬɟɥɹ.
ɉɢɬɚɧɢɟ, ɤɨɬɨɪɨɟ ɩɪɟɞɨɫɬɚɜɥɹɟɬ ɩɪɨɢɝɪɵɜɚɬɟɥɶ ɞɥɹ USB-ɩɨɪɬɨɜ, ɦɨɠɟɬ ɨɤɚɡɚɬɶɫɹ ɧɟɞɨɫɬɚɬɨɱɧɵɦ ɞɥɹ ɤɨɪ
ɪɟɤɬɧɨɝɨ ɮɭɧɤɰɢɨɧɢɪɨɜɚɧɢɹ USB-ɞɢɫɤɚ. ɇɟ ɨɬɫɨɟɞɢɧɹɣɬɟ ɢ ɧɟ ɜɵɤɥɸɱɚɣɬɟ USB-ɧɚɤɨɩɢɬɟɥɶ ɜɨ ɜɪɟɦɹ ɨɩɟɪɚɰɢɣ ɡɚɩɢɫɢ ɧɚ ɧɟɝɨ.
Ⱦɨɫɬɭɩ ɤ ɫɟɬɟɜɵɦ ɞɢɫɤɚɦ
Ⱦɥɹ ɩɨɞɤɥɸɱɟɧɢɹ ɫɟɬɟɜɨɝɨ ɞɢɫɤɚ ɩɨ ɩɪɨɬɨɤɨɥɭ SMB ɢɥɢ NFS, ɭɛɟɞɢɬɟɫɶ, ɱɬɨ ɜɵ ɧɚɯɨɞɢɬɟɫɶ ɧɚ ɝɥɚɜɧɨɦ ɷɤɪɚɧɟ ɦɟɧɸ ɩɪɨɢɝɪɵɜɚɬɟɥɹ, ɧɚɠɦɢɬɟ ɤɧɨɩɤɭ ɩɭɥɶɬɚ «MENU» ɢ ɜɵɛɟɪɢɬɟ ɩɭɧɤɬ «ɋɨɡɞɚɬɶ ɫɟɬɟɜɭɸ ɩɚɩɤɭ», ɡɚɬɟɦ
ɜɜɟɞɢɬɟ ɬɪɟɛɭɟɦɵɟ ɩɚɪɚɦɟɬɪɵ ɫɟɬɟɜɨɝɨ ɞɢɫɤɚ. ɉɪɨɢɝɪɵɜɚɬɟɥɶ ɛɭɞɟɬ ɩɨɤɚɡɵɜɚɬɶ ɷɥɟɦɟɧɬ, ɫɨɨɬɜɟɬɫɬɜɭɸɳɢɣ
ɷɬɨɦɭ ɫɟɬɟɜɨɦɭ ɞɢɫɤɭ, ɧɚ ɝɥɚɜɧɨɦ ɷɤɪɚɧɟ. Ⱦɥɹ ɩɪɨɫɦɨɬɪɚ ɫɩɢɫɤɚ ɞɨɫɬɭɩɧɵɯ ɫɟɬɟɜɵɯ ɪɟɫɭɪɫɨɜ ɩɨ ɩɪɨɬɨɤɨɥɭ
SMB ɢɥɢ UPnP, ɜɨɫɩɨɥɶɡɭɣɬɟɫɶ ɷɥɟɦɟɧɬɨɦ «Ȼɪɚɭɡɟɪ ɫɟɬɢ» ɧɚ ɝɥɚɜɧɨɦ ɷɤɪɚɧɟ ɦɟɧɸ ɩɪɨɢɝɪɵɜɚɬɟɥɹ.
ɉɊɂɆȿɑȺɇɂȿ: ȿɫɥɢ ɤɚɤɢɟ-ɬɨ ɫɟɬɟɜɵɟ ɪɟɫɭɪɫɵ ɧɟ ɩɨɤɚɡɵɜɚɸɬɫɹ ɩɪɨɢɝɪɵɜɚɬɟɥɟɦ, ɦɨɠɟɬ ɩɨɬɪɟɛɨɜɚɬɶ
ɫɹ ɩɨɞɨɠɞɚɬɶ ɧɟɫɤɨɥɶɤɨ ɦɢɧɭɬ ɢ ɩɨɜɬɨɪɢɬɶ ɩɨɩɵɬɤɭ (ɥɢɛɨ ɧɚɠɚɬɶ ɤɧɨɩɤɭ ɩɭɥɶɬɚ «MENU» ɢ ɜɵɛɪɚɬɶ
ɤɨɦɚɧɞɭ ©Ɉɛɧɨɜɢɬɶª)
Ɏɨɪɦɚɬɢɪɨɜɚɧɢɟ ɠɟɫɬɤɨɝɨ ɞɢɫɤɚ
Ⱦɥɹ ɮɨɪɦɚɬɢɪɨɜɚɧɢɹ ɩɨɞɤɥɸɱɟɧɧɨɝɨ ɤ ɩɪɨɢɝɪɵɜɚɬɟɥɸ HDD ɜɵɛɟɪɢɬɟ ɢɤɨɧɤɭ HDD ɜ ɝɥɚɜɧɨɦ ɦɟɧɸ ɩɪɨɢɝɪɵɜɚɬɟɥɹ, ɧɚɠɦɢɬɟ ɤɧɨɩɤɭ «INFO» ɧɚ ɉȾɍ ɢ ɜɵɛɟɪɢɬɟ ɷɥɟɦɟɧɬ «Ɏɨɪɦɚɬɢɪɨɜɚɧɢɟ ɞɢɫɤɚ» (ɞɥɹ ɬɨɝɨ, ɱɬɨɛɵ ɨɬɮɨɪɦɚɬɢɪɨɜɚɬɶ ɜɟɫɶ ɞɢɫɤ) ɢɥɢ «Ɏɨɪɦɚɬɢɪɨɜɚɧɢɟ ɪɚɡɞɟɥɚ» (ɱɬɨɛɵ ɨɬɮɨɪɦɚɬɢɪɨɜɚɬɶ ɭɠɟ ɫɭɳɟɫɬɜɭɸɳɢɣ ɪɚɡɞɟɥ).
ɉɪɨɢɝɪɵɜɚɬɟɥɶ ɩɪɨɢɡɜɟɞɟɬ ɮɨɪɦɚɬɢɪɨɜɚɧɢɟ. Ⱦɥɹ ɮɨɪɦɚɬɢɪɨɜɚɧɢɹ ɧɟ ɮɨɪɦɚɬɢɪɨɜɚɧɧɨɝɨ ɪɚɧɟɟ ɞɢɫɤɚ, ɧɚ
ɠɦɢɬɟ ɤɧɨɩɤɭ «ENTER» ɧɚ ɩɭɥɶɬɟ, ɩɪɟɞɜɚɪɢɬɟɥɶɧɨ ɜɵɛɪɚɜ ɢɤɨɧɤɭ HDD ɜ ɦɟɧɸ ɩɥɟɟɪɚ.
-
-
-
Page 25

Ɋɭɫɫɤɢɣ
ɉɊɂɆȿɑȺɇɂȿ: Ⱦɥɹ ɢɫɩɨɥɶɡɨɜɚɧɢɹ ɞɢɫɤɨɜ, ɨɬɮɨɪɦɚɬɢɪɨɜɚɧɧɵɯ ɩɪɨɢɝɪɵɜɚɬɟɥɟɦ ɜ Ɏɋ (;7(;7, ɧɚ
ɤɨɦɩɶɸɬɟɪɟ ɫ :indoZs, ɦɨɠɟɬ ɩɨɬɪɟɛɨɜɚɬɶɫɹ ɭɫɬɚɧɨɜɤɚ ɧɚ ɤɨɦɩɶɸɬɟɪ ɞɨɩɨɥɧɢɬɟɥɶɧɨɝɨ ɩɪɨɝɪɚɦɦɧɨɝɨ
ɨɛɟɫɩɟɱɟɧɢɹ, ɧɚɩɪɢɦɟɪ, ɬɚɤɨɝɨ, ɤɚɤ (;7)6' (httpZZZe[tfsdcom)
ȼɤɥɸɱɟɧɢɟ ɢ ɜɵɤɥɸɱɟɧɢɟ ɩɪɨɢɝɪɵɜɚɬɟɥɹ
Ⱦɥɹ ɩɟɪɟɜɨɞɚ ɩɪɨɢɝɪɵɜɚɬɟɥɹ ɜ ɪɟɠɢɦ ɨɠɢɞɚɧɢɹ, ɧɚɠɦɢɬɟ ɤɧɨɩɤɭ ɩɭɥɶɬɚ «POWER». Ⱦɥɹ ɜɵɯɨɞɚ ɢɡ ɪɟɠɢɦɚ ɨɠɢɞɚɧɢɹ ɧɚɠɦɢɬɟ ɷɬɭ ɤɧɨɩɤɭ ɟɳɟ ɪɚɡ.
ȼ ɪɟɠɢɦɟ «ɩɪɨɝɪɚɦɦɧɨɝɨ ɨɠɢɞɚɧɢɹ» ɩɪɨɢɝɪɵɜɚɬɟɥɶ ɧɟ ɜɵɞɚɟɬ ɫɢɝɧɚɥ ɧɚ ɜɢɞɟɨɜɵɯɨɞ, ɧɨ ɩɪɨɞɨɥɠɚɟɬ ɮɭɧɤɰɢɨɧɢɪɨɜɚɬɶ. ɇɚɩɪɢɦɟɪ, ɟɫɥɢ ɤ ɧɟɦɭ ɩɨɞɤɥɸɱɟɧɵ ɧɚɤɨɩɢɬɟɥɢ, ɨɧɢ ɩɨ-ɩɪɟɠɧɟɦɭ ɛɭɞɭɬ ɞɨɫɬɭɩɧɵ ɢɡ ɫɟɬɢ (ɮɭɧɤɰɢɹ
«NAS» ɩɪɨɢɝɪɵɜɚɬɟɥɹ). ȼɵɯɨɞ ɢɡ ɪɟɠɢɦɚ ɨɠɢɞɚɧɢɹ ɡɚɧɢɦɚɟɬ ɜɫɟɝɨ ɧɟɫɤɨɥɶɤɨ ɫɟɤɭɧɞ. Ʉɨɝɞɚ ɩɪɨɢɝɪɵɜɚɬɟɥɶ
ɧɚɯɨɞɢɬɫɹ ɜ ɪɟɠɢɦɟ «ɩɪɨɝɪɚɦɦɧɨɝɨ ɨɠɢɞɚɧɢɹ», ɨɧ ɩɨ-ɩɪɟɠɧɟɦɭ ɩɨɬɪɟɛɥɹɟɬ ɡɧɚɱɢɬɟɥɶɧɨɟ ɤɨɥɢɱɟɫɬɜɨ ɷɥɟɤɬɪɨɷɧɟɪɝɢɢ. Ⱦɥɹ ɩɨɥɧɨɝɨ ɨɬɤɥɸɱɟɧɢɹ ɩɥɟɟɪɚ ɨɬɫɨɟɞɢɧɢɬɟ ɤɚɛɟɥɶ ɩɢɬɚɧɢɹ.
ɉɊɂɆȿɑȺɇɂȿ: ɉɨɫɥɟ ɩɨɥɧɨɝɨ ɜɵɤɥɸɱɟɧɢɹ ɩɪɨɢɝɪɵɜɚɬɟɥɹ ɢɥɢ ɩɟɪɟɜɨɞɚ ɩɪɨɢɝɪɵɜɚɬɟɥɹ ɜ ɪɟɠɢɦ ©ɚɩɩɚɪɚɬ
ɧɨɝɨ ɨɠɢɞɚɧɢɹª, ɪɟɤɨɦɟɧɞɭɟɬɫɹ ɩɨɞɨɠɞɚɬɶ ɨɤɨɥɨ ɦɢɧɭɬɵ ɩɟɪɟɞ ɩɨɜɬɨɪɧɵɦ ɜɤɥɸɱɟɧɢɟɦ
NAS (Network Attached Storage)
Ɇɨɠɧɨ ɩɨɥɭɱɢɬɶ ɞɨɫɬɭɩ ɤ ɧɚɤɨɩɢɬɟɥɹɦ, ɩɨɞɤɥɸɱɟɧɧɵɦ ɤ ɩɪɨɢɝɪɵɜɚɬɟɥɸ, ɢɡ ɥɨɤɚɥɶɧɨɣ ɫɟɬɢ ɩɨ ɩɪɨɬɨɤɨɥɚɦ
FTP ɢ SMB. ɇɚ ɤɨɦɩɶɸɬɟɪɟ ɫ Windows ɩɪɨɫɬɨ ɧɚɛɟɪɢɬɟ «ftp://ip_address» ɢɥɢ «\\ip_address» ɜ ɉɪɨɜɨɞɧɢɤɟ
(Windows Explorer), ɝɞɟ «ip_address» — IP-ɚɞɪɟɫ ɩɪɨɢɝɪɵɜɚɬɟɥɹ.
Wi-Fi
ȿɫɥɢ ɜɚɲ ɩɥɟɟɪ ɨɫɧɚɳɺɧ ɜɫɬɪɨɟɧɧɵɦ ɚɞɚɩɬɟɪɨɦ Wi-Fi, ɜɵ ɦɨɠɟɬɟ ɢɫɩɨɥɶɡɨɜɚɬɶ ɟɝɨ ɞɥɹ ɩɨɞɤɥɸɱɟɧɢɹ ɩɥɟɟɪɚ
ɤ ɛɟɫɩɪɨɜɨɞɧɨɣ ɫɟɬɢ. ɇɚɥɢɱɢɟ ɜɫɬɪɨɟɧɧɨɝɨ ɦɨɞɭɥɹ ɛɟɫɩɪɨɜɨɞɧɨɣ ɫɜɹɡɢ ɡɚɜɢɫɢɬ ɨɬ ɦɨɞɢɮɢɤɚɰɢɢ ɩɥɟɟɪɚ.
25
-
Page 26
26
Dune HD Connect Ʉɪɚɬɤɨɟɪɭɤɨɜɨɞɫɬɜɨ
Ɉɝɪɚɧɢɱɟɧɢɹ
ɋɨɜɦɟɫɬɢɦɨɫɬɶ ɩɪɨɢɝɪɵɜɚɬɟɥɹ ɫ ɤɨɧɤɪɟɬɧɵɦ ɨɛɨɪɭɞɨɜɚɧɢɟɦ (ɚɭɞɢɨ-ɜɢɞɟɨɨɛɨɪɭɞɨɜɚɧɢɟ, ɫɟɬɟɜɨɟ ɨɛɨɪɭɞɨɜɚɧɢɟ, ɧɚɤɨɩɢɬɟɥɢ ɢ ɬ.ɩ.) ɦɨɠɟɬ ɡɚɜɢɫɟɬɶ ɨɬ ɪɚɡɥɢɱɧɵɯ ɮɚɤɬɨɪɨɜ (ɤɨɧɤɪɟɬɧɨɣ ɦɨɞɟɥɢ ɨɛɨɪɭɞɨɜɚɧɢɹ, ɨɫɨɛɟɧɧɨɫɬɟɣ ɚɩɩɚɪɚɬɧɨɣ ɢɧɫɬɚɥɥɹɰɢɢ ɢ ɟɟ ɢɫɩɨɥɶɡɨɜɚɧɢɹ, ɧɚɫɬɪɨɟɤ ɩɪɨɢɝɪɵɜɚɬɟɥɹ ɢ ɨɛɨɪɭɞɨɜɚɧɢɹ, ɢ ɬ.ɩ.). ȿɫɥɢ
ɩɪɨɢɝɪɵɜɚɬɟɥɶ ɧɟ ɪɚɛɨɬɚɟɬ ɤɨɪɪɟɤɬɧɨ ɫ ɧɟɤɨɬɨɪɵɦ ɨɛɨɪɭɞɨɜɚɧɢɟɦ, ɩɨɩɵɬɚɣɬɟɫɶ ɢɡɦɟɧɢɬɶ ɤɨɧɮɢɝɭɪɚɰɢɸ ɩɪɨ
ɢɝɪɵɜɚɬɟɥɹ ɢɥɢ ɨɛɨɪɭɞɨɜɚɧɢɹ, ɩɨɩɪɨɛɭɣɬɟ ɢɫɩɨɥɶɡɨɜɚɬɶ ɨɛɨɪɭɞɨɜɚɧɢɟ ɞɪɭɝɢɦ ɨɛɪɚɡɨɦ, ɥɢɛɨ ɢɫɩɨɥɶɡɨɜɚɬɶ
ɞɪɭɝɨɟ ɨɛɨɪɭɞɨɜɚɧɢɟ.
ɋɨɜɦɟɫɬɢɦɨɫɬɶ ɩɪɨɢɝɪɵɜɚɬɟɥɹ ɫ ɤɨɧɤɪɟɬɧɵɦ ɜɢɞɨɦ ɦɟɞɢɚɦɚɬɟɪɢɚɥɨɜ (ɮɚɣɥɵ, ɞɢɫɤɢ ɢ ɬ.ɩ.) ɦɨɠɟɬ ɡɚɜɢɫɟɬɶ
ɨɬ ɪɚɡɥɢɱɧɵɯ ɮɚɤɬɨɪɨɜ (ɨɫɨɛɟɧɧɨɫɬɢ ɤɨɞɢɪɨɜɚɧɢɹ ɦɟɞɢɚɦɚɬɟɪɢɚɥɨɜ, ɨɫɨɛɟɧɧɨɫɬɢ ɧɚɫɬɪɨɟɤ ɩɪɨɢɝɪɵɜɚɬɟɥɹ
ɢ ɬ.ɩ.). ȿɫɥɢ ɩɪɨɢɝɪɵɜɚɬɟɥɶ ɧɟ ɜɨɫɩɪɨɢɡɜɨɞɢɬ ɤɨɪɪɟɤɬɧɨ ɧɟɤɨɬɨɪɵɟ ɦɟɞɢɚɦɚɬɟɪɢɚɥɵ, ɩɨɩɪɨɛɭɣɬɟ ɢɡɦɟɧɢɬɶ
ɧɚɫɬɪɨɣɤɢ ɩɪɨɢɝɪɵɜɚɬɟɥɹ ɢɥɢ ɢɫɩɨɥɶɡɨɜɚɬɶ ɦɟɞɢɚɦɚɬɟɪɢɚɥɵ, ɡɚɤɨɞɢɪɨɜɚɧɧɵɟ ɜ ɨɬɥɢɱɧɨɦ ɮɨɪɦɚɬɟ.
Ɉɛɧɨɜɥɟɧɢɟ ɩɥɟɟɪɚ ɢ ɞɨɩ.ɢɧɮɨɪɦɚɰɢɹ
ɉɨɠɚɥɭɣɫɬɚ, ɩɪɨɜɟɪɹɣɬɟ ɞɨɫɬɭɩɧɨɫɬɶ ɨɛɧɨɜɥɟɧɢɹ ɩɪɨɝɪɚɦɦɧɨɝɨ ɨɛɟɫɩɟɱɟɧɢɹ ɩɪɨɢɝɪɵɜɚɬɟɥɹ («ɩɪɨɲɢɜɤɢ»)
ɧɚ ɫɥɟɞɭɸɳɟɣ ɢɧɬɟɪɧɟɬ-ɫɬɪɚɧɢɰɟ (ɷɬɨ ɦɨɠɟɬ ɭɥɭɱɲɢɬɶ ɮɭɧɤɰɢɨɧɚɥɶɧɨɫɬɶ ɩɪɨɢɝɪɵɜɚɬɟɥɹ ɢ ɪɚɫɲɢɪɢɬɶ ɟɝɨ
ɜɨɡɦɨɠɧɨɫɬɢ): http://dune-hd.com/¿rmware/
ɉɊɂɆȿɑȺɇɂȿ: ȼɵ ɬɚɤɠɟ ɦɨɠɟɬɟ ɩɨɞɤɥɸɱɢɬɶ ɩɥɟɟɪ ɤ ɢɧɬɟɪɧɟɬ ɢ ɜɨɫɩɨɥɶɡɨɜɚɬɶɫɹ ɮɭɧɤɰɢɟɣ
ɨɧɥɚɣɧ-ɨɛɧɨɜɥɟɧɢɹ ɩɪɨɲɢɜɤɢ, ɫɦ ɇɚɫɬɪɨɣɤɢ Ɋɚɡɧɨɟ Ɉɛɧɨɜɥɟɧɢɟ ɉɪɨɲɢɜɤɢ
-
Page 27
Ƚɚɪɚɧɬɢɣɧɵɣ ɬɚɥɨɧ / ɡɚɩɨɥɧɹɟɬɫɹ ɩɪɨɞɚɜɰɨɦ /
ɍɫɥɨɜɢ ɹɝɚɪɚɧ ɬɢɢ
1. Изготовитель предоставляет гарантии на данный товар в соответствии с действующим зако нодатель ством Ро ссийской Ф едерации п о защите пр ав потреби телей.
2. Гарантия действительна только на территории Российской Федерации. Гарантийные
обязательства не распространяются на продукцию DUNE HD, приобретенную за преде
лами Российской Федерации.
3. Дефек ты, которые м огут поя вится в теч ение гаран тийного срока, будут ус транены
бесплатно специализированными сервисными центрами DUNE HD.
4. Ср ок г ара нти и на о бор удов ани е Du ne HD сос тав ля ет от 12 до 24 мес яце в
от модел и. Узнать о срок ах гаранти и на оборудован ие Dune HD
ном интернет-сайте производителя: www.dune.ru. Срок гарантии, установленный
произв одителем, не мо жет превышать с рок гарантии, у казываемый в д анном гаран
тийном т алоне при п родаже.
Срок гар антии исчисляетс я со дня продажи и зделия в розничн ой торговой сети . Если
не удаетс я устано вить дату п родажи, то г арантийн ый срок исчи сляетс я со дня изгото в
ления изделия.
ɋ ɭɫɥɨɜɢɹɦɢ ɝɚ ɪɚɧɬɢɢ ɨɡɧɚɤɨɦɥɟɧ ɤ ɜɧɟɲɧɟɦɭ ɜɢɞɭ
ɢ ɤɨɦɩɥɟɤɬɧɨɫɬɢ ɩɪɟɬɟɧɡɢɣ ɧɟ ɢɦɟɸ
в зависи мост и
вы можете на официаль-
ɉɨɞɩɢɫɶ
ɩɨɤɭɩɚɬɟɥɹ:
ɉɨ ɜɫɟɦ ɜɨɩɪɨɫɚɦ ɨɛɪɚɳɚɣɬɟɫɶ ɜ ɫɥɭɠ ɛɭ ɫɟɪɜɢɫɧɨɣ ɩɨɞɞɟɪɠɤɢ:
ɗɥɟɤɬɪɨɧɧɚɹ ɩɨɱɬɚ: service#dunesales.ru
Ɍɟɥɟɮ ɨɧ: (495) 989-26-95. ɋɚɣɬ: www.rushd.ru; www.dune.ru
Ɇɨɞɟɥɶ
-
ɫɟɪɢɣɧɵɣ ɧɨɦɟɪ
Ⱦɚɬɚ ɩɪɨɞɚɠɢ
ɋɪɨɤ ɝɚɪɚɧɬɢɢ
-
ɉɪɨɞɚɜɟɰ
Ⱥɞɪɟɫ ɩɪɨɞɚɜɰɚ
-
Ɋɭɫɫɤɢɣ
ɦ. ɩ. ɩɪɨɞɚɜɰɚ
27
Page 28
www.Dune-HD.com
Page 29

FEDERAL COMMUNICATIONS COMMISSION INTERFERENCE STATEMENT
This equipment has been tested and found to comply with the limit s for a Class B
digital device, pursuant to Part 15 of the FCC Rules. These limits are designed to
provide reasonable protection against harmful interference in a residential installation.
This equipment generates, uses and can radiate radio frequency energy and, if not
installed and used in accordance with the instructions, may cause harmful
interference to radio communications. However, there is no guarantee that
interference will not occur in a particular installation. If this equipment does cause
harmful interference to radio or television reception, which can be determined by
turning the equipment of f and on, the user is encouraged to try to correct the
interference by one or more of the following measures:
-- Reorient or relocate the receiving antenna.
-- Increase the separation between the equipment and receiver.
-- Connect the equipment into an outlet on a circuit different from that to which the
receiver is connected.
-- Consult the dealer or an experienced radio/TV technician for help.
CAUTION:
Any changes or modifications not expressly approved by the p arty responsible for
compliance could void the user's authority to operate the equipment.
This device complies with part 15 of the FCC Rules. Operation is subject to the following two
conditions: (1) This device may not cause harmful interference, and (2) this device must accept any
interference received, including interference that may cause undesired operation.
FCC RF Radiation Exposure Statement:
1. This Transmitter must not be co-located or operating in conjunction with any other antenna or transmitter.
2. This equipment complies with FCC RF radiation exposure limits set forth for an uncontrolled environment.
This equipment should be installed and operated with a minimum distance of 20 centimeters between
the radiator and your body.
 Loading...