

Duke MUHC-51 Installation Manual
MUHC
(MULTI-USE HOLDING CABINET)
U.S. and Foreign Patents Pending
MODEL
MUHC 51 SERIES
MUHC 52 SERIES
MUHC 34 SERIES
Installation and
Operation Manual
CAUTION:
This manual is Copyright © 2018 Duke Manufacturing Co. All rights reserved.
Reproduction without written permission is prohibited. Duke is a registered
Please read this manual completely before attempting
to install, operate or service this equipment
trademark of the Duke Manufacturing Co.
P/N 165008
REV L 10/05/2018

Installation and Operation of MUHC
TABLE OF CONTENTS
SAFETY INFORMATION .......................................................................................................................3
INTRODUCTION .....................................................................................................................................5
INSTALLATION ........................................................................................................................................6
OPERATION ..............................................................................................................................................8
WEB PROGRAMMING ........................................................................................................................ 13
CLEANING INSTRUCTIONS .............................................................................................................. 16
TROUBLESHOOTING .......................................................................................................................... 17
PARTS LISTS AND ILLUSTRATIONS ...........................................................................................18-21
SPEC SHEETS AND WIRING SCHEMATICS ............................................................................22-30
MUHC-51 Spec Sheet ...................................................................................................................... 22
MUHC-51 Wire Diagram ............................................................................................................... 23
MUHC-52 Spec Sheet ...................................................................................................................... 24
MUHC-52 Wire Diagram ............................................................................................................... 25
MUHC-34SM/CH Spec Sheet ........................................................................................................ 26
MUHC-34SM/CH Wire Diagram .................................................................................................. 27
MUHC-34 Spec Sheet ...................................................................................................................... 28
MUHC-34 Wire Diagram ............................................................................................................... 29
MUHC-34SM Wire Diagram.......................................................................................................... 30
2

Installation and Operation of MUHC
SAFETY INFORMATION
THIS MANUAL HAS BEEN PREPARED FOR PERSONNEL QUALIFIED TO INSTALL
ELECTRICAL EQUIPMENT, WHO SHOULD PERFORM THE INITIAL FIELD STARTUP AND
ADJUSTMENTS OF THE EQUIPMENT COVERED BY THIS MANUAL.
READ THIS MANUAL THOROUGHLY BEFORE OPERATING, INSTALLING OR PERFORMING
MAINTENANCE ON THE EQUIPMENT.
: Failure to follow all the instructions in this manual can cause property
damage, injury or death.
: Improper installation, adjustment, alteration, service or maintenance
can cause property damage, injury or death.
: (US/CAN ONLY) Electrical connections should be performed only by
a certied professional.
: Electrical and grounding connections must comply with the applicable
portions of the National Electric Code and/or all local electric codes. Failure to
comply with this procedure can cause property damage, injury or death.
: Before connecting the unit to the electrical supply, verify that the
electrical and grounding connections comply with the applicable portions of the
National Electric Code and/or other local electrical codes. Failure to comply with
this procedure can cause property damage, injury or death.
: Before connecting the unit to the electrical supply, verify that the
electrical connection agrees with the specications on the data plate. Failure to
comply with this procedure can cause property damage, injury or death.
: UL73 grounding instructions: This appliance must be connected to a
grounded, metal, permanent wiring system. Or an equipment-grounding conductor
must be run with the circuit conductors and connected to the equipment-grounding
terminal or lead on the appliance. Failure to comply with this procedure can cause
property damage, injury or death.
: Appliances equipped with a exible electric supply cord, are provided
with a three-prong grounding plug (or a CEE7 Plug for International CE Units).
It is imperative that this plug be connected into a properly grounded receptacle.
Failure to comply with this procedure can cause property damage, injury or death.
: If the receptacle is not the proper grounding type, contact an electrician.
Do not remove the grounding prong from the plug. Failure to comply with this
procedure can cause property damage, injury or death.
3
Installation and Operation of MUHC
SAFETY INFORMATION continued
: Before performing any service that involves electrical connection
or disconnection and/or exposure to electrical components, always perform the
Electrical LOCKOUT/TAGOUT Procedure. Disconnect all circuits. Failure to comply
with this procedure can cause property damage, injury or death.
: Before removing any access panels or servicing this equipment,
always perform the Electrical LOCKOUT/TAGOUT Procedure. Be sure all circuits are
disconnected. Failure to comply with this procedure can cause property damage,
injury or death.
: Do not operate this equipment without properly placing and securing
all covers and access panels. Failure to comply with this procedure can cause
property damage, injury or death.
: For your safety, do not use or store gasoline or other ammable
vapors or liquids in the vicinity of this or any other appliance. Failure to comply
can cause property damage, injury or death.
: In the event of a power failure, do not attempt to operate this
appliance. Failure to comply can cause property damage, injury or death.
: This appliance is not intended for use by persons (including children)
with reduced physical, sensory or mental capabilities, or lack of experience and
knowledge, unless they have been given supervision or instruction concerning use
of the appliance by a person responsible for their safety.
: Never use a high-pressure water wash for this cleaning procedure as
water can damage electrical components
Observe the following:
• Minimum clearances must be maintained from all walls and combustible materials.
• Keep the equipment area free and clear of combustible material.
• Maintain adequate clearance for air openings.
• Operate equipment only on the type of electricity indicated on the data sticker.
• Retain this manual for future reference.
4

Installation and Operation of MUHC
INTRODUCTION
e Duke MUHC was developed for extended food-holding capabilities to provide consistently high, “just cooked”
food quality.
e MUHC utilizes Duke’s patented “heat sink” holding technology that provides even heat distribution to food
pans through the bottom and sides. is allows pre-cooked foods to be held for extended periods without noticeable
degradation of quality, reducing food scrap/waste.
e self contained, individually formed, sealed compartments of the MUHC eliminates food odor and taste transfer.
Because the compartments are sealed and feature fully radiused corners, no disassembly is required for cleaning
or product changes.
e unique design of the MUHC allows multiple temperature operation for all existing product groups.
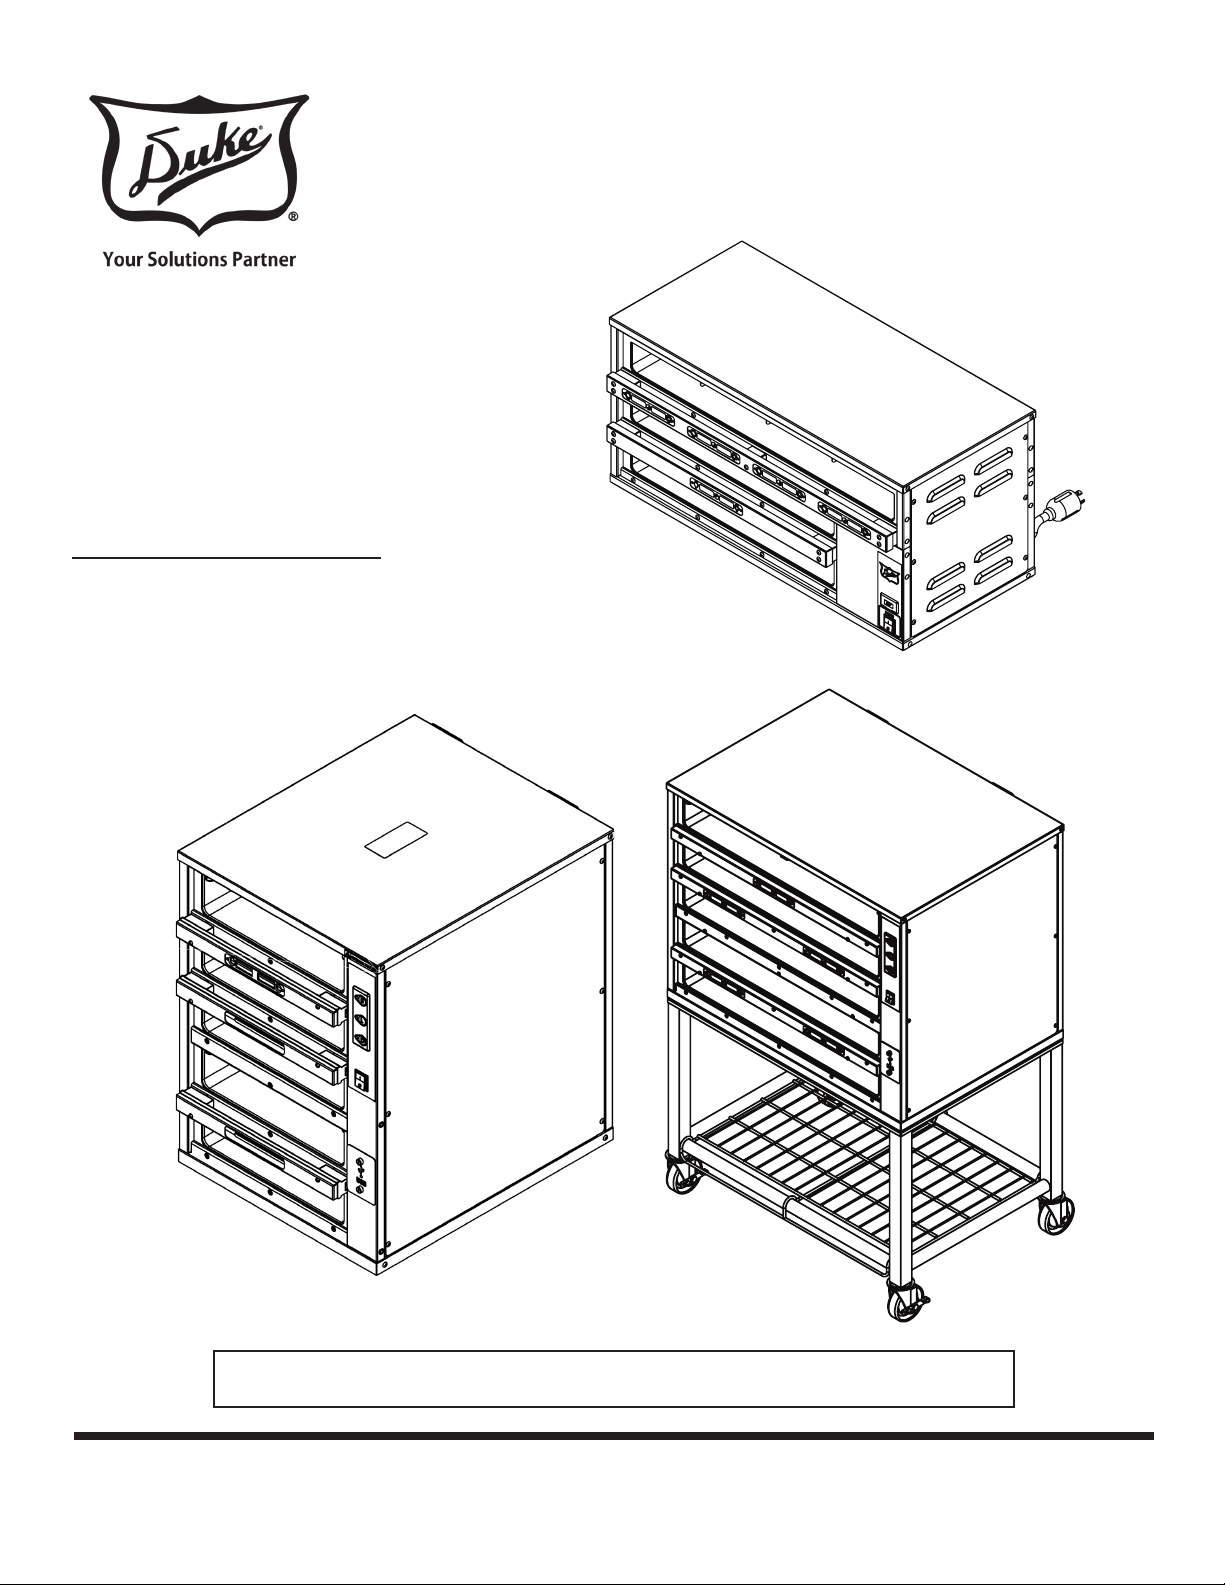
SERIAL NUMBER LOCATION
e Serial Number Data Label is located on the rear of the unit, above the power cord connection. Refer to the
Serial Number Data Label for proper electrical requirements. e serial number and model number are required
when communicating with the Duke Service Dept.
5
Installation and Operation of MUHC
INSTALLATION
Before installing, verify that the electrical service agrees
with the specications on the data label located on the
rear of the unit, above the power cord connection. If the
electrical service does not agree with the data label, do
not proceed with installation. Contact your dealer or
local Authorized Duke Servicer immediately.
UNPACKING
1. Inspect the shipping carton and/or container, carefully
noting any exterior damage on the delivery receipt.
2. Contact the carrier immediately and le a damage
claim with them. Save all packing materials when ling
a claim. Freight damage claims are the responsibility
of the purchaser and are not covered by the warranty.
3. Unpack and Inspect the unit for damage.
4. Report any dents or breakage to the source of purchase
immediately.
: Do not attempt to use the unit if damaged.
1. Local codes.
2. Canadian Electrical Code (CSA C22.2 No. 3, latest
edition) available from the Canadian Standards
Association, 5060 Spectrum Way, Mississauga,
Ontario, Canada L4W 5N6.
LOCATION
: To avoid risk of electrical shock
or death, this unit must be grounded and plug
must not be altered.
• e MUHC is designed for access from either side.
• e power outlet should be located so that plug is
accessible when the unit is in place.
• Proper airow around the unit cools its electrical
components. With restricted airow, the unit may
not operate properly and life of the electrical parts
is reduced.
5. Remove all materials from the unit interior.
6. If the unit has been stored in extremely cold area,
wait a few hours before connecting the power.
INSTALLATION CODES AND STANDARDS
In the United States, the MUHC must be installed in
accordance with the following:
1. State and local codes.
2. National Electrical Code (ANSI/NFPA No. 70, latest
edition) available from the National Fire Protection
Association, Batterymarch Park, Quincy, MA 02269.
3. Vapor Removal from Cooking Equipment, (NFPA-96,
latest edition) available from NFPA.
In Canada, the MUHC must be installed in accordance
with the following:
• Install unit on level counter or oor.
• Outlet should be located so that the plug is accessible
when the unit is in place.
: Do not install the unit next to or above heat
sources, such as oven or deep fat fryer.
Clearance Requirements
CLEARANCE
REQUIREMENT
Top 0/0
Right Side 1.00"/25.4 mm
Left Side 1.00"/25.4 mm
Bottom 0/0
Rear OPEN
CLEARANCE
IN/mm
ELECTRICAL CONNECTION
e US MUHC models are factory wired for 120 Volts
6
INSTALLATION
Installation and Operation of MUHC
AC, single phase, 60 Hz.
: BEFORE CONNECTING THE UNIT
TO THE POWER SOURCE, VERIFY THAT THE
VOLTAGE AND PHASE OF THE POWER SOURCE
ARE IDENTICAL TO THE VOLTAGE AND PHASE
INFORMATION ON THE DATA LABEL.
: ELECTRICAL AND GROUNDING
CONNECTIONS MUST COMPLY WITH THE
APPLICABLE PORTIONS OF THE NATIONAL
ELECTRICAL CODE AND/OR OTHER LOCAL
ELECTRICAL CODES.
For international units, the MUHC must be
installed in accordance with the following:
1. Local codes
2. European (IEC/CENELEC) Electrical Code.
: DO NOT STORE OR USE GASOLINE
OR OTHER FLAMMABLE VAPORS OR LIQUIDS IN
THE VICINITY OF THIS OR ANY OTHER APPLIANCE.
Refer to wiring diagram in this manual for proper
connection. Do not store ammables near unit.
1. At the circuit breaker, turn o power to the circuit to
which the unit is to be connected.
THE UNIT MUST BE GROUNDED. Grounding reduces
risk of electric shock by providing an escape wire for the
electric current if an electrical short occurs. is unit is
equipped with a cord having a grounding wire with a
grounding plug. e plug must be plugged into a receptacle
that is properly installed and grounded.
Consult a qualied electrician or service agent if grounding
instructions are not completely understood, or if doubt exists
as to whether the oven is properly grounded.
DO NOT USE AN EXTENSION CORD. If the product
power cord is too short, have a qualied electrician install
a three-slot receptacle (or the country specic receptacle
for International Units). is unit should be plugged into
a separate circuit with the electrical rating as provided
on the product data plate.
EXTERNAL EQUIPOTENTIAL BONDING
TERMINAL EXPORT ONLY
is equipment has supplemental bonding terminal. e
terminal provides an external bonding connection used in
addition to the earthing prong on the plug. e terminal
provides a connection for bonding to the equipment
enclosure. e external equipotential bonding terminal
is located on the rear outside surface of the oven, the
terminal is marked with this symbol.
2. Check that the unit Power ON/OFF Switch is in the
OFF position.
3. Connect the power cord on the back of the unit to
the electrical power source.
4. At the circuit breaker, turn on power to the circuit.
: If the supply cord is damaged, it must be
replaced by a special cord or a special cord assembly
available from Duke Manufacturing Co. or its service
agent.
Earthing Instructions
7
Installation and Operation of MUHC
OPERATION
e following procedures must be performed on a daily basis.
OPENING CHECKLIST
1. Ensure proper Pan Covers are inserted into the correct
locations for fried and broiled products.
2. Place empty pans in all locations.
3. Place the Power Switch, located on the front of the MUHC,
in the ON position.
CLEANING INSTRUCTIONS
1. Wipe down the interior and exterior of the Product Holding
Cabinet with warm water and mild detergent using a so
cloth. Do not use excessive amounts of water.
2. Clean pans and pan covers using mild detergent and warm
water.
3. Ensure all soap is rinsed from plastic pans and pan covers.
4. Allow the MUHC to heat for at least 20 min. or until the
temperature disappears and the menu bars display the
pre-programmed product names: “EGGS”, “FISH”, “----“
or “EMTY” (no product).
OPERATION INSTRUCTIONS AND
ADJUSTMENTS
1. If the menu bars display temperature at any time during
operation of the Product Holding Cabinet, discontinue
use of the aected shelf until the cabinet is serviced.
2. Refer to the Keypad Programming section of the manual
for instructions on using and programming the keypad.
CLOSING CHECKLIST
1. Place the Power Switch in its OFF position.
2. Remove all pans and pan covers.
3. Allow the cabinet to cool for approximately 30
minutes.
4. Refer to the Cleaning Instructions section of the manual
for proper care and cleaning of the cabinet.
: Electrical Shock Hazard, unplug the
cabinet before cleaning it.
: Do not wash with water jet or hose.
: Bottom and sides of warmer wells
are very hot and cool slowly.
CAUTION: Do not use caustic cleaners, acids, ammonia
products or abrasive cleaners or abrasive cloths. ese
can damage the stainless steel and plastic surfaces.
STAINLESS STEEL CARE
Cleaning
Stainless steel contains 70-80% iron, which will rust if not
properly maintained. It also contains 12-30% chromium,
which forms an invisible passive, protective lm that shields
against corrosion. If the lm remains intact, the stainless
steel will remain intact. However, if the lm is damaged, the
stainless steel can break down and rust. To prevent stainless
steel breakdown, follow these steps:
CAUTION: Never use any metal tools. Scrapers, les,
wire brushes or scouring pads (except for stainless steel
scouring pads) will mar the surface.
CAUTION: Never use steel wool, which will leave behind
particles that rust.
CAUTION: Never use acid-based or chloride-containing
cleaning solutions, which will break down the protective
lm.
CAUTION: Never rub in a circular motion.
CAUTION: Never leave any food products or salt on the
surface. Many foods are acidic. Salt contains chloride.
For routine cleaning, use warm water, mild soap or detergent
and a sponge or so cloth.
For heavy-duty cleaning, use warm water, a degreaser and a
plastic, stainless steel or Scotch-Brite pad.
Always rinse thoroughly. Always rub gently in the direction
of the steel grain.
8
Preserving & Restoring
Installation and Operation of MUHC
OPERATION continued
2. Arrow Buttons
Special stainless steel polishing cleaners can preserve and
restore the protective lm.
Preserve the life of stainless steel with a regular application of
a high quality stainless steel polishing cleaner as a nal step
to daily cleaning.
If signs of breakdown appear, restore the stainless steel surface.
First, thoroughly clean, rinse and dry the surface. en, on a
daily basis, apply a high-quality stainless steel polish according
to manufacturer’s instructions.
Heat Tint
Darkened areas, called heat tint, may appear on stainless steel
exposed to excessive heat, which causes the protective lm to
thicken. It is unsightly but is not a sign of permanent damage.
To remove heat tint, follow the routine cleaning procedure.
Stubborn heat tint will require heavy-duty cleaning.
To reduce heat tint, limit the exposure of equipment to
excessive heat.
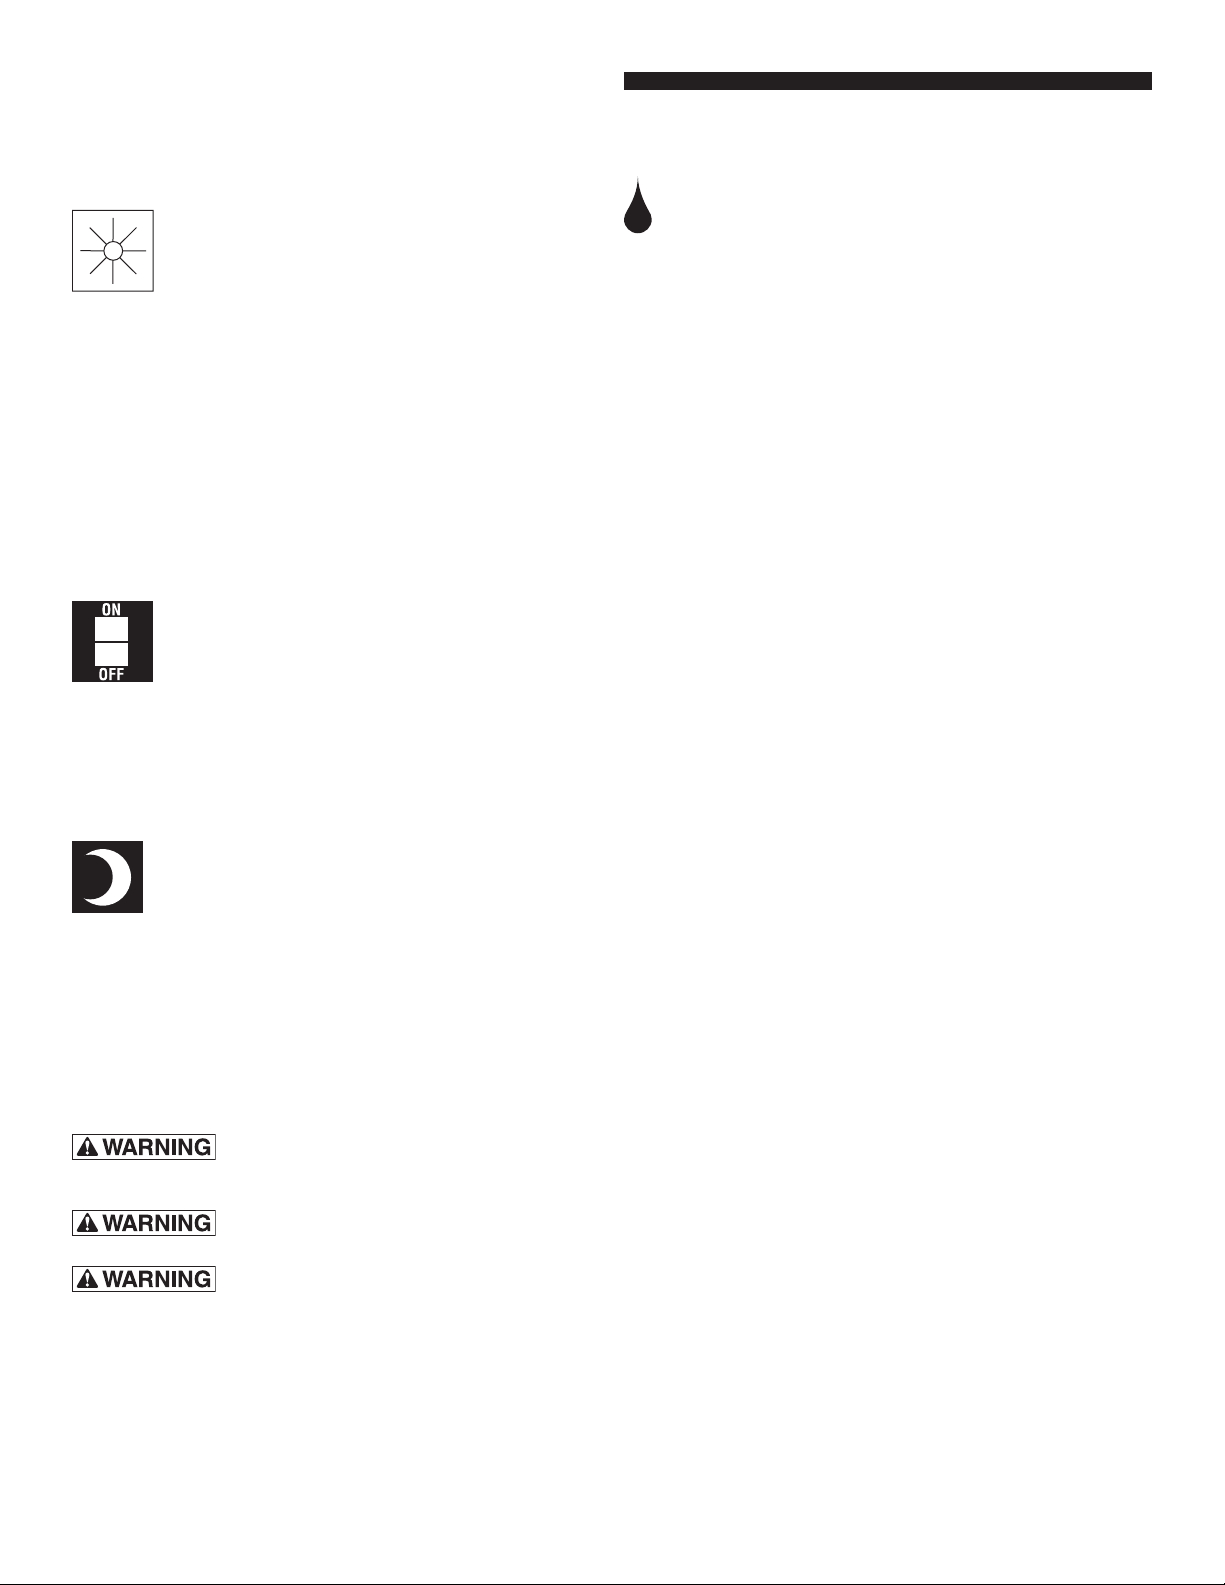
KEYPAD PROGRAMMING
a. Used for Starting/Stopping/Resetting Timer.
b. Used for Programming.
c. Indicate which pan the adjacent Status LED and
Pan Display are linked to (i.e. Status LED and Pan
Display on le side of keyboard are linked to the
pan above the keyboard and the Status LED and
Pan Display on right side of keyboard are linked
to the pan below).
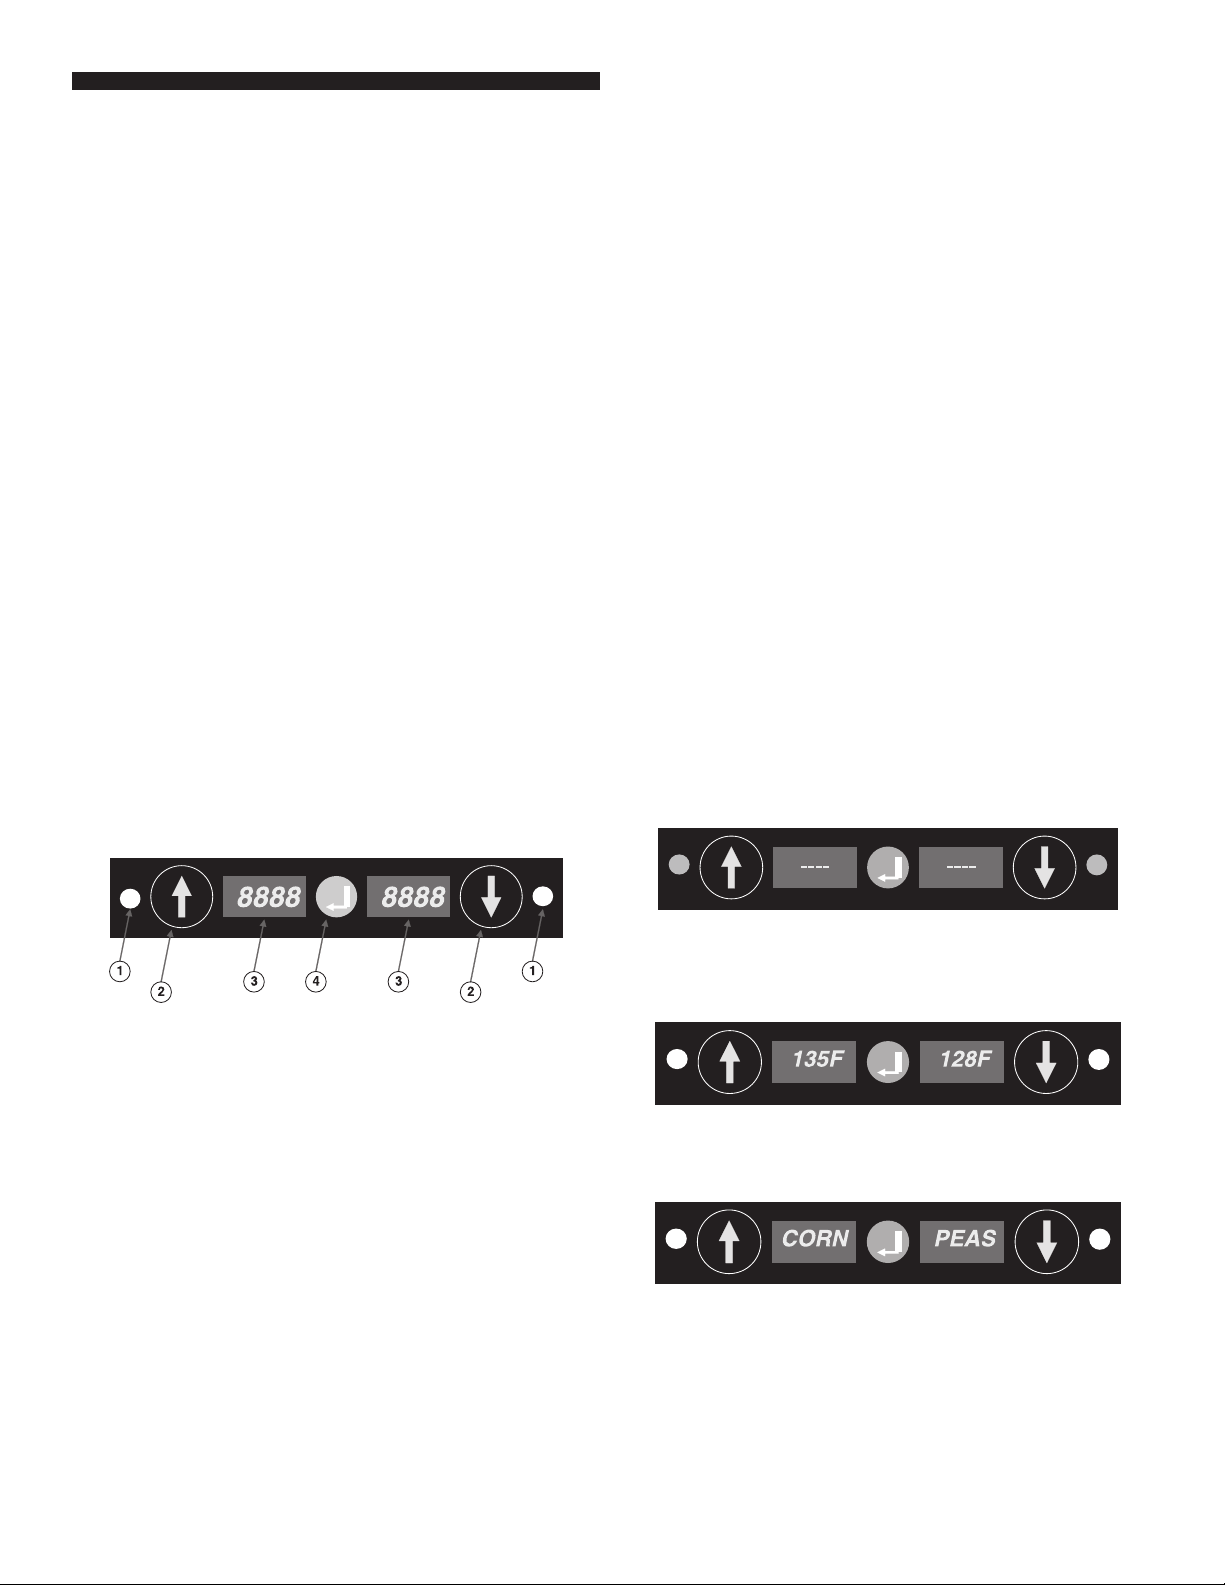
3. Pan Display
a. When timer is inactive: Displays product name
and lid type.
b. When timer is active: Displays product name and
time remaining.
4. Enter Button
a. Used to enter Menu Mode.
Power Up
1. Place the Power Switch in the ON position. Soware
initializes at startup.
1. Status LEDs: Used for indicating status of pan.
a. Non-Illuminated
I. Timer is Inactive - no product in pan,
OR
II. Timer is Active - product in pan – use pan
with GREEN STATUS LED rst.
b. Green = Timer is Active - product in pan (use
rst)
c. Flashing Green = Cook Warning Time reached
(cook more product) or keyboard in EDIT MODE
(programming).
2. Until warmer reaches preprogrammed operating
temperature, all displays will show actual temperature.
3. When the set point is reached, Product Name appears on
all Pan Displays.
Note: For these instructions only the pertinent keypads will be
shown, for simplicity, and not the warmer or pans. It is implied
that a product pan is located above and below each keypad.
9
 Loading...