

Page 1

Version 1.3
System
Administrator
Software
Downloading software for
Windows 95/98/NT 4.0/2000
Page 2

1Table of
Contents
IMPORTANT v
SECURITY STAMP........................................................... v
End User Liscence Agreement........................................... vi
Welcome to DLS–3 v1.3 ix
What is the DLS–3 SA System Administrator Software? . ix
Who should use DLS–3 SA?.............................................ix
Using the DLS–3 SA manual.............................................ix
Section 1: Introduction 1
Hardware and software requirements ................................. 1
Compatible modems........................................................... 1
About PC–Link................................................................... 2
Installing DLS-3 SA............................................................ 2
Uninstalling DLS-3 SA....................................................... 3
Section 2: Getting to Know Your Security Sys tem 5
Your Security System ......................................................... 5
Zones and Partitions............................................................ 5
Access Codes...................................................................... 6
Keypads............................................................................... 6
Audio Help.......................................................................... 6
Section 3: Exploring DLS-3 SA
DLS-3 SA......................................... ..................... .............. 7
Launching DLS-3 SA........ .................................................. 7
Entering a Security Stamp...................................................7
Logging on to DLS-3 SA.................................................... 8
Account Explorer Workspace.............................................8
The Table of Contents...................... ................................... 9
Tags............. ........................................ .............................. 10
Section.................... .......................................................... .10
Links.......................................................................... ........ 10
Section Title...................... .... ... ........................................ .10
Tables................. .... .... ...................... ................................. 10
Operations log............... ........................................ ............ 11
Creating new users and passwords.................................... 13
Page i
Page 3

DLS-3 SA v1.3
Creating Permissions groups.............................................14
Editing Permissions Groups..............................................17
Logging off to change users..............................................18
Display languages..............................................................18
Assigning languages to users.............................................19
Section 4:
Creating and managing folders & accounts 21
Creating folders........................ ........................................ .21
Creating folders on a different drive ................. ................21
Deleting folders........................ .........................................22
Renaming folders........................................... ....................23
Connecting to other folders...............................................23
Disconnecting from folders............. ..................................24
Creating accounts..............................................................25
Creating templates.................................. ...................... .....27
Creating an account using a template................................28
Moving accounts................................. ..................... .........29
Deleting accounts..............................................................29
Browser options.................................................................29
Entering programming information into an account.........31
Moving around in an account file......................................32
Checking for code and card errors.................................... .33
Printing account information.............................................34
Printing the entire account.................................................34
Printing part of an account................................................35
Printing a single section.....................................................35
Viewing the Print to File output for an account................36
Changing account properties............................. ................36
Exiting accounts................................................................37
Finding accounts.......................... ......................................38
Page ii
Section 5: Setting up communications 41
Configuring the modem............ ........................................ .41
Adding a new modem........................................................42
Deleting a modem...... ........................................................42
Selecting a modem or PC-Link for outgoing calls............42
Selecting a modem for incoming calls..............................43
Changing modem settings.......................... ... ....................43
Changing general modem properties..................... ... .........44
Changing the connection settings.................. .... ................45
Changing the Additional modem settings........................ .45
Communicating via PC–Link............................................46
Page 4

DLS-3 SA v1.3
Initiating a PC-Link connectio n........................................46
Initiating a modem conne ction......... ..................... ............ 47
Waiting for a panel to call................................................. 47
Communication status windo w............................. ............ 48
Section 6: Communicating with control panels 49
Sending information to a panel........................................ .49
Global downloading........................................... ............... 49
Tagged downloading ......................................................... 49
Section downloading.................... .....................................50
Uploading information from the panel.............................. 51
Global uploading.......................... ...................... ...............51
Tagged uploading.............................................................. 51
Section uploading.............. .... ..................... ....................... 52
Event Buffer............... ...................... ..................... ............ 53
To open the Event Buffer:................................................. 53
Uploading the status of an account................................... 54
Using DLS-3 SA to control a security system .................. 55
Communicating blocks of user codes and zones .............. 56
Section 7: Using Batch files 57
About batch files............................................................... 57
Creating batch files........................................................... 57
Waiting for batch mode calls............................................58
Viewing batch set files..................... ..................... .... .... .... 59
Restoring tags to a file from a batch set............................ 59
Deleting batch files........................................................... 60
Section 8:
Creating and Translating DLS-3 SA Languages 61
Display languages............................................................. 61
Setting up a new language ................................................ 61
Editing a new langu age....................... .............................. 62
Importing a language ........................................................ 64
Deleting a language...........................................................66
Appendix A: Troubleshoo ting 67
Communication troubl eshoo tin g................ ...................... .67
General troubleshooting.................................................... 69
Modem troubleshooting.................................................... 70
DLS-3 SA Modem/Installation Diagnose Utility.............. 72
Appendix B: Keyboard Shortcuts 75
DLS-3 SA......................................... ..................... ............ 75
Page iii
Page 5

DLS-3 SA v1.3
Account Explorer...............................................................76
Table of Contents..............................................................77
Tables (Programming Sections)........................................78
Glossary 81
Index 87
Page iv
Page 6

DLS-3 SA v1.3
2IMPORTANT
The following information relates to the SECURITY of the DLS-3 SA program.
Read this section carefully before installing DLS-3 SA.
When you install DLS-3 SA, the program will ask you for a security stamp.
Write this stamp down in the space provided on this page and keep it in a safe
place. This security code is used to stamp all of your account files. This means
that your accounts can only be used on a DLS-3 SA installation which has the
same stam p .
CAUTION: It is important that the security stamp be recorded and safely filed:
if it is forgotten, there is no way to recover the security stamp from the compu ter
or from the program.
The security stamp can be up to 31 characters long. The stamp can be made up
of any combination of numbers, letters or characters. Note that all letters are
case sensitive; that is, “A” is not the same as “a”.
NOTE: If you will be sharing files between computers, or over a network, each
DLS-3 SA installation must use the same security stamp. This will allow you to
transfer accounts from one computer to another, and to access account files
shared over a network.
Write down your stamp exactly as you enter it into the
computer (i.e. write down“UPPERCASE” and “lowercase”
characters where they occur).
SECURITY STAMP
l_____l_____l_____l_____l_____l_____l_____l_____l_____l_____l_____l_____l_____l_____l_____l_____l_____l_____l_____l_____l_____l_____l_____l_____l_____l_____l_____l_____l_____l_____l_____l
Remove this page and store it in a safe place. It will be
necessary to know the sec urity stamp if you have to
reinitialize or reinstall the software later.
Page v
Page 7

DLS-3 SA v1.3
END-USER LICENSE AGREEMENT
For DSC Software Provi ded With or Wit hout Products or Components
IMPORTANT - READ CAREFULLY: DSC Software purchased with or without Products and
Components is copyrighted and is purchased under the following license terms:
This End-User License Agreement ("EULA") is a legal agreement between You (the company,
individual or entity who acquired the Software and any related Hardware) and Digital Security
Controls Ltd. ("DSC"), the manufacturer of the integrated security systems and the developer of the
software and any related products or components ("HARDWARE") which You acquired.
If the DSC software product ("SOFTWARE PRODUCT" or "SOFTWARE") is intended to be
accompanied by HARDWARE, and is NOT accompanied by new HARDWARE, You may not use,
copy or install the SOFTW ARE PRODUCT. The SOFTWARE PRODUCT includes computer
software, and may include associated media, printed materials, and "online" or electronic
documentation.
Any software provided along with the SOFTWARE PRODUCT that is associated with a separate
end-user license agreement is licensed to You under the terms of that license agreement.
By installing, copying, downloading, storing, accessing or otherwise using the SOF TWARE
PRODUCT, You agree unconditionally to be bound by the terms of this EULA, even if this EULA is
deemed to be a modification of any previous arrangement or contract. If You do not agree to the
terms of this EULA, DSC is unwilling to license the SOFTWARE PRODUCT to You, and You have
no right to use it.
SOFTWARE PRODUCT LICENSE
The SOFTWARE PRODUCT is protected by copyright laws and international copyright treaties, as
well as other intellectual property laws and treaties. The SOFTWARE PRODUCT is licensed, not
sold.
1. GRANT OF LICENSE. This EULA grants You the following rights:
(a) Software Installation and Use. For each license You acquire, You may have only one copy of
the SOFTWARE PRODUCT installed on the HARDWARE.
(b) Storage/Network Use. The SOFTWARE PRODUCT may not be installed, accessed, displayed,
run, shared or used concurrently on or from different computers, including a workstation, terminal or
other digital electronic device ("Device"). In other words, if You have several workstations, Y ou will
have to acquire a license for each workstation where the SOFTWARE will be used.
(c) Back-up Copy. You may make back-up copies of the SOFTWARE PRODUCT, but You may onl y
have one copy per license installed at any given time. You may use the back-up copy solely for
archival purposes. Except as expressly provided in this EULA, You may not otherwise make copies
of the SOFTWARE PRODUCT, including the printed materials accompanying the SOFTWARE.
2. DESCRIPTION OF OTHER RIGHTS AND LIMITATIONS.
(a) Limitations on Reverse Engineering, Decompilation and Disassembly . You may not reverse
engineer, decompile, or disassemble the SOFTWARE PRODUCT, except and only to the extent that
such activity is expressly permitted by applicable law notwithstanding this limitation. You may not
make any changes or modifications to the Software, without the written permission of an officer of
DSC. You may not remove a ny proprietary notices, marks or labels from the Software Product. You
shall institute reasonable measures to ensure compliance with the terms and conditions of this EULA.
(b) Separation of Components. The SOFTWARE PRODUCT is licensed as a single product. Its
component parts may not be separated for use on more than one HARDWARE unit.
(c) Single INTEGRATED PRODUCT. If You acquired this SOFTWARE with HARDWARE, then
the SOFTWARE PRODUCT is licensed with the HARDWARE as a single integrated product. In this
case, the SOFTWARE PRODUCT may only be used with the HARDWARE as set forth in this
EULA.
Page vi
Page 8

DLS-3 SA v1.3
(d) Rental. You may not rent, lease or lend the SOFTWARE PRODUCT. You may not make it
available to others or post it on a server or a web site.
(e) Software Product Transfer. You may transfer all of Your rights under this EULA only as part of
a permanent sale or transfer of the HARDWARE, provided You retain no copies, You transfer all of
the SOFTWARE PRODUCT (including all component parts, the media and printed materials, any
upgrades and this EULA), and provided the recipient agrees to the terms of this EULA. If the
SOFTWARE PRODUCT is an upgrade, any transfer must also include all prior versions of the
SOFTWARE PRODUCT.
(f) Termination. Without prejudice to any other rights, DSC may terminate this EULA if You fail to
comply with the terms and conditions of this EULA. In such event, You must destroy all copies of the
SOFTWARE PRODUCT and all of its component parts.
(g) Trademarks. This EULA does not grant You any rights in connection with any trademarks or
service marks of DSC or its suppliers.
3. COPYRIGHT.
All title and intellectual property rights in and to the SOFTWARE PRODUCT (including but not
limited to any images, photographs, and text incorporated into the SOFTWARE PRODUCT), the
accompanying printed materials, and any copies of the SOFTWARE PRODUCT, are owned by DSC
or its suppliers. You may not copy the printed materials accompanying the SOFTWARE PRODUCT.
All title and intellectual property rights in and to the content which may be accessed through use of
the SOFTWARE PRODUCT are the property of the respective content owner and may be protected
by applicable copyright or other intellectual property laws and treaties. This EULA grants You no
rights to use such content. All rights not expressly granted under this EULA are reserved by DSC and
its suppliers.
4. EXPORT RESTRICTIONS.
Y ou a gree that You will not export or re-export the SOFTWARE PRODUCT to any country, person,
or entity subject to Can adian export restrictions.
5. CHOICE OF LAW: This Software License Agreement i s governed by the laws of the Pr ovince of
Ontario, Canada.
6. ARBITRATION
All disputes arising in connection with this Agreement shall be determined by final and binding
arbitration in accordance with the International Commercial Arbitration Act, R.S.O. 1990, c. I.9, or
any successor or replacement legislation which may be in force, and the parties agree to be bound by
the arbitrator's decision. The place of arbitration shall be Toronto, Canada.
7.LIMITED WARRANTY
(a) NO WARRANTY
DSC PROVIDES THE SOF TWARE "AS IS" WITHOUT WARRANTY. DSC DOES NOT
WARRANT THAT THE SOF TWARE WILL MEET YOUR REQUIREMENTS OR THAT
OPERATION OF THE SOFTWARE WILL BE UNINTERRUPTED OR ERROR-FREE.
(b) CHANGES IN OPERATING ENVIRONMENT
DSC shall not be responsible for problems caused by changes in the operating characteristics of the
HARDWAR E, or for problems in the interaction of the SOFTWARE PRODUCT with non-DSCSOFTWARE or HARDW ARE PRODUCTS.
(c)LIMITATION OF LIABILITY; WARRANTY REFLECTS ALLOCATION OF RISK
IN ANY EVENT, IF ANY STATUTE IMPLIES WARRANTIES OR CONDITIONS NOT STATED
IN THIS LICENSE AGREEMENT, DSC'S ENTIRE LIABILITY UNDER ANY PROVISION OF
THIS LICENSE AGREEMENT SHALL BE LIMITED TO THE GREA TER OF THE AMOUNT
ACTUALL Y PAID BY YOU TO LICENSE THE SOFTWARE PRODUCT AND FIVE CANADIAN
DOLLARS (USD$5.00). BECAUSE SOME JURISDICTIONS DO NOT ALLOW THE
EXCLUSION OR LIMITATION OF LIABILITY FOR CONSEQUENTIAL OR INCIDENTAL
Page vii
Page 9

DLS-3 SA v1.3
EXCLUSION OR LIMITATION OF LIABILITY FOR CONSEQUENTIAL OR INCIDENTAL
DAMAGES, THE ABOVE LIMITATION MAY NOT APPLY TO YOU.
(d)DISCLAIMER OF WARRANTIES
THIS WARRANTY CONTAINS THE ENTIRE WARRANTY AND SHALL BE IN LIEU OF ANY
AND ALL OTHER WARRANTIES, WHETHER EXPRESSED OR IMPLIED (INCLUDING ALL
IMPLIED WARRANTIES OF MERCHANTABILITY OR FITNESS FOR A PARTICULAR
PURPOSE) AND OF ALL OTHER OBLIGATIONS OR LIABILITIES ON THE PART OF DSC.
DSC MAKES NO OTHER WARRANTIES. DSC NEITHER ASSUMES NOR AUTHORIZES ANY
OTHER PERSON PURPORTING TO ACT ON ITS BEHALF TO MODIFY OR TO CHANGE
THIS WARRANTY, NOR TO ASSUME FOR IT A N Y OTHER WARRANTY OR LIAB ILI TY
CONCERNING THIS SOFTWARE PRODUCT.
(e)EXCLUSIVE REMEDY AND LIMITATION OF WARRANTY
UNDER NO CIRCUMSTANCES SHALL DSC BE LIABLE FOR ANY SPECIAL, INCIDENTAL,
CONSEQUENTIAL OR INDIRECT DAMAGES BASED UPON BREACH OF WARRANTY,
BREACH OF CONTRACT, NEGLIGENCE, STRICT LIABILITY, OR ANY OTHER LEGAL
THEORY. SUCH DAMAGES INCLUDE, BUT ARE NOT LIMITED TO, LOSS OF PROFITS,
LOSS OF THE SOFTWARE PRODUCT OR ANY ASSOCIATED EQUIPMENT, COST OF
CAPITAL, COST OF SUBSTITUTE OR REPLACEMENT EQUIPMENT, FACILITIES OR
SERVICES, DOWN TIME, PURCHASER?S TIME, THE CLAIMS OF THIRD PAR TIES,
INCLUDING CUSTOMERS, AND INJURY TO PROPERTY.
WARNING: DSC recommends that the entire system be completely tested on a regular basis.
However, despite frequent testing, and due to, but not limited to, criminal tampering or electrical
disruption, it is possible for this SOFTWARE PRODUCT to fail to perform as expected.
If Y ou do not agree to the terms of this EULA, DSC is unwilling to license the SOFTWARE
PRODUCT to You, and You have no right to use it.
Page viii
Page 10

1Welcome to
DLS–3 SA v1.3
What is
DLS–3 SA?
Who should use
DLS–3 SA?
Using the
DLS–3 SA
manual
Your DLS–3 System Administrator Software (SA) allows
you to program and control supported DSC Maxsys
security systems from any PC-compatible computer. DLS-3
SA can send data and programming infor matio n to, and
retrieve it from, security systems using an MD12 modem.
Using the DLS-3 SA Software, you will also be able to
upload the status reports from control panels, as well as
print and view reports about the security system.
Additionally, DLS–3 SA can execute batch files to perform
pre-programmed functions on a security system.
It is intended that the on-site person who is responsible for
the security system, such as the Security or Building/
Facility Manager, be responsible for maintaining the
system using the DLS-3 SA software.
This manual will help you learn to use the DLS–3 SA
software. For information on specific DLS-3 SA features,
refer to one or more of the following sections or
appendices.
• Section One – Introduction: Explains the basic hardware
and software requirements for using DLS-3 SA.
• Section Two – Getting to know your security system:
A brief overview of your security sec urity sy stem,
understanding zones and partitions, access codes,
keypads and audio help.
• Section Three – Exploring DLS–3 SA: Takes a look
at the DLS–3 SA environment, and identifies major
components of the program.
• Section Four – Managing Folders and Accounts: A
step-by-step guide to creating folders and accounts,
and to entering information into an account.
Welcome to DLS–3 SA v1.3 Page ix
Page 11

DLS-3 SA v1.3
• Section Five – Setting up Communications: How to
set up your modem, and how to begin communicating
with control panels.
• Section Six – Communicating with Control Panels:
How to send information to, and receive information
from, security systems (uploading and downloading).
• Section Seven -Using Batch Files: How to create,
view and delete Batch Files.
• Section Eight– Creating and Translating DLS-3 SA
Languages: How to enter and edit translations for the
text used in the DLS-3 SA program.
• Appendix A - Troubleshooting: How to identify and
correct any problems you may encou nter usin g D LS-3,
or using your modem.
• Appendix B- Keyboard Shortcuts: A list of
keyboard shortcuts available in the DLS-3 SA
software.
• Glossary: An explanation of some technical terms
used in DLS-3 SA and in this manual.
Page x Welcome to DLS–3 SA v1.3
Page 12

1Section 1:
Introduction
Hardware and
software
requirements
Compatible
modems
Before installing DLS-3 SA, make sure that your computer
matches or exceeds the following requirements:
• IBM compatible 486 DX2-66 (a Pentium CPU is
recommended)
• 16MB RAM (32MB or more is recommended)
• Microsoft Windows95™, Windows98™,
WindowsNT™ v4.0 Workstation (with Service Pack 3
installed)* or Windows2000 Professional™
• Color monitor supporting at least 640x480 resolution
with 16 colors (800x600 or more is recommended)
• DSC MD12 v1.1 external modem (included)
• CD–ROM drive to install the software, or an Internet
connection with access to the DSC Secure Website
• 1.44MB floppy drive (for installing upgrades)
• PC compatible mouse
• A hard disk with at least 55 megabytes of free space
(required space increases as panel files are added to
the installation)
• A PC–Link connector -optional (Maxsys v3.2 only)
• An inkjet, laser, or bubble jet printer
* Windows95™, Windows98™, W indowsNT™ and Windows2000
Professional™ are registered trademarks of Microsoft Ltd.
• This software is intended to work with the DSC MD12
v1.1 external modem. This modem is provided with the
software.
Section 1: Introduction Page 1
Page 13

DLS-3 SA v1.3
About PC-Link The PC–Link connector will allo w you to send data directly
from your computer to a compatibl e con trol panel. This is a
faster and more efficient way to communicate with a panel.
To use PC–Link, you will need either a DSC PC–Link
Local Download Kit–DB09 (9–pin connector) or a PC–
Link Local Download Kit-DB25 (25–pin connector). For
more information on communicating with panels using PCLink, see “Communicating via PC–Link” on page 46.
Installing
DLS-3 SA
Before you install DLS-3 SA, ensure that the computer's
hard drive has at least 55 megabytes of free disk space.
DLS-3 SA must be installed locally to function properly.
When installing from a network drive, ensure that the drive
is set up so that you can share it with other users.
When installing or uninstalling DLS-3 SA, make sure that
DLS-3 SA is not currently running.
NOTE: Only one cop y of any v ersion of DLS-3 SA can be
installed on a computer at any time.
1 Insert the DLS-3 SA installatio n CD into th e CD–
ROM drive
2 Click Start
3 Select Run
4 Click Browse to find the CD–ROM drive that
contains the DLS-3 SA in stal lati o n C D
5 Select the CD-ROM drive by doubl e-cli cki ng it
6 Select Setup.exe, under Fi le Name
7 Click OK
A window is displayed that contain s in formation about
the DLS-3 SA program and version number.
8 Follow the instructions in the Setup program
IMPORTANT NOTE
The computer running the DLS-3 SA software
must be in an area of the building that is
protected by the secur ity sys tem.
When using DLS-3 SA, it is recommended that a
password-protect ed scre ensa ver be use d in or der
to prevent unauthorized access.
Page 2 Section 1: Introduction
Page 14

DLS-3 SA v1.3
Uninstall in g
DLS-3 SA
Upload /
Download
Considerations
To uninstall DLS-3 SA:
1 Click Start
2 Select Settings
3 Select Control Panel
4 Double–click Add/Remove Programs
5 Select System Administrator Soft ware v1.3
6 Click Add/Remove
7 After the Uninstall shield is finish ed, click OK
When the uninstall process is complete, there may still be
some DLS-3 SA files on your hard drive. You can delete
these through Windows Explorer.
CAUTION: If you delete the remaining DLS-3 SA root
directory and its contents, all your account files will be
deleted.
The PC4020 system is capable of being uploaded or
downloaded over the public switched telephone net work, or
on-site using the PC - Lin k. Prio r to the fin a l veri fi cation of
system operation, uploading/downloading may be
performed as required.
Once the system has been approved by the AHJ (Authority
Having Jurisdiction), uploading/downloading can be done
observing the following:
1 Remote control (via downloading ) of any part of the
system is not allowed (e.g. sensor reset, signal
silence, zone bypassing , tro ubl e silen ci ng )
2 If programming changes are to be made fro m a
remote location, a qualified individu al mu st be on
site to verify that sy stem operati o n is not impaired
in any way.
3 Downloading should only be initiated from th e s ite.
The ‘User Enables DLS’ system togg le o ptio n is
enabled by default. This option will prevent any
downloading from occurri ng w itho ut a user
initiating download ing on site.
4 If an alarm occurs during an uploading/
downloading session, the system will disconnect
the downloading compu ter an d activate the sy stem
as programmed and will communicate normally to
the central station. If a computer is conn ected via
the PC-Link, the system will fu ncti on as
programmed but an alarm will not be
communicated to the central station unti l the PCLink connection is removed.
Section 1: Introduction Page 3
Page 15

DLS-3 SA v1.3
NOTE: If a DLS communication was ended abnormally,
the panel will annunciate a DLS Fault trouble. The trouble
will only restore after DLS has re-connected to the panel
and disconnected properly.
NOTE: If during the downloading of system programming
changes – either remotely or locally – an alarm occurs, the
system may not function as intended, depending on wheth er
the downloading was completed before the alarm. It is
imperative that system operation be verified after any
programming change.
Page 4 Section 1: Introduction
Page 16

1Section 2: Getting
to Know Your
Security System
Your Security
System
Zones and
Partitions
Your security system is made up of a control panel, one or
more keypads and various detectors and sensors. The
control panel will be mounted out of the way in a utility
room or basement. The metal control cabinet contai ns the
system’s electronics and standby battery. There is normally
no reason for anyone except an installer or service person
to have access to the control panel.
The keypads each have an audible indicator, an
alphanumeric liquid cr ystal display ( LCD), status li ghts and
command entry keys. The ke ypad is used to send
commands to the system an d to display the current system
status. Each keypad will be mounted in convenient
locations inside the protected premises, near designated
points of entry/exit.
The protected premises has been divided by your installer
into zones and partitions. A zone is an area of protection
that has one or more detection sensors connected to it
(motion detectors, glassbreak detectors, door contacts or
shock sensors). A single zone might be a room, a hallway
or a door or window. Two or more of these zones will be
linked together by the control panel to form a partition.
A partition is a region of the protected premises. A partition
can be armed and disarmed independently from other
partitions. All of the partitions tog ether for m the entire
system.
Some zones will belong to more than one partition, such as
points of entry/exit and hallways. These are called global
zones because they are not assigned to a single partition.
Section 2: Getting to Know Your Security System Page 5
Page 17

DLS-3 SA v1.3
Access Codes As a user of the system, you will be assigned a 4- or 6-digit
access code. Access codes are used to arm and disarm the
partition(s) to which they are assigned. Some access codes
can perform additional system functions, such as
programming system options and bypassing zones.
Your access code may not allow you to access certain
system functions.For instance, if your code is only allowed
to arm and disarm Partition 1, you will not be able to arm
or disarm other partitions, or the entire system.
Keypads Several LCD keypads will be installed throughout the
protected premises, usually one at each entry/exit door.
Some keypads are programmed only to access a single
partition. These are called partition keypads.
If required, the system may have a global keypad. A global
keypad can access any partition. When you enter your
access code at a global keypad, you will be asked which
partition you would like to arm. The keypad will only offer
the partitions available for your access code.
The keypad will display the message “Enter Your Access
Code” when it is not in use. Sometimes, it may display the
time and date. Whatever the display, enter a valid access
code on the keypad to access the system.
Audio Help If your security system has an audio matrix module
(PC49XX and intercom stations) and a PC4580 connected,
it can provide step-by-step audio instructions through the
intercom stations. Access the help function by pressing and
holding for 2 seconds the "Help" button on any system
keypad. The system will prompt you over the intercom
stations.
NOTE: If a user is accessing the PC4580 locally over the
telephone line, the Help button will not work.
Page 6 Section 2: Getting to Know Your Security System
Page 18

2Section 3:
Exploring
DLS-3 SA
Launching
DLS-3 SA
Entering a
Security Stamp
Once DLS-3 SA is installed, you can launch the program
from Windows Explorer, or from the Start menu.
To launch DLS-3 SA from the Start menu:
1 Click Start
2 Select Programs
3 Select DSC System Administrator
4 Select the System Administrator 1.3 icon
To launch DLS-3 SA from Windows Explorer:
1 Select the drive containin g the DL S-3 SA p rog ra m
2 Select the folder contain ing the DLS -3 SA program
3 Double–click Admin.exe, under Name, from the
right window of Windows Explorer
The first time that you run DLS-3 SA, it will ask you to
enter a Security Stamp. DLS-3 SA uses this stamp to
encrypt all of your accounts.
The stamp can be up to 31 characters long. When entering
the stamp, both “UPPERCASE” and “lowercase”
characters can be used, but they are not the same (i.e. “a”
and “A” are not the same).
NOTE: If you wish to share accounts between DLS-3 SA
installations over a network, all DLS-3 SA installations
must have the same security stamp.
After you have entered the stamp, write it down on the page
provided at the front of this manual, and keep it in a safe
place.
CAUTION: It is important that the security stamp be
recorded and safely filed: if it is forgotten, there is no way
to recover the security stamp from the computer or from the
program.
Section 3: Exploring DLS-3 SA Page 7
Page 19
DLS-3 SA v1.3
Logging on to
DLS-3 SA
Account Explorer
Workspace
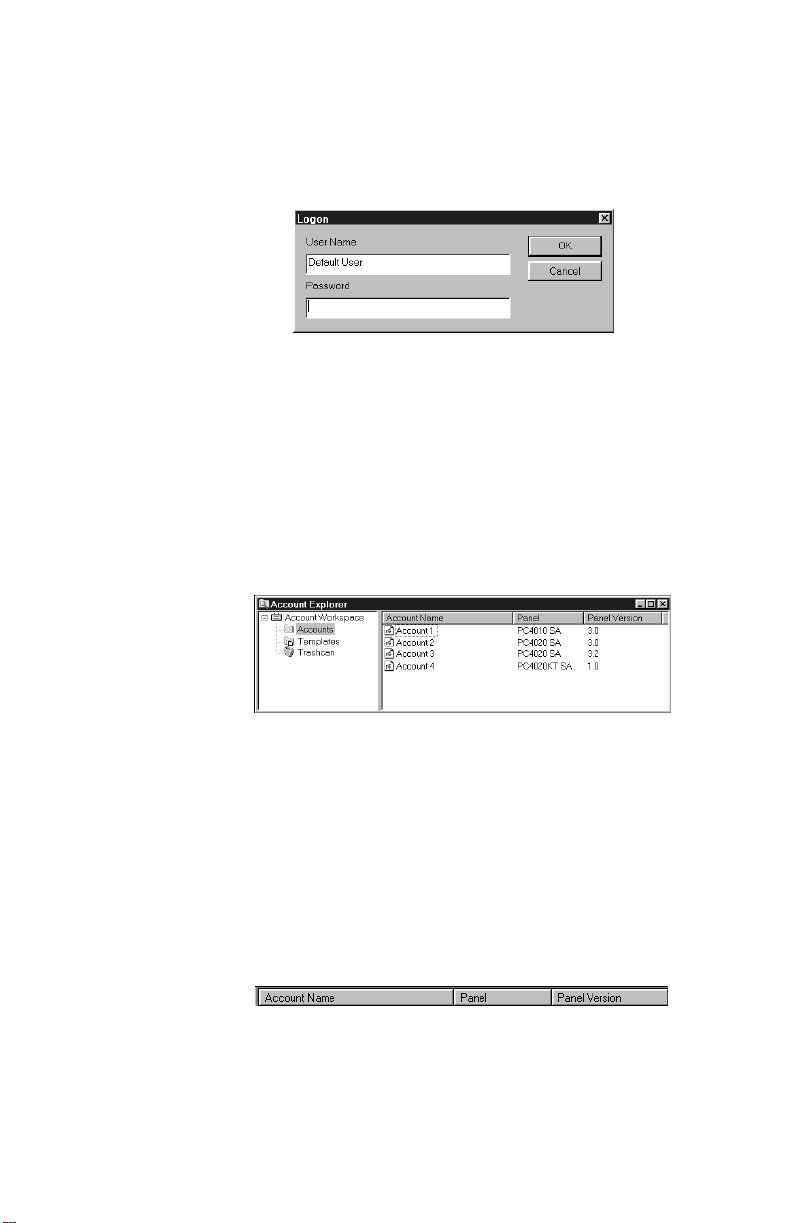
Once the program is running, the DLS-3 SA logon window
will prompt you to enter your user name and password.
1 Enter your user name, under User Name
2 Enter your password, under Password
3 Click OK
By default, the user name is ‘Default User’, and the
password is 1234. The user name and password fields are
case sensitive: if you choose as your password the word
‘SECURITY’ all in upper case, entering the word ‘security’
in lower case will not be accepted as a valid password.
After you log on, the Account Explorer window will be
displayed.
The Account Explorer window is divided into two areas
(“panes”). The Account Workspace is in the left pane, and
the Account Name, Panel, and Panel Version are in the
right pane. As you select folders on the left, the information
about accounts in the folder is displayed on the right.
The DLS-3 SA accounts and folders are arranged as in
Windows Explorer, that is, folders and accounts are
displayed in tree form.
You can sort the accounts by Account Name, Panel Type,
or Panel Version, by clicking the appropriate section of the
Title bar.
When you open DLS-3 SA for the first time, no folders or
accounts will be present. To create folders and accounts,
Page 8 Section 3: Exploring DLS-3 SA
Page 20
DLS-3 SA v1.3
please see “Section 4: Creating and managing folders and
accounts” on page 21.
The Table of
Contents
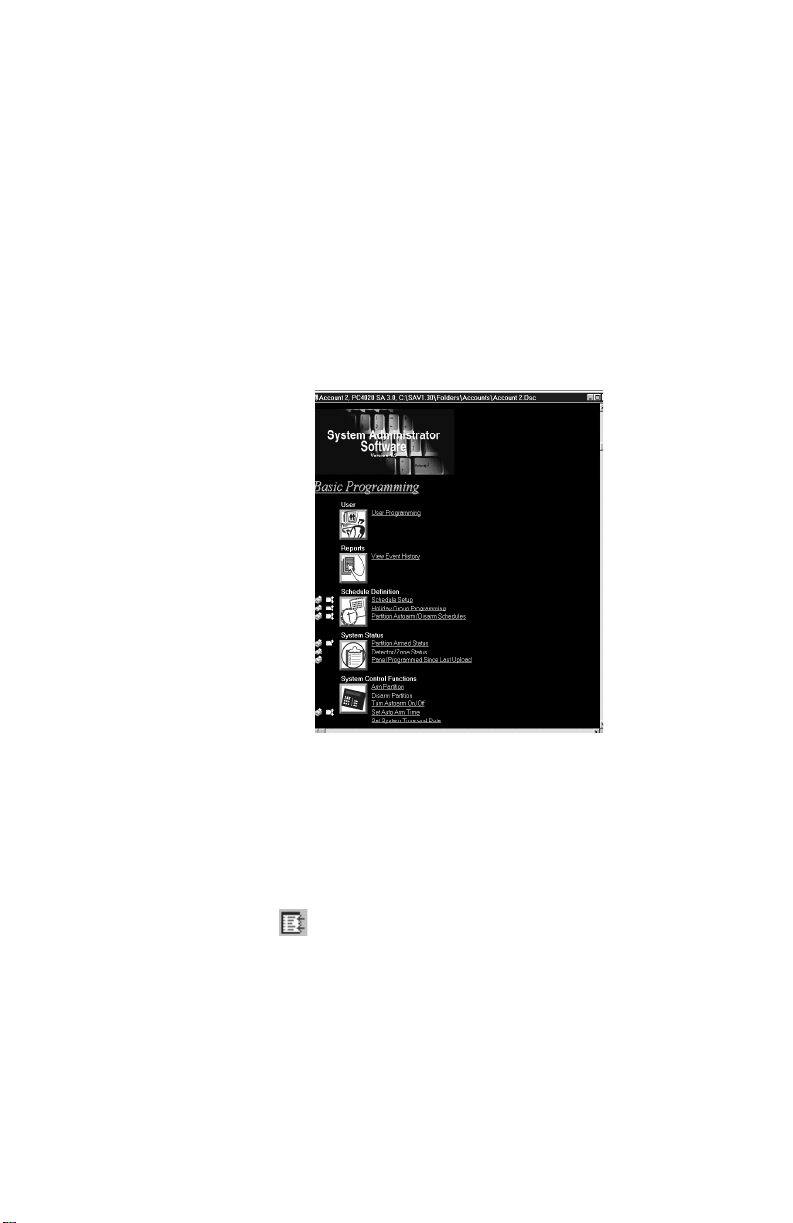
When you open any account, DLS-3 SA displays the Table
Of Contents screen.
To open an account:
1 Select the account name from the Account Explorer
2 Select File
3 Select Open
At the top of the Table of Contents window is the
panel name and type the account is using.
The Table of Contents screen provides an overview of all
the programming sections available for that account. This
screen is divided into three columns: Tags, Sections and
links to the tables (programming sections).
You can get to a programming section by clicking on one
of the underlined links. When you click on a link, DLS-3
SA opens a new window that displays the programming.
To return to the Table of Contents window, click the
Goto Table Of Contents button on the Navigation toolbar,
or click the right mouse button and select Table Of Contents.
Tags In the Tags column you can select one or more
programming sections for uploading or downloading, and/
or for printing. For more information on uplo adin g an d
Section 3: Exploring DLS-3 SA Page 9
Page 21

DLS-3 SA v1.3
downloading information to/from a control panel, please
see “Sending information to a panel” on page 49.
To select a tag, left-click on the desired action.
When a programming section is selected for
uploading, the up arrow will be blue.
When a programming section is selected for
downloading, the down arrow will be red.
A section cannot have tags set for both uploading and
downloading at the same time.
When the section is selected for printing, the printer
icon will have a checkmark.
You can select a section for printing regardless of the state
of the upload or download tags.
Section Most tables correspond to the programming sections of the
control panel. The section number will be in square
brackets beside the link in the Section column.
Each programming section is described in your security
system’s Programming Manual and Programming
Worksheets.
Links The underlined links in the Table Of Contents describe
each programming section available for the account. To
select a section from the Table Of Contents, you can left–
click on the link. DLS-3 SA will then display the contents
of the programming section.
Section Title The Section title gives a quick description of the areas of
programming (e.g. Installer Options, System Options). A
sub–section label may also be displayed to group multiple
tables together. (e.g. Zone Definitions).
Tables All the current data in the account file is displayed in
tables. Each table represents one programming section. The
tables contain descriptions of the data to be programmed
(i.e. the option label or valid data range), and space to enter
the data.
Section 3: Exploring DLS-3 SA Page 10
Page 22
DLS-3 SA v1.3
Some tables contain dropdown lists. To select an option,
click on the programming area (e.g. the name of the zone
type), then click on the down button beside it. You can
scroll through the list until you see the option you want.
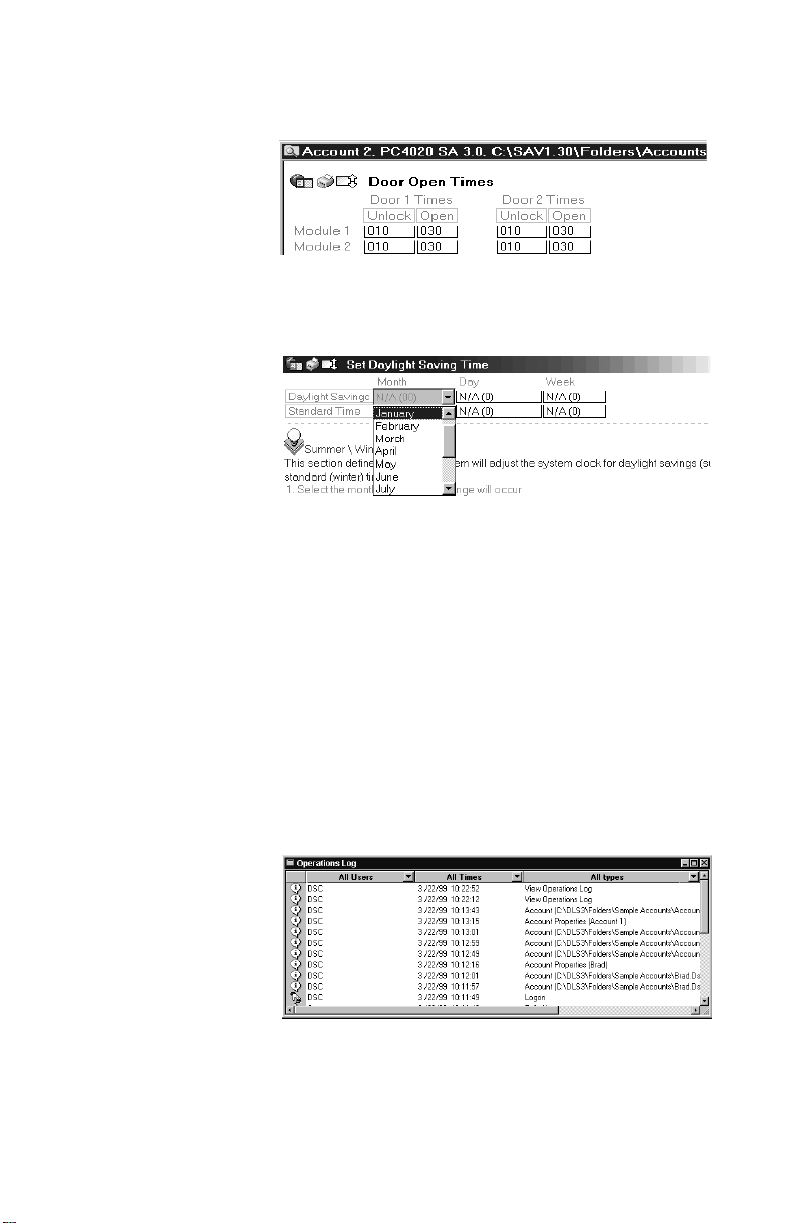
Operations log The Operations Log records all DLS-3 SA activities. The
log records which users have been communicating with
security systems, and the time, day, month, and year, each
user accessed DLS-3 SA. For example, the Operations Log
may show that a user,
Smith, initialized the modem on
January 10, 2000, at 10:00am.
You can filter the information displayed in the Operations
Log. That is, you can browse through the log, and observe
specific activities only. For example, you can filter the log
by asking the program to show activities that have occurred
in the last six months, and that have caused error messages.
To open the Operations Log:
1 Select View
2 Select Operations Log
To filter the log information, select one or more categories
from the dropdown lists at the top of the table.
Section 3: Exploring DLS-3 SA Page 11
Page 23
DLS-3 SA v1.3
g
g
g
g
g
g
g
g
• User – “All Users”, “System”, “DSC” or “UserDefined” may be selected. If you select “UserDefined”, a window will be displayed where you can
enter the name of a specific user whose activities you
want to see.
• Time/Date – “All Times”, “Last Day”, “Last Week”,
“Last Month”, “Last Six Months”, “User-Defined” or
“Last Year” may be selected. If you select “UserDefined”, you can select the time and date range you
want to see.
• Type – “All Types”, “Communications, “User”,
“Information”, “Warning”, “Error” or “User-Defined”
may be selected. If you select “User-Defined”, a
window will be displayed where you must enter text
that you would like to filter. For example, if you enter
“failed logon”, DLS-3 SA will display only the failed
logon events.
You can have multiple filters on the Operations Log to
search for a particular event, by clicking on the category
drop box at the top and choosing the criteria you would like
to use.
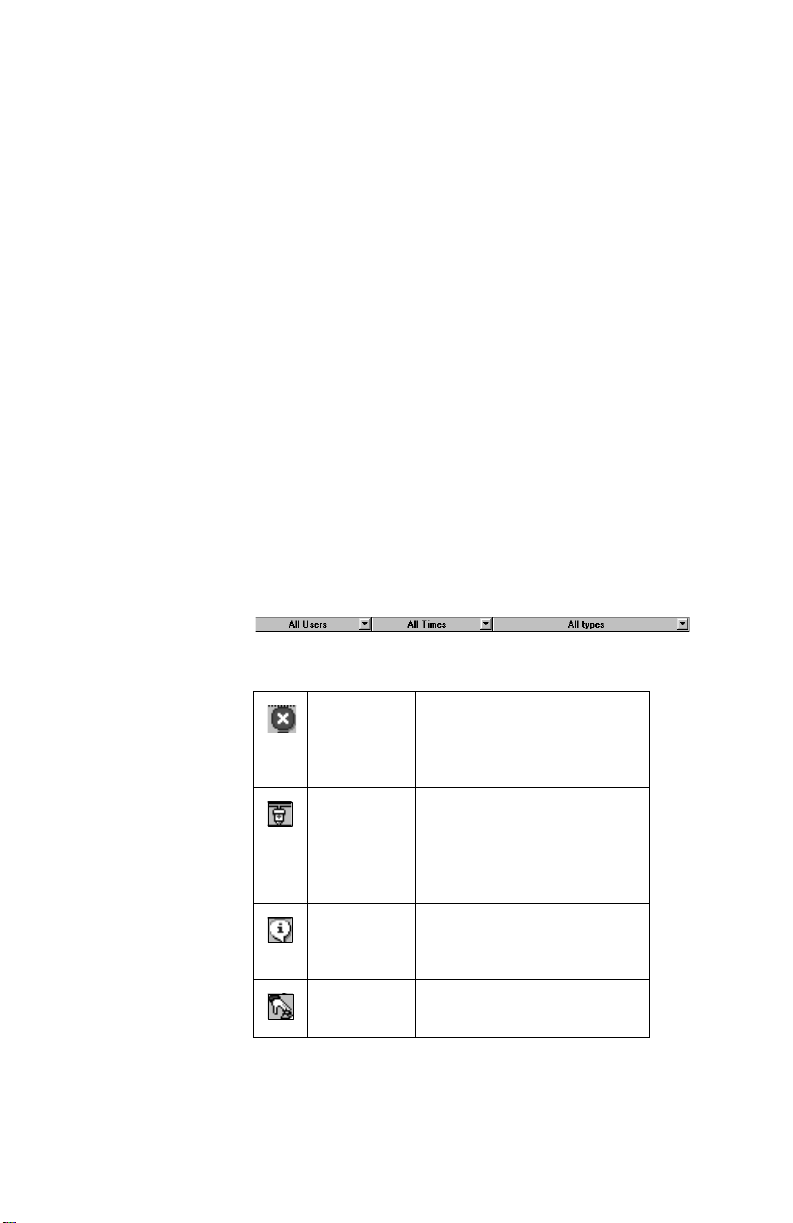
Below is a definition for the icons found in the Operations
Log.
Page 12 Section 3: Exploring DLS-3 SA
Error This i c on ind icate s that a m i s -
Communications
Information This icon ind icates a typical
User This icon indicates user activity
take has occurr ed while usin
function of the DLS-3 SA (e.
no response from the panel).
This icon indicates that an
activity requirin
PC–Link took place (e.
to a panel via the
nectin
PC–Link).
system event (e.
the Operations Lo
. logging on to DLS-3 SA).
(e.
modems or
. con-
. viewing
).
a
.
Page 24
DLS-3 SA v1.3
g
g
g
g
Creating new
users and
passwords
Warnin
This icon indicates a problem
encountered durin
tion of the software (e.
failed to lo
opera-
.
on).
You can create DLS-3 SA users, delete DLS-3 SA users,
change passwords, select a language, and set up
permissions groups for DLS-3 SA users with the User
Manager.
Once you have users set up, to ensure the security of your
account files, you should rename and change the password
of the default DSC user.
To create a new user:
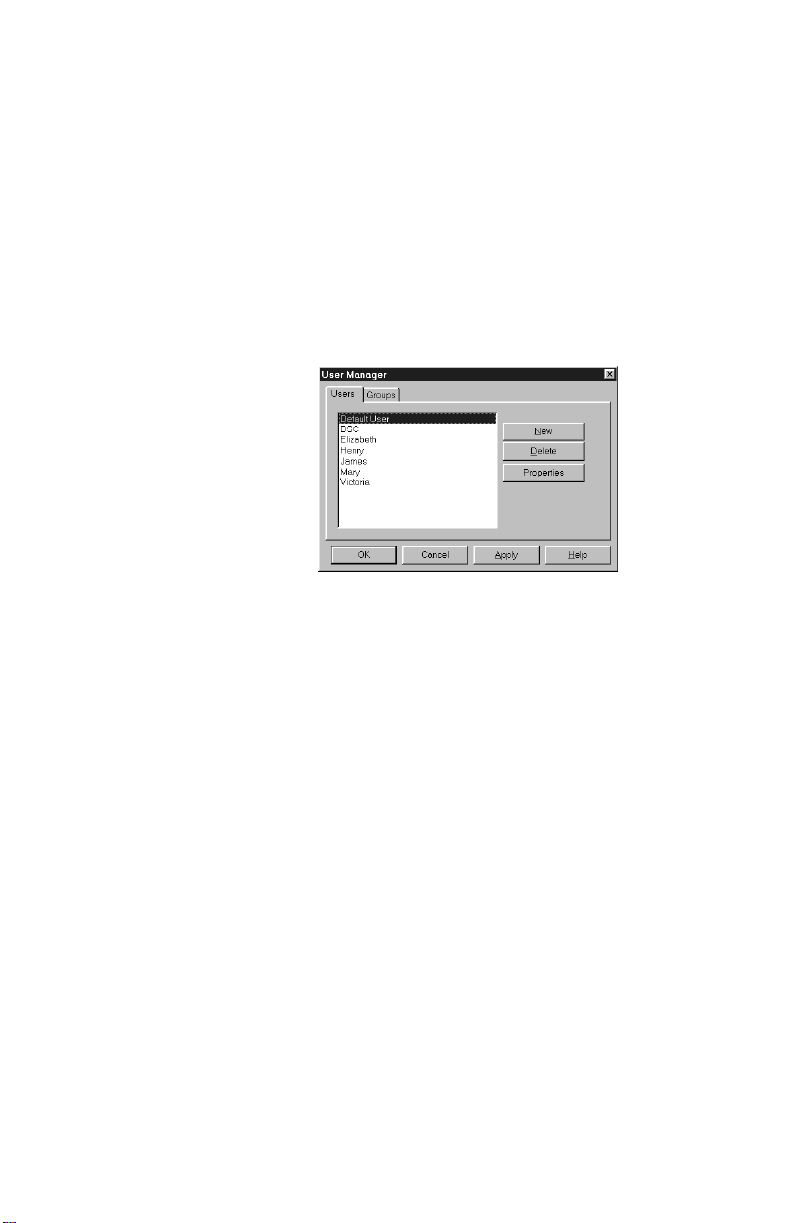
1 Select Tools
2 Select User Manager
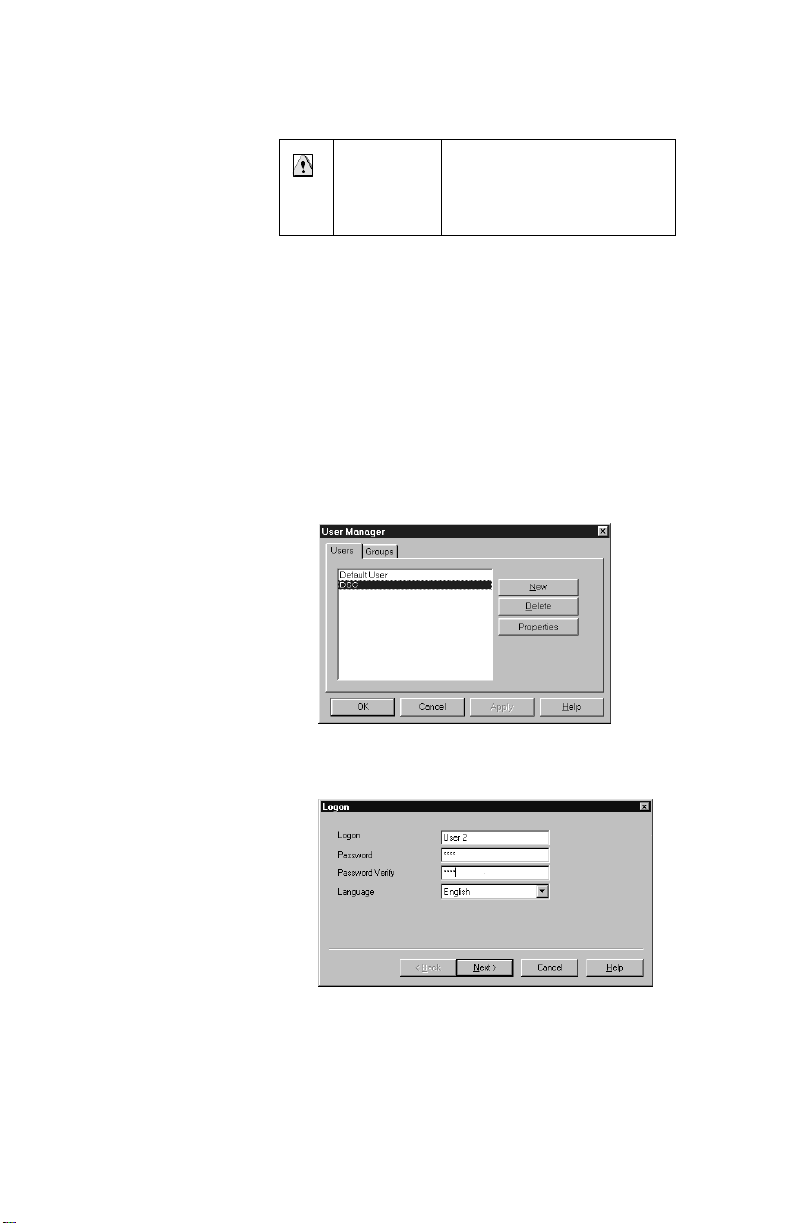
The User Manager dialog box appears.
3 Click New
The New User dialog box appears.
4 Type the name of the new user, under Logon
5 Type the password for the new user, under
Password. Type the password again, under
Password Verify
Section 3: Exploring DLS-3 SA Page 13
Page 25
DLS-3 SA v1.3
6 Select the language th at D LS -3 SA wi ll di sp lay fo r
the user under Languag e, the n click Next
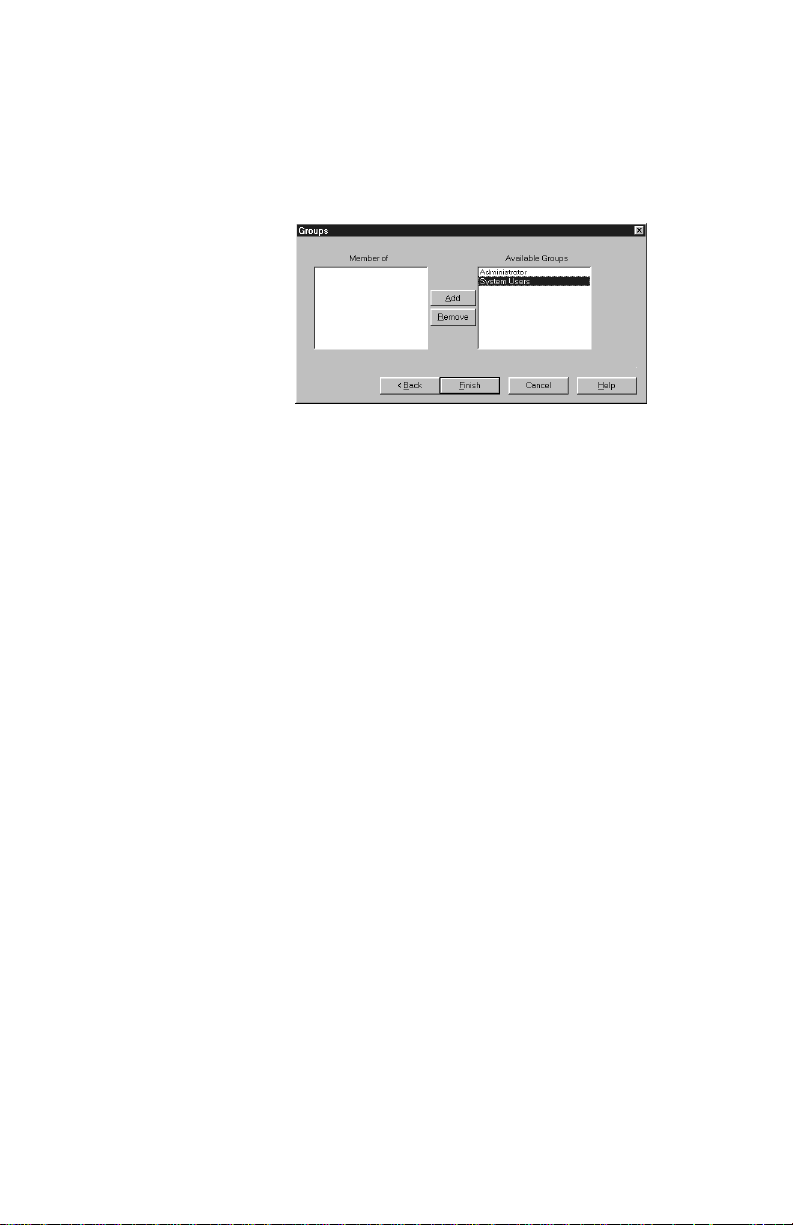
7 Select a permissions group for the new user: click
on the group you want, then click Add
To create new permissions groups, please see
“Creating permissions groups” on page 14.
NOTE: If you do not select any group for the user, that
user will not be able to perform any functions when they
log on to DLS-3 SA. Only users and access groups with
lower permission than the logged-in user will be visible.
This prevents users from assigning other users to groups
that have higher access than themselves.
8 Click Finish
9 Once you have finished programming users, select
File > Exit DLS-3 SA.
This will ensure that the user information will be
saved properly in the DLS-3 SA directory.
Creating
permissions
groups
You can set up groups of users who will have varying
degrees of access to DLS-3 SA functions and accounts.
These groups are called Permissions Groups.
DLS-3 SA has one default group called Administrator. All
users assigned to this group will have full access to all
DLS-3 SA functions and accounts.
To create a new permissions group:
1 Select Tools
2 Select User Manager
The User Manager dialog box appears.
3 Click on the Groups tab
DLS-3 SA displays a list of the current groups.
Page 14 Section 3: Exploring DLS-3 SA
Page 26
DLS-3 SA v1.3
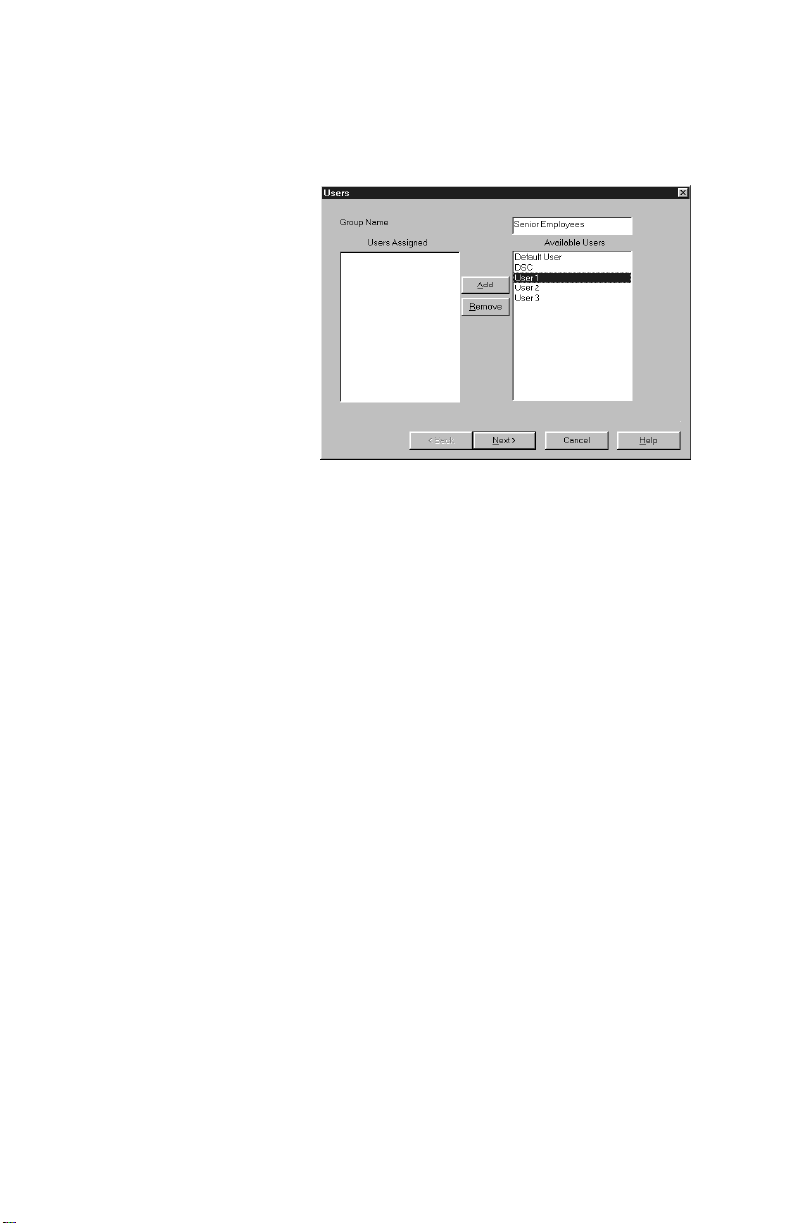
4 Click New
DLS-3 SA displays the new group setup window:
5 Enter the name of the new permissions group
beside Group Name
6 If you want, you can add users to the group: click
on a user and then click add. When you are
finished, click Next.
Selecting permissions for the group
In the next two screens, select the functions that users in the
group will be able to access. If a user tries to select a
function that they do not have permission for, DLS-3 SA
will display an “Insufficient Permission” message.
7 DLS-3 SA displays the shel l rig h ts win do w . In th is
window you can select the function s that memb ers
of the group will be able to perfo rm w ith i n the
DLS-3 SA program.
Section 3: Exploring DLS-3 SA Page 15
Page 27

DLS-3 SA v1.3
Click on the checkboxes beside the all o wed
functions.
You can select functions in each of the following
categories:
• Accounts
• Folders
• Communications
• Configuration
• Web access
To select all of the permissions within a category,
click on the . To clear all of the permissions in a
category, click on the .
NOTE: If the logged-in user does not have permission for a
specific function, they cannot grant themselves, or any
other permissions group, access to that function
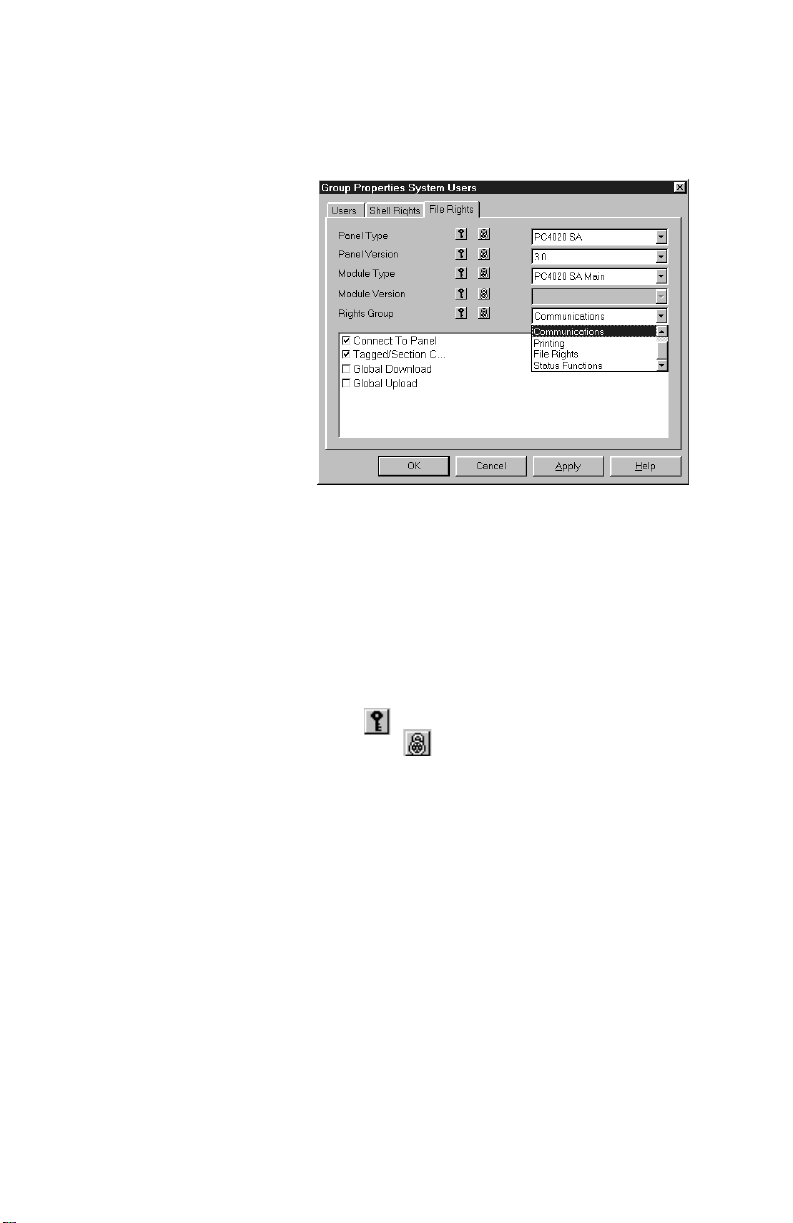
8 When you are finished, click next. DLS-3 SA
displays the File Rights window. In this window you
can select the functions that members of the group
will be able to perform within each type of accoun t
file.
Page 16 Section 3: Exploring DLS-3 SA
Page 28
DLS-3 SA v1.3
9 Click on the checkboxes beside the allo w ed
functions.
If you want, you can select different functions for each
panel, panel version, module, or module version.
For each panel version or module version, you can
select functions in each of the following categories:
• General
• Communications
• Printing
• File Rights
• Status Functions
To select all of the functions within a category, click
on the . To clear all of the functions in a category,
click on the .
10 When you are finished selecting functions, click
Finish
DLS-3 SA adds the new group to the list.
Editing
Permissions
Groups
You can change the list of functions available to users who
are members of a permissions group by changing the
properties of the group.
1 Select Tools
2 Select User Manager
The User Manager dialog box appears.
3 Click on the Groups tab
DLS-3 SA displays a list of the current groups.
Section 3: Exploring DLS-3 SA Page 17
Page 29
DLS-3 SA v1.3
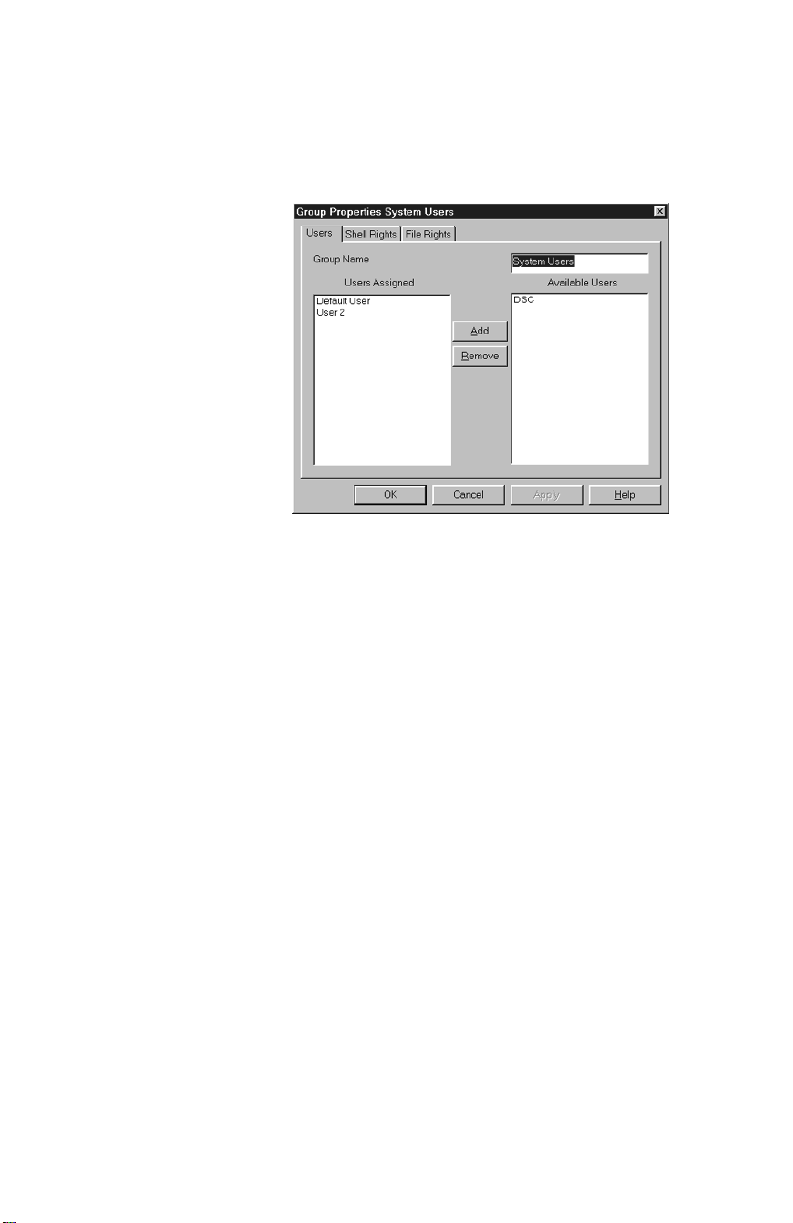
4 Select the group that you want to edit, then click
Properties.
DLS-3 SA displays the Group Properties window.
5 In this window, you can change th e users whi ch
belong to the group (User tab), the DLS- 3 SA
functions available to group members (Sh ell Rig hts
tab), and the account functi on s av ail abl e to grou p
members (File Rights tab ).
Changing the group properties works similarly to
setting up a new group. For more information on each
of these tabs, please see “Creating permissions
groups” on page14.
6 When you are finished, click OK
Logging off to
change users
You can log off the DLS-3 SA and change users without
having to close the entire program:
1 Select Tools
2 Select Logout
DLS-3 SA closes all open accounts and the Account
Explorer, and opens the logon dialog box.
3 Enter the new user name and pass word
Display
languages
The default languag e for D LS- 3 SA is En gl is h. Y ou c an
customize DLS-3 SA displays with different languages. The
text for all DLS-3 SA labels, buttons, windows, and menus
will be displayed in the language assigned to the user. After
you assign a language to a user, that language will
automatically be used when the user logs on to DLS-3 SA.
Page 18 Section 3: Exploring DLS-3 SA
Page 30
DLS-3 SA v1.3
After you launch DLS-3 SA, it will use the language
assigned to the last user that logged on. When a different
user logs on, the language assigned to that user will be
displayed.
To create a new DLS-3 SA language, please see “Setting up
a new language” on page 61.
Assignin g
languages to
users
1 Select Tools
2 Select User Manager
The User Manager dialog box appears.
3 Select the name of the user, under Users
4 Click Properties
The User Properties dialog box appears.
5 Select the language to be assigned to the user,
under Language
6 Click OK twice
7 Once you have finished programming users, select
File > Exit DLS-3 SA.
This will ensure that the user information will be
saved properly in the DLS-3 SA directory.
Section 3: Exploring DLS-3 SA Page 19
Page 31

DLS-3 SA v1.3
Page 20 Section 3: Exploring DLS-3 SA
Page 32

3Section 4:
Creating and managing
folders and accounts
Creating folders If this is your first DLS-3 SA session, there will be no
folders or accounts present in the Account Workspace. To
create a folder, follow the steps outlined below:
1 Select File
2 Select New Folder
The Create Folder dialog box appears.
3 Enter a name for the folder, under Name
4 Click Create
By default, all folders are created in the DLS3\Folders
directory. It is a good idea to keep your folders in one
location so that you can manage your accounts easily.
In DLS-3 SA you cannot create sub–folders.
Creating folders
on a different
drive
Section 4: Creating and managing folders and accou nt s Page 2 1
You can create folders on a local drive on your computer,
or on a shared drive in a Local Area Network (LAN). To
create a folder with a specific path, follow the steps
outlined below:
1 Select File
2 Select New Folder
3 Enter a name for the folder under Name
Page 33

DLS-3 SA v1.3
4 Click Advanced
The Advanced Folder options dialog box ap pears.
5 Type the path where y o u wan t to create the folde r,
under Path
For example, type F:\ABC\Accounts\1999, or
W:\Panel etc.
6 Click OK
7 Click Create
When entering a path, make sure that the path does
exist. If you enter a path that does not exist or is not
accessible on the network, DLS-3 SA will issue an
error message. Check Windows Explorer to locate the
correct path, or click the Browse button in the
Advanced Folder Options dialog box. When you
create a folder on a network drive, the folder will
appear in the DLS-3 SA Account Explorer with a
small t-bar underneath the folder, indicating that the
folder is in a network environment.
Deleting fold er s NOTE: If you a re co nnected to a fold er ov er a netwo rk and
you delete it, the folder and contents will be removed from
your Account Explorer. On the remote computer, the folder
will still be present, but the contents will be deleted.
1 Select the folder that is to be deleted
2 Select File
3 Select Delete
A dialog box appears and prompts you to confir m the
deletion of the folder.
Page 22 Section 4: Creating and managing folders and accou nt s
Page 34

NOTE: Once you have deleted a folder, you will not be
able to retrieve it, or its contents later.
4 To delete the folder and its con ten ts, cl ick Ye s
Renaming folders 1 Select the Fold er to be ren amed
2 Select File
3 Select Rename
The name of the folder becomes highlighted.
4 Type the new name of the folder
5 Press Enter or click the mouse pointer outside the
folder name
DLS-3 SA v1.3
Connecting to
other folders
DLS-3 SA allows you to connect to an existing folder
located somewhere else on the network. You must have full
access to the folder that you want to connect to and the
folder name must be less than 32 characters long. You
cannot create sub-folders in the connected folder.
1 Select File
2 Select Connect To Folder
The Connect Folder dialog box appears.
Section 4: Creating and managing folders and accou nt s Page 2 3
Page 35

DLS-3 SA v1.3
3 Click Browse
The Browse Folder dialog box appears, displaying the
directories in your computer, or on the network.
4 Find the folder you want to conn ect to, and click on
it once
5 Click OK
6 Click Connect
If you enter a path that does not exist, or which you do
not have permission to access, DLS-3 SA will display
an error message.
Disconnecting
from folders
If you disconnect from a folder, it will be removed from
your Account Explorer, but will not be deleted from the
computer on which it is stored. To disconnect a folder:
1 Select the folder to disconnect
2 Click File
3 Click Disconnect
Page 24 Section 4: Creating and managing folders and accou nt s
Page 36

DLS-3 SA v1.3
Creating
accounts
An account is where you enter all the information and
programming for each customer. Create a separate account
for each security system that you will communicate with.
1 Select File
2 Select New Account
The Create Account dialog box appears.
3 Type the name of the account, under Account Name
4 Type the telephone numb er of the pan el, under
Panel Telephone Number
You can type “,” (comma) to indicate that you want a
pause when dialing, and “w” if you want a second dial
tone search.
NOTE: To have the modem send a prefix before it dials the
panel telephone number, see “Changing the Additional
modem settings” on page 45.
5 Specify the type of panel, under Panel Type
When you select a panel type, the description of the
panel is displayed on the right side of the dialog box,
under Panel Description.
6 Specify the version number of the panel, under
Panel Version
7 To create a template file, click on the “This Account
Is To Be Used As A Template For Creating Other
Accounts” checkbox. If the account will not be a
template, leave the checkb ox bl ank .
Please see “Creating templates” on page 27 for a
detailed description of templates and how to use them.
Section 4: Creating and managing folders and accou nt s Page 2 5
Page 37

DLS-3 SA v1.3
8 Click Next
The Customer Information dialog box prompts you to
input the information for the customer. You can
change this information at any time, in the Account
Properties dialog box.
9 Enter all the relevant information about the
customer
10 Click Next
The Location dialog box prompts you to select the
folder where the new account is to be created.
11 Select the folder, under Choose A Location For This
New Account
12 Click Finish
Your new account will now appear in the Account
Explorer window, under the folder that you selected.
Page 26 Section 4: Creating and managing folders and accou nt s
Page 38

DLS-3 SA v1.3
Creating
templates
Creating templates can be very useful if you have to
program the same security system for two or more
customers. It saves time and enables you to create several
accounts with similar settings.
To create a new template:
1 Select File
2 Select New Account
The Create Account dialog box appears.
3 Enter the name of the template, under Account
Name
4 Select “This Account Is To Be Used As A Template
For Creating Other Accounts”
5 Click Finish
The template is automatically saved in the Templates
folder in Account Explorer.
You may want to create a number of accounts that have the
same basic programming. If so, you can edit the
programming in the template account. For example, if all
your PC4020 v3.0 accounts use the same reporting codes,
you can program those reporting codes in a PC4020 v3.0
template. To do this, open the t e mplate ac count and edit the
relevant programming sections. See “Entering
programming information into an account” on page 31
Section 4: Creating and managing folders and accou nt s Page 2 7
Page 39

DLS-3 SA v1.3
Creating an
account using a
template
When you create an account file using a template, the new
account will have the same modules and programming as are
contained in the template account. This can save you time
when you need to create several accounts with similar settings.
In order to do this, you must first create the template
account. Please see “Creating templates” on page 27.
To create an account using an existing template:
1 Select File
2 Select New Account Via Template
The Create Account dialog box appears.
3 Select the template you wish to use for the ne w
account
4 Enter the name of the new account, under Account
Name
5 Enter the panel telephone numb er, u nder Pan el
Telephone Number
6 Click Next
The Customer Information dialog box appears.
7 Enter the information for the ne w custom er, und er
the appropriate fields
8 Click Next
The Location dialog box appears.
9 Choose a destination fo lder for th e new account, in
“Choose A Location For This New Account...”
10 Click Finish
Your new account will now appear in the Account
Explorer window, under the folder that you selected. If
you need to do additional programming for the
account, you can open the account and change the
Page 28 Section 4: Creating and managing folders and accou nt s
Page 40

DLS-3 SA v1.3
appropriate programming sections. See “Entering
programming information into an account” on page 31.
Moving accounts Using Account Explorer you can move accounts from one
folder to another.
1 Click on the folder which cont ain s the acco u nt( s)
you want to move
2 Select an account to move by clicking on it. To
select more than one account, hold dow n the [Ctrl]
key and click on each account.
3 Click on the selected accounts, an d holdin g down
the mouse button, drag the accounts over to the
folder you want to move them to.
Deleting
accounts
NOTE: Once you confirm the deletion of the account you
will not be able to retrieve it. (DLS-3 SA will not keep the
accounts in the Trashcan.)
1 Select the account to be deleted from the rig h t side
of the Account Explorer
2 Select File > Delete
3 DLS-3 SA asks you to confirm that you want to
delete the account. If you are sure, click Yes.
OR
1 Drag the account to the Trashcan.
2 DLS-3 SA asks you to confirm that you want to
delete the account. If you are sure, click Yes.
Browser options When you view an account, by default, DLS-3 SA opens
the Table of Contents as one window. The “Browser
Options” define how DLS-3 SA displays the Table of
Contents and Tables.
By default, DLS-3 SA will automatically save all the tags
you selected when you close your accounts, and restore the
tags when you open them again. If you want, you can turn
off this feature in the Browser Options window.
To change the Browser options, all accounts must be
closed.
Section 4: Creating and managing folders and accou nt s Page 2 9
Page 41

DLS-3 SA v1.3
1 Select Tools
2 Select Browser Options
The Configuration Options dialog box appears.
3 Select how you want the browser to operat e by
clicking on any of the options:
• Open In Split Window Mode: Whe n you open
an account it will appear as below.
Page 30 Section 4: Creating and managing folders and accou nt s
Page 42

DLS-3 SA v1.3
• Cascade al l Windows before opening: When
you open accounts, DLS-3 SA will “cascade”
them so that all open windows are visible.
• Maximize Browser Window when opened:
When you open an account, DLS-3 SA will
maximize the Table of Contents window.
• Save Tags on Close, Restore on Open: If this
option is selected, when you close an account,
DLS-3 SA will automatically save any selected
tag s. Wh en you open the account again, DLS-3
SA will restore the tags. If this option is not
selected, when you close an account with pending
tags, DLS-3 SA will ask you if you want to save
the tags in a batch file. Please see “About batch
files” on page 57.
• Centre Tables vertically when selected: When
you select a table (programming section) in an
account, DLS-3 SA will display that table in the
middle of the window.
4 When you are finished selecting Browser options,
click OK
Entering
programming
information i nto
an account
Section 4: Creating and managing folders and accou nt s Page 3 1
For information on individual programming sections,
please refer to the installation manual for th e panel you are
programming. To enter programming information into an
account file:
1 Open the account to be programmed
2 Click on the underlined link to the programming
section you want to change
3 Complete the programming for the accou nt , in the
Tables section of the window
For example, if you want to enter the Access Code for User
004, follow the steps outlined below:
Page 43

DLS-3 SA v1.3
1 Click on User Code Options in the Table Of
Contents (left side of the windo w)
DLS-3 SA opens the User Code Options section in the
tables window.
2 Select User 004 in the drop-down list, an d enter t he
appropriate programming info rmati on in the table.
3 When you are finished enterin g the pro grammi n g
for the account, you can:
• send the new programming to the security
system (see “Sending information to a panel”
on page 49), or
• save the new programming in the accou nt file:
select File>Save, or
• close the account: select Window>Clo se. DL S3 SA will ask you if you want to save your
changes (see “Exiting accounts” on page 37).
Moving aro un d in
an account file
There are several ways to move around between the
programming sections in an account file:
• Using the Table of Contents window
When you first open an account, DLS-3 SA displays
the Table of Contents window. To program a section,
find it in the table and click on the underlined link.
DLS-3 SA opens the selected programming section.
Page 32 Section 4: Creating and managing folders and accou nt s
Page 44

DLS-3 SA v1.3
• Using the Goto Section feature
If you know the reference number of the programming
section, you can jump right to it using Goto Section:
1 In the acco unt windo w, select Go > Go to
Section.
2 E nter the referen ce nu mb er of the sectio n you
want to go to.
If you don’t know the entire reference number, enter
the first few digits of the number. The first section
closest to what you entered will appear in the list.
Click on the section you want to go to.
3 Click Display.
• Using the Previous Section, Next Section navigation
buttons
To move to the next numbered programming section
in the account file, at the bottom of the current
programming section click the Next Section button.
To move to the previous numbered programming
section in the account file, at the top of the current
programming section click the Previous Section
button.
Checking for
code and card
errors
Section 4: Creating and managing folders and accounts Page 33
• Using the Navigation toolbar
You can use the buttons on the Navigation toolbar to
jump to
• the Table of Contents window
• the previous section you visited (in your
navigation history)
• the next section you visited (i n your navigation
history)
• the previous section in numerical order
• the next section in numerical order
You can ask DLS-3 SA to check if there are any duplicate
access codes or access card numbers entered in the
programming section of the account.
Page 45

DLS-3 SA v1.3
1 Select File
2 Select Error Check
If there are no duplicate codes, the program displays
the following dialog box.
If there have been duplicate codes entered, the
program will displa y a dialog box describi n g which
codes are duplicates, and where they are located.
3 Click Close
4 Make the appropriate changes in the account
Printing account
information
You can print all the information in an account (Global
Print), or you can print selected items of an account (Print
Section, or Tagged Sections Only).
When you print account information, you can choose to
either send the information to your default printer, or to a
file on your hard drive (Print to File).
Printing the
entire account
Page 34 Section 4: Creating and managing folders and accou nt s
To print all the account information, follow the steps
outlined below:
1 Select File> Print> Glob al Pri nt
2 Select where you want DLS-3 SA to send the
account information: to you r prin ter, or to a text file
on your hard drive
Page 46

3 Click OK
DLS-3 SA v1.3
Printing part of
an account
Printing a single
section
When you click on the printer icon next to a progra mming
section (as shown below), you can tag that section to print.
A checkmark appears on the printer icon for all tagged
sections.
For example, you might want to print only the User Code
Options and the Installer Options. If you tag these sections,
the program will print only the sections which are tagged.
To print sections that you have tagged:
1 Select File> Print> Tagged Secti o ns Onl y
or
1 Click the Print Selected Tags butto n on the File
toolbar
2 Select where you want DLS-3 SA to send the
account information: to your printer, or to a text file
on your hard drive
3 Click OK
Section printing prints only the data currently displayed in
one programming section. To print sections only, follow
the steps outlined below:
1 Open the account
2 Select Print Section from the table’s pull down
menu
3 Select where you want DLS-3 SA to send the
account information: to your printer, or to a text file
on your hard drive
Section 4: Creating and managing folders and accou nt s Page 3 5
Page 47

DLS-3 SA v1.3
4 Click OK
Viewing the Print
to File output for
an account
If you choose to send the information to a file, DLS-3 SA
creates a text file on your hard drive. You can view this file
in a text editing program, such as Windows Wordpad.
To view the text file:
1 In the Account Explorer window, righ t-cl ick o n the
account that you printed
2 Select Account Properties
The Account Properties window opens.
3 Click on the Print to File Output tab
4 Click Open
DLS-3 SA opens Windows Notepad, or Windows
Wordpad (depending on the size of the file) to display
the text file.
NOTE: If you click the Delete button, DLS-3 SA deletes the
curren t output file.
Changing
account
properties
Page 36 Section 4: Creating and managing folders and accou nt s
If you need to change the customer information you can
edit the account properties.
1 In the Account Explorer window, click once on the
name of the account
2 Select File
Page 48

DLS-3 SA v1.3
3 Select Properties
The Account Properties window appears.
4 Click the tab in which you want to make the
changes
For example, if you wish to change the customer
information, click the Customer Information tab and
make the changes.
5 When you are finished making changes, click OK
Exiting accounts To exit an account, follow the steps outlined below:
1 Select Window
2 Select Close
If you have made changes to the account, (i.e. if the
information has been changed or additional
information has been added), the program will ask you
if you want to save these changes. If no additions or
changes have been made to the account, the program
will close the account automatically without
prompting you to save the account file.
If you wish, you can have DLS-3 SA automatically
save all pending tags whenever you close an account
(this feature is turned on by default). When you open
the account again, the tags will be restored. Please see
“Browser options” on page 29.
If DLS-3 SA is not set up to automatically save
pending tags, when you close a file with pending tags,
DLS-3 SA will ask if you want to save the tags in a
batch file. Please see “About batch files” on page 57.
Section 4: Creating and managing folders and accou nt s Page 3 7
Page 49

DLS-3 SA v1.3
Finding acco un ts The Find function allows you to search for accounts in
various ways, including combinations of Filename
Searches, Folder Searches, Text Searches or Contents
Searches.
You can search the account names in the Account
Workspace, and in each individual account, for a word or a
number. For example, you can ask the program to find all
accounts that contain the name Smith, or to find accounts
that contain the number 4020.
1 Select Tools
2 Select Find
Or,
1 Click the Find In Files button, on the File toolbar
The Find dialog box appears.
1 If you know the name of the account, enter it under
Named
2 If you know the name of the folder the account is in,
select it under Look In
NOTE: If you select Account Workspace under Look In, the
program will search in all the folders.
If you select Search Contents Of Found File, the rest of the
Find menu is un–grayed. There are two options to choose
from:
• Include All Fields In The Search: the Downloading
Access Code, Panel Access Codes, Panel Identifier
Code, User Labels, and Zone Labels of each file are
scanned for the text that is specified.
Page 38 Section 4: Creating and managing folders and accou nt s
Page 50

DLS-3 SA v1.3
• Specific Field: you may choose any one of the
following categories to search for the text that is
specified:
• Downloading Access Codes
• Panel Access Codes
• User Labels
• Zone Labels
• Panel Identifier Codes
If you click on the Account Details tab, you can search for
an account using information such as the e-mail address, or
telephone number of the customer. That is, if you know the
telephone number of the account holder (customer), then
you can enter that telephone number under the Voice
Telephone field.
If you know which panel type you are looking for, you can
search all the accounts using that type. To do this, click the
Advanced tab and select the appropriate panel type and
version number.
3 After you have entered the known inform atio n
about the account, click Find
Once the program has located accounts that match the data
you entered, the Find Results window appears. The Find
Results window displays the name of the account, the type
of panel the account uses, and the folder in which the
account is located.
Section 4: Creating and managing folders and accou nt s Page 3 9
Page 51

DLS-3 SA v1.3
Page 40 Section 4: Creating and managing folders and accou nt s
Page 52

1Section 5:
Setting up
communications
Configuring the
modem
For each modem that is available to DLS-3 SA, a file
containing all pertinent information and commands is
present in a subfolder of the DLS-3 SA installation folder.
All of the modem configuration files are automatically
detected, which allows you to add a new file to the folder if
other modems are found to be compatible in the future.
To select a particular type of modem, follow the steps
outlined below:
1 Select Tools
2 Select Modem Configuration
The Modem Configuration dialog box appears,
displaying all the modems that have been set up for
installation. The DSC MD12 v1.1 is the default
modem.
Section 5: Setting up communications Pa ge 4 1
Page 53

DLS-3 SA v1.3
Adding a new
modem
Deleting a
modem
Selecting a
modem or
PC-Link for
outgoing calls
1 Select Tools
2 Select Modem Configuration
3 Click the Add button of the Modem Con fig urati on
dialog box
The Add Modem dialog box appears.
4 Select the new modem
5 Click OK
1 Select Tools
2 Select Modem Configuration
3 Select the modem to be deleted, under The
following Modems Have Been Setup
4 Click Remove
5 Click OK
1 Select Tools
2 Select Modem Configuration
3 Click the Outgoing tab
4 From the pull-down list, select either the modem o r
PC–Link to use for outgoing calls
Page 42 Section 5: Setting up communications
Page 54

DLS-3 SA v1.3
5 Click OK
Note that only modems that have been added will be
displayed as optional modems. (See “Adding a new
modem” on page 42.)
Selecting a
modem for
incoming calls
Changing modem
settings
1 Select Tools
2 Select Modem Configuration
3 Click the Incoming tab
4 Select the modem to use for incoming call s from
the pull down list.
5 Click OK
Note that only modems that have been added will be
displayed as optional modems. (See “Adding a new
modem” on page 42.)
You can change the settings of any modem, including:
• The COM port
• The Baud rate
• Tone/pulse dialing
• Speaker setting
• Speaker volume
• Dial and busy tone detection
• Answering machine override (Automatic Redial)
• Number of rings to answer on
• Modem initialization string
• Modem dialing prefix
These settings are described below. To change the settings
for a modem:
1 Select Tools
2 Select Modem Configuration
3 Select the modem for which the setti ng s are to be
changed, under The follow i ng Modems Have Been
Setup
Section 5: Setting up communications Pa ge 4 3
Page 55

DLS-3 SA v1.3
4 Click Properties
The Properties dialog box appears.
5 Make the necessary chang es, as expl ained in the
sections below
6 When you are done making chang es, cli ck OK
Changing general
modem
properties
In the General tab, you can change several modem
properties:
• Port: Select the communications port (COM port) that
your modem is connected to on your computer.
• Baud Rate: If Auto Detect is selected, all
communications will be started at the 1200 Baud
format. If the telephone line is determined to be
unsuitable for 1200 baud, DLS-3 SA will
automatically switch down to 300 Baud until the end
of the call. For MD-12 modems, you can also select
communications at either 1200 or 300 Baud.
• Dialing Method: Select either tone, or pulse dialing,
depending on the type of telephone line you are using.
• Speaker Setting: If On Until Con nect i s s elected , wh en
DLS-3 SA makes a call, you will hear the progress of
the call on the speaker until DLS-3 SA is connected to
the panel. You can also choose to have the speaker on
all the time, or you can turn it off completely.
Page 44 Section 5: Setting up communications
Page 56

DLS-3 SA v1.3
• Speaker Volume: You can increase or decrease the
volume of the modem speaker by dragging the slider
up or down.
Changing the
connection
settings
In the Connection tab, you can change the following
settings:
• Call Preferences: When DLS-3 SA picks up the
telephone line, it can listen for a dial tone, or a busy
tone, or both. If you enable Dial Tone Detection, DLS3 SA will wait for a dial tone before it begins dialing.
If you enable Busy Tone Detection, DLS-3 SA will
hang up the line if it detects a busy tone.
• Automatic Redial (Answering Machine Override): If
the control panel is sharing a telephone line with an
answering machine, you can set up DLS-3 SA to
override the answering machine. To do this, DLS-3
SA will first call the panel, and then hang up after a
programmed number of seconds (by default, the
program will hang up after 7 seconds.). The program
will wait for another programmed amount o f time, an d
then call the panel again. The control panel will then
answer the call after one ring, and DLS-3 SA will
begin communicating with the panel.
To turn on the answering machine override:
1 Select Automatic Redial
2 Enter the number of seconds the DLS-3 SA will
wait before hanging up, in the first data entry
box
3 Enter the number of seconds the DLS-3 SA will
wait before calling the pan el the 2nd time, in
the data entry box underneath
• Number of Rings to Answer On: When a control pan el
calls the DLS-3 SA computer, DLS-3 SA will answer
the call after it detects the programmed number of
rings.
Changing the
Additional
modem settings
In the Additional tab of the Mo de m Properties windo w, you
can enter a modem initialization string and a dialing prefix.
You can use the modem initialization string section to have
DLS-3 SA send additional commands to the modem during
initialization. DLS-3 SA attempts to initialize the modem
when you try to communicate with a security system.
Section 5: Setting up communications Pa ge 4 5
Page 57

DLS-3 SA v1.3
For more information, please refer to your modem’s
manual, or see “Appendix A: Troubleshooting” on page 69.
DLS-3 SA will send the characters you enter in the dialing
prefix section before the telephone number is dialed. For
example, you can tell DLS-3 SA to dial [9] before dialing
the telephone number of the panel. The maximum number
of digits that may be entered is 23 characters.
Communicating
via PC–Link
Initiating a
PC-LINK
connection
PC–Link is a communications tool that allows you to
connect your DLS-3 SA computer directly to a compatible
control panel via a serial cable. To install PC–Link, follow
the instructions in the PC–Link installation sheet.
Before initiating a PC–Link connection make sure that:
• you have set up the program to transmit programming
information using the PC–Link connection (see
“Selecting a modem or PC-Link for outgoin g calls” on
page 42)
• you have set up the control panel to com muni cate with
DLS-3 SA
To begin PC–Link communications:
1 Open the account file for the panel
2 Make any programming changes n ecessary
3 Begin download i ng or up loading, as described in
“Section 6: Communicating with control panels” on
page 49
4 At a system keypad, initiate PC-Link
communications by following the appropriate
instructions:
PC4020 v3.2 and higher panels
1 E nter a system master cod e
2 E nter the system master men u by pressing [9]
3 S elect ‘En abl e PC-L ink’ by pressing [5]
The control panel begins communicating with DLS-3
SA. In DLS-3 SA, the Communication Status window
shows the progress of the communication.
Page 46 Section 5: Setting up communications
Page 58

DLS-3 SA v1.3
Initiating a
modem
connection
Waiting for a
panel to call
Before initiating a modem connection make sure that:
• you have set up the program to transmit programming
information using the correct modem (see “Selecting a
modem or PC-Link for outgoing calls” on page 42)
• you have set up the control panel to co mmu nicate with
DLS-3 SA
To initiate a modem connection:
1 Open the account file for the pa nel
2 Make any programming changes necessary
3 Begin downloading or uploading, as described in
“Section 6: Communicating with control panels” on
page 49
The Communication Status window will appear
showing the progress of the communication.
4 Once the information has been successfully
downloaded or uploaded, press the Disconnect
From Panel button on the Commun icatio n s tool bar
NOTE: If the modem cannot be initialized, DLS-3 SA will
display a “Communications Not Ready” message. Try
turning the modem off , then on agai n. If DLS -3 SA still
cannot initialize the modem, pleas e see “Modem
troubleshooting” on page 72.
You can set up the control panel to automatically initiate a
request to DLS-3 SA for downloading. Se e your secur i t y
system’s Installation Manual for information on setting up
the control panel to call the DLS-3 SA computer.
When DLS-3 SA answers an incoming call, it will attempt
to match the security system with the correct account using
the Panel Identification code. If the codes match, DLS-3
SA retrieves the correct account and you will then be able
to select the communications function that is required.
You must ensure that each account has a different Panel
Identification code. If two accounts have the same code, the
program may match the wrong account with the calling
panel. If the Panel Identification code for the panel that is
calling does not match the Panel Identification Code in any
of the accounts, the call is terminated.
Note that the DLS access code must also be correct, or the
account will not be able to communicate.
Section 5: Setting up communications Pa ge 4 7
Page 59

DLS-3 SA v1.3
Communication
status window
When DLS-3 SA begins communicating with a control
panel, the Communication Status window will be
displayed. This window displays messages showing the
status of the communication, such as “Dialing....”, “Global
upload is in progress...”, and “Disconnecting....”.
When communicating with a panel and when the account is
open, you can hide or display the communicatio n status
window.
1 Select View
2 Select Communications Status Window
Page 48 Section 5: Setting up communications
Page 60

2Section 6:
Communicating with
control panels
Sending
information to a
panel
Global
downloading
Tagged
downloading
When you use DLS-3 SA and a modem or PC-Link
(Maxsys 3.2 and higher) to send information to a control
panel, it is called “downloading”. There are three different
ways of downloading information to the panel: Global
downloading, Tagg ed downlo ad in g, and Section
downloading.
Global downloading will trans mit all programming
information to the control panel. To download all
programming sections from a DLS-3 SA account to a
control panel, follow the steps outlined below:
1 Open the desired account
2 Make any required changes to the programming
3 Click the Global Download button, on the
Communications to olb a r
DLS-3 SA wil l try to connect to the panel to download
the panel programming.
Tagged downloading allows you to download selected
programming sections such as Schedules, User Codes,
Installer's Codes, etc. to the control panel.
If you change the data in any programming section, DLS-3
SA will automatically tag it for downloading. You can also
tag a section for downloading by clicking on the down
arrow in the icon beside the section. When you click on the
down arrow, it turns red, indicating that downloading is
selected.
To download tagged sections to a control panel:
Section 6: Communicating with control panels Pa ge 49
Page 61

DLS-3 SA v1.3
1 Open the desired account
2 Make any required changes to the programmi n g
3 Select the section(s) to be downloaded, under the
heading Tags
4 Click the Communicate Selected Tags butto n , on
the Communicatio ns to olb a r
DLS-3 SA will try to connect to t he p anel t o do wnlo ad
the selected sections.
Section
downloading
Section downloading operates only on the data currently
displayed in the table. It allows you to communi cate one
programming section at a time (e.g. Schedules, or User
Codes).
1 Open the account
2 Click on the section to be downloaded
The selected Section will appear.
3 Make any required changes to programmin g
Page 50 Section 6: Communicating with contro l pan el s
Page 62

DLS-3 SA v1.3
4 Select Download Sectio n from the p ull-do w n menu
in the Table
DLS-3 SA wil l try to connect to the panel to download
the section.
Uploading
information fro m
the panel
When you use DLS-3 SA, and a modem or PC-Link to
retrieve programming or status information from a control
panel, it is called “uploading”. There are three different
ways of uploading information from the panel: Global
uploading, Tagged uploading, and Section uploading.
Global uploading Global uploading will retrieve all programming information
from the control pan el an d store it in the DLS-3 SA
account. To upload all the programming information,
follow the steps outlined below:
1 Open the desired account
2 Click the Global Upload button on the
Communications to olb a r
DLS-3 SA will try to connect to the panel to upload
the panel programming.
Tagged
uploading
Tagged uploading allows you to upload selected
programming sections (such as Schedules, User Codes,
User Cards, etc.) from the control panel to the DLS-3 SA
account.
You can tag a section for uploading by clicking on the up
arrow in the icon beside the section. When you click on the
up arrow, it turns blue, indicating that uploading is selected.
Section 6: Communicating with control panels Pa ge 51
Page 63

DLS-3 SA v1.3
1 Open the desired account
2 Select the section(s) to be uploaded , under the
heading Tags
3 Click the Communicate Selected Tags butto n , on
the Communicatio ns to olb a r
DLS-3 SA will try to connect to the panel to upload
the selected sections.
Section
uploading
Section uploading operates onl y on the data curren tly
displayed in the table. It allows you to communicate one
programming section at a time (e.g.Schedule, User Codes,
User Cards etc.).
1 Open the account
2 Click on the section to be uploaded
The selected Section will appear.
3 Select Upload Section fro m the p ull- dow n menu in
the Table
DLS-3 SA will try to connect to the panel to upload
the section.
Page 52 Section 6: Communicating with contro l pan el s
Page 64

DLS-3 SA v1.3
Event Buffer The Event Buffer rec ord s al l pan e l ac tiv iti es ; th is inf orm at ion
is stored in each panel's memory. The panel records many
events that occur, including which zones went into alarm,
system troubles, arming and disarming as well as other
important events. Also attach ed to each event is the time, day,
month, and year when each event occurred. For example, the
Event Buffer may show that a zone (Zone 1 - Front Door),
went into alarm on January 4, 2000, at 6:34 and 6:35am.
You can filter the information displ ayed in the event bu ffer.
That is, you can browse through the Event Buffer, and
observe specific activities only. For example, you can filter
the event buffer by asking DLS-3 to show all alarms that
have occurred on a specific partition in the last six months.
To open the
Event Buffer:
1 Open a panel with an event buffer (for example, the
PC4020 v3.0)
2 In the Table of Contents, select the Event Buf fer hype rlink
To filter the log information, select one or more categories
from the dropdown lists at the top of the table.
• Partition - "All Partitions", "System Area", "Partition 1",
"Partition 2", "Partition 3", "Part itio n 4" and oth ers ma y be
selected. This allows you to display all, or a specific area
of the security system that you are most interested in.
• Time/Date - "All Times", "Last Day", "Last Week", "Last
Month", "Last Six Months", "Last Year" or "UserDefined" may be selected. If you select "User-Defined",
you can select the time and date range you want to see.
• Event Type - "All Events", "Alarms", "Troubles", "Openings
and Closings", "Bypass", "Tests", "Access Control",
"Miscellaneous" or "User-Defined" may be select ed. If yo u
select "User-Defined", a window will be displayed where you
must enter te xt t hat yo u wo ul d li ke t o fi lt er . Fo r ex amp le , i f
you enter "John", DLS-3 will display only the events that
have the User Label "John" in them. You can have multiple
filters on the Event Buffer to search for a particular event, by
clicking on the category dropdown box at the top and
choosing the criteria you would like to use.
Section 6: Communicating with control panels Pa ge 53
Page 65

DLS-3 SA v1.3
Uploading the
status of an
account
You can call a panel and get information from it about its
current status. Depending on the type of panel you are
uploading from, you may be able to retrieve the current
status of partitions, zones, troubles, ke ypads, or modules.
The status sections of each account are located at the
bottom of the account’s Table of Contents window.
Uploading status information is similar to uploading other
account information, except that some status sections
cannot be included in global or tagged uploading (e.g.
PC4020 v3.2 Zone Status).
To upload status information for an account:
1 Open the account file
2 Scroll down in the Table of Co nt ent s un til you see
the status section you want to upload
3 Click on the link to the section you want to upload
(e.g. Zone Status)
DLS-3 SA displays that section in the window.
4 Click on the Communications men u icon for the
section
5 Make an appropriate selectio n from th e drop dow n
menu
DLS-3 SA attempts to upload the selected status (see
“Section 6: Communicating with control panels” on
page 49).
Using DLS-3 SA
to control a
security system
You can use DLS-3 SA to control various parts of a
security system. For example, you can arm and disarm
partitions, bypass zones, turn command output s on and off,
change auto-arm ing options, turn the do or chime on and
off, update the panel time and date, etc.
Page 54 Section 6: Communicating with contro l pan el s
Page 66

DLS-3 SA v1.3
The control sections of each account are located at the
bottom of the account’s Table of Contents window.
You cannot select uploading or downloading tags for these
status sections. To communicate any of these sections to
the system:
1 In the Table of Conten t s wind o w, cli ck on the
control section that you wa nt
For example, to arm a partition in a PC4020 panel,
under the heading PC4020 Functions, click on Arming
& Disarming.
2 Make the choices you want in the section
For example, you can select to arm one or more
partitions.
3 Click on the Communication s menu icon for the
section
Communicating
blocks of user
codes and zones
4 Make an appropriate selection from the dropdown
menu
For example, to arm a partition in a PC4020 panel,
select Arm Partition.
DLS-3 SA attempts to communicate with the panel
and make the selected changes.
When communicating with a Maxsys system (PC4010 or
PC4020), you can choose to upload, downlo ad, or print
groups of user code programming, or groups of zone
programming.
Section 6: Communicating with control panels Pa ge 55
Page 67

DLS-3 SA v1.3
For example, instead of communicating one user code at a
time, or communicating all of the user codes at once, you
can communicate only user codes 001 to 016.
To communicate one or more groups of user codes or
zones:
1 Open a PC4010 or PC4020 account file
2 Select User Code Options, Zone Assign men t, or
Zone Programming
3 Make any necessary prog ra mmi ng chan g es
4 Click on the Communications men u icon
5 Select Tag This Section, then select For Upload, For
Download, or For Printing
DLS-3 SA opens a window similar to this one:
6 Click in the check boxes beside the ranges of user
codes or zones that you want to communicate
7 When you are finished, close the window by
clicking on the [x].
8 When you are ready, click on the Communicate
Selected Tags button
DLS-3 SA will attempt to communicate the selected
tags and selected ranges.
Page 56 Section 6: Communicating with contro l pan el s
Page 68

3Section 7:
Using Batch files
About batch files A batch file is a separate file into which you can save the
tag settings for a particular account. This can be useful if
you need to upload or download, or print specific sections
of an account on a regular basis.
For example, if you need to upload the Status sections from
a PC4020 account regularly, you can create a batch file
called “PC4020 Status” which has the Partition Status,
Trouble Conditions, and Wireless Key Status sections
selected for uploading.
You can also have DLS-3 SA automatically save your
pending tags when you close an account and restore the
tags when you open the account again. This feature is
turned on by default. Please see “Browser options” on
page 29.
Creating batch
files
To save the tag settings for an account file, you can create a
batch file. You will then be able to restore the tag settings
from the batch file back to the account file at any time.
1 Select the Upload, Downlo ad or Print Tag s for th e
account
2 Select File
Section 7: Using Batch files Page 57
Page 69

DLS-3 SA v1.3
3 Select Batch Set Maintenance
The Batch Set Maintenance dialog box appears.
4 Click Add
5 Type a name for the batch set, under Name
6 Click OK
7 Click Save And Close
Waiting for batch
mode calls
If a control panel will be calling in to the DLS-3 SA
computer at a particular time, you can tell DLS-3 SA to
communicate a group of uploading or downloading tags
saved in a batch file for the account. (See also “Waiting for
a panel to call” on page 47.)
Before selecting Wait for Batch Mode, you must do the
following:
1 Open the account for the panel that will be calling
2 Select File
3 Select Batch Set Maintenance
4 Click the Batch Mode tab
5 Select the name of the batch set to be used when
the panel calls in, under Act ive Batch Mode Set
6 Click Save And Close
7 Close the account
If more than one panel will be calling in, you can select a
batch file for each panel by following the procedure above
for each account file.
DLS-3 SA is now ready to wait for batch mode calls.
Page 58 Section 7: Using Batch files
Page 70

DLS-3 SA v1.3
1 Select Tools
2 Select Wait For Batch Mode
When the telephone rings, DLS-3 SA will answer the
call and try to match the Panel ID code with the
account. Once that is done, the DLS-3 SA will open
the account, and begin communicating the tags saved
in the selected batch set for the matching account.
NOTE: DLS-3 SA will not communicate selected print tags
in Wait For Batch Mode.
Viewing batch set
files
If you have created a batch file for an account, you can
view the tags which have been saved in the file in the Batch
Set Maintenance window.
1 Select File
2 Select Batch Set Maintenance
The Batch Set Maintenance dialog box appears. DLS3 SA displays the batch sets that have been created for
the account.
3 Select the name of the batch set you want to view,
under Batch Set Name
4 Click Properties
The Batch Set Properties dialog box appears.
5 Click the name of the batch set you want to view,
under Subset
DLS-3 SA displays the selected tags in the right-hand
side of the dialog box.
6 When you are finished reviewing the batch set,
click Close
Restoring ta gs t o
a file from a
batch set
If you have created a batch file for an account, you can
restore the selected tags to the account. When the tags are
restored, you can continue working on the account, or
communicate the tags.
Section 7: Using Batch files Page 59
Page 71

DLS-3 SA v1.3
1 Open the account you want to restore the tags in
2 Select File
3 Select Open Batch Set Workspace
DLS-3 SA displays the batch sets which have been
created for the account.
4 Select the batch set you want to restore
5 Click OK
DLS-3 SA restores the tags to the open account.
Deleting batch
files
1 Select File
2 Select Batch Set Maintenance
3 Select the name of the batch set to be d elet ed,
under Batch Set Name
4 Click Delete
DLS-3 SA will ask you to confirm deletion of the
selected batch set.
5 Click Yes
Clicking Yes deletes the batch set, clicking No does
not delete the batch set.
6 Click Save And Close
Page 60 Section 7: Using Batch files
Page 72

4Section 8: Creating and
Translating DLS-3 SA
Languages
Display
languages
Setting up a new
language
The default language for DLS-3 SA is English. You can
customize DLS-3 SA displays with different languages.
The text for all DLS-3 SA labels, buttons, windows, and
menus will be displayed in the language assigned to the
user. After you assign a language to a user, that language
will automatically be used when the user logs on to DLS-3
SA. To change languages for users, please see “Assigning
languages to users” on page 19.
You can translate the names of programming sections for
panels and modules, DLS-3 SA dialog boxes, and title
menus using the DLS-3 SA Langua ge M ainten an ce featu re.
To enter your translations, first you must create the new
language:
1 Select Tools
2 Select Language Mainten ance
The Language Maintenance dialog box appears.
3 Click New
The New Language dialog box appears.
4 Type the name of a new language, under Language
Name
5 Click OK
DLS-3 SA creates a database for the new language.
However, in order for the DLS-3 SA to display the
new language you must enter the translations into the
database. See the section on Editing a new language,
below.
Section 8: Creating and Translating DLS-3 SA Languag es Page 6 1
Page 73

DLS-3 SA v1.3
Editing a new
language
Before the new language will appear in the DLS-3 SA
interface, you must enter your translations into the database
for the new language.
1 Select Tools
2 Select Language Maintenance
The Language Maintenance dialog box appears.
3 Select the langua ge to be edited
The default language (English) cannot be edited.
4 Click Edit
The Select Language Database dialog box appears.
5 Click the Shell tab or the Fi le tab
The databases listed in the File tab contain the text that
is displayed when you are viewing or editing the
programming for an account (e.g., the PC4020 v3.0
Main Panel Database contains the text that is
displayed in the PC4020 v3.0 accounts). The databases
listed in the Shell tab contain text that is displayed in
the rest of the DLS-3 SA program.
6 Select the section of the prog ra m you wish to
translate, under Available Lang u age Dat abases
For example, to translate all User Manager dialog
boxes, select the DLS-3 SA User Manager Database.
To translate the Operations Log window, select the
DLS-3 SA Operations Log Database, etc.
7 Click Edit
The Language Maintenance window appears
displaying the language you selected when logging in,
Page 62 Section 8: Creating and Translating DLS-3 SA Language s
Page 74

DLS-3 SA v1.3
on the left, and the text editor on the right. You can
now translate the database into the desired language.
8 Type the word(s) of th e n ew language in the right
window pane
For example, to replace the English word Cancel with
the French word Annuler in the User Manager dialog
box, then you would search for the word Cancel in the
right window pane, select the word, and type in the
translated word.
Note that “;” is not a valid character that can be
translated, and “\t” indicates a tab in a phrase, and
should not be removed.
When you see the “&” symbol in front of a letter in a
word (e.g. &Find), this letter will be underlined in the
dialog box or menu. This letter provides a sh ort cut fo r
selecting the option or menu item. You can change the
shortcut for a menu option by changing the position of
the “&” symbol.
Some of the names of programming sections in the
account window come with “too ltip s ” (add itional
information that pops up when you hold the mouse
pointer over a word or icon for a few seconds). You
can edit these tooltips in the database for the panel or
module in the InfoViewer at the bottom of the screen.
For example, in the Zone Attributes programming
section, one of the attributes is called Chime. The
tooltip for this word tells you that the full name of the
attribute is Door Chime. Only some of the entries in
the database have tooltips that you can edit.
Section 8: Creating and Translating DLS-3 SA Languag es Page 6 3
Page 75

DLS-3 SA v1.3
9 When you are finished translating the data base,
click OK
Note that for the language changes to take effect, you
must log off DLS-3 SA, and log on again.
10 If you want, you can now select another database to
translate (repeat steps 5-9). If you are finished
translating, click Close t wice.
Importing a
language
Some of the phrases that you can translate are the same in
different databases. For example, words like “enabled”,
“disabled” and “enrolled” may appear in several different
databases. Once you have translated any DLS-3 SA
database, you can save some time by copying words or
phrases that are the same from the translated database to an
untranslated one.
For example, if you have translated thePC4010 v3.0 main
panel database, you can import your translations into the
PC4020 v3.0 database. You will then only have to translate
the words and phrases that are different in the two
databases.
To import a translated database to an untranslated one:
1 Select Tools
2 Select Language Maintenance
3 Select the language, under Available Languages
4 Click Edit
5 Select a Panel Type that contains a database which
is already translated
6 Select a database that you have already translated ,
under Available Language Databases
Page 64 Section 8: Creating and Translating DLS-3 SA Language s
Page 76

DLS-3 SA v1.3
7 Click Import To
The Import dialog box appears.
8 Select the panel type that you want to imp ort t he
database to, under Panel Type
9 Select the untranslated database to impo rt to,
under Available Language Databases
10 Click OK
DLS-3 SA displays a message telling you that you are
about to overwrite phrases in the database chosen in
step 9, and asking whether or not you wish to
continue. If you have selected the correct database,
click Yes.
11 Check if any words or phrases sti ll need to be
translated in the database: select the panel and
database that you imported the new text into, and
then click Edit.
12 If you are finished edi ting the databases, click
Close twice
You must exit DLS-3 SA and re-enter DLS-3 SA, for
the changes to take effect.
Section 8: Creating and Translating DLS-3 SA Languag es Page 6 5
Page 77

DLS-3 SA v1.3
Deleting a
language
You cannot delete the language you are currently using, or
the default language, English.
To delete a language:
1 Select Tools
2 Select Language Maintenance
3 Select the language to be deleted
4 Click Delete
Page 66 Section 8: Creating and Translating DLS-3 SA Language s
Page 78

Appendix A:
Tr oubleshooting
If you are having trouble with your modem, or with the
DLS-3 SA program, look for the problem or error message
in these tables and try one or more of the suggested actions.
If you are unable to correct the problem, you can try
running the DLS-3 SA Modem/Installation Diagnose
Utility. Please see “DLS-3 SA Modem/Installation
Diagnose Utility” on page 72 for more information.
Communication
troubleshooting
If the system displays any of the following error messages,
try one or more of the suggestions to correct the problem..
Error message Correction
Cannot initialize the
modem
Ensure that the correct
modem and COM port
have been selected in the
Modem Configuration window
Shut off the modem, then
turn it on again. Click the
Initialize Mod em butto n on
the Communications toolbar
End both the Wind ows and
DLS-3 sessions and
restart your computer
Appendix A: Troubleshooting Page 67
Page 79

DLS-3 SA v1.3
Error message Correction
The specified port is in
use by another application
The specified port has
failed initialization.
Please check Your
Hardware
Close any appl ications that
may be using the COM
port specified for the
DLS-3 modem. Re-initialize the modem. If the e rror
is still present, end DLS-3
and Windows, and restart
your computer.
Ensure the COM port
specified for use by the
DLS-3 software is a valid
COM port on your computer
End the DLS-3 and Windows sessions, an d restart
Windows.
Shut down the computer
and restart it.
If hardware problems persist, contact you r computer
supplier to ensure that
your computer and COM
ports are operating properly.
File contained wrong
access code. Communications cancelled
Page 68 Appendix A: Troubleshooting
Ensure that the Downloading Access code is the
same in t he ac coun t as it is
in the customer's security
system.
If the downloading access
codes are not identical,
enter the correct Downloading Access Code in
the DLS Section for the
account.
Page 80

Error message Correction
DLS-3 SA v1.3
General
troubleshooting
Panel that called could
not be identified. Communications cancelled
Ensure that the Panel
Identifier Code is identical
to the code in the customer's security system.
You can check the Panel
Identifier Code for the
panel by vie wing the Eve nt
Detail for the event. If the
codes are not identica l,
enter the correct Panel
Identifier Code in the DLS
Section for the account.
Problem Correction
An information window i s
not being displayed
properly
Ensure that you are using
minimum resolution
settings for the monitor.
Set small fonts in Windows.
Check that the video display drivers are the most
recent ones.
The screen takes a long
time to display
Wait unt il the screen is fu lly
displayed before attempting to selec t any Communications function.
A
VBscript
sage
error mes-
Re–install the DLS-3 software.
Appendix A: Troubleshooting Page 69
Page 81

DLS-3 SA v1.3
Modem
troubleshooting
Problem Correction
Cable connections
If the modem is an e xternal
one, make sure you have
plugged the modem cable
into the correct serial port
(if you have more than
one).
The system cannot dial
out or receive calls
Make sure the telephone
line is plugged into the
proper wall jack and the
correct modem jac k. Som e
modems provide an extra
jack for a voice telephone;
this jack is usually marked
“To Phone”, but is sometimes unmark ed.
The telephone might not be
properly connected to the
wall jack. Plug a regular
telephone dire ctl y into the
jack, an d listen for a dial
tone. If you cannot hear a
dial tone, then the telephone line is not connected. You should contact
your local telephone company.
Page 70 Appendix A: Troubleshooting
Page 82

Problem Correction
When Call Waiting is
enabled, and another
call comes in when you
are already connected,
the connecti on is brie fly
cut off, and then a high
beep tone is gener-
ated.The modem inter-
prets this as a loss of
carrier and immediately
hangs up.
This will happen if the
second call c om es in to
either the panel or the
computer end of the
connection. Most areas
that provide call waiting
service allow it to be
disabled it by pressing a
sequence of keys on your
teleph one. To canc el Call
Waiting, dial 70# or *70 on
a tone telephone. Inco ming
callers will then hear a
busy signal, and your
communication will not be
interrupted.
DLS-3 SA v1.3
Appendix A: Troubleshooting Page 71
Page 83

DLS-3 SA v1.3
Problem Correction
Modem cable does not
work
Modem cables look a lot
like printer cables and are
often mistaken for them.
The main difference is that
a modem cable has a male
connector on one end, and
a female connector on the
other. A printer cable usually is male at both end s o r
has a Centronics ( slot) type
connector at one end.
If the shape and size of the
connectors is not the problem, then check the number of pins on the male end
of the cable. If not all 25
pins are present, it does
not necessaril y mean it will
not work, but it does mean
that the cable has either
been modified, or was not
standard to begin with. In
this case, trying a new
modem cable might solve
your problems. Als o, if your
modem cable is old, you
should check the connectors for any visible damages to the pins, or to the
wires, etc.
DLS-3 SA
Modem/
Installati on
Diagnose Utility
Page 72 Appendix A: Troubleshooting
Your DLS-3 SA package contains a testing utility for your
modem and your DLS-3 SA installation. The utility is
called “DLS-3 SA Diagnose.exe”. To run the utility:
1 In your Windows Explorer, select the drive
containing the DLS-3 program
2 Select the folder containing the DLS-3 program
3 Double–click DLS-3 SA diagnose.exe, under Name,
from the right window of Windows Explorer
Page 84

DLS-3 SA v1.3
4 If your DLS-3 SA is set up with more than one
language, the Diagn o se u ti lity wi ll pro mpt you to
select a language.
5 After you select a language, the Diagnose utility will
check the following:
• Directories
• Files
• Modem Files
• Modem Configuration
• APL Dependency
• File Attributes
If there were no errors detected, skip to step 6.
If DLS-3 SA Diagnose finds any problems it will
display error messages. At the end of the test, it will
display a window similar to this one:
To see the error messages, click on the Details button
beside each failed test. Any problems that the
Diagnose utility detects are also written to a text file in
the main DLS-3 directory called “DLS-3 SA diagnose
log.txt”. You can view this log file using any text
editor (e.g. Windows Notepad).
When you are finished viewing any errors, click OK.
Appendix A: Troubleshooting Page 73
Page 85

DLS-3 SA v1.3
6 The modem check screen appears:
From this screen, you can test the modem connected to
your computer, the COM port, the Baud rate, and, if
you are using a DSC modem, you can check the
modem version number.
Select the modem you want to test, the COM port and
Baud rate, then click Begin Test.
The utility tests that the selected modem is present,
and is working correctly. If there are any problems,
they will be listed in the Status Window.
7 If the Status Window shows an error message, try
one or more of the followi ng:
• check that the modem is connected to an AC
power supply
• check that the modem is properly connected to
a COM port on your computer (see also
“Modem troubl e sh o oting” on page 70).
• ensure that you have selected the COM port
(serial port) that the modem is connected to.
Once you have found the correct COM port,
make sure that the same port is also selected in
the DLS-3 SA Modem Properties window. See
“Changing general modem properties” on
page 44.
• try testing the modem at a lower Baud rate.
Once you have found the correct Baud rate for
the modem, ensure that the same rate is also
selected in the DLS-3 SA Modem Properties
window. See “Changing general modem
properties” on page 44.
8 When you are finished testing your mo dem , cli ck
Close
Page 74 Appendix A: Troubleshooting
Page 86

Appendix B:
Keyboard
Shortcuts
DLS-3 SA To: Use this
shortcut:
Close the current window [CTRL][F4]
Switch to another window [CTRL][F6] or
[CTRL][TAB]
Open DLS-3 SA Online Help [F1]
Close DLS-3 SA [ALT][F4]
Appendix B: Keyboard Shortcuts Page 7 5
Page 87

DLS-3 SA v1.3
Account Explorer To: Use this
shortcut:
Create a new account [CTRL][N]
Create a new account via template [CTRL][T]
Create a new (empty) folder [CTRL][E]
Select all accounts [CTRL][A]
Open the selected account [ENTER]
Cut selected ac counts
[CTRL][X]
(for transferring files to another
folder)
Copy selected accounts
[CTRL][C]
(for transferring files to another
folder)
Paste selected accounts
[CTRL][V]
(for transferring files to another
folder)
Delete selected accounts [DEL]
Edit account properties [ALT][ENTER]
Find a file [CTRL][F]
Refresh the current directory [F5]
Switch between the selection of
[TAB]
folders or accounts
Page 76 Appendix B: Keyboard Shortcuts
Page 88

DLS-3 SA v1.3
Table of Contents To: Use this
shortcut:
Jump to the selected table (pro-
[ENTER]
gramming section)
Move the cursor up [Up Arrow]
Move the cursor down [Down Arrow]
Go to a specific section [CTRL][G] or
[F10]
Go to the Tables window (pro-
[ALT][2]
gramming sections)
Appendix B: Keyboard Shortcuts Page 7 7
Page 89

DLS-3 SA v1.3
Tables
(Programming
Sections)
To: Use this
shortcut:
Go to the table of contents [ALT][1]
Generate a random access code
[CTRL][R]
(in access code programming sections)
Toggle the download tag for the
[CTRL][D]
current table
Toggle the upload tag for the cur-
[CTRL][U]
rent table
Toggle the print tag for the current
[CTRL][P]
table
Open the table pull-down menu [CTRL][SPACE]
Move the cursor up [Up Arrow]
Move the cursor down [Down Arrow]
Move the cursor left [Left Arrow]
Move the cursor right [Right Arrow]
Move to the table above [CTRL][PgUp]
Move to the table below [CTRL][PgDn]
Move to the next editable cell in a
table
Move to the previous editable cell
in a table
Scroll the screen up (the selected
cell does not change)
Scroll the screen down (the
selected cell does not change)
Scroll the screen to the top (curs or
does not move)
Page 78 Appendix B: Keyboard Shortcuts
[TAB] or
[ENTER]
[SHIFT][TAB] or
[SHIFT][ENTER]
[CTRL][Up
Arrow]
[CTRL][Down
Arrow]
[CTRL][HOME]
Page 90

DLS-3 SA v1.3
To: Use this
shortcut:
Scroll the screen to the bottom
[CTRL][END]
(cursor does not move)
Fast scroll up through dropdown
option list
Fast scroll down through drop-
down option list
Select option at beginning of drop-
down option list
Select option at end of dropdown
option list
Scroll up through dropd own opt ion
list
Scroll down through dropdown
option list
NUMBER PAD
[PgUp]
NUMBER PAD
[PgDn]
NUMBER PAD
[HOME]
NUMBER PAD
[END]
NUMBER PAD
[Up Arrow]*
NUMBER PAD
[Down Arrow]*
*NOTE: For dropdown option lists, turn off NumLo ck, or
hold down Shift, while pressing the listed key.
Appendix B: Keyboard Shortcuts Page 7 9
Page 91

DLS-3 SA v1.3
Page 80 Appendix B: Keyboard Shortcuts
Page 92

Glossary
This glossary defines words whic h are used in this manual.
Account Explorer
Workspace
Accounts An account is a file where all of the information and
All Times When you choose this option, you tell the program to show
All Types When you choose this option, you tell the program to show
All Users When you choose this option, you tell the program to show
Batch Set A batch file is a separate file into which you can save the
Communications When any interaction with the modem, or PC-LINK is
Command Output A port on the control panel which can be set up to control
The DLS-3 SA Account Explorer uses a tree structure that
is similar to Windows Explorer. The Account Explorer
Workspace is the highest level of the tree, the next branch
of the tree are folders on local drives, or folders on LAN
(Network) drives. The accounts contained within each
folder are shown in the right-hand pane of the Explorer
window.
programming for a particular customer is stored. That
information can be changed, edited, or deleted from the
account file.
all possible times for certain or all activities, by certain or
all individuals (Operations Log, Event Buffer).
all the different types of activities that are in DLS-3 and
that have been in progress (Operations Log, Event Buffer).
activities of all the individuals who have access to, and who
have been using DLS-3 (Operation s Log, Event Buffer).
tag settings for a particular account. This can be useful if
you need to upload or download, or print specific sections
of an account on a regular basis.
initiated by DLS-3 (General & Operations Log).
(turn on or off) a variety of devices (e.g. a light, or a door
lock). Users can then control the devices at a keypad or a
telephone. The control panel can also be programmed to
control the devices in response to system events (e.g.
alarms), or with schedules.
Glossary Pa ge 8 1
Page 93

DLS-3 SA v1.3
Control Panel A circuit board mounted in a cabinet. Contro ls and
monitors all the sensors, keypads, and modules. It contains
most of the programming for the security system.
Downloading The process of sending information and programming data
from a DLS-3 SA account to a security system.
Downloading
(DLS) Access Code
The downloading (DLS) access code will allow DLS-3 SA
to download information to the control panel, and upload
information from the control panel. The DLS access code
must be the same in the control panel and in the DLS-3 SA
account file, or DLS-3 SA will not be able to communicate
with the panel.
Error When the system detects a mistake in the use of the
software.
Folders A folder is a location in which account files are stored. All
the accounts that are contained in a folder will be displayed
in the right pane of the Account Explorer window.
Global
downloading
Downloading all programming information to the control
panel.
Global print Printing all programming sections.
Global Tag Tagging all the programming sections of an account for
printing, downloading, or uploading.
Global Uploading When uploading all programming information from the
control panel.
Groups See Permission Groups.
Hyperlinks An online cross–reference from a piece of text or graphic to
another piece of text or graphic in the same or in another
electronic document. Clicking a hyperlink (e.g., an entry in
the Table of Contents window) displays the corresponding
reference (i.e. the corresponding programming section).
Incoming Calls Calls that the computer receives.
Last Day Choose this option when you want to see the activities of
all or certain users, of all or certain types of activities, of
the past 24 hours (Operations Log, Event Buffer).
Last Month Choose this option when you want to see the activities of
all or certain users, of all or certain types of activities, of
the past 30 or 31 days (Operations Log, Event Buffer).
Last Six Months Choose this option when you want to see the activities of
all or certain users, of all or certain types of activities, of
the past 6 months (Operations Log, Event Buffer).
Page 82 Glossary
Page 94

DLS-3 SA v1.3
Last Week Choose this option when you want to see the activities of
all or certain users, of all or certain types of activities, of
the past 7 days (Operations Log, Event Buffer).
Last Year Choose this option when you want to see the activities of
all or certain users, of all or certain types of activities, of
the past 365 days (Operations Log, Event Buffer).
Modem A device used to connect a computer to the telephone line
network in order to send or receive data. In order to
establish communication between a PC equipped with a
modem and a security system, a software package like
DLS-3 is also required.
Operations Log A part of the program that records all DLS-3 activities.
Outgoing calls Calls being placed from a computer.
Panel ID code A 6–digit code that allows DLS-3 to call up the correct
account file for a control panel. The Panel ID code must be
programmed to be the same in both the panel and the
DLS-3 account file. Different panels must have different
Panel ID codes.
PC-Link A communications tool that allows you to connect a con tro l
panel directly to your DLS-3 SA computer using a serial
cable.
Permissions
Groups
Groups of users who have varying degress of access to
DLS-3 SA functions and accounts. DLS-3 SA has one
default group called Administrator. All users assigned to
this group will have access to all DLS-3 SA functions and
accounts.
Programming A set of instructions that tells a system how to operate. For
example, each control panel has programming that tells it
how to run the security system.
Programming
sections
Control panel progra mming is divided into a number o f
sections. You can enter data, or select options in each
section to tell the control panel how to operate. The tables
in the DLS-3 software correspond to the numbered
programming sections listed in the Programming
Worksheets for the control panel.
Security Stamp When you install DLS-3 SA, th e program will ask you for a
security stamp. Write this stamp down on page v, and keep
it in a safe place. This security code is used to encrypt all of
your account files. This means that your accounts can only
be used on a DLS-3 SA installation which has the same
stamp.
Glossary Pa ge 8 3
Page 95

DLS-3 SA v1.3
CAUTION: It is important that the security stamp be
recorded and safely filed: if it is forgotten, there is no way
to recover the security stamp from the computer or from the
program.
The security stamp can be up to 32 characters long. The
stamp can be made up of any combination of numbers,
letters or characters. Note that all letters are case sensitive;
that is, “A” is not the same as “a”.
NOTE: If you will be sharing files between computers, or
over a network, each DLS-3 SA installation must use the
same security stamp. This will allow you to transfer
accounts from one computer to another, and to access
account files shared over a network.
Security system A control panel with sensors, keypads, modules and
devices.
System A set of components designed to interact with one another
to yield desired results. For example, a computerized
system to program security control panels consists of
hardware (e.g., computer, modem, cables, control panel,
etc.) and software (e.g., Windows 95, DLS-3, etc.)
Table of Contents In DLS-3 SA, the Table of Contents window gi ves yo u
access to the programming s ections of the ac co unt. The
Table Of Contents screen is divided into three columns,
Tags, Sections and Hyperlinks to the tabl es ( progra mming
sections).
Tables Tables are used to display all data in the account file. A
table is divided into rows and columns, wh ich fo r m cells. A
cell can contain a description of the data to be programmed
or an editable space for you to enter data. Each table
corresponds to one or more control panel programming
sections.
Tagged
downloading
Downloading selected programming sections fro m a DLS-3
SA account to a control panel.
Tagged uploading Uploading selected programming sections from a control
panel to a DLS-3 SA account.
Tags Tags are icons with up or down arrows, or check marks.
They are used for filtering an activity. That is, if you tag the
up arrow button of a certain table and do not tag other
tables, the program will upload all the information of the
table from th e control panel.
Page 84 Glossary
Page 96

DLS-3 SA v1.3
Uploading The process of sending information and programming data
from a control panel (security system) to the DLS-3 SA
account file.
User-Defined Choose this option when you want to view specific user
activities, or a specific time, or a specific activity. You will
have to specify the name of the user, the time frame, and
the type of activity (Operations Log).
User Anybody who uses the DLS-3 SA software. Each user can
have a different password, and can use a different language.
User Manager Where users are created, deleted, or renamed. Where all
other properties pertaining to a user can be changed.
Warning A message alerting you that a problem has occurred during
the use of the software (Operations Log, Event Buffer).
Work file Also known as an account. A file where all the information
and programming for a particular customer are stored. That
information can be changed, edited, or deleted from the
work file.
Glossary Pa ge 8 5
Page 97

DLS-3 SA v1.3
Page 86 Glossary
Page 98

Index
A
Account Explorer 8
accounts
changing
programming 31
closing 37
controlling 55
creating 25
creating via
template 28
deleting 29
exiting 37
finding 38
printing 34
properties 26, 36
adding
accounts 25
folders 21
languages 63
modems 42
passwords 13
permissions groups 14
templates 27
users 13
answering machines 45
arming 55
assigning languages 19
automatic redial 45
B
batch files 59–62
creating 59
deleting 62
restoring tags from 61
viewing 61
Baud rate 44
browser options 29
busy tone detection 45
bypassing zones 55
C
calls
incoming to DLS-3 47
cascade windows 31
changing
account properties 36
communication
ports 44
dialing methods 45
display settings 29
modem settings 43
name of folder 23
panel programming 31
users 18
close account 37
code and card errors 33
command outputs 55
communicating
blocks of users and
zones 56
selected tags 50
status 54
via PC-LINK 46
with control panels49
communication ports 44
communication status
window 48
configuration options 29
configuring the modem 41
connecting to other
folders 23
copying
accounts 27
translations 66
creating
accounts 25
accounts using
templates 28
batch files 59
folders 21
languages 63
new users 13
passwords 13
permissions groups 14
templates 27
customer information 26
D
deleting
accounts 29
batch files 60
folders 22
languages 68
modems 42
dial tone detection 45
dialing prefix 46
disarming 55
disconnect
from folder 23
from pane l 47
display
settings 29
door chime 55
downloading 49–51
programming
sections 50
duplicate codes and cards 33
E
editing
languages 64
Index Page 87
Page 99

DLS-3 SA v1.3
panel programming 31
permissi ons groups 14
enterin g da ta into
accounts 31
errors
codes and cards 33
displayed in operations
log 12
exiting accounts 37
Explorer 8
F
file rights 16
filters
operations log 12
finding
accounts 38
programming
sections 33
folders
connecting over
network23
creating 21
deleting 22
disconnecting 24
renaming 23
G
getting information from
panel 51
global
downloading 49
printing 34
uploading 51
Goto Section 33
groups
of zones and users 56
H
hanging up46, 47
hard disk space 1
hardware and software
requirements 1
hyperlinks 10
I
importing
languages 66
incoming calls 43, 60
to DLS-3 47
initialization string45
initializ e modem 47
initiating a modem
connection 47
installing DLS-3 2
K
keypad status 54
L
languages 18, 63
assigning to users 19
deleting 68
editing 64
importing 66
new 63
links 10
log 11
logging on as a new user 18
logging on to DLS-3 8
M
maximize windows 31
memory 1
modem
adding 42
compatibility 1
configuration 43
connection 47
deleting 42
dialing pre fix 46
incoming calls43
initializing 47
outgoing calls 42
properties 44
setting up41
settings 43
speaker setting 44
modem initialization
string 45
modules
status 54
monitor 1
monitoring accounts54
moving
accounts 29
around in an account
file 32
multiple accounts
creating 27
N
navigation 32
new
account via
template 28
accounts 25
folder 21
langua ges63
passwords 13
users 13
number of rings 45
O
opening
accounts 61
batch files 61
DLS-3 7
operating systems 1
Operations Log 11
outgoing calls
from DLS-3 42
P
partition stat us 54
passwords
adding 13
PC4010/4020 46
PC-LINK
about 2
initiating a
connection 46
outgoing calls 42
using to
communicate 46
pending tags 37
prefix
Page 88 Index
Page 100

DLS-3 SA v1.3
dialing 46
print to file output
viewing 36
printer types 1
printing
accounts 34
programming
sections 35
to a file 34
programming
accounts 31
control panels 49
similar accounts 27
programming sections 9, 10
finding 33
properties. See account
properties
pulse dialing 44
R
redial 45
removing DLS-3 3
renaming folders 23
restoring tags 61
retrieving information from
panel 51
rings, number of 45
running DLS-3 7
S
saving
accounts 37
tags 59
tags (a utomatic) 31
searching for
accounts 38
programming
sections 33
section dow nloading 50
section numbers 10
section uploading52
selecting
modem for incoming
calls 43
modem for ou tg o ing
calls 42
sending data to a panel 49
settings
connection 45
modem 43
modem speaker 44
shell ri ghts 15
software requirements 1
split window mode 30
status of accounts 54
T
Table of Content s9
options 29
tables 10
display 31
tags 10
about 10
downloa ding 49
printing 35
restori ng 61
restoring
(automatic) 31
saving 59
saving (automatic)31
uploading 51
telephone number
of panel 25
templates 27
creating 27
using 28
time and date 55
tooltips 65
tone dialing 44
translating
DLS-3 interface 63–67
tooltips 65
transmitting data to a
panel 49
trashcan 29
trouble status 54
U
uninstalling DLS-3 1, 3
uploading 51–52
sections 52
User Manager. See users
users
creating 13
groups 14
language 18, 63
using
batch files 60
V
view optio n s29
viewing
batch files 61
communication
status 48
print to file output36
volume
modem speaker 45
W
wait for panel to call 47
waiting for batch mode 60
workspace 8
Z
zone status 54
Index Page 89
 Loading...