


S300
User Manual
Version 1.0
1

Please Read Before Proceeding
Microsoft, MS-DOS, Windows, Windows NT, Windows Server, Windows Mobile,
ActiveSync, Excel, Internet Explorer, MSN, Outlook, PowerPoint, and Word are either
registered trademarks or trademarks of Microsoft Corporation in the United States or other
countries.
THIS DEVICE IS NOT CHARGED WHEN YOU TAKE IT OUT OF THE BOX. DO
NOT REMOVE THE BATTERY PACK WHEN THE DEVICE IS CHARGING.
YOUR WARRANTY IS INVALIDATED IF YOU OPEN OR TAMPER WITH THE
DEVICE’S OUTER CASING.
EXPLOSIVE ATMOSPHERES
When in any area with a potentially explosive atmosphere or where flammable
materials exist, the product should be turned off and the user should obey all signs
and instructions. Sparks in such areas could cause an explosion or fire resulting in
bodily injury or even death. Users are advised not to use the equipment at
refueling points such as service or gas stations, and are reminded of the need to
observe restrictions on the use of radio equipment in fuel depots, chemical plants,
or where blasting operations are in progress. Areas with a potentially explosive
atmosphere are often, but not always, clearly marked. These include fueling areas,
below deck on boats, fuel or chemical transfer or storage facilities, and areas
where the air contains chemicals or particles, such as grain, dust, or metal
powders.
PRIVACY RESTRICTIONS
Some countries require full disclosure of recorded telephone conversations, and
stipulate that you must inform the person with whom you are speaking that the
conversation is being recorded. Always obey the relevant laws and regulations of your
country when using the recording feature of your Pocket PC Phone.
When using this product, the safety precautions below must be taken to offset
possible legal liabilities and damages.
ELECTRICAL SAFETY
This product is intended for use when supplied with power from the battery.
Other usage may be dangerous and will invalidate any approval given to this
product.
SAFETY IN AIRCRAFTS
Due to the possible interference caused by this product to an aircraft's navigation
system and its communications network, using this product on board an airplane
is against the law in most countries.
2

ENVIRONMENT RESTRICTIONS
Do not use this product at gas or refueling stations. The use of this product is
also prohibited in fuel storehouses, chemical plants, and locations containing
explosives.
SAFETY FOR ENVIRONMENTS
Do not use this product in gas stations, fuel depots, chemical plants or where
blasting operations are in progress, or in potentially explosive atmospheres such
as fuelling areas, below deck on boats, fuel or chemical transfer or storage
facilities, and areas where the air contains chemicals or particles, such as grain,
dust, or metal powders. Please be aware that Sparks in such areas could cause
an explosion or fire resulting in bodily injury or even death.
ROAD SAFETY
Vehicle drivers in motion are not permitted to use telephony services with
handhold devices, except in the case of emergency. In some countries, using
hand-free devices as an alternative is allowed.
INTERFERENCE WITH MEDICAL EQUIPMENT FUNCTIONS
This product may cause medical equipment to malfunction. The use of this device
is forbidden in most hospitals and medical clinics.
NONIONIZING RADIATION
This product should be operated in the suggested normal condition only to ensure the
radiative performance and safety of the interference. As with other mobile radio
transmitting equipment, users are advised that for satisfactory operation of the equipment
and for the safety of personnel, it is recommended that no part of the human body be
allowed to come too close to the antenna during operation of the equipment.
3

User Manual
··················································································································1
Version 1.0······························································································································1
Chapter 1·····························································································································14
Getting Started·····················································································································14
1.1 Getting to Know your Device and its Accessories························································15
Front, top, bottom and left-side view·························································································· 15
Back and right-side view·············································································································· 16
Accessories····································································································································· 17
1.2 Inserting the SIM Card ································································································17
1.3 Battery Information······································································································18
To check the battery power·········································································································· 18
To charge the battery····················································································································19
To deal with low battery··············································································································· 19
1.4 St arting Up····················································································································19
To turn the device on and off······································································································· 19
To calibrate the Device·················································································································19
To manage screen settings············································································································ 20
1.5 The Today Screen··········································································································20
Indicators······································································································································· 21
1.6 Using the Start Menu····································································································22
Program Indicators······················································································································· 23
Chapter 2·····························································································································25
Entering and Searching for Information···········································································25
2.1 Introduction ··················································································································26
To show or hide the Input Panel·································································································· 26
2.2 Using the on-screen Keyboard ·····················································································26
To use the standard on-screen Keyboard··················································································· 27
To enter text using the on-screen Keyboard·············································································· 27
To enlarge the on-screen Keyboard···························································································· 27
2.3 Using Letter Recognizer·······························································································27
To use Letter Recognizer·············································································································· 27
2.4 Using Block Recognizer ·······························································································27
To use Block Recognizer··············································································································· 27
4

2.5 Using Transcriber·········································································································28
To start Transcriber······················································································································ 28
To write using Transcriber··········································································································· 28
To enter punctuation and symbols······························································································ 28
To edit text ····································································································································· 28
Transcriber Gestures···················································································································· 28
The Transcriber toolbar··············································································································· 29
2.6 Drawing and Writing on the Screen·············································································30
2.7 Searching for Information···························································································30
To search for a file or an item······································································································ 30
Chapter 3·····························································································································31
Using Phone Features········································································································31
3.1 Using the Phone············································································································32
The Phone screen ··························································································································32
To enter your PIN·························································································································· 32
To turn flight mode on and off ···································································································· 32
To adjust the device volume·········································································································32
3.2 Making a Call ···············································································································33
To make a call from Phone··········································································································· 33
To make a call from Contacts······································································································ 34
To specify the number to dial ······································································································ 34
To make a call from Call History································································································ 34
To make a call from Speed Dial··································································································· 34
To create a Speed Dial entry········································································································ 35
3.3 Receiving a Call············································································································35
To answer or reject an incoming call··························································································35
To end a call··································································································································· 35
3.4 In-call Options··············································································································35
To put a call on hold······················································································································ 35
To switch between two calls········································································································· 35
To set up a conference call ··········································································································· 35
To turn on and off the Speakerphone························································································· 36
To mute a call································································································································· 36
3.5 Additional Dialing Information···················································································36
5

To make an emergency call·········································································································· 36
To make an international call······································································································ 36
Chapter 4·····························································································································37
Synchronizing Your Device·································································································37
4.1 Using ActiveSync··········································································································38
To install and set up ActiveSync·································································································· 38
4.2 Synchronizing Information··························································································39
To synchronize Outlook information·························································································· 39
To start and stop synchronization······························································································· 39
To change which information is synchronized ··········································································39
To synchronize directly with Exchange Server········································································· 40
4.3 Synchronizing via Bluetooth························································································40
To synchronize with a PC via Bluetooth ···················································································· 40
4.4 Synchronizing Music, Video, and Pictures··································································40
To change Media synchronization settings················································································ 41
To set up a sync relationship with a storage card·····································································41
Chapter 5·····························································································································42
Managing Your Pocket PC Phone······················································································42
5.1 Personalizing Your Pocket PC Phone··········································································43
To customize the Today screen···································································································· 43
To add a custom background image··························································································· 43
To set options for displaying tasks on the Today screen··························································· 43
To customize the Start menu········································································································ 44
To set Clock & Alarms·················································································································· 44
To change language and regional settings·················································································· 44
To reassign programs or shortcuts to program buttons···························································44
To increase or decrease the size of text on the screen······························································· 45
To enter owner information········································································································· 45
To choose how to be notified by events or actions····································································· 45
To adjust the speed for scrolling·································································································· 45
To find the operating system version information···································································· 45
To make the battery last longer···································································································46
To set the backlight······················································································································· 46
Phone settings································································································································ 46
6

5.2 Adding and Removing Programs·················································································47
To add programs··························································································································· 47
To remove programs····················································································································· 47
5.3 Managing Memory ·······································································································48
To see how much memory is available························································································ 48
To see available storage card memory························································································ 48
To free up program memory········································································································ 48
To close a program························································································································48
5.4 Backing Up Files ··········································································································49
To copy files to a storage card······································································································ 49
To copy a file using ActiveSync···································································································· 49
To save files on a storage card automatically············································································· 49
5.5 Protecting Your Device ·································································································50
To protect your phone with a PIN······························································································· 50
To protect your device with a password····················································································· 50
To change your password············································································································· 50
To display owner information on the Today screen·································································· 50
5.6 Resetting Your Pocket PC Phone ·················································································51
To perform a soft reset ················································································································· 51
To perform a hard reset ··············································································································· 51
Chapter 6·····························································································································53
Getting Connected ··············································································································53
6.1 Connecting to the Internet····························································································54
To connect to the Internet via ISP······························································································· 54
To connect to a private network·································································································· 55
To reset or modify the network card settings on your device··················································55
6.2 Internet Explorer Mobile······························································································55
To start Internet Explorer Mobile ······························································································ 55
To choose a Home page ················································································································ 55
To transfer favorites from your PC···························································································· 56
To add a favorite ··························································································································· 56
To delete a favorite or folder········································································································ 56
To change the size of text on Web pages····················································································· 56
To show or hide pictures on Web pages······················································································56
7

To change how Web pages fill the screen ··················································································· 56
To clear the History list················································································································ 56
To save a picture from a Web page····························································································· 56
To change cookies and security settings····················································································· 57
To delete temporary Internet files······························································································· 57
6.3 Using Bluetooth············································································································57
To turn on or off Bluetooth on your device················································································ 57
Bluetooth modes···························································································································· 58
To make your device visible········································································································· 58
Bluetooth partnerships················································································································· 58
To create a Bluetooth partnership ······························································································ 58
To accept a Bluetooth partnership······························································································ 59
To rename a Bluetooth partnership···························································································· 59
To delete a Bluetooth partnership·······························································································59
To beam information using Bluetooth························································································ 59
To use a Bluetooth device as a modem ······················································································· 59
To configure and use a Bluetooth device as a modem······························································· 59
6.4 Using Wi-Fi···················································································································60
To connect to a Wi-Fi network···································································································· 60
To check the Wi-Fi status············································································································· 60
6.5 Using Wireless Manager·······························································································62
6.6 Beam······························································································································62
To beam an item···························································································································· 62
6.7 Internet Sharing············································································································63
To start Internet Sharing ············································································································· 63
To connect Internet via USB········································································································ 63
To connect Internet via Bluetooth PAN······················································································63
Chapter 7·····························································································································64
Exchanging Messages and Using Outlook········································································64
7.1 Text Messages················································································································65
To create a text message··············································································································· 65
To insert predefined text into message······················································································· 65
To reply to a message ···················································································································· 65
7.2 E-mail····························································································································65
8

To set up an e-mail account·········································································································· 65
To compose and send a message·································································································· 67
To reply to or forward a message································································································ 67
To add an attachment to a message···························································································· 67
To receive attachments················································································································· 67
To download messages·················································································································· 67
To download messages from the server······················································································ 68
To manage folders························································································································· 68
7.3 MMS Messages·············································································································69
To set up MMS ······························································································································ 69
To access MMS······························································································································ 69
To set up a MMS account············································································································· 69
To manage MMS messages·········································································································· 69
To start composing an MMS message························································································69
To create a MMS message from a template···············································································71
To add predefined text strings to a MMS message ··································································· 71
To add an audio clip to a MMS message····················································································71
To reply to a MMS message········································································································· 71
To view a MMS message ·············································································································· 71
To set advanced options for a MMS message············································································ 71
To change MMS settings ··············································································································72
To configure MMS settings··········································································································72
7.4 Windows Live Messenger·····························································································73
To start Windows Live Messenger······························································································ 73
To sign in or out····························································································································· 74
To add or delete contacts·············································································································· 75
To send an instant message·········································································································· 75
To block or unblock contacts······································································································· 75
To change your Messenger status································································································ 76
To change your Messenger appearance······················································································ 76
To switch between Windows Live and Messenger···································································· 76
To set Windows Live options······································································································· 76
7.5 Calendar························································································································76
To schedule an appointment········································································································ 76
9

To send a meeting request············································································································ 77
To set a default reminder for all new appointments································································· 77
7.6 Contacts·························································································································77
To create a contact························································································································77
To change contact information···································································································· 78
To work with the contact list········································································································ 78
To find a contact···························································································································· 78
7.7 Tasks ······························································································································78
To create a task······························································································································ 78
To change the priority of a task··································································································· 79
To set a default reminder for all new tasks················································································ 79
To show start and due dates in the task list ···············································································79
To locate a task······························································································································ 79
7.8 Notes······························································································································79
To enter information in Notes······································································································ 79
To set the default input mode for Notes ····················································································· 80
To create a note······························································································································ 80
To draw in a note··························································································································· 80
To record a voice note··················································································································· 81
To create a voice note···················································································································· 81
To change recording formats······································································································· 81
Chapter 8·····························································································································82
Experiencing Multimedia···································································································82
8.1 Using the Camera·········································································································83
To launch the Camera ·················································································································· 83
To capture the pictures················································································································· 83
To capture a video························································································································· 83
Camera Tools································································································································· 84
Micro Mode ··································································································································· 84
Precautions when using the Camera ·························································································· 84
To exit From Camera···················································································································· 84
8.2 Using Pictures & Videos·······························································································85
To copy a picture or video clip to your device ··········································································· 85
To view pictures····························································································································· 85
10

To play videos with audio············································································································· 86
To view slide shows ······················································································································· 86
To sort pictures and video clips··································································································· 86
To delete a picture or video clip··································································································· 86
To edit a picture or video clip······································································································ 86
To set a picture as the Today screen background······································································ 87
To send pictures and video clips via e-mail················································································ 87
To beam a picture·························································································································· 87
To assign pictures to contacts······································································································87
To use advance options················································································································· 87
8.3 Using Windows Media Player······················································································88
About the controls························································································································· 88
About the screens and menus······································································································ 88
Playback screen menu·················································································································· 89
Now Playing screen menu············································································································ 89
Library screen menu ···················································································································· 89
About licenses and protected files······························································································· 90
To play items on your device········································································································ 90
To play an item on a network······································································································ 90
To copy files to your device·········································································································· 91
Accessibility for people with disabilities····················································································· 91
Troubleshooting····························································································································· 91
Chapter 9·····························································································································92
Using Other Applications ···································································································92
9.1 Using Office Mobile······································································································93
Word Mobile·································································································································· 93
To create a Word document········································································································· 93
Excel Mobile··································································································································93
To create a Excel file····················································································································· 93
PowerPoint Mobile ······················································································································· 93
To start a slide show presentation······························································································· 94
To stop a slide show······················································································································· 94
9.2 Using Java·····················································································································94
To install MIDlets from the Internet ·························································································· 94
11

To install MIDlets from a PC······································································································· 95
To install a MIDlet/MIDlet suite·································································································95
To run MIDlets on your device···································································································· 95
To manage MIDlets·······················································································································96
To change the name of a MIDlet·································································································96
To uninstall a MIDlet···················································································································· 96
To configure MIDlet security······································································································· 96
9.3 SIM Manager················································································································96
Appendix ·····························································································································98
A.1 Regulatory Notices·······································································································99
Regulatory Agency IDs················································································································· 99
European Union Notice················································································································ 99
Modifications······························································································································· 100
Important Health and Safety Information ·············································································· 100
Safety Precautions for RF Exposure························································································· 100
General Precautions ···················································································································100
Safety Precautions for Power Supply Unit··············································································101
Exposure to Radio Frequency (RF) Signals············································································· 102
SAR Information························································································································· 102
WEEE Notice······························································································································· 102
A.2 PC Requirement to Run ActiveSync4.5·····································································103
A.3 Troubleshooting··········································································································103
Power & Battery ························································································································· 104
ActiveSync···································································································································· 104
Display & Sound ························································································································· 104
Connection & Bluetooth············································································································· 104
Operating····································································································································· 105
Memory········································································································································ 105
Media Player································································································································ 105
Phone············································································································································ 106
A.4 Specifications ·············································································································106
System Information····················································································································106
Display·········································································································································· 106
GSM/EDGE Module··················································································································· 106
12

Camera Module··························································································································· 106
Physical········································································································································· 107
Controls and Lights···················································································································· 107
Audio ············································································································································ 107
Connection··································································································································· 107
Expansion Slots···························································································································107
13

Chapter 1
Getting Started
1.1 Getting to Know your Device and its Accessories
1.2 Installing the SIM Card
1.3 Battery Information
1.4 Starting Up
1.5 The Today Screen
1.6 Using the Start Menu
14
1.1 Getting to Know your Device and its Accessories
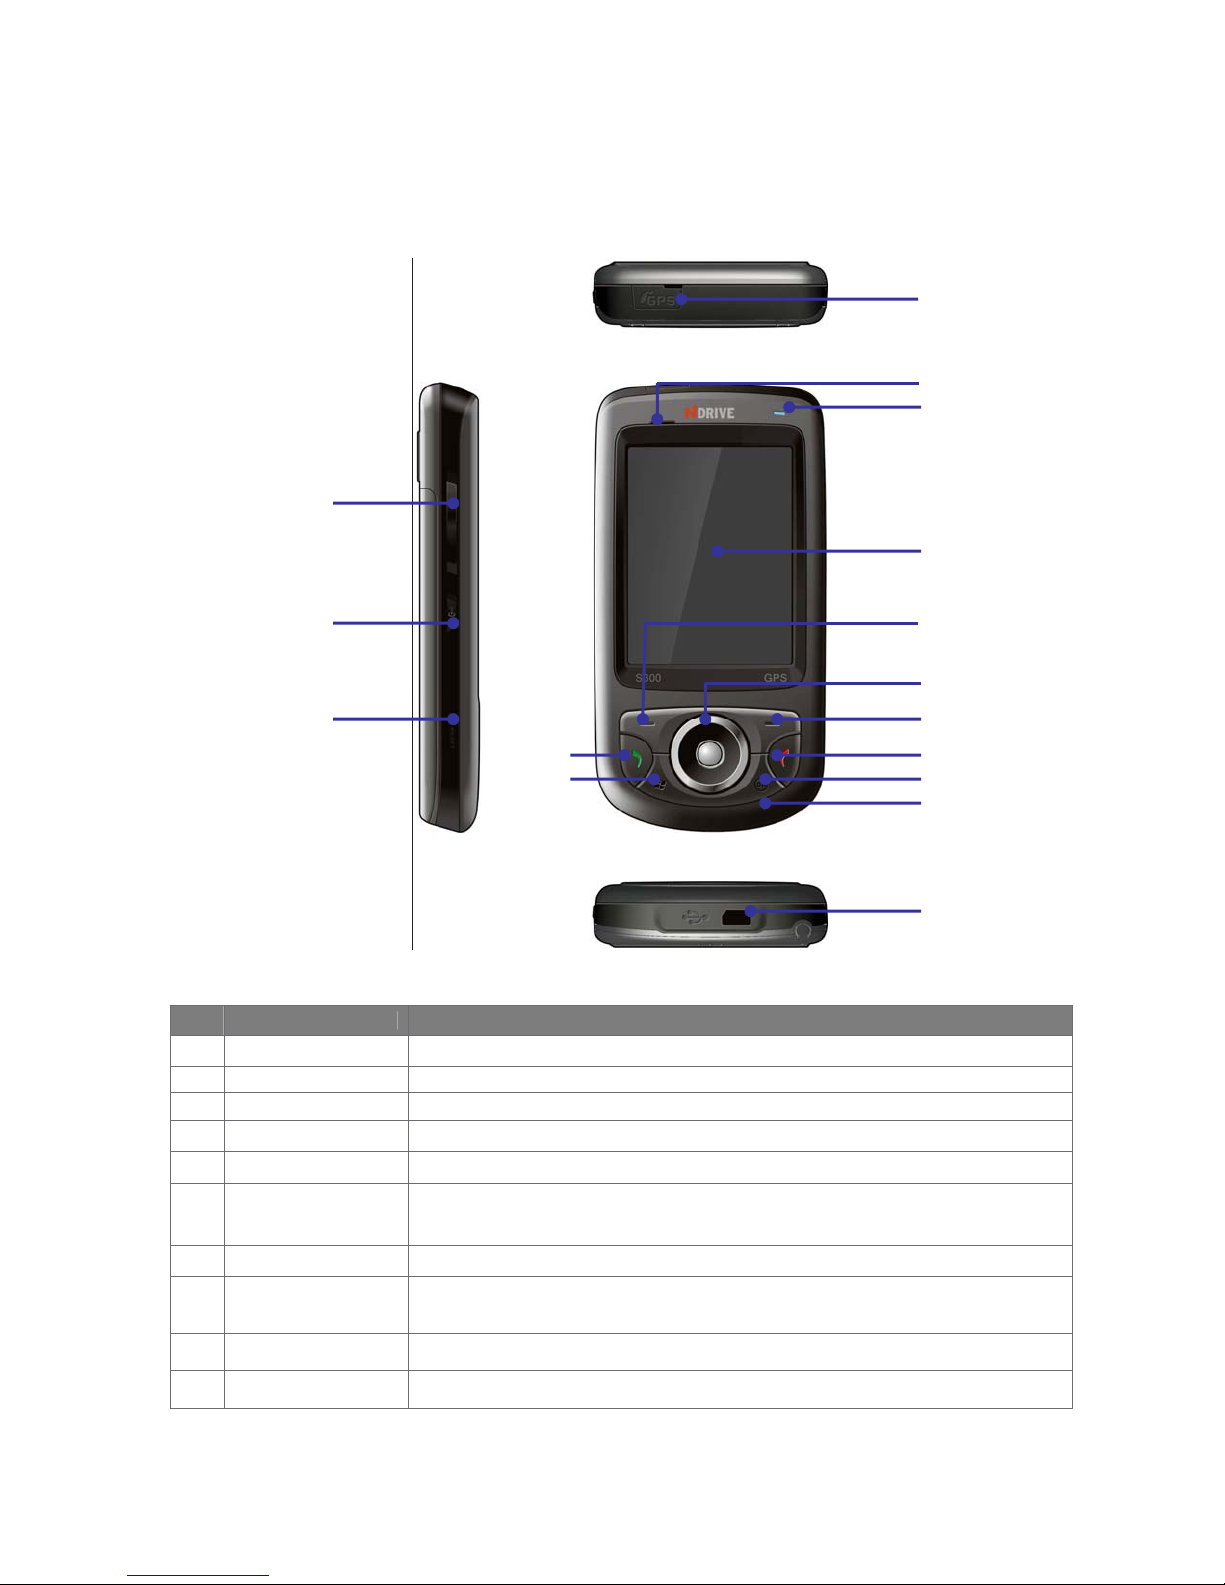
Front, top, bottom and left-side view
14
15
16
1
2
3
4
5
6
7
No. Item Function
1 GPS Antenna
2 Speaker
3 Power LED
4 Touch Screen
5 Left Soft Key
6 Navigation Pad
7 Right Soft Key
8 End Button
Connect GPS external antenna to obtain better signal.
Listen to audio media or phone call.
LED Power indicator, battery charging status.
Use to write, draw, or make selections with the stylus.
Performs the command shown in the label above the button.
Press the navigation pad to scroll left, right, up or down on the display; Slip the
jog ball to move the mouse on the screen and press it to enter a selection.
Performs the command shown in the label above the button.
Press this button to end a call or silence the ring from an incoming call. Also,
press this button to return to the Start screen from any location.
12
13
8
9
10
11
9 OK Button
10 Microphone
15
Press this button to perform the command highlighted.
Do not cover the microphone with your hand during phone call
11 Sync Connector
12 Talk Button
You can insert USB cable or AC adapter or headset provided with the device to
this connector.
Press this button to make a call to the name or number shown on the screen or
to answer a call.
13 Start Menu Button
14 Volume Button
15 GPS Button
16 RESET Button
22
23
24
Press this button to active your Start menu.
Press volume Buttons to adjust the volume
Press to launch the GPS navigation.
With the stylus, press the RESET button to soft-reset your device.
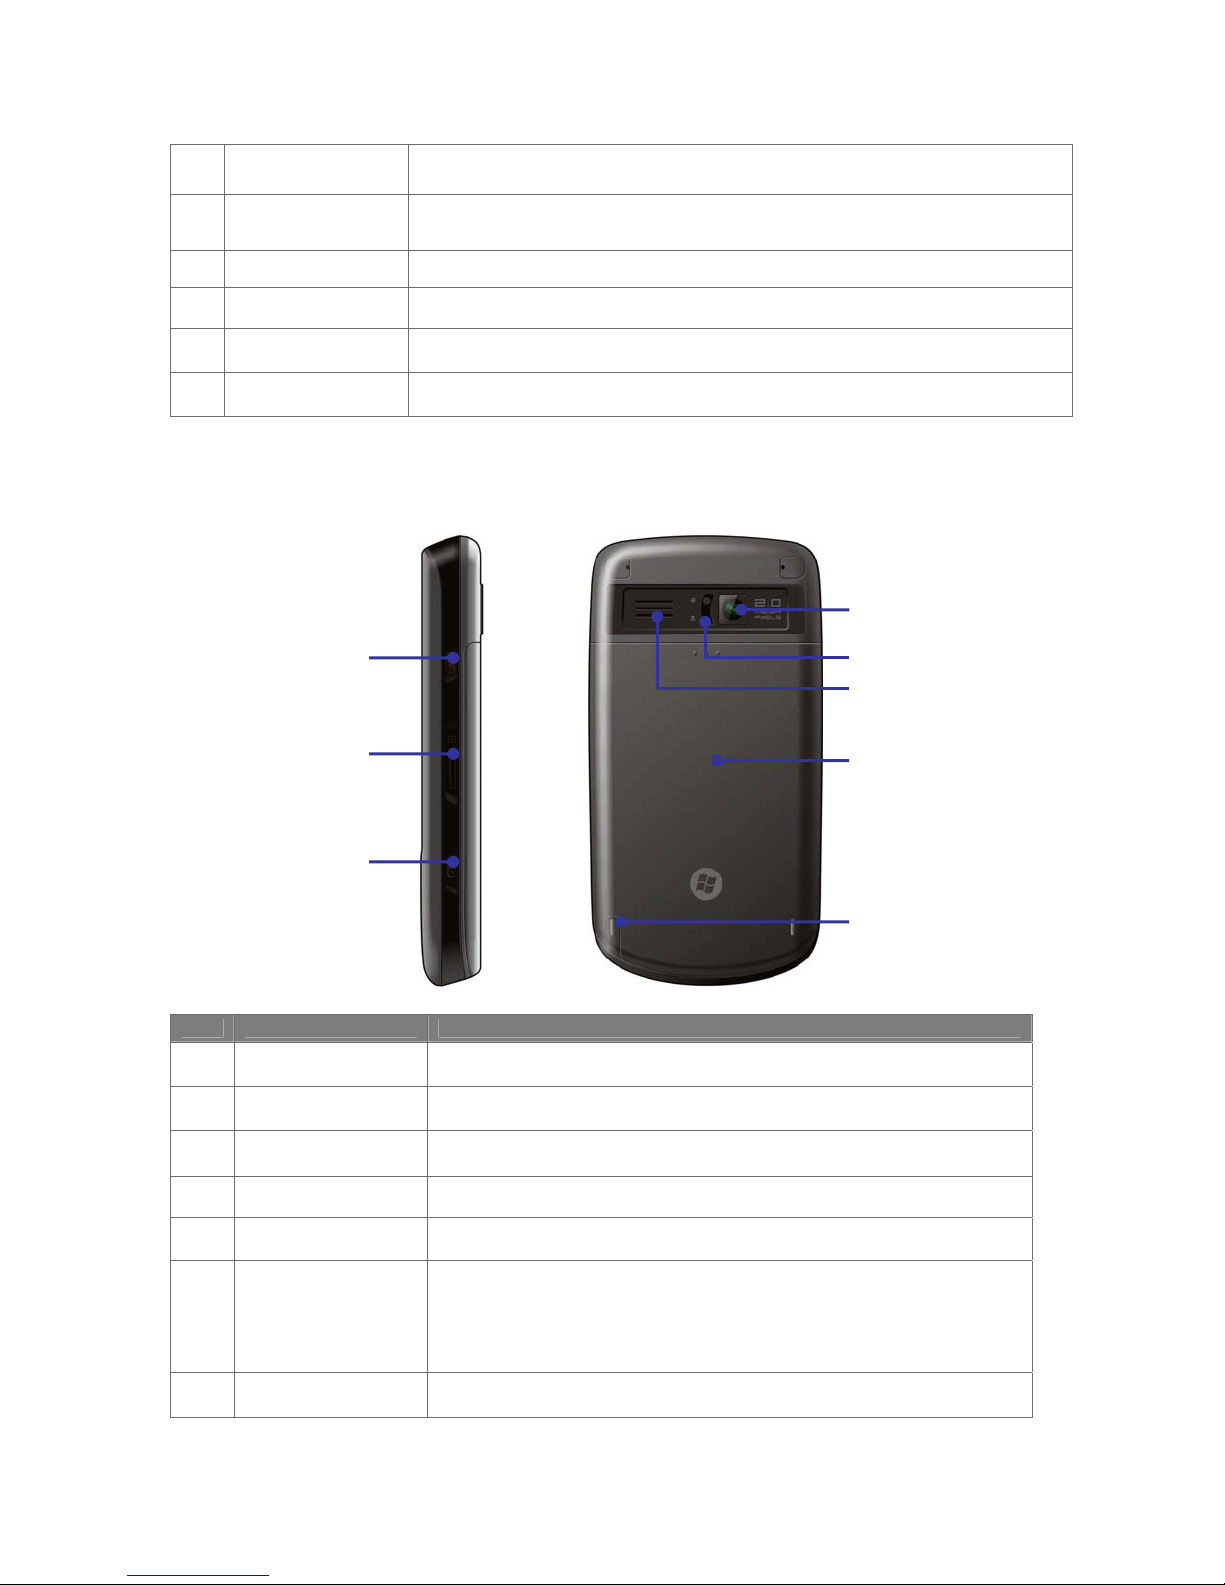
Back and right-side view
17
18
19
20
21
No. Item Function
17 Camera Lens
18 Zoom button
19 External Speaker
20 Cover Latch
21 Stylus
22 Power Button
23 MicroSD Card Slot
16
Use this built-in camera to take photos or video clips.
Use this button to adjust the zoom of Micro mode.
Allows you to listen audio media or hands-free calls
Slide this latch to release the battery cover.
Use the stylus to write, draw, or select items on the touch screen.
Press this button to turn off your device temporarily and switch the
device to sleep mode. Press and hold this button to turn off your device
completely. When your device is in sleep mode, you can still receive
calls; however, the phone function is off when you turn the device off
completely.
Insert a storage card (MicroSD) for storing data.
24 Camera Button
Press to launch the camera. Press again to take a picture.
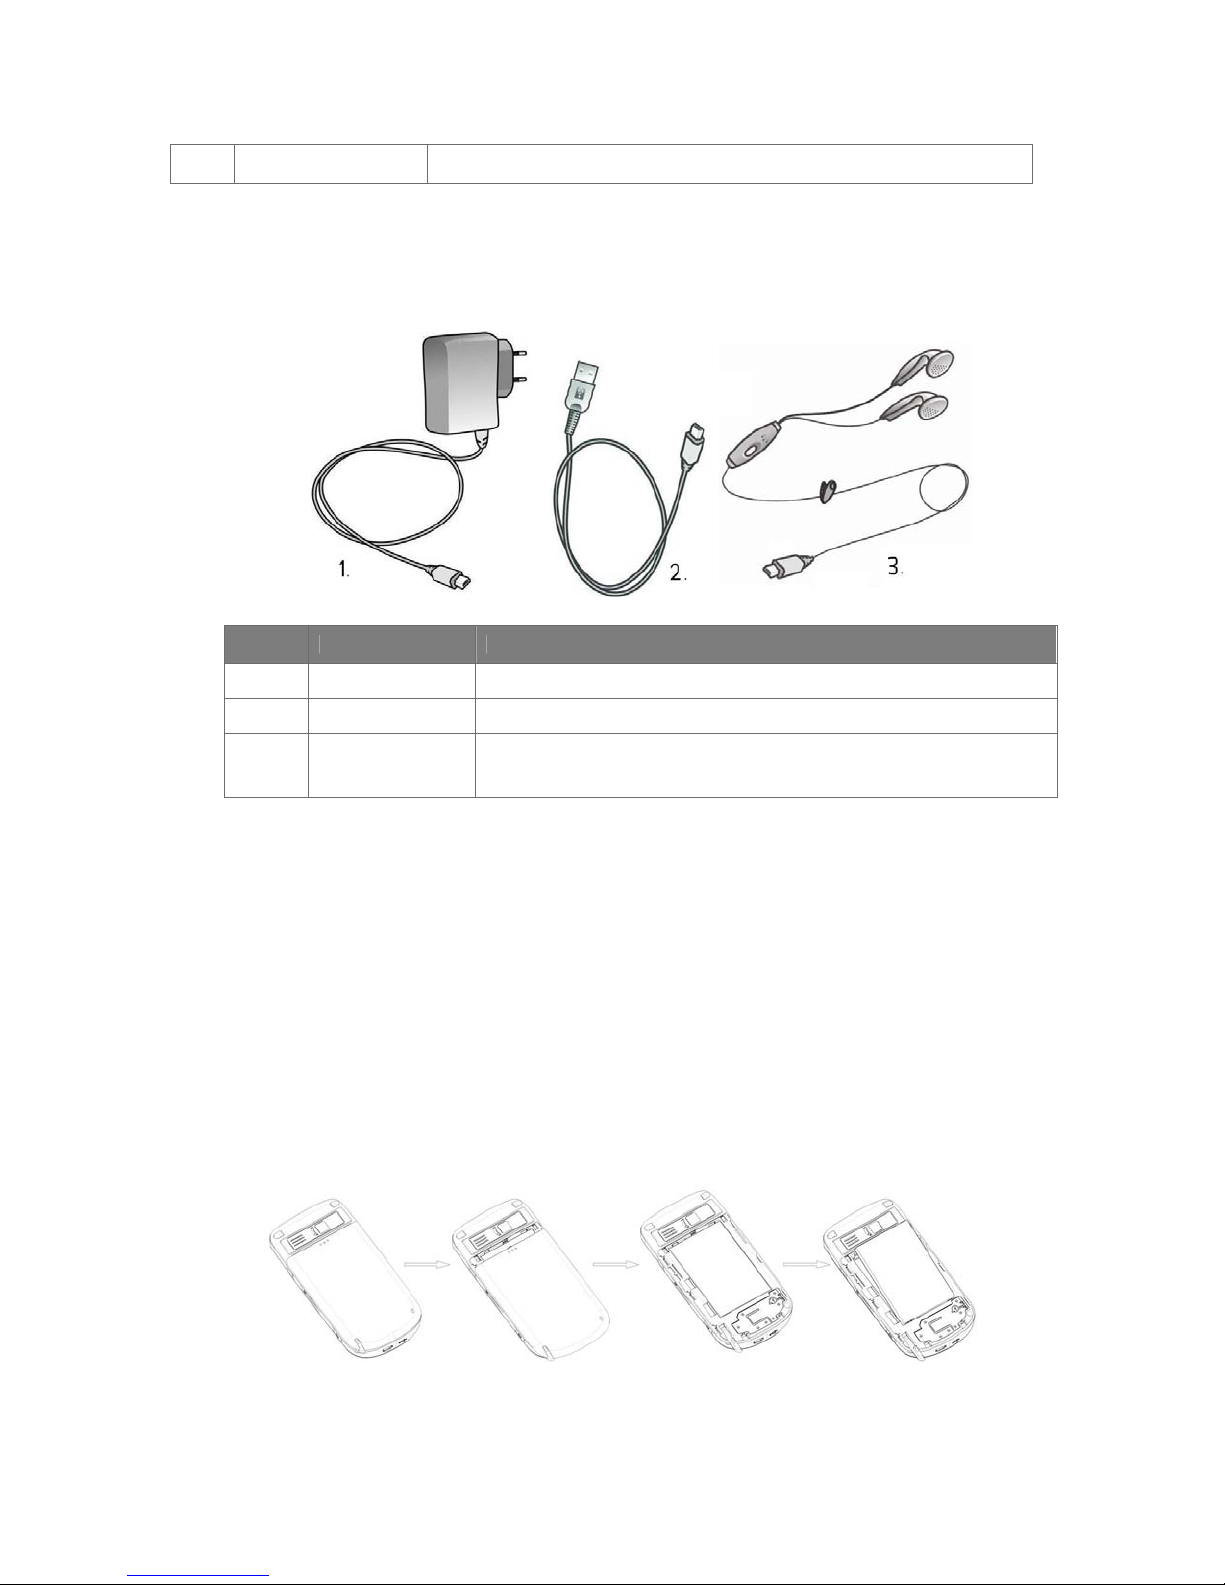
Accessories
The following accessories are provided with the device:
No. Item Function
1 AC adapter
2 USB cable
3 Stereo headset
Recharge the device battery.
Connect your device to PC and synchronize data.
Provide a Send/End button. You can use the button to pick up and
hang up incoming and outgoing calls. To use it, plug into Sync
Connector.
1.2 Inserting the SIM Card
Follow these steps to insert a GSM SIM (Subscriber Identity Module) card which is
provided by your local network service provider. The SIM card may contain your
phone number, service details, and phonebook/message memory.
Your device supports SIM cards both 1.8V and 3V. Some legacy SIM cards will not
function within this de vice. The customer should consult with their service provider
for a replacement SIM card. There may be a fee for this service.
1. Always switch the device off, and disconnect the charger before removing the
battery.
2. Slide the back cover to remove it from the phone
3. If the battery is installed, use the finger grip to lift the battery from the battery
compartment. Then, insert the SIM card into the SIM card slot with its gold
17

contacts facing down (the cutoff corner of the SIM card should match the cut-off
corner in the device.
4. Replace the battery and gently push down to snap it into place.
5. Replace the battery cover.
1.3 Battery Information
This device is intended for use with a Li-ion polymer battery. Use only batteries,
chargers and enhancements approve by the manufacturer. Battery performance
depends on many factors, including wireless service provider’s network configuration,
signal strength, temperature of the environment in which you operate your device, the
features and/or settings you select and use, items attached to your device’s
connecting ports, and your voice, data, and other program usage patterns.
Battery life estimates (approximations):
. •
. • Talk time (Screen off): 3.5 ~ 5 hours
Standby time: 150 ~ 200 hours
Warning! To reduce risk of fire or burns.
. • Do not attempt to open, disassemble, or service the battery pack.
• Do not crush, puncture, short external contacts, or dispose of in fire or
water.
. • Do not expose to temperatures above 60
. • Replace only with the battery pack designated for this product.
. • Recycle or dispose of used battery as stipulated by local regulation.
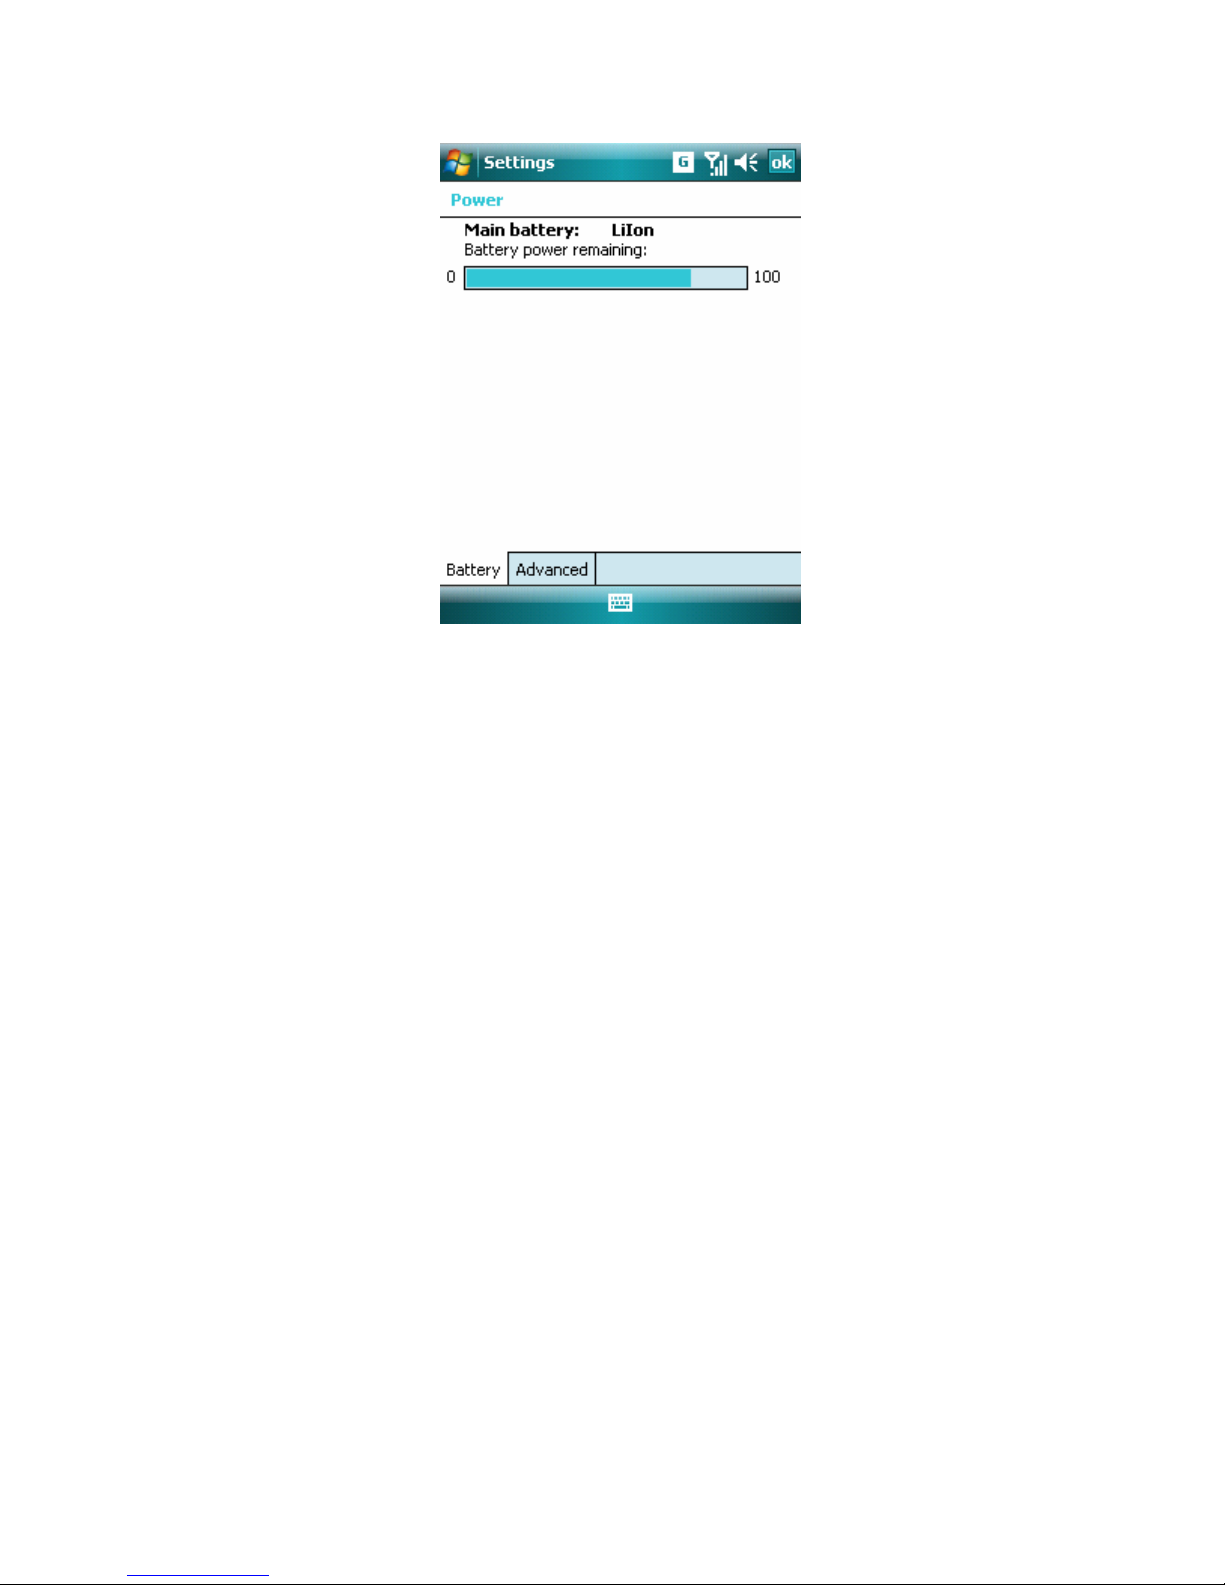
To check the battery power
o
C (140oF).
• Tap the battery level icon ( ) on the Today screen.
• Select Start > Settings > System tab > Power.
18
To charge the battery
New batteries are shipped partially charged. Install and charge the battery before use
with this device. The full performance of a new battery is achieved only after several
complete charge and discharge cycles. To charge the battery:
. • Connect your device directly to an external power source.
. • Plug the device sync cable into the USB port on your PC.
To deal with low battery
When the low-battery warning appears, the following actions are suggested:
. • Immediately save your current data.
. • Recharge the battery.
. • Turn off the device.
1.4 Starting Up
To turn the device on and off
To turn the device on, press and hold the Power button for several seconds. When
you turn the device on for the first time, you are asked to complete a calibration
process. For more information, see “To calibrate the device”.
To turn the device off, press and hold the Power button again.
Note Pressing the Power button turns your device off temporarily and switches the
device to sleep mode. However, messages and calls can still be received
while the device is in sleep mode.
To calibrate the Device
Calibrating the device screen involves using the stylus to tap the centre of a cross as
it moves around the screen.
19
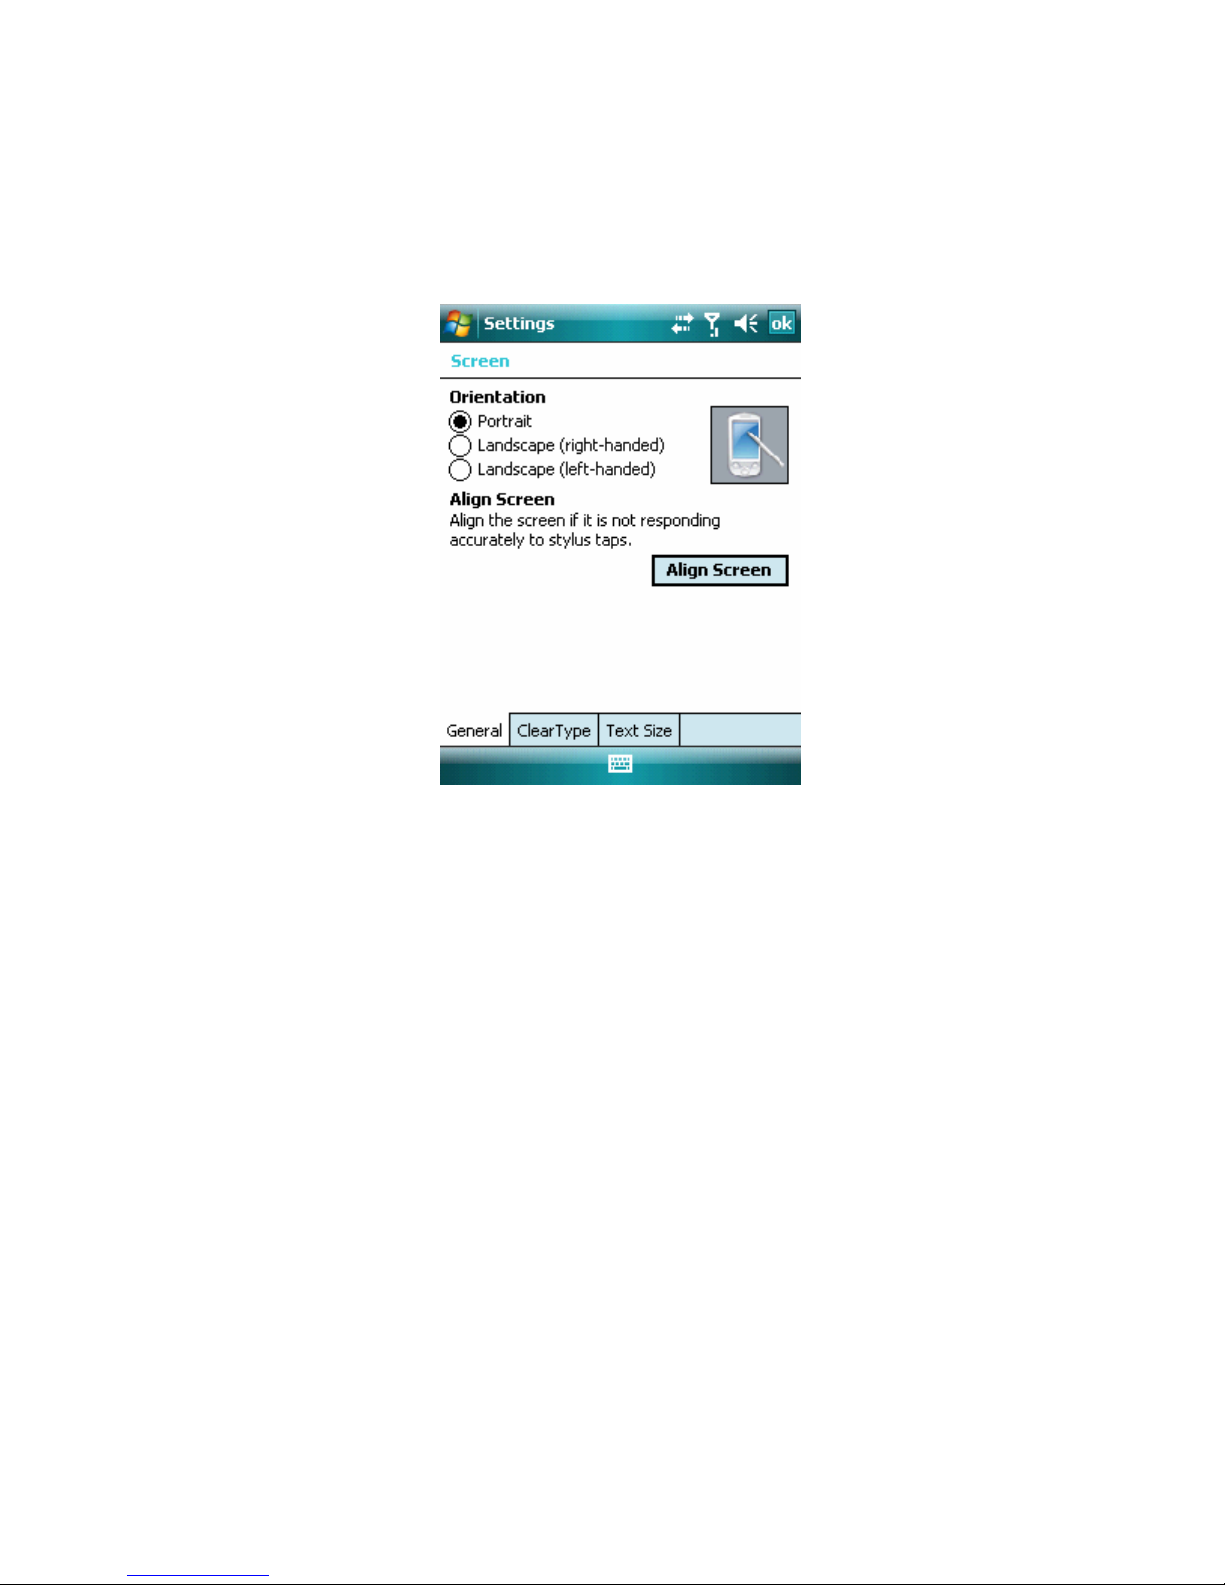
If the device does not accurately respond to screen taps, follow these steps to
re-calibrate it:
1. Select Start > Settings > System tab > Screen.
2. On the General tab, select Align Screen, and follow the instructions on the
screen.
To manage screen settings
The device touch screen has three orientation modes: Portrait, Landscape
(right-handed) and Landscape (left-handed). Your screen’s normal orientation is
Portrait. Choosing Landscape mode will rotate the screen 90°.
1.5 The Today Screen
The Today screen displays important information, such as upcoming
appointments and status indicators. To open the program, tap the associated
section on the screen.
. • To access the Today screen, tap Start > Today.
• To customize the Today screen display, which includes the background image,
select Start > Settings > Personal tab > Today.
20
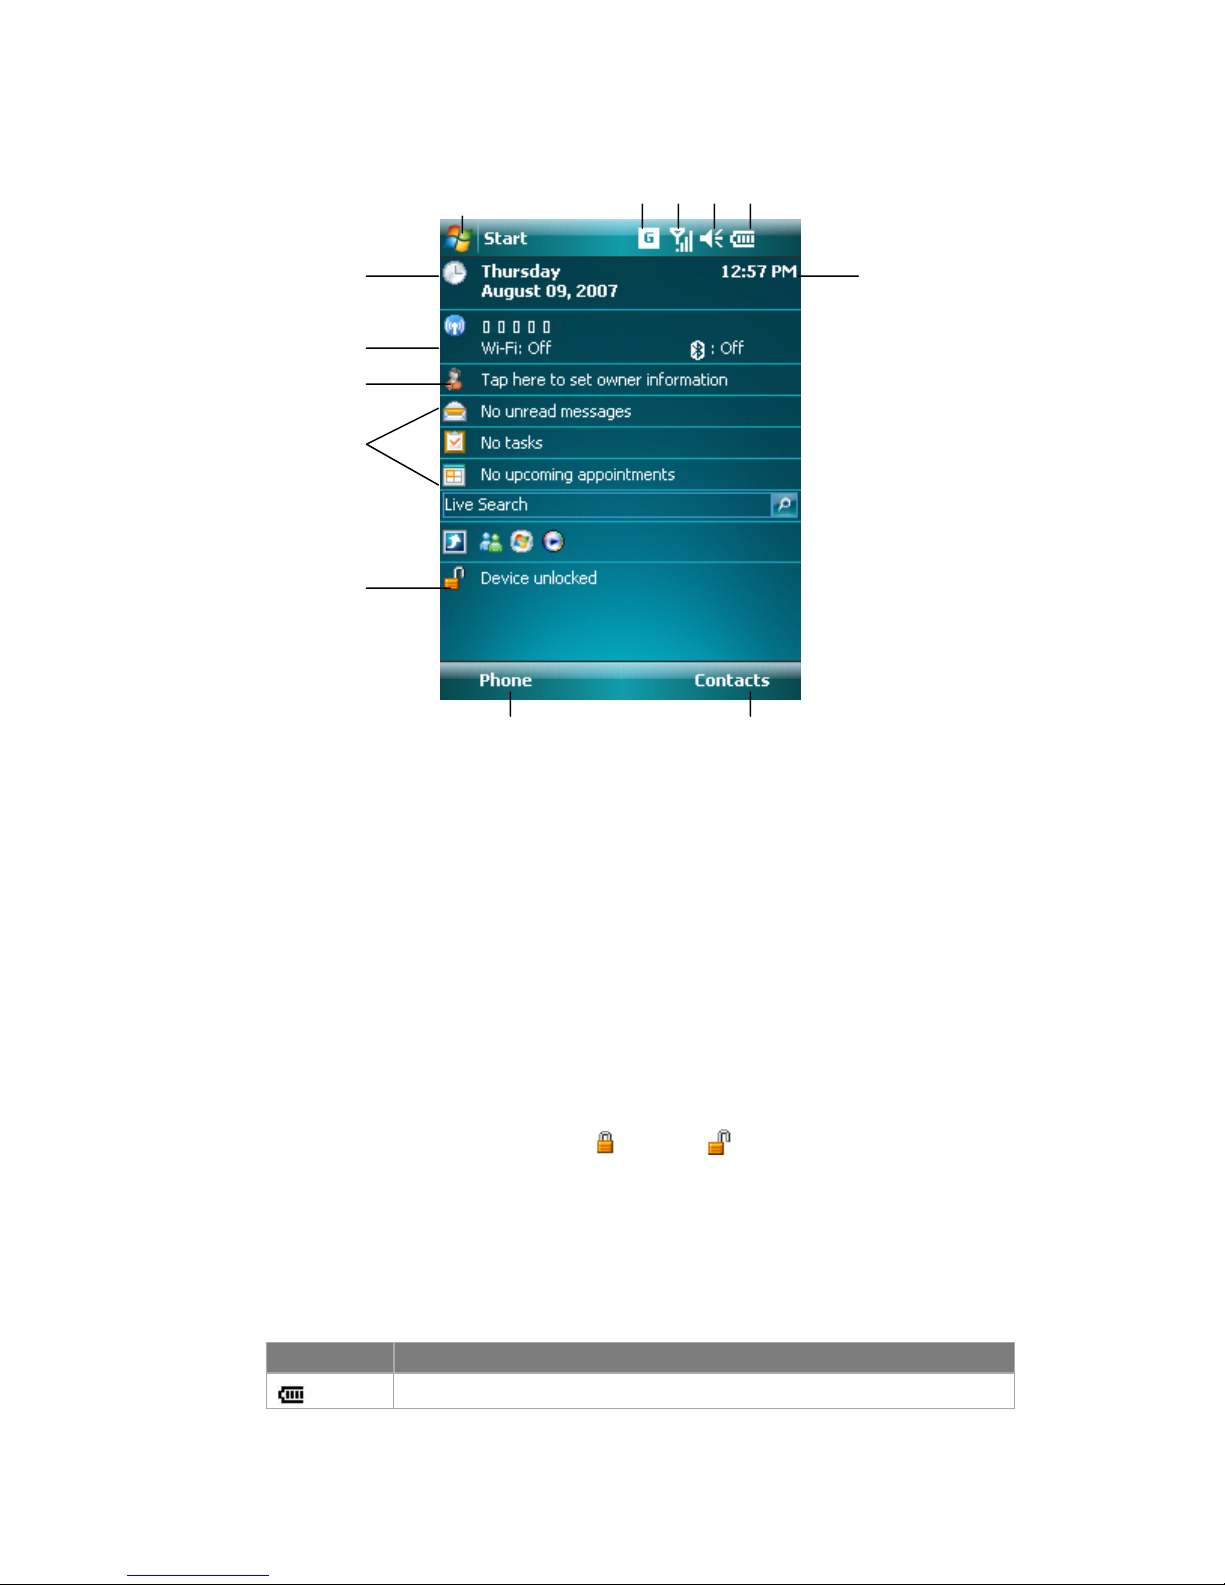
1
2 3 4 5
7
8
9
10
11
12 13
1 Tap to open the Start menu.
2 Tap to view connectivity status.
3 Indicates the radio signal strength. Tap to configuration the phone settings.
4 Tap to control device/ringer volume level.
5 Indicates the battery status. Tap to enter the Power Settings screen.
6 Displays the current time.
7 Displays the current date. Tap to setup date, time, alarm, and more.
8 Tap to start the Wireless Manager
9 Tap to set owner information
10 Your day at a glance with reminders. Tap to open the related program:
Messaging, Tasks, and Appointments.
11 Tap to lock or unlock the device.
: locked; : unlocked.
6
12 Tap to open the Phone screen.
13 Tap to open the Contacts screen.
Indicators
Following are some of the status icons that you may see on your device.
Icon Description
21
Indicates the battery is fully charged.
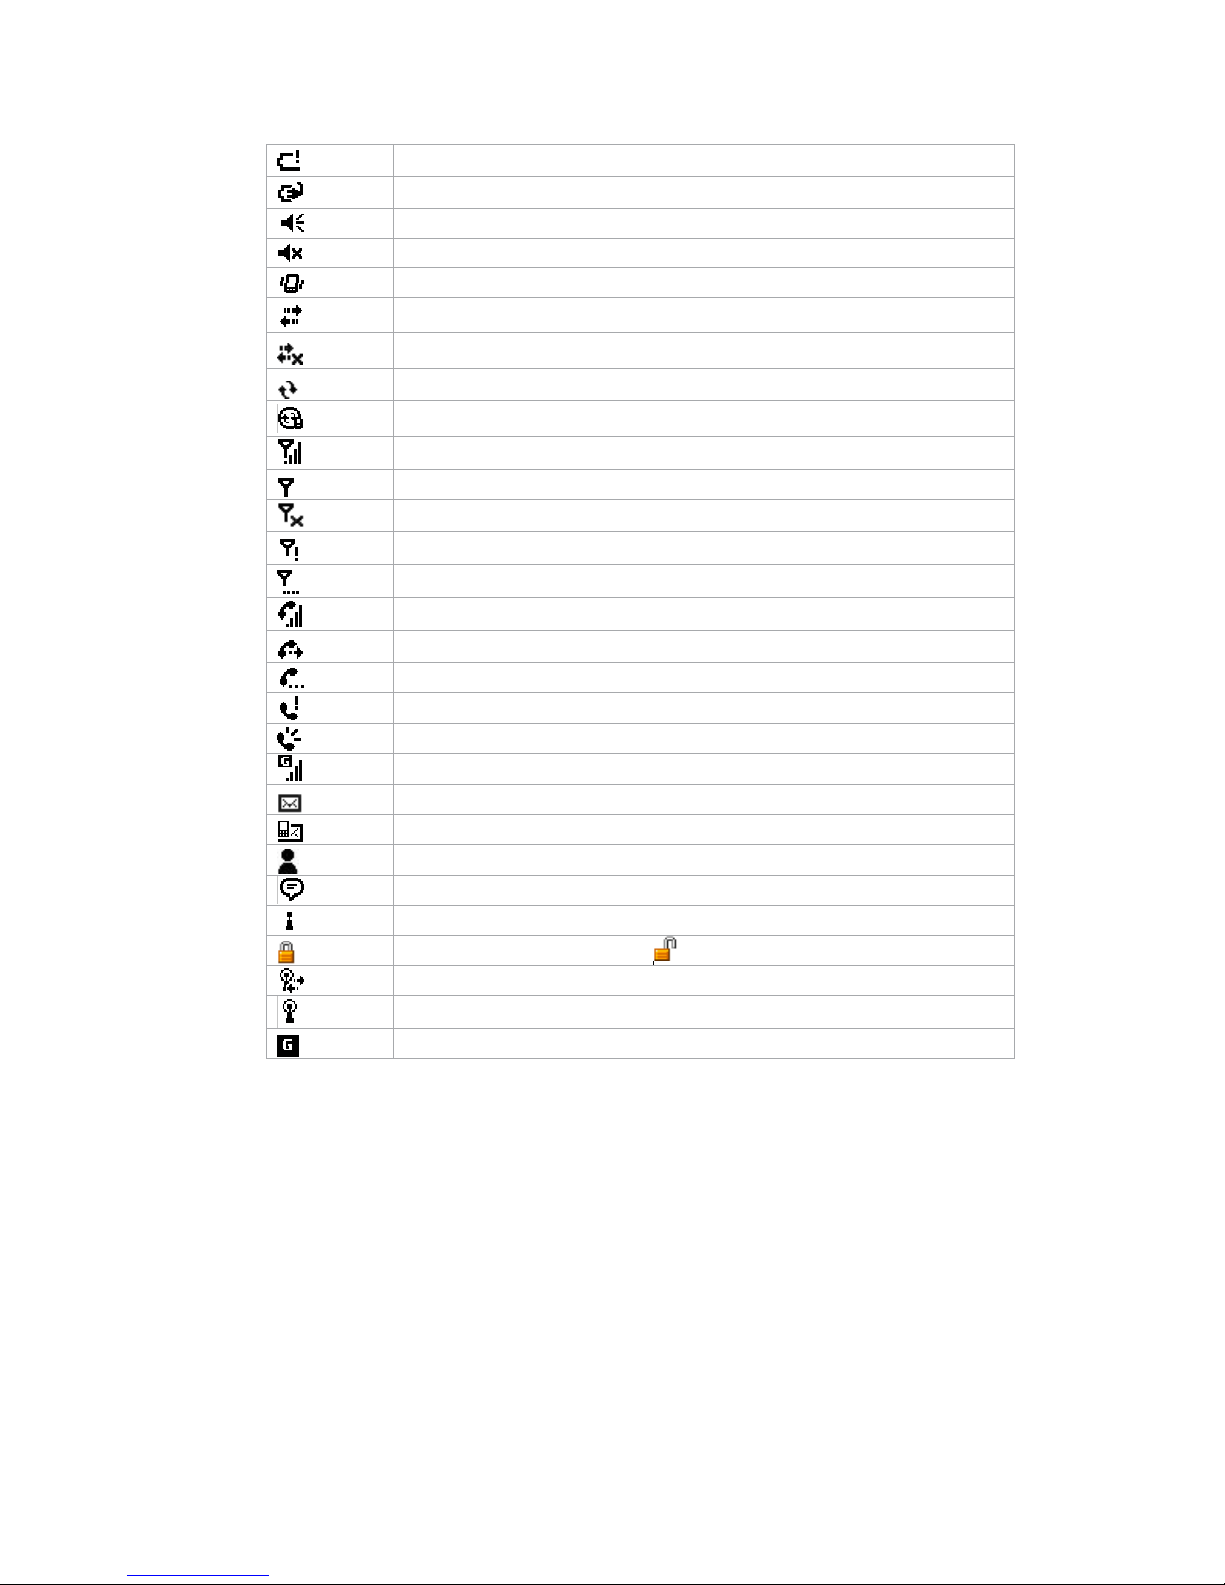
Indicates the battery is very low.
Battery charging.
Sound on.
Sound off.
Ringer in vibration mode.
Connection is active.
Connection is not active.
Synchronization in progress.
Synchronization error.
Indicates maximum signal strength.
No signal.
Phone is turned off.
No phone service.
Searching for phone service.
Voice call in progress.
Calls are forwarded.
Call on hold.
Missed call.
Speak on
GPRS connected
New e-mail or MMS.
New Text Messages
New IM
There are more notifications. Tap the icon to view all.
Indicates Wi-Fi is turned on.
Indicates the device is locked. : Device unlocked.
WiFi is connected
WiFi data call
GPRS available
1.6 Using the Start Menu
The Start menu which is located at the top left corner of the Today screen displays a
list of programs. It lets you close a screen and switch from one program to another.
To start a program, scroll through the programs list and then press the center button
of the navigation pad, or tap a program with the stylus.
22
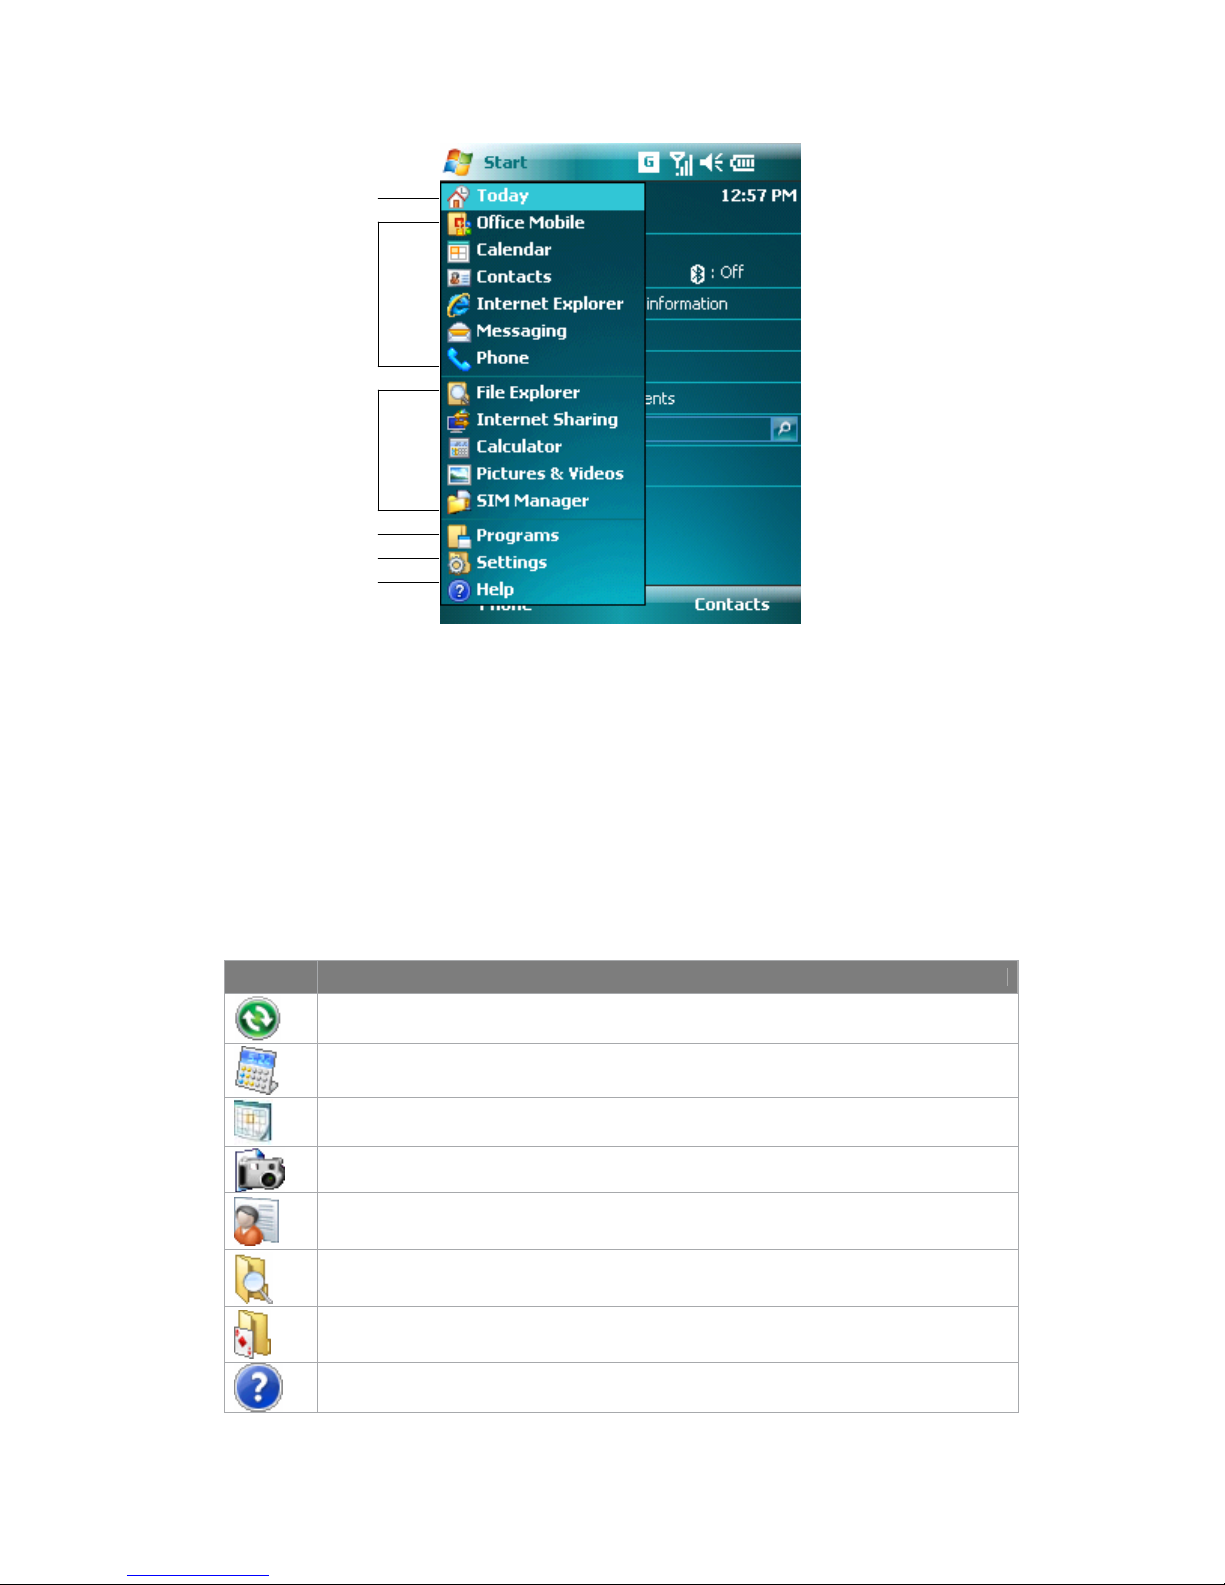
1
2
3
4
5
6
1 Tap to open the Today screen.
2 Tap to start a program. The items displayed in Start menu can be customized by
tapping Start > Settings > Personal tab >Menus.
3 Tap to start a recently-used program.
4 Tap to view and select more programs that are installed in your device.
5 Tap to change device settings.
6 Tap to see a Help topic for the current screen.
Program Indicators
Following indicators are some of the icons for the programs that are already installed
on your device.
Icon Description
ActiveSync Synchronizes information between yo ur device and a PC.
Calculator Performs basic arithmetic and calculat ions, such as addition, subtraction,
multiplication, and division.
Calendar Keeps track of your appointments and creates meeting requests.
Camera Snaps photos or shoots video clips with accompanying audio.
Contacts Keeps track of your friends and colleagues.
File Explorer Enables you to organize and manage files on your device.
Games Lets you play two pre-installed games: Bubble Breaker and Solitaire.
Help Enables you to see Help topics for a program on your device.
23
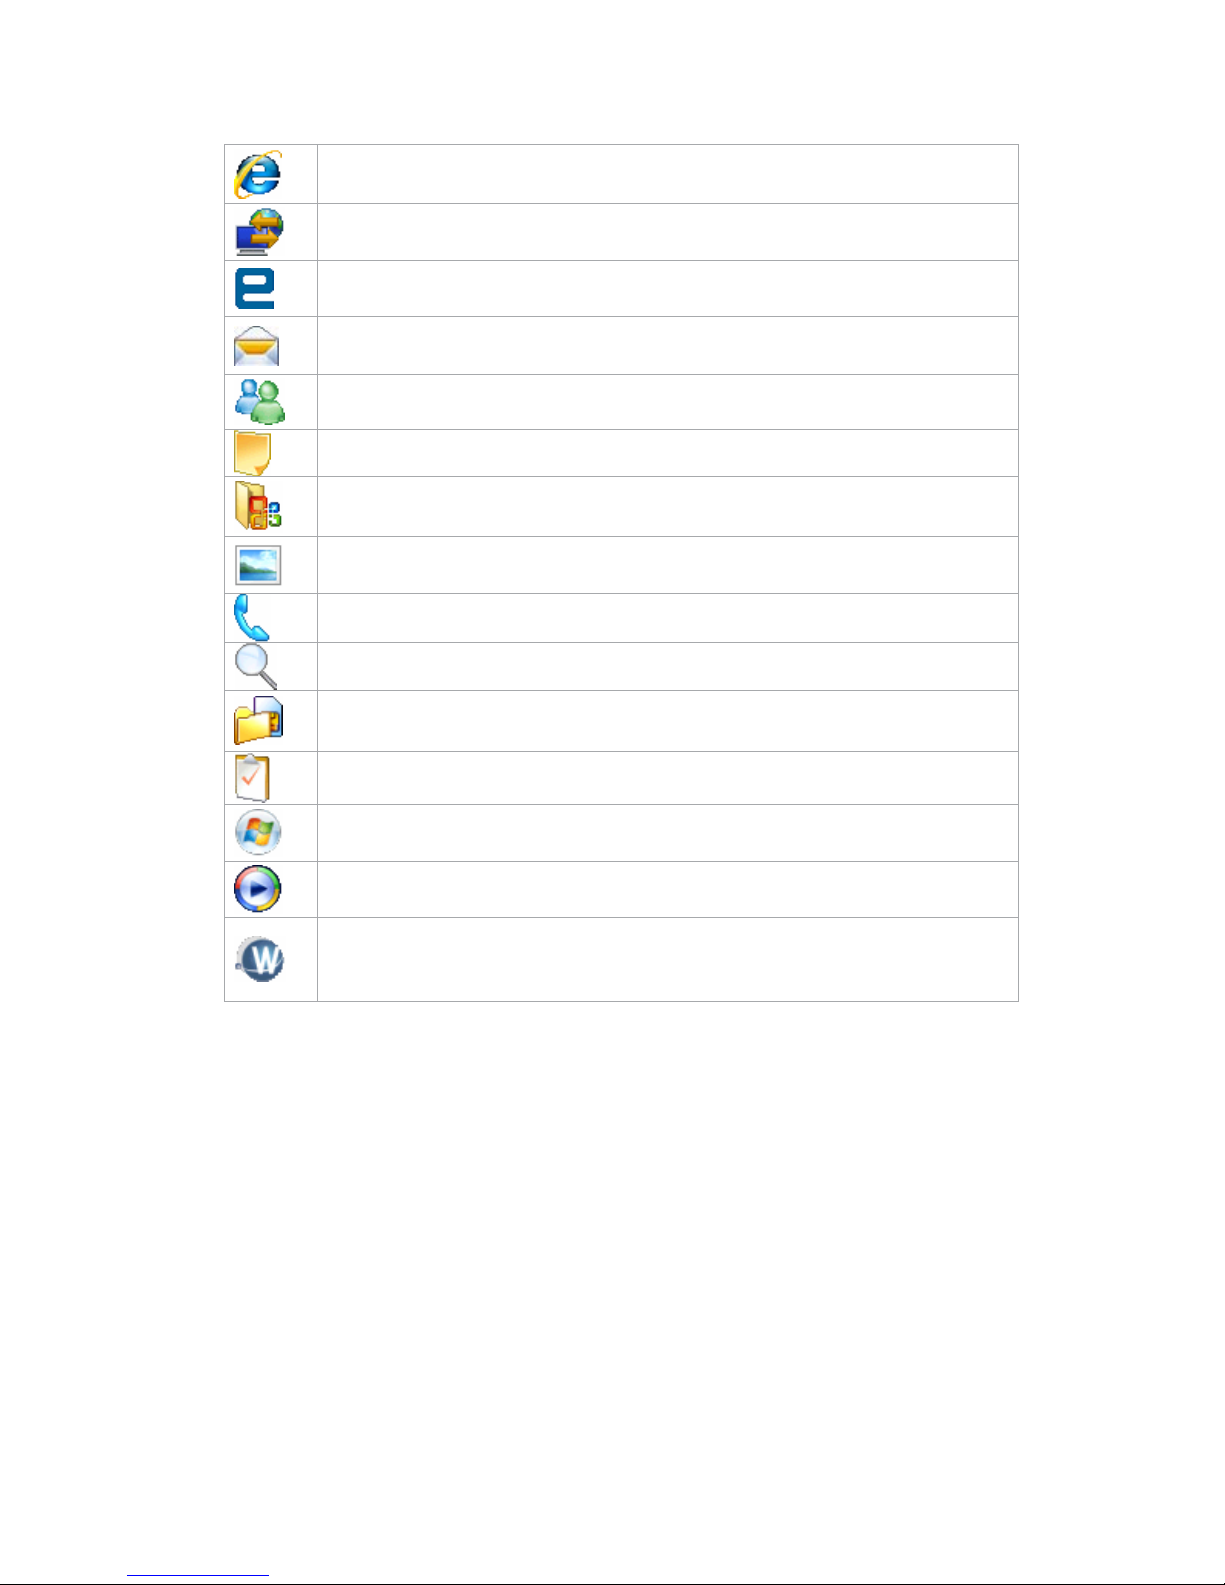
Internet Explorer Internet Explorer browses Web and WAP sites, and downloads
new programs and files from the Internet.
Internet Sharing It enables a Windows Mobile powered device connected to the
internet to act as a Network Access Point to devices connected to it.
JAVA Ena bles you to download and install Java applications, such as games and
tools, on your device.
Messaging Sends and receives e-mail and text messages.
Messenger Sends and receives instant messages with your MSN Messenger
contacts.
Notes Creates handwritten or typed notes, drawings, and recordings.
Office Mobile Lets you create, view and edit Excel workbooks, Po werPoint slides
and Word documents.
Pictures & Videos Collects, organizes, and sorts picture and video files in the My
Pictures folder of your device or on a storage card.
Phone Makes and receives calls, switches between calls and sets up conference
calling.
Search Enables you to search contacts, data, and other information on your device.
SIM Manager You can manage information of contacts stored on your SIM card. You
can also copy the SIM contacts to phone and copy phone contacts to the SIM card.
Tasks Keeps track of your tasks.
Windows Live Establish an internet connection. You can sync Contacts and
Messenger and E-mail.
Windows Media Enables the multimedia function on your device.
WorldCard Mobile Capture and edit your Business Cards, and export Business
Cards information. You must adjust the zoom button on the back of the device
(indicated in the phone overview page) to select micro mode before capture.
24

Chapter 2
Entering and Searching for Information
2.1 Introduction
2.2 Using the Keyboard
2.3 Using Letter Recognizer
2.4 Using Block Recognizer
2.5 Using Transcriber
2.6 Drawing and Writing on the Screen
2.7 Recording a Note
2.8 Searching for Information
25
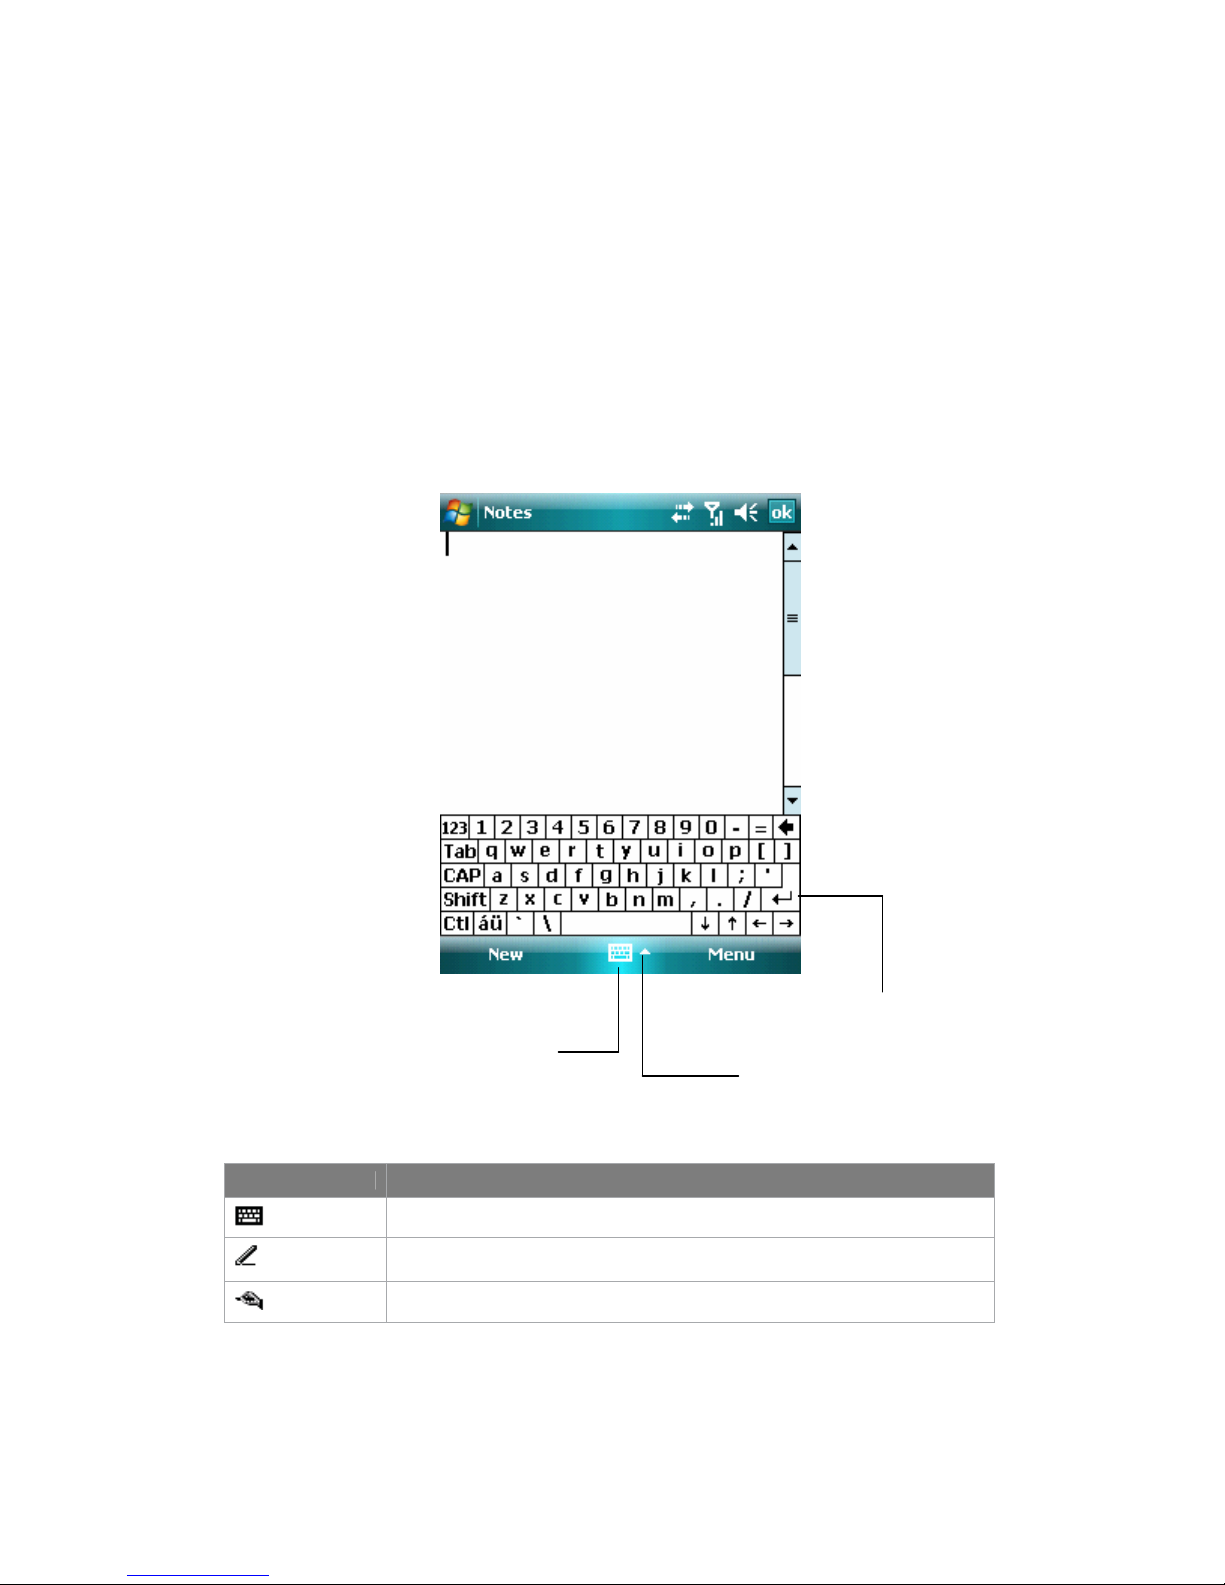
2.1 Introduction
When you start a program or select a field that requires text or numbers, the Input
Panel becomes available automatically. Input Panel provides various input methods
which are available on your device, including Block Recognizer, Keyboard, Letter
Recognizer, and Transcriber. By default, the Input Panel icon appears on the menu
bar to indicate which input method is currently selected. The Input Selector arrow
(shown at the right side of the Input Panel icon) opens a list of available input
methods.
To show or hide the Input Panel
• Tap the Input Panel icon on the menu bar.
Example:
Input Panel icon
Input Panel (Keyboard)
Input Selector arrow
Icon Input method
The on-screen keyboard.
Letter Recognizer or Block Recognizer.
Transcriber
2.2 Using the on-screen Keyboard
To enter text, symbols, and numbers, you can use the standard on-screen Keyboard.
26

To use the standard on-screen Keyboard
The on-screen Keyboard is available when text entry is possible. You can enter text
by tapping keys on the keyboard that is displayed on the screen.
To enter text using the on-screen Keyboard
1. In a program, tap the Input Selector arrow, and tap Keyboard.
2. Enter text by tapping keys on the on-screen Keyboard.
To enlarge the on-screen Keyboard
1. Tap the Input Selector arrow, and then tap Options.
2. In the Input method list, select Keyboard.
3. Tap Large Keys.
2.3 Using Letter Recognizer
With Letter Recognizer, you can write individual letters, numbers, and punctuation,
which can be converted into typed text.
To use Letter Recognizer
1. In a program, tap the Input Selector arrow, and then tap Letter Recognizer.
2. Write characters, numbers, and symbols in the designated writing area.
. • Enter capital letters by writing in the ABC (left) area of the box.
. • Enter lower case letters by writing in the abc (middle) area of the box.
. • Enter numbers by writing in the 123 (right) area of the box.
. •
Enter punctuation and symbols by tapping in either area of the box and then
writing the desired character.
.
Note Letter Recognizer is available only when text entry is possible.
Tip For help with writing characters with Letter Recognizer, tap the question
mark near the writing area.
2.4 Using Block Recognizer
With Block Recognizer, single strokes can be used to write letters, numbers,
symbols, and punctuation, which can be converted into typed text.
To use Block Recognizer
1. In a program, tap the Input Selector arrow, and then tap Block Recognizer.
2. Write characters, numbers, and symbols in the designated writing area.
. • Enter letters by writing in the abc (left) area of the box.
. • Enter numbers by writing in the 123 (right) area of the box.
. •
Enter symbols and punctuation by tapping in either area of the box and then
writing the desired character.
.
Note Block Recognizer is available only when text entry is possible.
Tip For help with writing characters with Block Recognizer, tap the question
mark near the writing area.
27

2.5 Using Transcriber
Transcriber is a handwriting recognition program that allows you to write in cursive,
print, or a combination of both. Transcriber works transparently in the background of
programs, recognizing words with its integrated dictionary. When Transcriber is
turned on, it interprets stylus movement anywhere on the screen as handwriting input.
For more information about using Transcriber, see Help on your device.
To start Transcriber
1. Start a program that accepts user input, such as Word Mobile.
2. Tap the Input Selector arrow, and tap Transcriber. The Transcriber introductory
screen appears.
To write using Transcriber
1. In a program, position the cursor where you want the text to appear.
2. Use the stylus to write anywhere on the screen. The handwriting will be
converted to text shortly after you lift the stylus from the screen.
To enter punctuation and symbols
Transcriber comes with an on-screen keyboard that provides an easy way to add
punctuation or a special symbol to existing text.
• In a program, tap on the Transcriber toolbar. The keyboard remains visible
until the button is tapped again.
Tips To reposition the keyboard, tap and hold the title bar, then drag to the
desired location. When no text is selected, you can also open the keyboard
by performing the
gesture.
To edit text
1. In a program, draw a line across the text which you want to edit.
2. After you lift the stylus from the screen, the line will disappear and the selected
text will be highlighted.
3. Do either of the following actions:
• Rewrite the text.
• Use gestures to capitalize letters, insert a space, and so on. For information
about using gestures, see “Transcriber Gestures” in this chapter.
Transcriber Gestures
Use quick strokes of the stylus to edit your text or to insert returns, spaces, or tabs.
Do To
Insert a paragraph return at the cursor. The horizontal portion of the gesture must
be at least two times longer than the vertical portion.
Insert a space at the cursor. The horizontal portion of the gesture must be at least
two times longer than the vertical portion.
28
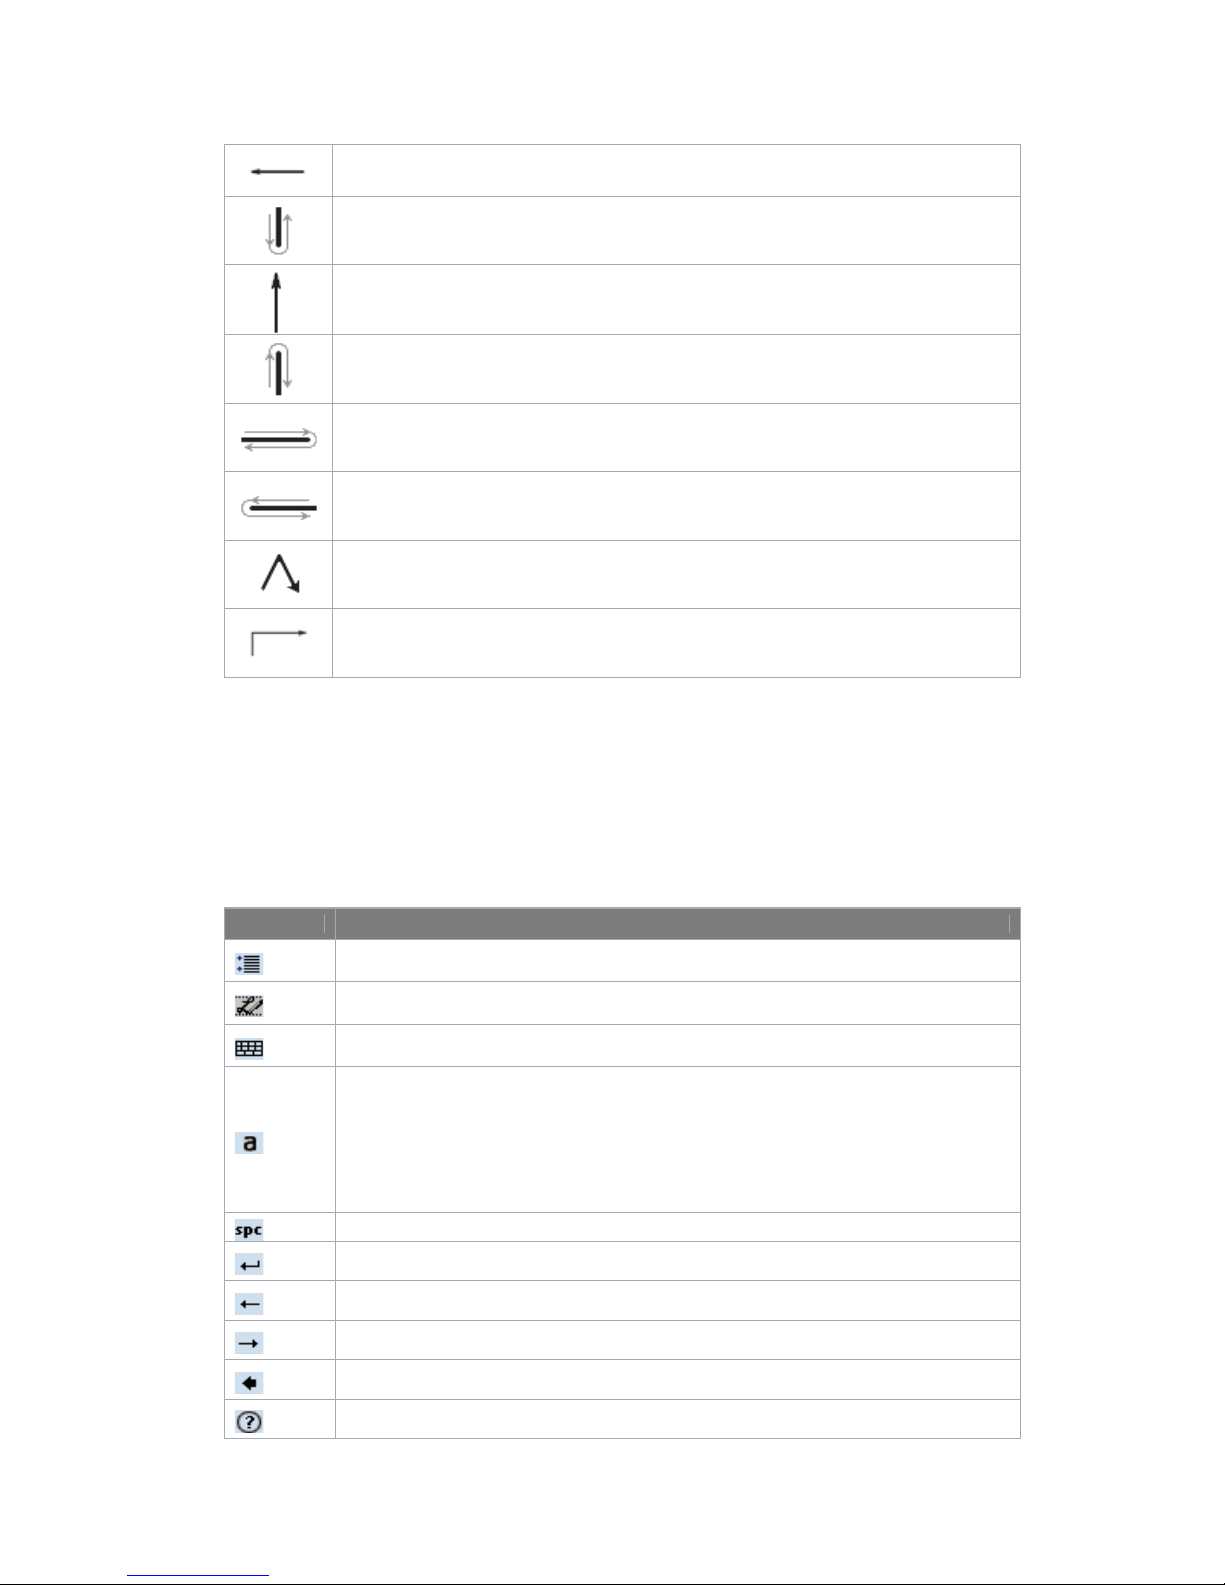
Move the cursor one space back and erase any text. Do the gesture by drawing a
line from right to left.
Open the alternate words menu if a word is selected or the onscreen Transcriber
keyboard if no text is selected. Do the gesture by drawing a line straight down and
back up.
Change the capitalization of a selected letter, word, or block of text. Do the gesture
by drawing a line straight up.
Undo the last action. Do the gesture by drawing a line straight up and back down.
Copy the selected text. Do the gesture by drawing a line from left to right and back.
Cut the selected text. Do the gesture by drawing a line from right to left and back.
Paste copied or cut text. Do the gesture by drawing a line from the lower left of the
screen diagonally up toward the right and back down to the right.
Insert a tab. The horizontal portion of the gesture must be at least two times longer
than the vertical portion.
Tip You can also use the Enter, Space or Backspace buttons on the
Transcriber toolbar.
The Transcriber toolbar
The Transcriber toolbar, which appears at the bottom of the screen when Transcriber
is open, provides easy access to several tools, Enter, Space, Backspace buttons, Left
and Right arrow buttons.
Tap To
Open the Options dialog box, where you can set options such as writing direction,
text entry, and shorthand.
Open Letter Shapes, where you can set your personal writing styles to maximize
recognition.
Use the miniature keyboard to quickly enter numbers, punctuation, and other
symbols.
Change the character recognition mode.
• a mode. This is the default for optimum handwriting recognition.
• 123 mode. Numbers and some letters are allowed and the calculator is
activated.
• A mode. All letters are automatically capitalized.
If you are in A or 123 mode, recognition returns automatically to the default mode
once you lift the stylus.
Insert a space at the cursor.
Insert a paragraph return at the cursor.
Move the cursor one space to the left.
Move the cursor one space to the right.
Move the cursor one space back and erase any text.
Open Transcriber Help.
29

2.6 Drawing and Writing on the Screen
With your device, you can draw directly on the screen, or write on the screen and
save notes in your own handwriting. For more information on what you can do with
Notes, see “Notes” in Chapter 7.
2.7 Searching for Information
You can search for files and other items stored on your device in the My Documents
folder or on a storage card. You can search by file name or by words located in the
item. For example, you can search in e-mail messages, notes, appointments, contacts,
and tasks, as well as in online Help.
To search for a file or an item
1. Tap Start > Programs > Search.
2. In Search for, enter the file name, word, or other information you want to search
for.
3. If you have looked for this item before, tap the Search for arrow and select the
item from the list.
4. In Type, select a data type to help narrow your search.
5. Tap Search. The My Documents folder and subfolders are searched.
6. In the Results list, tap the item you want to open.
Note The storage card symbol
a storage card.
is displayed next to the names of files saved on
30
 Loading...