

Drive PowerStroll Owner's Handbook Manual

OWNER’S HANDBOOK
™

PowerStroll Owner’s Handbook Page 2 of 8 Part Code: Z24000
Contents
1. Introduction
2. Safety Procedures
3. Parts Description
4. Installation Instructions
5. Disassembly and Transportation
6. Battery Charging and Care
7. Operating the PowerStroll
8. Troubleshooting
9. Specification
10. Warranty
11. Compatibility with Drive Wheelchairs
Introduction
• The PowerStroll is designed as an aid to a
wheelchair attendant providing power to
aid pushing in otherwise strenuous
situations such as up steep hills, etc.
• The PowerStroll features some ingenious
concepts to help the installation and
operation of the device. Some these are
covered by a pending patent GB 0723584.9
• The PowerStroll is designed to work in
conjunction with most wheelchairs with seat
widths between 16” and 20” (40cm – 50cm).
The PowerStroll will also fit some narrow
width wheelchairs such as Drive Medical’s
Lightweight Aluminium. An optional
extension bar is available to fit to
wheelchairs with 22” (55cm) seat widths.
• Single-wheel (for manoeuvrability) and dualwheel (for added stability and traction)
versions of the PowerStroll are available.
• The PowerStroll is to be controlled by an
attendant with a manual wheelchair and
user up to a combined weight of 21 stone
(135kg).
• The PowerStroll uses a 24V 12ah battery
pack, and has a range of up to ten miles
between charges.
• The PowerStroll is manufactured by Drive
Medical Ltd and is CE marked. Drive
Medical Ltd is an ISO 9001 and ISO 13485
certified Medical Device Manufacturer.
Safety Procedures
• The PowerStroll must not be used solely by
the wheelchair user under any
circumstances.
• Ensure the PowerStroll is installed as far to
the rear of the wheelchair as is comfortable
for the attendant to do so.
• Operate the PowerStroll at a speed that is
both comfortable for the operator and
wheelchair user.
• When connecting / disconnecting the
battery from the motor or the charger make
sure both the power to the charger and
PowerStroll handcontrol are switched off.
• Ensure the PowerStroll is secured in transit.
It is also recommended that the battery is
disconnected.
• Ensure that the battery is charged only with
the battery charger supplied with the
PowerStroll. Using another battery charger
may cause damage or injury.
• Whilst the PowerStroll has been EMC
tested, it may be susceptible to certain
types of electromagnetic waves. Avoid
close proximity to mobile phones,
commercial broadcast towers and
emergency services’ radios. Other
household appliances are not known to
pose any such risk. If involuntary movement
occurs, switch off of the PowerStroll and
report this to your dealer.
• The PowerStroll should not be used when it
is snowing or during heavy rain. This may
cause damage to the PowerStroll. The
PowerStroll should not be exposed to damp
conditions or direct sunlight.
• Note: Wheelchairs fitted with attendant
cable brakes. On such wheelchairs, the
attendant brake levers should be removed
prior to fitting. If the attendant brakes do
not have a separate parking brake facility,
then parking brakes should be added to the
wheelchair.
PowerStroll Owner’s Handbook Page 3 of 8 Part Code: Z24000
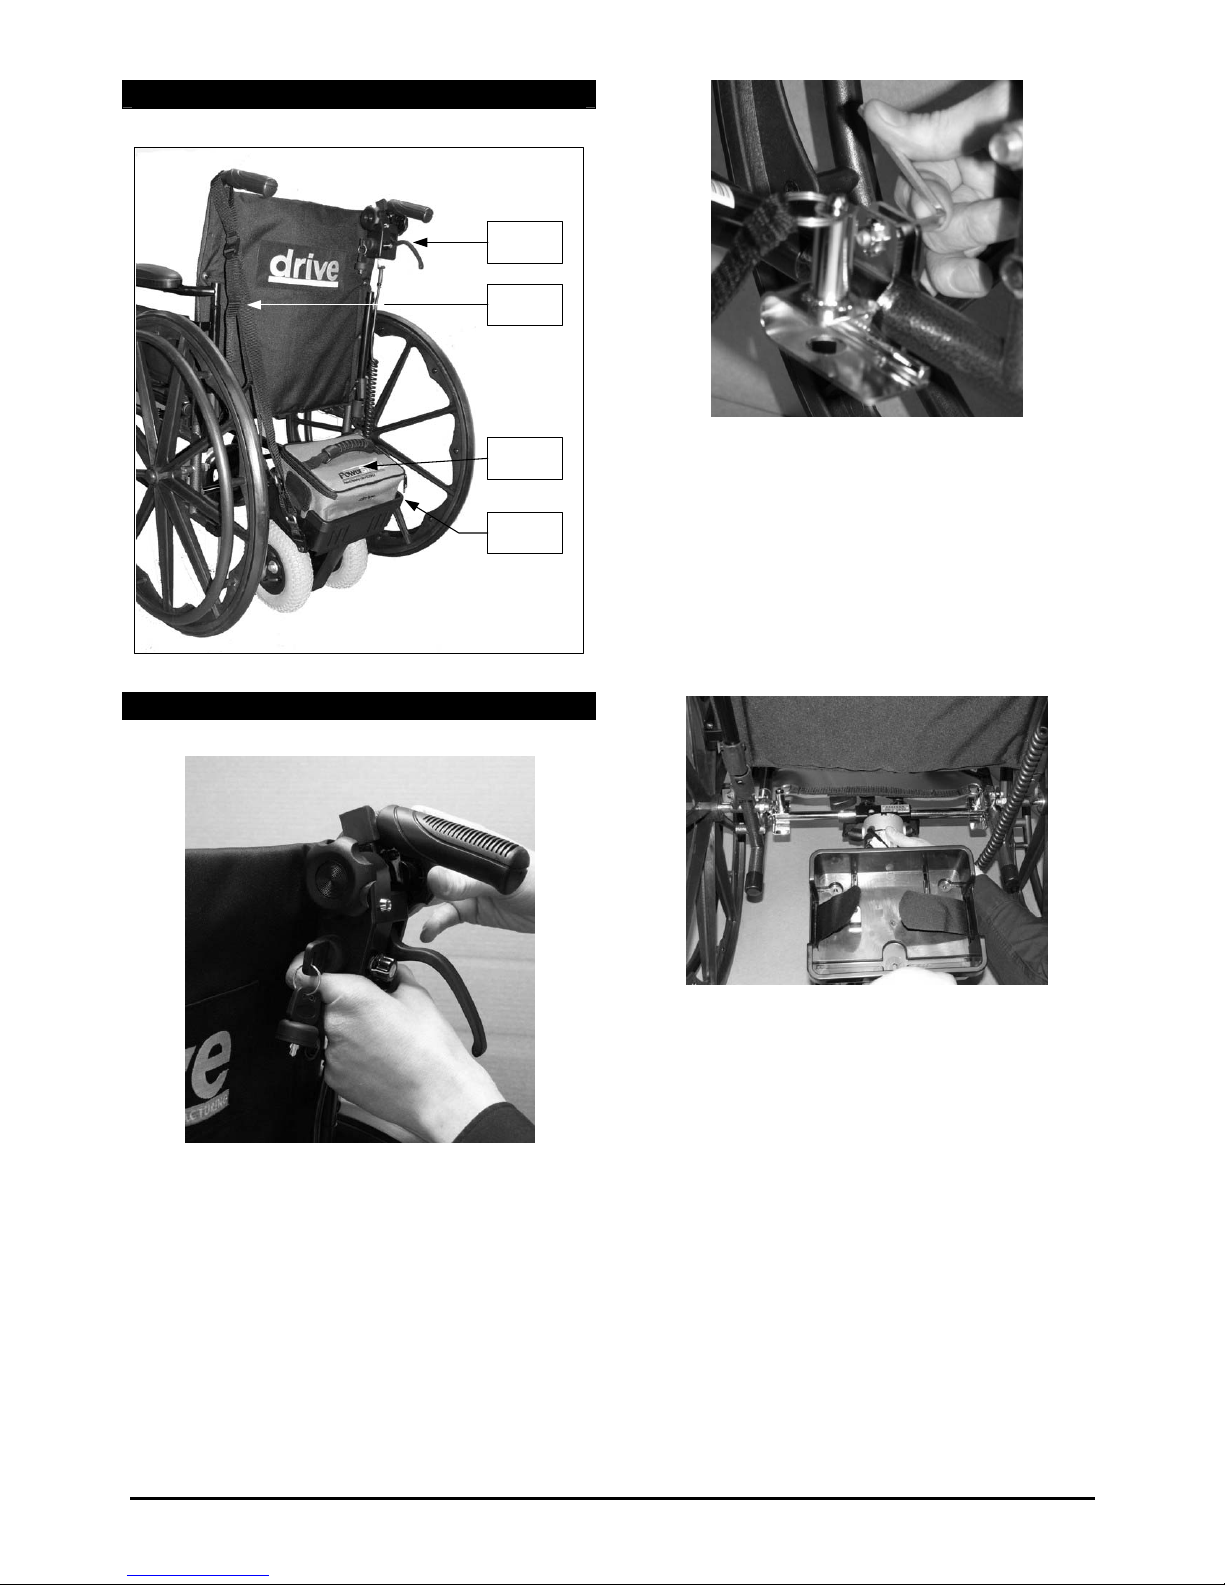
Parts Description
HAND
SET
POWER
PACK
BATTERY
PACK
LIFT UP
STRAP
Installation Instructions
1. Handset Installation
Loosen both knobs on the handset.
Squeeze the crocodile clip on the handset
and apply to the push handle as shown.
Secure the clip by turning the outer knob
clockwise.
Tilt the handset to the required angle then
tighten the inner knob clockwise to secure.
2. Bracket Installation
Install both brackets on the bottom
horizontal tubing of the wheelchair, using an
Allen Key.
Ensure that the screws are sufficiently tight
and do not rotate on the tubing.
Attach the two sections of Velcro together.
3. Powerpack Installation
Feed the telescopic bar through the front
end of the powerpack. Loosen the tristar
knob on the bar and adjust to the correct
length.
Tighten the knobs on the bar and at the
front of the powerpack.
Place the two ends of the bar on the rear of
the brackets, then push the powerpack
forward until it locks in position.
 Loading...