


OPERATING INSTRUCTIONS & DRILL INFORMATION
MODEL 750SP
US Patents
D385567, & 4,471,581 5,735,732 & 5,400,546 other Patents Pending
CONTENTS
Warranty |
1 |
Congratulations |
2 |
Quick Steps |
3 |
Instructions |
4 |
Maintenance |
7 |
Quick Facts |
8 |
Replacement Parts |
9 |
Troubleshooting |
10 |

US DEPARTMENT OF LABOR |
Form Approved Occupational Safety and Health |
|
|
Administration |
OMB No. 44-R1367 |
MATERIAL SAFETY DATA SHEET
Required under USDL Safety and Health Regulations for Ship Repairing, Shipbuilding and Shipbreaking (29 CFR 1915, 1916, 1917)
SECTION I
MANUFACTURES NAME:Professional Tool Manufacturing LLC EMERGENCY PHONE NO: (541) 552-1301
ADDRESS: 210 East Hersey Street, Ashland, Oregon 97520
CHEMICAL NAME & SYNONYMS: Diazon-Electroplated Diamond/CBN Products, Diamond (uncoated), Man-Made * Diamond, RVG, MBG, MBS Product Families, Standard Series and 300 Series Diamond Micron Powder
TRADE NAME & SYNONYMS: Electroplated CBN Wheels, Electroplated Diamond Wheels CHEMICAL FAMILY: Abrasive/Any Grade
FORMULA: N/A
|
SECTION II - COMPOSITION |
|
CHEMICAL NAME: |
Nickel |
Industrial Diamond |
REGULATED:* |
Yes |
No |
CAS#: |
7440-02-0 |
7882-40-3 |
AGIH / TLV: |
1.0 mg/m3 |
10.0 mg/m3 (PNOC) |
CARCINOGEN: |
Yes |
No |
*Materials are regulated by OSHA 29 CFR 1910,1200, Hazard Communication Standard.
|
SECTION III - PHYSICAL AND CHEMICAL DATA |
|
|||
BOILING POINT (F) |
n/a |
MELTING POINT |
|
n/a |
|
SPECIFIC GRAVITY |
n/a |
VAPOR PRESSURE |
|
n/a |
|
VAPOR DENSITY |
n/a |
EVAPORATION RATE |
|
n/a |
|
SOLUBILITY IN WATER |
n/a |
SOLUBILITY IN ALCOHOL |
n/a |
||
SOLUBILITY IN OTHER SOLVENT |
|
n/a |
|
|
|
PERCENT VOLATILE BY VOLUME (%) |
|
n/a |
|
|
|
APPEARANCE AND ODOR: Solid, Clear, White To Yellow To Dark Crystals Silver Color. |
|||||
SECTION IV - FIRE AND EXPLOSION HAZARD DATA |
|
||||
FLASH POINT |
n/a |
|
|
|
|
(METHOD USED) |
FLAMMABLE LIMITS |
LEL |
UEL |
|
|
EXTINGUISHING MEDIA: |
|
|
n/a |
|
|
SPECIAL FIRE FIGHTING PROCEDURES: |
n/a |
|
|
||
UNUSUAL FIRE AND EXPLOSION HAZARDS: |
n/a |
|
|
||
SECTION V - HEALTH, FIRST AID AND MEDICAL DATA
PRIMARY ROUTE(S) OF ENTRY:
Inhalation, Ingestion, Skin, Eye(s)
EFFECTS OF OVEREXPOSURE:
INHALATION: Difficulty in breathing (Dust from wheel use).
INGESTION: If dust, symptoms are variable.
SKIN: Irritation (especially if sensitive to Ni).
EYE(S): Irritation (from Ni or diamond particle).
FIRST AID AND MEDICAL INFORMATION:
INHALATION: Move to fresh air. Give oxygen if necessary.
INGESTION: Obtain medical attention.
SKIN: Wash thoroughly with water. Obtain medical help if necessary.
EYE(S): Flush thoroughly with water. Obtain medical assistance.
OTHER POTENTIAL HEALTH RISKS:
Nickel (Ni) is listed as a carcinogen. Avoid long exposure. Consult medical personnel for first aid and medical information.
|
SECTION VI - CORROSIVITY AND REACTIVITY DATA |
|
STABILITY: |
Unstable ( ) |
Stable (x) |
POLYMERIZATION: |
May occur ( ) |
Will not occur (x) |
INCOMPATIBILITY (Materials to avoid) |
n/a |
|
HAZARDOUS COMPOSITIONS PRODUCTS: |
n/a |
|
CONDITIONS TO BE AVOIDED: Contact with strong acids/caustics; enclosed areas.
SECTION VII - SPILL, LEAK AND DISPOSAL PROCEDURES
STEPS TO BE TAKEN IN CASE MATERIAL IS RELEASED OR SPILLED: Normal clean up procedure
WASTE DISPOSAL METHOD: Waste will contain nickel. Dispose in accordance with all applicable federal, state, and local regulations.
SECTION VIII - PERSONAL PROTECTION INFORMATION
RESPIRATORY PROTECTION:
Respiratory protection as needed see OSHA 29 CFR 1910.134 VENTILATION: LOCAL EXHAUST: strongly preferred MECHANICAL (GENERAL): Use only if adequate to maintain below TLV’s. PROTECTIVE GLOVES: As desired by user.
EYE PROTECTION: Recommended see OSHA 29 CFR 11910.215
OTHER PROTECTIVE EQUIPMENT: Use standard precautions for grinding operations.
SECTION IX - STORAGE AND HANDLING PROCEDURES
NORMAL STORAGE AND HANDLING: Store in clean, dry area, away from chemicals.
NORMAL USE: Use adequate ventilation (see Section VIII)
PAGE (1) |
FORM OSHA-20 |
IMPORTANT SAFETY INSTRUCTIONS
REMEMBER, FOR YOUR OWN SAFETY, READ INSTRUCTION MANUAL BEFORE OPERATING TOOL. Wear Eye Protection. Never touch internal parts of the sharpener when the sharpener is on. The rotating diamond grinding wheel can cause injury. Use caution when replacing the grinding wheel. Follow instructions entitled “Replacing The Grinding Wheel” in this Instruction Manual. Regularly empty accumulated grinding dust. Follow instructions entitled “Drill Doctor Maintenance” in this Instruction Manual.
WARNING : WHEN USING ELECTRIC TOOLS, BASIC SAFETY PRECAUTIONS INCLUDING THE FOLLOWING SHOULD ALWAYS BE FOLLOWED TO PREVENT THE RISK OF FIRE, ELECTRIC SHOCK AND PERSONAL INJURY.
1.KEEP GUARDS IN PLACE
2.REMOVE WRENCHES. Form a habit of checking to see that the wrench is removed from tool before turning on.
3.KEEP WORK AREA CLEAN. Cluttered areas and benches invite accidents.
4. DO NOT USE IN DANGEROUS ENVIRONMENT Don’t use power tools in damp or wet locations, avoid exposure to rain.
5.STORE EQUIPMENT in a safe place when not in use.
6.DON’T FORCE TOOL. It will do the job better and safer at the rate for which it was designed.
7.USE RIGHT TOOL. Don’t force tool or attachment to do a job it was not designed for.
8.ALWAYS USE SAFETY GLASSES. Also use face or dust mask if cutting operation is dusty. Everyday eyeglasses only have impact resistance lenses, they are NOT safety glasses.
9.MAINTAIN TOOL WITH CARE. Keep tools sharp and clean for best and safest performance.
10.DISCONNECT TOOLS from the power supply before servicing,when cleaning accessories.
11.AVOID ACCIDENTAL STARTING. Make sure switch is in “OFF “ position before plugging in.
12.USE RECOMMENDED ACCESSORIES.
13.CHECK FOR DAMAGED PARTS. Before further use of the tool, a guard or other part that is damaged should be carefully checked to assure that it will operate properly and perform its intended function. Check for alignment of moving parts, binding of moving parts,breakage of parts, mounting and any other conditions that may affect its operation. A guard or other part that is damaged should be properly repaired or replaced.
14.NEVER LEAVE TOOL RUNNING UNATTENDED.
15.USE PROPER EXTENSION CORD. Make sure extension cord is in good condition. When using an extension cord be sure to use one heavy enough to carry the current the Drill Doctor® will draw. An undersized cord will cause a drop in line voltage, resulting in a loss of power and/or overheating. Maximum cord length (5O ft), minimum gauge (16). The smaller the gauge the heavier the cord.
DRILL DOCTOR® WARRANTY
Professional Tool Manufacturing LLC warranties your Drill Doctor® to be free of defects due to workmanship and design for 1 year following the first day of in service use.
For warranty service see warranty card instructions or contact your authorized Drill Doctor® dealer.
1
Congratulations
You have just purchased the finest, most accurate and best engineered drill bit sharpener ever created for home and professional use. It is likely that your experience with this sharpener will be unlike any sharpener you have used before. We hope that in the next several minutes you will discover how Professional Tool Manufacturing LLC and the Drill Doctor® help to SIMPLY improve the quality of your life (and your drill bits’ too!).
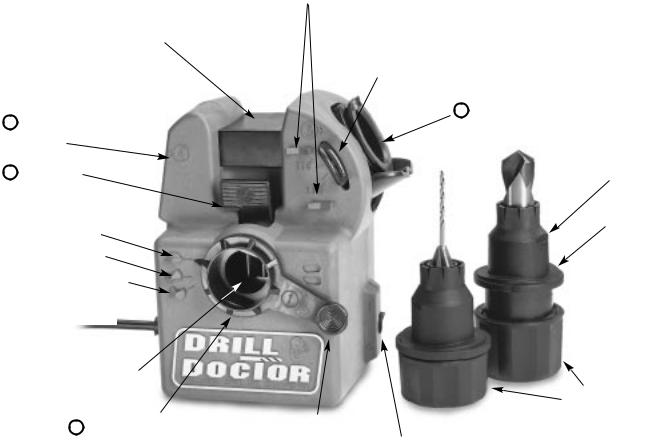
Before you sharpen your first drill bit
Take a few minutes to familiarize yourself with your new Drill Doctor® and its basic parts. We will refer to all of the parts and features (Figure 1) during the course of this manual and in the video. There are some features and characteristics unique to the Drill Doctor® which are explained and illustrated within the instruction section of this manual and the video. Don’t worry, the time it takes to watch the video or read this manual will be made up when you sharpen your first drill bits. Keep in mind that learning to sharpen drill bits is like learning to ride a bike: it takes a few tries to get it right, so you should expect that it may take a couple of drill bits to get the “point”.
DRILL DOCTOR® (MODEL 750SP Shown)
POINT ANGLE GAUGES
WHEEL COVER
PP01434PF
4 SPLIT POINT TUBE
2 PADDLE
MASONRY
SPLIT POINT
STANDARD POINT
POWER CORD 
Fig. 1
ANGLE CHANGE LOOP HANDLE
3 SHARPENING TUBE
PP01426PA
FLAT
CAM
3/4”/ ” CHUCK
SA01750PA
|
|
|
|
|
|
1/2”/ ” CHUCK |
|
SPRING STEEL PAWLS |
|
|
|
|
|||
|
|
|
|
SA01500PA |
|||
|
|
|
|
|
|
||
|
|
|
|
|
|
|
CHUCK KNOBS |
|
|
|
|
|
|
|
|
|
1 ALIGNMENT TUBE |
|
ALIGNMENT TUBE |
|
|
|
|
|
PP01455PF |
|
HANDLE |
|
|
|
|
|
|
|
ON/OFF SWITCH |
|
|||
|
|
|
|
|
|
|
|
|
|
|
|
|
|
|
|
|
|
|
|
|
|
|
|
About the Drill Doctor® and this manual
The Drill Doctor® is most efficient when used to resharpen a drill bit’s original point angle. It has been designed and engineered to sharpen three of the most common drill bit types: standard 118°, high-performance split point 135°, and carbide 135° masonry (see page 9 for illustrations and applications). With its standard diamond grinding wheel it will sharpen high-speed steel, cobalt, parabolic, TiN coated, and solid carbide drill bits. The troubleshooting section of this manual is designed to anticipate many common questions and applications. To keep your Drill Doctor® and your drill bits in top condition please refer to the maintenance section of this manual. Available replacement wheels and parts are shown in the exploded diagram (page 8). They are available from Drill Doctor® or your dealer. Please note that the 

 symbols refer to the three tubes and the
  refers to the paddle on the Drill Doctor®.
CONGRATULATIONS
2

QUICK STEPS
QUICK OPERATING STEPS
Models 500SP & 750SP
A. Setting for split point style (full instructions page 4)
1.Determine the point angle of your drill by placing the drill point in the point angle gauges. See A-1
2.Insert a chuck (without drill) into the sharpening tube  and pull the loop handle out. Move point angle indicator to the setting needed (118° or 135°). Make sure the loop seats properly. See A-2
3.Pull the alignment tube  handle slightly away from the housing and move to the (Split Point) setting. See A-3
B. Aligning the drill bit (full instructions page 4 and figure 9)
1.Insert the drill loosely into the chuck. Tighten the chuck knob clockwise, then loosen it so the metal chuck jaws are just loose enough for the drill bit to slide in and out.
2.Align the flat on the chuck with the flat in the alignment tube  . See B-1
3.Push the paddle  to open the blue spring steel pawls. See A-3. Push chuck and drill assembly into alignment
  tube so that the flat on the chuck is entirely hidden. See B-2
4.Push the drill in to the drill stop. Release the paddle and rotate the drill by the shank until the pawls grip inside the drill flutes. Keep the drill bit pushed to the drill stop and turn the chuck knob clockwise to tighten the jaws onto the drill bit. Push the paddle  back and remove the chucked drill (see Figures 8 and 24 for correct alignment and terminology).
C. Sharpening the drill bit point (full instructions page 5)
1.Turn the switch below the sharpening tube  on. Position the sharpener so that you are looking at it from the perspective shown in C-1. Insert the chuck in the tube
  .
.
2.Rotate the chuck clockwise, in half rotation increments, 12 to 20 times
(on a medium size drill bit 1/4” to 3/8” ) in the sharpening tube . It is important to keep consistent pressure going INTO the tube  . Let the cam dictate the natural in and out sharpening motion. The sharpening will occur in the low part of the chuck cam. Do not push the chuck down to the base. See C-2
D. Splitting the drill point (full instructions page 6)
1.Move the chucked drill to the point splitting tube  and again match the flats on the chuck with the flats in the tube
  . Insert the chucked drill until the flats are touching and the chuck does not rotate.
2.Slowly pull the chuck forward giving the drill bit one or two short ”pecks” on the wheel. Repeat untill the split is to the middle of the drill point. To avoid over-splitting inspect the drill point periodicaly. See D-1
3.Pull the chuck out of the point split tube just far enough to rotate the chuck 180°. Repeat steps 1 and 2 above.
A-1
A-2
PAWLS
A-3
B-1 FLATS
B-2
C-1
C-2 

D-1
3
 Loading...