


COMPACT SEWING MACHINE MÁQUINA DE COSER COMPACTA MACHINE À COUDRE COMPACTE
OWNER’S MANUAL
MANUAL DEL PROPIETARIO
MANUEL D’INSTRUCTION
Model / Modelo / Modèle: 970C
|
EURO-PRO Operating LLC |
U.S.:Boston Ma, 02465 |
Canada: 4400, Bois-Franc |
|
St-Laurent, QC H4S 1A7 |
Tél. : 1 (800) 361-4639
www.euro-pro.com
Copyright © EURO-PRO Operating LLC
IMPORTANT SAFETY INSTRUCTIONS
When using an electrical appliance, safety precautions should always be followed, including the following:
Read all instructions before using this sewing machine.
Danger - To reduce the risk of electric shock:
1.An appliance should never be left unattended when plugged in or with batteries in place.
2.Always unplug this appliance from the electrical outlet and/or remove batteries immediately after using and before cleaning.
Warning - To reduce the risk of burns, fire, electric shock, or injury to persons:
1.Do not allow to be used as a toy. Close attention is necessary when this appliance is used by or near children.
2.Use this appliance only for its intended use as described in this manual. Use only attachments recommended by the manufacturer as contained in this manual.
3.Never operate this appliance if it has a damaged cord or plug, if it is not working properly, if it has been dropped or damaged, or dropped into water. Return the appliance to
EURO-PRO Operating LLC for examination, repair, electrical or mechanical adjustment.
4.Never operate the appliance with any air openings blocked. Keep ventilation openings of the sewing machine and foot control free from accumulation of lint, dust and loose cloth.
5.Keep fingers away from all moving parts. Special care is required around the sewing machine needle.
6.Always use the proper needle plate. The wrong plate can cause the needle to break.
7.Do not use bent needles.
8.Do not push or pull fabric while stitching. It may deflect the needle causing it to break.
9.Switch the sewing machine off when making any adjustments in the needle area, such as threading needle, changing needle, threading bobbin or changing presser foot.
10.Always unplug sewing machine from electrical outlet when removing covers, lubricating or when making any other user servicing adjustments mentioned in the instruction manual.
11.Never drop or insert any object into any opening.
12.Do not use outdoors.
13.Do not operate where aerosol (spray products) are being used or where oxygen is being administered.
14.To disconnect, turn all controls to the off position, then remove plug from outlet.
15.Do not unplug by pulling on cord. To unplug, grasp the plug, not the cord.
SAVE THESE INSTRUCTIONS
This sewing machine is intended for household use only.
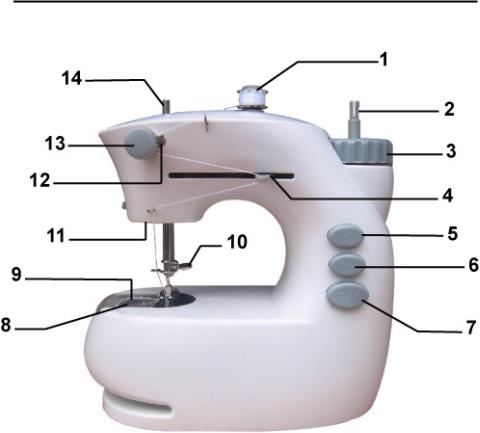
1. Getting to know your machine
Front view
1. |
Upper Bobbin |
8. |
Bobbin Cover |
2. |
Bobbin Winding Spindle |
9. |
Bottom Bobbin |
3. |
Hand Wheel |
10. |
Needle Clamp Screw |
4. |
Take Up Lever |
11. |
Light |
5. |
Light Switch |
12. |
Thread Tension Release |
6. |
Speed Button |
|
Disk |
7. |
On/Off Button |
13. |
Tension Dial |
|
|
14. |
Needle Bar |
Illustrations may differ from actual product.
1 |
Rev. 07/08 |
2 |

Rear view
1. |
Bobbin Spool Pin |
5. |
Needle |
|||
2. |
Thread Cutter |
6. |
Presser Foot |
|||
3. |
Presser Foot Lifter |
7. |
AC/DC Receptacle |
|||
4. |
Threading Guide |
8. |
Foot Control Receptacle |
|||
Accessories |
|
|
|
|
||
|
|
|
|
|
|
|
|
|
Foot controller |
|
|
Long spool |
|
|
|
|
|
pin |
|
|
|
|
|
|
|
|
|
|
|
|
|
|
|
|
|
|
Needle |
|
|
Threaded |
|
|
|
|
|
bobbins (x2) |
|
|
|
|
|
|
|
|
|
|
|
|
|
|
|
|
|
|
Needle threader |
|
|
Empty |
|
|
|
|
|
bobbins (x2) |
|
|
|
|
|
|
|
|
|
|
|
|
|
|
|
|
|
|
Bobbin winding |
|
|
|
|
|
|
spindle |
|
|
|
|
|
|
|
|
|
|
|
2. Connecting the machine to the power supply
Using the sewing machine with the power cord:
1.Connect plug “A” to the AC/DC receptacle on the sewing machine and plug “B” to the electrical outlet.
2.Push the ON/Off button in to turn the machine “On”.
3.Connect the foot control “C” to the Foot Control Receptacle on the machine.
4.The sewing machine can be controlled by applying pressure to the foot control. CAUTION: Always turn the sewing machine “Off” and unplug from the electrical
outlet when the machine is not in use.
Using the sewing machine with batteries:
1.Open the battery compartment cover that is on the bottom of the sewing machine.
2.Insert 4 “AA” alkaline batteries making sure that the batteries are in the correct position as marked on the inside of the battery compartment.
3.Replace the battery compartment cover.
CAUTION: Make sure that the On/Off button is in the “Off” position when changing or inserting batteries. If the machine is in the “On” position, it will start to sew when the batteries are inserted and may cause injuries.
3 |
4 |
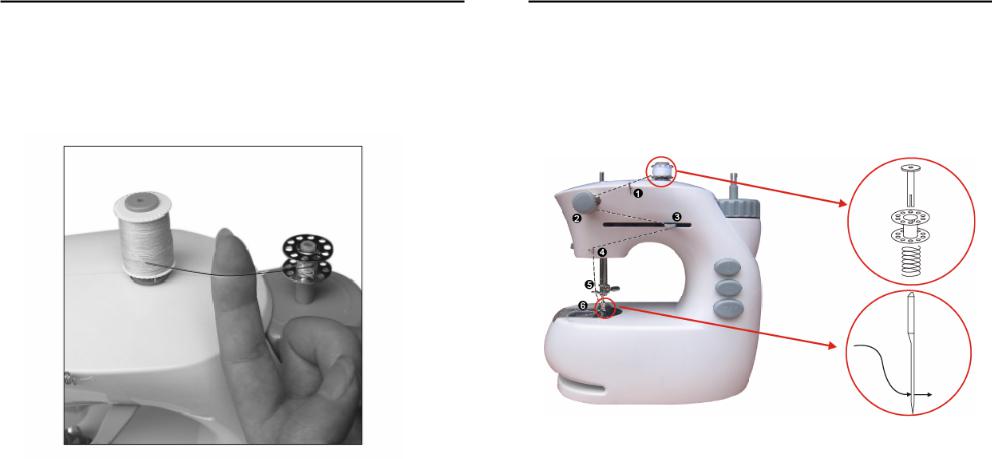
3.Bobbin winding
1.Place a spool of thread on the long spool pin.
2.Insert the bobbin winding spindle into the central hole of the handwheel and push an empty bobbin onto the spindle.
3.Wind the thread clockwise around the bobbin several times.
4.Place your index finger gently underneath the thread between the spool of thread and the bobbin as shown in the illustration below.
5.Press down on the On/Off button to start winding.
6.Stop the sewing machine after the correct amount of thread is wound around the bobbin.
7.Take the bobbin off the spindle and cut the thread.
4.Threading the upper thread
1.Place the upper bobbin or large spool of thread on the spool pin with the thread unwinding in a counter clockwise direction.
2.Pull the thread to the left and pass through the first thread guide (1).
3.Pass the thread between the two discs of the tension dial (2).
4.Thread it through the hole in the take-up lever (3) and then down through the second thread guide (4) and then through the needle bar thread guide (5).
5.Pass the thread through the eye of the needle going from left to right (6). A
needle threader is supplied with your machine to help you thread the eye of the needle. To use the needle threader, pass it through the eye of the needle going from right to left, insert the thread in the threader and gently pull the threader to the right.
5 |
6 |

5. Replacing the needle
Caution: Always remove the batteries or disconnect the AC/DC adapter from the electrical outlet before starting to replace the needle.
1.Turn the hand wheel in a counter clockwise direction to raise the needle to its highest position.
2.Hold the old needle and loosen the needle clamp screw. Remove the old needle. (Fig. 1)
3.Insert the new needle into the clamp with the flat side facing towards the inside of the machine. The eye of the needle should be facing the side of the machine.
4.Push the needle up into the needle clamp as far as it will go. (Fig. 2)
5.Tighten the needle clamp screw.
|
|
|
Fig. 1 |
Fig. 2 |
|
Please note:
After replacing the needle, turn the hand wheel by hand to check if the machine is stitching properly, then you can use the foot control or the On/Off button ONLY IF THE NEEDLE IS IN THE RIGHT POSITION AND THE STITCHES ARE GOOD.
6. Inserting or replacing the bobbin
Caution: Always remove the batteries or disconnect the AC/DC adapter from the electrical outlet before replacing the bobbin.
1.Remove the bobbin cover and take out the empty bobbin. (Fig. 1)
2.Place the new bobbin in the bobbin case with the thread unwinding in a clockwise direction. (Fig. 2, Fig. 3)
3.Leave about 4 inches of thread extended out from the bobbin case.
4.Holding the upper bobbin thread loosely in one hand, turn the hand wheel counter clockwise. (Fig. 4) The needle will go down, picking up the lower bobbin thread. Keep turning the hand wheel until the needle has come down completely and then come up again to its highest point. Stop when the needle starts to come down again.
5.Raise the presser foot and gently pull up the needle thread. You will see that it has caught the lower thread. Pull both threads towards the back of the needle and lay them under the presser foot.
6.Slide the bobbin cover back into place. (Fig. 5)
Note: It is important that the threading of both the top and bottom bobbins is properly threaded. Check carefully and do one practice stitch before beginning to sew. Improper threading will result in a thread jam or unbalanced stitch.
Very Important: Always make sure to use a metal bobbin. If not, the magnetized bobbin case will not be activated and there will be no tension on your bobbin thread.
Fig. 1 |
Fig. 2 |
Fig. 3
Fig. 4 |
Fig. 5 |
7 |
8 |

7. Setting the sewing speed
This sewing machine has two sewing speeds. Press the “ ” button in for a faster sewing speed or press “ ” button to the “out” position for a slower sewing speed.
8. Work light
If additional light is needed, press the light switch “ “ in to turn the light “On”. Press it again if you wish to turn it “Off”.
9. Starting to sew
You can start to sew using either the power cord with the foot control or insert batteries into the battery compartment and use the controls on the sewing machine.
1.Raise the needle to its highest position by turning the hand wheel counter clockwise and lift the presser foot.
2.Place both the upper and lower threads behind the presser foot. The threads should be approximately 4-inches long.
3.Place the fabric to be sewn under the presser foot. (Fig. 1) Lower the needle by turning the hand wheel counter clockwise and then lower the presser foot. (Fig. 2)
4.Press the “►/ █” On/Off button to the “On” position and begin sewing. Do not pull the fabric. Gently guide the fabric to keep the seam straight. (Fig. 3)
5.After finishing sewing, press the “►/ █” On/Off button to the “Off” position to stop sewing. (Fig. 3)
6.Turn the hand wheel counter clockwise to raise the needle to its highest position. (Fig. 4) Lift the presser foot and pull out the thread tension release bar. Then gently remove the fabric away from the sewing machine.
7.Cut the thread using the thread cutter.
Important: Do not touch the tension dial during sewing because it may cause the machine to jam.
Fig. 1 |
Fig. 2 |
Fig. 3 |
Fig. 4 |
10. Sewing sleeves
This sewing machine has been designed to sew sleeves or any narrow openings in a garment.
1.Lift the presser foot.
2.Position the garment over the sewing arm.
3.Lower the presser foot and follow the regular instructions.
9 |
10 |

11. Adjusting the thread tension
Test the stitch tension on a scrap piece of the same fabric you are going to use. When the thread tension is properly adjusted, the upper and lower threads tension is equal and strong enough to lock both threads in the center of the material.
If the upper tension is too tight, the upper thread lies straight along the surface of the fabric. Adjust the tension by turning the tension dial counter clockwise. (Fig. 1)
Fig. 1
If the upper tension is too loose, the bottom thread lies straight along the bottom of the fabric. Adjust by turning the tension dial clockwise. (Fig. 2)
Fig. 2
Please note:
The bobbin thread tension has been adjusted at the factory and does not need readjustment. If the upper tension adjustment does not correct the problem, then remove the bobbin and reinsert it making sure that the magnetism of the bobbin case is activated.
12. Troubleshooting
Problem |
Probable Cause |
Solution |
|
|
|
|
|
|
Batteries installed |
Reinsert using the |
|
|
incorrectly. |
diagram provided inside |
|
|
|
the battery compartment. |
|
|
Battery power low. |
Replace batteries with |
|
No power supply or |
|
new ones. |
|
Used and new battery are |
Replace batteries with |
||
machine runs slowly |
|||
|
used together. |
new ones. |
|
|
AC/DC adapter is not |
Make sure that the AC/DC |
|
|
connected to the right |
adapter is connected to |
|
|
position. |
the proper position on the |
|
|
|
machine. |
|
|
Needle is not properly |
Remove and reinsert the |
|
|
inserted. |
needle. |
|
Skipping stitches |
Needle is bent. |
Replace with a new |
|
|
|
needle. |
|
|
Presser foot is too loose. |
Tighten the presser foot. |
|
|
|
|
|
|
No more thread in lower |
Replace with a new lower |
|
Bobbin thread can |
bobbin. |
bobbin. |
|
Needle threaded |
Rethread the needle |
||
not be drawn up |
|||
|
incorrectly. |
making sure the thread |
|
|
|
goes from left to right. |
|
|
Upper thread is jamming |
Rethread the upper and |
|
|
under the presser foot. |
lower thread again. |
|
Breaking thread |
Needle is blunt. |
Replace with a new |
|
|
needle. |
||
|
Needle not inserted |
Reinsert the needle |
|
|
corrected. |
making sure to push it up |
|
|
|
as high as it can go. |
|
Stitches too loose or |
Upper thread too tight or |
Adjust the thread tension |
|
uneven |
lower thread too loose. |
dial. |
|
|
Needle bent or deformed. |
Replace with a new |
|
|
|
needle. |
|
Breaking needle |
Presser foot too loose. |
Replace with w new |
|
|
needle and tighten the |
||
|
|
presser foot. |
|
|
Pulled the fabric when |
Do not pull the fabric. Let |
|
|
sewing. |
the machine feed by itself. |
11 |
12 |
 Loading...