

COMPACT SEWING MACHINE
MÁQUINA DE COSER COMPACTA
MACHINE À COUDRE COMPACTE
OWNER’S MANUAL
MANUAL DEL PROPIETARIO
MANUEL D’INSTRUCTION
Model / Modelo / Modèle: 970C
EURO-PRO Operating LLC
U.S.:Boston Ma, 02465 Canada: 4400, Bois-Franc
St-Laurent, QC H4S 1A7
Tél. : 1 (800) 361-4639
www.euro-pro.com
Copyright © EURO-PRO Operating LLC
IMPORTANT SAFETY INSTRUCTIONS
When using an electrical appliance, safety precautions should always be followed,
including the following:
Read all instructions before using this sewing machine.
Danger - To reduce the risk of electric
shock:
1. An appliance should never be left
unattended when plugged in or with
batteries in place.
2. Always unplug this appliance from
the electrical outlet and/or remove
batteries immediately after using
and before cleaning.
Warning - To reduce the risk of burns,
fire, electric shock, or injury to persons:
1. Do not allow to be used as a toy.
Close attention is necessary
when this appliance is used by or
near children.
2. Use this appliance only for its
intended use as described in this
manual. Use only attachments
recommended by the manufacturer
as contained in this manual.
3. Never operate this appliance if it
has a damaged cord or plug, if it is
not working properly, if it has been
dropped or damaged, or dropped
into water. Return the appliance to
EURO-PRO Operating LLC for
examination, repair, electrical or
mechanical adjustment.
4. Never operate the appliance with
any air openings blocked. Keep
ventilation openings of the sewing
machine and foot control free from
accumulation of lint, dust and loose
cloth.
5. Keep fingers away from all moving
parts. Special care is required
around the sewing machine
needle.
6. Always use the proper needle
plate. The wrong plate can cause
the needle to break.
7. Do not use bent needles.
8. Do not push or pull fabric while
stitching. It may deflect the needle
causing it to break.
9. Switch the sewing machine off
when making any adjustments in
the needle area, such as threading
needle, changing needle,
threading bobbin or changing
presser foot.
10.Always unplug sewing machine
from electrical outlet when
removing covers, lubricating or
when making any other user
servicing adjustments mentioned
in the instruction manual.
11.Never drop or insert any object
into any opening.
12.Do not use outdoors.
13.Do not operate where aerosol
(spray products) are being used or
where oxygen is being
administered.
14.To disconnect, turn all controls to
the off position, then remove plug
from outlet.
15.Do not unplug by pulling on cord.
To unplug, grasp the plug, not the
cord.
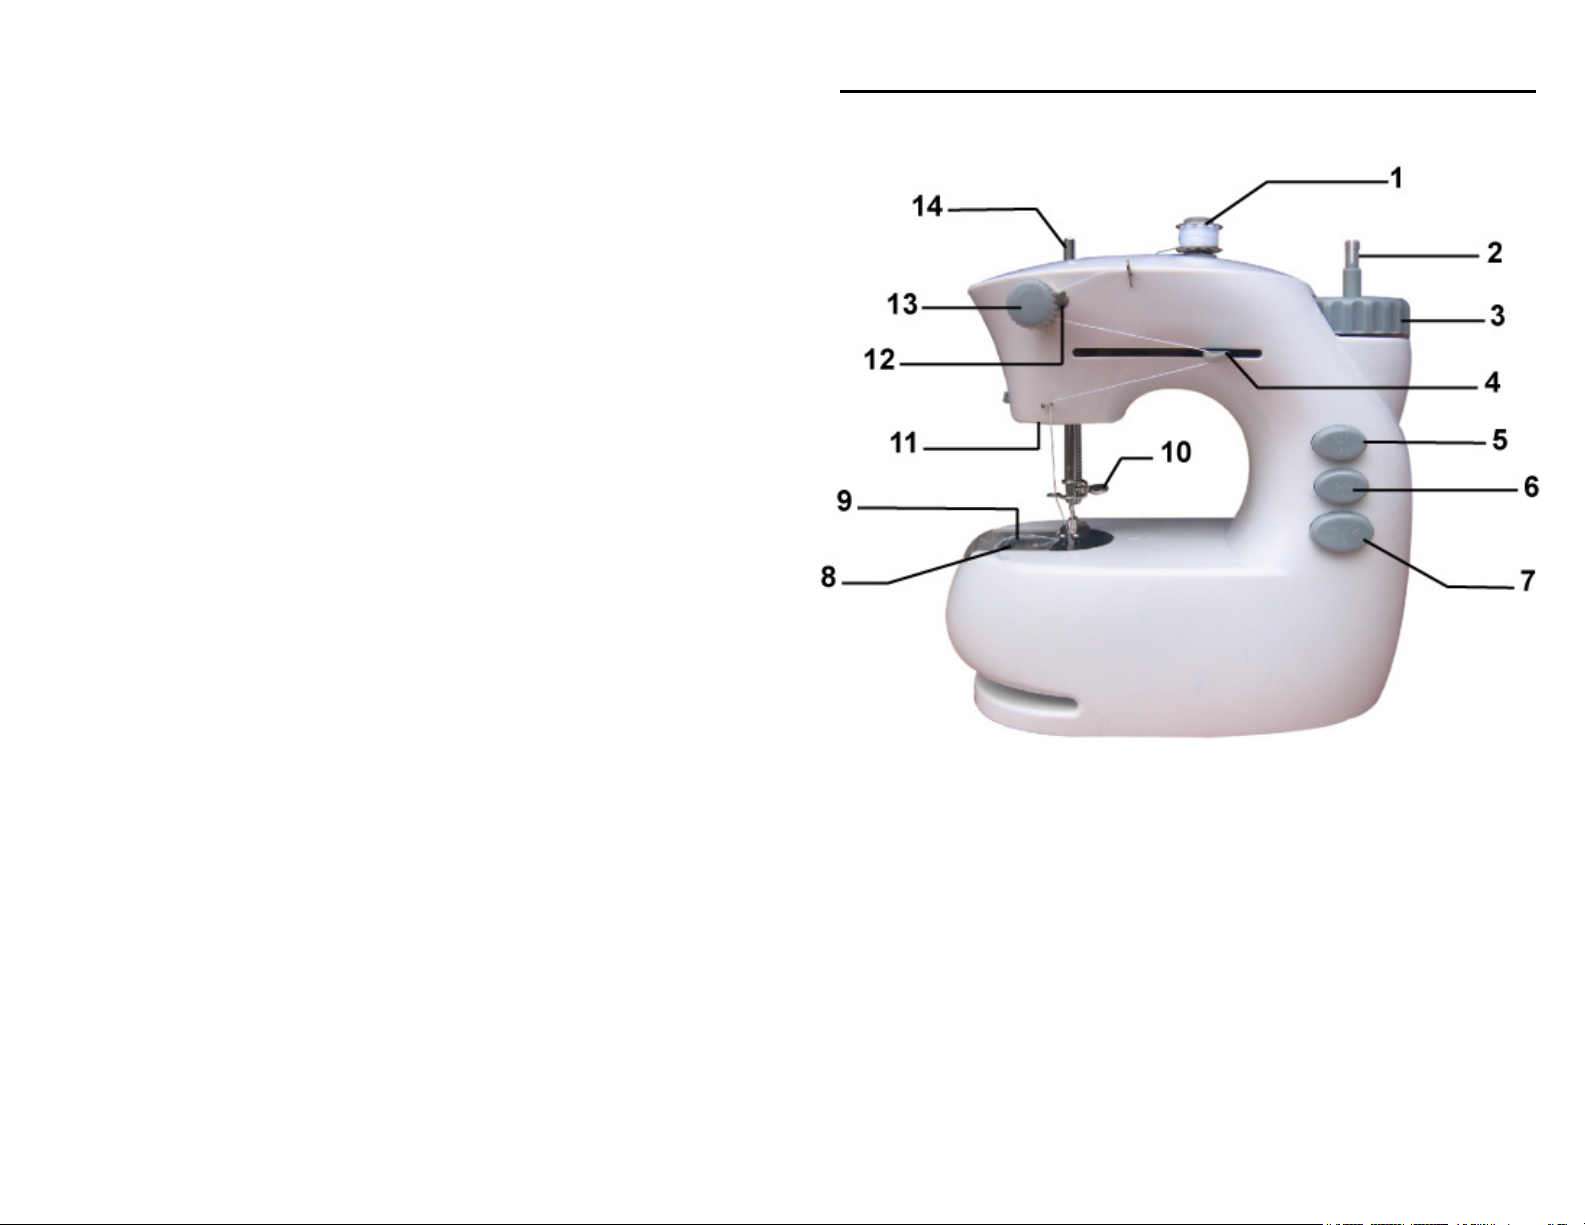
1. Getting to know your machine
Front view
1. Upper Bobbin
2. Bobbin Winding Spindle
3. Hand Wheel
4. Take Up Lever
5. Light Switch
6. Speed Button
7. On/Off Button
8. Bobbin Cover
9. Bottom Bobbin
10. Needle Clamp Screw
11. Light
12. Thread Tension Release
Disk
13. Tension Dial
14. Needle Bar
SAVE THESE INSTRUCTIONS
This sewing machine is intended for household use only.
1 Rev. 07/08
Illustrations may differ from actua l produ ct.
2
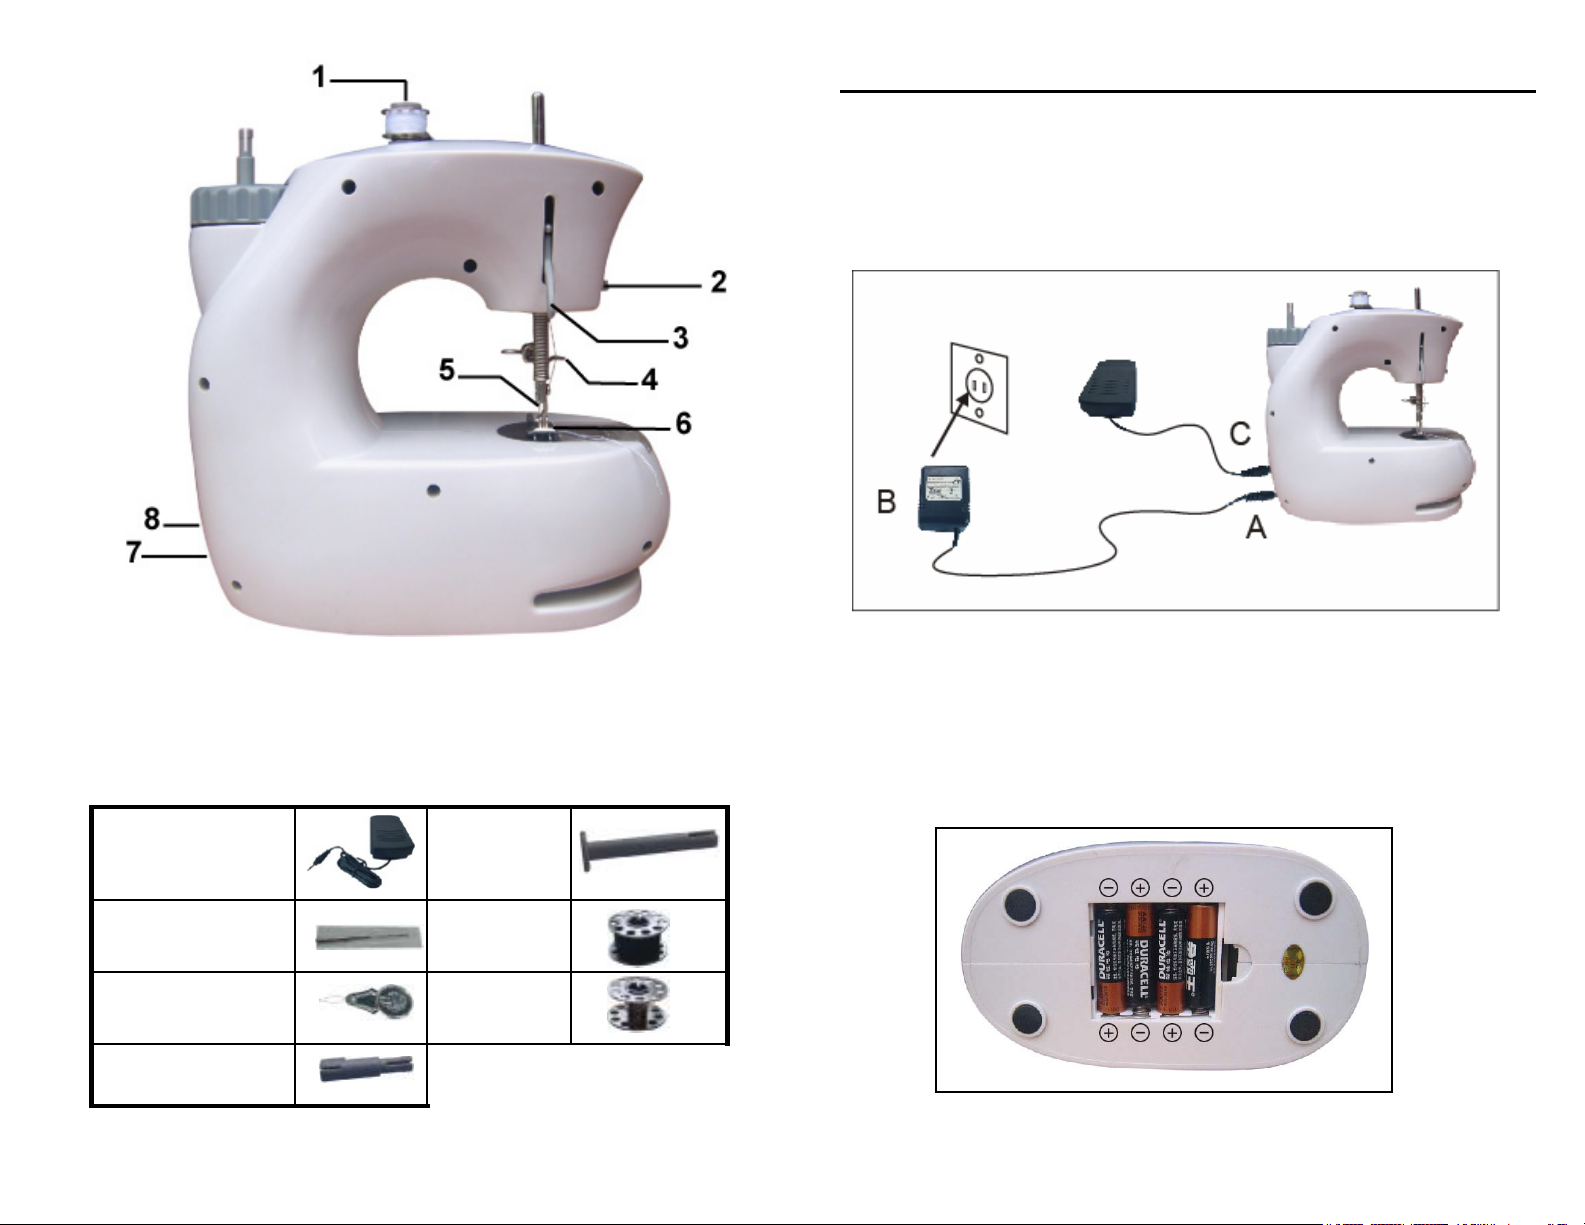
Rear view
1. Bobbin Spool Pin
2. Thread Cutter
3. Presser Foot Lifter
4. Threading Guide
Accessories
5. Needle
6. Presser Foot
7. AC/DC Receptacle
8. Foot Control Receptacle
2. Connecting the machine to the power supply
Using the sewing machine with the power cord:
1. Connect plug “A” to the AC/DC receptacle on the sewing machine and plug “B”
to the electrical outlet.
2. Push the ON/Off button in to turn the machine “On”.
3. Connect the foot control “C” to the Foot Control Receptacle on the machine.
4. The sewing machine can be controlled by applying pressure to the foot control.
CAUTION: Always turn the sewing machine “Off” and unplug from the electrical
outlet when the machine is not in use.
Using the sewing machine with batteries:
1. Open the battery compartment cover that is on the bottom of the sewing
machine.
2. Insert 4 “AA” alkaline batteries making sure that the batteries are in the correct
position as marked on the inside of the battery compartment.
3. Replace the battery compartment cover.
CAUTION: Make sure that the On/Off button is in the “Off” position when changing
or inserting batteries. If the machine is in the “On” position, it will start to sew when
the batteries are inserted and may cause injuries.
Foot controller
Needle
Needle threader
Bobbin winding
spindle
3
Long spool
pin
Threaded
bobbins (x2)
Empty
bobbins (x2)
4
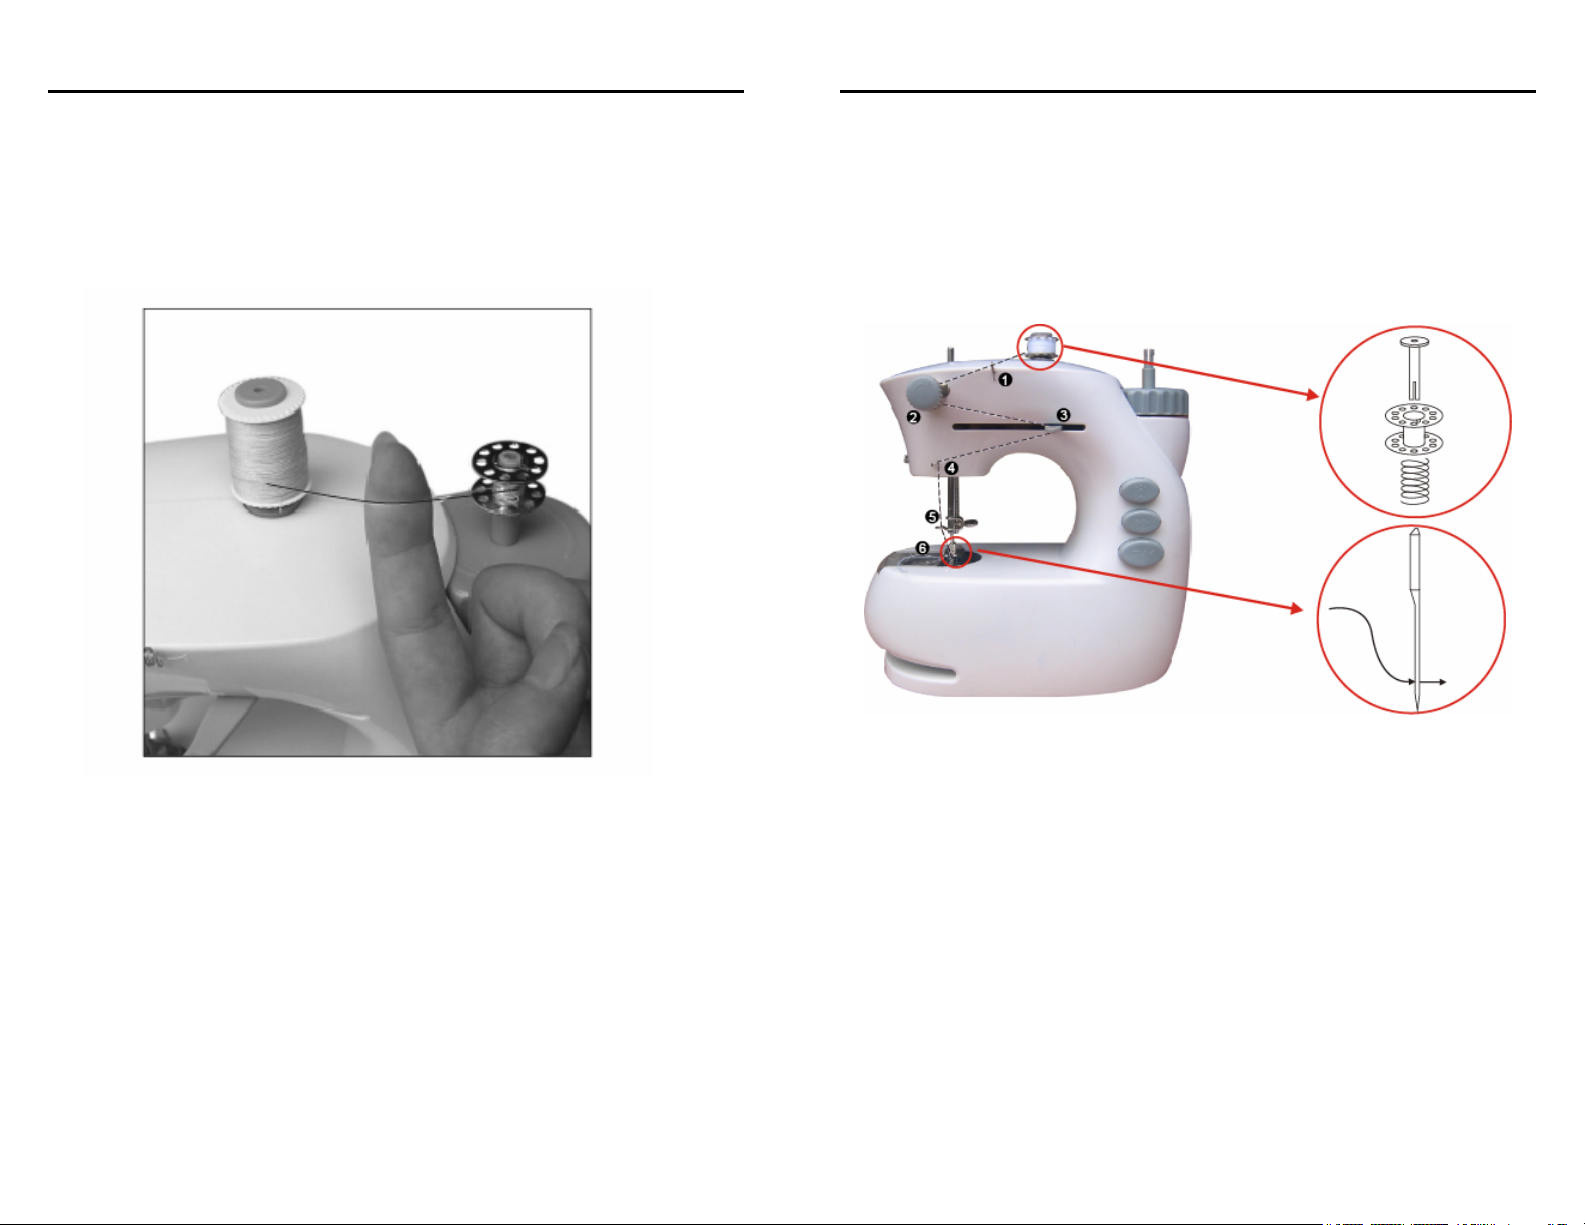
3. Bobbin winding
4. Threading the upper thread
1. Place a spool of thread on the long spool pin.
2. Insert the bobbin winding spindle into the central hole of the handwheel and
push an empty bobbin onto the spindle.
3. Wind the thread clockwise around the bobbin several times.
4. Place your index finger gently underneath the thread between the spool of
thread and the bobbin as shown in the illustration below.
5. Press down on the On/Off button to start winding.
6. Stop the sewing machine after the correct amount of thread is wound around
the bobbin.
7. Take the bobbin off the spindle and cut the thread.
1. Place the upper bobbin or large spool of thread on the spool pin with the thread
unwinding in a counter clockwise direction.
2. Pull the thread to the left and pass through the first thread guide (1).
3. Pass the thread between the two discs of the tension dial (2).
4. Thread it through the hole in the take-up lever (3) and then down through the
second thread guide (4) and then through the needle bar thread guide (5).
5. Pass the thread through the eye of the needle going from left to right (6). A
needle threader is supplied with your machine to help you thread the eye of the
needle. To use the needle threader, pass it through the eye of the needle
going from right to left, insert the thread in the threader and gently pull the
threader to the right.
5
6
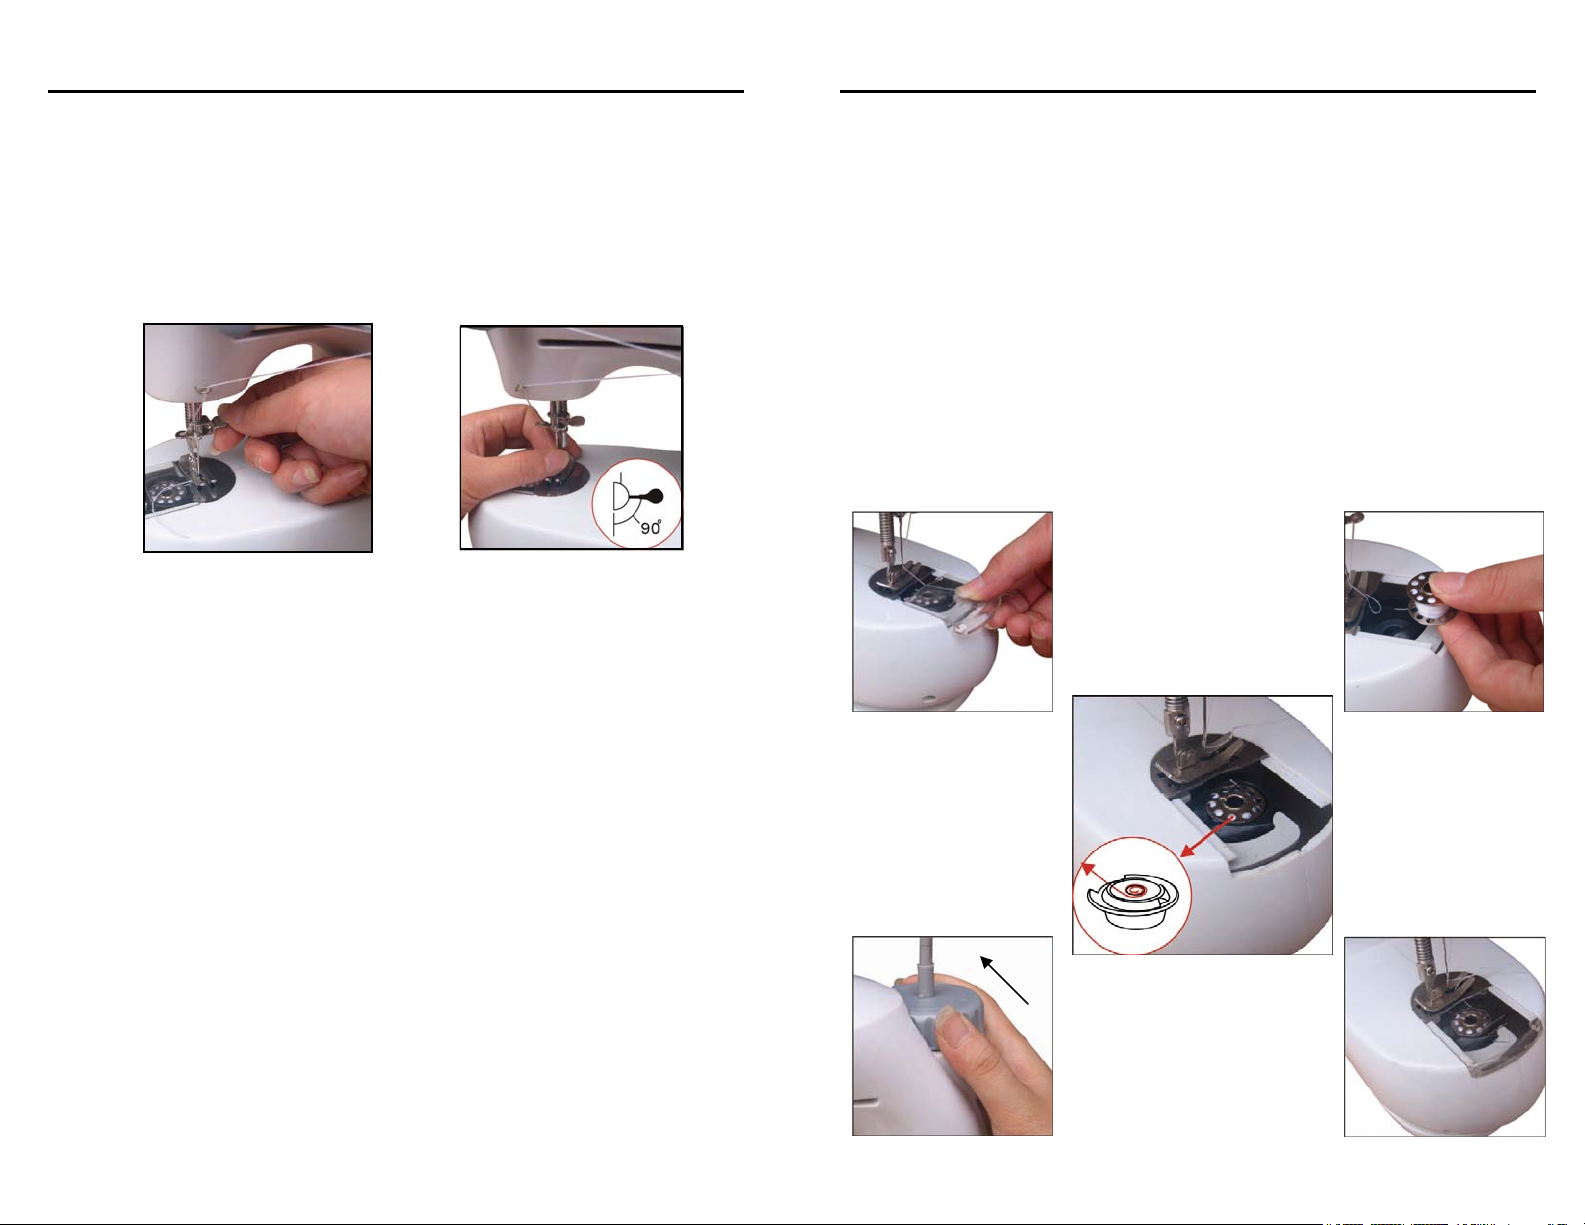
5. Replacing the needle
6. Inserting or replacing the bobbin
Caution: Always remove the batteries or disconnect the AC/DC adapter from the
electrical outlet before starting to replace the needle.
1. Turn the hand wheel in a counter clockwise direction to raise the needle to its
highest position.
2. Hold the old needle and loosen the needle clamp screw. Remove the old
needle. (Fig. 1)
3. Insert the new needle into the clamp with the flat side facing towards the inside
of the machine. The eye of the needle should be facing the side of the
machine.
4. Push the needle up into the needle clamp as far as it will go. (Fig. 2)
5. Tighten the needle clamp screw.
Fig. 1
Please note:
After replacing the needle, turn the hand wheel by hand to check if the machine is
stitching properly, then you can use the foot control or the On/Off button ONLY IF
THE NEEDLE IS IN THE RIGHT POSITION AND THE STITCHES ARE GOOD.
Fig. 2
Caution: Always remove the batteries or disconnect the AC/DC adapter from the
electrical outlet before replacing the bobbin.
1. Remove the bobbin cover and take out the empty bobbin. (Fig. 1)
2. Place the new bobbin in the bobbin case with the thread unwinding in a
clockwise direction. (Fig. 2, Fig. 3)
3. Leave about 4 inches of thread extended out from the bobbin case.
4. Holding the upper bobbin thread loosely in one hand, turn the hand wheel
counter clockwise. (Fig. 4) The needle will go down, picking up the lower
bobbin thread. Keep turning the hand wheel until the needle has come down
completely and then come up again to its highest point. Stop when the needle
starts to come down again.
5. Raise the presser foot and gently pull up the needle thread. You will see that it
has caught the lower thread. Pull both threads towards the back of the needle
and lay them under the presser foot.
6. Slide the bobbin cover back into place. (Fig. 5)
Note: It is important that the threading of both the top and bottom bobbins is
properly threaded. Check carefully and do one practice stitch before beginning to
sew. Improper threading will result in a thread jam or unbalanced stitch.
Very Important: Always make sure to use a metal bobbin. If not, the magnetized
bobbin case will not be activated and there will be no tension on your bobbin thread.
Fig. 1
Fig. 3
Fig. 4
7
8
Fig. 2
Fig. 5
7. Setting the sewing speed
This sewing machine has two sewing speeds. Press the “” button in for a faster
sewing speed or press “” button to the “out” position for a slower sewing speed.
8. Work light
If additional light is needed, press the light switch “ “ in to turn the light “On”.
Press it again if you wish to turn it “Off”.
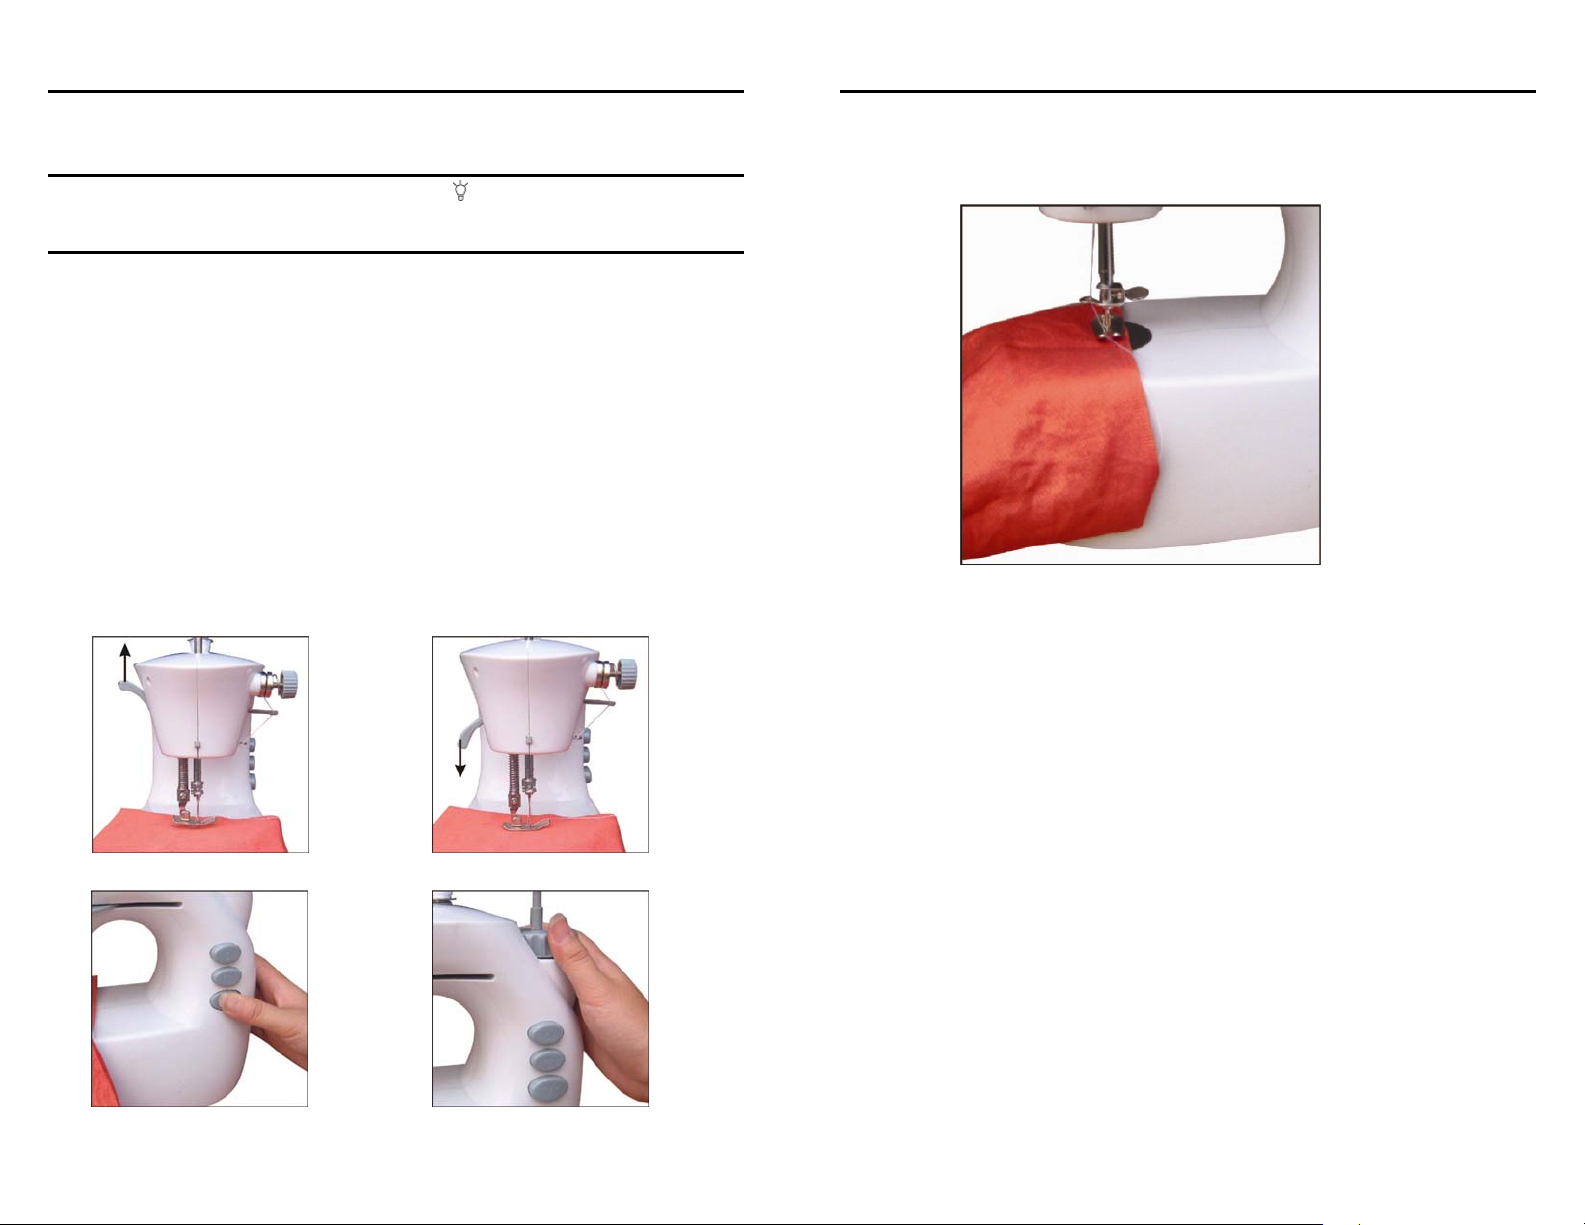
9. Starting to sew
You can start to sew using either the power cord with the foot control or insert
batteries into the battery compartment and use the controls on the sewing machine.
1. Raise the needle to its highest position by turning the hand wheel counter
clockwise and lift the presser foot.
2. Place both the upper and lower threads behind the presser foot. The threads
should be approximately 4-inches long.
3. Place the fabric to be sewn under the presser foot. (Fig. 1) Lower the needle
by turning the hand wheel counter clockwise and then lower the presser foot.
(Fig. 2)
4. Press the “►/
pull the fabric. Gently guide the fabric to keep the seam straight. (Fig. 3)
5. After finishing sewing, press the “►/
stop sewing. (Fig. 3)
6. Turn the hand wheel counter clockwise to raise the needle to its highest
position. (Fig. 4) Lift the presser foot and pull out the thread tension release
bar. Then gently remove the fabric away from the sewing machine.
7. Cut the thread using the thread cutter.
Important: Do not touch the tension dial during sewing because it may cause the
machine to jam.
█” On/Off button to the “On” position and begin sewing. Do not
█” On/Off button to the “Off” position to
10. Sewing sleeves
This sewing machine has been designed to sew sleeves or any narrow openings in
a garment.
1. Lift the presser foot.
2. Position the garment over the sewing arm.
3. Lower the presser foot and follow the regular instructions.
Fig. 1 Fig. 2
Fig. 3
9
Fig. 4
10
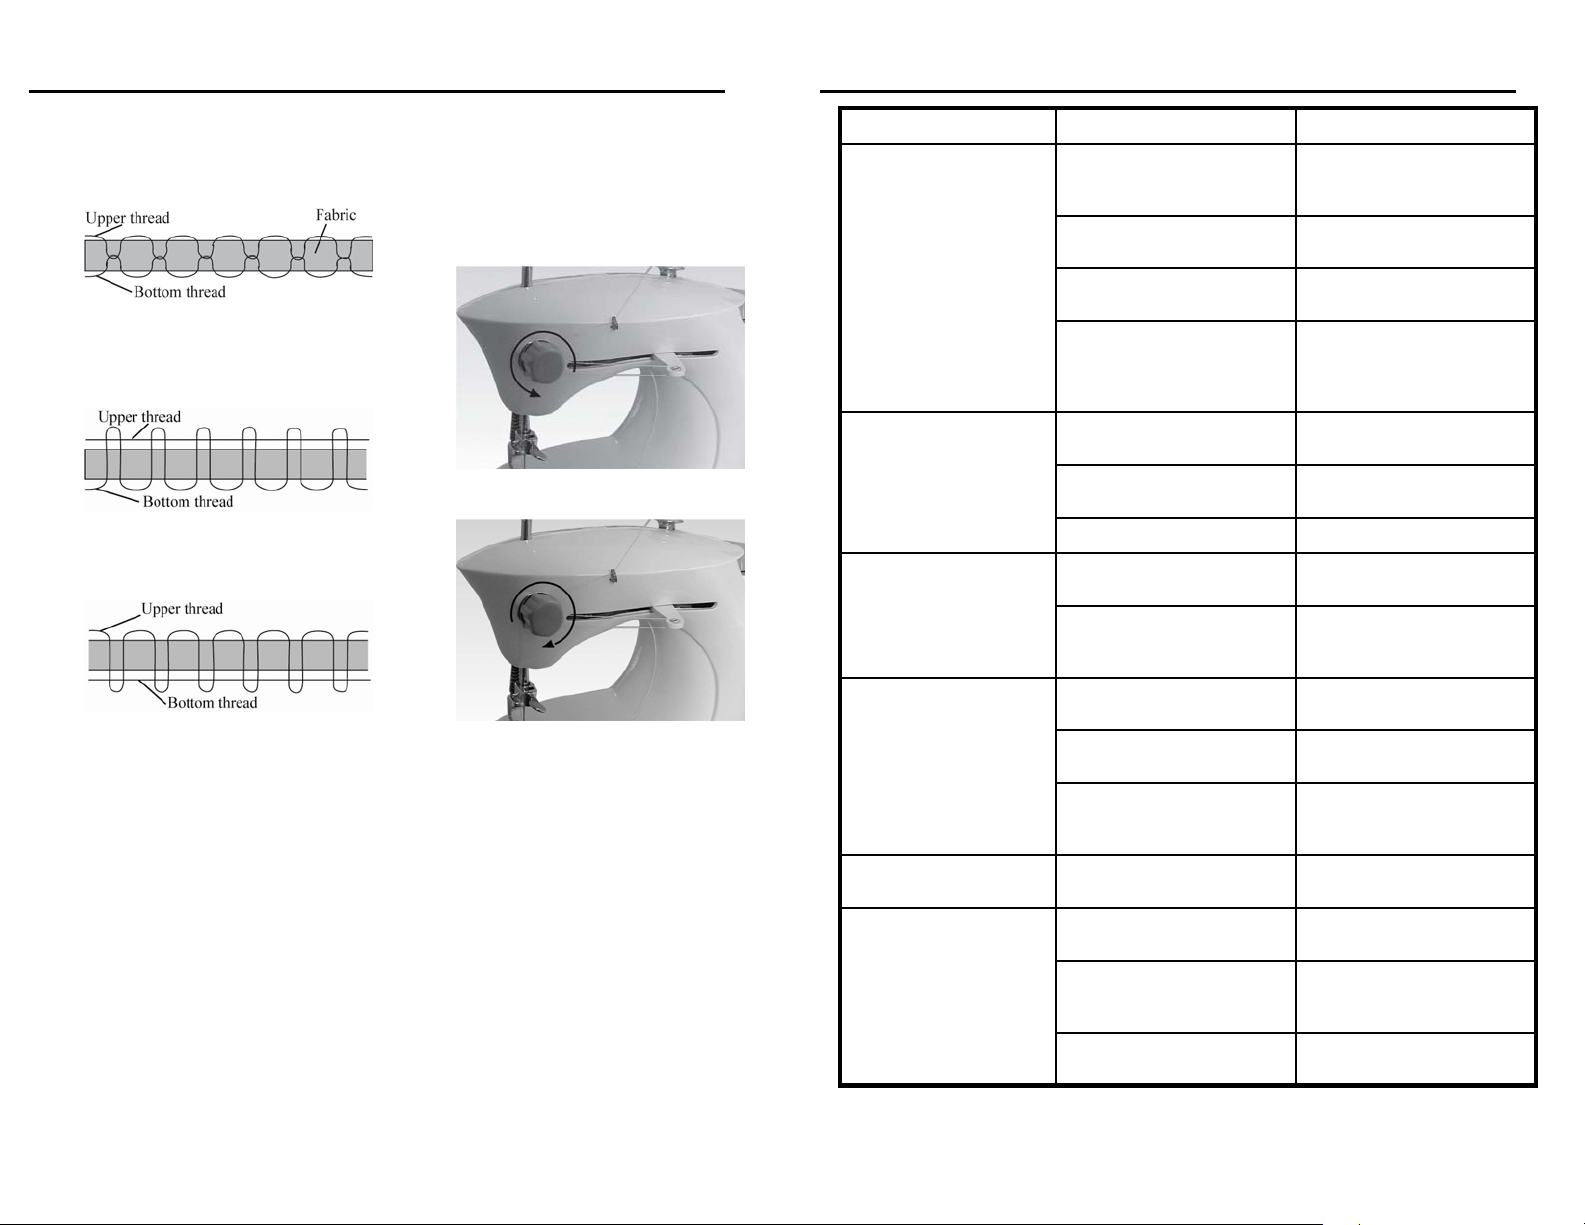
11. Adjusting the thread tension
Test the stitch tension on a scrap piece of the
same fabric you are going to use. When the
thread tension is properly adjusted, the upper and
lower threads tension is equal and strong enough
to lock both threads in the center of the material.
If the upper tension is too tight, the upper thread
lies straight along the surface of the fabric. Adjust
the tension by turning the tension dial counter
clockwise. (Fig. 1)
If the upper tension is too loose, the bottom thread
lies straight along the bottom of the fabric. Adjust
by turning the tension dial clockwise. (Fig. 2)
Please note:
The bobbin thread tension has been adjusted at
the factory and does not need readjustment. If the
upper tension adjustment does not correct the
problem, then remove the bobbin and reinsert it
making sure that the magnetism of the bobbin
case is activated.
Fig. 1
Fig. 2
12. Troubleshooting
No power supply or
machine runs slowly
Skipping stitches
Bobbin thread can
not be drawn up
Breaking thread
Stitches too loose or
uneven
Breaking needle
Batteries installed
incorrectly.
Battery power low.
Used and new battery are
used together.
AC/DC adapter is not
connected to the right
position.
Needle is not properly
inserted.
Needle is bent.
No more thread in lower
bobbin.
Needle threaded
incorrectly.
Upper thread is jamming
under the presser foot.
Needle is blunt.
Needle not inserted
corrected.
Upper thread too tight or
lower thread too loose.
Needle bent or deformed.
Presser foot too loose.
Pulled the fabric when
sewing.
SolutionProbable CauseProblem
Reinsert using the
diagram provided inside
the battery compartment.
Replace batteries with
new ones.
Replace batteries with
new ones.
Make sure that the AC/DC
adapter is connected to
the proper position on the
machine.
Remove and reinsert the
needle.
Replace with a new
needle.
Tighten the presser foot.Presser foot is too loose.
Replace with a new lower
bobbin.
Rethread the needle
making sure the thread
goes from left to right.
Rethread the upper and
lower thread again.
Replace with a new
needle.
Reinsert the needle
making sure to push it up
as high as it can go.
Adjust the thread tension
dial.
Replace with a new
needle.
Replace with w new
needle and tighten the
presser foot.
Do not pull the fabric. Let
the machine feed by itself.
11
12

Model
970C
INSTRUCCIONES IMPORTANTES DE SEGURIDAD
Al usar artefactos eléctricos siempre debe tomar precauciones de seguridad, incluyendo
las siguientes:
Lea todas las instrucciones antes de utilizar esta máquina de coser.
1 Year Limited Warranty
This warranty applies to defects resulting from imperfections in manufacture of
parts entering into the manufacture and assembly of the sewing machine which this
warranty accompanies, for a period of one (1) year, subject to the following
conditions, exclusions and exceptions.
This warranty is enforceable if said sewing machine is given reasonably good care
and proper maintenance in accordance with the accompanying printed instructions.
Needles, lamp bulb, and bobbins which normally require replacement are not
covered under this warranty.
Your exclusive remedy for any losses or damages resulting from defects in both
performance, workmanship and materials of this product shall be the repair or
replacement of this product.
The manufacturer shall not be liable for consequential or incidental damages for
breach of any express or implied warranty of this product.
This warranty is extended only to the original purchaser of the machine and this
warranty excludes all other legal and/or conventional warranties. The only
responsibility of EURO-PRO Operating LLC, if any, is in relation to the specific
obligations expressly assumed by it under the terms of this warranty bond.
Please include proof of purchase.
or visit our website at www.euro-pro.com.
------------------------------------------------------------------------------------------------------------------------------
OWNERSHIP REGISTRATION CARD
Please fill out and mail the product registration card within ten (10) days of purchase. The
registration will enable us to contact you in the unlikely event of a product safety notification.
By returning this card you acknowledge to have read and understood the instructions for use,
and warnings set forth in the accompanying instructions.
RETURN TO EURO-PRO OPERATING LLC,
970C
_________________________________________________________________________
Appliance model
_________________________________________________________________________
Date purchased Name of store
For Customer Service support, call 1 (800) 361-4639
4400 Bois Franc, St. Laurent, QC, H4S 1A7
Peligro - Para reducir el riesgo de
descarga eléctrica:
1. Nunca debe dejar artefactos sin
supervisión mientras los mismos
permanezcan enchufados o con las
baterías colocadas.
2. Siempre desenchufe este artefacto
del tomacorriente y/o quítele las
baterías inmediatamente después de
usarlo y antes de proceder a su
limpieza.
Advertencia - Para reducir el riesgo de
quemaduras, incendio, descarga eléctrica
o daños personales:
1. No permita que sea utilizado como un
juguete. Tenga mucho cuidado al
usar cualquier artefacto eléctrico
cerca de niños.
2. Utilice este artefacto únicamente para
los fines indicados en este manual.
Utilice únicamente los accesorios
recomendados por el fabricante,
indicados en este manual.
3. Nunca utilice este artefacto si su
cable o enchufe están dañados, si el
artefacto no funciona correctamente o
si sufrió algún golpe, daños o si se
cayó al agua. Retórnelo a EURO-
PRO Operating LLC para su
examen, reparación o por cualquier
ajuste eléctrico o mecánico que haya
que realizarle.
4. Nunca haga funcionar el artefacto
con una rejilla de ventilación tapada.
Mantenga las rejillas de ventilación de
la máquina de coser y del pedal de
control, libres de acumulación de
pelusa, polvo y trozos de tela.
5. Mantenga los dedos alejados de
todas las partes móviles. Tenga
especial cuidado en las
proximidades de la aguja de la
máquina de coser.
6. Siempre utilice la placa de aguja
adecuada. La placa equivocada
puede hacer que se rompa la
aguja.
7. No utilice agujas dobladas.
8. No tire o empuje la tela mientras
cose. Podría desviar la aguja y
hacer que se rompa.
9. Apague la máquina de coser antes
de hacer cualquier ajuste en la
zona de la aguja, tal como
enhebrar o cambiar la aguja,
enhebrar la bobina o cambiar el
pie prénsatelas.
10.Siempre desenchufe la máquina
de coser del tomacorriente al
quitarle las cubiertas, lubricarla, o
al hacer cualquier otro ajuste o
mantenimiento mencionado en
este manual.
11.Nunca inserte ningún objeto en
una de las ranuras.
12.No la utilice en el exterior.
13.No la utilice donde se usen
productos en aerosol (sprays) o
donde se esté administrando
oxígeno.
14.Para desconectarla, gire todos los
controles a la posición de apagado
y luego quite el enchufe del
tomacorriente.
15.No la desenchufe tirando del
cable. Para desenchufarla, tire del
enchufe, no del cable.
_________________________________________________________________________
Owner’s name
_________________________________________________________________________
Address City Prov. Postal Code
Printed in China
13
CONSERVE ESTAS INSTRUCCIONES
Esta máquina de coser está diseñada solo para uso doméstico.
14
Rev. 07/08

1. Conozca su máquina de coser
Vista frontal
Vista posterior
1. Bobina superior
2. Eje del devanador de la bobina
3. Manivela
4. Palanca tensora
5. Interruptor de la luz
6. Botón de velocidad
7. Botón de Encendido/Apagado
El dibujo puede no ser igual al producto r e al .
8. Tapa de la bobina
9. Bobina inferior
10. Tornillo de sujeción de la aguja
11. Luz
12. Disco de liberación de la tensión
13. Perilla de tensión del hilo
14. Barra de la aguja
15
del hilo
1. Eje porta carretes de la bobina
2. Corta-hilos
3. Elevador del pie prénsatelas
4. Guía de enhebrado
Accesorios
Pedal de control
Aguja
Enhebrador
Eje del devanador de
la bobina
5. Aguja
6. Pie prénsatelas
7. Tomacorrientes de CA/CC
8. Tomacorrientes de pedal de
control
Eje porta
carretes largo
Bobinas con
hilo (x2)
Bobinas
vacías (x2)
16

2. Conexión de la máquina a la corriente eléctrica.
3. Devanado de la bobina
Empleo de la máquina de coser con el cable de alimentación:
1. Conecte el enchufe “A” al conector de CA/CC en la máquina de coser y el
enchufe “B” al tomacorrientes.
2. Presione el botón de encendido (ON/Off) y encienda la máquina.
3. Conecte el pedal de control a su respectivo conector en la máquina de coser.
4. Se podrá controlar la máquina aplicando presión al pedal de control.
CUIDADO: Siempre apague la máquina de coser y desenchúfela del tomacorriente
cuando la misma no esté en uso.
Empleo de la máquina de coser con baterías:
1. Abra el compartimiento de baterías, ubicado en la parte inferior de la máquina
de coser.
2. Inserte 4 baterías alcalinas “AA”, asegurándose de que las mismas están en la
posición correcta, tal como está marcado a los costados del compartimiento.
3. Vuelva a colocar el tornillo de sujeción.
CUIDADO: Verifique que el botón de encendido esté en la posición “Off” (Apagado)
cuando cambie o coloque baterías nuevas. Si la máquina está en posición “On”
(Encendido), arrancará inmediatamente al colocarle las baterías y podría provocar
lesiones al operador.
1. Coloque un carrete de hilo en el eje porta carretes largo.
2. Inserte el eje del devanador de la bobina en el orificio central de la manivela y
coloque a presión una bobina vacía en dicho eje.
3. Enrosque varias vueltas de hilo en sentido horario alrededor de la bobina.
4. Coloque suavemente su dedo índice debajo del hilo entre el carrete y la
bobina, tal como se muestra en la siguiente ilustración.
5. Presione el botón de encendido para iniciar el devanado.
6. Detenga la máquina de coser después de haber enrollado una cantidad
adecuada de hilo en la bobina,
7. Retire la bobina del eje y corte el hilo.
17
18

4. Enhebrado del hilo superior
5. Reemplazo de la aguja
1. Coloque la bobina superior o un carrete grande de hilo en el eje porta carretes,
de tal manera que el hilo se desenrosque en sentido antihorario.
2. Tire el hilo hacia la izquierda y páselo a través de la primer guía del hilo (1).
3. Pase el hilo a través de los dos discos de la perilla de tensión (2).
4. Enhébrelo a través del orificio de la palanca tensora (3) y luego hacia abajo a
través de la segunda guía del hilo (4) y finalmente a través de la guía del hilo
en la barra de la aguja (5).
5. Pase el hilo a través del ojo de la aguja, yendo de la izquierda al derecho (6).
Con su máquina se provee un enhebrador para ayudarle a pasar el hilo por el
ojo de la aguja. Para usar el enhebrador, páselo a través del ojo de la aguja
del derecho de dejar, inserte el hilo en el enhebrador y luego tire con
suavidad del mismo hacia a la derecha.
Advertencia: Siempre quite las baterías o desconecte el adaptador de CA/CC del
tomacorriente antes de comenzar a reemplazar la aguja.
1. Gire la manivela en sentido antihorario para elevar la aguja hasta su posición
más alta.
2. Sostenga la aguja vieja y afloje el tornillo del sujetador de la misma. Quite la
aguja vieja. (Fig. 1)
3. Inserte una nueva aguja en el sujetador, con su lado plano mirando hacia el
interior de la máquina. El ojo de la aguja debería estar mirando hacia el lateral
de la máquina.
4. Empuje la aguja hacia arriba dentro del sujetador tanto como le sea posible.
(Fig. 2)
5. Ajuste el tornillo de sujeción.
Fig. 1
Observaciones:
Después de reemplazar la aguja, gire manualmente la manivela para verificar que
la máquina esté dando puntadas correctamente, y SOLO use el interruptor de
encendido o el pedal de control TRAS VERIFICAR QUE LA AGUJA ESTÁ BIEN
POSICIONADA Y QUE LAS PUNTADAS ESTÁN BIEN.
Fig. 2
19
20

6. Insertar o reemplazar la bobina
Advertencia: Siempre quite las baterías o desconecte el adaptador de CA/CC del
tomacorriente antes de reemplazar la bobina.
1. Quite la tapa de la bobina y retire la bobina vacía. (Fig. 1)
2. Coloque la bobina nueva en el porta bobinas, con el hilo desenroscándose en
sentido horario. (Fig. 2 y Fig. 3).
3. Deje aproximadamente 10 cm. de hilo libres fuera del porta bobinas.
4. Gire la manivela en sentido antihorario mientras sostiene suavemente la parte
superior del hilo de la bobina. (Fig. 4). La aguja descenderá, recogiendo el hilo de
la bobina inferior. Continúe girando la manivela hasta que la aguja haya terminado
de descender y vuelva ascender hasta su máxima altura. Deténgase cuando la
aguja comience a descender nuevamente.
5. Suba el pie prénsatelas y tire suavemente del hilo de la aguja. Verá que 'capturó’
el hilo inferior. Tire de ambos hilos hacia la parte de atrás de la aguja y apóyelos
debajo del pie prensatelas.
6. Vuela a poner en posición la tapa de la bobina. (Fig. 5)
Nota: Es importante que los hilos de ambas bobinas estén adecuadamente
enhebrados. Verifíquelo cuidadosamente y haga una puntada de prueba antes de
comenzar a coser. Un enhebrado incorrecto producirá el atascamiento de los hilos o
puntadas desbalanceadas.
Muy importante: Siempre asegúrese de usar una bobina metálica. Caso contrario, no
se activará el porta bobinas magnético y el hilo de la bobina no tendrá la tensión
necesaria.
7. Ajuste de la velocidad de costura
Esta máquina de coser tiene dos velocidades de costura. Presione el botón “” hacia
adentro para lograr la mayor velocidad ó vuelva a presionar “” para liberarlo y lograr
la velocidad más lenta.
8. Lámpara de trabajo
Si se necesita iluminación adicional, active el interruptor “ “ para encender la luz.
Presiónelo nuevamente para apagarla.
9. Comenzar a coser
Puede iniciar una costura empleando tanto el cable de alimentación y el pedal de control
como insertando baterías en el respectivo compartimiento y usando los controles sobre
la propia máquina de coser.
1. Suba la aguja hasta su posición superior girando la manivela en sentido antihorario y
luego libere el pie prénsatelas.
2. Coloque ambos hilos, tanto el superior como el inferior, debajo del pie prénsatelas.
Los hilos deben tener unos 10 cm. de largo.
3. Coloque la tela a coser debajo del pie prénsatelas. (Fig. 1) Baje la aguja girando la
manivela en sentido antihorario y luego baje el pie prénsatelas. (Fig. 2)
4. Presione el botón “►/ █” a su posición de encendido y comience a coser. No tire del
tejido. Guíe el tejido con suavidad para mantener la costura derecha. (Fig. 3)
5. Después de finalizar la costura, presione el botón “►/ █” a la posición de apagado.
(Fig. 3)
6. Gire la manivela en sentido antihorario para elevar la aguja hasta su posición
superior. (Fig. 4). Levante el pie prénsatelas y tire de la palanca de liberación de la
tensión del hilo. Retire con suavidad el tejido de la máquina de coser.
7. Corte los hilos con un corta-hilos.
Importante: No toque la perilla de tensión durante la costura porque producirá el
atascamiento de la máquina.
Fig. 1
Fig. 4
Fig. 3
21
Fig. 2
Fig. 5
Fig. 1 Fig. 2
Fig. 3 Fig. 4
22

10. Costura de mangas
Esta máquina de coser ha sido diseñada para coser mangas o cualquier abertura
estrecha de una prenda.
1. Levante el pie prénsatelas.
2. Posicione la prenda sobre el brazo para realizar costuras libres.
3. Baje el pie prénsatelas y prosiga con las instrucciones habituales.
11. Ajuste de la tensión del hilo.
Verifique la tensión de las puntadas sobre un
recorte de la misma tela que vaya a usar. Cuando
la tensión de las puntadas esté correctamente
ajustada, la tensión de los hilos superior e inferior
serán iguales y lo suficientemente elevadas para
que el ‘cruce’ entre ambos hilos quede trabado en
el centro del material.
Hilo superior
Hilo inferior
Si la tensión del hilo superior es demasiada, el hilo
inferior quedará derecho por sobre el tejido.
Ajuste la tensión girando la perilla de tensión en
sentido antihorario. (Fig. 1)
Hilo superior
Hilo inferior
Si la tensión del hilo superior es muy poca, el hilo
inferior quedará derecho en la parte inferior del
tejido. Ajuste la tensión girando la perilla de
tensión en sentido horario. (Fig. 2)
Hilo superior
Tela
Fig. 1
23
Hilo inferior
Observaciones:
La tensión del hilo viene ajustada de fábrica y no
necesita ser reajustada. Si el ajuste de la tensión
del hilo superior no corrige el problema, quite la
bobina y reinsértela, asegurándose de que esté
activado el magnetismo del porta bobinas.
24
Fig. 2

12. Solución de problemas
Instalación incorrecta de las
baterías.
No hay energía
eléctrica o la
máquina funciona
lentamente
Se saltean puntadas
No se puede retirar
más hilo de la
bobina
Rotura del hilo
Puntadas
demasiado sueltas
o desparejas
Rotura de agujas
Batería baja.
Se están usando baterías
nuevas y usadas al mismo
tiempo,
El adaptador de CA/CC no
está correctamente
conectado.
incorrectamente instalada.
demasiado poco ajustado.
No hay más hilo en la
bobina inferior.
La aguja está
incorrectamente
enhebrada.
El hilo superior se está
atascando debajo del pie
prénsatelas.
La aguja no está
correctamente insertada.
El hilo superior está
demasiado tenso o el
inferior demasiado suelto.
deformada.
El pie prénsatelas está
demasiado poco ajustado.
Se tiró del tejido mientras
se realizaba la costura.
SoluciónCausa probableProblema
Reinserte las baterías en su
compartimiento, según se
indica en el diagrama
provisto.
Reemplace las baterías por
otras nuevas.
Reemplace las baterías por
otras nuevas.
Asegúrese de que el
adaptador de CA/CC esté
bien conectado.
Quite la aguja y reinsértela.La aguja está
Reemplácela por una nueva.La aguja está doblada.
Afirme el pie prénsatelas.El pie prénsatelas está
Reemplace la bobina inferior
por una nueva.
Vuelva a enhebrar la aguja,
asegurándose de que el hilo
pasa de dejó al derecho.
Vuelva a enhebrar los hilos
superior e inferior.
Reemplácela por una nueva.La aguja está desafilada.
Reinserte la aguja,
asegurándose de empujarla
tan arriba como sea posible.
Ajuste la perilla de tensión
del hilo.
Reemplácela por una nueva.Aguja doblada o
Reemplace la aguja por una
nueva y vuelva a ajustar el
pie prénsatelas.
No tire del tejido. Deje que
la máquina se alimente a su
propio ritmo.
Modelo
970C
Garantía Limitada de 1 Año
Esta garantía cubre los defectos resultantes de imperfecciones involucradas en la
fabricación y armado de la máquina de coser con la que se adjunta, por el período de un (1)
año, y sujeta a las siguientes condiciones, exclusiones y excepciones.
Esta garantía es ejecutable si la referida máquina de coser recibió cuidados razonables y un
adecuado mantenimiento, de acuerdo a las instrucciones impresas adjuntas.
Esta garantía no cubre las agujas, lamparita y bobinas, que normalmente requieren ser
reemplazadas con el paso del tiempo.
La única compensación ofrecida por cualquier pérdida o daño producidos por defectos tanto
en el rendimiento, mano de obra y materiales de este producto, será la reparación o
reemplazo del mismo.
El fabricante no será responsable por las consecuencias o daños incidentales por
incumplimiento de cualquier garantía implícita o explícita sobre este producto.
Esta garantía es válida solo para el comprador original del producto y excluye cualquier otra
garantía legal y/o convencional. La única responsabilidad de EURO-PRO Operating LLC,
de existir, es en relación a las obligaciones específicas asumidas expresamente bajo los
términos del vínculo de esta garantía.
Por favor incluya el comprobante de compra. Para ser atendido por el servicio de ‘Atención
al cliente’, llame al (800) 361-4639 o visite nuestro sitio Web en www.euro-pro.com.
------------------------------------------------------------------------------------------------------------------------------
TARJETA DE REGISTRO DEL CLIENTE
Complete y envíe la tarjeta de registro del producto dentro de los diez (10) días posteriores a
la compra. El registro nos permitirá contactarnos con usted en caso de existir alguna
notificación de seguridad con respecto al producto. Retornando esta tarjeta usted reconoce
haber leído y entendido las instrucciones de uso y advertencias incluidas en estas
instrucciones.
ENVIAR A EURO-PROOperating LLC, 4400 Bois Franc, St. Laurent, QC, H4S 1A7
970C
_________________________________________________________________________
Modelo del artefacto
_________________________________________________________________________
Fecha de compra Nombre del negocio
_________________________________________________________________________
Nombre del dueño
_________________________________________________________________________
Dirección Ciudad Provincia Código postal
25
Impreso en China
26

MESURES DE SÉCURITÉ IMPORTANTES
Lorsque vous utilisez des appareils électriques, vous devez toujours respecter les
précautions de sécurité élémentaires, notamment les suivantes:
Lisez toutes les instructions avant d’utiliser cette machine à coudre.
Danger – Pour réduire le risque
d'électrocution:
1. Ne laissez aucun appareil branché ou
avec des piles en place sans
surveillance.
2. Débranchez toujours l’appareil de la
prise électrique et/ou enlevez les piles
immédiatement après l'utilisation et
avant de le nettoyer.
Avertissement — Pour réduire le risque
de brûlures, d’incendie, d’électrocution ou
de blessure:
1. Ne pas l’utiliser comme jouet. La
prudence est de rigueur lorsque
l’appareil est utilisé à proximité des
enfants.
2. Utilisez cet appareil uniquement pour
son utilisation prévue telle que décrite
dans ce manuel. Utilisez seulement
les accessoires recommandés par le
fabricant, tel qu’il figure dans ce
manuel.
3. Ne faites jamais fonctionner cet
appareil si le cordon ou la fiche est
endommagé, s'il ne fonctionne pas
correctement, s'il a été échappé ou
endommagé ou échappé dans l'eau.
Retournez l’appareil à EURO-PRO
Operating LLC pour son examen, sa
réparation ou sa mise au point
mécanique ou électrique.
4. N’utilisez jamais l’appareil si les
ouvertures d’aération sont bloquées.
Gardez les orifices de ventilation de la
machine à coudre et de la commande
au pied libre de l’accumulation de
peluches, poussières et morceaux de
tissus.
5. Tenez vos doigts à l’écart de toutes
pièces mobiles. Faites
spécialement attention à proximité
de l'aiguille.
6. Utilisez toujours la plaque à aiguille
adéquate. Une mauvaise plaque
peut casser l’aiguille.
7. N’utilisez jamais une aiguille tordue.
8. Ne pas tirer ou pousser le tissu en
cousant. Cela peut entraver le
fonctionnement de l’aiguille et
causer sa rupture.
9. Éteignez la machine à coudre lors
des réglages dans la zone de
l’aiguille, tels que l’enfilage, le
changement d’aiguille, la mise en
place de la canette ou le
changement de pied presseur.
9. Éteignez la machine à coudre lors
des réglages dans la zone de
l’aiguille, tels que l’enfilage, le
changement d’aiguille, la mise en
place de la canette ou le
changement de pied presseur.
10. Débranchez toujours la machine à
coudre avant de retirer les plaques
de protection, de la graisser ou
avant d’effectuer toute modification
accessible à l’utilisateur comme
indiqué dans le présent manuel
d’utilisation.
11. Évitez de laisser tomber ou
d'insérer un objet dans une
ouverture.
12. Ne pas utiliser à l'extérieur.
13. Ne faites pas fonctionner la
machine en cas d’utilisation de
produits en aérosol (vaporisateurs)
ou d’administration d'oxygène.
14. Pour débrancher, tournez les
boutons de réglage à la position
«Arrêt» puis retirez la fiche de la
prise de courant.
15. Ne pas débrancher en tirant sur le
cordon. Tirer sur la prise et non la
corde pour débrancher.
1. Apprendre à connaître votre machine à coudre
Vue de face
1. Bobine supérieure
2. Tige de la bobineuse
3. Manette
4. Levier
5. Interrupteur
6. Bouton vitesse
7. Bouton marche/arrêt
Les illustrations peuvent différer du produit exact.
8. Couverture de la bobine
9. Bobine inférieure
10. Vis de fixation de l’aiguille
11. Lumière
12. Disque de libération de la
tension du fil
13. Bouton de tension
14. Barre à aiguille
CONSERVER CES INSTRUCTIONS
Cette machine à coudre a été conçue pour un usage dom es tiq ue se ul e m ent.
27 Rev. 07/08
28

Vue arrière
2. Branchez la machine dans la source d'alimentation
Utilisation de la machine à coudre avec le cordon d’alimentation:
1. Branchez la fiche « A » au réceptacle AC/DC de la machine à coudre et branchez
« B » à la prise électrique.
2. Appuyez sur le bouton MARCHE/ARRÊT pour mettre la machine en « Marche ».
3. Branchez la commande au pied « C » au réceptacle de la commande au pied de la
machine.
4. La machine à coudre peut être contrôlée en appliquant de la pression sur la
commande au pied.
MISE EN GARDE: Mettez toujours la machine à coudre en arrêt et débranchez la prise
électrique lorsque la machine n'est pas en fonctionnement.
1. Porte bobine
2. Coupe fils
3. Levier de pied presseur
4. Guide-fil
Accessoires
Commande au pied
Aiguille
Enfileur
Tige de la bobineuse
5. Aiguille
6. Pied presseur
7. Réceptacle AC/DC
8. Réceptacle de la commande
au pied
Porte bobine
long
Bobines
enfilées (x2)
Bobines vides
(x2)
29
Utilisation de la machine à coudre avec des piles:
1. Ouvrez le compartiment de la batterie qui se trouve en bas de la machine à
coudre.
2. Installez 4 piles alcalines « AA » en vous assurant que les piles sont dans la
bonne position comme indiqué sur l'intérieur du compartiment des batteries.
3. Remplacez le couvercle du compartiment des batteries.
MISE EN GARDE: Assurez-vous que l’interrupteur Marche/Arrêt est sur la position
« Arrêt » lorsque vous changez ou installez les piles. Lorsque les piles sont
installées, et la machine est sur la position « Marche », elle va commencer à coudre
et peut provoquer des blessures.
30

3. Enroulage de la bobine
4. Enfilage du fil du haut
1. Placez la bobine de fil sur le porte bobine long.
2. Installez la tige de la bobineuse dans le trou central de la manivelle et poussez
une bobine vide sur la broche.
3. Enroulez le fil en sens horaire autour de la bobine à plusieurs reprises.
4. Placez votre index doucement sous le fil entre la bobine de fil et la bobine
comme indiqué sur l’illustration ci-dessous.
5. Appuyez sur le bouton « Marche/Arrêt » pour commencer à embobiner.
6. Arrêtez la machine à coudre lorsque le montant exact de fil est embobiné
autour de la bobine.
7. Enlevez la bobine de la tige et coupez le fil.
1. Placez la bobine supérieure ou la bobine de fil grande sur le porte bobine avec
le fil déroulé en sens antihoraire.
2. Tirez le fil vers la gauche et passez-le autour du premier guide-fil (1).
3. Passez le fil entre les deux disques du bouton de tension (2).
4. Enfilez à travers le trou dans le levier de fil (3) puis en dessous du deuxième
guide-fil (4) et puis à travers la barre à aiguille du guide-fil (5).
5. Passez le fil directement par le chas de l’aiguille de la gauche à la droite (6).
Un enfile-aiguille est fourni avec votre machine pour vous aider à enfiler le chas
de l’aiguille. Pour utiliser l’enfile-aiguille, passez-le par le chas de l’aiguille de
droite à gauche, insérez le fil dans l’enfileur et tirez doucement l’enfileur à
droite.
31
32

5. Remplacement de l’aiguille
6. Installation ou remplacement de la bobine
Attention: Enlevez toujours les piles ou débranchez l’adaptateur AC/DC de la prise
électrique avant de remplacer l’aiguille.
1. Tournez la manivelle en sens antihoraire pour soulever l’aiguille à sa position
plus élevée.
2. Tenez la vieille aiguille et dévissez la vis de serrage de l’aiguille. Enlevez la
vieille aiguille. (Fig. 1)
3. Insérez la nouvelle aiguille dans la fixation avec le côté plat vers l’intérieur de la
machine. La chas de l’aiguille doit être orientée sur le côté de la machine.
4. Poussez l’aiguille dans la vis de serrage aussi loin que possible. (Fig. 2)
5. Serrez la vis de serrage de l’aiguille.
Fig. 1
Fig. 2
Remarque:
Après avoir remplacé l’aiguille, tournez la manivelle à la main pour vérifier si la
machine est en train de coudre correctement, donc vous pouvez utiliser la
commande au pied ou le bouton « Marche/Arrêt » SEULEMENT SI L’AIGUILLE
EST DANS LA BONNE POSITION ET LES POINTS SONT BONS.
Attention : Enlevez toujours les piles ou débranchez l’adaptateur AC/DC de la prise
électrique avant de remplacer l’aiguille.
1. Enlevez la couverture de la bobine et retirez la bobine vide. (Fig. 1)
2. Placez la nouvelle bobine dans le boîtier de la canette avec le fil déroulé en sens
horaire. (Figures 2 et 3)
3. Laissez environ 10 cm (4 pouces) de fil étendu à partir du boîtier de la canette.
4. En tenant la bobine supérieure dans une main, tournez la manivelle en sens
antihoraire. (Fig. 4)
L’aiguille descendra en ramassant le fil de la bobine inférieure. Continuez à
tourner la manivelle jusqu’à ce que l’aiguille soit complètement descendue et
remontée à nouveau. Arrêtez quand l’aiguille commence à descendre à nouveau.
5. Relevez le pied presseur et doucement glissez le fil de la bobine. Vous allez voir
qu’il a pris le fil inférieur. Tirez les deux fils vers l’arrière de l’aiguille et posez-les
sous le pied presseur.
6. Mettez la couverture de la bobine en place. (Fig. 5)
Remarque: Il est important que l'enfilage des deux bobines, supérieure et inférieure,
soit bien enfilé. Vérifiez attentivement et faites un point de pratique avant de
commencer à coudre. Un mauvais enfilage se traduira par un bourrage de fil ou un
point déséquilibré.
Très important: Assurez-vous d’utiliser toujours une bobine métallique. En cas
contraire, le boîtier de la canette magnétisé ne sera pas activé et il n’y aura pas de
tension sur votre fil de bobine.
33
Fig. 1
Fig. 4
Fig. 2
Fig. 3
Fig. 5
34

7. Configuration de la vitesse
Cette machine à coudre a 2 vitesses. Appuyez sur le bouton « » pour une vitesse
de couture plus rapide ou appuyez sur le bouton « » jusqu’à la position « sortie »
pour une vitesse de couture plus lente.
8. Lumière de travail
Appuyez sur l'interrupteur " " pour mettre la lumière en « Marche » en cas de
besoin. Appuyez encore une fois si vous souhaitez la mettre en « Arrêt ».
9. Commencer à coudre
Vous pouvez commencer à coudre soit en utilisant le cordon d’alimentation avec la
commande au pied ou soit avec les batteries en utilisant les commandes de la machine à
coudre.
1. Remontez l’aiguille en position supérieure en tournant la manivelle en sens
antihoraire et soulevez le pied presseur.
2. Placez les fils supérieurs et inférieurs à l’arrière du pied presseur. Les fils devraient
avoir autour de 10 cm (4 po) de longueur.
3. Placez le tissu à coudre sous le pied presseur. (Fig. 1) Abaissez l’aiguille en
tournant la manivelle en sens antihoraire et puis abaissez le pied presseur.
(Fig. 2)
4. Ajustez le bouton Marche/Arrêt « ►/ █ » à la position « Marche » et commencez à
coudre. Ne tirez pas le tissu. Guidez doucement le tissu pour maintenir la couture
droite. (Fig. 3)
5. Après avoir fini, ajustez le bouton Marche/Arrêt « ►/ █ » à la position « Arrêt » pour
mettre la machine en arrêt. (Fig. 3)
6. Tournez la manivelle en sens antihoraire pour soulever l’aiguille à sa position plus
élevée. (Fig. 4) Soulevez le pied presseur et tirez de la barre de libération de la
tension du fil. Puis retirez doucement le tissu de la machine à coudre.
7. Coupez le fil à l’aide du coupe fil.
Important: Ne touchez pas le bouton de tension lorsque la machine est en marche
puisque cela peut bloquer la machine.
10. Manches de couture
Cette machine à coudre a été conçue pour coudre des manches ou toute ouverture
étroite dans un vêtement.
1. Soulevez le pied presseur.
2. Placez le vêtement sur le bras de couture.
3. Abaissez le pied presseur et suivez les instructions générales.
Fig. 1 Fig. 2
Fig. 3 Fig. 4
35
36

11. Ajuster la tension du fil
Vérifiez la tension du point sur un mauvais morceau
du même tissu que vous allez utiliser. Lorsque la
tension du fil est bien réglée, la tension des fils
supérieurs et inférieurs est égale et assez forte pour
verrouiller les deux fils dans le centre du matériau.
Fil supérieur
Fil inférieur
Si la tension supérieure est trop serrée, le fil
supérieur se trouve directement sur la surface du
tissu. Ajustez la tension en tournant le bouton de
tension en sens antihoraire. (Fig. 1)
Fil supérieur
Fil inférieur
Si la tension supérieure est trop lâche, le fil
inférieur se trouve directement en dessous du
tissu. Ajustez-le en tournant le bouton de tension
en sens horaire. (Fig. 2)
Fil supérieur
Fil inférieur
Remarque:
La tension du fil de la bobine a été ajustée à
l’usine et ne nécessite généralement pas d’autre
ajustement. Si l’ajustement de la tension
supérieure ne corrige pas le problème, alors
retirez la bobine puis réinstallez-la en vous
assurant que le magnétisme du boîtier de la
canette est activé.
Tissu
Fig. 1
Fig. 2
12. Dépannage
Pas d’alimentation
électrique ou la
machine fonctionne
lentement
Sauter des points
Le fil de bobine ne
peut pas être établi.
Le fil se casse
Les points ne sont
pas assez serrés ou
sont irréguliers.
L’aiguille est cassée
Batteries installées
incorrectement.
Faible puissance de la
batterie.
Les vieilles et les nouvelles
batteries sont utilisées en
même temps.
L’adaptateur AC/DC n’est
pas branché à la bonne
position.
L’aiguille n’est pas insérée
correctement.
L’aiguille est faussée.
assez serré.
Plus besoin de fil dans la
bobine inférieure.
L’aiguille n’est pas enfilée
correctement.
Le fil supérieur est emmêlé
en dessous du pied
presseur.
L’aiguille est épointée.
L’aiguille n’est pas insérée
correctement.
Le fil supérieur est trop
serré ou le fil inférieur est
trop relâché.
L’aiguille est faussée ou
épointée.
Le pied presseur n’est pas
assez serré.
Le tissu est trop tiré.
SolutionCause probable Problème
Réinstallez en utilisant le
schéma fourni dans le
compartiment de piles.
Remplacez les batteries
avec des nouvelles.
Remplacez les batteries
avec des nouvelles.
Assurez-vous que
l’adaptateur AC/DC soit
branché à la bonne position
dans la machine.
Enlevez puis réinsérez
l’aiguille.
Remplacez avec une
nouvelle aiguille.
Serrez le pied presseur.Le pied presseur n’est pas
Remplacez avec une
nouvelle bobine inférieure.
Renfilez l’aiguille en vous
assurant que le fil va de la
gauche à la droite.
Renfilez le fil supérieur et
inférieur à nouveau.
Remplacez avec une
nouvelle aiguille.
Réinstallez l’aiguille en vous
assurant de la soulever à sa
position la plus élevée.
Ajuster le bouton de tension
du fil.
Remplacez avec une
nouvelle aiguille.
Remplacez avec une
nouvelle aiguille et serrez le
pied presseur.
Ne tirez pas le tissu.
Laissez la machine entraîner
le tissu.
37
38

Modèle
970C
Garantie Limitée d’un an
Cette garantie s’applique aux défauts résultants d’imperfections dans la fabrication de pièces
et l’assemblage de la machine à coudre qui accompagnent cette garantie, pour une période
d’un (1) an, sous réserve des conditions, exclusions et exceptions suivantes.
Cette garantie est applicable si telle machine à coudre a raisonnablement de bons soins et
maintien adéquat conformément aux instructions imprimées évoquées dans le livret.
Les aiguilles, l’ampoule et les bobines, qui en principe doivent être remplacées, ne sont pas
couvertes par cette garantie.
Votre seul recours pour les pertes ou dommages résultant de défauts de performance, de
main-d’œuvre et de matériaux de ce produit, sera la réparation ou le remplacement de ce
produit.
Le fabricant n’est pas responsable des dommages circonstanciels ou conséquents pour le
manquement de toute garantie expresse ou implicite de ce produit.
Cette garantie s’adresse uniquement à l’acheteur d’origine de la machine et exclue toute
autre garantie légale et/ou conventionnelle. La seule responsabilité d’EURO-PRO
Operating LLC s’il y en a une, se limite aux obligations spécifiques exprimées sous cette
obligation de garantie.
Veuillez inclure la preuve d’achat. Pour le support au service à la clientèle, appelez le 1(800)
361-4639 ou visitez notre site web au www.euro-pro.com.
------------------------------------------------------------------------------------------------------------------------------
CARTE D’ENREGISTREMENT DU PROPRIÉTAIRE
S.V.P., remplir et poster cette carte d’enregistrement dans les 10 jours suivants la date
d’achat. Cette carte d’enregistrement nous permettra de vous contactez dans le cas d’un
événement concernant la sécurité. En retournant cette carte, vous reconnaissez avoir lu et
compris les instructions d’utilisation et les avertissements évoqués dans le livret.
RETOURNEZ À EURO-PRO OPERATING LLC, 4400 Bois Franc, St Laurent, QC H4S 1A7
970C
_________________________________________________________________________
Modèle de l’Appareil
_________________________________________________________________________
Date d’Achat Nom du magasin
_________________________________________________________________________
Nom du propriétaire
_________________________________________________________________________
Adresse Ville Prov. Code Postal
Imprimé en Chine
39
 Loading...