

Page 1
INSTRUCTION MANUAL
Kwik Slide
FOR USE WITH
30048
PLYMOUTH, MI
DEALER/INSTALLER:
(1) Provide this Manual to end user.
(2) Physically demonstrate sliding procedures in this Manual to end user.
(3) Have end user demonstrate that he/she understands procedures.
END USER:
(1) Read and follow this Manual every time you use this Kwik Slide.
(2) Save this Manual for future reference.
(3) Pass on copies of Manual to any other user or owner of a Kwik Slide.
(4) Never remove Kwik Slide warning decal as shown on the cover of this manual. If damaged, contact Towing Products
(1-800-326-1090) for free replacement decals.
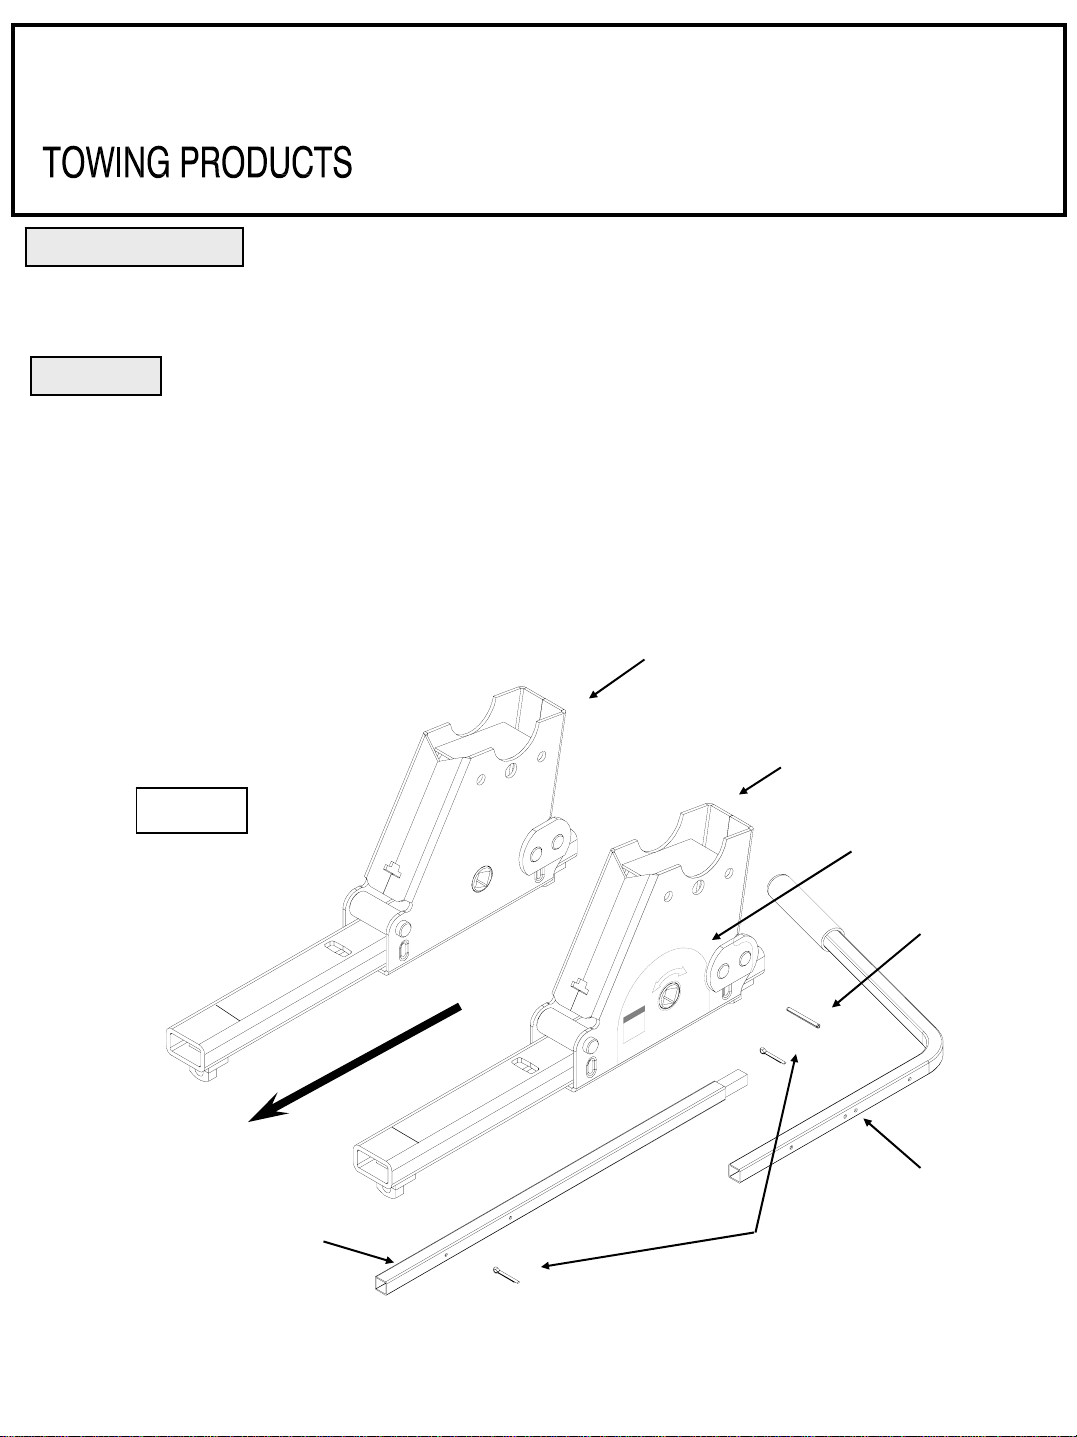
Right hand slide assembly
figure 1
O
R
F
Handle
Shaft
Left hand slide assembly
Warning label
Indicator pin
E
L
C
I
H
E
V
W
O
T
F
O
T
N
Handle
Elbow
Cotter pin
(OVER)
30048IN – 9-27-04E PCN7358 ©2001, 2002, 2004 TOWING PRODUCTS, INC. Litho in USA
Page 2
WARNING:
Failure to follow these instructions may result in death or serious injury!
WARNING:
Kwik-Slide hitches that are not properly locked can suddenly move and kill you!
To avoid death or serious injury:
•Never place any part of body in truck bed or between truck and trailer unless the
following conditions are met :
•Truck is in park with emergency brake on, and
•Trailer landing gear is down and resting on firm ground, and
•All trailer wheels are blocked on each side of wheel
•Always perform “push” or “pull test” by following instructions in this manual.
BEFORE INSTALLATION
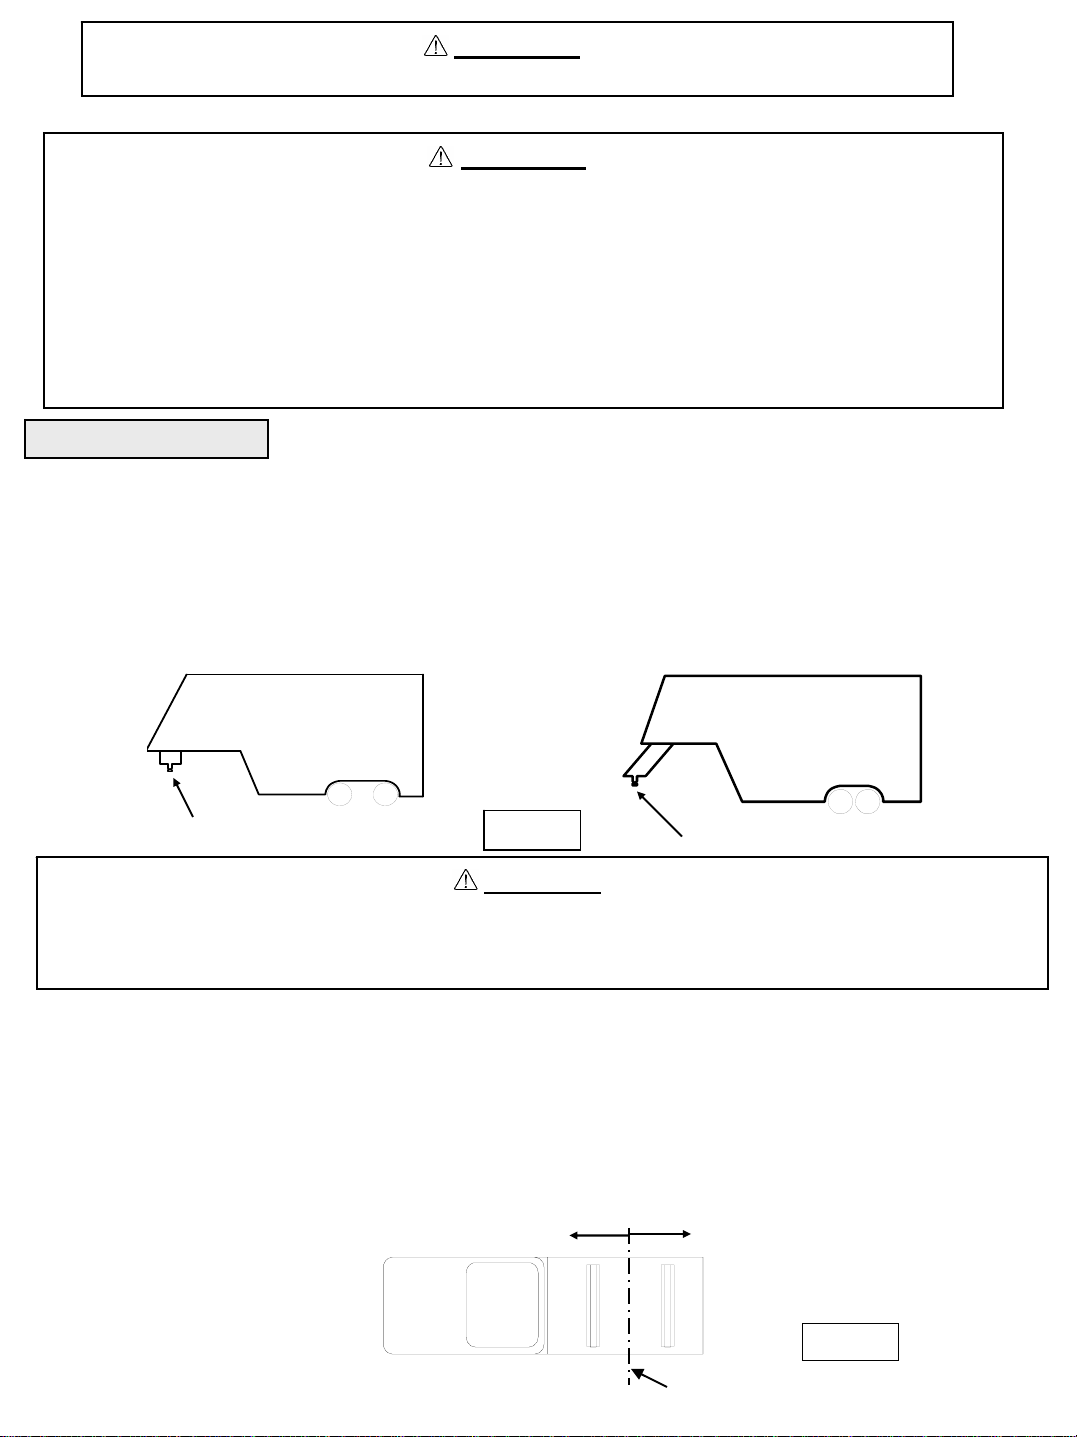
1. 5th wheel trailers are typically designed for use with long bed (8 foot) trucks. These trucks provide ample turning
clearance between the truck cab and trailer front. Short bed trucks (less than 8 ft. but longer than 6 ft.) require
additional turning clearance to avoid truck cab or trailer damage during normal turns. This is best accomplished
through the use of a trailer pin box extension (see figure 2). Towing Products suggest the use of a minimum of a
13 inch pin box extension to be able to comfortably make normal turning maneuvers with a short bed truck.
Contact your trailer manufacturer for pin box extension options.
Conventional Pin Box
figure 2
Trailer Pin Box Extension
CAUTION:
Turning clearance is reduced when towing with a short bed truck! This can result in
trailer striking inside of truck bed. Always monitor truck cab and trailer clearance
during turns. Failure to do so could result in significant property damage.
2. The 5TH WHEEL KWIK SLIDE is designed to be used with Towing Products 5TH WHEEL installations only.
These installations are described in the Towing Products INSTALLATION INSTRUCTIONS BASE RAIL
MOUNTING KIT (P/N 30035). These instructions specify the exact placement of the base rails in relation to the
rear truck axle for most current pickup trucks.
3. The trailer king pin should always be directly above or slightly forward of the rear truck axle when towing. Trailers
should never be towed with the trailer king pin rearward of the rear truck axle in highway conditions (see Fig. 3).
Acceptable King Pin Location
30048IN – 9-27-04E PCN7358 ©2001, 2002, 2004 TOWING PRODUCTS, INC. Litho in USA
Unacceptable King Pin Location
figure 3
Rear Truck Axle
2
Page 3
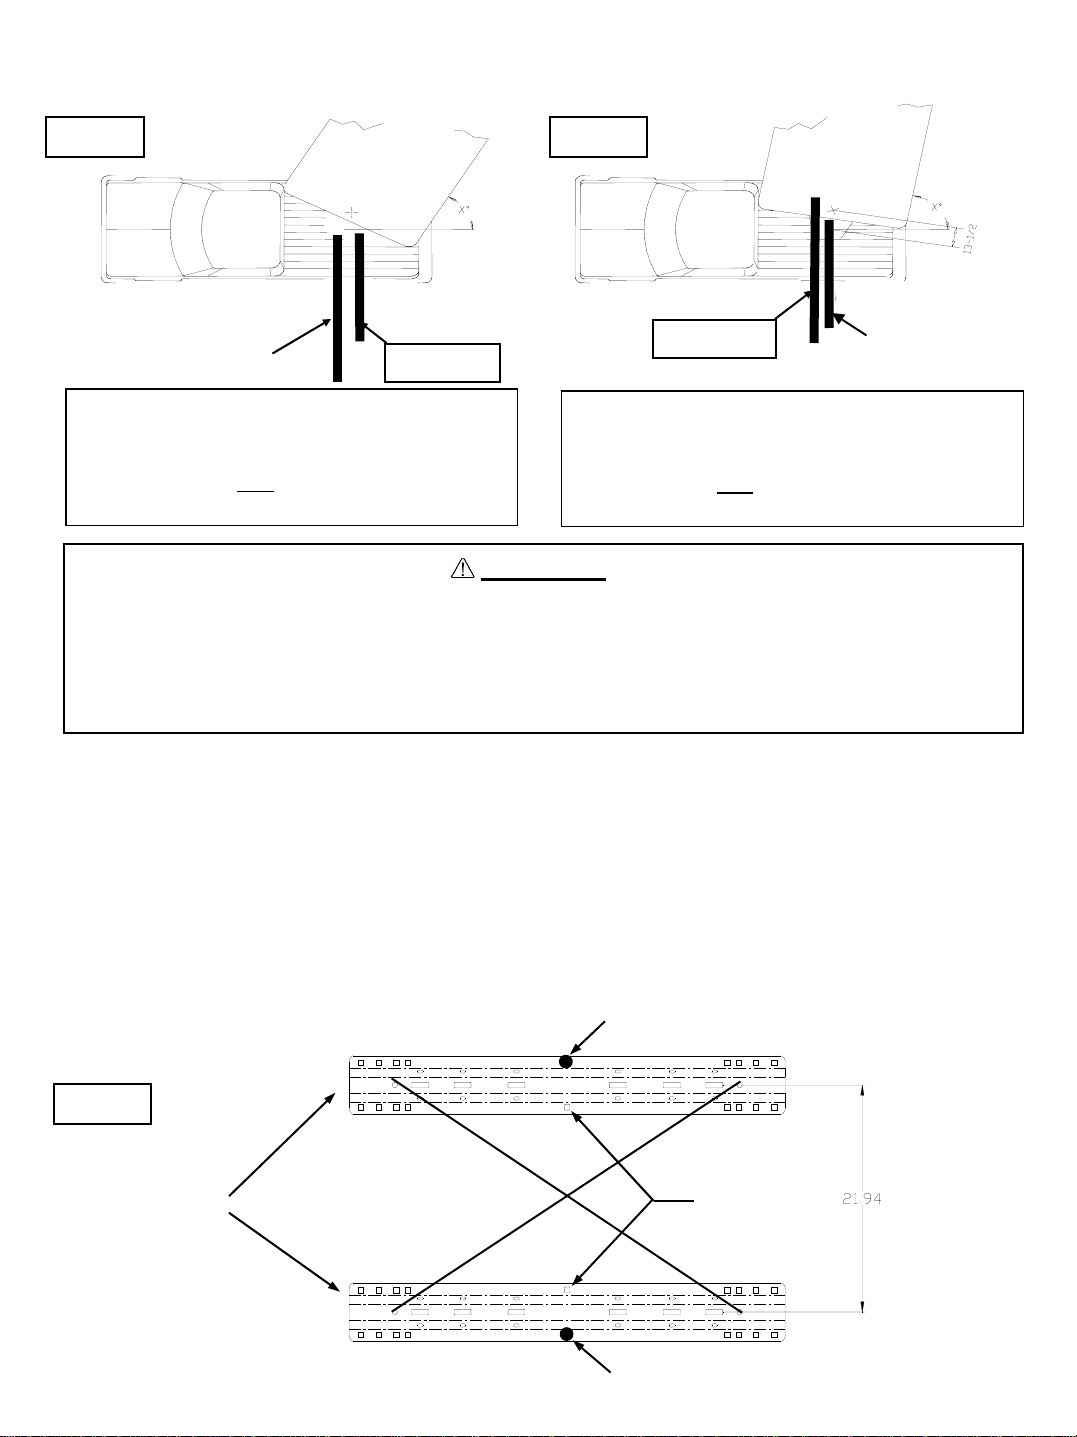
4. The 5TH WHEEL KWIK SLIDE provides additional turning clearance for low speed, off-highway
maneuvering such as backing a RV trailer into a tight camp site. This is done by sliding the hitch 10 inches
rearward of its normal Towing Position (figure 4) to a Maneuvering Position (figure 5). This places the trailer
king pin behind the rear truck axle.
figure 4
KING PIN
CENTER
Rear Axle
In this figure, the Kwik-Slide is positioned in the
Towing Position, forward of the rear axle.
Note that a 13-1/2" pin box extension has been
used. This is the only
position you should use
when towing!
figure 5
Rear Axle
KING PIN
CENTER
In this figure, the Kwik-Slide is positioned in the
Maneuvering Position. Note that a 13-1/2" pin
box extension has been used. The maneuvering
Position should only
be used at a low speed,
when high maneuverability is needed!
WARNING:
Never tow trailers in highway or high speed conditions with KWIK-SLIDE in the
Maneuvering Position (rearward of the rear axle)! Towing with the trailer king pin
rearward of rear truck axle can affect weight distributi on and may interfere with
the towing vehicle’s handling and response characteristics. Poor handling and
response characteristics could result in death or serious injury.
5. Due to the heavy duty nature of the 5TH WHEEL KWIK-SLIDE assembly, the assembly may not
slide by hand when installed, especially if base rails are not securely installed to be parallel and centered.
Rails should be installed so that the center lines of each rail are 21.94 inches (21 15/16”) apart (see figure 6).
Diagonal dimensions "x" and "y” (as depicted in figure 6) should be within 0.1 inch (1/8”) of each other.
If this alignment is not met, loosen hardwar e and realign base rail s. Retorque hardware per
instructions after base rails are properly aligned.
6. Drill 2 holes identified in figure 6 (check for obstructions). Drill all holes with 3/16” drill and enlarge them with a
17/32” drill. Always use sharp drill bits. Install 1/2” carriage bolts into holes. Install slotted spacer above or
below bed to fill corrugations in bed floor, also add bolt plate below bed with washers and nut. These bolts are
in addition to the 8 bolts used when installing base rails according to instructions 30035.
Add bolt (hardware supplied)
figure 6
X
Base rails in truck bed, (25) IN 30046 & 30047 instruction manual
Y
Optional bolt
positions, if
obstructed.
Add bolt (hardware supplied)
30048IN – 9-27-04E PCN7358 ©2001, 2002, 2004 TOWING PRODUCTS, INC. Litho in USA
3
Page 4

INSTALLATION
1. These instructions should be used to mount 5TH WHEEL KWIK-SLIDE. Care and attention to detail will ensure a
quick, safe and quality installation. Check parts against figure 1 to become familiar with kit.
2. Before installing 5TH WHEEL KWIK-SLIDE,
leaf spring must be greased as shown using
white lithium grease or equivalent (see figure 7). For
best results, use aerosol white lithium grease with a
spray nozzle extension. Make sure entire
underside of spring is coated! Repeat this application
monthly during use.
3. Before setting the 5TH WHEEL KWIK-SLIDE into
the bed of the pickup, attach handle shaft to handle
elbow (see figure 1 on first page). Insert handle
assembly through left hand slide assembly
(driver’s side of towing vehicle) and then through the
right hand side slide assembly (see figure 8).
TH
WHEEL KWIK-SLIDE is being used with the
If 5
PRO-SERIES 15k head assembly insert handle
through right hand slide assembly (passenger side of
towing vehicle) and then through left hand side of
slide assembly.
4. Set the 5TH WHEEL KWIK-SLIDE into
base rails and pin in position with the
KWIK-SLIDE in the middle of the tubes (see
figure 9).
Aerosol white lithium
grease spray with nozzle
extension
figure 7
Leaf spring
Reference label
facing driver side.
Kwik Slide Upright
figure 8
See figure 10 for
Slide Tube
installed clip locations.
WARNING:
Pull pin spring clips must
be on the outside of base rail
as shown. Spring clips
installed on the inside of
base rail will not allow Kwik-
Slide to slide far enough to
E
L
C
I
H
E
figure 9
O
T
N
O
R
F
30048IN – 9-27-04E PCN7358 ©2001, 2002, 2004 TOWING PRODUCTS, INC. Litho in USA
V
W
O
T
F
lock. Kwik-Slides that are
not properly locked can
suddenly move and cause
serious injury or death.
4
Page 5

5. Loosely assemble head support to 5TH WHEEL
KWIK-SLIDE at desired height.
NOTE: Bottom position may not be used on all
hitch models.
Use 2 cotter pins provided to trap handle in place as shown.
Install indicator pin i n handle as shown. Install such that the
indicator pin just goes through the bottom side of the handle.
(see figure 10).
6. Use a two step procedure to tighten hardware
A. Start at a point and snug all hardware.
Do not overlook connections under
bed at frame. Note sequence.
B. Using same start point and sequence, torque all hardware.
Torque 1/2” bolts to 85 lb.ft.
7. Coat top & side surfaces of slide tube and roller holes
(6 places) in each slider assembly with all purpose grease
or teflon lube, use as needed (see figure 11). Repeat this
application monthly during use.
Cotter pins
Indicator pin
figure 10
figure 11
OPERATION
LATCH CAM
ROLLERS
WELDED FOOT
SLIDE UPRIGHT
LEAF SPRING
LATCH
SLIDE TUBE
BOLT & LOCKWASHER
BOLT ON FOOT
figure 12
WARNING:
Kwik-Slide hitches that are not properly locked can suddenly mov e and kill you!
To avoid death or serious injury:
•Never place any part of body in truck bed or between truck and trailer unless the
following conditions are met :
•All trailer tires MUST
•Trailer landing gear MUST be resting on firm ground, AND
•Truck MUST be stationary, in park, with emergency brake on!
•Always perform “push” or “pull test” by following instructions in this manual.
be blocked in front and behind each tire, AND
30048IN – 9-27-04E PCN7358 ©2001, 2002, 2004 TOWING PRODUCTS, INC. Litho in USA
5
Page 6

Indicator pin
Leaf spring on latch cam keeps latch from
disengaging. Hitch can not move rearward with
latch engaged. Rearward load forces latch further
into slot. Hitch can not move forward due to
welded foot (see figures 1, 11 and 12).
TOWING POSITION
FRONT OF TOW VEHICLE
figure 13
MOVE FROM TOWING TO MANEUVERING POSITION
1. Position truck and trailer in a straight line on a flat, level area.
2. Place truck in “Park” with emerge ncy brake “on”.
3. Block front and back of all trailer wheels.
4. Lower trailer landing gear so it is resting on firm ground.
5. Pull handle forward (see figure 14). Indicator pin should be
over red unlocked range near the green locked maneuvering
range (see figure 14).Spring pressure will press latch against
top of tube, the latch will lock into slot when the 5TH WHEEL
KWIK-SLIDE moves to the maneuvering position (see figure 15).
6. Return to truck. Release emergency brake. Manually engage
trailer brake and pull truck forward until 5TH WHEEL KWIK
MOVE TO MANEUVERING POSITION
SLIDE stops at bolt in foot (figure 12) and latch engages in
maneuvering position (see figure 15).
7. Perform “PUSH TEST” as follows:
1. Manually engage trailer brakes from truck cab.
2. Back truck into trailer against trailer wheel blocks.
3. If Kwik-Slide does not move, latch has engaged tubes
and Kwik-Slide should be locked in maneuvering position.
4. If Kwik-Slide does move, latch has not engaged tubes.
DO NOT TOW!. Repeat steps 1 - 7 above.
8. Again, place truck in “Park” with emergency brake “on”.
9. Examine warning label. Indicator pin should now be over the green range
on the left side of the warning label (see figure 15). If indicator pin is over
red range on warning label, latch has not engaged tubes. DO NOT TOW!
Repeat steps 1- 7 above.
10. After successfully performing above steps, fully raise trailer
landing gear (See trailer manual).
11. Remove and store all trailer wheel blocks.
Indicator pin
Figure 14
Indicator pin
MANEUVERING POSITION
Figure 15
WARNING:
Kwik-Slide hitches that are not properly locked can suddenly mov e and kill you!
To avoid death or serious injury:
•Never place any part of body in truck bed or between truck and trailer unless the
following conditions are met :
•All trailer tires MUST
be blocked in front and behind each tire, AND
•Trailer landing gear MUST be resting on firm ground, AND
•Truck MUST be stationary, in park, with emergency brake on!
•Always perform “push” or “pull test” by following instructions in this manual.
30048IN – 9-27-04E PCN7358 ©2001, 2002, 2004 TOWING PRODUCTS, INC. Litho in USA
6
Page 7

MOVE FROM MANEUVERING TO TOWING POSITION
FRONT OF TOW VEHICLE
1. Position truck and trailer in a straight line on a flat, level area.
2. Place truck in “Park” with emerge ncy brake “on”.
Indicator pin
3. Block front and back of all trailer wheels.
4. Lower trailer landing gear so it is resting on firm ground.
5. Push handle rearward (see figure 16). Indicator pin should be
over red unlocked range near the green locked towing
range (see figure 16).Spring pressure will press latch against
top of tube, the latch will lock into slot when the 5TH WHEEL
KWIK-SLIDE moves to the towing position (see figure 17).
6. Return to truck. Release emergency brake. Manually engage
trailer brake and back truck rearward until 5TH WHEEL KWIK
SLIDE stops at the welded foot (figure 12) and latch engages in
towing position (see figure 17).
7. Perform “PULL TEST” as follows:
1. Manually engage trailer brakes from truck cab.
2. Pull truck and trailer forward against trailer wheel blocks.
3. If Kwik-Slide does not move, latch has engaged tubes
MOVE TO TOWING POSITION
Figure 16
Indicator pin
and Kwik-Slide should be locked in towing position.
4. If Kwik-Slide does move, latch has not engaged tubes.
DO NOT TOW!. Repeat steps 1 - 7 above.
8. Again, place truck in “Park” with emergency brake “on”.
9. Examine warning label. Indicator pin should now be over the green range
on the right side of the warning label (see figure 17). If indicator pin is
over red range on warning label, latch has not engaged tubes. DO NOT
TOW! Repeat steps 1- 7 above.
10. After successfully performing above steps, fully raise trailer
landing gear (See trailer manual).
11. Remove and store all trailer wheel blocks.
TOWING POSITION
Figure 17
WARNING:
Kwik-Slide hitches that are not properly locked can suddenly mov e and kill you!
To avoid death or serious injury:
•Never place any part of body in truck bed or between truck and trailer unless the
following conditions are met :
•All trailer tires MUST
be blocked in front and behind each tire, AND
•Trailer landing gear MUST be resting on firm ground, AND
•Truck MUST be stationary, in park, with emergency brake on!
•Always perform “push” or “pull test” by following instructions in this manual.
Towing Products warrants its 5TH WHEEL KWIK-SLIDE from date of purchase against defects in material and workmanship under normal use
and service, ordinary wear and tear excepted, for 5 years of ownership to the original consumer purchaser when a Towing Productsmounting kit is
used.
Products used by professional haulers are subject to Towing Products’ limited One (1) year warranty.
Towing Products will replace free of charge any part which proves defective in material or workmanship when presented to any Towing Products
dealer (consult local telephone directory) or Towing Products warehouse, or when returned to the factory, TRANSPORTATION CHARGES
PREPAID, at the address below. THIS WARRANTY IS LIMITED TO DEFECTIVE PARTS REPLACEMENT ONLY. LABOR CHARGES AND/OR
DAMAGE INCURRED IN INSTALLATION OR REPLACEMENT AS WELL AS INCIDENTAL AND CONSEQUENTIAL DAMAGES
CONNECTED THEREWITH ARE EXCLUDED.
Some states do not allow the exclusion or limitation of incidental or consequential damages, so the above limitation or exclusion may not apply to
you.
Any damage to the 5TH WHEEL KWIK-SLIDE as a result of misuse, abuse, neglect, accident, improper installation, or any use violative of the
instruction furnished by us WILL VOID THE WARRANTY.
This warranty gives you specific legal rights, and you may also have other rights which vary from state to state. In the event of a problem with
warranty service or performance, you may be able to go to a small claims court, a state court, or a federal district court.
Towing Products, Inc.
47774 Anchor Court
Plymouth, MI 48170
30048IN – 9-27-04E PCN7358 ©2001, 2002, 2004 TOWING PRODUCTS, INC. Litho in USA
FIVE YEAR LIMITED WARRANTY
Towing Products, Inc.
2602 College Ave.
Goshen, IN 46528
7
 Loading...