

Page 1
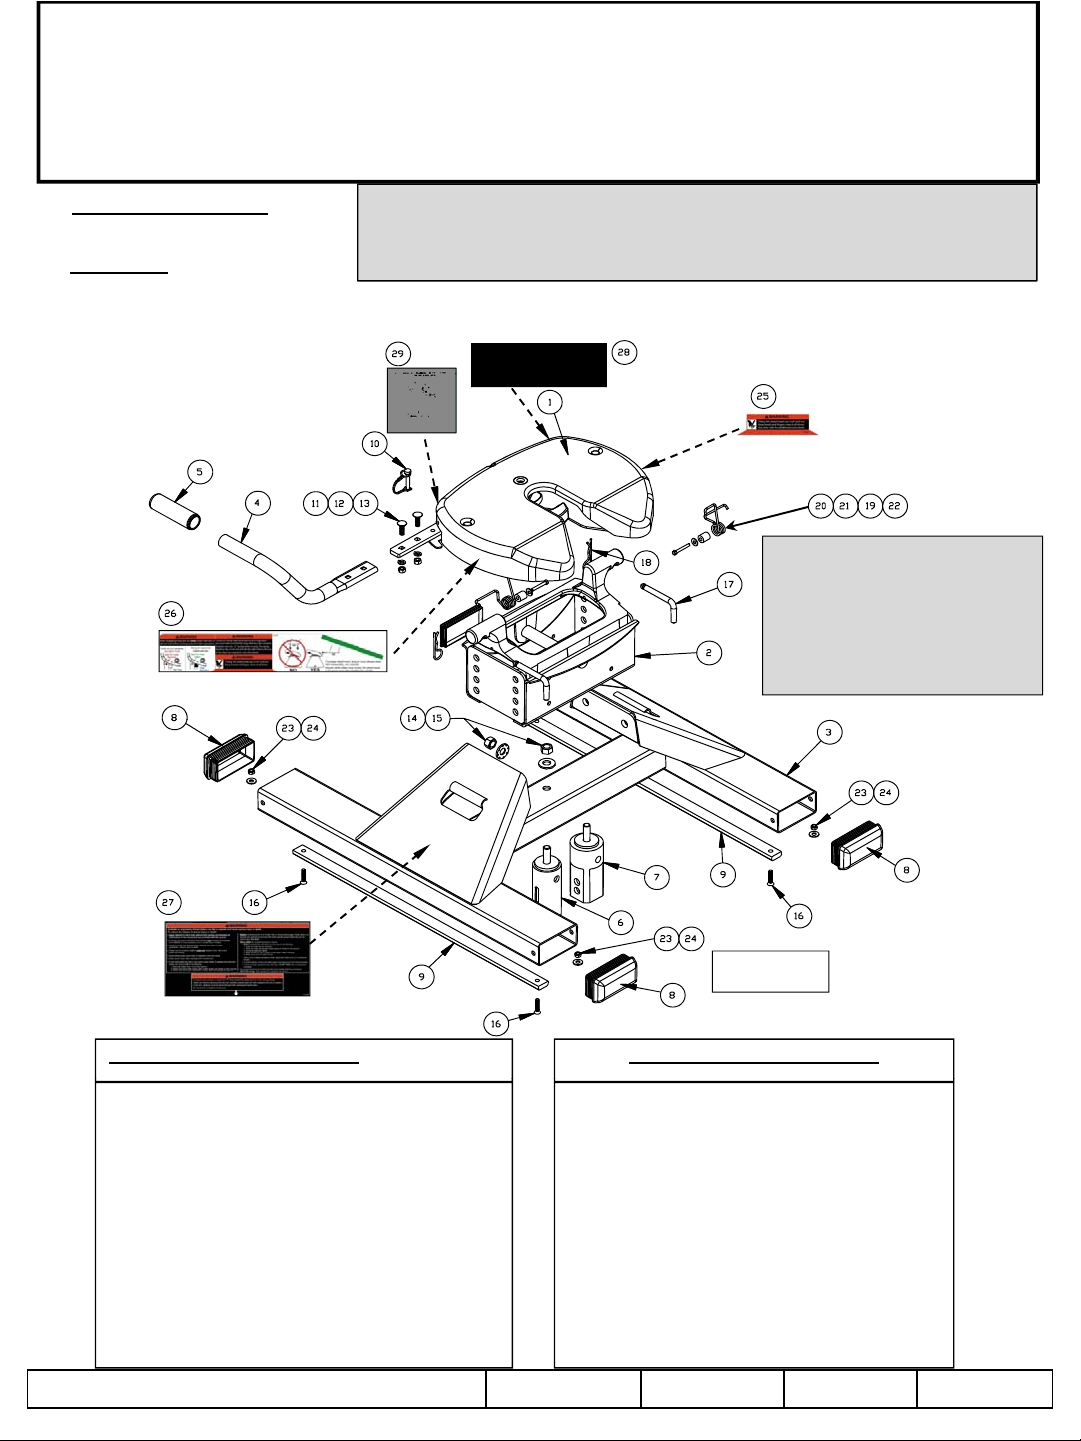
ASSEMBLY INSTRUCTIONS
BRAND &
251LABEL, PINCH POINT
101BAIL PIN
Hi-Rise
18K 5TH WHEEL CONVERSION HITCH
DEALER/INSTALLER:
(1) Provide this Manual to end user.
This hitch is designed to work with Cequent (94XX) series gooseneck heads
utilizing the (44XX) series rails only using the round post assembly.
By using the square post assembly this hitch will also work with the
END USER:
(1) Read and follow this Manual every time you use Hitch.
(2) Save this Manual for future reference.
(3) Pass on copies of Manual to any other users or owners of the Hitch.
WEIGHT RATING
B & W gooseneck hitch.
Plastic strips supplied with
this hitch are 1/2” thick.
3/8” thick plastic strips, part
number 58438, are available
for trucks with bed
corrugations that are
shallower.
REF # QTY. DESCRIPTION REF # QTY DESCRIPTION
1 1 SKID PLATE ASSEMBLY
2 1 CENTER SECTION
3 1 BASE ASSEMBLY
4 1 HANDLE TUBE
51HANDLE GRIP
6 1 ROUND POST ASSEMBLY
7 1 SQUARE POST ASSEMBLY
84END CAP
92PLASTIC STRIP
11 2 3/8 NUT
12 2 3/8 LOCKWASHER
13 2 3/8 CARRIAGE BOLT
14 2 5/8 CONICAL TOOTHED WASHER
15 2 5/8 NYLON LOCK NUT
z 2010, 2011 Cequent Performance Products
Printed In China
Figure 1
16 4 5/16 SCREW
17 2 ½ PULL PIN 90 DEGREE
18 2 RETAINING CLIP
19 2 FLATWASHER
20 2 TORSION SPRING
21 2 TUBE SPACER
22 2 ¼-20 HEX BOLT
23 4 5/16-18 NYLON LOCK NUT
24 4 5/16 FLATWASHER
26 1 LABEL, OPERATING WARNING
27 1 LABEL, WARNING
28 1 LABEL, RATING
29 1 HANG TAG
30 1 5/8” KNURL BOLT
Sheet 1 of 12 9480N 6-22-11 Rev. C
Page 2
WARNING:
1. GUIDELINES
FOR MATCHING TOW VEHICLE AND
TRAILER
P
. 2
4
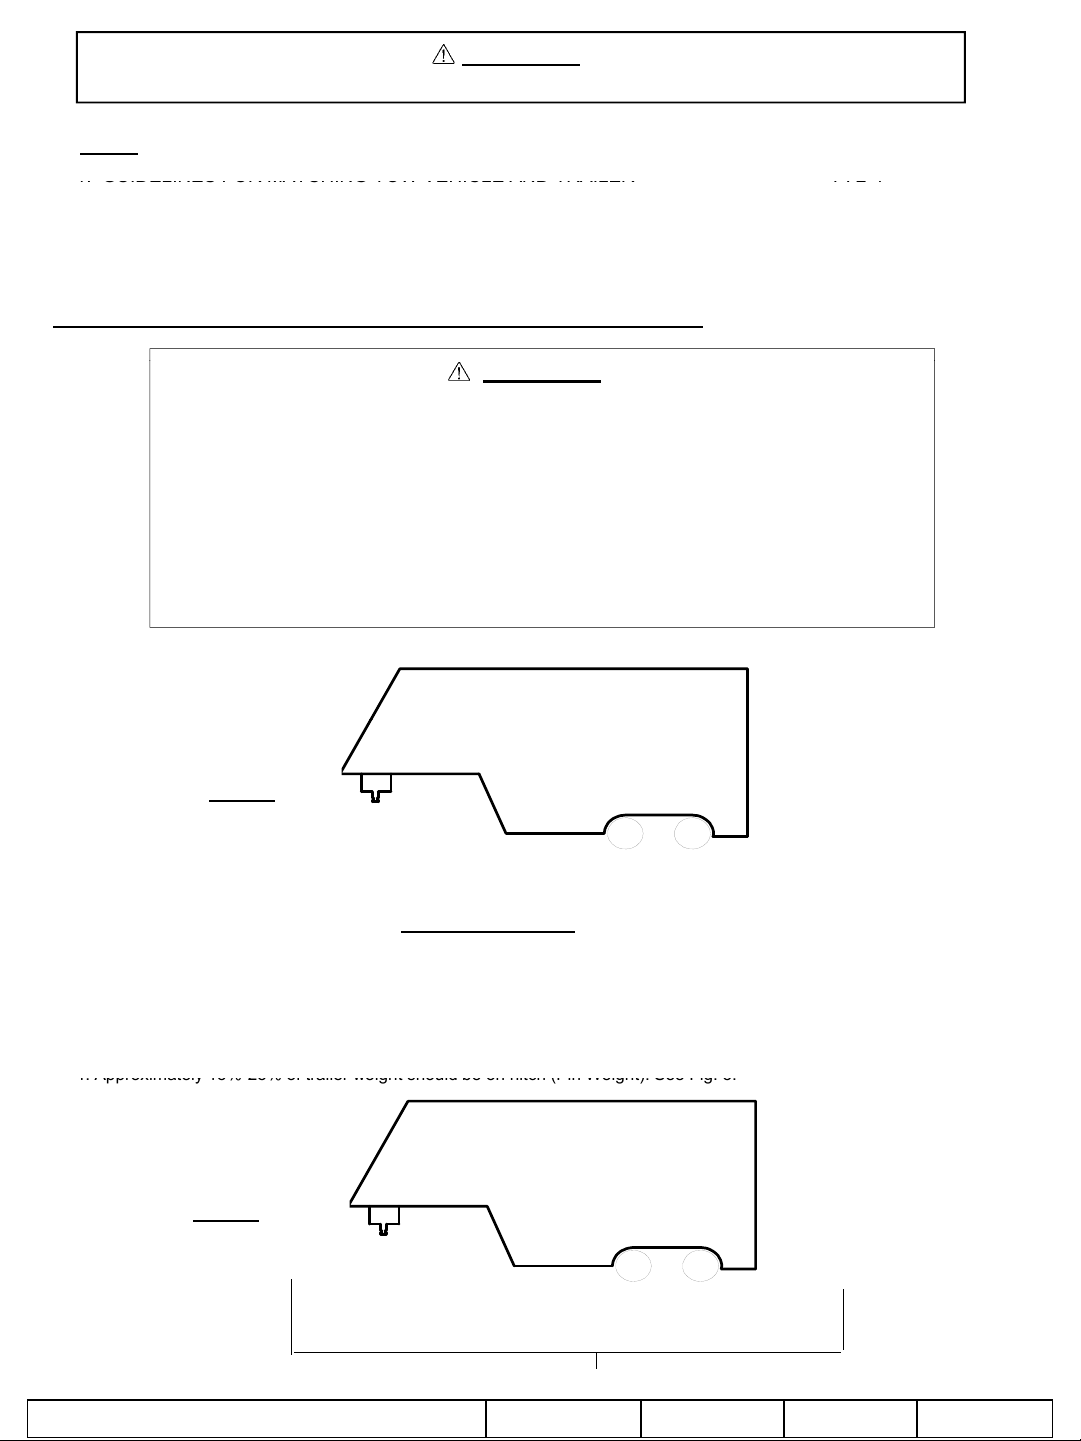
trailer). (See Fig. 2)
Vehicle T
4. Approximately 15%
25% of trailer weight should be on hitch (Pin Weight). See Fig. 3.
15-25%
Failure to follow all of these instructions may result in death or serious injury!
INDEX
2. PLASTIC BED LINER INSTRUCTIONS P. 5
3. ASSEMBLY INSTRUCTIONS P. 6-11
4. CEQUENT PERFORMANCE PRODUCTS TWO YEAR LIMITED WARRANTY P. 12
Section 1 - GUIDELINES FOR MATCHING HITCH, TRUCK, AND TRAILER
WARNING:
Failure to check and follow tow ratings could result in tow vehicle
damage or truck and trailer separation while towing.
•Trailer and its contents together must not exceed truck, hitch and/or trailer tow
ratings.
•Towing vehicle must have a manufacturer’s rated towing capacity equal to or
greater than the gross trailer weight (dry weight of the trailer plus payload of the
•Gross weight of trailer must not exceed 18,000 pounds.
•King pin weight must not exceed 4,500 pounds (See Fig. 3). If in doubt have king
pin weight measured by qualified facility.
-
FACTORY TRAILER + FULL WATER
TANKS + CARGO, ETC.
= GROSS TRAILER WEIGHT
Figure 2
1. Check Tow Ratings:
ow Rating:_______________________.
Hi-Rise Hitch Rating:_______18,000 lbs.__
Gross Trailer Weight (figure 2):______________.
*Trailer weight should be the lowest of these recorded ratings for safe towing conditions.
2. Cequent Performance Products hitches are designed for use with recreational fifth wheel trailers only. Hitch applications
other than recreational fifth wheel trailers must be approved in writing by Cequent Performance Products’
Engineering Department.
3. Use only a SAE 2-inch kingpin with your Hi-Rise Fifth Wheel Conversion Hitch.
-
Figure 3
GROSS TRAILER
WEIGHT
(PIN WEIGHT)
.
75-85%
GROSS TRAILER
WEIGHT
z 2010, 2011 Cequent Performance Products
Sheet 2 of 12 9480N 6-22-11 Rev. C
Page 3
5. Trucks come in many different configurations. Cequent Performance Products hitches are designed for use in light trucks
(
)
(g)
pp y
such as the Ford F-Series, the Chevy Silverado , Dodge Ram and the Toyota Tundra. Cequent Performance Products
recommends the use of long bed (8ft) trucks for the best combination in truck - trailer turning clearance.
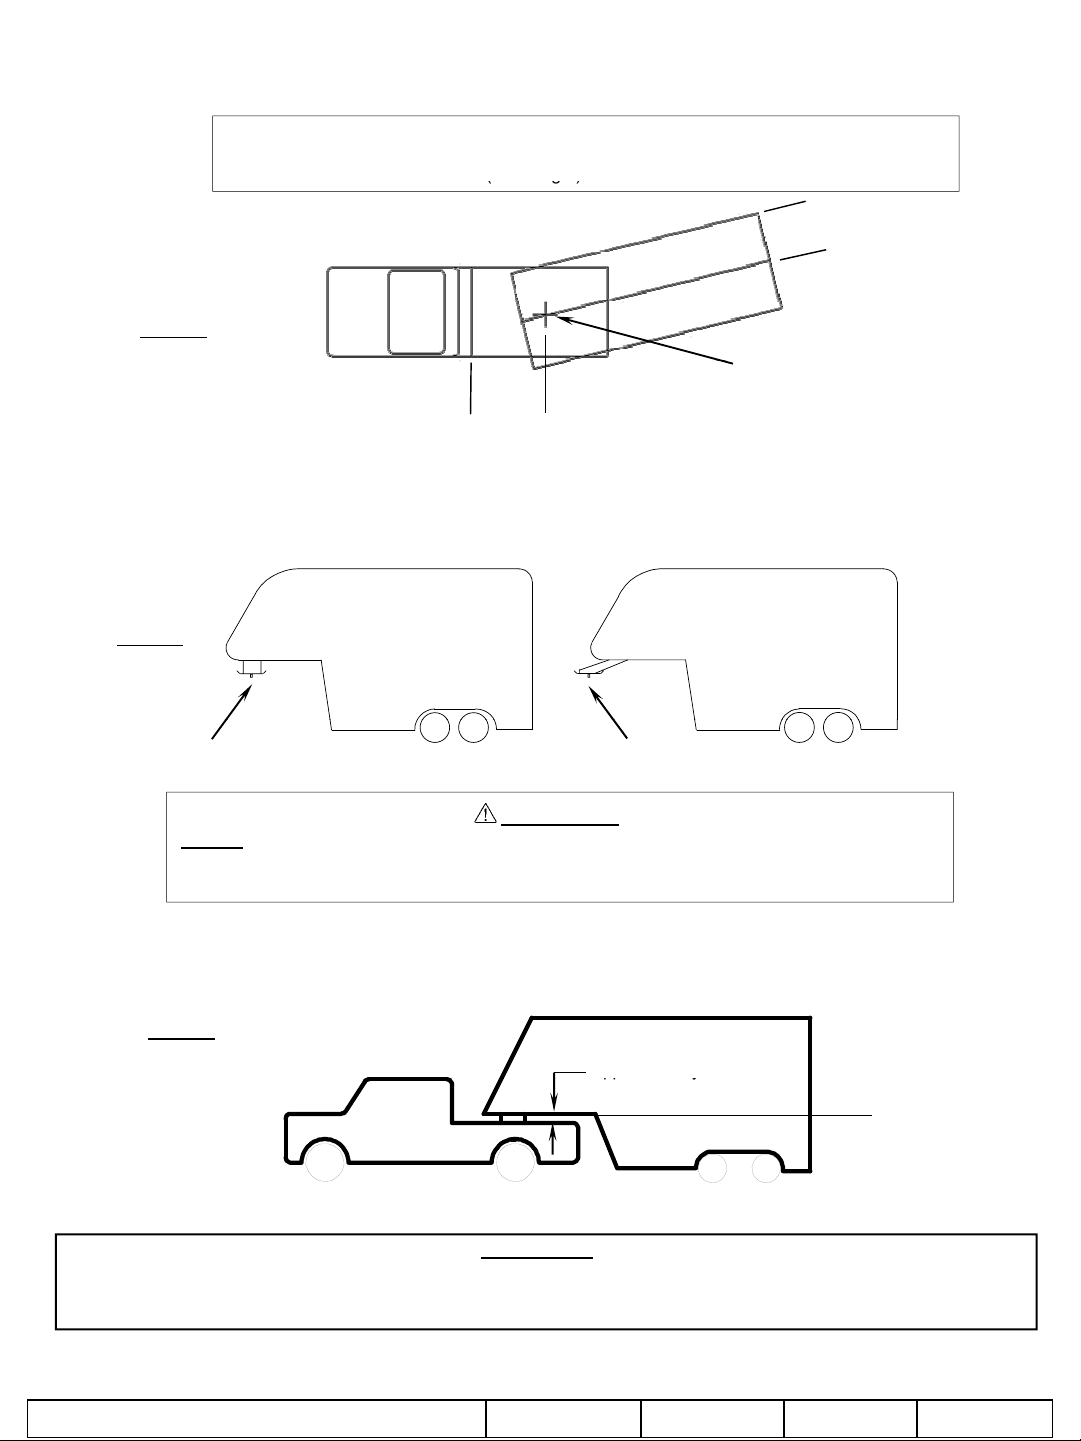
Rule of thumb: The distance from the back of the truck cab to the center of the rear truck
axle (“X” in Fig. 4), should be approximately 4 inches greater than one-half
the trailer width
“Y” in Fig.4
Y
RV TRAILER
Figure 4
TRUCK
KING PIN
X
6. If a short bed pickup (less than 8 ft. but longer than 6 ft.) is to be used for towing, Cequent Performance Products
recommends the trailer be equipped with a minimum 13” extended pin box to help gain additional truck - trailer turning
clearance (See trailer manufacturer for options) (See Fig. 5).
Figure 5
Conventional Pin Box
Extended Pin Box
WARNING:
Do Not install this fifth wheel hitch on or attempt to tow with a short bed pickup
truck that has a bed shorter than 6 ft.! Doing so could result in vehicle damage,
Serious injury, or Death
7. The height of the hitch and the pin box should be adjusted so the trailer is approximately level as it is towed. Allow
approximately 6 inches clearance between the top of the pickup walls and the underside of the front of the trailer for pitch and
roll of the trailer. (See Fig. 6). For off road use allow more clearance between pickup walls and trailer.
Figure 6
Approximately 6 Inches
Level Trailer
CAUTION:
The measurements above are guidelines. If your measurements are close to these numbers re-check
clearances. If vehicle and/or trailer has any added bed vicinity accessories (i.e. fairings, air dams, ground effects,
bed rails, etc.). Additional dimensioning and clearance checks have to be made.
z 2010, 2011 Cequent Performance Products
Sheet 3 of 12 9480N 6-22-11 Rev. C
Page 4
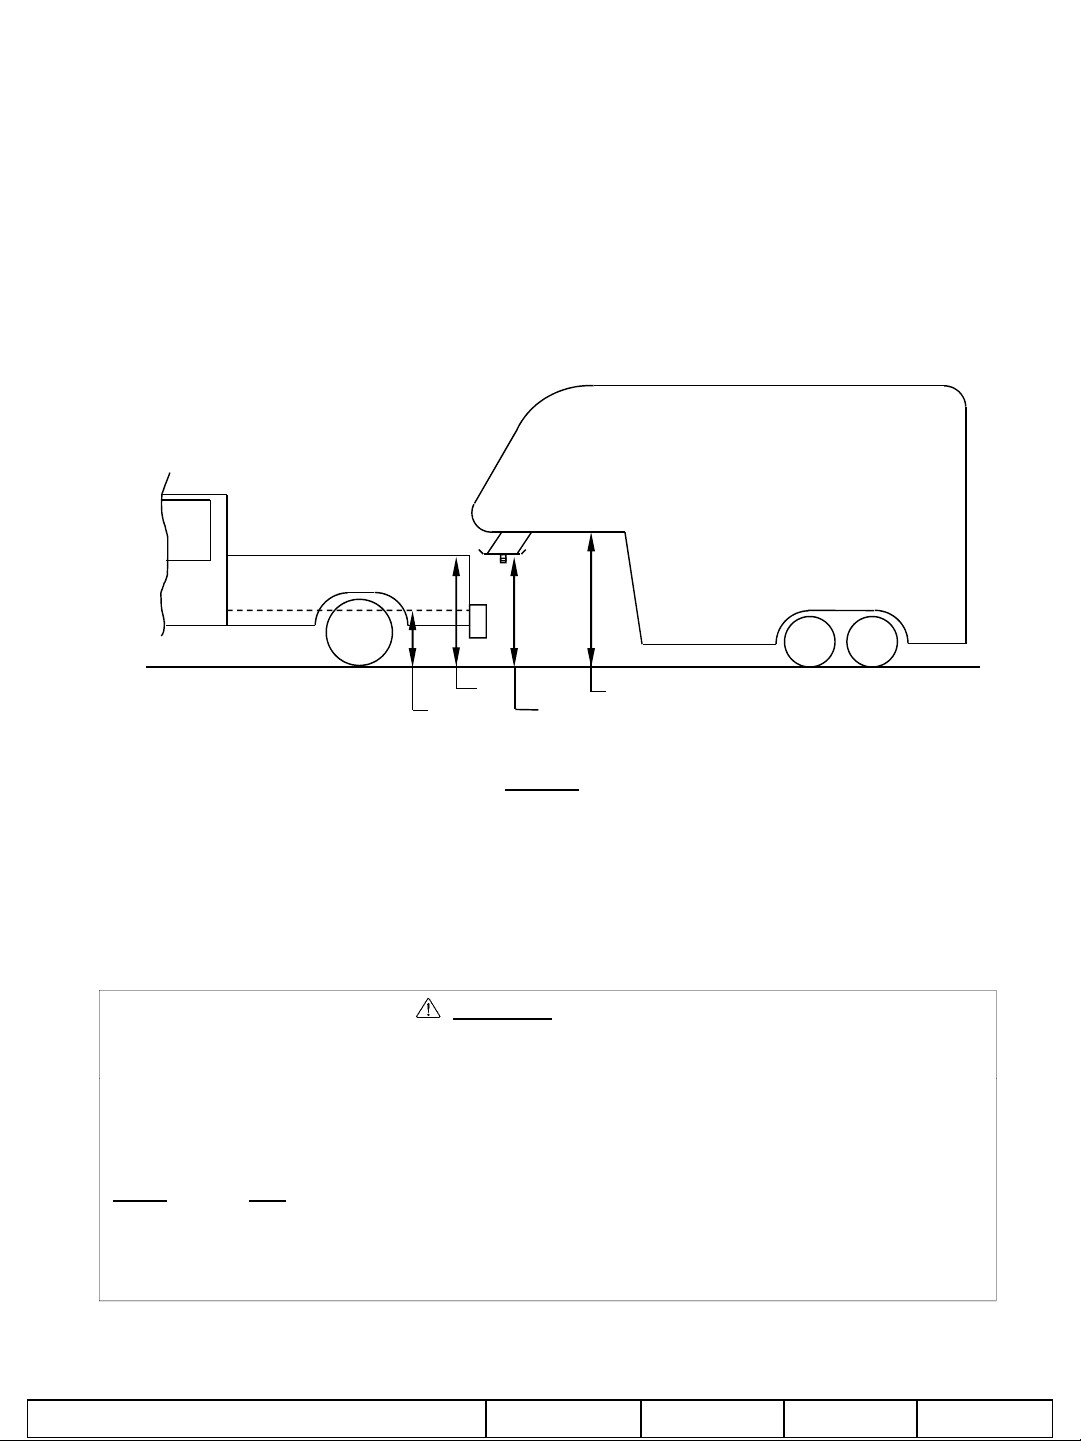
8. Hitch height determination:
A
•
Block in front of and behind all trailer tires
With trailer leveled and on level ground measure from the ground to the king pin box, “A” in Figure 7. Secondly measure
from the height of the inside of the truck bed, “B” in Figure 7. Dimensions “C” and “D” in Figure 7 can be used to determine
the amount of clearance over the side rails, as mentioned in Note 7.
The 2” value is an estimate of suspension compression due to king pin weight of the trailer. This compression could range
between 1”-5” depending on the truck being used and the trailer being towed.
Hitch Height = A – B + 2”
D – C + 2” > 6” as stated in Note 7.
C
B
D
*MEASURED WITH TRAILER LEVEL,
ON LEVEL GROUND
Figure 7
9. If a lube plate is to be used with a Hi-Rise 5thWheel Conversion Hitch, it must be at least 12” in diameter and not more
than 3/16” thick. Cequent Performance Products offers this optional lube plate as part # 83001 / 40001.
WARNING:
•Connection for trailer wiring must be located at the side of the truck bed between the driver’s
seat and the rear wheel to prevent operators from working between the truck and trailer.
•Avoid putting any part of your body under the trailer or between the truck and trailer.
Unexpected or accidental movement of the truck or the trailer can cause serious injury or death
•If you must place any part of your body under the trailer or between the truck and trailer you
MUST
perform ALL of the following steps:
•Check that the truck transmission is in park
•Check that the emergency brake is set
•Check that the trailer landing gear are resting on firm ground
z 2010, 2011 Cequent Performance Products
Printed In China
Sheet 4 of 12 9480N 6-22-11 Rev. C
Page 5

If your truck is equipped with a plastic bed liner, then cutting or removal of the plastic bed liner WILL be necessary for
remove liner and leave out.
the proper installation and operation of the 18K Hi-Rise Fifth Wheel Conversion Hitch. Refer to the “Plastic Bed
Liner Instructions” portion below for instructions on one option for cutting your plastic bed liner if required. If your truck
is not
equipped with a plastic bed liner or if it has a spray in bed liner, than you should use the instructions provided in
the mounting kit for your specific truck and skip to page 6 for the rest of the 18K Hi-Rise Fifth Wheel Conversion
Hitch instructions.
Plastic Bed Liner Instructions:
1. Note!
be removed totally as an option.
2. Follow the mounting kit instructions for your specific vehicle.
3. Measure and mark the distances provided in Figure 8 for the areas to be cut out of your plastic
bed liner. This is just one option, check with vehicle owner to discuss other ways to cut liner or
4. Remove the plastic bed liner from your truck and cut out the marked areas with a saw or cutting
device of your choice.
5. Reinstall the plastic bed liner.
6. Continue the rest of the 18K Hi-Rise Fifth Wheel Conversion Hitch instructions.
Before cutting check with vehicle owner to confirm that they want liner to be cut. Liner can
Front of Truck
Cutting
Cutting
Area
Area
Figure 8
One option for cutting of
plastic bed liner.
Check with vehicle
owner before cutting.
z 2010, 2011 Cequent Performance Products
Area in bed liner to be cut out is relative
to 3-1/2” round hole drilled in bed.
Tailgate
Sheet 5 of 12 9480N 6-22-11 Rev. C
Page 6

Hi-Rise FIFTH WHEEL ASSEMBLY
14
1/4
ASSEMBLY AND ADJUSTMENT
IS REQUIRED BEFORE INITIAL USE.
SOME USERS MAY REQUIRE MORE EXTENSIVE ADJUSTMENTS. THE TOOLS NEEDED FOR THESE
ADJUSTMENTS ARE LISTED BELOW.
POSSIBLE TOOLS NEEDED IF FURTHER ADJUSTMENT ARE REQUIRED
7/16”, 9/16” and 15/16" Socket, Open End Wrenches, Phillips Screw Driver,
200 lb-ft Torque Wrench
1. Check the box for all components listed in Figure 1 and become familiar with component terminology.
2. Determine from the Guide Lines portion of this instruction sheet (Pages 2 – 4 ) the height of the hitch that is required and
position at the correct setting. See Chart 1 on page 7 as a guide to determine which direction to attach the center section
to the base assembly. Attach the center section to the base assembly using the 5/8” Bolts and Lock washers (see Figure
9). Torque the 5/8 fasteners to 170 ft-lb. (230 N*M).
5/8” LOCK WASHER
-
15-1/2”
16-3/4”
18”
5/8” BOLT
”
CENTER SECTION
z 2010, 2011 Cequent Performance Products
FIGURE 9
Sheet 6 of 12 9480N 6-22-11 Rev. C
Page 7

Year Vehicle Fit Center-Section Offset
3A and 3B
Chart 1
See Steps
8810
GM 1500/2500/3500
including CKSeries (6’
& 8’ Beds)
Rearward
below for
spring
0410
Ford F-150 6’ & 8’
Beds
Forward
adjustment
9910
9410
Ford F-250/F-350/F450 6’ & 8’ Beds
Dodge
1500/2500/3500 6’ &
Rearward
Rearward
8’ Beds
0710
3A. To assemble the spring , use the ¼” bolts, washers, spacers and springs from the fastener kit. See Figure 10A.
Spring
Spacer
¼” Washer
¼” Bolt
Toyota Tundra 6’ & 8’
Beds
Center Section
Forward
Figure 10A
3B. The coil of the spring ( See Figure 10B) is facing the rear of the truck and wide hook sits over the center section casting as
shown in Figure 10C Assemble and tighten ¼” bolts into the thread holes in the casting.
Figure 10B
Wide Hook
Coil of Spring
Figure 10C
Center Section Casting
Rear of truck
z 2010, 2011 Cequent Performance Products
Sheet 7 of 12 9480N 6-22-11 Rev. C
Page 8

4. Assemble the plastic strips to the bottom of the legs on the base assembly, using the 5/16 X 1.50 screws, flat washers, and
FIGURE
11A
Plastic Stri
To yo ta Tundra
nylon lock nuts. The plastic strips are used to prevent rotation of the hitch and should be aligned so that they sit between
the corrugations of the bed as shown in Figure 11B.
NOTE: For the Toyota Tundra the plastic strips should be aligned so that the outer edge of the plastic strip is aligned with
the outer corrugation (see figure 11C).
Longer legs
Should be
positioned
towards the
vehicle cab
Nylok Nut
Flatwasher
p
5/16 X 1.50
Phillips Head
Machine Screw
Plastic strips supplied with
this hitch are 1/2” thick.
3/8” thick plastic strips, part
number 58438, are available
for trucks with bed
corrugations that are
shallower.
Truck Bed
Corrugations
z 2010, 2011 Cequent Performance Products
Plastic Strip
Shown In
Position
FIGURE 11B
Truck Bed
Corrugations
Sheet 8 of 12 9480N 6-22-11 Rev. C
Plastic Strip
Shown In
Position
FIGURE 11C – Toyota Tundra
Page 9

5. Insert the post assembly into the gooseneck hitch as shown in Figure 12. Fishwire the 5/8 knurl bolt through the inside of
b
the post assembly and through the horizontal hole in the post and the slot in the base assembly. Loosely tighten the 5/8”
conical toothed washers and nylon lock nuts.
6. Insert plastic end caps into the legs of the Base Assembly.
Insert End
Caps
Insert post assembly.
Fishwire 5/8 knurl bolt
through hole after
FIGURE 12
7. Slide the Post Assembly into the gooseneck hitch as shown below in figure 13. The plastic strips should fall into the
corrugations on the truck bed if adjusted correctly.
inserting the post
assembly into the
ase assembly.
FIGURE 13
8. Align the post assembly into position and close the Handle/Locking Pin mechanism on the gooseneck hitch.
Note: Before towing the 5/8 hex nuts connecting the Post Assembly to the Base Assembly should be torqued to a
minimum of 120 ft-lbs. The handle/locking Pin of the gooseneck hitch should not be able to be released when
tightened.
z 2010, 2011 Cequent Performance Products
Sheet 9 of 12 9480N 6-22-11 Rev. C
Page 10

9. Lube center section as shown in Figure 14 with lithium grease.
Figure 14
Lube 6 locations
11. Lube pins (2) shown in Figure 15 with lithium grease prior to installation/operation.
Figure 15
Lube 2 locations
z 2010, 2011 Cequent Performance Products
Sheet 10 of 12 9480N 6-22-11 Rev. C
Page 11

11. Place the skid plate assembly onto the center section assembly. Keep hands clear of pinch points while placing/removing
detachment
and
or
The
retaining
clip
can
easily
Pull Pin
15.Slide the handle grip over the handle tube
head onto/off hitch base as noted on head labels. Head will tilt rearward.
12. Insert the pull pins and retaining clips shown below. Note that the pull pins used with the Hi-Rise hitch are 90 degree bent
pins and if replacements are needed, please contact the factory.
13. Lube jaw and skid plate(If no lube plate is being used) with automotive type chassis grease. The jaw pin comes greased
from the factory. To insure smooth jaw operation, grease should be added every 6 months to grease fitting on top of head.
WARNING:
Tilting 5thWheel head can
crush and cut. Keep hands and
fingers clear from this area at
all times (including
placement/removal of head).
Grease Fitting
Sight Hole
Both Sides
Lube Skid Plate
Retaining Clip
Both Sides
(if not using a lube
plate)
Lube Jaw
WARNING:
To prevent tilting head
separation of hitch you must
make sure that the anchor
assemblies are properly
installed and pinned, and
the spring retaining clip is
properly installed onto the
½” pull pin before towing.
Figure 16
14. Attach the handle assembly to the skid plate assembly using the 3/8 carriage bolts, lock washer and hex nuts.
.
Both Sides
be seen through the sight
holes in the top of the head.
Figure 17
z 2010, 2011 Cequent Performance Products
Sheet 11 of 12 9480N 6-22-11 Rev. C
Page 12

TWO YEAR LIMITED WARRANTY
Cequent Performance Products
warrants the
Hi-Rise
5th Wheel Conversion Hitch
from date of
the address below. THIS WARRANTY IS LIMITED TO DEFECTIVE PARTS REPLACEMENT ONLY
improper installation, or any use violative of instructions furnished by us, WILL VOID THE WARRANTY
47912 Halyard
purchase against defects in material and workmanship under normal use and service, ordinary wear and
tear accepted, for 2 years of ownership to the original consumer purchaser when a Cequent
Performance Products mounting kit is used.
Cequent Performance Products will replace FREE OF CHARGE any part which proves defective in
material or workmanship when presented to any Cequent Performance Products dealer, Cequent
Performance Products warehouse or returned to factory. TRANSPORTATION CHARGES PREPAID, at
.
LABOR CHARGES AND/OR DAMAGE INCURRED IN INSTALLATION OR REPLACEMENT AS WELL
AS INCIDENTAL AND CONSEQUENTIAL DAMAGES CONNECTED THEREWITH ARE EXCLUDED.
Some states do not allow the exclusion or limitation of incidental or consequential damages, so the above
limitation or exclusion may not apply to you.
Any damage to the 5th Wheel Conversion Hitch as a result of misuse, abuse, neglect, accident,
.
This warranty gives you specific legal rights, and you may also have other rights which vary from state to
state. In the event of a problem with warranty service or performance, you may be able to go to a small
claims court, or a federal district court.
Cequent Performance Products
Plymouth, MI 48170
z 2010, 2011 Cequent Performance Products
Sheet 12 of 12 9480N 6-22-11 Rev. C
 Loading...