

Page 1
ÉQUIPEMENT DOYON INC.
1255, rue Principale
Linière, Qc, Canada G0M 1J0
Tel.: 1 (418) 685-3431
Canada: 1 (800) 463-1636
US: 1 (800) 463-4273
FAX: 1 (418) 685-3948
Internet: http://www.doyon.qc.ca
e-mail: doyon@doyon.qc.ca
WM35
Product / Produit:
Serial number / Numéro de série:
Page 2

WATER METER WM35
IMPORTANT SAFETY INSTRUCTIONS
SAVE THESE INSTRUCTIONS
TABLE OF CONTENTS
DESCRIPTION PAGE
General information 1
Description drawing 2
Description 3
Technical feature 3
Installation 4
Operating instructions 5
Faulty operations and solution 6
Maintenance instructions 6
Front view Parts drawing 7
Side view parts drawing 8
Spare parts list 9
Electrical drawing 10
Warranty 13
\\serveribm\I\Travaux\MANUEL\DOSEUR\EN RÉVISION\WM35-A.pdf
Créé le 14/07/09 13:15
Page 3
WM35
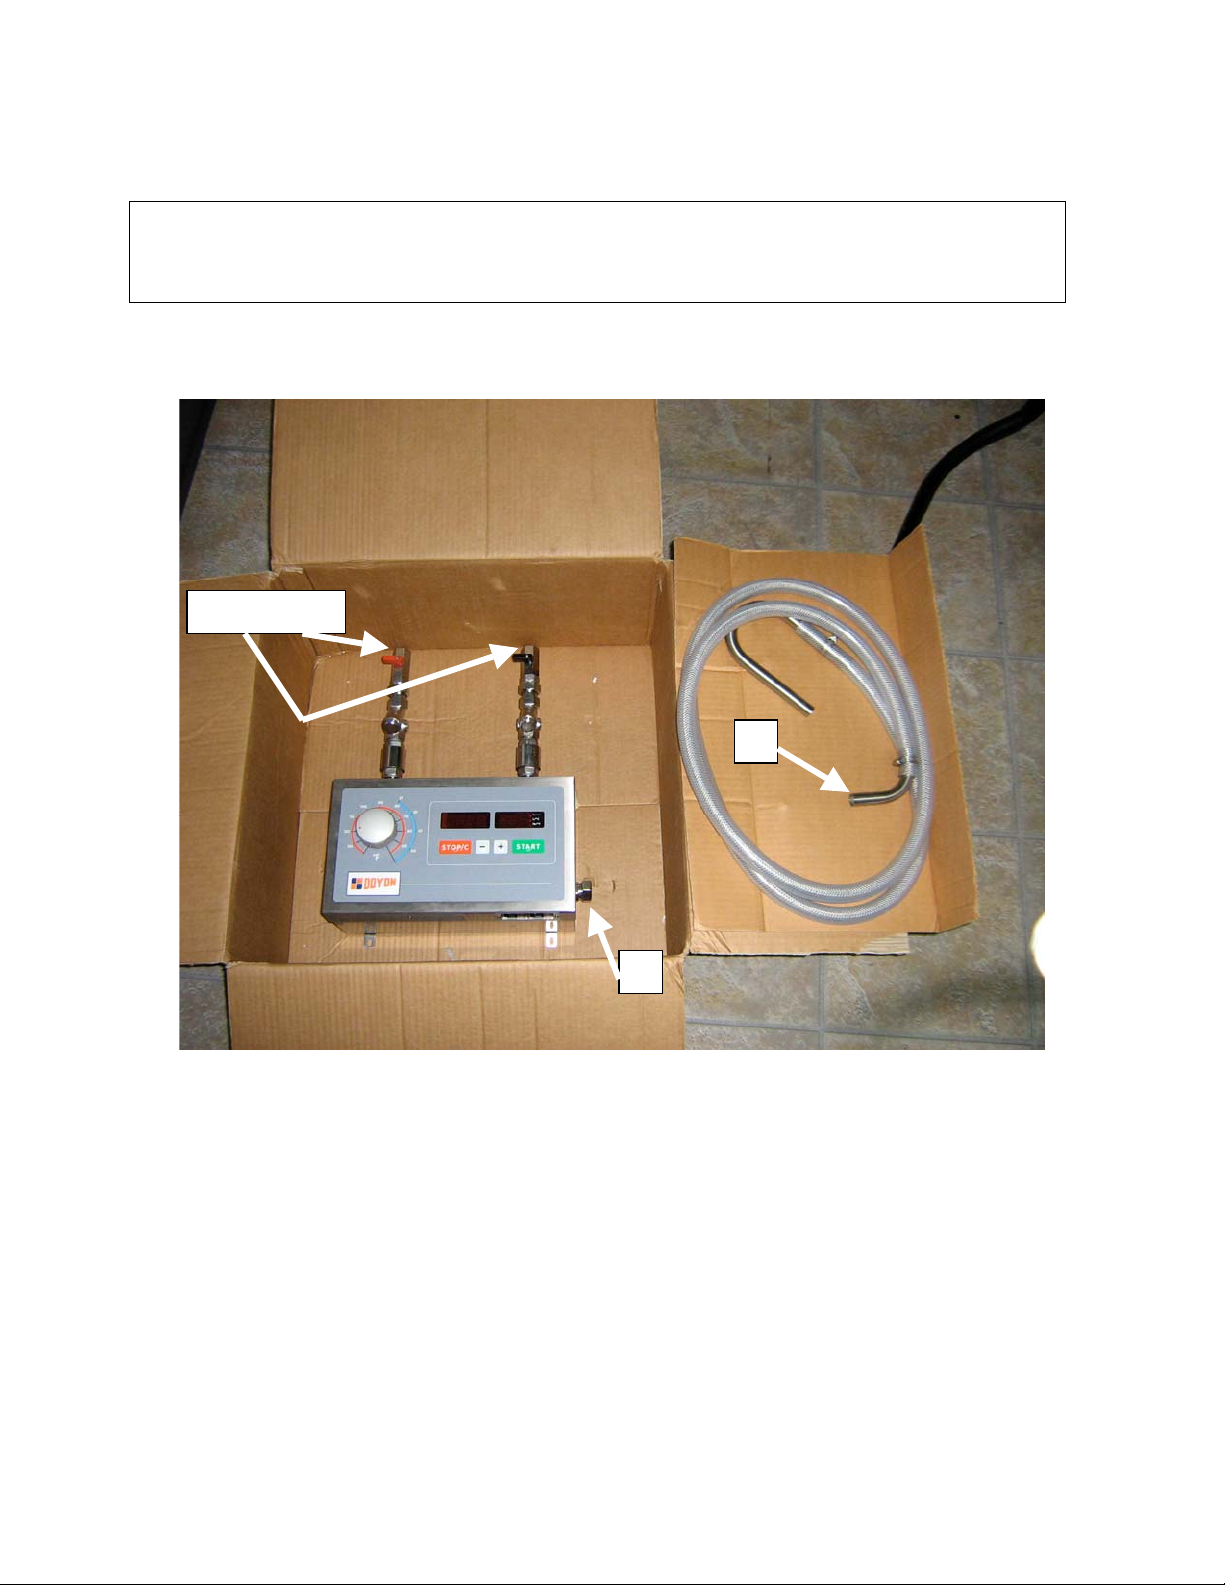
What you see is what you got with this unit. Plus a 120VAC 15A cord and plug. The point #1
of the 8.2' hose supplied need to be fasten to the water outlet point 3.
½ NPT inlets
1
2
Page 4
1
[
THE MANUFACTURER DECLINES ALL RESPONSABILITY FOR ANY DAMAGE
CAUSED BY AN UNPROPER USE OF THE MACHINE AND/OR IN
ENVIRONMENTAL CONDITIONS OUT OF THE ALLOWED RANGE.
WARNING
1) BEFORE BEGINNING THE USE OF THE MACHINE READ CAREFULLY THIS
WHOLE MANUAL.
2)
3)
4)
5) IN CASE OF SUPPLY OF HOT WATER TO THE MACHINE, THE
TEMPERATURE MUST NOT BE HIGHER THAN 65°C (150°F).
6) THIS EQUIPMENT IS TO BE INSTALLED WITH ADEQUATE BACKFLOW
PROTECTION TO COMPLY WITH FEDERAL, STATE OR LOCAL CODES
HAVING JURISDICTION.
THE OPERATION LISTED BELOW CANNOT BE PERFORMED BY THE USER.
A LICENSED INSTALLER INTERVENTION IS NEEDED.
A) ELECTRICAL CONNECTIONS
B) HYDRAULIC CONNECTIONS
C) INSTALLATION
D) OPEN THE MACHINE
E) REPAIR WITH OR WITHOUT DISASSEMBLY
F) SET-UP AND ADJUSTMENT PROCEDURES
IN ALL THE CASES EVIDENCED WITH THIS SYMBOL IN THE TEXT OF THIS
MANUAL AN INTERVENTION OF A LICENSED INSTALLER IS REQUIRED
THE OPERATION EVIDENCED WITH THIS SYMBOL IS STRICTLY FORBIDEN
1.0 GENERAL INFORMATION
This machine is a Doser-Mixer for the control of quantity and temperature of the water to be
delivered into the bread kneading machines, in small and larger industry.
The quantity control is carried out with an advanced microprocessor electronics, while
temperature is regulated by means of a thermostatic mixer and controlled with the same
electronics.
It is a model suitable for the batch of large (up to 999,9 l or 999,9 lb or 99lb and 15 oz) and
small quantities (under 5 l or 10 l).
Page 5
2 3
Page 6
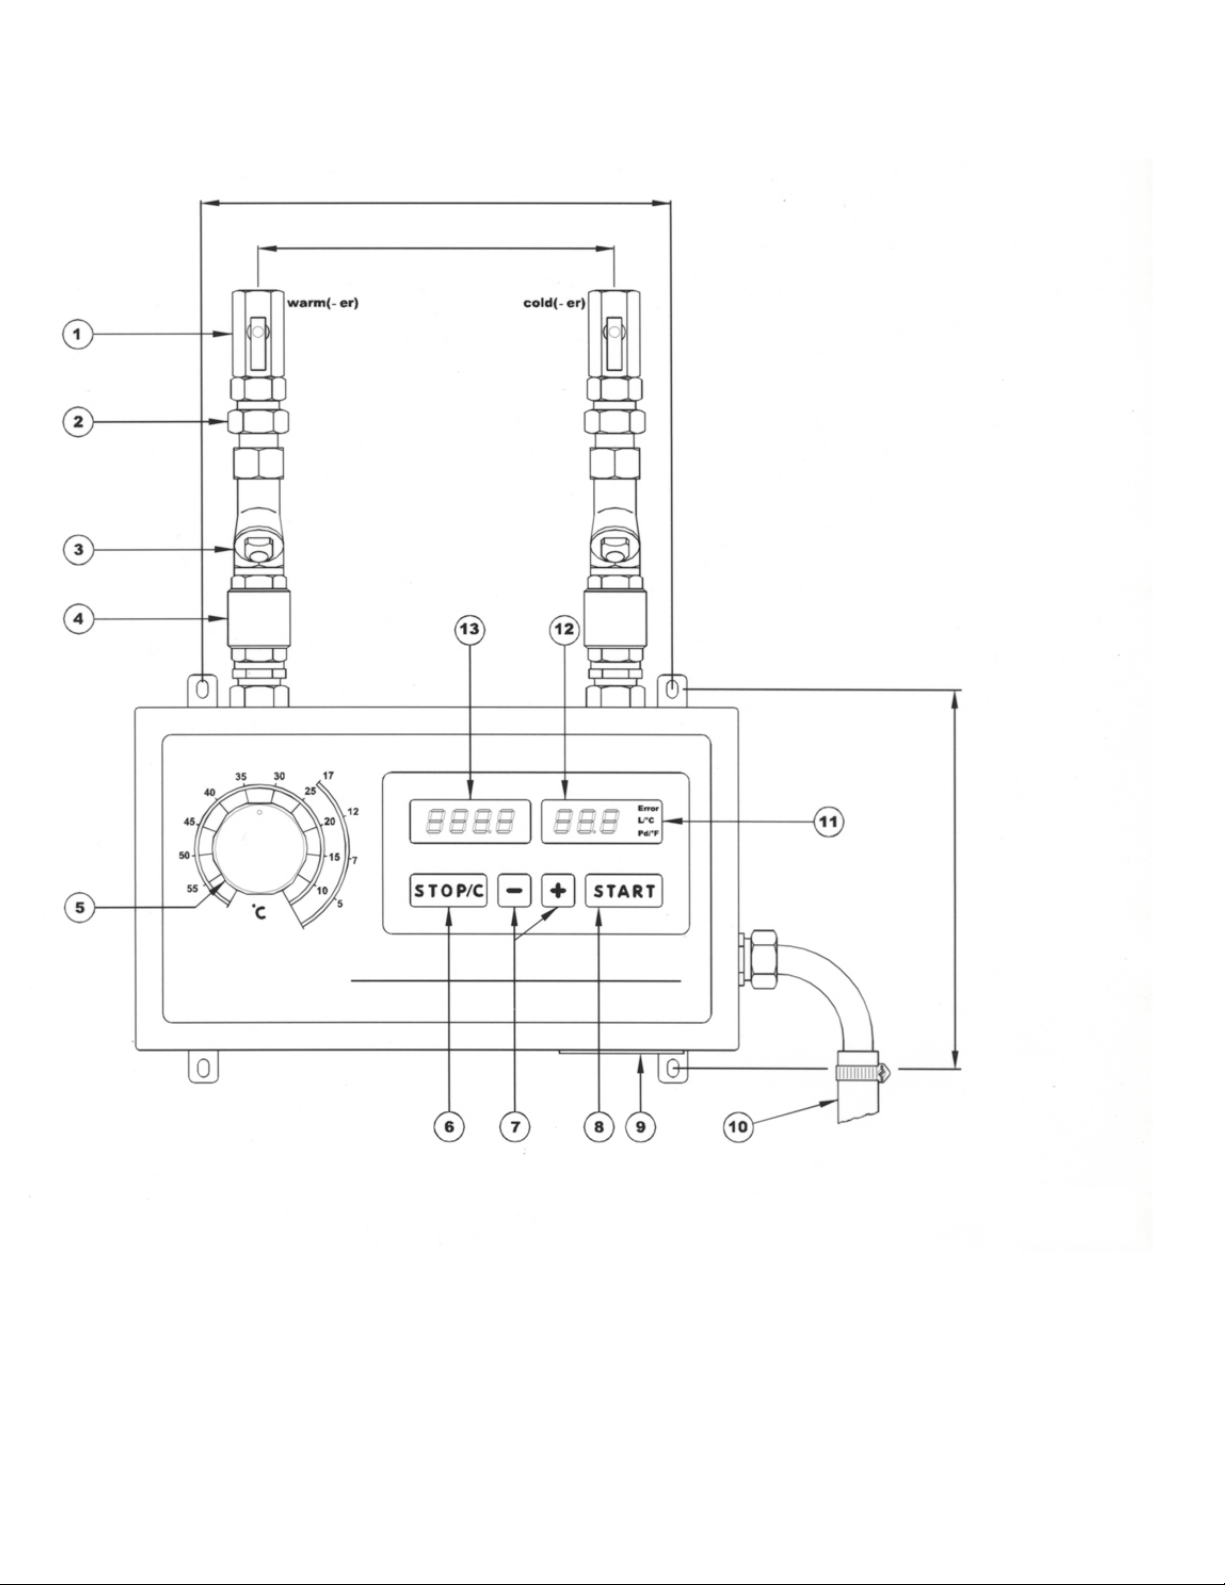
DESCRIPTION
(see figure page 2)
1. Ball-taps with OR gasket.
2. OR gasket-type unions for an easier installation.
3. Double stainless steel net filters for water impurities.
4. No-return valves.
5. Regulation knob for setting temperature, with reference scale.
6. Key STOP/C for manual stop or eventual clearing of memory.
7. Keys + and – for setting the quantity.
8. Key START for starting or restarting water delivery.
9. Supply plug, with fuse and spare, and remote pump control plug, with fuse and spare.
10. 2,5m delivery hose with stainless steel terminals.
11. Series of function control lights.
12. Digital display of electronic internal thermometer, showing °C with tenths or °F.
13. Digital display for selected, yet to be delivered (during batching), or already discharged (after
pressing STOP) litres (or pounds).
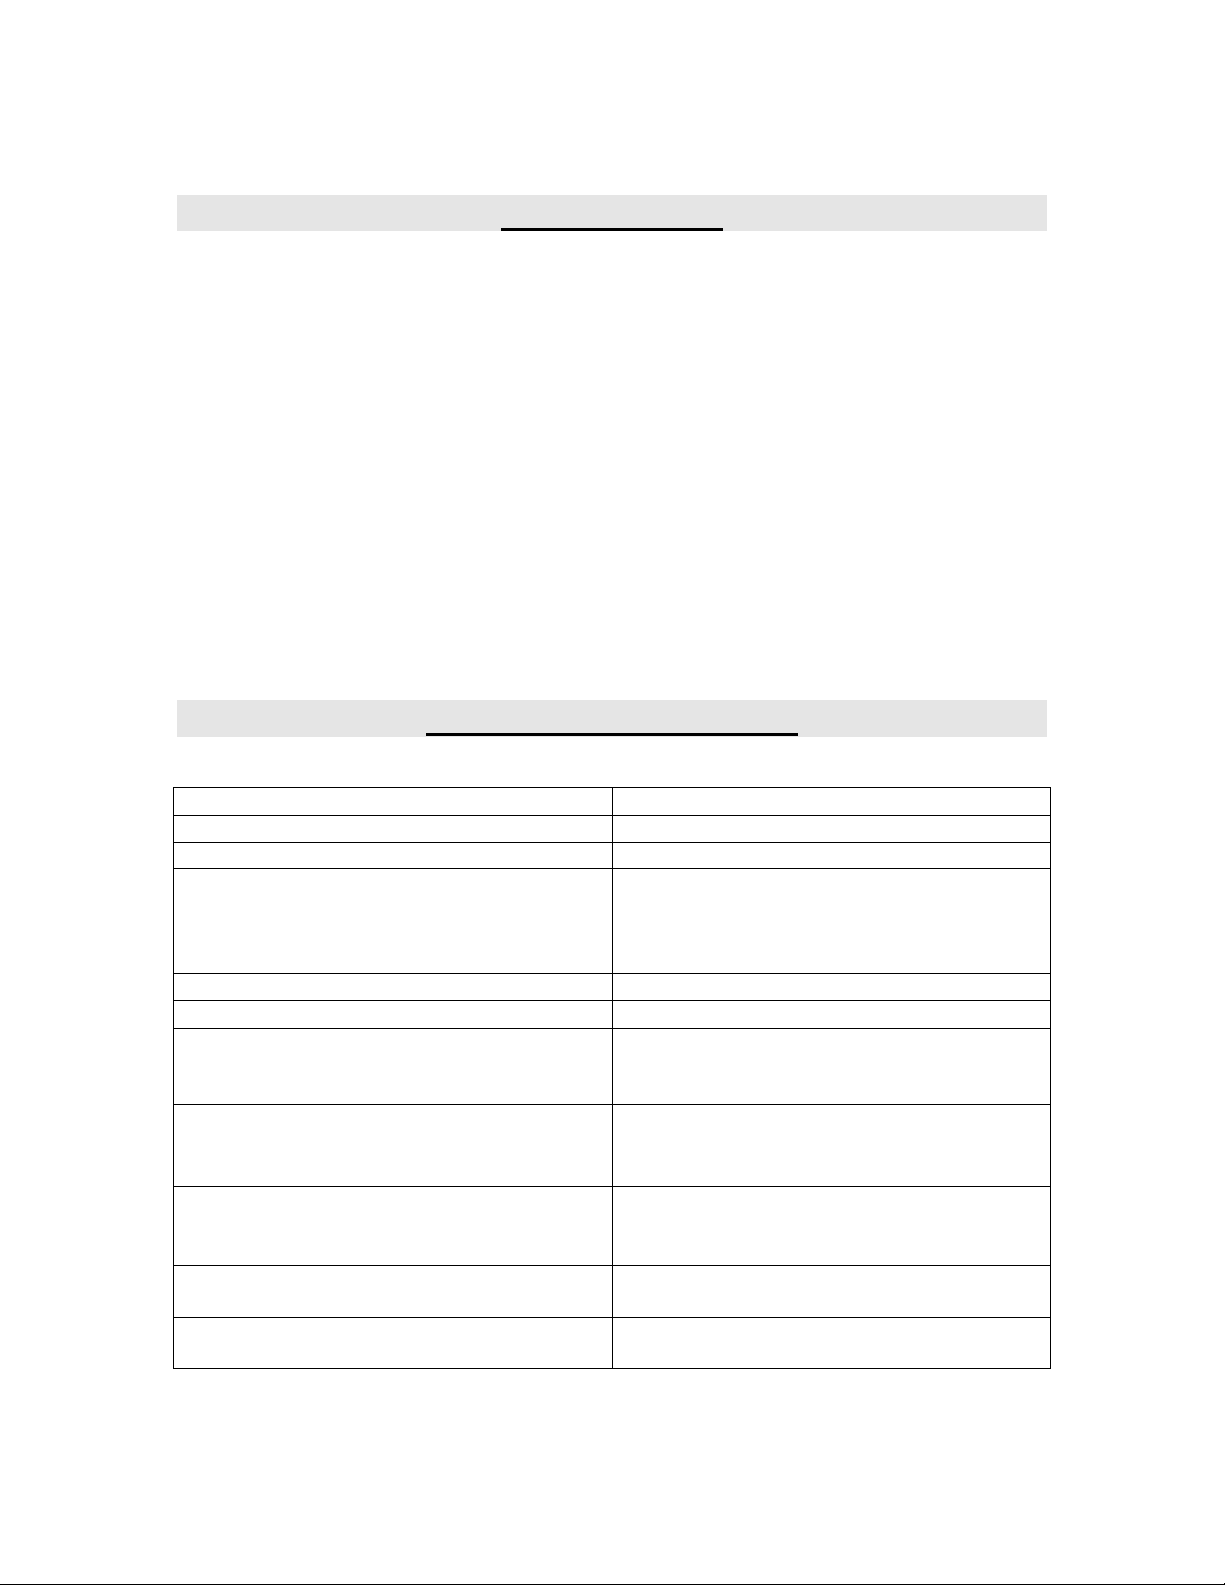
TECHNICAL FEATURES
Supply tension (see equipment label)
Frequency
Power
Environmental conditions Indoor use only
Water inlet connection
Max. warm inlet temperature
Inlet water pressures max: 70 psi
Temperature control
Dosing control Max. batch : 999,9 L (or 9999.9lb)
Water delivery At 15 psi and 68°F: 18 L/min (40 lb/min)
Supply fuse
Pump remote control fuse
110 A.C. ± 10%
50/60 Hz
25 VA
Temperature range 4 ÷ 50°C (40 ÷ 120°F)
Relative humidity range 0 ÷ 95%
1/2" NPT
65°C (150°F)
min : 15 psi
Max. pressure ratio between the 2 inlet 1 :5
Setting range 2 ÷ 60°C (35 ÷ 140F)
Measure precision : ± 0,3°C (±0,5°F)
Mixing precision : ± 1°C (±1,5°F)
Min. dosage quantity : 0,1 L (or 0,1 lb)
Precision : ± 1%
At 75 psi and 68°F: 40 L/min (90 lb/min)
5x20 mm, 630 mA Retarded (T) L 250V
5x20 mm, F 6, 3A L 250V
Page 7

4
INSTALLATION
WARNING : THE INTERVENTION OF A LICENSED INSTALLER IS NEEDED
• In the case of hard water (with high limescale content = hardness in French degrees higher
than 25-30) it is necessary to employ an ion exchange water softener. This unit must be
calibrated so as to maintain a residual hardness ranging between 5 and 10 French degrees.
We advise against the use of electronic water softeners, since their efficacy has not been
proved yet.
• Fix the doser on the wall and connect the supplied power cord to electrical wall outlet.
Do not place other machines below the DOSER.
• Arrange the water inlet tubings, mounting the ball taps (1) at their ends.
• Connect the doser to the ball gates valve using connectors (2).
• Connect the delivery tube (10) to the machine.
• Provide connection to an adeguate power supply (see equipment rating plate near the plug 6),
monophase, 50 or 60Hz, using the supplied flying spcket, fitted with a three core cable with
min. section 3 x 1 mm². It is advisable to use an external switch.
• If a pump remote control is required, use the power socket provided to supply the remote
contactor of the pump(s). The employment of such pump is necessary when the inlet pressure
is less than 7 psi, for example when using unpressurized water heaters or refrigerators.
NOTICE : in the case of water chiller equipped with a surge tank with pressure switch,
this must be by-passed and the pump must be controlled directly by the Doser, through
a power relay.
The plug has the following wiring diagram :
MAX 3A resistive
Page 8

5
OPERATING INSTRUCTIONS
• Switch on the doser using the external switch (or by plugging in the flying socket)
• Set desired water quantity using + and – keys. Setting appears on display (13).
Increments/decrements may be obtained in three different ways :
1. Step by step : pressing once + and = keys
2. Continuous : keeping constant pressure on + and – keys.
3. Fast : 3 seconds after keeping constant pressure on + or – keys.
• Press START key (8).
Water delivery may be stopped at any time by pressing STOP/C key (6). Quantity of water
delivered will then flash on display (12). To resume delivery of remaining water press
START key. Press STOP/C key and the original litre setting will reapears on display. Press
STOP/C key again to clear memory.
• Water temperature is selected by turning the temperature regulation knob (5) : the
temperature is shown on the electronic thermometer display (12). When regulating the water
temperature wait a few seconds between adjustments so as to allow the temperature to
stabilize.
• Quantity in memory is retained at the end of each dosing. Simply press START key if
identical successive dosing are desired.
Memory is protected against power failure; pre-set dosing can be resumed pressing START
key when power is restored.
• To ensure optimum operation the warm water temperature must be at least 10ºC higher than
the required delivery water temperature and the cold water should be at least 5ºC lower. Low
temperatures (below 10º - 15ºC) may be obtained only when using a refrigerator.
Page 9
6
FAULTY OPERATIONS AND REMEDIAL ACTION
• If during water delivery the litres display flashes and the buzzer sounds intermittently and no
water flows out of the doser, press the STOP/C key and then the START key :
➩ If no water flows out of the machine and after 10-12 seconds fault indication restarts,
check the water pipes and ball valve, probably water is not reaching the doser.
➩ If the water pipes are not obstructed, the water taps are all open and water arrives
regularly to the doser, check that the filter (3) is clean and then press the START key. If
the fault persists, the solenoid valve coil is faulty.
Ask for technical assistance.
• If during dosing, water is at first delivered regularly, but the litres display does not decrement
accordingly or decrements very slowly and/or irregularly, and after a while water delivery
stops, the buzzer sounds and display flashes :
Press the STOP/C key and then the START key :
➩ If after 10-12 seconds the anomaly reoccurs probably the internal litre counter is faulty.
Request technical assistance.
• All displays and led indicators remain off :
Check the fuse located next to the power supply plug, the housing can be opened with a
screwdriver.
If necessary, replace the fuse using the spare, located in the same housing.
If, after replacing the fuse, the fault persists, request technical assistances.
• The device discharges water regularly but the temperature display flashes : the internal
temperartureis faulty.
Request technical assistance.
MAINTENANCE INSTRUCTIONS
• To guarantee a long working life for the internal components, clean the filter (3) regularly,
particularly if the water supply has a high limescale content. Clean also filters upstream of the
machine regularly (if mounted).
• To clean the external surfaces of the doser-mixer, use a soft sponge and water or possibly a
neutral detergent; for more resistant grime, use turpentine.
Page 10

789
Page 11

Page 12

Page 13

10
SPARE PARTS
IT IS STRICTLY FORBIDEN TO USE NOT ORIGINAL SPARE PARTS !
[
Figure-3 shows the machine section indicating the different components of the device and the
following Table lists their description with relevant spare parts code numbers.
WM35 SPARE PARTS
POS DESCRIPTION CODE
230V 50Hz 110V 60Hz
1 Hot water ball gate valve (red,left) 3801229 /
2 Cold water ball gate valve (black, right) 3801228 /
3 Filter – no return valve assembly 3801230 /
4 2 wires liter counter 3801007 /
5 Actuators electronic board / plugs 3811547 3811548
6 Internal probe 3812522 /
7 Electrovalve internal kit 4400451 /
8 Electrovalve group with coil 3801136 3801138
9
10 Electrovalve coil 4400405 4400406
11 Mixing unit without knob 3801309 /
12 Thermostatic sensor 4400351 /
13 Regulating knob 3801208 /
14 Cover with electronics 3811044 /
Ø 16mm delivery hose
3801209 /
Page 14

11121
Page 15

Page 16

LIMITED WARRANTY
(Continental United States Of America And Canada Only)
Doyon Equipment Inc. guarantees to the original purchaser only that its product are free of
defects in material and workmanship, under normal use.
This warranty does not cover any light bulbs, thermostat calibration or defects due to or
resulting from handling, abuse, misuse, nor shall it extend to any unit from which the serial
number has been removed or altered, or modifications made by unauthorized service
personnel or damage by flood, fire or other acts of God. Nor will this warranty apply as
regards to the immersion element damaged by hard water.
The extent of the manufacturer’s obligation under this warranty shall be limited to the
replacement or repair of defective parts within the warranty period. The decision of the
acceptance of the warranty will be made by Doyon Equipment service department, which
decision will be final.
The purchaser is responsible for having the equipment properly installed, operated under
normal conditions with proper supervision and to perform periodic preventive maintenance.
If any parts are proven defective during the period of one year from date of purchase, Doyon
Equipment Inc. hereby guarantees to replace, without charge, F.O.B. Linière, Quebec,
Canada, such part or parts.
Doyon Equipment Inc will pay the reasonable labor charges in connection with the
replacement parts occurring within one year from purchase date. Travel over 50 miles,
holiday or overtime charges are not covered. After one year from purchase date, all labor
and transportation charges in connection with replacement parts will be the purchaser’s
responsibility.
Doyon Equipment Inc. does hereby exclude and shall not be liable to purchaser for any
consequential or incidental damages including, but not limited to, damages to property,.
damages for loss of use, loss of time, loss of profits or income, resulting from any breach
or warranty.
In no case, shall this warranty apply outside Canada and continental United States unless
the purchaser has a written agreement from Doyon Equipment Inc
Page 17

COMPTEUR D’EAU WM35
IMPORTANT INSTRUCTIONS DE SÉCURITÉ
CONSERVEZ CE MANUEL D’INSTRUCTIONS
TABLE DES MATIÈRES
DESCRIPTION PAGE
Information général 1
Dessin de description 2
Description 3
Caractéristiques techniques 3
Installation 4
Instructions d’opération 5
Problèmes et Solutions 6
Instructions d’entretien 6
Vue avant des composantes 7
Vue de côté des composante 8
Pièces composantes 9
Diagramme électrique 10
Garantie 13
I:\Travaux\MANUEL\DOSEUR\EN RÉVISION\WM35-F.pdf
Créé le 14/07/09 14:20
Page 18

1
[
LE MANUFACTURIER DÉCLINE TOUTE RESPONSABILITÉ POUR TOUS
DOMMAGES CAUSÉS PAR UNE UTILISATION INAPROPRIÉE DE L’ÉQUIPEMENT
ET/OU DES CONDITIONS ENVIRONNEMENTALES.
AVERTISSEMENT
1) AVANT DE DÉBUTER L’UTILISATION DE L’APPAREIL, LIRE
ATTENTIVEMENT CE MANUEL D’INSTRUCTIONS.
LES OPÉRATIONS ÉNUMÉRÉES CI-DESSOUS NE PEUVENT ÊTRE
APPLIQUÉES PAR L’UTILISATEUR. L’INTERVENTION D’UN
INSTALLEUR LICENSIÉ EST NÉCESSAIRE.
a) RACCORDEMENTS ÉLECTRIQUES
b) RACCORDEMENTS DE PLOMBERIE
c) INSTALLATION
d) OUVERTURE DE L’APPAREIL
e) REPARATION AVEC OU SANS DÉMONTAGE
f) INSTALLATION ET PROCÉDURES D’AJUSTEMENT.
3)
4)
5) EN CAS D’APPROVISIONNEMENT D’EAU CHAUDE À L’APPAREIL, LA
TEMPÉRATURE NE DOIT PAS ÊTRE PLUS ÉLEVÉE QUE 65°C.
6) CET ÉQUIPEMENT DOIT ÊTRE INSTALLÉ AVEC UNE PROTECTION DE
REFOULEMENT ADÉQUATE POUR ÊTRE EN CONFORMITÉ AVEC LES CODES
FÉDÉRAUX, PROVINCIAUX OU LOCAUX.
DANS TOUS LES CAS OU CE SYMBOLE EST ILLUSTRÉ AU
COURS DE CE MANUEL, L’INTERVENTION D’UN
INSTALLATEUR PROFESSIONNEL EST NÉCESSAIRE.
LES OPÉRATIONS ILLUSTRÉES AVEC CE SYMBOLE SONT
STRICTEMENT DÉFENDUES.
1.0 INFORMATION GÉNÉRALE
Cet appareil est un doseur mélangeur pour le contrôle de la quantité et de la température de l’eau
qui doit être acheminé.
Le contrôle de quantité est effectué à partir d’un microprocesseur électronique avancé, alors que
la température est réglée au moyen d’un mélangeur thermostatique et contrôlé avec le même
électroniques.
C’est un modèle approprié à la série de grande (jusqu’à 999,9 L ou 999,9 lb ou 99 lb et 15 oz) et
petite quantité (en dessous de 5L ou 10 lb).
Page 19

2
Page 20

3
DESCRIPTION
(voir figure 1)
1. Valve sphérique.
2. Union avec joint (de type o-ring) pour faciliter l’installation.
3. Filtre double grillage en acier inoxydable pour les impuretés.
4. Valves de non-retour.
5. Bouton de réglage de la température.
6. Touche STOP/C pour arrêter manuellement ou éventuellement effacer la mémoire.
7. Touche + et – pour ajuster la quantité.
8. Touche START pour démarrer ou redémarrer le déversement d’eau.
9. Prise d’approvisionnement avec le fusible et les pièces de rechange et prise pour la
pompe avec le fusible et les pièces de rechange.
10. 2.5m de tuyau de déversement avec bornes en acier inoxydable.
11. Témoins lumineux.
12. Affichage du thermomètre électronique interne et de la température sélectionnée,
montrant °C ou °F.
13. Affichage du thermomètre électronique externe et des programmes.
1.1 CARACTÉRISTIQUES TECHNIQUES
CARACTÉRISTIQUES
Tension (voir la plaque signalétique) 110 A.C. ± 10%
Fréquence
Puissance
Conditions environnementales Utilisation intérieure seulement
Raccordements plomberies
Max. température de l’eau à l’entrée
Pression d’eau à l’entrée Max. : 5 bar (70 PSI)
Contrôle de température Plage de réglage 2 ÷ 65°C (35 ÷ 140°F)
Contrôle du dosage Dosage max. : 999,9L
Déversement d’eau À 1 bar/15 PSI : 18 L/ min (40 lb/min)
Fusible pour l’alimentation
Fusible pour le contrôle de la pompe
50/60 Hz
25 VA
Température ambiante 4 ÷ 50°C (40 ÷ 120°F)
Degré d’humidité relative 0 ÷ 95%
1/2'’NPT
65°C (150°F)
Min. : 1 bar (15 PSI)
Différence de pression maximum entre les deux
entrées : 1:5
Précision dans la mesure : ±0,3°C (±0,5°F)
Précision de mélange dans le
dosage : ±1°C (±1,5°F)
Dosage min. : 0,1 L
Précision : ±1%
À 5 bar/75 PSI : 40 L/ min (90 lb/min)
5x20 mm, 630 mA Retardé (T) L 250V
5x20 mm, F 6,3A L 250V
Page 21

4
INSTALLATION
AVERTISSEMENT : L’INTERVENTION D’UN TECHNICIEN SPÉCIALISÉ
EST NÉCESSAIRE POUR L’INSTALLATION.
• En cas d’eau dure dont le contenu en sel de calcaire est élevé, un adoucisseur est
pratiquement indispensable. Cet appareil doit être réglé de manière à laisser une dureté
résiduelle comprise entre 50 – 100ppm.
• Poser le compteur d’eau sur la paroi du mur. Le crochet à 90° est prévu comme support mural
pour la courbe de déversement de l’eau.
Ne pas disposer d’autres machines en dessous de l’appareil.
• Installer les tuyaux d’arrivée d’eau, en fixant à leurs extrémités les valves sphériques (1).
• Connecter le tuyau de déversement (10) à l’appareil.
• Alimenter l’appareil avec la tension indiquée sur la plaque au côté de la fiche 7 sur l’appareil,
mono phase 50 ou 60Hz, en utilisant la prise fournie avec l’appareil. Il est opportun de
prévoir un interrupteur externe.
• Pour l’utilisation de la pompe à distance, utiliser la fiche de courant spéciale pour
l’alimentation de l’interrupteur des pompes. L’utilisation de la pompe est indispensable
lorsque l’une des deux pressions à l’entrée est inférieure à 7 PSI, comme par exemple dans le
cas d’un chauffe-eau ou d’un réfrigérateur à surface libre (non sous pression).
ATTENTION : Dans le cas de refroidisseurs munis d’autoclave (scellé
hermétiquement), il doit être désactivé et la pompe doit être contrôlée directement à
travers le doseur, par un relais de puissance.
Voir le schéma électrique suivant :
MAX 3A résistif
Page 22

5
INSTRUCTIONS D’OPÉRATION
• Brancher l’appareil à une prise de courant standard 120V à l’aide du cordon fourni avec
l’appareil.
• Programmer la quantité d’eau désiré en utilisant les touches + et -. La programmation
apparaît sur l’affichage (13). La croissance et la décroissance peut être obtenue de trois
façons :
1. Étape par étape : Appuyer une fois sur la touche + ou -.
2. Continu : Garder une pression constante sur les touches + ou -.
3. Rapide : 3 secondes après la pression constante sur les touches + ou –.
• Appuyer sur la touche START (8).
• Le déversement d’eau peut être interrompu à n’importe qu’elle moment en appuyant sur la
touche STOP/C (6). La quantité d’eau déverser apparaîtra sur le l’écran (12). Pour continuer
le déversement appuyer sur la touche START. Appuyer sur la touche STOP/C à nouveau
pour obtenir la programmation initial. Et finalement en appuyant sur la touche STOP/C une
deuxième fois, vous effacerez ainsi la programmation.
• La température de l’eau est sélectionné en tournant le bouton de régulation de la température
(5) : la température est indiquée sur l’écran du thermomètre électronique (12). Lorsque vous
régler la température de l’eau, attendez quelques secondes entre vos ajustements pour
permettre à la température de se stabiliser.
• La quantité en mémoire est maintenue à la fin de chaque dosage. Appuyez simplement sur la
touche START/C pour obtenir un dosage successif identique.
La mémoire est protégée contre les pannes de courant; le dosage préenregistré peut être
restitué en appuyant sur la touche START/C lorsque l’électricité revient.
• Pour assurer un rendement optimale, le température de l’eau chaude doit être 10ºC au-dessus
de la température désirée, et la température de l’eau froide doit être 5ºC en dessous de la
température de l’eau désirée. Pour les températures (en dessous de -10ºC -15ºC), utilisez un
refroidisseur d’eau.
Page 23

6
PROBLÈMES ET SOLUTIONS
• Si, durant le déversement d’eau, l’écran des litres clignotent et que la sonnerie retentit de
façon intermittente et qu’aucun déversement ne sort du DOSEUR, appuyez sur la touche
STOP/C et ensuite appuyez sur la touche START à nouveau.
➩ Si aucun déversement d’eau ne sort du doseur, et qu’après 10-12 secondes il y a toujours
un message d’erreur, vérifier les tuyaux et la valve d’entrée d’eau, probablement que
l’eau ne se rend pas au doseur.
➩ Si les tuyaux ne sont pas obstrués, les robinets sont tous ouverts et que l’eau se rend au
doseur, vérifiez que le filtre (3) est propre, appuyez sur la touche START.
Si le problème persiste, la valve à l’eau à l’
Demandez de l’assistance technique.
• Si durant le déversement, l’eau coule à une vitesse régulière, mais les litres affichés ne se
suivent pas, une sonnerie retentit et l’affichage clignote, appuyez sur la touche STOP/C et
ensuite sur la touche START.
➩ Si après 10-12 secondes, l’anomalie réapparaît, le compteur interne de litres est
défectueux.
intérieur du doseur est défectueuse.
Demandez de l’assistance technique.
Tout les écrans et indicateurs lumineux ne fonctionne pas :
• Vérifiez le fusible situé prêt du cordon (sur l’appareil), le compartiment peut être ouvert à
l’aide d’un tournevis.
Si nécessaire, remplacer le fusible en utilisant la pièce de rechange situé dans le
compartiment.
Si, après avoir remplacer la pièce, le problème persiste, demandez de l’aide technique.
• Le dispositif de déchargement de l’eau fonctionne régulièrement mais le témoin de
température clignote, la sonde de température interne est défectueuse.
Demandez de l’assistance technique.
même
INSTRUCTIONS D’ENTRETIEN
• Pour prolonger la durée de vie des composantes internes, nettoyer le filtre (3) régulièrement,
particulièrement si l’alimentation d’eau contient du calcaire.
Il est fortement recommandé d’installer un adoucisseur d’eau à l’entrée de l’appareil afin
d’élim
iner les minéraux dans l’eau.
Nous recommandons la marque CUNO # CFS6135 (num
éro de pièce DOYON PLF240).
• Pour nettoyer les surfaces externes du doseur, utiliser une éponge molle et de l’eau ou un
détergent neutre; pour une crasse plus résistante, utiliser de la térébenthine.
Page 24

789
Page 25

Page 26

PIÈCES COMPOSANTES
IL EST STRICTEMENT INTERDIT D’UTILISER DES PIÈCES NON-ORIGINAL
[
La figure-3 Montre les sections de l’appareil qui indique les différentes composante du dispositif
et le tableau suivant énumère leur description, ainsi que leur code de pièces de rechange.
WM35 PIÈCES COMPOSANTES
POS DESCRIPTION CODE
230V 50Hz 110V 60Hz
1 Valve d’entrée d’eau chaude (rouge) 3801229 /
2 Valve d’entrée d’eau froide (noir) 3801228 /
3 Filtre – Valve de non-retour 3801230 /
4 Compteur volumétrique 3801007 /
5 Panneau de contrôle électronique 3811547 3811548
6 Sonde de température 3812522 /
7 Ensemble interne d’électrovalve 4400451 /
8 Électrovalve avec bobine 3801136 3801138
9 Tuyau de sortie 3801209 /
10 Bobine d’électrovalve 4400405 4400406
11 Mélangeur sans sélecteur 3801309 /
12 Sonde thermostatique 4400351 /
13 Bouton sélecteur de température 3801208 /
14 Couvert avant 3811044 /
Page 27

10111
Page 28

Page 29

GARANTIE LIMITÉE
(Pour le Canada et les États continentaux des États-Unis)
Équipement Doyon Inc. garantit ses produits à l'acheteur original, contre tout défaut de matériaux
ou de fabrication, en autant qu'ils aient été utilisés de façon normale.
Cette garantie ne s'applique cependant pas sur les ampoules, les calibrations de température, tout
défaut dû ou résultant d'une mauvaise manipulation, d'un emploi abusif ou d'un mauvais usage.
La garantie ne s'applique pas non plus sur tout équipement dont le numéro de série aurait été
enlevé ou altéré, tout produit modifié par du personnel de service non autorisé, endommagé par
une inondation, un feu ou tout autre acte de Dieu, ni sur les éléments immergés endommagés par
l'eau dure.
L'étendue des obligations du manufacturier, selon cette garantie, est le remplacement ou la réparation des
pièces défectueuses durant la période de garantie. L'acceptation de la garantie sera faite par le département
de service d’Équipement Doyon Inc. Cette décision sera définitive.
L'acheteur est responsable de faire installer son équipement adéquatement, de l'opérer sous des conditions
normales d'utilisation avec une bonne supervision, ainsi que d'effectuer un entretien préventif périodique.
Dans le cas où les pièces s'avéreraient défectueuses durant une période d'un an à partir de la date d'achat,
Équipement Doyon Inc. s'engage à les remplacer, sans frais, F.O.B. Linière, Québec, Canada.
Équipement Doyon Inc. couvrira les frais raisonnables de main-d'œuvre reliés au remplacement des pièces,
pour une période d'un an à partir de la date d'achat. Toutefois, les frais encourus pour les déplacements audelà de 50 milles, le temps supplémentaire et les jours de congé ne sont pas couverts. Au-delà d'un an après
la date d'achat, tous frais de transport et de main-d'œuvre pour le remplacement des pièces sont la
responsabilité de l'acheteur.
Équipement Doyon Inc. ne se tient pas responsable envers l'acheteur pour toutes conséquences ou
dommages incluant, mais non limités à, dommages à la propriété, dommages pour perte d'usage, perte de
temps, perte de profits ou de revenus, provenant de tout bris de garantie.
En aucun cas, cette garantie ne s'applique à l'extérieur du continent des États-Unis d'Amérique ou du
Canada, à moins que l'acheteur n'ait une entente écrite avec Équipement Doyon Inc.
 Loading...