


Operations Manual
Endurance Pro X2 - Dual Heat Semi-automatic Dough Press
Model #: DP2010PRE
WWW.PROLUXE.COM
Version: 41219
Congratulations!
Your selection of the Proluxe DP2010 is a sound business decision. Whether your intended use is to press or par bake dough for pizzas, tortillas, mushi skins or other appropriate dough products, rest assured that you have made a wise choice.
Proluxe equipment is a result of the highest quality engineering and time-
tested design. Your machine, combined with Proluxe’s reputation of
innovation in dough press equipment manufacturing, insures the continuing capability of delivering the bestdecorated product possible.
This manual describes installation, operation, and maintenance procedures for your new model DP2010.
Your model DP2010 machine will have a long trouble-free life. Read this manual carefully and keep it with your machine; it’s your key to proper operation and lasting service.
Included with your shipment:
•5 Rubber Feet
•Platen Saver **If your unit has polished platens**
Installation
DOMESTIC
Use a separate 30 amp AC circuit. Only industrial extension cords with proper wire size should be used; size 16/3 wire for distance up to 25 feet, and size 14/3 for distance up to 50 feet.
INTERNATIONAL
Use a designated 30 amp AC circuit. Only industrial extension cords with proper wire size (2.5 sq. mm) shall be used.
Make sure there is a proper electrical wall outlet located within reach of the cord and plug attached to the press.
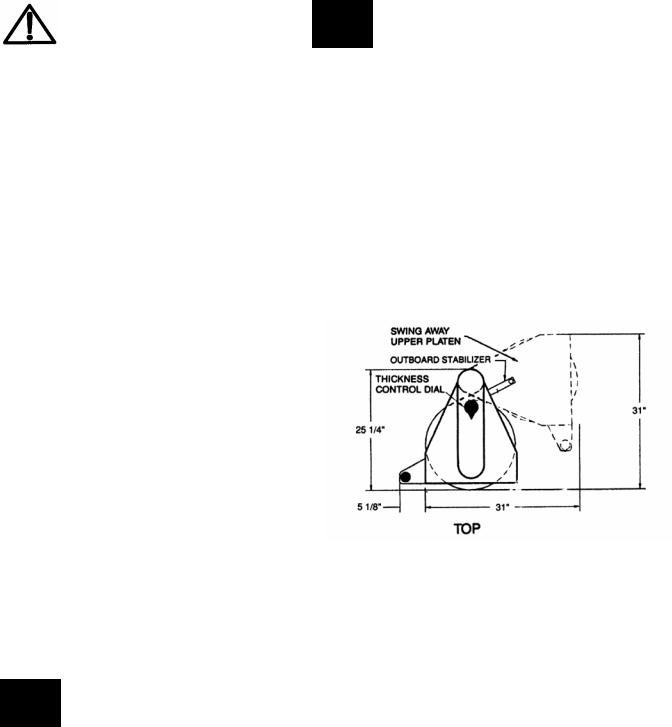
Then place the press in an area that allows for “swing clearance”. Note that the upper platen rotates up to 90°, in a backward rotation, to facilitate removal of the dough product after the press cycle has been completed. Also note that the machine requires a vertical, clear space of 33” from the bottom of the machine to the top of the pull handle.
Limited Machine Warranty
Proluxe warrants this dough press machine, when operated under normal conditions, to be free from manufacturing defects in material and workmanship for a period of one year on parts and labor from the invoice date.
This warranty will be effective only when Proluxe authorizes the original
purchaser to return the product to the
-1- |
DP20 0-1725-7/04 |

prepaid and only when the product, upon examination, has proven to be defective.
This warranty does not apply to any machine that has been subjected to misuse, negligence or accident.
Proluxe shall not be liable for the injury, loss or damage, direct or consequential, arising out of the use or the inability to use the product.
No claim of any kind shall be greater in amount than the sale price of the product or part to which claim is made.
This is the sole warranty given by the company, it is in lieu of any other warranties, expressed or implied, in law or in fact, including the warranties of merchantability and fitness for a particular use, and is accepted such by the purchaser in taking delivery of this product.
Specifications
Electrical:
208V/50-60Hz/4600W/22.11Amps Requires 30 AMP outlet
Includes 72” NEMA 6-30P approved cord and plug.
Shipping Weight:
180lbs. (82kg)
Familiarize yourself with controls and operating mechanisms before attempting to use the DP2010. These are as follows:
(A)Pull Pressing Handle for raising and lowering the upper platen. This action forces the mating of the platens.
(B)Lock release
(C)On/Off Button. The green light above the button will illuminate when turned on to indicate power is in the press.
(D)Control Panel (see Control Board Operations)
(E)Handle for swing-out platen.
(F)Upper platen
(G)Lower platen
-2- |
DP20 0-1725-7/04 |

WARNING
In case of power cord damage, do not attempt to repair or replace the power cord. Contact the manufacturer or the local distributor.
WARNING
Avoid touching hot surfaces while operating the machine.
CAUTION
During normal operation, the base of the machine must be installed or placed above the wall socket.
CAUTION
When servicing or cleaning the machine, make sure that the power cord is removed from the wall socket.
Control Board Operations
Solid State Controller
This controller has three (3) control features:
1.Temperature – Temperature may be set from 0°-450°F (0°-
232°C). The factory default setting is 240°. If you would like to change this setting, simply follow the Controller Operation directions.
2.Counter – Cycle counter counts the number of applications from 1 to 9999 (see additional Notes – Counter).
3.Timer – A timer mode is available upon special request. If you would like to have the timer function installed, please call 1-800-624-6717
Controller Operation
Temperature Control
1.Press the MODE button until temperature is displayed.
2.Push and hold SET button and simultaneously push UP (V) or DOWN (W) arrow buttons to the desired temperature setting.
For the DP2000, both the upper and lower platens may be set to different temperatures.
•Upper Platen: Simply push the MODE button until the “upper” light is illuminated. Adjust the temperature as noted above.
•Lower platen: Simply push the MODE button until the “lower” light is illuminated. Adjust the temperature as noted above.
-3- |
DP20 0-1725-7/04 |

Dough Pressing Operations
SETTING CRUST THICKNESS CONTROL:
*The thickness is determined by dough weight and temperature setting on each platen.
|
Press Only |
Press & Par Bake |
|||
Dough |
Temp |
Press |
Temp |
Press |
|
Product |
Time |
Time |
|||
|
|
||||
Pizza |
150°F |
3 |
325°F |
7-15 |
|
both |
both |
||||
seconds |
seconds |
||||
|
platens |
platens |
|||
|
|
|
|||
Flour |
N/A |
|
350°F |
1 quick |
|
|
both |
||||
Tortilla |
|
second |
|||
|
|
platens |
|||
|
|
|
|
||
|
No heat, |
|
|
|
|
Corn |
must |
3 |
N/A |
|
|
Tortilla |
use wax |
seconds |
|
||
|
|
||||
|
paper |
|
|
|
|
Mushi |
150°F |
3 |
|
|
|
both |
N/A |
||||
Skin |
seconds |
||||
platens |
|
|
|||
|
|
|
|
||
PRESSING DOUGH:
1.First make sure you have the correct type electrical current or serious damage could occur!
2.Press the Power Button in order to turn the machine on. A green light will illuminate above the power button indicating that power is in the machine.
3.Both the upper and lower platens will heat up once you have adjusted your digital control to your desired setting. Note: Different products require different temperature settings. In order to determine the right temperature setting for your product, refer to the following table simply as a guide for starting.
*To achieve consistent size flour tortillas of smaller than 10” you will need to only press 2 at a time as shown in the pictures included with the manual.
Note: Keep in mind that dough formulations may differ, and that you may have to do some trial and error testing of different temperatures and platen pressure to arrive at the proper end result for your particular product.
Also note that the finished, afterpressing diameter of the finished dough piece is determined by the weight of the dough and the amount of pressure applied to the platens.
For best results, your dough should be proofed at room temperature before pressing, but it will also press directly out of your refrigerator. Flour is not required to press a crust and should not be dusted on any part of the machine.
-4- |
DP20 0-1725-7/04 |

No. DPPC1. (See our catalog and price list for information.)
Note: This spray will not affect
6.Place your pre-portioned ball of dough in the approximate center of the lower platen. Add another dash of spray to the top of the dough ball.
7.Close the platen and pull the “U” shaped handle down to commence the pressing operation.
8.Press the handle down until the magnet has activated for the
9. Remove the finished product by
rotating the upper platen out of
the way until you have sufficient
space to do so. Place the dough
on a screen or in a pan. Since the
shape of the dough may be
altered slightly in the transfer
process, some hand fitting may
be required. Add toppings, if
desired, and now you are ready
to bake.
ADDITIONAL NOTES:
Temperature
Note
Fahrenheit/Centigrade (Celsius) Conversion
The temperature controller can be programmed to display either °F or °C. To change: Press the MODE button until the temperature is displayed, then push and hold the SET button for 10 seconds.
Counter
The controller has a built in cycle counter.
•Press MODE button until the counter is displayed.
•Counter display range is 0000 to 9999.
•To reset the cycle counter, display the counter reading, then push and hold both UP (V) and DOWN (W) arrow buttons for 3 seconds until the counter resets to zero (0000) on the display.
-5- |
DP20 0-1725-7/04 |

International Symbols |
Preventative Maintenance Suggestions |
|
|
The Proluxe DP2010 machines are |
|
|
relatively maintenance free. For a long |
|
|
||
|
and trouble-free life, the following |
|
|
preventative maintenance should be |
|
|
followed: |
|
|
Daily Care: |
|
|
1. Platens: These platens should |
|
|
only be cleaned with mild soap |
|
|
and warm water then wiped off |
|
|
with a clean, soft cloth or soft |
|
|
sponge. Never use steel wool or |
|
|
harsh abrasives or you will |
|
|
cause costly damage. |
|
|
2. All other exterior surfaces: |
|
|
Here again a daily wipe down |
|
|
with mild soap and warm water |
|
|
will do the job quite nicely. |
|
|
Never use steel wool or harsh |
|
|
abrasives or you will cause |
|
|
costly damage. |
|
|
|
|
Serial Tags |
|
|
|
|
|
-6- |
DP20 0-1725-7/04 |
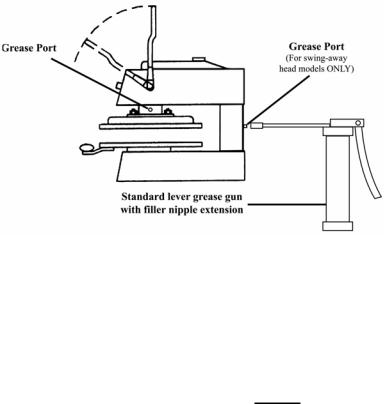
Piston Maintenance:
In order to ensure proper and trouble free operation of the press piston, it is important that the machine be lubricated once every three (3) months, under normal operation. High volume users may require more frequent lubrication.
The lubricant used must be USDA H-1 authorized for food machinery. This
lubricant can be ordered through Proluxe as part number # 110-002.
Please follow these simple instructions:
1.Locate the grease port on the machine. Machines with pull down arms have a single grease port located below the upper head on the right side of the vertical post. Machines with swing-away upper heads have two grease ports; one on the right side of the vertical post and one on the back of the vertical post. All other machines have a single port. (refer to illustration)
2.Place grease gun head against grease port and apply enough pressure to allow gun head to engage the grease port.
3.Squeeze handle of grease gun which forces the grease into the piston. One squeeze is all it takes.
Service Problems:
Contact our factory or approved service agency (U.S. only). Note: When contacting factory for information, parts or service instructions, it is of the utmost importance that the serial number of the machine be provided. This number can be found on the serial plate located on the rear of the machine.
-7- |
DP20 0-1725-7/04 |
 Loading...