

Page 1

X100
Exclusive `Caller Display`
compatible DIGITAL cordless
telephone
This equipment is not designed for making emergency telephone calls when the power fails.
Alternative arrangements should be made for access to the emergency services.
User guide
Page 2

1
DORO X100 CONTENTS
Contents .................. 1 Base Menu ................. 23-27
Safety information .......... 2 Ring Option ............. 23
Handset ................... 3 PABX usage ............. 24
Base unit .................. 4 Least cost routing ......... 25
Installation. . . . . . . . . . . . . . . . . . . . . 5-6 Call barring .............. 26
Locating the base unit ....... 5 Base unit PIN ............ 27
Charging the handset batteries . 5 Deregister ............... 27
Handset battery care ......... 6 Set to default ............. 27
Handset battery indicator ..... 6 Extended system ............ 28-30
Use. . . . . . . . . . . . . . . . . . . . . . . . . . . . 7-10 Additional base units ...... 28
The display ................ 7 Additional handsets ....... 29
Standby mode .............. 7 Intercom call ............. 30
Making an external call ...... 8 Transferring calls ......... 30
Range warning ............. 8 Paging all handsets ........ 30
Call timer ................. 8 Fault finding ................ 31-32
Answering incoming calls .... 8 Interference .............. 31
Earpiece volume control ...... 8 Additional equipment ........ 32
Belt clip ................... 9 Approved use ............... 33
Headset socket ............. 9 REN number ............. 33
Handset on/off button ........ 9 Technical data .............. 34
Do not disturb .............. 9
Last number redial .......... 9
Mute ..................... 9
Keypad lock ............... 10
Page/Find handset ........... 10
Additional Network services .. 10
Main Menu ................... 11
Phonebook ................... 12-13
Caller Display ................. 14-16
Handset menu ................. 17-22
Ring Option ............... 17
Display ................... 18-19
Key beep .................. 20
Auto receive ............... 20
Languages ................. 20
Select base ................ 20
Baby call .................. 21
Handset PIN ............... 21
Register ................... 22
Erase redial ................ 22
Set to default ............... 22
Page 3

2
DORO X100 SAFETY INFORMATION
Use only AUDIOLINE approved cadmium-free NiMh rechargeable batteries.
Never use other batteries or conventional AAA alkaline batteries. Batteries are
available from the Consumer Support Department on 01527 583800.
Do not use any power supply except the one provided. Any other usage will result in
non-compliance with EN41003:1993 and will invalidate the approval given to this
apparatus.
It is recommended that you disconnect the base unit from the mains power during a
thunderstorm.
Do not use in the rain, near a bath or with wet hands.
Do not allow the charging contacts to come into contact with conductive materials.
This is a rechargeable product and it is normal that a certain amount of heat will be
generated in its day to day operation. Whilst this is safe, it is recommended that this
product is not placed on antique, veneered surfaces.
To clean the product, use a damp cloth or antistatic wipe. Never spray cleaning fluid
directly onto the handset or base unit.
UNPACKING
In the box you should find the following items:
P Handset P Wall mounting bracket & screws
P Base unit P Power supply
P 2 NiMh batteries (re-chargeable types) P Line cord
Please contact your retailer, if an item is missing or damaged.
Page 4
3
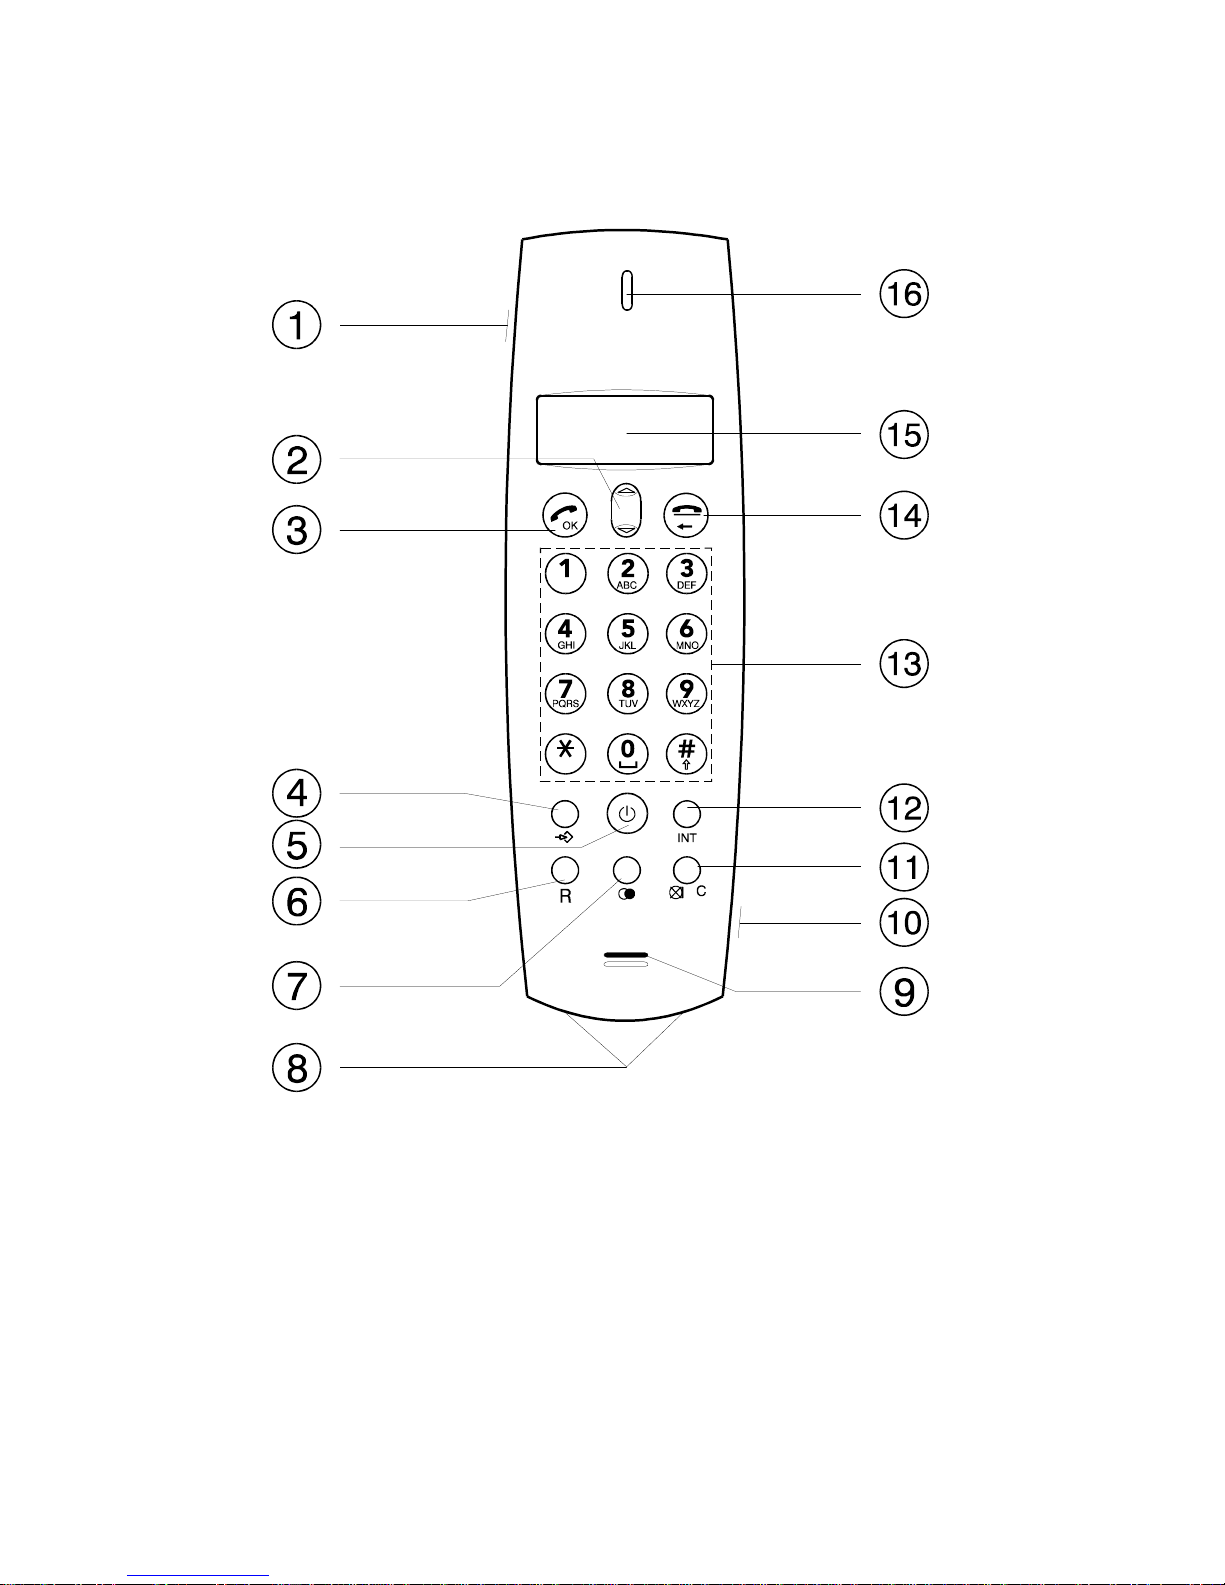
HANDSET
1 Headset socket 9 Microphone
2 Scroll button 10 Computer socket
3 Talk/OK button 11 Mute/cancel button
4 Memory store button 12 Internal call button
5 On/Off button 13 Keypad buttons 0-9, *, #
6 Recall button 14 End call button
7 Redial button 15 Display
8 Charging contacts 16 Earpiece
Page 5
4
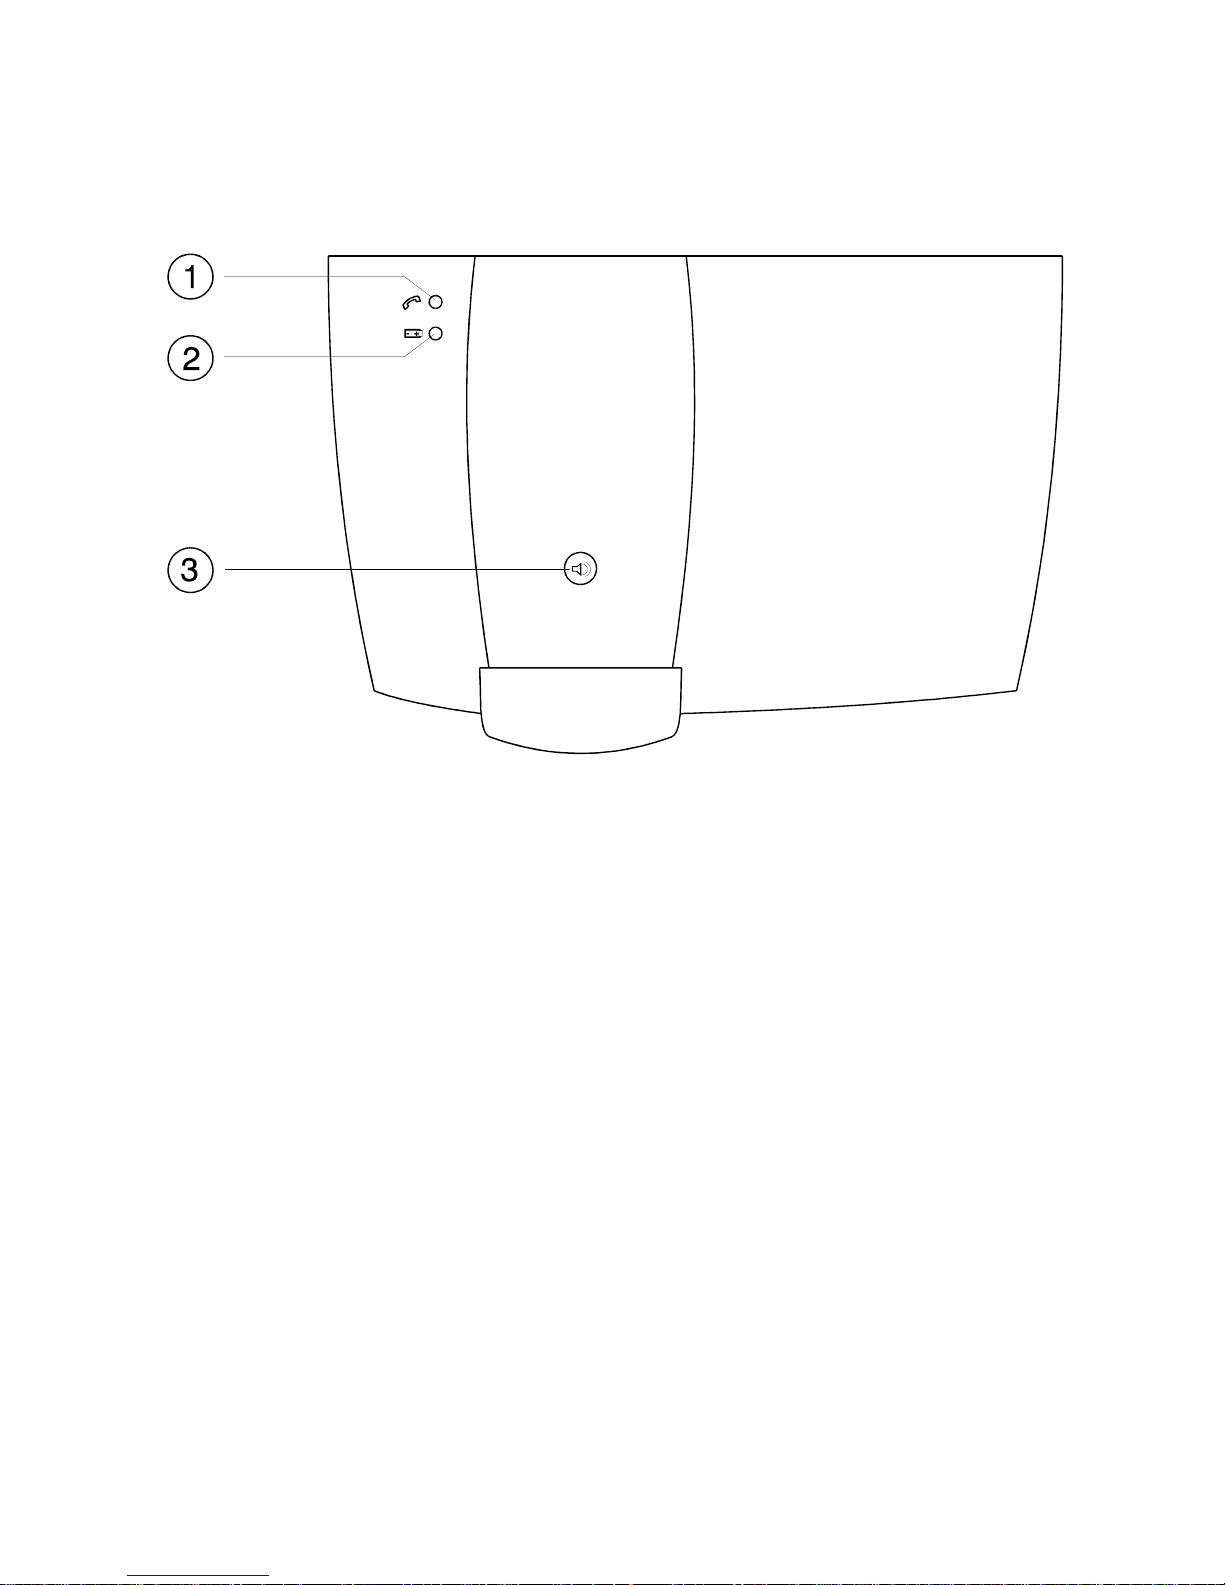
BASE UNIT
1 In-use/Caller Display (ID) indication
2 Charge LED indicator
3 Page/Find handset(s) button
Page 6

5
DORO X100 INSTALLATION
LOCATING THE BASE UNIT
It is essential to the overall range and performance that the base unit and handset can
receive and transmit good radio signals.
Place the base unit close to: - a telephone network socket
- a 13 Amp mains socket
The best location is in an upstairs room and central to the area to be covered. If you
experience poor range, try re-siting the base unit .
# Do not locate in: direct sunlight, damp or high humidity locations.
# Do not locate close to: electrical equipment such as TV’s, computers, fridges,
etc., or close to radiators, metal pipes or window frames.
WALL MOUNTING
Use the template supplied to mark the position of three holes on a wall. Drill the holes (check
for hidden pipes, etc). Use the raw plug and screws provided, ensuring approximately 4 mm
remain between the wall and the head of the screw. Connect the bracket to the rear of the base
unit and place the complete assembly above the screws and gently push it down onto the screws.
CHARGING THE HANDSET BATTERIES
From new, the batteries must be charged for 8 hours without interruption.
1. CONNECT the power adaptor to: - the rear of the base unit
2. REMOVE the battery cover from the bottom of the handset by applying gentle
pressure to the top of the cover and pushing away from the handset. Insert the
batteries (supplied) observing correct polarity. Replace the battery cover. The
display will show: DORO X100 and the battery and range indicators.
3. PLACE the handset onto the base unit (face up or down) and SWITCH mains
power ON. The base unit will beep and the red LED will illuminate.
4. LEAVE for 8 hours. When the handset batteries are fully charged the red
LED on the base unit will flash. If the handset has been placed face up, the battery
symbol will be present on the display when the batteries are fully charged.
5. CONNECT the telephone line to: - the rear of the base unit
- a telephone network socket.
Page 7

6
HANDSET BATTERY CARE
AFTER INITIAL CHARGING the power adaptor must remain connected to the mains
& base unit and mains power switched on. It is recommended that the handset is left
on charge overnight to ensure maximum in-use time. The batteries should hold their
charge for 60 hours, depending on use.
IF THE PHONE IS NOT TO BE USED for a substantial period of time, i.e. holidays,
disconnect the mains power adaptor, when power is reconnected it will be necessary
to recharge the handset for 8 hours.
TO MAINTAIN OPTIMUM CONDITION, allow the batteries to charge fully every 4
months approximately for 8 hours. The batteries will need replacing if: there are
signs of leakage, the batteries will not hold a charge for more than two hours.
The rechargeable batteries (NiMh) are cadmium-free and should be disposed of in a
responsible and environmentally friendly manner.
Note: When the handset batteries are fully charged, the handset may feel warm.
This is normal.
IMPORTANT!
From new, the batteries (supplied) must be charged for 8 hours without interruption.
You can obtain your replacement batteries from:
Consumer Support Department, Doro Audioline Ltd, 22 Walkers Road, North Moons
Moat, Redditch, Worcestershire, B98 9HE. Price available on request:
Telephone 01527 583800.
The guarantee will be invalid if any problems arise as a result of the use of an
incorrectly specified battery.
HANDSET BATTERY INDICATOR
When the battery is empty, calls cannot be made or received. When the battery is
nearly empty the indicator will begin to flash and a warning tone will be heard.
Battery status:
Fully charged
High charge
Half charge
Low battery
Empty battery. A warning beep will be heard.
Page 8
7
DORO X100 USE
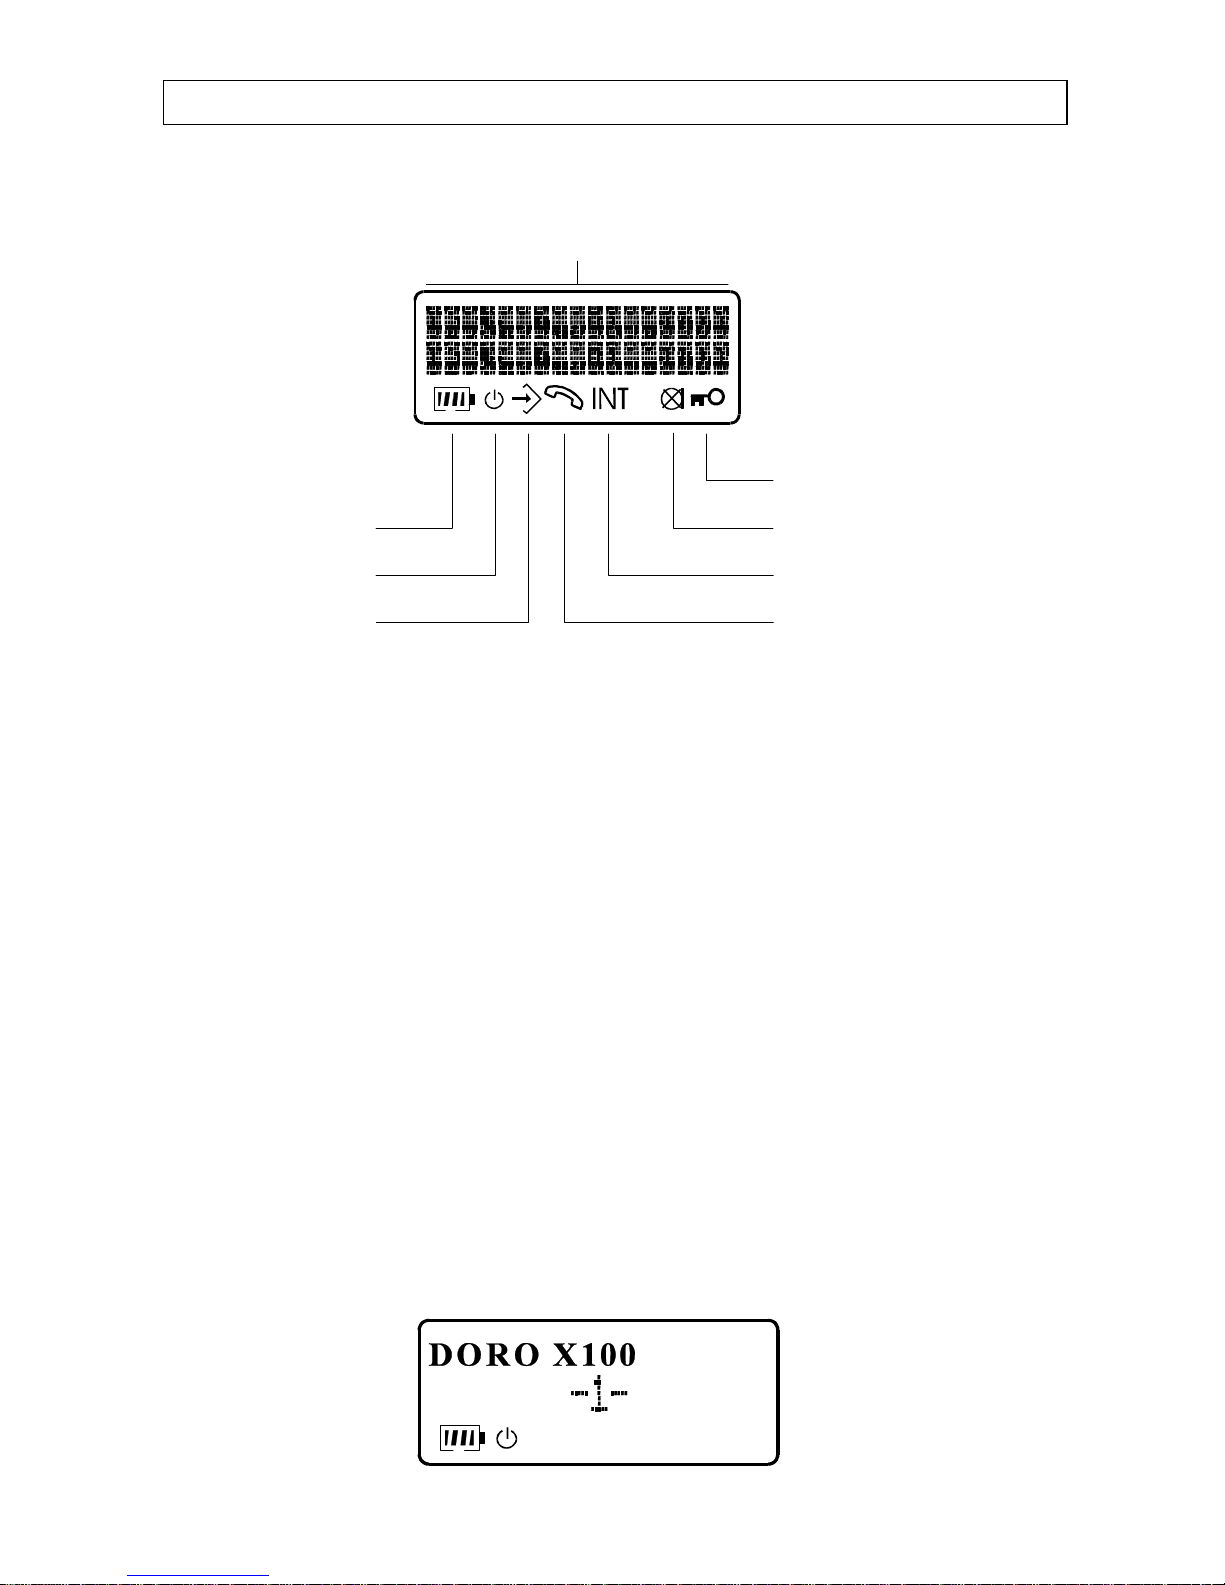
THE DISPLAY
2 x 16 alpha numerical display
Barred/Locked
Battery level Mute
Range Intercom call
Programming Talk
Battery status - Indicates the batteries' charging status.
Range - is ON - when the handset is switched on and within range.
- flashes - when the handset is out-of-range of the base unit.
Programming - is ON - when programming.
Talk - is ON - when line is connected and while calling.
- flashes - when an external call is received.
Intercom call - is ON - when an intercom call is received.
- flashes - when paging/or an intercom call is in progress.
Mute - is ON - when the mute function is activated
.
Barred/Locked - is ON - when calls are barred or baby call is activated.
STANDBY MODE
Standby mode is the term used when the handset is not in-use. In standby mode the
LCD display will show the handset identity number, (see pages 19) the battery status
(see page 6) and the in-range indicator (see page 8).
Page 9

8
MAKING AN EXTERNAL CALL
1. Dial the telephone number that you wish to call (the number will be visible on
the display). If you dial an incorrect digit, use the button to erase it.
2. Press the Talk button (the number will be dialled automatically).
3. To terminate the call, press the button.
Alternatively, it is possible to press the Talk button and then dial the number.
Note: If all available channels are in-use, a warning beep will be heard. The problem
can be that the handset is to far from the base unit or that all transmission channels
are occupied. Retry after a short while.
RANGE WARNING
If you are on a call and accidentally walk out of range of the base unit, the sound
quality in the earpiece will de-grade, warning beeps will be heard and the range
indicator will flash. Note: On the fringe of the range the range indicator may be
present on the display, but it is not possible to make or receive calls.
The range can be affected by obstacles, which partially reflect and partially absorb
the radio waves. Additional base units can be added in order to achieve better range.
The range stated in this user guide is based upon an area completely free of
obstructions between the handset and the base unit.
CALL TIMER
The length of outgoing and incoming calls will be displayed on the display
approximately 10 seconds after a call is connected.
ANSWERING INCOMING CALLS
When an external call is received, the base unit will ring first and the in-use LED
will flash.
# To take the call, press and release the button when the handset rings. When
a phone call is received the handset symbol will appear on the display. The ringer
sound can be changed to personal preferences (see page 17).
To finish the call either replace the handset on the base unit or press the
button. The handset can also be programmed to connect with a call automatically
when lifted off the base unit, if required (see page 20).
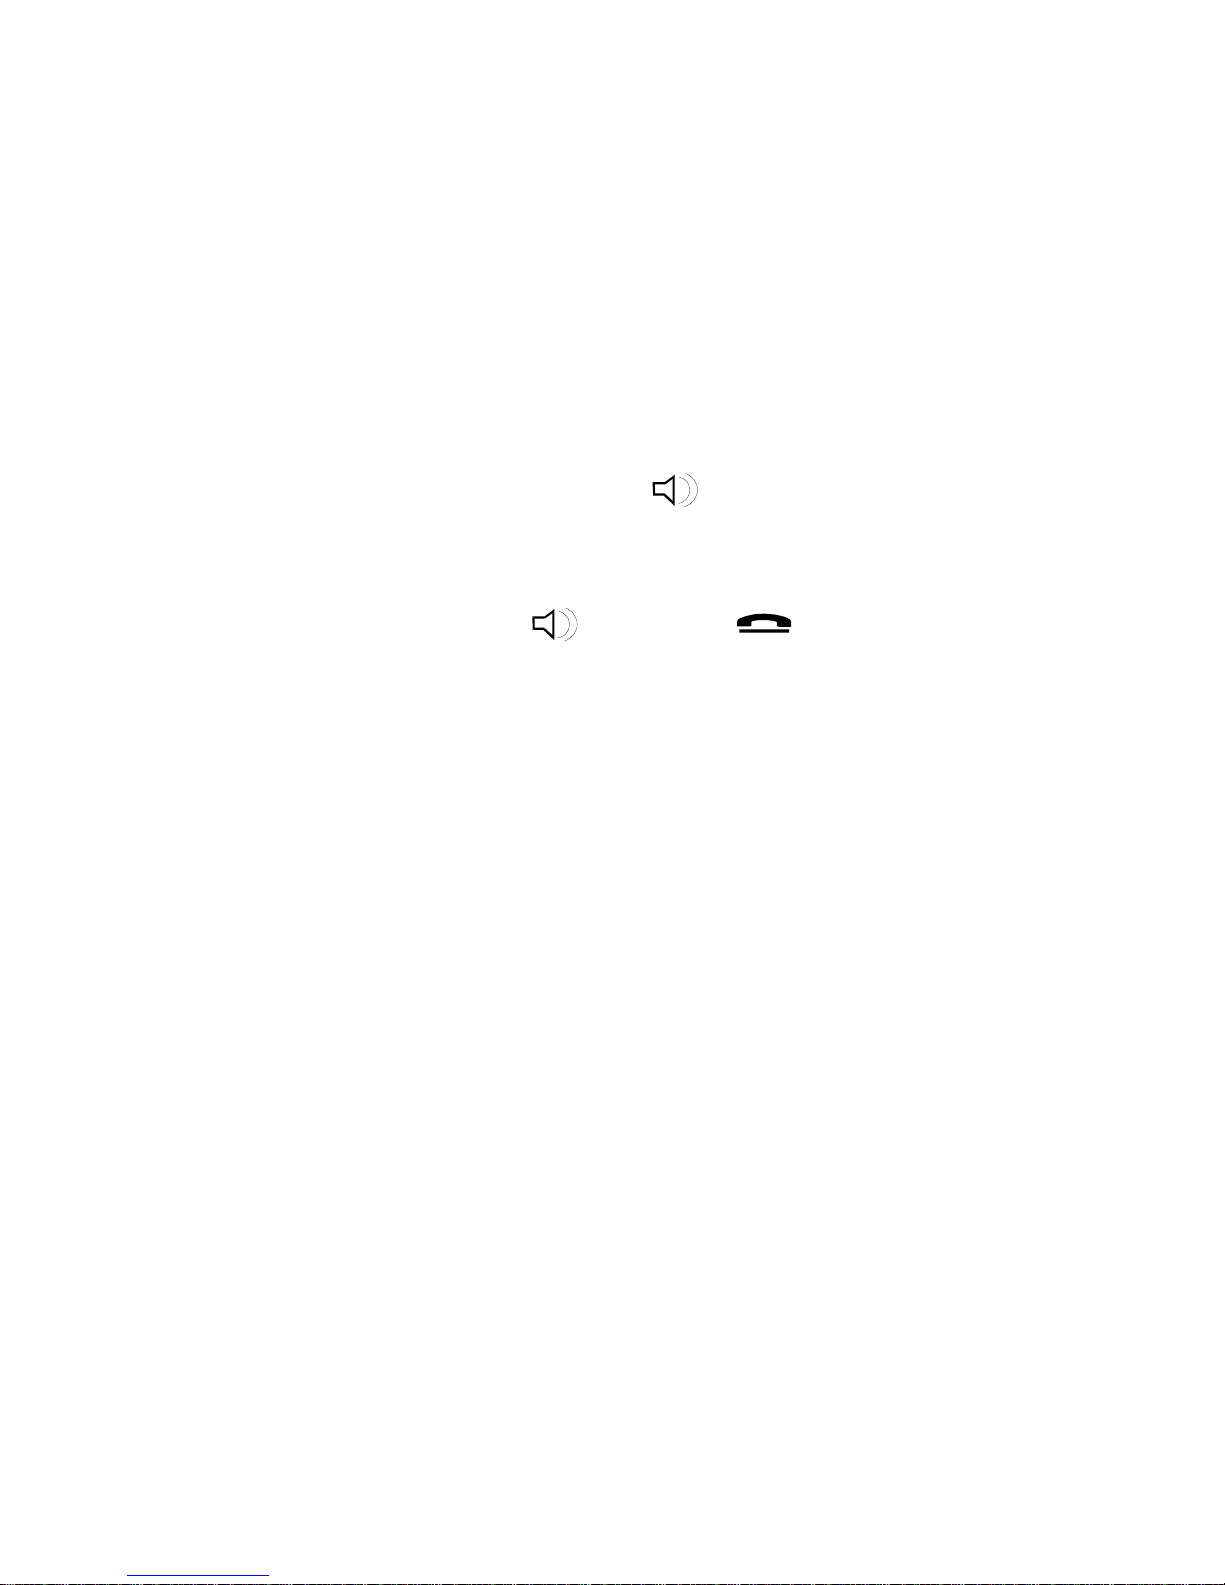
EARPIECE VOLUME CONTROL
When on a call, the volume level in the earpiece can be increased or decreased on
three levels using the button.
Page 10

9
BELT CLIP
A belt clip is mounted on the rear of the product. Using the clip the handset can be
attached to belt, trouser waist band, etc. This clip cannot be disconnected.
HEADSET SOCKET
The DORO X100 can be used with a suitable headset. The handset has a headset
socket on its left hand side, above the display. Answering or making a call with a
headset is done in the same way as without one. When the headset is connected the
microphone of the handset is muted automatically.
HANDSET ON/OFF-BUTTON
The silver on/off button is used to switch the handset on or off. When the handset
is switched off, battery power is conserved, but calls cannot be made or received.
The handset is best left switched on, i.e. it does not have to be switched off at night.
However, it is recommended that the handset is switched off if it is not going to be
used for a long period, such as a holiday. If the handset batteries are expired the
handset will be switched off automatically.
To switch off: press & hold the button until a beep is heard, then release.
To switch on: press & hold the button until the handset beeps, then release or
replace the handset on the base unit.
DO NOT DISTURB
If you receive an incoming call, but do not want to be disturbed - press and release
the button. The handset ringer will be switched off. The ringer will be
re-instated automatically when a new call is received. Note: The base ringer will
continue to ring.
LAST NUMBER REDIAL
The last ten numbers dialled are stored automatically in the memory. One or all of
the numbers can be re-dialled individually as required.
# Press button until the number you want to call is visible on the display.
# Press button (the number will be dialled automatically).
The complete redial memory can be erased when required, see page for further
information.
MUTE
If during a telephone conversation, you wish to talk privately to a third party without
the caller overhearing: Press the button (the mute symbol will appear on the
display). To resume the conversation, press the button again.
Page 11
10
KEYPAD LOCK
The keypad can be locked to prevent accidental operation when the handset is being
carried.
# To lock: press and release the # button.
# To unlock: press the # button and keep down.
If you receive an incoming call in this mode, press the Talk button to answer. When
the call is terminated, the keypad will revert to the locked position.
PAGE/FIND HANDSET
To page or locate a missing handset, press the button on the base unit. The
handset will ring for 30 seconds approximately. This feature is useful when looking
for the handset or to attract the attention of the carrier of the handset.
To terminate this action, press the button or the button on the handset.
ADDITIONAL NETWORK SERVICES
The R (Recall) button can be used to access additional network services. Contact
your network operator for further details.
Page 12
11
DORO X100 MAIN MENU
Your DORO X100 features a simple menu system with clear display texts. The menu
system is controlled by four buttons.
The button is used to move through the main menu.
The OK button is used to enter sub menus and/or confirms your choice.
The button moves you one step back and when pressed repeatedly returns you
to standby mode.
The button is used to erase incorrect numbers or settings.
The main menu consists of four categories:
Phone book
For storing up to 70 frequently used numbers/names. See pages 12-13.
Caller ID
The 24 latest received numbers can be viewed and redialled. See pages 14-16.
Handset menu
Used to tailor the handset to personal preferences. See pages 17-22.
Base menu
Used to tailor the base unit to personal preferences. See pages 23-27.
.
Page 13

12
DORO X100 PHONEBOOK
The telephone has a phone book where you can store 70 names and telephone
numbers for easy access and fast dialling. Please note that names associated with
numbers stored in the phonebook will not be visible on the display when an
incoming call is received.
LETTERS
The keypad digit buttons are also used to store letters in the phone book. Printed on
each keypad digit button are a number of letters which in total make up the English
alphabet. Lower case letters, other variants and some special symbols for example +
and & exist in the memory even though they are not printed on the buttons, the table
below indicates where you will find them.
Keypad digit Upper case letter/symbol Lower case letter/symbol
1 - ? ! , . & 1 - ? ! , . & 1
2 A B C 2 Ä Å à Æ Ç a b c 2 å ä æ ç
3 D E F 3 É ë è d e f 3 ë é
4 G H I 4 ì g h i 4 ì
5 J K L 5 j k l 5
6 M N O 6 Ö ò Ø Ñ ö m n o 6 ö ò Ø ñ
7 P Q R S 7 p q r s 7 ß
8 T U V 8 Ü ù t u v 8 ü ù
9 W X Y Z 9 w x y z 9
* + % *
0 0 Space
# Change between upper and lower case letters
While storing and changing numbers you can perform the following options are
available:
- To erase a letter, press .
- To enter a space, press 0.
- To change between upper and lower case letters, press #.
- To store a pause in the telephone number, press .
Page 14

13
STORING A NUMBER/NAME
1. Press the button. Display shows Enter Position with a cursor flashing
2. Select a memory location number from 00 to 69 using the keypad digits or use the
button to select an available location. Display confirms selection and
indicates position where phone number is to be stored.
3. Dial the full telephone number you wish to store. If you make a mistake use the
button.
4. Press OK.
5. Enter a name (16 letters maximum) by pressing the relevant keypad digit buttons
once or several times (see page 12).
7. When the full name is stored, press OK. If you make a mistake use the button.
8. The next available location will be shown. Continue to store more
names/numbers, or press to revert to standby mode.
To change a stored number/name, select the stored number as described above and
correct using the button.
To erase a stored entry, select the stored number as described above and press and
hold the button for approximately 2 seconds, the display will show "Erase?".
Press OK. to confirm.
DIALLING MEMORY NUMBERS
1. Use the button to select the Phone book menu, then press and release the OK
button.
2. Enter the first letter in the name and press OK or use the button to locate the
desired memory location.
# Press . The number will be dialled automatically.
HOT KEY DIALLING
Telephone numbers stored in memory locations 0-9 can be dialled by pressing the
location number until the number is displayed, then pressing the Talk button.
Telephone numbers stored in positions 10-69 can be dialled by first pressing the
corresponding button 0-9 for the first digit, and then the corresponding button 0-9
for the second digit until the number is displayed, then press the Talk button.
Page 15

14
DORO X100 CALLER DISPLAY
Caller display allows you to see who is calling before you answer a call and to see
who has called in your absence. When the service is implemented on your telephone
line, seconds before your telephone rings the number of the incoming caller will
appear on the display. Up to 24 incoming numbers can be stored in the call list.
When the list is full, the oldest number will be deleted automatically.
It is not possible to view the call list and take a new call at the same time.
NOTE!
Caller Display is an optional telephone Network service. This telephone will provide
Caller Display information provided the service is available on the telephone
Network and any subscription charges (if required) have been fulfilled. Check with
your telephone Network operator for full details.
If the Caller Display service is not implemented on your telephone line, incoming cal l
information will not be displayed.
If the handset is registered to a different base unit, any information in the call list will
be lost.
Page 16

15
VIEWING CALLER DISPLAY NUMBERS
The green in-use indicator on the base unit will flash and the letters CID will appear
on the handset to indicate when a new incoming number(s) has been stored in the
call list and not yet reviewed. Once the number(s) have been reviewed the indicator
will stop flashing and the letters will disappear.
When an incoming number is received it is assigned a call sequence number which
appears on the top left hand side of the display, commencing with 01 (oldest call) up
to 24 (latest call).
1. Use the button to select "Caller ID", then press the OK button. The display
will show the number of new (unread) calls and the total number of calls.
2. Use the button to view the call list.
Press upwards to view the latest number.
Press downwards to view the oldest number.
When the incoming number is on the display, wait for approximately 3 seconds and
the date and time the call was received will be displayed. This information will then
alternate on the display.
# Whilst viewing the list you have the following options:
- To dial the displayed number, press .
- To return to standby mode, press .
LIST INFORMATION
The display will also provide the following information:
DISPLAY INFORMATION
END OF LIST
The list has been reviewed to the oldest number
TOP OF LIST
The list has been reviewed to the latest number
OUT OF AREA
Call information is not available.
WITHHELD
SECRET
The caller has withheld their number or the number
cannot be transmitted.
INTERNATION
AL
OUT OF AREA
The call is from an international number.
Page 17

16
DELETING A NUMBER FROM THE LIST
1. Ensure the number you wish to erase is present on the display.
2. Press the button. The display will show Erase. Press to confirm.
DELETING ALL NUMBERS FROM THE LIST
1. Ensure that a call list number is on the display.
2. Press and hold the button, until the display shows "Erase all?" then release.
3. Press the button again, all numbers will be erased.
TRANSFERRING A NUMBER TO PHONE BOOK
1. Ensure the required number is on the display.
2. Press . The display will show Select Position and the next available location.
3. Press OK. or use the Scroll button to select a free memory location. The display
will show Enter name.
4. Enter name (16 letters maximum). Press the corresponding keypad digit button
(once or several times) to store the first letter in the name (see page xx for further
details).
5. When the full name is entered, press OK. The display will revert to the Caller ID
memory.
IF THE MEMORY IS FULL
The Caller ID memory capacity is 24 telephone numbers When the memory is full,
each new incoming call will replace the oldest stored number, the principle "first in,
first out" applies. The new number receives the highest number, 24, and all other
numbers are moved one step up in the memory order.
Page 18

17
DORO X100 HANDSET MENU
To enter the menu for handset settings, press Scroll repeatedly until the display
shows "Handset menu", then Press OK. You can now view the sub menus by
repeatedly pressing the Scroll button.
RING OPTION
The handset ringer volume, and the sound of the ringer on external and intercom
calls can be set to personal preferences.
RING VOLUME
1. Select the Handset menu and use the Scroll button to locate "Ring Option", then
press OK.
2. Press Scroll button to locate "Ring Volume", then press OK.
The current setting is displayed (Off = off, 1 = lowest level, 3 = highest level).
3. Select the required level using the Scroll button, then press OK.
RING EXTERNAL
1. Select the Handset menu and use the Scroll button to locate "Ring Option", then
press OK.
2. Press Scroll button to locate "Ring External", then press OK.
The current setting is displayed (1 = lowest level, 6 = highest level).
3. Select the required level using the Scroll button, then press OK.
RING INTERNAL
1. Select the Handset menu and use the Scroll button to locate "Ring Option", then
press OK.
2. Press Scroll button to locate "Ring Internal", then press OK.
The current setting is displayed (1 = lowest level, 6 = highest level).
3. Select the required level using the Scroll button, then press OK.
Page 19

18
DISPLAY
When the unit is in standby mode it can display the handset and the base identity
numbers (see page 18). This information can be switched on or off.
User name Handset paging
identity number
Base unit
identity number
CONTRAST
Five different settings are available for the contrast of the display.
1. Select the handset menu and use the Scroll button until "Display" is shown, then
press OK.
2. Press Scroll until "Contrast" is displayed, then press OK.
The current setting is displayed (1 = lowest contrast, 5 = highest contrast).
3. Select the required setting with the scroll button, then press OK.
BACK LIGHT
The illumination of the display can be switched on or off.
1. Select the handset menu and use the Scroll button until "Display" is shown, then
press OK.
2. Press Scroll until "Back light"is shown, then press OK.
The current setting is displayed (on/off).
3. Select a position with the Scroll button, then press OK.
Switching the back light on will dramatically reduce the standby time. To
achieve maximum standby time the back light should be switched off.
Page 20

19
BASE UNIT/HANDSET IDENTITY NUMBER
1. Select the handset menu and use the Scroll button until "Display" is shown, then
press OK.
2. Use the Scroll button to select either "Base number" or "Handset number", then
press OK.
The current setting is displayed (on/off).
3. Select your chosen setting with the scroll button, then press OK.
MY NAME
The words on the display DORO X100 can be changed to a name or names of your
choice. The feature is particularly useful when more than one handset is used in the
same household or business.
1. Select the handset menu and use the Scroll button until "Display" is shown, then
press OK.
2. Press Scroll until "My name" is displayed, then press OK.
Change name
# Press Scroll until "Edit my name" is shown, then press OK.
# Enter the name (16 letters maximum) using the keypad digit buttons (see page
12), then Press OK.. If you make a mistake use the button to erase a letter or
press repeatedly to erase the entire name.
Display name on/off
# Press Scroll until "Display my name" is shown, then press OK.
The current setting is shown (on/off).
# Select a setting with the scroll button, then press OK.
Page 21

20
KEY BEEP
From new, the handset keypad is programmed to emit a confirmation beep every
time a key is pressed. This beep can be turned on or off as desired.
1. Select the handset menu and use the Scroll button until "Key beep" is shown,
then press OK.
The current setting is displayed (on/off) .
2. Select the desired setting with the scroll button, then press OK.
AUTO RECEIVE
If the handset is on the base unit, this feature allows it to connect automatically with
a call when lifted off the base unit, without the need to press the Talk button.
1. Select the handset menu and scroll until "Auto receive" is displayed, then press
OK.
The current setting is displayed (on/off).
2. Select setting with the scroll button, then press OK.
LANGUAGES
The language on the display can be changed. The available languages are English,
German, Italian, French, Swedish, Norwegian, Danish and Finnish.
1. Enter the handset menu and scroll until "Language" is shown, then press OK.
The current language is displayed.
2. Select the desired language with the scroll button, then press OK.
SELECT BASE
This option enables you to select the base unit which the handset is operating from.
1. Enter the handset menu and scroll until "Select base" is shown, then press OK.
The current setting is displayed [0 1].
2. Select the desired setting with the scroll button, then press OK. The setting "0"
means that the handset automatically selects the nearest base unit.
Page 22

21
BABY CALL
This feature enables the handset to be pre-programmed with an emergency contact
number which can be dialled automatically by pressing any button (except the
programming button). It is still possible to answer calls even if this feature is
implemented.
PROGRAMMING
1. Enter the handset menu and scroll until "Baby Call" is shown, then press OK.
2. Enter the PIN-code of the handset (0000 from new).
3. Scroll until "Dial Number" is displayed, then press OK. Enter desired phone
number with the keypad digit buttons. Use the button to erase, if necessary.
4. Press OK. The programmed telephone number is displayed and the feature is
switched on. The barred indicator is shown on the display.
ON/OFF
1. Enter the handset menu and scroll until "Dial number" is shown, then press OK.
2. Enter the PIN-code of the handset (0000 from new).
3. Scroll until "Activation" is displayed, then press OK.
The current setting is displayed (on/off).
4. Select the desired setting using the Scroll button, then press OK.
Note: A number programmed will be dialled automatically after the activation has
switched on. To stop dialling press the button.
HANDSET PIN
A four digit PIN code is provide to ensure that some of the programmable settings
can not be changed by unauthorised users. From new the code is set to 0000.
1. Enter the handset menu and scroll until "Handset PIN" is displayed, then press
OK.
2. Enter the handset PIN-code (0000 from new).
3. Enter the new PIN-code twice and then press the OK button.
Page 23

22
REGISTER
From new the handset is registered to the base unit, to register additional handsets to
the base unit follow the instructions below. For other information on additional
handsets see page 29.
1. Enter the handset menu and scroll until "Register” is shown, then press OK.
2. Select a base unit number (1-6), using the handset keypad digit buttons.
3. Enter the system PIN code (0000 from new). The handset will commence
searching.
AND IMMEDIATELY
4. Press and hold the Paging button on the base unit (you will hear a beep). Release
when you hear a series of beeps.
5. When the handset has located the base unit, it will display all available handset
identity numbers. Enter your selection.
The handset will enter standby mode and can now be used together with the
registered base unit.
ERASE REDIAL
It is possible to erase the numbers temporarily stored in the redial memory.
1. Enter the handset menu and scroll until "Erase redial" is shown, then press OK.
2. Enter the PIN-code of the handset, then press OK.
SET TO DEFAULT
Set to default resets the handset to the original factory settings with the exception of
the registration and PIN-code.
1. Enter the handset menu and scroll until "Set to default" is shown, then press OK.
2. Enter the PIN-code of the handset, then press OK.
Page 24

23
DORO X100 BASE MENU
To select the Base Menu, press the Scroll button repeatedly until "Base menu" is
shown, then press OK
RING OPTION
In this sub menu there are three sections: volume, melody and priority.
# To enter this menu, press OK.
RINGER VOLUME
Four levels are available for the base unit ringer.
1. Ensure "Ring volume" is displayed, then press OK.
The current setting is shown (0 = off, 1 = low, 2 = normal and 3 = high).
2. Select a level using the Scroll button, then press OK.
RINGER PATTERN
Six melodies are available for the base unit melody.
1. Scroll until "Ring pattern" is displayed, then press OK.
The current setting is shown (1 = option 1, 2 = option 2, etc.)
2. Select a melody using the Scroll button, then press OK.
RING MODE
If using more than one handset with the same base, it is possible to programme the
order in which the handsets ring. From new, all handsets will ring simultaneously.
Order in which handsets ring
1. Scroll until "Ring mode" is shown, then press OK.
2. Select "Priority". Press OK. The display shows the number (flashing) of the
handset currently given priority.
3. Select the desired handset by pressing the corresponding keypad digit button,
then press OK.. If you select 0, the priority is terminated and all handsets will
ring simultaneously.
Number of rings per handset
1. Scroll until "Ring mode" is shown, then press OK.
2. Select "Ring count". Press OK. The current setting is displayed.
3. Select desired number of rings, then press OK.
Page 25

24
PABX USAGE (OPTION)
If you are connected to a PABX, the X100 can be programmed to accept an access
code and to insert a timed pause before the number is dialled.
A primary access code (4 digits maximum) can be stored. If you are connected to
two PABXs and it takes one more access code and two pauses to obtain an external
line, a secondary access code can be also programmed.
When using this feature, ensure that the access number stored is dialled as well as
the telephone number.
STORE ACCESS CODE
1. Enter the base menu and scroll until "Access codes" is shown, then press OK.
2. Select the desired setting (off/primary/secondary) to be stored, then press OK.
3. The current settings is shown on the display.
4. Scroll to the desired setting.
5. Enter the access code (R, * and # can also be stored as access codes).
6. Press OK.
PAUSE LENGTH
This feature allows you to select the pause time, often used in dialling sequences on
a PABX. The time can be set to 1, 3 and 5 seconds. From new, the setting is 3
seconds.
1. Enter the base menu and scroll until "Access codes" is shown, then press OK.
2. Scroll until the display shows "Pause time", then press OK.
3. The current setting is shown.
4. Select the desired setting using the Scroll button, then press OK.
Page 26

25
LEAST COST ROUTING (LCR)
Nowadays, a growing number of telephone operators offer discounted charges on
certain types of telephone calls. To take advantage of the cheaper charges you must
be registered with an alternative operator and often use a special access code before
you dial a telephone number. The X100 can be programmed to recognise a certain
dialling code or type of call and automatically dial an access code.
Up to two access codes can be stored under either position 0 or 1.
PROGRAMMING LCR
1. Enter the base menu and scroll until "LCR Selection" is shown, then press OK.
2. Enter the PIN-code of the base unit (from new 0000). The display shows the
current recognition position (0-1).
3. Use the button to select a position, then press OK.
4. Dial the numbers to be recognised (5 digits maximum), then press OK.
5. Dial the access code plus the numbers to be recognised (10 digits maximum),
then press OK.
6. Use the Scroll button to switch this feature on or off, then press OK.
7. Store the next position or press twice to return to standby mode.
Page 27

26
CALL BARRING
Call barring can be employed to restrict use of the handsets and thus to stop users
making expensive calls to international numbers or to premium rate numbers.
Select either to "Bar all dial", which will bar all outgoing calls, or "Bar specific",
which bars the first digits/digit of the number. For example 00 for international
calls.
To be able to set switch the feature on or off you need the PIN-code of the base unit.
The base unit can bar up to 3 (0-2) numbers of up to 4 digits each. Three emergency
numbers can be programmed and dialled irrespective of the bar feature.
PROGRAMMING CALL BARRING
1. Enter the base menu and scroll until "Call lock" is shown, then press OK.
2. Enter the PIN-code of the base unit (from new 0000).
3. Scroll until the display shows "Handset to lock", then press OK.
4. Enter the number of the handset to be locked.
5. Scroll until the display shows the required setting "No Barring", "Barr All Dial"
and "Bar Specific", then press OK.
If you select "Bar specific", use the Scroll button to select the desired position (0-
2) and then enter the digit/s (max. 4), then press OK.
PROGRAMMING EMERGENCY NUMBERS
1. Enter the base menu and scroll until "Call lock" is shown, then press OK.
2. Enter the PIN-code of the base unit (from new 0000).
3. Scroll until the display shows "Emergency dial", then press OK.
4. Enter the number of the handset to be locked.
5. Use the Scroll button to select the desired position (0-2), then enter the required
number (12 digits maximum), then press OK to store the selected setting.
Page 28

27
BASE UNIT (SYSTEM) PIN-CODE
Registration of new handsets to the base or barring (not allowing) certain phone
numbers is restricted to holders of the base unit PIN-Code. The base unit PIN-code is
a four digit code, and from new is 0000. It is recommended that this is changed to a
number of your choice.
1. Enter the base menu and scroll until "System PIN" is displayed, then press OK.
2. Enter the PIN-code of the system/base unit (from new 0000).
3. Enter the new PIN-code twice and then press OK.
DEREGISTER
Any handset can be deregistered from the base unit. This means that the identity
number of the selected handset is erased from the list of registered handsets. Note: It
is recommended that you do not de-register the master handset (handset no.1)
1. Enter the base menu and scroll until "Deregister" is shown, then press OK.
2. Enter the PIN-code of the system/base unit (from new 0000).
3. Enter the identity number of the handset that is to be erased by pressing the
corresponding keypad digit button, then press OK.
SET TO DEFAULT
All features and settings will reverted to default. Registration and PIN-code will not
be affected.
1. Enter the base menu and scroll until "Set to default" is shown, then press OK.
2. Enter the PIN-code of the system/base unit (from new 0000).
3. The handset will return to standby mode.
Page 29

28
DORO X100 EXTENDED SYSTEM
The DORO X100 can form the basis of a multi-handset DECT telephone system
which will allow you to:
P Register up to 6 handsets to the same base unit.
P Register up to 6 base units to the same handset.
P Make an internal call and transfer calls from one handset to another handset
which is connected to same base unit.
P Increase the range of handsets by automatic connection to the nearest base unit.
P Register other GAP (Generic Access Profile) compatible handsets to the base unit.
NOTE: Each base unit must be connect to a telephone line.
ADDITIONAL BASE UNITS
By connecting several base units to one system, the range of each handset can be
extended, but it is critical that all base units are within range of each other.
Otherwise it may be that dead spots occur where reception is not possible. It is
recommended that when a new base unit is located, a handset is used to make a call
and test the range.
It is also possible to locate one base unit at home and one base unit at work, and use
one handset at both locations.
The picture on your right illustrates a
system with four base units, A-D. The
dotted lines shows the range of each base
unit.
If the additional handset has been
registered with the base units and the
automatic connection option has been
selected (see page 20), connection will be
established automatically when moving
from base unit to base unit, but CAN NOT
OCCUR when a call is being made.
Page 30

29
ADDITIONAL HANDSETS
Adding additional handset to the system allows all users to make full use of the call
transfer and intercom facilities. A maximum of one external call and one internal call
can proceed at the same time.
If an additional handset is added to the system, the batteries must be charged for 8
hours without interruption. The registration procedure (see page 22) must be
performed prior to use.
The registration gives each handset a specific identity number, 1 to 6. This number is
used for internal calls only. From new, the handset is already registered to the base
unit and has been allocated number 1.
DISPLAY IPEI NUMBER
The handset has a unique identity number, which may be required when it is
registered with a base unit of another brand/model.
1. Enter the handset menu.
2. Press and hold the R button until the display shows the IPEI number of the
handset.
Page 31

30
INTERCOM CALL
When two or more handsets are registered to the same base unit it is possible to call
handset to handset. This type of call is not charged for by your Network operator.
1. Press the INT button.
2. Enter the handset number of the handset you wish to call 1-6.
The displays of the handsets will show the number of the other handset.
3. Press the button on the called handset to take the call.
4. To terminate the call, press the button.
When an intercom call is made, "INT" flashes on display of the called handset and the
ringer sound is different from that of an external call. The ringer sound can be
varied, see page xx.
If a external call is received while a intercom call is in progress, a reminder tone
will be heard in the handset earpiece, the base unit will ring and the in-use indicator
will flash.
To answer the call, either:
a) Press the R button. The intercom call will be terminated.
OR
b) Press the INT button to place the internal call on hold and answer the incoming
call. You can switch between an external call and an internal call by pressing the
INT button.
TRANSFERRING CALLS
A external call can be transferred from one handset to another (both handsets must be
registered to the same base unit).
When an external call is connected, press the INT button. Enter the handset identity
number of the handset to which the call is to be transferred. The external call will be
placed on hold and the called handset will ring. The called handset user presses the
TALK button to take the call. The two handset users can now talk to each other.
The calling handset user presses the button to transfer the call. If the call is not
answered, press the R button on the called handset to retrieve the call.
PAGING ALL HANDSETS
To call all handsets in a system, press the INT button and then the * button. All
handsets will ring until the call is answered.
Page 32

31
DORO X100 FAULT FINDING
If the telephone does not work properly, this fault finding section may help. If you
cannot solve the problem check that the power adaptor and the line cord are
connected properly and disconnect any additional equipment. If the telephone works
properly now, the fault is with some other piece of equipment or the telephone line.
INTERFERENCE
All cordless telephones are radio transmitters and receivers and such are subject to
interference from a wide range of sources.
Re-siting the base unit can improve reception substantially. An upstairs room is
usually the best location.
Electronic equipment like TV's, computers, etc. emit strong electronic magnetic fields
which can affect the radio signals. Try not to locate your DORO X100 next to this
type of equipment and ensure that the power line cords are separated from other
electrical units.
AN INCOMING NUMBER IS NOT VISIBLE ON THE DISPLAY
P Have you subscribed to the telephone network ‘Caller ID’ service?
P If "Out of area" or "Withheld Secret" are displayed, it either means that no
information of the number is available or that the caller has withheld their number.
P Is the phone connected to a PABX? Caller display is not available when connected
to a PABX.
THE TELEPHONE DOES NOT WORK
P Is the power adapter connected correctly and mains power switched on?
P Is the line cord connected correctly?
P Are the batteries in the handset charged?
P Connect a different telephone to the same wall socket. If the other telephone does
not work, contact your Network operator.
THE BASE UNIT DOES NOT RING
P Check that the ringer is programmed on.
P Does the total of REN numbers exceed 4? If it does, disconnect other equipment
until 4 is achieved.
P Is it connected to a mains power socket and mains power switched on?
WHEN ON A CALL, A WARNING TONE IS HEARD
P The batteries’ power may be low (recharge the handset for 8 hours).
P The handset may be out of range - move closer to the base unit.
Page 33

32
NO DIALLING TONE
P Have the handset batteries been charged for 8 hours?
P Is the Base connected to a mains power socket and mains power switched on?
P Is the telephone line cord plugged into a telephone Network wall socket?
THE DISPLAY ON THE HANDSET IS BLANK
P Is the handset switched off?
P Is mains power switched on?
THE BASE UNIT RINGS BEFORE THE HANDSET
P This is normal for all cordless telephones.
THE HANDSET WILL NOT CONNECT WITH AN INCOMING CALL WHEN
THE BASE UNIT RINGS
P Because this is a cordless telephone, the ringing signal has to be transmitted to
the handset which can take a few seconds. It is important that a call is not
picked-up on the handset until the handset rings.
THE HANDSET DOES NOT RING
P Is the ringer programmed Off?
MEMORY DIALLING DOES NOT WORK
P Store a new number and try again.
Technical Support: If you cannot resolve the fault using the fault finder section,
please call the Technical Helpline on: 0906 6800086 between 9AM - 5PM MondayFriday. Please note that this is a Premium Line number and all calls are charged
at 25 pence per minute. Price correct at the time of going to press.
Alternatively, you can write to: Technical Support Group, Doro-Audioline Ltd., 22
Walkers Road, North Moons Moat, Redditch, Worcestershire, B98 9HE.
ADDITIONAL EQUIPMENT
An additional piece of equipment for the X100, the Phone Book Express is available
which can be used for copying the phone book to/from a PC. Contact the Consumer
Support Department on 012527 583800 for further details.
Page 34

33
DORO X100 APPROVED USE
The DORO X100 is approved for connection to:
(a) Public Switched Telephone Networks (PSTN)
(b) Extensions via sockets provided for a direct exchange line
(c) PABX providing secondary proceed indication.
For use with the following facilities:
-cordless telephone
-caller display
-register recall (TBR)
-automatic storage of last 10 numbers dialled
-MF signalling/Pulse signalling
-microphone mute
-memory redial of up to 10 numbers
-intercom call
This apparatus should not be used as an extension to a payphone.
This apparatus should not be connected to a shared service (party line)
Any other usage will invalidate the approval of the apparatus if as a result it ceases to
conform to the standards against which the approval was granted.
In the event of a mains power failure it will not be possible to dial 999 or 112
emergency services numbers.
The power supply output and the handset charger contacts are SELV circuits as
defined in EN 41003.
The equipment has been approved in accordance with Council Decision 98/482/EC
for pan-European single terminal connection to the Public Switched Telephone
Network (PSTN). However, due to differences between the individual PSTN’s
provided in the different countries, the approval does not, of itself, give an
unconditional assurance of successful operation on every PSTN network termination
point.
In the event of problems, you should contact your equipment supplier in the first
instance.
Compatible countries: UK, Sweden, Switzerland, Norway, Denmark, Finland.
The REN number of the DORO X100 is 1.The REN number (Ringer Equivalence
Number) determines how many telephones can be connected to your telephone line.
Most normal exchange lines have a REN capacity of 4. If you exceed the REN value
one telephone may not ring. If the equipment is BT supplied then, unless otherwise
stated, the REN should be assumed to be 1.
Page 35

34
DORO X100 OTHER
TECHNICAL DATA
Standby : About 60 hours
Talk time : About 8 hours
Range : >300 meter in good conditions.
Number of positions in
the phone book : 70 numbers
Positions in the
Caller display memory : 24
Battery : 2 x 1.2V NiMH type. Rechargeable.
Weight : Handset: about 160 g (including battery)
Base unit: about 210 g
Size (BxHxD) : Handset: 45 x 163 x 30 mm
Base unit: 167 x 107 x 50 mm
Specifications may be changed without notice.
 Loading...