

Page 1

The English version of this document is the only legally binding version.
Translated versions are not legally binding and are for convenience only.
LE100
User Manual
Version 1.1
LE1.OM.002066.DRM Page 1 of 52 Version 1.1
Doremi Labs
Page 2

Table of Contents
1 Introduction ......................................................................................................................... 8
1.1 Purpose ....................................................................................................................... 8
1.2 Software Version ......................................................................................................... 8
1.3 Materials Required ....................................................................................................... 8
1.4 Contact Information ...................................................................................................... 8
2 Overview ............................................................................................................................. 9
2.1 Device Overview .......................................................................................................... 9
2.2 Media Formats Supported ...........................................................................................10
3 Configuration .....................................................................................................................11
3.1 Items to Configure.......................................................................................................11
3.2 Hardware Configuration ..............................................................................................11
4 Logging into LE100 ............................................................................................................12
4.1 Logging into the LE100 via Web GUI ..........................................................................12
4.2 Logging into the LE100 via SSH .................................................................................14
4.3 Logging into the LE100 via Serial Port ........................................................................15
5 Network Configuration........................................................................................................16
5.1 Network Configuration via Web GUI ...........................................................................16
5.1.1 Adding or Removing NTP Servers .......................................................................16
5.2 Network Configuration via CLI ....................................................................................18
5.2.1 IP Configuration ...................................................................................................18
5.2.2 Servers (Optional) ................................................................................................18
5.2.3 DNS (Required for NTP) ......................................................................................18
5.3 Network Configuration via USB ...................................................................................19
6 Setting the Time and Date .................................................................................................21
6.1 Setting the Time and Date via Web GUI .....................................................................21
7 Input Feed Manager ...........................................................................................................22
7.1 Network Input Configuration ........................................................................................22
7.2 Satellite Input Configuration (LE100-SR) ....................................................................23
7.3 Output Configuration ...................................................................................................24
8 Audio Configuration ...........................................................................................................25
8.1 Headphone Volume ....................................................................................................25
8.2 Audio Delay ................................................................................................................25
LE1.OM.002066.DRM Page 2 of 52 Version 1.1
Doremi Labs
Page 3

9 Video Configuration ...........................................................................................................27
10 Autostart Playback .........................................................................................................28
11 Account Manager ...........................................................................................................29
11.1 Adding a New User Account .......................................................................................29
11.2 Edit an Existing User ...................................................................................................30
11.3 Delete an Existing User ..............................................................................................30
12 Control ...........................................................................................................................31
12.1 CineLister Playback ....................................................................................................31
12.1.1 Playing a Live Stream ..........................................................................................32
12.1.2 Recording a Live Stream .....................................................................................34
12.2 CineLister Editor .........................................................................................................35
12.2.1 Playing a Single Clip from the Disk ......................................................................35
12.2.2 Creating a Playlist ................................................................................................36
12.2.3 Scheduling Playback ............................................................................................38
12.3 Ingest Manager ...........................................................................................................38
12.4 Content Manager ........................................................................................................39
12.4.1 Viewing Asset Properties .....................................................................................39
12.4.2 Deleting an Asset .................................................................................................40
12.5 Network Streamer .......................................................................................................41
12.5.1 Verifying Streaming Output ..................................................................................42
13 Logging Out of the LE100 ...............................................................................................43
14 Shutting Down or Restarting the LE100 ..........................................................................44
15 Updating the LE100 Software and Firmware ..................................................................45
15.1 Software Update via Web GUI ....................................................................................45
15.2 Software Update via FTP Client ..................................................................................46
15.3 Verifying the Software Update.....................................................................................46
16 Troubleshooting ..............................................................................................................47
16.1 Generating a Report via GUI .......................................................................................47
16.2 Generating a Report via CLI .......................................................................................48
16.3 Generating a Report via USB ......................................................................................48
17 Hardware Specifications .................................................................................................49
17.1 Main Chassis ..............................................................................................................49
17.2 HD/SD Decoding ........................................................................................................49
LE1.OM.002066.DRM Page 3 of 52 Version 1.1
Doremi Labs
Page 4

17.3 3D Support .................................................................................................................49
17.4 Output Video Formats .................................................................................................49
17.5 Input File Format Support (via USB or Ethernet) ......................................................... 49
17.6 Video Outputs .............................................................................................................50
17.7 Audio ..........................................................................................................................50
17.8 Control ........................................................................................................................50
17.9 Physical Characteristics ..............................................................................................50
17.10 Power ......................................................................................................................50
18 Acronyms .......................................................................................................................51
19 Document Revision History ............................................................................................52
LE1.OM.002066.DRM Page 4 of 52 Version 1.1
Doremi Labs
Page 5

Software License Agreement
The software license agreement can be found at the following location:
http://www.doremilabs.com/support/cinema-support/cinema-warranties/
The hardware warranty can be found at the following location:
http://www.doremilabs.com/support/cinema-support/cinema-warranties/
Hardware Warranty
LE1.OM.002066.DRM Page 5 of 52 Version 1.1
Doremi Labs
Page 6

WARNING
THIS DEVICE MUST BE GROUNDED
IMPORTANT
Power requirements for electrical equipment vary from area to area. Please ensure that the
LE100 meets the power requirements in the surrounding area. If in doubt, consult a qualified
electrician or a Doremi Labs dealer.
Power Ratings
Power Supply: 80 PLUS-certified
Voltage: AC 100-240 V
Current: 1.5 to 3.5 A
Frequency: 60 to 50 Hz
Total DC Output: 250 W
Idle Consumption: 28W
Peak Consumption: 41W
WARNING: Multiple sources of supply. Disconnect all sources before servicing.
Rack Mount and Thermal Information
Maximum operating ambient temperature is 35°C or 95°F.
Never restrict the air flow through the devices’ fan or vents.
When installing equipment into a rack, distribute the units evenly. Otherwise, hazardous
conditions may be created by an uneven weight distribution.
Connect the unit only to a properly rated supply circuit. Reliable earthing (grounding) of
rack-mounted equipment should be maintained.
LE1.OM.002066.DRM Page 6 of 52 Version 1.1
Doremi Labs
Page 7

PROTECTING YOURSELF AND THE LE100
Never touch the AC plug with wet hands. Always disconnect the LE100 from the power supply
by pulling on the plug, not the cord. Allow only a Doremi Labs dealer or qualified professional
engineer to repair or re-assemble the LE100. Apart from voiding the warranty, unauthorized
engineers might touch live internal parts and receive a serious electric shock. Do not put, or
allow anyone to put any object, especially metal objects, into the LE100. Only use an AC power
supply. Never use a DC power supply.
If water or any other liquid is spilled into or onto the LE100, disconnect the power and call a
Doremi Labs dealer. The unit must be well ventilated and away from direct sunlight. To avoid
damage to internal circuitry, as well as the external finish, keep the LE100 away from direct
sources of heat (heater vents, stoves, radiators). Avoid using flammable aerosols near the
LE100. They can damage the surface area and may ignite. Do not use denatured alcohol, paint
thinner or similar chemicals to clean the LE100. This can damage the unit.
Modification of this equipment is dangerous and can result in the functions of the LE100 being
impaired. Never attempt to modify the equipment in any way. In order to ensure optimum
performance of the LE100, select the setup location carefully and make sure the equipment is
used properly. Avoid setting up the LE100 in the following locations:
In a humid or dusty environment
In a room with poor ventilation
On a surface which is not level
Inside a moving vehicle where it will be subject to vibration
In an extremely hot or cold environment
Caution
Battery is located on the motherboard
Danger of explosion if battery is incorrectly replaced
Replace only with the same or equivalent type recommended by the manufacturer
Dispose of used batteries according to the manufacturer’s instructions
For LE100-SR, due to the presence of Satellite card, equipment is intended to be installed
by a service person and has installation instructions that require the equipment to be
connected to a socket-outlet with a protective earthing connection.
LE1.OM.002066.DRM Page 7 of 52 Version 1.1
Doremi Labs
Page 8

1 Introduction
1.1 Purpose
This manual explains how to set up and use the Doremi Labs LE100 device.
1.2 Software Version
The current versions that this manual pertains to are software version 1.4.2, firmware 1.2.1 and
above.
1.3 Materials Required
Computer
Ethernet Cable
USB Flash Drive (optional)
Serial cable (optional)
Power Cable (included)
FTP Client
Mozilla Firefox or Google Chrome Browser
1.4 Contact Information
If in need of help or assistance, please contact Doremi Labs Technical Services:
USA
24/7 Technical Services line: + 1-866-484-4004
Technical Services Email: cinemasupport@doremilabs.com
Europe
24/7 Technical Services line: + 33 (0) 492-952-847
Technical Services Link: http://support.doremitechno.org/ticketing
Japan
Technical Services line: + 044-966-4855
Technical Services Email: support@doremilabs.co.jp
Australia ~ China ~ India ~ Indonesia ~ Korea ~ Malaysia ~ New Zealand ~ Philippines ~
Singapore ~ Taiwan ~ Thailand
Technical Services Email: supportasia@doremilabs.com
LE1.OM.002066.DRM Page 8 of 52 Version 1.1
Doremi Labs
Page 9
2 Overview
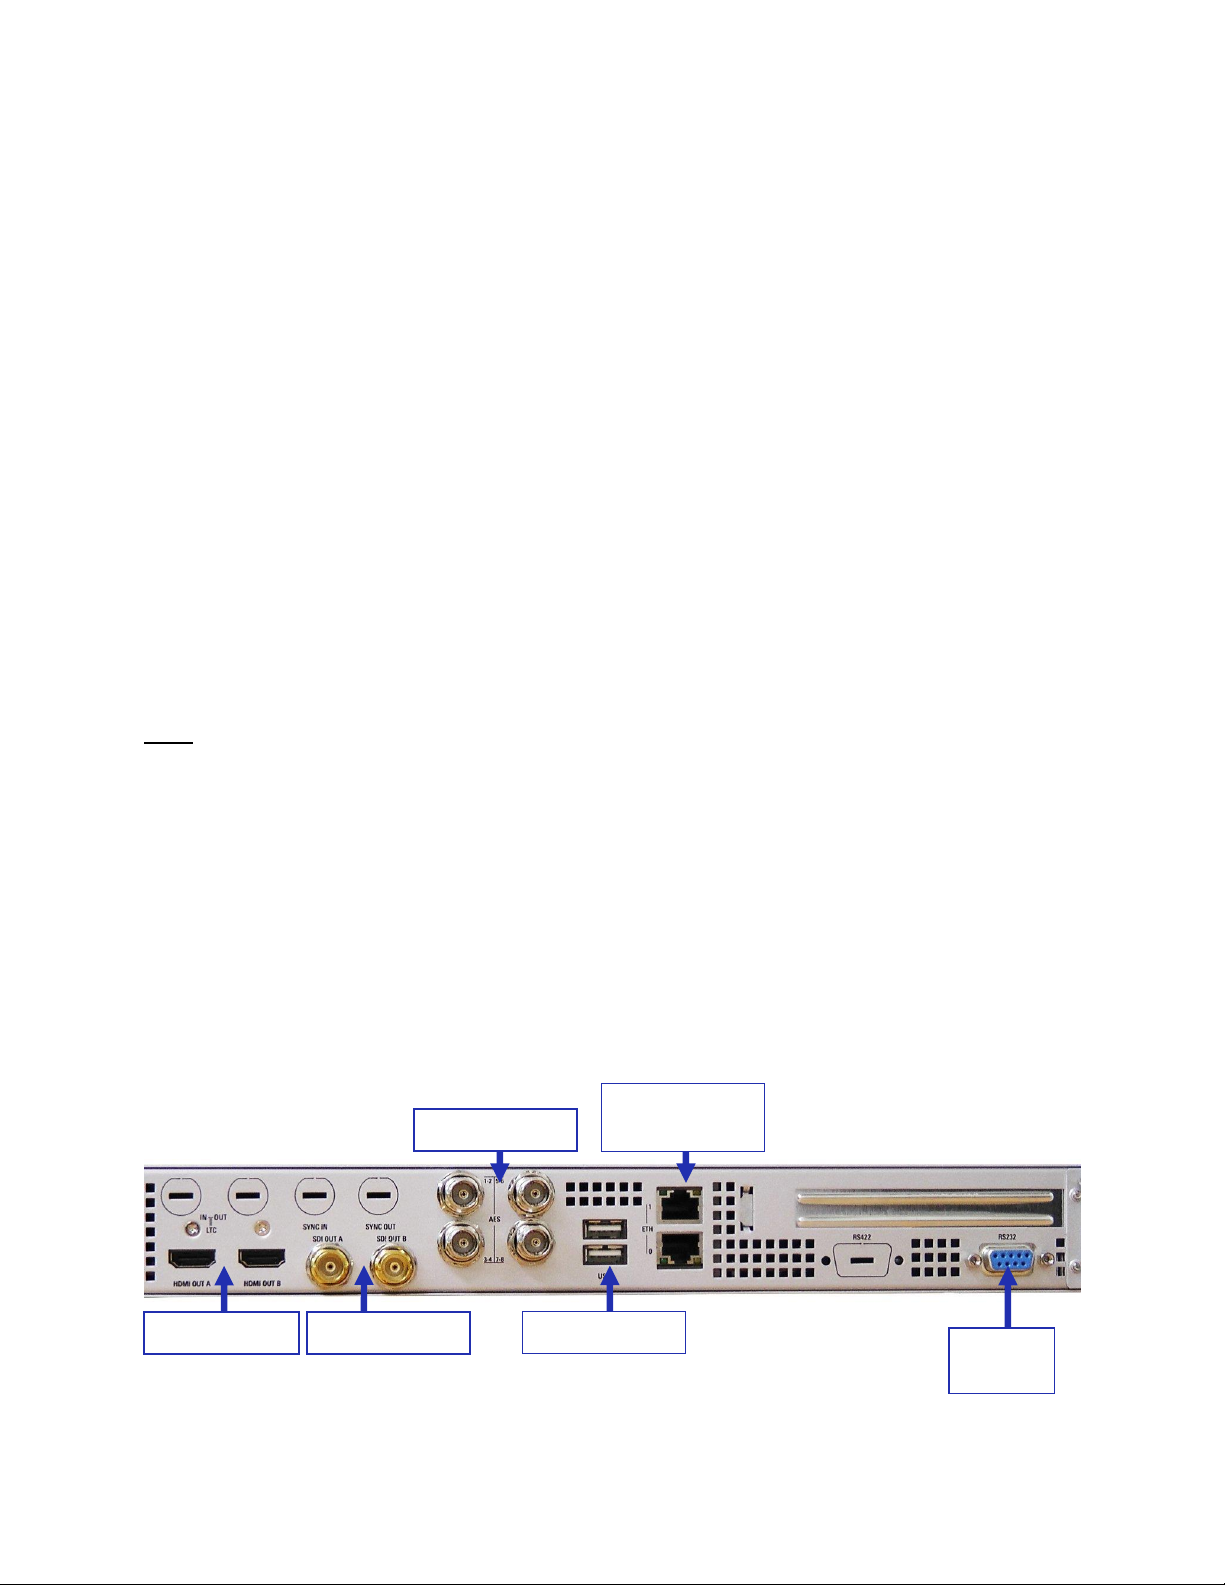
Debug
Port
2 x HDMI Out
2 x 3GSDI Out
2 x USB Ports
4 x AES Out
Ethernet Ports
0 and 1
The LE100 is a device designed to receive, record, decode and distribute live MPEG2 or H.264
media streams. There are two models available, LE100 and LE100-SR. LE100 accepts
streaming media in an MPEG2 Transport stream via Ethernet. In addition to Ethernet streams,
LE100-SR contains an optional satellite input and can receive DVB-S/DVB-S2 signals via
satellite feed.
Both LE100 models can save the incoming streams and wrap them in Digital Cinema Package
(DCP) format. It can record and play DCP's simultaneously allowing the user to play the files at
a later time or move the DCP's to another screen for an encore performance.
Alternatively, MPEG2 and H.264 DCP’s created with Doremi Content Manager software can be
ingested via USB. All content on the LE100 is stored on the internal hard drive and video
decoding is performed by the hardware. The LE100 can output directly to a display device
through HDMI or 3GSDI. LE100's can also re-distribute or forward the incoming stream to other
devices via Ethernet.
Configuring the LE100 network consists of three methods, which includes the Web GUI,
Command Line Interface (CLI), and USB flash drive (mainly used to “rescue” the device in case
of a system failure).
Note: For the purpose of this manual, everything applicable to the LE100 model is also
applicable to the LE100-SR model, unless indicated otherwise.
2.1 Device Overview
The LE100 has several ports on the back panel that perform specific functions:
2x HDMI Out
2x 3G-SDI Out
4x AES Digital Audio Out
2x USB Ports
2x Ethernet Ports
Serial Port
Figure 1: LE100 Back Panel I/Os
LE1.OM.002066.DRM Page 9 of 52 Version 1.1
Doremi Labs
Page 10
Video Format
Resolution
Frame
Rate(s)
Audio
Maximum
Bitrate
Record
and Play
H.264, MPEG-2,
VC-1
1920 x 1080p
23.98, 24, 25,
29.97, 30, 50,
59.94, 60
PCM,
AC3
(pass-thru)
50 Mbps
Yes
1920 x 1080i
50, 59.94, 60
1280 x 720p
50, 59.94, 60
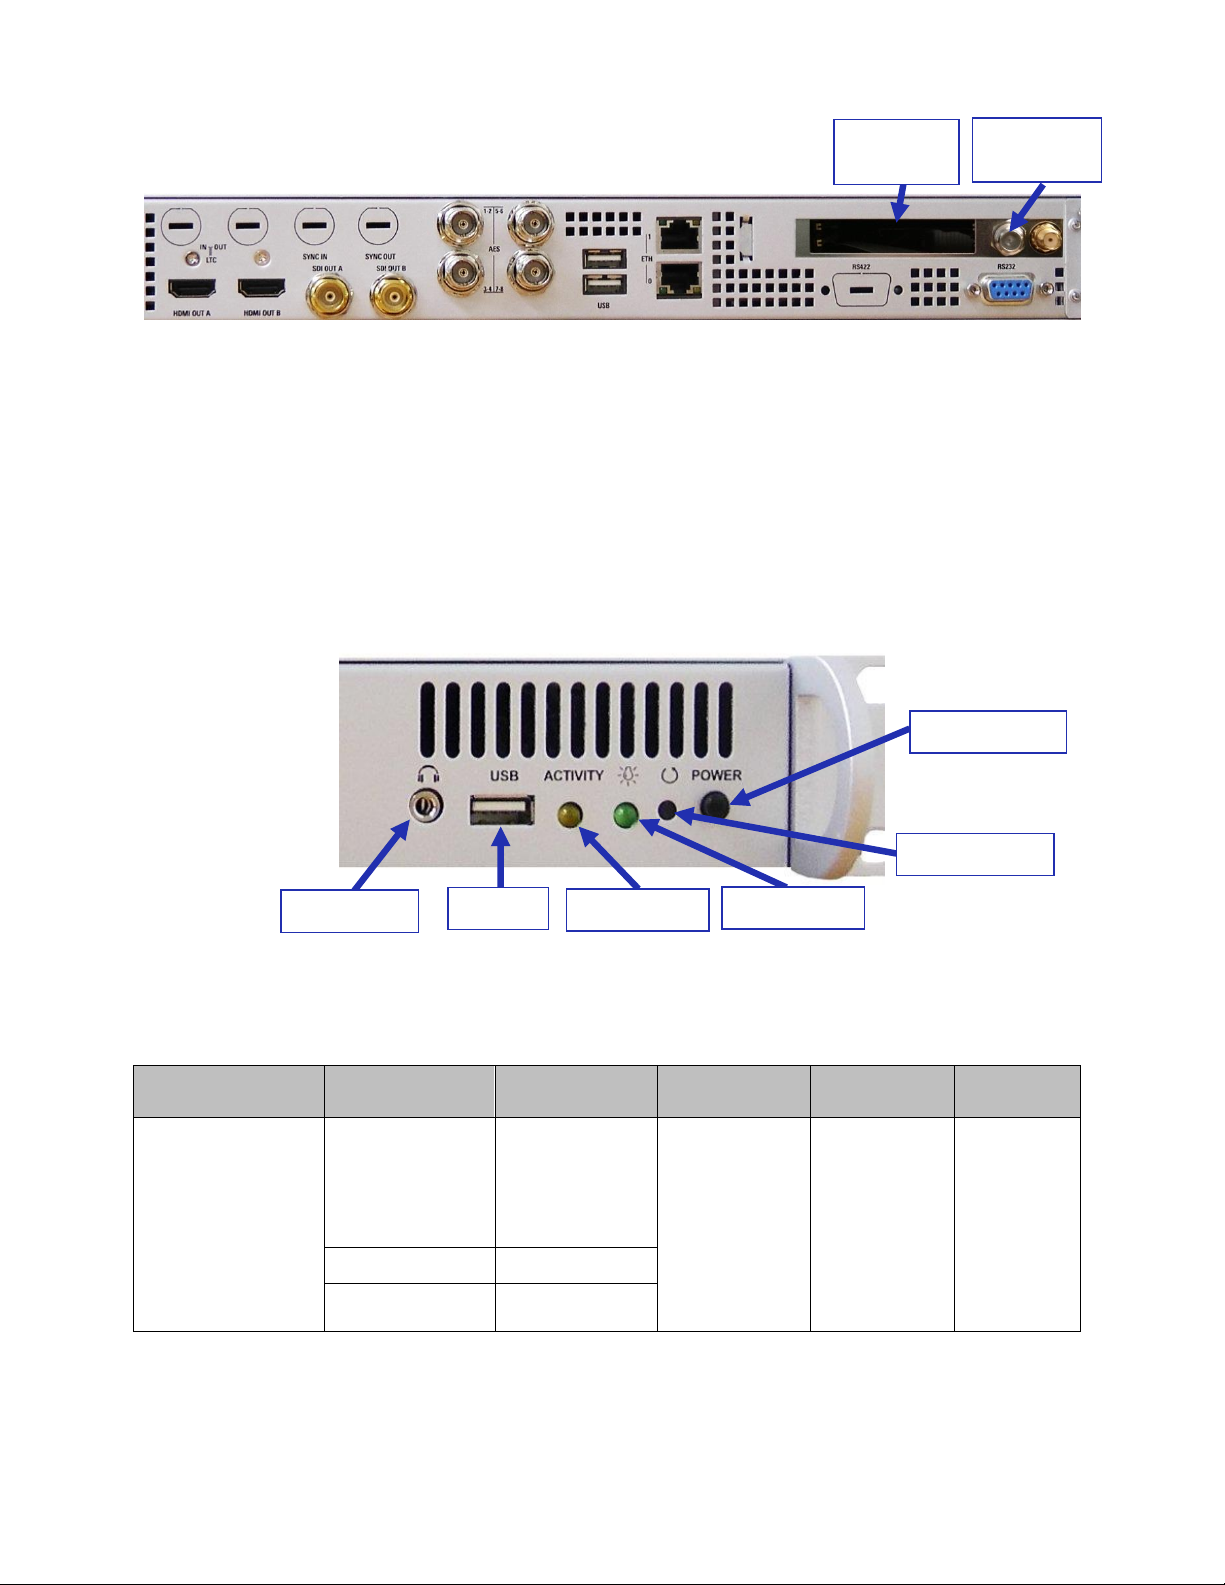
Audio Jack
USB
Activity LED
Power LED
Reset Button
Power Button
CAM Card
Slots
2x Satellite
Input
Figure 2: LE100-SR Back Panel I/Os
The LE100 has several front panel controls that include:
3.5mm Analog Audio Jack
USB Port
Activity LED
Power LED
Reset Button
Power Button
2.2 Media Formats Supported
The media formats below are supported by the LE100.
LE1.OM.002066.DRM Page 10 of 52 Version 1.1
Figure 3: LE100 Front Panel I/Os and LEDs
Doremi Labs
Page 11

3 Configuration
3.1 Items to Configure
All the items mentioned below must be configured for the LE100 to work properly:
Network configuration:
o IP address
o Netmask
o Gateway
o Unicast or Multicast UDP/IP
3.2 Hardware Configuration
Before beginning the network configuration, the user must set up the LE100's hardware and
cable connections.
Once the LE100 is taken out of the package, set it on a firm surface and connect the
single power supply cable from the unit to a reliable power source.
Connect an Ethernet cable from the LE100 to the desired network.
Depending on the specific setup and intended usage, one or more of the following connections
can be made:
Connect a Serial port cable from the LE100 to the computer.
Connect the HDMI cable from the LE100 to the display device.
Connect the HDSDI cable from the LE100 to the display device.
Connect the digital audio cable from the LE100 to the desired audio device.
LE1.OM.002066.DRM Page 11 of 52 Version 1.1
Doremi Labs
Page 12
4 Logging into LE100
Once the hardware is set up and the PC's IP configuration is complete, the user can use one of
several methods to log into the unit. Such as:
4.1 Logging into the LE100 via Web GUI
First, open a web browser and type the IP address of the LE100.
o The default IP address for Ethernet port 1 of the LE100 is 192.168.9.10.
o Set your computer's IP address in the range '192.168.9.xx' (with xx being in the
range 2-254 except 10 when using default IP).
Note: If the IP address was changed, use the IP address that was assigned to the LE100
instead of the default IP.
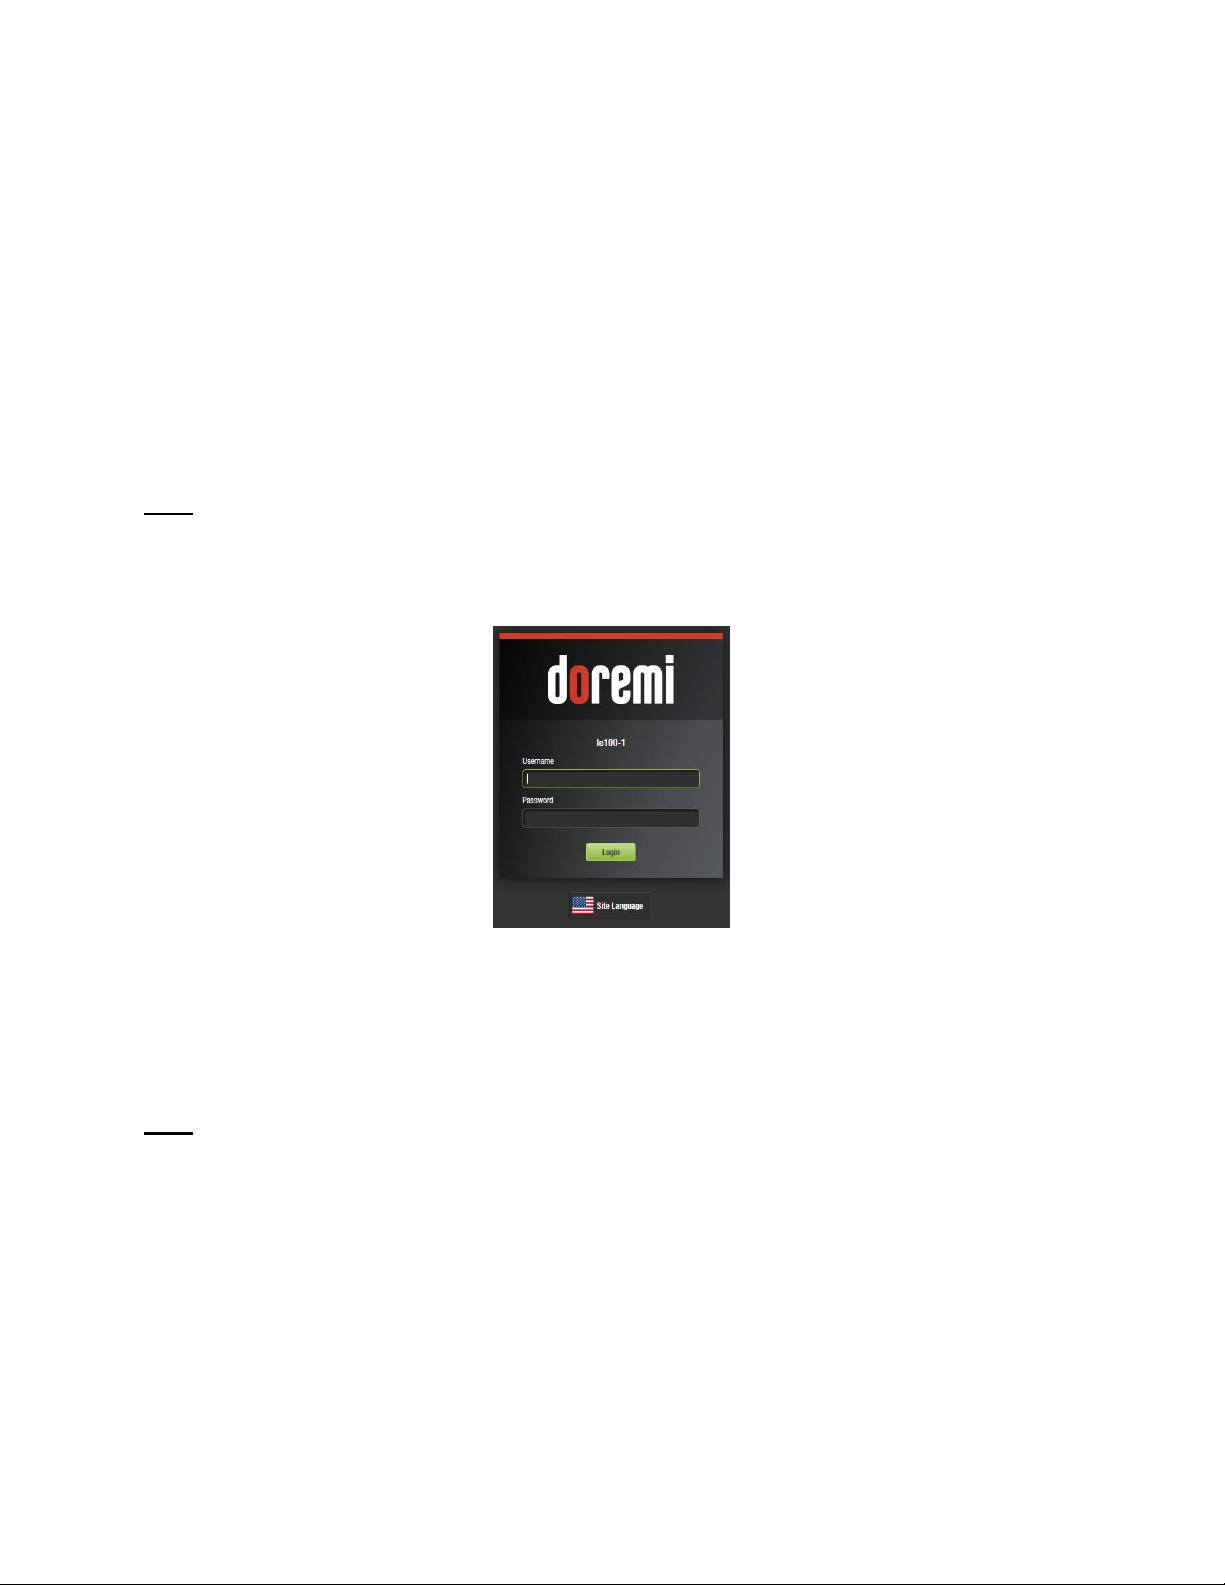
The following screen will appear:
Figure 4: Login Window
Type the username and password in the fields provided (Figure 4).
o Log in as "admin".
o Default password for "admin": "1234"
Note: The "admin" password can be changed in the web interface or by using the following
command and following the on-screen instructions: # passwd
If the user wants to change the default language before logging in, click on the “Site
Language” button below the Login button.
The following screen will appear:
LE1.OM.002066.DRM Page 12 of 52 Version 1.1
Doremi Labs
Page 13
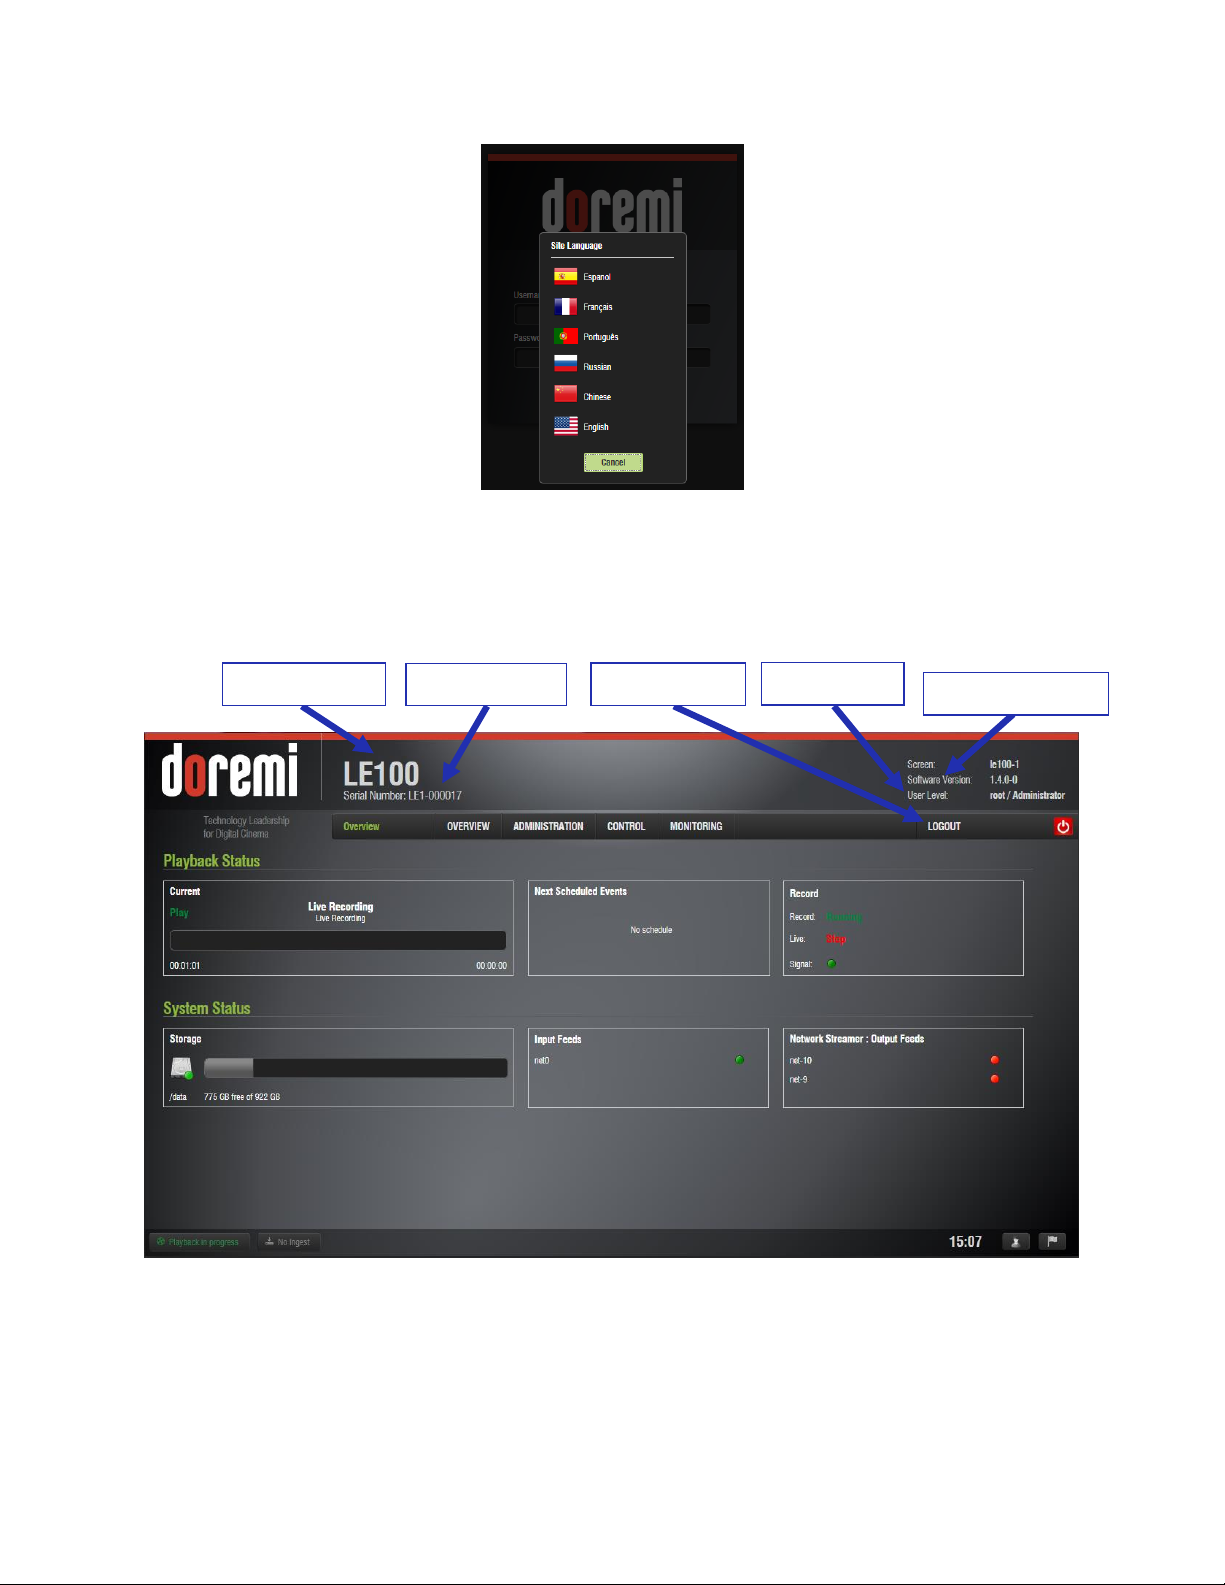
Product Name
Serial Number
Logout Button
User Level
Software Version
Figure 5: Login Window – Language Configuration
Select the desired language.
Click the Login button when finished. The user will be transferred to the Overview tab
(see Figure 6).
The Overview tab will provide information (e.g., Product Name, Serial Number, User Level, and
Software Version) as well as the current state of the LE100 (see Figure 6).
LE1.OM.002066.DRM Page 13 of 52 Version 1.1
Figure 6: Overview Tab
Doremi Labs
Page 14

4.2 Logging into the LE100 via SSH
Connect the LE100 with an Ethernet cable to the client computer and power ON.
Install the program "PuTTY" (or any similar SSH client) on the client computer.
Using the SSH client, log into the unit with the LE100’s IP address on port 22.
o The default IP address for Ethernet port 1 of the LE100 is 192.168.9.10.
o Set your computer's IP address in the range '192.168.9.xx', (with xx being in the
range 2-254 except 10 when using default IP).
Note: If the IP address was changed, use the IP address that was assigned to the LE100
instead of the default IP.
Log in as "admin".
o Default password for "admin": "1234"
Note: The "admin" password can be changed in the web interface or by using the following
command and following the on-screen instructions: # passwd
LE1.OM.002066.DRM Page 14 of 52 Version 1.1
Doremi Labs
Page 15

4.3 Logging into the LE100 via Serial Port
Connect the LE100 to a client computer via serial cable.
Using HyperTerminal, PuTTY or similar client, log into the LE100 on the connected COM
port.
o Serial connection settings are:
Speed 115200
Data bits: 8
Stop bits: 1
Parity: None
Flow control: None
Note: The serial cable required for a proper connection is a straight through, 1 to 1, serial cable
(not a null modem cable).
Once connected, log in as "admin".
o Default password for "admin" is “1234”
Note: The "admin" password can be changed in the web interface or by using the following
command and following the on-screen instructions: # passwd
LE1.OM.002066.DRM Page 15 of 52 Version 1.1
Doremi Labs
Page 16
5 Network Configuration
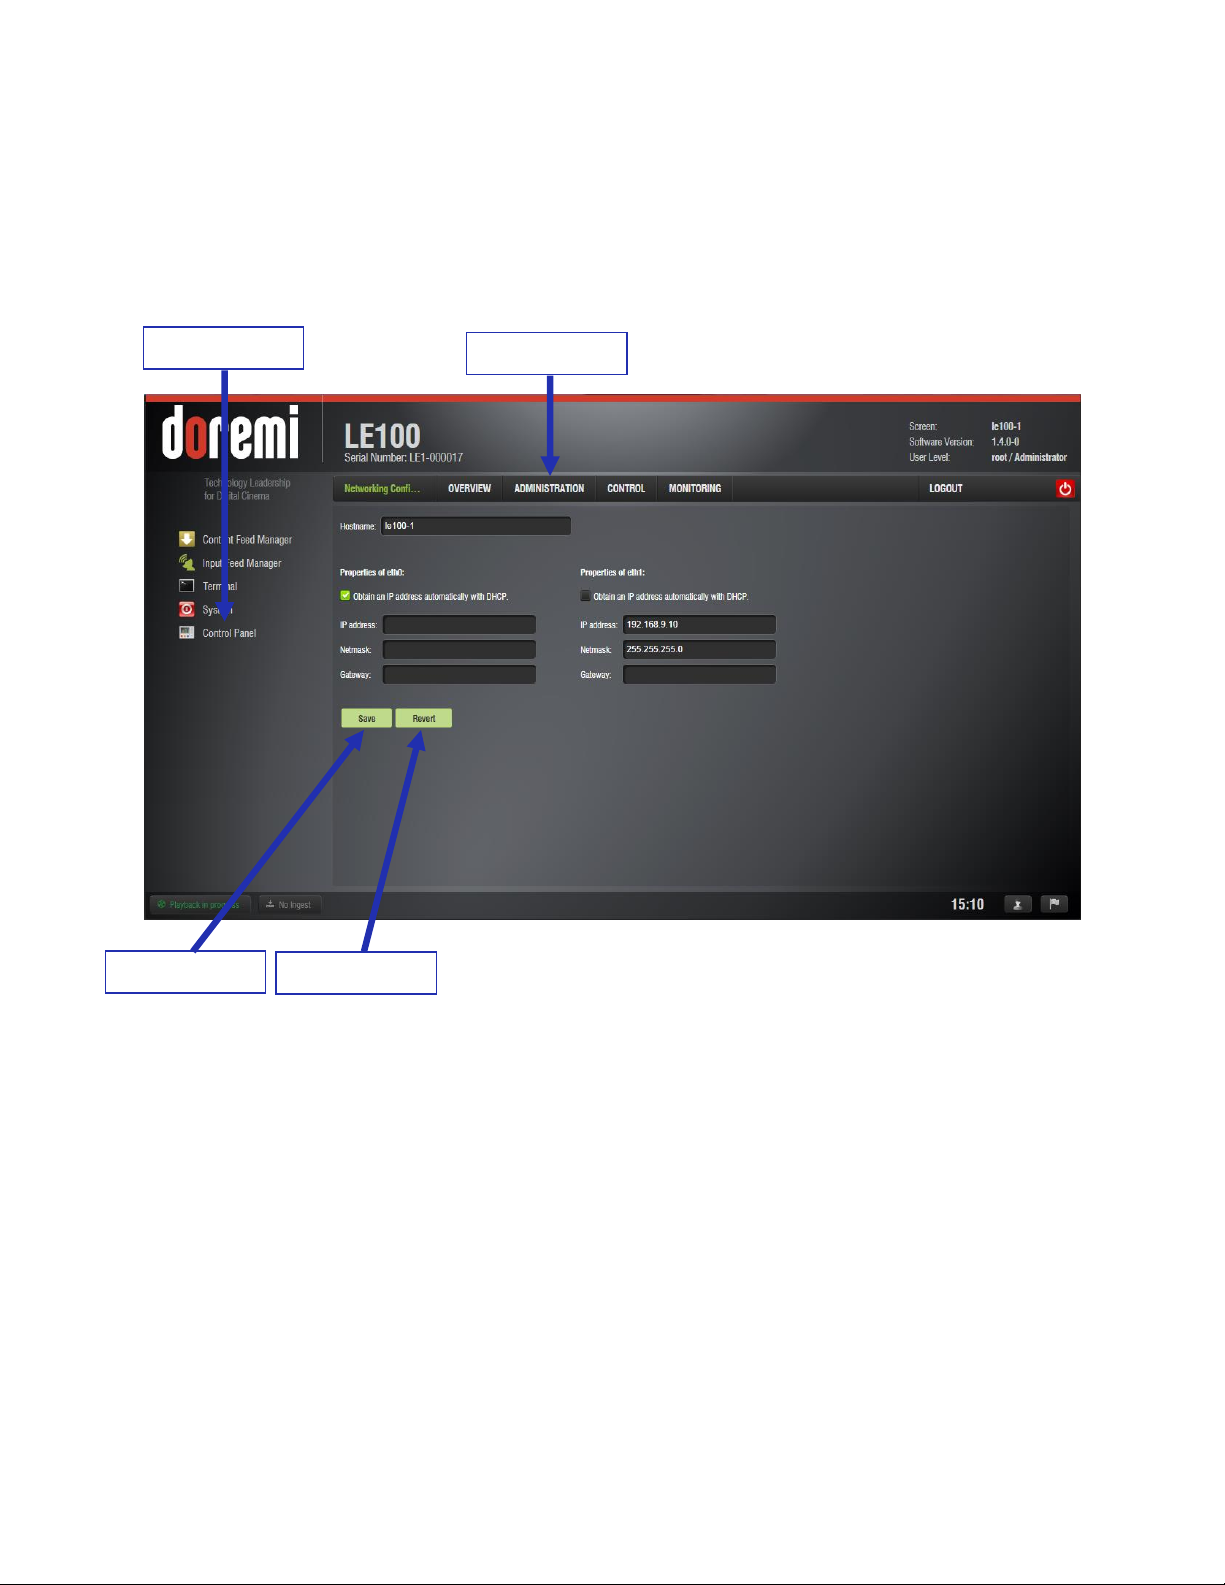
Control Panel
Reset Button
Administration
Save Button
5.1 Network Configuration via Web GUI
For more information on logging into the Web GUI, see Section 4.
Figure 7: Network Configuration
Go to the Administration tab, click on the Control Panel link followed by the Networking
Configuration link.
Fill in the appropriate information for either Ethernet Port 0 or Ethernet Port 1 and click
on the Save button. The changes will take effect once the unit is rebooted (see Figure
7).
5.1.1 Adding or Removing NTP Servers
To add or remove NTP Servers, click on the Administration tab, select Control Panel and
then, under Time Settings, select NTP Servers (see Figure 8).
LE1.OM.002066.DRM Page 16 of 52 Version 1.1
Doremi Labs
Page 17

Figure 8: NTP Servers
Click the Add button.
Name the NTP server according to the desired format.
Click the Save button to complete the configuration.
If the user decides to cancel the NTP addition, then click on the X next to the naming
field (see Figure 8).
Note: You must click on the Save button and reboot the unit for all changes to take effect.
DNS can only be added using the USB or Command Line Interface (CLI) method.
LE1.OM.002066.DRM Page 17 of 52 Version 1.1
Doremi Labs
Page 18

5.2 Network Configuration via CLI
Note: This method is valid for all LE100 software versions. For more information on logging into
the Command Line Interface (CLI), see Section 4.
5.2.1 IP Configuration
To change the IP address of either eth0 or eth1, first make a backup of the file 'interfaces',
located in the directory '/etc/network/'. Then run the following command and make necessary
changes:
# rwdo nano /etc/network/interfaces
Note: If you are unsure on how to use the command line editor, contact Doremi Cinema
Technical Support for assistance.
5.2.2 Servers (Optional)
To add a new NTP server, type the following command:
rwdo nano /doremi/etc/ntpservers <enter>
Then add the url or ip of the NTP Server after "NTPSERVERS=", separating servers with
a space.
exp. NTPSERVERS="pool.ntp.org 100.57.37.135"
5.2.3 DNS (Required for NTP)
To add a new line to your DNS, type the following command:
# echo “nameserver 172.17.16.1” >> /etc/resolv.conf <Enter>
LE1.OM.002066.DRM Page 18 of 52 Version 1.1
Doremi Labs
Page 19

5.3 Network Configuration via USB
This method should be used to “rescue” the device in case the IP address is lost or forgotten.
To update the network configuration with a USB flash drive:
Create a directory "doremi" at the root of the USB key
Create a directory "update" inside the /doremi/ directory
Create a directory "network" inside the /doremi/update/ directory
Create a text file inside the “network” directory and name it “ifconfig.0”. This will be used
to configure Ethernet port 0.
For static IP, enter the following information in the “ifconfig.0” file (replacing the items in
bold with your desired settings):
o interface: eth0
o ip: 192.168.9.10
o mask: 255.255.255.0
o gateway: 192.168.9.1
For DHCP use the following format:
o interface: eth0
o ip: dhcp
Create a second file inside the “network” directory and name it “ifconfig.1”. This will be
used to configure Ethernet port 1.
For static IP, enter the following information in the “ifconfig.1” file (replacing the items in
bold with your desired settings):
o interface: eth1
o ip: 192.168.9.10
o mask: 255.255.255.0
o gateway: 192.168.9.1
For DHCP use the following format:
o interface: eth1
o ip: dhcp
(optional) Create a file and name it “ntp” with the following format. Replace items in bold
with your desired settings.
o NTPSERVERS="server1.ntp.org server2.ntp.org"
(optional) Create a file and name it “dns” (required for NTP) with the following format.
Replace items in bold with your desired settings.
o Nameserver 172.17.16.1
o nameserver 8.8.8.8
o search rnd.doremilabs.fr
o domain rnd.doremilabs.fr
WARNING: When creating these configuration files, make sure that the files do not have any
extensions (e.g., .txt, .doc), which are the default for some operating systems.
LE1.OM.002066.DRM Page 19 of 52 Version 1.1
Doremi Labs
Page 20

Place all files that were created into the /doremi/update/network/ folder on the USB flash
drive.
On the LE100, plug your USB flash drive and wait for two minutes. Unplug the flash
drive and reboot.
Note: The files on USB flash drive are never modified by the LE100.
LE1.OM.002066.DRM Page 20 of 52 Version 1.1
Doremi Labs
Page 21

6 Setting the Time and Date
6.1 Setting the Time and Date via Web GUI
Log into the LE100 Web GUI and go to the Administration tab.
Click on the Control Panel link followed by Time Settings.
Adjust the time and time zone to the desired configuration.
Click on the Update button for changes to take effect. (Click both Update buttons if
configuring the time and time zone.) See Figure 9.
Note: There is no need to reboot the unit when changing the time. However, a reboot is
required when changing the time zone.
Figure 9: Administration – Time Settings
LE1.OM.002066.DRM Page 21 of 52 Version 1.1
Doremi Labs
Page 22
7 Input Feed Manager
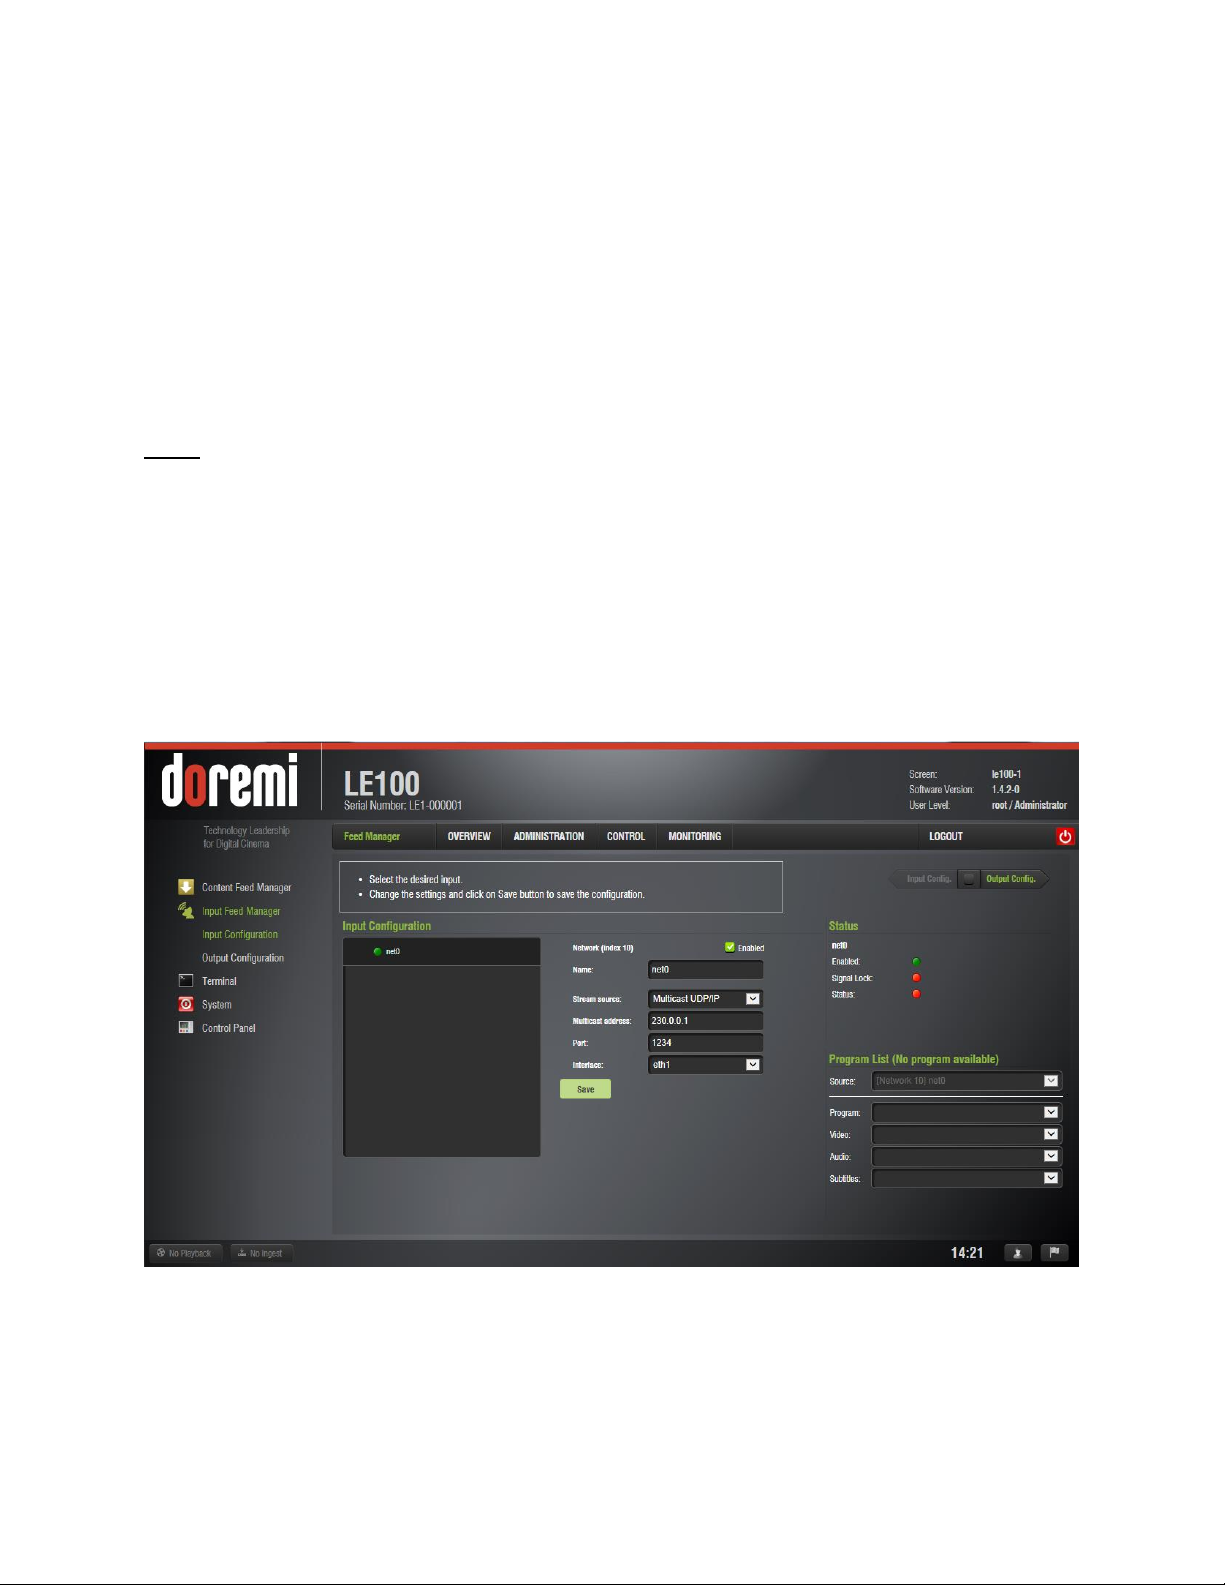
7.1 Network Input Configuration
To set up the LE100 for live streaming from a network input, you must configure the input
settings.
Go to the Administration tab, click on the Control Panel link followed by the Input Feed
Manager link.
Under Input Configuration, select “net0” to configure the network input.
Note: “net0” is the default name for the network input. This can be renamed as desired.
Select the stream source (Multicast or Unicast) and the network interface to use.
o For Unicast, enter the port to listen on.
o For Multicast, enter the address and port.
Then click on the Save button (see Figure 10).
The new settings will be effective after a reboot.
If there is a stream currently available, the status section will show green for Enabled,
Signal Lock and Status. The program list will also be displayed on the right hand side of
the interface.
Figure 10: Input Configuration – Network
LE1.OM.002066.DRM Page 22 of 52 Version 1.1
Doremi Labs
Page 23

7.2 Satellite Input Configuration (LE100-SR)
For LE100-SR, due to the presence of Satellite card, equipment is intended to be installed
by a service person and has installation instructions that require the equipment to be
connected to a socket-outlet with a protective earthing connection.
If you are using the LE100-SR with a satellite tuner installed, you must also configure the
satellite inputs for live streaming.
Note: These settings are not displayed if the correct satellite board is not properly installed.
Go to the Administration tab, click on the Control Panel link followed by the Input Feed
Manager link.
Under Input Configuration, select “sat0,0” or “sat0,1” (depending on which satellite input
you wish to configure).
Note: “sat0,0” and “sat0,1” are the default names for the satellite input ports. These can be
renamed as desired.
Select the Modulation, FEC, Disceq, Tone, Inversion and Polarity to use. Type in the
proper Frequency and Symbol Rate values. Then click on the Save button (see Figure
11).
The new settings will be effective without rebooting.
When the settings are entered correctly and there is a signal currently available, the
status section will show green for Enabled, Signal Lock and Status. The program list will
also be displayed on the right hand side of the interface.
Figure 11: Input Configuration – Satellite
LE1.OM.002066.DRM Page 23 of 52 Version 1.1
Doremi Labs
Page 24
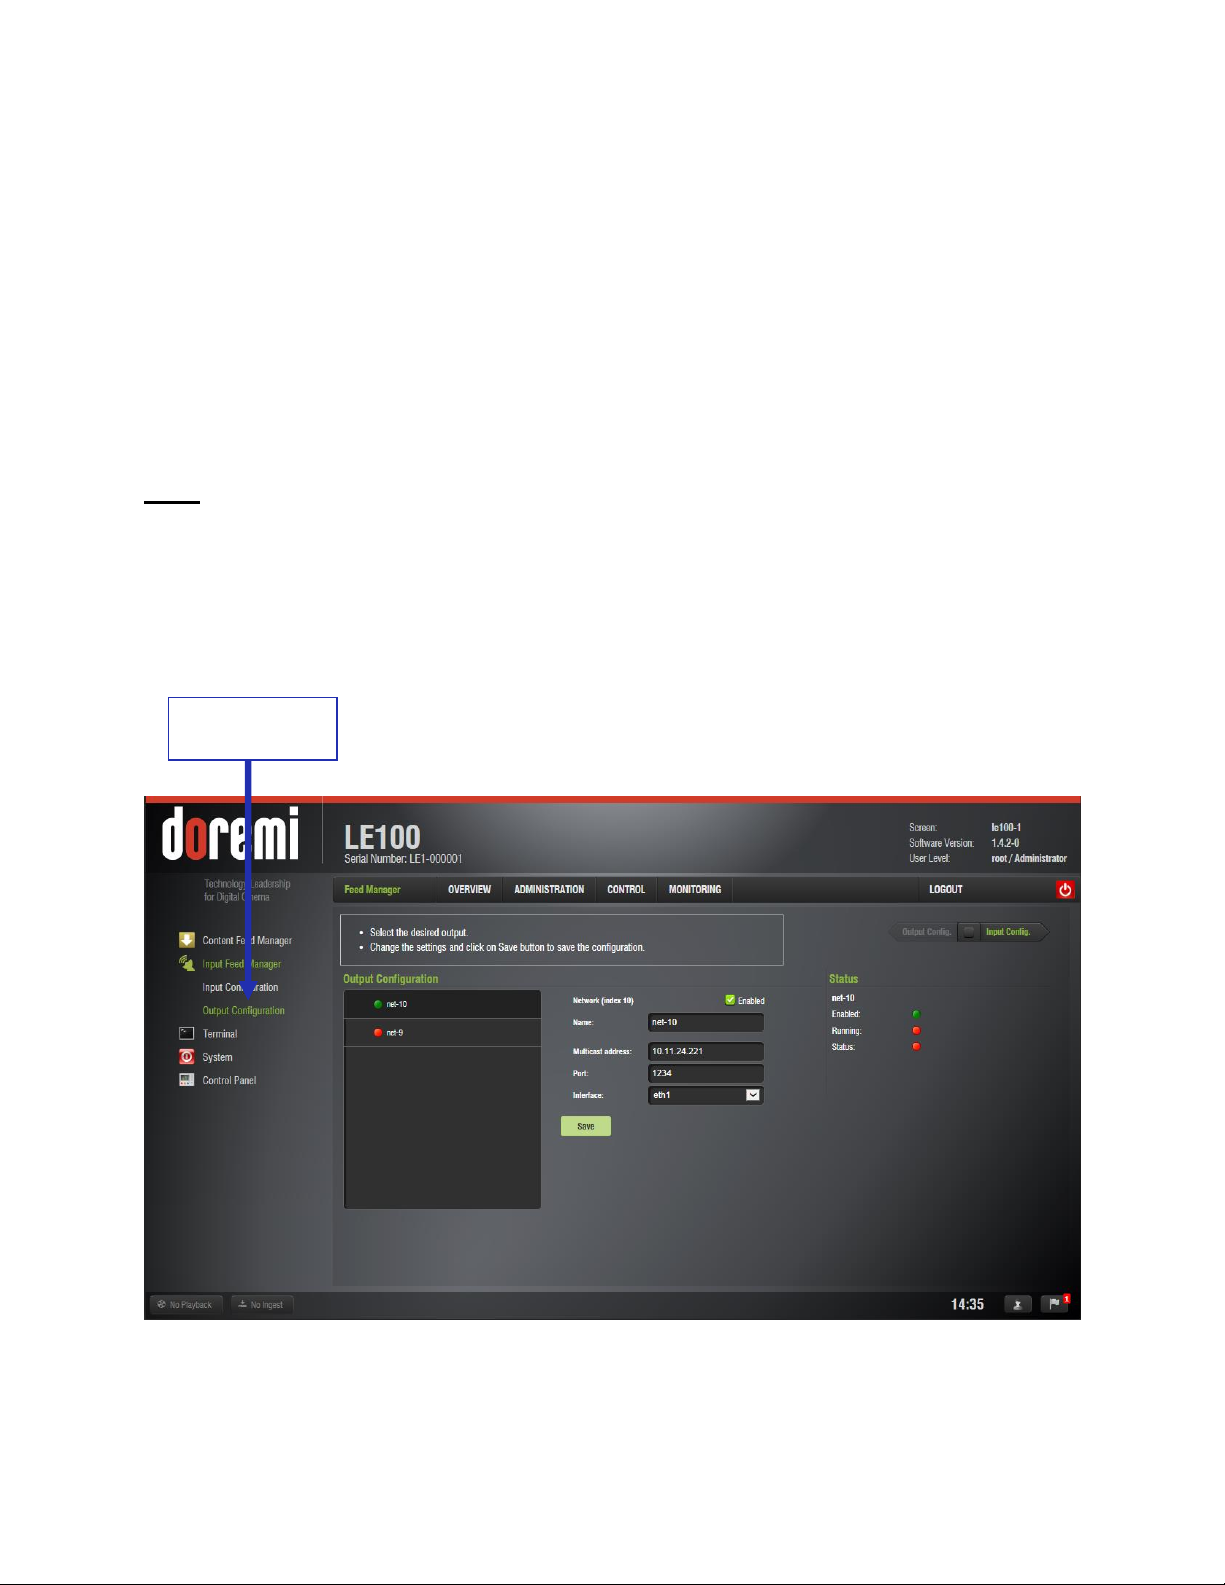
Output
Configuration
7.3 Output Configuration
In order to output a transport stream from the LE100, the network output settings (multicast
address, port, and interface) must be configured.
Go to the Administration tab, click on the Control Panel link followed by the Input Feed
Manager link.
Under Output Configuration, select “net-10” or “net-9” (depending on which output you
wish to configure) (see Figure 12).
Note: “net-10” and “net-9” are the default names for the network ports. These can be renamed
as desired.
Enable/Disable the network output by selecting Yes or No.
Enter the multicast address and port and then select the correct Ethernet port (eth0 or
eth1).
Click on the Save button to commit the changes.
Figure 12: Output Configuration
LE1.OM.002066.DRM Page 24 of 52 Version 1.1
Doremi Labs
Page 25

Volume
Control Slider
Audio Delay
8 Audio Configuration
8.1 Headphone Volume
The volume level of the front panel analog audio jack can be adjusted using the web interface.
Log into the LE100 Web GUI and go to the Administration tab.
In the Administration tab, select the Control Panel and click on the Audio Configuration
link.
Click and drag the volume control slider right or left to increase or decrease the volume
level (see Figure 13). The Save button must be pressed to commit the level change.
Figure 13: Headphone Volume
8.2 Audio Delay
The audio configuration also allows the user to add a delay between the audio and video.
Log into the LE100 Web GUI and go to the Administration tab.
From the Administration tab, select Control Panel and click on the Audio Configuration
link. This will take you to the Headphone Volume page. For the Audio Delay settings,
select the Audio Delay link (see Figure 13).
Use the audio delay slider to adjust the delay (see Figure 14).
LE1.OM.002066.DRM Page 25 of 52 Version 1.1
Doremi Labs
Page 26
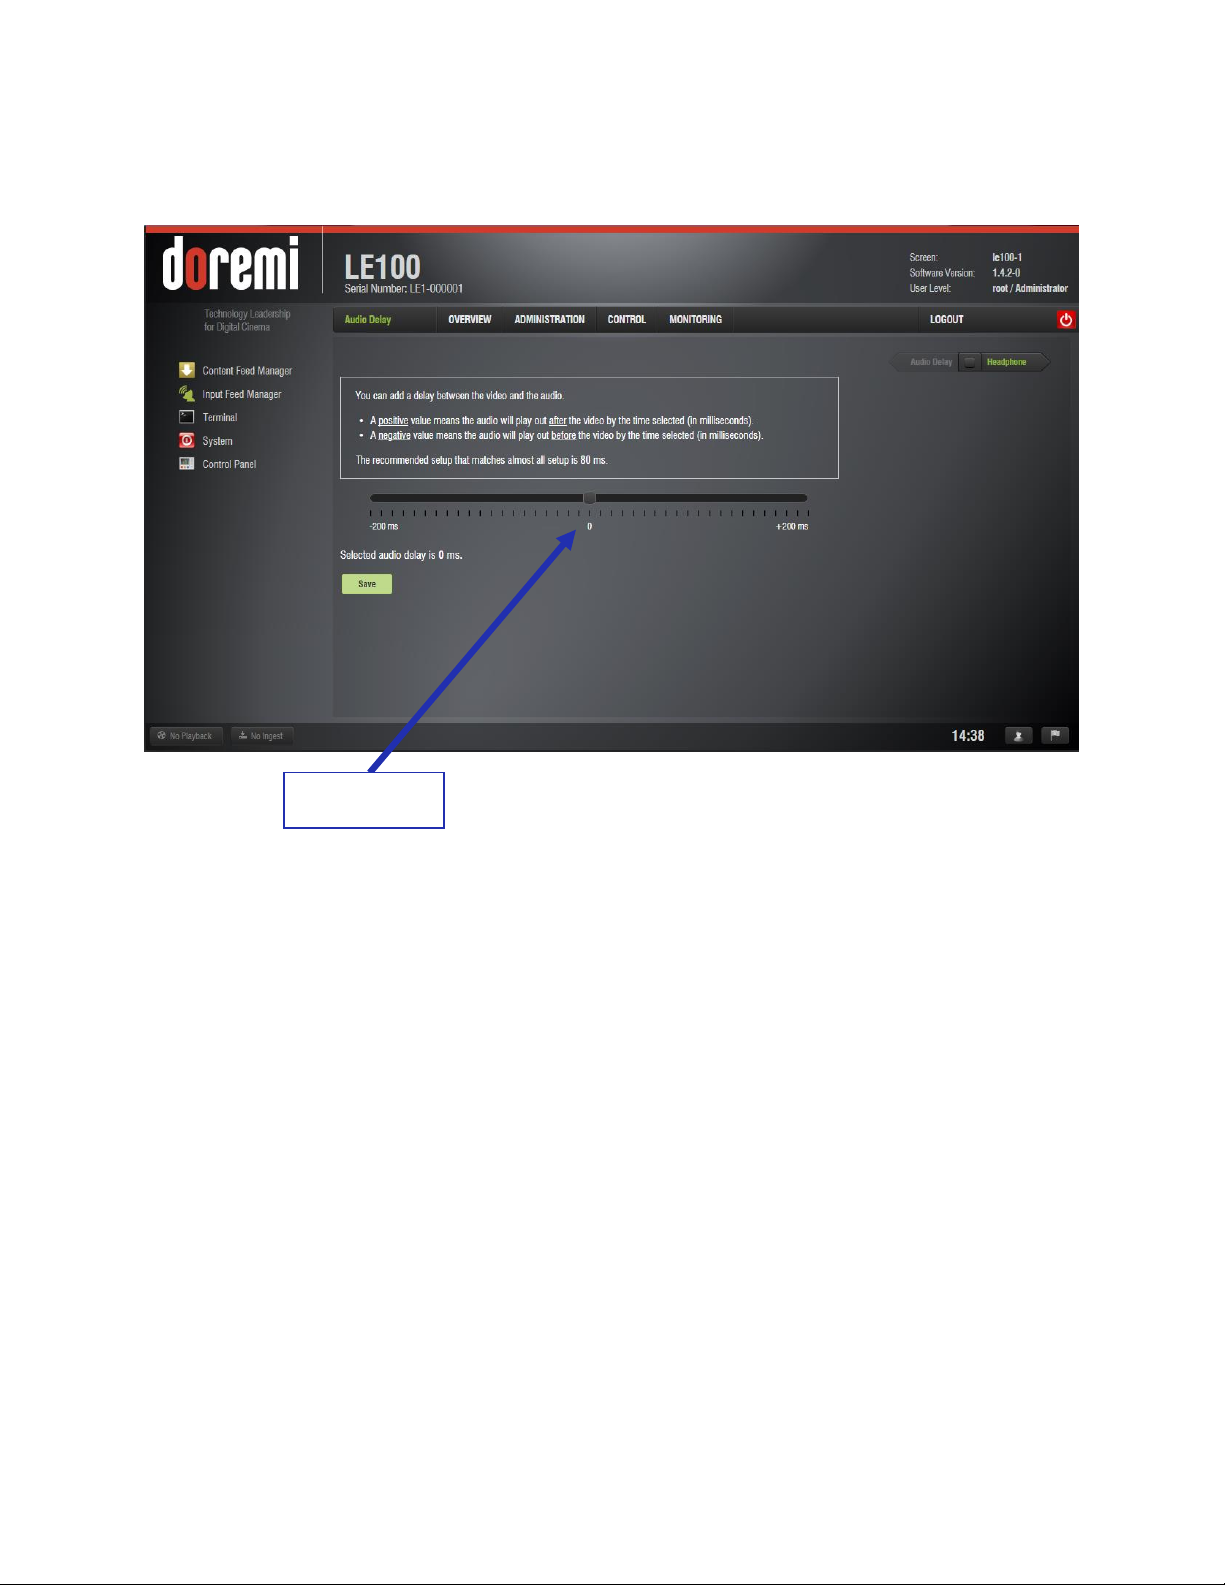
A positive value means the audio will be several milliseconds after the video.
Audio Delay
A negative value means the audio will be several milliseconds before the video.
Figure 14: Audio Delay
LE1.OM.002066.DRM Page 26 of 52 Version 1.1
Doremi Labs
Page 27

9 Video Configuration
There are several settings to determine how the video is output from the LE100. To
adjust the video output settings, log into the LE100 Web GUI and go to the
Administration tab.
Select the Control Panel and click on the Video Configuration link (see Figure 15).
Use the drop down menus to select:
o The desired video format (1920x1080 60Hz, 1280x720 60Hz or Native)
o The desired layout (Progressive or Native)
o The desired HDMI mode (HDCP active or HDCP inactive)
o The desired HDMI color space
o The desired HDSDI color space
o The desired 3D output mode (Dual HDMI/HDSDI, Single HDMI – Frame Packing
or Native).
Note: The Video Output Format and Video Output Layout settings are ignored when using
SENSIO or RealD content.
Click on Save to save the new configuration. The new configuration will be effective with
the next clip that is loaded.
Figure 15: Video Output Configuration
LE1.OM.002066.DRM Page 27 of 52 Version 1.1
Doremi Labs
Page 28

10 Autostart Playback
A Show Playlist can be chosen to automatically play whenever the LE100 is started. The LE100
can also be configured to begin live streaming when the LE100 is powered on.
To configure Autostart Playback, go to the Administration tab of the Web GUI and select
Control Panel. From the Control Panel, select Autostart Playback (see Figure 16).
Select the Autostart mode:
o None, nothing automatically plays upon startup.
o Live with latest configuration, LE100 streams most recent configuration upon
startup.
o ShowPlaylist, LE100 plays selected show playlist upon startup.
If using ShowPlaylist mode, select the desired Show Playlist from the drop down list (see
Section 12.2.2 for more information about creating playlists).
Select the playlist behavior from the mode drop down list.
o Play – plays the playlist once and stops at the end
o Loop – plays the playlist repeatedly until stopped manually.
o Play then Rewind – plays the playlist once to the end and then re-cues it to the
beginning
o Play then Eject – plays the playlist once to the end and then unloads the playlist
Select the Save button to commit the settings. The new settings will take effect the next
time the LE100 is rebooted.
Figure 16: Control Panel – Autostart Playback
LE1.OM.002066.DRM Page 28 of 52 Version 1.1
Doremi Labs
Page 29

11 Account Manager
The Account Manager allows the user to add/remove/edit user accounts.
To access the Account Manager, select the Administration tab followed by the Control
Panel and then Account Manager (see Figure 17).
Figure 17: Control Panel – Account Manager
11.1 Adding a New User Account
To add a new user account, click on the “New” button.
Enter the username (to be used for log in) in the Login field and the associated “Full
Name” used to describe the user. Both names will be displayed in the Account Manager
window after the new user addition is completed.
Select the Group. This will set the proper privileges for the user account. The following
privileges are available:
o Inactives:
o Ingests:
o Projectionist: Projectionist is a standard user allowed to use the Doremi
applications present on the unit without changing the configuration.
o Show Manager: In addition to Projectionist's privileges, a Show Manager user is
allowed to ingest and delete content.
LE1.OM.002066.DRM Page 29 of 52 Version 1.1
Doremi Labs
Page 30

o SuperUser: In addition to Show Manager's right, a SuperUser has the privileges
to configure the unit. For example, the SuperUser can update the firmware and
software.
o Administrator: An Administrator user will be a user in the group of “root.” The
Administrator can perform all of the privileges listed above in addition to creating,
modifying, and deleting user accounts.
Select the Login type. There are two different login types available:
o Virtual: Virtual user account only works with Doremi applications.
o System: Regular Linux user account that can be used anywhere on the system.
For example, on Linux terminal windows.
Define the password by entering into the Password field and confirm the password by re-
entering the password in the Confirm field.
Note: The user will be provided information about the strength of the chosen password.
Select the Save button to finalize creation of the new user account.
11.2 Edit an Existing User
To edit an existing user account, click on the Login name in the Account Manager user
list.
The edit user dialog will appear allowing you to edit the necessary fields. Click Save
when finished editing.
11.3 Delete an Existing User
To delete and existing user account, click the “X” on the right hand side of the user list.
The user will be asked for a confirmation. Clicking Yes will delete the user account.
LE1.OM.002066.DRM Page 30 of 52 Version 1.1
Doremi Labs
Page 31
12 Control
Control Option
Current
Timecode
Control Tab
Live
Buttons
Transport
Controls
Record
Start/Stop Button
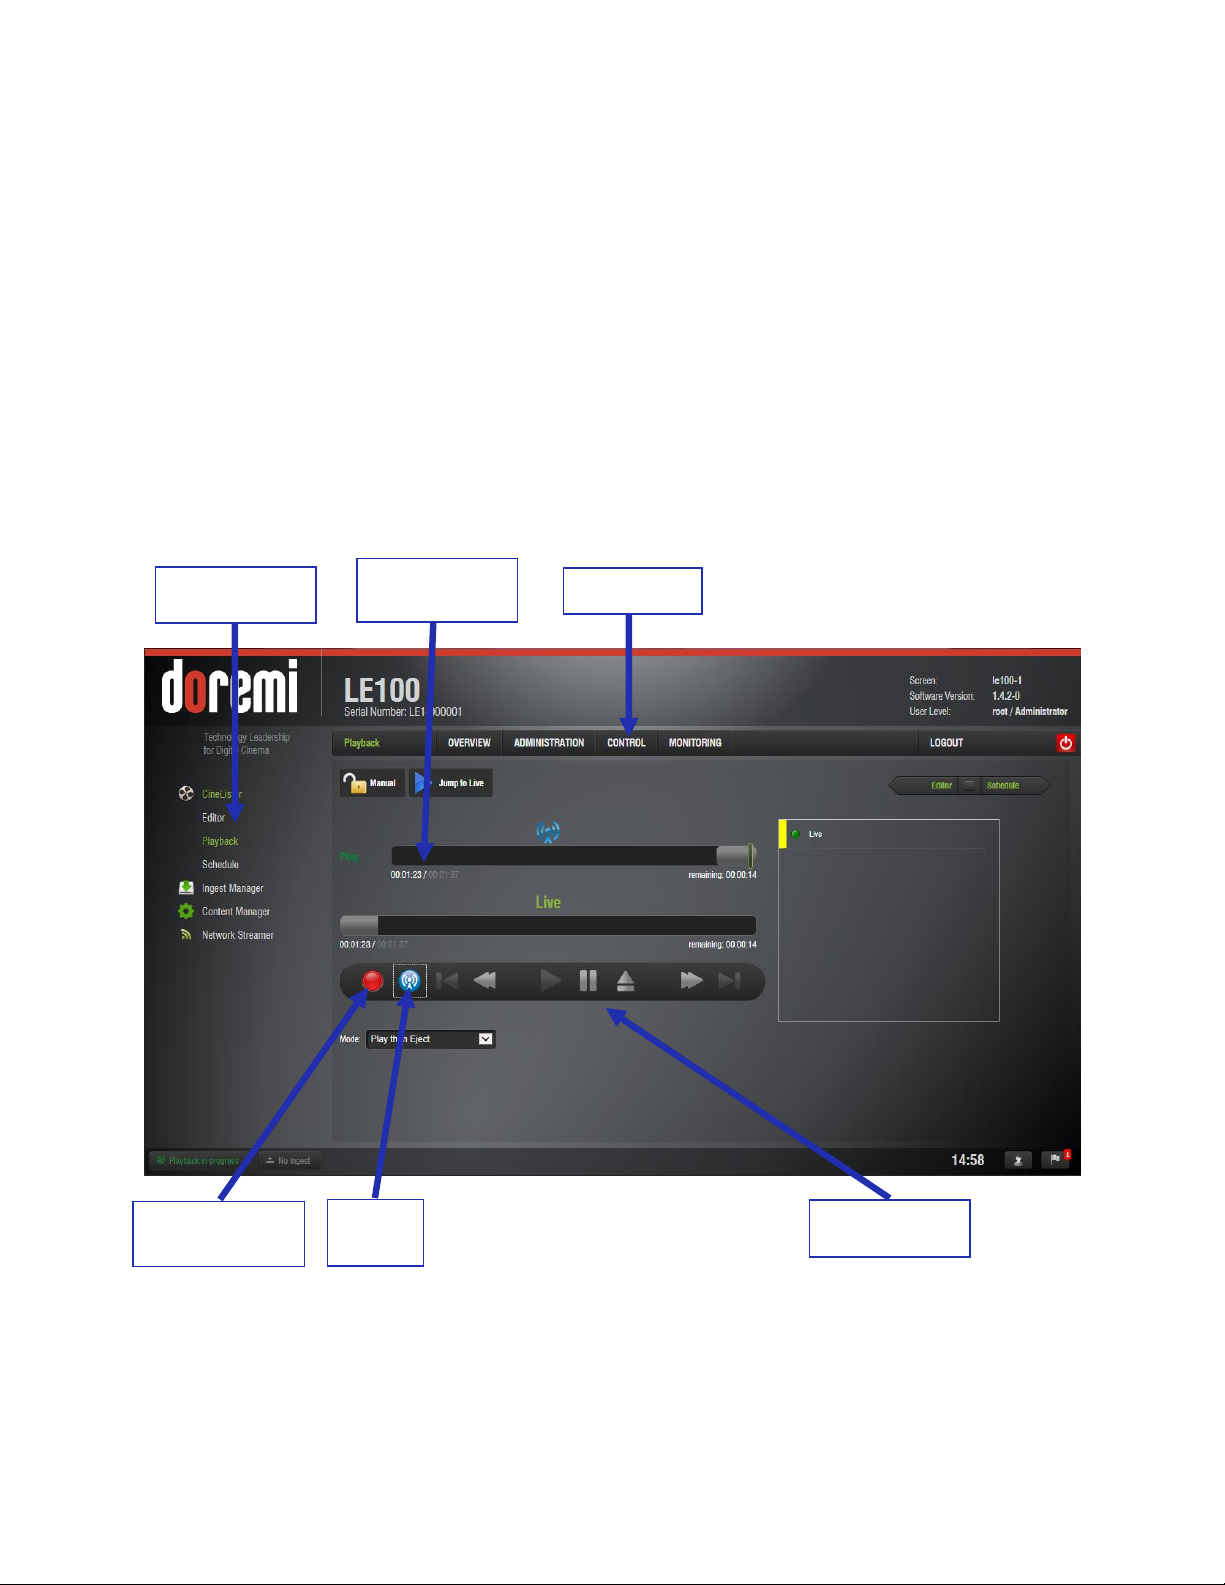
In the Control tab, users can manage content and control recording and playback. CineLister is
used to build playlists and control recording and playback. Ingest Manager is used to ingest
content and licenses. Content Manager is used to view and edit the properties of content as well
as to delete assets.
12.1 CineLister Playback
The CineLister Playback window is the primary way to control recording and
playback on the LE100. To access the playback controls, log into the LE100 Web
GUI and go to the Control tab.
Click on the CineLister link on the left side of the GUI (see Figure 18).
Figure 18: Control Tab – Playback
LE1.OM.002066.DRM Page 31 of 52 Version 1.1
Doremi Labs
Page 32

12.1.1 Playing a Live Stream
To play a live stream, first make sure the recorder settings have been configured as
described in Section 7.
Click on the “Live” button and the Live Setup dialog window will appear (see Figure
19).
Figure 19: Live Set Up
Choose the feed source (Network or Satellite).
Note: The satellite source is only displayed on LE100-SR or if the correct satellite board is
properly installed.
Select the appropriate Program, Video, Audio and Subtitle ID’s from the incoming
stream.
If the stream is 2D, leave the 3D mode set to “auto-detect”. If the stream is 3D, select the
appropriate 3D format.
Click the Live button.
The LE100 will recognize the live stream and begin playback after a few seconds.
o If the Playback window shows “Waiting for Signal”, there may be a problem with
the stream format or the network setup.
While the live stream is playing, the user can use the skip-forward or skip-backward
buttons to go forward or backward by 10 seconds. The pause button can also be used to
control playback.
If playback of a live stream is paused, the location bar can be selected and dragged to
navigate to a specific part of the video and resume playback.
LE1.OM.002066.DRM Page 32 of 52 Version 1.1
Doremi Labs
Page 33

Also, while paused, the current timecode field can be selected and a desired timecode
can be entered to locate to.
Note: In the Live mode, the record buffer, or the amount of video saved is only ten minutes. The
user will only be able to search and play back from the last ten minutes of incoming stream.
To cancel the live stream, click the Eject button.
Note: The stream will not be saved to disk when using the Live mode.
LE1.OM.002066.DRM Page 33 of 52 Version 1.1
Doremi Labs
Page 34

12.1.2 Recording a Live Stream
To record a live stream, first make sure the recorder settings have been configured as
described in Section 7.
Click on the “Record” button and the Record Setup dialog window will appear (see
Figure 20).
Figure 20: Record Set Up
Choose the feed source (Network or Satellite).
Note: The satellite source is only displayed on LE100-SR or if the correct satellite board is
properly installed.
Select the appropriate Program, Video, Audio and Subtitle ID’s from the incoming
stream.
Enter the desired name, duration and type of recording in the Record Setup window.
If the stream is 2D, leave the 3D mode set to “auto-detect”. If the stream is 3D, select the
appropriate 3D format.
Select the Record button.
The LE100 will recognize the live stream and begin saving the stream to the internal
hard drive.
o The LE100 will load the recording into the player but it does not automatically
start playback.
o If the Playback window shows “Waiting for Signal”, there may be a problem with
the stream format or the network setup.
LE1.OM.002066.DRM Page 34 of 52 Version 1.1
Doremi Labs
Page 35

The user can use the play, pause, skip-forward or skip-backward buttons to control
playback.
If playback of a current recording is paused, the location bar can be selected and
dragged to navigate to a specific part of the video and resume playback.
Also, while paused, the current timecode field can be selected and a desired timecode
can be entered to locate to.
If desired, a different clip that already resides on the hard drive can be loaded and
played back without interrupting the live recording.
To stop recording the incoming stream, click the Record button and the Record Setup
window will re-appear. Click the Stop button to stop the recording.
o The stream will be saved to disk and available for future playback.
12.2 CineLister Editor
In addition to playing and recording live streams, the LE100 has the capability of playing back
clips that are stored on the hard drive. The CineLister Editor can be used to select single clips
for playback as well as used to create playlists containing multiple clips.
12.2.1 Playing a Single Clip from the Disk
To select a clip from the hard drive for playback, log into the LE100 Web GUI and go to
the Control tab.
Click on the CineLister link followed by the Editor link (see Figure 21).
Single clicking on a clip in the “All Available Elements” column will add that clip to the
“Show Playlist” column. Once the desired clip is listed in the “Show Playlist”, switch back
to the CineLister Playback control and press play (see Figure 18). The clip will be cued
and played.
To play a different clip, first eject the clip in the CineLister Playback window. Then,
switch back to the CineLister Editor, clear the list and select the new clip. With the new
clip in the “Show Playlist” view, switch back to the CineLister Playback and press the
play button.
LE1.OM.002066.DRM Page 35 of 52 Version 1.1
Doremi Labs
Page 36
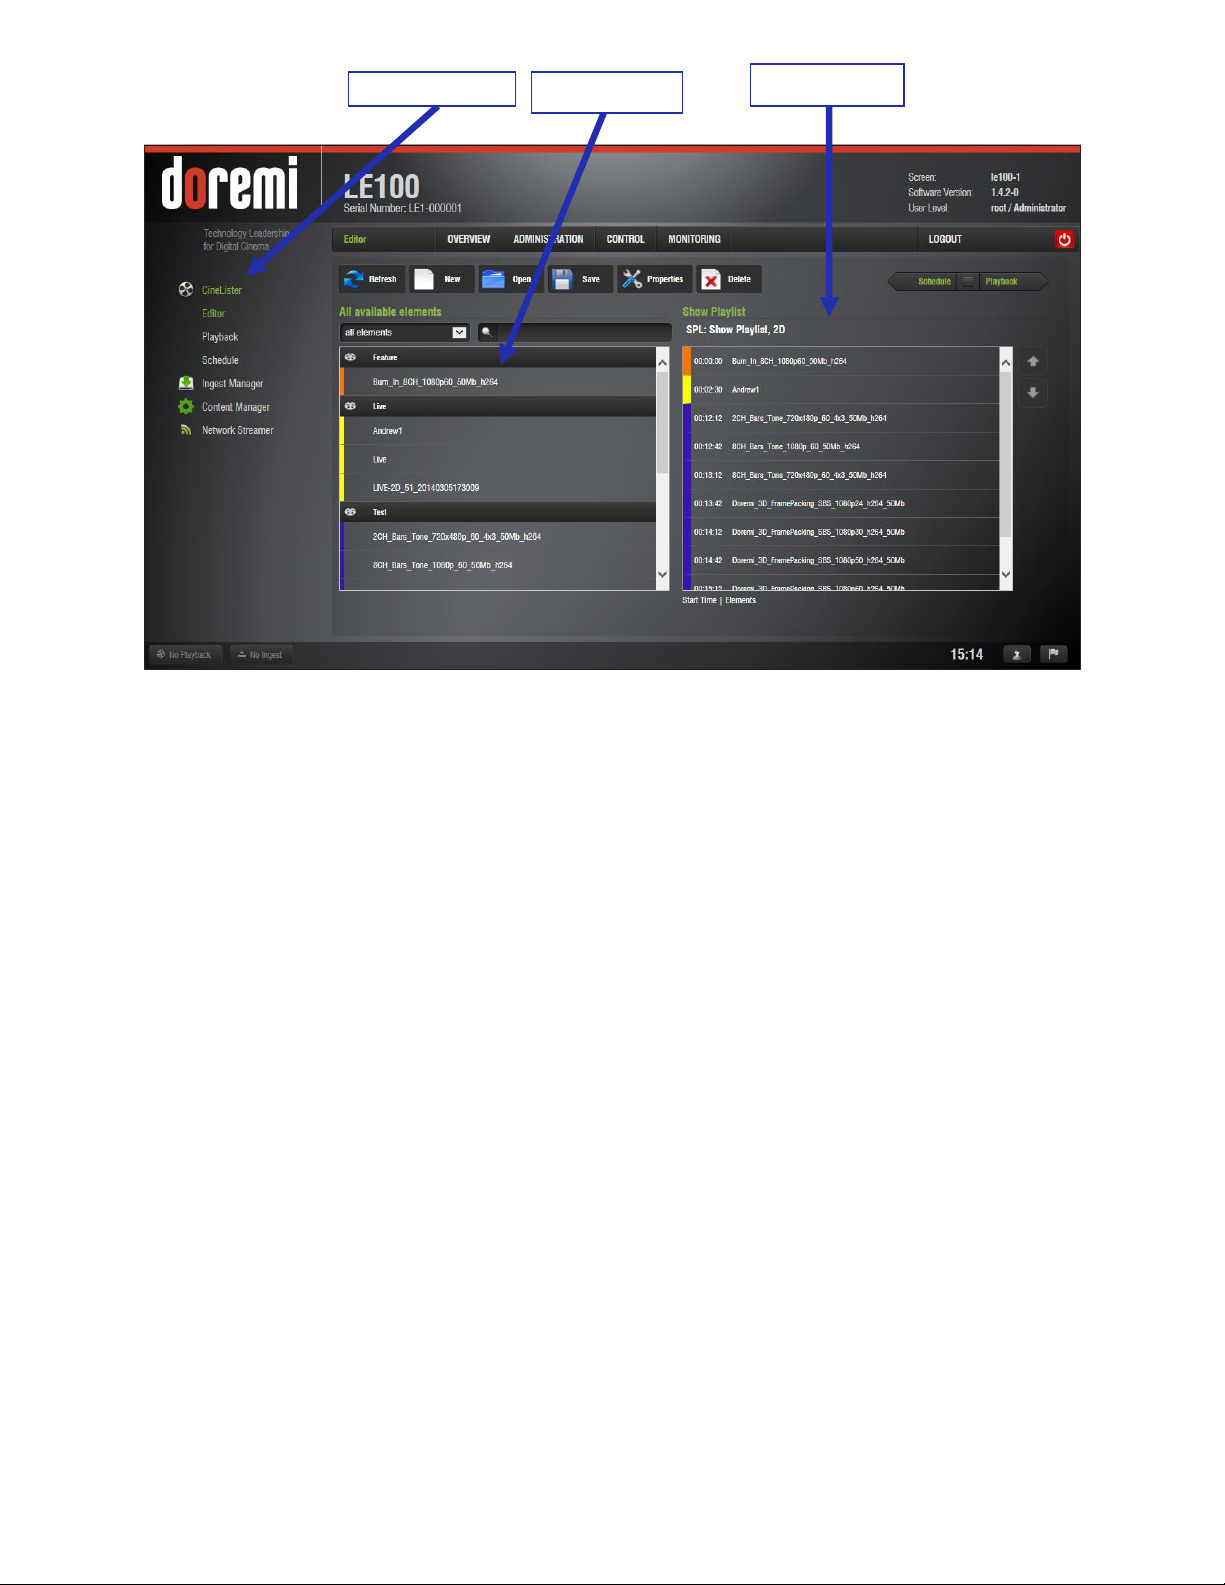
Figure 21: CineLister Editor
CineLister Editor
Available Clips
Playlist Editor
12.2.2 Creating a Playlist
To create a playlist containing multiple clips for playback, log into the LE100 Web GUI
and go to the Control tab.
Click on the CineLister link followed by the Editor link on the left side of the GUI (see
Figure 22).
Selecting the “New” button will clear the Show Playlist and allow the user to start a new
list.
Single clicking on a clip in the “All Available Elements” column will add that clip to the
“Show Playlist” column. Repeat this procedure to add all of the desired clips to the Show
Playlist.
o The up and down arrows at the right hand side of the Show Playlist window can
be used to re-arrange the clips in the list.
Use the Save button to name the playlist and save it for future use.
The Open Button can be used to open previously saved playlists for playback at a later
time.
The Show Playlist can be played by switching to the CineLister Playback control and
pressing the play button. The playlist will be cued and played.
LE1.OM.002066.DRM Page 36 of 52 Version 1.1
Doremi Labs
Page 37
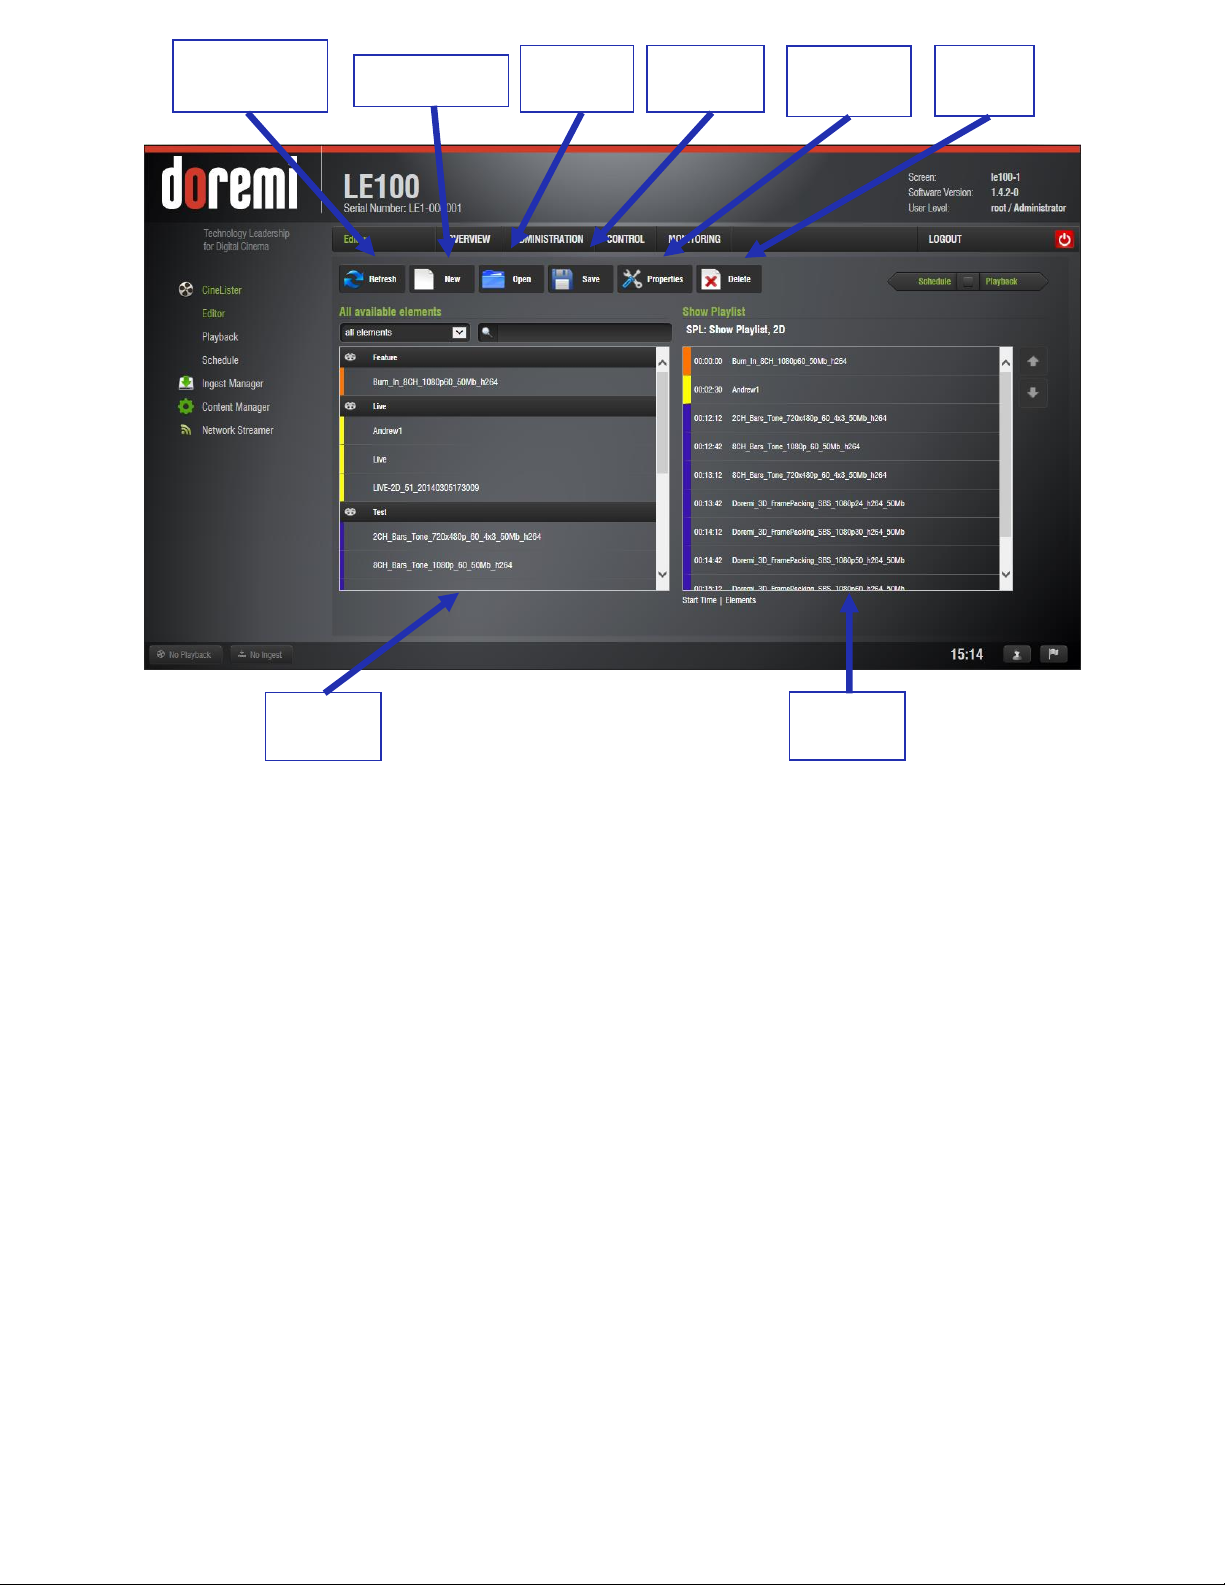
Playlist
Editor
Open
Playlist
Playlist
Properties
Refresh
Elements List
New Playlist
Delete
Playlist
Save
Playlist
Available
Clips
Figure 22: CineLister Editor
LE1.OM.002066.DRM Page 37 of 52 Version 1.1
Doremi Labs
Page 38
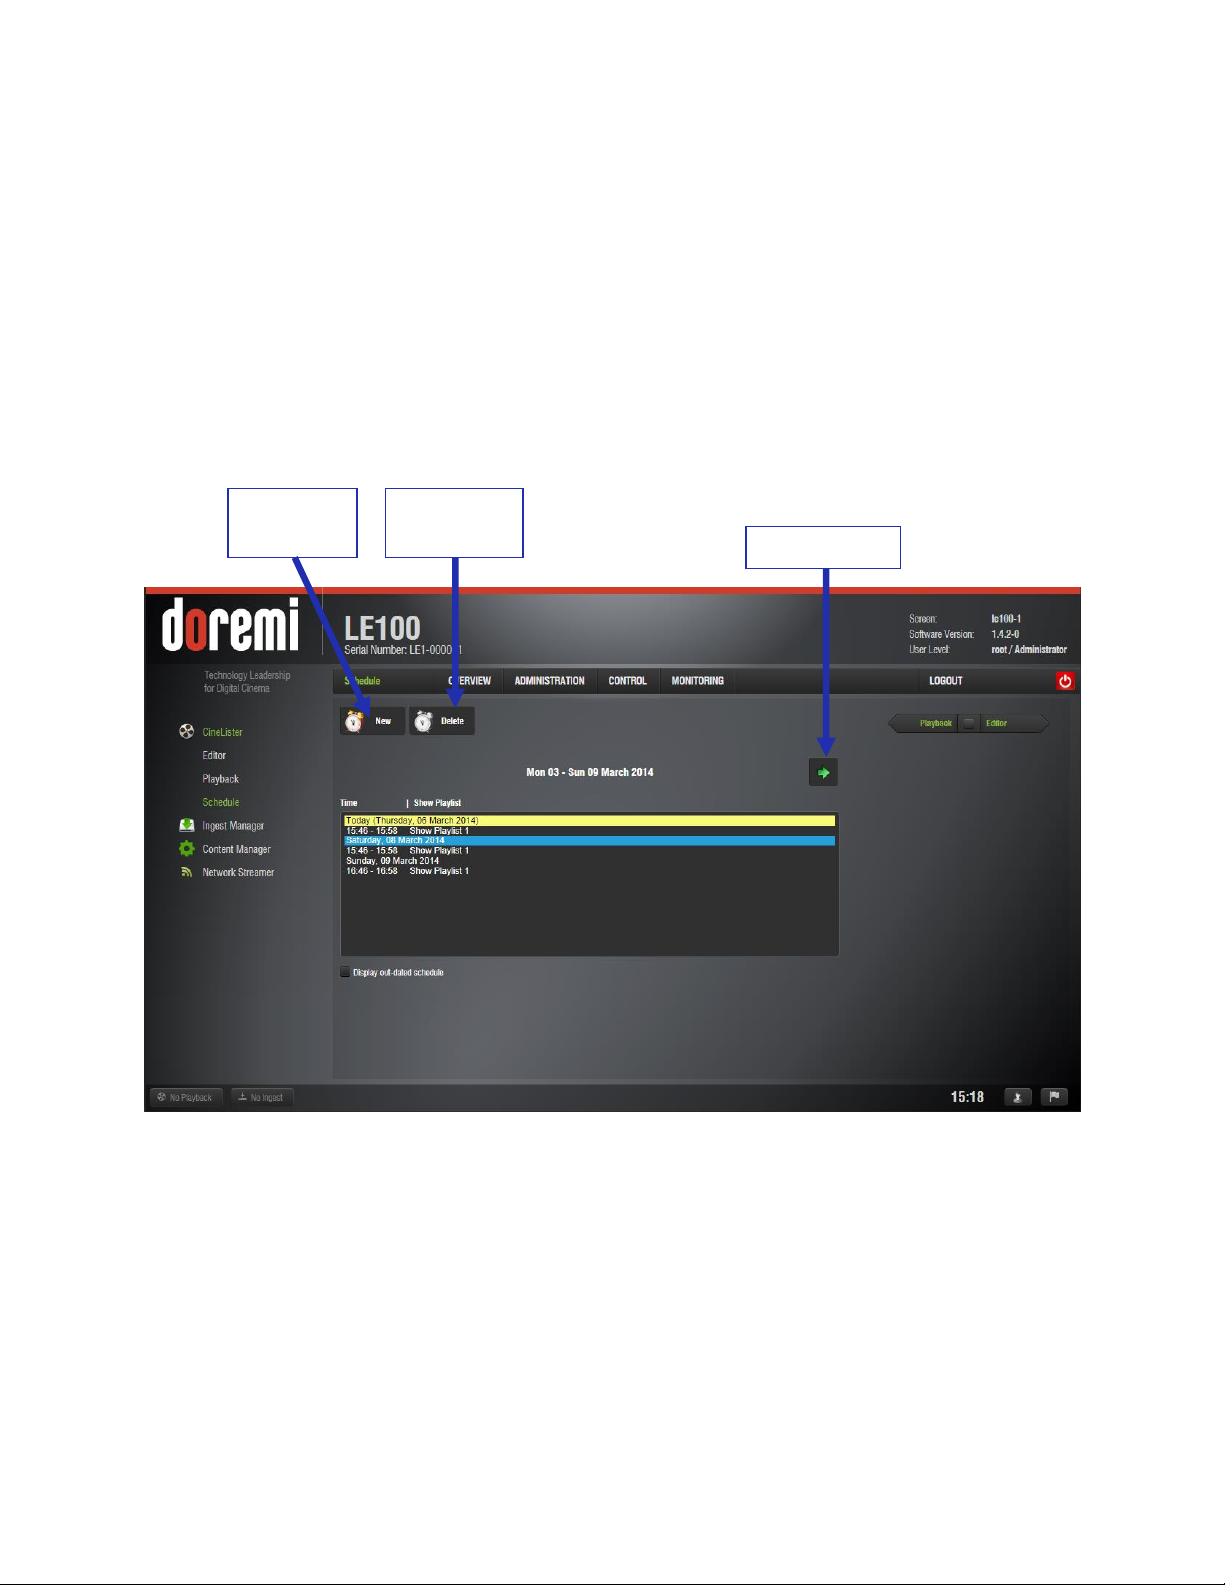
12.2.3 Scheduling Playback
New
Schedule
Delete
Schedule
Next Week
To schedule a playlist to begin playing at a specific date and time, log into the LE100
Web GUI and go to the Control tab.
Click on the CineLister link followed by the Schedule link on the left side of the GUI (see
Figure 23).
The first page shows existing schedules for the current week. To view or create
schedules for future weeks, click on the Next Week arrow until the desired week is
displayed.
To create a new schedule, select the New button. To delete an existing schedule,
highlight the event in the list and click the Delete button.
Figure 23: CineLister Schedule
12.3 Ingest Manager
The Ingest Manager is used to import DCP files as well as DLM license files that enable optional
features.
To ingest a DCP or DLM, plug a properly formatted USB drive containing the files into
one of the LE100's three USB ports.
Log into the LE100 Web GUI and go to the Control tab.
LE1.OM.002066.DRM Page 38 of 52 Version 1.1
Doremi Labs
Page 39

Click on the Ingest Manager and then the Ingest Scan link on the left side of the GUI
Scan Location
Ingest Scan
Link
Ingest
Button
Refresh
Button
(see Figure 24).
Using the “Select Location” pull down menu, choose local storage. All available local
storage devices will automatically be scanned and the available DCP(s) or DLM(s) will
appear in the list.
o If the list is not automatically updated, use the Refresh button.
Select the desired elements to ingest and then select the Ingest button.
The view will automatically switch to the Ingest Monitor window where the user can view
the progress of the ingest, pause the ingest, resume the ingest or cancel the ingest.
Figure 24: Control Tab – Ingest Manager
12.4 Content Manager
Content Manager is used to view the assets stored on the LE100, view the assets properties
and also delete unwanted assets.
12.4.1 Viewing Asset Properties
To see the properties of a particular asset, log into the LE100 Web GUI and go to the
Control tab.
LE1.OM.002066.DRM Page 39 of 52 Version 1.1
Doremi Labs
Page 40

Click on the Content Manager link and then the Composition Playlist link on the left side
Composition
Playlist
CPL Information
of the GUI (see Figure 25).
Single click on top of the name of the asset you wish to examine and the CPL
Information window will appear.
The CPL Information Settings tab can be used to set the clips 3D format so that it always
plays properly.
o In the Settings tab, use the pull down menu to select the appropriate 3D mode
and select Save.
Figure 25: Control Tab – CPL Information
12.4.2 Deleting an Asset
To permanently remove a particular asset from the hard drive, log into the LE100 Web
GUI and go to the Control tab.
Click on the Content Manager link and then the Composition Playlist link on the left side
of the GUI (see Figure 25).
Click on the row that contains the CPL name to select the CPL. Then click the Delete
button.
LE1.OM.002066.DRM Page 40 of 52 Version 1.1
Doremi Labs
Page 41

12.5 Network Streamer
Start/Stop
Stream Buttons
Network
Streamer Link
The LE100 is capable of outputting a standard transport stream over the network. The transport
stream output from the LE100 will be the output of an incoming network signal or, with a satellite
receiver card installed (LE100-SR), the output of either satellite input. This is controlled on the
Network Streamer page.
Log into the LE100 Web GUI, go to the Control tab and click on the Network Streamer
link on the left side of the GUI (see Figure 26).
Select the desired network output.
o The network outputs can be configured (interface, IP address, port) on the Input
Feed Manager Output Configuration page (see Section 7).
Then choose the input stream (in the "source" select box).
Note: The satellite sources are only displayed on LE100-SR or if the correct satellite board
is properly installed.
Next, select the desired program, video, audio and subtitles.
Settings are automatically saved when modified.
If the source settings are valid, the Input Status will display green for Running, Signal
Lock and Status.
The stream will be available once the “Start” button is selected.
To stop outputting the transport stream, select the “Stop” button.
Figure 26: Network Streamer
LE1.OM.002066.DRM Page 41 of 52 Version 1.1
Doremi Labs
Page 42
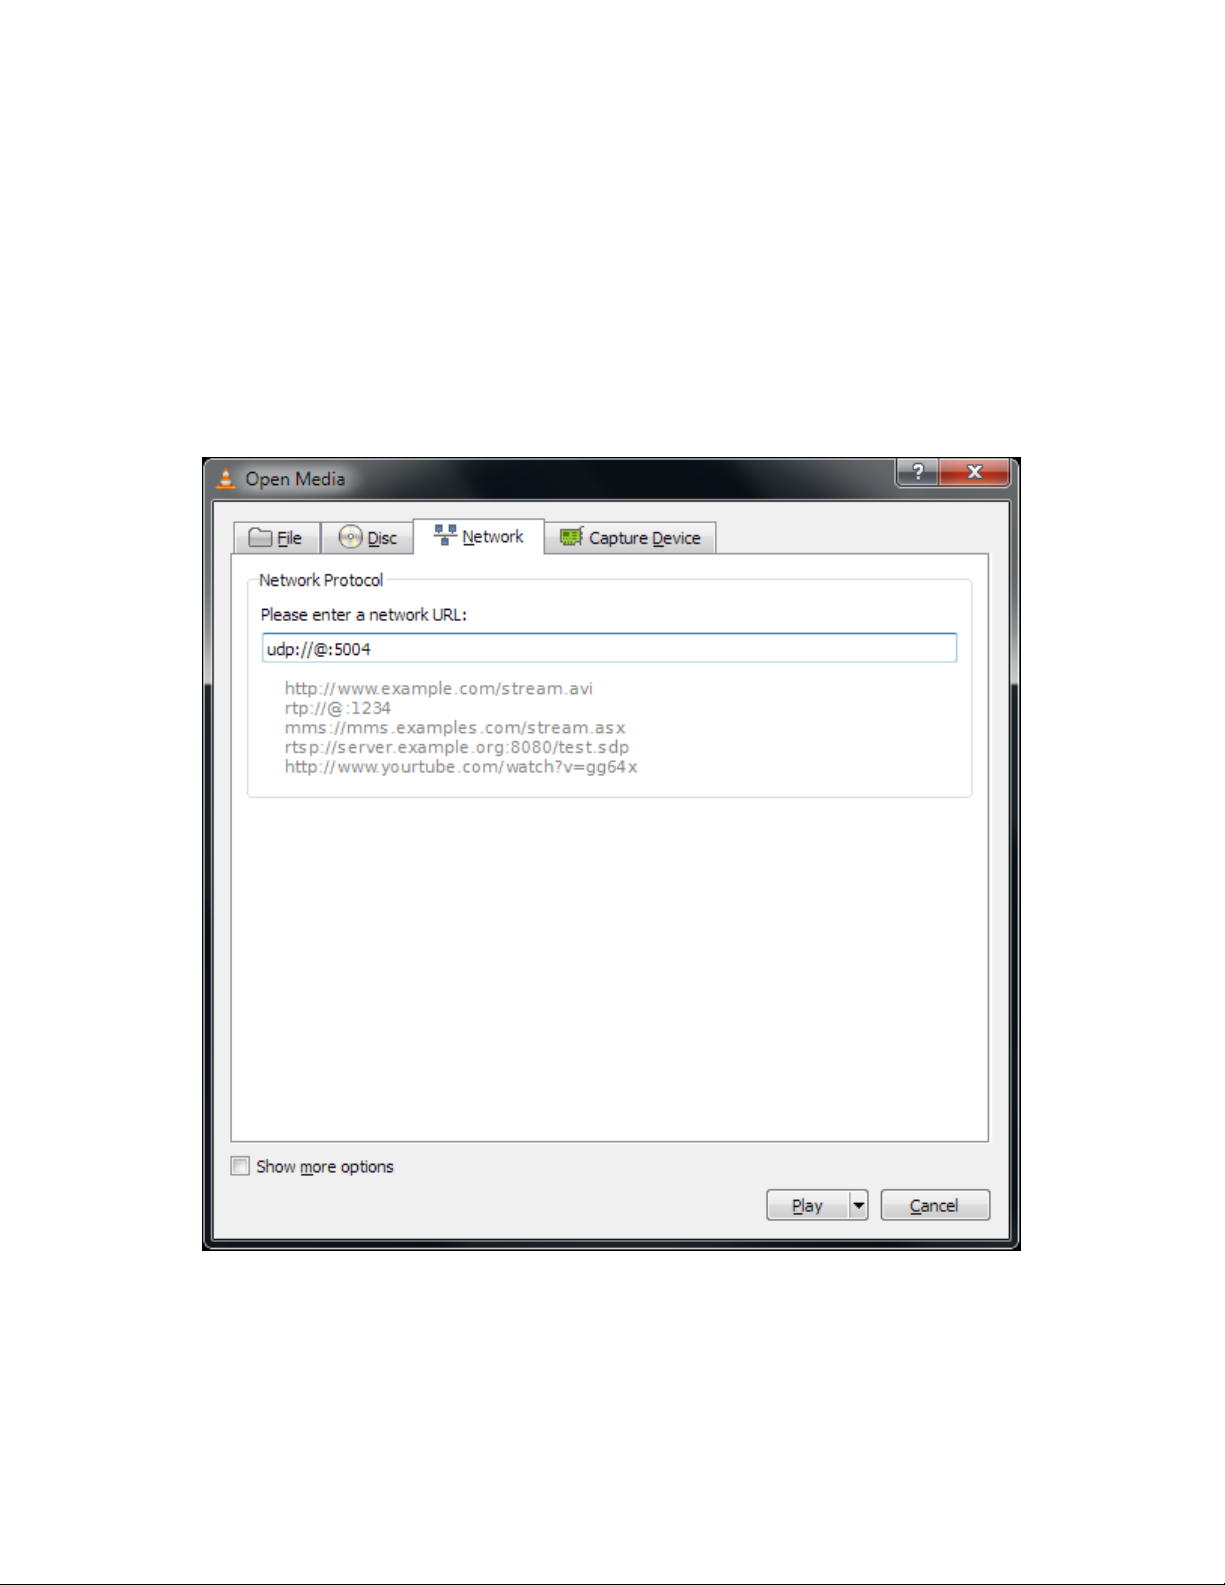
12.5.1 Verifying Streaming Output
The transport stream output of the LE100 can be verified using VLC media player.
Set the Multicast Address in the output configuration (Section 7.3) to the address of the
machine running VLC media player.
Launch VLC and from the “media” menu, select “Open Network Stream…”
In the network URL field, enter “udp://@:5004” (replacing 5004 with the port number you
have specified in the output configuration (see Figure 27).
Select play and the stream should begin to play in the VLC media player.
Figure 27: VLC media player
LE1.OM.002066.DRM Page 42 of 52 Version 1.1
Doremi Labs
Page 43

13 Logging Out of the LE100
Logout
Button
To log out of the LE100, follow the steps below:
From any tab in the Web GUI, scroll over to the Log Out button in the top right corner.
Click on the Log Out button (see Figure 28).
o Logging out will only disconnect the web interface from the LE100. Logging out
does not shut down the LE100 or interrupt any current operations.
Figure 28: Log Out
LE1.OM.002066.DRM Page 43 of 52 Version 1.1
Doremi Labs
Page 44

14 Shutting Down or Restarting the LE100
Restart
Button
System Link
Administration
Shutdown
Button
Shutdown/Restart
Button
To shut down the unit, select the red “Shutdown / Restart” button in the upper right hand
portion of the interface. Then click on the shutdown button.
Alternately, go to the Administration tab and click on the System link on the left. Then
click on the Shutdown button (see Figure 29).
Note: After pressing the Shutdown button, a warning will appear giving the user five (5) seconds
to cancel the shutdown process. If the user wants to shutdown the unit, simply let the process
continue.
To restart the unit, select the red “Shutdown / Restart” button in the upper right hand
portion of the interface. Then click on the Restart button.
Alternately, go to the Administration tab and click on the System link on the left. Then
click on the Restart button (see Figure 29).
LE1.OM.002066.DRM Page 44 of 52 Version 1.1
Figure 29: System
Doremi Labs
Page 45

15 Updating the LE100 Software and Firmware
Upload Link
Control Tab
Upload Button
Choose File
Button
Software and firmware updates for the LE100 can be performed using the web interface or by
using FTP. An FTP client (e.g., Core FTP or Filezilla) is needed to upgrade the LE100 via FTP.
WARNING: Firmware updates can take approximately ten minutes to complete. During the
firmware update process, the amber “Activity” LED on the front of the LE100 will remain
illuminated. Do not remove power or reset the unit during a firmware update. Once the “Activity”
LED turns off, it is safe to log into the LE100.
15.1 Software Update via Web GUI
Log into the LE100 Web GUI and go to the Control tab.
Click on the Ingest Manager and then Upload link on the left side of the GUI (see Figure
30).
Click on the “Choose File” button to browse to the update package (“.pkg” file) and then
click the “Upload” button.
Once successfully uploaded you will receive the message “File successfully uploaded.
Click here to reboot”. Reboot the LE100 to complete the update.
Figure 30: Software Update
LE1.OM.002066.DRM Page 45 of 52 Version 1.1
Doremi Labs
Page 46
15.2 Software Update via FTP Client
Make sure that an FTP client is installed on the computer.
Turn the LE100 on and make sure it is able to ping to the network.
Open the FTP client; connect using the IP address of the LE100 with port 22 and login
as the "Admin" user with the appropriate password.
Upload the update package (".pkg” file) to the folder /doremi/etc/rc.once and then reboot.
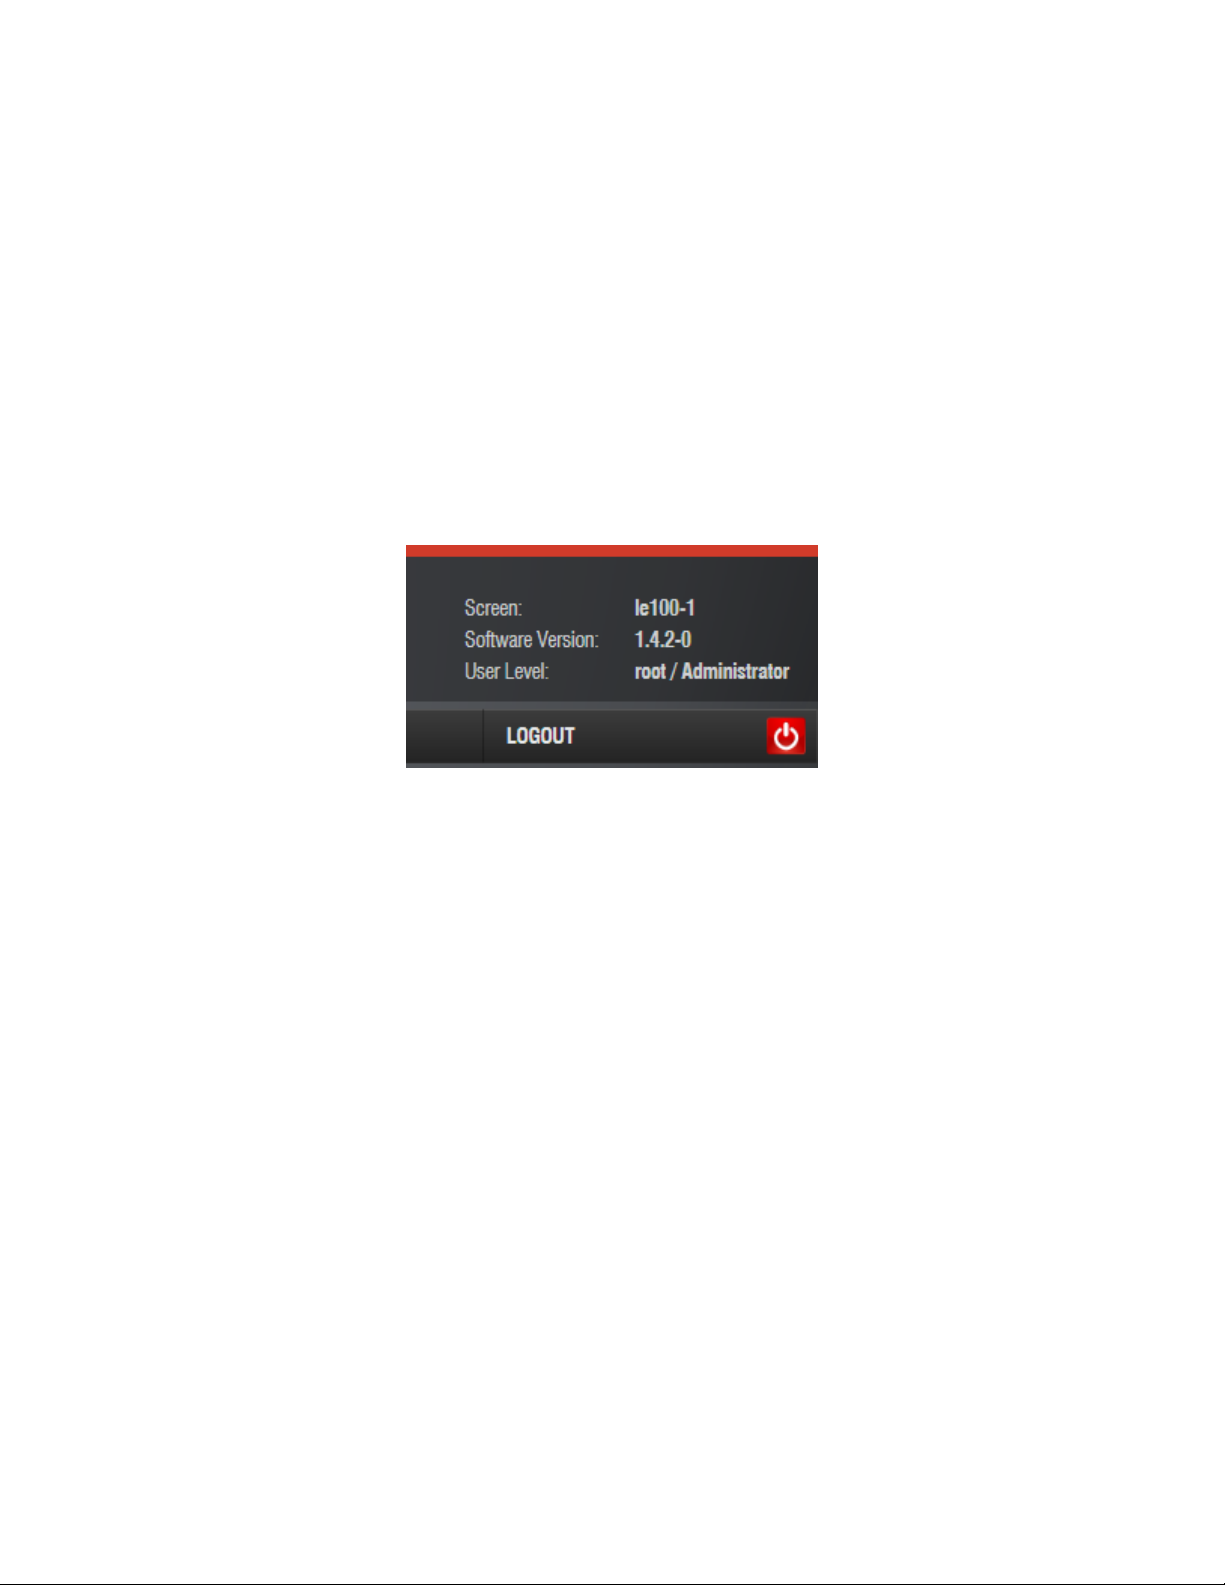
15.3 Verifying the Software Update
To check if the upgrade was successful, log into the Web GUI and the software version will be
shown in the top right corner (see Figure 31), or open an SSH session and type the following
command: tail /doremi/log/update.log and verify that the ".pkg" file installed successfully.
Figure 31: Software Version
LE1.OM.002066.DRM Page 46 of 52 Version 1.1
Doremi Labs
Page 47

16 Troubleshooting
System Link
Detailed
Report Button
To troubleshoot the product, all important product information is located on the Monitoring tab.
Here, logs can be collected and stored in a compressed folder that can be sent to Doremi Labs
Technical Support for review.
16.1 Generating a Report via GUI
In order to generate a detailed report, log into the LE100 Web GUI and go to the
Monitoring tab.
Click on the System link on the left side of the GUI (see Figure 32).
Click on the “Detailed Report” button.
o It may take several minutes to generate the report. The report will be saved to
the client computer based on the web browser's download settings.
Figure 32: Monitoring – Diagnostics
LE1.OM.002066.DRM Page 47 of 52 Version 1.1
Doremi Labs
Page 48

16.2 Generating a Report via CLI
To generate the report via CLI, the operator has to log into the LE100 with administrator access
and execute the following command:
# /doremi/sbin/report.sh <Enter>
The resulting file will be generated under the /doremi/tmp directory, and the user will be able to
use an FTP client to get it.
16.3 Generating a Report via USB
To generate a report using a USB key:
Create a directory "doremi" at the root of the USB key (may have been previously
created).
Create a directory "report" inside the /doremi directory.
Safely remove the USB drive and plug it into the LE100.
Wait two minutes without any USB activity (watch your USB key LED).
Reboot the LE100.
The report will be in the USB key folder: /doremi/report
LE1.OM.002066.DRM Page 48 of 52 Version 1.1
Doremi Labs
Page 49

17 Hardware Specifications
17.1 Main Chassis
Internal SATA HDD
2x 10/100/1000Base-T Ethernet ports
3x USB 2.0 ports (1 front, 2 rear)
1x AC Power Connector
Embedded Linux Operating System
17.2 HD/SD Decoding
MPEG2 (up to 50Mbps)
H.264 (up to 50Mbps)
VC1 (up to 50Mbps)
17.3 3D Support
3D Decoding
o SENSIO® Hi-Fi 3D format (optional)
o RealD® (optional)
3D Output Formats
o Side by Side
o Top/Bottom
o Dual Stream
o Frame Packing
17.4 Output Video Formats
720p @ 60fps / 50fps / 59.94fps
1080i @ 60fps / 50fps / 59.94fps
1080p @ 23.98fps / 24fps / 25fps / 29.97fps / 30fps / 50fps / 59.94fps / 60fps
17.5 Input File Format Support (via USB or Ethernet)
DCP files (MPEG2 / H.264 / VC1)
Transport Stream
LE1.OM.002066.DRM Page 49 of 52 Version 1.1
Doremi Labs
Page 50

17.6 Video Outputs
2 3G-SDI (SMPTE 259M, SMPTE 292M, SMPTE 424M)
2 HDMI (1.4)
17.7 Audio
8CH Embedded (HDMI/SDI)
8CH unbalanced AES/EBU (4x BNC)
2CH Analog stereo (3.5mm audio jack)
16, 20 or 24-bit PCM, 48 kHz
Compressed audio, Dolby® Digital (AC-3) pass through
17.8 Control
Input / Output - Ethernet
Odetics Protocol
17.9 Physical Characteristics
1 Rack Unit 1.75” x 19” x 13” (44mm x 483mm x 330mm)
Weight: 10.5 lbs (4.8 kg)
17.10 Power
Power Supply: 80 PLUS-certified
Voltage: AC 100-240 V
Current: 1.5 to 3.5 A
Frequency: 60 to 50 Hz
Total DC Output: 250 W
Idle Consumption: 28W
Peak Consumption: 41W
LE1.OM.002066.DRM Page 50 of 52 Version 1.1
Doremi Labs
Page 51

18 Acronyms
Term
Description
CLI
Command Line Interface
DCP
Digital Cinema Package
FTP
File Transfer Protocol
GUI
Graphical User Interface
LE
Live Event
SSH
Secure Shell Terminal
LE1.OM.002066.DRM Page 51 of 52 Version 1.1
Doremi Labs
Page 52

19 Document Revision History
Date
Revision
Description
03/19/2014
1.0
First version of document.
08/12/2014
1.1
Differences between LE100 and LE100-SR clarified.
LE1.OM.002066.DRM Page 52 of 52 Version 1.1
Doremi Labs
 Loading...