

Page 1

D V I 2 0 - D e v i c e s
User Manual
Version 1.4
The English version of this document is the only legally binding version.
Translated versions are not legally binding and are for convenience only.
DVI.OM.000262.DRM Page 1 of 33 Version 1.4
Doremi Labs
Page 2

Table of Content
1 Introduction.............................................................................................................................. 5
1.1 Purpose............................................................................................................................... 5
1.2 Presentation......................................................................................................................... 5
1.3 Contact Information............................................................................................................. 5
2 DVI20-Devices Overview.......................................................................................................... 6
2.1 Devices Description.............................................................................................................6
2.1.1 HDVI-20s...................................................................................................................... 6
2.1.2 HDVI-20d...................................................................................................................... 6
2.1.3 XDVI-20 ....................................................................................................................... 6
2.1.4 DSDI-20........................................................................................................................ 7
2.2 Supported Formats..............................................................................................................7
2.3 DVI20-Devices Operation....................................................................................................8
2.3.1 Resolution..................................................................................................................... 8
2.3.2 Frequency..................................................................................................................... 8
2.3.3 DVI-A Special Instructions............................................................................................9
3 Infrared Remote Controller.................................................................................................... 10
3.1 Remote Controller Overview..............................................................................................10
3.2 Remote Controller Functions.............................................................................................11
3.3 Reset I/O settings..............................................................................................................11
4 Input/Output Settings - Quick Start.......................................................................................12
4.1 Input Format Setting..........................................................................................................12
4.2 Output Format Setting........................................................................................................ 12
4.2.1 DVI Output Format...................................................................................................... 12
4.2.2 SDI Output Format...................................................................................................... 12
5 OSD Menus.............................................................................................................................14
5.1 Input Source Selection.......................................................................................................14
5.2 Picture Settings.................................................................................................................. 15
5.3 OSD Settings.....................................................................................................................17
5.4 SDI Settings.......................................................................................................................18
5.5 DVI Output Settings...........................................................................................................19
5.6 Miscellaneous.................................................................................................................... 21
6 HDVI-CP Application..............................................................................................................22
6.1 Overview............................................................................................................................22
6.2 HDVI-CP GUI Tabs............................................................................................................ 23
6.2.1 I/O Settings Tab.......................................................................................................... 23
6.2.2 Display Tab................................................................................................................. 23
6.2.3 Position Tab................................................................................................................ 24
6.2.4 Color Tab.................................................................................................................... 25
6.3 Connection........................................................................................................................ 25
DVI.OM.000262.DRM Page 2 of 33 Version 1.4
Doremi Labs
Page 3

6.4 Reset To Factory Settings.................................................................................................26
6.5 Quick Settings Access.......................................................................................................26
7 Firmware Upgrade.................................................................................................................. 28
8 Recommended LCD Monitors Specifications......................................................................29
8.1 Note about the Viewsonic VP2290b...................................................................................29
8.2 Note about the Apple Cinema Displays.............................................................................29
9 Wiring of the PC to DVI20-Devices cable.............................................................................. 30
10 DVI20-Devices Specifications............................................................................................31
11 Acronyms.............................................................................................................................. 32
12 Document Revision History................................................................................................. 33
DVI.OM.000262.DRM Page 3 of 33 Version 1.4
Doremi Labs
Page 4

Software License Agreement
The software license agreement can be found at the following location:
http://www.doremilabs.com/support/proav-support/proav-warranties/
Hardware Warranty
The hardware warranty can be found at the following location:
http://www.doremilabs.com/support/proav-support/proav-warranties/
DVI.OM.000262.DRM Page 4 of 33 Version 1.4
Doremi Labs
Page 5

1 Introduction
1.1 Purpose
This document provides guidance on HDVI-20s, HDVI-20d, XDVI-20 and DSDI-20 devices. It
explains the infrared remote control usage and the On Screen Display (OSD). It also explains the
HDVI-CP graphical user interface (GUI) operations.
Note: HDVI-20s, HDVI-20d, XDVI-20 and DSDI-20 devices will be referred to as “DVI20Devices” in this document.
1.2 Presentation
This document is divided into the following sections:
Section 1: Introduction – Overall presentation of the document
Section 2: DVI20-Devices Overview – Presentation of the DVI20-devices
Section 3: Infrared Remote Controller – Usage of the infrared remote controller
Section 4: Input/Output Settings - Quick Start – Quick start guide to set an input and/or
an output formats
Section 5: OSD Menus – Presentation of the OSD menus functions
Section 6: HDVI-CP Application – Presentation of the HDVI-CP software
Section 7: Firmware Upgrade – Procedure to follow to perform a firmware upgrade
Section 8: Recommended LCD Monitors
Section 9: Wiring of a PC to DVI20-Device Cable
Section 10: DVI20-Devies Specifications
Section 11: Acronyms
Section 12: Document Revision History
1.3 Contact Information
If in need of help or assistance, please contact Doremi Labs Technical Services at + 1-818-5621101 or email at proavsupport@doremilabs.com.
DVI.OM.000262.DRM Page 5 of 33 Version 1.4
Doremi Labs
Page 6

2 DVI20-Devices Overview
The DVI20-Device is an easy to use plug-and-play box that allows the use of much lower priced
DVI monitoring for SD and HD pictures. Set-up and operation are easy, and can be performed
using the HDVI-CP control utility, or the Infra-red Doremi Remote Control. To ensure that the
images look always good; Doremi has focused attention on the technical detail of the many
facets of the conversion process.
Accurate spatial interpolation for clear sharp rendition of static images
Advanced de-interlace processing for clear, accurate output of moving images
Image output is automatically matched to the size of the monitor display to give optimum
results and avoid further processing
Temporal processing for smoother frame rate conversion
Small size, low power consumption
2.1 Devices Description
2.1.1 HDVI-20s
Doremi Labs’ HDVI-20s is a universal DVI-D converter / switcher. It converts SDI, HD-SDI, DVID and DVI-A (analog RGB) to DVI-D (digital RGB). It automatically detects the input scan rate
and supports a wide variety of video formats including 720p, 1080p, 1080i, PAL, NTSC. It also
automatically detects the resolution of the connected DVI-D monitor using EDID messages and
supports a wide variety of progressive scan displays including computer LCD monitors, HDTV
Televisions with 720p, 1080i and 1080p support, video projectors and displays (Plasma, DLP, DILA etc.).
2.1.2 HDVI-20d
Doremi Labs’ HDVI-20d is a universal DVI-D converter / switcher. It converts SDI, HD-SDI, DVID and DVI-A (analog RGB) to DVI-D (digital RGB).. It automatically detects the input scan rate
and supports a wide variety of video formats including 720p, 1080p, 1080i, 2K (2048x1080),
PAL, NTSC. It also automatically detects the resolution of the connected DVI-D monitor using
EDID messages and supports a wide variety of progressive scan displays including computer
LCD monitors, HDTV Televisions with 720p, 1080i and 1080p support, video projectors and
displays (Plasma, DLP, D-ILA etc.).
2.1.3 XDVI-20
Doremi Labs’ XDVI-20s is a universal DVI-D / SDI (HD and SD) cross converter / switcher. It
converts SDI, HD-SDI, DVI-D and DVI-A (analog RGB) to DVI-D (digital RGB) and to SDI (SD or
HD digital YPbPr). It automatically detects the input scan rate and supports a wide variety of
video formats including 720p, 1080p, 1080i, PAL, NTSC. It also automatically detects the
resolution of the connected DVI-D monitor using EDID messages and supports a wide variety of
progressive scan displays including computer LCD monitors, HDTV Televisions with 720p, 1080i
or 1080p support, video projectors and displays (Plasma, DLP, D-ILA etc.).
The SDI output of the XDVI-20s makes it a full featured scan converter that can take SDI, HDSDI, DVI-D or DVI-A and convert it to SD-SDI or HD-SDI based on an output selection. So you
DVI.OM.000262.DRM Page 6 of 33 Version 1.4
Doremi Labs
Page 7
can convert from NTSC to PAL, from PAL to NTSC, from NTSC to 1080i, from RGB to 1080i,
etc….
2.1.4 DSDI-20
Doremi Labs DSDI-20 is a universal DVI-D converter. It converts DVI-D (Digital RGB) to SDI (SD
or HD digital YPbPr). It automatically detects the output resolution of the connected DVI-D
source and the output can be set to a variety of video formats (1080p, 1080i, 720p, NTSC, PAL).
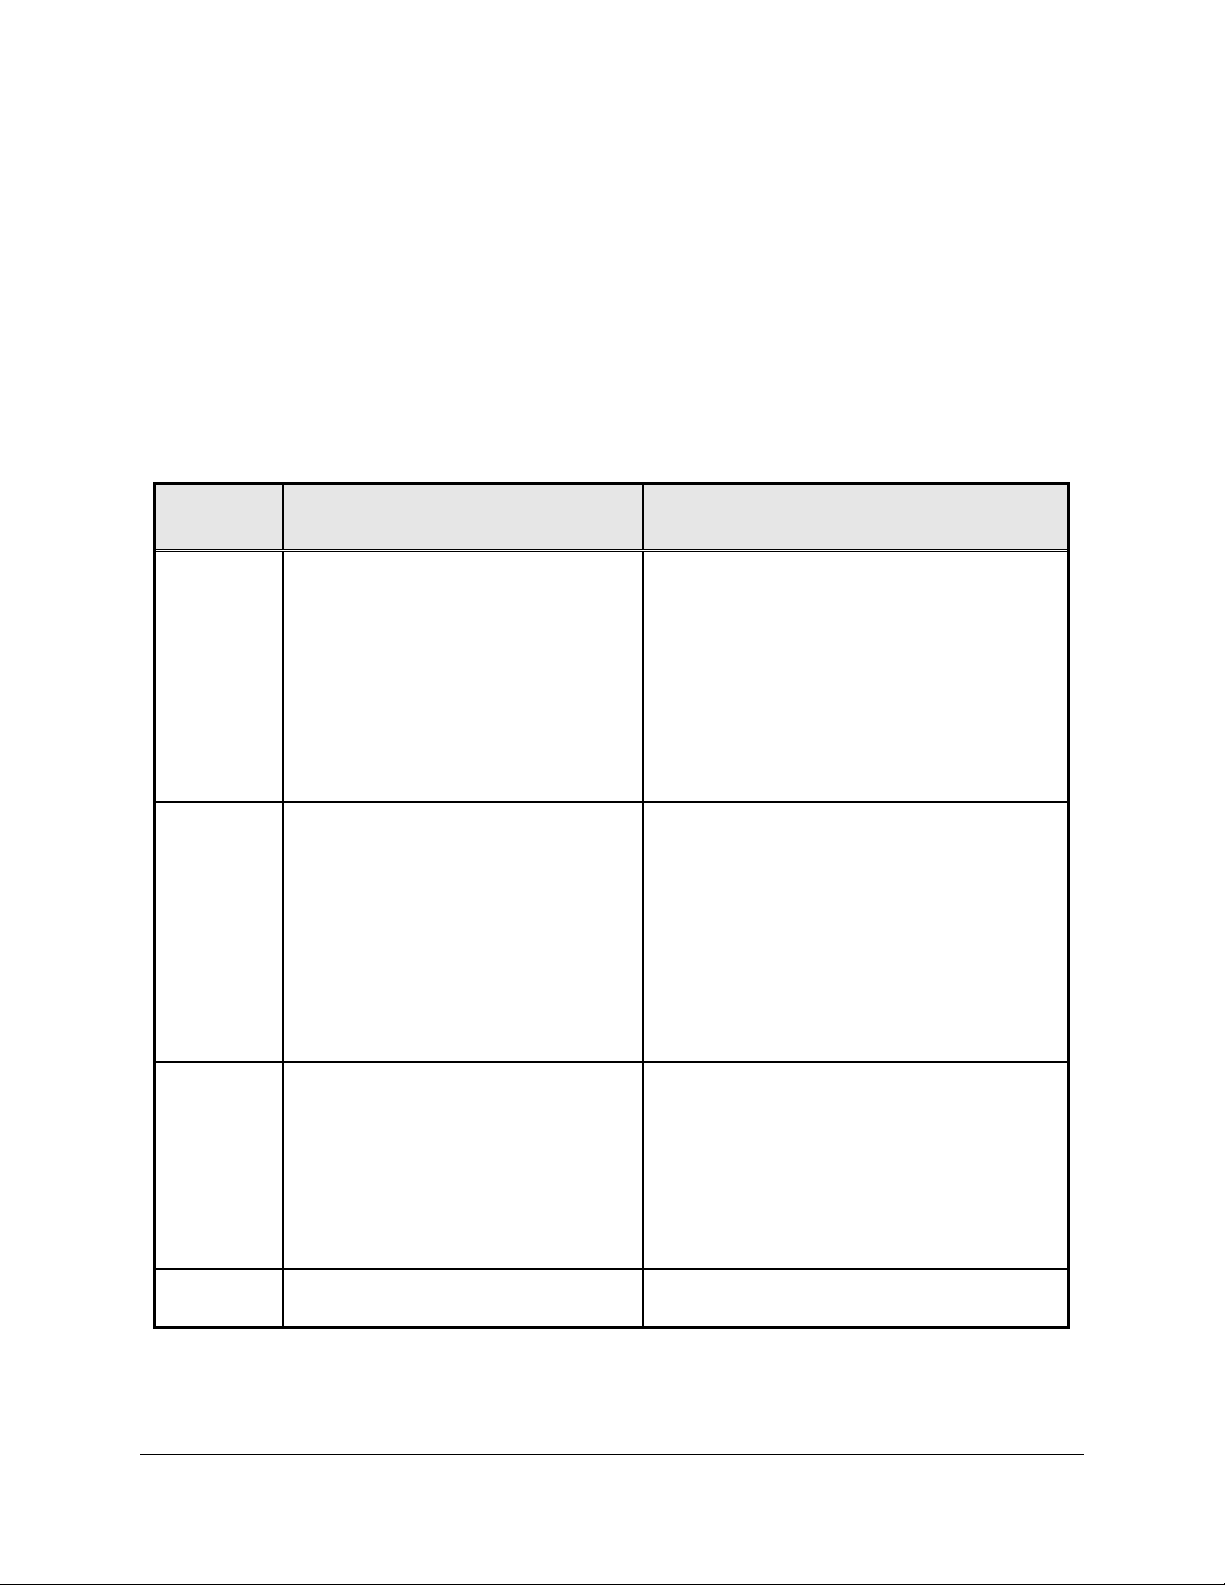
2.2 Supported Formats
The table below summarizes all input and output available for each DVI20-Device outlined in this
manual.
DVI20Device
HDVI-20s SD-SDI: NTSC, PAL
HD-SDI: all HD formats, NTSC, PAL, 2K-
psf, 2K-p, 720p-50
DVI-D: all DVI-D interlaced and
progressive scan formats up to 1920 x
1200
DVI-A: all DVI-A RGB analog formats up
to 1920 x 1200 (YPbPr not supported on
this input)
HDVI-20d SD-SDI: NTSC, PAL (Link A)
HD-SDI: all HD formats, NTSC, PAL, 2K-
psf, 2K-p, 720p-50, 422 (Link A) and 444
(Link A and Link B)
DVI-D: all DVI-D interlaced and
progressive scan formats up to 1920 x
1200
DVI-A: all DVI-A RGB analog formats up
to 1920 x 1200 (YPbPr not supported on
this input)
XDVI-20 HD-SDI: all HD formats, NTSC, PAL, 2K-
psf, 2K-p, 720p-50
DVI-D: all DVI-D interlaced and
progressive scan formats up to 1920 x
1200
DVI-A: all DVI-A RGB analog formats up
to 1920 x 1200 (YPbPr not supported on
this input)
Supported Input(s) Supported Output(s)
DVI (Digital RGB) and DVI-HDTV (Digital RGB
with HDTV resolution/frame rate) up to 1920 x
1200 progressive scan and 1080i formats
DVI (Digital RGB) and DVI-HDTV (Digital RGB
with HDTV resolution/frame rate) up to 1920 x
1200 progressive scan and 1080i formats
DVI (Digital RGB) and DVI-HDTV (Digital RGB
with HDTV resolution/frame rate) up to 1920 x
1200 progressive scan and 1080i formats
SD-SDI and HD-SDI: NTSC, PAL, 720p, 1080i
and 1080p
DSDI-20 DVI-D: interlaced and progressive sources
up to 1920 x 1200
SD-SDI and HD-SDI: NTSC, PAL, 720p, 1080i
and 1080p at all frame rates.
DVI.OM.000262.DRM Page 7 of 33 Version 1.4
Doremi Labs
Page 8

Note: According to the input(s)/output(s) available for each device, the OSD menus and remote
controller functions might not all be active for each device. For example, no SDI input setting will
be possible for the DSDI-20 device.
For clarity in this document, the OSD and remote controller functions are presented in their
entirety, while active functions might differ from one device to another.
Please refer to the table above to identify which function is applicable to each device.
2.3 DVI20-Devices Operation
On power up, the DVI20-Devices will automatically detect the input format of the selected input
and will send a message to the monitor connected via DVI requesting its EDID parameters. The
EDID parameters of the connected monitor will be used by the DVI20-Devices to determine its
output resolution.
The DVI20-Devices DVI-D output has 2 major controls: Resolution and Frequency.
Resolution:
Can be set to Auto (default) or forced to 1024x768, 1280x720, 1280x768, 1280x1024, 1366x768,
1400x1050, 1920x1080, 1920x1200 or 1080i
Frequency:
Can be set to 48Hz, 50Hz, 60Hz (default) or forced to Frame Sync.
2.3.1 Resolution
The output resolution can be set to Auto, 1024x768, 1280x720, 1280x768, 1280x1024,
1366x768, 1400x1050, 1920x1080, 1920x1200 or 1080i, using the On Screen Display (OSD). In
Auto mode, the output resolution will be set to match the monitor up to 1920x1200.
If the EDID response of the monitor is not recognized or is higher than
1920x1200, the DVI20-Device will default to 1280x1024. In the case where this
same monitor does not support 1280x1024, the output resolution can bet forced
using the infrared remote control and without the OSD interface by using the
remote control DVI out selection.
If the DVI20-Device DVI output is connected to a consumer TV that reports 1920x1080
interlaced, the unit will default to output 1080i.
In case of a TV set that reports 1080i, the HDVI-20 device will output a compliant 1080i
signal and the TV will display it properly.
XDVI-20 only:
The XDVI-20s cannot display both DVI-D and SDI at the same time - use the remote
control DVI out or SDI out selection.
Note: In case the selection is for SDI out, the displayed DVI output is not valid.
2.3.2 Frequency
The default frequency is 60Hz because it works with all displays. If your display supports lower
frequencies and if your input source is running at 24/48, 25/50 Frames/Fields per second, you
can avoid motion artifacts by forcing the output frequency to Frame Sync.
DVI.OM.000262.DRM Page 8 of 33 Version 1.4
Doremi Labs
Page 9

2.3.3 DVI-A Special Instructions
Analog input sources can be noisy and jittery. We strongly recommend using the digital inputs
whenever possible. If you have to use the analog input, make sure your timing is compliant with
the CEA-861-B standard, especially for 1920x1080p @ 60 Hz. These are the Guidelines for DVIA inputs:
1. The timing must comply with the standards: VESA or CEA
2. The Pixel Clock should be less than 165MHz
3. For 1920x1080, the timing must comply with CEA-861B that yields a pixel clock of 148.5
MHz.
4. For 1920x1200, the timing must comply with VESA or CEA, the total number of pixels
must be less than 2200 and the pixel clock must be lower than 165MHz.
The pixel clock P is equal to:
P = total_horizontal_size x total_vertical_size x refresh.
For a 1024*768 at 85 Hz:
total_horizontal_size = 1376 (1024 pixels + horizontal blanking)
total_vertical_size = 808 (768 + horizontal blanking)
refresh = 85
P = 1376 * 808 * 85
P = 94503680 Hz
P = 95.5 MHz
DVI.OM.000262.DRM Page 9 of 33 Version 1.4
Doremi Labs
Page 10
3 Infrared Remote Controller
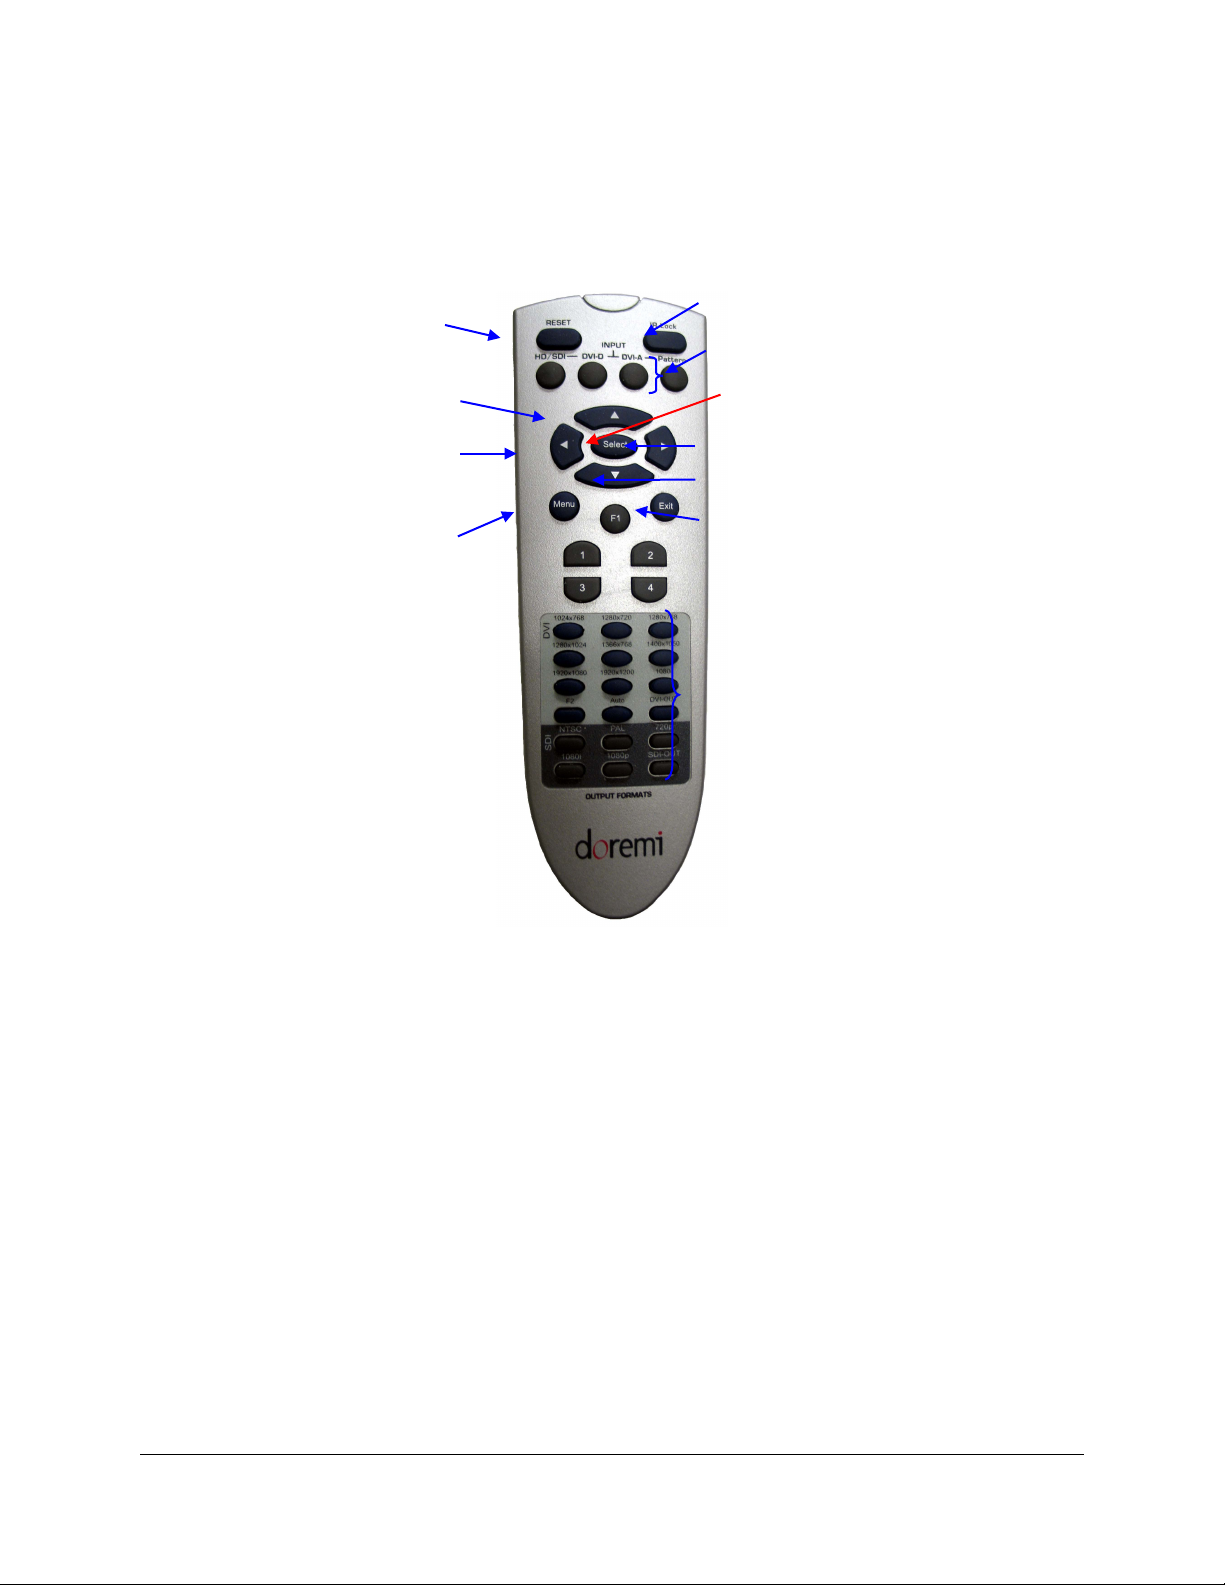
3.1 Remote Controller Overview
“Reset” button
“IR Lock” button
Input format area
“Up Arrow”
button
“Left Arrow”
button
“Menu”
button
“Select” button
“Right Arrow”
button
“Down Arrow”
button
“Exit” button
Output Format
Area
Figure 1: Infrared Remote Controller
The remote is composed of four different areas presented below:
Input format area
Arrows area
“Menu” and “Exit” buttons
Output format area
DVI.OM.000262.DRM Page 10 of 33 Version 1.4
Doremi Labs
Page 11

3.2 Remote Controller Functions
DVI-device Remote Control Function
Input format area Select HD-SDI, SDI, DVI-D, DVI-A or Pattern
“IR lock” button Lock/unlock the IR
“Reset” button Reset to default settings
“Menu” button Access the menu system
Output format area Force the DVI-D output to:
Auto Mode
1024x768
1280x720
1280x768
1280x1024
1366x768
1400x1050
1920x1080
1920x1200
1080i
Force the SDI output to:
720p
1080i
1080p
NTSC
PAL
“Up Arrow” button Navigate up
“Down Arrow” button Navigate down
“Left Arrow” button Navigate left
“Right Arrow” button Navigate Right
“Exit” button Exit submenu and menu
“Select” button Activate the selection
3.3 Reset I/O settings
This mode is very important should you lose track of the I/O settings of the DVI20-Devices.
When the I/O settings are restored, the DVI20-Devices output will be set to the assigned Default
Setting – see HDVI-CP application for Factory Default Settings.
To Reset I/O settings, press the RESET button of the Remote controller six consecutive times,
then reboot the unit – unplug and re-plug the power.
DVI.OM.000262.DRM Page 11 of 33 Version 1.4
Doremi Labs
Page 12

4 Input/Output Settings - Quick Start
4.1 Input Format Setting
Note: According to the input(s)/output(s) available for each device, the remote controller settings
might not all be active for each device.
For clarity in this document, the remote controller settings are presented in their entirety, while
available settings might differ from one device to another.
Please refer to the table in Section 2 to identify which setting is applicable to your DVI20-Device.
To select the input format corresponding to your usage, press one of the four buttons available at
the top of the remote controller.
Step 1: Press one of the
available input
format
Figure 2: Quick Input Format Setting
You have the choice between: HD/SDI, DVI-D, DVI-A and Pattern. Note that “Pattern” will
generate a color bar pattern.
4.2 Output Format Setting
4.2.1 DVI Output Format
To change the output format to a specific DVI format, hit “DVI-OUT” in the remote “Output
Format Area” – see Figure 1 - and press the corresponding output format: 1024x768, 1280x720,
1280x768, 1280x1024, 1366x768, 1400x1050, 1920x1080, 1920x1200 or 1080i. This procedure
is presented in the picture below:
Step 2: Press one of the
available DVI output
format
Step 1: Press “DVI-OUT”
Figure 3: Quick DVI Output Format Setting
4.2.2 SDI Output Format
To set the output format to a specific SDI format, just hit “SDI-OUT” in the remote “Output Format
Area” – see Figure 1 - and press the format you want to set: 720p, 1080i, 1080p, NTSC or PAL.
This procedure is presented in the picture below:
DVI.OM.000262.DRM Page 12 of 33 Version 1.4
Doremi Labs
Page 13

Step 2: Press one of the
available SDI output
format
Step 1: Press “SDI-OUT”
Figure 4: Quick SDI Output Format Setting
Note: To select the frame rate for a specific format, use the OSD menu or the HDVI-CP GUI.
DVI.OM.000262.DRM Page 13 of 33 Version 1.4
Doremi Labs
Page 14

5 OSD Menus
To access the OSD menu, press “Menu” on the remote controller – see Figure 1. The OSD will
display six icons:
Input Source
Selection
Picture
Settings
OSD
Settings
SDI
Settings
DVI Output
Settings
Miscellaneous
Figure 5: OSD Menu Icons
To navigate through the menus, use the four arrow buttons on your remote as Up, Down, Left,
Right – see Figure 1. When settings are done, or to go one level above within the menu items,
press the “Exit” button on the remote controller.
Note: According to the input(s)/output(s) available for each device, the OSD menus might not all
be active for each DVI20-Device.
For clarity, the OSD menus are presented in their entirety, while active menus might differ from
one device to another – each menu might also display/hide some items if they are not available
for a device.
Please refer to the table in section 2 to identify which OSD menu is available for your DVI20Device. In the example of the DSDI-20 device, the only input available is DVI-D. So the first OSD
menu item - Input Source Selection - will not be displayed.
By default, the remote is unlocked. Paragraphs below present the OSD usage.
5.1 Input Source Selection
To enter the Input Source Selection window presented in Figure 6, go to the Input Source
Selection icon using the remote controller arrows - see Figure 5 - and hit “Select” – see Figure 1.
The Input Source Selection window allows you to choose the input format among four different
possibilities:
DVI-A
DVI-D
Pattern
HD-SDI
DVI.OM.000262.DRM Page 14 of 33 Version 1.4
Doremi Labs
Page 15

To choose one of these four formats, go to its icon using the remote controller arrows – it will be
displayed in blue – and hit “Select”:
HD-SDI input format
selected
Figure 6: “Input Selection” Window Example
When the appropriate setting is done, press “Exit” on the remote controller to go back to the main
menu items selection presented at the beginning of Section 5. Then, press “Exit” a second time
to exit the OSD menu, or select another menu item as presented in this Section 5.
5.2 Picture Settings
To enter the Picture Settings window presented in Figure 9, go to the “Picture Settings” icon of
the menu using the remote controller arrows – see Figure 5 - and hit “Select” – see Figure 1.
The “Picture Settings” window allows you to set different picture parameters which belong to four
main groups:
Display
Image
Position
Color
Each main group allows you to change one Picture parameter according to the description
provided in the following table:
Main Group Parameters list
DISPLAY Access to: Brightness, Contrast, Hue, Saturation and Flesh Tone settings
IMAGE Access to Scaling, Adaptive De-interlacing, Noise Reduction, Auto-Filtering, Film
Mode Detect and Sharpness settings
POSITION Access Input Horizontal and Vertical Frame Offset and Horizontal and Vertical Flip
Control
COLOR Access to sRGB, Gamma Correction, Color Temperature, Red, Green and Blue
settings
DVI.OM.000262.DRM Page 15 of 33 Version 1.4
Doremi Labs
Page 16

Select one of these main groups using the remote controller arrows and hit “Select”. The
parameters belonging to the selected group will then be displayed in the “Picture Settings”
windows just below the main groups menu area as presented below:
Main groups area
Contrast parameter
selected
Parameters area
Figure 7: “Picture Settings” Window – Display Group
When the appropriate settings are done, press “Exit” on the remote controller to be able to
choose another main group item as presented below, or press a second time “Exit” to go back to
the OSD main menu items level.
The settings windows belonging to the other main groups are illustrated in the figures below:
Main groups area
Parameters area
Figure 8: “Picture Settings” Window – Image Group
DVI.OM.000262.DRM Page 16 of 33 Version 1.4
Doremi Labs
Page 17

Main groups area
Parameters area
Figure 9: “Picture Settings” Window – Position Group
Main groups area
Parameters area
Figure 10: “Picture Settings” Window – Color Group
5.3 OSD Settings
To enter the “OSD Settings” window presented in Figure 11, go to the OSD Settings icon of the
menu using the remote controller arrows – see Figure 5 - and hit “Select” – see Figure 1.
The “OSD Settings” window allows you to modify the way the On-Screen-Display is performed.
DVI.OM.000262.DRM Page 17 of 33 Version 1.4
Doremi Labs
Page 18

Figure 11: “OSD Settings” Window Example
When the appropriate settings are done, press “Exit” on the remote controller to go back to the
main menu items selection presented at the beginning of Section 5. Then, press “Exit” a second
time to exit the OSD menu, or select another menu item as presented in this Section 5.
5.4 SDI Settings
To enter the SDI Settings window presented in Figure 12, go to the SDI Settings icon of the
menu using the remote controller arrows – see Figure 5 - and hit “Select” – see Figure 1.
Depending on the DVI20-device, the SDI Settings window will allows you to choose the link color
(“RGB”, “YPbPr” and “XYZ’”) and/or the SDI output format (“1080i”, “1080p”, “720p”, “SD”) and
the frame rate (“23.98”, “24”, “25/50”, “29.97/59.97”, “30/60”).
Use the remote controller arrows to choose the appropriate setting and hit “Select”.
Figure 12: “SDI Settings” Window Example – HDVI-20s
DVI.OM.000262.DRM Page 18 of 33 Version 1.4
Doremi Labs
Page 19

Figure 13: “SDI Settings” Window Example – XDVI-20
When the appropriate settings are done, press “Exit” on the remote controller to go back to the
main menu items selection presented at the beginning of Section 5. Then, press “Exit” a second
time to exit the OSD menu, or select another menu item as presented in this Section 5.
5.5 DVI Output Settings
To enter the “DVI Output Settings” window presented in Figure 14, go to the DVI Output Settings
icon of the menu using the remote controller arrows – see Figure 5 - and hit “Select” – see Figure
1.
The “DVI Output Settings” window allows you to set DVI parameters using the arrows. Use the
remote controller arrow to choose the appropriate setting and hit “Select”.
Figure 14: “DVI Output Settings” Window
When the appropriate settings are done, press “Exit” on the remote controller to go back to the
main menu items selection presented at the beginning of Section 5. Then, press “Exit” a second
time to exit the OSD menu, or select another menu item as presented in this Section 5.
DVI.OM.000262.DRM Page 19 of 33 Version 1.4
Doremi Labs
Page 20

DVI
Resolution
-Auto (default): Use with all monitors up to 1920x1200. If the monitor reports a bad or
unsupported resolution, the HDVI-20s will default to 1280x1024. In the case
where this same monitor does not support 1280x1024, the output resolution can
be forced using the infrared remote control and without the OSD interface by
using the TV/Video + Number combination (see paragraph 2.3.1)
-1024x768, 1280x720, 1280x768, 1280x1024, 1366x768, 1400x1050, 1920x1080,
1920x1200 and 1080i
DVI
Frequency
Pattern
Mode
H Sync
Width
V Sync
Width
H Back
Porch
V Back
Porch
-48Hz: Forces the DVI output to 48Hz
-50Hz: Forces the DVI output to 50Hz
-60Hz: This is the default mode, it should work with all displays 1920x1200 or below
-Frame Sync: Eliminate motion artifacts by forcing the DVI output signal frequency to
the same or double the SDI input frequency.
All 24 and 48 FPS formats will be displayed at 48Hz
All 25 and 50 FPS formats will be displayed at 50Hz
All 29.97 (30) and 59.94 (60) FPS formats will be displayed at 59.94Hz (60Hz)
This menu has been removed in version 1.38 and higher. When input is set to pattern,
the only available pattern is Color Bars.
This setting is normally detected from the EDID message. If for any reason the EDID is
wrong, these settings can be manually adjusted. Pressing ENTER twice will restore the
default value
Same note as for H Sync Width
Same note as for H Sync Width
Same note as for H Sync Width
DVI.OM.000262.DRM Page 20 of 33 Version 1.4
Doremi Labs
Page 21

5.6 Miscellaneous
To enter the “Miscellaneous” window presented in Figure 15, go to the Miscellaneous icon of the
menu using the remote controller arrows – see Figure 5 - and hit “Select” – see Figure 1.
The “Miscellaneous” window allows you to set Miscellaneous parameters using the navigation
arrows and “Select” buttons – see Figure 1.
Figure 15: “Miscellaneous” Window Example
This menu can be used to reset the factory default settings of the unit. It also displays the
monitor’s native resolution, the current DVI output resolution, the current DVI output frequency,
the infrared remote control status, the current input and the firmware version. After you reset the
factory defaults, you MUST recycle power on the unit.
Note that some items might not be present for all DVI20-devices. For example, the DSDI-20
related “Miscellaneous” window would not contain “Current DVI Out Resolution”.
DVI.OM.000262.DRM Page 21 of 33 Version 1.4
Doremi Labs
Page 22

6 HDVI-CP Application
6.1 Overview
HDVI-CP is the application used to control/configure/update any DVI20-Device.
Figure 16: HDVI-CP GUI – I/O Settings Tab
DVI.OM.000262.DRM Page 22 of 33 Version 1.4
Doremi Labs
Page 23

6.2 HDVI-CP GUI Tabs
6.2.1 I/O Settings Tab
The I/O Settings Tab is presented above – see Figure 16. It allows the selection of the
input/output formats and of the frame rate.
6.2.2 Display Tab
The Display Tab allows adjustments to the device output.
Figure 17: HDVI-CP GUI – Display Tab
DVI.OM.000262.DRM Page 23 of 33 Version 1.4
Doremi Labs
Page 24

6.2.3 Position Tab
The Position Tab allows adjustments to the output position, and orientation.
Figure 18: HDVI-CP GUI – Position Tab
DVI.OM.000262.DRM Page 24 of 33 Version 1.4
Doremi Labs
Page 25

6.2.4 Color Tab
The Color Tab allows adjustments to the colors temperature and gamma.
Figure 19: HDVI-CP GUI – Color Tab
6.3 Connection
To connect to the DVI20-Device, use the supplied cable to connect your computer to the device
RS-422 port.
Go to the menu “Settings/Connect to…” and choose the appropriate port. A check mark will then
indicate the connection.
DVI.OM.000262.DRM Page 25 of 33 Version 1.4
Doremi Labs
Page 26

Green Dot indicating connection
Figure 20: HDVI-CP GUI – “Settings/Connect to …” Menu
6.4 Reset To Factory Settings
The Factory Settings can be re-defined by going to the menu “Settings/System Settings…”. The
System Settings window will appear. Enter the default settings using the Default Settings window
– see below - then press “Reset Factory Settings”.
Figure 21: Default Settings Window
6.5 Quick Settings Access
Settings can be saved into files using the menu “Save/Save Settings”.
DVI.OM.000262.DRM Page 26 of 33 Version 1.4
Doremi Labs
Page 27

Existing settings can be assigned to a quick access button (e.g. F1, F2, …F8): go to the menu
“Settings/Settings Quick Access”. The “Settings Quick Access” window will appear:
Figure 22: “Settings Quick Access” Window
You can assign a different settings file to each of the Fx button by browsing for a settings file with
the corresponding “Assign to Fx” button. Then click on “OK”. You can then easily switch between
the various existing configuration files by pressing the corresponding Fx button – the active one
is displayed in blue.
DVI.OM.000262.DRM Page 27 of 33 Version 1.4
Doremi Labs
Page 28

7 Firmware Upgrade
To upgrade the firmware of the DVI20-Devices, use the HDVI-CP application. You need to be
connected to an appropriate port as presented above.
Go to the menu “Settings/System Settings…”. The “Systems Settings” window will appear as
below:
Figure 23: “System Settings” Window
Choose the firmware upgrade binary file using the “Browse button”, then click on “Execute
Upgrade”:
Figure 24: “Firmware Upgrade” Window – Upgrade Completed
When the upgrade is completed, you will be prompted to reboot the device – unplug and re-plug
the power.
DVI.OM.000262.DRM Page 28 of 33 Version 1.4
Doremi Labs
Page 29

8 Recommended LCD Monitors Specifications
16ms response time or less for best motion performance.
Support for 1:1 display mode, in this mode the LCD will not scale the video and shows a
pixel-to-pixel image. (Useful when the LCD native pixel resolution is higher than
1920x1080).
24/48 frequency support, in this mode 24 frame video can be displayed at its native
frame rate, and eliminate the need to re-process to 30 fames. (For LCDs that only
support 25/50 and 30/60 frequency the HDVI-20 can be set to re-processes the video to
25 or to 30 frames)
8.1 Note about the Viewsonic VP2290b
Because the VP2290b is a 3840x2400 monitor, the DVI20-Devices output must be forced to
1920x1200. This monitor supports Frame Sync and can be operated at frequencies as low as
24Hz. In addition, this monitor is pre-adjusted according to ITU-709 to be used as a high def.
reference monitor. The combination of the DVI20-Devices with the VP2290b creates a low cost
reference monitor that competes with CRT reference monitors that are priced over $30,000 US
Dollars.
8.2 Note about the Apple Cinema Displays
All Apple cinema displays are supported by the DVI20-Devices except for the 30”. The Apple
displays support 60Hz frequency only. Frame Sync Mode should not be set with these monitors;
the DVI20-Devices will display all input resolutions at 60Hz. Note that Apple Cinema displays
with the ADC connector will need a DVI to ADC converter.
DVI.OM.000262.DRM Page 29 of 33 Version 1.4
Doremi Labs
Page 30

9 Wiring of the PC to DVI20-Devices cable
2
3 4 5
6 7 8
1
6
5 4 3 2 1
9 8 7
H D V I - 2 0 s
m i n i D I N 8 - M
F r o n t V i e w
V 1 D B 9 - F
F r o n t V i e w
5
G N D
3
R X B
2
T X A
4
S I G G N D
8
R X +
5
R X -
3
T X -
F r a m e G N D
F r a m e G N D
This is basically a RS232 to RS422 cable:
RS422
mini DIN8-M
Front View
RS232 DB9-F
Front View
DVI.OM.000262.DRM Page 30 of 33 Version 1.4
Doremi Labs
Page 31

10 DVI20-Devices Specifications
INPUT
SMPTE 259M-C (270Mbps) and SMPTE 292M (1.485, 1.485/1.001 Gbps)
720p @ 60, 59.94 and 50Hz
1080p @ 30, 29.97, 25, 24 & 23.98Hz,
1080i @ 60, 59.94, 50, 48 & 47.95Hz
2K-p & 2K-psf @ 23.98 & 24Hz (2048x1080)
NTSC, PAL.
OUTPUT
DVI (Digital RGB) and DVI-HDTV (Digital RGB with HDTV resolution/frame rate) up to
1920x1200 progressive scan and 1080i formats.
Connector: DVI-D, Female, compliant to DVI 1.0
SUPPORTED MONITORS
Depending on your DVI monitor's resolution, the HDVI will either scale the video to fit your
screen or output the video without scaling.
GENERAL
Size: Approx. 1 1/8th x 3 ¾ x 5 ½ (28mm x 95mm x 14mm)
Power: External Power Adapter with a locking power connector, AC IN 110-220V, DC OUT
+5.0V, 2.0A.
DVI.OM.000262.DRM Page 31 of 33 Version 1.4
Doremi Labs
Page 32

11Acronyms
Term Definition
DVI Digital Video Input
GUI Graphical User Interface
HD-SDI High Definition Serial Digital Interface
IR InfraRed
OSD On Screen Display
SDI Serial Digital Interface
DVI.OM.000262.DRM Page 32 of 33 Version 1.4
Doremi Labs
Page 33

12Document Revision History
Date Version Description
10/01/2007 1.1 First version released
10/24/2007 1.2 Minor editorial changes
07/26/2012 1.3 Logo and contact information updated.
05/06/2014 1.4 Minor editorial changes made.
DVI.OM.000262.DRM Page 33 of 33 Version 1.4
Doremi Labs
 Loading...