

Page 1

Doremi Cinema Server
Configuration for Dolby Atmos
Version 1.1
The English version of this document is the only legally binding version.
Translated versions are not legally binding and are for convenience only.
D2K.OM.003651.DRM Page 1 of 33 Version 1.1
Doremi Labs
Page 2

Table of Contents
1 Introduction...............................................................................................................................3
1.1 Purpose.............................................................................................................................3
1.2 Doremi Server Security Manager and Firmware Versions...............................................3
1.3 Dolby CP850 (Audio Processor) Software Version..........................................................3
1.4 Required Items..................................................................................................................3
2 ShowVault Server Configuration..............................................................................................5
2.1 Server Configuration.........................................................................................................5
2.2 Dolby CP850 (Audio Processor) Cable Configuration......................................................7
2.3 Doremi IMB Cable Configuration......................................................................................8
2.4 Request DLM (Doremi License Message)........................................................................8
2.5 License Manager.............................................................................................................8
2.5.1 Adding a License (DLM)...........................................................................................9
3 Adding the Audio Processor...................................................................................................12
3.1 Playing Dolby Atmos Content.........................................................................................18
3.2 Verifying Atmos Content.................................................................................................19
4 Dolby CP850 Web GUI..........................................................................................................22
4.1 Accessing the Dolby CP850 Web GUI...........................................................................22
5 Troubleshooting Tips..............................................................................................................27
5.1 Channels Not Recognized..............................................................................................27
5.1.1 Check the Cables....................................................................................................27
5.1.2 Disable Template Mapping......................................................................................27
5.2 Dolby Atmos Content Not Recognized...........................................................................30
5.3 KDMs for Dolby Atmos Content (CPL)...........................................................................30
5.4 Dolby Atmos Channel Drop Out.....................................................................................30
5.5 Contact Information........................................................................................................31
6 Revision History.....................................................................................................................33
D2K.OM.003651.DRM Page 2 of 33 Version 1.1
Doremi Labs
Page 3

1 Introduction
1.1 Purpose
This document provides instructions on how to setup and configure the ShowVault-3, ShowVault-4,
and associated IMB, DCP2000, or DCP-2K4 units to use the Dolby Atmos feature.
1.2 Doremi Server Security Manager and Firmware Versions
The Doremi server and IMB will need to be at the following Security Manager (SM), Firmware (FW),
and Software (SW) versions.
Server
DCP2000 and DCP-2K4 Servers
• SW: 2.6.4 (or latest version)
• FW: 21.3s (or latest version)
• SM: 2.1.102 (or latest version)
ShowVault-3 and ShowVault-4 Servers
• SW: 2.6.4 (or latest version)
IMB
• FW: 30.07t (or latest version)
• SM: 5.1.107 (or latest version)
1.3 Dolby CP850 (Audio Processor) Software Version
The Dolby CP850 will need to be at the following Software (SW) Version:
• SW: SW V_1.3.0.1 (or latest version)
1.4 Required Items
The following items are required for this procedure:
• Doremi DCP2000/DCP-2K4 Server or Doremi ShowVault/IMB
• Dolby CP850 (Audio Processor)
• DLM (Refer to Section 2.4)
D2K.OM.003651.DRM Page 3 of 33 Version 1.1
Doremi Labs
Page 4

This page was left blank intentionally
D2K.OM.003651.DRM Page 4 of 33 Version 1.1
Doremi Labs
Page 5
2 ShowVault Server Configuration
2.1 Server Configuration
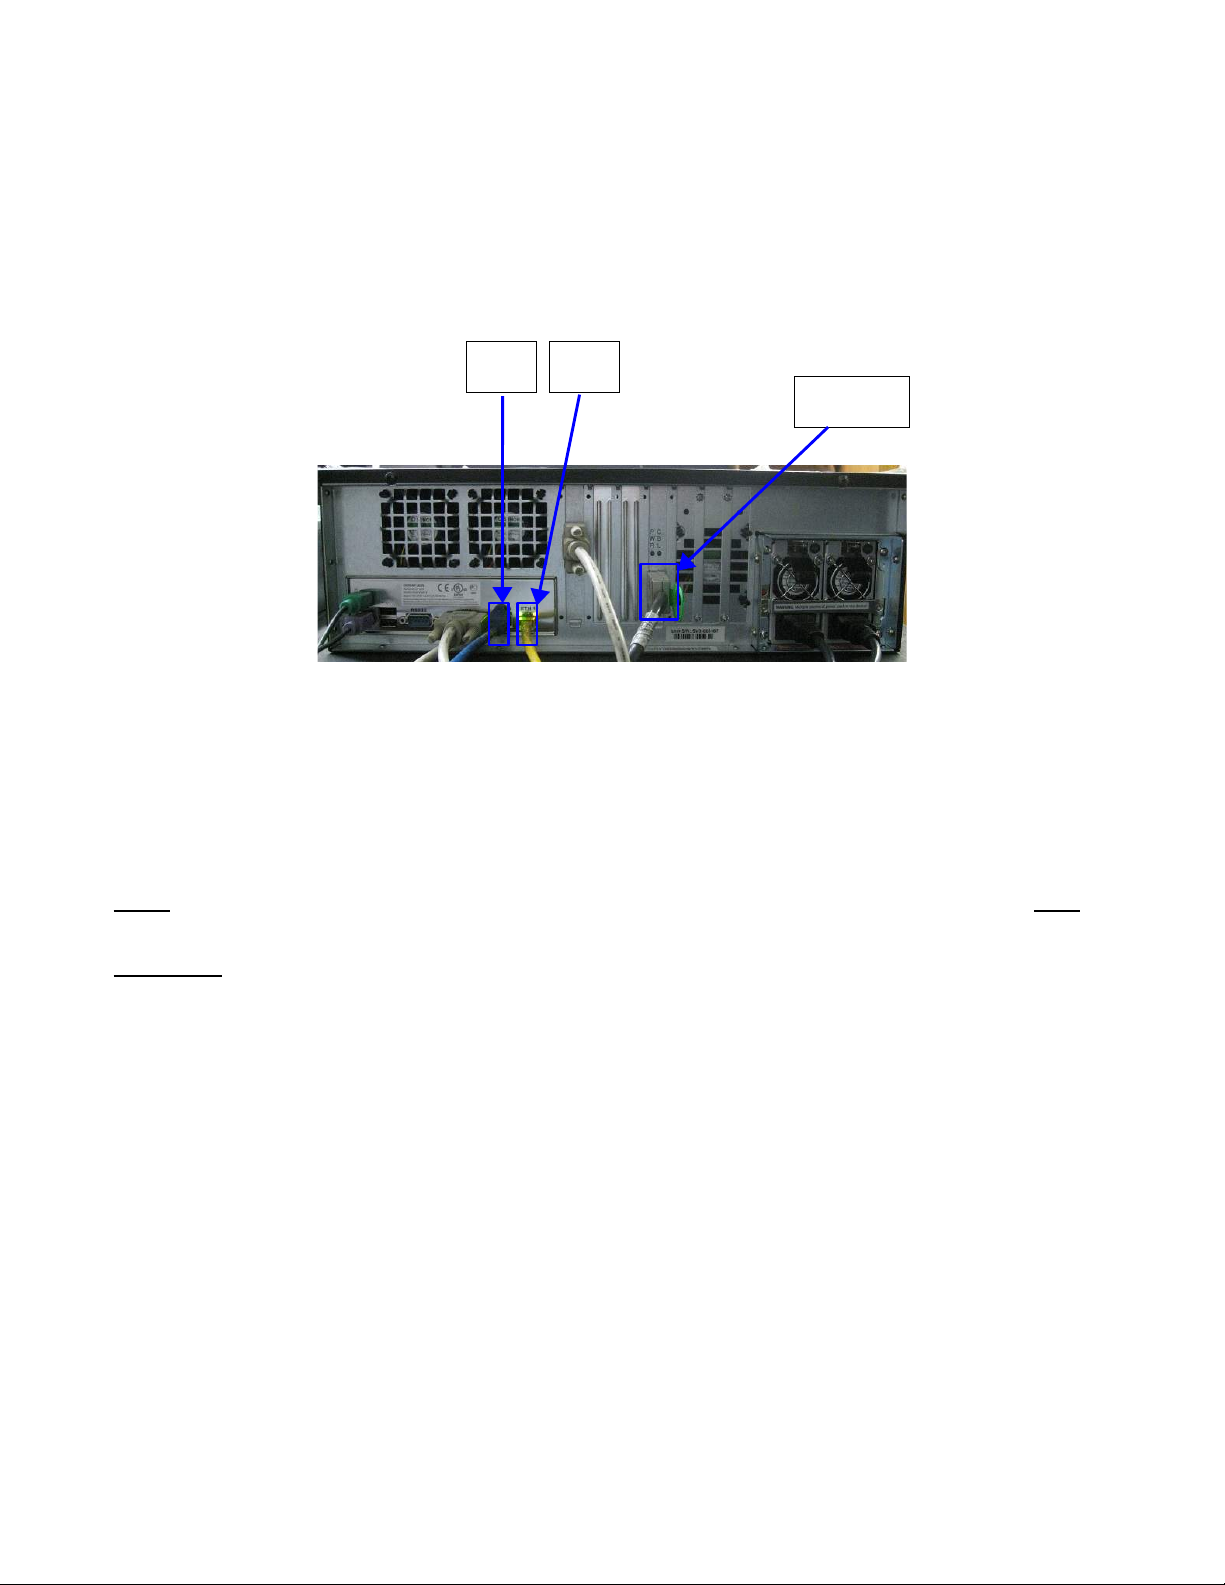
Follow the procedure below for the cabling configuration:
Eth0
Port
Figure 1: Doremi Server
• Connect an Ethernet cable to the ETH0 port on the Doremi server and connect the other end
to a Gigabit (1000) Switch. Connect an ethernet cable to the Command port on the Dolby
CP850 and connect the other end of the ethernet cable to the same switch you connected the
Doremi server to. (Figure 1 and Figure 3).
Note: The Dolby CP850 should be configured under the management/auditorium network and NOT
on the media network.
Eth1
Port
PCI-e
Port
Important: The Doremi server will need to be able to communicate with the Dolby CP850
(Same sub-network/IP range).
• Refer to Figure 2 for an example of how the equipment should be connected.
D2K.OM.003651.DRM Page 5 of 33 Version 1.1
Doremi Labs
Page 6

Figure 2: Connection Diagram
D2K.OM.003651.DRM Page 6 of 33 Version 1.1
Doremi Labs
Page 7

2.2 Dolby CP850 (Audio Processor) Cable Configuration
Power Port
Port
“A”
Port
“A”
Figure 3: Dolby Audio Processor (CP850)
Port
“B”
Port
“B”
“Input”
Port
“Command”
Male
End
Port
Female
End
Figure 4: Audio Adapter
• Connect an Ethernet cable to the Command port on the CP850 and connect the other end to
the Network Switch. (Refer to Figure 3).
• Connect the Doremi to Dolby audio adapter to the L-com port on the Dolby CP850.
• Connect the audio adapter to the Doremi to Dolby audio adapter on the CP850.
• Connect an ethernet cable to port A (Ch:1-8) on the audio adapter and connect the other end
to the IMB AES port Ch: 1-8. (Refer to Figure 3 & 6)
• Connect an ethernet cable to port B (Ch: 9-16) on the audio adapter and connect it to the IMB
AES port Ch. 9-16.(Refer to Figure 3 & 6)
• Connect the power cable to the power port of the audio processor.(Refer to Figure 3).
D2K.OM.003651.DRM Page 7 of 33 Version 1.1
Doremi Labs
Figure 5: Doremi to Dolby
Audio Adapter
Page 8

2.3 Doremi IMB Cable Configuration
CH. 1-8
Port
CH. 9-16
Port
Figure 6: Doremi IMB
Note: The IMB will need to be able to communicate with the Dolby CP850
(The projector and CP850 should be in the same sub-network).
PCI-e
Port
2.4 Request DLM (Doremi License Message)
You will need to contact Doremi Labs' customer service department to request a DLM in order to use
the Dolby Atmos feature.
Contact: cinemaorders@ doremilabs.com
Follow the procedure below on how to ingest a DLM:
2.5 License Manager
• To access the License Manager GUI, double-click the License Manager icon available in the
Control Panel.
• The following window will appear (if no licenses are installed on the unit):
Figure 7: License Manager GUI
D2K.OM.003651.DRM Page 8 of 33 Version 1.1
Doremi Labs
Page 9
2.5.1 Adding a License (DLM)
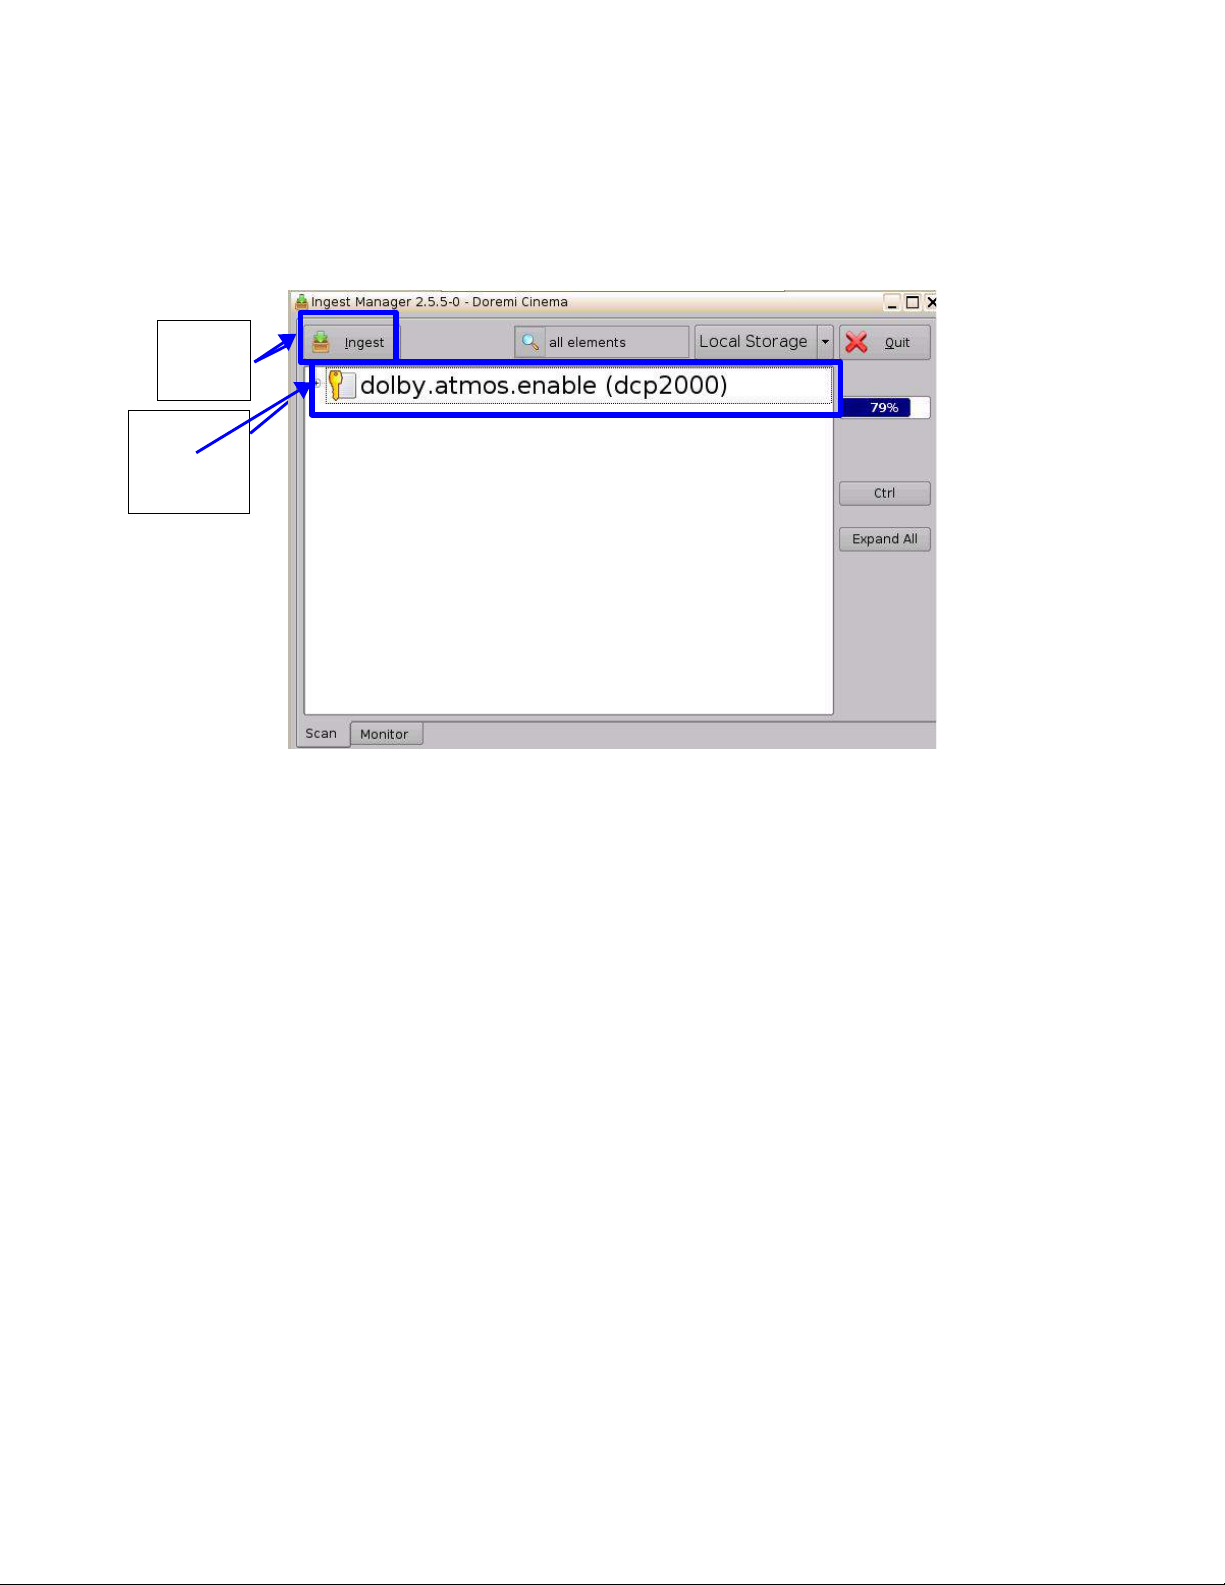
• To add a license, have the license file on a USB flash drive and connect it to a USB port on the
server.
• The Ingest Manager GUI will appear as illustrated below:
Ingest
Button
Select the
License
to add
Figure 8: License Ingest Example
Figure 9: License Ingest Example
• Select the license file(s) and click the Ingest button.
• The user will be asked for a password. Enter the appropriate password and press OK.
• You do not have to reboot the unit.
• Go back to the License Manager GUI from Menu → Control Panel. The ingested license(s) will
be visible as illustrated below:
D2K.OM.003651.DRM Page 9 of 33 Version 1.1
Doremi Labs
Page 10

View
Button
Atmos
License
Figure 10: License Manager GUI – Three Licenses Added
• To view the details of a, select it and click the View button. (Refer to Figure 10).
Figure 11: License View Window
• The License Information window will appear providing the validity window of the license.
• To delete a license from the unit, select it within the License Manager GUI and click the Delete
button.
• After ingesting a license, the associated device (e.g., “Audio Processor,” “Dolby DFC 100”) will
be visible in the Device Manager GUI.
D2K.OM.003651.DRM Page 10 of 33 Version 1.1
Doremi Labs
Page 11

This page was left blank intentionally
D2K.OM.003651.DRM Page 11 of 33 Version 1.1
Doremi Labs
Page 12

3 Adding the Audio Processor
Follow the procedure below to add the audio processor on the Doremi sever:
• On the Doremi server, open the “Device Manager” application by doing the following (Refer to
Figure 12):
◦ Menu → Doremi Apps → Device Manager.
Device
Manager
Doremi Apps
Menu
Button
Figure 12: Doremi Server Home Screen
D2K.OM.003651.DRM Page 12 of 33 Version 1.1
Doremi Labs
Page 13

• Once the Device Manager window opens, click on the Add button (Refer to Figure 13).
Add
Button
Figure 13: Device Manager Window
• Select Audio Processor from the Device list. (Refer to Figure 14).
Figure 14: Device List
D2K.OM.003651.DRM Page 13 of 33 Version 1.1
Doremi Labs
Page 14

• On the Device Manager window, select Audio Processor in the device selection column. (Refer
to Figure 15).
Audio
Processor
Selection
Device
Selection
Cloumn
Figure 15: Device Manager Window
D2K.OM.003651.DRM Page 14 of 33 Version 1.1
Doremi Labs
Page 15

• You will need to select the type of audio processor, do this in the Processor Model field in the
Device Manager window. (Refer to Figure 16).
Processor
Model Section
Figure 16: Device Manager Window
• Select Dolby as the device by clicking on the arrow to open the drop down menu. (Refer to
Figure 17).
Drop Down
Menu
Figure 17: Audio Processor Model Selection
Note: Once Dolby has been selected, Atmos will automatically be selected in the second field. (Refer
to Figure 18).
D2K.OM.003651.DRM Page 15 of 33 Version 1.1
Doremi Labs
Page 16

Atmos
Selected
Figure 18: Audio Processor Model Selection
• Enter the IP address of the Dolby CP850 in the IP address field.
IP Address
Field
Figure 19: IP Address Field
D2K.OM.003651.DRM Page 16 of 33 Version 1.1
Doremi Labs
Page 17

• Click the test button to confirm that the server is communicating with the CP850.
Figure 20: IP Address Test
Test Button
• Once the communication has been confirmed, click the Save button to save the settings.
Save Button
Figure 21: Saving Settings
Note: The audio processor needs to be enabled in order for Channel 14 and the Left Top Surround
and Right Top Surround to operate.
D2K.OM.003651.DRM Page 17 of 33 Version 1.1
Doremi Labs
Page 18

3.1 Playing Dolby Atmos Content
Follow the procedure below to play Atmos content from the Doremi server:
• Click the Menu button from the Doremi sever home-screen and select the Cinelister
application. (Refer to Figure 22).
Cinelister
Figure 22: Opening "Cinelister"
• A list of content will be displayed in the editor tab (Figure 23). Select the desired Atmos
content by highlighting it then click the Add to Show Playlist button.
Important: The user must insert a 5 second Black clip at the beginning of each Atmos CPL, to allow
the SM to connect to the CP850.
Playlist
Add to Show
Playlist
Button
Black Content
Atmos Content
Black Content
Atmos Content
Content List
Figure 23: Atmos Content Selection
D2K.OM.003651.DRM Page 18 of 33 Version 1.1
Doremi Labs
Page 19

3.2 Verifying Atmos Content
Follow the procedure below to verify that the selected content has the required Atmos data:
• In the playlist window, double click on the content to be played. This will open the
composition playlist properties window, as shown in Figure
Detail Button
Figure 24: Composition Playlist Properties
• Click on the Detail button, this will provide more information about the composition
playlist.
Content Title
Figure 25: Composition Playlist Configuration Window
D2K.OM.003651.DRM Page 19 of 33 Version 1.1
Doremi Labs
Page 20

• Using the chart below, verify the content has the required Atmos naming convention, by
checking the Audio type portion of the title. (Refer to Figure 26)
Figure 26: Digital Cinema Naming Convention V.9
D2K.OM.003651.DRM Page 20 of 33 Version 1.1
Doremi Labs
Page 21

This page was left blank intentionally
D2K.OM.003651.DRM Page 21 of 33 Version 1.1
Doremi Labs
Page 22

4 Dolby CP850 Web GUI
4.1 Accessing the Dolby CP850 Web GUI
Follow the procedure below to access the Dolby CP850 Web GUI:
• Open a Web browser on a MAC or PC that is on the same subnetwork as the CP850.
URL Field
Username
Username
Password
Figure 27: Dolby Audio Processor Log In Screen
• The default IP address will be required to access the Dolby Web GUI. Confirm the IP address
with your Dolby installer.
Caution: Do not change the Dolby Atmos Input port IP address. Do not connect this port to an
ethernet switch. If you experience any difficulty, contact Dolby Support.
• Once arriving to the Dolby Web GUI homepage (Figure 27), a username and password will be
needed. Contact your local Dolby support to obtain proper credentials.
D2K.OM.003651.DRM Page 22 of 33 Version 1.1
Doremi Labs
Page 23

• After logging in to the Dolby Web GUI, you will be taken to the Dolby Web GUI home-screen
(Status Screen), as shown in Figure 28.
Figure 28: Dolby Web GUI Home-Screen
D2K.OM.003651.DRM Page 23 of 33 Version 1.1
Doremi Labs
Page 24

Note: If the selected content does not have the required Atmos Data, the Dolby Atmos content section
will have a Red dot, Stating “ No Dolby Atmos frames available”, as shown in Figure 29.
Content without Atmos Data
Figure 29: No Dolby Atmos Content
D2K.OM.003651.DRM Page 24 of 33 Version 1.1
Doremi Labs
Page 25

• Dolby Atmos content should be green to show that the content playing has the appropriate
Atmos data and that Channel 14 is functioning.
Note: Ch.14 transfers the Dolby Atmos information from the player to the CP850(Audio Processor)
Content with Atmos Data
“Input Status” Section
Figure 30: With Dolby Atmos Content
• The row of green dots in the Input Status section signifies channels 1-8 and 9-16. (Refer to
Figure 30)
• If channels are disconnected then the dot will be grayed out, as shown in Figure 31.
Not
Recognized
Figure 31: Input Status Section
End of Procedure
D2K.OM.003651.DRM Page 25 of 33 Version 1.1
Doremi Labs
Page 26

This page was left blank intentionally
D2K.OM.003651.DRM Page 26 of 33 Version 1.1
Doremi Labs
Page 27

5 Troubleshooting Tips
Use the tips below to try and solve one of the issues mentioned below:
5.1 Channels Not Recognized
If the channels in the Input Status section are not recognized, try to fix the issue with the tips listed
below:
5.1.1 Check the Cables
Check the ethernet cable connections on the audio adapter. Refer to section 2.2 for connection
information.
5.1.2 Disable Template Mapping
Verify Template Mapping is disabled. Follow the procedure below to confirm audio mapping is
disabled:
• On the Doremi server home-screen, select “Menu”.
“Control”
Panel
“Menu”
Button
Figure 32: Home-Screen
D2K.OM.003651.DRM Page 27 of 33 Version 1.1
Doremi Labs
Page 28

• Select Control Panel.
• Select Audio Configuration.
Audio
Configuration
Figure 33: Control Panel Window
• Input the proper credentials in order to access the Audio Configuration menu then click OK.
Figure 34: Authentication Window
D2K.OM.003651.DRM Page 28 of 33 Version 1.1
Doremi Labs
Page 29

• Verify Template Mapping is Disabled. (Refer to Figure 35).
Figure 35: Template Mapping Disabled
“Disabled”
• If it is not disabled, click the drop down menu and select Disabled. Then click the Save button.
• Once saved, click the quit button to exit the Audio Configuration window.
Quit
Button
Disabled
Selection
Save
Button
Figure 36: Saving Settings
D2K.OM.003651.DRM Page 29 of 33 Version 1.1
Doremi Labs
Page 30

5.2 Dolby Atmos Content Not Recognized
If the Dolby Atmos content is not recognized, a gray or red dot will be present in the Dolby Atmos
Content section. (Refer to Figure 29)
Use the tips below to try and solve the issue:
• Verify the selected content is Atmos content. (Refer to Section 3.2 on how to verify the
content).
• Verify the audio processor is Enabled. (Refer to Section 3).
5.3 KDMs for Dolby Atmos Content (CPL)
All KDMs created to unlock encrypted Dolby Atmos content must have the audio watermark disabled
from only channels 12 and above.
Below is an example of what a correct KDM would look like:
• <ForensicMarkFlagList>
<ForensicMarkFlag>http://www.dcimovies.com/430-1/2006/KDM#mrkflg-audio-disable-above-
channel-12</ForensicMarkFlag>
</ForensicMarkFlagList
5.4 Dolby Atmos Channel Drop Out
If the system experiences Dolby Atmos drop out, when the system is only outputting the base bed
audio channels, (that being the first 10 physical channels, e.g. 5.1 or 7.1). The reason could be
network drop out or the network is not running fast enough.
Check which ethernet port your CP850 is on, e.g. 10.203.50.10
In the drmreport.txt, search for "IP Interfaces"
Example 1 - Dropped Packet
eth0 Link encap:Ethernet HWaddr 00:25:90:74:08:F8
inet addr:10.203.50.204 Bcast:10.203.50.255 Mask:255.255.255.0
inet6 addr: fe80::225:90ff:fe74:8f8/64 Scope:Link
UP BROADCAST RUNNING MULTICAST MTU:1500 Metric:1
RX packets:103696968 errors:0 dropped:12866overruns:0 frame:0
TX packets:34997690 errors:0 dropped:0 overruns:0 carrier:0
collisions:0 txqueuelen:1000
RX bytes:1007555312 (960.8 MiB) TX bytes:3127287593(2.9 GiB)
Base address:0x2000 Memory:d0300000-d0320000
D2K.OM.003651.DRM Page 30 of 33 Version 1.1
Doremi Labs
Page 31

Example 1 - network run is only at 100 base T (max 100mbps, and should be 1000 (gigabit) as
Atmos needs 150 mbps
eth0 Link encap:Ethernet HWaddr 00:25:90:74:08:F8
inet addr:10.203.50.204 Bcast:10.203.50.255 Mask:255.255.255.0
inet6 addr: fe80::225:90ff:fe74:8f8/64 Scope:Link
UP BROADCAST RUNNING MULTICAST MTU:1500 Metric:1
RX packets:103696968 errors:0 dropped:0 overruns:0 frame:0
TX packets:34997690 errors:0 dropped:0 overruns:0 carrier:0
collisions:0 txqueuelen:100
RX bytes:1007555312 (960.8 MiB) TX bytes:3127287593(2.9 GiB)
Base address:0x2000 Memory:d0300000-d0320000
Verify that you are using a gigabit network switch.
5.5 Contact Information
For more assistance please contact Doremi Labs:
If in need of help or assistance, please contact Doremi Labs Technical Services:
USA
24/7 Technical Services line: + 1-866-484-4004
Technical Services Email: cinemasupport@doremilabs.com
Europe
24/7 Technical Services line: + 33 (0) 492-952-847
Technical Services Link: http://support.doremitechno.org/ticketing
Japan
Technical Services line: + 044-966-4855
Technical Services Email: support@doremilabs.co.jp
Australia ~ China ~ India ~ Indonesia ~ Korea ~ Malaysia ~ New Zealand ~ Philippines ~
Singapore ~ Taiwan ~ Thailand
Technical Services Email: supportasia@doremilabs.com
D2K.OM.003651.DRM Page 31 of 33 Version 1.1
Doremi Labs
Page 32

This page was left blank intentionally
D2K.OM.003651.DRM Page 32 of 33 Version 1.1
Doremi Labs
Page 33

6 Revision History
Date Revision Description
11/18/2013 1.0 First Version
06/11/2014 1.1
• Updated connection information in Sections 2.1
and 2.2.
• Addition of Connection diagram (Figure 2)
• Addition of Section 5.3 – KDMS for Dolby Atmos
Content
• Addition of Section 5.4 – Dolby Atmos Channel
Drop Out.
D2K.OM.003651.DRM Page 33 of 33 Version 1.1
Doremi Labs
 Loading...