

Page 1

CaptiView Closed Caption System and
Rear Window Display
User Manual
Version 2.1
The English version of this document is the only legally binding version.
Translated versions are not legally binding and are for convenience only.
D2K.DP.000469.DRM Page 1 of 27 Version 2.1
Doremi Labs
Page 2

Table of Contents
1 Introduction ...................................................................................................................... 5
1.1 Purpose ...................................................................................................................... 5
1.2 System Requirements ................................................................................................ 5
1.3 Parts List .................................................................................................................... 5
1.4 Contact ....................................................................................................................... 7
2 CaptiView Installation Procedure .................................................................................... 9
2.1 Introduction ................................................................................................................. 9
2.2 How to Set Up the CaptiView System on a Doremi Cinema Server ...........................10
2.2.1 Installing the License .............................................................................................10
2.2.2 CaptiView Configuration ........................................................................................12
2.2.3 Operating the CaptiView Display............................................................................13
2.2.4 Charging the CaptiView .........................................................................................15
3 Rear Window Caption Configuration on Doremi Cinema Server .................................18
4 Appendix A: SB430-10 Set Up Instructions ...................................................................20
4.1 SMPTE 430-10 Protocol Set Up Via Ethernet Port.....................................................21
4.1.1 Configuring the IP Address for the AccessLink or CaptiLink ...................................21
4.1.2 Adding the IP Address of a Digital Cinema Server to the AccessLink or CaptiLink .21
4.2 SMPTE 430-10 Protocol Set Up Via Serial Port .........................................................22
4.2.1 Configuring the IP Address for AccessLink or CaptiLink .........................................22
4.2.2 Adding the IP Address of a Digital Cinema Server to the AccessLink or CaptiLink .22
4.3 Upgrading the SB430-10 Software ............................................................................23
4.3.1 FTP Client ..............................................................................................................23
4.3.2 USB Flash Update .................................................................................................23
4.4 Changing the Auditorium on the SB430-10 ................................................................23
5 Acronyms.........................................................................................................................25
6 Document Revision History ............................................................................................27
D2K.DP.000469.DRM Page 2 of 27 Version 2.1
Doremi Labs
Page 3

FCC Warning - CaptiView Transmitter
Be aware that any change or modification not expressly approved by Doremi Labs could
void the user's authority to operate the equipment.
This device complies with part 15 of the FCC Rules. Operation is subject to the following
two conditions: (1) This device may not cause harmful interference, and (2) this device
must accept any interference received, including interference that may cause undesired
operation.
Note: This equipment has been tested and found to comply with the limits for a Class B
digital device, pursuant to part 15 of the FCC Rules. These limits are designed to provide
reasonable protection against harmful interference in a residential installation. This
equipment generates, uses and can radiate radio frequency energy and, if not installed
and used in accordance with the instructions, may cause harmful interference to radio
communications. However, there is no guarantee that interference will not occur in a
particular installation. If this equipment does cause harmful interference to radio or
television reception, which can be determined by turning the equipment off and on, the
user is encouraged to try to correct the interference by one or more of the following
measures:
— Reorient or relocate the receiving antenna.
— Increase the separation between the equipment and receiver.
— Connect the equipment into an outlet on a circuit different from that to which the
receiver is connected.
— Consult the dealer or an experienced radio/TV technician for help.
IC Statement – CaptiView Transmitter
This device complies with Industry Canada licence-exempt RSS standard(s). Operation
is subject to the following two conditions: (1) this device may not cause interference, and
(2) this device must accept any interference, including interference that may cause
undesired operation of the device.
Le présent appareil est conforme aux CNR d'Industrie Canada applicables aux appareils
radio exempts de licence. L'exploitation est autorisée aux deux conditions suivantes : (1)
l'appareil ne doit pas produire de brouillage, et (2) l'utilisateur de l'appareil doit accepter
tout brouillage radioélectrique subi, même si le brouillage est susceptible d'en
compromettre le fonctionnement.
D2K.DP.000469.DRM Page 3 of 27 Version 2.1
Doremi Labs
Page 4

Under Industry Canada regulations, this radio transmitter may only operate using an
antenna of a type and maximum (or lesser) gain approved for the transmitter by Industry
Canada. To reduce potential radio interference to other users, the antenna type and its
gain should be so chosen that the equivalent isotropically radiated power (e.i.r.p.) is not
more than that necessary for successful communication.
Conformément à la réglementation d'Industrie Canada, le présent émetteur radio peut
fonctionner avec une antenne d'un type et d'un gain maximal (ou inférieur) approuvé
pour l'émetteur par Industrie Canada. Dans le but de réduire les risques de brouillage
radioélectrique à l'intention des autres utilisateurs, il faut choisir le type d'antenne et son
gain de sorte que la puissance isotrope rayonnée équivalente (p.i.r.e.) ne dépasse pas
l'intensité nécessaire à l'établissement d'une communication satisfaisante.
FCC Warning - CaptiView Display
Be aware that any change or modification not expressly approved by Doremi Labs could
void the user's authority to operate the equipment.
This device complies with part 15 of the FCC Rules. Operation is subject to the following
two conditions: (1) This device may not cause harmful interference, and (2) this device
must accept any interference received, including interference that may cause undesired
operation.
IC Statement – CaptiView Display
This Class B digital apparatus complies with Canadian ICES-003.
Cet appareil numérique de la classe B est conforme à la norme NMB-003 du Canada
D2K.DP.000469.DRM Page 4 of 27 Version 2.1
Doremi Labs
Page 5

1 Introduction
Parts
Part Numbers
Description
CaptiView Software
ACC-DCP
Play out software for the hearing impaired
and visually impaired. Controls Doremi
CapiView, WGBH and other personal
devices. Includes USB transmitter.
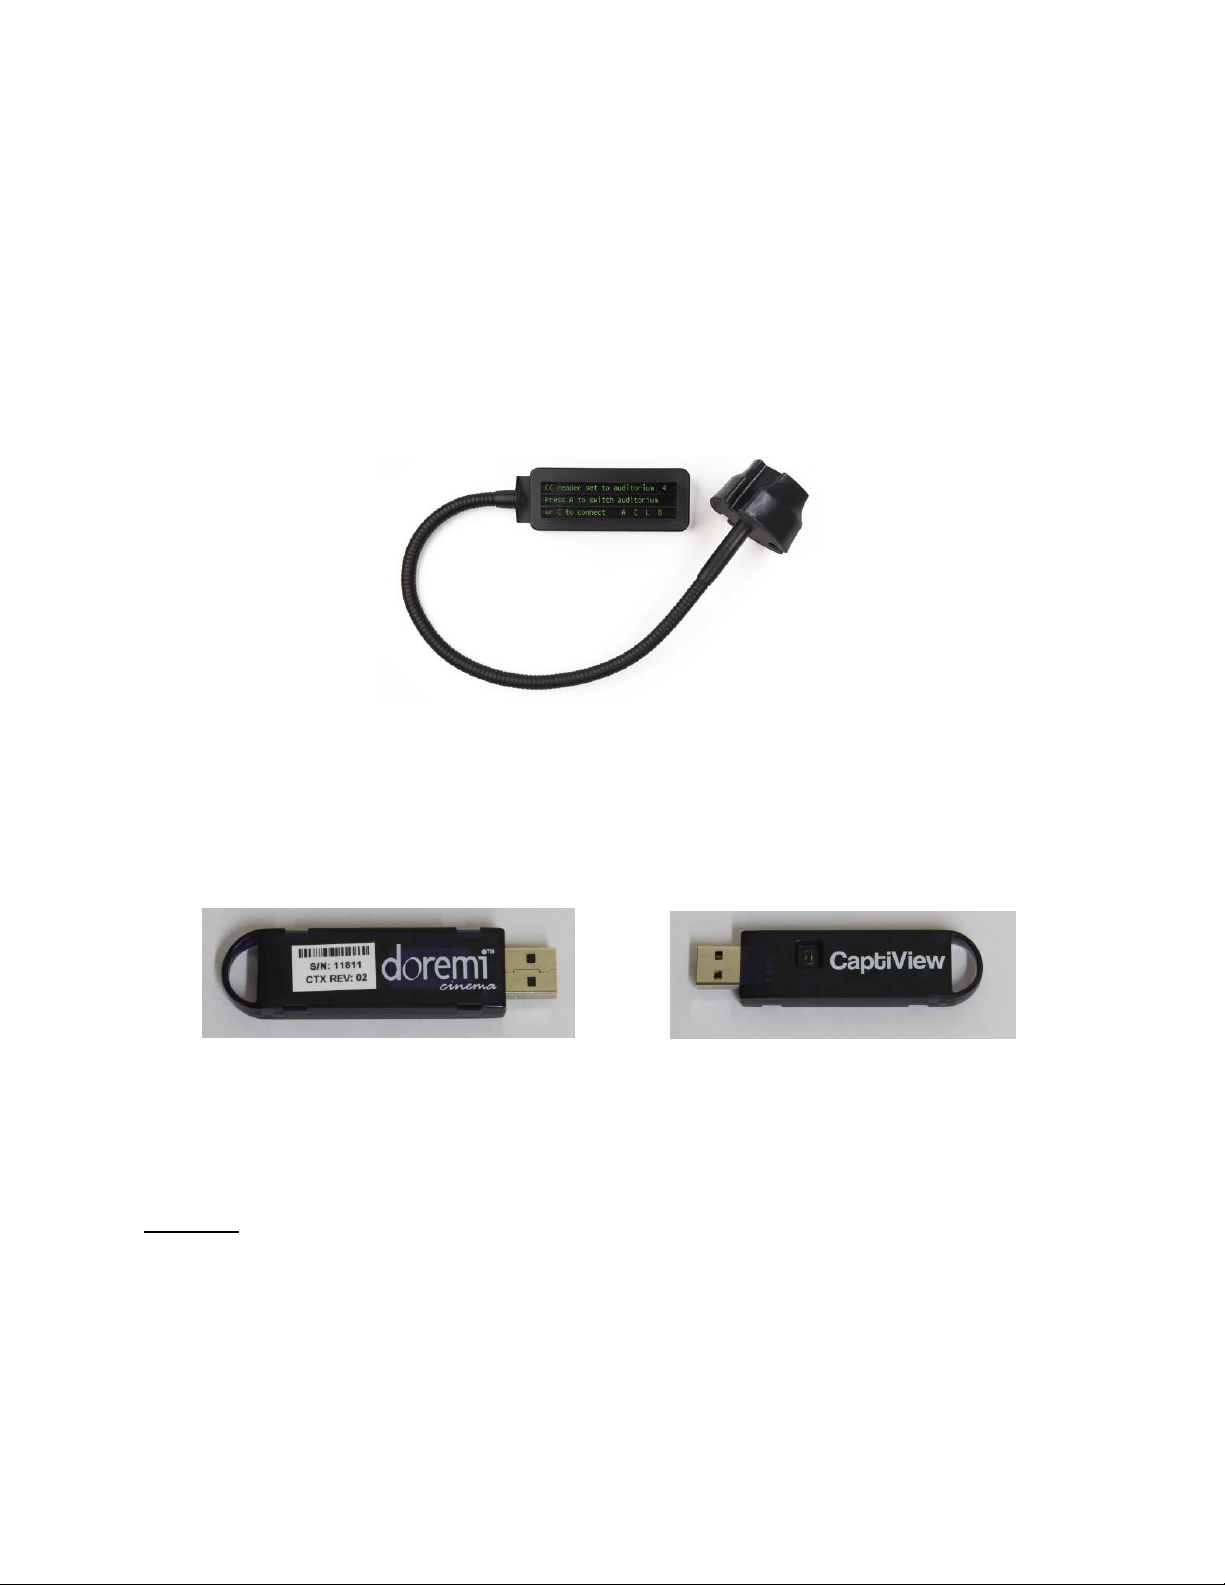
CaptiView Transmitter
CPTVW-Tx
USB CaptiView transmitter for use with
Doremi servers.
CaptiView Display
CPTVW-DCP
CPTVW-DCP-CLAMP
Doremi CaptiView Closed Caption viewing
device. Includes display device and rubber
mount for use in cup holder (Figure 1).
Doremi CaptiView Closed Caption viewing
device. Includes display device and clamp
mount for use on seat arm (Figure 2).
CaptiCart
CPTVW-CART
CaptiView display storage and charging
station. Rolling cart which holds and
charges 8 CaptiView displays. Assembly
required.
1.1 Purpose
This manual explains how to set up the Doremi Cinema Server in order to display Closed
Caption using the Doremi CaptiView device. This document also explains how to set up a
Doremi Cinema Server in order to display the Closed Caption using the Rear Window device
with Serial or Ethernet Communication. In Appendix A, there is more information on how to set
up the SB430-10, which is a device that allows non-Doremi Digital Cinema Servers to interface
with the CaptiView device.
1.2 System Requirements
This manual is for operating the CaptiView device software versions 2.0.0 and higher. The Rear
Window device can be used on any software versions. The SB430-10 device can be used on
various software versions, which depend on the provisions of the digital server. For earlier
software versions, please see earlier revisions of this document.
1.3 Parts List
D2K.DP.000469.DRM Page 5 of 27 Version 2.1
Doremi Labs
Page 6
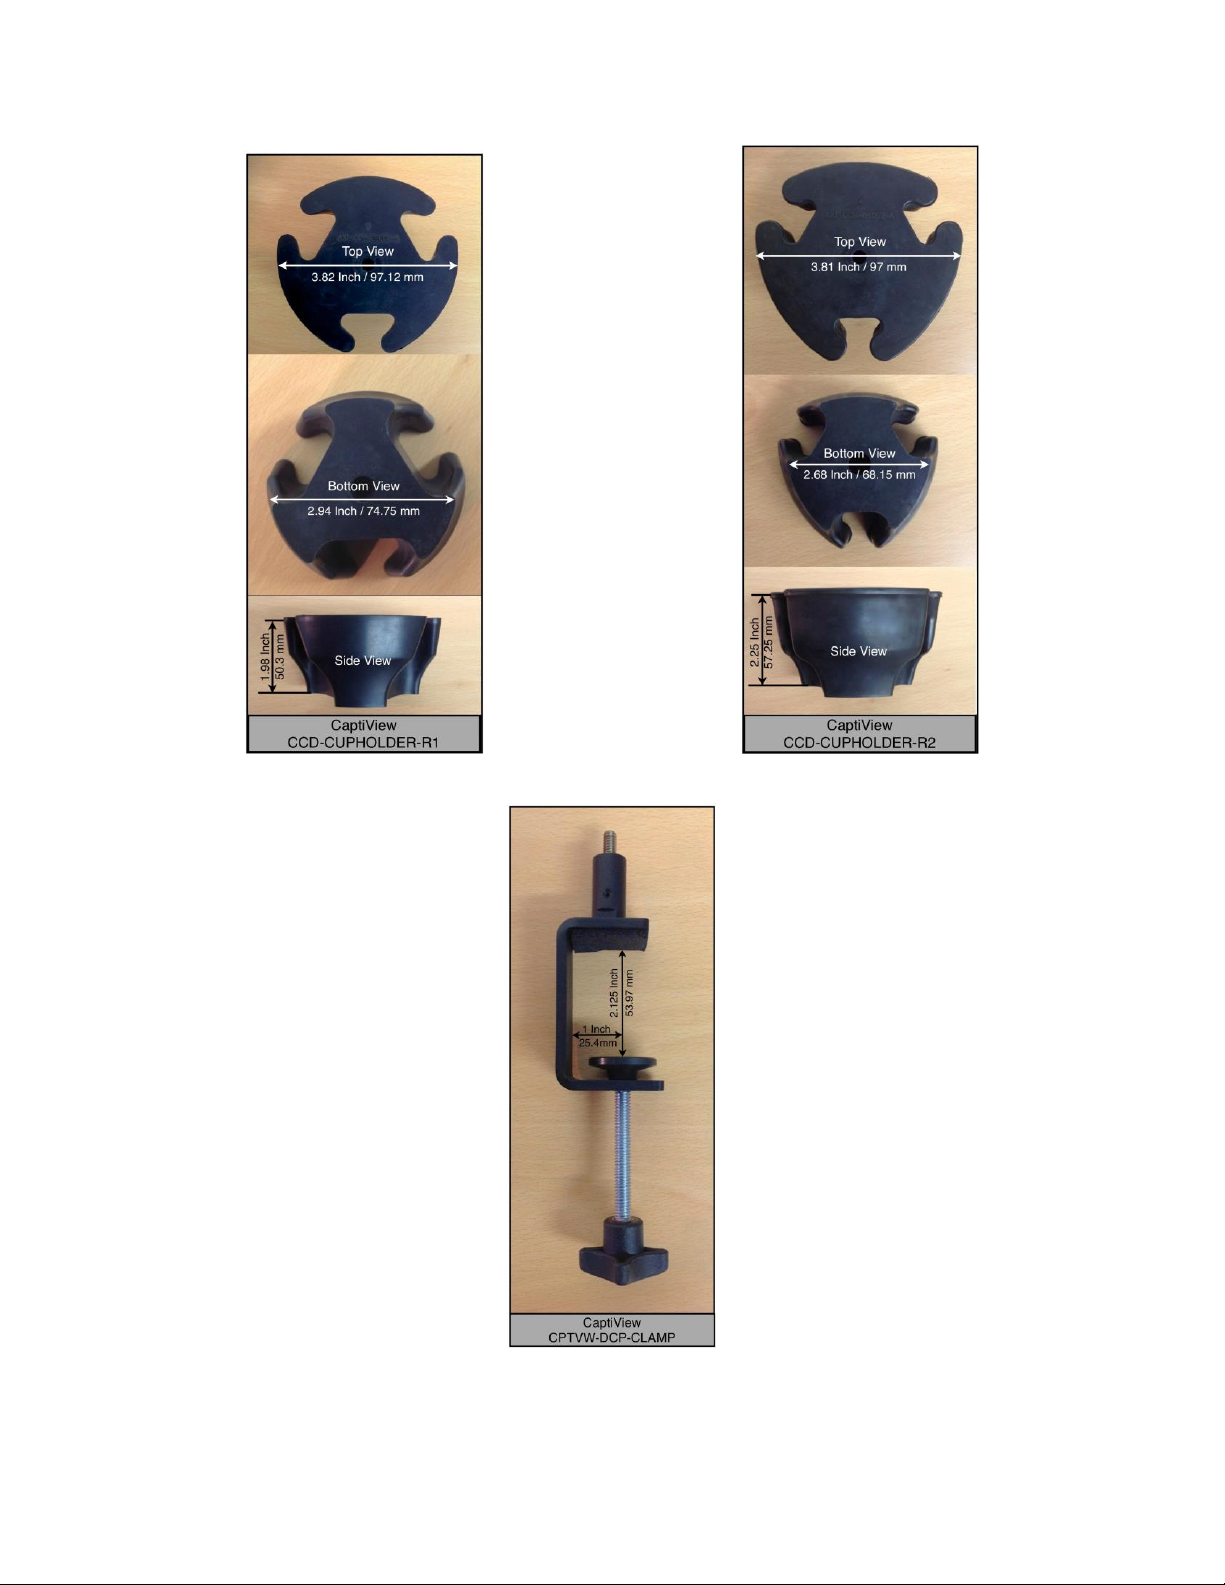
Figure 1: CaptiView Cupholder
Figure 2: CaptiView Clamp
D2K.DP.000469.DRM Page 6 of 27 Version 2.1
Doremi Labs
Page 7

1.4 Contact
If in need of help or assistance, please contact Doremi Labs Technical Services:
USA
24/7 Technical Services line: + 1-866-484-4004
Technical Services Email: cinemasupport@doremilabs.com
Europe
24/7 Technical Services line: + 33 (0) 492-952-847
Technical Services Link: http://support.doremitechno.org/ticketing
Japan
Technical Services line: + 044-966-4855
Technical Services Email: support@doremilabs.co.jp
Australia ~ China ~ India ~ Indonesia ~ Korea ~ Malaysia ~ New Zealand ~ Philippines ~
Singapore ~ Taiwan ~ Thailand
Technical Services Email: supportasia@doremilabs.com
D2K.DP.000469.DRM Page 7 of 27 Version 2.1
Doremi Labs
Page 8

This page has been intentionally left blank.
D2K.DP.000469.DRM Page 8 of 27 Version 2.1
Doremi Labs
Page 9
2 CaptiView Installation Procedure
2.1 Introduction
The CaptiView is an in-theater closed caption viewing system for the hearing impaired.
The system is composed of three key elements: CaptiView license, CaptiView display, and
Captiview transmitter.
The Display Screen is 31 x 3 lines for a total of 93 characters.
Figure 3: CaptiView Display
CaptiView Display is a portable LCD screen attached to a flexible arm that fits in any
standard cup holder on a theater seat (Figure 3).
Figure 4: CaptiView Transmitter
CaptiView Transmitter is a custom encrypted wireless dongle that is plugged into a USB
port on a Doremi Cinema Server or into the Doremi Fidelio and AccessLink products
(Figure 4).
Warning: DO NOT flip the switch on the Doremi Cinema side of the transmitter (Figure 4). This
will delete the firmware and lead to the device becoming inoperable.
D2K.DP.000469.DRM Page 9 of 27 Version 2.1
Doremi Labs
Page 10

2.2 How to Set Up the CaptiView System on a Doremi Cinema Server
Ingest
Button
2.2.1 Installing the License
The CaptiView license is required to enable a Doremi Cinema Server to playback the Closed
Caption data contained in the Digital Cinema Package (DCP). The license needs to be installed
before setting up the CaptiView system. Contact your local Doremi support team to receive the
Closed Caption license (Section 0).
Insert the USB drive that contains the Closed Caption license update into the unit.
The Ingest Manager GUI window will appear (Figure 5).
Select the file that contains the CaptiView license and then click on the Ingest button
(Figure 5).
Reboot the server to complete the ingest process.
Figure 5: Ingest Window
Once the ingest is complete, check the license information by going to Menu →
Control Panel → License Manager.
Follow the steps below for configuring the CaptiView System to finalize the set up
process:
D2K.DP.000469.DRM Page 10 of 27 Version 2.1
Doremi Labs
Page 11

Note: Doremi Cinema Servers (DCP-2000, DCP-2K4, or ShowVault) must have software 2.0.0-
Device
Manager
0 or higher to support the CaptiView. It is recommended to test the CaptiView system to ensure
that it operates correctly before using it in a live theater.
Plug the CaptiView transmitter dongle into a Doremi Digital Cinema Server USB port
only.
Go to Menu and then click Control Panel.
Select and open the Device Manager icon (Figure 6).
Figure 6: Control Panel Window
From the Device Manager window, click on the Add button.
The Add Device window will appear.
Select the Closed Caption device.
D2K.DP.000469.DRM Page 11 of 27 Version 2.1
Doremi Labs
Page 12

Add
Button
Closed
Caption
Figure 7: List of Devices - Closed Caption Example
Click the Add button (Figure 7).
The user will now be back to the Device Manager GUI to finish configuring the device.
2.2.2 CaptiView Configuration
To finish configuring the device, complete the fields in the Closed Caption Configuration window
(Figure 8).
Check the Enabled box to enable this feature.
It is recommended to leave the default settings as they are, except for the Auditorium
field.
In the Auditorium field, choose any channel other than 0. For example, choose 1, 2, 3,
etc., but do not leave the channel set at 0. The number, once saved, will be saved to the
USB transmitter which then must be power-cycled by unplugging and then re-plugging
the transmitter. This applies to software versions 2.0.10 and higher.
Note: To change the current auditorium number while using software versions 2.07 or below,
contact Doremi Technical Support to receive a hot fix. In software version 2.0.10 and higher, the
user can change the auditorium setting from the Device Manager GUI.
Define the Play Offset, Idle Text, and Idle Time.
o Play Offset: This feature offsets the Closed Captioning data in the form of
milliseconds.
o Idle Text: The default text that is shown on the display.
o Idle Time: The time it takes for default Idle Text to appear after loss of input.
Click the Save button.
D2K.DP.000469.DRM Page 12 of 27 Version 2.1
Doremi Labs
Page 13

Figure 8: Closed Caption Configuration Window
On/Off Switch which
goes left and right -
turn the device on
by moving the
switch to the left
2.2.3 Operating the CaptiView Display
To turn the CaptiView Display on, locate the small switch on the right side of the device
and set it to the left (Figure 9).
Figure 9: CaptiView Display On/Off Switch
When the CaptiView Display is on, it will read, “CaptiView set to auditorium 1, Press A to
switch auditorium or C to connect A C L” (Figure 10).
D2K.DP.000469.DRM Page 13 of 27 Version 2.1
Doremi Labs
Page 14

The letters A,C, and L
correspond to the
three buttons on the
device
Button A:
The first
button from
the left
Button C: The
second or
middle button
Button L: The
third or last
button from
the left
Figure 10: CaptiView Display Start-Up Message
Figure 11: CaptiView Display Button View
The letters A, C, and L represent the three buttons that are on the bottom of the
CaptiView device (Figure 11).
o A stands for Auditorium and is the first button from the left.
o C stands for Connect and is the second or middle button.
o L stands for Language, a feature that will be included in a future release, and is
the third or last button from the left.
Press the A button repeatedly until the desired auditorium number appears.
The CaptiView display must be set to the same auditorium number as the CaptiView
transmitter in order to establish a connection.
Press the C button to connect to the Auditorium.
A message saying, “Connecting to Auditorium #” will appear (Figure 12):
D2K.DP.000469.DRM Page 14 of 27 Version 2.1
Doremi Labs
Page 15

Charging
Cable
Receptacle
Figure 12: Connection Message
Note: If the CaptiView Display is being charged while it is on, it will show as charging even
when it is not charging anymore, until the device is turned off and on again. The charge time will
take approximately 2 hours to complete and will last for 24 hours of playing time.
Once the CaptiView system is connected, play a Digital Cinema Package (DCP) with
closed captioning to check if it is working properly.
Note: In the event that the Digital Cinema Server does not detect the CaptiView Transmitter,
follow the steps below:
Shut off the server. Do not reboot or log off.
Remove all USB devices.
Power the server back on.
Plug the CaptiView Transmitter in and the server should detect it.
2.2.4 Charging the CaptiView
To charge the CaptiView, connect the charging cable to the receptacle (Figure 13).
Figure 13: Charging Cable and Receptacle
Connect the mini USB end into the charging port on the CaptiView (Figure 14). Connect
D2K.DP.000469.DRM Page 15 of 27 Version 2.1
Doremi Labs
Page 16

the other end to a wall outlet.
Figure 14: Charging Port
When the device is in the On position (Figure 9), the screen will indicate that the device
is charging (Figure 15). When it is in the Off position, the screen will not be visible but it
will continue to charge. After about two hours, the device will be fully charged.
Figure 15: Charging Screen
D2K.DP.000469.DRM Page 16 of 27 Version 2.1
Doremi Labs
Page 17

This page has been intentionally left blank.
D2K.DP.000469.DRM Page 17 of 27 Version 2.1
Doremi Labs
Page 18

3 Rear Window Caption Configuration on Doremi
Save
Button
Serial
Port
Field
Model
Field
Cinema Server
To perform this set up, make sure the license is installed on the server and Closed
Caption is enabled. See steps above to install the license and enable the Closed
Caption.
Open the Device Manager.
Select the Closed Caption device and check the enable box on the top right (Figure 16).
In the Model field, click in the drop-down menu and select Wgbh (Figure 16).
The second drop-down menu in the Model field will change to RWC automatically
(Figure 16).
The Serial Port field drop-down menu will change to “/dev/ttyS0" automatically (Figure
16).
Figure 16: Rear Window Caption Configuration Example
Click the Save button when finished to save the configuration (Figure 16).
D2K.DP.000469.DRM Page 18 of 27 Version 2.1
Doremi Labs
Page 19

This page has been intentionally left blank.
D2K.DP.000469.DRM Page 19 of 27 Version 2.1
Doremi Labs
Page 20

4 Appendix A: SB430-10 Set Up Instructions
Doremi provides two hardware solutions, the AccessLink and CaptiLink, to use the CaptiView
system on Non Doremi cinema servers. Both of these products utilize the SMPTE430-10
protocol. There are two ways to set up these devices via the SMPTE430-10 protocol. The
Ethernet port is the primary way to set up the device. The secondary way is to use the serial
port, which is a backup mechanism if the Ethernet port fails or does not work properly (Figure 17
and Figure 18).
Figure 17: AccessLink
Figure 18: CaptiLink
D2K.DP.000469.DRM Page 20 of 27 Version 2.1
Doremi Labs
Page 21

4.1 SMPTE 430-10 Protocol Set Up Via Ethernet Port
Remove either the AccessLink or CaptiLink from packing and begin to set up near a
power outlet and computer that has a free Ethernet port.
The default IP address of the SB430-10 is "192.168.9.10"
Set your computer's IP address in the range '192.168.9.xx', xx being in the range (2-254
except 10).
Connect the AccessLink or CaptiLink with an Ethernet cable to the newly configured port
and power on.
Download and install the program "PuTTY" (or any ssh client) on the computer you just
assigned the new IP address to.
Connect to the default IP 192.168.9.10 on port 22 using the ssh client.
When the unit is done booting up, login as root.
o Password for root is: "veeone"
o It is recommended to change the root password by typing the following command
and following the on-screen instructions: "passwd"
4.1.1 Configuring the IP Address for the AccessLink or CaptiLink
To configure the IP of the AccessLink or CaptiLink, type the following command:
o echo -n xxx.xxx.xxx.xxx > /doremi/etc/ip_addr (xxx.xxx.xxx.xxx = the desired
IP address) and then press the Enter key.
To configure the netmask, type the following command:
o echo -n xxx.xxx.xxx.xxx > /doremi/etc/netmask and then press the Enter key.
To configure the gateway, type the following command:
o echo -n xxx.xxx.xxx.xxx > /doremi/etc/gateway and then press the Enter key.
4.1.2 Adding the IP Address of a Digital Cinema Server to the AccessLink
or CaptiLink
To add the IP address, type the following command:
o echo -n xxx.xxx.xxx.xxx > /doremi/etc/s430-10/ip.conf and then press the
Enter key.
Reboot the SB430-10 for the changes to take effect.
Connect the CaptiView Transmitter to the USB port on the AccessLink or CaptiLink and
then go back to Section 2 of this manual to finish the setup.
D2K.DP.000469.DRM Page 21 of 27 Version 2.1
Doremi Labs
Page 22

4.2 SMPTE 430-10 Protocol Set Up Via Serial Port
Remove the AccessLink or CaptiLink from packing and begin to set up near a power
outlet and computer that has a serial port.
The serial cable required for a proper connection is a female to female pin to pin cable,
which should be provided in the package.
o Serial connection settings are: Speed 115200, Data bits: 8, Stop bits: 1, Parity:
None, Flow control: None
o Connect and switch the device on and wait for it to boot.
When the unit is done booting up, login as root.
o Password for root is: "veeone"
o It is recommended to change the root password by typing the following command
and following the on-screen instructions: "passwd"
4.2.1 Configuring the IP Address for AccessLink or CaptiLink
To configure the IP of the AccessLink or CaptiLink, type the following command:
o echo -n xxx.xxx.xxx.xxx > /doremi/etc/ip_addr (xxx.xxx.xxx.xxx = the desired
IP address) and then press the Enter key.
To configure the netmask, type the following command:
o echo -n xxx.xxx.xxx.xxx > /doremi/etc/netmask and then press the Enter key.
To configure the gateway, type the following command:
o echo -n xxx.xxx.xxx.xxx > /doremi/etc/gateway and then press the Enter key.
4.2.2 Adding the IP Address of a Digital Cinema Server to the AccessLink
or CaptiLink
To add the IP address, type the following command:
o echo -n xxx.xxx.xxx.xxx > /doremi/etc/s430-10/ip.conf
Power cycle the AccessLink or CaptiLink for the changes to take effect.
Connect the CaptiView Transmitter to the USB port on the AccessLink or CaptiLink and
go back to Section 2 of this manual to finish the setup.
D2K.DP.000469.DRM Page 22 of 27 Version 2.1
Doremi Labs
Page 23

4.3 Upgrading the SB430-10 Software
There are two ways to upgrade the software on the AccessLink or CaptiLink. One way is to use
an FTP client (e.g., Core FTP or Filezilla) and the other is to use a USB flash drive to perform
the upgrade.
4.3.1 FTP Client
Make sure that an FTP client is installed on the computer.
Turn the SB430-10 on and make sure it is able to ping to the network.
Open the FTP client and connect using the IP of the AccessLink or CaptiLink under port
21. Login as the root user and enter the appropriate password.
Add the update package (".pkg file") to the folder, "/doremi/etc/rc.once," and then
reboot.
To check if the upgrade was successful, open an SSH session and type the following
command: 'more /doremi/etc/version' and make sure that the version matches that of
the ".pkg" file.
4.3.2 USB Flash Update
Create a folder in the USB drive and name it doremi, then inside the doremi folder
create another folder and name it "update." For example, '/doremi/update/.'
Copy the ".pkg" file to the path of the USB flash '/doremi/update/' then safely unmount
the USB flash drive.
Put the USB flash drive in place of the CaptiView transmitter. Wait for the light to stop
blinking and then do a reboot or power cycle.
To check if the upgrade was successful, open an SSH session and type the following
command: more /doremi/etc/version and make sure that the version matches that of
the ".pkg" file.
4.4 Changing the Auditorium on the SB430-10
Connect to the AccessLink or CaptiLink via ssh session.
Login as username root.
Type: echo -n aud_number > /doremi/etc/s430-10/audi.conf and then press the Enter
key.
Reboot for the changes to take effect.
D2K.DP.000469.DRM Page 23 of 27 Version 2.1
Doremi Labs
Page 24

This page has been intentionally left blank.
D2K.DP.000469.DRM Page 24 of 27 Version 2.1
Doremi Labs
Page 25

5 Acronyms
Term
Definition
DCP
Digital Cinema Package
USB
Universal Serial Bus
UUID
Universally Unique Identifier
RWC
Rear Window Caption
D2K.DP.000469.DRM Page 25 of 27 Version 2.1
Doremi Labs
Page 26

This page has been intentionally left blank.
D2K.DP.000469.DRM Page 26 of 27 Version 2.1
Doremi Labs
Page 27

6 Document Revision History
Date
Version
Description
09/28/2010
1.6
Rear Window Closed Caption section updated.
Software version updated to reflect version 2.0.0.
12/27/2010
1.7
All sections revised. New CaptiView Device and
SB430-10 pictures added.
01/10/2011
1.8
Section 2.2.2 revised.
07/02/2012
1.9
All sections revised. Contact information updated.
06/18/2013
2.0
Sections 2.2.4 and 1.3 added.
10/30/2014
2.1
Preface revised
D2K.DP.000469.DRM Page 27 of 27 Version 2.1
Doremi Labs
 Loading...