

Page 1

A S S E T
M A N A G E R
Software
User Manual
Version 2.2
The Asset Manager manual complies with the following products:
Doremi Asset Manager Version 5.2.x; Nugget Version 2.x; Nugget Post Version 5.x; NUG SDI
Version 94; V1-HD, V1-UHD, V1-UHD/LE Version 4.70
_____________________________________________________________________________________
AMR.OM.000163.DRM Page 1 Version 2.2
Doremi Labs Inc.
Page 2

Table of Contents
1 INTRODUCTION...................................................................................................................5
1.1 SYSTEM REQUIREMENTS.........................................................................................................5
1.2 DATABASE NOTICE:................................................................................................................6
1.3 NUGGET POST..................................................................................................................... 6
1.4 HOW TO CONNECT TO THE NUGGET: ........................................................................................6
1.5 USING DOREMI ASSET MANAGER WITH V1 UNITS........................................................................6
1.5.1 How to Connect to the V1.........................................................................................6
1.5.2 Maximum File Transfer Speed.................................................................................. 7
1.6 RELEASE NOTES...................................................................................................................8
2 DOREMI ASSET MANAGER SET UP..................................................................................9
2.1 INSTALLATION....................................................................................................................... 9
2.2 SOFTWARE LICENSE .............................................................................................................9
2.3 TOOL BAR ICON DESCRIPTION................................................................................................10
2.4 DATABASE AND DROP-IN FOLDERS SETUP................................................................................ 11
2.4.1 Database Folder.....................................................................................................11
2.4.2 How to Create a New Database Folder...................................................................11
2.4.3 Deleting Clips from the Database............................................................................13
2.4.4 Drop-In Folder......................................................................................................... 13
3 USING DOREMI ASSET MANAGER.................................................................................. 15
3.1 OVERVIEW......................................................................................................................... 15
3.2 DEVICE CONTROL............................................................................................................... 15
3.2.1 Device Manager...................................................................................................... 16
3.2.2 Device Status.......................................................................................................... 19
3.2.3 Device Access........................................................................................................20
3.2.4 Info Tab................................................................................................................... 23
3.2.5 Device Settings Window.........................................................................................25
3.2.6 Playlist Tab ............................................................................................................30
3.2.7 Doremi Asset Manager Database...........................................................................36
3.3 TRANSFERRING FILES TO THE DEVICE (NUGGET OR V1) .............................................................40
3.3.1 Using Windows Explorer......................................................................................... 40
3.3.2 Using DoremiAM Clip Database to Transfer a Clip to the Device ...........................42
3.3.3 Using the Drop-In Folders....................................................................................... 43
3.3.4 Drag and Drop........................................................................................................43
3.4 ADDING FILES TO THE DOREMIAM DATABASE........................................................................... 43
3.4.1 Using Windows Explorer to Add Files to the Database...........................................44
3.4.2 Using the Drop-In Folders to Add Files to the Database.........................................48
3.4.3 Using the Drop-Box to Add Files to the Database...................................................48
3.4.4 Using DoremiAM to Add Files to the Database.......................................................49
3.4.5 Using the Device to Add files to the Database........................................................50
3.5 TRANSFERRING VIDEO FILES.................................................................................................. 54
3.5.1 Doremi Asset Manager Supported File Formats and Codec's.................................55
3.5.2 Profiles.................................................................................................................... 56
3.5.3 Nugget Specific Parameters...................................................................................57
3.5.4 Using Profiles.......................................................................................................... 58
_____________________________________________________________________________________
AMR.OM.000163.DRM Page 2 Version 2.2
Doremi Labs Inc.
Page 3

3.5.5 The Pre-Defined Profiles.......................................................................................... 58
3.5.6 The Default Profile..................................................................................................58
3.5.7 Generating Side/Side and Top/Bottom 3D Files......................................................59
3.5.8 How to Generate a 3D clip (Nugget Specific)..........................................................59
3.5.9 Nugget and V1 Special Features............................................................................60
3.6 AUDIO DUBBING.................................................................................................................. 61
3.7 SCHEDULING TRANSFERS......................................................................................................64
3.8 TASKS MANAGEMENT...........................................................................................................65
3.9 SETTING THE NUGGET DATE AND TIME.................................................................................... 68
4 THE ADVANCED MENU..................................................................................................... 70
4.1 DEVICE STATUS.................................................................................................................. 70
4.2 SEND COMMAND.................................................................................................................70
5 FIRMWARE UPGRADE......................................................................................................72
5.1 UPGRADING THE NUGGET FIRMWARE AND NUG-SDI ................................................................72
5.2 UPGRADING THE FIRMWARE OF THE V1....................................................................................74
6 FINAL CUT PRO PLUG-IN (MAC ONLY)........................................................................... 76
6.1 USING THE FINAL CUT PRO PLUG-IN......................................................................................76
7 SUPPORTED RESOLUTIONS............................................................................................ 80
7.1 NUGGET SUPPORTED RESOLUTIONS........................................................................................ 80
7.2 V1 COMPLIANT VIDEO FORMATS............................................................................................83
7.2.1 V1-HD Additional Formats......................................................................................83
8 DOCUMENT REVISION HISTORY.....................................................................................84
_____________________________________________________________________________________
AMR.OM.000163.DRM Page 3 Version 2.2
Doremi Labs Inc.
Page 4

Software License Agreement
The software license agreement can be found at the following location:
http://www.doremilabs.com/support/cinema-support/cinema-warranties/
_____________________________________________________________________________________
AMR.OM.000163.DRM Page 4 Version 2.2
Doremi Labs Inc.
Page 5

1 Introduction
Doremi Asset Manager simplifies the selection and Ethernet transfer of video files such as
Quick Time, MXF, AVI, and WMV to the Nugget and V1's internal hard drive. The operator
simply adds the desired files into Asset Manager's clip database and the software will
transparently handle the synchronization and transfer of content to the device.
Doremi Asset Manager (DoremiAM) is designed to control and transfer media files to Doremi
Nugget Players and Doremi V1 servers (HD, UHD and UHD/LE series), which will simply be
referred as V1 throughout this manual.
Note: The Doremi Asset Manager will be referred to as DoremiAM throughout this manual.
The Doremi Asset Manager Manual complies with the following products:
• Doremi Asset Manager Version 5.2.x;
• Nugget version 2.x;
• Nugget Post Version 5.x;
• NUG SDI Version 94; and
• V1-HD, V1-UHD, V1-UHD/LE Version 4.70 or higher (Note: Only serial numbers above
20100 are supported*).
The Asset Manager is the only software utility you need to manage your database, playback
files and upgrade the firmware of your unit.
The Major Features added to the Asset Manager Version 5.1.x include:
• Multi-Thread support
• V1 Firmware upgrade
• Share Database between computers
• Final Cut Pro Plug-In for Mac Users only
1.1 System Requirements
Doremi AM software works on Windows XP Professional or Windows 7 and Mac OS X operating systems.
• Windows:
OS : XP, Vista, Windows 7.
RAM : 1GB minimum, recommended 512MB/core (example Quad Core => 2 GB).
Pentium IV 3.0GHz, recommended Quad Core.
• MAC:
OS: 10.6.X
RAM : 1GB minimum, recommended 512MB/core (example Quad Core => 2 GB).
Dual core, recommended Quad Core.
_____________________________________________________________________________________
AMR.OM.000163.DRM Page 5 Version 2.2
Doremi Labs Inc.
Page 6

1.2 Database Notice:
*************************************************************************************
The database structure for this version of Doremi Asset Manager has changed and is not
backwards compatible with version 5.0.0 or lower. When the software loads for the first
time, we suggest that you create a new database instead of using an existing one.
*************************************************************************************************************
In addition to Elementary, Program and Transport stream MPEG2 files, DoremiAM can transfer
Quick Time, AVI, WMV, MXF and Image Sequence files to all supported devices listed above.
1.3 Nugget Post
The Nugget Post is a special version of the Nugget:
• This unit is designed for Post Production Applications;
• It does not have Play-list capabilities and works only with I-Only files;
• This version is designed to support variable speed commands such as:
- Fast Forward
- Rewind
- Jog
- Shuttle, etc.
When DoremiAM is connected to a Nugget Post, some additional options will appear. These
options will be mentioned and explained in this manual in more detail. Note: Such options are
not always demonstrated by a screen capture.
1.4 How to Connect to the Nugget:
To connect to the Nugget your PC has to have an IP Address within the same range
as the Nugget (ex: if the Nugget's IP is 192.168.100.191, set your PC's IP to 192.168.100.159)
you can use a crossover cable or an Ethernet switch with 2 standard Ethernet cables.
1.5 Using Doremi Asset Manager with V1 Units
The V1 is a random access Digital Video Server with recording capabilities.
The V1 line of products includes uncompressed video servers (8 and 10 bit encoding) and
compressed video servers; the trade off is between storage requirements and video quality.
When DoremiAM is connected to a V1 (HD, UHD or UHD/LE), some additional options will
appear and other options will not be active. These options will be mentioned throughout this
manual.
Note: The connection between your V1 and PC needs to be on a separate network isolated
from the main network. Use a separate NIC and separate network to connect to you V1.
1.5.1 How to Connect to the V1
To connect to the V1, your PC has to have an IP within the same range as the V1 (for example,
if the V1's IP is 10.1.10.190, set your PC's IP to 10.1.10.100) you can use a crossover cable or
an Ethernet switch with 2 standard Ethernet cables.
_____________________________________________________________________________________
AMR.OM.000163.DRM Page 6 Version 2.2
Doremi Labs Inc.
Page 7

1.5.1.1 To Find the IP Address of the V1
• Go to OPTION+MENU (00).
• Press the ++ button until “IP xxx.xxx” is displayed.
• These are the first two octets of the IP address.
• To view the second two octets press the TOGGLE button.
1.5.2 Maximum File Transfer Speed
In order to achieve the maximum speed during file transfer to and from you V1 you need to set
the Jumbo packet setting of you NIC to its maximum Value.
Note: The Jumbo Packet Setting only applies for V1 units with a gigabit Ethernet card and
firmware versions above 4.70d.
1.5.2.1 To set the Jumbo Packets
• Open the System Control Panel.
• Select Device Manager
• From the Device Manager expand the Network Adapters
• Right-click on the NIC you are using to connect to your V1 and select properties
• From the properties window Select the Advanced Tab.
• From the “Property” list select “Jumbo Packet”
• Use the drop down box to set it to its maximum value.
• Press OK.
_____________________________________________________________________________________
AMR.OM.000163.DRM Page 7 Version 2.2
Doremi Labs Inc.
Page 8

Figure 1: Setting Jumbo Packets
1.6 Release Notes
Always refer to the release notes attached with the DoremiAM software package for most recent
features and bug fixes.
_____________________________________________________________________________________
AMR.OM.000163.DRM Page 8 Version 2.2
Doremi Labs Inc.
Page 9

2 Doremi Asset Manager Set Up
2.1 Installation
How to install the DoremiAM application:
You can download the latest version of Doremi Asset Manager from the Doremi website:
www.doremilabs.com.
The downloaded file will be a compressed folder with a title like: “Doremi Asset Manager-
4.4.40_2.0.0-0_5.0.0-0_94_4.70.zip”
Note: For Mac users, the file will be named 4.4.40_2.0.0-0_5.0.0-0_94_4.70.dmg.zip
Note: This is an example, the numbers you will see may vary.
The Installer naming convention is as follows:
• The first part (e.g. 4.4.40 indicates the DoremiAM version number
• The second part (e.g. 2.0.0-0) indicates the Nugget firmware number
• The third part (e.g.5.0.0-0) indicates the Nugget Post firmware number
• The fourth part (e.g. 94) indicates the NUG-SDI(serial digital interface) firmware #
• The fifth part (e.g. 4.70) indicates the V1 firmware number
To install Doremi Asset manager, unzip the file and double-click the installer, then follow the
instructions to complete the instillation.
Note: It is recommended to reboot you computer after installing Doremi Asset Manager.
2.2 Software License
Without a software license Doremi Asset Manager version 5.0.0 and above will be installed in
evaluation mode which will burn a video watermark and have a clip time limitation on all newly
generated media. The full version can be activated using a license file that can be purchased
directly from Doremi Labs.
Figure 2: Doremi AM Watermark
• To purchase a software license contact sales@doremilabs.com.
_____________________________________________________________________________________
AMR.OM.000163.DRM Page 9 Version 2.2
Doremi Labs Inc.
Page 10
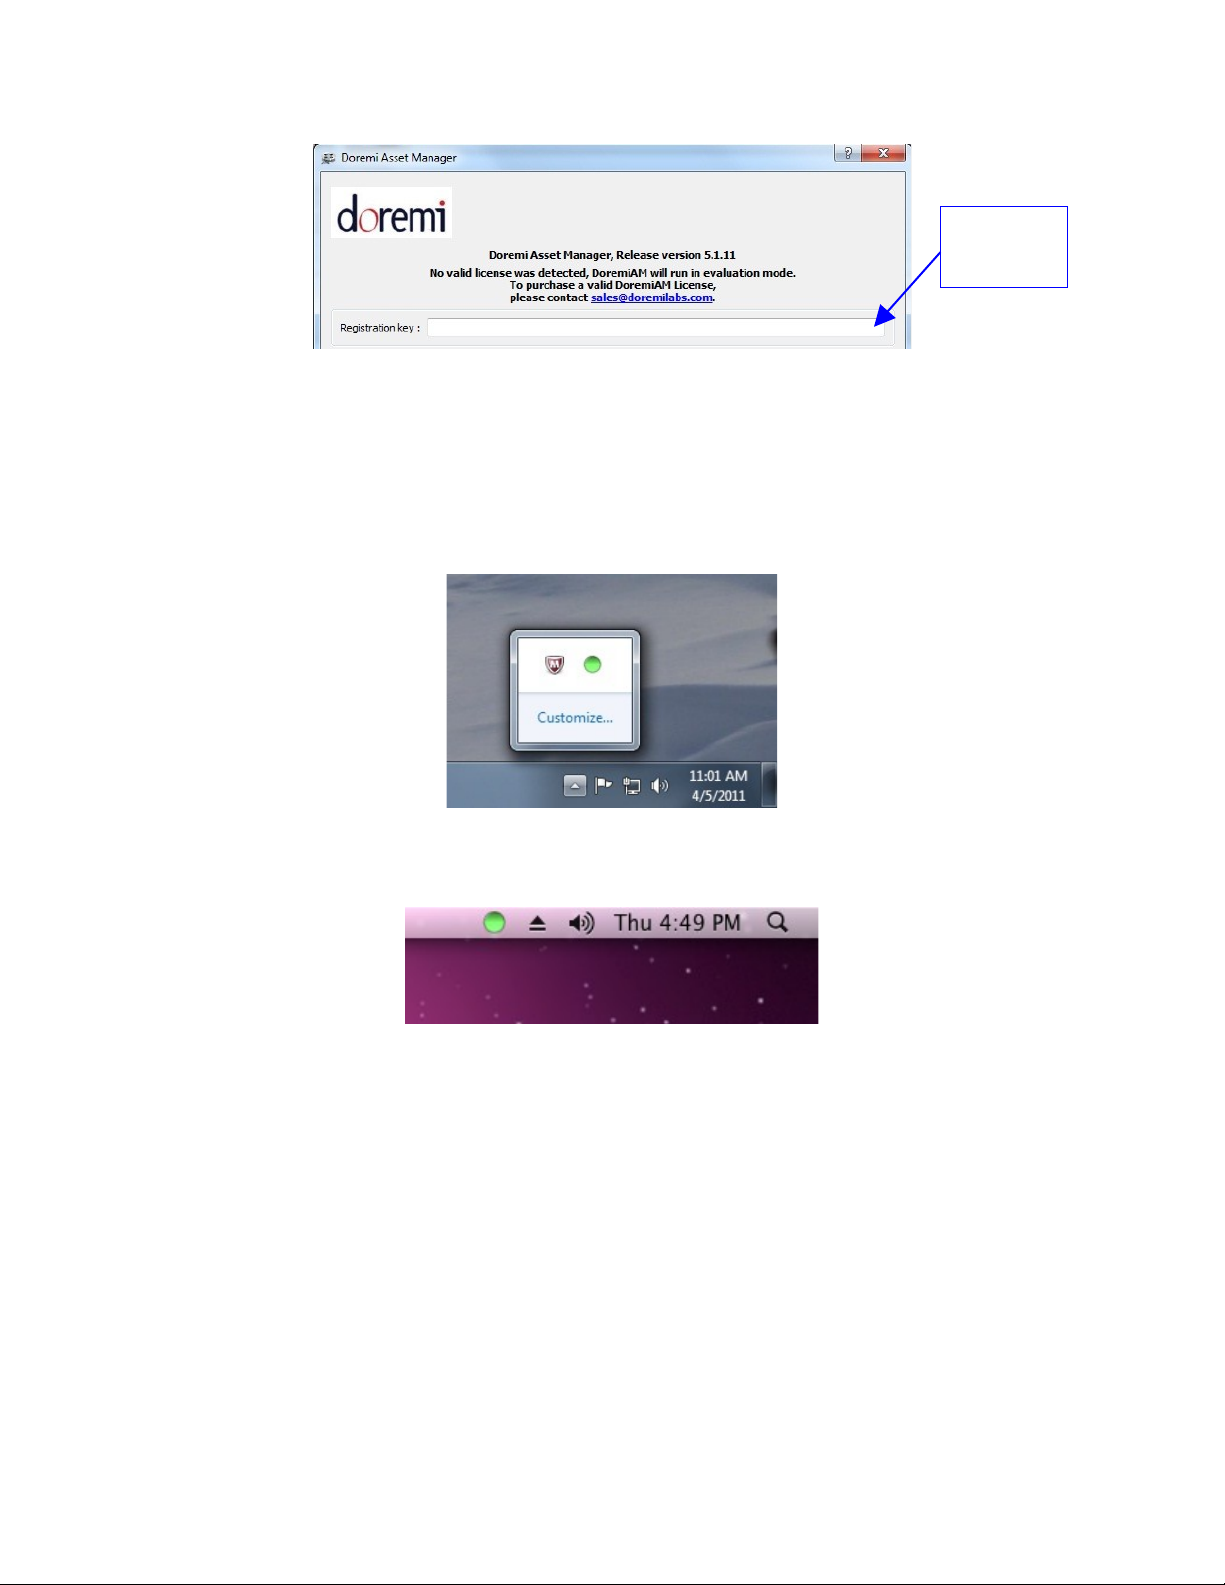
Registration
Key will be
found here
Figure 3: About Window Registration Key
2.3 Tool bar Icon Description
Doremi Asset Manger runs as a service indicated by an icon (green circle) in the right section of
the tool bar on the PC desktop (see Figure 4). For Mac OS X platform, the icon (green circle)
will be located in the upper-right corner of the screen (see Figure 5).
Figure 4: Green Circle Icon Windows
Figure 5: Green Circle Icon - Mac
• The Tool bar icon color indicates the current status.
• GREEN circle indicates status is good (see Figure 5)
• AMBER circle appears when processing tasks.
• RED circle will appear in the event of a failure.
• To exit the Doremi AM application, right-click on the tool bar icon and select “Quit
Doremi Asset Manager.”
The DoremiAM version 5.2.x includes Multi-thread support on Windows XP, Windows 7 and
Mac OS-X. This feature makes the application extremely fast when used to import files to the
DoremiAM database.
_____________________________________________________________________________________
AMR.OM.000163.DRM Page 10 Version 2.2
Doremi Labs Inc.
Page 11

Note: Because hard drive transfer times can be a bottleneck, to get the fastest DoremiAM
station, use faster hard drives such as SATA or eSATA instead of using a slower network or
USB drives.
2.4 Database and Drop-in Folders Setup
2.4.1 Database Folder
When Asset Manager is installed it will automatically create default database folders for all the
available database types. The Database folders will be found in: ~/Doremi Asset Manager/ and
are named “Default_Nugget”, “Default_V1_HD” and “Defualt_V1_UNCOMPRESSED”.
Note: You must select a different database for each of the following type of devices: Nugget,
V1-HD and V1-UHD.
Note: Make sure that the current database used by Doremi Asset Manager belongs to the
device type you intend to use.
2.4.2 How to Create a New Database Folder
To create a new database folder:
• Go to the “File” menu.
• Select Options.
• From the General Tab of the Options Window Click on the “Change” button.
• Next you will be prompted to the “Browse for Folder” window (see Figure 7).
• Select the folder where you want to store your database and press “Select Folder.”
• You will be prompted to “Select a Database Type,” click “OK”(see Figure 8).
• Choose the database type from the drop-down list (see Figure 8).
- For Nugget and Nugget Post select “Nugget.”
- For V1-UHD or V1UHD-LE select “V1-Uncompressed.”
- For the V1-HD select “V1-HD.”
Note: To support video files that exceed 4GB, your drive needs to use a NTFS file system or
any other file systems that can support large files (Fat32 file systems cannot exceed 4GB).
_____________________________________________________________________________________
AMR.OM.000163.DRM Page 11 Version 2.2
Doremi Labs Inc.
Page 12
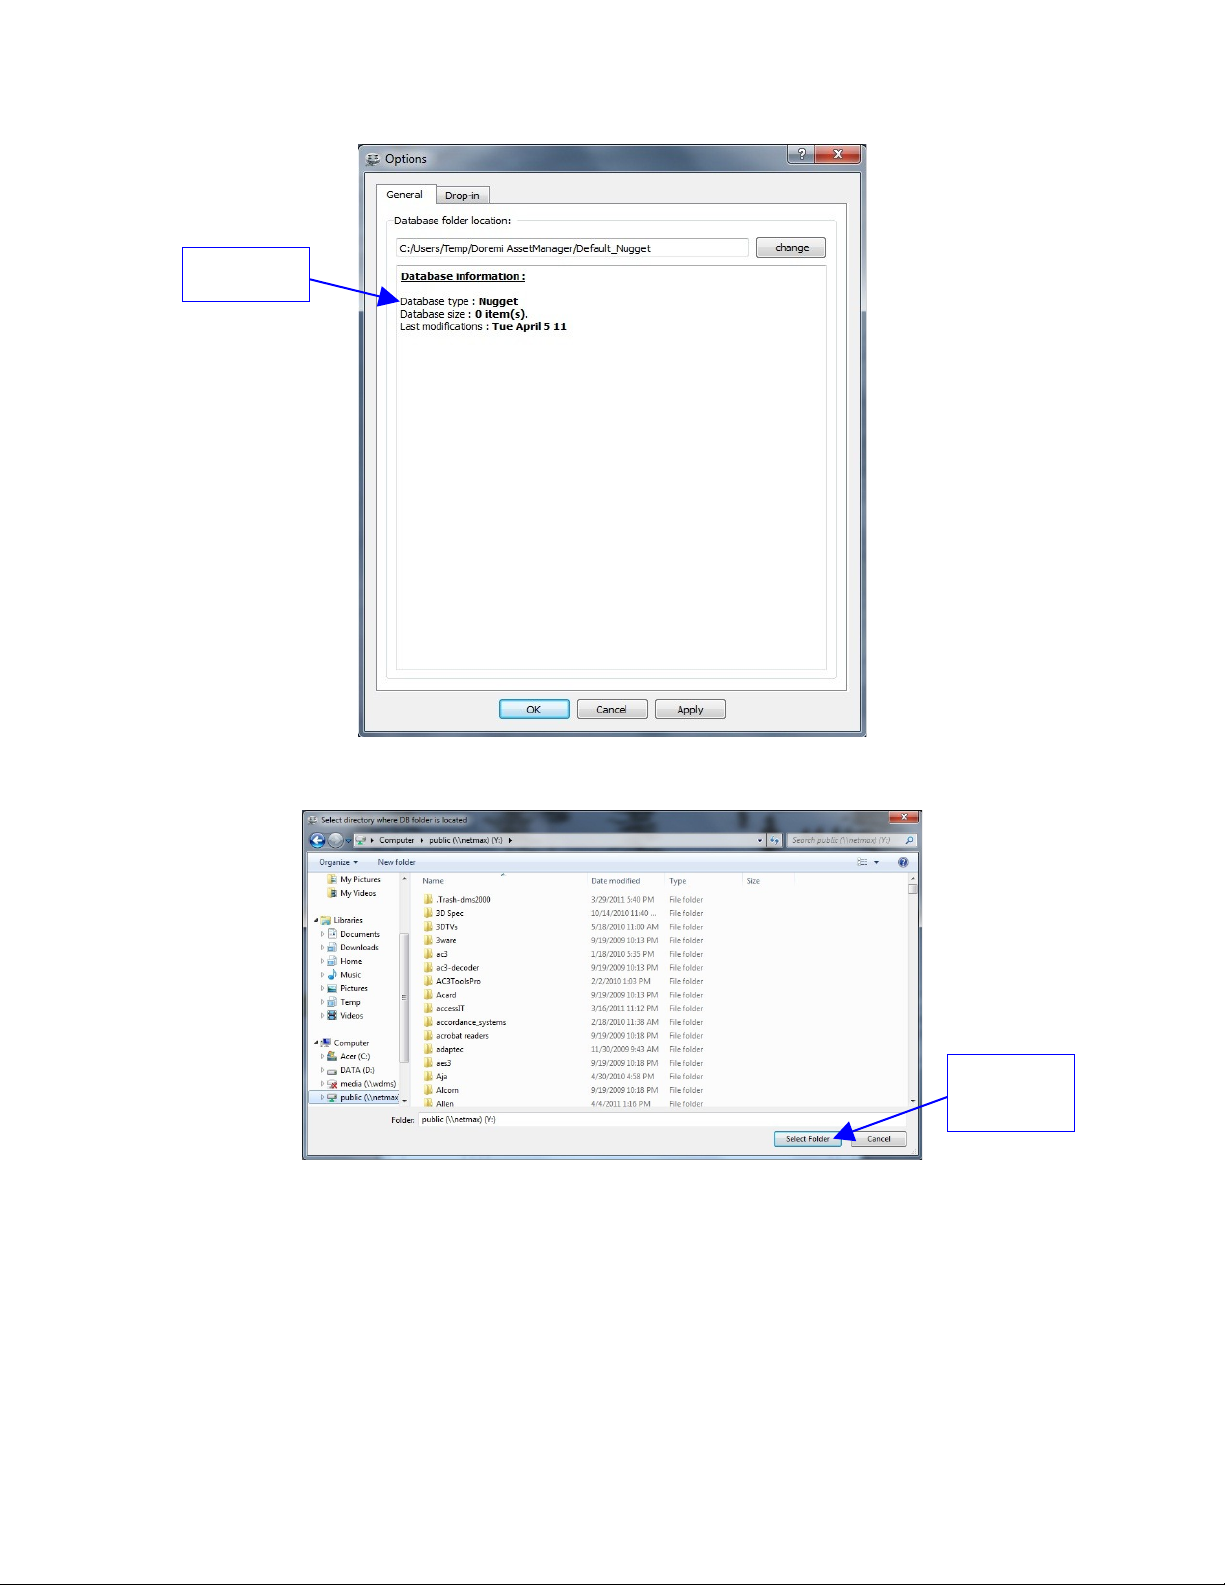
Database
Type
Figure 6: “Options” Window – General Tab
“Select
Folder”
Button
Figure 7: “Browse For Folder” Window
_____________________________________________________________________________________
AMR.OM.000163.DRM Page 12 Version 2.2
Doremi Labs Inc.
Page 13

Figure 8: “Please Select database type” Window
Figure 9 “Choose database type” Window
The Database type for each folder is indicated directly below the Database Folder Location see Figure 6. An existing database already has a device type associated with it. Make sure it
matches the type of device you intend to use.
• After selecting the database type press the Apply button and then press Ok.
2.4.3 Deleting Clips from the Database
How to delete a clip from the database:
• Go to the “Clip Database” tab, and select the clip(s) you wish to delete.
• Click the Remove button.
Note: This operation will delete the clip(s) from the database; it will not affect/delete the clips
that are already present on the device.
2.4.4 Drop-In Folder
Doremi Asset Manager allows you to use Drop-In folders to automate the importing of files as
well as the transferring of files to the attached devices. Once a file is added to the the Drop-In
folder it is automatically added to the Doremi AM database and transferred to a device. After
making changes to the drop in folder settings click the “Apply” button.
How to Create a new “Drop-In Folder”:
• Go to the File menu and select “Options.”
• From the Options window select the Drop-In tab.
• Click the “New” button (see Figure 10).
• Click on an already existing folder or Create a new folder. (see Figure 7).
_____________________________________________________________________________________
AMR.OM.000163.DRM Page 13 Version 2.2
Doremi Labs Inc.
Page 14
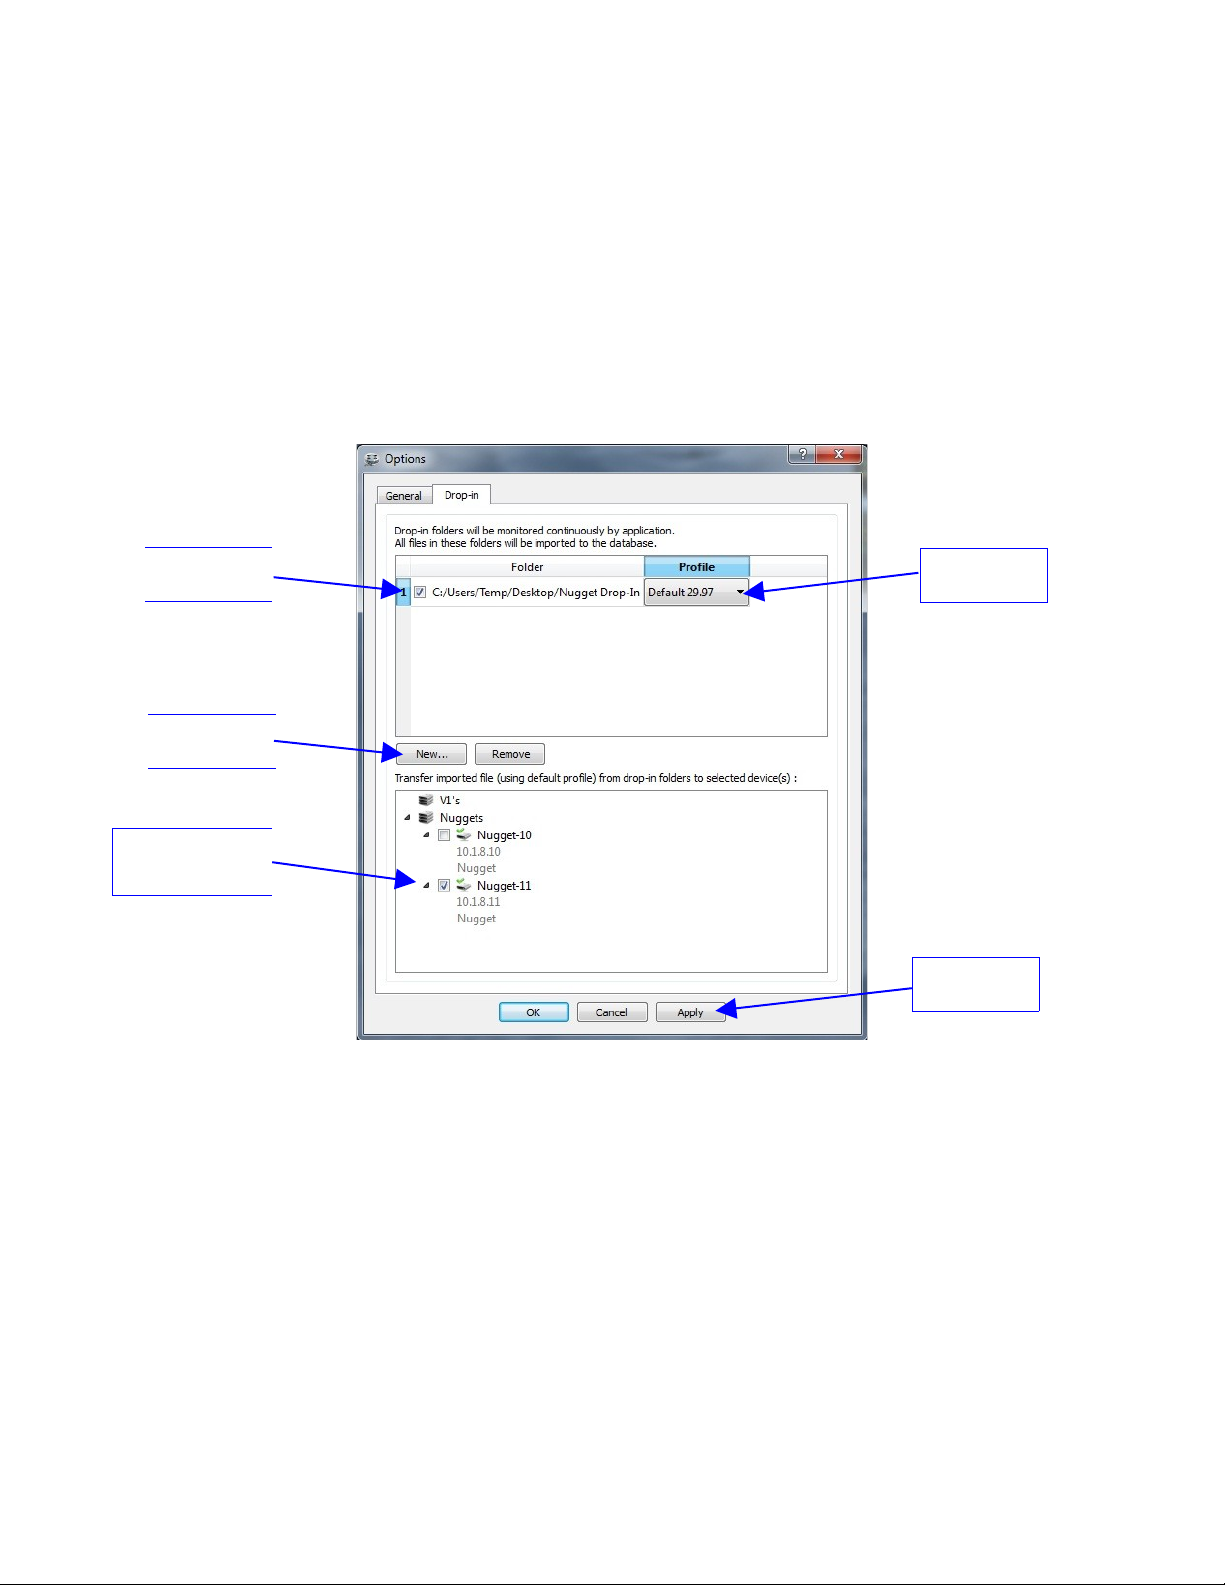
• Click “Select Folder,” the folder will then appear in the Drop-In window (see Figure 10).
• Clicking “Apply” will automatically import the files in that folder to the corresponding
database.
• To remove a Drop-In folder, select the number of the corresponding Drop-In Folder and
click the “Remove” button.
• Click on “Close” when you are done.
Each Drop-In folder can have a different profile assigned to it as well as different device for
automated transfer. All Drop-In folders must be deactivated before changing the database.
Active Drop-In
Folder
New
Button
Device Assigned
for Automated
Transfer
Assigned
Profile
Apply
Button
Figure 10: “Options” Window – Drop-In Tab
_____________________________________________________________________________________
AMR.OM.000163.DRM Page 14 Version 2.2
Doremi Labs Inc.
Page 15
3 Using Doremi Asset Manager
To launch the Doremi Asset Manager GUI, right-click on the Green circle Icon in the task-bar
and select “Show Doremi Asset Manager” (see Figure 4).
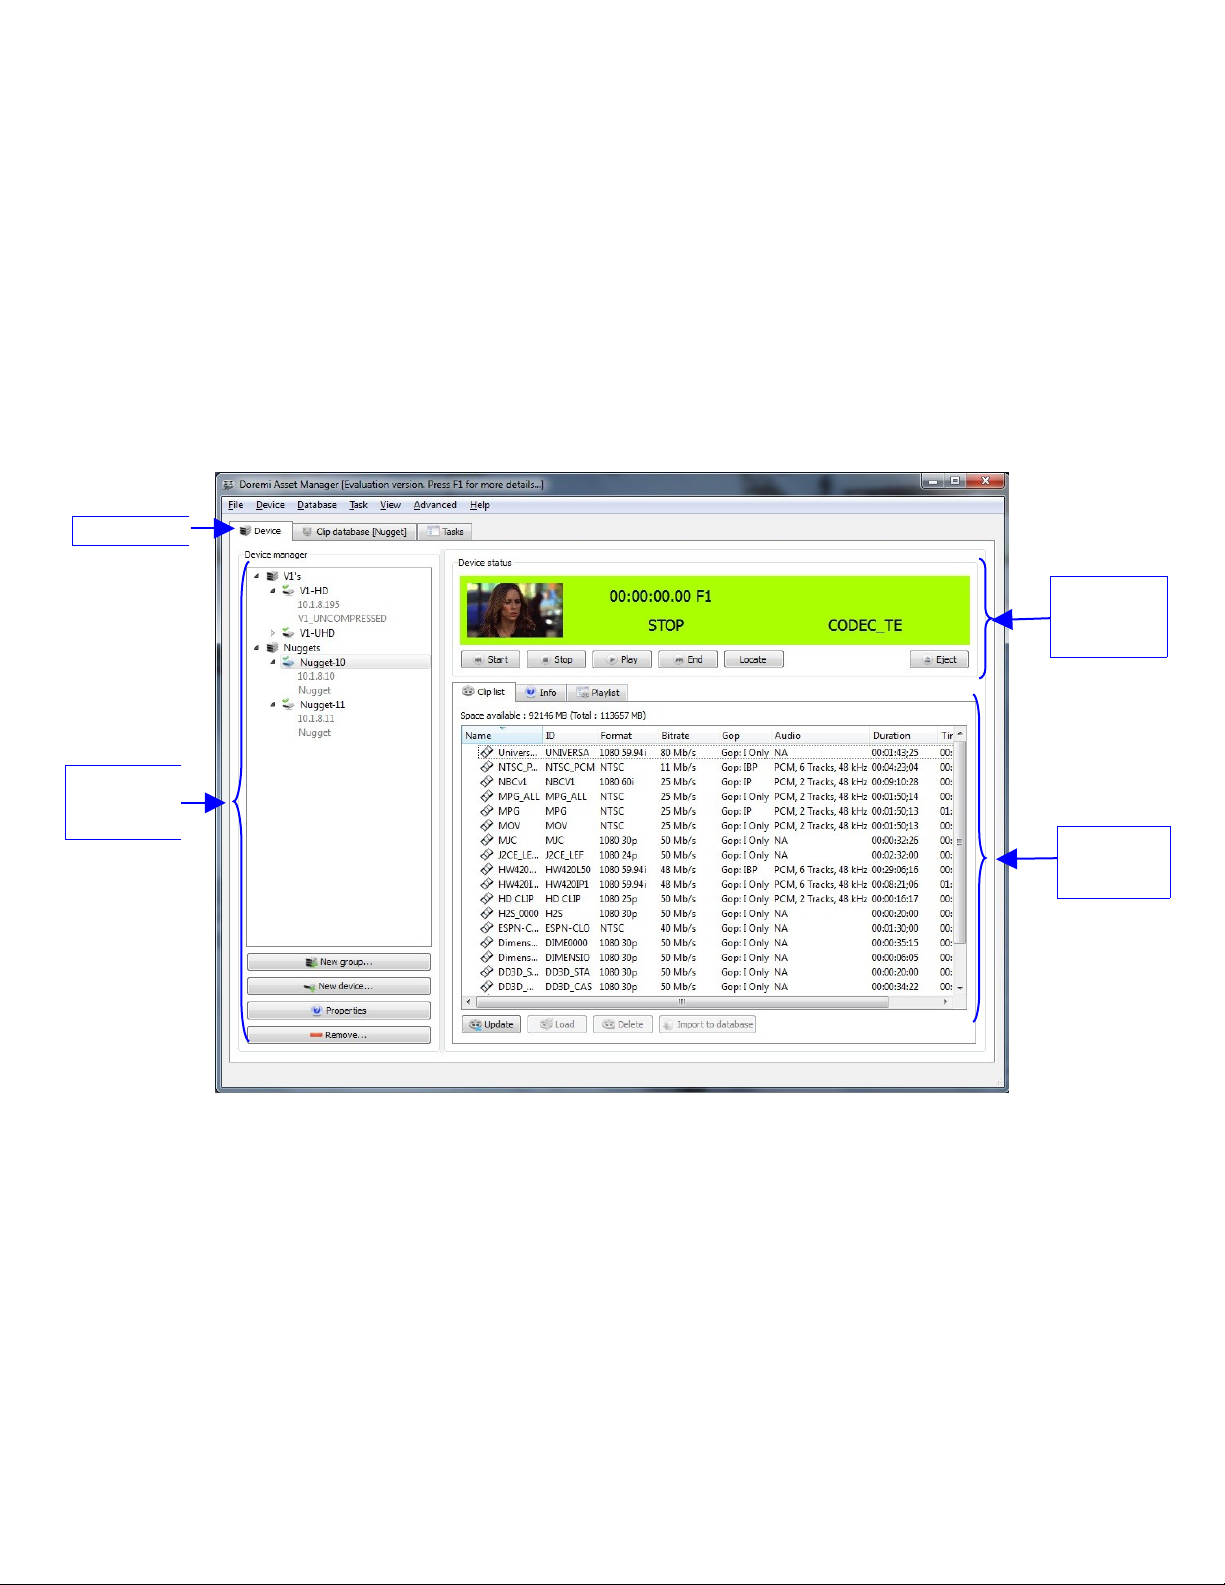
3.1 Overview
The DoremiAM Graphical User Interface (GUI) is shown in Figure 11 below. This GUI contains
three tabs:
“Device” Tab
• The “Device” tab is used to manage the devices (e.g., Nugget, V1-HD, V1-UHD, etc.).
• The “Clip Database” tab is used to manage the database and to transfer clips.
• The “Tasks” tab contains the list of tasks and associated log information.
“Device
status“
window
“Device
manager”
window
Figure 11: Asset Manager’s Device Tab
3.2 Device Control
The “Device” tab consists of three sections: “Device manager”, “Device status” and “Device
access” – see Figure 11.
“Device
access“
window
_____________________________________________________________________________________
AMR.OM.000163.DRM Page 15 Version 2.2
Doremi Labs Inc.
Page 16

3.2.1 Device Manager
button
The Device Manager will help you manage the devices that are connected to DoremiAM. The
Device Manager allows you to easily manage your devices and tell connection status at a
glance.
Note: When using a V1 device, a “Lock Icon” will appear anytime a file is being transferred
either from or to the V1, and a message saying “LOCKED Transferring” will appear in the
“Device Status Window.” Also, see Section 3.7 of this manual for more information on
“Scheduling Transfers.”
Four devices
added
• For each device, either a red X or a green check mark will appear.
• The red X indicates that the device is currently not connected.
• The green check mark indicates that the device is connected.
Status
information
related to
the selected
device
Selected
device
“New Group”
Button
“New Device”
button
Properties
button
“Remove”
To create a new “Group” click on the “New Group” button (see Figure 12). The “New Group”
window will appear (see Figure 13). Enter a name for the new group and click the “Add” button.
The New group will be displayed in the device manager:
Clip list of
the selected
device
Figure 12: Doremi AM Device Tab
_____________________________________________________________________________________
AMR.OM.000163.DRM Page 16 Version 2.2
Doremi Labs Inc.
Page 17
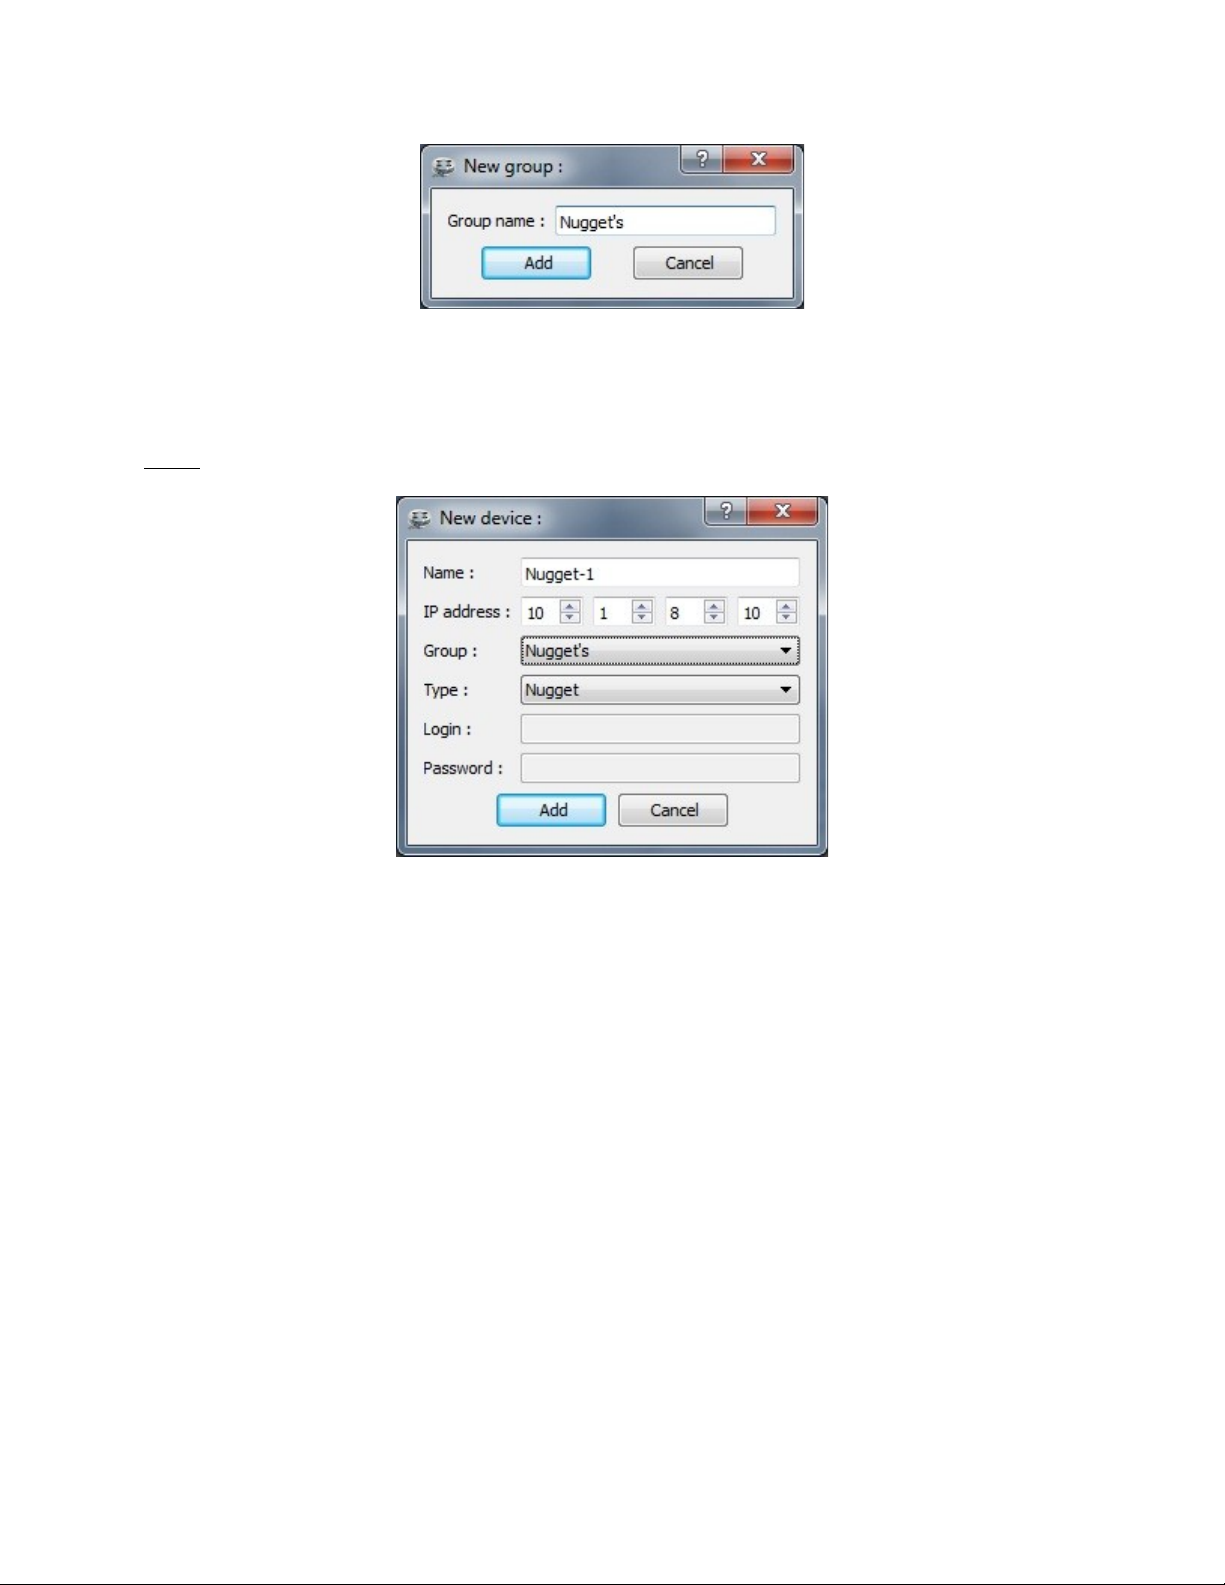
Figure 13: “New group” Window
To add a new device, click on the “New Device” button as seen in Figure 12 above. The New
Device window will appear; enter the Name and IP address of the device and click Add.
Note: Make sure to select the proper device type in the “type” field as shown in Figure 14
below.
Figure 14: “New device” Window
To Edit or Remove a particular device or group name, click on the device as shown in Figure 12
above and then click the “Properties” or “Remove” buttons respectively.
3.2.1.1 Unknown Nugget or Nugget Post IP Address
If you do not know the IP address of your Nugget or Nugget Post it can be retrieved by
connecting your Nugget to your PC using the Provided RS-422 to RS-232 cable.
To retrieve the IP address of your Nugget by Serial:
• Connect the provided serial cable between your computer's COM port and the Nugget's
RS-422 port.
• Form the Doremi AM GUI go to the “Device” menu and select “IP Address.”
• You will be prompted to select either “Current device” or “serial port.”
• Select “serial port” and then select “Com1” or “Com2.”
_____________________________________________________________________________________
AMR.OM.000163.DRM Page 17 Version 2.2
Doremi Labs Inc.
Page 18

• The “Device Network Configuration” window (see Figure 16) will show you the current
settings.
• Type in the desired IP address, Subnet Mask and Gateway IP and press Ok.
• The unit will reboot with the new IP address.
Note: The factory default IP and Subnet Mask settings for the Nugget are as follows:
• IP Address: 192.168.100.191
• Subnet Mask: 255. 255. 255. 0
Note: See Section 1.4 above for instructions on how to connect the Nugget.
Figure 15: Select Serial Port or Current Device Window
Figure 16: “Device Network Configuration” Window – Nugget Connection
3.2.1.2 Finding and Changing the V1's IP Address Note: See Section 1.5.1 above on how to connect to the V1.
_____________________________________________________________________________________
AMR.OM.000163.DRM Page 18 Version 2.2
Doremi Labs Inc.
Page 19
Finding the IP Address of the V1
• Go to OPTION+MENU (00).
• Press the ++ button until “IP xxx.xxx” is displayed.
• These are the first two octets of the IP address.
• To view the second two octets press the TOGGLE button.
Changing the IP Address on the V1
• Type in the new IP using the numeric keypad, use the "." to move between the octets.
• Press Enter after you finish typing the new IP address.
• Use the UP arrow key to go to OPTION+MENU (05) "Save Settings."
• Press the Toggle key; you will be prompted "Are You Sure."
• Press Enter to accept (the unit will exit the menu).
• Wait for 1 minute and then shutdown the unit.
• Wait for 1 minute and then power-up the unit.
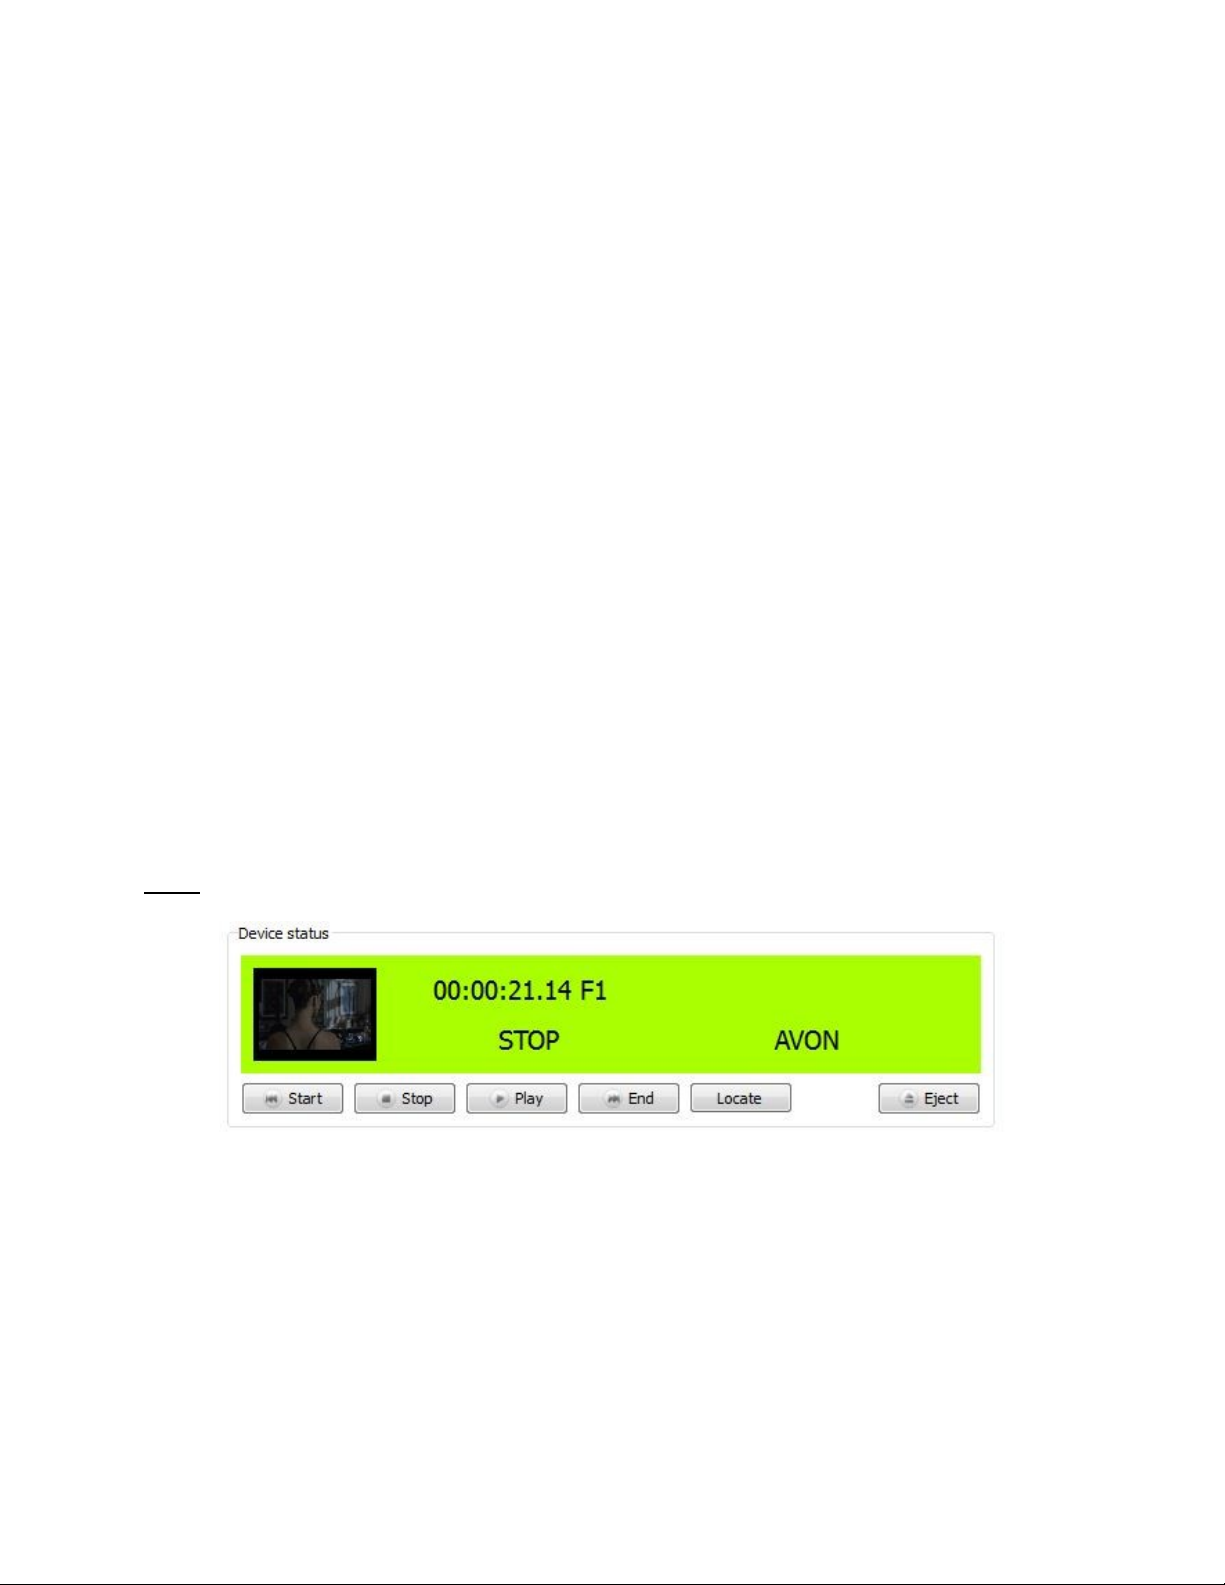
3.2.2 Device Status
The “Device status” window (see Figure 17) displays the current status of the selected device. It
also has some transport control buttons.
Note: The icon/thumbnail that appears to the far left in Figure 17 below will only appear on a
Nugget (implemented beginning with Doremi AM version 4.3.25).
Figure 17: Device Status Window
To locate to a specific frame:
• Click Stop.
• Click Locate.
• The “Locate” window will appear (see Figure 18).
• Specify a timecode and click on “locate” to cue the unit.
_____________________________________________________________________________________
AMR.OM.000163.DRM Page 19 Version 2.2
Doremi Labs Inc.
Page 20

• Clicking on the “++” or “--” buttons allow you to step through the clip frame by frame.
• You can keep the “Locate” window open while using the transport controls.
Figure 18: Locate Window
On the Nugget Post and V1, the Locate timecode window has more functions such as: Shuttle,
Rewind and Fast Forward. (see Figure 19).
Rewind
Feature
Shuttle
Feature
Fast Forward
Button
Figure 19: Locate Window for Nugget Post and V1 Units
3.2.3 Device Access
The “Device Access” window contains three sub-tabs: “Clip-list”, “Info” and “Playlist.”
_____________________________________________________________________________________
AMR.OM.000163.DRM Page 20 Version 2.2
Doremi Labs Inc.
Page 21

3.2.3.1 Clip List Tab Overview
button
button
This tab provides the list of clips present on the selected device:
“Load”
button
“Delete”
“Update”
Figure 20: “Clip List” Sub-Tab
Clip-List Functions:
• To load a selected clip, Highlight the clip and click “Load” or just double click on the clip
itself.
• To import the selected clip to the active database, click the “Import to database” button.
• To remove one or several clips from the device, select the desired clip(s) and click
“Delete.”
Note: The loaded clip cannot be deleted.
• To update the clip-list after a file transfer, click Update.
“Import to
database”
button
_____________________________________________________________________________________
AMR.OM.000163.DRM Page 21 Version 2.2
Doremi Labs Inc.
Page 22

3.2.3.1.1 The V1 Clip List
When connected to a V1 unit, the “Clip-list” sub-tab provides one additional “Create file” option
at the bottom.
Note: The empty file will be created in the V1 unit and not in the DoremiAM database.
“Create file” button
How to create an empty file on the V1 unit:
• Click the “Create File” button.
• The “Create File” window will appear (see Figure 22).
• Choose the settings for this file; including a Clip ID number (max. 8 digits).
• Click “OK” when you are done.
• This newly created clip will now appear in the “Clip-list” window, if it does not appear,
Figure 21: “Clip list” Sub-Tab when Connected to a V1 Unit
wait a few seconds and click on the “Update” button.
Figure 22: “V1 Create file” Window
_____________________________________________________________________________________
AMR.OM.000163.DRM Page 22 Version 2.2
Doremi Labs Inc.
Page 23

3.2.4 Info Tab
Note: Depending on the type of device you have connected (e.g., Nugget, V1-HD, V1-UHD),
the contents of the “Info Tab” will vary.
The “Info Tab” provides information on the selected device, it also provides information about
the loaded clip. The “Info Tab” can be accessed from the “Device Tab” on the main GUI.
Firmware version of
the selected device
Current File
Settings
Info
Tab
Device
Settings
Button
“Selected
Device
audio/video
settings”
Figure 23: “Info” Tab – Connection to a Nugget Device
• TimeCode (TC) Offset: Enabled for Nugget devices only. The TC Offset allows you to
change the time code offset of the loaded clip. For Nugget units the TC Offset is only
valid when the Nugget is in A-Time, for the Nugget-Post it is valid in Timecode mode.
This parameter is file based and is saved on the video file only. The options include “Set
Timecode Current Frame,” “Set Timecode for First Frame,” and “Revert to Original
Timecode.”
_____________________________________________________________________________________
AMR.OM.000163.DRM Page 23 Version 2.2
Doremi Labs Inc.
Page 24
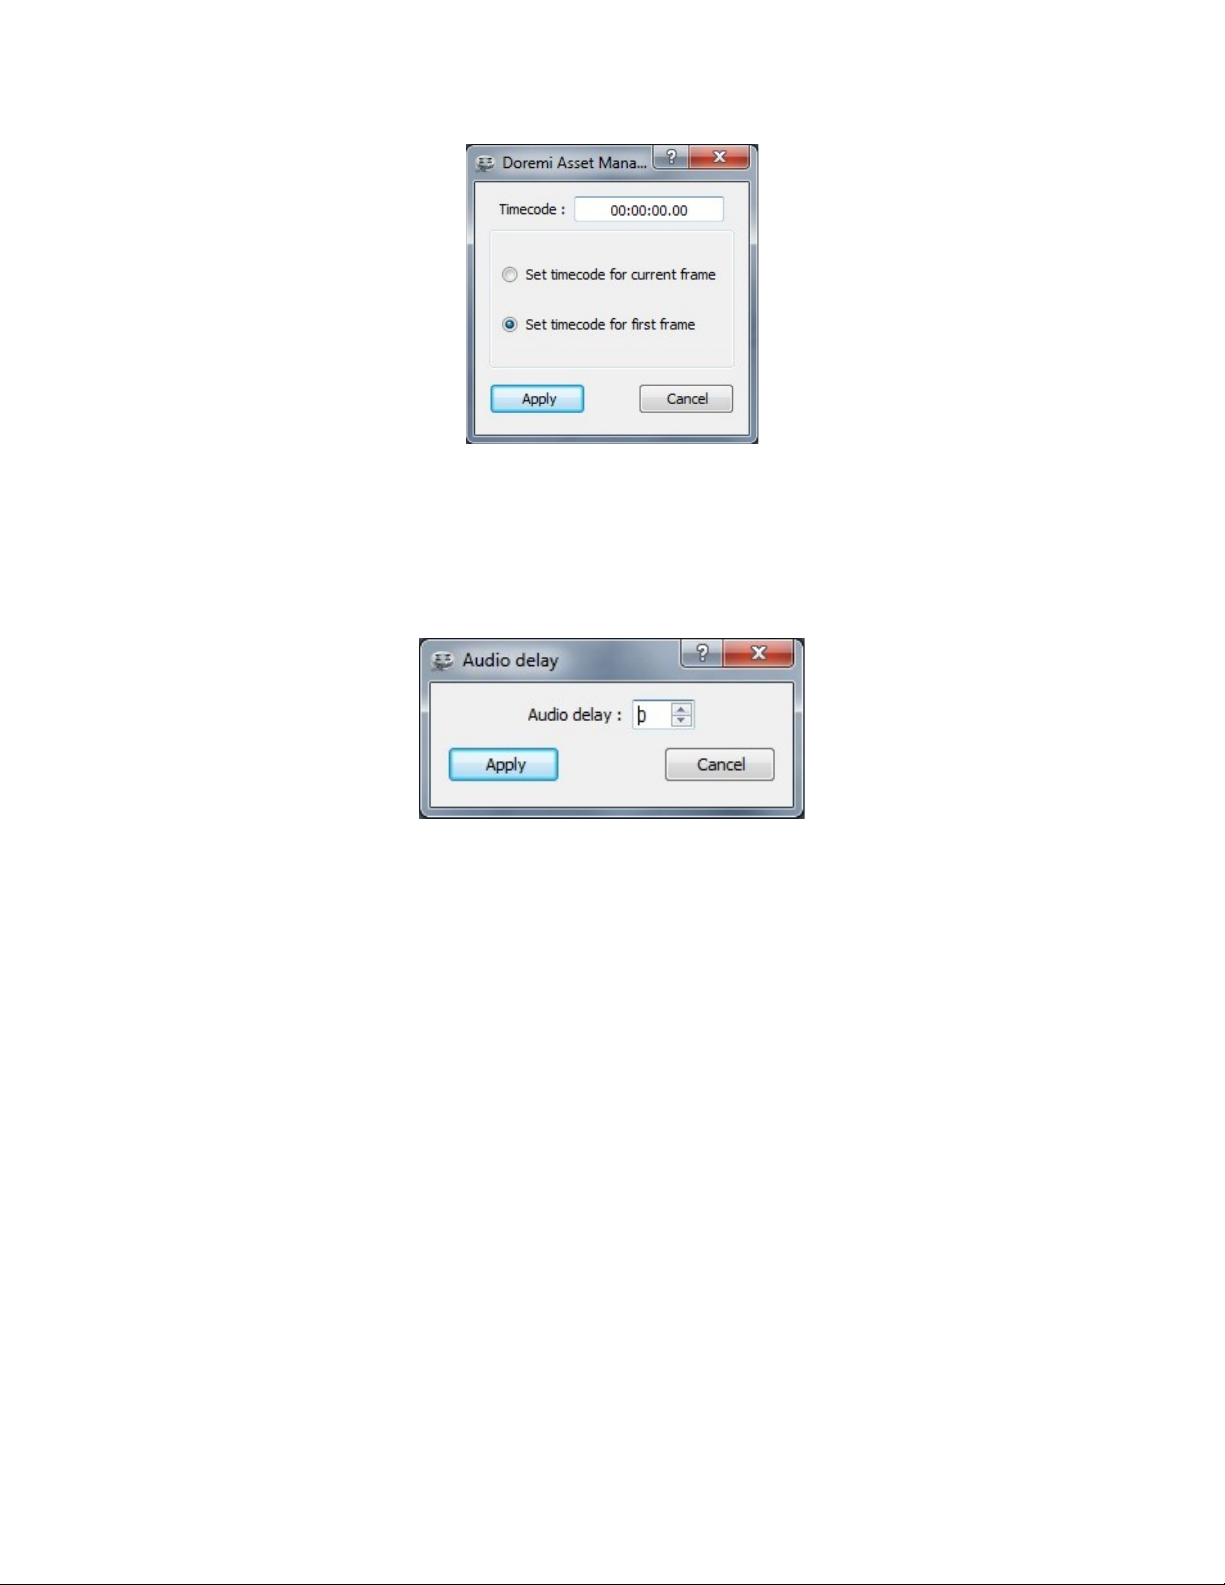
Figure 24: Timecode Offset Window
• Audio Delay: Enabled for Nugget devices only. Allows you to set the file audio offset that
can be used to synchronize video and audio on the file level. Audio delay is file based
and is different than Device settings Audio tab “delay” which is unit based (applies to all
files).
Figure 25: Audio Delay Window
_____________________________________________________________________________________
AMR.OM.000163.DRM Page 24 Version 2.2
Doremi Labs Inc.
Page 25

3.2.5 Device Settings Window
The “Device Settings” window allows you to view and make changes to the parameters and
configuration settings of the device. To get to the “Device Settings” window, click on the “Info”
Tab, which can be accessed by from the “Device Tab” on the main GUI (see Figure 23).
Please see the following instructions on how to access the “Device Settings” window from each
device:
Instructions:
• Nugget Specific :
To have access to this “Device settings” window when connected to a
Nugget Player, the Nugget should have firmware version 1.4.27-67 or
higher – check the Nugget’s firmware version using the “Info” tab as
shown in Figure 23.
If the Nugget does not have the proper firmware, clicking on the “Device
settings” button will bring an alert window asking you to upgrade to
version 1.4.27-67 or higher.
*To upgrade the Nugget firmware using Doremi AM, please refer to
Section 5.1 .
How to use the “Device Settings” option when connected to a Nugget:
When connected to a Nugget unit with the appropriate Nugget firmware version, clicking the
“Device settings” button will prompt you to the “Device Settings” window where you will see two
tabs: General and Audio/Video (see Figure 26).
• The “General” tab allows access to the general parameters of the connected device.
• The “Audio/Video”tab allows access to audio/video specific parameters of the selected
device.
_____________________________________________________________________________________
AMR.OM.000163.DRM Page 25 Version 2.2
Doremi Labs Inc.
Page 26
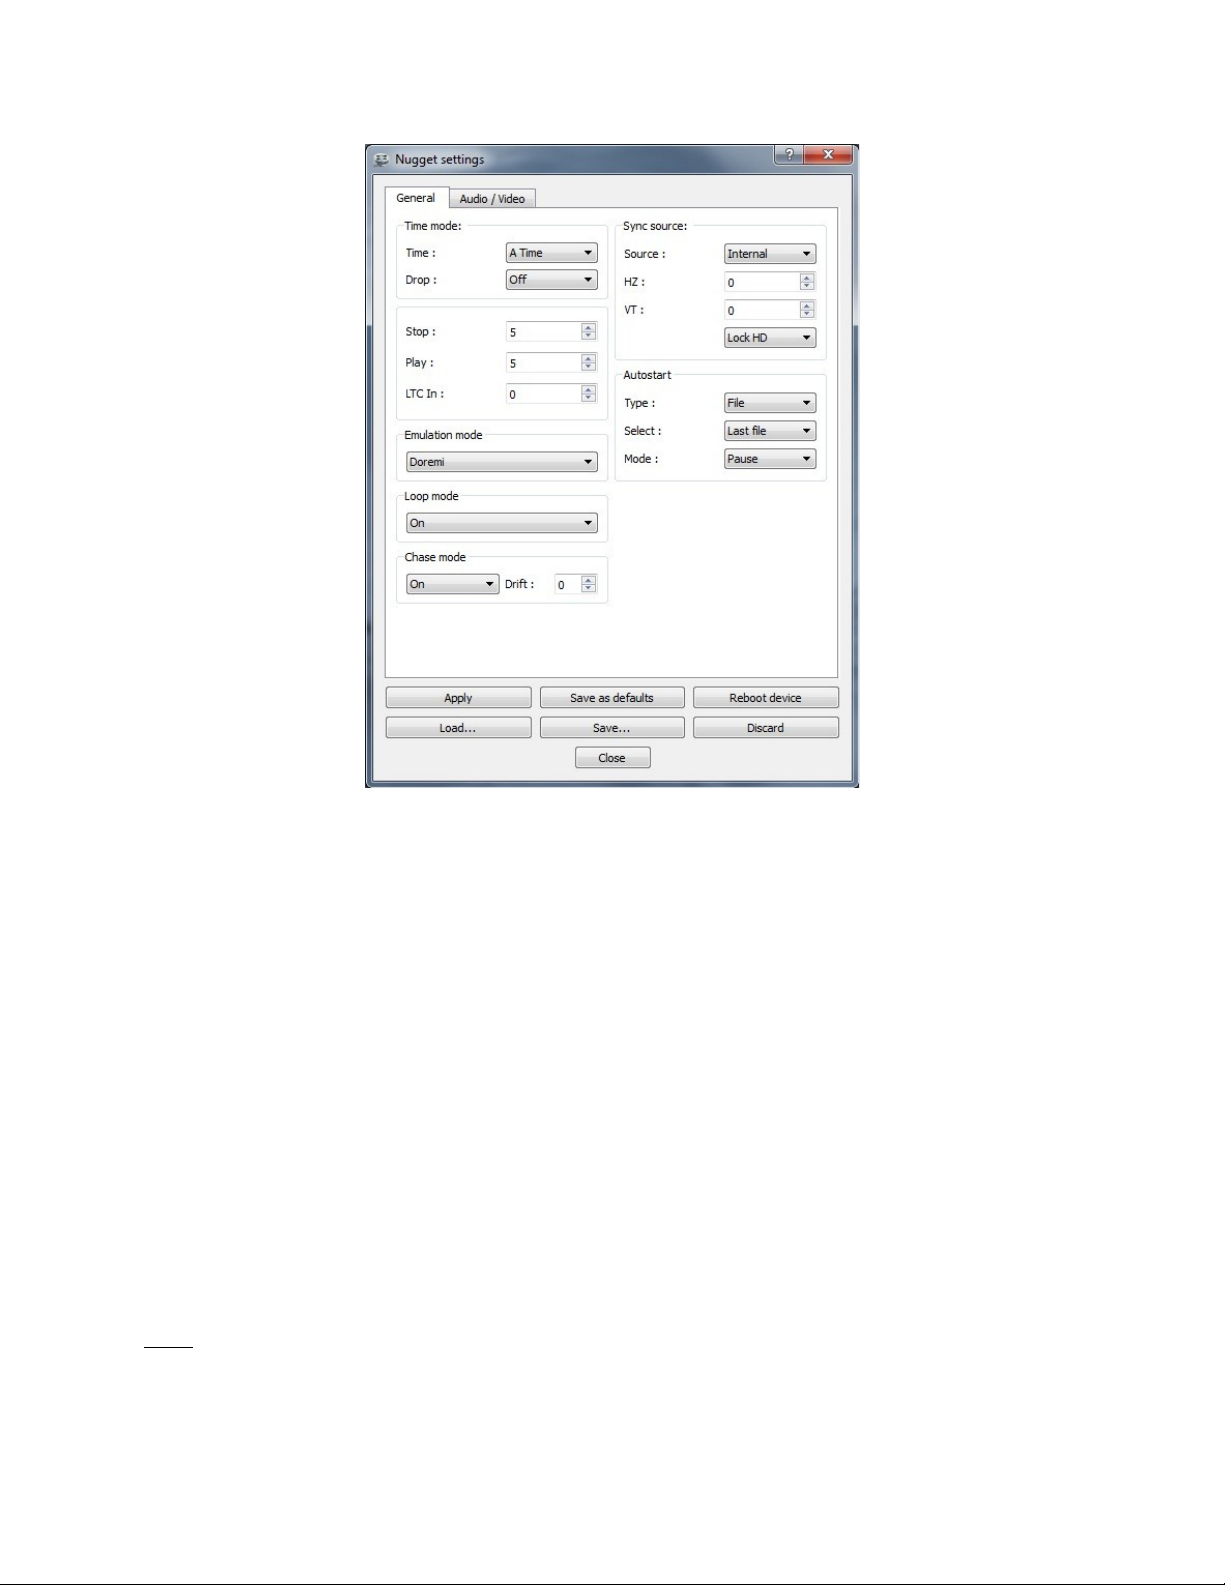
Figure 26: Nugget Device Settings Window
“Device Setting” functions when using a Nugget unit:
• To save the changes you have made to the unit, click “Apply” when you are done.
• To save the changes you have made to the flash (default settings after power up), click
“Save as default”.
• To export the current settings to a file, click “Save,” you will then be prompted to enter a
settings file name.
• To abort the changes and restore the unit’s current settings, click “Discard”.
• To load an existing settings file from your computer, click “Load”, select the
corresponding settings file then hit “Save settings”.
• The Local/Remote and Visual Cues sections will only appear on the Nugget Post.
• The Time Mode section is grayed out on the Nugget Post but it is enabled on the Non-
post version.
• The Burn in Window (BIW) located in “General Tab” field has a drop-down folder (see
the note below for more information on the BIW feature).
Note: The BIW is used when performing editing work on a clip such as visual timecode
reference, background settings (Black/White, White/White), positioning, and sizes.
_____________________________________________________________________________________
AMR.OM.000163.DRM Page 26 Version 2.2
Doremi Labs Inc.
Page 27

How to use the “Device Settings” option when connected to a V1 unit:
From the Info Tab of the Doremi AM GUI clicking the Device Settings button will bring up the
Device Settings window.
The “Device Setting” window on a V1 unit has 10 tabs (see Figure 28).
Note: There will initially be only one tab, this tab is called the “General” tab (see Figure 27).In
order to see all ten tabs in the device settings window, you must click the “Expert” button.
Figure 27: Default V1 Device Settings Window
_____________________________________________________________________________________
AMR.OM.000163.DRM Page 27 Version 2.2
Doremi Labs Inc.
Page 28

“Refresh”
button of the
“0. General”
tab
“Expert”
button
“Commit
all” button
“Refresh
all” button
Figure 28: Expert V1 Device Settings Window
“Device Settings” functions when using a V1 unit:
• Each tab has its own set of “Refresh” and “Commit” buttons which update current
settings and apply changes to and from the V1.
• Click on “Commit all” to apply all of your new and or changed settings to all of all the
tabs.
• Click on “Refresh all” to refresh all the settings of all the tabs.
• Click on “Save as default” to save the current settings as the default settings of the V1
unit.
• Click on “Recall defaults” to set all the settings to the default settings as they were
before any changes were made.
• Click on “Load” to load an existing settings configuration file from your computer.
“Load”
button
“Save”
button
• Click on “Save” to save the settings into a settings configuration file – you will be
prompted to define a file name.
• The Burn in Window (BIW) located in “General Tab” field has a drop-down folder (see
the note below for more information on the BIW feature).
Note: The BIW is used when performing editing work on a clip such as visual timecode
reference, background settings (Black/White, White/White), positioning, and sizes.
_____________________________________________________________________________________
AMR.OM.000163.DRM Page 28 Version 2.2
Doremi Labs Inc.
Page 29

3.2.5.1 Logo Overlay
The logo overlay allows you to choose a logo that can be displayed on the SDI output only (not
on the DVI output). This function can be performed from the “Device Settings” window using the
Audio/Video tab.
Note: The logo overlay feature is only enabled when connected to a Nugget or a Nugget Post
device – NOT when connected to a V1 device.
Figure 29: Logo Overlay section of the Device Settings window.
How to use an already existing Logo:
• Use the “Name” field (see Figure 29) to select any logo files that are present on the
Nugget.
• Use the “HPAD” and “VPAD” buttons to change the vertical and horizontal positioning of
the logo.
• Use the “Zoom” window to set the size of the logo from “normal” up to twice its size.
• When the logo settings are defined, hit “Save settings” on the Audio/Video tab to validate
the changes.
• Use the Logo Manager to create a logo file (see the section on Logo Manager below).
3.2.5.2 Logo Manager
Note: Sending a logo to a device is only possible when connected to a Nugget or a Nugget Post
device – not enabled when connected to a V1 device.
• Logo files should be designed as PNG without compression with the following
restrictions:
64x64 with 15 colors + transparency or 128x64 with 3 colors + transparency.
• We suggest using “Gimp,” which is a free software utility that can be used to generate
PNG files.
_____________________________________________________________________________________
AMR.OM.000163.DRM Page 29 Version 2.2
Doremi Labs Inc.
Page 30

How to create a new Logo for a Nugget or Nugget Post:
• Go to the DoremiAM GUI and select the “Device” menu.
• From the Device menu, select Logo Manager.
• Click on “Open PNG file” and browse for the logo of your choice.
• Click “Send” and the new logo will appear under “Device logos” in the Logo Manager
window (see Figure 30).
New Logos will
appear here under
“Device logos”
Figure 30: “Logo manager” Window
3.2.6 Playlist Tab
The Playlist tab allows you to manage and create playlists on the selected device. The Playlist
tab has two sub-tabs; “Device Playlists” and “Device Clips.”
*Playlist files reside on the Nugget hard drive.
In order to get (retrieve) playlists from the Nugget:
• From the “Device Playlists” sub-tab click on the playlist you want (see Figure 33).
• The playlist will be reverse highlighted, click on “Get” (see Figure 33).
• You will be prompted to select a destination folder where you wish to save the playlist
unto your computer.
• Select the folder and click save.
Note: Because the playlists are on the Nugget itself and not on your computer, you can exit
DoremiAM when you are playing back a playlist.
How to send playlists stored on your computer to the Nugget:
_____________________________________________________________________________________
AMR.OM.000163.DRM Page 30 Version 2.2
Doremi Labs Inc.
Page 31

• From the “Device Playlists” sub-tab, click the “Send” button (see Figure 33).
• You will be prompted to choose a playlist/file from your computer.
• Double click on the desired playlist/file.
• Click the “Update” button from the “Playlists Device” sub-tab (see Figure 33) and wait
approximately 30 seconds for DoremiAM to update.
3.2.6.1 Playlist Generation
How to create a new playlist on the Nugget and V1:
• Select the desired device in the Device Manager.
• From the Playlist Tab (see Figure 31) click New.
• The “Playlist clips” window will activate (see Figure 31).
• Create a new playlist clip-by-clip by choosing from the existing clips from the “Device
clips” tab (see Figure 31).
• When creating a playlist on the V1 you can edit the IN and OUT points to create a
segment of the selected clip by double clicking on the IN timecode and OUT timecode
(See Figure 32).
• Using the “Insert above” and “Insert below” buttons (See Figure 31), you can choose
whether a clip will precede or follow another clip.
• When you are done creating the playlist, enter a playlist name in the “name field” (see
Figure 31) and click Save.
• When creating a playlist on the V1 you do not need to enter a name simply press save
and the playlist will be generated and numbered automatically.
Note: For a “seamless” playlist, the playlist should contain clips with matching parameters, it
cannot be made with different parameters (video standards, number of audio tracks, frame rate,
etc.). Once you select a clip from the Device Clips list any clips that do match the parameters of
that clip will be grayed out and inaccessible.
_____________________________________________________________________________________
AMR.OM.000163.DRM Page 31 Version 2.2
Doremi Labs Inc.
Page 32

Editing the playlist:
• To move a clip up or down in the “Playlist Edit” window (see Figure 31), select the clip in
the “Playlist clips” sub-tab and hit “Move Up” or “Move Down” respectively.
• To remove a clip from the playlist, select it from the “Playlist clips” tab and click
“Remove”.
• To remove all the clips from the playlist, click Clear.
• To cancel a playlist creation, click Abort.
• To loop (re-play from the beginning) the playlist, check the “Loop playlist” check-box.
• To delete a playlist, select the playlist you wish to delete from the “Device playlists” sub-
tab and click “Delete”. Click ”Update” when done.
• To play the sequence of clips defined by a playlist, select the corresponding playlist on
the “Device playlists” window and click “Start”. The playback can be monitored from the
“Device Status” window as seen in Figure 17 above.
Playlist Limitation
Short clips (less than 30 frames) are not supported in a playlist. If you have a clip in the playlist
that is shorter than 30 frames, the playlist will stop.
Missing clips
If you open a playlist that has missing clips, you will get a warning message and those clips
will appear with “!” as the first character in their name.
Playlist Name
Device Clips
Insert Above
and
Insert Below
Buttons
Playlist Clips
Loop Playlist
Checkbox
Figure 31: Playlist Generation and Editing for the Nugget
_____________________________________________________________________________________
AMR.OM.000163.DRM Page 32 Version 2.2
Doremi Labs Inc.
Field
Page 33

Figure 32: Playlist Generation and Editing for the V1
Define In and
Out points of
the Segment
_____________________________________________________________________________________
AMR.OM.000163.DRM Page 33 Version 2.2
Doremi Labs Inc.
Page 34

“Device
Playlists”
Sub-tab
Selected
playlist
“Update”
button
“Device
playlists”
window
“Start” button
“Send” button
“Get” button
“Delete” button
Figure 33: “Playlist” Sub-Tab Nugget
_____________________________________________________________________________________
AMR.OM.000163.DRM Page 34 Version 2.2
Doremi Labs Inc.
Page 35

Automatically
-numbered
Playlist
Figure 34: Playlist Sub-Tab V1
_____________________________________________________________________________________
AMR.OM.000163.DRM Page 35 Version 2.2
Doremi Labs Inc.
Page 36
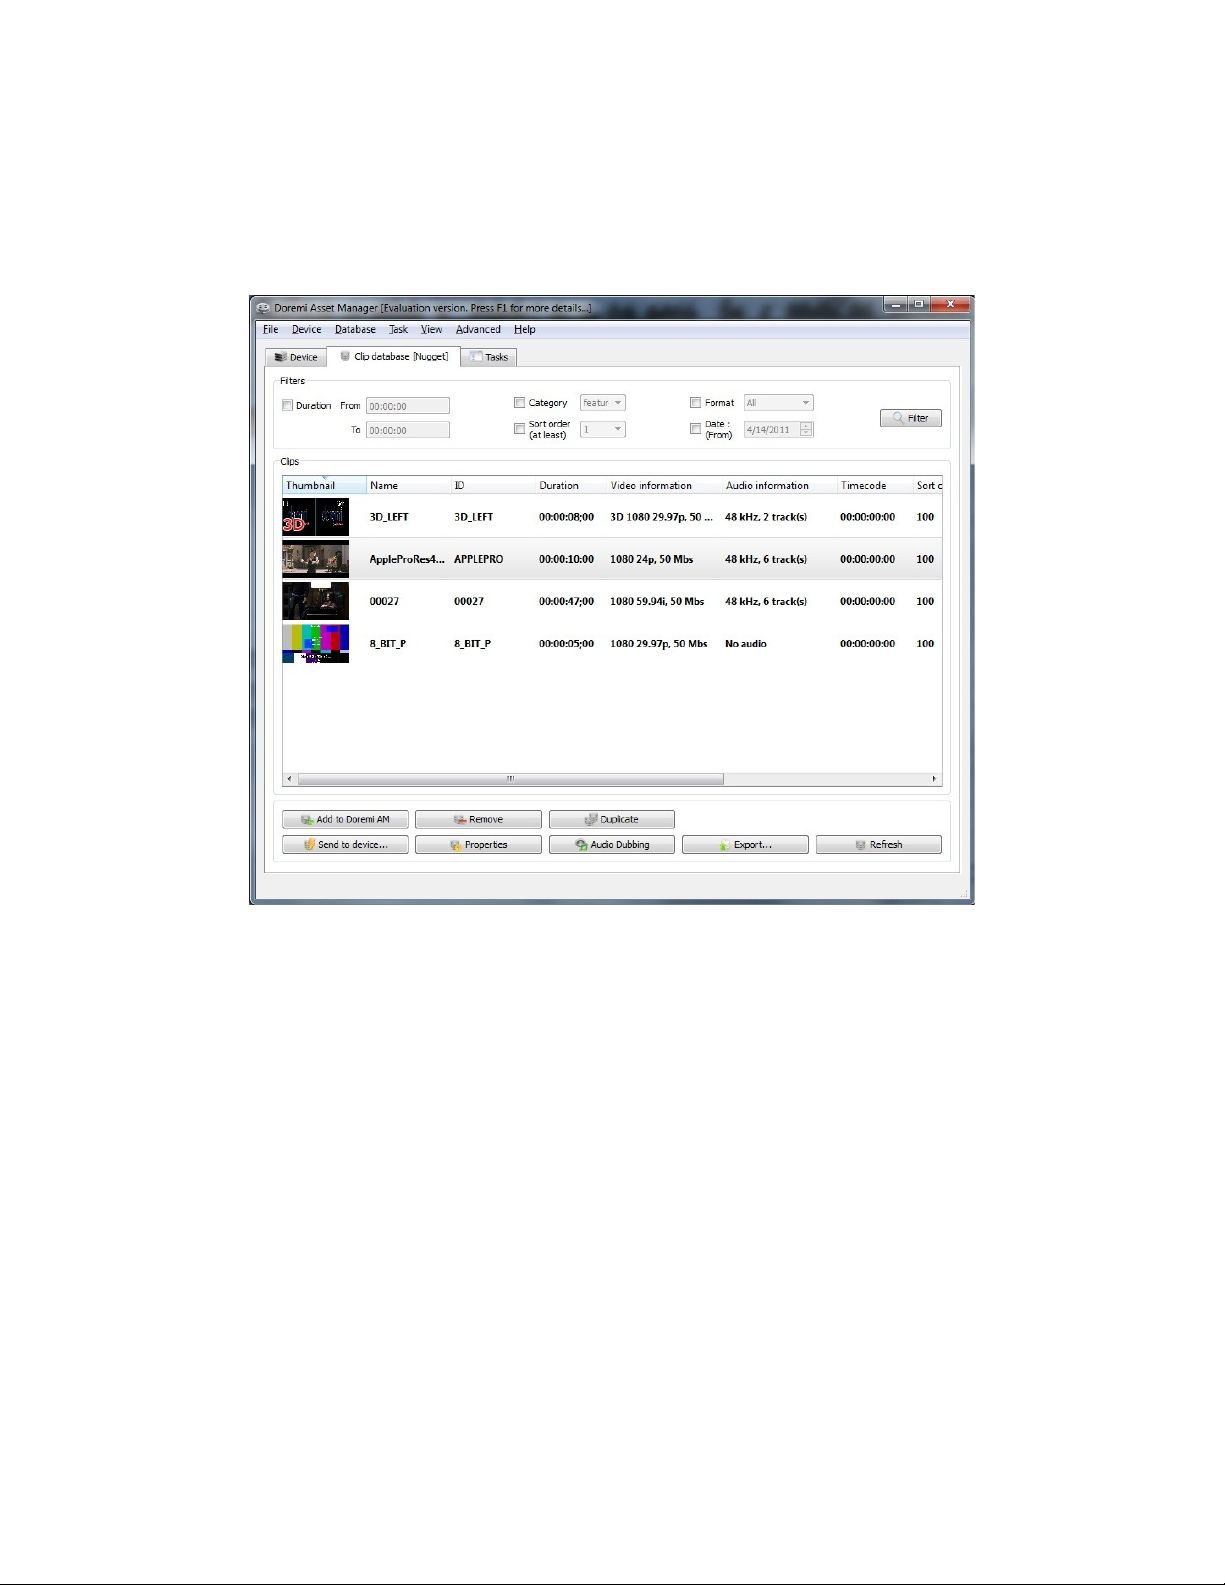
3.2.7 Doremi Asset Manager Database
All media files are imported to the DoremiAM database before they are transferred to the units
(e.g., Nugget or V1). When the “Clip database” tab is selected (see Figure 35), the application
will show a list of all files with their properties such as duration, video format, audio format, etc.
You can hide or show thumbnails using the “View” menu or by pressing F10.
Figure 35: “Clip database” Tab Example of a Nugget Database
3.2.7.1 Clips Properties
In addition to the properties listed, if you select a clip and click “Properties” (see Figure 35) or
double click on the clip, you will get the “Properties” window.
The “Properties” window has 4 tabs: General, Video, Audio, Timecode and Thumbnail (see
Figure 36). The “Name”, “ID” and “Timecode offset” can be edited if necessary using these tabs.
Click “OK” when you are done to save the changes to the clip in the database. Thumbnails can
be either a frame from the video file or from an image file on your PC.
_____________________________________________________________________________________
AMR.OM.000163.DRM Page 36 Version 2.2
Doremi Labs Inc.
Page 37

Figure 36: “Properties” Window
3.2.7.2 3D Merge
The 3D Merge feature allows you to create a 3D database clip using two existing 2D clips. The
3D merge function can also be used to create a ”Video + “Key File,” where “Video” corresponds
to the Left eye and the “Key” corresponds to the Right eye. The “Key File” is the
still/constant/recorded image/clip.
Note: This feature is enabled only when using a compressed V1 unit (“V1 JPEG 2000”).
How to execute a 3D Merge:
• Select the two clips you want to merge from the “Clip Database” tab (see Figure 35) –
hold the “Ctrl” or “Shift” button of the keyboard in order to highlight both files.”
• Click on the “3D Merge” button.
• Use the Drop down arrows in Figure 37 below to select the file you wish for each eye.
Note: The two clips you are using must be the same duration and same format. Also, you can
select only an audio track from either the Right or Left Eye by checking the box on one of the
clips (see Figure 38).
_____________________________________________________________________________________
AMR.OM.000163.DRM Page 37 Version 2.2
Doremi Labs Inc.
Page 38

Left eye clip
snapshot
“Timecode
Value”
“--” and “++”
buttons
“Use
Audio
track from
Clip”
buttons
Figure 37: “3D – Files Assignment” Window
• After pressing Ok on the “3D Assignment Window” the “3D Merge settings” window will
appear (see Figure 38).
Right eye clip
snapshot
“Set sync
Point” button
“Locate”
button
“Name” field
Figure 38: "3D Merge Settings” Window
How to use the 3D merge settings:
• To navigate within both the selected 2D clips, with each one corresponding to the right
or left “eye” (see Figure 38), use the “--” and “++” buttons or the “position cursor” button.
• To manually navigate through the clips, enter the desired timecode in the “timecode
value” box (see Figure 38) and then click “Locate,” this will prompt the clip directly to the
entered timecode position.
• When you select the timecode values, the “Set In” and “Set Out” boxes will automatically
be computed to match. To make those values the permanent IN and OUT points for your
new 3D clip, click on the “Set In” and “Set Out” buttons (See Figure 38).
_____________________________________________________________________________________
AMR.OM.000163.DRM Page 38 Version 2.2
Doremi Labs Inc.
Page 39

Note: Make sure to define valid IN and OUT points for the left eye clip, otherwise you will not be
able to complete the following steps.
• You must define a “Sync Point” by entering a value for each clip (right and left eye) in the
timecode box (see Figure 38). After you have chosen the timecode values for each clip,
click “Set Sync Point.” The settings for the Duration and IN/Out points for the “Right Eye
Clip” will be automatically computed after the Sync Point is defined.
• After having defined the “Sync Point,” the duration values for the Left and Right eye
should match.
• Enter a Name and Clip ID (see Figure 38) for the new 3D file and click “OK.
3.2.7.3 3D Split
NOTE: This feature is enabled only when using a compressed V1 unit (“V1 JPEG 2000”).
The 3D split feature allows you to create a database clip for each one of the “eye” streams (left
and right) of a 3D file.
How to Split a 3D file:
• Select the 3D clip you want to split and click on the “3D Split” button;
• Click on Finish to start the “splitting process”
• When you are done, you will see the left and right eye streams under the “Clip
Database” window. The file name will be the same as the original with an extension of
“..._left” and “..._right.”
Figure 39: 3D Clip Splitting
_____________________________________________________________________________________
AMR.OM.000163.DRM Page 39 Version 2.2
Doremi Labs Inc.
Page 40

3.3 Transferring Files to the Device (Nugget or V1)
You can transfer files directly to the device using Windows Explorer, Drag and Drop, Drop-in
folders or using the Doremi Asset Manager application.
3.3.1 Using Windows Explorer
How to transfer clips to a Nugget or a V1 using Windows Explorer:
• Select all media files you want to transfer and, “right click “(Windows) or '”ctrl click”
(Mac), on one of them.
Note: For image sequences, it is necessary to select only the first image.
• Scroll down to “Send To” and select “Doremi devices” for Windows users. Mac users
must manually drop it in the desired folder.
• Click on “Transfer options” and select all units to send the files to. Check the box for the
units you wish the files to be transferred to (see Figure 41).
• Click “Finish” to start the transfer. Note: At this stage you can choose to schedule the
transfer instead of starting the transfer immediately (see Section 3.7 ).
• You can see the progress of the transfers under the “Tasks” tab in the DoremiAM GUI.
Once the transfers are complete, the “Clip Database” tab will list all files in the database.
• All media files will be added to the database before they get transferred to the units.
Figure 40: Send to Doremi Device
_____________________________________________________________________________________
AMR.OM.000163.DRM Page 40 Version 2.2
Doremi Labs Inc.
Page 41

Figure 41: “Send to Doremi Devices” Window
_____________________________________________________________________________________
AMR.OM.000163.DRM Page 41 Version 2.2
Doremi Labs Inc.
Page 42

Figure 41 above is an example of a folder/clip being transferred from the database to a specific
device. The green check-mark indicates that the selected device (the V1-HD) is connected. By
clicking the “Apply Selection To All” button you are able to transfer the folder/clip to more than
one unit at a time.
3.3.2 Using DoremiAM Clip Database to Transfer a Clip to the Device
To transfer a clip from the database to the connected device (Nugget or V1):
• Go to the “Clip database” tab.
• Select the media file(s) to transfer.
• Click on the “Send to Doremi devices” button.
• Select the unit(s) you wish to send the file to.
• Click on “Finish” to start the transfer.
• Go to the “Tasks” tab to see the progress of the transfers. To see a list of all the new
files, click “Update” on the “Clip Database” tab. Note: The update process takes
approximately 30 seconds.
Note: At this stage you can also choose to schedule the transfer instead of starting it. This
procedure is detailed in Section 3.7 below.
• You can see the progress of the file transfer in the “Tasks” tab as shown below:
_____________________________________________________________________________________
AMR.OM.000163.DRM Page 42 Version 2.2
Doremi Labs Inc.
Page 43

Transfer
Progress
Figure 42: Clip Transfer Progress
3.3.3 Using the Drop-In Folders
If you have already enabled one or more Drop-in folders from the Options menu, you can just
drop media files in the designated directory and they will be automatically imported to the
database and transferred to the associated unit(s).
3.3.4 Drag and Drop
Select the media file(s) and drag them to the DoremiAM Database window.
3.4 Adding Files to the DoremiAM Database
Files can be transferred to the database using Windows Explorer, Drop-in folders, DoremiAM
“Clip database.” or using the Drop Box. Files can also be added to the database by importing
them from a device (Nugget or V1) using the “Clip List” tab.
_____________________________________________________________________________________
AMR.OM.000163.DRM Page 43 Version 2.2
Doremi Labs Inc.
Page 44

3.4.1 Using Windows Explorer to Add Files to the Database
How to add files to the database using Windows Explorer:
• Select one or more media files using Windows Explorer and right click on one of them.
• Scroll down to “Send To.”
• Select “Doremi AM Database.”
• This will launch Doremi AM Transfer (see Figure 43).
Figure 43: “Doremi AM Transfer” Default Window
• Doremi AM Transfer consists of 3 separate windows; the Source List window, the
Summary Window and the Profile and Encoding Options Window.
• These windows can be separated and moved around on the desktop to suite the users
needs by selecting the window title and dragging to the desired location.
_____________________________________________________________________________________
AMR.OM.000163.DRM Page 44 Version 2.2
Doremi Labs Inc.
Page 45

Figure 44: Doremi AM Transfer Floating Windows
• The Summary window displays information about the source file and the current
encoding parameters selected.
Figure 45: Summary Window
• Using the Source List window you can rename the Clip as well as select whether to
import the audio along with the video or not.
• To rename the clip double-click on the Filename and type in a new name for the clip.
• To omit the audio track press the expand arrow underneath the Thumbnail and then click
the check-box next to the audio track.
_____________________________________________________________________________________
AMR.OM.000163.DRM Page 45 Version 2.2
Doremi Labs Inc.
Page 46

Double-click
to change
Clip name
Audio Track
Select
Check-Box
• Each clip in the source list can have a different profile or different encoding parameters
applied to it.
Figure 46: Source List Window
• The Profile and Encoding Options window allows you to Load and Save profiles, as well
as manually adjust the encoding parameters for the clip selected in the Source List.
• The Profile and Encoding Options window contains seven tabs; the Information Tab, the
Encoding Options Tab, the Stereoscopic Options Tab, the Scaling and Resolution Tab,
the Image Sequence Tab, the Trimming Tab and the Misc. Tab.
• The Encoding Options tab displays the different encoding parameters available for the
selected database type. The options displayed will be different depending on which
database type you have selected.
Figure 47: Profile and Encoding Options Window Encoding Options V1-HD
_____________________________________________________________________________________
AMR.OM.000163.DRM Page 46 Version 2.2
Doremi Labs Inc.
Page 47

Figure 48: Profile and Encoding Options Window Encoding Options Nugget
Figure 49: Profile and Encoding Options Window Encoding Options V1-UHD
• When importing an Image Sequence use the Image Sequence tab to select the frame
rate to import the sequence at.
• Once all the settings are adjusted appropriately press the “Ok” button on the Source List
window to start the import process.
• When the import is complete the clip will be visible in the Clip Database Tab.
_____________________________________________________________________________________
AMR.OM.000163.DRM Page 47 Version 2.2
Doremi Labs Inc.
Page 48

3.4.2 Using the Drop-In Folders to Add Files to the Database
Place media files in the Drop-in folders and they will be automatically imported to the Database.
If you assign units/devices to the drop-in folders, these files will also be transferred to the units.
3.4.3 Using the Drop-Box to Add Files to the Database
When Doremi AM is Launched the Drop Box will appear on the desktop. The Drop box will
remain on the desktop even when the Doremi AM GUI is closed. It can be used to add
files to the database at any time. By right-clicking on the Doremi AM icon in the taskbar,
you can choose to hide or show the Drop Box (see Figure 36 & Figure 37 below). You
can also choose to have the Drop Box "Always on top", which will make it appear in front
of all open windows.
• Simply dragging and dropping files onto the drop box will open Doremi AM transfer.
• If Doremi AM Transfer is already open dragging and dropping additional files onto the
drop-box will add them to the Source List. This way you can cue multiple files for
importing to the database.
• Each file in the Source List can have different encoding parameters or profiles applied.
Figure 50: Drop-Box
_____________________________________________________________________________________
AMR.OM.000163.DRM Page 48 Version 2.2
Doremi Labs Inc.
Page 49

Figure 51: Drop-Box options – Windows
Figure 52: Drop-Box options – Mac
3.4.4 Using DoremiAM to Add Files to the Database
How to add files to the database using DoremiAM:
• Go to the “Clip database” tab and click on the “Add to Doremi AM” button (see Figure
53).
• Browse your computer for a media file and click “Open.”
• Clicking “Open” will launch Doremi AM Transfer.
• Click “Ok” on the Source List window to start the import Process.
• When the import task is finished, the “Clip database” window will show the added clip.
_____________________________________________________________________________________
AMR.OM.000163.DRM Page 49 Version 2.2
Doremi Labs Inc.
Page 50

“Duration”
Check-Box
Filter by
“Sort Order”
Added
Clip
“Add to
Doremi AM”
button
Filter by
“Category”
“Filter”
button
Filter by
“Date”
Figure 53: Updated “Clip database” Tab
Filter Options:
DoremiAM allows you to “filter” through clips that have been transferred to your V1 or Nugget
database. Specify the “Duration,” “Sort Order,” “Format,” “Category,” or “Date,” and click on the
“Filter” button (see Figure 53). The “Clip Database” window will display the clips with matching
specifications. For example, you can access clips that were transferred on a certain date, that
are of a certain duration, and that are within a certain category.
3.4.5 Using the Device to Add files to the Database
How to transfer files from the device to the database:
• Click on the “Device” tab and select the Clip you wish to add from the “Clip List.”
• Click on the “Import to Database” button (see Figure 54).
• An “Add to Doremi AM Database” window will appear (see Figure 55).
• Click “Ok” to import the file to the Doremi AM database.
• To see the transfer, click on the “Tasks” tab.
_____________________________________________________________________________________
AMR.OM.000163.DRM Page 50 Version 2.2
Doremi Labs Inc.
Page 51

Note: To have access to the “Import to Doremi AM Database” feature, the
Nugget Player should have firmware version 1.4.28-1 or higher – check the
Nugget’s firmware version using the “Info” tab as shown in Figure 23 above. If
you need to upgrade the Nugget's firmware version, see Section 5.1 of this
manual below.
Figure 54: “Clip List” Window when Connected to a Nugget
Selected Clip
to Import
“Import to
Database”
button
_____________________________________________________________________________________
AMR.OM.000163.DRM Page 51 Version 2.2
Doremi Labs Inc.
Page 52

Figure 55: “Add to Doremi Database” Window
V1 Specific: When Adding Files from the V1 to the Database
When using a V1 device to add files to the database, you can “Trim” the clip you are adding. For
example, if the clip that you are importing is 10 minutes long, you may trim/cut the time down to
9 minutes or you may decide that you only need one minute of that clip, in which case you can
“trim” the clip to that one minute segment.
How to “trim” the imported clip when using a V1 device:
• From the Device Tab select the desired clip in the Clip List
• Press the “Import to Database” button.
• From the Add to Doremi Database window Select the trimming Tab.
• Locate to the desired timecode location to for the In point and press the Trim IN button.
• Locate to the desired timecode location for the Out point and press the Trim OUT button.
• Press the “Ok” button to start the import process.
_____________________________________________________________________________________
AMR.OM.000163.DRM Page 52 Version 2.2
Doremi Labs Inc.
Page 53

“Locate”
forward”
button
“Step
backward”
button
“Position
cursor”
“Trim IN”
button
“Trim OUT”
button
Figure 56: “Trimming” Window when Connected to a V1 Unit
“Step
_____________________________________________________________________________________
AMR.OM.000163.DRM Page 53 Version 2.2
Doremi Labs Inc.
Page 54

3.5 Transferring Video Files
DoremiAM can be used to transfer popular video formats like Quick Time, AVI, MXF, etc., into
the supported Doremi Devices. For each device, Nugget, V1-HD and V1-UHD, there is a
DoremiAM database format and a device format. The table below shows what those formats
are:
Nugget V1-HD V1-UHD
Supported AV Media
Files
Device Format MPEG2 elementary
DoremiAM Database
Format
• *Blackmagic codec can be downloaded from:
http://www.decklink.com/downloads/codecs/Blackmagic_Codecs_v4.9.zip
You can use DoremiAM to transfer Audio/Video Media Files that can be wrapped/formatted as
Quick Time, AVI, MXF, WMV or Image Sequences. All media will be converted in the
background (this is done automatically during the Import process) to the Doremi AM Database
Format. The conversion is defined by the Profile Settings (see Figure 57).
Note: Make sure that the AV Media File format and codec are supported by Doremi AM – see
Section 3.5.1 of this manual below.
Most popular video
formats
streams
MPEG2 elementary
streams
Most popular video
formats
Proprietary JPEG-2000 Proprietary
MXF JPEG-2000 Quick Time
Most popular video
formats
Uncompressed
Uncompressed Black
Magic codec*
_____________________________________________________________________________________
AMR.OM.000163.DRM Page 54 Version 2.2
Doremi Labs Inc.
Page 55

3.5.1 Doremi Asset Manager Supported File Formats and Codec's
This paragraph provides a list of file formats supported by the Doremi AM application.
3.5.1.1 Supported Codec's
• ProRes-422
• DNxHD®
Note: To use Avid DNxHD codec technology available from Avid Technology, Inc., in the
CineAsset and Doremi Asset Manager products available from Doremi Labs, Inc., plug a
licensed Avid DNxHD codec into a licensed QuickTime player. Avid Technology, Inc., is not
affiliated with Doremi Labs, Inc.
• YUV Uncompressed 8-10 bits
• DIVX®, XVID®, MPEG4 AVC/H-264
• VC-1
• MPEG1, MPEG2, Matrox MPEG2
• DVCPRO HD, DVCPRO 25/100
• Photo JPEG, MJPEG-A&B
• DV, DV 100
• and many more...
3.5.1.2 Supported Containers
• AVI
• MOV
• MXF
• MPG
• TS
• EVO
• WMV
• M2TS
• and many more...
3.5.1.3 Supported Image Formats
• BMP
• TIFF
• TARGA
• JPG
• DPX
• and many more...
3.5.1.4 Supported Audio Formats
• WAV
• AAC
• AIFF
• PCM
• and many more...
_____________________________________________________________________________________
AMR.OM.000163.DRM Page 55 Version 2.2
Doremi Labs Inc.
Page 56

3.5.2 Profiles
A profile defines the compression parameters that will be used to import Audio/Video Media
Files. You can define multiple profiles with different parameters so you can change settings with
a click of the mouse. You can access the profile manager either from the File menu or the
Encoding Options window of Doremi AM transfer.
Profile Name
Field
Add
Button
Figure 57: “Profile Manager” Window
Note: When importing a file, DoremiAM automatically uses the default profile. The Defualt
profile can be set to any user defined or pre-defined profile.
To create a new profile:
• Go to the File Menu and Select “Profiles”; the “Profile Manager” window will appear
(see Figure 57).
• Type a name in the “Profile name” field (see Figure 57).
• Click on the “Encoding options” tab and make the desired changes.
• Click on the “Scaling & Resolution” tab to define the desired scaling.
• Click on the “Image sequence” tab to define how image sequences should be
imported.
• Click on the “Add” button to create the profile.
• The newly created profile will appear in the Profile Lists Field.
_____________________________________________________________________________________
AMR.OM.000163.DRM Page 56 Version 2.2
Doremi Labs Inc.
Page 57

How to Edit an existing profile:
• Go to the File Menu and Select “Profiles.”
• Select an existing profile and Click on the “Edit” button (see Figure 57).
• Click “Save” after you have finished making changes to the profile.
• To set any profile as “default”, select the profile from the list and click on the “Set as
default” button.
• Profiles can be Deleted, Imported or Exported using the “Delete,” “Import” and “Export”
buttons.
3.5.3 Nugget Specific Parameters
• Encode if necessary: Encode all files except MPEG2
• Encode all files: Encode all files including MPEG2
• Encode all files except I-Only: Encode all file except I-Only MPEG2. On Nugget Post
installations, select one of the two “Post productions” profiles from the list and click on
“Set as default.”
Select the desired bitrate for SD files. We recommend 15-25 Mbits/sec
Select the GOP structure I-Only, Single Pass Closed GOP or Dual Pass Open GOP (see Figure
58)
Note: For Nugget-Post only I-GOP can be used.
Select the Chroma 420 or 422 (see Figure 58)
Check the Interlace option to import progressive files as interlaced..
Select the desired bitrate for HD files. We recommend 40-70 Mbits/sec for I-Only / Single Pass
Closed GOP and 40Mbits/sec or less for Dual Pass Open GOP.
To import 24/30/60 frames per second files as 23.98/29.97/59.94 FPS files, check the
appropriate box. Since playing a file at a lower speed will increase the duration, DoremiAM will
time stretch the audio to keep video and audio synchronization.
3.5.3.1 V1-HD Specific
When the active database is of type V1-HD, importing 1920x1080 image sequences at
47,48,50,59,60 FPS is possible. For example at 59FPS the database clip will be 1080p-59 and
will be sent to the V1-HD as 3D 1080i-59 which is the same as 1080p-59.
3.5.3.2 V1 and Nugget Units
• Click on Scaling and Resolutions to set the scaling method.
• Select the frame rate for Image Sequence imports. This frame rate applies only when
you import an image sequence (See Figure 58).
• Click “Ok” or “Close” to exit the Profile Manager window.
_____________________________________________________________________________________
AMR.OM.000163.DRM Page 57 Version 2.2
Doremi Labs Inc.
Page 58

Figure 58: Profile Manager – Encoding Options Tab Nugget
3.5.4 Using Profiles
You can use the profile you want during an import or transfer by selecting the “Encoding
Options” tab on Dormei AM Transfer (see Figure 47) and selecting the profile of your choice.
Click “Finish” when you are done.
Note: To have access to the “Import to Doremi AM Database” feature, the Nugget Player should
have firmware version 1.4.28-1 or higher – check the Nugget’s firmware version using the “Info”
tab as shown in Figure 23 above.
3.5.5 The Pre-Defined Profiles
For each database type, DoremiAM creates one or more pre-defined profiles. One of these
profiles is set to be the default profile at installation time, however, you can select any other
profile and make it the “Default Profile.”
Note: ON NUGGET POST INSTALLATIONS, SELECT ONE OF THE TWO “POST PROD.”
PROFILES FROM THE LIST AND CLICK ON “SET AS DEFAULT.”
3.5.6 The Default Profile
When you Import an Audio/Video Media file to the DoremiAM database, the profile used will
automatically be the “default” profile unless you change it.
_____________________________________________________________________________________
AMR.OM.000163.DRM Page 58 Version 2.2
Doremi Labs Inc.
Page 59

3.5.7 Generating Side/Side and Top/Bottom 3D Files
Beginning with the 4.4.x version of DoremiAM, Nugget users can generate 3D side/side or
top/bottom clips from two left/right eye media files.
Connect the Nugget SDI or DVI output to a Dimension-3D unit to feed any 3D display device.
How does it work?
Left and Right eye files must reside in the same folder and should have identical names, except
for the identifiers defined in the profile (case sensitive). Since the profile does not allow for
“slipping”, both Left and Right eye files must be properly synchronized at merge time.
DoremiAM can generate Side/Side or Top/Bottom 3D material.
Note: The side/side and top/bottom selection mode is available for the Nugget only.
3.5.8 How to Generate a 3D clip (Nugget Specific)
• Go to the Clip Databse Tab and slect “Add to Doremi AM.”
• From the Encoding Options window select the Stereoscopic Options tab.
• Check the “Generate 3D” box (see Figure 59).
• For video files choose Identifier and designate the identifier for left and right eyes. (e.g. If
your identifiers are LEFT and RIGHT the files will be named Video_LEFT and
Video_RIGHT.)
• For image sequences choose ether to designate the odd frames or even frames for the
left or right eye.
• Choose the mode, side/side or top/bottom of the 3D file by using the drop-down arrow
(see Figure 59).
• Select whether to use the audio from the right or left eye file by using the Audio From
drop-down box; to dub an audio track to the file, see Section 3.6 of this manual below.
• Click “Ok” on the Source list window when you are done.
• The two files will be imported as a 3D file and will appear in the Clip database tagged as
3D.
_____________________________________________________________________________________
AMR.OM.000163.DRM Page 59 Version 2.2
Doremi Labs Inc.
Page 60

Generate 3D
Check-Box
3D Mode Select
Drop Down Box
3.5.9 Nugget and V1 Special Features
This paragraph highlights some of the important features of each device supported by
DoremiAM.
3.5.9.1 V1-HD (compressed)
Uses JPEG-2000 compression, supports recording and full resolution 3D formats with separate
left and right eye SDI outputs. Formats supported are SD, HD, 2K and 3D.
Audio From
Drop Down-Box
Figure 59:Stereoscopic Options Tab – Nugget
3.5.9.2 V1-UHD
Uncompressed 8 or 10 bit server with recording capabilities. Formats supported are SD, HD and
2K.
3.5.9.3 Nugget
MPEG2 422 and 420 player with built in pixel aspect ratio (PAR) converter. 3D support is
provided in conjunction with the Dimension-3D unit. Formats supported are SD and HD.
Because of the Nugget's built in PAR converter, HDV and DVCProHD files are imported to a
Nugget database without scaling (1440x1080 and 1280x1080), however, importing such files to
a V1 database will result in scaling the files to 1920x1080, which makes the import process a bit
longer.
_____________________________________________________________________________________
AMR.OM.000163.DRM Page 60 Version 2.2
Doremi Labs Inc.
Page 61

3.5.9.4 Nugget + Dimension-3D
Combining the Nugget-Pro with a Dimension-3D will make for a low cost high definition 3D
server that supports most popular 3D display formats like Side/Side, Top/Bottom, Line/Line,
Sequential and dual stream Left and Right SDI. DoremiAM will encode left and right media files
to side/side or top/bottom media that can be transferred to the Nugget. The Dimension-3D will
convert the Nugget output from side/side or top/bottom to the 3D format required by the display
device.
3.6 Audio Dubbing
If you receive the video and audio in separate files or if you want to change the audio of an
existing clip, you can use the Audio Dubbing feature of Doremi AM. If you don’t want to alter the
original clip, you can make a duplicate copy and work on it.
Duplicating a clip:
From the “Clip Database” tab on the main GUI select the clip you wish to duplicate and click the
“Duplicate” button.
• The Duplicate window will appear.
• Press the expand arrow underneath the thumbnail and the un-check the check-box next
to the audio track to duplicate the clip without the audio.
• When finished press the Ok button.
Figure 60: “Duplicate database” Window
_____________________________________________________________________________________
AMR.OM.000163.DRM Page 61 Version 2.2
Doremi Labs Inc.
Page 62

Audio Dubbing
To add audio channels to an existing clip, select the clip from the “Clip database” tab and click
on the “Audio Dubbing” button.
• The “Audio Dubbing” window will appear (see Figure 61) displaying the audio channel(s)
available in the selected file.
• You can click on “Clear” to remove all audio channels or select a specific audio track and
click “Remove audio” to remove only the selected track.
• The “Move up” and “Move down” buttons can be used to place the audio on different
tracks (see Figure 61).
• To add audio channels, click on “Add from file”, “Add from database” (see Figure 61) or
“Add silence” button. You will be able to respectively add an audio channel from any file,
add an audio channel from the database or add a silent audio channel.
Figure 61: Audio Dubbing Window
• Choosing “Add From File will bring up an Explorer window where you can browse for
and select audio files.
• Choosing the “Add from database” button will prompt you to the following window:
_____________________________________________________________________________________
AMR.OM.000163.DRM Page 62 Version 2.2
Doremi Labs Inc.
Page 63

Figure 62: Adding Audio Channel(s) from the Database – Clip Selection
• Select the clip you want to use and click OK.
• Once you have selected either the Clip or audio file you will be prompted with the Audio
Tracks window allowing you to select which audio tracks to add to the Clip.
Check to add
the
corresponding
audio channel
Figure 63: Adding Audio from Database – Audio Channel(s) Selection
• To complete the operation, click the “OK” button, the “Audio dubbing” window will be
updated according to the audio channel selection you made – note that you can choose
to add silence at the end of the audio files in order to fit the video duration – see Figure
64.
_____________________________________________________________________________________
AMR.OM.000163.DRM Page 63 Version 2.2
Doremi Labs Inc.
Page 64

• Click on the “Create audio dub task” button at the bottom of the window to update the
clip with the new audio tracks.
Figure 64: Audio Dubbing Window Update
Add silence
at the
end of
the audio files
3.7 Scheduling Transfers
We don’t recommend transferring files to any unit while the unit is playing back a playlist.
V1 Specific:
When you have something scheduled for transfer or are transferring files from or to the unit, the
unit will abort playback and or recording. The “Lock Icon” will appear again (see Section 3.2.1 )
and the message “LOCKED Transferring” will appear in the “Device Status Window.”
How to schedule a transfer:
• From the DoremiAM GUI window select the “Send to Device...” button.
• Click on the “Transfer option” tab and schedule the transfer at the desired date and time.
(see Figure 65).
_____________________________________________________________________________________
AMR.OM.000163.DRM Page 64 Version 2.2
Doremi Labs Inc.
Page 65

Figure 65: Transfer Options
3.8 Tasks Management
Tab Overview
The “Tasks” tab displays the task list status and the associated log information (see Figure 66).
Note: The “Task information” window will be visible only if the “View/Log information/Show/Hide
log information” menu is checked. Use F6 to enable or disable this option.
_____________________________________________________________________________________
AMR.OM.000163.DRM Page 65 Version 2.2
Doremi Labs Inc.
Page 66

Figure 66: Tasks Tab - Tasks List Window
Task Information
To open a text file containing all the log information associated to a task, select the task in the
“Task list” window and click on the “Show log” button.
You can also see all the log information in the “Task information” Window. The “View” menu will
allow you to show or hide the “Task information” Window, Error messages, Warning messages
and Information messages.
• When DoremiAM encounters a problem that will not allow it to finish a task, an “Error”
message will be displayed.
• When DoremiAM encounters a problem that will not impact the task, a “Warning”
message will be displayed.
Tasks Status
The status of a task is indicated by the color of the circle icon associated with that task.
• Green Circle – Task Completed without any warnings or Errors
• Yellow circle – Task Completed successfully but there are some warning messages
• Red Circle – Task has failed
• Brown Circle - task currently being processed
• Blue Circle – This task is pending and will start once the currently running task is
completed.
_____________________________________________________________________________________
AMR.OM.000163.DRM Page 66 Version 2.2
Doremi Labs Inc.
Page 67

A task can fail to import for many different reasons:
• Unsupported resolution: See “Supported Resolutions” (see Section 7.1 ).
• Video Format or Codec not supported: See the “Transferring Quick Time, AVI, MXF and
WMV Files” paragraph for more details.
• Audio Format not supported: You can always redo the Import and omit the audio tracks.
This will import the video only. You can extract the AAC audio (which is a supported
format) as PCM and add it to the database clip using “Audio Dubbing.”
(see Section 3.6 ).
Tasks Management
• To remove a task, select it in the “Task list” window (see Figure 66).
• Click the “Remove” button.
Note: In case the task is pending (when a transfer is scheduled), you need to first cancel the
task by clicking the “Cancel” button – you will then be prompted for confirmation before the task
is removed.
• To restart a canceled or failed task, select the task and click on “Restart” – you will also
be prompted for confirmation.
• To remove all the “failed tasks”, “done tasks” or all the “canceled tasks”, click
respectively on the “Remove failed task(s)”, “Remove done task(s)” or “Remove
canceled task(s)” button. You will not be prompted for confirmation in these three cases.
Show/Hide Tasks:
• Starting with Doremi Asset Manager Version 5.2.0 you can share database folders
between multiple computers. When the database is shared any task processed by any
of the computers connected to that database will be shown in the Tasks tab of all
associated computers.
• To show only the tasks processed by your computer from the View menu select “Display
Only Tasks Generated by [Computer Name]” or press F4.
_____________________________________________________________________________________
AMR.OM.000163.DRM Page 67 Version 2.2
Doremi Labs Inc.
Page 68

3.9 Setting the Nugget Date and Time
• In the Device Manager select the Nugget to set the date and time on.
Nugget
Selected
Figure 67: Device Manager
• From the Device menu select “Date and time settings.” This will open the “Date & Time”
window (see Figure 69).
_____________________________________________________________________________________
AMR.OM.000163.DRM Page 68 Version 2.2
Doremi Labs Inc.
Page 69

Figure 68: Device Menu
Figure 69: Date & Time Window
3. Type in the desired date and time or press the “Synchronize with PC” button to set the
Nuggets internal clock to the same as you PC's. Then click on the Apply button
(see Figure 69).
4. The Nugget Date and Time is now set.
_____________________________________________________________________________________
AMR.OM.000163.DRM Page 69 Version 2.2
Doremi Labs Inc.
Page 70

4 The Advanced Menu
The advanced menu was added in DoremiAM version 2.3.36 to provide useful tools for
programmers and developers.
4.1 Device Status
This window provides a graphical view to the status register of the selected device. The first
column shows the status Byte value, the 8 following columns show each bit and its
interpretation.
Figure 70: Device Status Window
4.2 Send Command
This window can be used to send and test specific commands to see how the device will
respond. It can also be used to determine the “hex” representation of a file name and calculate
the “checksum” of the command.
Figure 71: “Send command” Window
_____________________________________________________________________________________
AMR.OM.000163.DRM Page 70 Version 2.2
Doremi Labs Inc.
Page 71

How to Send and test specific Commands (See Figure 71 above):
• Command Field: If you know the full command, you can just type it here. Do not include
checksum.
• File name Field: If the command has a file name, you can type the name as it appears
under Clip ID. The program will convert it to “hex” and show the result under “Full
Command.”
• Timecode: If the command has a timecode, you can type it as HH:MM:SS:FF. The
program will convert it to FF:SS:MM:HH which is the standard Sony 9-pin protocol
representation.
• Full command: shows the full command that will be sent to the device
• Reply: Shows the device’s response to the command sent.
• Click on Send to send the command.
• Click on Clear to clear an entry box.
_____________________________________________________________________________________
AMR.OM.000163.DRM Page 71 Version 2.2
Doremi Labs Inc.
Page 72

5 Firmware Upgrade
This section describes how to perform a firmware upgrade of both the Nugget and V1
5.1 Upgrading the Nugget Firmware and NUG-SDI
To upgrade a Nugget you need to upgrade both the Nugget firmware and the NUG-SDI
firmware. The process is the same, but each firmware has a different package file. Nugget
firmware files will start with “nugget” while NUG-SDI firmware files will start with “fpga.”
• Select the Nugget from the list of devices in the “Device Manager.”
• From the “Device” menu (not the tab) select “Firmware Update (see Figure 72).
• Click the “Browse” button, you will be prompted to the installation folder which lists the
firmware files that are packaged with Doremi AM (see Figure 73).
• Select the appropriate firmware version and click Open.
Figure 72: “Firmware update” Option
Figure 73: “Firmware update” Window
_____________________________________________________________________________________
AMR.OM.000163.DRM Page 72 Version 2.2
Doremi Labs Inc.
Page 73

Note: Nugget firmware files will start with “nugget” while NUG-SDI firmware files will start with
“fpga.”
• Once you have selected the appropriate firmware, press the Upgrade Now button.
Figure 74: Nugget Firmware Patch Selected
• During the upgrade process, a progress bar window will be displayed on the screen:
Figure 75: Upgrade Progress Bar
When the upgrade is done, a window confirming a successful upgrade should appear as
presented below:
Figure 76: Upgrade Success Message
In case of failure, you will get one of two different messages: For example, for a Nugget
application:
• If the Nugget firmware upgrade fails, you will get a message asking you to recycle
power on the unit then hit OK and wait.
• If the NUG-SDI firmware fails, you will get a message asking you to redo the upgrade.
_____________________________________________________________________________________
AMR.OM.000163.DRM Page 73 Version 2.2
Doremi Labs Inc.
Page 74

5.2 Upgrading the Firmware of the V1
Starting with Doremi Asset Manger version 5.2.0 the V1 firmware upgrade utility is included with
the application.
Note: Upgradign the Firmware of the V1 is only possible using Doremi Asset Manager for
Windows. The Mac version does not include the VUploader application.
How to connect to the V1:
To connect to the V1 your PC needs to have IP address within the same range as the V1 (ex: if
the IP address of the V1is 10.1.10.190, set your PC to 10.1.10.100). You can connect you
computer and V1 using either a crossover cable or two standard Ethernet Cables and a switch.
To find the IP address of the V1:
• Go to OPTION+MENU (00)
• Press the ++ button until “IP xxx.xxx” is displayed
• These are the first two octets of the IP address
• To view the second two octets press the TOGGLE button.
What is the firmware version of my V1:
To find the current firmeare version of the V1:
• Go to OPTION+MENU (00)
• Press the ++ button until “V1 4.xxy” is displayed
• This is the firmware version of your V1.
How to upgrade the V1 firmware:
• Select the V1 in the “Device Manager”
• From the Device menu select “Start VUPloader.
• Make sure that no other applications are running and press Ok.
• This will Launch the VUPloader Utility (see Figure 77).
_____________________________________________________________________________________
AMR.OM.000163.DRM Page 74 Version 2.2
Doremi Labs Inc.
Page 75

Figure 77: VUPloader Utility
• From the File menu of the VUPloader utility select Open.
• Browse for the appropriate firmware .bin file and press Open.
Note: Make sure to select the appropriate firmware as Doremi AM will install with the current
firmware for all V1 types.
The V1 Frimware naming convention is as follows:
• C_HD_4.xx.bin for V1-HD units.
• HD200_4.xx.bin for V1-UHD units.
• HD_LE_4.xx.bin for V1-UHD/LE units.
• After the appropriate firmware is loaded, press the connect button.
• In the pop up window type in your V1's IP address and press Ok.
Figure 78: VUPloader with Firmware Loaded and Connected to V1 Unit
• Press the “Upgrade” button to start the firmware upgrade process.
• During the upgrade the unit will do a soft reboot.
• Once the firmware upgrade is finished you can close the VUPloader utility.
• Verify in OPTION+MENU (00) that he unit shows the new Firmware version.
_____________________________________________________________________________________
AMR.OM.000163.DRM Page 75 Version 2.2
Doremi Labs Inc.
Page 76

6 Final Cut Pro Plug-In (Mac Only)
Starting with Doremi Asset Manager 5.2.0 a Final Cut Pro Plug-in has been implemented for
Mac users. The Plug-In is installed automatically when you install the Doremi AM application.
The plug-in allows you to export directly from the Final Cut Pro Timeline to the either the active
Doremi AM database or the last used database for the selected type. (e.g., If you current
database is of the Nugget type and choose to export to V1-HD JPEG2000, the clip will be
exported to ~/Doremi Asset Manager/Default_V1_HD/. Assuming you have not changed the
location.
Note: Final Cut Pro Must be installed before installing Doremi Asset Manager.
6.1 Using the Final Cut Pro Plug-In
• In the browser window select the sequence to export.
Figure 79: Selected Sequence
• From the File menu select Export > Export to DoremiAM database.
Figure 80: Export Menu Selection
_____________________________________________________________________________________
AMR.OM.000163.DRM Page 76 Version 2.2
Doremi Labs Inc.
Page 77

• This will bring up the Doremi Media Export plug-in window.
• Select the appropriate Video Codec for the database type you are using. The clip will be
exported to the whichever database supports the Video Codec you have chosen (e.g., if
you want to export to your Nugget database choose MPEG2 for Nugget.
Figure 81: Doermi Media Export Plug-In Window Video Codec Selection
• Enter a name for the Clip in the “Title” text box.
• Use the “Codec Options” tab to set the encoding parameters for you clip. The options
on this tab will be different depending on which Video Codec you have chosen.
_____________________________________________________________________________________
AMR.OM.000163.DRM Page 77 Version 2.2
Doremi Labs Inc.
Page 78

Figure 82: FCP Plug-In MPEG2 Options
Figure 83: FCP Plug-In Uncompressed Options
_____________________________________________________________________________________
AMR.OM.000163.DRM Page 78 Version 2.2
Doremi Labs Inc.
Page 79

Figure 84: FCP Plug-In JPEG2000 Options
• Use the Scaling options tab to apply any scaling to exported clip.
Figure 85: Scaling Options
• When you are finished press the OK button.
• The clip will be exported to the database which supports the selected video codec and
will be visible in the Clip Database Tab of the Doremi AM GUI.
_____________________________________________________________________________________
AMR.OM.000163.DRM Page 79 Version 2.2
Doremi Labs Inc.
Page 80

7 Supported Resolutions
DoremiAM works with different types of Doremi devices: Nugget (Nugget Post) and V1( V1-HD,
V1-UHD and V1-UHD/LE).
Each type of device supports a different set of video formats. They are presented in the
following sections.
7.1 Nugget Supported Resolutions
Doremi Asset Manager supports all standard HD and SD video formats. It can also import files
with non-standard video resolutions that will be played on a Nugget using a standard video
format. The table of supported formats (see Figure 86) and the comments below highlight all
formats supported by DoremiAM. The formats listed in Figure 86 show the standard video
formats that a Nugget will use to play the clips in Auto mode.
_____________________________________________________________________________________
AMR.OM.000163.DRM Page 80 Version 2.2
Doremi Labs Inc.
Page 81

Frame Rate
Video
Height
240 480p 23.98
480 480p 23.98
540 1080p 23.98
576 576p 24
720 720p 23.98
23.98 24 25 29.97 30 50 59.94 60
480p 24
↨
1080p 23.98
↨
1080p 23.98
↨
1080p 23.98
or
1080i 47.95
↨
1080i 47.95
↨
1080p 23.98
or
720i 47.95
↨
1080i 47.95
↨
1080p 24
480p 24
1080p 24
1080p 24
↨
1080p 24
or
1080i 48
↨
1080i 48
↨
1080p 24
720p 24
↨
1080p 24
or
720i 48
↨
1080i 48
1080p 25
↨
1080p 25
or
1080i 50
↨
1080i 50
576p 25
or
PAL
720p 25
↨
1080p 25
or
720i 50
↨
1080i 50
480p 29.97
or
NTSC
480p 29.97
or
NTSC
1080p 29.97
↨
1080p 29.97
or
1080i 59.94
↨
1080i 59.94
720p 29.97
↨
1080p 29.97
or
720i 5994
↨
1080i 59.94
480p 30
↨
1080p 30
480p 30
↨
1080p 30
1080p 30
↨
1080p 30
or
1080i 60
↨
1080i 60
720p 30
↨
1080p 30
or
720i 60
↨
1080i 60
480p 59.94
↨
720p 59.94
720p 50 720p 59,94 720p 60
480p 60
↨
720p 60
1080 1080p 23.98
or
1080i 47.95
1080p24
or
1080i 48
1080p 25
or
1080i 50
1080p 29.97
or
1080i 59.94
1080p 30
or
1080i 60
Figure 86: Supported Formats
_____________________________________________________________________________________
AMR.OM.000163.DRM Page 81 Version 2.2
Doremi Labs Inc.
Page 82

Description of Supported Formats above:
• The formats highlighted in yellow and in italic denote non-standard video formats that
cannot be played by the Nugget as they are.
• Although the files are imported to the Nugget Database, and transferred to the Nugget
as listed above, these formats will be played on the Nugget using the standard video
format denoted in orange and underscored.
• The required sync (Bi-level or Tri-level) will follow the playback format, (ex: 720p 23.98
will be played at 1080p 23.98 and will require Tri-level sync at 23.98)
• The formats highlighted in green will be imported and played as listed in the above
formats.
Comments:
1) The frame rate must be equal to: 23.98, 24, 25, 29.97, 30, 50, 59.94 or 60 fps. If not, the
file will not be imported.
2) The video height must be within 32 lines of: 240, 480, 540, 576, 720 or 1080 lines. For
example a file with 512 lines will be imported, but a file with 620 lines will not be
imported.
3) Short clips (5 frames or less) cannot be imported.
_____________________________________________________________________________________
AMR.OM.000163.DRM Page 82 Version 2.2
Doremi Labs Inc.
Page 83

7.2 V1 Compliant Video Formats
When using DoremiAM with a V1-HD, V1-UHD or V1-UHD/LE unit, make sure that the video
format will be compliant with one of the V1 video formats (see Figure 87).
Video Format Description
480 29.97p 480 line progressive 29.97 frames/sec standard (UHD only).
Note: for the V1-HD, this format will be imported to the database
and subsequently to the unit as 480 59.94i
576 25p 576 line progressive 25 frames/sec standard (UHD only). Note:
for the V1-HD, this format will be imported to the database and
subsequently to the unit as 576 50i
720 50p 720 line progressive 50 frames/sec standard
720 59.94p 720 line progressive 59.94 frames/sec standard
720 60p 720 line progressive 60 frames/sec standard
1080 23.98p 1080 line progressive 23.98 frames/sec standard
1080 24p 1080 line progressive 24 frames/sec standard
1080 25p 1080 line progressive 25 frames/sec standard
1080 29.97p 1080 line progressive 29.97 frames/sec standard
1080 30p 1080 line progressive 30 frames/sec standard
1080 47.95i 1080 line interlaced 47.95 fields/sec standard
1080 48i 1080 line interlaced 48 fields/sec standard
1080 50i 1080 line interlaced 50 fields/sec standard
1080 59.94i 1080 line interlaced 59.94 fields/sec standard
1080 60i 1080 line interlaced 60 fields/sec standard
2K RGB 23.98p 2K RGB progressive 23.98 frames/sec standard
2K RGB 24p 2K RGB progressive 24 frames/sec standard
2K RGB 47.95i 2K RGB interlaced 47.95 fields/sec standard
2K RGB 48i 2K RGB interlaced 48 fields/sec standard
PAL PAL resolution and frame rate
NTSC NTSC resolution and frame rate
Figure 87: V1-HD, V1-UHD and V1-UHD/LE Compliant Video Formats
7.2.1 V1-HD Additional Formats
In addition to the formats listed above, the V1-HD supports 1080p-47, 1080p-48, 1080p-50,
1080p-59 and 1080p-60. These formats are defined on the V1-HD menu as 1080i-47 3D, 1080i48 3D, 1080i-50 3D, 1080i-59 3D, and 1080i-60 3D respectively.
_____________________________________________________________________________________
AMR.OM.000163.DRM Page 83 Version 2.2
Doremi Labs Inc.
Page 84

8 Document Revision History
Date Version Description
03/29/2007 1.0 First version.
07/31/2007 1.1 Version 1.1
03/14/2008 1.2 Version 1.2
05/16/2008 1.3 Version 1.3
09/25/2008 1.4 Includes V1 devices communication.
09/14/2009 1.5 Includes Nugget 3D support, ProRes422 and new Profile
and AM Transfer windows.
11/18/2009 1.6 Version 1.6 has been updated extensively from version 1.5.
12/07/2009 1.7 Version 1.7
05/25/2010 1.8 Fixed manual paragraph numbers and updated to match
4.4.40.
06/22/2011 1.9 Updated to comply with Doremi Asset Manager Version
5.2.x.
08/04/2011 2.0 Warranty link redirected to new website.
11/23/2011 2.1 Section 3.9 added for Nugget date and time.
03/15/2012 2.2 Section 3.5.1.1 modified.
_____________________________________________________________________________________
AMR.OM.000163.DRM Page 84 Version 2.2
Doremi Labs Inc.
 Loading...