

Page 1

3-PIECE ROUND ALUMINUM ARM KITS
These kits are designed ONLY for the 1602 model barrier gate operator with or without LED lights.
Clip around counterweights
before srewing cover on.
Counterweight
Mounting Plate
Hardware x 4
Hex Nut 3/8”
Washer 3/8”
Lockwasher 3/8”
H
Lighted Arms ONLY Note:
See page 3 for correct
arm positions and wiring.
orizontal Arm
Direction
Counterweight
Mounting
Plate Holes
Vertical
Ar
m Directi
on
Hub
Washer 3/8”
1602-162
20 ft Arm
1602-164
1602-172
20 ft LED Arm
Tap
asher
ex Bolt 1/2” x 1”-3/4”
H
Counterweight Mounting Pla
Screw 10-32 x 1/2”
Locking Plate W
Phillips
Hex Bolt 3/8” x 1”
Hardware x 4
DoorKing Part Numbers:
24 ft Arm
1602-174
24 ft LED Arm
Mount hubs on
operator FIRST.
Test hubs UP and
DOWN positions
BEFORE installing
counterweight
mounting plates,
te
then assemble arms,
cables and wire
harness on LED
models.
1602-166
27 ft Arm
1602-176
27 ft LED Arm
Support arms during assembly until all cables
have been installed and adjusted for level.
Test hub UP and DOWN position
before installing arms.
1602-149-E-11-19
Hub
r Pin
a
e
sher
W Sh
r Pin
UHM
e
3/8” Wa
Cott
&
Washer 3/8”
Cotter Pin
Copyright 2019 DoorKing®, Inc. All rights reserved.
1
See
next
page
Counter
Mounting Plate
14 ft cable (See page 3)
Nylon Washer
Hex Head Screw
we
ight
120 S. Glasgow Avenue
Inglewood, California 90301 U.S.A.
Page 2
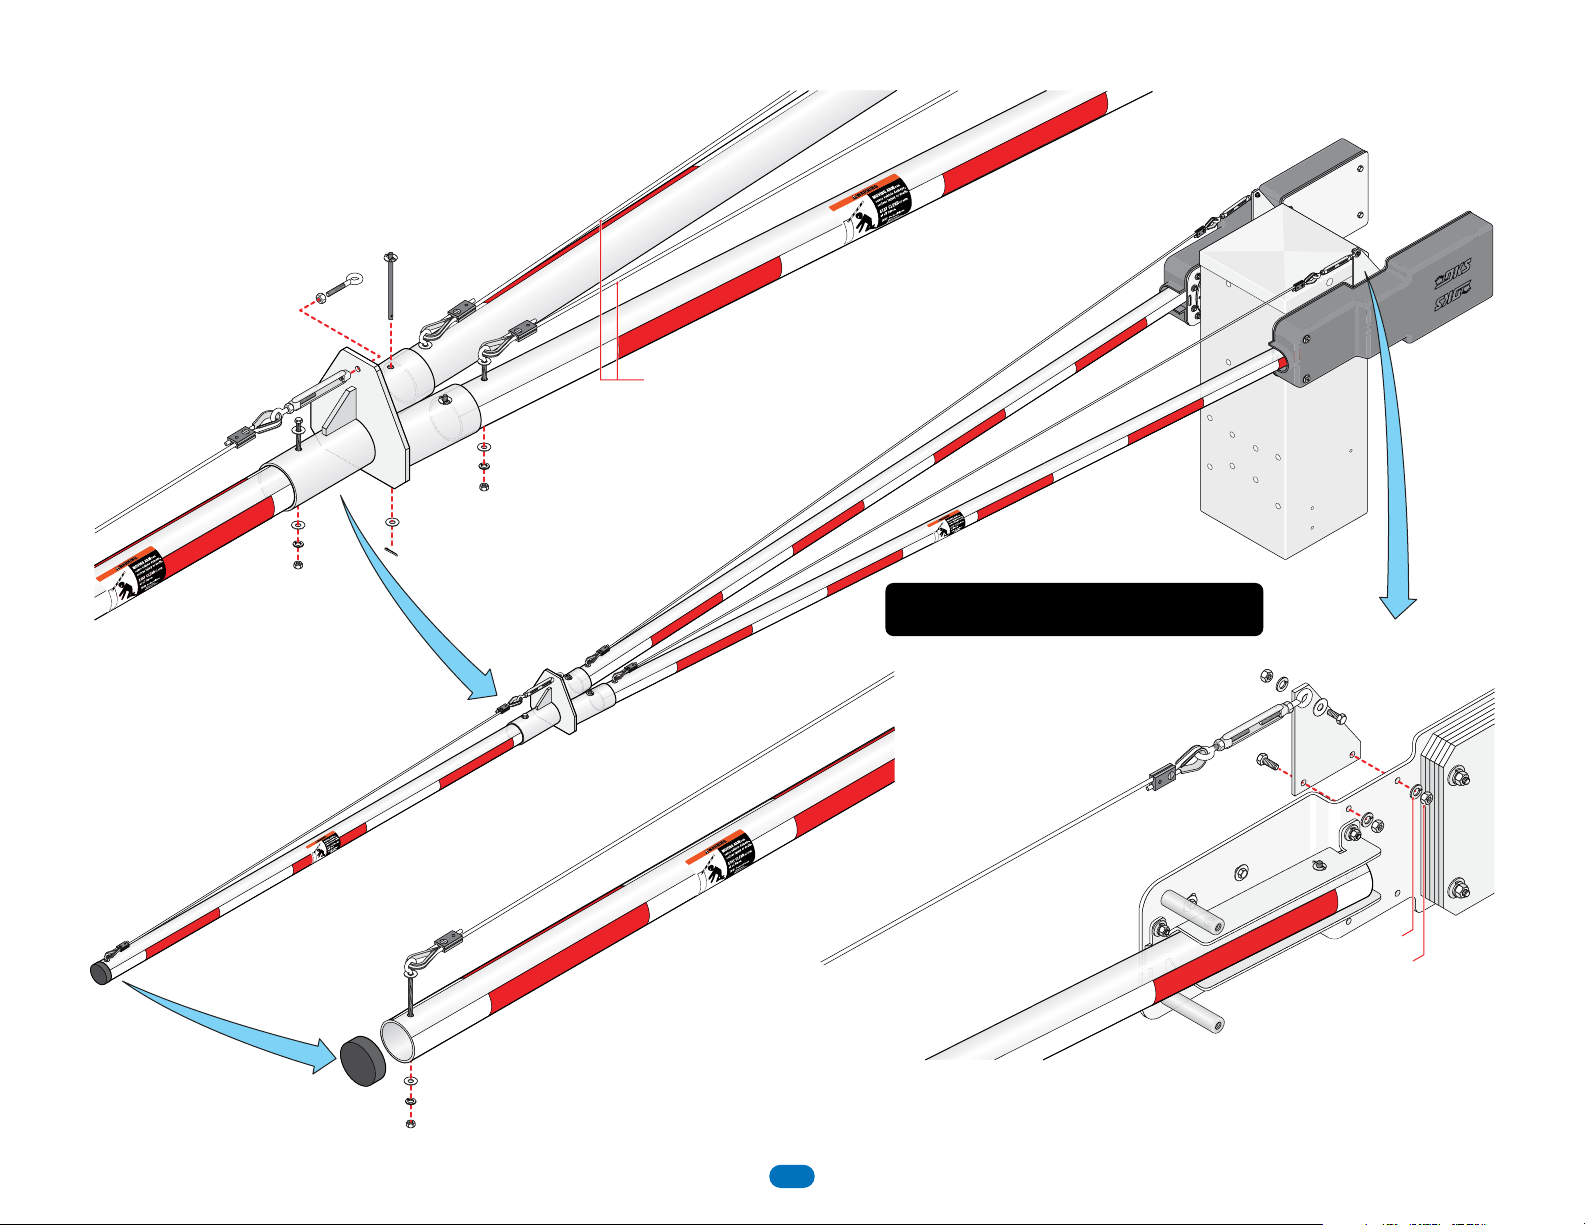
Wishbone Hardware Assembly
Adjust ALL cables
with turnbuckles to
make the arms level.
Turnbuckle Eye
Thimble
Eye
Cable
p
am
Cl
Stainless Steel
Cable on 27 ft
models ONLY
Hex Bolt 3/8” x 4” and Washer 3/8”
Washer 3/8”
Lockwasher 3/8”
Hex Nut 3/8”
Bolt and Nu
Turnbuckle
HMW Shear Pin
U
t
3/8” Washer & Cotter Pin
Thimble
Eye
Washer 3/8”
Cotter Pin
Cable
p
am
Cl
Wa
Eye Bolt 3/8” x 4”
Washer 3/8”
Lockwasher 3/8”
Hex Nut 3/8”
Wishbone Stainless Steel Cables
sher 3/8”
Wishbone Steel Cables Note:
These 2 steel cables are used
on ALL arm assemblies.
14 ft Arm
14 ft Arm
Support arms during assembly until all cables
have been installed and adjusted for level.
urnbuckle
T
Thimble
Eye
Cable
Clamp
Hex Nut 3/8
Lockwasher 3/8”
Washer 3/8”
”
Hex Bolt 3/8” x 1”
1602-149-E-11-19
Thimble
Washer 3/8”
Pl
ast
End Ca
i
c
p
Cable
p
am
Cl
Eye
Eye Bolt 3/8” x 4”
Washer 3/8”
Lockwasher 3/8”
Hex Nut 3/8”
el Cable
e
Stainless St
Stainless Steel Cable
End of Arm
The End of Arm Assembly steel cable is ONLY used on the 27 ft arm.
The 20 ft and 24 ft arms DO NOT use this steel cable.
2
Hex Bolts 3/8” x 1”
Lockwashers 3/8”
Hex Nuts 3/8”
Page 3
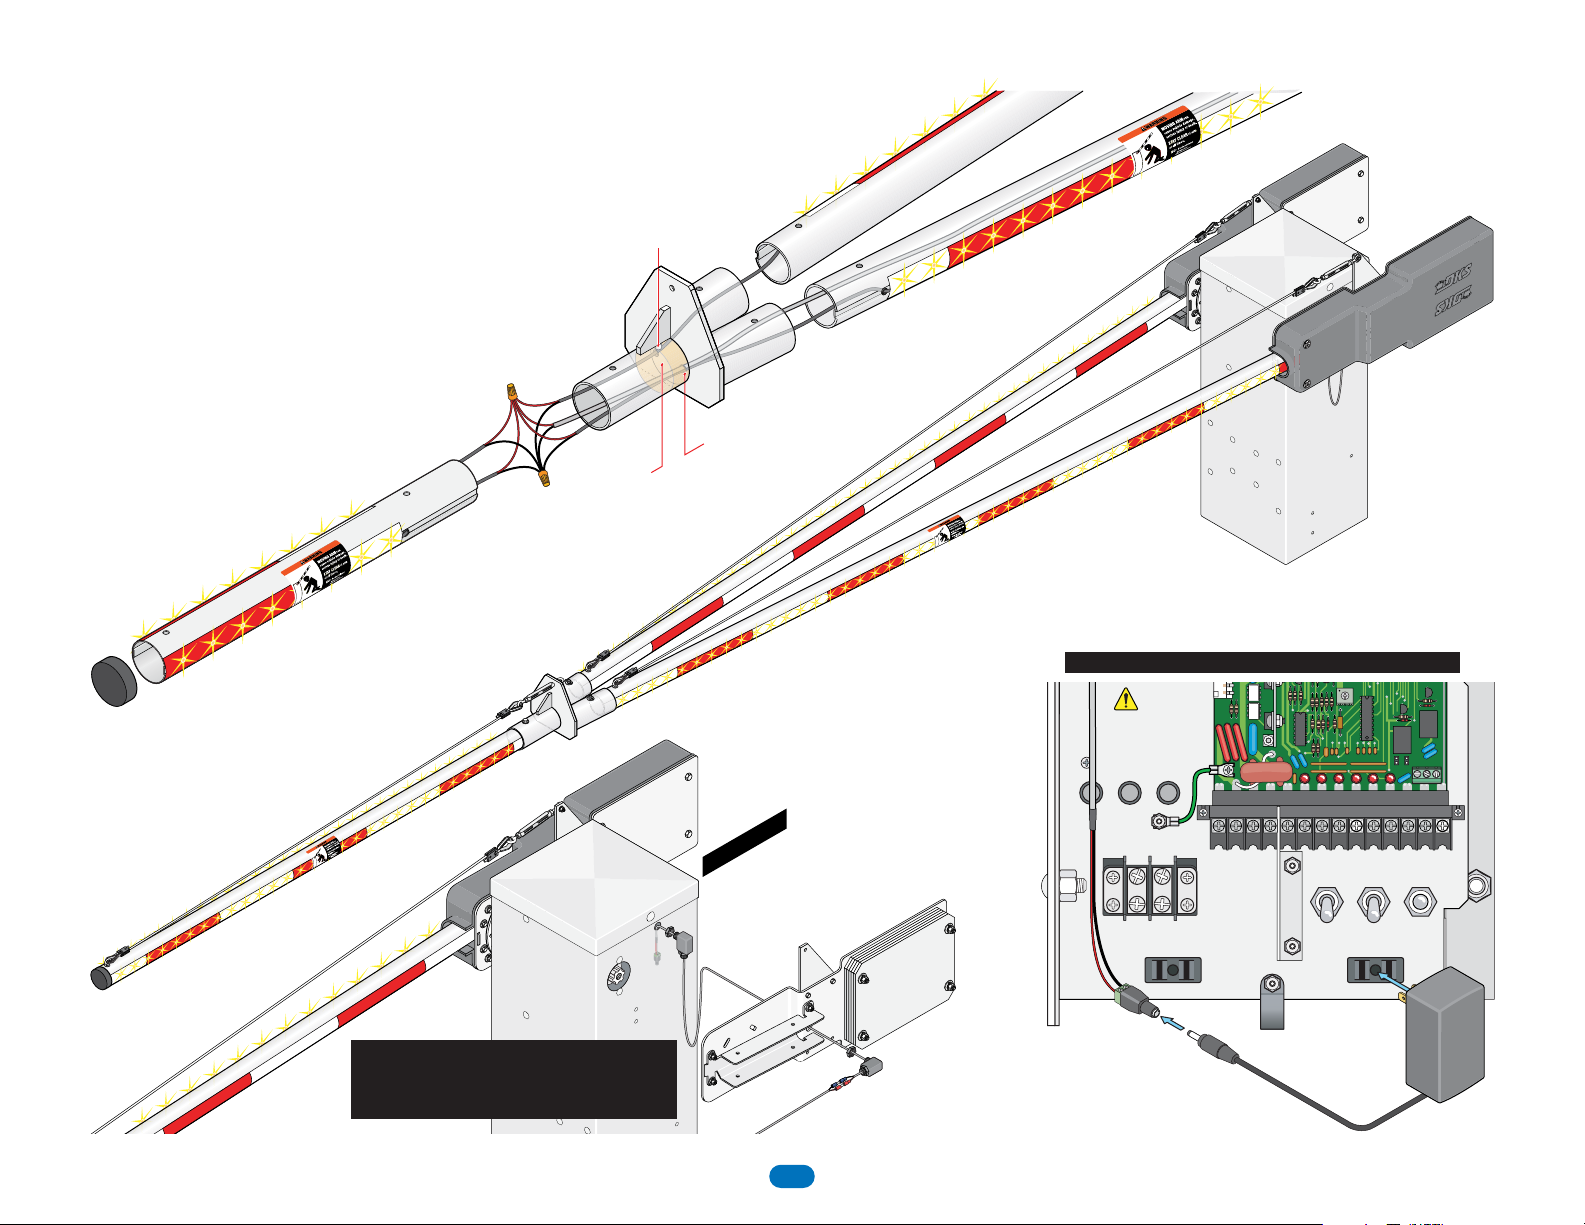
Lighted Arms
(for LED models ONLY)
Arm Stop Inside
Arm Sleeve
14 ft Single Sided LED Arm
LED
Wire
14 ft Cable Assembly inside Arm
Pl
ast
End Cap
i
c
1602-149-E-11-19
Double Sided LED Arm
Note: Stainless Steel
Cable on 27 ft arm ONLY
RED
ct ALL
ogether
Conne
wires T
LED
Wire
LED
Wire
LED
Arm
Sleeve
Wire
LED
Wire
Conne
BLAC
Together
ct AL
K wires
L
Area for
Excess
ide Arm
ins
Sleeve.
Wire
KNOCKOUT
IMPORTANT: Wire harness MUST
remain clear of the rotating arm and
the arm cover to avoid wire chaffing.
LED
Wire
un wires through
R
2 holes inside
Arm Sleeve.
14 ft Cable run inside this Arm ONLY.
IMPORTANT:
KNOCKOUT
on ONE SIDE of operator
for 14 ft cable is located
e slack in the
b
There needs to
14 ft cable for rotating arm.
BLUE
3
to
BLUE
RED to RED
14 ft Cable
inside Arm
14 ft Single Sided LED Arm
ONLY.
Counterweight
nting Bracket
Mou
Run cable through
hole in counterweight
mounting bracket.
TIME
DELAY
UP
LOOP
Slack in the
ing
14 ft cable
for rotat
arm.
ON
2 3 4 5 6 7 8
SW 1
ON
1
2 3 4 5 6 7 81
Power from Operator
MAKE SURE ALL POWER IS TURNED OFF TO OPERATOR!
DOWN
LOOP
123456789 10 11 12 13 14
AC POWER DC POWER
Tr
ansformer Plug
Red+
Black-
Keep wire
harness
clear of
all moving
parts.
POWER
SW 2
REVERSE
SENSITIVITY
NONCC
NC NO
ON
ON
UP
AUTO
OFF
DOWN
OFF
wer
o
P
mer
r
ansfo
Tr
VAC
5
1
1
 Loading...