

Page 1
HANDLEIDING
MODE D’EMPLOI
GEBRAUCHSANLEITUNG
INSTRUCTION BOOKLET
MANUAL DE INSTRUCCIONES
NÁVOD K POUŽITÍ
DELI-FRYER
HORKOVZDUŠNÁ FRITÉZA
TEPLOVZDUŠNÁ FRITÉZA
DO469FR
PRODUCT OF
Page 2

DO469FR
GARANTIEVOORWAARDEN
Wij hanteren een garantietermijn van 2 jaar vanaf de datum van aankoop. Gedurende de
garantieperiode zal de distributeur volledige verantwoording op zich nemen voor gebreken,
die aanwijsbaar berusten op materiaal- of constructiefouten. Wanneer dergelijke gebreken
voorkomen, zal het apparaat indien nodig vervangen of gerepareerd worden. Het recht op
garantie vervalt wanneer de gebreken zijn ontstaan door hardhandig gebruik, het niet in
acht nemen van de gebruiksaanwijzing of ingreep door derden. De garantie wordt verleend
op basis van het originele kassaticket. Alle onderdelen die aan slijtage onderhevig zijn,
vallen buiten de garantie. Indien je apparaat defect is binnen de garantietermijn van 2 jaar,
dan mag je het toestel samen met het originele kassaticket binnenbrengen in de winkel
waar je het toestel hebt aangekocht.
CONDITIONS DE GARANTIE
Nous accordons une garantie de 2 ans sur ce produit à partir de la date d’achat.
Pendant la durée de la garantie, le distributeur prendra à sa charge la réparation des vices
de fabrication ou de matières, en se réservant le droit de décider si certaines pièces doivent
être réparées ou échangées, ou si l’appareil lui-même doit être échangé. Les dommages
occasionnés par une utilisation inadéquate (branchement continu, erreur de voltage, prise
inappropriée, choc, etc...), l’usure normale ne portant préjudice ni au bon fonctionnement
ni à la valeur de l’appareil, excluent toute prétention à la garantie. La garantie devient
caduque si des réparations ont été effectuées par des personnes non agréées. La garantie est
accordée sur la base du ticket de caisse original.Toutes les pièces détachées non résistantes
et par conséquent sujettes à l‘usure, ne sont pas sous garantie. Dans le cas où votre
appareil est défectueux pendant la période de garantie de 2 ans, vous pouvez ramener votre
appareil, ainsi que votre ticket de caisse, au magasin où vous l’avez acheté.
GARANTIE
Die Garantie für dieses Gerät beträgt 2 Jahre ab dem Kaufdatum. Während dieser
zweijährigen Garantie trägt der Verteiler die Verantwortung für Mängel, die eindeutig
auf Material- oder Konstruktionsfehler zurückzuführen sind. Wenn es solche Mängel
gibt, wird das Gerät, wenn notwendig, ersetzt oder repariert. Das Recht auf Garantie
erlischt, wenn die Mängel auf eine unangemessene Anwendung, die Nichtbefolgung der
Gebrauchsanleitungen oder eine Reparatur von einer dritten Partei zurückzuführen sind.
Die Garantie wird auf der Grundlage des originalen Kassenbons gewährt. Alle Teile, dem
Verschleiß ausgesetzt sein, sind nicht in der Garantie eingeschlossen. Wenn Ihr Gerät
innerhalb der Garantiefrist von zwei Jahren defekt ist, können Sie das Gerät zusammen mit
Ihrem Kassenbon in das Geschäft zurückbringen, in dem Sie es gekauft haben.
WARRANTY
This appliance has a two year warranty period. During this period the manufacturer is
responsible for any failures that are the direct result of construction failure. When these
failures occur the appliance will be repaired or replaced if necessary. The warranty will
not be valid when the damage to the appliance is caused by wrong use, not following the
instructions or repairs executed by a third party. The guarantee is issued with the original
till receipt. All parts, which are subject to wear, are excluded from the warranty.
LINEA 2000 - Dompel 9 - 2200 Herentals Belgium - Tel 014/21.71.91 - Fax : 014/21.54.63
Page 3

www.domo-elektro.be
DO469FR
If your device breaks down within the 2-year warranty period, you can return the device
together with your receipt to the shop where you purchased it.
CONDICIONES DE GARANTÍA
Este aparato tiene un término de garantía de 2 años, desde la fecha de la compra.
Durante el período de garantía, el suministrador asumirá la entera responsabilidad en
cuanto a defectos debidos a errores de material o de fabricación.
En caso de tales defectos, el aparato será reemplazado o reparado, cuando sea necesario. La
garantía perderá su vigencia en caso de defectos causados por mal uso, no cumplimiento
del manual de instrucciones o intervención por una tercera persona. La garantía se concede
sobre la base del recibo de caja. La garantía no cubre piezas expuestas al desgaste.
Si el producto está defectuoso dentro del período de garantía de 2 años, puede traer su
recibo de caja junto con el teléfono a la tienda donde adquirió la unidad.
ZÁRUKA
Pro záruku začínající dnem prodeje spotřebiče platí na území ČR tyto podmínky:
1. trvání záruky: 2 roky
2. poskytování záruky:
a) záruční opravu provedeme podle našeho zvážení opravou nebo výměnou vadných dílů,
jestliže tyto závady vznikly prokazatelně vadou materiálu nebo chybou při výrobě
b) záruční oprava bude provedena jen při předložení tohoto záručního listu a dokladu o
zaplacení
c) jestliže dojde k opravě nebo výměně spotřebiče v záruční době, záruční doba se
prodlužuje
3. záruka se nevztahuje
a) na mechanické poškození
b) nesprávné používání v rozporu s návodem k použití
1. záruka zaniká:
- při použití spotřebiče jinak než v domácnosti
- při provádění opravy nebo změny na spotřebiči osobou jinou než pověřenou
naším servisem
Na tento spotřebič poskytujeme záruku na nedostatky, které jsou označeny jako výrobní
chyby nebo chyby materiálu. Záruční doba začíná dnem prodeje a je uznána po předložení
potvrzeného tohoto záručního listu nebo orig.dokladu o zaplacení + tento nepotvrzený,
ale vyplněný ZL pro záznam opravy. Případné reklamace můžete uplatnit v místě nákupu
tohoto přístroje nebo v servisním středisku rmy:
Domo-elektro s.r.o. Hluboká 147, 34506 Kdyně viz www.domo-elektro.cz
tel. 379 789 684 nebo na servis@domo-elektro.cz , tel. 379 422 550
LINEA 2000 - Dompel 9 - 2200 Herentals Belgium - Tel 014/21.71.91 - Fax : 014/21.54.63
Page 4

DO469FR
ZÁRUKA
Pre záruku začínajúcich dňom predaja spotrebiča platí na území SR tieto podmienky:
1. trvania záruky: 2 roky
2. poskytovanie záruky:
a) záručnú opravu vykonáme podľa nášho zvážení opravou alebo výmenou
chybných dielov, ak tieto závady vznikli preukázateľne chybou materiálu alebo
chybou pri výrobe
b) záručná oprava bude vykonaná len pri predložení tohto záručného listu a
dokladu o zaplatenie
c) ak dôjde k oprave alebo výmene spotrebiča v záručnej dobe, záručná doba sa
predlžuje.
3. záruka sa nevzťahuje
a) na mechanické poškodenie
b) nesprávne používanie v rozpore s návodom na použitie
1. záruka zaniká:
- Pri použití spotrebiča inak ako v domácnosti
- Pri vykonávaní opravy alebo zmeny na spotrebiči osobou inou ako poverenou naším
servisom
Na tento spotrebič poskytujeme záruku na nedostatky, ktoré sú označené ako výrobné
chyby alebo chyby materiálu. Záručná doba začína dňom predaja a je uznaná po
predložení potvrdeného tohoto záručného listu alebo orig.dokladu o zaplatení +
tento nepotvrdený, ale vyplnený ZL pre záznam opravy. Prípadné reklamácie môžete
uplatniť v mieste nákupu tohto prístroja alebo v servisnom stredisku rmy:
Domo-elektro s.r.o. Hluboká 147, 34506 Kdyně pozri www.domo-elektro.cz
tel. 379 789 684 alebo na servis@domo-elektro.cz, tel. 379 422 550
4
Page 5

www.domo-elektro.be
DO469FR
Type nr. apparaat
N° de modèle de l’appareil DO469FR
Typ Nr. des Gerätes
Type nr. of appliance
N° de modelo del aparato
Model
Naam
Nom ..................................................................................................................................
Name
Nombre
Jméno
Adres
Adresse .............................................................................................................................
Address
Dirección
Adresa
Aankoopdatum
Date d’achat .....................................................................................................................
Kaufdatum
Date of purchase
Fecha de compra
Datum nákupu,podpis a razítko
Tel.: ..................................................................................................................................
* Jméno kupujícího, adresu a tel.spojení je nutno vyplnit pokud si zákazník přeje
zaslání opraveného přístroje domů. Bez úplného vyplnění všech ostatních údajů v
záručním listu nebude možno Vaši reklamaci včas vyřídit.
5
Page 6

DO469FR
REKLAMACE/REKLAMÁCIE : (VYPLNÍ ZÁKAZNÍK NEBO
OBCHOD)
Popis vady 1. reklamace (reklamácie) / Datum uplatnění reklamace (Dátum uplatnenia
reklamácie):
Popis vady 2. reklamace (reklamácie) / Datum uplatnění reklamace (Dátum uplatnenia
reklamácie):
Popis vady 3. reklamace (reklamácie) / Datum uplatnění reklamace (Dátum uplatnenia
reklamácie):
Záznamy servisu :
1.reklamace (datum přijetí/odeslání/ číslo reklamačního dokladu)
(dátum prijatia / odoslania / číslo reklamačného dokladu)
2.reklamace (datum přijetí/odeslání/ číslo reklamačního dokladu)
(dátum prijatia / odoslania / číslo reklamačného dokladu)
3.reklamace (datum přijetí/odeslání/ číslo reklamačního dokladu)
(dátum prijatia / odoslania / číslo reklamačného dokladu)
* Jméno kupujícího, adresu a tel.spojení je nutno vyplnit pokud si zákazník přeje
zaslání opraveného přístroje domů.
Bez úplného vyplnění všech ostatních údajů v záručním listu nebude možno Vaši
reklamaci včas vyřídit.
* Meno kupujúceho, adresu a tel.spojení je nutné vyplniť ak si zákazník praje zaslanie
opraveného prístroja domov.
Bez vyplnenia všetkých ostatných údajov v záručnom liste nebude možné Vašu
reklamáciu včas vybaviť.
6
Page 7
www.domo-elektro.be
DO469FR
RECYCLAGE-INFORMATIE
Dit symbool op het product of op de verpakking wijst erop dat dit product niet als
huishoudafval mag worden behandeld. Het moet naar een
plaats worden gebracht waar elektrische en elektronische
apparatuur wordt gerecycleerd. Als u ervoor zorgt dat dit
product op de correcte manier wordt verwijderd, voorkomt
u mogelijk voor mens en milieu negatieve gevolgen die
zich zouden kunnen voordoen in geval van verkeerde
afvalbehandeling. Voor meer details in verband met het
recycleren van dit product, neemt u best contact op met de
gemeentelijke instanties, het bedrijf of de dienst belast met
de verwijdering van huishoudafval of de winkel waar u het
product hebt gekocht.
Het verpakkingsmateriaal is recycleerbaar. Behandel de
verpakking milieubewust.
INFORMATION DE RECYCLAGE
Ce symbole sur le produit ou son emballage indique que
ce produit ne peut être traité comme déchet ménager. Il
doit plutôt être remis au point de ramassage concerné, se
chargeant du recyclage du matériel électrique et électronique.
En vous assurant que ce produit est éliminé correctement,
vous favorisez la prévention des conséquences négatives pour
l’environnement et la santé humaine qui, sinon, seraient le résulat d’un traitement
inapproprié des déchets de ce produit. Pour obtenir plus de détails sur le recyclage de
ce produit, veuillez prendre contact avec le bureau municipal de votre région, votre
service d’éliminiation des déchets ménagers ou le magasin où vous avez acheté le
produit.
L’emballage est recyclable. Traitez l’emballage écologiquement.
RECYCLING INFORMATIONEN
Dieses Symbol auf dem Produkt oder seiner Verpackung weist darauf hin, dass
dieses Produkt nicht als normaler Haushaltsabfall zu behandeln ist, sondern an
einem Sammelpunkt für das Recyling von elektrischen und elektronischen Geräten
abgegeben werden muss. Durch Ihren Beitrag zum korrekten Entsorgen dieses
Produkts schützen Sie die Umwelt und die Gesundheit Ihrer Mitmenschen. Umwelt
und Gesundheit werden durch falsches Entsorgen gefährdet. Weitere Informationen
über das Recycling dieses Produkts erhalten Sie von Ihren Rathaus, Ihrer Müllabfuhr
oder dem Geschäft, in dem Sie das Produkt gekauft haben.
Das Verpackungsmaterial ist wiederverwertbar. Entsorgen Sie die Verpackung
umweltgerecht und führen Sie sie der Wertstoffsammlung zu.
7
Page 8
DO469FR
RECYCLING INFORMATION
This symbol on the product or on its packaging indicates that this product may not
be treated as household waste. Instead it must be brought to the applicable collection
point for recycling of electrical and electronic equipment. By ensuring this product is
disposed of correctly, you will help prevent potential negative consequences for the
environment and human health, which could otherwise be caused by inappropriate
waste handling of this product. For more detailed information about recycling of this
product, please contact your local city ofce, your household waste disposal service or
the shop where you purchased the product. The packaging is
recyclable. Please treat the packaging ecologically.
INFORMACIÓN DE RECICLAJE
El símbolo en el producto o el embalaje indica que este
producto no puede ser tratado como residuo doméstico. Los
residuos de aparatos tienen que ser depositados en un punto
de recogida destinado al reciclaje de aparatos eléctricos y
electrónicos. Eliminando este producto de manera correcta,
se puede evitar las consecuencias negativas posibles para el
hombre y el medio ambiente en caso de un tratamiento de
residuos incorrecto. Si desea obtener más información sobre
el reciclaje de este producto, pónganse en contacto con la
ocina municipal, la empresa o el servicio de recogida de
residuos domésticos correspondiente o con el establecimiento
dónde ha adquirido el producto. El material de embalaje es
reciclable. Trate el embalaje de manera ecológica.
INFORMACE O RECYKLACI ODPADU
Symbol na přístroji či na jeho obalu znamená, že s tímto výrobkem není možno
nakládat jako s běžným domovním odpadem, nýbrž musí být odevzdán na místech
určených ke sběru a likvidaci elektrických a elektronických zařízení. Dodržením
tohoto doporučení chráníte životní prostředí a zdraví spoluobčanů. Více informací o
možnostech likvidace nebezpečného odpadu obdržíte na obecních nebo městských
úřadech, sběrných dvorech nebo v prodejně, kde jste přístroj zakoupili. Obalové
materiály jsou recyklovatelné, nakládejte s nimi podle předpisů pro životní prostředí.
INFORMÁCIE O RECYKLÁCIU ODPADU
Symbol na prístroji alebo na jeho obale znamená, že s týmto výrobkom nie je možné
nakladať ako s domovým odpadom, ale musí byť odovzdaný na miestach určených
na zber a likvidáciu elektrických a elektronických zariadení. Dodržaním tohto
odporúčania chránite životné prostredie a zdravie spoluobčanov. Viac informácií o
možnostiach likvidácie nebezpečného odpadu obdržíte na obecných alebo mestských
úradoch, zberných dvoroch alebo v predajni, kde ste prístroj zakúpili. Obalové
materiály sú recyklovateľné, nakladajte s nimi podľa predpisov pre životné prostredie.
8
Page 9

www.domo-elektro.be
WEBSHOP
Accessoires en onderdelen van Domo-toestellen kunnen vanaf nu ook online besteld worden
NL
via de webshop van Domo*:
http://webshop.domo-elektro.be
De webshop is ook te bereiken via de Domo-website: www.domo-elektro.be.
Hiernaast zijn de accessoires en onderdelen ook nog altijd te verkrijgen in de winkel waar u het
toestel heeft aangekocht.
Les accessoires et pièces détachées de Domo sont à présent disponibles en ligne sur le
FR
webshop*:
http://webshop.domo-elektro.be
Le webshop est aussi accessible via le site internet de Domo: www.domo-elektro.be.
Vous pouvez toujours vous procurer les accessoires et pièces détachées au point de vente dont
provient votre appareil.
Zubehör und Ersatzteile von Domo-Geräten können ab jetzt auch online im Domo-Webshop
DE
bestellt werden*:
http://webshop.domo-elektro.be
Zum Domo-Webshop gelangen Sie auch über die Domo-Internetseite: www.domo-elektro.be.
Außerdem können Sie nach wie vor Domo-Zubehör und -Ersatzteile in Geschäften bekommen,
wo Domo-Gerät verkauft werden.
DO469FR
From now on, accessories and parts of Domo appliances can also be ordered online from the
EN
Domo webshop*:
http://webshop.domo-elektro.be
You can reach the webshop through the Domo website as well: www.domo-elektro.be. The
accessories and parts can also still be obtained at the store where you bought the appliance.
Nyní je možné nakupovat originální příslušenství i náhradní díly online přes internetový
CZ
obchod:
www.domo-elektro.cz
(platí pouze pro Českou a Slovenskou republiku)
Příslušenství i náhradní díly je možné objednat i přes obchod, kde jste zakoupili vás spotřebič.
* Enkel in België, Nederland, Luxemburg, Frankrijk en Duitsland.
* Seulement dans la Belgique, le Pays-Bas, le Luxembourg, la France et l’Allemagne.
* Nur in Belgien, die Niederlande, Luxemburg, Frankreich und Deutschland.
* Only in Belgium, the Netherlands, Luxemburg, France and Germany.
9
Page 10

DO469FR
Als de voedingskabel beschadigd is, moet hij vervangen
worden door de fabrikant, zijn dienst na verkoop of een
gelijkaardig gekwaliceerd persoon, om ongelukken te
voorkomen.
Si le cordon d’alimentation est endommagé, il doit être
remplacé par le fabricant, son service après-vente ou toute
autre personne qualiée, pour éviter tout accident.
Wenn das Stromzuführungskabel beschädigt ist, muss es
vom Hersteller, dessen Kundendienst oder einer gleichartig
geschulten Person ersetzt werden, um Unfälle zu verhindern.
If the power supply cord is damaged, it must be replaced by
the manufacturer, its service agent or a similarly qualied
person in order to avoid a hazard.
Cuando el cable de alimentación está dañado, tiene que ser
reemplazado por el fabricante, el servicio posventa o una
persona similarmente calicada, para evitar accidentes.
Jestliže je poškozený přívodní kabel, musí být neprodleně
vyměněn v odborném servisu nebo oprávněnou osobou. Jinak
hrozí nebezpečí úrazu!
Ak je poškodený prívodný kábel, musí byť bezodkladne
vymenený v odbornom servise alebo oprávnenou osobou.
Inak hrozí nebezpečenstvo úrazu!
10
Page 11

www.domo-elektro.be
DO469FR
VEILIGHEIDSINSTRUCTIES
Dit toestel mag gebruikt worden door kinderen
vanaf 16 jaar en ouder, en door personen met
een fysieke of sensoriële beperking of mensen
met een beperkte mentale capaciteit of gebrek
aan ervaring of kennis, op voorwaarde dat deze
personen toezicht krijgen of instructies hebben
gekregen over het gebruik van het toestel op
een veilige manier en dat ze ook de gevaren
kennen bij het gebruik van het toestel.
Kinderen mogen niet met het toestel spelen.
Onderhoud en reiniging van het toestel mogen
niet gebeuren door kinderen, tenzij ze ouder
zijn dan 16 jaar en toezicht krijgen. Hou het
toestel en het snoer buiten het bereik van
kinderen jonger dan 16 jaar.
Dit toestel is geschikt om te gebruiken in de
huishoudelijke omgeving en in gelijkaardige
omgevingen zoals:
• Keukenhoek voor personeel van winkels,
kantoren en andere gelijkaardige
professionele omgevingen
• Boerderijen
11
Page 12

DO469FR
• Hotel- en motelkamers en andere
omgevingen met een residentieel karakter
• Gastenkamers, of gelijkaardige
Opgelet: het toestel mag niet gebruikt
worden met een externe timer of een aparte
afstandsbediening.
• Lees alle instructies voor gebruik.
• Kijk voor gebruik na of het voltage vermeld
op het toestel overeenkomt met het voltage
van het elektriciteitsnet bij je thuis.
• Laat het snoer niet op een heet oppervlak
of over de rand van een tafel of aanrecht
hangen.
• Gebruik het toestel nooit wanneer het snoer
of de stekker beschadigd is, na een slechte
werking van het toestel of wanneer het
toestel beschadigd is. Breng het toestel dan
naar het dichtsbijzijnde gekwaliceerde
service center voor nazicht en reparatie.
• Streng toezicht is noodzakelijk wanneer
het toestel door of in de buurt van kinderen
gebruikt wordt.
• Het gebruik van accessoires die niet
12
Page 13

www.domo-elektro.be
DO469FR
aanbevolen of verkocht worden door de
fabrikant, kan brand, elektrische schokken of
verwondingen veroorzaken.
• Trek de stekker uit het stopcontact wanneer
het toestel niet in gebruik is, vooraleer
onderdelen te monteren of demonteren en
vooraleer het toestel te reinigen. Zet eerst
alle knoppen in ‘uit’-stand en trek de stekker
bij de stekker zelf uit het stopcontact. Trek
nooit aan het snoer om de stekker uit het
stopcontact te trekken.
• Laat een werkend toestel niet zonder toezicht
achter.
• Zet dit toestel nooit op of in de buurt van een
gasvuur of elektrisch vuur of op een plaats
waar het in contact zou kunnen komen met
een warm toestel.
• Gebruik het toestel niet buiten.
• Gebruik het toestel enkel voor het doel
waarvoor het bestemd is.
• Gebruik het toestel altijd op een stevig,
droog, effen oppervlak.
• Gebruik het toestel alleen voor huishoudelijk
gebruik. De fabrikant is niet verantwoordelijk
13
Page 14
DO469FR
voor ongelukken die een gevolg zijn van
verkeerd gebruik van het toestel, of het niet
naleven van de regels zoals ze vermeld zijn
in deze handleiding.
• Alle herstellingen, buiten het gewone
onderhoud van het toestel, moeten uitgevoerd
worden door de fabrikant of zijn dienst na
verkoop.
• Dompel het toestel, het elektrisch snoer of
de stekker nooit onder in water of een andere
vloeistof.
• Zorg ervoor dat kinderen het elektrisch snoer
of het toestel niet kunnen aanraken.
• Hou het snoer uit de buurt van scherpe
randen en hete onderdelen of andere
warmtebronnen.
• Verwijder voor het eerste gebruik alle
verpakkingsmaterialen en eventuele
promotionele stickers.
Het toestel kan warm worden tijdens
het gebruik. Houd het elektrisch
snoer weg van hete onderdelen en
dek het toestel niet af.
14
Page 15

www.domo-elektro.be
DO469FR
• Sluit het toestel aan op een geaard
stopcontact.
• Zorg ervoor dat er geen vloeistof in het
toestel kan komen.
• Zorg ervoor dat alle ingrediënten goed
in het mandje blijven zitten, zodat
ze niet in aanraking komen met de
verwarmingselementen.
• Bedek de ventilatie-openingen niet wanneer
het toestel in werking is.
• Vul de frituurpan nooit met olie.
• Raak de binnenkant van het toestel niet aan
wanneer het in werking is.
• Plaats het toestel niet tegen een muur of
tegen andere apparaten. Laat minstens 30 cm
ruimte leeg rondom het toestel.
• Zet niets op het toestel.
• Tijdens de werking van het toestel ontsnapt
er hete stoom uit de ventilatie-openingen.
Hou je handen en gezicht op een veilige
afstand. Let ook op voor hete stoom en
lucht wanneer je de frituurpan uit de friteuse
neemt.
• Trek meteen de stekker uit het stopcontact
15
Page 16
DO469FR
wanneer je donkere rook uit het toestel ziet
komen. Wacht tot de rookontwikkeling is
gestopt vooraleer de frituurpan uit het toestel
te nemen.
• Zet het toestel op een vlakke, stabiele en
hittebestendige ondergrond.
• Laat het toestel minstens 30 minuten
afkoelen vooraleer het te verplaatsen of te
reinigen.
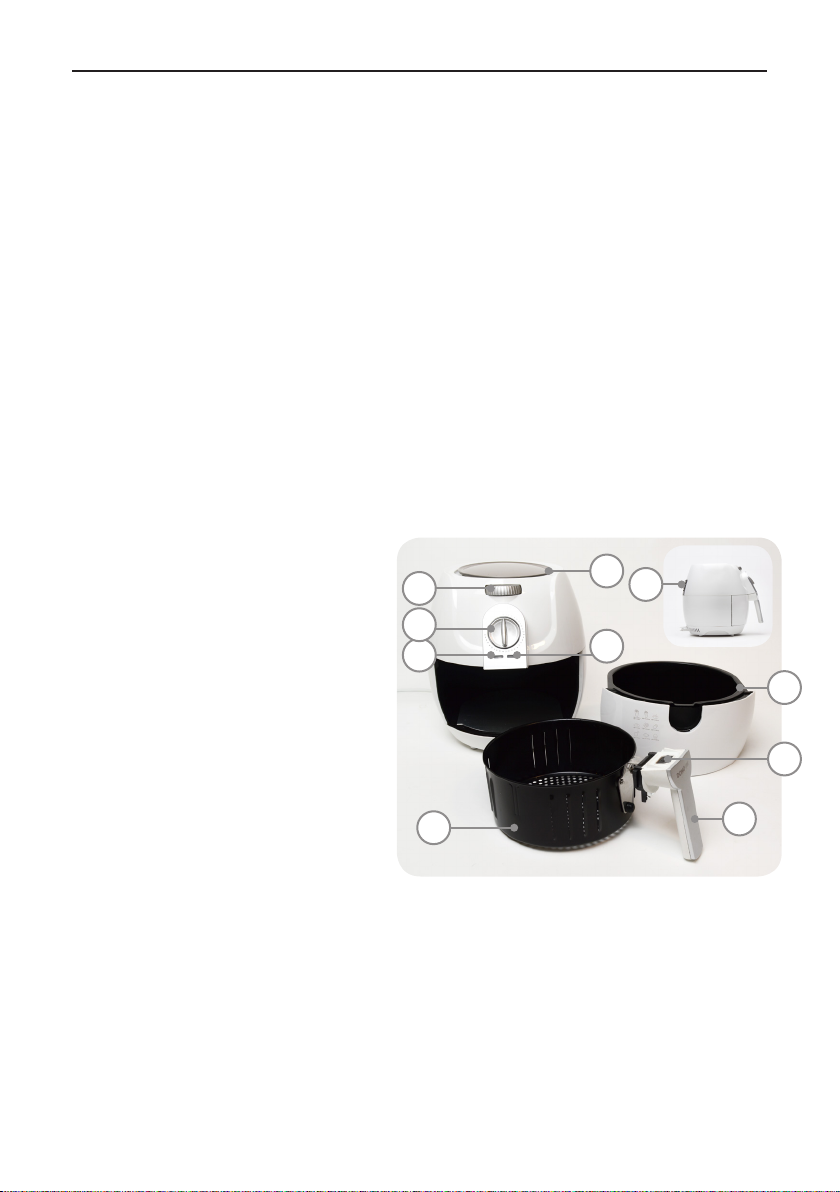
ONDERDELEN
1. Frituurmandje
2. Frituurpan
3. Handvat
4. Ontgrendelknop mandje
5. Temperatuurindicatielampje:
groen
6. Stroomindicatielampje: rood
7. Timer/aan-uitknop
8. Temperatuurknop
9. Ventilatie-openingen
VOOR HET EERSTE GEBRUIK
• Verwijder alle verpakkingsmaterialen en eventuele promotionele stickers.
• Maak de frituurpan en het mandje schoon met warm water, met wat afwasmiddel
en een niet-schurende spons. Deze onderdelen kunnen ook schoongemaakt
worden in de vaatwasmachine.
• Wrijf de binnen- en buitenkant van het toestel schoon met een zachte doek.
• Let op: er mag geen frituurolie of -vet in de frituurpan gedaan worden.
8
7
6
1
16
9
9
5
3
2
4
Page 17

www.domo-elektro.be
DO469FR
GEBRUIK
1. Plaats het toestel op een vlakke, stabiele en hittebestendige ondergrond. Zorg
ervoor dat er minstens 30 cm lege ruimte is rondom het toestel.
2. Zorg ervoor dat het frituurmandje in de frituurpan is geplaatst. Het mandje moet
hierbij vastklikken. Doe geen olie of vet in de frituurpan.
3. Schuif de frituurpan met het mandje leeg in de friteuse.
Opgelet: Gebruik de frituurpan nooit zonder het mandje erin.
4. Zorg ervoor dat de timerknop op 0 staat. Steek de stekker in het stopcontact.
5. Draai aan de temperatuurknop om de gewenste temperatuur in te stellen.
6. Zet het toestel aan door de timerknop met de klok mee te draaien. Draai de knop
helemaal tot het maximum en draai hem daarna terug naar de gewenste timertijd zeker meer dan 3 minuten om voor te verwarmen. Het rode stroomindicatielampje
zal aan gaan en het toestel zal nu beginnen voorverwarmen. Wacht tot het groene
temperatuurlampje aan gaat om aan te geven dat de gewenste temperatuur bereikt
is.
7. Neem de frituurpan nu uit het toestel. Het toestel zal automatisch stoppen met
werken. Vul het mandje met de ingrediënten. Overschrijd hierbij niet de ‘MAX’
maximumindicatie. Plaats de frituurpan met het gevulde mandje terug in het
toestel. De friteuse zal automatisch terug beginnen werken (als de ingestelde tijd
nog niet verstreken was).
8. Stel de gewenste tijd in met de timerknop.
Opgelet:
Je kan het mandje ook al in het begin vullen en van in het begin het gevulde
mandje in de frituurpan en in de friteuse plaatsen, in de plaats van te wachten
tot het toestel voorverwarmd is. Tel in dit geval 3 minuten extra bij de normale
frituurtijd.
9. Tijdens het frituren zal het temperatuurindicatielampje afwisselend aan en uit
gaan. Dit geeft aan dat de friteuse ervoor zorgt dat de ingestelde temperatuur
behouden blijft.
10. Overtollige olie wordt opgevangen in de frituurpan.
11. Wanneer de ingestelde tijd om is, klinkt er een belsignaal. De friteuse schakelt
automatisch uit. Je kan de timerknop ook manueel op 0 zetten, als je ingrediënten
al klaar zijn vooraleer de ingestelde tijd is verstreken. De friteuse staat dan uit.
12. Haal de frituurpan uit het toestel en zet de pan op een hittebestendige houder.
Neem het mandje met de ingrediënten eruit door op de ontgrendelknop te
drukken.
BELANGRIJKE BAKTIPS
• Het is aangeraden om frieten elke 5 à 10 minuten op te schudden, zodat ze
gelijkmatig gebakken worden. Dit geldt ook voor andere, kleinere snacks die
in het mandje over mekaar komen te liggen. Opgelet: zorg ervoor dat je de
17
Page 18

DO469FR
ontgrendelknop van het mandje niet indrukt tijdens het schudden.
• Je kan een eetlepel olie toevoegen voor een knapperiger resultaat, bv. olijfolie,
zonnebloemolie of arachideolie. Vermeng deze olie dan goed met de ongebakken
frieten, vooraleer de frieten in het mandje te doen. Andere ingrediënten kan je
bv. met een kwastje instrijken of insprayen met wat olie. Zorg er telkens voor dat
overtollige olie niet mee in het mandje/de frituurpan terecht komt. Gebruik ook
zeker niet te veel olie. Dan worden de frieten net minder krokant en vettig.
• Laat verse, ongebakken frieten eerst 30 minuten in water weken vooraleer ze
te bakken, zodat het zetmeel van de aardappelen is weggespoeld. Dep ze hierna
goed droog.
• Bereid geen overdreven vette ingrediënten in deze friteuse.
• Wanneer je vette ingrediënten bereidt, kan er witte rook uit het toestel komen.
Dit heeft echter geen effect op de werking van het toestel of het eindresultaat.
Ook als het toestel niet goed is schoongemaakt, of als er olie in de frituurpan is
achtergebleven, kan er witte rook ontstaan bij een volgende frituurbeurt.
• Snacks die in de oven gemaakt kunnen worden, kunnen ook in deze friteuse
bereid worden.
• Om zo knapperig mogelijke frieten te bekomen, bak je best 500 g frieten per keer.
• Kleinere hoeveelheden ingrediënten worden gelijkmatiger gebakken dan grote
hoeveelheden.
• Dunnere frieten geven ook een knapperiger resultaat dan dikkere frieten.
• Plaats een bakvorm of ovenschaal in het mandje wanneer je een cake of quiche
wilt bakken, of fragiele of gevulde ingrediënten.
• Je kan deze friteuse ook gebruiken om ingrediënten weer op te warmen. Zet de
friteuse dan op 150°C, gedurende 10 minuten.
• Ingrediënten die even lang op eenzelfde temperatuur gebakken moeten worden,
kan je gerust gelijktijdig in het mandje plaatsen en bakken.
• Diepvriesproducten hoeven niet op voorhand ontdooid te worden.
• Je kan bakpapier of aluminiumfolie of -bakjes gebruiken in het mandje van deze
friteuse, maar wees hierbij wel heel voorzichtig. Let op dat je niet het hele
mandje bedekt. De lucht moet altijd nog goed door het toestel, door het mandje
en de ingrediënten kunnen stromen. Er moet ook altijd genoeg voedsel op het
bakpapier of de aluminiumfolie geplaatst worden, zodat het papier of de folie
zeker op zijn plaats gehouden wordt. Anders kan dit door de sterke luchtstroom
naar het verwarmingselement worden gezogen en gaan branden. Zorg ervoor dat
je bakpapier of aluminiumfolie altijd wat groter is dan het voedsel zelf. Zorg er
wel voor dat het niet buiten de mand komt.
• Ovensnacks geven altijd het beste, meest krokante resultaat. Maar ook
diepvriessnacks voor in de gewone friteuse kunnen in deze friteuse bereid
worden.
18
Page 19

www.domo-elektro.be
DO469FR
BAKTIJDEN EN -TEMPERATUREN
Onderstaande tabel bevat een aantal richtlijnen voor het klaarmaken van verschillende
gerechten. Opgelet: dit zijn enkel richtlijnen. De tijden zijn altijd ook afhankelijk
van de hoeveelheid en de dikte van het voedsel. Hou ook altijd rekening met de
hierboven vermelde baktips.
Frieten, vers eerst 18 min. 140°
dan 12 min. 180°
Frieten, diepvries 12-20 min. 200°
Aardappelwedges 18-22 min. 180°
Kroketten 15 min. 185°
Kaaskroketten, diepvries 12 min. 180°
Kippennuggets, bitterballen,
6-10 min. 200°
vissticks en andere snacks
Kiplet 15 min. 200°
Kippenschnitzel, diepvries 12 min. 180°
Steak 8-12 min. 180°
Vis 10-15 min. 180°
Champignons 3-4 min. 180°
Loempia’s 8-13 min. 200°
Drumsticks 15-20 min. 180°
Gehaktballen 6 min. 180°
Hamburger 6-10 min. 180°
Saté 10 min. 190°
Scampi 6 min. 180°
Ei, hardgekookt 12 min. 160°
Ei, zachtgekookt 6-7 min. 160°
Groenten 15 min. 200°
Groentefriet - harde groenten 10-13 min. 200°
Groentefriet - zachte groenten 7 min. 200°
Appeltjes 7 min. 180°
Banaan 7 min. 200°
Bladerdeeghapjes 10 min. 180°
Afbakbroodjes 7 min. 200°
Cake 20 min. 165°
Mufns 15-20 min. 160°
19
Page 20

DO469FR
REINIGING EN ONDERHOUD
• Maak het toestel na elk gebruik schoon.
• Gebruik geen metalen of schurende schoonmaakproducten. Deze kunnen het
toestel beschadigen.
• Zorg ervoor dat de timerknop op 0 (= uit) staat en trek de stekker uit het
stopcontact.
• Laat het toestel minstens 30 minuten afkoelen vooraleer het te verplaatsen of
schoon te maken.
• Wrijf de buitenkant van het toestel schoon met een vochtige doek.
• Maak de frituurpan en het frituurmandje schoon met warm water, wat
afwasmiddel en een niet-schurende spons. Deze onderdelen kunnen ook
schoongemaakt worden in de vaatwasmachine.
• Maak de binnenkant van het toestel schoon met warm water en een zachte spons.
• Maak het verwarmingselement schoon met een borsteltje om voedselresten te
verwijderen.
• Droog alles grondig af.
20
Page 21

www.domo-elektro.be
DO469FR
PRÉCAUTIONS
Cet appareil peut être utilisé par des enfants
âgés d’au moins 16 ans et par des personnes
ayant des capacités physiques, sensorielles ou
mentales réduites ou dénuées d’expérience
ou de connaissance, s’ils (si elles) sont
correctement surveillé(e)s ou si des instructions
relatives à l’utilisation de l’appareil en toute
sécurité leur ont été données et si les risques
encourus ont été appréhendés.
Veillez à ce que les enfants ne puissent pas
jouer avec l’appareil. L’entretien et le nettoyage
de l’appareil ne peuvent pas s’effectuer par
des enfants, à moins qu’ils aient plus de 16
ans et qu’ils soient sous surveillance. Gardez
l’appareil et le cordon hors de la portée
d’enfants de moins de 16 ans.
Cet appareil est destiné à un usage domestique
ou à d’autres usages comme:
• Dans la cuisine du personnel dans des
magasins, des bureaux ou d’autres lieux mis
en rapport avec l’environnement de travail.
• Dans les fermes.
21
Page 22

DO469FR
• Dans les chambres d’hôtels, de motels et
d’autres lieux avec un caractère résidentiel.
• Dans les chambres d’hôtes ou similaires.
Attention: l’appareil ne peut pas être utilisé
avec une minuterie externe ou une commande à
distance séparée.
• Veuillez lire toutes les instructions avant
d’utiliser l’appareil.
• Vériez avant usage si la tension indiquée
sur l’appareil correspond à la tension du
réseau électrique de votre domicile.
• Ne laissez pas le cordon pendre sur une
surface chaude ou sur le rebord d’une table.
• N’utilisez jamais l’appareil lorsque le cordon
ou la che sont endommagés, après un
mauvais fonctionnement de l’appareil ou
lorsque l’appareil est endommagé. Amenez
alors l’appareil au centre de services le plus
proche pour contrôle et réparation.
• Soyez très attentif lorsque l’appareil est
utilisé par des enfants ou à proximité
d’enfants.
• L’utilisation d’accessoires non préconisés par
22
Page 23

www.domo-elektro.be
DO469FR
le fabricant peut provoquer un incendie, une
électrocution ou des blessures.
• Retirez la che de la prise lorsque l’appareil
n’est pas utilisé, avant d’installer ou
d’enlever des pièces et avant de nettoyer
l’appareil. Mettez tous les boutons en
position « arrêt » et retirez la che de la
prise. Ne tirez jamais sur le câble pour retirer
la che de la prise.
• Ne laissez jamais un appareil en service sans
surveillance.
• Ne placez jamais cet appareil sur ou à
proximité d’un feu au gaz ou d’un feu
électrique où il pourrait entrer en contact
avec un appareil chaud.
• N’utilisez pas l’appareil à l’extérieur.
• Utilisez l’appareil uniquement dans le but
auquel il est destiné.
• Utilisez toujours l’appareil sur une surface
solide, sèche et plane.
• Cet appareil ne convient qu’à un usage
domestique. Le fabricant décline toute
responsabilité pour des accidents qui
découleraient d’un mauvais usage de
23
Page 24
DO469FR
l’appareil ou du non-respect des instructions
fournies dans ce manuel.
• Toutes les réparations, en dehors de
l’entretien ordinaire de l’appareil, doivent
être réalisées par le fabricant ou son service
après-vente.
• N’immergez jamais le cordon électrique, la
che ou l’appareil lui-même dans l’eau ou
tout autre milieu liquide.
• Veillez à ce que les enfants ne puissent pas
toucher à l’appareil ou au cordon électrique.
• Tenez le cordon éloigné de rebords
tranchants et de pièces brûlantes ou d’autres
sources de chaleur.
• Avant la première utilisation, enlevez tous
les éléments d’emballage et les éventuels
autocollants promotionnels.
L’appareil peut chauffer en cours
d’utilisation. Tenez le cordon
électrique éloigné des éléments
chauds et ne recouvrez pas
l’appareil.
24
Page 25

www.domo-elektro.be
DO469FR
• Branchez l’appareil sur une prise de courant
raccordée à la terre.
• Assurez-vous qu’aucun liquide ne pénètre
dans l’appareil.
• Assurez-vous que tous les aliments restent
bien dans le panier, de telle façon qu’ils
n’entrent pas en contact avec les résistances
chauffantes.
• Ne couvrez pas les orices de ventilation
lorsque l’appareil est en fonctionnement.
• Ne remplissez jamais la cuve d’huile.
• Ne touchez pas l’intérieur de l’appareil
lorsque celui-ci est en fonctionnement.
• Ne placez pas l’appareil contre un mur ou
contre d’autres appareils. Laissez un espace
d’au moins 30 cm autour de l’appareil.
• Ne déposez rien sur l’appareil.
• Pendant le fonctionnement de l’appareil,
les orices de ventilation laissent échapper
de la vapeur brûlante. Gardez vos mains et
votre visage à une distance de sécurité. Faites
également attention à la vapeur brûlante et à
l’air chaud lorsque vous retirez la cuve de la
friteuse.
25
Page 26

DO469FR
• Débranchez immédiatement la che de la
prise de courant si vous voyez de la fumée
noire s’échapper de l’appareil. Attendez que
la fumée se dissipe avant de retirer la cuve de
l’appareil.
• Posez l’appareil sur une surface plane, stable
et résistante.
• Laissez l’appareil refroidir au moins 30
minutes avant de le déplacer ou de le
nettoyer.
ELEMENTS
8
1. Panier
2. Cuve
3. Poignée
4. Bouton de déverrouillage du
panier
5. Témoin de température: vert
6. Témoin d’alimentation: rouge
7. Minuterie – Bouton marche /
arrêt
8. Bouton de température
9. Orices de ventilation
AVANT LA PREMIERE UTILISATION
• Enlevez tous les éléments d’emballage et les éventuels autocollants
promotionnels.
• Nettoyez la cuve et le panier avec de l’eau chaude, un peu de détergent et une
éponge non abrasive. Ces éléments peuvent également être lavés au lave-vaisselle.
• Nettoyez l’intérieur et l’extérieur de l’appareil à l’aide d’un chiffon doux.
• Attention : n’utilisez jamais d’huile ou de graisse de friture dans la cuve de
friture.
7
6
1
26
9
9
5
3
2
4
Page 27

www.domo-elektro.be
DO469FR
UTILISATION
1. Placez l’appareil sur une surface plane, stable et résistante. Assurez-vous de
laisser un espace d’au moins 30 cm autour de l’appareil.
2. Assurez-vous que le panier se trouve dans la cuve. Le panier doit se verrouiller.
Ne versez pas d’huile ou de graisse dans la cuve.
3. Introduisez la cuve et le panier dans la friteuse lorsqu’ils sont vides.
Attention : N’utilisez jamais la cuve sans le panier à l’intérieur.
4. Branchez l’appareil. Assurez-vous que la minuterie est sur 0.
5. Tournez le bouton de température pour régler la température souhaitée.
6. Allumez l’appareil en tournant la minuterie dans le sens des aiguilles d’une
montre. Tournez le bouton au maximum, puis faites-le ensuite tourner dans le
sens inverse jusqu’au nombre de minutes souhaitées (plus que 3 minutes pour le
préchauffage). Le témoin d’alimentation rouge s’allume et l’appareil commence
à préchauffer. Attendez que le témoin de température vert s’allume (l’appareil a
atteint la température souhaitée).
7. Retirez la cuve de l’appareil. L’appareil cesse automatiquement de fonctionner.
Remplissez le panier avec les aliments. Ne dépassez pas le repère « MAX ».
Replacez la cuve et le panier rempli dans l’appareil. La friteuse recommence
automatiquement à fonctionner (si le temps programmé n’est pas encore écoulé).
8. Réglez le temps souhaité à l’aide de la minuterie.
Remarques :
Vous pouvez déjà remplir le panier et le mettre directement dans la cuve de friture
placée préalablement dans la friteuse, sans attendre le préchauffage. Dans ce cas,
comptez 3 minutes supplémentaires par rapport au temps de cuisson habituel.
9. Pendant la cuisson, le témoin de thermostat s’allume et s’éteint. Cela indique que
la friteuse maintient la température programmée.
10. La cuve récupère l’huile excédentaire.
11. Lorsque le temps programmé est écoulé, une sonnerie retentit. La friteuse s’éteint
automatiquement. Vous pouvez également mettre la minuterie sur 0 manuellement
si vos aliments sont prêts avant que le temps programmé soit écoulé. La friteuse
est hors tension.
12. Retirez la cuve de l’appareil et placez-la sur un support résistant. Ôtez le panier
qui contient les aliments en appuyant sur le bouton de déverrouillage.
CONSEILS DE CUISSON IMPORTANTS
• Il est recommandé de secouer les frites toutes les 5 à 10 minutes pour qu’elles
cuisent uniformément. Cette recommandation s’applique également aux snacks
plus petits qui collent entre eux dans le panier. Attention : assurez-vous de ne
pas appuyer sur le bouton de déverrouillage du panier lorsque vous secouez les
aliments.
• Pour obtenir des aliments plus croustillants, vous pouvez ajouter une cuillère
27
Page 28

DO469FR
à soupe d’huile comme de l’huile d’olive, de l’huile de tournesol ou de l’huile
d’arachide. Mélangez bien l’huile avec les frites crues avant de placer les frites
dans le panier. Vous pouvez badigeonner les autres aliments d’un peu d’huile
ou utiliser de l’huile en aérosol, par exemple. Assurez-vous toujours que l’huile
excédentaire ne coule pas dans le panier ou la cuve. N’utilisez jamais trop d’huile,
sinon les frites deviendront grasses et moins croustillantes.
• Avant de les cuire, laissez d’abord tremper les frites crues et fraîches dans
l’eau pendant 30 minutes pour éliminer l’amidon des pommes de terre. Séchezles ensuite soigneusement en tamponnant.
• Ne cuisez pas d’aliments trop gras dans la friteuse.
• Lorsque vous cuisez des aliments gras, de la fumée blanche peut s’échapper de
l’appareil. Cela n’a cependant aucun effet sur le fonctionnement de l’appareil ou
sur le résultat nal. De la fumée blanche peut également apparaître si l’appareil
n’a pas été nettoyé correctement ou s’il reste de l’huile dans la cuve suite à la
dernière utilisation.
• Les snacks qui peuvent se préparer au four peuvent également être cuits dans la
friteuse.
• Pour obtenir des frites aussi croustillantes que possible, il est préférable de les
faire cuire par portions de 500 g.
• Les plus petites quantités cuisent de façon plus uniforme que les grandes
quantités.
• Les frites plus nes donnent également un résultat plus croustillant que les frites
plus grosses.
• Placez un moule de cuisson ou un plat à four dans le panier lorsque vous voulez
faire cuire un cake, une quiche ou des aliments fragiles ou farcis.
• Vous pouvez également utiliser la friteuse pour réchauffer des aliments. Réglez
la friteuse sur 150 °C et 10 minutes.
• Vous pouvez mettre dans le panier tous les aliments qui se cuisent à la même
température pendant le même nombre de minutes et les faire cuire tous ensemble.
• Il n’est pas nécessaire de décongeler les produits surgelés à l’avance.
• Vous pouvez utiliser du papier cuisson, du papier aluminium ou des barquettes en
aluminium dans le panier de la friteuse, mais soyez très prudent. Faites attention
de ne pas couvrir tout le panier. L’air doit toujours pouvoir circuler correctement
dans l’appareil, le panier et les aliments. Il doit toujours y avoir sufsamment
d’aliments sur le papier cuisson ou le papier aluminium an qu’il reste bien
en place. Dans le cas contraire, le papier peut être aspiré dans la résistance
chauffante par le ux d’air puissant et prendre feu. Assurez-vous toujours que
le papier cuisson ou le papier aluminium est un peu plus grand que les aliments.
Assurez-vous que les aliments ne sortent pas du panier.
• Les snacks à cuire au four sont les meilleurs et donnent toujours le résultat le
plus croustillant. Toutefois, les snacks surgelés qui se cuisent dans une friteuse
traditionnelle peuvent également être préparés dans cette friteuse.
28
Page 29

www.domo-elektro.be
DO469FR
TEMPS ET TEMPERATURES DE CUISSON
Le tableau ci-dessous contient quelques indications relatives à la préparation de
différents plats. Attention : ce ne sont que des indications. Le temps de cuisson
dépend toujours de la quantité et de l’épaisseur des aliments. Tenez également toujours
compte des conseils de cuisson susmentionnés.
Frites (fraîches) première cuisson : 18 min. 140°
deuxième cuisson : 12 min. 180°
Frites (surgelées) 12-20 min. 200°
Quartiers de pommes de terre 18-22 min. 180°
Croquettes 15 min. 185°
Croquettes de fromage
12 min. 180°
(surgelées)
Nuggets de poulet, Fish sticks
6-10 min. 200°
et autres snacks
Filet de poulet 15 min. 200°
Escalopes de poulet panées
12 min. 180°
(surgelées)
Steak 8-12 min. 180°
Poisson 10-15 min. 180°
Champignons 3-4 min. 180°
Loempias 8-13 min. 200°
Pilons 15-20 min. 180°
Boulettes 6 min. 180°
Hamburger 6-10 min. 180°
Saté 10 min. 190°
Scampi 6 min. 180°
Œuf cuit dur 12 min. 160°
Œuf à la coque 6-7 min. 160°
Légumes 15 min. 200°
Frites de légumes (légumes
10-13 min. 200°
durs)
Frites de légumes (légumes
7 min. 200°
mous)
Pommes 7 min. 180°
Banane 7 min. 200°
29
Page 30

DO469FR
Amuse-bouche feuilletés 10 min. 180°
Petits pains précuits 7 min. 200°
Cake (gâteau) 20 min. 165°
Mufns 15-20 min. 160°
NETTOYAGE ET ENTRETIEN
• Nettoyez l’appareil après chaque utilisation.
• N’utilisez pas de produits d’entretien abrasifs ou d’outils en métal. Ils pourraient
endommager l’appareil.
• Assurez-vous que la minuterie est sur 0 (= arrêt), puis débranchez l’appareil.
• Laissez l’appareil refroidir au moins 30 minutes avant de le déplacer ou de le
nettoyer.
• Essuyez l’extérieur de l’appareil avec un chiffon humide.
• Nettoyez la cuve et le panier avec de l’eau chaude, un peu de détergent et une
éponge non abrasive. Ces éléments peuvent également être lavés au lave-vaisselle.
• Nettoyez l’intérieur de l’appareil avec de l’eau chaude et une éponge douce.
• Nettoyez la résistance chauffante avec une brossette an d’éliminer les résidus de
nourriture.
• Veillez à bien sécher tous les éléments.
30
Page 31

www.domo-elektro.be
DO469FR
SICHERHEITSHINWEISE
Dieses Gerät darf von Kindern ab 16 Jahren
oder älter gebraucht werden. Ebenso dürfen
Personen mit körperlicher bzw. leichter
geistiger Behinderung sowie Personen mit
eingeschränkter Erfahrung das Gerät betätigen.
Dies unter der Voraussetzung, dass diese
Personen ausreichende Anweisungen sowohl
zum Gebrauch des Gerätes, als auch zu den
hiermit verbundenen Gefahren erhalten haben.
Kinder dürfen nicht mit dem Gerät spielen.
Die Pege und Wartung des Gerätes darf nicht
von Kindern ausgeführt werden, es sei denn,
dass dies unter Aufsicht passiert und es sich um
Kinder handelt, die älter als 16 Jahre sind und
im Voraus ausreichend über den Gebrauch/die
Wartung informiert worden sind. Sorgen Sie
dafür, dass sich das Gerät nicht in Anwesenheit
von Kindern unter 16 Jahren bendet.
Dieses Gerät eignet sich zum Gebrauch im
Haushalt oder ähnlichen Umgebungen, wie
z.B.:
• Küchenzeile für Personal in Geschäften,
31
Page 32

DO469FR
Büros oder anderen professionellen
Umgebungen
• Bauernhöfe
• Hotel-/Motel-/Gästezimmer u.ä.
Achtung: das Gerät darf nicht mit einer
externen Zeitschaltuhr oder Fernbedienung
gebraucht werden.
• Bitte alle Anweisungen vor dem Gebrauch
durchlesen.
• Vor der Benutzung prüfen, ob die Spannung,
die auf dem Gerät angegeben ist, mit der
Spannung Ihres Stromnetzes übereinstimmt.
• Lassen Sie das Netzkabel nicht über den
Tisch oder die Anrichte hängen, oder in
Kontakt mit heißen Oberächen kommen.
• Benutzen Sie das Gerät niemals, wenn die
Kabelschnur oder der Stecker beschädigt
ist, nach beeinträchtigtem Funktionieren des
Gerätes, oder wenn das Gerät beschädigt
ist. Bringen Sie in solchen Fällen das Gerät
zur nächsten qualizierten Servicestelle zur
Überprüfung und/oder Reparatur.
• Beim Einsatz des Gerätes in Anwesenheit
32
Page 33

www.domo-elektro.be
DO469FR
von Kindern ist strenge Aufsicht geboten.
• Die Verwendung von Zubehör, das nicht vom
Hersteller empfohlen oder verkauft wird,
besteht die Gefahr von Brand, elektrischen
Schlages oder von Verletzungen.
• Ziehen Sie den Stecker aus der Steckdose,
wenn das Gerät nicht im Einsatz ist,
Einzelteile montiert oder demontiert werden,
oder das Gerät gereinigt wird. Ziehen Sie den
Stecker direkt am Stecker selber und nicht an
der Kabelschnur aus der Steckdose.
• Lassen Sie das im Betrieb bendliche Gerät
nicht unbeaufsichtigt.
• Stellen Sie das Gerät nicht in der Nähe oder
auf einer Gasamme, einer elektrischen
Platte oder an einer Stelle ab, auf der es in
Kontakt mit einem Elektroofen oder einem
anderen heißen Geräten kommen kann.
• Benutzen Sie das Gerät nicht im Freien.
• Benutzen Sie das Gerät ausschließlich für
den Zweck, für den es gedacht ist.
• Stellen Sie das Gerät immer auf eine stabile,
ache und trockene Oberäche.
• Das Gerät ist nur auf den privaten
33
Page 34

DO469FR
Gebrauch ausgelegt. Der Hersteller ist nicht
verantwortlich für Unfälle, die als Folge
von unsachgemäßem Gebrauch des Geräts
oder Nichtbefolgen der in dieser Anleitung
aufgeführten Regeln entstehen.
• Sämtliche Reparaturen, abgesehen von
der gewöhnlichen Pege, sind durch den
Hersteller oder dessen Kundendienst zu
übernehmen.
• Das Gerät, das Kabel oder den Stecker
niemals in Wasser oder in andere
Flüssigkeiten tauchen.
• Sorgen Sie dafür, dass Kinder das Netzkabel
oder das Gerät nicht berühren können.
• Netzkabel vor scharfen Kanten, heißen
Gegen-ständen oder anderen Wärmequellen
schützen.
• Beim ersten Gebrauch Verpackungsmaterial
und mögliche Werbeaufkleber komplett
entfernen.
34
Page 35

www.domo-elektro.be
DO469FR
Das Gerät kann bei der Benutzung
heiß werden. Halten Sie das
Stromkabel von heißen Teilen fern
und decken Sie das Gerät nicht ab.
• Schließen Sie das Gerät an einer geerdeten
Steckdose an.
• Achten Sie darauf, dass kein Wasser in das
Gerät eindringt.
• Achten Sie darauf, dass alle Zutaten
ordnungsgemäß im Korb verbleiben, sodass
sie nicht mit den Heizelementen in Kontakt
kommen.
• Decken Sie die Lüftungsschlitze nicht ab,
wenn das Gerät in Betrieb ist.
• Füllen Sie die Frittierpfanne nie mit Öl.
• Berühren Sie das Gerät nicht, wenn es in
Betrieb ist.
• Stellen Sie das Gerät nicht an eine Wand
oder an andere Geräte auf. Lassen Sie einen
Freiraum von mindestens 30 cm rund um das
Gerät.
• Stellen Sie nichts auf das Gerät.
35
Page 36

DO469FR
• Während das Gerät in Betrieb ist, entweicht
heißer Dampf aus den Lüftungsschlitzen.
Halten Sie mit Händen und Gesicht einen
Sicherheitsabstand ein. Beachten Sie auch
beim Entnehmen der Frittierpfanne aus der
Fritteuse den (entweichenden) heißen Dampf
und die Luft.
• Ziehen Sie sofort den Stecker aus der
Steckdose, wenn dunkler Rauch aus dem
Gerät quillt. Warten Sie mit dem Entnehmen
der Frittierpfanne aus dem Gerät, bis die
Rauchentwicklung nachgelassen hat.
• Stellen Sie das Gerät auf eine ebene, stabile
und hitzebeständige Fläche.
• Lassen Sie das Gerät mindestens 30 Minuten
abkühlen, bevor es an einen anderen Ort
gestellt oder gereinigt wird.
36
Page 37

www.domo-elektro.be
TEILE
DO469FR
1. Frittierkorb
2. Frittierpfanne
3. Griff
4. Verriegelungstaste Korb
5. Temperaturanzeigenleuchte:
grün
6. Netzkontrollleuchte: rot
7. Timer/An-/Aus-Schalter
8. Temperaturregler
9. Lüftungsschlitze
8
7
6
1
VOR DER ERSTEN INBETRIEBNAHME
• Sämtliches Verpackungsmaterial und mögliche Werbeaufkleber entfernen.
• Reinigen Sie die Frittierpfanne und den Korb mit warmem Wasser mit etwas
Spülmittel und einem nicht scheuernden Schwamm. Diese Teile können auch in
der Spülmaschine gereinigt werden.
• Wischen Sie die Innen- und Außenseite des Geräts mit einem weichen Tuch ab.
• Achtung: Es darf kein Frittieröl- oder -fett in der Frittierpfanne verwendet
werden.
VERWENDUNG
1. Stellen Sie das Gerät auf eine ebene, stabile und hitzebeständige Fläche. Sorgen
Sie dafür, dass sich ein Freiraum von mindestens 30 cm rund um das Gerät
bendet.
2. Sorgen Sie dafür, dass sich der Frittierkorb in der Frittierpfanne bendet. Der
Korb muss dabei einrasten. Geben Sie kein Öl oder Fett in die Frittierpfanne.
3. Schieben Sie die Frittierpfanne mit dem leeren Korb in die Fritteuse.
Achtung: Benutzen Sie die Frittierpfanne niemals ohne den Korb.
4. Stecken Sie den Stecker in die Steckdose. Sorgen Sie dafür, dass der Timer auf 0
steht.
5. Drehen Sie zur Einstellung der gewünschten Temperatur den Temperaturregler.
6. Schalten Sie das Gerät ein, indem Sie den Timer im Uhrzeiger drehen. Drehen
Sie den Schalter zunächst auf die maximale Zeiteinstellung und drehen Sie ihn
anschließend auf die gewünschte Zeit zurück - mit Sicherheit zum Vorwärmen auf
mehr als 3 Minuten. Die rote Netzkontrollleuchte geht an und das Gerät beginnt
mit dem Vorwärmen. Warten Sie, bis die grüne Temperaturanzeigenleuchte
angeht, die anzeigt, dass die gewünschte Temperatur erreicht wurde.
7. Nehmen Sie jetzt die Frittierpfanne aus dem Gerät. Das Gerät schaltet sich
9
9
5
3
2
4
37
Page 38

DO469FR
automatisch. Füllen Sie den Korb mit den Zutaten. Überschreiten Sie dabei
nicht die maximale Füllmenge, die durch „MAX“ angegeben ist. Setzen Sie die
Frittierpfanne mit dem gefüllten Korb wieder in das Gerät ein. Die Fritteuse
startet automatisch wieder (wenn die eingestellte Zeit noch nicht verstrichen ist).
8. Stellen Sie die gewünschte Zeit mit dem Timer ein.
Achtung:
Statt zu warten, bis das Gerät vorgewärmt ist, können Sie den Korb auch bereits
zu Beginn füllen, ihn in die Frittierpfanne einrasten lassen und beides in die
Fritteuse einsetzen. Addieren Sie dann 3 Minuten zur gewöhnlichen Frittierzeit.
9. Während des Frittiervorgangs wird sich die Temperaturanzeige ein- und
ausschalten. Dies zeigt an, dass die Fritteuse dafür sorgt, dass die eingestellte
Temperatur gehalten wird.
10. Überschüssiges Öl wird in der Frittierpfanne aufgefangen.
11. Wenn die eingestellte Zeit vorüber ist, ertönt ein Klingelgeräusch. Die Fritteuse
schaltet sich automatisch aus. Wenn die Zutaten bereits gar sind, bevor die
eingestellte Zeit verstrichen ist, können Sie den Timer auch manuell auf 0 stellen.
Die Fritteuse geht dann aus.
12. Nehmen Sie die Frittierpfanne aus dem Gerät und stellen Sie diese auf einen
hitzebeständigen Untersetzer. Nehmen Sie den Korb mit den Zutaten heraus,
indem Sie die Entriegelungstaste drücken.
WICHTIGE FRITTIERTIPPS
• Es wird empfohlen, Pommes frites alle 5 bis 10 Minuten durchzuschütteln,
sodass diese gleichmäßig frittiert werden. Dies gilt auch für andere, kleine
Snacks, die im Korb übereinander liegen. Achtung: Achten Sie darauf, dass Sie
den Entriegelungsknopf des Korbes nicht beim Schütteln drücken.
• Für ein knusprigeres Ergebnis können Sie einen Esslöffel Öl, z.B. Olivenöl,
Sonnenblumenöl oder Erdnussöl, hinzufügen. Mischen Sie dieses Öl gut mit
den noch nicht frittierten Pommes frites, bevor Sie diese in den Korb geben.
Andere Zutaten können Sie z.B. mit einem Pinsel einpinseln oder mit etwas
Öl einsprühen. Achten Sie jeweils darauf, dass überschüssiges Öl nicht in den
Korb/die Frittierpfanne gelangt. Verwenden Sie vor allem nicht zu viel Öl. Dann
werden die Pommes frites weniger knusprig sondern fettig.
• Weichen Sie frische, noch nicht frittierte Pommes frites zunächst 30 Minuten
lang in Wasser ein, sodass die Stärke aus den Kartoffeln ausgespült wird. Tupfen
Sie diese anschließend gut trocken.
• Bereiten Sie keine übermäßig fettigen Zutaten in dieser Fritteuse zu.
• Wenn Sie fettige Zutaten zubereiten, kann weißer Rauch aus dem Gerät
aufsteigen. Dies beeinträchtigt jedoch die Funktion des Geräts oder das
Endergebnis nicht. Auch wenn das Gerät nicht gut gereinigt wurde oder wenn Öl
in der Frittierpfanne zurückgeblieben ist, kann es beim nächsten Frittiervorgang
38
Page 39

www.domo-elektro.be
DO469FR
zur Entstehung von weißem Rauch kommen.
• Snacks, die im Backofen zubereitet werden können, können auch in dieser
Fritteuse zubereitet werden.
• Um so knusprige Pommes frites wie möglich zu erhalten, frittieren Sie am besten
500 g Pommes frites pro Durchgang.
• Kleinere Mengen von Zutaten werden gleichmäßiger frittiert als große Menge.
• Dünnere Pommes frites werden deshalb auch knuspriger als dickere Pommes
frites.
• Geben Sie eine Backform oder Glasform in den Korb, wenn Sie einen Kuchen
oder eine Quiche frittieren oder zerbrechliche oder gefüllte Zutaten zubereiten
wollen.
• Sie können die Fritteuse auch verwenden, um Zutaten wieder zu erwärmen.
Stellen Sie die Fritteuse dazu für 10 Minuten auf 150°C ein.
• Zutaten, die gleich lange bei gleicher Temperatur zubereitet werden müssen,
können Sie einfach gleichzeitig in den Korb geben und frittieren.
• Tiefkühlwaren müssen vorher nicht aufgetaut werden.
• Sie können im Korb der Fritteuse Aluminiumfolie oder -behälter verwenden.
Seien Sie dabei jedoch sehr vorsichtig. Achten Sie darauf, dass Sie nicht den
gesamten Korb bedecken. Die Luft muss immer gut durch das Gerät, durch den
Korb und die Zutaten strömen können. Es müssen sich auch immer genügend
Zutaten auf dem Backpapier oder auf der Aluminiumfolie benden, sodass das
Papier oder die Folie sicher im Korb gehalten werden. Andernfalls können sie
durch den starken Luftstrom zum Heizelement gesogen werden und Feuer fangen.
Sorgen Sie dafür, dass das Backpapier oder die Aluminiumfolie immer etwas
größer ist als das Lebensmittel selbst. Achten Sie jedoch darauf, dass es nicht über
den Korb hinausragt.
• Backofensnacks führen immer zu den besten, knusprigsten Ergebnissen.
Doch auch Tiefkühlsnacks für die normale Fritteuse können in dieser Fritteuse
zubereitet werden.
FRITTIERZEITEN UND -TEMPERATUREN
Die Tabelle unten enthält eine Reihe von Anweisungen für die Zubereitung
verschiedener Gerichte. Achtung: Es handelt sich nur um Anweisungen. Die Zeiten
sind immer auch von der Menge und der Stärke der Lebensmittel abhängig. Beachten
Sie auch stets die oben genannten Frittiertipps.
Pommes frites, frisch zunächst 18 Min. 140°C
dann 12 Min. 180°C
Pommes frites, Tiefkühlware 12-20 Min. 200°C
Kartoffelecken (Viertel) 18-22 Min. 180°C
Kroketten 15 Min. 185°C
39
Page 40

DO469FR
Käsekroketten, Tiefkühlware 12 Min. 180°C
Hühnchen-Nuggets, Fischstäbchen und
6-10 Min. 200°C
andere Snacks
Hühnerlet 15 Min. 200°C
Hühnerschnitzel, Tiefkühlware 12 Min. 180°C
Steak 8-12 Min. 180°C
Fisch 10-15 Min. 180°C
Champignons 3-4 Min. 180°C
Frühlingsrollen 8-13 Min. 200°C
Geügel-Drumsticks 15-20 Min. 180°C
Hackbällchen 6 Min. 180°C
Hamburger 6-10 Min. 180°C
Satay 10 Min. 190°C
Scampi 6 Min. 180°C
Ei, hart gekocht 12 Min. 160°C
Ei, weich gekocht 6-7 Min. 160°C
Gemüse 15 Min. 200°C
Gemüse-Pommes frites - harte Gemüse 10-13 Min. 200°C
Gemüse-Pommes frites - weiche Gemüse 7 Min. 200°C
Äpfel 7 Min. 180°C
Banane 7 Min. 200°C
Blätterteighäppchen 10 Min. 180°C
Brötchen zum Aufbacken 7 Min. 200°C
Kuchen 20 Min. 165°C
Mufns 15-20 Min. 160°C
REINIGUNG UND PFLEGE
• Reinigen Sie das Gerät nach jedem Gebrauch.
• Keine scheuernden Reinigungsmittel oder Reinigungsmittel aus Metall
verwenden. Diese können das Gerät beschädigen.
• Achten Sie darauf, dass der Timer auf 0 steht und ziehen Sie den Stecker aus der
Steckdose.
• Lassen Sie das Gerät mindestens 30 Minuten abkühlen, bevor es an einen anderen
Ort gestellt oder gereinigt wird.
• Reinigen Sie das Gehäuse des Geräts mit einem feuchten Tuch.
• Reinigen Sie die Frittierpfanne und den Frittierkorb mit warmem Wasser mit
40
Page 41

www.domo-elektro.be
DO469FR
etwas Spülmittel und einem nicht scheuernden Schwamm. Diese Teile können
auch in der Spülmaschine gereinigt werden.
• Reinigen Sie das Gerät im Inneren mit warmem Wasser und einem weichen
Schwamm.
• Reinigen Sie das Heizelement zur Entfernung von Lebensmittelresten mit einer
Bürste.
• Trocknen Sie alles gründlich ab.
41
Page 42

DO469FR
SAFETY INSTRUCTIONS
This appliance may be used by children from
the age of 16 and up, and also by persons with
a physical or sensorly limitation, as well as
mentally limited persons or persons with a
lack of experience and knowledge. But only on
the condition that these persons have received
the necessary instructions on how to use this
appliance in a safe way and know the dangers
that can occur by using this appliance.
Children cannot be allowed to play with the
appliance.
Maintenance and cleaning of the appliance may
not be done by children, unless they are older
than 16 years old and are under supervision.
Keep the appliance out of reach of children
younger than 16 years old.
This appliance is suitable to be used in
a household environment and in similar
surroundings such as:
• Kitchen for personnel of shops, ofces or
other similar professional surroundings
• Farms
42
Page 43

www.domo-elektro.be
DO469FR
• Hotel or motel rooms and other
surroundings with a residential character
• Guest rooms or similar
Attention: This appliance cannot be used with
an external timer or a separate remote control.
• Read all instructions before use.
• Before use, check if the voltage stated on the
appliance corresponds with the voltage of the
power net at your home.
• Do not let the cord hang on a hot surface or
on the edge of a table or counter top.
• Never use the appliance when the cord or
plug is damaged, after malfunction or when
the appliance itself is damaged. In that case,
take the appliance to the nearest qualied
service center for check-up and repair.
• Close supervision is necessary when the
appliance is used near or by children.
• The use of accessories that are not
recommended or sold by the manufacturer
can cause re, electrical shock or injuries.
• Unplug the appliance when it is not in use,
before assembling or disassembling any parts
43
Page 44

DO469FR
and before cleaning the appliance. Put all
buttons and knobs into the ‘off’ position and
unplug the appliance by grasping the plug.
Never unplug by pulling the cord.
• Do not leave a working appliance unattended.
• Never place this appliance near a gas stove
or electrical stove or in a place where it may
come into contact with a warm appliance.
• Do not use the appliance outdoors.
• Only use the appliance for its intended use.
• Always use the appliance on a steady, dry
and level surface.
• Only use the appliance for domestic use. The
manufacturer can not be held responsible for
accidents that result from improper use of the
appliance or not following the instructions
described in this manual.
• All repairs should be carried out by the
manufacturer or its aftersales service.
• Never immerse the appliance, the cord or the
plug in water or any other liquid.
• Make sure that children do not touch the cord
or appliance.
• Keep the cord away from sharp edges and
44
Page 45

www.domo-elektro.be
DO469FR
hot parts or other heat sources.
• Before use, remove all packaging materials
and any promotional stickers.
The appliance can become hot during
use. Keep the power cord away
from hot parts and don’t cover the
appliance.
• Connect the appliance to an earthed socket.
• Make sure that it is not possible for any
liquid to enter the appliance.
• Make sure that all ingredients stay in the
basket, so that they do not come into contact
with the heating elements.
• Do not cover the air inlet or outlet when the
appliance is switched on.
• Never ll the frying pan with oil.
• Do not touch the inside of the appliance
when it is in use.
• Do not place the appliance against a wall or
other appliances. Always leave a free space
of at least 10 cm around the appliance.
• Do not place anything on top of the
appliance.
45
Page 46

DO469FR
• When the appliance is operating, hot steam
may escape from the air inlet and/or outlet.
Keep your hands and face at a safe distance.
Also be careful when taking the frying pan
out of the fryer. Hot steam or air may escape.
• When you see dark smoke coming from the
appliance, immediately pull the plug out of
the socket. Wait until the smoke development
has stopped before removint the frying pan
from the fryer.
• Place the appliance on a at, stable and heat-
resistant surface.
• Let the appliance cool down for at least 30
minutes before moving or cleaning it.
PARTS
1. Frying basket
2. Frying pan
3. Handle
4. Unlock button for basket
5. Temperature indicator light
6. Power indicator light
7. Timer/on-off knob
8. Temperature disc
9. Air inlet
10. Air outlet
8
7
6
1
46
9
5
9
2
4
3
Page 47

www.domo-elektro.be
DO469FR
BEFORE THE FIRST USE
• Remove all packaging materials and any promotional stickers.
• Clean the frying pan and basket with warm water, some washing-up liquid and a
non-abrasive sponge. These parts can also be cleaned in the dishwasher.
• Wipe the inside and outside of the fryer clean with a soft cloth.
• Caution: you may not add any frying oil or fat in the frying pan.
USE
1. Place the appliance on a at, stable and heat-resistant surface. Make sure that
there is at least 10 cm of free space around the appliance.
2. Make sure that the frying basket is placed inside the frying pan. The basket should
click into place. Do not put any oil or fat into the frying pan.
3. Slide the frying pan with the empty basket inside the fryer.
Caution: Never use the frying pan without the basket inside.
4. Make sure that the timer knob is set to 0. Put the plug into the socket.
5. Turn the temperature disc to set the desired temperature.
6. Switch on the appliance by turning the timer knob clockwise. Turn the knob
up to the maximum and then turn it back to the desired time - denitely over 3
minutes to preheat. The power indicator light will light up and the appliance will
start preheating. Wait until the temperature light goes on to indicate that the set
temperature has been reached.
7. Pull the frying pan out of the appliance. The fryer will automatically stop
working. Fill the basket with the ingredients. Make sure that they don’t exceed the
MAX maximum indication. Place the frying pan with the lled basket back into
the fryer. The fryer will automatically start working again (if the set time had not
been passed yet).
8. Set the desired time with the timer knob.
Caution:
You can already ll the basket in the beginning and place a full basket in
the frying pan inside the fryer to begin with, instead of waiting for the fryer
to preheat. In this case, add 3 minutes to the total, normal frying time of the
ingredients.
9. During frying the temperature indicator light will go on and off regularly. This
indicates that the fryer is making sure that the set temperature is maintained.
10. Excessive oil will be caught in the frying pan.
11. When the set time has passed, a bell sound is heard. The fryer will automatically
switch off. You can also set the timer knob to 0 manually, if the ingredients are
done before the set time has passed. The fryer will then also be switched off.
12. Take the frying pan out of the fryer and place the pan on a heat-resistant surface.
Remove the basket with the ingredients from the pan by pressing the unlock
button above the handle.
47
Page 48

DO469FR
IMPORTANT FRYING TIPS
• It is recommended to shake the fries every 5 to 10 minutes, so that they are
baked evenly. This also applies to other, smaller snacks that cover eachother
when they are inserted in the basket. Caution: make sure that you do not press the
unlock button of the basket while shaking.
• You can add a table spoon of oil for a crunchier result, for instance olive oil,
sunower oil or groundnut oil. Mix this oil well with the raw fries before placing
the fries in the basket. Other ingredients can be sprayed with oil or coated with oil
with a brush. Always make sure that there is no excessive oil added in the basket
or frying pan. Do not use too much oil. Then the fries will become less crisp and
greasy.
• Put fresh, raw fries in water for 30 minutes before frying them, so that the
starch of the potatoes is washed away. Dry them thoroughly afterwards.
• Do not cook very greasy foods in this fryer.
• When you are preparing greasy ingredients, white smoke might come out of the
appliance. However, this does not affect the operation of the appliance or the end
result. Also when the fryer is not properly cleaned, or if any oil is left behind in
the frying pan, white smoke might develop.
• Snacks that can be cooked inside an oven can also be cooked inside this fryer.
• It is best to fry max. 500 g of fries at once, for a crispy result.
• Smaller quantities are fried more evenly than larger quantities.
• Thinner fries will be crispier than thicker fries.
• Place a baking tin or oven tray inside the basket if you want to make a cake or
quiche, or fragile or stuffed ingredients.
• You can also use this fryer to reheat ingredients. Set the fryer to 150°C, for 10 minutes.
• Ingredients that need to be cooked at the same temperature can be placed inside
the basket together and cooked together.
• Frozen products do not need to be thawed beforehand.
• You can use baking paper or aluminum foil or trays in the basket of the fryer,
but do be very careful when you do this. Do not cover the whole bottom of the
basket. The air should be able to circulate well through the appliance, the basket
and the ingredients. Also, there should be enough food on the paper or foil, so
that it stays in place. Otherwise, the strong air ow will cause the paper or foil to
be sucked into the heating elements, which could cause re. Make sure that the
baking paper or aluminum foil is larger than the food itself. However, the paper or
foil should not come out of the basket.
• Oven snacks always give the best, crispiest result. But also frozen snacks
suitable for a regular fryer can be fried in this appliance.
BAKING TIMES AND TEMPERATURES
The table below holds a few guidelines for cooking and frying different ingredients.
Caution: these are merely guidelines. The times also depend on the quantity and
thickness of the food. Also always take into account the above mentioned frying tips.
48
Page 49

www.domo-elektro.be
Fries, fresh rst 18 min. 140°
then 12 min. 180°
Fries, frozen 12-20 min. 200°
Potato wedges 18-22 min. 180°
Croquettes 15 min. 185°
Cheese croquettes, frozen 12 min. 180°
Chicken nuggets, sh sticks
6-10 min. 200°
and other snacks
Chicken llet 15 min. 200°
Chicken schnitzel, frozen 12 min. 180°
Steak 8-12 min. 180°
Fish 10-15 min. 180°
Mushrooms 3-4 min. 180°
Spring rolls 8-13 min. 200°
Drumsticks 15-20 min. 180°
Meatballs 6 min. 180°
Hamburger 6-10 min. 180°
Satay 10 min. 190°
Prawns 6 min. 180°
Egg, boiled hard 12 min. 160°
Egg, boiled soft 6-7 min. 160°
Vegetables 15 min. 200°
Vegetable fries - hard 10-13 min. 200°
Vegetable fries - soft 7 min. 200°
Apples 7 min. 180°
Banana 7 min. 200°
Puff pastry snacks 10 min. 180°
Ready to bake bread rolls 7 min. 200°
Cake 20 min. 165°
Mufns 15-20 min. 160°
DO469FR
49
Page 50

DO469FR
CLEANING AND MAINTENANCE
• Clean the appliance after each use.
• Do not use any metal or abrasive cleaning products. These could damage the
appliance.
• Make sure that the timer knob is set to 0 (= off) and unplug the appliance.
• Let the appliance cool down for at least 30 minutes before moving or cleaning it.
• Wipe the outside of the appliance clean with a damp cloth.
• Clean the frying pan and frying basket with warm water, some washing-up liquid
and a non-abrasive sponge. These parts can also be cleaned in the dishwasher.
• Clean the inside of the appliance with warm water and a soft sponge.
• Clean the heating element with a brush to remove any food residues.
• Dry all parts thoroughly.
50
Page 51

www.domo-elektro.be
DO469FR
PRECAUCIONES IMPORTANTES
Este aparato está diseñado para ser utilizado
por niños a partir de 16 años de edad y por
personas con discapacidades físicas, sensoriales
o mentales, o por personas que no dispongan de
suciente experiencia y conocimientos, a no ser
que sean supervisados o instruidos inicialmente
en la utilización segura del aparato y los
posibles peligros.
Los niños deben estar siempre bajo supervisión,
para asegurar que no juegan con el aparato.
El mantenimiento y la limpieza del aparato
no pueden efectuarse por niños, a no ser
que tengan más de 16 años de edad y sean
supervisados. Mantenga el aparato y el cordón
eléctrico fuera del alcance de niños menores de
16 años.
Este aparato está diseñado para ser utilizado en
un entorno doméstico y en entornos similares
como:
• En la cocina para el personal de tiendas,
ocinas y otros entornos profesionales
similares.
51
Page 52

DO469FR
• En las ncas.
• En las habitaciones de hoteles y moteles y
otros entornos con un carácter residencial.
• En los cuartos de huéspedes o similares.
Atención: el aparato no puede ser utilizado con
un temporizador externo o un mando a distancia
separado.
• Lea todas las instrucciones antes del uso.
• Antes de utilizarlo, compruebe si
el voltaje indicado en el aparato
corresponde al voltaje de la electricidad
de su casa.
• No permita que el cable cuelgue sobre
una supercie o el borde de una mesa o
encimera.
• No utilice nunca el aparato si el cable
o el enchufe están dañados, después de
un mal funcionamiento de la unidad
o si están dañados. Lleve el aparato al
distribuidor autorizado más cercano
centro para la inspección y reparación.
• Se requiere supervisión cuando el aparato
es usado por o cerca de niños.
52
Page 53

www.domo-elektro.be
• El uso de accesorios no recomendados o
vendidos por el fabricante puede causar
incendios, descargas eléctricas o lesiones.
• Desenchufe la toma de corriente cuando
no se usa, para montar o desmontar
piezas y antes de limpiarlo. Ponga todos
los botones en posición desconectado
(“off”) y desconecte el enchufe de la
toma de corriente. Nunca tire del cable
para desenchufarlo.
• No deje que el aparato funcione sin
supervisión.
• No encienda nunca el aparato cerca de
DO469FR
una estufa de gas o eléctrica, ni en un
lugar donde pueda entrar en contacto
con un horno eléctrico o con otro aparato
caliente.
• No utilice el aparato en el exterior.
• Utilice el aparato sólo para el n para el
que se ha fabricado.
• Coloque siempre el aparato sobre una
supercie rme, horizontal y seca.
• Utilice el aparato sólo para uso doméstico.
El fabricante no es responsable de los
53
Page 54

DO469FR
accidentes que resulten del uso incorrecto del
aparato, ni del incumplimiento de las normas
establecidas en este manual.
• Todas las reparaciones aparte del
mantenimiento ordinario de la unidad deben
ser efectuadas por el fabricante o por su
servicio post-venta.
• No sumerja nunca el aparato, el cable o el
enchufe en agua o cualquier otro líquido.
• Asegúrese de que los niños no puedan tocar
el cable eléctrico o el aparato.
• Mantenga el cable alejado de bordes alados
y piezas calientes u otras fuentes de calor.
• Antes del primer uso retire todos los
materiales de embalaje y etiquetas de
promoción.
El aparato se puede calentar
durante el uso. Mantenga el cable
alejado de las partes calientes y no
cubra el aparato.
• Conecte el aparato a una toma de corriente
conectada a tierra.
54
Page 55

www.domo-elektro.be
DO469FR
• Asegúrese de que no puede entrar ningún
líquido en el aparato.
• Asegúrese de que todos los ingredientes están
correctamente colocados en la cesta, para
que no entren en contacto con los elementos
calefactores.
• No cubra las aberturas de ventilación cuando
el aparato está en funcionamiento.
• Nunca llene la cubeta con aceite.
• No toque el interior del aparato cuando está
en funcionamiento.
• No coloque el aparato contra una pared
o contra otros aparatos. Deje un espacio
mínimo de 30 cm alrededor del aparato.
• No coloque objetos sobre el aparato.
• Durante el funcionamiento del aparato
sale vapor caliente por las aberturas de
ventilación. Mantenga las manos y la cara a
una distancia segura. También tenga cuidado
con el vapor y el aire calientes cuando retire
el recipiente de la freidora.
• Retire inmediatamente el enchufe de la toma
de corriente cuando salga humo oscuro del
aparato. Espere hasta que ya no salga humo
55
Page 56

DO469FR
antes de retirar la cesta del aparato.
• Coloque el aparato sobre una supercie plana
y estable, resistente al calor.
• Deje que el aparato se enfríe durante al
menos 30 minutos antes de desplazarlo o
limpiarlo.
PIEZAS
1. Cesta
2. Cubeta
3. Asa
4. Botón de liberación de la cesta
5. Luz indicadora de temperatura:
verde
6. Luz indicadora de corriente:
rojo
7. Botón de encendido/apagado
del temporizador
8. Botón de temperatura
9. Aberturas de ventilación
ANTES DEL PRIMER USO
• Retire todos los materiales de embalaje y, en su caso, los adhesivos
promocionales.
• Limpie la cubeta y la cesta con agua caliente y un estropajo no abrasivo con un
poco de jabón. Estas piezas también se pueden lavar en el lavavajillas.
• Frote el interior y el exterior del aparato con un paño suave.
• Atención: tenga en cuenta que no debe haber aceite o grasa en la cubeta.
MODO DE EMPLEO
1. Coloque el aparato sobre una supercie plana, estable y resistente al calor.
Asegúrese de que hay al menos 30 cm de espacio alrededor del aparato.
2. Asegúrese de que la cesta se coloca en la cubeta. Si la cesta hace clic en la cubeta
estará bien colocada. No ponga aceite o grasa en la cubeta.
3. Deslice la cubeta con la cesta vacía en la freidora.
Atención: Nunca utilice la cubeta sin la cesta.
8
7
6
1
56
9
9
5
3
2
4
Page 57

www.domo-elektro.be
DO469FR
4. Introduzca el enchufe en la toma de corriente. Asegúrese de que el botón del
temporizador está en 0.
5. Gire el botón de temperatura para ajustar la temperatura deseada.
6. Encienda el aparato girando hacia la derecha el botón del temporizador. Gire
el botón al máximo y, a continuación, vuelva a girarlo hasta la hora deseada siempre más de 3 minutos para precalentar. La luz indicadora rojo de corriente se
encenderá y el aparato comenzará a precalentarse. Espere hasta que el indicador
de temperatura verde se encienda para indicar que se ha alcanzado la temperatura
deseada.
7. Retire la cubeta del aparato. El aparato dejará de funcionar automáticamente.
Llene la cesta con los ingredientes. No exceda la indicación máxima “MAX”.
Coloque la cubeta con la cesta llena en el aparato. La freidora empezará a
funcionar automáticamente (siempre que el tiempo establecido no haya expirado).
8. Ajuste el tiempo deseado con el botón del temporizador.
Atención:
También puede llenar la cesta al principio y colocar la cesta llena en la cubeta y
en la freidora, en lugar de esperar hasta que el aparato se haya precalentado. En
este caso debe añadir 3 minutos adicionales al tiempo de fritura normal.
9. Durante la fritura, el indicador de temperatura se enciende y apaga
alternativamente. Esto indica que la freidora se ocupa de mantener la temperatura
ajustada.
10. El exceso de aceite se recoge en la cubeta.
11. Cuando haya terminado el tiempo establecido se escuchará un tono de aviso. La
freidora se apagará automáticamente. También puede poner manualmente a 0 el
botón del temporizador cuando todos los ingredientes estén preparados antes del
tiempo establecido. En ese caso, la freidora está apagada.
12. Retire la cubeta del aparato y colóquela sobre una supercie resistente al calor.
Retire la cesta con los ingredientes presionando en el botón de liberación.
CONSEJOS DE COCINA IMPORTANTES
• Se recomienda agitar las patatas fritas cada 5 o 10 minutos para que se cocinen
de manera uniforme. Esto también es aplicable para otros aperitivos, pequeños,
que se amontonan unos encima de otros en la cesta. Atención: asegúrese de no
presionar el botón de liberación de la cesta durante la agitación.
• Puede agregar una cucharada de aceite para obtener un resultado más crujiente,
por ejemplo, de aceite de oliva, aceite de girasol o aceite de cacahuete. Mezcle
bien este aceite con las patatas sin cocinar, antes de introducir las patatas en
la cesta. Para otros ingredientes puede aplicar un poco de aceite con un pincel
o spray. Asegúrese de que el exceso de aceite no llega a la cubeta o a la cesta.
Nunca debe utilizar demasiado aceite. Las patatas fritas quedarían menos
crujientes y más grasientas.
57
Page 58

DO469FR
• Deje las patatas frescas, sin cocinar, sumergidas durante 30 minutos en agua
antes de freírlas, para que se limpie el almidón de las patatas. A continuación,
séquelas.
• No prepare ingredientes excesivamente grasientos en la freidora.
• Al preparar ingredientes grasientos puede salir humo blanco del aparato. Esto no
inuye en el funcionamiento del dispositivo o en el resultado nal. Este humo
blanco también se puede producir cuando el aparato no se limpia adecuadamente
o si ha quedado aceite en la cubeta en una fritura posterior.
• Los aperitivos que se pueden preparar en el horno, también se pueden preparar en
esta freidora.
• Para obtener unas patatas fritas lo más crujientes posible, cocine un máximo de
500 g de patatas por turno.
• Las pequeñas cantidades de ingredientes se pueden cocinar de una manera más
uniforme que en el caso de las grandes cantidades.
• Las patatas fritas nas también ofrecen un resultado más crujiente que las
patatas fritas gruesas.
• Coloque un molde o bandeja para horno en la cesta cuando quiera cocinar un
bizcocho o un quiche, o cuando quiera preparar ingredientes frágiles o rellenos.
• También puede utilizar esta freidora para volver a calentar ingredientes.
Encienda la freidora a 150°C durante 10 minutos.
• Puede poner tranquilamente los ingredientes que se deben freír a la misma
temperatura y durante el mismo tiempo en la cesta y cocinarlos.
• No es necesario descongelar previamente los productos congelados.
• Puede utilizar papel de horno o papel de aluminio, o recipientes, en la cesta de
la freidora, pero tenga mucho cuidado. Preste atención a que no cubre toda la
cesta. El aire siempre debe circular perfectamente por el aparato para poder llegar
a la cesta y a los ingredientes. Además, siempre se debe colocar suciente comida
en el papel de horno o papel de aluminio, de manera que el papel se mantenga en
su lugar. De lo contrario, este podría ser aspirado por el fuerte ujo de aire hacia
el elemento calentador e incendiarse. Asegúrese de que el papel de horno o de
aluminio siempre es algo más grande que los alimentos. También debe asegurarse
de que no se sale de la cesta.
• Los aperitivos que se pueden cocinar en el horno siempre ofrecen el mejor
resultado, más crujiente. Pero también los aperitivos congelados que se preparan
en freidoras convencionales se pueden preparar en esta freidora.
TIEMPOS Y TEMPERATURAS DE PREPARACIÓN
La siguiente tabla contiene una serie de directrices para la preparación de diversos
platos. Atención: estos datos solo se deben tener en cuenta como orientación.
Además, los tiempos siempre dependen de la cantidad y del grosor de la comida.
También debe tener en cuenta los consejos de cocina mencionados anteriormente.
58
Page 59

www.domo-elektro.be
Patatas fritas, frescas primer turno, 18 minutos. 140°
segundo, 12 min. 180°
Patatas fritas, congeladas 12-20 min. 200°
Gajos de patata (gruesas) 18-22 min. 180°
Croquetas 15 min. 185°
Croquetas de queso,
12 min. 180°
congeladas
Nuggets de pollo,
6-10 min. 200°
albóndigas rebozadas,
palitos de pescado y otros
aperitivos
Pechuga de pollo 15 min. 200°
Filetes rebozados de pollo,
12 min. 180°
congelados
Filetes 8-12 min. 180°
Pescado 10-15 min. 180°
Champiñones 3-4 min. 180°
Rollitos de primavera 8-13 min. 200°
Muslos de pollo 15-20 min. 180°
Albóndigas rebozadas 6 min. 180°
Hamburguesa 6-10 min. 180°
Saté 10 min. 190°
Gambas rebozadas 6 min. 180°
Huevo, huevo cocido 12 min. 160°
Huevo, hervido 6-7 min. 160°
Verduras 15 min. 200°
Aperitivos de verdura -
10-13 min. 200°
verduras duras
Aperitivos de verdura -
7 min. 200°
verduras blandas
Manzanas 7 min. 180°
Plátano 7 min. 200°
Aperitivos de hojaldre 10 min. 180°
Panecillos 7 min. 200°
Bizcocho 20 min. 165°
Magdalenas 15-20 min. 160°
DO469FR
59
Page 60

DO469FR
LIMPIEZA Y MANTENIMIENTO
• El aparato se debe limpiar después de cada uso.
• No se deben usar productos de limpieza de metal o abrasivos. Estos podrían dañar
el aparato.
• Asegúrese de que el botón del temporizador está en 0 (apagado) y retire el
enchufe de la toma de corriente.
• Deje que el aparato se enfríe durante al menos 30 minutos antes de desplazarlo o
limpiarlo.
• Limpie el exterior del aparato con un paño húmedo.
• Limpie la cubeta y la cesta con agua caliente y use un estropajo no abrasivo con
un poco de jabón. Estas piezas también se pueden lavar en el lavavajillas.
• Limpie el interior del aparato con agua tibia y un estropajo suave.
• Limpie el elemento calentador con un cepillo para eliminar los restos de comida.
• Seque bien todos los componentes.
60
Page 61

www.domo-elektro.be
DO469FR
BEZPEČNOSTNÍ POKYNY
Přístroj smí být používán dětmi starších 16 let.
Osoby se sníženou psychickou, motorickou
nebo mentální schopností smí používat přístroj
pouze za neustálého dohledu odpovědné osoby,
která je seznámena s pravidly používání a
případným rizikem. Přístroj a přívodní kabel
držte mimo dosah dětí mladších 16 let. Čištění a
údržba by neměla být prováděna dětmi vůbec.
Přístroj není určen pro používání osobami
se sníženou psychickou, motorickou nebo
mentální schopností. Takto smí být používán
pouze za nepřetržitého dohledu odpovědné
osoby, která má zkušenosti ke správnému
používání.
Přístroj je určen pro používání v domácnostech
a prostředích jako jsou např.:
• kuchyňky v obchodech, kancelářích atd.
• chaty, chalupy
• hotely, penziony a jiné dočasné ubytování
POZOR: tento přístroj nesmí být používán s
žádnou externí součástkou (např. časovač …)
ani jiné dálkové ovládání.
61
Page 62

DO469FR
• Pozorně si přečtěte všechny následující
instrukce a návod uchovejte pro pozdější
potřebu.
• Před použitím zkontrolujte, zda parametry el.
sítě odpovídají požadovaným parametrům na
informativním štítku přístroje.
• Před použitím odstraňte z přístroje veškeré
obalové materiály a reklamní samolepky.
• Obalový materiál není hračka. Děti si s obaly
nesmí hrát, aby nevzniklo riziko poranění.
• Nenechávejte viset kabel přístroje přes ostré
hrany a vyvarujte se toho, aby přišel do styku
s horkými plochami.
• Pokud je přívodní kabel poškozen, musí být
vždy okamžitě opraven v odborném servise
nebo proškolenou osobou.
• Při pohybu dětí okolo přístroje musí být
zajištěno, aby si s přístrojem nehrály
• Používejte pouze originální příslušenství
k tomu určené. V jiném případě zvyšujete
riziko poranění nebo poškození přístroje.
• Pokud přístroj nepoužíváte, nebo se jej
chystáte rozebírat či měnit součásti, tak
ho odpojte od el. napětí. Před rozebírání,
62
Page 63

www.domo-elektro.be
DO469FR
skládáním i před čistěním, vždy nechte
přístroj dostatečně vychladnout. Nikdy
netahejte přímo za kabel, vypojujte za
zástrčku.
• Nikdy nenechávejte spuštěný přístroj bez
dozoru.
• Neumisťujte přístroj v blízkosti el. sporáků či
trub, ani na místech kde je zvýšené teplo.
• Neumisťujte přístroj do blízkosti hořlavých
ani vznětlivých materiálů.
• Nikdy nepoužívejte přístroj venku.
• Nikdy nepoužívejte jinak, než je zamýšleno a
určeno výrobcem.
• Přístroj vždy používejte na stabilním,
rovném a suchém místě, tak aby se zaránilo
převrhnutí.
• Přístroj je určen pouze pro domácí používání.
Výrobce ani prodejce nene žádnou
odpovědnost při jiném používání než je zde
popsáno a doporučeno.
• Pokud je přístroj nebo přívodní kabel
poškozený, nikdy se ho nesnažte opravit sami
doma. Vždy ho svěřte odbornému servisu
DOMO, který jej prohlédne a případně
63
Page 64

DO469FR
opraví.
• Přístroj ani přívodní kabel nikdy neponořujte
pod vodu.
• Děti se nesmí dotýkat el. kabelu ani jej
zapojovat.
Povrch přístroje může být
během používání horký, proto
doporučujeme se ho během
procesu smažení nedotýkat.
• Přístroj zapojujte pouze do uzemněné
zásuvky, která odpovídá místním
standardům.
• Zamezte, aby se do útrob přístroje dostala
voda (ani nadměrná vlhkost).
• Během používání nesmí žádné suroviny
vypadnout ven z fritovacího košíku. Nesmí
se dotýkat topného tělesa. Košík tedy
nepřeplňujte.
• Pokud je fritéza spuštěná, nepřekrývejte
odvětrávací výstup vzduchu.
• Nikdy nenaplňujte fritovací nádobu olejem.
• Nikdy přístroj neumisťujte do blízkosti stěn
64
Page 65

www.domo-elektro.be
DO469FR
nebo jiných spotřebičů. Vždy musíte nechat
alespoň 10cm místo na dostatečnou cirkulaci
vzduchu.
• Na horní část přístroje nikdy nic nestavte.
• Je pravděpodobné, že během používání bude
přístroj horký, proto buďte opatrní a vždy se
držte v dostatečné vzdálenosti, tak abyste se
neopařili. Pozor, přes větrací otvory může
unikat i horká pára.
• Pokud by se z přístroj začal linout tmavý
dým, ihned fritézu vypojte z el. sítě. Poté
počkejte až se přestane z přístroje kouřit, a až
poté opatrně vyndejte fritovací koš/nádobu.
• Nesahejte na přístroj s mokrýma rukama.
• Vždy přívodní kabel kompletně odmotejte,
aby se předešlo přehřívání tohoto kabelu.
• Přívodní kabel nikdy nesmí být pod
přístrojem ani omotán kolem něj.
• Zanedbaná údržba a nečistoty mohou vést ke
zkrácené životnosti přístroje. Při extrémní
nečistotě dokonce hrozí riziko požáru.
• Nemanipulujte s přístrojem, pokud je zapojen
a právě pracuje Vždy nechte přístroj alespoň
30 min vychladnout, až potom přemisťujte.
65
Page 66

DO469FR
NÁVOD SI USCHOVEJTE PRO POZDĚJŠÍ
NAHLÉDNUTÍ
ČÁSTI
1. Fritovací koš
2. Fritovací nádoba
3. Rukojeť
4. Tlačítko pro uvolnění košíku
5. Světelná kontrolka teploty
6. Světelná kontrolka zapnutí
7. Časovač / hlavní spínač
8. Nastavení teploty
9. Vstup vzduchu
10. Výstup vzduchu
8
7
6
1
PŘED PRVNÍM POUŽITÍM
• Před použitím odstraňte z přístroje veškeré obalové materiály a reklamní
samolepky.
• Fritovací nádobu a koš vymyjte teplou vodou, můžete přidat mycí prostředek na
nádobí. Nesmí však být drsný, aby nepoškrábal povrch nádoby. Tyhle dvě části
můžou být umývány i vy myčce na nádobí.
• Vnější i vnitřní prostory přístroje otřete vlhkým hadříkem.
• POZOR: Do nádoby nevkládejte ani nelijte žádný tuk.
POUŽITÍ
1. Přístroj postavte na rovné stabilní místo, které je odolné proti zvýšené teplotě.
Zajistěte, aby po každé straně bylo alespoň 10 cm volného místa pro dostatečnou
cirkulaci vzduchu.
2. Fritovací koš musí být vložen ve fritovací nádobě. Měl by se zacvaknout a pevně
držet ve své poloze. Do fritovací nádoby nevkládejte žádný tuk.
3. Fritovací nádobu i s košíkem zasuňte do těla fritézy.
POZOR: Nikdy nepoužívejte fritovací nádobu bez košíku!!
4. Časovač musí být v poloze „0“. Pokud tomu tak je, přístroj zapojte do el. sítě.
5. Pomocí otočného ovladače si nastavte požadovanou teplotu smažení.
6. Přístroj zapnete nastavením a pootočením časovače po směru hodinových ručiček.
Časovač otočte („natáhněte“) do maximální hodnoty a vracením zpět nastavte
požadovaný čas (nahřívání přístroje zabere cca 3 minuty, můžete je rovnou
připočíst k nastavenému času). Rozsvítí se kontrolka zapnutí a přístroj začne
9
9
5
2
4
3
66
Page 67

www.domo-elektro.be
DO469FR
nahřívat. Počkejte až do chvíle, kdy se zcela nahřeje na požadovanou teplotu a
rozsvítí se kontrolka nahřátí. Rozsvícení kontrolky nahřátí signalizuje dosažení
požadované teploty a vhodný okamžik pro začátek fritování.
7. Vytáhněte nádobu z přístroje (zatím prázdnou). Přístroj se automaticky pozastaví.
Fritovací koš naplňte surovinami. Nikdy nepřesahujte maximální možné
množství. Nádobu s naplněným košem zasuňte zpět do přístroje. Fritéza se opět
automaticky zapne (pokud mezitím neuplynul celý nastavený čas).
8. Překontrolujte a znovu nastavte požadovaný čas na smažení.
POZOR: Košík můžete naplnit již před začátkem a zastrčit ho do přístroje ještě
před začátkem nahřívání. V takovém případě je však potřeba na časovačí nastavit
o 3 minuty více, neboť přibližně takovou dobu zabírá nahřátí.
9. Během procesu fritování bude průběžně zhasínat a rozsvicovat kontrola nahřátí, to
však jen proto, že přístroj udržuje nastavenou teplotu.
10. Přebytečný vypečený tuk / omastek bude zachycen do fritovací nádoby.
11. Po uplynutí nastaveného času se ozve zvukový signál. Fritéza se automaticky
vypne. Pokud jsou suroviny hotové již dříve, můžete fritézu kdykoli vypnout sami
(otočit časovač do polohy 0).
12. Vyjměte fritovací nádobu s košem ven z přístroje a postavte na tepluvzdorný
povrch. Z nádoby vyndejte košík se surovinami – je potřeba zmáčknout tlačítko
pro uvolnění košíku, které je nad rukojetí.
DŮLEŽITÉ RADY PRO SPRÁVNÉ FRITOVÁNÍ
• Doporučujeme každých 5 – 10 min fritované suroviny protřást, jedině takto se vše
osmaží rovnoměrně. To platí i pro veškeré potraviny, které by se mohly v košíku
překrývat. POZOR: buďte opatrní, abyste při protřásání nezmáčkli bezpečnostní
tlačítko pro uvolnění košíku.
• Aby se dosáhlo křupavé a křehké struktury, můžete přidat lžíci oleje. Všechny
suroviny promíchejte s olejem ještě před vložením do fritovacího košíku. Další
přidání oleje se může provést průběžně postříkáním nebo politím přímo v košíku.
Nikdy však nedávejte příliš mnoho oleje. Nikdy nesmí být oleje více než je objem
nádoby.
• Čerstvě nakrájené hranolky nechte cca 30 min ve vodě, aby se z nich omyl škrob.
Před smažením je důkladně osušte.
• V přístroji nesmažte velmi mastné pokrmy. Nepoužívejte moc oleje.
• Pokud připravujete mastné pokrmy, je možné, že se objeví lehký dým. To však
neznamená nic špatného a neovlivní to průběh ani výsledek fritování. Kouřit z
fritézy se může také v případě, pokud v přístroji zůstal starý omastek či nečistoty.
• V tomto přístroji můžete připravovat i pokrmy určené pro přípravu v troubě
• Pro dosáhnutí nejlepšího (křupavého) výsledku doporučujeme připravovat max.
500g surovin najednou.
• Menší množství je fritováno rovnoměrněji než velké množství.
67
Page 68

DO469FR
• Tenčí hranolky budou křupavější než hranolky silnější.
• Pokud chcete upéci koláč, cheesecake nebo quiche, pečící plech či pečící formu
vkládejte do fritovacího košíku.
• Fritézu můžete používat i pro rozehřívání potravin – nastavte teplotu 150 °C a
nechte rozehřávat cca 10 minut.
• Suroviny, které se pečou na stejnou teplotu, je možné do košíku vložit současně a
fritovat je dohromady.
• Zmražené suroviny nechte předem vždy rozmrazit.
• Při přípravě můžete na dno fritovacího koše vložit pečící papír nebo alobal. Ale
pokud se takto rozhodnete, buďte velmi opatrní jak postupovat: Nesmí být
překryto celé dno koše. Je potřeba nechat část dna volného, tak aby byla zaručena
dokonalá cirkulace vzduchu. Pokud jste vložili folii/papír, je nutné aby na ni
byla dostatečná vrstva surovin, aby se folie/papír nezvedla foukajícím horkým
vzduchem. V opačném případě se papír může vznést, přilepit na topné těleso,
vzplanout a tím založit požár. Alobal ani papír nesmí přesahovat přes rozměry
košíku.
• Pokrmy pro přípravu v toubě jsou z této fritézy zpravidla chutnější. Tímto
způsobem je však vhodné připravovat i zmrazené potraviny pro klasické fritézy.
DOPORUČENÉ TEPLOTY A ČAS PEČENÍ
Níže vypsaná tabulka popisuje několik návodů přípravy a fritování hlavních surovin.
POZOR: Tyto hodnoty jsou pouze orientační. Hodně závisí na množství surovin a
jejich tloušťce. Je potřeba vzít v úvahu i způsob přípravy.
Čerstvé hranolky nejdříve 18 min. 140 °C
poté ješte 12 min. 180 °C
Mražené hranolky 12-20 min. 200 °C
Americké brambory 18-22 min. 180 °C
Krokety 15 min. 185 °C
Sýrové krokety (mražené) 12 min. 180 °C
Kuřecí nugetky / lé 6-10 min. 200 °C
Kuřecí stripsy 15 min. 200 °C
Kuřecí řízek (mražený) 12 min. 180 °C
Steak 8-12 min. 180 °C
Ryba 10-15 min. 180 °C
Houby 3-4 min. 180 °C
Jarní závitky 8-13 min. 200 °C
Kuřecí paličky 15-20 min. 180 °C
68
Page 69

www.domo-elektro.be
DO469FR
Masové kuličky 6 min. 180 °C
Hamburgry 6-10 min. 180 °C
Satay 10 min. 190 °C
Krevety 6 min. 180 °C
Vejce natvrdo 12 min. 160 °C
Vejce naměkko 6-7 min. 160 °C
Zelenina 15 min. 200 °C
Zeleninové hranolky
10-13 min. 200 °C
(tvrdé)
Zeleninové hranolky
7 min. 200 °C
(měkké)
Jablka 7 min. 180 °C
Banány 7 min. 200 °C
Listové těsto 10 min. 180 °C
Polotovar – pečivo 7 min. 200 °C
Koláč 20 min. 165 °C
Mufn 15-20 min. 160 °C
ČIŠTĚNÍ A ÚDRŽBA
• Přístroj čistěte po každém použití.
• Nikdy na čištění nepoužívejte kovové ani drsné čistící prostředky, které by mohly
přístroj poškrábat.
• Před čištěním se vždy ujistěte, aby byl časovač v poloze 0 a přístroj vypojen z el.
sítě.
• Před čištěním nechte přístroj vždy dostatečně vychladnout (alespoň 30 min).
• Povrch přístroje otírejte pouze vlhkým jemným hadříkem.
• Fritovací nádobu a koš vymyjte teplou vodou, můžete přidat mycí prostředek na
nádobí. Nesmí však být drsný, aby nepoškrábal povrch nádoby. Tyhle dvě části
můžou být umývány i vy myčce na nádobí.
• Vnitřní prostory přístroje myjte pouze měkkým vlhkým hadříkem / houbičkou.
• Topné těleso je potřeba čistit kartáčkem, tak aby se z něj odstranily všechny
nečistoty.
• Všechny části po umytí ještě pořádně osušte.
69
Page 70

DO469FR
BEZPEČNOSTNÉ POKYNY
Prístroj nesmie byť používaný deťmi starších
ako 16 rokov. Osoby so zníženou psychickou,
motorickú alebo mentálnou schopnosťou smie
používať prístroj iba za neustáleho dohľadu
zodpovednej osoby, ktorá je oboznámená s
pravidlami používania a prípadným rizikom.
Prístroj a prívodný kábel držte mimo dosahu
detí mladších ako 16 rokov. Čistenie a údržba
by nemala byť vykonávaná deťmi vôbec.
Prístroj nie je určený pre používanie osobami
so zníženou psychickou, motorickú alebo
mentálnou schopnosťou. Takto môže sa
používať iba za nepretržitého dohľadu
zodpovednej osoby, ktorá má skúsenosti k
správnemu používaniu.
Prístroj je určený pre používanie v
domácnostiach a prostrediach ako sú napr .:
• kuchynky v obchodoch, kanceláriách atď.
• chaty, chalupy
• hotely, penzióny a iné dočasné ubytovanie
POZOR: tento prístroj nesmie byť používaný
s žiadnu externú súčiastkou (napr. Časovač ...)
ani iné diaľkové ovládanie.
70
Page 71

www.domo-elektro.be
DO469FR
• Pozorne si prečítajte všetky nasledujúce
inštrukcie a návod uschovajte pre neskoršiu
potrebu.
• Pred použitím skontrolujte, či parametre el.
siete odpovedajú požadovaným parametrom
na informatívnym štítku prístroja.
• Pred použitím odstráňte z prístroja všetky
obalové materiály a reklamné samolepky.
• Obalový materiál nie je hračka. Deti sa s
obalmi nesmie hrať, aby nevzniklo riziko
poranenia.
• Nenechávajte visieť kábel prístroja cez ostré
hrany a vyvarujte sa toho, aby prišiel do
styku s horúcimi plochami.
• Pokiaľ je prívodný kábel poškodený, musí
byť vždy okamžite opravený v odbornom
servise alebo preškolenou osobou.
• Pri pohybe detí okolo prístroja musí byť
zabezpečené, aby sa nehrali so zariadením
• Používajte iba originálne príslušenstvo k
tomu určené. V inom prípade zvyšujete riziko
poranenia alebo poškodenia prístroja.
• Pokiaľ prístroj nepoužívate, alebo sa ho
chystáte rozoberať či meniť súčasti, tak ho
71
Page 72

DO469FR
odpojte od el. napätia. Pred rozoberanie,
skladaním aj pred čistením, vždy nechajte
prístroj dostatočne vychladnúť. Nikdy
neťahajte priamo za kábel, vypojujte za
zástrčku.
• Nikdy nenechávajte spustený prístroj bez
dozoru.
• Neumiestňujte prístroj v blízkosti el.
sporákov či rúr, ani na miestach kde je
zvýšené teplo.
• Neumiestňujte prístroj do blízkosti horľavých
ani horľavých materiálov.
• Nikdy nepoužívajte prístroj vonku.
• Nikdy nepoužívajte inak, než je zamýšľané a
určené výrobcom.
• Prístroj vždy používajte na stabilnom,
rovnom a suchom mieste, tak aby sa zaránilo
prevrhnutiu.
• Prístroj je určený len na domáce používanie.
Výrobca ani predajca nene žiadnu
zodpovednosť pri inom používaní ako je tu
popísané a odporúčané.
• Pokiaľ je prístroj alebo prívodný kábel
poškodený, nikdy sa ho nesnažte opraviť
72
Page 73

www.domo-elektro.be
DO469FR
sami doma. Vždy ho zverte odbornému
servisu DOMO, ktorý ho prezrie a prípadne
opraví.
• Prístroj ani prívodný kábel nikdy neponárajte
pod vodu.
• Deti sa nesmú dotýkať el. kábla ani ho
zapájať.
Povrch prístroja môže byť
počas používania horúci, preto
odporúčame sa ho počas procesu
smaženia nedotýkať.
• Prístroj zapájajte iba do uzemnenej zásuvky,
ktorá zodpovedá miestnym štandardom.
• Zamedzte, aby sa do útrob prístroja dostala
voda (ani nadmerná vlhkosť).
• Počas používania nesmie žiadne suroviny
vypadnúť von z fritovacieho košíka. Nesmie
sa dotýkať vykurovacieho telesa. Košík teda
neprepĺňajte.
• Ak je fritéza spustená, neprekrývajte
odvetrávacie výstup vzduchu.
• Nikdy nenapĺňajte fritovací nádobu olejom.
73
Page 74

DO469FR
• Nikdy prístroj neumiestňujte do blízkosti
stien alebo iných spotrebičov. Vždy musíte
nechať aspoň 10cm miesto na dostatočnú
cirkuláciu vzduchu.
• Na hornú časť prístroja nikdy nič nestavajte.
• Je pravdepodobné, že počas používania bude
prístroj horúci, preto buďte opatrní a vždy
sa držte v dostatočnej vzdialenosti, tak aby
ste sa nepopálili. Pozor, cez vetracie otvory
môže unikať aj horúca para.
• Ak by sa z prístroj začal šíriť tmavý dym,
ihneď fritézu vypojte z el. siete. Potom
počkajte až sa prestane z prístroja fajčiť, a až
potom opatrne vyberte fritovací kôš / nádobu.
• Nesiahajte na prístroj s mokrými rukami.
• Vždy prívodný kábel kompletne odmotajte,
aby sa predišlo prehrievaniu tohto kábla.
• Prívodný kábel nikdy nesmie byť pod
prístrojom ani omotaný okolo neho.
• Zanedbaná údržba a nečistoty môžu viesť ku
skrátenej životnosti prístroja. Pri extrémnej
nečistote dokonca hrozí riziko požiaru.
• Nemanipulujte s prístrojom, ak je zapojený
a práve pracuje Vždy nechajte prístroj aspoň
74
Page 75

www.domo-elektro.be
DO469FR
30 min vychladnúť, až potom premiestňujte.
NÁVOD SI USCHOVAJTE PRE NESKORŠIU
NAHLIADNUTIU
ČASTI
1. Fritovací kôš
2. Fritovací nádoba
3. Rukoväť
4. Tlačidlo pre uvoľnenie košíka
5. Svetelná kontrolka teploty
6. Svetelná kontrolka zapnutia
7. Časovač / hlavný spínač
8. Nastavenie teploty
9. Vstup vzduchu
10. Výstup vzduchu
8
7
6
9
9
5
2
4
1
PRED PRVÝM POUŽITÍM
• Pred použitím odstráňte z prístroja všetky obalové materiály a reklamné
samolepky.
• Fritovací nádobu a kôš vymyte teplou vodou, môžete pridať umývací prostriedok
na riad. Nesmie však byť drsný, aby nepoškrabal povrch nádoby. Tieto dve časti
môžu byť umývané aj vy umývačke riadu.
• Vonkajšie i vnútorné priestory prístroja utrite vlhkou handričkou.
• POZOR: Do nádoby nevkladajte ani nelejte žiadny tuk.
POUŽITIE
1. Prístroj postavte na rovné stabilné miesto, ktoré je odolné proti zvýšenej teplote.
Zaistite, aby po každej strane bolo aspoň 10 cm voľného miesta pre dostatočnú
cirkuláciu vzduchu.
2. Fritovací kôš musí byť vložený vo fritovací nádobe. Mal by sa zacvaknúť a pevne
držať vo svojej polohe. Do fritovacie nádoby nevkladajte žiadny tuk.
3. Fritovací nádobu aj s košíkom zasuňte do tela fritézy.
POZOR: Nikdy nepoužívajte fritovacie nádobu bez košíka !!
4. Časovač musí byť v polohe “0”. Ak tomu tak je, prístroj zapojte do el. siete.
5. Pomocou otočného ovládača si nastavte požadovanú teplotu vyprážanie.
75
3
Page 76

DO469FR
6. Prístroj zapnete nastavením a pootočením časovača v smere hodinových ručičiek.
Časovač otočte ( “natiahnite”) do maximálnej hodnoty a vrátením späť nastavte
požadovaný čas (nahrievanie prístroja zaberie cca 3 minúty, môžete ich rovno
pripočítať k nastavenému času). Rozsvieti sa kontrolka zapnutia a prístroj začne
nahrievať. Počkajte až do chvíle, keď sa úplne nahreje na požadovanú teplotu
a rozsvieti sa kontrolka nahriatie. Rozsvietenie kontrolky nahriatie signalizuje
dosiahnutie požadovanej teploty a vhodný okamih pre začiatok fritovanie.
7. Vytiahnite nádobu z prístroja (zatiaľ prázdnu). Prístroj sa automaticky pozastaví.
Fritovací kôš naplňte surovinami. Nikdy Nepresahujte maximálne možné
množstvo. Nádobu s naplneným košom zasuňte späť do prístroja. Fritéza sa opäť
automaticky zapne (ak medzitým neuplynul celý nastavený čas).
8. Skontrolujte a znovu nastavte požadovaný čas na vyprážanie.
POZOR: Košík môžete naplniť už pred začiatkom a zastrčiť ho do prístroja
ešte pred začiatkom nahrievania. V takom prípade je však potrebné na časovač
nastaviť o 3 minúty viac, pretože približne takú dobu zaberá nahriatie.
9. Počas procesu fritovanie bude priebežne zhasínať a rozsvecovať kontrola
nahriatie, to však len preto, že prístroj udržuje nastavenú teplotu.
10. Prebytočný vypečený tuk / omastok bude zachytený do fritovacej nádoby.
11. Po uplynutí nastaveného času sa ozve zvukový signál. Fritéza sa automaticky
vypne. Ak sú suroviny hotové už skôr, môžete fritézu kedykoľvek vypnúť sami
(otočiť časovač do polohy 0).
12. Vyberte fritovací nádobu s košom von z prístroja a postavte na Tepluvzdorné
povrch. Z nádoby vyberte košík so surovinami - je potreba stlačiť tlačidlo pre
uvoľnenie košíka, ktoré je nad rukoväťou.
DÔLEŽITÉ RADY PRE SPRÁVNE FRITOVANIE
• Odporúčame každých 5 - 10 min fritované suroviny protřást, jedine takto sa
všetko osmažia rovnomerne. To platí aj pre všetky potraviny, ktoré by sa mohli
v košíku prekrývať. POZOR: buďte opatrní, aby ste pri protřásání nestlačili
bezpečnostné tlačidlo pre uvoľnenie košíka.
• Aby sa dosiahlo chrumkavé a krehké štruktúry, môžete pridať lyžicu oleja. Všetky
suroviny premiešajte s olejom ešte pred vložením do fritovacieho košíka. Ďalšie
pridanie oleja sa môže vykonať priebežne postriekaním alebo poliatím priamo v
košíku. Nikdy však nedávajte príliš veľa oleja. Nikdy nesmie byť oleja viac než je
objem nádoby.
• Čerstvo nakrájané hranolky nechajte cca 30 min vo vode, aby sa z nich omyl
škrob. Pred vyprážaním ich dôkladne osušte.
• V prístroji nevyprážajte veľmi mastné pokrmy. Nepoužívajte moc oleja.
• Ak pripravujete mastné pokrmy, je možné, že sa objaví ľahký dym. To však
neznamená nič zlé a neovplyvní to priebeh ani výsledok fritovanie. Fajčiť z
fritézy sa môže tiež v prípade, ak v prístroji zostal starý omastok či nečistoty.
76
Page 77

www.domo-elektro.be
DO469FR
• V tomto prístroji môžete pripravovať aj pokrmy určené na prípravu v rúre
• Pre dosiahnutie najlepšieho (chrumkavého) výsledku odporúčame pripravovať
max. 500g surovín naraz.
• Menšie množstvo je fritovanie rovnomernejšie než veľké množstvo.
• Tenšie hranolčeky budú chrumkavejšiu než hranolky silnejšie.
• Pokiaľ chcete upiecť koláč, cheesecake alebo Quiche, plech na pečenie či pečenie
formu vkladajte do fritovacieho košíka.
• Fritézu môžete používať aj pre rozohrievanie potravín - nastavte teplotu 150 ° C a
nechajte rozohráva cca 10 minút.
• Suroviny, ktoré sa pečú na rovnakú teplotu, je možné do košíka vložiť súčasne a
fritovať ich dohromady.
• Zmrazené suroviny nechajte vopred vždy rozmraziť.
• Pri príprave môžete na dno fritovacieho koša vložiť papier na pečenie alebo
alobal. Ale ak sa takto rozhodnete, buďte veľmi opatrní ako postupovať:
Nesmie byť prekryté celé dno koša. Je potrebné nechať časť dna voľného, tak
aby bola zaručená dokonalá cirkulácia vzduchu. Ak ste vložili fóliu / papier, je
nutné aby na ňu bola dostatočná vrstva surovín, aby sa fólia / papier nezdvihla
fúkajúcim horúcim vzduchom. V opačnom prípade sa papier môže vzniesť,
prilepiť na vykurovacie teleso, vzplanúť a tým založiť požiar. Alobal ani papier
nesmie presahovať cez rozmery košíka.
• Pokrmy na prípravu v Toub sú z tejto fritézy spravidla chutnejšie. Týmto
spôsobom je však vhodné pripravovať aj mrazené potraviny pre klasické fritézy.
ODPORÚČANÉ TEPLOTY A ČAS PEČENIA
Nižšie vypísaná tabuľka popisuje niekoľko návodov prípravy a fritovanie hlavných
surovín. POZOR: Tieto hodnoty sú orientačné. Veľa závisí od množstva surovín a
ich hrúbke. Je potrebné vziať do úvahy aj spôsob prípravy.
Čerstvé hranolčeky najskôr 18 min. 160 °C
potom ešte 12 min. 180 °C
Mrazené hranolčeky 12-20 min. 200 °C
Americké zemiaky 18-22 min. 180 °C
Krokety 15 min. 185 °C
Sýrové krokety (mrazené) 12 min. 180 °C
Kuracie nugetky / lé 6-10 min. 200 °C
Kuracie kúsky (strips) 15 min. 200 °C
Kuracie rezeň (mrazený) 12 min. 180 °C
Steak 8-12 min. 180 °C
Ryba 10-15 min. 180 °C
77
Page 78

DO469FR
Huby 3-4 min. 180 °C
Jarné závitky 8-13 min. 200 °C
Kuracie paličky 15-20 min. 180 °C
Mäsové guločky 6 min. 180 °C
Hamburgry 6-10 min. 180 °C
Satay 10 min. 190 °C
Krevety 6 min. 180 °C
Vajcia natvrdo 12 min. 160 °C
Vajcia namäkko 6-7 min. 160 °C
Zelenina 15 min. 200 °C
Zeleninové hranolčeky
10-13 min. 200 °C
(tvrdé)
Zeleninové hranolčeky
7 min. 200 °C
(mäkké)
Jablká 7 min. 180 °C
Banány 7 min. 200 °C
Lístkové cesto 10 min. 180 °C
Polotovar – pečivo 7 min. 200 °C
Koláč 20 min. 165 °C
Mufn 15-20 min. 160 °C
ČISTENIE A ÚDRŽBA
• Prístroj čistite po každom použití.
• Nikdy na čistenie nepoužívajte kovové ani drsné čistiace prostriedky, ktoré by
mohli prístroj poškrabať.
• Pred čistením sa vždy uistite, aby bol časovač v polohe 0 a prístroj vypojený z el.
siete.
• Pred čistením nechajte prístroj vždy dostatočne vychladnúť (aspoň 30 min).
• Povrch prístroja utierajte iba vlhkou jemnou handričkou.
• Fritovací nádobu a kôš vymyte teplou vodou, môžete pridať umývací prostriedok
na riad. Nesmie však byť drsný, aby nepoškrabal povrch nádoby. Tieto dve časti
môžu byť umývané aj vy umývačke riadu.
• Vnútorné priestory prístroje umývajte iba mäkkou vlhkou handričkou / hubkou.
• Vykurovacie teleso je potrebné čistiť kefkou, tak aby sa z neho odstránili všetky
nečistoty. Všetky časti po umytí ešte poriadne osušte.
78
Page 79

www.domo-elektro.be
DO469FR
79
Page 80

Webshop
BESTEL
de originele
Domo-accessoires
en -onderdelen
online via:
COMMANDEZ
d’authentiques
accessoires et
pièces Domo en
ligne sur:
BESTELLEN SIE
Original-Zubehör
die Domo
und -Ersatzteile
online über:
ORDER
the original
Domo
accessories and
parts online at:
webshop.domo-elektro.be
of scan hier:
ou scannez ici:
oder hier scannen:
or scan here:
LINEA 2000 - Dompel 9 - 2200 Herentals - Belgium - Tel: +32 14 21 71 91 - Fax: +32 14 21 54 63
 Loading...