

Page 1
_Origo_1500_3000_6000.book Seite 1 Freitag, 12. Dezember 2008 3:14 15
Alcohol stoves
EN
Operating manual . . . . . . . . . . . . . . . 8
Spirituskocher
DE
Bedienungsanleitung . . . . . . . . . . . . 24
Cuisinières à alcool
FR
Notice d’utilisation . . . . . . . . . . . . . . 41
Hornillos de alcohol
ES
Instrucciones de uso . . . . . . . . . . . . 58
Spirituskooktoestellen
NL
Gebruiksaanwijzing . . . . . . . . . . . . . 76
Fornelli ad alcool
IT
Istruzioni per I’uso . . . . . . . . . . . . . . 92
Spriikeitin
FI
Käyttöohje . . . . . . . . . . . . . . . . . . . 108
Spritkök
SV
Bruksanvisning . . . . . . . . . . . . . . . 124
0
ORIGO
1
2
3
4
3000
0
1
2
3
4
0
O
1
RI
2
GO
3
4
3000
0
1
2
3
C
C
C
C
0
1
2
3
4
4
0
1
2
3
4
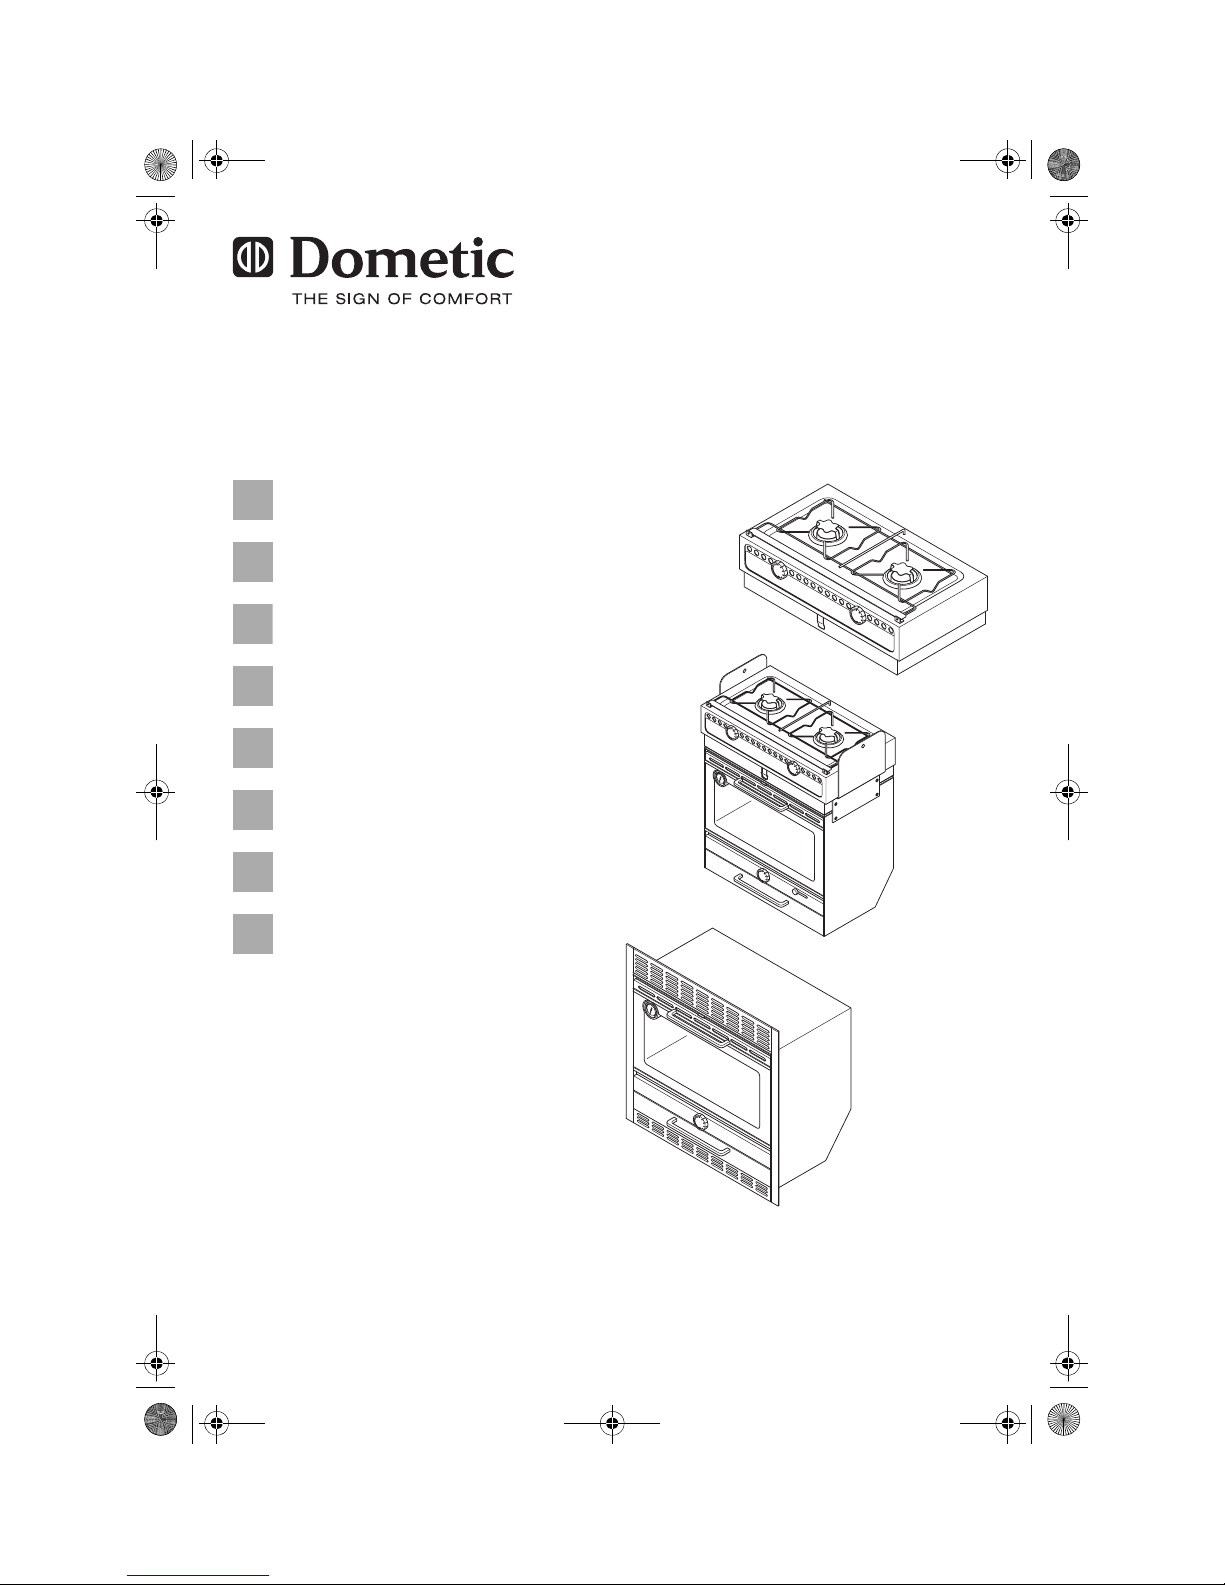
ORIGO 1500, 3000
ORIGO 6000, 6100, 6200
Page 2
_Origo_1500_3000_6000.book Seite 2 Freitag, 12. Dezember 2008 3:14 15
1
0
ORIGO
1
2
3
4
3000
2
Dometic ORIGO
0
ORIGO
1
2
3
4
3000
0
1
2
0
1
2
3
4
3
4
2
1
2
Page 3
_Origo_1500_3000_6000.book Seite 3 Freitag, 12. Dezember 2008 3:14 15
Dometic ORIGO
3
6
0
O
1
R
IGO
2
3
4
3
0
0
0
0
1
2
3
C
5
C
4
1
6000
4
0
1
2
3
4
2
4
3
6100
C
C
2
0
1
2
3
4
1
3
Page 4
_Origo_1500_3000_6000.book Seite 4 Freitag, 12. Dezember 2008 3:14 15
5
Dometic ORIGO
6
ORIGO
5
6
4
1
0
1
2
3
4
3
000
0
1
2
3
4
2
3
6
5
1
0
O
1
R
IG
2
3
O
4
3
0
0
0
0
1
2
3
C
C
4
4
3
2
0
1
2
3
4
4
Page 5

_Origo_1500_3000_6000.book Seite 5 Freitag, 12. Dezember 2008 3:14 15
Dometic ORIGO
7
0
1
2
3
4
8
9
1.
2.
0
1
2
3
4
5
Page 6
0
1
2
3
4
C
C
0
1
2
3
4
_Origo_1500_3000_6000.book Seite 6 Freitag, 12. Dezember 2008 3:14 15
Dometic ORIGO
0
a
6000,
6100,
6200
1
2
0
ORIGO
1
2
3
4
3000
b
6000,
6100,
2.
6
1.
6200
Page 7
_Origo_1500_3000_6000.book Seite 7 Freitag, 12. Dezember 2008 3:14 15
Dometic ORIGO
c
2.
1.
7
Page 8

_Origo_1500_3000_6000.book Seite 8 Freitag, 12. Dezember 2008 3:14 15
Dometic ORIGO
Please read this manual carefully before installing and starting up the
device, and store it in a safe place. If the device is passed on to another
person, this manual must also be handed over with it.
Table of contents
1 Notes on using the manual . . . . . . . . . . . . . . . . . . . . . . . . . . . . . . . . 9
2 General safety instructions . . . . . . . . . . . . . . . . . . . . . . . . . . . . . . . . 9
3 Scope of delivery . . . . . . . . . . . . . . . . . . . . . . . . . . . . . . . . . . . . . . . 11
4 Accessories . . . . . . . . . . . . . . . . . . . . . . . . . . . . . . . . . . . . . . . . . . . 12
5 Intended use . . . . . . . . . . . . . . . . . . . . . . . . . . . . . . . . . . . . . . . . . . 12
6 Technical description . . . . . . . . . . . . . . . . . . . . . . . . . . . . . . . . . . . . 12
7 Mounting the stove. . . . . . . . . . . . . . . . . . . . . . . . . . . . . . . . . . . . . . 14
8 Using the stove . . . . . . . . . . . . . . . . . . . . . . . . . . . . . . . . . . . . . . . . 17
9 Cleaning and maintaining the stove. . . . . . . . . . . . . . . . . . . . . . . . . 21
10 Guarantee . . . . . . . . . . . . . . . . . . . . . . . . . . . . . . . . . . . . . . . . . . . . 22
11 Disposal . . . . . . . . . . . . . . . . . . . . . . . . . . . . . . . . . . . . . . . . . . . . . . 22
12 Technical data . . . . . . . . . . . . . . . . . . . . . . . . . . . . . . . . . . . . . . . . . 22
8
Page 9

_Origo_1500_3000_6000.book Seite 9 Freitag, 12. Dezember 2008 3:14 15
Dometic ORIGO Notes on using the manual
1 Notes on using the manual
Warning!
Safety instruction: failure to observe this instruction can cause
d
a
material damage or personal injury.
Caution!
Safety instruction: Failure to observe this instruction can cause
material damage and impair the function of the device.
Note
Supplementary information for operating the device.
I
➤ Action: This symbol indicates that action is required on your part. The
required action is described step-by-step.
✓ This symbol describes the result of an action.
fig. 1 5, page 3: This refers to an element in an illustration. In this case,
item 5 in figure 1 on page 3.
Please observe the following safety instructions.
2 General safety instructions
The manufacturer will not be held liable for claims for damage resulting from
the following:
z Faulty assembly or connection
z Damage to the appliance resulting from mechanical influences and
excess voltage
z Alterations to the device without express permission from the manu-
facturer
z Use for purposes other than those described in the operating manual
9
Page 10

_Origo_1500_3000_6000.book Seite 10 Freitag, 12. Dezember 2008 3:14 15
General safety instructions Dometic ORIGO
2.1 General safety
z Use denatured alcohol only. Do not use other fuels such as
gasoline, diesel, methanol, propane or charcoal lighter.
d
z Danger of asphyxiation!
Before starting the device, ensure that the area is sufficiently
ventilated.
z Place a class A fire extinguisher (for alcohol fires) in reaching
distance.
Ensure the fire extinguisher is regularly checked by qualified
personnel.
z Persons whose physical, sensory or mental capacities prevent
them from using this device safely should not operate it without
the supervision of a responsible adult.
z Use the stove only as intended.
a
2.2 Safety precautions when handling denatured
alcohol
z Keep inflammable substances apart from heating and cooking
devices and other light and heat sources.
d
a
10
z Store alcohol in suitable containers only and in sufficient
distance from the stove.
z Eliminate all sources of sparks or flames where the alcohol is
stored or filled-in.
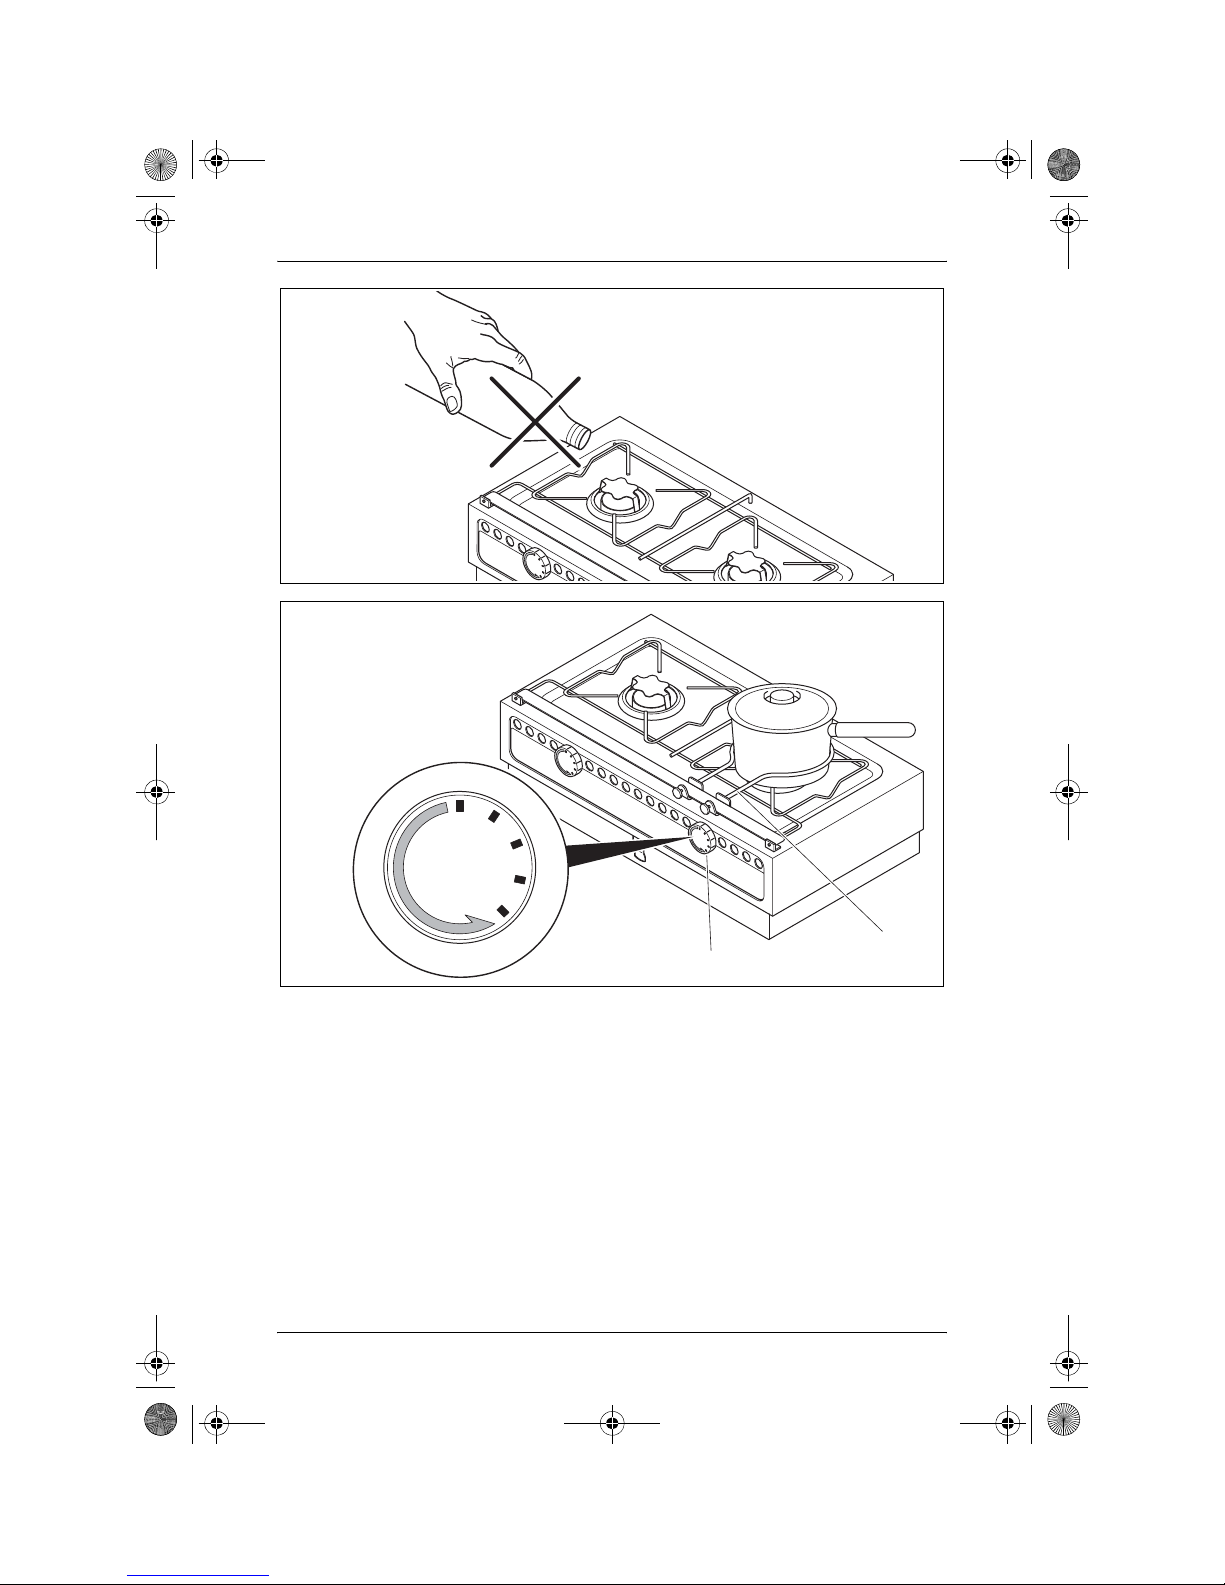
z Never fill the canisters while still in the stove. Never pour fuel
through the burner openings in top of the stove (fig. 1, page 2).
z Overfilling, spilt alcohol and hot objects can cause severe
burns.
z Denatured alcohol burns with almost invisible flame, so great
damage can arise before you notice the danger.
z Mop up any spilt alcohol immediately to prevent uncontrollable
burning.
z Do not smoke when handling alcohol or when operating the
stove.
Page 11

_Origo_1500_3000_6000.book Seite 11 Freitag, 12. Dezember 2008 3:14 15
Dometic ORIGO Scope of delivery
z Fill the canister to the maximum capacity only. Alcohol expands
in the canister when heated. Overfilled alcohol can cause uncontrollable burning inside the stove.
2.3 Operating the device safely
z Use long matches or long lighters to light the burner.
Quickly remove your hand as soon as the burner ignites.
d
a
z Wear proper clothing when operating the stove.
Do not wear hanging garments which can catch fire.
z Let the stove cool down to ambient temperature before you
touch it with bare hands.
z Keep the area surrounding the stove and interior parts free of
grease, fat, alcoholic substances, plastic or inflammable cloths
(for instance curtains, towels, kitchen utensils).
z Use only pots and pans with a maximum diameter of 23 cm.
z When cooking ensure that pans and pots are securely in posi-
tion. Recommended is the use of pot holders (fig. 2 2, page 2,
accessory).
z Be careful when heating grease or oil. Grease and oil catch fire
when exposed to great heat.
z Use only dry pot cloths to prevent the formation of steam. Do not
use towels or the like instead of pot cloths as these can catch
fire.
z Never leave the stove unattended when cooking. Pots boiling
over can cause smoke and fires.
z Move the burner control (fig. 2 1, page 2) to the off position
before removing the pot.
z Do not use the stove to heat the environment.
3 Scope of delivery
z Stove
z Gasket per canister
z 6000, 6200 only: Gimbals
11
Page 12

_Origo_1500_3000_6000.book Seite 12 Freitag, 12. Dezember 2008 3:14 15
Accessories Dometic ORIGO
4 Accessories
Description Item no.
1500 3000 6000 6100 6200
Gimbals 958148201 – – –
Pot Holder 958148001 958148001 – 958148001
Cutting Board 388015415 388004630 388004630 – 388004630
5 Intended use
The Dometic ORIGO stoves are designed for use in vehicles or boats.
6 Technical description
6.1 Function
Stoves and ovens are made of stainless steel and use the absorption
principle. The canister has a capacity of 1.2 l. Denatured alcohol is used as
fuel.
Alcohol is absorbed into a non-flammable material in the canister. They are
not equipped with fuel valve or fuel lines, which can develop leaks, or with
other such components requiring regular service.
6.2 Specifications for the device variants
Various stove versions are available.
z 1500: single-burner unit
z 3000: double-burner unit
z 6000: double-burner unit with additional oven
z 6100: oven without cooktop for build-in mounting
z 6200: oven without cooktop, can be combined with 3000
To define your device see the item number on the type plate.
12
Page 13

_Origo_1500_3000_6000.book Seite 13 Freitag, 12. Dezember 2008 3:14 15
Dometic ORIGO Technical description
6.3 Operating elements
Operating elements for operation with denatured alcohol (fig. 2,
page 2):
No. Description
1 Control knob
– “0”: burner closed
– “4”: burner open
2 Pot holder (accessory)
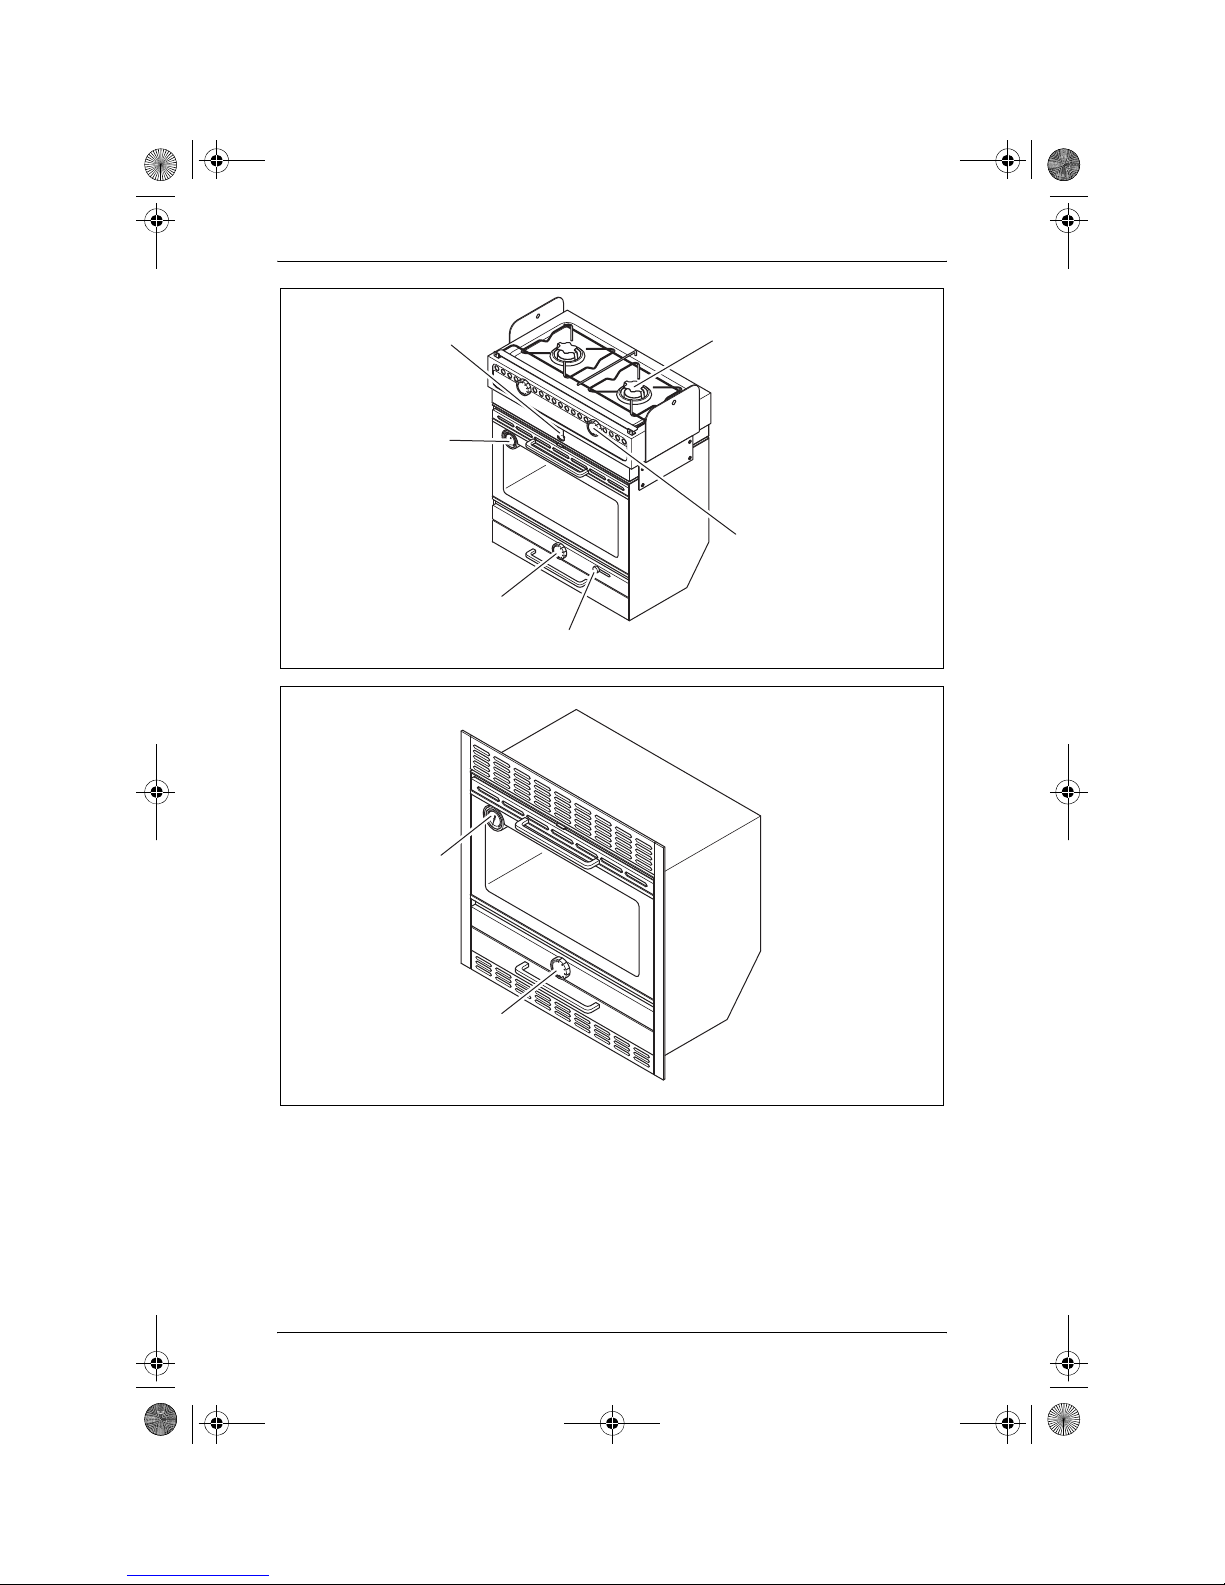
Operating elements of Origo 6000 and 6200 (fig. 3, page 3):
No. Description
1 Burner opening of stove
2 Knob for regulating the stove
3 Swing locking device
4 Oven knob for regulating the oven
– “0”: burner closed
– “4”: burner open
5 Oven thermometer
6 Catch of stove top
Operating elements of Origo 6100 (fig. 4, page 3):
No. Description
1 Oven knob for regulating the oven
– “0”: burner closed
– “4”: burner open
2 Oven thermometer
13
Page 14

_Origo_1500_3000_6000.book Seite 14 Freitag, 12. Dezember 2008 3:14 15
Mounting the stove Dometic ORIGO
7 Mounting the stove
You can fit the stove (1500/3000) into the countertop of your kitchen. Place
Origo 6000 – 6200 into your kitchen.
7.1 Selecting the installation location
When selecting the installation location, observe the following instructions:
z Select a well-ventilated location for the device.
z Avoid draft at the installation location.
If you fit the stove in an open cockpit or other open areas mount an
additional wind protection.
z Do not operate the device in spaces where danger of explosion is
present.
z Leave a clearance of at least 50 mm to the side walls and 750 mm to
uninsulated surface above the stove.
z If gimbals are used (accessory for 1500 and 3000), ensure that the stove
can swing freely.
z 6000, 6200: Leave at least 100 mm to the back wall and 750 mm to
uninsulated surface above the oven.
z 6000, 6200: Ensure you have ample room to swing the gimballed range.
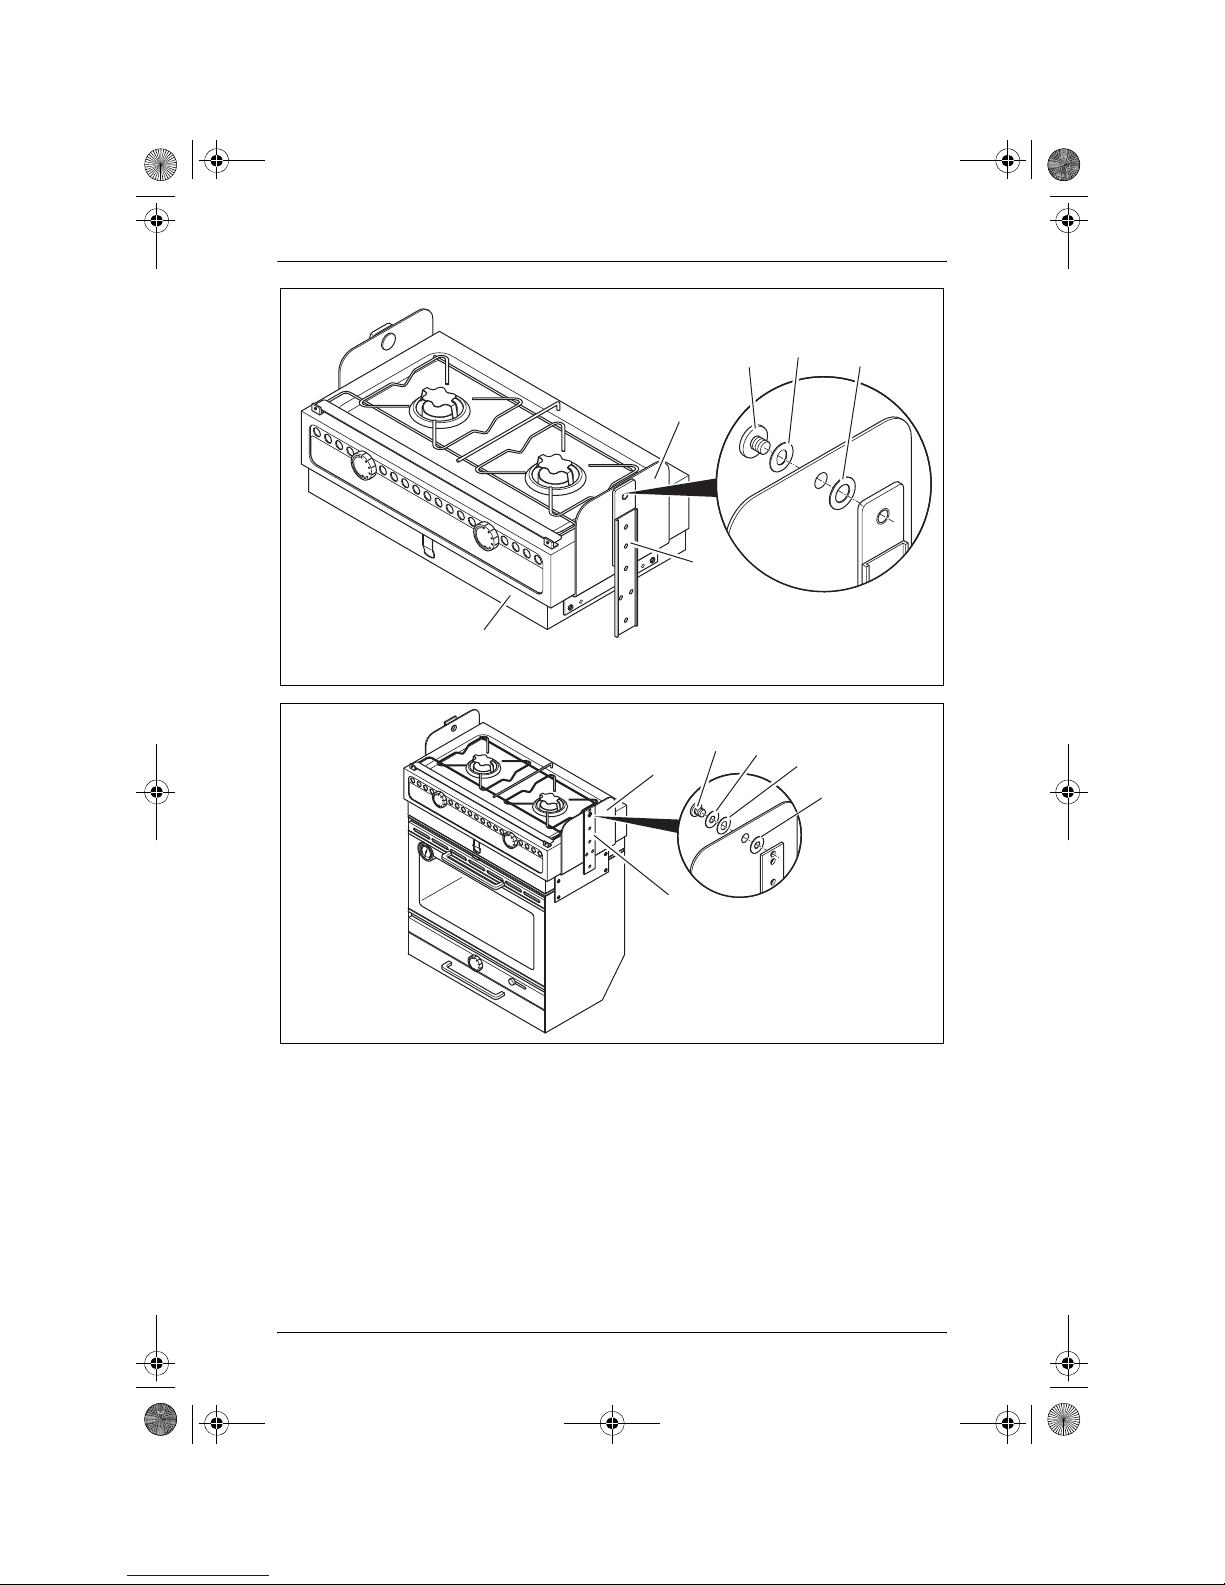
7.2 Installing the stove (fig. 5, page 4)
Caution – Danger of damaging the device!
Before drilling any holes, make sure that no electrical cables or
a
If you don’t use gimbals, mount the stove as follows:
➤ Drill through the markings in the stove bottom.
➤ Fasten the stove through the holes in place.
other parts of the vehicle can be damaged by drilling, sawing and
filing.
14
Page 15

_Origo_1500_3000_6000.book Seite 15 Freitag, 12. Dezember 2008 3:14 15
Dometic ORIGO Mounting the stove
The manufacturer recommends the use of gimbals to mount ORIGO 1500 or
3000 (accessory). Mount the gimbals as follows:
➤ Fasten the gimbal sideplates (1) to the lower body of the stove (3) using
the enclosed nuts and bolts.
Note
The gimbal arms (2) can be turned to enable the stove (3) to be
I
➤ Before mounting the gimbal arms (2), make a test by attaching them to
➤ Place the fibre washers (4) with round holes on the gimbal arms (2).
lowered forwards or backwards.
the gimbal sideplates (1) in order to determine which alternative is right
for your boat.
Remember, when the gimbals are in down position, the stovetop must be
raised to full upright position in order to remove the fuel canisters for filling.
Ensure the installation is done according to fig. 5, page 4.
➤ Lift the stove into position.
➤ Place the fibre washers (5) with oblong holes on the gimbal sidearms (2).
➤ Fasten the screws (6).
➤ Adjust the tension of the screws to the desired friction.
➤ Place a class B-1 fire extinguisher in reaching distance.
15
Page 16

_Origo_1500_3000_6000.book Seite 16 Freitag, 12. Dezember 2008 3:14 15
Mounting the stove Dometic ORIGO
7.3 Installing Origo 6000 and 6200 (fig. 6, page 4)
Caution – Danger of damaging the device!
Before drilling any holes, make sure that no electrical cables or oth-
a
➤ Determine the best position for the pivot points by placing the range in the
➤ Open the stovetop.
➤ Mark the fixing points through the holes in the gimbal sideplates (1).
➤ Remove the range.
➤ Fasten the gimbal arms (2) with fibre washers and screws removed.
➤ Fit one fibre washer with round hole (3) on each gimbal arm (2).
➤ Lift the range in-between gimbal arms (2) so that the gimbal sideplates will
➤ With open stovetop fit the fibre washers with oblong holes (4) to the
er parts of the vehicle can be damaged by drilling, sawing and filing.
desired position.
spring into place on the gimbal arms (2).
gimbal arm (2).
Ensure they fit properly on the gimbal arms (2) so they can't rotate.
➤ Fit steel washers (5), screws (6) and tighten.
➤ Adjust the tension of the screws to desired friction.
➤ Place a class B-1 fire extinguisher in reaching distance.
7.4 Installing Origo 6100
Caution – Danger of damaging the device!
Before drilling any holes, make sure that no electrical cables or oth-
a
➤ Make a cutout with the following dimensions (W x H x D):
➤ Place the oven into the cutout.
➤ Fix the oven.
➤ Place a class B-1 fire extinguisher in reaching distance.
er parts of the vehicle can be damaged by drilling, sawing and filing.
490 x 530 x 400 mm.
16
Page 17

_Origo_1500_3000_6000.book Seite 17 Freitag, 12. Dezember 2008 3:14 15
Dometic ORIGO Using the stove
8 Using the stove
8.1 Filling-in denatured alcohol
Caution! Danger of injury!
Never pour fuel through the burner openings in top of the stove
d
I
➤ Ensure all burners are turned off: turn the knob to “0”.
➤ Ensure the stove is cooled down to room temperature.
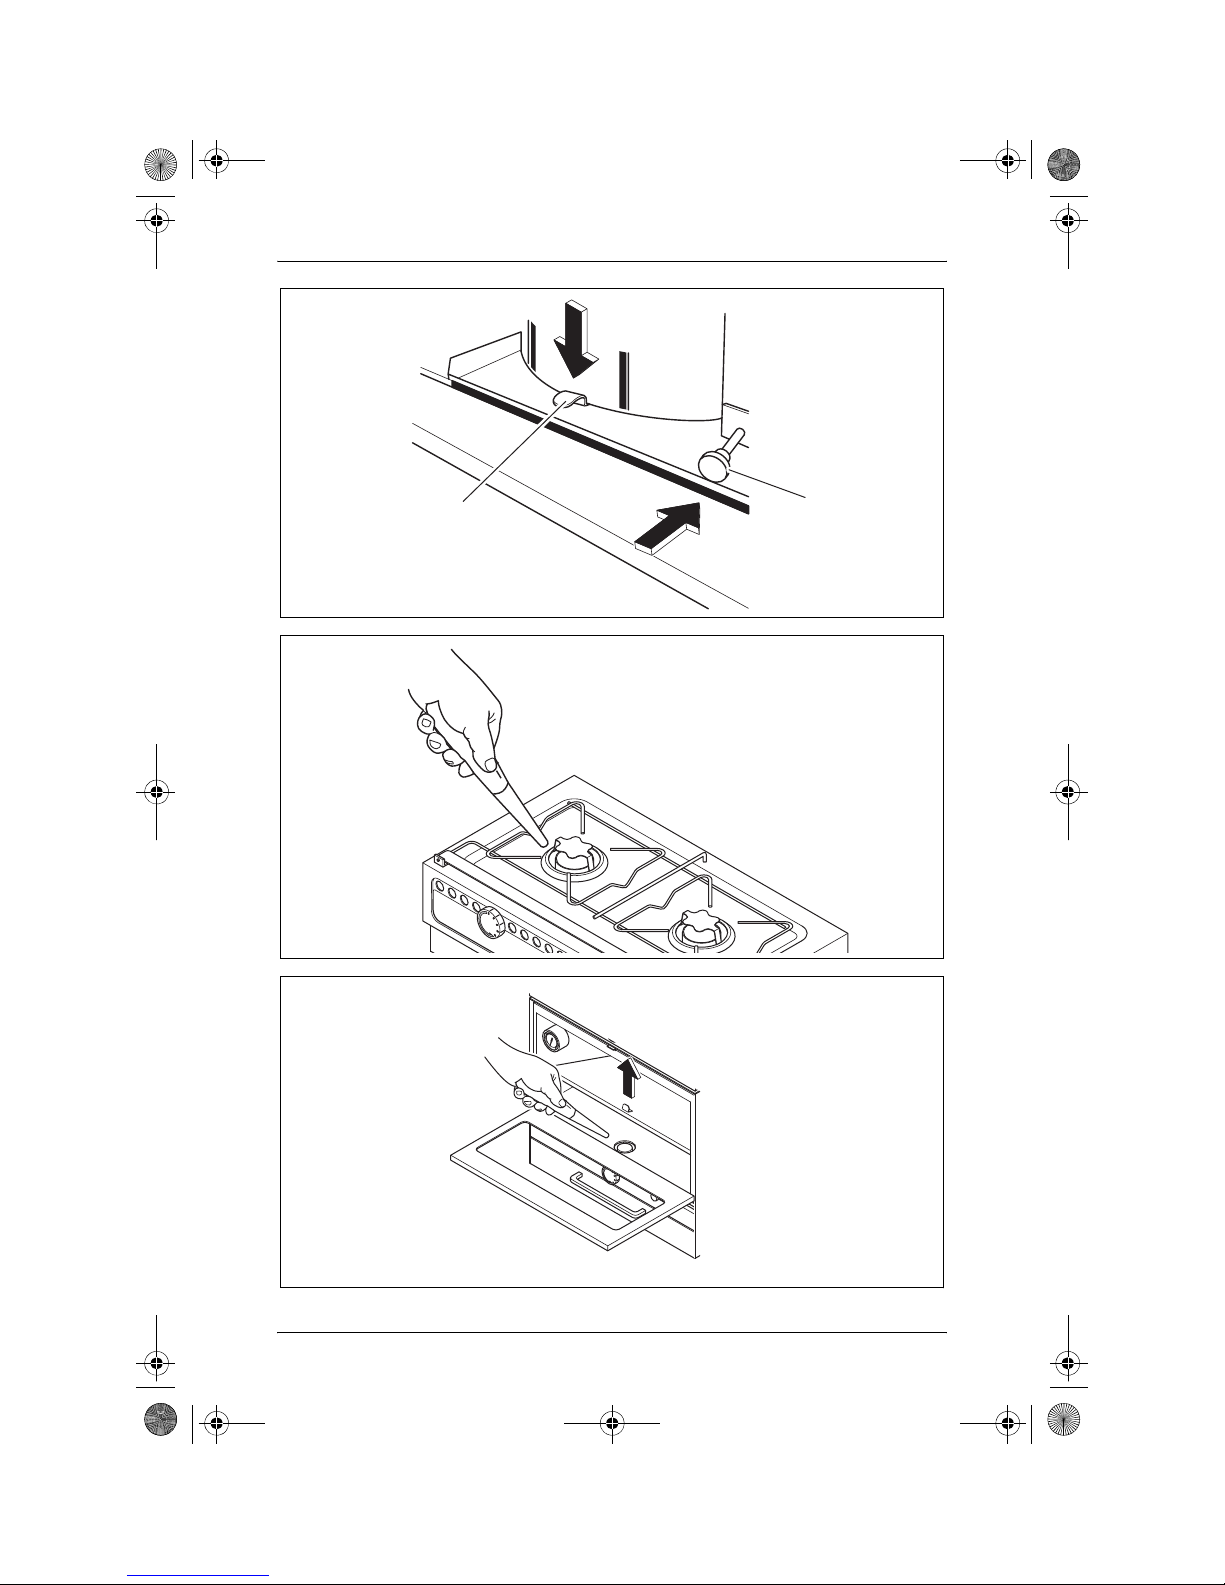
➤ Pull the lower edge of the stovetop slightly forward while simultaneously
(fig. 1, page 2).
Overfilling, spilt alcohol and hot objects can cause severe burns.
Note
If the stove is mounted with gimbals located in down position, the
stovetop must be raised to full upright position in order to remove
the fuel tanks for filling.
Otherwise the stove top cannot be opened.
pressing the catch (fig. 7, page 5).
➤ Lift the stovetop.
➤ Check canister opening ensuring there’s neither fire nor glow.
➤ Take out the canister.
➤ Hold the canister tilted down (fig. 8, page 5).
➤ Fill the denatured alcohol through the wire mesh into the opening of the
canisters.
The maximum capacity per canister must not exceed 1.2 l.
➤ Check the fuel level by tilting the canister vertically (fig. 9, page 5).
Keep it in this position for 20 s, to make sure it's not overfilled. In addition, in the case of accidental overfilling you can get rid of the surplus
fuel.
✓ The maximum fuel level is reached when the fuel is visible at the bottom
of the opening.
Note
The stove will operate even if the canister isn’t filled with the
I
maximum capacity.
17
Page 18

_Origo_1500_3000_6000.book Seite 18 Freitag, 12. Dezember 2008 3:14 15
Using the stove Dometic ORIGO
➤ Wipe possible spilt alcohol off the outside of the canister.
➤ Replace the canister.
➤ Close the stovetop.
The knobs must be in “0”-position; otherwise the stove top will not fold.
✓ The catch locks.
➤ Ensure the regulating plates cover the burner openings so that stovetop
is level.
8.2 Filling-in denatured alcohol for the oven
(6000 – 6200 only)
Caution! Danger of injury!
Never pour fuel through the burner opening in top of the oven.
d
➤ Ensure the burner is turned off: turn the oven knob to “0”.
➤ Ensure the oven is cooled down to room temperature.
Overfilling, spilt alcohol and hot objects can cause severe burns.
➤ Open the burner lid.
➤ Push the knob (fig. 0 2, page 6) while simultaneously pressing the catch
(fig. 0 1, page 6).
➤ Take out the canister.
➤ Check canister opening ensuring there’s neither fire nor glow.
➤ Hold the canister tilted down (fig. 8, page 5).
➤ Fill the denatured alcohol through the wire mesh into the opening of the
canisters.
The maximum capacity per canister must not exceed 1.2 l.
➤ Check the fuel level by tilting the canister vertically (fig. 9, page 5).
Keep it in this position for 20 s, to make sure it's not overfilled. In addition, in the case of accidental overfilling you can get rid of the surplus
fuel.
✓ The maximum fuel level is reached when the fuel is visible at the bottom
of the opening.
18
Page 19

_Origo_1500_3000_6000.book Seite 19 Freitag, 12. Dezember 2008 3:14 15
Dometic ORIGO Using the stove
Note
The oven will operate even if the canister isn’t filled with the
I
➤ Wipe possible spilt alcohol off the outside of the canister.
➤ Replace the canister into the compartment.
✓ The catch locks.
8.3 Lighting the stove
d
➤ Turn the knob to “4”.
✓ The burner is open.
➤ Light the stove by placing a long match or a long lighter to the burner
maximum capacity.
Caution! Danger of injury!
Use long matches or long lighters to light the burner.
Quickly remove your hand as soon as the burner ignites.
opening (fig. a, page 6).
➤ Adjust the flame so it does not extend beyond the edge of the pot.
➤ Choose the desired power setting via knob.
Note
If the stove hasn’t cooled down from previous use, the burner may
I
ignite but immediately extinguish. In this case blow air into the
burner opening to dissipate vapour.
Afterwards light the stove as described above.
19
Page 20

_Origo_1500_3000_6000.book Seite 20 Freitag, 12. Dezember 2008 3:14 15
Using the stove Dometic ORIGO
8.4 Lighting the oven
Caution! Danger of injury!
Use long matches or long lighters to light the burner.
d
➤ Turn the oven knob to “4”.
✓ The burner is open.
✓ Open the oven door.
➤ Lift the burner lid (fig. b 1, page 6).
➤ Light the oven by placing a long match or a long lighter to the burner open-
➤ Choose the desired power setting via oven knob.
I
Quickly remove your hand as soon as the burner ignites.
ing (fig. b 2, page 6).
Note
If the oven hasn’t cooled down from previous use, the burner may
ignite but immediately extinguish. In this case blow air into the
burner opening to dissipate vapour.
Afterwards light the oven as described above.
8.5 Extinguish the flame
➤ Turn the knob to “0”.
✓ The burned is closed.
➤ Wait about five seconds.
➤ Turn the knob to “4” to make sure the flame is extinguished.
✓ The burner is open.
➤ Turn the knob to “0”.
✓ The burner is closed.
20
Page 21

_Origo_1500_3000_6000.book Seite 21 Freitag, 12. Dezember 2008 3:14 15
Dometic ORIGO Cleaning and maintaining the stove
8.6 Covering the stove canister with a gasket
To prevent the evaporation of denatured alcohol the burners are covered
with rubber gaskets, when the stove is not to be used for a long period.
➤ Ensure the stove is cooled down to room temperature.
➤ Pull the lower edge of the stovetop slightly forward while simultaneously
pressing the catch (fig. 7, page 5).
➤ Lift the stovetop.
➤ Place the gasket over the canister opening.
➤ Close the stovetop.
✓ The catch locks.
Note
Remove the gaskets before using the stove.
I
9 Cleaning and maintaining the stove
Caution
Do not use any sharp or hard objects for cleaning since they may
a
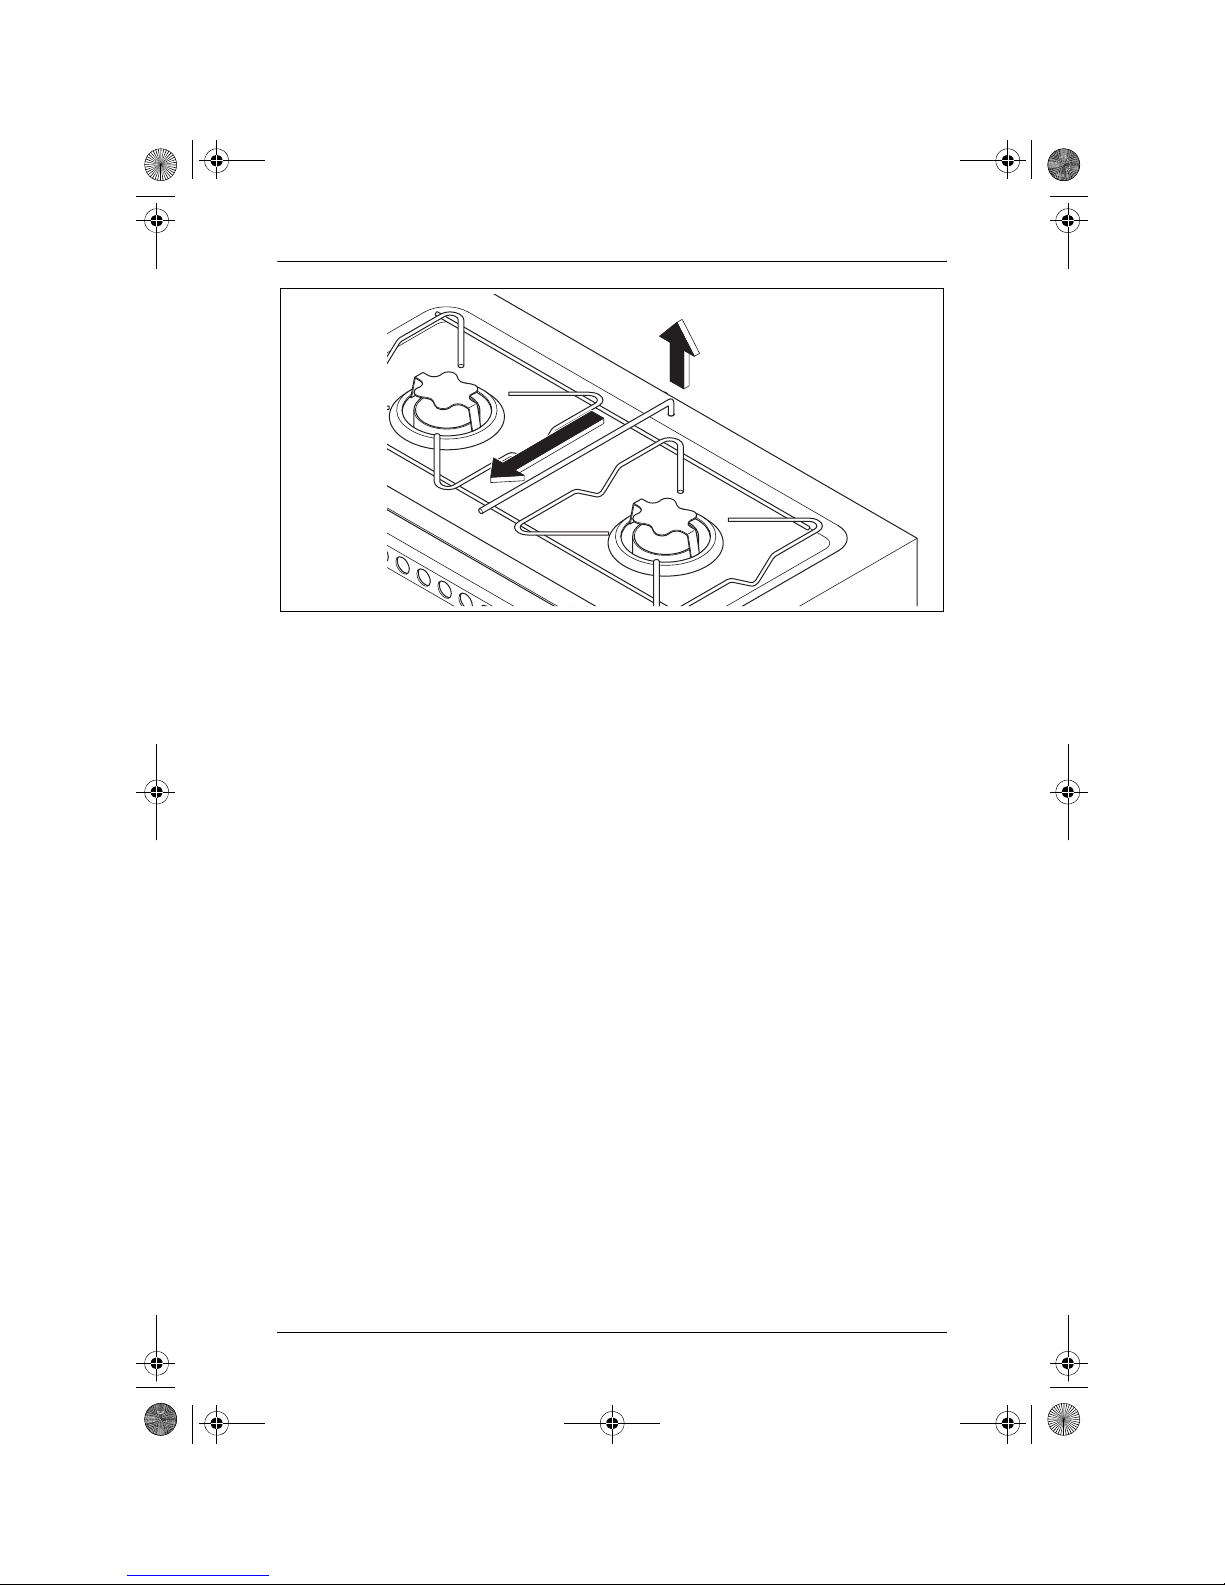
➤ Remove the grate from the stovetop. Therefore slide the retainer off the
➤ Clean the stovetop. In particular remove carefully sticky grease and oil.
➤ 6000: Clean the oven. In particular remove carefully sticky grease and oil.
damage the device.
hole and lift the grate (fig. c, page 7).
21
Page 22

_Origo_1500_3000_6000.book Seite 22 Freitag, 12. Dezember 2008 3:14 15
Guarantee Dometic ORIGO
10 Guarantee
The statutory warranty period applies. If the product is defective, please
contact the manufacturer's branch in your country (see the back of the
instruction manual for the addresses) or your retailer.
For repair and guarantee processing, please include the following documents when you send in the device:
z A copy of the receipt with purchasing date
z A reason for the claim or description of the fault
11 Disposal
➤ Place the packaging material in the appropriate recycling waste bins
wherever possible.
If you wish to finally dispose of the device, ask your local recycling
centre or specialist dealer for details about how to do this in
M
accordance with the applicable disposal regulations.
12 Technical data
Dometic ORIGO stove
1500 3000
Item no.: 958140101 958140501
Number of burners: 1
Burning duration: approx. 4.5 h
Power of burner: 2000 W
Cooking time for 1 l water: 10 min
Canister capacity: 1.2 l
Dimensions (W x D x H)/mm:
Dimensions including gimbals
(W x D x H)/mm:
Weight: 3.4 kg 6.3 kg
236 x 137 x 262
282 x 228 x 262
22
2
464 x 137 x 262
510 x 228 x 262
Page 23

_Origo_1500_3000_6000.book Seite 23 Freitag, 12. Dezember 2008 3:14 15
Dometic ORIGO Technical data
Dometic ORIGO oven
6000 6100 6200
Item no.: 958145001 958145010 958145020
Number of burners: 2 + 1 1 1
Burning duration: approx. 4.5 h approx. 4.5 h approx. 4.5 h
Power of burner: 2000 W – –
Power of oven: 1500 W 1500 W 1500 W
Cooking time for 1 l water: 10 min – –
Canister capacity: 1.2 l 1.2 l 1.2 l
Dimensions (W x D x H)/mm:
Dimensions including
gimbals (W x D x H)/mm:
Weight: 28.8 kg 22.5 kg 24 kg
465 x 562 x 335
510 x 562 x 335
510 x 554 x 335–465 x 335 x 562
–
Variations, technical improvements and delivery options reserved.
23
 Loading...