

Page 1
FDDornetic'
GENERATOR
SET
MODEL
Kwyatt
4
&
7
SEB/ICE OFFICE
The
Dometic
Corp.
509
So.
Poplat
St
LaGrange,
lN
46761
Form No. 3102650.003
11/89
@1989
The Oomelic
Corp.
LaGrange,
lN 46761
OPERATING
INSTRUCTIONS
Please
give
this Manualto
the
Customer
along
with
the
lnstallation
Manual.
MODEL
KVNTATT
4.101
& 7.101
Page 2
Please
read this
Operator's
Manual
carefully so that
you
may enjoy
trouble-free,
safe
operation of
your generator
set.
TABLE
OFCONTENTS
External View of Generator Set
Caution Tips to Prevent Troubles
Table of
Generator Set Specifications
After-Sales Service
Pre-Work
lnspection.
Checking
Procedure
Engine Oil Level;
Deterioration & Leakage;
Governor
Oil Level
& Deterioration; Coolant Level
& Dirty
Condition; Coolant Leakage
from Cooling System;
Easiness
of Engine Starting;
Abnormal Noise from
Engine;
Exhaust
Gas Conditions; Fuel
Level; Fuel Leakage;
Cleaning
of Spark Arrester; Clogged Radiator
Core;
and Installation
Condition of Radiator
Cap.
General Service
Caution
Tips for Service; Engine
Oil Replenishment;
Engine Oil Change;
Governor Oil Replenishment;
Governor
Oil Change;
Coolant Replenishment;
Coolant Change;
Tightening of Banery
Terminals & Cleaning;
Battery
Water Replenishment,
Air Cleaner
Element Cleaning
&
Replenishment,
Oil Filter Element Replacement,
Fuel
Fiher
Replacement,
and Cleaning lnside of
Radiator
Protective
Storage
Periods
of Time
Measures
for Long
Service Data
3
4-6
B
8
Generator
Set Control System
Starting Engine
8-9
Main Switch,
Start/Stop Switch; Starting; Check
after Starting,
Stopping; Instruments and
Consuming Power; Intake
Air Switching Lever
Periodical
Maintenance Service
9-10
-tl
12-14
14-19
19
19
Page 3
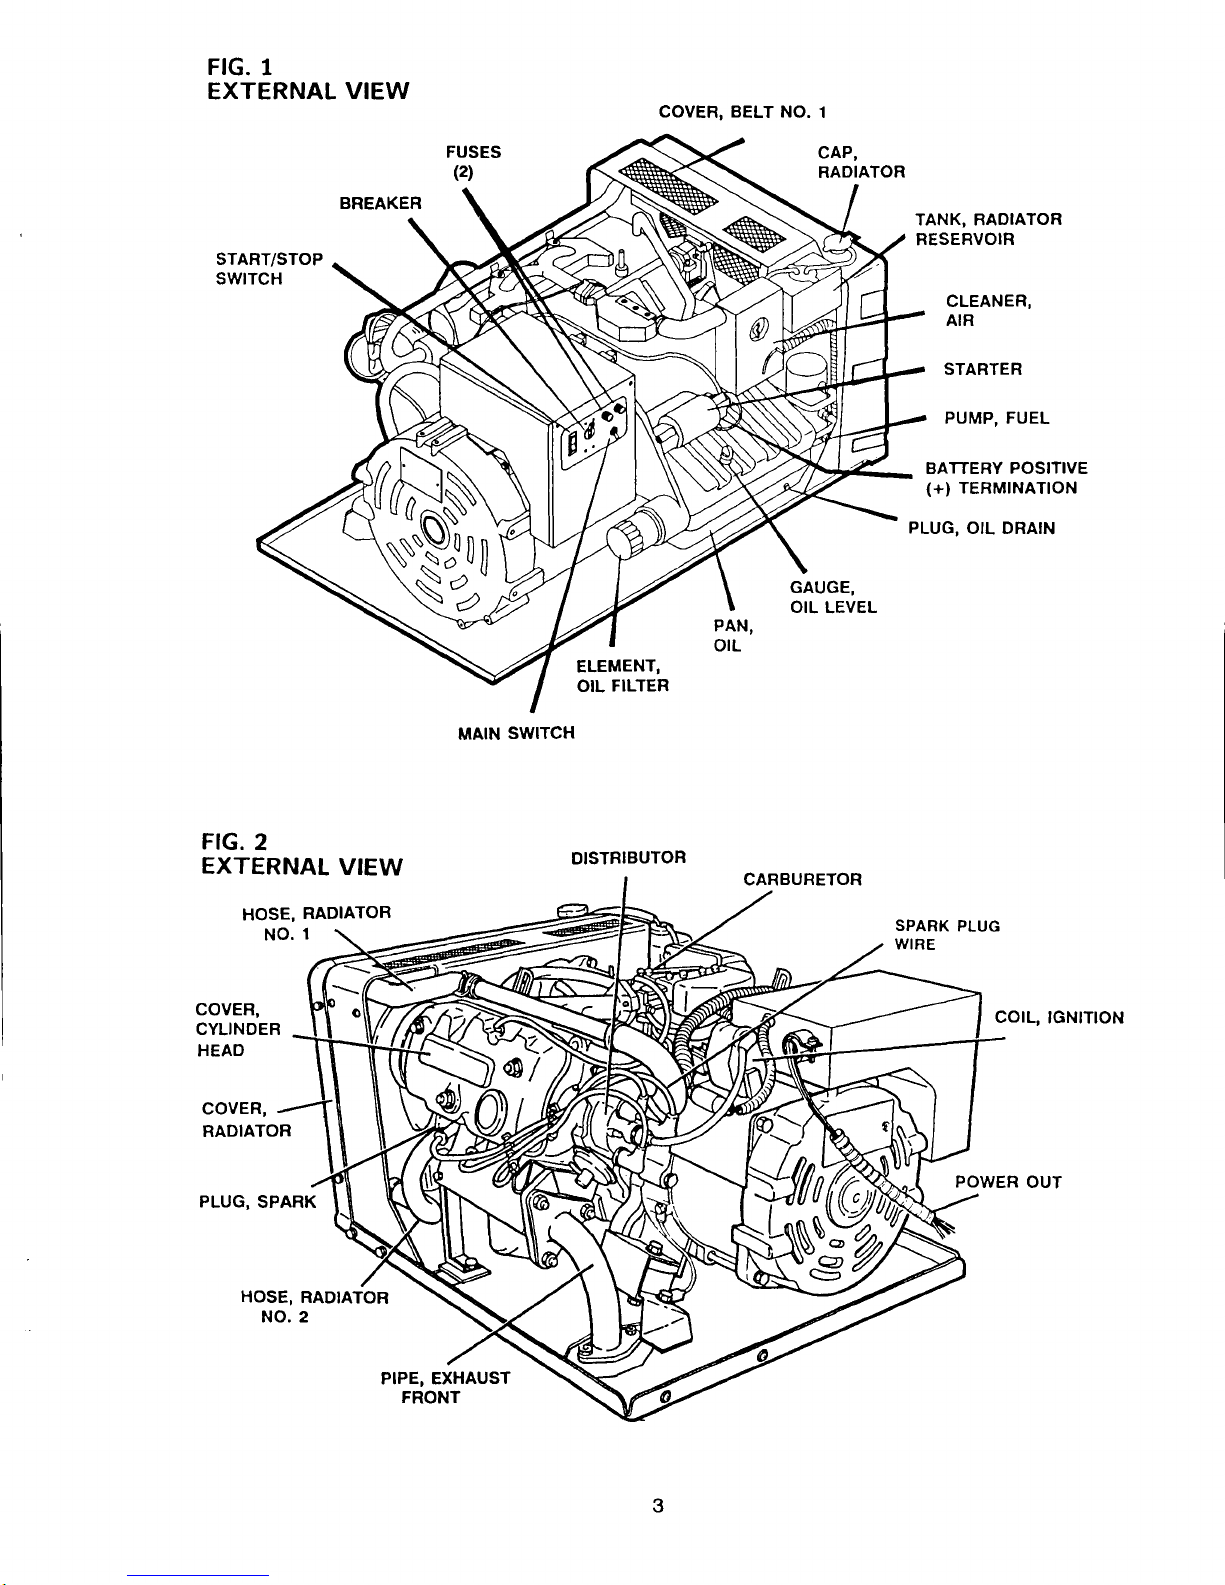
N
Sz
COVER, BELT NO.
1
MAIN
SWITCH
FIG.
1
EXTERNAL
VIEW
START/STOP
swtTcH
FIG.
2
EXTERNAL
VIEW
HOSE,
RADIATOR
No.
1
covER,
CYLINDER
HEAD
COVER,
RADIATOR
PLUG,
SPARK
HOSE,
RADIATOR
NO.2
ELEMENT,
OIL
FILTER
DISTRIBUTOR
cAP,
RADIATOR
CARBURETOR
TANK, RADIATOR
FESERVOIR
CLEANER,
AIR
STARTER
PUMP, FUEL
BATTERY POSITIVE
(+)
TERMINATION
PLUG,
OIL DRAIN
cotL,
lGNtTloN
POWER
OUT
GAUGE,
OIL LEVEL
SPARK
PLUG
WIRE
PIPE, EXHAUST
FRONT
3
*fii
Page 4
TO
THE NEW
OWNER
We heartily
express our
gratitude
to
you
for
purchasing
a
Dometic
generator
set.
This
Operators
Manual describes
the correct
handling
procedure
and
general
servicing method of
the
generator
set.
Please
read this
manual
carefully
before operating
your generator
set. Be sure
to observe all items of:
-
WARNING
-
and
CAUTION
Even
during the
operation, consult this manual as
required.
The contents and specifications of this manual may
be
partly
revised
due
to
the
continuing improvements
in
the design
without
advance
notice and
without incurring
any
obligation
to
us.
SAFETY
PRECAUTIONS
The following
symbols
in this
manual
warn that
you
or
your
equipment is
placed
under
potentially
dangerous
conditions
according to
its
use.
Bearing
such
potential
danger
in mind, in accordance
with the warning, it is important
for
you
to
take
necessary
precautionary
measures
so
as
to
ensure
safety.
'l-
WARNING
-
This
symbol is used
to
remind
you
of a
potential
hazard
or unsafe
practice
which can result in serious
personal
injury
or death.
CAUTION
This symbol is
used to remind
you
of
a
potential
hazard
or unsafe
practice
which can resuh in
personal
injury or
equipment damage.
Fuels, electrical
equipment,
exhaust
gases,
batteries and
moving
parts
have
potential
hazards that
could
result
in
serious
personal
injury. Care must
be taken
as to the
following
items:
Gasollne ls
DANGEROUS
Use extreme
caution around
gasoline
because
a
potential
for explosion
or
fire
exists at all times.
Never use
open
flame or sparks near
gasoline.
Never
fill the fuel
tank near the
generator
set
while the engine is running.
Install flexible section, e.g.
flexible tubes or hoses
(SAE
J30b-1973) to the
fuel
line
between the
generator
set and the fuel
tank, where vibrations
must be absorbed.
Gasoline is more dangerous when it
is in a
vaporous
state, mixed with air at a
certain
ratio,
than when it
is
in a liquid
state.
Securely
close
the lid of a
gasoline
container.
Wipe off any spilt
gasoline
immediately and
thoroughly. Never
start
the engine when
the area
is wet with
gasoline.
.
Always have a fire extinguisher
nearby. Ensure
that
the
extinguisher
is
properly
maintained and
be
familiar
with
its
proper
use so
you
can use it
effectively
in an emergency. E).tinguishers rated
ABC by
the
NFPA are suitable for oils, electrical
and
general
use.
Consult
the
local fire
department
for
the correct type of extinguisher
for various applications.
Careless
Handllnq
of
Electrlcitv
ls
Danoerous
Cunent flow is invisible. Careless handling can
cause
an electric
shock.
Pay utmost attention
to the
handling ot electricity.
.
Do not use the
generator
set
at
those
places
exposed
to
rain
or snow.
.
Do not
apply water
or oil
directly
to the
generator
set
during cleaning.
.
Do not touch switches
with
wet,
oily
or dirty
hands.
.
Be sure to turn off
start/stop switch and
disconnect negative
(-)
battery cable.
lf it is not
disconnected, and
someone
turned
the start/stop
switch on during servicing, death
or severe in;ury
may result
by electrical shock
or
damage from
moving
parts.
.
Turn
off the main switch located on the control
panel
of the
generator,
before
performing
installation or service.
This
protects
the unit
from
damage and
protects a person
from
injury.
.
When handling electrical equipment, never wear
jewelry,
damp clothing
or wet
shoes. Also, be
very
careful not
to
allow
skin
surfaces to be
damp. Since these articles constitute
good
conductors
of
electricity, they are very dangerous
to
you.
.
Do not
connect
the
generator
set
to household
wiring. This could cause
problems
for
the
household appliances. lt can also
produce
elilreme
hazards
to anyone
working outdoors on
utility lines to
restore
power.
.
With
regard
to electricity, be sure
to follow
all
state
and
local
electrical codes.
All installations and repairs
must be
performed
by a
qualified
licensed electrician.
Page 5
Exhaust Gasee are Toxlc
Exhaust
gases
include toxic
components such as
carbon
monoxide.
Therefore,
inhaling exhaust
gases
can lead to losing consciousness
or deatlt.
Carbon monoxide is a colorless
and
odorless
gas.
It
will cause the
following toxic symptoms to a
person
inhaling it:
Dizziness, headache,
vomiting, muscular
twitching, weakness,
sleepiness and
throbbing
in
temples.
lf
you
feel one
of
the
toxic
symptoms above,
immediately
go
out
to the fresh
air.
Stop the
generator
set. DO
NOT
operate it until
it
has been checked and necessary
repairs have
been
made.
.
Take adequate measures to
properly
discharge
exhaust
gases
to the
atmosphere.
.
Do
not
operate
the
generator
set where ventilation
is
poor,
close
to
buildings, other RV's, etc.
.
At regular intervals, check the exhaust system
tor
leaks.
.
Do
not
operate the
generator
set
with its exhaust
port
directed to
houses,
passersby,
or livestock.
Keep Flres awav from Batterv
Fire
near the
banery is
extremely dangerous.
Flammable
gases
which vaporize from
the
battery
may
be ignited
or
exploded.
.
Do
not
allow
the
battery to be shorted or sparked.
.
Do not inspect the battery electrolyte level with
open
flame of a
lighter or match. These vapors
can explode.
Do Not Touch Battery Electrolvte
.
Battery acid
contacting
skin will cause severe
burning; and
contact to clothing will
cause damage
to the clothing.
.
lf the
battery electrolyte
gets
in
your
eyes, or on
your
skin, immediately
llush
that area with lots of
water. Consuh a doctor.
Potentlal Danoer Exlsts when Enolne
ls Runnlnq
.
Be sure to operate the
generator
set
with
the
protective
cover installed correctly.
.
Do not bring
your
hands
close
to
the
rotating
parts.
Do not wear
ties,
loose-bodied
jackets,
shirts
and
sleeves during the
operation, for
they may be
caught
in the rotating
parts.
Alwavs Keep Clean
around Generator Set
.
Do
not leave tools, cloth,
etc.,
around the
generator
set.
lf they
are left around the set, they
could
be
thrown during
operation
and strike someone; or
they
could
be
caught
in the rotating
parts,
causing
unit
malfunction.
Fires
may
occur
when
flammable
objects contact
the
hot
exhaust
pipes.
.
Clearly wipe
off
deposits of
grease
and
oil, etc.
Remove all foreign materials to
help maintain a
space
necessary
for the
generator
set and keep it
dry
at all times.
Failure to observe this note
may
cause
overheating
or fires.
Never Open
the Radlator Cap
when
Water Temper-
ature ls stlll hloh.
.
Failure
to observe
the
caution
will
cause
pressurized
vapor or hot
water
to
blow up, resulting in scalding
yourself.
Other Handllnq
Instructlons
.
Never
modify the
generator
set.
.
Do not use the
generator
set for
applications except
for recreational
vehicles.
.
Do not operate
or work on the
generator
set
when
you
are
mentally or
physically
fatigued.
CAUTION
TIPS TO
PREVENT
TROUBLE
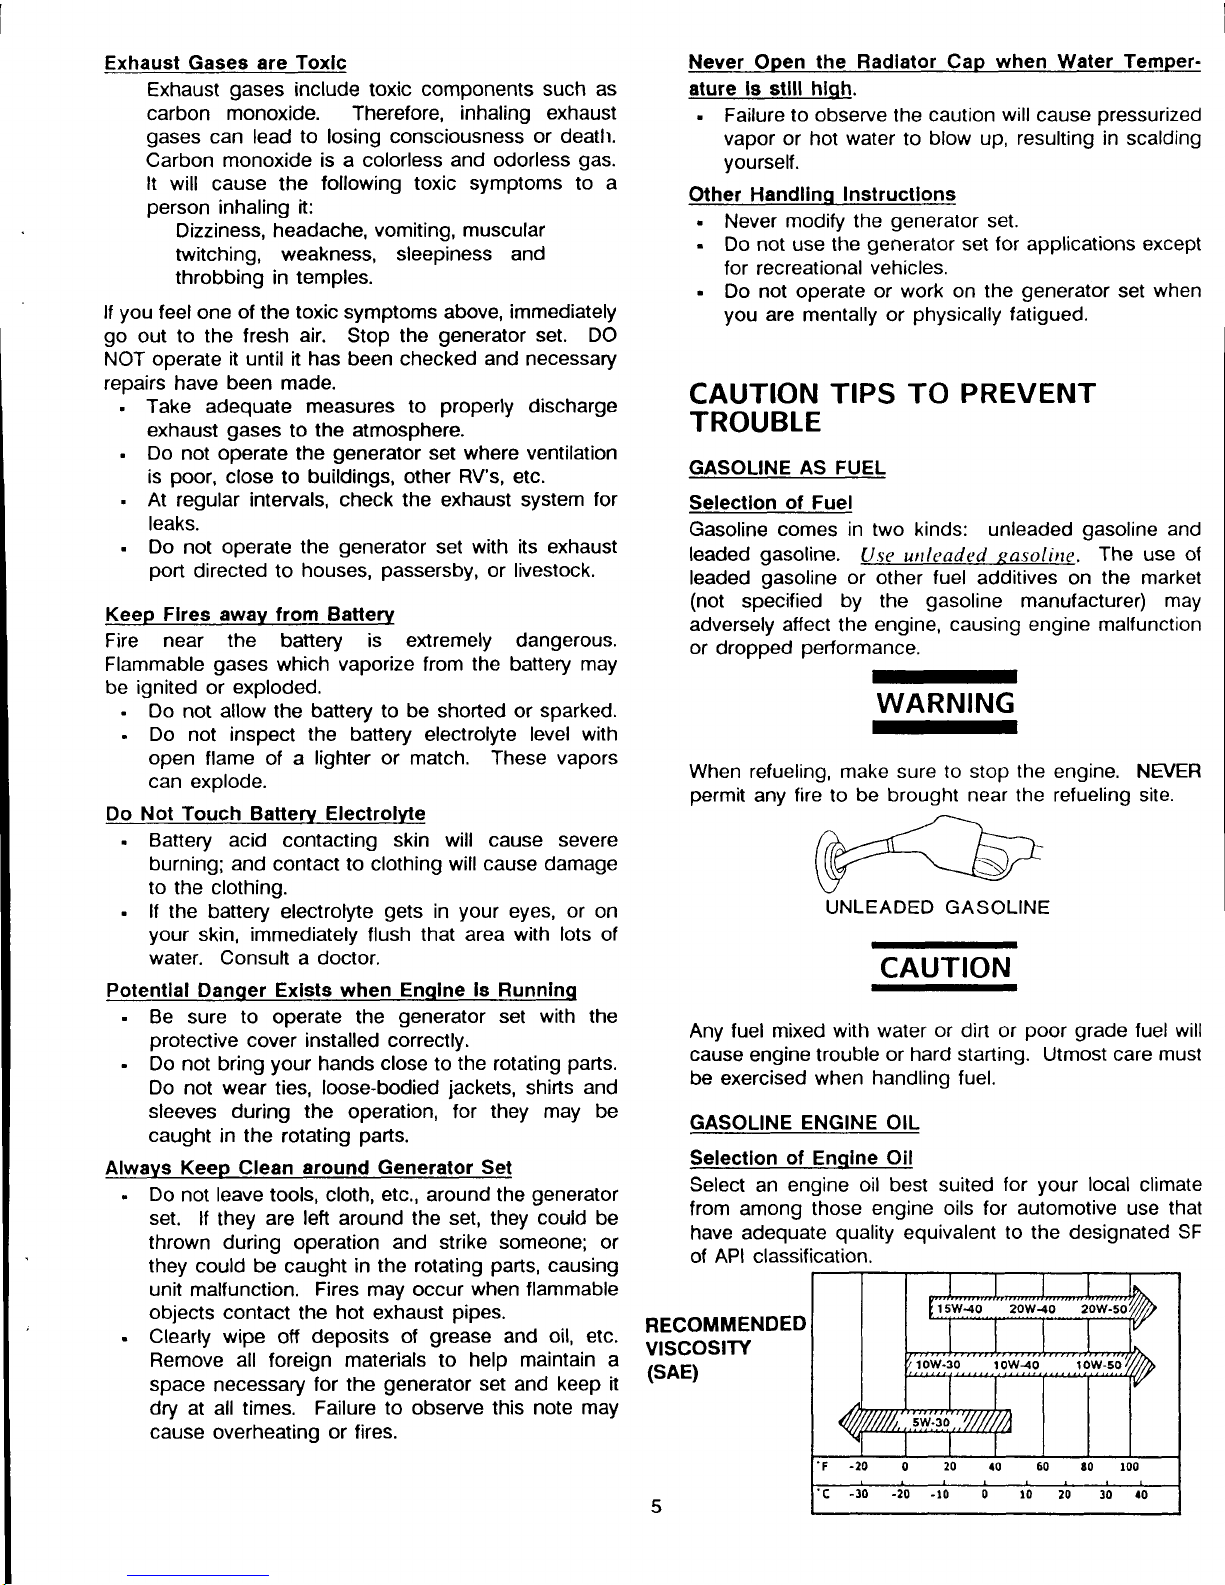
GASOLINE AS FUEL
Selectlon
of
Fuel
Gasoline comes in two kinds: unleaded
gasoline
and
leaded
gasoline.
Use wrleaded
easoline.
The use
of
leaded
gasoline
or
other
fuel
additives on
the
market
(not
specified
by the
gasoline
manufacture|
may
adversely affect
lhe
engine, causing engine malfunction
or
dropped
performance.
-
WARNING
-
When refueling, make sure to stop
the
engine. NEVER
permit
any
fire
to
be brought near the refueling site.
CAUTION
Any
luel mixed with water
or
dirt or
poor
grade
luel will
cause
engine trouble
or hard starting. Utmost care
must
be exercised when
handling fuel.
GASOLINE ENGINE OIL
Selectlon of Enqlne
Oil
Select
an
engine oil best suited
for
your
local
climate
from among those
engine oils for automotive use
that
have
adequate
quality
equivalent
to the designated
SF
of API classification.
4
b
h
10w.30
t0w{0 tow-50
n
sw-to
///,
F
-20
0
20
40
60
t0 r00
'c
-30 -20
-r0
0 r0
20 30
.0
RECOMMENOED
vtscoslrY
(sAE)
UNLEADED GASOLINE
Page 6

The
quality
of
gasoline
engine oil bears close
relationship
to
the
engine
performance
and
life.
The
use
of a
poor
grade
oil or an oil
having
viscosity not
suited
to
your
climate may cause hard
starting and/or
premature
wear due to inadequate
lubrication of
various
components,
even
leading
to engine seizure.
CAUTION
1. When the engine
is
pr.rt
into
operation for
a long
period
of
time, engine oil
properties
are bound to
deteriorate as the engine
oil
is exposed to highly
heated components,
or worn
metal
particles,
carbon, water or dust
gets
into
the
engine oil. lt is,
therefore,
necessary
to change the engine oil
at
regular
intervals,
2. Too low
oil
level not only will
quicken
oil
deterioration, btrt
will
cause
engine
seizure.
So
replenish engine oil as soon as
possible.
3.
Mixing oils of different brands might
deteriorate oil
properties.
Therefore, avoid mixing
engine oils of
different brands.
LONG LIFE
COOLANT
(Year
round
coolant) and Antlfreeze
Solutlon
Selectlon
of
Long
Llfe Coolant & Antlfreeze Solutlon
When
the
cooling water
is
frozen,
there
is
a
possibility
that
the cylinder head or cylinder block,
or
possibly
the
radiator, may
be
broken.
Long
life coolant or
antifreeze is
mixed
with
the cooling
water
to
prevent
freezing.
These solutions come
in two
kinds: Antifreeze is used
only
during a winter
season mainly
for
the
purpose
of
preventing
freezing.
Long
life coolant is used
throughout
the
year
for the
purpose
of
preventing
corrosion of
the
cooling
system, besides
the
prevention
of freezing. Select
'long
life coolant or antifreeze for
aluminum engines'. Use a mixture that is
best
suited
for
your
local
conditions
and temperature.
It
is advisable to use
long
life
coolant having
the
following
features:
1.
Long life
type coolant
in
which
special rust
prohibitive
agents, anticorrosion agents, etc. have
been added
(in
larger amounts than in antifreeze)
to a highly
pure
ethylene
glycol.
The components
of
coolant of this type will hardly
evaporate. Simple
replenishment
of
water
will
maintain the original intended
performance.
'Long
life
coolant
for
aluminum engines'can
protect
aluminum alloys that
do
not
have strong
rust/corrosion-withstanding
properties.
Also,
it can
protect
cast
iron.
Long
life
coolant
prevents
wear
of the water
pump
or water leakage.
CAUTION
Be
sure to
use
tap water to dilute long life
coolant
or antifreeze.
Keep
the concentration of long life coolant or
antifreeze at
a level matched with the lowest
temperature in
your
local
region.
3. Mixing of
long
life coolant or antifreeze
of different
brands might deteriorate its
properties.
Therefore,
avoid
mixing solutions
of
different
brands.
4. Using
100%
of undiluted solution does
not always
ensure
the
safety
of
your
engine. ln a very cold
climate,
100%
antifreeze or
long
life
coolant
can
treeze
and
cause damage.
5. The use of a
poor grade
antifreeze
may
cause
damage
to
the engine and
radiator.
The
use
of long
life coolant or antifreeze for cast iron engines may
cause
damage to aluminum, copper,
etc.
6. Long life coolant
or
antifreeze
is
poisonous.
Be sure
to
keep it in the original container and always store
it
in a
place
where
children
can
not reach.
LEAD BATTERY ELECTROLYTE
A
mixing
solution of sulfuric acid
and
distilled
water
is
used
as the battery
electrolyte.
Normally, the battery
electrolyte
is
a diluted sulfuric acid having
such
a
concentration that its specific
gravity
becomes 1.26 at
a
solution
temperature
of 20"C
(68'F)
in a fully
charged
state.
When
over-charged, the water
component
of
the
battery
electrolyte is
prone
to
evaporate.
lf the battery is operated continually with the
electrolyte
level too low, it will no longer be
possible
to store
electricity. Add water to compensate for the
evaporated
water.
-
WARNING
-
.
Never
permit
any fire to be brought
near
the battery.
CAUTION
USE DIST]LLED
WATER OR
DRINKING WATER
in
water replenlshment for lhe batlery efectrolyle.
In
each
cell,
add water up to
the
'UPPER'
level.
1.
2.
2.
3.
Page 7

Generator
Set Specifications:
Kywatl 7.1O1Kwyan 4.101
15.3
in.
(388mm)
34.4
in.
(875mm)
23.2
in.
(589mm)
313 lbs.
(1a2
Kg)
155 in.2
(0.1m,)
Negative
(-) ground
'|
2 Volts
32.2 in.
(818mm)
276 lbs.
(1
25Kg)
Weight
(without
oil, waler, muffler)
Required Air
Inlet
Opening Area
Generator
Specif
ications :
Specificallons
Kwyatt 4.101
Kwyatt 7.1O1
AC Output
UIOOO
watts 700O
watts
Voltage
12O volts
120/240 volts
Currenl
58.4
N29.2
each
leg
Frequency
60 Hz
No. of
Poles
No. of Phases
1
Power Factor
100%
Battery Charging
6 Amps @ 12VDC
DC
Voltage Control
Regulating Voltage 14.5 volts
Engine
Specifications:
Control:
Specifications Kywatl 4.101
Kwyan 7.101
Engine
Daihatsu. Model EB Daihatsu,
Model ED
TyPe 4-cycle, 3-cylinder
water cooled,
camshaft
Fuel Unleaded
Gasoline
Displacement
33.38in3
(547cc)
t1 .62 lns
(B46cc)
Bore & Stroke 2.44 x2.33
in.
(62.0
x 6O.5 mm)
2.62
x 3.19 in.
(66.6
x 81 .0 mm)
Compression Ratio 10.O : 1 9.5:1
Governed Speed
18OO rpm
Direction
of
Rotation
Clockwise
as viewed from crankshaft
pulley
side
(right)
Firing Order
1-2-3
Fuel Pump Electric, 12 volts DC, negative
ground
Lubrication
Syslem Fressurized by Oll
Pump
Oil Capacity
2.5
quarts (2.8
liters)
oil
API-SF, Use
proper
viscosity for climate
Conditions
General SAE
5W-30 or
10W-30
Oil Filter Use Dometic Part
#3102117
Only
Air Filter Use Dometic Part
#3101
191
Onlv
Coolant
Capacity
(lnclude
Reservoir)
1.11
sal.
(a.2
L) 1.27
gal.
(4.8
L)
Governor Mechanical
Governor Oil
Capacity
2.5
in3
(40cc)
Governor Oil
Starter
Use same oil as engine
lubrication
Electric, 12
volts DC, negative
ground
Spark Plug NGK, Type BP-28
Speclfications
Kwyatt 4.1O1 Kwyatl
7.101
Conlrol
Remote Slart
(Equipped
with two connectors)
and control
panel
on
generalor
sel
-7
Page 8

AFTER-SALES
SERVICE
The
Dometic Corporation has a
thoroughly
established
service
network in
all states so lhat
you
may
enjoy
a
safe,
long,
pleasant,
trouble-free operation of
your
generator
set. we
are
always ready to
meet
your
needs.
When
you
contact
The Dometic Corporation for service
or
parts,
please
supply
complete
information
regarding
the
generator
set's
model and serial numbers
(specification
number), as shown on the Dometic
nameplate, and the date
of
delivery. Thus, we can offer
correct
service
or
parts
delivery for
your
specific
generator
set.
E0
Dometlc'
b'brrd&d. h@.r.,.1
.@'
sERnlNo.
XXIOOO(
you
may replace
it
once with fuse of equal value. lf
ehher
fuse
opens a
second
time,
DO
NOT
REPI.ACE
lT
-
call
your
nearest Dometic service center for service.
Replacing Fuse:
A. Turn OFF main switch.
B. Unscrew fuse cap and remove
fuse,
C. Install new fuse rated at
'125V
-
15A into
cap.
D. Screw cap back into
fuse
holder.
E. Turn ON main
switch.
l
FU.E
H.LDE*
\ ,iifr
"o,
4f /-^
FlG.
1
fl, <:a ?-f
W
lr r
("t
,,'
/ 4,
lciruennron
ll I
tl-l
"'/'I
FUSE
I
t
Y{'l I$iT""
CIRCUIT BREAKER
FUSE
-
When excessive current flows
on
power
line,
or switch
is turned
off
manually, the breaker will
open
the
circuit.
When it closes
(switch
on),
power
is
supplied to the
appliances. NOTE: lf the breaker
opens,
you
can reset
it
once.
lf breaker
opens twice,
please
call the nearest
Dometic service center without resetting.
-
WARNING
-
Never
touch the
switches wlth wet,
olly
or dlrty
hands.
Not hlghly
purified
waler, oil
(especlally
englne oil)
or wet dust may conduct electriclty.
REMOTE CONTROL
Terminalfor remote control wiring is
provided.
lf remote
control
panel
is
provided,
remote
start/remote stop is
available.
STARTING
ENGINE
-
WARNING
-
.
Do not
operate
the
generator
when
you park
in tall,
grassy places,
bushes, etc.
There
is a
fire
hazard
in these
places.
.
Do
not operate
the
generator
set where ventilation
is
poor,
for instance close lo houses or obstructions
where the
exhaust
gases
may be hard to dissipate.
Exhaust
gzlses
may cause serirJus
personal
inlury or
(bath.
MAIN SWITCH:
(See
FlG.
1)
Turns
power
ON or OFF
to the engine control circuit.
ON
position:
Must be in
this
position
for
the engine
to
start
and
run.
OFF
position:
Used to shut
power
OFF
to control
circuit
of engine.
Always turn switch to
OFF
position
when servicing
generator
set or engine.
@:;
VOLTS
FL
AMPS.
PFOO.
NO.
MooELNo.
KWYATTX.IOl
FdR.cr..tloo.lv.hlcl.u..
rc.
60
PH s€ I
nPM 1800
KvA
}|s.ct^ss
a-ul
Ec6 AM8T. 40.C
BAIT. Ct|(l. R^nNO
a AtrpE Af r IVOC WATTS AT
pF
I .o
LTTLEADEO O
S
CO.\NEFT€OFoRLPO
E
WARNING
GENERATOR
SET CONTROL
SYSTEM
WATER TEMPERATURE CONTROL
When the cooling
water temperature rises above 107"C
(224"F)
the engine stops
automatically, thus
preventing
engine
overheating.
OIL
PRESSURE CONTROL
When the engine oil
pressure
drops below 0.3 kg/cm'
(4.25
PSI),
the
engine
stops
automatically,
thus
preventing
engine seizure.
REVOLUTION
SPEED CONTROL
When
the
engine
revolution
speed
exceeds 2500
rpm,
the engine
stops automatically,
thus
preventing
generator
set
malfunction.
CURRENT
CONTROL
1.
MAIN FUSE
(Left
Hand):
(See
FlG. 1)
When
current in excess
of 15 amps flow in wires
of
control circuit, this fuse will open.
This
prevents
the control
circuit from being
damaged. When this
fuse opens, the engine
will not run
and
the starter
will
not operate.
2. GENERATOR
FUSE
(Right
Hand):
(See
FlG. 1)
When
current in excess
of
'15
amps
flows on DC
generator
windings, this fuse will
open. This
prevents
damage
to
the
windings.
When
this
fuse
opens,
the engine will
not run, but the starter will
engage
when start/stop
switch is
pressed
to the
start
position.
NOTE:
lf
either
main or
generator
fuse
is open,
Page 9

NOTE: In
the event the engine
does not stop when
start/stop
switch is depressed,
turn main switch
to
OFF
position
to stop engine.
ASTART
srARr/sroP swlrcH
6H
sroP
START:
Position
to
be
used for starting engine. When
you
release
your
finger, the switch returns
to the
original
position.
STOP:
Position to be
used for stopping the engine.
When
you
release
your
finger,
the switch returns
to
the original
position.
STARTING
1. Before starting
the engine, be sure to turn off the
circuit breaker, or disconnect appliances
from
power
line, as far as
you
can. The
generator
may be
hard
to
start
if load is connected.
2. Press the start/stop
switch of the
generator
control
or remote control to the
ISTART]
position.
The
starter operates,
and then the engine
will start.
3. After the
engine has started, release
your
finger
from the start/stop switch.
The start/stop switch
will automatically
return to the original
position.
CAUTION
.
lf
the engine fails
to
start
in
your
first attempt,
wait for
about 30 seconds.
Then
proceed
to start the engine,
lollowing the
starting
procedure.
.
The operating duration
of the starter should
be limited
to
'10
seconds
for each cranking.
CHECK
AFTER STARTING
1. After the engine
had started, warm
up
the
engine
under unloaded
state for five
minutes. Perform the
engine warm-up
for a slightly
longer
duration
during
a cold
climate.
2. Check various
parts
of the engine
while warming
up the engine.
(Pre-work
inspection)
A. Check the
engine for abnormal
noise.
B.
Check the exhaust
gases
for improper
conditions.
CAUTION
.
Be sure to avoid
applying heavy loads
without warming
up
the engine.
.
The load
should
be limited within
the rated value
specified in the nameplate.
Overload may cause
grave problems
for the
generator
set.
STOPPING
First, disconnect loads,
and then
press
the START/STOP
switch to the
ISTOP]
position,
the engine
will stop.
Failure to follow
this
procedure
may
shorten the
generator
set life.
INSTRUMENTS
AND
POWER
CONSUMPTION
INSTRUMENT
GENERAL
TVATTAGE
Space
Heater
1000 - 1500
Air
Conditioner r400
-
2600
Converter 300
-
500
Refrigerator
600
-
1000
Coffee Percolator
500
-
700
Microwave
Oven
700
-
|
500
Ice
maker 800
-
1000
Mixer
800 - 1200
Electric
Frying Pan r000
-
r400
Electric Boiler
800 - 1500
Illumination Lamp 1000
-
2000
Electric Blanket
50
-
200
Electric Iron
600 - 1200
Hair Dryer 700
-
1400
Television
Set 100
-
500
Radio Receiver
50 - 200
INTAKE AIR SWITCHING
LEVER
This device
prevents
engine stall due
to carburetor icing.
For cold season, set the lever to WINTER
position.
For
other seasons, set the lever
to SUMMER
position.
PERIODICAL MAINTENANCE
SERVICE
The following
table informs the owner
(operator)
of
necessary maintenance service to keep
the
generator
set in
good
condition.
.
To maintain the
generator
set at
its
peaked
efficiency, it is imperative
to conduct
maintenance
service at regular
intervals and to
remedy any defect
immediately.
@
Page 10

ENGINE
MAINTENANCE
SERVICE
SCHEDULE
Mainlenance Service
hems
'See
Note
Below
Pre-Work
Inspection
Minimum
Every
25
hrs.
Every
1 25
hrs.
Every
25O hrs.
Every
5OO hrs.
Every
10OO hr.
Remarks
Engine
oil level, deterioration
&
leakage
o
o
Enqine
oil change
o
or
€very 6 months
Oil {iher change
o
or every
6 months
Governor
oil level &
deterioration
o
o
or every 6
months
Governor oil chanoe
o
or every 2 vears
Coolant
level
o
o
Coolant
leakage o o
Coolant
chanqe
o
or evsry 1
vear
Radiator cor€ clogging
*
o
or ev€ry I
y€ar
Clean radiator
interior
o
or every 2
years
Radiator cao condition
o
or
€very 6 months
Fuel level
o
as necessary
Fuel
leakage
O
o
Fuel fihor
replacement
o
or ev€ry
I
year
Air liher cleaning
o
or ev€ry 3
months
Air fiher replacemenl
o
or
every 1
year
Damaged,
worn or
loose behs
*
o
or
gvery
2
yeafs
Spark
plug
replacemenl
*
o
or ev€ry I
year
Distributor
cap condition
*
o
or ev€ry I
y€al
lgnition
timing *
o
or every
1
year
Valve clearanco
*
o
or overy 2
yoars
Battery electrolyte
level
o
Spocilic
oravitv
of batterf
elec{rolyte
*
o
or overy 1
year
Tiohtness
and corrosion
ol'batterv
iorminals
o
or svary 3 months
Easy
engine starting
*
Abnormal
engine noise
o o
Abnormal
generalor
noise
o
o
Mutfler condition
o
o
Soark arrestor cleanino
o
or
every 3 months
Exhaust
pipe
condition
o
o or every 3
months
Exhaust
gas
condition
o
o
or every
6 months
Check
generator
brush wear
*
o
or every 2
years
-
WARNING
-
For
asterisk
(t)
markod mainlenance
service ilems, NEVER DO lT BY
YOURSELF unless
you
are
an experienced, licensed service
person
and have the Dometic service manuals.
Inadequale service may incur
hazards or lroubles.
NOTE:
Aslerisk marked hema contain two cases:
l.Though service
procedures
themselves are simpl€
and easy, there
are hazards
for
personal
injury or deaih, due to accidental
fall down
or tilt of
generaior
Bot, etc.
2.Service equipment and
tools in combination with
professional
service
techniques are needed.
.
Belore
you per{orm
periodical
maintenance
service,
make sure
that
the engine lemperature
has
dropped io a
normal level
after stopPing
the engine.
.
Prior
to maintenance
sorvice lor
tho electrical
system, be
sure to
turn
otf the START/STOP
switch
and to disconnecl
the negative
(')
terminal
of th€ battery
so that no spark
or short
may occur.
This engine
maintenance
service schedule
applies
to an engine
which
will not be subjected
to elireme
operating conditions
and
which will
be
operated
approximately
5OO hours
a
year.
Hence,
if
your
engino
is operated
under more
severe
oPerating
conditions,
you
should
perform
maintenance
servico
at shorlened
intervals accordingly.
With regard
to those mainienancs
service
items
where both the
number
of operating
hours and elapsed
time
are
given,
perform
maintenance
service. whichever
comes first.
10
Page 11

I
t
PRE.WORK
INSPECTION
--
WARNING
-
Do
not
operate
or
work
on
the
generator
set
when
you
are mentally
or
physically fatigued.
The
pre-work
inspection
is
general maintenance
which
is carried
out
once
a
day
before
the engine
is operated'
To
prevent engine
trouble
because
of careless
mistakes,
e.g.
engine
stall
from
lack
of
fuel and
engine
overheating
trdm
tait<
of
cooling
water,
make
certain
to
perform
this
inspection
so
that
you may
enjoy
safe,
trouble-fee
operation.
THINGS
TO
CHECK
INSPECTION
ITEM
Check
that
engine
oil
level
is
proper.
Check
that
engine
oil
is not
dirtY.
Check
that
governor
oil
level
is
proper.
Check that
governor oil
is
not dirty'
Check
that
engine
exhibits
no
oil leakage.
Before
startlng
englne
(wlth englne
cold)
Check
that
cooling
water
level
is
proper and
not dirty'
Check
that
cooling
system
exhibits
no cooling
water
leakage'
Check
that
reservoir
tank cap
is
installed
securely'
Check
that
fuel
level
is
sufficient.
Check
that
engine
exhibits
no fuel
leakage.
Check
that
engine
starts
easily'
Check
that
engine
emits
no
abnormal
noise'
Check
that
exhaust
gases
are
in
good
condition'
After
startlng
englne
The
Engine
proper
11
Page 12

CHECKING
PROCEDURE
This section
describes the checking
procedure
for those
items of
the
pre-work
inspection and
general
maintenance
service. Be sure to see that
periodical
maintenance service
is
carried
out
without fail.
WARNING
-
Before
you perform
the
followlng servlce, make
sure
that the englne
has
cooled after
stopplng
the englne.
CAUTION
Turn off the
maln
swhch localed
on the
control
panel
of the
generator
before
performlng
Installallon or
servlce.
Thls
protects
the
unlt
from
damage and
protects a person
from
Inlury.
ENGINE
OIL
LEVEL.
DETERIORATION AND LEAKAGE
(Minlmum
of every 25 operatlng hours)
1. Ensure that the englne
oll
level ls
between the
upper llmlt and the lower llmlt on the oil level
gauge.
Check
the
oll
level
as followe: Pull
out
the oil
level
gauge.
Wlpe
otf
the oll
stlcklng
on
the
gauge
and fully Insert
the
gauge
Into
posltion.
Agaln
pull
lt out to eee
the
oil level.
CAUTION
-
The
engine
oil
level check should
be
conducted
on
level
ground,
floor, etc, before
the
engine
is
started.
-
lf
the
engine has started, stop the
engine. Wait
at
least
three minutes
before
you
check
the
oil
level.
Also,
check
the
oil
for deterioration by
touching the
oil
sticking
on the oil level
gauge
with
your
finger or
by allowing the oil to stick to cloth.
Check to see
if
engine
oil
is leaking
from the
cylinder head cover, oil
pan
and so
forth.
Check
to
be certain that
there is
no
trace
of oil leakage
beneath
the
engine or vehicle.
GOVERNOR OIL
LEVEL AND DETERIORATION
(Every
250
operating
hours or every
6 months)
1.
Ensure
that the
governor
oil level
is
between
the
upper
limit
and the
lower
limit on
the
oil level
gauge.
Lower
Limit
COOI.ANT LEVEL
AND
DIRTY
CONDITIONS
(Every
25 operating hours
minimum)
Ensure that
the
cooling water
level
of the
radiator
reservoir tank
is
between
the
upper limit
(FULL)
and
the
lower
(LOW)
limit
on the
side
of reservoir
tank.
lf no cooling
water is found
in the
reservoir tank, be sure
to fill the radiator with coolinq water.
-
WARNING
-
Never open the radiator cap when the water
temperature ls still hlgh. Failure to observe this
warnlng will
cause
pressurized
vapor
or hot water to
blow
up, resulting
in scalding
yourself.
COOI.ANT
LEAKAGE
FROM COOLING SYSTEM
(Every
25 operating hours minimum)
Check to
see
if any
water
leakage ls
present
at the
radiator, radiator hoses, water
pump
and so
forth.
Check the
ground,
floor, etc. for
trace
of
water leakage
3.
12
Page 13

EASINESS
OF
ENGINE
STARTING
1.
Check
to see
lf
the englne
can
start readlly.
Also,
check
that
the englne
runs
smoothly.
2. lf lhe englne
lalls
to slart on the flrst attempt,
walt
two or
three
mlnutes
to
allow the battery
to
recover hs functlon before
you
attempt
to start
lhe
englne agaln.
3. lf englne wlll
not
start In splte of two or three
retlres,
check
the
followlng
hems:
-
Out of
fuel
-
Low oll level
I
-
Water temperature too
high
*
(
'
Control system operates
to
prevent
starting)
ABNORMAL
NOISE FROM ENGINE
(Every
25 operating
hours
minimum)
1.
Check to see if the engine starts
smoothly
withont
emitting any abnormal noise.
2. lf
the
engine emits abnormal noise, immediately
stop
the
engine to
check
possible
causes.
EXHAUST GAS CONOITIONS
(Every
125 operating
hours or every 3 months)
1.
The engine combustion conditions can be
judged
by the color
of exhaust
gases
after the engine has
been
warmed
up.
lf
the
gases
are:
Colorless or a
light
blue
=
Good
combustion
Black
White
:
Poor
combustion
:
Oil being burned
Check to see
if exhaust
gas
is leaking
from
the
midway
point
of the
exhaust
system.
-
WARNING
-
lf the exhaust
gas
is leaking or
if
the color of
exhaust
gas
remains black or white
even
after the
engine is
running for
a little
while, stop the
engine.
DO NOT
use the
engine
until it is repaired
completely.
DO
NOT
operate
the
generator
set where ventilation
is
poor
and the
exhaust
gases
are hard to dissipate
because of recessed
ground
obstructions.
FUEL LEVEL
Before starting,
ensure
that
the fuel
level is
sufficient for
operation.
-
WARNING
-
-Never
fill
the
fuel tank near
the
generator
set.
-Make
sure
the lid of
any
gasoline
container
is
closed
tightly at
all
times. A mixture of
gasoline
vapor with air
having a
certain
ratio becomes highly
dangerous.
FUEL LEAKAGE
(Every
25
operating
hours minimum)
Check
to
see if any
fuel
leakage is
present
at the fuel
filter, carburetor, fuel hoses, etc. Be
sure
no trace
of
fuel leakage is
present
beneath the engine or vehicle.
i-
WARNING
-
-lf
any
fuel
leak
point
is
discovered,
never start
the
engine
until
it is
repaired
completely.
Call
for nearest
Dometic
service
center immediately. Also, wipe off
any
leaking
gasoline
and wait until the
engine
becomes
completely
dry.
Then
proceed
to start
the
engine.
-Under
no circumstances
should
open
fire,
such
as a lit
candle or
lighter,
be brought near
the engine
to
check
for fuel leaks.
-Have
a fire extinguisher
nearby.
CLEAN]NG
OF
SPARK
ARRESTOR
(Every
125
operallng
hours or every
3 months)
The spark
arrestor
is incorporated In
the
muffler to
prevent
llre
or burning due
to sparks. lf lt ls
reslrlcted by
carbon
deposit, the englne output
may
drop under
some
circumstances. Clean the spark
arrestor
at
regular
intervals.
Cleanlno Procedure:
After
confirming that exhaust muffler has
cooled,
remove
the 6 mm screw in the bottom of muffler.
Run set under
load for 5 minutes. lnstall screw.
13
Page 14

CLOGGED
RADIATOR
CORE
(Every
500
Operating
Hours or
Once
a Year)
lf
any mud,
paper,
dead leaves
or insects
are stuck on
the
radiator
core or
the belt
cover, ventilation
will
be
restricted
and reduced
cooling
will
result.
Deformation
or clogging
of radiator
core, or
scales,
etc., will restrict
coolant
flow.
Contact
a Domet
periodically.
INSTALLATION
CONDITION
OF
RADIATOR
CAP
(Every
250 Operatlng
Hours or Every
6 months)
'1.
When installing
the radiator
cap,
check
to see
if the
turning
effort of
the radiator
cap
is correct.
2.
Ensure
that the
negative
pressure
valve
of the
radiator
cap opens
when
it is
pulled
out by
your
fingers.
Also,
ensure
that the
valve
closes
when
you
release
your
fingers.
ic
service
.,5
{{"
GENERAL
SERVICE
When
you perform
the
pre-work
inspection
and
periodical
maintenance
service,
rt
will become
necessary
to
perform
general
service
of cleaning,
adjustment,
replacement,
etc.
This
section
describes
the
servicing
procedure
for
those
most common
items
of
general
service.
l-
WARNING
-
Before
you
perform
the
followlng
servlce:
1. Be
sure to turn
off START/STOP
switch and
to
disconnect
negative
O
banery
cable.
lf it is
not
disconnected,
and
someone
turned
the sTART/sTop
switch on
during
servicing,
death
or
severe
InJury
may result
by electrlcal
shock
or
damage
from
sudden
movement
of
parts.
2. Make
sure
that the
engine
has cooled
after stopping
the engine.
CAUTION
Turn off the
maln
swltch
located
on
lhe control
panel
of the
generator,
before
performing
Instaltatlon
or
servlce.
Thls
protects
the unlt
from
damage
and
protects
a
person
from Injury.
CAUTION
TIPS
FOB
SERVICE:
When
you perform
general
service, care
must be
taken
to follow the
points
given
below:
-First,
select a
place
which
assures
safe
operation.
-Prior
to
the service,
be
sure
to stop
the engine.
-Use
tools
best
suited
for the
parts,
-This
generator
set is
designed
in the
millimeter
systern
except
some
fittings,
i.e. oil
pump,
etc.
please
use
tools for
the
millimeter
system.
-Slart
the
operation
only
after
the engine
has
cooled.
-Be
very
careful
not to
drop
small
parts,
e.g. bolts and
nuts,
into
the
generator
set.
-When
parts
are removed,
first clean
the ad.iacent
area
thoroughly
to
remove
any mud
or dirt.
-Before
the
operation
for
the
electric
circuit
is
started,
be
certain
to disconnect
the
negative
(-)
terminal
of
the
battery.
-lt
is advisable
to use
genuine
parts,
recommended
lubricants
and recommended
antifreeze (coolant).
ENGINE
OIL
REPLENISHMENT
(Every
25 operating
hours
minimum)
lf
you
continually
operate
the
generator
set
while the
engine
oil level
is low,
it will cause
premature
wear.
3.
center
to
check
the unit
exhibits
no
Ensure
that
damage.
&
the seal
packing
section
ffi
-
WARNING
-
-
Never
open
the radiator
cap when
the water
temperature
is still
high.
14
Page 15

Engine seizure is
prevented
by
the control circuit;
please
replenish
the engine oil at an earlier
time.
'1.
Remove the oil
filler cap or the oil level
gauge
to
replenish engine oil.
After
the
engine
oil has been drained,
install the
drain
plug
securely.
Fill engine oil to the specified
level, while
checking
the oil level using
the level
gauge.
Install the oil
filler cap or the
oil level
gauge
securely.
Start
the
engine
and run it
for about five minutes.
Stop the engine and wait
at least three minutes.
Ensure that the
oil
level
is within the specified
range,
using the oil
level
gauge.
GOVERNOR OIL
REPLENISHMENT
(Every
250 operating
hours or every
6 months)
1. Remove the level
gauge.
Replenish
governor
oil.
After
the oil has been replenished,
ensure that the
oil level is
near the upper limit,
using the oil level
gauge.
CAUTION
As for the
governor
oil, use
the same oil as
the engine
oil.
GOVERNOR
OIL CHANGE
(Every
1000 Operating Hours or
Every 2
years)
1. Remove
the level
gauge
and
oil drain
plug
to drain
the
governor
oil.
2. After the oil has drained,
install the drain
plug
securely.
3. Fill oil to the
upper level, while checking
the oil level
using the level
gauge.
4. Install the level
gauge
securely.
(MMl
AttEN
3.
4.
6.
2.
After the engine
oil has
that the oil level
is
within
the oil level
gauge.
been replenished,
ensure
the specified range, using
Install
the oil
securely.
filler cap
or the oil level
gauge
CAUTION
-
Perform
the operation at
a level
place.
-
Select an engine
oil best suited
to
your
local climate
from
among those engine
oils equivalent to
designation
SF ot
API service classification
(SAE
5W-30,
10W-30,
10w-40, 10w-50,
15w-40, 20w40,
20w-50).
-
As for the oil level,
care must be taken
not to
exceed
the
upper limit.
ENGINE
OIL CHANGE
(Every
250 Operatlng
Hours or Every 6 Months)
The use of deteriorated
engine oil will cause
premature
wear,
overheating, hard starting
or even engine seizure.
Be
sure to change
the engine oil
periodically.
1. lf the
engine is cold, run the engine for about
three
minutes
so
that
the engine may drain easily. After
warming
up, stop the engine. lt
may be necessary
to
warm-up longer in a
cold climate.
2. Next, remove
the oil filler cap or the
oil level
gauge.
Remove the
oil
pan
drain
plug
to drain
the engine
oil.
2.
Wrench
15
WRENCH
Page 16

COOI.ANT
REPLENISHMENT
(Every
25 Operallng Hours
Mlnlmum)
lf
you
continually operate the
generator
set
while the
coolant level is low, it
will cause overheating or even
engine
seizure. Be
sure to replenish the tap water
(not
long life
coolant
or antifreeze).
NOTE:
lf long life coolant was
thrown away
inadvertently, the coolant system must
be filled
with long life coolant
or antifreeze of the same
concentration.
1. Remove the reservoir
tank cap. Replenish tap
water up to the
'FULL'
mark.
Normally, do not remove the radiator
cap. But if
the
reservoir tank contains no
coolant, it is
necessary to remove
the radiator cap and
to
fill
the
radiator with tap
water.
After tap
water
has
been replenished, install
the
caps securely.
-
WARNING
-
-
lf the radiator cap is opened too
early when the
coolant ternperature
is still high,
pressurized
vapor or
hot water will blow out, resulting
in
personal
injury.
After the coolant temperature
has dropped,
slowly
open the radiator cap
by wrapping the cap
with a
clolh.
-
Be careful of HOT WATER
BLOWING OUT of breather
of reservoir tank.
CAUTION
-
use tap water to dilute long life coolant or antifreeze.
-
With regard to coolant - it is advisable to use
a'long
life coolant'.
-
Long life coolant or antifreeze
must be
prepared
in a
concentration
matched with
the lowest temperature in
your
area.
-
Use
'long
life coolant or antifreeze for aluminum
engines'.
COOLANT CHANGE
(Every
500 Operatlng Hours or Once a Year)
lf
dirty coolant
is
used
continually,
rust
formation or
corrosion will be accelerated. As a resuh, it will
incur
water
leakage or
overheating. Change coolant
periodically.
Remove
the
radiator
cap. Drain coolant by opening
the drain cock.
At
the
same time. drain the coolant
from the
reservoir tank.
Close the drain cock
securely.
Loosen the
breather
plug
of the intake manifold.
Put
the
specified
amount of undiluted long
life
coolant
(or
antifreeze) in the radiator and
reservoir
tank.
When filling
radiator, do it slowly taking a
sufficient
length of
time.
(Specified
amount : See
'Service
Data:).
After confirming that
coolant has started flowing from
the breather
plug,
tighten
the breather
plug.
Fill the radiator
with tap water until the radiator
is
full. Then fill the reservoir
tank with tap water up to
'FULL'
line.
After
filling the cooling system with
tap
water,
close
the
radiator cap tightly, also install the reservoir
tank
cap securely.
8. Start the
engine. After warming up, stop the engine.
After the engine has cooled, remove the
radiator
cap. Check to see
if
the
coolant level of the radiator
drops. lf the coolant level is
low, add
tap
water.
Also, check to see it the coolant
level
of the
reservoir
tank
drops. lf the coolant level is low, add tap
water.
9. After adding
water,
tighten
the caps securely.
TIGHTENING
OF BATTERY TERMINALS
& CLEANING
(Check
Every 125 Operallng Hours)
To assure
smooth flow of electricity,
check the terminal
conditions
periodically.
1. Tighten
the terminals if they
are loose.
2.
Clean the terminals if they
are dirty or corroded.
3. lf the terminals
exhibit white
powder
due
to
corrosion, wipe off
the terminals using warm water.
4. lf the terminal
section exhibits excessive corrosion,
remove
the cable terminal by means
of a terminal
puller,
Polish the terminals using a
wire
brush
in
combination
with abrasive
paper.
5. After
cleaning and tightening, coat the terminal
section with a thin film of
grease.
1.
2.
3.
4.
5.
6.
7.
16
Page 17

-
WARNING
-
-
Be sure to stop
the engine before
the
above
operation
is
performed.
-
When disconnecting the battery terminals,
remove the
negative
(-)
cable
terminal first. Conversely, when
installing the banery cable terminal,
attach
the
positive
(+)
terminal first.
-
To avoid hazards caused by shorts,
utmost caution
must
be
taken when handling
tools
while doing the
work.
-
Never
allow any
fire to
be
brought near the battery.
Failure to follow the above instructions may resutt in
severe injury
or
dedh due to
shock
or fire.
BATTERY
WATER
REPLENISHMENT
(Check
Every 125
Operatlng
Houre
Mlnlmum)
lf the
battery is
used with
a low water
level as a resuh
of vaporizing
or
electrolyzing, water
sulfating
will take
place
on
the
plates
resulting
in
shortened battery life.
NOTE: For
inspection
intervals of
'Maintenance
Free'
batteries,
consuh a Dometic
Service
Center or
battery shop.
lf the battery electrolyte level
plug.
Replenish distilled water
is low. remove the cell
up to
the
UPPER level
for each cell.
-
WARNING
-
-
Be sure to stop the engine before
the
operation is
performed.
-
Never allow any fire to be brought near the banery.
-
The
battery electrolyte has strong corrosive
properties,
presenting potential
hazards that
could result in
dermatitis
on skin or corrosion on
metals.
Extrerne
cautbn
must be
exercised
to efie.Jre
that no bdtery
electrolyte touches skin, chhes, equiprnent,
etc.
-
lf
the banery electrolyte
gets
in
your
eyes, immediately
flush
your
eyes with
lots
of water.
Consult a doctor.
-
Carefully read the caution
plate
affixed
to the banery
so that
you
may
handle the battery correctly.
AIR CLEANER
ELEMENT CLEAN]NG &
REPI.ACEMENT
(Clean
Every
125 Operatlng Hours)
(Replace
Every
500 Operatlng
Hours)
Using a restricted air cleaner element
will
reduce engine
output, increase
fuel
consumption
or
premature
engine
wear. In dusty
conditions, clean and replace the
air
cleaner element more frequently.
1. Remove the air cleaner element by removing the
wing
nut
at the center of the
air
cleaner case
cover.
Clean the
air
cleaner element,
being very
careful not
to damage the lilter
paper
during
the cleaning.
Lighrly
rap the filter
paper
with
the handle of
a
screwdriver or
blow
out the element from the inside
of the element, using compressed
air.
Element Cleaning Intervals: Every 125 Operating
Hours or Every
3 months.
-When
replacing
the element,
thoroughly
clean the inside
of
the
case.
Element Replacement
Intervals: Every 500
Operating
Hours or once a
year.
-Replace
the
gasket
if it is damaged.
-
WARNING
-
-Be
very careful
not to inhale dirt or
dust.
/-\
IteR. \
v
\{ta&
\"
17
Page 18

CAUTION
-
Some air
cleaner
elements
sold in
the
market do
not
satisfy requirements
concerning the
engine
performance
or durability. lt is, therefore, advisable to
use reliable Dometic elements.
OIL
FILTER ELEMENT REPI.ACEMENT
(Every
250 Operatlng Hours or Every 6 Monthe)
Using a dirty oil fifter elements will weaken the
purifying
action of the engine oil
and
accelerate
engine
wear.
Beplace
the
oil fiher element
periodically.
1. Remove
the
oil fitter
element,
using a
tool.
When installing a new
oil
filter element, first apply
engine
oil to the'O'
ring.
Tighten filter with hand(s)
aboun
3/4
turn after
gasket
contacts mounting
surface
of
engine.
After installing
the
oil
filter element,
run
the engine
for 3
minutes. Ensure
that
the oil
fitter
element
installing
section exhibits no oil leakage.
4. Stop
the
engine.
After a lapse
of
at least three
minutes,
check the
oil level.
Replenish
engine
oil,
as required.
FUEL FILTER
REPI.ACEMENT
(Every
500
Operatlng Hours or once a Year)
Restricted luel
litter
will hamper
smooth flow of the fuel,
thereby causing
reduced engine output
or engine
stall.
Replace filter
periodically.
'1.
Replace
the
filter
by disconnecting
the
fuel
filter
hose. Prior to this
operation. take
precautionary
measure,
such
as
placing
a
cloth
under the filter,
so
that
the
flowing fuel from
the
fuel
fillter
may not
splash,.
lnsert
the
fuel hose
into
position.
lnstall
the
clam
p.
Start
the engine. Check to see
if
the
fuel
hose
attaching section
exhibits
any fuel leakage.
-
WARNING
-
-Pay
utmost cautlon
not
to splll
fuel
durlng
the
operatlon.
-Thoroughly
wlpe off
any
spllled fuel.
-Under
no clrcumstances should any fire be brought
near the englne.
CAUTION
-Some
fuel
filters
sold
In lhe market do not satlsty
requlrements
concernlng
the
englne
performance
or
durablllty. lt ls, therefore, advisable
to
use reliable
Dometlc fllter.
CLEANING INSIDE
OF THE RADIATOR
(Every
1000 Operatlng
Hours
or
every
2 Years)
Drain any deposition matter or
water
scale from the
radiator
periodically
to keep the cooling effect.
Remove
the radiator
cap. Drain
the coolant
by
opening
the drain
cock.
At the
same time, drain
the
coolant from the
reservoir tank.
Close
the drain
cock securely.
Loosen
the breather
plug
of the
intake manifold.
Pour
tap water
into water filling
port
of the radiator.
The water should
be
poured
slowly - taking
your
time.
After
confirming
that water has
started flowing
from
the
breather
plug,
tighten the breather
plug.
2.
2.
1.
2.
3.
4.
5.
18
Page 19

6. After filling the
radiator, fill the
reservoir
tank with
water
up to the
'FULL'
mark.
7. After filling water,
install the
radiator cap
and
reservoir
tank cap securely.
8. Start
the engine.
After warming
up, stop
the
engine.
9. Wait until the cooling
water
temperature drops.
Remove
the radiator cap
and open the
drain
cock
to
drain the cooling water.
10. Nerc,
fill
the
radiator with
tap
water
and drain the
cooling
water again. Repeat
this operation three
or
four times.
Finally, fill the
radiator with long life
coolant
or antifreeze according to
the
procedure
written
in
the
'Coolant
Change' section.
-
WARNING
-
-
Never
open the
radlator cap when the coolant
(water)
temperature ls stlll hlgh.
CAUTION
-As
for
flushlng waler,
use tap water.
-
WARNING
-
-
Exhaust
gases
are
toxic. Do not operate
the
generator
set
in
a building.
-
Before
you perform
the following service, make
sure
that the engine was
stopped
and
coolant
has cooled.
When
you
do not
operate
your
recreational
vehicle for a
long
period
of time,
perform
the
following operations to
protect generator
set
from
harmful effects of rust,
humidity and
freezing.
'1.
Start
the
engine
outdoors where ventilation is
good.
Stop
the
engine
after warming it up
thoroughly.
2.
Drain
the
old
engine oil.
Fill
with
new
engine
oil.
3.
Drain
the
oil
coolant. Fill
the
cooling
system with
new
coolant according
to the
procedure
written in
section
'coolant
Change'.
(Protection
of cooling
system against
freezing and
corrosion).
4.
To keep the
vacant
space in
the fuel
tank at
a
minimum level,
fill the fuel tank with fuel
after
stopping the
engine during a
cold
season.
(Protection
of fuel
system
against freezing
and rust
formation).
5.
Start
the
engine
outdoors where
ventilation
is
good
at regular intervals of about once
a week.
Stop the
engine
after warming it up
thoroughly
so
that each
part
may
be
lubricated by
engine oil.
CAUTION
Store
lhe
generator
set
In
a dry
bulldlng.
SERVICE DATA
ITEM
SPECIFIED VALUE
REMARKS
Engine oil
Capacity
Total oil
Capacity
2.8s - 2.96
qt.
(2.7
-
2.8
t)
Selecl an engine oil
best suited
to
your
local climate lrom among
those
engine
oils equivalent to
designation
SF
of API
service
classification
(SAE
5W-30. 10W€0,
10w-40,
10w-50, 15w40,
20w40,
and 20W-50)
Change oil
Capacity
2.54
qr.
(2.4
t)
Filling
amount of
anlilreeze
Mixing solution of
5O% long
lile
coolant
and 50%
ot
tap water is
recommended tor most
temperaturgs
and
provide
good protection
lor
corrosion
and scale. Higher
concentration
decreases cooling
effici€ncy.
Use
higher
concentration
only
when
additional
protection
against freezing
il
needed. Lower
concentration
than
40%,
under some
circumstances, may resuh
in
poor
protection
against
corrosion.
Coolant
Capacity
KWYATT 4
1.11
gal.
(4.2
t)
This
value
is
for
solution.
Also, reservoir
tank capacity
is
contained to this value
KWYATT 7
1.27
gal.
(4.8
t)
19
 Loading...