

Page 1
ENDEFR
ES
PT
ITNLDASVNOFIRUPLSKCSHU
WINDOWS & DOORS
FP200
Windscreen blackout system
Installation and Operating Manual. . . . . . . . 7
Frontscheiben Plissee
Montage- und Bedienungsanleitung . . . . . 10
Système d'occultation de
pare-brise
Instructions de montage
et de service . . . . . . . . . . . . . . . . . . . . . . . . . 13
Sistema para oscurecer el
parabrisas
Instrucciones de montaje y de uso. . . . . . . 17
Sistema de escurecimento do
pára-brisas
Instruções de montagem e manual de
instruções . . . . . . . . . . . . . . . . . . . . . . . . . . . 21
Sistema di oscuramento del
parabrezza
Istruzioni di montaggio e d’uso . . . . . . . . .25
BLINDS
Voorruitverduisteringssysteem
Montagehandleiding en
gebruiksaanwijzing. . . . . . . . . . . . . . . . . . . 29
System til mørklægning af forrude
Monterings- og betjeningsvejledning. . . . 32
Mörkläggningssystem för framruta
Monterings- och bruksanvisning . . . . . . . . 35
Blendingssystem for frontrute
Monterings- og bruksanvisning. . . . . . . . . 38
Tuulilasin tummennusjärjestelmä
Asennus- ja käyttöohje . . . . . . . . . . . . . . . . 41
Система затемнения лобового
стекла
Инструкция по монтажу и эксплуатации . 44
System zasłaniania przedniej szyby
Instrukcja montażu i obsługi. . . . . . . . . . . . 47
Systém zatienenia čelného skla
Návod na montáž a uvedenie
do prevádzky. . . . . . . . . . . . . . . . . . . . . . . . 51
Systém stínění pro čelní sklo
Návod k montáži a obsluze . . . . . . . . . . . . 54
Első szélvédő sötétítő-rendszer
Szerelési és használati útmutató . . . . . . . . 57
Page 2

Page 3
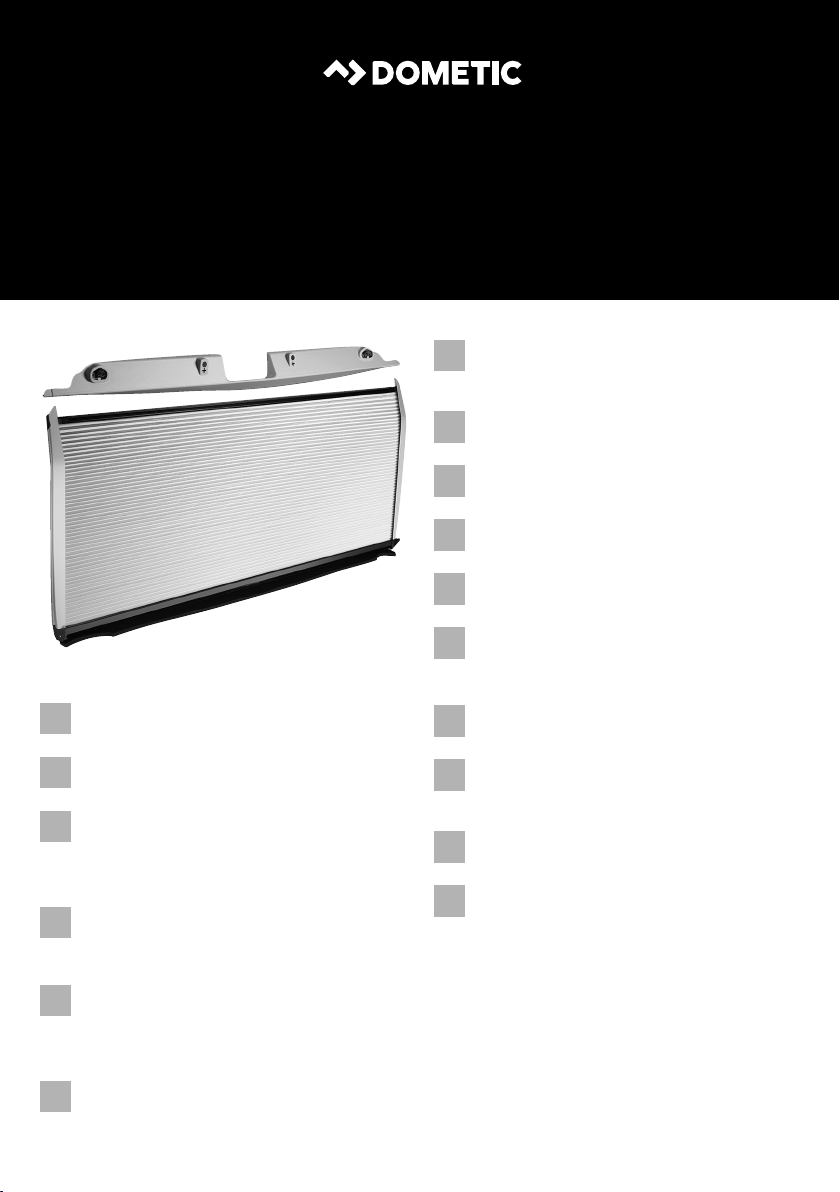
FP200
1
2345687
A
B
C
D
2x
E
6x 4x 4x 14x
1
1.
2
2.
3
Page 4
FP200
1.
2.
C
C
E E
E E
DD
3
1.
2,5 mm
4
1.
2.
4
B
5
4
2.
Page 5

FP200
2.
2,5 mm
6A7
8
1.
3
2 1
5
Page 6
9
FP200
6
Page 7

EN
FP200 Safety and installation instructions
Please read this instruction manual carefully before installation and first
use, and store it in a safe place. If you pass on the product to another
person, hand over this instruction manual along with it.
Table of contents
1 Safety and installation instructions . . . . . . . . . . . . . . . . . . . . . . . . . . . . . . . . . .7
2 Scope of delivery . . . . . . . . . . . . . . . . . . . . . . . . . . . . . . . . . . . . . . . . . . . . . . .8
3 Intended use . . . . . . . . . . . . . . . . . . . . . . . . . . . . . . . . . . . . . . . . . . . . . . . . . . .8
4 Mounting the product . . . . . . . . . . . . . . . . . . . . . . . . . . . . . . . . . . . . . . . . . . .8
5 Using the product. . . . . . . . . . . . . . . . . . . . . . . . . . . . . . . . . . . . . . . . . . . . . . .9
6 Cleaning and maintenance. . . . . . . . . . . . . . . . . . . . . . . . . . . . . . . . . . . . . . . .9
7 Warranty . . . . . . . . . . . . . . . . . . . . . . . . . . . . . . . . . . . . . . . . . . . . . . . . . . . . . .9
1 Safety and installation instructions
Please observe the prescribed safety instructions and stipulations from the
vehicle manufacturer and service workshops.
The manufacturer accepts no liability for damage in the following cases:
• Damage to the product resulting from mechanical influences
• Alterations to the product without express permission from the manufacturer
• Use for purposes other than those described in the operating manual
NOTE
I
Please note the following:
• During installation, do not damage any cables in the vehicle.
• Do not obscure the windscreen while driving.
If you do not have sufficient technical knowledge for installing the
components in vehicles, you should have a specialist install the roof light
in your vehicle.
7
Page 8

EN
Scope of delivery FP200
2Scope of delivery
No. in
fig. 1,
page 3
1 1 Trim plate
2 1 Blind
3 12 Bolt 3.5 x 13 mm (beige)
4 4 Bolt 3.5 x 13 mm (black)
5 4 Bolt M6 x 50 mm
6 2 Bolt M6 x 70 mm
7 2 Guide rail
8 6 Washer M6
Quantity Description
3 Intended use
The Dometic windscreen blackout system FP200 (item no. 9104116564) is suitable
for the windscreen of mobile homes of type Fiat Ducato type 250 from model
year 07/2006 and Fiat Ducato type 290 from model year 07/2014 as well as identically constructed Peugeot Boxers and Citroën Jumpers (without roof rack, without
folding bed and without head airbag).
4 Mounting the product
NOTE
I
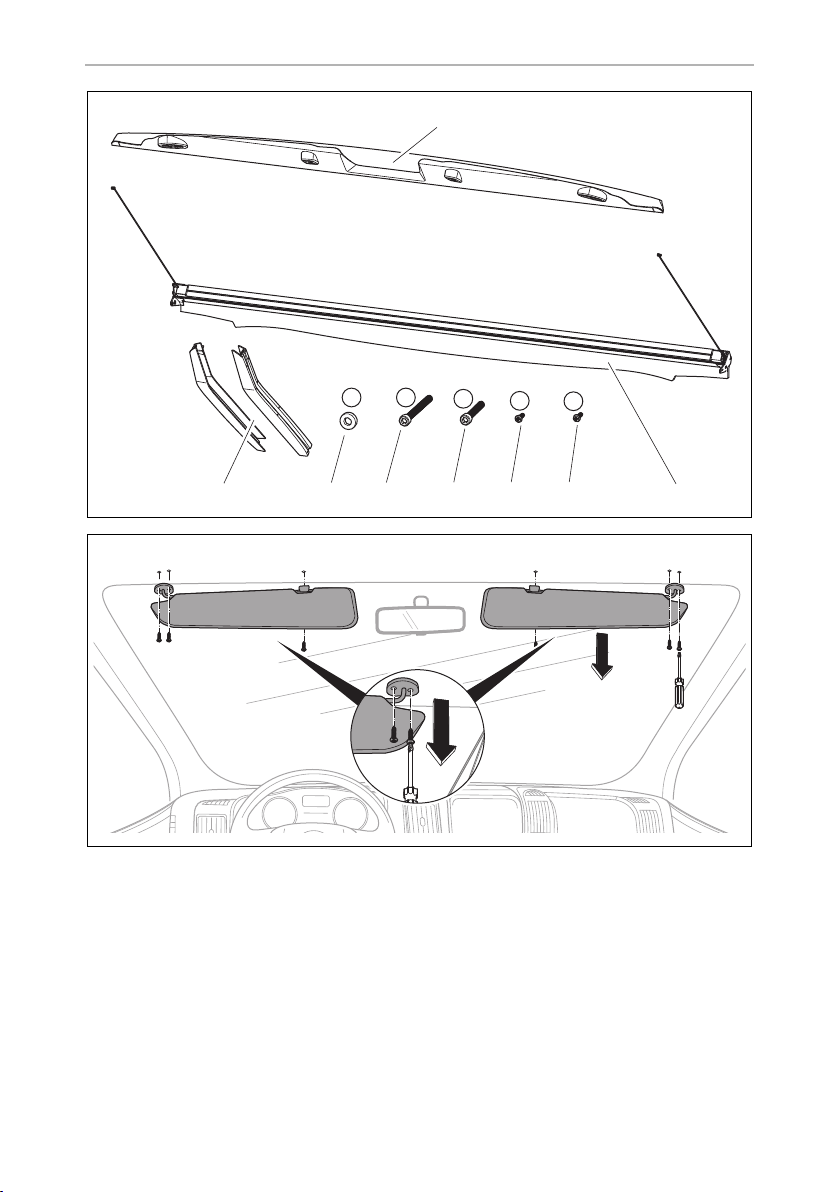
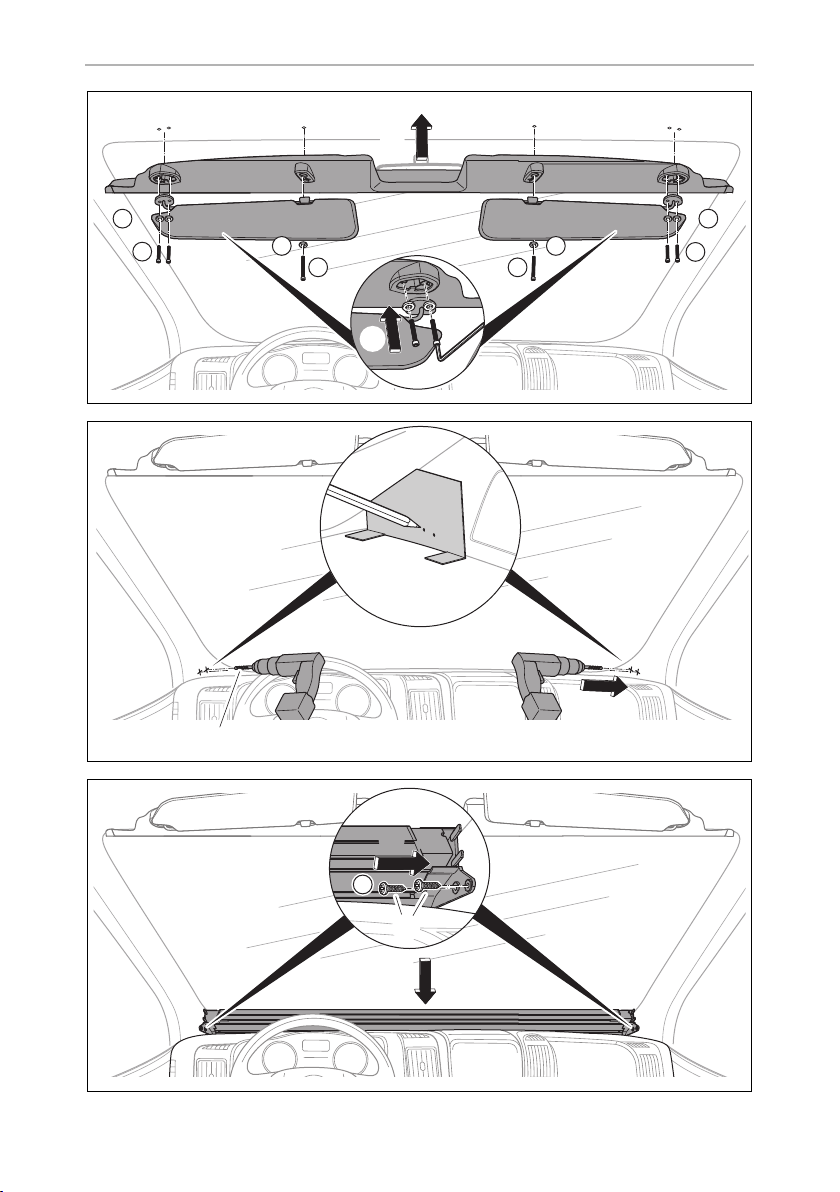
➤ Mount the blind as shown in the figures: fig. 4, page 4 to fig. 8, page 5.
I
8
To mark the holes for the blind, you can use the template that is included
in the package.
NOTE
fig. 8, page 5: The tension of the cords (3) depends on which groove
(1 or 2) the cords are hung in.
Use groove 2 if the cords are to have higher tension.
Page 9

EN
FP200 Using the product
5 Using the product
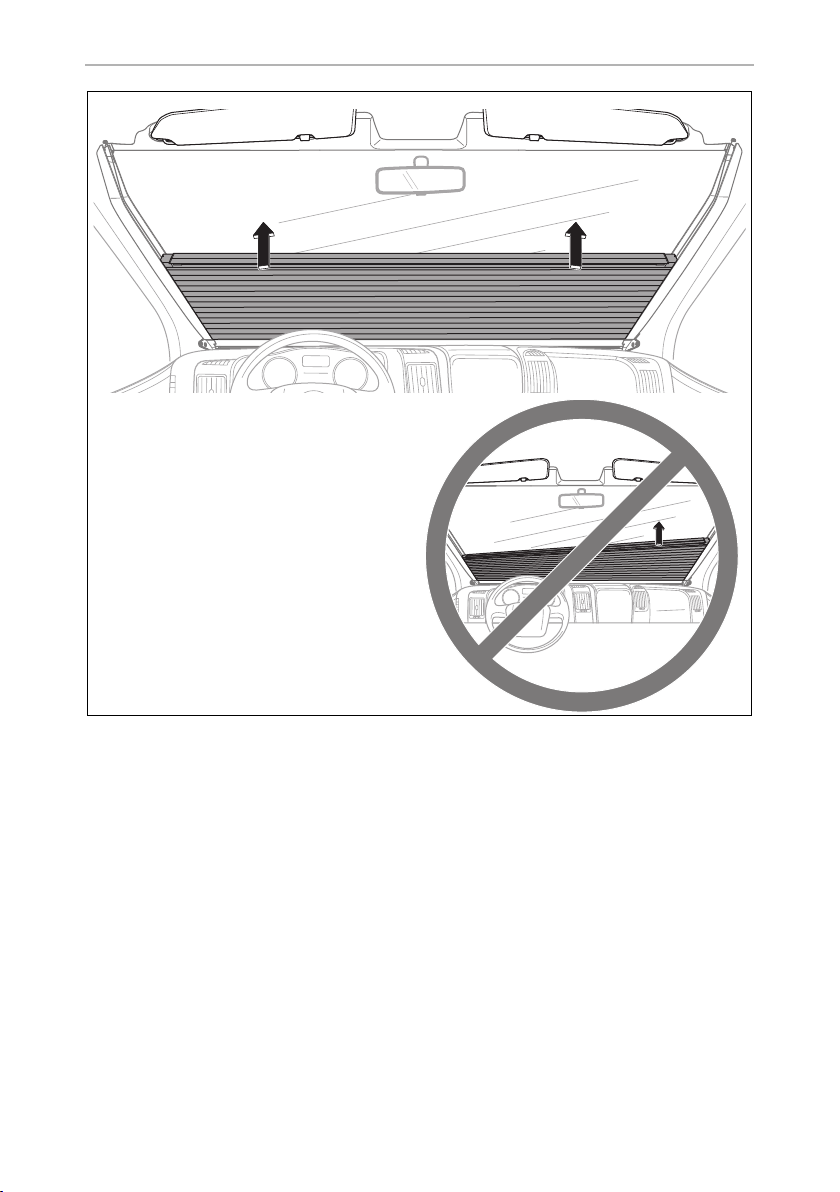
Closing the blind (fig. 9, page 6)
➤ Pull the blind with both hands up to the desired position.
The two cords in the guide rails keep the blind in the desired position.
Opening the blind
➤ Guide the blind back into its holder slowly using both hands.
6 Cleaning and maintenance
NOTICE!
A
➤ Occasionally clean the product with a damp cloth.
➤ Spray the sliding surfaces of the guide rails periodically with small amounts of
silicone spray to achieve the smoothest possible sliding of the handle strips in the
guide rails.
Do not use sharp or hard objects or cleaning agents for cleaning as these
may damage the product.
➤ To prevent material fatigue, do not keep the blind closed for an extended period
of time.
7Warranty
The statutory warranty period applies. If the product is defective, please contact your
retailer or the manufacturer's branch in your country (see the back of the instruction
manual for the addresses).
For repair and guarantee processing, please include the following documents when
you send in the device:
• A copy of the receipt with purchasing date
• A reason for the claim or description of the fault
9
Page 10

DE
Sicherheits- und Einbauhinweise FP200
Bitte lesen Sie diese Anleitung vor Einbau und Inbetriebnahme sorgfältig
durch und bewahren Sie sie auf. Geben Sie sie im Falle einer Weitergabe
des Produktes an den Nutzer weiter.
Inhaltsverzeichnis
1 Sicherheits- und Einbauhinweise . . . . . . . . . . . . . . . . . . . . . . . . . . . . . . . . . .10
2 Lieferumfang . . . . . . . . . . . . . . . . . . . . . . . . . . . . . . . . . . . . . . . . . . . . . . . . . . 11
3 Bestimmungsgemäßer Gebrauch . . . . . . . . . . . . . . . . . . . . . . . . . . . . . . . . . 11
4 Produkt montieren . . . . . . . . . . . . . . . . . . . . . . . . . . . . . . . . . . . . . . . . . . . . . 11
5 Produkt benutzen . . . . . . . . . . . . . . . . . . . . . . . . . . . . . . . . . . . . . . . . . . . . . .12
6 Reinigung und Pflege . . . . . . . . . . . . . . . . . . . . . . . . . . . . . . . . . . . . . . . . . . .12
7 Gewährleistung. . . . . . . . . . . . . . . . . . . . . . . . . . . . . . . . . . . . . . . . . . . . . . . .12
1 Sicherheits- und Einbauhinweise
Beachten Sie die vom Fahrzeughersteller und vom Kfz-Handwerk vorgeschriebenen Sicherheitshinweise und Auflagen!
Der Hersteller übernimmt in folgenden Fällen keine Haftung für Schäden:
• Beschädigungen am Produkt durch mechanische Einflüsse
• Veränderungen am Produkt ohne ausdrückliche Genehmigung vom Hersteller
• Verwendung für andere als die in der Anleitung beschriebenen Zwecke
HINWEIS
I
Beachten Sie folgende Hinweise:
• Beschädigen Sie bei der Montage keine Kabel im Fahrzeug.
• Verdunkeln Sie die Frontscheibe nicht während der Fahrt.
Wenn Sie nicht über ausreichende technische Kenntnisse zum Einbauen
von Komponenten in Fahrzeugen verfügen, sollten Sie sich das Dachfenster von einem Fachmann ins Fahrzeug einbauen lassen.
10
Page 11

DE
FP200 Lieferumfang
2 Lieferumfang
Pos. in
Abb. 1,
Seite 3
11Blende
2 1 Rollo
3 12 Schraube 3,5 x 13 mm (beige)
4 4 Schraube 3,5 x 13 mm (schwarz)
5 4 Schraube M6 x 50 mm
6 2 Schraube M6 x 70 mm
7 2 Führungsschiene
8 6 Unterlegscheibe M6
Anzahl Beschreibung
3 Bestimmungsgemäßer Gebrauch
Das Dometic Frontscheibenverdunklungssystem FP200 (Art.-Nr. 9104116564) ist
geeignet für die Frontscheibe von Wohnmobilen des Typs Fiat Ducato Typ 250 ab
Baujahr 07/2006 und Fiat Ducato Typ 290 ab Baujahr 07/2014 und baugleiche
Peugeot Boxer und Citroën Jumper (ohne Dachablage, ohne Hubbett und ohne
Kopfairbag).
4 Produkt montieren
HINWEIS
I
➤ Montieren Sie das Rollo wie in den Abbildungen dargestellt: Abb. 4, Seite 4
bis Abb. 8, Seite 5.
I
Zum Anzeichnen der Bohrungen für das Rollo können Sie die Schablone
verwenden, die in der Verpackung enthalten ist.
HINWEIS
Abb. 8, Seite 5: Die Spannung der Bänder (3) hängt davon ab, in
welche Nut (1 oder 2) die Bänder eingehängt werden.
Verwenden Sie die Nut 2, wenn die Bänder eine höhere Spannung
haben sollen.
11
Page 12

DE
Produkt benutzen FP200
5 Produkt benutzen
Rollo schließen (Abb. 9, Seite 6)
➤ Ziehen Sie das Rollo mit beiden Händen nach oben in die gewünschte Stellung.
Die beiden Bänder in den Führungsschienen halten das Rollo in der gewünschte
Stellung.
Rollo öffnen
➤ Führen Sie das Rollo mit beiden Händen langsam in seine Aufnahme zurück.
6 Reinigung und Pflege
ACHTUNG!
A
➤ Reinigen Sie das Produkt gelegentlich mit einem feuchten Tuch.
➤ Sprühen Sie die Führungsschienen an den Gleitflächen in regelmäßigen
Abständen mit Silikonspray in geringer Dosis ein, um ein möglichst leichtes
Gleiten der Griffleisten in den Führungsschienen zu erreichen.
Keine scharfen oder harten Gegenstände oder Reinigungsmittel zur
Reinigung verwenden, da dies zu einer Beschädigung des Produktes
führen kann.
➤ Halten Sie das Rollo nicht über einen längeren Zeitraum geschlossen, um eine
Materialermüdung zu vermeiden.
7Gewährleistung
Es gilt die gesetzliche Gewährleistungsfrist. Sollte das Produkt defekt sein, wenden
Sie sich bitte an Ihren Fachhändler oder an die Niederlassung des Herstellers in
Ihrem Land (Adressen siehe Rückseite der Anleitung).
Zur Reparatur- bzw. Gewährleistungsbearbeitung müssen Sie folgende Unterlagen
mitschicken:
• eine Kopie der Rechnung mit Kaufdatum,
• einen Reklamationsgrund oder eine Fehlerbeschreibung.
12
Page 13

FR
FP200 Consignes de sécurité et instructions de montage
Veuillez lire attentivement cette notice avant le montage et la mise en
service. Veuillez ensuite la conserver. En cas de passer le produit, veuillez
le transmettre au nouvel acquéreur.
Table des matières
1 Consignes de sécurité et instructions de montage . . . . . . . . . . . . . . . . . . . .13
2 Pièces fournies . . . . . . . . . . . . . . . . . . . . . . . . . . . . . . . . . . . . . . . . . . . . . . . . 14
3 Usage conforme . . . . . . . . . . . . . . . . . . . . . . . . . . . . . . . . . . . . . . . . . . . . . . . 14
4 Montage du produit . . . . . . . . . . . . . . . . . . . . . . . . . . . . . . . . . . . . . . . . . . . .15
5 Utilisation du produit . . . . . . . . . . . . . . . . . . . . . . . . . . . . . . . . . . . . . . . . . . . 15
6 Entretien et nettoyage . . . . . . . . . . . . . . . . . . . . . . . . . . . . . . . . . . . . . . . . . .16
7 Garantie. . . . . . . . . . . . . . . . . . . . . . . . . . . . . . . . . . . . . . . . . . . . . . . . . . . . . .16
1 Consignes de sécurité et instructions de
montage
Respectez les consignes de sécurité et autres prescriptions imposées par
le fabricant du véhicule et par les professionnels de l’automobile !
Le fabricant décline toute responsabilité pour des dommages dans les cas suivants :
• des influences mécaniques ayant endommagé le matériel
• des modifications apportées au produit sans autorisation explicite de la part du
fabricant
• une utilisation différente de celle décrite dans la notice
REMARQUE
I
Tenez compte des remarques suivantes :
• Attention de ne pas endommager de câble au montage.
• N'occultez pas le pare-brise pendant le trajet.
Si vos connaissances techniques en matière d'installation d'éléments
dans un véhicule sont insuffisantes, nous vous recommandons de faire
installer le dôme de toit par un spécialiste.
13
Page 14

FR
Pièces fournies FP200
2Pièces fournies
Pos. dans
fig. 1,
page 3
11Cache
21Store
3 12 Vis 3,5 x 13 mm (beige)
4 4 Vis 3,5 x 13 mm (noire)
54Vis M6x50mm
62Vis M6x70mm
7 2 Rail de guidage
8 6 Rondelle M6
Nombre Description
3Usage conforme
Le système d'occultation de pare-brise Dometic FP200 (réf. 9104116564)
convient aux pare-brises : Fiat Ducato de type 250, à partir de l'année de
fabrication 07/2006 ; Fiat Ducato de type 290, à partir de l'année de fabrication
07/2014 ; Peugeot Boxer et Citroën Jumper de construction identique (sans
compartiment de rangement dans le toit, ni lit escamotable, ni airbag rideau).
14
Page 15

FR
FP200 Montage du produit
4 Montage du produit
REMARQUE
I
➤ Montez le store comme sur les schémas : fig. 4, page 4 à fig. 8, page 5.
I
Le gabarit de l'emballage permet de marquer les alésages pour le store.
REMARQUE
fig. 8, page 5 : La tension des bandes (3) dépendra des rainures (1 ou
2) par lesquelles elles seront accrochées.
La rainure 2 permet d'obtenir une tension supérieure.
5 Utilisation du produit
Fermeture du store (fig. 9, page 6)
➤ Tirez le store vers le haut et mettez-le dans la position souhaitée.
Les deux bandes dans les rails de guidage maintiennent le store dans la position
souhaitée.
Ouverture du store
➤ Faites remonter lentement le store à deux mains dans son logement.
15
Page 16

FR
Entretien et nettoyage FP200
6 Entretien et nettoyage
AVIS !
A
➤ Nettoyez le produit avec un tissu humide.
➤ Vaporisez à intervalles réguliers une faible dose de spray au silicone sur les
surfaces de glissement des glissières latérales afin que les poignées glissent aussi
facilement que possible dans les glissières latérales.
➤ Ne laissez pas le store fermé pendant une période prolongée pour éviter que le
matériau ne s’use.
N’utilisez aucun objet coupant ou dur, ni de détergents pour le
nettoyage. Cela pourrait endommager le produit.
7 Garantie
Le délai légal de garantie s'applique. Si le produit s'avérait défectueux, veuillez vous
adresser à la filiale du fabricant située dans votre pays (voir adresses au verso du
présent manuel) ou à votre revendeur spécialisé.
Veuillez y joindre les documents suivants pour la gestion des réparations et de la
garantie :
• une copie de la facture avec la date d'achat,
• le motif de la réclamation ou une description du dysfonctionnement.
16
Page 17

ES
FP200 Indicaciones de seguridad y montaje
Lea detenidamente estas instrucciones antes de llevar a cabo la instalación
y puesta en funcionamiento, y consérvelas en un lugar seguro. En caso de
vender o entregar el producto a otra persona, entregue también estas
instrucciones.
Índice
1 Indicaciones de seguridad y montaje . . . . . . . . . . . . . . . . . . . . . . . . . . . . . .17
2 Volumen de entrega . . . . . . . . . . . . . . . . . . . . . . . . . . . . . . . . . . . . . . . . . . . .18
3 Uso adecuado . . . . . . . . . . . . . . . . . . . . . . . . . . . . . . . . . . . . . . . . . . . . . . . . .18
4 Montar el producto. . . . . . . . . . . . . . . . . . . . . . . . . . . . . . . . . . . . . . . . . . . . .19
5 Utilizar el producto . . . . . . . . . . . . . . . . . . . . . . . . . . . . . . . . . . . . . . . . . . . . .19
6 Limpieza y cuidado . . . . . . . . . . . . . . . . . . . . . . . . . . . . . . . . . . . . . . . . . . . . .19
7 Garantía legal . . . . . . . . . . . . . . . . . . . . . . . . . . . . . . . . . . . . . . . . . . . . . . . . 20
1 Indicaciones de seguridad y montaje
Tenga en cuenta las indicaciones de seguridad y la documentación
suministrada por el fabricante del vehículo y por el taller.
El fabricante declina toda responsabilidad ante daños ocurridos en los siguientes
casos:
• daños en el producto debido a influencias mecánicas
• modificaciones realizadas en el producto sin el expreso consentimiento del
fabricante
• utilización del aparato para fines distintos a los descritos en las instrucciones
NOTA
I
Tenga en cuenta las siguientes indicaciones:
• No dañe ningún cable del vehículo durante el montaje.
• No oscurezca el parabrisas durante la conducción.
Si no dispone de conocimientos técnicos suficientes para llevar a cabo
el montaje y las conexiones de componentes en el vehículo, encargue
el montaje de la claraboya a personal técnico cualificado.
17
Page 18

ES
Volumen de entrega FP200
2 Volumen de entrega
Pos. en
fig. 1,
página 3
11Panel:
2 1 Estor
3 12 Tornillo 3,5 x 13 mm (beige)
4 4 Tornillo 3,5 x 13 mm (negro)
5 4 Tornillo M6 x 50 mm
6 2 Tornillo M6 x 70 mm
7 2 Carril de guía
8 6 Arandela de apoyo M6
To t a l Descripción
3Uso adecuado
El sistema para oscurecer el parabrisas de Dometic FP200 (n.º de art. 9104116564)
es adecuado para el parabrisas de autocaravanas de modelo Fiat Ducato tipo 250 a
partir del año de construcción 07/2006 y Fiat Ducato tipo 290 a partir del año de
construcción 07/2014, así como Peugeot Boxer y Citroën Jumper del mismo
modelo constructivo (sin compartimiento de techo, sin cama en la cabina y sin airbag
de cabeza).
18
Page 19

ES
FP200 Montar el producto
4 Montar el producto
NOTA
I
➤ Monte el estor tal y como se muestra en las figuras: de fig. 4, página 4 a fig. 8,
página 5.
I
Para marcar los orificios para el estor puede utilizar la plantilla incluida en
el envase.
NOTA
fig. 8, página 5: La tensión de las bandas (3) depende de la ranura (1 o
2) en las que éstas se encajen.
Utilice la ranura 2 si las bandas requieren una tensión mayor.
5 Utilizar el producto
Cierre del estor (fig. 9, página 6)
➤ Empuje el estor hacia arriba con las dos manos hacia la posición deseada.
Las dos bandas en los carriles de guía mantienen el estor en la posición
deseada.
Abrir el estor
➤ Reinserte el estor lentamente con las dos manos en su alojamiento.
6 Limpieza y cuidado
¡AVISO!
A
➤ Limpie de vez en cuando el producto con un paño húmedo.
➤ Pulverice a intervalos regulares las superficies de deslizamiento de los carriles
guía con spray de silicona en pequeñas dosis para alcanzar una suave deslizamiento de los perfiles en C en los carriles guía.
➤ No deje el estor cerrado durante demasiado tiempo para evitar que los materia-
les se deterioren.
No utilice ningún objeto o producto de limpieza corrosivo o duro en la
limpieza, ya que podría dañar el producto.
19
Page 20

ES
Garantía legal FP200
7 Garantía legal
Rige el plazo de garantía legal. Si el producto presenta algún defecto, diríjase a su
establecimiento especializado o a la sucursal del fabricante de su país (ver
direcciones en el dorso de estas instrucciones).
Para la tramitación de la reparación y de la garantía debe enviar también los
siguientes documentos:
• una copia de la factura con fecha de compra,
• el motivo de la reclamación o una descripción de la avería.
20
Page 21

PT
FP200 Indicações de segurança e de montagem
Por favor, leia atentamente este manual antes da montagem e colocação
em funcionamento do aparelho e guarde-o em local seguro. Em caso de
transmissão do produto, entregue o manual ao novo utilizador.
Índice
1 Indicações de segurança e de montagem . . . . . . . . . . . . . . . . . . . . . . . . . .21
2 Material fornecido. . . . . . . . . . . . . . . . . . . . . . . . . . . . . . . . . . . . . . . . . . . . . 22
3 Utilização adequada . . . . . . . . . . . . . . . . . . . . . . . . . . . . . . . . . . . . . . . . . . . 22
4 Montar o produto . . . . . . . . . . . . . . . . . . . . . . . . . . . . . . . . . . . . . . . . . . . . . 23
5 Utilizar o produto . . . . . . . . . . . . . . . . . . . . . . . . . . . . . . . . . . . . . . . . . . . . . 23
6 Limpeza e manutenção . . . . . . . . . . . . . . . . . . . . . . . . . . . . . . . . . . . . . . . . . 24
7 Garantia . . . . . . . . . . . . . . . . . . . . . . . . . . . . . . . . . . . . . . . . . . . . . . . . . . . . . 24
1 Indicações de segurança e de
montagem
Cumpra as indicações de segurança e o especificado na literatura do
fabricante automóvel e das associações profissionais do setor!
O fabricante não se responsabiliza por danos nos seguintes casos:
• Danos no produto resultantes de influências mecânicas
• Alterações ao produto sem autorização expressa do fabricante
• Utilização para outras finalidades que não as descritas no manual de instruções
OBSERVAÇÃO
I
Preste atenção ao seguinte:
• Não danifique nenhum cabo durante a montagem no veículo.
• Não escureça o pára-brisas em andamento.
Caso não disponha dos conhecimentos técnicos necessários para
proceder à montagem de componentes no veículo, entregue a
montagem da claraboia a um técnico competente nesta matéria.
21
Page 22

PT
Material fornecido FP200
2 Material fornecido
Pos. na
fig. 1,
página 3
1 1 Anteparo
21Persiana
3 12 Parafuso 3,5 x 13 mm (bege)
4 4 Parafuso 3,5 x 13 mm (preto)
5 4 Parafuso M6 x 50 mm
6 2 Parafuso M6 x 70 mm
7 2 Calha de guia
8 6 Arruela M6
Quant. Descrição
3Utilização adequada
O sistema de escurecimento do para-brisas da Dometic FP 200 (art. n. º
9104116564) é adequado para o para-brisas de autocaravanas Fiat Ducato
modelo 250 a partir do ano de construção de 07/2006 e Fiat Ducato modelo 290
a partir do ano de construção de 07/2014 e Peugeot Boxer e Citroën Jumper
semelhantes (sem compartimento de arrumação de teto, sem cama superior nem
airbag de cabeça).
22
Page 23

PT
FP200 Montar o produto
4 Montar o produto
OBSERVAÇÃO
I
➤ Monte a persiana conforme ilustrado nas figuras: fig. 4, página 4 a fig. 8,
página 5.
I
Para assinalar os furos para a persiana é possível utilizar o molde incluído
na embalagem.
OBSERVAÇÃO
fig. 8, página 5: A tensão das cintas (3) depende do orifício (1 ou 2)
em que elas estão suspensas.
Utilize o orifício 2 caso pretenda que as cintas possuam uma tensão
superior.
5 Utilizar o produto
Fechar a persiana (fig. 9, página 6)
➤ Puxe a persiana para cima com ambas as mãos para a posição desejada.
As duas cintas nas calhas de guia mantêm a persiana na posição desejada.
Abrir a persiana
➤ Guie lentamente a persiana com ambas as mãos de volta para a respetiva caixa.
23
Page 24

PT
Limpeza e manutenção FP200
6 Limpeza e manutenção
NOTA!
A
➤ De vez em quando, limpe o aparelho com um pano húmido.
➤ Pulverize regularmente com spray à base de silicone em pouca quantidade as
superfícies de deslizamento das calhas de guia para que as barras de abertura/fecho deslizem o mais facilmente possível nas calhas de guia.
➤ Não mantenha a persiana fechada durante um período de tempo prolongado
para evitar um desgaste do material.
Não utilizar objectos afiados ou duros ou agentes de limpeza para
a limpeza, uma vez que podem ser causados danos no produto.
7 Garantia
É válido o prazo de garantia legal. Se o produto estiver com defeito, por favor,
dirija-se ao seu revendedor ou à representaçãodo fabricante no seu país (endereços,
ver verso do manual).
Para fins de reparação ou de garantia, terá de enviar os seguintes documentos em
conjunto:
• uma cópia da factura com a data de aquisição,
• um motivo de reclamação ou uma descrição da falha.
24
Page 25

IT
FP200 Istruzioni per la sicurezza e il montaggio
Prima di effettuare il montaggio e la messa in funzione leggere accuratamente questo manuale di istruzioni, conservarlo e in caso di trasmissione
del prodotto, consegnarlo all'utente successivo.
Indice
1 Istruzioni per la sicurezza e il montaggio . . . . . . . . . . . . . . . . . . . . . . . . . . . 25
2 Dotazione . . . . . . . . . . . . . . . . . . . . . . . . . . . . . . . . . . . . . . . . . . . . . . . . . . . 26
3 Conformità d’uso . . . . . . . . . . . . . . . . . . . . . . . . . . . . . . . . . . . . . . . . . . . . . 26
4 Montaggio del prodotto . . . . . . . . . . . . . . . . . . . . . . . . . . . . . . . . . . . . . . . 27
5 Utilizzo del prodotto. . . . . . . . . . . . . . . . . . . . . . . . . . . . . . . . . . . . . . . . . . . 27
6 Pulizia e cura . . . . . . . . . . . . . . . . . . . . . . . . . . . . . . . . . . . . . . . . . . . . . . . . . 28
7 Garanzia . . . . . . . . . . . . . . . . . . . . . . . . . . . . . . . . . . . . . . . . . . . . . . . . . . . . 28
1 Istruzioni per la sicurezza e il montaggio
Osservare le istruzioni per la sicurezza e le direttive previste dal
produttore del veicolo e degli specialisti del settore!
Il produttore non si assume nessuna responsabilità per danni nei seguenti casi:
• danni al prodotto dovuti a influenze meccaniche
• modifiche al prodotto senza esplicita autorizzazione del produttore
• impiego per altri fini rispetto a quelli descritti nel manuale di istruzioni
NOTA
I
Osservare le seguenti avvertenze.
• Non danneggiare nessun cavo del veicolo durante il montaggio.
• Non oscurare il parabrezza durante la marcia.
Nel caso in cui non si disponga di sufficienti conoscenze tecniche per
installare i componenti nei veicoli, è necessario fare installare l'oblò nel
veicolo da un tecnico.
25
Page 26

IT
Dotazione FP200
2Dotazione
Pos. in
fig. 1,
pagina 3
1 1 Mascherina
2 1 Tendina parasole avvolgibile
3 12 Vite 3,5 x 13 mm (beige)
4 4 Vite 3,5 x 13 mm (nero)
5 4 Vite M6 x 50 mm
6 2 Vite M6 x 70 mm
72Guida
8 6 Rondella M6
To t a l e Descrizione
3Conformità d’uso
Il sistema di oscuramento per il parabrezza Dometic FP 200 (n. art. 9104116564) è
adatto per il parabrezza di camper del tipo Fiat Ducato tipo 250 a partire dall'anno
di costruzione 07/2006 e Fiat Ducato tipo 290 a partire dall'anno di costruzione
07/2014 e modelli simili Peugeot Boxer e Citroën Jumper (senza ripiano a tetto,
senza cuccetta e senza airbag per la testa).
26
Page 27

IT
FP200 Montaggio del prodotto
4 Montaggio del prodotto
NOTA
I
➤ Montare la tendina parasole avvolgibile come rappresentato nelle figure: da
fig. 4, pagina 4 a fig. 8, pagina 5.
I
Per contrassegnare i fori per la tendina parasole avvolgibile è possibile
utilizzare una dima inclusa nella confezione.
NOTA
fig. 8, pagina 5: la tensione delle strisce (3) dipende dalla scanalatura
(1 o 2) in cui le strisce vengono agganciate.
Utilizzare la scanalatura 2 se le strisce devono avere una tensione maggiore.
5 Utilizzo del prodotto
Chiusura della tendina parasole avvolgibile (fig. 9, pagina 6)
➤ Sollevare la tendina parasole avvolgibile con entrambe le mani nella posizione
desiderata.
Le due strisce nelle guide mantengono la tendina parasole avvolgibile nella
posizione desiderata.
Apertura della tendina parasole avvolgibile
➤ Riportare lentamente la tendina parasole avvolgibile nel suo alloggiamento con
entrambe le mani.
27
Page 28

IT
Pulizia e cura FP200
6 Pulizia e cura
AVVISO!
A
➤ Pulire il prodotto di tanto in tanto con un panno umido.
➤ Per consentire un facile scorrimento delle barre nelle guide, spruzzare sulle
superfici di scorrimento delle guide piccole quantità di silicone spray a intervalli
regolari.
➤ Per evitare un affaticamento del materiale, non tenere la tendina parasole
vvolgibile chiusa per lunghi periodi.
Per la pulizia non impiegare oggetti ruvidi o appuntiti, oppure
detergenti perché potrebbero danneggiare il prodotto.
7 Garanzia
Vale il termine di garanzia previsto dalla legge. Qualora il prodotto risultasse
difettoso, La preghiamo di rivolgersi al proprio rivenditore specializzato o alla filiale
del produttore del suo Paese (l'indirizzo si trova sul retro del manuale di istruzioni).
Per la riparazione e per il disbrigo delle condizioni di garanzia è necessario inviare la
seguente documentazione:
• una copia della fattura con la data di acquisto del prodotto,
• un motivo su cui fondare il reclamo, oppure una descrizione del guasto.
28
Page 29

NL
FP200 Veiligheids- en inbouwinstructies
Lees deze handleiding voor de montage en de ingebruikname zorgvuldig
door en bewaar hem. Geef de handleiding bij het doorgeven van het
product aan de gebruiker.
Inhoudsopgave
1 Veiligheids- en inbouwinstructies . . . . . . . . . . . . . . . . . . . . . . . . . . . . . . . . 29
2 Omvang van de levering . . . . . . . . . . . . . . . . . . . . . . . . . . . . . . . . . . . . . . . 30
3 Gebruik volgens bestemming . . . . . . . . . . . . . . . . . . . . . . . . . . . . . . . . . . . 30
4 Product monteren . . . . . . . . . . . . . . . . . . . . . . . . . . . . . . . . . . . . . . . . . . . . . 30
5 Product gebruiken . . . . . . . . . . . . . . . . . . . . . . . . . . . . . . . . . . . . . . . . . . . . .31
6 Reiniging en onderhoud. . . . . . . . . . . . . . . . . . . . . . . . . . . . . . . . . . . . . . . . .31
7 Garantie. . . . . . . . . . . . . . . . . . . . . . . . . . . . . . . . . . . . . . . . . . . . . . . . . . . . . .31
1 Veiligheids- en inbouwinstructies
Neem de veiligheidsinstructies en voorschriften van de fabrikant van het
voertuig en het garagebedrijf in acht!
De fabrikant kan in de volgende gevallen niet aansprakelijk worden gesteld voor
schade:
• beschadiging van het product door mechanische invloeden
• veranderingen aan het product zonder uitdrukkelijke toestemming van de
fabrikant
• gebruik voor andere dan de in de handleiding beschreven toepassingen
INSTRUCTIE
I
Neem de volgende instructies in acht:
• Voorkom beschadiging van kabels in het voertuig tijdens de montage.
• Verduister de voorruit niet tijdens het rijden.
Als u niet voldoende technisch onderlegd bent voor het monteren van
componenten in voertuigen, dient u het dakraam door een deskundige
in het voertuig te laten inbouwen.
29
Page 30

NL
Omvang van de levering FP200
2 Omvang van de levering
Pos. in
afb. 1,
pagina 3
11Afdekking
2 1 Rolgordijn
3 12 Schroef 3,5 x 13 mm (beige)
4 4 Schroef 3,5 x 13 mm (zwart)
5 4 Schroef M6 x 50 mm
6 2 Schroef M6 x 70 mm
7 2 Geleiderail
8 6 Onderlegschijf M6
Aantal Beschrijving
3 Gebruik volgens bestemming
Het Dometic voorruitverduisteringssysteem FP200 (artikelnummer 9104116564) is
geschikt voor de voorruit van campers van het type Fiat Ducato type 250 vanaf
bouwjaar 07/2006 en Fiat Ducato type 290 vanaf bouwjaar 07/2014 en de
vergelijkbare Peugeot Boxer en Citroën Jumper (zonder dakkast, zonder alkoofbed
en zonder hoofdairbag).
4 Product monteren
INSTRUCTIE
I
➤ Monteer het rolgordijn zoals in de afbeeldingen weergegeven: afb. 4,
pagina 4 tot afb. 8, pagina 5.
I
30
Voor het voortekenen van de rolgordijnboringen kunt u het
meegeleverde sjabloon gebruiken.
INSTRUCTIE
afb. 8, pagina 5: De bandenspanning (3) hangt er vanaf in welke groef
(1 of 2) de banden werden gehangen.
Gebruik de groef 2 als de banden een hogere spanning moeten
hebben.
Page 31

NL
FP200 Product gebruiken
5 Product gebruiken
Rolgordijn sluiten (afb. 9, pagina 6)
➤ Trek het rolgordijn met beide handen omhoog in de gewenste stand.
De beide banden in de geleiderails houden het rolgordijn in de gewenste
stand.
Rolgordijn openen
➤ Leid het rolgordijn met beide handen langzaam terug in de opname.
6 Reiniging en onderhoud
LET OP!
A
➤ Reinig het product af en toe met een vochtige doek.
➤ Besproei de geleiderails op de glijvlakken regelmatig licht met siliconespray in
om licht glijden van de greeplijsten in de geleiderails te garanderen.
Geen scherpe of harde voorwerpen of reinigingsmiddelen bij het
reinigen gebruiken. Dit kan het product beschadigen.
➤ Houd het rolgordijn niet langdurig gesloten om een materiaalvermoeidheid te
vermijden.
7 Garantie
De wettelijke garantieperiode is van toepassing. Als het product defect is, wendt u
zich tot uw speciaalzaak of tot het filiaal van de fabrikant in uw land (adressen zie
achterkant van de handleiding).
Voor de afhandeling van de reparatie of garantie dient u de volgende documenten
mee te sturen:
• een kopie van de factuur met datum van aankoop,
• reden van de klacht of een beschrijving van de storing.
31
Page 32

DA
Sikkerheds- og installationshenvisninger FP200
Læs denne vejledning omhyggeligt igennem før installation og ibrugtagning, og opbevar den. Giv den til brugeren, hvis du giver produktet
videre.
Indholdsfortegnelse
1 Sikkerheds- og installationshenvisninger. . . . . . . . . . . . . . . . . . . . . . . . . . . 32
2 Leveringsomfang. . . . . . . . . . . . . . . . . . . . . . . . . . . . . . . . . . . . . . . . . . . . . . 33
3 Korrekt brug . . . . . . . . . . . . . . . . . . . . . . . . . . . . . . . . . . . . . . . . . . . . . . . . . 33
4 Montering af produktet . . . . . . . . . . . . . . . . . . . . . . . . . . . . . . . . . . . . . . . . 33
5 Brug af produktet . . . . . . . . . . . . . . . . . . . . . . . . . . . . . . . . . . . . . . . . . . . . . 34
6 Rengøring og vedligeholdelse. . . . . . . . . . . . . . . . . . . . . . . . . . . . . . . . . . . 34
7 Garanti . . . . . . . . . . . . . . . . . . . . . . . . . . . . . . . . . . . . . . . . . . . . . . . . . . . . . . 34
1 Sikkerheds- og installations-
henvisninger
Overhold sikkerhedshenvisningerne og pålæggene, der er foreskrevet af
køretøjsproducenten og af automobilbranchen!
Producenten påtager sig intet ansvar for skader i følgende tilfælde:
• Beskadigelser på produktet på grund af mekanisk påvirkning
• Ændringer på produktet uden udtrykkelig tilladelse fra producenten
• Anvendelse til andre formål end dem, der er beskrevet i vejledningen
BEMÆRK
I
Overhold følgende henvisninger:
• Under monteringen må kablerne i køretøjet ikke beskadiges.
• Forruden må ikke mørklægges under kørslen.
Hvis du ikke har tilstrækkelig teknisk viden til at installere komponenterne i køretøjer, bør du lade en fagmand installere tagvinduet
i køretøjet.
32
Page 33

DA
FP200 Leveringsomfang
2Leveringsomfang
Pos. på
fig. 1,
side 3
11Blænde
2 1 Rullegardin
3 12 Skrue 3,5 x 13 mm (beige)
4 4 Skrue 3,5 x 13 mm (sort)
5 4 Skrue M6 x 50 mm
6 2 Skrue M6 x 70 mm
7 2 Føringsskinne
8 6 Spændeskive M6
Antal Beskrivelse
3 Korrekt brug
Systemet til mørklægning af forruden fra Dometic FP 200 (art.nr. 9104116564) er
egnet til forruden i autocampere af typen Fiat Ducato type 250 fra årgang 07/2006
og Fiat Ducato type 290 fra årgang 07/2014 samt Peugeot Boxer og Citroën Jumper
af samme type (uden tagmagasin, uden køjeseng og uden hovedairbag).
4 Montering af produktet
BEMÆRK
I
➤ Montér rullegardinet som vist i illustrationerne: fig. 4, side 4 til fig. 8, side 5.
I
For at markere boringerne til rullegardinet kan man anvende
skabelonen, som medfølger i emballagen.
BEMÆRK
fig. 8, side 5: Båndenes spænding (3) afhænger af, i hvilken not (1 eller
2) båndene sættes i.
Anvend noten 2, hvis båndene skal være spændt kraftigere.
33
Page 34

DA
Brug af produktet FP200
5 Brug af produktet
Lukning af rullegardinet (fig. 9, side 6)
➤ Træk rullegardinet op i den ønskede stilling med begge hænder.
De to bånd i føringsskinnerne holder rullegardinet i den ønskede stilling.
Åbning af rullegardinet
➤ Før rullegardinet langsomt tilbage i dets holder med begge hænder.
6 Rengøring og vedligeholdelse
VIGTIGT!
A
➤ Rengør af og til produktet med en fugtig klud.
➤ Sprøjt en lille dosis silikonespray på føringsskinnernes glideflader med regel-
mæssige mellemrum for at opnå, at grebslisterne glider så let som muligt i
føringsskinnerne.
Anvend ikke skarpe eller hårde genstande eller rengøringsmidler til
rengøring, da det kan beskadige produktet.
➤ Hold ikke rullegardinet lukket i et længere tidsrum for undgå materialetræthed.
7 Garanti
Den lovbestemte garantiperiode gælder. Hvis produktet er defekt, skal du kontakte
din forhandler eller producentens afdeling i dit land (adresser, se vejledningens bagside).
Ved reparation eller krav om garanti skal du medsende følgende bilag:
• En kopi af regningen med købsdato
• En reklamationsgrund eller en fejlbeskrivelse
34
Page 35

SV
FP200 Säkerhets- och installationsanvisningar
Läs igenom anvisningarna noga innan produkten monteras och används.
Spara monterings- och bruksanvisningen för senare bruk. Överlämna
bruksanvisningen till den nya ägaren vid ev. vidareförsäljning.
Innehållsförteckning
1 Säkerhets- och installationsanvisningar . . . . . . . . . . . . . . . . . . . . . . . . . . . . 35
2 Leveransomfattning. . . . . . . . . . . . . . . . . . . . . . . . . . . . . . . . . . . . . . . . . . . . 36
3 Ändamålsenlig användning . . . . . . . . . . . . . . . . . . . . . . . . . . . . . . . . . . . . . 36
4 Montera produkt. . . . . . . . . . . . . . . . . . . . . . . . . . . . . . . . . . . . . . . . . . . . . . 36
5 Använda produkt . . . . . . . . . . . . . . . . . . . . . . . . . . . . . . . . . . . . . . . . . . . . . 37
6 Rengöring och skötsel . . . . . . . . . . . . . . . . . . . . . . . . . . . . . . . . . . . . . . . . . 37
7 Garanti . . . . . . . . . . . . . . . . . . . . . . . . . . . . . . . . . . . . . . . . . . . . . . . . . . . . . . 37
1 Säkerhets- och installationsanvisningar
Beakta säkerhetsanvisningarna och riktlinjerna från fordonstillverkaren
samt reglerna för bilmekaniska arbeten!
Tillverkaren övertar inget ansvar för skador i följande fall:
• skador på produkten, orsakade av mekanisk påverkan
• ändringar som utförts utan uttryckligt medgivande från tillverkaren
• ej ändamålsenlig användning
ANVISNING
I
Beakta följande:
• Se till att inte skada några kablar i fordonet vid monteringen.
• Dra inte ner mörkläggningsgardinen för framrutan under körning.
Låt fackfolk montera takfönstret på fordonet om du inte har erfarenhet
med/tillräcklig kännedom om montering av tekniska komponenter
ifordon.
35
Page 36

SV
Leveransomfattning FP200
2 Leveransomfattning
Pos. på
bild 1,
sida 3
1 1 Bländskydd
2 1 Rullgardin
3 12 Skruv 3,5 x 13 mm (beige)
4 4 Skruv 3,5 x 13 mm (svart)
5 4 Skruv M6 x 50 mm
6 2 Skruv M6 x 70 mm
72Styrskena
8 6 Underläggsbricka M6
Antal Beskrivning
3 Ändamålsenlig användning
Dometics mörkläggningssystem för framruta FP 200 (art.nr 9104116564) kan användas på framrutor i husbilar av typen Fiat Ducato typ 250 från årsmodell 07/2006 och
Fiat Ducato typ 290 från årsmodell 07/2014 samt identiska Peugeot Boxer och
Citroën Jumper (utan takförvaring, utan hopfällbar säng och utan huvudairbag).
4 Montera produkt
ANVISNING
I
➤ Montera rullgardinen som på bilderna: bild 4, sida 4 till bild 8, sida 5.
I
36
Använd mallen i förpackningen för att rita ut hålen för rullgardinen.
ANVISNING
bild 8, sida 5: Bandens spänning (3) beror på i vilket spår (1 eller 2)
man hänger in banden.
Använd spår 2 om du vill att banden ska vara mer spända.
Page 37

SV
FP200 Använda produkt
5Använda produkt
Stänga rullgardinen (bild 9, sida 6)
➤ Använd båda händerna och dra rullgardinen uppåt till önskat läge.
De båda banden i styrskenorna håller kvar rullgardinen i önskat läge.
Dra upp rullgardinen
➤ Använd båda händerna och för långsamt tillbaka rullgardinen till upphängnings-
anordningen.
6 Rengöring och skötsel
OBSERVERA!
A
➤ Rengör produkten då och då med en fuktig trasa.
➤ Spraya styrskenornas glidytor regelbundet med lite silikonspray för att
grepplisterna ska glida lätt i styrskenorna.
Använd inga vassa eller hårda föremål för rengöring, använd inga skarpa
rengöringsmedel; produkten kan skadas.
➤ För att undvika materialtrötthet ska man inte låta rullgardinen vara neddragen
under en längre tidsperiod.
7 Garanti
Den lagstadgade garantitiden gäller. Om produkten är defekt: kontakta återförsäljaren eller tillverkarens kontor i ditt land (adresser, se bruksanvisningens baksida).
Vid reparations- resp. garantiärenden ska följande skickas med:
• en kopia på fakturan med inköpsdatum,
• en reklamationsbeskrivning/felbeskrivning.
37
Page 38

NO
Råd om sikkerhet og montering FP200
Les bruksanvisningen nøye før du monterer og tar apparatet i bruk, og
ta vare på den. Hvis produktet selges videre, må du sørge for å gi bruksanvisningen videre også.
Innhold
1 Råd om sikkerhet og montering . . . . . . . . . . . . . . . . . . . . . . . . . . . . . . . . . . 38
2 Leveringsomfang. . . . . . . . . . . . . . . . . . . . . . . . . . . . . . . . . . . . . . . . . . . . . . 39
3 Tiltenkt bruk. . . . . . . . . . . . . . . . . . . . . . . . . . . . . . . . . . . . . . . . . . . . . . . . . . 39
4 Montere produktet . . . . . . . . . . . . . . . . . . . . . . . . . . . . . . . . . . . . . . . . . . . . 39
5 Bruk av produktet . . . . . . . . . . . . . . . . . . . . . . . . . . . . . . . . . . . . . . . . . . . . . 40
6 Rengjøring og stell . . . . . . . . . . . . . . . . . . . . . . . . . . . . . . . . . . . . . . . . . . . . 40
7 Garanti . . . . . . . . . . . . . . . . . . . . . . . . . . . . . . . . . . . . . . . . . . . . . . . . . . . . . . 40
1 Råd om sikkerhet og montering
Følg rådene og betingelsene som er foreskrevet av kjøretøyprodusenten
og motorvognprodusenten!
Produsenten tar i følgende tilfeller intet ansvar for skader:
• Skader på produktet på grunn av mekanisk påvirkning
• Endringer på produktet uten at det er gitt uttrykkelig godkjenning av
produsenten
• Bruk til andre formål enn det som er beskrevet i veiledningen
MERK
I
Følg disse rådene:
• Påse at ikke kabler i kjøretøyet kommer til skade under monteringen.
• Frontruten må ikke blendes under kjøring.
Hvis du ikke har nok teknisk kunnskap om montering av komponenter i
kjøretøy, må du få fagfolk til å montere takvinduet.
38
Page 39

NO
FP200 Leveringsomfang
2Leveringsomfang
Pos. i
fig. 1,
side 3
11Skjerm
2 1 Rullegardin
3 12 Skrue 3,5 x 13 mm (beige)
4 4 Skrue 3,5 x 13 mm (svart)
5 4 Skrue M6 x 50 mm
6 2 Skrue M6 x 70 mm
7 2 Føringsskinne
8 6 Underlagsskive M6
Antall Beskrivelse
3Tiltenkt bruk
Dometic FP 200 blendingssystem for frontrute (art.nr. 9104116564) er
egnet for frontruten i bobiler av typen Fiat Ducato type 250 fra og med
produksjonsår 07/2006 og Fiat Ducato type 290 fra og med 07/2014 og
Peugeot Boxer og Citroën Jumper som er bygd på samme måte (uten takrom,
uten alkove, og uten airbag for hodet).
4 Montere produktet
MERK
I
➤ Monter rullegardinen som vist på illustrasjonene: fig. 4, side 4 til fig. 8, side 5.
I
Bruk malen i forpakningen for å bore hull til rullegardinen.
MERK
fig. 8, side 5: Spenningen på båndene (3) avhenger av i hvilket spor
(1 eller 2) man fester båndene i.
Bruk spor 2 hvis båndene skal spennes strammere.
39
Page 40

NO
Bruk av produktet FP200
5Bruk av produktet
Lukke rullegardinen (fig. 9, side 6)
➤ Trekk rullegardinen oppover i ønsket stilling med begge hendene.
De to båndene på føringsskinnene holder rullegardinen i ønsket stilling.
Åpne rullegardinen
➤ Før rullegardinen langsomt tilbake i holderen med begge hendene.
6 Rengjøring og stell
PASS PÅ!
A
➤ Rengjør produktet regelmessig med en fuktig klut.
➤ Spray føringsskinnene på glideflatene med en liten dose silikonspray med jevne
mellomrom for å sikre at holdelistene glir lett inn i føringsskinnene.
Bruk ikke skarpe eller harde gjenstander eller rengjøringsmidler til
rengjøring, da det kan skade produktet.
➤ For å unngå materialtretthet bør ikke rullegardinen holdes lukket over lengre tid.
7 Garanti
Lovmessig garantitid gjelder. Hvis produktet skulle være defekt, kontakter du din
faghandler eller produsentens filial i ditt land (du finner adressene på baksiden av
veiledningen).
Ved henvendelser vedrørende reparasjon eller garanti, må du sende med følgende
dokumentasjon:
• kopi av kvitteringen med kjøpsdato,
• årsak til reklamasjonen eller beskrivelse av feilen.
40
Page 41

FI
FP200 Turvallisuus- ja kiinnitysohjeita
Lue tämä ohje huolellisesti läpi ennen asennusta ja käyttöönottoa ja säilytä
ohje hyvin. Jos myyt tuotteen eteenpäin, anna ohje tällöin edelleen
uudelle käyttäjälle.
Sisällysluettelo
1 Turvallisuus- ja kiinnitysohjeita . . . . . . . . . . . . . . . . . . . . . . . . . . . . . . . . . . . .41
2 Toimituskokonaisuus. . . . . . . . . . . . . . . . . . . . . . . . . . . . . . . . . . . . . . . . . . . 42
3 Käyttötarkoitus. . . . . . . . . . . . . . . . . . . . . . . . . . . . . . . . . . . . . . . . . . . . . . . . 42
4 Tuotteen asennus . . . . . . . . . . . . . . . . . . . . . . . . . . . . . . . . . . . . . . . . . . . . . 42
5 Tuotteen käyttäminen . . . . . . . . . . . . . . . . . . . . . . . . . . . . . . . . . . . . . . . . . . 43
6 Puhdistus ja hoito . . . . . . . . . . . . . . . . . . . . . . . . . . . . . . . . . . . . . . . . . . . . . 43
7 Tuotevastuu . . . . . . . . . . . . . . . . . . . . . . . . . . . . . . . . . . . . . . . . . . . . . . . . . . 43
1 Turvallisuus- ja kiinnitysohjeita
Noudata ajoneuvovalmistajan ja autoalan ammattipiirien antamia
turvallisuusohjeita ja vaatimuksia!
Valmistaja ei ota mitään vastuuta vahingoista seuraavissa tapauksissa:
• tuotteeseen mekaanisen vaikutuksen takia syntyneet vauriot
• tuotteeseen ilman valmistajan nimenomaista lupaa tehdyt muutokset
• käyttö muuhun kuin käyttöohjeessa ilmoitettuun tarkoitukseen
OHJE
I
Noudata seuraavia ohjeita:
• Ajoneuvon kaapeleita ei saa vauroittaa asennuksen. aikana
• Tuulilasia ei saa tummentaa ajon aikana.
Anna ammattimiehen asentaa kattoikkuna, jos itselläsi ei ole riittävää
teknistä tietämystä, joka koskee komponenttien asentamista.
41
Page 42

FI
Toimituskokonaisuus FP200
2 Toimituskokonaisuus
Kohta –
kuva 1,
sivulla 3
11Peitelevy:
21Kaihdin
3 12 Ruuvi 3,5 x 13 mm (beige)
4 4 Ruuvi 3,5 x 13 mm (beige)
5 4 Ruuvi M6 x 50 mm
6 2 Ruuvi M6 x 70 mm
7 2 Ohjainkisko
8 6 Prikka M6
Määrä Kuvaus
3 Käyttötarkoitus
Dometic tuulilasin tummennusjärjestelmä FP200 (tuotenro 9104116564) on tarkoitettu mallin Fiat Ducato, tyyppi 250 vuosimallista 07/2006 alkaen ja mallin Fiat
Ducato, tyyppi 290 vuosimallista 07/2014 alkaen sekä samanrakenteisten Peugeot
Boxerin ja Citroën Jumperin (ilman katon säilytystilaa, ilman nostettavaa vuodetta ja
ilman pään alueen ilmatyynyä) matkailuautojen tuulilaseille.
4 Tuotteen asennus
OHJE
I
➤ Asenna kaihdin kuvissa esitetyllä tavalla: kuva 4, sivulla 4 – kuva 8, sivulla 5.
I
42
Kaihtimen reikien paikkojen merkitsemiseen voi käyttää toimituksessa
mukana olevaa sabluunaa.
OHJE
kuva 8, sivulla 5: Hihnojen (3) kireys riippuu siitä mihin uraan (1 tai 2)
hihnat ripustettiin.
Käytä uraa 2, jos hihnojen on oltava kireämmällä.
Page 43

FI
FP200 Tuotteen käyttäminen
5Tuotteen käyttäminen
Kahtimen sulkeminen (kuva 9, sivulla 6)
➤ Vedä kaihdin molemmin käsin ylös haluamaasi asentoon.
Ohjauskiskojen molemmat hihnat pitävät kaihtimen halutussa asennossa.
Kaihtimen avaaminen
➤ Palauta kaihdin molemmin käsin hitaasti pidikkeensä sisään.
6Puhdistus ja hoito
HUOMAUTUS!
A
➤ Puhdista tuote toisinaan ulkopuolelta kostealla liinalla.
➤ Suihkuta ohjainkiskojen liukupinnoille säännöllisin väliajoin pieni määrä silikoni-
suihketta, jotta kahvalistat liukuvat mahdollisimman hyvin ohjainkiskoissa.
Puhdistukseen ei saa käyttää teräviä tai kovia välineitä eikä puhdistusaineita, koska tämä voi johtaa tuotteen vahingoittumiseen.
➤ Älä pidä kaihdinta pidempiä aikoja suljettuna, jotta materiaalin väsyminen välte-
tään.
7 Tuotevastuu
Laitetta koskee lakisääteinen takuuaika. Jos tuote sattuu olemaan viallinen, käänny
oman ammattikauppiaasi tai maasi valmistajan toimipisteen puoleen (osoitteet käyttöohjeen takasivulla).
Korjaus- ja takuukäsittelyä varten lähetä mukana seuraavat asiakirjat:
• kopio ostolaskusta, jossa näkyy ostopäivä,
• valitusperuste tai vikakuvaus.
43
Page 44

RU
Указания по безопасности и монтажу FP200
Прочтите данную инструкцию перед монтажом и вводом в эксплуатацию и сохраните ее. В случае передачи продукта передайте инструкцию следующему пользователю.
Оглавление
1 Указания по безопасности и монтажу . . . . . . . . . . . . . . . . . . . . . . . . . . . . 44
2 Комплект поставки . . . . . . . . . . . . . . . . . . . . . . . . . . . . . . . . . . . . . . . . . . . . 45
3 Использование по назначению . . . . . . . . . . . . . . . . . . . . . . . . . . . . . . . . . 45
4 Монтаж изделия . . . . . . . . . . . . . . . . . . . . . . . . . . . . . . . . . . . . . . . . . . . . . . 45
5 Использование изделия . . . . . . . . . . . . . . . . . . . . . . . . . . . . . . . . . . . . . . . 46
6 Очистка и уход . . . . . . . . . . . . . . . . . . . . . . . . . . . . . . . . . . . . . . . . . . . . . . . 46
7 Гарантия . . . . . . . . . . . . . . . . . . . . . . . . . . . . . . . . . . . . . . . . . . . . . . . . . . . . 46
1 Указания по безопасности и монтажу
Соблюдайте правила техники безопасности и требования, предписанные изготовителем автомобиля, а также автомастерской!
Изготовитель не несет никакой ответственности за ущерб в следующих случаях:
• Повреждения продукта из-за механических воздействий
• Изменения в продукте, выполненные без однозначного разрешения
изготовителя
• Использование в целях, отличных от указанных в данной инструкции
УКАЗАНИЕ
I
Соблюдайте следующие указания:
• Не повредите при монтаже кабели в транспортном средстве.
• Не затемняйте лобовое стекло во время движения.
Если у вас не имеется достаточных технических знаний по монтажу
компонентов в автомобили, то доверьте выполнение монтажа окна
для крыши автомобиля специалисту.
44
Page 45

RU
FP200 Комплект поставки
2Комплект поставки
Поз. на
рис. 1,
стр. 3
11Панель
21Ролета
3 12 Винт 3,5 x 13 мм (бежевый)
4 4 Винт 3,5 x 13 мм (черный)
5 4 Винт M6 x 50 мм
6 2 Винт M6 x 70 мм
7 2 Направляющая
8 6 Подкладная шайба M6
Количество Описание
3 Использование по назначению
Система затемнения лобового стекла Dometic FP200 (арт. № 9104116564)
подходит для лобового стекла кемперов типа Fiat Ducato 250 с 07/2006 года
выпуска Fiat Ducato 290 с 07/2014 года выпуска и конструктивно идентичных
Peugeot Boxer и Citroën Jumper (без накрышной секции, складной койки
и головной подушки безопасности).
4Монтаж изделия
УКАЗАНИЕ
I
➤ Установите ролету, как показано на рисунках: рис. 4, стр. 4 – рис. 8,
стр. 5.
I
Для обозначения сверлильных отверстий вы можете использовать
шаблоны, содержащиеся в упаковке.
УКАЗАНИЕ
рис. 8, стр. 5: Натяжение лент (3) зависит от того, в какой паз
(1 или 2) навешиваются ленты.
Если ленты должны быть сильнее натянуты, то используйте паз 2.
45
Page 46

RU
Использование изделия FP200
5 Использование изделия
Закрывание ролеты (рис. 9, стр. 6)
➤ Потяните ролету двумя руками вверх в нужное положение.
Обе ленты в направляющих удерживают ролету в нужном положении.
Открывание ролеты
➤ Двумя руками медленно введите ролету обратно в приемное устройство.
6 Очистка и уход
ВНИМАНИЕ!
A
➤ Периодически очищайте продукт влажной тряпкой.
➤ Для достижения по возможности легкого скольжения ручек в направляющих
регулярно опрыскивайте поверхности скольжения направляющих силиконовым аэрозолем в малых количествах.
Не использовать для очистки острые или твердые предметы или
чистящие средства, т. к. это может привести к повреждениям
продукта.
➤ Не держите ролету в течение долгого времени закрытой во избежание устало-
сти материала.
7 Гарантия
Действителен установленный законом срок гарантии. Если продукт неисправен,
обратитесь в торговую организацию или в представительство изготовителя в
Вашей стране (адреса см. на оборотной стороне инструкции).
В целях проведения ремонта или гарантийного обслуживания Вы должны также
послать следующие документы:
• копию счета с датой покупки,
• причину рекламации или описание неисправности.
46
Page 47

PL
FP200 Zasady bezpieczeństwa i montażu
Przed instalacją i uruchomieniem urządzenia należy uważnie przeczytać
niniejszą instrukcję. Instrukcję należy zachować. W razie przekazywania
urządzenia należy ją udostępnić kolejnemu nabywcy.
Spis treści
1 Zasady bezpieczeństwa i montażu . . . . . . . . . . . . . . . . . . . . . . . . . . . . . . . 47
2 Zakres dostawy . . . . . . . . . . . . . . . . . . . . . . . . . . . . . . . . . . . . . . . . . . . . . . . 48
3 Użytkowanie zgodne z przeznaczeniem . . . . . . . . . . . . . . . . . . . . . . . . . . . 48
4 Montaż produktu . . . . . . . . . . . . . . . . . . . . . . . . . . . . . . . . . . . . . . . . . . . . . 49
5 Korzystanie z produktu . . . . . . . . . . . . . . . . . . . . . . . . . . . . . . . . . . . . . . . . . 49
6 Czyszczenie. . . . . . . . . . . . . . . . . . . . . . . . . . . . . . . . . . . . . . . . . . . . . . . . . . 50
7 Gwarancja . . . . . . . . . . . . . . . . . . . . . . . . . . . . . . . . . . . . . . . . . . . . . . . . . . . 50
1 Zasady bezpieczeństwa i montażu
Należy stosować się do uwag dot. bezpieczeństwa i dokumentacji,
zalecanych przez producenta i branżę motoryzacyjną!
Producent nie odpowiada za szkody spowodowane:
• uszkodzeniem produktu w sposób mechaniczny
• zmianami dokonanymi w produkcie bez wyraźnej zgody producenta
• użytkowaniem w celach innych niż opisane w niniejszej instrukcji
WSKAZÓWKA
I
Należy stosować się do następujących wskazówek:
• Podczas montażu chronić wszystkie przewody w pojeździe przed
uszkodzeniem.
• Nie zasłaniać przedniej szyby podczas jazdy.
Jeśli użytkownik nie dysponuje odpowiednimi umiejętnościami
technicznymi pozwalającymi na montaż komponentów w pojazdach,
montaż okna dachowego należy zlecić specjaliście.
47
Page 48

PL
Zakres dostawy FP200
2 Zakres dostawy
Poz. na
rys. 1,
strona 3
11Osłona
2 1 Roleta
3 12 Śruba 3,5 x 13 mm (beżowa)
4 4 Śruba 3,5 x 13 mm (czarna)
54Śruba M6x50mm
62Śruba M6x70mm
7 2 Prowadnica
8 6 Podkładka M6
Liczba Opis
3 Użytkowanie zgodne z przeznaczeniem
System zasłaniania przedniej szyby Dometic FP200 (nr art. 9104116564) nadaje się
do szyb przednich pojazdów kempingowych typu Fiat Ducato typ 250 od roku
produkcji 07/2006 i Fiat Ducato typ 290 od roku produkcji 07/2014 oraz tej samej
konstrukcji Peugeot Boxer oraz Citroën Jumper (bez półki dachowej i bez składanego łóżka).
48
Page 49

PL
FP200 Montaż produktu
4 Montaż produktu
WSKAZÓWKA
I
➤ Zamontować roletę zgodnie z rysunkami: rys. 4, strona 4 do rys. 8, strona 5.
I
Do wyznaczenia otworów na roletę można zastosować szablon
zopakowania.
WSKAZÓWKA
rys. 8, strona 5: Naprężenie taśm (3) zależy od tego, w który rowek
(1 lub 2) zostaną zaczepione taśmy.
Rowek 2 należy używać wówczas, gdy taśmy mają być naprężone
mocniej.
5 Korzystanie z produktu
Podnoszenie rolety (rys. 9, strona 6)
➤ Pociągnąć roletę obiema rękami do góry do żądanej pozycji.
Obie taśmy w prowadnicach utrzymują roletę w żądanym położeniu.
Opuszczanie rolety
➤ Powoli wsunąć roletę obiema rękami w uchwyt.
49
Page 50

PL
Czyszczenie FP200
6Czyszczenie
UWAGA!
A
➤ Od czasu do czasu należy czyścić produkt wilgotną ściereczką.
➤ W celu uzyskania możliwie lekkiego poślizgu listew uchwytowych
w prowadnicach prowadnice i powierzchnie ślizgowe należy spryskiwać
regularnie małymi ilościami silikonu w sprayu.
➤ Nie należy przetrzymywać rozłożonej rolety przez dłuższy czas, aby uniknąć
zmęczenia materiału.
Do czyszczenia nie należy używać ostrych i twardych środków
czyszczącyc; mogą one uszkodzić produkt.
7Gwarancja
Warunki gwarancji zostały opisane w Karcie Gwarancyjnej dołączonej do produktu.
W celu naprawy lub rozpatrzenia gwarancji konieczne jest przesłanie:
• kopii rachunku z datą zakupu,
• informacji o przyczynie reklamacji lub opisu wady.
50
Page 51

SK
FP200 Bezpečnostné a montážne pokyny
Pred montážou a uvedením do prevádzky si prosim pozorne prečítajte
tento návod a odložte si ho. V prípade odovzdania výrobku ďalšiemu
používateľovi mu odovzdajte aj tento návod.
Obsah
1 Bezpečnostné a montážne pokyny . . . . . . . . . . . . . . . . . . . . . . . . . . . . . . . .51
2 Rozsah dodávky . . . . . . . . . . . . . . . . . . . . . . . . . . . . . . . . . . . . . . . . . . . . . . 52
3 Používanie v súlade s určením . . . . . . . . . . . . . . . . . . . . . . . . . . . . . . . . . . . 52
4 Montáž produktu . . . . . . . . . . . . . . . . . . . . . . . . . . . . . . . . . . . . . . . . . . . . . 52
5 Používanie produktu . . . . . . . . . . . . . . . . . . . . . . . . . . . . . . . . . . . . . . . . . . . 53
6 Čistenie a údržba . . . . . . . . . . . . . . . . . . . . . . . . . . . . . . . . . . . . . . . . . . . . . 53
7 Záruka . . . . . . . . . . . . . . . . . . . . . . . . . . . . . . . . . . . . . . . . . . . . . . . . . . . . . . 53
1 Bezpečnostné a montážne pokyny
Rešpektujte bezpečnostné pokyny a podklady vydané výrobcom vozidla
a predpísané remeselným zväzom!
Výrobca v nasledujúcich prípadoch nepreberá za škody žiadnu záruku:
• Poškodenia produktu mechanickými vplyvmi
• Zmeny produktu bez vyjadreného povolenia výrobcu
• Použitie na iné účely ako sú účely uvedené v návode
POZNÁMKA
I
Rešpektujte nasledovné upozornenia:
• Pri montáži nepoškoďte žiadny kábel vo vozidle.
• Čelné sklo nezatieňujte počas jazdy.
Keď nemáte dostatočné technické vedomosti o montáži komponentov
vo vozidlách, mali by ste montáž strešného okna na vozidle prenechať
odborníkovi.
51
Page 52

SK
Rozsah dodávky FP200
2 Rozsah dodávky
Poz. v
obr. 1,
strane 3
1 1 Clona
2 1 Roleta
3 12 Skrutka 3,5 x 13 mm (béžová)
4 4 Skrutka 3,5 x 13 mm (čierna)
5 4 Skrutka M6 x 50 mm
6 2 Skrutka M6 x 70 mm
7 2 Vodiaca koľajnica
8 6 Podložka M6
Počet Opis
3 Používanie v súlade s určením
Systém zatienenia čelného skla Dometic FP 200 (tov. č. 9104116564) je vhodný pre
čelné sklo obytných vozidiel typu Fiat Ducato, typ 250 od roku výroby 07/2006
a Fiat Ducato, typ 290 od roku výroby 07/2014 a konštrukčne zhodný Peugeot
Boxer a Citroën Jumper (bez strešného odkladacieho priestoru, zdvíhacej postele
a hlavového airbagu).
4 Montáž produktu
POZNÁMKA
I
➤ Roletu namontujte podľa obrázkov: obr. 4, strane 4 až obr. 8, strane 5.
I
52
Pre naznačenie otvorov pre roletu môžete použiť šablónu, ktorá je
súčasťou balenia.
POZNÁMKA
obr. 8, strane 5: Napnutie pásov (3) závisí od toho, do ktorej drážky
(1 alebo 2) sa pásy zavesia.
Použite drážku 2, keď majú byť pásy napnuté viac.
Page 53

SK
FP200 Používanie produktu
5 Používanie produktu
Zatvorenie rolety (obr. 9, strane 6)
➤ Potiahnite roletu oboma rukami nahor do želanej polohy.
Oba pásy vo vodiacich koľajniciach pridržiavajú roletu v želanej polohe.
Vytiahnutie rolety
➤ Veďte roletu oboma rukami pomaly späť do jej upnutia.
6 Čistenie a údržba
POZOR!
A
➤ Výrobok príležitostne vyčistite mierne navlhčenou handričkou.
➤ Na klzné plochy vodiacich koľajničiek pravidelne nanášajte malé dávky
silikónového spreja, aby sa dosiahlo čo najľahšie kĺzanie úchytných líšt vo
vodiacich koľajničkách.
Na čistenie nepoužívajte ostré alebo tvrdé predmety, pretože by mohli
poškodiť výrobok.
➤ Roletu nenechávajte dlhšie obdobie spustenú, aby sa zabránilo únave materiálu.
7Záruka
Platí zákonom stanovená záručná lehota. Ak by bol výrobok chybný, obráťte sa na
vášho špecializovaného predajcu alebo na pobočku výrobcu vo vašej krajine (adresy
pozri na zadnej strane návodu).
Ak žiadate o vybavenie opravy alebo nárokov vyplývajúcich zo záruky, musíte priložiť
nasledovné podklady:
• kópiu faktúry s dátumom kúpy,
• dôvod reklamácie alebo opis chyby.
53
Page 54

CS
Bezpečnostní pokyny a pokyny k instalaci FP200
Před zahájením instalace a uvedením do provozu si pečlivě přečtěte tento
návod a uschovejte jej. V případě dalšího prodeje výrobku předejte návod
novému uživateli.
Obsah
1 Bezpečnostní pokyny a pokyny k instalaci . . . . . . . . . . . . . . . . . . . . . . . . . . 54
2 Rozsah dodávky . . . . . . . . . . . . . . . . . . . . . . . . . . . . . . . . . . . . . . . . . . . . . . 55
3 Použití v souladu se stanoveným účelem. . . . . . . . . . . . . . . . . . . . . . . . . . . 55
4 Montáž výrobku . . . . . . . . . . . . . . . . . . . . . . . . . . . . . . . . . . . . . . . . . . . . . . 55
5 Použití výrobku . . . . . . . . . . . . . . . . . . . . . . . . . . . . . . . . . . . . . . . . . . . . . . . 56
6 Čištění a péče . . . . . . . . . . . . . . . . . . . . . . . . . . . . . . . . . . . . . . . . . . . . . . . . 56
7 Záruka . . . . . . . . . . . . . . . . . . . . . . . . . . . . . . . . . . . . . . . . . . . . . . . . . . . . . . 56
1 Bezpečnostní pokyny a pokyny
kinstalaci
Dodržujte předepsané bezpečnostní pokyny a předpisy vydané výrobcem
vozidla a autoservisem!
V následujících případech nepřebírá výrobce žádné záruky za škody:
• Poškození výrobku působením mechanických vlivů
• Změna výrobku bez výslovného souhlasu výrobce
• Použití k jiným účelům, než jsou popsány v tomto návodu
POZNÁMKA
I
Dodržujte následující pokyny:
• Během montáže zabraňte poškození kabelů vozidla.
• Nepoužívejte stínění čelního skla za jízdy.
Pokud nemáte dostatečné technické znalosti v oblasti instalace součástí
do vozidla, pověřte instalací střešního okna na vozidlo odborníka.
54
Page 55

CS
FP200 Rozsah dodávky
2 Rozsah dodávky
Pol. na
obr. 1,
strana 3
11Kryt
2 1 Roleta
3 12 Šroub 3,5 x 13 mm (béžový)
4 4 Šroub 3,5 x 13 mm (černý)
54Šroub M6x50mm
62Šroub M6x70mm
7 2 Vodicí lišty
8 6 Podložka M6
Počet Popis
3 Použití v souladu se stanoveným účelem
Systém stínění pro čelní sklo Dometic FP200 (výr. č. 9104116564) je určen na čelní
sklo obytných automobilů typu Fiat Ducato typ 250 od roku výroby 07/2006 a Fiat
Ducato typ 290 od roku výroby 07/2014 a konstrukčně stejných vozidel Peugeot
Boxer a Citroën Jumper (bez zvedací postele a airbagu hlavy).
4 Montáž výrobku
POZNÁMKA
I
➤ Namontujte roletu podle obrázků: obr. 4, strana 4 až obr. 8, strana 5.
I
K označení vrtaných otvorů pro roletu můžete použít šablonu, která je
součástí balení.
POZNÁMKA
obr. 8, strana 5: Napínání popruhů (3) závisí na tom, ve které drážce
(1 nebo 2) jsou popruhy uchyceny.
Drážku 2 použijte, pokud mají být popruhy napjaty více.
55
Page 56

CS
Použití výrobku FP200
5 Použití výrobku
Zatažení rolety (obr. 9, strana 6)
➤ Zatáhněte roletu oběma rukama dolů do požadované polohy.
Oba popruhy ve vodicích lištách drží roletu v požadované poloze.
Vytažení rolety
➤ Veďte roletu oběma rukama pomalu zpět do držáku.
6Čištění a péče
POZOR!
A
➤ Příležitostně vyčistěte výrobek zvlhčenou utěrkou.
➤ Na kluzné plochy vodicích lišt nastříkejte v pravidelných intervalech malé množ-
ství silikonového oleje ve spreji, aby bylo dosaženo hladkého posouvání úchytných lišt ve vodicích lištách.
Nepoužívejte k čištění žádné tvrdé nebo ostré předměty, může dojít
kpoškození výrobku.
➤ Nenechávejte roletu po dlouhou dobu zataženou, zabráníte tak opotřebovávání
materiálu.
7Záruka
Na výrobek je poskytována záruka v souladu s platnými zákony. Pokud je výrobek
vadný, kontaktujte svého specializovaného prodejce nebo pobočku výrobce ve vaší
zemi (adresy jsou uvedeny na zadní straně návodu).
K provedení opravy nebo záručního servisu musíte zaslat následující dokumentaci:
• kopii účtu s datem zakoupení,
• uvedení důvodu reklamace nebo popis vady.
56
Page 57

HU
FP200 Biztonsági és beszerelési útmutatások
Beépítés és üzembe vétel előtt gondosan olvassa el és őrizze meg ezt a
használati útmutatót. Ha a terméket továbbadja, mellékelje hozzá a használati útmutatót is.
Ta r t a l o m j e g y z é k
1 Biztonsági és beszerelési útmutatások. . . . . . . . . . . . . . . . . . . . . . . . . . . . . 57
2 A csomag tartalma . . . . . . . . . . . . . . . . . . . . . . . . . . . . . . . . . . . . . . . . . . . . 58
3 Rendeltetésszerű használat. . . . . . . . . . . . . . . . . . . . . . . . . . . . . . . . . . . . . . 58
4 A termék felszerelése . . . . . . . . . . . . . . . . . . . . . . . . . . . . . . . . . . . . . . . . . . 58
5 A termék használata . . . . . . . . . . . . . . . . . . . . . . . . . . . . . . . . . . . . . . . . . . . 59
6 Tisztítás és ápolás . . . . . . . . . . . . . . . . . . . . . . . . . . . . . . . . . . . . . . . . . . . . . 59
7 Szavatosság. . . . . . . . . . . . . . . . . . . . . . . . . . . . . . . . . . . . . . . . . . . . . . . . . . 59
1 Biztonsági és beszerelési útmutatások
Vegye figyelembe a járműgyártó és a gépjárműszakma által előírt
biztonsági megjegyzéseket és előírásokat!
A gyártó a bekövetkező károkért a következő esetekben nem vállal felelősséget:
• a termék mechanikai behatások miatti sérülése
• a termék kifejezett gyártói engedély nélküli módosítása
• az útmutatóban leírt céloktól eltérő felhasználás
MEGJEGYZÉS
I
Vegye figyelembe az alábbi megjegyzéseket:
• A beszerelés során ne tegyen kárt a jármű kábeleiben.
• Menet közben ne sötétítse el az első szélvédőt.
Ha nem rendelkezik részegységek járművekbe történő beszereléséhez
szükséges kielégítő műszaki ismeretekkel, akkor a tetőablakot szakemberrel szereltesse a járműbe.
57
Page 58

HU
A csomag tartalma FP 200
2A csomag tartalma
Té te l /
1.ábra,
3. oldal
11Takarólemez
21Roló
3 12 3,5 x 13 mm csavar (bézs)
4 4 3,5 x 13 mm csavar (fekete)
5 4 M6 x 50 mm csavar
6 2 M6 x 70 mm csavar
7 2 Vezetősín
8 6 Alátét M6
Mennyiség Leírás
3 Rendeltetésszerű használat
A Dometic FP200 első szélvédő sötétítő-rendszer (cikkszáma: 9104116564) Fiat
Ducato 250 típusú lakóautókba, 07/2006 gyártási évtől és Fiat Ducato 290 típusú
lakóautókba, 07/2014 gyártási évtől és ezzel megegyező építésű Peugeot Boxer és
Citroën Jumper (tetőtároló nélküli, tetőágy nélküli és fejlégzsák nélküli) járművekbe
való beépítésre alkalmas.
4 A termék felszerelése
MEGJEGYZÉS
I
➤ A rolót az ábrán látható módon szerelje fel: 4. ábra, 4. oldal - 8. ábra, 5. oldal.
I
58
A roló furatainak előrajzolásához használja a csomagolásban lévő
sablont.
MEGJEGYZÉS
8. ábra, 5. oldal: A szalagok (3) feszessége attól függ, hogy melyik
hornyolásba (1 vagy 2) akasztja be a szalagokat.
Ha a szalagokat feszesebbre kívánja állítani, használja a 2. hornyolást.
Page 59

HU
FP200 A termék használata
5 A termék használata
A roló bezárása (9. ábra, 6. oldal)
➤ Mindkét kézzel húzza felfelé, a kívánt állásba a rolót.
A vezetősínekben lévő két szalag megtartja a kívánt helyzetben a rolót.
A roló nyitása
➤ Két kézzel lassan vezesse vissza a rolót a tartójába.
6 Tisztítás és ápolás
FIGYELEM!
A
➤ Alkalmanként tisztítsa meg a terméket nedves ruhával.
➤ Fújja be a vezetősínek egyenes felületeit rendszeres időközönként kis mennyi-
ségű szilikonpermettel, így a fogólécek könnyebben fognak csúszni a vezetősínekben.
Ne használjon éles vagy kemény eszközöket vagy tisztítószereket a
tisztításhoz, mivel azok a termék sérülését okozhatják.
➤ Az anyagfáradás elkerülése érdekében ne tartsa a rolót hosszabb ideig zárva.
7Szavatosság
A termékre a törvény szerinti szavatossági időszak érvényes. A termék
meghibásodása esetén forduljon az illetékes szakkereskedőhöz vagy gyártói
lerakathoz (a címeket lásd jelen útmutató hátoldalán).
A javításhoz, illetve a szavatossági adminisztrációhoz a következő dokumentumokat
kell mellékelnie:
• a számla vásárlási dátummal rendelkező másolatát,
• a reklamáció okát vagy a hibát tartalmazó leírást.
59
Page 60

dometic.com
4445101869 08/2019 MO1130I02
YOUR LOCAL
DEALER
dometic.com/dealer
A complete list of Dometic companies, which comprise the Dometic Group, can be found in the public filings of:
DOMETIC GROUP AB
Hemvärnsgatan 15 SE-17154 Solna Sweden
YOUR LOCAL
SUPPORT
dometic.com/contact
YOUR LOCAL
SALES OFFICE
dometic.com/sales-offices
Page 61

FP200, FP300
Drill template • Bohrschablone • Gabarit de perçage • Plantilla de perforación • Molde de perfuração •
Dima di foratura • Boormal • Boreskabelon • Borrmall • Bormal • Poraussabluuna •
Сверлильный шаблон • Szablon wiercenia • Vrtací šablona • Šablóna vŕtania • Fúrósablon
167
YOUR LOCAL DEALER
dometic.com/dealer
A complete list of Dometic companies, which comprise the Dometic Group, can be found in the public filings of:
DOMETIC GROUP AB Hemvärnsgatan 15 SE-17154 Solna
YOUR LOCAL SUPPORT
dometic.com/contact
Sweden
YOUR LOCAL SALES OFFICE
dometic.com/sales-offices
4445101870 08/2019 M01136I02
 Loading...