

Page 1
Central vacuum cleaner
Installation and Operating Manual. . . 8
Zentralstaubsauger
Montage- und Bedienungsanleitung 19
Aspirateur central
Instructions de montage
et de service . . . . . . . . . . . . . . . . . . 32
Aspirador central
Instrucciones de montaje y de uso . 44
Aspirapolvere centralizzato
Istruzioni di montaggio e d’uso . . . . 56
Centrale stofzuiger
Montagehandleiding en gebruiks-
aanwijzing . . . . . . . . . . . . . . . . . . . . 68
Centralstøvsuger
Monterings- og betjeningsvejledning 80
Centraldammsugare
Monterings- och bruksanvisning . . . 91
Sentralstøvsuger
Monterings- og bruksanvisning . . . 102
Keskuspölynimuri
Asennus- ja käyttöohje . . . . . . . . . 113
Aspirador central
Instruções de montagem e manual de
instruções . . . . . . . . . . . . . . . . . . . 124
Центральный пылесос
Инструкция по монтажу и
эксплуатации . . . . . . . . . . . . . . . . 136
EN
DE
FRESIT
NLDASVNOFI
PT
RU
Odkurzacz centralny
Instrukcja montażu i obsługi . . . . . 148
Centrální vysavač
Návod k montáži a obsluze. . . . . . 159
Centrálny vysávač
Návod na montáž a uvedenie do
prevádzky . . . . . . . . . . . . . . . . . . . 170
Központi porszívó
Szerelési és használati útmutató . 181
PL
CS
SK
HU
CV1004
Page 2

Page 3
CV1004
3
1
2
3
4
5
6
7
12
8
11
9
10
1
3
1
2
4
2
Page 4
CV1004
4
3
2
1 1
2
min. 10 mm
max. 25 mm
280 mm
153 mm
4
2.
1.
567
Page 5
CV1004
5
890
Ø 60 mm
a
b
Page 6
CV1004
6
cde
f
1.
2.
g
h
Page 7
CV1004
7
ijklm
n
Page 8

EN
Explanation of symbols CV1004
8
Please read this instruction manual carefully before installation and
first use, and store it in a safe place. If you pass on the product to
another person, hand over this instruction manual along with it.
Table of contents
1 Explanation of symbols . . . . . . . . . . . . . . . . . . . . . . . . . . . . . . . . . . . 8
2 Safety instructions . . . . . . . . . . . . . . . . . . . . . . . . . . . . . . . . . . . . . . . 9
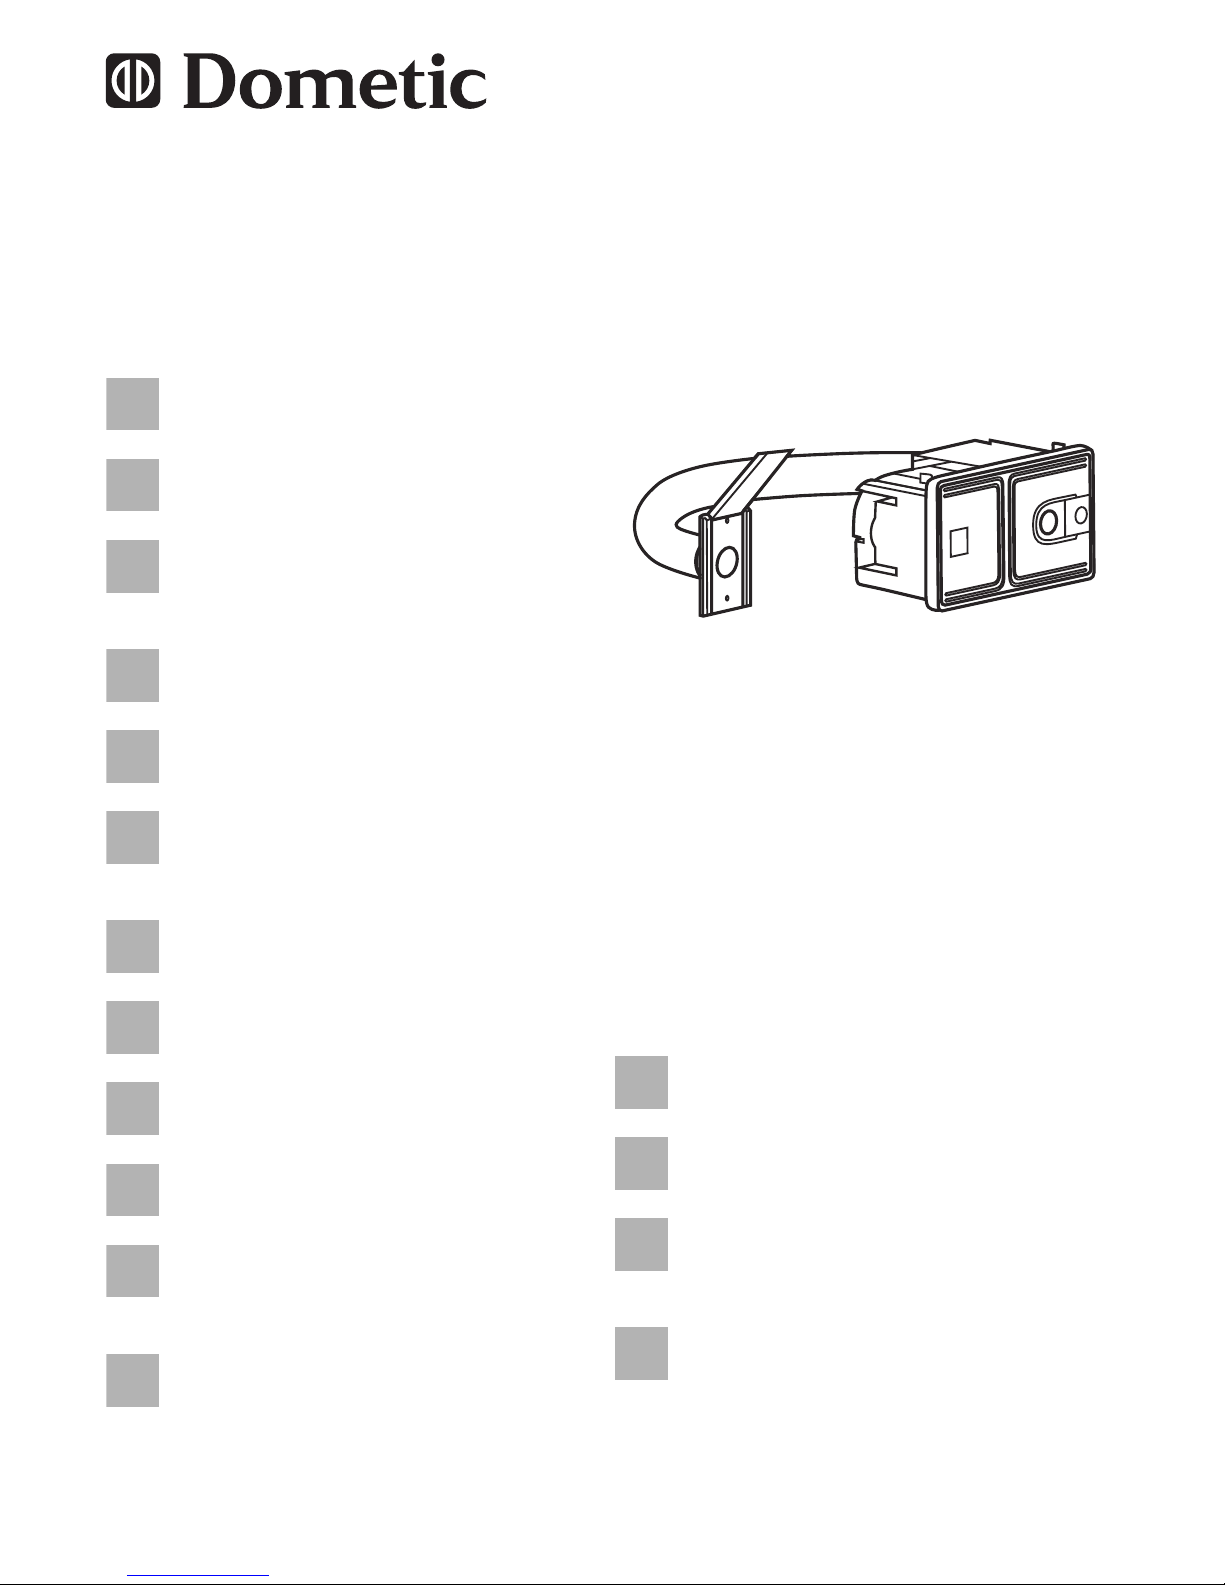
3 Scope of delivery . . . . . . . . . . . . . . . . . . . . . . . . . . . . . . . . . . . . . . . 11
4 Accessories . . . . . . . . . . . . . . . . . . . . . . . . . . . . . . . . . . . . . . . . . . . 11
5 Intended use . . . . . . . . . . . . . . . . . . . . . . . . . . . . . . . . . . . . . . . . . . 12
7 Installing the vacuum cleaner . . . . . . . . . . . . . . . . . . . . . . . . . . . . . 13
8 Using the vacuum cleaner . . . . . . . . . . . . . . . . . . . . . . . . . . . . . . . . 14
9 Maintaining and cleaning the vacuum cleaner. . . . . . . . . . . . . . . . . 16
10 Troubleshooting . . . . . . . . . . . . . . . . . . . . . . . . . . . . . . . . . . . . . . . . 16
11 Warranty . . . . . . . . . . . . . . . . . . . . . . . . . . . . . . . . . . . . . . . . . . . . . 17
12 Disposal . . . . . . . . . . . . . . . . . . . . . . . . . . . . . . . . . . . . . . . . . . . . . . 18
13 Technical data . . . . . . . . . . . . . . . . . . . . . . . . . . . . . . . . . . . . . . . . . 18
1 Explanation of symbols
!
!
A
WARNING!
Safety instruction: Failure to observe this instruction can cause
fatal or serious injury.
CAUTION!
Safety instruction: Failure to observe this instruction can lead to
injury.
NOTICE!
Failure to observe this instruction can cause material damage and
impair the function of the product.
Page 9

EN
CV1004 Safety instructions
9
I
➤ Action: This symbol indicates that action is required on your part. The
required action is described step-by-step.
✓ This symbol describes the result of an action.
Fig. 1 5, page 3: This refers to an element in an illustration. In this case,
item 5 in figure 1 on page 3.
2 Safety instructions
The manufacturer accepts no liability for damage in the following cases:
Damage to the product resulting from mechanical influences and excess
voltage
Alterations to the product without express permission from the manu-
facturer
Use for purposes other than those described in the operating manual
2.1 General safety
!
WARNING!
Before you use the device for the first time, check that the oper-
ating voltage matches the mains voltage (see type plate).
Do not operate the appliance if it is visibly damaged.
This device may only be repaired by qualified personnel. Inade-
quate repairs may cause serious hazards.
Should your appliance need to be repaired, please contact customer service.
This appliance can be used by children aged 8 years or over, as
well as by persons with diminished physical, sensory or mental
capacities or a lack of experience and knowledge, providing
they are supervised, or have been taught how to use the appliance safely and are aware of the resulting risks.
Cleaning and user maintenance must not carried out by unsu-
pervised children.
Children must not play with the device.
NOTE
Supplementary information for operating the product.
Page 10

EN
Safety instructions CV1004
10
Children must be supervised to ensure that they do not play with
the device.
Always keep and use the device out of the reach of children
under 8 years of age.
Never expose the device to moisture.
Do not use accessories that have not been recommended by
the manufacturer. This can lead to injury and material damage.
Only use accessories recommended by the manufacturer.
Do not lean any objects against the vacuum cleaner.
2.2 Operating the device safely
!
CAUTION!
Never pull the plug out of the socket by the connection cable.
Remove the power plug from the socket if you plan to carry out
maintenance work.
Never use the device in rooms where flammable materials are
stored or flammable gases have built up. Sparks from the motor
could ignite them.
Keep the nozzles away from eyes, ears and face while operat-
ing. Ensure that hair, loose clothing and fingers do not get in the
outlets or moving parts.
Keep children and animals at a safe distance when operating
the device.
Do not use the device with wet hands.
A
NOTICE!
Do not vacuum any
– wet objects
– solvents or caustic liquids
– hot, glowing, hard or sharp objects
– poisonous materials
These could damage the device or the filter.
Do not vacuum any large objects, such as waste paper or
cloths. These could block the hose.
If the motor filter is dirty, rinse it in warm water or insert a new
filter. Only insert filters that are completely dry.
Only use the device indoors, never outside.
Page 11
EN
CV1004 Scope of delivery
11
Make sure that none of the vents are blocked. If necessary,
clean the vents before you use the device.
Do not use the device without a filter or a dust bag.
Do not tread on the hose and do not pull too tightly on it.
3 Scope of delivery
4 Accessories
Available as accessories (not included in the scope of delivery):
No. in
fig. 1, page 3
Quantity Designation
1 1 Central vacuum cleaner
2 1 Floor nozzle
3 1 Attachment brush
4 1 Dust nozzle
5 1 Crevice nozzle
6 1 Telescopic tube
7 1 Suction hose
8 1 Hose socket
9 2 Screw connector (black)
10 2 Mounting connector (white)
11 1 Connection hose (2 m)
12 2 Dust bag
Designation Item no.
New dust bag (pack of 5 incl a motor filter) 9103501128
Dometic VacPort automatic dust pan 9103501127
Page 12

EN
Intended use CV1004
12
5 Intended use
The CV1004 central vacuum cleaner (item no. 9103501126) is a vacuum
cleaner for installation in a suitable cavity wall or in existing fixtures in caravans, motorhomes or boats. This device is not intended for commercial use.
It may not be used outdoors.
6 Technical description
The central vacuum cleaner's suction hose can be connected directly to the
device or to an external hose socket.
The suction hose must be turned on and off using the switch when using it
while connected to the central vacuum cleaner. The device has automatic
suction which is activated when the suction hose is inserted into the hose
socket.
The vacuum cleaner system can be extended using the Dometic VacPort
(not included in the scope of delivery). This automatic dust pan can be fitted,
for example, in the entrance or kitchen area in order to suck away dirt which
has been swept up there using the permanently installed nozzle.
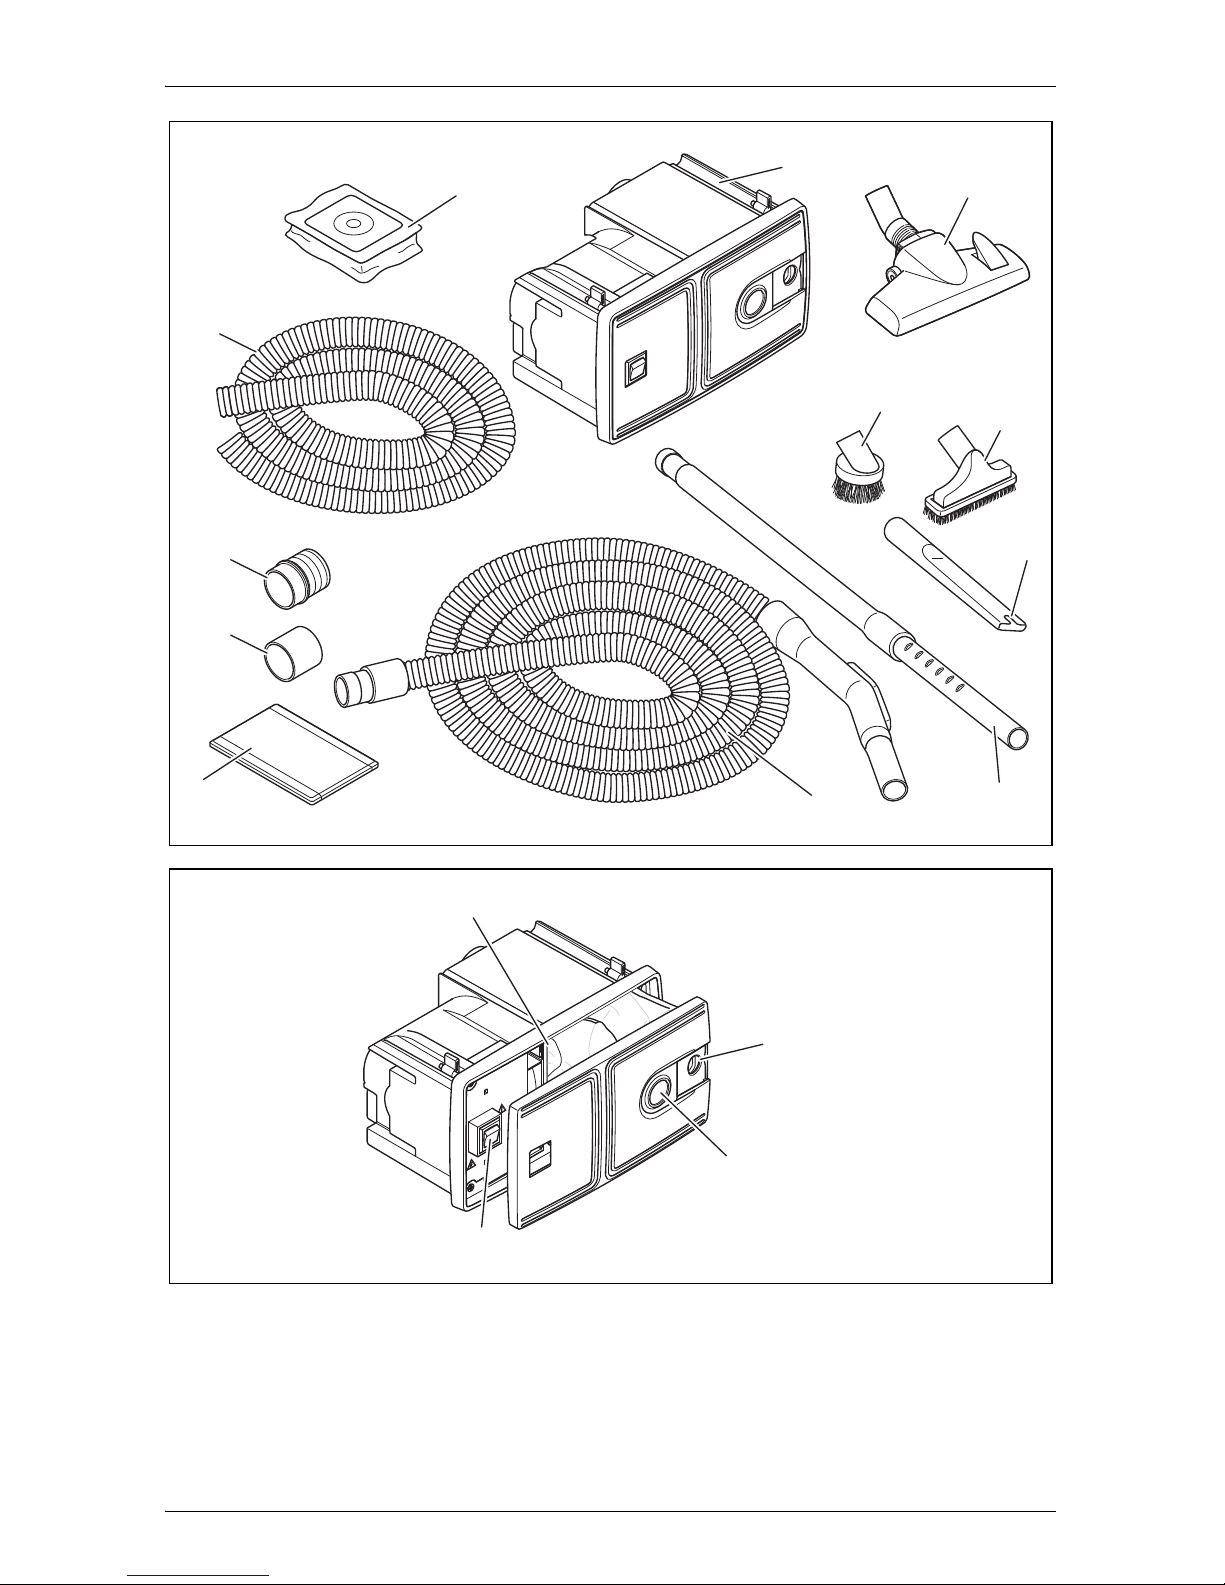
6.1 Control elements
No. in
fig. 2, page 3
Description Explanation
1 I/O switch Switches the vacuum cleaner on or off
whenever the suction hose is connected to the central vacuum cleaner.
2 Sliding cover Closes up the hose connection on the
device. Closing increases the suction
when working from an external hose
socket.
3 Slider Opens the front of the device (e.g. for
changing the dust bag)
4 Motor filter Protects the motor from contamination
Page 13

EN
CV1004 Installing the vacuum cleaner
13
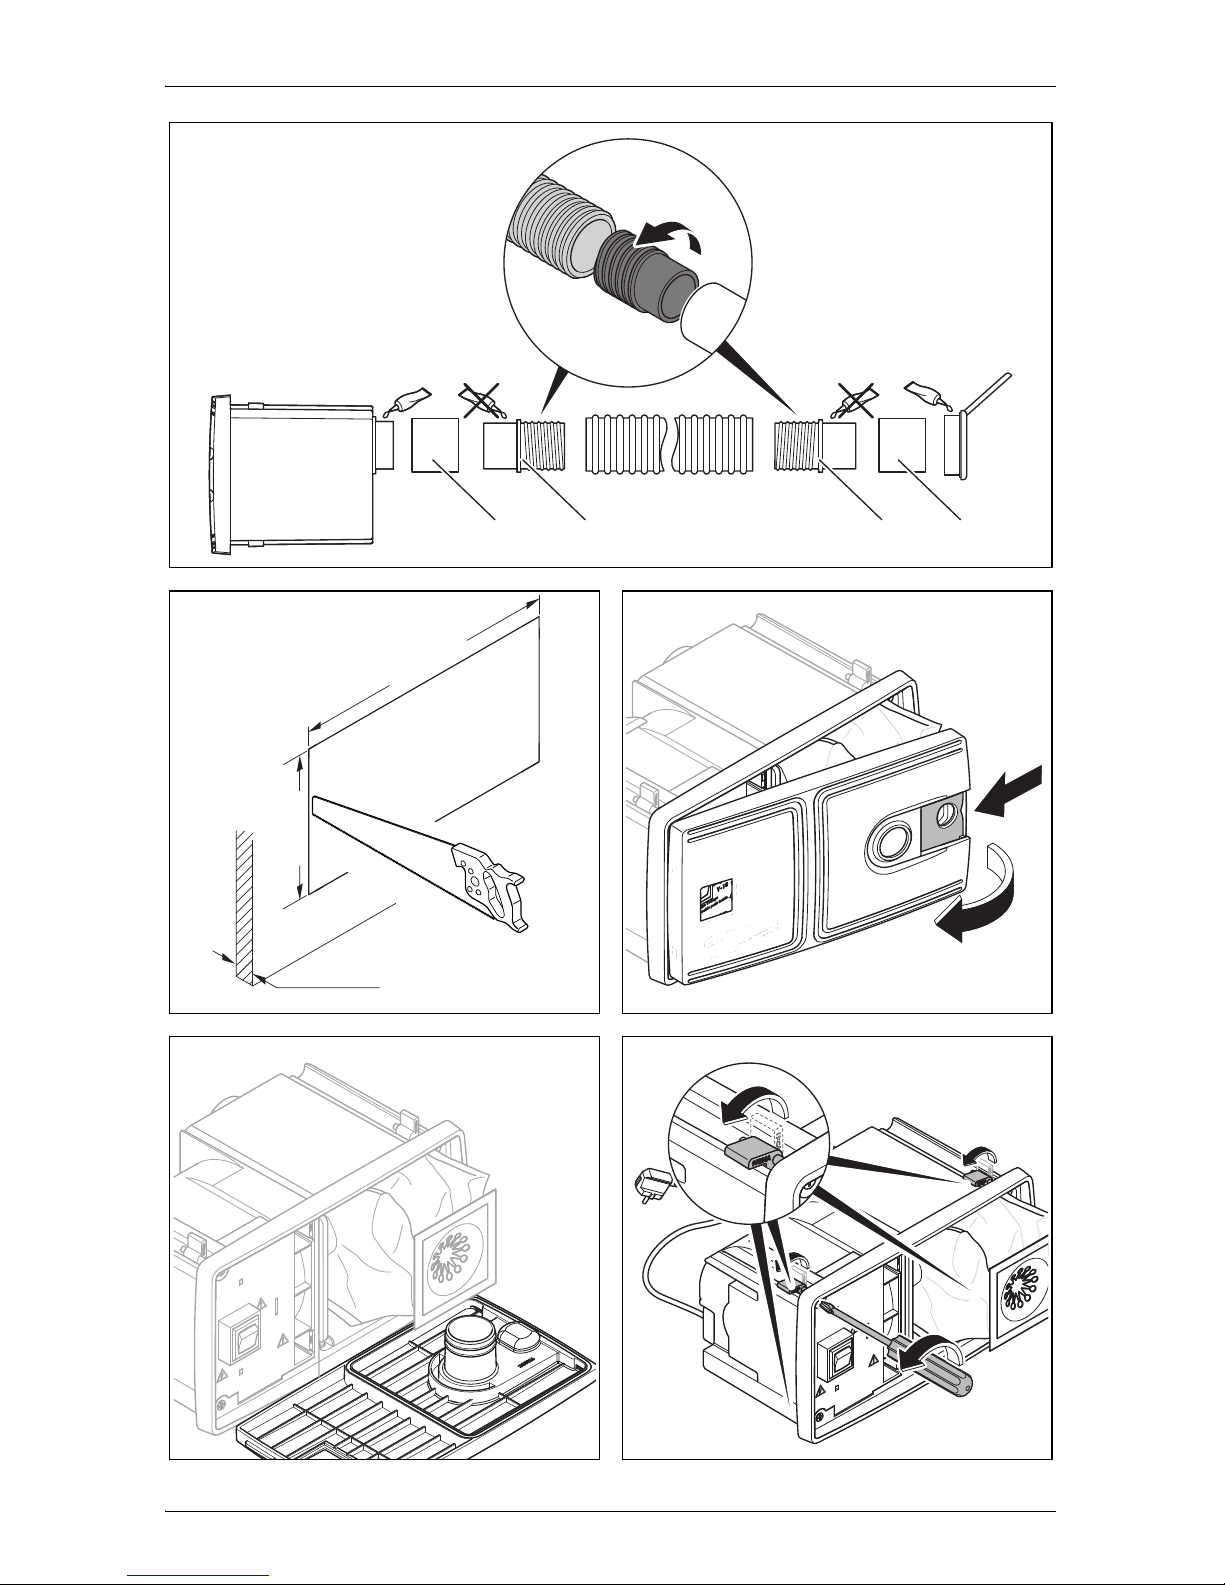
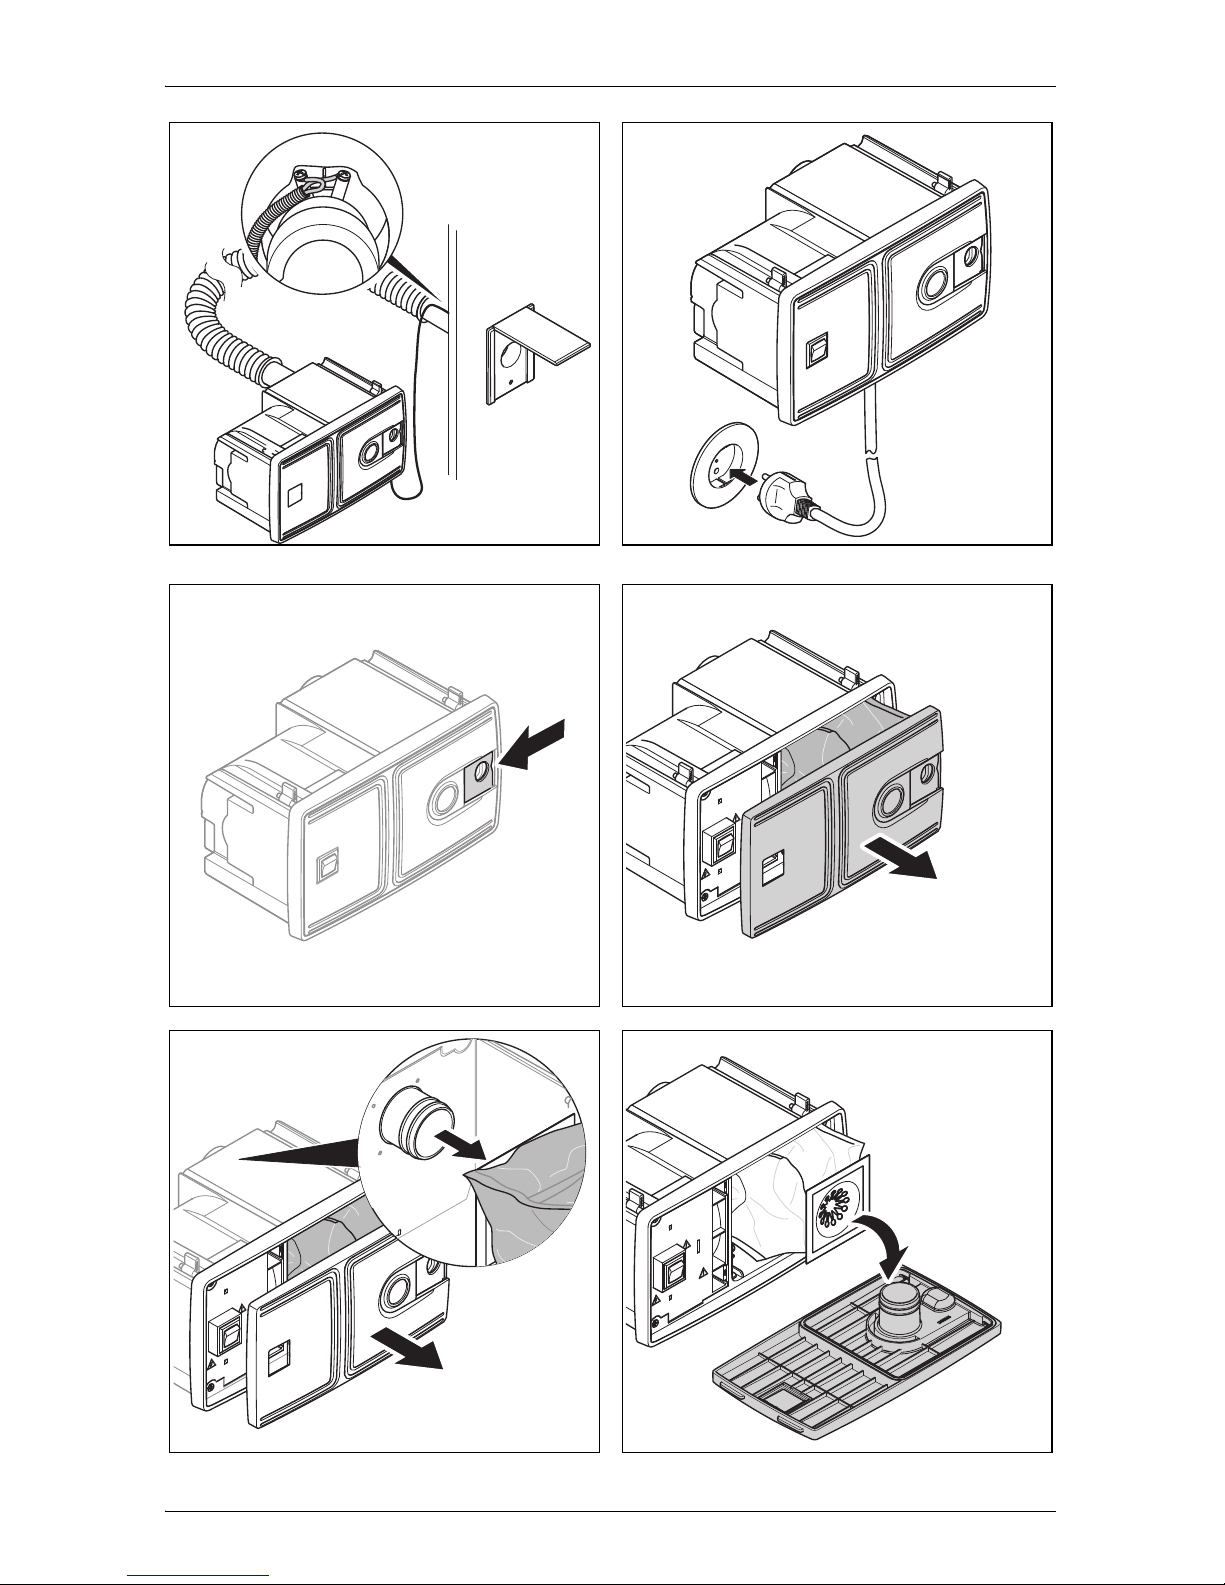
7 Installing the vacuum cleaner
!
A
➤ Ensure that the dust bag and the motor filter are in place.
➤ Check the vacuum cleaner works prior to installation.
A
➤ Mount the vacuum cleaner (fig. 4, page 4 to fig. 0, page 5).
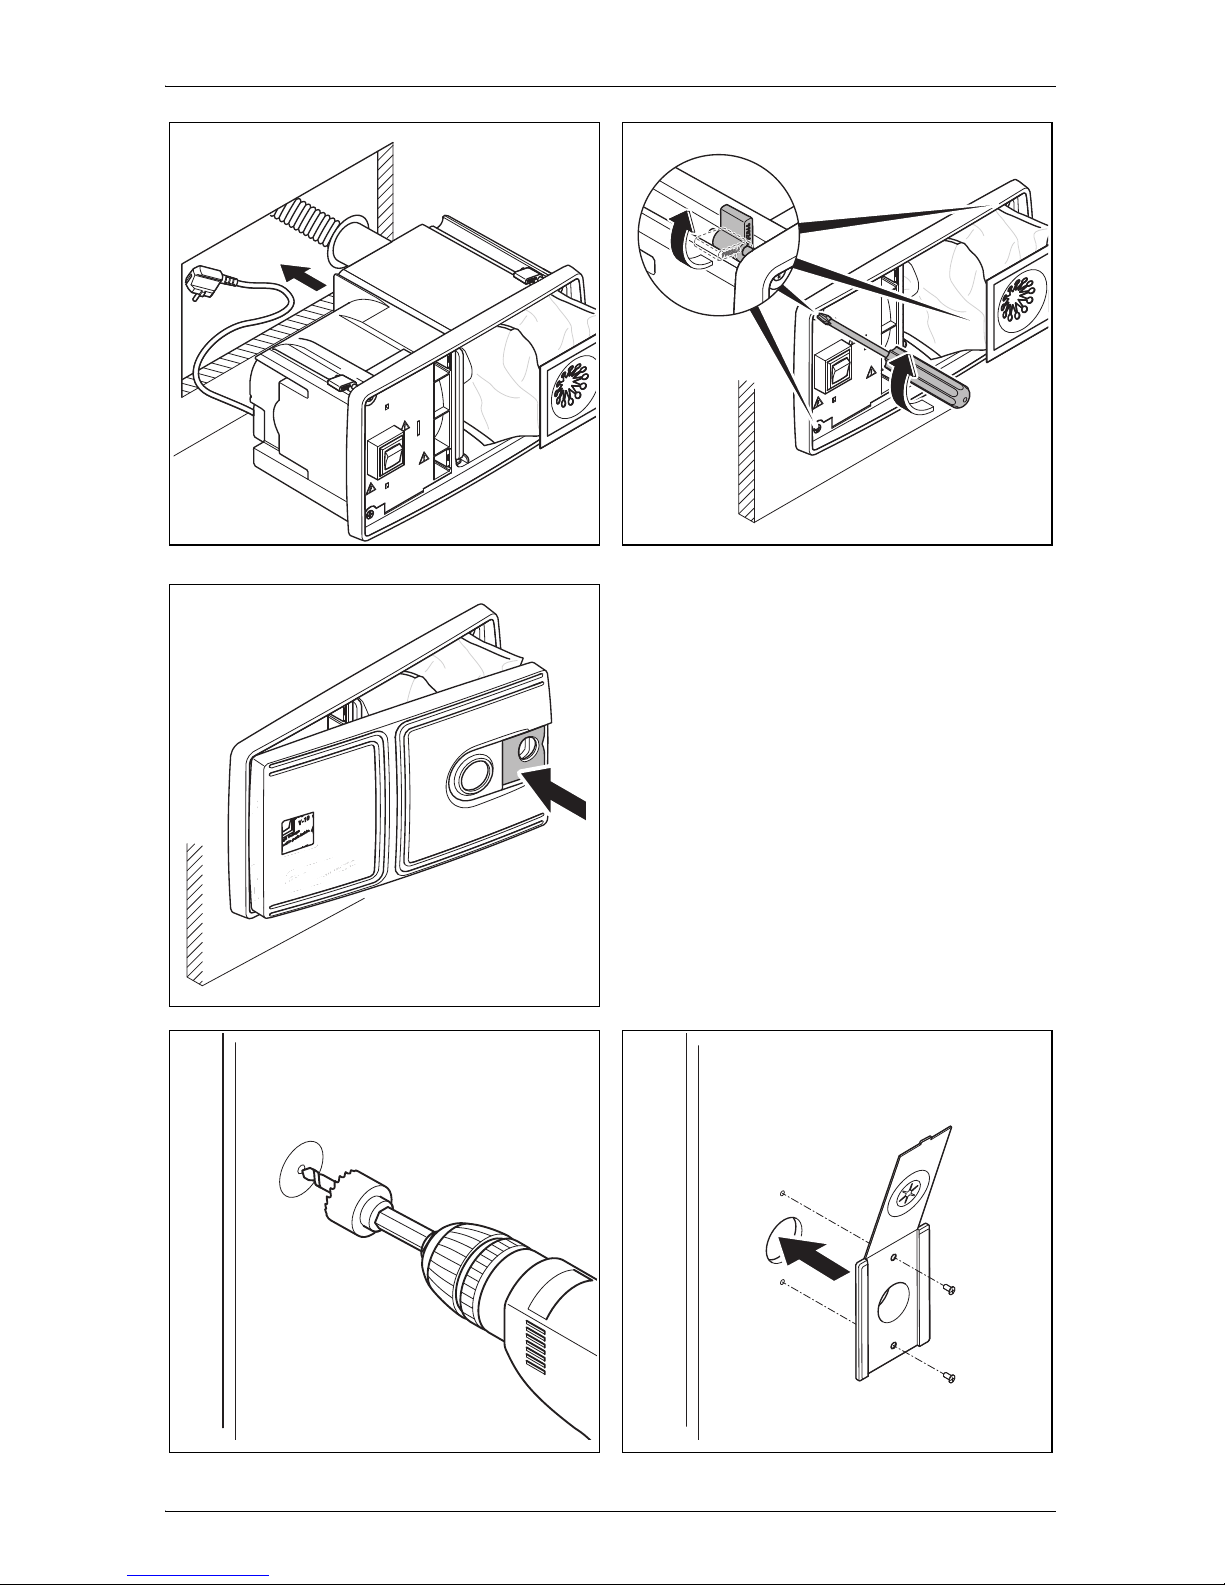
I
➤ Mount the hose socket and route the connection hose (fig. a, page 5,
and fig. b, page 5).
WARNING! Danger of electrocution and serious injury.
Beware of electrical cables in the wall when drilling and sawing.
NOTICE!
Mount the vacuum cleaner in a dry place.
Do not mount the vacuum cleaner in an area which is subject
to high temperatures.
Do not bend the connection cable round sharp edges or cor-
ners. Keep the connection cable away from heated surfaces.
To install the vacuum cleaner, the wall thickness must be a
minimum of 10 mm and a maximum of 25 mm.
Ensure there is a socket nearby which can be used to supply
the vacuum cleaner with power. Do not use extension cables.
If the vacuum cleaner is being installed in small spaces with
poor ventilation (e.g. cabinet), then an air outlet and an air outlet grille with a cross-section of 70 mm must be installed in
order to transport warm air generated by the device outside.
NOTICE!
The bolts on the housing must not be screwed out completely
because they are fitted with a spring mechanism.
NOTE
The mounting connectors (fig. 3 1, page 4) need to be glued on
the device-side using a standard adhesive. The screw connectors
(fig. 3 2, page 4) are screwed into the connection hose and
inserted into the mounting connectors.
Page 14

EN
Using the vacuum cleaner CV1004
14
Connecting electrical power to the vacuum cleaner
➤ Connect the orange-coloured 24 Vg cables on the rear of the device to
the contacts on the hose socket (fig. c, page 6).
!
➤ Connect the 230 V connection cable to a suitable socket (fig. d, page 6).
8 Using the vacuum cleaner
A
8.1 Vacuuming using the central vacuum cleaner
➤ Open the sliding cover (fig. 2 2, page 3) by sliding it to the right.
➤ Insert the hose into the hose connection on the device.
➤ Set the switch to position “I” (fig. 2 1, page 3) to switch on the device.
✓ The vacuum cleaner switches on.
➤ Set the switch to position “O” (fig. 2 1, page 3) to switch off the device.
➤ Disconnect the hose from the hose connection on the device.
➤ Close the sliding cover (fig. 2 2, page 3) by sliding it to the left.
WARNING!
Danger of electrocution and serious injury.
Only use the 230 V connection cable supplied.
NOTICE!
Do not use the vacuum cleaner without a dust bag or motor
filter.
Only use spare parts and accessories recommended by the
manufacturer.
Page 15

EN
CV1004 Using the vacuum cleaner
15
8.2 Vacuuming using the hose socket
I
➤ To switch on, connect the hose to the external hose socket.
✓ The vacuum cleaner switches on automatically.
➤ To switch off, disconnect the hose from the external hose socket.
✓ The vacuum cleaner switches off automatically.
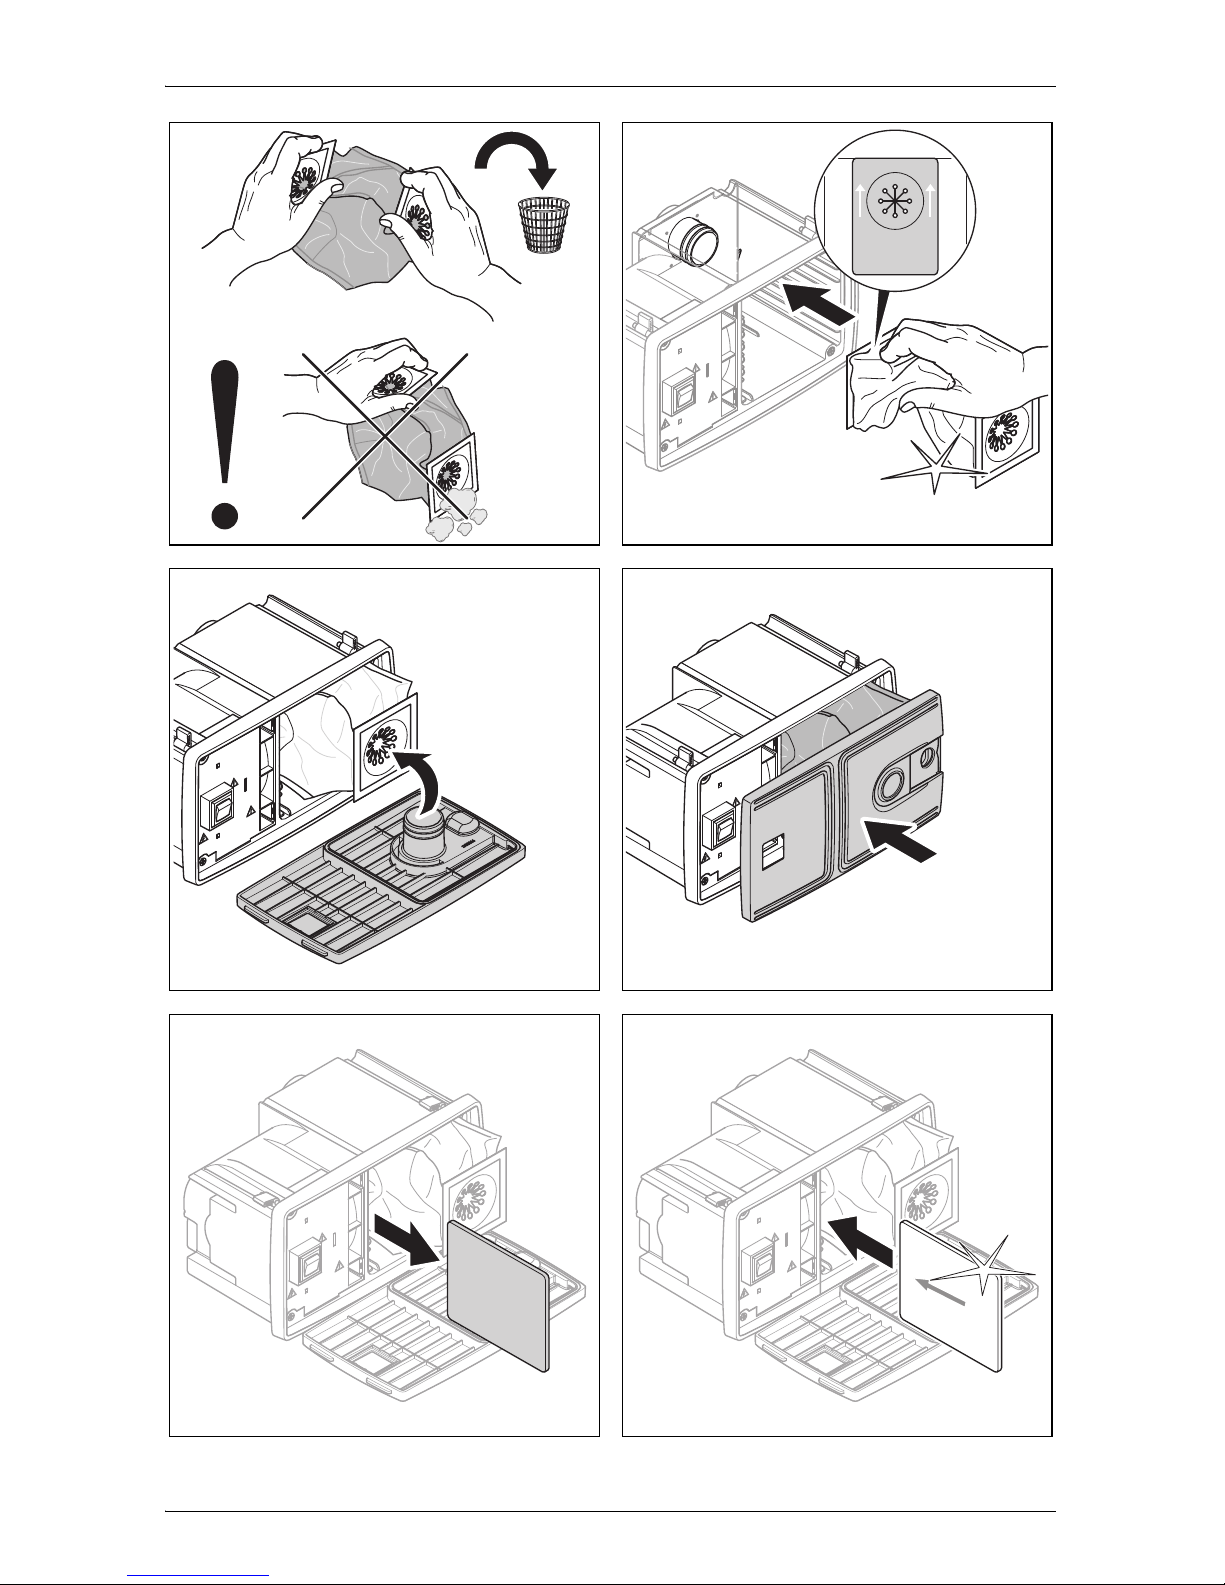
8.3 Changing the dust bag
A
I
➤ Change the dust bag (fig. e, page 6, to fig. l, page 7).
NOTE
Use the sliding cover to close up the hose connection on the front
of the device if you are vacuuming from the external hose socket.
This increases the level of suction.
NOTICE!
It is important for vacuum cleaner suction that the dust bag is fitted
correctly. Please follow the instructions carefully, see fig. e,
page 6 to fig. l, page 7.
NOTE
The dust bag has two openings. One of the two ends has two
arrows. This end must be attached on the device with the
arrows pointing upwards (fig. j, page 7). Make sure the dust
bag is fitted in the correct position.
Firstly remove the opening from the connecting nozzle in the
device and then remove the other opening from the connecting
nozzle on the front of the device. Hold the openings upwards
to prevent any dust falling out.
Replace or clean the motor filter after you have changed the
dust bag five times.
Page 16

EN
Maintaining and cleaning the vacuum cleaner CV1004
16
8.4 Replacing and cleaning the motor filter
I
➤ Remove the motor filter and insert a new one or reinsert the cleaned
motor filter (fig. m, page 7 and fig. n, page 7).
9 Maintaining and cleaning the vacuum
cleaner
A
➤ Occasionally clean the product with a damp cloth.
10 Troubleshooting
I
NOTE
Replace or clean the motor filter after you have changed the dust
bag five times or if it is heavily soiled.
You can wash the motor filter by hand in mild soapy water. Do not
wash it in a washing machine or with hard objects. Leave it to dry
before fitting it in the vacuum cleaner in the direction of the
arrows.
NOTICE!
Do not use sharp or hard objects or cleaning agents for cleaning
as these may damage the product.
NOTE
The vacuum cleaner is equipped with a thermal overload protection which prevents the motor from overheating.
If the motor stops, switch the device off by setting the switch to
position “O” or disconnecting the suction hose from the external
hose socket.
Let the device cool down for around 1 hour. If this fault still occurs
following the troubleshooting measures described below, then
please contact the manufacturer or your dealer.
Page 17

EN
CV1004 Warranty
17
If the motor stops, switch off the vacuum cleaner and proceed as follows:
➤ Check whether the suction hose is blocked.
Hold the suction hose up and drop a small coin in from above. If the coin
does not fall through the hose, it is blocked. Push the dirt ball through the
hose using a long rod.
➤ Check the dust bag.
If a large amount of dirt which is not household dust (plasterboard dust,
fine sawdust etc.) is vacuumed up, the pores in the dust bag can get
blocked.
Insert a new dust bag.
➤ Clean the suction hose if it is heavily soiled.
– Hold the ends of the suction hose up high.
– Pour liquid detergent into both ends.
– Fill up with water while holding both ends up.
– Shake the suction hose to and fro to loosen the dirt.
– Pull the suction hose apart as far as possible.
– Rinse out the dirt.
– Repeat this procedure until the suction hose is clean.
– Hang the suction hose up from the middle and leave it to dry before
using it again.
➤ Check whether the floor nozzle is blocked.
Clean the floor nozzle.
➤ Check the motor filter.
Clean or replace the motor filter.
11 Warranty
The statutory warranty period applies. If the product is defective, please
contact the manufacturer's branch in your country (see the back of the
instruction manual for the addresses) or your retailer.
For repair and guarantee processing, please include the following documents when you send in the device:
A copy of the receipt with purchasing date
A reason for the claim or description of the fault
Page 18
EN
Disposal CV1004
18
12 Disposal
➤ Place the packaging material in the appropriate recycling waste bins
wherever possible.
M
If you wish to finally dispose of the product, ask your local recycling
centre or specialist dealer for details about how to do this in
accordance with the applicable disposal regulations.
13 Technical data
CV1004
Item no.: 9103501126
Input voltage: 220 - 240 Vw
Power consumption: 950 W
Current: 4.5 A
Suction power: 2500 mm water column
Operating temperature: –15 °C to +40 °C
Dimensions W x H x D: 298 x 171 x 175 mm
Weight: 2.7 kg
Certificate:
Page 19

DE
CV1004 Erklärung der Symbole
19
Bitte lesen Sie diese Anleitung vor Einbau und Inbetriebnahme sorgfältig durch und bewahren Sie sie auf. Geben Sie sie im Falle einer
Weitergabe des Produktes an den Nutzer weiter.
Inhaltsverzeichnis
1 Erklärung der Symbole . . . . . . . . . . . . . . . . . . . . . . . . . . . . . . . . . . 19
2 Sicherheitshinweise . . . . . . . . . . . . . . . . . . . . . . . . . . . . . . . . . . . . . 20
3 Lieferumfang . . . . . . . . . . . . . . . . . . . . . . . . . . . . . . . . . . . . . . . . . . 22
4 Zubehör . . . . . . . . . . . . . . . . . . . . . . . . . . . . . . . . . . . . . . . . . . . . . . 23
5 Bestimmungsgemäßer Gebrauch . . . . . . . . . . . . . . . . . . . . . . . . . . 23
7 Staubsauger montieren . . . . . . . . . . . . . . . . . . . . . . . . . . . . . . . . . . 25
8 Staubsauger benutzen. . . . . . . . . . . . . . . . . . . . . . . . . . . . . . . . . . . 26
9 Staubsauger pflegen und reinigen . . . . . . . . . . . . . . . . . . . . . . . . . . 28
10 Störungsbeseitigung . . . . . . . . . . . . . . . . . . . . . . . . . . . . . . . . . . . . 29
11 Gewährleistung . . . . . . . . . . . . . . . . . . . . . . . . . . . . . . . . . . . . . . . . 30
12 Entsorgung. . . . . . . . . . . . . . . . . . . . . . . . . . . . . . . . . . . . . . . . . . . . 30
13 Technische Daten . . . . . . . . . . . . . . . . . . . . . . . . . . . . . . . . . . . . . . 31
1 Erklärung der Symbole
!
!
A
WARNUNG!
Sicherheitshinweis: Nichtbeachtung kann zu Tod oder schwerer
Verletzung führen.
VORSICHT!
Sicherheitshinweis: Nichtbeachtung kann zu Verletzungen
führen.
ACHTUNG!
Nichtbeachtung kann zu Materialschäden führen und die
Funktion des Produktes beeinträchtigen.
Page 20

DE
Sicherheitshinweise CV1004
20
I
➤ Handlung: Dieses Symbol zeigt Ihnen, dass Sie etwas tun müssen. Die
erforderlichen Handlungen werden Schritt für Schritt beschrieben.
✓ Dieses Symbol beschreibt das Ergebnis einer Handlung.
Abb. 1 5, Seite 3: Diese Angabe weist Sie auf ein Element in einer Abbildung hin, in diesem Beispiel auf „Position 5 in Abbildung 1 auf Seite 3“.
2 Sicherheitshinweise
Der Hersteller übernimmt in folgenden Fällen keine Haftung für Schäden:
Beschädigungen am Produkt durch mechanische Einflüsse und Über-
spannungen
Veränderungen am Produkt ohne ausdrückliche Genehmigung vom
Hersteller
Verwendung für andere als die in der Anleitung beschriebenen Zwecke
2.1 Allgemeine Sicherheit
!
WARNUNG!
Kontrollieren Sie vor Inbetriebnahme des Gerätes, ob Betriebs-
spannung und Netzspannung übereinstimmen (siehe Typenschild).
Wenn das Gerät sichtbare Beschädigungen aufweist, dürfen
Sie es nicht in Betrieb nehmen.
Reparaturen an diesem Gerät dürfen nur von Fachkräften
durchgeführt werden. Durch unsachgemäße Reparaturen
können erhebliche Gefahren entstehen.
Wenden Sie sich im Reparaturfall an den Kundendienst.
Dieses Gerät kann von Kindern ab 8 Jahren und darüber sowie
von Personen mit verringerten physischen, sensorischen oder
mentalen Fähigkeiten oder Mangel an Erfahrung und Wissen
benutzt werden, wenn sie beaufsichtigt oder bezüglich des
sicheren Gebrauchs des Gerätes unterwiesen wurden und die
daraus resultierenden Gefahren verstehen.
Reinigung und Benutzer-Wartung dürfen nicht von Kindern
ohne Beaufsichtigung durchgeführt werden.
HINWEIS
Ergänzende Informationen zur Bedienung des Produktes.
Page 21

DE
CV1004 Sicherheitshinweise
21
Kinder dürfen nicht mit dem Gerät spielen.
Kinder sollten beaufsichtigt werden, um sicherzustellen, dass
sie nicht mit dem Gerät spielen.
Verwahren und benutzen Sie das Gerät außerhalb der Reich-
weite von Kindern unter 8 Jahren.
Setzen Sie das Gerät niemals Nässe aus.
Verwenden Sie kein Zubehör, dass nicht vom Hersteller
empfohlen ist. Dies kann zur Verletzungen und Materialschäden führen.
Verwenden Sie nur vom Hersteller empfohlenes Zubehör.
Lehnen Sie keine Gegenstände gegen den Staubsauger.
2.2 Sicherheit beim Betrieb des Gerätes
!
VORSICHT!
Ziehen Sie den Stecker nie am Anschlusskabel aus der Steck-
dose.
Ziehen Sie den Netzstecker aus der Steckdose, wenn Sie
Wartungsarbeiten vornehmen.
Benutzen Sie das Gerät nie in Räumen, in denen feuer-
gefährliche Stoffe lagern oder sich brennbare Gase gebildet
haben. Funken vom Motor können diese entzünden.
Halten Sie die Düsen während des Betriebs von Augen, Ohren
und Gesicht fern. Achten Sie darauf, dass Haare, lose Kleidung
und Finger nicht in die Öffnungen oder an sich drehende Teile
kommen.
Halten Sie Kinder und Tiere beim Gebrauch des Gerätes in
einem sicheren Abstand.
Benutzen Sie das Gerät nicht mit nassen Händen.
A
ACHTUNG!
Saugen Sie keine
– nassen Gegenstände
– lösungsmittelhaltigen oder ätzenden Flüssigkeiten
– heißen, glühenden, harten oder spitzen Gegenstände
– giftigen Materialien
Diese können das Gerät oder den Filter beschädigen.
Saugen Sie keine großen Gegenstände wie Abfallpapier oder
Tücher. Diese können den Schlauch verstopfen.
Page 22
DE
Lieferumfang CV1004
22
Wenn der Motorfilter schmutzig ist, spülen Sie ihn in warmem
Wasser aus, oder setzen einen neuen Filter ein. Setzen Sie nur
vollständig trockene Filter ein.
Verwenden Sie das Gerät ausschließlich in Räumen, nie im
Freien.
Achten Sie darauf, dass keine Öffnungen verstopft werden. Rei-
nigen Sie ggf. die Öffnungen, bevor Sie das Gerät benutzen.
Nehmen Sie das Gerät nicht ohne Filter oder ohne Staubbeutel
in Betrieb.
Treten sie nicht auf den Schlauch, und ziehen sie nicht zu stark
am Schlauch.
3Lieferumfang
Nr. in
Abb. 1, Seite 3
Menge Bezeichnung
1 1 Zentralstaubsauger
2 1 Bodendüse
3 1 Aufsatzbürste
4 1 Staubdüse
5 1 Fugendüse
6 1 Teleskoprohr
7 1 Saugschlauch
8 1 Schlauchsteckdose
9 2 Schraubverbinder (schwarz)
10 2 Aufsteckverbinder (weiß)
11 1 Verbindungsschlauch (2 m)
12 2 Staubbeutel
Page 23

DE
CV1004 Zubehör
23
4 Zubehör
Als Zubehör erhältlich (nicht im Lieferumfang enthalten):
5 Bestimmungsgemäßer Gebrauch
Der Zentralstaubsauger CV1004 (Art.-Nr. 9103501126) ist ein Staubsauger
für den Einbau in eine geeignete Hohlwand oder in vorhandene Einbauten in
Wohnwagen, Wohnmobilen oder Booten. Dieses Gerät ist nicht für den gewerblichen Einsatz vorgesehen. Es darf nicht im Freien verwendet werden.
6 Technische Beschreibung
Der Saugschlauch des Zentralstaubsaugers kann direkt am Gerät oder an
eine externe Schlauchsteckdose angeschlossen werden.
Bei Benutzung des Saugschlauches am Zentralstaubsauger muss dieser
über den Schalter ein- und ausgeschaltet werden. Das Gerät verfügt über
eine Saugautomatik, die aktiviert wird, wenn der Saugschlauch in die
Schlauchsteckdose eingesteckt wird.
Das Staubsaugersystem ist erweiterbar durch den Dometic VacPort (nicht im
Lieferumfang enthalten). Diese Einkehrdüse kann z. B. im Eingangs- oder
Küchenbereich angebracht werden, um dort zusammengefegten Schmutz
direkt mit Hilfe der fest montierten Düse einzusaugen.
Bezeichnung Art.-Nr.
Ersatz-Staubbeutel (5er-Pack inkl. ein Motorfilter) 9103501128
Dometic VacPort Einkehrdüse 9103501127
Page 24

DE
Technische Beschreibung CV1004
24
6.1 Bedienelemente
Nr. in
Abb. 2, Seite 3
Bezeichnung Erklärung
1 Schalter I/O Schaltet den Staubsauger ein oder aus,
wenn der Saugschlauch am Zentralstaubsauger eingesteckt wird.
2 Schiebeblende Verschließt den Schlauchanschluss am
Gerät. Das Verschließen erhöht die
Saugkraft bei Betrieb an der externen
Schlauchsteckdose.
3 Schieber Öffnet die Gerätefront (z. B. für den
Wechsel des Staubbeutels)
4 Motorfilter Schützt den Motor vor Verunreinigung
Page 25

DE
CV1004 Staubsauger montieren
25
7 Staubsauger montieren
!
A
➤ Vergewissern Sie sich, dass der Staubbeutel und der Motorfilter einge-
setzt sind.
➤ Prüfen Sie vor der Montage des Staubsaugers, ob er funktioniert.
A
➤ Montieren Sie den Staubsauger (Abb. 4, Seite 4 bis Abb. 0, Seite 5).
I
WARNUNG! Gefahr von Stromschlägen und schweren Verletzungen.
Achten Sie beim Bohren und Sägen auf Elektrokabel, die sich in
der Wand befinden.
ACHTUNG!
Montieren Sie den Staubsauger an einem trockenen Ort.
Montieren Sie den Staubsauger nicht in einem Bereich, an
dem hohe Temperaturen herrschen.
Biegen Sie das Anschlusskabel nicht um scharfe Kanten oder
Ecken. Halten Sie das Anschlusskabel von beheizten Flächen
fern.
Für die Montage des Staubsaugers muss die Wandstärke min.
10 mm und max. 25 mm betragen.
Beachten Sie, dass sich eine Steckdose in der Nähe befindet,
über die der Staubsauger mit Strom versorgt werden kann.
Verwenden Sie keine Verlängerungskabel.
Falls der Staubsauger in kleinen Räumen mit schlechter Belüf-
tung (z. B. Einbauschrank) montiert wird, muss ein Luftauslass
mit Luftauslassgitter von mindestens 70 mm Querschnitt eingebaut werden, um die durch das Gerät erwärmte Luft nach
außen zu transportieren.
ACHTUNG!
Die Schrauben am Gehäuse dürfen nicht komplett herausgedreht
werden, da sie mit einem Federmechanismus versehen sind.
HINWEIS
Die Aufsteckverbinder (Abb. 3 1, Seite 4) müssen geräteseitig
mit handelsüblichem Kunststoffkleber verklebt werden. Die
Schraubverbinder (Abb. 3 2, Seite 4) werden in den
Verbindungsschlauch eingeschraubt und in den Aufsteckverbinder gesteckt.
Page 26

DE
Staubsauger benutzen CV1004
26
➤ Montieren Sie die Schlauchsteckdose und verlegen Sie den
Verbindungsschlauch (Abb. a, Seite 5, und Abb. b, Seite 5).
Staubsauger elektrisch anschließen
➤ Verbinden Sie die orangefarbenen 24 Vg-Leitungen auf der Rückseite
des Gerätes mit den Kontakten an der Schlauchsteckdose (Abb. c,
Seite 6).
!
➤ Schließen Sie das 230-V-Anschlusskabel an eine geeignete Steckdose
an (Abb. d, Seite 6).
8 Staubsauger benutzen
A
8.1 Mit Zentralstaubsauger staubsaugen
➤ Öffnen Sie die Schiebeblende (Abb. 2 2, Seite 3), indem Sie sie nach
rechts schieben.
➤ Stecken Sie den Schlauch in den Schlauchanschluss am Gerät.
➤ Stellen Sie den Schalter in Stellung „I“ (Abb. 2 1, Seite 3), um das Gerät
einzuschalten.
✓ Der Staubsauger wird eingeschaltet.
➤ Stellen Sie den Schalter in Stellung „O“ (Abb. 2 1, Seite 3), um das
Gerät auszuschalten.
➤ Ziehen Sie den Schlauch aus dem Schlauchanschluss am Gerät.
➤ Schließen Sie die Schiebeblende (Abb. 2 2, Seite 3), indem Sie sie
nach links schieben.
WARNUNG!
Gefahr von Stromschlägen und schweren Verletzungen.
Verwenden Sie nur das mitgelieferte 230-V-Anschlusskabel.
ACHTUNG!
Verwenden Sie den Staubsauger nicht ohne Staubbeutel
oder ohne Motorfilter.
Verwenden Sie ausschließlich vom Hersteller empfohlene
Ersatz- und Zubehörteile.
Page 27

DE
CV1004 Staubsauger benutzen
27
8.2 Mit Schlauchsteckdose staubsaugen
I
➤ Zum Einschalten stecken Sie den Schlauch in die externe Schlauch-
steckdose.
✓ Der Staubsauger wird automatisch eingeschaltet.
➤ Zum Ausschalten ziehen Sie den Schlauch aus der externen Schlauch-
steckdose.
✓ Der Staubsauger wird automatisch ausgeschaltet.
8.3 Staubbeutel wechseln
A
I
➤ Wechseln Sie den Staubbeutel (Abb. e, Seite 6, bis Abb. l, Seite 7).
HINWEIS
Verschließen Sie den Schlauchanschluss an der Gerätefront mit
der Schiebeblende, wenn Sie über die externe Schlauchsteckdose staubsaugen. So erhöhen Sie die Saugleistung.
ACHTUNG!
Ein korrektes Einsetzen des Staubbeutels ist wichtig für die Saugkraft des Staubsaugers. Bitte befolgen Sie genau die Anweisungen, siehe Abb. e, Seite 6, bis Abb. l, Seite 7.
HINWEIS
Der Staubbeutel hat zwei Öffnungen. Eine der beiden Öffnun-
gen ist mit zwei Pfeilen gekennzeichnet. Diese Seite muss auf
den Stutzen im Gerät mit den Pfeilen nach oben aufgesetzt
werden (Abb. j, Seite 7). Achten Sie beim Einsetzen des
Staubbeutels auf die korrekte Position.
Entnehmen Sie zuerst die eine Öffnung vom Stutzen im Gerät
und danach die andere Öffnung vom Stutzen an der Gerätefront. Halten Sie die Öffnungen nach oben, damit kein Staub
aus dem Staubbeutel herausfallen kann.
Wechseln oder reinigen Sie den Motorfilter bei jedem fünften
Auswechseln des Staubbeutels.
Page 28

DE
Staubsauger pflegen und reinigen CV1004
28
8.4 Motorfilter wechseln oder reinigen
I
➤ Entnehmen Sie den Motorfilter, und setzen Sie einen neuen oder den
gereinigten Motorfilter wieder ein (Abb. m, Seite 7 und Abb. n, Seite 7).
9 Staubsauger pflegen und reinigen
A
➤ Reinigen Sie das Produkt gelegentlich mit einem feuchten Tuch.
HINWEIS
Wechseln oder reinigen Sie den Motorfilter bei jedem fünften Auswechseln des Staubbeutels oder bei starker Verschmutzung.
Sie können den Motorfilter mit der Hand in milder Seifenlauge
waschen. Waschen Sie ihn nicht in einer Waschmaschine oder
mit harten Gegenständen. Lassen Sie ihn in der Luft trocknen,
ehe Sie ihn in Pfeilrichtung in den Staubsauger einsetzen.
ACHTUNG!
Keine scharfen oder harten Gegenstände oder Reinigungsmittel
zur Reinigung verwenden, da dies zu einer Beschädigung des
Produktes führen kann.
Page 29

DE
CV1004 Störungsbeseitigung
29
10 Störungsbeseitigung
I
Wenn der Motor stehen bleibt, schalten Sie den Staubsauger aus und gehen
Sie wie folgt vor:
➤ Prüfen Sie, ob der Saugschlauch verstopft ist.
Halten Sie den Saugschlauch mit einer Hand nach oben, und stecken
Sie von oben eine kleine Münze hinein. Wenn die Münze nicht durch den
Schlauch fällt, ist er verstopft. Schieben Sie mit einem langen Stab das
Schmutzknäuel aus dem Schlauch.
➤ Prüfen Sie den Staubbeutel.
Durch das Ansaugen von großen Mengen Schmutz, der kein Haushaltsstaub ist (Gipsplattenstaub, feiner Holzstaub usw.), können die Poren
des Staubbeutels verstopfen.
Setzen Sie einen neuen Staubbeutel ein.
➤ Wenn der Saugschlauch stark verschmutz ist, reinigen Sie ihn.
– Halten Sie beide Enden des Saugschlauchs hoch.
– Füllen Sie flüssiges Reinigungsmittel in beide Enden.
– Füllen Sie Wasser ein, während Sie die beiden Enden weiterhin nach
oben halten.
– Schütteln Sie den Saugschlauch hin und her, um den Schmutz zu
lösen.
– Ziehen Sie den Saugschlauch so weit wie möglich auseinander.
– Spülen Sie den Schmutz aus.
– Wiederholen Sie diesen Vorgang, bis der Saugschlauch sauber ist.
– Hängen Sie den Saugschlauch in der Mitte auf und lassen Sie ihn vor
der Verwendung vollständig trocknen.
HINWEIS
Der Staubsauger ist mit einem thermischen Überlastschutz ausgestattet, der ein Überhitzen des Motors verhindert.
Wenn der Motor stehen bleibt, schalten Sie das Gerät aus, indem
Sie den Schalter in Stellung „O“ stellen oder den Saugschlauch
aus der externen Schlauchsteckdose ziehen.
Lassen Sie das Gerät ca. 1 Stunde abkühlen. Wenn dieser Fehler
auch nach den unten beschriebenen Maßnahmen zur Störungsbeseitigung auftritt, wenden Sie sich an den Hersteller oder Ihren
Händler.
Page 30

DE
Gewährleistung CV1004
30
➤ Prüfen Sie, ob die Bodendüse verstopft ist.
Reinigen Sie die Bodendüse.
➤ Prüfen Sie den Motorfilter.
Säubern Sie den Motorfilter oder wechseln Sie ihn aus.
11 Gewährleistung
Es gilt die gesetzliche Gewährleistungsfrist. Sollte das Produkt defekt sein,
wenden Sie sich bitte an die Niederlassung des Herstellers in Ihrem Land
(Adressen siehe Rückseite der Anleitung) oder an Ihren Fachhändler.
Zur Reparatur- bzw. Gewährleistungsbearbeitung müssen Sie folgende
Unterlagen mitschicken:
eine Kopie der Rechnung mit Kaufdatum,
einen Reklamationsgrund oder eine Fehlerbeschreibung.
12 Entsorgung
➤ Geben Sie das Verpackungsmaterial möglichst in den entsprechenden
Recycling-Müll.
M
Wenn Sie das Produkt endgültig außer Betrieb nehmen, informieren Sie sich bitte beim nächsten Recyclingcenter oder bei
Ihrem Fachhändler über die zutreffenden Entsorgungsvorschriften.
Page 31

DE
CV1004 Technische Daten
31
13 Technische Daten
CV1004
Art.-Nr.: 9103501126
Eingangsspannung: 220 – 240 Vw
Leistungsaufnahme: 950 W
Stromaufnahme: 4,5 A
Saugleistung: 2500 mm Wassersäule
Betriebstemperatur: –15 °C bis +40 °C
Abmessungen B x H x T: 298 x 171 x 175 mm
Gewicht: 2,7 kg
Zertifikat:
Page 32

FR
Explication des symboles CV1004
32
Veuillez lire attentivement cette notice avant le montage et la mise en
service. Veuillez ensuite la conserver. En cas de passer le produit,
veuillez le transmettre au nouvel acquéreur.
Sommaire
1 Explication des symboles. . . . . . . . . . . . . . . . . . . . . . . . . . . . . . . . . 32
2 Consignes de sécurité . . . . . . . . . . . . . . . . . . . . . . . . . . . . . . . . . . . 33
3 Contenu de la livraison . . . . . . . . . . . . . . . . . . . . . . . . . . . . . . . . . . 36
4 Accessoires . . . . . . . . . . . . . . . . . . . . . . . . . . . . . . . . . . . . . . . . . . . 36
5 Usage conforme. . . . . . . . . . . . . . . . . . . . . . . . . . . . . . . . . . . . . . . . 37
7 Montage de l'aspirateur . . . . . . . . . . . . . . . . . . . . . . . . . . . . . . . . . . 38
8 Utilisation de l'aspirateur . . . . . . . . . . . . . . . . . . . . . . . . . . . . . . . . . 39
9 Nettoyage et entretien de l'aspirateur . . . . . . . . . . . . . . . . . . . . . . . 41
10 Guide de dépannage . . . . . . . . . . . . . . . . . . . . . . . . . . . . . . . . . . . . 41
11 Garantie . . . . . . . . . . . . . . . . . . . . . . . . . . . . . . . . . . . . . . . . . . . . . . 43
12 Retraitement . . . . . . . . . . . . . . . . . . . . . . . . . . . . . . . . . . . . . . . . . . 43
13 Caractéristiques techniques. . . . . . . . . . . . . . . . . . . . . . . . . . . . . . . 43
1 Explication des symboles
!
!
A
AVERTISSEMENT !
Consigne de sécurité : le non-respect de ces consignes peut
entraîner la mort ou de graves blessures.
ATTENTION !
Consigne de sécurité : le non-respect de ces consignes peut
entraîner des blessures.
AVIS !
Le non-respect de ces consignes peut entraîner des dommages
matériels et des dysfonctionnements du produit.
Page 33

FR
CV1004 Consignes de sécurité
33
I
➤ Manipulation : ce symbole vous indique une action à effectuer. Les
manipulations à effectuer sont décrites étape par étape.
✓ Ce symbole décrit le résultat d’une manipulation.
Fig. 1 5, page 3 : cette information renvoie à un élément figurant sur une
illustration, dans cet exemple à la « position 5 de l'illustration 1 à la page 3 ».
2 Consignes de sécurité
Le fabricant décline toute responsabilité pour des dommages dans les cas
suivants :
des influences mécaniques et des surtensions ayant endommagé le
matériel
des modifications apportées au produit sans autorisation explicite de la
part du fabricant
une utilisation différente de celle décrite dans la notice
2.1 Consignes générales de sécurité
!
AVERTISSEMENT !
Avant de mettre l'appareil en service, vérifiez que la tension de
service et la tension de secteur sont identiques (voir plaque
signalétique).
Si l'appareil présente des dommages visibles, vous ne devez
pas le mettre en service.
Seul un personnel qualifié est habilité à effectuer des répara-
tions sur l'appareil. Toute réparation mal effectuée risquerait
d'entraîner de graves dangers.
Si des réparations sont nécessaires, adressez-vous au service
après-vente.
Les enfants âgés de 8 ans et plus ainsi que les personnes ayant
des déficiences physiques, sensorielles ou mentales ou un
manque d'expérience ou de connaissances peuvent utiliser ce
produit à condition d'être sous surveillance ou d'avoir reçu des
instructions concernant l'utilisation de l'appareil en toute sécurité et de comprendre les dangers qui en résultent.
REMARQUE
Informations complémentaires sur l'utilisation du produit.
Page 34

FR
Consignes de sécurité CV1004
34
Le nettoyage et la maintenance ne doivent pas être effectués
par des enfants sans surveillance.
Les enfants ne doivent pas jouer avec cet appareil.
Les enfants doivent être surveillés pour s'assurer qu'ils ne
jouent pas avec l'appareil.
Placez et utilisez l'appareil hors de portée des enfants de moins
de 8 ans.
N'exposez jamais l'appareil à l'humidité.
N'utilisez aucun accessoire non recommandé par le fabricant.
Cela pourrait provoquer des blessures et des dommages.
Utilisez uniquement les accessoires recommandés par le fabri-
cant.
Ne posez aucun objet contre l'aspirateur.
2.2 Consignes de sécurité concernant le fonctionnement de l'appareil
!
ATTENTION !
Ne tirez jamais sur le câble de raccordement pour sortir la fiche
de la prise.
Retirez la fiche secteur de la prise lorsque vous effectuez des
travaux d'entretien.
N'utilisez jamais l'appareil dans des pièces dans lesquelles se
trouvent des matières ou des gaz inflammables. Des étincelles
provoquées par le moteur pourraient les enflammer.
Pendant le fonctionnement, tenez les buses d'aspiration éloi-
gnées des yeux, des oreilles et du visage. Veillez à ce que les
cheveux, les vêtements et les doigts n'entrent pas en contact
avec les ouvertures ou les pièces en rotation.
Tenez les enfants et les animaux à distance lorsque vous utili-
sez l'appareil.
N'utilisez pas l'appareil avec les mains mouillées.
Page 35

FR
CV1004 Consignes de sécurité
35
A
AVIS !
N'aspirez
– aucun objet humide
– aucun liquide contenant des solvants ou des produits corro-
sifs
– aucun objet chaud, incandescent, dur ou pointu
– aucune matière toxique
Ceci pourrait endommager l'appareil ou le filtre.
N'aspirez pas de gros objets tels que des vieux papiers. Ils
pourraient boucher le flexible.
Si le filtre du moteur est sale, rincez-le à l'eau chaude ou utilisez
un nouveau filtre. Utilisez uniquement des filtres totalement
secs.
Utilisez l'appareil uniquement à l'intérieur, jamais en plein air.
Assurez-vous que les ouvertures ne sont pas bouchées. Le cas
échéant, nettoyez les ouvertures avant d'utiliser l'appareil.
Ne faites pas fonctionner l'aspirateur sans filtre ou sans sac.
Ne marchez pas sur le flexible et ne tirez pas trop dessus.
Page 36

FR
Contenu de la livraison CV1004
36
3 Contenu de la livraison
4 Accessoires
Disponibles en accessoires (non compris dans la livraison) :
N° dans
fig. 1, page 3
Quantité Désignation
1 1 aspirateur central
2 1 buse pour sols
3 1 brosse
4 1 buse à poussières
5 1 buse pour fentes
6 1 tube télescopique
7 1 flexible d'aspiration
8 1 prise du flexible
9 2 raccords vissables (noirs)
10 2 raccords enfichables (blancs)
11 1 flexible de raccordement (2 m)
12 2 sac d'aspirateur
Désignation N° de produit
Sacs d'aspirateur de rechange (pack de 5 avec un filtre de
moteur)
9103501128
Buse de balayage Dometic VacPort 9103501127
Page 37

FR
CV1004 Usage conforme
37
5 Usage conforme
L'aspirateur central CV1004 (n° d'art. 9103501126) est un aspirateur conçu
pour l'encastrement dans une niche adaptée ou dans des encastrements
prévus dans des camping-cars, caravanes ou bateaux. Cet appareil n'est
pas prévu pour une utilisation professionnelle. Il ne doit pas être utilisé à l'air
libre.
6 Description technique
Le flexible d'aspiration de l'aspirateur central peut être raccordé directement
à l'appareil ou à une prise de flexible externe.
En cas d'utilisation du flexible d'aspiration au niveau de l'aspirateur central,
celui-ci doit être allumé et éteint via le commutateur. L'appareil dispose d'une
aspiration automatique qui est activée lorsque le flexible d'aspiration est enfiché dans une prise pour flexible.
Le système de l'aspirateur peut être étendu grâce au Dometic VacPort (non
fourni à la livraison). Cette buse de balayage peut être installée dans l'entrée
ou dans la cuisine p. ex., afin d'y aspirer directement les salissures balayées
à l'aide de la buse à montage fixe.
6.1 Éléments de commande
N° dans
fig. 2, page 3
Désignation Explication
1 Commutateur I/O Permet d'allumer et d'éteindre l'aspira-
teur lorsque le flexible d'aspiration est
enfiché sur l'aspirateur central.
2 Cache coulissant Permet de fermer le raccord du flexible
au niveau de l'appareil. Le fait de fermer
l'appareil augmente sa puissance
d'aspiration en cas de fonctionnement
sur la prise externe du flexible.
3 Coulisseau Permet d'ouvrir l'avant de l'appareil
(p. ex. pour changer le sac de l'aspirateur)
4 Filtre du moteur Protège le moteur des saletés
Page 38

FR
Montage de l'aspirateur CV1004
38
7 Montage de l'aspirateur
!
A
➤ Assurez-vous que le sac d'aspirateur et le filtre du moteur sont en place.
➤ Avant de monter l'aspirateur, assurez-vous qu'il fonctionne.
A
➤ Montez l'aspirateur (fig. 4, page 4, jusqu'à fig. 0, page 5).
I
➤ Montez la prise pour flexible et posez le flexible de raccordement (fig. a,
page 5, et fig. b, page 5).
AVERTISSEMENT ! Danger d'électrocutions et de blessures
graves.
Lorsque vous sciez ou percez les parois, prenez garde aux câbles
électriques se trouvant dans la paroi.
AVIS !
Montez l'aspirateur dans un lieu sec.
Ne montez pas l'appareil dans un lieu où règnent des tempé-
ratures élevées.
Ne posez pas le câble de raccordement sur des arêtes vives.
Tenez le câble de raccordement éloigné de surfaces chauffées.
Pour le montage de l'aspirateur, l'épaisseur de paroi doit être
de 10 mm minimum et de 25 mm maximum.
Veillez à ce qu'une prise permettant d'alimenter l'appareil en
courant se trouve à proximité. N'employez pas de câble de rallonge.
Si l'aspirateur est monté dans de petites pièces mal aérées
(p. ex. armoire d'encastrement), une sortie d'air équipée d'une
grille d'au moins 70 mm de section doit être montée afin de
transporter vers l'extérieur l'air chauffé par l'appareil.
AVIS !
Les vis de l'appareil ne doivent pas être complètement dévissées,
car elles sont pourvues d'un mécanisme de ressort.
REMARQUE
Les raccords enfichables (fig. 3 1, page 4) doivent être collés du
côté de l'appareil avec de la colle pour plastique usuelle. Les raccords vissables (fig. 3 2, page 4) sont vissés dans le flexible de
raccordement et enfichés dans les raccords enfichables.
Page 39

FR
CV1004 Utilisation de l'aspirateur
39
Raccordement électrique de l'aspirateur
➤ Raccordez les conduites orange 24 Vg situées au dos de l'appareil aux
contacts de la prise pour flexible (fig. c, page 6).
!
➤ Branchez le câble de raccordement 230 V à une prise adaptée (fig. d,
page 6).
8 Utilisation de l'aspirateur
A
8.1 Aspiration avec l'aspirateur central
➤ Ouvrez le cache coulissant (fig. 2 2, page 3) en le poussant vers la
droite.
➤ Enfichez le flexible dans le raccord pour flexible situé sur l'appareil.
➤ Placez le commutateur en position « I » (fig. 2 1, page 3) pour mettre
l'appareil en marche.
✓ L'aspirateur se met en marche.
➤ Placez le commutateur en position « O » (fig. 2 1, page 3) pour éteindre
l'appareil.
➤ Retirez le flexible du raccord pour flexible situé sur l'appareil.
➤ Fermez le cache coulissant (fig. 2 2, page 3) en le poussant vers la
gauche.
AVERTISSEMENT !
Danger d'électrocutions et de blessures graves.
Utilisez uniquement le câble de raccordement 230 V fourni à la
livraison.
AVIS !
N'utilisez pas l'appareil sans sac d'aspirateur ou sans le filtre
du moteur.
Utilisez uniquement les accessoires et les pièces de rechange
recommandés par le fabricant.
Page 40

FR
Utilisation de l'aspirateur CV1004
40
8.2 Aspiration avec la prise pour flexible
I
➤ Pour mettre en marche l'aspirateur, branchez le flexible dans la prise
pour flexible externe.
✓ L'aspirateur se met automatiquement en marche.
➤ Pour mettre à l'arrêt l'aspirateur, retirez le flexible de la prise externe.
✓ L'aspirateur se met automatiquement à l'arrêt.
8.3 Changement du sac de l'aspirateur
A
I
➤ Changez le sac d'aspirateur (fig. e, page 6, jusqu'à fig. l, page 7).
REMARQUE
Fermez la prise pour flexible avec le cache coulissant lorsque
vous aspirez grâce à une prise pour flexible externe. Vous augmentez ainsi la puissance d'aspiration.
AVIS !
Une mise en place correcte du sac de l'aspirateur est importante
pour la puissance d'aspiration de l'aspirateur. Veuillez suivre
exactement les instructions, voir fig. e, page 6, à fig. l, page 7.
REMARQUE
Le sac de l'aspirateur a deux ouvertures. L'une des deux
ouvertures est marquée de deux flèches. Ce côté doit être
placé sur la tubulure dans l'appareil, avec les flèches vers le
haut (fig. j, page 7). Lors de l'insertion du sac de l'aspirateur,
veillez au positionnement correct.
Retirez d'abord l'ouverture située sur la tubulure dans l'appa-
reil puis l'autre ouverture de la tubulure à l'avant de l'appareil.
Maintenez les ouvertures vers le haut pour qu'aucune poussière ne puisse tomber du sac de l'aspirateur.
Changez ou nettoyez le filtre du moteur au bout de cinq chan-
gements du sac d'aspirateur.
Page 41

FR
CV1004 Nettoyage et entretien de l'aspirateur
41
8.4 Changement ou nettoyage du filtre du moteur
I
➤ Retirez le filtre du moteur et mettez un nouveau filtre ou un filtre nettoyé
en place (fig. m, page 7 et fig. n, page 7).
9 Nettoyage et entretien de l'aspirateur
A
➤ Nettoyez le produit avec un tissu humide.
10 Guide de dépannage
I
REMARQUE
Changez ou nettoyez le filtre du moteur au bout de cinq changements du sac d'aspirateur ou en cas de fort encrassement.
Vous pouvez nettoyer le filtre du moteur à la main, avec une lessive douce. Ne le lavez pas dans une machine à laver ou avec
des objets durs. Laissez-le sécher à l'air avant de le replacer dans
l'aspirateur dans le sens de la flèche.
AVIS !
N’utilisez aucun objet coupant ou dur, ni de détergents pour le
nettoyage. Cela pourrait endommager le produit.
REMARQUE
L'aspirateur est équipé d'une protection de surcharge thermique
qui empêche une surchauffe du moteur.
Si le moteur s'arrête, éteignez l'aspirateur en plaçant le commutateur en position « O » ou en retirant le flexible d'aspiration de la
prise externe d'aspiration.
Laissez l'appareil refroidir pendant 1 heure environ. Si ce dysfonctionnement survient même après les mesures de dépannage
décrites ci-dessous, adressez-vous au fabricant ou à votre revendeur.
Page 42

FR
Guide de dépannage CV1004
42
Si le moteur s'arrête, éteignez l'aspirateur et procédez de la manière
suivante :
➤ Vérifiez que le flexible d'aspiration n'est pas bouché.
Soulevez le flexible d'aspiration d'une main et jetez-y une petite pièce de
monnaie par en haut. Si la pièce de monnaie ne retombe pas, le flexible
est bouché. A l'aide d'un long bâton, retirez les salissures du flexible.
➤ Contrôlez le sac de l'aspirateur.
Le fait d'aspirer de grandes quantités de poussières non ménagères
(poussières de plâtre, fines poussières de bois, etc.) risque de boucher
les pores du sac de l'aspirateur.
Utilisez un nouveau sac d'aspirateur.
➤ Si le flexible d'aspiration est fortement encrassé, nettoyez-le.
– Soulevez les deux extrémités du flexible.
– Versez du détergent liquide dans les deux extrémités.
– Versez de l'eau dans le flexible, tout en maintenant les deux extrémi-
tés en haut.
– Agitez le flexible d'aspiration afin de faire partir les salissures.
– Étirez le flexible d'aspiration autant que possible.
– Rincez les salissures.
– Répétez cette procédure jusqu'à ce que le flexible soit propre.
– Suspendez le flexible par le milieu et laissez-le sécher complètement
avant de l'utiliser.
➤ Vérifiez que la buse pour sols n'est pas bouchée.
Nettoyez la buse pour sols.
➤ Contrôlez le filtre du moteur.
Nettoyez le filtre du moteur ou changez-le.
Page 43

FR
CV1004 Garantie
43
11 Garantie
Le délai légal de garantie s'applique. Si le produit s'avérait défectueux,
veuillez vous adresser à la filiale du fabricant située dans votre pays (voir
adresses au verso du présent manuel) ou à votre revendeur spécialisé.
Veuillez y joindre les documents suivants pour la gestion des réparations et
de la garantie :
une copie de la facture avec la date d'achat,
le motif de la réclamation ou une description du dysfonctionnement.
12 Retraitement
➤ Jetez les emballages dans les conteneurs de déchets recyclables prévus
à cet effet.
M
Lorsque vous mettrez votre produit définitivement hors service,
informez-vous auprès du centre de recyclage le plus proche ou
auprès de votre revendeur spécialisé sur les prescriptions relatives
au retraitement des déchets.
13 Caractéristiques techniques
CV1004
N° de produit : 9103501126
Tension d'entrée : 220 – 240 Vw
Puissance absorbée : 950 W
Intensité absorbée : 4,5 A
Dépression : 2 500 mm de colonne d’eau
Température de fonctionnement : –15 °C à +40 °C
Dimensions L x h x l : 298 x 171 x 175 mm
Poids : 2,7 kg
Certificat :
Page 44

ES
Explicación de los símbolos CV1004
44
Lea detenidamente estas instrucciones antes de llevar a cabo la instalación y puesta en funcionamiento, y consérvelas en un lugar seguro.
En caso de vender o entregar el producto a otra persona, entregue
también estas instrucciones.
Índice
1 Explicación de los símbolos. . . . . . . . . . . . . . . . . . . . . . . . . . . . . . . 44
2 Indicaciones de seguridad . . . . . . . . . . . . . . . . . . . . . . . . . . . . . . . . 45
3 Volumen de entrega. . . . . . . . . . . . . . . . . . . . . . . . . . . . . . . . . . . . . 48
4 Accesorios . . . . . . . . . . . . . . . . . . . . . . . . . . . . . . . . . . . . . . . . . . . . 48
5 Uso adecuado . . . . . . . . . . . . . . . . . . . . . . . . . . . . . . . . . . . . . . . . . 49
7 Montar el aspirador . . . . . . . . . . . . . . . . . . . . . . . . . . . . . . . . . . . . . 50
8 Uso del aspirador. . . . . . . . . . . . . . . . . . . . . . . . . . . . . . . . . . . . . . . 51
9 Mantenimiento y limpieza del aspirador. . . . . . . . . . . . . . . . . . . . . . 53
10 Solución de averías . . . . . . . . . . . . . . . . . . . . . . . . . . . . . . . . . . . . . 53
11 Garantía legal . . . . . . . . . . . . . . . . . . . . . . . . . . . . . . . . . . . . . . . . . 55
12 Gestión de residuos . . . . . . . . . . . . . . . . . . . . . . . . . . . . . . . . . . . . . 55
13 Datos técnicos . . . . . . . . . . . . . . . . . . . . . . . . . . . . . . . . . . . . . . . . . 55
1 Explicación de los símbolos
!
!
A
¡ADVERTENCIA!
Indicación de seguridad: su incumplimiento puede acarrear la
muerte o graves lesiones.
¡ATENCIÓN!
Indicación de seguridad: su incumplimiento puede acarrear
lesiones.
¡AVISO!
Su incumplimiento puede acarrear daños materiales y perjudicar
el correcto funcionamiento del producto.
Page 45

ES
CV1004 Indicaciones de seguridad
45
I
➤ Paso a seguir: este símbolo le indica que debe realizar un paso. Todos
los procedimientos necesarios se describen paso a paso.
✓ Este símbolo describe el resultado de un paso realizado.
Fig. 1 5, página 3: esta indicación hace referencia a un elemento de una
figura, en este ejemplo a la “Posición 5 en la figura 1 de la página 3”.
2 Indicaciones de seguridad
El fabricante declina toda responsabilidad ante daños ocurridos en los
siguientes casos:
daños en el producto debido a influencias mecánicas y sobretensiones
modificaciones realizadas en el producto sin el expreso consentimiento
del fabricante
utilización del aparato para fines distintos a los descritos en las instruc-
ciones.
2.1 Seguridad general
!
¡ADVERTENCIA!
Antes de poner en funcionamiento el aparato, compruebe que
la tensión de funcionamiento y la tensión de red coincidan
(véase la placa de características).
No ponga el aparato en funcionamiento si presenta desperfec-
tos visibles.
Solo personal especializado está autorizado a realizar repara-
ciones en el aparato. Las reparaciones que se realicen incorrectamente pueden dar lugar a situaciones de considerable
peligro.
Diríjase al servicio de atención al cliente en caso de que sea
necesario reparar el aparato.
NOTA
Información adicional para el manejo del producto.
Page 46

ES
Indicaciones de seguridad CV1004
46
Los niños mayores de 8 años y las personas de capacidad
física, sensorial o mental disminuida, así como aquellas personas con falta de experiencia y conocimientos suficientes solo
podrán utilizar este aparato bajo vigilancia o si han sido instruidos respecto al uso seguro del aparato y a los posibles peligros
que pueden emanar de él.
Los niños solo podrán realizar las tareas de limpieza y mante-
nimiento bajo vigilancia.
Los niños no están autorizados a jugar con el aparato.
Se debe vigilar a los niños para asegurarse de que no jueguen
con el aparato.
Mantenga y utilice el aparato fuera del alcance de los niños
menores de 8 años.
No exponga nunca el aparato a la humedad.
No utilice ningún accesorio que no haya sido recomendado por
el fabricante. Esto puede provocar lesiones y daños materiales.
Utilice únicamente accesorios recomendados por el fabricante.
No apoye ningún objeto contra el aspirador.
2.2 Seguridad durante el funcionamiento del aparato
!
¡ATENCIÓN!
No desenchufe nunca el cable de conexión tirando de él.
Desenchufe el cable de conexión cuando vaya a realizar tareas
de mantenimiento.
No utilice nunca el aparato en recintos donde haya almacena-
dos materiales inflamables o donde se puedan formar gases
inflamables, pues las chispas del motor podrían encenderlos.
Durante el funcionamiento mantenga las boquillas alejadas de
los ojos, oídos y cara. Preste atención a que no entren en contacto con las aberturas ni con los componentes giratorios el
pelo, ropa holgada ni los dedos.
Mantenga a los niños y animales domésticos a una distancia
segura al utilizar el aparato.
No utilice el aparato con las manos mojadas.
Page 47

ES
CV1004 Indicaciones de seguridad
47
A
¡AVISO!
No aspire:
– objetos húmedos
– líquidos corrosivos o que contengan disolventes
– objetos calientes, incandescentes, duros o puntiagudos
– materiales tóxicos
Estos materiales pueden dañar el aparato o el filtro.
No aspire ningún objeto grande, como papel o paños, pues
podrían obstruir la manguera.
Si el filtro del motor está sucio, enjuáguelo en agua caliente o
inserte un nuevo filtro. Inserte únicamente filtros completamente secos.
Utilice el aparato solo en recintos cerrados y nunca al aire libre.
Preste atención a que no se obstruya ninguna abertura. En
caso necesario, limpie las aberturas antes de utilizar el aparato.
No ponga nunca en funcionamiento el aparato sin filtro ni sin
bolsa para el polvo.
No pise la manguera ni tire demasiado fuerte de ella.
Page 48

ES
Volumen de entrega CV1004
48
3 Volumen de entrega
4 Accesorios
Disponibles como accesorios (no incluidos en el volumen de entrega):
N.º en
fig. 1, página 3
Cantidad Denominación
1 1 Aspirador central
2 1 Boquilla para suelos
3 1 Cepillo
4 1 Boquilla para el polvo
5 1 Boquilla para ranuras
6 1 Tubo telescópico
7 1 Manguera de aspiración
8 1 Caja de conexión de la manguera
9 2 Conector roscado (negro)
10 2 Conector enchufable (blanco)
11 1 Manguera de unión (2 m)
12 2 Bolsa para el polvo
Denominación N.° art.
Bolsas para el polvo de recambio (paquete de 5 bolsas incl.
filtro de motor)
9103501128
Boquilla de barrido VacPort de Dometic 9103501127
Page 49

ES
CV1004 Uso adecuado
49
5 Uso adecuado
El aspirador central CV1004 (n.° de art. 9103501126) es un aspirador para
montar en una pared hueca adecuada o en un lugar previsto para ello de una
caravana, una autocaravana o una embarcación. Este aparato está previsto
para un uso doméstico. No se puede utilizar al aire libre.
6 Descripción técnica
La manguera de aspiración del aspirador central se puede conectar directamente al aparato o a una caja de conexión externa de aspiración.
Al usar la manguera de aspiración con el aspirador central, este debe conectarse y desconectarse mediante el interruptor. El aparato dispone de un sistema automático de aspiración que se activa cuando se introduce la
manguera de aspiración en la caja de conexión.
El sistema de aspirador se puede ampliar con el VacPort de Dometic (no
está incluido). Esta boquilla de barrido se puede instalar, por ejemplo, en el
área de la cocina o de la entrada para aspirar la suciedad barrida directamente con la boquilla fija.
6.1 Elementos de mando
N.º en
fig. 2, página 3
Denominación Explicación
1 Interruptor I/O Enciende y apaga el aspirador cuando
se introduce la manguera de aspiración
en el aspirador central.
2 Cierre deslizante Cierra la conexión de la manguera del
aparato. Cuando se cierra, aumenta la
potencia de aspiración cuando se usa
una caja de conexión externa de manguera.
3 Corredera Abre la parte frontal del aparato (por
ejemplo, para cambiar la bolsa para el
polvo)
4 Filtro del motor Protege al motor frente a las impurezas
Page 50

ES
Montar el aspirador CV1004
50
7 Montar el aspirador
!
A
➤ Asegúrese de que la bolsa para el polvo y el filtro del motor estén coloca-
dos.
➤ Antes de montar el aspirador, compruebe si funciona.
A
➤ Monte el aspirador (véase fig. 4, página 4 hasta fig. 0, página 5).
I
¡ADVERTENCIA! Peligro de sufrir descarga eléctrica y
graves lesiones.
Preste atención a cables eléctricos que se encuentren en la pared
al taladrar y serrar.
¡AVISO!
Monte el aspirador en un lugar seco.
No monte el aspirador en una zona donde haya una tempera-
tura elevada.
No doble el cable de conexión en esquinas o bordes afilados.
Mantenga el cable de conexión alejado de superficies calientes.
Para el montaje del aspirador, el grosor de pared debe estar
entre 10 mm mínimo y 25 mm máximo.
Asegúrese de que haya una caja de enchufe en las cercanías
para la alimentación de corriente del aspirador. No utilice
cables alargadores.
Si se monta el aspirador en estancias pequeñas con mala
ventilación (por ejemplo, en un armario empotrado), debe
montarse una salida de aire con una rejilla de al menos 70 mm
de sección para evacuar el aire calentado por el aparato.
¡AVISO!
No está permitido sacar del todo los tornillos de la carcasa, ya
que están provistos de un mecanismo de resorte.
NOTA
Los conectores enchufables (fig. 3 1, página 4) deben pegarse
por el lado del aparato con cola para plásticos. Los conectores
roscados (fig. 3 2, página 4) se enroscan en la manguera de
unión y se insertan en el conector enchufable.
Page 51

ES
CV1004 Uso del aspirador
51
➤ Monte la caja de conexión de la manguera y tienda la manguera de unión
(véase fig. a, página 5 y fig. b, página 5).
Conexión eléctrica del aspirador
➤ Conecte los cables de 24 Vg en la parte trasera del aparato con los con-
tactos tocando la caja de conexión de la manguera (fig. c, página 6).
!
➤ Conecte el cable de conexión de 230 V a una caja de enchufe adecuada
(fig. d, página 6).
8 Uso del aspirador
A
8.1 Aspirar el polvo con el aspirador central
➤ Abra el cierre deslizante (fig. 2 2, página 3) desplazándolo a la derecha.
➤ Introduzca la manguera en la conexión del aparato.
➤ Ponga el interruptor en la posición “I” (fig. 2 1, página 3) para encender
el aparato.
✓ El aspirador se enciende.
➤ Ponga el interruptor en la posición “O” (fig. 2 1, página 3) para apagar
el aparato.
➤ Saque la manguera de la conexión del aparato.
➤ Cierre el cierre deslizante (fig. 2 2, página 3) desplazándolo a la
izquierda.
¡ADVERTENCIA!
Peligro de sufrir descarga eléctrica y graves lesiones.
Utilice únicamente el cable de conexión de 230 V suministrado.
¡AVISO!
No utilice el aspirador sin bolsa para el polvo ni sin el filtro del
motor.
Utilice exclusivamente piezas de repuesto y accesorios reco-
mendados por el fabricante.
Page 52

ES
Uso del aspirador CV1004
52
8.2 Aspirar el polvo con la caja de conexión de la
manguera
I
➤ Para encenderlo, introduzca la manguera en la caja de conexión exter-
na.
✓ El aspirador se enciende automáticamente.
➤ Para apagarlo, extraiga la manguera de la caja de conexión externa.
✓ El aspirador se apaga automáticamente.
8.3 Cambiar la bolsa para el polvo
A
I
➤ Cambie la bolsa para el polvo (véase de fig. e, página 6 hasta fig. l,
página 7).
NOTA
Cierre la conexión de la manguera en la parte delantera del aspirador con el cierre deslizante cuando aspire con una caja de
conexión externa. De esta forma, aumenta la potencia de aspiración.
¡AVISO!
Colocar correctamente la bolsa para el polvo es importante para
la potencia de aspiración del aspirador. Siga con exactitud las instrucciones, véase de fig. e, página 6 hasta fig. l, página 7.
NOTA
La bolsa para el polvo tiene dos aberturas. Una de ellas está
marcada con dos flechas. Ese lado debe colocarse sobre el
empalme del aparato con las flechas hacia arriba (fig. j,
página 7). Asegúrese de que la posición es correcta cuando
coloque la bolsa para el polvo.
Extraiga primero la abertura del empalme del aparato y, a con-
tinuación, la abertura del empalme en la parte delantera del
aparato. Mantenga las aberturas hacia arriba para que no
caiga polvo de la bolsa.
Cambie o limpie el filtro del motor cada cinco veces que cam-
bie la bolsa para el polvo.
Page 53

ES
CV1004 Mantenimiento y limpieza del aspirador
53
8.4 Cambiar o limpiar el filtro del motor
I
➤ Retire el filtro del motor y coloque uno nuevo, o el mismo una vez limpio
(véase fig. m, página 7 y fig. n, página 7).
9 Mantenimiento y limpieza del
aspirador
A
➤ Limpie de vez en cuando el producto con un paño húmedo.
10 Solución de averías
I
NOTA
Cambie o limpie el filtro del motor cada cinco veces que cambie
la bolsa para el polvo o cuando esté muy sucio.
Puede lavar el filtro del motor a mano en agua jabonosa suave.
No lo lave en la lavadora ni con objetos duros. Deje que se seque
al aire antes de colocarlo en el aspirador en el sentido que indica
la flecha.
¡AVISO!
No utilice ningún objeto o producto de limpieza corrosivo o duro
en la limpieza, ya que podría dañar el producto.
NOTA
El aspirador está provisto de una protección térmica contra sobrecarga que evita un sobrecalentamiento del motor.
Si el motor se queda parado, apague el aparato poniendo el interruptor en la posición “O” o extraiga la manguera de aspiración de
la caja de conexión externa.
Deje enfriar el aparato durante una hora. Si se sigue produciendo
este error incluso después de tomar las medidas para la solución
de averías, consulte al fabricante o a su distribuidor.
Page 54

ES
Solución de averías CV1004
54
Si el motor se para, apague el aspirador y proceda de la forma siguiente:
➤ Compruebe si la manguera de aspiración está obstruida.
Sujete la manguera de aspiración hacia arriba e introduzca por arriba
una moneda pequeña. Si la moneda no cae a través del tubo, significa
que está obstruido. Con una barra larga, empuje la maraña de polvo
fuera del tubo.
➤ Compruebe la bolsa para el polvo.
Si se aspira gran cantidad de suciedad que no sea polvo doméstico
(polvo de placas de yeso, polvo fino de madera, etc.) se pueden obstruir
los poros de la bolsa.
Coloque una nueva bolsa.
➤ Cuando la manguera de aspiración esté muy sucia, límpiela.
– Sujete los dos extremos de la manguera hacia arriba.
– Vierta detergente líquido por ambos extremos.
– Llene de agua mientras sigue manteniendo ambos extremos hacia
arriba.
– Agite el tubo flexible hacia los lados para desprender la suciedad.
– Estire lo más posible el tubo flexible.
– Enjuague la suciedad.
– Repita este procedimiento hasta que el tubo quede limpio.
– Cuelgue el tubo por la mitad y deje que se seque totalmente antes de
volver a utilizarlo.
➤ Compruebe si la boquilla para suelos está obstruida.
Limpie la boquilla para suelos.
➤ Compruebe el filtro del motor.
Limpie el filtro del motor o cámbielo.
Page 55

ES
CV1004 Garantía legal
55
11 Garantía legal
Rige el plazo de garantía legal. Si el producto presenta algún defecto,
diríjase a la sucursal del fabricante de su país (ver direcciones en el dorso
de estas instrucciones) o a su establecimiento especializado.
Para la tramitación de la reparación y de la garantía debe enviar también los
siguientes documentos:
una copia de la factura con fecha de compra,
el motivo de la reclamación o una descripción de la avería.
12 Gestión de residuos
➤ Deseche el material de embalaje en el contenedor de reciclaje correspon-
diente.
M
Cuando vaya a desechar definitivamente el producto, infórmese en
el centro de reciclaje más cercano o en un comercio especializado
sobre las normas pertinentes de eliminación de materiales.
13 Datos técnicos
CV1004
N.° de art.: 9103501126
Tensión de entrada: 220 – 240 Vw
Consumo de potencia: 950 W
Consumo de corriente: 4,5 A
Potencia de aspiración: 2500 mm de columna de agua
Temperatura de funcionamiento: de –15 °C a +40 °C
Dimensiones An x Al x P: 298 x 171 x 175 mm
Peso: 2,7 kg
Certificado:
Page 56

IT
Spiegazione dei simboli CV1004
56
Prima di effettuare il montaggio e la messa in funzione leggere
accuratamente questo manuale di istruzioni, conservarlo e in caso di
trasmissione del prodotto, consegnarlo all'utente successivo.
Indice
1 Spiegazione dei simboli . . . . . . . . . . . . . . . . . . . . . . . . . . . . . . . . . . 56
2 Istruzioni per la sicurezza . . . . . . . . . . . . . . . . . . . . . . . . . . . . . . . . 57
3 Dotazione. . . . . . . . . . . . . . . . . . . . . . . . . . . . . . . . . . . . . . . . . . . . . 59
4 Accessori . . . . . . . . . . . . . . . . . . . . . . . . . . . . . . . . . . . . . . . . . . . . . 60
5 Conformità d'uso . . . . . . . . . . . . . . . . . . . . . . . . . . . . . . . . . . . . . . . 60
7 Montaggio dell'aspirapolvere . . . . . . . . . . . . . . . . . . . . . . . . . . . . . . 61
8 Utilizzo dell'aspirapolvere. . . . . . . . . . . . . . . . . . . . . . . . . . . . . . . . . 63
9 Cura e pulizia dell'aspirapolvere . . . . . . . . . . . . . . . . . . . . . . . . . . . 65
10 Eliminazione dei guasti . . . . . . . . . . . . . . . . . . . . . . . . . . . . . . . . . . 65
11 Garanzia . . . . . . . . . . . . . . . . . . . . . . . . . . . . . . . . . . . . . . . . . . . . . 66
12 Smaltimento . . . . . . . . . . . . . . . . . . . . . . . . . . . . . . . . . . . . . . . . . . . 66
13 Specifiche tecniche . . . . . . . . . . . . . . . . . . . . . . . . . . . . . . . . . . . . . 67
1 Spiegazione dei simboli
!
!
A
AVVERTENZA!
Avviso di sicurezza: la mancata osservanza di questo avviso
può causare ferite gravi anche mortali.
ATTENZIONE!
Avviso di sicurezza: la mancata osservanza di questo avviso
può essere causa di lesioni.
AVVISO!
La mancata osservanza di questa nota può causare danni materiali e compromettere il funzionamento del prodotto.
Page 57

IT
CV1004 Istruzioni per la sicurezza
57
I
➤ Modalità di intervento: questo simbolo indica all'utente che è necessario
un intervento. Le modalità di intervento necessarie saranno descritte
passo dopo passo.
✓ Questo simbolo descrive il risultato di un intervento.
Fig. 1 5, pagina 3: questi dati si riferiscono ad un elemento in una figura,
in questo caso alla “posizione 5 nella figura 1 a pagina 3”.
2 Istruzioni per la sicurezza
Il produttore non si assume nessuna responsabilità per danni nei seguenti
casi:
danni al prodotto dovuti a influenze meccaniche o a sovratensioni
modifiche al prodotto senza esplicita autorizzazione del produttore
impiego per altri fini rispetto a quelli descritti nel manuale di istruzioni
2.1 Sicurezza generale
!
AVVERTENZA!
Prima della messa in funzione del dispositivo controllare se la
tensione di esercizio e quella di rete corrispondono (vedi targhetta).
Se il dispositivo presenta danni visibili, non metterlo in funzione.
Questo dispositivo può essere riparato solo da personale spe-
cializzato. Le riparazioni effettuate in modo scorretto potrebbero
causare rischi enormi.
In caso di riparazioni rivolgersi al Servizio Assistenza Clienti.
Questo dispositivo può essere usato sia da bambini dagli 8 anni
in su, sia da persone con ridotte capacità fisiche, sensoriali o
mentali o con poca esperienza o conoscenze, se non lasciati
soli o se istruiti sull’utilizzo sicuro del dispositivo e se sono in
grado di capire i pericoli che possono sorgere.
La pulizia e la manutenzione da parte dell’utente non possono
essere compiute da bambini lasciati soli.
I bambini non possono giocare con il dispositivo.
NOTA
Informazioni integranti relative all'impiego del prodotto.
Page 58

IT
Istruzioni per la sicurezza CV1004
58
Controllare che i bambini non lo facciano.
Conservare e utilizzare il dispositivo lontano dalla portata dei
bambini al di sotto degli 8 anni.
Non esporre mai il dispositivo all'umidità.
Non utilizzare accessori non consigliati dal produttore. Ciò può
causare lesioni alle persone e danni materiali.
Utilizzare esclusivamente gli accessori consigliati dal produt-
tore.
Non appoggiare alcun oggetto contro l'aspirapolvere.
2.2 Sicurezza durante il funzionamento del dispositivo
!
ATTENZIONE!
Non estrarre mai la spina dalla presa tirando il cavo di allaccia-
mento.
Estrarre la spina dalla presa quando vengono effettuati i lavori
di manutenzione.
Non utilizzare mai il dispositivo in ambienti in cui sono immagaz-
zinate sostanze infiammabili o in cui si sono formati gas combustibili. Le scintille del motore potrebbero infiammarli.
Durante il funzionamento tenere gli ugelli lontano da occhi,
orecchie e viso. Assicurarsi che capelli, abiti larghi e dita non
entrino nelle aperture o non vengano in contatto con i componenti rotanti.
Quando il dispositivo è in funzione, tenere bambini e animali a
una distanza di sicurezza.
Non utilizzare il dispositivo con le mani bagnate.
A
AVVISO!
Non aspirare
– oggetti bagnati
– solventi o liquidi corrosivi
– oggetti caldi, incandescenti, duri o appuntiti
– materiali tossici
Essi potrebbero danneggiare il dispositivo o il filtro.
Non aspirare oggetti grandi quali carta o panni, in quanto
potrebbero intasare il tubo.
Page 59

IT
CV1004 Dotazione
59
Se il filtro del motore è sporco, sciacquarlo con acqua calda o
inserire un nuovo filtro. Installare solo filtri completamente
asciutti.
Utilizzare il dispositivo esclusivamente in ambienti chiusi, mai
all'aria aperta.
Assicurarsi che le aperture non siano intasate. Se necessario
pulire le aperture prima di utilizzare il dispositivo.
Evitare di mettere in funzione il dispositivo senza filtro o senza
sacchetto per la polvere.
Non calpestare mai il tubo flessibile e non tirarlo con troppa
forza.
3Dotazione
N. in
fig. 1, pagina 3
Quantità Denominazione
1 1 Aspirapolvere centralizzato
2 1 Ugello per pavimenti
3 1 Spazzola
4 1 Ugello per la polvere
5 1 Ugello per fessure
6 1 Tubo telescopico
7 1 Tubo flessibile
8 1 Presa del tubo flessibile
9 2 Connettore a vite (nero)
10 2 Connettore push-on (bianco)
11 1 Tubo flessibile di collegamento (2 m)
12 2 Sacchetto per la polvere
Page 60

IT
Accessori CV1004
60
4 Accessori
Disponibili come accessori (non in dotazione):
5 Conformità d'uso
L'aspirapolvere centralizzato CV1004 (N. art. 9103501126) è un dispositivo
idoneo per l'installazione in un'apposita cavità di una parete o in strutture predisposte in caravan, camper o imbarcazioni. Questo dispositivo non è concepito per l'uso professionale. Non deve essere messo in funzione all'aria
aperta.
6 Descrizione tecnica
Il tubo flessibile dell'aspirapolvere centralizzato può essere collegato direttamente al dispositivo o a una presa esterna.
Nel caso dell'utilizzo del tubo con l'aspirapolvere centralizzato, questo deve
essere acceso e spento tramite l'interruttore. Il dispositivo è dotato di un
sistema automatico di aspirazione che viene attivato ogni volta che il tubo
flessibile viene inserito nell'apposita presa.
Il sistema di aspirazione è ampliabile con il Dometic VacPort (non in dotazione). Questa presa aspirante può essere installata ad es. nella zona
dell'ingresso o della cucina per aspirarvi lo sporco spazzato, direttamente
tramite la presa montata a muro.
Denominazione N. art.
Sacchetto per la polvere sostitutivo (pacco da 5 incluso filtro
del motore)
9103501128
Presa aspirante Dometic VacPort 9103501127
Page 61

IT
CV1004 Montaggio dell'aspirapolvere
61
6.1 Elementi di comando
7 Montaggio dell'aspirapolvere
!
A
N. in
fig. 2, pagina 3
Denominazione Spiegazione
1 Interruttore I/O Accende e spegne l'aspirapolvere
quando il tubo flessibile è inserito nel
sistema centralizzato.
2 Coperchio a scorri-
mento
Chiude il collegamento del tubo flessibile al dispositivo. Chiudendolo,
aumenta la potenza di aspirazione nel
caso dell'uso con la presa del tubo
esterna.
3 Fermo Apre la parte frontale del dispositivo (ad
es. per sostituire il sacchetto per la polvere)
4 Filtro del motore Protegge il motore dalle impurità
AVVERTENZA! Pericolo di scosse elettriche e lesioni gravi.
Prestare attenzione ai cavi elettrici che si trovano nella parete
durante le fasi di trapanatura e taglio.
AVVISO!
Montare l'aspirapolvere in un luogo asciutto.
Non montare il dispositivo in un punto in cui sono presenti tem-
perature elevate.
Non piegare il cavo di collegamento formando spigoli vivi o
angoli. Tenere il cavo di collegamento lontano da superfici
riscaldate.
Per il montaggio dell'aspirapolvere, lo spessore della parete
deve essere di minimo 10 mm e massimo 25 mm.
Assicurarsi della presenza nelle vicinanze di una presa a cui
collegare l'aspirapolvere per l'alimentazione elettrica. Non
usare cavi di prolunga.
Se l'aspirapolvere viene montato in ambienti piccoli con cattiva
aerazione (ad es. in un armadio incassato), deve essere creata un'uscita d'aria con una grata di almeno 70 mm di diametro
per espellere l'aria riscaldata dal dispositivo.
Page 62

IT
Montaggio dell'aspirapolvere CV1004
62
➤ Assicurarsi che siano stati inseriti il sacchetto dell'aspirapolvere e il filtro
del motore.
➤ Prima di montare l'aspirapolvere controllare che funzioni.
A
➤ Montare l'aspirapolvere (fig. 4, pagina 4 fino a fig. 0, pagina 5).
I
➤ Montare la presa del tubo flessibile e posare il tubo di collegamento
(fig. a, pagina 5, e fig. b, pagina 5).
Allacciamento elettrico dell'aspirapolvere
➤ Collegare i cavi di color arancio da 24 Vg sul lato posteriore del disposi-
tivo ai contatti della presa del tubo flessibile (fig. c, pagina 6).
!
➤ Allacciare il cavo di collegamento da 230 V a una presa adeguata (fig. d,
pagina 6).
AVVISO!
Le viti dell'alloggiamento non devono essere svitate completamente perché sono dotate di un meccanismo a molla.
NOTA
I connettori push-on (fig. 3 1, pagina 4) devono essere incollati
sul lato dell'apparecchio con un collante plastico disponibile in
commercio. I connettori a vite (fig. 3 2, pagina 4) vengono avvitati nel tubo flessibile di collegamento e inseriti nel connettore
push-on.
AVVERTENZA!
Pericolo di scosse elettriche e lesioni gravi.
Utilizzare solo il cavo di collegamento da 230 V fornito in dotazione.
Page 63

IT
CV1004 Utilizzo dell'aspirapolvere
63
8 Utilizzo dell'aspirapolvere
A
8.1 Uso dell'aspirapolvere centralizzato
➤ Aprire il coperchio (fig. 2 2, pagina 3) facendolo scorrere verso destra.
➤ Inserire il tubo flessibile nell'apposita presa del dispositivo.
➤ Posizionare l'interruttore su “I” (fig. 2 1, pagina 3) per accendere il
dispositivo.
✓ L'aspirapolvere si attiva.
➤ Posizionare l'interruttore su “O” (fig. 2 1, pagina 3) per spegnere il
dispositivo.
➤ Disinserire il tubo flessibile dall'apposita presa nel dispositivo.
➤ Chiudere il coperchio (fig. 2 2, pagina 3) facendolo scorrere verso sini-
stra.
8.2 Uso dell'aspirapolvere con la presa del tubo
flessibile
I
➤ Per accendere l'aspirapolvere, inserire il tubo flessibile nella relativa
presa esterna.
✓ L'aspirapolvere si accenderà automaticamente.
➤ Per spegnere l'aspirapolvere, staccare il tubo flessibile dalla presa ester-
na.
✓ L'aspirapolvere si spegnerà automaticamente.
AVVISO!
Non utilizzare l'aspirapolvere senza sacchetto o senza filtro
del motore.
Utilizzare esclusivamente accessori e pezzi di ricambio consi-
gliati dal produttore.
NOTA
Chiudere il collegamento del tubo flessibile con l'apposito coperchio a scorrimento nella parte centrale del dispositivo, tutte le
volte che si utilizza la presa del tubo esterna. In questo modo
aumenta la potenza di aspirazione.
Page 64

IT
Utilizzo dell'aspirapolvere CV1004
64
8.3 Sostituzione del sacchetto dell'aspirapolvere
A
I
➤ Sostituire il sacchetto per la polvere (da fig. e, pagina 6 fino a fig. l,
pagina 7).
8.4 Sostituzione o pulizia del filtro del motore
I
➤ Estrarre il filtro del motore e introdurne uno nuovo o pulito (fig. m,
pagina 7 e fig. n, pagina 7).
AVVISO!
Inserire correttamente il sacchetto per la polvere è importante per
garantire la potenza di aspirazione. Seguire esattamente le istruzioni, vedi da fig. e, pagina 6, a fig. l, pagina 7.
NOTA
Il sacchetto ha due aperture. Una delle due aperture è contras-
segnata con due frecce. Questo lato deve essere applicato sul
bocchettone dentro al dispositivo con le frecce rivolte verso
l'alto (fig. j, pagina 7). Nell'inserire il sacchetto per la polvere, osservare il corretto posizionamento.
Estrarre prima l'apertura dal bocchettone dentro il dispositivo
e poi quella dal bocchettone sulla parte frontale del dispositivo.
Tenere le aperture verso l'altro affinché non fuoriesca polvere
dal sacchetto.
Dopo aver sostituito il sacchetto per l'aspirapolvere per cinque
volte, sostituire o pulire il filtro del motore.
NOTA
Sostituire o pulire il filtro del motore dopo aver sostituito il sacchetto dell'aspirapolvere per cinque volte o in caso di sporco
eccessivo.
È possibile lavare il filtro del motore a mano in acqua leggermente
saponata. Non lavarlo in lavatrice o con oggetti duri. Farlo asciugare all'aria prima di inserirlo nell'aspirapolvere nella direzione
della freccia.
Page 65

IT
CV1004 Cura e pulizia dell'aspirapolvere
65
9 Cura e pulizia dell'aspirapolvere
A
➤ Pulire il prodotto di tanto in tanto con un panno umido.
10 Eliminazione dei guasti
I
Se il motore dovesse fermarsi, spegnere l'aspirapolvere e procedere come
segue:
➤ Controllare se il tubo flessibile di aspirazione è intasato.
Con una mano tenere il tubo verso l'alto e inserirvi una monetina. Se
essa non cade lungo il tubo, significa che è intasato. Con l'aiuto di
un'asta lunga spingere lo sporco intasato fuori dal tubo.
➤ Controllare il sacchetto dell'aspirapolvere.
Se viene aspirata una grande quantità di sporco non domestico (polvere
di cartongesso, polvere sottile di legno ecc.), i pori del sacchetto
dell'aspirapolvere possono intasarsi.
Inserire un nuovo sacchetto.
AVVISO!
Per la pulizia non impiegare oggetti ruvidi o appuntiti, oppure
detergenti perché potrebbero danneggiare il prodotto.
NOTA
L'aspirapolvere è dotato di una protezione termica contro il
sovraccarico che impedisce un surriscaldamento del motore.
Se il motore si arresta, disattivare il dispositivo posizionando
l'interruttore su “O” oppure estraendo il tubo di aspirazione dalla
presa esterna.
Lasciar raffreddare il dispositivo per circa 1 ora. Se questo guasto
si ripresenta anche dopo aver adottato le misure descritte qui
sotto, rivolgersi al produttore o al vostro rivenditore.
Page 66

IT
Garanzia CV1004
66
➤ Pulire il tubo flessibile di aspirazione se è molto sporco.
– Mantenere verso l'alto le estremità del tubo di aspirazione.
– Inserire in entrambe le estremità del detergente liquido.
– Riempire con dell'acqua, continuando a tenere verso l'alto le due
estremità.
– Scuotere il tubo per aiutare la rimozione dello sporco.
– Tenerlo il più possibile in tensione.
– Risciacquare lo sporco.
– Ripetere questa procedura finché il tubo di aspirazione non è pulito.
– Appendere il tubo di aspirazione nella parte centrale e farlo asciugare
completamente prima di impiegarlo di nuovo.
➤ Controllare se l'ugello per pavimenti è intasato.
Pulire l'ugello per pavimenti.
➤ Controllare il filtro del motore.
Pulire il filtro del motore o sostituirlo.
11 Garanzia
Vale il termine di garanzia previsto dalla legge. Qualora il prodotto risultasse
difettoso, La preghiamo di rivolgersi alla filiale del produttore del suo Paese
(l'indirizzo si trova sul retro del manuale di istruzioni), oppure al rivenditore
specializzato di riferimento.
Per la riparazione e per il disbrigo delle condizioni di garanzia è necessario
inviare la seguente documentazione:
una copia della fattura con la data di acquisto del prodotto,
un motivo su cui fondare il reclamo, oppure una descrizione del guasto.
12 Smaltimento
➤ Raccogliere il materiale di imballaggio possibilmente negli appositi
contenitori di riciclaggio.
M
Quando il prodotto viene messo fuori servizio definitivamente,
informarsi al centro di riciclaggio più vicino, oppure presso il proprio
rivenditore specializzato, sulle prescrizioni adeguate concernenti lo
smaltimento.
Page 67

IT
CV1004 Specifiche tecniche
67
13 Specifiche tecniche
CV1004
N. art.: 9103501126
Tensione di ingresso: 220 – 240 Vw
Potenza assorbita: 950 W
Corrente assorbita: 4,5 A
Potenza di aspirazione: 2500 mm di colonna d'acqua
Temperatura di esercizio: da –15 °C a +40 °C
Dimensioni L x H x P: 298 x 171 x 175 mm
Peso: 2,7 kg
Certificato:
Page 68

NL
Verklaring van de symbolen CV1004
68
Lees deze handleiding voor de montage en de ingebruikname zorgvuldig door en bewaar hem. Geef de handleiding bij het doorgeven van
het product aan de gebruiker.
Inhoudsopgave
1 Verklaring van de symbolen. . . . . . . . . . . . . . . . . . . . . . . . . . . . . . . 68
2 Veiligheidsinstructies . . . . . . . . . . . . . . . . . . . . . . . . . . . . . . . . . . . . 69
3 Omvang van de levering . . . . . . . . . . . . . . . . . . . . . . . . . . . . . . . . . 71
4 Toebehoren . . . . . . . . . . . . . . . . . . . . . . . . . . . . . . . . . . . . . . . . . . . 71
5 Gebruik volgens de voorschriften . . . . . . . . . . . . . . . . . . . . . . . . . . 72
7 Stofzuiger monteren. . . . . . . . . . . . . . . . . . . . . . . . . . . . . . . . . . . . . 73
8 Stofzuiger gebruiken . . . . . . . . . . . . . . . . . . . . . . . . . . . . . . . . . . . . 74
9 Stofzuiger onderhouden en reinigen . . . . . . . . . . . . . . . . . . . . . . . . 76
10 Verhelpen van storingen . . . . . . . . . . . . . . . . . . . . . . . . . . . . . . . . . 77
11 Garantie . . . . . . . . . . . . . . . . . . . . . . . . . . . . . . . . . . . . . . . . . . . . . . 78
12 Afvoer. . . . . . . . . . . . . . . . . . . . . . . . . . . . . . . . . . . . . . . . . . . . . . . . 78
13 Technische gegevens . . . . . . . . . . . . . . . . . . . . . . . . . . . . . . . . . . . 79
1 Verklaring van de symbolen
!
!
A
WAARSCHUWING!
Veiligheidsaanwijzing: Het niet naleven kan leiden tot overlijden
of ernstig letsel.
VOORZICHTIG!
Veiligheidsaanwijzing: Het niet naleven kan leiden tot letsel.
LET OP!
Het niet naleven ervan kan leiden tot materiële schade en de
werking van het product beperken.
Page 69

NL
CV1004 Veiligheidsinstructies
69
I
➤ Handeling: dit symbool geeft aan dat u iets moet doen. De vereiste
handelingen worden stap voor stap beschreven.
✓ Dit symbool beschrijft het resultaat van een handeling.
Afb. 1 5, pagina 3: deze aanduiding wijst u op een element in een afbeelding, in dit voorbeeld op „positie 5 in afbeelding 1 op pagina 3”.
2 Veiligheidsinstructies
De fabrikant kan in de volgende gevallen niet aansprakelijk worden gesteld
voor schade:
beschadiging van het product door mechanische invloeden en over-
spanningen
veranderingen aan het product zonder uitdrukkelijke toestemming van de
fabrikant
gebruik voor andere dan de in de handleiding beschreven toepassingen
2.1 Algemene veiligheid
!
WAARSCHUWING!
Controleer voor ingebruikneming van het toestel of bedrijfs-
spanning en netspanning overeenkomen (zie projectieplaatje).
Als het toestel zichtbaar beschadigd is, mag het niet in gebruik
worden genomen.
Reparaties aan dit toestel mogen uitsluitend door vakmonteurs
worden uitgevoerd. Door onvakkundige reparaties kunnen
grote gevaren ontstaan.
Neem contact op met de klantenservice, indien een reparatie
nodig is.
Dit toestel kan door kinderen vanaf 8 jaar en ouder alsmede
door personen met verminderde fysieke, zintuiglijke of geestelijke vermogens of tekortschietende ervaring en kennis gebruikt
worden, indien ze worden begeleid of hun is uitgelegd hoe ze
het apparaat veilig kunnen gebruiken. Ook dienen ze inzicht te
hebben in de gevaren die het gebruik van het toestel zich meebrengt.
INSTRUCTIE
Aanvullende informatie voor het bedienen van het product.
Page 70

NL
Veiligheidsinstructies CV1004
70
Reiniging en onderhoud door de gebruiker mogen niet door
kinderen zonder begeleiding worden uitgevoerd.
Kinderen mogen niet met het toestel spelen.
Er moet toezicht worden gehouden op kinderen, om te
voorkomen dat ze met het toestel spelen.
Bewaar en gebruik het toestel buiten het bereik van kinderen
onder 8 jaar.
Stel het toestel nooit bloot aan vocht.
Gebruik geen toebehoren, die niet door de fabrikant wordt aan-
bevolen. Dit kan tot letsel en materiële schade leiden.
Gebruik enkel door de fabrikant aanbevolen toebehoren.
Plaats geen voorwerpen tegen de stofzuiger.
2.2 Veiligheid bij het gebruik van het toestel
!
VOORZICHTIG!
Trek de stekker nooit aan de aansluitkabel uit het stopcontact.
Trek de netstekker uit het stopcontact, alvorens onderhouds-
werkzaamheden uit te voeren.
Gebruik het toestel nooit in ruimtes, waarin brandgevaarlijke
stoffen zijn opgeslagen of waar zich ontvlambare gassen hebben gevormd. Vonken van de motor kunnen deze ontsteken.
Houd de sproeiers tijdens gebruik uit de buurt van ogen, oren
en gezicht. Let erop, dat haren, losse kleding en vingers niet in
de openingen of bij bewegende onderdelen terechtkomen.
Houd kinderen en dieren bij het gebruik van het toestel op een
veilige afstand.
Gebruik het toestel niet met natte handen.
A
LET OP!
Zuig geen
– natte voorwerpen
– oplosmiddel of bijtende vloeistoffen
– hete, gloeiende, harde of spitse voorwerpen
– giftige materialen
Deze kunnen het toestel en filter beschadigen.
Zuig geen grote voorwerpen zoals afvalpapier of doeken op.
Deze kunnen de slang verstoppen.
Page 71

NL
CV1004 Omvang van de levering
71
Als het motorfilter vuil is, spoelt u hem in warm water af of
plaatst u een nieuw filter. Plaats enkel volledig droger filters.
Gebruik het toestel uitsluitend in ruimtes, nooit buiten.
Let erop dat er de openingen niet verstopt raken. Reinig indien
nodig de openingen, voordat u het toestel in gebruik neemt.
Gebruik het toestel niet zonder filter of zonder stofzak.
Ga niet op de slang staan en trek niet te hard aan de slang.
3 Omvang van de levering
4 Toebehoren
Als toebehoren verkrijgbaar (niet bijgeleverd):
Nr. in
afb. 1, pagina 3
Aantal Omschrijving
1 1 Centrale stofzuiger
2 1 Vloermondstuk
3 1 Opzetborstel
4 1 Stofmondstuk
5 1 Voegenmondstuk
6 1 Telescoopbuis
7 1 Zuigslang
8 1 Slangstopcontact
9 2 Schroefverbinding (zwart)
10 2 Opsteekverbinding (wit)
11 1 Verbindingsslang (2 m)
12 2 Stofzak
Omschrijving Artikelnr.
Reservestofzak (5 stuks incl. een motorfilter) 9103501128
Dometic VacPort inbouwmondstuk 9103501127
Page 72

NL
Gebruik volgens de voorschriften CV1004
72
5 Gebruik volgens de voorschriften
De centrale stofzuiger CV1004 (artikelnr. 9103501126) is een stofzuiger
voor inbouw in een geschikte holle wand of in voorhandene inbouweenheden
in caravans, campers of boten. Dit toestel is niet bestemd voor professioneel
gebruik. Hij kan niet buiten worden gebruikt.
6 Technische beschrijving
De zuigslang van de centrale stofzuiger kan direct op het toestel of op een
externe slangaansluitdoos worden aangesloten.
Bij gebruik van de zuigslang met de centrale stofzuiger moet deze via de
schakelaar worden in- en uitgeschakeld. Het toestel beschikt over een aanzuigautomaat die wordt geactiveerd als de zuigslang in de slangaansluitdoos
wordt gestoken.
Het stofzuigersysteem kan worden uitgebreid met de Dometic VacPort (niet
meegeleverd). Dit inbouwmondstuk kan bijvoorbeeld in het ingangs- of keukenbereik worden aangebracht om bij elkaar geveegd vuil direct met het vast
gemonteerde mondstuk worden aangezogen.
6.1 Bedieningselementen
Nr. in
afb. 2, pagina 3
Omschrijving Verklaring
1 Schakelaar I/O Schakelt de schakelaar in of uit, als de
zuigslang in de centrale stofzuiger
wordt gestoken.
2 Schuifbare afdek-
king
Sluit de slangaansluiting van het toestel. Afsluiten verhoogt de zuigkracht bij
gebruik met de externe slangaansluitdoos.
3 Schuif Opent de toestelvoorzijde (bijvoorbeeld
voor het wisselen van de stofzak)
4 Motorfilter Beschermt de motor voor verontreini-
ging
Page 73

NL
CV1004 Stofzuiger monteren
73
7 Stofzuiger monteren
!
A
➤ Controleer of de stofzak en het motorfilter zijn aangebracht.
➤ Controleer voor de montage van de stofzuiger of deze werkt.
A
➤ Monteer de stofzuiger (afb. 4, pagina 4 tot afb. 0, pagina 5).
I
WAARSCHUWING! Gevaar voor elektrische schok en
ernstig letsel.
Let tijdens het boren en zagen op elektrische kabels die zich in de
wand bevinden.
LET OP!
Monteer de stofzuiger op een droge plaats.
Monteer de stofzuiger niet op een plaats met hoge temperatu-
ren.
Buig de aansluitkabel niet rond scherpe randen of hoeken.
Houd de aansluitkabel uit de buurt van verwarmde oppervlakken.
Voor de montage van de stofzuiger moet de wanddikte min.
10 mm en max. 25 mm bedragen.
Voer de montage uit in de buurt van een stopcontact waarmee
de stofzuiger van stroom kan worden voorzien. Gebruik geen
verlengkabel.
Als de stofzuiger in een kleine, slecht geventileerde ruimte (bij-
voorbeeld inbouwkast) wordt gemonteerd, moet een luchtuitlaat met luchtuitlaatrooster van minstens 70 mm
dwarsdoorsnede worden ingebouwd om de door het toestel
verwarmde lucht naar buiten te transporteren.
LET OP!
De schroeven van de behuizing mogen niet compleet worden uitgedraaid omdat ze van een veermechanisme zijn voorzien.
INSTRUCTIE
De opsteekverbindingen (afb. 3 1, pagina 4) moeten aan apparaatzijde met in de handel verkrijgbare kunststoflijm worden vastgelijmd. De schroefverbindingen (afb. 3 2, pagina 4) worden in
de verbindingsslang geschroefd en in de opsteekverbinding
gestoken.
Page 74

NL
Stofzuiger gebruiken CV1004
74
➤ Monteer de slangcontactdoos en de verbindingsslang (afb. a, pagina 5,
en afb. b, pagina 5).
Stofzuiger elektrisch aansluiten
➤ Verbind de oranje 24-Vg-leidingen aan de achterzijde van het toestel
met de contacten van de slangaansluitdoos (afb. c, pagina 6).
!
➤ Sluit de 230-V-aansluitkabel aan op een geschikt stopcontact (afb. d,
pagina 6).
8 Stofzuiger gebruiken
A
8.1 Met centrale stofzuiger stofzuigen
➤ Open de schuif (afb. 2 2, pagina 3) door deze naar rechts te schuiven.
➤ Steek de slang in de slangaansluiting van het toestel.
➤ Zet de schakelaar in stand „I” (afb. 2 1, pagina 3) om het toestel in te
schakelen.
✓ De stofzuiger wordt ingeschakeld.
➤ Zet de schakelaar in stand „O” (afb. 2 1, pagina 3) om het toestel uit te
schakelen.
➤ Trek de slang uit de slangaansluiting van het toestel.
➤ Sluit de schuif (afb. 2 2, pagina 3) door deze naar links te schuiven.
WAARSCHUWING!
Gevaar voor elektrische schok en ernstig letsel.
Gebruik alleen de meegeleverde 230-V-aansluitkabel.
LET OP!
Gebruik de stofzuiger niet zonder stofzak of zonder motorfil-
ter.
Gebruik uitsluitend door de fabrikant aanbevolen reserveon-
derdelen en toebehoren.
Page 75

NL
CV1004 Stofzuiger gebruiken
75
8.2 Met slangaansluitdoos stofzuigen
I
➤ Voor het inschakelen steekt u de slang in de externe slangaansluiting.
✓ De stofzuiger schakelt automatisch in.
➤ Voor het uitschakelen trekt u de slang uit het externe slangstopcontact.
✓ De stofzuiger schakelt automatisch uit.
8.3 Stofzak wisselen
A
I
➤ Vervang de stofzak (afb. e, pagina 6, tot afb. l, pagina 7).
INSTRUCTIE
Sluit de slangaansluiting aan de toestelvoorzijde met de schuif,
als u via de externe slangaansluiting stofzuigt. Zo verhoogt u het
zuigvermogen.
LET OP!
Correct plaatsen van de stofzak is belangrijk voor het zuigvermogen van de stofzuiger. Volg nauwkeurig de instructies op, zie
afb. e, pagina 6, tot afb. l, pagina 7.
INSTRUCTIE
De stofzak heeft twee openingen. Een van beide openingen is
met twee pijlen gemarkeerd. Deze zijde moet op de steun in
het apparaat met de pijlen omhoog worden geplaatst (afb. j,
pagina 7). Let bij het plaatsen van de stofzak op de correcte
positie.
Verwijder eerst de ene opening van de steun in het apparaat
en daarna de andere opening van de steun aan apparaatvoorzijde. Houd de openingen omhoog zodat geen stof uit de stofzak kan vallen.
Wissel en reinig het motorfilter steeds bij de vijfde verwisseling
van de stofzak.
Page 76

NL
Stofzuiger onderhouden en reinigen CV1004
76
8.4 Motorfilter wisselen of reinigen
I
➤ Verwijder het motorfilter en plaats het nieuwe of het gereinigde motorfilter
(zie afb. m, pagina 7 en afb. n, pagina 7).
9 Stofzuiger onderhouden en reinigen
A
➤ Reinig het product af en toe met een vochtige doek.
INSTRUCTIE
Wissel en reinig het motorfilter steeds bij de vijfde verwisseling
van de stofzak of wanneer het filter sterk vervuild is.
U kunt het motorfilter met de hand in een milde zeeploog wassen.
Was het filter niet in een wasmachine of met harde voorwerpen.
Laat het in de lucht drogen, voordat u het weer in pijlrichting in de
stofzuiger plaatst.
LET OP!
Geen scherpe of harde voorwerpen of reinigingsmiddelen bij het
reinigen gebruiken. Dit kan het product beschadigen.
Page 77

NL
CV1004 Verhelpen van storingen
77
10 Verhelpen van storingen
I
Als de motor niet meer draait, schakelt u de stofzuiger uit en neemt u de volgende stappen:
➤ Controleer of de zuigslang verstopt is.
Houd de zuigslang met één hand naar boven en steek er van bovenaf
een kleine munt in. Als de munt niet door de slang valt, is deze verstopt.
Schuif met een lange staaf het opgehoopte vuil uit de slang.
➤ Controleer de stofzak.
Door het opzuigen van grote hoeveelheden vuil, dat geen huishoudelijk
stof is (stof van gipsplaten, fijn houtstof e.d.), kunnen de poriën van de
stofzak verstopt raken.
Plaats een nieuwe stofzak.
➤ Als de stofslang sterk vervuild is, reinig deze dan.
– Houd beide uiteinden van de zuigslang omhoog.
– Vul een vloeibaar reinigingsmiddel in beide uiteinden.
– Vul water bij terwijl u de beide uiteinden omhoog houdt.
– Schud de zuigslang heen en weer, om het vuil los te maken.
– Trek de zuigslang zover mogelijk uit elkaar.
– Spoel het vuil eruit.
– Herhaal deze stappen, totdat de zuigslang schoon is.
– Hang de zuigslang in het midden op en laat deze volledig drogen voor-
dat u hem weer in gebruik neemt.
INSTRUCTIE
De stofzuiger is uitgerust met een thermische overbelastingsbeveiliging, die voorkomt dat de motor oververhit raakt.
Als de motor niet draait, het toestel uitschakelen door de schakelaar in stand „O” te zetten of de zuigslang uit de externe slangaansluiting te trekken.
Laat het toestel ca. 1 uur afkoelen. Raadpleeg de fabrikant of uw
handelaar, als deze fout ook na de hieronder beschreven maatregelen ter verhelping van storingen optreedt.
Page 78

NL
Garantie CV1004
78
➤ Controleer of het vloermondstuk verstopt is.
Reinig het vloermondstuk.
➤ Controleer het motorfilter.
Maak het motorfilter schoon of wissel deze.
11 Garantie
De wettelijke garantieperiode is van toepassing. Als het product defect is,
wendt u zich tot het filiaal van de fabrikant in uw land (adressen zie achterkant van de handleiding) of tot uw speciaalzaak.
Voor de afhandeling van de reparatie of garantie dient u de volgende documenten mee te sturen:
een kopie van de factuur met datum van aankoop,
reden van de klacht of een beschrijving van de storing.
12 Afvoer
➤ Laat het verpakkingsmateriaal indien mogelijk recyclen.
M
Als u het product definitief buiten bedrijf stelt, informeer dan bij het
dichtstbijzijnde recyclingcentrum of uw speciaalzaak naar de
betreffende afvoervoorschriften.
Page 79

NL
CV1004 Technische gegevens
79
13 Technische gegevens
CV1004
Artikelnr.: 9103501126
Ingangsspanning: 220 – 240 Vw
Opgenomen vermogen: 950 W
Stroomgebruik: 4,5 A
Zuigvermogen: 2500 mm waterkolom
Bedrijfstemperatuur: –15 °C tot +40 °C
Afmetingen b x h x d: 298 x 171 x 175 mm
Gewicht: 2,7 kg
Certificaat:
Page 80

DA
Forklaring af symbolerne CV1004
80
Læs denne vejledning omhyggeligt igennem før installation og ibrugtagning, og opbevar den. Giv den til brugeren, hvis du giver produktet
videre.
Indholdsfortegnelse
1 Forklaring af symbolerne . . . . . . . . . . . . . . . . . . . . . . . . . . . . . . . . . 80
2 Sikkerhedshenvisninger. . . . . . . . . . . . . . . . . . . . . . . . . . . . . . . . . . 81
3 Leveringsomfang . . . . . . . . . . . . . . . . . . . . . . . . . . . . . . . . . . . . . . . 83
4 Tilbehør . . . . . . . . . . . . . . . . . . . . . . . . . . . . . . . . . . . . . . . . . . . . . . 83
5 Korrekt brug . . . . . . . . . . . . . . . . . . . . . . . . . . . . . . . . . . . . . . . . . . . 84
7 Montering af støvsugeren . . . . . . . . . . . . . . . . . . . . . . . . . . . . . . . . 85
8 Anvendelse af støvsugeren . . . . . . . . . . . . . . . . . . . . . . . . . . . . . . . 86
9 Vedligeholdelse og rengøring af støvsugeren . . . . . . . . . . . . . . . . . 88
10 Udbedring af fejl. . . . . . . . . . . . . . . . . . . . . . . . . . . . . . . . . . . . . . . . 88
11 Garanti . . . . . . . . . . . . . . . . . . . . . . . . . . . . . . . . . . . . . . . . . . . . . . . 89
12 Bortskaffelse . . . . . . . . . . . . . . . . . . . . . . . . . . . . . . . . . . . . . . . . . . 90
13 Tekniske data. . . . . . . . . . . . . . . . . . . . . . . . . . . . . . . . . . . . . . . . . . 90
1 Forklaring af symbolerne
!
!
A
ADVARSEL!
Sikkerhedshenvisning: Manglende overholdelse kan medføre
død eller alvorlig kvæstelse.
FORSIGTIG!
Sikkerhedshenvisning: Manglende overholdelse kan medføre
kvæstelser.
VIGTIGT!
Manglende overholdelse kan medføre materielle skader og
begrænse produktets funktion.
Page 81

DA
CV1004 Sikkerhedshenvisninger
81
I
➤ Handling: Dette symbol viser dig, at du skal gøre noget. De påkrævede
handlinger beskrives trin for trin.
✓ Dette symbol beskriver resultatet af en handling.
Fig. 1 5, side 3: Denne information henviser til et element på en figur, i
dette eksempel til „Position 5 på figur 1 på side 3“.
2 Sikkerhedshenvisninger
Producenten påtager sig intet ansvar for skader i følgende tilfælde:
Beskadigelser på produktet på grund af mekanisk påvirkning og over-
spænding
Ændringer på produktet uden udtrykkelig tilladelse fra producenten
Anvendelse til andre formål end dem, der er beskrevet i vejledningen
2.1 Generel sikkerhed
!
ADVARSEL!
Kontrollér før idrifttagning af apparatet, om driftsspændingen og
netspændingen stemmer overens (se typeskilt).
Hvis apparatet har synlige beskadigelser, må du ikke tage det i
brug.
Reparationer på dette apparat må kun foretages af fagfolk. Ved
ukorrekte reparationer kan der opstå betydelige farer.
Kontakt kundeserviceafdelingen i forbindelse med reparationer.
Dette apparat kan anvendes af børn over 8 år og derudover af
personer med begrænsede fysiske, sanse- eller mentale evner
eller uden erfaring eller viden, hvis de er under opsyn eller blev
instrueret i sikker brug af apparatet og forstår farerne, der følger
heraf.
Rengøring og brugerens vedligeholdelse må ikke udføres af
børn uden opsyn.
Børn må ikke lege med apparatet.
Børn bør være under opsyn for at sikre, at de ikke leger med
apparatet.
BEMÆRK
Supplerende informationer om betjening af produktet.
Page 82

DA
Sikkerhedshenvisninger CV1004
82
Opbevar og anvend apparatet uden for børns rækkevidde
(under 8 år).
Udsæt aldrig apparatet for fugtighed.
Anvend ikke tilbehør, der ikke er anbefalet af producenten. Det
kan medføre kvæstelser og materielle skader.
Anvend kun tilbehør, der er anbefalet af producenten.
Læn ikke genstande op ad støvsugeren.
2.2 Sikkerhed under anvendelse af apparatet
!
FORSIGTIG!
Træk aldrig stikket ud af stikdåsen med tilslutningskablet.
Træk netstikket ud af stikdåsen, når der foretages vedligehol-
delsesarbejder.
Anvend aldrig apparatet i rum, hvor der opbevares brandfarlige
materialer eller har dannet sig brændbare gasser. Gnister fra
motoren kan antænde dem.
Hold dyser væk fra øjne, ører og ansigt under driften. Sørg for,
at hår, løs beklædning og fingre ikke kommer ind i åbningerne
eller i nærheden af drejende dele.
Hold børn og dyr på en sikker afstand under brug af apparatet.
Anvend ikke apparatet med våde hænder.
A
VIGTIGT!
Opsug ikke
– våde genstande
– opløsningsmiddelholdige eller ætsende væsker
– varme, glødende, hårde eller spidse genstande
– giftige materialer
De kan beskadige apparatet eller filteret.
Opsug ikke store genstande som affaldspapir eller servietter.
De kan tilstoppe slangen.
Skyl motorfilteret ud i varmt vand, når det er snavset, eller sæt
et nyt filter i. Sæt kun helt tørre filtre i.
Anvend udelukkende apparatet indenfor, aldrig i det fri.
Sørg for, at åbninger ikke tilstoppes. Rengør evt. åbningerne,
før apparatet anvendes.
Page 83

DA
CV1004 Leveringsomfang
83
Tag aldrig apparatet i drift uden filter eller uden støvpose.
Træd ikke på slangen, og træk ikke for kraftigt i slangen.
3 Leveringsomfang
4 Tilbehør
Kan fås som tilbehør (ikke indeholdt i leveringsomfanget):
Nr. på
fig. 1, side 3
Mængde Betegnelse
1 1 Centralstøvsuger
21Gulvdåse
3 1 Ekstra børste
4 1 Støvdyse
5 1 Fugedyse
6 1 Teleskoprør
7 1 Sugeslange
8 1 Slangestik
9 2 Skrueforbindelse (sort)
10 2 Ekstra forbindelse (hvid)
11 1 Forbindelsesslange (2 m)
12 2 Støvpose
Betegnelse Art.nr.
Reservestøvpose (pakke med 5 inkl. et motorfilter) 9103501128
Dometic VacPort opfejningsdyse 9103501127
Page 84

DA
Korrekt brug CV1004
84
5 Korrekt brug
Centralstøvsugeren CV1004 (art.nr. 9103501126) er en støvsuger til montering i en egnet hulvæg eller i eksisterende indbyggede dele i campingvogne,
autocampere eller både. Apparatet er ikke egnet til erhvervsmæssig anvendelse. Det må ikke anvendes i det fri.
6 Teknisk beskrivelse
Centralstøvsugerens sugeslange kan tilsluttes direkte til apparatet eller til en
ekstern slangestikdåse.
Hvis sugeslangen tilsluttes til centralstøvsugeren, skal den tændes og slukkes direkte med kontakten. Apparatet har en sugeautomatik, der aktiveres,
når sugeslangen sættes i slangestikdåsen.
Støvsugersystemet kan udvides med Dometic VacPort (ikke indeholdt i leveringsomfanget). Denne opfejningsdyse kan f.eks. placeres i indgangs- eller
køkkenområdet for dér direkte at opsuge sammenfejet smuds ved hjælp af
den fast monterede dyse.
6.1 Betjeningselementer
Nr. på
fig. 2, side 3
Betegnelse Forklaring
1 Kontakt I/O Tænder eller slukker støvsugeren, når
sugeslangen sættes i centralstøvsugeren.
2 Skydeblænde Lukker slangetilslutningen på apparatet.
Når den lukkes, forøges sugekraften
påå den eksterne slangetilslutning
under driften.
3 Skyder Åbner apparatets front (f.eks. for at
udskifte støvposen)
4 Motorfilter Beskytter motoren mod forurening
Page 85

DA
CV1004 Montering af støvsugeren
85
7 Montering af støvsugeren
!
A
➤ Kontrollér, at støvposen og motorfilteret er sat i.
➤ Kontrollér før monteringen af støvsugeren, om den fungerer.
A
➤ Montér støvsugeren (fig. 4, side 4 til fig. 0, side 5).
I
➤ Montér slangestikket, og træk forbindelsesslangen (fig. a, side 5, og
fig. b, side 5).
ADVARSEL! Fare for elektrisk stød og alvorlige kvæstelser.
Vær opmærksom på el-kabler, der befinder sig i væggen, når du
borer.
VIGTIGT!
Montér støvsugeren på et tørt sted.
Montér ikke støvsugeren i et område med høje temperaturer.
Bøj ikke tilslutningskablet omkring skarpe kanter eller hjørner.
Hold tilslutningskablet væk fra opvarmede flader.
Ved monteringen af støvsugeren skal vægtykkelsen være min.
10 mm og maks. 25 mm.
Vær opmærksom på, at der befinder sig en stikdåse i nærhe-
den, hvor støvsugeren kan forsynes med strøm. Anvend ikke
et forlængerkabel.
Hvis støvsugeren monteres i små rum med dårlig ventilation
(f.eks. et indbygget skab), skal der monteres en luftudgang
med luftudgangsgitter med et tværsnit på mindst 70 mm for at
transportere luften, der er opvarmet af apparatet, ud.
VIGTIGT!
Skruerne på huset må ikke skrues helt ud, da de er forsynet med
en fjedermekanisme.
BEMÆRK
De ekstra forbindelser (fig. 3 1, side 4) skal klæbes på apparatsiden med almindeligt kunststofklæbemiddel. Skrueforbindelserne (fig. 3 2, side 4) skrues i forbindelsesslangen og sættes i
den ekstra forbindelse.
Page 86

DA
Anvendelse af støvsugeren CV1004
86
Elektrisk tilslutning af støvsugeren
➤ Forbind de orangefarvede 24 Vg-ledningerne på bagsiden af apparatet
med kontakterne på slangestikdåsen (fig. c, side 6).
!
➤ Tilslut 230 V-tilslutningskablet til en egnet stikdåse (fig. d, side 6).
8 Anvendelse af støvsugeren
A
8.1 Støvsugning med centralstøvsuger
➤ Åbn skydeblænden (fig. 2 2, side 3) ved at skubbe den til højre.
➤ Stik slangen ind i slangetilslutningen på apparatet.
➤ Stil kontakten i stilling „I“ (fig. 2 1, side 3) for at tænde apparatet.
✓ Støvsugeren tændes.
➤ Stil kontakten i stilling „O“ (fig. 2 1, side 3) for at slukke apparatet.
➤ Træk slangen ud af slangetilslutningen på apparatet.
➤ Luk skydeblænden (fig. 2 2, side 3) ved at skubbe den til venstre.
ADVARSEL!
Fare for elektrisk stød og alvorlige kvæstelser.
Anvend kun det medfølgende 230 V-tilslutningskabel.
VIGTIGT!
Anvend ikke støvsugeren uden støvpose eller uden motor-
filter.
Anvend udelukkende reserve- og tilbehørsdele, der er anbefa-
let af producenten.
Page 87

DA
CV1004 Anvendelse af støvsugeren
87
8.2 Støvsugning med slangestikdåse
I
➤ Sæt slangen i den eksterne slangestikdåse for at tænde.
✓ Støvsugeren tændes automatisk.
➤ Træk slangen ud af den eksterne slangestikdåse for at slukke.
✓ Støvsugeren slukkes automatisk.
8.3 Udskiftning af støvposen
A
I
➤ Udskift støvposen (fig. e, side 6, til fig. l, side 7).
BEMÆRK
Luk slangetilslutningen på apparatets front med skydeblænden,
når du støvsuger via den eksterne slangestikdåse. På den måde
forøger du sugeeffekten.
VIGTIGT!
En korrekt isætning af støvposen er vigtig for støvsugerens sugekraft. Følg anvisningerne nøje, se fig. e, side 6, til fig. l, side 7.
BEMÆRK
Støvposen har to åbninger. En af de to åbninger er markeret
med to pile. Denne side skal sættes på studsen i apparatet
med pilene opad (fig. j, side 7). Sørg for korrekt position, når
støvposen sættes i.
Tag først den ene åbning af studsen i apparatet og derefter
den anden åbning af studsen på apparatets front. Hold åbningerne opad, så der ikke kan falde støv ud af støvposen.
Udskift eller rengør motorfilteret ved hver femte udskiftning af
støvposen.
Page 88

DA
Vedligeholdelse og rengøring af støvsugeren CV1004
88
8.4 Udskiftning eller rengøring af motorfilteret
I
➤ Tag motorfilteret ud, og sæt et nyt eller det rengjorte motorfilter i igen
(fig. m, side 7 og fig. n, side 7).
9 Vedligeholdelse og rengøring af
støvsugeren
A
➤ Rengør af og til produktet med en fugtig klud.
10 Udbedring af fejl
I
BEMÆRK
Udskift eller rengør motorfilteret ved hver femte udskiftning af
støvposen, eller hvis det er meget snavset.
Motorfilteret kan vaskes med hånden i en mild sæbeopløsning.
Vask det ikke i en vaskemaskine eller med hårde genstande. Lad
det tørre i luften, inden det sættes ind i støvsugeren i pilens retning.
VIGTIGT!
Anvend ikke skarpe eller hårde genstande eller rengøringsmidler
til rengøring, da det kan beskadige produktet.
BEMÆRK
Støvsugeren er udstyret med en termisk overbelastningssikring,
der forhindrer, at motoren overophedes.
Hvis motoren forbliver standset, skal du slukke apparatet ved at
stille kontakten på stilling „O“ eller trække sugeslangen ud af den
eksterne slangestikdåse.
Lad apparatet køle af i 1 time. Hvis denne fejl også forekommer
efter de foranstaltninger til udbedring af fejl, der er beskrevet
nedenfor, skal du kontakte producenten eller din forhandler.
Page 89

DA
CV1004 Garanti
89
Sluk støvsugeren, hvis motoren standser, og gå frem på følgende måde:
➤ Kontrollér, om sugeslangen er tilstoppet.
Hold sugeslangen op med en hånd, og stik en lille mønt ind foroven. Hvis
mønten ikke falder gennem slangen, er den tilstoppet. Skub smudsklumpe ud af slangen med en lang stav.
➤ Kontrollér støvposen.
Hvis der opsuges store mængder smuds, der ikke er husholdningsstøv
(gipspladestøv, fint træstøv osv.), kan porerne i støvposen blive tilstoppet.
Sæt en ny støvpose i.
➤ Rengør sugeslangen, hvis den er meget tilsmudset.
– Hold begge ender af sugeslangen op.
– Fyld flydende rengøringsmiddel i begge ender.
– Fyld vand i, mens begge ender fortsat holdes oppe.
– Ryst sugeslangen frem og tilbage for at løsne smuds.
– Stræk sugeslangen så langt ud som muligt.
– Skyl smuds ud.
– Gentag dette forløb, indtil sugeslangen er ren.
– Hæng sugeslangen op i midten, og lad den tørre fuldstændigt, før den
anvendes.
➤ Kontrollér, om bunddysen er tilstoppet.
Rengør bunddysen.
➤ Kontrollér motorfilteret.
Rengør motorfilteret, eller udskift det.
11 Garanti
Den lovbestemte garantiperiode gælder. Hvis produktet er defekt, skal du
kontakte producentens afdeling i dit land (adresser, se vejledningens bagside) eller din forhandler.
Ved reparation eller krav om garanti skal du medsende følgende bilag:
En kopi af regningen med købsdato
En reklamationsgrund eller en fejlbeskrivelse
Page 90

DA
Bortskaffelse CV1004
90
12 Bortskaffelse
➤ Bortskaf så vidt muligt emballagen sammen med det tilsvarende
genbrugsaffald.
M
Hvis du tager produktet endegyldigt ud af drift, skal du kontakte det
nærmeste recyclingcenter eller din faghandel for at få de pågældende forskrifter om bortskaffelse.
13 Tekniske data
CV1004
Art.nr.: 9103501126
Indgangsspænding: 220 – 240 Vw
Effektforbrug: 950 W
Strømforbrug: 4,5 A
Sugeeffekt: 2500 mm vandsøjle
Driftstemperatur: –15 °C til +40 °C
Mål B x H x D: 298 x 171 x 175 mm
Vægt: 2,7 kg
Certifikat:
Page 91

SV
CV1004 Förklaring till symboler
91
Läs igenom anvisningarna noga innan produkten monteras och
används. Spara monterings- och bruksanvisningen för senare bruk.
Överlämna bruksanvisningen till den nya ägaren vid ev. vidareförsäljning.
Innehållsförteckning
1 Förklaring till symboler . . . . . . . . . . . . . . . . . . . . . . . . . . . . . . . . . . . 91
2 Säkerhetsanvisningar . . . . . . . . . . . . . . . . . . . . . . . . . . . . . . . . . . . 92
3 Leveransomfattning . . . . . . . . . . . . . . . . . . . . . . . . . . . . . . . . . . . . . 94
4 Tillbehör . . . . . . . . . . . . . . . . . . . . . . . . . . . . . . . . . . . . . . . . . . . . . . 94
5 Ändamålsenlig användning . . . . . . . . . . . . . . . . . . . . . . . . . . . . . . . 95
7 Installera dammsugaren . . . . . . . . . . . . . . . . . . . . . . . . . . . . . . . . . 96
8 Använda dammsugaren. . . . . . . . . . . . . . . . . . . . . . . . . . . . . . . . . . 97
9 Skötsel och rengöring av dammsugaren . . . . . . . . . . . . . . . . . . . . . 99
10 Felsökning . . . . . . . . . . . . . . . . . . . . . . . . . . . . . . . . . . . . . . . . . . . . 99
11 Garanti . . . . . . . . . . . . . . . . . . . . . . . . . . . . . . . . . . . . . . . . . . . . . . 100
12 Avfallshantering . . . . . . . . . . . . . . . . . . . . . . . . . . . . . . . . . . . . . . . 101
13 Tekniska data. . . . . . . . . . . . . . . . . . . . . . . . . . . . . . . . . . . . . . . . . 101
1 Förklaring till symboler
!
!
A
VARNING!
Observera: Beaktas anvisningen ej kan det leda till dödsfara eller
svåra skador.
AKTA!
Observera: Beaktas anvisningen ej kan det leda till kropps-
skador.
OBSERVERA!
Om anvisningarna inte beaktas kan det leda till materialskador
och produktens funktion kan påverkas negativt.
Page 92

SV
Säkerhetsanvisningar CV1004
92
I
➤ Arbetssteg: denna symbol står framför en arbetsinstruktion.
Tillvägagångssättet beskrivs steg för steg.
✓ Denna symbol står framför beskrivningen av resultatet.
Bild 1 5, sidan 3: anger en detalj på en bild, i detta exempel ”position 5 på
bild 1 på sidan 3”.
2 Säkerhetsanvisningar
Tillverkaren övertar inget ansvar för skador i följande fall:
skador på produkten, orsakade av mekanisk påverkan eller överspänning
ändringar som utförts utan uttryckligt medgivande från tillverkaren
ej ändamålsenlig användning
2.1 Allmän säkerhet
!
VARNING!
Kontrollera att driftspänningen och nätspänningen stämmer
överens innan apparaten tas i drift (se typskylten).
Om produkten uppvisar synliga skador får den ej användas.
Reparationer på produkten får endast utföras av behörig perso-
nal. Icke fackmässiga reparationer kan medföra allvarliga risker.
Vänd dig till kundtjänsten när det gäller reparationer.
Denna apparat kan användas av barn från 8 år samt av perso-
ner med fysiska, sensoriska eller mentala funktionshinder och
personer som saknar erfarenhet och kunskap under förutsättning att de använder den under uppsikt eller har undervisats om
hur apparaten används på ett säkert sätt och känner till ev. risker i samband med användningen.
Rengöring och underhåll får inte genomföras av barn utan upp-
sikt.
Barn får inte leka med apparaten.
Barn bör hållas under uppsikt, så att de inte leker med appara-
ten.
ANVISNING
Kompletterande information om användning av produkten.
Page 93

SV
CV1004 Säkerhetsanvisningar
93
Förvara och använd apparaten utom räckhåll för barn under
8år.
Utsätt inte apparaten för fukt.
Använd inte tillbehör som inte rekommenderas av tillverkaren.
Det kan leda till personskador eller skador på apparaten.
Använd endast tillbehör som rekommenderas av tillverkaren.
Luta inga föremål mot dammsugaren.
2.2 Säkerhet under användning
!
AKTA!
Dra aldrig ut stickkontakten ur uttaget genom att dra i anslut-
ningskabeln.
Dra alltid ut stickkontakten ur uttaget vid underhållsarbeten.
Använd aldrig apparaten i rum där brandfarliga ämnen förvaras
eller där brännbara gaser har bildats. Gnistor från motorn kan
antända ämnena/gaserna.
Håll munstycket borta från ögon, öron och ansikte under
användningen. Se till att hår, lösa klädstycken och fingrar inte
kommer i närheten av öppningar eller roterande delar.
Håll barn och djur på ett säkert avstånd när du använder appa-
raten.
Använd inte apparaten med våta händer.
A
OBSERVERA!
Sug inte upp
–våta föremål
– vätskor som innehåller lösningsmedel eller är frätande
– heta, glödande, hårda eller vassa föremål
– giftiga material
Det kan skada apparaten eller filtret.
Sug inte upp stora föremål, som t.ex. papper eller tygstycken.
Det kan leda till tilltäppningar i slangen.
När motorfiltret är smutsigt, spola det i varmt vatten eller sätt in
ett nytt. Sätt bara in helt torra filter.
Använd endast apparaten inomhus, aldrig utomhus.
Se till att inga öppningar är tilltäppta. Eventuellt måste du ren-
göra öppningarna innan du använder apparaten.
Page 94

SV
Leveransomfattning CV1004
94
Ta inte apparaten i drift utan filter eller utan dammsugarpåse.
Trampa inte på slangen och dra inte för hårt i den.
3 Leveransomfattning
4 Tillbehör
Följande tillbehör finns tillgängliga (ingår inte i leveransen):
Nr på
bild 1, sida 3
Mängd Beteckning
1 1 Centraldammsugare
2 1 Golv- och mattmunstycke
3 1 Extra borste
4 1 Dammunstycke
5 1 Skarvmunstycke
6 1 Teleskoprör
7 1 Dammsugarslang
8 1 Slanguttag
9 2 Skruvkoppling (svart)
10 2 Fäste (vitt)
11 1 Kopplingsslang (2 m)
12 2 Dammsugarpåse
Beteckning Art.nr
Reservdammsugarpåsar (förpackning med 5 st. inkl. ett
motorfilter)
9103501128
Dometic VacPort suguttag 9103501127
Page 95

SV
CV1004 Ändamålsenlig användning
95
5 Ändamålsenlig användning
Centraldammsugaren CV1004 (artikelnummer 9103501126) är avsedd för
montering i lämpliga ihåliga väggar eller i husvagnar, husbilar eller på båtar.
Apparaten är inte avsedd för yrkesmässig användning. Den får inte användas utomhus.
6 Teknisk beskrivning
Sugslangen kan anslutas direkt till dammsugaren eller till en extern sugdosa.
När sugslangen används på centraldammsugaren ska den slås på och av
med strömbrytaren. Dammsugaren har en automatisk sugfunktion som aktiveras när sugslangen sätts in i sugdosan.
Dammsugningssystemet kan kompletteras med Dometic VacPort (medföljer
ej) Detta suguttag kan t.ex. monteras i hallen eller köket för att där direkt suga
upp ihopsopad smuts med hjälp av det fast monterade munstycket.
6.1 Reglage, detaljer
Nr på
bild 2, sida 3
Beteckning Förklaring
1 Strömbrytare I/O Slår på och av dammsugaren när
sugslagen är ansluts till centraldammsugaren.
2 Täckplatta Försluter slanganslutningen på damm-
sugaren Detta ökar sugkraften när den
externa sugdosan används.
3 Regel Öppnar kortsidan (t.ex. för byte av
dammsugarpåse)
4 Motorfilter Skyddar motorn mot smuts
Page 96

SV
Installera dammsugaren CV1004
96
7 Installera dammsugaren
!
A
➤ Kontrollera att dammsugarpåsen och motorfiltret har satts in.
➤ Kontrollera att dammsugaren fungerar innan den monteras.
A
➤ Montera dammsugaren (bild 4, sida 4 till bild 0, sida 5).
I
➤ Montera slanguttaget och dra kopplingsslangen (bild a, sida 5, och
bild b, sida 5).
VARNING! Risk för elektriska stötar och svåra skador.
Observera eventuella elkablar när du borrar och sågar i väggen.
OBSERVERA!
Montera ihop dammsugaren på ett torrt ställe.
Montera inte ihop dammsugaren på ställen med hög tempera-
tur.
Lägg inte anslutningskabeln runt vassa föremål eller kanter.
Se till att anslutningskabeln inte kommer i närheten av uppvärmda ytor.
För montering av dammsugaren ska väggtjockleken vara
minst 10 mm och max. 25 mm.
Se till att det finns ett eluttag i närheten som dammsugaren
kan anslutas till. Använd inga förlängningskablar.
Om dammsugaren monteras i små utrymmen med dålig ven-
tilation (t.ex.skåp) måste ett luftutsläpp med galler och en area
på minst 70 mm installeras så att den varma luften från dammsugaren kan släppas ut.
OBSERVERA!
Skruvarna på dammsugarens hölje har en fjädermekanism och
får inte skruvas ut helt.
ANVISNING
Fästena (bild 3 1, sida 4) måste klistras fast på maskinen med
traditionellt platslim. Skruvkopplingarna (bild 3 2, sida 4) skruvas in i kopplingsslangen och stoppas in i fästena.
Page 97

SV
CV1004 Använda dammsugaren
97
Ansluta el till dammsugaren
➤ Anslut de oranga 24 Vg-kablarna på dammsugarens baksida till sugdo-
sans kontakter (bild c, sida 6).
!
➤ Anslut 230 V-anslutningskabeln till ett lämpligt eluttag (bild d, sida 6).
8 Använda dammsugaren
A
8.1 Dammsuga med centraldammsugaren
➤ Öppna täckplattan (bild 2 2, sida 3) genom att skjuta den åt höger.
➤ Anslut slangen till dammsugarens slanganslutning.
➤ Ställ strömbrytaren i läget ”I” (bild 2 1, sida 3) för att slå på dammsuga-
ren.
✓ Dammsugaren slås på.
➤ Ställ strömbrytaren i läget ”O” (bild 2 1, sida 3) för att stänga av damm-
sugaren.
➤ Dra ut slangen från dammsugarens slanganslutning.
➤ Stäng täckplattan (bild 2 2, sida 3) genom att skjuta den åt vänster.
VARNING!
Risk för elektriska stötar och svåra skador.
Använd endast den medföljande 230 V-anslutningskabeln.
OBSERVERA!
Använd inte dammsugaren utan dammsugarpåse eller utan
motorfilter.
Använd endast reservdelar och tillbehör som rekommenderas
av tillverkaren.
Page 98

SV
Använda dammsugaren CV1004
98
8.2 Dammsuga med sugdosa
I
➤ Sätt in slangen i den externa sugdosan för att slå på dammsugaren.
✓ Dammsugaren slås på automatiskt.
➤ Dra ut slangen ur den externa sugdosan för att stänga av dammsugaren.
✓ Dammsugaren stängs av automatiskt.
8.3 Byta dammsugarpåse
A
I
➤ Byt dammsugarpåse (bild e, sida 6, till bild l, sida 7).
ANVISNING
Förslut slanganslutningen på dammsugarens kortsida med täckplattan när den externa sugdosan används för dammsugning.
Detta ger ökad sugkraft.
OBSERVERA!
Det är viktigt att dammsugarpåsen sätts i på rätt sätt så att dammsugarens sugeffekt inte påverkas. Följ anvisningarna noggrant,
se bild e, sida 6, till bild l, sida 7.
ANVISNING
Det finns två öppningar på dammsugarpåsen. En av de båda
öppningarna har märkts med två pilar. Sidan måste placeras
på stöden i maskinen med pilarna vända uppåt (bild j,
sida 7). När dammsugarpåsen sätts i måste man se till att den
hamnar rätt.
Börja med att ta bort den ena öppningen från stödet i maski-
nen och sedan den andra öppningen från maskinens främre
stöd. Håll påsen så att öppningarna pekar uppåt och inget
damm sipprar ut.
Motorfiltret behöver bytas ut eller rengöras var femte gång
dammsugarpåsen byts ut.
Page 99

SV
CV1004 Skötsel och rengöring av dammsugaren
99
8.4 Byta eller rengöra motorfilter
I
➤ Ta bort motorfiltret och sätt tillbaka det nya eller rengjorda motorfiltret
(bild m, sida 7 och bild n, sida 7).
9 Skötsel och rengöring av
dammsugaren
A
➤ Rengör produkten då och då med en fuktig trasa.
10 Felsökning
I
ANVISNING
Motorfiltret behöver bytas ut eller rengöras var femte gång dammsugarpåsen byts ut eller om det är hårt smutsat.
Motorfiltret kan tvättas för hand i milt tvålvatten. Filtret får inte
tvättas i tvättmaskin eller tillsammans med hårda föremål. Låt det
lufttorka innan du sätter tillbaka det i pilens riktning i dammsugaren.
OBSERVERA!
Använd inga vassa eller hårda föremål för rengöring, använd inga
skarpa rengöringsmedel; produkten kan skadas.
ANVISNING
Dammsugaren har ett termiskt överbelastningsskydd som skyddar motorn från överhettning.
Om motorn stannar: stäng av dammsugaren genom att ställa
strömbrytaren i läget ”O” eller dra ut sugslangen ur den externa
sugdosan.
Låt dammsugaren svalna ca 1 timme. Kontakta tillverkaren eller
återförsäljaren om felet kvarstår efter nedan angivna åtgärder.
Page 100

SV
Garanti CV1004
100
Om motorn stannar, stäng av dammsugaren och utför följande steg:
➤ Kontrollera om sugslangen är tilltäppt.
Håll sugslangen uppåt med en hand och släpp in ett litet mynt. Om myntet inte kommer ut på andra sidan är slangen tilltäppt. Skjut ut den tilltäppta smutsen ur slangen med en lång pinne.
➤ Kontrollera dammsugarpåsen.
Om man dammsuger mycket smuts som inte är normalt hushållsdamm
(gipsdamm, sågspån osv.), kan dammsugarpåsens porer täppas igen.
Sätt in en ny dammsugarpåse.
➤ Rengör sugslangen om den är starkt nedsmutsad.
– Håll upp båda ändarna på sugslangen.
– Fyll på med flytande rengöringsmedel i båda ändarna.
– Fyll på vatten medan du fortfarande håller upp båda ändarna.
– Skaka sugslangen så att smutsen löses upp.
– Dra isär sugslangen så långt som möjligt.
– Skölj bort smutsen.
– Upprepa detta tills sugslangen är ren.
– Häng upp sugslangen i mitten och låt den torka fullständigt innan den
används igen.
➤ Kontrollera om golvmunstycket är tilltäppt.
Rengör golvmunstycket.
➤ Kontrollera motorfiltret.
Rengör motorfiltret eller byt ut det.
11 Garanti
Den lagstadgade garantitiden gäller. Om produkten är defekt: kontakta tillverkarens kontor i ditt land (adresser, se bruksanvisningens baksida) eller
återförsäljaren.
Vid reparations- resp. garantiärenden ska följande skickas med:
en kopia på fakturan med inköpsdatum,
en reklamationsbeskrivning/felbeskrivning.
 Loading...