

Page 1
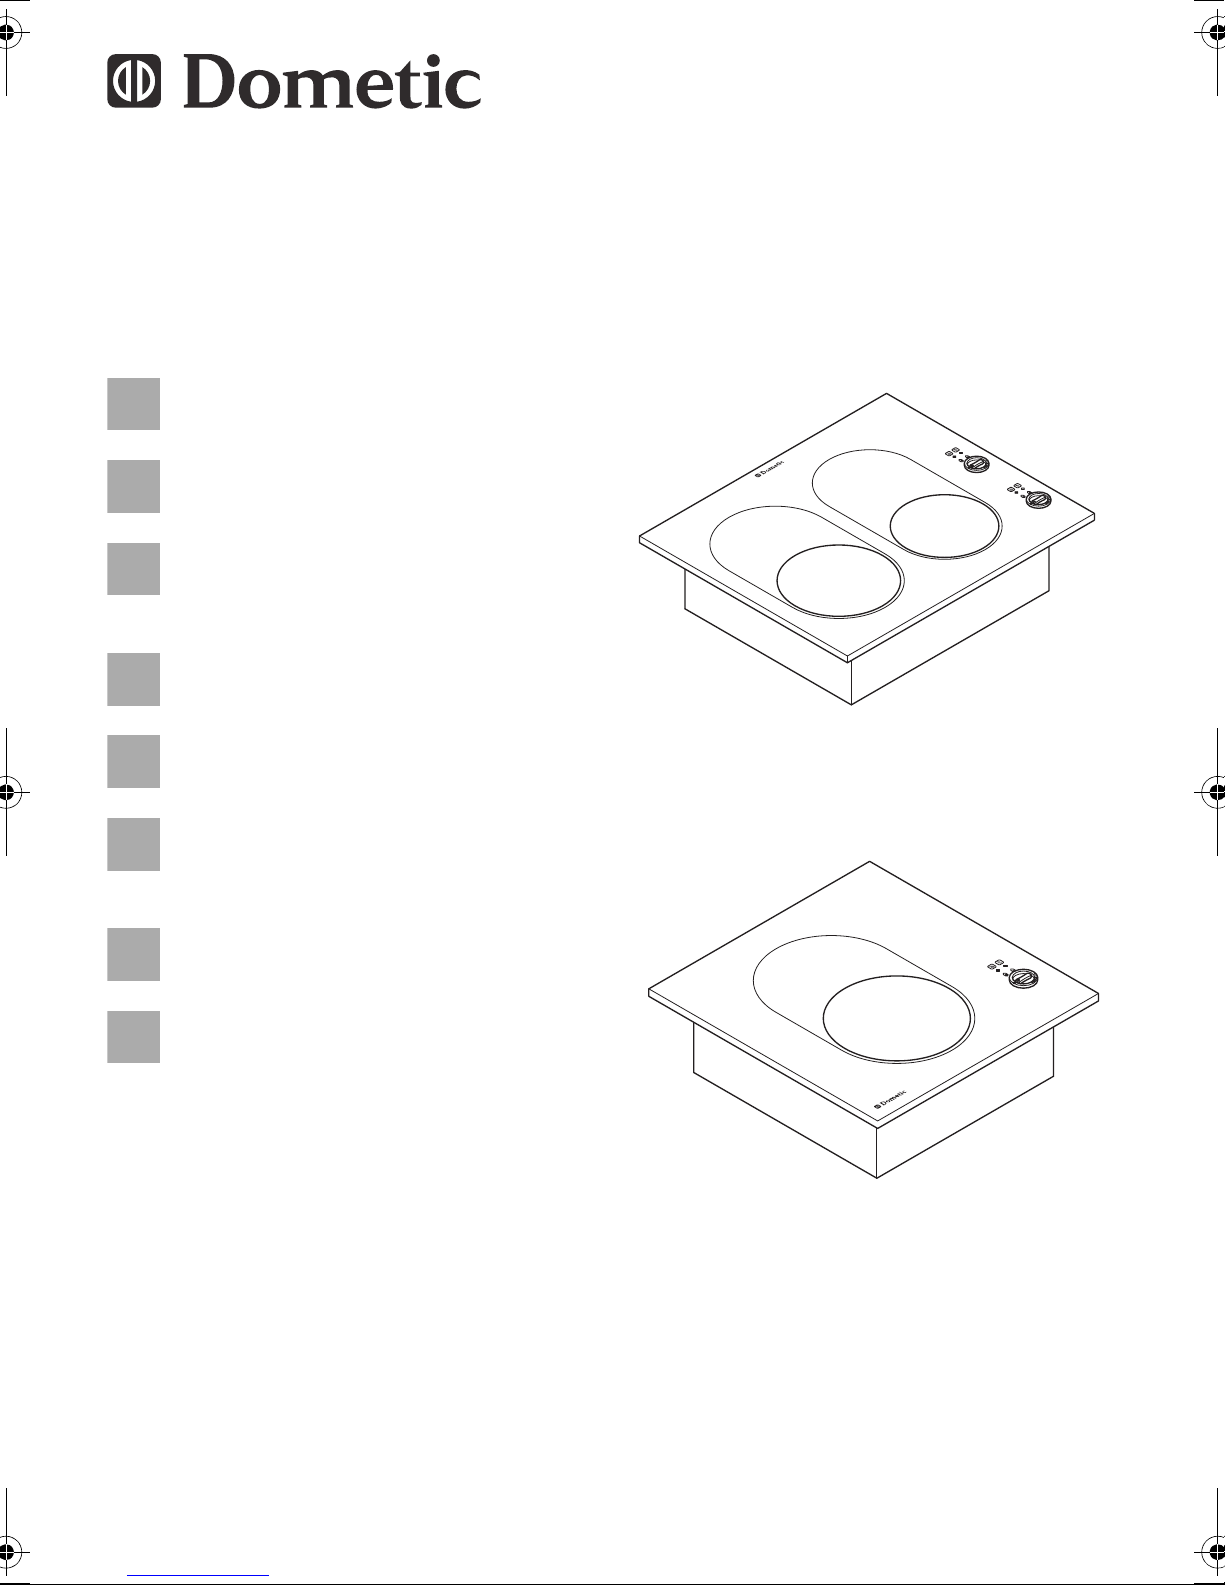
Gas ceramic cooktop
EN
DEFRES
NLITFI
SV
Operating manual . . . . . . . . . . . . . . . 4
Gas-Glaskeramik-Kochfeld
Bedienungsanleitung . . . . . . . . . . . . 22
Plan de cuisson vitrocéramique
au gaz
Notice d’utilisation . . . . . . . . . . . . . . 40
Hornillo de vitrocerámica a gas
Instrucciones de uso . . . . . . . . . . . . 59
Glaskeramische gaskookplaat
Gebruiksaanwijzing . . . . . . . . . . . . . 77
Piano cottura in vetroceramica
a gas
Istruzioni per I’uso . . . . . . . . . . . . . . 95
Kaasu-lasikeramiikka-keittolevy
Käyttöohje . . . . . . . . . . . . . . . . . . . 113
CC09, CC11
Gas-glaskeramikhäll
Bruksanvisning . . . . . . . . . . . . . . . 131
CCK09
Page 2
CC09, CC11, CCK09
1
2
3
2
3
4
1
5
50
500
15-20
10
max. R5
537
0,5
488
0,5
max. R5
377
CC09 CC11CCK09
0,5
0,5
488
max. R5
546
0,5
428
0,5
2
Page 3

CC09, CC11, CCK09
4
5
1
2
4
3
1
5 A
+12 V
3
Page 4
EN
Notes on using the manual CC09, CCK09, CC11
Please read this manual carefully before installation and starting up the
device. Keep it in a safe place for future reference. If the device is handed over to another person, this manual is to be handed over along with
it.
Contents
1 Notes on using the manual . . . . . . . . . . . . . . . . . . . . . . . . . . . . . . . . 4
2 General safety instructions . . . . . . . . . . . . . . . . . . . . . . . . . . . . . . . . 5
3 Scope of delivery . . . . . . . . . . . . . . . . . . . . . . . . . . . . . . . . . . . . . . . . 8
4 Intended use . . . . . . . . . . . . . . . . . . . . . . . . . . . . . . . . . . . . . . . . . . . 8
5 Technical description . . . . . . . . . . . . . . . . . . . . . . . . . . . . . . . . . . . . . 9
6 Installing the hob . . . . . . . . . . . . . . . . . . . . . . . . . . . . . . . . . . . . . . . 10
7 Connecting the electrical power to the hob . . . . . . . . . . . . . . . . . . . 13
8 Using the hob. . . . . . . . . . . . . . . . . . . . . . . . . . . . . . . . . . . . . . . . . . 14
9 Troubleshooting . . . . . . . . . . . . . . . . . . . . . . . . . . . . . . . . . . . . . . . . 17
10 Cleaning the hob . . . . . . . . . . . . . . . . . . . . . . . . . . . . . . . . . . . . . . . 18
11 Cleaning and maintaining the hob . . . . . . . . . . . . . . . . . . . . . . . . . . 18
12 Warranty . . . . . . . . . . . . . . . . . . . . . . . . . . . . . . . . . . . . . . . . . . . . . 20
13 Disposal . . . . . . . . . . . . . . . . . . . . . . . . . . . . . . . . . . . . . . . . . . . . . . 20
14 Technical data . . . . . . . . . . . . . . . . . . . . . . . . . . . . . . . . . . . . . . . . . 21
1 Notes on using the manual
WARNING!
Safety instruction: Failure to observe this instruction can cause
!
fatal or serious injury.
CAUTION!
Safety instruction: Failure to observe this instruction can lead to
!
injury.
4
Page 5
EN
CC09, CCK09, CC11 General safety instructions
NOTICE!
Failure to observe this instruction can cause material damage and
A
impair the function of the product.
NOTE
Supplementary information for operating the product.
I
➤ Action: This symbol indicates that action is required on your part. The
required action is described step-by-step.
✓ This symbol describes the result of an action.
fig. 1 5, page 3: This refers to an element in an illustration. In this case,
item 5 in figure 1 on page 3.
Please observe the following safety instructions.
2 General safety instructions
The manufacturer will not be held liable for claims for damage resulting from
the following:
Damage to the product resulting from mechanical influences
Alterations to the product without express permission from the manu-
facturer
Use for purposes other than those described in the operating manual
Note the following basic safety information when using electrical devices to
protect against:
Electric shock
Fire hazards
Injury
5
Page 6
EN
General safety instructions CC09, CCK09, CC11
2.1 General safety
!
Only use liquid gas (butane, propane) in the I
ries. Do not use any other fuel sources.
Keep a suitable fire extinguisher in the immediate vicinity.
Ensure that the fire extinguisher is regularly checked by a specialist.
Persons whose physical, sensory or mental capabilities prevent
them from using the device safely should only use it under the
supervision of a responsible adult.
Do not touch the cooking zones or the area near them.
The surface of the cooking zones could be hot even if they are
still dark. The areas near the cooking zones can be hot enough
to cause burns.
If the surface of the cooking zone is cracked, cleaning agents
and spilt liquids could penetrate the device, which could cause
an electric shock. In this case, switch off the device straight
away.
Always disconnect the power supply when working on the de-
vice.
, I3+, I3 catego-
3B/P
A
Maintenance and repair work may only be carried out by quali-
fied personnel who are familiar with the risks involved and the
relevant regulations.
Only use the device with the approval of qualified personnel.
Do not perform any modifications to the device.
Switch off the device when it is not in use.
Do not use the device if it is damaged or parts of it are faulty.
6
Page 7

EN
CC09, CCK09, CC11 General safety instructions
2.2 Safety precautions when handling liquid gas
Keep combustible materials away from heating or cooking de-
vices and other light or heat sources.
!
Danger of suffocation!
Ensure that the surrounding area is sufficiently ventilated before
switching on the device. During operation, air vents with a
cross-section of at least 50 cm
tion space. These vents can be closed, but must be kept open
when the device is in use (see sign located above the hob).
Compare the pressure information on the type plate with the in-
formation on the pressure regulator.
Never store liquid gas bottles in unventilated areas.
Keep liquid gas cylinders away from direct sunlight. The temper-
ature may not exceed 50 °C.
If you smell gas:
– Open all windows and leave the room.
– Do not touch any electrical devices or switches and do not
use naked flames (risk of gas ignition).
– Close the valve on the gas cylinder and keep it closed until
the error is rectified.
– Never attempt to find a gas leak with a naked flame.
2
must be present in the installa-
The hob must not be used in garages, on ferries or when refu-
elling.
2.3 Operating the device safely
Wear suitable clothing when using the hob.
Do not wear loose hanging clothing which might catch fire.
!
Leave the hob to cool down properly before you touch it with
bare hands.
Keep the area around the hob free from fat, alcoholic substanc-
es, plastic and flammable materials (e.g. curtains, cloths or
kitchen materials).
Do not hang up hand towels, curtains or any other flammable
materials near the hob and do not place them on it.
Proceed with caution when heating oil or fat, as they can ignite
under excessive heat.
Do not attempt to put out burning fat with water.
7
Page 8

EN
Scope of delivery CC09, CCK09, CC11
Only use dry oven cloths and wooden spoons to avoid steam
build-up. Wet or damp oven cloths on hot surfaces can cause
burns from steam.
Only use the hob when you or another person can attend to it.
Pots which boil over can cause smoke and fires.
Switch off the cooking zone before you remove the pot.
Turn the handles inwards, to prevent the risk of burns, flamma-
ble material from igniting and spillage from occurring due to accidently knocking the pots. Make sure that they do not protrude
onto the adjacent cooking zone.
Do not use the hob to heat the room.
A
Using the hob at a high temperature without putting any pots on
it can damage the hob.
Do not place any plastic objects, such as salt and pepper hold-
ers, packets etc. while the hob is on.
Make sure that there are no oven cloths on or near the cooking
zones.
Use pots, pans and other equipment which are designed for ce-
ramic surfaces and the rated power of the hob.
Only certain types of glass, glass ceramic, crockery or other
glazed cookware can withstand the rapid changes in temperatures and are suitable for ovens.
Use pots and pans that are the right size.
3 Scope of delivery
Gas glass ceramic hob
Operating manual
4 Intended use
Dometic CC09, CCK09 and CC11 are glass ceramic hobs operated with liquid gas. They are intended for installing in fitted kitchens at home, in motorhomes, caravans or boats.
8
Page 9

EN
CC09, CCK09, CC11 Technical description
5 Technical description
The hob is available in different versions.
CC09 (item no. 9103303386): two cooking zones
CCK09 (item no. 9103303387): one cooking zone
CC11 (item no. 9103303390/9103303391): two cooking zones
You can find out your device type by checking the item number shown on the
type plate.
The cooking zones are all heated with a gas burner.
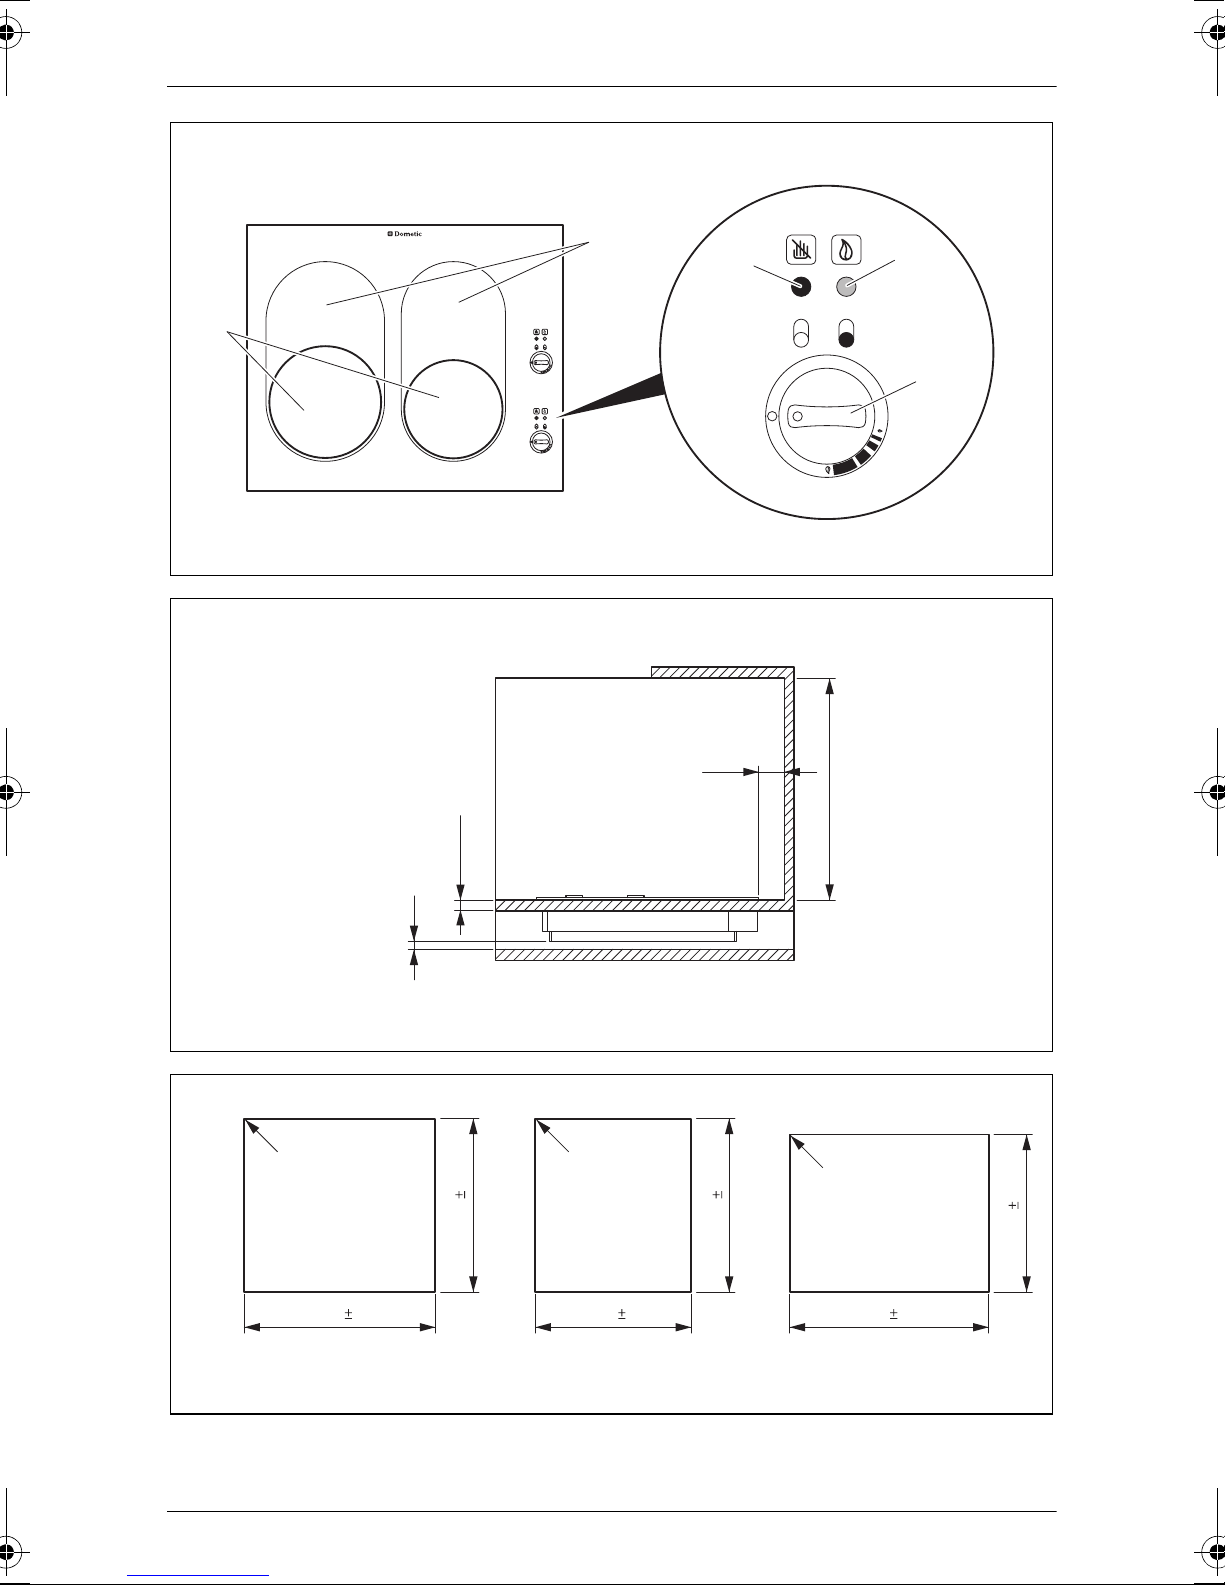
Behind the cooking zone (fig. 1 1, page 2) is a simmer cooking zone
(fig. 1 2), which is heated by the flue gas of the burner under the cooking
zone. Here the temperature is not as hot as the cooking zone. The simmer
cooking zone can be used as an additional cooking zone, which needs a lower temperature.
Only CC09, CC11: The smaller cooking zone on the right has a lower heating
power.
The glass ceramic hob is resistant to heat and cold. It can withstand heavy
pots. Prevent impact caused by pointed items, such as falling objects. This
can cause damage.
9
Page 10

EN
Installing the hob CC09, CCK09, CC11
Control elements
No. in fig. 1,
page 2
1 Cooking zone
2 Simmer cooking zone
3 Warning LED “Hot surface”
4 Control LED
5 Control knob with three settings (neutral position, large flame
Description
This LED lights up when the cooking zone is switched on.
It stays lit until the surface has cooled down and can be safely
touched again (this takes about 12 minutes once the cooking
zone has been switched off).
This LED lights up green when the cooking zone is switched
on.
and small flame)
Press and turn clockwise or anti-clockwise to set the required
temperature.
Turn the knob anti-clockwise to open the gas cock.
Turn the knob clockwise up to the stop to close the gas cock.
Only CC09, CC11: The front control knob corresponds to the cooking zone
on the right and the rear control knob to the cooking zone on the left.
6 Installing the hob
The hob can be installed in your kitchen worktop.
6.1 Selecting the installation location
When selecting the installation location, observe the following instructions:
Select a well-ventilated location for the device.
Select a covered place to prevent water or any other liquids splashing di-
rectly onto the hob.
Observe the minimum distance according to fig. 2, page 2.
Underneath the hob, air vents must have a cross-section of at least
50 cm² for the combustion air supply and heat discharge.
Die Lüftungsöffnungen müssen mindestens 5 mm breit sein.
10
Page 11

EN
CC09, CCK09, CC11 Installing the hob
Ensure that there are no draughts in the installation location.
If the hob is installed in an open cockpit or another exposed location, then
also install a wind guard.
Do not operate the device in rooms that are potentially explosive.
6.2 Installing the hob
NOTICE! Beware of damage
A
➤ Saw a rectangular opening in the worktop (for dimensions, see fig. 3,
page 2).
➤ Place the hob in the middle of the cut-out section.
➤ Attach the hob (2) with the four attachment elements (3) and screws (4)
to the worktop (1), see fig. 4, page 3.
➤ Keep a class B-1 fire extinguisher in the immediate vicinity.
Before drilling any holes, make sure that no electrical cables or
other parts of the vehicle can be damaged by drilling, sawing
and filing.
Do not use the gas pipe, tap or burner parts to attach the hob.
6.3 Connecting the hob to the gas supply
WARNING! Beware of injury
!
Only use propane or butane gas cylinders with an approved
pressure regulator and a suitable connector.
Compare the pressure information on the type plate with the in-
formation on the pressure regulator.
The device may only be connected to the gas supply by quali-
fied personnel.
Observe the following instructions during connection:
Use gas pipes made from steel ∅ 8 x 1 mm (welded, seamless or stain-
less steel), which are flush-mounted with a cutting ring screw assembly.
Fasten the pipes on the side or rear wall of the surrounding furniture parts
so that no loads are exerted on the actuators.
The connection must only be able to be released using tools. Observe the
technical regulations on DVGW worksheets G607 and G608.
The entire pipe system must be free of stress.
11
Page 12
EN
Installing the hob CC09, CCK09, CC11
Keep the hose connection between the gas appliance and the liquid gas
supply system as short as possible, and no longer than 750 mm.
The entire hose connection must be accessible for inspection purposes.
During operation, air vents must have a cross-section of at least 50 cm
in the installation space. These vents can be closed, but must be kept
open when the device is in use.
➤ Connect the hob to the gas supply.
➤ Attach a sign above the hob with the following text:
“WARNING!
When cooking, provide additional ventilation e.g. by opening windows
near the grill, hob or oven.
This equipment must not be used for heating the room.”
➤ Make sure that the hose line:
– is not crushed or kinked
– is a safe distance from the burner
2
➤ Open the valve on the gas cylinder.
WARNING! Beware of injury
Never check for leaks with a naked flame or near sources of igni-
!
➤ Check all connections with leak spray.
There are no leaks if no bubbles form.
tion.
12
Page 13
EN
CC09, CCK09, CC11 Connecting the electrical power to the hob
7 Connecting the electrical power to the
hob
WARNING! Beware of injury
Connecting the hob may only be carried out by a qualified techni-
!
Observe the following safety instructions for the electrical connections:
cian.
The following information is intended for technicians who are familiar with the guidelines and safety precautions.
NOTICE!
A
➤ Make sure that the operating voltage of the device corresponds to the on-
board electricity supply by referring to the type plate on the hob.
➤ Connect the device according to fig. 5, page 3 to the 12 V
electronics.
Use a two-wire cable with flat sockets 6.3 x 0.8 mm (1).
The power circuit must be protected with a 5 A fuse (not included in
delivery scope).
➤ Secure the cable with a clip.
If you need to feed cables through metal walls or any other walls
with sharp edges, use ducts or tubes.
Do not lay cables which are loose or bent next to electrically
conductive material (metal).
Fasten the cables securely.
Do not pull on the cables.
Lay the cables so that they cannot be tripped over or damaged.
g on-board
13
Page 14

EN
Using the hob CC09, CCK09, CC11
8 Using the hob
CAUTION! Beware of injury
The hob remains hot for some time even after it is switched off. The
!
A
Tips on handling the hob
To prevent the glass ceramic surface from damage, observe the following:
Do not use the hob for resting things on.
warning LED indicates this.
Do not place any items on the hob which could get damaged or become hot until the surface has cooled down.
NOTICE!
Make sure that there are no flammable materials on the hob before
you switch it on.
The base of the pots and pans may have edges and ridges which leave
scratches when moved, particularly for cast iron cookware.
Scratches can occur for instance, if grains of sand left over from cleaning
vegetables are dragged over the surface of the hob.
Prevent the following from coming into contact with the hot surface:
– Plastic
– Aluminium foil
– Sugar or substances with a high sugar content.
Prevent food residues from burning on repeatedly.
To achieve the best results with the hob, observe the following basic rules
when cooking and preparing meals:
The cooking zones heat up very quickly, but cool down slowly. Turn the
control knob to the required position straight away.
Use high quality pots and pans with even bases to ensure full contact with
the cooking zone.
The better the contact between the cooking zone and the pot or pan, the
better the efficiency.
Pots and pans made from stainless steel and cast iron are the most suit-
able. Aluminium pans are not recommended for the maximum temperature setting.
Make sure that the pot or pan is the same size as the cooking zone or
slightly larger.
14
Page 15
EN
CC09, CCK09, CC11 Using the hob
If you use a pot or pan that is too small, part of the cooking zone is
exposed, which could result in your clothing catching fire.
Make sure that the base of the pot or pan is dry.
Turn the handles inwards, to prevent the risk of burns, flammable material
from igniting and spillage from occurring due to accidently knocking the
pot or pan. Make sure that it does not protrude onto the adjacent cooking
zone.
Checking before switching on
Check the following before you switch on the hob:
Is the correct type of gas connected? The device is only permitted for liq-
uid gas.
Are the air inlet and outlets unobstructed in the room or on the outside of
the vehicle? The openings ensure a supply of fresh air and that the flue
gas is discharged.
Is the hob surface clean? Dirt could catch fire and damage or blemish the
surface.
Is the shut-off valve for the gas cylinder open?
15
Page 16
EN
Using the hob CC09, CCK09, CC11
Switching on the cooking zone
➤ Put the control knob to the neutral position.
➤ Press the control knob in, hold it down and turn it anti-clockwise to the
“large flame” position.
➤ Keep the control knob pressed down for not more than 15 seconds until it
is ignited and the thermoelectric safety pilot has responded.
➤ Release the control knob.
✓ The burner is on.
✓ The status LED
✓ The warning LED
➤ If the burner goes out after releasing the control knob,
wait at least 60 seconds before you ignite it again.
NOTE
When using for the first time or after changing a gas cylinder, the
I
Adjusting the temperature
➤ Adjust the temperature with the control knob to between the “large flame”
and “small flame”.
Switching off the cooking zone
➤ Turn the control knob to the neutral position.
burner might not ignite after 15 seconds due to a lack of air in the
gas pipe.
In this case, ignite it again.
lights up.
lights up.
✓ The status LED
✓ The warning LED
The warning LED switches off when the surface has cooled down and can
be safely touched again (this takes about 12 minutes once the cooking
zone has been switched off).
➤ Close the shut-off valve on the gas cylinder if it will be out of operation for
a long time.
16
is off.
stays lit.
Page 17
EN
CC09, CCK09, CC11 Troubleshooting
8.1 Replacing the gas cylinder
WARNING! Beware of injury
Only change the gas cylinder in well-ventilated areas.
!
➤ Switch off the hob by turning the control knob clockwise to the neutral po-
sition.
➤ Completely close the valve on the gas cylinder.
➤ Unscrew the pressure regulator from the gas cylinder.
➤ Check the condition of the hose line.
Replace the hose line if the material is brittle or porous.
➤ Screw the pressure regulator firmly onto the new gas cylinder by hand.
Make sure that there are no ignition sources in the vicinity.
Only change the gas cylinder when the device is switched off.
9 Troubleshooting
Repairs to the gas supply parts on the device may only be carried out by a
qualified technician.
➤ Shut off the gas supply immediately if a fault occurs.
➤ Check again for any damage to the device.
➤ Replace the damaged parts.
➤ Only use the device again once all the faults have been rectified.
Before you contact customer services about problems with the hob, check:
The connection to the on-board supply is OK.
The controller is switched on and the temperature setting is correct.
The base of the pot or pan and the hob surface are all clean and dry.
The pot or pan is the correct size and positioned on the cooking zone
properly.
The base of the pot or pan is level and even.
17
Page 18
EN
Cleaning the hob CC09, CCK09, CC11
10 Cleaning the hob
For safety reasons, it is necessary to have the device inspected before using
for the first time and then every two years by a specialist to check it functions
properly and to correct any faults.
➤ While checking the device every year, pay particular attention to the fol-
lowing:
–Gas leaks
– Burning and flame stability
– Fresh air supply
– Safety and regulating devices (burner taps, pressure regulator)
➤ Check that the installation location conforms to local regulations.
11 Cleaning and maintaining the hob
CAUTION! Beware of injury
!
A
➤ Before using for the first time, clean the glass ceramic surface thoroughly
(see the following chapter).
Make sure that the surface has cooled down and the warning
LED
Be careful when removing any spilt cooking residues with a wet
sponge or cloth, to avoid scalding from steam.
NOTICE!
Do not use scouring agents for cleaning the hob's glass ceramic
surface.
Only use special cleaning agents for glass ceramic hobs. Any
other cleaning agents will damage the surface or in some circumstances create poisonous fumes if they are applied to a hot
surface.
Do not use a steam cleaner.
is off.
18
Page 19
EN
CC09, CCK09, CC11 Cleaning and maintaining the hob
11.1 Regular cleaning
➤ Put a small amount of cleaning agent into the middle of the surface to be
cleaned.
➤ Dampen a paper towel and rub the cleaning agent into the surface.
➤ Wipe the surface with a clean, dry paper towel.
✓ Now there is a protective film on the surface which is resistant to water
and dirt.
11.2 Removing spilt cooking residues
➤ If cooking residues get spilt while cooking, switch off the cooking zone and
wipe the area around it with a dry paper towel.
Treat spilt cooking residues on the cooking zones in the same way as for
burnt on cooking residues (see chapter “Burned on, spilt cooking residue” on page 19).
Removing melted substances or spilt cooking residues with high
sugar content (jam, ketchup, tomato sauce etc.)
➤ Remove the spilt substance straight away using a scraper while the sur-
face is still hot: Move the spilt or melted substance to a cool part of the
hob surface.
➤ Switch off the cooking zones.
➤ Leave the hob to cool down (warning LED
➤ Clean the surfaces according to chapter “Regular cleaning” on page 19.
must be off).
11.3 Burned on, spilt cooking residue
➤ Remove the burnt substance with a scraper. Keep the scraper at an angle
of approx. 30° to the surface and scrape off the substance.
➤ Finish cleaning, see chapter “Regular cleaning” on page 19.
19
Page 20

EN
Warranty CC09, CCK09, CC11
11.4 Removing metal traces
Metal traces might appear on the hob surface, especially if you use lightweight pots and pans. These traces appear more often than scratches.
➤ Remove the metal traces according to chapter “Removing spilt cooking
residues” on page 19.
➤ For stubborn traces, use a cleaning agent with the scraper.
12 Warranty
The statutory warranty period applies. If the product is defective, please
contact the manufacturer's branch in your country (see the back of the
instruction manual for the addresses) or your retailer.
For repair and guarantee processing, please include the following documents when you send in the device:
A copy of the receipt with purchasing date
A reason for the claim or description of the fault
13 Disposal
➤ Place the packaging material in the appropriate recycling waste bins
wherever possible.
If you wish to finally dispose of the product, ask your local recycling
centre or specialist dealer for details about how to do this in
M
accordance with the applicable disposal regulations.
20
Page 21
EN
CC09, CCK09, CC11 Technical data
14 Technical data
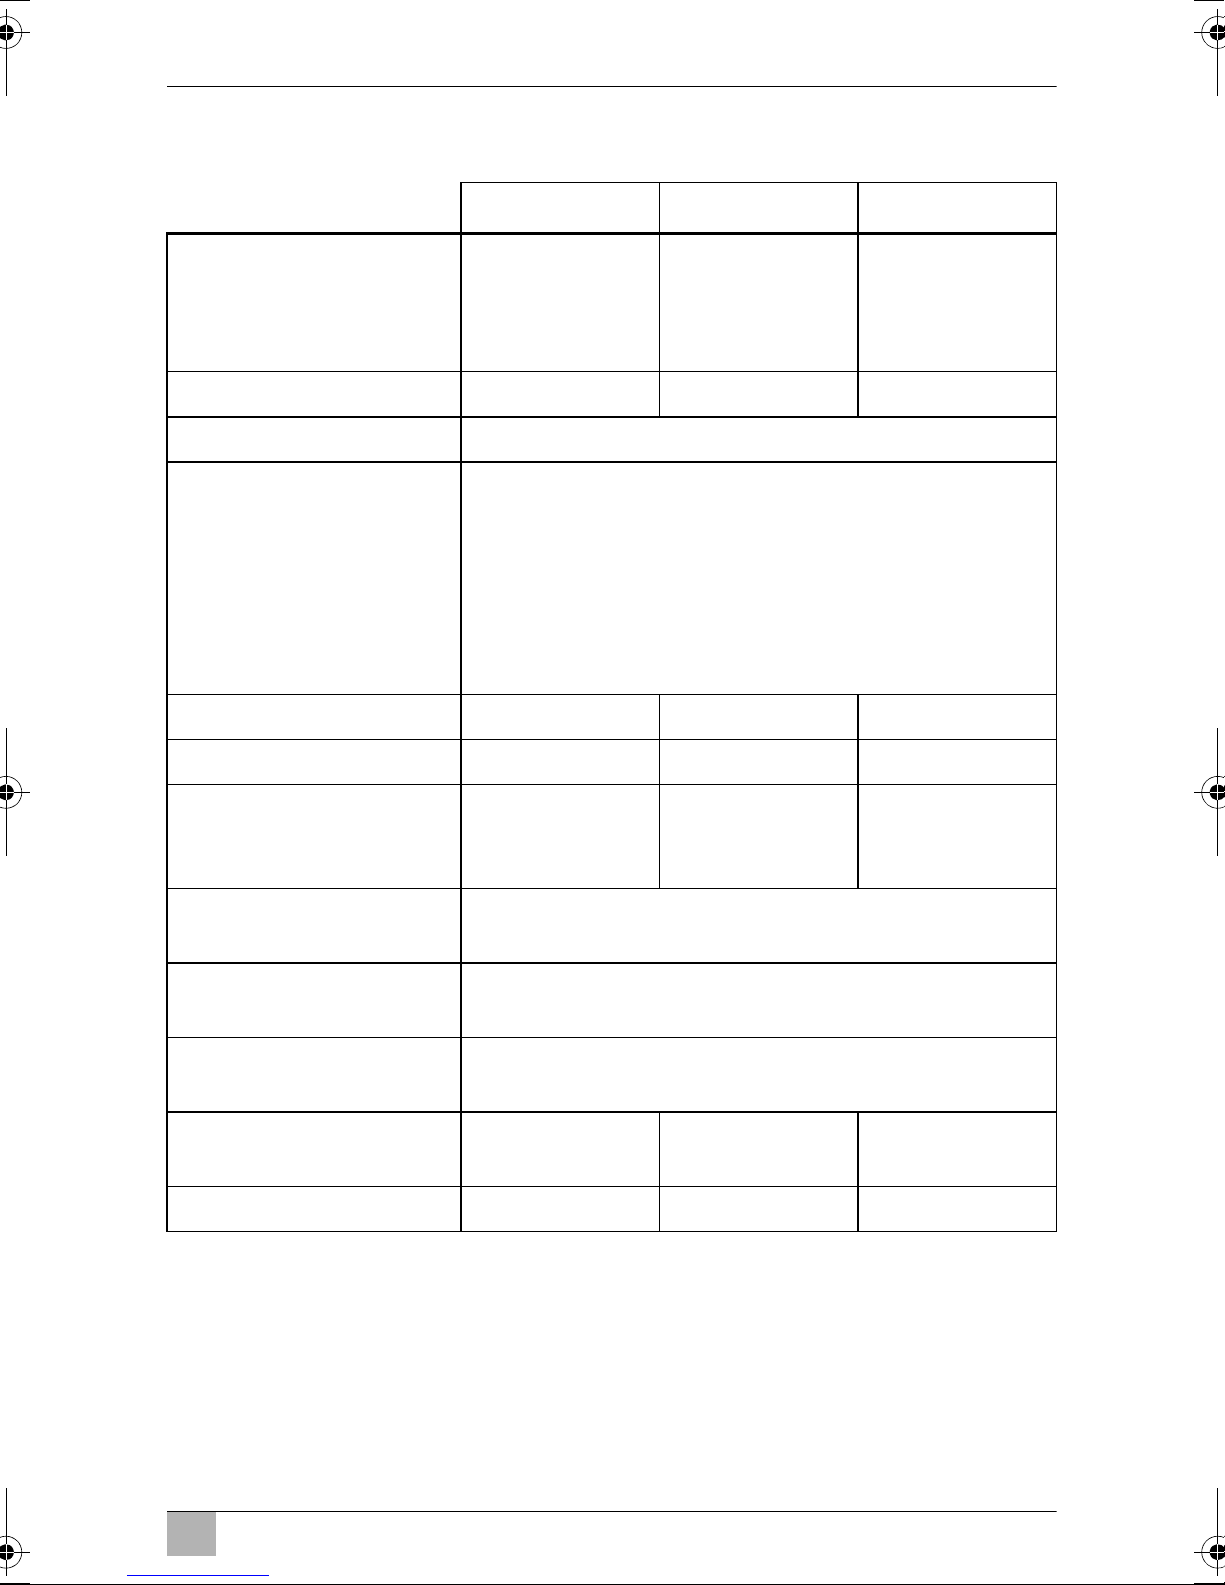
Dometic CCK09 Dometic CC09 Dometic CC11
9103303387 9103303386 9103303390
Item no.:
Gas consumption: 115 g/h 210 g/h 210 g/h
Device class: I
AT, DE, LV, MT, PL: 30 mbar (
CY, DK, EE, FI, HU, IS, NL, NO, RO, SE, SK:
Connection pressure /
Gas category:
28 – 30 mbar (I
SI: 28 – 30 mbar (
BE, CH, CZ, ES, FR, GB, GR, IE, IT, LT, LU, PT, TR:
28 – 30/37 mbar (I3+)
3B/P
I
)
3P
(black)
9103303391
(white)
I
)
3B/P
)
Number of cooking zones: 2 4 4
Number of burners: 1 2 2
1600 W 2900 W
Nominal heat input:
Cooking time for 1 litre of
water:
Voltage
(for ignition):
Current:
Dimensions in mm
(W x H x D):
Weight: 6.0 kg 10.8 kg 11.0 kg
(depending on the ambient conditions and pot used)
398 x 110 x 505 558 x 110 x 505 566 x 110 x 445
(1300 W +
1600 W)
Approx. 7.5 min.
12 Vg
While igniting: 0.6 A
In operation: 0.3 A
2900 W
(1300 W +
1600 W)
Variations, technical improvements and delivery options reserved.
21
Page 22

DE
Hinweise zum Benutzen der Anleitung CC09, CCK09, CC11
Bitte lesen Sie diese Anleitung vor dem Einbau und der Inbetriebnahme
sorgfältig durch und bewahren Sie sie auf. Geben Sie sie im Falle einer
Weitergabe des Geräts an den Nutzer weiter.
Inhalt
1 Hinweise zum Benutzen der Anleitung . . . . . . . . . . . . . . . . . . . . . . 22
2 Allgemeine Sicherheitshinweise . . . . . . . . . . . . . . . . . . . . . . . . . . . 23
3 Lieferumfang . . . . . . . . . . . . . . . . . . . . . . . . . . . . . . . . . . . . . . . . . . 27
4 Bestimmungsgemäßer Gebrauch . . . . . . . . . . . . . . . . . . . . . . . . . . 27
5 Technische Beschreibung . . . . . . . . . . . . . . . . . . . . . . . . . . . . . . . . 27
6 Kochfeld einbauen . . . . . . . . . . . . . . . . . . . . . . . . . . . . . . . . . . . . . . 28
7 Kochfeld elektrisch anschließen . . . . . . . . . . . . . . . . . . . . . . . . . . . 31
8 Kochfeld benutzen . . . . . . . . . . . . . . . . . . . . . . . . . . . . . . . . . . . . . . 32
9 Fehlerbehebung. . . . . . . . . . . . . . . . . . . . . . . . . . . . . . . . . . . . . . . . 35
10 Kochfeld warten . . . . . . . . . . . . . . . . . . . . . . . . . . . . . . . . . . . . . . . . 36
11 Kochfeld reinigen und pflegen . . . . . . . . . . . . . . . . . . . . . . . . . . . . . 36
12 Garantie . . . . . . . . . . . . . . . . . . . . . . . . . . . . . . . . . . . . . . . . . . . . . . 38
13 Entsorgung. . . . . . . . . . . . . . . . . . . . . . . . . . . . . . . . . . . . . . . . . . . . 38
14 Technische Daten . . . . . . . . . . . . . . . . . . . . . . . . . . . . . . . . . . . . . . 39
1 Hinweise zum Benutzen der Anleitung
WARNUNG!
Sicherheitshinweis: Nichtbeachtung kann zu Tod oder schwerer
!
Verletzung führen.
VORSICHT!
Sicherheitshinweis: Nichtbeachtung kann zu Verletzungen
!
führen.
22
Page 23

DE
CC09, CCK09, CC11 Allgemeine Sicherheitshinweise
ACHTUNG!
Nichtbeachtung kann zu Materialschäden führen und die Funktion
A
des Produktes beeinträchtigen.
HINWEIS
Ergänzende Informationen zur Bedienung des Produktes.
I
➤ Handlung: Dieses Symbol zeigt Ihnen, dass Sie etwas tun müssen. Die
erforderlichen Handlungen werden Schritt für Schritt beschrieben.
✓ Dieses Symbol beschreibt das Ergebnis einer Handlung.
Abb. 1 5, Seite 3: Diese Angabe weist Sie auf ein Element in einer Abbildung hin, in diesem Beispiel auf „Position 5 in Abbildung 1 auf Seite 3“.
Beachten Sie bitte auch die nachfolgenden Sicherheitshinweise.
2 Allgemeine Sicherheitshinweise
Der Hersteller übernimmt keine Haftung für Schäden aufgrund folgender
Punkte:
Beschädigungen am Produkt durch mechanische Einflüsse
Veränderungen am Produkt ohne ausdrückliche Genehmigung vom
Hersteller
Verwendung für andere als die in der Anleitung beschriebenen Zwecke
Beachten Sie bitte die folgenden grundsätzlichen Sicherheitsmaßnahmen
beim Gebrauch von elektrischen Geräten zum Schutz vor:
elektrischem Schlag
Brandgefahr
Verletzungen
23
Page 24

DE
Allgemeine Sicherheitshinweise CC09, CCK09, CC11
2.1 Grundlegende Sicherheit
!
Verwenden Sie ausschließlich Flüssiggas der Kategorien I
I
, I3 (Butan/Propan). Verwenden Sie keine anderen Brenn-
3+
stoffe.
Bringen Sie einen geeigneten Feuerlöscher in Reichweite an.
Sorgen Sie dafür, dass der Feuerlöscher in regelmäßigen
Abständen von einem Fachmann überprüft wird.
Personen, die aufgrund ihrer physischen, sensorischen oder
geistigen Fähigkeiten nicht in der Lage sind, das Gerät sicher zu
benutzen, dürfen es nur unter Aufsicht eines verantwortungsbewussten Erwachsenen anwenden.
Berühren Sie nicht die Kochzonen oder den Bereich in deren
Nähe.
Die Oberflächen der Kochzonen können heiß sein, auch wenn
sie dunkel sind. Die Bereiche in der Nähe der Kochzonen können so heiß werden, dass sie Verbrennungen verursachen.
Wenn die Oberfläche des Kochfelds gesprungen ist, können
Reinigungslösungen und überlaufende Flüssigkeiten in das
Gerät eindringen, was zur Gefahr eines elektrischen Schlags
führt. Schalten Sie das Gerät in diesem Fall sofort ab.
3B/P
,
A
Unterbrechen Sie bei Arbeiten am Gerät immer die
Stromversorgung.
Wartungs- und Reparaturarbeiten dürfen nur von einer
Fachkraft ausgeführt werden, die mit den damit verbundenen
Gefahren und den einschlägigen Vorschriften vertraut ist.
Benutzen Sie das Gerät nur entsprechend seiner Bestimmung.
Nehmen Sie keine Änderungen am Gerät vor.
Schalten Sie das Gerät bei Nichtbenutzung ab.
Benutzen Sie das Gerät nicht, wenn es beschädigt ist oder Teile
davon defekt sind.
24
Page 25

DE
CC09, CCK09, CC11 Allgemeine Sicherheitshinweise
2.2 Sicherheit beim Umgang mit Flüssiggas
Halten Sie brennbare Stoffe von Heiz- und Kochgeräten sowie
anderen Licht- und Wärmequellen fern.
!
Erstickungsgefahr!
Sorgen Sie vor dem Einschalten des Geräts dafür, dass der
Bereich ausreichend belüftet ist. Während des Betriebs müssen
Lüftungsöffnungen mit einem freien Querschnitt von mindestens 50 cm
nungen können verschließbar sein, müssen aber bei Betrieb
der Brennstelle geöffnet werden (siehe Hinweisschild, angebracht über dem Kochfeld).
Vergleichen Sie die Druckangabe auf dem Typenschild mit der
Druckangabe auf dem Druckregler.
Bewahren Sie Flüssiggasflaschen niemals an unbelüfteten
Orten auf.
2
im Aufstellungsraum vorhanden sein. Diese Öff-
Schützen Sie Flüssiggasflaschen vor direkter Sonneneinstrah-
lung. Die Temperatur darf 50 °C nicht überschreiten.
Wenn Sie Gasgeruch wahrnehmen:
– Öffnen Sie alle Fenster und verlassen Sie den Raum.
– Betätigen Sie keine elektrische Einrichtung und vermeiden
Sie die Benutzung offener Flammen, die das Gas entzünden
können.
– Schließen Sie das Gasflaschenventil und lassen Sie es ge-
schlossen, bis der Fehler behoben wurde.
– Versuchen Sie niemals das Leck mit einer offenen Flamme
zu finden.
Das Kochfeld darf beim Tanken und in Garagen und auf Fähren
nicht betrieben werden.
2.3 Sicherheit beim Betrieb des Geräts
Tragen Sie beim Benutzen des Kochfelds entsprechende
Kleidung.
!
Tragen Sie keine lose hängenden Kleidungsstücke, die Feuer
fangen könnten.
Lassen Sie das Kochfeld bis auf die Umgebungstemperatur ab-
kühlen, bevor Sie es mit den bloßen Händen berühren.
25
Page 26

DE
Allgemeine Sicherheitshinweise CC09, CCK09, CC11
Halten Sie den Bereich um das Kochfeld frei von Fett, alkoholi-
schen Substanzen, Plastikmaterial und brennbarem Stoff (z. B.
Vorhänge, Handtücher, Küchenmaterialien).
Hängen Sie keine Handtücher, Papier, Vorhänge oder anderen
brennbaren Materialien in die Nähe des Kochfelds und legen
Sie sie nicht dort ab.
Gehen Sie vorsichtig vor, wenn Sie Fett oder Öl erhitzen. Fett
und Öl können sich bei zu großer Hitze entzünden.
Versuchen Sie nicht, brennendes Fett mit Wasser zu löschen.
Benutzen Sie nur trockene Topflappen und Holzlöffel, um die
Dampfbildung zu vermeiden. Nasse oder feuchte Topflappen
auf heißen Oberflächen können Verbrennungen durch Dampf
verursachen.
Betreiben Sie das Kochfeld niemals unbeaufsichtigt. Über-
kochende Töpfe können Rauch und Brände verursachen.
Schalten Sie die Kochzone ab, bevor Sie den Topf herunter-
nehmen.
A
Um die Gefahr von Verbrennungen, das Entzünden brennbarer
Materialien und das Verschütten des Kochguts durch das versehentliche Anstoßen von Töpfen u. ä. zu vermeiden, richten
Sie deren Griffe nach innen. Achten Sie darauf, dass sie nicht
in benachbarte Kochzonen hineinragen.
Benutzen Sie das Kochfeld nicht zum Heizen des Raums.
Das Betreiben des Kochfelds mit hoher Temperatur ohne einen
gefüllten Topf kann das Kochfeld beschädigen.
Stellen oder legen Sie keine Plastikgegenstände, wie Salz- und
Pfefferstreuer, Verpackungen u. ä. während des Betriebs auf
das Kochfeld.
Achten Sie darauf, dass sich keine Topflappen an oder auf der
Kochzone befinden.
Benutzen Sie Töpfe, Pfannen und andere Geräte, die für Kera-
mikflächen und die Nennleistung des Kochfelds ausgelegt sind.
Nur bestimmte Arten von Glas, Glaskeramik, Steingut oder
anderen glasierten Geräten können den raschen Temperaturänderungen standhalten und sind damit für Herde geeignet.
Benutzen Sie Töpfe und Pfannen der richtigen Größe.
26
Page 27

DE
CC09, CCK09, CC11 Lieferumfang
3Lieferumfang
Gas-Glaskeramik-Kochfeld
Bedienungsanleitung
4 Bestimmungsgemäßer Gebrauch
Dometic CC09, CCK09 und CC11 sind mit Flüssiggas betriebene Glaskeramik-Kochfelder. Sie sind für den Einbau in einen Küchenblock in
Haushalten, Wohnmobilen, Caravans oder Booten bestimmt.
5 Technische Beschreibung
Das Kochfeld ist in verschiedenen Ausführungen erhältlich.
CC09 (Art.-Nr. 9103303386): zwei Kochzonen
CCK09 (Art.-Nr. 9103303387): eine Kochzone
CC11 (Art.-Nr. 9103303390/9103303391): zwei Kochzonen
Ihren Gerätetyp können Sie anhand der Artikelnummer ermitteln, die auf
dem Typenschild angegeben ist.
Die Kochzonen werden durch jeweils einen Gasbrenner beheizt.
Hinter der Kochzone (Abb. 1 1, Seite 2) befindet sich eine Fortkochzone
(Abb. 1 2), die durch die Abgase des Brenners unter der Kochzone beheizt
wird. Dadurch ist die Temperatur nicht so hoch wie in der Kochzone. Die
Fortkochzone kann für einen zweiten Kochtopf genutzt werden, für den
weniger hohe Temperaturen benötigt werden.
Nur CC09, CC11: Die rechte, kleinere Kochzone hat eine geringere Heizleistung.
Die Glaskeramik-Kochfläche ist hitze- und kältebeständig. Sie kann mit
schweren Töpfen belastet werden. Punktförmige Schockbelastungen, z. B.
durch fallende Gegenstände, müssen vermieden werden. Dies kann zu
Beschädigungen führen.
27
Page 28
DE
Kochfeld einbauen CC09, CCK09, CC11
Bedienelemente
Nr. in Abb. 1,
Seite 2
1 Kochzone
2 Fortkochzone
3 Warn-LED „Heiße Oberfläche“
4 Kontroll-LED
5 Regler, in drei Positionen einstellbar (Nullstellung, große
Beschreibung
Diese LED leuchtet rot, wenn die Kochzone eingeschaltet ist.
Sie leuchtet weiter, bis die Oberfläche abgekühlt ist und
gefahrlos berührt werden kann (dies dauert etwa 12 Minuten
nach dem Abschalten der Kochzone).
Die LED leuchtet grün, wenn die Kochzone eingeschaltet ist.
Flamme, kleine Flamme)
Drücken und im oder entgegen dem Uhrzeigersinn drehen, um
die gewünschte Temperatur einzustellen.
Drehen gegen den Uhrzeigersinn öffnet den Gashahn.
Drehen im Uhrzeigersinn zum Anschlag schließt den Gashahn.
Nur CC09, CC11: Der vordere Regler ist dem rechten Kochfeld zugeordnet,
der hintere Regler dem linken Kochfeld.
6 Kochfeld einbauen
Sie können das Kochfeld in die Arbeitsplatte Ihrer Küche einbauen.
6.1 Wahl des Einbauorts
Beachten Sie bei der Wahl des Einbauorts folgende Hinweise:
Wählen Sie einen gut belüfteten Ort für das Gerät aus.
Wählen Sie einen überdachten Ort, um zu vermeiden, dass Wasser oder
andere Flüssigkeiten direkt auf den Kocher spritzen.
Achten Sie auf die Mindestabstände gemäß Abb. 2, Seite 2.
Zur Brennluftzufuhr und Wärmeabfuhr müssen unterhalb des Kochfelds
Lüftungsöffnungen mit einem freien Querschnitt von mindestens 50 cm²
vorhanden sein.
Die Lüftungsöffnungen müssen mindestens 5 mm breit sein.
28
Page 29
DE
CC09, CCK09, CC11 Kochfeld einbauen
Achten Sie darauf, dass am Montageort kein Durchzug entsteht.
Wenn Sie das Kochfeld in ein offenes Cockpit oder andere offene Stellen
einbauen, montieren Sie zusätzlich einen Windschutz.
Betreiben Sie das Gerät nicht in explosionsgefährdeten Räumen.
6.2 Einbau des Kochfelds
ACHTUNG! Beschädigungsgefahr!
A
➤ Sägen Sie eine rechteckige Öffnung in die Arbeitsplatte (Abmessungen
siehe Abb. 3, Seite 2).
➤ Setzen Sie das Kochfeld in die Mitte des Ausschnitts.
➤ Befestigen Sie das Kochfeld (2) mit den vier Befestigungselementen (3)
und Schrauben (4) an der Arbeitsplatte (1), siehe Abb. 4, Seite 3.
➤ Bringen Sie einen Feuerlöscher der Klasse B-1 in Reichweite an.
Bevor Sie irgendwelche Bohrungen vornehmen, stellen Sie si-
cher, dass keine elektrischen Kabel oder andere Teile des Fahrzeugs durch Bohren, Sägen und Feilen beschädigt werden.
Verwenden Sie zur Befestigung des Kochfelds nicht die Gas-
leitungen, Hähne oder Teile des Brenners.
6.3 Kochfeld an die Gasversorgung anschließen
WARNUNG! Verletzungsgefahr!
!
Beachten Sie beim Anschluss folgende Hinweise:
Verwenden Sie eine Gasleitung aus Stahlrohr ∅ 8 x 1 mm (geschweißt,
nahtloser Stahl oder nichtrostender Stahl), die Sie mittels Schneidringverschraubung dicht montieren.
Befestigen Sie die Rohre so an einer Seiten- oder Rückwand der
umgebenden Möbelteile, dass keine Kraftübertragung auf die Stellglieder
erfolgt.
Verwenden Sie nur Propan- oder Butangasflaschen mit geprüf-
tem Druckregler und passendem Anschluss.
Vergleichen Sie die Druckangabe auf dem Typenschild mit der
Druckangabe auf dem Druckregler.
Das Gerät darf nur von dafür zugelassenem Fachpersonal an
die Gasversorgung angeschlossen werden.
29
Page 30
DE
Kochfeld einbauen CC09, CCK09, CC11
Die Verbindung darf nur mit Werkzeug lösbar sein. Beachten Sie dabei
die technischen Regeln der DVGW-Arbeitsblätter G607 und G608.
Die gesamte Verrohrung muss spannungsfrei sein.
Halten Sie die Länge der Schlauchverbindung zwischen dem Gasgerät
und der Flüssiggasversorgungsanlage so kurz wie möglich und nicht
länger als 750 mm.
Die Schlauchverbindung muss über ihre gesamte Länge zur Überprüfung
zugänglich sein.
Während des Betriebs müssen Lüftungsöffnungen mit einem freien Quer-
schnitt von mindestens 50 cm
Diese Öffnungen können verschließbar sein, müssen aber bei Betrieb der
Brennstelle geöffnet werden.
➤ Verbinden Sie das Kochfeld mit der Gasversorgung.
➤ Bringen Sie über dem Kochfeld ein Hinweisschild mit folgendem Text an:
2
im Aufstellungsraum vorhanden sein.
„WARNUNG!
Beim Kochen ist es erforderlich, für zusätzliche Lüftung zu sorgen, z. B.
durch das Öffnen von Fenstern in der Nähe des Grill-, Koch-, und Backgerätes.
Diese Geräte dürfen nicht zur Raumheizung verwendet werden.“
➤ Achten Sie darauf, dass die Schlauchleitung
– nicht eingeklemmt oder abgeknickt wurde,
– in sicherem Abstand vom Brenner liegt.
➤ Öffnen Sie das Ventil der Gasflasche.
WARNUNG! Verletzungsgefahr!
Prüfen Sie die Dichtheit niemals bei offener Flamme oder in der
!
➤ Prüfen Sie alle Verbindungen mit Lecksuchspray auf Dichtheit.
Die Dichtheit ist gewährleistet, wenn sich keine Bläschen bilden.
Nähe von Zündquellen.
30
Page 31

DE
CC09, CCK09, CC11 Kochfeld elektrisch anschließen
7 Kochfeld elektrisch anschließen
WARNUNG! Verletzungsgefahr!
Der Anschluss des Kochers darf nur von einem Fachmann
!
Beachten Sie beim elektrischen Anschluss folgende Sicherheitshinweise:
ausgeführt werden.
Die nachfolgenden Informationen richten sich an Fachkräfte, die
mit den entsprechenden Richtlinien und Sicherheitsvorkehrungen
vertraut sind.
ACHTUNG!
A
➤ Vergewissern Sie sich anhand des Typenschildes des Kochfelds, dass
die Betriebsspannung des Geräts mit der Bordnetzspannung übereinstimmt.
➤ Schließen Sie das Gerät gemäß Abb. 5, Seite 3 an das 12-V
an.
Verwenden Sie ein zweiadriges Kabel mit Flachsteckhülsen
6,3x0,8mm (1).
Wenn Sie Leitungen durch Metall- oder andere scharfkantige
Wände führen müssen, verwenden Sie Kanäle oder Durchführungen.
Verlegen Sie Leitungen nicht lose oder abgeknickt an elektrisch
leitenden Materialien (Metall).
Befestigen Sie die Leitungen sicher.
Ziehen Sie nicht an den Leitungen.
Verlegen Sie die Leitungen so, dass keine Stolpergefahr ent-
steht und eine Beschädigung des Kabels ausgeschlossen ist.
g-Bordnetz
Der Stromkreis muss mit einer 5-A-Schmelzsicherung (nicht im Lieferumfang enthalten) abgesichert sein.
➤ Sichern Sie das Kabel mit einer Schelle.
31
Page 32

DE
Kochfeld benutzen CC09, CCK09, CC11
8 Kochfeld benutzen
VORSICHT! Verletzungsgefahr!
Die Kochzone bleibt auch nach dem Abschalten für einige Zeit
!
A
Tips zum Umgang mit dem Kochfeld
Damit die Glaskeramik-Oberfläche nicht beschädigt wird, beachten Sie
folgendes:
heiß. Die Warn-LED zeigt dies an.
Legen Sie keine Gegenstände auf dem Kochfeld ab, die beschädigt oder heiß werden könnten, bis die Oberfläche abgekühlt ist.
ACHTUNG!
Sorgen Sie vor dem Einschalten des Kochfeld dafür, dass sich
keine brennbaren Stoffe auf der Kochzone befinden.
Verwenden Sie das Kochfeld nicht als Abstellfläche.
Topf- und Pfannenböden können Ränder und Grate haben, die beim
Verschieben Spuren oder Kratzer hinterlassen. Dies gilt besonders für
Kochgeschirr aus Gusseisen.
Kratzer können auch entstehen, wenn z. B. Sandkörner vom vorange-
gangenen Gemüseputzen mit dem Topf über die Kochfläche gezogen
werden.
Vermeiden Sie, folgendes auf die heiße Oberfläche gelangen zu lassen:
– Kunststoffe
– Alufolie
– Zucker oder stark zuckerhaltige Stoffe.
Vermeiden Sie ein wiederholtes Festbrennen von Verschmutzungen.
Um die besten Resultate mit dem Kochfeld zu erzielen, beachten Sie beim
Kochen und der Zubereitung von Mahlzeiten die folgenden Grundregeln:
Die Kochzonen heizen sich sehr rasch auf, kühlen sich aber langsam ab.
Stellen Sie den Regler sofort auf die gewünschte Temperatur.
Benutzen Sie hochwertige Töpfe und Pfannen mit ebenen Böden, um den
vollständigen Kontakt mit der Kochzone zu gewährleisten.
Der gute Kontakt des Topfes bzw. der Pfanne mit der Kochzone
verbessert die Effizienz.
32
Page 33

DE
CC09, CCK09, CC11 Kochfeld benutzen
Am besten eignen sich Töpfe und Pfannen aus Edelstahl und Gusseisen.
Aluminiumpfannen werden für die maximale Temperatureinstellung nicht
empfohlen.
Achten Sie darauf, dass der Topf bzw. die Pfanne so groß wie die Koch-
zone oder etwas größer ist.
Wird ein zu kleiner Topf bzw. eine zu kleine Pfanne benutzt, liegt ein Teil
der Kochzone frei, was zur Entzündung von Kleidungsstücken führen
kann.
Achten Sie darauf, dass der Boden des Topfes bzw. der Pfanne trocken
ist.
Um die Gefahr von Verbrennungen, das Entzünden brennbarer Materia-
lien und das Verschütten des Kochguts durch das versehentliche
Anstoßen des Topfes bzw. der Pfanne zu vermeiden, richten Sie deren
Griff nach innen. Achten Sie darauf, dass er nicht in die benachbarten
Kochzonen hineinragt.
Vor dem Einschalten prüfen
Prüfen Sie vor dem Einschalten des Kochfelds:
Ist die richtige Gassorte angeschlossen? Das Gerät ist nur für Flüssiggas
zugelassen.
Sind die Zu- und Abluftöffnungen im Raum oder an der Außenseite des
Fahrzeugs frei? Die Öffnungen sichern die Frischluftzufuhr und Abgasabfuhr.
Ist die Oberfläche des Glaskeramik-Kochfelds frei von
Verunreinigungen? Verunreinigungen können einbrennen und dadurch
die Oberfläche beschädigen oder verunstalten.
Ist das Absperrventil der Gasflasche geöffnet?
33
Page 34

DE
Kochfeld benutzen CC09, CCK09, CC11
Kochzone einschalten
➤ Bringen Sie den Regler in die Nullstellung.
➤ Drücken Sie den Regler ein, halten Sie ihn gedrückt und drehen Sie ihn
gegen den Uhrzeigersinn in die Position „Große Flamme“.
➤ Halten Sie den Regler für maximal 15 Sekunden gedrückt, bis der Zünd-
vorgang beendet ist und die thermoelektrische Zündsicherung angesprochen hat.
➤ Lassen Sie den Regler los.
✓ Der Brenner brennt.
✓ Die Kontroll-LED
✓ Die Warn-LED
➤ Wenn der Brenner nach dem Loslassen des Reglers ausgeht:
Warten Sie mindestens 60 Sekunden, bevor Sie den Zündvorgang
wiederholen.
HINWEIS
Beim ersten in Betrieb Nehmen oder nach einem Flaschenwechsel
I
Temperatur regeln
➤ Regeln Sie mit dem Regler die Temperatur im Bereich zwischen den
Stellungen „Große Flamme“ und „Kleine Flamme“.
Kochzone abschalten
kann es vorkommen, dass der Brenner nach 15 Sekunden noch
nicht brennt, da sich noch Luft in der Gasleitung befindet.
Wiederholen Sie in diesem Fall den Zündvorgang erneut.
leuchtet.
leuchtet.
➤ Stellen Sie den Regler in die Nullstellung.
✓ Die Kontroll-LED
✓ Die Warn-LED
Die Warn-LED wird ausgeschaltet, wenn die Oberfläche abgekühlt ist und
gefahrlos berührt werden kann (dies dauert etwa 12 Minuten nach dem
Abschalten der Kochzone).
➤ Schließen Sie bei längerer Betriebsunterbrechung das Absperrventil der
Gasflasche.
34
ist aus.
leuchtet weiter.
Page 35

DE
CC09, CCK09, CC11 Fehlerbehebung
8.1 Gasflasche auswechseln
WARNUNG! Verletzungsgefahr!
Wechseln Sie die Gasflasche nur bei guter Belüftung aus.
!
➤ Schalten Sie das Kochfeld aus, indem Sie den Regler im Uhrzeigersinn in
die Nullstellung drehen.
➤ Schließen Sie das Ventil der Gasflasche ganz.
➤ Schrauben Sie den Druckregler von der Gasflasche ab.
➤ Prüfen Sie den Zustand der Schlauchleitung.
Wechseln Sie die Schlauchleitung aus, falls das Material spröde oder
porös ist.
➤ Schrauben Sie den Druckregler von Hand auf der neuen Gasflasche fest.
Achten Sie darauf, dass keine Zündquelle in der Nähe ist.
Wechseln Sie die Gasflasche nur bei ausgeschaltetem Gerät.
9 Fehlerbehebung
Reparaturen am gasführenden Teil des Geräts dürfen nur Fachleute durchführen.
➤ Schließen Sie bei Störungen sofort die Gaszufuhr.
➤ Prüfen Sie nochmals, ob das Gerät unbeschädigt ist.
➤ Wechseln Sie beschädigte Teile aus.
➤ Nehmen Sie das Gerät erst wieder in Betrieb, wenn alle Störungen
beseitigt sind.
Bevor Sie sich bei Problemen mit dem Kochfeld an den Kundendienst
wenden, überprüfen Sie bitte Folgendes:
dass der Anschluss an das Bordnetz in Ordnung ist
dass der Regler eingeschaltet und die Temperatureinstellung korrekt ist
dass der Boden des Topfes bzw. der Pfanne und die Kochfeldoberfläche
sauber und trocken sind
dass der Topf bzw. die Pfanne die richtige Größe hat und richtig auf die
Kochzone gestellt ist
dass der Boden des Topfes bzw. der Pfanne eben und gleichmäßig ist
35
Page 36

DE
Kochfeld warten CC09, CCK09, CC11
10 Kochfeld warten
Aus Sicherheitsgründen ist es nötig, dass das Gerät vor der ersten Inbetriebnahme und danach alle zwei Jahre von einem Sachkundigen auf seine einwandfreie Funktion hin überprüft wird und eventuelle Mängel beseitigt
werden.
➤ Kontrollieren Sie bei der jährlichen Überprüfung des Gerätes
insbesondere folgende Funktionen:
– Prüfung der Gasdichtheit
– Prüfung der Brennsicherheit und Flammstabilität.
– Prüfung der Frischluftzufuhr.
– Prüfung der Sicherheits- und Regeleinrichtungen (Brennstellenhähne,
Druckregler).
➤ Kontrollieren Sie, ob der Aufstellungsraum mit den örtlich geltenden
Vorschriften übereinstimmt.
11 Kochfeld reinigen und pflegen
VORSICHT! Verletzungsgefahr!
!
A
Achten Sie darauf, dass die Oberfläche abgekühlt und die
Warn-LED
Wenn Sie verschüttetes Kochgut mit einem feuchten Schwamm
oder Tuch beseitigen, gehen Sie vorsichtig vor, um Verbrennungen durch Dampf zu vermeiden.
ACHTUNG!
Behandeln Sie die Glaskeramik-Oberfläche des Kochfelds nicht
mit Scheuermitteln.
Verwenden Sie ausschließlich spezielle Reinigungsmilch für
Glaskeramik-Oberflächen. Andere Reinigungsmittel beschädigen die Oberfläche oder erzeugen u. U. giftige Dämpfe, wenn
sie auf eine heiße Oberfläche aufgetragen werden.
Verwenden Sie keinen Dampfreiniger.
aus ist.
➤ Reinigen Sie vor dem ersten Gebrauch die Glaskeramik-Oberfläche
gründlich (siehe folgendes Kapitel).
36
Page 37

DE
CC09, CCK09, CC11 Kochfeld reinigen und pflegen
11.1 Regelmäßige Pflege
➤ Geben Sie ein wenig Reinigungsmilch auf die Mitte der zu reinigenden
Fläche.
➤ Feuchten Sie ein Papierhandtuch an und verreiben Sie die Reinigungs-
milch auf der Oberfläche.
➤ Wischen Sie die Fläche mit einem sauberen, trockenen Papierhandtuch
ab.
✓ Jetzt befindet auf der Oberfläche ein Schutzfilm, der wasser- und
schmutzabweisend ist.
11.2 Übergelaufenes Kochgut beseitigen
➤ Sollte Kochgut während des Kochens überlaufen, schalten Sie das Koch-
feld ab und wischen den Bereich um die Kochzone herum mit einem
sauberen Papierhandtuch ab.
Übergelaufenes Kochgut auf den Kochzonen ist wie eingebranntes übergelaufenes Kochgut zu behandeln (siehe Kapitel „Eingebranntes übergelaufenes Kochgut“ auf Seite 37).
Geschmolzene Substanzen oder übergelaufenes Kochgut mit hohem
Zuckergehalt (Konfitüre, Ketchup, Tomatensoße u. ä.) beseitigen
➤ Beseitigen Sie das übergelaufene Material sofort mit einem Schaber,
während die Oberfläche noch heiß ist: Schieben Sie das übergelaufene
bzw. geschmolzene Material von der Kochzone auf einen kühlen Bereich
der Kochfeldoberfläche.
➤ Schalten Sie die Kochzonen ab.
➤ Lassen Sie das Kochfeld abkühlen (Warn-LED
➤ Reinigen Sie die Oberfläche gemäß Kapitel „Regelmäßige Pflege“ auf
Seite 37.
muss aus sein).
11.3 Eingebranntes übergelaufenes Kochgut
➤ Entfernen Sie das eingebrannte Material mit einem Schaber. Halten Sie
den Schaber in einem Winkel von ca. 30° zur Oberfläche und schaben Sie
das Material ab.
➤ Schließen Sie die Reinigung ab; siehe Kapitel „Regelmäßige Pflege“ auf
Seite 37.
37
Page 38

DE
Garantie CC09, CCK09, CC11
11.4 Metallspuren entfernen
Es kann vorkommen, besonders wenn Sie leichtere Töpfe oder Pfannen
verwenden, dass Metallspuren auf der Kocheroberfläche auftreten. Diese
Spuren erscheinen häufig als Kratzer.
➤ Entfernen Sie die Metallspuren gemäß Kapitel „Übergelaufenes Kochgut
beseitigen“ auf Seite 37.
➤ Für sehr hartnäckige Spuren verwenden Sie Reinigungsmilch zusammen
mit einem Schaber.
12 Garantie
Es gilt die gesetzliche Gewährleistungsfrist. Sollte das Produkt defekt sein,
wenden Sie sich bitte an die Niederlassung des Herstellers in Ihrem Land
(Adressen siehe Rückseite der Anleitung) oder an Ihren Fachhändler.
Zur Reparatur- bzw. Gewährleistungsbearbeitung müssen Sie folgende
Unterlagen mitschicken:
eine Kopie der Rechnung mit Kaufdatum,
einen Reklamationsgrund oder eine Fehlerbeschreibung.
13 Entsorgung
➤ Geben Sie das Verpackungsmaterial möglichst in den entsprechenden
Recycling-Müll.
Wenn Sie das Produkt endgültig außer Betrieb nehmen, informieren Sie sich bitte beim nächsten Recyclingcenter oder bei
M
Ihrem Fachhändler über die zutreffenden Entsorgungsvorschriften.
38
Page 39

DE
CC09, CCK09, CC11 Technische Daten
14 Technische Daten
Dometic CCK09 Dometic CC09 Dometic CC11
9103303387 9103303386 9103303390
Art.- Nr.:
Gasverbrauch: 115 g/h 210 g/h 210 g/h
Geräteklasse: I
AT, DE, LV, MT, PL: 30 mbar (
CY, DK, EE, FI, HU, IS, NL, NO, RO, SE, SK:
Anschlussdruck /
Gaskategorie:
28 – 30 mbar (I
SI: 28 – 30 mbar (I3P)
BE, CH, CZ, ES, FR, GB, GR, IE, IT, LT, LU, PT, TR:
28–30/37mbar (I3+)
3B/P
(schwarz)
9103303391
(weiß)
I
)
3B/P
)
Anzahl der Kochstellen: 2 4 4
Anzahl der Brenner: 1 2 2
1600 W 2900 W
Nennwärmebelastung:
Kochzeit für 1 l Wasser:
Anschlussspannung
(für Zündung):
Stromaufnahme:
Abmessungen in mm
(B x H x T):
Gewicht: 6,0 kg 10,8 kg 11,0 kg
(abhängig von den Umgebungsbedingungen und dem
Während des Zündvorgangs: 0,6 A
398 x 110 x 505 558 x 110 x 505 566 x 110 x 445
(1300 W +
1600 W)
ca. 7,5 min
benutztem Topf)
12 Vg
Im Betrieb: 0,3 A
2900 W
(1300 W +
1600 W)
Abweichungen, dem technischen Fortschritt dienende Änderungen und
Liefermöglichkeiten vorbehalten.
39
Page 40

FR
Remarques relatives à l'utilisation de cette notice CC09, CCK09, CC11
Veuillez lire ce manuel avec attention avant le montage et la mise en
service, puis le conserver. En cas de revente de l'appareil, veuillez le remettre au nouvel acquéreur.
Contenu
1 Remarques relatives à l'utilisation de cette notice . . . . . . . . . . . . . . 40
2 Consignes générales de sécurité. . . . . . . . . . . . . . . . . . . . . . . . . . . 41
3 Contenu de la livraison . . . . . . . . . . . . . . . . . . . . . . . . . . . . . . . . . . 44
4 Usage conforme. . . . . . . . . . . . . . . . . . . . . . . . . . . . . . . . . . . . . . . . 45
5 Description technique . . . . . . . . . . . . . . . . . . . . . . . . . . . . . . . . . . . 45
6 Montage du plan de cuisson . . . . . . . . . . . . . . . . . . . . . . . . . . . . . . 47
7 Raccordement électrique du plan de cuisson . . . . . . . . . . . . . . . . . 49
8 Utilisation du plan de cuisson . . . . . . . . . . . . . . . . . . . . . . . . . . . . . 50
9 Résolution des pannes . . . . . . . . . . . . . . . . . . . . . . . . . . . . . . . . . . 53
10 Maintenance du plan de cuisson . . . . . . . . . . . . . . . . . . . . . . . . . . . 54
11 Nettoyage et entretien du plan de cuisson. . . . . . . . . . . . . . . . . . . . 55
12 Garantie . . . . . . . . . . . . . . . . . . . . . . . . . . . . . . . . . . . . . . . . . . . . . . 57
13 Elimination . . . . . . . . . . . . . . . . . . . . . . . . . . . . . . . . . . . . . . . . . . . . 57
14 Caractéristiques techniques. . . . . . . . . . . . . . . . . . . . . . . . . . . . . . . 58
1 Remarques relatives à l'utilisation de
cette notice
AVERTISSEMENT !
Consigne de sécurité : le non-respect de ces consignes peut
!
entraîner la mort ou de graves blessures.
ATTENTION !
Consigne de sécurité : le non-respect de ces consignes peut
!
40
entraîner des blessures.
Page 41

FR
CC09, CCK09, CC11 Consignes générales de sécurité
AVIS !
Le non-respect de ces consignes peut entraîner des dommages
A
matériels et des dysfonctionnements du produit.
REMARQUE
Informations complémentaires sur l'utilisation du produit.
I
➤ Manipulation : ce symbole vous indique une action à effectuer. Les
manipulations à effectuer sont décrites étape par étape.
✓ Ce symbole décrit le résultat d’une manipulation.
fig. 1 5, page 3 : cette information renvoie à un élément figurant sur une
illustration, dans cet exemple à la « position 5 de l'illustration 1 à la page 3 ».
Respectez également les consignes de sécurité suivantes.
2 Consignes générales de sécurité
Le fabricant décline toute responsabilité en cas de dommages causés par :
des influences mécaniques ayant endommagé le matériel
des modifications apportées au produit sans autorisation explicite de la
part du fabricant
une utilisation différente de celle décrite dans la notice
Lors de l'utilisation d'appareils électriques, les consignes générales de sécurité suivantes doivent être respectées afin d'éviter
une décharge électrique,
un incendie,
des blessures.
41
Page 42

FR
Consignes générales de sécurité CC09, CCK09, CC11
2.1 Consignes générales de sécurité
!
Utilisez exclusivement du gaz liquide des catégories I
I
(butane/propane). N'utilisez pas d'autres combustibles.
3
Installez un extincteur d'incendie adapté à proximité.
Veillez à ce que l'extincteur soit contrôlé à intervalles réguliers
par un professionnel.
Les personnes présentant des déficiences physiques, senso-
rielles ou mentales ne sont pas autorisées à exploiter l'appareil
sans surveillance.
Ne touchez pas les zones de cuisson ni la zone adjacente.
Les surfaces des zones de cuisson peuvent être chaudes
même si leur couleur est noire. Les parties situées à proximité
des zones de cuisson peuvent chauffer au point de provoquer
des brûlures.
Si le dessus du plan de cuisson est endommagé, des produits
de nettoyage et du liquide peuvent pénétrer par la partie cassée
et provoquer une décharge électrique. Eteignez immédiatement
le plan de cuisson.
3B/P
, I3+,
Coupez l'alimentation électrique au cours de travaux sur l'appa-
reil.
Seul un personnel qualifié et parfaitement informé des dangers
et règlements spécifiques à ces manipulations est habilité à effectuer les réparations et l'entretien.
N'utilisez l'appareil qu'aux fins auxquelles il a été conçu.
Ne procédez à aucune modification sur l'appareil.
A
Eteignez l'appareil lorsque celui-ci n'est pas utilisé.
N'utilisez pas l'appareil si celui-ci est endommagé ou si des piè-
ces sont défectueuses.
2.2 Sécurité de manipulation du gaz liquide
Veillez à tenir les matières inflammables éloignées des cuisiniè-
res, appareils de chauffage et autres sources de lumière ou de
!
chaleur.
42
Page 43

FR
CC09, CCK09, CC11 Consignes générales de sécurité
Risque d'étouffement !
Veillez à mettre l'appareil en marche dans un endroit suffisamment aéré. Les orifices d'aération de la zone d'installation de
l'appareil doivent présenter une section d'au moins 50 cm
orifices peuvent disposer d'une fermeture mais ils devront être
impérativement ouverts pendant l'exploitation du foyer (cf. plaque signalétique au-dessus du plan de cuisson).
Vérifiez que les données inscrites sur le régulateur de pression
correspondent aux données inscrites sur la plaque signalétique.
Ne conservez jamais les bouteilles de gaz liquide dans des en-
droits non aérés.
Protégez les bouteilles de gaz liquide d'un rayonnement solaire
direct. La température ne doit pas dépasser 50 °C.
Si vous sentez une odeur de gaz :
– Ouvrez toutes les fenêtres et quittez la pièce.
– N'actionnez aucun système électrique et n'allumez aucune
flamme qui pourraient enflammer le gaz.
– Fermez le robinet de la bouteille de gaz et laissez-le fermé
jusqu'à élimination de la fuite.
– N'essayez en aucun cas de détecter la fuite avec une flam-
me.
2
. Ces
Il est interdit de faire fonctionner le plan de cuisson lors d'un ra-
vitaillement en carburant, dans les garages et sur les navires
transbordeurs.
2.3 Sécurité lors de l'utilisation de l'appareil
Portez des vêtements adaptés lorsque vous utilisez le plan de
cuisson.
!
Ne portez pas de vêtements amples qui pourraient prendre feu.
Laissez le plan de cuisson refroidir à température ambiante
avant de le toucher à mains nues.
Veillez à ce que la zone autour du plan de cuisson soit exempte
de graisses, de produits alcoolisés, de matières plastiques, de
substances et objets inflammables (rideaux, torchons, ustensiles de cuisine, etc.).
Ne suspendez et ne placez jamais de torchons, papiers, rideaux
ou autres matériaux inflammables à proximité du plan de cuisson.
43
Page 44

FR
Contenu de la livraison CC09, CCK09, CC11
Soyez prudent lorsque vous chauffez de la graisse ou de l'huile,
car ces substances peuvent s'enflammer à haute température.
N'utilisez pas jamais d'eau si la graisse s'enflamme.
N'utilisez que des maniques sèches et des cuillères en bois afin
d'éviter toute formation de vapeur. Le contact de maniques
mouillées ou humides avec des surfaces chaudes peut causer
des brûlures du fait de la vapeur qui se dégage.
Ne laissez jamais le plan de cuisson sans surveillance. Les cas-
seroles qui débordent peuvent occasionner la formation de fumées ou d'incendies.
Eteignez la zone de cuisson avant de retirer la casserole.
Pour limiter les risques de brûlures, d'inflammation des maté-
riaux et de débordement dus à un contact non intentionnel avec
les ustensiles, il est préférable de diriger les manches des ustensiles vers l'intérieur et de façon à ce qu'ils ne dépassent pas
sur les surfaces des zones de cuisson adjacentes.
A
Ne vous servez pas du plan de cuisson pour chauffer la pièce.
L'utilisation du plan de cuisson à régime élevé et avec une cas-
serole vide peut endommager le plan.
Ne placez pas d'éléments en plastique tels qu'une salière ou
une poivrière, des emballages ou d'autres ustensiles sur le plan
de cuisson lorsque celui-ci est en fonctionnement.
Veillez à ne pas laisser de maniques à côté ou sur la zone de
cuisson.
Utilisez des casseroles, poêles et autres ustensiles conçus pour
les surfaces céramiques ainsi que pour la puissance nominale
du plan de cuisson.
Seuls certains types d'ustensiles en verre, vitrocéramique,
faïence ou autres matières vitrées peuvent être utilisés avec ce
type de plan de cuisson sans risquer de se rompre sous l'effet
de brusques changements de température.
Utilisez des poêles et casseroles de dimension appropriée.
3 Contenu de la livraison
Plan de cuisson vitrocéramique au gaz
Manuel d'utilisation
44
Page 45

FR
CC09, CCK09, CC11 Usage conforme
4 Usage conforme
Dometic CC09, CCK09 et CC11 sont des plans de cuisson vitrocéramiques
qui fonctionnent au gaz liquide. Ils sont conçus pour être intégrés dans un
bloc de cuisine dans un cadre domestique, dans des camping-cars, caravanes ou à bord de bateaux.
5 Description technique
Le plan de cuisson est disponible en différentes versions.
CC09 (réf. 9103303386) : deux zones de cuisson
CCK09 (réf. 9103303387) : une zone de cuisson
CC11 (réf. 9103303390/9103303391) : deux zones de cuisson
La version de votre appareil est indiquée par le numéro de référence sur la
plaque signalétique.
Chaque zone de cuisson est chauffée par un brûleur à gaz.
Derrière la zone de cuisson (fig. 1 1, page 2) se trouve une zone de cuisson
supplémentaire (fig. 1 2) chauffée par la combustion du brûleur de devant.
Ainsi, pour cette zone de cuisson, la température n'est pas aussi élevée. Celle-ci peut être utilisée pour une deuxième casserole nécessitant des températures moins élevées.
Uniquement pour CC09, CC11 : la petite zone de cuisson de droite a une
puissance calorifique plus faible.
La surface de cuisson vitrocéramique résiste à la chaleur et au froid. Elle
peut supporter des casseroles lourdes. Les chocs ponctuels tels que la chute
d'objets doivent être évités. Cela peut causer des dommages.
45
Page 46

FR
Description technique CC09, CCK09, CC11
Eléments de commande
N° dans fig. 1,
page 2
1 Zone de cuisson
2 Zone de cuisson supplémentaire (plaque de poursuite de la
3 DEL d'avertissement « Surface chaude »
4DEL de contrôle
5 Régulateur à trois positions (zéro, grande flamme, petite
Description
cuisson)
Cette DEL s'allume en rouge lorsque la zone de cuisson est
allumée.
Elle reste allumée jusqu'à ce que la surface refroidisse et
puisse être touchée sans danger (cela prend environ
12 minutes après arrêt de la zone de cuisson).
Cette DEL s'allume en vert lorsque la zone de cuisson est allumée.
flamme)
Appuyez sur le régulateur et dans le sens des aiguilles d'une
montre ou dans le sens inverse pour régler la température souhaitée.
Le robinet de gaz s'ouvre par rotation dans le sens inverse des
aiguilles d'une montre.
Le robinet de gaz se ferme par rotation dans le sens des
aiguilles d'une montre jusqu'à la butée.
Uniquement pour CC09, CC11 : le régulateur avant correspond au plan de
cuisson de droite et le régulateur arrière au plan de cuisson de gauche.
46
Page 47

FR
CC09, CCK09, CC11 Montage du plan de cuisson
6 Montage du plan de cuisson
Vous pouvez intégrer le plan de cuisson au plan de travail de votre cuisine.
6.1 Choix du lieu de montage
Lisez attentivement les remarques suivantes lors du choix du lieu de montage :
Choisissez un endroit bien aéré.
Choisissez un lieu couvert pour éviter les projections directes d'eau ou
d'autres liquides sur le réchaud.
Respectez les écarts minimum conformément à la fig. 2, page 2.
Pour l'arrivée de l'air de combustion et l'évacuation de la chaleur, les ori-
fices d'aération sous le plan de cuisson doivent avoir une section d'au
moins 50 cm².
Les orifices d'aération doivent avoir une largeur minimale de 5 mm.
Veillez à ce qu'il n'y ait pas de courant d'air sur le lieu de montage.
Si vous montez le plan de cuisson sur un cockpit ou dans un autre endroit
à ciel ouvert, montez également un abrivent.
N'exploitez pas l'appareil dans un environnement explosif.
6.2 Montage du plan de cuisson
AVIS ! Risque d'endommagement !
A
➤ Sciez un orifice carré dans le plan de travail (dimensions voir fig. 3,
page 2).
➤ Placez le plan de cuisson au centre de la découpe.
Avant de commencer à percer, assurez-vous qu’aucun câble
électrique ou autre élément du véhicule ne risque d’être endommagé par le perçage, le sciage ou le limage.
Pour fixer le plan de cuisson, n'utilisez pas les conduites de gaz,
robinets ou éléments du brûleur.
➤ Fixez le plan de cuisson (2) sur le plan de travail (1) à l'aide des quatre
éléments de fixation (3) et des vis (4), voir fig. 4, page 3.
➤ Installez un extincteur d'incendie de classe B-1 à proximité.
47
Page 48

FR
Montage du plan de cuisson CC09, CCK09, CC11
6.3 Raccordement du plan de cuisson au gaz
AVERTISSEMENT ! Risque de blessures !
!
Consignes de raccordement :
La conduite de gaz doit être un tube d'acier ∅ 8 x 1 mm (coulé sans sou-
dure ou inoxydable) à monter avec un raccord à bague coupante.
Fixez les tubes sur une paroi latérale ou arrière des meubles avoisinants
en veillant à ce qu'il n'y ait pas de transmission d'effort sur les composants
de réglage.
Le raccordement ne doit être démontable qu'à l'aide d'outils. Observez à
cet effet les réglementations techniques des fiches de travail G607 et
G608 de la DVGW (Fédération allemande du secteur du gaz et de l'eau).
Utilisez uniquement des bouteilles de gaz propane ou butane
dont le régulateur de pression a été contrôlé et un raccordement
correspondant.
Vérifiez que les données inscrites sur le régulateur de pression
correspondent aux données inscrites sur la plaque signalétique.
L'appareil doit être raccordé au gaz uniquement par un person-
nel spécialisé autorisé.
Le tubage doit être exempt de contraintes.
Le raccordement par flexible entre l'appareil à gaz et l'unité d'alimentation
en gaz liquide doit être le plus court possible et ne pas dépasser 750 mm.
Le raccordement par flexible doit être parfaitement accessible pour con-
trôle sur toute sa longueur.
Les orifices d'aération de la zone d'installation de l'appareil doivent pré-
senter une section d'au moins 50 cm
d'une fermeture mais ils devront impérativement être ouverts pendant
l'exploitation du foyer.
➤ Raccordez le plan de cuisson à l'alimentation en gaz.
➤ Posez au-dessus du plan de cuisson un panneau sur lequel est inscrit le
texte suivant :
« ATTENTION !
Veillez à ce que l'aération soit satisfaisante pendant que vous
cuisinez en ouvrant par exemple les fenêtres à proximité du gril ou de
l'appareil de cuisson.
Ceux-ci ne doivent en aucun cas servir à chauffer la pièce. »
2
. Ces orifices peuvent disposer
48
Page 49

FR
CC09, CCK09, CC11 Raccordement électrique du plan de cuisson
➤ Veillez à ce que le flexible
– ne soit pas compressé ou plié,
– se trouve à une distance suffisante du brûleur.
➤ Ouvrez le robinet de la bouteille de gaz.
AVERTISSEMENT ! Risque de blessures !
Ne contrôlez jamais l'étanchéité lorsque la flamme est nue ou à
!
➤ Vérifiez l'étanchéité de tous les branchements à l'aide d'un spray détec-
teur de fuites.
Si vous ne voyez aucune petite bulle apparaître, c'est que l'étanchéité est
assurée.
proximité de sources d'étincelles.
7 Raccordement électrique du plan de
cuisson
AVERTISSEMENT ! Risque de blessures !
Le raccordement du réchaud doit être exécuté par un profession-
!
Veuillez respecter les consignes de sécurité suivantes pour le raccordement
électrique :
A
nel.
Les informations suivantes sont destinées à un personnel qualifié,
informé des directives et des consignes de sécurité à appliquer.
AVIS !
Si des câbles doivent être passés au travers de murs métalli-
ques ou autres parois à arêtes vives, utilisez des conduits ou
tuyaux afin d'éviter tout endommagement.
Ne faites pas passer de lignes électriques non fixées ou cou-
dées près de matériaux conducteurs (métal).
Fixez bien les câbles.
Ne tirez pas sur les câbles.
Posez les câbles de manière à exclure tout risque de trébuche-
ment ou d'endommagement du câble.
49
Page 50

FR
Utilisation du plan de cuisson CC09, CCK09, CC11
➤ Consultez la plaque signalétique du plan de cuisson pour vérifier que la
tension de l'appareil correspond à la tension du réseau de bord.
➤ Raccordez l'appareil, conformément à la fig. 5, page 3, au réseau de
bord du véhicule 12 V
Utilisez un câble à deux fils avec contacts plats isolés 6,3 x 0,8 mm (1).
Le circuit doit être protégé par un fusible coupe-circuit de 5 A (non compris dans la livraison).
➤ Sécurisez le câble à l'aide d'une attache.
g.
8 Utilisation du plan de cuisson
ATTENTION ! Risque de blessures !
La zone de cuisson reste chaude encore quelques instants même
!
une fois éteinte. La DEL d'avertissement indique que la zone de
cuisson est encore chaude.
Ne placez pas d'objets sur la plaque de cuisson. Ils pourraient être
endommagés ou devenir brûlants au toucher si la plaque n'est pas
complètement refroidie.
AVIS !
Avant d'allumer le plan de cuisson, assurez-vous qu'aucune subs-
A
Conseils pour la manipulation du plan de cuisson
Afin de ne pas endommager la surface vitrocéramique, respectez les règles
suivantes :
N'utilisez pas le plan de cuisson comme surface de rangement.
Les fonds parfois rugueux des casseroles et des poêles peuvent rayer le
plan de cuisson lors de leur déplacement. Cela s'applique surtout à la
vaisselle en fonte.
Des rayures peuvent aussi être provoquées par des grains de sable,
par ex., provenant du nettoyage de légumes, et qui sont entraînés avec
la casserole sur le plan de cuisson.
Evitez que les éléments suivants ne touchent les zones chaudes :
– Matières plastiques
– Feuille d'aluminium
– Sucre ou aliments à forte teneur en sucre
tance inflammable ne se trouve sur celui-ci.
50
Page 51

FR
CC09, CCK09, CC11 Utilisation du plan de cuisson
Evitez d'incruster les traces de saleté par des cuissons répétées sans
nettoyage préalable.
Pour tirer le meilleur parti du plan de cuisson, respectez les règles de base
suivantes lorsque vous cuisinez :
Les zones de cuisson chauffent très rapidement, mais refroidissent lente-
ment. Placez le régulateur sur la température souhaitée.
Utilisez des casseroles et des poêles de bonne qualité, avec un fond plat,
pour permettre un contact total avec la zone de cuisson.
Un bon contact entre la poêle/casserole et la zone de cuisson permet une
plus grande efficacité.
Les poêles et casseroles en acier inoxydable et en fonte sont les plus ap-
propriées. Il est déconseilé d'utiliser des poêles en aluminium avec le réglage de température maximal.
Veillez à utiliser des poêles ou des casseroles de même dimension ou lé-
gèrement plus larges que la zone de cuisson.
L'utilisation de poêles ou de casseroles trop petites expose une partie de
la zone de cuisson au contact direct et peut provoquer l'inflammation de
tissus.
Vérifiez que le fond de la poêle ou de la casserole est sec.
Pour limiter les risques de brûlures, d'inflammation des matériaux et de
débordement dus à un contact non intentionnel avec les ustensiles, il est
préférable de diriger les manches des ustensiles vers l'intérieur et de façon à ce qu'ils ne dépassent pas sur les surfaces des zones de cuisson
adjacentes.
Vérification avant la mise en marche
Avant la mise en marche du plan de cuisson, vérifiez ce qui suit :
Le bon type de gaz est-il raccordé ? L'appareil ne doit être utilisé qu'avec
du gaz liquide.
Les ouvertures d'entrée et d'évacuation de l'air dans la pièce ou sur le
côté extérieur du véhicule sont-elles bien dégagées ? Les ouvertures garantissent l'entrée de l'air frais et l'évacuation des gaz d'échappement.
La surface du plan de cuisson vitrocéramique est-elle propre ? Les impu-
retés peuvent brûler et endommager la surface.
Le robinet d'arrêt de la bouteille de gaz est-il ouvert ?
51
Page 52

FR
Utilisation du plan de cuisson CC09, CCK09, CC11
Mise en marche de la zone de cuisson
➤ Mettez le régulateur en position zéro.
➤ Appuyez sur le régulateur, maintenez-le appuyé et tournez dans le sens
contraire des aiguilles d'une montre jusqu'à la position « grande
flamme ».
➤ Maintenez le régulateur appuyé pendant 15 secondes maximum jusqu'à
ce que la procédure d'allumage soit terminée et que la protection thermoélectrique ait réagi.
➤ Relâchez le régulateur.
✓ La flamme du brûleur s'allume.
✓ La DEL de contrôle s'allume.
✓ La DEL d'avertissement
➤ Si le brûleur s'éteint lorsque vous relâchez le régulateur :
attendez au moins 60 secondes avant de répéter la procédure d'allumage.
REMARQUE
Lors de la première mise en service ou après le remplacement de
I
Réglage de la température
➤ A l'aide du régulateur, réglez la température entre les positions « grande
flamme » et « petite flamme ».
Mise à l'arrêt de la zone de cuisson
la bouteille de gaz, il se peut que le brûleur ne soit toujours pas allumé au bout de 15 secondes, car de l'air se trouve encore dans la
conduite de gaz.
Répétez dans ce cas la procédure d'allumage.
s'allume.
➤ Mettez le régulateur en position zéro.
✓ La DEL de contrôle
✓ La DEL d'avertissement
Celle-ci reste allumée jusqu'à ce que la surface refroidisse et puisse être
touchée sans danger (cela prend environ 12 minutes après arrêt de la
zone de cuisson).
➤ En cas d'interruption prolongée, fermez le robinet d'arrêt de la bouteille de
gaz.
52
s'éteint.
reste allumée.
Page 53

FR
CC09, CCK09, CC11 Résolution des pannes
8.1 Remplacement de la bouteille de gaz
AVERTISSEMENT ! Risque de blessures !
Ne changez la bouteille de gaz que lorsque l'aération est
!
➤ Eteignez le plan de cuisson en mettant le régulateur en position zéro par
rotation dans le sens des aiguilles d'une montre.
➤ Fermez complètement le robinet de la bouteille de gaz.
➤ Dévissez le régulateur de pression de la bouteille de gaz.
➤ Vérifiez l'état du flexible.
Changez le flexible si le matériel est cassant ou poreux.
➤ Fixez le régulateur de pression en le vissant à la main sur la nouvelle bou-
teille de gaz.
suffisante.
Veillez à ce qu'aucune source d'étincelles ne soit à proximité.
Ne changez la bouteille de gaz que lorsque l'appareil est éteint.
9 Résolution des pannes
Seuls des spécialistes sont habilités à effectuer des réparations sur la partie
de l'appareil dans laquelle se trouve le gaz.
➤ En cas de dysfonctionnements, fermez immédiatement l'alimentation en
gaz.
➤ Vérifiez de nouveau si l'appareil n'est pas endommagé.
➤ Remplacez les pièces endommagées.
➤ Ne remettez l'appareil en marche que lorsque tous les dysfonctionne-
ments sont éliminés.
Avant de contacter le service après-vente en cas de dysfonctionnement du
plan de cuisson, vérifiez
que le raccordement au réseau de bord est correct,
que le régulateur est allumé et que le réglage de la température est
correct,
que le fond de la casserole ou de la poêle ainsi que la surface du plan de
cuisson sont propres et secs,
53
Page 54

FR
Maintenance du plan de cuisson CC09, CCK09, CC11
que la casserole ou la poêle a la bonne dimension et qu'elle est bien po-
sitionnée sur la zone de cuisson, et
que le fond de la casserole ou de la poêle est plat et régulier.
10 Maintenance du plan de cuisson
Avant sa première mise en service, l'appareil doit être contrôlé, pour des raisons de sécurité, par un professionnel qui devra attester qu'il fonctionne correctement et éliminer tous les défauts éventuellement constatés. Ensuite, un
contrôle tous les deux ans est requis.
➤ Fonctions devant faire l'objet d'une attention particulière lors du contrôle
annuel :
– Contrôle de l'étanchéité au gaz
– Contrôle de la sécurité de combustion et de la stabilité de la flamme
– Contrôle de l'alimentation en air frais
– Contrôle des systèmes de sécurité et de réglage (robinets des foyers,
régulateur de pression)
➤ Assurez-vous que la pièce d'installation de l'appareil est en conformité
avec les réglementations locales.
54
Page 55

FR
CC09, CCK09, CC11 Nettoyage et entretien du plan de cuisson
11 Nettoyage et entretien du plan de
cuisson
ATTENTION ! Risque de blessures !
!
A
➤ Avant la première utilisation, nettoyez bien la surface vitrocéramique du
plan de cuisson (voir chapitre suivant).
Veillez à ce que la surface du plan de cuisson soit froide et que
la DEL d'avertissement
Si vous utilisez une éponge ou un chiffon humide pour essuyer
les éclaboussures, veillez à ne pas vous brûler avec la vapeur.
AVIS !
N'utilisez pas de produits abrasifs pour nettoyer la surface vitro-
céramique du plan de cuisson.
Utilisez uniquement des crèmes détergentes conçues spéciale-
ment pour le nettoyage de plaques de cuisson vitrocéramiques.
L'utilisation de crèmes détergentes non appropriées endommage le plan de cuisson ou génère notamment des vapeurs nocives lorsqu'elles sont appliquées sur une surface chaude.
N'utilisez pas de nettoyeur vapeur.
soit éteinte.
11.1 Entretien régulier
➤ Appliquez un peu de crème détergente au centre de la zone à nettoyer.
➤ Humidifiez une feuille d'essuie-tout et étalez la crème sur la surface.
➤ Essuyez avec une feuille d'essuie-tout propre et sèche.
✓ Un film protecteur repoussant l'eau et la saleté recouvre maintenant le
plan de cuisson.
11.2 Elimination des éclaboussures
➤ Lorsque du liquide déborde ou éclabousse en cours de cuisson, éteignez
le plan de cuisson et essuyez autour de la zone de cuisson avec une
feuille d'essuie-tout propre.
Les éclaboussures sur les zones de cuisson doivent être traitées comme
les éclaboussures brûlées (voir chapitre « Eclaboussures brûlées »,
page 56).
55
Page 56

FR
Nettoyage et entretien du plan de cuisson CC09, CCK09, CC11
Nettoyage de substances fondues ou de produits alimentaires à forte
teneur en sucre (confitures, ketchup, sauce tomate, etc.)
➤ Nettoyez les éclaboussures immédiatement à l'aide d'un grattoir lorsque
l'élément est encore chaud : grattez le produit renversé ou fondu sur la
zone de cuisson en le poussant vers une partie froide du plan de cuisson.
➤ Eteignez les zones de cuisson.
➤ Laissez le plan de cuisson refroidir (la DEL d'avertissement
éteinte).
➤ Nettoyez la surface conformément au chapitre « Entretien régulier »,
page 55.
doit être
11.3 Eclaboussures brûlées
➤ Détachez la substance brûlée à l'aide d'un grattoir. Maintenez le grattoir
selon un angle d'environ 30° par rapport au plan de cuisson et grattez la
substance.
➤ Finissez de nettoyer en vous conformant aux instructions du
chapitre « Entretien régulier », page 55.
11.4 Elimination des traces de métal
Il peut arriver, surtout si vous utilisez des ustensiles légers recouverts d'une
fine couche métallique, que le métal déteigne et laisse des traces à la surface
du réchaud. Ces traces apparaissent souvent sous forme de rayures.
➤ Retirez les traces de métal en vous conformant au chapitre « Elimination
des éclaboussures », page 55.
➤ Pour les traces particulièrement tenaces, utilisez de la crème détergente
et un grattoir.
56
Page 57

FR
CC09, CCK09, CC11 Garantie
12 Garantie
Le délai légal de garantie s'applique. Si le produit s'avérait défectueux,
veuillez vous adresser à la filiale du fabricant située dans votre pays (voir
adresses au verso du présent manuel) ou à votre revendeur spécialisé.
Veuillez y joindre les documents suivants pour la gestion des réparations et
de la garantie :
une copie de la facture avec la date d'achat,
le motif de la réclamation ou une description du dysfonctionnement.
13 Elimination
➤ Jetez les emballages dans les conteneurs de déchets recyclables prévus
à cet effet.
M
Lorsque vous mettrez votre produit définitivement hors service,
informez-vous auprès du centre de recyclage le plus proche ou
auprès de votre revendeur spécialisé sur les prescriptions relatives
au retraitement des déchets.
57
Page 58

FR
Caractéristiques techniques CC09, CCK09, CC11
14 Caractéristiques techniques
Dometic CCK09 Dometic CC09 Dometic CC11
9103303387 9103303386 9103303390
Réf. :
Consommation de gaz : 115 g/h 210 g/h 210 g/h
Catégorie d'appareil : I
AT, DE, LV, MT, PL : 30 mbar (
CY, CZ, DK, FI, HU, IS, NL, NO, SE, SI, SK :
Pression de
raccordement/Catégorie
de gaz :
BE, CH, CZ, ES, FR, GB, GR, IE, IT, LT, LU, PT, TR :
28 – 30 mbar (I
SI : 28 – 30 mbar (
28 – 30/37 mbar (I3+)
3B/P
I
3B/P
)
(noir)
9103303391
(blanc)
I
)
3B/P
)
Nombre de zones de cuisson :
Nombre de brûleurs : 1 2 2
Charge thermique nominale :
Temps de mise à ébullition d'1 l d'eau :
Tension de raccordement
(pour l'allumage) :
Intensité absorbée :
Dimensions en mm
(l x h x p) :
Poids : 6,0 kg 10,8 kg 11,0 kg
(en fonction de la température ambiante et du type de
398 x 110 x 505 558 x 110 x 505 566 x 110 x 445
244
1600 W 2900 W
(1300 W +
1600 W)
env. 7,5 min
casserole)
12 Vg
Durant la procédure d'allumage : 0,6 A
En cours de fonctionnement : 0,3 A
2900 W
(1300 W +
1600 W)
Spécifications sous réserve de modifications dues à la réglementation, à
l'évolution technique des produits et aux possibilités de livraison.
58
Page 59

ES
CC09, CCK09, CC11
Lea atentamente este manual antes del montaje y de la puesta en funcionamiento del aparato y consérvelo en un lugar seguro para futuras
consultas. En caso de vender o entregar el aparato a otra persona, entregue también estas instrucciones.
Índice
1 Notas relativas al uso de las instrucciones . . . . . . . . . . . . . . . . . . . 60
2 Indicaciones generales de seguridad . . . . . . . . . . . . . . . . . . . . . . . 60
3 Volumen de entrega. . . . . . . . . . . . . . . . . . . . . . . . . . . . . . . . . . . . . 63
4 Uso adecuado . . . . . . . . . . . . . . . . . . . . . . . . . . . . . . . . . . . . . . . . . 64
5 Descripción técnica . . . . . . . . . . . . . . . . . . . . . . . . . . . . . . . . . . . . . 64
6 Empotrar el hornillo . . . . . . . . . . . . . . . . . . . . . . . . . . . . . . . . . . . . . 65
7 Conexión eléctrica del hornillo . . . . . . . . . . . . . . . . . . . . . . . . . . . . . 68
8 Uso del hornillo . . . . . . . . . . . . . . . . . . . . . . . . . . . . . . . . . . . . . . . . 69
9 Solución de fallos. . . . . . . . . . . . . . . . . . . . . . . . . . . . . . . . . . . . . . . 72
10 Mantenimiento del hornillo . . . . . . . . . . . . . . . . . . . . . . . . . . . . . . . . 73
11 Limpieza y cuidado del hornillo . . . . . . . . . . . . . . . . . . . . . . . . . . . . 73
12 Garantía . . . . . . . . . . . . . . . . . . . . . . . . . . . . . . . . . . . . . . . . . . . . . . 75
13 Gestión de residuos . . . . . . . . . . . . . . . . . . . . . . . . . . . . . . . . . . . . . 75
14 Datos técnicos . . . . . . . . . . . . . . . . . . . . . . . . . . . . . . . . . . . . . . . . . 76
59
Page 60

ES
Notas relativas al uso de las instrucciones CC09, CCK09, CC11
1 Notas relativas al uso de las
instrucciones
¡ADVERTENCIA!
Indicación de seguridad: su incumplimiento puede acarrear la
!
!
A
muerte o graves lesiones.
¡ATENCIÓN!
Indicación de seguridad: su incumplimiento puede acarrear
lesiones.
¡AVISO!
Su incumplimiento puede acarrear daños materiales y perjudicar el
correcto funcionamiento del producto.
NOTA
Información adicional para el manejo del producto.
I
➤ Paso a seguir: este símbolo le indica que debe realizar un paso. Todos
los procedimientos necesarios se describen paso a paso.
✓ Este símbolo describe el resultado de un paso realizado.
fig. 1 5, página 3: esta indicación hace referencia a un elemento de una
figura, en este ejemplo a la “Posición 5 en la figura 1 de la página 3”.
Tenga en cuenta también las siguientes indicaciones de seguridad.
2 Indicaciones generales de seguridad
El fabricante no se hace responsable de los daños causados como consecuencia de:
daños en el producto debido a influencias mecánicas
modificaciones realizadas en el producto sin el expreso consentimiento
del fabricante
utilización del aparato para fines distintos a los descritos en las instruc-
ciones.
60
Page 61

ES
CC09, CCK09, CC11 Indicaciones generales de seguridad
Tenga en cuenta las siguientes medidas básicas de seguridad en el manejo
de aparatos eléctricos para la protección ante:
descargas eléctricas
peligro de incendio
lesiones
2.1 Seguridad básica
!
Utilice únicamente gas licuado de las categorías I
(butano/propano). No utilice otro combustible.
Coloque un extintor adecuado en las proximidades.
Asegúrese de que un especialista compruebe el extintor a intervalos regulares.
Las personas cuyas condiciones físicas, sensoriales o menta-
les les impidan utilizar el aparato de forma segura, sólo deberán
utilizarlo bajo la vigilancia de una persona responsable.
No toque los focos ni el área en derredor.
La superficie de los focos puede estar caliente, aunque esté oscura. El área en derredor puede estar tan caliente que provoque
quemaduras.
Si se ha levantado la superficie del hornillo, puede penetrar so-
lución de limpieza y líquido que se salga durante la cocción, y
ello podría provocar un riesgo eléctrico. En este caso, apague
inmediatamente el aparato.
Siempre que realice tareas en el aparato desconecte la alimen-
tación de corriente.
3B/P
, I3+, I3
Sólo personal técnico especializado que conozca los posibles
peligros y las normativas pertinentes puede realizar trabajos de
mantenimiento y reparación.
Utilice el aparato sólo conforme al uso adecuado.
No realice ninguna modificación en el aparato.
A
Apague el aparato cuando no lo utilice.
No utilice el aparato cuando esté estropeado o tenga piezas
averiadas.
61
Page 62

ES
Indicaciones generales de seguridad CC09, CCK09, CC11
2.2 Seguridad al manipular el gas licuado
Mantenga las sustancias inflamables alejadas de calefactores,
placas de cocina y otras fuentes de luz y calor.
!
¡Peligro de asfixia!
Antes de encender el aparato garantice que el área esté suficientemente ventilada. Durante el funcionamiento deben estar
disponibles orificios de ventilación con una sección transversal
libre de al menos 50 cm
cios pueden contar con un cierre pero deben estar abiertos
cuando el fuego esté encendido (véase la señal de aviso colocada sobre el hornillo).
Compare la indicación de presión dada en la placa de caracte-
rísticas con la que figura en el presostato.
No guarde nunca las bombonas de gas licuado en lugares sin
ventilación.
2
en el lugar de colocación. Estos orifi-
Proteja las bombonas de gas licuado de las radiaciones solares
directas. La temperatura no debe superar los 50 °C.
Si nota olor a gas:
– Abra todas las ventanas y salga del habitáculo.
– No accione ningún dispositivo eléctrico y evite usar disposi-
tivos con llama que puedan prender el gas.
– Cierre la válvula de la bombona y déjela cerrada hasta que
se subsane el fallo.
– No intente encontrar fugas con un fuego abierto.
El hornillo no debe utilizarse al repostar combustible, en garajes
ni durante la conducción.
2.3 Seguridad durante el funcionamiento del aparato
Al utilizar el hornillo, lleve ropa adecuada.
No lleve ropa amplia que pueda prenderse con facilidad.
!
Deje que el hornillo se enfríe a la temperatura ambiente, antes
de tocarlo directamente con las manos.
Mantenga el hornillo y sus inmediaciones libres de grasa, sus-
tancias alcohólicas, material plástico yo material que pueda
prender (p. ej. cortinas, toallas, utensilios de cocina).
No cuelgue ni guarde toallas, papel, cortinas ni otros materiales
inflamables cerca del hornillo.
62
Page 63

ES
CC09, CCK09, CC11 Volumen de entrega
Proceda con cuidado al calentar grasa o aceite. La grasa y el
aceite prenden a elevadas temperaturas.
No utilice agua para apagar grasa ardiente.
Utilice únicamente agarradores de ollas secos y cucharas de
madera para evitar la formación de vapor. Los agarradores de
ollas mojados o húmedos sobre superficies calientes pueden
provocar quemaduras por efecto del vapor.
Mantenga siempre vigilado el hornillo durante su funcionamien-
to. Las cazuelas que se desbordan pueden provocar humo e incendios.
Apague el foco antes de retirar la cazuela.
A fin de evitar el riesgo de que sufrir quemaduras, de que se
prendan materiales inflamables y de que se derrame contenido
de la cazuela debido a un golpe accidental, oriente el mango o
las asas de forma que no sobresalgan hacia fuera y que no entren en el área de los focos vecinos.
No utilice el hornillo para calentar el habitáculo.
A
El uso del hornillo a alta temperatura sin que haya sobre él una
cazuela con algún contenido en su interior.
Durante su funcionamiento, no coloque sobre el hornillo ningún
objeto de plástico como salero, pimentero, envases, etc.
Asegúrese de que no haya ningún agarradero de ollas sobre o
junto al quemador.
Utilice cazuelas, sartenes y demás recipientes que hayan sido
diseñados para superficies de cerámica y la potencia nominal
del hornillo.
Sólo determinados tipos de vidrio, vitrocerámica, gres y demás
recipientes vidriados pueden resistir los cambios bruscos de
temperatura y son adecuados para cocinas.
Utilice cazuelas y sartenes que tengan un tamaño adecuado.
3 Volumen de entrega
Hornillo de vitrocerámica a gas
Instrucciones de uso
63
Page 64

ES
Uso adecuado CC09, CCK09, CC11
4 Uso adecuado
Dometic CC09, CCK09 y CC11 son hornillos de vitrocerámica que funcionan
con gas líquido. Están concebidos para ser integrados en una cocina amueblada en hogares, autocaravanas o embarcaciones.
5 Descripción técnica
El hornillo está disponible en diferentes modelos.
CC09 (n.° de art. 9103303386): dos focos
CCK09 (n.° de art. 9103303387): un foco
CC11 (n.° de art. 9103303390/9103303391): dos focos
El tipo de aparato viene indicado en el número de artículo que figura en la
placa de características.
Cada una de las placas es calentada por un quemador de gas.
Detrás del foco (fig. 1 1, página 2) se encuentra un foco de cocción lenta
(fig. 1 2) que se calienta con el gas de escape del quemador situado debajo
del foco, con lo que la temperatura no es tan alta como en este último. El foco
de cocción lenta se puede utilizar para una segunda cazuela que no necesite
tanta temperatura.
Sólo CC09, CC11: el foco derecho, más pequeño, tiene una potencia calorífica menor.
La placa vitrocerámica es resistente al calor y al frío, y resiste la carga de
cazuelas pesadas. Se debe evitar que se caigan objetos que puedan dañar
la superficie, pues ello podría provocar averías.
64
Page 65

ES
CC09, CCK09, CC11 Empotrar el hornillo
Elementos de mando
N.° en fig. 1,
página 2
1 Foco de cocción
2 Foco de cocción lenta
3 LED de aviso “Superficie caliente”
4LED de control
5 Regulador ajustable en tres posiciones (a cero, fuego alto,
Descripción
El LED se ilumina en rojo cuando el foco de cocción está
encendido.
Sigue iluminado hasta que la superficie se haya enfriado y se
pueda tocar sin peligro (tarda unos 12 minutos después de
haber apagado el foco).
Este LED se ilumina en verde cuando el foco de cocción está
encendido.
fuego bajo)
Se debe apretar y girar en la dirección necesaria para ajustar
la temperatura que se desee.
Girando en sentido contrario a las agujas del reloj se abre la
llave de paso del gas.
Girando en el sentido de las agujas de reloj hasta el tope se
cierra la llave de paso del gas.
Sólo CC09, CC11: El regulador delantero corresponde al foco derecho y el
trasero al izquierdo.
6 Empotrar el hornillo
Puede empotrar el hornillo en la encimera de su cocina.
6.1 Selección del lugar de montaje
Al elegir el lugar de montaje, tenga en cuenta las siguientes indicaciones:
Seleccione un lugar bien ventilado.
Elija un lugar techado a fin de evitar que el agua u otros líquidos salpiquen
directamente al hornillo.
65
Page 66

ES
Empotrar el hornillo CC09, CCK09, CC11
Preste atención a guardar la distancia mínima conforme a fig. 2,
página 2.
Para que tenga lugar la alimentación de aire combustible y la evacuación
de calor, debajo del hornillo debe haber previstas aberturas de ventilación
con una sección libre de al menos 50 cm².
Estas aberturas deben tener una anchura de al menos 5 mm.
Preste atención a que no haya corrientes de aire en el lugar de montaje.
Si monta el hornillo en una cabina abierta o en otro lugar abierto, monte
adicionalmente un cortavientos.
No ponga en funcionamiento el aparato en zonas con riesgo de explo-
sión.
6.2 Montaje del hornillo
¡AVISO! Peligro de ocasionar daños materiales
A
➤ Sierre una abertura rectangular en la encimera (véanse las medidas en
fig. 3, página 2).
➤ Coloque el hornillo en la mitad de la abertura.
➤ Fije el hornillo (2) con los cuatro elementos de fijación (3) y tornillos (4) a
la encimera (1), véase fig. 4, página 3.
➤ Coloque un extintor de la clase B-1 en las proximidades.
Antes de realizar cualquier perforación, asegúrese de que nin-
gún cable eléctrico ni ninguna pieza del vehículo puedan resultar dañados al taladrar, serrar o limar.
Para fijar el hornillo no utilice los conductos de gas, ni los man-
dos ni partes del quemador.
6.3 Conectar el hornillo a la alimentación de gas
¡ADVERTENCIA! ¡Peligro de sufrir lesiones!
!
Utilice sólo bombonas de gas butano o propano equipadas con
un presostato autorizado y una conexión adecuada.
Compare la indicación de presión dada en la placa de caracte-
rísticas con la que figura en el presostato.
La conexión del aparato a la alimentación de gas sólo la puede
realizar personal técnico autorizado.
66
Page 67

ES
CC09, CCK09, CC11 Empotrar el hornillo
Durante la conexión tenga en cuenta las siguientes indicaciones:
Como conducto para el gas utilice un tubo de acero ∅ 8 x 1 mm (acero
soldado sin costuras o acero inoxidable) y móntelo herméticamente con
un racor de anillo cortante.
Fije los tubos a una pared lateral o trasera del mobiliario alrededor de for-
ma que no se transmitan esfuerzos a los elementos de ajuste.
La conexión sólo debe poder soltarse con una herramienta. Respete las
reglas técnicas de las hojas de trabajo DVGW G607 y G608.
Ningún tubo debe tener tensión.
La longitud de la unión de manguera entre el consumidor de gas y el ali-
mentador de gas líquido debe ser lo más corta posible y no debe superar
los 750 mm.
Debe poder accederse a la conexión de la manguera en toda su longitud,
a efectos de su comprobación.
Para el funcionamiento debe haber previstas en el lugar de instalación
aberturas de ventilación con una sección libre de por lo menos 50 cm
Estas aberturas pueden contar con un cierre pero deben estar abiertas
cuando el fuego esté encendido.
2
.
➤ Conecte el hornillo a la alimentación de gas.
➤ Coloque sobre el hornillo un cartel de aviso con el siguiente texto:
“¡ADVERTENCIA!
Al cocinar es necesario disponer se una ventilación adicional, p. ej.
abriendo las ventanas situadas cerca de la parrilla, hornillo y horno.
Estos aparatos no pueden utilizarse como calefactores.”
➤ Compruebe que la manguera
– no se doble ni quede pillada,
– esté colocada a una distancia prudencial de seguridad del quemador.
➤ Abra la válvula de la bombona de gas.
¡ADVERTENCIA! ¡Peligro de sufrir lesiones!
Nunca compruebe la estanqueidad con una llama abierta o cerca
!
➤ Compruebe que ninguna de las conexiones presenta fugas con un spray
detector de fugas.
Si no aparecen burbujas, no hay fugas.
de fuentes de encendido.
67
Page 68

ES
Conexión eléctrica del hornillo CC09, CCK09, CC11
7 Conexión eléctrica del hornillo
¡ADVERTENCIA! ¡Peligro de sufrir lesiones!
Sólo un especialista está autorizado a conectar el hornillo.
!
Tenga en cuenta las siguientes indicaciones de seguridad durante la conexión eléctrica:
La siguiente información va dirigida a personal técnico familiarizado con las directivas y normativas de seguridad que correspondan.
¡AVISO!
A
➤ Consulte en la placa de características del hornillo si la tensión de funcio-
namiento del aparato coincide con la alimentación de tensión del vehículo.
➤ Conecte el aparato conforme a fig. 5, página 3 a la alimentación de ten-
sión del vehículo de 12 V
Utilice un cable bifilar con manguitos planos de 6,3 x 0,8 mm (1).
El circuito eléctrico debe estar asegurado con un cortocircuito fusible de
5 A (no incluido en el volumen de entrega).
Si los cables deben pasar a través de paredes metálicas o de
aristas afiladas, utilice guías de cable o canales de paso.
Los cables no deben quedar sueltos ni doblados al colocarlos
en materiales conductores de electricidad (metales).
Fije bien los cables.
No tire de los cables.
Tienda los cables de forma que no generen ningún peligro de
tropiezo y que se excluyan daños en el cable.
g.
➤ Asegure el cable con una abrazadera.
68
Page 69

ES
CC09, CCK09, CC11 Uso del hornillo
8 Uso del hornillo
¡ATENCIÓN! ¡Peligro de sufrir lesiones!
Aun después de haberse apagado, el foco de cocción permanece
!
A
Consejos para el manejo del hornillo
Para no dañar la superficie de vitrocerámica, siga las siguientes indicaciones:
caliente durante un tiempo. El LED de aviso lo indica.
No deposite sobre el hornillo ningún objeto que pueda resultar dañado o que se pueda calentar hasta que no se haya enfriado la superficie.
¡AVISO!
Antes de encender el hornillo, retire del foco de cocción todo material inflamable.
No utilice el hornillo como superficie para depositar objetos.
Las bases de las cazuelas y sartenes pueden tener bordes afilados que
pueden dejar marcas o rayaduras al manipularlos. Lo mismo ocurre con
recipientes de hierro fundido.
Las rayaduras también se pueden producir si, por ejemplo, con la cazuela
se arrastra, por ejemplo, arenisca que se haya soltado al lavar la verdura.
Estando la superficie caliente, evite que entre en contacto con ella:
– plástico
– lámina de aluminio
– azúcar ni sustancias con alto contenido de azúcar
Evite que se quemen repetidamente restos de suciedad en la superficie
para que no se incrusten.
A fin de obtener los mejores resultados posibles con el hornillo, al cocinar
tenga en cuenta las siguientes reglas básicas:
Los focos de cocción se calientan con mucha rapidez, pero se enfrían
lentamente. Ajuste directamente el regulador a la temperatura que desee.
Utilice cazuelas de buena calidad con una base totalmente llana que per-
mita un contacto pleno con todo el foco de cocción.
Un buen contacto de la cazuela o sartén con el foco de cocción aumenta
la eficiencia.
69
Page 70

ES
Uso del hornillo CC09, CCK09, CC11
Lo más adecuado son cazuelas y sartenes de acero fino y de hierro fun-
dido. No se recomienda el uso de sartenes de aluminio a una temperatura
máxima.
Preste atención a que la cazuela, o sartén, sea tan grande o más que el
foco de cocción.
Si se utiliza una cazuela, o sartén, demasiado pequeña, queda al descubierto una parte del foco de cocción que podría hacer arder la ropa.
Preste atención a que la base de la cazuela, o sartén, esté seca.
A fin de evitar el riesgo de sufrir quemaduras, de que ardan materiales
inflamables y de que se derrame contenido de la cazuela debido a un golpe accidental, oriente el mango o las asas de forma que no sobresalgan
hacia fuera y que no entren en el área de los focos vecinos.
Comprobaciones antes de encender el hornillo
Antes de encender el hornillo compruebe los siguientes puntos:
¿Se ha conectado la clase de gas correcta? El aparato sólo está autori-
zado para gas líquido.
¿Están despejadas las aberturas de ventilación previstas en el habitáculo
o en la parte exterior del vehículo? Las aberturas garantizan la entrada
de aire fresco y la salida del gas de escape.
¿Está totalmente limpia la superficie del hornillo de vitrocerámica? Los
restos de suciedad se pueden incrustar con el calor y ello podría dañar o
deformar la superficie.
¿Está abierta la válvula de cierre de la bombona de gas?
Encender el foco de cocción
➤ Coloque el regulador en la posición cero.
➤ Presione el regulador, manténgalo presionado y gírelo en el sentido con-
trario a las agujas del reloj a la posición “Fuego alto”.
➤ Manténgalo presionado durante un máximo de 15 segundos hasta que
haya finalizado el proceso de encendido y haya saltado el seguro termoeléctrico contra encendido.
➤ Suelte el regulador.
✓ La llama del quemador prende.
✓ El LED de control
✓ El LED de aviso
70
se ilumina.
se ilumina.
Page 71

ES
CC09, CCK09, CC11 Uso del hornillo
➤ Cuando se apaga el quemador tras soltar el regulador:
espere por lo menos 60 segundos antes de repetir el proceso de encendido.
NOTA
En la primera puesta en funcionamiento o tras haber cambiado la
I
Regulación de la temperatura
➤ Regule la temperatura con el regulador en el área comprendida entre las
posiciones “Fuego alto” y “Fuego bajo”.
Apagar el foco de cocción
➤ Coloque el regulador en la posición cero.
bombona puede ocurrir que después de 15 segundos el quemador
todavía no esté encendido porque hay aire en el conducto de gas.
En tal caso, repita el proceso de encendido.
✓ El LED de control
✓ El LED de aviso
El LED de aviso se apaga cuando la superficie se haya enfriado y se pueda tocar sin peligro (tarda unos 12 minutos después de haber apagado el
foco de cocción).
➤ Cuando vaya a interrumpir el funcionamiento durante un tiempo prolon-
gado, cierre completamente la válvula de cierre de la bombona de gas.
está apagado.
sigue iluminado.
8.1 Cambiar la bombona de gas
¡ADVERTENCIA! ¡Peligro de sufrir lesiones!
Cambie la bombona de gas sólo en lugares con una buena venti-
!
lación.
Compruebe que no haya ninguna fuente de calor en las inmediaciones.
Desconecte siempre el aparato antes de realizar el cambio de
bombona.
➤ Apague el hornillo girando el regulador en el sentido de las agujas del re-
loj a la posición cero.
➤ Cierre completamente la válvula de la bombona de gas.
➤ Desenrosque el presostato de la bombona de gas.
71
Page 72

ES
Solución de fallos CC09, CCK09, CC11
➤ Compruebe el estado del conducto de tubo flexible.
Sustituya el conducto de tubo flexible si el material está demasiado seco
o presenta porosidades.
➤ Enrosque a mano el presostato a la nueva bombona de gas.
9 Solución de fallos
Las reparaciones de las partes del aparato conductoras de gas deben ser
realizadas únicamente por especialistas.
➤ En caso de avería cierre inmediatamente el suministro de gas.
➤ Compruebe otra vez que el aparato no presenta daños.
➤ Cambie las piezas dañadas.
➤ No vuelva a poner el aparato en funcionamiento hasta que todas las ave-
rías estén subsanadas.
Antes de dirigirse al servicio de atención al cliente, cuando surja algún problema, compruebe primero lo siguiente:
la conexión a la alimentación de tensión del vehículo es correcta
se ha accionado el regulador y se ha ajustado la temperatura correcta
la base de la cazuela, o de la sartén, y la superficie del hornillo están lim-
pias y secas
la cazuela o la sartén tienen el tamaño adecuado y están correctamente
colocadas sobre el foco de cocción
la base de la cazuela o sartén es totalmente llana y uniforme
72
Page 73

ES
CC09, CCK09, CC11 Mantenimiento del hornillo
10 Mantenimiento del hornillo
Por motivos de seguridad, es necesario que especialistas autorizados comprueben, antes de la primera puesta en funcionamiento y posteriormente
cada dos años, el correcto funcionamiento del aparato y que subsanen posibles defectos.
➤ Durante la comprobación anual del aparato, compruebe, en especial:
– la hermeticidad a los gases
– la seguridad ante incendios y estabilidad de la llama
– la entrada de aire fresco
– los dispositivos de seguridad y de regulación (reguladores, presosta-
tos).
➤ Compruebe si el lugar de colocación cumple con las normas locales vi-
gentes.
11 Limpieza y cuidado del hornillo
¡ATENCIÓN! ¡Peligro de sufrir lesiones!
!
A
Preste atención a que se haya enfriado la superficie y el LED de
aviso
Si se ha derramado comida, elimínela con una esponja húmeda
o un paño. Al hacerlo tenga cuidado de no quemarse por efecto
del vapor.
¡AVISO!
No limpie la superficie vitrocerámica del hornillo con sustancias
abrasivas.
Utilice únicamente crema especial para limpiar superficies de
vitrocerámica. Otros limpiadores perjudican la superficie o pueden llegar a producir vapores tóxicos si se aplican sobre una
superficie caliente.
No utilice ningún limpiador a vapor.
esté apagado.
➤ Antes del primer uso, limpie a fondo la superficie vitrocerámica (véase el
siguiente capítulo).
73
Page 74

ES
Limpieza y cuidado del hornillo CC09, CCK09, CC11
11.1 Cuidados a intervalos regulares
➤ Vierta un poco de crema limpiadora en la mitad de la superficie que vaya
a limpiar.
➤ Humedezca un pañuelo de papel y frote la superficie con la crema limpia-
dora.
➤ Seque la superficie con un pañuelo de papel limpio y seco.
✓ Ahora la superficie está provista de una película protectora que repele el
agua y la suciedad.
11.2 Limpiar comida derramada
➤ Si se derrama comida mientras se está cocinando, apague el hornillo y
limpie el área en derredor del foco de cocción con un pañuelo de papel
limpio.
La comida que se haya derramado sobre los focos se ha de eliminar
como si fueran restos incrustados por efecto del calor (véase el capítulo
“Restos de comida incrustados” en la página 74).
Eliminar sustancias derretidas o derramadas con un alto contenido de
azúcar (mermelada, ketchup, salsa de tomate, etc.)
➤ Elimine inmediatamente con un rascador la comida que se salga mien-
tras la superficie todavía esté caliente: rasque los restos derramados o
derretidos llevándolos del el foco a un área fría de la superficie del hornillo.
➤ Apague los focos de cocción.
➤ Deje que se enfríe el hornillo (el LED de aviso
do).
➤ Limpie la superficie conforme al capítulo “Cuidados a intervalos regula-
res” en la página 74.
tiene que estar apaga-
11.3 Restos de comida incrustados
➤ Elimine las incrustaciones con un rascador. Coloque el rascador con un
ángulo de inclinación de aproximadamente 30° respecto a la superficie y
rasque el material.
➤ Siga el procedimiento de limpieza; véase al respecto el capítulo “Cuida-
dos a intervalos regulares” en la página 74.
74
Page 75

ES
CC09, CCK09, CC11 Garantía
11.4 Eliminar marcas de metal
Puede ocurrir, sobre todo si se utilizan cazuelas y sartenes ligeras, que queden marcas de metal en la superficie del hornillo. Estas marcas son más frecuentes que las rayaduras.
➤ Limpie las marcas conforme al capítulo “Limpiar comida derramada” en
la página 74.
➤ Para marcas de difícil eliminación utilice crema de limpieza y un rascador.
12 Garantía
Rige el plazo de garantía legal. Si el producto presenta algún defecto,
diríjase a la sucursal del fabricante de su país (ver direcciones en el dorso
de estas instrucciones) o a su establecimiento especializado.
Para la tramitación de la reparación y de la garantía debe enviar también los
siguientes documentos:
una copia de la factura con fecha de compra,
el motivo de la reclamación o una descripción de la avería.
13 Gestión de residuos
➤ Deseche el material de embalaje en el contenedor de reciclaje correspon-
diente.
Cuando vaya a desechar definitivamente el producto, infórmese en
el centro de reciclaje más cercano o en un comercio especializado
M
sobre las normas pertinentes de eliminación de materiales.
75
Page 76

ES
Datos técnicos CC09, CCK09, CC11
14 Datos técnicos
Dometic CCK09 Dometic CC09 Dometic CC11
9103303387 9103303386 9103303390
Art. n.º:
Consumo de gas: 115 g/h 210 g/h 210 g/h
Categoría de aparato: I
AT, DE, LV, MT, PL: 30 mbares (
CY, DK, EE, FI, HU, IS, NL, NO, RO, SE, SK:
Presión de conexión /
categoría de gas:
28 – 30 mbares (I
SI: 28 – 30 mbares (
BE, CH, CZ, ES, FR, GB, GR, IE, IT, LT, LU, PT, TR:
28 – 30/37 mbares (I3+)
3B/P
I
3P
(negro)
9103303391
(blanco)
I
)
3B/P
)
)
Número de focos: 2 4 4
Número de quemadores: 1 2 2
1600 W 2900 W
Carga calorífica nominal:
Tiempo de cocción para
1 l de agua:
Tensión de conexión
(para encendido):
Consumo de corriente:
Dimensiones en mm
(An x Al x P):
Peso: 6,0 kg 10,8 kg 11,0 kg
(en función de las condiciones del entorno y de la
Durante el proceso de encendido: 0,6 A
En funcionamiento: 0,3 A
398 x 110 x 505 558 x 110 x 505 566 x 110 x 445
(1300 W +
1600 W)
Unos 7,5 min
cazuela utilizada)
12 Vg
2900 W
(1300 W +
1600 W)
Reservado el derecho a realizar modificaciones en los modelos y envíos en
función de los avances técnicos.
76
Page 77

NL
CC09, CCK09, CC11 Instructies voor het gebruik van de handleiding
Lees deze handleiding voor de montage en ingebruikneming zorgvuldig door en bewaar de handleiding. Geef de handleiding bij doorverkoop van het toestel door aan de gebruiker.
Inhoud
1 Instructies voor het gebruik van de handleiding. . . . . . . . . . . . . . . . 77
2 Algemene veiligheidsinstructies. . . . . . . . . . . . . . . . . . . . . . . . . . . . 78
3 Omvang van de levering . . . . . . . . . . . . . . . . . . . . . . . . . . . . . . . . . 81
4 Gebruik volgens de voorschriften . . . . . . . . . . . . . . . . . . . . . . . . . . 82
5 Technische beschrijving. . . . . . . . . . . . . . . . . . . . . . . . . . . . . . . . . . 82
6 Kookplaat inbouwen. . . . . . . . . . . . . . . . . . . . . . . . . . . . . . . . . . . . . 83
7 Kookplaat elektrisch aansluiten . . . . . . . . . . . . . . . . . . . . . . . . . . . . 86
8 Kookplaat gebruiken . . . . . . . . . . . . . . . . . . . . . . . . . . . . . . . . . . . . 87
9 Oplossing . . . . . . . . . . . . . . . . . . . . . . . . . . . . . . . . . . . . . . . . . . . . . 90
10 Kookplaat onderhouden. . . . . . . . . . . . . . . . . . . . . . . . . . . . . . . . . . 91
11 Kookplaat reinigen en onderhouden . . . . . . . . . . . . . . . . . . . . . . . . 91
12 Garantie . . . . . . . . . . . . . . . . . . . . . . . . . . . . . . . . . . . . . . . . . . . . . . 93
13 Afvoeren. . . . . . . . . . . . . . . . . . . . . . . . . . . . . . . . . . . . . . . . . . . . . . 93
14 Technische gegevens . . . . . . . . . . . . . . . . . . . . . . . . . . . . . . . . . . . 94
1 Instructies voor het gebruik van de
handleiding
WAARSCHUWING!
Veiligheidsaanwijzing: Het niet naleven kan leiden tot overlijden
!
of ernstig letsel.
VOORZICHTIG!
Veiligheidsaanwijzing: Het niet naleven kan leiden tot letsel.
!
77
Page 78

NL
Algemene veiligheidsinstructies CC09, CCK09, CC11
LET OP!
Het niet naleven ervan kan leiden tot materiële schade en de
A
werking van het product beperken.
INSTRUCTIE
Aanvullende informatie voor het bedienen van het product.
I
➤ Handeling: dit symbool geeft aan dat u iets moet doen. De vereiste
handelingen worden stap voor stap beschreven.
✓ Dit symbool beschrijft het resultaat van een handeling.
afb. 1 5, pagina 3: deze aanduiding wijst u op een element in een afbeelding, in dit voorbeeld op „positie 5 in afbeelding 1 op pagina 3”.
Neem ook de volgende veiligheidsinstructies in acht.
2 Algemene veiligheidsinstructies
De fabrikant kan niet aansprakelijk gesteld worden voor schade veroorzaakt
door:
beschadiging van het product door mechanische invloeden
veranderingen aan het product zonder uitdrukkelijke toestemming van de
fabrikant
gebruik voor andere dan de in de handleiding beschreven toepassingen
Neem de volgende fundamentele veiligheidsmaatregelen bij het gebruik van
elektrische toestellen in acht om u te beschermen tegen:
elektrische schokken
brandgevaar
verwondingen
78
Page 79

NL
CC09, CCK09, CC11 Algemene veiligheidsinstructies
2.1 Fundamentele veiligheid
!
Gebruik uitsluitend vloeibaar gas van de categorieën I
I
(butaan/propaan). Gebruik geen andere brandstoffen.
3
Breng een geschikte brandblusser in reikwijdte aan.
Zorg ervoor dat de brandblusser regelmatig door een deskundige wordt gecontroleerd.
Personen die op grond van hun lichamelijke, sensorische of
geestelijke capaciteiten niet in staat zijn, het toestel veilig te gebruiken, mogen het toestel enkel onder toezicht van een verantwoordelijksbewuste volwassene gebruiken.
Raak de kookzones of de zone errond niet aan.
De oppervlakken van de kookzones kunnen heet zijn, ook als ze
donker zijn. De zones in de buurt van de kookzones kunnen zo
heet worden dat ze verbrandingen veroorzaken.
Als het oppervlak van de kookplaat gesprongen is, kunnen rei-
nigingsoplossingen en overlopende vloeistoffen in het toestel
dringen, wat tot gevaar voor een elektrische schok leidt. Schakel het toestel in dit geval onmiddellijk uit.
3B/P
, I3+,
A
Onderbreek bij werkzaamheden aan het toestel altijd de
stroomtoevoer.
Onderhouds- en reparatiewerkzaamheden mogen alleen wor-
den uitgevoerd door een vakman die vertrouwd is met de gevaren die ermee verbonden zijn en de geldende voorschriften.
Gebruik het toestel alleen waarvoor het bestemd is.
Voer geen wijzigingen aan het toestel uit.
Schakel het toestel bij niet-gebruik uit.
Gebruik het toestel niet als het beschadigd is of als delen ervan
defect zijn.
79
Page 80

NL
Algemene veiligheidsinstructies CC09, CCK09, CC11
2.2 Veiligheid bij de omgang met vloeibaar gas
Houd brandbare stoffen uit de buurt van verwarmings- en kook-
toestellen, evenals andere licht- en warmtebronnen.
!
Gevaar voor verstikking!
Zorg er voor het inschakelen van het toestel voor, dat de ruimte
voldoende is geventileerd. Tijdens het gebruik moeten er ventilatieopeningen met een vrije diameter van ten minste 50 cm
beschikbaar zijn in opstelruimte. Deze openingen kunnen afsluitbaar zijn, moeten echter bij gebruik van de pit worden geopend (zie het bordje dat is aangebracht boven de kookplaat).
Vergelijk de aangegeven druk op het typeplaatje met de druk
die is aangegeven op de drukregelaar.
Bewaar nooit gasflessen voor vloeibaar gas op niet-geventileer-
de plaatsen.
Bescherm flessen met vloeibaar gas tegen directe zonnestra-
len. De temperatuur mag niet hoger zijn dan 50 °C.
2
Indien u gas ruikt:
– Alle vensters openen en de ruimte verlaten.
– Geen elektrisch toestel gebruiken en het gebruik van open
vlammen vermijden. Hierdoor kan het gas ontsteken.
– Sluit het gasflesventiel en houd deze gesloten, totdat de fout
is verholpen.
– Probeer nooit het lek met een vlam te vinden.
De kookplaat mag niet worden gebruikt tijdens het tanken, in
garages en op veerboten.
2.3 Veiligheid bij het gebruik van het toestel
Draag tijdens het gebruik van de kookplaat geschikte kleding.
Draag geen loshangende kledingstukken, die vuur kunnen vat-
!
ten.
Laat de kookplaat tot op omgevingstemperatuur afkoelen, voor-
dat u het met blote handen aanraakt.
Houd de omgeving rondom de kookplaat vrij van vet, alcoholi-
sche stoffen, kunststof materiaal en brandbaar textiel (zoals
gordijnen, handdoeken, keukenmaterialen).
Hang geen handdoeken, papier, gordijnen of andere brandbare
materialen in de buurt van de kookplaat en leg deze er ook niet
op.
80
Page 81

NL
CC09, CCK09, CC11 Omvang van de levering
Ga voorzichtig te werk, als u vet of olie verhit. Vet en olie kunnen
bij grote hitte ontvlammen.
Probeer nooit om brandend vet met water te blussen.
Gebruik enkel droge pannenlappen en houten lepels om stoom-
vorming te voorkomen. Natte of vochtige pannenlappen op hete
oppervlakken kunnen verbrandingen door damp veroorzaken.
Gebruik de kookplaat nooit zonder toezicht. Overkokende pan-
nen kunnen rook en brand veroorzaken.
Schakel de kookplaat uit voor u de pan eraf neemt.
Om gevaar voor verbrandingen, het ontvlammen van brandbaar
materiaal en het morsen van eten door het per ongeluk aanstoten van pannen e.d. te vermijden, dient u de grepen naar binnen
te draaien. Zorg ervoor dat ze over ernaast liggende kookzones
uitsteken.
Gebruik de kookplaat niet voor het verwarmen van de ruimte.
A
Het gebruiken van de kookplaat met hoge temperatuur zonder
een gevulde pan kan de kookplaat beschadigen.
Plaats of leg geen plastic voorwerpen, zoals zout- en peper-
vaatjes, verpakkingen e.d. tijdens het gebruik op de kookplaat.
Zorg ervoor dat er zich geen pannenlappen aan of op de kook-
plaat bevinden.
Gebruik potten, pannen en andere toestellen die voor kerami-
sche oppervlakken en het nominale vermogen van de kookplaat
geschikt zijn.
Alleen bepaalde soorten glas, glaskeramiek, aardewerk of
andere verglaasde toestellen kunnen de snelle temperatuursveranderingen weerstaan en zijn hierdoor voor fornuizen
geschikt.
Gebruik pannen en potten van het juiste formaat.
3 Omvang van de levering
Glaskeramische gaskookplaat
Gebruiksaanwijzing
81
Page 82

NL
Gebruik volgens de voorschriften CC09, CCK09, CC11
4 Gebruik volgens de voorschriften
Dometic CC09, CCK09 en CC11 zijn op vloeibaar gas werkende glaskeramische kookplaten. Ze zijn voor de inbouw in een keukenblok in huishoudens,
campers, caravans of boten bestemd.
5 Technische beschrijving
De kookplaat is in verschillende uitvoeringen verkrijgbaar.
CC09 (art.-nr. 9103303386): twee kookzones
CCK09 (art.-nr. 9103303387): een kookzone
CC11 (art.-nr. 9103303390/9103303391): twee kookzones
Uw toesteltype kunt u aan de hand van het artikelnummer bepalen dat op het
typeplaatje aangegeven is.
De kookzones worden door telkens een gasbrander verwarmd.
Achter de kookzone (afb. 1 1, pagina 2) bevindt zich een doorkookzone
(afb. 1 2), die door de rookgassen van de brander onder de kookzone verwarmd wordt. Daardoor is de temperatuur niet zo hoog als in de kookzone.
De doorkookzone kan voor een tweede kookpan gebruikt worden waarvoor
minder hoge temperaturen nodig zijn.
Alleen CC09, CC11: de rechter, kleinere kookzone heeft een geringer verwarmingsvermogen.
Het glaskeramische kookvlak is hitte- en koudebestendig. Het kan met zware
pannen belast worden. Puntvormige schokbelastingen, bijv. door vallende
voorwerpen, moeten vermeden worden. Dit kan schade veroorzaken.
82
Page 83

NL
CC09, CCK09, CC11 Kookplaat inbouwen
Bedieningselementen
Nr. in afb. 1,
pag. 2
1 Kookzone
2 Doorkookzone
3 Waarschuwings-LED „Heet oppervlak”
4 Controle-LED
5 Regelaar, in drie standen instelbaar (nulstand, grote vlam,
Beschrijving
Deze LED brandt rood als de kookzone ingeschakeld is.
De LED blijft branden tot het oppervlak afgekoeld is en zonder
gevaar aangeraakt kan worden (dit duurt ongeveer 12 minuten
na het uitschakelen van de kookzone).
De LED brandt groen als de kookzone ingeschakeld is.
kleine vlam)
Indrukken en met de klok mee of tegen de klok in draaien om
de gewenste temperatuur in te stellen.
Draaien tegen de klok in opent de gaskraan.
Helemaal met de klok mee draaien sluit gaskraan.
Alleen CC09, CC11: de voorste regelaar is aan de rechter kookplaat toegewezen, de achterste regelaar aan de linker kookplaat.
6 Kookplaat inbouwen
U kunt de kookplaat in het werkblad van uw keuken inbouwen.
6.1 Keuze van de inbouwplaats
Neem bij de keuze van de montageplaats de volgende aanwijzingen in acht:
Kies een goed geventileerde plaats voor het toestel.
Kies een overdekte plaats om te vermijden dat water of andere vloeistof-
fen direct op de kookplaat spatten.
Neem de minimumafstanden volgens afb. 2, pag. 2 in acht.
Voor de verbrandingsluchttoevoer en de warmteafvoer moeten onder de
kookplaat ventilatieopeningen met een vrije doorsnede van minstens
50 cm² voorhanden zijn.
De ventilatieopeningen moeten minstens 5 mm breed zijn.
83
Page 84

NL
Kookplaat inbouwen CC09, CCK09, CC11
Let erop, dat er op de montageplaats geen tocht ontstaat.
Indien u de kookplaat monteert in een open cockpit of op andere open
plaatsen, monteert u dan ook een extra windbescherming.
Gebruik het toestel niet in explosieve ruimtes.
6.2 Inbouw van de kookplaat
LET OP! Gevaar voor beschadiging!
A
➤ Zaag een rechthoekige opening in het werkblad (afmetingen zie afb. 3,
pag. 2).
➤ Plaats de kookplaat in het midden van de uitsnijding.
➤ Bevestig de kookplaat (2) met de vier bevestigingselementen (3) en
schroeven (4) aan het werkblad (1), zie afb. 4, pag. 3.
➤ Breng een brandblusser van de klasse B-1 binnen handbereik aan.
Controleer voor het boren of er geen elektrische kabels of ande-
re delen van het voertuig door boren, zagen en vijlen beschadigd kunnen raken.
Gebruik ter bevestiging van de kookplaat niet de gasleidingen,
kranen of delen van de brander.
6.3 Kookplaat aansluiten op de gastoevoer
WAARSCHUWING! Gevaar voor verwonding!
!
Neem de volgende aanwijzingen bij het gebruik in acht:
Gebruik een gasleiding van staalbuis ∅ 8 x 1 mm (gelast, naadloos staal
of roestvrij staal) die u met een snijringschroefverbinding dicht monteert.
Bevestig de buis zo aan een zij- of achterwand van de meubeldelen in de
buurt, dat er geen krachten worden overgedragen naar de regelelementen.
Gebruik uitsluitend propaan- of butaangasflessen met gekeurde
drukregelaar en passende aansluiting.
Vergelijk de aangegeven druk op het typeplaatje met de druk
die is aangegeven op de drukregelaar.
Het toestel mag alleen door daarvoor geautoriseerd vakperso-
neel op de gastoevoer aangesloten worden.
84
Page 85

NL
CC09, CCK09, CC11 Kookplaat inbouwen
Voor het losmaken van de verbinding moet altijd gereedschap nodig zijn.
Houd u daarbij aan de technische regels van de DVGW-werkbladen G607
en G608.
Alle buizen moeten spanningsvrij zijn.
Houd de lengte van de slangverbinding tot het gastoestel en de toevoer
van het vloeibare gas zo kort mogelijk en niet langer dan 750 mm.
De slangverbinding moet over de volledige lengte toegankelijk zijn voor
controle.
Tijdens het gebruik moeten er ventilatieopeningen met een vrije diameter
van ten minste 50 cm
kunnen afsluitbaar zijn, maar moeten bij het gebruik van de pit worden geopend.
➤ Verbind de kookplaat met de gastoevoer.
➤ Breng boven de kookplaat een bord aan met de volgende tekst:
2
beschikbaar zijn in opstelruimte. De openingen
„WAARSCHUWING!
Tijdens het koken is het nodig voor extra ventilatie te zorgen, bijv. door
het openen van vensters in de buurt van het grill-, kook- en baktoestel.
Deze toestellen mogen niet worden gebruikt voor het verwarmen van de
ruimte.”
➤ Let erop dat de slangleiding
– niet ingeklemd of geknikt is,
– op veilige afstand van de brander ligt.
➤ Open het ventiel van de gasfles.
WAARSCHUWING! Gevaar voor verwonding!
Controleer de lekdichtheid nooit bij open vuur of in de buurt van
!
➤ Controleer alle verbindingen met lekspray op lekdichtheid.
De lekdichtheid is gegarandeerd als er zich geen luchtbellen vormen.
ontstekingsbronnen.
85
Page 86

NL
Kookplaat elektrisch aansluiten CC09, CCK09, CC11
7 Kookplaat elektrisch aansluiten
WAARSCHUWING! Gevaar voor verwonding!
De aansluiting van het kooktoestel mag alleen door een vakman
!
Neem bij de elektrische aansluiting de volgende veiligheidsaanwijzingen in
acht:
uitgevoerd worden.
De volgende informatie is bestemd voor vaklieden die met de betreffende richtlijnen en veiligheidsmaatregelen vertrouwd zijn.
LET OP!
A
➤ Controleer aan de hand van het typeplaatje van de kookplaat of de be-
drijfsspanning van het toestel met de boordnetspanning overeenkomt.
➤ Sluit het toestel conform afb. 5, pag. 3 op het 12-V
Gebruik een tweeaderige kabel met platte vlaksteker-kabelschoenen
6,3x0,8mm (1).
Het stroomcircuit moet met een 5 A smeltzekering (niet in de omvang
van de levering inbegrepen) beveiligd zijn.
Als u leidingen door metalen of andere scherpe muren moet lei-
den, gebruik dan goten of doorvoeren.
Leg de leidingen niet los of geknikt op elektrisch geleidend ma-
teriaal (metaal).
Bevestig de leidingen goed.
Trek niet aan leidingen.
Leg de leidingen zodanig dat er niet over gestruikeld kan wor-
den en beschadiging van de kabel uitgesloten is.
g-boordnet aan.
➤ Beveilig de kabel met een klem.
86
Page 87

NL
CC09, CCK09, CC11 Kookplaat gebruiken
8 Kookplaat gebruiken
VOORZICHTIG! Gevaar voor verwonding!
De kookzone blijft ook na het uitschakelen nog een tijdje heet. De
!
A
Tips voor de omgang met de kookplaat
Opdat het glaskeramische oppervlak niet beschadigd wordt, dient u het volgende in acht te nemen:
waarschuwings-LED geeft dit aan.
Leg geen voorwerpen op de kookplaat die beschadigd of heet kunnen worden tot het oppervlak afgekoeld is.
LET OP!
Zorg er voor het inschakelen van de kookplaat voor dat zich geen
brandbare stoffen op de kookzone bevinden.
Gebruik de kookplaat niet als aflegvlak.
Bodems van potten en pannen kunnen randen en bramen hebben die bij
het verschuiven sporen of krassen achterlaten. Dit geldt vooral bij kookgerei van gietijzer.
Krassen kunnen ook ontstaan als bijv. zandkorrels van het voordien was-
sen van groenten met de pot over het kookvlak getrokken worden.
Vermijd dat het volgende op het hete oppervlak terechtkomt:
– Kunststoffen
– Aluminiumfolie
– Suiker of sterk suikerhoudende stoffen.
Vermijd het herhaaldelijk vastbranden van verontreinigingen.
Om de beste resultaten met de kookplaat te bereiken, dient u bij het koken
en bereiden van maaltijden de volgende basisregels in acht te nemen:
De kookzones warmen erg snel op, maar koelen langzaam af. Zet de re-
gelaar onmiddellijk op de gewenste temperatuur.
Gebruik hoogwaardige potten en pannen met effen bodem om het volle-
dige contact met de kookzone te garanderen.
Het goede contact van de pot of pan met de kookzone verhoogt de effi-
ciëntie.
Het meest geschikt zijn potten en pannen van roestvast staal en gietijzer.
Aluminiumpannen worden voor de maximale temperatuurinstelling niet
aanbevolen.
87
Page 88

NL
Kookplaat gebruiken CC09, CCK09, CC11
Zorg ervoor dat de pot of pan zo groot is als de kookzone of iets groter.
Wordt een te kleine pot of een te kleine pan gebruikt, dan ligt een deel
van de kookzone vrij, wat tot het ontbranden van kledingstukken kan
leiden.
Zorg ervoor dat de bodem van de pot of pan droog is.
Om gevaar voor verbrandingen, het ontvlammen van brandbaar materi-
aal en het morsen van eten door het per ongeluk aanstoten van de pot of
pan te vermijden, dient u de greep naar binnen te draaien. Zorg ervoor dat
de greep niet in de ernaast liggende kookzones uitsteekt.
Voor het inschakelen controleren
Controleer voor het inschakelen van de kookplaat:
Is de juiste gassoort aangesloten? Het toestel is alleen voor vloeibaar gas
bestemd.
Zijn de luchttoevoer- en luchtafvoeropeningen in het vertrek of aan de bui-
tenkant van het voertuig vrij? De openingen garanderen de verseluchttoevoer en de rookgasafvoer.
Is het oppervlak van de glaskeramische kookplaat vrij van verontreinigin-
gen? Verontreinigingen kunnen inbranden en hierdoor het oppervlak beschadigen of ontsieren.
Is het afsluitventiel van de gasfles geopend?
88
Page 89

NL
CC09, CCK09, CC11 Kookplaat gebruiken
Kookzone inschakelen
➤ Zet de regelaar op de nulstand.
➤ Druk de regelaar in, houd hem ingedrukt en draai hem tegen de klok in op
de positie „grote vlam”.
➤ Houd de regelaar maximaal 15 seconden ingedrukt tot de ontsteking
beëindigd is en de thermo-elektrische ontstekingsbeveiliging
aangesproken is.
➤ Laat de regelaar los.
✓ De brander brandt.
✓ De controle-LED
✓ De waarschuwings-LED
➤ Als de brander na het loslaten van de regelaar uitgaat:
wacht minstens 60 seconden voor u het ontstekingsproces herhaalt.
INSTRUCTIE
Bij de eerste ingebruikneming of na een fleswissel kan het gebeu-
I
Temperatuur regelen
➤ Regel met de regelaar de temperatuur tussen de standen „grote vlam” en
„kleine vlam”.
Kookzone uitschakelen
➤ Zet de regelaar op de nulstand.
ren dat de brander na 15 seconden nog niet brandt, omdat er zich
nog lucht in de gasleiding bevindt.
Herhaal in dit geval de ontstekingsprocedure.
brandt.
brandt.
✓ De controle-LED
✓ De waarschuwings-LED
De waarschuwings-LED wordt uitgeschakeld als het oppervlak afgekoeld
is en zonder gevaar aangeraakt kan worden (dit duurt ongeveer 12 minuten na het uitschakelen van de kookzone).
➤ Sluit bij een langere gebruikspauze het afsluitventiel van de gasfles.
is uit.
brandt verder.
89
Page 90

NL
Oplossing CC09, CCK09, CC11
8.1 Gasfles vervangen
WAARSCHUWING! Gevaar voor verwonding!
Vervang de gasfles uitsluitend bij een goede ventilatie.
!
➤ Schakel de kookplaat uit door de regelaar tegen de klok in in de nulstand
te draaien.
➤ Sluit het ventiel van de gasfles volledig.
➤ Schroef de drukregelaar van de gasfles.
➤ Controleer de toestand van de slangleiding.
Vervang de slangleiding als het materiaal broos of poreus is.
➤ Schroef de drukregelaar met de hand vast op de nieuwe gasfles.
Let erop dat er geen ontstekingsbron in de buurt is.
Vervang de gasfles uitsluitend als het toestel uitgeschakeld is.
9 Oplossing
Het gasgeleidende onderdeel van het toestel mag uitsluitend door een vakmonteur worden gerepareerd.
➤ Sluit bij storingen meteen de gastoevoer.
➤ Controleer nog eens of het toestel onbeschadigd is.
➤ Vervang de beschadigde onderdelen.
➤ Neem het toestel pas weer in gebruik als alle storingen verholpen zijn.
Voor u bij problemen met de kookplaat met de klantendienst contact opneemt, gelieve het volgende te controleren:
of de aansluiting op het boordnet in orde is
of de regelaar ingeschakeld en de temperatuurinstelling correct is
of de bodem van de pot of pan en het kookplaatoppervlak schoon en
droog zijn
of de pot of pan het juiste formaat heeft en juist op de kookzone geplaatst
is
of de bodem van de pot of pan effen en gelijkmatig is
90
Page 91

NL
CC09, CCK09, CC11 Kookplaat onderhouden
10 Kookplaat onderhouden
Om veiligheidsredenen is het nodig, het toestel één keer voor de eerste ingebruikneming en daarna om de twee jaar door een deskundige te laten controleren op een goede werking en eventuele gebreken te laten verhelpen.
➤ Controleer bij de jaarlijkse controle van het toestel in het bijzonder de vol-
gende functies:
– controle van gasdichtheid
– controle van de brandveiligheid en de stabiliteit van de vlam
– controle van de toevoer van verse lucht
– controle van de veiligheids- en regelinrichtingen (pitkranen, drukrege-
laar).
➤ Controleer of de opstelruimte voldoet aan de plaatselijk geldende voor-
schriften.
11 Kookplaat reinigen en onderhouden
VOORZICHTIG! Gevaar voor verwonding!
!
A
Controleer of het oppervlak afgekoeld en de waarschuwings-
LED
Als u gemorst eten met een vochtige spons of doek afveegt,
dient u voorzichtig te werk te gaan om verbrandingen door
damp te vermijden.
LET OP!
Behandel het glaskeramische oppervlak van de kookplaat nooit
met schuurmiddelen.
Gebruik uitsluitend speciale reinigingsmelk voor glaskerami-
sche oppervlakken. Andere reinigingsmiddelen beschadigen
het oppervlak of veroorzaken soms giftige dampen als ze op
een heet oppervlak aangebracht worden.
Gebruik geen stoomreinigers.
uit is.
➤ Reinig voor het eerste gebruik grondig het glaskeramische oppervlak
(zie volgend hoofdstuk).
91
Page 92

NL
Kookplaat reinigen en onderhouden CC09, CCK09, CC11
11.1 Regelmatig onderhoud
➤ Doe een beetje reinigingsmelk op het midden van het te reinigen opper-
vlak.
➤ Bevochtig een papieren handdoek en wrijf de reinigingsmelk op het op-
pervlak.
➤ Veeg het oppervlak met een schone, droge papieren handdoek af.
✓ Nu bevindt zich op het oppervlak een beschermende film die water- en
vuilafstotend is.
11.2 Overgelopen eten verwijderen
➤ Mocht er eten tijdens het koken overlopen, schakel dan de kookplaat uit
en veeg het eten rond de kookzone met een schone papieren handdoek
af.
Overgelopen eten op de kookzones moet als ingebrand overgelopen
eten behandeld worden (zie hoofdstuk „Ingebrand overgelopen eten” op
pagina 92).
Gesmolten substanties of overgelopen eten met hoog suikergehalte
(confituur, ketchup, tomatensaus e.d.) verwijderen.
➤ Verwijder het overgelopen materiaal onmiddellijk met een schaaf terwijl
het oppervlak nog heet is: schuif het overgelopen of gesmolten materiaal
van de kookzone op een koele zone van het kookplaatoppervlak.
➤ Schakel de kookzones uit.
➤ Laat de kookplaat afkoelen (waarschuwings-LED
➤ Reinig het oppervlak conform hoofdstuk „Regelmatig onderhoud” op
pagina 92.
moet uit zijn).
11.3 Ingebrand overgelopen eten
➤ Verwijder het ingebrande materiaal met een schaaf. Houd de schaaf in
een hoek van ca. 30° t.o.v. het oppervlak en schaaf het materiaal af.
➤ Sluit de reiniging af; zie hoofdstuk „Regelmatig onderhoud” op pagina 92.
92
Page 93

NL
CC09, CCK09, CC11 Garantie
11.4 Metaalsporen verwijderen
Het kan gebeuren, vooral als u lichtere potten of pannen gebruikt, dan metaalsporen op het oppervlak achterblijven. Deze sporen verschijnen vaker
dan krassen.
➤ Verwijder de metaalsporen conform hoofdstuk „Overgelopen eten verwij-
deren” op pagina 92.
➤ Voor erg hardnekkige sporen gebruikt u reinigingsmelk samen met een
schaaf.
12 Garantie
De wettelijke garantieperiode is van toepassing. Als het product defect is,
wendt u zich tot het filiaal van de fabrikant in uw land (adressen zie achterkant van de handleiding) of tot uw speciaalzaak.
Voor de afhandeling van de reparatie of garantie dient u de volgende documenten mee te sturen:
een kopie van de factuur met datum van aankoop,
reden van de klacht of een beschrijving van de storing.
13 Afvoeren
➤ Laat het verpakkingsmateriaal indien mogelijk recyclen.
Als u het product definitief buiten bedrijf stelt, informeer dan bij het
dichtstbijzijnde recyclingcentrum of uw speciaalzaak naar de be-
M
treffende afvoervoorschriften.
93
Page 94

NL
Technische gegevens CC09, CCK09, CC11
14 Technische gegevens
Dometic CCK09 Dometic CC09 Dometic CC11
9103303387 9103303386 9103303390
Artikelnr.:
Gasverbruik: 115 g/h 210 g/h 210 g/h
Toestelklasse: I
AT, DE, LV, MT, PL: 30 mbar (
CY, DK, EE, FI, HU, IS, NL, NO, RO, SE, SK:
Aansluitdruk /
gascategorie:
28 – 30 mbar (I
SI: 28 – 30 mbar (
BE, CH, CZ, ES, FR, GB, GR, IE, IT, LT, LU, PT, TR:
28 – 30/37 mbar (I3+)
3B/P
I
)
3P
(zwart)
9103303391
(wit)
I
)
3B/P
)
Aantal kookplaten: 2 4 4
Aantal branders: 1 2 2
Nominale warmtebelasting:
Kooktijd voor 1 l water:
Aansluitspanning
(voor ontsteking):
Stroomgebruik:
Afmetingen in mm
(b x h x d):
Gewicht: 6,0 kg 10,8 kg 11,0 kg
1600 W 2900 W
(1300 W +
1600 W)
ca. 7,5 min
(afhankelijk van de omgevingsvoorwaarden en de
gebruikte pan)
12 Vg
Tijdens de ontsteking: 0,6 A
In werking: 0,3 A
398 x 110 x 505 558 x 110 x 505 566 x 110 x 445
2900 W
(1300 W +
1600 W)
Afwijkingen, wijzigingen in verband met de technische vooruitgang en voorradigheid voorbehouden.
94
Page 95

IT
CC09, CCK09, CC11
Prima di effettuare il montaggio e la messa in funzione, leggere
accuratamente questo manuale di istruzioni, conservarlo e nel caso in
cui l'apparecchio venga consegnato ad un altro utente, consegnare
anche le relative istruzioni.
Indice
1 Indicazioni per l'uso del manuale di istruzioni . . . . . . . . . . . . . . . . . 96
2 Indicazioni di sicurezza generali . . . . . . . . . . . . . . . . . . . . . . . . . . . 96
3 Dotazione. . . . . . . . . . . . . . . . . . . . . . . . . . . . . . . . . . . . . . . . . . . . 100
4 Uso conforme alla destinazione. . . . . . . . . . . . . . . . . . . . . . . . . . . 100
5 Descrizione tecnica . . . . . . . . . . . . . . . . . . . . . . . . . . . . . . . . . . . . 100
6 Montaggio del piano cottura. . . . . . . . . . . . . . . . . . . . . . . . . . . . . . 101
7 Allacciamento elettrico del piano cottura . . . . . . . . . . . . . . . . . . . . 104
8 Utilizzo del piano cottura . . . . . . . . . . . . . . . . . . . . . . . . . . . . . . . . 105
9 Rimedio . . . . . . . . . . . . . . . . . . . . . . . . . . . . . . . . . . . . . . . . . . . . . 108
10 Manutenzione del piano cottura. . . . . . . . . . . . . . . . . . . . . . . . . . . 109
11 Pulizia e cura del piano cottura . . . . . . . . . . . . . . . . . . . . . . . . . . . 109
12 Garanzia . . . . . . . . . . . . . . . . . . . . . . . . . . . . . . . . . . . . . . . . . . . . 111
13 Smaltimento . . . . . . . . . . . . . . . . . . . . . . . . . . . . . . . . . . . . . . . . . . 111
14 Specifiche tecniche . . . . . . . . . . . . . . . . . . . . . . . . . . . . . . . . . . . . 112
95
Page 96

IT
Indicazioni per l'uso del manuale di istruzioni CC09, CCK09, CC11
1 Indicazioni per l'uso del manuale di
istruzioni
AVVERTENZA!
Avviso di sicurezza: la mancata osservanza di questo avviso può
!
!
A
causare ferite gravi anche mortali.
ATTENZIONE!
Avviso di sicurezza: la mancata osservanza di questo avviso può
essere causa di lesioni.
AVVISO!
La mancata osservanza di questa nota può causare danni materiali
e compromettere il funzionamento del prodotto.
NOTA
Informazioni integranti relative all'impiego del prodotto.
I
➤ Modalità di intervento: questo simbolo indica all'utente che è necessario
un intervento. Le modalità di intervento necessarie saranno descritte
passo dopo passo.
✓ Questo simbolo descrive il risultato di un intervento.
fig. 1 5, pagina 3: questi dati si riferiscono ad un elemento in una figura, in
questo caso alla “posizione 5 nella figura 1 a pagina 3”.
Osservare anche le indicazioni di sicurezza riportate qui di seguito.
2 Indicazioni di sicurezza generali
Il produttore non si assume nessuna responsabilità per danni risultanti dai
seguenti punti:
danni al prodotto dovuti a influenze meccaniche
modifiche al prodotto senza esplicita autorizzazione del produttore
impiego per altri fini rispetto a quelli descritti nel manuale di istruzioni
96
Page 97

IT
CC09, CCK09, CC11 Indicazioni di sicurezza generali
Durante l'uso di apparecchi elettrici attenersi alle misure di sicurezza
fondamentali descritte qui di seguito per proteggersi da:
scosse elettriche
pericolo di incendio
ferite
2.1 Sicurezza di base
!
Impiegare esclusivamente gas liquido delle categorie I
I
(butano/propano). Non impiegare altri combustibili.
3
Tenere un estintore adeguato nelle vicinanze.
Assicurarsi che l'estintore venga controllato a intervalli regolari
da un esperto.
Persone che, a causa della proprie capacità fisiche, sensoriali o
mentali, non siano in grado di utilizzare l'apparecchio in modo
sicuro, devono utilizzarlo solo in presenza di una persona per
loro responsabile.
Non toccare le zone di cottura o quella nelle immediate
vicinanze.
Le superfici delle zone di cottura possono essere calde anche
se sono scure. Le superfici nelle vicinanze delle zone di cottura
possono diventare così calde da causare ustioni.
Se la superficie del piano cottura è scheggiata, nell'apparecchio
possono penetrare soluzioni detergenti e liquidi fuoriuscenti che
possono causare una scossa elettrica. In un caso simile,
spegnere immediatamente l'apparecchio.
3B/P
, I3+,
Interrompere sempre l'alimentazione elettrica qualora si operi
sull'apparecchio.
I lavori di manutenzione e di riparazione devono essere
effettuati solo da uno specialista informato sui pericoli connessi
e sulle relative prescrizioni.
Utilizzare l'apparecchio solo in conformità alla sua destinazione.
Non apportare nessuna modifica all'apparecchio.
A
Spegnere l'apparecchio se non viene utilizzato.
Non utilizzare l'apparecchio se è danneggiato o se i pezzi sono
difettosi.
97
Page 98

IT
Indicazioni di sicurezza generali CC09, CCK09, CC11
2.2 Sicurezza durante l'uso del gas liquido
Tenere le sostanze infiammabili lontane da stufette elettriche,
apparecchi per la cucina e altre fonti di luce o di calore.
!
Pericolo di asfissia!
Prima di accendere l'apparecchio, assicurarsi che la zona sia
sufficientemente ventilata. Durante il funzionamento, nel luogo
di installazione devono essere presenti aperture di aerazione
con un diametro libero di almeno 50 cm
possono essere chiuse, ma durante il funzionamento dei fuochi
devono essere aperte (vedi targhetta segnaletica applicata sul
piano cottura).
Confrontare i dati della pressione riportati sulla targhetta con
quelli indicati sul regolatore di pressione.
Non conservare mai le bombole di gas liquido in luoghi non
aerati.
2
. Queste aperture
Proteggere le bombole di gas liquido dalla diretta esposizione
dei raggi solari. La temperatura non deve superare i 50 °C.
In caso di odore di gas:
– aprire tutte le finestre e abbandonare la stanza.
– non azionare nessun dispositivo elettrico ed evitare di
utilizzare fiamme libere che possono infiammare il gas.
– chiudere la valvola della bombola del gas e lasciarla chiusa
fino a quando non è stato eliminato l'errore.
– non provare mai a cercare la perdita con una fiamma libera.
Non mettere in funzione il piano cottura quando si fa
rifornimento, in garage e durante la marcia.
2.3 Sicurezza durante il funzionamento
dell'apparecchio
Quando si utilizza il piano cottura, indossare sempre un
abbigliamento adeguato.
!
Non indossare vestiti ampi e cadenti, in quanto possono
prendere fuoco facilmente.
Lasciare raffreddare il piano cottura finché non è stata raggiunta
la temperatura ambiente prima di toccarlo a mani nude.
98
Page 99

IT
CC09, CCK09, CC11 Indicazioni di sicurezza generali
Assicurarsi che sulle zone vicine al piano cottura non siano
presenti grasso, sostanze alcoliche, materiale plastico e
sostanze infiammabili (ad es. tende, asciugamani, utensili per la
cucina).
Non appendere panni da cucina, carta, tende o altri materiali
infiammabili nelle vicinanze del piano cottura e non
appoggiarceli sopra.
Prestare la massima attenzione quando si scaldano grasso o
olio, infatti essi potrebbero infiammarsi se dovessero
raggiungere temperature molto elevate.
Non cercare di spegnere il grasso che brucia con acqua.
Utilizzare esclusivamente presine asciutte e cucchiai di legno,
in modo da evitare la formazione di vapore. Presine bagnate o
umide su superfici calde possono causare ustioni dovute al
vapore.
Non azionare mai il piano cottura in assenza di controllo. Le
pentole che traboccano possono provocare fumo e incendi.
A
Spegnere la zona di cottura prima di togliere la pentola.
Per evitare il pericolo di ustioni, l'incendio di materiali
infiammabili e il rovesciamento dei cibi in preparazione a causa
di scontri involontari di pentole o altro, orientare i relativi manici
verso l'interno. Fare attenzione che questi non sporgano nelle
zone di cottura vicine.
Non utilizzare il piano cottura per riscaldare il locale.
L'utilizzo del piano cottura ad una temperatura alta senza una
pentola riempita può danneggiare il piano cottura.
Durante il funzionamento, sul piano cottura non poggiare
oggetti di plastica come porta sale e pepe, confezioni ecc.
Assicurarsi che non si trovino presine sulla o nelle vicinanze
della zona di cottura.
Utilizzare pentole, padelle e altri apparecchi che siano adatti per
superfici in ceramica e per la potenza nominale del piano
cottura.
Solo determinati tipi di vetro, vetroceramica, terraglia o altri
apparecchi smaltati possono resistere a cambi repentini di
temperatura e quindi essere adatti per fornelli.
Utilizzare pentole e padelle della dimensione giusta.
99
Page 100

IT
Dotazione CC09, CCK09, CC11
3Dotazione
Piano cottura in vetroceramica a gas
Istruzioni per l’uso
4 Uso conforme alla destinazione
Dometic CC09, CCK09 e CC11 sono piani cottura in vetroceramica con
funzionamento a gas liquido. Sono progettati per essere integrati in un
blocco cucina in abitazioni, camper, caravan o imbarcazioni.
5 Descrizione tecnica
Il piano cottura è disponibile in diversi modelli.
CC09 (n. art. 9103303386): due zone di cottura
CCK09 (n. art. 9103303387): una zona di cottura
CC11 (n. art. 9103303390/9103303391): due zone di cottura
È possibile determinare il tipo di apparecchio dal numero articolo indicato
sulla targhetta.
Le zone di cottura vengono riscaldate rispettivamente da un bruciatore a gas.
Dietro la zona di cottura (fig. 1 1, pagina 2) si trova una zona di
propagazione della cottura (fig. 1 2) che viene riscaldata dagli scarichi del
bruciatore posto sotto la zona di cottura. In questo modo la temperatura non
è così alta come nella zona di cottura. La zona di propagazione della cottura
può essere utilizzata per una seconda pentola che necessita di temperature
più basse.
Solo CC09, CC11: la zona di cottura di destra più piccola ha una capacità di
riscaldamento inferiore.
La superficie di cottura in vetroceramica è resistenze al calore e al freddo.
Può essere caricata con pentole pesanti. Evitare che cadano oggetti che
possono danneggiare la superficie. Questo può causare danni.
100
 Loading...