

Dometic 9105306654, FreshJet 1100, 9105306658, 9105306513, FreshJet 2200 Installation Manual
...
Dometic WAECO International GmbH
Hollefeldstrasse 63
D-48282 Emsdetten
dometic.com
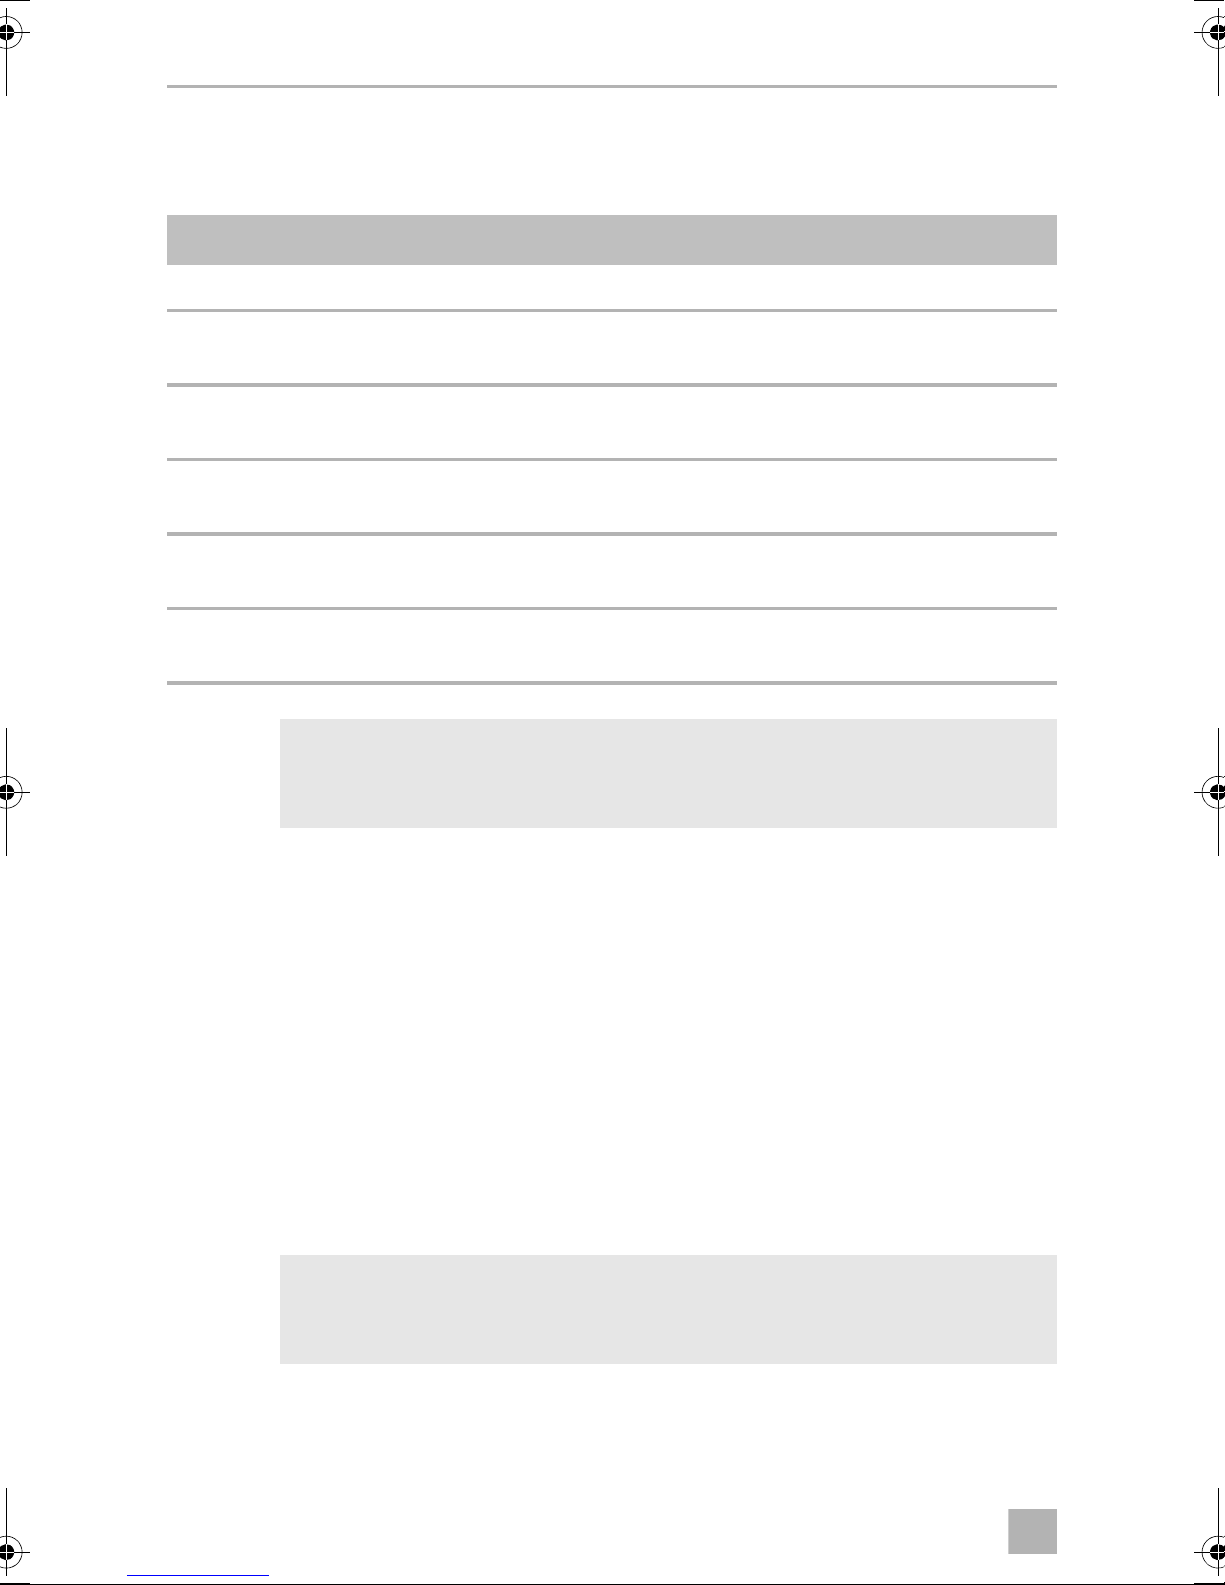
787
254 533
25 – 60
562
535
225
==
480
==
47
980
703277
248
25 – 60
650
480535
=====
A
A
B
B
A
2.
1.
B
400 mm
400 mm
rt
gn
cy
ge
br
ws/sw
ws
or
bl
sw
gr
vt
1
2
3
4
5
6
7
8
9
11
10
12
REMOTE
C3
Cx
LED LED LED LED
Jx
Jx
12345
6789101112
1
2
Cx Jx
1
2
1
FreshJet 1100, 1700, 2200
FreshJet 3200
BA
1
2
6
9
8
7
10
4
5
2
3
FreshJet 1100, 1700, 2200
FreshJet 3200
FreshJet
Chillout ADB (9105306662)
1
2
6
7
8
3
4
9
0
5
4445101816 ST0179 825 02 01-83 03/2017
j
EN DE FR ES PT IT NL DA SV NO FI RU PL SK CS HU
bl Blue Blau Bleu Azul Azul Blu Blauw Blå Blå Blå Sininen Синий Niebieski Modrá Modrá Kék
br Brown Braun Marron Marrón Castanho Marrone Bruin Brun Brun Brun Ruskea Коричневый Brązowy Hnedá Hněda Barna
cy Cyan Cyan Cyan Cian Ciano Cyan Cyaan Cyan Cyan Cyan Syaa ni Голубой Cyjan Azúrová Azurová Cián
ge Yellow Gelb Jaune Amarillo Amarelo Giallo Geel Gul Gul Gul Kelt ainen Желтый Żółty Žltá Žlutá Sárga
gn Green Grün Vert Verd e Ver de Verde Groen Grøn Grön Grønn Vihreä Зеленый Zielony Zele ná Zelená Zöld
gr Grey Grau Gris Gris Cinzento Grigio Grijs Grå Grå Grå Harmaa Серый Szary Sivá Šedá Szürke
or Orange Orange Orange Naranja Cor de
laranja
Arancione Oranje Orange Orange Oransje Oranssi Оранжевый Pomarańczowy Oranžová Oranžová Narancs
pk Pink Pink Rosa Rose Cor de
rosa
Rosa Roze Lyserøde Rosa Rosa Pinkki Розовый Różowy Ružová Růžová Rózsaszín
rt Red Rot Rouge Rojo Verm elh o Rosso Rood Rød Röd Rød Punainen Красный Czerwony Červená Červená Piros
sw Black Schwarz Noir Negro Preto Nero Zwart Sort Svart Svart Musta Черный Czarny Čierna Černá Fekete
vt Violet Violett Violeta Lila Violeta Violetto Paars Violet Viole tt Fiolett Violett i Фиолетовый Fioletowy Fialová Fialová Ibolya
ws White Weiß Blanc Blanco Branco Bianco Wit Hvid Vit Hvit Valkoi nen Белый Biały Biela Bílá Fehér
k
FreshJet-ADB2015-I-16s.book Seite 1 Mittwoch, 8. März 2017 9:47 21
A
2,5 Nm
1
2
ROOMROOM
PROBEPROBE
1
2
EV. PROBEEV. PROBE
FJ2200FJ1100, FJ1700
1
2
EV. PROBEEV. PROBE
+12 Vg
–
230 Vw
ge/gn
bl
br
T3
T2
T1
F3 F1
SOFT START
F2
bl
F4
F5
0x1
0x2
ge/gn
3
2
1pk
123
MAIN
ON/OFF
ECONOMY
INVERTER
1
2
3
4
1
2
3
4
MAIN FUSE
BATTERY FUSE
BATTERY
CAN BUS
COND FAN
COND FAN
EVAP FAN
COMPRESSOR
REMOTE
J12
UV LAMP
RESISTOR
123
ge/gn
sw
br
bl
ge/gnswbr
bl
1
2
3
4
ge/gnswbr
bl
rt
PROBEPROBE
or
or
(8) PROBE
RESISTOR
VALVE
1
2
1
2
1
2
CO. PROBECO. PROBE
EV. PROBEEV. PROBE
ROOM PROBEROOM PROBE
PROBEPROBE
1
4
2
5
3
6
FJ3200
15 mm
30 mm
45 mm
1
2
3
4
56
1
3
4
1 2
3
1.
2.
7
6
8
5
2
3
4
1
F2AL250V
F15AL250V
1.
2.
3.
11
9
10
e
d
f
c
g
a
h
b
i
FreshJet-ADB2015-I-16s.book Seite 2 Mittwoch, 8. März 2017 9:47 21
Dometic WAECO International GmbH
Hollefeldstrasse 63
D-48282 Emsdetten
dometic.com
470
===
555
257.5 297.5
980
703277
650
25 – 60
45
248
25 – 60
257.5 297.5
555
= =
470
225
254 533
787
562
45
A
A
B
B
A
BA
B
400 mm
400 mm
rt
gn
cy
ge
br
ws/sw
ws
or
bl
sw
gr
vt
1
2
3
4
5
6
7
8
9
11
10
12
REMOTE
C3
Cx
LED LED
Jx
Jx
12345
6789101112
1
2
Cx Jx
1
2
2.
1.
1
2
FreshJet 1100, 1700, 2200
FreshJet 1100, 1700, 2200
FreshJet 3200
FreshJet 3200
1
2
6
7
4
5
3
8
FreshJet
ADB (9105306664)
1
2
6
7
8
3
4
9
0
5
4445101817 ST0180 825 02 01-8 4 03/2017
h
EN DE FR ES PT IT NL DA SV NO FI RU PL SK CS HU
bl Blue Blau Bleu Azul Azul Blu Blauw Blå Blå Blå Sininen Синий Niebieski Modrá Modrá Kék
br Brown Braun Marron Marrón Castanho Marrone Bruin Brun Brun Brun Ruskea Коричневый Brązowy Hnedá Hněda Barna
cy Cyan Cyan Cyan Cian Ciano Cyan Cyaan Cya n Cyan Cyan Sy aani Голубой Cyjan Azúrová Azurová Cián
ge Ye l l ow Gelb Jaune Amarillo Amarelo Giallo Geel Gul Gul Gul Ke ltaine n Желтый Żółty Žltá Žlutá Sárga
gn Green Grün Ver t Verde Ve rde Verde Groen Grøn Grön Grønn Vihreä Зеленый Zielony Zelená Zelená Zöld
gr Grey Grau Gris Gris Cinzento Grigio Grijs Grå Grå Grå Harmaa Серый Szary Sivá Šedá Szürke
or Orange Orange Orange Naranja Cor de
laranja
Arancione Oranje Orange Orange Oransje Oranssi Оранжевый Pomarańczowy Oranžová Oranžová Narancs
pk Pink Pink Rosa Rose Cor de
rosa
Rosa Roze Lyser øde Rosa Rosa Pinkki Розовый Różowy Ružová Růžová Rózsaszín
rt Red Rot Rouge Rojo Vermel ho Rosso Rood Rød Röd Rød Punainen Красный Czerwony Červená Červená Piros
sw Black Schwarz Noir Negro Preto Nero Zwart Sort Svart Svart Musta Черный Czarny Čierna Černá Fekete
vt Violet Violett Violeta Lila Violeta Violetto Paars Vio let Vi olett Fiolett Violetti Фиолетовый Fioletowy Fialová Fialová Ibolya
ws White Wei ß Blanc Blanco Branco Bianco Wit Hvid Vit Hvit Valkoin en Белый Biały Biela Bílá Fehér
i
FreshJet-ADB2015-I-16s.book Seite 1 Mittwoch, 8. März 2017 9:48 21
–
ge/gn
bl
br
T3
T2
T1
F3 F1
SOFT START
F2
bl
F4
F5
0x1
0x2
ge/gn
3
2
1pk
123
MAIN
ON/OFF
ECONOMY
INVERTER
1
2
3
4
1
2
3
4
MAIN FUSE
BATTERY FUSE
BATTERY
CAN BUS
COND FAN
COND FAN
COMPRESSOR
VALVE
RESISTOR
REMOTE
J12
123
ge/gn
sw
br
bl
ge/gnswbr
bl
1
2
3
4
ge/gnswbr
bl
rt
or
or
PROBE
PROBE
230 Vw
+12 Vg
4
5 6
1
2
8
1.
2.
3.
3
7
A
2,5 Nm
click
click
15 mm
30 mm
45 mm
EVAP FAN
UV LAMP
RESISTOR
1
2
ROOM
ROOM
PROBE
PROBE
1
2
EV. PROBE
EV. PROBE
FJ2200FJ1100, FJ1700
1
2
EV. PROBE
EV. PROBE
(8) PROBE
1
2
1
2
1
2
CO. PROBE
CO. PROBE
EV. PROBE
EV. PROBE
ROOM PROBE
ROOM PROBE
PROBE
PROBE
1
4
2
5
3
6
FJ3200
7
6
8
5
2
3
4
1
F2AL250V
F15AL250V
11
9
10
b
d
e
a
f
c
g
FreshJet-ADB2015-I-16s.book Seite 2 Mittwoch, 8. März 2017 9:48 21
ENDEFRESPT
IT
NLDASV
NO
FIRUPLSKCS
HU
AIR CONDITIONERS
FRESHJET
FJ1100, FJ1700, FJ2200, FJ3200
Air conditioning roof unit
Installation Manual. . . . . . . . . . . . . . . . . . . . .3
Dachklimaanlage
Montageanleitung. . . . . . . . . . . . . . . . . . . .27
Climatiseur de toit
Instructions de montage . . . . . . . . . . . . . . .52
Aire acondicionado de techo
Instrucciones de montaje . . . . . . . . . . . . . .76
Ar condicionado para tejadilho
Instruções de montagem . . . . . . . . . . . . . 101
Climatizzatore a tetto
Indicazioni di montaggio . . . . . . . . . . . . .128
Airconditioning voor dakinbouw
Montagehandleiding . . . . . . . . . . . . . . . . 152
Klimaanlæg til tagmontering
Monteringsvejledning. . . . . . . . . . . . . . . .176
Kattooilmastointilaitteisto
Asennusohje . . . . . . . . . . . . . . . . . . . . . . . 245
Накрышный кондиционер
Инструкция по монтажу. . . . . . . . . . . . . . 267
Klimatyzator dachowy
Instrukcja montażu . . . . . . . . . . . . . . . . . . 293
Strešné klimatizačné zariadenie
Návod na montáž . . . . . . . . . . . . . . . . . . . 318
Střešní klimatizace
Návod k montáži. . . . . . . . . . . . . . . . . . . . 341
Te t ő k l í m a-b e r ende zés
Szerelési útmutató . . . . . . . . . . . . . . . . . . 363
Takmonterad klimatanläggning
Monteringsanvisning. . . . . . . . . . . . . . . . 200
Takmontert klimaanlegg
Monteringsanvisning. . . . . . . . . . . . . . . . 222

EN
FreshJet
Please read this instruction manual carefully before installation and startup, and store it in a safe place. If you pass on the device to another person,
hand over this instruction manual along with it.
Table of contents
1 Explanation of symbols. . . . . . . . . . . . . . . . . . . . . . . . . . . . . . . . . . . . . . . . . . .4
2 Safety and installation instructions . . . . . . . . . . . . . . . . . . . . . . . . . . . . . . . . . .4
3 Target group for this instruction manual . . . . . . . . . . . . . . . . . . . . . . . . . . . . .6
4 Scope of delivery . . . . . . . . . . . . . . . . . . . . . . . . . . . . . . . . . . . . . . . . . . . . . . .7
5 Accessories . . . . . . . . . . . . . . . . . . . . . . . . . . . . . . . . . . . . . . . . . . . . . . . . . . . .8
6 Intended use . . . . . . . . . . . . . . . . . . . . . . . . . . . . . . . . . . . . . . . . . . . . . . . . . . .8
7 Labels. . . . . . . . . . . . . . . . . . . . . . . . . . . . . . . . . . . . . . . . . . . . . . . . . . . . . . . . .9
8 Installation . . . . . . . . . . . . . . . . . . . . . . . . . . . . . . . . . . . . . . . . . . . . . . . . . . . . .9
9 Troubleshooting . . . . . . . . . . . . . . . . . . . . . . . . . . . . . . . . . . . . . . . . . . . . . . .21
10 Disposal . . . . . . . . . . . . . . . . . . . . . . . . . . . . . . . . . . . . . . . . . . . . . . . . . . . . . 22
11 Technical data . . . . . . . . . . . . . . . . . . . . . . . . . . . . . . . . . . . . . . . . . . . . . . . . 23
3
EN
Explanation of symbols FreshJet
1 Explanation of symbols
DANGER!
D
!
Safety instruction: Failure to observe this instruction will cause fatal or
serious injury.
WARNING!
Safety instruction: Failure to observe this instruction can cause fatal or
serious injury.
CAUTION!
Safety instruction: Failure to observe this instruction can lead to injury.
!
NOTICE!
A
Failure to observe this instruction can cause material damage and impair
the function of the product.
NOTE
Supplementary information for operating the product.
I
2 Safety and installation instructions
Please observe the prescribed safety instructions and stipulations from the
vehicle manufacturer and service workshops.
The manufacturer accepts no liability for damage in the following cases:
• Faulty assembly or connection
• Damage to the product resulting from mechanical influences and excess voltage
• Alterations to the product without express permission from the manufacturer
• Use for purposes other than those described in the operating manual
Note the following basic safety information when using electrical devices to protect
against:
• Electric shock
• Fire hazards
• Injury
4

EN
FreshJet Safety and installation instructions
2.1 Handling the device
WARNING!
!
!
• Installation and repair of the roof air conditioner may only be carried
out by qualified personnel who are familiar with the risks involved and
the relevant regulations. Inadequate repairs may cause serious
hazards. For repair service, please contact the service centre in your
country (addresses on the back page).
• Electrical devices are not toys.
Keep electrical devices out of reach of children or infirm persons. Do
not allow them to use electrical devices without supervision.
• Persons whose physical, sensory or mental capabilities or whose lack
of experience and knowledge prevent them from using the device
safely should not use it without supervision or instruction by a responsible person.
• Do not undo the upper cover of the roof air conditioner in the event of
a fire. Use approved extinguishing agents instead. Do not use water to
extinguish fires.
CAUTION!
• The roof air conditioner must be installed securely so that it cannot fall
down.
A
• Only operate the roof air conditioner if you are certain that the housing
and the cables are not damaged.
• Do not use the roof air conditioner near flammable fluids or in closed
rooms.
• Make sure no combustible objects are stored or installed near the air
outlet. A distance of at least 50 cm must be kept.
• Do not reach into air outlets or insert any foreign objects in the device.
NOTICE!
• Only use the device as intended.
• The roof air conditioner is not suitable for use in agricultural or con-
struction vehicles.
• Do not make any alterations or conversions to the device.
• Never drive through automatic car washes when the roof air
conditioner is mounted.
• If faults occur in the refrigerant circuit, the system must be checked by
a specialist company and repaired properly. The refrigerant must
never be released into the air.
5

EN
Target group for this instruction manual FreshJet
NOTE
I
2.2 Handling electrical cables
!
!
• Please ask your vehicle manufacturer if a technical inspection is
required after fitting an air conditioner and whether the height entered
in the vehicle documents needs to be altered:
– FreshJet 1100, 1700, 2200: increased height 225 mm
– FreshJet 3200: increased height 248 mm
WARNING!
• The electrical power supply may only be connected by a qualified
electrician (e.g. VDE 0100, Part 721 in Germany).
CAUTION!
• Attach and lay the cables so that they cannot be tripped over or
damaged.
NOTICE!
• Use cable ducts to lay cables through walls with sharp edges.
A
• Do not lay loose or bent cables next to electrically conductive
materials (metal).
• Do not pull on the cables.
3 Target group for this instruction manual
The instructions in this manual are intended for qualified personnel at workshops
who are familiar with the guidelines and safety precautions to be applied.
6
EN
FreshJet Scope of delivery
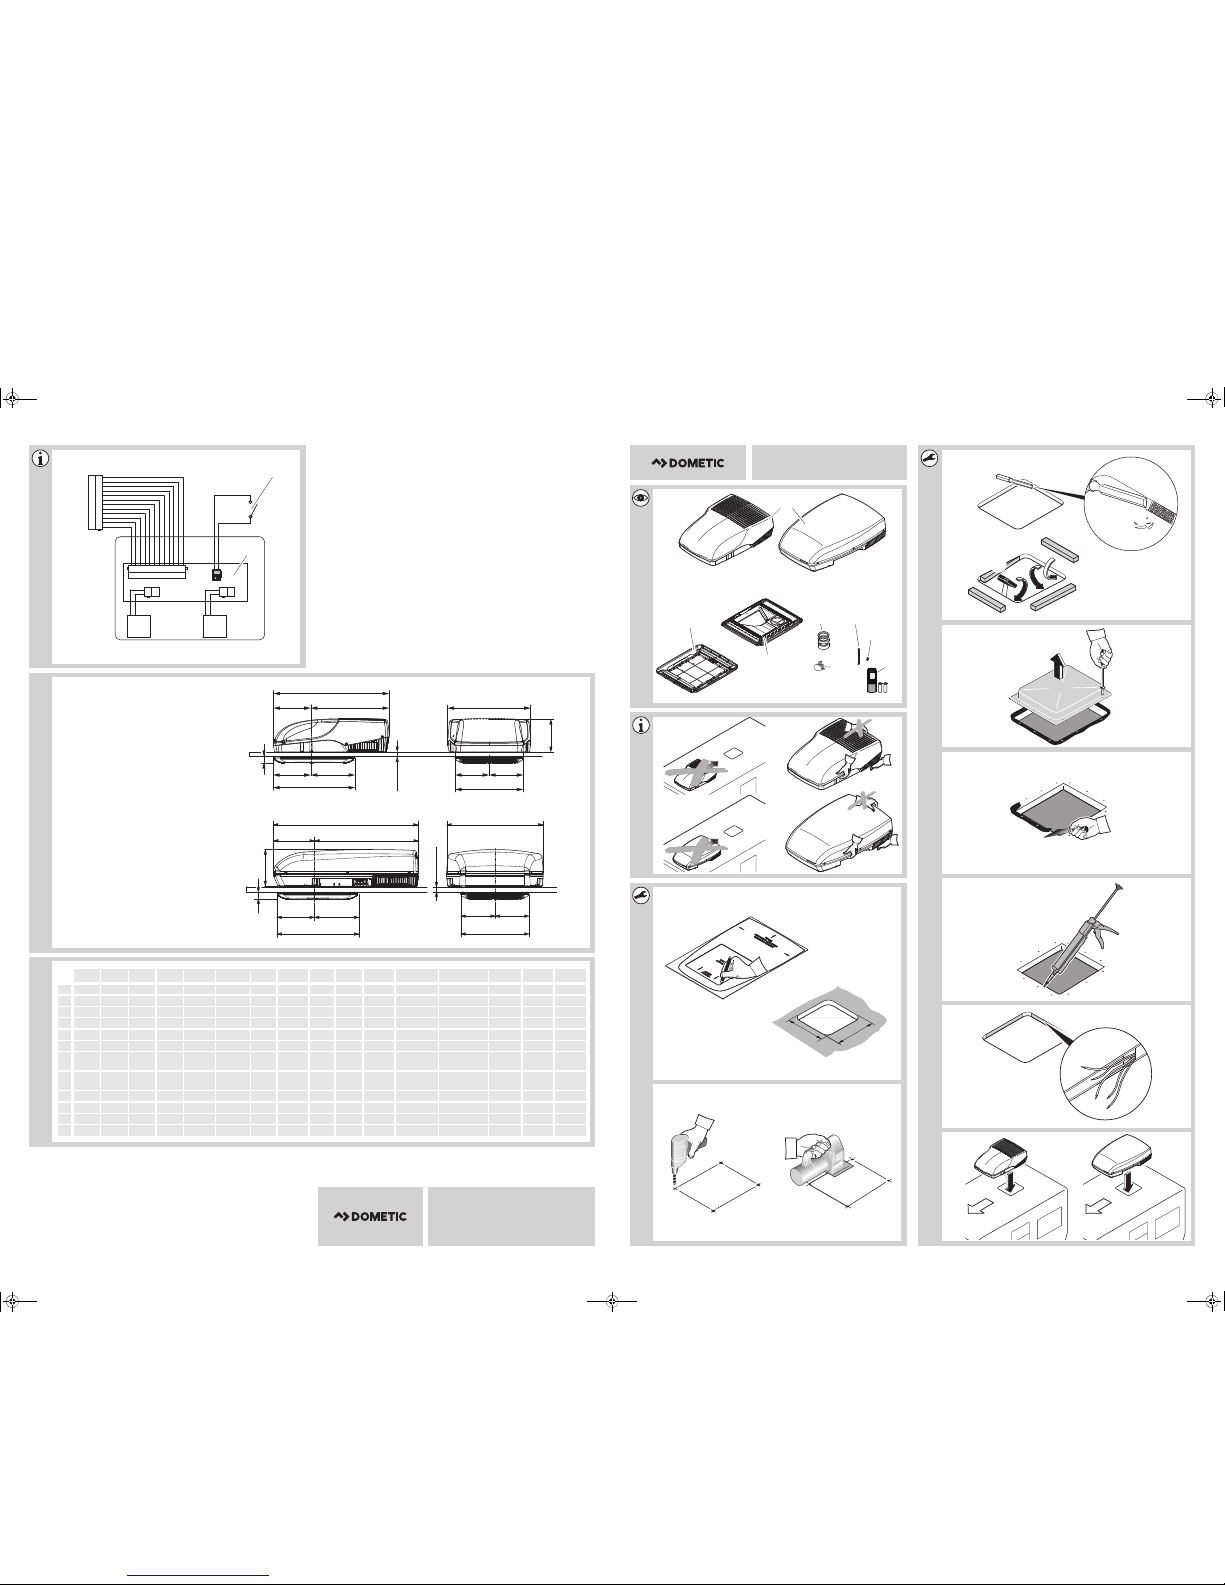
4Scope of delivery
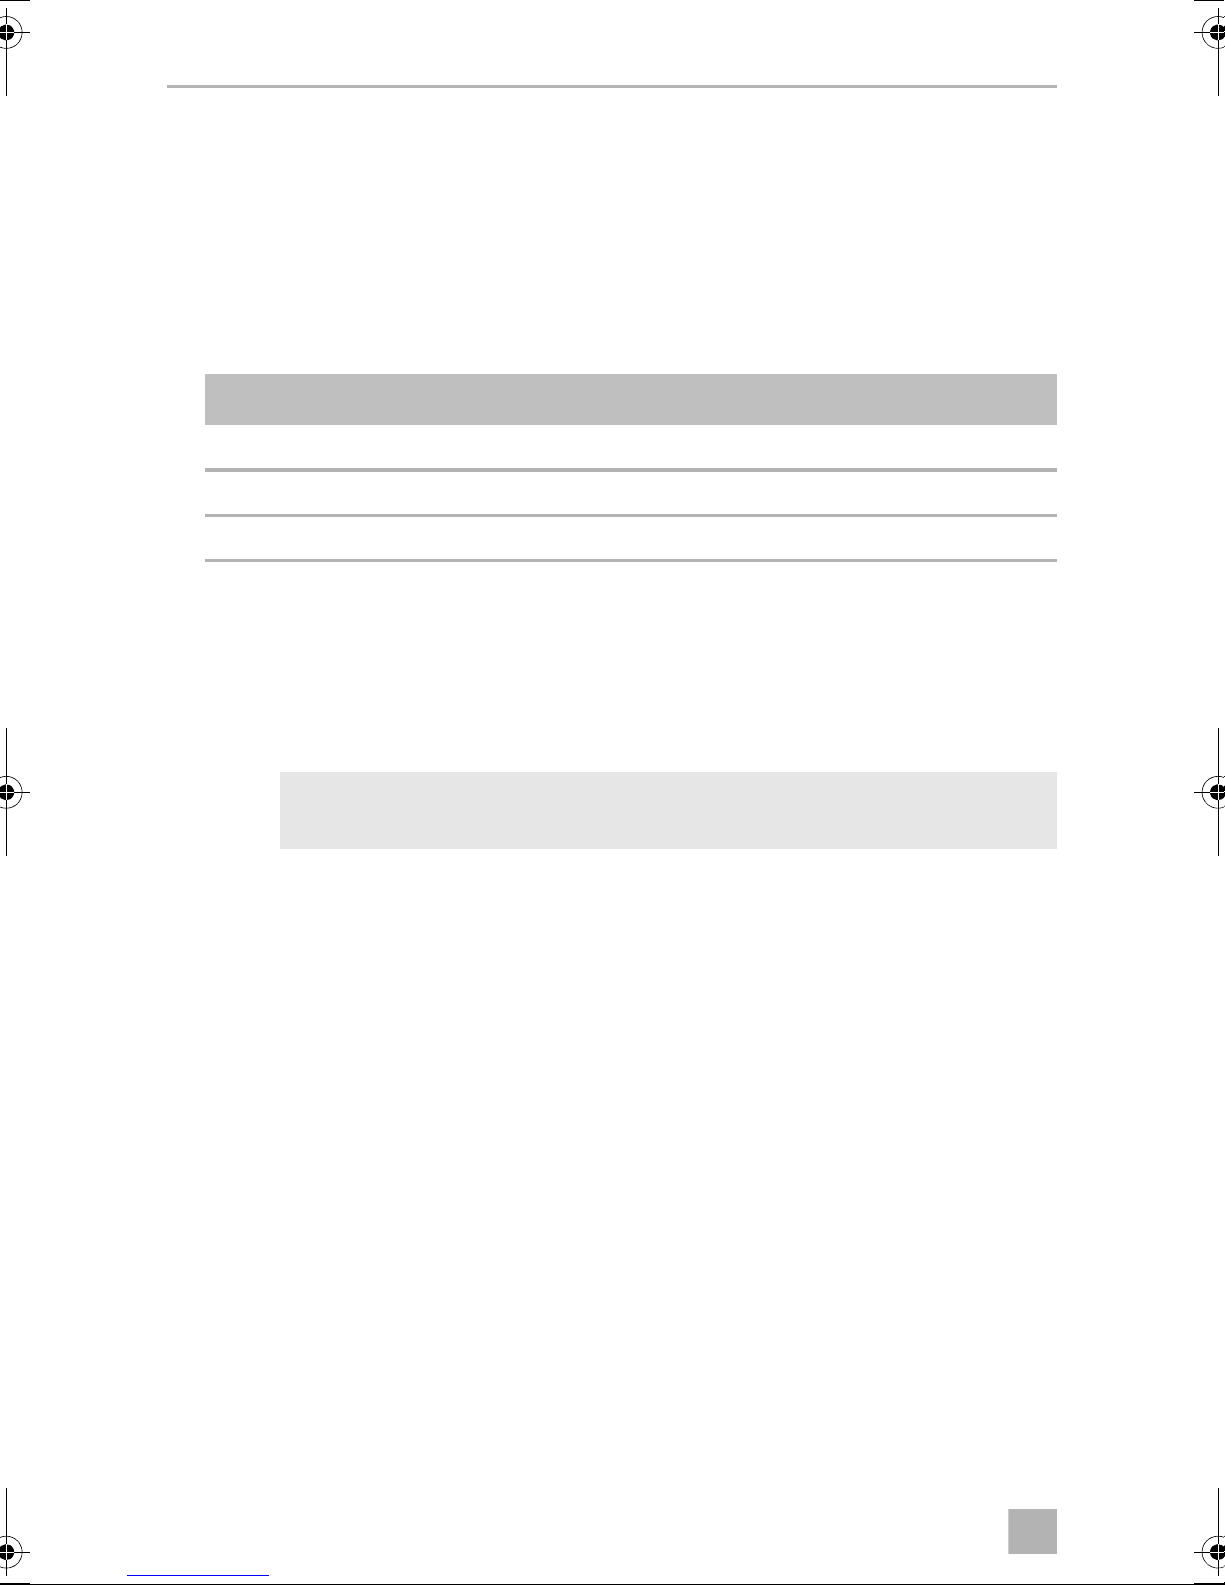
4.1 With air diffuser box Chillout ADB
(9105306662)
No. in fig. 1 Number Description
1 1 Roof air conditioner
2 1 Air outlet unit
3 1 Fastening frame
4 1 Air filters
51Filter covers
6 1 Seals
7 3 Cable connectors
8 4 Long fastening screws
9 4 Short fastening screws
10 1 Remote control
4.2 With air diffuser box ADB
(9105306664)
No. in fig. 1 Number Description
1 1 Roof air conditioner
2 1 Air outlet unit
3 1 Fastening frame
4 1 Seals
5 3 Cable connectors
6 4 Long fastening screws
7 4 Short fastening screws
8 1 Remote control
7
EN
Accessories FreshJet
5Accessories
Available as accessories (not included in the scope of delivery):
Designation Reference no.
DC extension kit DC-Kit1 (FJ1100 only) 9100300003
DC extension kit DC-Kit2
(FreshJet 1100, 1700, 2200 only)
DC extension kit DC-Kit3
(FreshJet 1100, 1700, 2200 only)
DC extension kit DC-Kit4
(FreshJet 1100, 1700, 2200, 3200)
DC extension kit DC-Kit5
(FreshJet 1100, 1700, 2200 only)
DC extension kit DC-Kit6
(FreshJet 1100, 1700, 2200, 3200)
NOTE
I
The DC extension kit (accessory) allows the Dometic FreshJet roof air
conditioner to be used while in motion.
6 Intended use
9100300001
9100300002
9100300044
9100300073
9100300074
The Dometic FreshJet roof air conditioner is designed for use in motorcaravans,
caravans and other vehicles with habitation compartments only. It is not suitable for
houses and appartments.
The roof air conditioner is not suitable for installation in construction machines, agricultural machines or similar equipment. It will not work properly if exposed to strong
vibrations.
The operating mode of Freshjet is guaranteed for temperature between 0 °C and
52 °C.
NOTE
I
You can find additional information on roof air conditioners in the
operating manual, such as the technical description or the controls.
8

EN
FreshJet Labels
7Labels
Labels are attached to the Dometic FreshJet roof air conditioners. These labels
provide the user and fitter with information on specifications of the device.
8 Installation
CAUTION! Beware of injury
!
8.1 Note on installation
The roof air conditioner may only be installed by qualified personnel
from a specialist company. The following information is intended for
technicians who are familiar with the guidelines and safety precautions
to be applied.
Read this installation manual completely before installing the roof air conditioner.
The following tips and instructions must be observed while installing the roof air
conditioner:
DANGER! Danger of electrocution
Disconnect all power supplies when working on the roof air conditioner.
D
CAUTION! Beware of injury
!
• Improper installation of the roof air conditioner can result in
irreparable damage to the device and put the safety of the user at
risk.
• The manufacturer assumes no liability for malfunctions and for the
safety of the roof air conditioner, especially for injury and/or damage
to property, if the roof air conditioner is not fitted in accordance with
these installation instructions.
• Always wear the recommended protective clothing (e.g. protective
goggles, gloves).
NOTICE! Beware of damage
A
• Observe the structural engineering of the vehicle and seal of all
openings made when installing the roof air conditioner.
• Check whether the roof of the vehicle is able to support the weight
of a person before climbing onto it. Ask the vehicle manufacturer
about the permissible roof loads.
9

EN
Installation FreshJet
Note on transport
• Always have someone help you carry the roof air conditioner.
• Always lift the roof air conditioner to move it and never drag it over the roof
(fig. 2 A).
• Do not use the rear ventilation slots to lift it (fig. 2 B).
Note on installation location
• Before installing the roof air conditioner, check whether any vehicle components
could be damaged by the installation of the roof air conditioner (such as lamps,
cupboards, doors).
• Before installation, find out (by consulting the manufacturer of the vehicle)
whether the construction is designed for the static weight and the loads of the air
conditioner when the vehicle is in motion. The manufacturer of the roof air
conditioner assumes no liability whatsoever.
• The vehicle manufacturer may have already provided points where the opening
for the installation of the roof air conditioner can be made without any risk of
weakening the construction or cutting power cables.
• Select a flat and sufficiently level area at the centre of the vehicle roof between
two longitudinal sections for installation.
• The roof inclination of the installation surface may not exceed 10°.
• The roof air conditioner must be installed above 2 meters.
• Make sure no combustible objects are stored or installed near the air outlet. A
distance of at least 50 cm should be kept.
• Make sure that there are no objects within the vehicle which could obstruct the
attachment of the air outlet unit or the cooled air from flowing through the
swivelling air distribution nozzles.
• For safety reasons, note the location of existing wiring harnesses, wires and other
components within the installation area, in particular those which are not visible,
when installing the roof air conditioner (when drilling or screwing etc.).
10

EN
FreshJet Installation
Note on electrical system
• Only a qualified electrician should connect the roof air conditioner to the
electrical power.
• Check that the voltage specification on the type plate is the same as that of the
power supply.
• If the lighting should also be switched on without a 230 V voltage supply, make
sure that there is a 12 Vg power supply line from the battery to the roof air
conditioner.
• Do not lay the 230 V mains cable and the 12/24 Vg cable together in the same
cable duct.
• Do not lay cables which are loose or bent next to electrically conductive material
(metal).
• Install an all-pole switch with a contact opening width of at least 3 mm on the
installation side.
There are two ways of installing the roof air conditioner:
• Making a new opening (chapter “Making a new opening” on page 11). In this
case the opening must be reinforced by an appropriate frame.
• Using the existing roof hatch openings (ventilation hatch) in the vehicle (chapter
“Installing in a roof hatch opening already provided” on page 12).
8.2 Making a new opening
See fig. 3
➤ Select an area at the centre on the roof between two longitudinal supports.
➤ Mark the position and size of the opening using the template included in the
packaging (A and B).
See fig. 4
➤ Drill out the corners (A).
➤ Carefully cut out the opening on the roof using a keyhole saw or a similar tool (B).
Make sure no electrical power cables are damaged.
11
EN
Installation FreshJet
See fig. 5
➤ Before installation, check whether the roof hole needs reinforcing.
➤ Remove the foam according to the width of your reinforcing rails (not in scope of
delivery) (A).
➤ Fit the reinforcing rails (B).
8.3 Installing in a roof hatch opening already provided
NOTE
I
• Existing roof hatch openings in accordance with fig. 3 are suitable
for installing the roof air conditioner.
• Dispose of all waste material, glue, silicone and seals separately.
Observe the disposal guidelines.
• The manufacturer only assumes liability for parts included in the
scope of delivery. The validity of the warranty expires if the device is
installed together with third-party parts.
See fig. 6
➤ Remove all screws and fixtures of the existing roof hatch.
➤ Take out the roof hatch.
See fig. 7
➤ Remove the sealant around the opening using a scraper or similar tool.
See fig. 8
NOTICE!
Observe the sealant manufacturer’s instructions.
A
➤ Seal the screw holes and recesses with a flexible non-hardening butyl sealing
compound (e.g. SikaLastomer-710).
12
EN
FreshJet Installation
8.4 Laying the connecting cables
DANGER! Danger of electrocution
D
The roof air conditioner must be connected to an electric circuit which is able to
supply the required current (see chapter “Technical data” on page 23).
➤ Select the cross-section of the cable corresponding to the length:
– Length < 7.5m: 1.5mm²
–Length > 7.5m: 2.5mm²
See fig. 9
➤ Make an opening on one side in order to feed through the electrical power
supply cable.
➤ Feed the 230 Vw cable through the opening into the vehicle interior.
Make sure there is no voltage at electrically operated components
before carrying out work on them!
If the lighting should be switched on without the use of a 230 Vw voltage supply:
➤ Connect the cable with the positive terminal and the negative terminal of the
vehicle battery.
➤ Feed the 12 Vg cable through the opening into the vehicle interior.
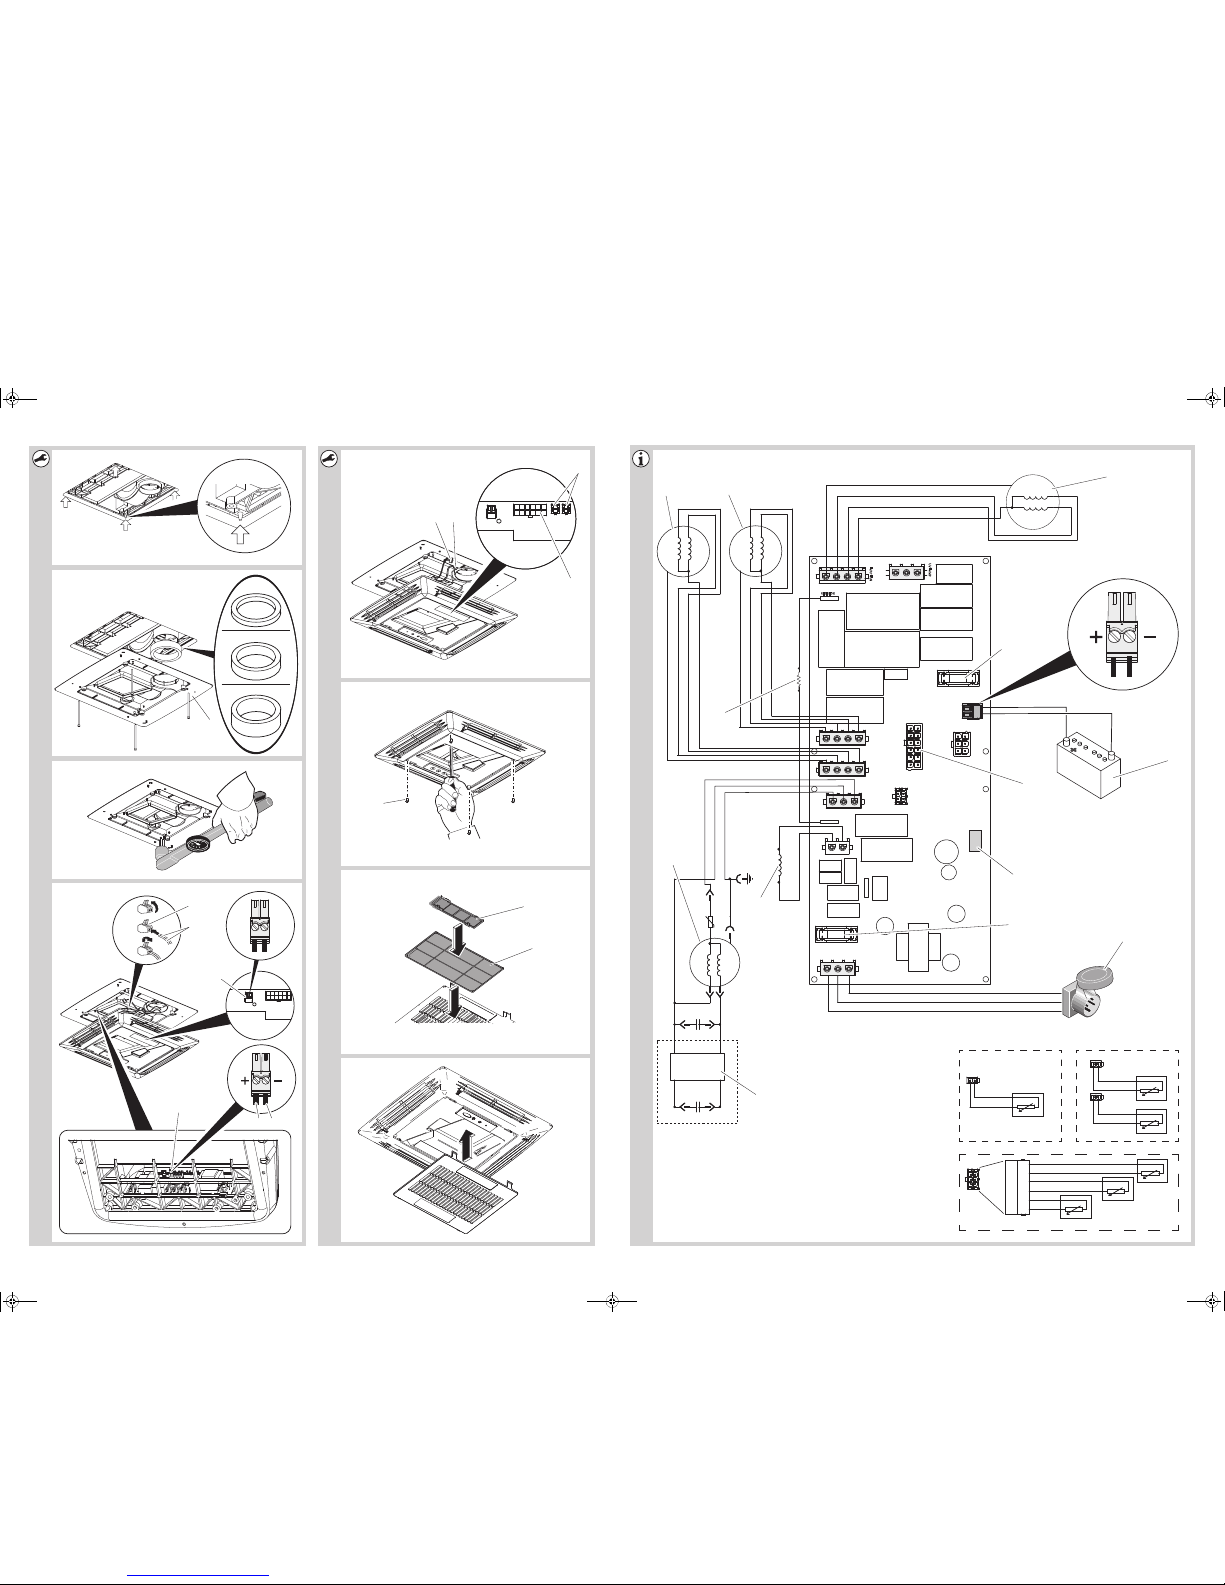
8.5 Installing the roof air conditioner with Chillout ADB
(9105306662)
NOTICE! Risk of damage
A
See fig. 0
➤ Lift the roof air conditioner onto the roof of the vehicle.
Observe the structural strength of the roof of the vehicle. The roof of the
vehicle must be able to bear the weight of the roof air conditioner. The
roof must not be indented or deformed by the weight of the unit, even
over a longer period of time.
➤ Position the roof air conditioner over the installation opening.
Observe the direction of travel.
13
EN
Installation FreshJet
Attaching the roof air conditioner
See fig. a
➤ Position the roof air conditioner into the mounting opening using the conical
noses.
See fig. b
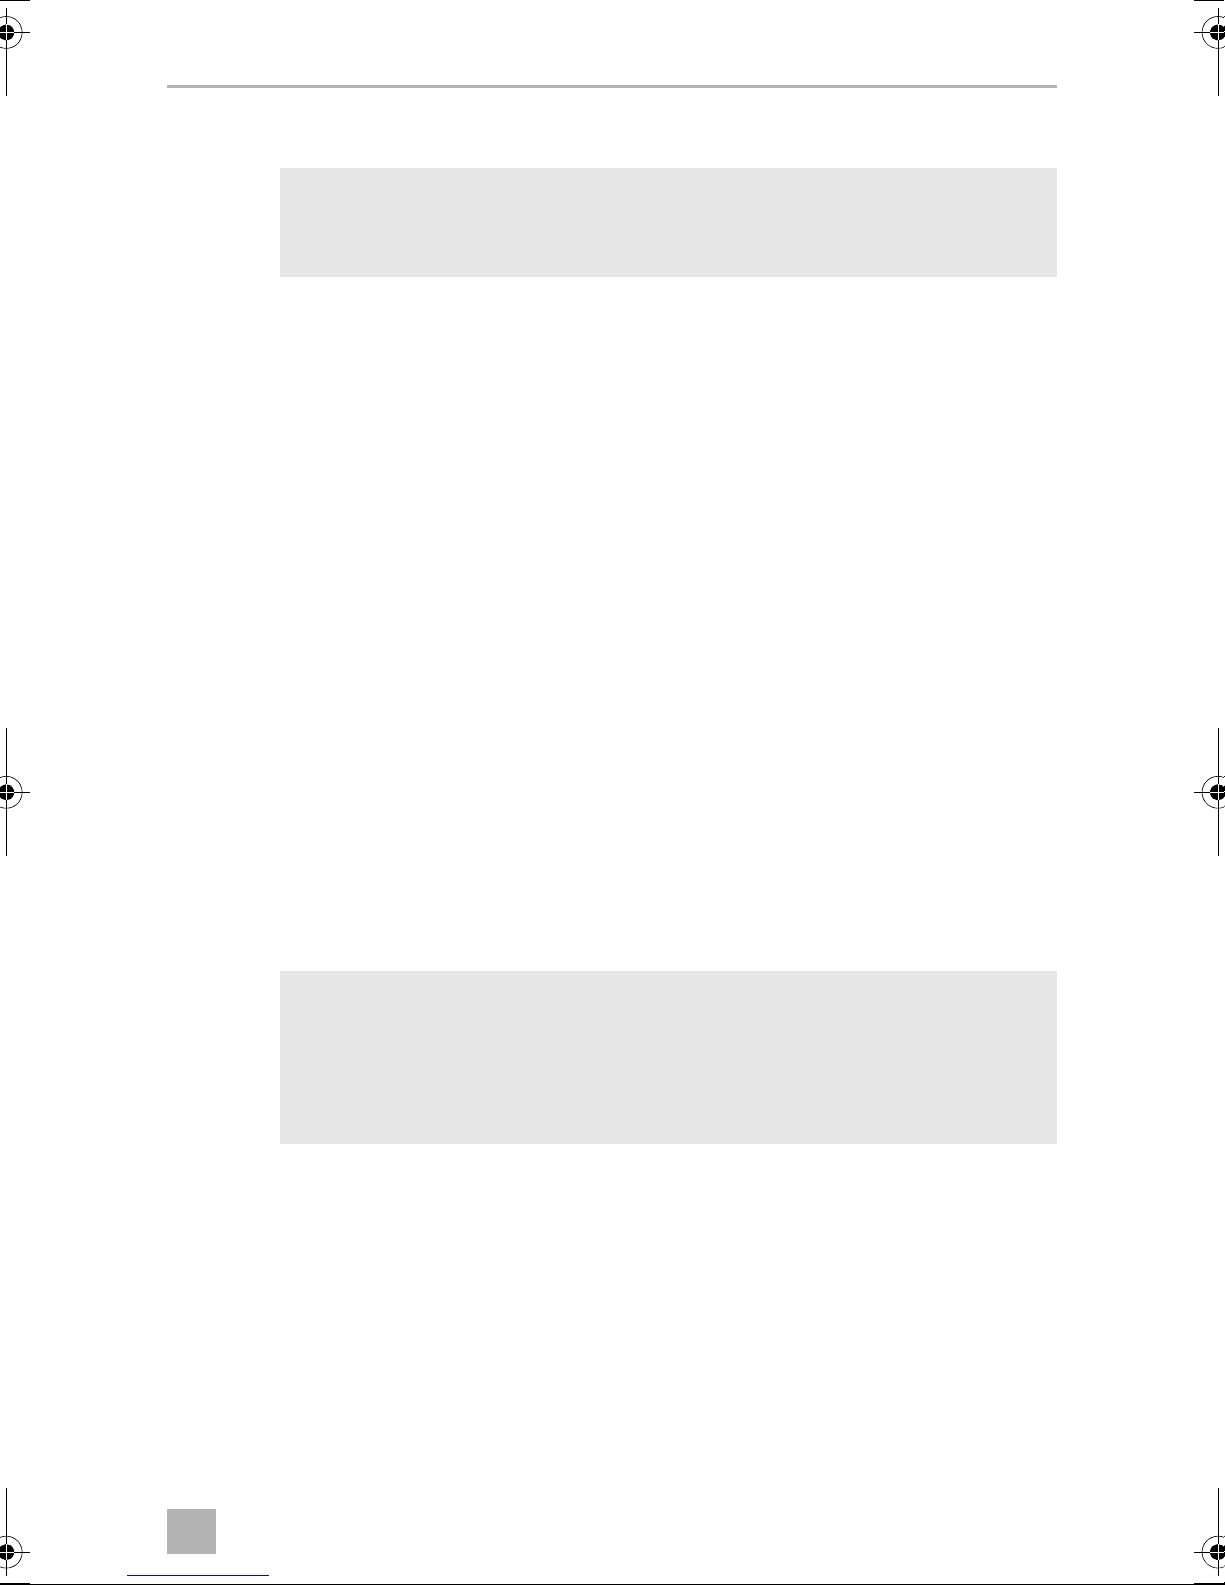
➤ Choose the suitable seal in accordance with the following table:
Roof thickness Seal thickness
25 – 30 mm 15 mm
30 – 40 mm 30 mm
40 – 60 mm 45 mm
➤ Position the seal with the adhesive side on the ADB.
➤ Fasten the mounting frame (3) on the underside of the roof air conditioner with
the 4 screws supplied.
See fig. c
NOTICE! Risk of damage
Tighten to the specified torque.
A
➤ Tighten the screws using a torque spanner and a fastening torque of 2.5 Nm.
14
EN
FreshJet Installation
Electrical connection
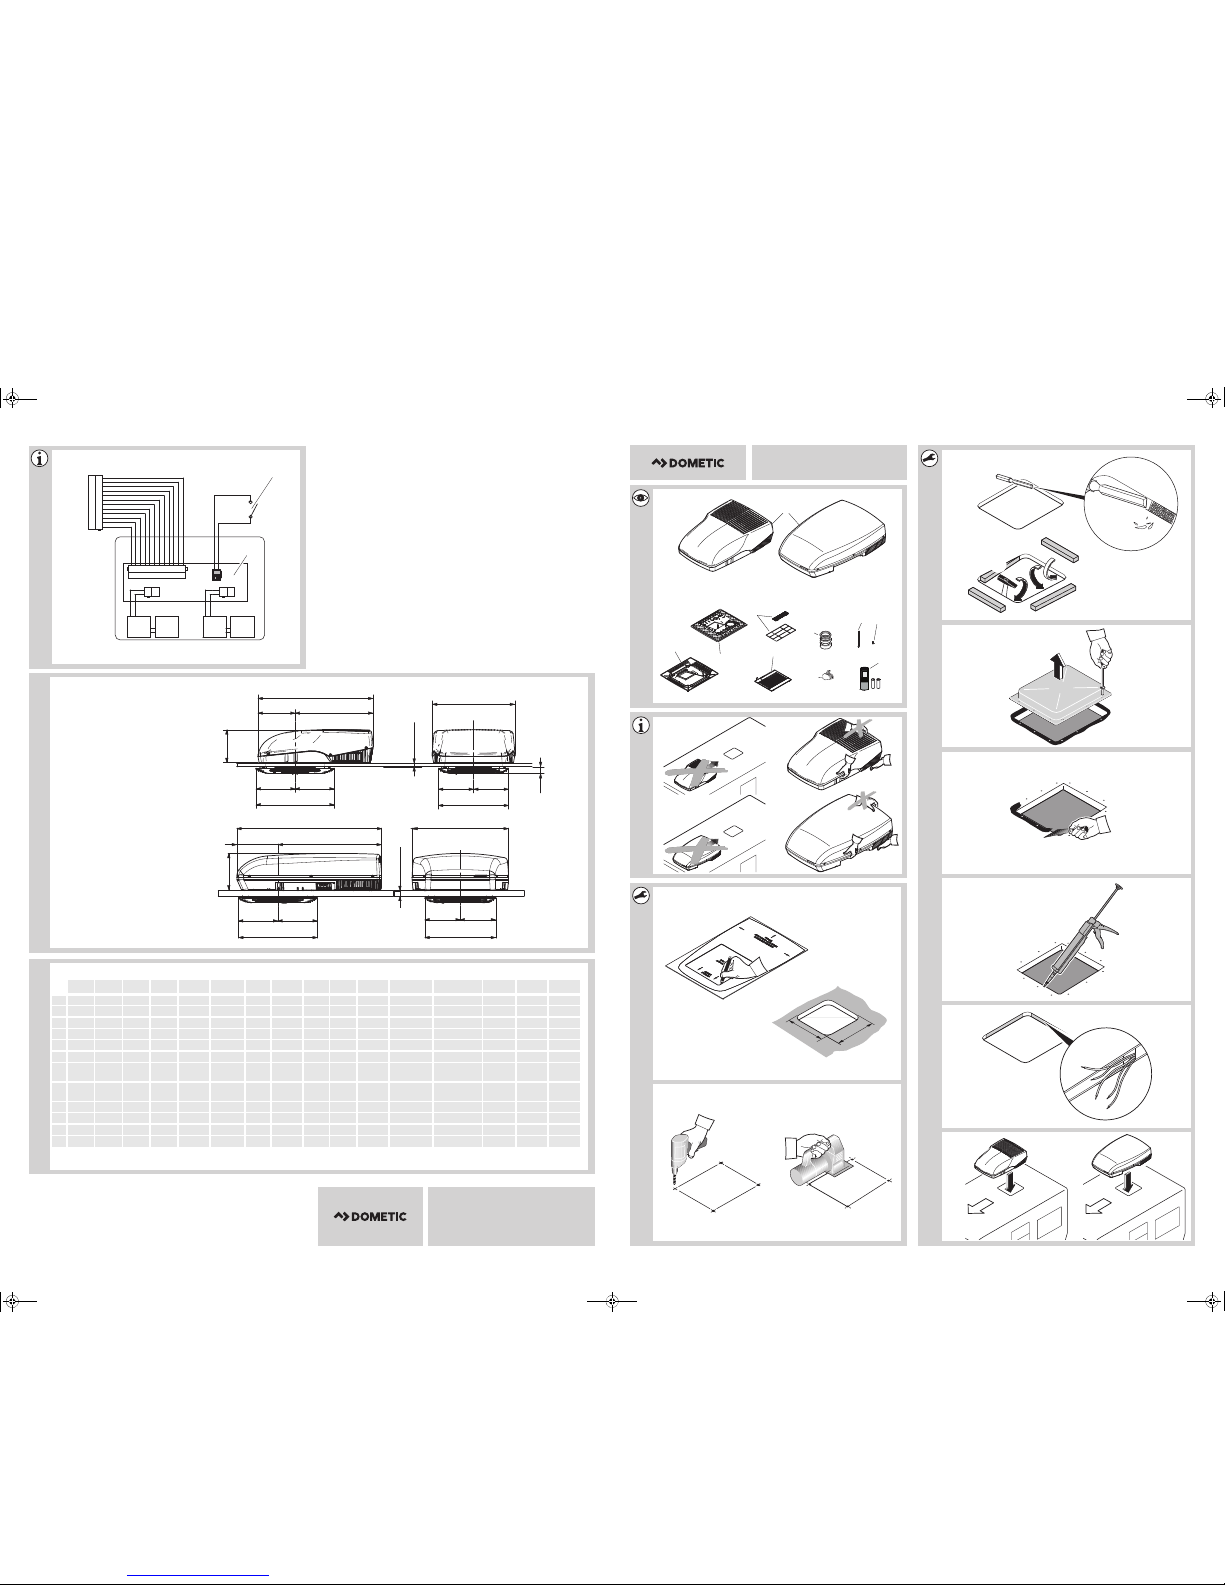
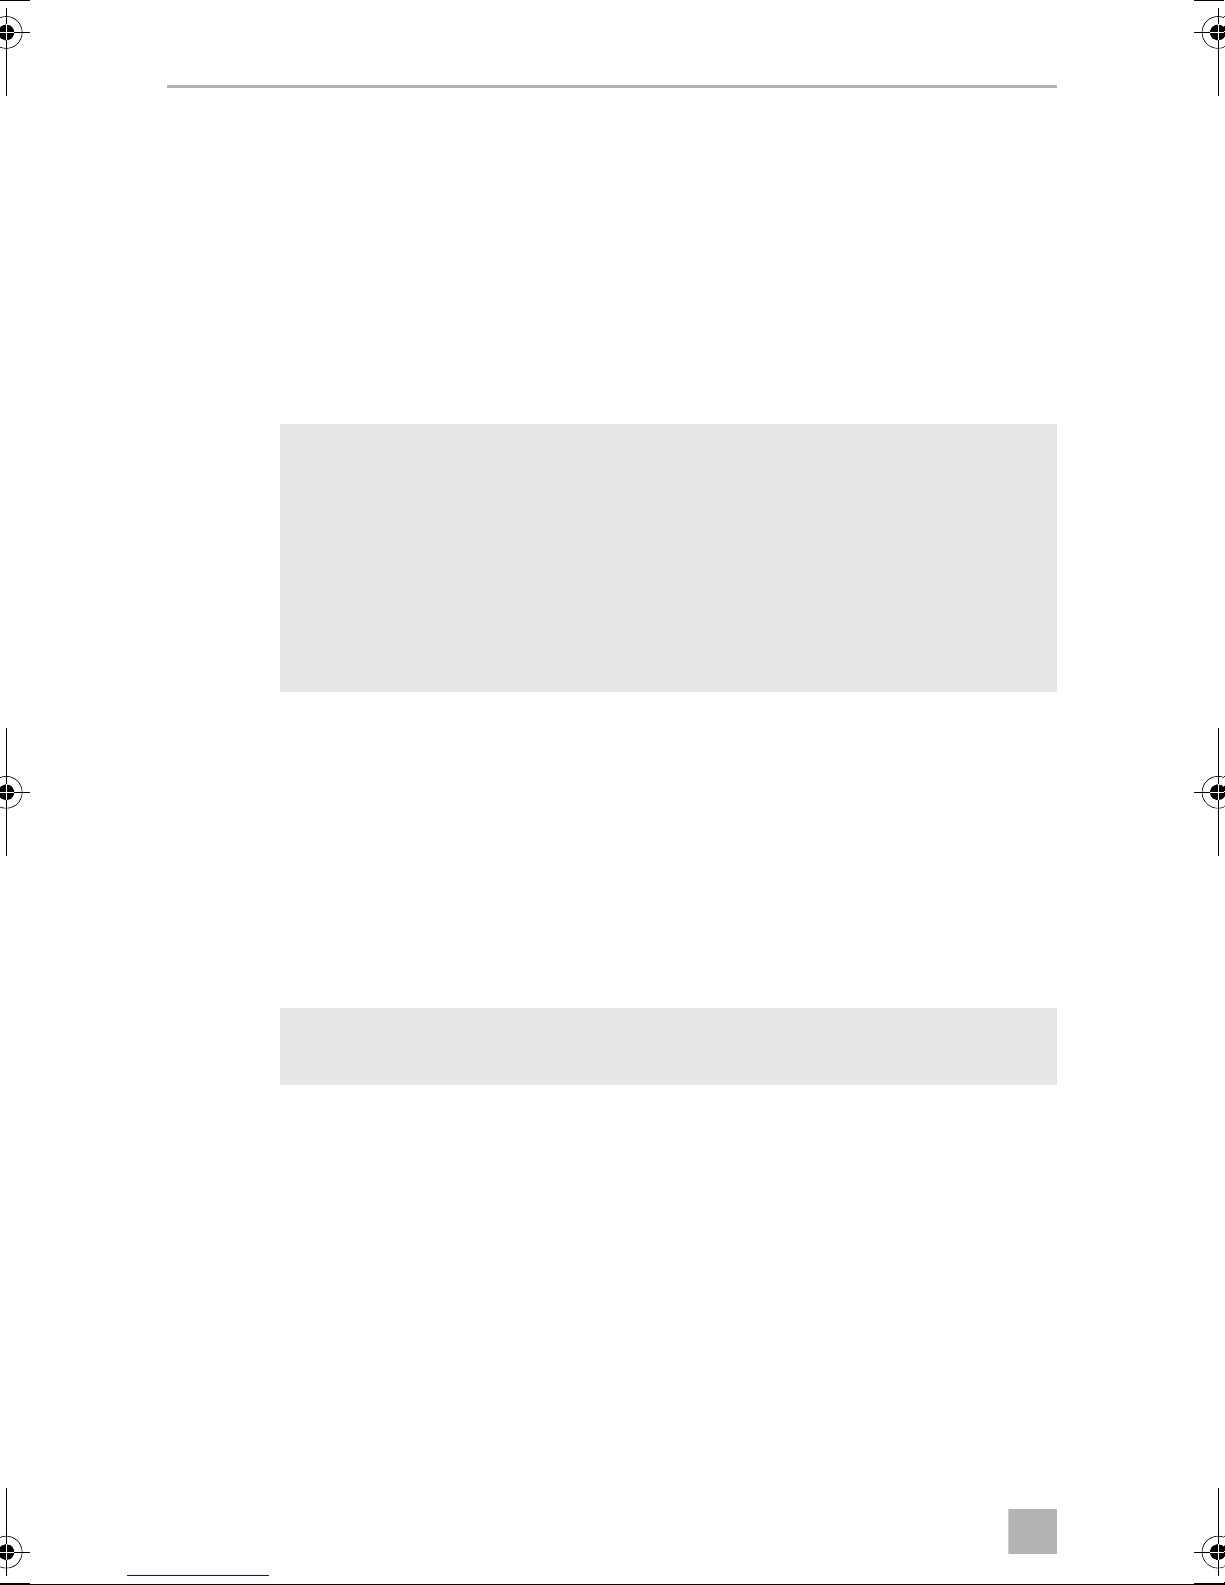
The complete circuit diagram can be found in fig. i:
Item Description
1 230 Vw mains
2 Compressor
3 Fan condenser
4 Fan condenser (FreshJet 3200 only)
5 Fan evaporator
6 Battery
7 Remote socket
8 Temperature sensor
9 Heating (FreshJet 1700, ref. no. 9105306658 and
FreshJet 2200, ref. no. 9105306515, 9105306512 only)
10 Heat Pump (FreshJet 3200 only)
11 Soft Start (FreshJet 2200, ref. no. 9105306515, FreshJet 3200 only)
Keys for fig. j:
Item Description
1 Remote light switch
2 Circuit board in the air outlet unit
See fig. d
230 Vw cable
➤ Connect the roof air conditioner with the 230 Vw voltage supply.
Connect the cables (1) to a cable connector (2).
15
EN
Installation FreshJet
Remote light switch (not included in the scope of delivery)
You can connect the lighting to a remote light switch. This enables you to switch on
the lighting remotely.
To do this, proceed as follows:
➤ Disconnect the 2-pin plug (3) from the socket on the circuit board of the air outlet
unit.
➤ Connect the two cables of the remote light switch to the 2-pin plug (3).
➤ Insert the 2-pin plug (3) into socket on the circuit board.
12 Vg cable
You can connect the lighting to the battery. This enables you to switch on the lighting
even if the 230 Vw voltage supply is not connected.
To do this, proceed as follows:
➤ Disconnect the 2-pin plug (4) from the socket on the main board.
➤ Connect the positive cable (5) with the plug.
➤ Connect the negative cable (6) with the plug.
Connecting the circuit board
See fig. e
➤ Insert the 12-pin plug (1) in the socket (4) on the circuit board of the air outlet unit.
➤ Insert the two 2-pin plugs (2) in the sockets (3) on the circuit board.
16
EN
FreshJet Installation
8.6 Installing the air outlet unit Chillout ADB
See fig. f
➤ Attach the air outlet unit to the (1) fastening frame using the short fastening
screws.
See fig. g
➤ Install the air filter in the specified sequence.
See fig. h
➤ Fit the filter covers.
➤ Enter the new vehicle height and weight in the vehicle documents.
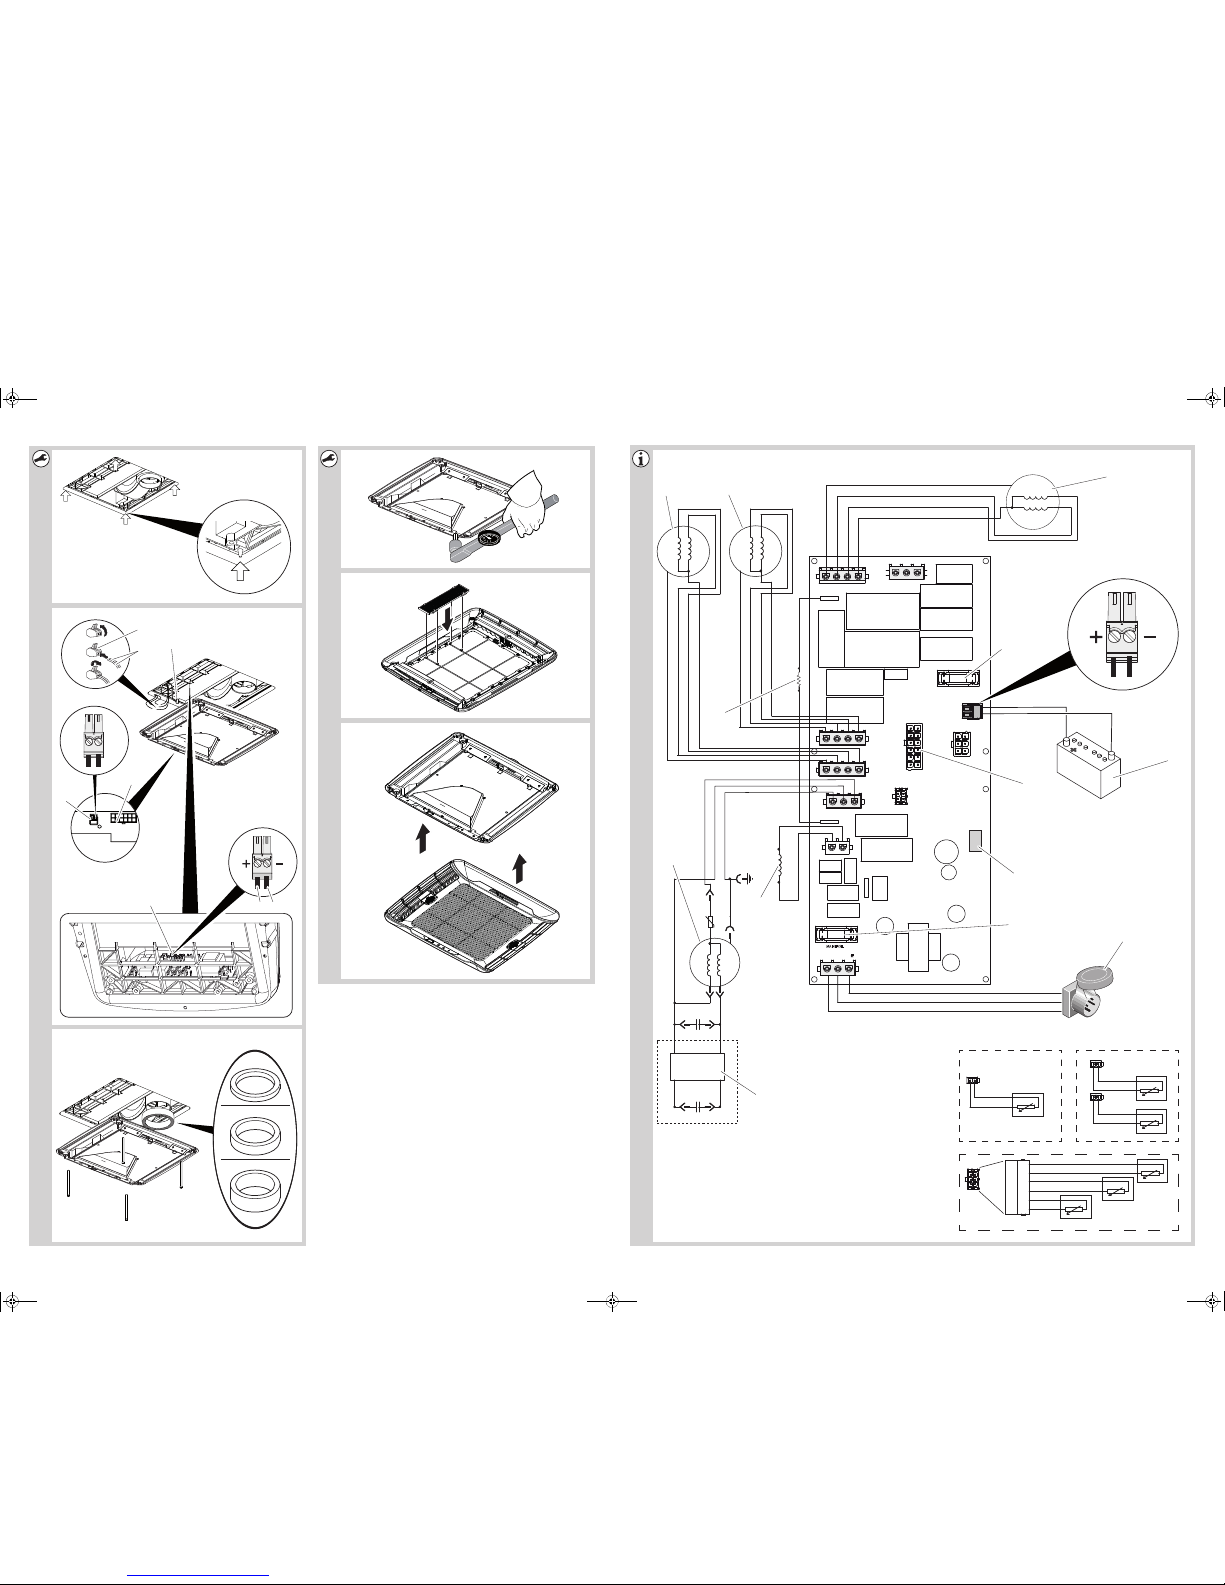
8.7 Installing the roof air conditioner with ADB
(9105306664)
NOTICE! Risk of damage
A
See fig. 0
➤ Lift the roof air conditioner onto the roof of the vehicle.
➤ Position the roof air conditioner over the installation opening.
Observe the direction of travel.
Attaching the roof air conditioner
See fig. a
➤ Position the roof air conditioner into the mounting opening using the conical
noses.
Observe the structural strength of the roof of the vehicle. The roof of the
vehicle must be able to bear the weight of the roof air conditioner. The
roof must not be indented or deformed by the weight of the unit, even
over a longer period of time.
17
EN
Installation FreshJet
Electrical connection
The complete circuit diagram can be found in fig. g:
Item Description
1 230 Vw mains
2 Compressor
3 Fan condenser
4 Fan condenser (FreshJet 3200 only)
5 Fan evaporator
6 Battery
7 Remote socket
8 Temperature sensor
9 Heating (FreshJet 1700, ref. no. 9105306658 and
FreshJet 2200, ref. no. 9105306515, 9105306512 only)
10 Heat Pump (FreshJet 3200 only)
11 Soft Start (FreshJet 2200, ref. no. 9105306515, FreshJet 3200 only)
Keys for fig. h:
Item Description
1 Remote light switch
2 Circuit board of the air outlet unit
See fig. b
230 Vwcable
➤ Connect the roof air conditioner with the 230 Vwvoltage supply.
Connect the cables (1) to a cable connector (2).
18
EN
FreshJet Installation
Remote light switch (not included in the scope of delivery)
You can connect the lighting to a remote light switch. This enables you to switch on
the lighting remotely.
To do this, proceed as follows:
➤ Disconnect the 2-pin plug (3) from the socket on the circuit board of the air outlet
unit.
➤ Connect the two cables of the remote light switch to the 2-pin plug (3).
➤ Insert the 2-pin plug (3) into socket on the circuit board.
12 Vg cable
You can connect the lighting to the battery. This enables you to switch on the lighting
even if the 230 Vw voltage supply is not connected.
To do this, proceed as follows:
➤ Disconnect the 2-pin plug (4) from the socket on the main board.
➤ Connect the positive cable (5) with the plug.
➤ Connect the negative cable (6) with the plug.
Connecting the circuit board
➤ Insert the 12-pin plug (8) in the socket (7) on the circuit board of the air outlet unit.
See fig. c
➤ Choose the suitable seal in accordance with the following table:
Roof thickness Seal type
25 – 30 mm 15 mm
30 – 40 mm 30 mm
40 – 60 mm 45 mm
➤ Position the seal with the adhesive side on the ADB.
➤ Fasten the fastening frame (3) on the underside of the roof air conditioner with
the 4 screws supplied.
19
EN
Installation FreshJet
See fig. d
NOTICE! Risk of damage
Tighten to the specified torque.
A
➤ Tighten the screws using a torque spanner and a fastening torque of 2.5 Nm.
8.8 Installing the air outlet unit
See fig. e
➤ Install the air filter in the specified sequence.
See fig. f
➤ Attach the air outlet unit magnetically to the fastening frame.
20
EN
FreshJet Troubleshooting
9 Troubleshooting
Problem Cause Remedy
Roof air conditioner constantly
switches itself off.
No cooling
capacity
Low air output The air intake section is clogged up. ➤ Remove any leaves and other dirt
Icing sensor has tripped. Outer temperature is too low or all air
nozzles are closed.
The roof air conditioner is not set to
cooling.
The ambient temperature is above 52 °C. The roof air conditioner is only
The temperature set is higher that the
room temperature.
The ambient temperature is below 16 °C. ➤ The roof air conditioner is only
One of the temperature sensors is
defective.
The vaporiser fan is damaged.
The condenser fan is damaged.
➤ Set the roof air conditioner to
cooling.
designed for ambient temperatures of
up to 52 °C.
➤ Select a lower temperature.
designed for ambient temperature above 16 °C.
➤ Contact an authorised workshop.
from the ventilation grilles of the
roof air conditioner.
Water enters the
vehicle
Roof air conditioner does not
switch on.
Roof air conditioner does not
switch off.
The blower is defective. ➤ Contact an authorised workshop.
The condensation water drainage openings are clogged up.
The seals are damaged. ➤ Contact an authorised workshop.
No supply voltage (230 Vw) connected. ➤ Check the power supply.
The voltage is too low (under 200 V).
The voltage converter is defective.
One of the temperature sensors is
defective.
The electrical fuse of the power supply is
too low.
One of the temperature sensors is
defective.
The electrical fuse of the power supply is
too low.
➤ Clean the drainage openings for
condensation water.
➤ Contact an authorised workshop.
➤ Check the electrical fuse of the
power supply.
➤ Contact an authorised workshop.
➤ Check the electrical fuse of the
power supply.
21

EN
Disposal FreshJet
10 Disposal
Regulations for environmental safety and correct disposal
All organisations must apply a set of procedures to identify, evaluate and control the
influence that their activities (manufacturing, products, services, etc.) have on the
environment.
The procedures to be followed to identify significant environmental impact must take
the following factors into account:
• use of raw materials and natural resources
• atmospheric emissions
• discharge of liquids
• waste management and recycling
• contamination of the soil
In order to minimise environmental impact, the manufacturer provides a series of
indications here below that should be taken into account by all those who, for whatever reason, interact with the appliance during its working life.
• All packing components must be disposed of (preferably recycled) in compli-
ance with statutory legislation in the country in which disposal takes place.
• All product components must be disposed of (preferably recycled) in compli-
ance with statutory legislation in the country in which disposal takes place.
• For correct disposal, the appliance must be consigned to an authorised waste
disposal company to ensure that all recyclable components are reused and the
remaining materials are processed properly.
• During installation ensure the room has adequate ventilation to prevent the build-
up of stale air that might be harmful to the health of the operators.
• During operation and maintenance ensure that any waste pollutant products (oil,
grease, etc.) are disposed of correctly.
• Keep noise levels down to reduce noise pollution.
22
EN
FreshJet Technical data
For more information on correct dismantling of our products please refer to the
recycling handbooks at www.dometic.com.
➤ Place the packaging material in the appropriate recycling waste bins wherever
possible.
➤ When in operation or undergoing repairs and maintenance work, make sure that
the refrigerant circuit is not damaged and refrigerant cannot escape. It acts as a
greenhouse gas and should not be allowed into the environment.
If you wish to finally dispose of the product, ask your local recycling centre
or specialist dealer for details about how to do this in accordance with the
M
➤ Dispose of the product at an official waste disposal facility in accordance with the
applicable recycling or disposal guidelines.
B
applicable disposal regulations.
Protect the environment!
Do not dispose of any batteries with general household waste.
Return defective or used batteries to your retailer or dispose of them at
collection points.
11 Technical data
Contains fluorinated greenhouse gases
Hermetically sealed equipment
23
EN
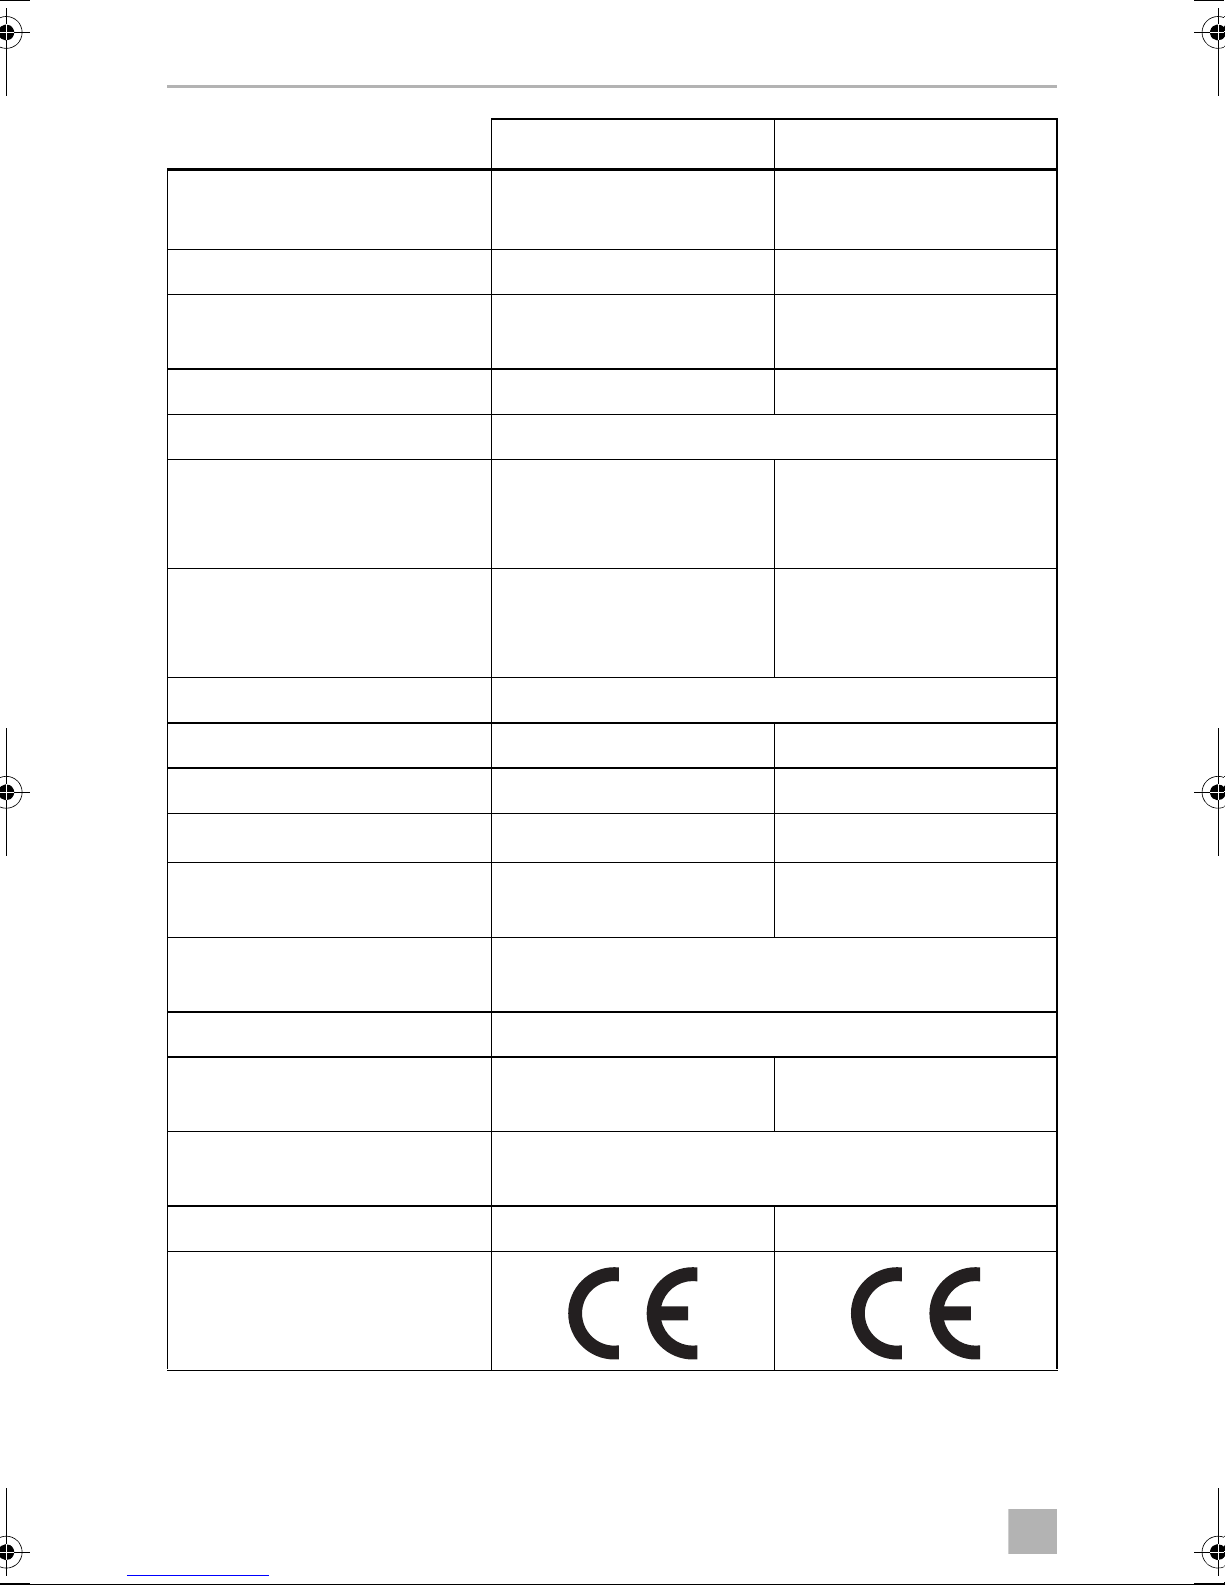
Technical data FreshJet
FreshJet 1100 FreshJet 1700
Ref. no.: 9105306654
9105306655
Compressor cooling capacity: 1000 W 1700 W
Cooling capacity based on
ISO 5151:
Heating capacity: – 800 W
Rated input voltage: 230 Vw/ 50 Hz
Power consumption in cooling
mode:
Required fuse:
Power consumption in heating
mode:
Required fuse:
Operating temperature range: 0 °C to +52 °C
Refrigerant: R-134a R-407c
850 W 1600 W
2.0 A
3 A
–
–
9105306656
9105306658
2.7 A
4 A
3.5 A
4 A
Refrigerant quantity: 0.280 kg 0.545 kg
equivalent: 0.4004 t 0.96683 t
CO
2
Global warming potential
(GWP):
Blower: 4 blower levels
Protection class: IPX4
Max. volume of space in the
vehicle (with insulated walls):
Dimensions L x W x H: 787 x 562 x 225 mm
Weight: approx. 22.5 kg approx. 29 kg
Inspection/certification:
1430 1774
1 Automatic mode
16 m³ 20 m³
(height above vehicle roof)
24
EN
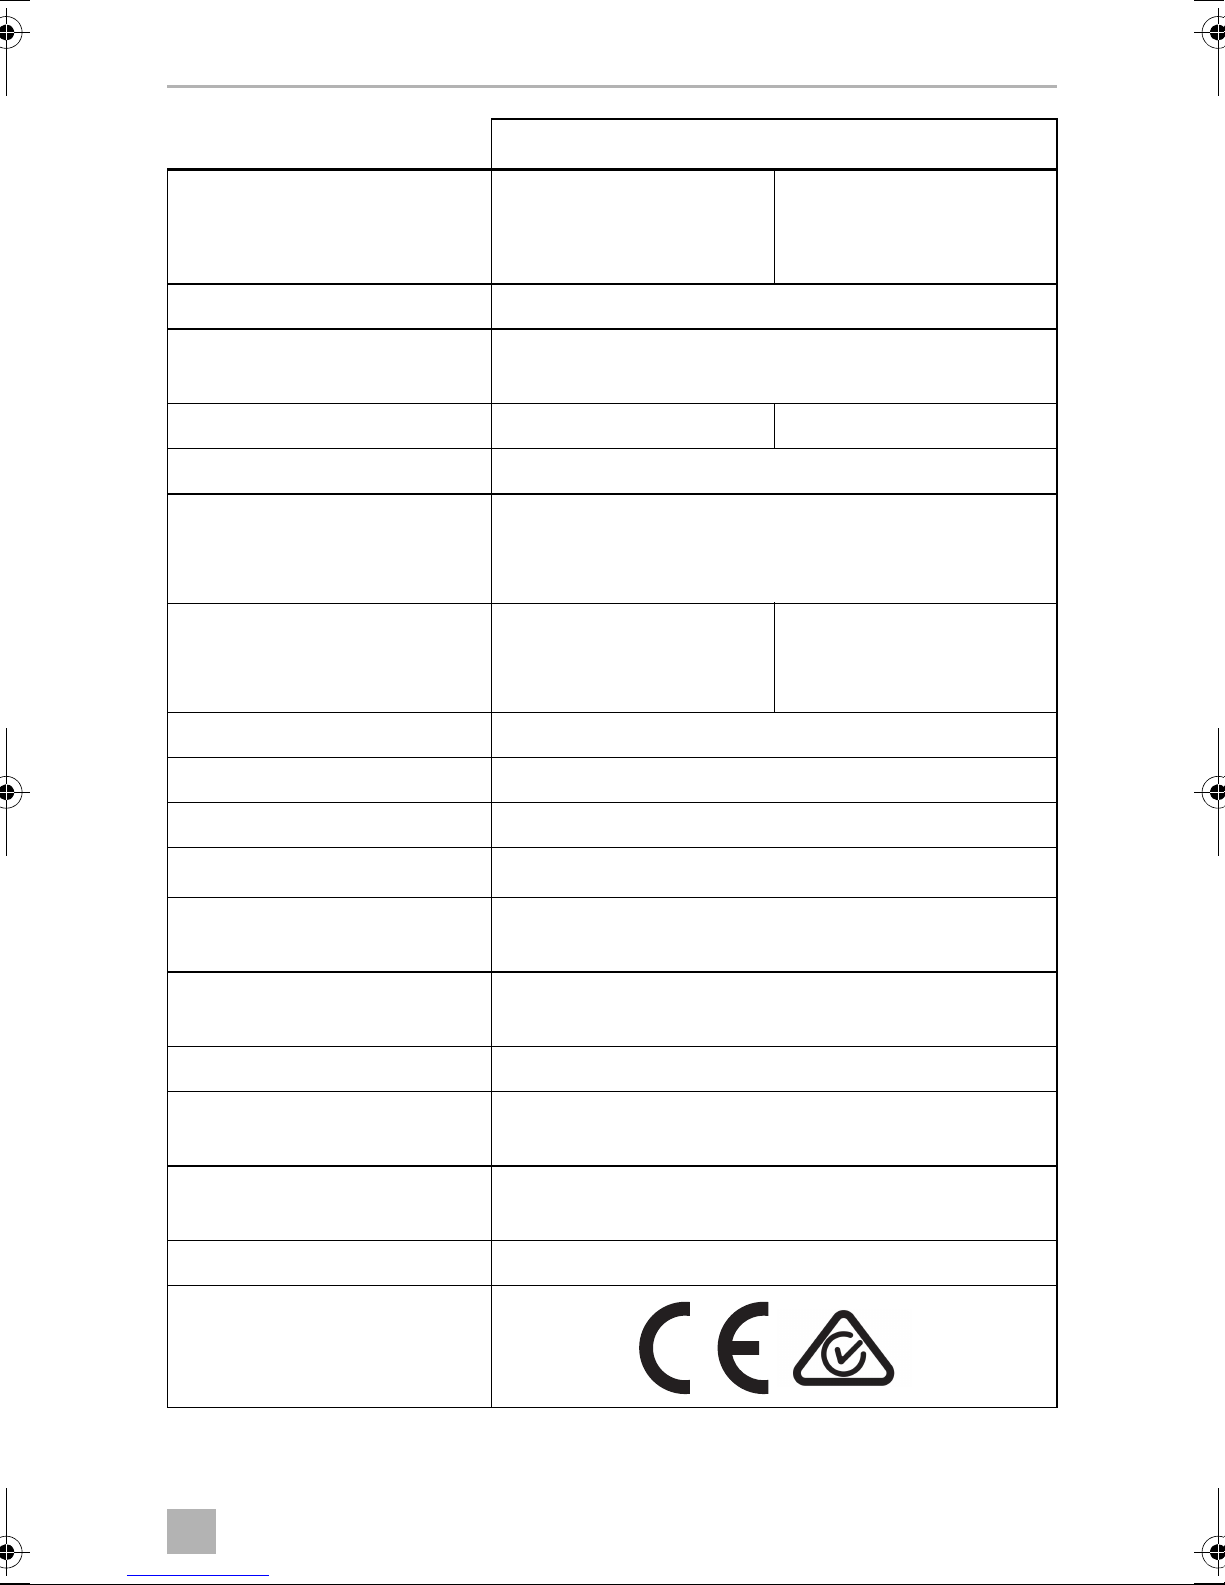
FreshJet Technical data
FreshJet 2200
Ref. no.: 9105306513 9105306511
9105306512
9105306515
Compressor cooling capacity: 2200 W
Cooling capacity based on
ISO 5151:
Heating capacity: – 1200 W
Rated input voltage: 230 Vw / 50 Hz
Power consumption in
cooling mode:
Required fuse:
Power consumption in
heating mode:
Required fuse:
Operating temperature range: 0 °C to +52 °C
Refrigerant: R-407c
Refrigerant quantity: 0.520 kg
equivalent: 1.09564 t
CO
2
Global warming potential
(GWP):
–
–
2050 W
4.1 A
5 A
5.2 A
6 A
1774
Blower: 4 blower levels
Protection class: IPX4
Max. volume of space in the
vehicle (with insulated walls):
Dimensions L x W x H: 787 x 562 x 225 mm
Weight: approx. 32 kg
Inspection/certification:
1 Automatic mode
25 m³
(height above vehicle roof)
25
EN
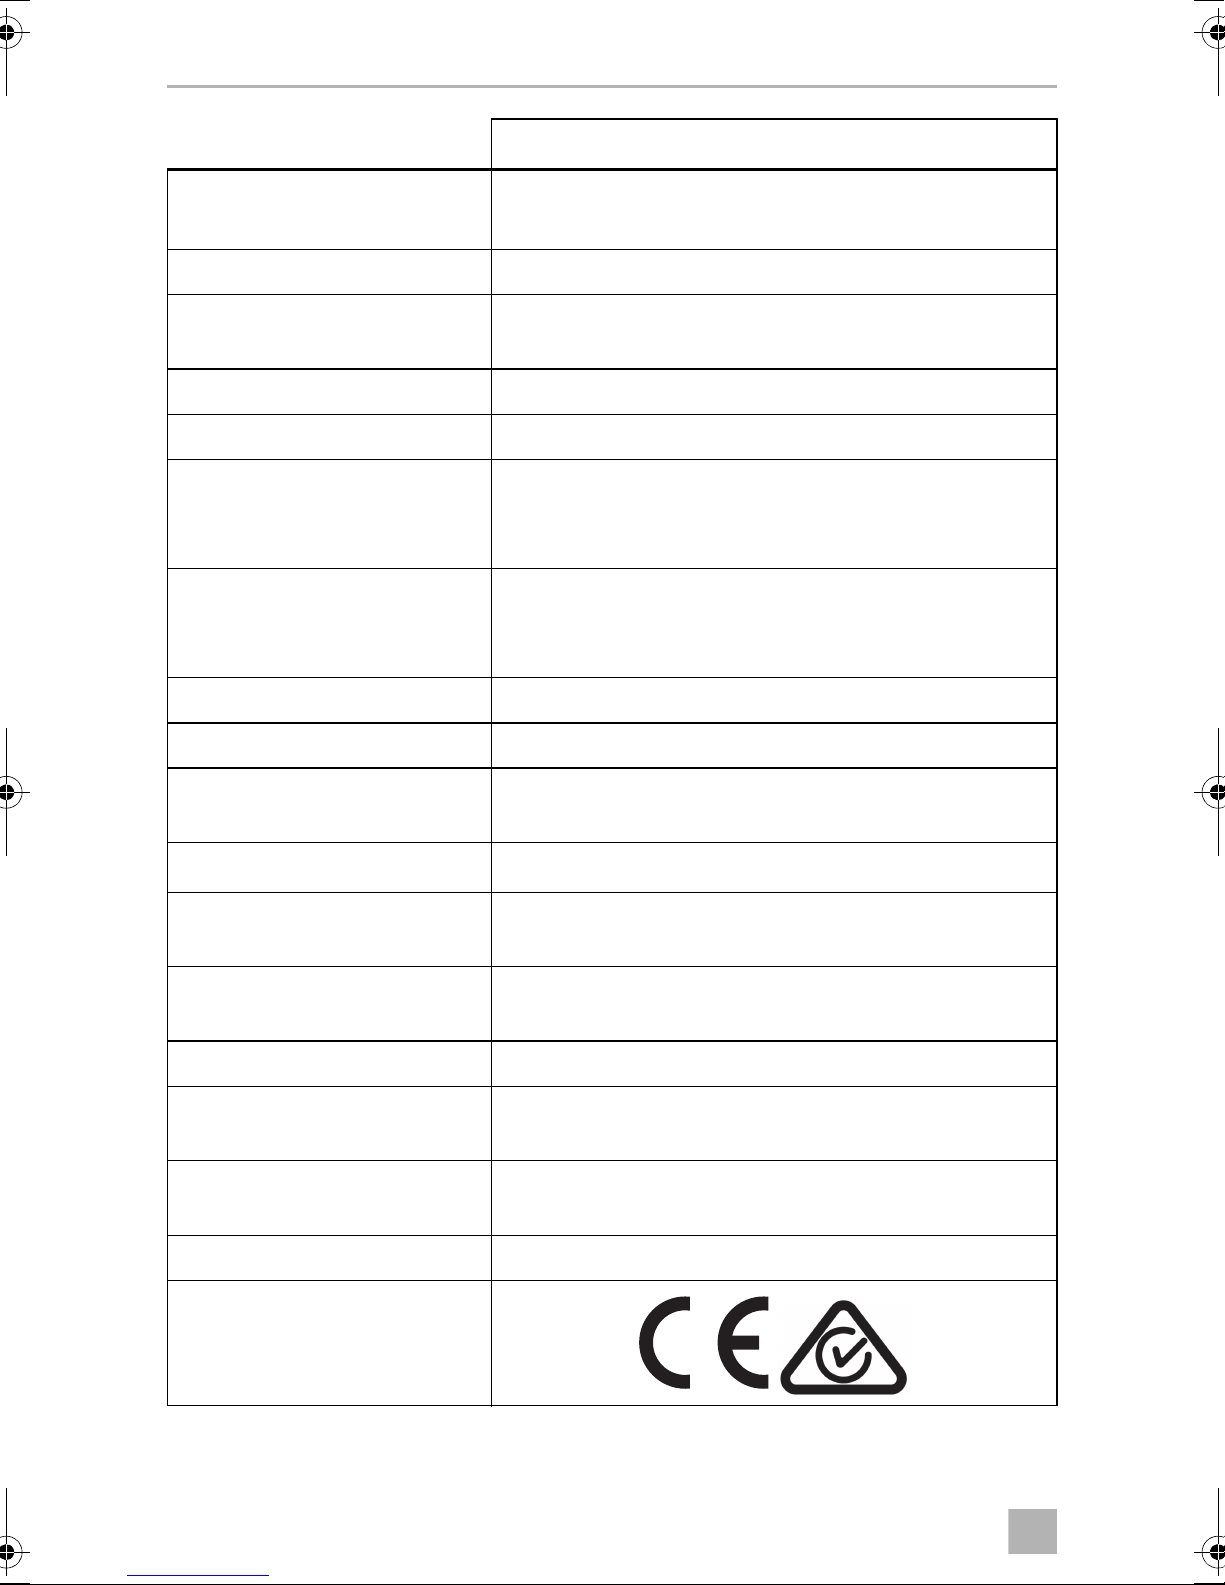
Technical data FreshJet
FreshJet 3200
Ref. no.: 9105306660
9105306659
Compressor cooling capacity: 2800 W
Cooling capacity based on
ISO 5151:
Heating capacity: 3300 W
Rated input voltage: 230 Vw / 50 Hz
Power consumption in cooling
mode:
Required fuse:
Power consumption in heating
mode:
Required fuse:
Operating temperature range: 0 °C to +52 °C
Refrigerant: R-410a
Global warming potential
(GWP):
equivalent: 1.53468 t
CO
2
2800 W
5.7 A
10 A
5.9 A
10 A
1774
Global warming potential
(GWP):
Blower: 4 blower levels
1 Automatic mode
Protection class: IPX4
Max. volume of space in the
vehicle (with insulated walls):
Dimensions L x W x H (mm): 980 x 650 x 248 mm
(height above vehicle roof)
Weight: approx. 36 kg
Inspection/certification:
2088
29 m³
26
 Loading...