

Dometic 9105306654, FreshJet 1100, 9105306658, 9105306513, FreshJet 2200 Installation Manual
...Page 1
Dometic WAECO International GmbH
Hollefeldstrasse 63
D-48282 Emsdetten
dometic.com
787
254 533
25 – 60
562
535
225
==
480
==
47
980
703277
248
25 – 60
650
480535
=====
A
A
B
B
A
2.
1.
B
400 mm
400 mm
rt
gn
cy
ge
br
ws/sw
ws
or
bl
sw
gr
vt
1
2
3
4
5
6
7
8
9
11
10
12
REMOTE
C3
Cx
LED LED LED LED
Jx
Jx
12345
6789101112
1
2
Cx Jx
1
2
1
FreshJet 1100, 1700, 2200
FreshJet 3200
BA
1
2
6
9
8
7
10
4
5
2
3
FreshJet 1100, 1700, 2200
FreshJet 3200
FreshJet
Chillout ADB (9105306662)
1
2
6
7
8
3
4
9
0
5
4445101816 ST0179 825 02 01-83 03/2017
j
EN DE FR ES PT IT NL DA SV NO FI RU PL SK CS HU
bl Blue Blau Bleu Azul Azul Blu Blauw Blå Blå Blå Sininen Синий Niebieski Modrá Modrá Kék
br Brown Braun Marron Marrón Castanho Marrone Bruin Brun Brun Brun Ruskea Коричневый Brązowy Hnedá Hněda Barna
cy Cyan Cyan Cyan Cian Ciano Cyan Cyaan Cyan Cyan Cyan Syaa ni Голубой Cyjan Azúrová Azurová Cián
ge Yellow Gelb Jaune Amarillo Amarelo Giallo Geel Gul Gul Gul Kelt ainen Желтый Żółty Žltá Žlutá Sárga
gn Green Grün Vert Verd e Ver de Verde Groen Grøn Grön Grønn Vihreä Зеленый Zielony Zele ná Zelená Zöld
gr Grey Grau Gris Gris Cinzento Grigio Grijs Grå Grå Grå Harmaa Серый Szary Sivá Šedá Szürke
or Orange Orange Orange Naranja Cor de
laranja
Arancione Oranje Orange Orange Oransje Oranssi Оранжевый Pomarańczowy Oranžová Oranžová Narancs
pk Pink Pink Rosa Rose Cor de
rosa
Rosa Roze Lyserøde Rosa Rosa Pinkki Розовый Różowy Ružová Růžová Rózsaszín
rt Red Rot Rouge Rojo Verm elh o Rosso Rood Rød Röd Rød Punainen Красный Czerwony Červená Červená Piros
sw Black Schwarz Noir Negro Preto Nero Zwart Sort Svart Svart Musta Черный Czarny Čierna Černá Fekete
vt Violet Violett Violeta Lila Violeta Violetto Paars Violet Viole tt Fiolett Violett i Фиолетовый Fioletowy Fialová Fialová Ibolya
ws White Weiß Blanc Blanco Branco Bianco Wit Hvid Vit Hvit Valkoi nen Белый Biały Biela Bílá Fehér
k
FreshJet-ADB2015-I-16s.book Seite 1 Mittwoch, 8. März 2017 9:47 21
Page 2
A
2,5 Nm
1
2
ROOMROOM
PROBEPROBE
1
2
EV. PROBEEV. PROBE
FJ2200FJ1100, FJ1700
1
2
EV. PROBEEV. PROBE
+12 Vg
–
230 Vw
ge/gn
bl
br
T3
T2
T1
F3 F1
SOFT START
F2
bl
F4
F5
0x1
0x2
ge/gn
3
2
1pk
123
MAIN
ON/OFF
ECONOMY
INVERTER
1
2
3
4
1
2
3
4
MAIN FUSE
BATTERY FUSE
BATTERY
CAN BUS
COND FAN
COND FAN
EVAP FAN
COMPRESSOR
REMOTE
J12
UV LAMP
RESISTOR
123
ge/gn
sw
br
bl
ge/gnswbr
bl
1
2
3
4
ge/gnswbr
bl
rt
PROBEPROBE
or
or
(8) PROBE
RESISTOR
VALVE
1
2
1
2
1
2
CO. PROBECO. PROBE
EV. PROBEEV. PROBE
ROOM PROBEROOM PROBE
PROBEPROBE
1
4
2
5
3
6
FJ3200
15 mm
30 mm
45 mm
1
2
3
4
56
1
3
4
1 2
3
1.
2.
7
6
8
5
2
3
4
1
F2AL250V
F15AL250V
1.
2.
3.
11
9
10
e
d
f
c
g
a
h
b
i
FreshJet-ADB2015-I-16s.book Seite 2 Mittwoch, 8. März 2017 9:47 21
Page 3
Dometic WAECO International GmbH
Hollefeldstrasse 63
D-48282 Emsdetten
dometic.com
470
===
555
257.5 297.5
980
703277
650
25 – 60
45
248
25 – 60
257.5 297.5
555
= =
470
225
254 533
787
562
45
A
A
B
B
A
BA
B
400 mm
400 mm
rt
gn
cy
ge
br
ws/sw
ws
or
bl
sw
gr
vt
1
2
3
4
5
6
7
8
9
11
10
12
REMOTE
C3
Cx
LED LED
Jx
Jx
12345
6789101112
1
2
Cx Jx
1
2
2.
1.
1
2
FreshJet 1100, 1700, 2200
FreshJet 1100, 1700, 2200
FreshJet 3200
FreshJet 3200
1
2
6
7
4
5
3
8
FreshJet
ADB (9105306664)
1
2
6
7
8
3
4
9
0
5
4445101817 ST0180 825 02 01-8 4 03/2017
h
EN DE FR ES PT IT NL DA SV NO FI RU PL SK CS HU
bl Blue Blau Bleu Azul Azul Blu Blauw Blå Blå Blå Sininen Синий Niebieski Modrá Modrá Kék
br Brown Braun Marron Marrón Castanho Marrone Bruin Brun Brun Brun Ruskea Коричневый Brązowy Hnedá Hněda Barna
cy Cyan Cyan Cyan Cian Ciano Cyan Cyaan Cya n Cyan Cyan Sy aani Голубой Cyjan Azúrová Azurová Cián
ge Ye l l ow Gelb Jaune Amarillo Amarelo Giallo Geel Gul Gul Gul Ke ltaine n Желтый Żółty Žltá Žlutá Sárga
gn Green Grün Ver t Verde Ve rde Verde Groen Grøn Grön Grønn Vihreä Зеленый Zielony Zelená Zelená Zöld
gr Grey Grau Gris Gris Cinzento Grigio Grijs Grå Grå Grå Harmaa Серый Szary Sivá Šedá Szürke
or Orange Orange Orange Naranja Cor de
laranja
Arancione Oranje Orange Orange Oransje Oranssi Оранжевый Pomarańczowy Oranžová Oranžová Narancs
pk Pink Pink Rosa Rose Cor de
rosa
Rosa Roze Lyser øde Rosa Rosa Pinkki Розовый Różowy Ružová Růžová Rózsaszín
rt Red Rot Rouge Rojo Vermel ho Rosso Rood Rød Röd Rød Punainen Красный Czerwony Červená Červená Piros
sw Black Schwarz Noir Negro Preto Nero Zwart Sort Svart Svart Musta Черный Czarny Čierna Černá Fekete
vt Violet Violett Violeta Lila Violeta Violetto Paars Vio let Vi olett Fiolett Violetti Фиолетовый Fioletowy Fialová Fialová Ibolya
ws White Wei ß Blanc Blanco Branco Bianco Wit Hvid Vit Hvit Valkoin en Белый Biały Biela Bílá Fehér
i
FreshJet-ADB2015-I-16s.book Seite 1 Mittwoch, 8. März 2017 9:48 21
Page 4
–
ge/gn
bl
br
T3
T2
T1
F3 F1
SOFT START
F2
bl
F4
F5
0x1
0x2
ge/gn
3
2
1pk
123
MAIN
ON/OFF
ECONOMY
INVERTER
1
2
3
4
1
2
3
4
MAIN FUSE
BATTERY FUSE
BATTERY
CAN BUS
COND FAN
COND FAN
COMPRESSOR
VALVE
RESISTOR
REMOTE
J12
123
ge/gn
sw
br
bl
ge/gnswbr
bl
1
2
3
4
ge/gnswbr
bl
rt
or
or
PROBE
PROBE
230 Vw
+12 Vg
4
5 6
1
2
8
1.
2.
3.
3
7
A
2,5 Nm
click
click
15 mm
30 mm
45 mm
EVAP FAN
UV LAMP
RESISTOR
1
2
ROOM
ROOM
PROBE
PROBE
1
2
EV. PROBE
EV. PROBE
FJ2200FJ1100, FJ1700
1
2
EV. PROBE
EV. PROBE
(8) PROBE
1
2
1
2
1
2
CO. PROBE
CO. PROBE
EV. PROBE
EV. PROBE
ROOM PROBE
ROOM PROBE
PROBE
PROBE
1
4
2
5
3
6
FJ3200
7
6
8
5
2
3
4
1
F2AL250V
F15AL250V
11
9
10
b
d
e
a
f
c
g
FreshJet-ADB2015-I-16s.book Seite 2 Mittwoch, 8. März 2017 9:48 21
Page 5
ENDEFRESPT
IT
NLDASV
NO
FIRUPLSKCS
HU
AIR CONDITIONERS
FRESHJET
FJ1100, FJ1700, FJ2200, FJ3200
Air conditioning roof unit
Installation Manual. . . . . . . . . . . . . . . . . . . . .3
Dachklimaanlage
Montageanleitung. . . . . . . . . . . . . . . . . . . .27
Climatiseur de toit
Instructions de montage . . . . . . . . . . . . . . .52
Aire acondicionado de techo
Instrucciones de montaje . . . . . . . . . . . . . .76
Ar condicionado para tejadilho
Instruções de montagem . . . . . . . . . . . . . 101
Climatizzatore a tetto
Indicazioni di montaggio . . . . . . . . . . . . .128
Airconditioning voor dakinbouw
Montagehandleiding . . . . . . . . . . . . . . . . 152
Klimaanlæg til tagmontering
Monteringsvejledning. . . . . . . . . . . . . . . .176
Kattooilmastointilaitteisto
Asennusohje . . . . . . . . . . . . . . . . . . . . . . . 245
Накрышный кондиционер
Инструкция по монтажу. . . . . . . . . . . . . . 267
Klimatyzator dachowy
Instrukcja montażu . . . . . . . . . . . . . . . . . . 293
Strešné klimatizačné zariadenie
Návod na montáž . . . . . . . . . . . . . . . . . . . 318
Střešní klimatizace
Návod k montáži. . . . . . . . . . . . . . . . . . . . 341
Te t ő k l í m a-b e r ende zés
Szerelési útmutató . . . . . . . . . . . . . . . . . . 363
Takmonterad klimatanläggning
Monteringsanvisning. . . . . . . . . . . . . . . . 200
Takmontert klimaanlegg
Monteringsanvisning. . . . . . . . . . . . . . . . 222
Page 6
Page 7

EN
FreshJet
Please read this instruction manual carefully before installation and startup, and store it in a safe place. If you pass on the device to another person,
hand over this instruction manual along with it.
Table of contents
1 Explanation of symbols. . . . . . . . . . . . . . . . . . . . . . . . . . . . . . . . . . . . . . . . . . .4
2 Safety and installation instructions . . . . . . . . . . . . . . . . . . . . . . . . . . . . . . . . . .4
3 Target group for this instruction manual . . . . . . . . . . . . . . . . . . . . . . . . . . . . .6
4 Scope of delivery . . . . . . . . . . . . . . . . . . . . . . . . . . . . . . . . . . . . . . . . . . . . . . .7
5 Accessories . . . . . . . . . . . . . . . . . . . . . . . . . . . . . . . . . . . . . . . . . . . . . . . . . . . .8
6 Intended use . . . . . . . . . . . . . . . . . . . . . . . . . . . . . . . . . . . . . . . . . . . . . . . . . . .8
7 Labels. . . . . . . . . . . . . . . . . . . . . . . . . . . . . . . . . . . . . . . . . . . . . . . . . . . . . . . . .9
8 Installation . . . . . . . . . . . . . . . . . . . . . . . . . . . . . . . . . . . . . . . . . . . . . . . . . . . . .9
9 Troubleshooting . . . . . . . . . . . . . . . . . . . . . . . . . . . . . . . . . . . . . . . . . . . . . . .21
10 Disposal . . . . . . . . . . . . . . . . . . . . . . . . . . . . . . . . . . . . . . . . . . . . . . . . . . . . . 22
11 Technical data . . . . . . . . . . . . . . . . . . . . . . . . . . . . . . . . . . . . . . . . . . . . . . . . 23
3
Page 8
EN
Explanation of symbols FreshJet
1 Explanation of symbols
DANGER!
D
!
Safety instruction: Failure to observe this instruction will cause fatal or
serious injury.
WARNING!
Safety instruction: Failure to observe this instruction can cause fatal or
serious injury.
CAUTION!
Safety instruction: Failure to observe this instruction can lead to injury.
!
NOTICE!
A
Failure to observe this instruction can cause material damage and impair
the function of the product.
NOTE
Supplementary information for operating the product.
I
2 Safety and installation instructions
Please observe the prescribed safety instructions and stipulations from the
vehicle manufacturer and service workshops.
The manufacturer accepts no liability for damage in the following cases:
• Faulty assembly or connection
• Damage to the product resulting from mechanical influences and excess voltage
• Alterations to the product without express permission from the manufacturer
• Use for purposes other than those described in the operating manual
Note the following basic safety information when using electrical devices to protect
against:
• Electric shock
• Fire hazards
• Injury
4
Page 9

EN
FreshJet Safety and installation instructions
2.1 Handling the device
WARNING!
!
!
• Installation and repair of the roof air conditioner may only be carried
out by qualified personnel who are familiar with the risks involved and
the relevant regulations. Inadequate repairs may cause serious
hazards. For repair service, please contact the service centre in your
country (addresses on the back page).
• Electrical devices are not toys.
Keep electrical devices out of reach of children or infirm persons. Do
not allow them to use electrical devices without supervision.
• Persons whose physical, sensory or mental capabilities or whose lack
of experience and knowledge prevent them from using the device
safely should not use it without supervision or instruction by a responsible person.
• Do not undo the upper cover of the roof air conditioner in the event of
a fire. Use approved extinguishing agents instead. Do not use water to
extinguish fires.
CAUTION!
• The roof air conditioner must be installed securely so that it cannot fall
down.
A
• Only operate the roof air conditioner if you are certain that the housing
and the cables are not damaged.
• Do not use the roof air conditioner near flammable fluids or in closed
rooms.
• Make sure no combustible objects are stored or installed near the air
outlet. A distance of at least 50 cm must be kept.
• Do not reach into air outlets or insert any foreign objects in the device.
NOTICE!
• Only use the device as intended.
• The roof air conditioner is not suitable for use in agricultural or con-
struction vehicles.
• Do not make any alterations or conversions to the device.
• Never drive through automatic car washes when the roof air
conditioner is mounted.
• If faults occur in the refrigerant circuit, the system must be checked by
a specialist company and repaired properly. The refrigerant must
never be released into the air.
5
Page 10

EN
Target group for this instruction manual FreshJet
NOTE
I
2.2 Handling electrical cables
!
!
• Please ask your vehicle manufacturer if a technical inspection is
required after fitting an air conditioner and whether the height entered
in the vehicle documents needs to be altered:
– FreshJet 1100, 1700, 2200: increased height 225 mm
– FreshJet 3200: increased height 248 mm
WARNING!
• The electrical power supply may only be connected by a qualified
electrician (e.g. VDE 0100, Part 721 in Germany).
CAUTION!
• Attach and lay the cables so that they cannot be tripped over or
damaged.
NOTICE!
• Use cable ducts to lay cables through walls with sharp edges.
A
• Do not lay loose or bent cables next to electrically conductive
materials (metal).
• Do not pull on the cables.
3 Target group for this instruction manual
The instructions in this manual are intended for qualified personnel at workshops
who are familiar with the guidelines and safety precautions to be applied.
6
Page 11
EN
FreshJet Scope of delivery
4Scope of delivery
4.1 With air diffuser box Chillout ADB
(9105306662)
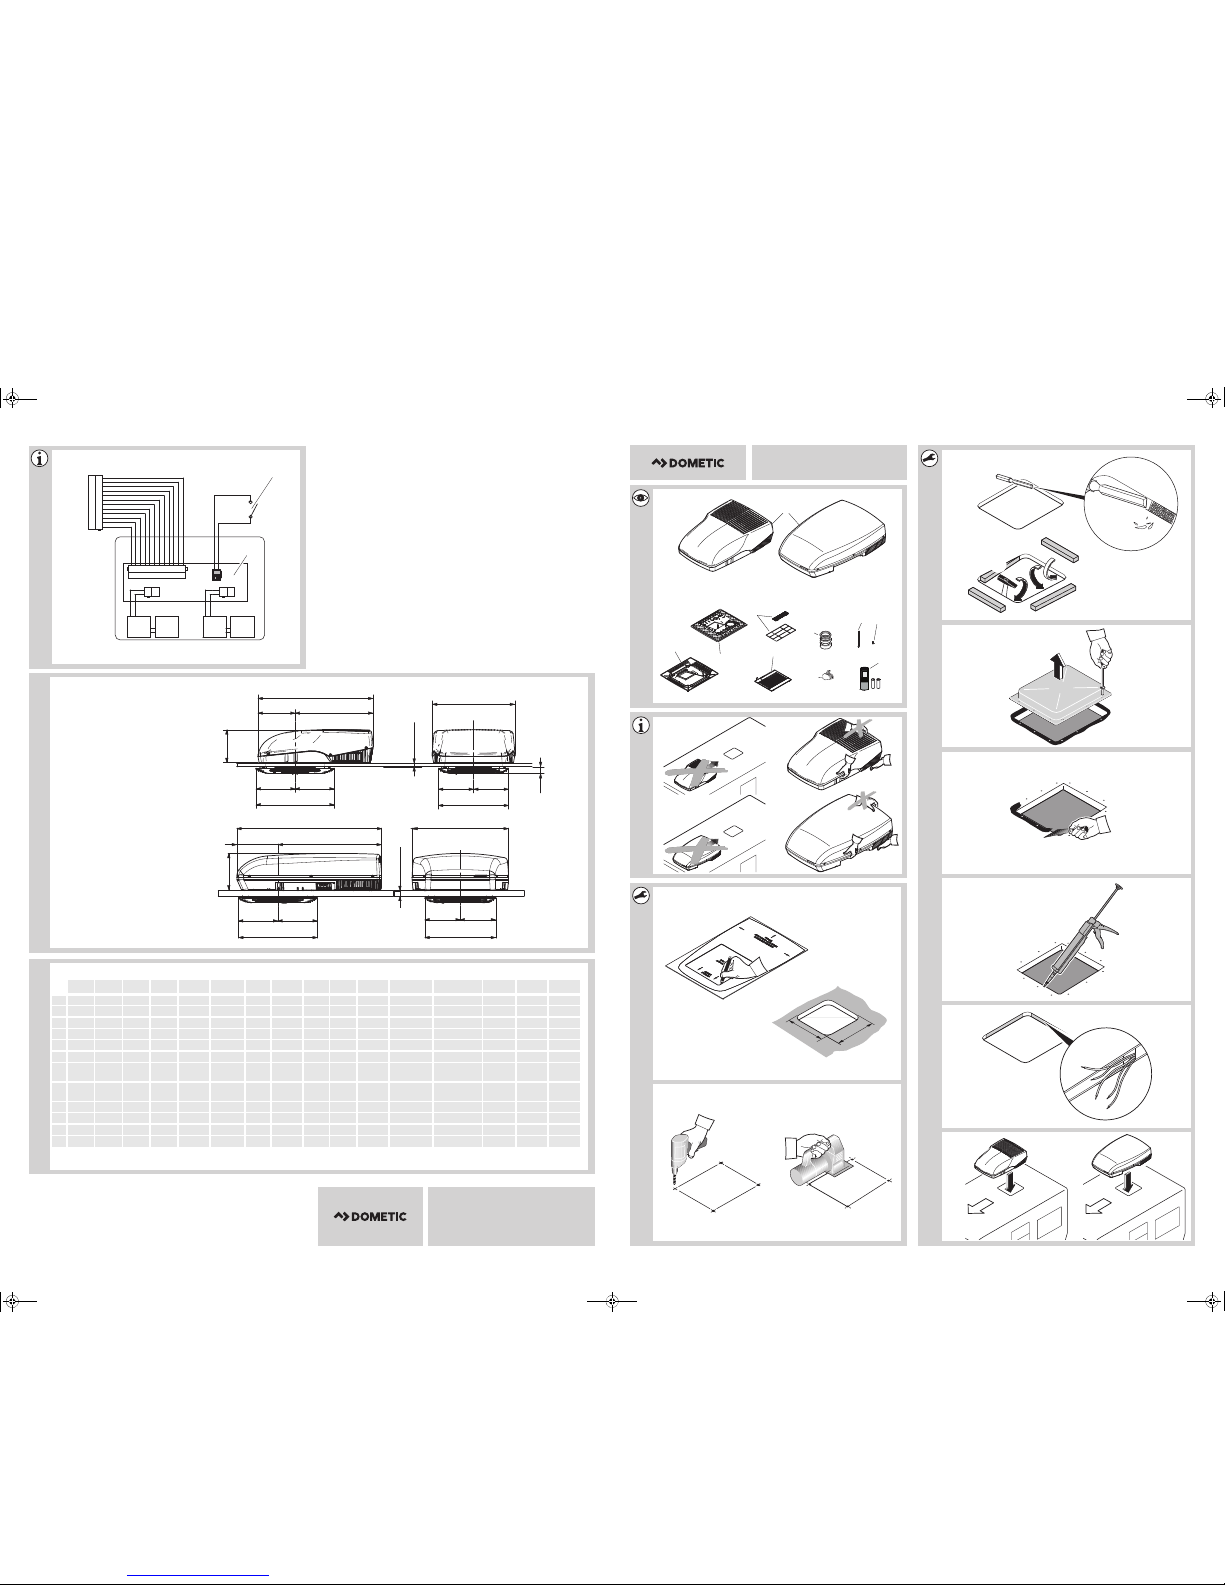
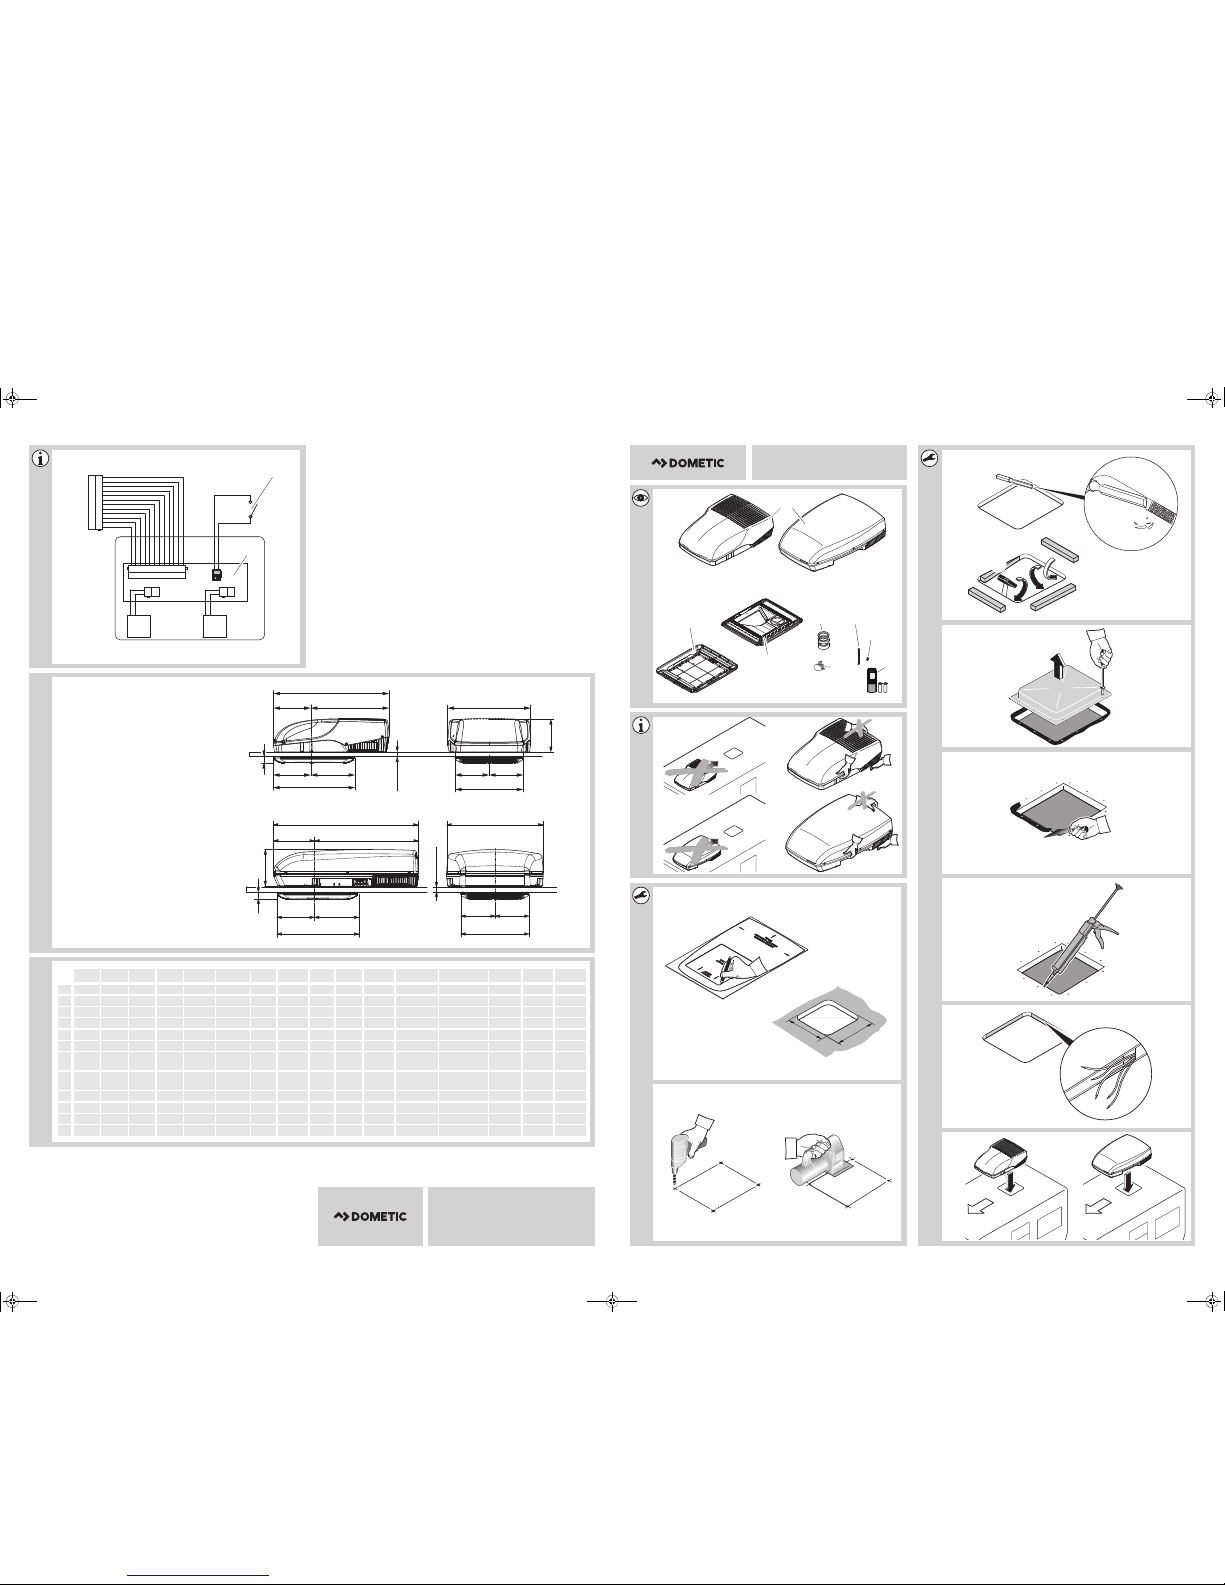
No. in fig. 1 Number Description
1 1 Roof air conditioner
2 1 Air outlet unit
3 1 Fastening frame
4 1 Air filters
51Filter covers
6 1 Seals
7 3 Cable connectors
8 4 Long fastening screws
9 4 Short fastening screws
10 1 Remote control
4.2 With air diffuser box ADB
(9105306664)
No. in fig. 1 Number Description
1 1 Roof air conditioner
2 1 Air outlet unit
3 1 Fastening frame
4 1 Seals
5 3 Cable connectors
6 4 Long fastening screws
7 4 Short fastening screws
8 1 Remote control
7
Page 12
EN
Accessories FreshJet
5Accessories
Available as accessories (not included in the scope of delivery):
Designation Reference no.
DC extension kit DC-Kit1 (FJ1100 only) 9100300003
DC extension kit DC-Kit2
(FreshJet 1100, 1700, 2200 only)
DC extension kit DC-Kit3
(FreshJet 1100, 1700, 2200 only)
DC extension kit DC-Kit4
(FreshJet 1100, 1700, 2200, 3200)
DC extension kit DC-Kit5
(FreshJet 1100, 1700, 2200 only)
DC extension kit DC-Kit6
(FreshJet 1100, 1700, 2200, 3200)
NOTE
I
The DC extension kit (accessory) allows the Dometic FreshJet roof air
conditioner to be used while in motion.
6 Intended use
9100300001
9100300002
9100300044
9100300073
9100300074
The Dometic FreshJet roof air conditioner is designed for use in motorcaravans,
caravans and other vehicles with habitation compartments only. It is not suitable for
houses and appartments.
The roof air conditioner is not suitable for installation in construction machines, agricultural machines or similar equipment. It will not work properly if exposed to strong
vibrations.
The operating mode of Freshjet is guaranteed for temperature between 0 °C and
52 °C.
NOTE
I
You can find additional information on roof air conditioners in the
operating manual, such as the technical description or the controls.
8
Page 13
EN
FreshJet Labels
7Labels
Labels are attached to the Dometic FreshJet roof air conditioners. These labels
provide the user and fitter with information on specifications of the device.
8 Installation
CAUTION! Beware of injury
!
8.1 Note on installation
The roof air conditioner may only be installed by qualified personnel
from a specialist company. The following information is intended for
technicians who are familiar with the guidelines and safety precautions
to be applied.
Read this installation manual completely before installing the roof air conditioner.
The following tips and instructions must be observed while installing the roof air
conditioner:
DANGER! Danger of electrocution
Disconnect all power supplies when working on the roof air conditioner.
D
CAUTION! Beware of injury
!
• Improper installation of the roof air conditioner can result in
irreparable damage to the device and put the safety of the user at
risk.
• The manufacturer assumes no liability for malfunctions and for the
safety of the roof air conditioner, especially for injury and/or damage
to property, if the roof air conditioner is not fitted in accordance with
these installation instructions.
• Always wear the recommended protective clothing (e.g. protective
goggles, gloves).
NOTICE! Beware of damage
A
• Observe the structural engineering of the vehicle and seal of all
openings made when installing the roof air conditioner.
• Check whether the roof of the vehicle is able to support the weight
of a person before climbing onto it. Ask the vehicle manufacturer
about the permissible roof loads.
9
Page 14

EN
Installation FreshJet
Note on transport
• Always have someone help you carry the roof air conditioner.
• Always lift the roof air conditioner to move it and never drag it over the roof
(fig. 2 A).
• Do not use the rear ventilation slots to lift it (fig. 2 B).
Note on installation location
• Before installing the roof air conditioner, check whether any vehicle components
could be damaged by the installation of the roof air conditioner (such as lamps,
cupboards, doors).
• Before installation, find out (by consulting the manufacturer of the vehicle)
whether the construction is designed for the static weight and the loads of the air
conditioner when the vehicle is in motion. The manufacturer of the roof air
conditioner assumes no liability whatsoever.
• The vehicle manufacturer may have already provided points where the opening
for the installation of the roof air conditioner can be made without any risk of
weakening the construction or cutting power cables.
• Select a flat and sufficiently level area at the centre of the vehicle roof between
two longitudinal sections for installation.
• The roof inclination of the installation surface may not exceed 10°.
• The roof air conditioner must be installed above 2 meters.
• Make sure no combustible objects are stored or installed near the air outlet. A
distance of at least 50 cm should be kept.
• Make sure that there are no objects within the vehicle which could obstruct the
attachment of the air outlet unit or the cooled air from flowing through the
swivelling air distribution nozzles.
• For safety reasons, note the location of existing wiring harnesses, wires and other
components within the installation area, in particular those which are not visible,
when installing the roof air conditioner (when drilling or screwing etc.).
10
Page 15

EN
FreshJet Installation
Note on electrical system
• Only a qualified electrician should connect the roof air conditioner to the
electrical power.
• Check that the voltage specification on the type plate is the same as that of the
power supply.
• If the lighting should also be switched on without a 230 V voltage supply, make
sure that there is a 12 Vg power supply line from the battery to the roof air
conditioner.
• Do not lay the 230 V mains cable and the 12/24 Vg cable together in the same
cable duct.
• Do not lay cables which are loose or bent next to electrically conductive material
(metal).
• Install an all-pole switch with a contact opening width of at least 3 mm on the
installation side.
There are two ways of installing the roof air conditioner:
• Making a new opening (chapter “Making a new opening” on page 11). In this
case the opening must be reinforced by an appropriate frame.
• Using the existing roof hatch openings (ventilation hatch) in the vehicle (chapter
“Installing in a roof hatch opening already provided” on page 12).
8.2 Making a new opening
See fig. 3
➤ Select an area at the centre on the roof between two longitudinal supports.
➤ Mark the position and size of the opening using the template included in the
packaging (A and B).
See fig. 4
➤ Drill out the corners (A).
➤ Carefully cut out the opening on the roof using a keyhole saw or a similar tool (B).
Make sure no electrical power cables are damaged.
11
Page 16
EN
Installation FreshJet
See fig. 5
➤ Before installation, check whether the roof hole needs reinforcing.
➤ Remove the foam according to the width of your reinforcing rails (not in scope of
delivery) (A).
➤ Fit the reinforcing rails (B).
8.3 Installing in a roof hatch opening already provided
NOTE
I
• Existing roof hatch openings in accordance with fig. 3 are suitable
for installing the roof air conditioner.
• Dispose of all waste material, glue, silicone and seals separately.
Observe the disposal guidelines.
• The manufacturer only assumes liability for parts included in the
scope of delivery. The validity of the warranty expires if the device is
installed together with third-party parts.
See fig. 6
➤ Remove all screws and fixtures of the existing roof hatch.
➤ Take out the roof hatch.
See fig. 7
➤ Remove the sealant around the opening using a scraper or similar tool.
See fig. 8
NOTICE!
Observe the sealant manufacturer’s instructions.
A
➤ Seal the screw holes and recesses with a flexible non-hardening butyl sealing
compound (e.g. SikaLastomer-710).
12
Page 17
EN
FreshJet Installation
8.4 Laying the connecting cables
DANGER! Danger of electrocution
D
The roof air conditioner must be connected to an electric circuit which is able to
supply the required current (see chapter “Technical data” on page 23).
➤ Select the cross-section of the cable corresponding to the length:
– Length < 7.5m: 1.5mm²
–Length > 7.5m: 2.5mm²
See fig. 9
➤ Make an opening on one side in order to feed through the electrical power
supply cable.
➤ Feed the 230 Vw cable through the opening into the vehicle interior.
Make sure there is no voltage at electrically operated components
before carrying out work on them!
If the lighting should be switched on without the use of a 230 Vw voltage supply:
➤ Connect the cable with the positive terminal and the negative terminal of the
vehicle battery.
➤ Feed the 12 Vg cable through the opening into the vehicle interior.
8.5 Installing the roof air conditioner with Chillout ADB
(9105306662)
NOTICE! Risk of damage
A
See fig. 0
➤ Lift the roof air conditioner onto the roof of the vehicle.
Observe the structural strength of the roof of the vehicle. The roof of the
vehicle must be able to bear the weight of the roof air conditioner. The
roof must not be indented or deformed by the weight of the unit, even
over a longer period of time.
➤ Position the roof air conditioner over the installation opening.
Observe the direction of travel.
13
Page 18
EN
Installation FreshJet
Attaching the roof air conditioner
See fig. a
➤ Position the roof air conditioner into the mounting opening using the conical
noses.
See fig. b
➤ Choose the suitable seal in accordance with the following table:
Roof thickness Seal thickness
25 – 30 mm 15 mm
30 – 40 mm 30 mm
40 – 60 mm 45 mm
➤ Position the seal with the adhesive side on the ADB.
➤ Fasten the mounting frame (3) on the underside of the roof air conditioner with
the 4 screws supplied.
See fig. c
NOTICE! Risk of damage
Tighten to the specified torque.
A
➤ Tighten the screws using a torque spanner and a fastening torque of 2.5 Nm.
14
Page 19
EN
FreshJet Installation
Electrical connection
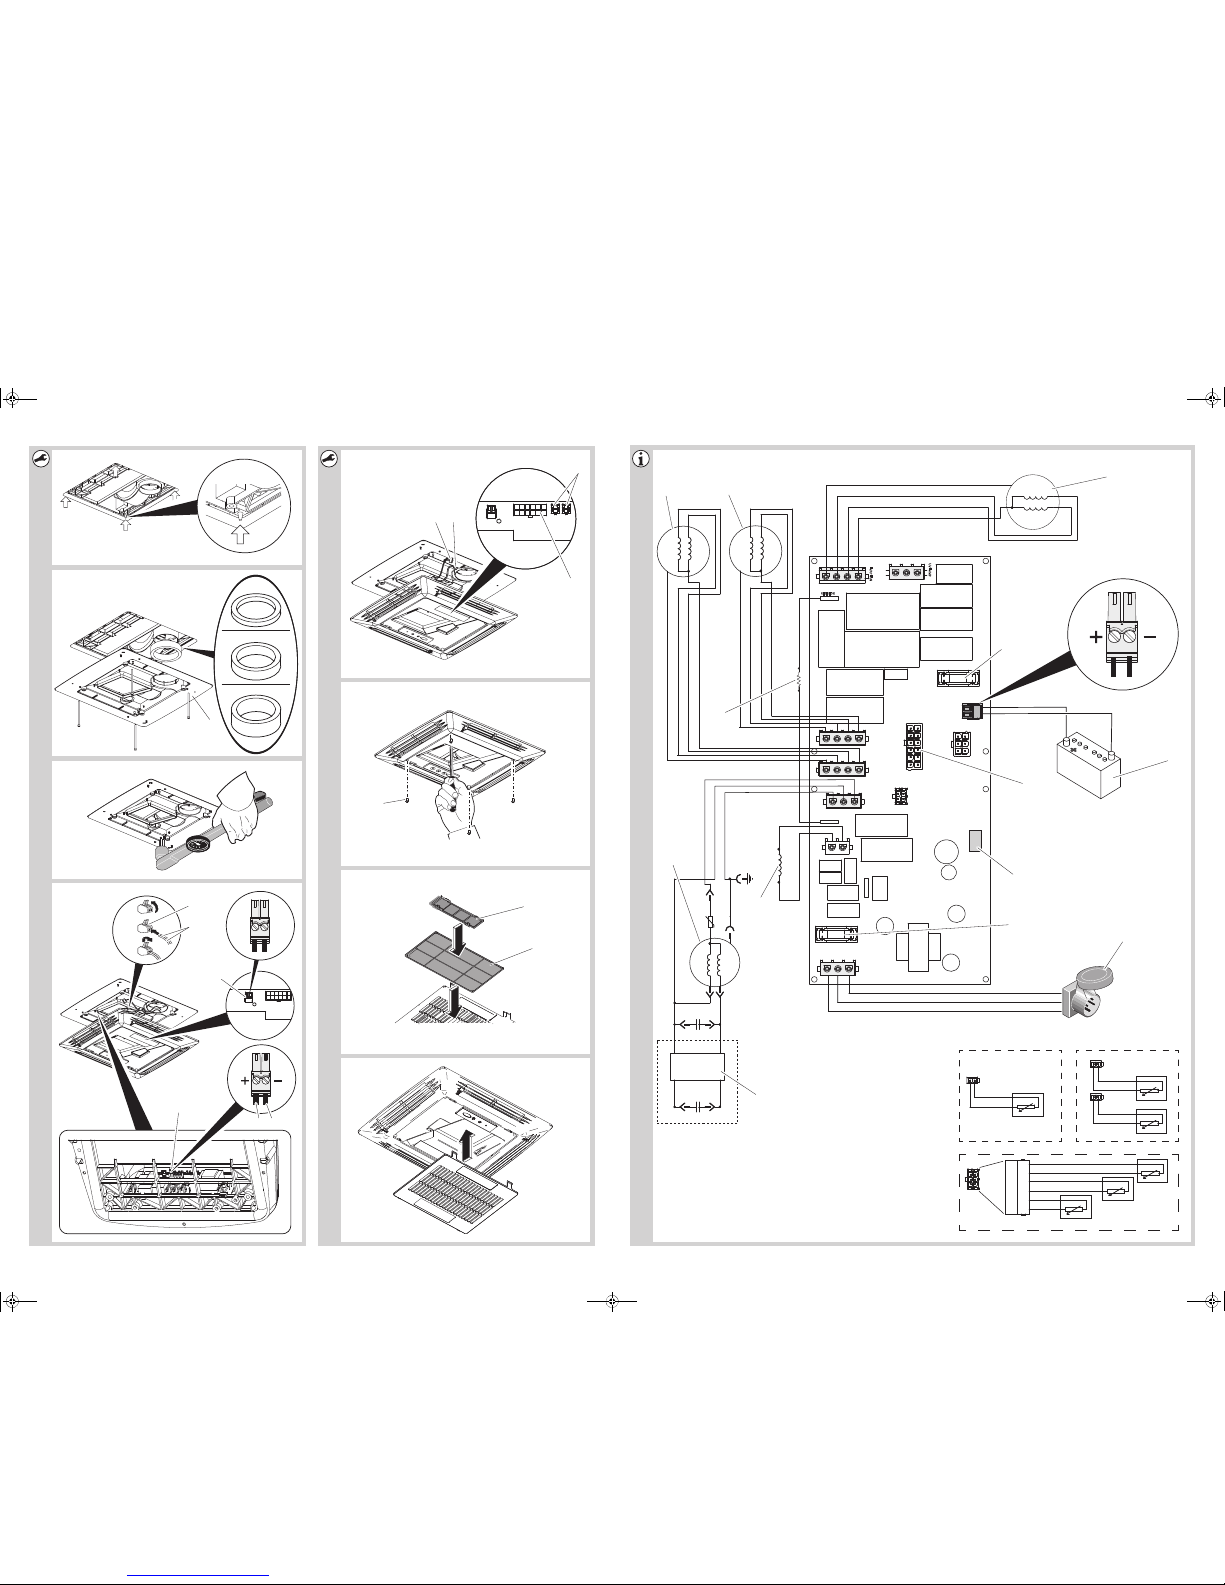
The complete circuit diagram can be found in fig. i:
Item Description
1 230 Vw mains
2 Compressor
3 Fan condenser
4 Fan condenser (FreshJet 3200 only)
5 Fan evaporator
6 Battery
7 Remote socket
8 Temperature sensor
9 Heating (FreshJet 1700, ref. no. 9105306658 and
FreshJet 2200, ref. no. 9105306515, 9105306512 only)
10 Heat Pump (FreshJet 3200 only)
11 Soft Start (FreshJet 2200, ref. no. 9105306515, FreshJet 3200 only)
Keys for fig. j:
Item Description
1 Remote light switch
2 Circuit board in the air outlet unit
See fig. d
230 Vw cable
➤ Connect the roof air conditioner with the 230 Vw voltage supply.
Connect the cables (1) to a cable connector (2).
15
Page 20
EN
Installation FreshJet
Remote light switch (not included in the scope of delivery)
You can connect the lighting to a remote light switch. This enables you to switch on
the lighting remotely.
To do this, proceed as follows:
➤ Disconnect the 2-pin plug (3) from the socket on the circuit board of the air outlet
unit.
➤ Connect the two cables of the remote light switch to the 2-pin plug (3).
➤ Insert the 2-pin plug (3) into socket on the circuit board.
12 Vg cable
You can connect the lighting to the battery. This enables you to switch on the lighting
even if the 230 Vw voltage supply is not connected.
To do this, proceed as follows:
➤ Disconnect the 2-pin plug (4) from the socket on the main board.
➤ Connect the positive cable (5) with the plug.
➤ Connect the negative cable (6) with the plug.
Connecting the circuit board
See fig. e
➤ Insert the 12-pin plug (1) in the socket (4) on the circuit board of the air outlet unit.
➤ Insert the two 2-pin plugs (2) in the sockets (3) on the circuit board.
16
Page 21
EN
FreshJet Installation
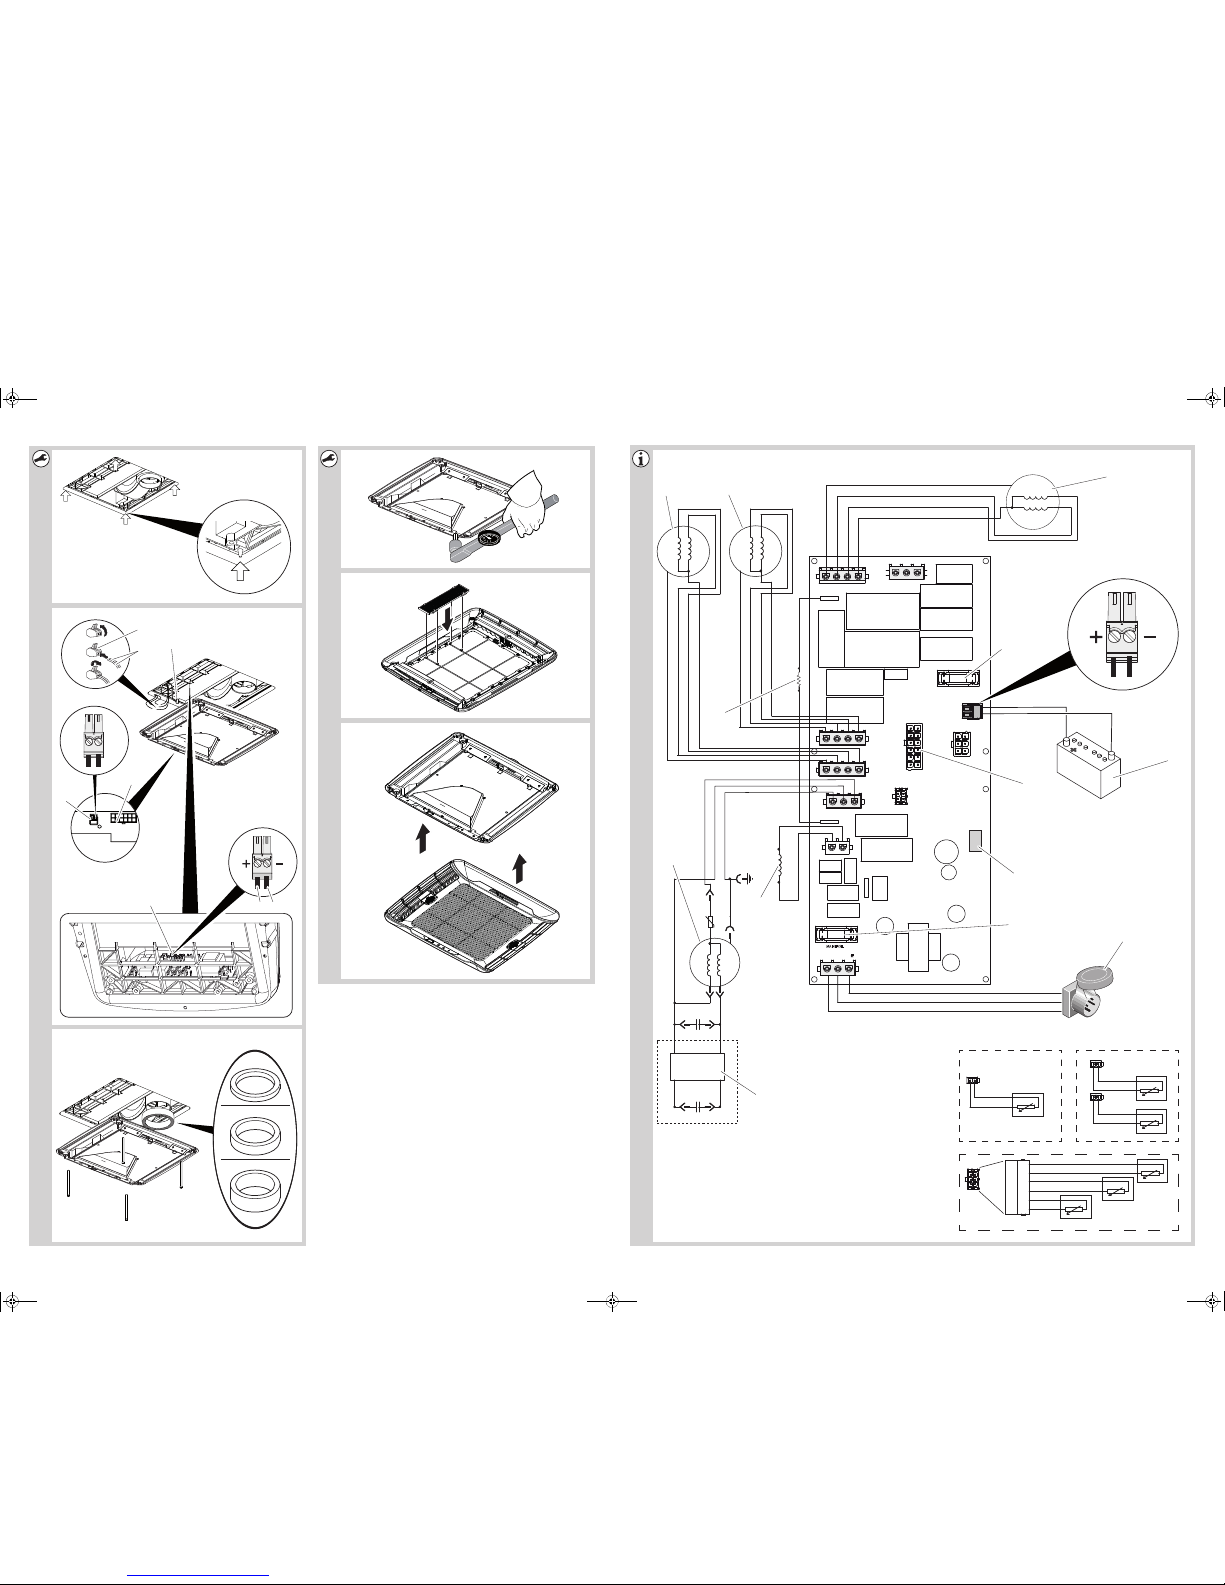
8.6 Installing the air outlet unit Chillout ADB
See fig. f
➤ Attach the air outlet unit to the (1) fastening frame using the short fastening
screws.
See fig. g
➤ Install the air filter in the specified sequence.
See fig. h
➤ Fit the filter covers.
➤ Enter the new vehicle height and weight in the vehicle documents.
8.7 Installing the roof air conditioner with ADB
(9105306664)
NOTICE! Risk of damage
A
See fig. 0
➤ Lift the roof air conditioner onto the roof of the vehicle.
➤ Position the roof air conditioner over the installation opening.
Observe the direction of travel.
Attaching the roof air conditioner
See fig. a
➤ Position the roof air conditioner into the mounting opening using the conical
noses.
Observe the structural strength of the roof of the vehicle. The roof of the
vehicle must be able to bear the weight of the roof air conditioner. The
roof must not be indented or deformed by the weight of the unit, even
over a longer period of time.
17
Page 22
EN
Installation FreshJet
Electrical connection
The complete circuit diagram can be found in fig. g:
Item Description
1 230 Vw mains
2 Compressor
3 Fan condenser
4 Fan condenser (FreshJet 3200 only)
5 Fan evaporator
6 Battery
7 Remote socket
8 Temperature sensor
9 Heating (FreshJet 1700, ref. no. 9105306658 and
FreshJet 2200, ref. no. 9105306515, 9105306512 only)
10 Heat Pump (FreshJet 3200 only)
11 Soft Start (FreshJet 2200, ref. no. 9105306515, FreshJet 3200 only)
Keys for fig. h:
Item Description
1 Remote light switch
2 Circuit board of the air outlet unit
See fig. b
230 Vwcable
➤ Connect the roof air conditioner with the 230 Vwvoltage supply.
Connect the cables (1) to a cable connector (2).
18
Page 23
EN
FreshJet Installation
Remote light switch (not included in the scope of delivery)
You can connect the lighting to a remote light switch. This enables you to switch on
the lighting remotely.
To do this, proceed as follows:
➤ Disconnect the 2-pin plug (3) from the socket on the circuit board of the air outlet
unit.
➤ Connect the two cables of the remote light switch to the 2-pin plug (3).
➤ Insert the 2-pin plug (3) into socket on the circuit board.
12 Vg cable
You can connect the lighting to the battery. This enables you to switch on the lighting
even if the 230 Vw voltage supply is not connected.
To do this, proceed as follows:
➤ Disconnect the 2-pin plug (4) from the socket on the main board.
➤ Connect the positive cable (5) with the plug.
➤ Connect the negative cable (6) with the plug.
Connecting the circuit board
➤ Insert the 12-pin plug (8) in the socket (7) on the circuit board of the air outlet unit.
See fig. c
➤ Choose the suitable seal in accordance with the following table:
Roof thickness Seal type
25 – 30 mm 15 mm
30 – 40 mm 30 mm
40 – 60 mm 45 mm
➤ Position the seal with the adhesive side on the ADB.
➤ Fasten the fastening frame (3) on the underside of the roof air conditioner with
the 4 screws supplied.
19
Page 24
EN
Installation FreshJet
See fig. d
NOTICE! Risk of damage
Tighten to the specified torque.
A
➤ Tighten the screws using a torque spanner and a fastening torque of 2.5 Nm.
8.8 Installing the air outlet unit
See fig. e
➤ Install the air filter in the specified sequence.
See fig. f
➤ Attach the air outlet unit magnetically to the fastening frame.
20
Page 25
EN
FreshJet Troubleshooting
9 Troubleshooting
Problem Cause Remedy
Roof air conditioner constantly
switches itself off.
No cooling
capacity
Low air output The air intake section is clogged up. ➤ Remove any leaves and other dirt
Icing sensor has tripped. Outer temperature is too low or all air
nozzles are closed.
The roof air conditioner is not set to
cooling.
The ambient temperature is above 52 °C. The roof air conditioner is only
The temperature set is higher that the
room temperature.
The ambient temperature is below 16 °C. ➤ The roof air conditioner is only
One of the temperature sensors is
defective.
The vaporiser fan is damaged.
The condenser fan is damaged.
➤ Set the roof air conditioner to
cooling.
designed for ambient temperatures of
up to 52 °C.
➤ Select a lower temperature.
designed for ambient temperature above 16 °C.
➤ Contact an authorised workshop.
from the ventilation grilles of the
roof air conditioner.
Water enters the
vehicle
Roof air conditioner does not
switch on.
Roof air conditioner does not
switch off.
The blower is defective. ➤ Contact an authorised workshop.
The condensation water drainage openings are clogged up.
The seals are damaged. ➤ Contact an authorised workshop.
No supply voltage (230 Vw) connected. ➤ Check the power supply.
The voltage is too low (under 200 V).
The voltage converter is defective.
One of the temperature sensors is
defective.
The electrical fuse of the power supply is
too low.
One of the temperature sensors is
defective.
The electrical fuse of the power supply is
too low.
➤ Clean the drainage openings for
condensation water.
➤ Contact an authorised workshop.
➤ Check the electrical fuse of the
power supply.
➤ Contact an authorised workshop.
➤ Check the electrical fuse of the
power supply.
21
Page 26

EN
Disposal FreshJet
10 Disposal
Regulations for environmental safety and correct disposal
All organisations must apply a set of procedures to identify, evaluate and control the
influence that their activities (manufacturing, products, services, etc.) have on the
environment.
The procedures to be followed to identify significant environmental impact must take
the following factors into account:
• use of raw materials and natural resources
• atmospheric emissions
• discharge of liquids
• waste management and recycling
• contamination of the soil
In order to minimise environmental impact, the manufacturer provides a series of
indications here below that should be taken into account by all those who, for whatever reason, interact with the appliance during its working life.
• All packing components must be disposed of (preferably recycled) in compli-
ance with statutory legislation in the country in which disposal takes place.
• All product components must be disposed of (preferably recycled) in compli-
ance with statutory legislation in the country in which disposal takes place.
• For correct disposal, the appliance must be consigned to an authorised waste
disposal company to ensure that all recyclable components are reused and the
remaining materials are processed properly.
• During installation ensure the room has adequate ventilation to prevent the build-
up of stale air that might be harmful to the health of the operators.
• During operation and maintenance ensure that any waste pollutant products (oil,
grease, etc.) are disposed of correctly.
• Keep noise levels down to reduce noise pollution.
22
Page 27
EN
FreshJet Technical data
For more information on correct dismantling of our products please refer to the
recycling handbooks at www.dometic.com.
➤ Place the packaging material in the appropriate recycling waste bins wherever
possible.
➤ When in operation or undergoing repairs and maintenance work, make sure that
the refrigerant circuit is not damaged and refrigerant cannot escape. It acts as a
greenhouse gas and should not be allowed into the environment.
If you wish to finally dispose of the product, ask your local recycling centre
or specialist dealer for details about how to do this in accordance with the
M
➤ Dispose of the product at an official waste disposal facility in accordance with the
applicable recycling or disposal guidelines.
B
applicable disposal regulations.
Protect the environment!
Do not dispose of any batteries with general household waste.
Return defective or used batteries to your retailer or dispose of them at
collection points.
11 Technical data
Contains fluorinated greenhouse gases
Hermetically sealed equipment
23
Page 28
EN
Technical data FreshJet
FreshJet 1100 FreshJet 1700
Ref. no.: 9105306654
9105306655
Compressor cooling capacity: 1000 W 1700 W
Cooling capacity based on
ISO 5151:
Heating capacity: – 800 W
Rated input voltage: 230 Vw/ 50 Hz
Power consumption in cooling
mode:
Required fuse:
Power consumption in heating
mode:
Required fuse:
Operating temperature range: 0 °C to +52 °C
Refrigerant: R-134a R-407c
850 W 1600 W
2.0 A
3 A
–
–
9105306656
9105306658
2.7 A
4 A
3.5 A
4 A
Refrigerant quantity: 0.280 kg 0.545 kg
equivalent: 0.4004 t 0.96683 t
CO
2
Global warming potential
(GWP):
Blower: 4 blower levels
Protection class: IPX4
Max. volume of space in the
vehicle (with insulated walls):
Dimensions L x W x H: 787 x 562 x 225 mm
Weight: approx. 22.5 kg approx. 29 kg
Inspection/certification:
1430 1774
1 Automatic mode
16 m³ 20 m³
(height above vehicle roof)
24
Page 29
EN
FreshJet Technical data
FreshJet 2200
Ref. no.: 9105306513 9105306511
9105306512
9105306515
Compressor cooling capacity: 2200 W
Cooling capacity based on
ISO 5151:
Heating capacity: – 1200 W
Rated input voltage: 230 Vw / 50 Hz
Power consumption in
cooling mode:
Required fuse:
Power consumption in
heating mode:
Required fuse:
Operating temperature range: 0 °C to +52 °C
Refrigerant: R-407c
Refrigerant quantity: 0.520 kg
equivalent: 1.09564 t
CO
2
Global warming potential
(GWP):
–
–
2050 W
4.1 A
5 A
5.2 A
6 A
1774
Blower: 4 blower levels
Protection class: IPX4
Max. volume of space in the
vehicle (with insulated walls):
Dimensions L x W x H: 787 x 562 x 225 mm
Weight: approx. 32 kg
Inspection/certification:
1 Automatic mode
25 m³
(height above vehicle roof)
25
Page 30
EN
Technical data FreshJet
FreshJet 3200
Ref. no.: 9105306660
9105306659
Compressor cooling capacity: 2800 W
Cooling capacity based on
ISO 5151:
Heating capacity: 3300 W
Rated input voltage: 230 Vw / 50 Hz
Power consumption in cooling
mode:
Required fuse:
Power consumption in heating
mode:
Required fuse:
Operating temperature range: 0 °C to +52 °C
Refrigerant: R-410a
Global warming potential
(GWP):
equivalent: 1.53468 t
CO
2
2800 W
5.7 A
10 A
5.9 A
10 A
1774
Global warming potential
(GWP):
Blower: 4 blower levels
1 Automatic mode
Protection class: IPX4
Max. volume of space in the
vehicle (with insulated walls):
Dimensions L x W x H (mm): 980 x 650 x 248 mm
(height above vehicle roof)
Weight: approx. 36 kg
Inspection/certification:
2088
29 m³
26
Page 31

DE
FreshJet
Bitte lesen Sie diese Anleitung vor Einbau und Inbetriebnahme sorgfältig
durch und bewahren Sie sie auf. Geben Sie sie im Falle einer Weitergabe
des Gerätes an den Nutzer weiter.
Inhaltsverzeichnis
1 Erklärung der Symbole . . . . . . . . . . . . . . . . . . . . . . . . . . . . . . . . . . . . . . . . . 28
2 Sicherheits- und Einbauhinweise . . . . . . . . . . . . . . . . . . . . . . . . . . . . . . . . . 28
3 Zielgruppe dieser Anleitung . . . . . . . . . . . . . . . . . . . . . . . . . . . . . . . . . . . . .31
4 Lieferumfang . . . . . . . . . . . . . . . . . . . . . . . . . . . . . . . . . . . . . . . . . . . . . . . . . .31
5 Zubehör. . . . . . . . . . . . . . . . . . . . . . . . . . . . . . . . . . . . . . . . . . . . . . . . . . . . . 32
6 Bestimmungsgemäßer Gebrauch . . . . . . . . . . . . . . . . . . . . . . . . . . . . . . . . 33
7 Kennzeichnungsschilder . . . . . . . . . . . . . . . . . . . . . . . . . . . . . . . . . . . . . . . 33
8 Montage . . . . . . . . . . . . . . . . . . . . . . . . . . . . . . . . . . . . . . . . . . . . . . . . . . . . 34
9 Störungsbeseitigung . . . . . . . . . . . . . . . . . . . . . . . . . . . . . . . . . . . . . . . . . . 45
10 Entsorgung . . . . . . . . . . . . . . . . . . . . . . . . . . . . . . . . . . . . . . . . . . . . . . . . . . 47
11 Technische Daten . . . . . . . . . . . . . . . . . . . . . . . . . . . . . . . . . . . . . . . . . . . . . 48
27
Page 32

DE
Erklärung der Symbole FreshJet
1 Erklärung der Symbole
GEFAHR!
D
!
Sicherheitshinweis: Nichtbeachtung führt zu Tod oder schwerer
Verletzung.
WARNUNG!
Sicherheitshinweis: Nichtbeachtung kann zu Tod oder schwerer
Verletzung führen.
VORSICHT!
Sicherheitshinweis: Nichtbeachtung kann zu Verletzungen führen.
!
ACHTUNG!
A
Nichtbeachtung kann zu Materialschäden führen und die Funktion des
Produktes beeinträchtigen.
HINWEIS
Ergänzende Informationen zur Bedienung des Produktes.
I
2 Sicherheits- und Einbauhinweise
Beachten Sie die vom Fahrzeughersteller und vom Kfz-Handwerk vorgeschriebenen Sicherheitshinweise und Auflagen!
Der Hersteller übernimmt in folgenden Fällen keine Haftung für Schäden:
• Montage- oder Anschlussfehler
• Beschädigungen am Produkt durch mechanische Einflüsse und Über-
spannungen
• Veränderungen am Produkt ohne ausdrückliche Genehmigung vom Hersteller
• Verwendung für andere als die in der Anleitung beschriebenen Zwecke
Beachten Sie folgende grundsätzliche Sicherheitsmaßnahmen beim Gebrauch von
elektrischen Geräten zum Schutz vor:
• elektrischem Schlag
• Brandgefahr
• Verletzungen
28
Page 33

DE
FreshJet Sicherheits- und Einbauhinweise
2.1 Umgang mit dem Gerät
WARNUNG!
!
• Die Montage und Reparaturen der Dachklimaanlage dürfen nur von
Fachkräften durchgeführt werden, die mit den verbundenen Gefahren bzw. den einschlägigen Vorschriften vertraut sind. Durch unsachgemäße Reparaturen können erhebliche Gefahren entstehen.
Wenden Sie sich im Reparaturfall an den Service-Stützpunkt in Ihrem
Land (Adressen auf der Rückseite).
• Elektrogeräte sind kein Kinderspielzeug!
Kinder können Gefahren, die von elektrischen Geräten ausgehen,
nicht richtig einschätzen. Lassen Sie Kinder nicht ohne Aufsicht elektrische Geräte benutzen.
• Dieses Gerät kann von Kindern ab 8 Jahren und darüber sowie von Personen mit verringerten physischen, sensorischen oder mentalen
Fähigkeiten oder Mangel an Erfahrung und Wissen benutzt werden,
wenn sie beaufsichtigt oder bezüglich des sicheren Gebrauchs des
Gerätes unterwiesen wurden und die daraus resultierenden Gefahren
verstehen.
• Im Falle von Feuer lösen Sie nicht den oberen Deckel der Dach-
klimaanlage, sondern verwenden Sie zugelassene Löschmittel.
Verwenden Sie kein Wasser zum Löschen.
!
VORSICHT!
• Die Dachklimaanlage muss so sicher installiert werden, dass diese
nicht herabfallen kann.
• Betreiben Sie die Dachklimaanlage nur, wenn das Gehäuse und die
Leitungen unbeschädigt sind.
• Setzen Sie die Dachklimaanlage nicht in der Nähe von entflammbaren
Flüssigkeiten oder in geschlossenen Räumen ein.
• Achten Sie darauf, dass brennbare Gegenstände nicht im Bereich des
Luftaustritts gelagert bzw. montiert sind. Der Abstand muss mindestens 50 cm betragen.
• Greifen Sie nicht in Lüftungsauslässe, und führen Sie keine Fremdgegenstände in die Anlage ein.
29
Page 34

DE
Sicherheits- und Einbauhinweise FreshJet
ACHTUNG!
A
I
• Benutzen Sie das Gerät nur zu seinem bestimmungsgemäßen
Gebrauch.
• Die Dachklimaanlage ist nicht für den Betrieb in Land- und Baumaschinen geeignet.
• Führen Sie keine Änderungen oder Umbauten am Gerät durch.
• Bei angebauter Dachklimaanlage dürfen Sie auf keinen Fall mit Ihrem
Wohnmobil in die Waschanlage fahren.
• Treten Fehler im Kältemittelkreislauf der Anlage auf, so muss die
Anlage von einem Fachbetrieb geprüft und ordnungsgemäß instand
gesetzt werden. Auf keinen Fall darf das Kältemittel in die freie Atmosphäre abgelassen werden.
HINWEIS
• Bitte informieren Sie sich bei Ihrem Fahrzeughersteller, ob aufgrund
des Aufbaus der Dachklimaanlage eine Abnahme (nach § 19 StVZO)
und eine Änderung des Eintrags der Fahrzeughöhe in Ihren Fahrzeugpapieren notwendig sind:
– FreshJet 1100, 1700, 2200: Aufbauhöhe 225 mm
– FreshJet 3200: Aufbauhöhe 248 mm
2.2 Umgang mit elektrischen Leitungen
WARNUNG!
!
!
A
• Der elektrische Anschluss darf nur von einem Fachbetrieb durch-
geführt werden (z. B. in Deutschland VDE 0100, Teil 721).
VORSICHT!
• Befestigen und verlegen Sie Leitungen so, dass keine Stolpergefahr
entsteht und eine Beschädigung des Kabels ausgeschlossen ist.
ACHTUNG!
• Müssen Leitungen durch scharfkantige Wände geführt werden, so
verwenden Sie Leerrohre bzw. Leitungsdurchführungen.
• Verlegen Sie keine losen oder scharf abgeknickten Leitungen an elektrisch leitenden Materialien (Metall).
• Ziehen Sie nicht an Leitungen.
30
Page 35

DE
FreshJet Zielgruppe dieser Anleitung
3 Zielgruppe dieser Anleitung
Diese Anleitung richtet sich an Facharbeiter in Werkstätten, die mit den anzuwendenden Richtlinien und Sicherheitsvorkehrungen vertraut sind.
4 Lieferumfang
4.1 Mit Luftauslasseinheit Chillout ADB
(9105306662)
Nr. in Abb. 1 Anzahl Bezeichnung
1 1 Dachklimaanlage
2 1 Luftauslasseinheit
3 1 Montagerahmen
4 1 Luftfilter
5 1 Filterabdeckung
6 1 Dichtungen
7 3 Kabelverbinder
8 4 Lange Befestigungsschraube
9 4 Kurze Befestigungsschraube
10 1 Fernbedienung
31
Page 36

DE
Zubehör FreshJet
4.2 Mit Luftauslasseinheit ADB
(9105306664)
Nr. in Abb. 1 Anzahl Bezeichnung
1 1 Dachklimaanlage
2 1 Luftauslasseinheit
3 1 Montagerahmen
4 1 Dichtungen
5 3 Kabelverbinder
6 4 Lange Befestigungsschraube
7 4 Kurze Befestigungsschraube
8 1 Fernbedienung
5Zubehör
Als Zubehör erhältlich (nicht im Lieferumfang enthalten):
Bezeichnung Artikelnummer
DC-Erweiterungskit DC-Kit1 (nur FreshJet 1100) 9100300003
DC-Erweiterungskit DC-Kit2
(nur FreshJet 1100, 1700, 2200)
DC-Erweiterungskit DC-Kit3
(nur FreshJet 1100, 1700, 2200)
DC-Erweiterungskit DC-Kit4
(FreshJet 1100, 1700, 2200, 3200)
DC-Erweiterungskit DC-Kit5
(nur FreshJet 1100, 1700, 2200)
DC-Erweiterungskit DC-Kit6
(FreshJet 1100, 1700, 2200, 3200)
9100300001
9100300002
9100300044
9100300073
9100300074
HINWEIS
I
Mit einem DC-Erweiterungskit (Zubehör) kann die Dachklimaanlage
Dometic FreshJet für den Fahrbetrieb erweitert werden.
32
Page 37

DE
FreshJet Bestimmungsgemäßer Gebrauch
6 Bestimmungsgemäßer Gebrauch
Die Dachklimaanlage Dometic FreshJet ist ausschließlich geeignet für Wohnmobile,
Caravans und sonstige Fahrzeuge mit Wohnräumen. Sie ist nicht geeignet für Häuser oder Wohnungen.
Die Dachklimaanlage ist nicht für die Installation in Baumaschinen, Landmaschinen
oder ähnlichen Arbeitsgeräten geeignet. Bei zu starker Vibrationseinwirkung ist eine
ordnungsgemäße Funktion nicht gewährleistet.
Die Funktion der Dachklimaanlage ist garantiert für Temperaturen zwischen 0 °C und
52 °C.
HINWEIS
I
Weitere Informationen zur Dachklimaanlage wie die technische
Beschreibung oder Bedienung finden Sie in der Bedienungsanleitung.
7 Kennzeichnungsschilder
An der Dachklimaanlage Dometic FreshJet sind Kennzeichnungsschilder
angebracht. Diese Kennzeichnungsschilder informieren den Anwender und den Installateur über Gerätespezifikationen.
33
Page 38

DE
Montage FreshJet
8Montage
VORSICHT! Verletzungsgefahr!
!
8.1 Hinweise zur Montage
Vor der Montage der Dachklimaanlage muss diese Montageanleitung vollständig
gelesen werden.
Folgende Tipps und Hinweise müssen bei der Montage der Dachklimaanlage
beachtet werden:
D
Die Montage der Dachklimaanlage darf ausschließlich von entsprechend ausgebildeten Fachbetrieben durchgeführt werden. Die
nachfolgenden Informationen richten sich an Fachkräfte, die mit den
anzuwendenden Richtlinien und Sicherheitsvorkehrungen vertraut sind.
GEFAHR! Lebensgefahr durch Stromschlag!
Unterbrechen Sie bei Arbeiten an der Dachklimaanlage alle Spannungsversorgungen.
!
A
VORSICHT! Verletzungsgefahr!
• Eine falsche Montage der Klimaanlage kann zu irreparablen Schäden
am Gerät führen und die Sicherheit des Benutzers beeinträchtigen.
• Wenn die Dachklimaanlage nicht gemäß dieser Montageanleitung
installiert wird, übernimmt der Hersteller keinerlei Haftung, weder
für Betriebsstörungen noch für die Sicherheit der Dachklimaanlage,
insbesondere nicht für Personen- und/oder Sachschäden.
• Tragen Sie bei allen Arbeiten die vorgeschriebene Schutzbekleidung (z .B. Schutzbrille, Schutzhandschuhe).
ACHTUNG! Beschädigungsgefahr!
• Beachten Sie beim Einbau der Dachklimaanlage stets die Statik des
Fahrzeugs und die Abdichtung aller beim Einbau entstandenen
Öffnungen.
• Bevor Sie das Fahrzeugdach besteigen, prüfen Sie, ob dieses für
Personen begehbar ist. Zulässige Dachlasten können Sie beim
Fahrzeughersteller erfragen.
34
Page 39

DE
FreshJet Montage
Hinweise zum Transport
• Tragen Sie die Dachklimaanlage immer zu zweit.
• Heben Sie die Dachklimaanlage zum Bewegen immer an, ziehen Sie sie nicht
über das Dach (Abb. 2 A).
• Verwenden Sie zum Anheben nicht die hinteren Lüftungsschlitze (Abb. 2 B).
Hinweise zum Montageort
• Prüfen Sie vor Montage der Dachklimaanlage, ob durch den Einbau der Dachklimaanlage ggf. Fahrzeugkomponenten beschädigt werden könnten (z. B. Lampen, Schränke, Türen).
• Klären Sie vor dem Einbau über den Fahrzeughersteller, ob der Aufbau für das
statische Gewicht und die Belastungen durch die Klimaanlage bei in Bewegung
befindlichem Fahrzeug ausgelegt ist. Der Hersteller der Dachklimaanlage übernimmt keinerlei Haftung.
• Der Fahrzeughersteller hat eventuell bereits Stellen vorgesehen, an denen die
Öffnung zur Montage der Dachklimaanlage ohne Gefahr der Schwächung des
Aufbaus oder des Durchtrennens von Stromkabeln eingebracht werden kann.
• Wählen Sie als Montageort eine flache und ausreichend ebene Zone in der Mitte
zwischen zwei Längsprofilen des Fahrzeugdaches.
• Die Dachneigung der Montagefläche darf nicht mehr als 10° betragen.
• Die Dachklimaanlage muss in einer Höhe von mindestens 2 Metern installiert
werden.
• Achten Sie darauf, dass brennbare Gegenstände nicht im Bereich des Luftaustrittes gelagert bzw. montiert sind. Der Abstand sollte mindestens 50 cm betragen.
• Stellen Sie sicher, dass im Fahrzeuginneren kein Hindernis für die Befestigung
der Luftauslasseinheit und das Austreten der gekühlten Luft über die schwenkbaren Luftverteilerdüsen vorliegt.
• Achten Sie aus Sicherheitsgründen beim Einbau der Dachklimaanlage (beim
Bohren und Schrauben usw.) auf den Verlauf von vorhandenen, insbesondere
nicht sichtbaren Kabelsträngen, Leitungen und anderen Komponenten, die sich
im Montagebereich befinden!
35
Page 40

DE
Montage FreshJet
Hinweise zur Elektrik
• Lassen Sie die Dachklimaanlage nur von einer Fachkraft elektrisch anschließen.
• Vergleichen Sie die Spannungsangabe auf dem Typenschild mit der vorhande-
nen Energieversorgung.
• Wenn die Beleuchtung auch ohne 230-Vw-Spannungsversorgung einschaltbar
sein soll, stellen Sie sicher, dass eine 12-Vg-Zuleitung von der Batterie zur Dachklimaanlage vorhanden ist.
• Verlegen Sie 230-Vw-Leitungen und 12/24-Vg-Leitungen nicht zusammen im
gleichen Leitungskanal (Leerrohr).
• Verlegen Sie Leitungen nicht lose oder scharf abgeknickt an elektrisch leitenden
Materialien (Metall).
• Bauen Sie auf der Montageseite einen allpoligen Schalter mit mind. 3 mm
Kontaktöffnungsweite ein.
Für den Einbau der Dachklimaanlage können Sie zwei verschiedene Lösungen wählen:
• Herstellen einer neuen Öffnung (Kapitel „Neue Öffnung herstellen“ auf Seite 36).
In diesem Fall muss in die neue Öffnung ein geeigneter Rahmen zur Verstärkung
eingebaut werden.
• Verwendung der am Fahrzeug vorhandenen Dachlukenöffnungen (Lüftungsluke)
(Kapitel „In eine vorhandene Dachlukenöffnung einbauen“ auf Seite 37).
8.2 Neue Öffnung herstellen
Siehe Abb. 3
➤ Wählen Sie auf dem Dach eine Zone in der Mitte zwischen zwei Längsprofilen.
➤ Zeichnen Sie die Lage und Größe der Öffnung mit Hilfe der Schablone vor, die in
der Verpackung enthalten ist (A und B).
Siehe Abb. 4
➤ Bohren Sie die Ecken aus (A).
➤ Schneiden Sie die Öffnung auf dem Dach sorgfältig mit einer Stichsäge o. ä. aus
(B).
Achten Sie dabei darauf, dass keine elektrischen Kabel beschädigt werden.
36
Page 41

DE
FreshJet Montage
Siehe Abb. 5
➤ Klären Sie vor dem Einbau, ob der Dachausschnitt verstärkt werden muss.
➤ Entfernen Sie die Ausschäumung entsprechend der Breite Ihrer Verstärkungs-
leisten (nicht im Lieferumfang) (A).
➤ Passen Sie die Verstärkungsleisten ein (B).
8.3 In eine vorhandene Dachlukenöffnung einbauen
HINWEIS
I
• Der Einbau der Dachklimaanlage kann in vorhandenen Dachluken-
öffnungen mit den Abmessungen gemäß Abb. 3 vorgenommen
werden.
• Entsorgen Sie sämtliches Abfallmaterial, Leim, Silikon und Dichtungen getrennt. Beachten Sie dabei die Entsorgungsrichtlinien.
• Der Hersteller übernimmt ausschließlich Haftung für im Lieferumfang
enthaltene Teile. Beim Einbau der Anlage zusammen mit produktfremden Teilen entfällt die Gewährleistung.
Siehe Abb. 6
➤ Entfernen Sie alle Schrauben und Befestigungen der vorhandenen Dachluke.
➤ Nehmen Sie die Dachluke heraus.
Siehe Abb. 7
➤ Entfernen Sie das Dichtungsmaterial rund um die Öffnung mit einem Schaber o.
ä.
Siehe Abb. 8
ACHTUNG!
Beachten Sie die Hinweise des Dichtmittel-Herstellers.
A
➤ Schließen Sie Schraubenlöcher und Vertiefungen mit einem plastischen nicht
aushärtenden Butyldichtstoff (z. B. SikaLastomer-710).
37
Page 42

DE
Montage FreshJet
8.4 Anschlussleitungen verlegen
GEFAHR! Lebensgefahr durch Stromschlag!
D
Die Dachklimaanlage muss an einen Stromkreis angeschlossen werden, der in der
Lage ist, den erforderlichen Strom zu liefern (siehe Kapitel „Technische Daten“ auf
Seite 48).
➤ Wählen Sie den Leitungsquerschnitt entsprechend der Leitungslänge:
–Länge < 7,5m: 1,5mm²
–Länge > 7,5m: 2,5mm²
Siehe Abb. 9
➤ Bringen Sie an einer Seite eine Öffnung für das Durchführen der elektrischen Ver-
sorgungskabel an.
Vor Arbeiten an elektrisch betriebenen Komponenten ist sicherzustellen, dass keine Spannung mehr anliegt!
➤ Verlegen Sie die 230-Vw-Leitung durch die Öffnung ins Fahrzeuginnere.
Wenn die Beleuchtung ohne 230-Vw-Spannung einschaltbar sein soll:
➤ Verbinden Sie jeweils eine Leitung mit dem Pluspol und dem Minuspol der Fahr-
zeugbatterie.
➤ Verlegen Sie die 12-Vg-Leitungen durch die Öffnung ins Fahrzeuginnere.
8.5 Dachklimaanlage mit Chillout ADB (9105306662)
montieren
ACHTUNG! Beschädigungsgefahr!
A
Siehe Abb. 0
Beachten Sie die Statik des Fahrzeugdachs. Das Fahrzeugdach muss
das Gewicht der Dachklimaanlage tragen können. Das Dach darf durch
das Gewicht der Anlage auch langfristig nicht eingedrückt werden oder
seine Form verändern.
➤ Heben Sie die Dachklimaanlage auf das Fahrzeugdach.
➤ Positionieren Sie die Dachklimaanlage über der Montageöffnung.
Beachten Sie die Fahrtrichtung.
38
Page 43

DE
FreshJet Montage
Dachklimaanlage befestigen
Siehe Abb. a
➤ Positionieren Sie die Dachklimaanlage mit Hilfe der konischen Vorsprünge in der
Montageöffnung.
Siehe Abb. b
➤ Wählen Sie die passende Dichtung entsprechend der folgenden Tabelle aus:
Deckenstärke Dicke der Dichtung
25 – 30 mm 15 mm
30 – 40 mm 30 mm
40 – 60 mm 45 mm
➤ Positionieren Sie die Dichtung mit der selbstklebenden Seite auf der Luftaus-
lasseinheit.
➤ Befestigen Sie den Montagerahmen (3) an der Unterseite der Dachklimaanlage
mit den 4 mitgelieferten Schrauben.
Siehe Abb. c
ACHTUNG! Beschädigungsgefahr!
Halten Sie das angegebene Anzugsmoment ein!
A
➤ Ziehen Sie die Schrauben mit einem Drehmomentschlüssel und einem Anzugs-
moment von 2,5 Nm an.
39
Page 44

DE
Montage FreshJet
System elektrisch anschließen
Den Gesamtschaltplan finden Sie in Abb. i:
Pos. Beschreibung
1 230-Vw-Anschluss
2 Kompressor
3 Lüfterkondensator
4 Lüfterkondensator (nur FreshJet 3200)
5 Lüfterverdampfer
6 Batterie
7 Remote-Buchse
8 Temperaturfühler
9 Heizung (nur FreshJet 1700, Art.-Nr. 9105306658, und FreshJet 2200, Art.-
Nr. 9105306515, 9105306512)
10 Wärmepumpe (nur FreshJet 3200)
11 Soft Start (nur FreshJet 2200, Art.-Nr. 9105306515, FreshJet 3200)
Legende zu Abb. j:
Pos. Beschreibung
1 Externer Lichtschalter
2 Platine in der Luftauslasseinheit
Siehe Abb. d
230-Vw-Leitung
➤ Verbinden Sie die Dachklimaanlage mit der 230-Vw-Spannungsversorgung.
Schließen Sie die zugehörigen Leitungen (1) an jeweils einen Kabelverbinder (2)
an.
40
Page 45

DE
FreshJet Montage
Externer Lichtschalter (nicht im Lieferumfang enthalten)
Sie können die Beleuchtung mit einem externen Lichtschalter verbinden. Dadurch
können Sie die Beleuchtung aus der Ferne einschalten.
Gehen Sie hierzu wie folgt vor:
➤ Ziehen Sie den 2-poligen Stecker (3) aus der Buchse auf der Platine der Luftaus-
lasseinheit.
➤ Verbinden Sie die zwei Kabel des Fern-Lichtschalters mit dem 2-poligen Stecker
(3).
➤ Stecken Sie den 2-poligen Stecker (3) in die Buchse auf der Platine.
12-Vg-Leitung
Sie können die Beleuchtung mit der Batterie verbinden. Dadurch können Sie die
Beleuchtung auch dann einschalten, wenn keine 230-Vw-Spannung angeschlossen
ist.
Gehen Sie hierzu wie folgt vor:
➤ Ziehen Sie den 2-poligen Stecker (4) aus der Buchse auf der Hauptplatine.
➤ Verbinden Sie das Pluskabel (5) mit dem Stecker.
➤ Verbinden Sie das Minuskabel (6) mit dem Stecker.
Platine anschließen
Siehe Abb. e
➤ Stecken Sie den 12-poligen Stecker (1) in die Buchse (4) auf auf der Platine der
Luftauslasseinheit.
➤ Stecken Sie die zwei 2-poligen Stecker (2) in die Buchsen (3) auf der Platine.
8.6 Luftauslasseinheit Chillout ADB montieren
Siehe Abb. f
➤ Befestigen Sie die Luftauslasseinheit mit den kurzen Befestigungsschrauben (1)
am Montagerahmen.
Siehe Abb. g
➤ Montieren Sie die Luftfilter in der angegebenen Reihenfolge.
41
Page 46

DE
Montage FreshJet
Siehe Abb. h
➤ Montieren Sie die Filterabdeckungen.
➤ Lassen Sie die geänderte Fahrzeughöhe und das geänderte Gewicht in die Fahr-
zeugpapiere eintragen.
8.7 Dachklimaanlage mit ADB (9105306664) montieren
ACHTUNG! Beschädigungsgefahr!
A
Siehe Abb. 0
➤ Heben Sie die Dachklimaanlage auf das Fahrzeugdach.
Beachten Sie die Statik des Fahrzeugdachs. Das Fahrzeugdach muss
das Gewicht der Dachklimaanlage tragen können. Das Dach darf durch
das Gewicht der Anlage auch langfristig nicht eingedrückt werden oder
seine Form verändern.
➤ Positionieren Sie die Dachklimaanlage über der Montageöffnung.
Beachten Sie die Fahrtrichtung.
Dachklimaanlage befestigen
Siehe Abb. a
➤ Positionieren Sie die Dachklimaanlage mit Hilfe der konischen Vorsprünge in der
Montageöffnung.
42
Page 47

DE
FreshJet Montage
System elektrisch anschließen
Den Gesamtschaltplan finden Sie in Abb. g:
Pos. Beschreibung
1 230-Vw-Anschluss
2 Kompressor
3 Lüfterkondensator
4 Lüfterkondensator (nur FreshJet 3200)
5 Lüfterverdampfer
6 Batterie
7 Remote-Buchse
8 Temperaturfühler
9 Heizung (nur FreshJet 1700, Art.-Nr. 9105306658, und FreshJet 2200, Art.-
Nr. 9105306515, 9105306512)
10 Wärmepumpe (nur FreshJet 3200)
11 Soft Start (nur FreshJet 2200, Art.-Nr. 9105306515, FreshJet 3200)
Legende zu Abb. h:
Pos. Beschreibung
1 Externer Lichtschalter
2 Platine in der Luftauslasseinheit
Siehe Abb. b
230-Vw-Leitung
➤ Verbinden Sie die Dachklimaanlage mit der 230-Vw-Spannungsversorgung.
Schließen Sie die zugehörigen Leitungen (1) an jeweils einen Kabelverbinder (2)
an.
43
Page 48

DE
Montage FreshJet
Externer Lichtschalter (nicht im Lieferumfang enthalten)
Sie können die Beleuchtung mit einem externen Lichtschalter verbinden. Dadurch
können Sie die Beleuchtung aus der Ferne einschalten.
Gehen Sie hierzu wie folgt vor:
➤ Ziehen Sie den 2-poligen Stecker (3) aus der Buchse auf der Platine der Luftaus-
lasseinheit.
➤ Verbinden Sie die zwei Kabel des Fern-Lichtschalters mit dem 2-poligen
Stecker (3).
➤ Stecken Sie den 2-poligen Stecker (3) in die Buchse auf der Platine.
12-Vg-Leitung
Sie können die Beleuchtung mit der Batterie verbinden. Dadurch können Sie die
Beleuchtung auch dann einschalten, wenn keine 230-Vw-Spannung angeschlossen
ist.
Gehen Sie hierzu wie folgt vor:
➤ Ziehen Sie den 2-poligen Stecker (4) aus der Buchse auf der Hauptplatine.
➤ Verbinden Sie das Pluskabel (5) mit dem Stecker.
➤ Verbinden Sie das Minuskabel (6) mit dem Stecker.
Platine anschließen
➤ Stecken Sie den 12-poligen Stecker (8) in die Buchse (7) auf auf der Platine der
Luftauslasseinheit.
Siehe Abb. c
➤ Wählen Sie die passende Dichtung entsprechend der folgenden Tabelle aus:
Deckenstärke Dicke der Dichtung
25 – 30 mm 15 mm
30 – 40 mm 30 mm
40 – 60 mm 45 mm
➤ Positionieren Sie die Dichtung mit der selbstklebenden Seite auf der Luftauslass-
einheit.
➤ Befestigen Sie den Montagerahmen (3) an der Unterseite der Dachklimaanlage
mit den 4 mitgelieferten Schrauben.
44
Page 49

DE
FreshJet Störungsbeseitigung
Siehe Abb. d
ACHTUNG! Beschädigungsgefahr!
Halten Sie das angegebene Anzugsmoment ein!
A
➤ Ziehen Sie die Schrauben mit einem Drehmomentschlüssel und einem Anzugs-
moment von 2,5 Nm an.
8.8 Luftauslasseinheit ADB montieren
Siehe Abb. e
➤ Montieren Sie die Luftfilter in der angegebenen Reihenfolge.
Siehe Abb. f
➤ Befestigen Sie die Luftauslasseinheit magnetisch am Montagerahmen.
9 Störungsbeseitigung
Störung Ursache Behebung
Dachklimaanlage
schaltet ständig ab
Keine Kühlleistung Die Dachklimaanlage ist nicht auf Küh-
Vereisungsfühler hat geschaltet. Außentemperatur ist zu niedrig oder
alle Luftdüsen sind verschlossen.
➤ Stellen Sie die Dachklimaanlage
len eingestellt.
Die Umgebungstemperatur ist höher
als 52 °C.
Die eingestellte Temperatur ist höher als
die Raumtemperatur.
Die Umgebungstemperatur ist
niedriger als 16 °C.
Einer der Temperaturfühler ist defekt. ➤ Wenden Sie sich an eine autori-
Das Verdampfergebläse ist schadhaft.
auf Kühlen.
Die Dachklimaanlage ist nur für eine
Umgebungstemperatur bis 52 °C
ausgelegt.
➤ Wählen Sie eine niedrigere Tem-
peratur.
➤ Die Dachklimaanlage ist nur für
eine Umgebungstemperatur ab
16 °C ausgelegt.
sierte Fachwerkstatt.
Das Kondensatorgebläse ist schadhaft.
45
Page 50

DE
Störungsbeseitigung FreshJet
Störung Ursache Behebung
Schlechte
Luftleistung
Wassereintritt im
Fahrzeug
Dachklimaanlage
schaltet nicht ein
Die Luftansaugung ist verstopft. ➤ Entfernen Sie Laub und anderen
Schmutz von den Belüftungslamellen auf der Dachklimaanlage.
Das Gebläse ist defekt. ➤ Wenden Sie sich an eine autori-
sierte Fachwerkstatt.
Die Ablauföffnungen für Kondenswasser sind verstopft.
Die Dichtungen sind schadhaft. ➤ Wenden Sie sich an eine autori-
Es liegt keine Versorgungsspannung
(230 Vw) an.
Die Spannung ist zu niedrig
(unter 200 V).
Der Spannungswandler ist defekt.
Einer der Temperaturfühler ist defekt.
Die elektrische Absicherung der
Spannungsversorgung ist zu gering.
➤ Reinigen Sie die Ablauföffnungen
für Kondenswasser.
sierte Fachwerkstatt.
➤ Kontrollieren Sie die Spannungs-
versorgung.
➤ Wenden Sie sich an eine autori-
sierte Fachwerkstatt.
➤ Prüfen Sie die elektrische
Absicherung der Spannungsversorgung.
Dachklimaanlage
schaltet nicht ab
Einer der Temperaturfühler ist defekt. ➤ Wenden Sie sich an eine autori-
sierte Fachwerkstatt.
Die elektrische Absicherung der
Spannungsversorgung ist zu gering.
➤ Prüfen Sie die elektrische
Absicherung der Spannungsversorgung.
46
Page 51

DE
FreshJet Entsorgung
10 Entsorgung
Vorschriften für Umweltschutz und fachgerechte Entsorgung
Alle Organisationen müssen eine Reihe von Maßnahmen anwenden, um den Einfluss, den ihre Aktivitäten (Herstellung, Produkte, Service usw.) auf die Umwelt
haben, zu erkennen, zu bewerten und zu kontrollieren.
Die zu befolgenden Maßnahmen zur Erkennung von erheblichen Auswirkungen auf
die Umwelt müssen folgende Faktoren zu berücksichtigen:
• Verwendung von Rohstoffen und natürlichen Ressourcen
• atmosphärische Emissionen
• Austritt von Flüssigkeiten
• Entsorgung und Recycling
• Bodenkontamination
Um die Auswirkungen auf die Umwelt zu minimieren, stellt der Hersteller im Folgenden eine Reihe von Anzeichen dar, die jeder berücksichtigen muss, der (aus welchem Grund auch immer) mit dem Gerät während dessen Lebensdauer interagiert.
• Das gesamte Verpackungsmaterial muss entsprechend der gesetzlichen Vor-
schriften des Landes, in dem die Entsorgung stattfindet, entsorgt (vorzugsweise
recycelt) werden.
• Alle Produkt-Komponenten müssen entsprechend der gesetzlichen Vorschriften
des Landes, in dem die Entsorgung stattfindet, entsorgt (vorzugsweise recycelt)
werden.
• Zur korrekten Entsorgung muss das Gerät an ein autorisierten Recyclingcenter
übergeben werden, damit sichergestellt ist, dass alle recycelbaren Komponenten wiederverwendet werden und mit den restlichen Materialien ordnungsgemäß verfahren wird.
• Stellen Sie während der Installation sicher, dass der Raum ausreichend belüftet
ist, um das Entstehen von abgestandener Luft zu verhindern, die schädlich für die
Gesundheit des Bediener könnte.
• Stellen Sie während des Betrieb und der Wartung sicher, dass alle schädlichen
Abfallprodukte (Öl, Fett usw.) ordnungsgemäß entsorgt werden.
• Halten Sie den Lärmpegel zur Reduzierung der Lärmbelästigung gering.
Weitere Informationen zur korrekten Deinstallation unserer Produkte entnehmen Sie
bitte den Recycling-Anleitungen auf www.dometic.com.
➤ Geben Sie das Verpackungsmaterial möglichst in den entsprechenden
Recycling-Müll.
47
Page 52

DE
Technische Daten FreshJet
➤ Achten Sie im Betrieb sowie bei Reparaturen und Wartungsarbeiten darauf, dass
der Kühlkreislauf nicht beschädigt wird und das Kältemittel nicht entweichen
kann. Es wirkt als Treibhausgas und sollte nicht in die Umwelt gelangen.
Wenn Sie das Produkt endgültig außer Betrieb nehmen, informieren Sie
sich bitte beim nächsten Recyclingcenter oder bei Ihrem Fachhändler
M
➤ Entsorgen Sie das Produkt nur entsprechend der geltenden Recycling- oder Ent-
sorgungsvorschriften bei einem autorisierten Entsorgungsunternehmen.
B
über die zutreffenden Entsorgungsvorschriften.
Schützen Sie Ihre Umwelt!
Akkus und Batterien gehören nicht in den Hausmüll.
Geben Sie bitte Ihre defekten Akkus oder verbrauchten Batterien beim
Händler oder bei einer Sammelstelle ab.
11 Technische Daten
Enthält fluorierte Treibhausgase
Hermetisch geschlossene Einrichtung
48
Page 53

DE
FreshJet Technische Daten
FreshJet 1100 FreshJet 1700
Art.-Nr.: 9105306654
9105306655
Kühlleistung des Kompressors: 1000 W 1700 W
Kühlleistung in Anlehnung an
ISO 5151:
Heizleistung: – –
Eingangsnennspannung: 230 Vw / 50 Hz
Stromaufnahme bei
Kühlbetrieb:
Benötigte Sicherung:
Stromaufnahme bei
Heizbetrieb:
Benötigte Sicherung:
Betriebstemperaturbereich: 0 °C bis +52 °C
Kühlmittel: R-134a R-407c
850 W 1600 W
2,0 A
3 A
–
–
9105306656
9105306658
2,7 A
4 A
3,5 A
4 A
Kühlmittelmenge: 0,280 kg 0,545 kg
-Äquivalent: 0,4004 t 0,96683 t
CO
2
Treibhauspotential (GWP): 1430 1774
Gebläse: 4 Gebläsestufen
1 Automatikmodus
Schutzklasse: IPX4
Max. Raumvolumen des Fahrzeugs (mit isolierten Wänden):
Abmessungen L x B x H: 787 x 562 x 225 mm
Gewicht: ca. 22,5 kg ca. 29 kg
Prüfung/Zertifikat:
16 m³ 20 m³
(Höhe über Fahrzeugdach)
49
Page 54

DE
Technische Daten FreshJet
FreshJet 2200
Art.-Nr.: 9105306513 9105306511
9105306512
9105306515
Kühlleistung des Kompressors: 2200 W
Kühlleistung in Anlehnung an
ISO 5151:
Heizleistung: – 1200 W
Eingangsnennspannung: 230 Vw / 50 Hz
Stromaufnahme bei
Kühlbetrieb:
Benötigte Sicherung:
Stromaufnahme bei
Heizbetrieb:
Benötigte Sicherung:
Betriebstemperaturbereich: 0 °C bis +52 °C
Kühlmittel: R-407c
Kühlmittelmenge: 0,520 kg
-Äquivalent: 0,92248 t
CO
2
Treibhauspotential (GWP): 1774
–
–
2050 W
4,1 A
5 A
5,2 A
6 A
Gebläse: 4 Gebläsestufen
1 Automatikmodus
Schutzklasse: IPX4
Max. Raumvolumen des Fahrzeugs (mit isolierten Wänden):
Abmessungen L x B x H: 787 x 562 x 225 mm
(Höhe über Fahrzeugdach)
Gewicht: ca. 32 kg
Prüfung/Zertifikat:
25 m³
50
Page 55

DE
FreshJet Technische Daten
FreshJet 3200
Art.-Nr.: 9105306660
9105306659
Kühlleistung des Kompressors: 2800 W
Kühlleistung in Anlehnung an
ISO 5151:
Heizleistung: 3300 W
Eingangsnennspannung: 230 Vw / 50 Hz
Stromaufnahme bei
Kühlbetrieb:
Benötigte Sicherung:
Stromaufnahme bei
Heizbetrieb:
Benötigte Sicherung:
Betriebstemperaturbereich: 0 °C bis +52 °C
Kühlmittel: R-410a
Kühlmittelmenge: 0,735 kg
-Äquivalent: 1,53468 t
CO
2
Treibhauspotential (GWP): 2088
2800 W
5,7 A
10 A
5,9 A
10 A
Gebläse: 4 Gebläsestufen
1 Automatikmodus
Schutzklasse: IPX4
Max. Raumvolumen des
Fahrzeugs
(mit isolierten Wänden):
Abmessungen L x B x H: 980 x 650 x 248 mm
(Höhe über Fahrzeugdach)
Gewicht: ca. 36 kg
Prüfung/Zertifikat:
32 m³
51
Page 56

FR
FreshJet
Veuillez lire ce manuel avec attention avant le montage et la mise en service, puis le conserver. En cas de revente de l’appareil, veuillez le transmettre au nouvel acquéreur.
Table des matières
1 Explication des symboles . . . . . . . . . . . . . . . . . . . . . . . . . . . . . . . . . . . . . . . 53
2 Consignes de sécurité et instructions de montage . . . . . . . . . . . . . . . . . . . 53
3 Groupe cible de cette notice . . . . . . . . . . . . . . . . . . . . . . . . . . . . . . . . . . . . 56
4 Contenu de la livraison . . . . . . . . . . . . . . . . . . . . . . . . . . . . . . . . . . . . . . . . . 56
5 Accessoires . . . . . . . . . . . . . . . . . . . . . . . . . . . . . . . . . . . . . . . . . . . . . . . . . . 57
6 Usage conforme . . . . . . . . . . . . . . . . . . . . . . . . . . . . . . . . . . . . . . . . . . . . . . 58
7 Plaquettes de spécifications . . . . . . . . . . . . . . . . . . . . . . . . . . . . . . . . . . . . . 58
8 Montage . . . . . . . . . . . . . . . . . . . . . . . . . . . . . . . . . . . . . . . . . . . . . . . . . . . . 58
9 Guide de dépannage . . . . . . . . . . . . . . . . . . . . . . . . . . . . . . . . . . . . . . . . . . 69
10 Retraitement . . . . . . . . . . . . . . . . . . . . . . . . . . . . . . . . . . . . . . . . . . . . . . . . . .71
11 Données techniques. . . . . . . . . . . . . . . . . . . . . . . . . . . . . . . . . . . . . . . . . . . 72
52
Page 57

FR
FreshJet Explication des symboles
1 Explication des symboles
DANGER !
D
!
!
A
Consigne de sécurité : le non-respect de ces consignes entraîne la
mort ou de graves blessures.
AVERTISSEMENT !
Consigne de sécurité : le non-respect de ces consignes peut entraîner
la mort ou de graves blessures.
ATTENTION !
Consigne de sécurité : le non-respect de ces consignes peut entraîner
des blessures.
AVIS !
Le non-respect de ces consignes peut entraîner des dommages
matériels et des dysfonctionnements du produit.
REMARQUE
Informations complémentaires sur l'utilisation du produit.
I
2 Consignes de sécurité et instructions de
montage
Respectez les consignes de sécurité et autres prescriptions imposées par
le fabricant du véhicule et par les professionnels de l’automobile !
Le fabricant décline toute responsabilité pour des dommages dans les cas suivants :
• des défauts de montage ou de raccordement
• des influences mécaniques et des surtensions ayant endommagé le matériel
• des modifications apportées au produit sans autorisation explicite de la part du
fabricant
• une utilisation différente de celle décrite dans la notice
53
Page 58

FR
Consignes de sécurité et instructions de montage FreshJet
Lors de l’utilisation d’appareils électriques, les consignes générales de sécurité suivantes doivent être respectées afin d’éviter
• une décharge électrique,
• un incendie,
• des blessures.
2.1 Précautions d’usage
AVERTISSEMENT !
!
• Le montage et les réparations du climatiseur de toit doivent être effec-
tués par un personnel qualifié et parfaitement informé des dangers et
règlements spécifiques à ces manipulations. Toute réparation mal
effectuée risquerait d’entraîner de graves dangers. Si des réparations
sont nécessaires, adressez-vous à la succursale de votre pays
(adresses au dos de la notice).
• Les appareils électriques ne sont pas des jouets pour enfants !
Les enfants ne peuvent estimer les dangers éventuels des appareils
électriques. Ne laissez pas les enfants utiliser des appareils électriques
sans surveillance.
• Les enfants âgés de 8 ans et plus ainsi que les personnes ayant des
déficiences physiques, sensorielles ou mentales ou un manque
d'expérience ou de connaissances peuvent utiliser ce produit à condition d'être sous surveillance ou d'avoir reçu des instructions concernant l'utilisation de l'appareil en toute sécurité et de comprendre les
dangers qui en résultent.
• En cas d’incendie, n’ouvrez pas le couvercle supérieur du climatiseur
de toit et utilisez un agent d’extinction agréé. N’essayez pas
d’éteindre l’incendie avec de l’eau.
ATTENTION !
!
• Le climatiseur de toit doit être installé de manière à ce qu’il ne puisse
pas tomber !
• Ne faites fonctionner le climatiseur de toit que si le boîtier et les raccordements sont intacts !
• N’utilisez pas le climatiseur de toit à proximité de liquides
inflammables ou dans des pièces fermées.
54
Page 59

FR
FreshJet Consignes de sécurité et instructions de montage
• Veillez à ce qu’aucun objet inflammable ne soit entreposé ni monté
dans la zone de sortie de l’air. Il convient de maintenir une distance de
50 cm minimum.
• Ne glissez pas les doigts dans les sorties d’air et n’introduisez aucun
objet à l’intérieur de l’appareil.
AVIS !
A
I
• Utilisez l’appareil conformément à l’usage pour lequel il a été conçu.
• Le climatiseur de toit n’est pas conçu pour être utilisé dans des
machines agricoles ou de construction.
• Ne procédez à aucune modification ni transformation de l’appareil.
• Si votre camping-car est équipé d’un climatiseur de toit, ne le lavez
jamais dans une station de lavage automatique.
• Si des défauts apparaissent dans le circuit frigorifique du climatiseur,
ce dernier doit être contrôlé et remis en état par une entreprise spécialisée. Tout échappement du fluide frigorigène dans l’atmosphère est
formellement interdit.
REMARQUE
• Veuillez vous informer auprès du constructeur de votre véhicule si son
changement de hauteur en raison de l'installation du climatiseur de
toit doit être agréé (conformément à la réglementation nationale sur la
mise en circulation des véhicules) et consigné dans les papiers du
véhicule.
– FreshJet 1100, 1700, 2200 : hauteur rapportée 225 mm
– FreshJet 3200 : hauteur rapportée 248 mm
2.2 Précautions concernant les lignes électriques
AVERTISSEMENT !
!
!
• Seule une entreprise qualifiée est autorisée à effectuer le raccordement électrique conformément aux normes correspondantes (p. ex.
dans le cas de l’Allemagne, il s’agit de la norme VDE 0100 Teil 721).
ATTENTION !
• Posez et fixez les lignes électriques de manière à ce que les câbles ne
puissent pas être endommagés et à ce que personne ne risque de trébucher dessus.
55
Page 60

FR
Groupe cible de cette notice FreshJet
AVIS !
A
• Si les lignes électriques doivent traverser des parois à arêtes vives, uti-
lisez des tubes vides ou des passe-câbles.
• Ne faites passer aucune ligne électrique non fixée ou fortement coudée sur des matériaux conducteurs (métal).
• Ne tirez pas sur les lignes électriques.
3 Groupe cible de cette notice
Cette notice s’adresse au personnel qualifié, travaillant dans des ateliers, informé
des directives et des consignes de sécurité à appliquer.
4 Contenu de la livraison
4.1 Avec unité de sortie d'air Chillout ADB
(9105306662)
N° dans fig. 1 Nombre Désignation
1 1 Climatiseur de toit
2 1 Unité de sortie d’air
3 1 Cadre de montage
4 1 Filtre à air
5 1 Cache du filtre
61Joints
7 3 Raccord de câble
8 4 Longue vis de fixation
9 4 Courte vis de fixation
10 1 Télécommande
56
Page 61

FR
FreshJet Accessoires
4.2 Avec unité de sortie d'air ADB
(9105306664)
N° dans fig. 1 Nombre Désignation
1 1 Climatiseur de toit
2 1 Unité de sortie d’air
3 1 Cadre de montage
41Joints
5 3 Raccord de câble
6 4 Longue vis de fixation
7 4 Courte vis de fixation
8 1 Télécommande
5Accessoires
Disponibles en accessoires (non compris dans la livraison) :
Désignation
Kit d’extension DC DC-Kit1 (FJ1100 uniquement) 9100300003
Kit d’extension DC DC-Kit2
(FJ1100, 1700, 2200 uniquement)
Kit d’extension DC DC-Kit3
(FJ1100, 1700, 2200 uniquement)
Kit d’extension DC DC-Kit4
(FJ1100, 1700, 2200, 3200)
Kit d’extension DC DC-Kit5
(FJ1100, 1700, 2200 uniquement)
Kit d’extension DC DC-Kit6
(FJ1100, 1700, 2200, 3200)
Numéro de
produit
9100300001
9100300002
9100300044
9100300073
9100300074
REMARQUE
I
À l’aide d’un kit d’extension DC (en accessoire), il est possible d’utiliser
le climatiseur de toit Dometic FreshJet pendant le trajet.
57
Page 62

FR
Usage conforme FreshJet
6Usage conforme
Le climatiseur de toit Dometic FreshJet est exclusivement conçu pour les campingcars, caravanes et autres véhicules contenant des pièces d'habitation. Il ne
convient pas aux maisons ou appartements.
Le climatiseur de toit ne convient pas aux engins de construction, aux machines agricoles ou autres engins de travail similaires. Le fonctionnement correct du climatiseur
n’est pas garanti en cas de vibrations excessives.
Le fonctionnement du climatiseur de toit est garanti pour des températures comprises entre 0 °C et 52 °C.
REMARQUE
I
Vous trouverez dans la notice d’utilisation d’autres informations concernant le climatiseur, telle que la description technique ou l’utilisation.
7 Plaquettes de spécifications
Le climatiseur de toit Dometic FreshJet porte des plaquettes de spécifications. Elles
informent l’installateur et l’utilisateur sur les spécifications de l’appareil.
8Montage
ATTENTION ! Risque de blessures !
!
8.1 Consignes de sécurité concernant le montage
Les instructions de montage doivent être lues dans leur intégralité avant le montage
du climatiseur.
Seule une entreprise spécialisée possédant le savoir-faire nécessaire est
habilitée à effectuer le montage du climatiseur. Les
informations suivantes sont destinées à un personnel qualifié, informé
des directives et des consignes de sécurité à appliquer.
Lors du montage du climatiseur, les consignes et conseils suivants doivent être
respectés :
DANGER ! Danger de mort par électrocution !
D
58
Coupez toutes les tensions électriques pendant les travaux sur le
climatiseur.
Page 63

FR
FreshJet Montage
ATTENTION ! Risque de blessures !
!
A
• Un montage non conforme du climatiseur peut endommager
l’appareil de manière irréversible et mettre en danger la sécurité de
l’utilisateur.
• Si le climatiseur n’est pas installé conformément aux instructions de
montage décrites dans ce manuel, le fabricant décline toute responsabilité en cas de dysfonctionnements, de problèmes de sécurité
liés au climatiseur et en particulier d’accidents matériels ou de
personnes.
• Pour tous les travaux, vous devez porter les vêtements de protection
obligatoires (p. ex. lunettes de protection, gants de protection).
AVIS ! Risque d’endommagement !
• Lors du montage du climatiseur, vérifiez en permanence la stabilité
statique du véhicule et l’étanchéité des ouvertures percées pendant
les travaux.
• Avant de monter sur le toit du véhicule, assurez-vous que celui-ci est
praticable pour les personnes. Le constructeur du véhicule pourra
vous renseigner sur les charges de toit autorisées.
Consignes relatives au transport
• Portez toujours le climatiseur de toit à deux.
• Pour déplacer le climatiseur de toit, soulevez-le toujours, ne le faites pas glisser
sur le toit (fig. 2 A).
• Pour le soulever, n’utilisez pas les fentes d’aération arrière (fig. 2 B).
Consignes relatives au lieu de montage
• Avant le montage, vérifiez si des éléments du véhicule (p. ex. éclairages,
armoires, portes, etc.) ne risquent pas d’être endommagés par le montage du
climatiseur.
• Avant le montage, assurez-vous auprès du constructeur du véhicule que la structure de celui-ci est conçue pour le poids statique du climatiseur et les contraintes
qu’il crée sur le véhicule en mouvement. Le fabricant du climatiseur de toit
décline toute responsabilité.
• Le constructeur du véhicule a éventuellement déjà prévu des emplacements où
l’ouverture pour le montage du climatiseur peut être percée sans risque d’affaiblissement de la structure, ni de rupture de câbles électriques.
• Choisissez comme emplacement de montage une zone plane et suffisamment
lisse située au milieu du toit, entre deux profils longitudinaux.
59
Page 64

FR
Montage FreshJet
• L’inclinaison du toit de la surface de montage ne doit pas dépasser 10°.
• Le climatiseur de toit doit être installé à une hauteur d'au moins 2 mètres.
• Veillez à ce qu’aucun objet inflammable ne soit entreposé ni monté dans la zone
de sortie de l’air. Une distance de 50 cm minimum doit être respectée.
• Assurez-vous qu’à l’intérieur du véhicule aucun obstacle ne puisse gêner la fixation de l’unité de sortie d’air ni la sortie de l’air frais par les ailettes orientables.
• Pour des raisons de sécurité, faites attention lors de l’installation du climatiseur
(opérations de perçage, de vissage, etc.) à la position des faisceaux de câbles,
conduites et autres éléments, éventuellement encastrés et invisibles, qui se
trouvent dans la zone de montage !
Consignes de sécurité concernant les circuits électriques
• Faites effectuer le raccordement électrique du climatiseur de toit par un spécialiste.
• Vérifiez que la tension indiquée sur la plaque signalétique correspond à l’alimentation électrique dont vous disposez.
• Si l’éclairage doit pouvoir s’allumer même sans alimentation en tension de
230 Vw, assurez-vous qu’une ligne d’alimentation de 12 Vg va de la batterie au
climatiseur de toit.
• Ne placez pas de câbles 230 Vw et de câbles 12/24 Vg dans le même conduit
(tube vide).
• Ne faites pas passer de lignes électriques non fixées ou fortement coudées sur
des matériaux conducteurs (métal).
• Installez du côté montage un disjoncteur universel d’une ouverture de contact
d’au moins 3 mm.
Vous avez le choix entre deux possibilités pour le montage du climatiseur de toit :
• Percement d’une nouvelle ouverture (chapitre « Percement d’une nouvelle
ouverture », page 61). Il faut dans ce cas monter un cadre adapté pour renforcer
l’ouverture pratiquée.
• Utilisation d’une ouverture existante du toit (lanterneau) (chapitre « Montage
dans une ouverture de lanterneau existante », page 61).
60
Page 65

FR
FreshJet Montage
8.2 Percement d’une nouvelle ouverture
Voir fig. 3
➤ Choisissez une zone du toit située au centre, entre deux profils longitudinaux.
➤ Dessinez la position et la taille de l’ouverture à l’aide du gabarit contenu dans
l’emballage (A et B).
Voir fig. 4
➤ Percez les angles (A).
➤ Découpez soigneusement l’ouverture sur le toit avec une scie sauteuse ou un
outil similaire (B).
Veillez à ne pas endommager de câbles électriques pendant cette opération.
Voir fig. 5
➤ Avant le montage, vérifiez si la découpe de toit doit être renforcée ou non.
➤ Retirez la mousse en fonction de la largeur de vos barres de renforcement (non
comprises dans la livraison) (A).
➤ Insérez les barres de renforcement (B).
8.3 Montage dans une ouverture de lanterneau existante
REMARQUE
I
Voir fig. 6
➤ Retirez toutes les vis et fixations du lanterneau.
• Le climatiseur de toit peut être installé dans une ouverture de lanterneau existante si celle-ci correspond aux mesures de fig. 3.
• Eliminez séparément tous les déchets, colle, silicone et joints. Respectez les directives concernant l’élimination des déchets.
• La garantie du fabricant s’applique uniquement aux éléments fournis
à la livraison. La garantie devient caduque si le climatiseur est monté
avec des éléments étrangers au produit.
➤ Retirez le lanterneau.
Voir fig. 7
➤ Nettoy ez les res tes de mas tic t out a utour de l ’ouv erture av ec un racl oir ou un o util
similaire.
61
Page 66

FR
Montage FreshJet
Voir fig. 8
AVIS !
A
➤ Fermez les trous des vis et les renfoncements avec un mastic butyle souple (Sika-
Lastomer-710, par exemple).
Veuillez tenir compte des recommandations du fabricant du produit
d’étanchéité.
8.4 Pose des lignes de raccordement
DANGER ! Danger de mort par électrocution !
D
Le climatiseur de toit doit être relié à un circuit électrique capable de fournir le courant nécessaire (voir chapitre « Données techniques », page 72).
Avant tout travail sur les éléments fonctionnant à l’électricité, assurezvous qu’ils ne sont plus sous tension !
➤ Choisissez la section du câble en fonction de sa longueur :
–Longueur < 7,5m : 1,5mm²
– Longueur > 7,5 m : 2,5 mm²
Voir fig. 9
➤ Percez sur un côté une ouverture pour le passage des câbles d’alimentation élec-
trique.
➤ Faites passer le câble 230 Vw à l’intérieur du véhicule, par l’ouverture.
Si l’éclairage doit pouvoir s’allumer sans tension 230 Vw :
➤ Raccordez un câble au pôle positif et un câble au pôle négatif de la batterie du
véhicule.
➤ Faites passer les câbles 12 Vg à l’intérieur du véhicule, par l’ouverture.
62
Page 67

FR
FreshJet Montage
8.5 Montage de climatiseur de toit à unité de sortie d'air
Chillout ADB (9105306662)
AVIS ! Risque d’endommagement !
A
Voir fig. 0
➤ Montez le climatiseur sur le toit du véhicule.
➤ Positionnez le climatiseur sur l’ouverture de montage.
Tenez compte du sens de la marche.
Fixation du climatiseur de toit
Tenez compte des contraintes statiques exercées sur le toit du véhicule.
Le toit du véhicule doit pouvoir supporter le poids du climatiseur de toit.
Même à long terme, le toit du véhicule ne doit pas s’enfoncer ni se
déformer sous le poids du climatiseur.
Voir fig. a
➤ Positionnez le climatiseur de toit à l’aide des avancées coniques dans l’ouverture
de montage.
Voir fig. b
➤ Sélectionnez le joint adapté en fonction du tableau suivant :
Épaisseur du plafond Épaisseur du joint
25 – 30 mm 15 mm
30 – 40 mm 30 mm
40 – 60 mm 45 mm
➤ Positionnez le joint d'étanchéité avec le côté auto-adhésif sur l'unité de sortie
d'air.
➤ Fixez le cadre de montage (3) sur le dessous du climatiseur de toit, avec les 4 vis
livrées.
Voir fig. c
AVIS ! Risque d’endommagement !
Respectez le couple de serrage indiqué !
A
➤ Serrez les vis avec une clé dynamométrique au couple de serrage de 2,5 Nm.
63
Page 68

FR
Montage FreshJet
Raccordement électrique du système
Vous trouvez le schéma de raccordement complet à la fig. i :
Pos. Description
1 Raccordement 230 Vw
2 Compresseur
3 Évaporateur du ventilateur
4 Évaporateur du ventilateur (uniquement FreshJet 3200)
5 Condenseur du ventilateur
6 Batterie
7 Douile Remote
8 Capteur de température
9 Chauffage (uniquement FreshJet 1700, n° de produit 9105306658, et
FreshJet 2200, n° de produit 9105306515, 9105306512)
10 Pompe à chaleur (uniquement FreshJet 3200)
11 Démarrage progressif (uniquement FreshJet 2200,
n° de produit 9105306515, et FreshJet 3200)
Légende de fig. j :
Pos. Description
1 Commutateur externe de l’éclairage
2 Platine dans l'unité de sortie d'air
Voir fig. d
Câble 230 Vw
➤ Raccordez le climatiseur de toit à l’alimentation en tension de 230 V.
Raccordez les câbles correspondants (1) à un raccord de câble chacun (2).
64
Page 69

FR
FreshJet Montage
Commutateur externe de l’éclairage (non compris dans la livraison)
Vous pouvez raccorder l’éclairage à un commutateur externe de l'éclairage. Vous
pouvez ainsi mettre l’éclairage en marche de loin.
Procédez comme suit :
➤ Retirez le connecteur à 2 pôles (3) de la prise de la platine de l’unité de sortie
d’air.
➤ Raccordez les deux câbles du commutateur externe de l'éclairage au connecteur
à 2 pôles (3).
➤ Enfichez le connecteur à 2 pôles (3) dans la prise de la platine.
Câble 12 Vg
Vous pouvez raccorder l’éclairage à la batterie. Vous pouvez ainsi allumer l’éclairage
même lorsqu’aucune tension de 230 Vw n’est raccordée.
Procédez comme suit :
➤ Retirez le connecteur à 2 pôles (4) de la prise de la platine principale.
➤ Raccordez le câble positif (5) au connecteur.
➤ Raccordez le câble négatif (6) au connecteur.
Raccordement de la platine
Voir fig. e
➤ Enfichez le connecteur à 12 pôles (1) dans la prise (4) de la platine de l’unité de
sortie d’air.
➤ Enfichez les deux connecteurs à 2 pôles (2) dans les prises (3) de la platine.
8.6 Montage de l’unité de sortie d’air Chillout ADB
Voir fig. f
➤ Fixez l'unité de sortie d'air au cadre de montage avec les vis de fixation courtes
(1).
Voir fig. g
➤ Montez les filtres d’air dans l’ordre indiqué.
65
Page 70

FR
Montage FreshJet
Voir fig. h
➤ Montez les caches des filtres.
➤ Faites noter les modifications de la hauteur et du poids du véhicule sur les papiers
du véhicule.
8.7 Montage de climatiseur de toit à unité de sortie d'air
ADB (9105306664)
AVIS ! Risque d’endommagement !
A
Voir fig. 0
Tenez compte des contraintes statiques exercées sur le toit du véhicule.
Le toit du véhicule doit pouvoir supporter le poids du climatiseur de toit.
Même à long terme, le toit du véhicule ne doit pas s’enfoncer ni se
déformer sous le poids du climatiseur.
➤ Montez le climatiseur sur le toit du véhicule.
➤ Positionnez le climatiseur sur l’ouverture de montage.
Tenez compte du sens de la marche.
Fixation du climatiseur de toit
Voir fig. a
➤ Positionnez le climatiseur de toit à l’aide des avancées coniques dans l’ouverture
de montage.
66
Page 71

FR
FreshJet Montage
Raccordement électrique du système
Vous trouvez le schéma de raccordement complet à la fig. g :
Pos. Description
1 Raccordement 230 Vw
2 Compresseur
3 Évaporateur du ventilateur
4 Évaporateur du ventilateur (uniquement FreshJet 3200)
5 Condenseur du ventilateur
6 Batterie
7 Douile Remote
8 Capteur de température
9 Chauffage (uniquement FreshJet 1700, n° de produit 9105306658, et
FreshJet 2200, n° de produit 9105306515, 9105306512)
10 Pompe à chaleur (uniquement FreshJet 3200)
11 Démarrage progressif (uniquement FreshJet 2200, n° de produit
9105306515, FreshJet 3200)
Légende de fig. h :
Pos. Description
1 Commutateur externe de l’éclairage
2 Platine dans l'unité de sortie d'air
Voir fig. b
Câble 230 Vw
➤ Raccordez le climatiseur de toit à l’alimentation en tension de 230 V.
Raccordez les câbles correspondants (1) à un raccord de câble chacun (2).
67
Page 72

FR
Montage FreshJet
Commutateur externe de l’éclairage (non compris dans la livraison)
Vous pouvez raccorder l’éclairage à un commutateur externe de l'éclairage. Vous
pouvez ainsi mettre l’éclairage en marche de loin.
Procédez comme suit :
➤ Retirez le connecteur à 2 pôles (3) de la prise de la platine de l’unité de sortie
d’air.
➤ Raccordez les deux câbles du commutateur externe de l'éclairage au connecteur
à 2 pôles (3).
➤ Enfichez le connecteur à 2 pôles (3) dans la prise de la platine.
Câble 12 Vg
Vous pouvez raccorder l’éclairage à la batterie. Vous pouvez ainsi allumer l’éclairage
même lorsqu’aucune tension de 230 Vw n’est raccordée.
Procédez comme suit :
➤ Retirez le connecteur à 2 pôles (4) de la prise de la platine principale.
➤ Raccordez le câble positif (5) au connecteur.
➤ Raccordez le câble négatif (6) au connecteur.
Raccordement de la platine
➤ Enfichez le connecteur à 12 pôles (8) dans la prise (7) de la platine de l’unité de
sortie d’air.
Voir fig. c
➤ Sélectionnez le joint adapté en fonction du tableau suivant :
Épaisseur du plafond Épaisseur du joint
25 – 30 mm 15 mm
30 – 40 mm 30 mm
40 – 60 mm 45 mm
➤ Positionnez le joint d'étanchéité avec le côté auto-adhésif sur l'unité de sortie
d'air.
➤ Fixez le cadre de montage (3) sur le dessous du climatiseur de toit, avec les 4 vis
livrées.
68
Page 73

FR
FreshJet Guide de dépannage
Voir fig. d
AVIS ! Risque d’endommagement !
Respectez le couple de serrage indiqué !
A
➤ Serrez les vis avec une clé dynamométrique au couple de serrage de 2,5 Nm.
8.8 Montage de l’unité de sortie d’air ADB
Voir fig. e
➤ Montez les filtres d’air dans l’ordre indiqué.
Voir fig. f
➤ Fixez magnétiquement l'unité de sortie d'air sur le cadre de montage.
9 Guide de dépannage
Dysfonctionnement
Le climatiseur de toit
s’éteint en permanence.
Pas de rafraîchissement
Cause Solution
Le détecteur de givrage interrompt le
fonctionnement.
Le climatiseur de toit n’est pas en mode
rafraîchissement.
La température ambiante est supérieure
à 52 °C.
La température réglée est supérieure à
la température ambiante.
La température ambiante est inférieure
à 16 °C.
Une des sondes de température est
défectueuse.
La température extérieure est trop
basse ou toutes les buses de ventilation sont fermées.
➤ Mettez le climatiseur de toit en
mode rafraîchissement.
Le climatiseur est conçu pour une
température ambiante inférieure à
52 °C.
➤ Sélectionnez une température
plus basse.
➤ Le climatiseur est conçu unique-
ment pour une température
ambiante supérieure à 16 °C.
➤ Prenez contact avec un atelier
spécialisé.
La turbine de l’évaporateur est défectueuse.
Le ventilateur du condensateur est
défectueux.
69
Page 74

FR
Guide de dépannage FreshJet
Dysfonctionnement
Mauvaise ventilation L’aspiration d’air est bouchée. ➤ Enlevez la poussière et autres
Infiltration d’eau
dans le véhicule
Le climatiseur de toit
ne se met pas en
marche
Cause Solution
salissures qui encombrent les
lamelles de ventilation du climatiseur.
Le ventilateur est défectueux. ➤ Prenez contact avec un atelier
spécialisé.
Les ouvertures d’écoulement d’eau de
condensation sont bouchées.
Les joints sont défectueux. ➤ Prenez contact avec un atelier
Il n’y a pas de tension électrique
(230 V).
La tension est trop faible (moins
de 200 V).
Le transformateur est défectueux.
Une des sondes de température est
défectueuse.
➤ Nettoyez les ouvertures d’écou-
lement d’eau de condensation.
spécialisé.
➤ Contrôlez l’alimentation en ten-
sion.
➤ Prenez contact avec un atelier
spécialisé.
Le climatiseur de toit
ne s’éteint pas
La protection par fusible de l’alimentation en tension est trop faible.
Une des sondes de température est
défectueuse.
La protection par fusible de l’alimentation en tension est trop faible.
➤ Vérifiez les fusibles de l’alimenta-
tion en tension.
➤ Prenez contact avec un atelier
spécialisé.
➤ Vérifiez les fusibles de l’alimenta-
tion en tension.
70
Page 75

FR
FreshJet Retraitement
10 Retraitement
Directives de protection de l’environnement et élimination conforme
Toutes les organisations doivent appliquer une série de mesures visant à détecter,
évaluer et contrôler l’influence que leurs activités (fabrication, produits, service
après-vente, etc.) ont sur l’environnement.
Les mesures à suivre pour la détection d’effets importants sur l’environnement
doivent prendre en compte les facteurs suivants :
• Utilisation de matières premières et de ressources naturelles
• Émissions dans l’atmosphère
• Écoulement de liquides
• Élimination et recyclage
• Contamination du sol
Afin de minimiser les effets sur l’environnement, le fabricant présente ci-dessous une
série de consignes que toute personne interagissant avec l’appareil pendant la
durée de vie de celui-ci (pour quelque raison que ce soit) doit prendre en compte.
• Tous les matériaux d’emballage doivent être éliminés (de préférence recyclés)
conformément aux directives légales en vigueur dans le pays où l’élimination a
lieu.
• Tous les composants du produit doivent être éliminés (de préférence recyclés)
conformément aux directives légales en vigueur dans le pays où l’élimination a
lieu.
• Pour une élimination correcte, l’appareil doit être transmis à un centre de recy-
clage, afin que tous les composants recyclables puissent être réutilisés et que les
matériaux restants soient traités de manière conforme.
• Pendant l’installation, assurez-vous que l’habitacle est suffisamment aéré pour
éviter la formation d’air vicié, qui pourrait être nocif pour la santé de l’utilisateur.
• Pendant l’utilisation et l’entretien, assurez-vous que les déchets toxiques (huile,
graisse, etc.) sont éliminés de manière conforme.
• Afin de réduire les nuisances sonores, minimisez le niveau sonore.
Vous trouverez de plus amples informations concernant le démantèlement correct
de nos produits dans les instructions de recyclage disponibles sur www.dometic.com.
➤ Jetez les emballages dans les conteneurs de déchets recyclables prévus à cet
effet.
71
Page 76

FR
Données techniques FreshJet
➤ Lors de l’exploitation ainsi que des réparations et des travaux de maintenance,
veillez à ce que le circuit de refroidissement ne soit pas endommagé et que le
fluide frigorigène ne puisse s’échapper. Il s’agit d’un gaz à effet de serre, qui ne
doit pas parvenir dans l’atmosphère.
Lorsque vous mettez le produit définitivement hors service, informez-vous
auprès du centre de recyclage le plus proche ou auprès de votre reven-
M
➤ Éliminez le produit en vous conformant uniquement aux directives de recyclage
ou d’élimination en vigueur, auprès d’une entreprise de recyclage agréée.
B
deur spécialisé sur les prescriptions relatives à la récupération des
déchets.
Protégez l'environnement !
Les piles et les batteries usagées ne sont pas des déchets ménagers.
Rapportez les piles défectueuses ou les batteries usagées à votre revendeur ou à un centre de collecte.
11 Données techniques
Contient des gaz à effet de serre fluorés
Equipement hermétiquement scellé
72
Page 77

FR
FreshJet Données techniques
FreshJet 1100 FreshJet 1700
N° de produit : 9105306654
9105306655
Puissance frigorifique du
compresseur :
Puissance frigorifique selon
ISO 5151 :
Puissance calorifique : – 800 W
Tension nominale d’entrée : 230 Vw / 50 Hz
Intensité absorbée en mode
refroidissement :
Fusible requis :
Intensité absorbée en mode
chauffage :
Fusible requis :
Plage de température de
fonctionnement :
1000 W 1700 W
850 W 1600 W
2,0 A
3 A
–
–
de 0 °C à +52 °C
9105306656
9105306658
2,7 A
4 A
3,5 A
4 A
Frigorigène : R-134a R-407c
Quantité de fluide frigorigène : 0,280 kg 0,545 kg
Équivalent CO
Potentiel d'effet de serre
(GWP) :
Ventilateur : 4 niveaux de soufflerie
Type de protection : IPX4
Volume max. de l’habitacle du
véhicule (avec parois isolées) :
Dimensions l x L x h: 787 x 562 x 225 mm
Poids : env. 22,5 kg env. 29 kg
Contrôle/certificat :
: 0,4004 t 0,96683 t
2
1430 1774
1 mode automatique
16 m³ 20 m³
(hauteur au-dessus du toit du véhicule)
73
Page 78

FR
Données techniques FreshJet
FreshJet 2200
N° de produit : 9105306513 9105306511
9105306512
9105306515
Puissance frigorifique du
compresseur :
Puissance frigorifique selon
ISO 5151 :
Puissance calorifique : – 1200 W
Tension nominale d’entrée : 230 Vw / 50 Hz
Intensité absorbée en mode
refroidissement :
Fusible requis :
Intensité absorbée en mode
chauffage :
Fusible requis :
Plage de température de
fonctionnement :
Frigorigène : R-407c
Quantité de fluide frigorigène : 0,520 kg
–
–
2200 W
2050 W
4,1 A
5 A
5,2 A
6 A
de 0 °C à +52 °C
Équivalent CO
Potentiel d'effet de serre (GWP) : 1774
Ventilateur : 4 niveaux de soufflerie
Type de protection : IPX4
Volume max. de l’habitacle du
véhicule (avec parois isolées) :
Dimensions l x L x h: 787 x 562 x 225 mm
Poids : env. 32 kg
Contrôle/certificat :
: 0,92248
2
1 mode automatique
25 m³
(hauteur au-dessus du toit du véhicule)
74
Page 79

FR
FreshJet Données techniques
FreshJet 3200
N° de produit : 9105306660
9105306659
Puissance frigorifique du
compresseur :
Puissance frigorifique selon
ISO 5151 :
Puissance calorifique : 3300 W
Tension nominale d’entrée : 230 Vw / 50 Hz
Intensité absorbée en mode
refroidissement :
Fusible requis :
Intensité absorbée en mode
chauffage :
Fusible requis :
Plage de température de
fonctionnement :
Frigorigène : R-410a
Quantité de fluide frigorigène : 0,735 kg
2800 W
2800 W
5,7 A
10 A
5,9 A
10 A
de 0 °C à +52 °C
Équivalent CO
Potentiel d'effet de serre (GWP) : 2088
Ventilateur : 4 niveaux de soufflerie
Type de protection : IPX4
Volume max. de l’habitacle du
véhicule (avec parois isolées) :
Dimensions l x L x h: 980 x 650 x 248 mm
Poids : env. 36 kg
Contrôle/certificat :
: 1,53468 t
2
1 mode automatique
32 m³
(hauteur au-dessus du toit du véhicule)
75
Page 80

ES
FreshJet
Lea atentamente estas instrucciones antes de proceder al montaje y
puesta en funcionamiento del aparato, y consérvelas en un lugar seguro
para futuras consultas. En caso de vender o entregar el aparato a otra persona, entregue también estas instrucciones.
Índice
1 Aclaración de los símbolos. . . . . . . . . . . . . . . . . . . . . . . . . . . . . . . . . . . . . . 77
2 Aclaración de los símbolos. . . . . . . . . . . . . . . . . . . . . . . . . . . . . . . . . . . . . . 77
3 Destinatarios de estas instrucciones . . . . . . . . . . . . . . . . . . . . . . . . . . . . . . 80
4 Volumen de entrega . . . . . . . . . . . . . . . . . . . . . . . . . . . . . . . . . . . . . . . . . . . 80
5 Accesorios. . . . . . . . . . . . . . . . . . . . . . . . . . . . . . . . . . . . . . . . . . . . . . . . . . . .81
6 Uso adecuado. . . . . . . . . . . . . . . . . . . . . . . . . . . . . . . . . . . . . . . . . . . . . . . . 82
7 Placas de identificación . . . . . . . . . . . . . . . . . . . . . . . . . . . . . . . . . . . . . . . . 82
8 Montaje . . . . . . . . . . . . . . . . . . . . . . . . . . . . . . . . . . . . . . . . . . . . . . . . . . . . . 82
9 Solución de averías . . . . . . . . . . . . . . . . . . . . . . . . . . . . . . . . . . . . . . . . . . . . 94
10 Eliminación de desechos . . . . . . . . . . . . . . . . . . . . . . . . . . . . . . . . . . . . . . . 96
11 Datos técnicos. . . . . . . . . . . . . . . . . . . . . . . . . . . . . . . . . . . . . . . . . . . . . . . . 97
76
Page 81

ES
FreshJet Aclaración de los símbolos
1 Aclaración de los símbolos
¡PELIGRO!
D
!
!
A
Indicación de seguridad: su incumplimiento acarrea la muerte
o graves lesiones.
¡ADVERTENCIA!
Indicación de seguridad: su incumplimiento puede acarrear la
muerte o graves lesiones.
¡ATENCIÓN!
Indicación de seguridad: su incumplimiento puede acarrear
lesiones.
¡AVISO!
Su incumplimiento puede acarrear daños materiales y perjudicar el
correcto funcionamiento del producto.
NOTA
Información adicional para el manejo del producto.
I
2 Aclaración de los símbolos
Tenga en cuenta las indicaciones de seguridad y la documentación suministrada por el fabricante y el taller del vehículo.
El fabricante declina toda responsabilidad ante daños ocurridos en los siguientes
casos:
• errores de montaje o de conexión
• daños en el producto debido a influencias mecánicas y sobretensiones
• modificaciones realizadas en el producto sin el expreso consentimiento del
fabricante
• utilización del aparato para fines distintos a los descritos en las instrucciones
77
Page 82

ES
Aclaración de los símbolos FreshJet
Al utilizar los aparatos eléctricos, respete las siguientes normas básicas de seguridad
para protegerse de:
• descargas eléctricas
• peligro de incendio
• lesiones
2.1 Manejo del aparato
¡ADVERTENCIA!
!
• Sólo personal técnico que conozca los posibles peligros y las normas
correspondientes tiene autorización para realizar las tareas de instalación y la reparación del equipo de aire acondicionado de techo. Las
reparaciones que se realicen incorrectamente pueden dar lugar a
situaciones de considerable peligro. En caso de reparaciones, diríjase
al punto de atención al cliente de su país (direcciones al dorso).
• Los aparatos eléctricos no son juguetes.
Los niños no tienen capacidad de percibir los peligros que representan los aparatos eléctricos. No deje que los niños usen aparatos eléctricos sin estar bajo su vigilancia.
• Los niños mayores de 8 años y las personas de capacidad física, sensorial o mental disminuida, así como aquellas personas con falta de
experiencia y/o conocimientos suficientes solo podrán utilizar este
aparato si están vigilados o han sido instruidos respecto al uso seguro
del aparato y a los posibles peligros que pueden emanar de él.
• En caso de incendio, no abra la tapa superior del equipo de aire acon-
dicionado de techo y utilice medios de extinción autorizados. No utilice agua para extinguir el fuego.
¡ATENCIÓN!
!
• Instale el equipo de aire acondicionado de techo de forma segura
para evitar que se pueda caer.
• Use el equipo de aire acondicionado de techo sólo cuando la carcasa
y los cables no presenten daños.
• No utilice el equipo de aire acondicionado de techo cerca de fluidos
inflamables o en habitaciones cerradas.
78
Page 83

ES
FreshJet Aclaración de los símbolos
• Asegúrese de que no haya objetos inflamables situados o instalados
en el área de salida de aire. La distancia debe ser como mínimo de
50 cm.
• No introduzca las manos en las salidas de ventilación, ni inserte objetos extraños en el equipo.
¡AVISO!
A
I
• Utilice el aparato sólo para aquellos fines para los que ha sido conce-
bido.
• El equipo de aire acondicionado de techo no está diseñado para su
uso en maquinaria agrícola y de construcción.
• No realice cambios o modificaciones en el aparato.
• Nunca introduzca su caravana en el túnel de lavado estando instalado
el equipo de aire acondicionado de techo.
• Si se producen fallos en el circuito de refrigerante, un taller
especializado debe comprobar el equipo y repararlo según las normativas. Nunca se debe dejar salir refrigerante a la atmósfera.
NOTA
• Consulte al fabricante de su vehículo si es necesario realizar una aprobación técnica nueva (según el parágrafo 19 de la ley de circulación
alemana StVZO) a causa de la instalación del equipo de aire acondicionado de techo y modificar los datos de altura en la documentación
del vehículo.
– FreshJet 1100, 1700, 2200: Altura de montaje 225 mm
– FreshJet 3200: Altura de montaje 248 mm
2.2 Manipulación de los cables eléctricos
¡ADVERTENCIA!
!
!
• Sólo puede realizar la conexión eléctrica un taller especializado (en
Alemania, por ejemplo, VDE 0100, parte 721).
¡ATENCIÓN!
• Fije y tienda los cables de forma que no supongan un peligro de tropiezo ni puedan resultar dañados.
79
Page 84

ES
Destinatarios de estas instrucciones FreshJet
¡AVISO!
A
• Si los cables atraviesan paredes con bordes afilados, utilice conductos
para cables o guías de cable.
• No coloque cables sueltos ni doblados en extremo sobre materiales
conductores de electricidad (metales).
• No tire de los cables.
3 Destinatarios de estas instrucciones
Estas instrucciones van dirigidas al personal técnico de talleres familiarizado con las
directivas y medidas de seguridad que se hayan de aplicar.
4 Volumen de entrega
4.1 Con unidad de salida del aire Chillout ADB
(9105306662)
N.º en fig. 1 To t a l Denominación
1 1 Equipo de aire acondicionado de techo
2 1 Unidad de salida de aire
3 1 Bastidor de montaje
4 1 Filtro de aire
5 1 Tapa de filtro
6 1 Juntas
7 3 Abrazadera para cables
8 4 Tornillo de fijación largo
9 4 Tornillo de fijación corto
10 1 Control remoto
80
Page 85

ES
FreshJet Accesorios
4.2 Con unidad de salida del aire ADB
(9105306664)
N.º en fig. 1 To t a l Denominación
1 1 Equipo de aire acondicionado de techo
2 1 Unidad de salida de aire
3 1 Bastidor de montaje
4 1 Juntas
5 3 Abrazadera para cables
6 4 Tornillo de fijación largo
7 4 Tornillo de fijación corto
8 1 Control remoto
5Accesorios
Disponibles como accesorio (no incluidos en el volumen de entrega):
Denominación
Kit complementario para CC DC-Kit1 (sólo FJ1100) 9100300003
Kit complementario para CC DC-Kit2
(sólo FJ1100, 1700, 2200)
Kit complementario para CC DC-Kit3
(sólo FJ1100, 1700, 2200)
Kit complementario para CC DC-Kit4
(FJ1100, 1700, 2200, 3200)
Kit complementario para CC DC-Kit5
(sólo FJ1100, 1700, 2200)
Kit complementario para CC DC-Kit6
(FJ1100, 1700, 2200, 3200)
Número de
artículo
9100300001
9100300002
9100300044
9100300073
9100300074
NOTA
I
Con un kit complementario para CC de (accesorio), el equipo de aire
acondicionado de techo Dometic FreshJet puede ampliarse para que
funcione durante la marcha.
81
Page 86

ES
Uso adecuado FreshJet
6Uso adecuado
El equipo de aire acondicionado de techo de Dometic FreshJet es adecuado únicamente para autocaravanas, caravanas y otros vehículos con estancias para vivir. No
es adecuado para casas o viviendas.
El equipo de aire acondicionado de techo no es apropiado para su instalación en
maquinaria de construcción, en maquinaria agrícola o en maquinaria similar. En caso
de que se produzcan vibraciones demasiado fuertes no se garantiza un funcionamiento correcto.
El funcionamiento del equipo de aire acondicionado de techo está garantizado para
temperaturas entre 0 °C y 52 °C.
NOTA
I
En las instrucciones de uso encontrará más información sobre los
equipos de aire acondicionado de techo como la descripción técnica
o el manejo de éstos.
7 Placas de identificación
El equipo de aire acondicionado de techo Dometic FreshJet dispone de placas de
identificación. Estas placas de identificación informan al usuario y al instalador sobre
las especificaciones del aparato.
8Montaje
¡ATENCIÓN! ¡Peligro de sufrir lesiones!
!
8.1 Indicaciones para el montaje
Lea íntegramente estas instrucciones de montaje antes de realizar el montaje del
equipo de aire acondicionado de techo.
Sólo personal técnico debidamente cualificado tiene permitido realizar
el montaje del equipo de aire acondicionado de techo. La siguiente
información va dirigida a personal técnico familiarizado con las
directivas y normativas de seguridad que se han de aplicar.
82
Page 87

ES
FreshJet Montaje
Tenga en cuenta los siguientes consejos e indicaciones al montar el equipo de aire
acondicionado de techo:
¡PELIGRO! ¡Peligro de muerte por descarga eléctrica!
D
!
Desconecte siempre todas las alimentaciones de tensión mientras esté
trabajando en el equipo de aire acondicionado de techo.
¡ATENCIÓN! ¡Peligro de lesiones!
• Una instalación incorrecta del equipo de aire acondicionado puede
provocar daños irreparables en el aparato y limitar la seguridad del
usuario.
• Si el equipo de aire acondicionado de techo no se ha instalado de
acuerdo a estas instrucciones de montaje, el fabricante no asumirá
ningún tipo de responsabilidad por fallos en el funcionamiento ni
por la seguridad del equipo de aire acondicionado de techo ni,
especialmente, por daños personales y/o materiales.
• Al realizar cualquier tarea, lleve el equipo de protección personal
prescrito (p. ej. gafas de protección, guantes de protección).
¡AVISO! Peligro de ocasionar daños materiales
A
Indicaciones para el transporte
• Transporte el equipo de aire acondicionado de techo siempre con ayuda de otra
persona.
• Siempre levante el equipo de aire acondicionado de techo a mover, no lo arrastre por encima del techo (fig. 2 A).
• No lo sujete por las ranuras de ventilación traseras para levantarlo (fig. 2 B).
Indicaciones relativas al lugar de montaje
• Antes de instalar el equipo de aire acondicionado de techo, compruebe si el
montaje podría provocar daños en componentes del vehículo (por ejemplo,
lámparas, armarios, puertas).
• Durante el montaje del equipo de aire acondicionado de techo,
preste siempre atención a la estática del vehículo y al sellado de
todas las aberturas realizadas.
• Antes de subirse al techo del vehículo, compruebe si es transitable
para personas. Puede consultar al fabricante del vehículo las cargas
autorizadas sobre el techo.
83
Page 88

ES
Montaje FreshJet
• Antes del montaje, consulte al fabricante del vehículo para asegurarse de que la
estructura está diseñada para soportar el peso estático y las cargas generadas
por el equipo de aire acondicionado cuando el vehículo se encuentre en movimiento. El fabricante del equipo de aire acondicionado de techo no asume ningún tipo de responsabilidad.
• Existe la posibilidad de que el fabricante del vehículo haya previsto lugares en los
que se pueda realizar la abertura para el montaje del equipo de aire acondicionado de techo sin peligro de debilitamiento de la estructura o de cortar los
cables eléctricos.
• Seleccione como lugar de montaje una zona plana y suficientemente lisa en el
centro del techo del vehículo entre dos perfiles longitudinales del techo del vehículo.
• La inclinación del techo en la superficie de montaje no debe superar los 10°.
• El equipo de aire acondicionado de techo se tiene que instalar a una altura de al
menos 2 metros.
• Asegúrese de que no haya objetos inflamables situados o montados en el área
de salida de aire. La distancia debe ser como mínimo de 50 cm.
• Asegúrese de que no exista ningún impedimento en el interior del vehículo para
la fijación de la unidad de salida de aire y para la salida del aire enfriado a través
de las toberas orientables de distribución de aire.
• Por motivos de seguridad, al montar el equipo de aire acondicionado de techo
(al realizar perforaciones, al atornillar, etc.) preste atención al recorrido de los
mazos de cables, conducciones y otros componentes, especialmente cuando
no estén a la vista, y a que se encuentren en la zona de montaje.
Indicaciones relativas al sistema eléctrico
• La conexión eléctrica del equipo de aire acondicionado de techo debería ser
realizada únicamente por un técnico.
• Compare el valor de tensión indicado en la placa de características con el suministro de energía existente.
• Si desea que las luces también puedan encenderse sin alimentación de tensión
de 230 Vw, asegúrese de contar con una conexión de 12 Vg de la batería al
equipo de aire acondicionado de techo.
• No tienda el cable de red de 230 Vw junto con el cable de corriente continua de
12/24 Vg en el mismo canal de cableado (tubo corrugado).
• Los cables no deben quedar sueltos ni muy doblados al colocarlos en materiales
conductores de electricidad (metales).
• Monte en el lateral de montaje un interruptor multipolar con una abertura de contacto de por lo menos 3 mm.
84
Page 89

ES
FreshJet Montaje
Para montar el equipo de aire acondicionado de techo podrá elegir entre dos posibilidades:
• Creación de una abertura nueva (capítulo “Crear una nueva abertura” en la
página 85). En este caso, deberá instalar un bastidor adecuado como refuerzo
en la nueva abertura.
• Uso de la abertura del techo solar existente en el vehículo (ventanilla de ventilación) (capítulo “Montaje en una abertura existente en el techo” en la página 86).
8.2 Crear una nueva abertura
Véase la fig. 3
➤ Seleccione una zona en el centro del techo situada entre dos perfiles longitudi-
nales.
➤ Marque la posición y el tamaño de la abertura con ayuda de la plantilla incluida
en el paquete (A y B).
Véase la fig. 4
➤ Taladre las esquinas (A).
➤ Recorte cuidadosamente la abertura en el techo con una sierra de calar o una
herramienta similar (B).
Al hacerlo, tenga cuidado de que no dañar ningún cable eléctrico.
Véase la fig. 5
➤ Antes del montaje, aclare si la abertura del techo debe ser reforzada.
➤ Retire el esponjado en la medida correspondiente al ancho de las guías de
refuerzo (no incluidas en el volumen de entrega) (A).
➤ Adapte las guías de refuerzo (B).
85
Page 90

ES
Montaje FreshJet
8.3 Montaje en una abertura existente en el techo
NOTA
I
Véase la fig. 6
➤ Retire todos los tornillos y fijaciones del techo solar.
➤ Extraiga el techo solar.
• El montaje del equipo de aire acondicionado de techo se puede realizar en aberturas de techo solar ya existentes con las dimensiones
correspondientes.
• Deseche todos los desperdicios, cola, silicona y juntas por
separado. Respete las directivas sobre eliminación de residuos.
• El fabricante se responsabiliza únicamente de las piezas incluidas en
el alcance del suministro. La garantía pierde su validez en caso de
instalación del equipo con piezas ajenas al producto.
Véase la fig. 7
➤ Retire el material de sellado alrededor de la abertura utilizando un rascador o una
herramienta similar.
Véase la fig. 8
¡AVISO!
Siga también las indicaciones del fabricante del sellador.
A
➤ Selle los orificios de tornillos y las cavidades con un sellante butílico plástico que
no se endurezca (por ejemplo, SikaLastomer-710).
8.4 Tendido de cables de conexión
¡PELIGRO! ¡Peligro de muerte por descarga eléctrica!
D
Antes de realizar trabajos en componentes que funcionan con electricidad, asegúrese de que no haya tensión eléctrica.
El equipo de aire acondicionado de techo debe conectarse a un circuito eléctrico
capaz de suministrar la corriente necesaria (véase capítulo “Datos técnicos” en la
página 97).
➤ Seleccione la sección de cable conforme a su longitud:
–Longitud < 7,5m: 1,5mm²
– Longitud > 7,5 m: 2,5 mm²
86
Page 91

ES
FreshJet Montaje
Véase la fig. 9
➤ Realice una abertura en un lado para introducir el cable de alimentación eléctrica.
➤ Tienda el cable de 230 Vw en el interior del vehículo a través de la abertura.
Si desea que las luces también puedan encenderse sin alimentación de tensión de
230 V:
➤ Conecte cada cable respectivamente con el polo positivo y con el polo negativo
de la batería del vehículo.
➤ Tienda los cables de 12 Vw en el interior del vehículo a través de la abertura.
8.5 Monte el equipo de aire acondi9cionado de techo con
la unidad de salida de aire Chillout ADB
(9105306662)
¡AVISO! ¡Peligro de daños materiales!
A
Preste atención a las relaciones estáticas del techo del vehículo. El techo
del vehículo debe poder soportar el peso del equipo de aire acondicionado de techo. A largo plazo, el techo no se debe abollar o cambiar de
forma debido al peso del equipo.
Véase la fig. 0
➤ Suba el equipo de aire acondicionado al techo del vehículo.
➤ Coloque el equipo de aire acondicionado de techo sobre la abertura de mon-
taje.
Tenga en cuenta el sentido de la marcha.
Fijación del equipo de aire acondicionado de techo
Véase la fig. a
➤ Con ayuda de los salientes cónicos, posicione el equipo de aire acondicionado
de techo en la abertura de montaje.
87
Page 92

ES
Montaje FreshJet
Véase la fig. b
➤ Seleccione la junta correspondiente de acuerdo con la siguiente tabla:
Espesor del techo Espesor de la junta
25 – 30 mm: 15 mm
30 – 40 mm 30 mm
40 – 60 mm: 45 mm
➤ Coloque la junta con el lado autoadhesivo sobre la unidad de salida de aire.
➤ Utilice los 4 tornillos suministrados para fijar el bastidor de montaje (3) a la parte
inferior del aire acondicionado de techo.
Véase la fig. c
¡AVISO! ¡Peligro de daños materiales!
¡Tenga en cuenta el par de apriete indicado!
A
➤ Apriete los tornillos con una llave dinamométrica y con un par de apriete de
2,5 Nm.
Conexión eléctrica del sistema
En la fig. i encontrará el esquema de conexiones completo:
Pos. Descripción
1 Conexión de 230 Vw
2 Compresor
3 Evaporador del ventilador
4 Evaporador del ventilador (solo FreshJet 3200)
5 Condensador del ventilador
6Batería
7 Clavija remoto
8 Sensor de temperatura
9 Calefacción (solo FreshJet 1700, n.° art. 9105306658, y FreshJet 2200, n.°
art. 9105306515, 9105306512)
10 Bomba de calor (solo FreshJet 3200)
11 Soft Start (solo FreshJet 2200, n.° art. 9105306515, FreshJet 3200)
88
Page 93

ES
FreshJet Montaje
Leyenda para fig. j:
Pos. Descripción
1 Interruptor de luz remoto
2 Placa de la unidad de salida de aire
Véase la fig. d
Cable de 230 Vw
➤ Conecte el equipo de aire acondicionado de techo con la alimentación de ten-
sión de 230 V.
Conecte los cables correspondientes (1) a cada una de las abrazaderas para
cables (2).
Interruptor de luz remoto (no incluido en el suministro de entrega)
Las luces pueden conectarse a un interruptor de luz remoto. Éste permite encender
las luces desde lejos.
Para ello proceda de la siguiente manera:
➤ Extraiga la clavija de 2 polos (3) de la toma situada en la placa de la unidad de
salida de aire.
➤ Conecte los dos cables del interruptor de luz remoto con la clavija de 2 polos (3).
➤ Inserte la clavija de 2 polos (3) en la toma situada en la placa.
Cable de 12 Vw
Las luces puede conectarse a la batería. De este modo también podrá encender las
luces aunque no cuente con una conexión de tensión de 230 V.
Para ello proceda de la siguiente manera:
➤ Extraiga la clavija de 2 polos (4) de la toma situada en la placa principal.
➤ Conecte el cable positivo (5) a la clavija.
➤ Conecte el cable negativo (6) a la clavija.
89
Page 94

ES
Montaje FreshJet
Conexión de la placa
Véase la fig. e
➤ Inserte la clavija de 12 polos (1) en la toma (4) situada en la placa de la unidad de
salida de aire.
➤ Inserte las dos clavijas de 2 polos (2) en las tomas (3) situadas en la placa.
8.6 Montaje de la unidad de salida de aire Chillout ADB
Véase la fig. f
➤ Sujete la unidad de salida de aire con los tornillos de fijación cortos (1) en el
marco de montaje.
Véase la fig. g
➤ Monte el filtro de fijación en el orden correspondiente.
Véase la fig. h
➤ Monte las tapas del filtro.
➤ Haga registrar en la documentación del vehículo la nueva altura y el nuevo peso
del mismo.
8.7 Monte el equipo de aire acondi9cionado de techo con
la unidad de salida de aire ADB (9105306664)
¡AVISO! ¡Peligro de daños materiales!
A
Véase la fig. 0
➤ Suba el equipo de aire acondicionado al techo del vehículo.
Preste atención a las relaciones estáticas del techo del vehículo. El techo
del vehículo debe poder soportar el peso del equipo de aire acondicionado de techo. A largo plazo, el techo no se debe abollar o cambiar de
forma debido al peso del equipo.
➤ Coloque el equipo de aire acondicionado de techo sobre la abertura de mon-
taje.
Tenga en cuenta el sentido de la marcha.
90
Page 95

ES
FreshJet Montaje
Fijación del equipo de aire acondicionado de techo
Véase la fig. a
➤ Con ayuda de los salientes cónicos, posicione el equipo de aire acondicionado
de techo en la abertura de montaje.
Conexión eléctrica del sistema
En la fig. g encontrará el esquema de conexiones completo:
Pos. Descripción
1 Conexión de 230 Vw
2 Compresor
3 Evaporador del ventilador
4 Evaporador del ventilador (solo FreshJet 3200)
5 Condensador del ventilador
6Batería
7 Clavija remoto
8 Sensor de temperatura
9 Calefacción (solo FreshJet 1700, n.° art. 9105306658, y FreshJet 2200,
n.° art. 9105306515, 9105306512)
10 Bomba de calor (solo FreshJet 3200)
11 Soft Start (solo FreshJet 2200, n.° art. 9105306515, FreshJet 3200)
Leyenda para fig. h:
Pos. Descripción
1 Interruptor de luz remoto
2 Placa de la unidad de salida de aire
Véase la fig. b
Cable de 230 Vw
➤ Conecte el equipo de aire acondicionado de techo con la alimentación de
tensión de 230 V.
Conecte los cables correspondientes (1) a cada una de las abrazaderas para
cables (2).
91
Page 96

ES
Montaje FreshJet
Interruptor de luz remoto (no incluido en el suministro de entrega)
Las luces pueden conectarse a un interruptor de luz remoto. Éste permite encender
las luces desde lejos.
Para ello proceda de la siguiente manera:
➤ Extraiga la clavija de 2 polos (3) de la toma situada en la placa de la unidad de
salida de aire.
➤ Conecte los dos cables del interruptor de luz remoto con la clavija de 2 polos (3).
➤ Inserte la clavija de 2 polos (3) en la toma situada en la placa.
Cable de 12 Vw
Las luces puede conectarse a la batería. De este modo también podrá encender las
luces aunque no cuente con una conexión de tensión de 230 V.
Para ello proceda de la siguiente manera:
➤ Extraiga la clavija de 2 polos (4) de la toma situada en la placa principal.
➤ Conecte el cable positivo (5) a la clavija.
➤ Conecte el cable negativo (6) a la clavija.
Conexión de la placa
➤ Inserte la clavija de 12 polos (8) en la toma (7) situada en la placa de la unidad de
salida de aire.
Véase la fig. c
➤ Seleccione la junta correspondiente de acuerdo con la siguiente tabla:
Espesor del techo Espesor de la junta
25 – 30 mm: 15 mm
30 – 40 mm 30 mm
40 – 60 mm: 45 mm
➤ Coloque la junta con el lado autoadhesivo sobre la unidad de salida de aire.
➤ Utilice los 4 tornillos suministrados para fijar el bastidor de montaje (3) a la parte
inferior del aire acondicionado de techo.
92
Page 97

ES
FreshJet Montaje
Véase la fig. d
¡AVISO! ¡Peligro de daños materiales!
¡Tenga en cuenta el par de apriete indicado!
A
➤ Apriete los tornillos con una llave dinamométrica y con un par de apriete de
2,5 Nm.
8.8 Montaje de la unidad de salida de aire ADB
Véase la fig. e
➤ Monte el filtro de fijación en el orden correspondiente.
Véase la fig. f
➤ Fije de forma magnética la unidad de salida de aire en el bastidor de montaje.
93
Page 98

ES
Solución de averías FreshJet
9 Solución de averías
Avería Causa Solución
El equipo se apaga
constantemente.
No se produce
enfriamiento
El sensor de congelación se ha activado. La temperatura exterior es demasiado
baja o todas las toberas de aire están
cerradas.
El equipo de aire acondicionado de
techo no está en modo “Enfriar”.
La temperatura ambiente es superior a
52 °C.
La temperatura ajustada es mayor que la
temperatura ambiente.
La temperatura ambiente es inferior a
16 °C.
Uno de los sensores de temperatura está
averiado.
El ventilador del evaporador está
dañado.
➤ Ponga el equipo de aire acondi-
cionado de techo en modo
“Enfriar”.
El equipo de aire acondicionado de
techo está concebido para una temperatura ambiente de hasta 52 °C.
➤ Seleccione una temperatura infe-
rior.
➤ El equipo de aire acondicionado
de techo está concebido para
una temperatura ambiente a partir de 16 °C.
➤ Diríjase a un taller autorizado.
Poca potencia de
aire
Entrada de agua en
el vehículo
El ventilador del condensador está
dañado.
La aspiración de aire está atascada. ➤ Quite la hojarasca y otro tipo de
suciedad de las láminas de ventilación del equipo de aire acondicionado de techo.
El ventilador está averiado. ➤ Diríjase a un taller autorizado.
Las aberturas de salida para el agua de
condensación están atascadas.
Las juntas están dañadas. ➤ Diríjase a un taller autorizado.
➤ Límpielas.
94
Page 99

ES
FreshJet Solución de averías
Avería Causa Solución
El equipo de aire
acondicionado de
techo no se
enciende
El equipo de aire
acondicionado de
techo no se apaga
No hay tensión de alimentación (230 V). ➤ Controle la alimentación de ten-
sión.
La tensión es demasiado baja (por debajo
de 200 V).
El transformador de tensión está averiado.
Uno de los sensores de temperatura está
averiado.
La protección eléctrica de la alimentación
de tensión es demasiado escasa.
Uno de los sensores de temperatura está
averiado.
La protección eléctrica de la alimentación
de tensión es demasiado escasa.
➤ Diríjase a un taller autorizado.
➤ Controle la protección eléctrica
de la alimentación de tensión.
➤ Diríjase a un taller autorizado.
➤ Controle la protección eléctrica
de la alimentación de tensión.
95
Page 100

ES
Eliminación de desechos FreshJet
10 Eliminación de desechos
Normas de protección del medio ambiente y gestión adecuada de
residuos
Todas las organizaciones deben adoptar una serie de medidas para identificar, evaluar y controlar la influencia que sus actividades (fabricación, productos, servicios y
demás) ejercen sobre el medio ambiente.
Las medidas a seguir para detectar repercusiones importantes en el medio ambiente
deben tener en cuenta los siguientes factores
• Empleo de materias primas y recursos naturales
• Emisiones atmosféricas
• Derrames de fluidos
• Gestión de residuos y reciclaje
• Contaminación del suelo
Para minimizar las repercusiones en el medio ambiente, el fabricante presenta a continuación una serie de indicaciones que deberán ser tenidas en cuenta por todas
aquellas personas que (por el motivo que sea) interactúen con el aparato durante el
transcurso de su vida útil.
• Todo el material de embalaje debe descartarse (de preferencia reciclándose)
conforme a las normas legales del país donde se realice la gestión de residuos.
• Todos los componentes del producto deben descartarse (de preferencia reci-
clándose) conforme a las normas legales del país donde se realice la gestión de
residuos.
• Para una correcta gestión de residuos, el aparato debe entregarse en un centro
de reciclaje autorizado para asegurarse de que se reutilicen todos los componentes reciclables y que el resto de los materiales se deseche según las normativas.
• Asegúrese durante la instalación de que el habitáculo reciba ventilación sufi-
ciente para evitar la acumulación de aire viciado que podría resultar perjudicial
para la salud del usuario.
• Asegúrese durante el uso y el mantenimiento de que todos los efluentes nocivos
(aceite, grasa y demás) se descarten según las normativas.
• Mantenga el nivel de ruido bajo para reducir la contaminación sonora.
En nuestra página web www.dometic.com encontrará más informaciones acerca de
la correcta desinstalación de nuestros productos.
➤ Deseche el material de embalaje en el contenedor de reciclaje correspondiente.
96
 Loading...