

Original Instruction Manual
Originalbruksanvisning
Original bruksanvisning
Alkuperäinen käyttöohje
Oriģinālā instrukciju rokasgrāmata
Originali naudojimo instrukcija
Algne kasutusjuhend
Оригинальное руководство по эксплуатации
MS-27 U MS-27 C
Important:
Read this instruction manual carefully before putting the brush cutter/string trimmer into operation and strictly observe the safety regulations!
Preserve instruction manual carefully!
Viktigt:
Läs igenom bruksanvisningen noggrant innan du använder röjsågen/grästrimmern och följ säkerhetsanvisningarna noga!
Förvara bruksanvisningen för framtida bruk!
Viktig:
Les denne bruksanvisningen nøye før du tar skogrydderen/gresstrimmeren i bruk og følg sikkerhetsanvisningene nøye!
Ta godt vare på bruksanvisningen!
Tärkeää:
Lue tämä käyttöohje huolellisesti ennen polttomoottorikäyttöisen raivaussahan/siimaleikkurin käyttöönottoa ja noudata tarkoin
turvamääräyksiä.
Säilytä käyttöohje huolellisesti.
Svarīgi:
Pirms krūmgrieža/ zāles trimera ekspluatācijas rūpīgi izlasiet šo lietošanas rokasgrāmatu un pilnībā ievērojiet drošības noteikumus!
Lietošanas rokasgrāmatu rūpīgi glabājiet!
Svarbu:
Prieš pradėdami naudoti krūmapjovę/vielinę žoliapjovę, atidžiai perskaitykite visą naudojimo instrukciją ir griežtai laikykitės saugos taisyklių!
Išsaugokite naudojimo instrukciją, kad galėtumėte ja pasinaudoti ateityje!
Tähtis:
Enne võsalõikuri/murutrimmeri kasutamist lugege hoolikalt käesolevat kasutusjuhendit ja järgige täpselt kõiki ohutuseeskirju!
Hoidke kasutusjuhend alles!
Важно:
Внимательно ознакомьтесь с данным руководством, прежде чем
приступать к эк
сплу
атации бензокосы, и строго соблюдайте правила
техники безопасности!
Бережно храните данное руководство!

2
Thank you for purchasing this DOLMAR brush cutter/string trimmer. DOLMAR
brush cutters/string trimmers are developed as a product of our many years of
knowledge, experience, and a detailed development programme.
Please read this booklet thoroughly to ensure you gain the best possible
performance and outstanding results that your DOLMAR brush cutter/string
trimmer can provide.
You need to note the following symbols when reading the instructions manual.
Symbols
Read instruction Manual
Wear eye and ear protection
(for string trimmer only)
Take Particular care and Attention
Wear protective helmet, eye and ear protection
(for brush cutter only)
Forbidden
Do not use metal blades
(for string trimmer only)
Keep your distance Maximum permissible tool speed
Flying object hazard Hot surfaces - Burns to fingers or hands
No Smoking Fuel and oil mixture
No open flames Engine-Manual start
Protective gloves must be worn Emergency stop
Kickback First Aid
Keep the area of operation clear of all
persons and animals
ON/START
Wear sturdy boots with nonslip soles. Steeltoed safety boots are recommended.
OFF/STOP
START
Table of Contents Page
Symbols ........................................................................ 2
Safety instructions......................................................... 3
Technical data............................................................... 7
Names of parts.............................................................. 8
Mounting the handle ..................................................... 9
Mounting the protector ................................................10
Mounting the cutter blade/nylon cutting head ............. 11
Fuel/Refuelling ............................................................ 12
Correct handling.......................................................... 13
Important operating points/stopping the cutter/
trimmer........................................................................ 13
Resharpening the cutting tool ..................................... 15
Servicing instructions .................................................. 17
Storage ....................................................................... 19
English

3
General Instructions
– To ensure correct operation, make sure that you read and fully understand this
instruction manual to familiarise yourself with how to use the brush cutter/
string trimmer. Using this equipment without understanding how to operate it
correctly may result in serious injury to yourself or others.
– Only lend the brush cutter/string trimmer to people who have proved
experienced with brush cutter/string trimmers. Always lend them this
instruction manual at the same time.
– If this is your first time using an engine powered cutter, consult your dealer for
basic instructions.
– Children and young persons aged under 18 years must not be allowed to
operate the brush cutter/string trimmer. Persons over the age of 16 years may
use the device for training purposes, only whilst under supervision of a
qualified trainer.
– Use brush cutter/string trimmers with the utmost care and attention.
– Only operate the brush cutter/string trimmer if you are in good physical
condition. Perform all work calmly and carefully. Users must accept
responsibility for those around them.
– Never use the brush cutter/string trimmer after consumption of alcohol or
medicines, or if you are feeling tired or ill.
WARNING: This machine produces an electromagnetic field during operation.
This field may under some circumstances interfere with active or passive
medical implants. To reduce the risk of serious or fatal injury, we recommend
persons with medical implants to consult their physician and the medical implant
manufacturer before operating this machine.
Intended use of the equipment
– The brush cutter/string trimmer is only intended for cutting grass, weeds, bush
and other such undergrowth, and should not be used for any other purpose
such as edging or hedge cutting as this may cause injury.
Personal protective equipment
– Always wear clothing that is both functional and appropriate to your work, i.e.
tight-fitting, but not so tight as to cause uncomfortable movement. Do not wear
either jewelry or clothing which could become entangled with bushes or
shrubs.
– In order to avoid head, eye, hand, or foot injuries, as well as to protect your
hearing during operation, the following protective equipment and protective
clothing must be used while using the brush cutter/string trimmer.
– Always wear a helmet where there is a risk of falling objects. The protective
helmet (1) is to be checked at regular intervals for damage and is to be
replaced at the latest after 5 years. Use only approved protective helmets.
– The visor (2) of the helmet (or alternatively goggles) protects the face from
flying debris and stones. During operation of the brush cutter/string trimmer,
always wear goggles or a visor to prevent eye injuries.
– Wear adequate noise protection equipment to avoid hearing impairment (ear
muffs (3), ear plugs etc.).
– Work overalls (4) protect against flying stones and debris.
We strongly recommend that you wear work overalls.
– Special gloves (5) made of thick leather are part of the prescribed equipment
and must always be worn during operation of the brush cutter/string trimmer.
– When using the brush cutter/string trimmer, always wear sturdy shoes (6) with
a non-slip sole. Such shoes protect against injuries and ensure good footing.
Residual risks
– Even when the machine is used as prescribed it is not possible to eliminate all
residual risk factors. The following hazards may arise in connection with the
machine’s construction and design:
1. Damage to lungs if an effective dust mask is not worn.
2. Damage to hearing if effective hearing protection is not worn.
3. Damages to health resulting from vibration emission if the machine is being
used over longer period of time or not adequately managed and properly
maintained.
Starting the brush cutter
– Make sure that there are no children or other people within a working range of
15 meters (50ft), also pay attention to any animals in the working vicinity.
– Before use, always check that the brush cutter/string trimmer is safe for
operation:
Check that the cutting tool is secure, that the control lever can be operated
easily, and that the control lever lock is functioning correctly.
– Rotation of the cutting tool during idling is prohibited. Check with your dealer if
you think the equipment may need adjusting. Check to make sure that the
handles are clean and dry, and that the start/stop switch is functioning
correctly.
Safety instructions
Diagram
15 meters
(1)
(3)
(2)
(4)
(5)
(6)
4
– Start the brush cutter/string trimmer only in accordance with the instructions.
Do not use any other methods to start the engine!
– Only use the brush cutter/string trimmer and tools for the specified purposes.
– Only start the brush cutter/string trimmer engine after the equipment is fully
assembled. Do not operate the equipment until all of the appropriate
accessories are attached!
– Before starting, make sure that the cutting tool is not in contact with hard objects
such as branches, stones etc. as the cutting tool will rotate when starting.
– Switch off the engine immediately if any type of engine problem occurs.
– Should the cutting tool hit stones or other hard objects, immediately switch off
the engine and inspect the cutting tool.
– Inspect the cutting tool at short regular intervals for damage (inspect for
hairline cracks using the tapping test).
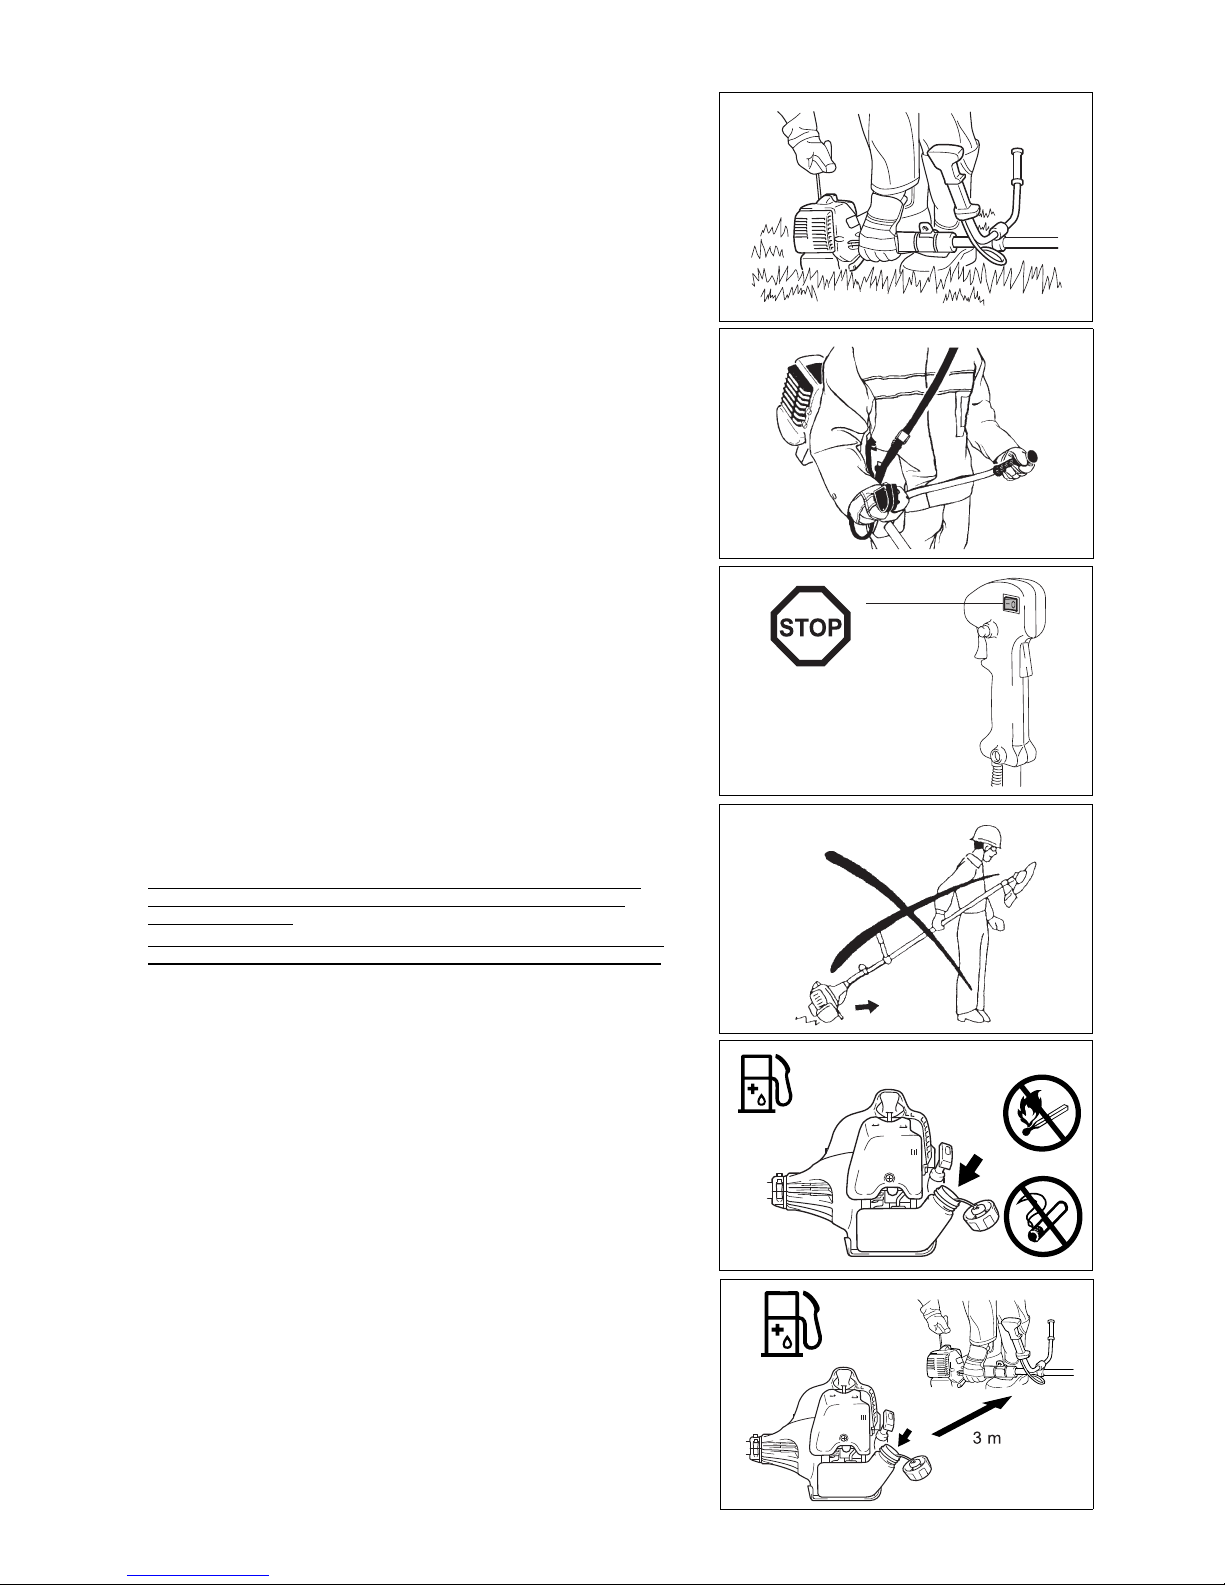
– Only operate the brush cutter/string trimmer after attaching and adjusting the
shoulder strap to the correct length. The shoulder strap must be adjusted to
the user’s size and fastened to prevent fatigue during operation of the
equipment. Never hold the cutter with one hand during operation.
– During operation, always hold the brush cutter/string trimmer with both hands.
Always ensure you are on safe footing.
– Operate the brush cutter/string trimmer in such a manner as to avoid
inhalation of the exhaust gases. Never run the engine in an enclosed space
such as inside a room (risk of gas poisoning). Carbon monoxide is an odorless
gas.
– Always switch off the engine when resting, or if you intend to leave the brush
cutter/string trimmer unattended, and place it in a safe location to prevent
injury to other people and damage to the equipment.
– Never put the hot brush cutter/string trimmer onto dry grass or onto any other
combustible materials.
– The cutting tool must always be equipped with the appropriate guard.
Never run the cutter without this guard!
– All protective installations and guards supplied with the equipment must be
used during operation.
– Never operate the engine if the exhaust muffler is faulty.
– Shut off the engine during transport.
– When transporting the equipment, always attach the cover to the cutting
blade.
– Ensure the brush cutter/string trimmer is positioned safely during transport to
avoid fuel leakage.
– When transporting the brush cutter/string trimmer, ensure the fuel tank is
completely empty.
– When unloading the brush cutter/string trimmer from a truck or other such
vehicle, never drop the engine to the ground, as doing so may severely
damage the fuel tank.
– Unless in an emergency, never drop or cast the brush cutter/string trimmer to
the ground as doing so may severely damage the brush cutter/string trimmer.
– Always lift the entire equipment from the ground when moving it. Dragging the
equipment on its fuel tank is extremely dangerous and may cause fuel to leak,
which may cause fire.
– If the equipment gets heavy impact or fall, check the condition before
continuing work. Check the fuel system for fuel leakage and the controls and
safety devices for malfunction. If there is any damage or doubt, ask our
authorized service center for the inspection and repair.
Refuelling
– Shut off the engine during refuelling, keep away from open flames and do not
smoke during refuelling.
– Ensure mineral oil products do not come into contact with skin. Do not inhale
the fuel vapor. Always wear protective gloves during refuelling. Change and
clean protective clothing at regular intervals.
– To prevent soil contamination (environmental protection), make sure you do
not spill fuel or oil on the ground. If you do spill fuel, clean the brush cutter/
string trimmer immediately.
– Make sure fuel does not come into contact with your clothing. If fuel does
come into contact with your clothing, change your clothing immediately to
prevent fire.
– Inspect the fuel cap at regular intervals to make sure that it can be securely
fastened and does not leak.
– Carefully tighten the fuel tank cap. Once refuelling is complete, move to a
location at least 3 meters away from where you refuelled before starting the
engine.
– Never refuel in an enclosed space such as inside a room. Doing so may cause
an explosion due to the accumulation of fuel vapor at ground level.
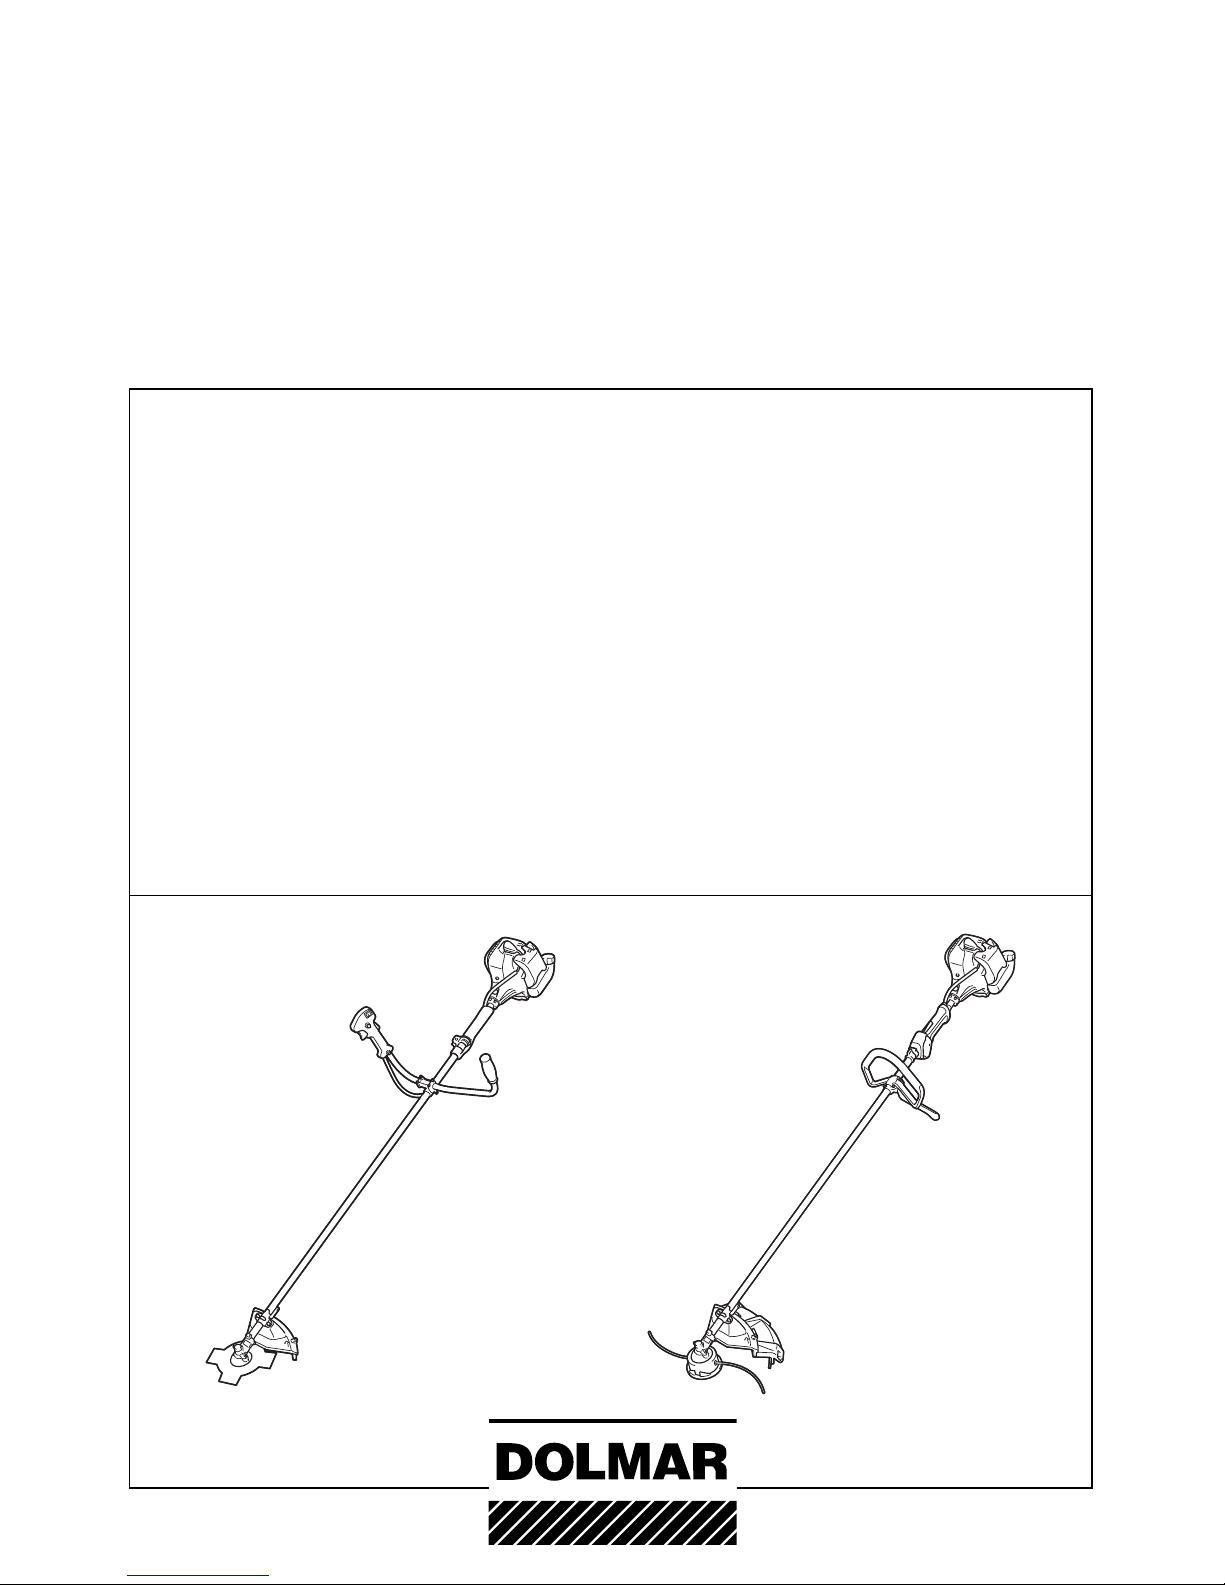
• Resting
• Transport
• Refuelling
• Maintenance
• Tool Replacement
5
– Only transport and store fuel in approved containers. Make sure stored fuel is
not accessible to children.
Method of operation
– Only use the brush cutter/string trimmer in good light and visibility. During the
winter season, beware of slippery or wet areas such as icy or snow-covered
areas (risk of slipping). Always ensure you are on safe footing.
– Never cut above waist height.
– Never stand on a ladder while using the brush cutter/string trimmer.
– Never climb up into trees to use with the brush cutter/string trimmer.
– Never work on unstable surfaces.
– Remove sand, stones, nails etc. found within the working range.
Foreign objects may damage the cutting tool and can cause dangerous kick-
backs.
– Before starting to cut, make sure the cutting tool has reached full working
speed.
– If grass or branches get caught between the cutting tool and guard, always
stop the engine before cleaning. Otherwise unintentional blade rotation may
cause serious injury.
– Take a rest to prevent loss of control caused by fatigue. We recommend to
take a 10 to 20-minute rest every hour.
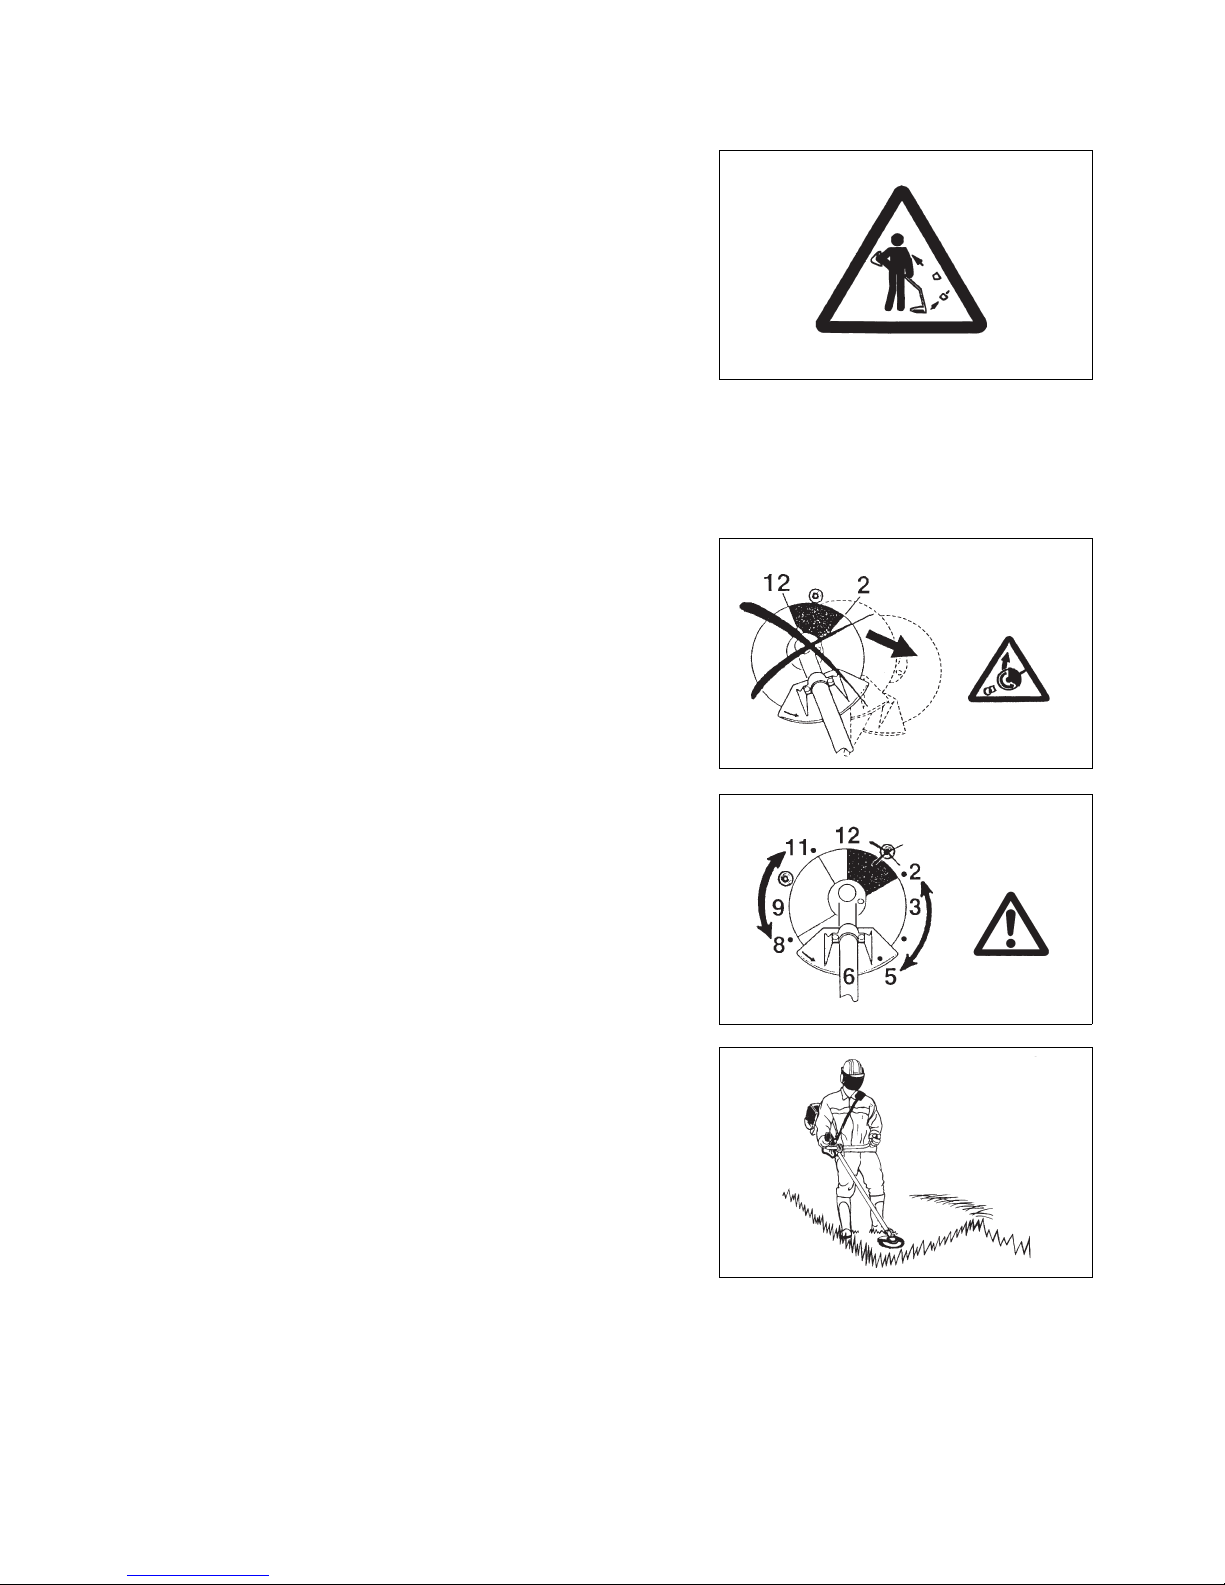
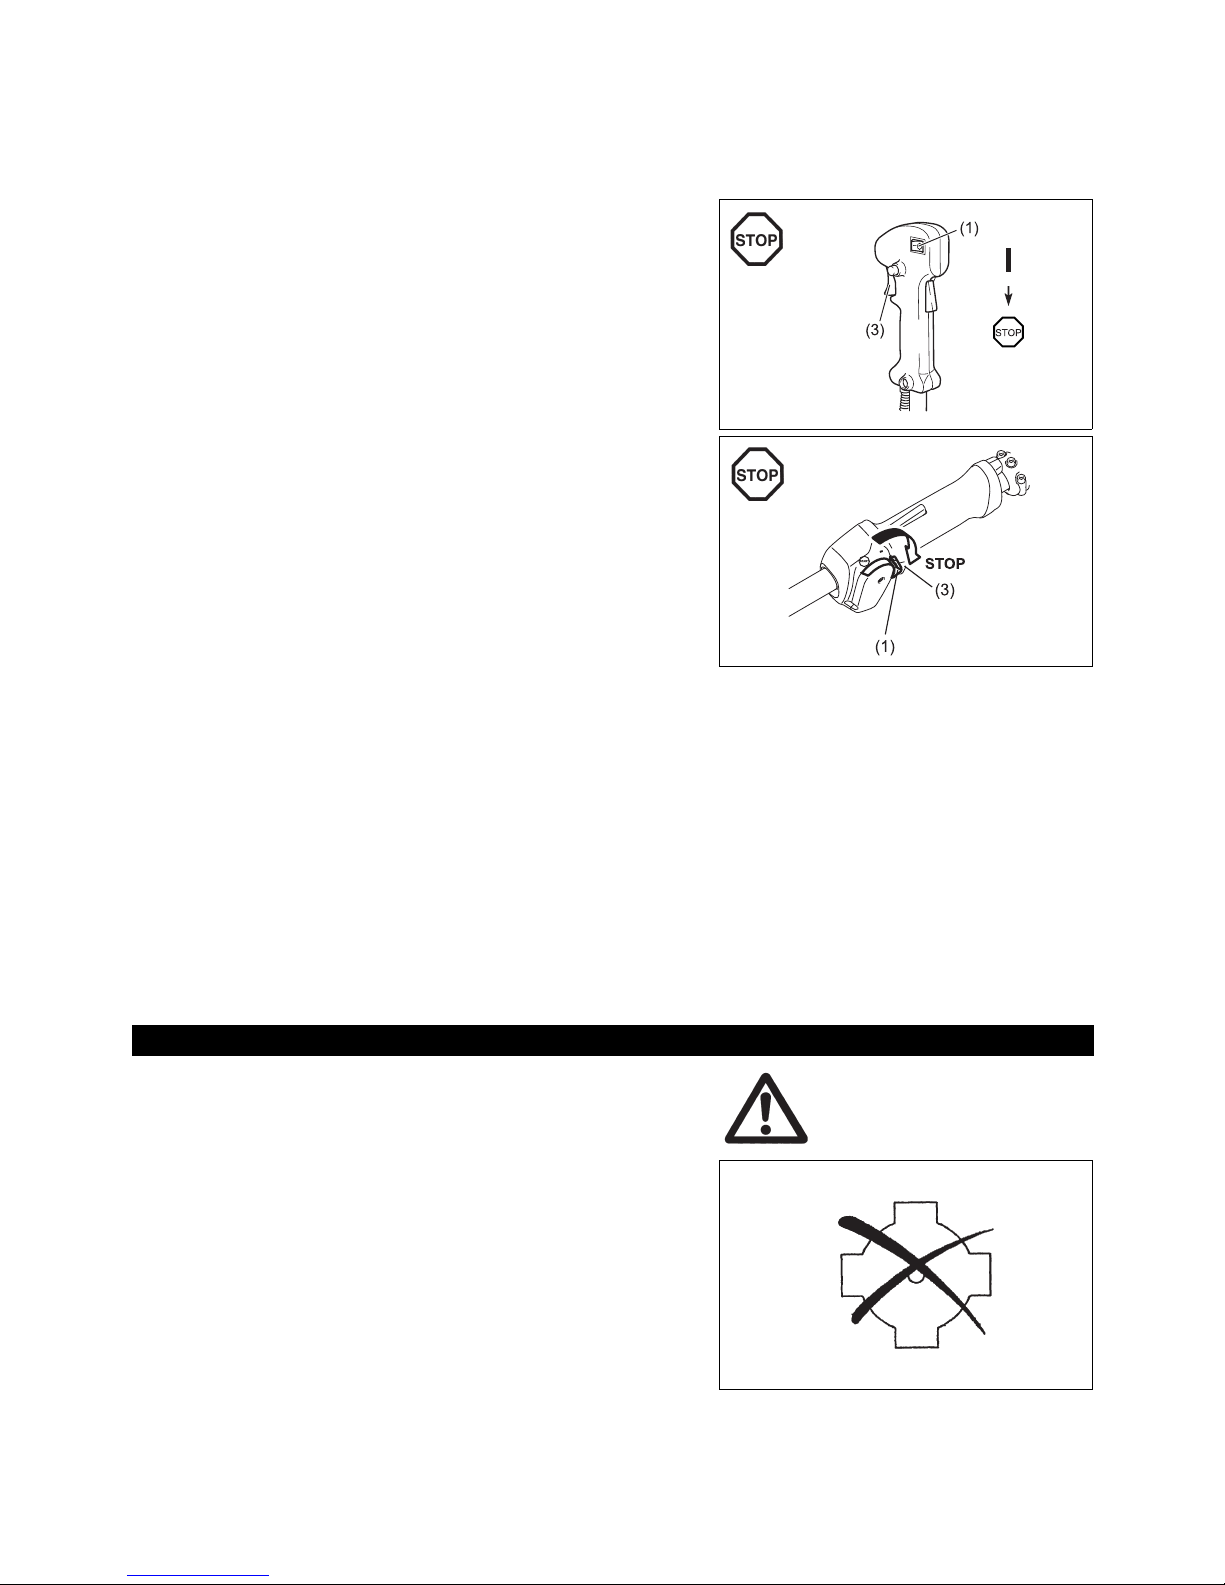
Kickback (blade thrust)
– When operating the brush cutter, uncontrolled kickbacks may occur.
– Kickbacks occur frequently when attempting to cut with the 12 to 2 o’clock
section of the blade.
– Never apply the 12 to 2 o’clock section of the brush cutter blade.
– Never apply this section of the brush cutter blade to solid objects, such as
bushes or trees etc. that have a diameter greater than 3 cm. Doing so will
cause the brush cutter to deflect with a large amount of force, which is
extremely dangerous and may cause injury.
Kickback prevention
To avoid kickbacks, remember the following:
– Using the 12 to 2 o’clock section of the blade is extremely hazardous,
especially when using metal cutting tools.
– Cutting operations using the 11 to 12 o’clock section and 2 to 5 o’clock section
of the blade must only be performed by trained and experienced operators,
and then only at their own risk.
The optimum cutting section for easy cutting with almost no kickback is
between the 8 to 11 o’clock section of the blade.
Cutting Tools
– Use an applicable cutting tool for the job in hand.
Nylon cutting heads (string trimmer heads) are suitable for trimming lawn
grass.
Metal blades are suitable for cutting weeds, high grasses, bushes, shrubs,
underwood, thicket, and the like.
Never use other blades including metal multi-piece pivoting chains and flail
blades. Otherwise serious injury may result.
– When using metal blades, avoid “kickback” and always prepare for an
accidental kickback. See the section “Kickback” and “Kickback prevention”.
Maintenance instructions
– Have your equipment serviced by our authorized service center, always using
only genuine replacement parts. Incorrect repair and poor maintenance can
shorten the life of the equipment and increase the risk of accidents.
– Always check the condition of the cutter, in particular the cutter protective
devices and shoulder strap, before commencing work. Particular attention
should also be paid to the cutting blades, which must be correctly sharpened.
– Turn off the engine and remove the spark plug connector when replacing or
sharpening cutting tools, and also when cleaning the cutter or cutting tool.
Caution:
Kickback
Diagram
Diagram

6
Never straighten or weld damaged cutting tools.
– Operate the brush cutter/string trimmer with as little noise and contamination
as possible. In particular, check that the carburetor is set correctly.
– Clean the brush cutter/string trimmer at regular intervals and check that all
screws and nuts are well tightened.
– Never service or store the brush cutter/string trimmer in the vicinity of naked
flames.
– Always store the brush cutter/string trimmer in locked rooms and with an
emptied fuel tank.
– When cleaning, servicing and storing the equipment, always attach the cover
to the cutting blade.
Observe the relevant accident prevention instructions issued by the relevant
trade associations and insurance companies.
Do not perform any modifications on the brush cutter/string trimmer, as doing so
will endanger your safety.
The performance of maintenance or repair work by the user is limited to those
activities described in the instruction manual. All other work is to be done by an
Authorized Service Agent. Use only genuine spare parts and accessories
released and supplied by DOLMAR.
Using non-approved accessories and tools will cause an increased risk of
accidents.
DOLMAR will not accept any liability for accidents or damage caused by the use
of non-approved cutting tools, fixing devices of cutting tools, or accessories.
First Aid
In case of accident, make sure that a first-aid box is available in the vicinity of the
cutting operations. Immediately replace any item taken from the first aid box.
When asking for help, please give the following information:
– Place of the accident
– What happened
– Number of injured persons
– Kind of injuries
– Your name
Vibration
– People with poor circulation who are exposed to excessive vibration may
experience injury to blood vessels or the nervous system. Vibration may
cause the following symptoms to occur in the fingers, hands or wrists: “Falling
asleep” (numbness), tingling, pain, stabbing sensation, alteration of skin color
or of the skin. If any of these symptoms occur, see a physician!
– To reduce the risk of “white finger disease”, keep your hands warm during
operation and well maintain the equipment and accessories.
For European countries only
EC Declaration of Conformity
The undersigned, Tamiro Kishima and Rainer Bergfeld, as authorized by Dolmar GmbH, declare that the DOLMAR machine(s):
Designation of Machine: Brush Cutter/String Trimmer
Model No./ Type: MS-27 U, MS-27 C
Specifications: see “TECHNICAL DATA” table
are of series production and
Conforms to the following European Directives:
2000/14/EC, 2006/42/EC, 2004/108/EC
And are manufactured in accordance with the following standards or standardized documents:
EN ISO 11806-1, EN ISO 14982
The technical documentation is on file at:
Dolmar GmbH,
Jenfelder Straße 38, Abteilung FZ, D-22045 Hamburg
The conformity assessment procedure required by Directive 2000/14/EC was in Accordance with annex V.
Measured Sound Power Level (as a grass trimmer): 109.77 dB
Measured Sound Power Level (as a brush cutter): 107.29 dB
Guaranteed Sound Power Level: 112 dB
15. 4. 2013
Tamiro Kishima
Managing Director
Rainer Bergfeld
Managing Director

7
Technical data
Model
MS-27 U MS-27 C
U handle Loop handle
Dimensions: length x width x height (without cutting blade) 1,770 x 610 x 410 mm 1,770 x 330 x 185 mm
Net Weight 5 kg 5 kg
Engine displacement
25.7 cm
3
Maximum engine performance 0.83 kW
Maximum rotational frequency of the spindle
8,800 min
-1
Cutting attachment
Single piece metal blade φ230 mm
String trimmer head φ430 mm
Idling speed 3,000/min
Clutch engagement speed 4,100/min
Gear ratio 14/19
Fuel
Mixed gas
Gasoline: Two-stroke Engine Oil = 50:1
Volume (fuel tank) 0.6 L
Carburetor WALBRO WYC
Spark plug NGK BPMR7A
Electrode gap 0.6 - 0.7 mm
Vibration: (For brush cutter)
Left handle (Front grip)
14.680 m/s
2
K = 1.5 m/s
2
5.152 m/s2 K = 1.5 m/s
2
Right handle (Rear grip)
9.037 m/s
2
K = 1.5 m/s
2
9.677 m/s2 K = 1.5 m/s
2
Vibration: (For grass trimmer)
Left handle (Front grip)
7.961 m/s
2
K = 1.5 m/s
2
8.83 m/s2 K = 1.5 m/s
2
Right handle (Front grip)
7.019 m/s
2
K = 1.5 m/s
2
14.381 m/s2 K = 1.5 m/s
2
Noise (tested according to 2000/14/EC & 2005/88/EC):
Sound pressure level at the operator’s position (Grass trimmer): 98.52 dB (A) K = 2.5 dB (A)
Sound pressure level at the operator’s position (Brush cutter): 96.15 dB (A) K = 2.5 dB (A)
Measured sound power level (Grass trimmer): 109.77 dB (A) K =2.5 dB (A)
Measured sound power level (Brush cutter): 107.29 dB (A) K = 2.5 dB (A)
Noise (tested according to 2000/14/EC & 2005/88/EC): guaranteed
sound power values
112 dB (A)

8
Names of parts
Names of parts
1 Fuel Tank
2 Rewind Starter
3 Air Cleaner
4 I-Stop Switch (on/off)/Start-Stop Switch
5Spark Plug
6 Exhaust Muffler
7Clutch Case
8 Rear Grip
9 Hanger
10 Handle
11 Control Lever
12 Control Cable
13 Shaft
14 Protector (Cutting tool guard)
15 Gear Case
16 Handle Holder
17 Cutter Blade
18 Nylon Cutting Head
19 Fuel Filler Cap
20 Starter Knob
21 Primer Pump
22 Choke Lever
MS-27 U
U Handle Type
MS-27 C
Loop Handle Type
(3)
(7)
(21)
(1)
(19)
9
CAUTION: Before doing any work on the brush cutter, always stop the engine
and disconnect the spark plug connector from the spark plug.
Always wear protective gloves!
CAUTION: Ensure you have reassembled the brush cutter completely before
starting it.
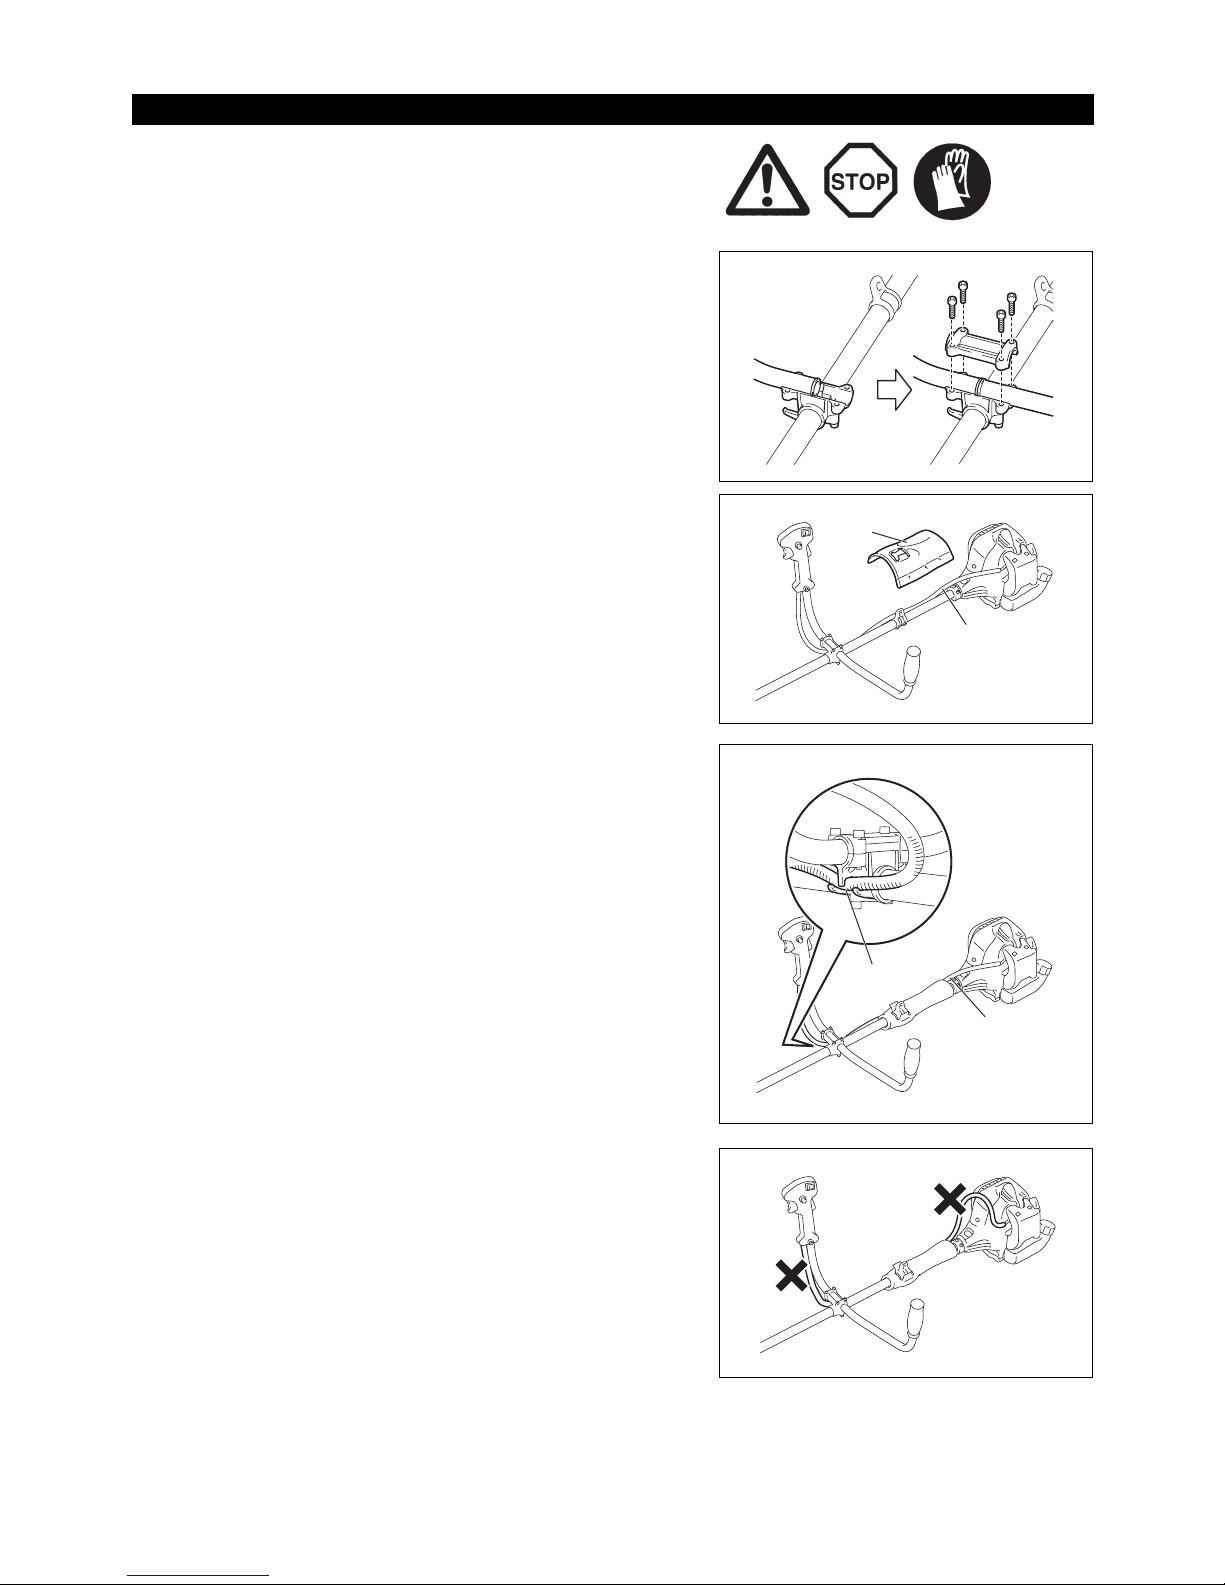
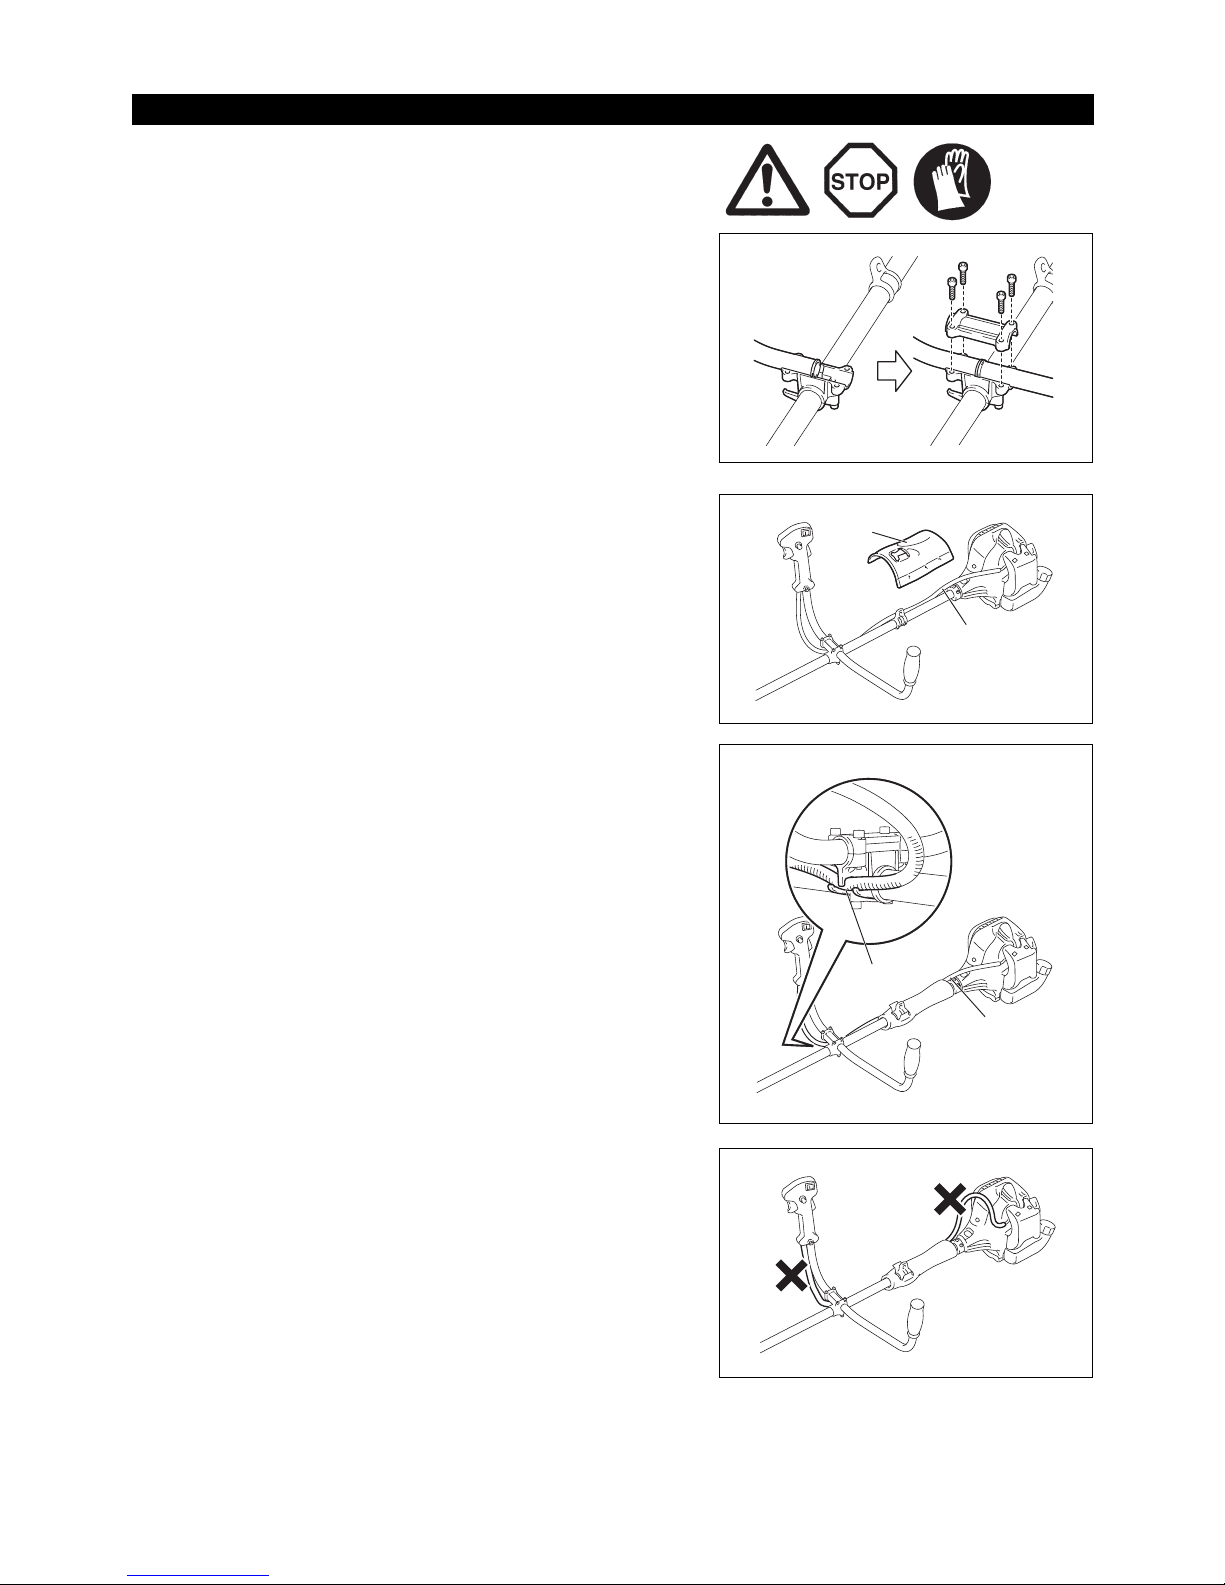
For U handle models
– Place the two handles onto the handle holder. The control lever must come
right side when you look towards the cutting tool.
– Fit the handle ends to the groove on the handle holder and fit the clamp on
them. Loosely tighten them with four bolts for adjustment.
– Adjust handles’ angle, and then tighten all bolts evenly by a hex wrench.
– Place the throttle cable (1) to the control lever side of the shaft. And then wrap
them with the waist pad (2).
– Insert the throttle cable (1) into the clamping slot (3) of the handle holder.
– Make sure the throttle cable is positioned as shown.
– Operate the control lever and make sure it moves smoothly.
CAUTION: Do not position the throttle cable as shown. Otherwise curved cable
may cause high idle speed, and uncontrollable blade may cause
personal injury.
Mounting the handle
MS-27 U
L
R
(1)
MS-27 U
(2)
MS-27 U
(3)
(1)
MS-27 U
10
For loop handle model
– Put the thread (1) on handle holder into the location hole (2) on tube.
– Fix the assistant handle (3) onto the barrier.
– Tighten the 4 bolts (4) M5 x 30.
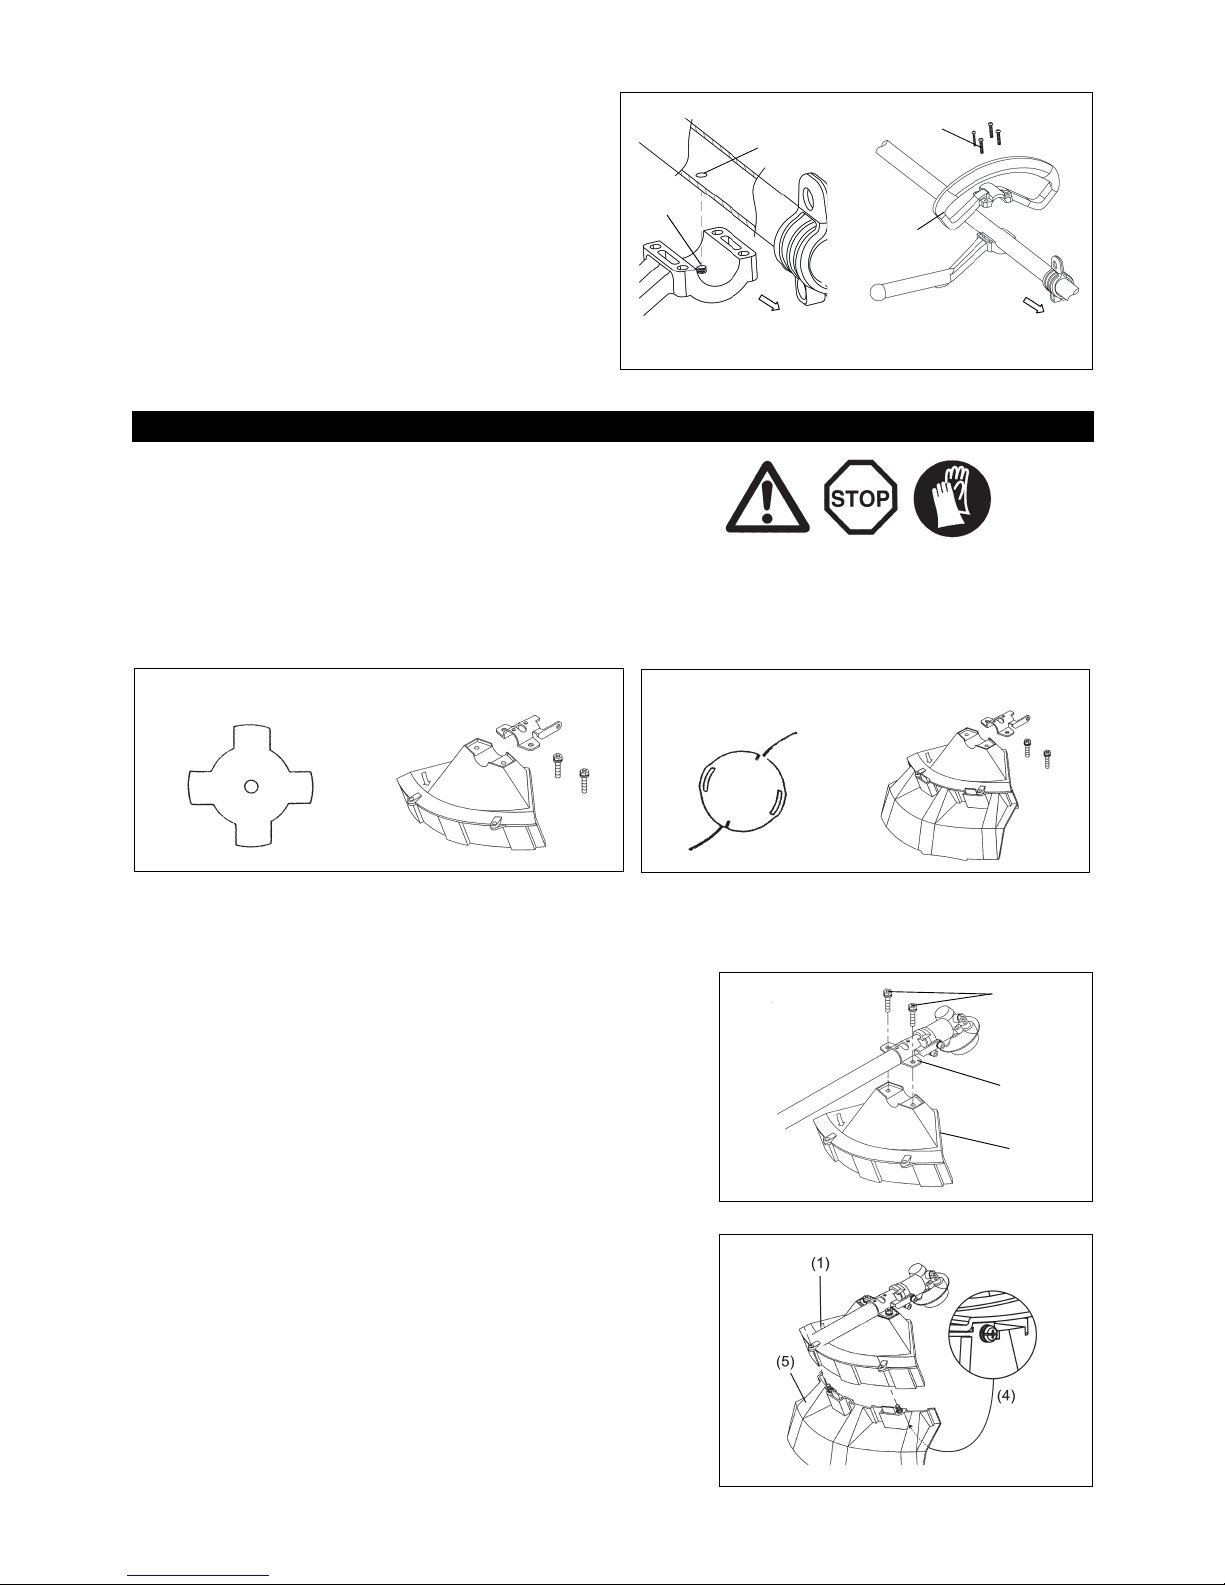
To meet the applicable safety standards, you must only use the tool/protector
combinations indicated in the table.
Always use genuine DOLMAR cutter blades/nylon cutting head.
– The cutter blade must be well polished, and free of cracks or breakages. If the
cutter blade hits against a stone during operation, stop the engine and check
the blade immediately.
– Polish or replace the cutter blade every three hours of operation.
– If the nylon cutting head hits against a stone during operation, stop the engine
and check the nylon cutting head immediately.
CAUTION: The appropriate protectors must always be installed for your own
safety and in order to comply with accident-prevention regulations.
Operation of the equipment without the guard installed is prohibited.
– Fix the protector (1) to the clamp (3) with two M6 x 30 bolts (2).
– When using the nylon cutting head, fit the protector (5) into the protector (1),
and tighten them with two screws (4).
Mounting the protector
(2)
(1)
Engine
(4)
(3)
Engine
MS-27 C
Star Blade Protector for metal blades Nylon cutting head Protector for cord cutter
(2)
(3)
(1)

11
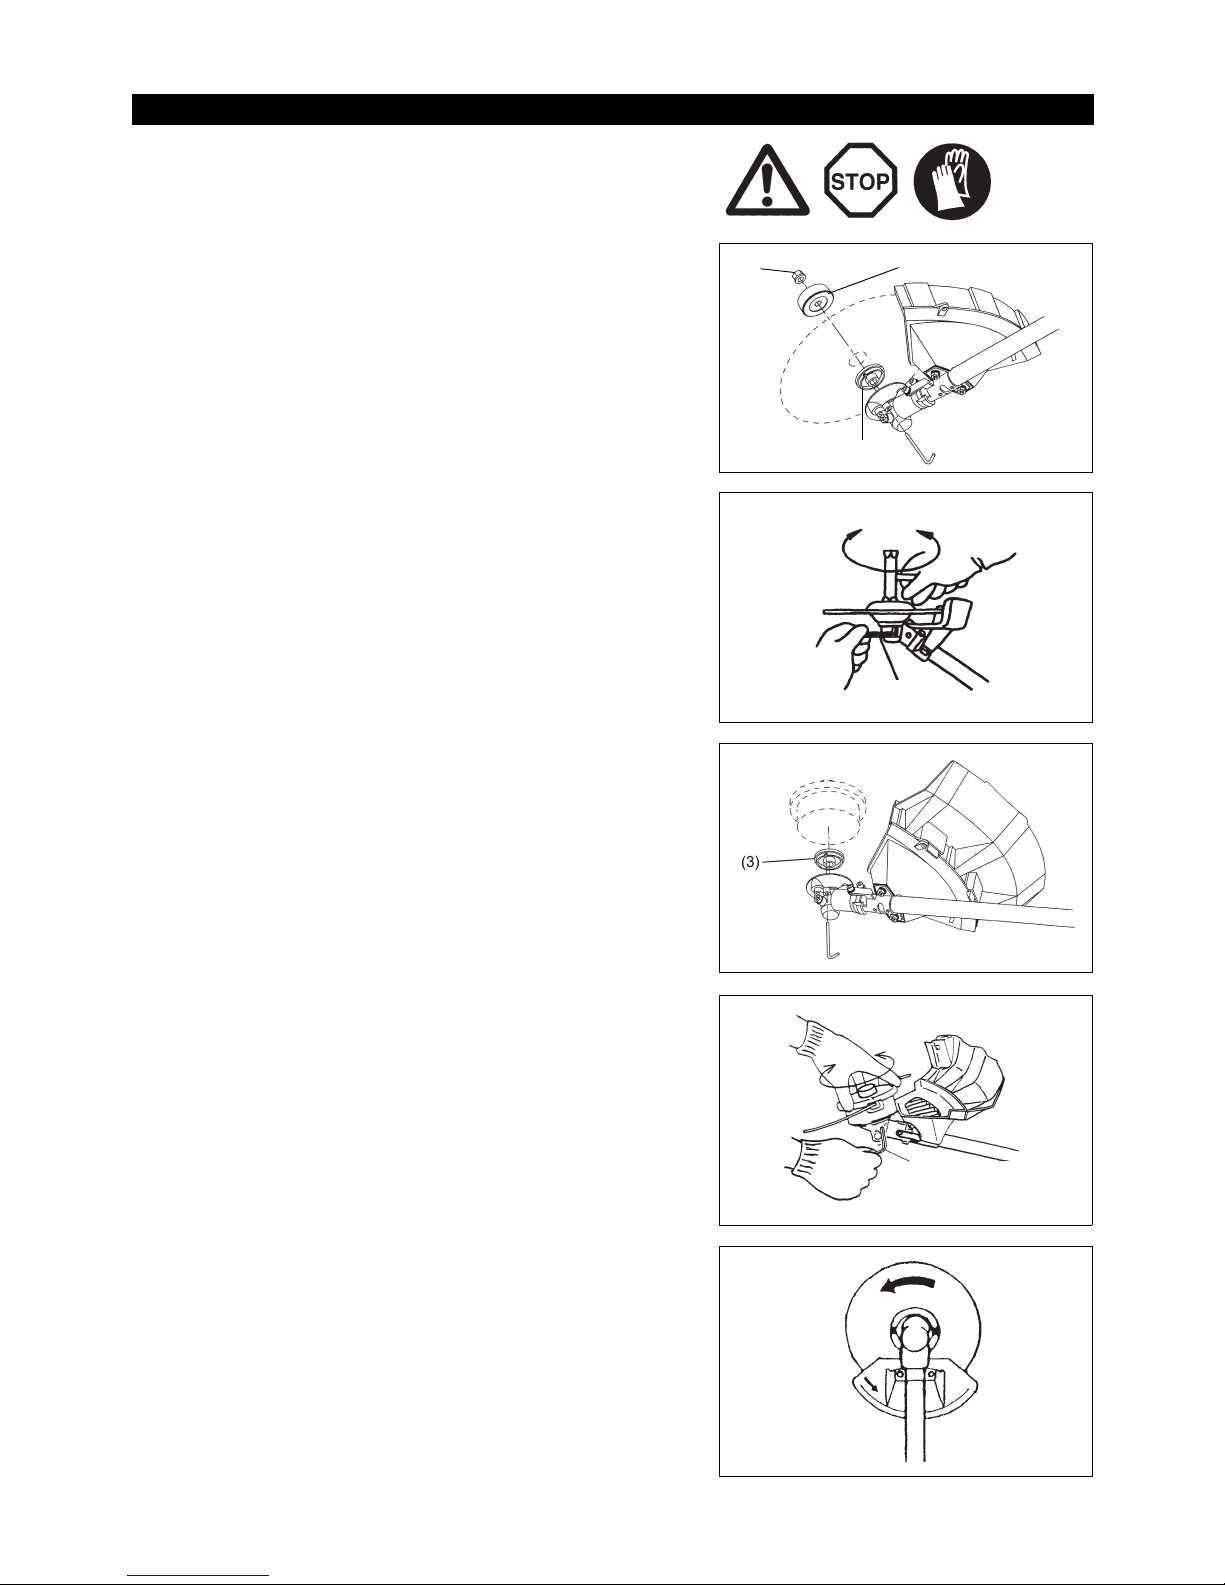
The cutter blade or nylon cutting head can be replaced easily by first turning the
equipment upside down.
– Insert the hex wrench through the hole in the gear case and rotate the receiver
washer (3) until it is locked with the hex wrench.
– Loosen the nut/spring washer (1) (left-hand thread) with the socket wrench,
and remove the nut/spring washer (1) and clamp washer (2).
With the hex wrench still in place
– Mount the cutter blade onto the shaft so that the guide of the receiver washer
(3) fits in the arbor hole in the cutter blade. Install the clamp washer (2) and
secure the cutter blade with the nut/spring washer (1).
[Tightening torque: 13 - 23 N-m]
NOTE: Always wear gloves when handling the cutter blade.
NOTE: The cutter blade-fastening nut (with spring washer) is a consumable
part. If there appears any wear or deformation on the spring washer,
replace the nut.
NOTE: The clamp washer (2), and nut/spring washer (1) are not necessary for
mounting the nylon cutting head. The nylon head should go on top of the
receiver washer (3).
– Screw the nylon cutting head onto the shaft.
– Make sure that the blade rotates counterclockwise.
Mounting the cutter blade/nylon cutting head
(2)
(1)
(3)
Loosen
Hex wrench
Tighten
Loosen
Hex wrench
Tighten
Rotation
12
Handling fuel
Utmost care is required when handling fuel. Fuel may contain substances similar
to solvents. Refuel either in a well ventilated room or outdoors. Do not inhale fuel
vapors, and avoid any contact of fuel or oil with your skin.
Mineral oil products degrease your skin. Prolonged skin contact with these
products will cause your skin to become extremely dry, which may result in
various kinds of skin disease. In addition, allergic reactions may occur.
Eyes can be irritated by contact with oil. If oil comes into your eyes, immediately
wash them with clear water. If your eyes are still irritated, see a doctor
immediately.
Fuel and oil mixture
The brush cutter engine is a high-efficiency two-stroke engine. It runs on a
mixture of fuel and two-stroke engine oil. The engine is designed for unleaded
regular fuel with a min. octane value of 91 RON.
To obtain optimum engine performance and to protect your health and the
environment, use only unleaded fuel!
To lubricate the engine, add two-stroke engine oil (quality grade: JASO FC or
ISO EGD) to the fuel. The engine has been designed to use the specified twostroke engine oil at mixture ratio of 50:1 to protect the environment.
Additionally, long service life accompanied by reliable operation and minimum
emissions are guaranteed through the use of this mixture ratio. Reliable
functioning of the brush cutter cannot be guaranteed unless this mixture ratio of
50:1 (specified 2-stroke engine oil) is strictly observed.
Correct mixture ratio:
Gasoline: Specified two-stroke engine oil = 50 : 1 or
Gasoline: Other manufacturer’s two-stroke engine oil = 25 : 1 recommended
NOTE: To prepare the fuel-oil mixture, first mix the entire oil quantity with half of
the fuel required, then add the remaining fuel. Thoroughly shake the
mixture before pouring it into the brush cutter tank. To ensure safe
operation, do not add more engine oil than the specified amount. Doing
so will only result in a higher production of combustion residues which
pollute the environment and clog the exhaust channel in the cylinder as
well as the muffler. In addition, the fuel consumption will rise and the
performance will decrease.
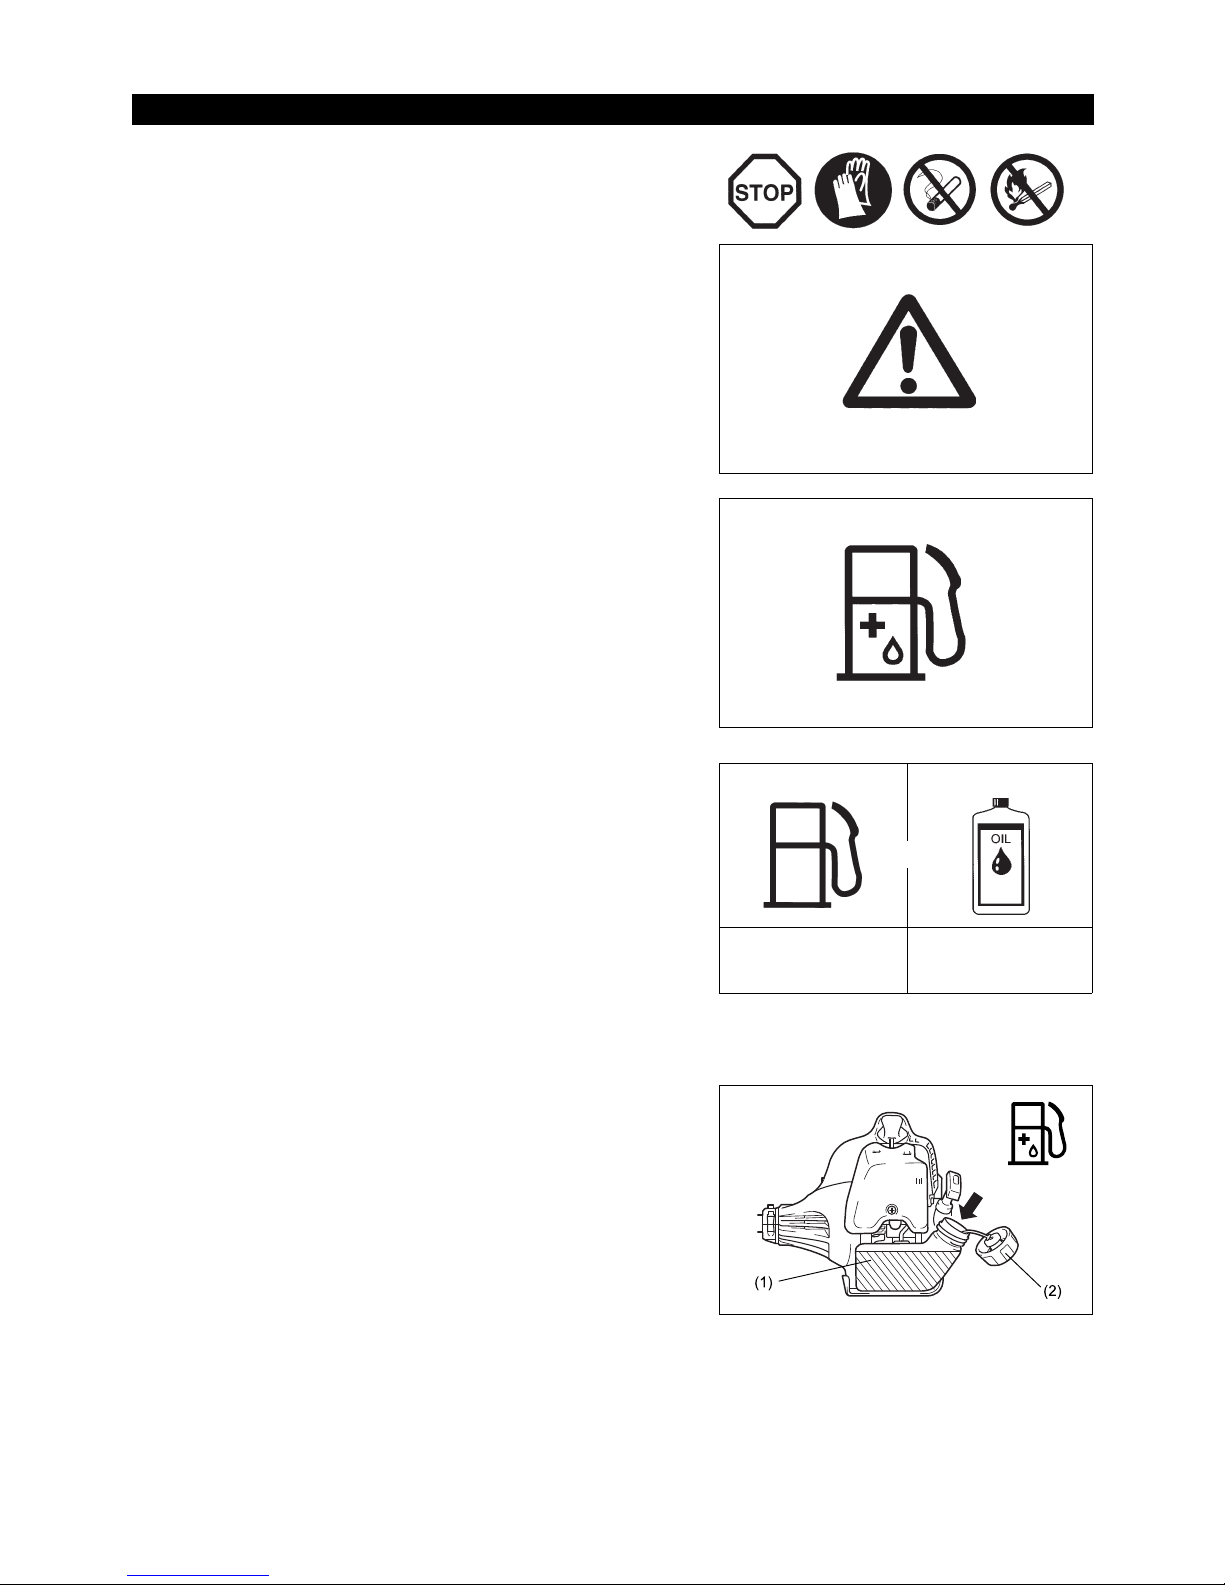
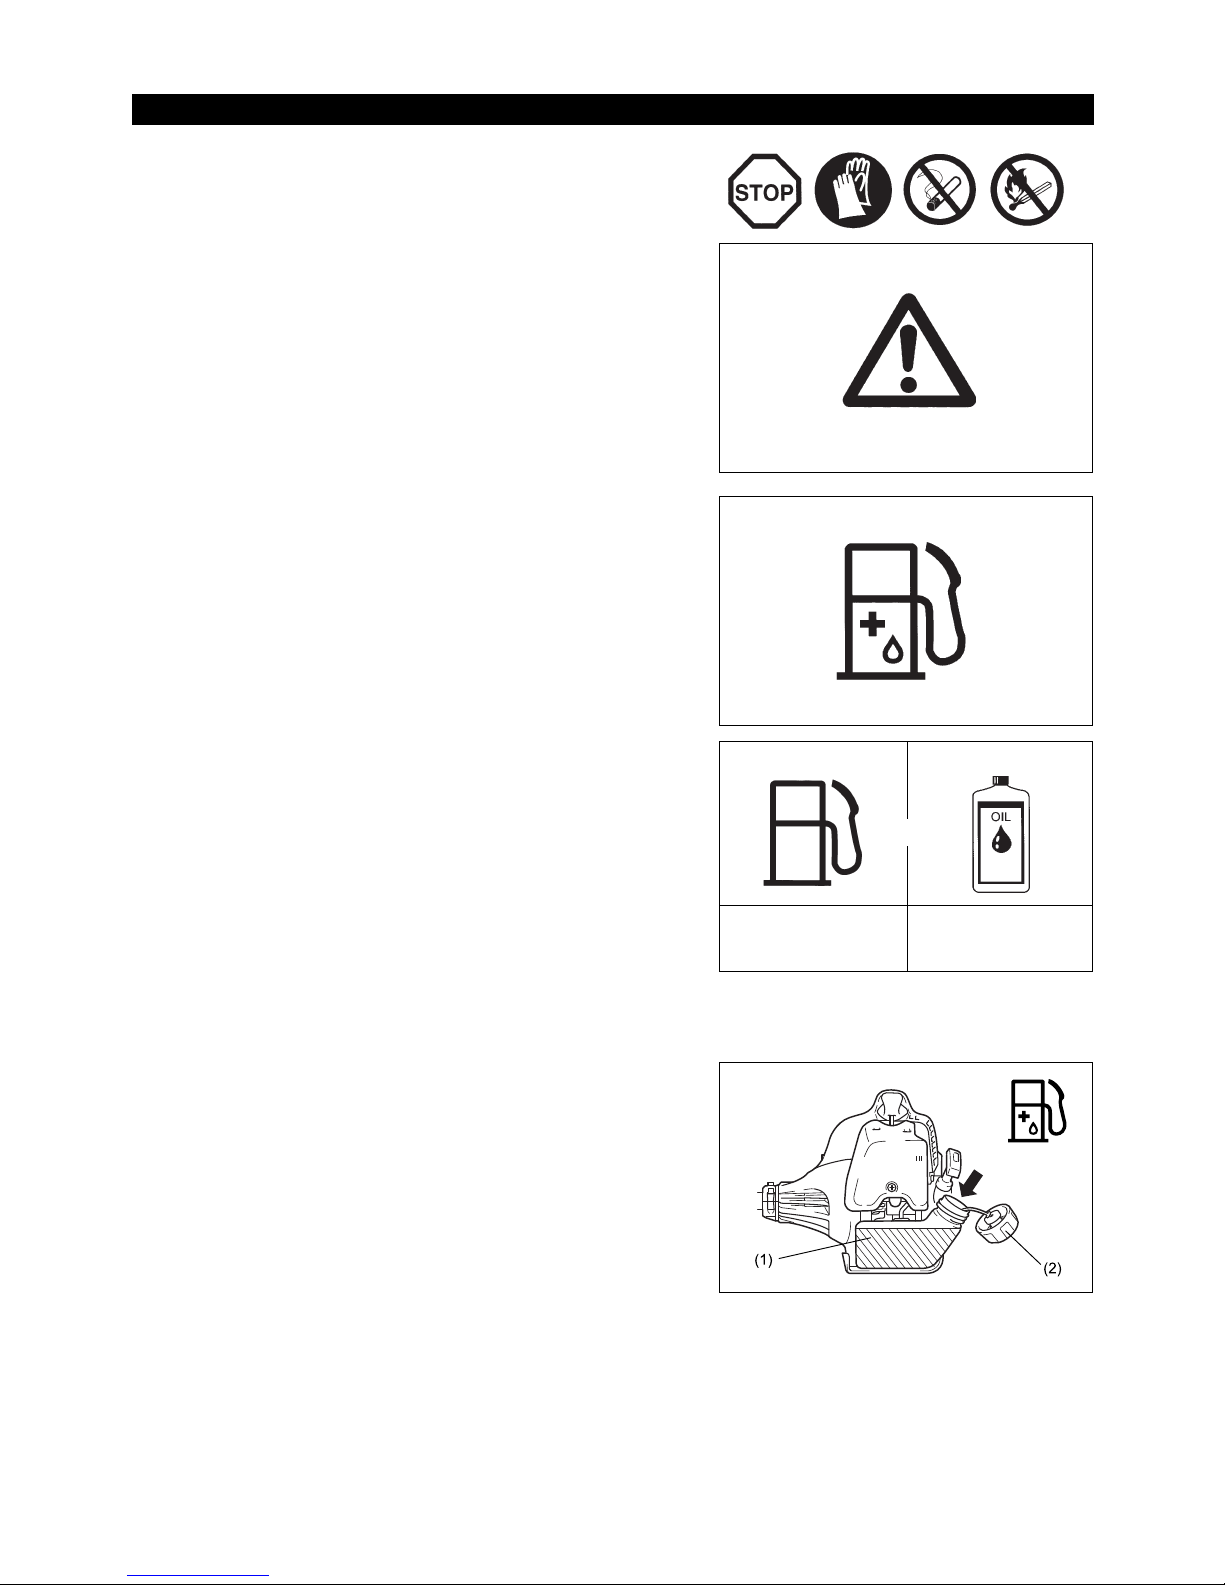
Refuelling
The engine must be switched off.
– Thoroughly clean the area around the fuel filler cap (2) to prevent dirt from
getting into the fuel tank (1).
– Unscrew the fuel filler cap (2) and fill the tank with fuel.
– Tightly screw on the fuel filler cap (2).
– Clean the screw fuel filler cap (2) and tank after refueling.
Storage of Fuel
Fuel cannot be stored for an unlimited period of time.
Purchase only the quantity required for a 4-week operating period. Only use
approved fuel storage containers.
Fuel/Refuelling
Observe the Safety Instructions on page 3.
20 cm3 40 cm
3
100 cm3 200 cm
3
200 cm3 400 cm
3
1,000 cm3 (1 liter)
5,000 cm
3
(5 liter)
10,000 cm
3
(10 liter)
50:1 25:1
Gasoline
+
13
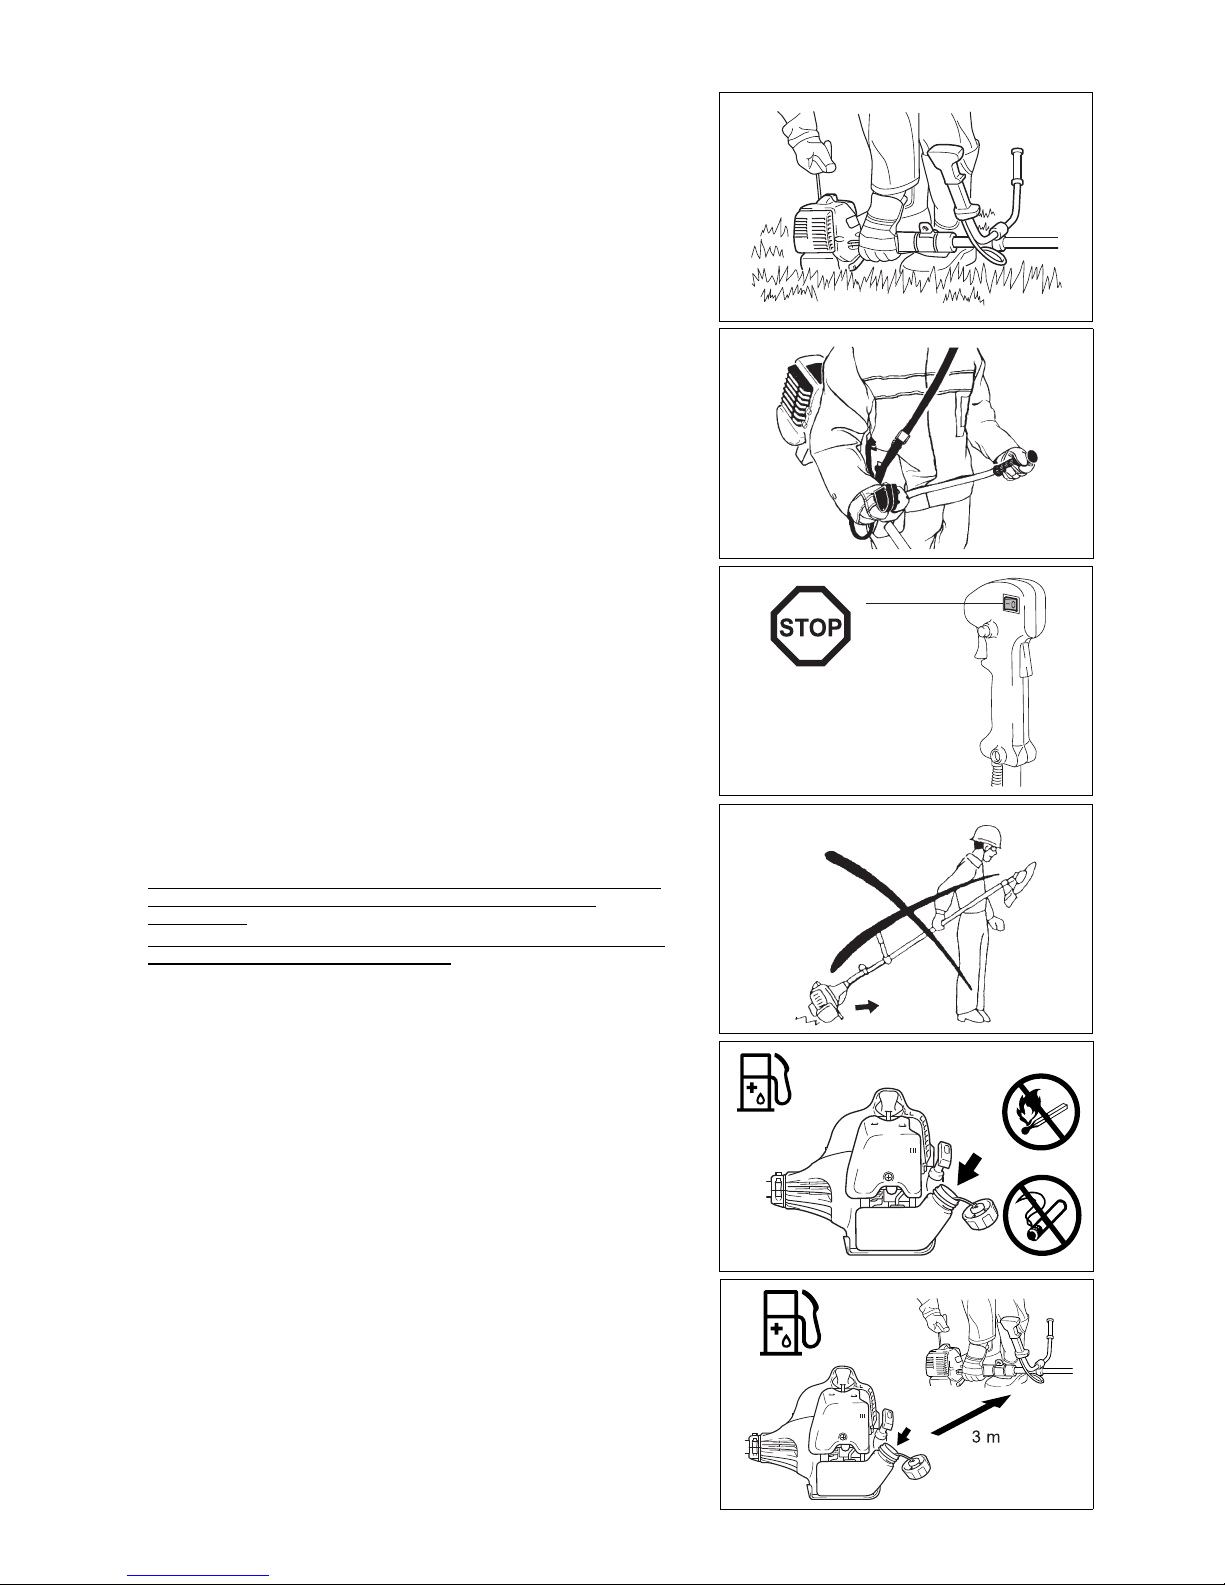
Attachment of shoulder strap
– Adjust the strap length so that the cutter blade is kept parallel with the ground.
Detachment
– In case of emergency, push the notches (1) at both sides, and detach the
equipment.
Be extremely careful to maintain control of the equipment at this time. Do not
allow the equipment to be deflected toward you or anyone in your vicinity.
WARNING: Failure to maintain complete control of the machine at all could
result in serious injury or DEATH.
Note: In some countries, shoulder strap does not have this detachment function.
Observe the applicable accident prevention regulations.
Starting
Move at least 3 m away from the area where you refuelled the equipment. Place the brush cutter on a clean piece of ground taking care that the
cutting tool does not come into contact with the ground or any other objects.
WARNING: Pay attention that the cutting tool rotates immediately after the
engine starts.
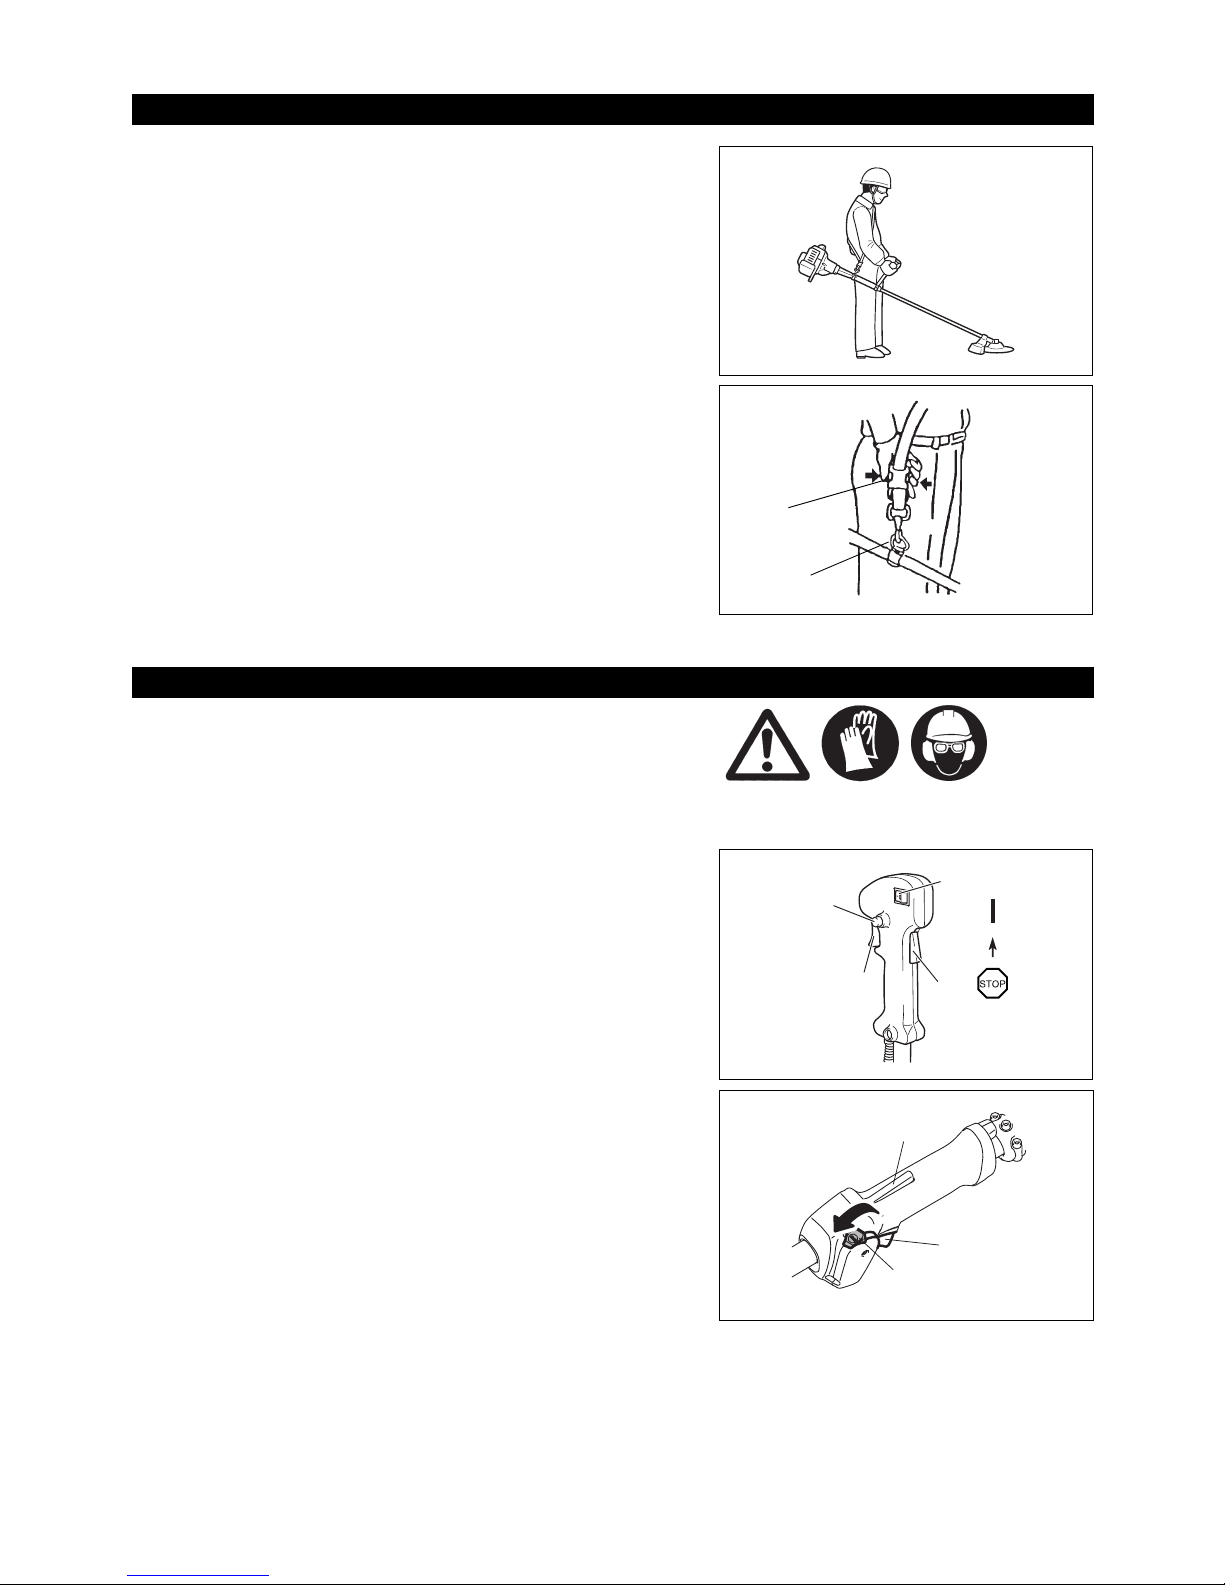
Cold start for U handle models
– Set the I-Stop Switch (on/off) (1) as illustrated.
– Grasp the handle (hand pressure activates the safety lock-off lever (2)).
– Press the throttle lever (3) and hold it down.
– Press the lock button (4) and release the control lever, and then release the
lock button (the lock button holds the throttle lever in the start-up position).
Cold start for loop handle models
– Set the Start-Stop Switch (1) to start position as illustrated.
– Grasp the handle (hand pressure activates the safety lock-off lever (2)).
– Press the throttle lever (3) and hold it down.
– Set the Start-Stop Switch (1) to start position and release the control lever, and
then release the Start-Stop Switch (the Start-Stop Switch holds the throttle
lever in the start-up position).
Correct handling
Important operating points/stopping the cutter/trimmer
Hanger
(1)
MS-27 U
(1)
(4)
(2)
(3)
(1)
(3)
(2)
MS-27 C

14
Warm start for U handle models
– Set the I-Stop Switch (on/off) (1) as illustrated.
Warm start for loop handle models
– Set the Start-Stop Switch (1) to neutral position as illustrated.
– First, place the equipment on the ground.
– Gently press the primer pump (5) repeatedly (7-10 times) until fuel comes into
the primer pump.
– Close the choke lever (6).
Choke opening:
• Fully closed in cold temperatures or when the engine is cold
• Fully or half open for restart while the engine is still warm
– Firmly hold the clutch case with your left hand, as illustrated.
– Slowly pull the starter grip until you feel resistance, and then continue to pull
sharply.
– Do not pull out the starter rope to its full extent, and do not allow the starter
handle to retract by itself. Maintain control of the starter rope and ensure it
retracts slowly.
– Repeat the starting operation until you hear the engine’s initial ignitions.
– Depress the choke lever (6) ( ) and pull the starter rope again until the
engine starts.
– As soon as the engine starts, immediately tap and release the throttle, to
release the half-throttle lock and allow the engine to idle.
– Run the engine for approximately one minute at a moderate speed before
applying full throttle.
NOTE: – If you pull the starter handle repeatedly when the choke lever is in the at “ ” position, the engine will not start easily due to excessive
fuel intake.
– If excessive fuel intake occurs, remove the spark plug and pull the starter handle slowly to remove excess fuel. Also, dry the electrode
section of the spark plug.
MS-27 U
MS-27 C
(6)
(5)
CLOSE
(6)
(5)
OPEN
15
Caution during operation:
If the throttle lever is opened fully during a no-load operation, the engine revolutions increase over 10,000 min
-1
. Never operate the engine at a
higher speed than required, and keep the revolutions at an approximate speed of 6,000 - 8,000 min
-1
.
CAUTION: Always reduce the engine revolutions when the equipment is not being used for work.
Operating the equipment at high revolutions when not being used for work will shorten the lifespan of the equipment.
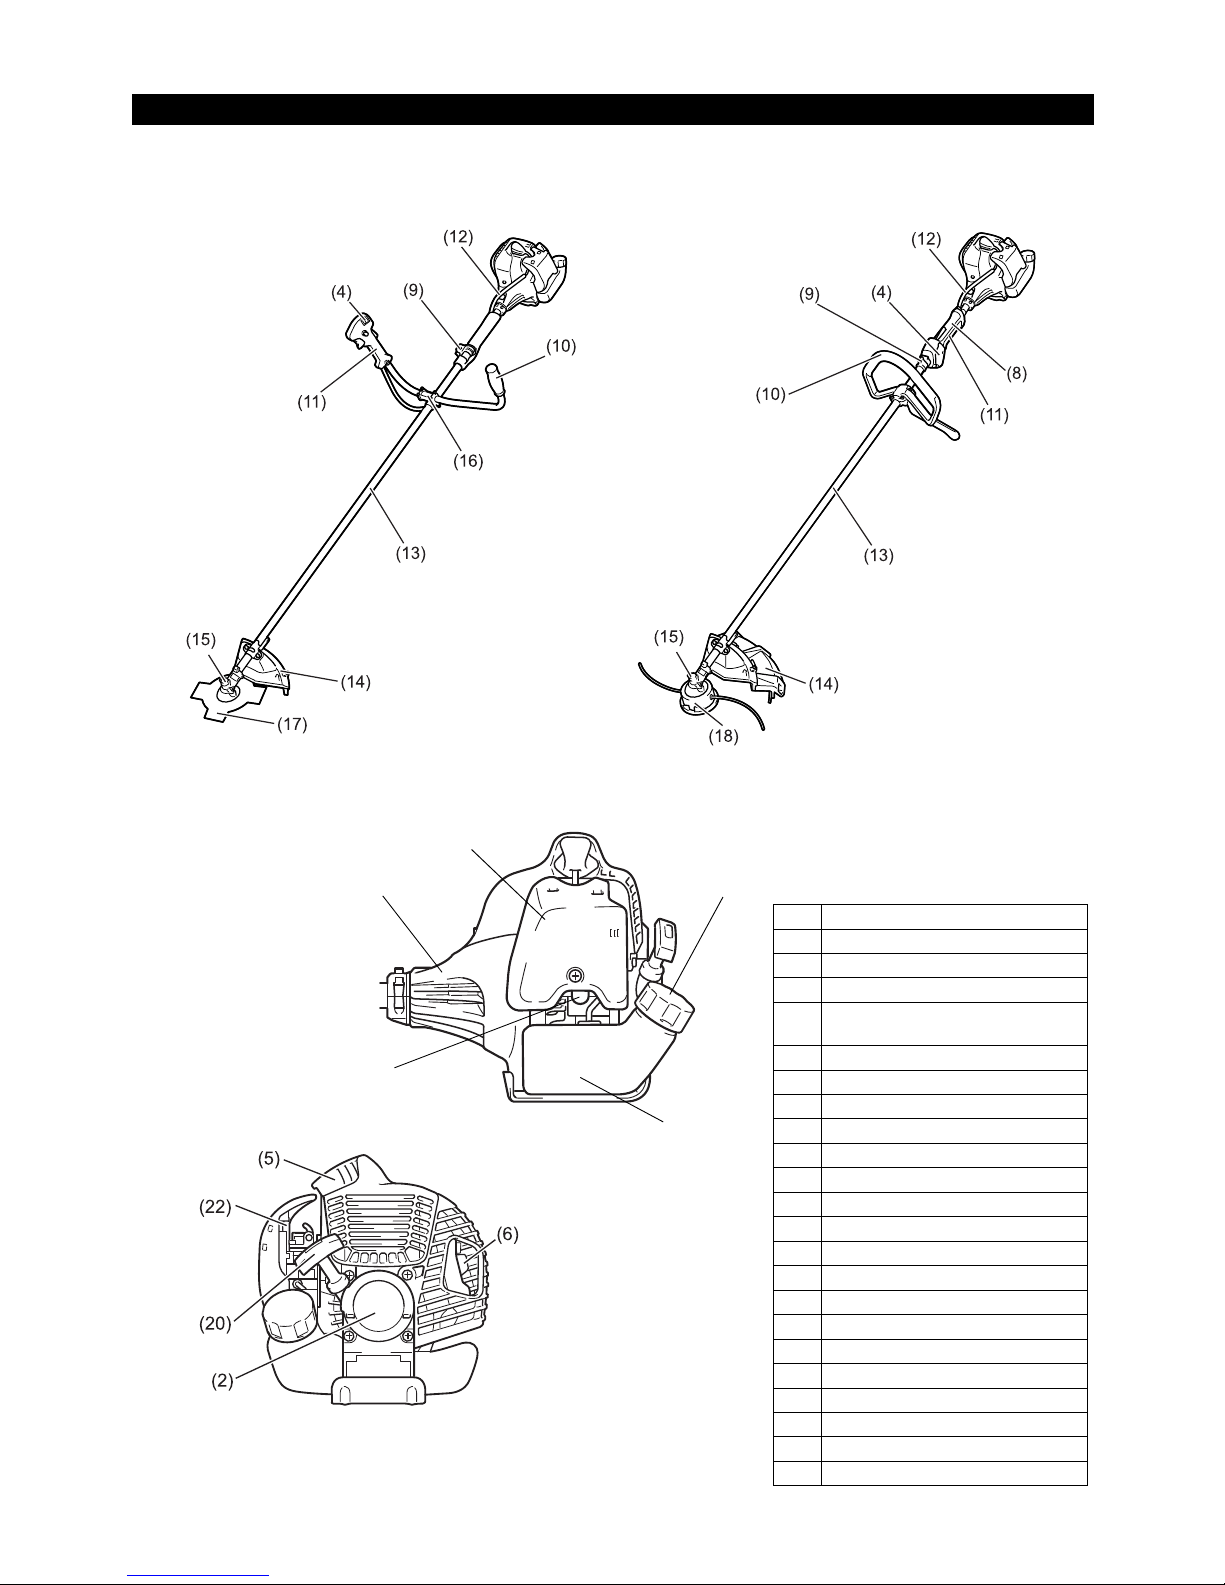
Stopping
– Release the throttle lever (3) fully, and when the engine rpm has lowered,
push the I-Stop Switch (on/off)/Start-Stop Switch (1) to “STOP” position to stop
the engine.
– Be aware that the cutting head may not stop immediately, and always allow it
to slow down and stop fully by itself.
CAUTION: The cutting tools listed below must only be resharpened by an
authorized facility. Manual resharpening will result in imbalances of
the cutting tool, which will cause vibrations and damage to the
equipment.
– cutter blade (star blade (4 teeth))
A professional resharpening and balancing service is provided by Authorized
Service Agents.
NOTE: To increase the service life of the cutter blade (star blade) the blade may
be turned over to allow both cutting edges to wear.
Resharpening the cutting tool
MS-27 C
MS-27 U
16
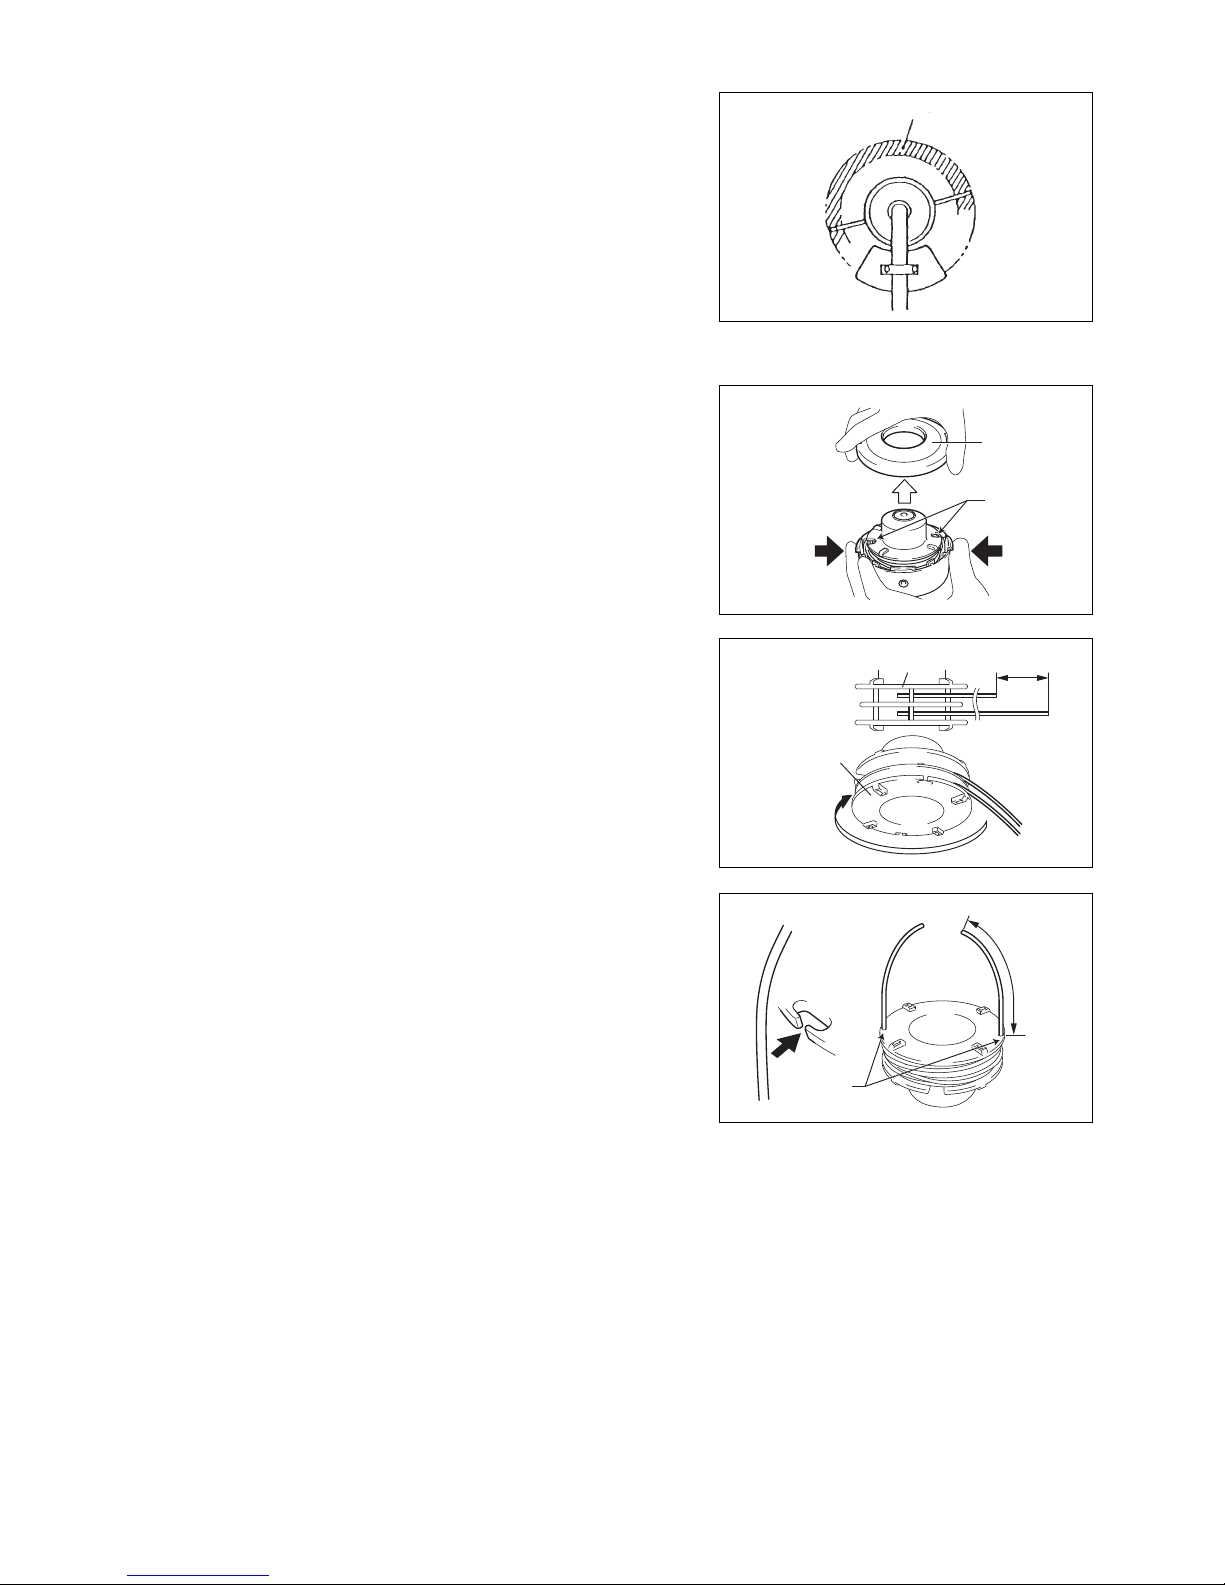
NYLON CUTTING HEAD
The nylon cutting head is a dual line trimmer head that has bump & feed
mechanism.
The nylon cutting head feeds out the nylon cord after tapping the trimmer head
on the ground.
Operation
– The most effective cutting area is shown by the shaded area.
– To feed the nylon cord, increase the nylon cutting head speed to approx. 6,000
min
-1
and tap the nylon cutting head lightly on the ground.
– If the nylon cutting head does not feed out by tapping, rewind/replace the
nylon cord by following the procedures described under “Replacing the nylon
cord.”
Replacing the nylon cord
– Stop the engine.
– Press the housing latches inward to lift off the cover, then remove the spool.
– Hook the center of new nylon cord into the notch in the center of the spool,
with one end of the cord extending about 80 mm (3-1/8”) more than the other.
Then wind both ends firmly around the spool in the direction of the head
rotation (left-hand direction indicated by LH and right-hand direction by RH on
the side of the spool).
– Wind all but about 150 mm (6”) of the cords around the spool, leaving the ends
temporarily hooked through the notch on the side of the spool.
Most effective cutting area
Cover
Latches
Press
Press
Spool
80 mm (3-1/8”)
For left hand
rotation
Spool
150 mm (6”)
Notches

17
– Feed the cords through the eyelets to come out of the housing.
Mount the washer, spring, and spool in the housing.
– Align the hooks on the the cover and the housing.
Then push cover firmly onto the housing to secure it.
Servicing instructions
CAUTION: Before performing any type of maintenance work on the brush cutter,
always switch off the motor and detach the plug cap from the spark
plug (see “checking the spark plug”).
Always wear protective gloves.
CAUTION: Never remove the recoil starter yourself. Doing so may cause an
accident. This procedure should only be performed by an Authorized
Service Agent.
To ensure a long service life and to avoid any damage to the equipment, perform the following maintenance operations regularly.
Daily inspection and maintenance
– Before operation, check the equipment for loose screws or missing parts. Pay particular attention to the tightness of the cutter blade or nylon
cutting head.
– Before operation, always check to make sure that the cooling air passage and cylinder fins are not clogged.
Clean them if necessary.
– Perform the following maintenance operations daily after use:
• Clean the brush cutter externally and inspect it for damage.
• Clean the air filter. When working under extremely dusty conditions, clean the filter several times a day.
• Check the blade or the nylon cutting head for damage and make sure it is firmly mounted.
• Check that there is sufficient difference between the idling and operating speeds to ensure the cutting tool is at a standstill while the engine
is idling (if necessary, reduce the idling speed).
If the cutting tool continues to rotate during engine idling, consult your nearest Authorized Service Agent.
– Check that the I-Stop Switch (on/off)/Start-Stop Switch, the lock-off lever, the control lever, and the lock button are all functioning correctly.
Cleaning the air cleaner (filter)
– Turn the choke lever (4) to the fully closed side, and keep the carburetor away
from any dust or dirt.
– Remove the screw (1).
– Remove the air cleaner cover (3).
– Remove the sponge element (2), wash it in lukewarm water and dry it
completely.
– After cleaning, put back the air cleaner cover (3) and fasten it with screw (1).
NOTE: If there is excessive dust or dirt adhering to the air cleaner, clean it every
day. A clogged air cleaner may make it difficult or impossible to start the
engine or increase the engine rotational speed.
Servicing instructions
Eyelet
Cover
Hook
Eyelet
Hook
(1)
(2)
(3)
(4)

18
Checking the spark plug
– Only use the supplied universal wrench to remove or to install the spark plug.
– The gap between the two electrodes of the spark plug should be 0.6-0.7 mm
(0.024”-0.028”). If the gap is too wide or too narrow, adjust it. If the spark plug
is clogged with carbon or dirty, clean it thoroughly or replace it.
CAUTION: Never touch the spark plug connector while the engine is running
(danger of high voltage electric shock).
Supply of grease to gear case
– Supply grease (Shell Alvania 2 or equivalent) to the gear case through the
grease hole every 30 hours. (Genuine DOLMAR grease may be purchased
from your DOLMAR dealer.)
Suction head in the fuel tank
– The fuel filter (5) of the suction head is used to supply the fuel required by the
carburetor.
– Visually inspect the fuel filter periodically. To inspect the filter, open the fuel
filler cap, use a wire hook and pull out the suction head through the tank
opening. Replace the filter if it has hardened, become particularly dirty, or
clogged.
– Insufficient fuel supply may result in the maximum permissible speed being
exceeded. Therefore, the fuel filter must be replaced at least quarterly to
ensure satisfactory fuel supply to the carburetor.
Any other maintenance or adjustment work that is not described in this manual must only be performed by Authorized Service Agents.
0.6 mm-0.7 mm
(0.024”-0.028”)
Grease hole
(5)

19
– When storing the equipment for a long period of time, drain all the fuel from
the fuel tank and carburetor. To do this, simple drain all of the fuel from the fuel
tank. Dispose of the drained fuel in accordance with local applicable laws.
– Remove the spark plug and add a few drops of oil into the spark plug hole.
Then, pull the starter gently so that oil coats the inside of the engine, then
tighten the spark plug.
– Clean any dirt or dust from the cutter blade and outside of the engine, and
wipe them with a oil-immersed cloth. Store the equipment in a dry place.
Maintenance schedule
Troubleshooting
Storage
General
Engine assembly, screws and nuts
Visual inspection for damage and tightness
Check for general condition and security
After each refuelling Control lever
I-Stop Switch (on/off)/Start-Stop Switch
Functional check
Functional check
Daily Air filter
Cooling air duct
Cutting tool
Idling speed
To be cleaned
To be cleaned
Check for damage and sharpness
Inspection (cutting tool must not move)
Weekly Spark plug
Muffler
Inspection, replace if necessary
Inspect, and clean the opening if necessary
Quarterly Suction head
Fuel tank
To be replaced
To be cleaned
Shutting down procedure Fuel tank
Carburetor
Empty fuel tank
Operate until engine runs out of fuel
Fault System Observation Cause
Engine doesn’t start, or is
difficult to start
Ignition system Ignition spark O.K. Fault in fuel supply or compression system, mechanical
defect
No ignition spark I-Stop Switch (on/off)/Start-Stop Switch operated, wiring
fault or short circuit, spark plug or connector defective,
ignition module faulty
Fuel supply Fuel tank filled Incorrect choke position, carburetor defective, fuel
supply line bent or blocked, fuel dirty
Compression No compression when
pulled over
Cylinder bottom gasket defective, crankshaft seals
damaged, cylinder or piston rings defective or improper
sealing of spark plug
Mechanical fault Starter not engaging Broken starter spring, broken parts inside the engine
Warm start problems Tank filled. Ignition spark
O.K.
Carburetor contaminated, must be cleaned
Engine starts but dies Fuel supply Tank filled Incorrect idling adjustment, carburetor contaminated
Fuel tank vent defective, fuel supply line interrupted,
cable or I-Stop Switch (on/off)/Start-Stop Switch faulty
Insufficient performance Several systems
may simultaneously
be affected
Engine idling poor Air filter contaminated, carburetor contaminated, muffler
clogged, exhaust duct in the cylinder clogged
Drain fuel
Humidity

20
Tack att du köpt denna DOLMAR-röjsåg/grästrimmer. DOLMAR-röjsåg/
grästrimmer är ett resultat av mångårig kunskap, erfarenhet och ett detaljerat
utvecklingsprogram.
Läs noga igenom denna handbok för att säkerställa att du får ut den bästa
möjliga prestandan och det enastående resultatet som DOLMAR-röjsåg/
grästrimmer kan ge.
Följande symboler är viktiga att notera när du läser denna bruksanvisningen.
Symboler
Läs bruksanvisningen
Använd skyddsglasögon och hörselskydd
(endast för grästrimmer)
Var särskilt försiktig och uppmärksam
Använd skyddshjälm, skyddsglasögon och
hörselskydd (endast för röjsåg)
Förbjudet
Använd inte metallblad
(endast för grästrimmer)
Håll avstånd Högsta tillåtna maskinhastighet
Fara för flygande föremål Heta ytor – brännskador på fingrar eller händer
Rökning förbjuden Bränsle-och-oljeblandning
Inga öppna lågor Motor – manuell start
Skyddshandskar måste bäras Nödstopp
Kast Första hjälpen
Håll alla personer och djur borta från
arbetsområdet
PÅ/START
Använd kraftiga stövlar med halkfri sula.
Skyddsstövlar med stålförstärkt tåhätta
rekommenderas.
AV/ STO PP
START
Innehållsförteckning Sida
Symboler..................................................................... 20
Säkerhetsanvisningar.................................................. 21
Teknisk data................................................................ 25
Namn på delar............................................................. 26
Montering av handtag ................................................. 27
Montering av skyddskåpa ........................................... 28
Montering av slyklinga eller trimmerhuvud.................. 29
Bränsle/tankning ......................................................... 30
Korrekt hantering......................................................... 31
Viktigt om användning/avstängning av
röjsågen/grästrimmern ................................................ 31
Slipning av skärverktyg ............................................... 33
Serviceanvisningar...................................................... 35
Förvaring..................................................................... 37
Svenska

21
Allmänna anvisningar
– För att säkerställa korrekt användning ska du se till att ha läst och förstått
bruksanvisningen för att bekanta dig med hur du använder röjsågen/
grästrimmern. Om du använder denna utrustning utan att förstå hur du
använder den på ett korrekt sätt kan det resultera i allvarlig skada för dig själv
eller andra.
– Låna bara ut röjsågen/grästrimmern till personer som har dokumenterad
erfarenhet av röjsågar/grästrimmer. Vid utlåning ska alltid denna
bruksanvisning medfölja.
– Om det är första gången som du använder en motordriven röjsåg bör du
kontakta din återförsäljare för grundläggande anvisningar.
– Barn och ungdomar under 18 år ska inte tillåtas att använda röjsågen/
grästrimmern. Ungdomar över 16 år kan använda maskinen för utbildning
men endast under uppsikt av en yrkeskunnig instruktör.
– Använd röjsågen/grästrimmern med största försiktighet och uppmärksamhet.
– Använd endast röjsågen/grästrimmern om du är i god fysisk kondition. Utför
allt arbete lugnt och försiktigt. Användare är ansvariga mot tredje man.
– Använd aldrig röjsågen/grästrimmern efter förtäring av alkohol eller mediciner,
eller om du känner dig trött eller sjuk.
VARNING: Denna maskin skapar ett elektromagnetiskt fält när den används.
Detta fält kan under vissa omständigheter störa aktiva eller passiva medicinska
implantat. För att minska risken för livshotande skador rekommenderar vi att
personer med medicinska implantat kontaktar sin läkare samt tillverkaren av det
medicinska implantatet innan de använder denna maskin.
Verktygets användningsområde
– Röjsågen/grästrimmern är endast avsedd att användas till att klippa gräs,
ogräs, buskar och liknande undervegetation, och den ska inte användas för
något annat syfte såsom kant- eller häckklippning eftersom detta kan orsaka
skada.
Personlig skyddsutrustning
– Använd alltid kläder som är både funktionella och lämpliga för arbetet, dvs.
tättsittande men inte så täta att de blir obekväma att röra sig i. Bär varken
smycken eller kläder som kan trassla in sig i snår eller buskar.
– För att undvika skador på huvud, ögon, händer och fötter samt för att skydda
hörseln vid användning, måste följande skyddsutrustning och skyddskläder
användas när röjsågen/grästrimmern används.
– Bär alltid hjälm om det finns risk för fallande föremål. Skyddshjälmen (1) ska
regelbundet kontrolleras för skador och ska bytas ut minst vart 5:e år. Använd
endast godkända skyddshjälmar.
– Hjälmens visir (2) (eller skyddsglasögon) skyddar ansiktet mot flygande skräp
och stenar. Använd alltid korgglasögon eller ett visir för att förhindra
ögonskador när du använder röjsågen/grästrimmern.
– Bär lämplig hörselskyddsutrustning för att undvika försämrad hörsel
(hörselkåpor (3), öronproppar etc.).
– Arbetsoveraller (4) skyddar mot flygande stenar och skräp.
Vi rekommenderar starkt att du bär arbetsoverall.
– Speciella handskar (5) tillverkade av tjockt läder är en del av den obligatoriska
utrustningen och ska alltid bäras när röjsågen/grästrimmern används.
– Använd alltid kraftiga skor (6) med en halksäker sula när röjsågen/
grästrimmern används. Sådana skor skyddar mot skador och ger ett säkert
fotfäste.
Kvarvarande risker
– Även om maskinen används i enlighet med föreskrifterna går det inte att
utesluta kvarvarande riskfaktorer. Följande risker kan uppstå på grund av
maskinens konstruktion och utformning:
1. Skada på lungor om inte effektivt dammskydd används.
2. Hörselskada om inte effektivt hörselskydd används.
3. Skador på hälsan på grund av vibrationsavgivning om maskinen används
under långa tidsperioder eller om den inte hanteras och underhålls på rätt
sätt.
Starta röjsågen
– Se till att barn och andra obehöriga inte befinner sig inom ett arbetsområde på
15 meter (50 fot) från maskinen, och var även uppmärksam på eventuella djur
i omgivningen.
– Kontrollera alltid före användning att röjsågen/grästrimmern är säker att
använda:
Kontrollera att skärverktyget är säkert fastsatt, att gasreglaget är lätt att styra
samt att gasreglagets lås fungerar på rätt sätt.
– Skärverktyget får inte rotera under tomgång. Kontrollera med din
återförsäljare om du tror att utrustningen behöver justeras. Kontrollera att
handgreppen är rena och torra och att start/stopp-knappen fungerar på rätt
sätt.
Säkerhetsanvisningar
Figur
15 meter
(1)
(3)
(2)
(4)
(5)
(6)
22
– Starta endast röjsågen/grästrimmern i enlighet med anvisningarna. Använd
inte några andra metoder för att starta motorn!
– Använd endast röjsågen/grästrimmern och verktygen för här angivna
ändamål.
– Starta endast röjsågens/grästrimmerns motor efter att utrustningen är
fullständigt monterad. Använd inte utrustningen innan alla tillbörliga tillbehör är
monterade!
– Kontrollera innan du startar att skärverktyget inte är i kontakt med hårda
föremål såsom grenar, stenar etc. eftersom skärverktyget roterar vid start.
– Stäng av motorn omedelbart om någon typ av motorproblem uppstår.
– Stäng omedelbart av motorn och inspektera skärverktyget om det har slagit i
stenar eller andra hårda föremål.
– Kontrollera om det finns några skador på skärverktyget med korta,
regelbundna intervaller (eventuella hårfina sprickor avslöjas genom att man
knackar med ett hårt föremål och bedömer klangen).
– Använd endast röjsågen/grästrimmern efter att bärremmen är fastsatt och
justerad till rätt längd. Bärremmen ska justeras till användarens storlek och
fästas för att arbetet inte skall bli tröttande. Röjsågen får aldrig under arbetet
hanteras med bara ena handen.
– Håll alltid i röjsågen/grästrimmern med båda händerna under arbetet.
Se alltid till att du har bra fotfäste.
– Använd röjsågen/grästrimmern på ett sådant sätt att inandning av avgaser
undviks. Kör aldrig motorn i ett instängt utrymme som t.ex. i ett rum (risk för
gasförgiftning). Kolmonoxid är en luktfri gas.
– Slå alltid av motorn när du vilar eller om du tänker lämna röjsågen/
grästrimmern obevakad, och placera den på en säker plats för att förhindra att
andra och utrustningen skadas.
– Placera aldrig röjsågen/grästrimmern på torrt gräs eller på annat lättantändligt
material.
– Skärverktyget måste vara utrustat med det rätta skyddet.
Använd aldrig skärverktyget utan detta skydd!
– Alla skyddsanordningar och skydd som medföljer utrustningen måste
användas när du arbetar med den.
– Kör aldrig motorn om det är fel på ljuddämparen.
– Stäng av motorn under transport.
– Sätt alltid fast klingans skydd när utrustningen transporteras.
– Säkerställ att röjsågen/grästrimmern är placerad på ett säkert sätt under
transport för att undvika bränsleläckage.
– Försäkra dig om att bränsletanken är helt tom vid transport av röjsågen/
grästrimmern.
– Tappa aldrig motorn på marken vid avlastning av röjsågen/grästrimmern från
en lastbil eller ett liknande fordon, eftersom det allvarligt kan skada
bränsletanken.
– Såvida det inte är ett nödfall, släpp eller släng aldrig röjsågen/grästrimmern på
marken eftersom det allvarligt kan skada den.
– Lyft alltid hela utrustningen från marken när den flyttas. Att dra utrustningen
med bränsletanken i marken är mycket farligt och kan resultera i
bränsleläckage vilket kan orsaka brand.
– Kontrollera utrustningen innan du fortsätter att arbeta igen om den slagits
emot hårt eller fallit hårt. Kontrollera bränslesystemet så att inte
bränsleläckage uppstått samt kontrollerna och säkerhetsenheterna för
felfunktion. Om det finns någon skada eller tveksamhet ska du be vårt
auktoriserade servicecenter om kontroll och reparation.
Tankning
– Stäng av motorn vid tankningen och se till att ingen öppen eld finns i närheten
samt rök inte medan du tankar.
– Se till att mineralolja inte kommer i kontakt med hud. Andas inte in
bränsleångorna. Bär alltid skyddshandskar vid tankning. Byt och tvätta
skyddskläder regelbundet.
– Se till att inte spilla bränsle eller olja på marken för att förhindra
markföroreningar (miljöskydd). Om du spiller bränsle ska du genast rengöra
röjsågen/grästrimmern.
– Se till att bränslet inte kommer i kontakt med dina kläder. Om kläderna
förorenats med bränsle ska de genast bytas ut för att förhindra brand.
– Kontrollera regelbundet att tanklocket sitter ordentligt fast och att det inte
läcker.
– Skruva åt tanklocket ordentligt. När tankningen är klar, flytta till en plats minst
3 meter bort från där du tankade innan du startar motorn.
– Tanka aldrig i ett slutet utrymme som t.ex. inuti ett rum. Om du gör det kan det
orsaka en explosion eftersom bränsleångor samlas vid golvet.
•Paus
• Transport
• Tankning
• Underhåll
• Byte av verktyg

23
– Transportera och förvara bränsle endast i godkända behållare. Se till att barn
inte kan komma i kontakt med bränslet.
Arbetsmetod
– Använd endast röjsågen/grästrimmern vid god belysning och sikt. Se upp för
hala och våta områden som t.ex. is och snötäckta områden under
vintersäsongen (risk för halka). Se alltid till att du har bra fotfäste.
– Skär aldrig över midjehöjd.
– Stå aldrig på en stege under arbete med röjsågen/grästrimmern.
– Klättra aldrig i träd för arbete med röjsågen/grästrimmern.
– Arbeta aldrig på ostadiga underlag.
– Ta bort sand, stenar, spikar etc. från arbetsområdet.
Främmande föremål kan skada skärverktyget och eventuellt orsaka farliga
kast (kick-back).
– Se till att skärverktyget har nått fullt arbetsvarvtal innan arbetet påbörjas.
– Om gräs eller kvistar fastnar mellan skärverktyget och skyddet ska du alltid
stoppa motorn innan hindret avlägsnas. I annat fall kan klingan oavsiktligt
rotera vilket kan orsaka allvarlig skada.
– Ta en paus för att förebygga trötthet och förlorad kontroll. Vi rekommenderar
en paus på 10 till 20 minuter varje timme.
Kast (klingan slår tillbaka)
– Vid arbete med röjsågen kan okontrollerade kast inträffa.
– Kast förekommer ofta när man arbetar i området mellan klockan 12 och 2 på
klingan (se bild).
– Använd aldrig området 12 till 2 på röjsågens klinga.
– Lägg aldrig an röjsågens klinga inom denna sektion vid arbete i fasta material
som buskar eller träd etc. som har en diameter större än 3 cm. Röjsågen
slungas i så fall okontrollerbart i sidled med stor kraft, vilket är ytterst farligt
och kan orsaka skadan.
Så här undviker du kast
Ta hänsyn till nedanstående för att undvika kast:
– Det är ytterst farligt att arbeta inom området mellan klockan 12 och 2 på
klingan, särskilt när skärverktyg i metall används.
– Arbete inom området klockan 11–12 och 2–5 på klingan får endast utföras av
utbildade personer och på egen risk.
Inom området mellan klockan 8 och 11 på klingan är det lättast att arbeta och
nästan helt utan risk för kast.
Skärverktyg
– Använd ett lämpligt skärverktyg för det arbete som ska utföras.
Trimmerhuvuden (grästrimmerhuvuden) är lämpliga vid trimning av
gräsmattor.
Metallklingor är lämpliga till att kapa ogräs, tjockt gräs, snår, buskar, snårskog,
sly och liknande.
Använd aldrig andra klingor inklusive svängande metallkedjor och klingor för
dikesputsare. Det kan i så fall resultera i allvarlig skada.
– När metallklingor används ska du undvika “kast” och alltid vara förberedd på
oavsiktliga kast. Se avsnittet “Kast” och “Så här undviker du kast”.
Underhållsanvisningar
– Låt din utrustning servas av ett godkänt servicecenter och alltid med
originalreservdelar. Felaktiga reparationer och dåligt underhåll kan förkorta
utrustningens livslängd och öka risken för olyckor.
– Kontrollera innan arbetet påbörjas att röjsågen är i driftsäkert tillstånd, detta
gäller speciellt skärverktygets skyddsanordningar och bärrem. Särskild
uppmärksamhet ska observeras för klingorna som måste vara rätt slipade.
– Stäng av motorn och ta bort tändhatten från tändstiftet vid byte eller skärpning
av skärverktyg, och även när röjsågen eller skärverktyget ska rengöras.
Försiktighet:
Kast
Figur
Figur

24
Skadat skärverktyg får ej riktas eller svetsas.
– Se till att röjsågen/grästrimmern går med minsta möjliga buller och förorening.
Detta realiseras med korrekt inställning av förgasaren.
– Rengör röjsågen/grästrimmern regelbundet och kontrollera att alla skruvar
och muttrar är ordentligt åtdragna.
– Röjsågen/grästrimmern får inte servas eller förvaras i närheten av öppen eld.
– Förvara alltid röjsågen/grästrimmern i låsta lokaler och med tömd bränsletank.
– Sätt alltid fast skyddet på klingan när utrustningen rengörs, servas eller
transporteras.
Följ relevanta säkerhetsföreskrifter utgivna av branschorganisationer och
försäkringsbolag.
Under inga omständigheter får konstruktionsändringar utföras på röjsågen/
grästrimmern. Sådana ändringar äventyrar din säkerhet.
Underhåll och reparationer av användare får utföras endast i den omfattning
som beskrivs i denna bruksanvisning. Allt övrigt arbete måste utföras av en
auktoriserad serviceverkstad. Använd bara originalreservdelar och tillbehör från
DOLMAR.
Om ej godkända tillbehör och verktyg används ökar risken för olyckor.
DOLMAR kommer inte att acceptera något ansvar för olyckor eller skador som
orsakats genom användning av icke godkända skärverktyg, infästningar av
skärverktyg eller tillbehör.
Första hjälpen
Se till att alltid ha en förbandslåda till hands i händelse av eventuella olyckor.
Ersätt omedelbart material som tagits från förbandslådan.
När du tillkallar hjälp, uppge följande:
– Platsen för olyckan
– Vad som hänt
– Antal skadade personer
– Typ av skador
– Ditt namn
Vibration
– Personer med cirkulationsrubbningar som utsätts för kraftiga vibrationer kan
drabbas av blodutgjutningar eller skador på nervsystemet. Vibrationer kan
orsaka följande symptom i fingrar, händer och handleder: “Somningar”
(domningar), krypningar, smärtor, stickningar, färgförändringar i huden och
hudförändringar. Uppsök läkare om du drabbats av något av dessa symptom!
– För att minska risken för “vita fingrar” ska du hålla händerna varma under
arbetet samt hålla utrustningen och tillbehören i gott skick.
Gäller endast Europa
EU-deklaration om överensstämmelse
Undertecknade, Tamiro Kishima och Rainer Bergfeld, auktoriserade av Dolmar GmbH, deklarerar att DOLMAR:s maskin(er):
Maskinbeteckning: Röjsåg/Grästrimmer
Modellnr./Typ: MS-27 U, MS-27 C
Specifikationer: se tabellen “TEKNISK DATA”
ingår i serieproduktion och
Uppfyller följande europeiska direktiv:
2000/14/EG, 2006/42/EG, 2004/108/EG
Och är tillverkade i enlighet med följande standarder eller standardiseringsdokument:
EN ISO 11806-1, EN ISO 14982
Den tekniska dokumentationen finns arkiverad i:
Dolmar GmbH,
Jenfelder Straße 38, Abteilung FZ, D-22045 Hamburg
Konformitetsgodkännandet som krävs av direktiv 2000/14/EG, var i överensstämmelse med Annex V.
Uppmätt ljudeffektnivå (som grästrimmer): 109,77 dB
Uppmätt ljudeffektnivå (som röjsåg): 107,29 dB
Garanterad ljudeffektnivå: 112 dB
15. 4. 2013
Tamiro Kishima
Verkställande direktör
Rainer Bergfeld
Verkställande direktör

25
Teknisk data
Modell
MS-27 U MS-27 C
U-format handtag Öglehandtag
Dimensioner: längd x bredd x höjd (utan klinga) 1 770 x 610 x 410 mm 1 770 x 330 x 185 mm
Nettovikt 5 kg 5 kg
Cylindervolym
25,7 cm
3
Maximal motoreffekt 0,83 kW
Maximalt varvtal på axeln
8 800 min
-1
Skärtillsats
Metallklinga i ett stycke φ230 mm
Grästrimmerhuvud φ430 mm
Tomgångsvarvtal 3 000/min
Ingreppsvarvtal för koppling 4 100/min
Kuggutväxling 14/19
Bränsle
Bensinblandning
Bensin: Tvåtaktsmotorolja = 50:1
Volym (bränsletank) 0,6 l
Förgasare WALBRO WYC
Tändstift NGK BPMR7A
Elektrodavstånd 0,6 - 0,7 mm
Vibration: (för röjsåg)
Vänster handtag (främre
grepp)
14,680 m/s
2
K = 1,5 m/s
2
5,152 m/s2 K = 1,5 m/s
2
Höger handtag (bakre
grepp)
9,037 m/s
2
K = 1,5 m/s
2
9,677 m/s2 K = 1,5 m/s
2
Vibration: (för grästrimmer)
Vänster handtag (främre
grepp)
7,961 m/s
2
K = 1,5 m/s
2
8,83 m/s2 K = 1,5 m/s
2
Höger handtag (främre
grepp)
7,019 m/s
2
K = 1,5 m/s
2
14,381 m/s2 K = 1,5 m/s
2
Buller (testad enligt 2000/14/EG och 2005/88/EG):
Ljudtrycksnivå vid användarens position (grästrimmer): 98,52 dB (A) K = 2,5 dB (A)
Ljudtrycksnivå vid användarens position (röjsåg): 96,15 dB (A) K = 2,5 dB (A)
Uppmätt ljudeffektnivå (grästrimmer): 109,77 dB (A) K = 2,5 dB (A)
Uppmätt ljudeffektnivå (röjsåg): 107,29 dB (A) K = 2,5 dB (A)
Buller (testad enligt 2000/14/EG och 2005/88/EG): garanterade
ljudeffektvärden
112 dB (A)
26
Namn på delar
Namn på delar
1 Bränsletank
2 Ryckstartsmekanism
3 Luftfilter
4
I-Stop-knapp (på/av)/
Start-Stop-knapp
5 Tändstift
6 Ljuddämpare
7 Kopplingshus
8 Bakre grepp
9 Bärremsfäste (upphängningspunkt)
10 Handtag
11 Gasreglage
12 Reglerkabel
13 Skaft
14 Skyddskåpa (skydd för skärverktyg)
15 Växellåda
16 Handtagsfäste
17 Slyklinga
18 Trimmerhuvud
19 Tanklock
20 Starthandtag
21 Primerpump
22 Chokereglage
MS-27 U
U-format handtag
MS-27 C
Öglehandtag
(3)
(7)
(21)
(1)
(19)
27
FÖRSIKTIGHET: Stäng alltid av motorn och dra bort tändhatten från tändstiftet
innan åtgärder vidtas på röjsågen. Bär alltid skyddshandskar!
FÖRSIKTIGHET: Röjsågen får startas först när den är komplett monterad.
För modeller med U-format handtag
– Placera de två handtagen på handtagsfästet. Gasreglaget måste vara på
höger sida när du tittar mot skärverktyget.
– Montera handtagsändarna i spåret på handtagsfästet och montera klämman
på dem. Dra lätt åt dem med de fyra bultarna för justering.
– Justera handtagens vinkel och dra åt alla bultar jämt med en insexnyckel.
– Placera gasvajern (1) på samma sida av skaftet som gasreglaget. Och sätt
fast det nedre skyddet runt dem (2).
– För in gasvajern (1) i fästhaken (3) på handtagsfästet.
– Se till att gasvajern är placerad så som visas i bilden.
– Manövrera gasreglaget och säkerställ att det rör sig utan problem.
FÖRSIKTIGHET: Placera inte gasvajern så som visa. En böjd vajer kan ge högt
tomgångsvarvtal och en klinga som inte kan kontrolleras kan
orsaka personskada.
Montering av handtag
MS-27 U
L
R
(1)
MS-27 U
(2)
MS-27 U
(3)
(1)
MS-27 U

28
För modeller med öglehandtag
– Placera gängan (1) på handtagsfästet i placeringshålet (2) på röret.
– Fäst hjälphandtaget (3) på skyddet.
– Dra åt de 4 bultarna (4) M5 x 30.
Enligt aktuella säkerhetsbestämmelser får endast de i tabellen angivna
kombinationer av verktyg eller skyddskåpor användas.
Använd alltid slyklingor/trimmerhuvuden från DOLMAR.
– Slyklingan ska vara välslipad och fri från sprickor och brott. Om slyklingan
träffar sten under arbete ska motorn omedelbart stängas av och klingan
undersökas.
– Slipa eller byt ut slyklingan var tredje arbetstimme.
– Stanna omedelbart motorn och kontrollera trimmerhuvudet om det slår emot
en sten under arbetet.
FÖRSIKTIGHET: Tillämpliga skyddskåpor ska alltid vara monterad, för din egen
säkerhet och för att följa säkerhetsföreskrifter. Det är förbjudet
att använda utrustningen utan skyddskåpa.
– Montera skyddskåpan (1) på klämman (3) med två M6 x 30 bultar (2).
– När trimmerhuvudet används ska skyddskåpan (5) monteras i skyddskåpan
(1), därefter säkras dessa genom att du drar två skruvar (4).
Montering av skyddskåpa
(2)
(1)
Motor
(4)
(3)
Motor
MS-27 C
Stjärnklinga Skyddskåpa för metallklingor
Trimmerhuvud
Skyddskåpa för
trimmerhuvud
(2)
(3)
(1)
29
Slyklingan eller trimmerhuvudet kan enkelt bytas ut genom att verktyget först
vänds upp-och-ner.
– För in insexnyckeln genom hålet i växellådan och rotera kontrabrickan (3) tills
den låses med insexnyckeln.
– Lossa muttern/fjäderbrickan (1) (vänstergängad) med hylsnyckeln och ta bort
muttern/fjäderbrickan (1) och spännbrickan (2).
Med insexnyckeln kvar på plats
– Montera slyklingan på skaftet så att kontrabrickans (3) styrkant sitter i
axelhålet på slyklingan. Montera spännbrickan (2) och lås slyklingan med
muttern/fjäderbrickan (1).
[Åtdragningsmoment: 13–23 Nm]
OBS: Bär alltid skyddshandskar när du hanterar slyklingan.
OBS: Muttern som fäster slyklingan (tillsammans med fjäderbrickan) är en
förbrukningsdel. Om fjäderbrickan uppvisar något tecken på slitning eller
deformation ska muttern bytas ut.
OBS: Spännbrickan (2) och muttern/fjäderbrickan (1) erfordras inte vid
montering av trimmerhuvudet. Trimmerhuvudet ska ligga ovanpå
kontrabrickan (3).
– Skruva på trimmerhuvudet på skaftet.
– Kontroller att klingan roterar moturs.
Montering av slyklinga eller trimmerhuvud
(2)
(1)
(3)
Lossa
Insexnyckel
Dra åt
Lossa
Insexnyckel
Dra åt
Rotation
30
Hantering av bränsle
Hantering av bränsle kräver största försiktighet. Bränsle kan innehålla ämnen
liknande lösningsmedel. Tanka antingen i ett välventilerat rum eller utomhus.
Andas inte in bränsleångor och undvik hudkontakt med bränsle och mineralolja.
Mineraloljeprodukter avfettar huden. Vid upprepad och längre tids kontakt med
dessa produkter blir huden extremt torr vilket kan orsaka olika typer av
hudsjukdomar. Dessutom kan allergiska reaktioner uppstå.
Oljestänk i ögonen kan orsaka irritation. Om olja kommer in i ögonen ska du
genast skölja dem med rent vatten. Om irritation kvarstår ska du genast uppsöka
läkare.
Bränsle-och-oljeblandning
Röjsågens motor är en högpresterande tvåtaktsmotor. Den går på en blandning
av bensin och tvåtaktsmotorolja. Motorn är konstruerad för vanlig blyfri bensin
med ett oktantal på minst 91 RON.
För optimal prestanda och med hänsyn till miljö och hälsa bör därför alltid blyfri
bensin användas!
För att smörja motorn ska en tvåtaktsmotorolja (kvalitetsgrad: JASO FC eller ISO
EGD) läggas till i bränslet. Motorn är anpassad för den angivna
tvåtaktsmotoroljan med en miljövänlig blandning på 50:1.
Dessutom ger denna blandningsproportion lång livslängd och pålitlig, röksvag
drift. Tillförlitlig funktion för röjsågen kan inte garanteras om inte detta
blandningsförhållande 50:1 (angiven tvåtaktsmotorolja) följs exakt.
Korrekt blandningsförhållande:
Bensin: Angiven tvåtaktsmotorolja = 50:1 eller
Bensin: Andra tillverkares tvåtaktsmotorolja = 25:1 rekommenderas
OBS: För att bereda bensin-oljeblandningen ska du först blanda hela mängden
olja med hälften av bensinmängden, tillsätt sedan resterande bensin.
Skaka den färdiga blandningen väl innan den hälls in i röjsågens tank.
Öka inte oljemängden utöver den angivna mängden för att säkerställa
säker drift. Om du gör detta ökar det bara mängden av förbränningsrester
som förorenar miljön och täpper igen cylinderns utsugskanal och
ljuddämparen. Dessutom ökar bensinförbrukningen och prestandan
minskar.
Tankning
Vid påfyllning ska motorn vara avstängd.
– Rengör partiet kring tanklocket (2) väl, så att föroreningar inte kan tränga in i
bränsletanken (1).
– Skruva bort tanklocket (2) och fyll tanken.
– Skruva åter kraftigt fast tanklocket (2).
– Rengör tanklocket (2) och tanken efter påfyllning.
Lagring av bränsle
Bränslet har en begränsad lagringstid.
Köp endast den mängd som du behöver för en 4 veckors driftsperiod. Lagra
bränslet endast i godkända behållare.
Bränsle/tankning
Observera säkerhetsanvisningarna på sidan 21.
20 cm3 40 cm
3
100 cm3 200 cm
3
200 cm3 400 cm
3
1 000 cm3 (1 liter)
5 000 cm
3
(5 liter)
10 000 cm
3
(10 liter)
50:1 25:1
Bensin
+
 Loading...