

Dodge Challenger 2018 Owner's Manual
2018
OWNER’S MANUAL
Challenger
VEHICLES SOLD IN CANADA
With respect to any Vehicles Sold in Canada, the name
FCA US LLC shall be deemed to be deleted and the name
FCA Canada Inc. used in substitution therefore.
DRIVING AND ALCOHOL
Drunken driving is one of the most frequent causes of
accidents.
Your driving ability can be seriously impaired with blood
alcohol levels far below the legal minimum. If you are
drinking, don’t drive. Ride with a designated nondrinking driver, call a cab, a friend, or use public transportation.
WARNING!
Driving after drinking can lead to an accident.
Your perceptions are less sharp, your reflexes are
slower, and your judgment is impaired when you
have been drinking. Never drink and then drive.
This manual illustrates and describes the operation of
features and equipment that are either standard or optional on this vehicle. This manual may also include a
description of features and equipment that are no longer
available or were not ordered on this vehicle. Please
disregard any features and equipment described in this
manual that are not on this vehicle.
FCA US LLC reserves the right to make changes in design
and specifications, and/or make additions to or improvements to its products without imposing any obligation
upon itself to install them on products previously manufactured.
Copyright © 2017 FCA US LLC

SECTION PAGE
INTRODUCTION ...................................................................3
1
GRAPHICAL TABLE OF CONTENTS ......................................................7
2
GETTING TO KNOW YOUR VEHICLE ...................................................13
3
GETTING TO KNOW YOUR INSTRUMENT PANEL . .........................................95
4
SAFETY ........................................................................121
5
TABLE OF CONTENTS
1
2
3
4
5
STARTINGANDOPERATING.........................................................189
6
INCASEOFEMERGENCY ...........................................................261
7
SERVICING AND MAINTENANCE .....................................................309
8
TECHNICAL SPECIFICATIONS ........................................................377
9
MULTIMEDIA ....................................................................391
10
CUSTOMER ASSISTANCE ............................................................479
11
INDEX..........................................................................485
12
6
7
8
9
10
11
12


INTRODUCTION
CONTENTS
䡵 INTRODUCTION .........................4
1
䡵 WARNINGS AND CAUTIONS ................6
䡵 HOW TO USE THIS MANUAL ...............4
▫ Essential Information ......................4
▫ Symbols ...............................5
䡵 VEHICLE MODIFICATIONS/ALTERATIONS .....6

4 INTRODUCTION
INTRODUCTION
Dear Customer,
Congratulations on selecting your new vehicle. Be assured
that it represents precision workmanship, distinctive styling, and high quality. This Owner’s Manual has been
prepared with the assistance of service and engineering
specialists to acquaint you with the operation and maintenance of your vehicle. It is supplemented by Warranty
Information, and customer oriented documents. In the
attached Warranty Booklet, you will find a description of
the services that FCA offers to its customers, the Warranty
Certificate and the details of the terms and conditions for
maintaining its validity. Please take the time to read all of
these publications carefully before driving your vehicle for
the first time. Following the instructions, recommendations, tips, and important warnings in this manual will
help assure safe and enjoyable operation of your vehicle.
Be sure you are familiar with all vehicle controls, particularly those used for braking, steering, transmission, and
transfer case shifting (if equipped). Learn how your vehicle
handles on different road surfaces. Your driving skills will
improve with experience.
This Owner’s Manual describes all versions of this vehicle.
Options and equipment dedicated to specific markets or
versions are not expressly indicated in the text. Therefore,
you should only consider the information which is related
to the trim level, engine, and version that you have
purchased. Any content introduced throughout the Owner’s Information, that may or may not be applicable to your
vehicle, will be identified with the wording “If Equipped”.
All data contained in this publication are intended to help
you use your vehicle in the best possible way. FCA aims at
a constant improvement of the vehicles produced. For this
reason, it reserves the right to make changes to the model
described for technical and/or commercial reasons. For
further information, contact an authorized dealer.
NOTE: After reviewing the Owner’s Information, it should
be stored in the vehicle for convenient referencing, and
remain with the vehicle when sold.
When it comes to service, remember that an authorized
dealer knows your vehicle best, has factory-trained technicians and genuine MOPAR® parts, and cares about your
satisfaction.
HOW TO USE THIS MANUAL
Essential Information
Consult the Table of Contents to determine which section
contains the information you desire.

Since the specification of your vehicle depends on the items
of equipment ordered, certain descriptions and illustrations may differ from your vehicle’s equipment.
The detailed index at the back of this Owner’s Manual
contains a complete listing of all subjects.
INTRODUCTION 5
Symbols
Consult the following table for a description of the symbols
that may be used on your vehicle or throughout this
Owner’s Manual:
1
6 INTRODUCTION
WARNINGS AND CAUTIONS
This Owner’s Manual contains WARNINGS against oper-
ating procedures that could result in a collision, bodily
injury and/or death. It also contains CAUTIONS against
procedures that could result in damage to your vehicle. If
you do not read this entire Owner’s Manual, you may miss
important information. Observe all Warnings and Cautions.
VEHICLE MODIFICATIONS/ALTERATIONS
WARNING!
Any modifications or alterations to this vehicle could
seriously affect its roadworthiness and safety and may
lead to a collision resulting in serious injury or death.

GRAPHICAL TABLE OF CONTENTS
CONTENTS
䡵 FRONT VIEW ............................8
䡵 REAR VIEW .............................9
䡵 INSTRUMENT PANEL .....................10
2
䡵 INTERIOR ..............................11

8 GRAPHICAL TABLE OF CONTENTS
FRONT VIEW
Front View
1 — Doors 4 — Windshield
2 — Exterior Mirrors 5 — Headlights
3 — Wheels/Tires 6 — Hood/Engine Compartment

REAR VIEW
1 — Rear Lights
2 — Trunk
GRAPHICAL TABLE OF CONTENTS 9
2
Rear View
10 GRAPHICAL TABLE OF CONTENTS
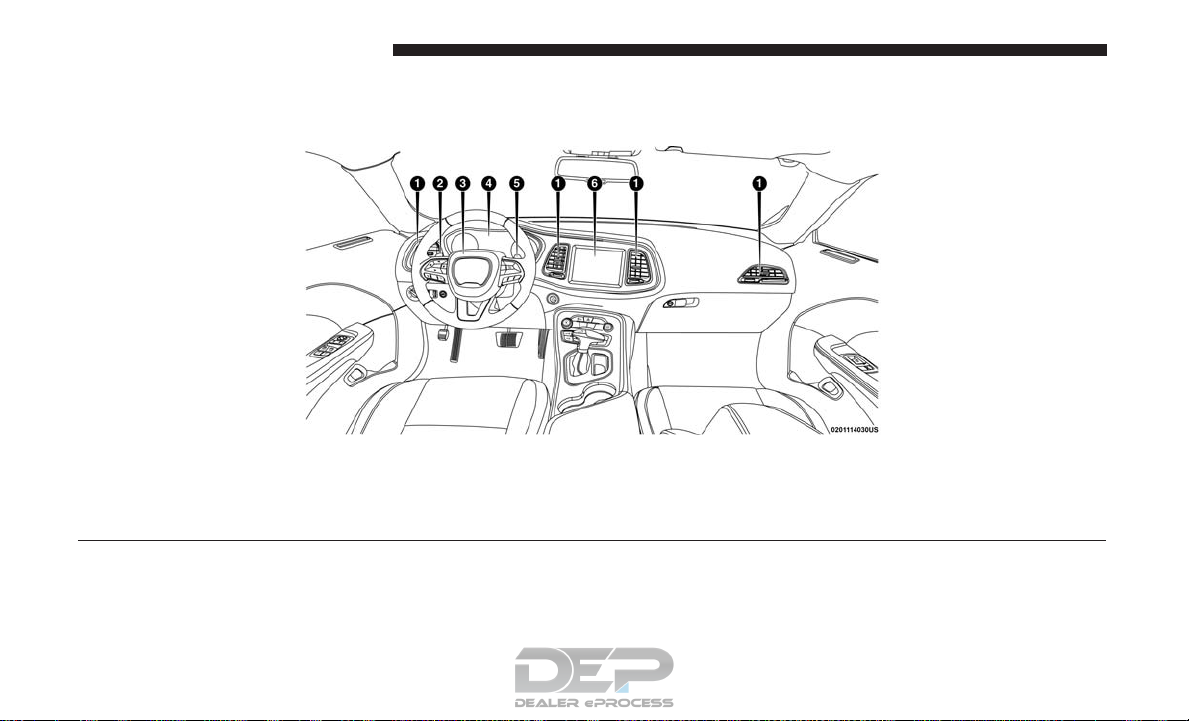
INSTRUMENT PANEL
Instrument Panel
1 — Air Vents 4 — Instrument Cluster
2 — Paddle Shifter – 5 — Paddle Shifter +
3 — Steering Wheel 6 — Radio
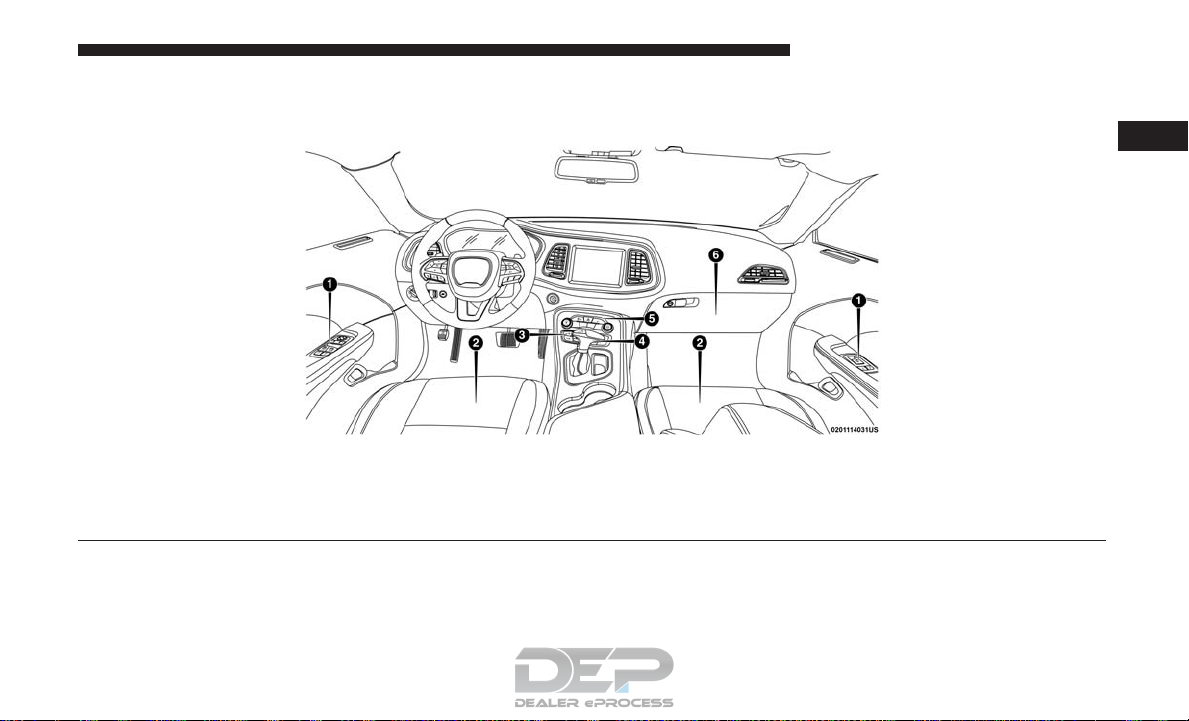
INTERIOR
Interior
1 — Window Switches/Door Locks 4 — Gear Selector
2 — Seats 5 — Switch Panel
3 — Climate Controls 6 — Glove Compartment
GRAPHICAL TABLE OF CONTENTS 11
2


GETTING TO KNOW YOUR VEHICLE
CONTENTS
䡵 KEYS .................................17
▫ KeyFob..............................17
䡵 IGNITION SWITCH .......................23
▫ Keyless Push Button Ignition ...............23
▫ Vehicle On Message .....................25
䡵 REMOTE START — IF EQUIPPED .............26
▫ How To Use Remote Start — If Equipped ......26
▫ Remote Start Abort Message On The Instrument
Cluster Display — If Equipped ..............27
▫ To Enter Remote Start Mode ................27
▫ To Exit Remote Start Mode Without Driving
The Vehicle ...........................27
▫ To Exit Remote Start Mode And Drive
The Vehicle ............................28
▫ Remote Start Comfort Systems — If Equipped . . .28
▫ General Information .....................29
3
䡵 SENTRY KEY ...........................29
▫ Customer Key Programming ...............30
▫ Replacement Keys .......................30
▫ General Information .....................30
䡵 VEHICLE SECURITY ALARM — IF EQUIPPED . . .31
▫ To Arm The System .....................31
▫ To Disarm The System ....................31
▫ Rearming Of The System ..................32
▫ Tamper Alert ...........................32
䡵 DOORS ...............................32
▫ Manual Door Locks ......................32
▫ Power Door Locks ......................34
▫ Keyless Enter-N-Go — Passive Entry .........34

14 GETTING TO KNOW YOUR VEHICLE
▫ Automatic Unlock Doors On Exit ............38
▫ Automatic Door Locks — If Equipped ........39
▫ Child-Protection Door Lock System —
Rear Doors (If Equipped) .................39
▫ Power Tilt/Telescoping Steering Column —
If Equipped ...........................50
▫ Heated Steering Wheel — If Equipped.........51
䡵 MIRRORS ..............................52
䡵 SEATS ................................40
▫ Manual Adjustment (Front Seats) —
If Equipped ...........................40
▫ Power Seats — If Equipped ................42
▫ Heated Seats — If Equipped ...............43
▫ Front Ventilated Seats — If Equipped .........45
▫ Passenger Seat Easy Entry .................46
▫ Folding Rear Seat .......................46
䡵 HEAD RESTRAINTS ......................47
▫ Reactive Head Restraints — Front Seats .......48
▫ Rear Head Restraints .....................49
䡵 STEERING WHEEL .......................49
▫ Manual Tilt/Telescoping Steering Column ......49
▫ Automatic Dimming Mirror ................52
▫ Outside Mirrors ........................53
▫ Power Mirrors .........................53
▫ Heated Mirrors — If Equipped .............54
▫ Illuminated Vanity Mirrors ................54
䡵 EXTERIOR LIGHTS .......................55
▫ Headlight Switch .......................55
▫ Multifunction Lever .....................56
▫ Daytime Running Lights (DRL) — If Equipped . .56
▫ High/Low Beam Switch ..................56
▫ Automatic High Beam Headlamp Control —
If Equipped ...........................56
▫ Flash-To-Pass ..........................57

▫ Automatic Headlights ....................57
▫ Parking Lights .........................57
▫ Headlights On With Wipers ................58
▫ Headlight Time Delay ....................58
▫ Lights-On Reminder .....................58
▫ Fog Lights — If Equipped .................59
▫ Turn Signals ...........................59
▫ Lane Change Assist — If Equipped ..........60
䡵 INTERIOR LIGHTS .......................60
▫ Map/Reading Lights .....................60
▫ Dimmer Controls .......................61
䡵 WINDSHIELD WIPERS AND WASHERS ........62
▫ Wiper Operation ........................62
▫ Rain Sensing Wipers — If Equipped ..........64
䡵 CLIMATE CONTROLS .....................65
▫ Automatic Climate Control Overview .........65
▫ Climate Control Functions .................70
GETTING TO KNOW YOUR VEHICLE 15
▫ Automatic Temperature Control (ATC) —
If Equipped ...........................71
▫ Operating Tips .........................72
䡵 WINDOWS .............................74
▫ Power Window Controls ..................74
▫ Wind Buffeting .........................75
䡵 POWER SUNROOF — IF EQUIPPED ..........76
▫ Opening Sunroof ........................77
▫ Closing Sunroof.........................77
▫ Wind Buffeting .........................77
▫ Venting Sunroof — Express.................78
▫ Sunshade Operation ......................78
▫ Pinch Protect Feature .....................78
▫ Sunroof Maintenance .....................78
▫ Ignition Off Operation ....................78
䡵 HOOD ................................79
▫ To Open The Hood ......................79
3

16 GETTING TO KNOW YOUR VEHICLE
▫ To Close The Hood ......................80
▫ Using HomeLink .......................87
䡵 TRUNK ...............................80
▫ Opening .............................80
▫ Closing ..............................82
▫ Trunk Safety ...........................82
䡵 GARAGE DOOR OPENER — IF EQUIPPED .....83
▫ Before You Begin Programming HomeLink .....83
▫ Canadian/Gate Operator Programming ........86
▫ Security ..............................87
▫ Troubleshooting Tips .....................87
▫ General Information ......................88
䡵 INTERNAL EQUIPMENT ...................89
▫ Storage ...............................89
▫ Cupholders ............................90
▫ Electrical Power Outlets ..................92

KEYS
Key Fob
The key fob allows you to lock or unlock the doors and
trunk from distances up to approximately 66ft (20m) using
a handheld key fob. The key fob does not need to be
pointed at the vehicle to activate the system.
Key Fob
GETTING TO KNOW YOUR VEHICLE 17
The key fob also contains an emergency key, which stores
in the rear of the key fob.
3
Emergency Key
The emergency key allows for entry into the vehicle should
the battery in the vehicle or the key fob go dead. The
emergency key is also for locking/unlocking the glove
compartment. You can keep the emergency key with you
when valet parking.

18 GETTING TO KNOW YOUR VEHICLE
To remove the emergency key, slide the mechanical release
button on the back of the key fob sideways with your
thumb and then pull the key out with your other hand.
Emergency Key Removal Process
1 — Mechanical Release Button
2 — Emergency Key
To Unlock The Doors
Unlock The Doors
Push and release the unlock button on the key fob once to
unlock the driver’s door or twice within five seconds to
unlock all doors.
The turn signal lights will flash to acknowledge the unlock
signal. The illuminated entry system will also be activated.
NOTE: All door unlock settings can be programmed to
your convenience through Uconnect Settings. Refer to
“Uconnect Settings” in “Multimedia” for further information.
• Unlock the driver door on the first push of the key fob
unlock button.
• Unlock all doors on the first push of the key fob unlock
button.
NOTE: To unlock doors and trunk with passive entry,
Refer to “Keyless Enter-N-Go — Passive Entry” located in
“Doors” in “Getting To Know Your Vehicle” for further
information.

NOTE: When you use the key fob to open any door, the
courtesy lights, overhead lights, and approach lighting in
the outside mirrors (if equipped) will turn on. Refer to
“Interior Lights” in “Getting To Know Your Vehicle” for
further information
1st Press Of Key Fob Unlocks
This feature lets you program the system to unlock either
the driver’s door or all doors on the first push of the unlock
button on the key fob.
To change the current setting, refer to “Uconnect Settings”
in “Multimedia” for further information.
Flash Lights With Lock
This feature will cause the turn signal lights to flash when the
doors are locked with the key fob. This feature can be turned
on or turned off. To change the current setting, refer to
“Uconnect Settings” in “Multimedia” for further information.
Headlight Illumination On Approach
This feature activates the headlights for up to 90 seconds
when the doors are unlocked with the key fob. The time for
this feature is programmable on vehicles equipped through
Uconnect. To change the current setting, refer to “Uconnect
Settings” in “Multimedia” for further information.
GETTING TO KNOW YOUR VEHICLE 19
To Unlatch The Trunk
Push the trunk button on the key fob two times within five
seconds to unlatch the trunk.
If the vehicle is equipped with Passive Entry, refer to
“Keyless Enter-N-Go — Passive Entry” under “Getting To
Know Your Vehicle” for further information.
To Lock The Doors And Trunk
Push and release the lock button on the key fob to lock all
doors.
The turn signal lights will flash and the horn will chirp to
acknowledge the signal if programmed. Refer to “Uconnect
Settings” in “Multimedia” for further programmable information.
NOTE: To lock the doors with passive entry, Refer to
“Keyless Enter-N-Go — Passive Entry” located in “Doors”
in “Getting To Know Your Vehicle” for further information.
If one or more doors are open, or the trunk is open, the
doors will lock. The doors will unlock automatically if the
key is left inside the passenger compartment, otherwise the
doors will stay locked.
3

20 GETTING TO KNOW YOUR VEHICLE
Sound Horn With Lock
This feature will cause the horn to chirp when the doors are
locked with the key fob. This feature can be turned on or
turned off. To change the current setting, refer to
“Uconnect Settings” in “Multimedia” for further information.
Using The Panic Alarm
To turn the Panic Alarm feature on or off, push the Panic
button on the key fob. When the Panic Alarm is activated,
the turn signals will flash, the horn will pulse on and off,
and the interior lights will turn on.
The Panic Alarm will stay on for three minutes unless you
turn it off by either pushing the Panic button a second time
or drive the vehicle at a speed of 15 mph (24 km/h) or
greater.
NOTE:
• The interior lights will turn off if you place the ignition
in the ACC or ON/RUN position while the Panic Alarm
is activated. However, the exterior lights and horn will
remain on.
• You may need to be less than 35 ft (11 m) from the
vehicle when using the key fob to turn off the Panic
Alarm due to the radio frequency noises emitted by the
system.
Key Fob Battery Replacement
The recommended replacement battery is one CR2032
battery.
NOTE:
• Perchlorate Material — special handling may apply. See
www.dtsc.ca.gov/hazardouswaste/perchlorate for further information.
• Do not touch the battery terminals that are on the back
housing or the printed circuit board.
1. Remove the emergency key by sliding the mechanical
latch on the back of the key fob sideways with your
thumb and then pull the emergency key out with your
other hand.

GETTING TO KNOW YOUR VEHICLE 21
3
Emergency Key Removal
1 — Emergency Key Release Button
2 — Emergency Key
2. Separate the key fob halves using the tip of the emergency key, a #2 flat blade screwdriver, or a coin and
gently pry the two halves of the key fob apart. Make
sure not to damage the seal during removal.
Emergency Key Removal
Separating Case With A Coin

22 GETTING TO KNOW YOUR VEHICLE
Programming Additional Key Fobs
Programming the key fob may be performed by an authorized dealer.
Request For Additional Remote Controls
NOTE: Only key fobs that are programmed to the vehicle
electronics can be used to start and operate the vehicle.
Once a key fob is programmed to a vehicle, it cannot be
programmed to any other vehicle.
WARNING!
Key Fob Battery Replacement
3. Remove the battery by turning the back cover over
(battery facing downward) and tapping it lightly on a
solid surface such as a table or similar, and then replace
the battery. When replacing the battery, match the + sign
on the battery to the + sign on the inside of the battery
clip, located on the back cover. Avoid touching the new
battery with your fingers. Skin oils may cause battery
deterioration. If you touch a battery, clean it with
rubbing alcohol.
4. To assemble the key fob case, snap the two halves
together.
• Always remove the key fobs from the vehicle and
lock all doors when leaving the vehicle unattended.
• For vehicles equipped with Keyless Enter-N-Go —
Ignition, always remember to place the ignition in
the OFF mode.
Duplication of key fobs may be performed at an authorized
dealer. This procedure consists of programming a blank
key fob to the vehicle electronics. A blank key fob is one
that has never been programmed.
NOTE: When having the Sentry Key Immobilizer System
serviced, bring all vehicle keys with you to an authorized
dealer.

General Information
The following regulatory statement applies to all radio
frequency (RF) devices equipped in this vehicle:
This device complies with Part 15 of the FCC Rules and
with Industry Canada license-exempt RSS standard(s).
Operation is subject to the following two conditions:
1. This device may not cause harmful interference, and
This device must accept any interference received, includ-
2.
ing interference that may cause undesired operation.
NOTE: Changes or modifications not expressly approved
by the party responsible for compliance could void the
user’s authority to operate the equipment.
IGNITION SWITCH
Keyless Push Button Ignition
This feature allows the driver to operate the ignition with the
push of a button as long as the key fob is in the passenger
compartment.
The Keyless Push Button Ignition has four operating positions,
three of which are labeled and will illuminate when in
position. The three positions are OFF, ACC, and ON/RUN.
The fourth position is START. During start, ON/RUN will
illuminate.
GETTING TO KNOW YOUR VEHICLE 23
NOTE: If the ignition switch does not change with the
push of a button, the key fob may have a low or dead
battery. In this situation, a back up method can be used to
operate the ignition switch. Put the nose side (side opposite
of the emergency key) of the key fob against the ENGINE
START/STOP button and push to operate the ignition
switch.
START/STOP Ignition Button
1—OFF
2 — ACC
3 — RUN
3
24 GETTING TO KNOW YOUR VEHICLE
The push button ignition can be placed in the following
modes:
OFF
• The engine is stopped.
• Some electrical devices (e.g. central locking, alarm, etc.)
are still available.
ACC
• Engine is not started.
• Some electrical devices are available.
RUN
• Driving position.
• All the electrical devices are available.
START
• The engine will start.
WARNING!
• When exiting the vehicle, always remove the key fob
from the vehicle and lock your vehicle.
WARNING! (Continued)
• Never leave children alone in a vehicle, or with
access to an unlocked vehicle.
• Allowing children to be in a vehicle unattended is
dangerous for a number of reasons. A child or others
could be seriously or fatally injured. Children
should be warned not to touch the parking brake,
brake pedal or the gear selector.
• Do not leave the key fob in or near the vehicle, or in
a location accessible to children, and do not leave the
ignition of a vehicle equipped with Keyless EnterN-Go in the ON/RUN mode. A child could operate
power windows, other controls, or move the vehicle.
• Do not leave children or animals inside parked
vehicles in hot weather. Interior heat build-up may
cause serious injury or death.
CAUTION!
An unlocked vehicle is an invitation for thieves. Always remove key fob from the vehicle and lock all
doors when leaving the vehicle unattended.
(Continued)
NOTE: Refer to ⬙Starting The Engine,⬙ in ⬙Starting And
Operating⬙ for further information.
Vehicle On Message
When opening the driver’s door and the ignition is in
ON/RUN (engine not running) position, a chime will
sound to remind you to place the ignition in the OFF
position.
In addition to the chime, the Vehicle On message will
display in the cluster (if equipped).
NOTE: The power window switches and power sunroof (if
equipped) will remain active for three minutes after the
ignition is cycled to the OFF position. Opening either front
door will cancel this feature. The time for this feature is
programmable.
WARNING!
• Before exiting a vehicle, always come to a complete
stop, then shift the automatic transmission into
PARK, apply the parking brake, place the engine in
the OFF position, remove the key fob from the
vehicle and lock your vehicle. If equipped with
Keyless Enter-N-Go, always make sure the keyless
ignition is in “OFF” position, remove the key fob
from the vehicle and lock the vehicle.
GETTING TO KNOW YOUR VEHICLE 25
WARNING! (Continued)
• Never leave children alone in a vehicle, or with
access to an unlocked vehicle.
• Allowing children to be in a vehicle unattended is
dangerous for a number of reasons. A child or others
could be seriously or fatally injured. Children
should be warned not to touch the parking brake,
brake pedal or the gear selector.
• Do not leave the key fob in or near the vehicle, or in
a location accessible to children, and do not leave the
ignition of a vehicle equipped with Keyless EnterN-Go in the ON/RUN mode. A child could operate
power windows, other controls, or move the vehicle.
• Do not leave children or animals inside parked
vehicles in hot weather. Interior heat build-up may
cause serious injury or death.
CAUTION!
An unlocked vehicle is an invitation for thieves. Always remove key fob from the vehicle and lock all
doors when leaving the vehicle unattended.
3
(Continued)

26 GETTING TO KNOW YOUR VEHICLE
REMOTE START — IF EQUIPPED
How To Use Remote Start — If Equipped
Push remote start button on the key fob twice
within five seconds. Pushing the remote start
button a third time shuts the engine off.
To drive the vehicle, push unlock button, push the ignition
to the ON/RUN position.
NOTE:
• With remote start, the engine will only run for 15
minutes (timeout) unless the ignition is placed in the
ON/RUN position.
• The vehicle must be started with the key after two
consecutive timeouts.
All of the following conditions must be met before the
engine will remote start:
• Gear selector in PARK
• Doors closed
• Hood closed
• Trunk closed
• Hazard switch off
• Brake switch inactive (brake pedal not pushed)
• Battery at an acceptable charge level
• Check engine light shall not be present
• PANIC button not pushed
• System not disabled from previous remote start event
• Vehicle alarm system indicator flashing
• Ignition in STOP/OFF position
• Fuel level meets minimum requirement
• Vehicle Security Alarm is not signaling an intrusion
WARNING!
• Do not start or run an engine in a closed garage or
confined area. Exhaust gas contains Carbon Monoxide (CO) which is odorless and colorless. Carbon
Monoxide is poisonous and can cause serious injury
or death when inhaled.
• Keep key fobs away from children. Operation of the
Remote Start System, windows, door locks or other
controls could cause serious injury or death.

Remote Start Abort Message On The Instrument Cluster Display — If Equipped
The following messages will display in the instrument
cluster display if the vehicle fails to remote start or exits
remote start prematurely:
• Remote Start Aborted — Door Open
• Remote Start Aborted — Hood Open
• Remote Start Aborted — Fuel Low
• Remote Start Aborted — Trunk Open
• Remote Start Disabled — Start Vehicle To Reset
The message will stay active until the ignition is turned to
the ON/RUN position.
To Enter Remote Start Mode
Push and release the remote start button on the key fob
twice within five seconds. The vehicle doors will lock, the
parking lights will flash, and the horn will chirp twice (if
programmed). Then, the engine will start, and the vehicle
will remain in the Remote Start mode for a 15-minute cycle.
GETTING TO KNOW YOUR VEHICLE 27
NOTE:
• If an engine fault is present or fuel level is low, the
vehicle will start and then shut down in 10 seconds.
• The park lamps will turn on and remain on during
Remote Start mode.
• For security, power window and power sunroof operation (if equipped) are disabled when the vehicle is in the
Remote Start mode.
• The engine can be started two consecutive times with
the key fob. However, the ignition must be cycled by
pushing the START/STOP button twice (or the ignition
switch must be cycled to the ON/RUN position) before
you can repeat the start sequence for a third cycle.
To Exit Remote Start Mode Without Driving The Vehicle
Push and release the remote start button one time or allow
the engine to run for the entire 15-minute cycle.
NOTE: To avoid unintentional shutdowns, the system will
disable with a one time push of the remote start button for
two seconds after receiving a valid remote start request.
3

28 GETTING TO KNOW YOUR VEHICLE
To Exit Remote Start Mode And Drive The Vehicle
Before the end of 15-minute cycle, push and release the
unlock button on the key fob to unlock the doors and
disarm the vehicle security alarm (if equipped). Then, prior
to the end of the 15-minute cycle, push and release the
START/STOP button. If the START/STOP button is not
present, insert the key fob into the ignition switch and turn
the switch to the ON/RUN position.
NOTE:
• For vehicles not equipped with the Keyless Enter-N-Go
— Passive Entry feature, the ignition switch must be in
the ON/RUN position in order to drive the vehicle.
• For vehicles not equipped with the Keyless Enter-N-Go
— Passive Entry feature, the message “Remote Start
Active — Insert Key and Turn To Run” will show in the
instrument cluster display until you insert the key.
• For vehicles equipped with the Keyless Enter-N-Go —
Passive Entry feature, the message “Remote Start Active
— Push Start Button” will show in the instrument
cluster display until you push the START button.
To Cancel Remote Start
Remote Starting will also cancel if any of the following
occur:
• The engine stalls or engine speed exceeds 2500 rpm.
• Any engine warning lights come on.
• Low Fuel Light turns on.
• The hood is opened.
• The hazard switch is pushed.
• The gear selector is moved out of PARK.
• The brake pedal is pushed.
Remote Start Comfort Systems — If Equipped
When remote start is activated, the heated steering wheel
and driver heated seat features will automatically turn on
in cold weather. In warm weather, the driver vented seat
feature will automatically turn on when the remote start is
activated. These features will stay on through the duration
of remote start or until the ignition switch is cycled to the
ON/RUN position.
 Loading...