

DE96258F
Mounting Instructions:
If your PostLite™ is loose on the post, wrap tape
(electrical or duct) around the post until the
PostLite™ has a snug fit on the post. Secure the
PostLite™ to the post with a set screw.
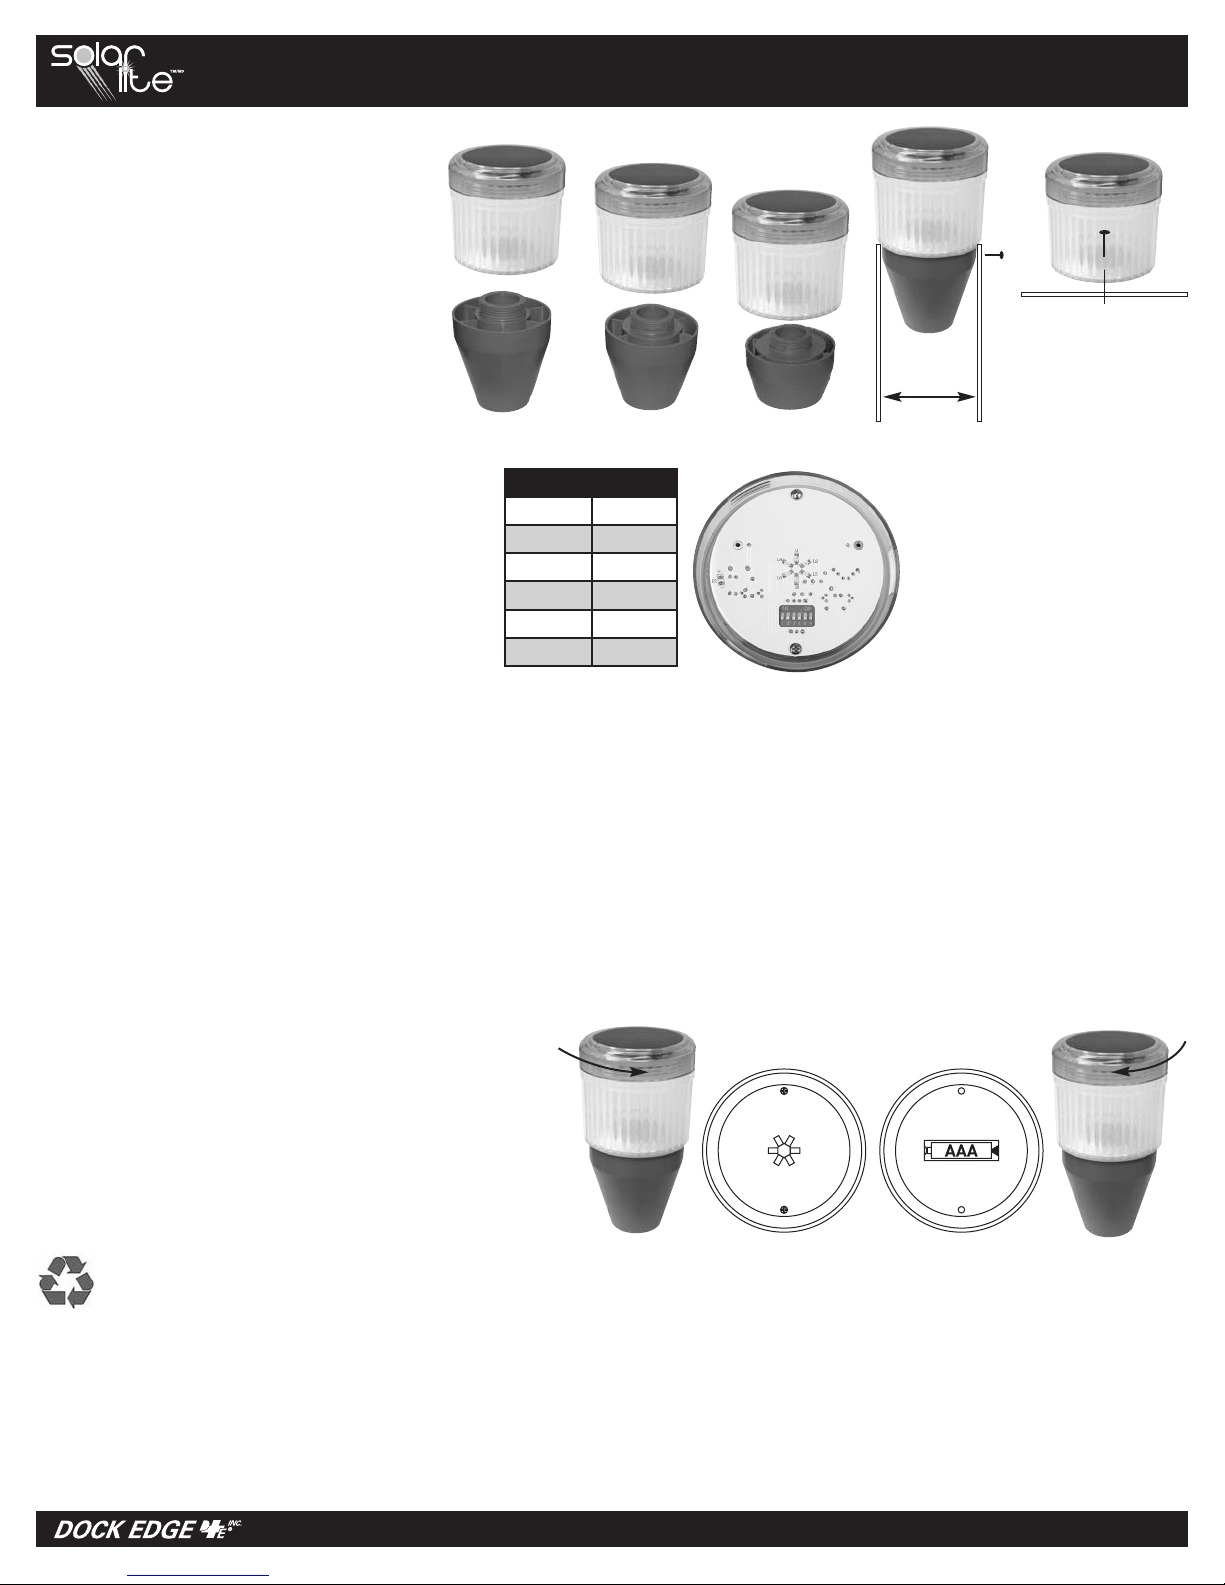
3-1/4” ID Posts
Remove top cap of the post.
Clean the inside edges of the post.
Apply glue if necessary to the inside of the
post or drill a hole for a set screw through the
post. Use an appropriate screw to act as a set
screw through the post and into the side of
the PostLite™ base. Any one of the adaptors
provided with your PostLite™ may be used for
installation in this size of post.
CHANGING LED ILLUMINATION COLOR:
There is no need to replace LED’s with the PostLite to
change colors. Remove the threaded solar cap and flip
the current color switch to the “OFF” position. Flip the
appropriate switch to the “ON” position as per the chart
to illuminate the desired color LED.
Note: Only one (1) color should be in the “ON” position at
any given time. More than one color in the “ON” position
may result in product failure.
1-5/8” (41mm) 1-7/8” (48mm) 2-3/8” (60mm) 3-1/4” (83mm)
SWITCH COLOR
1 WHITE
2 GREEN
3 BLUE
4 ORANGE
5 YELLOW
6 RED
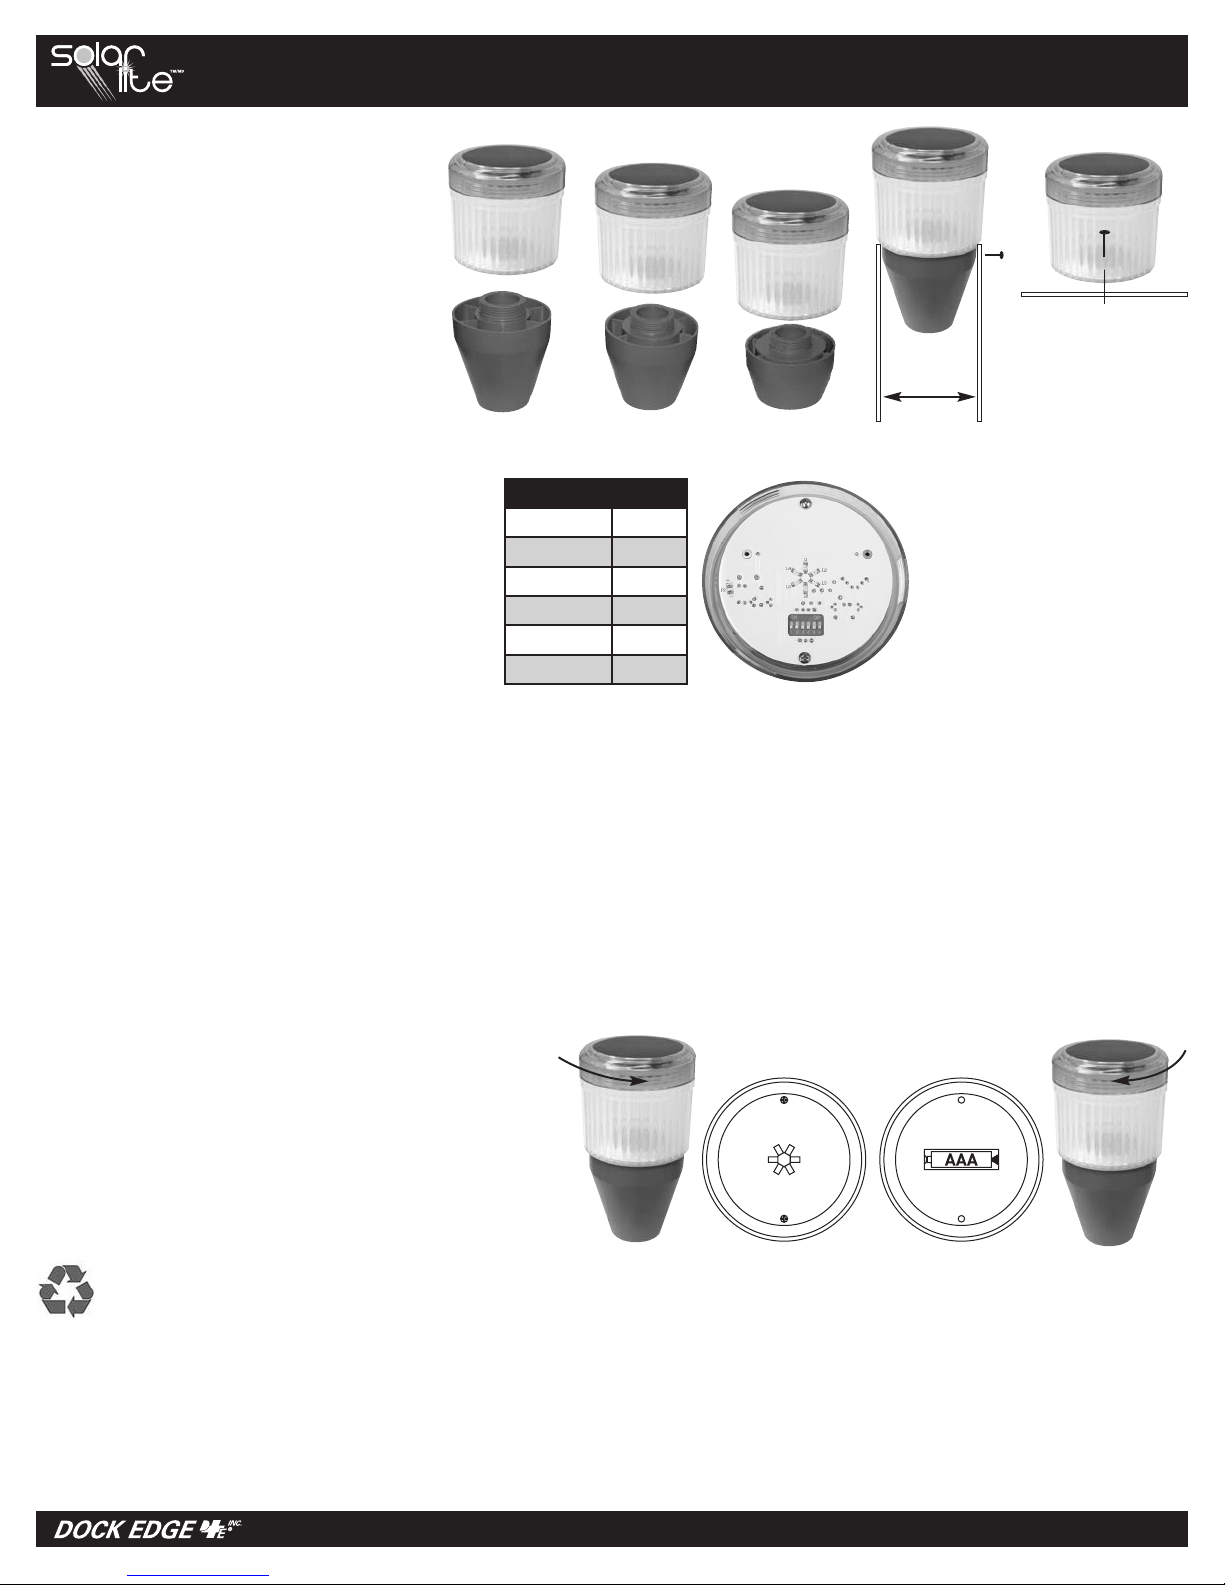
SOLAR POSTLITE™
Remove the single screw from the
bottom of the PostLite™ lens and
remove the reector. Place the
lens into the desired position and
secure with a fastener through
the single hole in the bottom.
Insert domed reector back into
I.D. Posts
the bottom of the lens and screw
the solar cap back on.
Universal Flat Services
IMPORTANT:
PostLites™ are NOT
intended for use as
navigational lighting.
*
Winter Storage Tips:
Extreme weather conditions can reduce the life and efficiency of your PostLite™.
• Extreme weather conditions can reduce the life and efficiency of your PostLite™ Ni-Cd or Ni-Mh battery. Remove and store your PostLite™ indoors if
possible during the winter.
• Remove the set screw from the PostLite™. Romove the PostLite™ and take indoors for winter storage. Unscrew the solar cap and remove the battery
for separate storage from the PostLite™.
• If you have glued the base of your PostLite™ a 3-1/4” post or do not wish to remove the entire assembly, you may simply remove the solar top
(Electronics Portion) and store the entire electronic portion of your PostLite indoors. Cover the remaining PostLite™ base with plastic and tie or tape
the plastic to the post to protect from the elements and moisture accumulation.
PostLite™ Quick Reference:
1. The solar panel of the PostLite™ needs exposure to direct
sunlight for several hours during the day to accumulate a
sufficient charge to light through the evening. If the operating
time of the light is short, try moving the PostLite™ to an area
exposed to sunlight for a longer duration during the day.
2. Ensure that the battery is seated properly and is correctly
installed. The negative side of the battery goes against the
spring contact. Periodically inspect the battery connections for
corrosion.
3. If the battery is not charged sufficiently, or if the battery is
damaged, the length of time the PostLite illuminates will be
reduced.
4. If the LED does not work, try another LED color to determine
if it is the result of poor battery performance or a burnt out
LED. If the alternate LED illuminates, the battery may require
replacement. Use only rechargeable Ni-Cd or Ni-Mh batteries.
CAUTION:
Contains Nickel-Cadmium batteries. Expired batteries
must be recycled or disposed of properly.
PostLite™ 1-Year Limited Warranty
DockEdge+ Inc. warrants the PostLite™ to be free from defects in workmanship and material present at the time of shipment from the factory for a period of one year after the date
of purchase by the original purchaser. We agree to correct such defects without charge or at our option replace with a comparable or superior model if the product is returned to the
retailer. To obtain warranty service, you must present a copy of the receipt as proof of purchase. All costs of removing and reinstalling the product are your responsibility. Damage to
any part such as by accident or misuse or improper installation or by affixing any accessories, is not covered by this warranty. There is no other express warranty. The retailer hereby
disclaims any and all warranties, including but not limited to, those of merchantability and fitness for a particular purpose to the extent permitted by law. The duration of any implied
warranty, which cannot be disclaimed, is limited to the time period as specified in the express warranty. Some states do not allow limitation on how long an implied warranty lasts,
so the above limitation may not apply to you. The retailer shall not be liable for incidental, consequential, or special damages arising out of or in connection with the product use or
performance except as may otherwise be accorded by law. Some states do not allow the exclusion of the incidental or consequential damage, so the above exclusion or limitation may
apply to you. This warranty gives specific legal rights, and you may also have other rights, which vary from state to state. This warranty supersedes all prior warranties.
Battery Removal and Installation:
1. Unscrew off the top cap with solar panel.
2. Unscrew the two screws holding the circuit board in place.
3. Replace battery with AAA (triple A) rechargeable Ni-Cd or Ni-Mh batteries.
4. Reinstall the circuit board and screw the solar cap on snugly to properly seal
your PostLite™.
1 2 3 4
v3
300 New Huntington Rd, Woodbridge, ON, L4H 0R4 800-295-3625
www.dockedge.com
DE96258F
Instructions d’installation :
Si votre luminaire PostLiteMC glisse sur le poteau,
ajoutez du ruban adhésif (électrique ou à conduits)
autour du poteau jusqu’à ce que le luminaire soit
stable. Fixez le luminaire PostLiteMC avec une vis
d’arrêt.
Poteaux de 3-1/4 po de diamètre intérieur
Retirez le capuchon du poteau.
Nettoyez l’intérieur des rebords du poteau.
Appliquez de la colle, au besoin, à l’intérieur du
poteau ou percez un trou afin de pouvoir insérer une
vis d’arrêt sur le poteau. Utilisez une vis appropriée
comme vis d’arrêt et insérez-la dans le poteau, sur le
côté de la base du luminaire PostLiteMC. Vous pouvez
utiliser n’importe quel des adaptateurs fournis avec
votre luminaire PostLiteMC pour ce type de poteau.
Pour changer la couleur des ampoules à DEL :
Avec ce modèle de luminaire PostLite, il n’est pas
nécessaire de remplacer les ampoules à DEL pour changer
les couleurs. Retirez le bouchon solaire fileté et tournez
l’interrupteur de couleur actuel à la position «OFF». Il
suffit de mettre l’interrupteur approprié à la position «ON»
pour obtenir la couleur souhaitée voir le tableau.
Note: Une seule (1) couleur doit être en position «ON» à
un moment donné. Plusieurs couleurs de la position «ON»
peuvent entraîner une défaillance du produit.
Conseils pour le remisage (hiver) :
Les conditions hivernales extrêmes peuvent réduire la longévité et le rendement de vos luminaires PostLiteMC.
• Les conditions hivernales extrêmes peuvent réduire la longévité et le rendement des piles rechargeables (Ni-Cd ou Ni-Mh) de vos luminaires PostLiteMC.
Démontez et entreposez vos luminaires PostLiteMC à l’intérieur, si possible, pendant la période hivernale.
• Enlevez la vis d’arrêt du luminaire PostLiteMC, puis retirez le luminaire PostLiteMC du poteau et rangez-le à l’intérieur pendant la période hivernale.
Dévissez le capuchon et retirez la pile de votre luminaire afin de les entreposer séparément.
• Si vous avez collé la base de votre luminaire PostLiteMC à un poteau de 3-1/4 po ou si vous ne souhaitez pas démonter complètement l’ensemble, vous
pouvez retirer seulement la portion solaire (électronique) et la ranger à l’intérieur. Recouvrez le reste du luminaire PostLiteMC avec une pellicule plastique
et attachez-la au poteau avec du ruban adhésif ou des attaches pour protéger le luminaire contre l’humidité et les intempéries.
1-5/8 po (41mm) 1-7/8 po (48mm) 2-3/8 po (60mm) Poteaux de
INTERRUPTEUR COULEUR
LUMINAIRE DE POTEAU POSTLITE
Retirez la vis de la partie
inférieure de la lentille du
luminaire PostLiteMC pour
enlever le réecteur. Placez la
lentille dans la position désirée,
puis xez-la à l’aide d’une
xation dans le trou de la partie
inférieure. Replacez le réecteur
bombé dans la partie inférieure
de la lentille et vissez le
capuchon du luminaire solaire.
Surfaces plates
universelles
1 BLANC
2 VERT
3 BLEU
4 ORANGE
5 JAUNE
6 ROUGE
3-1/4 po
(83mm) de
diamètre
intérieur
IMPORTANT :
Les luminaires PostLiteMC N’ONT
PAS été conçus pour être utilisés
comme feux de navigation.
*
MC
Aide-mémoire - Luminaires PostLiteMC :
1. Afin que le luminaire PostLiteMC puisse rester allumé toute la
soirée, le panneau solaire doit être placé directement sous
la lumière du soleil pendant plusieurs heures par jour pour
charger suffisamment la pile. Si votre luminaire ne reste pas
allumé longtemps, déplacez-le à un endroit exposé à la lumière
du soleil et laissez-le à cet endroit plus longtemps.
2. Assurez-vous que la pile est bien installée. La borne négative de
la pile doit être appuyée contre le contact à ressort. Inspectez
régulièrement la pile afin de vous assurer qu’il n’y a pas de
corrosion sur les bornes.
3. Si la pile n’est pas assez chargée ou si elle est endommagée, le
luminaire PostLiteMC restera allumé moins longtemps.
4. Si la lampe à DEL ne s’allume pas, essayez une autre couleur
pour déterminer si ce problème découle d’une pile déchargée ou
d’une ampoule brûlée. Si l’autre couleur fonctionne, changez la
pile. N’utilisez que des piles rechargeable Ni-Cd ou Ni-Mh.
MISE EN GARDE :
Contient des piles au nickel-cadmium. Les piles à plat
doivent être recyclées ou jetées adéquatement.
Garantie limitée de 1 an des luminaires PostLite
DockEdge+ Inc. garantit les luminaires PostLiteMC contre les défauts de fabrication et de matériel à l’expédition de l’usine pour une période d’un an à compter de la date d’achat par l’acheteur initial. Nous
nous engageons à corriger toute défectuosité ou à remplacer le produit défectueux par un modèle comparable ou supérieur, à notre discrétion, une fois le produit retourné au détaillant. Toute réclamation
au titre de la garantie doit s’accompagner d’une copie du reçu de caisse original portant la date d’achat. Tous les coûts engendrés par le retrait et la réinstallation du produit sont à la charge du client. Les
dommages résultant d’un accident, d’une mauvaise utilisation, d’une installation inadéquate ou de l’utilisation d’accessoires ne sont pas couverts par cette garantie. Il n’y a aucune autre garantie expresse.
Par la présente, le détaillant renonce à toute garantie, y compris, sans s’y limiter, les garanties de qualité marchande et d’adaptation à une utilisation particulière dans les limites de la loi. La durée des
garanties implicites, qui ne peuvent être invalidées, est limitée à la période précisée par la garantie expresse. Certains États ou certaines provinces n’autorisent pas la limitation de la durée des garanties
implicites, de sorte que les limitations énoncées ci-dessus peuvent ne pas s’appliquer. Le détaillant ne peut être tenu responsable des dommages consécutifs, indirects ou particuliers résultants de
l’utilisation du produit ou liés à la performance du produit dans les limites de la loi. Certains États ou certaines provinces n’autorisent pas la limitation de la responsabilité en cas de dommages consécutifs
ou indirects, de sorte que les limitations ou les exclusions énoncées ci-dessus peuvent ne pas s’appliquer. Cette garantie peut varier d’un État ou d’une province à l’autre. Cette garantie vous confère des
droits spécifiques et vous pouvez en avoir d’autres aux termes des lois de votre État ou de votre province. Cette garantie remplace toutes les garanties précédentes.
MC
Installation et remplacement des piles :
1. Dévissez le capuchon comportant le panneau solaire.
2. Desserrez les deux vis qui retiennent la carte de circuit imprimé en place.
3. Remplacez la pile par une pile rechargeable Ni-Cd ou Ni-Mh de format «AAA».
4. Réinstallez la carte de circuit imprimé, puis vissez le capuchon afin de bien
refermer votre luminaire PostLiteMC.
1 2 3 4
300 New Huntington Rd, Woodbridge, ON, L4H 0R4 800-295-3625
www.dockedge.com
 Loading...