

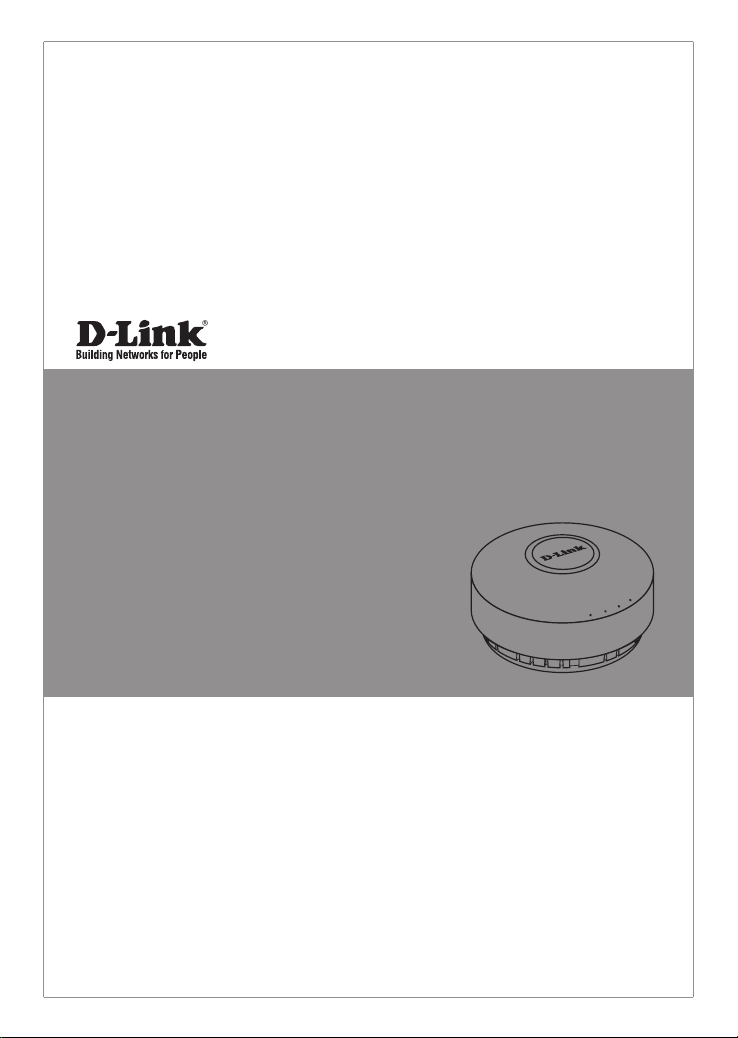
Quick Installation Guide
Unied Concurrent Dual-Band Access Point
This document will guide you through the basic installation
process for your new D-Link Wireless AC Access Point.
DWL-6610AP
Documentation also available on
CD and via the D-Link Website

DWL-6610AP Quick Install Guide
This installation guide provides basic instructions for installing the DWL-6610AP Wireless
Access Point on your network. For additional information about how to use the Access Point,
please see the User’s Manual which is available on the CD included in this package or from
ENGLISH
the D-Link support website.
System Requirements
Minimum System Requirements:
• CD-ROM Drive
• An Ethernet port, or an installed Ethernet adapter
• Internet Explorer 7.0, Safari 5.0, Firefox 3.5, Chrome 20 or later versions of these
browsers
1. Package Contents
DWL-6610AP 802.11ac Power over Ethernet (PoE) Access Point
Power Adapter*
Mounting Ring
Ethernet Cable
Console Cable*
CD-ROM
If any of the above items are missing, please contact your reseller.
Note: Using a power supply with a different voltage than the one included with the
DWL-6610AP will cause damage and void the warranty for this product.
*No PSU supplied in EU region. To power the units use an D-Link PoE switch or the D-Link
DPE-101GI PoE injector.
*Console cable is an optional accessory and not included in the package in Armenia,
Azerbaijan, Belarus, Georgia, Israel, Pakistan, Kaliningrad, Kazakhstan, Kyrgyzstan, Latvia,
Lithuania, Moldova, Mongolia, Russia, Turkey, Turkmenistan, Ukraine and Uzbekistan. If
required, please contact your reseller (model: ACS-AP-CONSOLE).
Optional Accessories
PoE Base Unit (Model: DPE-101GI)
Note: These accessories are not included in the package. If any of these items are required,
please contact your reseller.
2
D-Link DWL-6610AP Quick Install Guide
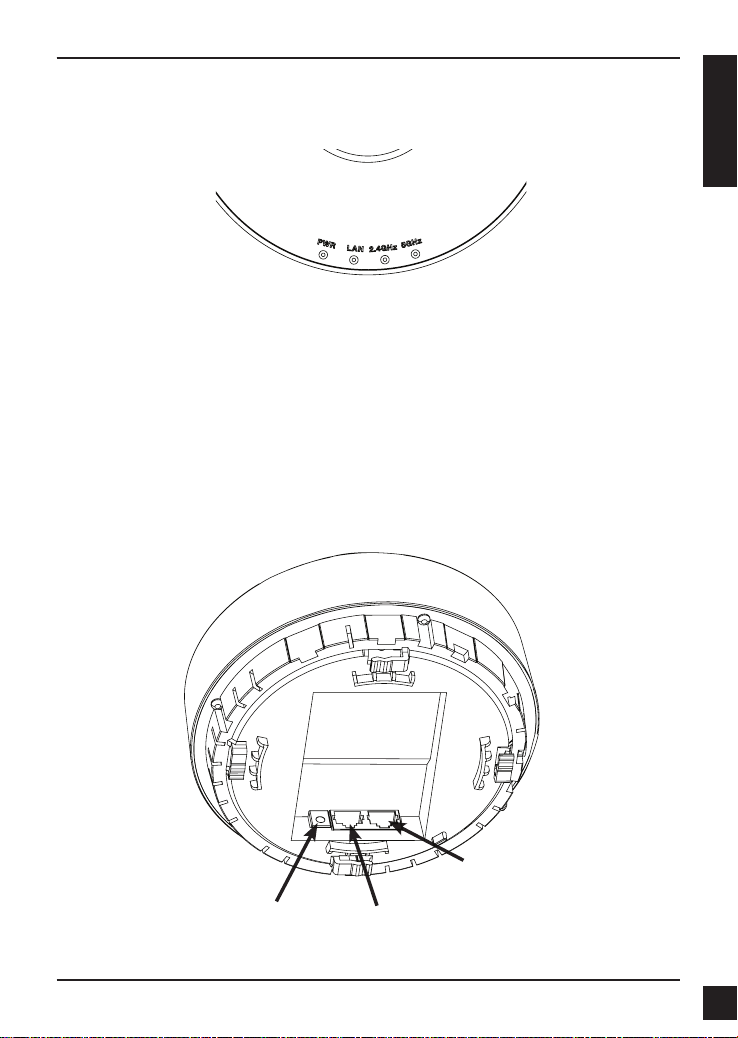
LEDs
ENGLISH
2. Hardware Overview
5 GHz – When this LED is lit, the Access Point is operating at 5 GHz. It will blink when there
2.4 GHz – When this LED is lit, the Access Point is operating at 2.4 GHz. It will blink when
LAN – When this LED is lit, the device’s Ethernet port is connected to an active router or
POWER – When this LED is lit red, the Access Point is booting up. When this LED is lit
is wireless traffic.
there is wireless traffic.
switch. The light will blink when there is traffic going through the port.
green, the Access Point is ready.
Interfaces
Console Port
Power Receptor
D-Link DWL-6610AP Quick Install Guide
LAN Port (PoE)
3
ENGLISH
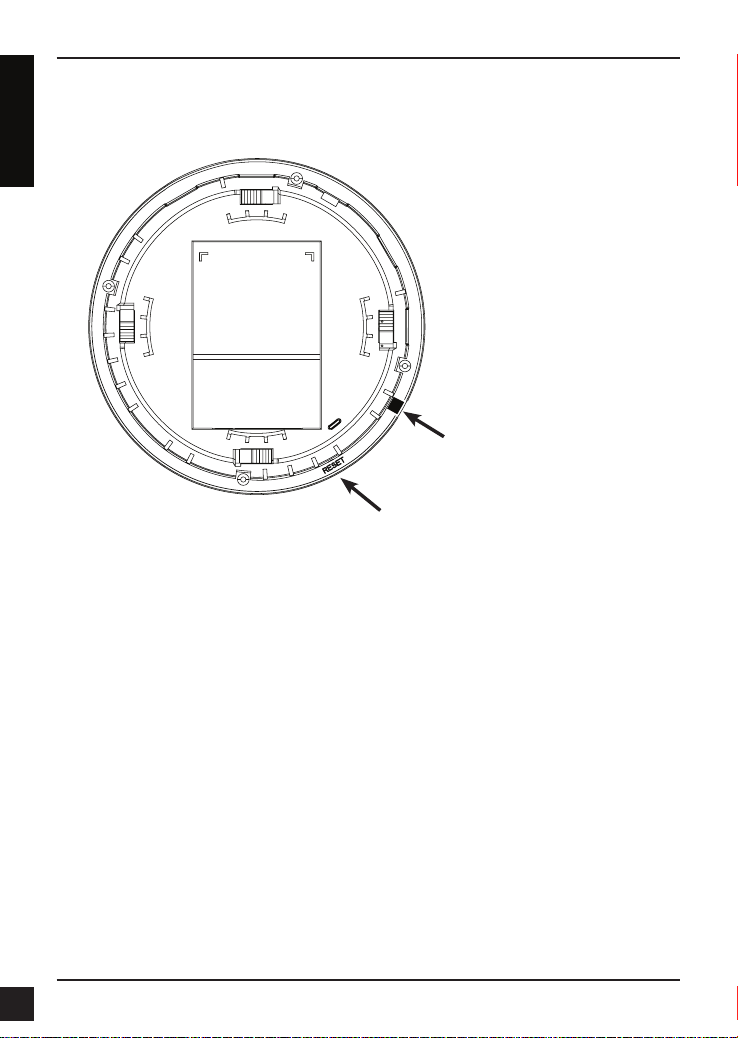
Power Button
(For Power Adapter)
Reset Button
4
D-Link DWL-6610AP Quick Install Guide
3. Installation
Power on the Access Point
To power on the DWL-6610AP, you can use ONE of the following methods:
1. Connect the supplied power adapter, OR
2. Plug one end of your Ethernet cable into the LAN port of the DWL-6610AP, and
the other end into a port on a PoE switch.
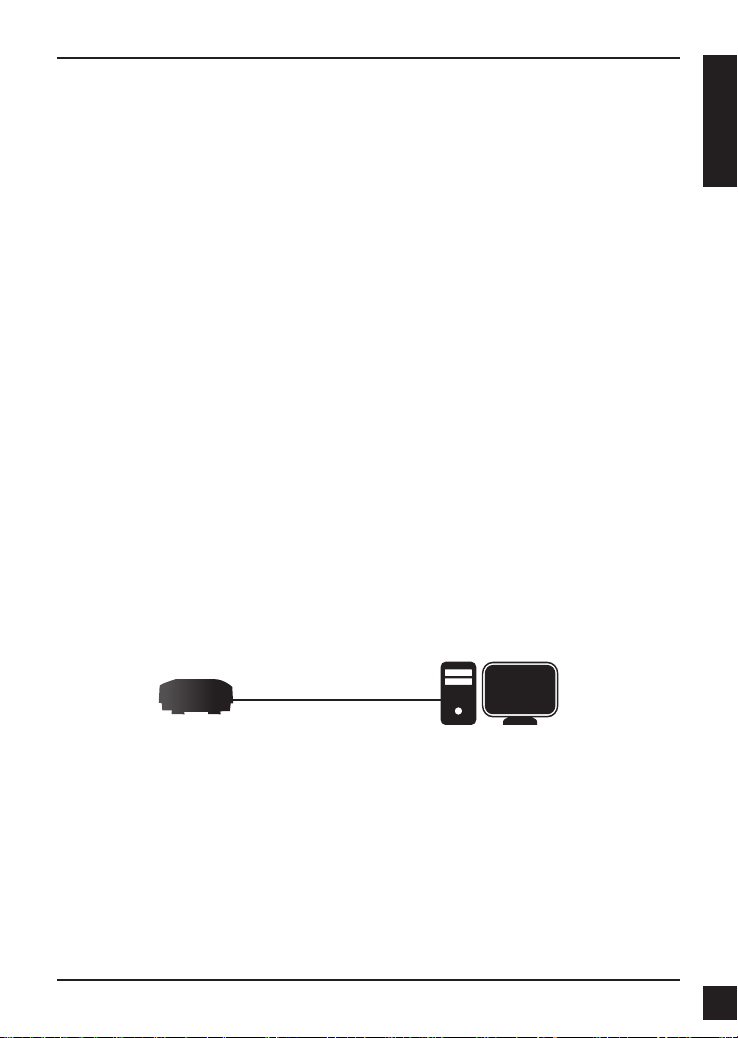
Congure the Access Point
To set up and manage the DWL-6610AP, use one of the following methods:
1. Connect the Access Point to your computer directly via a straight-through Ethernet
cable. Manage the Access Point from the computer.
Ensure your computer is congured with a static IP address in the 10.90.90.0/24
subnet.
Launch a web browser, type the default IP address of the Access Point
(http://10.90.90.91) and then press Enter.
Log in to the Administration Web pages. The default login information is:
Username: admin
Password: admin
ENGLISH
D-Link DWL-6610AP Quick Install Guide
ComputerDWL-6610AP
5
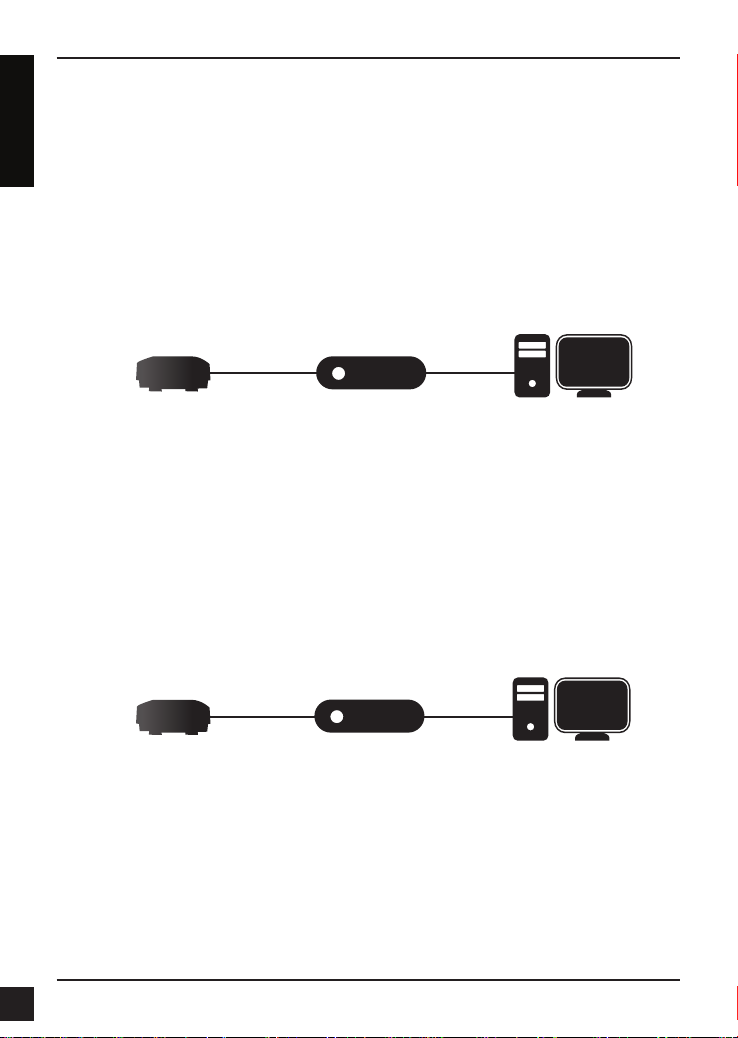
2. Connect the Access Point and your computer to the same switch or router.
Manage the Access Point from the computer.
If the Access Point did not acquire an IP address from a DHCP server on your
ENGLISH
network, enter 10.90.90.91 in the address field of your browser, which is the default
IP address of the Access Point. If you used a DHCP server on your network to
automatically configure network information for the Access Point, enter the new IP
address of the Access Point into the Web browser.
Log in to the Administration Web pages. The default login information is:
Username: admin
Password: admin
Switch or Router
3. Connect the Access Point to a Unied Wireless Switch or Wireless Controller.
Connect your computer to the same network as that of the Unied Wireless Switch
or Wireless Controller. Manage the Access Point from the computer via the Unied
Wireless Switch or Wireless Controller.
Log in to the Unied Wireless Switch Administration Web pages or Wireless
Controller Administration Web pages. For the default login information please see
Unied Wireless Switch user manual or Wireless Controller user manual.
Unied Wireless Switch
or
Wireless Controller
ComputerDWL-6610AP
ComputerDWL-6610AP
6
D-Link DWL-6610AP Quick Install Guide
Solid Wall or Ceiling
Installation
ENGLISH
1. Place the plastic wall-mounting ring on a
wall or ceiling.
2. Mark the points where you will insert the
screws. Take out the mounting ring.
3. Drill holes in the marked points and
insert the plastic wall anchors.
4. Use the supplied screws to attach the
mounting ring to the wall.
5. To attach the Access Point to the
mounting ring, rst locate the right
side of the Access Point that has a
small lock symbol on it, and make
sure to line up this side with the side
of the mounting ring that has Open Close written on it.
6. Twist counterclockwise to lock the
Access Point onto the ring. The lock
symbol on the Access Point must
point directly to the Close text on the
mounting ring.
7. Plug the CAT 5 cable into the LAN
port on the Access Point.
D-Link DWL-6610AP Quick Install Guide
7

Mounting With A Ceiling Bracket
Installation
1. Clip two ceiling brackets onto the ceiling
ENGLISH
panels. Make sure both brackets are in
line with each other.
Ceiling crossbar
Ceiling bracket
2. Use the provided screws to attach the
mounting ring to the ceiling bracket.
3. Place the DWL-6610AP’s male bracket
in the mounting ring’s female bracket.
Rotate the DWL-6610AP clockwise to
lock it in position.
4. Plug the CAT 5 cable into the LAN port
on the Access Point.
8
D-Link DWL-6610AP Quick Install Guide

Federal Communication Commission Interference Statement
This equipment has been tested and found to comply with the limits for a
Class B digital device, pursuant to Part 15 of the FCC Rules. These limits
are designed to provide reasonable protection against harmful interference
in a residential installation. This equipment generates, uses and can radiate
radio frequency energy and, if not installed and used in accordance with
the instructions, may cause harmful interference to radio communications.
However, there is no guarantee that interference will not occur in a particular
installation. If this equipment does cause harmful interference to radio or
television reception, which can be determined by turning the equipment off
and on, the user is encouraged to try to correct the interference by one of the
following measures:
- Reorient or relocate the receiving antenna.
- Increase the separation between the equipment and receiver.
- Connect the equipment into an outlet on a circuit different from that to which
the receiver is connected.
- Consult the dealer or an experienced radio/TV technician for help.
FCC Caution: Any changes or modications not expressly approved by the
party responsible for compliance could void the user's authority to operate this
equipment.
This device complies with Part 15 of the FCC Rules. Operation is subject
to the following two conditions: (1) This device may not cause harmful
interference, and (2) this device must accept any interference received,
including interference that may cause undesired operation.
This transmitter must not be co-located or operating in conjunction with any
other antenna or transmitter.
Operations in the 5.15-5.25GHz band are restricted to indoor usage only.
ENGLISH
IMPORTANT NOTE:
FCC Radiation Exposure Statement:
This equipment complies with FCC radiation exposure limits set forth for an
uncontrolled environment. This equipment should be installed and operated
with minimum distance 24cm between the radiator & your body.
D-Link DWL-6610AP Quick Install Guide
9

Industry Canada statement:
This device complies with RSS-210 of the Industry Canada Rules. Operation
is subject to the following two conditions: (1) This device may not cause
harmful interference, and (2) this device must accept any interference
received, including interference that may cause undesired operation.
ENGLISH
Ce dispositif est conforme à la norme CNR-210 d'Industrie Canada applicable
aux appareils radio exempts de licence. Son fonctionnement est sujet aux
deux conditions suivantes: (1) le dispositif ne doit pas produire de brouillage
préjudiciable, et (2) ce dispositif doit accepter tout brouillage reçu, y compris
un brouillage susceptible de provoquer un fonctionnement indésirable.
Caution :
(i) the device for operation in the band 5150-5250 MHz is only for indoor
use to reduce the potential for harmful interference to co-channel mobile
satellite systems;
(ii) high-power radars are allocated as primary users (i.e. priority users) of the
bands 5250-5350 MHz and 5650-5850 MHz and that these radars could
cause interference and/or damage to LE-LAN devices.
Avertissement:
(i) les dispositifs fonctionnant dans la bande 5150-5250 MHz sont réservés
uniquement pour une utilisation à l’intérieur an de réduire les risques de
brouillage préjudiciable aux systèmes de satellites mobiles utilisant les
mêmes canaux;
(ii) De plus, les utilisateurs devraient aussi être avisés que les utilisateurs de
radars de haute puissance sont désignés utilisateurs principaux (c.-à-d.,
qu’ils ont la priorité) pour les bandes 5250-5350 MHz et 5650-5850 MHz et
que ces radars pourraient causer du brouillage et/ou des dommages aux
dispositifs LAN-EL.
Radiation Exposure Statement:
This equipment complies with IC radiation exposure limits set forth for an
uncontrolled environment. This equipment should be installed and operated
with minimum distance 24cm between the radiator & your body.
Déclaration d'exposition aux radiations:
Cet équipement est conforme aux limites d'exposition aux rayonnements
IC établies pour un environnement non contrôlé. Cet équipement doit être
installé et utilisé avec un minimum de 24cm de distance entre la source de
rayonnement et votre corps.
10
D-Link DWL-6610AP Quick Install Guide

Professional installation instruction
1. Installation personal
This product is designed for specic application and needs to be installed by a
qualied personal who has RF and related rule knowledge. The general user
shall not attempt to install or change the setting.
2. Installation location
The product shall be installed at a location where the radiating antenna can
be kept 24cm from nearby person in normal operation condition to meet
regulatory RF exposure requirement.
3. External antenna
Use only the antennas which have been approved by the applicant. The
non-approved antenna(s) may produce unwanted spurious or excessive
RF transmitting power which may lead to the violation of FCC/IC limit and is
prohibited.
4. Installation procedure
Please refer to user’s manual for the detail.
5. Warning
Please carefully select the installation position and make sure that the
nal output power does not exceed the limit set force in relevant rules. The
violation of the rule could lead to serious federal penalty.
ENGLISH
Instructions d'installation professionnelle
1. Installation
Ce produit est destine a un usage specique et doit etre installe par un
personnel qualie maitrisant les radiofrequences et les regles s'y rapportant.
L'installation et les reglages ne doivent pas etre modies par l'utilisateur nal.
2. Emplacement d'installation
En usage normal, an de respecter les exigences reglementaires concernant
l'exposition aux radiofrequences, ce produit doit etre installe de facon a
respecter une distance de 24cm entre l'antenne emettrice et les personnes.
D-Link DWL-6610AP Quick Install Guide
11

3. Antenn externe.
Utiliser uniiquement les antennes approuvees par le fabricant. L'utilisation
d'autres antennes peut conduire a un niveau de rayonnement essentiel ou
non essentiel depassant les niveaux limites denis par FCC/IC, ce qui est
interdit.
ENGLISH
4. Procedure d'installation
Consulter le manuel d'utilisation.
5. Avertissement
Choisir avec soin la position d'installation et s'assurer que la puissance de
sortie ne depasse pas les limites en vigueur. La violation de cette regle peut
conduire a de serieuses penalites federales.
12
D-Link DWL-6610AP Quick Install Guide

TECHNICAL SUPPORT
You can nd software updates and user documentation on the D-Link website.
Tech Support for customers in
Australia:
Tel: 1300-766-868
24/7 Technical Support
Web: http://www.dlink.com.au
E-mail: support@dlink.com.au
India:
Tel: +91-832-2856000
Toll Free 1800-233-0000
Web: www.dlink.co.in
E-Mail: helpdesk@dlink.co.in
Singapore, Thailand, Indonesia,
Malaysia, Philippines, Vietnam:
Singapore - www.dlink.com.sg
Thailand - www.dlink.co.th
Indonesia - www.dlink.co.id
Malaysia - www.dlink.com.my
Philippines - www.dlink.com.ph
Vietnam - www.dlink.com.vn
Korea:
Tel : +82-2-2028-1810
Monday to Friday 9:00am to 6:00pm
Web : http://d-link.co.kr
E-mail : g2b@d-link.co.kr
New Zealand:
Tel: 0800-900-900
24/7 Technical Support
Web: http://www.dlink.co.nz
E-mail: support@dlink.co.nz
South Africa and Sub Sahara
Region:
Tel: +27 12 661 2025
08600 DLINK (for South Africa only)
Monday to Friday 8:30am to 9:00pm South
Africa Time
Web: http://www.d-link.co.za
E-mail: support@d-link.co.za
D-Link Middle East - Dubai, U.A.E.
Plot No. S31102,
Jebel Ali Free Zone South,
P.O.Box 18224, Dubai, U.A.E.
Tel: +971-4-8809022
Fax: +971-4-8809066 / 8809069
Technical Support: +971-4-8809033
General Inquiries: info.me@dlinkmea.com
Tech Support: support.me@dlinkmea.com
Egypt
1, Makram Ebeid Street -
City Light Building - oor 5
Nasrcity - Cairo, Egypt
Tel.: +2 02 23521593 - +2 02 23520852
Technical Support: +2 02 26738470
General Inquiries: info.eg@dlinkmea.com
Tech Support: support.eg@dlinkmea.com
Kingdom of Saudi Arabia
Ofce # 84 ,
Al Khaleej Building ( Mujamathu Al-Khaleej)
Opp. King Fahd Road, Olaya
Riyadh - Saudi Arabia
Tel: +966 1121 70008
Technical Support:
+966 1121 70009
General Inquiries: info.sa@ dlinkmea.com
Tech Support: support.sa@ dlinkmea.com
Pakistan
Islamabad Ofce:
61-A, Jinnah Avenue, Blue Area,
Suite # 11, EBC, Saudi Pak Tower,
Islamabad - Pakistan
Tel.: +92-51-2800397, 2800398
Fax: +92-51-2800399
Karachi Ofce:
D-147/1, KDA Scheme # 1,
Opposite Mudassir Park, Karsaz Road,
Karachi – Pakistan
Phone: +92-21-34548158, 34326649
Fax: +92-21-4375727
Technical Support: +92-21-34548310, 34305069
General Inquiries: info.pk@dlinkmea.com
Tech Support: support.pk@dlinkmea.com
ENGLISH
D-Link DWL-6610AP Quick Install Guide
13

TECHNICAL SUPPORT
Iran
Unit 5, 5th Floor, No. 20, 17th Alley , Bokharest
St. , Argentine Sq. ,
Tehran IRAN
ENGLISH
Postal Code : 1513833817
Tel: +98-21-88880918,19
+98-21-88706653,54
General Inquiries: info.ir@dlinkmea.com
Tech Support: support.ir@dlinkmea.com
Morocco
M.I.T.C
Route de Nouaceur angle RS et CT 1029
Bureau N° 312 ET 337
Casablanca , Maroc
Phone : +212 663 72 73 24
Email: support.na@dlinkmea.com
Lebanon RMA center
Dbayeh/Lebanon
PO Box:901589
Tel: +961 4 54 49 71 Ext:14
Fax: +961 4 54 49 71 Ext:12
Email: taoun@dlinkmea.com
Bahrain
Technical Support: +973 1 3332904
Kuwait:
Techni cal S uppor t: + 965 22453939 / +965
22453949
Türkiye
Büyükdere Cad. Ferro Plaza No:155
D: 1 K: 1 Zincirlikuyu / Istanbul
Tel: +90 (212) 289-56-59
Email: info.tr@dlink.com.tr
לארשי
רטנס ןולטמ
20 םימישגמה 'חר
7060 ד"ת ,49348 ת"פ ,ןולטמ תירק
03-9215173 :לט
073-7962797 :לט
info@dlink.co.il :יללכ ל"אוד
support@dlink.co.il :הכימת ל"אוד
14
D-Link DWL-6610AP Quick Install Guide

ТЕХНИЧЕСКАЯ ПОДДЕРЖКА
Обновления программного обеспечения и документация доступны на Интернет-сайте D-Link.
D-Link предоставляет бесплатную поддержку для клиентов в течение гарантийного срока.
Клиенты могут обратиться в группу технической поддержки D-Link по телефону или через
Интернет.
Техническая поддержка компании D-Link работает в круглосуточном режиме ежедневно,
кроме официальных праздничных дней. Звонок бесплатный по всей России.
Техническая поддержка D-Link:
8-800-700-5465
Техническая поддержка через Интернет:
http://www.dlink.ru
e-mail: support@dlink.ru
ОФИСЫ
PYCCКИЙ
Россия
Москва, Графский переулок, 14
Тел. : +7 (495) 744-00-99
E-mail: mail@dlink.ru
Україна
Київ, вул. Межигірська, 87-А
Тел.: +38 (044) 545-64-40
E-mail: ua@dlink.ua
Moldova
Chisinau; str.C.Negruzzi-8
Tel:+373(22) 80-81-07
E-mail:info@dlink.md
Беларусь
Мінск, пр-т Незалежнасці, 169
Тэл.: +375 (17) 218-13-65
E-mail: support@dlink.by
Қазақстан
Алматы, қ. Құрманғазы,143 үй
Тел.: +7 (727) 378-55-90
E-mail: almaty@dlink.ru
Հայաստան
Երևան, Դավթաշեն 3-րդ
թաղամաս, 23/5
Հեռ.՝ +374 (10) 39-86-67
Էլ. փոստ՝ info@dlink.am
საქართველო
თბილისი, მარიჯანის ქუჩა N4
ტელ.: +995 (032) 220-77-01
E-mail: info@dlink.ge
Latvija
Rīga, Lielirbes iela 27
Tel.: +371 (6) 761-87-03
E-mail: info@dlink.lv
Lietuva
Vilnius, Žirmūnų 139-303
Tel.: +370 (5) 236-36-29
E-mail: info@dlink.lt
Eesti
E-mail: info@dlink.ee
D-Link DWL-6610AP Quick Install Guide
15

SOPORTE TÉCNICO
Usted puede encontrar actualizaciones de softwares o rmwares y documentación para usuarios a
través de nuestro sitio www.dlinkla.com
SOPORTE TÉCNICO PARA USUARIOS EN LATINO AMERICA
Por favor revise el número telefónico del Call Center de su país en
http://www.dlinkla.com/soporte/call-center
Soporte Técnico de D-Link a través de Internet
Horario de atención Soporte Técnico en www.dlinkla.com
e-mail: soporte@dlinkla.com & consultas@dlinkla.com
Please ensure that channels 36/40/44/48 on the 5 GHz band are unlicensed and unrestricted in
your country of residence before using them.
ESPAÑOL
Any illegal usage of these channels is the responsibility of the user.
Por favor asegúrese de que los canales 36/40/44/48 en la banda de 5 GHz estén sin licencia
y sin restricciones de uso en su país de residencia antes de utilizarlos. Cualquier uso ilegal de
estos canales es responsabilidad del usuario.
16
D-Link DWL-6610AP Quick Install Guide

SUPORTE TÉCNICO
Caso tenha dúvidas na instalação do produto, entre em contato com o Suporte Técnico D-Link.
Acesse o site: www.dlink.com.br/suporte
PORTUGUÊS
D-Link DWL-6610AP Quick Install Guide
17

D-Link
友訊科技 台灣分公司 技術支援資訊
如果您還有任何本使用手冊無法協助您解決的產品相關問題,台灣地區用戶可以透過我
們的網站、電子郵件或電話等方式與
D-Link
0800-002-615
手機付費電話 (02)6600-0123#8715
服務時間:週一至週五,早上
週六日及國定假日(不含農曆春節) 早上10:00到晚上7:00
網 站:
電子郵件:
免付費技術諮詢專線
http://www.dlink.com.tw
dssqa_service@dlink.com.tw
如果您是台灣地區以外的用戶,請參考
9:00
D-Link
到晚上
台灣地區技術支援工程師聯絡。
9:00
D-Link
網站,全球各地分公司
的聯絡資訊以取得相關支援服務。
產品保固期限、台灣區維修據點查詢,請參考以下網頁說明:
http://www.dlink.com.tw
產品維修:
使用者可直接送至全省聯強直營維修站或請洽您的原購買經銷商。
中
注意 !
依據 低功率電波輻射性電機管理辦法
文
第十二條 : 經型式認證合格之低功率射頻電機,非經許可,公司、商號或使用
者均不得擅自變更頻率、加大功率或變更原設計之特性及功能。
第十四條 : 低功率射頻電機之使用不得影響飛航安全及干擾合法通信;經發現
有干擾現象時,應立即停用,並改善至無干擾時方得繼續使用。
前項合法通信,指依電信規定作業之無線電信。低功率射頻電機須忍受合法通
信或工業、科學及醫療用電波輻射性電機設備之干擾。
5.25-5.35
在
秭赫頻帶內操作之無線資訊傳輸設備,限於室內使用
18
D-Link DWL-6610AP Quick Install Guide

DUKUNGAN TEKNIS
Update perangkat lunak dan dokumentasi pengguna dapat diperoleh pada situs web D-Link.
Dukungan Teknis untuk pelanggan:
Dukungan Teknis D-Link melalui telepon:
Tel: +62-21-5731610
Dukungan Teknis D-Link melalui Internet:
Email : support@dlink.co.id
Website : http://support.dlink.co.id
D-Link DWL-6610AP Quick Install Guide
BAHASA INDONESIA
19

TECHNICAL SUPPORT
この度は弊社製品をお買い上げいただき、誠にありがとうございます。
製品に同梱されている保証書の購入元にお問い合わせください。
20
日本語
D-Link DWL-6610AP Quick Install Guide

Technical Support
D-Link’s website contains the latest user documentation and software updates for D-Link
products. U.S. and Canadian customers can contact D-Link Technical Support through our
website or by phone.
United States
(877) 354-6555
http://support.dlink.com
Canada
(877) 354-6560
http://support.dlink.ca
Version 1.00
June 17, 2015
Copyright ©2015 D-Link Corporation/D-Link Systems, Inc. All rights reserved. D-Link and the D-Link logo are registered trademarks of
D-Link Corporation or its subsidiaries in the United States and other countries. Other trademarks are the property of their respective owners.
Actual data throughput will vary. Network conditions and environmental factors, including volume of network trac, building materials
and construction, and network overhead lower actual data throughput rate. Product specications, size and shape are subject to change
without notice, and actual product appearance may dier from that depicted on the packaging. Visit www.dlink.com for more details.
21
 Loading...