

Page 1
Section 2 - Installation
Manual Connect
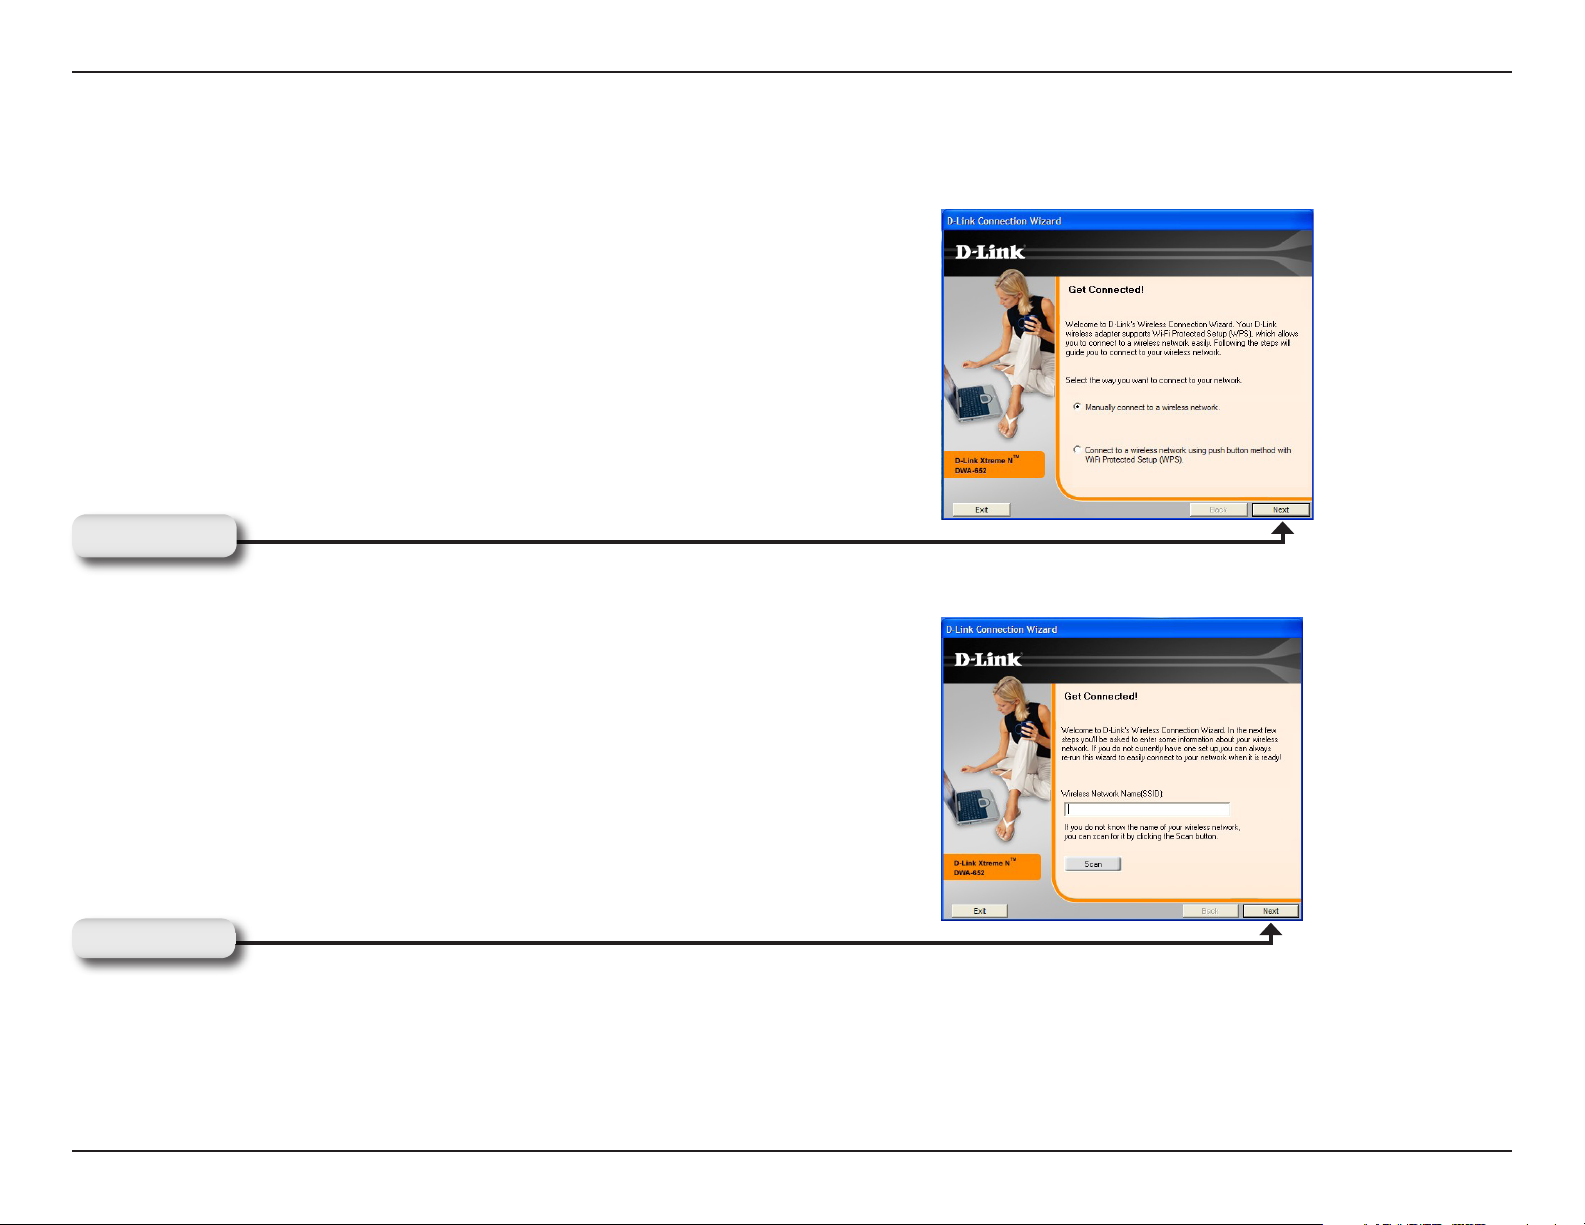
To manually connect to your wireless network, select Manually
connect to a wireless network and then click Next.
Click Next
Enter the network name (SSID) manually. If you enter the SSID
incorrectly, you will automatically be brought to the site survey
page. Click Scan to display the site survey page.
Click Next
15D-Link DWA-652 User Manual
Page 2
Section 2 - Installation
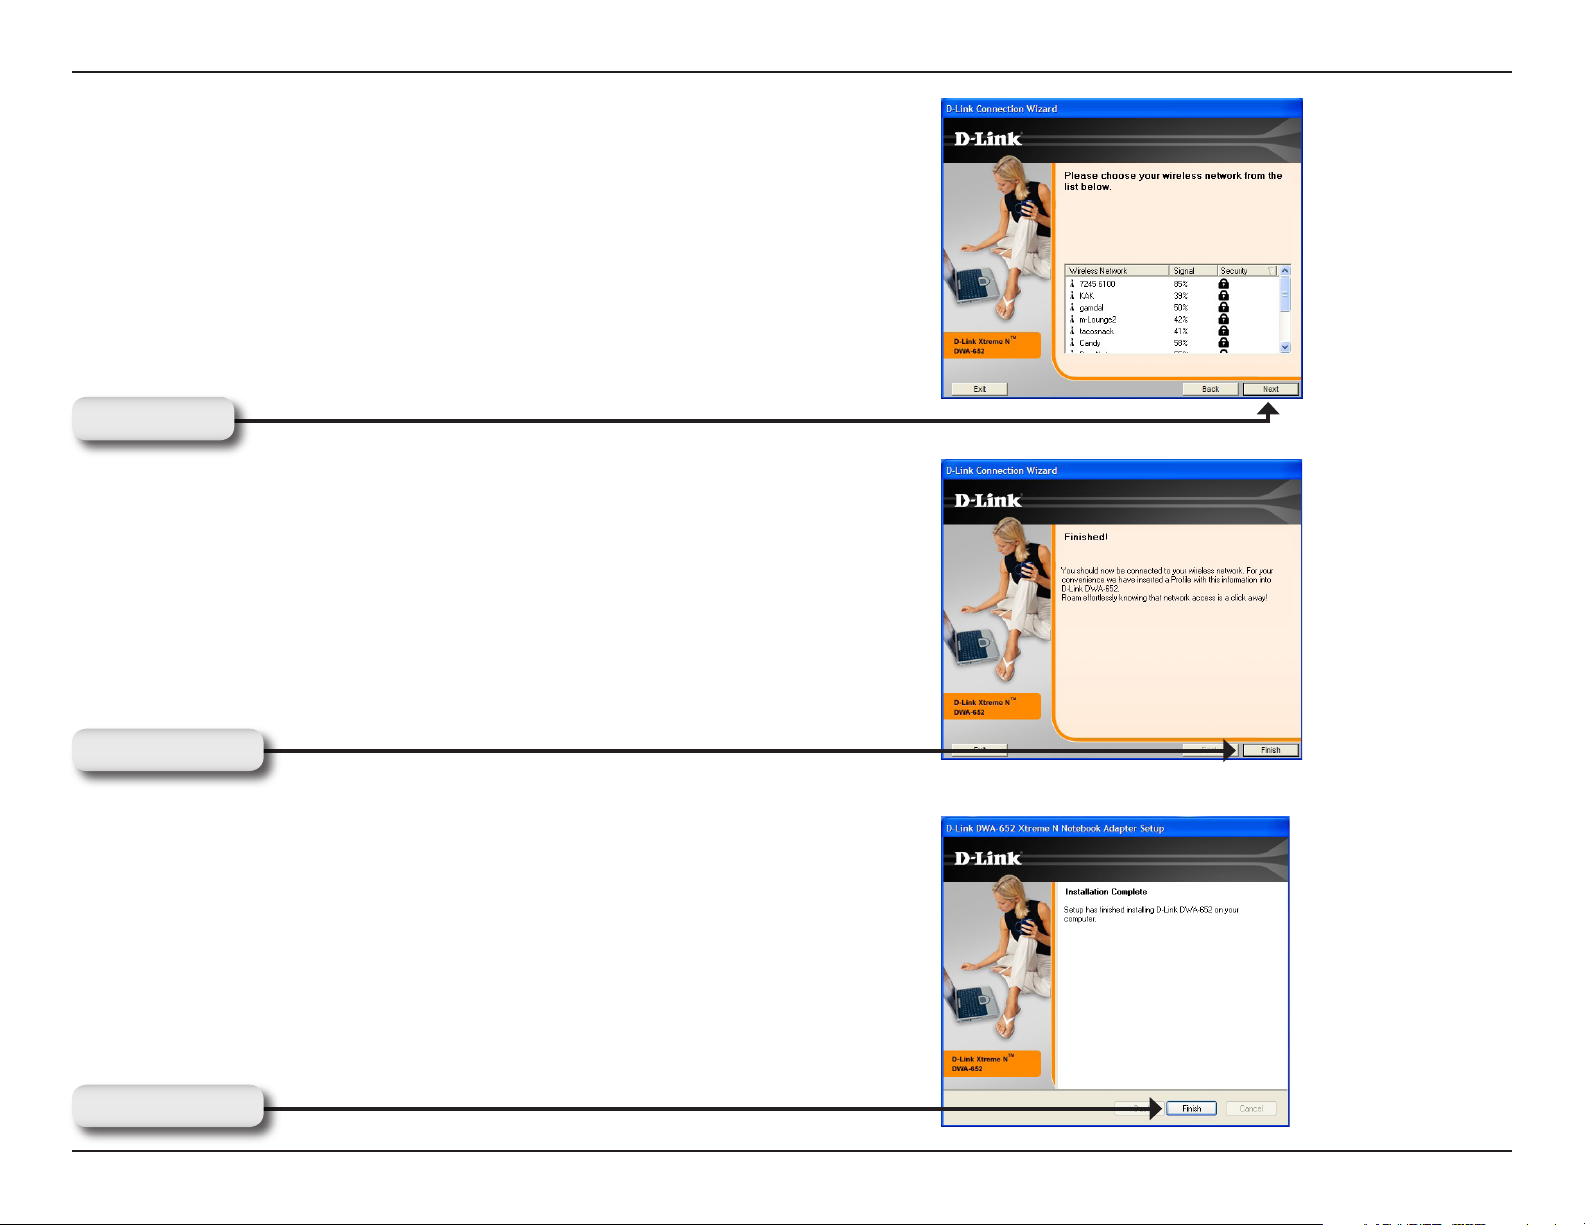
Click the Scan button to display a list of wireless networks (site
survey). Click on the network name (SSID) and click Next.
Click Next
When this screen appears, you are successfully connected to
your wireless network. Click Finish to complete your setup.
Click Finish
Click Finish to continue. If you are prompted to reboot your
computer, select Yes, I want to restart my computer now.
Click Finish
16D-Link DWA-652 User Manual
Page 3

Section 3 - Configuration
Configuration
This section will show you how to configure your new D-Link wireless adapter using the D-Link Utility as well as Windows®
XP Zero Configuration and Vista™ WLAN Auto Configuration.
D-Link Wireless Connection Manager
The D-Link DWA-652 uses the Wireless Connection Manager as the management software. The manager provides
the user an easy interface to change any settings related to the wireless adapter. Clicking on the Wireless Connection
Manager icon on the desktop will start the Configuration.
If you are using Windows® Vista™ please skip to page 27 or Windows® XP skip to page 29.
Double-click the Wireless Connection
Manager icon on your desktop.
17D-Link DWA-652 User Manual
Page 4

Section 3 - Configuration
Wireless Networks
The Wireless Networks (Site Survey) page will display all wireless networks that are available in your area. To connect
to a network, simply highlight the wireless network (SSID) and click Connect.
SSID:
MAC:
Signal:
Security:
Channel:
WPS Button:
Refresh Button:
The SSID (Service Set Identifier) is the name
of the wireless network.
Displays the MAC address of the wireless
device.
Displays the Link Quality of the wireless
connection.
If there is a “lock” icon, this means the wireless
network is secure. You must know the encryption
key/security settings to connect.
Displays the channel of the wireless network.
Connect to a wireless network using Wi-Fi
Protected Setup. Refer to the next page.
Rescans for available wireless networks in your
area.
®
Connect Button:
Activate Button:
Highlight a wireless network and click the
Connect button. If the network is secure, a
pop-up window will appear. Enter the security
information to connect (refer to the Wireless
Security section for more information).
Select a wireless network profile from the
drop-down menu and click Activate to connect.
Allow up to 30 seconds to connect.
18D-Link DWA-652 User Manual
Page 5
Section 3 - Configuration
Wi-Fi® Protected Setup (WPS)
Wi-Fi Protected Setup (WPS) System is designed for easy setup
of security-enabled Wi-Fi networks. It is recommended to have
the access point or wireless router nearby during setup.
For more information on WPS, visit the Wi-Fi Alliance website at
www.wi-fi.org.
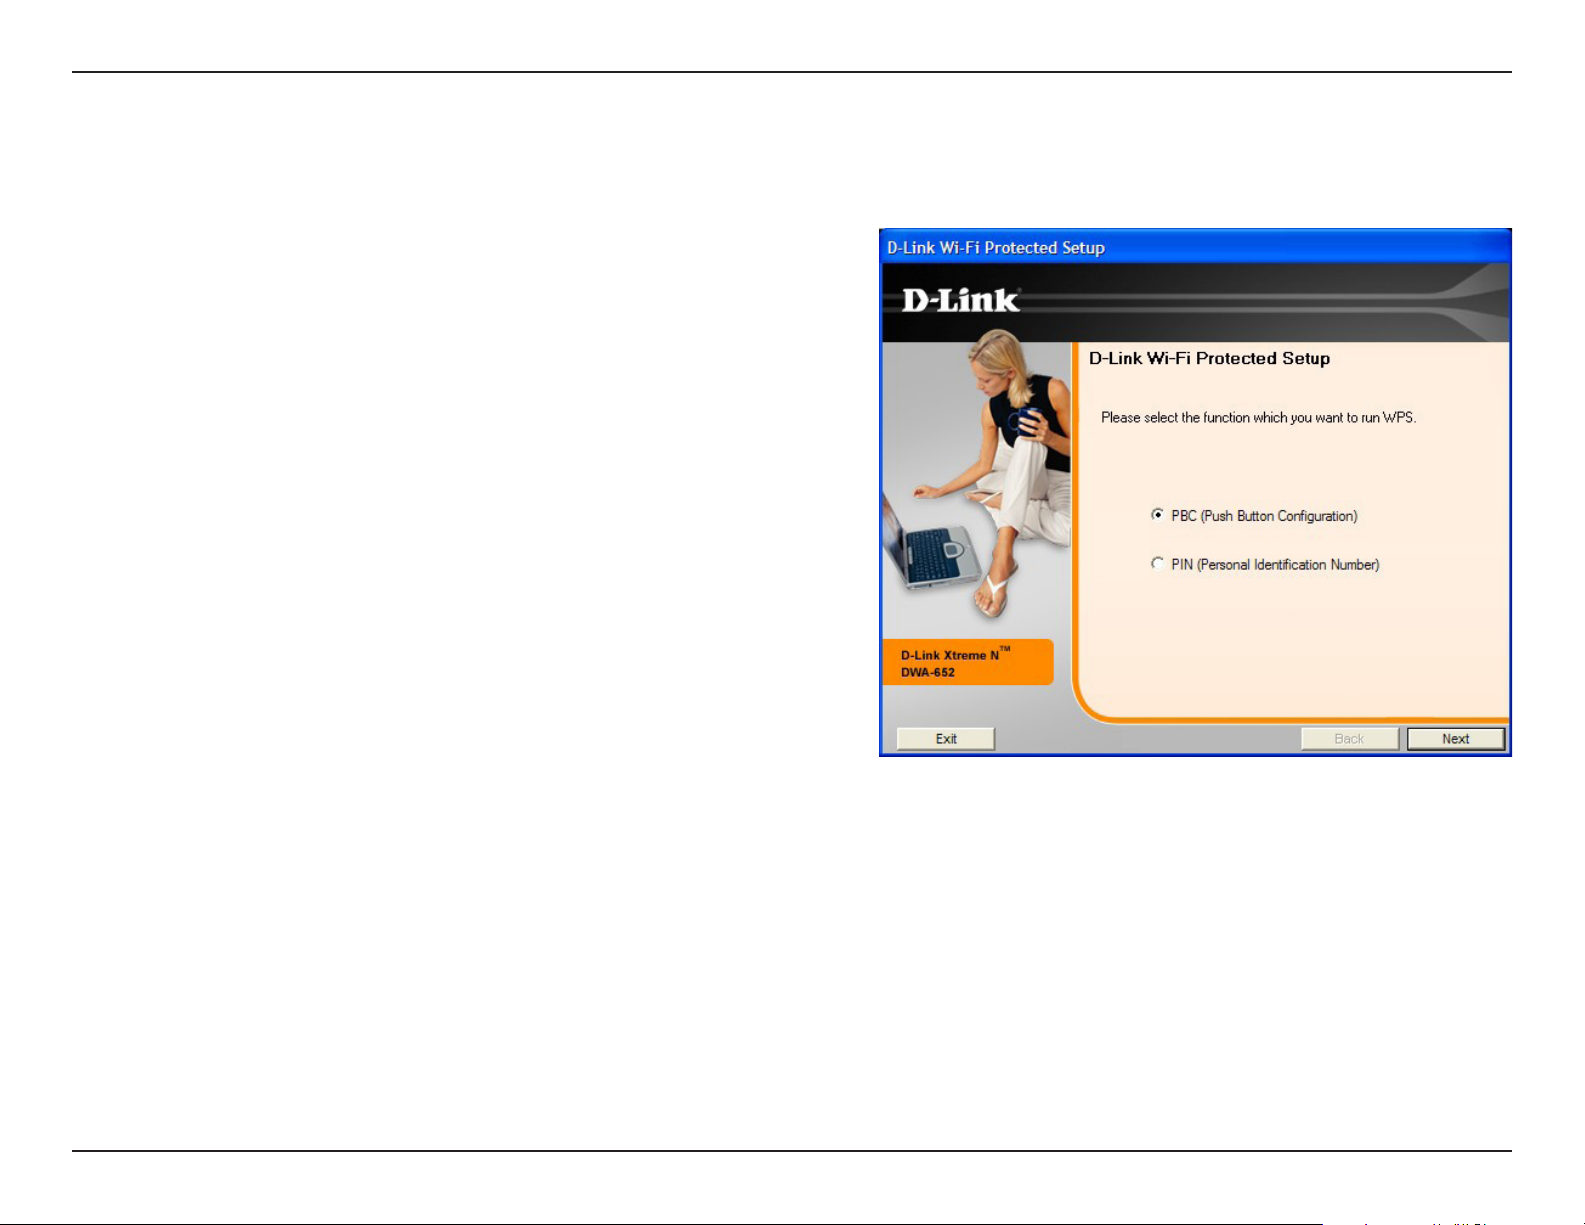
“Push Button Configuration” (PBC) is a virtual button in
the utility that connects you to other WPS-enabled devices. A
connection can be established by clicking on the virtual button,
then pushing the physical button on the access point or wireless
router within 120 seconds. Refer to page 14.
“Personal Identification Number” (PIN) is a unique number
generated randomly by the wireless adapter’s utility. Entering
this number in the utility of the WPS-enabled wireless router or
access point connects you with the intended wireless network.
Refer to the next page for more information.
19D-Link DWA-652 User Manual
Page 6
Section 3 - Configuration
Personal Identification Number (PIN)
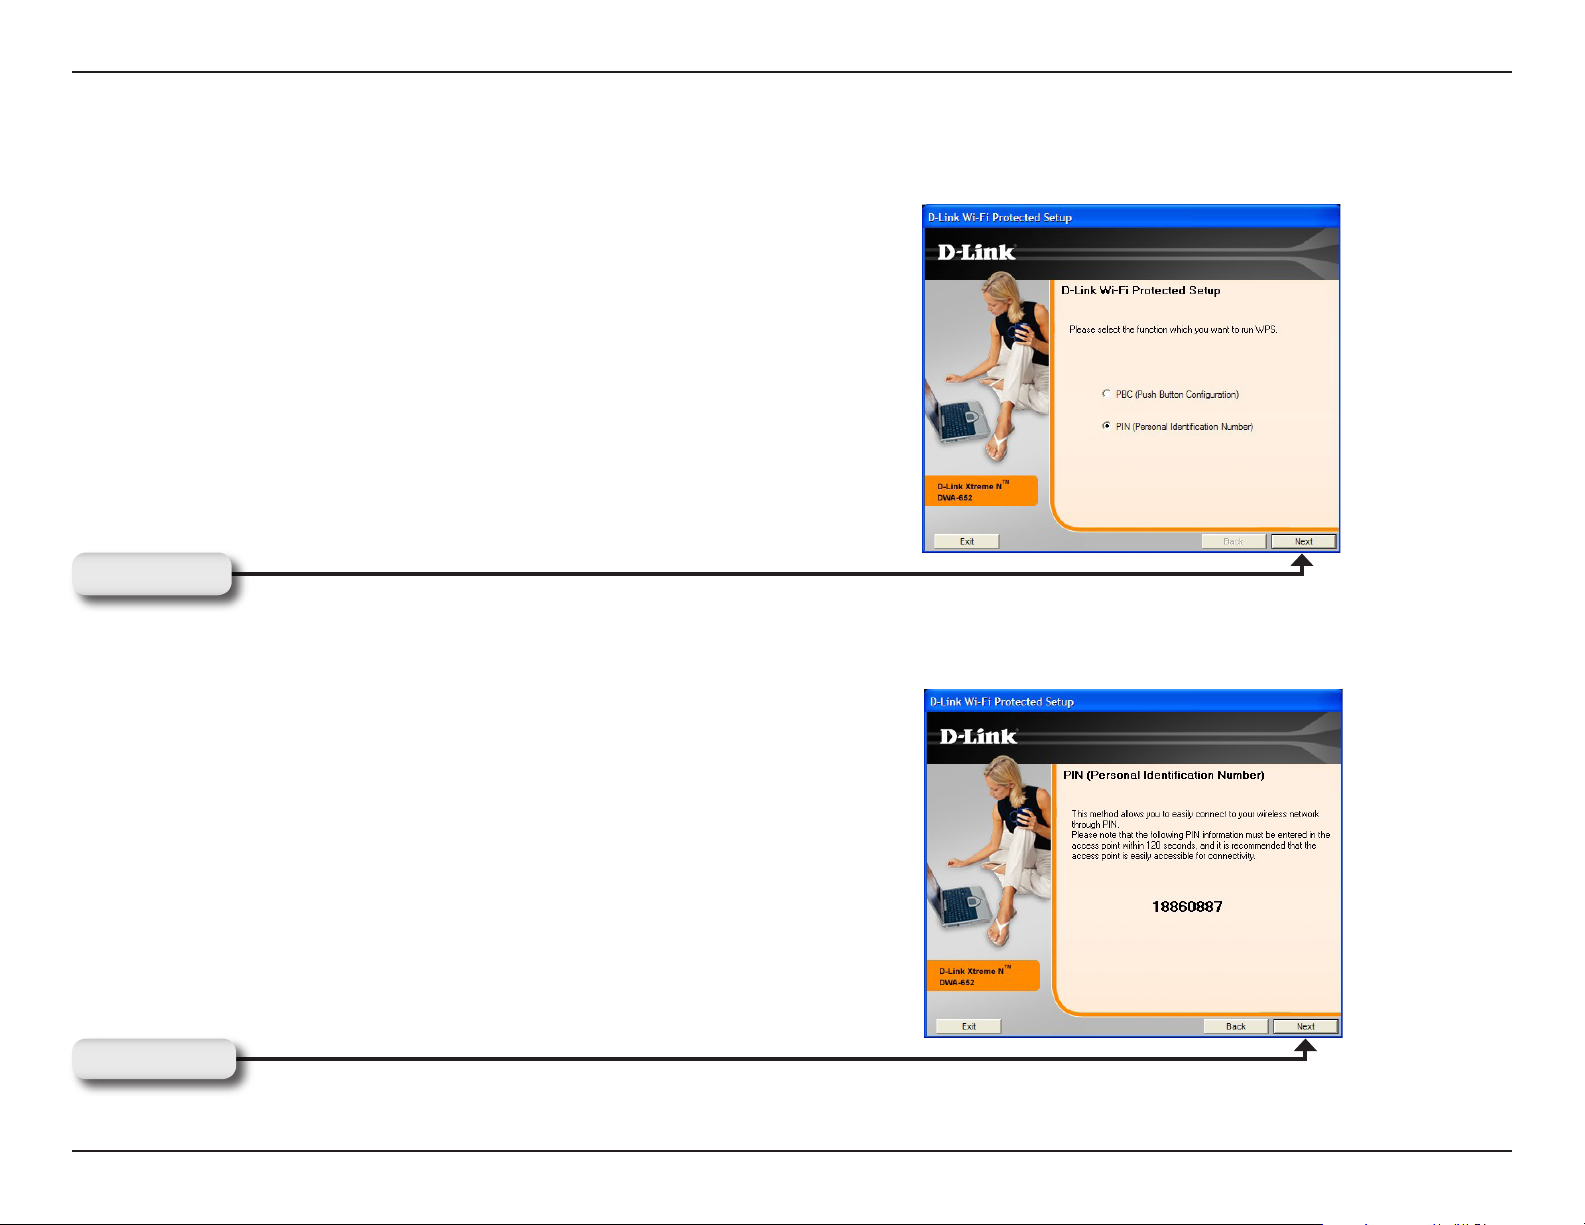
If you want to connect using the PBC method, refer to page 14. To
use the PIN method, select PIN (Personal Identification Number)
and click Next.
Click Next
Make sure your access point or wireless router is close by. Write
down the number on the screen. Enter this number in your access
point or wireless router. Please refer to the manufacture’s manual
for instructions.
Once you click Next, you will have 2 minutes to enter this number
in your access point or wireless router.
Click Next
20D-Link DWA-652 User Manual
Page 7
Section 3 - Configuration
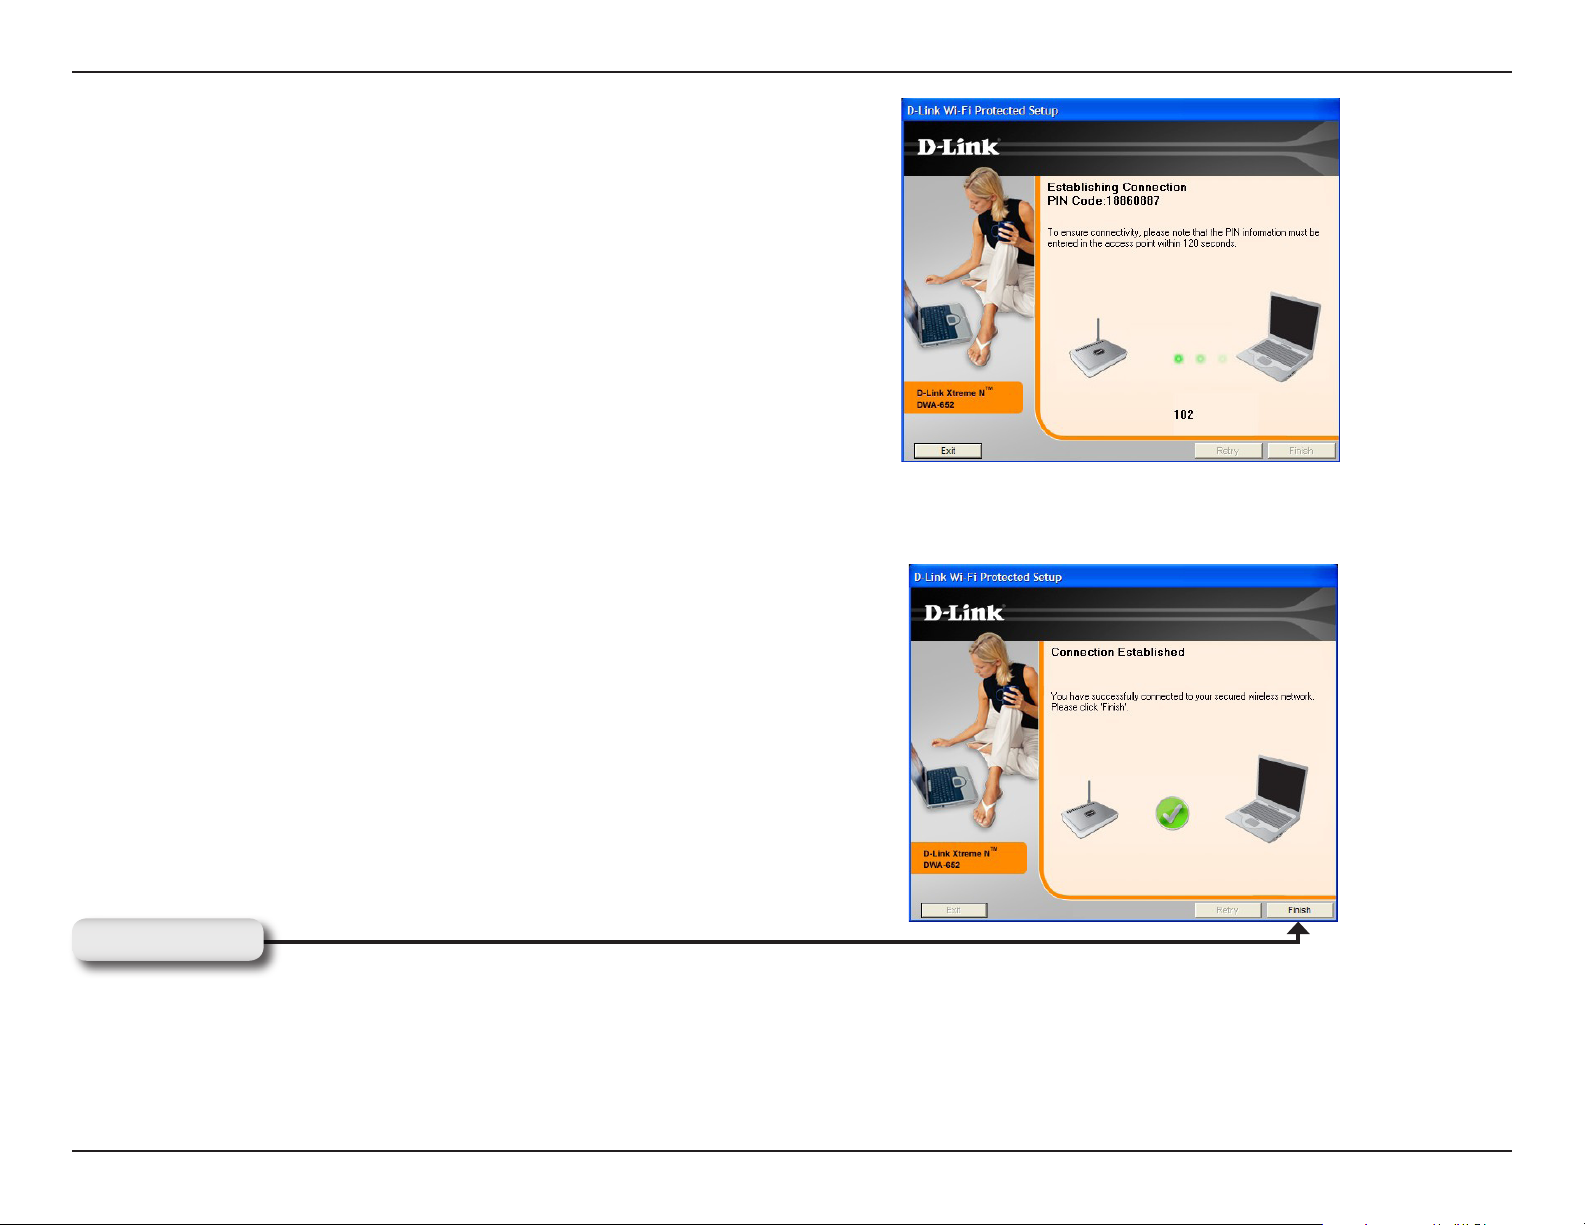
The adapter will try to establish connectivity to your access point
or wireless router.
When this screen appears, you have successfully established
connectivity. Click Finish to complete your setup.
Click Finish
21D-Link DWA-652 User Manual
Page 8
Section 3 - Configuration
My Wireless Networks
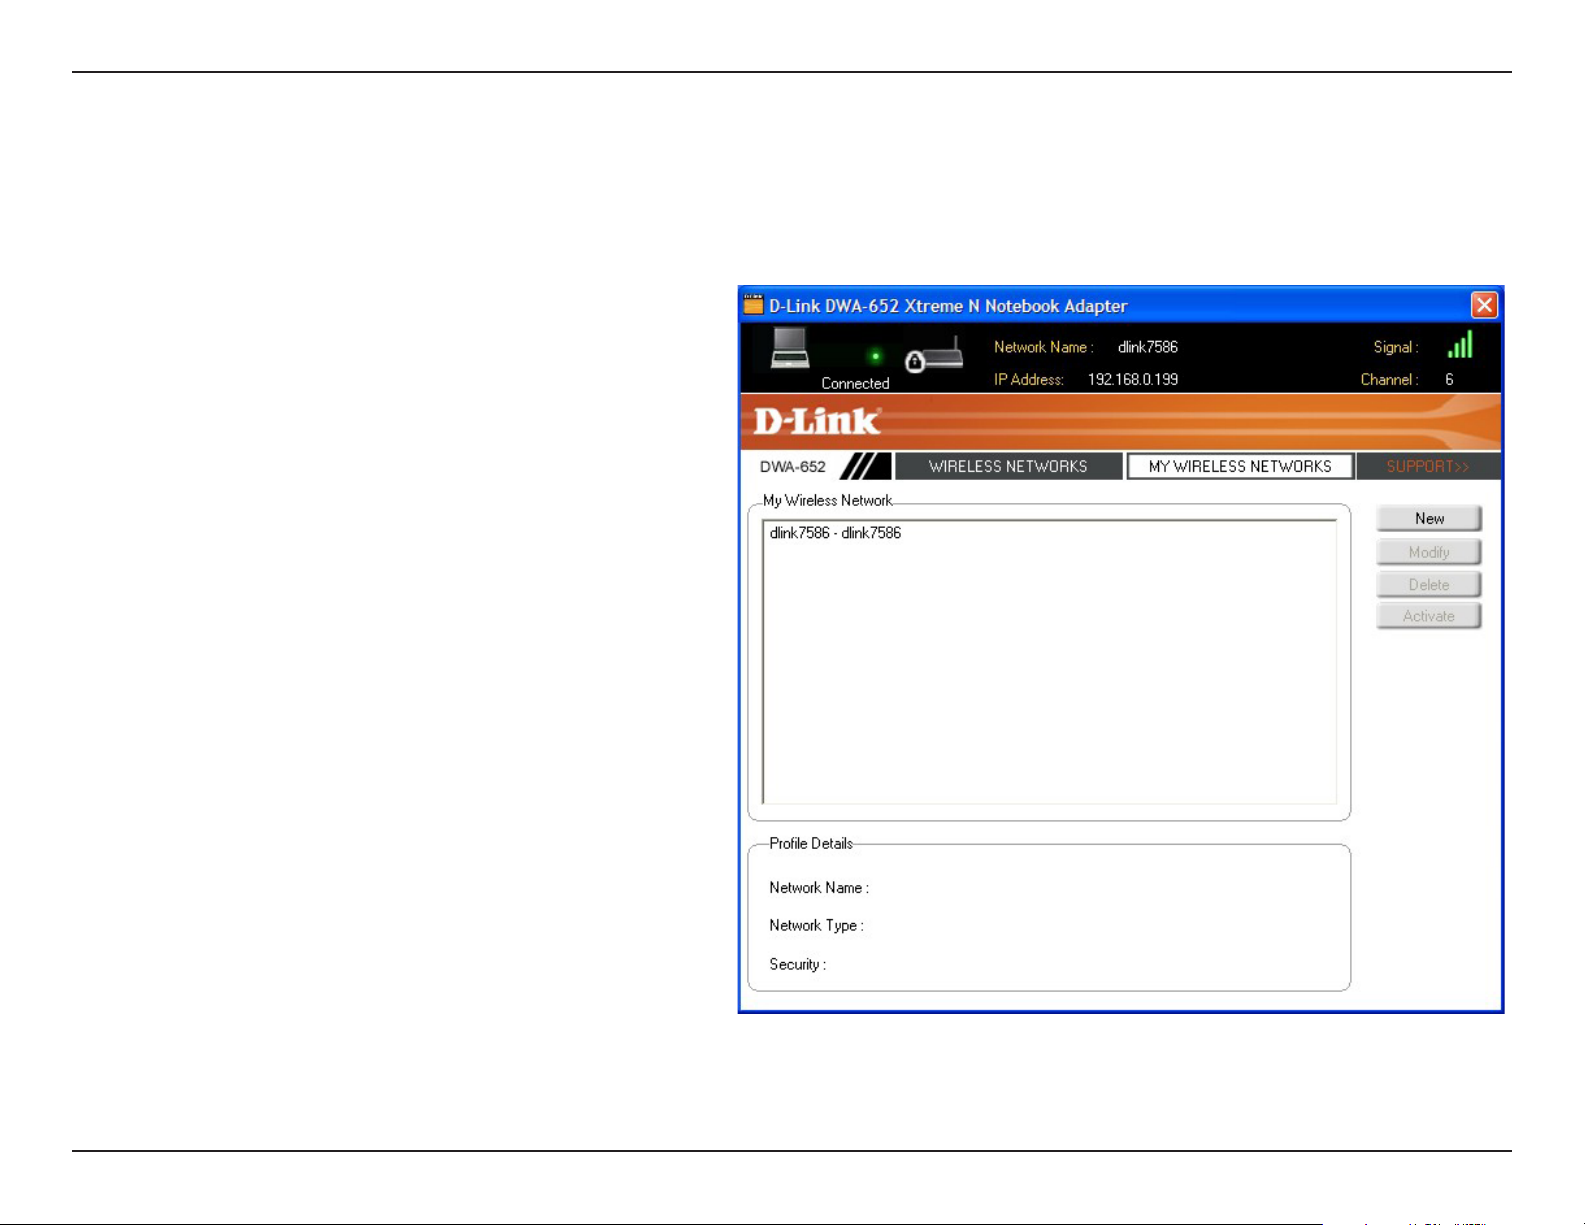
The My Wireless Networks page will allow you to create, edit, and delete wireless network profiles. Every time you
connect to a network using the Wireless Networks page, a profile will automatically be created.
New Button:
Modify:
Delete:
Activate:
Profile Details:
Click New to create a new wireless network
profile (refer to page 23).
Click Modify to edit a current profile (refer to
page 24).
Click Delete to remove a profile.
Click Activate to use a profile. Allow up to 30
seconds to connect to the wireless network.
The Profile Details section will display information
about the wireless network such as the network
name (SSID), network type (Infrastructure), and
if the network is secured.
22D-Link DWA-652 User Manual
Page 9
Section 3 - Configuration
Add Profile
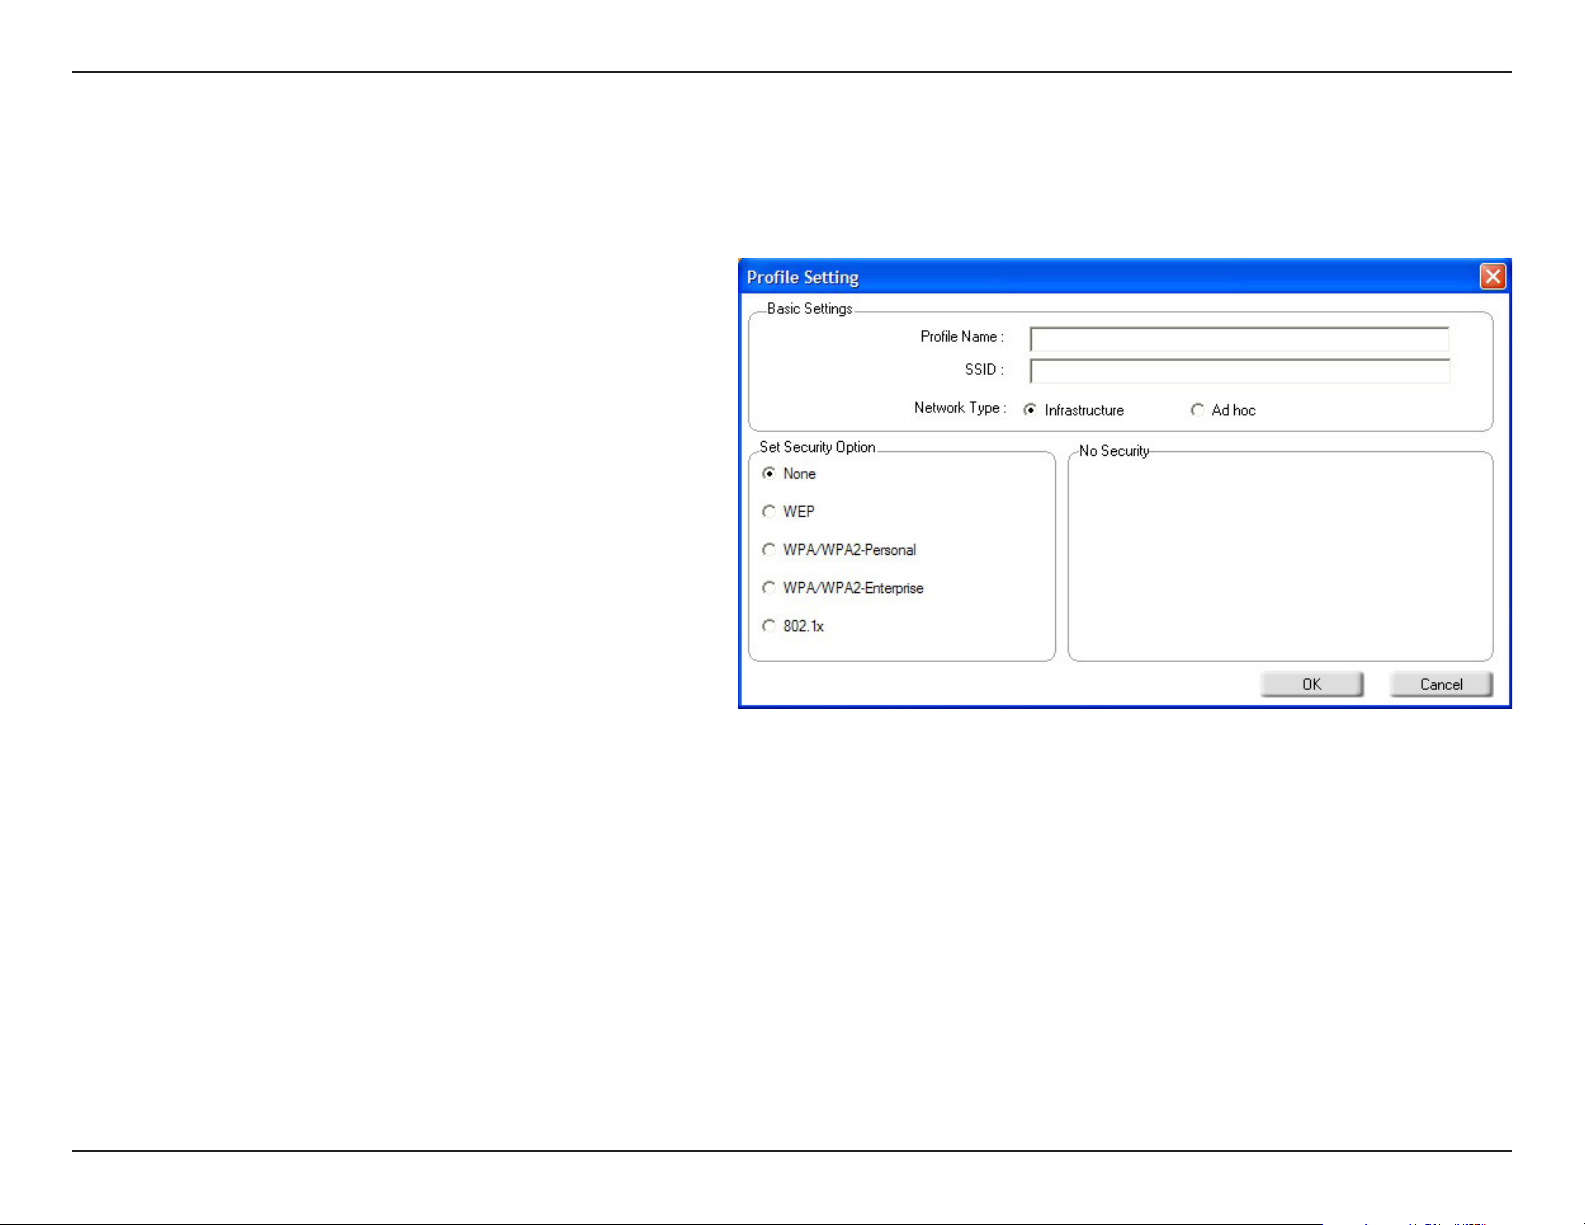
You may add a new network by clicking the New button from the My Wireless Networks page.
Profile Name:
SSID:
Network Type:
Security Type:
OK Button:
Enter a name for your profile (e.g. Home, Office,
Coffee Shop).
Enter the SSID of the wireless network.
Select the network type. If you are connecting
to a wireless router or access point, select
Infrastructure. (Ad-hoc mode is not supported)
Select the type of security used. Please refer
to the Wireless Security section for more
information.
Click OK to save your settings.
23D-Link DWA-652 User Manual
Page 10
Section 3 - Configuration
Modify Profile
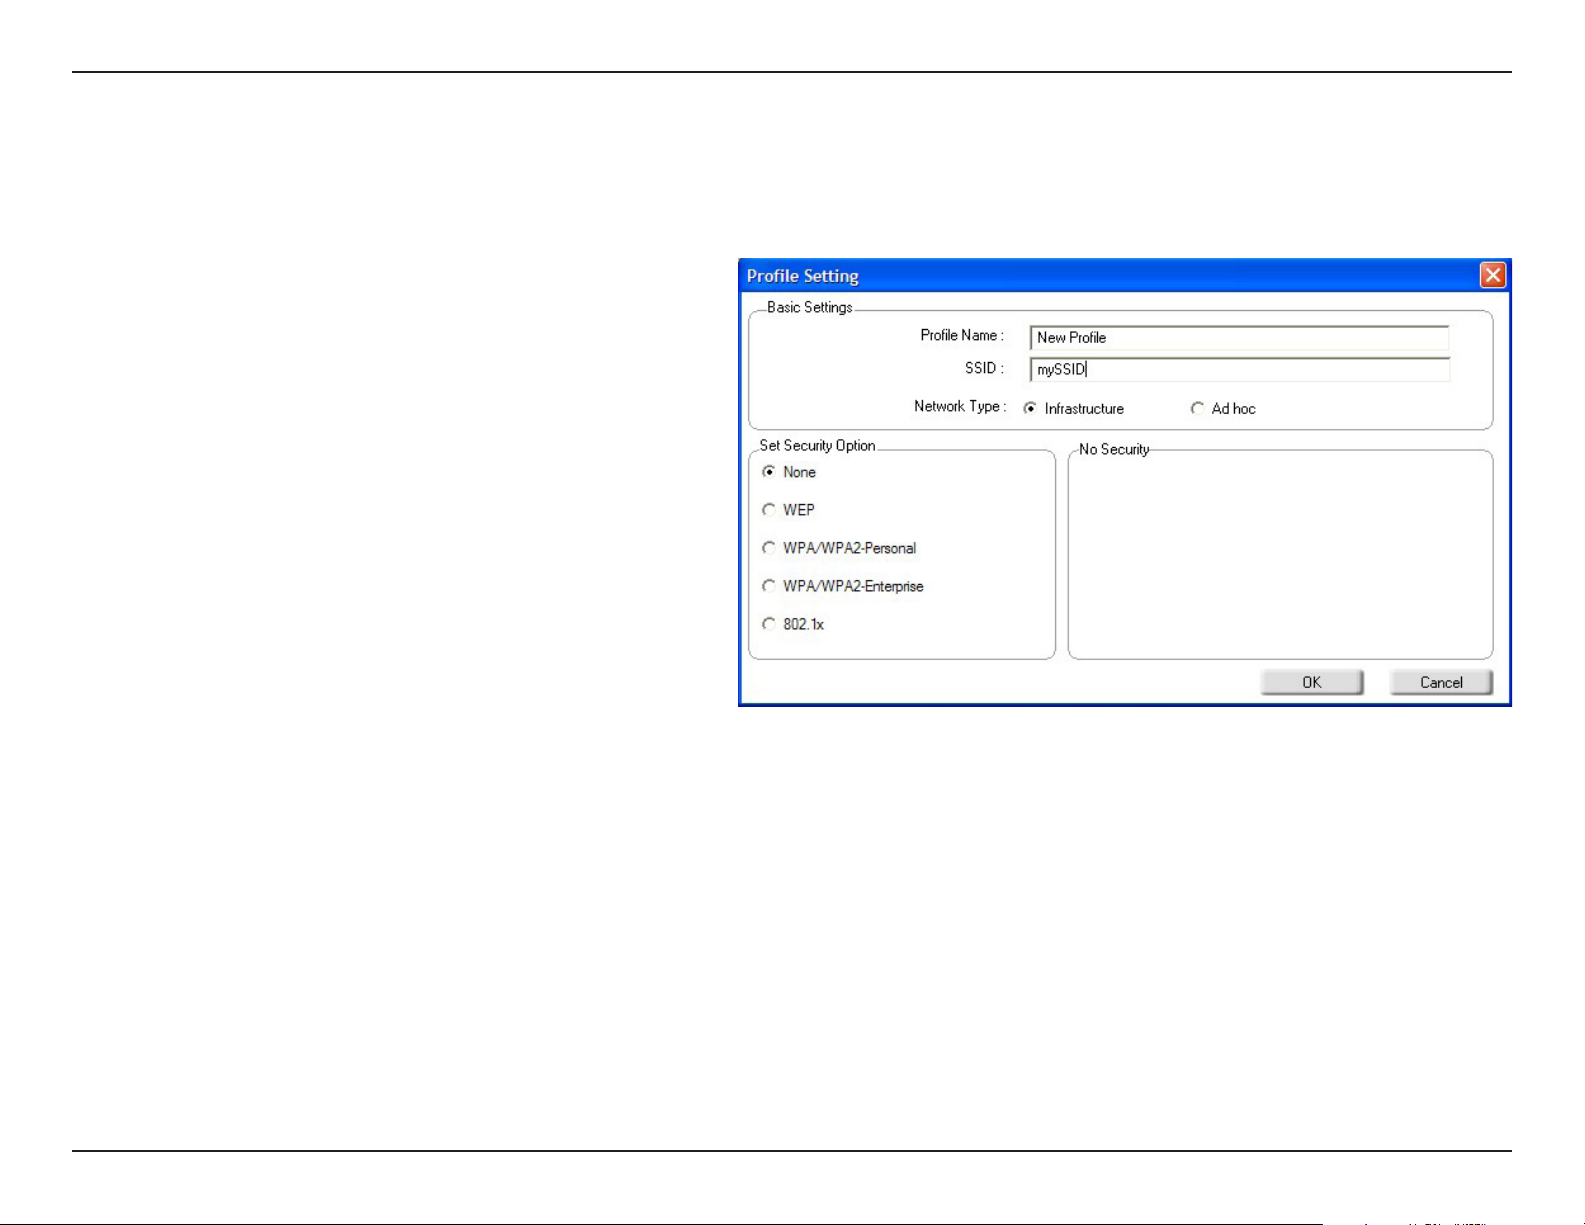
You may edit an existing profile by selecting the profile and clicking the Modify button from the My Wireless Networks
page.
Profile Name:
SSID:
Network Type:
Security Type:
OK Button:
Enter a name for your profile (e.g. Home, Office,
Coffee Shop).
Displays the SSID of the network.
Displays the network type.
Select the type of security used. Please refer
to the Wireless Security section for more
information.
Click OK to save your settings.
24D-Link DWA-652 User Manual
Page 11
Section 3 - Configuration
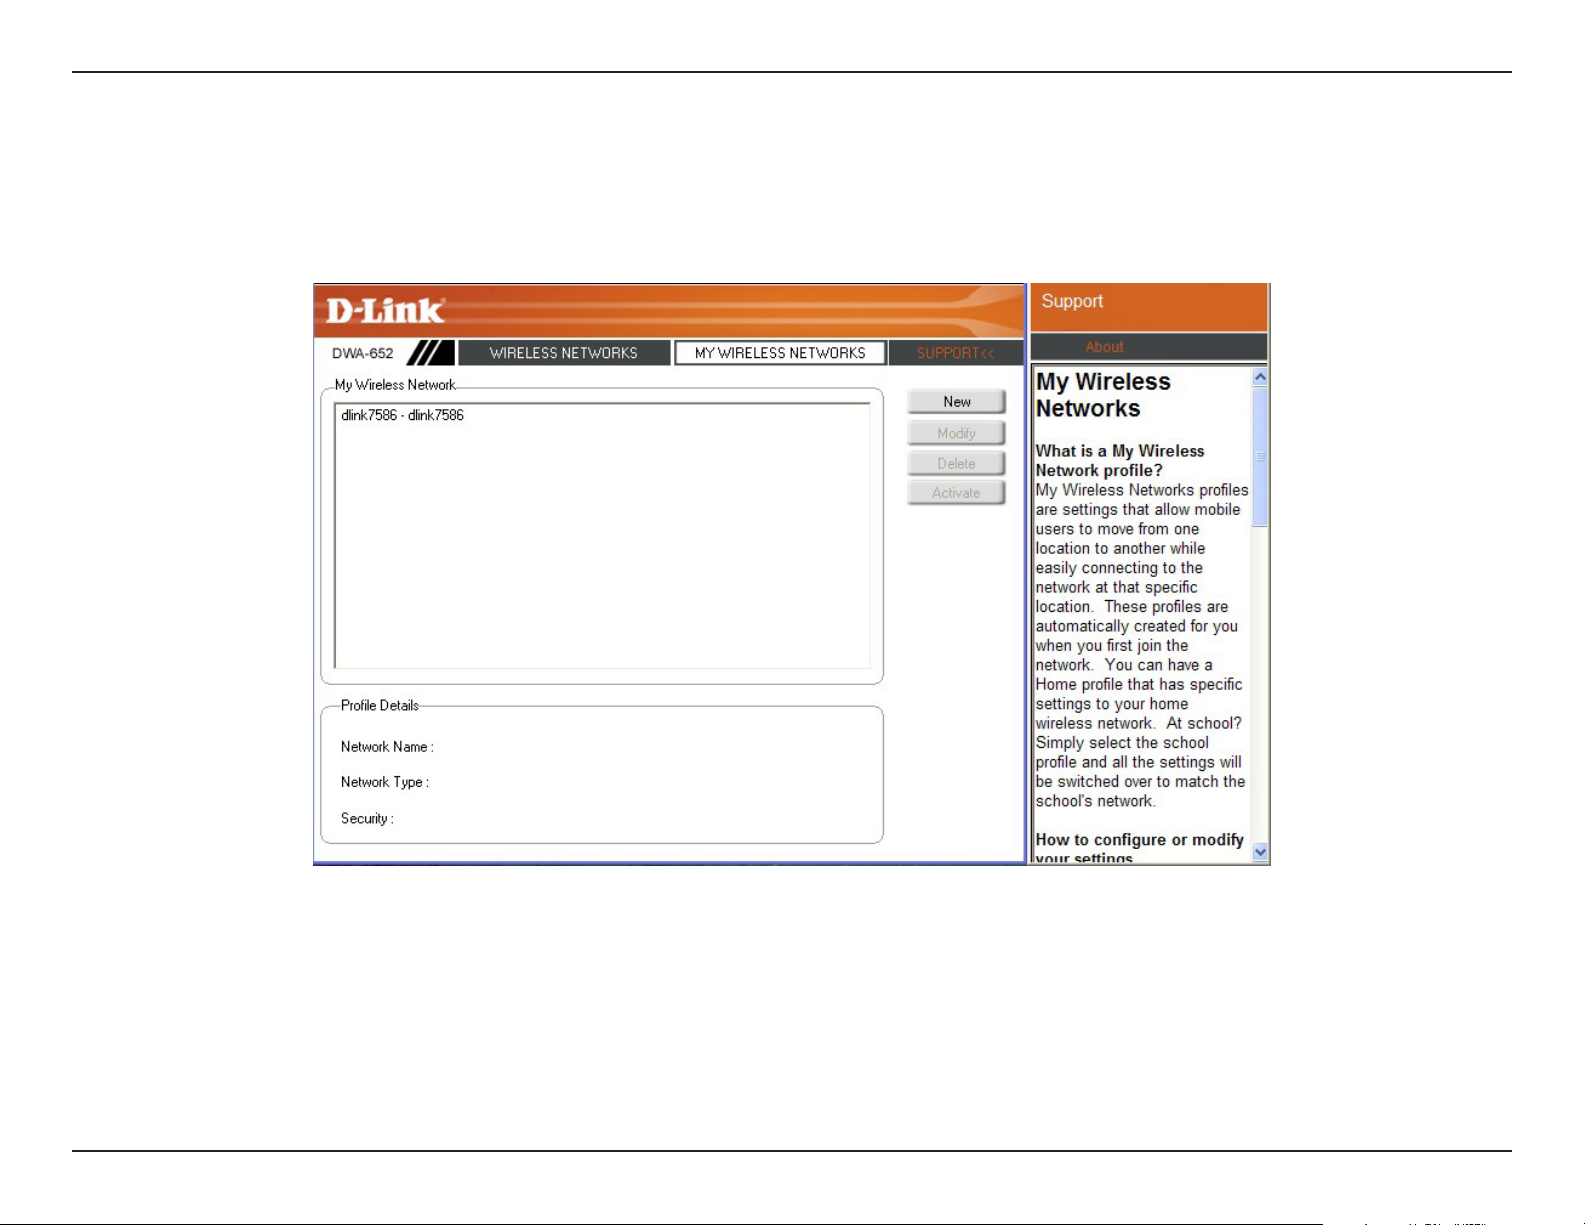
Support
If you need help, click the Support button. A panel will appear to the right of the utility which will display information
about the utility.
25D-Link DWA-652 User Manual
Page 12
Section 3 - Configuration
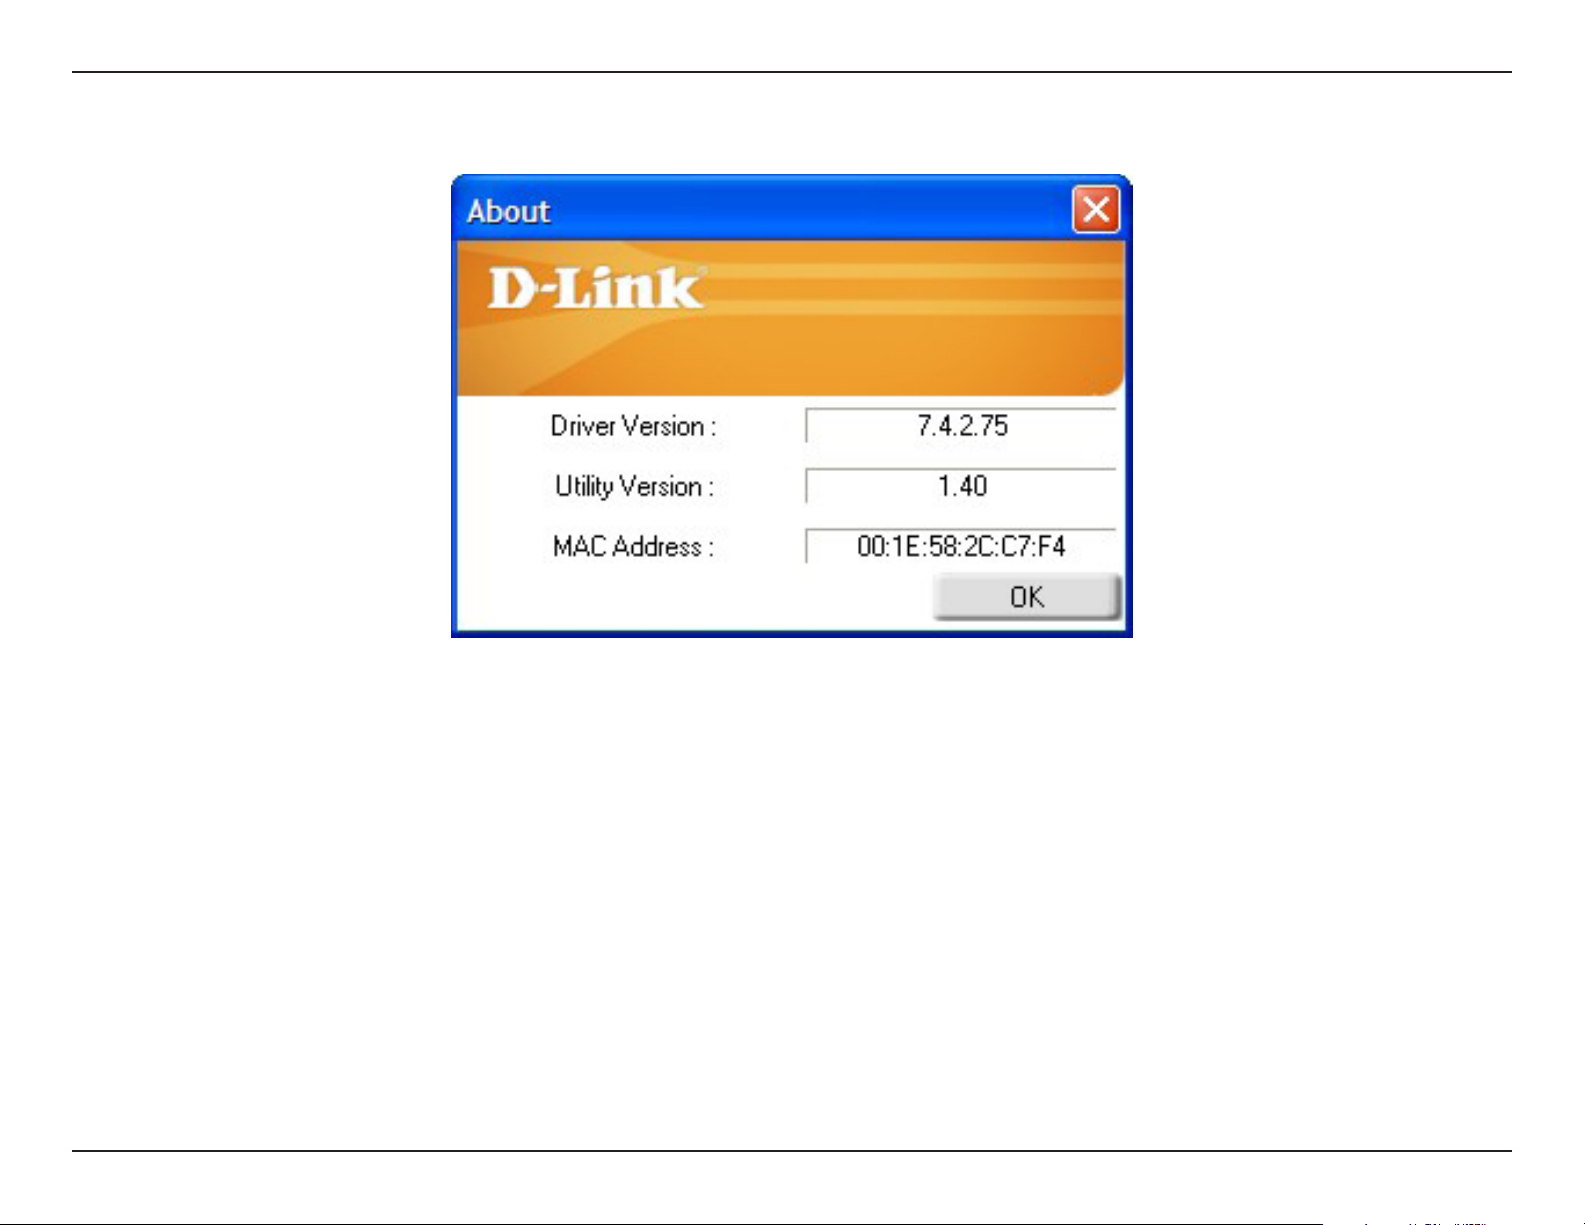
About
The About screen gives you information about the Firmware and Utility Versions of the DWA-652.
26D-Link DWA-652 User Manual
Page 13
Section 3 - Configuration
Connect to a Wireless Network
Using Windows® Vista
™
Windows® Vista™ users may use the built-in wireless utility. If you are using another company’s utility or Windows® 2000,
please refer to the user manual of your wireless adapter for help with connecting to a wireless network. Most utilities
will have a “site survey” option similar to the Windows® Vista™ utility as seen below.
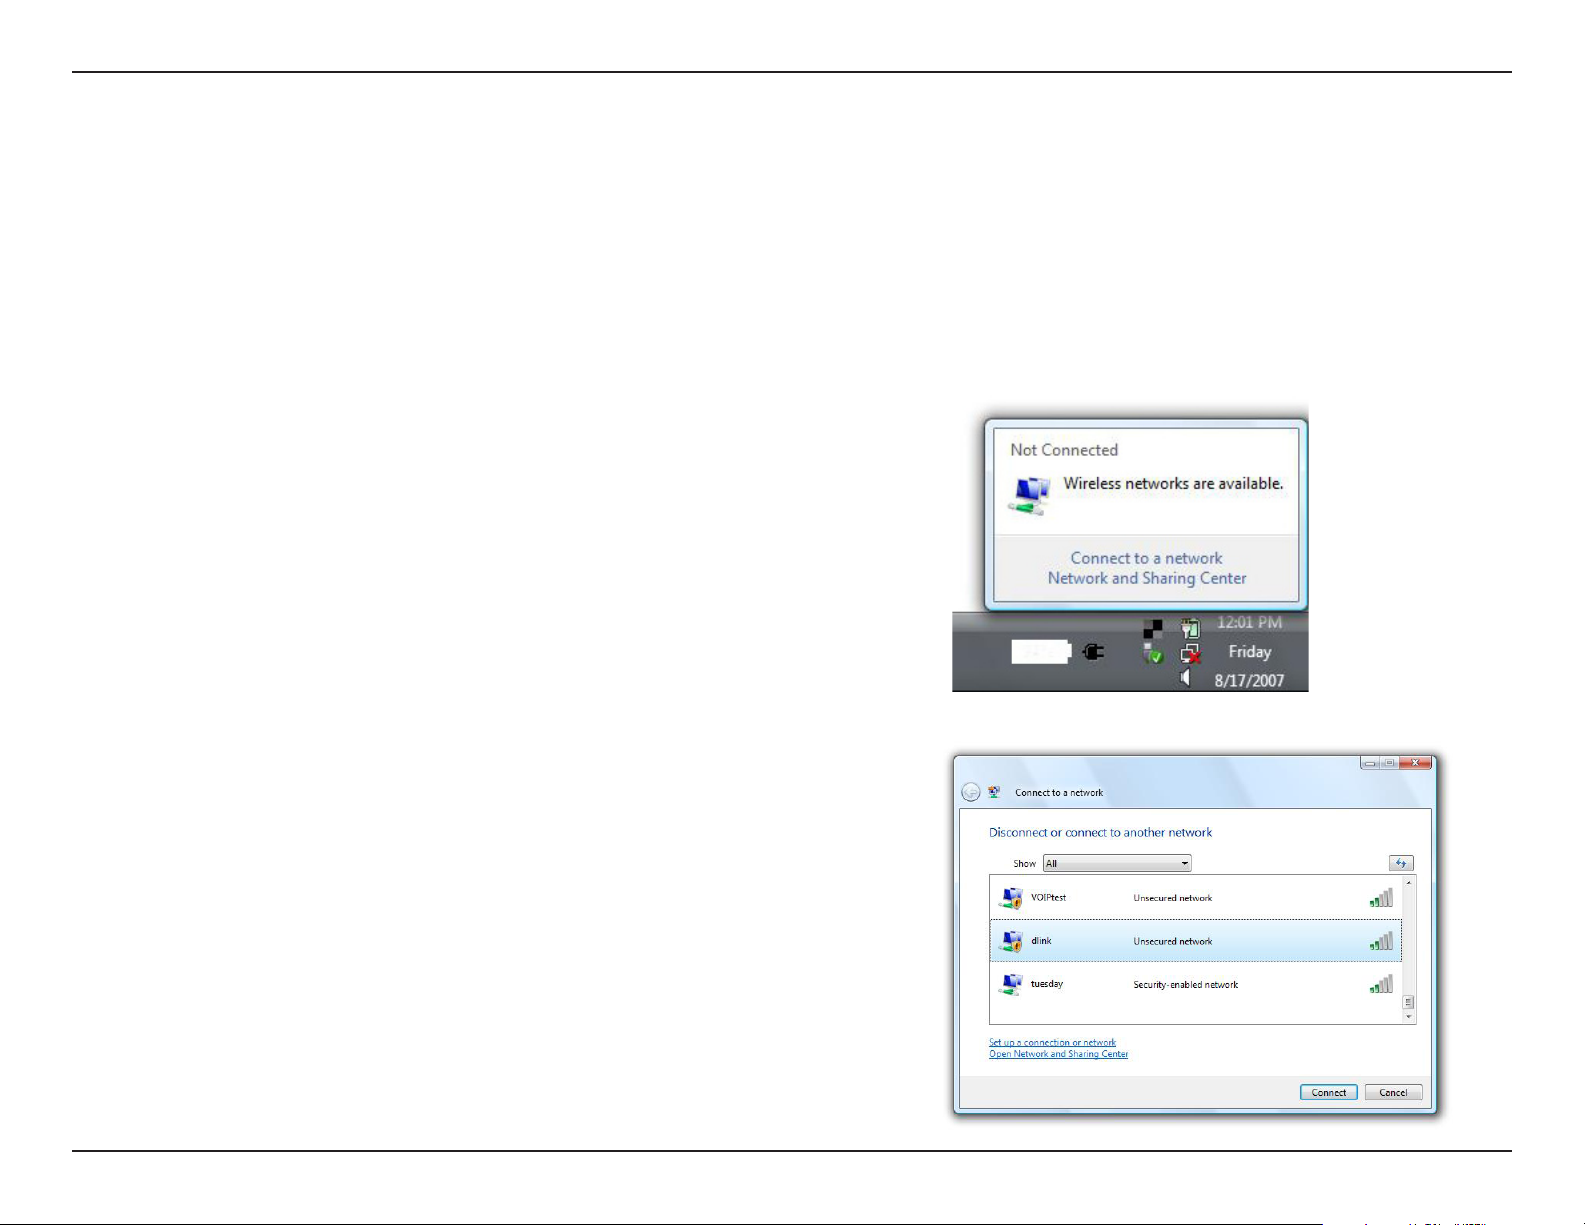
If you receive the Wireless Networks Detected bubble, click
on the center of the bubble to access the utility.
or
Right-click on the wireless computer icon in your system tray
(lower-right corner next to the time). Select Connect to a
network.
The utility will display any available wireless networks in your
area. Click on a network (displayed using the SSID) and click
the Connect button.
If you get a good signal but cannot access the Internet, check the
TCP/IP settings for your wireless adapter. Refer to the Networking
Basics section in this manual for more information.
27D-Link DWA-652 User Manual
Page 14
Section 3 - Configuration
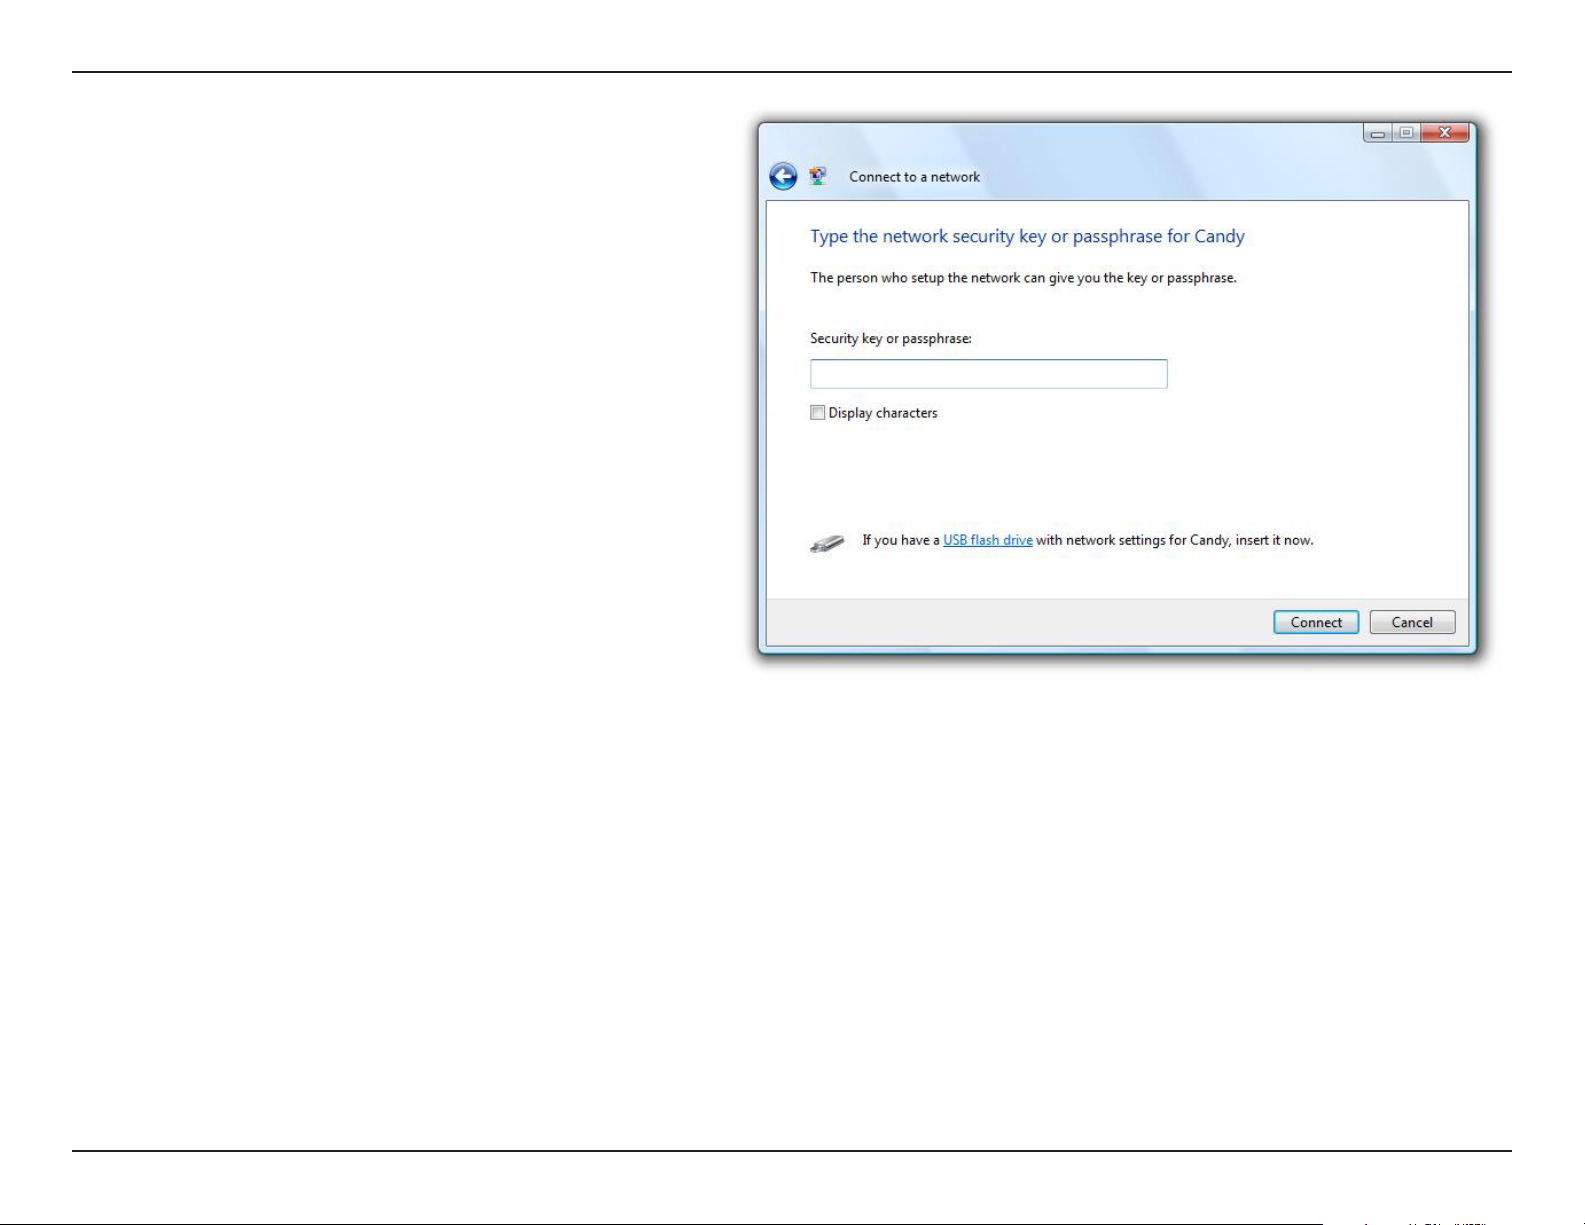
Enter the same security key or passphrase that is
on your router and click Connect.
It may take 20-30 seconds to connect to the wireless
network. If the connection fails, please verify that the
security settings are correct. The key or passphrase
must be exactly the same as on the wireless
router.
28D-Link DWA-652 User Manual
Page 15
Section 3 - Configuration
Connect to a Wireless Network
Using Windows® XP
Windows® XP users may use the built-in wireless utility (Zero Configuration Utility). The following instructions are for
Service Pack 2 users. If you are using another company’s utility or Windows® 2000, please refer to the user manual
of your wireless adapter for help with connecting to a wireless network. Most utilities will have a “site survey” option
similar to the Windows® XP utility as seen below.
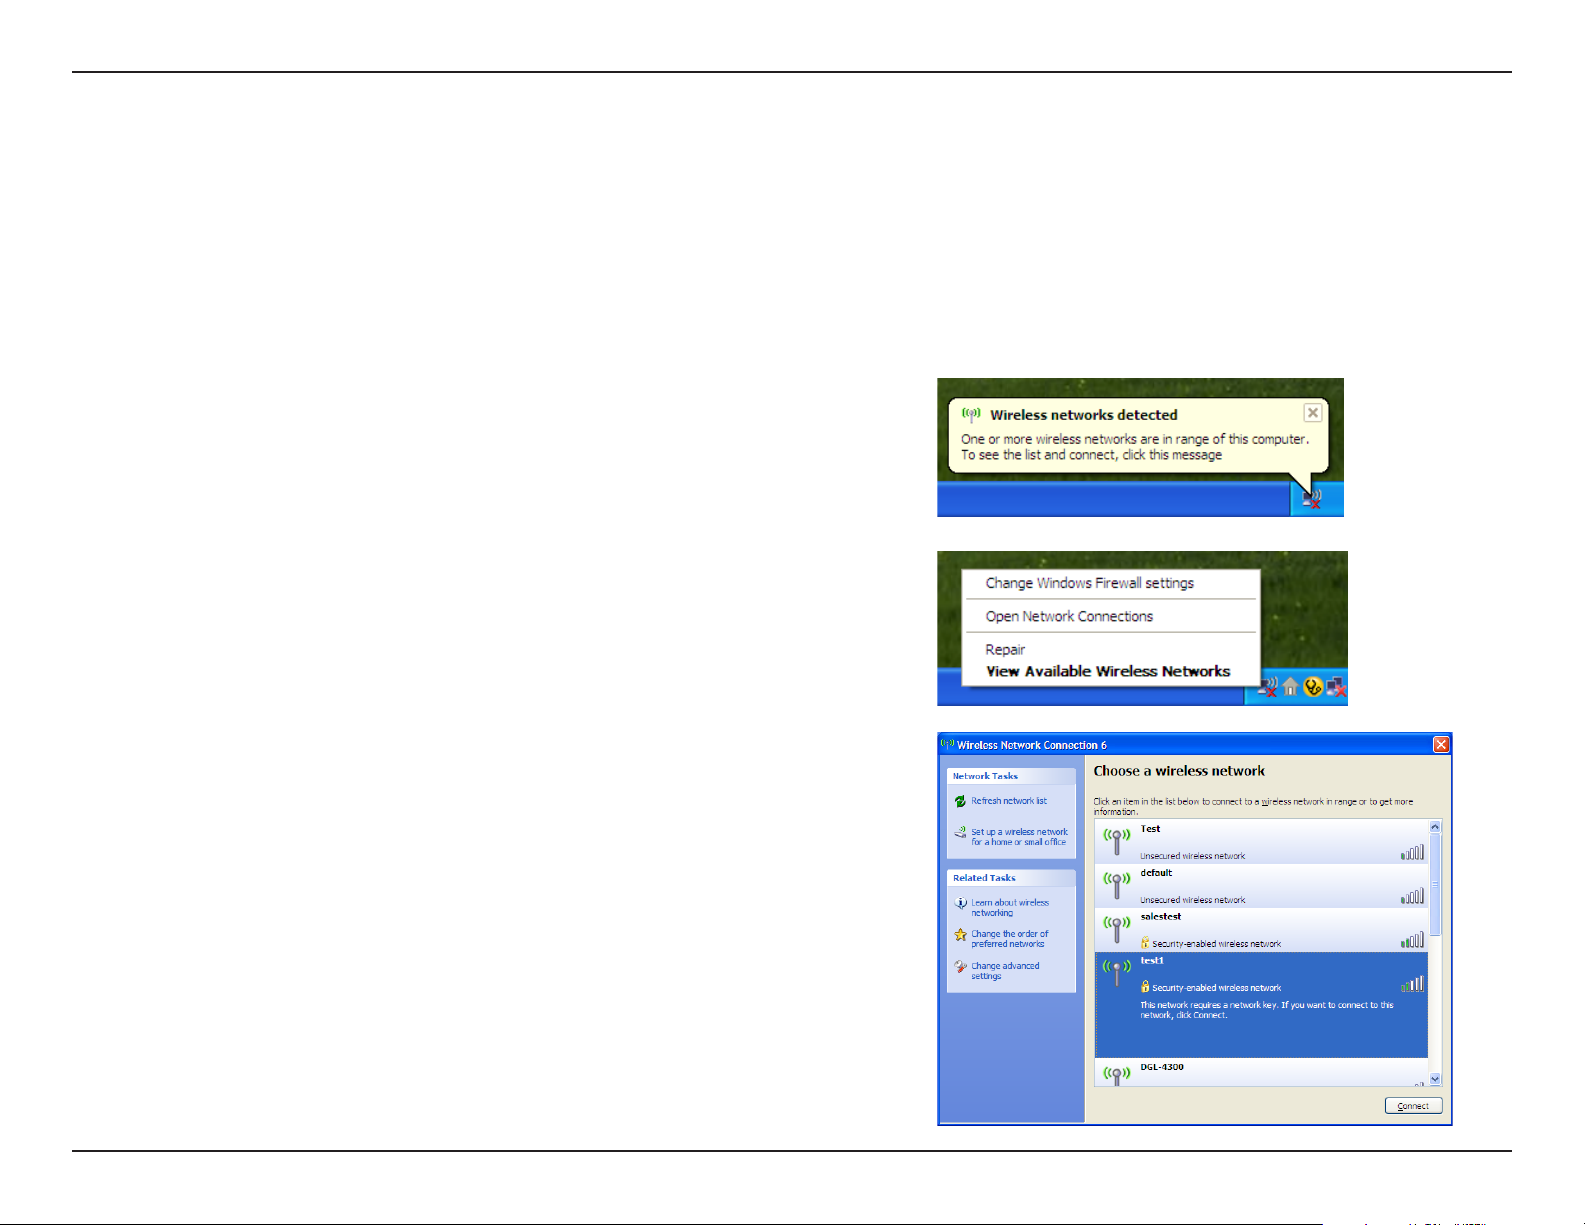
If you receive the Wireless Networks Detected bubble, click
on the center of the bubble to access the utility.
or
Right-click on the wireless computer icon in your system tray
(lower-right corner next to the time). Select View Available
Wireless Networks.
The utility will display any available wireless networks in your
area. Click on a network (displayed using the SSID) and click
the Connect button.
If you get a good signal but cannot access the Internet, check the
TCP/IP settings for your wireless adapter. Refer to the Networking
Basics section in this manual for more information.
29D-Link DWA-652 User Manual
Page 16

Section 4 - Wireless Security
Wireless Security
This section will show you the different levels of security you can use to protect your data from intruders. The
DWA-652 offers the following types of security:
• WPA/WPA2-Personal
• WPA/WPA2-Enterprise
• 802.1x (RADIUS)
What is WPA™?
WPA, or Wi-Fi® Protected Access, is a Wi-Fi standard that was designed to improve the security features of WEP
(Wired Equivalent Privacy).
The 2 major improvements over WEP:
• Improved data encryption through the Temporal Key Integrity Protocol (TKIP). TKIP scrambles the keys
using a hashing algorithm and, by adding an integrity-checking feature, ensures that the keys haven’t been
tampered with. WPA2 is based on 802.11i and uses Advanced Encryption Standard instead of TKIP.
• User authentication, which is generally missing in WEP, through the extensible authentication protocol
(EAP). WEP regulates access to a wireless network based on a computer’s hardware-specific MAC
address, which is relatively simple to be sniffed out and stolen. EAP is built on a more secure public-key
encryption system to ensure that only authorized network users can access the network.
WPA/WPA2-Personal uses a passphrase or key to authenticate your wireless connection. The key is an alpha-numeric
password between 8 and 63 characters long. The password can include symbols (!?*&_) and spaces. This key must
be the exact same key entered on your wireless router or access point.
WPA/WPA2-Enterprise incorporates user authentication through the Extensible Authentication Protocol (EAP). EAP
is built on a more secure public key encryption system to ensure that only authorized network users can access the
network.
30D-Link DWA-652 User Manual
Page 17
Section 4 - Wireless Security
Configure WPA™/WPA2™-Personal
Using the D-Link Wireless Connection Manager
It is recommended to enable WPA/WPA2-Personal on your wireless router or access point before configuring your
wireless adapter. If you are joining an existing network, you will need to know the WPA/WPA2-Personal passphrase
being used.
1. Open the Wireless Connection Manager by double-clicking on the
D-Link icon on your desktop.
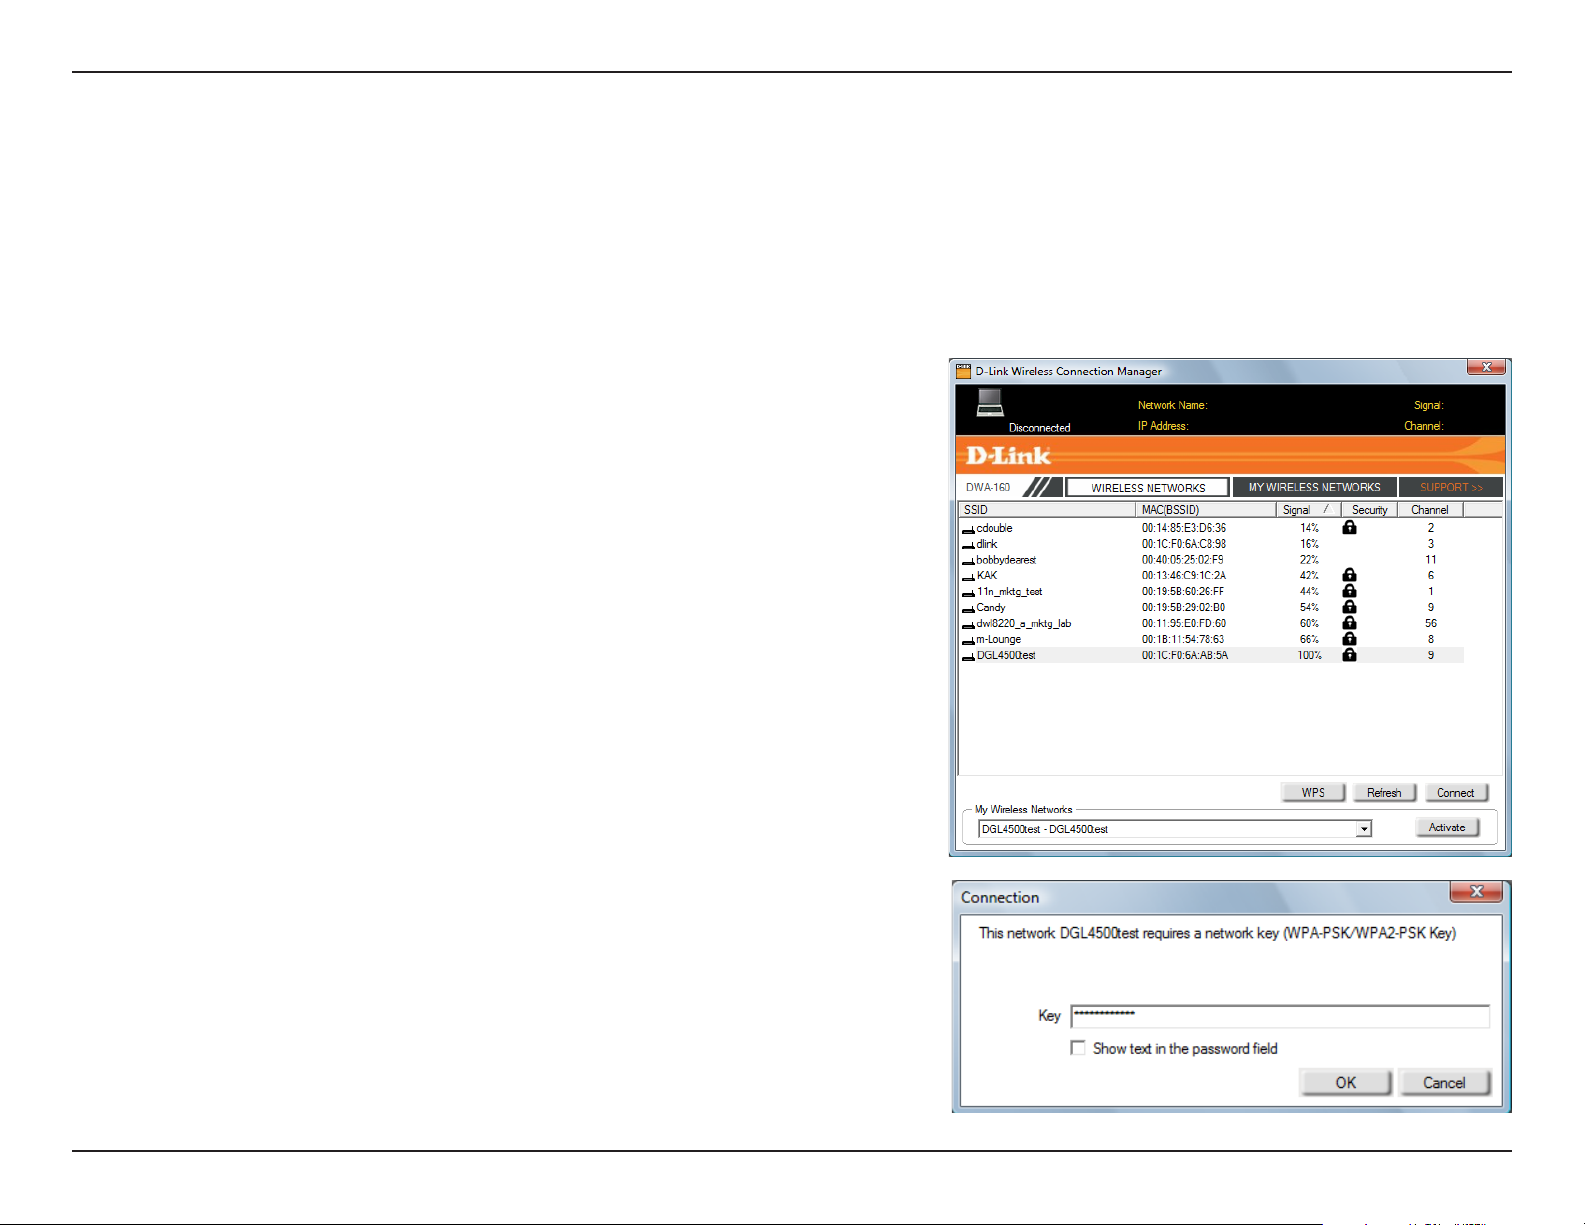
2. Highlight the wireless network (SSID) you would like to connect to
and click Connect. If the network is using WPA/WPA2-Personal, the
screen (as shown to the bottom-right) will appear.
3. Enter the WPA/WPA2-Personal passphrase exactly as it is on your
wireless router or access point. Click the Show text in the password
field box to see the passphrase. Unchecking it will hide it.
4. Click OK to connect to the network. Allow up to 30 seconds to
connect.
If you would like to create a new network and enter the WPA/WPA2-Personal
settings, refer to the next page.
31D-Link DWA-652 User Manual
Page 18
Section 4 - Wireless Security
It is recommended to enable WPA™/WPA2™-Personal on your wireless router or access point before configuring your
wireless adapter. Make sure you enter the passphrase exactly the same on all wireless devices.
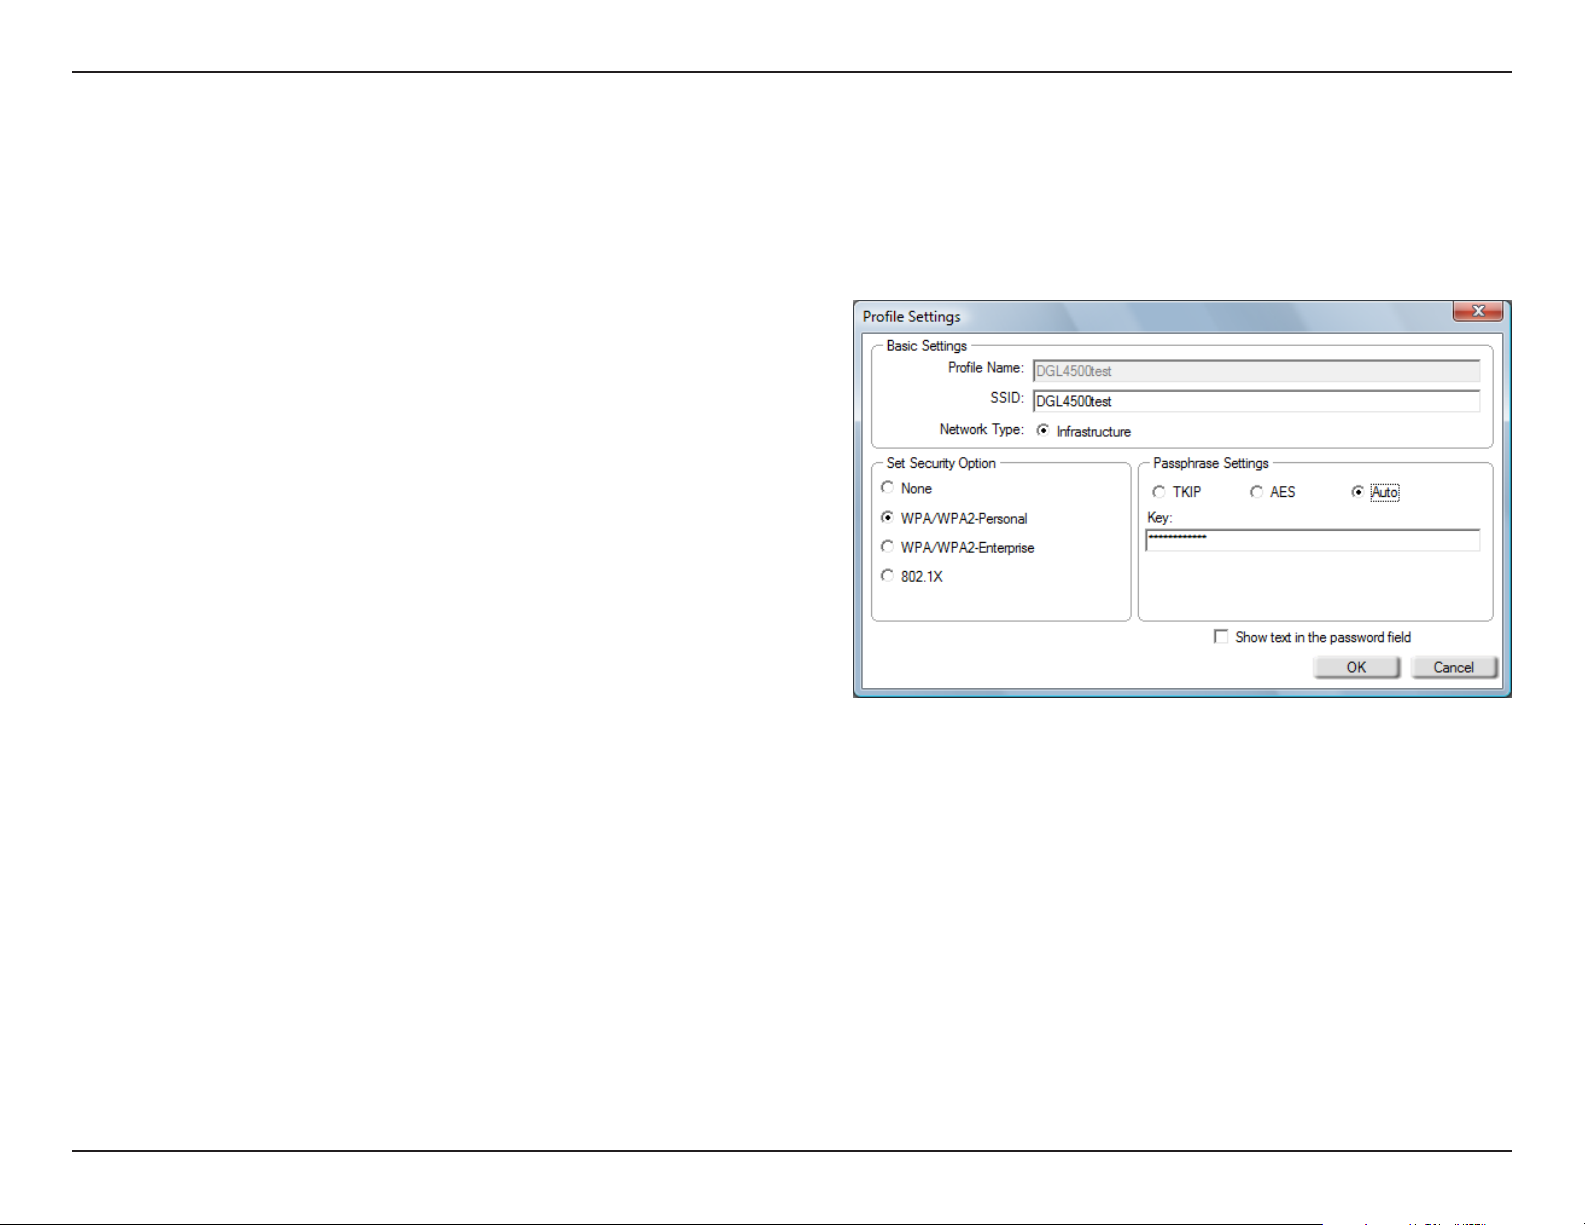
1. Open the Wireless Connection Manager by double-clicking on the D-Link icon on your desktop. Click on New to
create a new profile or highlight an existing profile and click Modify.
2. Select WPA/WPA2-Personal under Set Security Option.
3. Select TKIP or AES, or Auto.
4. Enter the passphrase exactly as it is on your wireless router
or access point.
5. Click OK to connect to the network. Allow up to 30 seconds
to connect.
32D-Link DWA-652 User Manual
Page 19
Section 4 - Wireless Security
Configure WPA™/WPA™-Personal
Using Windows® Vista
It is recommended to enable wireless security (WPA/WPA2) on your wireless router or access point before configuring
your wireless adapter. If you are joining an existing network, you will need to know the security key or passphrase
being used.
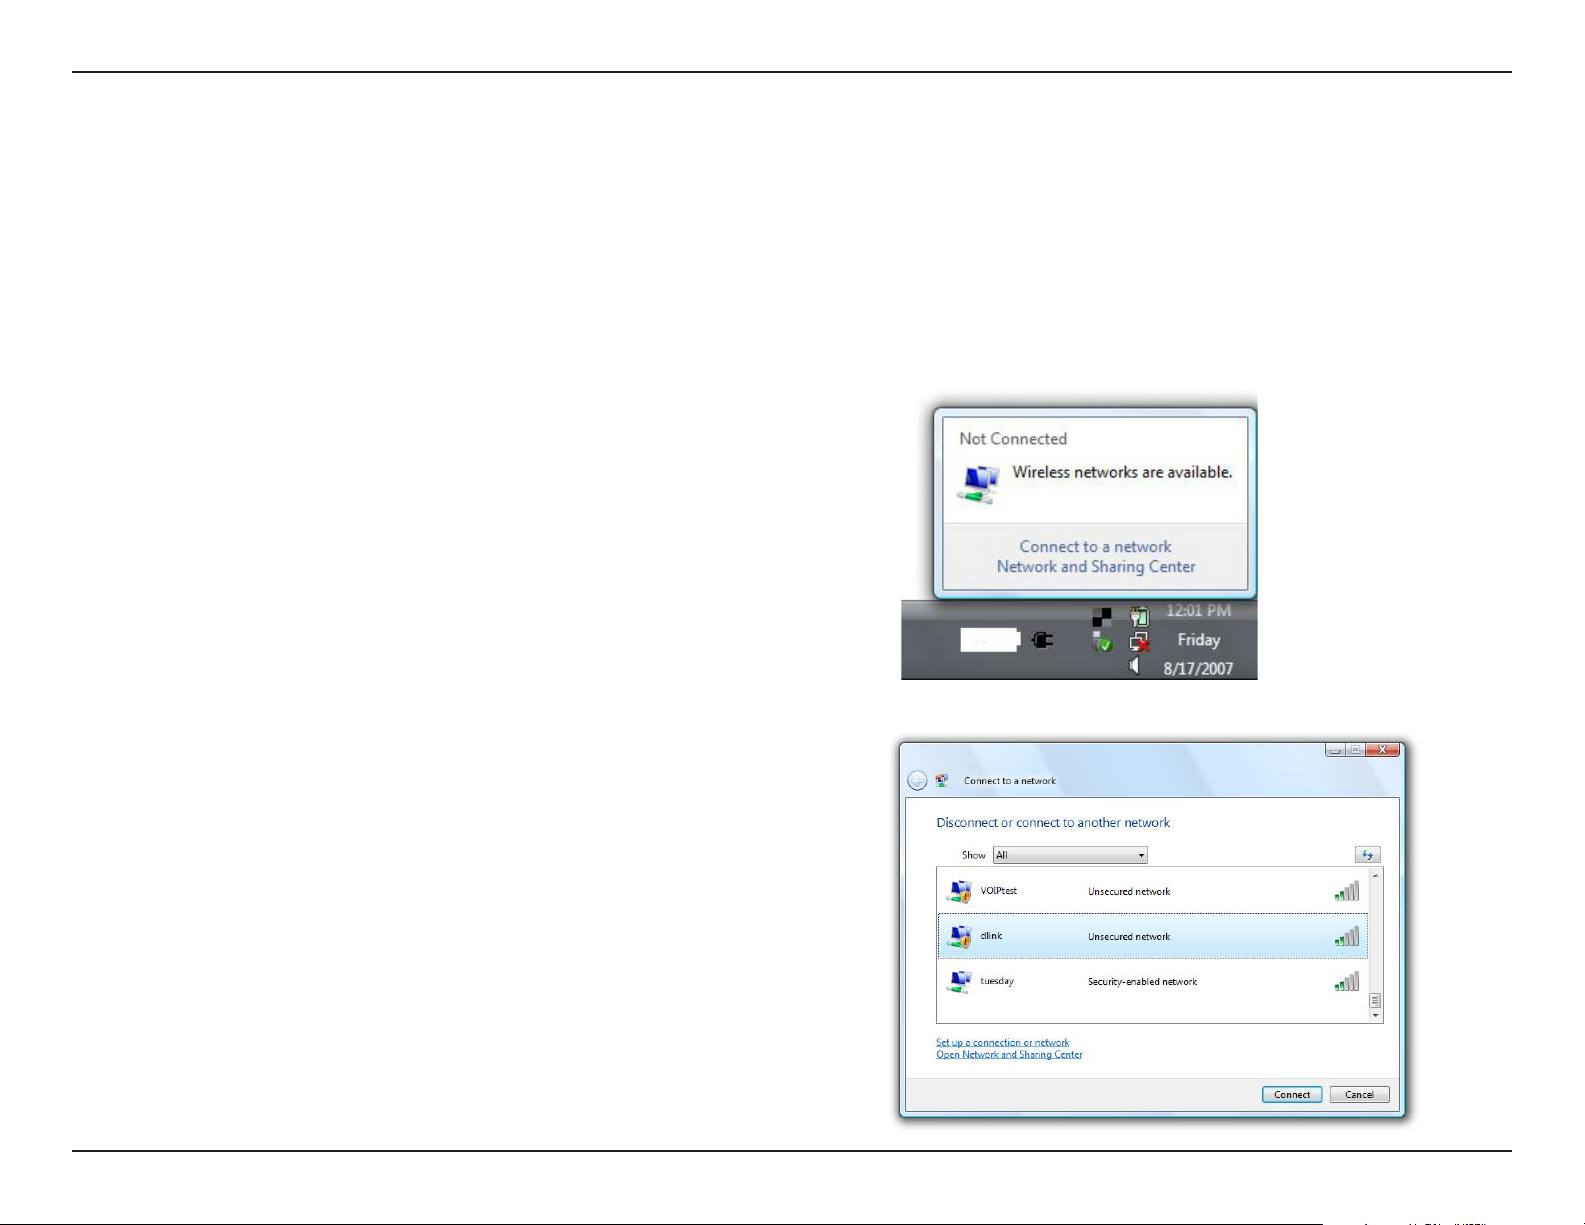
1. Open the Windows® Vista™ Wireless Utility by right-clicking
on the wireless computer icon in your system tray (lower
right corner of screen). Select Connect to a network.
2. Highlight the wireless network (SSID) you would like to
connect to and click Connect.
™
33D-Link DWA-652 User Manual
Page 20
Section 4 - Wireless Security
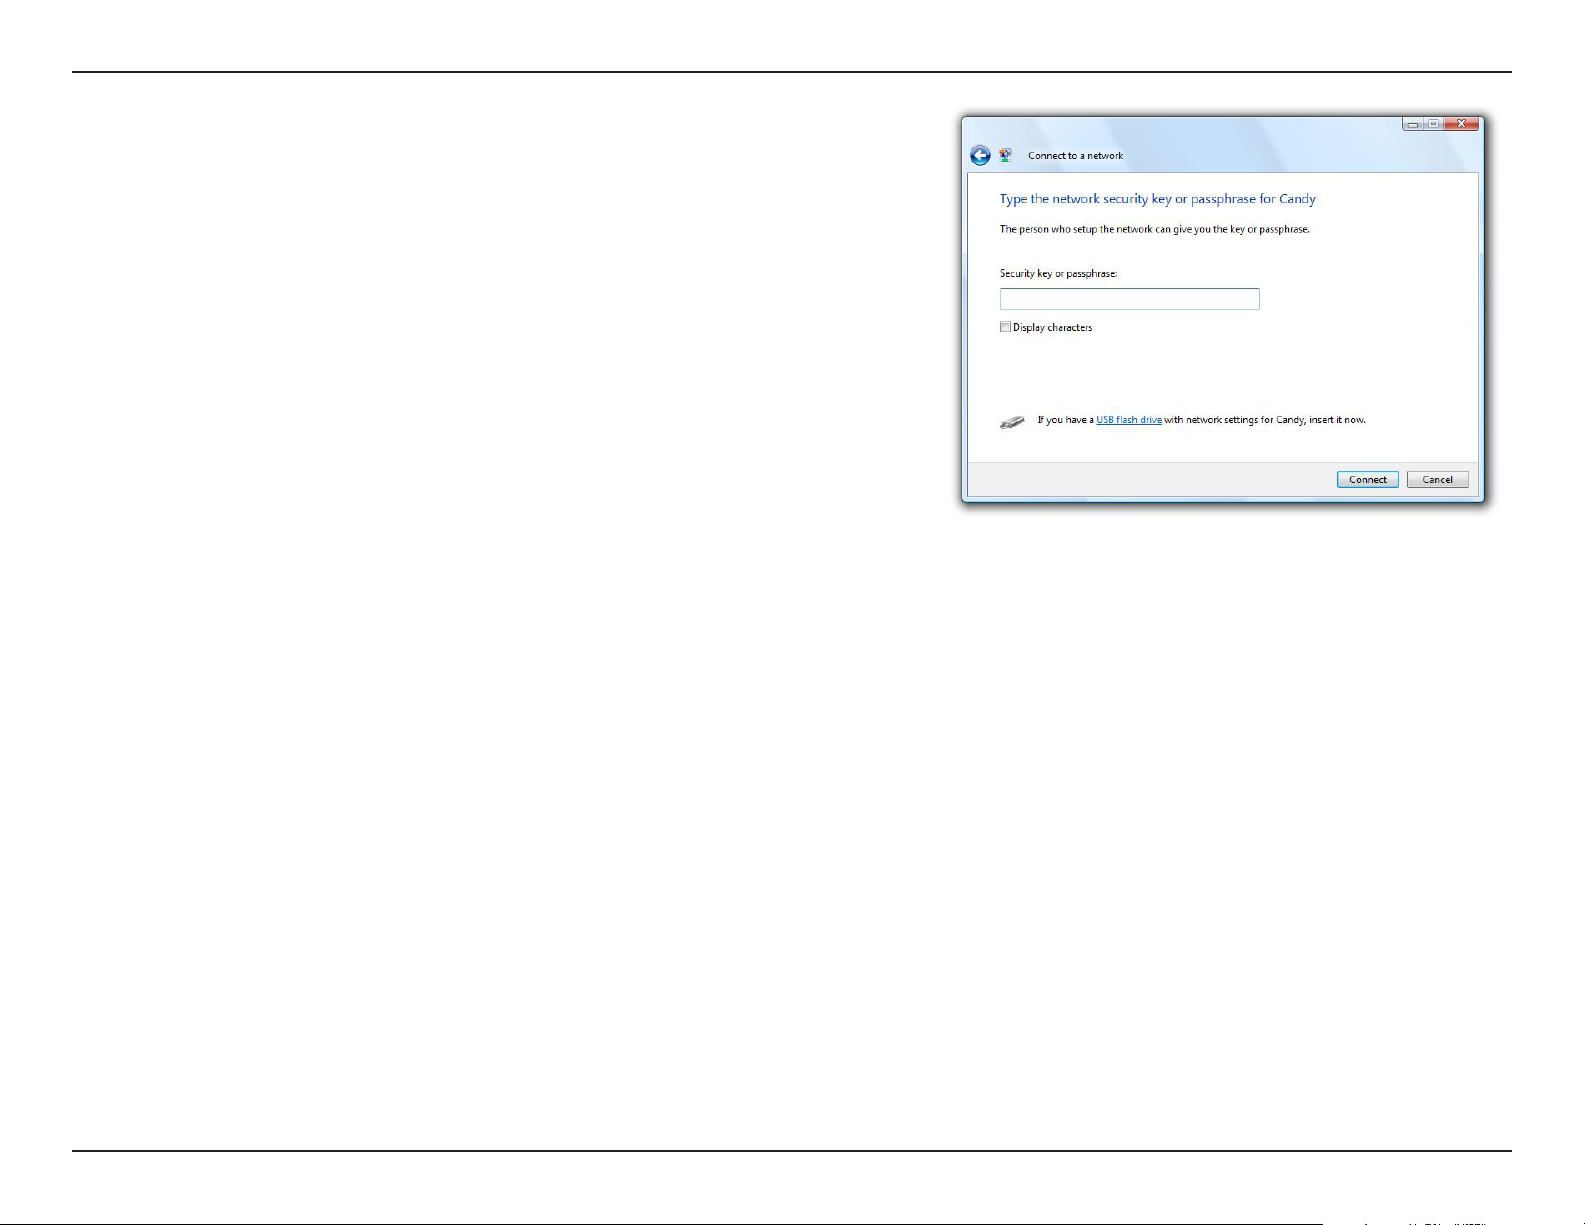
3. Enter the same security key or passphrase that is on your router
and click Connect.
It may take 20-30 seconds to connect to the wireless network. If the
connection fails, please verify that the security settings are correct.
The key or passphrase must be exactly the same as on the wireless
router.
34D-Link DWA-652 User Manual
Page 21
Section 4 - Wireless Security
Configure WPA™/WPA2™-Personal
Using the Windows® XP Utility
It is recommended to enable WPA/WPA2-Personal on your wireless router or access point before configuring your wireless
adapter. If you are joining an existing network, you will need to know the WPA/WPA2-Personal key being used.
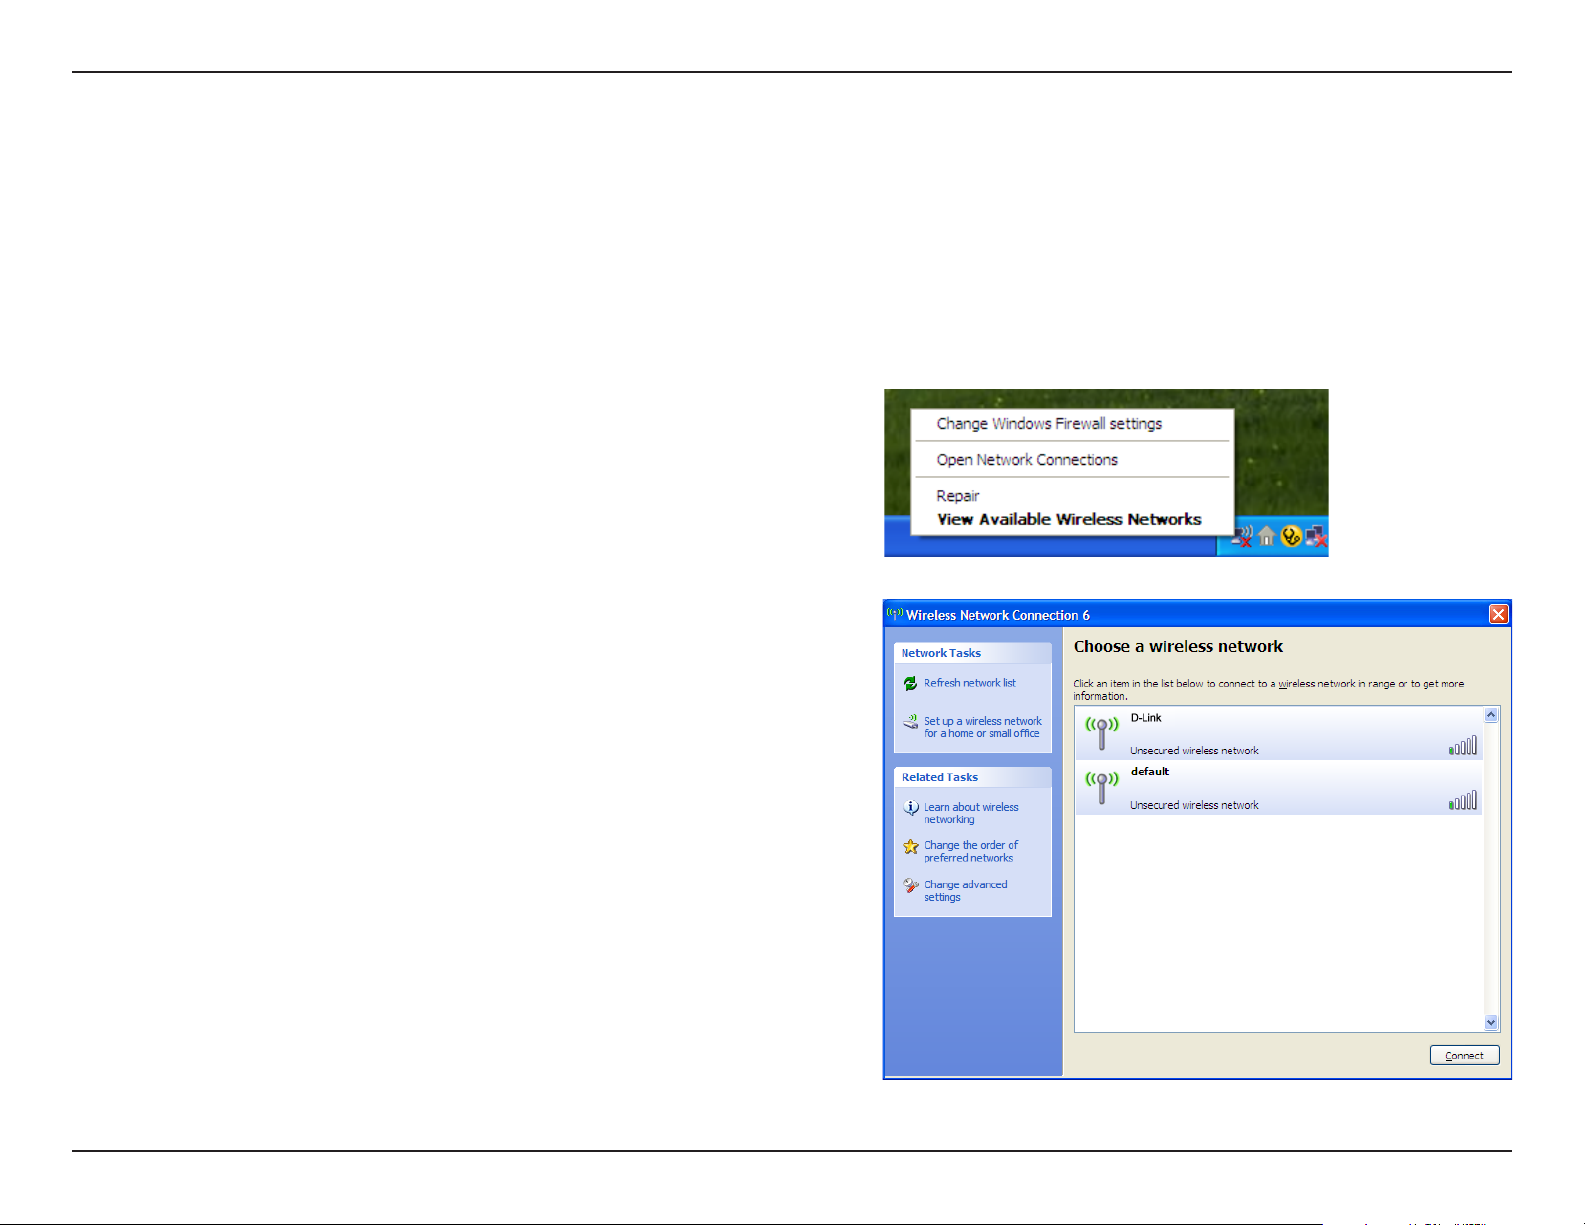
1. Open the Windows® XP Wireless Utility by right-clicking
on the wireless computer icon in your system tray
(lower-right corner of screen). Select View Available
Wireless Networks.
2. Highlight the wireless network (SSID) you would like
to connect to and click Connect.
35D-Link DWA-652 User Manual
Page 22
Section 4 - Wireless Security
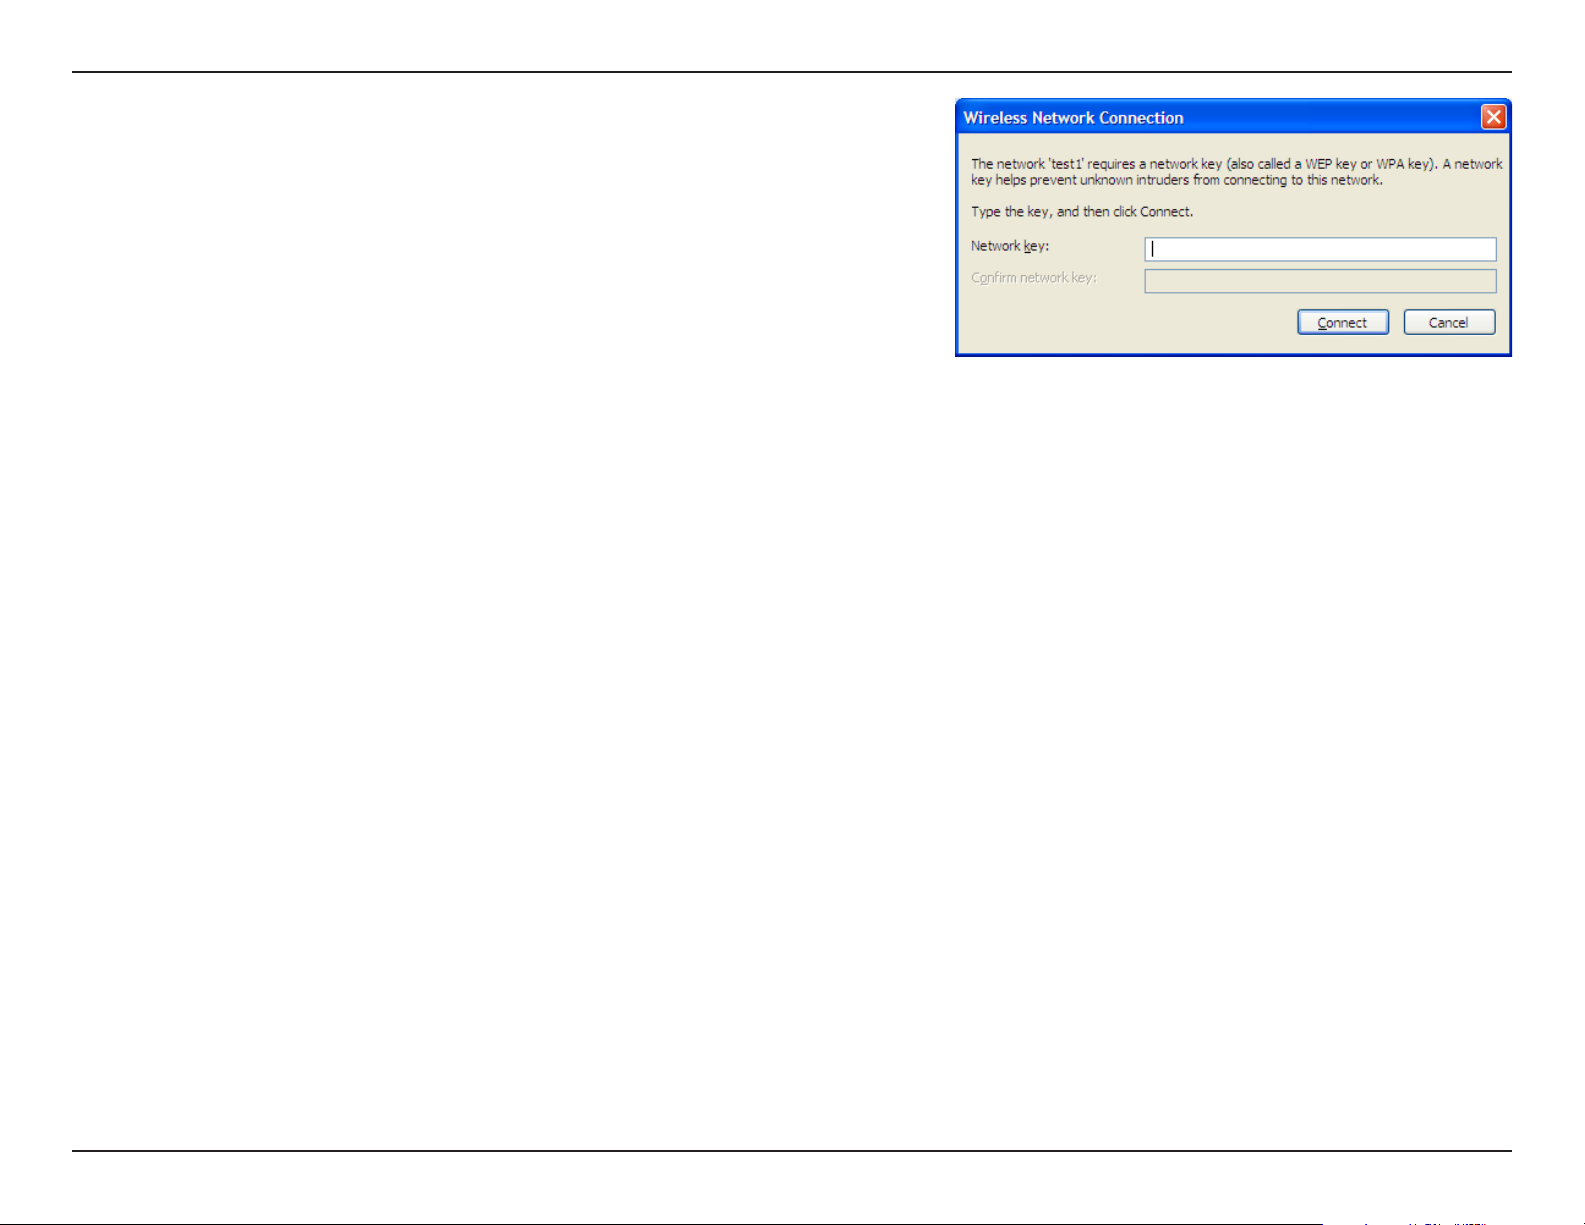
3. The Wireless Network Connection box will appear. Enter the
WPA™/WPA2™-Personal passphrase and click Connect.
It may take 20-30 seconds to connect to the wireless network. If the
connection fails, please verify that the WPA/WPA2-Personal settings
are correct. The WPA/WPA2-Personal passphrase must be exactly the
same as on the wireless router or access point.
36D-Link DWA-652 User Manual
Page 23
Section 4 - Wireless Security
Configure WPA™/WPA2™-Enterprise
Using the D-Link Wireless Connection Manager
WPA/WPA2-Enterprise is for advanced users who are familiar with using a RADIUS server and setting up certificates.
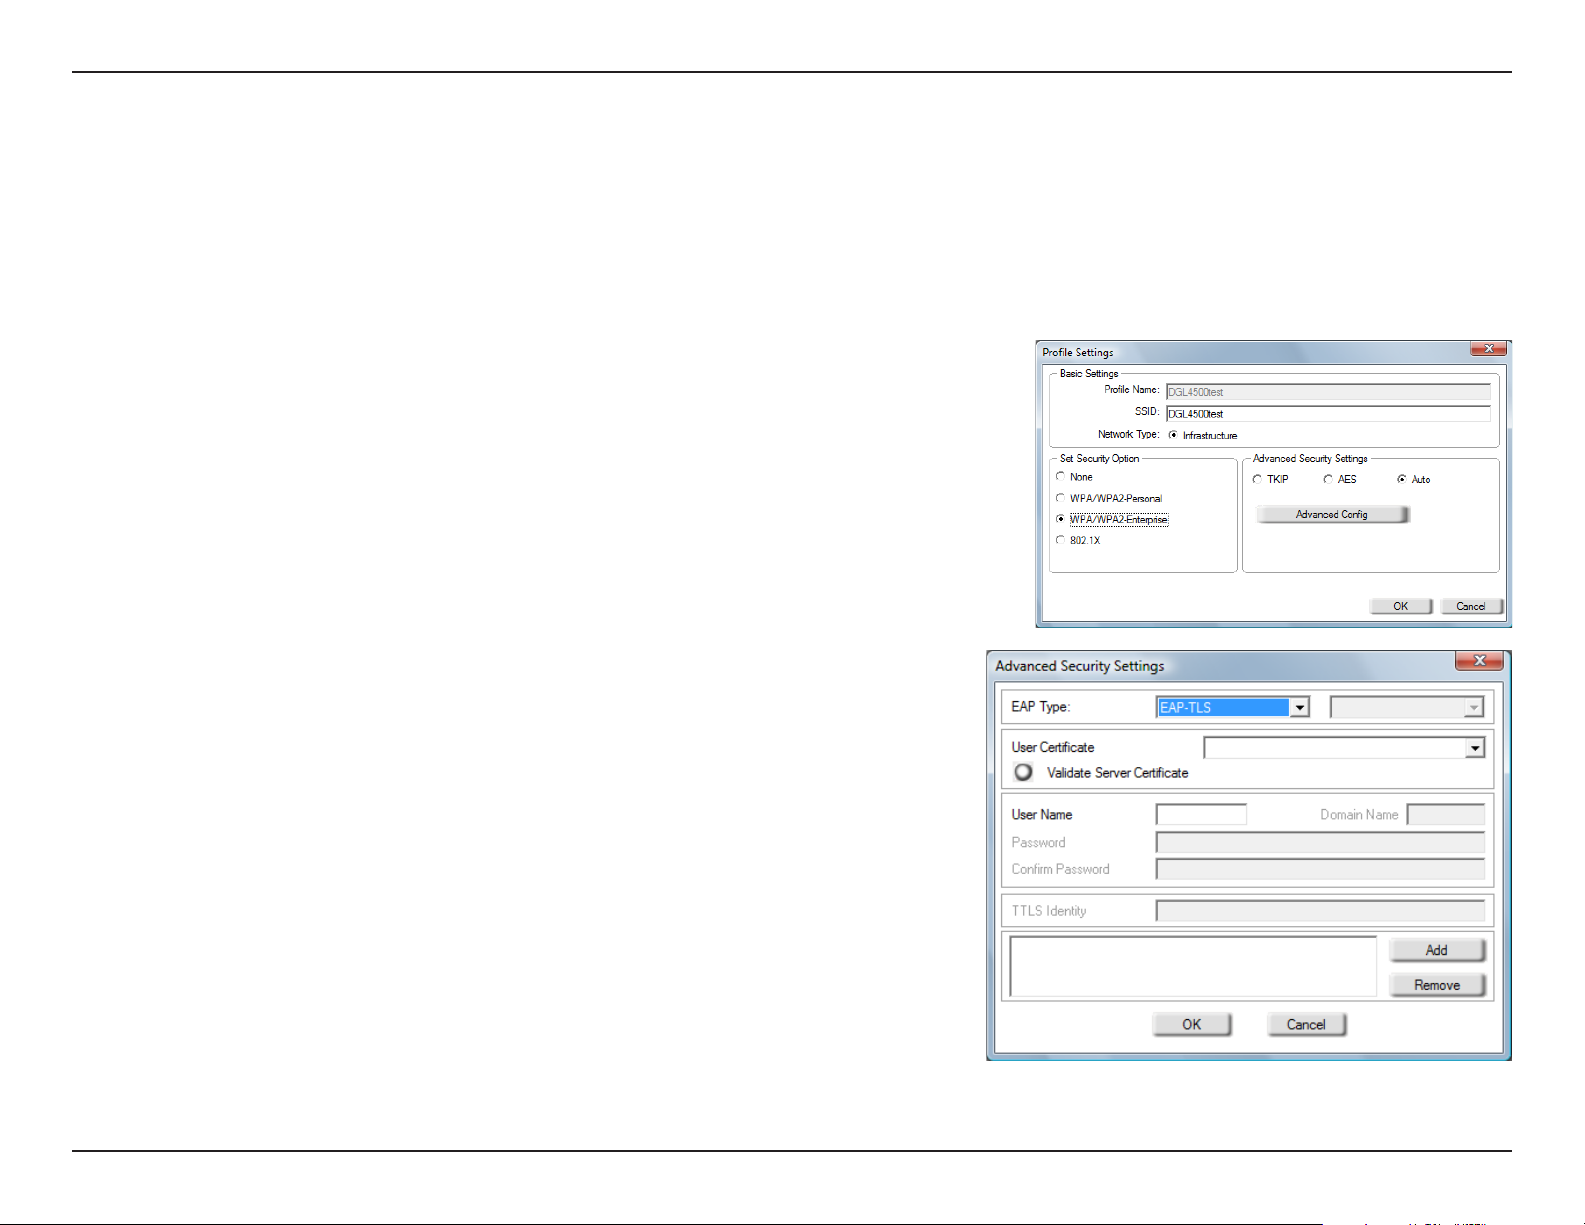
1. Open the Wireless Connection Manager by double-clicking on the D-Link
icon on your desktop. Click on New to create a new profile or highlight an
existing profile and click Modify.
2. Select WPA/WPA2-Enterprise under Set Security Option and then select
TKIP or AES.
3. Click on Advanced Config to continue.
4. Next to EAP Type, select EAP-TLS, EAP-TTLS, or PEAP. Extensible
Authentication Protocols allow devices on the network to request
authentication from the RADIUS server in the network. All the devices
on the network must use the same EAP type when using a RADIUS
server for authentication. Some RADIUS servers require that the Validate
Server field be selected. Check this field if your RADIUS server requires
validation.
5. Select an User Certificate from the drop-down menu.
6. Enter the login information required to authenticate.
7. Click Add to enter the IP address(es) of your RADIUS servers.
8. Click OK to save your settings.
37D-Link DWA-652 User Manual
Page 24
Section 4 - Wireless Security
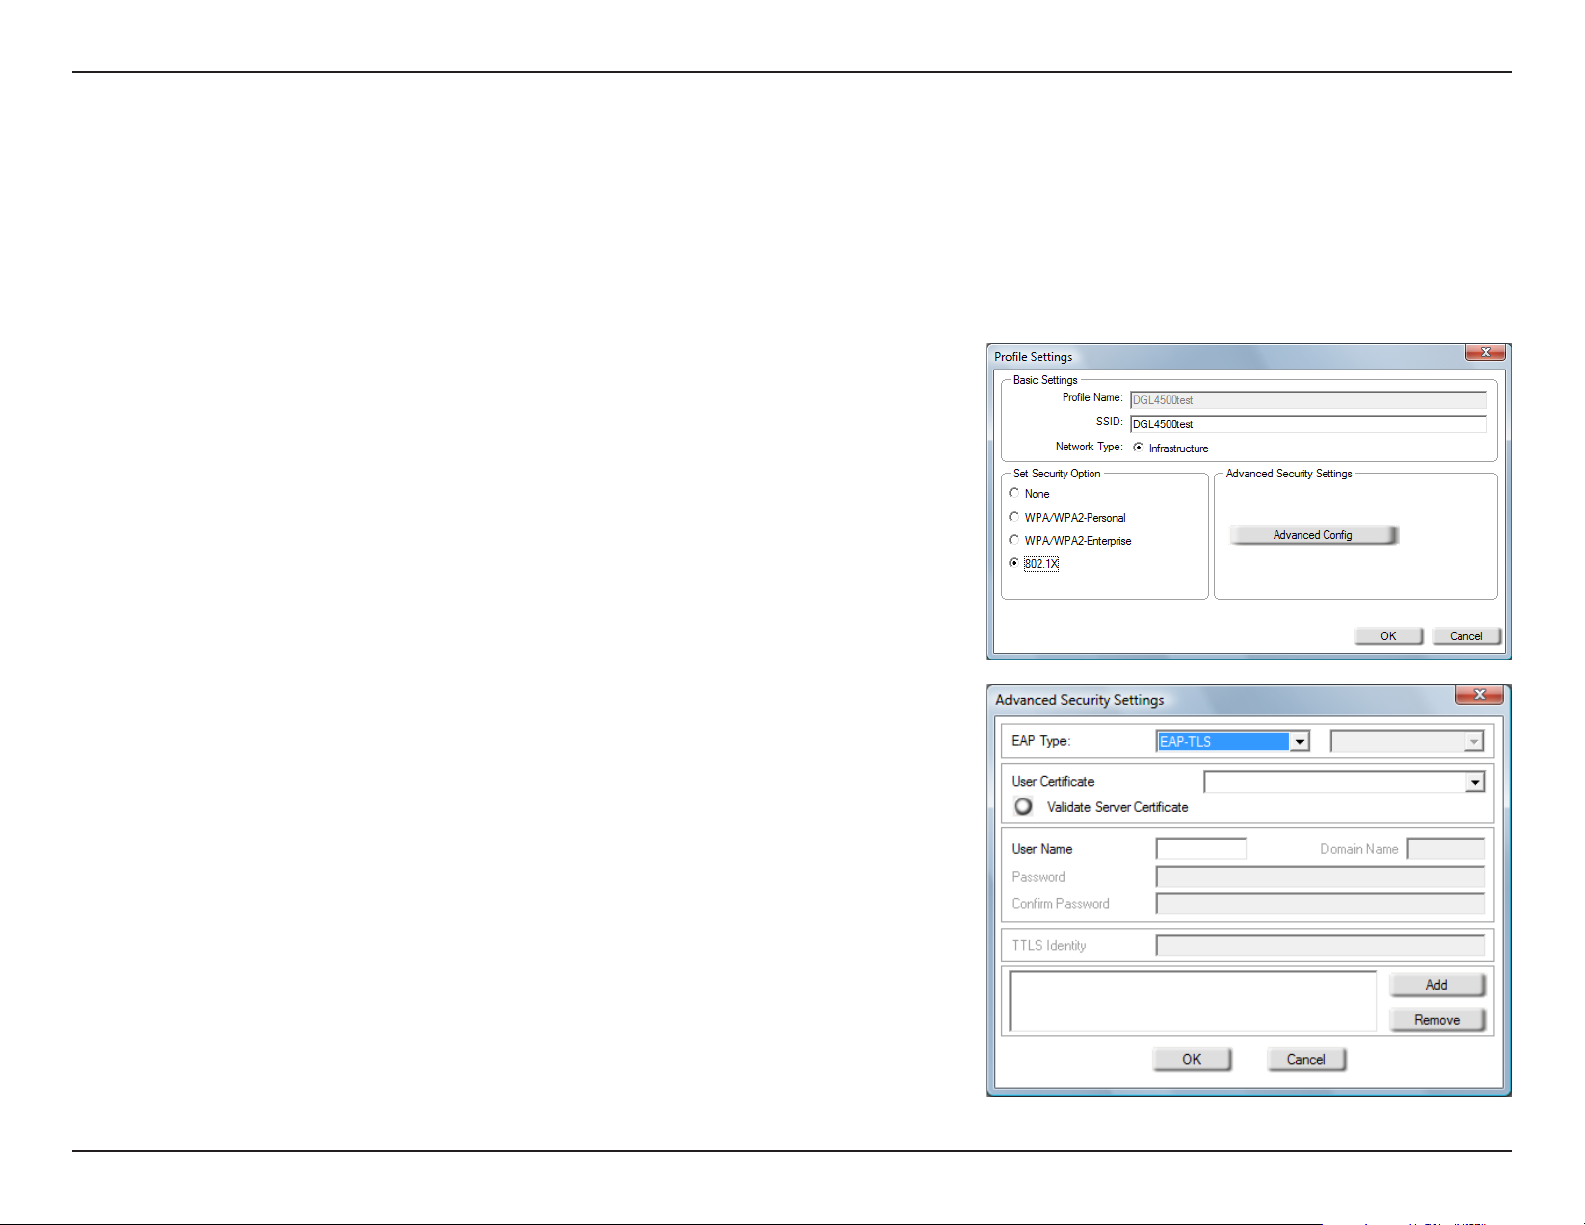
Configure 802.1x (RADIUS)
Using the D-Link Utility
802.1x is for advanced users who are familiar with using a RADIUS server and setting up certificates.
1. Open the Wireless Utility by double-clicking on the D-Link icon in your
system tray (lower-right corner of screen). Click on New to create a new
profile or highlight an existing profile and click Modify.
2. Select 802.1x under Set Security Option.
3. Click on Advanced Config to continue.
4. Next to EAP Type, select EAP-TLS, LEAP, EAP-TTLS, or PEAP.
Extensible Authentication Protocols allow devices on the network to
request authentication from the RADIUS server in the network. All the
devices on the network must use the same EAP type when using a
RADIUS server for authentication. Some RADIUS servers require that
the Validate Server field be selected. Check this field if your RADIUS
server requires validation.
5. Select an User Certificate from the drop-down menu.
6. Enter the login information required to authenticate.
7. Click Add to enter the IP address(es) of your RADIUS servers.
8. Click OK to save your settings.
38D-Link DWA-652 User Manual
 Loading...