

Page 1

KVM SWITCH
KVM-121
Quick Installation Guide+
Руководство по быстрой установке+
Guía de Instalación Rápida+
Guia de Instalação Rápida+
快速安裝指南+
Petunjuk Pemasangan Cepat+
WIRED
Page 2

Install Guide
KVM-121
KVM Switch
Page 3

System Requirements
• PS/2 keyboard
• PS/2 Mouse
• Speakers or Headphones
• VGA or Higher Monitor
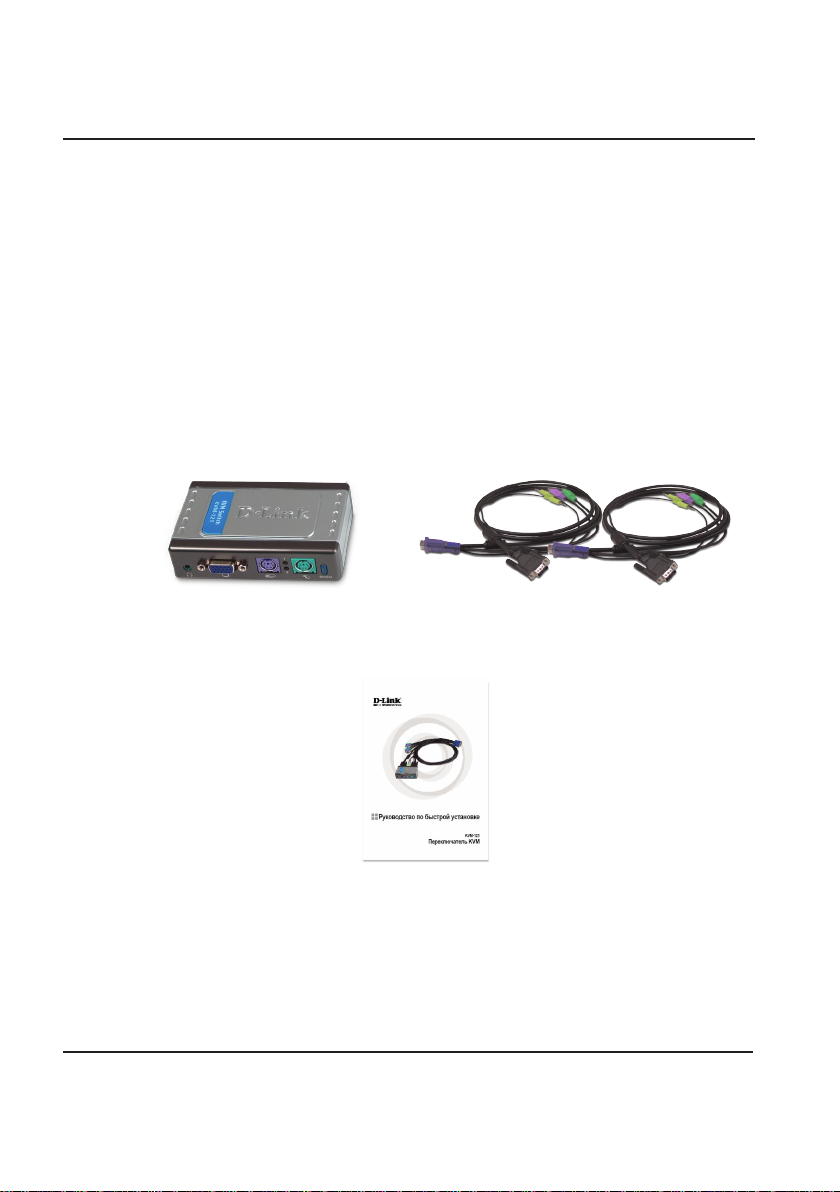
Package Contents
System Requirements
D-Link KVM-121
KVM Switch
Quick Install Guide
If any of the above items are missing, please contact your reseller.
3
2 Sets of KVM Cables
Page 4
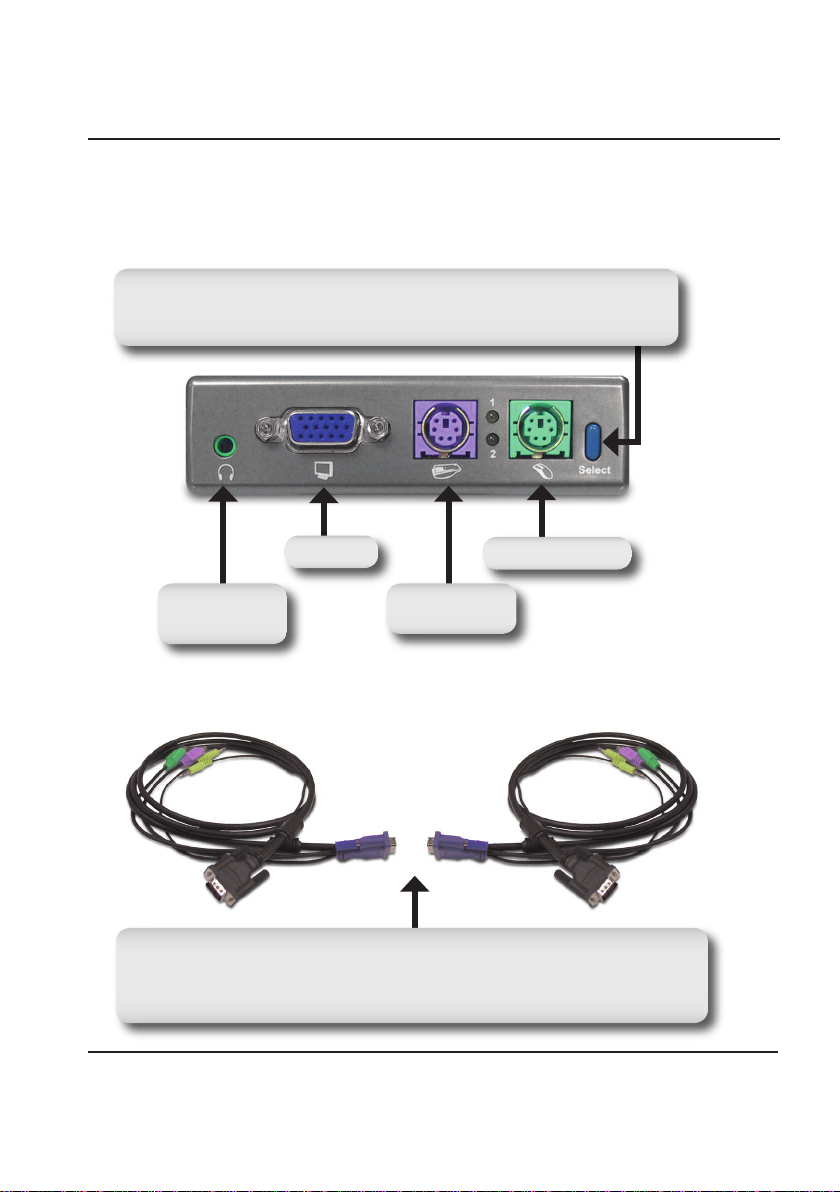
Hardware Overview
Hardware Overview
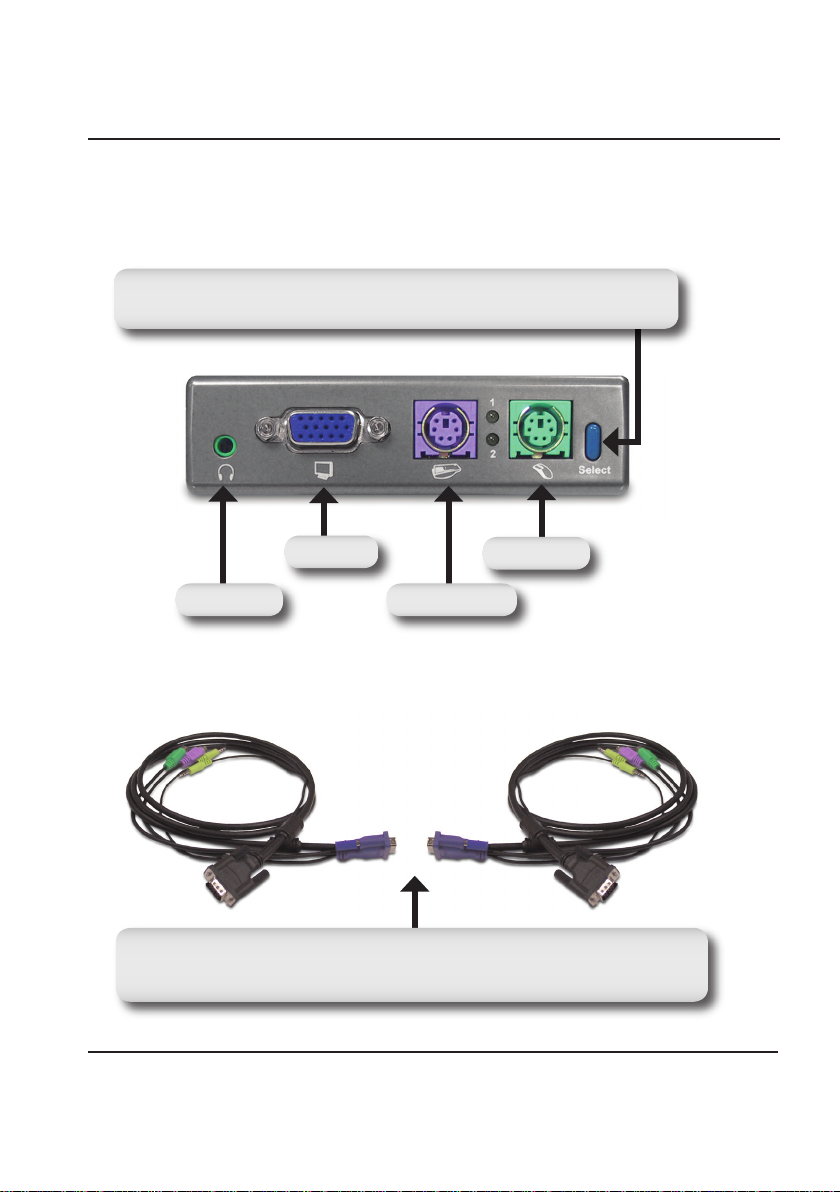
Select Button
Press the select button to switch quickly and easily between both computers.
VGA Port
Audio Jack
KVM Cables
Plug the cables from your keyboard, monitor, sound card, and mouse into the KVM
switch, and plug the supplied cables from your KVM switch into your computers.
Keyboard Port
Mouse Port
4
Page 5
Hardware Overview
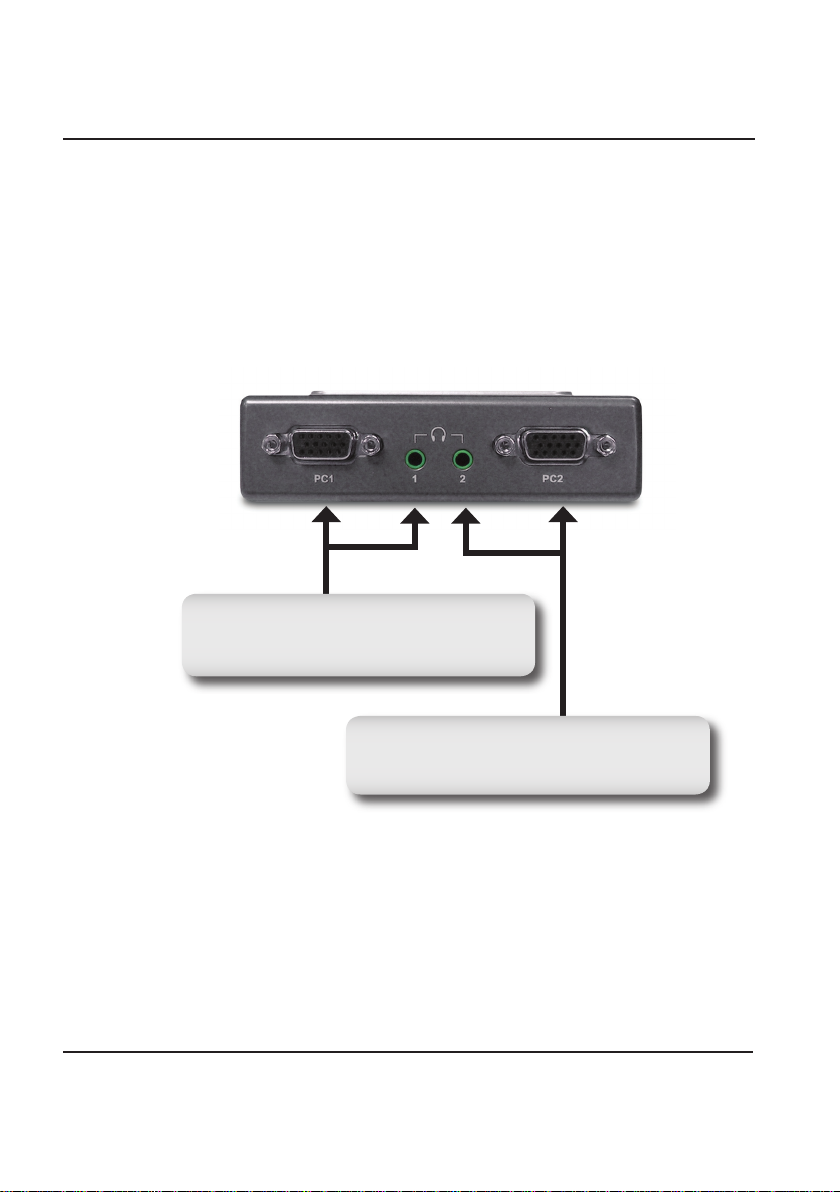
The KVM-121 is assembled with the supplied KVM cables fastened
to the PC 1 and PC 2 ports. Plug the cable from PC 1 into your rst
computer (Computer 1), and plug the cable from PC 2 into your second
computer (Computer 2).
PC1
Connect the audio and VGA cable to your rst
computer (Computer 1).
PC2
Connect your audio or VGA cable to your second
computer (Computer 2).
5
Page 6
Hardware Installation
Hardware Installation
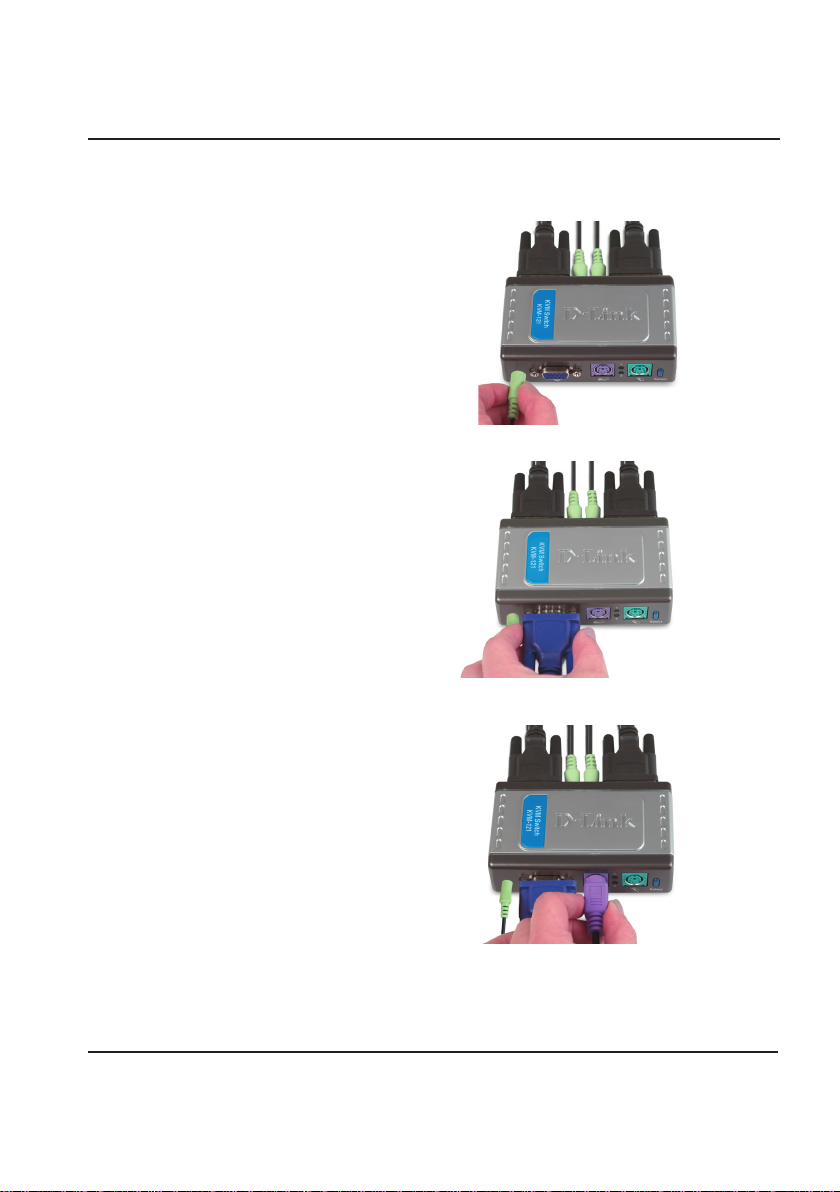
Attach your headphone or speakers
to the green audio jack located on
the KVM-121.
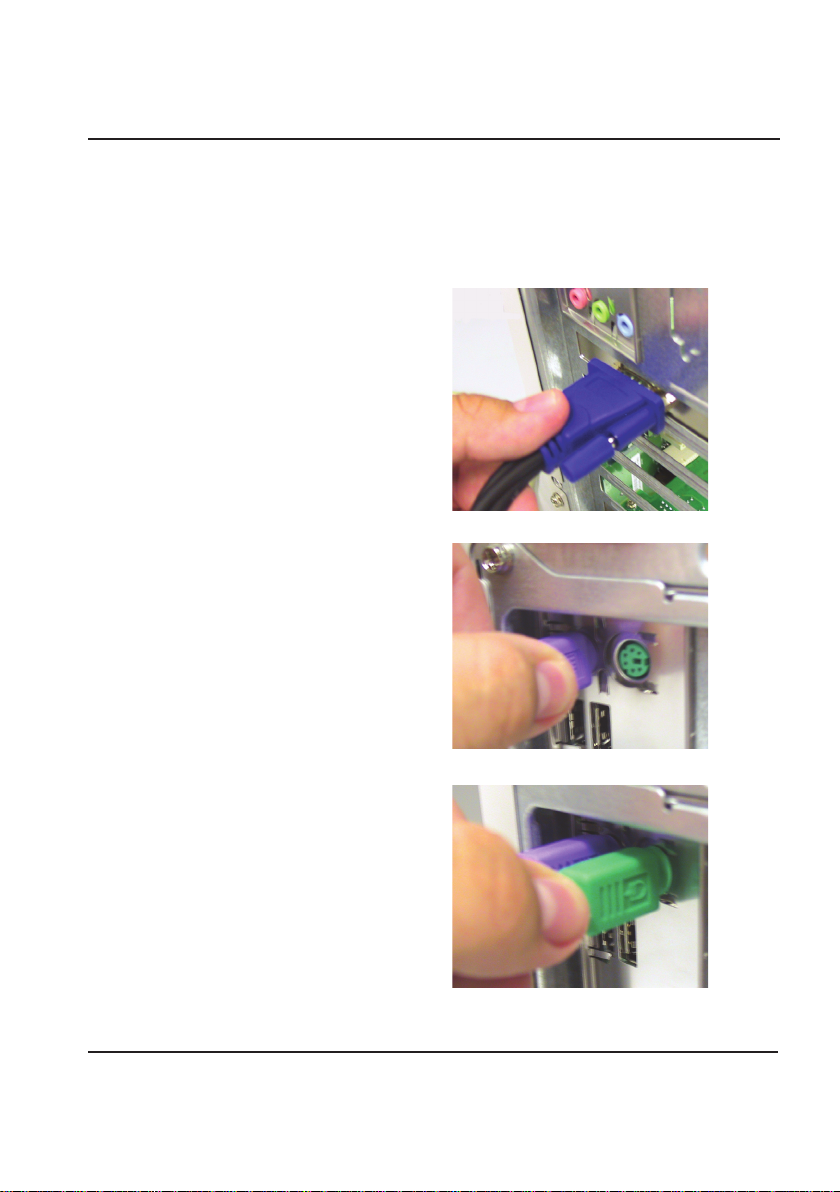
Attach your monitor’s 15-pin VGA
connector to the blue VGA port
located on the KVM-121.
Attach your computer’s 6-pin PS/2
male keyboard connector to the
purple keyboard port located on the
KVM-121.
6
Page 7
Hardware Installation
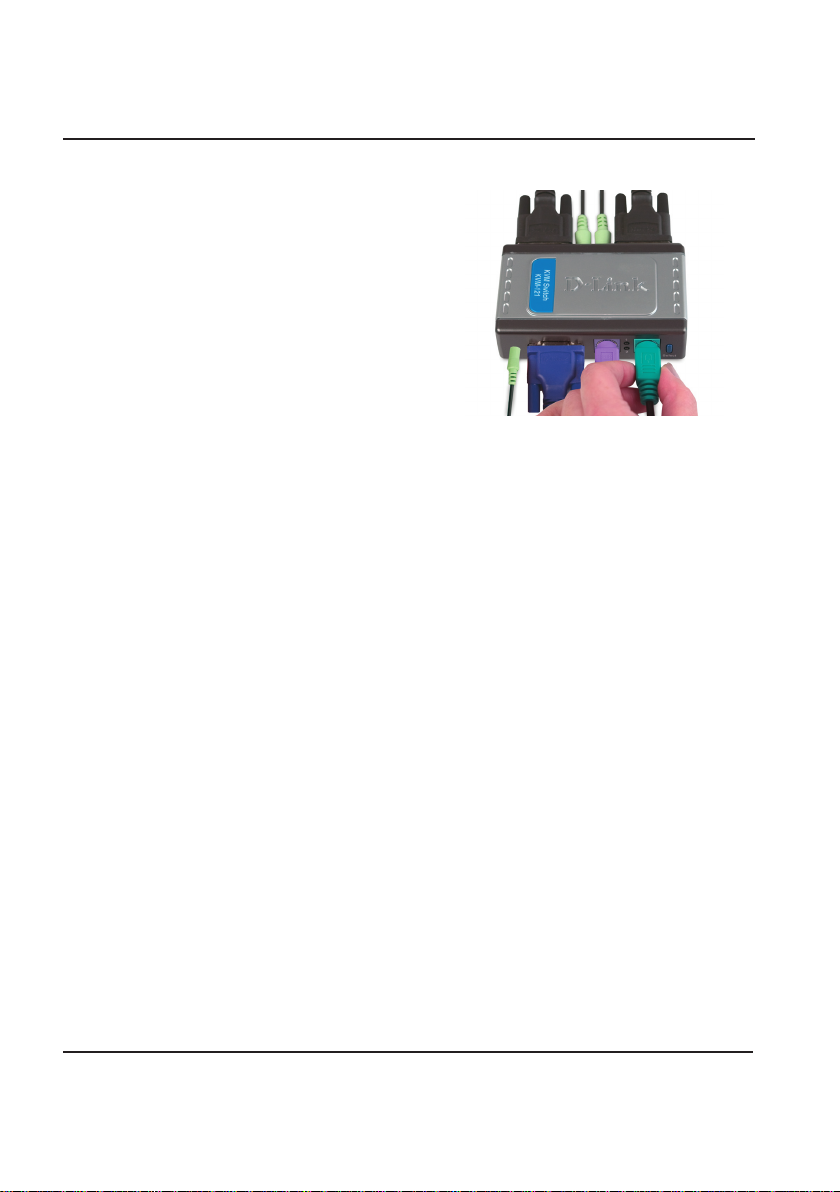
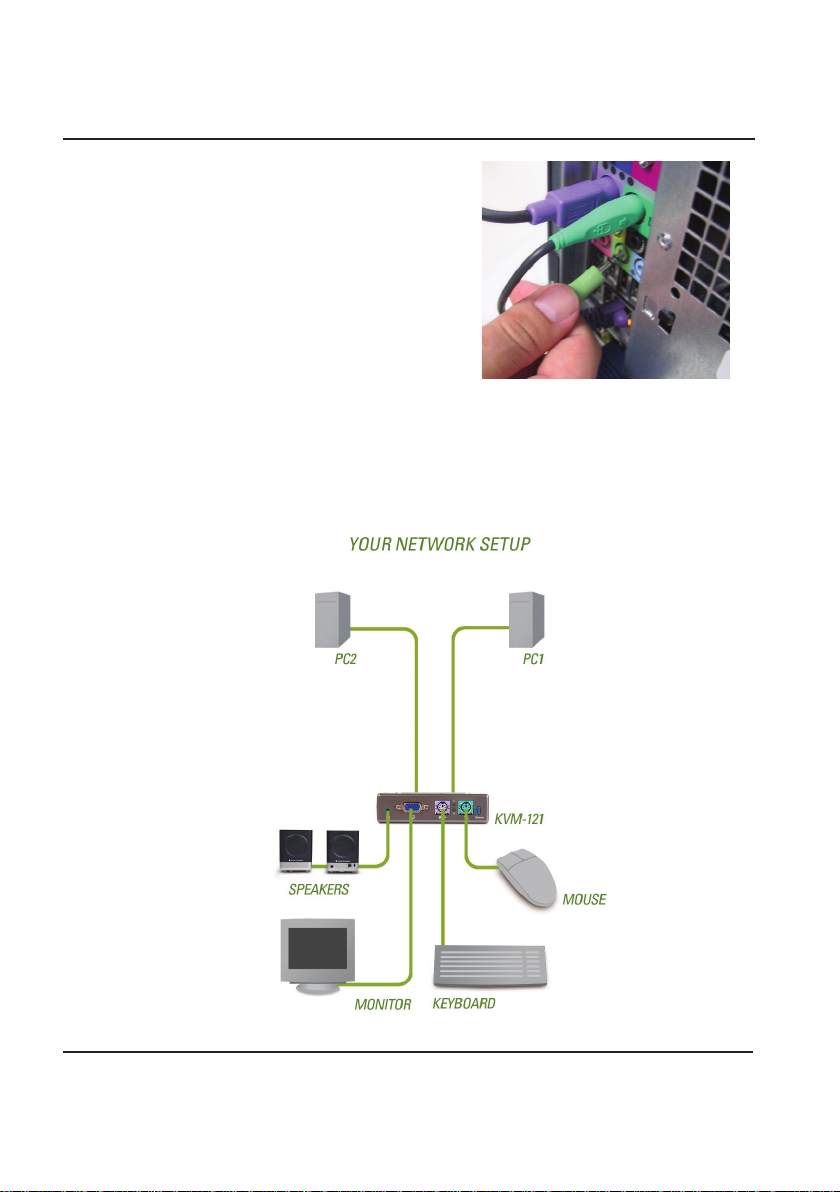
Attach your computer’s 6-pin PS/2
male mouse connector to the green
mouse port located on the KVM-121.
Note: Make sure that all your computers are turned OFF before
installing the KVM-121 to avoid mouse and keyboard errors when
booting up your computers.
7
Page 8
Hardware Installation
The following steps apply to both computers that will be used with
the KVM-121. Start by attaching the cables connected from the PC
1 port of the KVM-121 to Computer 1.
Connect the KVM-121’s included
monitor cable (blue coated) to the
VGA port located on the back of your
computer case.
Plug the KVM-121’s included
keyboard cable (purple coated) to
the PS/2 keyboard port located on
the back of your computer case.
Plug the KVM-121’s included mouse
cable (green coated) to the PS/2
mouse port located on the back of
your computer case.
8
Page 9
Hardware Installation
Plug the KVM-121’s included audio
cable to the audio jack located on the
back of your computer case.
Note: Repeat these steps to attach
the cables connected from the PC 2
port of the KVM-121 to Computer 2.
Power ON both of your attached computers after you have completed
the KVM-121 installation.
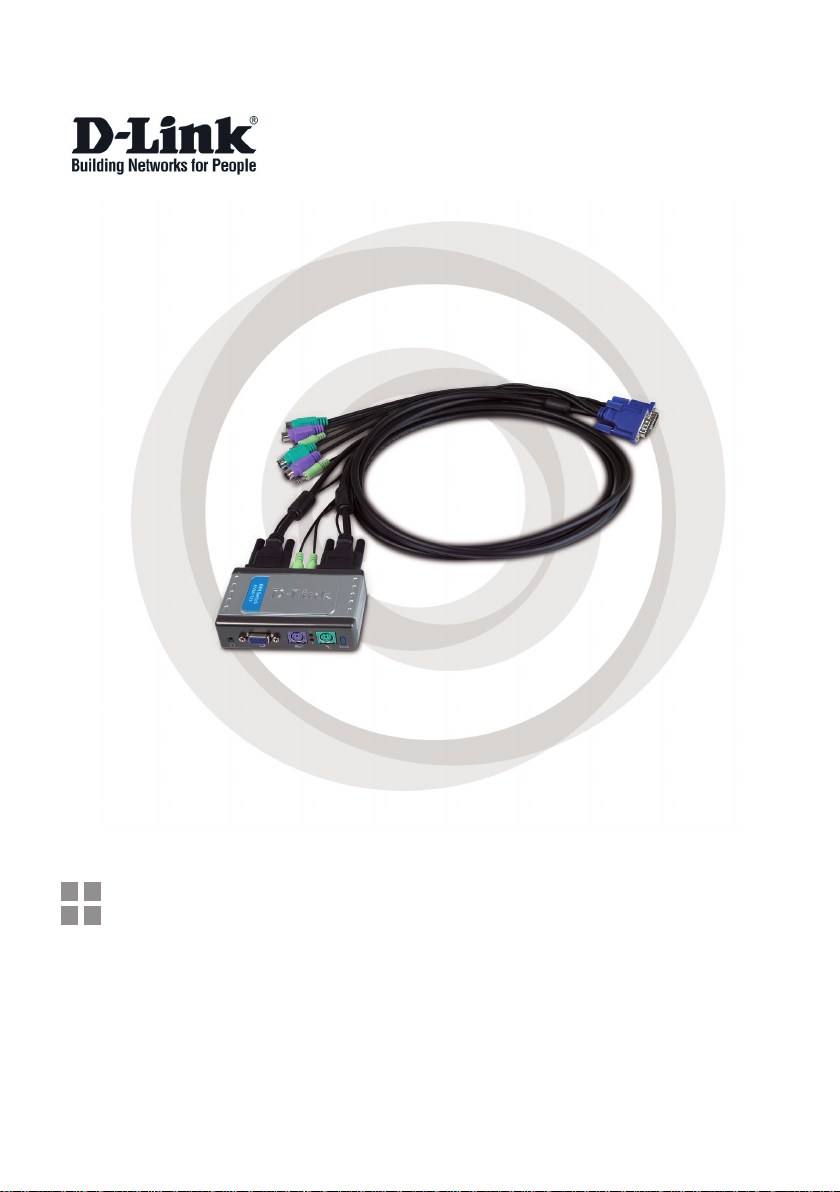
Once you’ve completed your KVM-121 installation, your connections
may appear similar to the diagram below.
9
Page 10

Switching the KVM-121
Switching the KVM-121
You can use your keyboard to switch between your computers. Press
and hold the Scroll Lock key twice to enter the Hot Key switching mode.
A beep conrms that the Hot Key switching mode is activated.
Hot Key Menu
Scroll Lock + Scroll Lock + 1 : Switches to PC1 only.
Scroll Lock + Scroll Lock + 2 : Switches to PC2 only.
Scroll Lock + Scroll Lock + F1 : Switches to PC1 with audio
signal synchronously.
Scroll Lock + Scroll Lock + F2 : Switches to PC2 with audio
signal synchronously.
Scroll Lock + Scroll Lock + → : Switches to the next PC
with audio signal synchronously.
Scroll Lock + Scroll Lock + ← : Switches to the previous PC
with audio signal synchronously.
Scroll Lock + Scroll Lock + B : Enable/Disable Beep.
Scroll Lock + Scroll Lock + M : Resets the mouse and keyboard.
Scroll Lock + Scroll Lock + S : Auto-Scan Mode automatically
switches between computers
every 10 seconds (Monitor Only).
Spacebar : Exits Auto Scan Mode.
10
Page 11

Troubleshooting
Troubleshooting
Keyboard
If your keyboard is not functional, not detected, or there is a keyboard
error on boot-up, check the following:
• Make sure that the keyboard is properly connected to the
KVM-121. Check that the purple coated keyboard cable is securely
plugged into the correct PS/2 keyboard port (purple colored) and
not the PS/2 mouse port (green colored).
• Verify that the keyboard works when plugged into the computer
directly. You will have to shut down your computer rst to do
this.
• Read your motherboard documentation and make sure that
the PS/2 keyboard’s IRQ is enabled. This can be set for most
computers in the BIOS setup.
• Try using a different keyboard.
Mouse
If your mouse is not functional, not detected, or there is a mouse error
on boot-up, check the following:
• Make sure that the mouse is properly connected to the KVM-121.
Check that the green coated mouse cable is plugged into the
correct PS/2 mouse port (green colored) and not the PS/2
keyboard port (purple colored).
• Verify that the mouse works when plugged into the computer
directly. You will have to shut down your computer rst to do
this.
• Read your motherboard documentation and make sure that the
PS/2 mouse’s IRQ is enabled. This can be set for most computers
in the BIOS setup.
• Try using a different mouse.
• If mouse movement is random when switching between computers,
try shutting down your computer and rebooting.
• Verify that your computers do not have more than one mouse
11
Page 12

Troubleshooting
driver installed (check your cong.sys and autoexec.bat les for
Windows) and that you are using the latest mouse driver.
• If a special mouse is used such as a cordless or scrolling mouse,
make sure you use generic PS/2 mouse drivers. A non-standard
PS/2 mouse may have extensions on the PS/2 protocol that are
not supported by the KVM-121.
• Do not move the mouse or press any mouse buttons when
switching from one PC to another.
• Try resetting the mouse by unplugging it from the KVM-121 for
about 3 seconds and then reconnect.
Video
If the image on your monitor is not clear, check the following:
• Verify that all video monitor cables are inserted properly. Make
sure that the blue coated VGA cable is connected to your computer
and that the black coated cable is connected to the KVM-121.
• Try lowering the resolution and refresh rate of your monitor.
• Try using a shorter video cable.
Audio
If your audio is not functional properly check the following:
• Make sure that the speakers are properly connected to the KVM-121.
Check that the green coated audio cable is plugged into the correct
audio jack (green colored).
• Verify that the speaker works when plugged into the computer
directly.
• Try using a different set of speakers.
12
Page 13

Notes
Page 14

Technical Support
You can nd software updates and user documentation on the D-Link website.
Tech Support for customers in
Australia:
Tel: 1300-766-868
Monday to Friday 8:00am to 8:00pm EST
Saturday 9:00am to 1:00pm EST
http://www.dlink.com.au
e-mail: support@dlink.com.au
India:
Tel: 1800-222-002
Monday to Friday 9:30AM to 7:00PM
http://www.dlink.co.in/support/productsupport.aspx
Indonesia, Malaysia, Singapore and Thailand:
Tel: +62-21-5731610 (Indonesia)
Tel: 1800-882-880 (Malaysia)
Tel: +65 66229355 (Singapore)
Tel: +66-2-719-8978/9 (Thailand)
Monday to Friday 9:00am to 6:00pm
http://www.dlink.com.sg/support/
e-mail: support@dlink.com.sg
Korea:
Tel: +82-2-890-5496
Monday to Friday 9:00am to 6:00pm
http://www.d-link.co.kr
e-mail: lee@d-link.co.kr
New Zealand:
Tel: 0800-900-900
Monday to Friday 8:30am to 8:30pm
Saturday 9:00am to 5:00pm
http://www.dlink.co.nz
e-mail: support@dlink.co.nz
Page 15

Technical Support
You can nd software updates and user documentation on the D-Link website.
Tech Support for customers in
Egypt:
Tel: +202-2919035 or +202-2919047
Sunday to Thursday 9:00am to 5:00pm
http://support.dlink-me.com
e-mail: amostafa@dlink-me.com
Iran:
Tel: +98-21-88822613
Sunday to Thursday 9:00am to 6:00pm
http://support.dlink-me.com
e-mail: support.ir@dlink-me.com
Israel:
Tel: +972-9-9715701
Sunday to Thursday 9:00am to 5:00pm
http://www.dlink.co.il/support/
e-mail: support@dlink.co.il
Pakistan:
Tel: +92-21-4548158 or +92-21-4548310
Sunday to Thursday 9:00am to 6:00pm
http://support.dlink-me.com
e-mail: support.pk@dlink-me.com
South Africa and Sub Sahara Region:
Tel: +27-12-665-2165
08600 DLINK (for South Africa only)
Monday to Friday 8:30am to 9:00pm South Africa Time
http://www.d-link.co.za
Turkey:
Tel: +90-212-2895659
Monday to Friday 9:00am to 6:00pm
http://www.dlink.com.tr
e-mail: turkiye@dlink-me.com
e-mail: support@d-link.co.za
U.A.E and North Africa:
Tel: +971-4-391-6480 (U.A.E)
Sunday to Wednesday 9:00am to 6:00pm GMT+4
Thursday 9:00am to 1:00pm GMT+4
http://support.dlink-me.com
e-mail: support@dlink-me.com
Page 16
Руководство по быстрой установке
KVM-121
Переключатель KVM
Page 17
Системные требования
• Клавиатура PS/2
• Мышь PS/2
• Динамики или наушники
• Монитор VGA или выше
Содержимое комплекта
System Requirements
Переключатель KVM
D-Link KVM-121
Руководство по быстрой
установке
Если что-либо из перечисленного отсутствует, обратитесь к Вашему
поставщику.
17
2 набора кабелей KVM
Page 18
Hardware Overview
Описание оборудования
Кнопка Select
Нажмите на кнопку Select, чтобы быстро и легко переключиться между
обоими компьютерами.
Порт VGA
Гнездо для
подключения
наушников
Кабели KVM
Подключите кабели клав иатуры, монитора, зву ковой карты и мыши к
переключателю KVM, а кабели переключателя KVM, входящие в комплект
поставки к компьютеру.
Порт для
клавиатуры
Порт для мыши
18
Page 19

Hardware Overview
KVM-121 оснащен кабелями KVM, включенными в поставку,
закрепленными на портах PC1 и PC2. Подключите кабель от PC1
к первому компьютеру, а кабель от PC2 ко второму компьютеру.
PC1
Подключите аудио - и VGA- кабели к первому
компьютеру.
19
PC2
Подключите аудио - и VGA- кабели ко второму
компьютеру.
Page 20

Hardware Installation
Установка оборудования
Подключите наушники или
динамики к зеленому гнезду
для подключения наушников,
расположенному на KVM-121.
Подключите разъем 15-pin VGA
монитора к голубому разъему
порта VGA, расположенному на
KVM-121.
Подключите клавиатуру
компьютера с разъемом 6-pin
PS/2 «папа» к пурпурному порту
клавиатуры, расположенному на
KVM-121.
20
Page 21

Hardware Installation
Подключите мышь компьютера
с разъемом 6-pin PS/2 «папа»
к зеленому порту мыши,
расположенному на KVM-121.
Замечание:Перед установкой KVM-121 убедитесь, что
все компьютеры выключены, чтобы избежать ошибок при
определении мыши и клавиатуры при загрузке компьютеров.
21
Page 22

Hardware Installation
Шаги, описанные ниже, выполняются на обоих компьютерах,
которые используются с KVM-121. Начните подключение
кабелей от порта PC1 KVM-121 к первому компьютеру.
Подключите мониторный кабель
(с голубым покрытием) KVM-121
к порту VGA, расположенному
на задней панели корпуса
компьютера.
Подключите кабель для
клавиатуры (с пурпурным
покрытием) KVM-121 к порту
PS/2, расположенному на задней
панели корпуса компьютера.
Подключите кабель для мыши (с
зеленым покрытием) KVM-121
к порту PS/2, расположенному
на задней панели корпуса
компьютера.
22
Page 23

Hardware Installation
Подключите аудиокабель KVM121 к разъему для подключения
наушников, расположенному
на задней панели корпуса
компьютера.
Замечание: Повторите эти
шаги, чтобы подключить кабели
от порта PC2 KVM-121 ко
второму компьютеру.
Включите питание всех подключенных компьютеров после
завершения установки KVM-121.
После установки KVM-121 схема должна выглядеть подобно
диаграмме ниже.
23
Page 24

Switching the KVM-121
Переключение с помощью KVM-121
Кроме того, для переключения между компьютерами можно
использовать клавиатуру. Нажмите и удерживайте клавишу
Scroll Lock дважды для входа в режим переключения с помощью
«горячих» клавиш. Звуковой сигнал подтвердит, что режим
переключения по «горячим» клавишам активирован.
Меню горячих клавиш
Scroll Lock + Scroll Lock + 1 : Переключение только на ПК1.
Scroll Lock + Scroll Lock + 2 : Переключение только на ПК2.
Scroll Lock + Scroll Lock + F1 : Переключение на ПК1 с
синхронизацией аудиосигнала.
Scroll Lock + Scroll Lock + F2 : Переключение на ПК2 с
синхронизацией аудиосигнала.
Scroll Lock + Scroll Lock + → : Переключение на следующий ПК
с синхронизацией аудиосигнала.
Scroll Lock + Scroll Lock + ← : Переключение на предыдущий
ПК с синхронизацией
аудиосигнала.
Scroll Lock + Scroll Lock + B : Включить/отключить звуковой
сигнал.
Scroll Lock + Scroll Lock + M : Сброс в исходное состояние
мыши и клавиатуры
Scroll Lock + Scroll Lock + S : Переход в режим
автосканирования переключений
между компьютерами каждый 10
секунд (только контроль).
Клавиша пробела : Выход из режима
автосканирования.
24
Page 25

Troubleshooting
Поиск неисправностей
Клавиатура
Если клавиатура не функционирует, не определяется или возникли
ошибки клавиатуры при загрузке, проверьте следующее:
• Убедитесь, что клавиатура правильно подключена к KVM-121.
Убедитесь, что кабель клавиатуры с пурпурным покрытием
надежно подключен к порту клавиатуры PS/2 (с пурпурным
покрытием), а не к порту для мыши (с зеленым покрытием).
• Убедитесь в работоспособности клавиатуры, подключив
ее непосредственно к компьютеру. Для этого необходимо
выключить компьютер.
• Прочитайте документацию по системной плате и убедитесь,
что прерывание IRQ клавиатуры PS/2 активировано. В
большинстве случаев это осуществляется посредством BIOS
Setup.
• Попробуйте использовать другую клавиатуру.
Мышь
Если мышь не функционирует, не определяется, или возникли
ошибки мыши при загрузке, проверьте следующее:
• Убедитесь, что мышь правильно подключена к KVM-121.
Проверьте, что кабель мыши (с зеленым покрытием) подключен к
порту мыши PS/2 (с зеленым покрытием), а не к порту клавиатуры
PS/2 (с пурпурным покрытием).
• Убедитесь в работоспособности мыши, подключив ее
непосредственно к компьютеру. Для этого необходимо сначала
выключить компьютер.
• Прочтите документацию по системной плате и убедитесь, что
прерывание IRQ мыши PS/2 активизировано. В большинстве
случаев это осуществляется посредством BIOS Setup.
• Попробуйте использовать другую мышь
• Если при перек лючен ии между ком пьютерами, мыш ь
перемещается произвольно, попробуйте выключить компьютер
и перезагрузиться.
25
Page 26

Troubleshooting
• Убедитесь, что на компьютере установлено не более одного
драйвера мыши (проверьте файлы cong.sys и autoexec.bat
для Windows), и что используется последняя версия драйвера
мыши.
• Если используется специальная мышь, такая как беспроводная
или мышь со скроллингом, то убедитесь, что используется
базовый драйвер для мыши PS/2. Нестандартные мыши
могут и мет ь рас ширение проток ола P S/2, к оторые не
поддерживаются KVM-121.
• Не перемещайте мышь и не используйте ее кнопки при
переключении с одного компьютера на другой.
• Постарайтесь сбросить мышь в исходное состояние, отключив
ее от KVM-121 секунды на 3, и снова подключите.
Видеоизображение
Есл и изо б ра жен ие н а мо н ито ре н е ч етк о е, п ро в е рьт е
следующее:
• Убедитесь, что кабели монитора подключены правильно.
Убедитесь, что кабель VGA с голубым покрытием подключен
к компьютеру, и что кабель с черным покрытием подключен к
KVM-121.
• Попробуйте уменьшить частоту регенерации или разрешение
монитора.
• Попробуйте использовать более к ороткий мониторный
кабель.
Звук
Если отсутствует звук, проверьте следующее:
• Убедитесь, что динамики правильно подключены к KVM-121.
Проверьте, что аудиокабель с зеленым покрытием подключен к
разъему для наушников (с зеленым покрытием).
• Убедитесь, что динамики работают при непосредственном
подключении к компьютеру
• Попробуйте использовать другие динамики.
26
Page 27

Техническая поддержка
Обновления программного обеспечения и документация
доступны на Интернет-сайте D-Link.
D-Link предоставляет бесплатную поддержку для клиентов
в течение гарантийного срока.
Клиенты могут обратиться в группу технической поддержки
D-Link по телефону или через Интернет.
Техническая поддержка D-Link:
+495-744-00-99
Техническая поддержка через Интернет
http://www.dlink.ru
e-mail: support@dlink.ru
Page 28

Guía de Instalación
KVM-121
Switch KVM
Page 29

Requerimientos del Sistema
• Teclado PS/2
• Mouse PS/2
• Parlantes o Audífonos
• Monitor VGA o superior
Contenido del Paquete
System Requirements
Switch Dlink KVM-121
Guía de instalación rápida
Si no encuentra alguno de los elementos listados arriba póngase en contacto con su
Reseller.
29
2 Sets de cables KVM
Page 30

Hardware Overview
Descripción del hardware
Botón Select
Presione el botón “Select” para cambiar de manera fácil y rápida entre ambos
computadores.
Puerto VGA
Conector Jack
para Audio
Cables KVM
Conecte directamente su teclado, monitor, tarjeta de sonido y Mouse al KVM Switch,
y conecte el cable KVM suministrado desde el KVM Switch a su computador.
Puerto del Teclado
Puerto del Mouse
30
Page 31

Hardware Overview
El KVM-121 debe ser conectado con los cables KVM suministrados
hacia los puertos PC1 y PC2. Conecte el cable desde el PC1 en su
primer computador (Computer 1), y lo mismo para el segundo computador (Computador 2).
PC1
Conecte el cable de audio y VGA al primer
computador (Computer 1).
31
PC2
Conecte el cable de audio y VGA al segundo
computador (Computer 2).
Page 32

Hardware Installation
Instalación del Hardware
Conecte sus audífonos o parlantes
en el conector verde de audio
ubicado en el KVM-121.
Conecte su monitor en el puerto
VGA azul ubicado en el KVM-121
(conector 15-pin)
Conecte su teclado PS/2 en el
conector púrpura ubicado en el
KVM-121 (conector macho 6-pin)
32
Page 33

Conecte su Mouse PS/2 en el
conector verde ubicado en el KVM121 (conector macho 6-pin).
Nota: Asegúrese de que los
computadores estén apagados
antes de conectar todos los cables
al KVM-121 para evitar errores
de detección de Mouse o teclado
durante el proceso de booteo de los
computadores.
Hardware Installation
33
Page 34

Hardware Installation
Los pasos siguientes serán aplicados a ambos computadores que
serán conectados con el KVM-121.
Comience uniendo los cables conectados desde el puerto PC1 del
Kvm-121 a la computadora 1.
Conecte al KVM-121 el cable de
monitor VGA incluido y por el otro
extremo hacia el conector VGA
del case de su PC (conector azul)
localizado en la parte trasera.
Conecte al KVM-121 el cable de
Teclado incluido y por el otro extremo
hacia el conector de teclado PS/2 del
case de su PC (conector púrpura)
localizado en la parte trasera.
Conecte al KVM-121 el cable de
Mouse incluido y por el otro extremo
hacia el puerto de Mouse PS/2 del
case de su PC (conector verde)
localizado en la parte trasera.
34
Page 35

Hardware Installation
Conecte al KVM-121 el cable de audio incluido y por el otro extremo hacia el jack de audio del case de su
PC (conector púrpura) localizado en
la parte trasera.
Nota: Repita estos pasos para el
computador 2
Encienda ambos computadores conectados al KVM-121, la instalación
se habrá completado.
Una vez completada la instalación de su KVM-121 el diagrama de su
conexión se verá similar al ilustrado abajo.
35
Page 36

Switching the KVM-121
Conmutación del KVM-121
Usted puede utilizar el teclado para cambiarse entre los computadores.
Presione 2 veces la tecla de Scroll Lock, “(Bloq. despl.)” para ingresar
a modo de conmutación activado por Hot Key. Un beep audible
conrmará que el modo Hot Key está activado.
Menú de Hot Key
Scroll Lock + Scroll Lock + 1 : Cambia hacia PC1.
Scroll Lock + Scroll Lock + 2 : Cambia hacia PC2.
Scroll Lock + Scroll Lock + F1 : Cambia a PC1 con señal de
audio sincronizada.
Scroll Lock + Scroll Lock + F2 : Cambia a PC2 con señal de
audio sincronizada.
Scroll Lock + Scroll Lock + → : Cambia al siguiente PC con
señal de audio sincronizada.
Scroll Lock + Scroll Lock + ← : Cambia al PC anterior con
señal de audio sincronizada.
Scroll Lock + Scroll Lock + B : Habilita/Deshabilita beep
Scroll Lock + Scroll Lock + M : Resetea el Mouse y Teclado
Scroll Lock + Scroll Lock + S : Modo de Auto-Scan conmuta
automáticamente entre
los computadores cada
10 segundos (solamente
Monitoreo).
Spacebar : Salir del modo Auto Scan.
36
Page 37

Troubleshooting
Troubleshooting
Teclado
Si su teclado no funciona, no es detectado o marca error durante el
proceso de booteo verique lo siguiente:
• Asegúrese de que el teclado este correctamente conectado al
KVM-121. Verique que el conector púrpura este correctamente
conectado a su conector del mismo color en el PC. (Púrpura:
teclado y Verde: Mouse)
• Verique que el teclado funciona correctamente conectándolo al
PC directamente. Es conveniente apagar el PC antes de realizar
esto.
• Lea la documentación de su Placa Madre y asegúrese de que el
IRQ del Teclado este habilitado en la BIOS de esta.
• Intente utilizando un teclado diferente.
Mouse
Mouse
Si su Mouse no funciona, no es detectado o marca error durante el
proceso de booteo verique lo siguiente:
• Asegúrese de que el Mouse este correctamente conectado al
KVM-121. Verique que el conector verde este correctamente
conectado a su conector del mismo color en el PC. (Púrpura:
teclado y Verde: Mouse)
• Verique que el teclado funciona correctamente conectándolo al
PC directamente. Es conveniente apagar el PC antes de realizar
esto.
• Lea la documentación de su Placa Madre y asegúrese de que el
IRQ del Mouse este habilitado en la BIOS de esta.
• Intente utilizando un teclado diferente.
• Si el movimiento del Mouse es aleatorio cuando se cambia entre
los PC, trate apagando el PC y encendiéndolo nuevamente.
• Verique que el PC no tenga mas de un driver de Mouse instalado
en el sistema operativo (Chequear los archivos cong.sys y
autoexec.bat en Windows) y que el Mouse esté utilizando su
37
Page 38

Troubleshooting
ultima versión de driver disponible).
• Si algún Mouse especial es utilizado tal como un inalámbrico
o scrolling Mouse, asegúrese de tener los drivers genéricos
instalados. Un Mouse no estándar puede contener extensiones
en el protocolo PS/2 que no son soportados por el KVM-121
• No mover el Mouse o presionar sus botones mientras se conmuta
a otro PC a través del KVM-121
• Trate reseteando el Mouse desconectándolo del KVM-121 durante
unos tres segundos y luego reconecte.
Video
Si la imagen en su monitor no es clara, verique lo siguiente:
• Verifique que los cables de video de los monitores estén
apropiadamente insertados. Asegúrese que el conector VGA azul
este conectado en su PC y el conector negro al KVM-121.
• Intente bajando la resolución y refrescar la velocidad de barrido
de su monitor.
• Intente utilizando otro cable VGA.
Audio
Si el audio no funciona correctamente, verique lo siguiente:
• Asegúrese de que los parlantes o audífonos estén apropiadamente
conectados al KVM-121. Chequear que el conector verde de audio
este apropiadamente insertado en el jack (conector verde).
• Verique que los parlantes o audífonos funcionan correctamente
conectándolos directamente al PC.
• Intente utilizando otro set de parlantes o audífonos.
38
Page 39

Asistencia Técnica
D-Link Latin América pone a disposición de sus clientes, especicaciones,
documentación y software mas reciente a través de nuestro Sitio Web
www.dlinkla.com
El servicio de soporte técnico tiene presencia en numerosos países de la Región
Latino América, y presta asistencia gratuita a todos los clientes de D-Link, en
forma telefónica e internet, a través de la casilla
soporte@dlinkla.com
Soporte Técnico Help Desk Argentina:
Teléfono: 0800-12235465 Lunes a Viernes 09:00 am a 22:00 pm
Soporte Técnico Help Desk Chile:
Teléfono: 800 8 35465 Lunes a Viernes 08:00 am a 21:00 pm
Soporte Técnico Help Desk Colombia:
Teléfono: 01800-9525465 Lunes a Viernes 07:00 am a 20:00 pm
Soporte Técnico Help Desk Ecuador:
Teléfono: 1800-035465 Lunes a Viernes 07:00 am a 20:00 pm
Soporte Técnico Help Desk El Salvador:
Teléfono: 800-6335 Lunes a Viernes 06:00 am a 19:00 pm
Soporte Técnico Help Desk Guatemala:
Teléfono: 1800-8350255 Lunes a Viernes 06:00 am a 19:00 pm
Soporte Técnico Help Desk Panamá:
Teléfono: 00800 0525465 Lunes a Viernes 07:00 am a 20:00 pm
Soporte Técnico Help Desk Costa Rica:
Teléfono: 0800 0521478 Lunes a Viernes 06:00 am a 19:00 pm
Soporte Técnico Help Desk Perú:
Teléfono: 0800-00968 Lunes a Viernes 07:00 am a 20:00 pm
Soporte Técnico Help Desk México:
Teléfono: 001 800 123-3201 Lunes a Viernes 06:00 am a 19:00
Soporte Técnico Help Desk Venezuela:
Teléfono: 0800-1005767 Lunes a Viernes 08:00 am a 21:00 pm
Page 40

Guia de Instalação Rápida
KVM-121
Switch KVM
Page 41

Necessidades do Sistema
• Teclado PS/2
• Mouse PS/2
• Caixas Acústicas ou Fones de Ouvido
• Monitor VGA ou Superior
Conteúdo da Embalagem
System Requirements
Switch D-Link KVM-121
Guia de Instalação
Rápida
Se algum desses ítens estiver faltando, favor entrar em contato com a sua revenda.
41
2 conjuntos de cabos
KVM
Page 42

Hardware Overview
Visualizando Hardware
Botão Select
Pressione o botão “select” para alternar rapidamente entre ambos
computadores.
Porta VGA
Conector de Audio
Cabos KVM
Conecte os cabos do teclado, monitor, placa de som e mouse nos conectores do
KVM, e conecte os cabos fornecidos com o KVM nos seus computadores.
Porta de Teclado
Porta de Mouse
42
Page 43

Hardware Overview
O KVM-121 acompanha os cabos KVM para conexão rápida entre o PC 1 e o PC 2. Conecte o cabo no PC 1 ao seu primeiro
computador(Computador 1), e conecte o cabo no PC 2 ao seu segundo computador(Computador 2).
PC1
Conecte o cabo de áudio, e o VGA ao seu
primeiro computador (Computador 1).
43
PC2
Conecte o cabo de áudio, e o VGA ao seu
segundocomputador (Computador 2).
Page 44

Hardware Installation
Instalação do Hardware
Conecte seu fone de ouvido ou
alto-falantesno conector verde de
áudio sobre o DKVM-121.
Conecte seu Monitor de 15 pinos
(VGA) ao conector azul (VGA)
localizado no KVM-121.
Conecte o cabo de teclado
noconector roxo localizado no
KVM-121.
Conecte o cabo macho do teclado
ao conector roxo (porta de teclado)
localizado na parte traseira do
KVM-121.
44
Page 45

Conecte o cabo do mouse (PS/2
)ao conector verde de conexão do
mouselocalizado no KVM-121.
Nota: Certique-se que todos
os seus computadores estão
desligadosantes de instalar o KVM-
121, para evitar erros de mouse
e tecladodurante o reinício dos
computadores.
Hardware Installation
45
Page 46

Hardware Installation
Os passos seguintes se aplicam para os computadores que serão
usados com oKVM-121. Inicie conectando os cabos ao PC através
da porta 1 do KVM-121 para o computador 1.
Conecte o cabo azul do
monitorincluído com o KVM121 à portaVGA localizado na
parte traseira do gabinete do seu
computador.
Conecte o cabo roxo do teclado
à porta PS/2 na parte traseira do
gabinete do seu computador.
Conecte o cabo verde do mouse
àporta de mouse localizada na
partetraseira do gabinete do seu
computador.
46
Page 47

Hardware Installation
Conecte o cabo de áudio incluído
como KVM-121, no conector de áudio
naparte traseira do seu computador.
Nota: Repita estes passos
conectandoos cabos de áudio no
Computador 2.
Ligue os dois computadores que
estão conectados ao KVM-121.
Somente quando você tiver concluído a instalação do seu KVM-121,
sua rede terá uma aparência similar ao diagrama abaixo:
47
Page 48

Switching the KVM-121
Conectando com o KVM-121
Você pode usar o seu teclado para conectar entre os seus
computadores.Pressione a tecla Scroll Lock duas vezes para entrar
na função de alternar.O beep conrma que a função de teclado está
ativada.
Funções de Teclado
Scroll Lock + Scroll Lock + 1 : Conecta no PC1 somente.
Scroll Lock + Scroll Lock + 2 : Conecta no PC2 somente.
Scroll Lock+ Scroll Lock+ F1 : Conecta no PC1 com áudio
sincronizado.
Scroll Lock + Scroll Lock + F2 : Conecta no PC2 com áudio
sincronizado.
Scroll Lock + Scroll Lock + → : Conecta no próximo PC com
áudio sincronizado.
Scroll Lock + Scroll Lock + ← : Conecta ao PC anterior com
áudio sincronizado.
Scroll Lock + Scroll Lock + B : Habilita/Desabilita o Beep.
Scroll Lock + Scroll Lock + M : Reinicia o mouse e o teclado.
Scroll Lock + Scroll Lock + S : Modo Auto-Scan para detectar
e conectar os computadores
por 10 segundos (Monitor
Somente).
Barra de Espaço : Sai do modo Auto Scan.
48
Page 49

Troubleshooting
Resolvendo Problemas
Teclado
Se o seu teclado não está funcionando, não foi detectado, ou está
com erro durante o reinicio, conra o seguinte:
• Certique-se que o teclado está conectado corretamente ao KVM-
121.
• Conra se o conector roxo do teclado está seguramente conectado
na porta PS/2 de teclado (cor roxa) e não na porta PS/2do mouse
(cor verde).
• Verique se o teclado funciona quando conectado ao computador
diretamente. Você terá que reiniciar o computador para fazer
isso.
• Leia a documentação da sua placa mãe e certique-se que
o IRQ do teclado PS/2 está ativado. Pode ser congurado na
maioriados computadores através da BIOS.• Tente usar um
teclado diferente.
Mouse
Se o seu mouse não funcionar, não for detectado, ou está com erro
durante o reinicio, conra o seguinte:
• Certique-se que o mouse está conectado corretamente ao KVM-
121. Conra se o conector verde do mouse está seguramente
conectado na porta PS/2 de mouse (cor verde) e não na porta
PS/2 do teclado (cor roxa).
• Verique se o mouse funciona quando conectado diretamente
no computador. Você terá que reiniciar o computador para fazer
isso.• Leia a documentação da sua placa mãe e certique-se que
o IRQdo mouse PS/2 mouse está ativado. Pode ser congurado
na maioria dos computadores através da BIOS
• Tente usar um mouse diferente.
• Se o movimento do mouse está randomico quando alterna entre
os, computadores, tente desligar o computador e reiniciar.
• Verique se os computadores não possuem mais de um driver
49
Page 50

Troubleshooting
de mouse instalado (verique seu cong.sys e autoexec.bat
do Windows) e se você está usando um driver atualizado de
mouse.
• Se o mouse que você está utilizando é sem o ou scrolling,
verique se você está usando um driver PS/2 generico. Um mouse
que não seja do padrão PS/2 pode ter uma extensão do protocolo
PS/2 que não seja suportado pelo KVM-121
• Não mexa o mouse ou pressione qualquer botão quando for
alternar entre os PCs.
• Tente desconectar o mouse do KVM-121 por 3 segundos, e depois
reconecte-o novamente.
Video
Se a imagem no monitor não aparecer, conra o seguinte:
• Verifique se todos os cabos de video do monitor estão
conectadoscorretamente, se o cabo VGA azul está conectado no
seu computador,e o cabo VGA preto conectado ao KVM-12.1
• Tente baixar a resolução e atualizar a taxa de atualização do
monitor.
• Tente usar um cabo de video menor.
Audio
ÁudioSe o seu áudio não funcionar corretamente, confira o
seguinte:
• Certique-se que as caixas acusticas estão instaladas no KVM-
121. Conra se o cabo de áudio está conectado corretamente no
conector de áudio (cor verde).
• Verique se as caixas acústicas funcionam quando conectadas
diretamente no computador.
• Tente usar outras caixas acústicas.
50
Page 51

Suporte Técnico
Você pode encontrar atualizações de software e documentação
de usuário no site da D-Link Brasil www.dlinkbrasil.com.br.
A D-Link fornece suporte técnico gratuito para clientes no Brasil
durante o período de vigência da garantia deste produto.
Suporte Técnico para clientes no Brasil:
Telefone
São Paulo +11-2185-9301
Segunda à sexta
Das 8h30 às 18h30
Demais Regiões do Brasil 0800 70 24 104
E-mail:
e-mail: suporte@dlinkbrasil.com.br
Page 52

產品使用說明書
KVM-121
KVM交換器
Page 53

系統需求
• PS/2鍵盤
• PS/2滑鼠
• 麥克風或頭戴式耳機
• VGA或更高等級的顯示器
包裝內容物
System Requirements
53
D-Link KVM-121 KVM交換器
快速安裝手冊
以下物件如有缺漏,請聯繫您的經銷商。
2組KVM線
Page 54

Hardware Overview
硬體說明
切換鍵
透過切換鍵,可輕鬆快速切換操作不同的電腦
VGA埠
音效插孔
KVM線
使用所提供的KVM線,一端連接至您電腦的鍵盤、螢幕、音效卡與滑鼠上,另一
端連接至KVM交換器上。
鍵盤埠
滑鼠埠
54
Page 55

Hardware Overview
透過連接KVM-121 KVM交換器,控制第1部與第2部電腦
PC1
連接音效與VGA線至您的第1部電腦(電腦1)
PC2
連接音效與VGA線至您的第2部電腦(電腦2)
55
Page 56

Hardware Installation
硬體安裝
連 接 您 的 頭 戴 式 耳 機 或 麥 克 風 至
DKVM-121上面的綠色音效插孔
連接您的螢幕15-pin連接頭至KVM121的藍色VGA埠上
連接您的鍵盤6-pin連接頭至KVM121的紫色的鍵盤埠上
56
Page 57

Hardware Installation
連接您的 滑 鼠6-p i n連接頭 至 KVM121的綠色的滑鼠埠上
安裝KVM-121時,請確定您的電腦都已經關機,可以避免當電腦重
新開機時,滑鼠與鍵盤無法運作
57
Page 58

Hardware Installation
接下來說明電腦與KVM-121連接的步驟與方式,將從第1部電腦開始
說明
將KVM線連接螢幕的藍色接頭接到電
腦的VGA埠上
將KVM線連接鍵盤的紫色接頭接到電
腦的PS/2鍵盤埠上
將KVM線連接滑鼠的綠色接頭接到電
腦的PS/2滑鼠埠上
58
Page 59

將KVM線連接音效卡的接頭接到電腦
的音效卡上
請重複上述的步驟,連接第2部電腦
完成電腦與KVM-121連接後,將所連接的電腦開機
您依據上述步驟連接完成後,架構圖將與下圖類似
Hardware Installation
59
Page 60

Switching the KVM-121
KVM-121切換方式
您可以使用鍵盤切換您欲操作的電腦,按下Scroll Lock兩次之後,再
加上輸入熱鍵切換不同的電腦,當聽到嗶聲表示熱鍵切換模式正在
運作。
熱鍵目錄
Scroll Lock + Scroll Lock + 1 :螢幕、鍵盤與滑鼠切換到第1部
電腦
Scroll Lock + Scroll Lock + 2 :螢幕、鍵盤與滑鼠切換到第2部
電腦
Scroll Lock + Scroll Lock + F1:螢幕、鍵盤、滑鼠與音效同步切
換到第1部電腦
Scroll Lock + Scroll Lock + F2:螢幕、鍵盤、滑鼠與音效同步切
換到第2部電腦
Scroll Lock + Scroll Lock + →:螢幕、鍵盤、滑鼠與音效同步切
換到下一部電腦
Scroll Lock + Scroll Lock + ←:螢幕、鍵盤、滑鼠與音效同步切
換到前一部電腦
Scroll Lock + Scroll Lock + B :關閉”嗶”聲音效
Scroll Lock + Scroll Lock + M: 重新設定鍵盤與滑鼠
Scroll Lock + Scroll Lock + S : 自動掃瞄模式,螢幕每10秒鐘
切換不同的電腦
Spacebar : 離開自動掃瞄模式
60
Page 61

Troubleshooting
障礙排除
鍵盤
如果您的鍵盤無法運作,或者是鍵盤在開機時無法運作:
• 確認鍵盤正確連接至KVM-121 ,紫色的接頭正確的插入KVM 紫色
的接孔,而非滑鼠埠
• 請您在電腦關機後,接上鍵盤,確定連接至電腦時可以正常運作
• 請閱讀您電腦主機板使用手冊,確認PS/2鍵盤的IRQ是開啟的,大
部分電腦都是在BIOS設定
• 使用不同的鍵盤
滑鼠
假如 您的滑鼠無法運作、無法偵測,或者 是 滑鼠在開機時無法運
作:
• 確認滑鼠正確連接至KVM-121 ,綠色的接頭正確的插入KVM 綠色
的接孔,而非鍵盤埠
• 請您在電腦關機後,接上滑鼠,確定連接至電腦時可以正常運作
• 請閱讀您電腦主機板使用手冊,確認PS/2滑鼠的IRQ是開啟的,大
部分電腦都是在BIOS設定
• 使用不同的滑鼠
• 當切換不同電腦時,滑鼠會隨機移動現象,請試著將電腦重新啟
動
• 請確定您的電腦只安裝一個滑鼠驅動程式,以及您正使用最新的
滑鼠驅動程式
• 假如您使用特殊滑鼠,請確定使用一般的PS/2滑鼠驅動程式,非標
準的PS/2滑鼠可能使用不同的通訊協定,導致KVM-121無法支援
• 當切換到不同電腦時,請勿移動滑鼠或者是按滑鼠上面的任何按
鍵
• 請將滑鼠從KVM-121重新插拔,三秒後重新連接回去
61
Page 62

Troubleshooting
視訊
假如您的顯示器不清晰,請確認下面幾點
• 確認螢幕正確連接至KVM-121 ,藍色的VGA接頭正確的插入KVM
藍色的接孔
• 使用更低的螢幕解析度與螢幕更新頻率
• 使用更短的螢幕連接線
音效
假如無法正常運作,請確認下列幾點:
•請確認麥克風正確連接到KVM-121,確認綠色音效線正確插入綠
色音效插孔
•請確認當麥克風直接插入電腦時是可運作的
•試著使用不同的麥克風
62
Page 63

D-Link 友訊科技 台灣分公司
技術支援資訊
如果您還有任何本使用手冊無法協助您解決的產品相關問題,台灣
地區用戶可以透過我們的網站、電子郵件或電話等方式與D-Link台灣
地區技術支援工程師聯絡。
D-Link 免付費技術諮詢專線
0800-002-615
服務時間:週一至週五,早上8:30 到 晚上9:00
(不含周六、日及國定假日)
網 站:http://www.dlink.com.tw
電子郵件 :dssqa_service@dlink.com.tw
如果您是台灣地區以外的用戶,請參考D-Link網站 全球各地
分公司的聯絡資訊以取得相關支援服務。
產品保固期限、台灣區維修據點查詢,請參考以下網頁說明:
http://www.dlink.com.tw
產品維修:
使用者可直接送至全省聯強直營維修站或請洽您的原購買經銷商。
Page 64

Petunjuk Pemasangan
KVM-121
KVM Switch
Page 65

Kebutuhan Sistem
• Keyboard PS/2
• Mouse PS/2
• Speakers atau Headphones
• Monitor VGA atau lebih tinggi
Isi Paket
System Requirements
65
D-Link KVM-121
KVM Switch
Petunjuk Pemasangan Cepat
Jika isi paket tidak lengkap, harap hubungi penjual.
2 set kabel KVM
Page 66

Hardware Overview
Pengenalan Perangkat
Tombol “select”
Tekan tombol select untuk berpindah dari komputer satu ke komputer lainnya
secara cepat
Port VGA
Audio Jack
Kabel KVM
Hubungkan kabel dari keyboard, monitor, sound card dan mouse anda ke KVM
switch dan hubungkan kabel KVM yang disediakan dari KVM Switch ke komputerkomputer anda
Port Keyboard
Port Mouse
66
Page 67

Hardware Overview
KVM-121 dipasangkan dengan kabel KVM yang sudah disediakan
dimana kabel ini dikaitkan ke port PC 1 dan PC 2. Hubungkan kabel
dari PC 1 ke komputer pertama anda (Komputer 1) dan hubungkan
kabel dr PC 2 ke komputer kedua anda (Komputer 2).
PC1
Hubungkan kabel audio dan VGA ke komputer
pertama anda (komputer 1)
67
PC2
Hubungkan kabel audio dan VGA ke komputer
kedua anda (komputer 2)
Page 68

Hardware Installation
Pemasangan perangkat
Hubungkan headphone atau
speaker anda ke audio jack
berwarna hijau yang ada pada
KVM-121.
Hubungkan konektor VGA 15-pin
dari monitor anda ke port VGA
berwarna biru yang ada pada KVM-
121.
Hubungkan konektor PS/2 dari
keyboard anda ke port keyboard
berwarna ungu yang ada pada
KVM-121.
68
Page 69

Hardware Installation
Hubungkan konektor PS/2 dari
mouse anda ke port mouse berwarna
hijau yang ada pada KVM-121.
Catatan : Pastikan semua komputer anda dalam keadaan mati
sebelum pemasangan KVM-121 untuk menghindari gangguan pada
keyboard dan mouse ketika anda menghidupkan komputer anda.
69
Page 70

Hardware Installation
Langkah berikut ini berlaku untuk kedua komputer yang akan dipakai menggunakan KVM-121.
Dimulai dengan menghubungkan kabel dari port PC1 pada KVM121 ke Komputer 1.
Hubungkan kabel monitor berwarna
biru yang merupakan bagian dari
kabel KVM ke port VGA yang terletak pada bagian belakang komputer
anda.
Hubungkan kabel keyboard
berwarna ungu yang merupakan
bagian dari kabel KVM ke port
PS/2 keyboard yang terletak
pada bagian belakang komputer
anda.
Hubungkan kabel mouse berwarna
hijau yang merupakan bagian dari
kabel KVM ke port PS/2 mouse yang
terletak pada bagian belakang komputer anda.
70
Page 71

Hardware Installation
Hubungkan kabel audio yang
merupakan bagian dari kabel KVM
ke port audio jack yang terletak pada
bagian belakang komputer anda.
Catatan : Ulangi langkah-langkah
diatas untuk menghubungkan kabel
dari port PC 2 pada KVM-121 ke
Komputer 2
Nyalakan kedua komputer anda setelah anda menyelesaikan
pemasangan KVM-121
Setelah anda menyelesaikan pemasangan KVM-121 anda maka
koneksi anda akan terlihat sama dengan diagram dibawah ini.
71
Page 72

Switching the KVM-121
Pemindahan pada KVM-121
Anda dapat menggunakan keyboard untuk berpindah dari satu
komputer ke komputer lainnya. Tekan dan tahan tombol “Scroll
Lock” sebanyak 2 kali untuk masuk kedalam mode pemindahan
menggunakan Hot Key. Sebuah bunyi beep menandakan bahwa
mode pemindahan Hot Key sudah aktif
Menu Hot Key
Scroll Lock + Scroll Lock + 1 : Hanya berpindah ke PC1
Scroll Lock + Scroll Lock + 2 : Hanya berpindah ke PC2
Scroll Lock + Scroll Lock + F1 : Berpindah ke PC1 dengan
sinkronisasi Sinyal Audio
Scroll Lock + Scroll Lock + F2 : Berpindah ke PC2 dengan
sinkronisasi Sinyal Audio
Scroll Lock + Scroll Lock + → : Berpindah ke PC berikutnya
dengan sinkronisasi Sinyal Audio
Scroll Lock + Scroll Lock + ← : Berpindah ke PC sebelumnya
dengan sinkronisasi Sinyal Audio
Scroll Lock + Scroll Lock + B : Mengaktifkan/Menonaktikan
bunyi Beep
Scroll Lock + Scroll Lock + M : Me-reset mouse dan keyboard
Scroll Lock + Scroll Lock + S : Mode Auto-Scan secara
otomatis akan berpindah antar komputer setiap 10 detik
(Hanya Monitor saja)
Spacebar : Keluar dari Mode Auto-Scan
72
Page 73

Troubleshooting
Penyelesain masalah yang umum ditemui
Keyboard
Jika keyboard anda tidak berfungsi, tidak terdeteksi atau adanya
pesan yang menyatakan keyboard error pada saat proses boot-up
maka lakukan langkah berikut :
• Pastikan keyboard tersebut terhubung dengan baik ke KVM-121.
Pastikan kabel keyboard yang berwarna ungu terhubung dengan
benar ke port PS/2 keyboard (berwarna ungu juga) dan bukan
terkoneksi ke port PS/2 mouse (yang berwarna hijau)
• Pastikan keyboard bekerja jika dihubungkan ke komputer secara
langsung. Anda mungkin harus mematikan komputer anda terlebih
dahulu untuk melakukan hal ini.
• Baca dokumentasi motherboard komputer anda dan pastikan
bahwa IRQ dari keyboard PS/2 sudah diaktifkan. Pada umumnya,
ini dapat di-setting pada setup BIOS.
• Coba anda gunakan keyboard lainnya.
Mouse
Jika mouse anda tidak berfungsi, tidak terdeteksi atau adanya pesan
yang menyatakan mouse error pada saat proses boot-up maka
lakukan langkah berikut :
• Pastikan mouse tersebut terhubung dengan baik ke KVM-121.
Pastikan kabel mouse yang berwarna hijau terhubung dengan benar
ke port PS/2 mouse (berwarna hijau juga) dan bukan terkoneksi ke
port PS/2 keyboard (yang berwarna ungu)
• Pastikan mouse bekerja jika dihubungkan ke komputer secara
langsung. Anda mungkin harus mematikan komputer anda terlebih
dahulu untuk melakukan hal ini.
• Baca dokumentasi motherboard komputer anda dan pastikan bahwa
IRQ dari mouse PS/2 sudah diaktifkan. Pada umumnya, ini dapat
di-setting pada setup BIOS.
• Coba anda gunakan mouse lainnya.
• Jika kursor mouse bergerak secara serampangan ketika berpindah
antar komputer, coba matikan komputer anda dan hidupkan
73
Page 74

Troubleshooting
kembali
• Pastikan komputer anda tidak mempunyai lebih dari satu driver mouse
yang terpasang (periksa le cong.sys dan autoexec.bat anda untuk
sistem operasi Windows) dan pastikan anda menggunakan driver
mouse yang terbaru.
• Jika menggunakan mouse khusus misalnya mouse cordless
atau scrolling, pastikan anda menggunakan driver mouse PS/2
generik. Mouse PS/2 yang tidak standar biasanya mempunyai
penambahan pada protokol PS/2 yang tidak didukung oleh KVM121
• Jangan memindahkan kursor mosue atau menekan tombol mouse
pada saat berpindah dari satu PC ke PC lainnya
• Coba me-reset mouse dengan cara mencabutnya dari KVM-121
selama 3 detik dan kemudian menghubungkannya kembali
Video
Jika gambar pada monitor anda tidak jelas maka lakukan langkah
berikut :
• Pastikan semua kabel monitor sudah terpasang dengan benar.
Pastikan kabel VGA berwarna biru terhubung ke komputer anda
dan kabel yang berwarna hitam terhubung ke KVM-121
• Coba turunkan resolusi dan refresh rate pada monitor anda
• Coba gunakan kabel video yang lebih pendek
Audio
Jika audio anda tidak berfungsi dengan benar maka lakukan langkah
berikut :
• Pastikan speaker anda terhubung dengan benar ke KVM-121. Periksa
kabel audio yang berwarna hijau sudah dihubungkan ke audio jack
yang tepat (berwarna hijau)
• Pastikan speaker bekerja dengan baik ketika dihubungkan ke
komputer secara langsung
• Coba anda gunakan speaker lainnya
74
Page 75

Dukungan Teknis
Update perangkat lunak dan dokumentasi pengguna dapat
diperoleh pada situs web D-Link.
Dukungan Teknis untuk pelanggan:
Dukungan Teknis D-Link melalui telepon:
Tel: +62-21-5731610
Dukungan Teknis D-Link melalui Internet:
Email : support@dlink.co.id
Website : http://support.dlink.co.id
Page 76

Ver. 2.00(I)
2007/12/19
5SF2100022-GP
 Loading...