

D Link IR618B1 User Manual

Wireless N 無線寬頻路由器

Table of Contents
Table of Contents
Package Contents ....................................................... 4
System Requirements .............................................4
Features ..................................................................5
Hardware Overview ................................................. 7
LEDs......................................................................... 7
Installation .................................................................... 8
Before you Begin ..................................................... 8
Wireless Installation Considerations ........................ 9
Wall Mounting Your Device ...................................10
Connect to Cable/DSL/Satellite Modem ................ 11
Connect to Another Router .................................... 12
Configuration ............................................................. 14
Web-based Configuration Utility ............................ 14
Setup Wizard ................................................... 15
Internet Setup.....................................................18
Static (assigned by ISP).......... ............................... 22
PPPoE ......................................................... 24
PPTP ............................................................ 25
L2TP ............................................................. 26
Wireless Setup ................................................. 28
LAN Setup .......................................................34
Dynamic ....................................................... 23
DHCP Server Settings .....................................35
Time and Date ................................................. 36
Parental Control ............................................... 37
Port Forwarding ............................................... 38
Application Rules .............................................39
MAC Filter.........................................................40
Traffic Control ................................................. 41
Firewall & DMZ ................................................42
Advanced Wireless ..........................................43
Advanced Network ........................................... 44
Routing ............................................................45
Device Administration ......................................46
Save and Restore ............................................47
Firmware Update ............................................. 48
DDNS Setting ..................................................49
System Check .................................................. 50
Schedules ........................................................51
Log Settings ..................................................... 52
Device Info ....................................................... 53
Log ................................................................... 54
Statistics ..........................................................55
Active Session ................................................ 55
2D-Link DIR-618 User Manual

Table of Contents
Wireless ...........................................................56
Help .................................................................57
Wireless Security ....................................................... 58
What is WEP? .......................................................58
Configure WEP ...................................................... 59
What is WPA? .......................................................60
Configure WPA/WPA2-PSK ..................................61
Configure WPA/WPA2(RADIUS)............................62
Connect to a Wireless Network ................................ 63
®
Using Windows
XP ............................................... 63
Configure WEP ...................................................... 64
Configure WPA-PSK .............................................66
Setting Up Wi-Fi Protection ...................................... 68
Connecting to an Unsecured Wireless Network ..... 84
Troubleshooting ........................................................ 88
Wireless Basics ......................................................... 92
What is Wireless? .................................................. 93
Tips ........................................................................ 95
Wireless Modes ..................................................... 96
Networking Basics .................................................... 97
Check your IP address ..........................................97
Statically Assign an IP address .............................98
Technical Specifications ........................................... 99
Warranty ..................................................................... 101
(WCN 2.0 in Windows Vista) ..................................... 68
Initial Router Configuration for Wi-Fi Protection .... 68
Setting Up a Configured Router ............................69
Changing the Computer Name and Joining a
Workgroup .................................................................70
Configuring the IP Address in Vista ........................ 72
Setting Up a Connection or Network Wirelessly .... 75
Connecting to a Secured Wireless Network (WEP,
WPA-PSK & WPA2-PSK) ........................................... 80
3D-Link DIR-618 User Manual

Section 1-product overview
Note: Using a power supply with a different voltage rating than the one included
with the DIR-618 will cause damage and void the warranty for this product.
Package Contents
• D-Link DIR-618 wireless router
• power adapter
• Ethernet Cable
• CD-ROM with User Manual, and warrenty
Note: each time power on, first please plug the power cord into the power receptor
of the device, and the other end into the power socket on the wall.
System Requirements
• Ethernet-based Cable or DSL Modem
• Computers with Windows, Macintosh, or Linux-based operating systems with an installed Ethernet adapter
®
• Internet Explorer Version 6.0, or Firefox 2.0 and above (for configuration)
®
4D-Link DIR-618 user manual

Section 1-Product Overview
Feature
•
Faster wireless network - The DIR-618 provides up to 300Mbps* wireless connection with other 802.11n
wireless clients. This capability allows users to participate in real-time activities online, such as video
streaming, online gaming, and real-time audio.
• Compatible with 802.11b and 802.11g Devices - The DIR-618 is still fully compatible with the IEEE 802.11b
and 802.11g standard, so it can connect with existing 802.11b and IEEE 802.11g PCI, USB and Cardbus
adapters.
• Advaced firewall feature- The web-based user interface displays many advanced network management
features including :
• Content Filter - Easily applied content filtering based on MAC Address, and/or parent control.
• Filter Scheduling - These filters can be scheduled to be active on certain days or for a duration of
hours or minutes.
• Secure Multiple/Concurrent Sessions - The DIR-618 can pass through VPN sessions. It supports
multiple and concurrent IPSec and PPTP sessions, so users behind the DIR-618 can securely
access corporate networks.
• User-friendly Setup Wizard - Through its easy-to-use Web-based user interface, the DIR-618 lets you control
what information is accessible to those on the wireless network, whether from the Internet or from your company’s
server. Configure your router to your specific settings within minutes.
* Maximum wireless signal rate derived from IEEE Standard 802.11g and Draft 802.11n specifications. Actual data throughput will vary. Network conditions and
environmental factors, including volume of network traffic, building materials and construction, and network overhead, lower actual data throughput rate.
Environmental conditions will adversely affect wireless signal range.
5D-Link DIR-618 user manual
Section 1-Product Overview
Pressing the Reset button
restore the router to its
original factory default settings
Auto MDI/MDIX WAN port
is the connection for the
Ethernet cable to the cable
or DSL modem
。
power Receptor
LAN Port
connect Ethernet device such as
computers, switches and hubs
6D-Link DIR-618 User Manual
Section 1-Product Overview
LEDs
INTERNET
A solid light indicates connection on
the WAN port.This LED blinks during
data transmission.
WLAN LED
A solid light indicates that the wireless
function is ready.this LED blinks during
wireless data transmission.
LAN LED
Power LED
A solid light indicates a proper
connection to the power supply.
Hardware Overview
A solid light indicates connection to the
Ethernet-enabled computers on ports
1-4.This LED blinks during data
transmission.
7D-Link DIR-618 User Manual

Section 2-Installation
Installation
this section will walk you through the installation process. Placement of the router is very important. Please do not
put the router in an enclosed area such as closet, cabinet, or in the attic or garage.
Before you Begin
Please configure the router with the computer that was last connected directly to your modem. Also, you can only
use the Ethernet port on your modem. If you were using the USB connection before using the router, then you must
turn off your modem, disconnect the USB cable and connect an Ethernet cable to the Internet port on the router, and
then turn the modem back on. In some cases, you may need to call your ISP to change connection types (USB to
Ethernet).
If you have DSL and are connecting via PPPoE, make sure you disable or uninstall any PPPoE software such as
WinPoet, Broadjump, or Enternet 300 from your computer or you will not be able to connect to the Internet.
8D-Link DIR-618 User manual

Section 2-Installation
Wireless Installation Considerations
The D-Link wireless router lets you access your network using a wireless connection from virtually anywhere within
the operating range of your wireless network. Keep in mind, however, that the number, thickness and location of walls,
ceilings, or other objects that the wireless signals must pass through, may limit the range. Typical ranges vary depending
on the types of materials and background RF (radio frequency) noise in your home or business. The key to maximizing
wireless range is to follow these basic guidelines:
1. Keep the number of walls and ceilings between the D-Link router and other network devices to a minimum
- each wall or ceiling can reduce your adapter’s range from 3-90 feet (1-30 meters.) Position your devices
so that the number of walls or ceilings is minimized.
2. Be aware of the direct line between network devices. A wall that is 1.5 feet thick (.5 meters), at
a 45-degree angle appears to be almost 3 feet (1 meter) thick. At a 2-degree angle it looks over 42 feet
(14 meters) thick! Position devices so that the signal will travel straight through a wall or ceiling (instead
of at an angle) for better reception.
3. Building Materials make a difference. A solid metal door or aluminum studs may have a negative effect on
range. Try to position access points, wireless routers, and computers so that the signal passes through drywall
or open doorways. Materials and objects such as glass, steel, metal, walls with insulation, water (fish tanks),
mirrors, file cabinets, brick, and concrete will degrade your wireless signal.
4. Keep your product away (at least 3-6 feet or 1-2 meters) from electrical devices or appliances that generate
RF noise.
5. If you are using 2.4GHz cordless phones or X-10 (wireless products such as ceiling fans, lights, and home
security systems), your wireless connection may degrade dramatically or drop completely. Make sure your
2.4GHz phone base is as far away from your wireless devices as possible. The base transmits a signal even
if the phone in not in use.
9D-Link DIR-618 User Manual

Section 2 - Installation
Wall Mounting Your Device
You can mount the DIR-618 to a wall or a partition for easy and convenient placement of your device.
To wall mount your device,
A. Screw the provided screws with the equipment to the wall or partition where the device to be placed.
B. Place the mounting holes on the bottom of the device over the screws to mount it to the wall or partition.
C. Connect your cables to the device.
Step A Step B Step C
10D-Link DIR-618 User Manual

Section 2 - Installation
Connect to Cable/DSL/Satellite Modem
If you are connecting the router to a cable/DSL/satellite modem, please follow the steps below:
1. Place the router in an open and central location.
2. Turn the power off on your modem. If there is no on/off switch, then unplug the modem’s power adapter. Shut down
your computer.
3. Unplug the Ethernet cable (that connects your computer to your modem) from your computer and place it into the
WAN port on the router.
4. Plug an Ethernet cable into one of the four LAN ports on the router. Plug the other end into the Ethernet port on
your computer.
5. Turn on or plug in your modem. Wait for the modem to boot (about 30 seconds).
6. Plug the power adapter to the router and connect to an outlet or power strip. Wait about 30 seconds for the router
to boot.
7. Turn on your computer.
8. Verify the link lights on the router. The power light, WAN light, and the LAN light (the port that your computer is
plugged into) should be lit. If not, make sure your computer, modem, and router are powered on and verify the cable
connections are correct.
9. Skip to page 16 to congure your router.
11D-Link DIR-618 User Manual

Section 2 - Installation
Connect to Another Router
If you are connecting the D-Link router to another router to use as a wireless access point and/or switch, you will have
to do the following before connecting the router to your network:
• Disable UPnP
• Disable DHCP
• Change the LAN IP address to an available address on your network. The LAN ports on the router cannot
accept a DHCP address from your other router.
To connect to another router, please follow the steps below:
1. Plug the power into the router. Connect one of your computers to the router (LAN port) using an Ethernet cable.
Make sure your IP address on the computer is 192.168.0.xxx (where xxx is between 2 and 254). Please see the
Networking Basics section for more information. If you need to change the settings, write down your existing settings
before making any changes. In most cases, your computer should be set to receive an IP address automatically in
which case you will not have to do anything to your computer.
2. Open a web browser and enter http://192.168.0.1 and press Enter. When the login window appears, set the user
name to admin and leave the password box empty. Click OK to continue.
3. Uncheck the Enable UPnP checkbox. Click Save Settings to continue.
™
4. Uncheck the Enable DHCP Server server checkbox. Click Save Settings to continue.
5. Under Router Settings, enter an available IP address and the subnet mask of your network. Click Save Settings to
save your settings. Use this new IP address to access the conguration utility of the router in the future. Close the
browser and change your computer’s IP settings back to the original values as in Step 1.
12D-Link DIR-618 User Manual

Section 2 - Installation
6. Disconnect the Ethernet cable from the router and reconnect your computer to your network.
7. Connect an Ethernet cable in one of the LAN ports of the router and connect it to your other router. Do not plug
anything into the WAN port of the D-Link router.
8. You may now use the other three LAN ports to connect other Ethernet devices and computers. To congure your
wireless network, open a web browser and enter the IP address you assigned to the router. Refer to the Conguration
and Wireless Security sections for more information on setting up your wireless network.
13D-Link DIR-618 User Manual

Section 3 - Configuration
Configuration
This section will show you how to configure your new D-Link wireless router using the web-based configuration utility.
Web-based Configuration Utility
To access the configuration utility, open a web-browser such
as Internet Explorer and enter the IP address of the router
(192.168.0.1).
Enter the user name (admin) and your password. Leave the
password blank by default.
If you get a Page Cannot be Displayed error, please refer to
the Troubleshooting section for assistance.
14D-Link DIR-618 User Manual

Section 3-Configuration
Configuration Wizard
You may run the setup wizard from the opening quick
setup window to quickly set up your router. Click Quick
Setup , you will be directed to the first window of the
wizard.
Select the type of Internet connection you use.
If you select dynamic IP, click Next Page to continue.
15D-Link DIR-618 User Manual

Section 3-Configuration
If you select PPPoE, enter your PPPoE username and
password.Click Next to continue. If your ISP assigned
IP address,subnetmask,gateway and DNS server address,
then select static IP.
Enter the network settings provided by your Internet
provider if you selected static IP address connection.
Click Next to continue.
Set up the name of the wireless network and select the
security mode of the wireless network.then click Next
to continue.
16D-Link DIR-618 User Manual
Section 3- Configuration
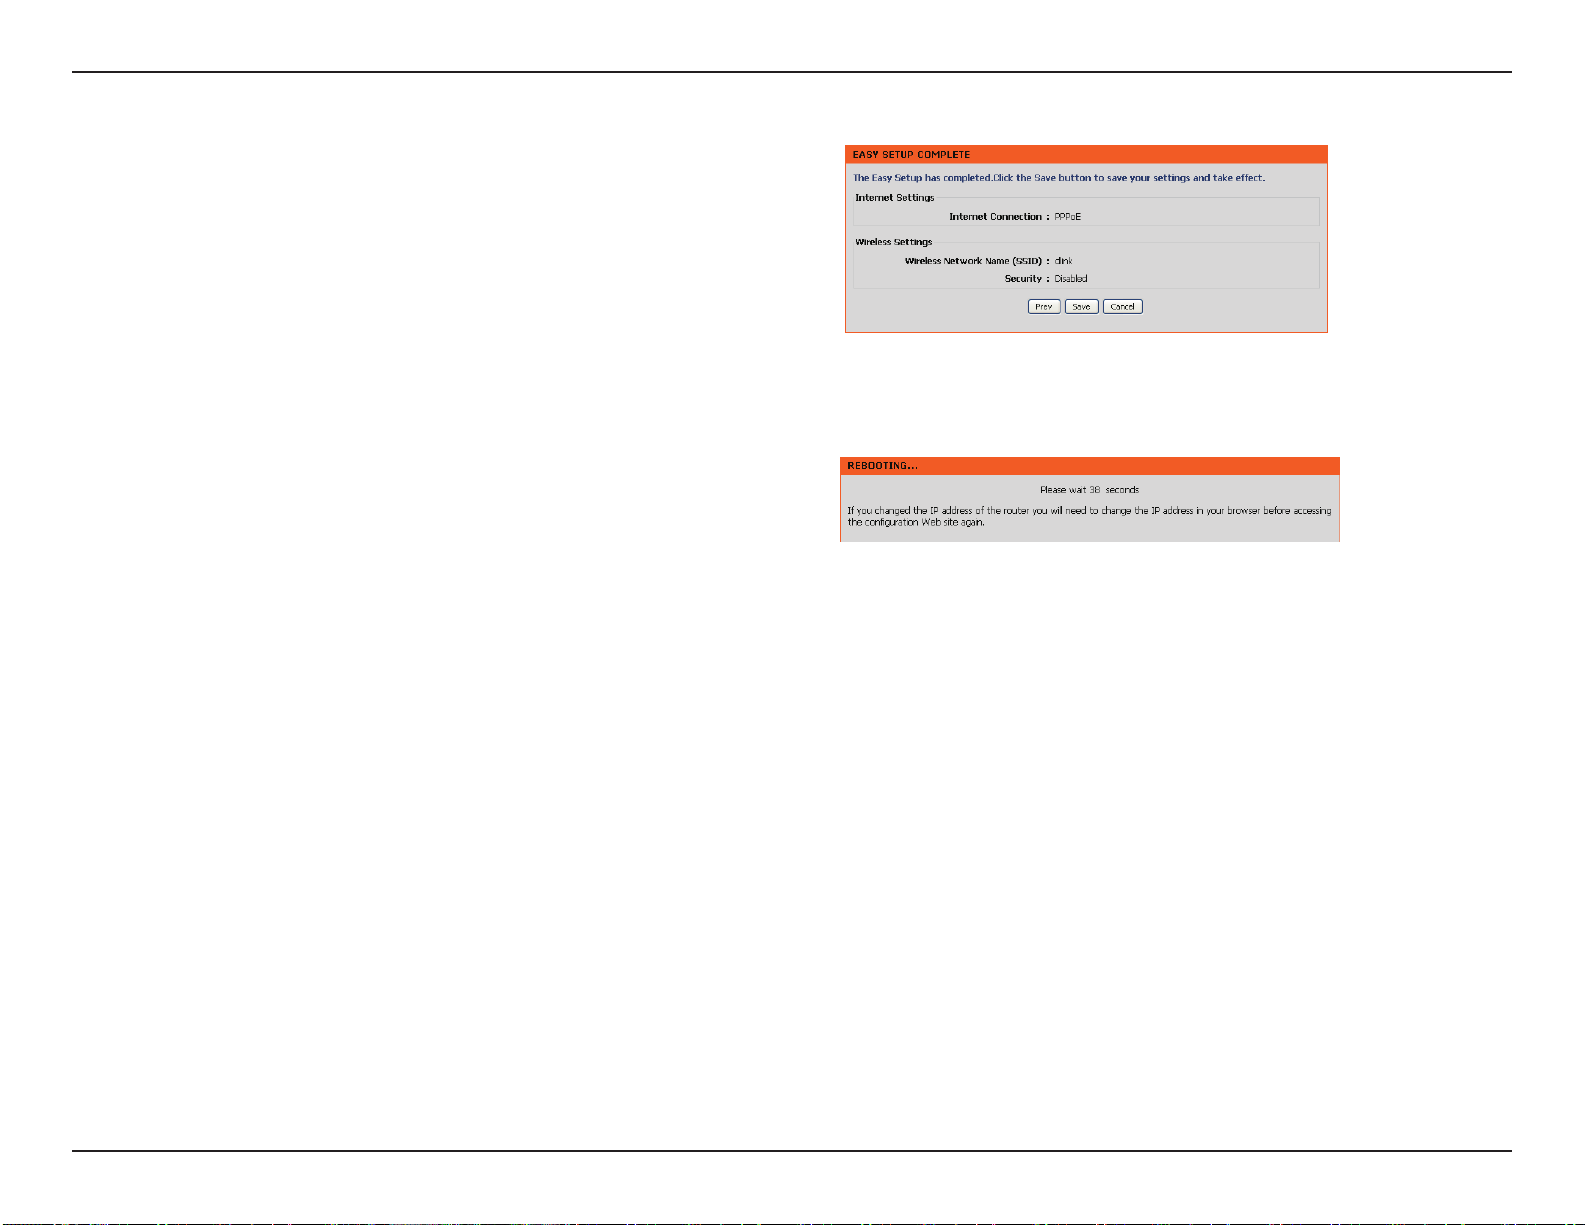
Please wait for rebooting. When the router has finished
rebooting, the opening window will be displayed.
This page displays the completed Internet and wireless
configuration.Click Save to save your settings.
17D-Link DIR-618 User Manual
Section 3- Configuration
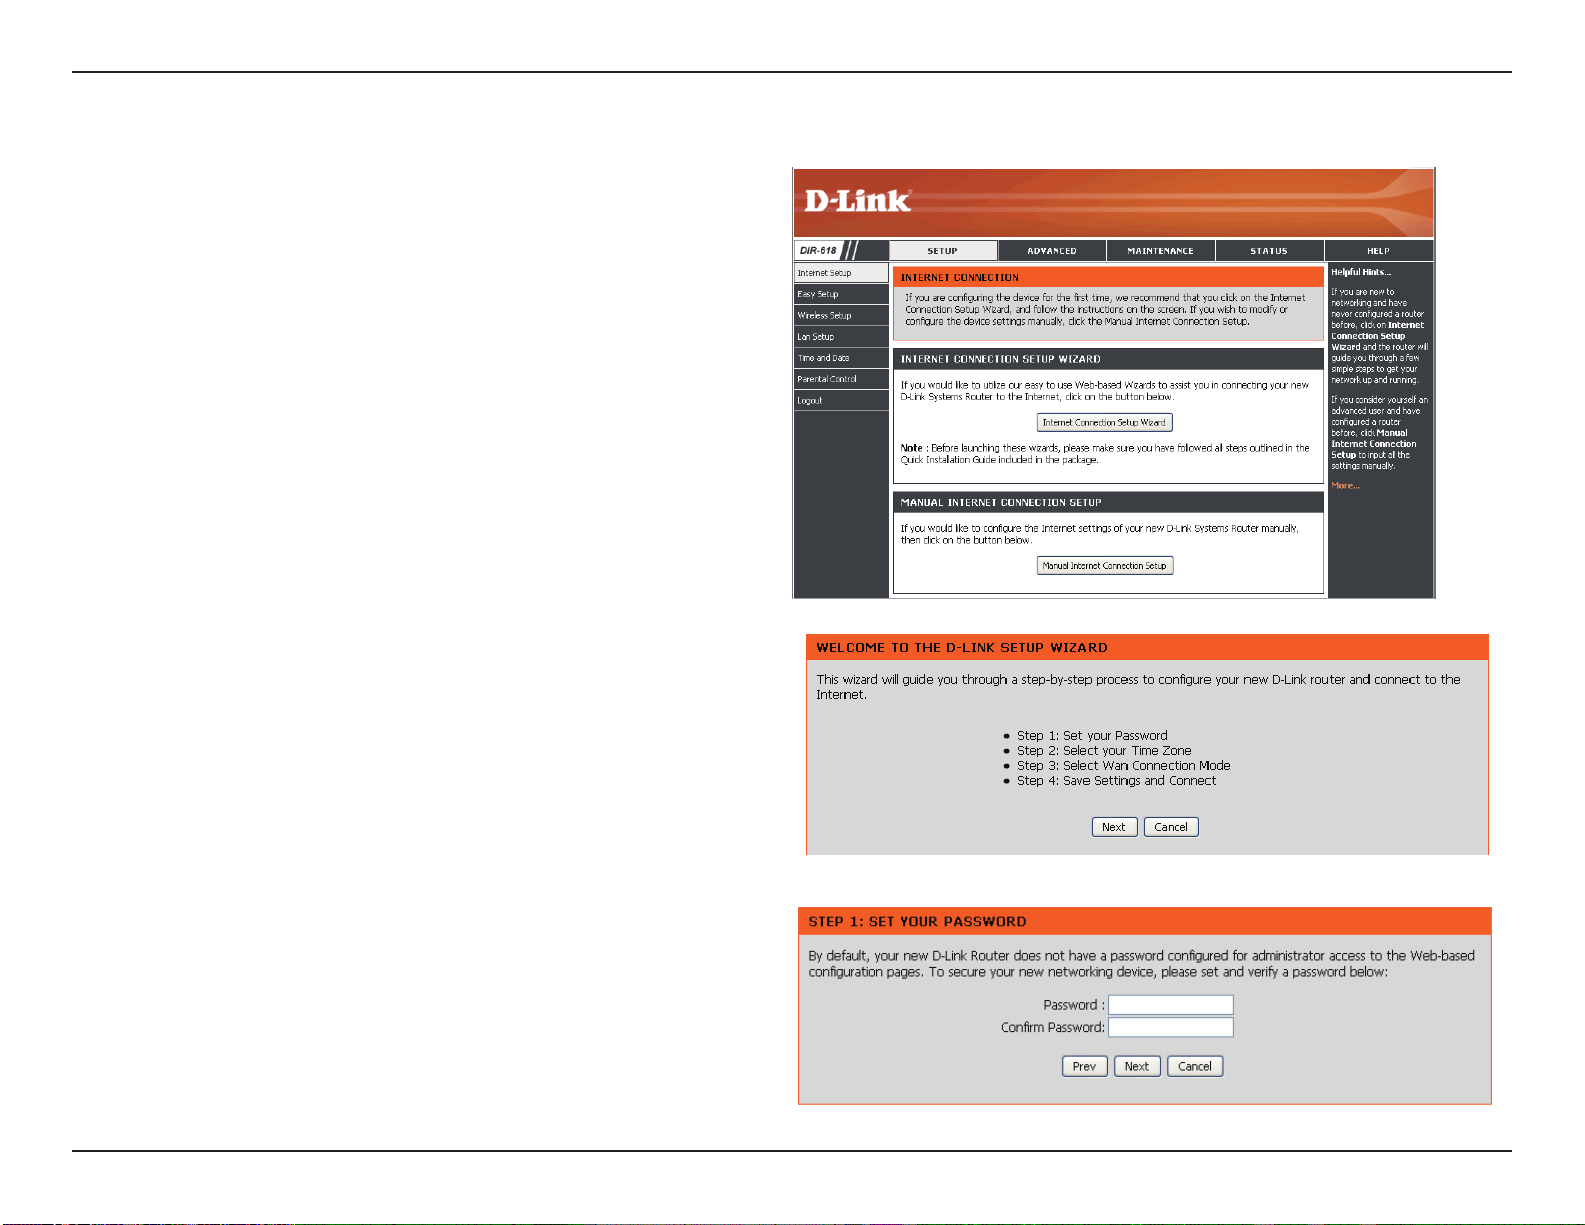
You may run the setup wizard from the opening
Internet Setup window to quickly set up your router.
Click Internet Connection Setup Wizard, you will
be directed to the first window of the wizard.
Internet Setup
Click Next to continue.
Create a new password and then click Next to
continue.
18D-Link DIR-618 User Manual
Section 3-Configuration
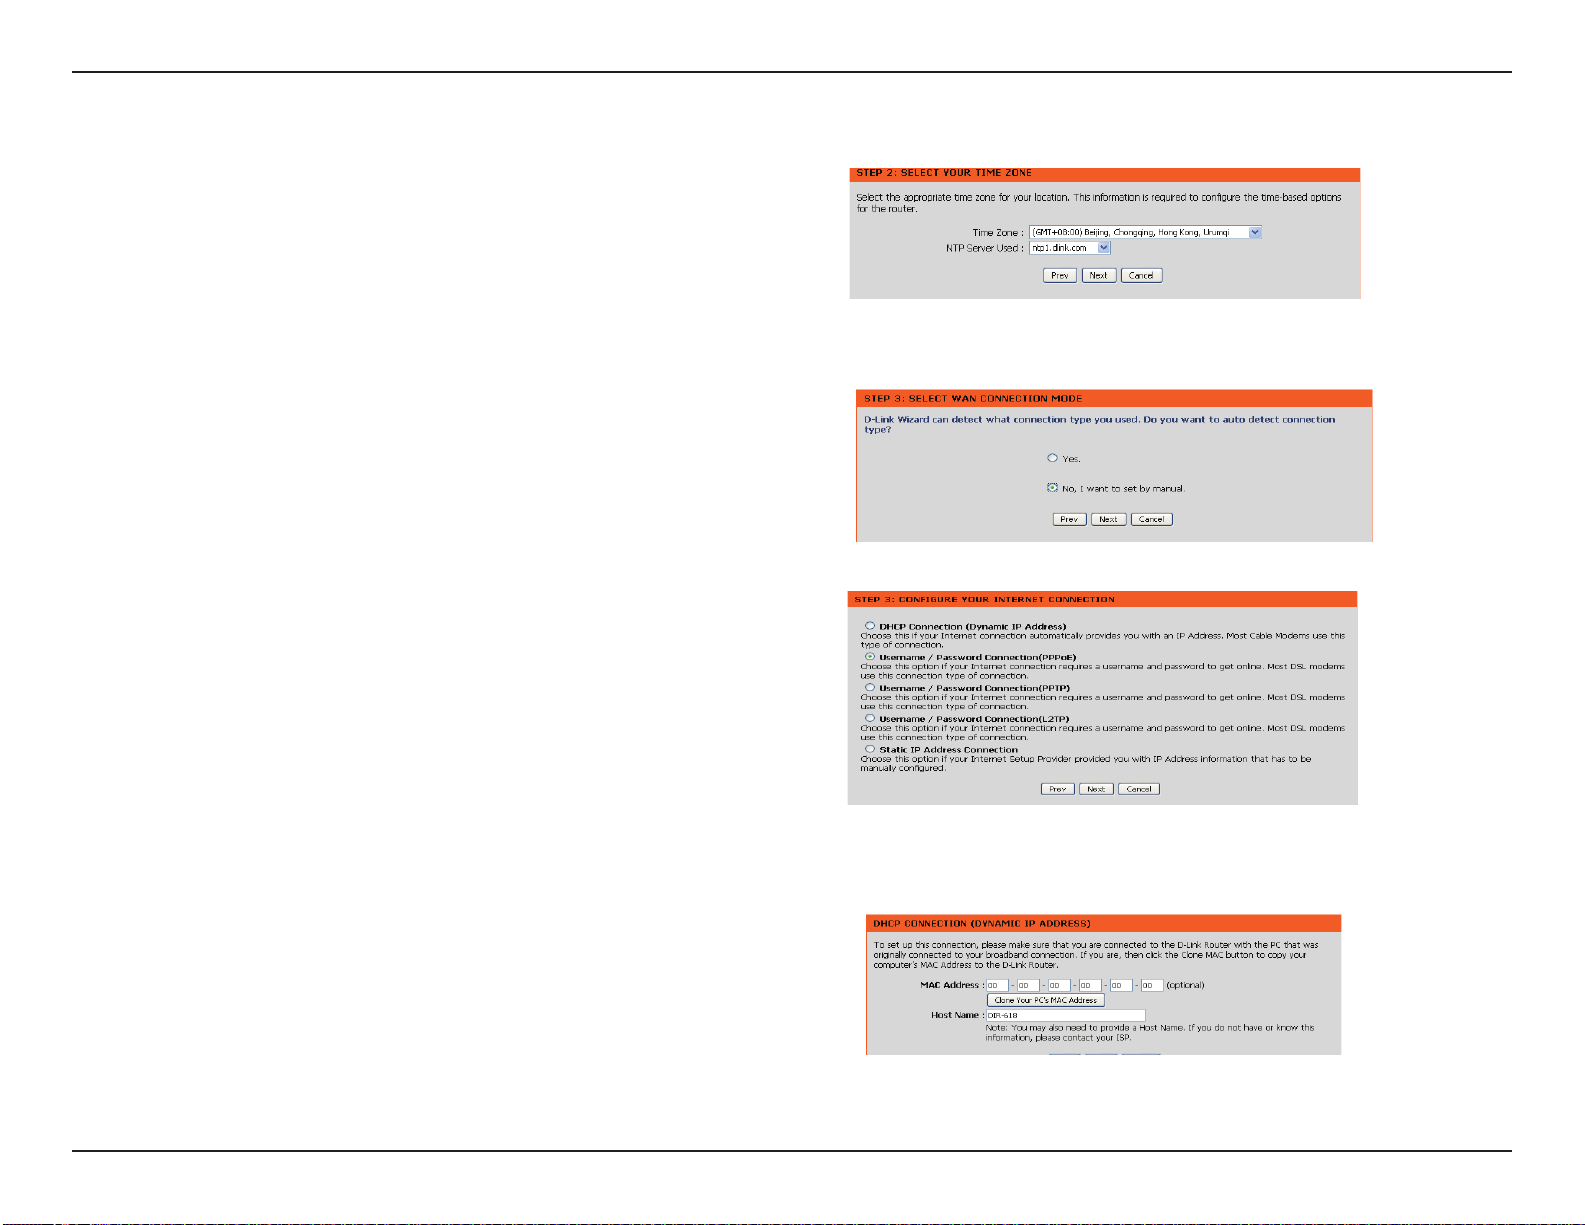
Select your time zone and NTP-server from the drop-down
menu and then click Next to continue.
Select No, I want to set by manual
Select the type of Internet connection you use and then click
Next to continue.
If you selected Dynamic, you may need to enter the MAC
address of the computer that was last connected directly
to your modem. If you are currently using that computer,
click Clone Your PC’s MAC Address and then click
Next to continue.
The Host Name is optional but may be required by some ISPs.
The default host name is the device name of the Router and
may be changed.
19D-Link DIR-618 User Manual
Section 3-Configuration
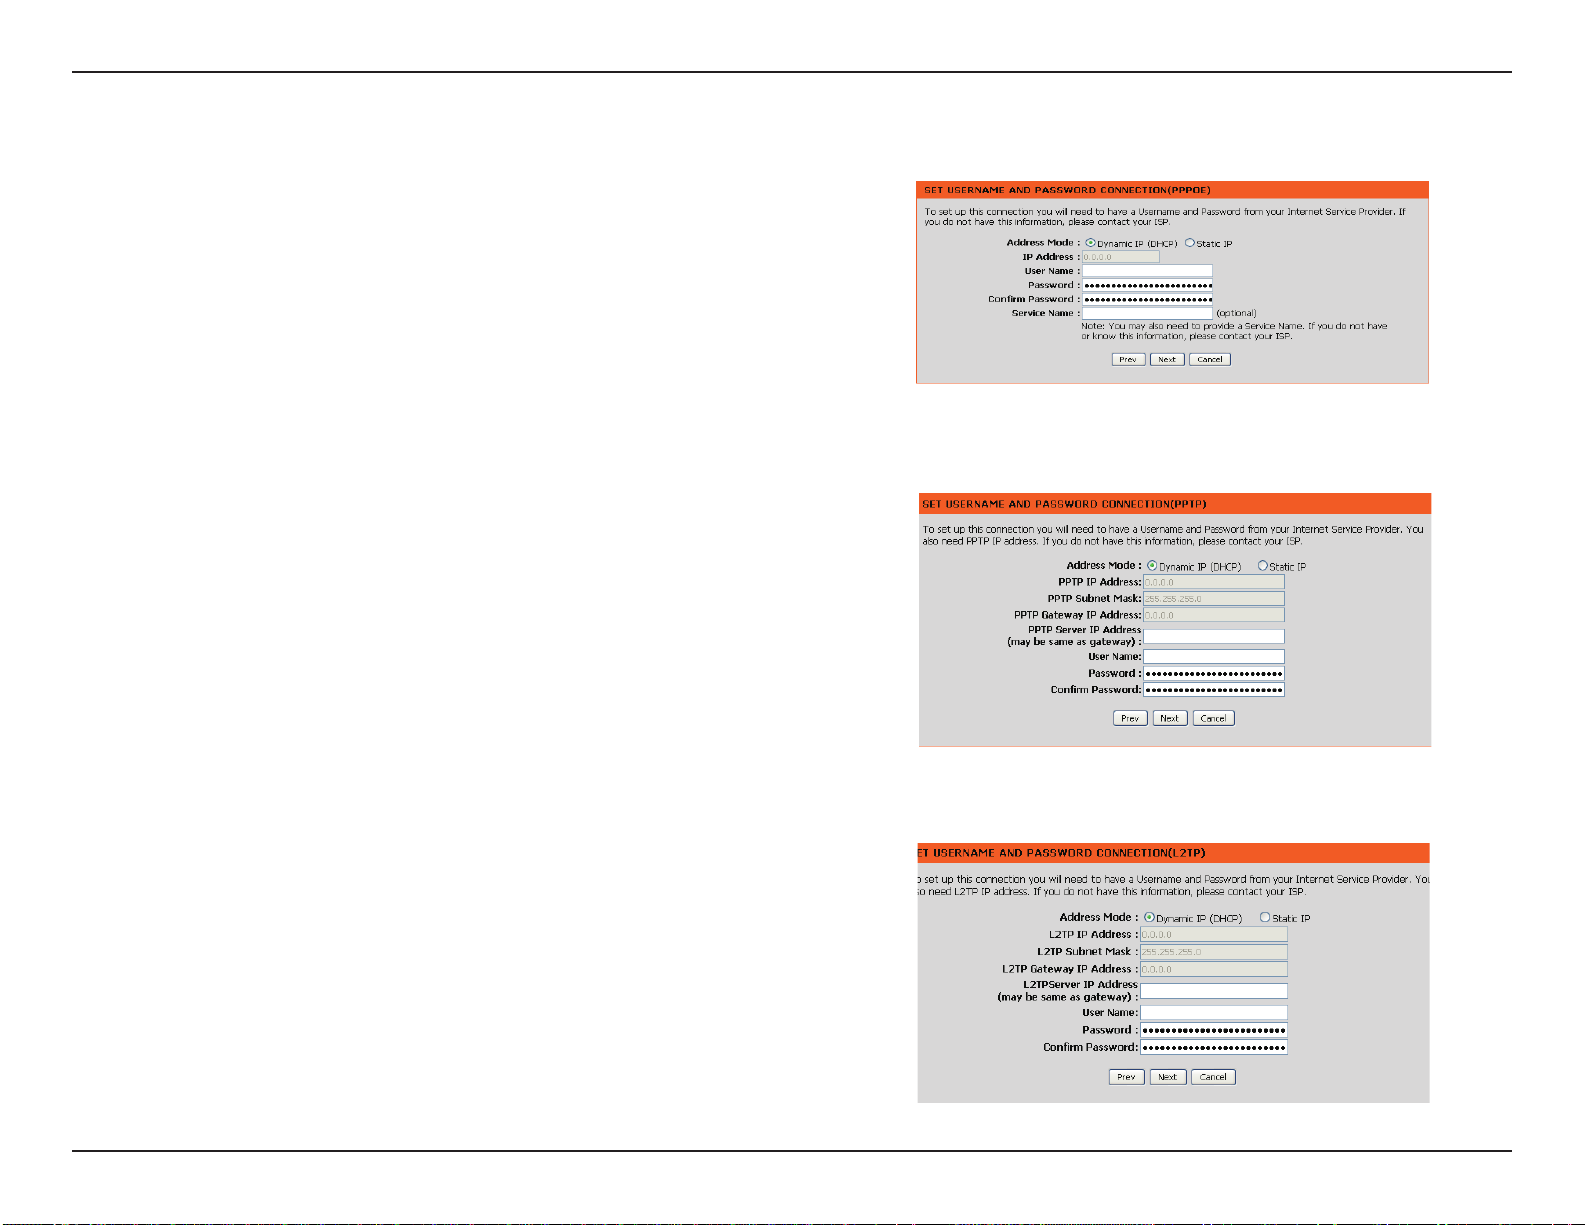
If you selected PPPoE, enter your PPPoE username and
password. Click Next to continue.Select Static if your ISP
assigned you the IP address,subnet mask,gateway, and
DNS server addresses.
Note: Make sure to remove your PPPoE software from
your computer. The software is no longer needed and
will not work through a router.
If you selected PPTP, enter your PPTP username and
password. Click Next to continue.
If you selected L2TP, enter your L2TP username and password.
Click Next to continue.
20D-Link DIR-618 User Manual
Section 3-Configuration
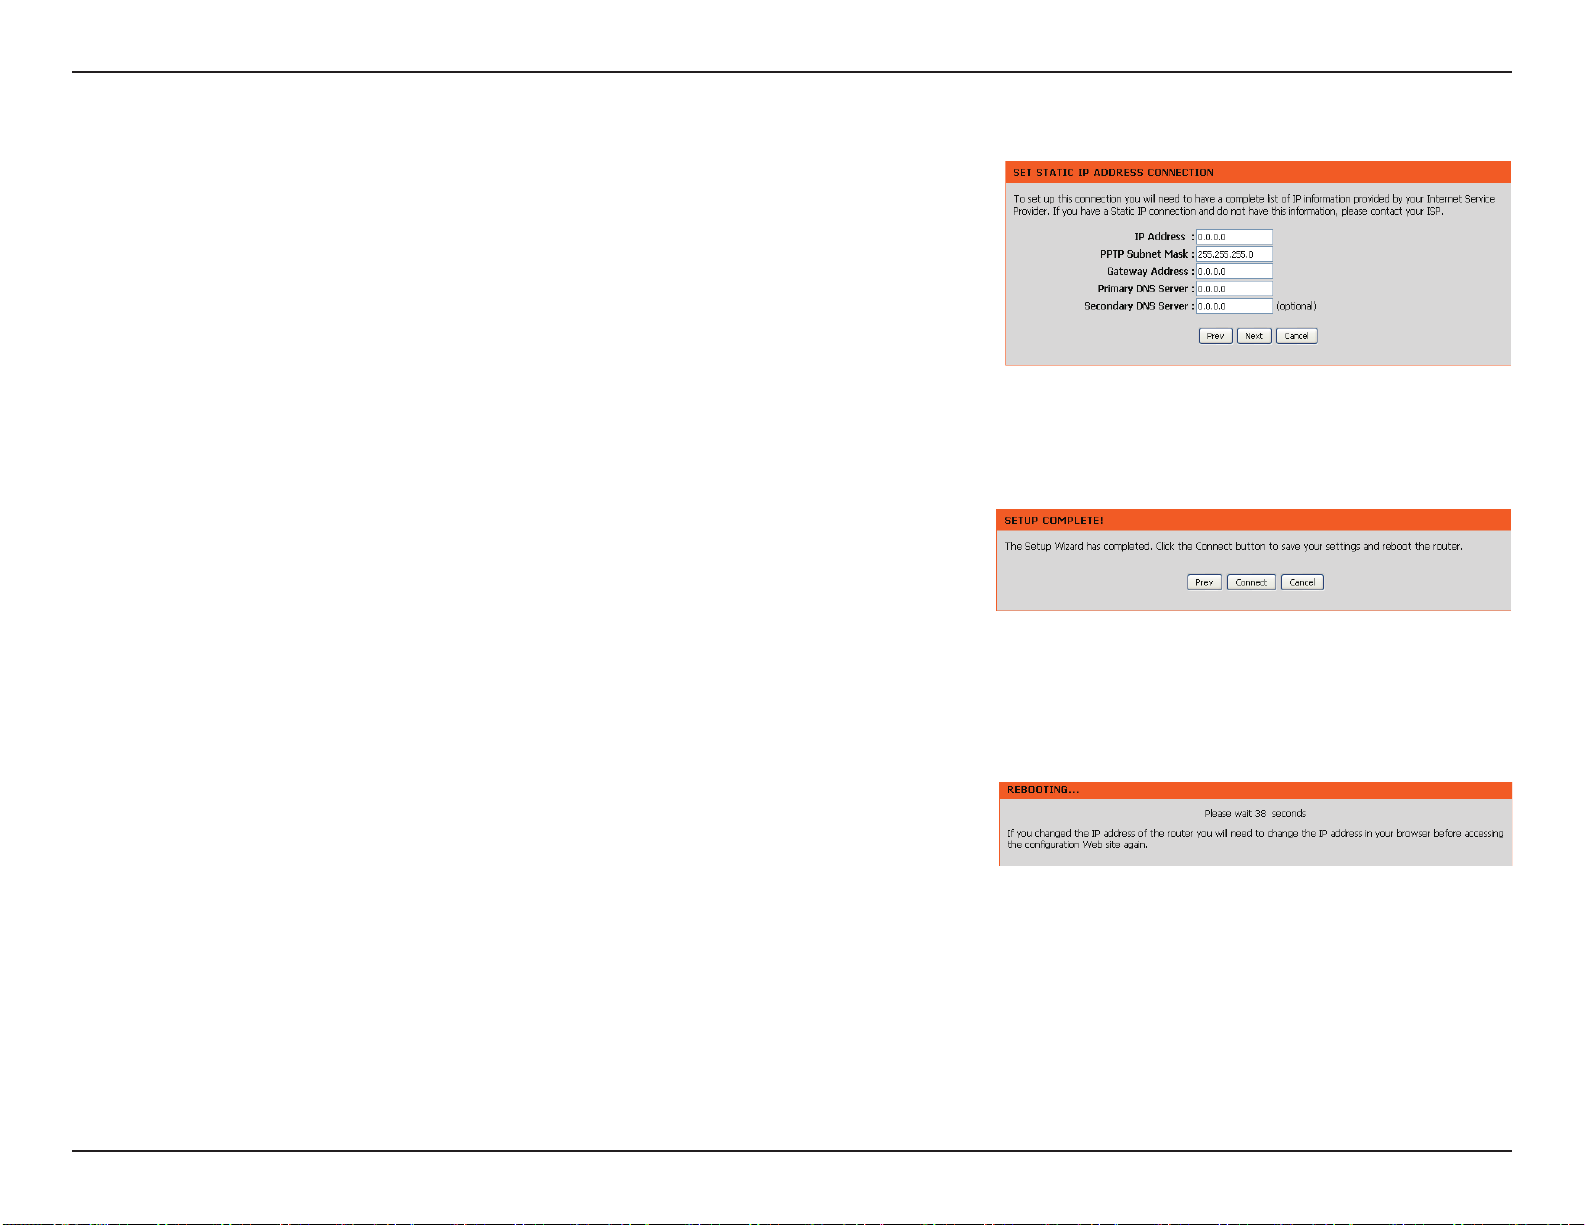
If you selected Static, enter your network settings supplied by
your Internet provider. Click Next to continue.
Click Connect to save your settings.
Please allow 1-2 minutes for rebooting. When the router has finished
rebooting, the opening window will be displayed.
21D-Link DIR-618 User Manual
Section 3 - Configuration
Internet Setup
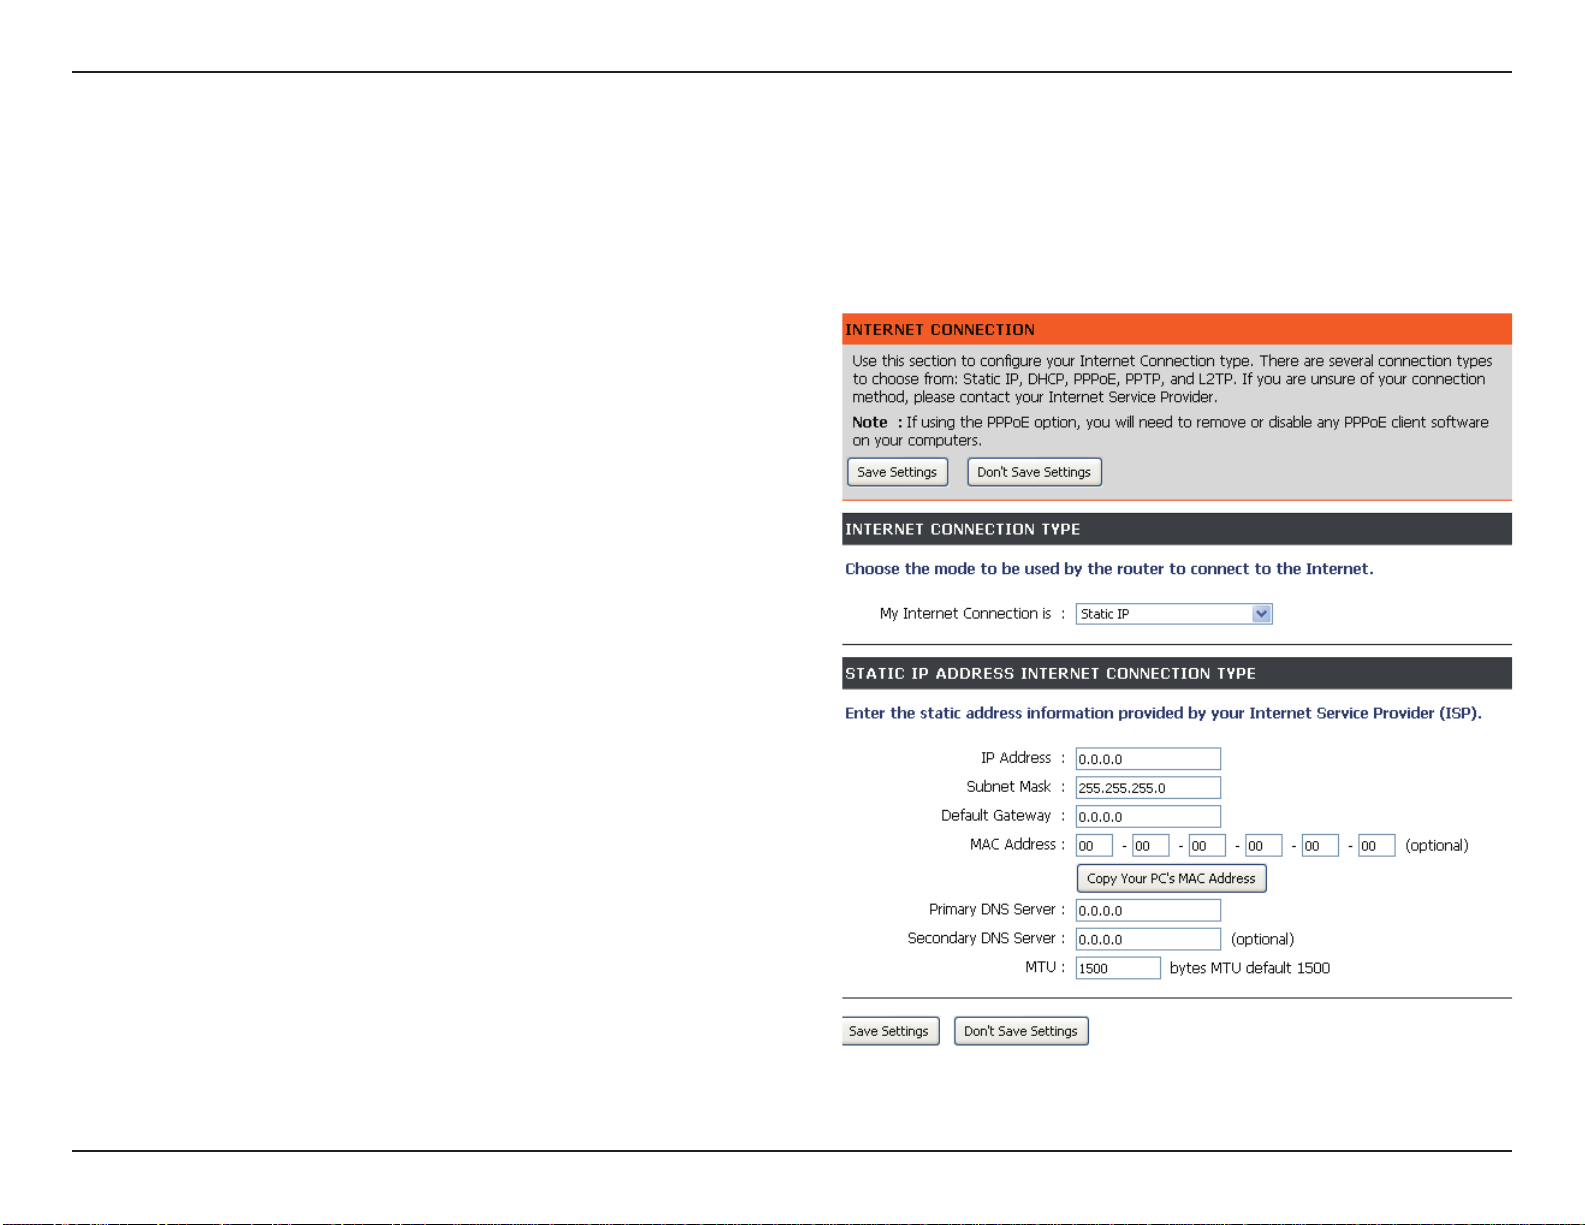
Static (assigned by ISP)
Select Static IP Address if all WAN IP information is provided to you by your ISP. You will need to enter in the IP address, subnet mask,
gateway address, and DNS address(es) provided to you by your ISP. Each IP address entered in the fields must be in the appropriate IP
form, which are four octets separated by a dot (x.x.x.x). The Router will not accept the IP address if it is not in this format.
IP Address:
Subnet Mask:
ISP Gateway
Address:
MAC Address:
Clone MAC
Address:
Primary DNS
Address:
Enter the IP address assigned by your ISP.
Enter the Subnet Mask assigned by your ISP.
Enter the Gateway assigned by your ISP.
The default MAC Address is set to the WAN’s physical
interface MAC address on the Broadband Router. It is not
recommended that you change the default MAC address
unless required by your ISP.
The default MAC address is set to the WAN’s physical
interface MAC address on the Broadband Router. You
can use the Clone MAC Address button to copy the MAC
address of the Ethernet Card installed by your ISP and
replace the WAN MAC address with the MAC address of the
router. It is not recommended that you change the default
MAC address unless required by your ISP.
Enter the Primary DNS server IP address assigned by your
ISP.
Secondary DNS
Address:
MTU:
This is optional.
Maximum Transmission Unit - you may need to change the
MTU for optimal performance with your specific ISP. 1492
is the default MTU.
22D-Link DIR-618User Manual

Section 3 - Configuration
Internet Setup
Dynamic
To manually set up the Internet connection, click the Manual Internet Connection Setup button on the Router’s
opening window.
Host
Name:
MAC Address:
Clone MAC
Address:
Primary /
Secondary
DNS
Addresses:
The Host Name is optional but may be required by some
ISPs. The default host name is the device name of the
Router and may be changed.
The default MAC Address is set to the WAN’s physical
interface MAC address on the Broadband Router. It is not
recommended that you change the default MAC address
unless required by your ISP.
The default MAC address is set to the WAN’s physical
interface MAC address on the Broadband Router. You
can use the “Clone MAC Address” button to copy the MAC
address of the Ethernet Card installed by your ISP and
replace the WAN MAC address with the MAC address of the
router. It is not recommended that you change the default
MAC address unless required by your ISP.
Enter the DNS (Domain Name Server) server IP address
assigned by your ISP.the secondary DNS address is
optional .
MTU:
Maximum Transmission Unit - You may need to change
the MTU for optimal performance with your specific ISP.
23D-Link DIR-618 User Manual
Section 3 - Configuration
Internet Setup
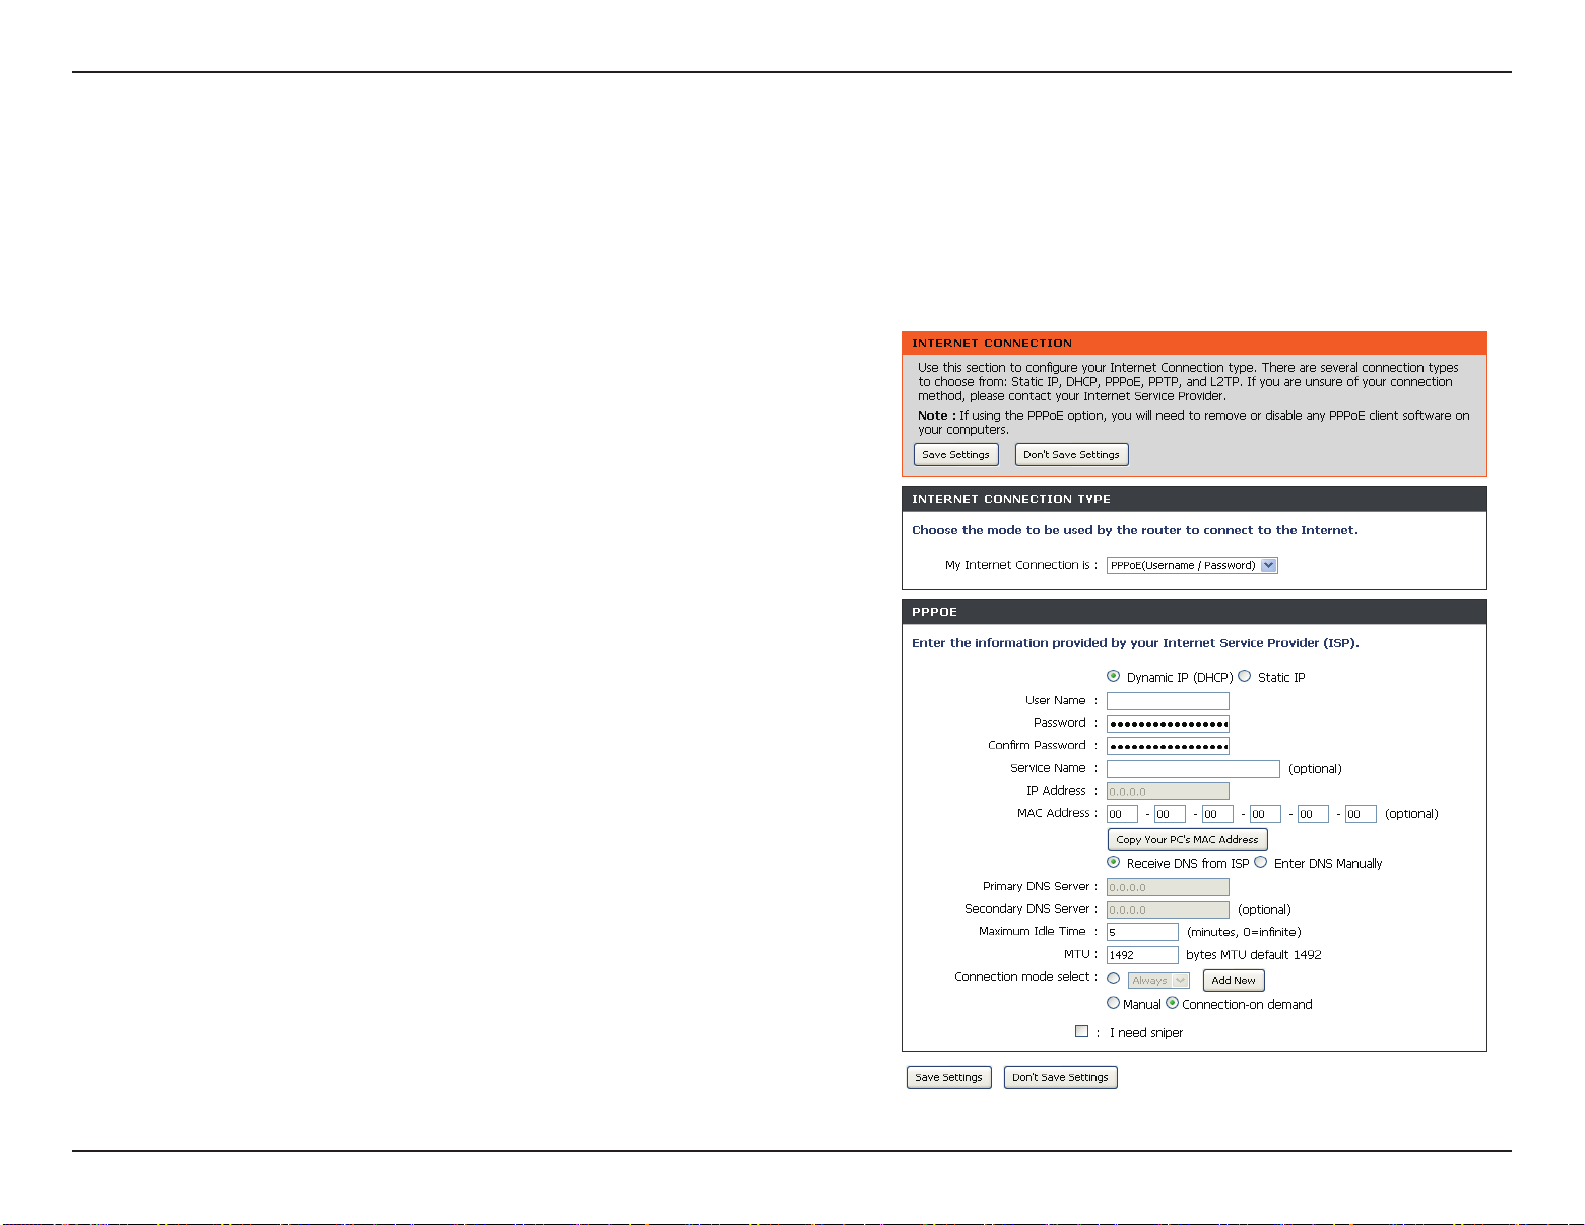
PPPoE
Choose PPPoE (Point to Point Protocol over Ethernet) if your ISP uses a PPPoE connection. Your ISP will provide
you with a username and password. This option is typically used for DSL services. Make sure to remove your PPPoE
software from your computer. The software is no longer needed and will not work through a router.
PPPoE:
User Name:
Password:
Service Name:
IP Address:
DNS
Addresses:
Maximum Idle
Time:
MTU:
Select Dynamic (most common) or Static . Select Static if your
ISP assigned you the IP address, subnet mask, gateway, and
DNS server addresses.
Enter your PPPoE user name.
Enter your PPPoE password and then retype the password in
the next box.
Enter the ISP Service Name (optional).
Enter the IP address (Static PPPoE only).
Enter the Primary and Secondary DNS Server Addresses (Static
PPPoE only).
Enter a maximum idle time during which the Internet connection
is maintained during inactivity. To disable this feature,
enable Auto-reconnect.
Maximum Transmission Unit - You may need to change the
MTU for optimal performance with your specific ISP. 1492 is
the default MTU.
Connection
Mode Select:
Select either Always-on , Manual , or Connect-on demand .
24D-Link DIR-618 User Manual
Section 3 - Conguration
Internet Setup
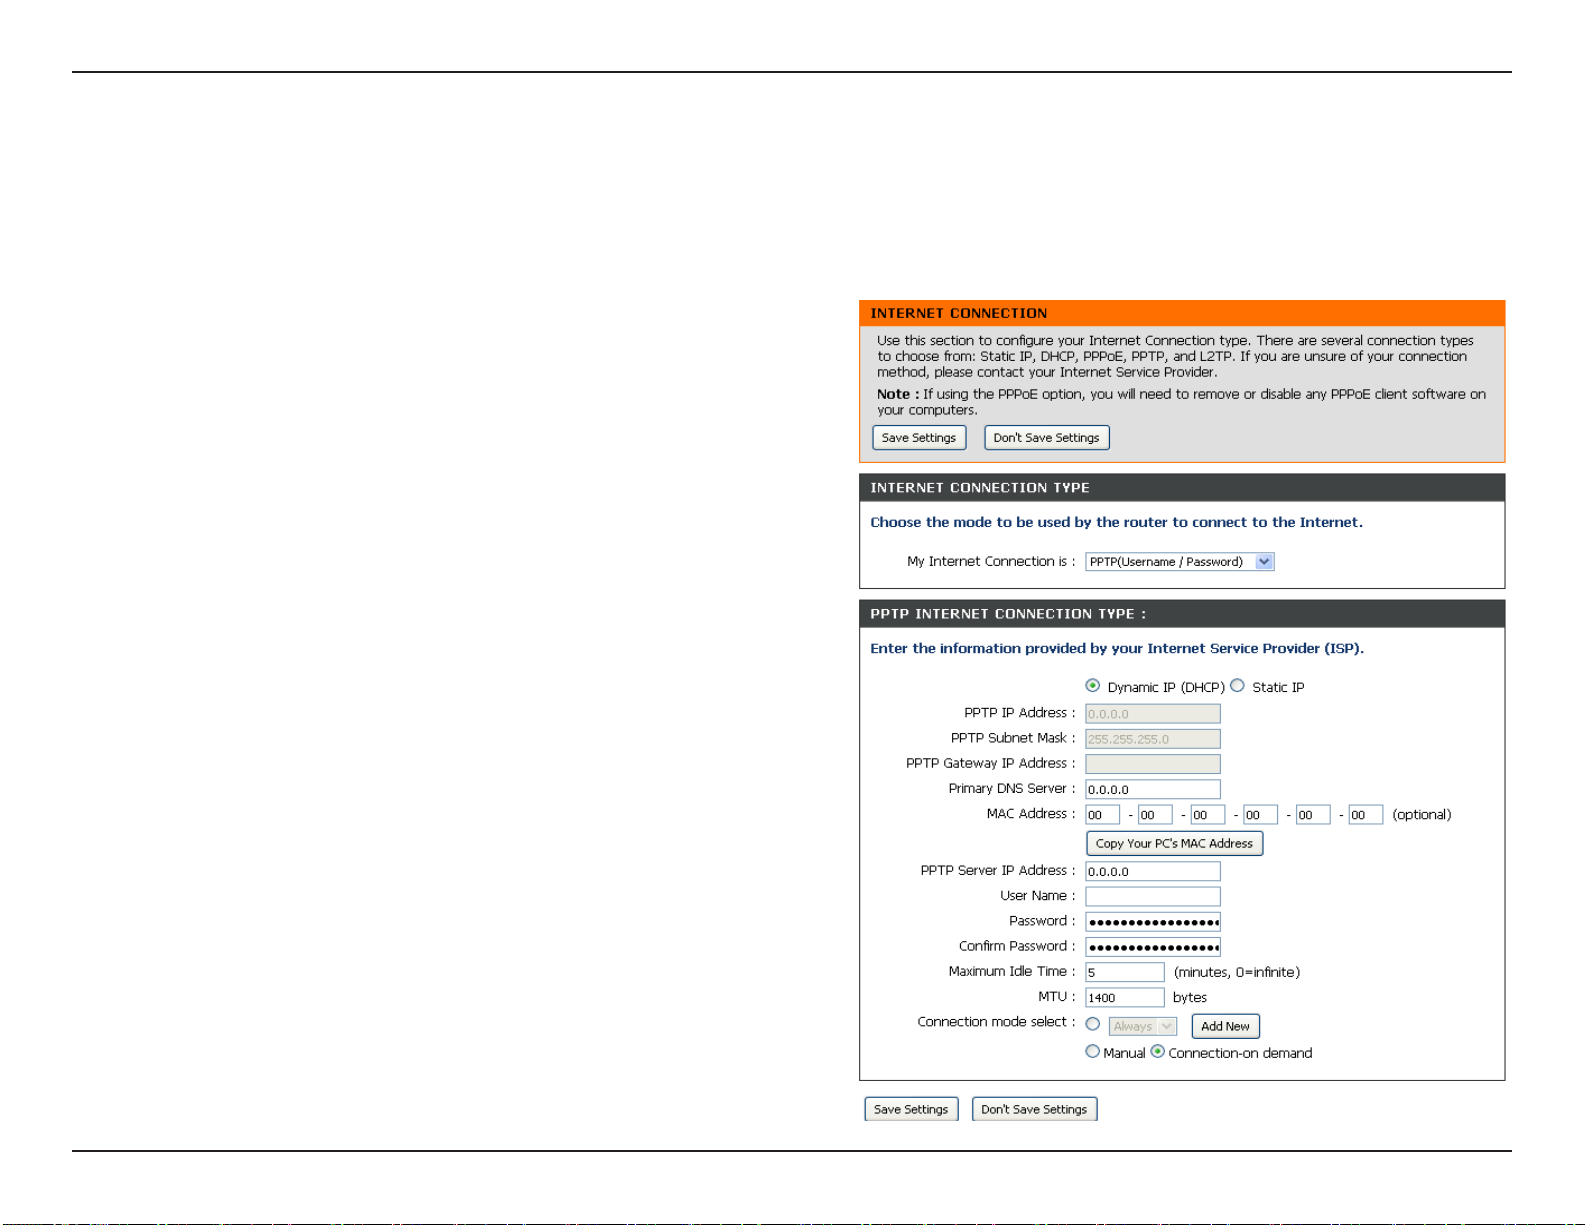
PPTP
Choose PPTP (Point-to-Point-Tunneling Protocol ) if your ISP uses a PPTP connection. Your ISP will provide you with
a username and password. This option is typically used for DSL services.
PPTP:
IP Address:
Subnet Mask:
Gateway:
DNS:
Server IP:
User Name:
Password:
Select Dynamic (most common) or Static. Select Static if
your ISP assigned you the IP address, subnet mask, gateway,
and DNS server addresses.
Enter the IP address (Static PPTP only).
Enter the Primary and Secondary DNS Server Addresses
(Static PPTP only).
Enter the Gateway IP Address provided by your ISP.
The DNS server information will be supplied by your ISP
(Internet Service Provider.)
Enter the Server IP provided by your ISP (optional).
Enter your PPTP account name.
Enter your PPTP password and then retype the password
in the next box.
Maximum Idle
Time:
MTU:
Connect Mode:
Enter a maximum idle time during which the Internet
connection is maintained during inactivity. To disable this
feature, enable Auto-reconnect.
Maximum Transmission Unit - You may need to change the
MTU for optimal performance with your specic ISP
Select either Always-on, Manual, or Connect-on demand.
25D-Link DIR-618 User Manual
Section 3 - Conguration
Internet Setup
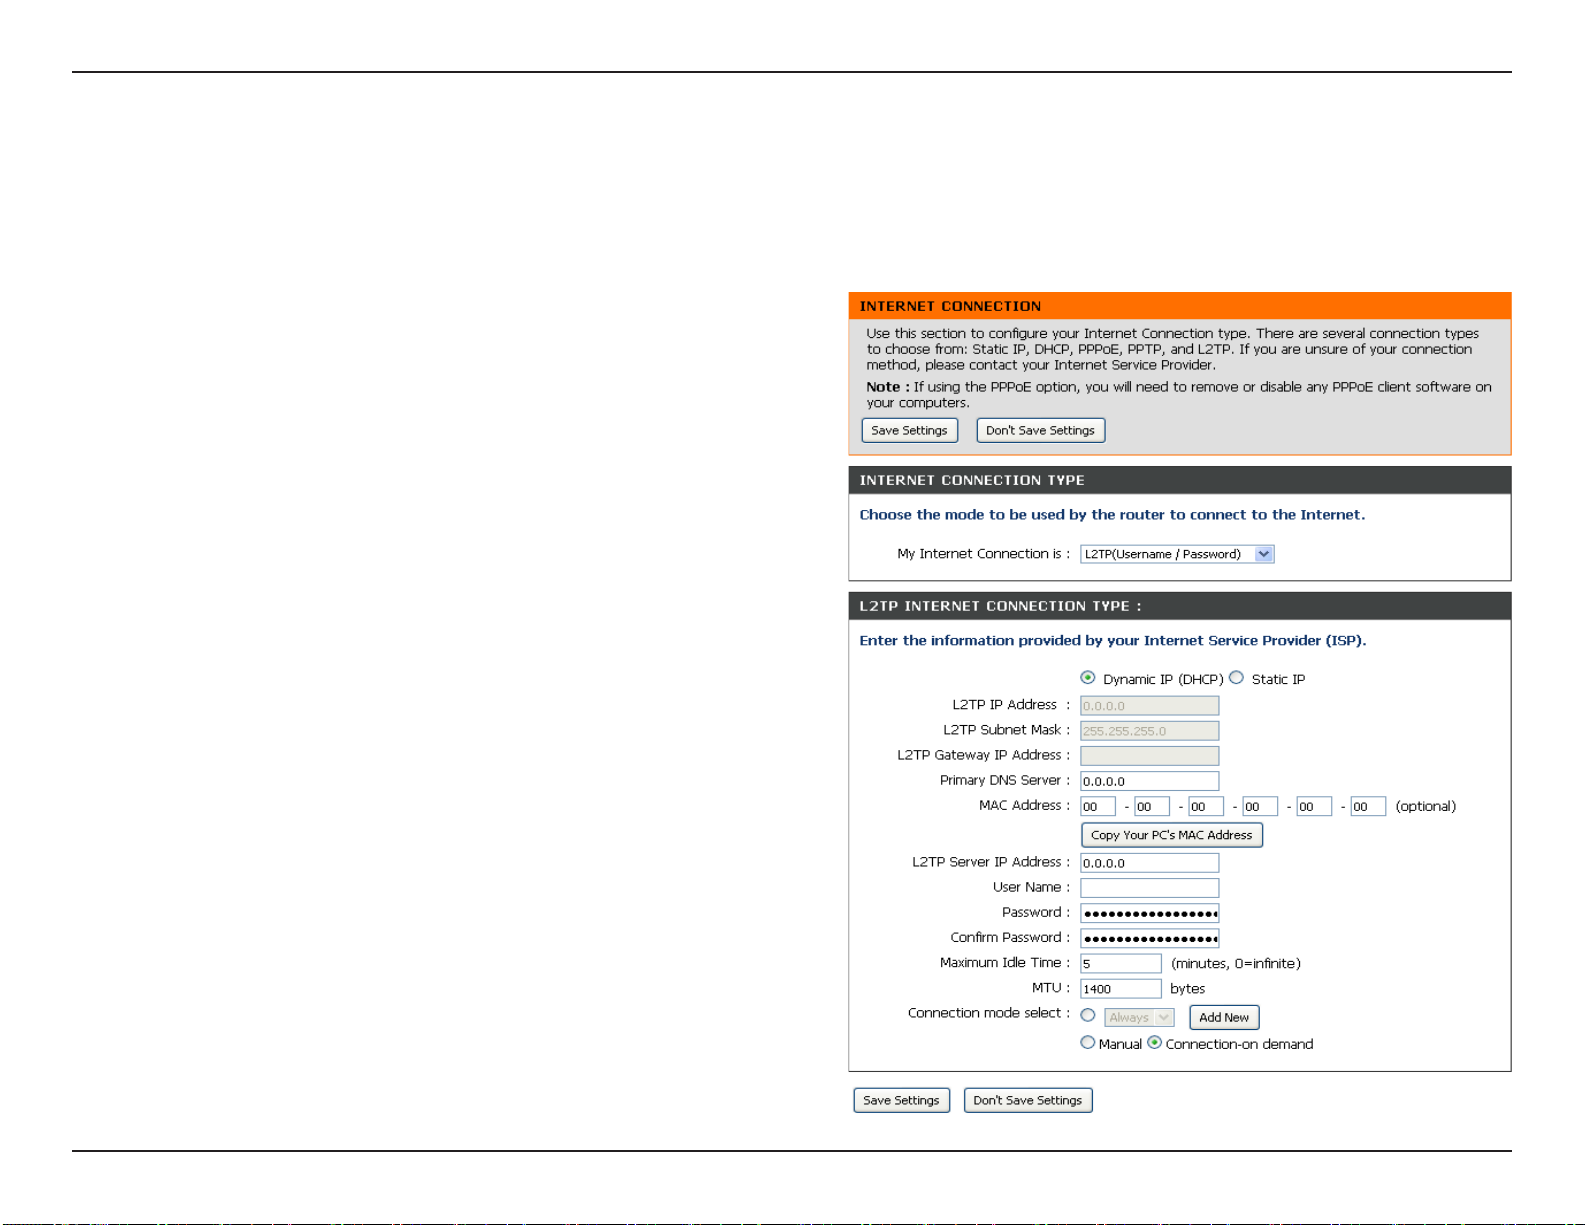
L2TP
Choose L2TP (Layer 2 Tunneling Protocol) if your ISP uses a L2TP connection. Your ISP will provide you with a
username and password. This option is typically used for DSL services.
L2TP:
IP Address:
Subnet Mask:
Gateway:
DNS:
Server IP:
L2TP Account:
L2TP
Password:
Select Dynamic (most common) or Static. Select Static
if your ISP assigned you the IP address, subnet mask,
gateway, and DNS server addresses.
Enter the IP address (Static L2TP only).
Enter the Primary and Secondary DNS Server Addresses
(Static L2TP only).
Enter the Gateway IP Address provided by your ISP.
The DNS server information will be supplied by your ISP
(Internet Service Provider.)
Enter the Server IP provided by your ISP (optional).
Enter your L2TP account name.
Enter your L2TP password and then retype the password
in the next box.
Maximum Idle
Time:
MTU:
Connect Mode:
Enter a maximum idle time during which the Internet
connection is maintained during inactivity. To disable this
feature, enable Auto-reconnect.
Maximum Transmission Unit - You may need to change the
MTU for optimal performance with your specic ISP.
Select either Always-on, Manual, or Connect-on demand.
26D-Link DIR-618 User Manual
Section 3-Configuration
Internet Setup
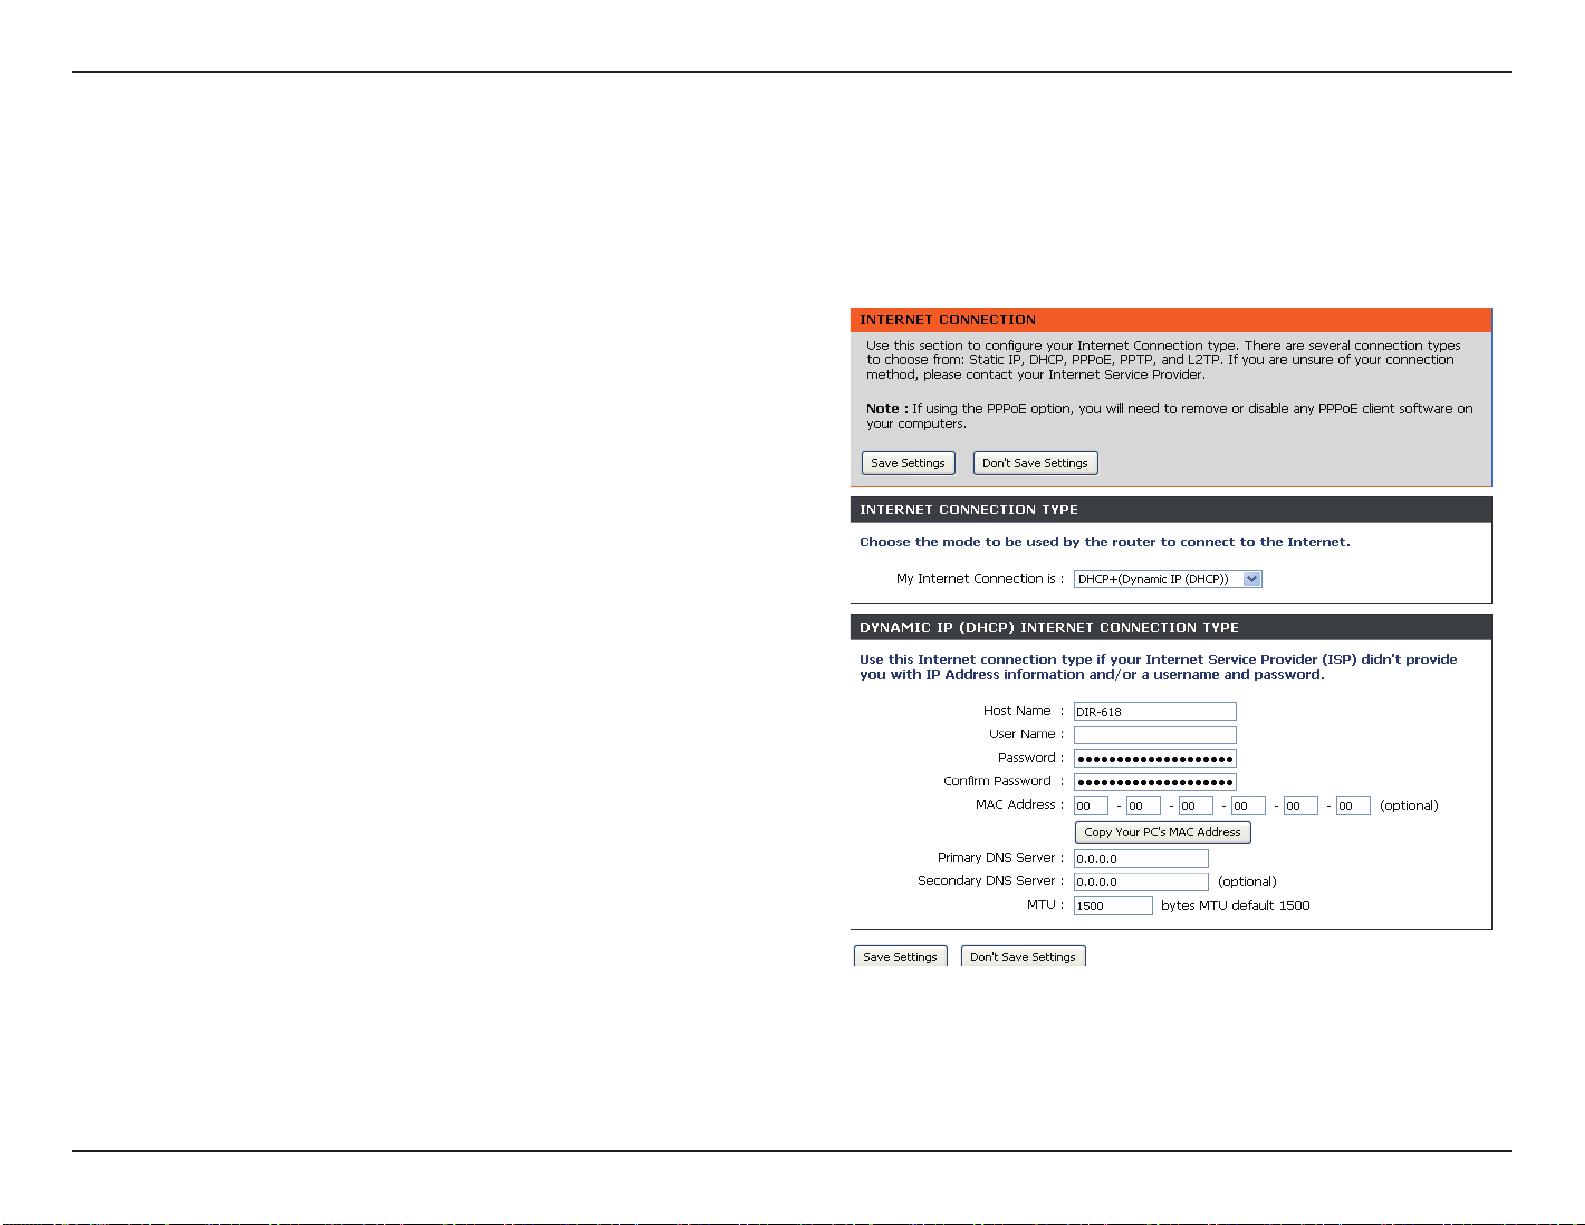
DHCP+Dynamic
Host Name:
User Name:
Password:
MAC Address:
Clone MAC
Adddress:
The Host Name is optional but may be required by some
ISPs. The default host name is the device name of the
Router and may be changed.
Enter your user name.
Enter your password and then retype the password in
the next box.
The default MAC Address is set to the WAN’s physical
interface MAC address on the Broadband Router. It is
not recommended that you change the default MAC
address unless required by your ISP.
The default MAC address is set to the WAN’s physical
interface MAC address on the Broadband Router. You
can use the “Clone MAC Address” button to copy the MAC
address of the Ethernet Card installed by your ISP . It is
not recommended that you change the default MAC address
unless required by your ISP.
Primary DNS
Address:
Secondary DNS
Address:
MTU :
Enter the DNS (Domain Name Server) server IP address
assigned by your ISP.
It’s optional.
Maximum Transmission Unit - You may need to change the
MTU for optimal performance with your specific ISP.
27D-Link DIR-618 User Manual
Section 3 - Conguration
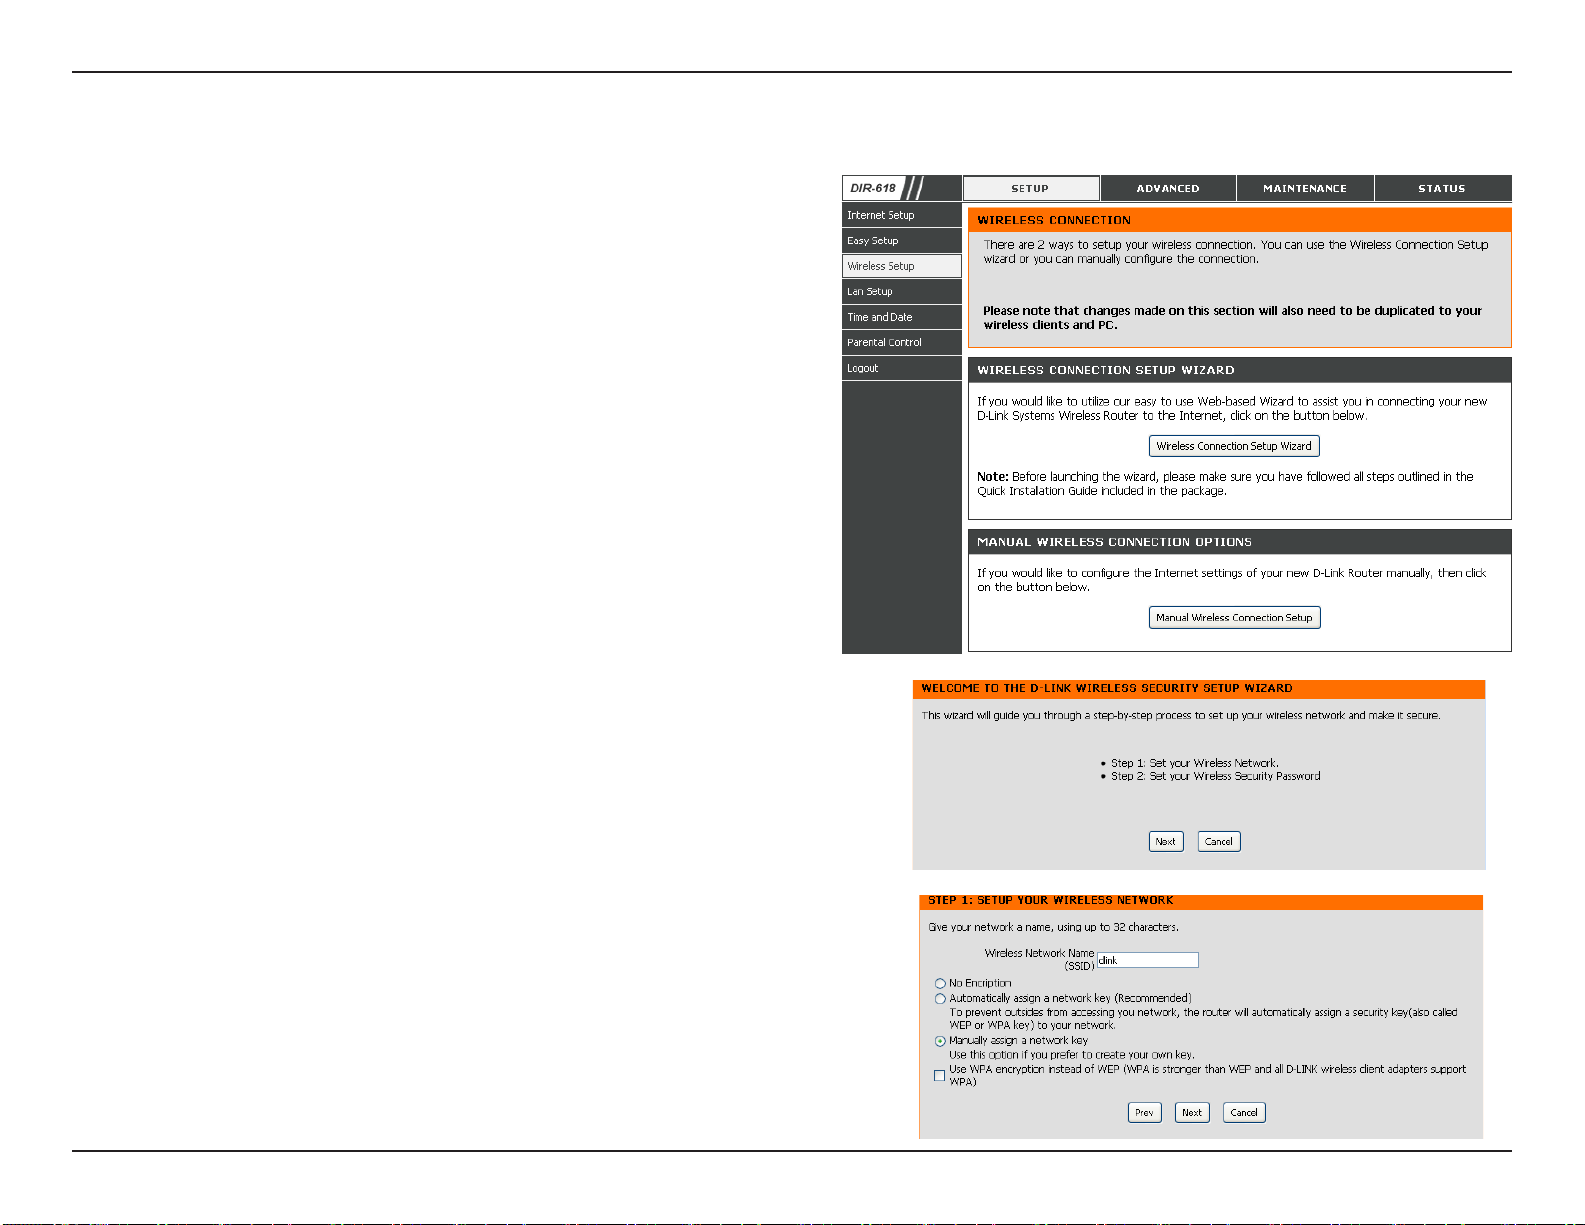
Wireless Setup
Wireless settings for the router may be congured
manually or by using a wizard. To use the wizard,
click the Wireless Connection Setup Wizard button
and then follow the steps that are described below.
To congure the wireless settings manually, click
the Manual Wireless Connection Setup button.
The parameters for this window are described later
in this section. The Wireless Security section that
directly follows this Conguration section provides
additional explanation for how to congure the WEP,
WPA, WPA2, and WPA/WPA2 wireless security
mode options.
Click Next to continue.
Enter a Wireless Network Name in the textbox, which
is also know as the SSID and select manually assign
a network key. and then click Next to continue.
28D-Link DIR-618 User Manual

Section 3 - Conguration
Enter a Wireless Security Password in the textbox and then click
Next to continue.
This window displays a summary of your wireless security settings.
Please print this out or record this information in a safe place and
then click Save to continue.
The Router will save your new settings and reboot. When it is nished
after 1-2 minutes, the opening Wireless Setup window is displayed.
29D-Link DIR-618 User Manual
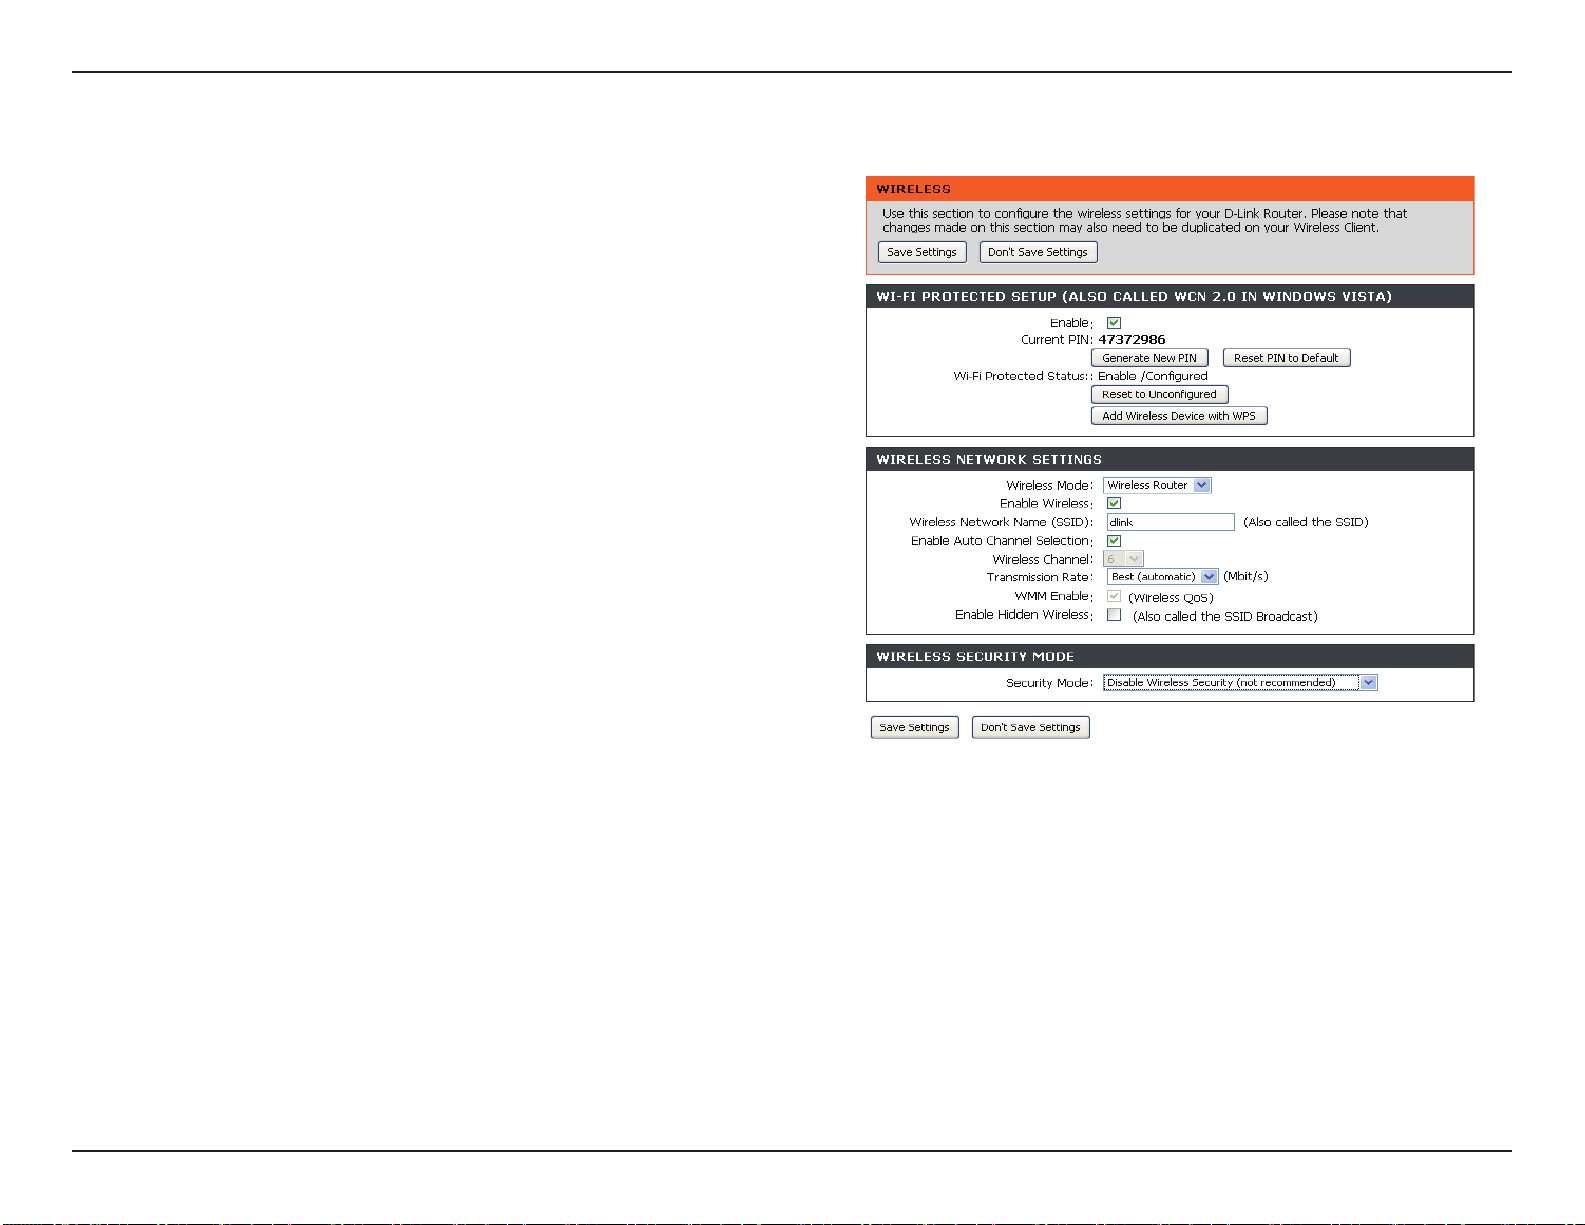
Section 3 - Configuration
Wi-Fi
Protected
Setup:
Wireless Mode:
Enable
Wireless:
Wireless
Network Name:
Enable
Wireless
Channel:
To implement Wi-Fi protection, or WCN 2.0, tick the Enable
checkbox, click either Generate New PIN or Reset PIN to
Default , and then configure the Wi-Fi settings below. Please
see the Setting Up Wi-Fi Protection (WCN 2.0 in Windows
Vista) section later in this manual for detailed configuration
information.
Select the wireless mode with which the device is running.
Check the box to enable the wireless function. If you do
not want to use wireless, uncheck the box to disable all the
wireless functions.
Service Set Identifier (SSID) is the name of your wireless
network. Create a name using up to 32 characters. The
SSID is case-sensitive.
Indicates the channel setting for the DIR-618. By default
the channel is set to 6. The Channel can be changed to
fit the channel setting for an existing wireless network or
to customize the wireless network. The Auto Channel
Selection setting can be selected to allow the DIR-618 to
choose the channel with the least amount of interference.
Transmission
Rate:
WMM Enable:
Enable Hidden
Wireless:
Use the drop-down menu to select the appropriate Transmission Rate in Mbits per second. Many users will want to use the
default setting, Best (automatic).
Enable Wi-Fi Multimedia to enjoy basic quality of service features. WMM prioritizes traffic according to four acc
voice, video, best effort, and background.
Check this option if you would not like the SSID of your wireless network to be broadcasted by the DIR-618. If this option is
checked, the SSID of the DIR-618 will not be seen by Site Survey utilities so your wireless clients will have to know the SSID
of your DIR-618 in order to connect to it.
ess categories:
30D-Link DIR-618 User Manual
 Loading...