

Page 1
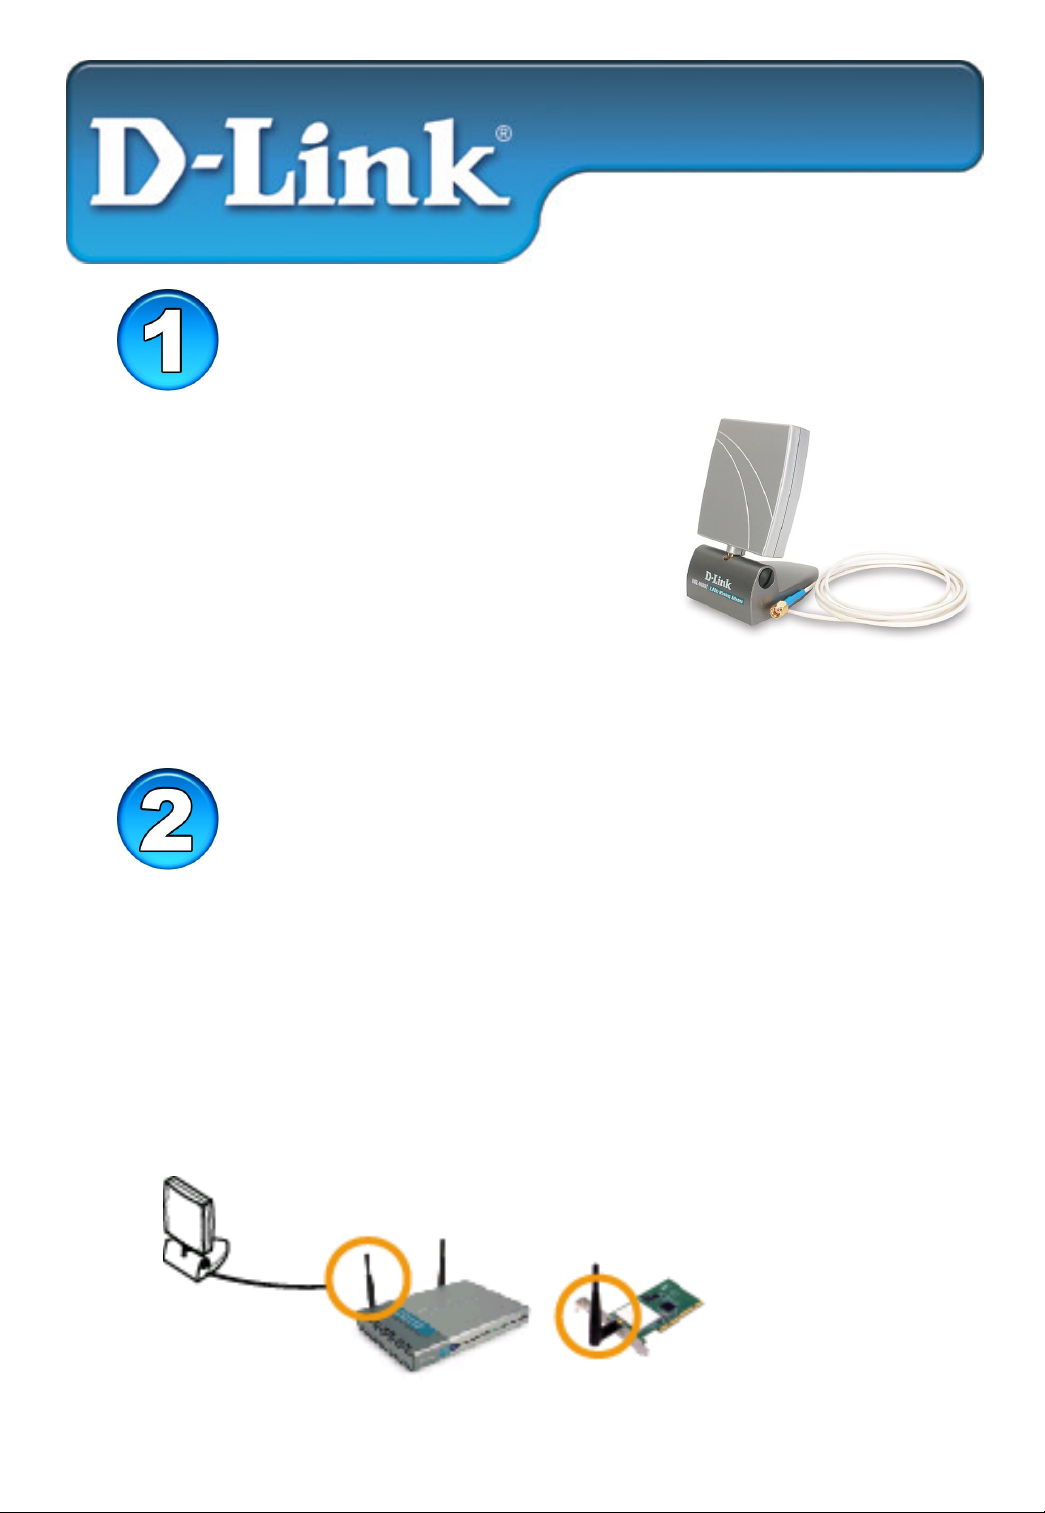
Check Your Package Contents
These are the items included with your
DWL-M60AT
DWL-M60AT antenna with 1.5m pig tail
Mounting accessories ( screw *1,
plastic anchor*1, plastic cable clamp*2 )
Quick installation guide
Installation Guide
D-Link DWL-M60AT
2.4GHz Wireless Indoor Antenna
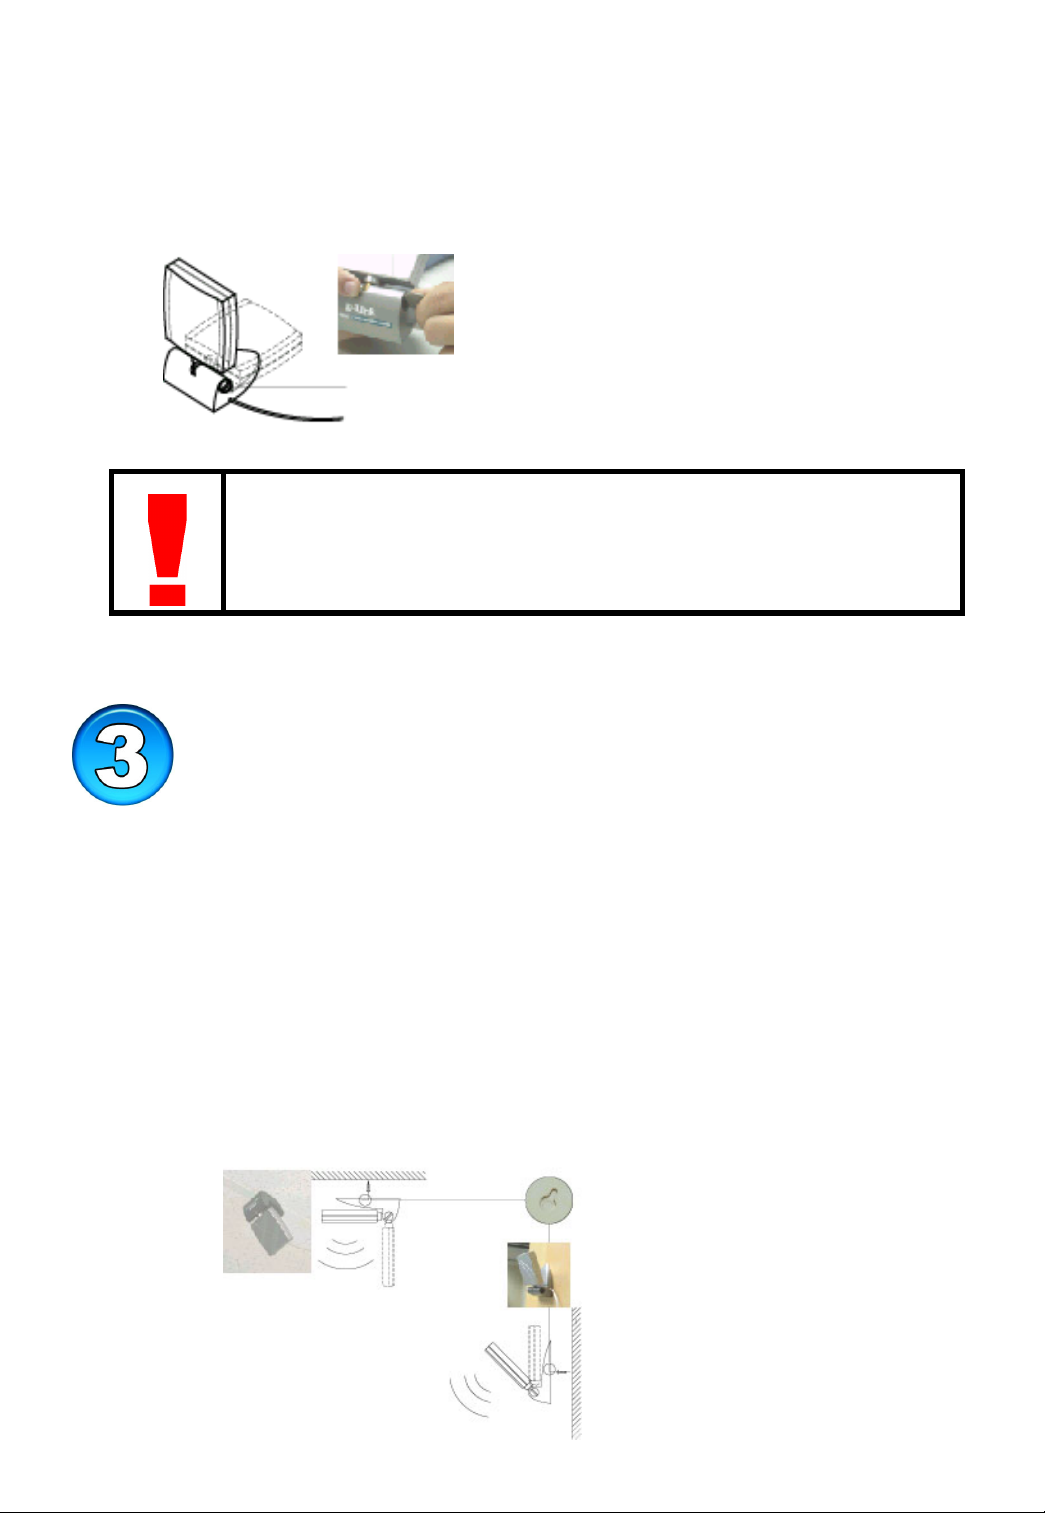
Step 1. Carefully remove the antenna from the package and identify
Notice: Allow the cable to bend naturally. It is recommended that you place the
antenna near wireless devices to avoid excessive strain to the cable and connector
Step 2. Place the antenna on a stable, flat surface, and use the enclosed
Installing the DWL-M60AT
the optimal location for the antenna.
mounting accessories to mount the antenna on the walls or
ceiling.
Remove the existing antenna and start to link with DWL-M60AT.
.
Page 2
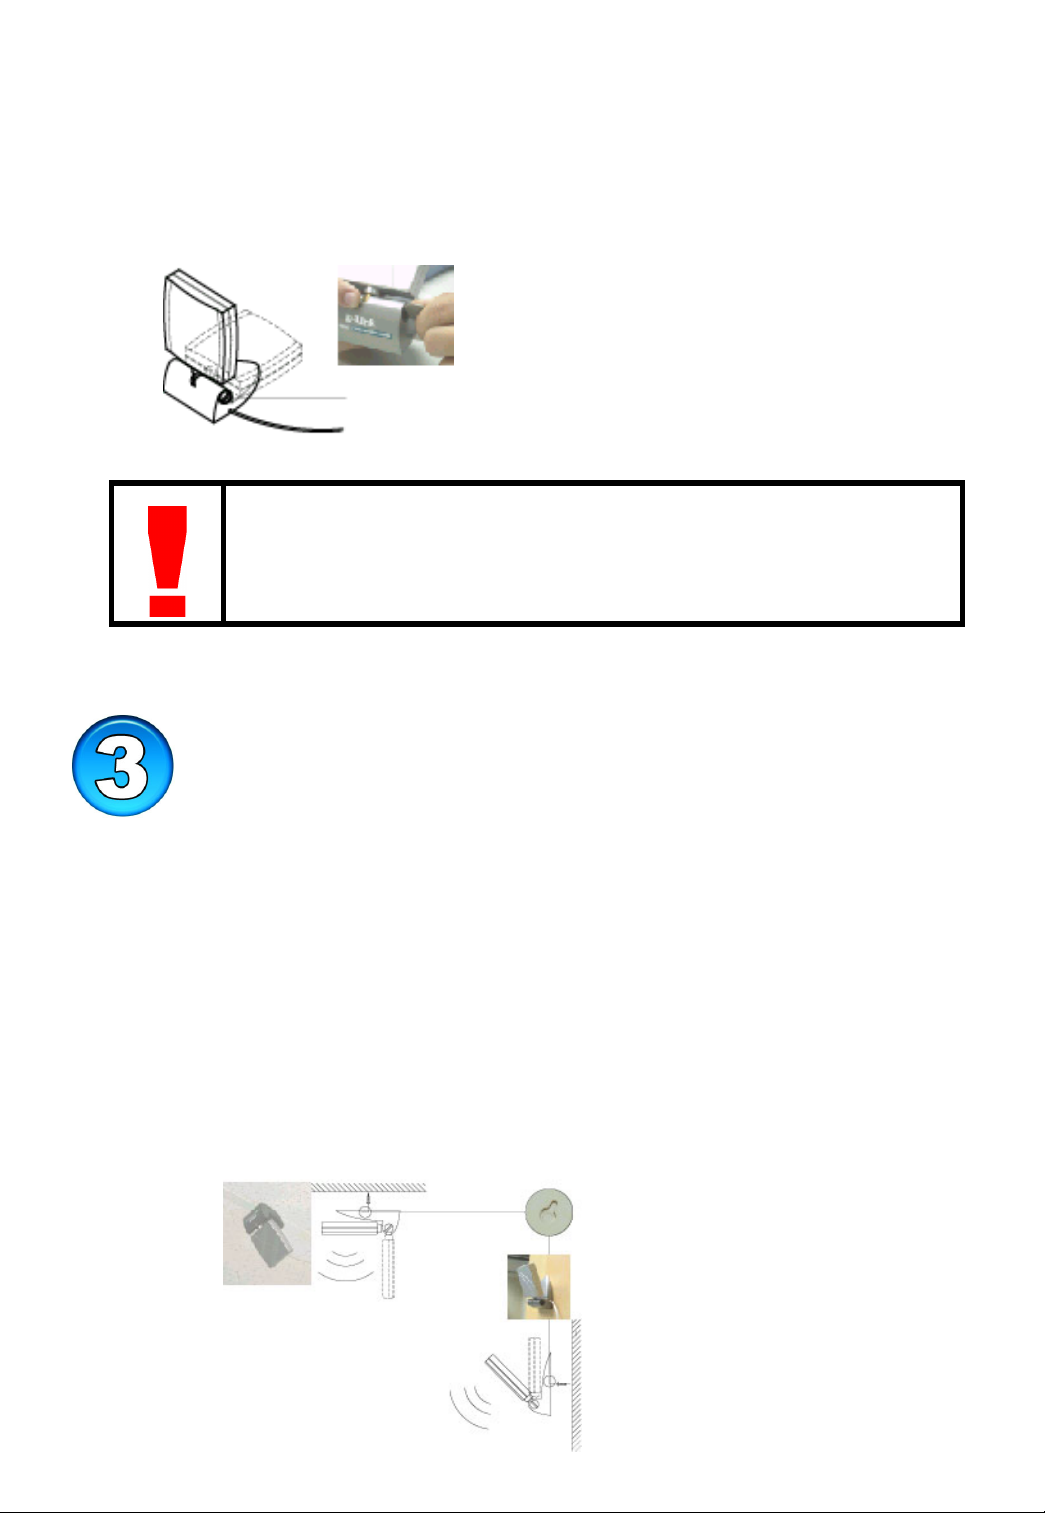
Step3. Adjust the antenna transmission direction to a right angle with
your coin.
Fixed screw on antenna
base
•
Always place the antenna on a flat or secure surface.
• Concealing the antenna behind books, cabinets or other office equipment
may affect the performance of the wireless networks.
• The antenna transmission range may vary according to different
environments or applications.
Mounting Configurations
• When the location which is identified, fix the mounting accessories
( screw and plastic wall anchor ) into the position.
•
Click the antenna base with the screw, press gently until the screw
clicked into the base clip.
• Adjust the angle of the antenna to a right angle, which can attain
better signal transmission and coverage area.
• In order to fix the antenna body and the base, please use coin to
tighten the black fixed screw.
Page 3
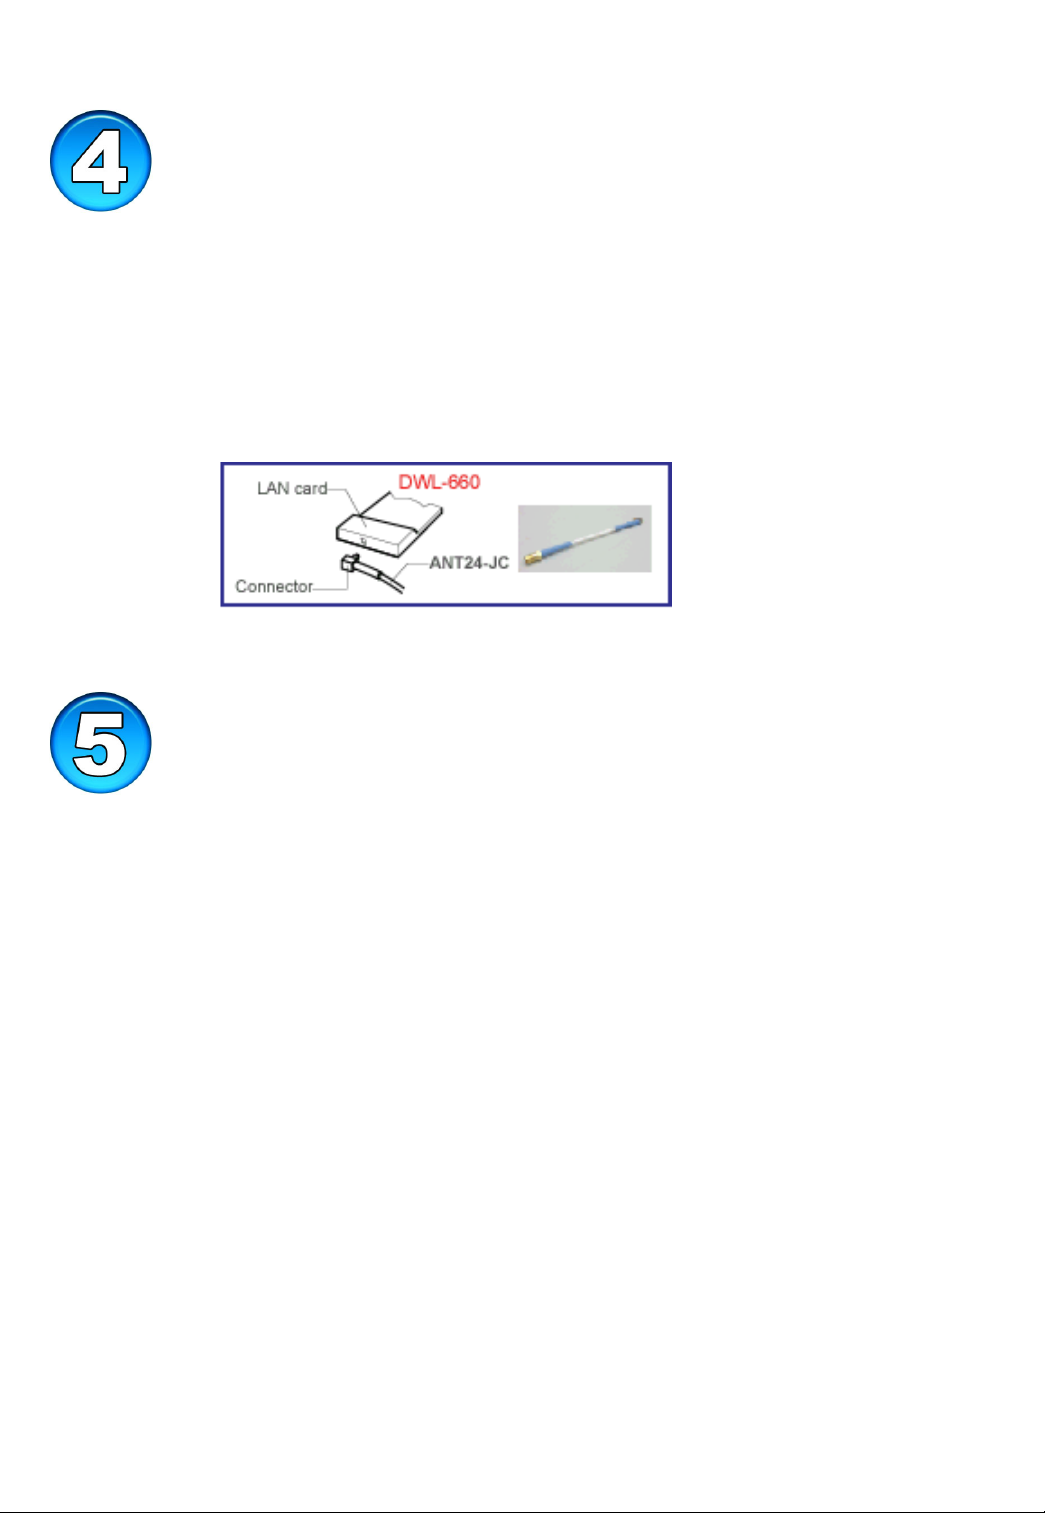
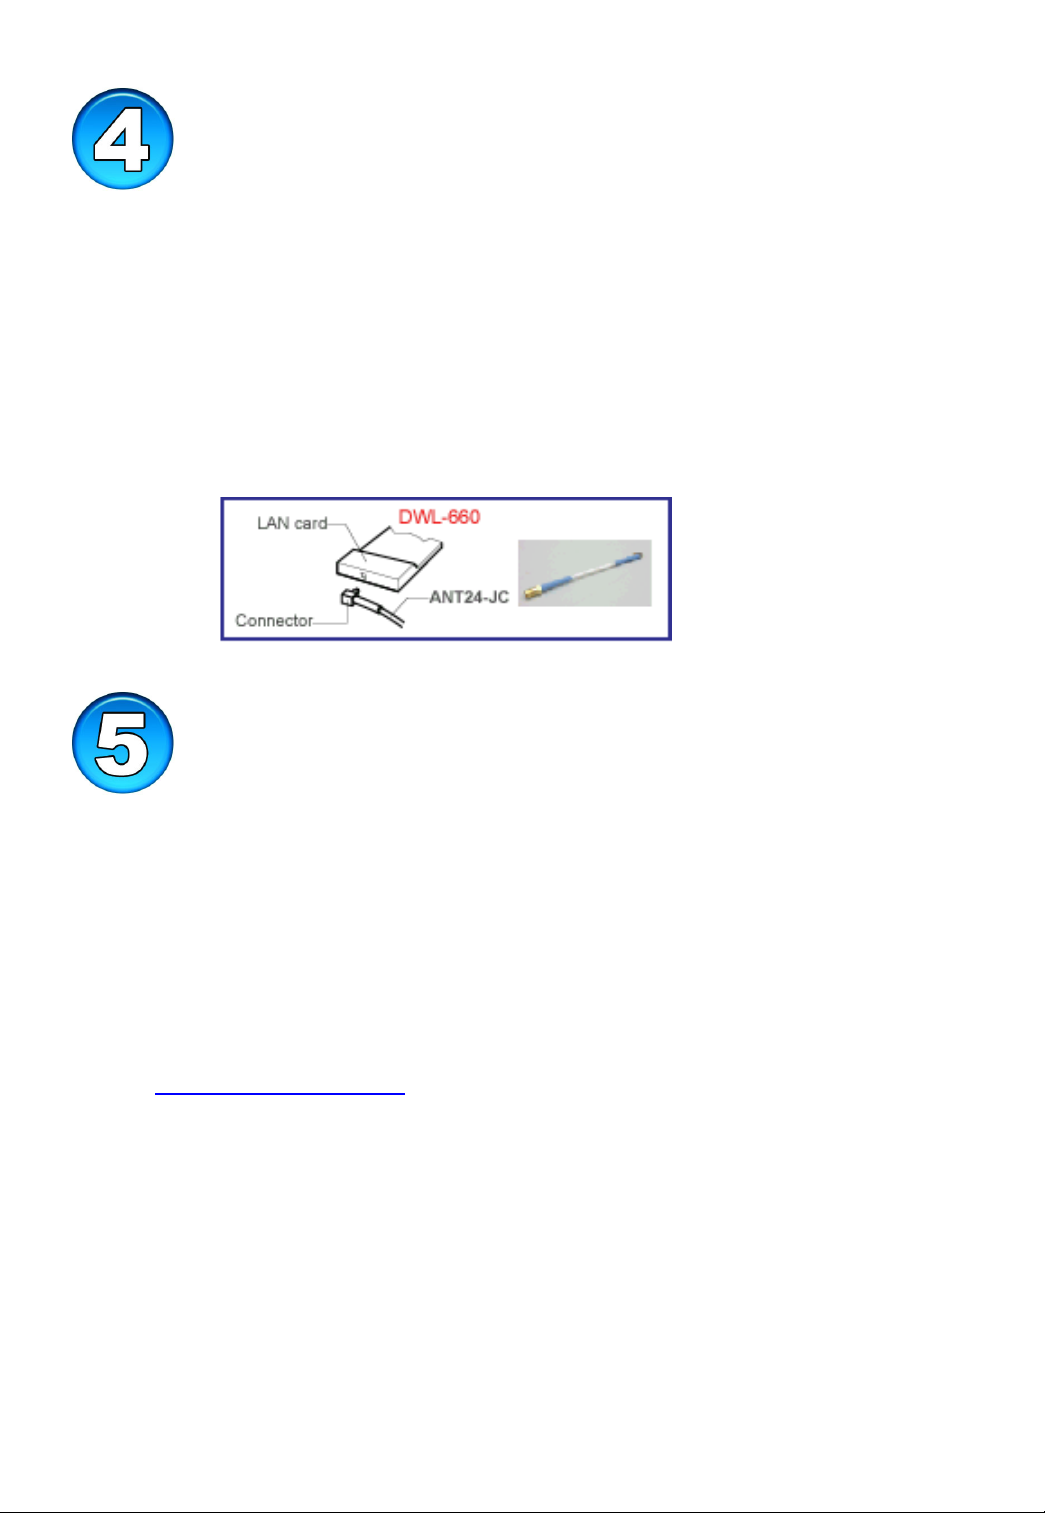
Installing ANT24-JC
Please use another D-Link optional jumper cable ANT24-JC to change
your DWL-M60AT from RP-SMA jack to MCC. It may allow your
antenna to link with D-Link DWL-660 wireless PC card.
Please contact your reseller for D-Link optional MCC jumper
cable.
Technical Support
D-Link provides free technical support for customers within the United States
during the warranty period on this product.
U.S. customers can contact D-Link Technical Support through our web site, or
by phone.
D-Link Technical Support over Telephone
:
1-800-758-5489
24 Hours a Day, 7 Days a Week
1-Year Limited Warranty from date of purchase.
D-Link Technical Support over the Internet
support.dlink.com
support@dlink.com
:
Page 4
Prüfen Sie den Paketinhalt
Folgende Teile gehören zu Ihrer
DWL-M60AT
DWL-M60AT Antenne mit 1,5m
Anschlusskabel
Installationszubehör (1 Schraube,
1 Kunststoffhaken,
2 Kunststoffkabelklemmen)
Kurzanleitung
Installation Guide
D-Link DWL-M60AT
2.4GHz Wireless Indoor Antenna
Installation von DWL-M60AT
1. Schritt. Entnehmen Sie die Antenne vorsichtig dem Paket und suchen
Sie einen optimalen Standort für die Antenne.
Hinweis: Das Kabel sollte nicht verbogen oder geknickt werden. Platzieren Sie die
Antenne möglichst in der Nähe der drahtlosen Geräte, damit Kabel und Stecker nicht zu
stark gespannt werden müssen.
2. Schritt Setzen Sie die Antenne auf eine stabile, ebene Fläche.
Verwenden Sie das beigelegten Installationszubehör, um die
Antenne an der Wand oder Decke anzubringen.
Entfernen Sie die bisherige Antenne und stellen Sie eine Verbindung mit
DWL-M60AT her
.
Page 5
A
3. Schritt. Richten Sie die Übertragungsrichtung Ihrer Antenne mit einer
Münze rechtwinklig aus.
Fixier Schraube am
ntennenfuß
• Platzieren Sie die Antenne nur auf einer ebenen, sicheren Fläche.
• Das Platzieren der Antenne hinter Büchern, in Schränken oder anderer
Büroeinrichtung kann die Leistung des drahtlosen Netzes beeinträchtigen.
• Die Übertragungsreichweite der Antenne kann je nach Umgebung und
Anwendung schwanken.
Installationseinstellungen
• Wenn ein geeigneter Standort gefunden ist, setzen Sie die
Installationsteile (Schraube und Kunststoffwandhaken) ein.
• Klicken Sie den Antennenfuß mit der Schraube ein und drücken Sie
so lange vorsichtig, bis die Schraube in den Fuß-Clip einrastet.
• Richten Sie die Antenne rechtwinklig aus, um eine bessere
Signalübertragung und einen größeren Abdeckungsbereich zu erzielen.
•
Verwenden Sie eine Münze, um das Antennenhauptteil und den Fuß
zu fixieren, indem Sie die schwarze Schraube festziehen.
Page 6
Installation von ANT24-JC
Stellen Sie mithilfe eines zusätzlichen optionalen D-Link Zwischenstücks
vom Typ ANT24-JC die DWL-M60AT von der RP-SMA-Buchse auf
MCC um. Auf diese Weise wird die Verbindung der Antenne mit der DLink DWL-660 Wireless PC Card ermöglicht.
Wenden Sie sich bitte für das optionale D-Link MCC Jumper-Kabel an
Ihren Händler.
Technische Unterstützung
Aktualisierte Versionen von Software und Benutzerhandbuch finden Sie auf der
Website von D-Link unter www.dlink.de.
D-Link bietet kostenfreie technische Unterstützung für Kunden innerhalb
Deutschlands, Österreichs, der Schweiz und Osteuropas.
Unsere Kunden können technische Unterstützung über unsere Website oder
telefonisch anfordern.
Web:
E-Mail: support@dlink.de
Telefon: 00800 7250 4000
Telefonische technische Unterstützung erhalten Sie montags bis donnerstags von
08.00 bis 19.00 Uhr, freitags von 08.00 bis 17.00 Uhr.
http://www.dlink.de/
Wenn Sie Kunde von
D-Link
außerhalb Deutschlands, Österreichs, der
Schweiz und Osteuropas sind, wenden Sie sich bitte an die zuständige
Niederlassung aus der Liste im Benutzerhandbuch.
Page 7
Antenne sans fil intérieure 2.4GHz
Vérifier le contenu de l’emballage
Voici les éléments inclus dans l’emballage de la
DWL-M60AT
Antenne DWL-M60AT avec un câble de
1.5m intégré
Accessoires de montage ( vis *1,
pivot en plastique*1, pince câble en plastique *2 )
Guide d’installation
D-Link DWL-M60AT
Etape 1. Enlever délicatement l’antenne de l’emballage et identifier
Note: Il est conseillé de placer l’antenne prêt de l’équipement sans fil de sorte que le
câble et le connecteur ne soient pas tendus de façon excessive.
Etpae 2. Placer l’antenne sur une face plane et stable et utiliser les
Guide d’installation rapide
Installer la DWL-M60AT
l’endroit idéal pour placer l’antenne.
accessoires de montage fournis pour fixer l’antenne sur le mûr
ou le plafond.
Enlver l’antenne existante et commencer la connexion avec la DWL-M60AT.
.
Page 8

Etape 3. Ajuster la direction de transmission de l’antenne dans le bonne
angle.
Vis fixées à la base de
l’antenne
•
Toujours placer l’antenne sur une surface plane et sûre.
• Dissimuler l’antenne derrière des livres, ou tout autre élément de bureau
peut affecter de façon significative les performances du réseau sans fil.
• La portée de transmission de l’antenne peut varier considérablement en
fonction des conditions environnementales et des applications.
Configurations de montage
• Lorsque l’endroit pour placer l’antenne est identifié, fixer les
accessoires de montage.
•
Cliquer la base de l’antenne avec la vis, presser doucement jusqu’à ce
que la vis clique dans la base.
• Ajuster l’angle de l’antenne dans le bon sens, de sorte d’obtenir le
meilleur signal de transmission et la meilleure couverture.
• Dans le but de fixer l’antenne, utiliser une pièce pour resserrer la vis
noire.
Page 9

Installer ANT24-JC
Utiliser le câble optionnel D-Link ANT24-JC pour changer le
connecteur de l’antenne DWL-M60AT d’une prise RP-SMA vers MCC.
Cela vous permettra de relier l’antenne avec la PC card sans fil D-Link
DWL-660.
Contacter votre revendeur habituel pour l’option D-Link MCC
Support Technique
Vous trouverez la documentation et les logiciels les plus récents sur le site
web
D-Link.
Le service technique de
durant la période de garantie.
D-Link
est gratuit pour les clients aux Etats-Unis
.
Ceux-ci peuvent contacter le service technique de
internet ou par téléphone.
Assistance technique D-Link par téléphone :
0 820 0803 03
Assistance technique D-Link sur internet :
Web :http://www.dlink.fr
E-mail :support@dlink
.fr
D-Link
par notre site
Page 10

Guía de Instalación
D-Link DWL-M60AT
2.4GHz Antena Inalámbrica de
Compruebe el contenido de la caja
Estos son los artículos incluídos con su
DWL-M60AT
•
DWL-M60AT antena con 1.5m de cola
enrollada
•
Accesorios de montaje (tornillo *1, ancla de
plástico*1, cable con abrazadera de
plástico*2)
• Guía de instalación rápida
Instalación de la DWL-M60AT
Paso 1. Con cuidado quite la antena de la caja y coloque la posición
óptima para la antena.
Nota: Permita que el cable se doble de forma natural . Se recomienda que coloque la
antena cerca del dispositivo inalámbrico para evitar una excesiva tensión del cable y
el conector
Paso 2. Coloque la antena sobre una superficie estable, plana, y use los
accesorios de montaje incluidos para montar la antena sobre las
paredes o el techo.
Quite la antena existente y comience a unir con DWL-M60AT..
Page 11

Paso3. Ajuste la dirección de transmisión de antena a un ángulo recto
con su moneda.
Fije el tornillo en la base de
la antena
•
Siempre coloque la antena sobre suelo o una superficie segura.
• Ocultando la antena detrás de libros, armarios u otros equipos de oficina
pueden afectar el rendimiento de las redes inalámbricas.
• El rango de transmisión de la antena puede variar según los diferentes
ambientes o aplicaciones.
Configuraciones de Montaje
• Una vez encontrado el lugar, fijar los accesorios de montaje (el
tornillo y el ancla de plástico de pared) en el lugar.
•
Coloque la base de la antena con el tornillo, presione con cuidado
hasta que el tornillo haga clic en la base del clip.
• Ajuste el ángulo de la antena en el mejor ángulo, pudiendo lograr la
mejor transmisión de señal y cobertura del área.
• Para fijar el cuerpo de la antena y la base, por favor use la moneda
para apretar el tornillo negro fijo.
Page 12

Instalación ANT24-JC
Por favor use otro “jumper” opcional D-Link del cable ANT24-JC para
cambiar su DWL-M60AT de RP-SMA “jack” a MCC. Esto le permitirá
a su antena unirse con la tarjeta inalámbrica “PC card” D-Link DWL-
660.
Por favor póngase en contacto con su proveedor para el “jumper” MCC
opcional del cable D-Link.
Soporte Técnico
D-Link proporciona el soporte técnico gratuito para clientes dentro de los
Estados Unidos durante el período de la garantía sobre este producto.
Los clientes estadounidenses pueden ponerse en contacto con el Soporte
técnico de D-Link por nuestro sitio web, o por teléfono.
D-Link Soporte Técnico Telefónico
D-Link Iberia: +34 93 4090770
1-Año de garantía limitada desde fecha de compra.
D-Link Soporte Técnico por Internet
www.dlink.es
soporte@dlink.es
:
:
Page 13

Guida all’installazione
Verificare il contenuto della confezione
La confezione dell’antenna modello
DWL-M60AT contiene:
Un’antenna modello DWL-M60AT con
cavo di collegamento di 1.5m
Accessori di montaggio (una vite, un punto
di ancoraggio plastico, due fermacavo
plastici)
Guida all’installazione rapida
D-Link DWL-M60AT
2.4GHz Wireless Indoor Antenna
Step 1. Rimuovere attentamente l’antenna dalla confezione ed
Nota: Verificare che il cavo non sia attorcigliato ma ben steso. Si raccomanda di
posizionare l’antenna il più vicino possibile agli altri accessori wireless onde evitare
particolari tensioni dovute alla distanza tra cavo e connettore.
Step 2. Posizionare l’antenna su una superficie piana e stabile
Installare la DWL-M60AT
identificare il posizionamento per una miglior trasmissione e
ricezione.
utilizzando gli appositi accessori di montaggio in caso di
posizionamento a parete o a soffitto.
Rimuovere l’antenna esistente e collegare la DWL-M60AT.
.
Page 14

Step3. Adattare la direzione dell’antenna in base alla miglior
trasmissione e direzione agendo sulla vite di fissaggio alla base
dell’antenna stessa
Vite di fissaggio sulla base dell’antenna
• Posizionare sempre l’antenna su una superficie piana, stabile ed asciutta.
• Posizionare l’antenna sopra libri, monitor, scaffali o attrezzature per ufficio
potrebbe compromettere le prestazioni della rete wireless.
•
Le distanze di trasmissione possono variare in funzione dell’ambiente di
installazione e degli apparati utilizzati.
Configurazione e montaggio
• Una volta identificato dove installare l’antenna, fissare gli
accessori di montaggio presenti nella confezione nella posizione
preferita.
• Fare pressione delicatamente sulla base dell’antenna per sbloccare
la vite di fissaggio mediante un cacciavite e regolare manualmente
l’angolo dell’antenna stessa per ottenere un miglior range di
copertura
• Per fissare/bloccare il corpo dell’antenna alla base, utilizzare una
moneta oppure un cacciavite avvitando delicatamente la vite.
Page 15

Installazione dell’accessorio ANT24-JC
Per passare dal connettore RP-SMA presente sulla DWL-M60AT al
connettore MCC normalmente presente sui principali Access Point o
schede wireless, è necessario utilizzare un cavo di conversione opzionale
il cui codice è ANT24-JC. Questo cavo, per esempio, vi consentirà di
collegare un’antenna wireless standard alla scheda PCMCIA wireless DLink modello DWL-660.
Contattate il vostro rivenditore di fiducia per avere ulteriori informazioni
sul cavo opzionale D-Link ANT24-JC
.
Supporto Tecnico
D-Link mette a disposizione un Supporto Tecnico telefonico gratuito in caso
di informazioni o problematiche di configurazione dell’apparato.
Potete contattare in Supporto Tecnico D-Link via telefono, via posta
elettronica, oppure via web attraverso il forum D-Link.
Supporto Tecnico Telefonico D-Link
:
+39 02 39607160 dalle 09.00 alle 19.00 dal Lunedì al Venerdì
Supporto Tecnico Internet D-Link
http://www.dlink.it
tech@dlink.it
:
Page 16

Инструкция по установке
D-Link DWL-M60AT
2.4ц Беспроводная Дома
Проверьте Комплектацию Вашего
Набора
В поставку DWL-M60AT входит следующее:
Антенна DWL-M60AT с 1,5м. шнуром
Крепежный комплект (1 винт, 1
пластмассовый анкер, 2 пластмассовых
хомута для кабеля)
Инструкция по установке
шняя Антенна
Установка Антенны DWL-M60AT
Шаг 1. Осторожно извлеките антенну из упаковки и выберите
оптимальное размещение для антенны.
Внимание: Позвольте кабелю сгибаться естественным образом.
Рекомендуется размещать антенну рядом с беспроводными
устройствами во избежание деформации кабеля и коннектора.
Шаг 2. Разместите антенну на устойчивой, плоской поверхности или
используйте крепежный комплект для установки антенны на стену или
потолок.
Отключите существующую антенну и подключите DWL-M60AT
Page 17

Шаг 3. Отрегулируйте угол наклона антенны для оптимального
приема сигнала.
Закрепите винт на корпусе
антенны с помощью
монеты
• Всегда размещайте антенну на плоской устойчивой поверхности.
• Размещение антенны за книгами, шкафами и другими предметами
может отрицательно сказаться на производительности беспроводной
сети.
•
Диапазон передачи антенны может варьироваться для различных
приложений и окружения
Установка на стену
•
Когда вы выбрали расположение для антенны, установите
крепежный комплект (винт и настенный пластиковый
анкер)
•
Зафиксируйте корпус антенны мягким нажатием на винте,
пока винт не защелкнется в зажиме корпуса.
• Отрегулируйте угол антенны для обеспечения лучшего
приема сигнала и области покрытия.
•
Для фиксации положения антенны относительно
подставки используйте монету и затяните винт.
Page 18

Установка ANT24-JC
Вы можете использовать дополнительный кабель ANT24-JC для
изменения разъема подключения антенны с RP-SMA DWL-M60AT
на разъем MCC. Это позволит вам подключать антенну DWLM60AT к беспроводному PC – адаптеру.
Для установки дополнительного кабеля обращайтесь к вашему
поставщику оборудования.
Техническая Поддержка
D-Link обеспечивает бесплатную техническую поддержку
клиентов в течение гарантийного срока изделия.
Клиенты могут связаться со службой технической поддержки
D-Link через web-сайт, или по телефону.
Телефоны службы технической поддержки D-Link:
+7 (095) 744 00 99
Техническая Поддержка D-Link через Internet:
support@dlink.ru
Page 19

檢查產品包裝
無線室內天線
安裝指南
DWL-M60AT 包裝內應有以下配件:
DWL-M60AT 天線(附有 1.5m 纜線)
安裝配件 ( 螺絲 *1, 塑膠錨釘*1,
塑膠電纜夾*2 )
快速安裝指南
D-Link DWL-M60AT
2.4GHz
安裝DWL-M60AT
第1步. 從包裝中小心地取出天線,確認天線的最佳安裝位置。
注意
將纜線拉的太緊。
第 2 步. 將天線置於穩固、平坦的表面,用所附安裝附件將其安裝
讓纜線自然彎曲,建議將天線安裝於無線設備旁,距離不要太遠,以避免
:
在牆上或天花板上。
拆掉現有天線,開始安裝
DWL-M60AT
Page 20

第3步. 用硬幣將天線發射方向調整到最佳角度。
固定的螺絲位於天線基座
•
總是將天線安裝在平坦或安全的表面。
•
將天線隱藏於書籍、櫃子或其他辦公室設備後面可能影響無線網路的性能。
•
天線發射範圍可能受環境或應用層面的影響。
安裝配置
• 選好位置後,將安裝附件(螺絲和塑膠錨釘)固定到位置上。
• 用螺絲卡住天線基座,輕按將螺絲卡入基座夾。
• 調整天線至正確角度,可獲得最佳信號發射和覆蓋區域。
• 請用硬幣上緊黑色固定螺絲,以固定天線本體和基座。
Page 21

安裝 ANT24-JC
您可以使用 D-Link ANT24-JC(選購配備)將您的 DWL-M60AT 從
RP-SMA
接頭改爲
MCC
接頭,以便讓
DWL-660 無線網路 PC 卡連結。
請向經銷商洽詢選購 D-Link MCC 轉接線。
技術支援
友冠技術支援
DWL-M60AT
天線與
D-Link
台灣地區用戶可以透過我們的網站,電子郵件或電話與友冠
資訊技術支援人員 聯絡。
支援服務時間從週一到週五,上午
Web: http://www.dlinktw.com.tw/
FAQ: http://www.dlinktw.com.tw/faq.html
Email: dssqa@dlinktw.com.tw
Phone: 0800-002-615
如果您是台灣地區以外的用戶,請向
取得支援服務。
8:30 a.m. 到 5:30 p.m
D-Link
全球各地分公司
 Loading...