

Page 1
This product can be set up using
any current web browser, i.e.,
Internet Explorer 6 or Netscape
Navigator 7
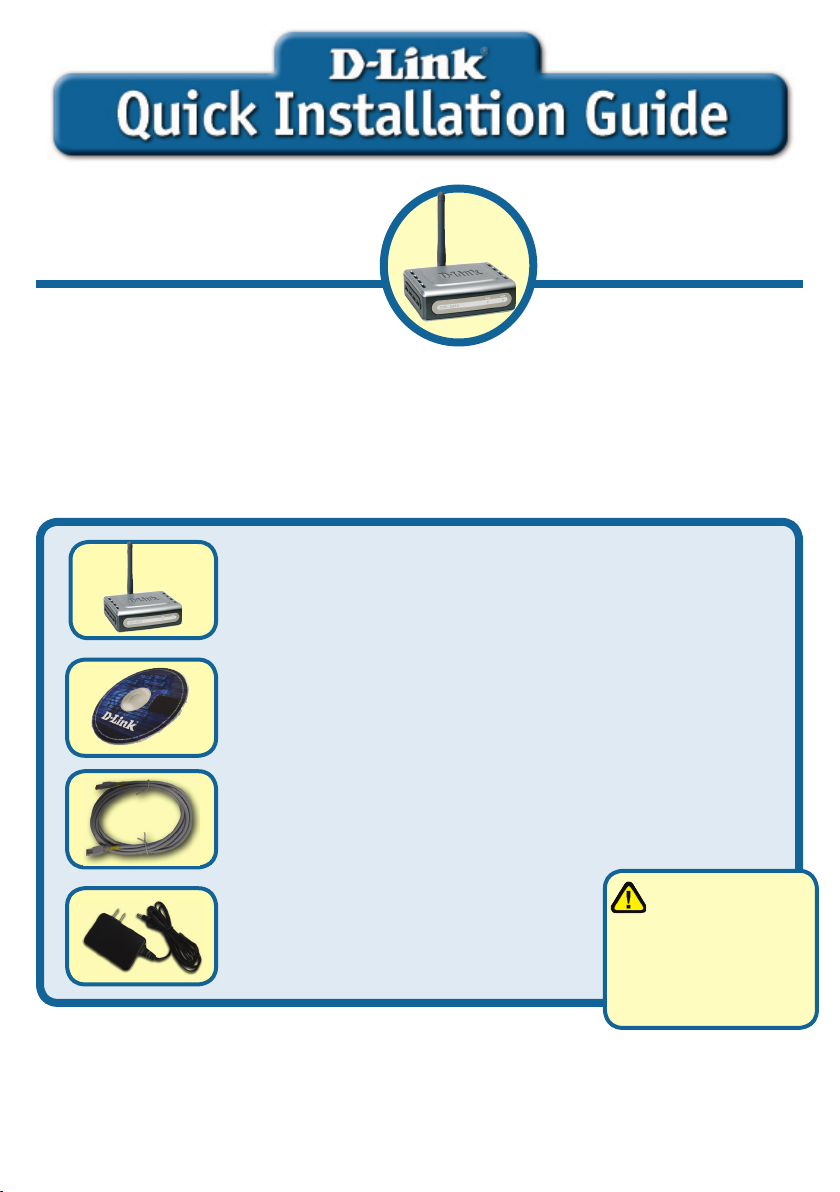
DWL-G810
D-Link AirPlus XtremeG
Ethernet-to-Wireless Bridge
Before You Begin
You must have at least the following:
An Ethernet-enabled device, such as a game console, laptop or desktop computer,
network printer or set-top box that will connect to the DWL-G810.
Check Your Package Contents
DWL-G810 Ethernet-to-Wireless Bridge
CD-ROM (Manual and Warranty)
Ethernet (CAT5 UTP) Cable
Using a power
supply with a
5V DC 2.5A Power Adapter
If any of the above items are missing, please contact your reseller.
©2004 D-Link Systems, Inc. All rights reserved. Trademarks or registered trademarks are the property of their respective holders. Software and
specifications subject to change without notice.
1
different voltage
rating will damage
this product and void
its warranty.
Page 2
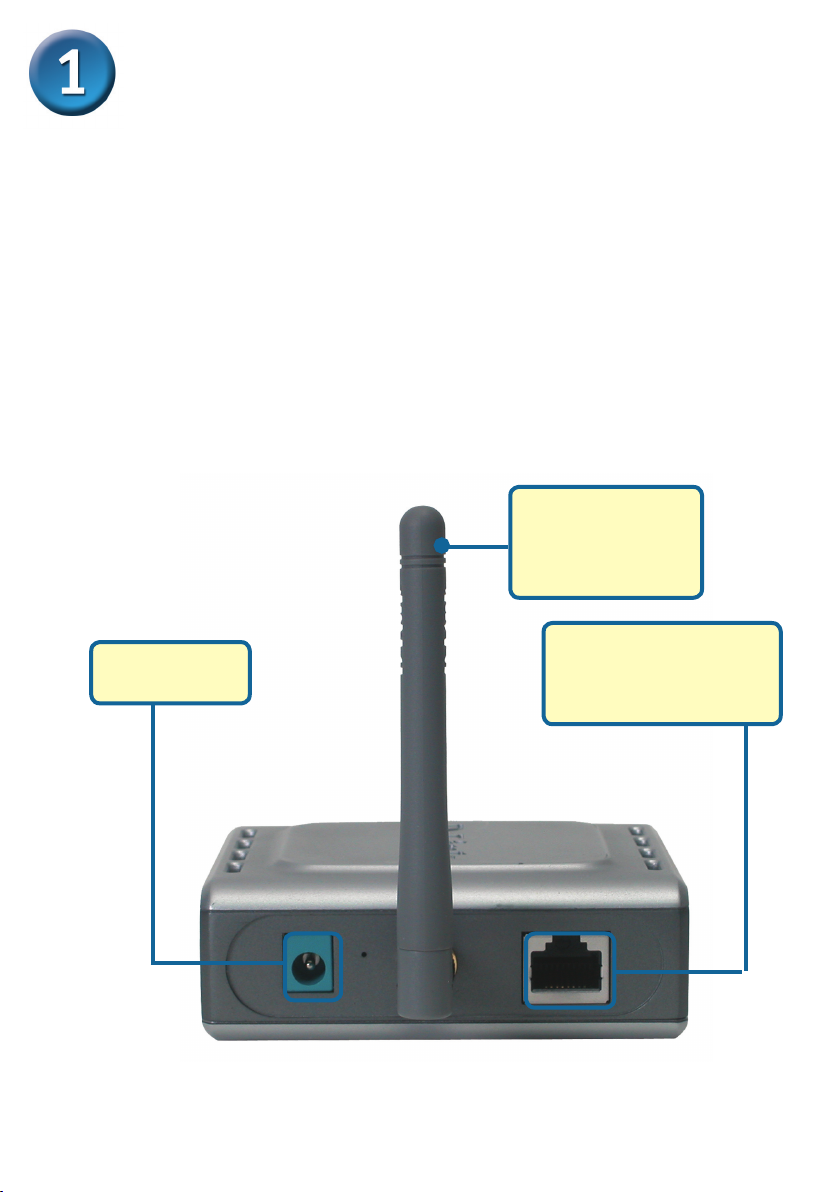
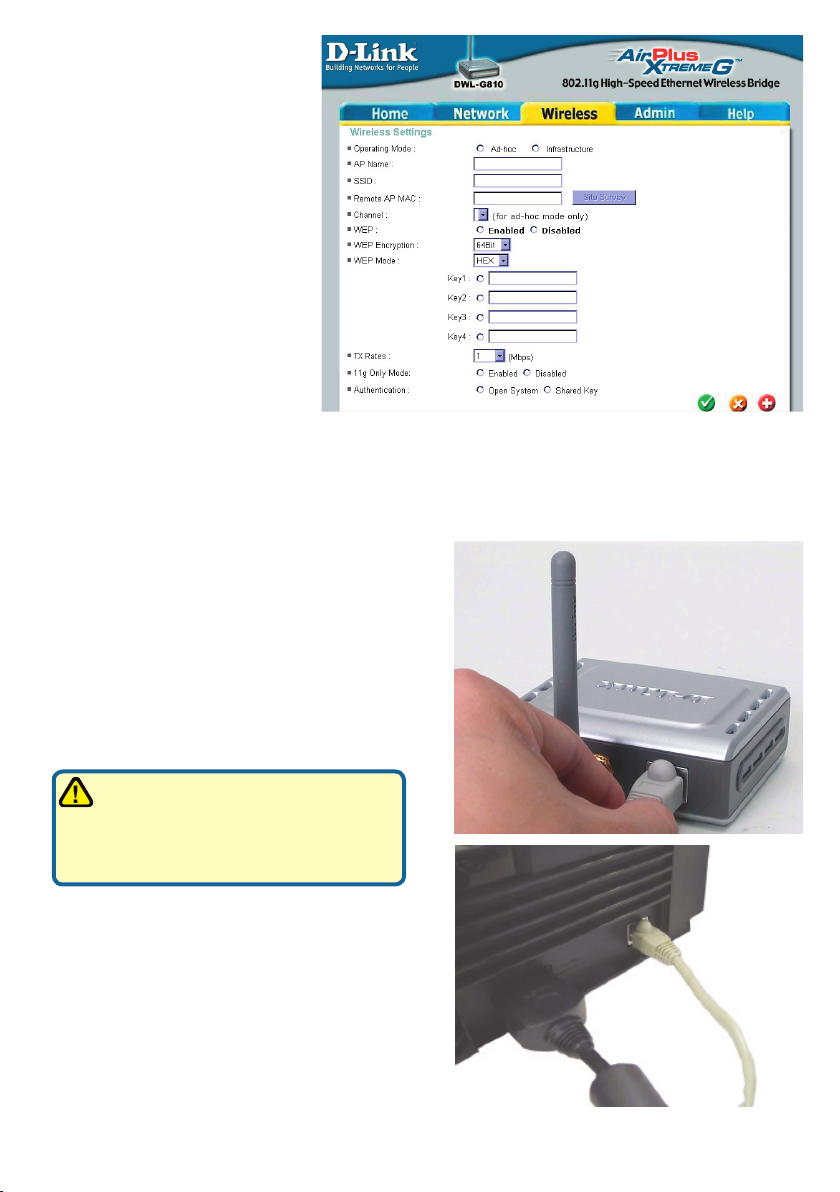
Connecting the DWL-G810 to your
Ethernet-enabled device
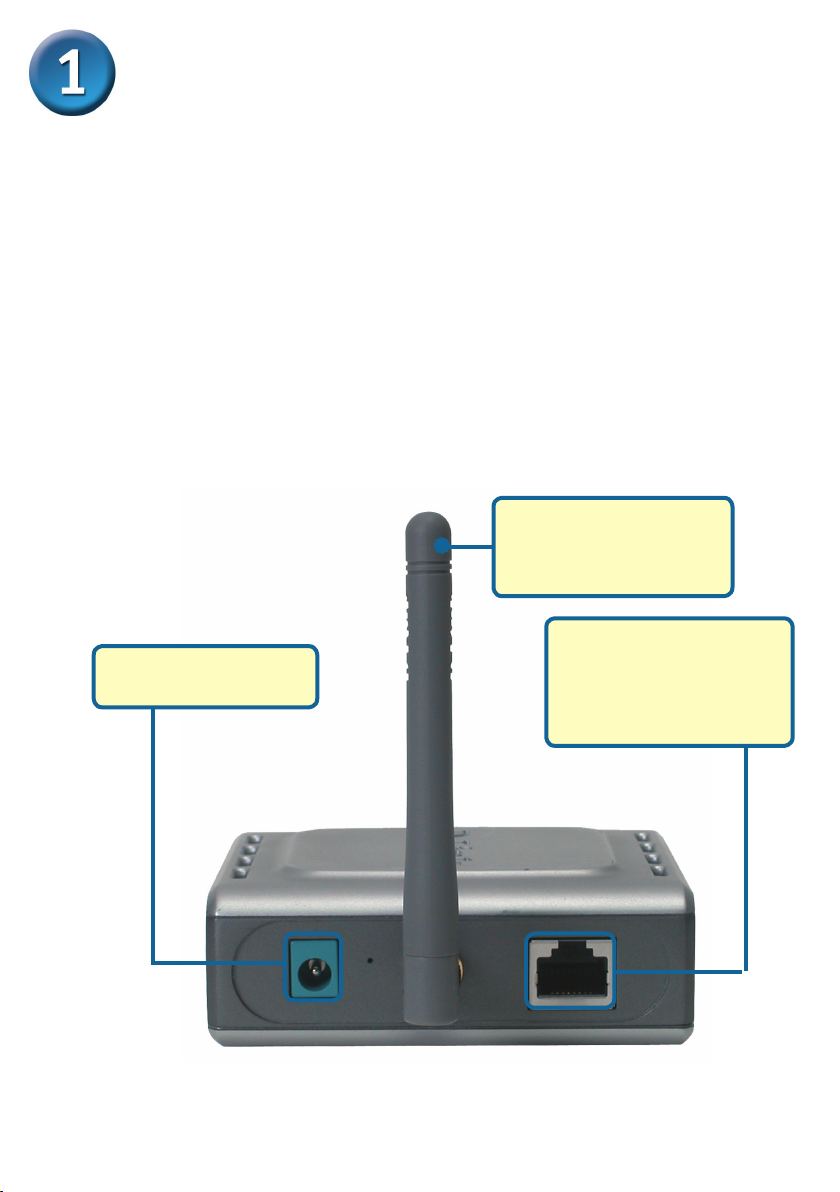
A. First, connect the power adapter to the receptor at the back panel of the DWL-
G810 and then plug the other end of the power adapter to a wall outlet or power
strip. The Power LED will turn ON to indicate proper operation.
B. Insert one end of an Ethernet cable (included) to the Ethernet port on the back
panel of the DWL-G810 and connect the other end to the Ethernet port located
on the device (e.g., a Set Top Box, Gaming Console, laptop or desktop computer,
or network printer.) The LED light will blink when there is data tranfer through the
wireless connection. (Note: The Ethernet port on the DWL-G810 is Auto-MDI/
MDIX. Meaning you can use a straight-through or crossover-cable to the Ethernet
Port.)
C. The antenna is used by the DWL-G810 to connect to other 802.11b/g wireless
devices.
C. Antenna
Used to wirelessly
connect to 802.11b/
g networks.
B. LAN Port
A. Receptor for
Power Adapter
This is the connection for
Ethernet cables to your
Ethernet-enabled device.
2
Page 3
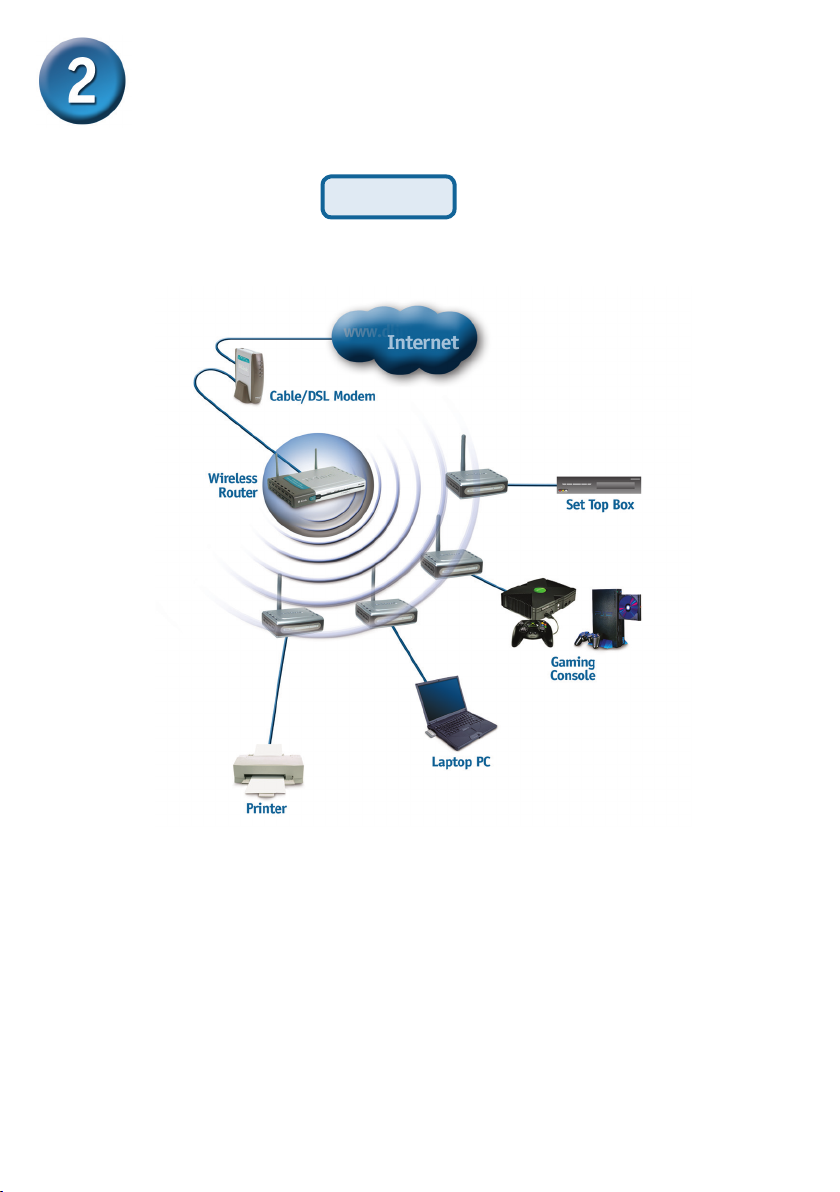
Connecting the DWL-G810 in
Infrastructure Mode
Setup #1
Connect an Ethernet cable from the DWL-G810 to your Ethernet enabled:
Desktop PC, Laptop PC, Set-Top-Box, or Gaming Console.
3
Page 4
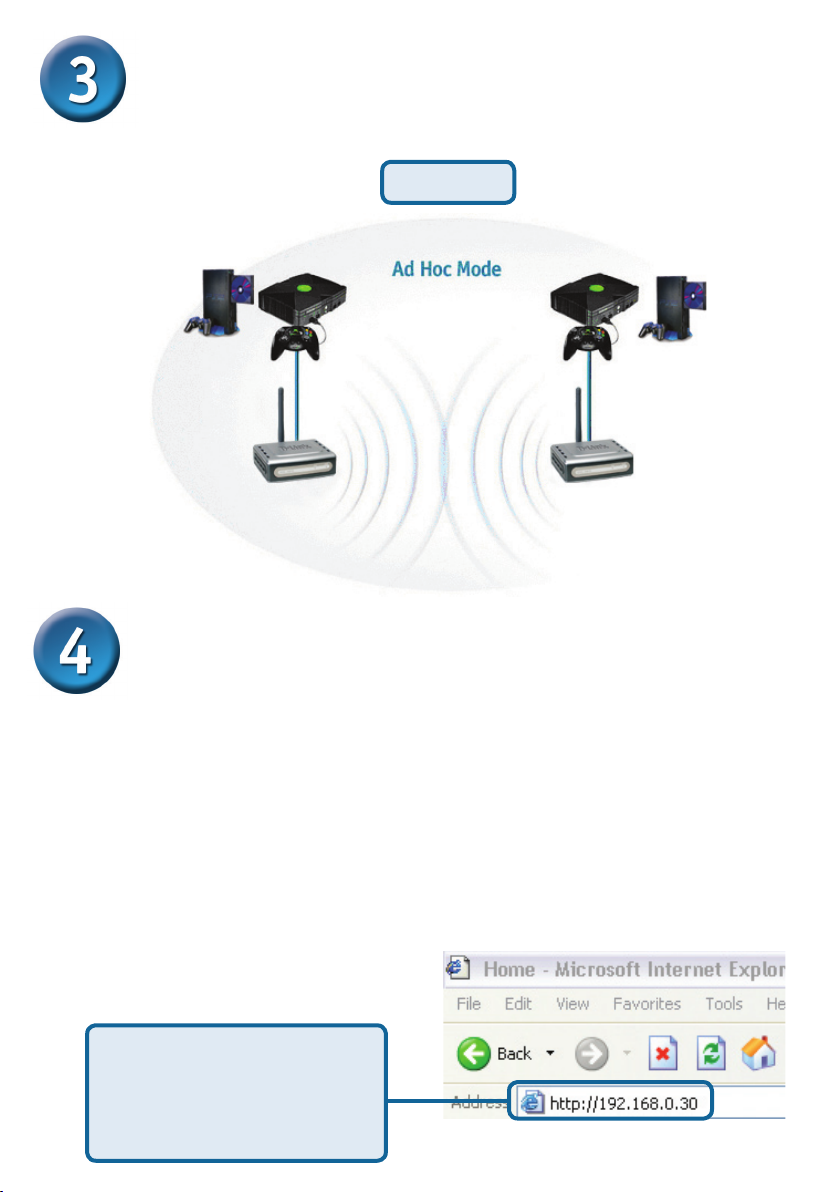
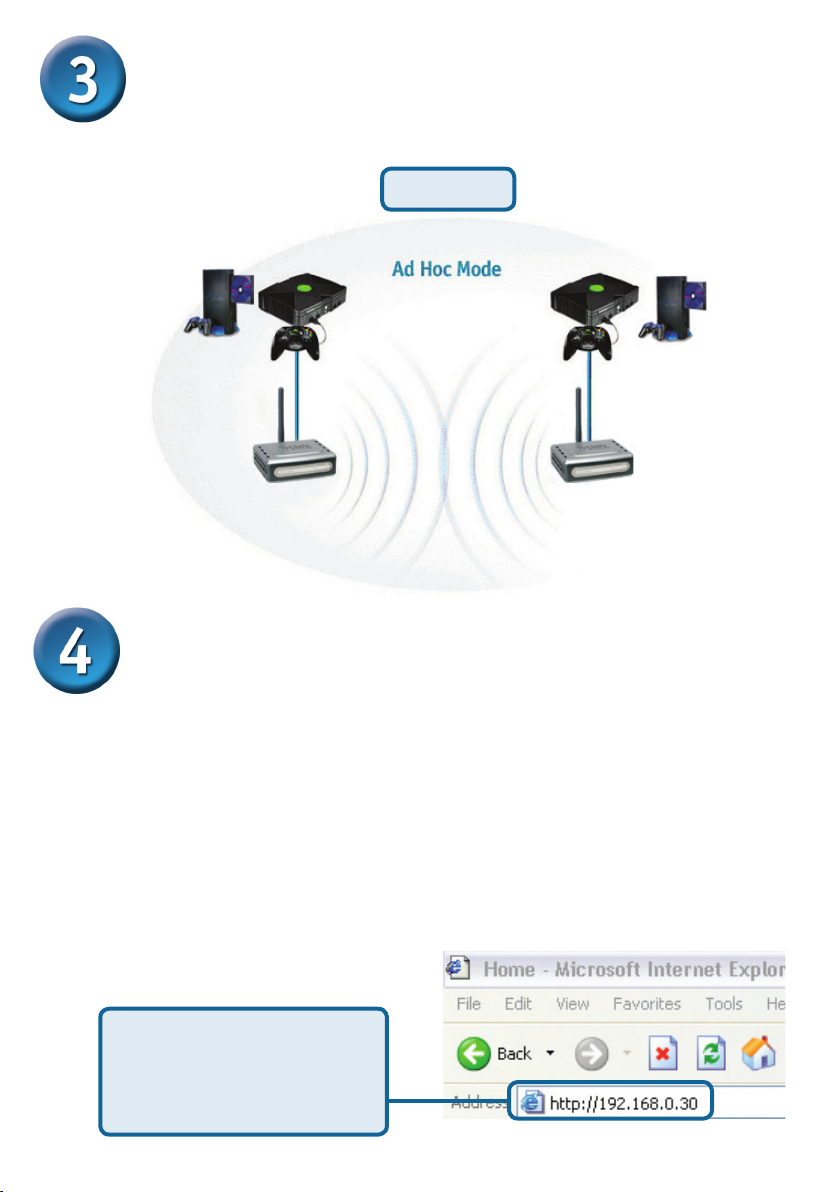
Connecting the DWL-G810 in Ad-Hoc
Mode
Setup #2
or or
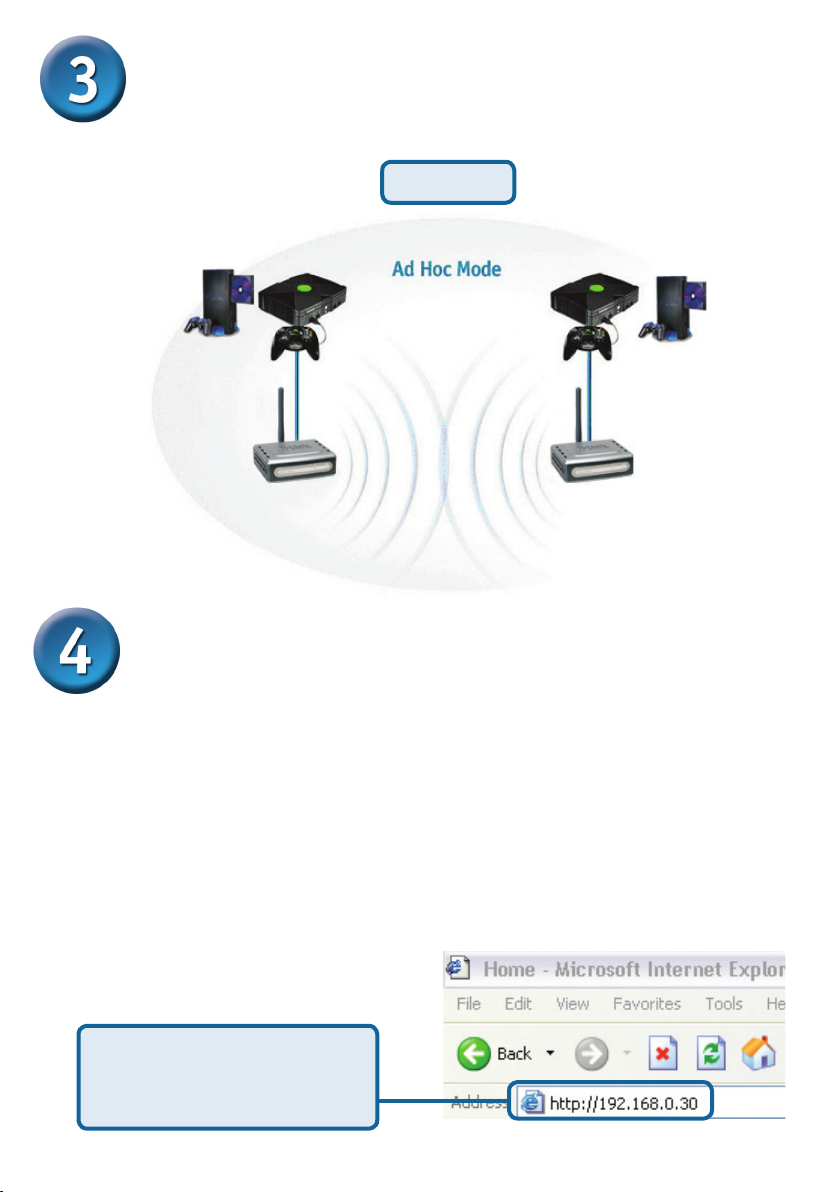
Web-based Configuration
Before You Begin the Configuration
It’iis best to use a computer (with an Ethernet adapter) that is connected to a switch for
configuring the DWL-G810.
directly to the computer that will be used for configuration). The default IP address for
the DWL-G810 is
your computer a Static IP address within the same range as the DWL-G810 IP address for
the purpose of configuring the DWL-G810. See the Manual on the CD-ROM if you need
assistance in assigning a Static IP address for your network adapter.
Open your Web browser and
type “http://192.168.0.30” into
the URL address box. Then
press the Enter or Return key.
192.168.0.30 with a Subnet Mask of 255.255.255.0. You will need to assign
(Note: You also have the option of connecting the DWL-G810
4
Page 5

Continued...
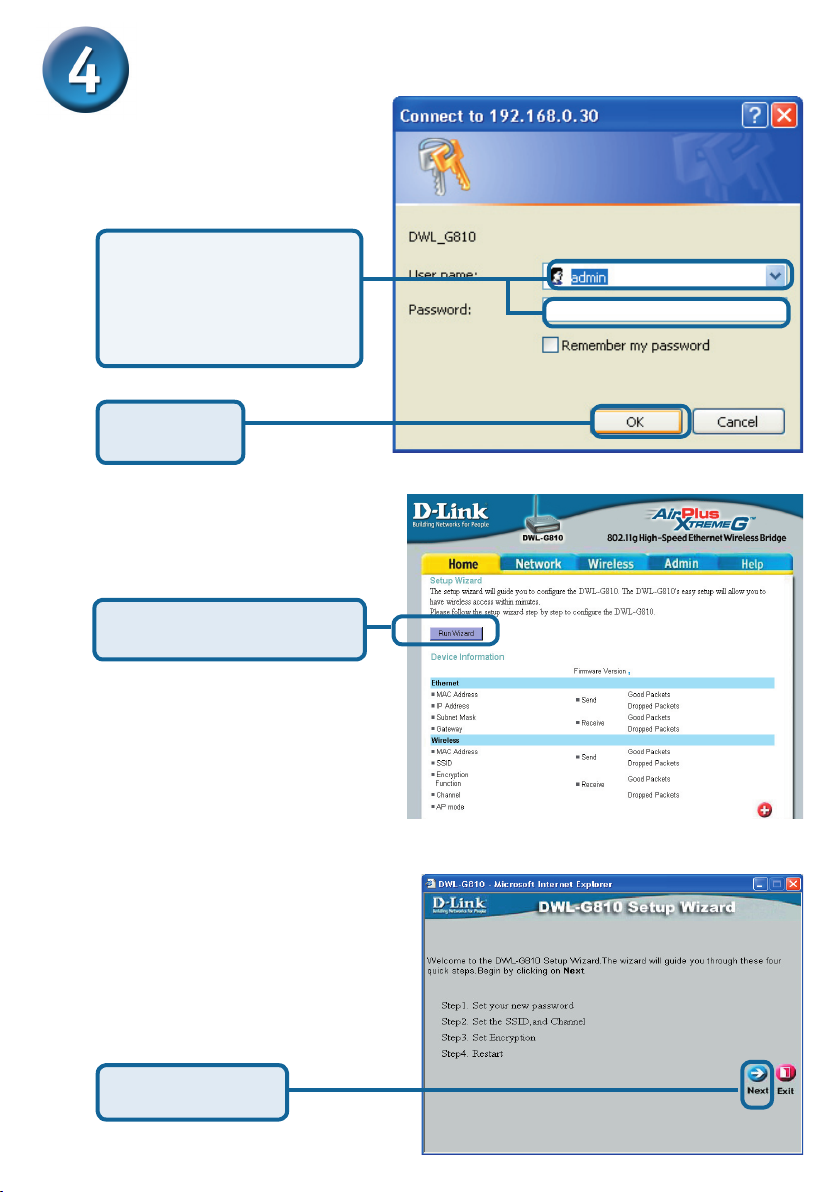
The logon pop-up
screen will appear.
Type admin for the
username and leave the
password field blank.
Click OK
Once you have logged
in, the Home screen will
appear.
Click Run Wizard
You will see the
following screens.
Click Next
5
Page 6
Continued...
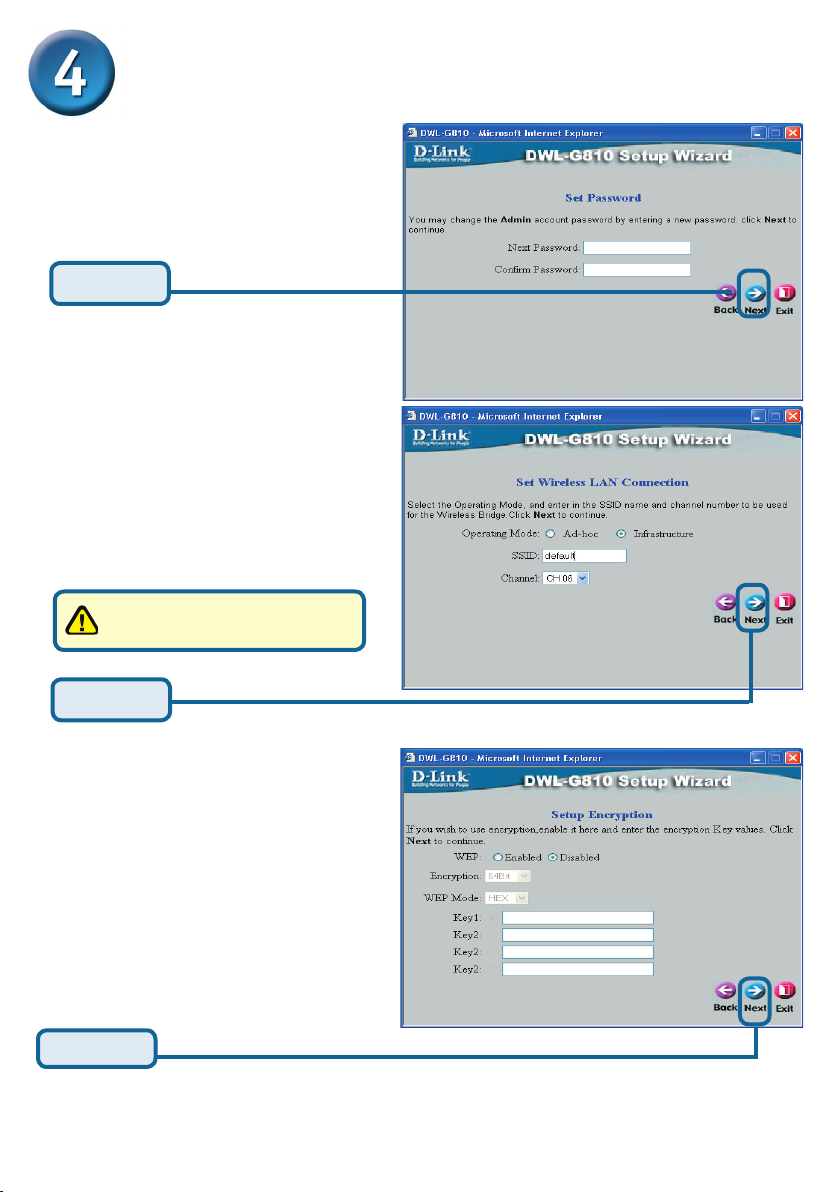
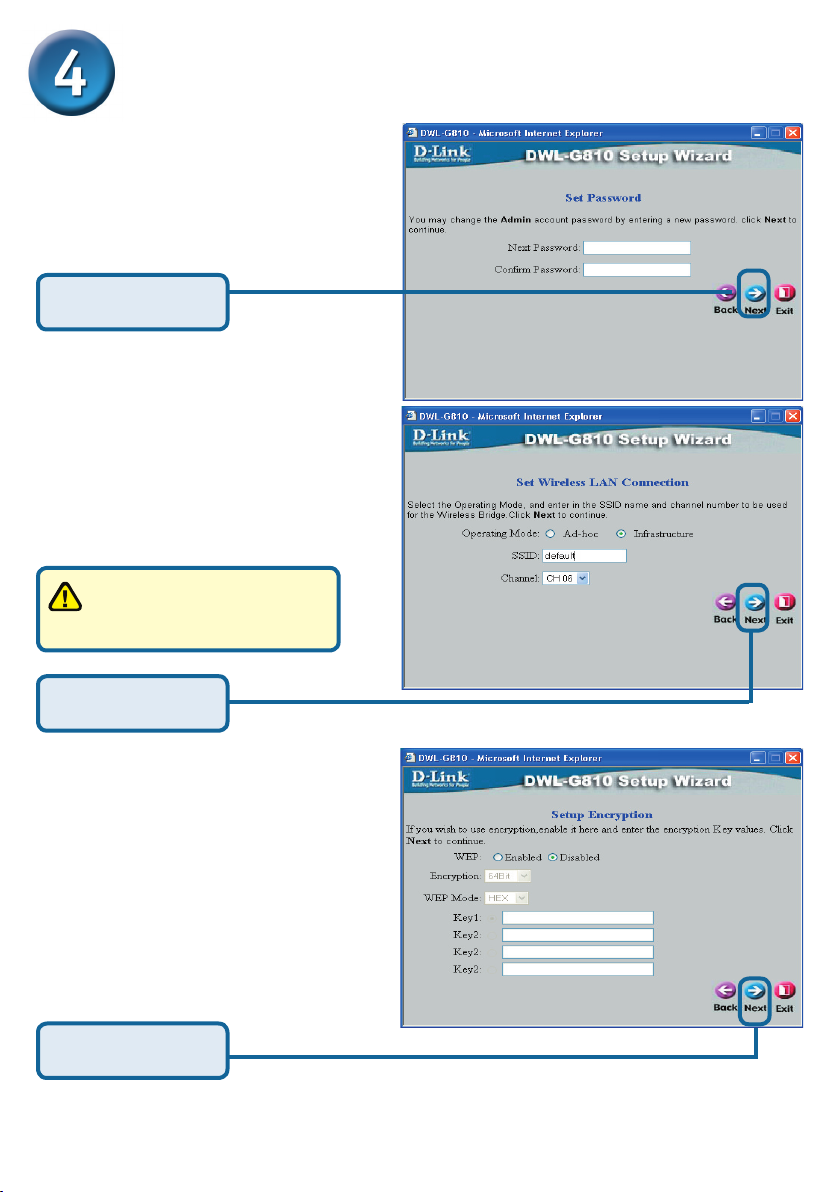
Step 1 - Set up your new
password. You have the option
to establish a password.
Click Next
Step 2 - Wireless Setup
The default wireless settings are:
SSID = default
Channel = 6
Operating Mode = Infrastructure
For Set Up #2 select Ad-hoc
as the operating mode.
Click Next
Step 3 - Encryption
The DWL-G810 is capable of two
levels of wireless encryption - 64-bit,
and 128-bit.
Click Next
6
Page 7
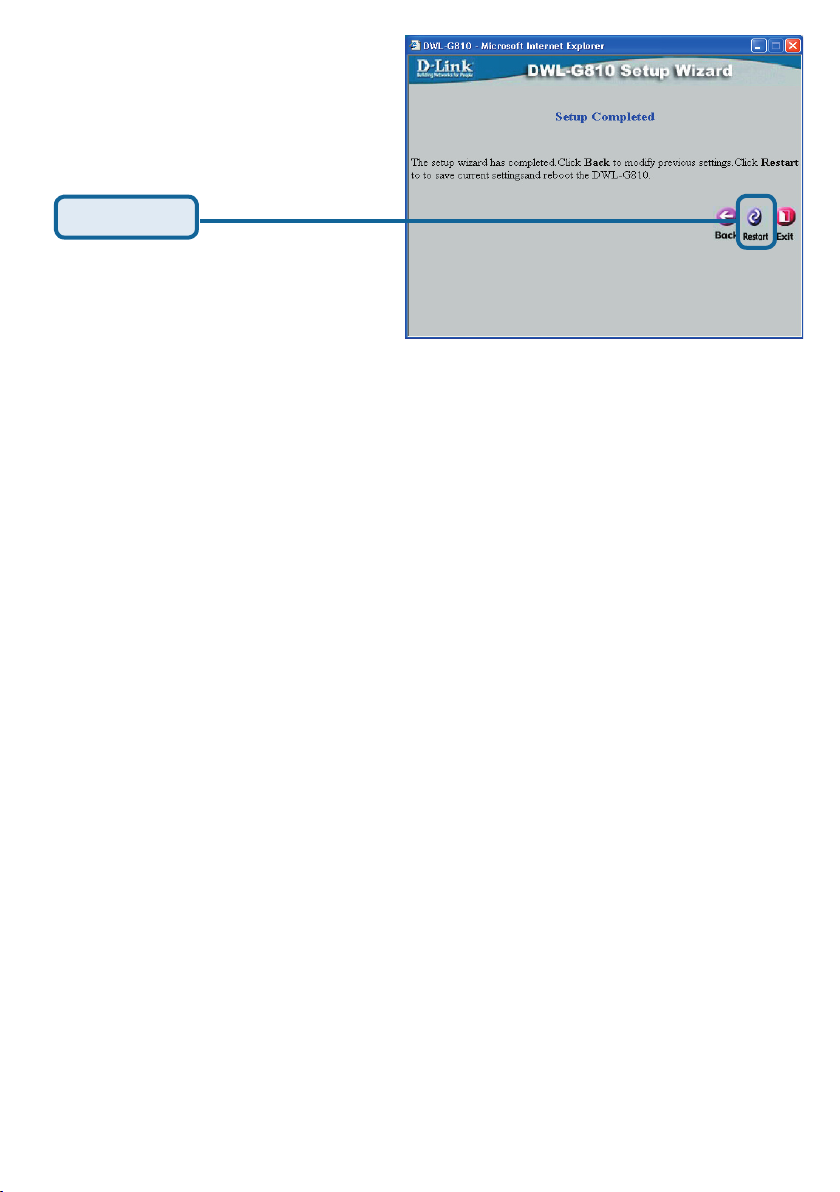
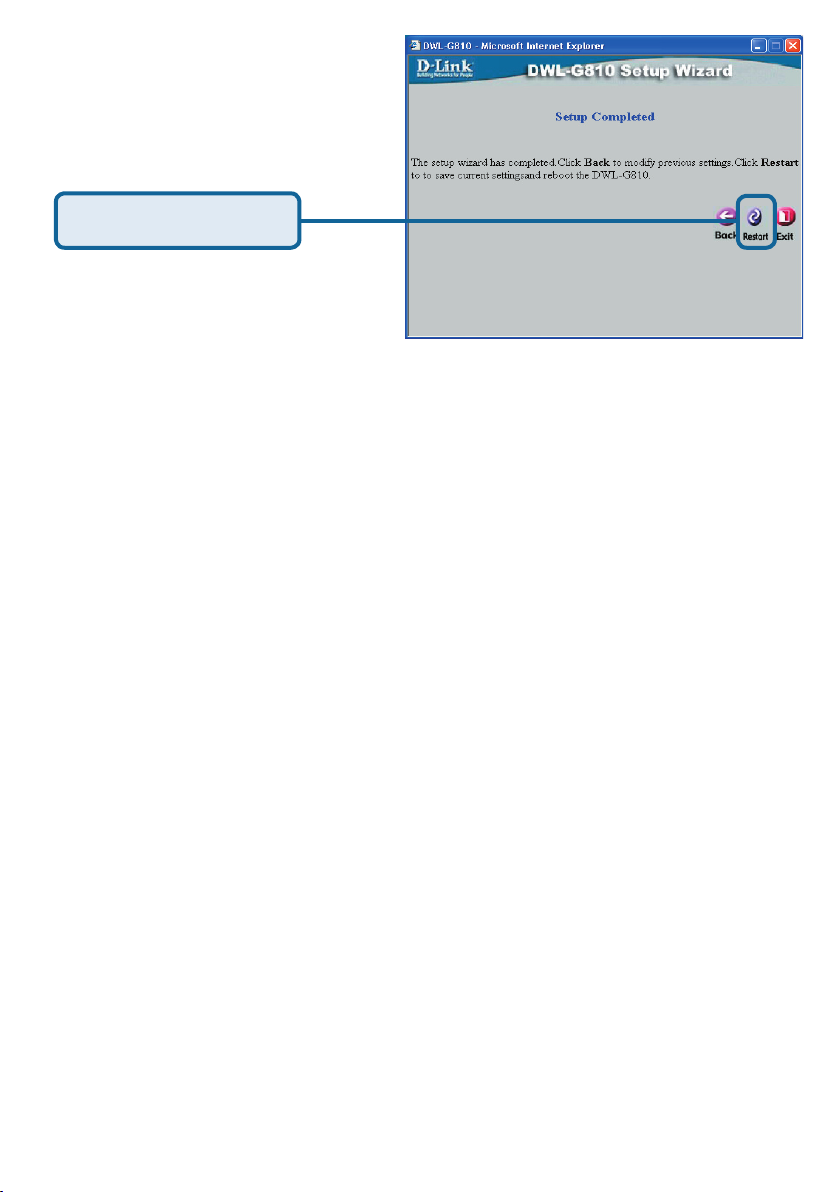
Click Restart
You have completed the Configuration of the DWL-G810!
7
Page 8
Appendix
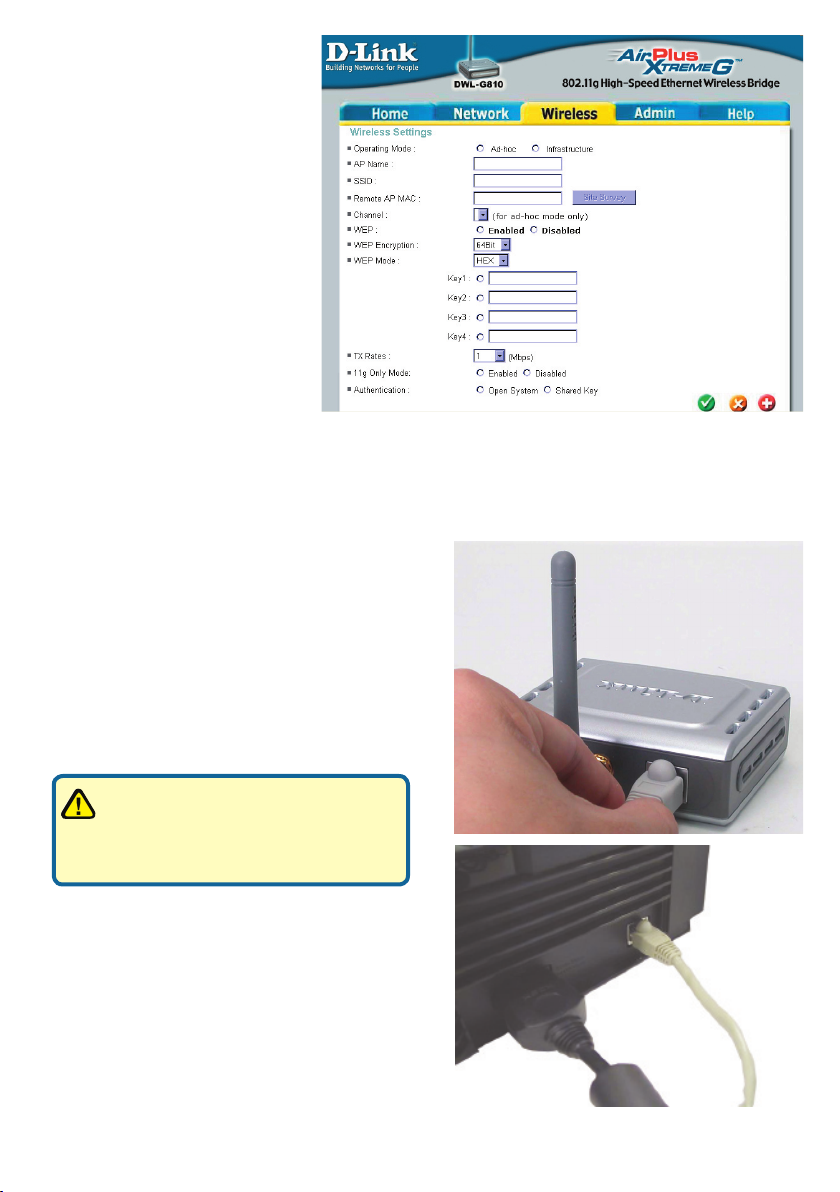
Xbox Setup
Step 1 - Please refer to Step 4
for configuring and modifying
the wireless settings of the
DWL-G810
Step 2 - Connect an Ethernet cable
from the DWL-G810 to the Ethernet
port on the back of your Xbox.
In order to connect to the XBox
Live service, you will need to
have the proper XBox Live equipment
and account.
8
Page 9
Appendix
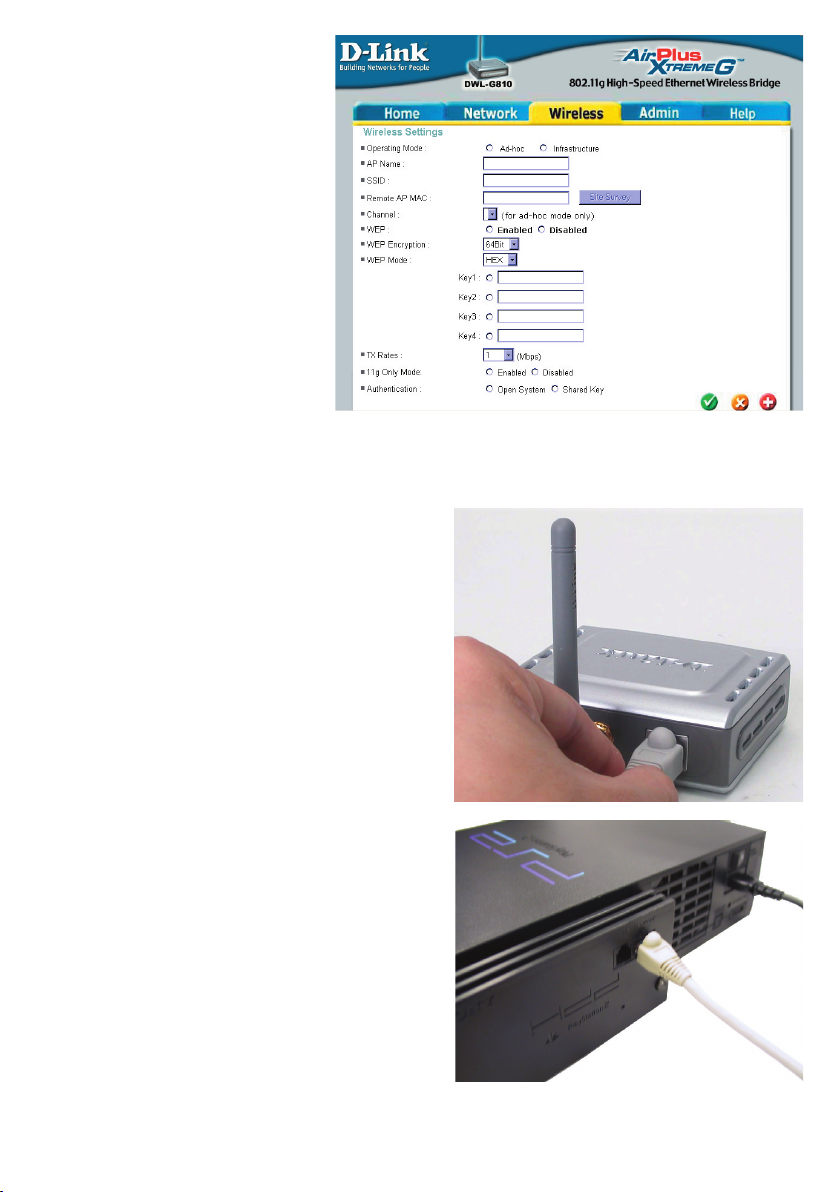
PlayStation 2 Setup
Step 1 - Please refer to Step 4
for configuring and modifying
the wireless settings of the
DWL-G810
Step 2 - Connect an Ethernet cable
from the DWL-G810 to the Ethernet port
on the back of your PlayStation 2.
9
Page 10
Appendix
Assigning a Static IP Address in Windows
To assign a Static IP Address to the laptop or computer that you are using to configure
the DWL-G810, please do the following:
Note: The following screens are taken using
Windows XP. Your screens may look similar.
Go to Start > Double- click on Control
Panel > Double-click on Network
Connections > Right-click on Local
Area Connections > Click Properties
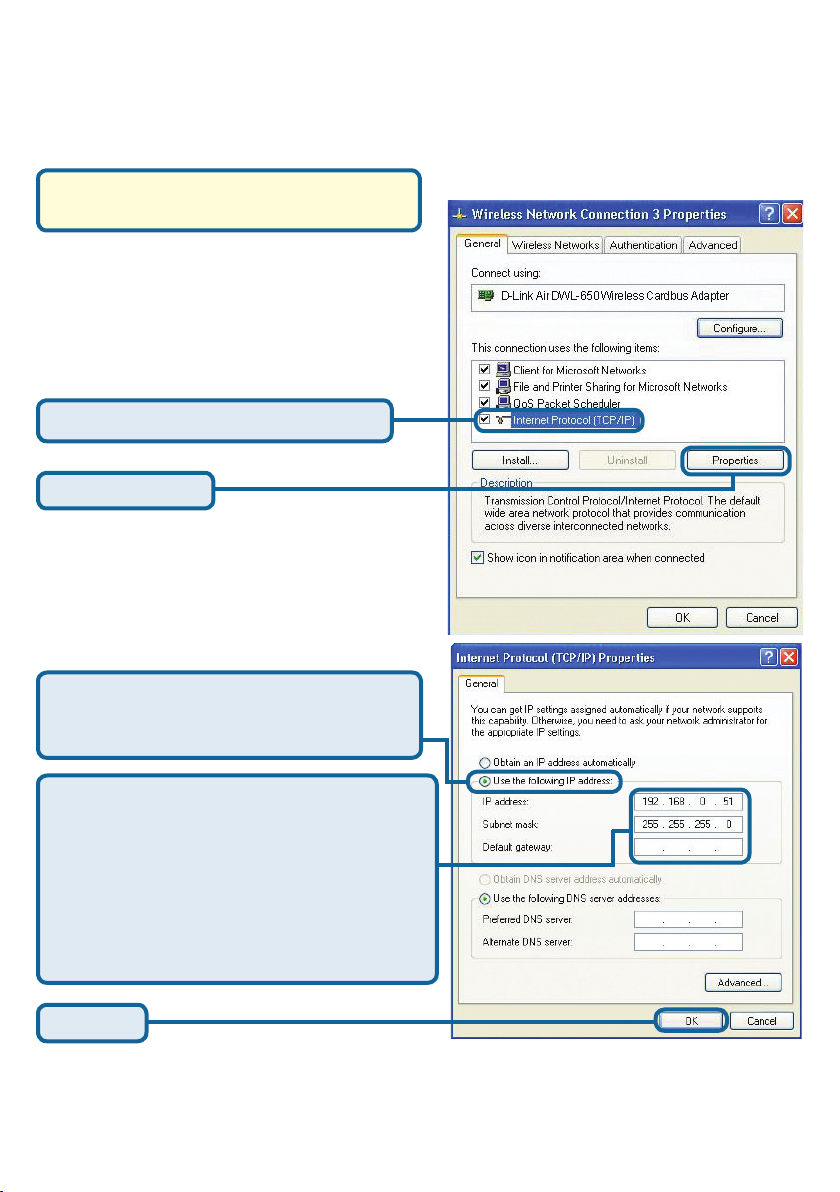
Highlight Internet Protocol (TCP/IP)
Click Properties
Select Use the following IP address in
the Internet Protocol (TCP/IP) Properties
window
Input your IP address and subnet mask.
(The IP Address must be within the same
range as the DWL-G810. The IP Address
of the DWL-G810 is 192.168.0.30. You
can assign 192.168.0.51 for your computer.
No two computers can have the same
IP Address. Assign a subnet mask of
255.255.255.0.)
Click OK
10
Page 11
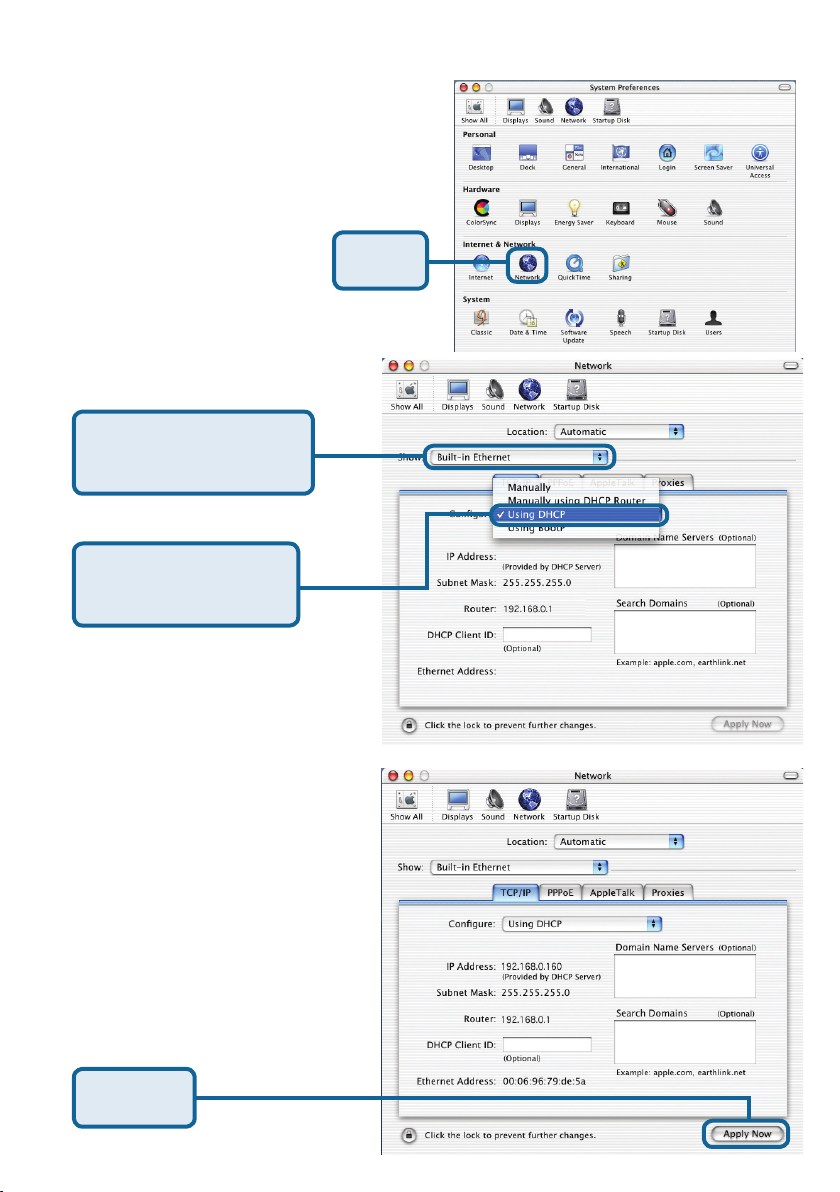
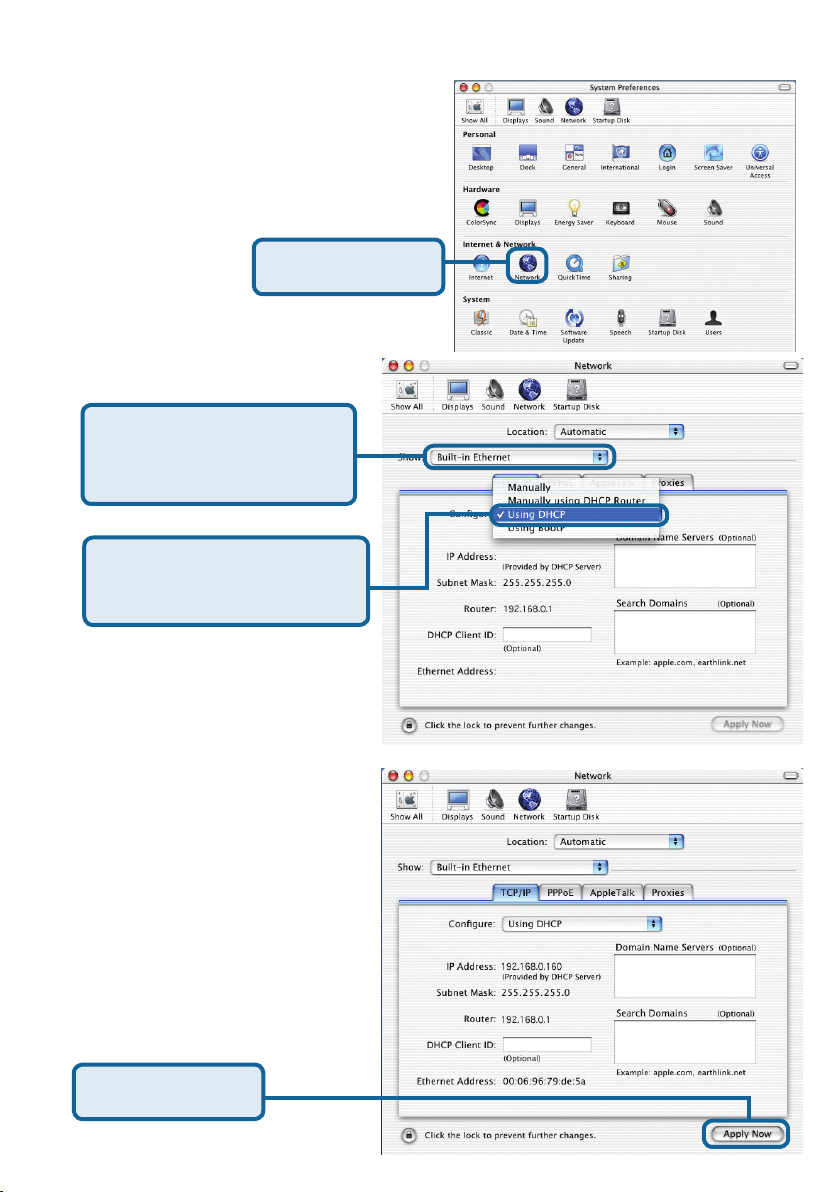
For Apple Macintosh OS X:
Go to the Apple Menu Click
on Network and Select
System Preferences
Select Built in Ethernet
in the Show pull-down
menu
Select Using DHCP in
the Configuration pulldown menu
Click on
Network
The IP address information,
the Subnet Mask, the Router’s
IP address and the Ethernet
adapter address will appear
Click on
Apply Now
11
Page 12
Technical Support
You can find software updates and user documentation on the D-Link website.
D-Link provides free technical support for customers within the United States and
within Canada for the duration of the warranty period on this product.
U.S. and Canadian customers can contact D-Link technical support through our
website, or by phone.
Tech Support for customers within the United States:
D-Link Technical Support over the Telephone:
(877) 453-5465
24 hours a day, seven days a week
D-Link Technical Support over the Internet:
http://support.dlink.com
email:support@dlink.com
Tech Support for customers within Canada:
D-Link Technical Support over the Telephone:
(800) 361-5265
Monday to Friday 8:30am to 9:00pm EST
D-Link Technical Support over the Internet:
http://support.dlink.ca
email:support@dlink.ca
Tech Support for customers within
the United Kingdom & Ireland:
D-Link UK & Ireland Technical Support over the Telephone:
+44 (0)20 7365 8440 (United Kingdom)
+353 (0)12 421 061 (Ireland)
Monday to Friday 8:00 am to 10:00 pm
D-Link Technical Support over the Internet:
http://www.dlink.co.uk
12
Page 13
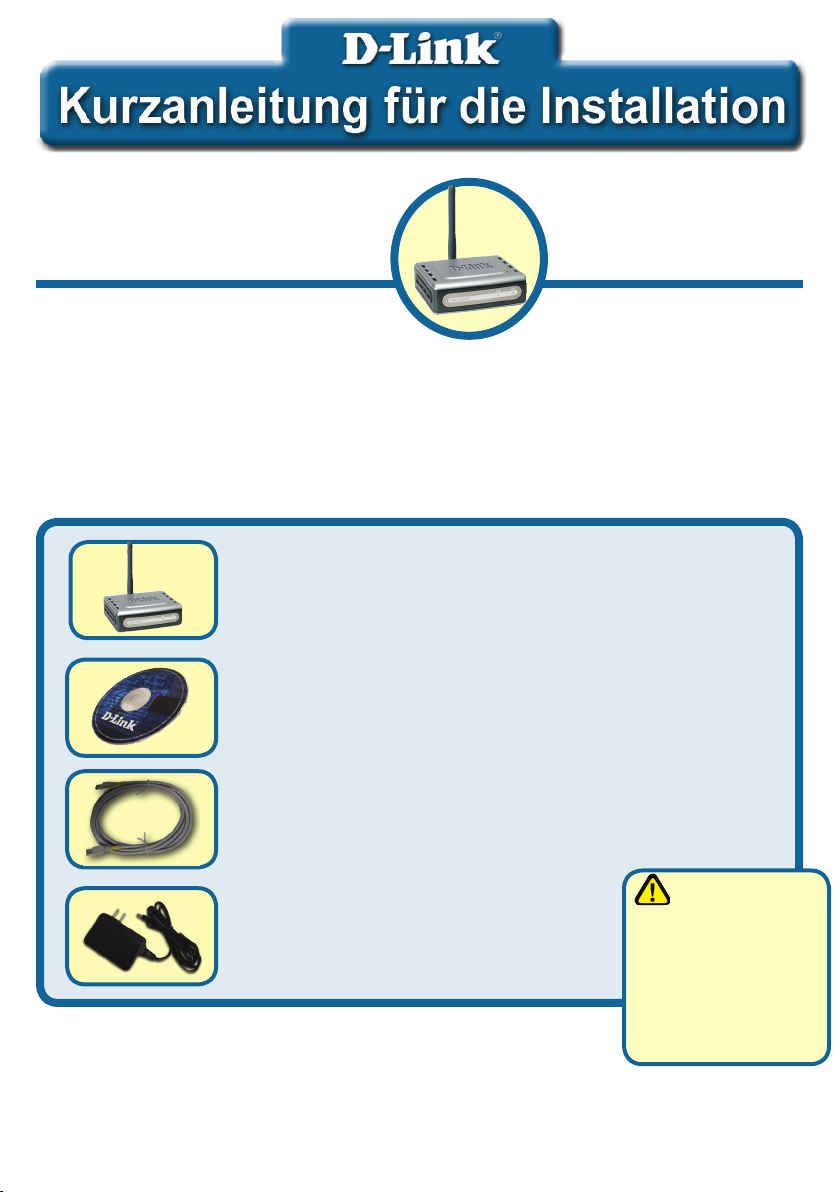
Dieses Produkt kann mit jedem
aktuellen Webbrowser eingerichtet
werden (Internet Explorer 6 oder
Netscape Navigator ab Version 7).
DWL-G810
D-Link AirPlus XtremeG
Ethernet-Wireless-Bridge
Vor dem Start
Als Mindestausstattung ist erforderlich:
Ein Ethernet-kompatibles Gerät, das an die DWL-G810 angeschlossen werden kann,
z. B. Spielkonsole, Notebook, Desktop-Computer, Netzwerkdrucker oder Set-Top-Box.
Lieferumfang überprüfen
DWL-G810 Ethernet-Wireless-Bridge
CD-ROM mit Handbuch und Garantiekarte
Ethernet-Kabel (CAT5 UTP-kompatibel)
Die Verwendung
Netzteil 5 V, 2.5 A (Gleichstrom)
Sollte eines dieser Teile fehlen oder beschädigt sein, wenden Sie
sich an Ihren Fachhändler.
©2004 D-Link Systems, Inc. All rights reserved. Trademarks or registered trademarks are the property of their respective holders. Software and
specifications subject to change without notice.
13
eines Netzteils
mit abweichender
Spannung führt zur
Beschädigung des
Geräts und zum
Erlöschen der Garantie.
Page 14

Die DWL-G810 an das Ethernet-Gerät
anschließen
A. Verbinden Sie das Netzteil zunächst mit der Buchse auf der Rückseite der DWL-
G810 und dann mit einer Steckdose. Die LED-Betriebsanzeige leuchtet und zeigt
damit den ordnungsgemäßen Betrieb des Geräts an.
B. Verwenden Sie das beiliegende Ethernetkabel, um den Ethernet-Anschluss auf
der Rückseite der DWL-G810 mit dem Ethernet-Anschluss des anderen Geräts
zu verbinden (z. B. Set-Top-Box, Spielkonsole, Laptop oder Desktop-Computer,
Netzwerkdrucker). Die LED blinkt, wenn Daten über die drahtlose Verbindung
übertragen werden. (Hinweis: Der Ethernet-Anschluss der DWL-G810 wird über
Auto-MDI/MDIX identifiziert. Sie können also ein ungekreuztes oder ein gekreuztes
Netzwerkkabel für die Ethernet-Verbindung verwenden.)
C. Die drahtlose Verbindung der DWL-G810 mit anderen 802.11b/g-kompatiblen
Geräten erfolgt mit Hilfe der Antenne.
C. Antenne
Für drahtlose Verbindungen
mit Funknetzwerken nach
802.11b/g.
A. Buchse für
Netzteil
B. LAN-Anschluss
Dies ist der Anschluss für
das Ethernet-Kabel zu dem
vernetzten Gerät.
14
Page 15

Mit der DWL-G810 eine Verbindung im
Infrastructure-Modus herstellen
Setup #1
Verbinden Sie die DWL-G810 per Ethernetkabel mit dem netzwerkfähigen
Desktop-PC, Laptop-PC, der Set-Top-Box oder Spielkonsole.
15
Page 16
Mit der DWL-G810 eine Verbindung im
Ad-hoc-Modus herstellen
Setup #2
or or
Webbasierte Konfiguration
Vor der Konfiguration
• Es empfiehlt sich, zum Konfigurieren der DWL-G810 einen Computer mit
einem Ethernet-Adapter zu verwenden, der an einen Switch angeschlossen
ist. (Hinweis: Sie können die DWL-G810 auch direkt mit dem Computer
verbinden, der für die Konfiguration eingesetzt wird.) Die Standard-IP-Adresse
der DWL-G810 ist 192.168.0.30, und die Subnetz-Maske ist 255.255.255.0. Zur
Konfiguration der DWL-G810 muss die statische IP-Adresse des Computers
im selben Bereich wie die IP-Adresse der DWL-G810 liegen. Hinweise zum
Zuweisen einer statischen IP-Adresse für Ihren Netzwerkadapter finden Sie
im Handbuch auf der CD-ROM.
Starten Sie den Webbrowser,
und geben Sie in das Adressfeld “http://192.168.0.30” ein.
Drücken Sie anschließend die
Eingabetaste.
16
Page 17
Fortsetzung
Das Anmeldedialogfeld
wird angezeigt.
Geben Sie im Feld “Username” den Benutzernamen “admin” ein, und
lassen Sie das Feld
“Password” frei.
Klicken Sie
auf OK.
Nach der Anmeldung
wird der Bildschirm
“Home” angezeigt.
Klicken Sie auf Run Wizard
(Assistent starten).
Danach werden folgende
Bildschirme aufgerufen:
Klicken Sie auf
Next (Weiter).
17
Page 18
Fortsetzung
Schritt 1: Legen Sie Ihr
neues Kennwort fest. Sie
haben die Möglichkeit, ein
Kennwort einzurichten.
Klicken Sie auf
Next (Weiter).
Schritt 2: Einrichtung für drahtlosen
Betrieb
Die Standardeinstellungen für den
drahtlosen Betrieb sind:
SSID = default
Channel = 6
Operating Mode = Infrastructure
Wählen Sie für Setup #2
als „Operating Mode” den
„Ad-hoc”-Modus.
Klicken Sie auf
Next (Weiter).
Schritt 3: Verschlüsselung
Das Modell DWL-G810 unterstützt
die drahtlose Verschlüsselung in
64- und 128-Bit-Stärke.
Klicken Sie auf
Next (Weiter).
18
Page 19
Klicken Sie auf Restart
(Neu starten).
Die Konfiguration des drahtlosen Client-Adapters
DWL-G810 ist hiermit abgeschlossen!
19
Page 20
Anhang
Xbox einrichten
Schritt 1 - Die Konfiguration
und Änderung der
Einstellungen des DWL-G810
für eine drahtlose Verbindung
wird in Schritt 4 beschrieben.
Schritt 2 - Verbinden Sie das DWL-G810
über ein Ethernetkabel mit Ihrer Xbox.
Sie benötigen die entsprechende
Xbox-Live-Ausstattung und ein
Benutzerkonto, um auf den XboxLive-Service zugreifen zu können.
20
Page 21

Anhang
PlayStation 2 einrichten
Schritt 1 - Die Konfiguration und
Änderung der Einstellungen des
DWL-G810 für eine drahtlose
Verbindung wird in Schritt 4
beschrieben.
Schritt 2 - Verbinden Sie das DWL-G810
über ein Ethernetkabel mit Ihrer Xbox.
21
Page 22

Anhang
Statische IP-Adresse unter Windows zuweisen
Gehen Sie folgendermaßen vor, um dem Computer, der zur Konfiguration der DWLG810 verwendet werden soll, eine statische IP-Adresse zuzuweisen.
Hinweis: Die folgenden Abbildungen wurden
unter Windows XP erstellt. Je nach Ihrer
Windows-Version können die Dialogfenster
leicht variieren.
Klicken Sie auf “Start” > “Systemsteuerung”
> “Netzwerkverbindungen”. Klicken Sie
nun mit der rechten Maustaste auf “LANVerbindungen”, und klicken Sie auf
“Eigenschaften”.
Markieren Sie den Eintrag
Internetprotokoll (TCP/IP).
Klicken Sie auf
Eigenschaften.
Wählen Sie Folgende IP-Adresse
verwenden
Geben Sie die IP-Adresse und die
Subnetzmaske in die dafür vorgesehenen
Felder ein. (Die IP-Adresse muss im selben
Bereich liegen wie die der DWL-G810. Die
IP-Adresse der DWL-G810 ist 192.168.0.30.
Für den Computer kann z. B. 192.168.0.51
als IP-Adresse verwendet werden. Zwei
Computer dürfen nicht die gleiche IP-Adresse
haben. Stellen Sie als Subnetzmaske den
Wert 255.255.255.0 ein.)
Klicken Sie auf OK
22
Page 23
Unter Apple Macintosh OS X:
Öffnen Sie das Apple Menü, und
wählen Sie System-Eigenschaften.
Klicken Sie auf
Netzwerk
Wählen Sie im Menü Show
(Anzeige) den Befehl
Built-in Ethernet aus.
Wählen Sie im Menü
Configure (Konfigurieren)
den Befehl Using DHCP aus.
Daraufhin werden die SubnetzMaske, die IP-Adresse des
Routers und die Adresse des
Ethernet-Adapters angezeigt.
Klicken Sie auf
Anwenden
23
Page 24
Technische Unterstützung
Aktualisierte Versionen von Software und Benutzerhandbuch finden Sie
auf der Website von D-Link.
D-Link bietet kostenfreie technische Unterstützung für Kunden innerhalb
Deutschlands, Österreichs, der Schweiz und Osteuropas.
Unsere Kunden können technische Unterstützung über unsere Website,
per E-Mail oder telefonisch anfordern.
Web: http://www.dlink.de
E-Mail: support@dlink.de
Telefon: 01805 2787
0,12€/Min aus dem Festnetz der Deutschen Telekom.
Telefonische technische Unterstützung erhalten Sie Montags bis Freitags
von 08.00 bis 19.00 Uhr.
Wenn Sie Kunde von D-Link außerhalb Deutschlands, Österreichs, der
Schweiz und Osteuropas sind, wenden Sie sich bitte an die zuständige
Niederlassung aus der Liste im Benutzerhandbuch.
24
Page 25
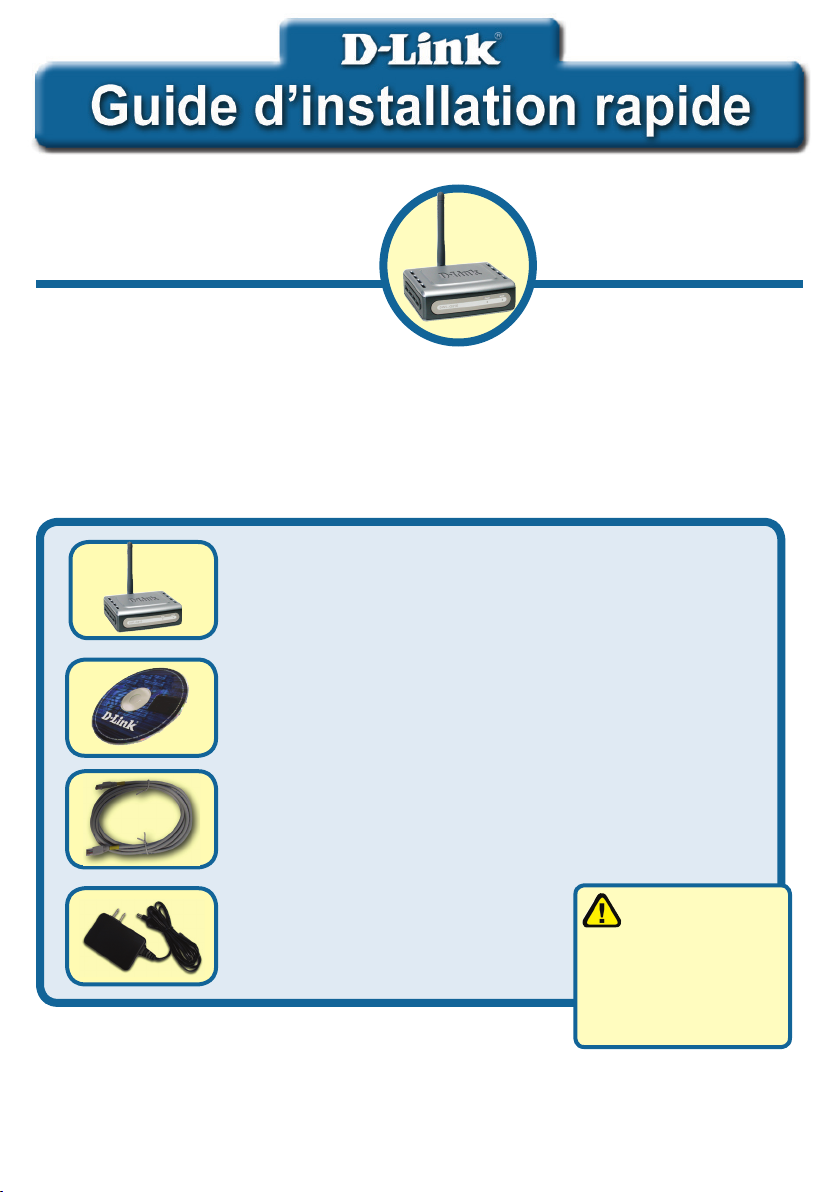
Ce produit peut être configuré à l’aide
de n’importe quel navigateur internet
actuel, comme Internet Explorer 6 ou
Netscape Navigator 7.
DWL-G810
D-Link AirPlus XtremeG
Pont Ethernet réseau sans fil
Avant de commencer
Vous devez avoir au minimum :
Un périphérique compatible Ethernet, comme une console de jeux, un ordinateur portable ou
de bureau, une imprimante réseau ou un décodeur reliés au DWL- G810.
Vérifiez le contenu de l’emballage
Pont Ethernet réseau sans fil DWL-G810
CD-ROM (manuel et garantie)
Un câble Ethernet (de catégorie 5 UTP)
Adaptateur secteur 5V DC, 2.5A
Si l’un des éléments ci dessus manque, contactez
votre revendeur.
©2004D-Link Systems, Inc. Tous droits réservés. Les marques sont la propriété de leurs propriétaires respectifs. Le logiciel et les spécifications
sont susceptibles d’être modifiés sans préavis.
25
L’alimentation sous
une tension différente
de la tension nominale
endommagera ce produit
et annulera la garantie.
Page 26
Raccordement du DWL-G810 à votre
périphérique compatible Ethernet
A. Connectez le câble de l’adaptateur secteur à la prise située à l’arrière du
DWL-G810 et branchez l’adaptateur secteur sur une prise murale ou sur
un bloc multiprise. Le voyant d’alimentation doit s’allumer.
B. Connectez le câble Ethernet (fourni) entre le port Ethernet situé à
l’arrière du DWL-G810 et le port Ethernet du périphérique (c’est à dire du
décodeur, de la console de jeux, de l’ordinateur portable ou de bureau ou
de l’imprimante réseau). Le voyant Link clignote lorsque des données sont
transmises via la liaison sans fil. (Nota : le port LAN du DWL-G810 est
Auto MDI/MIDIX, ce qui veut dire que vous pouvez utiliser indifféremment
un câble croisé ou non croisé sur ce port).
C. L’antenne sert au DWL-G810 à communiquer avec d’autres périphériques
sans fil 802.11b/g.
C. Antenne
Pour établir une
connexion sans fil à des
réseaux 802.11b/g.
B. Port LAN
A. Prise d’adaptateur
secteur
Pour le raccordement par
câble Ethernet à votre
périphérique compatible
Ethernet.
26
Page 27

Montage du DWL-G810 en mode
infrastructure
Montage 1
Branchez un câble Ethernet entre le DWL-G810 et votre compatible Ethernet : PC de
bureau, PC portable, décodeur ou console de jeux.
27
Page 28
Montage du DWL-G810 en mode ad hoc
Montage 2
or or
Configuration via l’internet
Avant de commencer à configurer le DWL-G810
• Pour configurer le DWL-G810, il vaut mieux utiliser un commutateur our la
configuration du DWL-G810. (Nota : vous pouvez également relier directement
le DWL-G810 à l’ordinateur qui servira à le configurer). L’adresse IP par défaut
du DWL-G810 est 192.168.0.30 ; le masque de sous réseau est 255.255.255.0. Il
vous faudra attribuer une adresse IP statique appartenant à la même tranche que
l’adresse IP du DWL-G810. Consultez le manuel qui se trouve sur le CD ROM
si vous avez besoin d’aide pour attribuer une adresse IP statique à votre
carte réseau.
Ouvrez votre navigateur
internet et tapez
“http://192.168.0.30” dans la
zone d’adresse URL. Appuyez
sur Entrée ou Retour.
28
Page 29

Suite…
L’écran de connexion apparaît.
Tapez “admin” comme
nom d’utilisateur et
laissez le champ mot de
passe vide.
Cliquez ur OK
Une fois la connexion
établie, l’écran d’accueil
(Home) apparaît.
Cliquez sur Lancer
l’assistant
Les écrans suivants se
succèdent.
Cliquez sur Suivant
29
Page 30

Suite…
Étape 1 - Choisissez votre
nouveau mot de passe. Vous
avez la possibilité de définir un
mot de passe.
Cliquez sur Suivant
Étape 2 – Paramétrage de la
connexion sans fil
Les paramètres de connexion sans fil
par défaut sont :
SSID = default
Channel = 6
Mode de fonctionnement =
Infrastructure
Dans le cas du montage 2,
sélectionnez le mode de
fonctionnement ad hoc.
Cliquez sur Next
(SUIVANT)
Étape 3 - Cryptage
Le DWL-G810 autorise deux
niveaux de cryptage radio-64 bits et
128 bits.
Cliquez sur Suivant
30
Page 31

Cliquez sur Restart
(Redémarrer)
La configuration de votre DWL-G810 est
terminée !
31
Page 32

Annexe
Configuration pour la
Xbox
Étape 1 – Reportez vous à
l’étape 4 pour configurer et
modifier les paramètres de
communication sans fil du
DWL-G810
Étape 2 – Branchez un câble
Ethernet entre le DWL-G810 et le
port Ethernet situé à l’arrière de
votre Xbox.
Pour vous connecter au service
XBox Live, il vous faut le matériel et
le compte XBox appropriés.
32
Page 33

Annexe
Configuration pour la
PlayStation 2
Étape 1 - Reportez vous à
l’étape 4 pour configurer et
modifier les paramètres de
communication sans fil du
DWL-G810
Étape 2 - Branchez un câble Ethernet
entre le DWL-G810 et le port Ethernet
situé à l’arrière de votre PlayStation 2.
33
Page 34

Annexe
Pour attribuer une adresse IP statique au portable ou à l’ordinateur que vous utilisez
pour configurer le DWL-G810, procédez de la manière suivante :
Nota : les écrans suivants sont ceux qui
apparaissent sous Windows XP. Vos
écrans peuvent être légèrement différents.
Sélectionnez Démarrer > Double cliquez
sur Paramètres > Double cliquez sur
Connexions réseau > Clic droit sur
Connexions de réseau local > Cliquez sur
Propriétés
Choisissez Protocole Internet
(TCP/IP)
Cliquez sur
Properties
Sélectionnez Spécifier une adresse IP
dans la fenêtre Propriétés du Protocole
Internet (TCP/IP)
Tapez votre adresse IP et votre masque de
sous réseau. (L’adresse IP doit appartenir à
la même tranche que celle du DWL-G810.
L’adresse IP du DWL-G810 est 192.168.0.30.
Vous pouvez attribuer 192.168.0.51 à votre
portable. Chaque ordinateur doit avoir une
adresse IP unique. Spécifier le masque de
sous réseau 255.255.255.0.)
Cliquez sur OK
34
Page 35

Pour Apple Macintosh OS X :
Sélectionnez l’option
Préférences système du
menu Apple.
Sélectionnez l’option
Ethernet intégré du
menu déroulant Montrer
Sélectionnez
Utilisation de DHCP
du menu déroulant
Configurer
Cliquez sur
Réseau
L’adresse IP, le masque
de sous-réseau, l’adresse
IP du routeur et l’adresse
de l’adaptateur Ethernet
apparaissent.
Cliquez sur
Appliquer
maintenant
35
Page 36

Assistance technique
Vous trouverez la documentation et les logiciels les
plus récents sur le site web D-Link.
Le service technique de D-Link est gratuit pour les
clients aux Etats-Unis durant la période de garantie.
Ceux-ci peuvent contacter le service technique de
D-Link par notre site internet ou par téléphone.
Assistance technique D-Link par téléphone :
0 820 0803 03
Assistance technique D-Link sur internet :
Web :http://www.dlink.fr
E-mail :support@dlink.fr
36
Page 37

Este producto puede instalarse
usando cualquier navegador; p.
ej.: Internet Explorer 6, Netscape
Navigator 7.
DWL-G810
D-Link AirPlus XtremeG
Bridge Ethernet-a-Wireless
Antes de empezar
Debe disponerse al menos de lo siguiente:
Un dispositivo Ethernet, como una consola de videojuegos, un portátil, un ordenador
de sobremesa, una impresora de red o un set-top box, que se conectará al DWL-G810
Comprobación del contenido del paquete
DWL-G810 Bridge Ethernet-a-Wireless
CD-ROM (manual y garantía)
Cable Ethernet (CAT5 UTP)
El uso de una
fuente de alimentación
Adaptador de alimentación
5V DC 2.5A
Si no tuviera alguno de los componentes mencionados, contacte
con el punto de venta.
©2004 D-Link Systems, Inc. Todos los derechos reservados. Todas las marcas o marcas registradas pertenecen a sus
propietarios respectivos. El software y el contenido están sujetos a cambios sin previo aviso.
37
con distinto voltaje
puede ser perjudicial
y anular la garantía de
este producto.
Page 38

Conectar el DWL-G810 al dispositivo
Ethernet
A. Primero, conectar el adaptador de alimentación al receptor, situado en
el panel trasero del DWL-G810, y después conectar el otro extremo del
adaptador de alimentación a una base de pared o regleta de alimentación.
El LED de Power se pondrá en ON para indicar que la operación ha sido
correcta.
B. Introducir uno de los extremos del cable Ethernet (incluido) en el puerto
Ethernet del panel trasero del DWL-G810, y conectar el otro extremo en
el puerto Ethernet del dispositivo (p.ej. un set-top box, una consola de
videojuegos, un portátil, un ordenador de sobremesa o una impresora de
red). Se encenderá la luz del LED cuando se estén transfiriendo datos a
través de la conexión inalámbrica. (Nota: El puerto Ethernet en el DWLG810 es Auto-MDI/MDIX, por lo que se puede usar un cable straight-
through o crossover para el puerto Ethernet)
C. El DWL-G810 usa la antena para conectarse con otro dispositivo
inalámbrico 802.11b/g.
C. Antena
Se usa para conexiones
inalámbricas a redes
802.11b/g.
A. Receptor para
el adaptador de
alimentación
B. Puerto LAN
Ésta es la conexión para
los cables Ethernet al
dispositivo Ethernet.
38
Page 39

Conectar el DWL-G810 en
modo infraestructura
Configuración #1
Conectar un cable Ethernet desde el DWL-G810 al dispositivo Ethernet:
PC de sobremesa, PC portátil, set-top box, o consola de videojuegos.
39
Page 40

Conectar el DWL-G810 en modo Ad-Hoc
Configuración #2
or or
Configuración basada en Web
Antes de empezar la configuración
• Para configurar el DWL-G810, es mejor usar un ordenador (con un adaptador
Ethernet) que esté conectado a un conmutador. (Nota: También se puede
conectar el DWL-G810 directamente al ordenador que se usará para realizar la
configuración). La dirección IP por defecto para el DWL-G810 es 192.168.0.30
con una máscara de subred de 255.255.255.0. Para configurar el DWL-G810,
es necesario asignar al ordenador una dirección IP estática dentro del mismo
rango que la dirección IP del DWL-G810. Si se necesita ayuda para asignar
la dirección IP estática al adaptador de red, puede consultarse el manual
incluido en el CD-ROM.
Abra su navegador de Web
y teclee “http://192.168.0.30”
en la barra de direcciones URL.
A continuación, pulse la tecla
Intro o Retorno.
40
Page 41

Continuación...
Aparecerá la pantalla de conexión.
Teclee “admin” en
el campo de usuario
y deje el campo de la
contraseña en blanco.
Haga clic en OK
Una vez se haya
conectado, aparecerá la
pantalla de Inicio.
Haga clic en
Run Wizard
Aparecerán las siguientes
pantallas
Haga clic en Next
41
Page 42

Continuación...
Paso 1 - Configurar la nueva
clave de acceso. Se dispone
de la opción de establecer una
clave de acceso.
Haga clic en Next
Paso 2 - Configuración inalámbrica
Por defecto los parámetros
inalámbricos son:
SSID = por defecto
Canal = 6
Modo de funcionamiento=
Infraestructura
Para configuración #2
seleccionar Ad-hoc como modo
de funcionamiento.
Haga clic en Next
Paso 3 - Encriptación
El DWL-G810 soporta dos niveles
de encriptación inalámbrica: 64-bit
y 128-bit.
Haga clic en Next
42
Page 43

Haga clic en Restart
La configuración del DWL-G810 ha finalizado.
43
Page 44

Apéndice
Configurar Xbox
Paso 1 - Para configurar
y modificar los parámetros
inalámbricos del DWL-G810,
véase el paso 4.
Paso 2 - Conectar un cable Ethernet
desde el DWL-G810 hasta el puerto
Ethernet, en la parte trasera del Xbox.
Para conectarse al servicio XBox
Live, se requieren los apropiados
equipo y cuenta XBox Live.
44
Page 45

Apéndice
Configurar PlayStation 2
Paso 1 - Para configurar
y modificar los parámetros
inalámbricos del DWL-G810,
véase el paso 4.
Paso 2 - Conectar un cable Ethernet
desde el DWL-G810 hasta el puerto
Ethernet, en la parte trasera de la
PlayStation 2.
45
Page 46

Apéndice
Para asignar una dirección IP estática al portátil o al ordenador que se use para
configurar el DWL-G810, debe hacerse lo siguiente:
Nota: Las pantallas siguientes pertenecen a
Windows XP. Si se usa otro sistema, serán
similares.
Ir a Start > Hacer doble click en Control
Panel > Hacer doble click en Network
Connections > Hacer click con el botón de
la derecha en Local Area Connections >
Hacer click en Properties.
Resaltar Internet Protocol (TCP/IP)
Haga click en
Properties
Seleccionar Use the following IP ad-
dress en la ventana Internet Protocol
(TCP/IP) Properties.
Introducir la dirección IP y al máscara de
subred. (La dirección IP debe estar en el
mismo rango que el DWL-G810. La dirección
IP del DWL-G810 es 192.168.0.30. Puede
asignarse 192.168.0.51 al ordenador. Dos
ordenadores no pueden tener la misma
dirección IP. Asignar una máscara de
subred de 255.255.255.0.)
Haga click en OK
46
Page 47

Para Apple Macintosh OS X:
Vaya al menú de Apple,
haga clic en Network
y seleccione System
Preferences
Seleccione Built-in
Ethernet en el menú
desplegable Show
Seleccione utilizar
Servidor DHCP en el
menú desplegable
de configuración
Haga clic en
Network
Aparecerá la información sobre
la dirección IP, la máscara
de subred, la dirección IP del
enrutador y la dirección del
adaptador Ethernet
Haga clic en
Apply Now
47
Page 48

Asistencia Técnica
Puede encontrar el software más reciente y
documentación para el usuario en el sitio web de
D-Link . D-Link ofrece asistencia técnica gratuita para
clientes dentro de España durante el periodo de garantía
del producto. Los clientes españoles pueden ponerse en
contacto con la asistencia técnica de D-Link a través de
nuestro sitio web o por teléfono.
Asistencia Técnica de D-Link por teléfono:
902 304545
de lunes a viernes desde las 9:00 hasta las14:00 y de las
15:00 hasta las 18:00
Asistencia Técnica de D-Link a través de Internet:
http://www.dlink.es
email: soporte@dlink.es
48
Page 49

Questo prodotto può essere configurato utilizzando i comuni browser
web, come ad esempio Internet
Explorer 6 o Netscape Navigator 7.
DWL-G810
D-Link AirPlus XtremeG
Ethernet-a-Wireless Bridge
Prima di cominciare
Requisiti minimi di sistema:
Un dispositivo Ethernet attivo, come ad esempio una console giochi, un laptop o un
computer desktop, una stampante di rete o un set-top box al quale sarà connesso il
DWL-G810
Contenuto del pacchetto
DWL-G810 Ethernet-a-Wireless Bridge
CD-ROM (con Manuale e Garanzia)
Cavo Ethernet (CAT5 UTP)
L’utilizzo di un
Alimentatore 5V DC 2.5A
Se uno dei componenti dovesse risultare mancante, contattare il
rivenditore.
©2004 D-Link Systems, Inc. Tutti i diritti sono riservati. I marchi o i marchi registrati sono dei rispettivi proprietari. Il software e le specifiche sono
soggetti a cambiamento senza preavviso.
49
trasformatore con
voltaggio differente
può danneggiare
il dispositivo e
compromette la
garanzia.
Page 50

Connessione del DWL-G810 al
dispositivo Ethernet attivo
A. Primo, connettere l’alimentatore al receptor sul pannello posteriore del
DWL-G810 e poi connettere l’altro capo dell’alimentatore alla presa di
corrente a muro. Il LED Power LED sarà ON per indicare che il dispositivo
è alimentato correttamente.
B. Inserire il cavo Ethernet (incluso) nella porta Ethernet del panello posteriore
del DWL-G810 e poi connettere l’altro capo nella porta Ethernet del
dispositivo (ad esempio un Set Top Box, Console Giochi , laptop o computer
desktop, o stampante di rete). Il LED acceso lampeggerà quando ci sarà
trasferimento dati sulla connessione wireless. (Nota: la porta Ethernet del
DWL-G810 è Auto-MDI/MDIX. Questo significa che è possibile usare un
cavo diritto o un cavo cross per la connessione alla porta Ethernet)
C. L’ antenna usata dal DWL-G810 serve per la connessione ad un altro apparato
wireless 802.11b/g.
C. Antenna
Usata per la connessione
wireless a reti 802.11b/g.
A. Receptor dell’
Alimentatore
B. Porta LAN
Utilizzata per la
connessione con cavi
Ethernet all’apparato
Ethernet attivo.
50
Page 51

Connessione del DWL-G810 in
modalità Infrastructure
Fase # 1
Connettere un cavo Ethernet dal DWL-G810 all’apparato Ethernet attivo
quale : PC Desktop, PC Laptop, Set-Top-Box, o Console giochi.
51
Page 52

Connessione del DWL-G810 in
modalità Ad-Hoc
Fase #2
or or
Configurazione basata su Web
Prima di cominciare la configurazione
• Per configurare il DWL-G810 è preferibile utilizzare un computer (con scheda di
rete Ethernet) collegato ad uno switch. (Nota: E’ anche possibile connettere il DWLG810 direttamente al computer che sarà usato per la configurazione). L’indirizzo
IP di default del DWL-G810 è 192.168.0.30 con Subnet Mask 255.255.255.0.
Al computer usato per configurare il DWL-G810 sarà necessario assegnare un
indirizzo IP Statico della stessa classe di indirizzi IP del DWL-G810 in questione.
Controllare sul Manuale contenuto nel CD-ROM se è necessario avere
assistenza nell’assegnazione di un indirizzo IP statico alla scheda di rete.
Aprire il browser web e
inserire “http://192.168.0.30”
nel campo URL address.
Premere Invio.
52
Page 53

Continua…
Il sistema visualizza la
finestra logon.
Inserire “admin” nel campo
username e lasciare vuoto il
campo password.
Cliccare su OK
Al termine della
procedura di login, il
sistema visualizza la
finestra Home.
Cliccare su
Run Wizard
Il sistema visualizza le
seguenti finestre
Cliccare su Next
53
Page 54

Continua…
Fase 1 – Assegna una nuova
password. Inserimento della
password
Cliccare su Next
Fase 2 – Configurazione Wireless
La configurazione wireless di default è:
SSID = default
Canale = 6
Modalità Operativa = Infrastructure
Per la Fase #2 selezionare Adhoc come modalità operativa
Cliccare su Next
Fase 3 - Cifratura
Il DWL-G810 è in grado di
gestire due livelli di cifratura
wireless : 64-bit e 128-bit.
Cliccare su Next
54
Page 55

Cliccare su
Restart
La configurazione del DWL-G810 è completata!
55
Page 56

Appendice
Configurazione Xbox
Fase 1 – Prego fare riferimento
alla fase 4 per configurare
e modificare le impostazioni
wireless del DWL-G810.
Fase 2 - Connettere un cavo
Ethernet dal DWL-G810 alla porta
Ethernet situata sulla parte posteriore
del proprio Xbox.
Per ottenere la connessione con
il servizio XBox Live, occorre avere
apparato e account appropriati per il
servizio Xbox.
56
Page 57

Appendice
Configurazione
PlayStation 2
Fase 1 – Prego fare riferimento
alla fase 4 per configurare
e modificare le impostazioni
wireless del DWL-G810.
Fase 2 - Connettere un cavo Ethernet
dal DWL-G810 alla porta Ethernet
situata sulla parte posteriore della
propria PlayStation 2.
57
Page 58

Appendice
Per assegnare un indirizzo IP Statico ad un laptop o computer usato per
configurare il DWL-G810, utilizzare la seguente procedura:
Nota : Le seguenti immagini si riferiscono a
Windows XP. Le vostre immagini potrebbero
essere simili
Selezionare Start > Doppio click su
Pannello di Controllo > Doppio click
su Connessioni di Rete > Click del
tasto destro su Connessioni alla Rete
Locale > cliccare su Proprietà
Selezionare Internet Protocol (TCP/IP)
Cliccare su
Properties
Selezionare Utilizza il seguente
indirizzo IP nella finestra Protocollo
Internet (TCP/IP)
Inserire l’indirizzo IP e la subnet
mask.(L’indirizzo IP deve essere della
stessa classe del DWL-G810. L’indirizzo
IP del DWL-G810 è 192.168.0.30. E’
possibile assegnare al computer l’indirizzo
192.168.0.51. Due computer non possono
avere lo stesso indirizzo IP. Assegnare
come subnet mask of 255.255.255.0.)
Cliccare su OK
58
Page 59

Apple Macintosh OS X:
Accedere all’Apple Menu
e cliccare su Network.
Selezionare System
Preferences
Selezionare Built-in
Ethernet dal menu a
cascata Show
Selezionare Using
DHCP dal menu a
cascata Configure
Cliccare su
Network
Il sistema visualizza le
informazioni su indirizzo
IP, Subnet Mask, indirizzo
IP del Router e indirizzo
dell’adattatore Ethernet
Cliccare su
Apply Now
59
Page 60

Supporto tecnico
Gli ultimi aggiornamenti e la documentazione sono
disponibili sul sito D-Link.
Supporto tecnico per i clienti residenti in Italia
D-Link Mediterraneo S.r.L.
Via N. Bonnet 6/B 20154 Milano
Supporto Tecnico dal lunedì al venerdì dalle ore
9.00 alle ore 19.00 con orario continuato
Telefono: 02-39607160
URL : http://www.dlink.it/supporto.html
email: tech@dlink.it
60
Page 61

Dit product kunt u configureren
met elke recente webbrowser,
bijvoorbeeld Internet Explorer 6
of Netscape Navigator 7.
DWL-G810
D-Link AirPlus XtremeG
Ethernet-to-Wireless Bridge
Voordat u begint
Dit zijn de minimale systeemvereisten:
Een apparaat met een Ethernet-poort, zoals een spelcomputer, laptop of
desktopcomputer, netwerkprinter of opzetkastje (set-top box), dat wordt verbonden
met de DWL-G810.
Controleer de inhoud van de verpakking
DWL-G810 Ethernet-to-Wireless Bridge
Cd (met de handleiding en een garantieformulier)
Ethernet-kabel (CAT 5 UTP)
5 V 2,5 A gelijkstroomadapter
Als een van deze items ontbreekt, neemt u contact op met de leverancier.
©2004 D-Link Systems, Inc. Alle rechten voorbehouden. Handelsmerken of gedeponeerde handelsmerken zijn het eigendom van hun respectieve
eigenaars. Software en specificaties kunnen zonder voorafgaande kennisgeving worden gewijzigd.
61
Als u een voeding
met een andere
nominale spanning
gebruikt, heeft dit
beschadiging van het
product tot gevolg en
vervalt de garantie.
Page 62

De DWL-G810 aansluiten op een
Ethernet-apparaat
A. Steek eerst het ene uiteinde van de kabel van de voedingsadapter in de aansluiting op de
achterzijde van de DWL-G810 en steek de stekker in een wandcontactdoos of stekkerdoos.
Het aan/uit-lampje (Power) gaat branden om aan te geven dat het apparaat werkt.
B. Steek het ene uiteinde van de bijgeleverde Ethernet-kabel in de Ethernet-poort op de
achterzijde van de DWL-G810 en het andere uiteinde in de Ethernet-poort van het
andere apparaat (zoals een opzetkastje, spelcomputer, laptop of desktopcomputer of
netwerkprinter). Het lampje gaat knipperen als er gegevens worden uitgewisseld via de
draadloze verbinding. (Opmerking: De Ethernet-poort op de DWL-G810 is van het type
Auto-MDI/MDIX. Dit betekent dat u een kabel van het type straight-through (recht) of
crossover (gekruist) kunt aansluiten op de Ethernet-poort.)
C. De antenne wordt door de DWL-G810 gebruikt om verbinding te maken met andere
802.11b/g draadloze apparaten.
C. Antenna
De antenne zorgt voor de
draadloze verbinding met
802.11b/g-netwerken.
A. Aansluiting
voor adapter.
B. LAN Port
Dit is de poort waarop u de
Ethernet-kabel van een ander
apparaat met een Ethernetpoort kunt aansluiten.
62
Page 63

De DWL-G810 aansluiten in
de modus Infrastructuur
Configuratie 1
Sluit een Ethernet-kabel aan tussen de DWL-G810 en een ander
apparaat met een Ethernet-poort, zoals: een desktopcomputer, een
laptop, een opzetkastje of een spelcomputer.
63
Page 64

De DWL-G810 aansluiten in de
modus Ad hoc
Configuratie 2
or or
Configuratie via webinterface
Voordat u de configuratie gaat uitvoeren
U kunt de DWL-G810 het beste configureren vanaf een computer (met een Ethernet-kaart) die
is aangesloten op een switch. (Opmerking: U kunt de DWL-G810 ook rechtstreeks aansluiten
op de computer die u gebruikt om het apparaat te configureren.) Het standaard-IP-adres voor
de DWL-G810 is 192.168.0.30, met het subnetmasker 255.255.255.0. U moet aan uw computer
een statisch IP-adres toewijzen uit hetzelfde bereik als het IP-adres van de DWL-G810 om de
DWL-G810 te kunnen configureren. Raadpleeg de handleiding op de cd als u hulp nodig
hebt bij het toewijzen van een statisch IP-adres voor de netwerkadapter.
Open uw web browser en
typ http://192.168.0.30 in het
URL-vak. Druk vervolgens op
Enter.
64
Page 65

Vervolg...
Er verschijnt een
aanmeldingsscherm.
Typ admin als
gebruikersnaam en laat
het wachtwoordveld leeg.
Klik op OK
Als u bent aangemeld,
verschijnt het scherm
Home.
Klik op Run Wizard
(Wizard uitvoeren).
De volgende schermen
worden weergegeven.
Klik op Next (Volgende).
65
Page 66

Vervolg...
Stap 1 - Stel het nieuwe
wachtwoord in. U hebt de
mogelijkheid een wachtwoord in
te stellen.
Klik op Next (Volgende).
Stap 2 – Draadloze verbinding
instellen
Dit zijn de standaardinstellingen voor
een draadloze verbinding:
SSID = default (standaardwaarde)
Channel (Kanaal) = 6
Operating Mode (Bedrijfsmodus) =
Infrastructure (Infrastructuur)
Selecteer voor Configuratie
2 Ad-hoc (Ad hoc) als de
bedrijfsmodus.
Klik op Next (Volgende).
Stap 3 - Encryptie
De DWL-G810 ondersteunt op twee
niveaus draadloze encryptie - 64-bits
en 128-bits.
Klik op Next (Volgende).
66
Page 67

Klik op Restart
(Opnieuw opstarten).
De configuratie van de DWL-G810 is voltooid!
67
Page 68

Bijlage
Xbox aansluiten
Stap 1 - Zie stap 4 voor het
configureren en wijzigen van
de draadloze instellingen van
de DWL-G810.
Stap 2 - Sluit een Ethernet-kabel
aan tussen de DWL-G810 en de
Ethernet-poort op de achterzijde van
de Xbox.
Als u gebruik wilt maken van
XBox Live, hebt u de juiste Xboxapparatuur en een geschikte account
nodig.
68
Page 69

Bijlage
PlayStation 2 aansluiten
Stap 1 - Zie stap 4 voor het
configureren en wijzigen van
de draadloze instellingen van
de DWL-G810.
Stap 2 - Sluit een Ethernet-kabel
aan tussen de DWL-G810 en de
Ethernet-poort op de achterzijde van de
PlayStation 2.
69
Page 70

Bijlage
Een statisch IP-adres toewijzen in Windows
Ga als volgt te werk om een statisch IP-adres toe te wijzen aan de computer die u
gebruikt voor het configureren van de DWL-G810:
Opmerking: De volgende scherm zijn van Windows
XP. Het is mogelijk dat vergelijkbare schermen van
andere Windows-versies iets afwijken.
Ga naar Start > klik op Control Panel
(Configuratiescherm)
Connections (Netwerkverbindingen) > klik met
de rechtermuisknop op Local Area Connections
(LAN-verbinding) > klik op Properties
(Eigenschappen).
Selecteer Internet Protocol (TCP/IP)
(Internet-protocol (TCP/IP)).
Klik op Properties (Eigenschappen).
> dubbelklik op Network
Selecteer Use the following IP address
(Het volgende IP-adres gebruiken) in
het venster Internet Protocol (TCP/IP)
Properties (Eigenschappen voor Internetprotocol (TCP/IP)).
Typ uw IP-adres en subnetmasker. (Het
IP-adres moet in hetzelfde bereik liggen als
het adres van de DWL-G810. Het IP-adres
van de DWL-G810 is 192.168.0.30. U kunt
het adres 192.168.0.51 gebruiken voor
uw computer. Alle computers moeten
een uniek IP-adres hebben. Wijs het
subnetmasker 255.255.255.0 toe.)
Klik op OK
70
Page 71

Apple Mac OS X:
Open het Apple-menu en
klik op System Preferenc-
es (Systeemvoorkeuren). Klik op Network
(Netwerk)
Klik op Network (Netwerk).
Selecteer Built in Ethernet
(Ingebouwd Ethernet) in het
menu et Show (Toon).
Selecteer Using DHCP (Via
DHCP) in het menu Configure
(Configureer).
De gegevens van het IP-adres,
het subnetmasker, het IP-adres
van de router en het adres van
de Ether net-adapte r worden
ingevuld.
Klik op Apply now (Pas nu toe).
71
Page 72

Technical Support
You can find software updates and user documentation on the D-Link website.
D-Link provides free technical support for customers within Benelux for the
duration of the warranty period on this product.
Benelux customers can contact D-Link technical support through our website, or
by phone.
Tech Support for customers within the Netherlands:
D-Link Technical Support over the Telephone:
+31(0)20 201 3856
Monday to Friday 8:00 am to 10:00 pm
D-Link Technical Support over the Internet:
www.dlink.nl
Tech Support for customers within Belgium:
D-Link Technical Support over the Telephone:
+32(0)2 717 3248
Monday to Friday 8:00 am to 10:00 pm
D-Link Technical Support over the Internet:
www.dlink.be
Tech Support for customers within
Luxemburg:
D-Link UK & Ireland Technical Support over the Telephone:
+352 342 080 82 13
Monday to Friday 8:00 am to 10:00 pm
D-Link Technical Support over the Internet:
www.dlink.be
www.dlink-benelux.com
72
Page 73

Urządzenie można skonfigurować
za pomocą każdej nowoczesnej
przeglądarki internetowej, np. Internet
Explorer 6 lub Netscape Navigator 7.
DWL-G810
D-Link AirPlus XtremeG — most
Ethernet-sieć bezprzewodowa
Przed rozpoczęciem
Do korzystania z urządzenia niezbędne są następujące elementy:
Urządzenie przystosowane do pracy w sieci Ethernet, takie jak konsola do gier,
laptop lub komputer biurkowy, drukarka sieciowa albo przystawka telewizyjna
(set-top box), która będzie podłączana do urządzenia DWL-G810.
Zawartość opakowania
Most Ethernet-sieć bezprzewodowa DWL-G810
Dysk CD (z podręcznikiem użytkownika)
Kabel ethernetowy (Kat. 5 UTP)
U ż yc ie z a si la cz a o
niewł aściw ym napięciu
Zasilacz 5 V, 2,5 A
Jeżeli którejkolwiek z tych pozycji brakuje, należy skontaktować się ze sprzedawcą.
©2004 D-Link Systems Inc. Wszelkie prawa zastrzeżone. Znaki towarowe lub zastrzeżone znaki towarowe są własnością odpowied-
nich podmiotów. Oprogramowanie i dane techniczne mogą ulec zmianie bez powiadomienia.
73
uszkodzenie urządzenia i utratę
gwarancji.
znamionowym spowoduje
Page 74

Podłączanie mostu DWL-G810 do
urządzenia pracującego w sieci Ethernet
A. Najpierw należy podłączyć jeden koniec zasilacza do złącza na tylnym panelu
urządzenia DWL-G810, a następnie drugi koniec zasilacza do gniazda zasilania
na ścianie lub listwie rozdzielczej zasilania. Włączy się wskaźnik LED zasilania,
co oznacza prawidłowe działanie.
B. Podłącz jeden koniec dołączonego kabla ethernetowego do złącza na tylnym
panelu urządzenia DWL-G810, a drugi koniec do portu Ethernet urządzenia
(np. przystawki telewizyjnej, konsoli do gier, laptopa, komputera biurkowego lub
drukarki sieciowej). Podczas przesyłania danych przez połączenie bezprzewodowe
wskaźnik LED miga. (Uwaga: Port Ethernet urządzenia DWL-G810 obsługuje
funkcję Auto-MDI/MDIX. Oznacza to, że można używać kabla bezpośredniego
lub krosowego.).
C. Antena umożliwia łączenie się bramy DWL-G810 z innymi urządzeniami
bezprzewodowymi w sieci 802.11 b/g.
C. Antena
Umożliwia bezprzewodową
łączność z sieciami
802.11b/g.
A. Gniazdo
zasilacza.
B. Port LAN
Łączy się go kablem
ethernetowym z urządzeniem
obsługującym sieć Ethernet.
74
Page 75

Podłączenie mostu DWL-G810 w
trybie Infrastructure
Konfiguracja nr 1
Połącz kablem ethernetowym most DWL-G810 z urządzeniem
obsługującym sieć Ethernet: komputerem biurkowym, laptopem,
przystawką telewizyjną lub konsolą do gier.
75
Page 76

Podłączenie mostu DWL-G810 w
trybie Ad-Hoc
Konfiguracja nr 2
or or
Konfiguracja przez Internet
Przed rozpoczęciem konfiguracji
Do skonfigurowania mostu DWL-G810 najlepiej użyć komputera z kartą Ethernet podłączonego
do przełącznika. (
komputera, który będzie użyty do konfiguracji). Domyślny adres IP mostu DWL-G810 to
192.168.0.30 z maską podsieci 255.255.255.0. W celu skonfigurowania mostu DWL-G810
należy przypisać komputerowi statyczny adres IP z tego samego zakresu, co adres IP
urządzenia DWL-G810. Więcej informacji o tym, jak przypisać statyczny adres IP do
karty sieciowej, można znaleźć w podręczniku na dysku CD.
Uruchom przeglądarkę
internetową i wpisz w polu
adres „http://192.168.0.30”.
Następnie naciśnij klawisz
Enter lub Return.
Uwaga: Można także podłączyć urządzenie DWL-G810 bezpośrednio do
76
Page 77

Ciąg dalszy
Wyświetli się ekran
logowania.
Wpisz nazwę użytkownika
admin, a pole hasła
pozostaw puste.
Kliknij OK
Po zalogowaniu wyświetli
się strona główna.
Kliknij Run Wizard
(Uruchom kreator).
Wyświetlą się okna
pokazane poniżej.
Kliknij Next (Dalej).
77
Page 78

Ciąg dalszy
Krok 1 — Konfigurowanie
nowego hasła. Opcjonalnie
możesz ustalić nowe hasło.
Kliknij Next (Dalej).
Krok 2 — Konfiguracja ustawień
bezprzewodowych
Ustawienia domyślne sieci
bezprzewodowej są następujące:
SSID = default (domyślny)
Channel (kanał) = 6
Tryb pracy = Infrastructure
W konfiguracji nr 2 wybierz
tryb pracy Ad-hoc.
Kliknij Next (Dalej).
Krok 3 — Szyfrowanie
Most DWL-G810 udostępnia dwa
poziomy szyfrowania danych
przesyłanych siecią – 64-bitowe i
128-bitowe.
Kliknij Next (Dalej).
78
Page 79

Kliknij Restart
Konfiguracja mostu DWL-G810 została zakończona!
79
Page 80

Dodatek
Konfigurowanie
konsoli Xbox
Krok 1 – Informacje o
konfigurowaniu i zmianach
ustawień bezprzewodowych
mostu DWL-G810 są podane
w Kroku 4.
Krok 2 - Połącz kablem
ethernetowym most DWL-G810 z
portem Ethernet z tyłu konsoli Xbox.
Aby połączyć się z usługą XBox
Live niezbędne jest posiadanie
odpowiedniego urządzenia Xbox Live
oraz konta.
80
Page 81

Dodatek
Konfigurowanie
konsoli PlayStation 2
Krok 1 – Informacje o
konfigurowaniu i zmianach
ustawień bezprzewodowych
mostu DWL-G810 są podane
w Kroku 4.
Krok 2 - Połącz kablem ethernetowym
most DWL-G810 z portem Ethernet z
tyłu konsoli PlayStation 2.
81
Page 82

Dodatek
Przypisanie statycznego adresu IP w systemie Windows
Aby przypisać statyczny adres IP do laptopa lub komputera biurkowego używanego do
skonfigurowania mostu DWL-G810, wykonaj następujące czynności:
Uwaga: Podane poniżej ekrany pochodzą
z systemu Windows XP. Ekrany w innych
systemach operacyjnych Windows są podobne.
Wybierz Start > kliknij podwójnie Panel
sterowania > kliknij podwójnie Połączenia
sieciowe > kliknij prawym przyciskiem
myszy Połączenie lokalne > kliknij
Właściwości.
Zaznacz Protokół internetowy (TCP/IP).
Kliknij Właściwości.
W oknie właściwości protokołu
internetowego (TCP/IP) zaznacz Użyj
następującego adresu IP.
Wpisz adres IP i maskę podsieci. (Adres IP
musi być z tego samego zakresu, co adres IP
urządzenia DWL-G810. Adres IP urządzenia
DWL-G810 to 192.168.0.30. Swojemu
komputerowi możesz przypisać adres IP
192.168.0.51. Żadne dwa komputery nie
mogą mieć identycznych adresów IP.
Przypisz maskę podsieci 255.255.255.0.).
Kliknij OK
82
Page 83

W systemie Apple Mac OS X:
Wybierz Apple Menu (Menu Apple)
i wybierz System Preferences
(Preferencje systemowe). Kliknij
Network (Sieć).
Kliknij Network (Sieć).
Z menu rozwij anego
wybierz Built-in Ethernet
(Wbudowany Ethernet).
Z menu rozwijanego Configure
(Konfiguruj) wybierz Using
DHCP (Użyj DHCP).
Wyświetlą się następujące
informacje: adres IP, maska
podsieci, adres IP rutera i
adres karty Ethernet.
Kliknij Apply Now
(Zastosuj teraz).
83
Page 84

Pomoc techniczna
Najnowsze wersje oprogramowania i dokumentacji użytkownika
można znaleźć w serwisie internetowym firmy D-Link.
D-Link zapewnia bezpłatną pomoc techniczną klientom w Polsce
w okresie gwarancyjnym produktu.
Klienci z Polski mogą się kontaktować z działem pomocy
technicznej firmy D-Link za pośrednictwem Internetu lub
telefonicznie.
Telefoniczna pomoc techniczna firmy D-Link:
+49 (1805)-2787
Pomoc techniczna firmy D-Link świadczona przez Internet:
URL: http://www.dlink.pl
e-mail: pomoc_techniczna@dlink.de
84
Page 85

Toto zařízení lze nakonfigurovat pomocí
libovolného aktuálního webového
prohlížeče, např. Internet Explorer 6
nebo Netscape Navigator 7
DWL-G810
D-Link AirPlus XtremeG Adaptér
Ethernet – bezdrátová síť
Než začnete
Musíte mít minimálně následující vybavení:
Zařízení vybavené ethernetovým portem, např. herní konzolu, přenosný nebo stolní
počítač, síťovou tiskárnu nebo set-top box (TV adaptér), který se připojí k DWL-G810
Zkontrolujte obsah dodávky
DWL-G810 Adaptér Ethernet – bezdrátová síť
CD-ROM (návod a záruční informace)
Ethernetový (CAT5 UTP) kabel
Napájecí adaptér 5 V ss,
2,5 A
Pokud některá z výše uvedených položek chybí, spojte se s prodejcem.
©2004 D-Link Systems, Inc. Všechna práva vyhrazena. Ochranné známky nebo registrované ochranné známky jsou majetkem
příslušných vlastníků. Software a parametry mohou být bez upozornění změněny.
85
Použití napájecího zdroje
s jiným napětím způsobí
poškození přístroje a
ztrátu záruky.
Page 86

Připojení DWL-G810 k zařízení s
ethernetovým portem
A. Nejprve připojte kabel napájecího adaptéru do konektoru na zadním panelu DWL-
G810 a pak připojte napájecí adaptér do zásuvky elektrické sítě. Správná činnost
je indikována rozsvícením indikátoru Power.
B. Zasuňte jeden konec ethernetového kabelu (přiložen) do ethernetového portu
na zadním panelu DWL-G810 a druhý konec připojte do ethernetového portu
zařízení (např. set-top box, herní konzola, přenosný nebo stolní počítač nebo
síťová tiskárna). Během přenosu dat přes bezdrátové spojení bude blikat indikátor
činnosti. (Poznámka: Ethernetový port na DWL-G810 je typu Auto-MDI/MDIX.
To znamená, že pro připojení k ethernetovému portu můžete použít přímý i
překřížený kabel.)
C. Anténa se používá pro připojení DWL-G810 k ostatním 802.11b/g bezdrátovým
zařízením.
C. Anténa
Používá se pro
bezdrátové připojení
k 802.11b/g sítím.
A. Konektor pro
napájecí adaptér
B. LAN Port
Pro připojení ethernetového
kabelu k zařízení s
ethernetovým portem.
86
Page 87

Připojení DWL-G810 v
infrastrukturním režimu
Struktura sítě č. 1
Připojte ethernetový kabel z DWL-G810 k ethernetovému portu stolního
PC, přenosného PC, set-top boxu nebo herní konzoly.
87
Page 88

Připojení DWL-G810 v režimu Ad-Hoc
Struktura sítě č. 2
or or
Konfigurace přes webové rozhraní
Před zahájením konfigurace
Pro konfiguraci DWL-G810 je nejlépe použít počítač (vybavený ethernetovým portem), který je
připojen k přepínači. (Poznámka: Máte také možnost připojit DWL-G810 přímo k počítači,
který bude použit pro konfiguraci.) Výchozí IP adresa pro DWL-G810 je
maskou podsítě 255.255.255.0. Pro účely konfigurace DWL-G810 budete muset přiřadit
počítači statickou IP adresu ze stejného intervalu, jaký používá DWL-G810.
pomoci s nastavením statické IP adresy síťového adaptéru počítače, podívejte se do
návodu na CD-ROM.
Spusťte webový prohlížeč
a do pole URL adresy zadejte
„http://192.168.0.30“. Pak
stiskněte klávesu Enter nebo
Return.
88
192.168.0.30 s
Potřebujete-li
Page 89

Pokračování...
Objeví se
přihlašovací okno.
Do pole User name (Jméno
uživatele) zadejte admin
a pole Password (Heslo)
nechejte prázdné.
Klikněte na OK
Po přihlášení se objeví
okno Home.
Klikněte na Run Wizard
Uvidíte následující okna.
Klikněte na Next
89
Page 90

Pokračování...
Krok 1 - Nastavte nové heslo.
Zde máte možnost zadat heslo.
Klikněte na Next
Step 2 - Nastavení bezdrátové
komunikace
Výchozí nastavení bezdrátové
komunikace je:
SSID = default
Channel = 6
Operating Mode = Infrastructure
Pro strukturu sítě č. 2 nastavte
režim provozu Ad-hoc.
Klikněte na Next
Krok 3 - Šifrování
DWL-G810 může používat dvě
úrovně šifrování bezdrátové
komunikace - 64bitové a 128bitové.
Klikněte na Next
90
Page 91

Klikněte na Restart
Dokončili jste konfiguraci DWL-G810!
91
Page 92

Dodatek
Instalace Xboxu
Krok 1 - Proveďte nastavení
konfigurace DWL-G810 pro
bezdrátovou komunikaci podle
kroku 4
Krok 2 - Připojte ethernetový kabel
z DWL-G810 k ethernetovému portu
vzadu na Xboxu.
Abyste se mohli připojit ke službě
XBox Live, budete potřebovat příslušné
vybavení pro XBox Live a účet.
92
Page 93

Dodatek
Instalace
PlayStation 2
Step 1 - Proveďte nastavení
konfigurace DWL-G810 pro
bezdrátovou komunikaci podle
kroku 4
Step 2 - Připojte ethernetový kabel
z DWL-G810 k ethernetovému portu
vzadu na PlayStation 2.
93
Page 94

Dodatek
Nastavení statické IP adresy ve Windows
Pro nastavení statické IP adresy na přenosném nebo stolním počítači, který používáte
pro nakonfigurování DWL-G810, postupujte takto:
Poznámka: Následující ukázky oken jsou z Windows
XP. Na vašem počítači by měla být podobná.
Jděte na Start > klikněte na Nastavení
> kliněte na Síťová připojení > klikněte
pravým tlačítkem na název síťového
připojení patřící příslušnému síťovému
připojení > vyberte Vlastnosti
Vyberte Protokol sítě Internet (TCP/IP)
Klikněte na Vlastnosti
V okně Protokol sítě Internet (TCP/IP)
- vlastnosti vyberte Použít následující
adresu IP
Zadejte IP adresu a masku podsítě.
(IP adresa musí být ze stejného intervalu
jako u DWL-G810. IP adresa DWL-G810
je 192.168.0.30. Počítači můžete přiřadit
adresu 192.168.0.51. Žádné dva počítače
v síti nesmí mít stejnou IP adresu.
Nastavte masku podsítě 255.255.255.0.)
Klikněte na OK
94
Page 95

Apple Mac OS X:
Jděte na Apple Menu a zvolte System
Preferences Klikněte na Network
Klikněte na Network
V rozvinovacím menu Show
zvolte Built-in Ethernet.
V rozvinovacím menu Configure
zvolte Using DHCP.
Objeví se údaje o IP adrese, maska
podsítě, IP adresa směrovače a
adresa síťového adaptéru.
Klikněte na Apply Now
95
Page 96

Technická podpora
Aktualizované verze software a uživatelských příruček
najdete na webové stránce firmy D-Link.
D-Link poskytuje svým zákazníkům bezplatnou
technickou podporu.
Zákazníci mohou kontaktovat oddělení technické
podpory přes webové stránky, mailem nebo telefonicky
Web: http://www.dlink.de
E-Mail: support@dlink.de
Telefon: +49 (1805)-2787
Telefonická podpora je v provozu:
PO-ČT od 08.00 do 19.00
PÁ od 08.00 do 17.00
96
Page 97

Ez a termék a bármely mai ismert web
böngészővel (pl. Internet Explorer 6
vagy Netscape Navigator 7) beállítható.
DWL-G810
D-Link AirPlus XtremeG
Ethernet-Wireless Híd
Kezdő lépések
Legalább az alábbiakkal kell rendelkeznie:
Egy Ethernet képes eszköz, például egy játékkonzol, hordozható vagy asztali
számítógép, hálózati nyomtató vagy set-top box, amely kapcsolódik a DWL-G810-hez.
Ellenőrizze a csomag tartalmát
DWL-G810 Ethernet-Wireless Híd
CD-ROM (Használati útmutató és garancia)
Ethernet (CAT5 UTP) kábel
Eltérő hálózati feszültségű
5V 2.5A Váltóáram-adapter
és érvényteleníti a garanciát.
Amennyiben a fenti elemek bármelyike hiányzik, kérjük, keresse fel értékesítőjét.
©2004 D-Link Systems,Inc. Minden jog fenntartva. A márkanevek és a védjegyek birtokosaik tulajdonát képezik. A szoftverek és a
termékjellemzők előzetes értesítés nélküli módosításának jogát a gyártó fenntartja.
97
ár amforrás használ ata
károsíthatja a készüléket
Page 98

A DWL-G810 csatlakoztatása az
Ethernet képes eszközhöz
A. Elsőként csatlakoztassa az áramadaptert a DWL-G810 hátsó paneljén
található bemenetre, majd az adapter másik végét dugja be a fali csatlakozóba
vagy elosztóba. A Power (Bekapcsolás) LED kigyulladása jelzi a megfelelő
működést.
B. A mellékelt Ethernet kábel egyik végét csatlakoztassa a DWL-G810 hátsó paneljén
található Ethernet portra, míg a másik végét az eszközön (pl. Set Top Box,
játékkonzol, hordozható vagy asztali számítógép vagy hálózati nyomtató) található
Ethernet portra. A vezeték nélküli kapcsolat adatforgalmát a LED villogása jelzi.
(Megjegyzés: A DWL-G810 Ethernet portja Auto-MDI/MDIX. Ennek köszönhetően
mind egyenes, mind keresztirányú Ethernet kábelt használhat az Ethernet porthoz
történő csatlakozásra.)
C. Az antenna segítségével a DWL-G810 kapcsolódhat más 802.11b/g vezeték
nélküli eszközökhöz.
C. Antenna
802.11b/g vezeték
nélküli hálózatokhoz
kapcsolódáshoz
A. Az Áram-adapter
bemenete
B. LAN Port
Az Ethernet képes
eszközöktől érkező Ethernet
kábelek csatlakoztatására
98
Page 99

A DWL-G810 csatlakoztatása
Infrastrukturális módban
Beállítás #1
Csatlakoztasson egy a DWL-G810-hez kapcsolódó Ethernet kábelt
Ethernet képes asztali vagy hordozható számítógépéhez, a Set-TopBox-hoz vagy játékkonzolhoz.
99
Page 100

A DWL-G810 csatlakoztatása Ad-Hoc
módban
Beállítás #2
or or
Web-alapú konfiguráció
A konfigurációt megelőző lépések
A DWL-G810 konfigurálásához a legalkalmasabb egy, Ethernet adapterrel rendelkező
számítógép használata switch-en keresztül. (Megjegyzés: A DWL-G810-et közvetlenül a
konfigurációhoz használt számítógéphez is csatlakoztathatja.) A DWL-G810 is alapbeállított
IP-címe: 192.168.0.30, alhálózati maszkja: 255.255.255.0. Számítógépe számára ki kell
osztania egy a DWL-G810 IP-címének tartományába eső statikus IP-címet a konfiguráláshoz.
Amennyiben segítségre van szüksége a hálózati adapter statikus IP-címének
kiosztásához, kérjük, olvassa el a CD-ROM-on található használati útmutatót.
Nyissa meg a web böngészőt,
és billentyűzze be a következő
URL címet: http://192.168.0.30.
Ezután nyomja meg az Enter
vagy a Return gombot.
100
 Loading...