

Page 1

D-Link AirPro DWL-AB650
5/2.4 GHz Wireless Multimode Cardbus Adapter
User’s Guide
Rev. 102402
Building Networks for People
Page 2

2
Contents
Package Contents....................................................3
Introduction..............................................................4
Wireless Basics........................................................7
Getting Started .......................................................11
Installation..............................................................19
Using the Select Country Utility..............................35
Using the Configuration Utility for Windows 2000, 98,
or ME......................................................................37
Using the Configuration Utility for Windows XP......43
Networking Basics..................................................53
Troubleshooting......................................................84
Technical Specifications .........................................89
Limited Warranty and Registration .........................92
Page 3
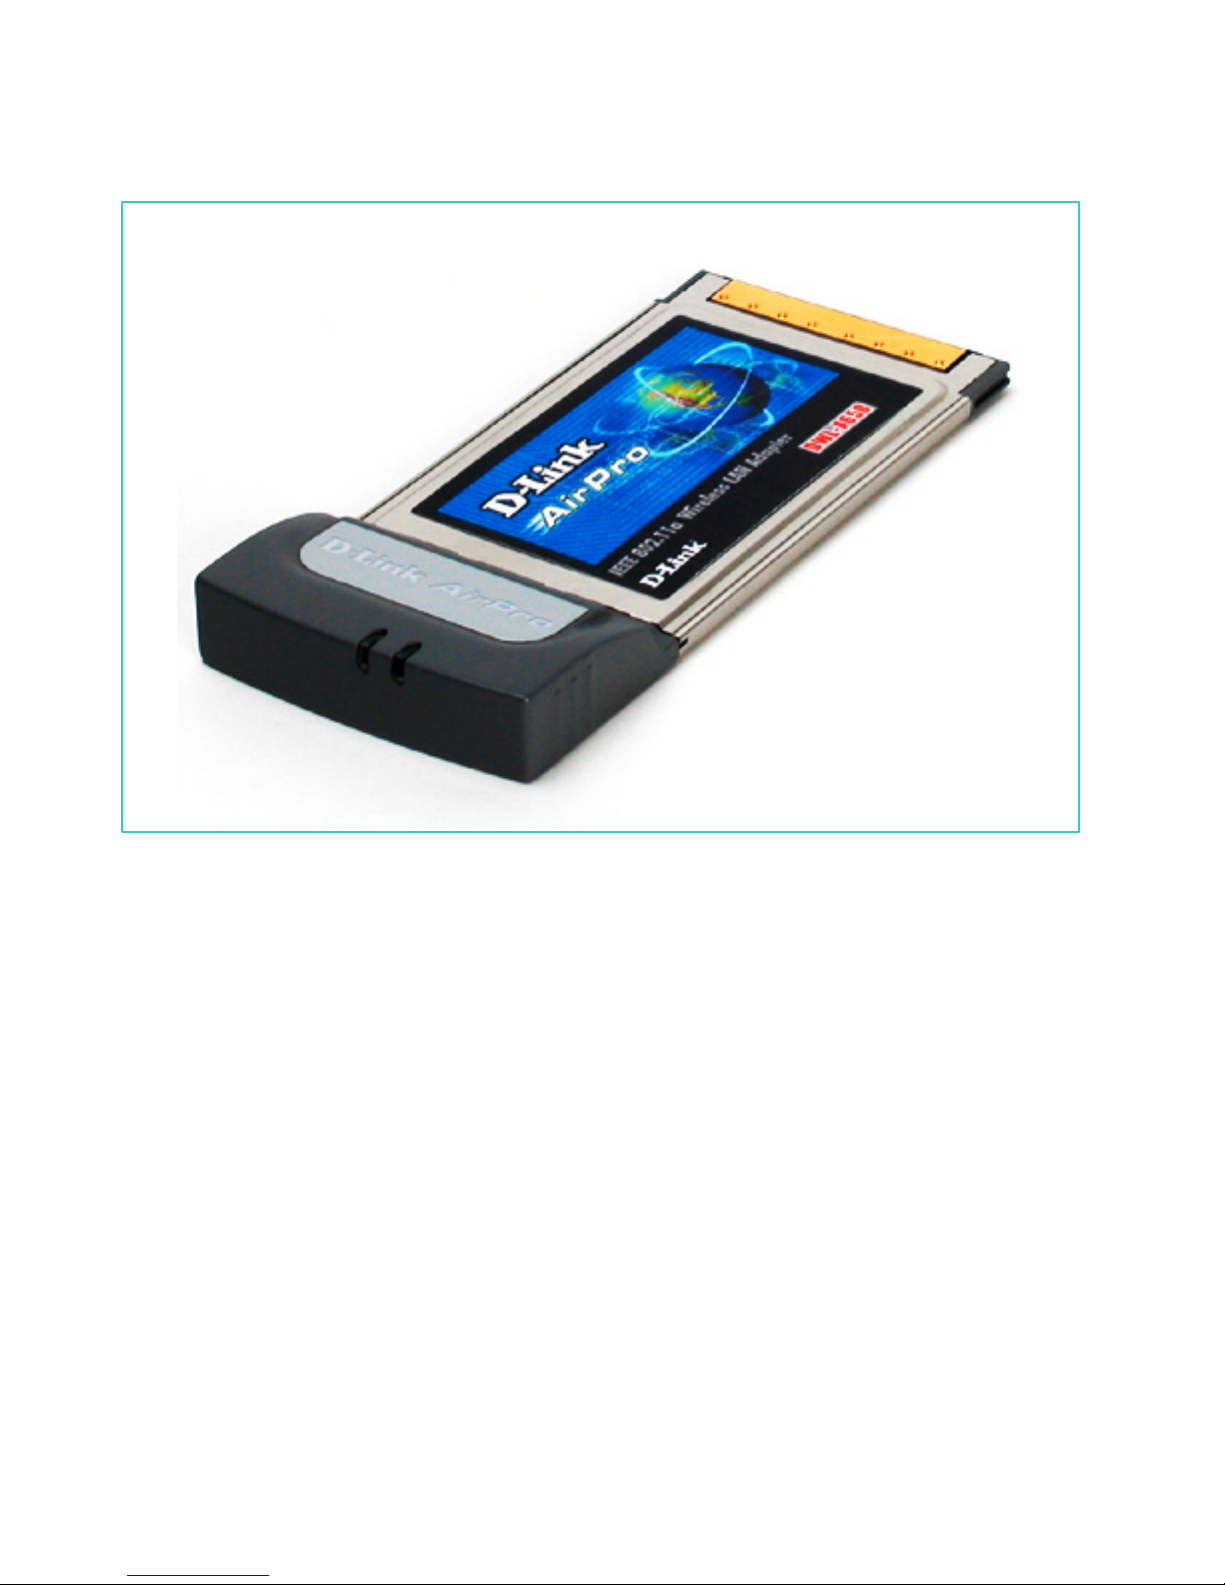
DWL-AB650 Wireless Multimode Cardbus Adapter
3
Package Contents
Contents of Package:
• D-Link AirPro DWL-AB650 5/2.4 GHz Wireless Cardbus Adapter
• Manual and Drivers on CD
• Quick Installation Guide (printed)
If any of the above items are missing, please contact your reseller.
System Requirements:
• A laptop computer with an available 32-bit Cardbus slot
• Windows XP, Windows 2000, Windows ME, or Windows 98 SE
• At least 32 MB of memory and a 300 MHz processor or higher
• An 802.11a Access Point (e.g., DWL-5000AP for Infrastructure
Mode) or another computer with either an 802.11a or 802.11b
wireless adapter installed (for Ad-hoc Mode)
Page 4

DWL-AB650 Wireless Multimode Cardbus Adapter
4
Introduction
The D-Link AirPro DWL-AB650 Wireless Cardbus Adapter is an advanced
IEEE 802.11a and 802.11b compatible, high performance, wireless adapter
that supports data transfer speeds of up to 54 Mbps in 802.11a mode and up
to 11 Mbps in 802.11b mode. Transfer modes of up to 108 Mbps can be
achieved in D-Link’s proprietary Turbo mode (this feature is currently only
available in USA).
It is an ideal way to connect your laptop computer to a Wireless Local Area
Network (WLAN). After completing the steps outlined in the Quick Installation
Guide (included in your package) you will have the ability to share
information and resources, such as files and printers, and take full
advantage of a “connected” environment for work or play! Please take a look
at our Getting Started section in this manual. You will see several options
for setting up a network using your new DWL-AB650.
The DWL-AB650 comes with software drivers for the most popular Microsoft
Windows operating systems and can be integrated into a larger network,
running Windows XP, Windows 2000, Windows ME, Windows 98SE, in
either Ad Hoc mode (without an Access Point) or Infrastructure mode (with
an Access Point).
This manual provides a quick introduction to wireless technology and its
application as it relates to networking. Take a moment to read through this
manual and get acquainted with wireless technology.
Page 5

DWL-AB650 Wireless Multimode Cardbus Adapter
5
Product Features
• Compatible with IEEE 802.11a high data-rate standard to provide wireless
communication at rates up to 54 Mbps, and up to 108 Mbps in a proprietary
turbo mode
• Compatible with IEEE 802.11b standard to provide wireless Ethernet data
rates of up to11Mbps data rate
• Operation at dual 2.4 ~ 2.5GHz and 5.15 ~ 5.825GHz frequency bands
• Dynamic date rate scaling at 6, 9, 12, 18, 24, 36, 48, 54 and up to 108 Mbps
(in a proprietary turbo mode) for IEEE 802.11a
• Dynamic date rate scaling at 1, 2, 5.5, and 11Mbps for IEEE 802.11b
• Maximum reliability, throughput and connectivity with automatic data rate
switching
• Supports wireless data encryption with 64/128/152-bit WEP for security
• Supports infrastructure networks via Access Point and ad-hoc network via
peer-to-peer communication
• Built-in dual diversity antenna for reduction of interference in a multi-path
environment
• Supports AES enhanced security
• Supports DFS/TPC for European operation
• Supports VLAN tagging
• User-friendly configuration utilities
• Driver support for Windows 98SE, ME, 2000, and XP
• Supports CardBus (32-bit) Type II PC Card
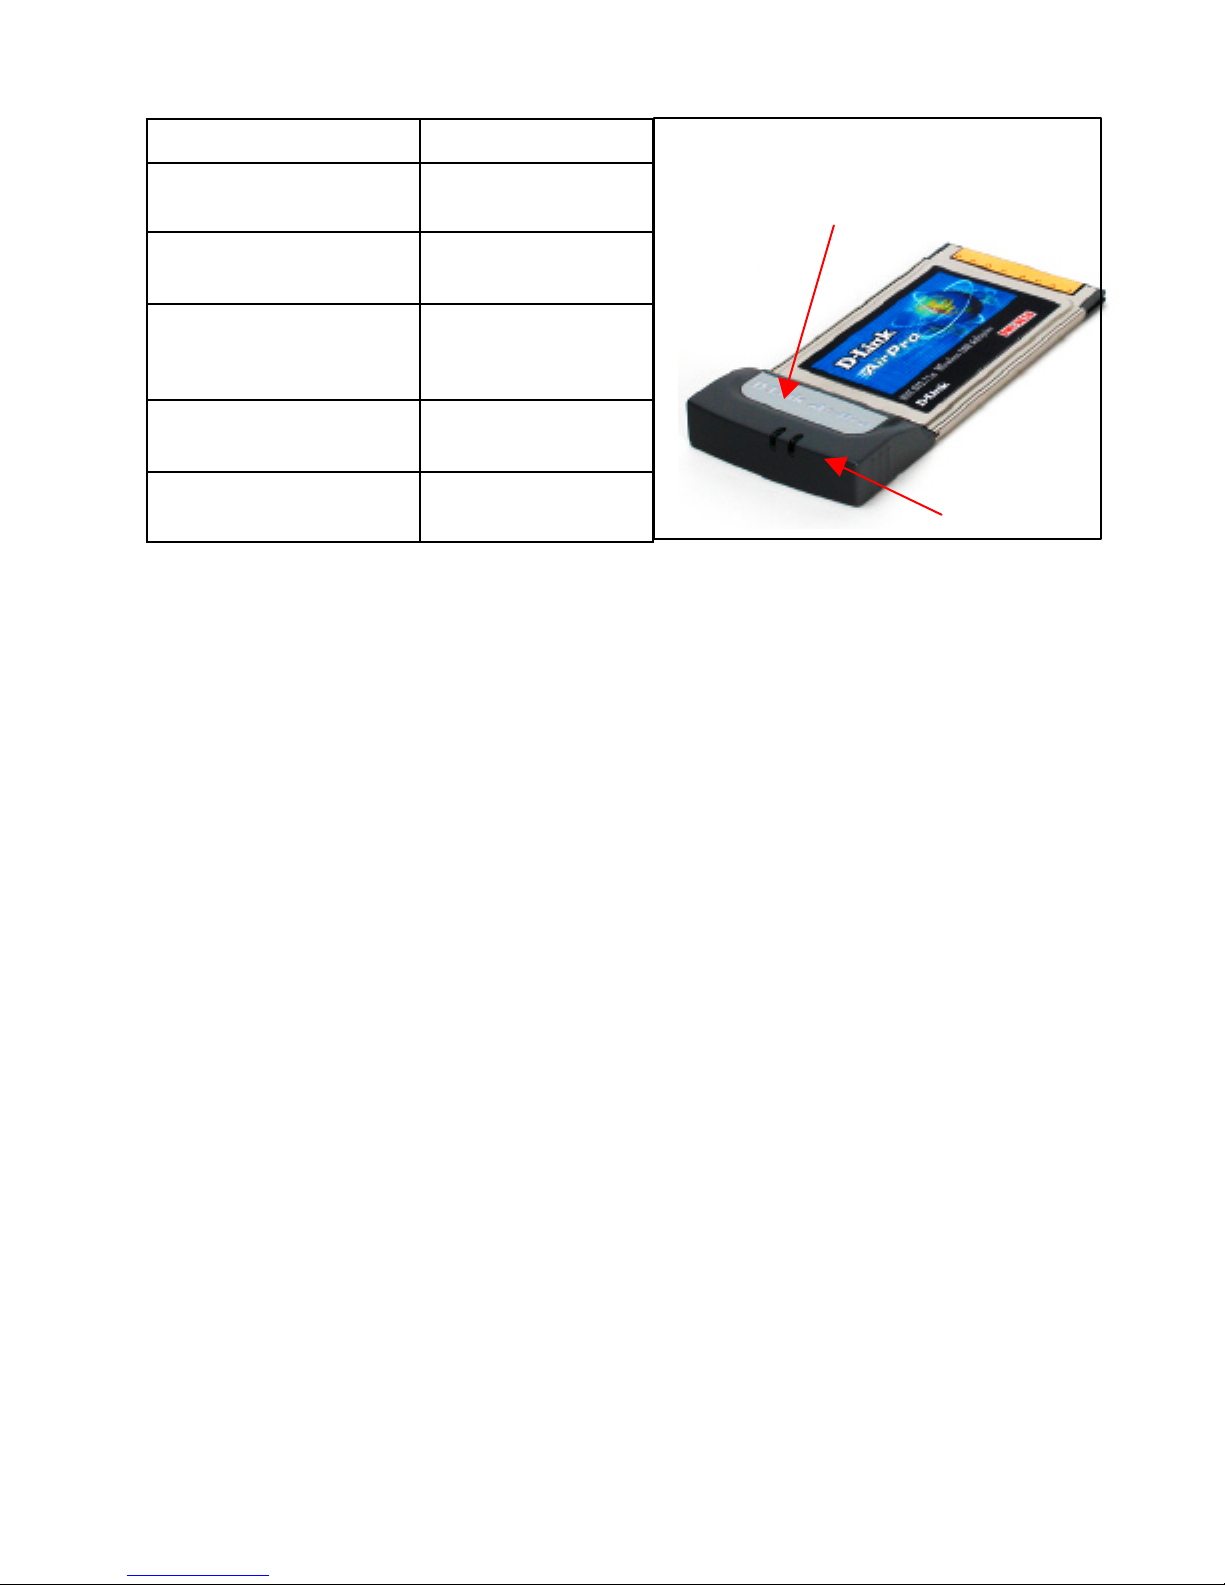
LEDS
LED stands for Light-Emitting Diode. The DWL-AB650 Wireless Cardbus
Adapter has two LEDs: POWER and ACTIVITY.
Page 6
DWL-AB650 Wireless Multimode Cardbus Adapter
6
Network Mode LED Activity
Network Activity Both LEDs flash in
unison
Searching for a
Network Connection
Both LEDs flash
alternately
Associated with the
Network, but No
Activity
Both LEDs flicker
dimly
Power Save Mode
(Power-up or Reset)
POWER LED –
slow rate blink
Adapter is disabled Only the POWER
LED flashes
ACTIVITY
POWER
Page 7

DWL-AB650 Wireless Multimode Cardbus Adapter
7
Wireless Basics
D-Link AirPro wireless products are based on industry standards to provide
easy-to-use and compatible high-speed wireless connectivity within your
home or business. Strictly adhering to the IEEE 802.11a and 802.11b
standards, the D-Link AirPro wireless family of products will allow you to
access the data you want, when and where you want it. No longer will you
be limited to one location or forced to run new wiring through your home or
office. You will be able to enjoy the freedom that wireless networking delivers.
A Wireless LAN (WLAN) is a cellular computer network that transmits and
receives data with radio signals instead of wires. Wireless LANs are used
increasingly in both home and office environments. Innovative ways to utilize
WLAN technology are helping people to work and communicate more
efficiently. Increased mobility and the absence of cabling and other fixed
infrastructure has proven to be beneficial for many users.
Wireless users can use the same network applications they use on an
Ethernet LAN. Wireless adapter cards used on laptop and desktop systems,
support the same protocols as Ethernet adapter cards. For most users, there
is no noticeable functional difference between a wired Ethernet desktop
computer and a wireless computer equipped with a wireless adapter other
than the added benefit of the ability to roam within the wireless-cell. Under
many circumstances, it may be desirable for mobile network devices to link
to a conventional Ethernet LAN in order to use servers, printers or an
Internet connection supplied through the wired LAN. A Wireless Access
Point (AP) is a device used to provide this link. Your new DWL-AB650
Cardbus adapter can connect to either an 802.11a or an 802.11b AP, as well
as other computers that have an 802.11a or 802.11b WLAN adapter
installed.
People use wireless LAN technology for many different purposes:
Mobility - Productivity increases when people have access to data in any
location within the operating range of the WLAN. Ad-hoc management
decisions based on real-time information can significantly improve worker
efficiency.
Low Implementation Costs - WLANs are easy to set up, manage, change
and relo cate. Networks that frequently change, both physically and logically,
can benefit from WLANs’ ease of implementation. WLANs can operate in
Page 8

DWL-AB650 Wireless Multimode Cardbus Adapter
8
locations where installation of wiring may be impractical. Furthermore, IEEE
standardization facilitates interoperability of all WLAN devices that conform
to the 802.11a or 802.11b sets of standards.
Installation Speed and Simplicity - Installing a wireless LAN system can
be fast and easy and can eliminate the need to pull cable through walls and
ceilings.
Installation Fle xibility - Wireless technology allows the network to go where
wires cannot go.
Reduced Cost-of-Ownership - While the initial investment required for
wireless LAN hardware might be higher than the cost of wired LAN hardware,
overall installation expenses and life-cycle costs will be significantly lower.
Long-term cost benefits are greatest in dynamic environments requiring
frequent moves, adds, and changes.
Scalability - Wireless LAN systems can be configured in a variety of
topologies to meet the needs of specific applications and installations.
Configurations are easily changed and range from peer-to-peer networks
suitable for a small number of users to full infrastructure networks of
thousands of users that allow roaming over a broad area.
D-Link AirPro Wireless LAN products include:
♦ 802.11a 5GHz Wireless Cardbus Adapters used with laptop
computers (such as the DWL-AB650)
♦ 802.11a 5GHz Wireless PCI cards (such as the DWL-A520) or
Cardbus Cards used with desktop or notebook computers
♦ 802.11b 2.4 GHz Wireless PCI cards or PC Cards (such as the
DWL-650) used with desktop or notebook computers.
♦ 802.11a 5GHz Wireless Access Points (such as the DWL-
5000AP)
Standards - Based Technology
The IEEE 802.11a standard designates that devices operate at an optimal
data rate of 54 Megabits per second. This means you will be able to transfer
large files quickly or even watch a movie in MPEG format over your network
without noticeable delays. This technology works by transmitting high-speed
digital data over a radio wave utilizing OFDM (Orthogonal Frequency
Page 9

DWL-AB650 Wireless Multimode Cardbus Adapter
9
Division Multiplexing) technology. OFDM works by splitting the radio signal
into multiple smaller sub-signals that are then transmitted simultaneously at
different frequencies to the receiver. OFDM reduces the amount of
crosstalk (interference) in signal transmissions. D-Link AirPro products will
automatically sense the best possible connection speed to ensure the
greatest speed and range possible with the technology.
Installation Considerations
Designed to traverse distances up to 900 feet (~300 meters), D-Link AirPro
DWL-AB650 lets you access your network from your laptop computer
virtually anywhere you want. Keep in mind, however, that the number and
thickness of walls, ceilings or other objects that the wireless signals must
pass thru may limit range. Typical ranges vary depending on the types of
materials and background RF noise in your home or business. The key to
maximizing the transmission range is to follow these basic principles:
1. Keep the number of walls and ceilings between the Access Point and
your receiving device to a minimum - Each wall or ceiling can reduce
your D-Link AirPro Wireless product’s range from 3-90 feet (1-30 meters.)
For some businesses or for a large residential home deployment, it may
be beneficial to have more than one access point with overlapping
coverage.
2. Be aware of the direct line between Access Points and computers with
wireless adapters - A wall that is 1.5 feet thick (.5 meters), at a 45degree angle appears to be almost 3 feet (1 meter) thick. At a 2-degree
angle it looks as if it were over 42 feet (14 meters) thick! Try to make
sure that the Access Points and Adapters are positioned so that the
signal will travel in as straight a line through a wall or ceiling as possible
for better reception.
3. Building Materials make a difference - A solid metal door or aluminum
studs can have a negative effect on range. Try to position Access Points
and computers with wireless adapters so that the signal passes through
drywall or open doorways and not other materials.
4. Make sure that the antenna is positioned for best reception by using the
software signal strength tools included with your DWL-AB650 Carbus
Adapter.
Page 10

DWL-AB650 Wireless Multimode Cardbus Adapter
10
5. Keep your product away (at least 3-6 feet or 1-2 meters) from electrical
devices or appliances that generate RF noise.
For the average residence, range should not be a problem. If you experience
low or no signal strength in areas of your home that you wish to access,
consider positioning the Access Point in a location directly between the
computers with wireless adapters that will be connected. Additional Access
Points can be connected to provide better coverage in rooms where the
signal does not appear as strongly as desired.
Page 11

DWL-AB650 Wireless Multimode Cardbus Adapter
11
Getting Started
To begin, select the type of wireless network you will be building.
We will discuss the following types of networks in this section:
1. A Home Internet Network
with A Residential Gateway/Router
2. A Home Internet Network with Multiple IP Addresses
3. An Ad Hoc Network
4. An Ad Hoc Network with Internet Sharing
Please select, from the four types of networks described above, the type of
network that is appropriate for your needs. Please follow the instructions in
the corresponding section that follows.
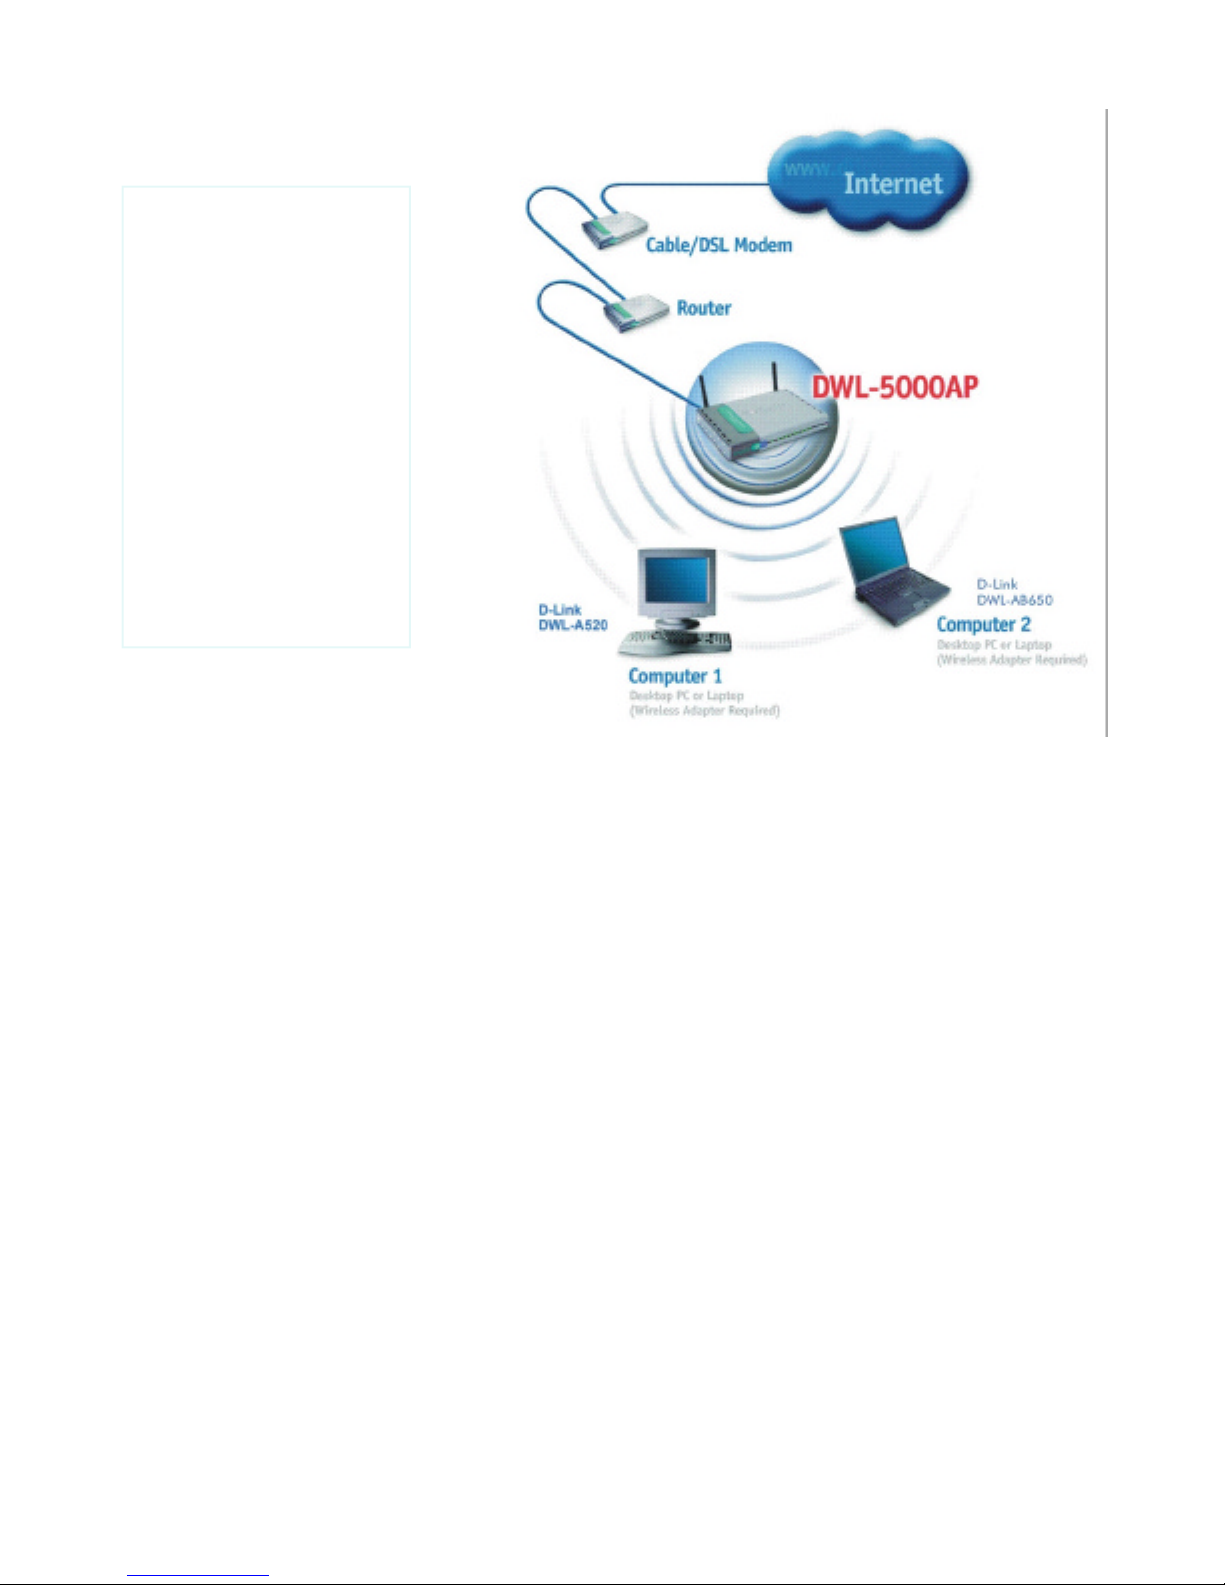
1. A Home Internet Network with A Residential Gateway/Router
(Network administrators with Dynamic IPs can also follow these instructions.)
If you have two or more computers (laptops or desktops) and want to share
files, printers, and Internet access using a DHCP-capable Residential
Gateway/Router – or − if you want to connect to an Ethernet network that
uses Dynamic (DHCP) IP addresses, then follow the instructions on the next
page. When it is complete, your network may look similar to this:
Page 12
DWL-AB650 Wireless Multimode Cardbus Adapter
12
(Requirements: A Residential Gateway/Router connected with an Ethernet
(CAT5) cable to an 802.11a Access Point such as the DWL-5000AP or an
802.11b Access Point or another computer with an 802.11a or 802.11b
WLAN adapter installed).
This type of installation requires that you provide a dynamic IP address for
each computer on your network. You will need a DHCP-capable Residential
Gateway/Router for your network.
To complete the installation, please follow these steps:
1. Connect the Router/Gateway (for example, the D-Link DI-704P) to
a Broadband connection, (e.g., a Cable modem such as the D-Link
DCM-200 cable modem or a DSL modem such as the D-Link DSL-
300.)
2. Connect the 802.11a Access Point (DWL-5000AP) to the router.
3. Install the D-Link AirPro DWL-AB650 Wireless Cardbus Adapter
into a laptop computer on your wireless network.
4. Check the Device Manager to confirm that the wireless adapter is
installed correctly. Please refer to the Networking Basics section in
DHCP stands for
Dynamic Host
Configuration Protocol.
It is a protocol for
assigning dynamic IP
addresses
“automatically.” With a
DHCP-capable
gateway, there is no
need to manually
assign an IP address.
Page 13

DWL-AB650 Wireless Multimode Cardbus Adapter
13
this manual entitled: Checking the Installation of the Drivers for
the Wireless Adapter.
5. By default, the wireless adapter is set to obtain a Dynamic IP
Address. If you are having difficulty connecting, check to make sure
that the IP Address of the wireless adapter is within the IP address
range of your network. Please refer to the Networking Basics
section in this manual entitled: Checking The IP Address.
6. Learn to share printers and files. Please refer to the Networking
Basics section in this manual entitled: Adding and Sharing Printers
in Windows XP.
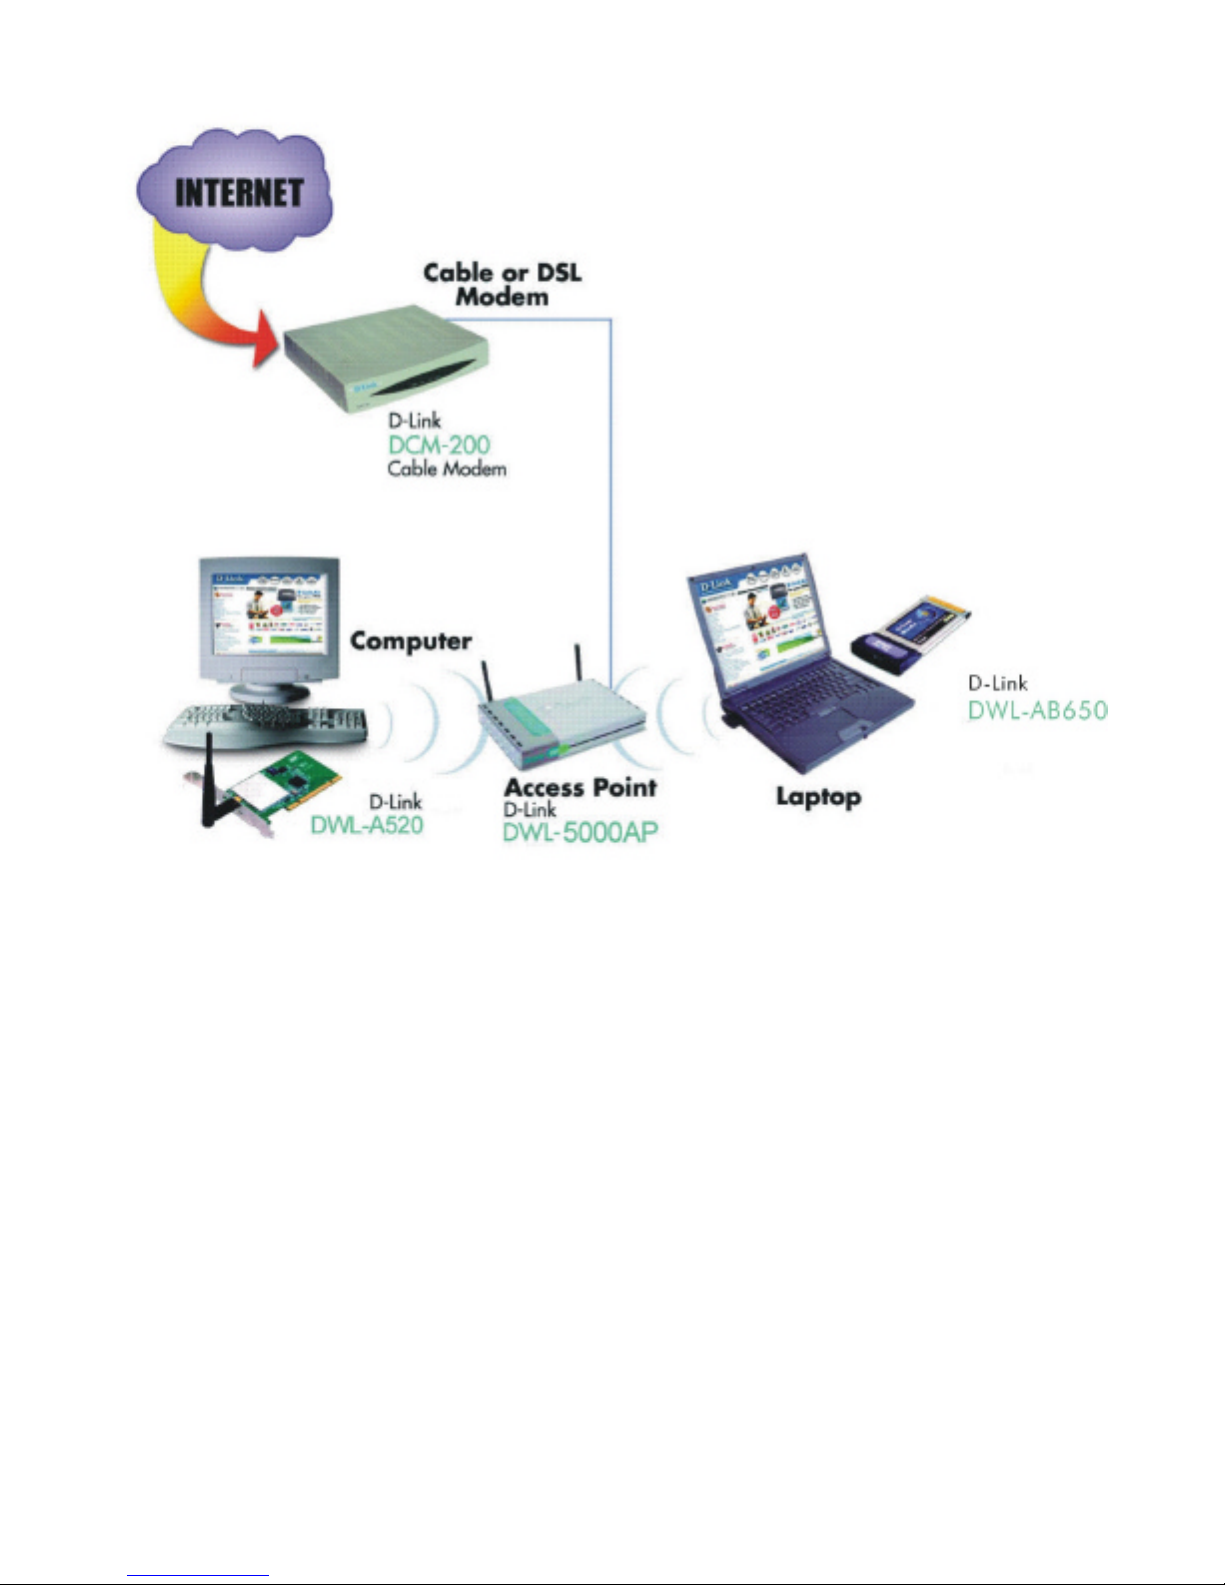
2. A Home Internet Network with Multiple IP Addresses
(Network administrators with Static IPs can also follow these instructions.)
If you have two or more computers (laptops or desktops) and want to share
files, printers, and Internet access using multiple IP addresses that you have
purchased from your Internet Service Provider -or- you want to connect to
an Ethernet network that uses Static IP Addresses, then follow the
instructions on the next page. When you have completed your network, it
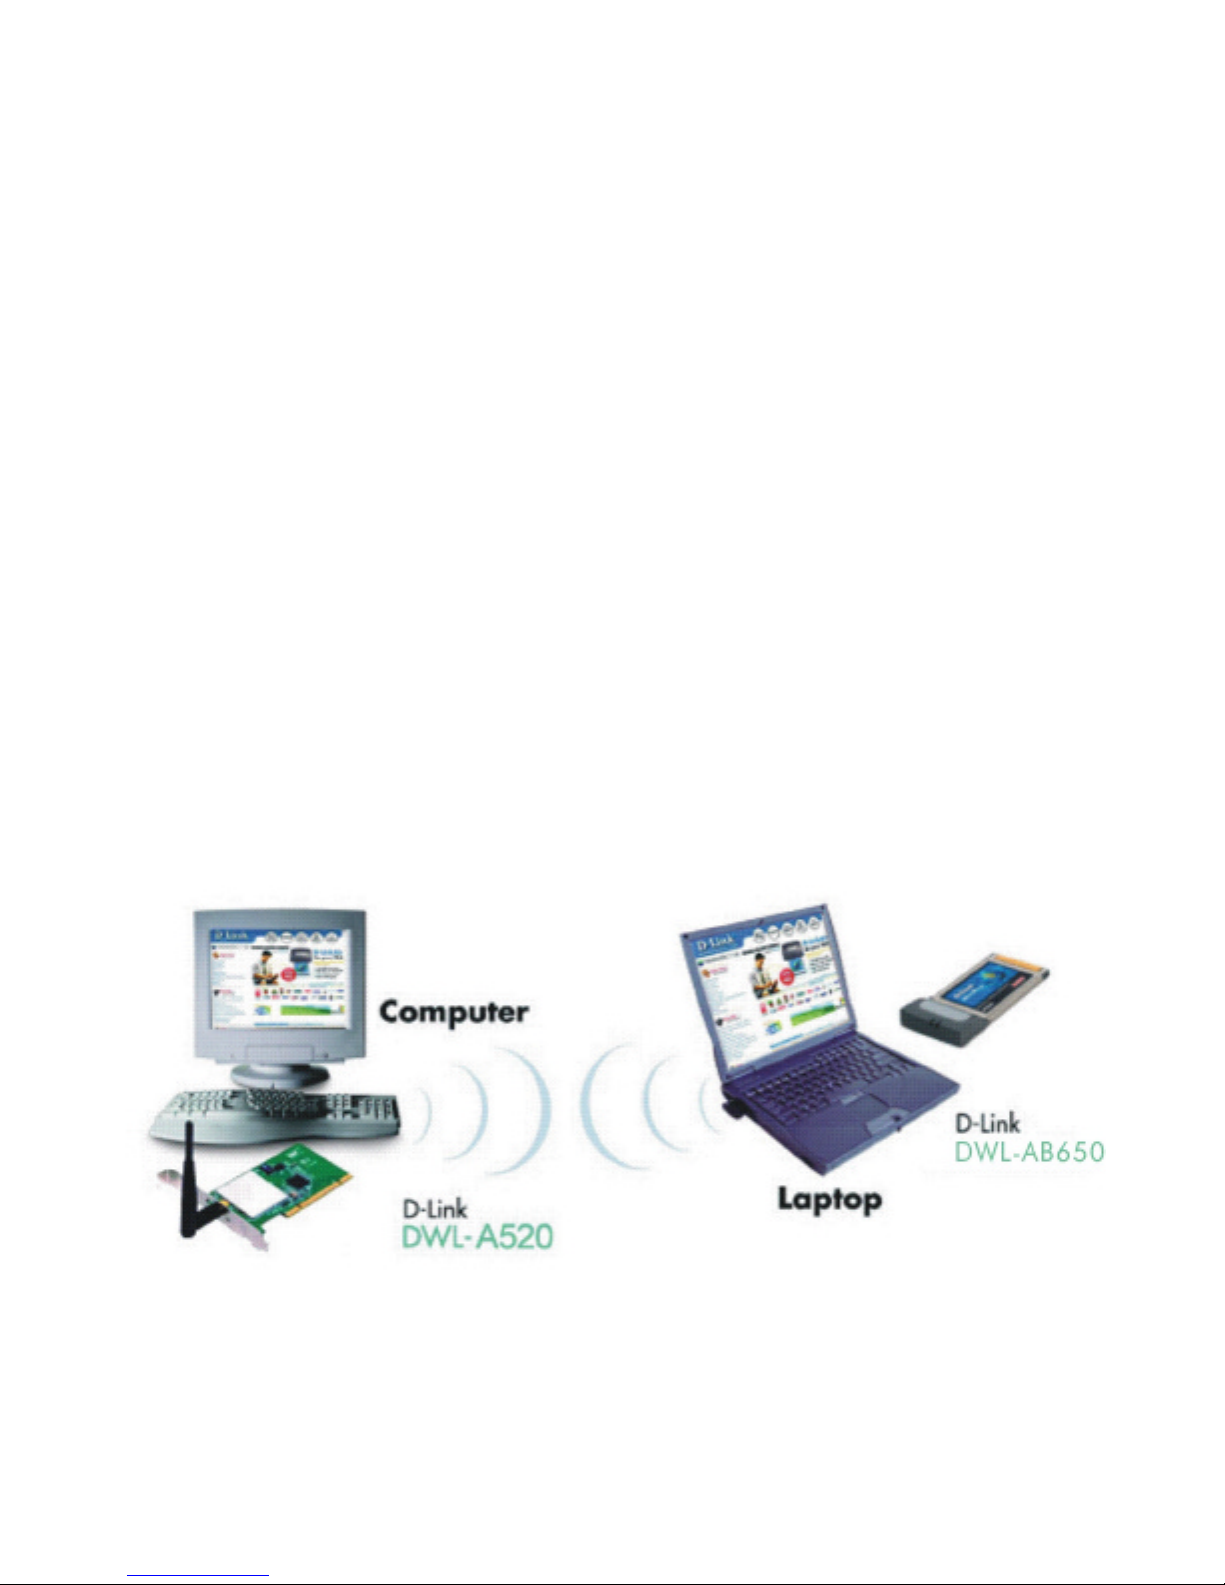
should look similar to this:
Page 14
DWL-AB650 Wireless Multimode Cardbus Adapter
14
Please note that this type of installation requires that your ISP (Internet
Service Provider) provides you a static IP address for each computer and
the Access Point on your network. Please refer to the manual that came
with your Access Point to determine its configuration.
Please follow these steps to complete the installation:
1. Connect the Wireless Access Point (the D-Link AirPro DWL-
5000AP is shown in the example) to a Broadband connection.
2. Install the D-Link AirPro DWL-AB650 Wireless Cardbus Adapter
into the laptop computer(s) on your wireless network.
3. Check the Device Manager to confirm that the wireless adapter is
installed correctly. Please refer to the Networking Basics section in
this manual entitled: Checking the Installation of the Drivers for
the Wireless Adapter.
Page 15
DWL-AB650 Wireless Multimode Cardbus Adapter
15
4. Set the Static IP Address of the wireless adapters. Please refer to
the Networking Basics section in this manual entitled: Assigning
an IP Address.
Note: The IP Address for all computers must be in the same IP Address range,
and the Subnet Mask must be the same for all the computers on the
network. For example: If the first computer is assigned an IP Address of
192.168.0.2 with a Subnet Mask of 255.255.255.0, then the second
computer can be assigned an IP Address of 192.168.0.3 with a Subnet
Mask of 255.255.255.0, etc.
If you are using a PPPoE client (Point to Point Protocol over Ethernet)
please contact your ISP (Internet Service Provider) for further instructions
regarding connecting to the Internet.
5. To learn to share printers and files. Please refer to the Networking
Basics section in this manual entitled: Adding and Sharing Printers
in Windows XP.
3. An Ad Hoc Network
If you have two or more computers (desktops or laptops) and want to share
files and printers, but no Internet connection, please com plete the following
instructions. When your Ad Hoc network is complete it may look similar to
this:
(Requirements: Wireless network adapters -for example, the D-Link AirPro DWL-
AB650.)
To complete this installation, please follow these steps:
1. Install the D-Link AirPro DWL-AB650 Wireless Cardbus Adapter
into your desktop computers. (You may install the D-Link AirPro
Page 16

DWL-AB650 Wireless Multimode Cardbus Adapter
16
DWL-A520 Wireless PCI Adapters into your desktops - please refer
to the Quick Installation Guide for further instructions.)
2. Set the Static IP Address of the wireless adapters. Please refer to
the Networking Basics section in this manual entitled: Assigning
an IP Address.
Note: The IP Address for all computers must be in the same IP Address range,
and the Subnet Mask must be the same for all computers on your network.
For example: If the first computer is assigned an IP Address of 192.168.0.2
with a Subnet Mask of 255.255.255.0, then the second computer can be
assigned an IP Address of 192.168.0.3 with a Subnet Mask of
255.255.255.0, etc.
3. Check the Device Manager to confirm that the wireless adapter is
installed correctly. Please refer to the Networking Basics section in
this manual entitled: Checking the Installation of the Drivers for
the Wireless Adapter.
4. Check the Wireless Configuration for each wireless adapter.
Please refer to the Networking Basics section in this manual
entitled: Checking the Wireless Configuration.
4. An Ad Hoc Network with Internet Sharing
5. Learn to share printers and files. Please refer to the Networking
Basics section in this manual entitled: Adding and Sharing Printers
in Windows XP.
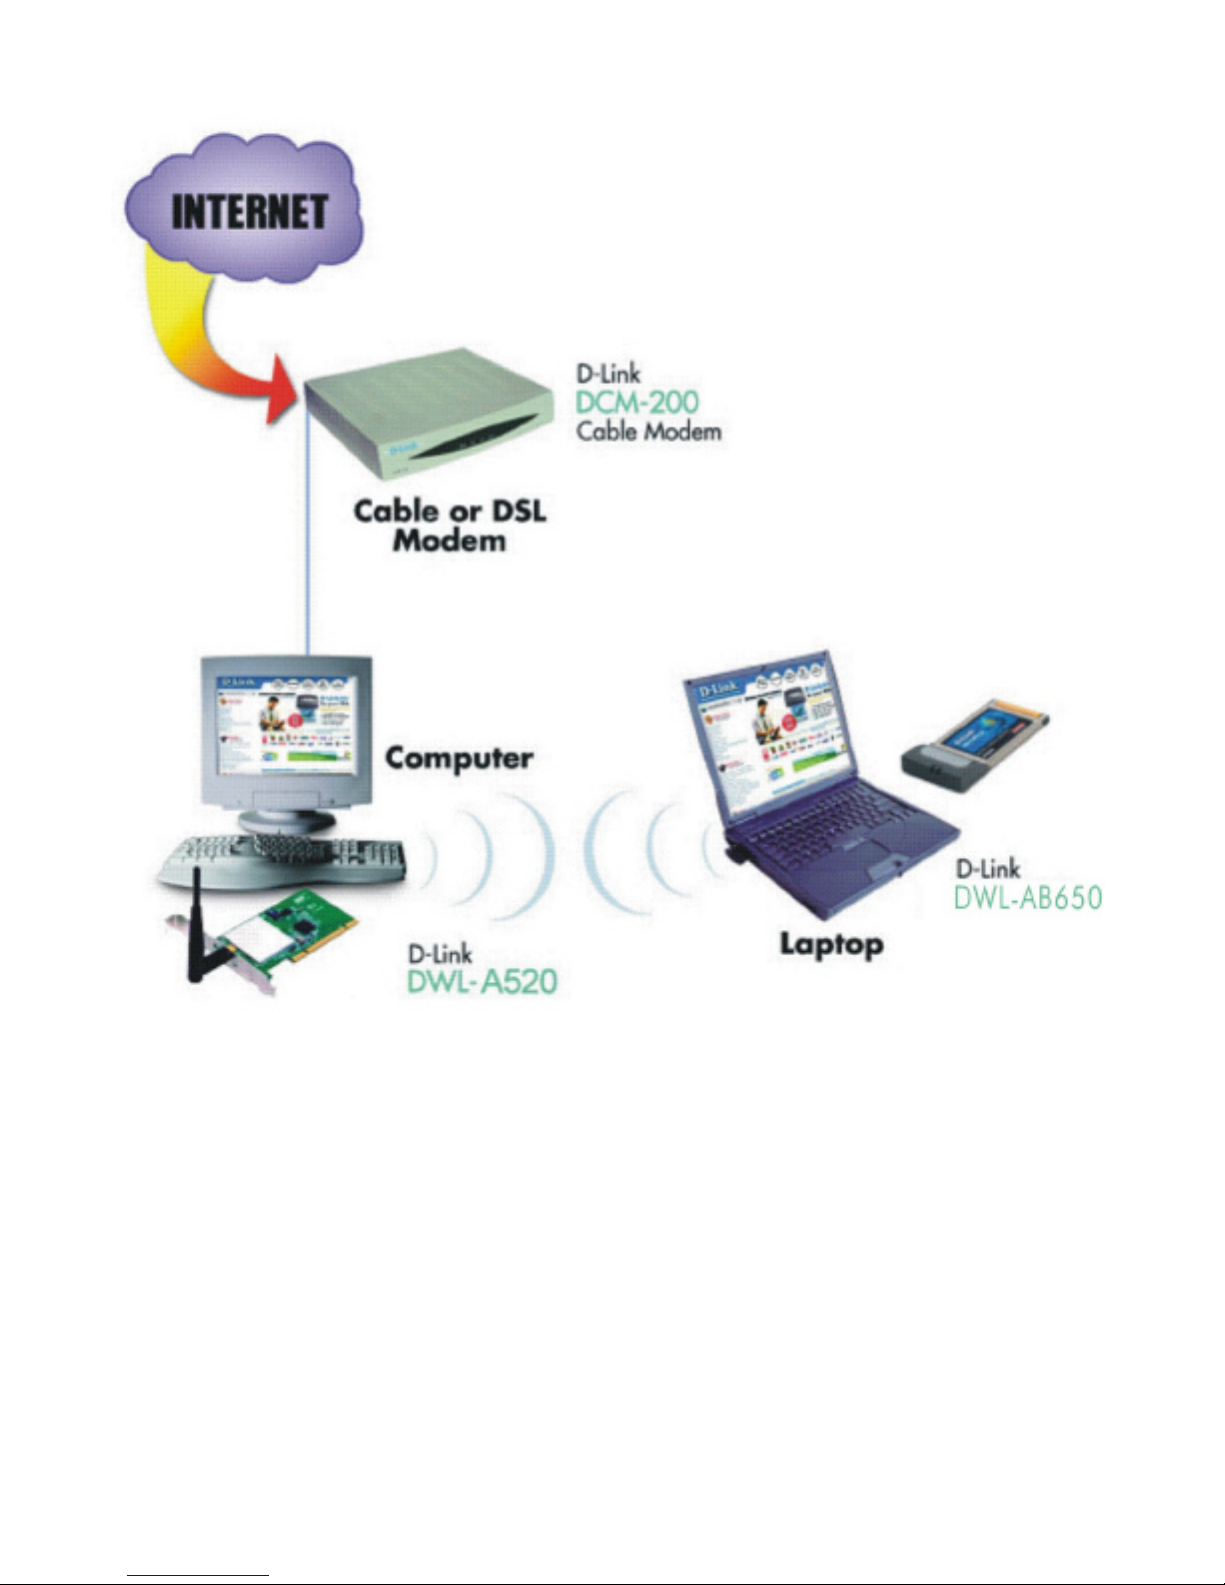
If you have two or more computers (desktops or laptops) and want to share
files, printers, and Internet access using one computer or laptop as an
Internet Server, then follow the instructions below. When you have
completed your network, it should look similar to this:
Page 17
DWL-AB650 Wireless Multimode Cardbus Adapter
17
To share an Internet connection with Internet Sharing software you will need
to purchase Internet Sharing software or use the Internet Connection
Sharing (ICS) utility provided with Windows XP, Windows 2000, Windows
ME or Windows 98SE.
Please follow your software documentation to properly configure the Internet
sharing software after you install your wireless networking adapters. To
install your wireless network adapter follow the instructions on the next page.
If the Internet Sharing Software will be installed on the same computer into
which you are installing this wireless network adapter, then follow these
steps:
DFE-530TX
Page 18

DWL-AB650 Wireless Multimode Cardbus Adapter
18
1. Install the D-Link AirPro DWL-AB650 Wireless Cardbus Adapter
(please refer to the Quick Install Guide.)
2. Check the Device Manager to confirm that your adapter is installed
correctly. Please refer to the Networking Basics section in this
manual entitled: Checking the Installation of the Drivers for the
Wireless Adapter.
3. Install your Internet Sharing Software
4. If required by the ICS software, set the static IP Address for the
wireless adapter. Please refer to the Networking Basics section in
this manual entitled: Assigning an IP Address.
Note: The IP Add ress for all the computers on the network must be in the same IP
Address range, and the Subnet Mask must be the same for all the
computers on the network. For example: If the first computer is assigned an
IP Address of 192.168.0.2 with a Subnet Mask of 255.255.255.0, then the
second computer can be assigned an IP address of 192.168.0.3 with a
Subnet Mask of 255.255.255.0, etc.
5. Learn to share printers and files. Please refer to the Networking
Basics section in this manual entitled: Adding and Sharing Printers .
If the Internet Sharing Software will be installed on a computer other than
the one in which you are installing the D-Link AirPro DWL -AB650 Wireless
Cardbus Adapter, then follow these steps:
1. Install the D-Link AirPro DWL-AB650 Wireless Cardbus Adapter
into the computer (please refer to the Quick Install Guide.)
2. Check the IP Address for the wireless adapter. Please make
certain that all the computers on your network are in the same IP
Address range. Please refer to the Networking Basics section in
this manual entitled: Checking your IP Address.
Note: By default, the wireless adapter is set to obtain a Dynamic IP Address,
automatically.
3. Learn to share printers and files. Please refer to the Networking
Basics section in this manual entitled: Adding and Sharing Printers
in Windows XP.
Page 19
DWL-AB650 Wireless Multimode Cardbus Adapter
19
Installation
This section shows you how to install the AirPro Utility if you are using the
operating systems Windows 2000, 98, ME, or NT. Follow the instructions
given below on how to install the hardware (DWL-AB650 Cardbus Adapter)
and then the software (AirPro driver and utility). For those using Windows XP,
the installation procedure will be the same until the utility installation.
Windows XP has a built in utility for wireless devices. The AirPro
configuration utility does not need to be installed for users using the XP
operating system.
System Requirements:
• A laptop computer with an available 32-bit Cardbus PC Card slot
• At least a 300 MHz processor and 32 MB of memory
• Cardbus Controller properly installed and working
• An 802.11a Access Point (for Infrastructure Mode) or another
802.11a wireless adapter (for Ad-Hoc mode.)
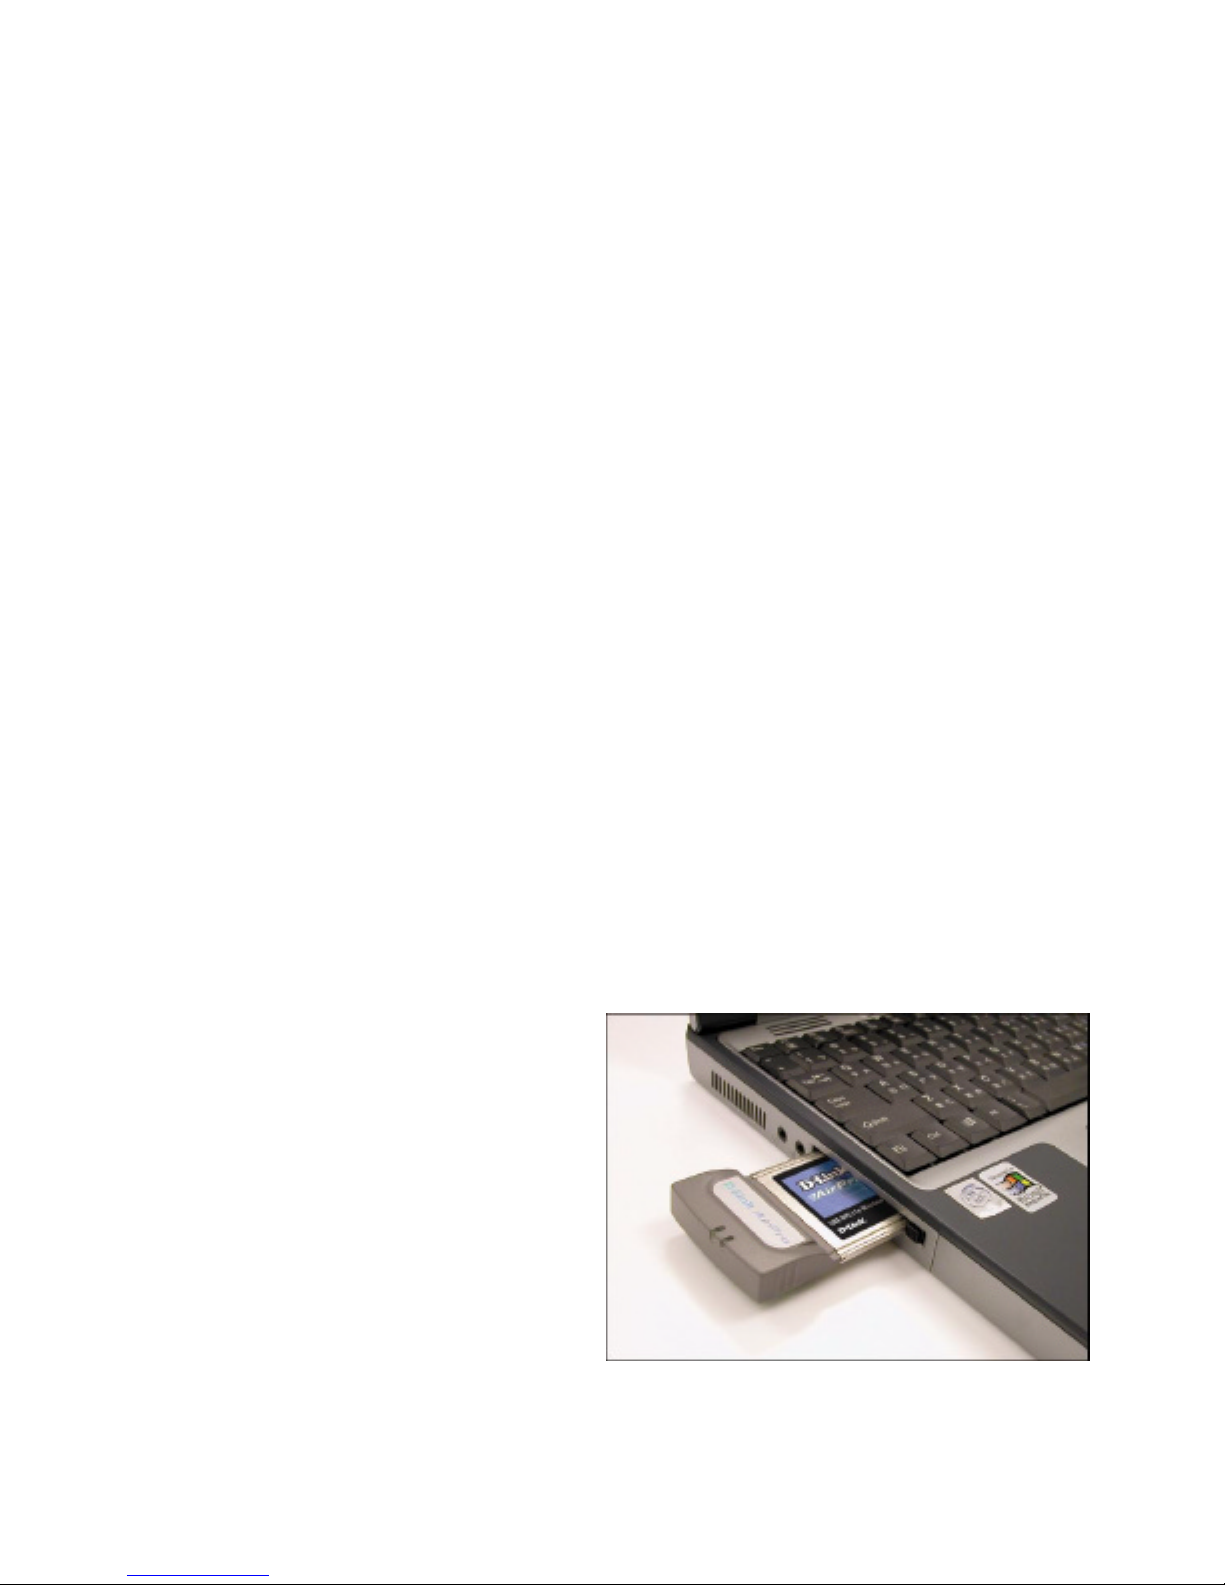
1. Installing the DWL-AB650
•
Turn on the computer
• Insert the D-Link AirPro
DWL-AB650 Wireless
Cardbus Adapter into an
available 32-
bit Cardbus
PC Card slot.
Page 20
DWL-AB650 Wireless Multimode Cardbus Adapter
20
2. Installing the Driver
Installing the software involves two steps. The first is to install the Driver and
the second is to install the Configuration Utility.
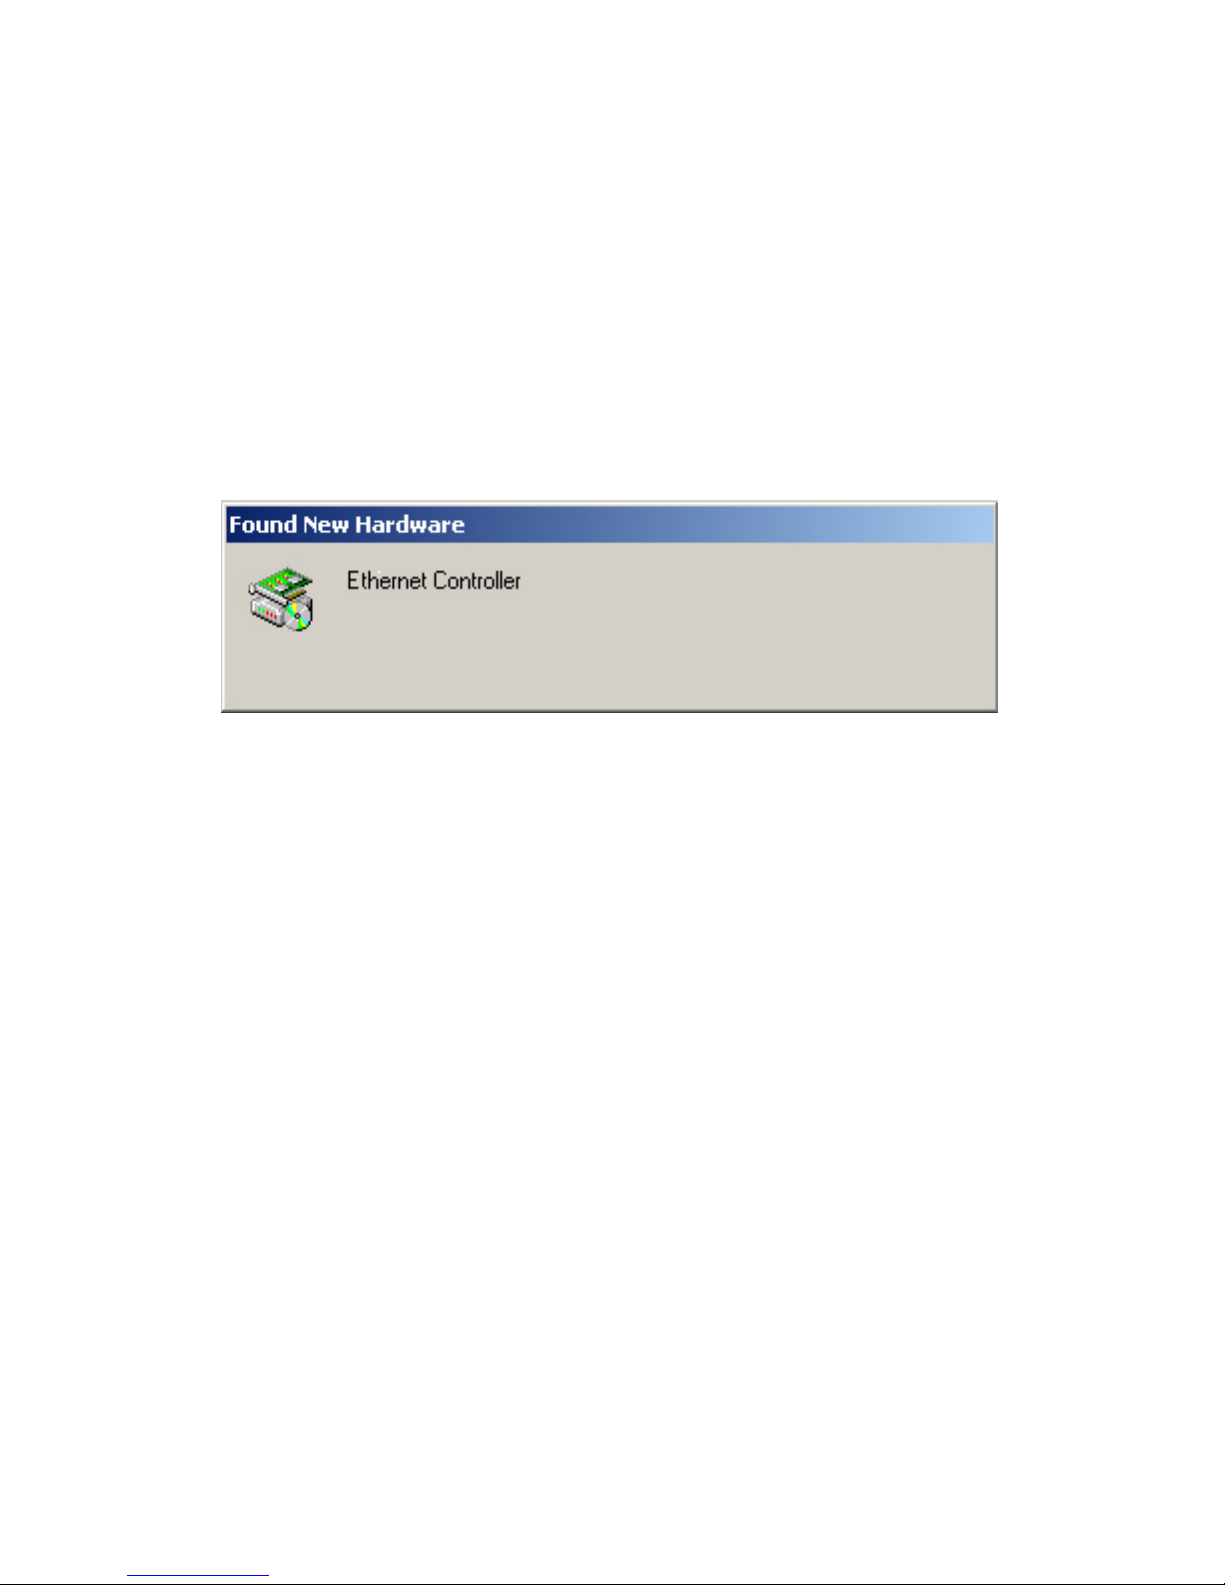
• When the DWL-AB650 has been inserted into a 32-bit Cardbus
slot, the Found New Hardware Wizard screen appears.
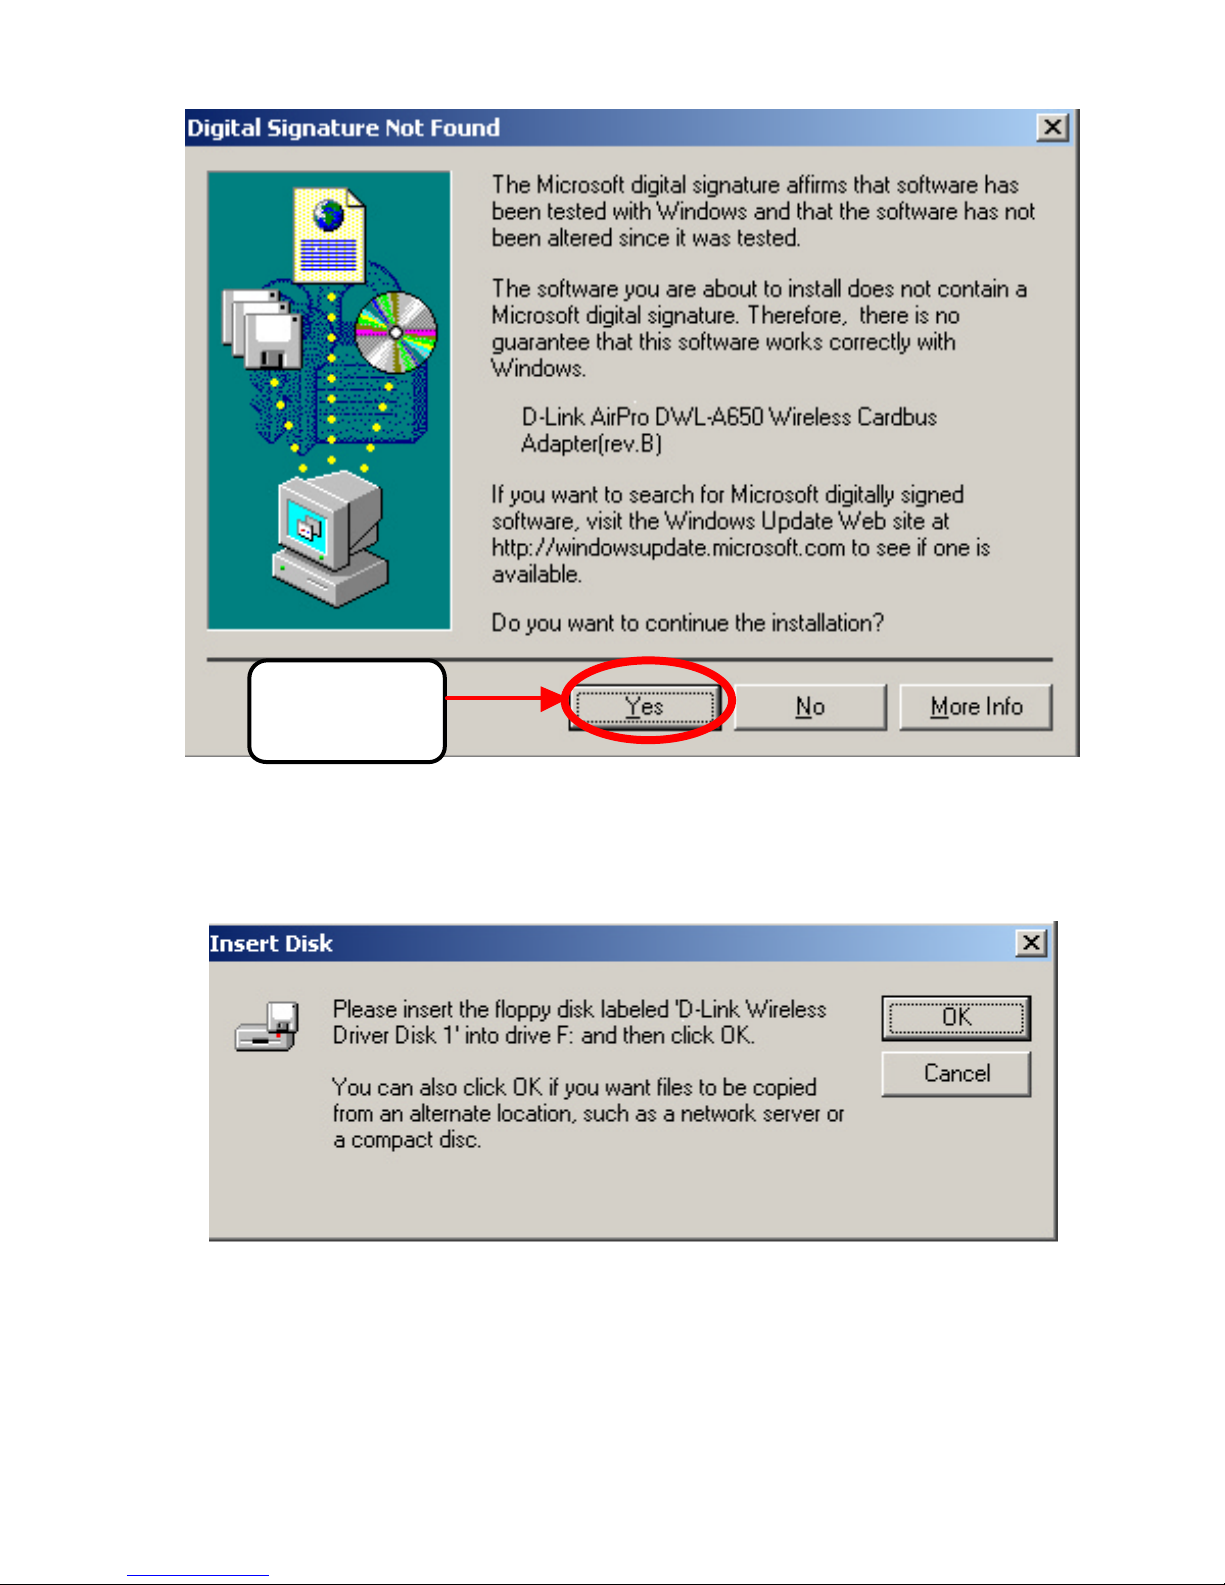
• Continue with the installation and the screen below should appear.
Click on Yes to proceed with the installation.
Page 21
DWL-AB650 Wireless Multimode Cardbus Adapter
21
• Insert the Driver CD into the CD-ROM drive. If you have not
inserted the Driver CD into the CD-Rom a prompt such as the
one below will appear. Click OK.
• Otherwise installation will continue with the following screen and
come to completion.
Click
Yes
Page 22
DWL-AB650 Wireless Multimode Cardbus Adapter
22
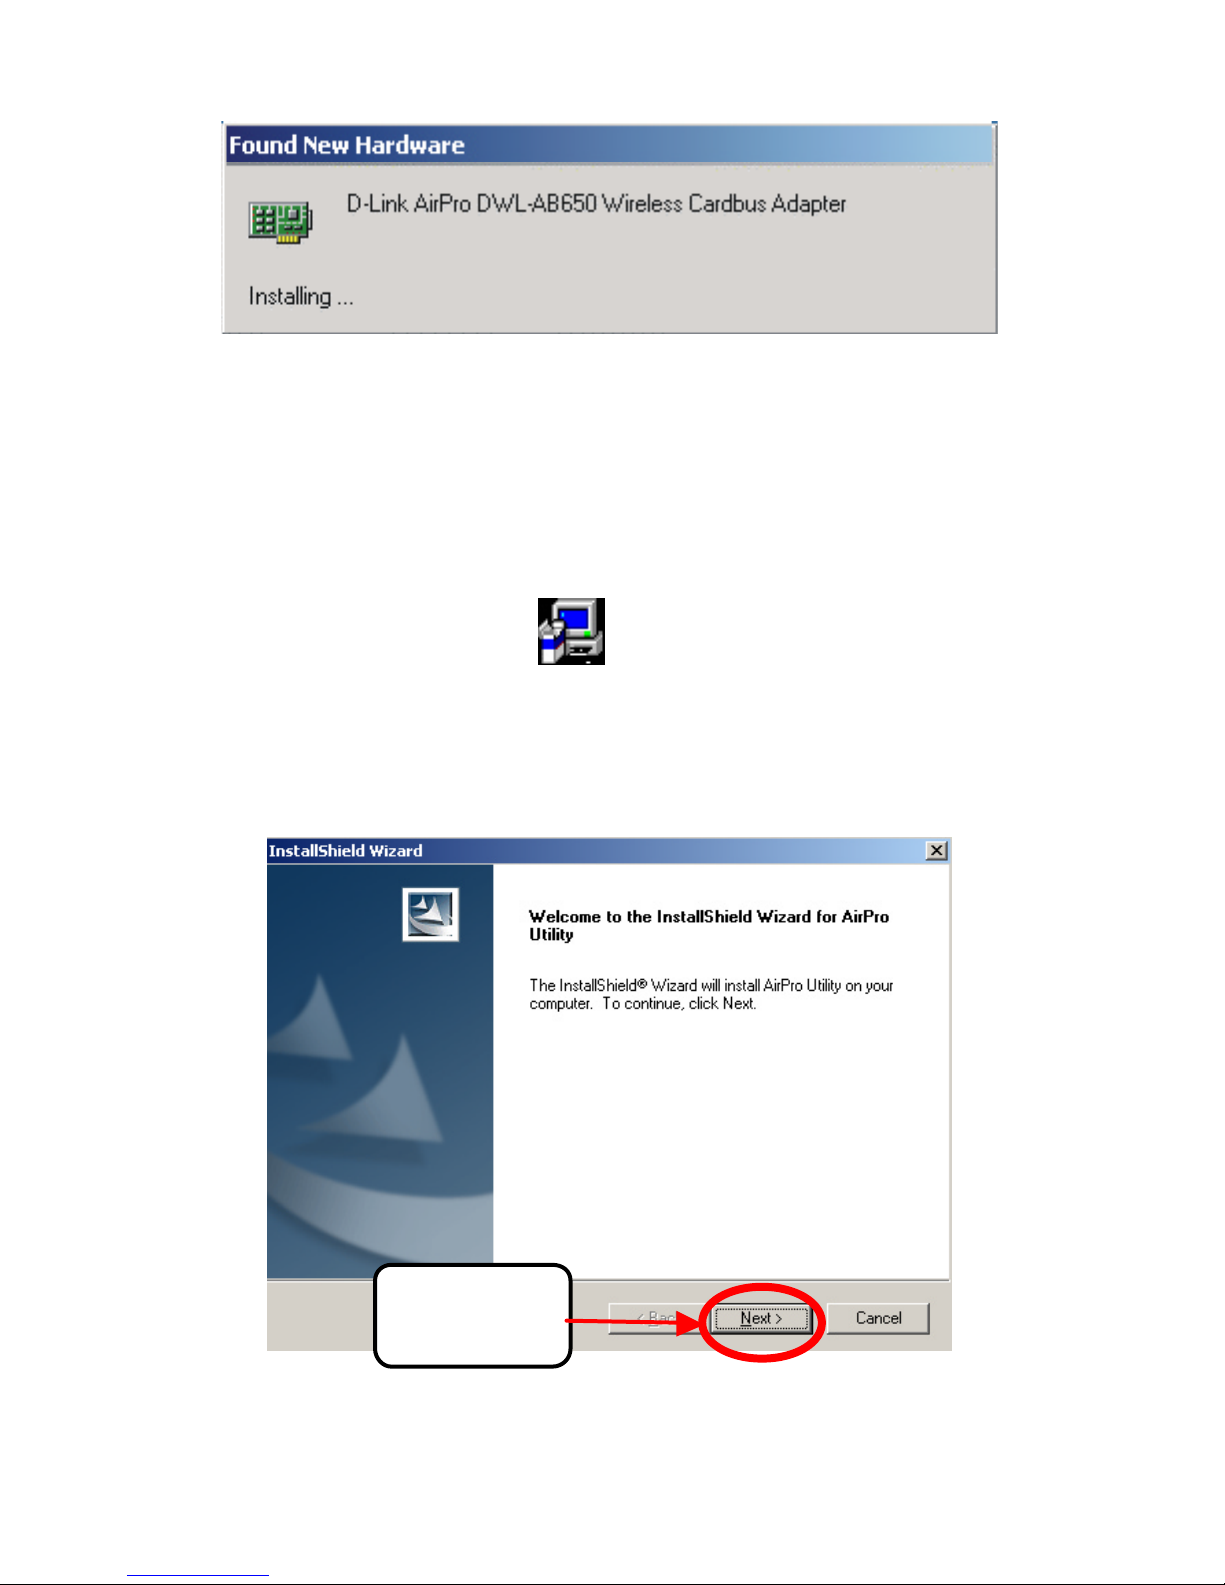
3. Installing the Configuration Utility
Look for the file named “Setup.exe” on the installation CD-ROM. Doubleclick on it to start the installation for the configuration utility.
l When this screen appears click Next.
Click Next.
Setup.exe
Page 23
DWL-AB650 Wireless Multimode Cardbus Adapter
23
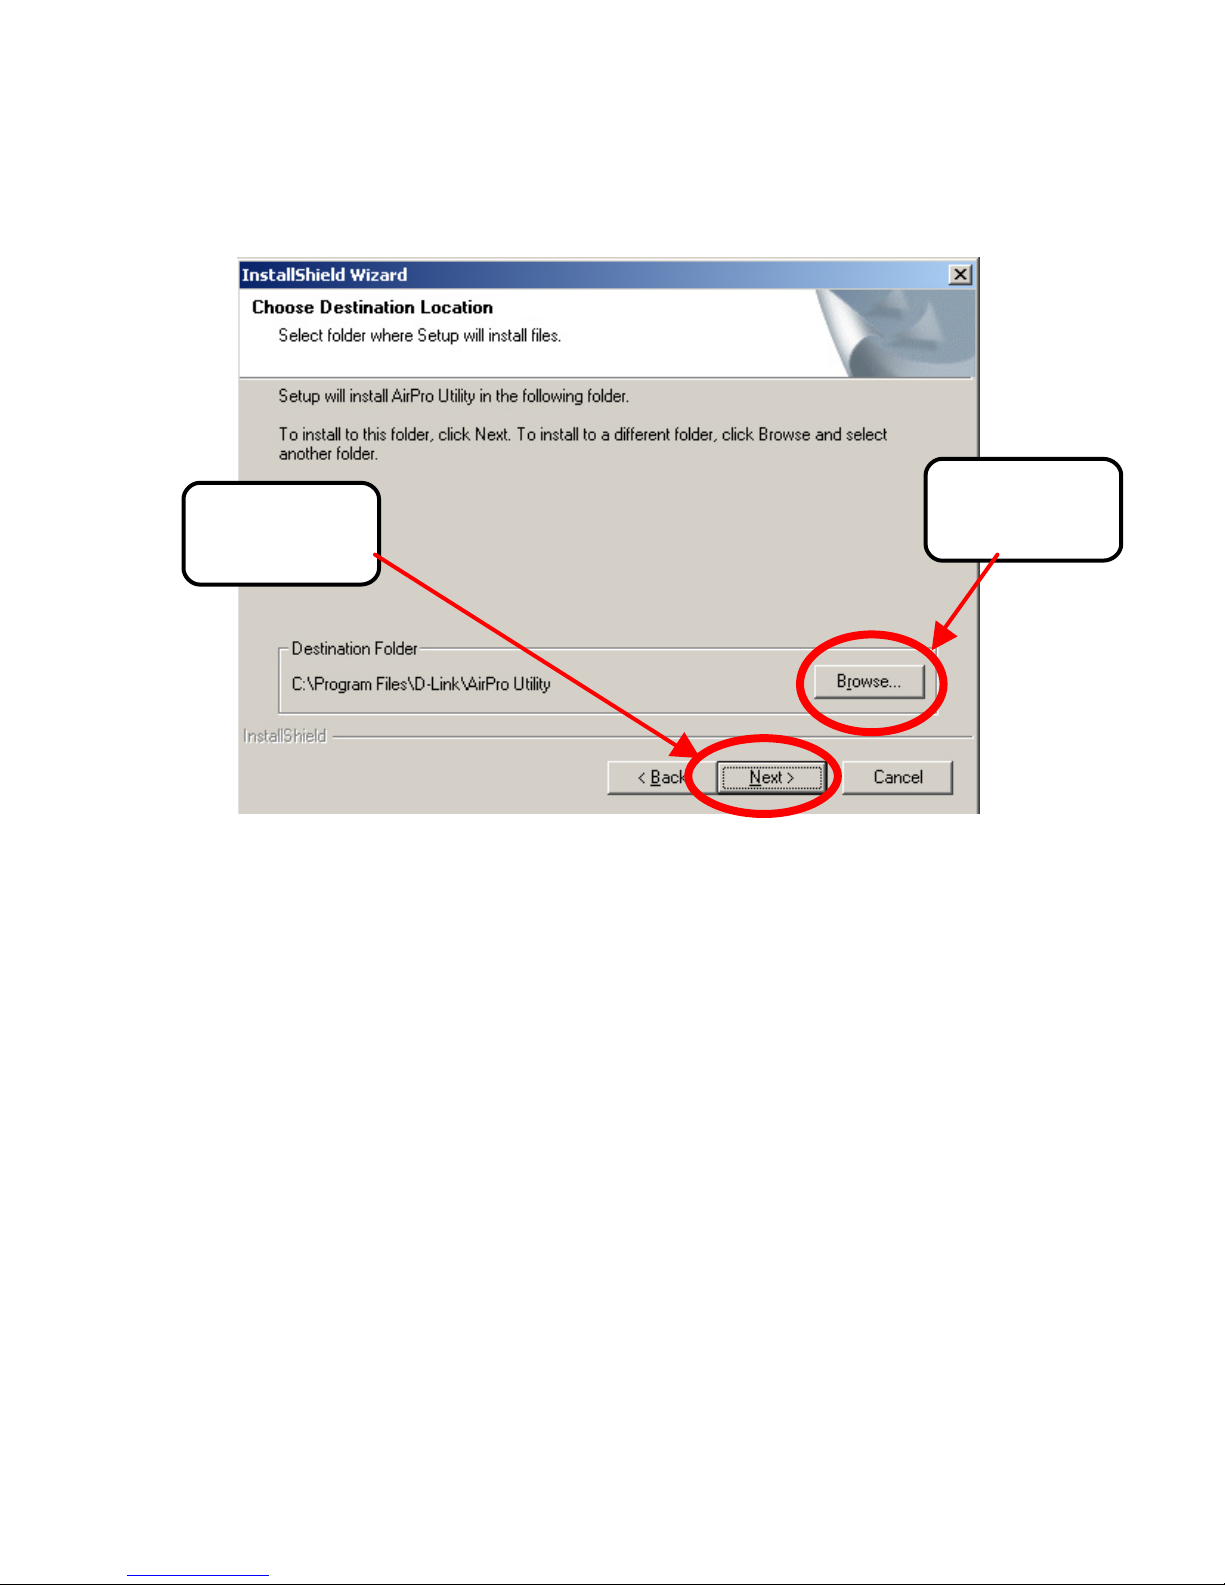
l To install to the folder C:\Program Files\D-Link\AirPro Utility click
Next. Otherwise click on Browse to choose an alternate
location.
Click Next
Or Click
Browse
Page 24
DWL-AB650 Wireless Multimode Cardbus Adapter
24
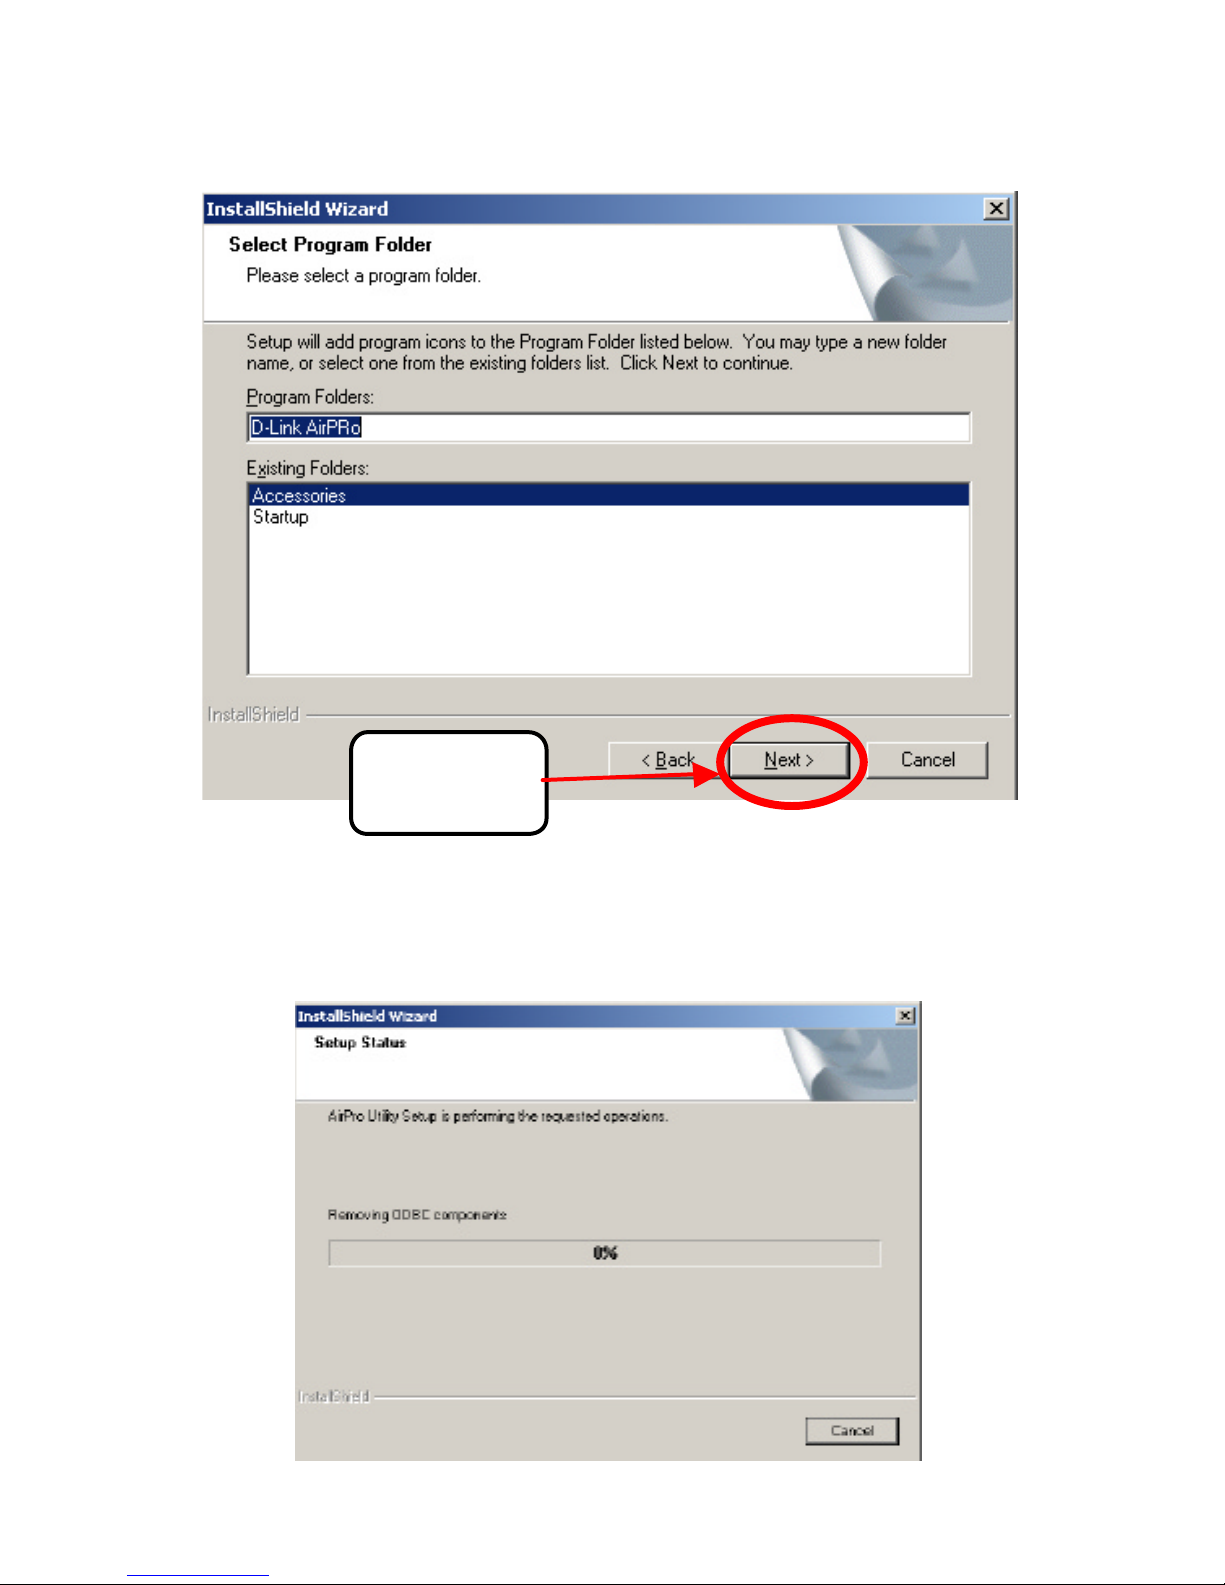
l Click Next to proceed with the utility installation.
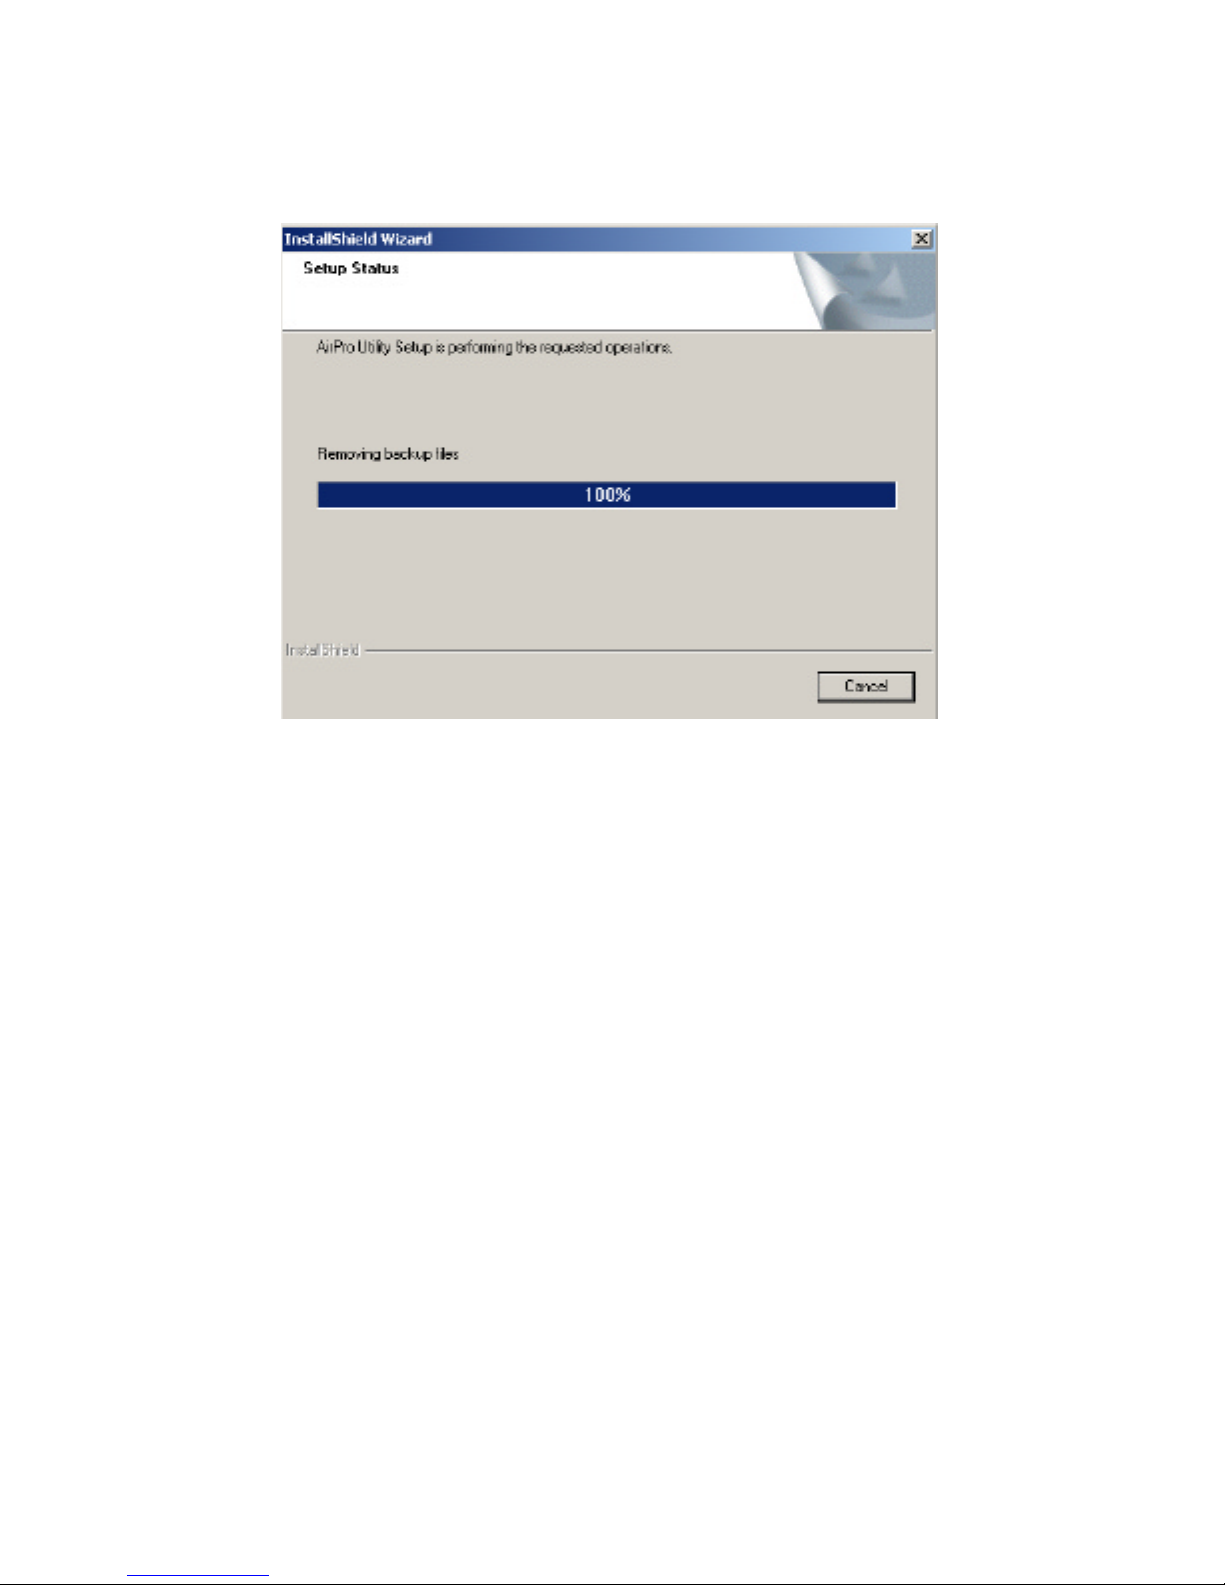
l The Setup Status screen will appear like the one below:
Click Next
Page 25
DWL-AB650 Wireless Multimode Cardbus Adapter
25
l A screen alerting you that all backup files have been removed
will appear as below:
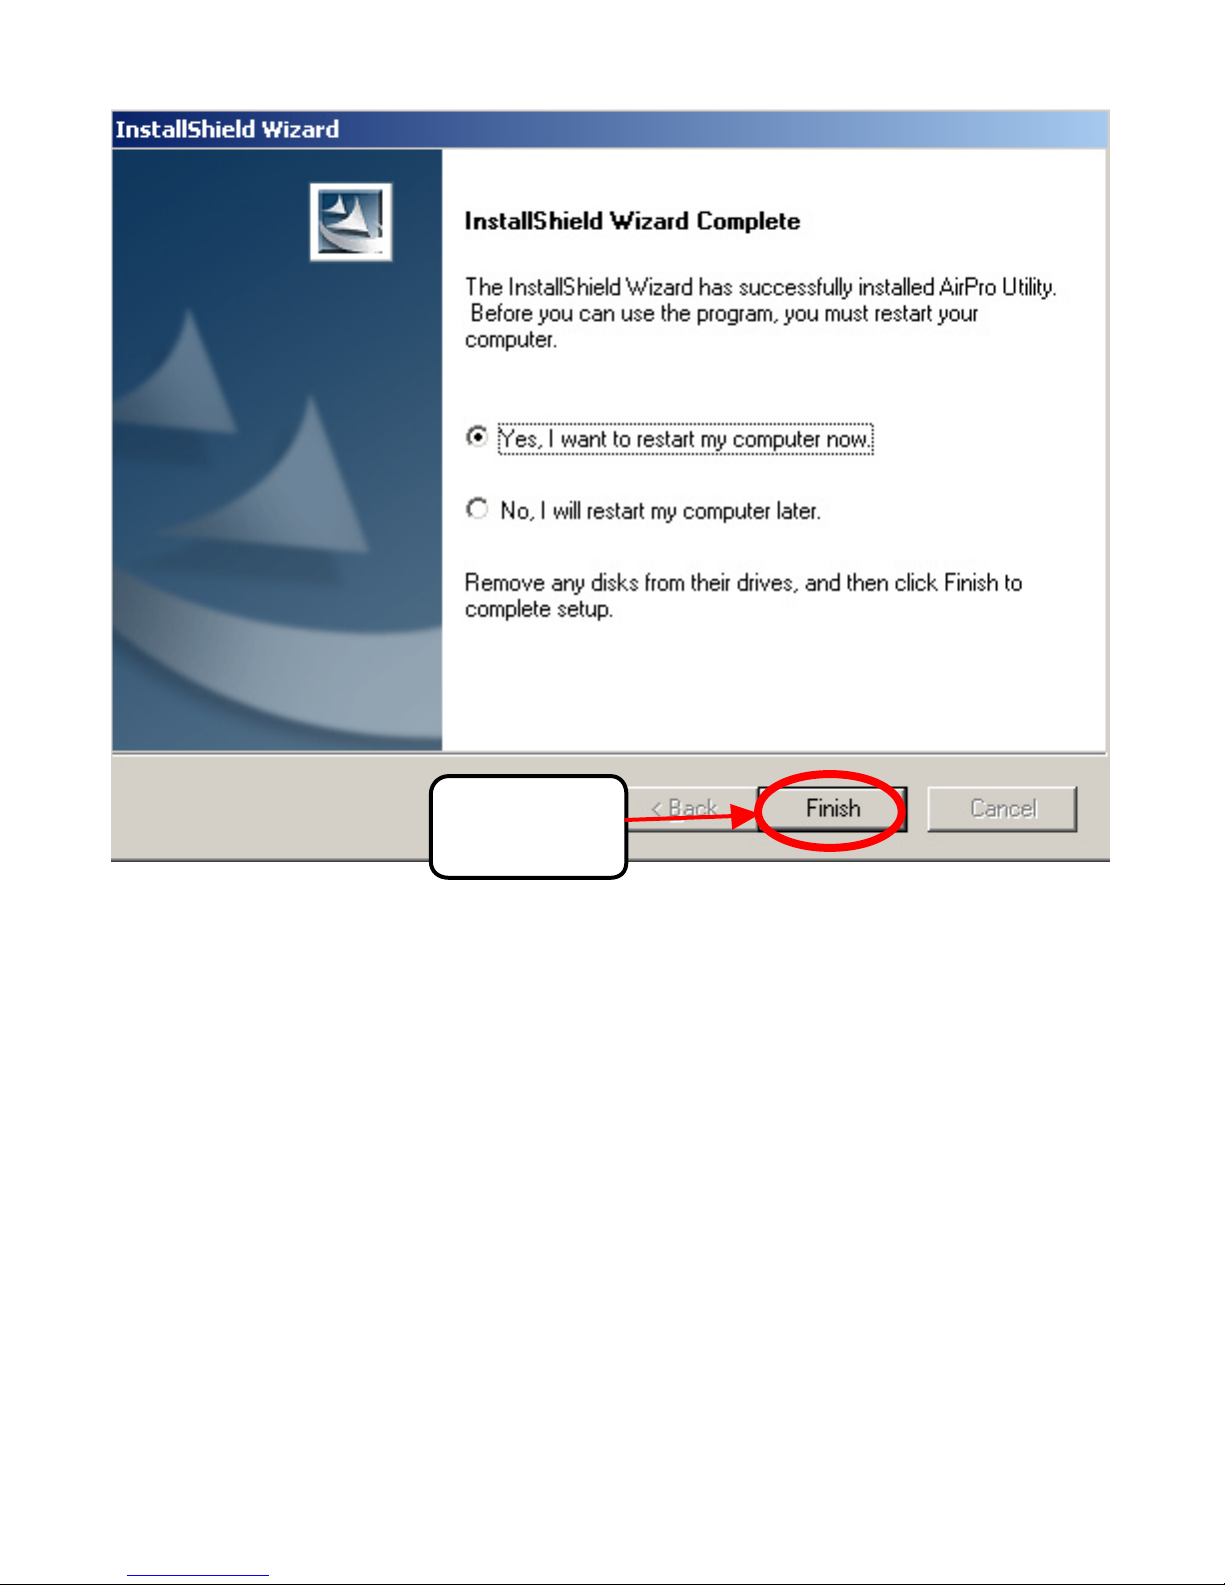
l After AirPro Utility has been successfully installed, InstallShield
Wizard will prompt you to restart your computer. Select “Yes, I
want to restart my computer now,” and click on Finish.
Page 26
DWL-AB650 Wireless Multimode Cardbus Adapter
26
Click Finish
Page 27
DWL-AB650 Wireless Multimode Cardbus Adapter
27
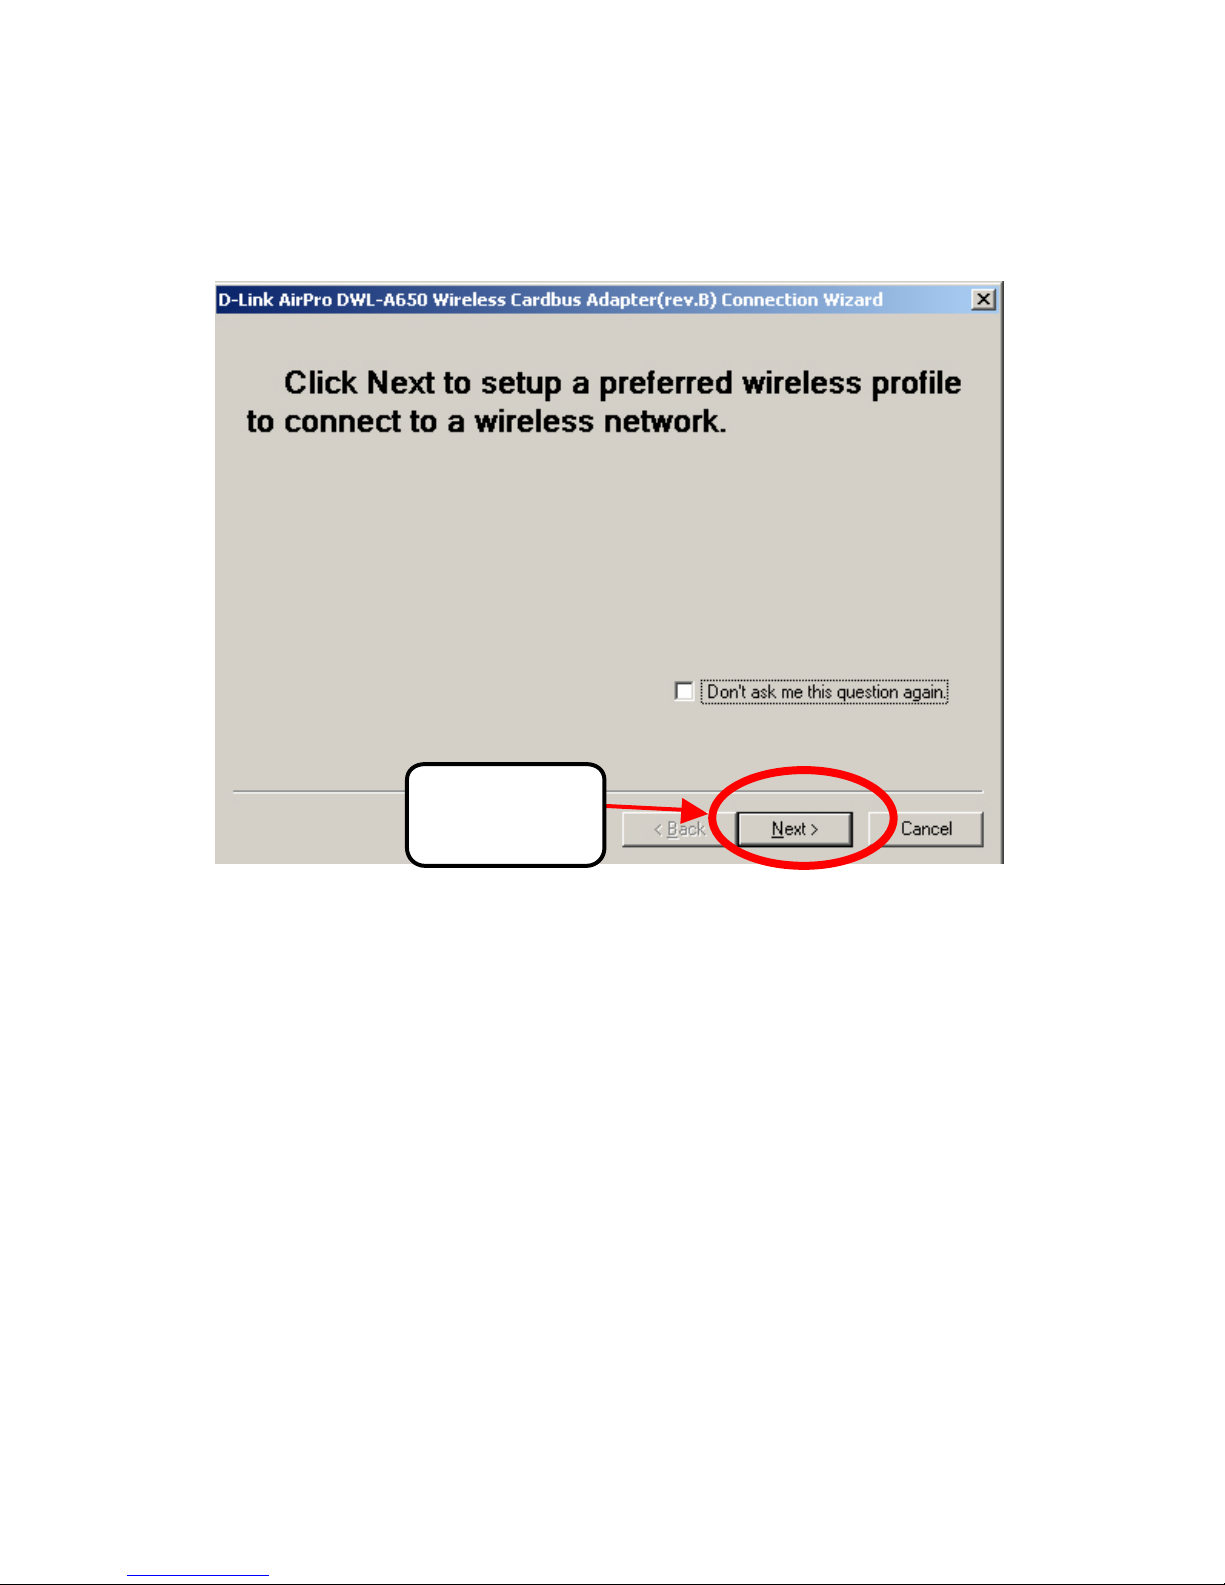
l After you have restarted your computer the following screen will
appear. Click Next to continue.
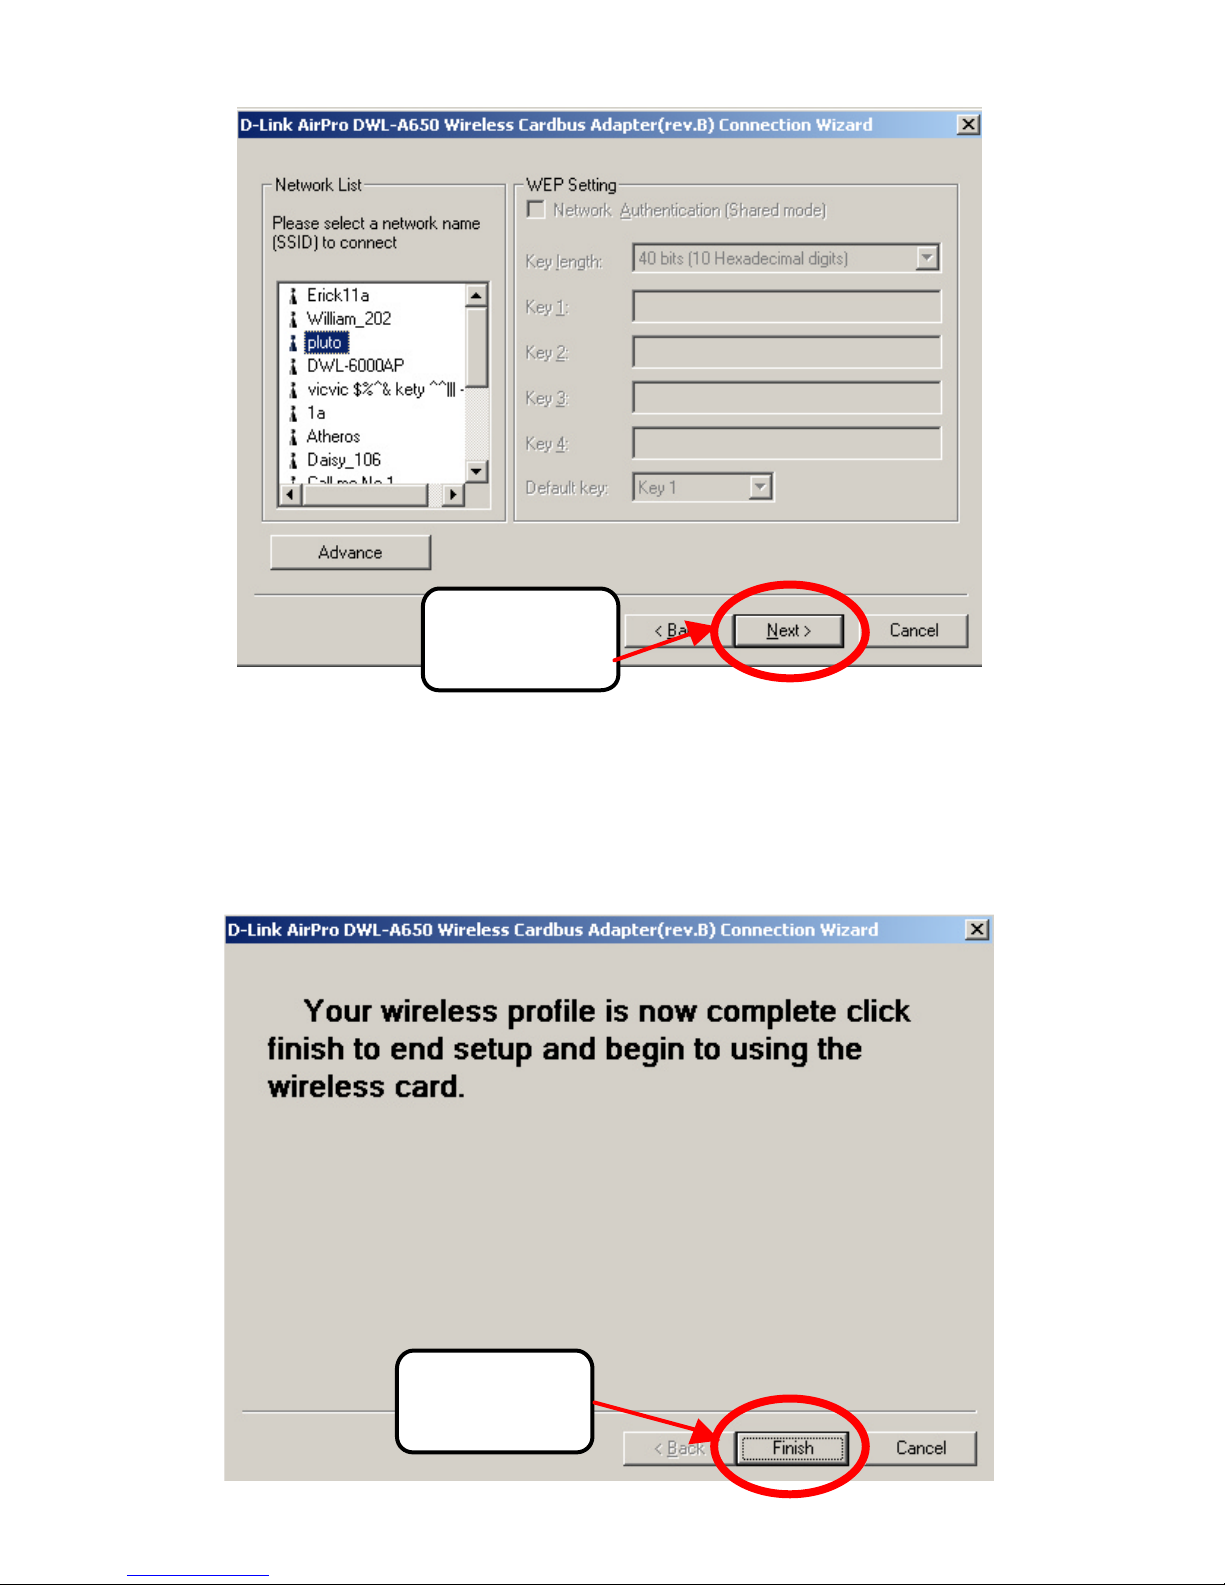
l Select the appropriate settings in the screen below to connect to
a wireless network (network name to connect and WEP settings).
Click Next to put settings into effect.
Click Next
Page 28
DWL-AB650 Wireless Multimode Cardbus Adapter
28
l You have completed the installation of the DWL-AB650.
l Now click Finish to end the setup procedures and start using
your new wireless card.
Click Next
Click Finish
Page 29
DWL-AB650 Wireless Multimode Cardbus Adapter
29
3. Uninstalling the Configuration Utility
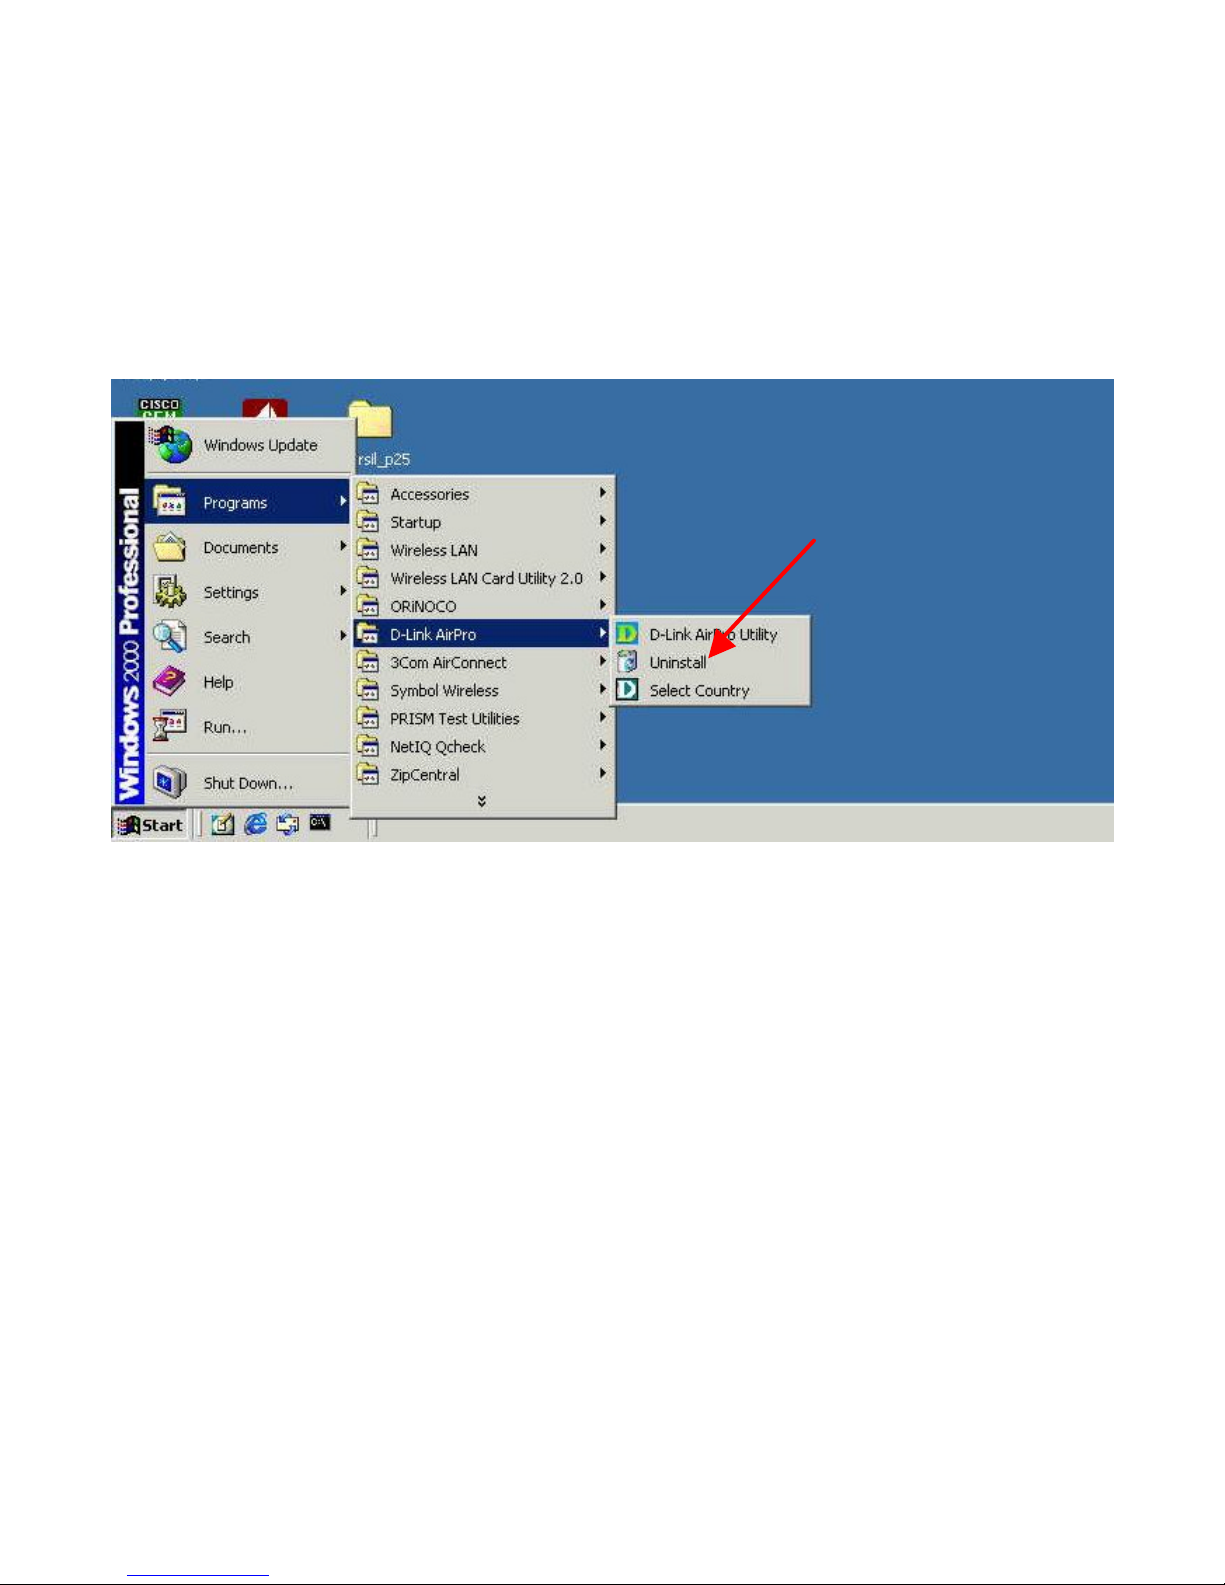
To uninstall the configuration utility simply click Uninstall under
ProgramsàD-Link AirProàUninstall.
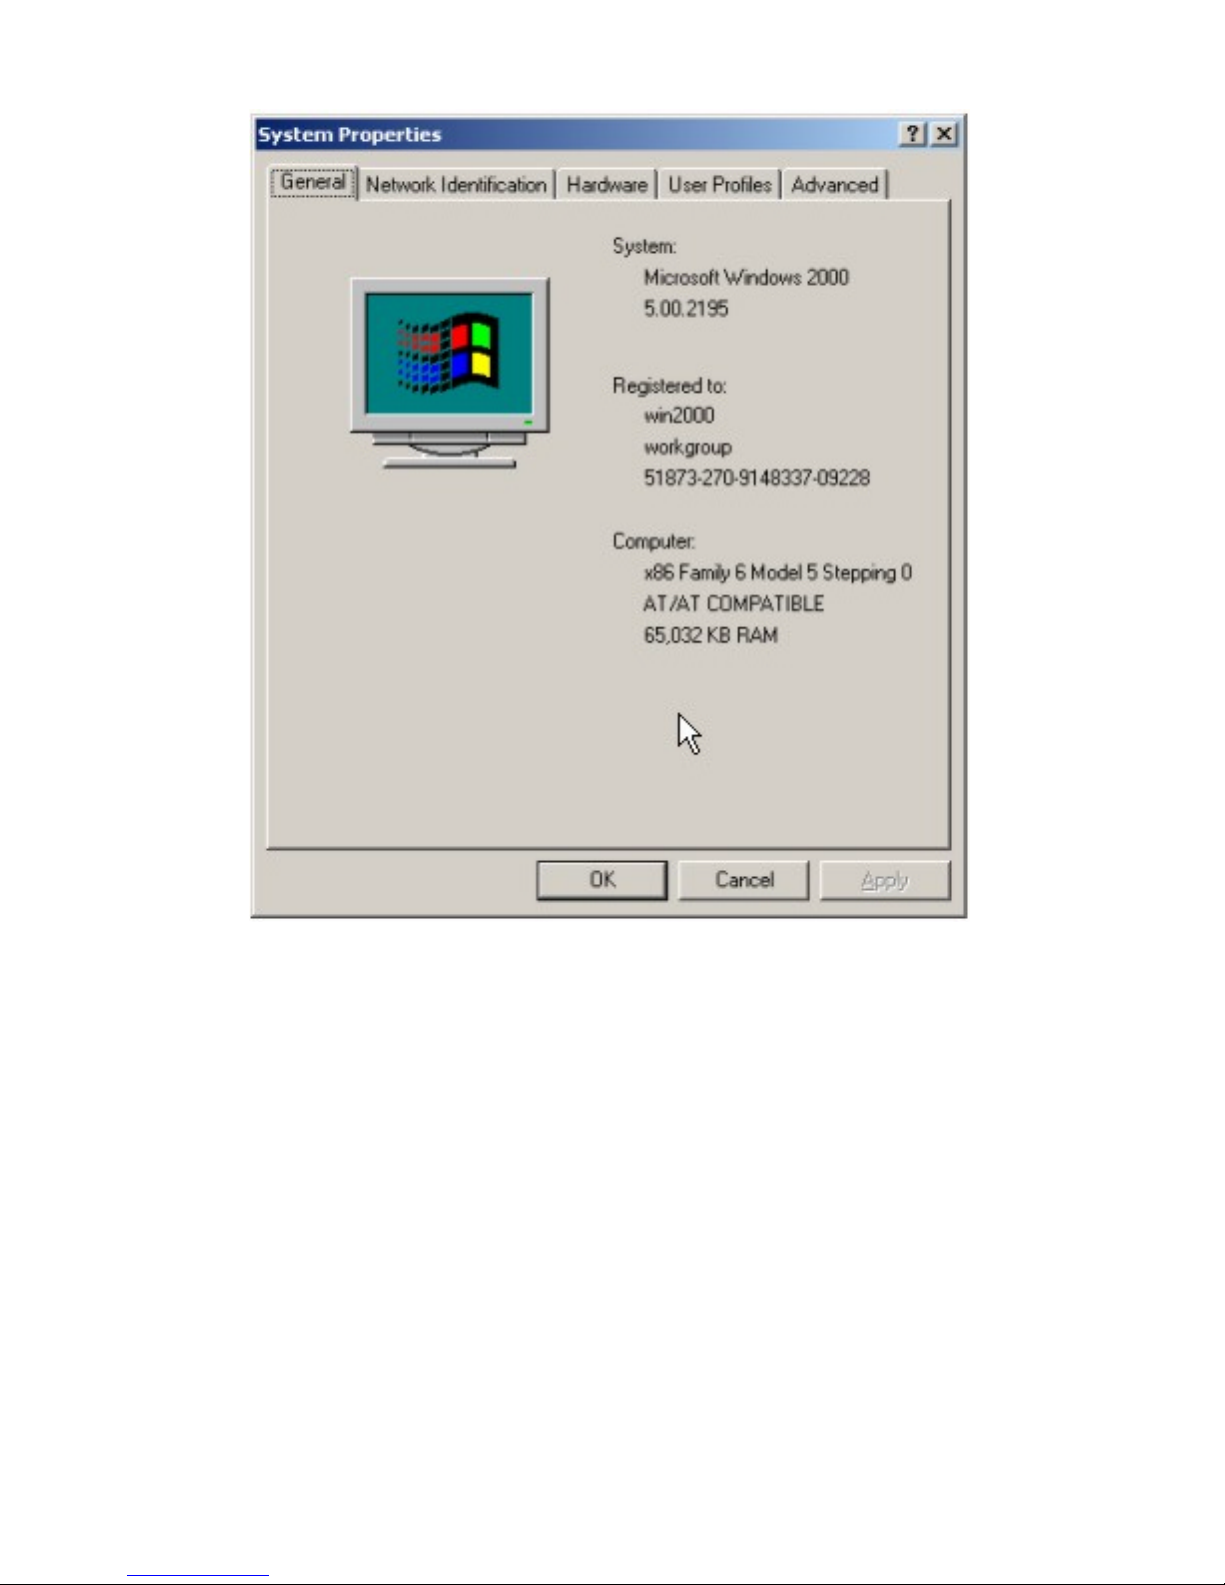
To uninstall the driver, right-click on My Computer.
Left-click on Properties to bring up the System Properties screen.
Page 30
DWL-AB650 Wireless Multimode Cardbus Adapter
30
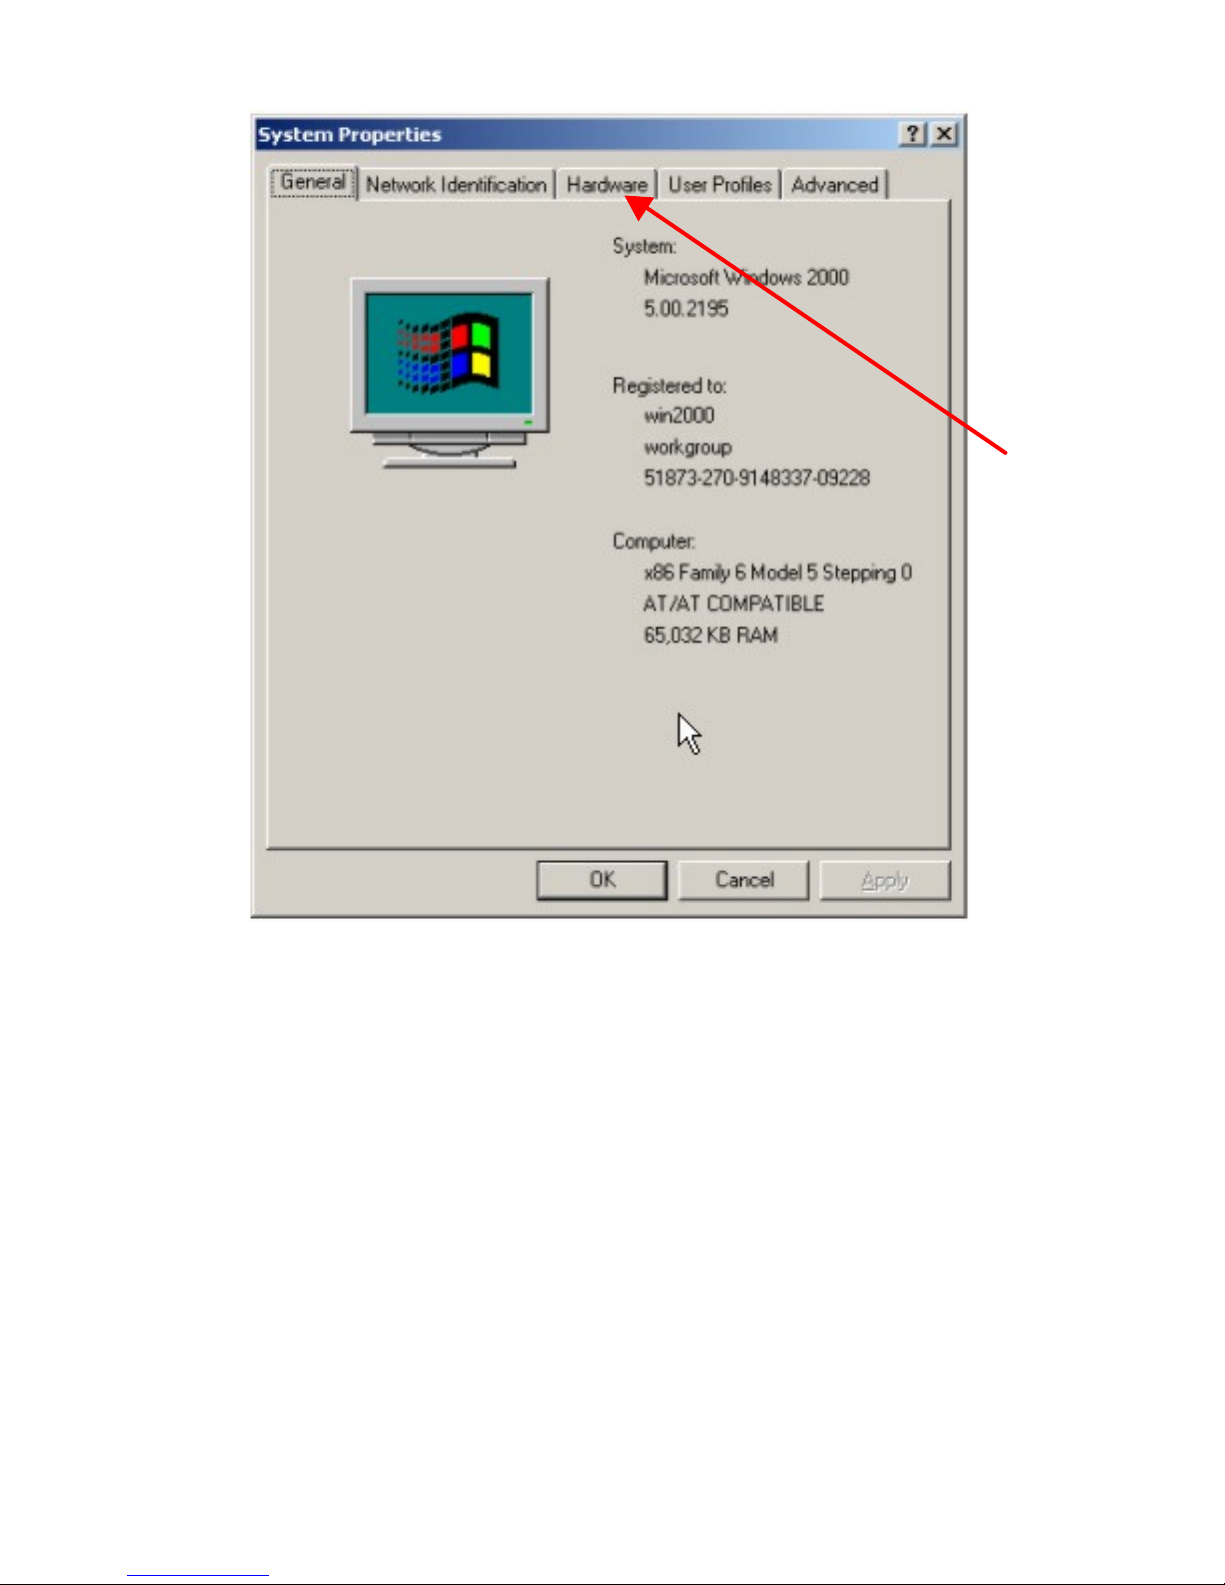
Click on the Hardware tab.
Page 31
DWL-AB650 Wireless Multimode Cardbus Adapter
31
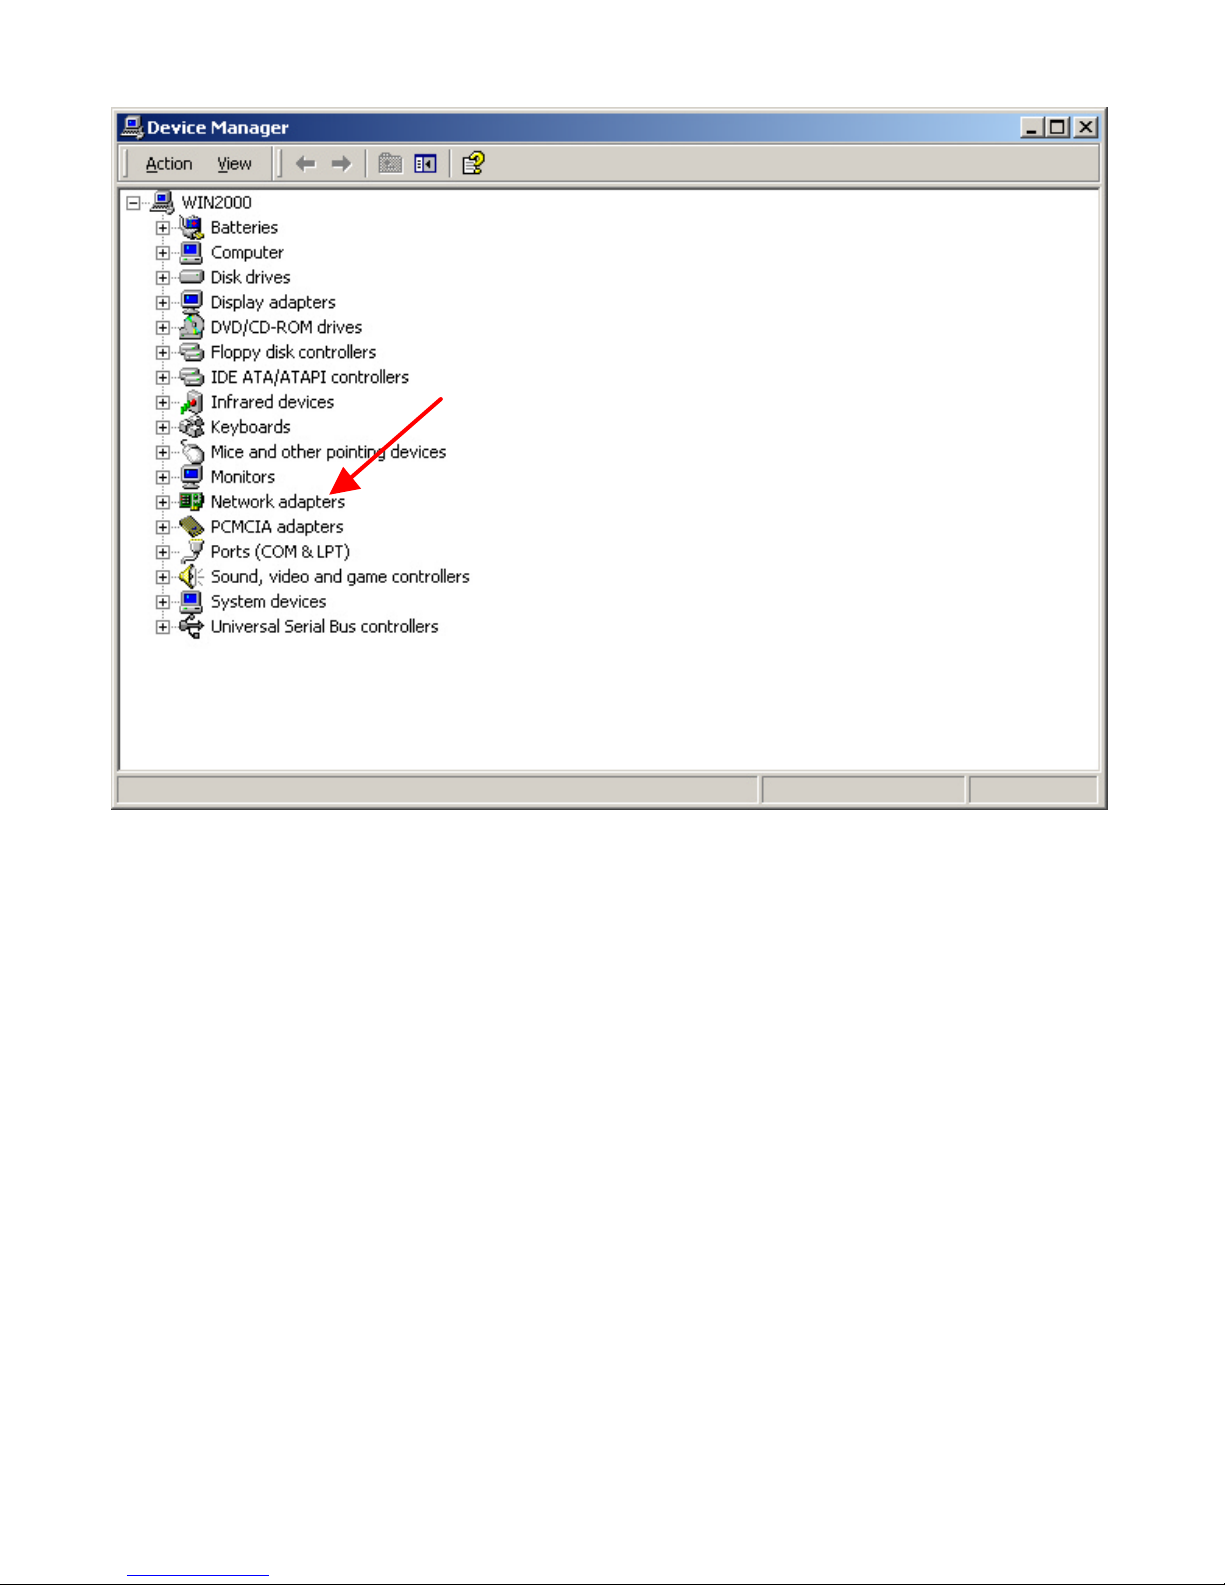
Click on Device Manager.
Page 32
DWL-AB650 Wireless Multimode Cardbus Adapter
32
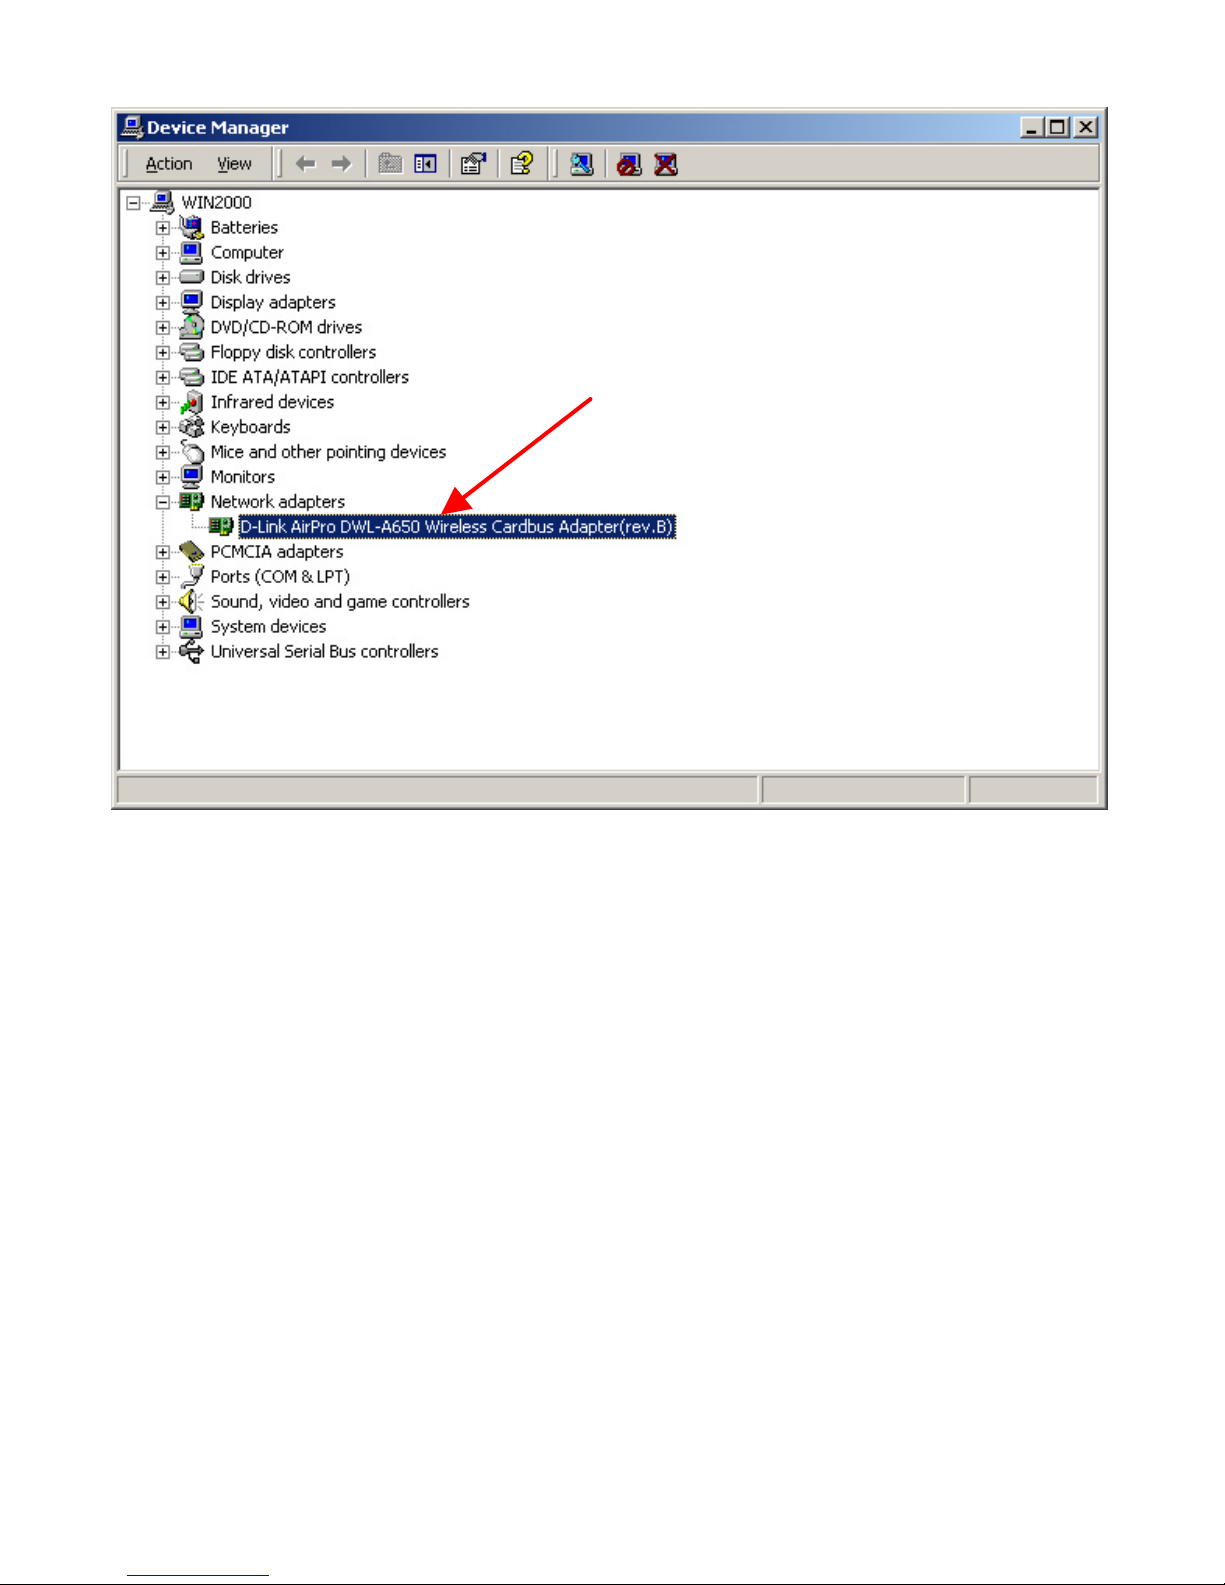
Click on Network adapters.
Page 33
DWL-AB650 Wireless Multimode Cardbus Adapter
33
Right click on the “D-Link AirPro DWL-AB650 Wireless Cardbus Adapter”
icon.
Page 34
DWL-AB650 Wireless Multimode Cardbus Adapter
34
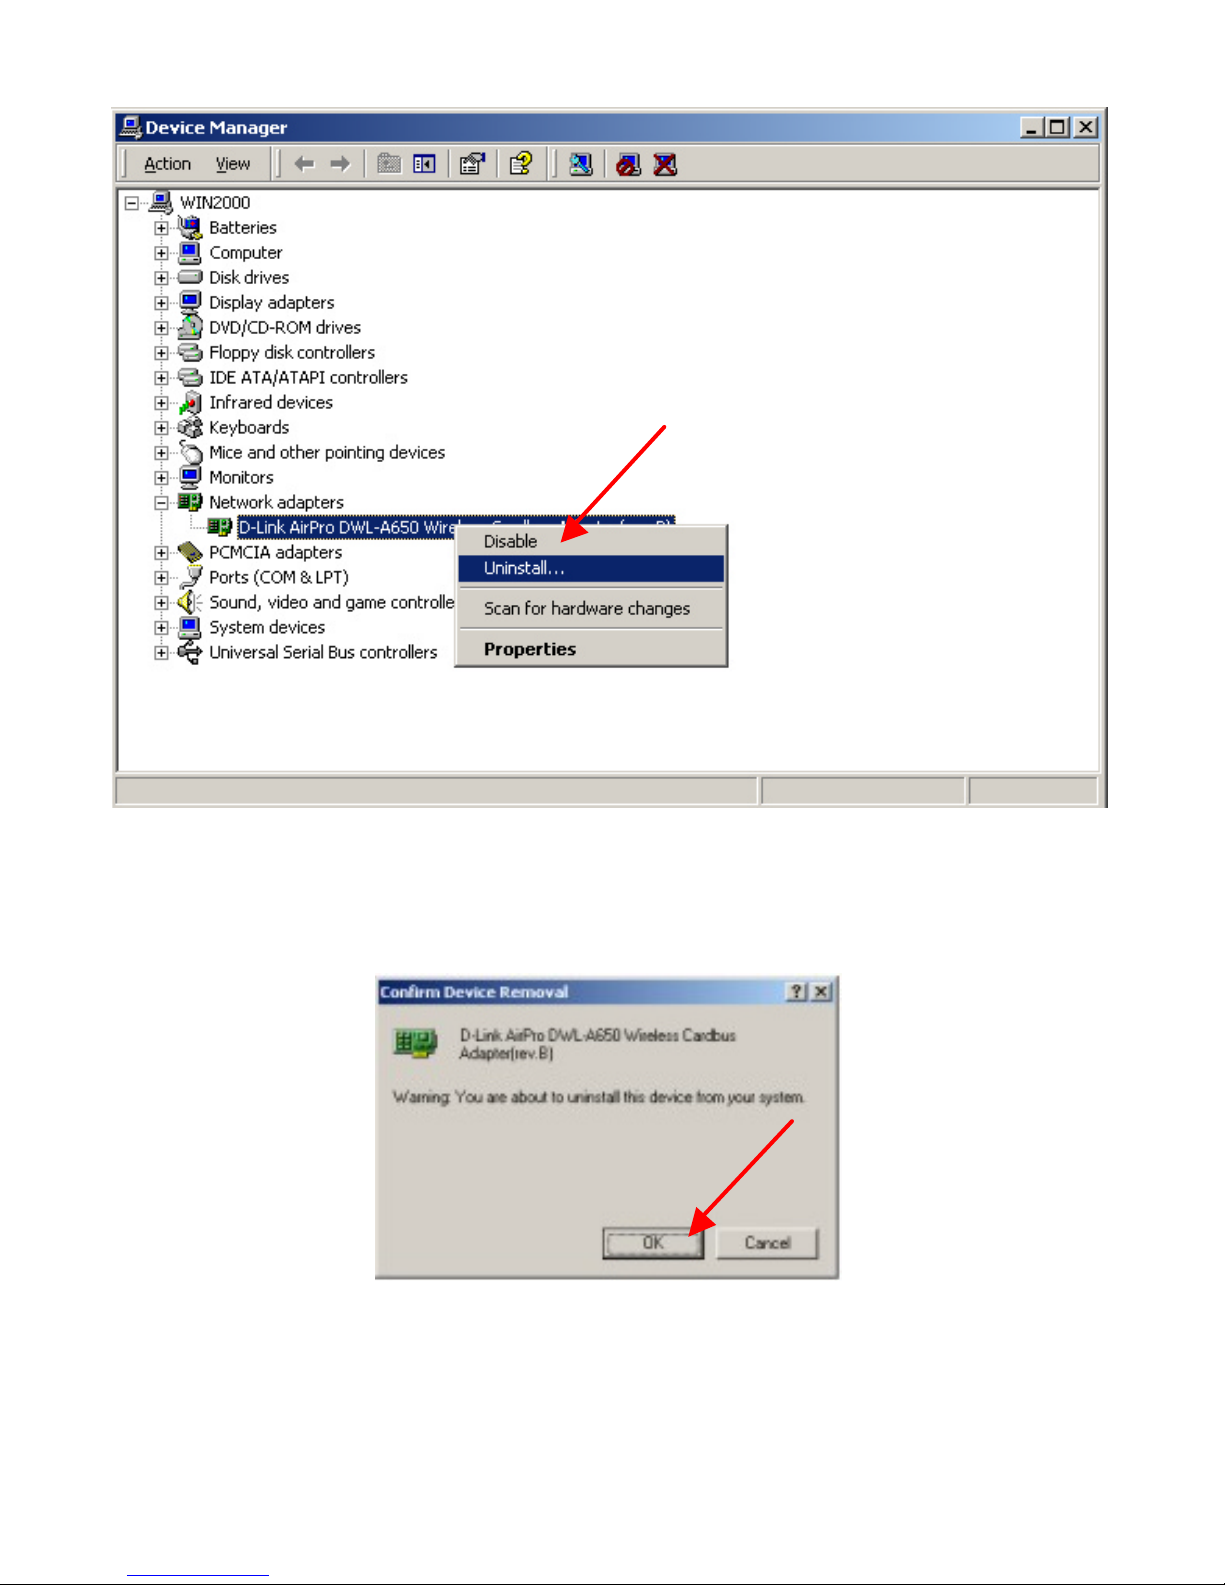
Click on Uninstall. You will then receive a Confirm Device Removal screen.
Click OK to complete the uninstall procedure.
Page 35
DWL-AB650 Wireless Multimode Cardbus Adapter
35
Using the Select Country Utility
An additional utility is provided with your DWL-AB650 Cardbus Adapter to
set the card’s country location. Different countries around the world regulate
the frequencies that your DWL-AB650 Cardbus Adapter uses to
communicate with an AP and to transfer data. The Select Country utility
allows you to tell the card which country you are in, and the card will then
select the frequencies appropriate to that country.
It is important to note that the Country settings of your DWL-AB650 must be
the same as the country settings of an AP or another 802.11a or 802.11b
Cardbus Adapter in order for communication to take place.
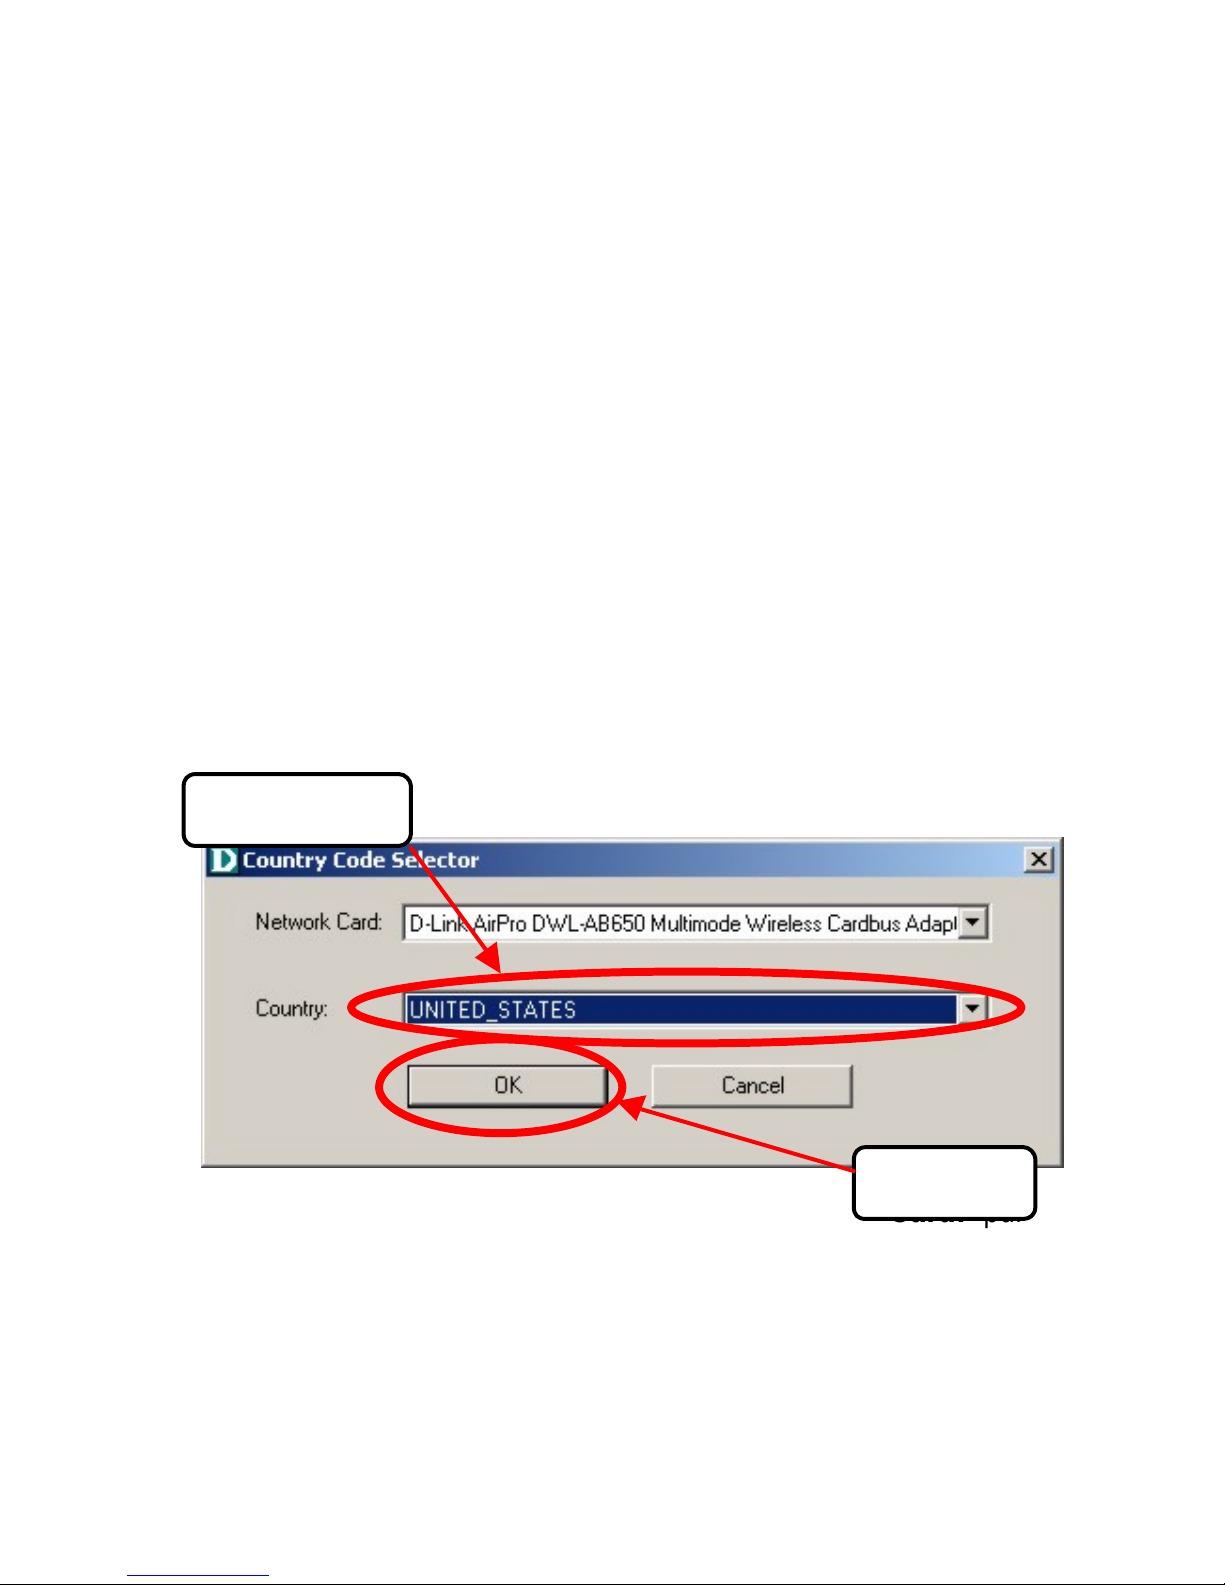
l From the Windows Start button, select Programs, and then
D-Link AirPro, and finally Select Country. The following screen
will open:
l Select your DWL-AB650 from the Network Card: pull-down
menu, if you have multiple NICs installed in your computer.
l Select the appropriate country from the Country: pull-down
menu.
l Click OK.
Click OK
Select Country
Page 36
DWL-AB650 Wireless Multimode Cardbus Adapter
36
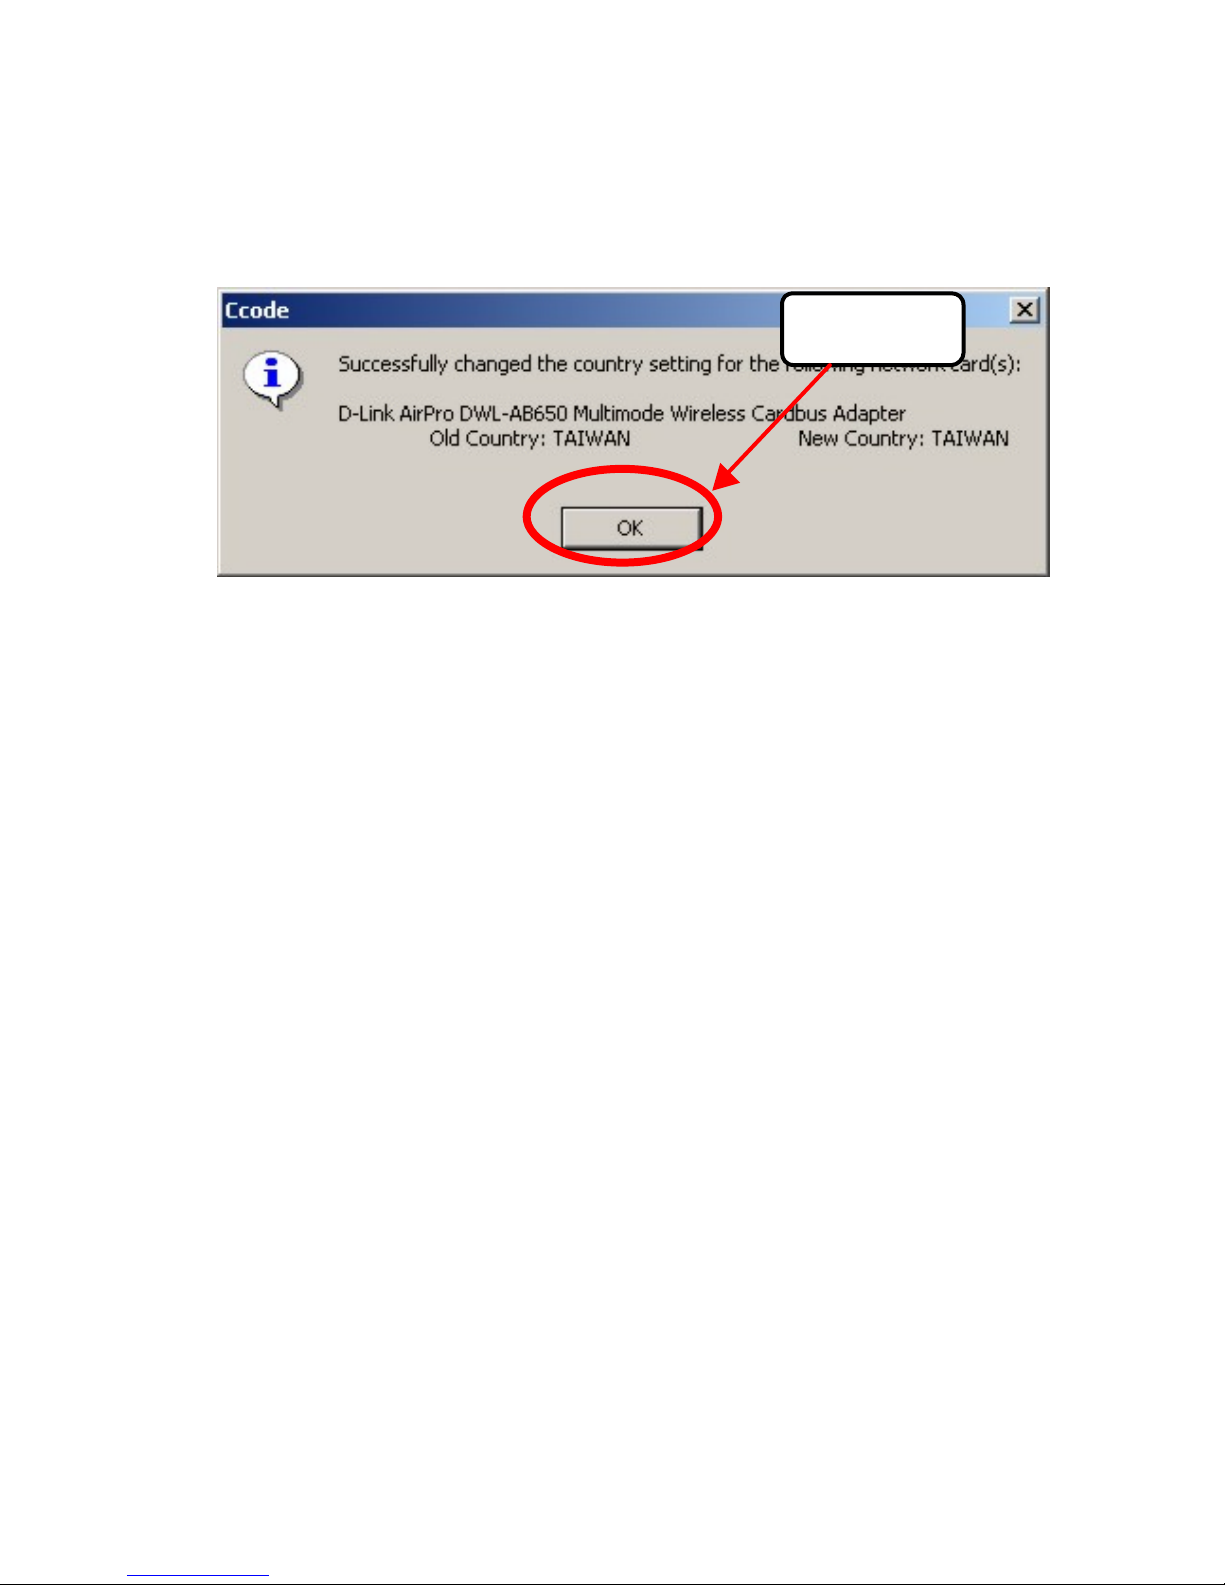
The Select Country utility will display the following screen for confirmation
of the change:
Click OK to make the change.
Click OK
Page 37
DWL-AB650 Wireless Multimode Cardbus Adapter
37
Using the Configuration Utility for Windows 2000, 98,
or ME
If you are using Windows 2000, 98, ME, or NT, the Configuration Utility
program for the DWL-AB650 is called AirPro. Once you have installed
AirPro (the configuration utility), you can read this section of the manual to
find out how to monitor and configure your DWL-AB650 adapter using
AirPro. Screenshots for this section have been taken in Windows 2000.
There are four tabs in the AirPro Configuration Utility program. In this
section we will describe the uses for each tab in the Configuration Utility
window.
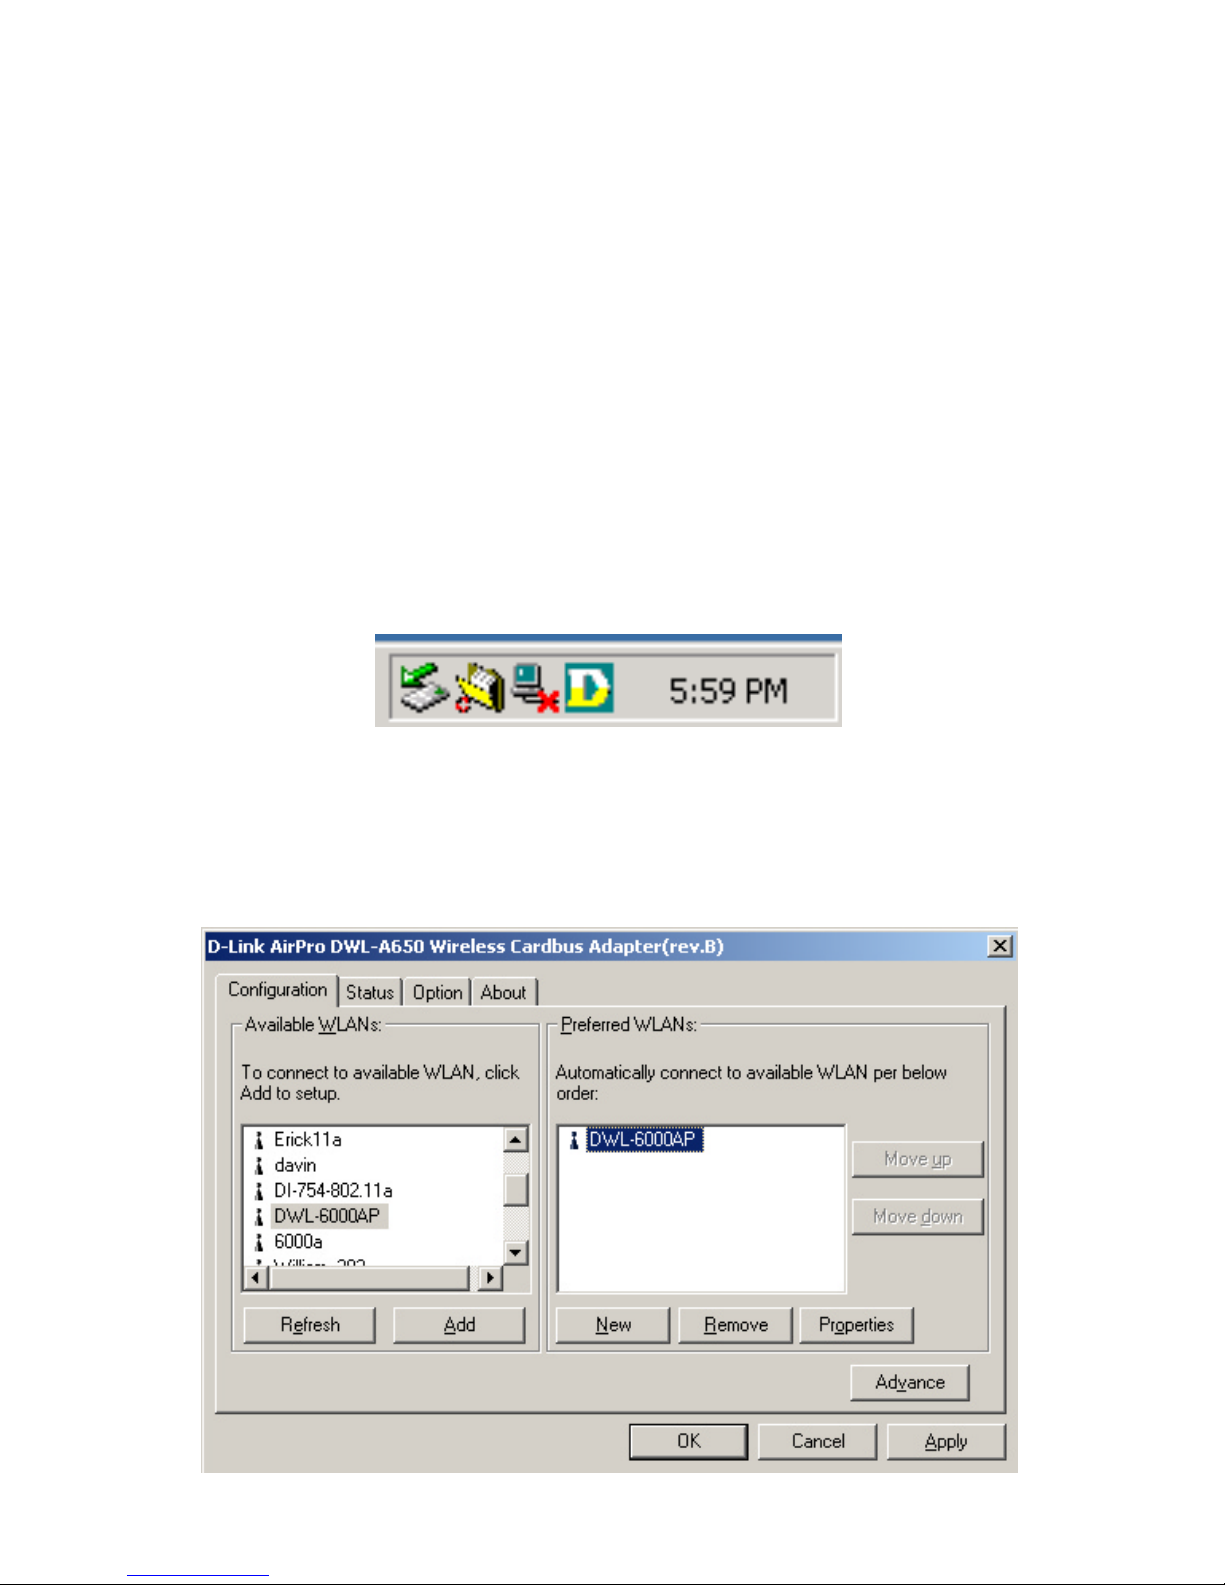
To access AirPro once it has been installed, just double-click on the AirPro
icon in the taskbar:
Under the Configuration Tab you will find a list of access points to which
you may add or change connections.
Configuration Tab
Page 38
DWL-AB650 Wireless Multimode Cardbus Adapter
38
On the left side of the screen are Available WLANs which you may connect
to by first selecting the WLAN (it will appear highlighted) and then clicking on
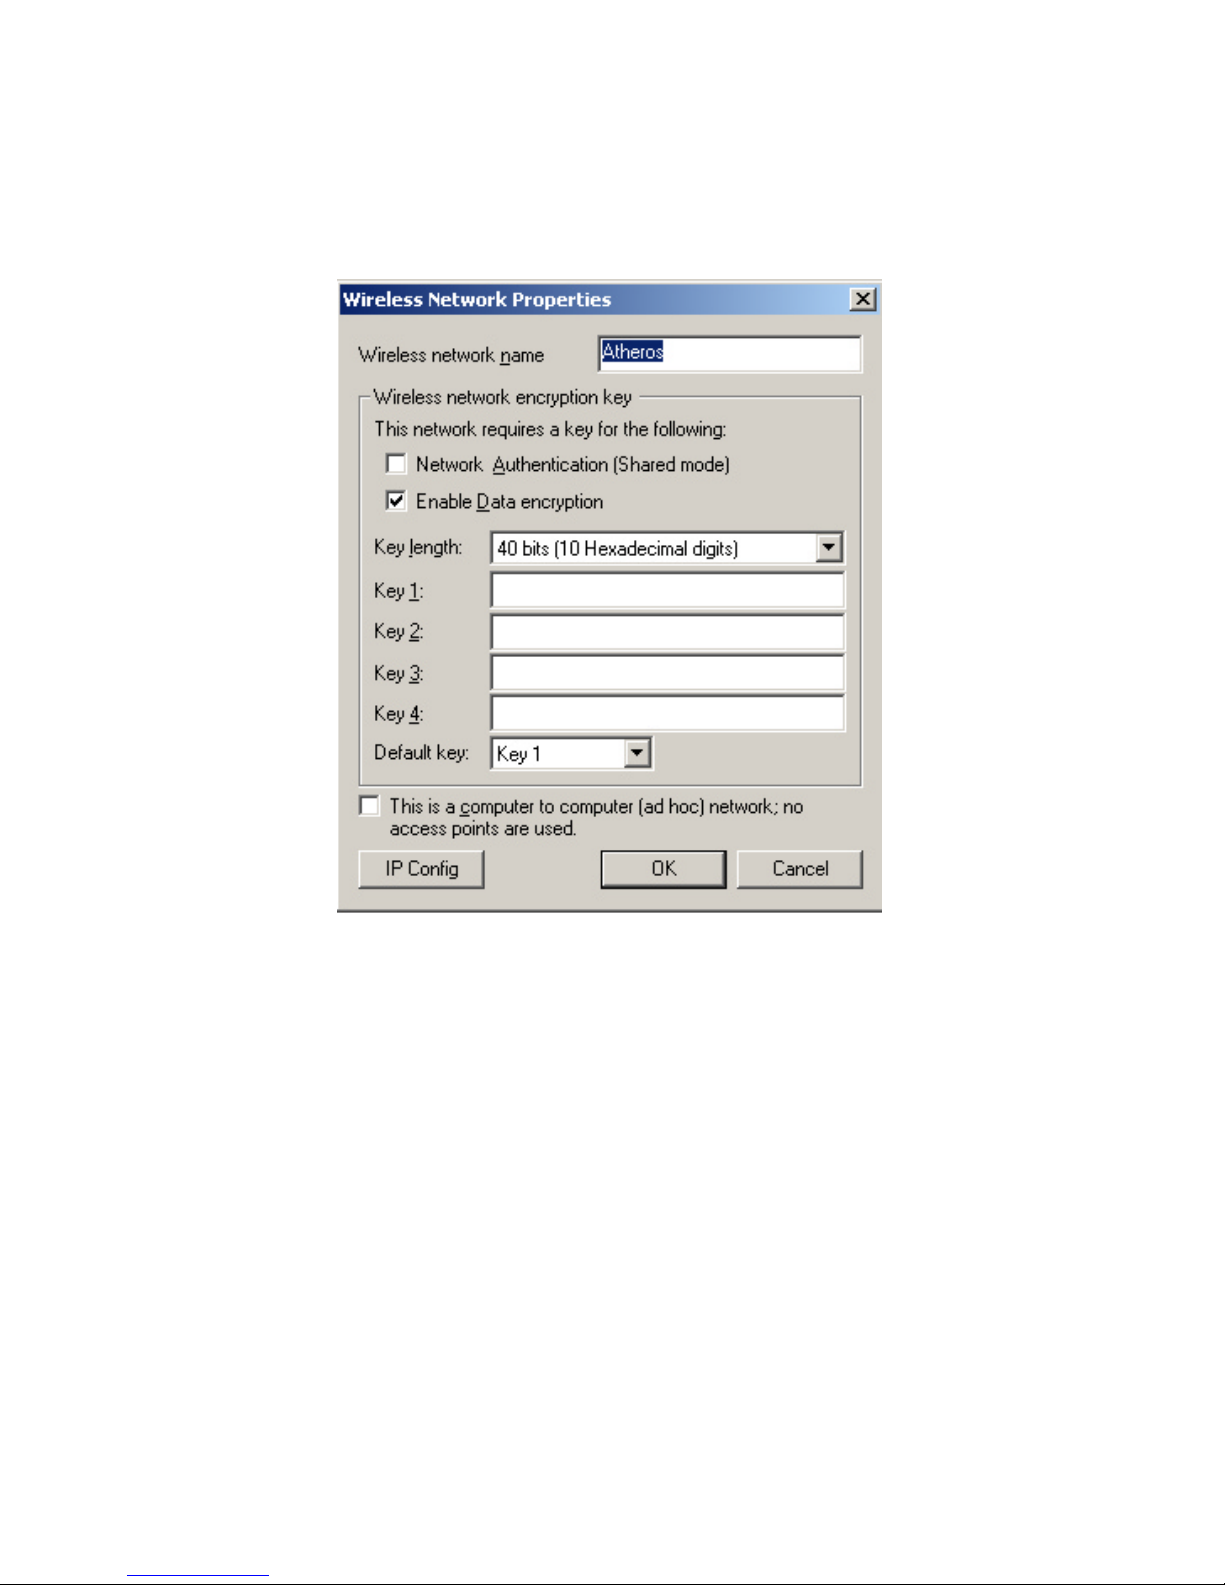
Add. When you do so a screen like the one below will pop up:
In the Wireless Network Properties screen you may change the name of
the WLAN. You may also enter wireless network encryption keys by
checking Network Authentication (Shared mode) or Enable Data
encryption. You may enter up to four keys of length 10 or 25 hexadecimal
digits. You may also set one of the four keys as a default key.
Click on IP Config to set the IP address, Subnet mask, and Default gateway
manually instead of obtaining the IP address automatically through the
Dynamic Configuration Host Protocol (DCHP) server. You may also set the
DNS server address settings and WINS address settings.
If the network you are using is a computer-to-computer network or ad hoc
network, no access points are used. You may check the box “This is a
computer to computer (ad hoc) network; no access points are used” to
enable this option.
Page 39

DWL-AB650 Wireless Multimode Cardbus Adapter
39
On the Configuration Tab click on Refresh to call up all the available
WLANs. On the right side of the screen is a list of Preferred WLANs. These
are WLANs that have already been added to the wireless network. Click
New to rename the WLAN and reset its properties. You will see the
Wireless Network Properties screen as displayed previously when you
click New. This is also the same screen that will appear when you click
Properties on the right side of the Configuration Tab screen. Click
Remove to remove the connection.
On the right side of the screen you may click Move Up to move the selected
WLAN up in the order it is displayed on the Preferred WLANs screen. You
may click Move Down to move the selected WLAN down in the order in
which it is displayed.
The Advance button allows the user to set the WLAN type to connect:
infrastructure and ad hoc network, infrastructure network only, or ad hoc
network only. You may also automatically connect to non-preferred networks
by checking the option.
Note: The following countries cannot use the ad hoc network: Austria,
Belgium, Denmark, Finland, France, Germany, Ireland, Italy, the
Netherlands, Norway, Poland, Sweden, Switzerland, and the United
Kingdom.
When you are done entering the settings and options for the wireless
network click on OK, Cancel, or Apply. OK places the settings into effect
and closes the graphical user interface (GUI). Cancel makes invalid all
settings entered. Apply places the settings entered into effect but does not
close the GUI.
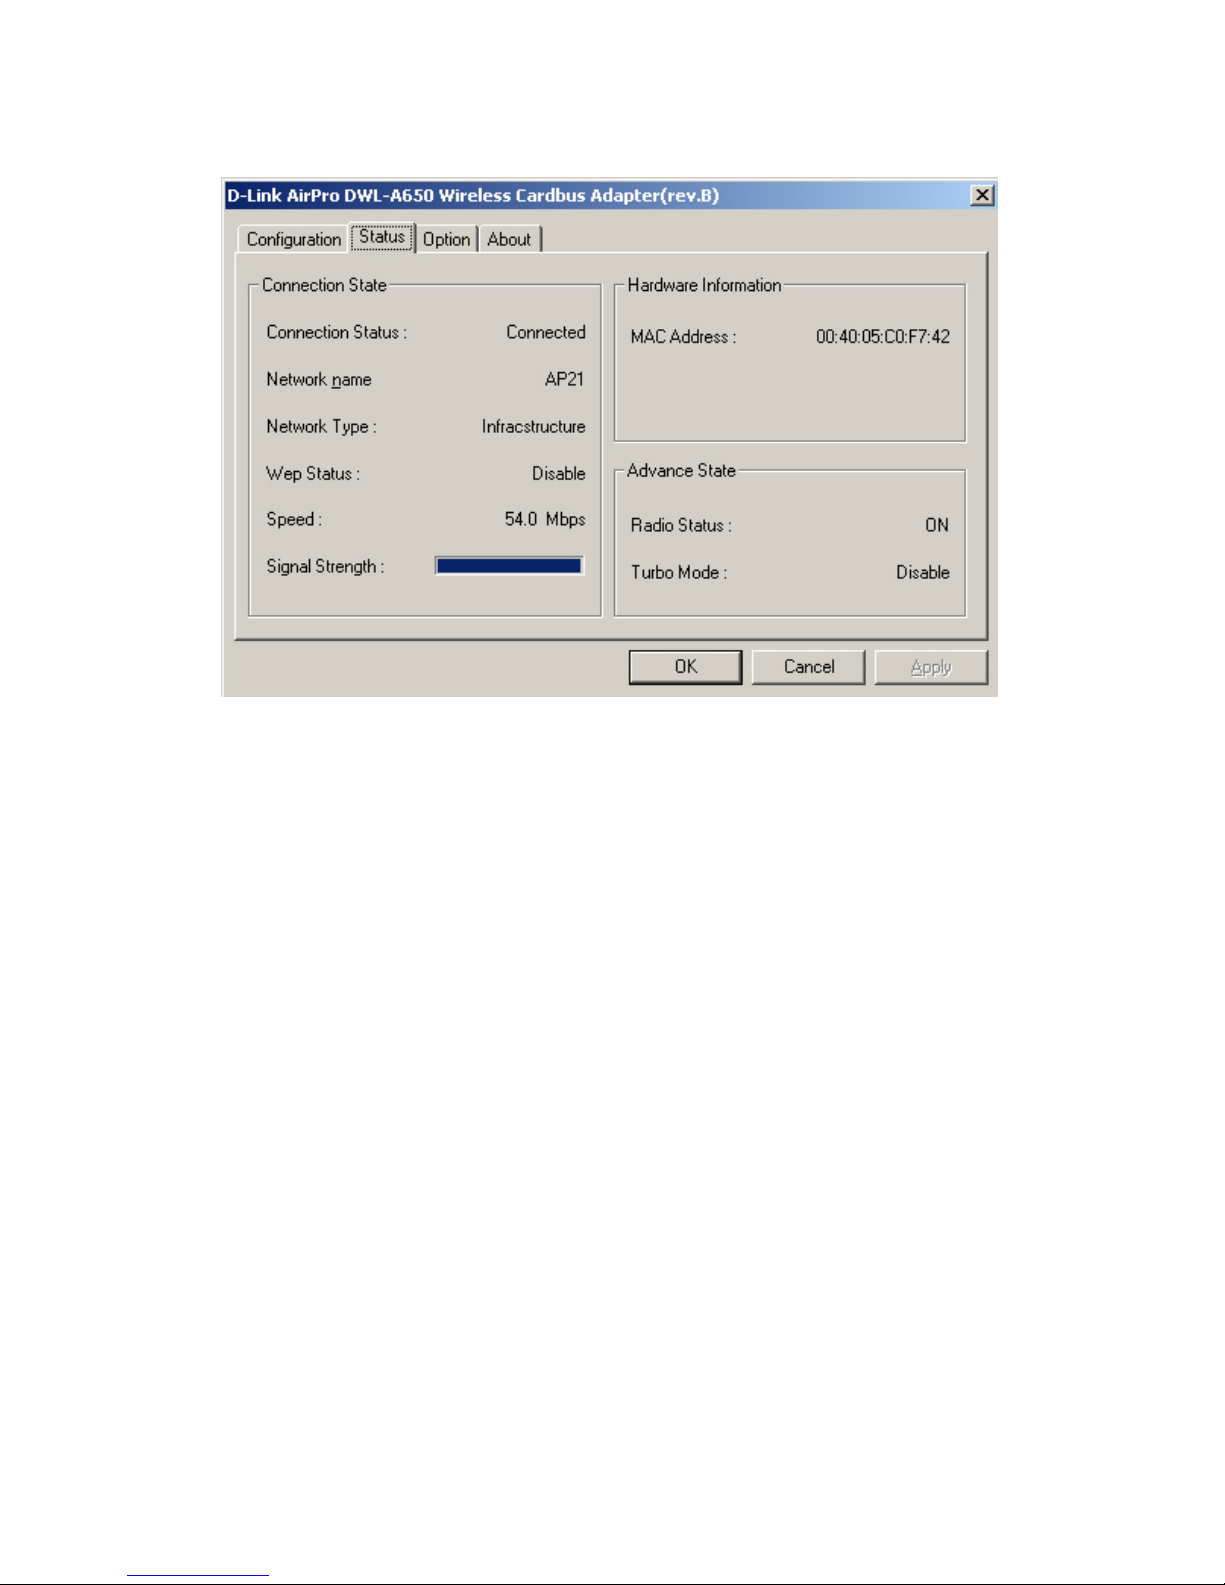
Under the Status Tab you will find information on the connection state,
hardware information, and advanced state.
Page 40
DWL-AB650 Wireless Multimode Cardbus Adapter
40
Status Tab
Information given under Connected State are the Connection status
(connected or disconnected), Network name, Network type (infrastructure
or adhoc), Wep Status (enabled or disabled), Speed (of the wireless
connection), and Signal Strength (a colored bar shows the intensity of the
radio signals in the network).
Under Hardware Information the Media Access Control (MAC) address of
the hardware (WLAN cardbus adapter) is given. The MAC address is a
factory given address that cannot be changed.
Advanced State shows the Radio Status (ON or OFF) and Turbo Mode
(Enabled or Disabled).
Click OK to accept the connection status and exit the GUI. Click Cancel to
not accept the status settings and exit the GUI.
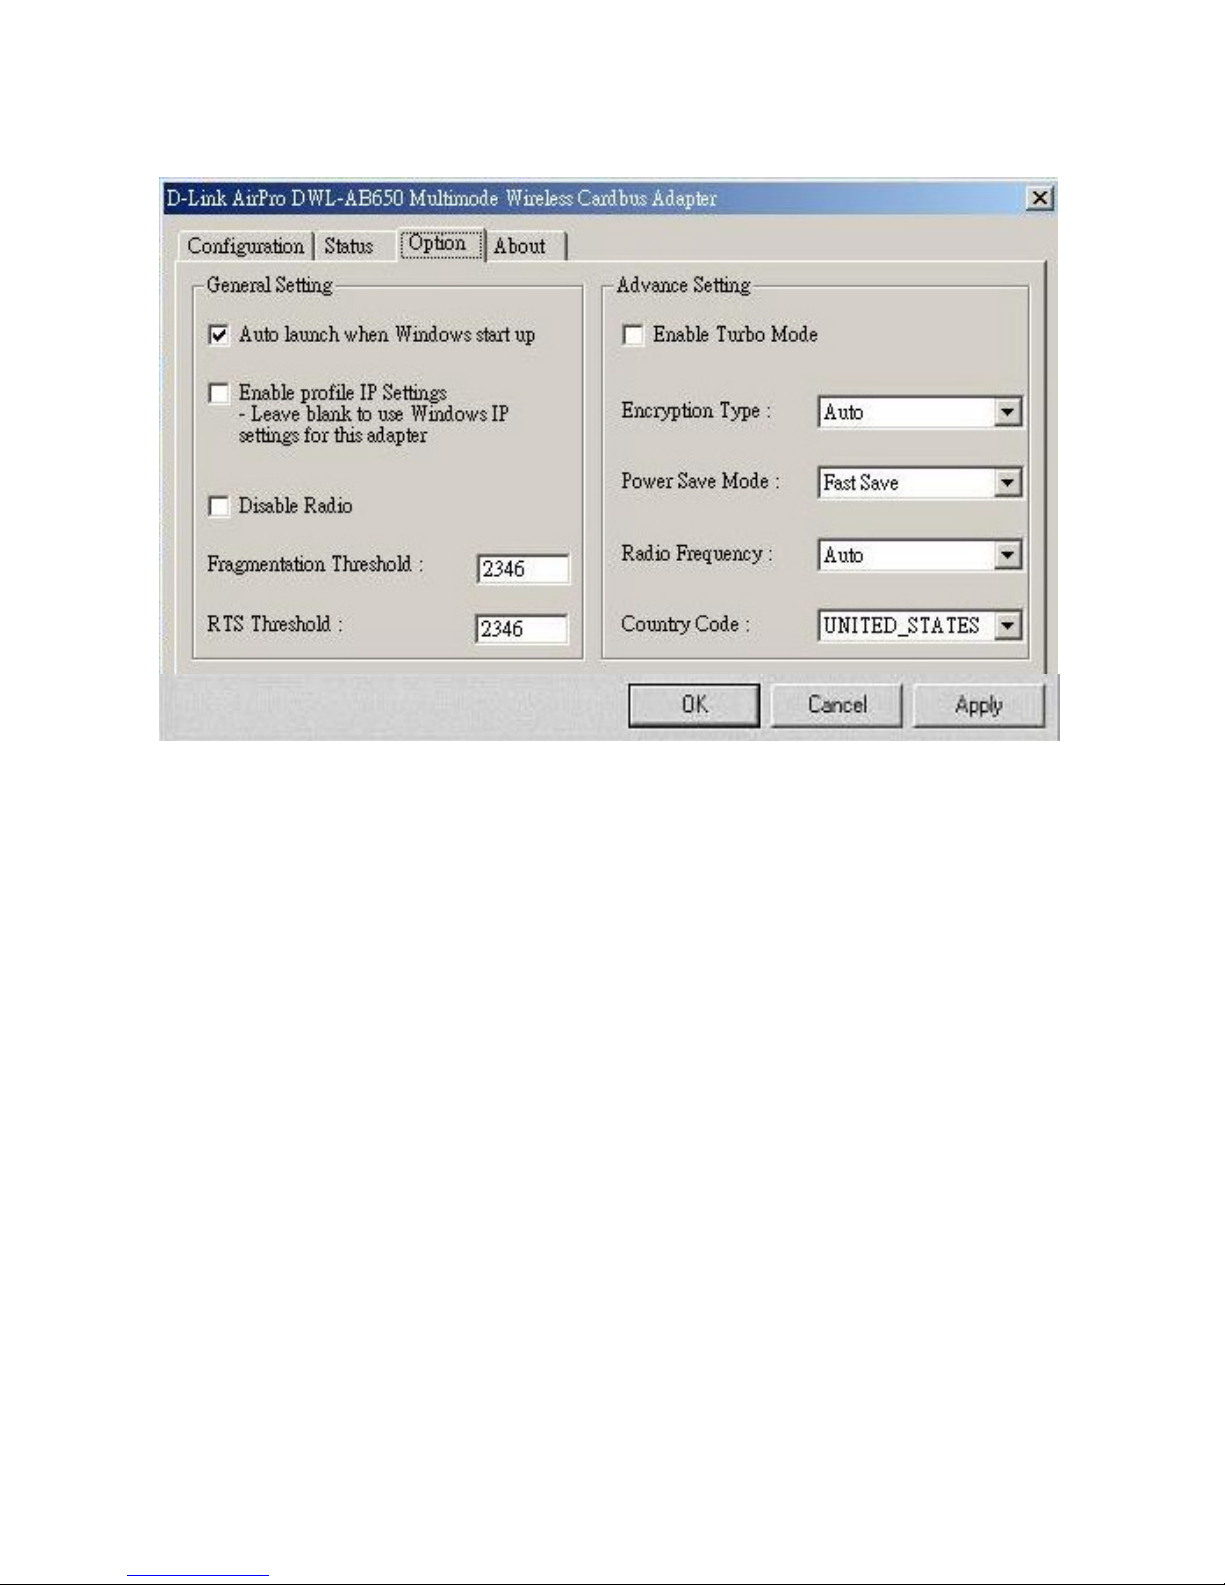
Under the Option Tab general settings and advanced settings are shown.
Page 41
DWL-AB650 Wireless Multimode Cardbus Adapter
41
Option Tab
Under General Setting, check “Auto launch when Windows starts up” so
that AirPro automatically launches when Windows starts up. Check “Use IP
Setting in Profile” to enable the IP settings made under IP Config in the
Wireless Network Properties screen. If checked current IP settings will be
saved. If unchecked (and previously checked), previous IP settings will be
restored. If “Use Windows IP settings” is checked, IP settings from “Network
and Dial-up connections” will be used. Check “Disable Radio” to disconnect
the network connection without removing the WLAN cardbus adapter.
Under Advanced Settings, check “Enable Turbo Mode” to enable turbo
mode. Turbo mode can then take effect if you are using a turbo mode
enabled Access Point. Set the Encryption Type to Auto, WEP, or Advanced
Encryption Standard (AES). The Radio Frequency has been preset to
802.11a-5GHz.
Note: Currently, the Turbo Mode is only available in the United States.
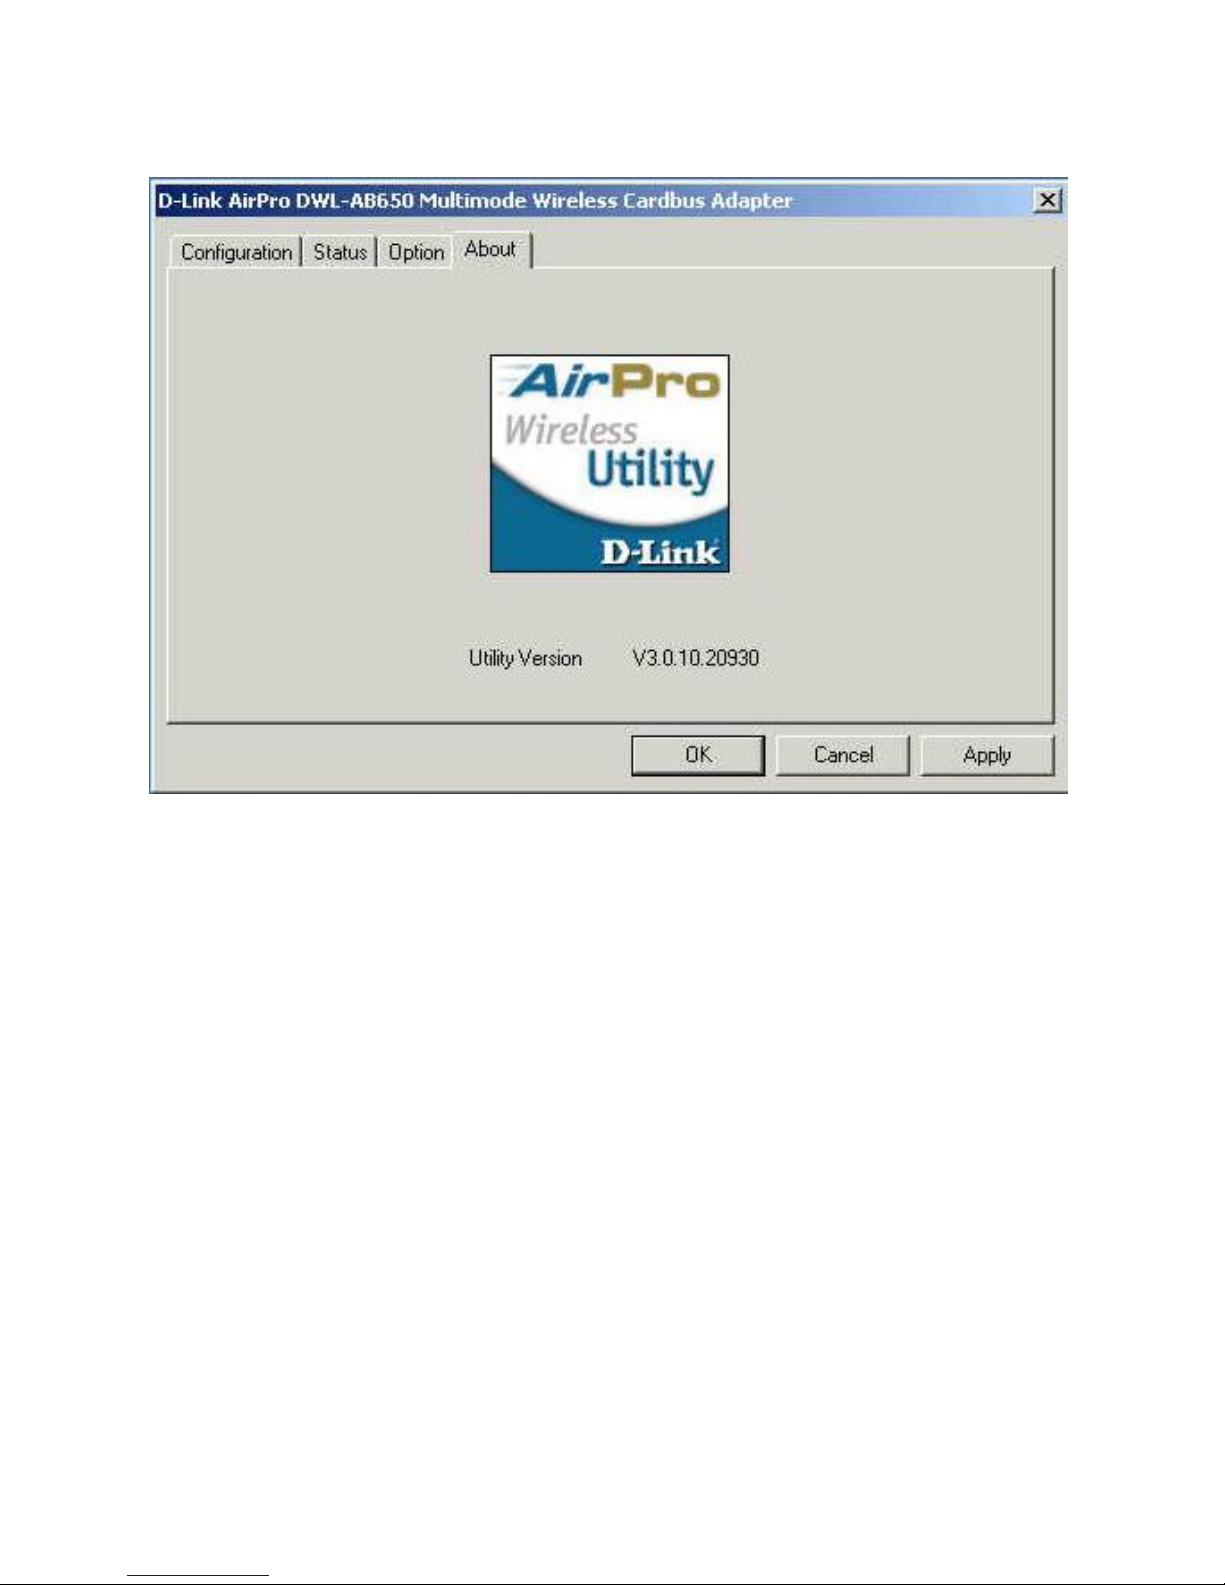
The About Tab gives the utility version number of the AirPro utility.
Page 42
DWL-AB650 Wireless Multimode Cardbus Adapter
42
About Tab
Page 43
DWL-AB650 Wireless Multimode Cardbus Adapter
43
Using the Configuration Utility for Windows XP
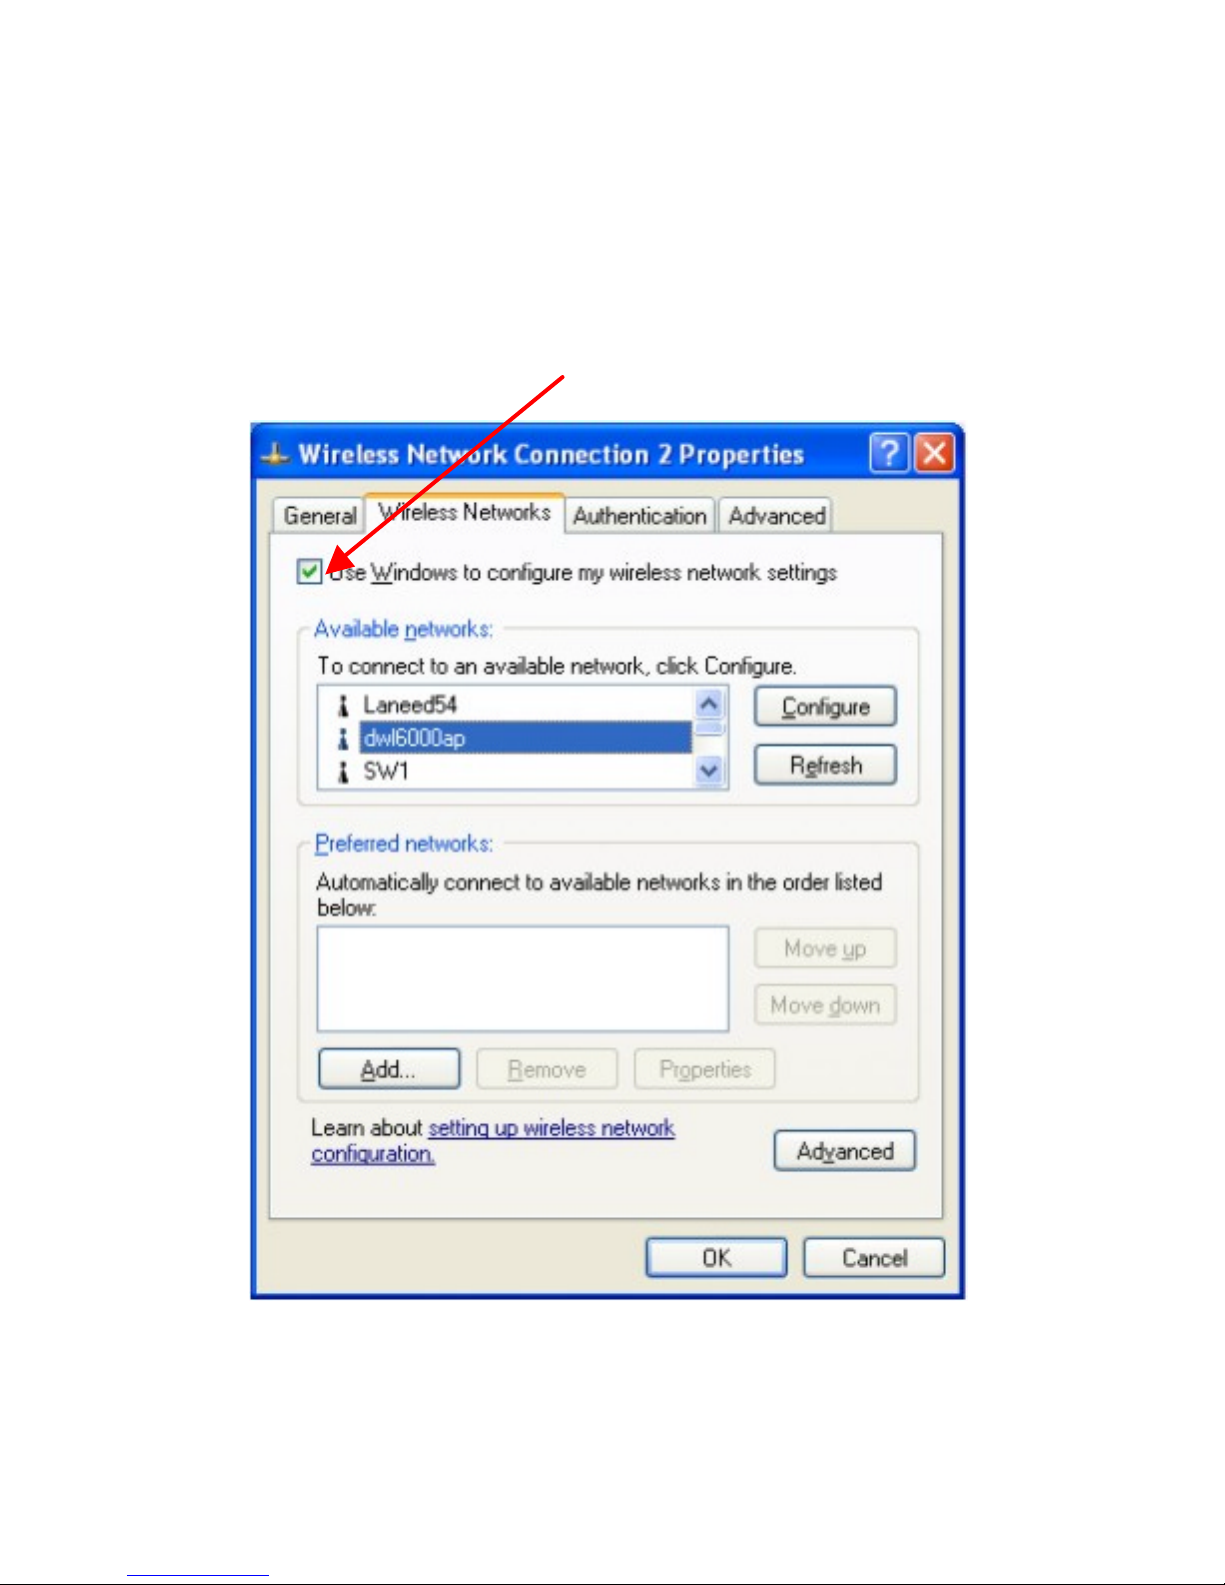
The Air Pro Configuration Utility supports Windows XP; however, Windows
XP has its own utility for wireless devices. In order to use the AirPro
Configuration Utility as described in the last section you must disable the
utility built into Windows XP by unchecking the box below.
Page 44
DWL-AB650 Wireless Multimode Cardbus Adapter
44
If you leave the “Use Windows to configure my wireless network settings”
box checked, you will use the Windows XP utility for wireless devices.
The following demonstrates how to manage wireless network connections
with the Windows XP built-in utility.
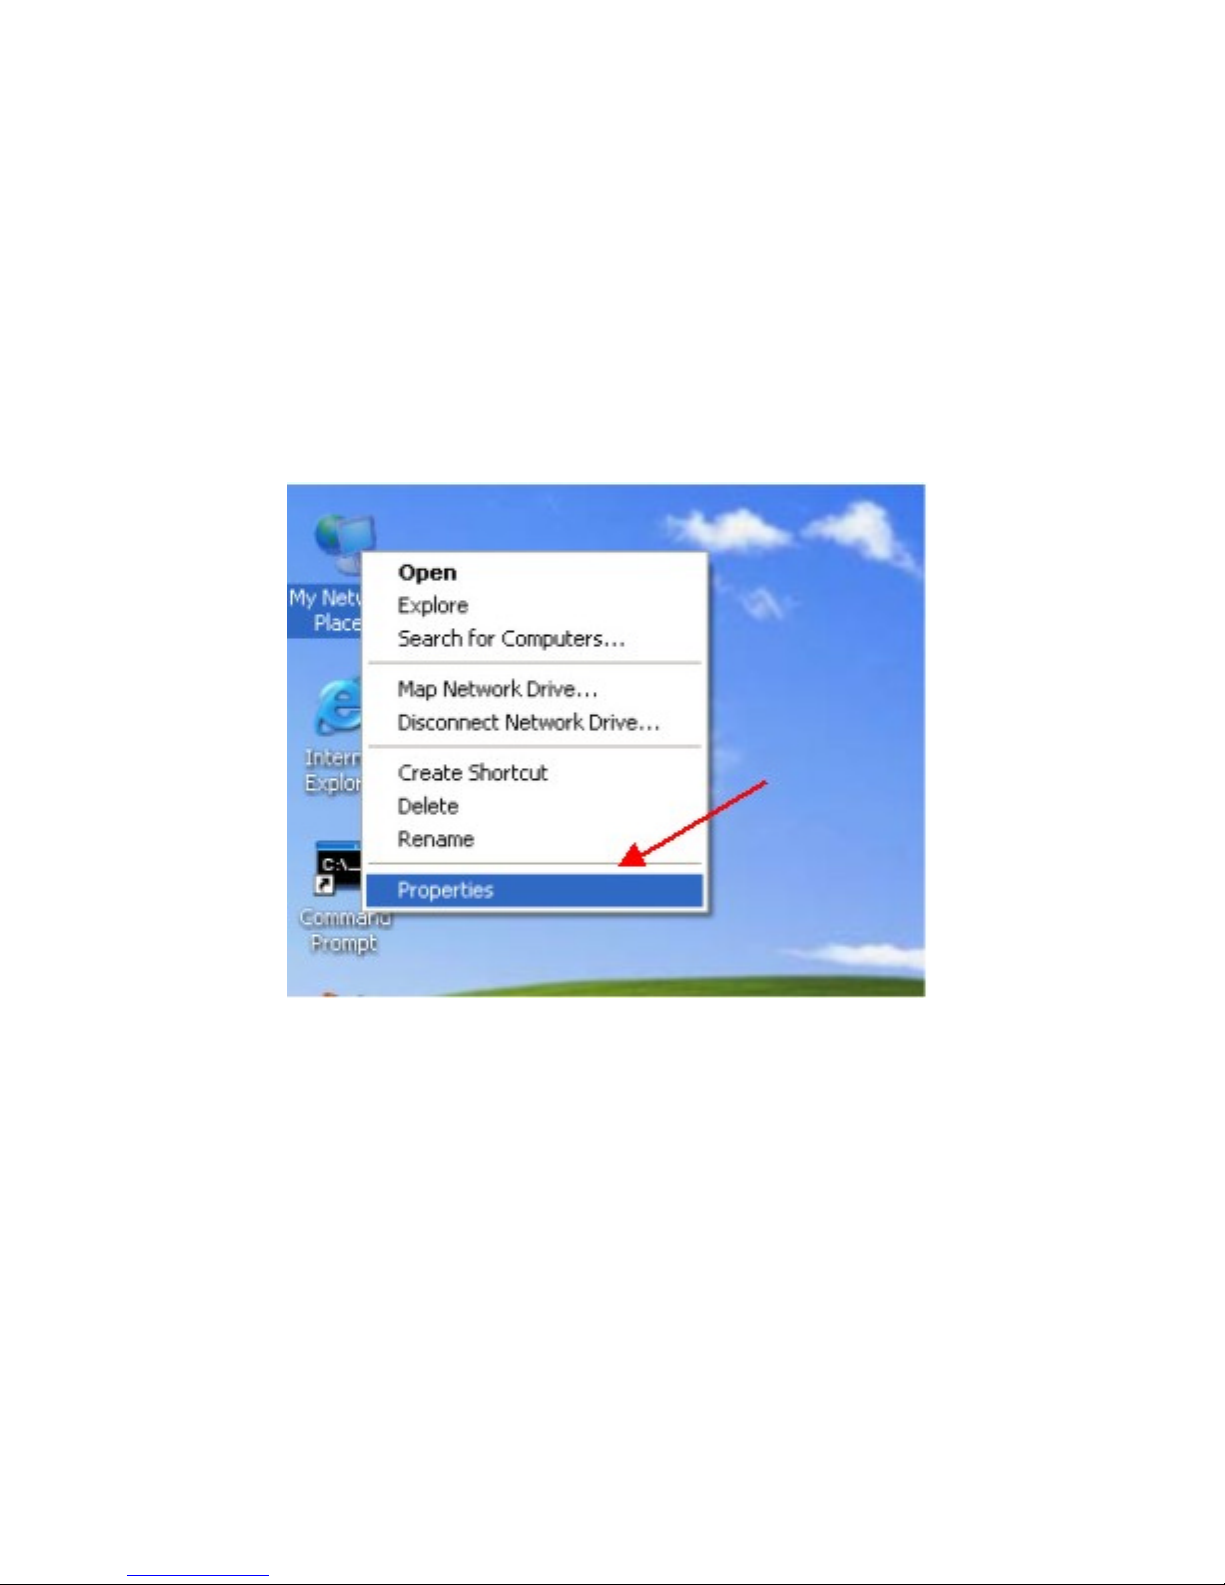
Creating a connection
Right click on “My Network Places” to obtain a drop-down menu with
Properties listed.
Page 45
DWL-AB650 Wireless Multimode Cardbus Adapter
45
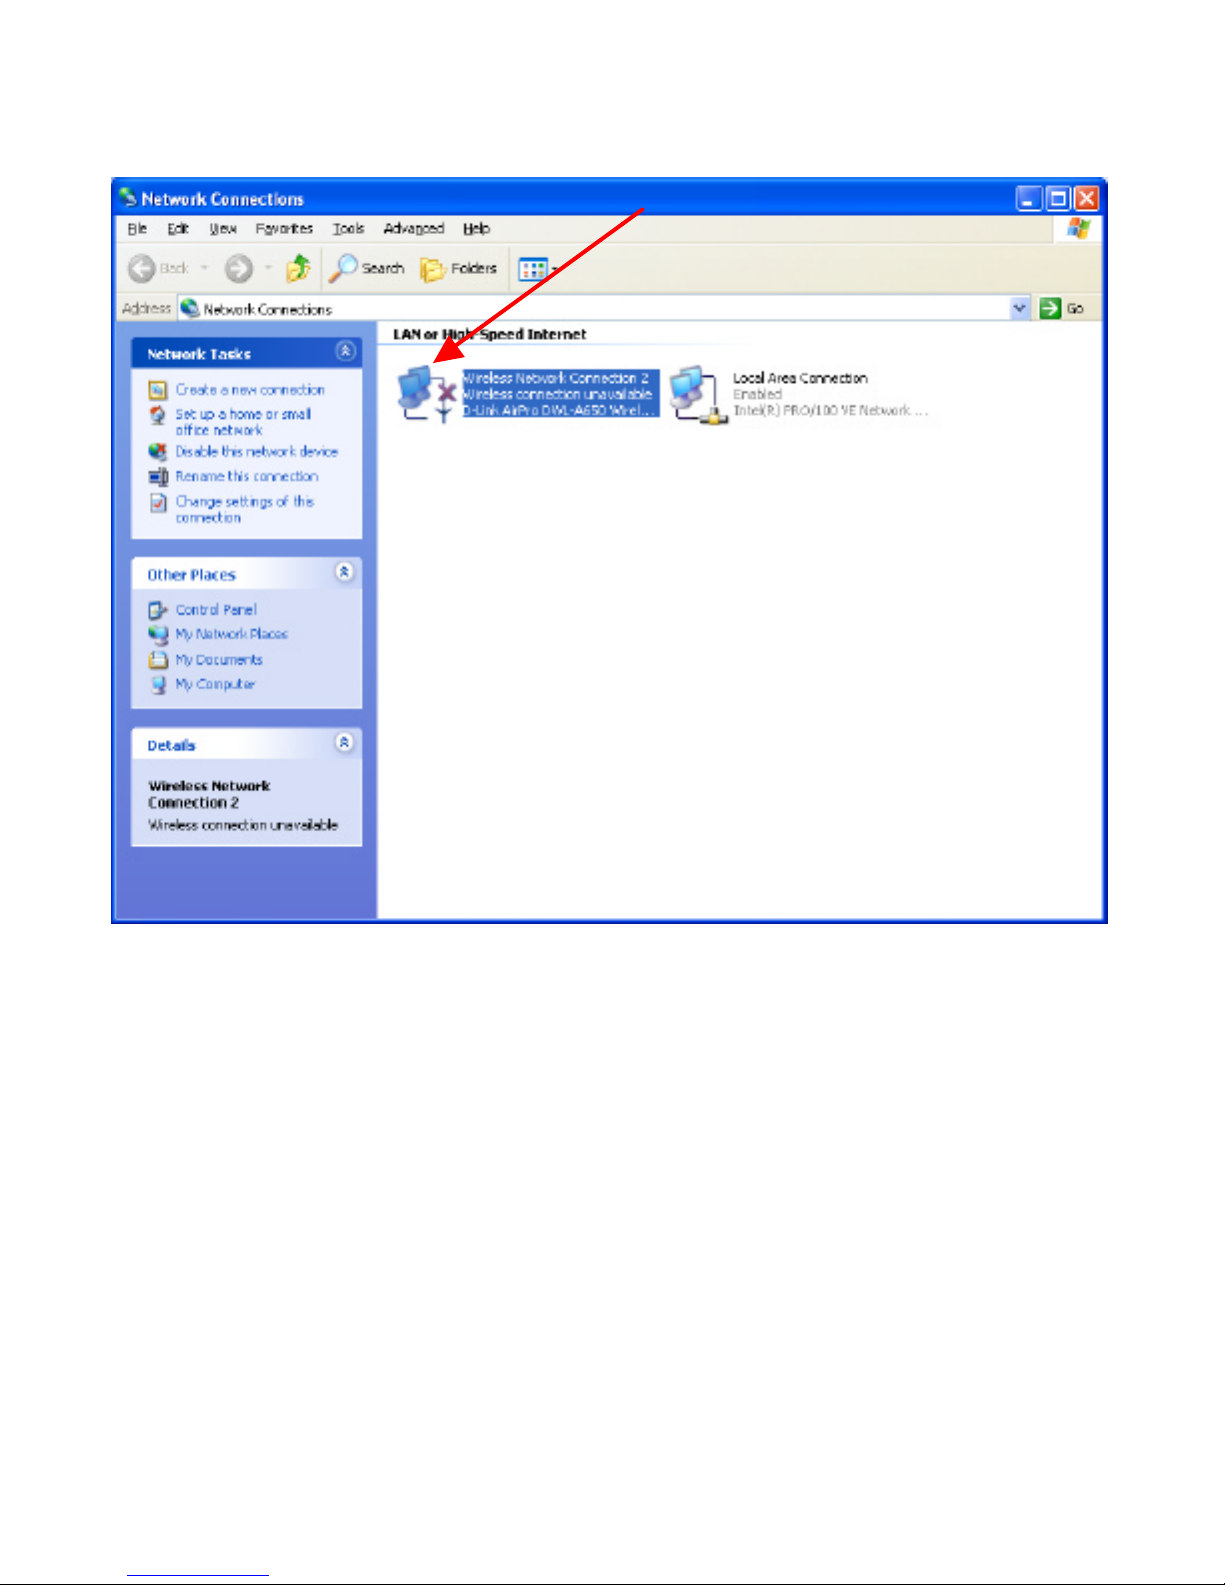
Left-click on Properties to obtain the Network Connections screen.
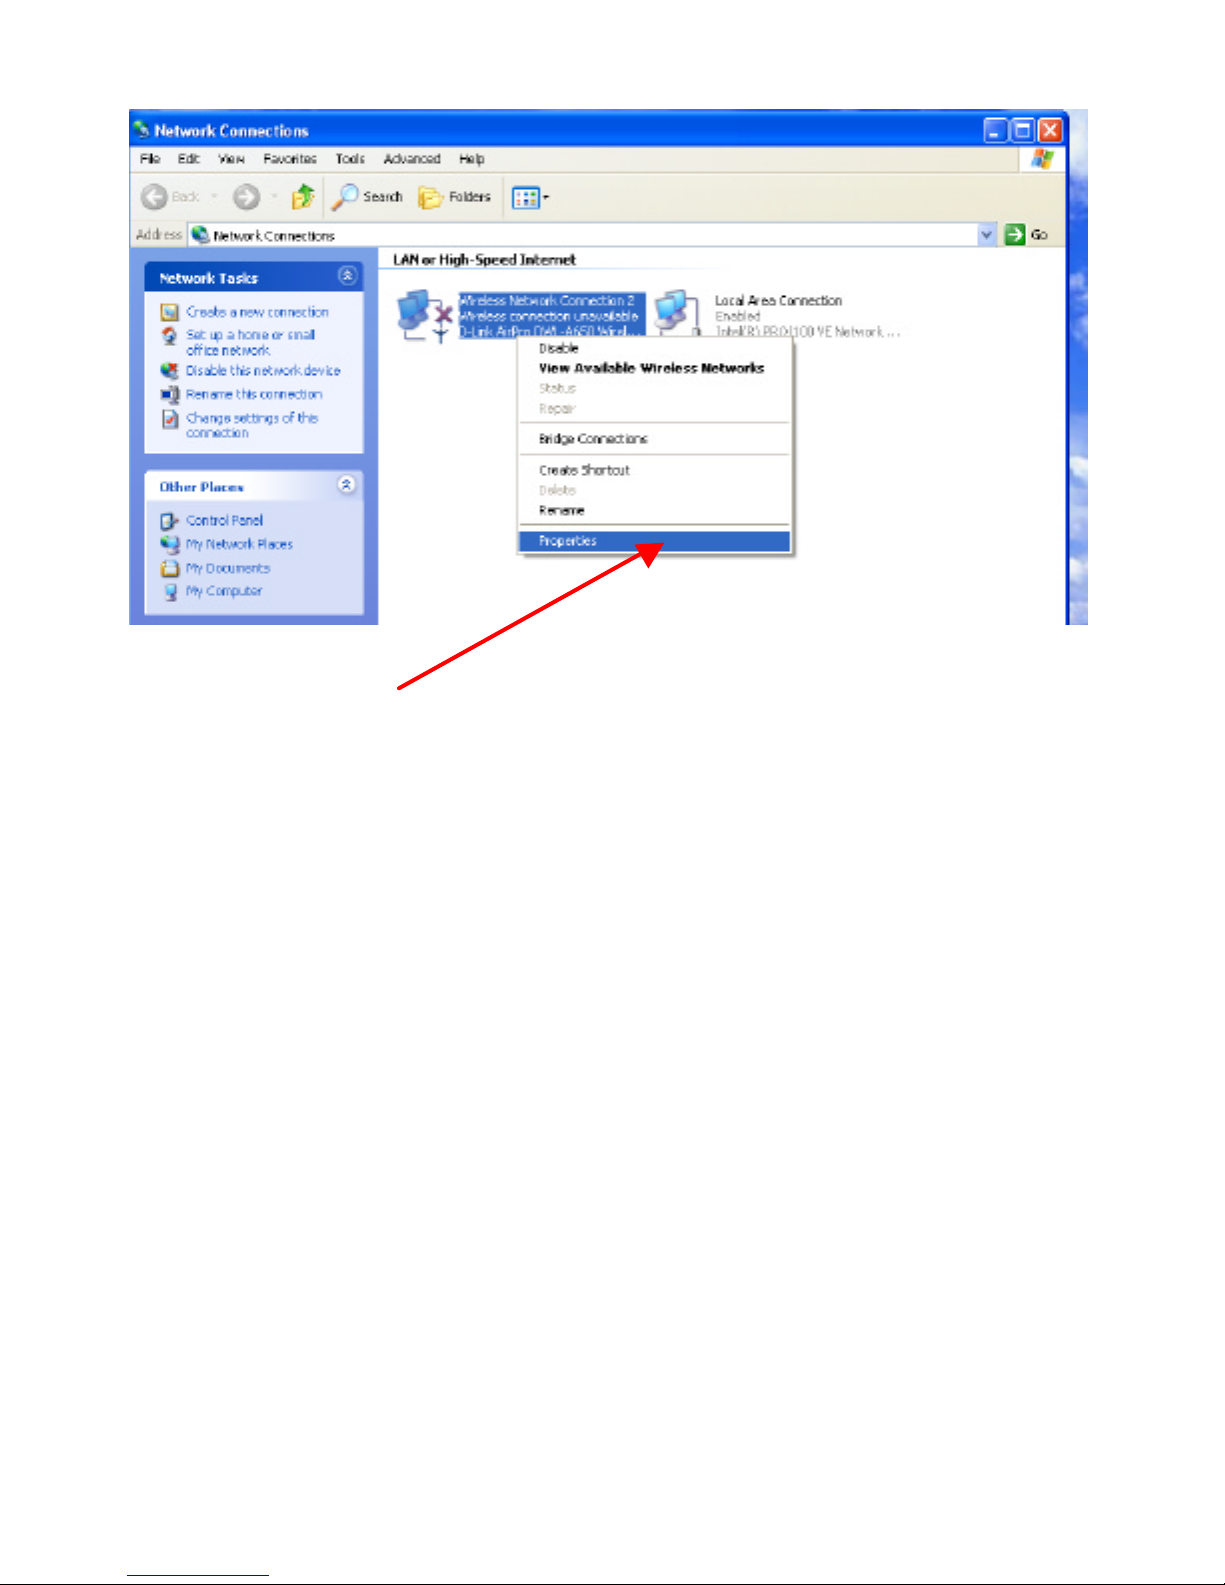
Right-click on the “Wireless Network Connection” icon to produce another
drop-down menu with item Properties.
Page 46
DWL-AB650 Wireless Multimode Cardbus Adapter
46
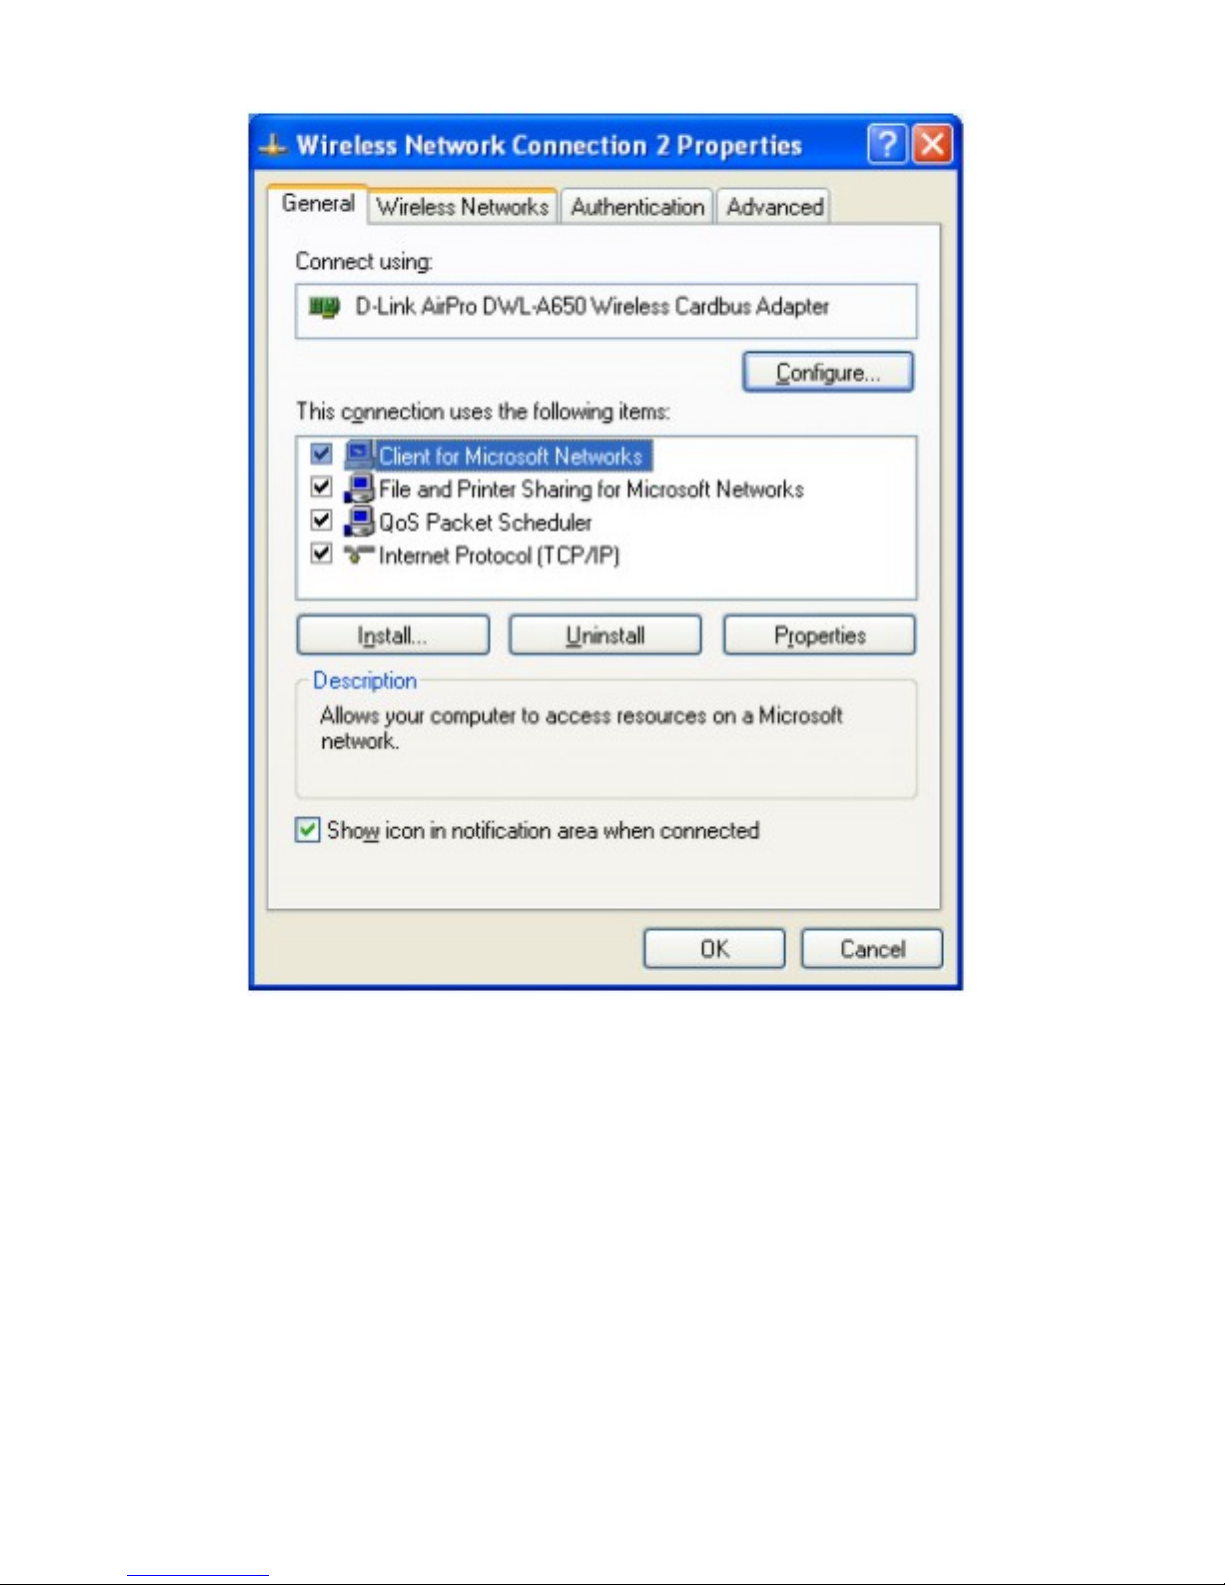
Left-click on Properties to bring up the screen below.
Page 47
DWL-AB650 Wireless Multimode Cardbus Adapter
47
Page 48
DWL-AB650 Wireless Multimode Cardbus Adapter
48
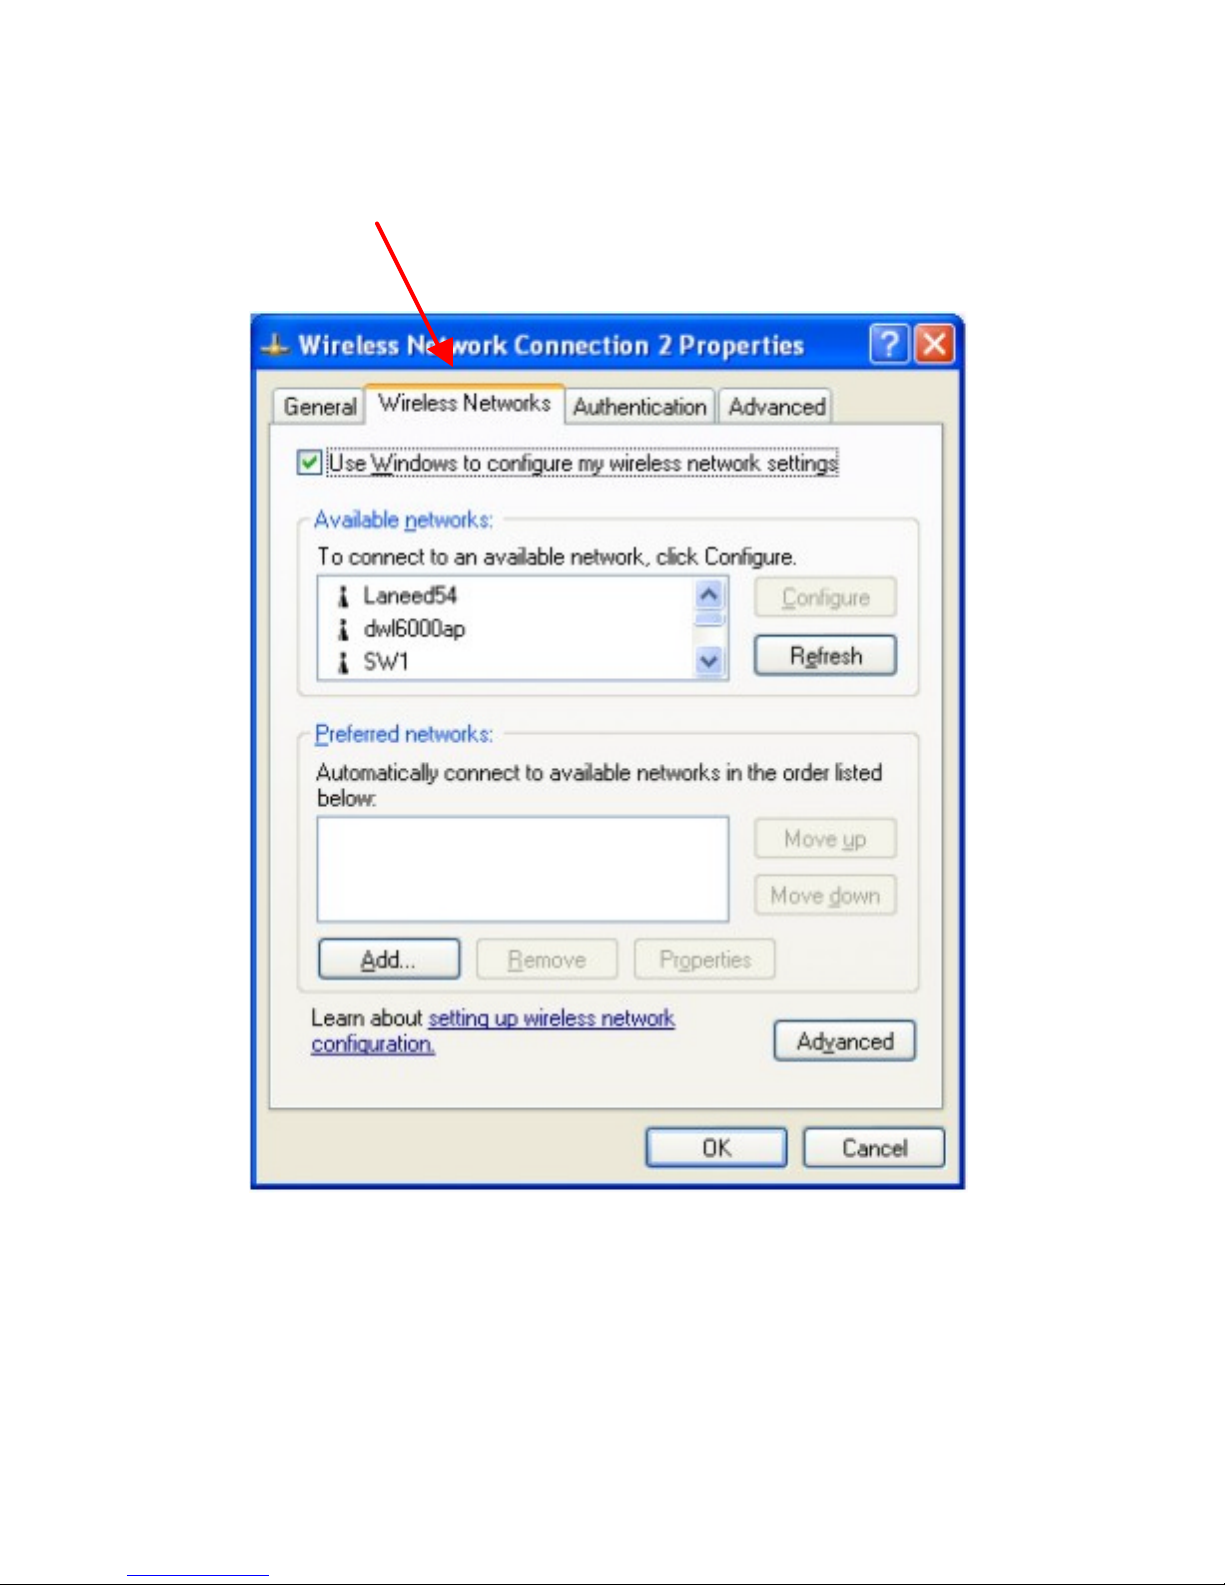
Click on the Wireless Networks tab.
Click on the Access Point under Available Networks with which you wish to
establish a connection.
Page 49
DWL-AB650 Wireless Multimode Cardbus Adapter
49
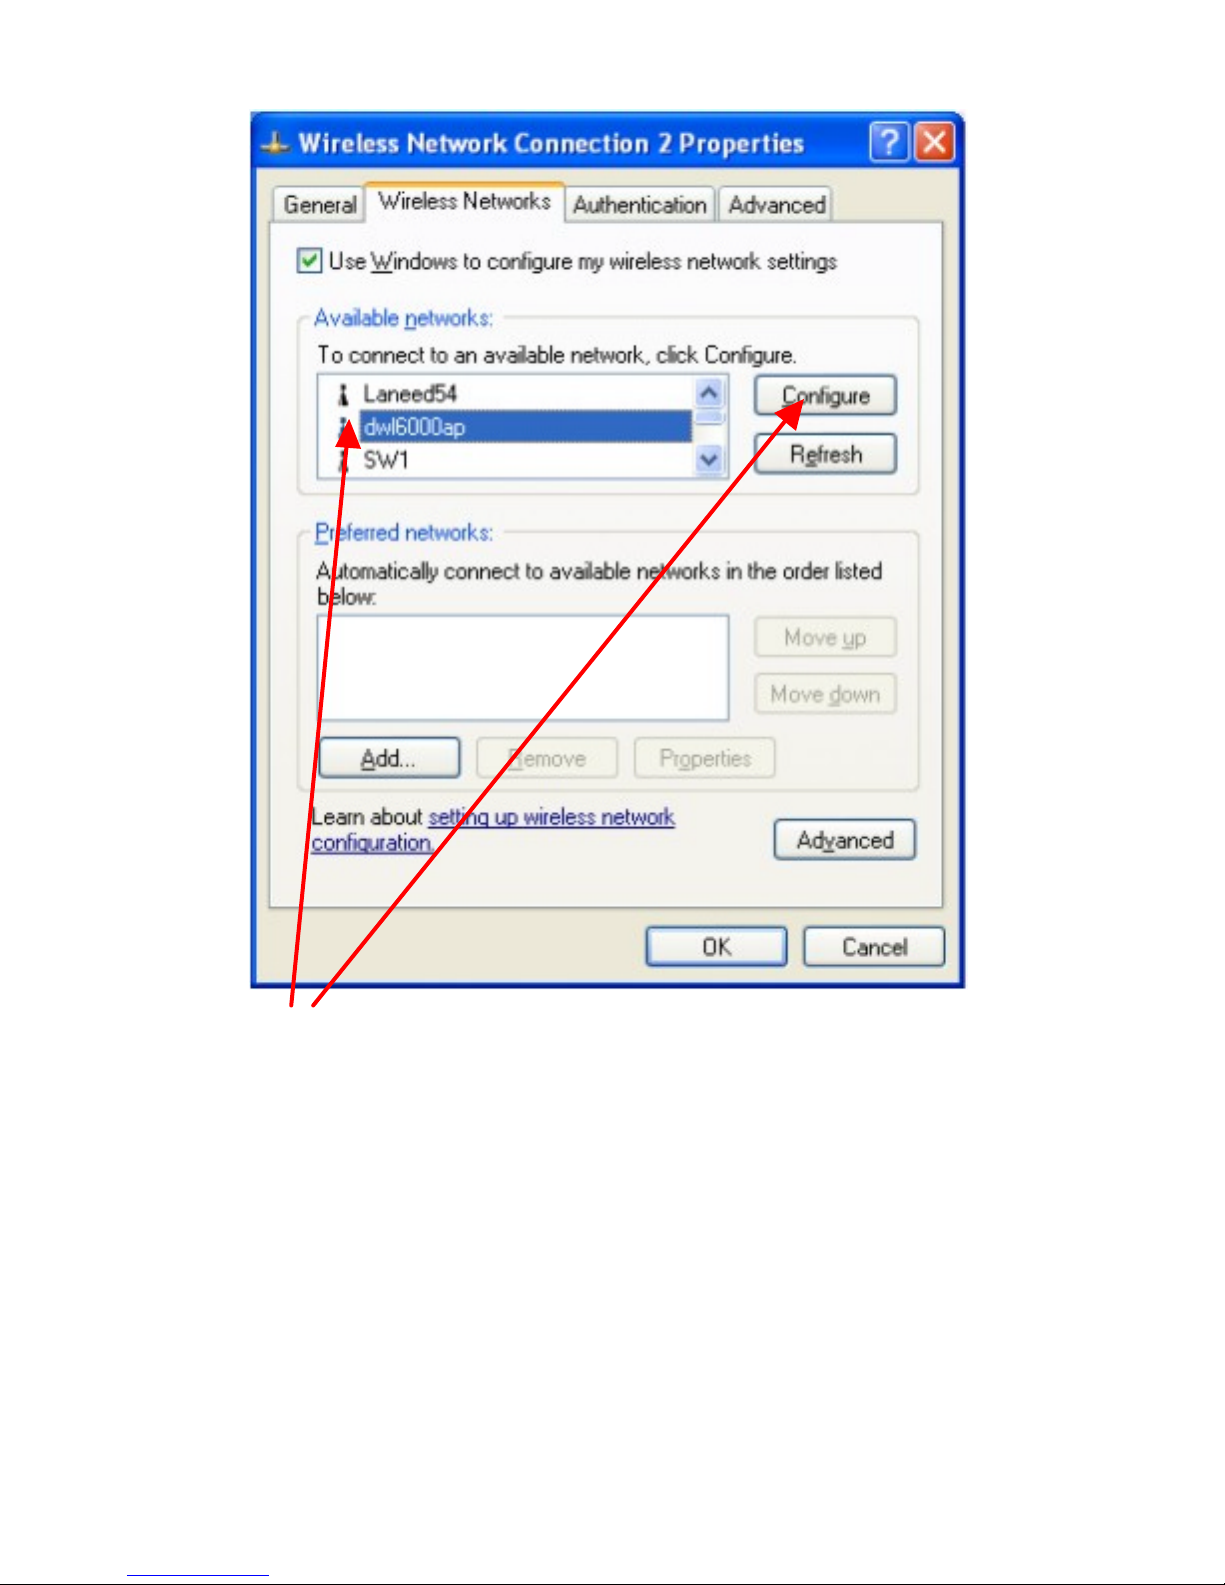
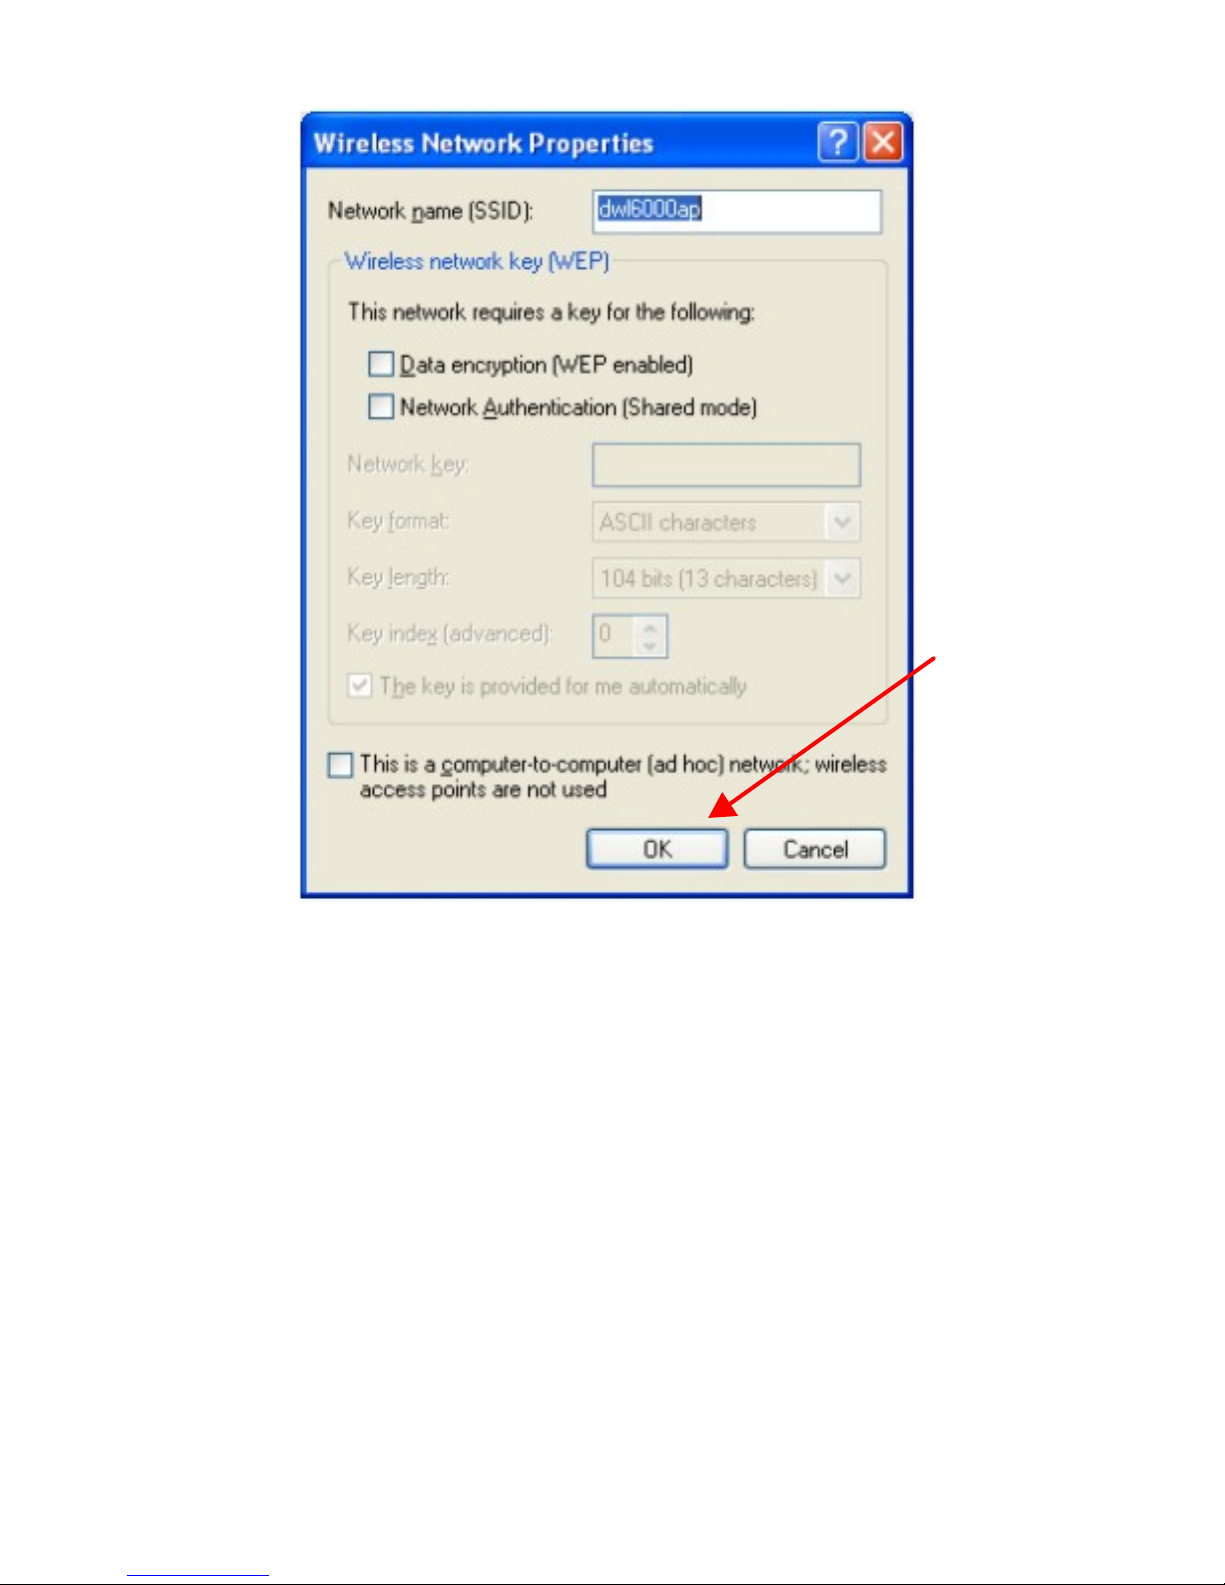
Click on Configure to establish a connection with the chosen access point
“dwl6000ap.” A screen such as the following called Wireless Network
Properties will then appear.
Enter the appropriate settings on the screen below and click OK.
Page 50
DWL-AB650 Wireless Multimode Cardbus Adapter
50
Page 51
DWL-AB650 Wireless Multimode Cardbus Adapter
51
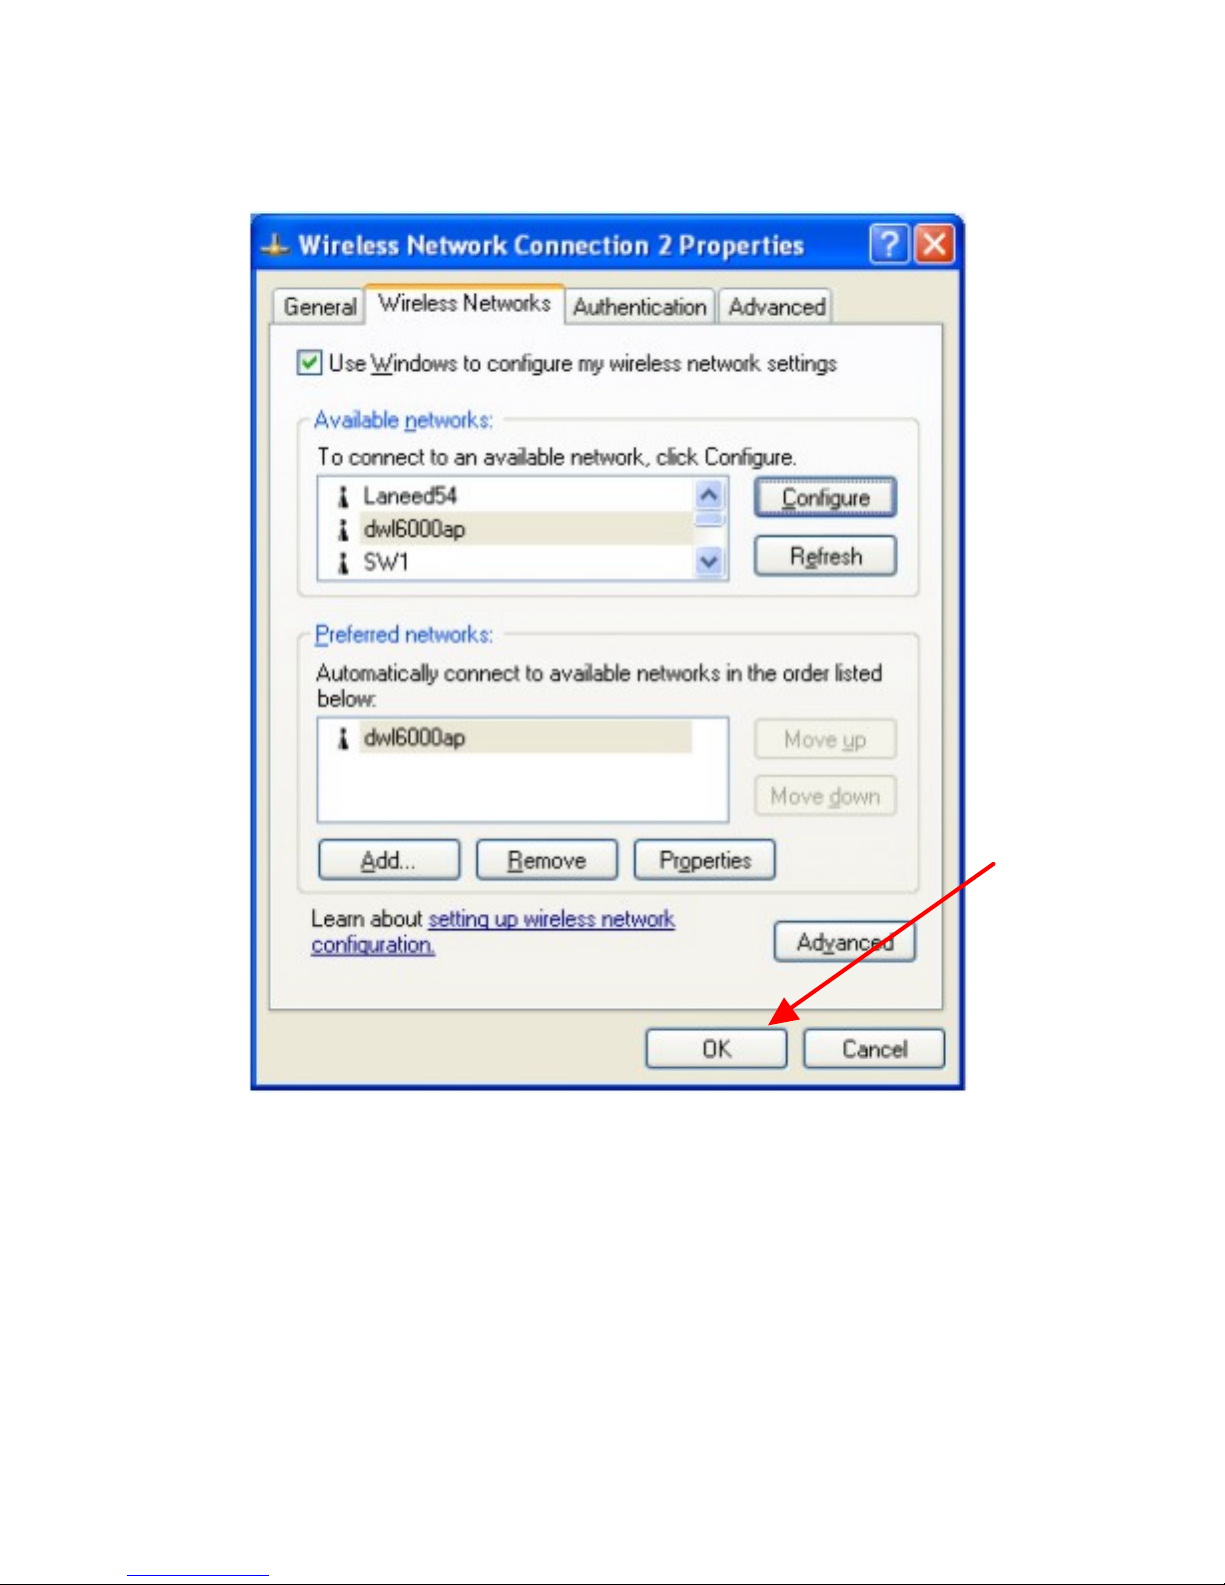
The access point “dwl6000ap” has been added to the network under
Preferred networks.
Click OK.
Page 52
DWL-AB650 Wireless Multimode Cardbus Adapter
52
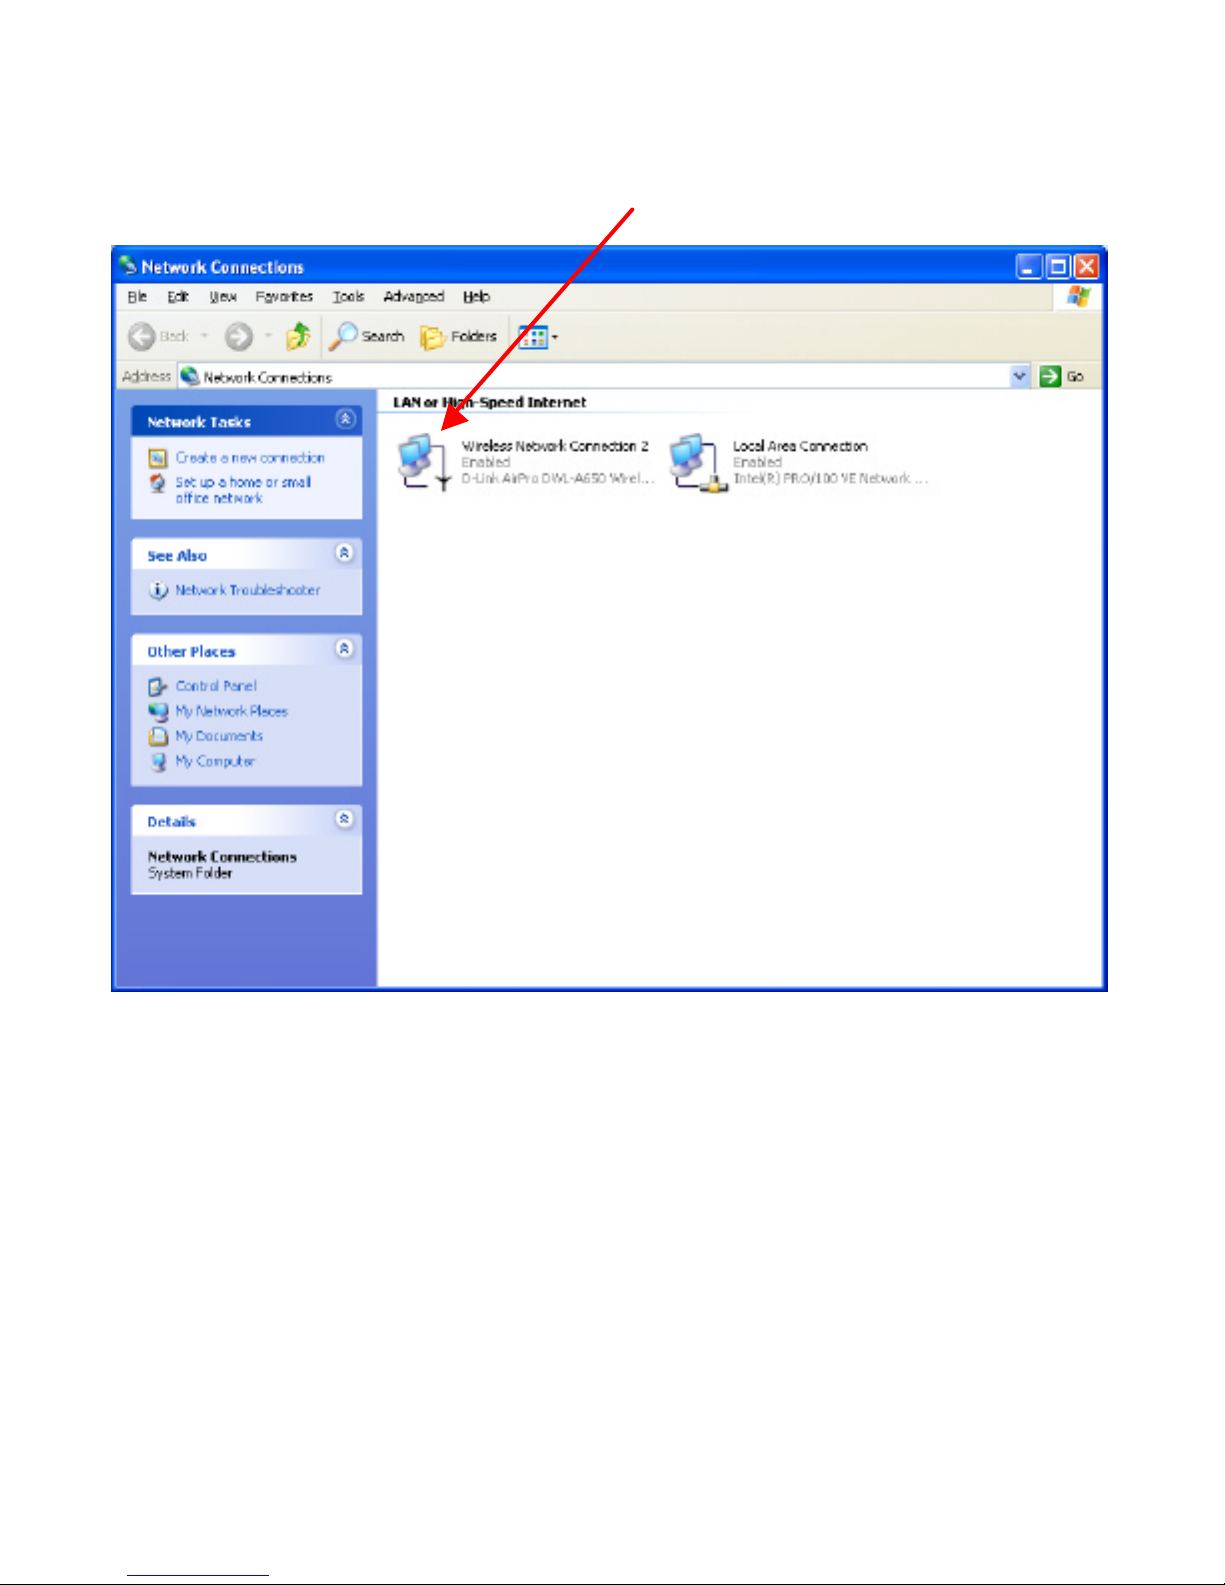
The Network Connections window now shows the wireless network
connection as “Enabled”.
Page 53
DWL-AB650 Wireless Multimode Cardbus Adapter
53
Networking Basics
Using the Network Setup Wizard in Windows XP
In this section you will learn how to establish a network at home or work,
using Microsoft Windows XP.
Note: Please refer to websites such as http://www.homenethelp.com
and http://www.microsoft.com/windows2000 for information about
networking computers using Windows 2000, ME or 98.
Go to START>CONTROL PANEL>NETWORK CONNECTIONS
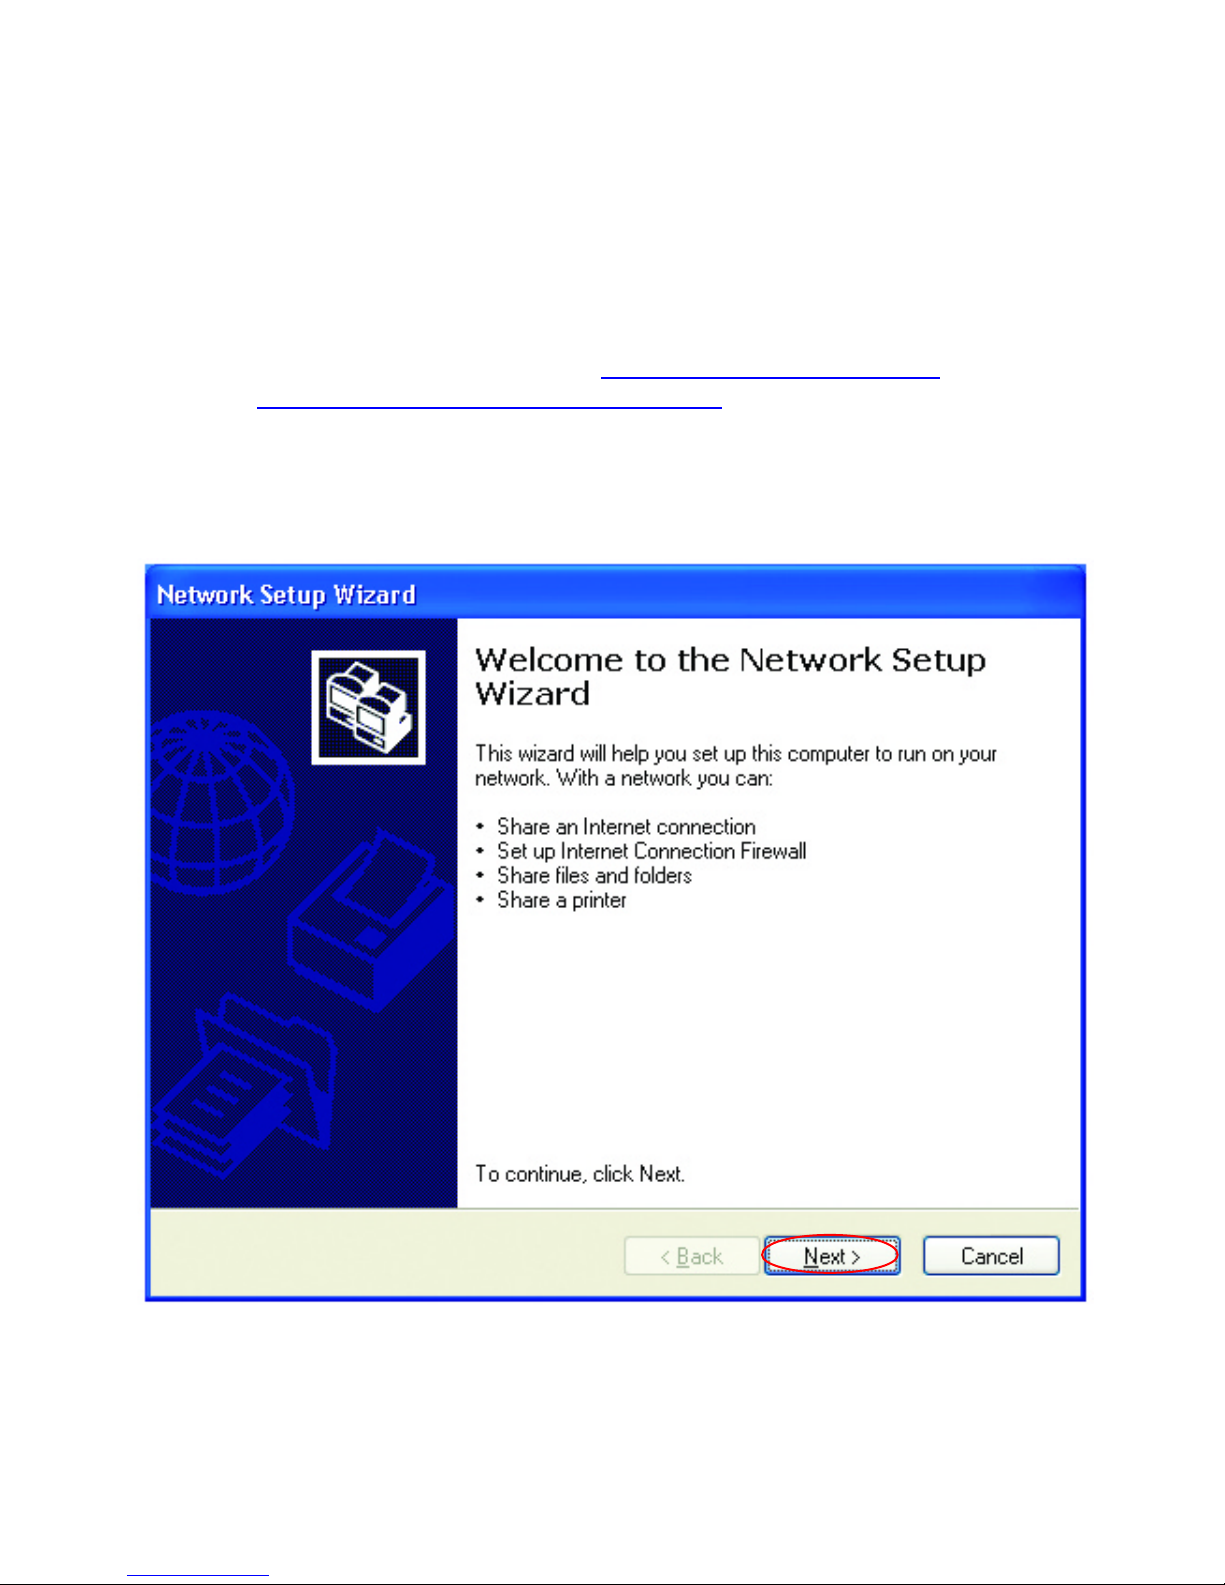
Select Set up a home or small office network
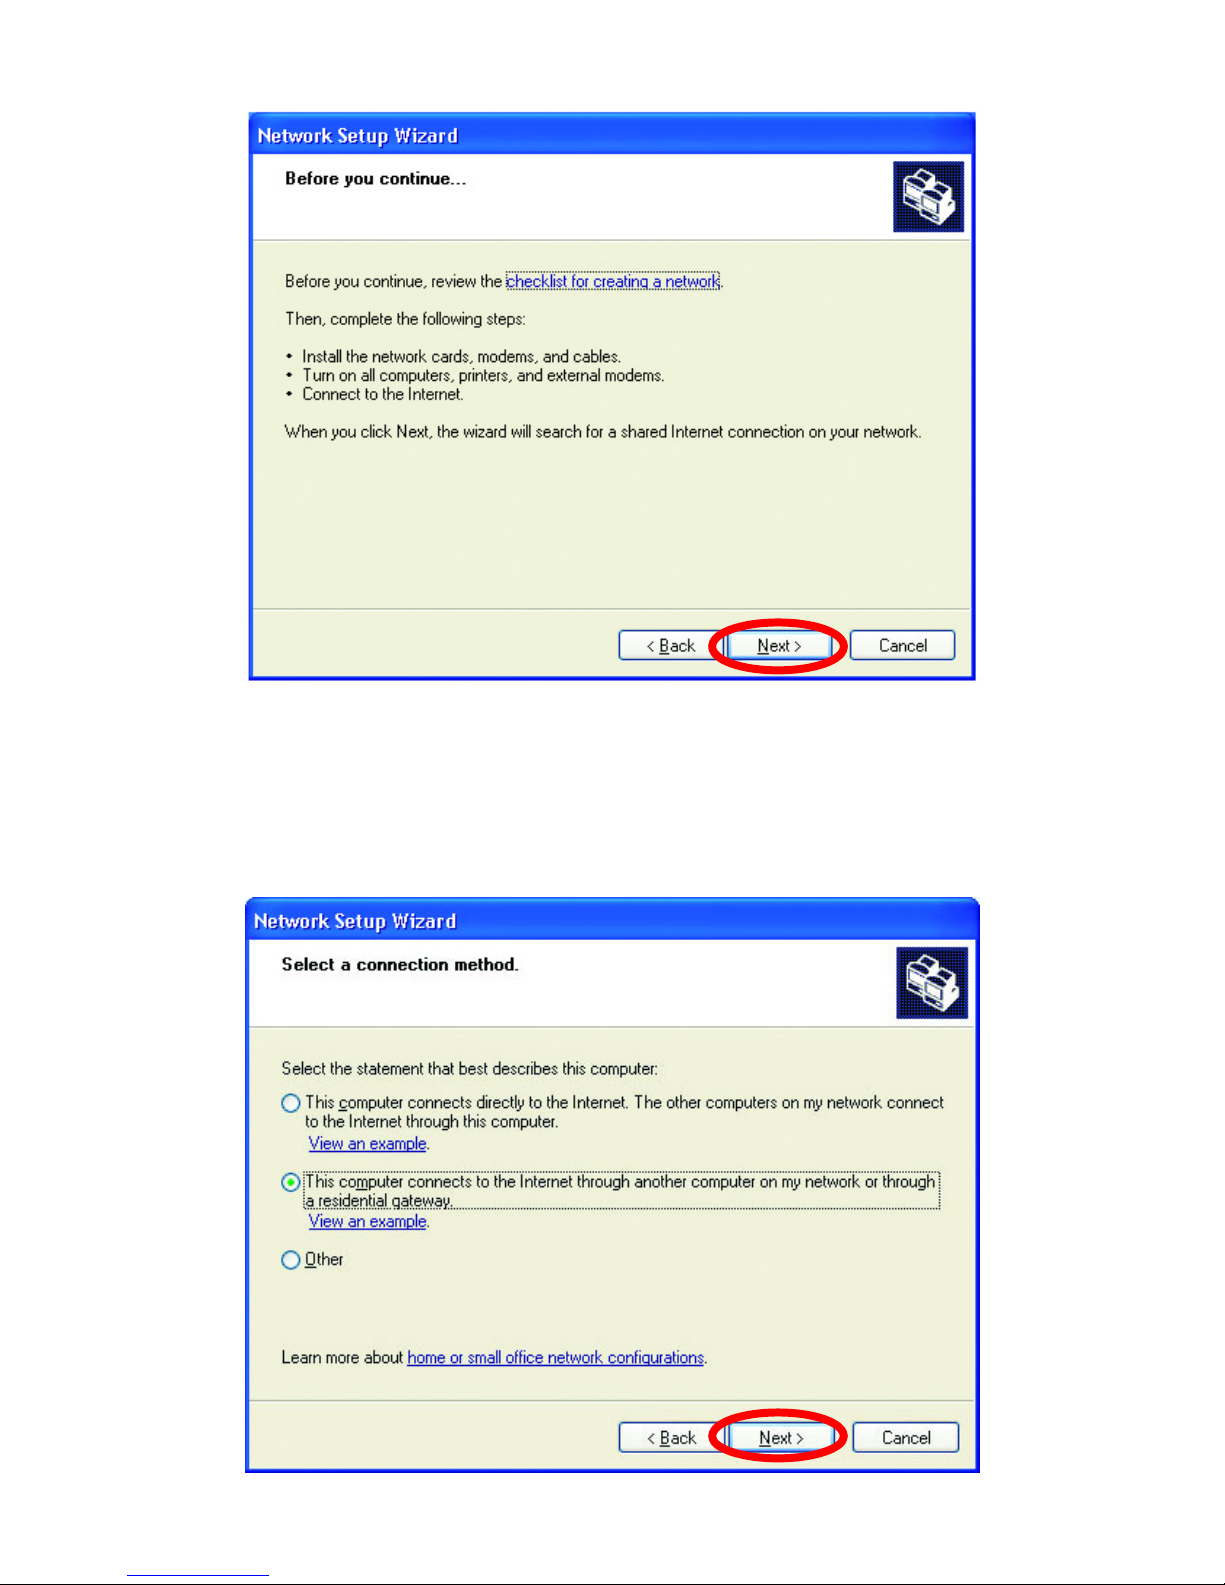
When this screen appears, click Next.
Please follow all the instructions in this window:
Page 54
DWL-AB650 Wireless Multimode Cardbus Adapter
54
Click Next.
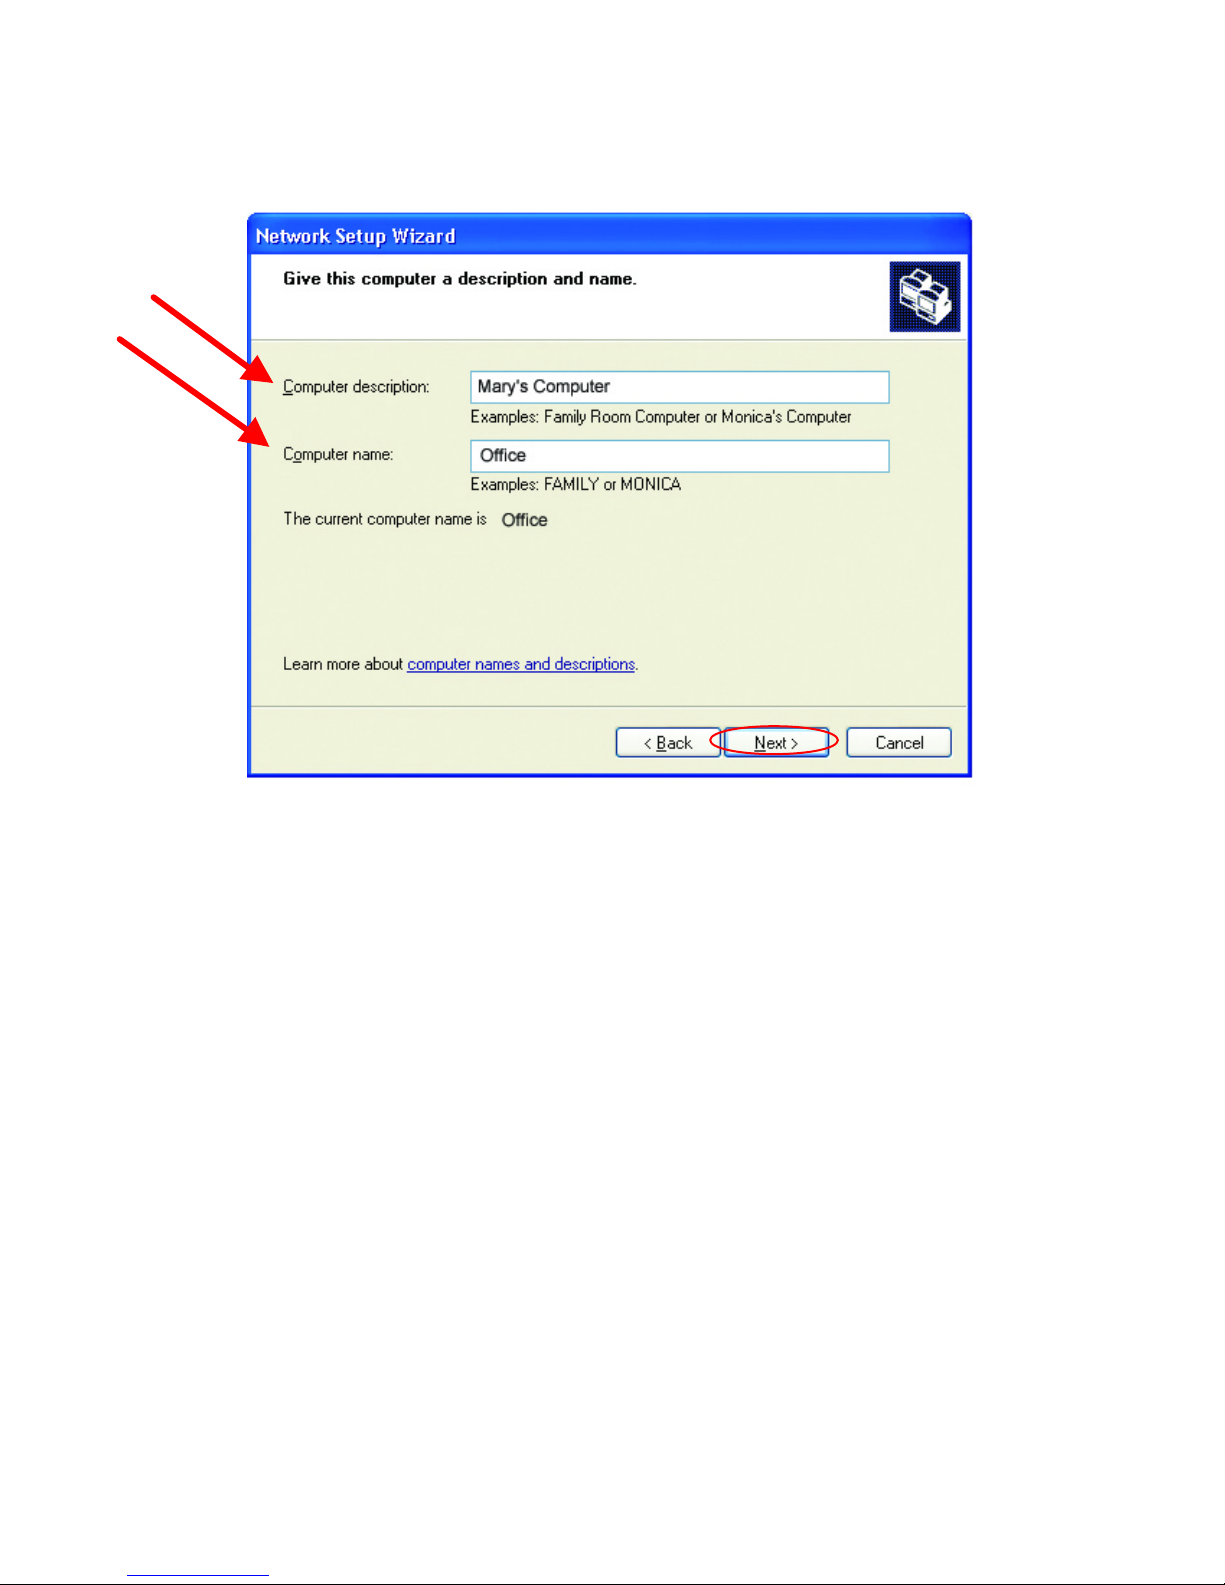
In the following window, select the best description of your computer. If your
computer connects to the internet through a gateway/router, select the
second option as shown.
Page 55
DWL-AB650 Wireless Multimode Cardbus Adapter
55
Click Next.
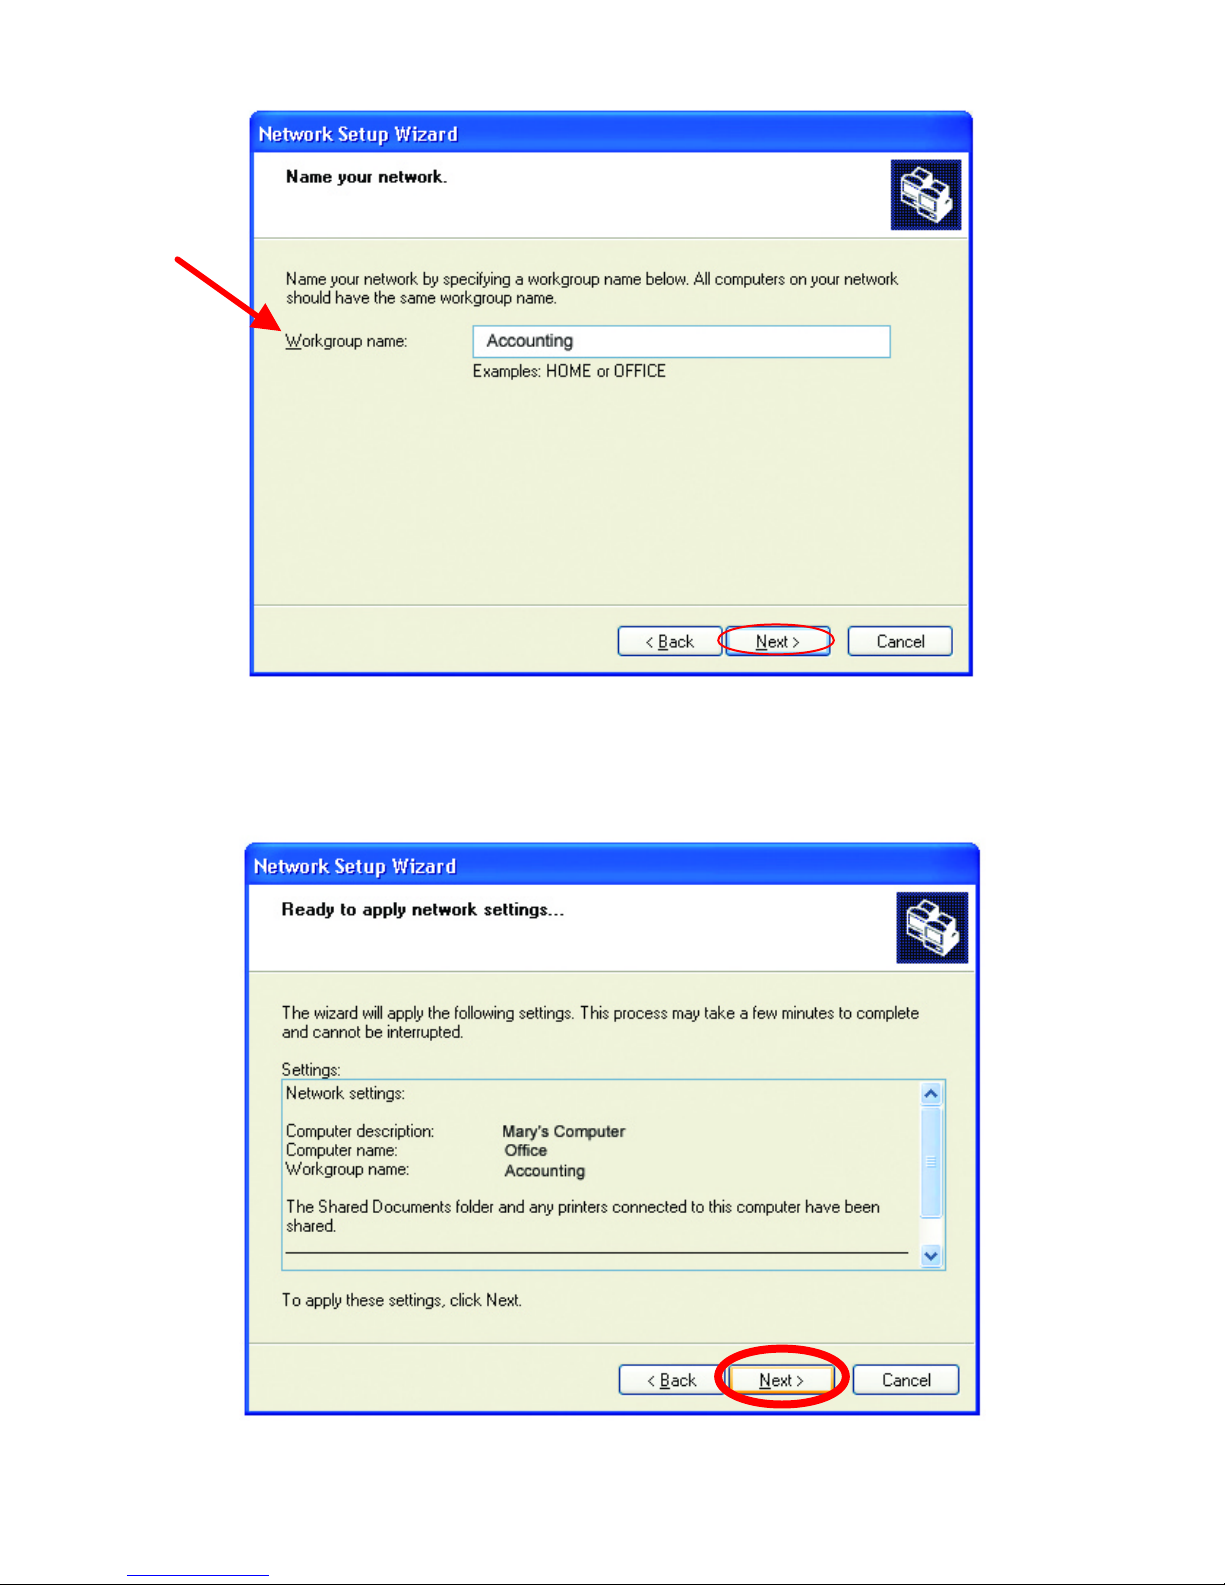
Enter a Computer description and a Computer name (optional.)
Click Next.
Enter a Workgroup name. All computers on your network should have the
same Workgroup name.
Page 56
DWL-AB650 Wireless Multimode Cardbus Adapter
56
Click Next.
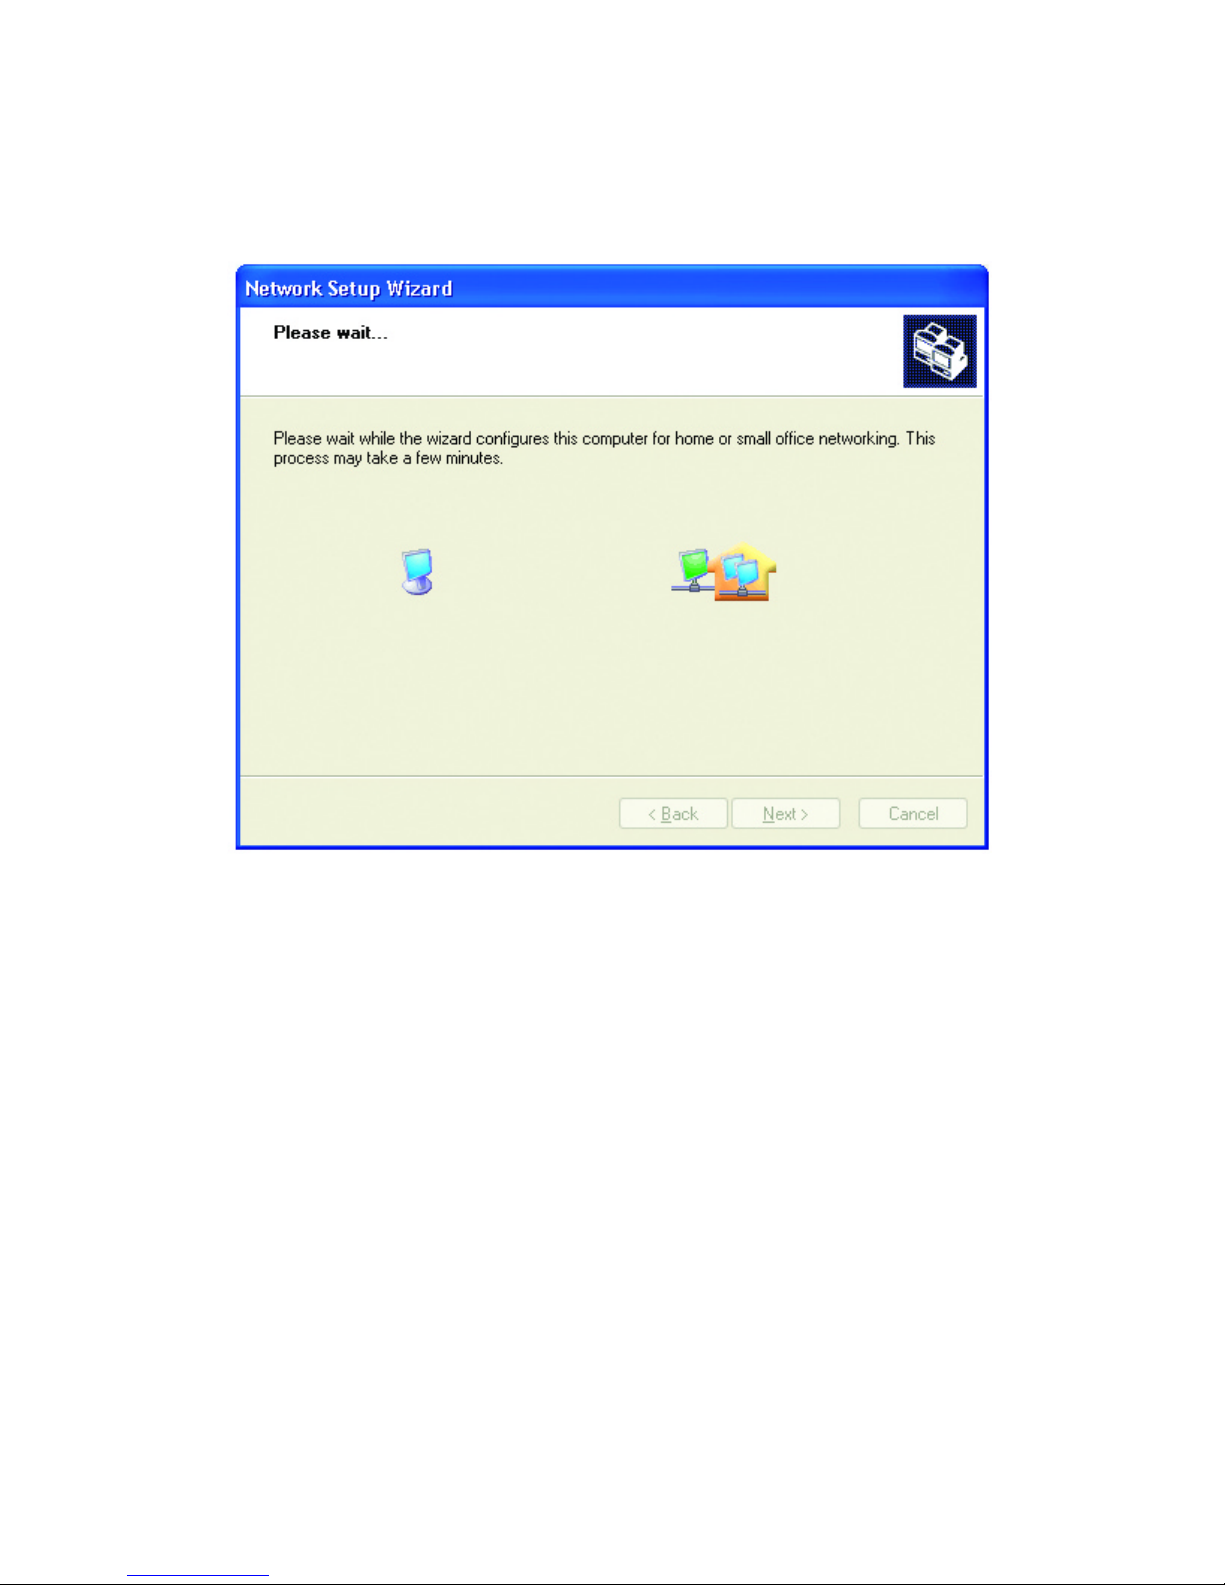
Please wait while the wizard applies the changes.
When the changes are complete, click Next.
Page 57
DWL-AB650 Wireless Multimode Cardbus Adapter
57
Please wait while the wizard configures the computer.
This may take a few minutes.
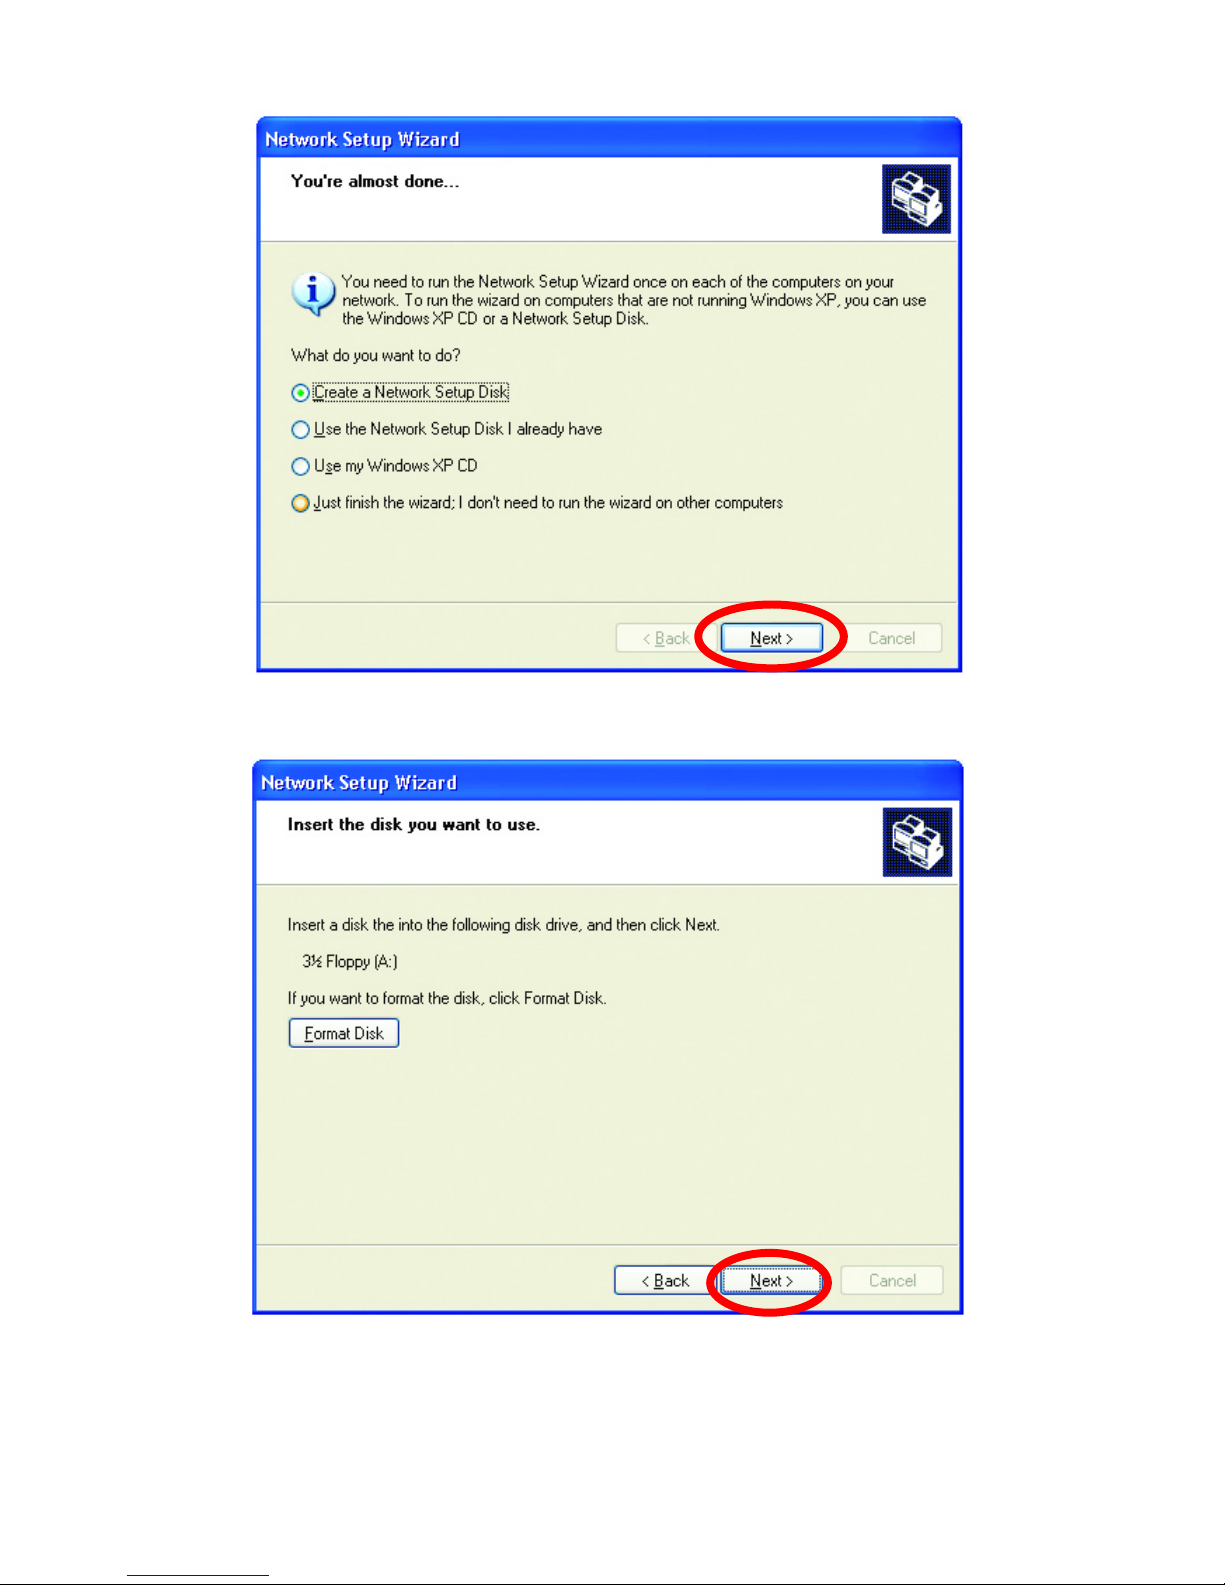
In the window below, select the best option. In this example, “Create a
Network Setup Disk” has been selected. You will run this disk on each of
the computers on your network. Click Next.
Page 58
DWL-AB650 Wireless Multimode Cardbus Adapter
58
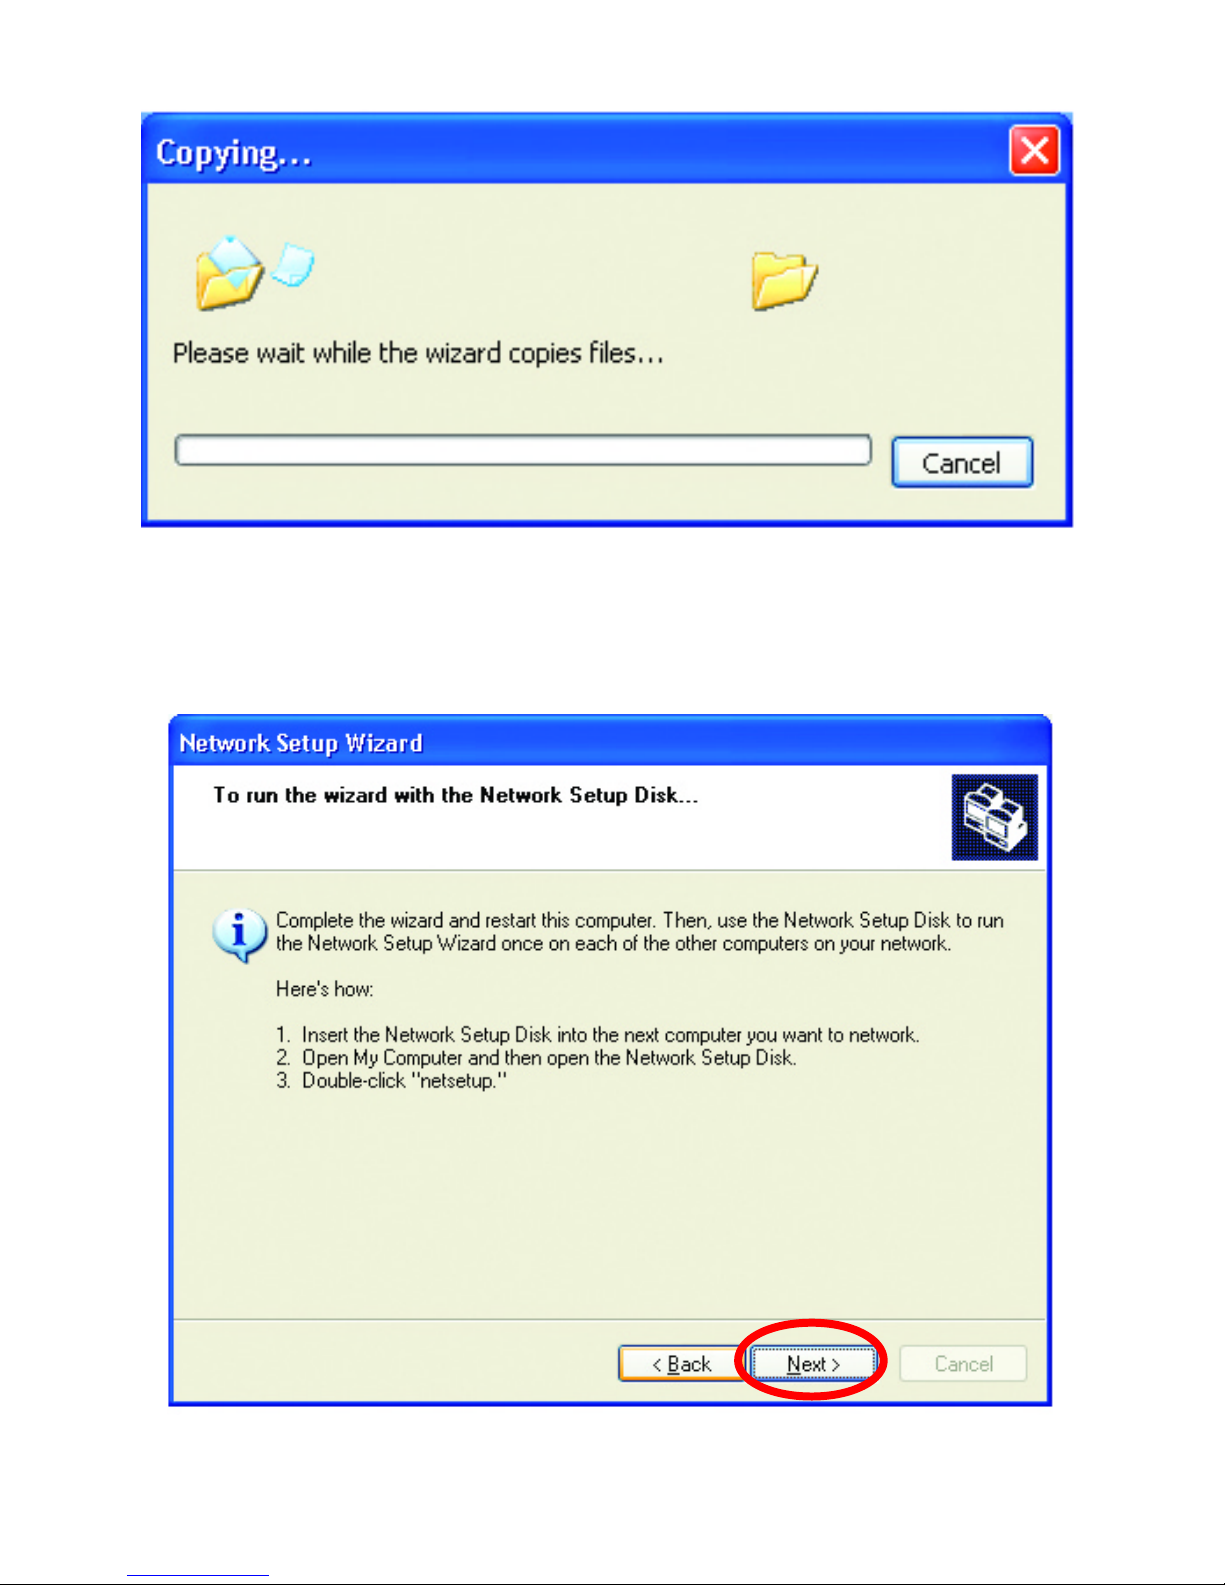
Insert a disk into the Floppy Disk Drive, in this case drive “A:”
Format the disk if you wish, and click Next.
Please wait while the wizard copies the files.
Page 59
DWL-AB650 Wireless Multimode Cardbus Adapter
59
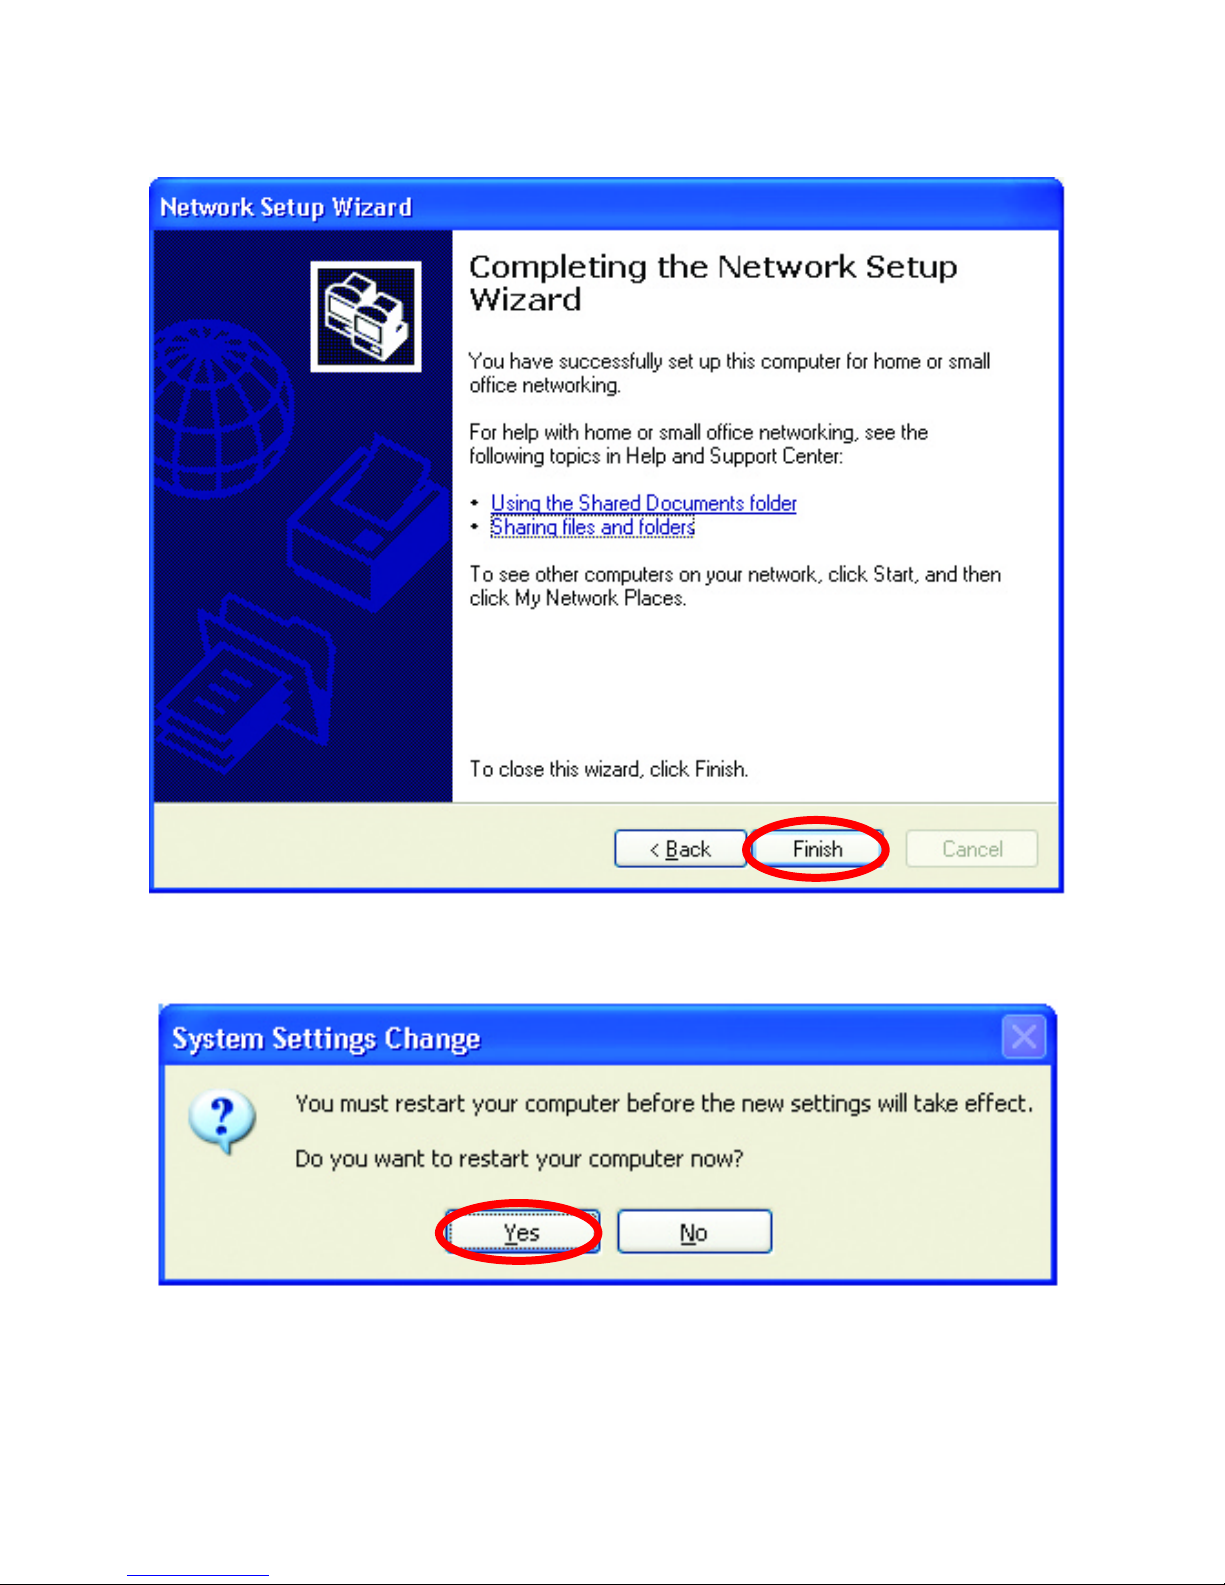
Please read the information under Here’s how in the screen below. After
you complete the Network Setup Wizard you will use the Network Setup
Disk to run the Network Setup Wizard once on each of the computers on
your network. To continue, click Next.
Page 60
DWL-AB650 Wireless Multimode Cardbus Adapter
60
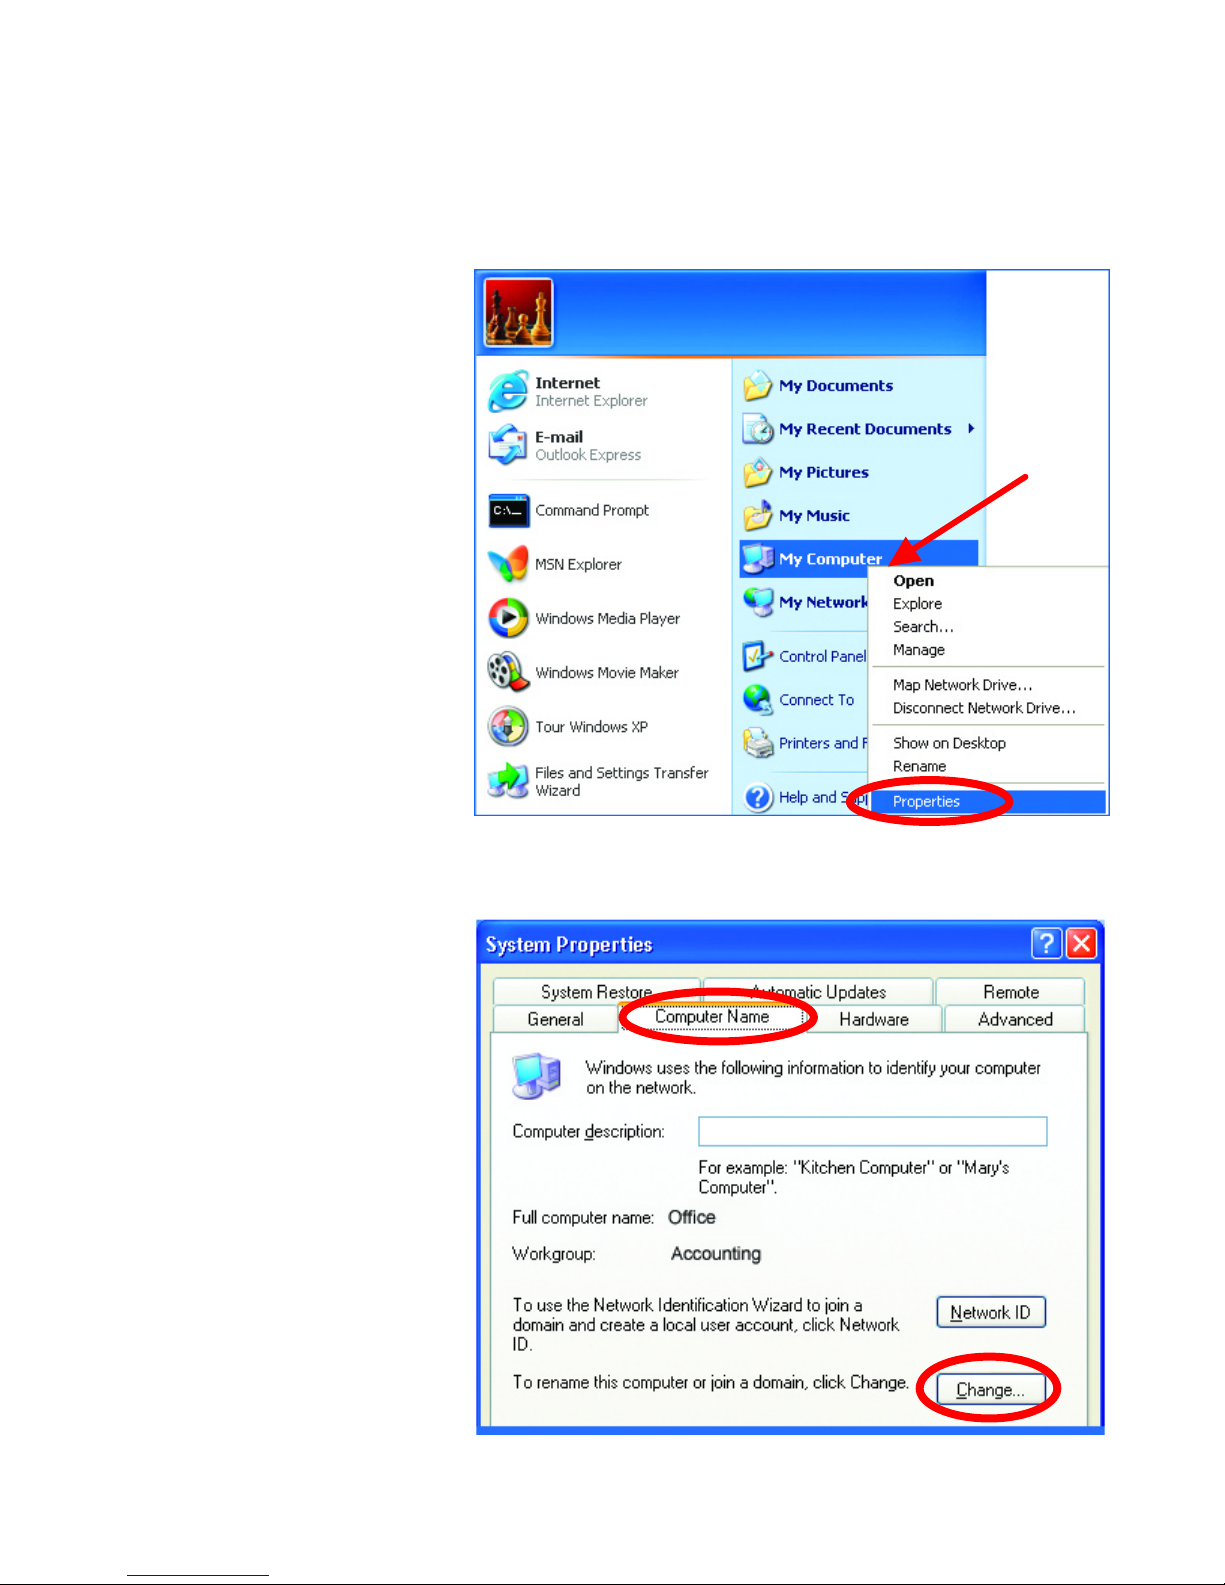
Please read the information on this screen, then click Finish to complete the
Network Setup Wizard.
The new settings will take effect when you restart the computer. Click Yes to
restart the computer.
You have completed configuring this computer. Next, you will need to run the
Network Setup Disk on all the other computers on your network. After
running the Network Setup Disk on all your computers, your new wireless
network will be ready to use.
Page 61
DWL-AB650 Wireless Multimode Cardbus Adapter
61
Networking Basics
Naming your Computer
To name your computer, please follow these directions:
In
Windows XP
:
• Click START (in
the lower left
corner of the
screen) .
• Right-click on My
Computer.
• Select Properties
and Click.
•
Select the
Computer Name
Tab in the System
Properties window.
You may enter a
Computer description
if
you wish, this field is
optional.
To rename the computer
and join a domain,
• Click Change
Page 62
DWL-AB650 Wireless Multimode Cardbus Adapter
62
Checking the Installation of the Drivers for the Wireless Adapter
•
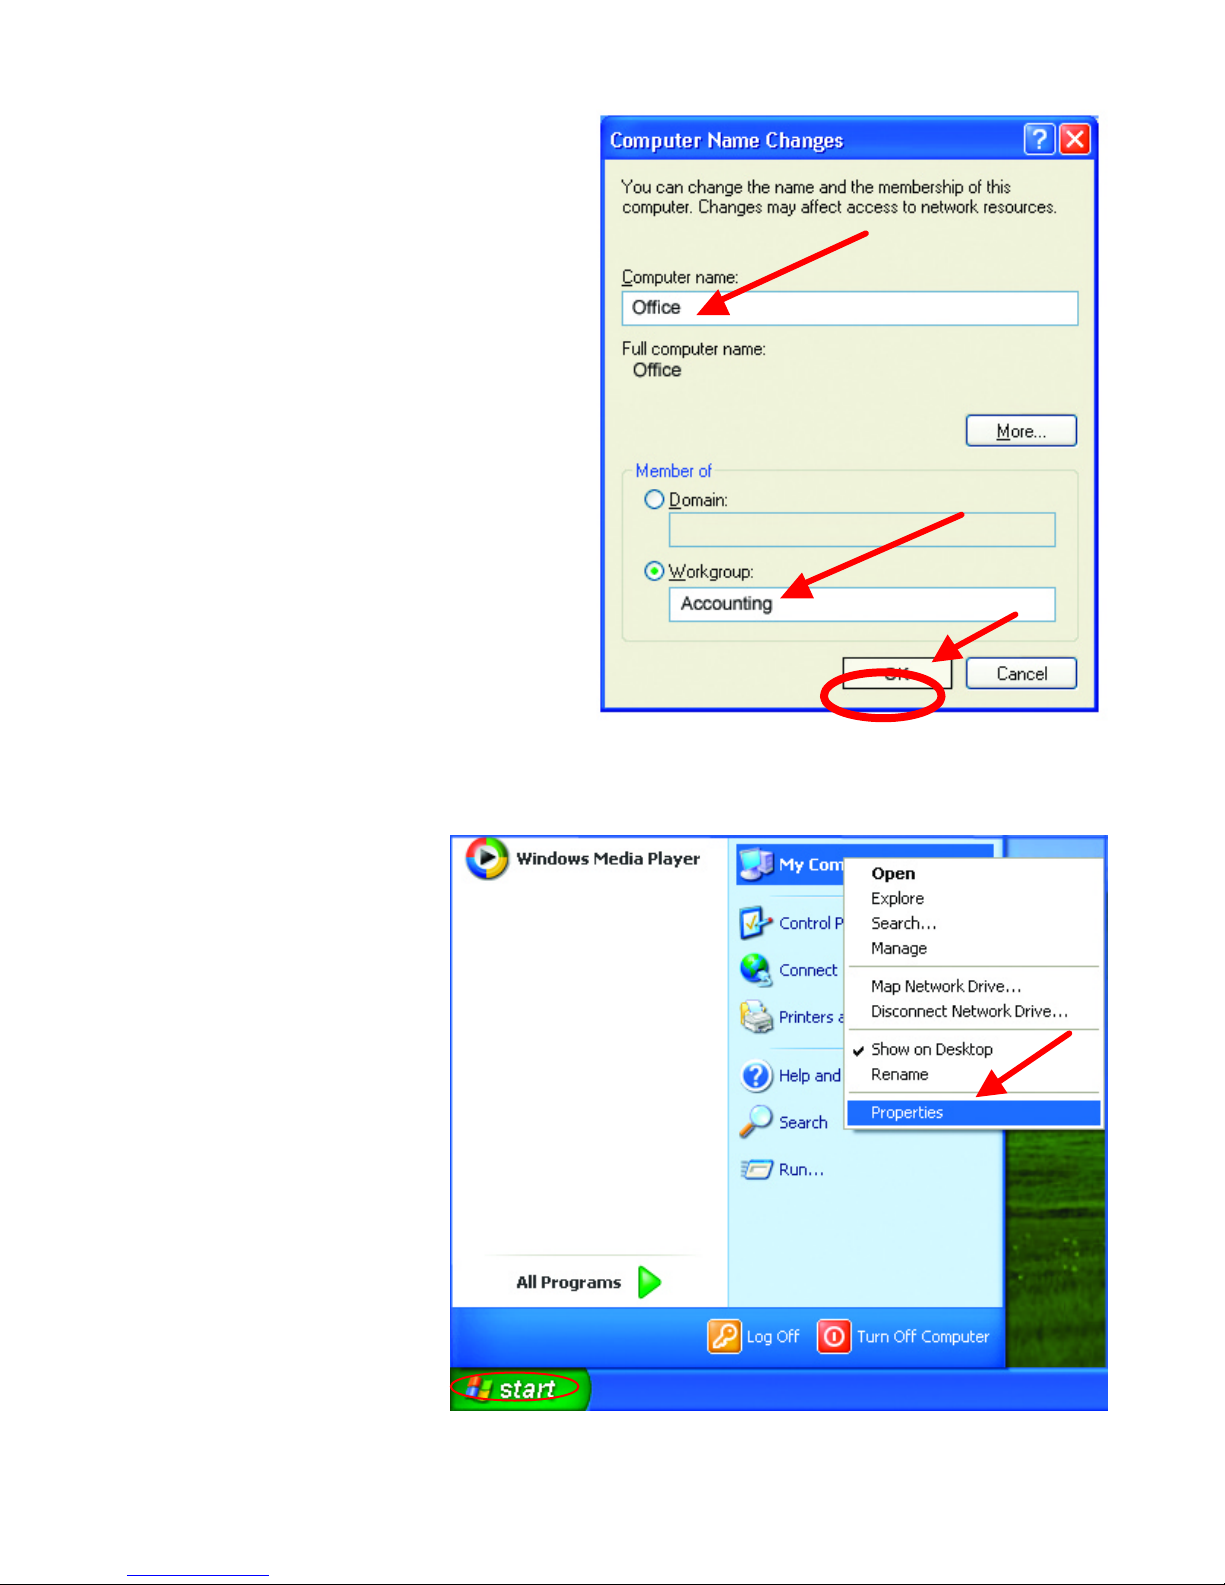
In this window, enter
the Computer
name.
• Select Workgroup
and enter the name
of the Workgroup.
• All computers on
your network must
have the same
Workgroup name.
• Click OK.
•
Go to
Start
.
• Right-click on
My Computer.
• Click Properties.
Page 63
DWL-AB650 Wireless Multimode Cardbus Adapter
63
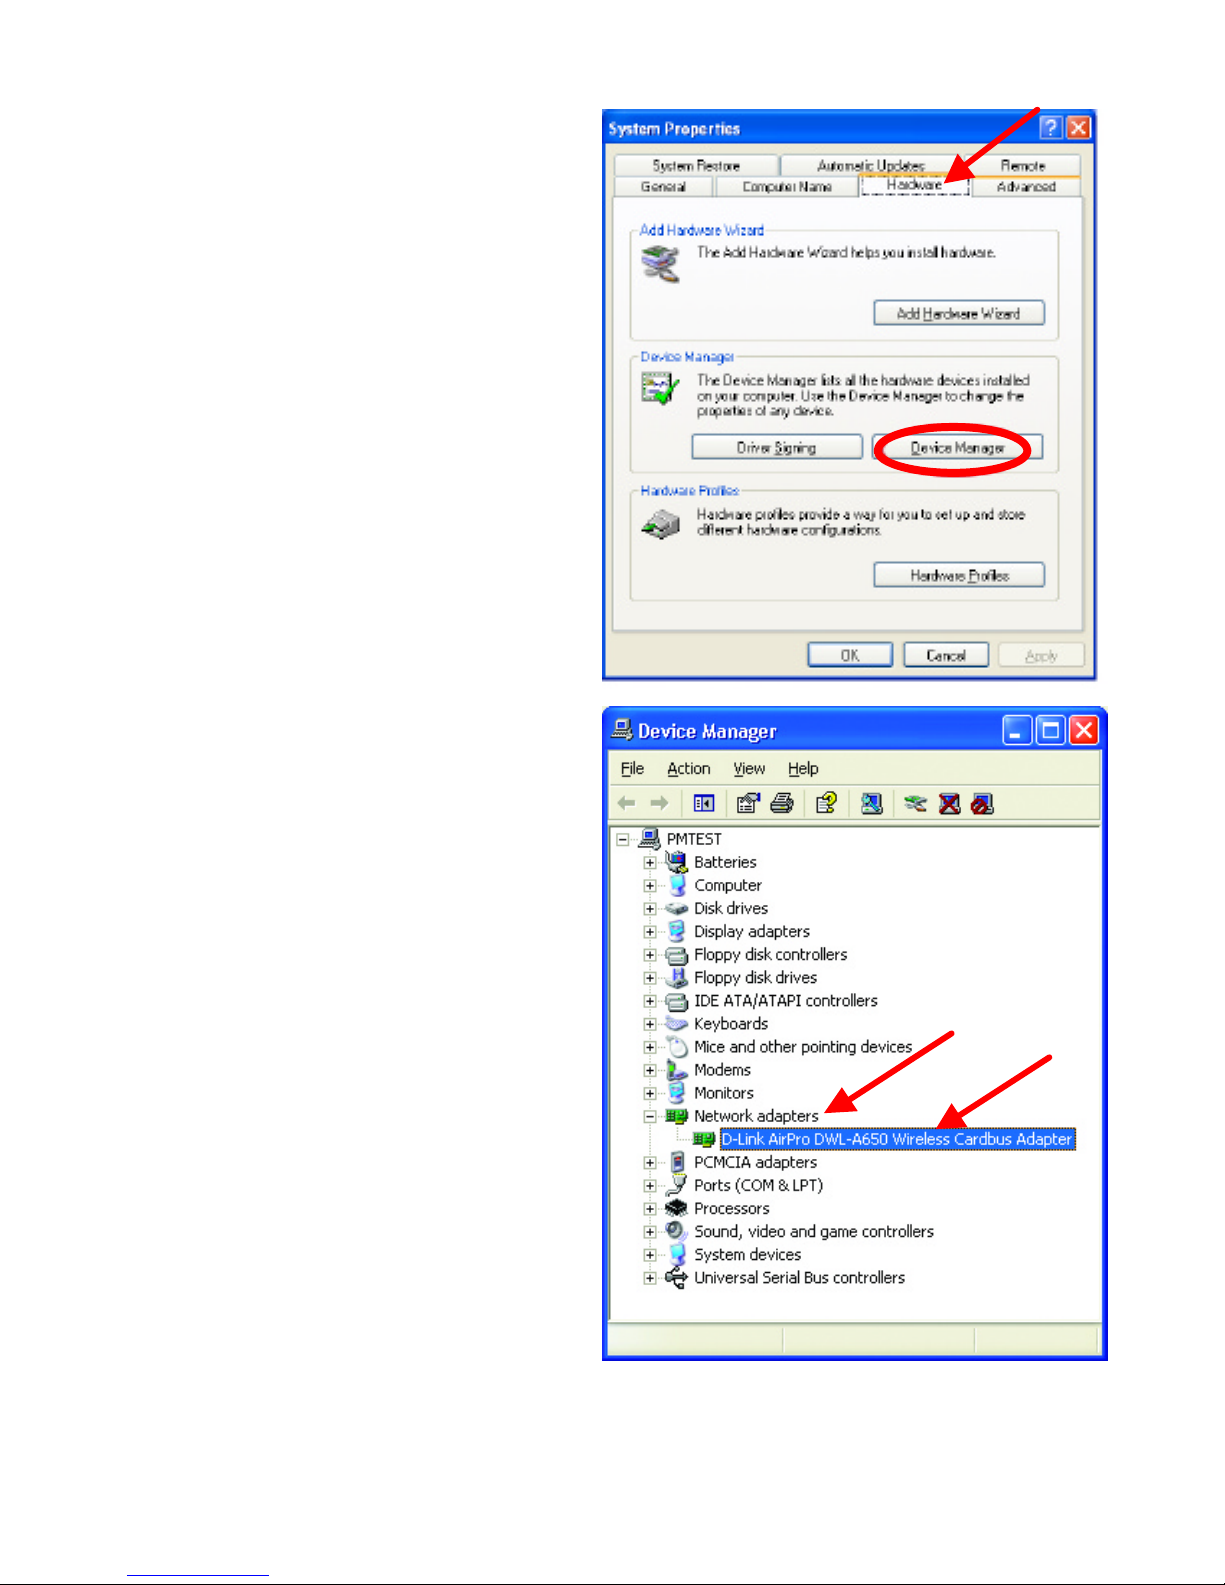
•
Select the
Hardware Tab
.
• Click Device Manager.
•
Click
on Network
Adapters
• Right-click on D-Link Air
Pro DWL-
AB650 Wireless
Cardbus Adapter
• Select Properties
to check
that the drivers are
installed properly
Page 64
DWL-AB650 Wireless Multimode Cardbus Adapter
64
Networking Basics
Checking the IP Address in Windows XP
The following window will display
• Click the Support tab.
•
Look un
der
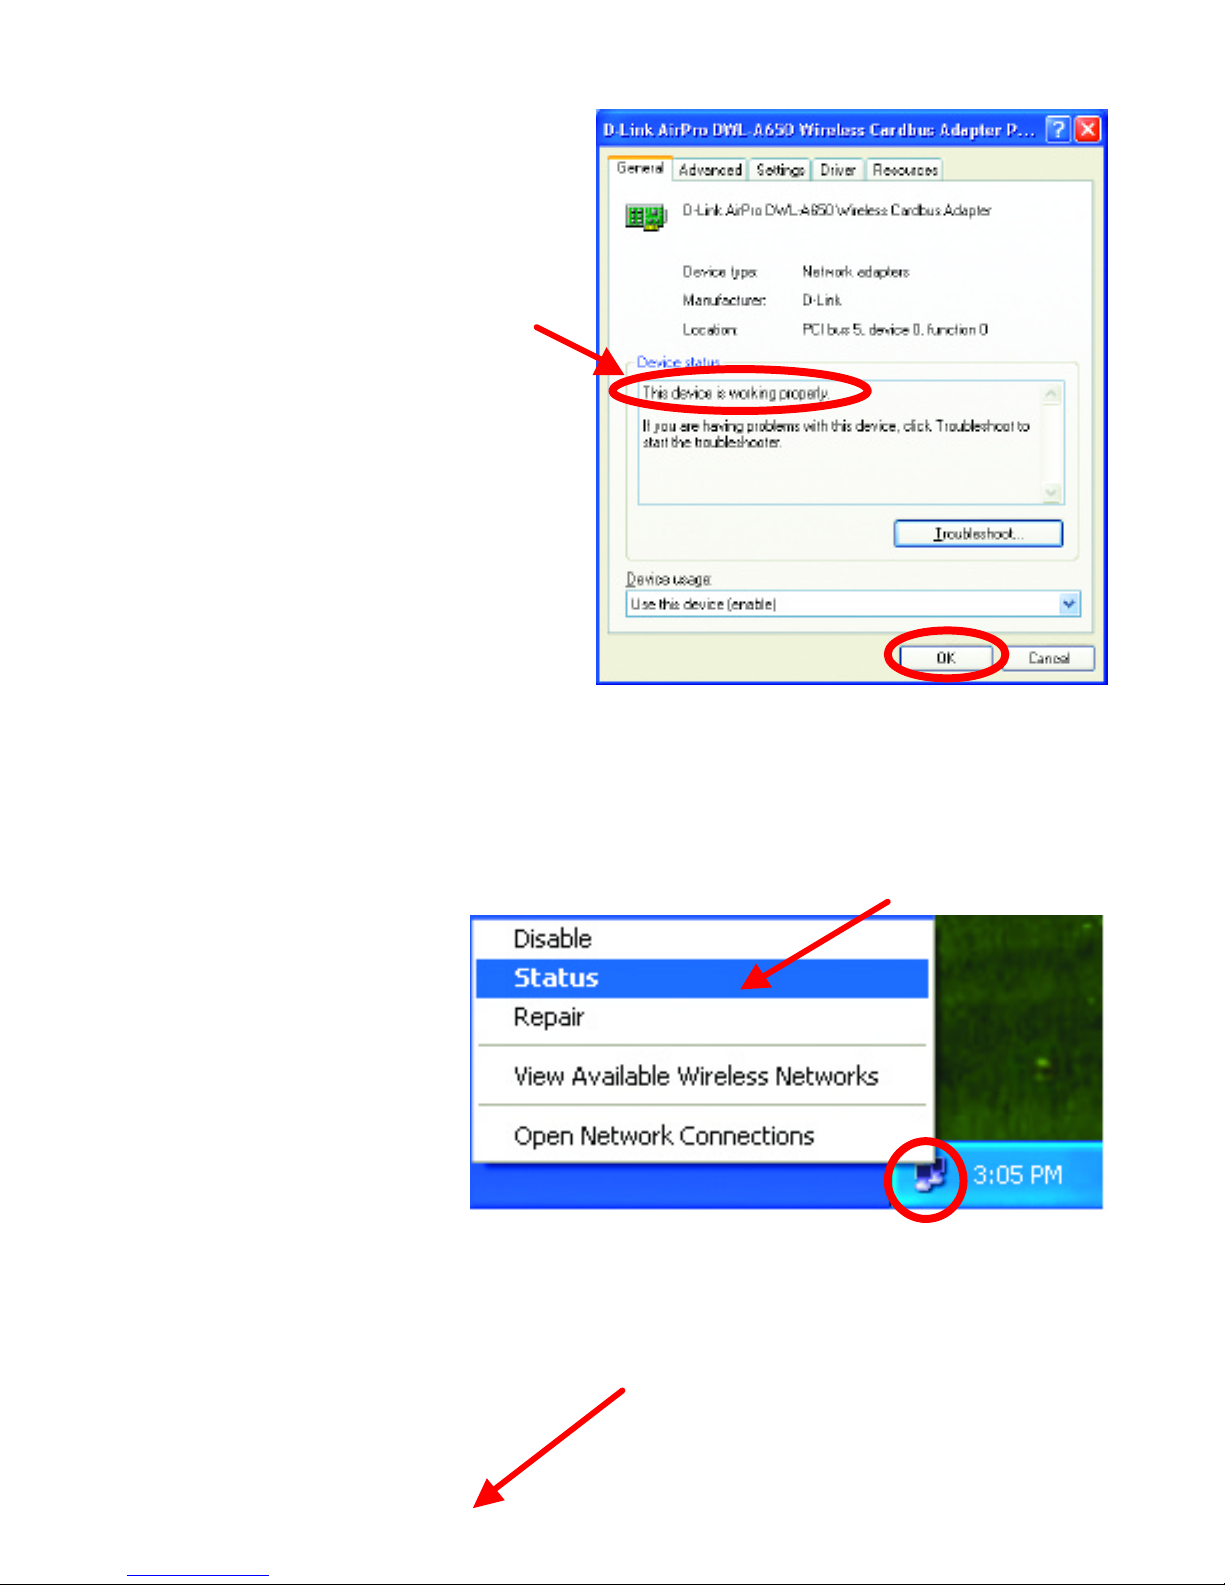
Device
Status
to check that the
device is working
properly.
• Click OK.
• Right-click on the
networking icon in
the task bar.
• Click on Status.
Page 65
DWL-AB650 Wireless Multimode Cardbus Adapter
65
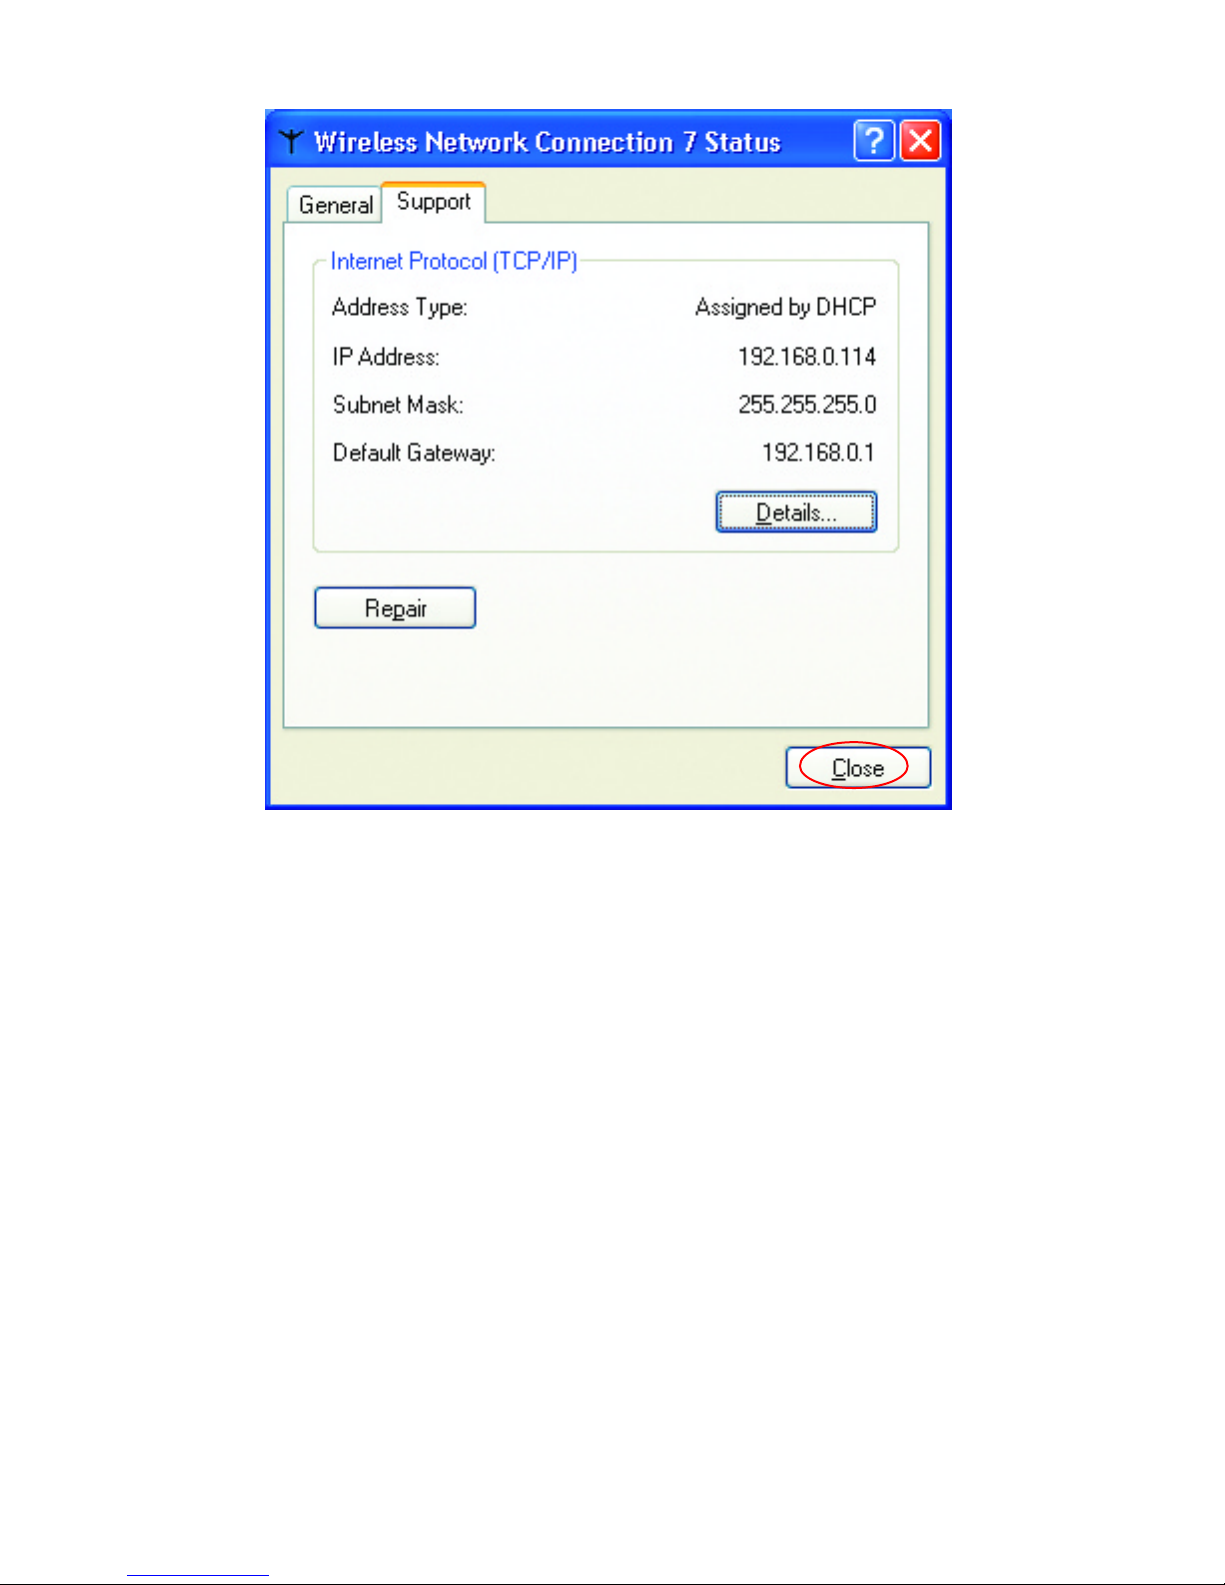
• Click Close.
Page 66
DWL-AB650 Wireless Multimode Cardbus Adapter
66
Networking Basics
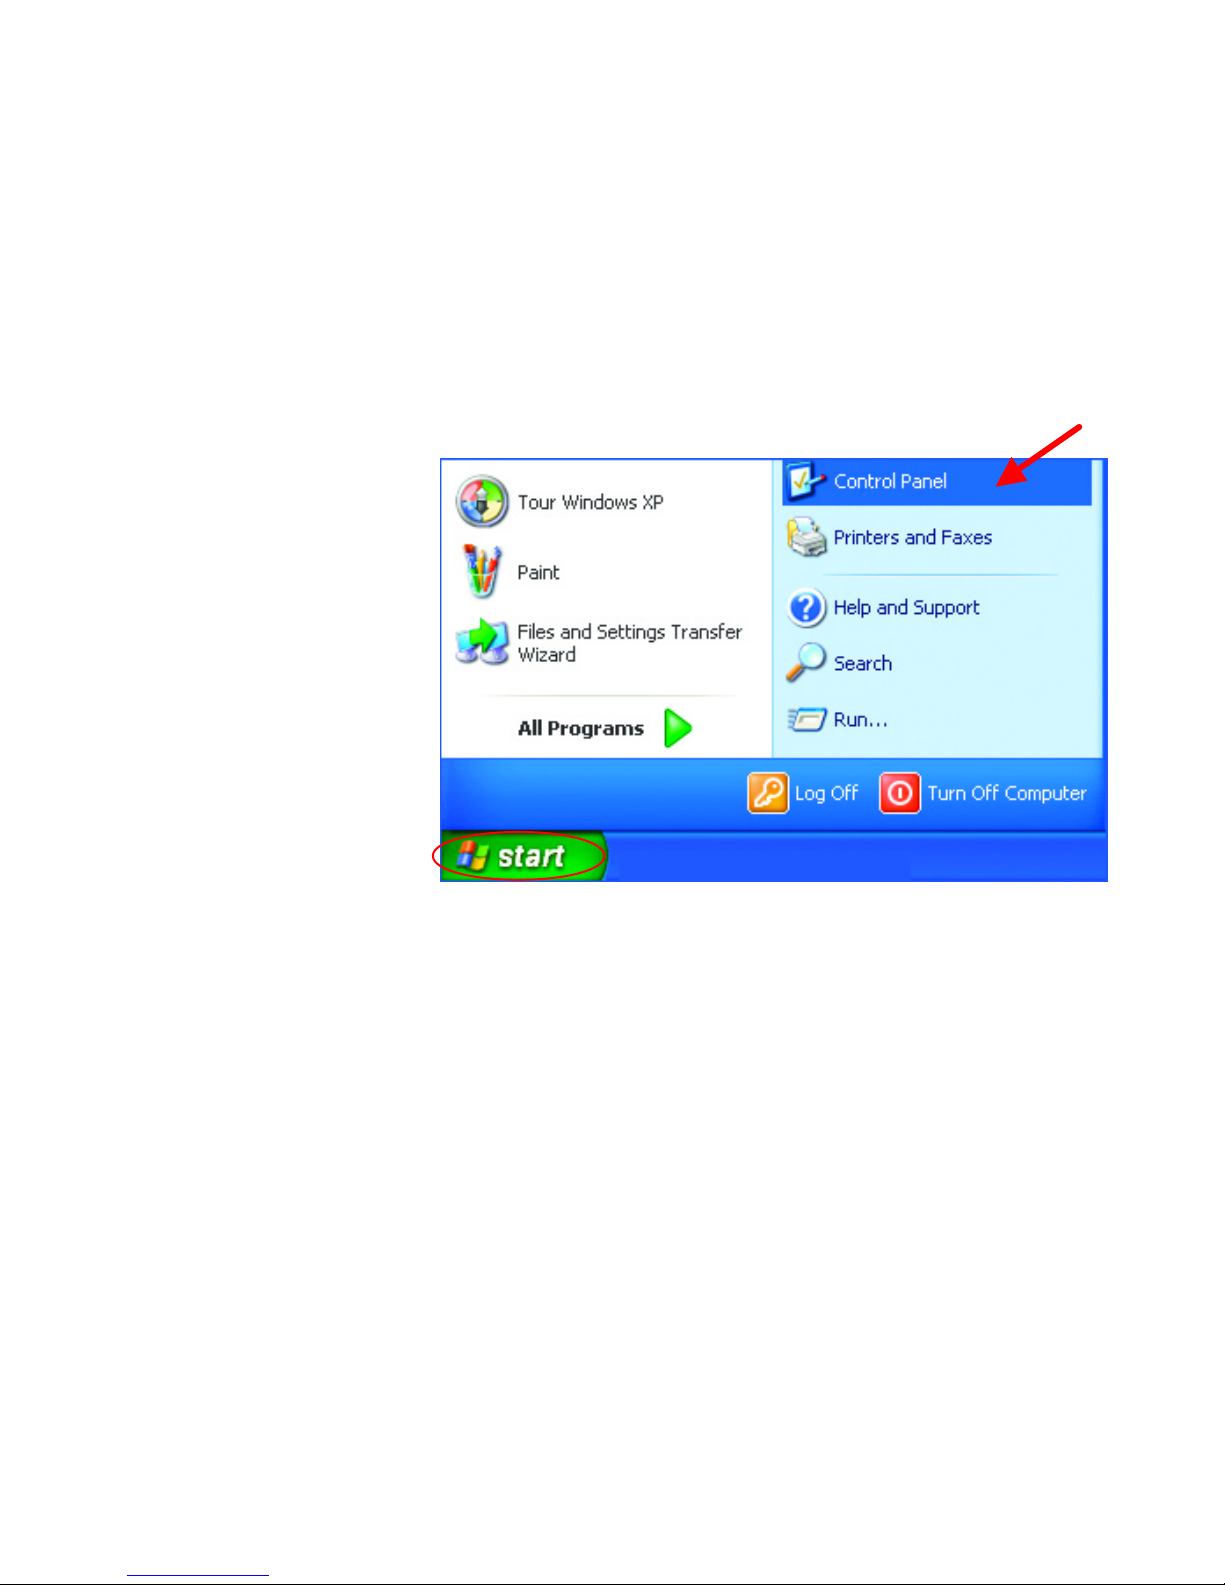
Assigning a Static IP Address
Note: Residential Gateways/Broadband Routers will automatically assign IP
Addresses to the computers on the network, using DHCP (Dynamic Host
Configuration Protocol) technology. If you are using a DHCP-capable
Gateway/Router you will not need to assign Static IP Addresses.
If you are not using a DHCP capable Gateway/Router, or you need to assign a
Static IP Address, please follow these instructions:
•
Go to
START
.
• Double-click on
Control Panel.
Page 67
DWL-AB650 Wireless Multimode Cardbus Adapter
67
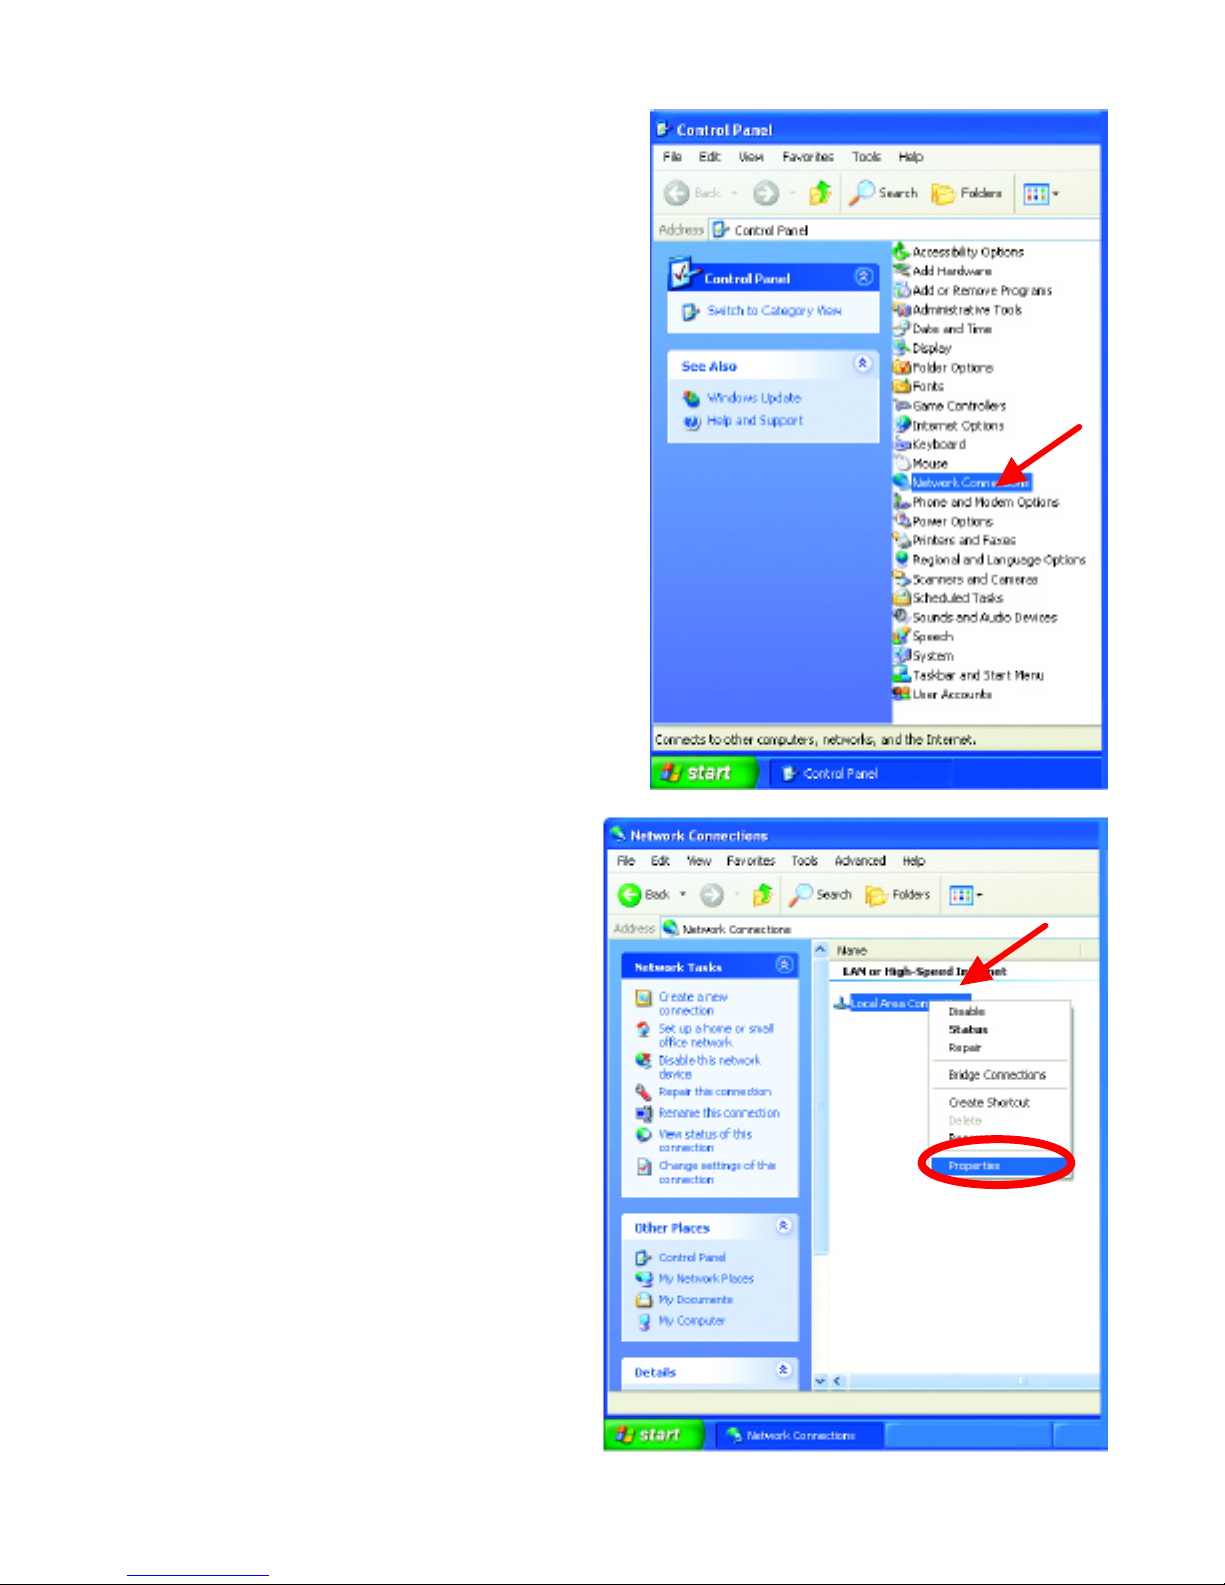
•
Double-click on
Network Connections.
•
Right
-
click
on Local
Area Connections.
• Double-click
Properties.
Page 68
DWL-AB650 Wireless Multimode Cardbus Adapter
68
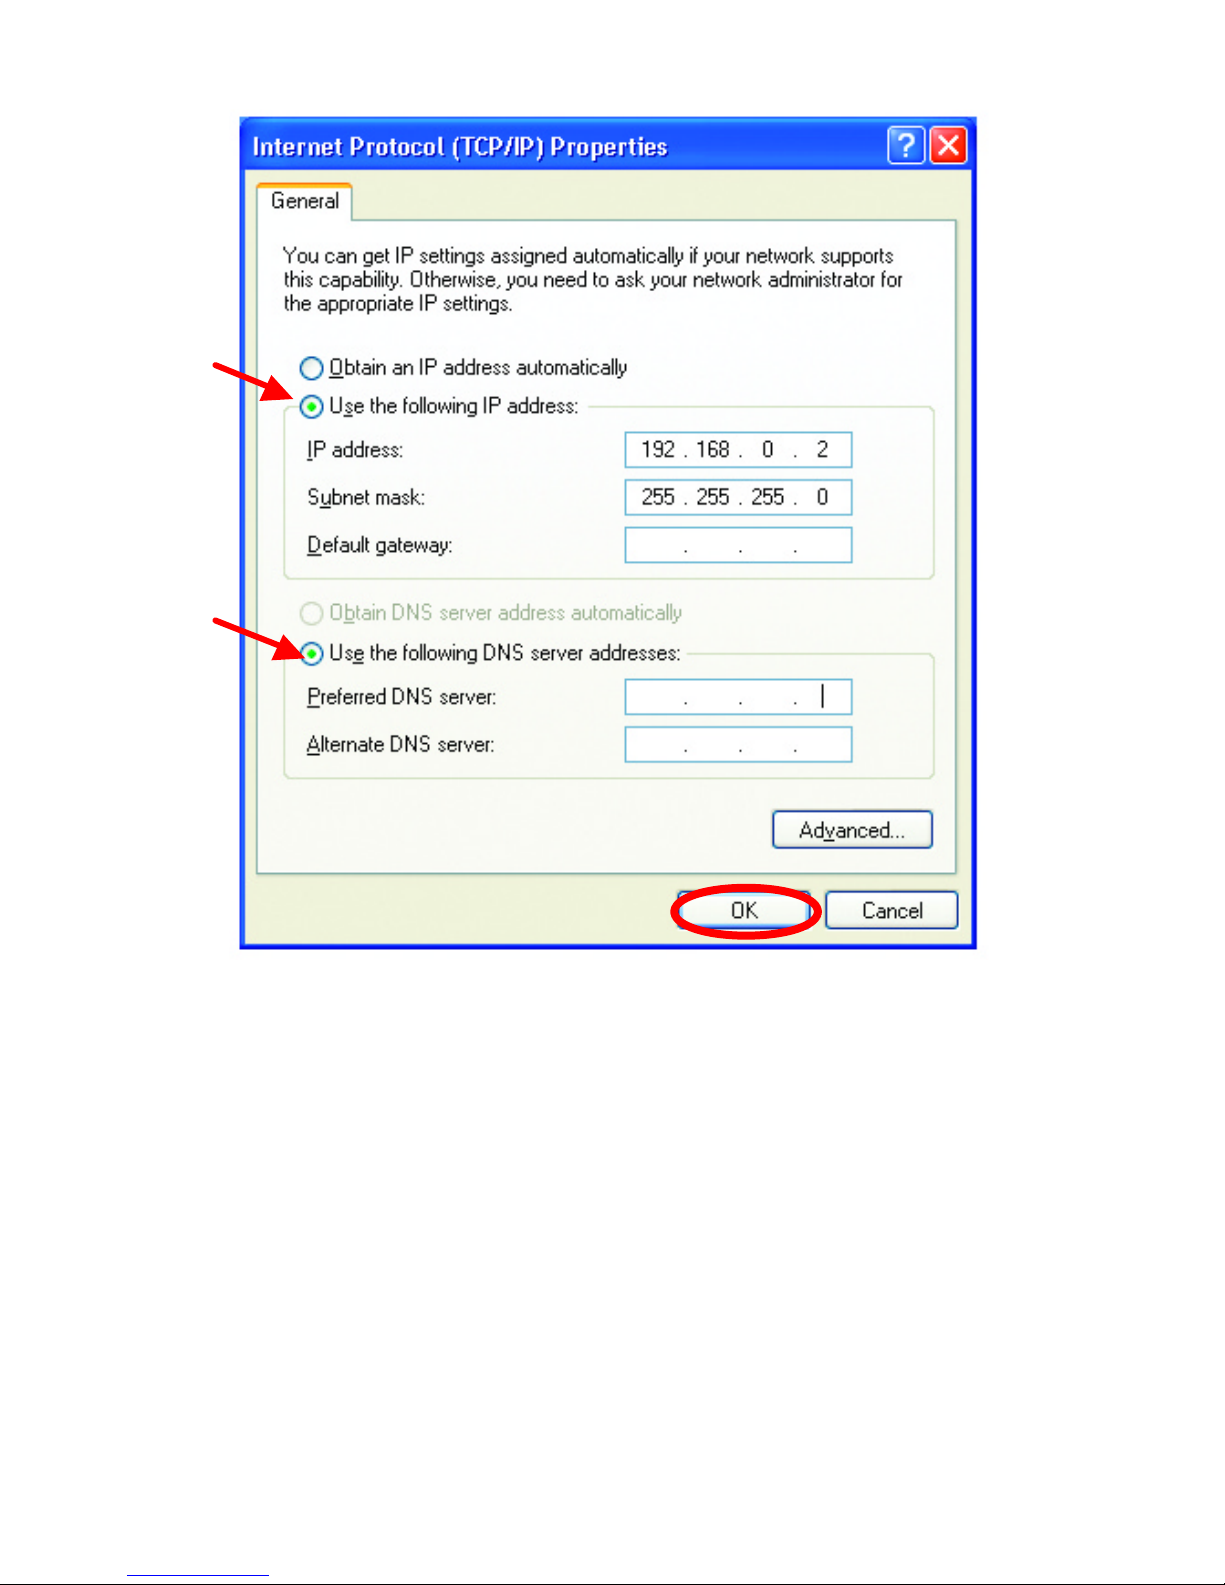
• Select Use the following IP address in the Internet Protocol (TCP/IP)
Properties window.
• Input your IP address and subnet mask. (The IP Addresses on your
network must be within the same range. For example, if one computer
has an IP Address of 192.168.0.2, the other computers should have IP
Addresses that are sequential, like 192.168.0.3 and 192.168.0.4. The
subnet mask must be the same for all the computers on the network.)
• Input your DNS server addresses. (Note: If you are entering a DNS
server address, you must enter the IP Address of the Default
Gateway.)
The DNS server information will be provided by your ISP (Internet Service
Provider.)
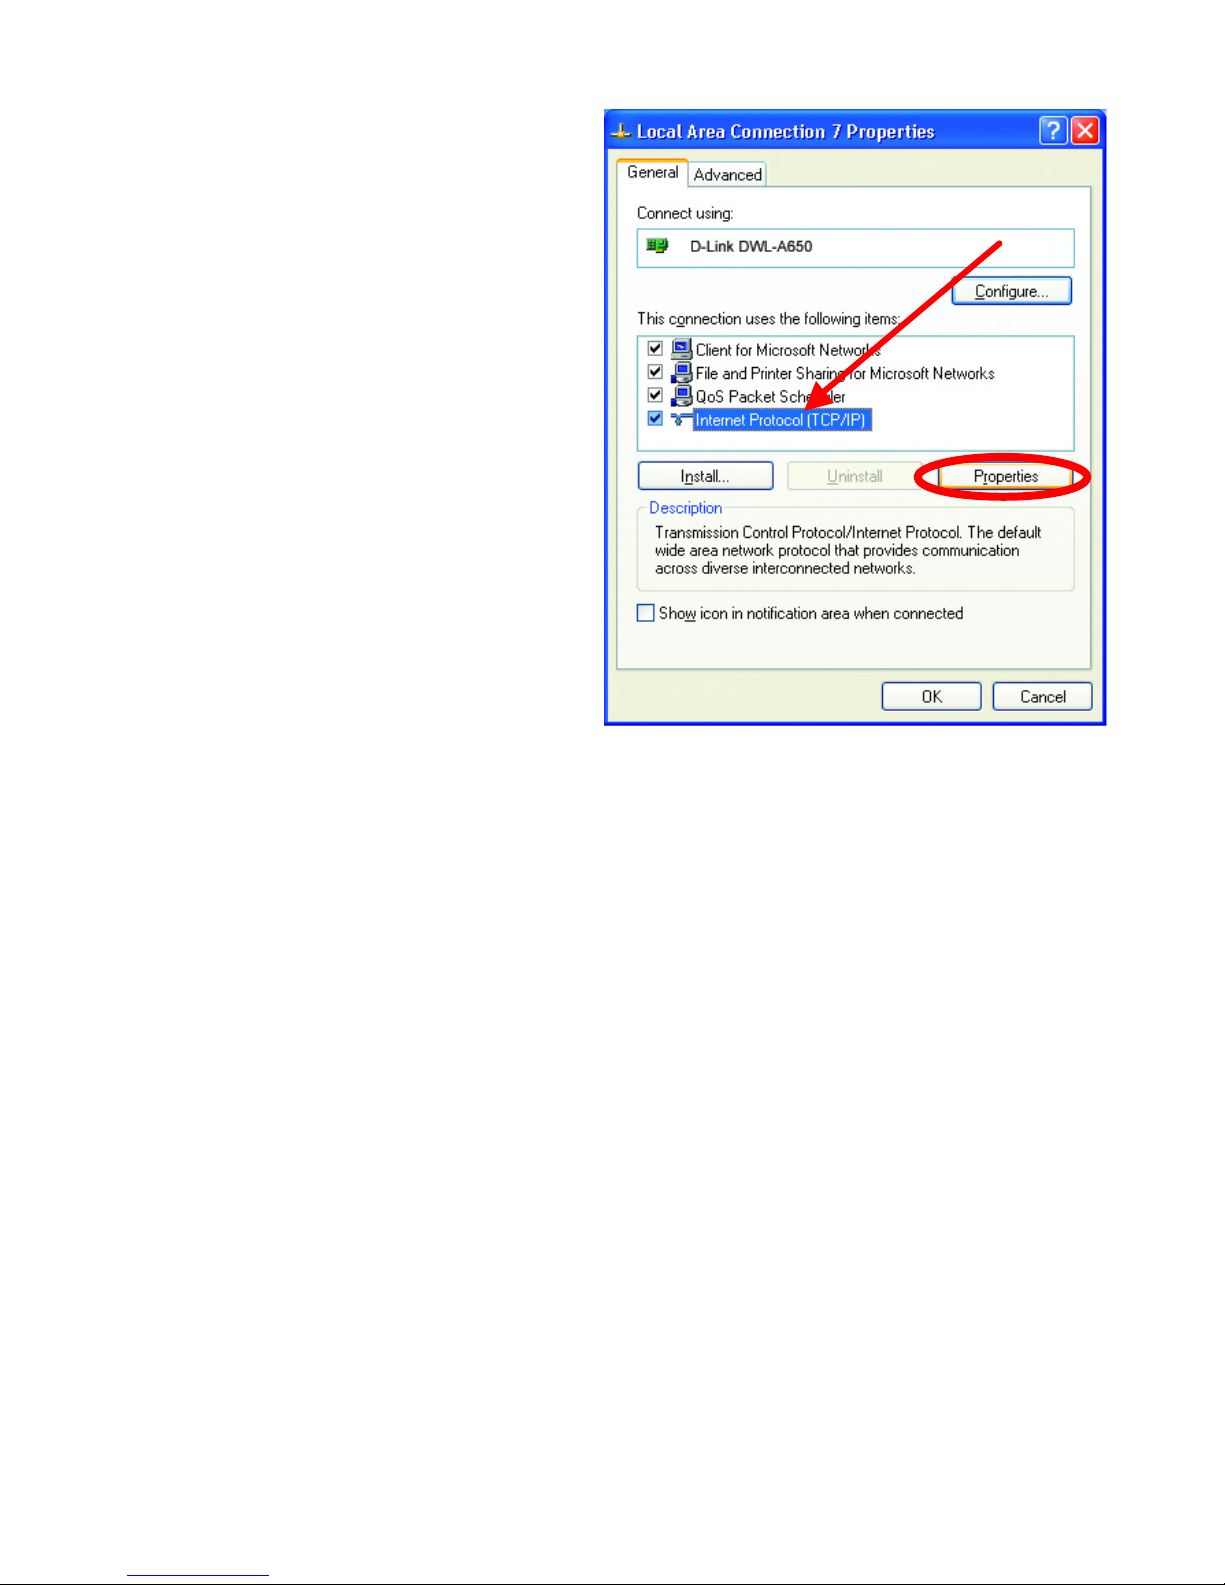
•
Highlight
In
ternet
Protocol (TCP/IP).
• Click Properties.
Page 69
DWL-AB650 Wireless Multimode Cardbus Adapter
69
• Click OK.
You have completed the assignment of a Static IP Address. (You do not need to
assign a Static IP Address if you have a DHCP -capable Gateway/Router.)
Networking Basics
Adding and Sharing Printers in Windows XP
After you have run the Network Setup Wizard on all the computers in your
network (please see the Network Setup Wizard section at the beginning of
Networking Basics,) you can use the Add Printer Wizard to add or share a
printer on your network.
Whether you want to add a local printer (a printer connected directly to one
computer,) share an LPR printer (a printer connected to a print server) or
Page 70
DWL-AB650 Wireless Multimode Cardbus Adapter
70
share a network printer (a printer connected to your network through a
Gateway/Router,) use the Add Printer Wizard. Please follow the directions
below:
First, make sure that you have run the Network Setup Wizard on all of
the computers on your network.
We will show you 3 ways to use the Add Printer Wizard
1. Adding a local printer
2. Sharing an network printer
3. Sharing an LPR printer
Adding a local printer
(A printer connected directly to a computer)
A printer that is not shared on the network and is connected directly to one
computer is called a local printer. If you do not need to share your printer
on a network, follow these directions to add the printer to one computer.
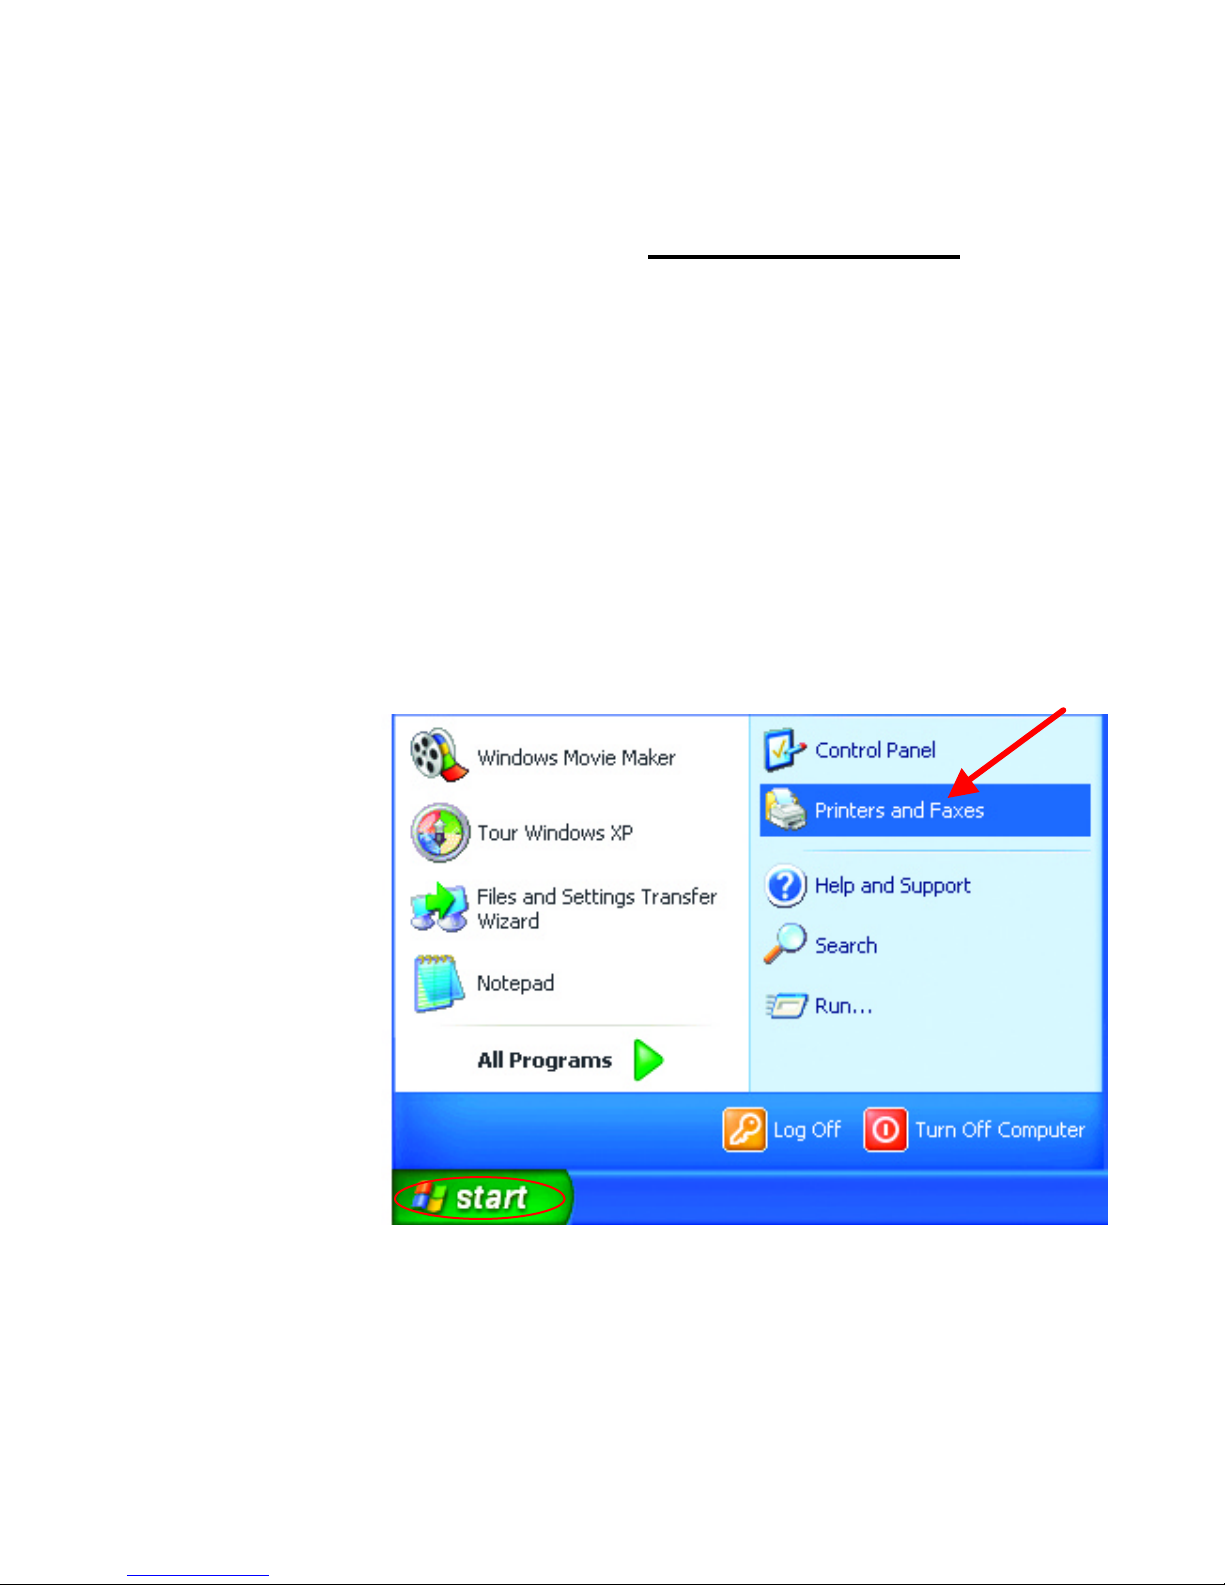
•
Go to
Start>
Printers and
Faxes.
Page 71
DWL-AB650 Wireless Multimode Cardbus Adapter
71
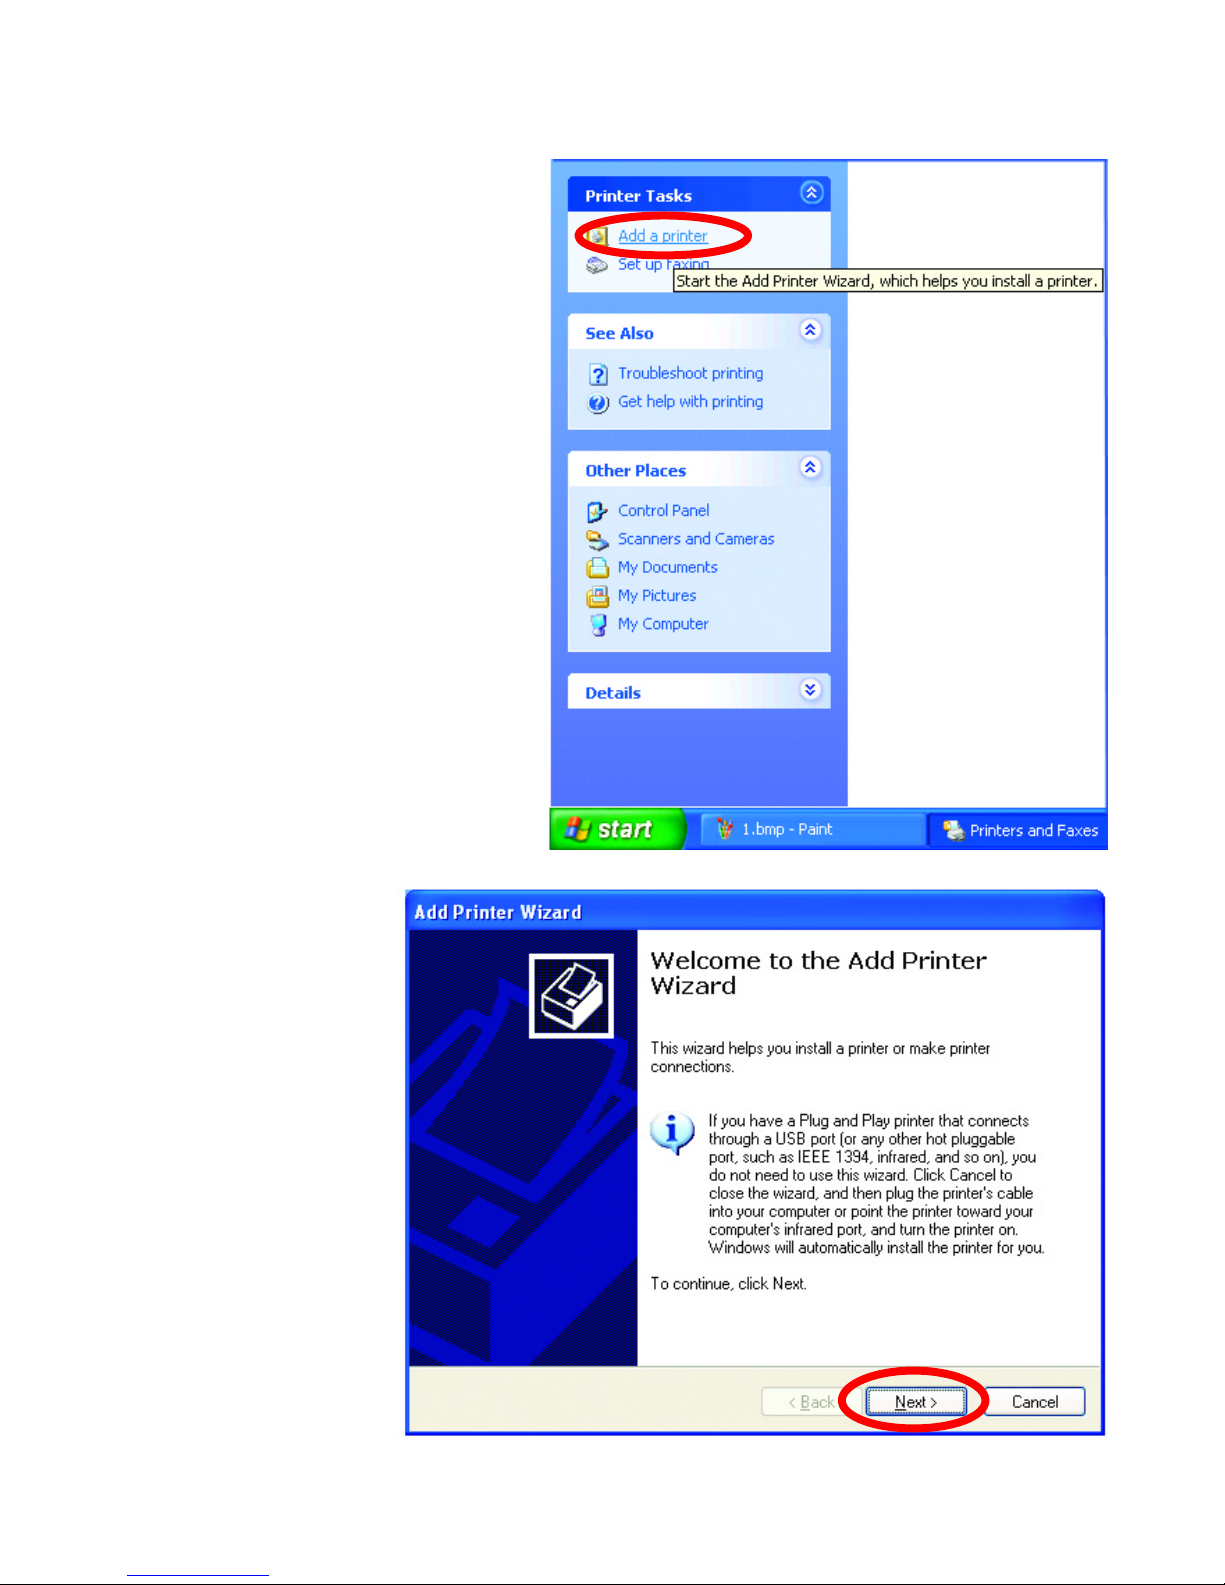
•
Click
on Add a
printer.
• Click Next.
Page 72
DWL-AB650 Wireless Multimode Cardbus Adapter
72
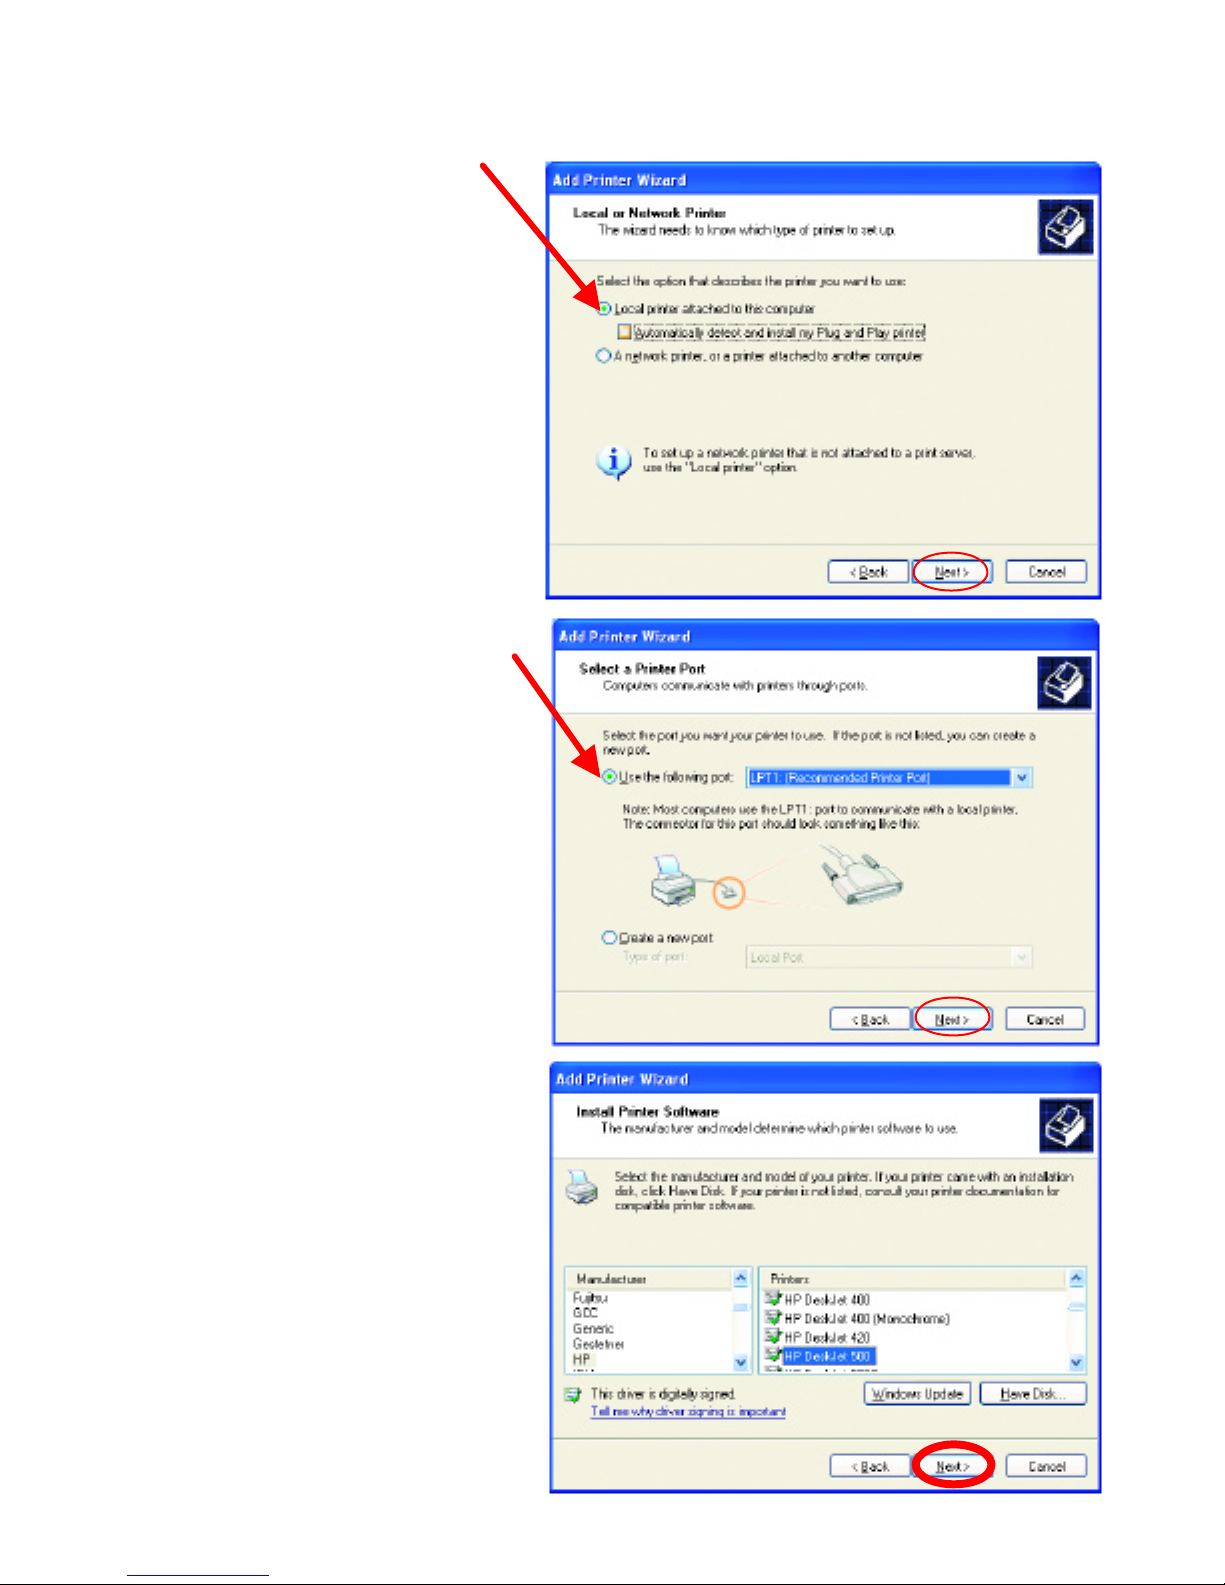
•
Select
Local printer
attached to this computer.
• (Deselect Automatically detect
and install my Plug and Play
printer if it has been selected.)
• Click Next.
•
Select
Use the
following port:
• From the pull-down
menu select the
correct port for your
printer.
(Most computers use the
LPT1: port, as shown in
the illustration.)
• Click Next.
•
Select and highlight the
correct driver for your
printer.
• Click Next.
(If the correct driver is not
displayed, insert the CD or
floppy disk that came with your
printer and click Have Disk.)
Page 73
DWL-AB650 Wireless Multimode Cardbus Adapter
73
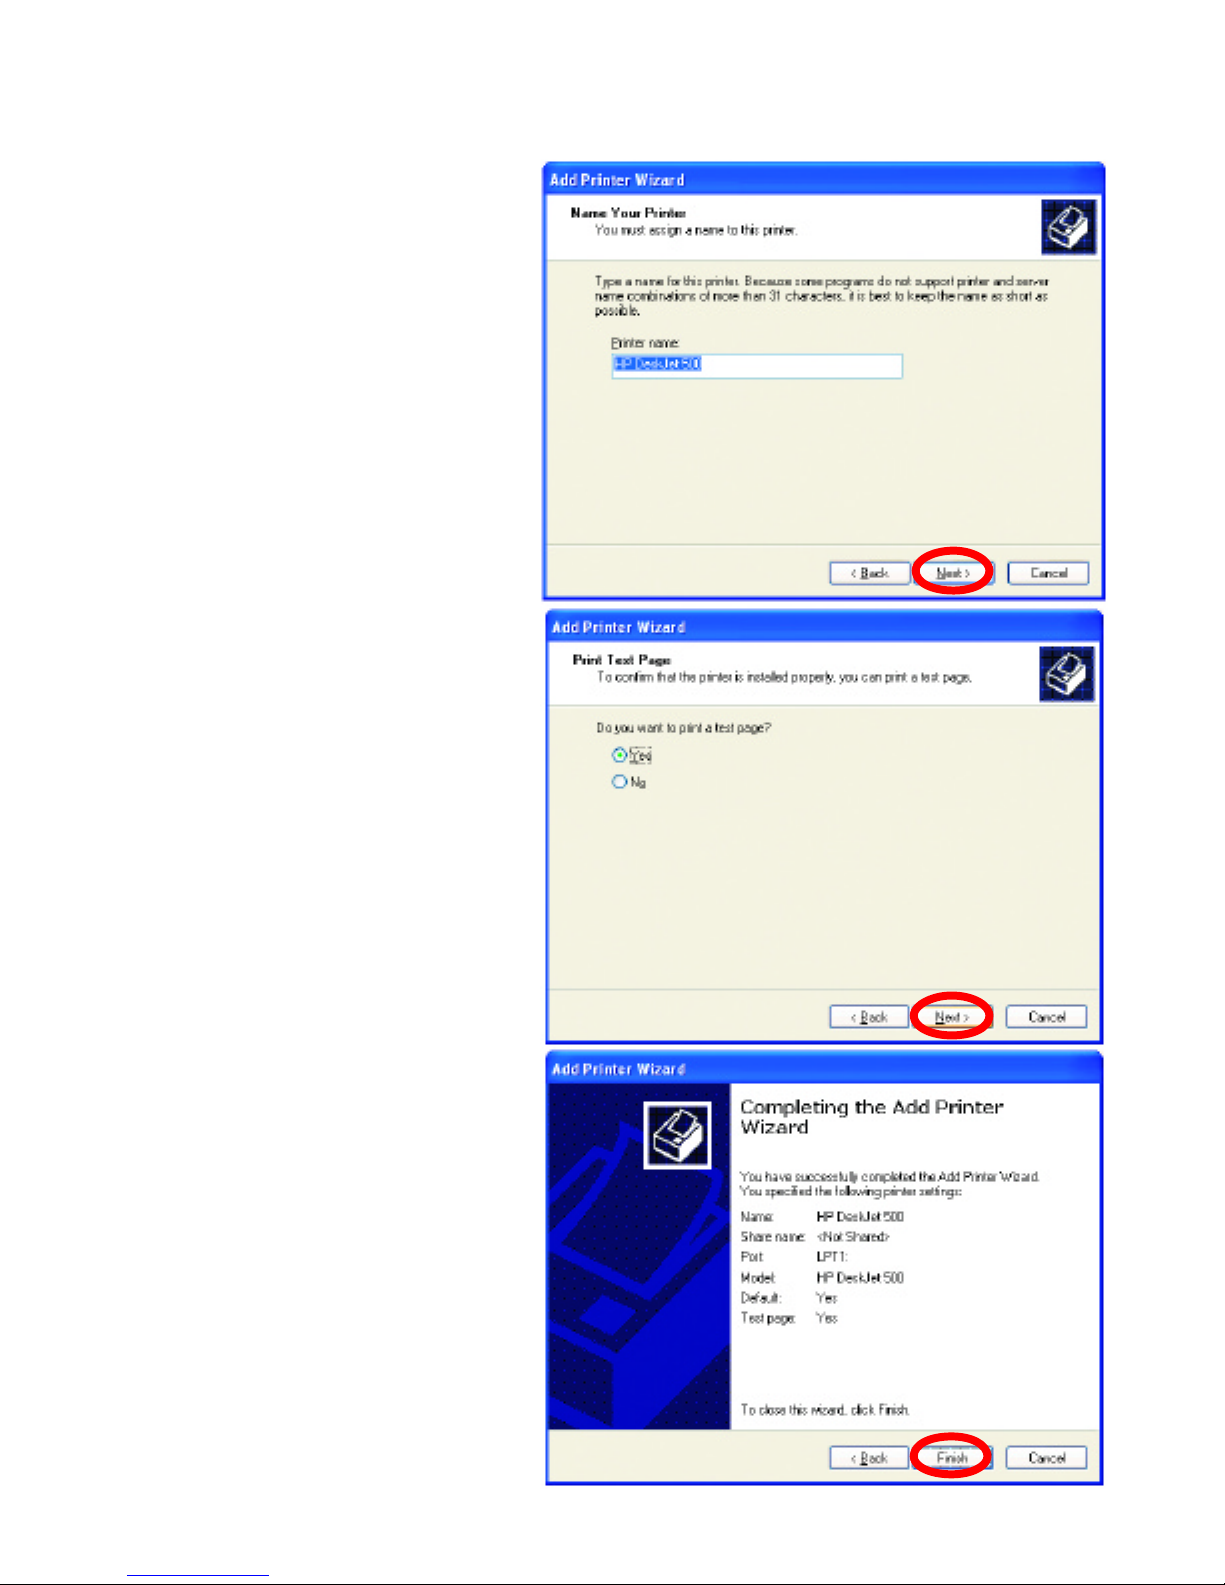
•
At this screen, you c
an
change the name of the
printer (optional.)
• Click Next.
•
Select
Yes
to print a
test page. A
successful printing will
confirm that you have
chosen the correct
driver.
• Click Next.
This screen gives you
information about your
printer.
• Click Finish.
Page 74
DWL-AB650 Wireless Multimode Cardbus Adapter
74
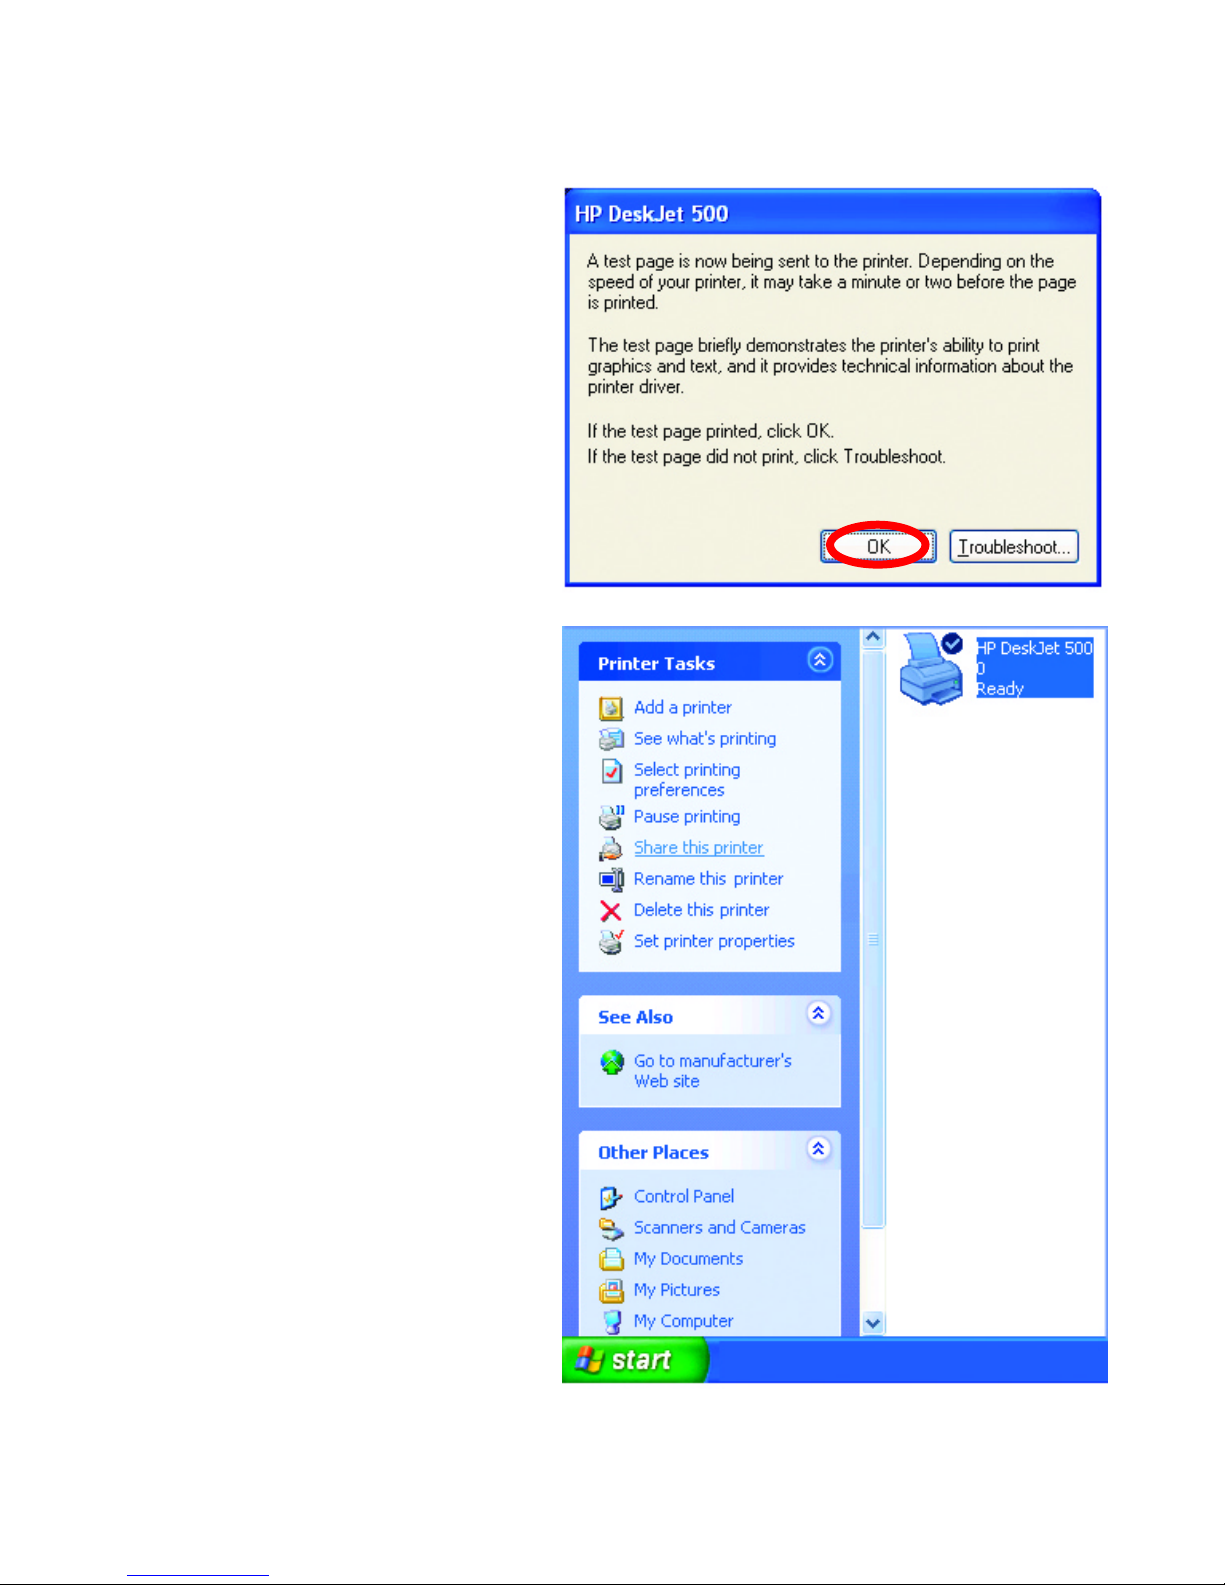
When the test page has
printed,
• Click OK.
•
Go to
Start
>
Printers and
Faxes.
A successful installation will
display the printer icon as
shown at right.
You have su
ccessfully added a
local printer.
Page 75
DWL-AB650 Wireless Multimode Cardbus Adapter
75
Networking Basics
Sharing a network printer
After you have run the Network Setup Wizard on all the computers on your
network, you can run the Add Printer Wizard on all the computers on your
network. Please follow these directions to use the Add Printer Wizard to
share a printer on your network:
•
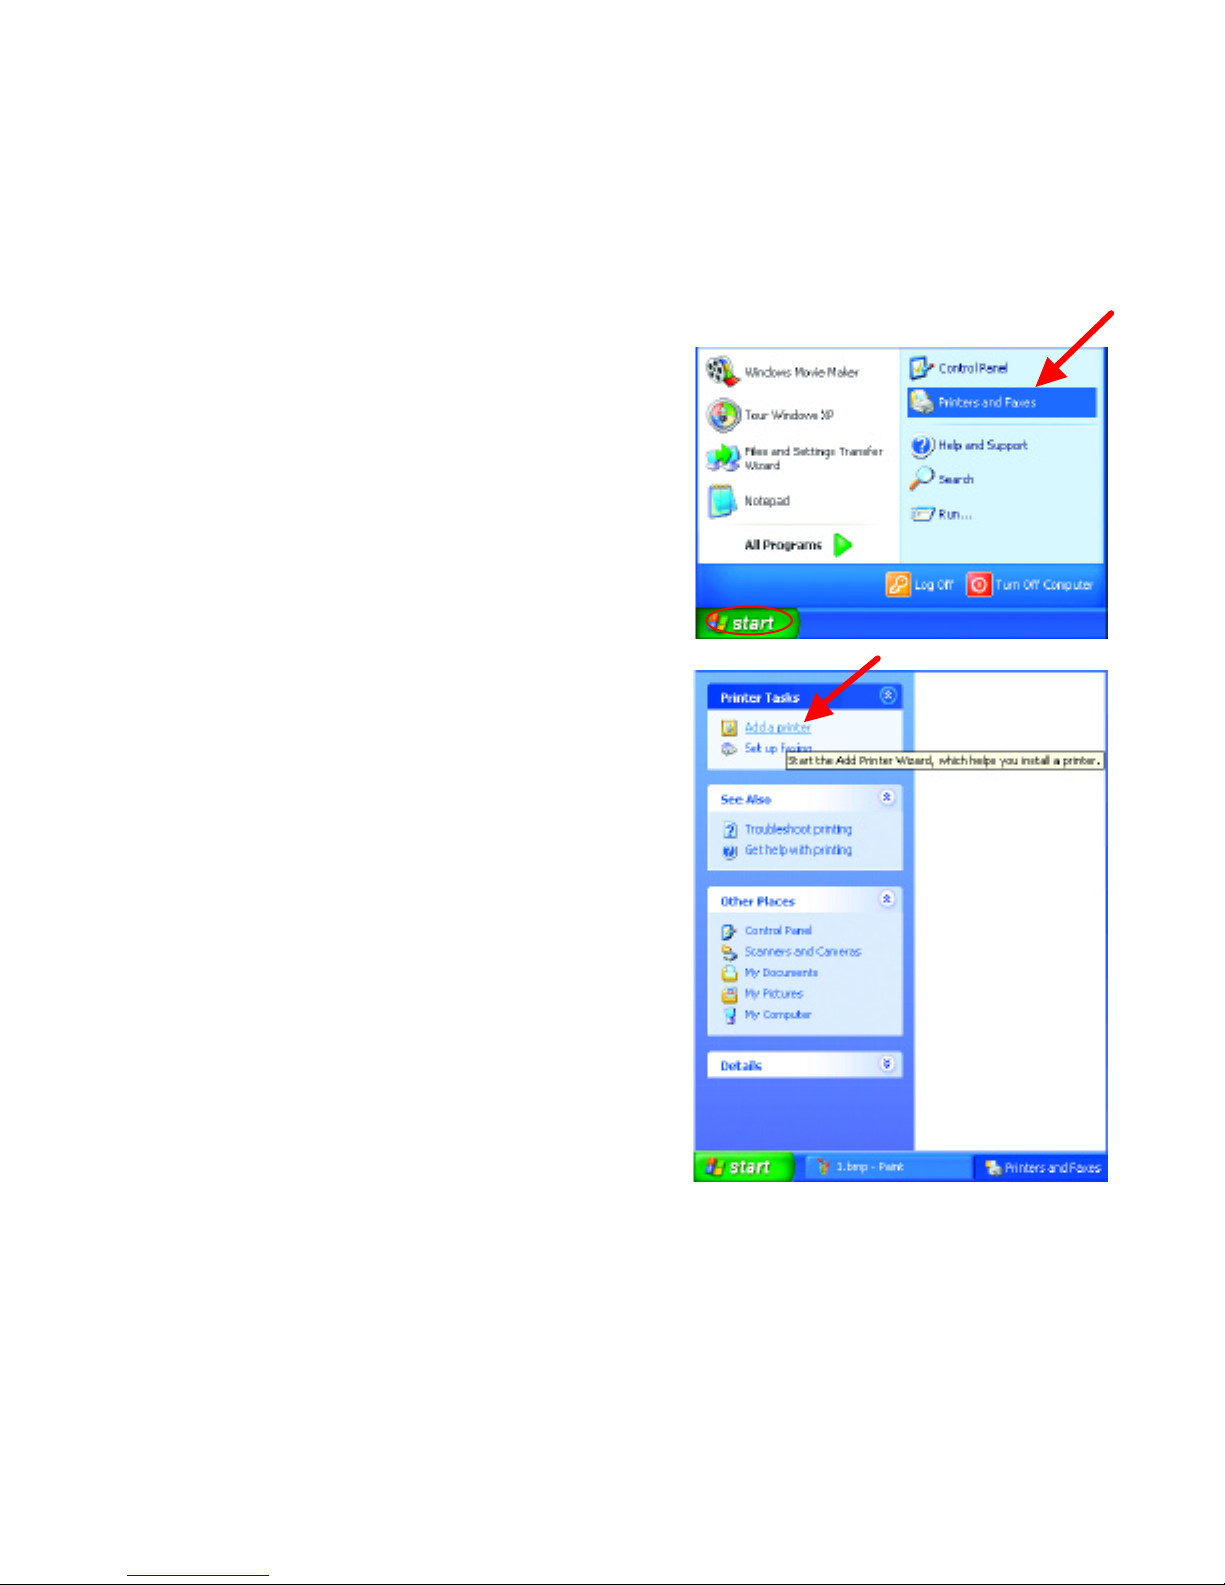
Go to
Start
> Printers and Faxes
.
• Click on Add a Printer.
Page 76
DWL-AB650 Wireless Multimode Cardbus Adapter
76
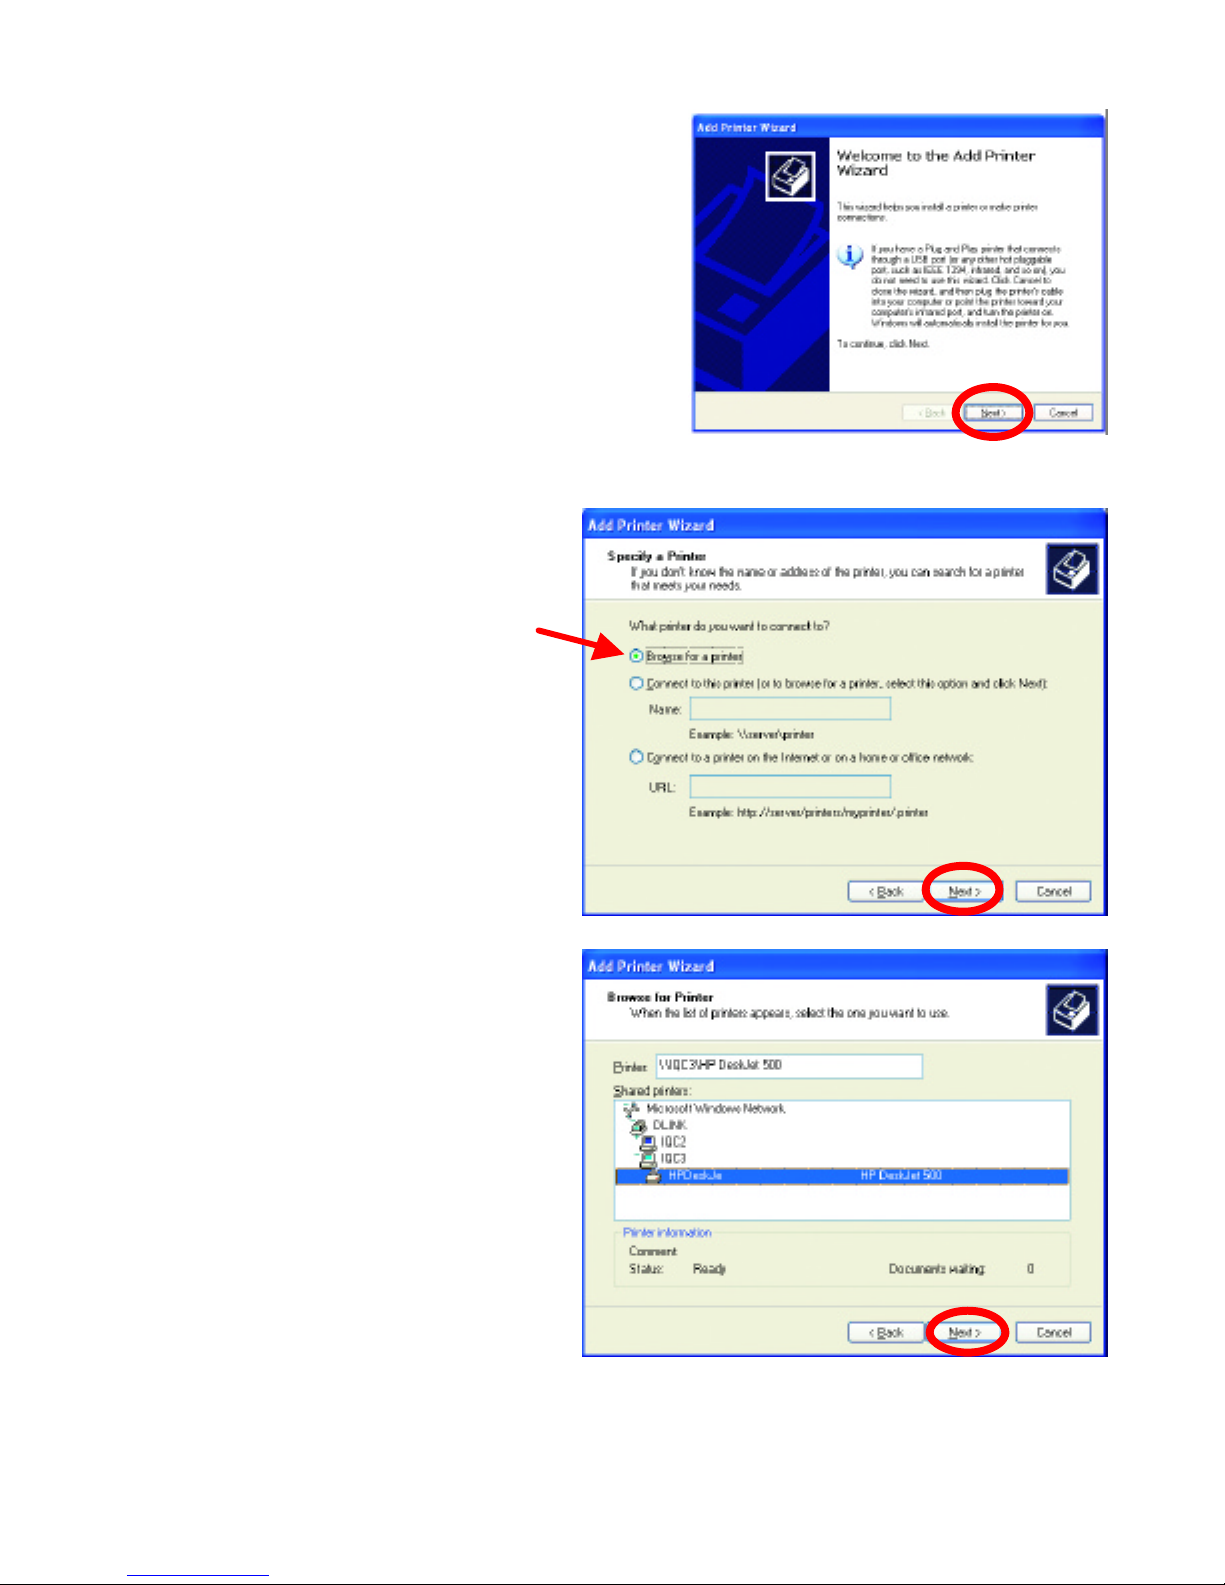
• Click Next.
•
Select
Browse for a printer
• Click Next.
•
Select the printer you
would like to share.
• Click Next.
Page 77
DWL-AB650 Wireless Multimode Cardbus Adapter
77
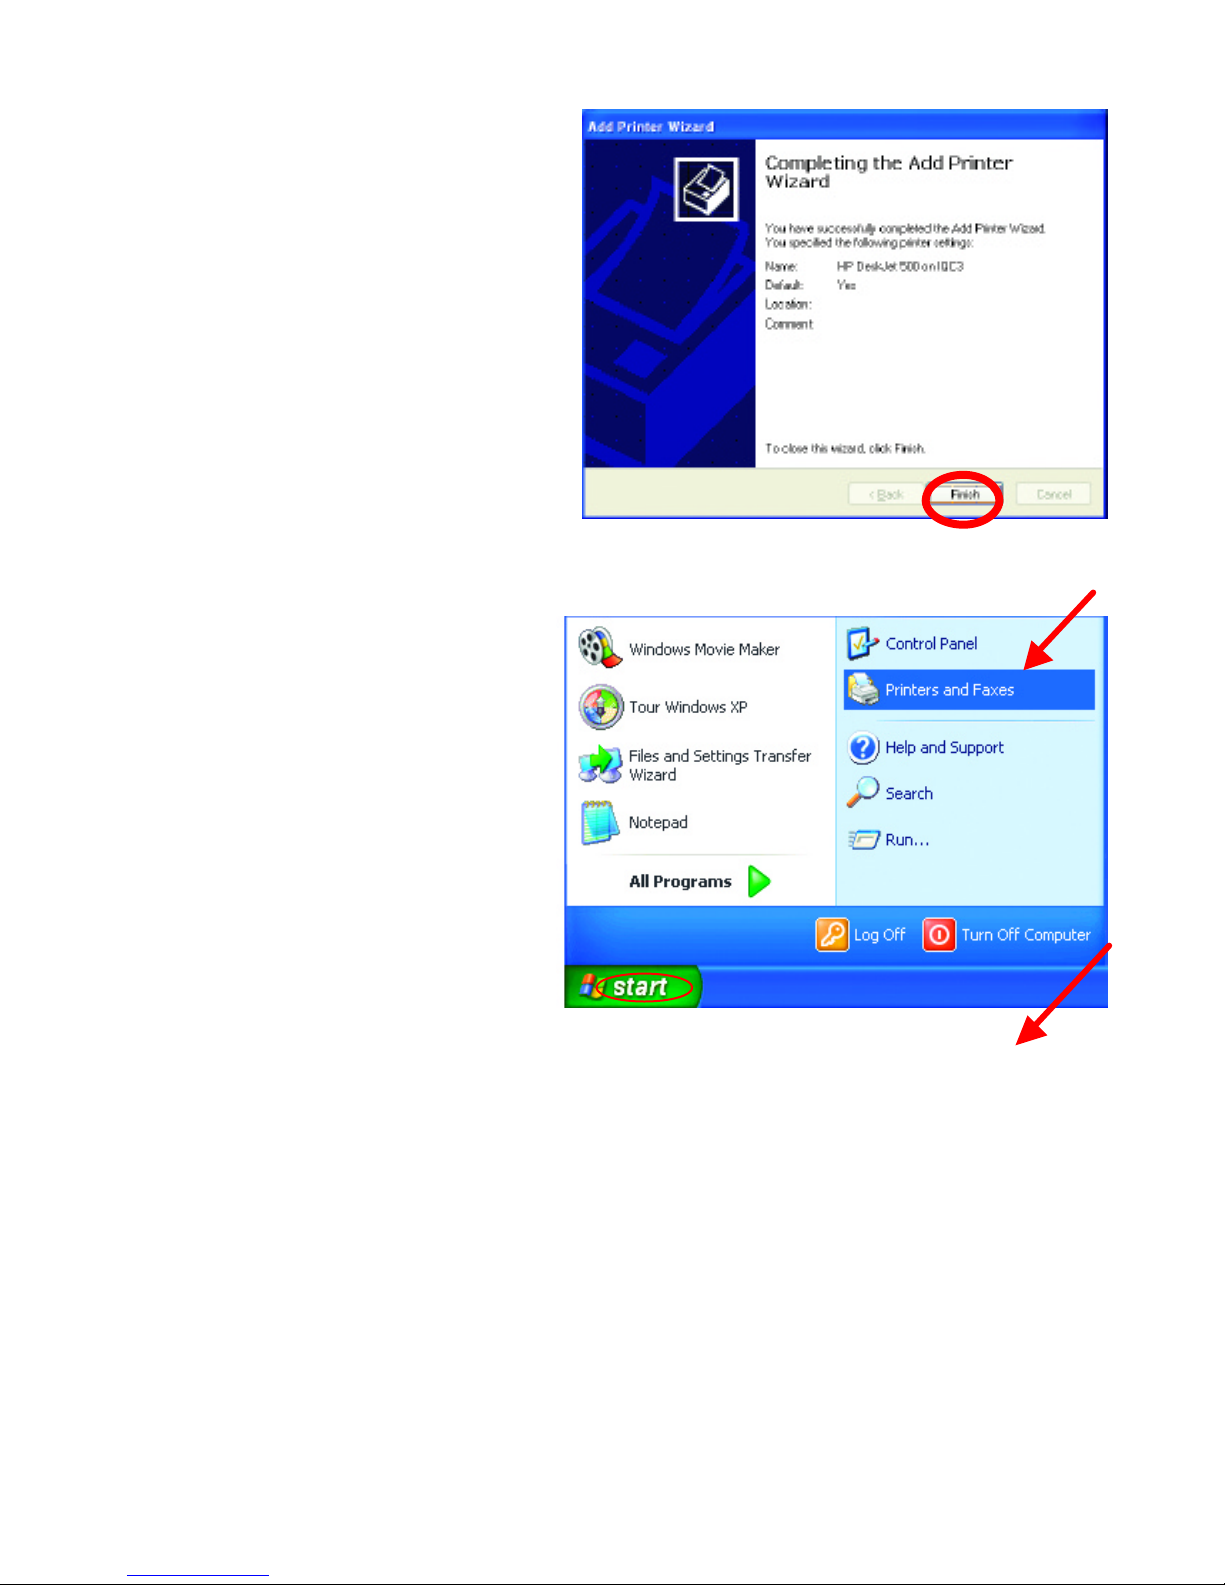
To check for proper installation:
• Click Finish.
•
Go to
Start>
Printers and Faxes.
Page 78
DWL-AB650 Wireless Multimode Cardbus Adapter
78
Networking Basics
Sharing an LPR printer
To share an LPR printer (using a print server,) you will need a Print Server such as
the DP-101P+ or the DP-313 or a Gateway/Router with a printer port such as the DI-
713P. Please make sure that you have run the Network Setup Wizard on all the
computers on your network. To share an LPR printer, please follow these directions:
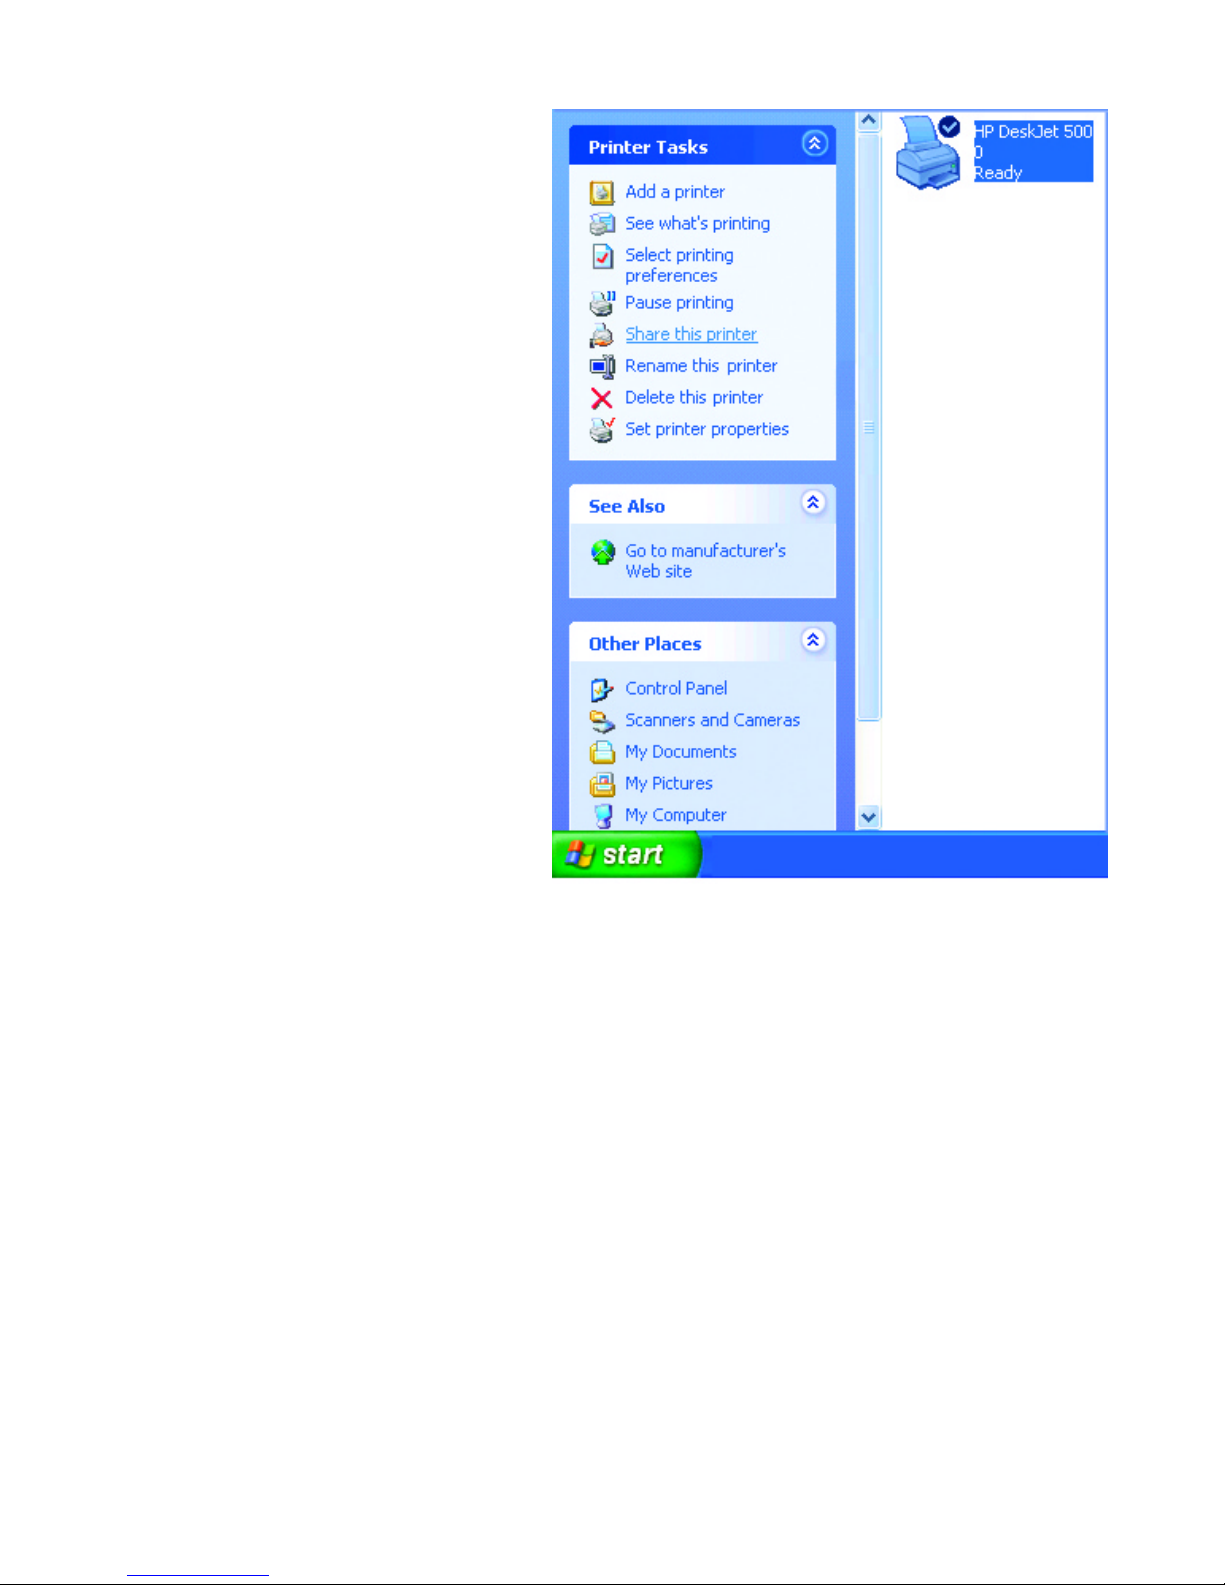
The printer icon will appear
at right, indicating proper
installation.
You have completed
adding the printer.
To share this printer on
your network:
• Remember the
printer name
• Run the Add Printer
Wizard on all the
computers on your
network.
• Make sure you have
already run the
Network Setup
Wizard on all the
network computers.
After you run the Add
Printer Wizard on all the
computers in the
network, you can share
the printer.
Page 79
DWL-AB650 Wireless Multimode Cardbus Adapter
79
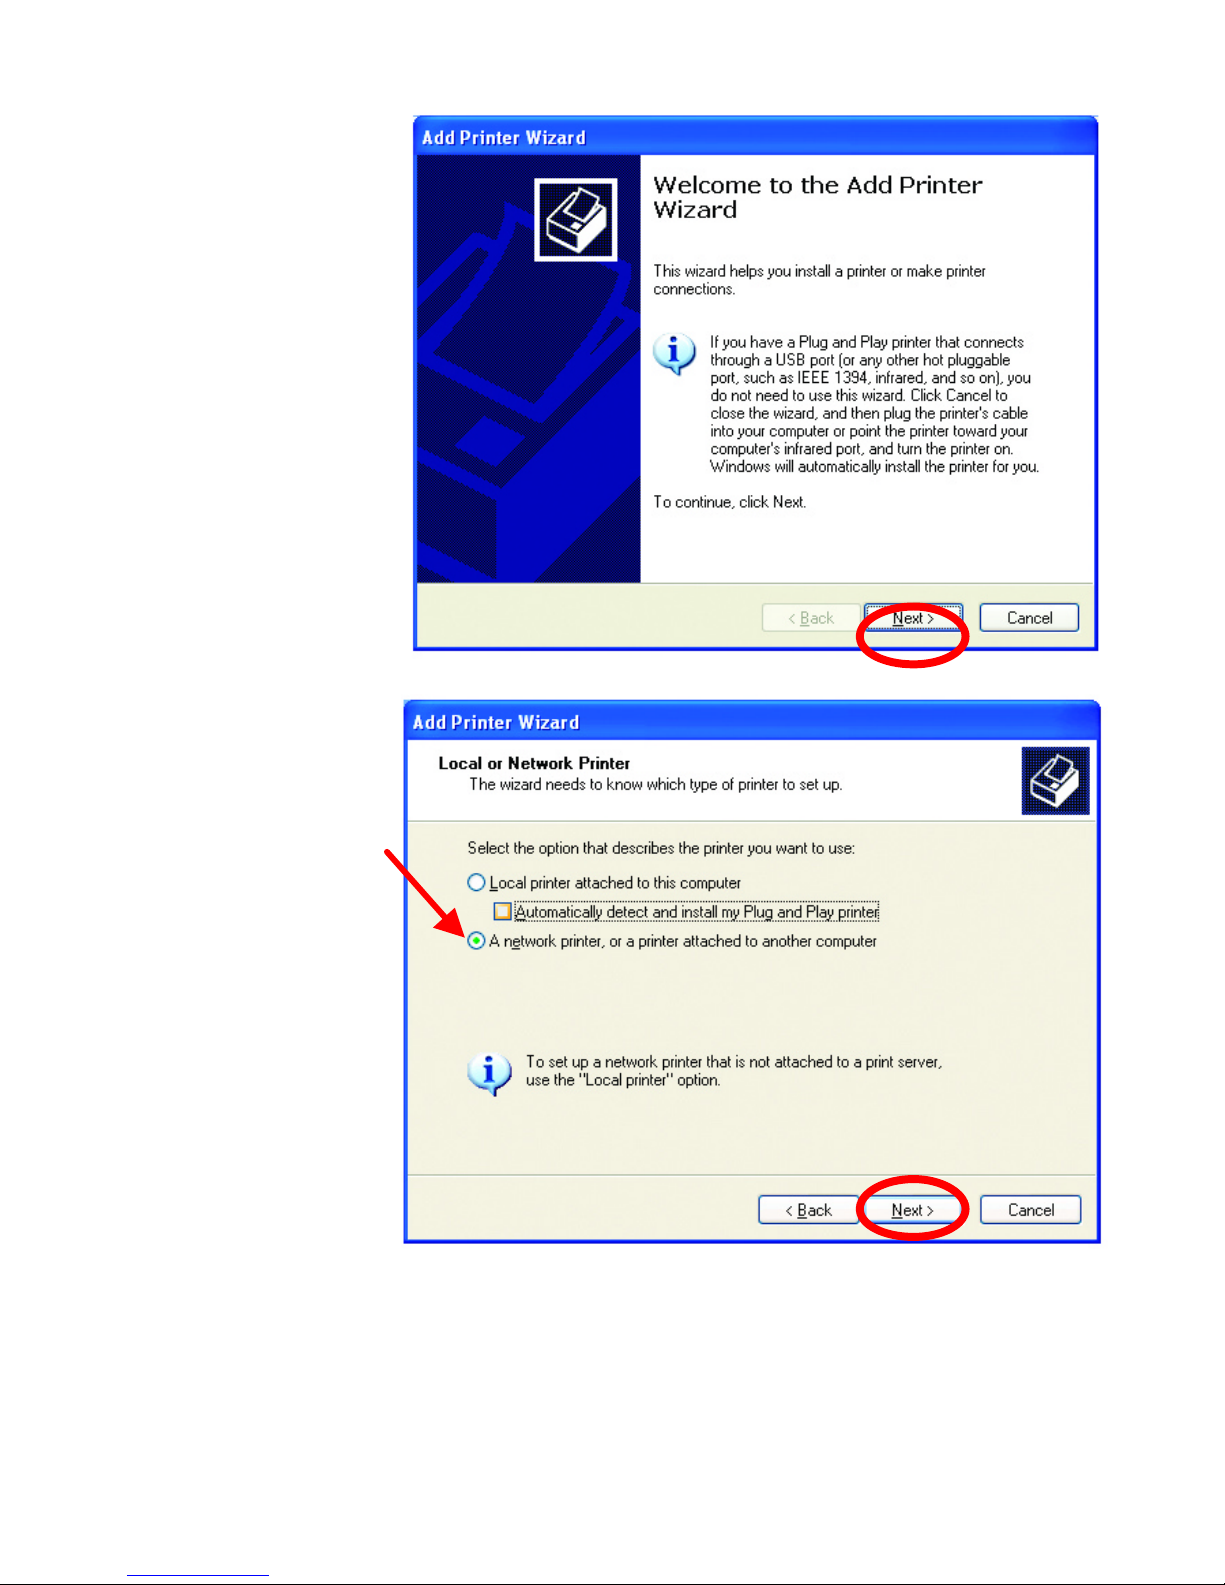
•
Go to
Start>
Printers
and Faxes.
• Click on
Add a Printer.
The screen to the
right will display.
• Click Next.
•
Select
A Network
Printer.
• Click Next.
Page 80
DWL-AB650 Wireless Multimode Cardbus Adapter
80
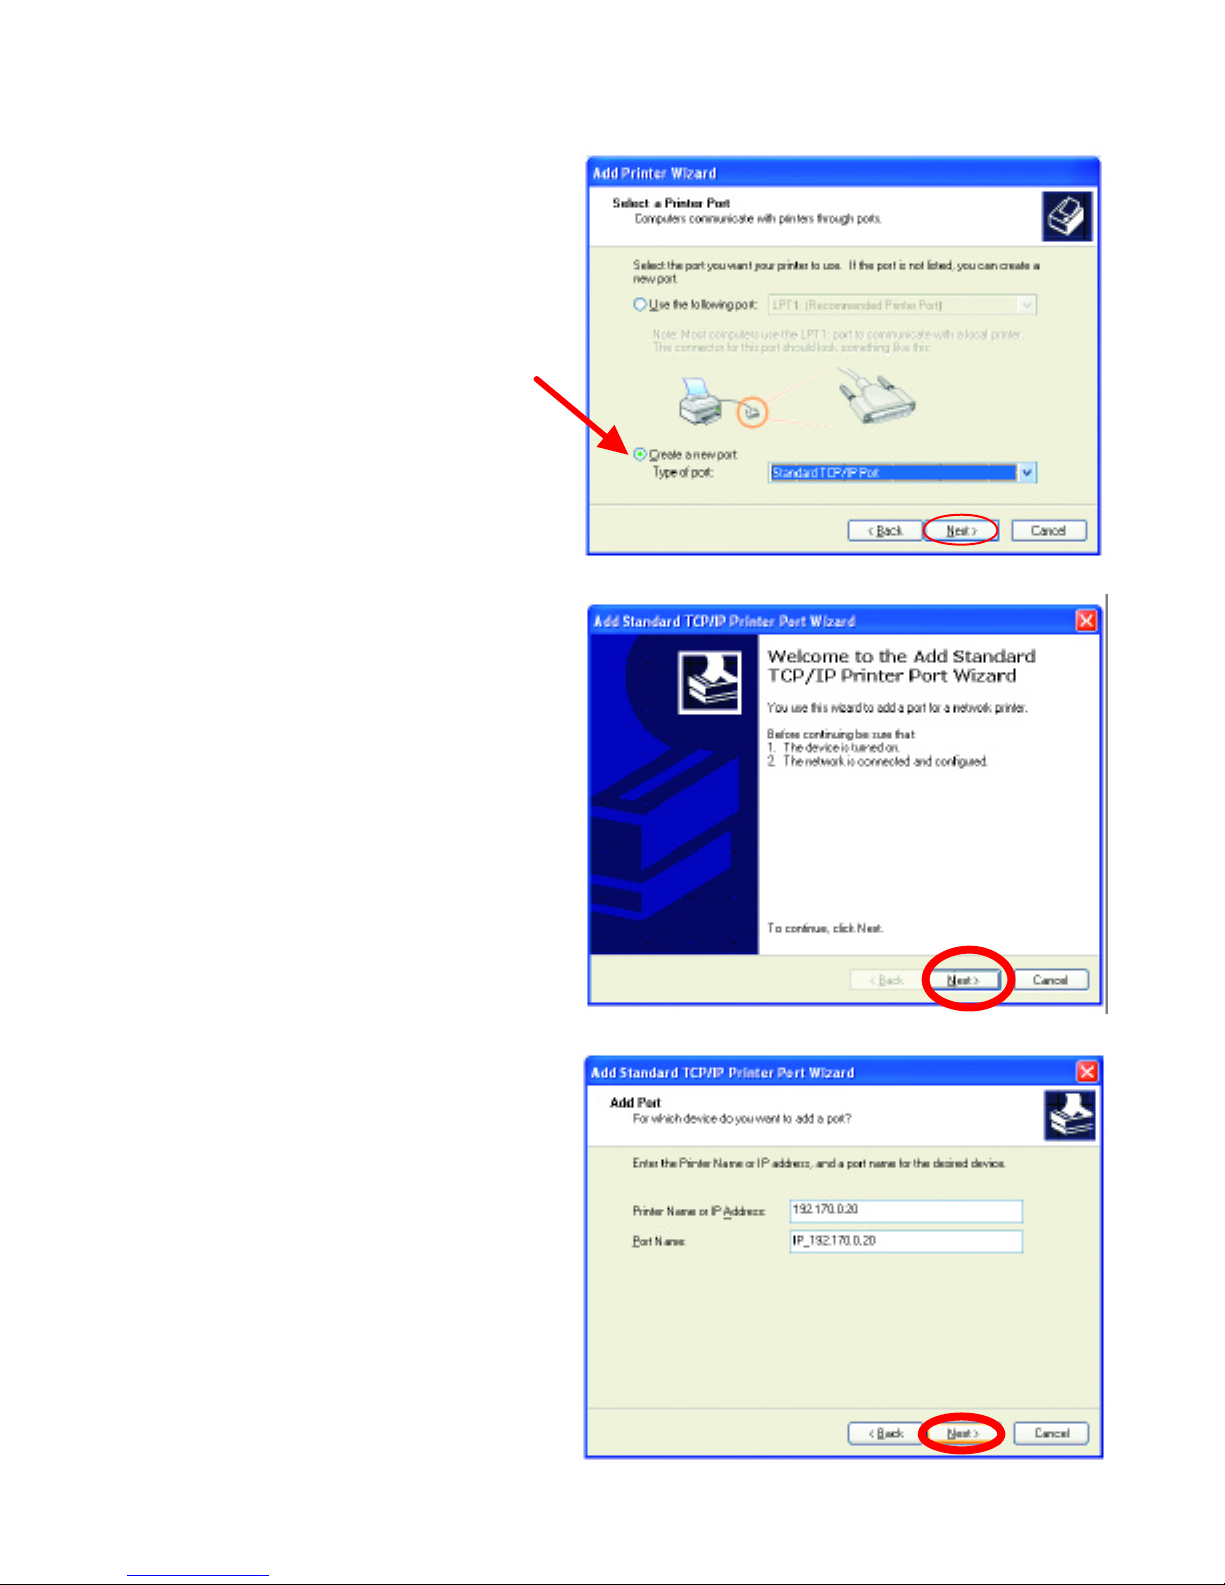
•
Select
Create a new port
.
• From the pull-down menu,
select Standard TCP/IP
Port, as shown.
• Click Next.
•
Please read the instructions
on this screen.
• Click Next.
•
Enter the
Printer IP
Address and the Port
Name, as shown.
• Click Next.
Page 81
DWL-AB650 Wireless Multimode Cardbus Adapter
81
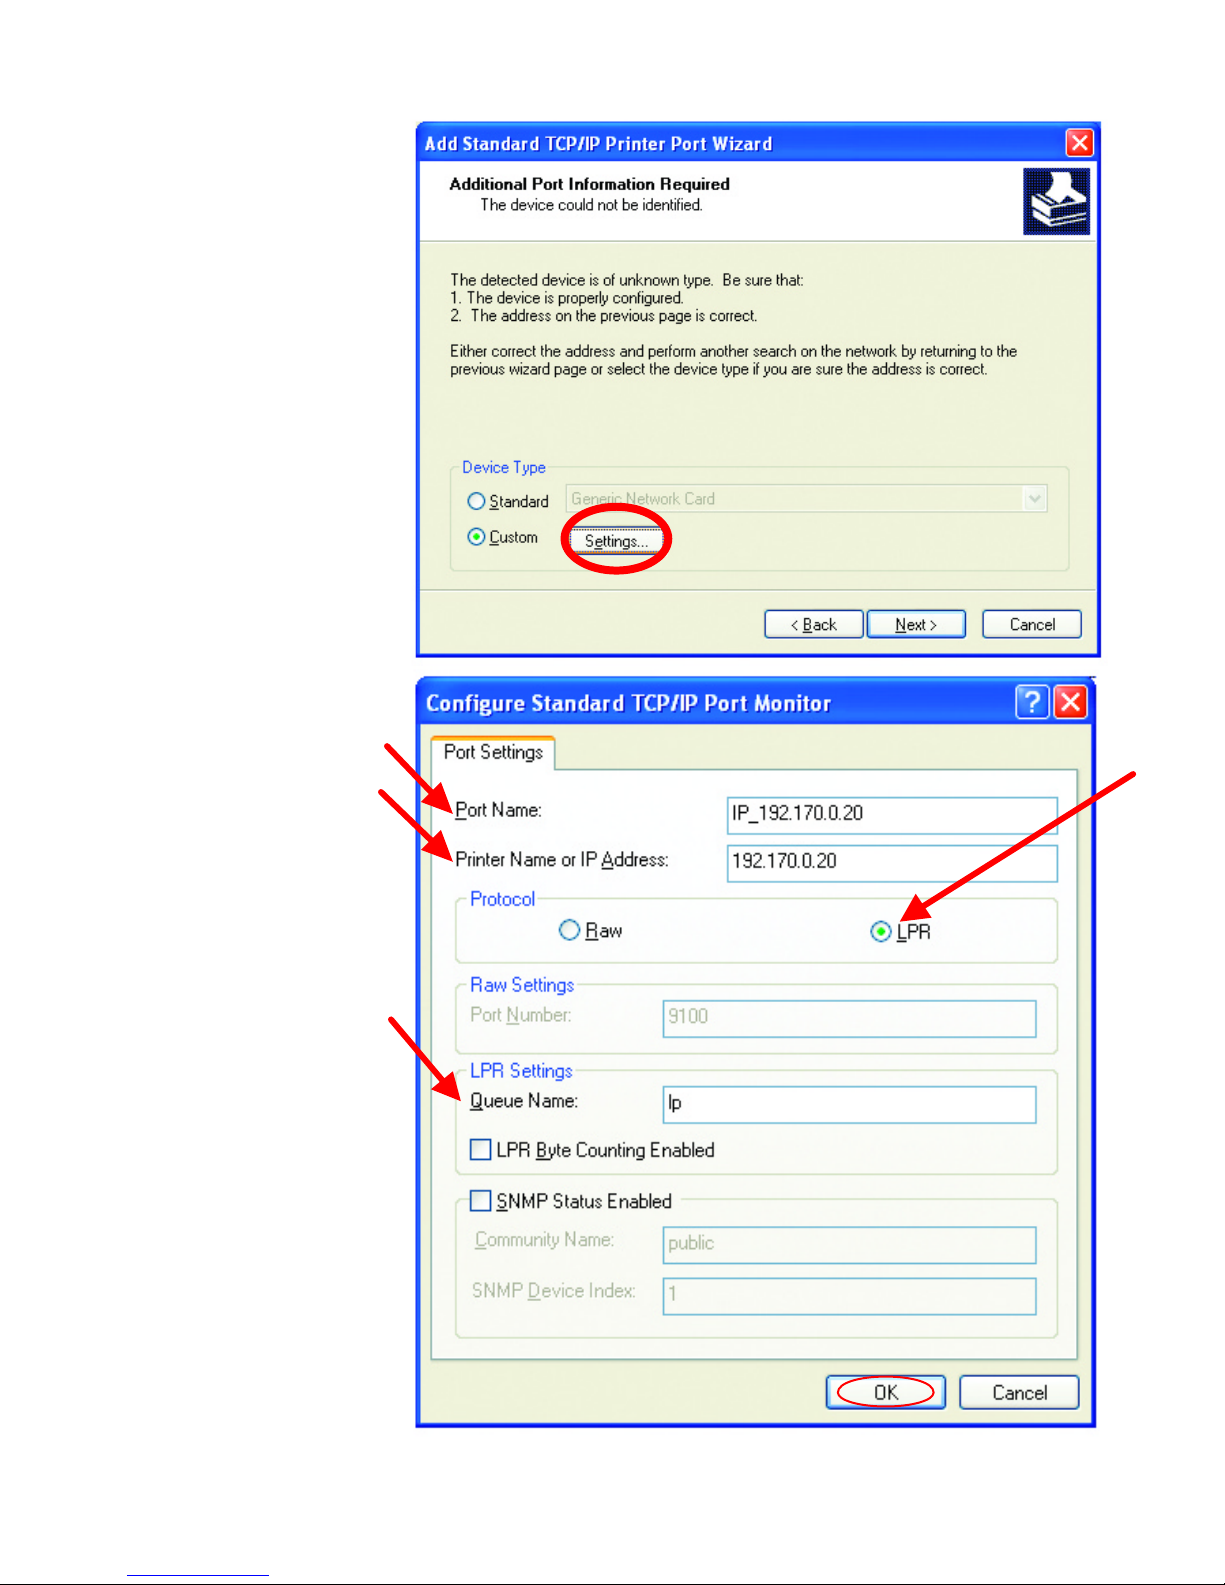
•
In this screen,
select Custom.
• Click Settings.
•
Enter the
Port
Name and the
Printer Name
or
IP Address.
• Select LPR.
• Enter a Queue
Name. If there
is more than
one port on the
print server, you
must name the
Queue.
• Click OK.
Page 82
DWL-AB650 Wireless Multimode Cardbus Adapter
82
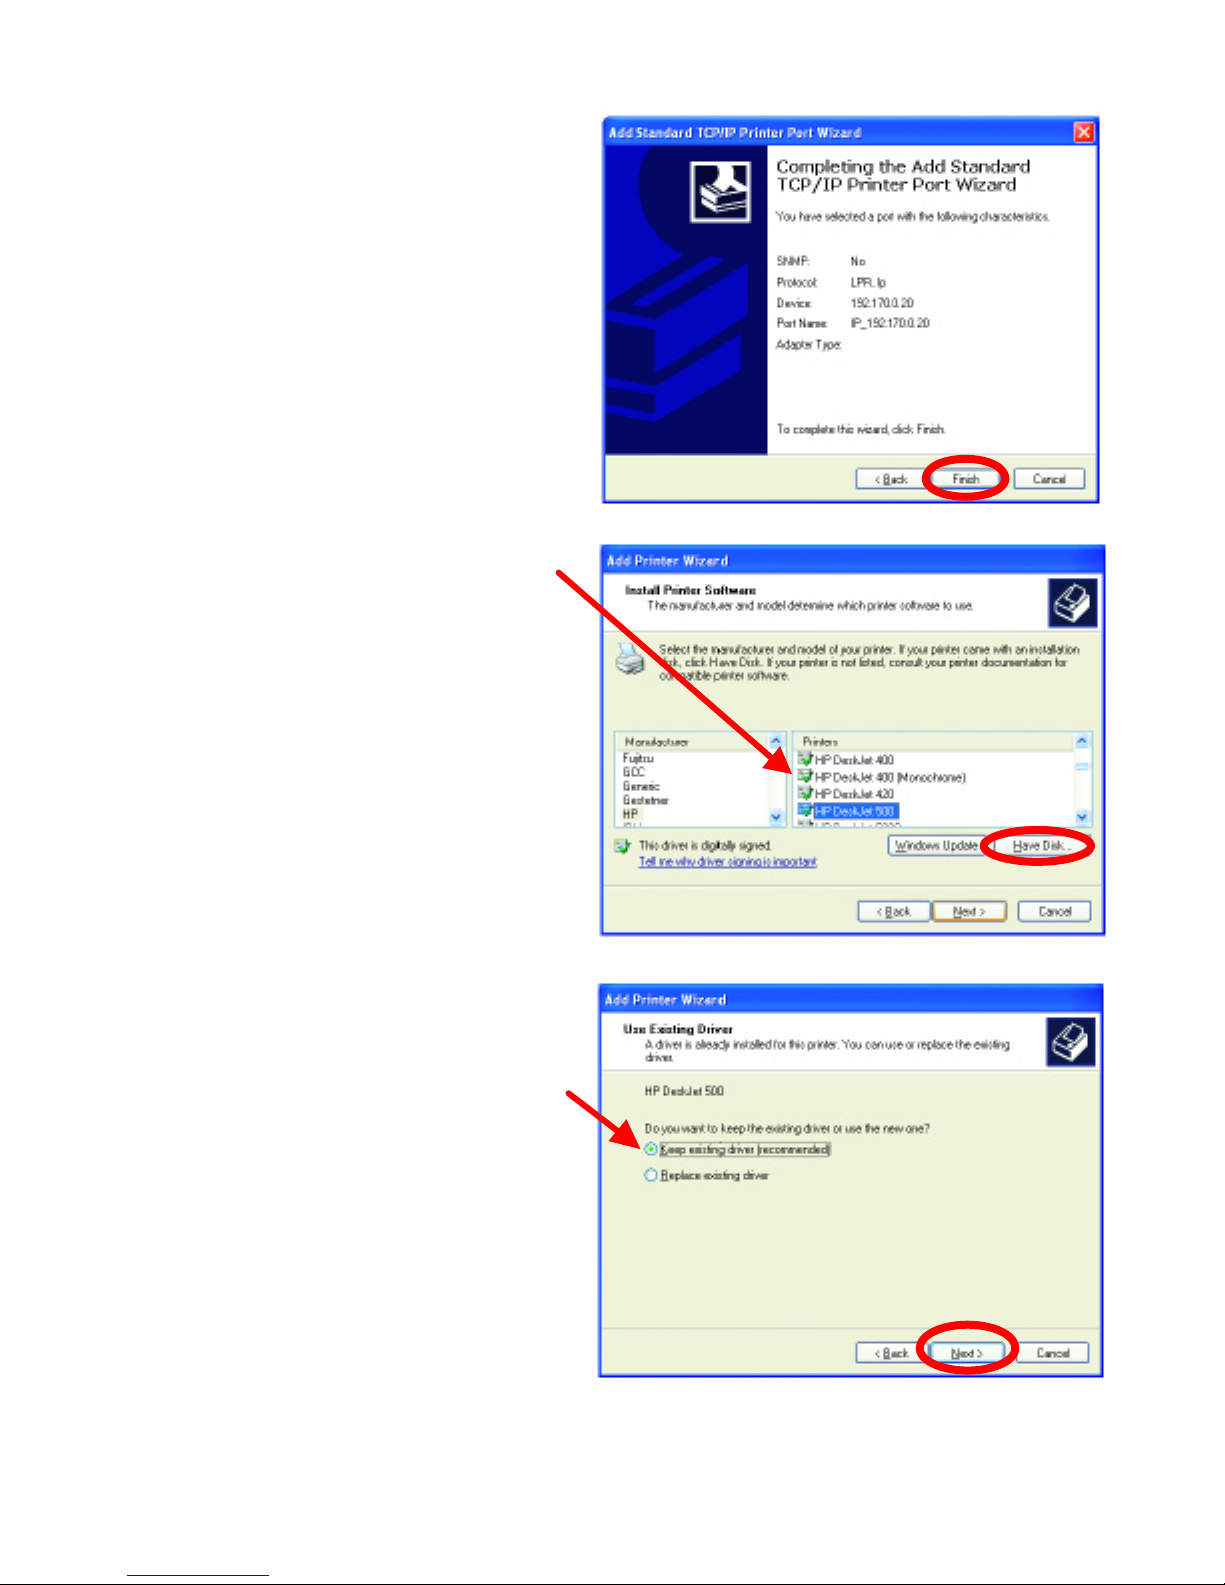
•
This screen will show
you information
about your printer.
• Click Finish.
• Select the printer
you are adding from
the list of Printers.
• Insert the printer
driver disk that came
with your printer.
• Click Have Disk.
If the printer driver is already
installed,
• Select Keep existing
driver.
• Click Next.
Page 83
DWL-AB650 Wireless Multimode Cardbus Adapter
83
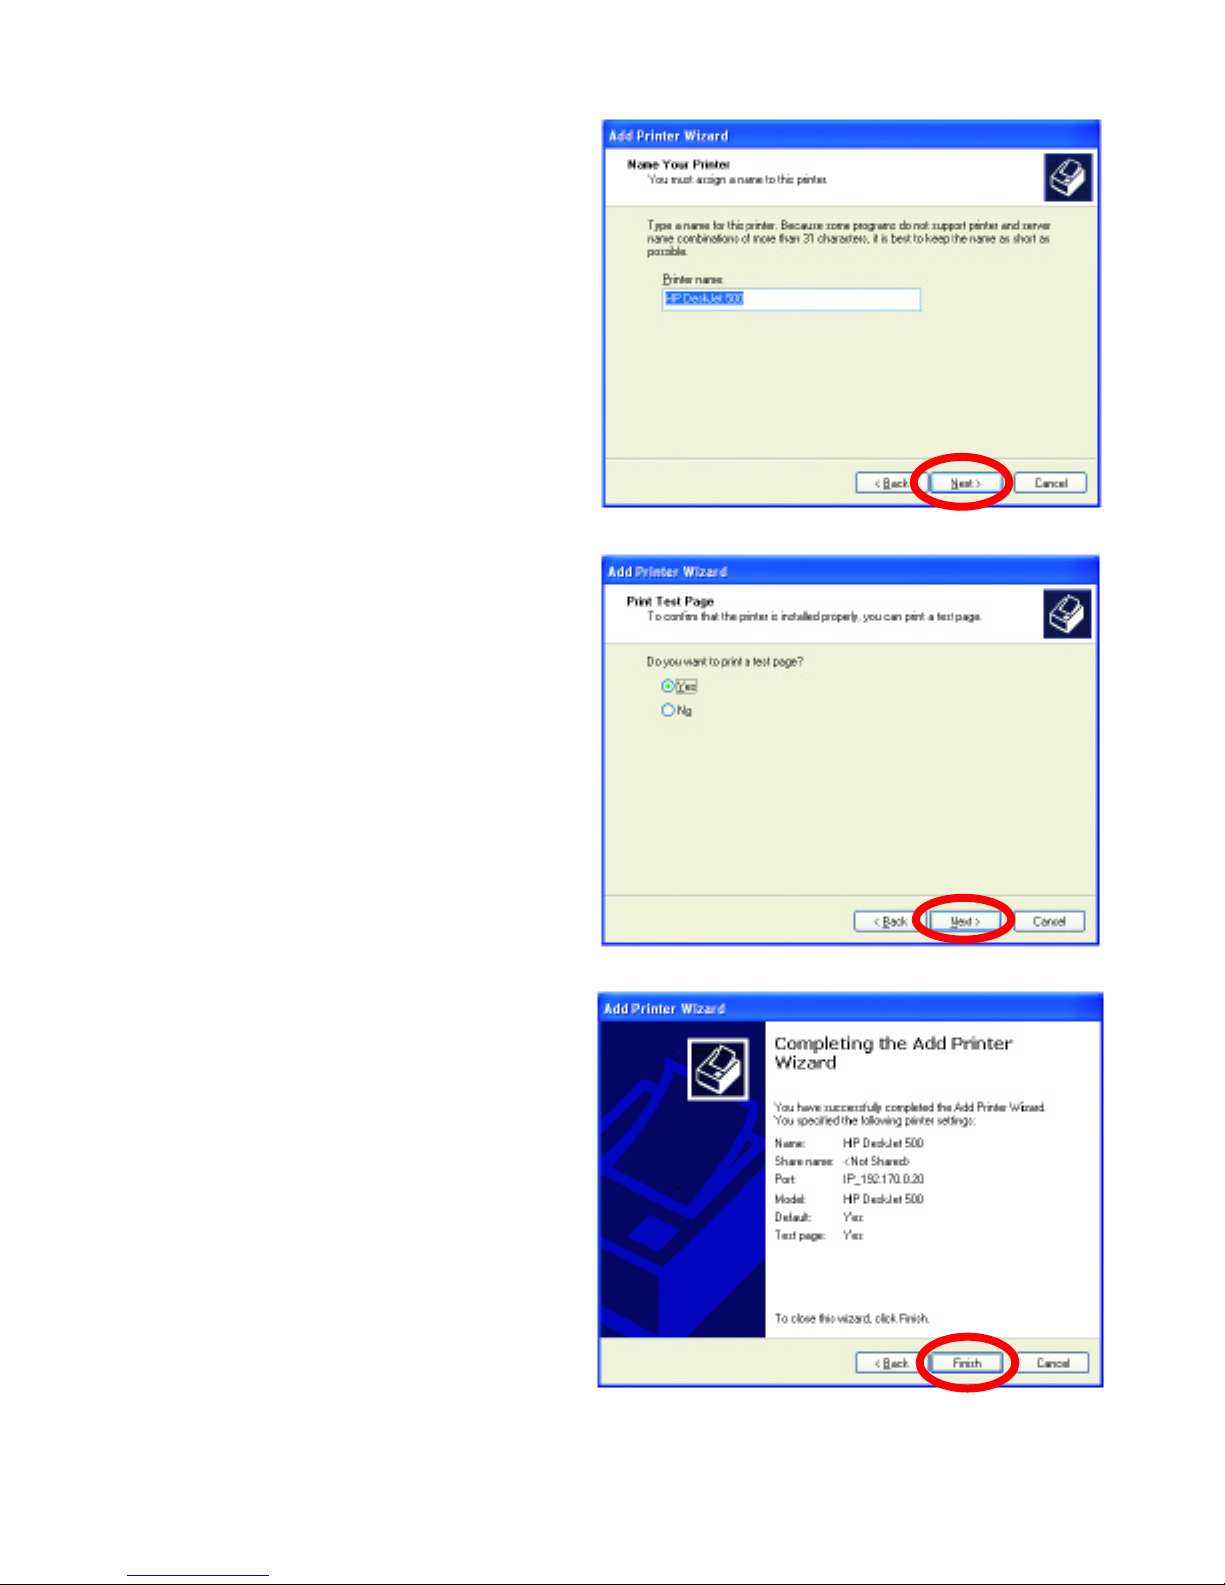
•
You can rename your
printer if you choose. It
is optional.
Please remember the name of
your printer. You will need t
his
information when you use the
Add Printer Wizard
on the
other computers on your
network.
• Click Next.
•
Select
Yes
, to print a
test page.
• Click Next.
This screen will display
information about your
printer.
• Click Finish to
complete the
addition of the
printer.
• Please run the
Add Printer
Wizard on all the
computers on your
network in order to
share the printer.
Note:
You must run the
Network Setup Wizard
on all the computers on your network
before you run the Add Printer Wizard .
Page 84
DWL-AB650 Wireless Multimode Cardbus Adapter
84
Troubleshooting
This chapter provides solutions to problems that can occur during the
installation and operation of the DWL-AB650 Wireless Cardbus Adapter.
Read the following descriptions if you are having problems.
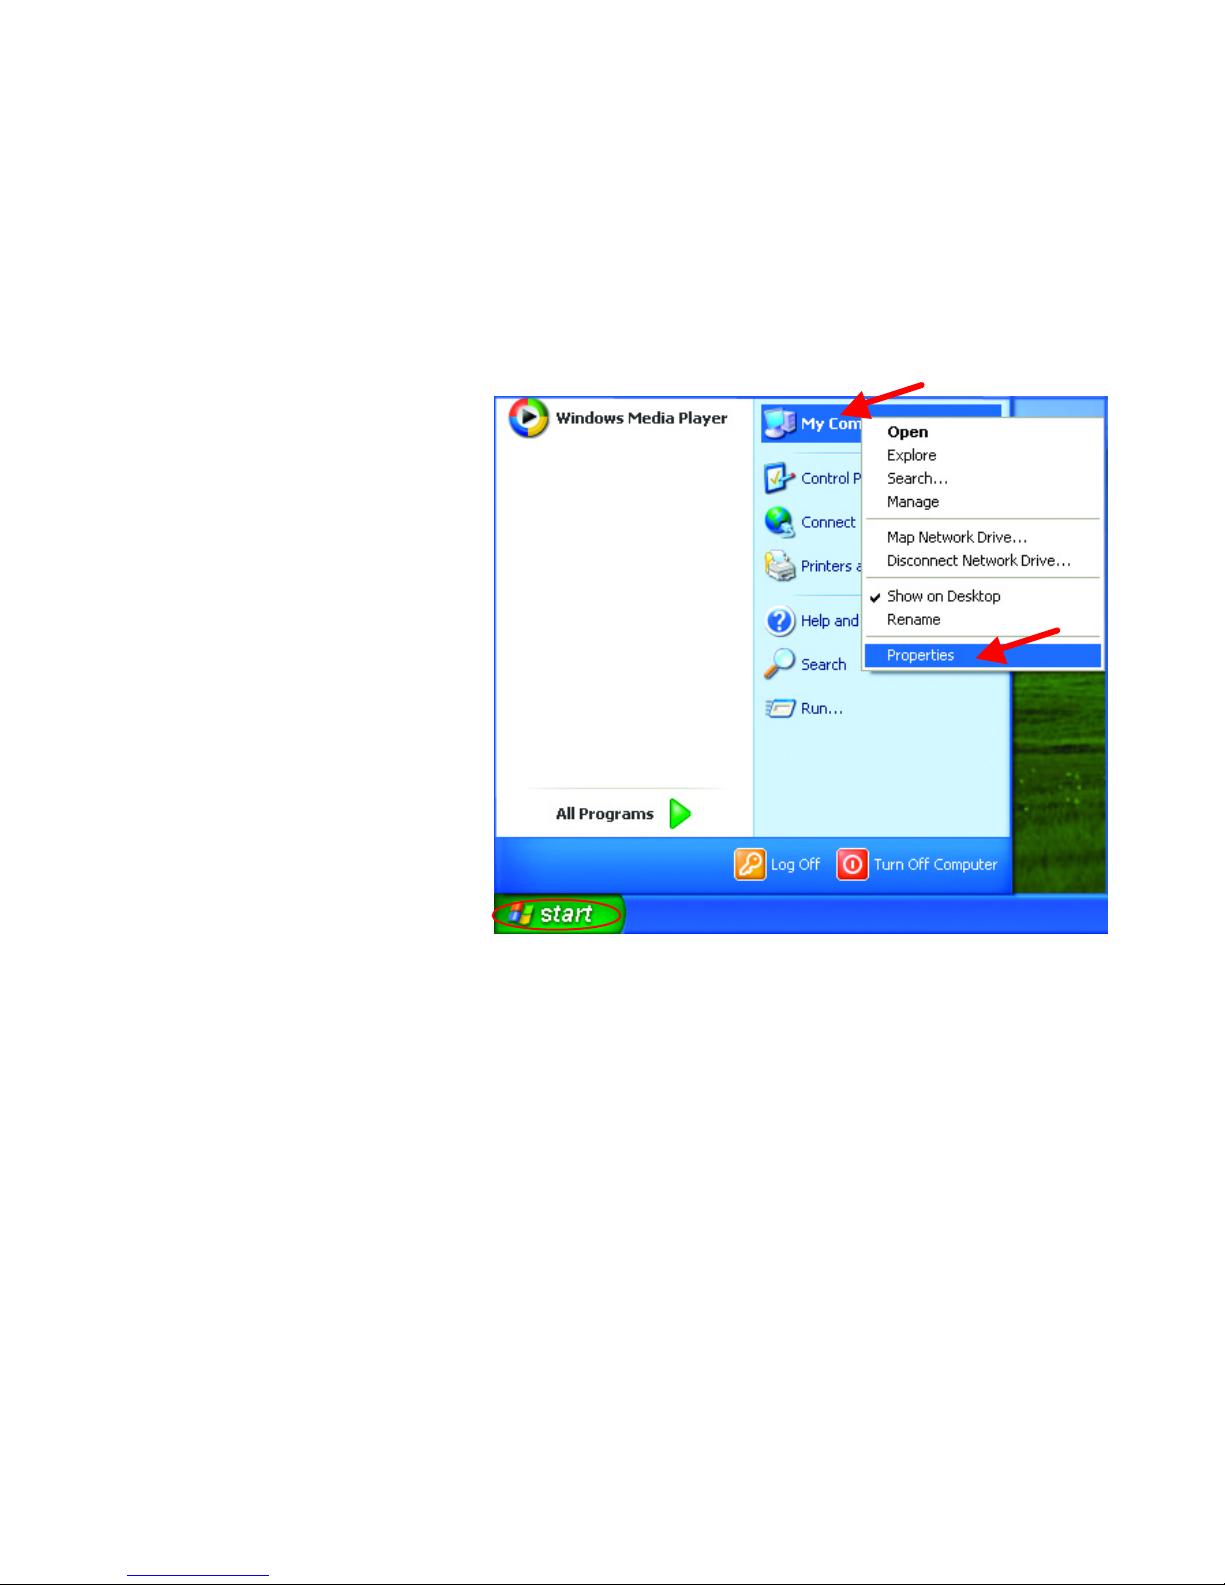
1. Checking the Installation of the Drivers for the Wireless Adapter
•
Go
to
Start
.
• Right-click on
My Computer.
• Click Properties.
Page 85
DWL-AB650 Wireless Multimode Cardbus Adapter
85
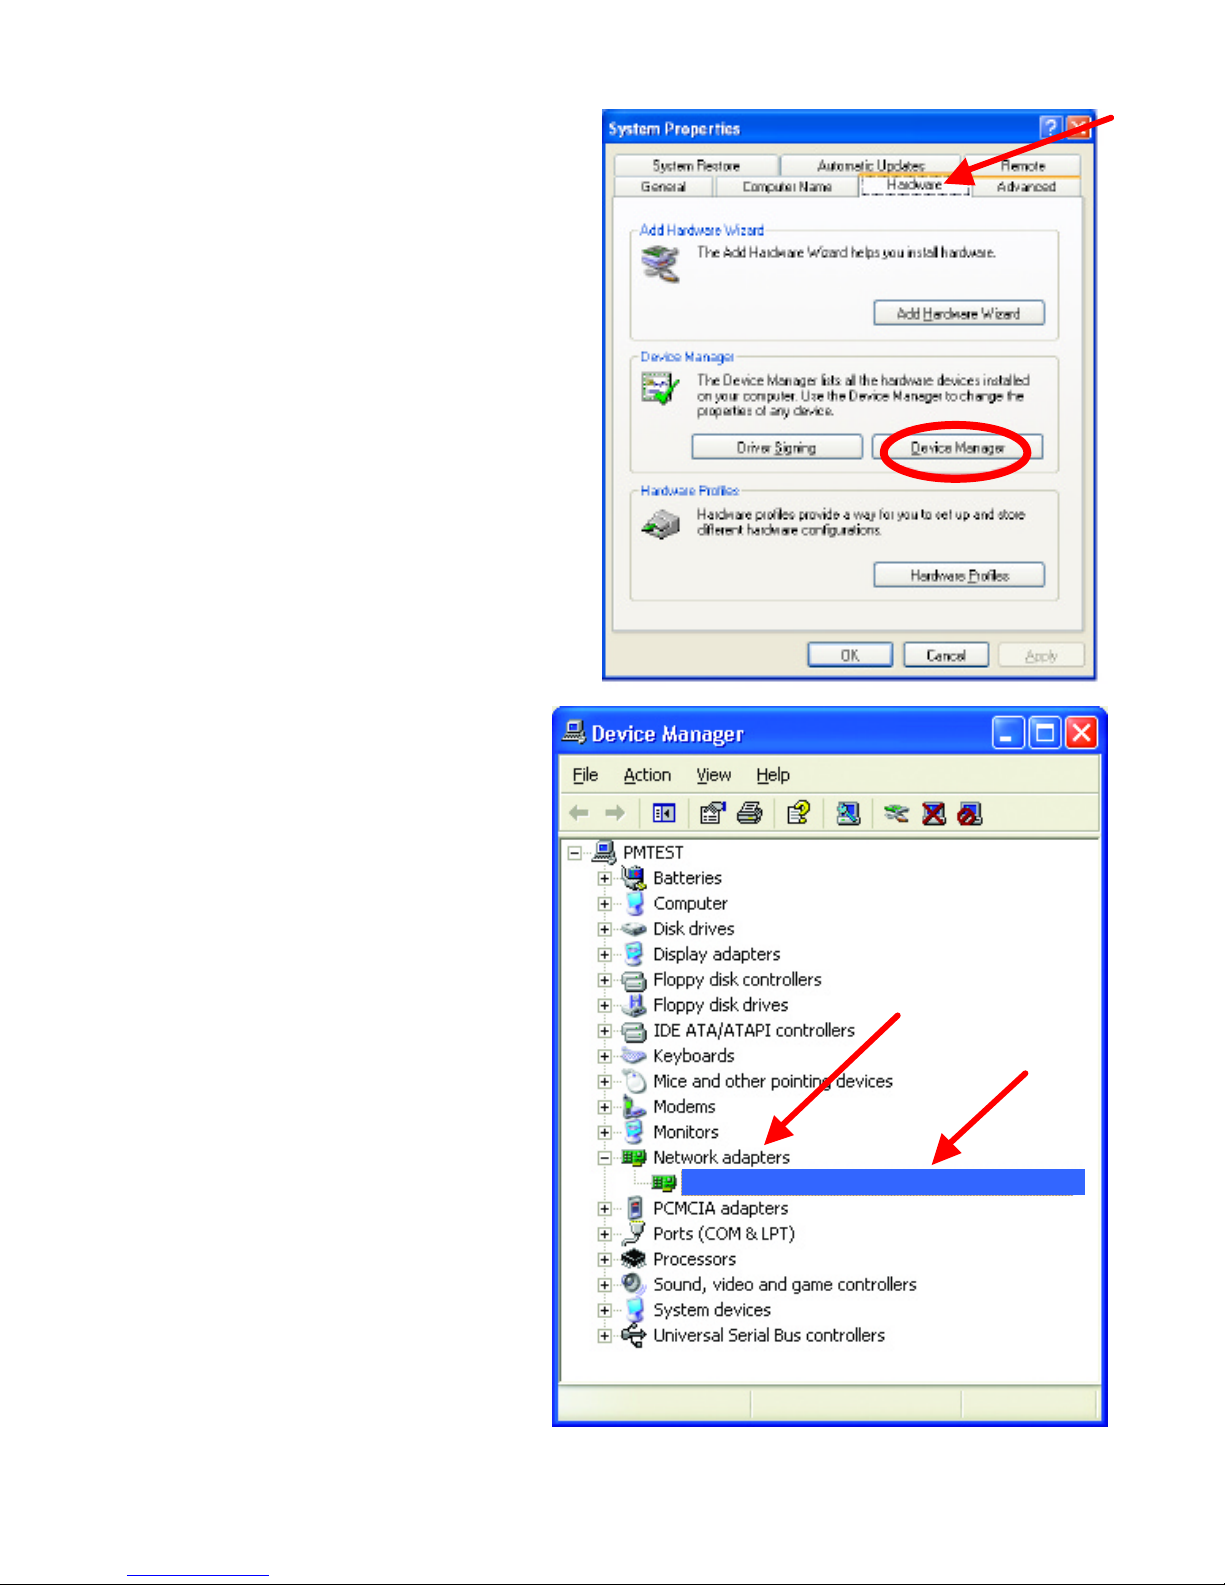
•
Select the
Hardware Tab
.
• Click Device Manager.
•
Click
on Net
work
Adapters.
• Right-click on D-Link Air
Pro DWL-
AB650 Wireless
Cardbus Adapter.
• Select Properties
to check
that the drivers are
installed properly.
D-Link
AirPro
DWL
-
AB650 Wireless Cardbus
Adapter
Page 86
DWL-AB650 Wireless Multimode Cardbus Adapter
86
2. The computer does not recognize the DWL -AB650 Wireless Cardbus
Adapter.
• Make sure that the DWL-AB650 Wireless Cardbus Adapter is
properly seated in the computer’s cardbus slot.
• If Windows does not detect the hardware upon insertion of the
adapter, make sure to completely remove drivers that were
previously installed. To remove the drivers, do the following:
A. Under Tools> select Folder Options…> select View >
under Hidden files and folders > select Show hidden
files and folders.
B. Uncheck Hide extension for known file types > click on
Apply.
C. Search for the files NetA3AB.inf and A3AB.sys. Remove
these files from the INF and SYSTEM32 (DRIVERS) folders
in the Windows directory. Note: Windows XP and Windows
2000 will rename .inf files that have not received
certification into oem.inf files (e.g., oem1.inf.).
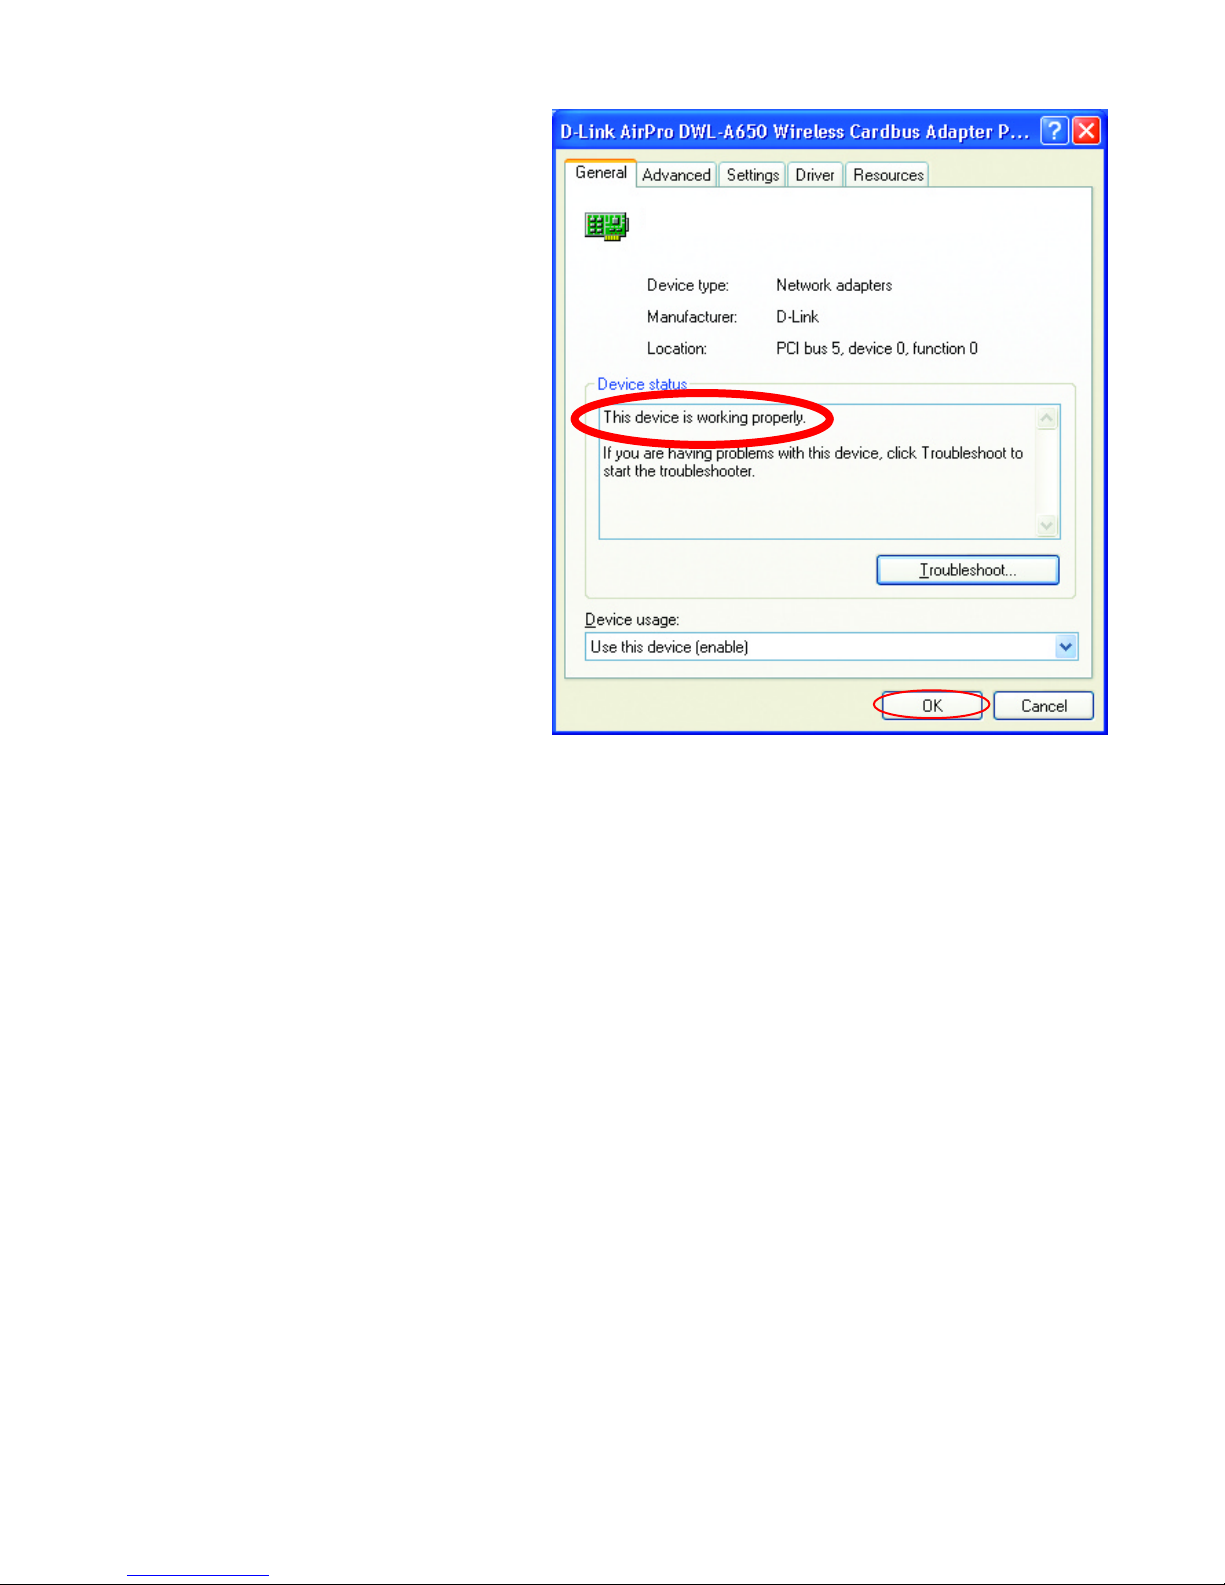
•
Look
under
Device
Status to check
that the device is
working properly.
• Click OK.
D-Link AirPro DWL-AB650 Wireless Cardbus Adapter
Page 87
DWL-AB650 Wireless Multimode Cardbus Adapter
87
3. The DWL - AB650 Wireless Cardbus Adapter does not work properly
after the driver is installed.
• Restart the computer. (In some cases, it will be necessary to restart
the computer after installing the drivers.)
• In Windows XP, go to Start>Control Panel>System>Hardware
Tab> click on the Device Manager Tab> click on Network
Adapters> double click on D-Link AirPro DWL-AB650 Wireless
Cardbus Adapter> make sure that “This device is working
properly” is displayed under Device Status under the General Tab.
(Please refer to Checking the Installation of the Drivers for the
Wireless Adapter in the Networking Basics section of this manual
for more information.)
• If the device is not working properly and a yellow exclamation mark is
displayed, then there is probably a resource conflict. In this case,
make sure the computer system has a free IRQ and if necessary,
uninstall the drivers, restart the system, and repeat the driver
installation procedure.
4. The wireless client cannot access the Internet in the Infrastructure
mode.
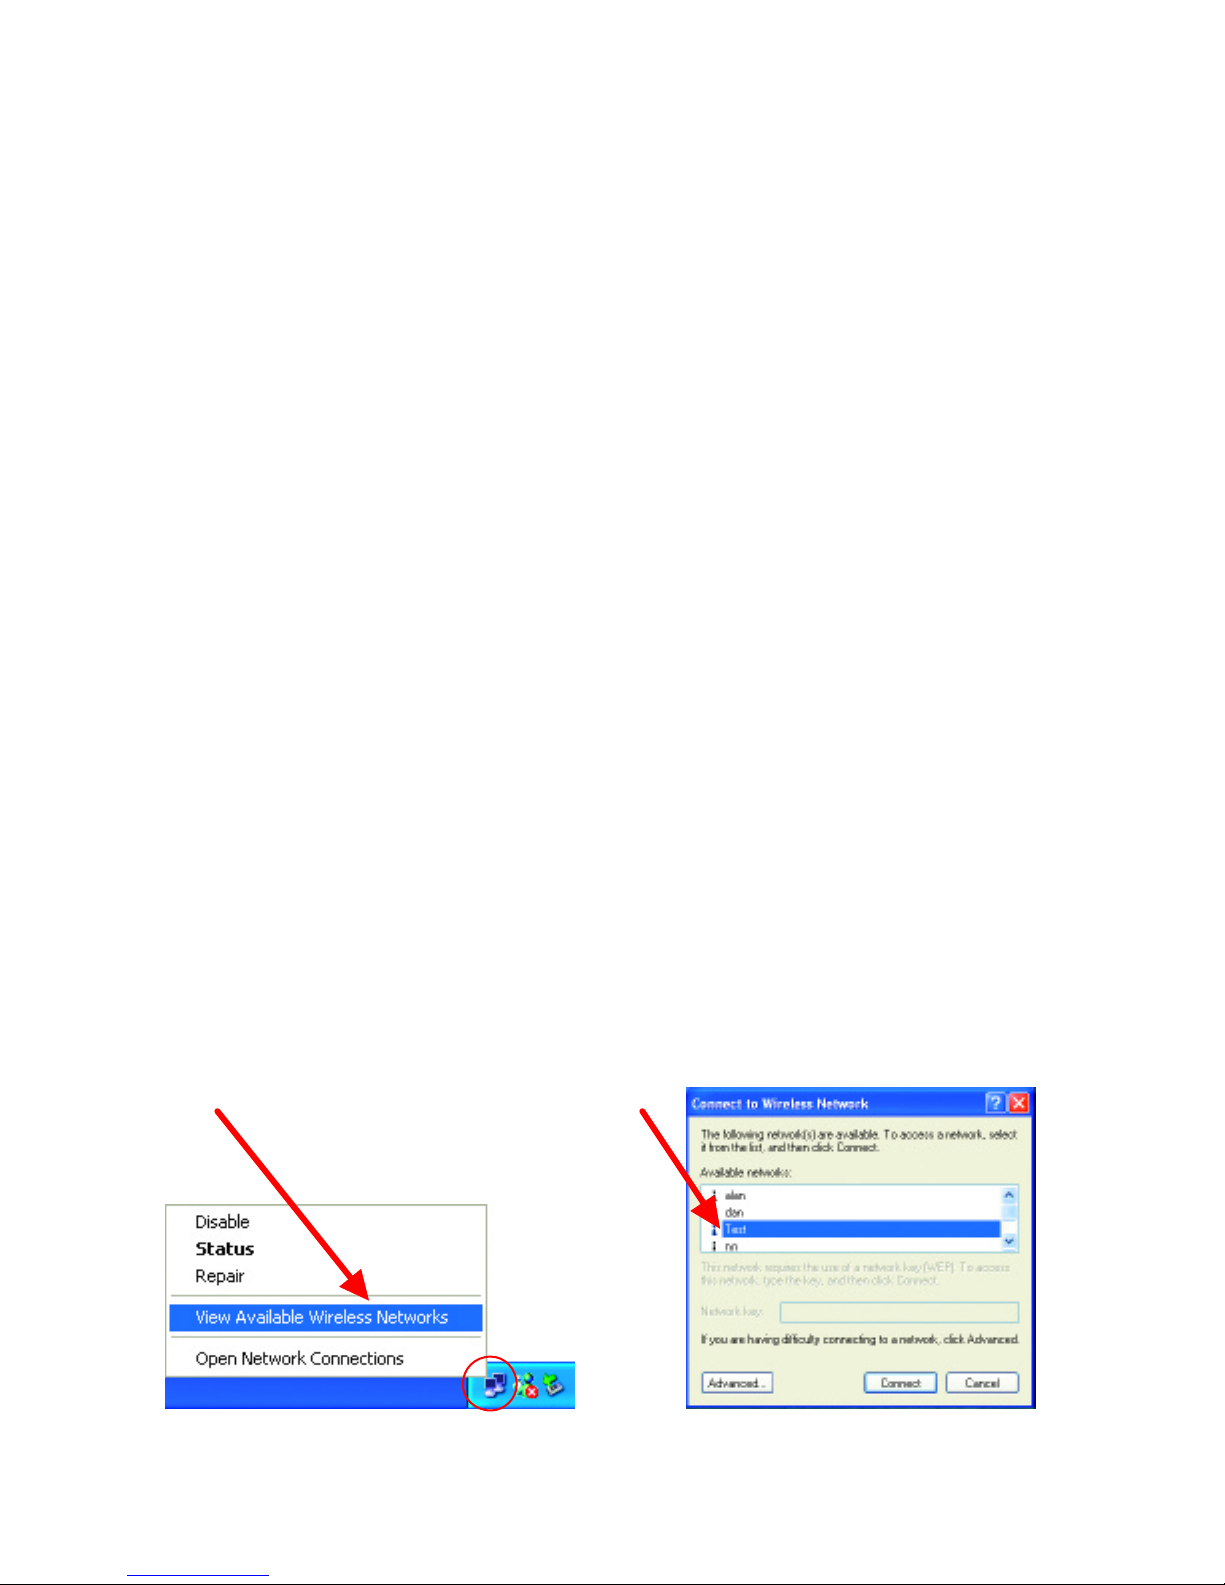
• Make sure the wireless client is associated and joined with the
correct Access Point. To check this connection: Right-click on the
Networking Icon in the taskbar> select View Available Wireless
Networks. The Connect to Wireless Network screen will appear.
Please make sure you have selected the correct available network,
as shown in the illustrations below.
Page 88

DWL-AB650 Wireless Multimode Cardbus Adapter
88
• Check that the IP Address assigned to the wireless adapter is within
the same IP Address range as the access point and gateway. (For
example: if one computer has an IP Address of 192.168.0.2, the
other computers should have IP Addresses that are sequential, like
192.168.0.3 and 192.168.0.4. The subnet mask must be the same for
all the computers on the network.) To check the IP Address
assigned to the wireless adapter, double-click on the Network
Connection Icon in the taskbar > select the Support tab and the IP
Address will be displayed. (Please refer to Checking the IP
Address in the Networking Basics section of this manual.)
If it is necessary to assign a Static IP Address to the wireless adapter,
please refer to the appropriate section in Networking Basics. If you are
entering a DNS Server Address, you must also enter the Default Gateway
Address. (Remember that if you have a DHCP-capable router, you will not
need to assign a Static IP Address. See Networking Basics: Assigning a
Static IP Address.)
Page 89

DWL-AB650 Wireless Multimode Cardbus Adapter
89
Technical Specifications
Standards
• IEEE 802.11a (up to 54 Mbps)
• IEEE 802.11b (up to 11 Mbps)
Adapter Type
• Cardbus PC Card Type II
Supported OS
• Windows XP
• Windows 2000
• Windows ME
• Windows 98SE
Frequency Range
• 5.150-5.350 GHz (IEEE 802.11a)
Ÿ 5.15 ~ 5.35GHz and 5.725 ~ 5.825GHz for US and Canada
Ÿ 5.15 ~ 5.25GHz for Japan
Ÿ 5.15 ~ 5.35GHz and 5.47 ~ 5.725GHz for Europe
• 2.400-2.497 GHz (IEEE 802.11b)
Data Rates
• 6, 9, 12, 18, 24, 36, 48, 54, 72 Mbps (IEEE 802.11a)
• 1, 2, 5.5, 11 Mbps (IEEE 802.11b)
Modulation Technology
• Orthogonal Division Frequency Multiplexing (OFDM)
Modulation Techniques
IEEE 802.11a
• BPSK
• QPSK
• 16 QAM
• 64 QAM
IEEE 802.11b
• DQPSK
• DBPSK
Page 90

DWL-AB650 Wireless Multimode Cardbus Adapter
90
• DSSS
• CCK
Data Security
• 64, 128, 154-bit WEP (Wired Equivalent Privacy) Encryption
Media Access Control
• CSMA/CA with ACK
Diagnostic LED
• Power
• Link
Current Consumption
• Sleep mode - <40mW
• Transmit mode - 1650mW
• Receive mode – 1250mW
Operating Voltage
• 3.3V± -10%
Network Architecture
• Ad-Hoc Mode (Peer-to-Peer without Access Point)
• Infrastructure Mode (Communications to wired networks via
Access Points with Roaming)
Antenna Type
• Integrated dual diversity antennas with 1.5dBi gain
Available Channels:
• Eight non-overlapping channels for North America
(IEEE 802.11a)
• Eleven channels for United States (IEEE 802.11b)
MBTF (Mean Time Between Failure)
• 30,000 hours
Physical Dimensions
• L ~ 4.64 inches (118 mm)
• W ~ 2.13 inches (54 mm)
• H ~ 0.2 inches (5mm)
Page 91

DWL-AB650 Wireless Multimode Cardbus Adapter
91
Temperature
• Operating: 0ºC to 60ºC (32ºF to 140ºF)
• Storing: -20ºC to 85ºC (-4ºF to 185ºF)
Humidity:
• 5%-95%, non-condensing
Emissions:
• FCC part 15b
• UL1950-3
Page 92

DWL-AB650 Wireless Multimode Cardbus Adapter
92
Limited Warranty and Registration
Wichtige Sicherheitshinweise
1. Bitte lesen Sie sich diese Hinweise sorgfältig durch.
2. Heben Sie diese Anleitung für den spätern Gebrauch auf.
3. Vor jedem Reinigen ist das Gerät vom Stromnetz zu trennen. Vervenden Sie keine
Flüssig- oder Aerosolreiniger. Am besten dient ein angefeuchtetes Tuch zur Reinigung.
4. Um eine Beschädigung des Gerätes zu vermeiden sollten Sie nur Zubehörteile
verwenden, die vom Hersteller zugelassen sind.
5. Das Gerät is vor Feuchtigkeit zu schützen.
6. Bei der Aufstellung des Gerätes ist auf sichern Stand zu achten. Ein Kippen oder
Fallen könnte Verletzungen hervorrufen. Verwenden Sie nur sichere Standorte und
beachten Sie die Aufstellhinweise des Herstellers.
7. Die Belüftungsöffnungen dienen zur Luftzirkulation die das Gerät vor Überhitzung
schützt. Sorgen Sie dafür, daß diese Öffnungen nicht abgedeckt werden.
8. Beachten Sie beim Anschl uß an das Stromnetz die Anschlußwerte.
9. Die Netzanschlußsteckdose muß aus Gründen der elektrischen Sicherheit einen
Schutzleiterkontakt haben.
10. Verlegen Sie die Netzanschlußleitung so, daß niemand darüber fallen kann. Es sollete
auch nichts auf der Leitung abgestellt werden.
11. Alle Hinweise und Warnungen die sich am Geräten befinden sind zu beachten.
12. Wird das Gerät über einen längeren Zeitraum nicht benutzt, sollten Sie es vom
Stromnetz trennen. Somit wird im Falle einer Überspannung eine Beschädigung
vermieden.
13. Durch die Lüftungsöffnungen dürfen niemals Gegenstände oder Flüssigkeiten in das
Gerät gelangen. Dies könnte einen Brand bzw. Elektrischen Schlag auslösen.
14. Öffnen Sie niemals das Gerät. Das Gerät darf aus Gründen der elektrischen
Sicherheit nur von authorisiertem Servicepersonal geöffnet werden.
15. Wenn folgende Situationen auftreten ist das Gerät vom Stromnetz zu trennen und von
einer qualifizierten Servicestelle zu überprüfen:
a – Netzkabel oder Netzstecker sint beschädigt.
b – Flüssigkeit ist in das Gerät eingedrungen.
c – Das Gerät war Feuchtigkeit ausgesetzt.
d – Wenn das Gerät nicht der Bedienungsanleitung ensprechend funktioniert oder Sie
mit Hilfe dieser Anleitung keine Verbesserung erzielen.
e – Das Gerät ist gefallen und/oder das Gehäuse ist beschädigt.
f – Wenn das Gerät deutliche Anzeichen eines Defektes aufweist.
16. Bei Reparaturen dürfen nur Orginalersatzteile bzw. den Orginalteilen entsprechende
Teile verwendet werden. Der Einsatz von ungeeigneten Ersatzteilen kann eine weitere
Beschädigung hervorrufen.
17.Wenden Sie sich mit allen Fragen die Service und Repartur betreffen an Ihren
Servicepartner. Somit stellen Sie die Betriebssicherheit des Gerätes sicher.
Page 93

DWL-AB650 Wireless Multimode Cardbus Adapter
93
Limited Warranty
Hardware:
D-Link warrants its hardware products to be free from defects in workmanship and materials,
under normal use and service, for the following periods measured from date of purchase from
D-Link or its Authorized Reseller:
Product Type Warranty Period
Complete products One year
Spare parts and spare kits 90 days
The one-year period of warranty on complete products applies on condition that the product's
Registration Card is filled out and returned to a D- Link office within ninety (90) days of
purchase. A list of D-Link offices is provided at the back of this manual, together with a copy
of the Registration Card. Failing such timely registration of purchase, the warranty period
shall be limited to 90 days.
If the product proves defective within the applicable warranty period, D-Link will provide repair
or replacement of the product. D-Link shall have the sole discretion whether to repair or
replace, and replacement product may be new or reconditioned. Replacement product shall be
of equivalent or better specifications, relative to the defective product, but need not be identical.
Any product or part repaired by D- Link pursuant to this warranty shall have a warranty period
of not less than 90 days, from date of such repair, irrespective of any earlier expiration of
original warranty period. When D-Link provides replacement, then the defective product
becomes the property of D-Link.
Warranty service may be obtained by contacting a D-Link office within the applicable warranty
period, and requesting a Return Material Authorization (RMA) number. If a Registration Card
for the product in question has not been returned to D-Link, then a proof of purchase (such as
a copy of the dated purchase invoice) must be provided. If Purchaser's circumstances require
special handling of warranty correction, then at the time of requesting RMA number, Purchaser
may also propose special procedure as may be suitable to the case.
After an RMA number is issued, the defective product must be packaged securely in the
original or other suitable shipping package to ensure that it will not be damaged in transit, and
the RMA number must be prominently marked on the outside of the package. The package
must be mailed or otherwise shipped to D-Link with all costs of mailing/shipping/insurance
prepaid; D-Link will ordinarily reimburse Purchaser for mailing/shipping/insurance expenses
incurred for return of defective product in accordance with this warranty. D- Link shall never
be responsible for any software, firmware, information, or memory data of Purchaser contained
in, stored on, or integrated with any product returned to D-Link pursuant to this warranty.
Any package returned to D-Link without an RMA number will be rejected and shipped back to
Purchaser at Purchaser's expense, and D- Link reserves the right in such a case to levy a
reasonable handling charge in addition mailing or shipping costs.
Software:
Warranty service for software products may be obtained by contacting a D-Link office within
the applicable warranty period. A list of D- Link offices is provided at the back of this manual,
together with a copy of the Registration Card. If a Registration Card for the product in question
has not been returned to a D-Link office, then a proof of purchase (such as a copy of the dated
purchase invoice) must be provided when requesting warranty service. The term "purchase" in
this software warranty refers to the purchase transaction and resulting licence to use such
software.
Page 94

DWL-AB650 Wireless Multimode Cardbus Adapter
94
D-Link warrants that its software products will perform in substantial conformance with the
applicable product documentation provided by D- Link with such software product, for a period
of ninety (90) days from the date of purchase from D-Link or its Authorized Reseller. D-Link
warrants the magnetic media, on which D-Link provides its software product, against failure
during the same warranty period. This warranty applies to purchased software, and to
replacement software provided by D-Link pursuant to this warranty, but shall not apply to any
update or replacement which may be provided for download via the Internet, or to any update
which may otherwise be provided free of charge.
D-Link's sole obligation under this software warranty shall be to replace any defective software
product with product which substantially conforms to D-Link's applicable product
documentation. Purchaser assumes responsibility for the selection of appropriate application
and system/platform software and associated reference materials. D- Link makes no warranty
that its software products will work in combination with any hardware, or any application or
system/platform softwar e product provided by any third party, excepting only such products
as are expressly represented, in D-Link's applicable product documentation as being
compatible. D- Link's obligation under this warranty shall be a reasonable effort to provide
compatibility, but D-Link shall have no obligation to provide compatibility when there is fault
in the third-party hardware or software. D-Link makes no warranty that operation of its
software products will be uninterrupted or absolutely error-free, and no warranty that all
defects in the software product, within or without the scope of D-Link's applicable product
documentation, will be corrected.
Page 95

DWL-AB650 Wireless Multimode Cardbus Adapter
95
LIMITATION OF WARRANTIES
IF THE D- LINK PRODUCT DOES NOT OPERATE AS WARRANTED ABOVE, THE CUSTOMER'S
SOLE REMEDY SHALL BE, AT D- LINK'S OPTION, REPAIR OR REPLACEMENT. THE
FOREGOING WARRANTIES AND REMEDIES ARE EXCLUSIVE AND ARE IN LIEU OF ALL
OTHER WARRANTIES, EXPRESSED OR IMPLIED, EITHER IN FACT OR BY OPERATION OF
LAW, STATUTORY OR OTHERWISE, INCLUDING WARRANTIES OF MERCHANTABILITY AND
FITNESS FOR A PARTICULAR PURPOSE. D-LINK NEITHER ASSUMES NOR AUTHORIZES ANY
OTHER PERSON TO ASSUME FOR IT ANY OTHER LIABILITY IN CONNECTION WITH THE
SALE, INSTALLATION MAINTENANCE OR USE OF D-LINK'S PRODUCTS.
D-LINK SHALL NOT BE LIABLE UNDER THIS WARRANTY IF ITS TESTING AND EXAMINATION
DISCLOSE THAT THE ALLEGED DEFECT IN THE PRODUCT DOES NOT EXIST OR WAS
CAUSED BY THE CUSTOMER'S OR ANY THIRD PERSON'S MISUSE, NEGLECT, IMPROPER
INSTALLATION OR TESTING, UNAUTHORIZED ATTEMPTS TO REPAIR, OR ANY OTHER
CAUSE BEYOND THE RANGE OF THE INTENDED USE, OR BY ACCIDENT, FIRE, LIGHTNING
OR OTHER HAZARD.
LIMITATION OF LIABILITY
IN NO EVENT WILL D-LINK BE LIABLE FOR ANY DAMAGES, INCLUDING LOSS OF DATA,
LOSS OF PROFITS, COST OF COVER OR OTHER INCIDENTAL, CONSEQUENTIAL OR
INDIRECT DAMAGES ARISING OUT THE INSTALLATION, MAINTENANCE, USE,
PERFORMANCE, FAILURE OR INTERRUPTION OF A D- LINK PRODUCT, HOWEVER CAUSED
AND ON ANY THEORY OF LIABILITY. THIS LIMITATION WILL APPLY EVEN IF D- LINK HAS
BEEN ADVISED OF THE POSSIBILITY OF SUCH DAMAGE.
IF YOU PURCHASED A D-LINK PRODUCT IN THE UNITED STATES, SOME STATES DO NOT
ALLOW THE LIMITATION OR EXCLUSION OF LIABILITY FOR INCIDENTAL OR
CONSEQUENTIAL DAMAGES, SO THE ABOVE LIMITATION MAY NOT APPLY TO YOU.
D-Link Offices for Registration and Warranty Service
The product's Registration Card, provided at the back of this manual, must be sent to a D-Link
office. To obtain an RMA number for warranty service as to a hardware product, or to obtain
warranty service as to a software product, contact the D-Link office nearest you. An
addresses/telephone/fax list of D-Link offices is provided in the back of this manual.
Trademarks
Copyright 2002 D-Link Corporation.
Contents subject to change without prior notice.
D-Link is a registered trademark of D-Link Corporation/D-Link Systems, Inc.
All other trademarks belong to their respective proprietors.
Copyright Statement
No part of this publication may be reproduced in any form or by any means or used to make any
derivative such as translation, transformation, or adaptation without permission from D -Link
Corporation/D-Link Systems Inc., as stipulated by the United States Copyright Act of 1976
Page 96

DWL-AB650 Wireless Multimode Cardbus Adapter
96
FCC Warning
This equipment has been tested and found to comply with the limits for a Class A digital device, pursuant
to Part 15 of the FCC Rules. These limits are designed to provide reasonable protection against harmful
interference when the equipment is operated in a commercial environment. This equipment generates,
uses, and can radiate radio frequency energy and, if not installed and used in accordance with this user’s
guide, may cause harmful interference to radio communications. Operation of this equipment in a
residential area is likely to cause harmful interference in which case the user will be required to correct
the interference at his own expense.
This device complies with part 15 of the FCC Rules. Operation is subject to the following two conditions:
(1) This device may not cause harmful interference, and (2) this device must accept any interference
received, including interference that may cause undesired operation.
CE Mark Warning
This is a Class A product. In a domestic environment this product may cause radio
interference in which case the user may be required to take adequate measures.
Warnung!
Dies ist ein Produkt der Klasse A. Im Wohnbereich kann dieses Produkt
Funkstoerungen verursachen. In diesem Fall kann vom Benutzer verlangt werden,
angemessene Massnahmen zu ergreifen.
Precaución!
Este es un producto de Clase A. En un entorno doméstico, puede causar
interferencias de radio, en cuyo case, puede requerirse al usuario para que adopte
las medidas adecuadas.
Attention!
Ceci est un produit de classe A. Dans un environnement domestique, ce produit
pourrait causer des interférences radio, auquel cas l`ut ilisateur devrait prendre les
mesures adéquates.
Attenzione!
Il presente prodotto appartiene alla classe A. Se utilizzato in ambiente domestico il
prodotto può causare interferenze radio, nel cui caso è possibile che l`utente debba
assumere provvedimenti adeguati.
BSMI Warning
Page 97

DWL-AB650 Wireless Multimode Cardbus Adapter
97
AVERTISSEMENT AUX UTILISATEURS
La décision N° 01-480 en date du 23 mai 2001 prise par l’Autorité
de Régulation des Télécommunications (ART) autorise l’utilisation
d’une partie de la bande de fréquences 2400- 2483,5 MHz pour les
ré seaux locaux radioéléctriques (RLAN)
Au niveau national, seule la bande 2446,5-2483,5 MHz est
autorisée pour des produits ayant une puissance limitée à 100 mW
Cette bande de fréquences correspond aux canaux 10,11,12 et 13.
En installant et utilisant les produits réseaux sans fils de la gamme
proposée par D-Link, vous vous engagez donc à respecter cette
réglementation et à n’utiliser que ces 4 canaux.
WARNING
The Decision N° 01 -480 taken by ART (Autorité de Régulation de
Télécommunications) on May 23, 2001 authorizes the utilisation of
a part of the 2400 -2483.5MHz band for Radio Local Area Network
(RLAN) in France.
Only the 2446.5- 2483.5MHz band is authorized for RLAN with
products with a limited power to 100mW.
This band concerns the channels 10, 11, 12 and 13.
Using and installing D-Link Wireless solutions for RLAN, you
commit to respect this regulation and to use only these four
channels.
Page 98

DWL-AB650 Wireless Multimode Cardbus Adapter
98
Offices
Australia D-Link Australasia
Unit 16, 390 Eastern Valley Way, Roseville, NSW 2069 Australia
TEL: 61-2-9417-7100 FAX: 61-2-9417-1077
TOLL FREE (Australia): 1800-177100
TOLL FREE (New Zealand): 0800-900900
URL: www.dlink.com.au
E-MAIL: [email protected] & [email protected]
Level 1, 434 St. Kilda Road, Melbourne, Victoria 3004 Australia
TEL: 61-3-9281-3232 FAX: 61-3-9281-3229 MOBILE: 0412-660-064
Canada D-Link Canada
2180 Winston Park Drive, Oakville, Ontario, L6H 5W1 Canada
TEL: 1-905-829-5033 FAX: 1-905-829-5095 BBS: 1-965-279-8732
TOLL FREE: 1-800-354-6522 URL: www.dlink.ca
FTP: ftp.dlinknet.com E-MAIL: [email protected]
Chile D-Link South America
Isidora Goyeechea 2934 of 702, Las Condes, Santiago, Chile, S. A.
TEL: 56-2-232-3185 FAX: 56-2-232-0923 URL: www.dlink.cl
E-MAIL: [email protected] & [email protected]
China D-Link China
2F, Sigma Building, 49 Zhichun Road, Haidan District, 100080
Beijing, China
Denmark D-Link Denmark
Naverland 2, DK-2600 Glostrup, Copenhagen, Denmark
TEL: 45-43-969040 FAX:45-43-424347 URL: www.dlink.dk
E-MAIL: [email protected]
Egypt D-Link Middle East
7 Assem Ebn Sabet Street, Heliopolis, Cairo, Egypt
TEL: 20-2-635-6176 FAX: 20-2-635-6192 URL: www.dlink-me.com
E-MAIL: support@dlink -me.com & [email protected]
Finland D-Link Finland
Thlli-ja Pakkahuone Katajanokanlaituri 5, FIN– 00160 Helsinki
TEL: 358-9-622-91660 FAX: 358-9-622-91661 URL: www.dlink- fi.com
France D-Link France
Le Florilege #2, Allee de la Fresnerie, 78330 Fontenay le Fleury, France
TEL: 33-1-3023-8688 FAX: 33-1-3023-8689 URL: www.dlink-france.fr
E-MAIL: info@dlink -france.fr
Page 99

DWL-AB650 Wireless Multimode Cardbus Adapter
99
Germany D-Link Central Europe/D-Link Deutschland GmbH
Schwalbacher Strasse 74, D-65760 Eschborn, Germany
TEL: 49-6196- 77990 FAX: 49-6196-7799300 URL: www.dlink.de
BBS: 49-(0) 6192-971199 (analog) BBS: 49-(0) 6192-971198 (ISDN)
INFO: 00800-7250- 0000 (toll free) HELP: 00800-7250-4000 (toll free)
REPAIR: 00800 -7250-8000 E-MAIL: [email protected]
India D-Link India
Plot No.5, Kurla-Bandra Complex Rd., Off Cst Rd., Santacruz (E),
Bombay, 400 098 India
TEL: 91-22-652-6696 FAX: 91-22-652-8914 URL: www.dlink-india.com
E-MAIL: [email protected]
Italy D-Link Mediterraneo Srl/D-Link Italia
Via Nino Bonnet n. 6/b, 20154, Milano, Italy
TEL: 39-02-2900-0676 FAX: 39-02-2900-1723 URL: www.dlink.it
E-MAIL: [email protected]
Japan D-Link Japan
10F, 8- 8-15 Nishi-Gotanda, Shinagawa-ku, Tokyo 141, Japan
TEL: 81-3-5434-9678 FAX: 81-3-5434-9868 URL: www.d-link.co.jp
E-MAIL: kida@d- link.co.jp
Netherlands D-Link Benelux
Fellenoord 1305611 ZB, Eindhoven, the Netherlands
TEL: 31-40-2668713 FAX: 31- 40-2668666 URL: www.d-link-benelux.n
Norway D-Link Norway
Waldemar Thranesgt. 77, 0175 Oslo, Norway
TEL: 47-22-991890 FAX: 47-22-207039
Russia D-Link Russia
Michurinski Prospekt 49, 117607 Moscow, Russia
TEL: 7- 095-737-3389 & 7-095-737-3492 FAX: 7-095- 737-3390
URL: www.dlink.ru E-MAIL: [email protected]
Singapore D-Link International
1 International Business Park, #03-12 The Synergy, Singapore 609917
TEL: 65-774-6233 FAX: 65-774-6322 E-MAIL: [email protected]
URL: www.dlink-intl.com
South Africa D-Link South Africa
102 – 10 6 Witchhazel Avenue, Einstein Park 2, Block B,
Highveld Technopark,
Centurion, South Africa
TEL: 27 (0) 12-665-2165 FAX: 27 (0) 12-665- 2186 URL: www.d-link.co.za
E-MAIL: attie@d -link.co.za
Spain D-Link Iberia
C/Sabino De Arana, 56 Bajos, 08028 Barcelona, Spain
TEL: 34 93 4090770 FAX: 34 93 4910795 URL: www.dlinkiberia.es
E-MAIL: [email protected]
Page 100

DWL-AB650 Wireless Multimode Cardbus Adapter
100
Sweden D-Link Sweden
P. O. Box 15036, S-167 15 Bromma, Sweden
TEL: 46-(0) 8-564-61900 FAX: 46-(0) 8- 564-61901 E-MAIL: [email protected]
URL: www.dlink.se
Taiwan D-Link Taiwan
2F, No. 119 Pao-Chung Rd, Hsin- Tien, Taipei, Taiwan
TEL: 886-2-2910-2626 FAX: 886-2-2910-1515 URL: www.dlinktw.com.tw
E-MAIL: [email protected]
Turkey D-Link Middle East
Deniz Bilgisayar, Buyukdere Cad. Naci Kasim Sk., No. 5 Mecidiyekoy,
Istanbul, Turkey
TEL: 90-212-213-3400 FAX: 90-212- 213-3420
E-MAIL: smorovati@dlink -me.com
U.A.E. D-Link Middle East
CHS Aptec (Dubai), P.O. Box 33550 Dubai U.A.E.
TEL: 971-4-366-885 FAX: 971-4-355-941 E-MAIL: [email protected]
U.K. D-Link Europe
4th Floor, Merit House, Edgware Road, Colindale, London NW9 5AB
United Kingdom
TEL: 44 (0) 20-8731- 5555 FAX: 44 (0) 20-8731-5511
BBS: 44 (0) 181- 235-5511
URL: www.dlink.co.uk E-MAIL: [email protected]
U.S.A. D-Link U.S.A.
53 Discovery Drive, Irvine, CA 92618, USA
TEL: 1-949-788-0805 FAX: 1-949-753-7033
BBS: 1-949-455- 1779 & 1-949-455-9616
INFO: 1-800-326- 1688 URL: www.dlink.com
E-MAIL: [email protected] & [email protected]
 Loading...