

Page 1

DWL-650H
WLAN PC Card
Quick Installation Guide
First Edition (January, 2002)
6RDWL650HQ01
Printed in Taiwan
RECYCLABLE
Page 2
Contents of Package:
DWL-650H WLAN PC Card 11 Mbps Ethernet Adapter
CD-ROM, including User’s Manual
Quick Installation Guide
Installing Your DWL-650H WLAN PC Card Windows Driver
for Windows 95, 98, ME, and 2000
Installing your Wireless LAN (WLAN) PC Card involves two
steps − installing the driver for the PC Card and then installing
the Plus Pack WLAN PC Card management application. The
WLAN PC Card driver should be installed first. Inserting the
PC Card into an available Cardbus slot − while your computer
is running − starts the PC Card driver installation.
Note: Windows XP does require the PC Card driver to be
installed, but the Windows XP operating system has built-in
Wireless LAN adapter card support, so the Plus Pack
supplied with your DWL-650H PC Card is not required and
should not be installed. See the sections titled “Installing
your DWL-650H PC Card Driver for Windows XP” and
“Configuring Your DWL-650H for Windows XP” below.
Insert the DWL-650H PC Card into an available Cardbus slot. You
can then follow the instructions below to install your DWL-650H
PC Card.
Page 3
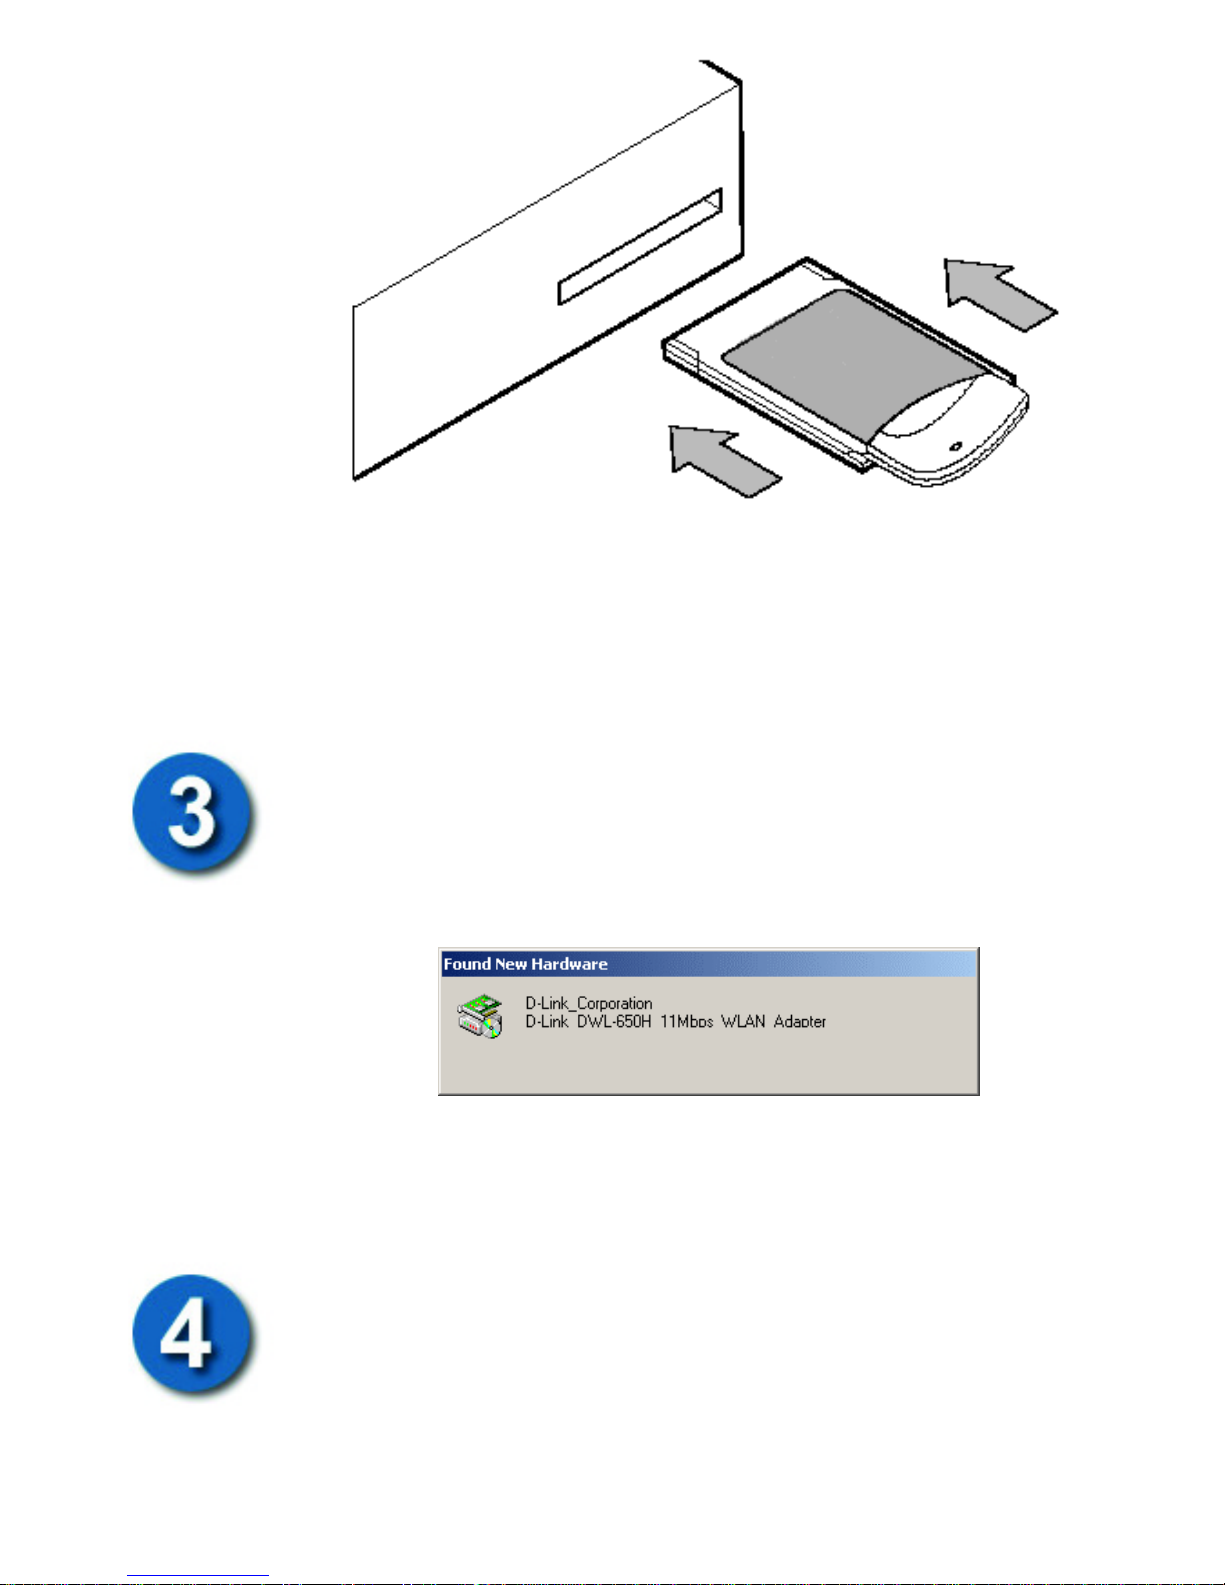
Windows will automatically recognize the card, and open the Found
New Hardware dialog box and prompt you for the location of the
WLAN PC Card driver. The PC Card driver and the Plus Pack
WLAN PC Card management application are located on the
Installation CD.
First, Windows informs you that it has found new hardware. The
DWL-650H WLAN Adapter, in this case.
After a short time, Windows will open the Found New Hardware
Wizard. This will begin the WLAN PC Card driver installation.
Page 4
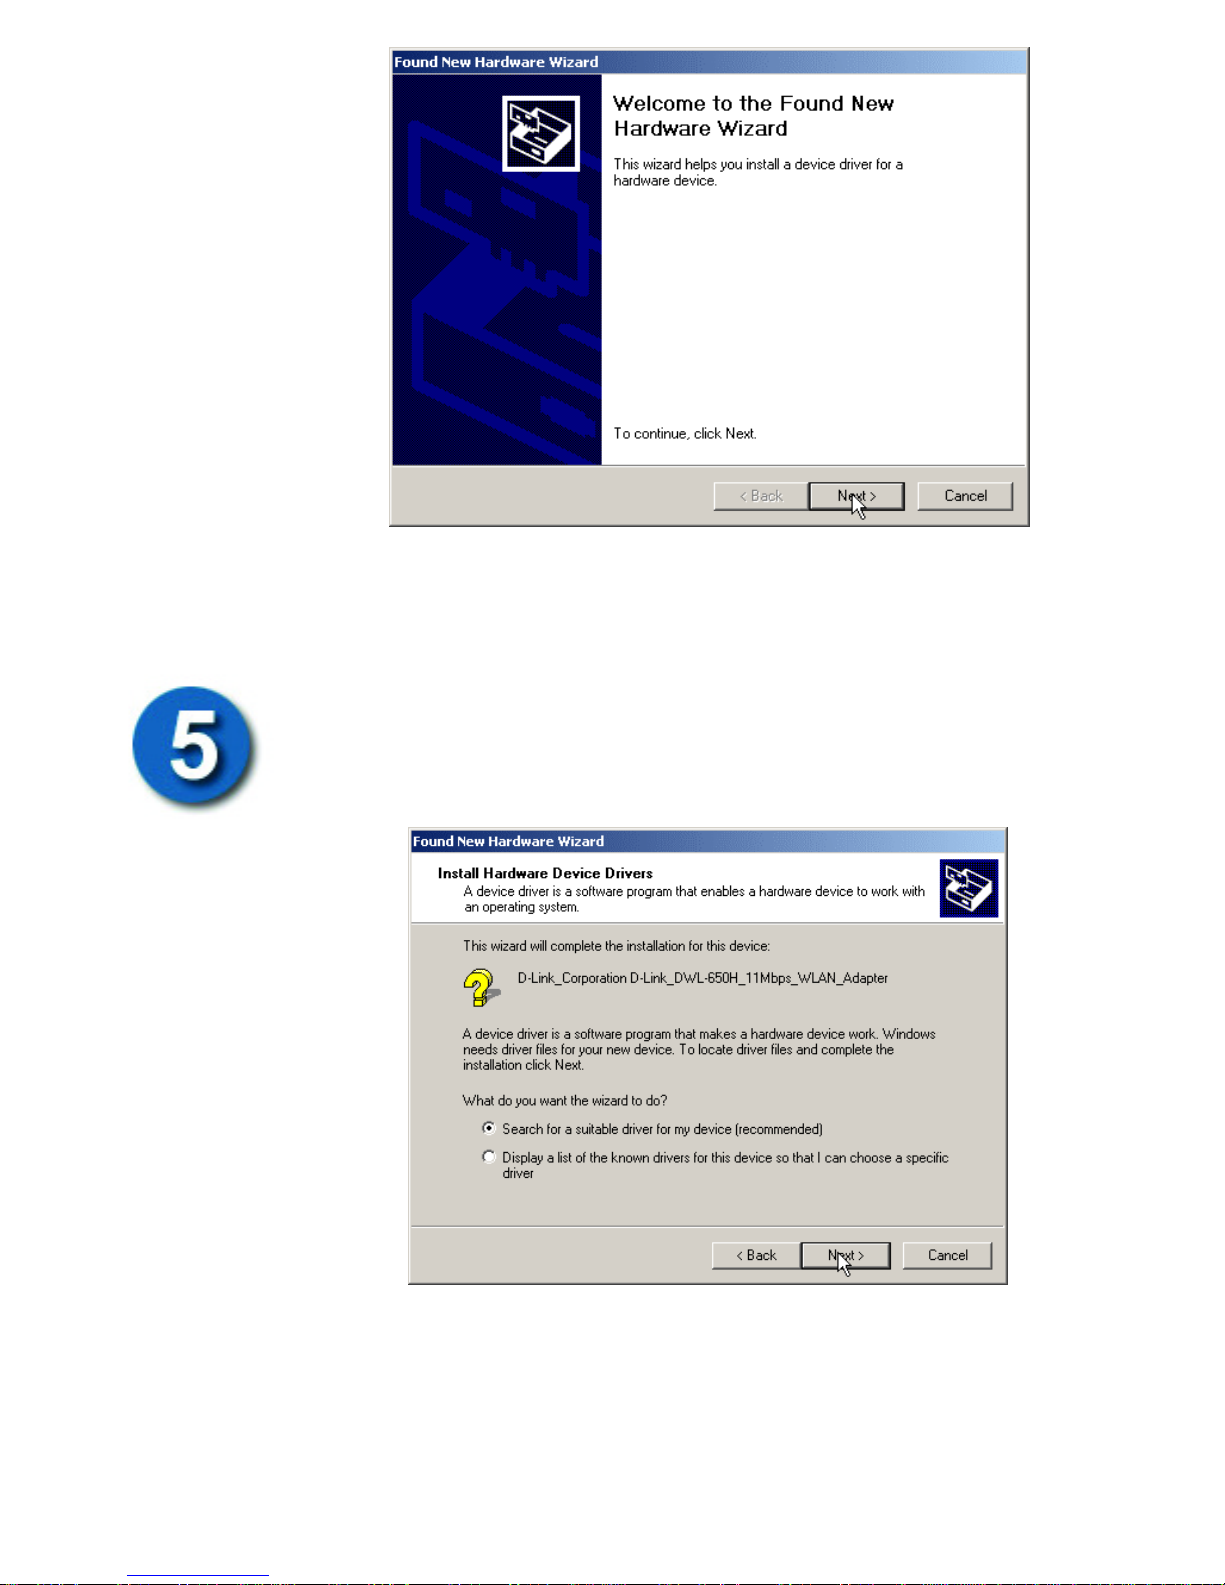
Click Next to continue installing your PC Card driver.
Windows will then prompt you for the location of the PC Card
driver. The driver is located on the WLAN PC Card installation CD
or on your hard drive (if you downloaded the software from the DLink Website).
Use the Search for a suitable driver box and then either the CD-
ROM drives (if you are using the WLAN PC Card Installation CD-
ROM) or the Specify a location box (if you downloaded the software
from the Website) and then the Browse button to tell the New
Hardware Found wizard where the netwlan5.inf file is. Windows
Page 5
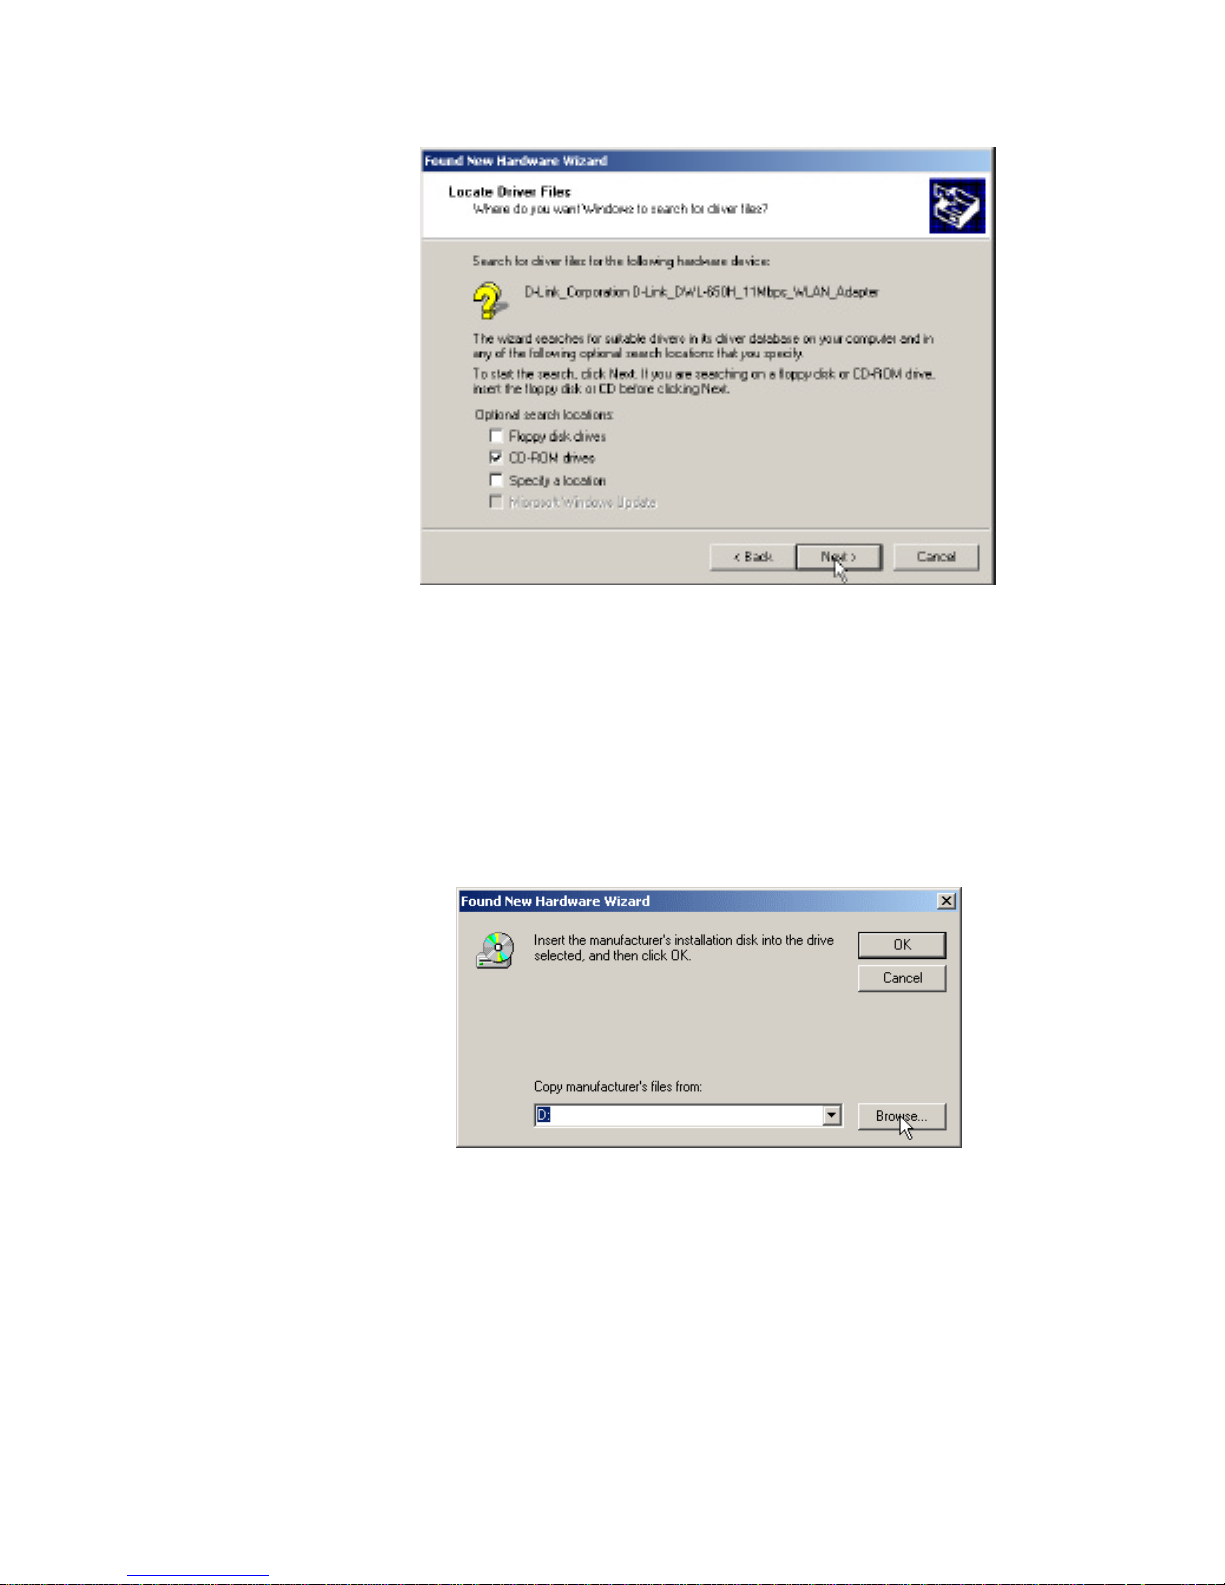
will automatically find this file on the Installation CD. Click OK
and then Next to continue.
Clicking the CD-ROM Drives check box will instruct Windows to
make an automated search of the CD in your CD-ROM drive. When
Windows finds the driver file (named netwlan5.inf), the Driver Files
Search Results screen will be displayed.
Clicking the Specify a location check box will open the following
dialog box:
This dialog box allows you to specify the location of the PC Card
driver files. This is usually a CD-ROM drive, but if you do not
know the location of the PC Card driver file, you can click the
Browse button to open the Locate File dialog box shown below.
Page 6
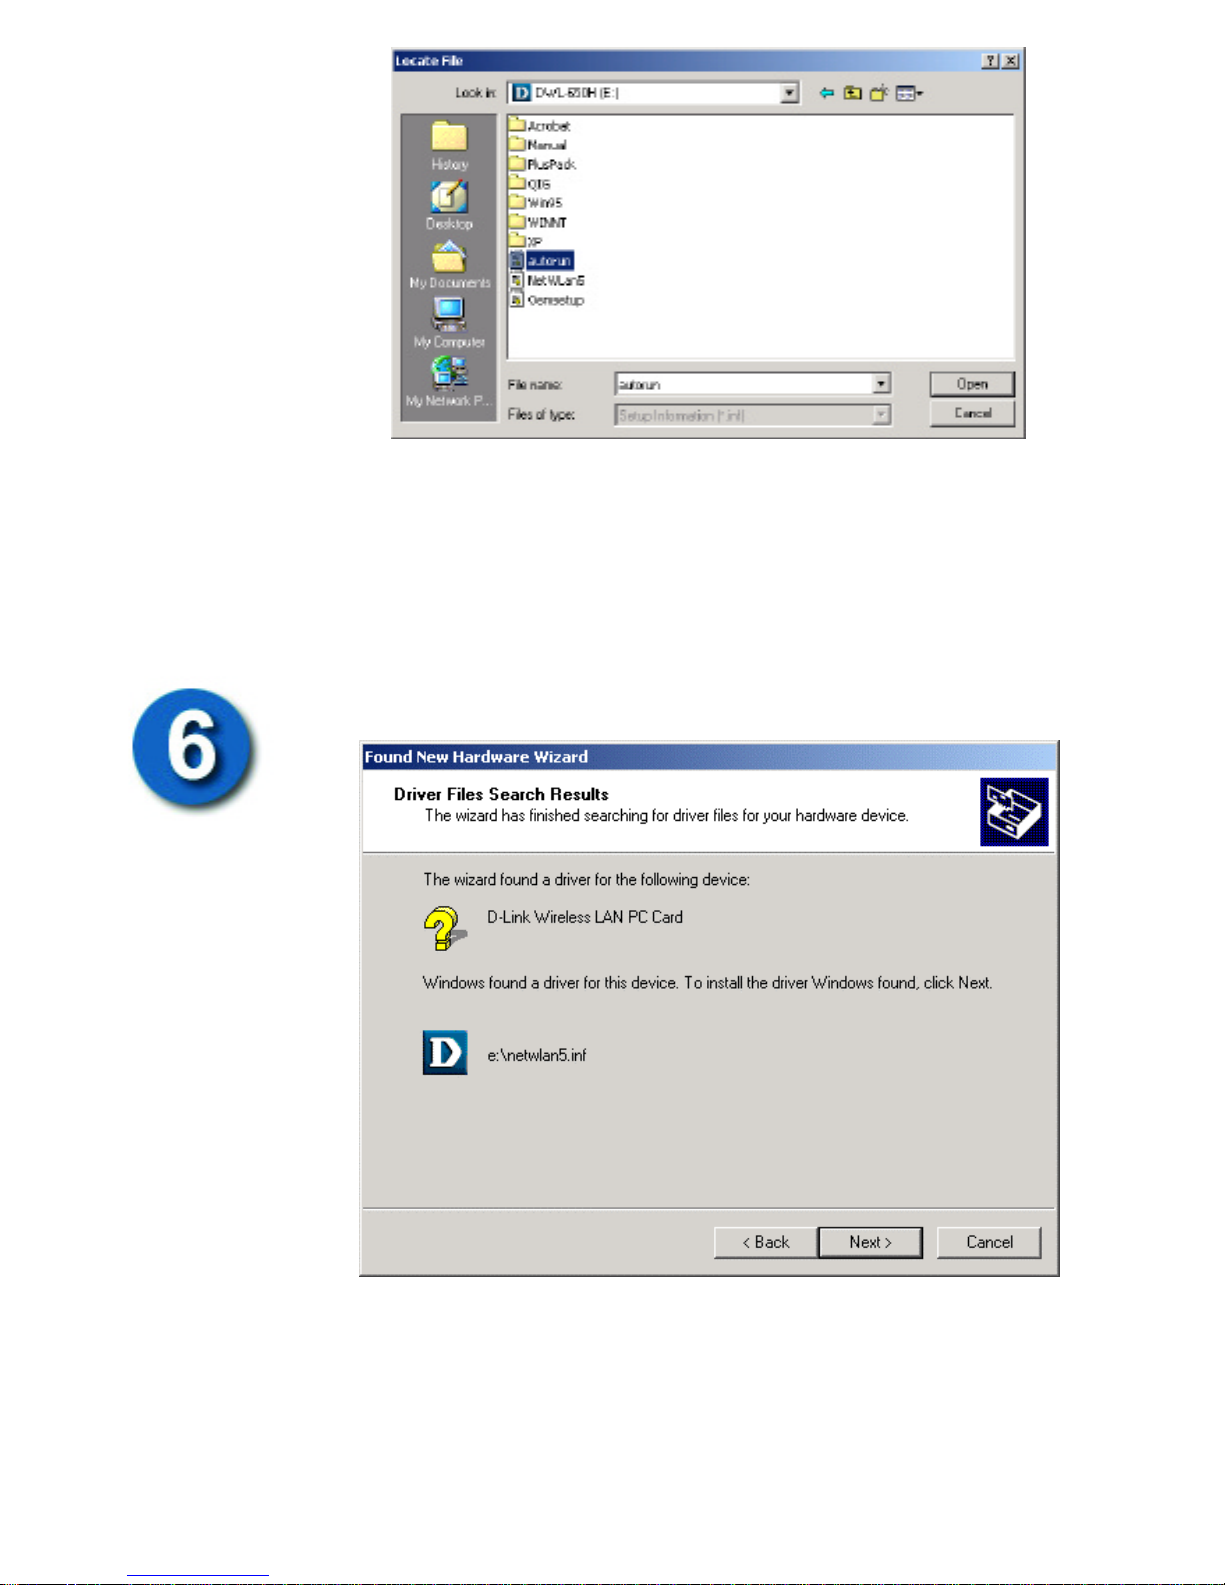
Windows will find the appropriate file, so long as the folder the file
is in is open in the Locate File dialog box. In this case, Windows is
looking for a file named autorun.inf. If you are using the
Installation CD, this file is located in the root directory of the CD.
When Windows locates the appropriate file, you will be prompted to
begin the installation of the driver.
Click Next to install the driver for your DWL-650H WLAN PC Card.
On some versions of Windows (Windows 2000, for example) you
may be prompted to accept the driver even though it does not have a
“digital signature”. If this dialog box (shown below) appears asking
you if you want to install the driver even though it does not have a
Page 7
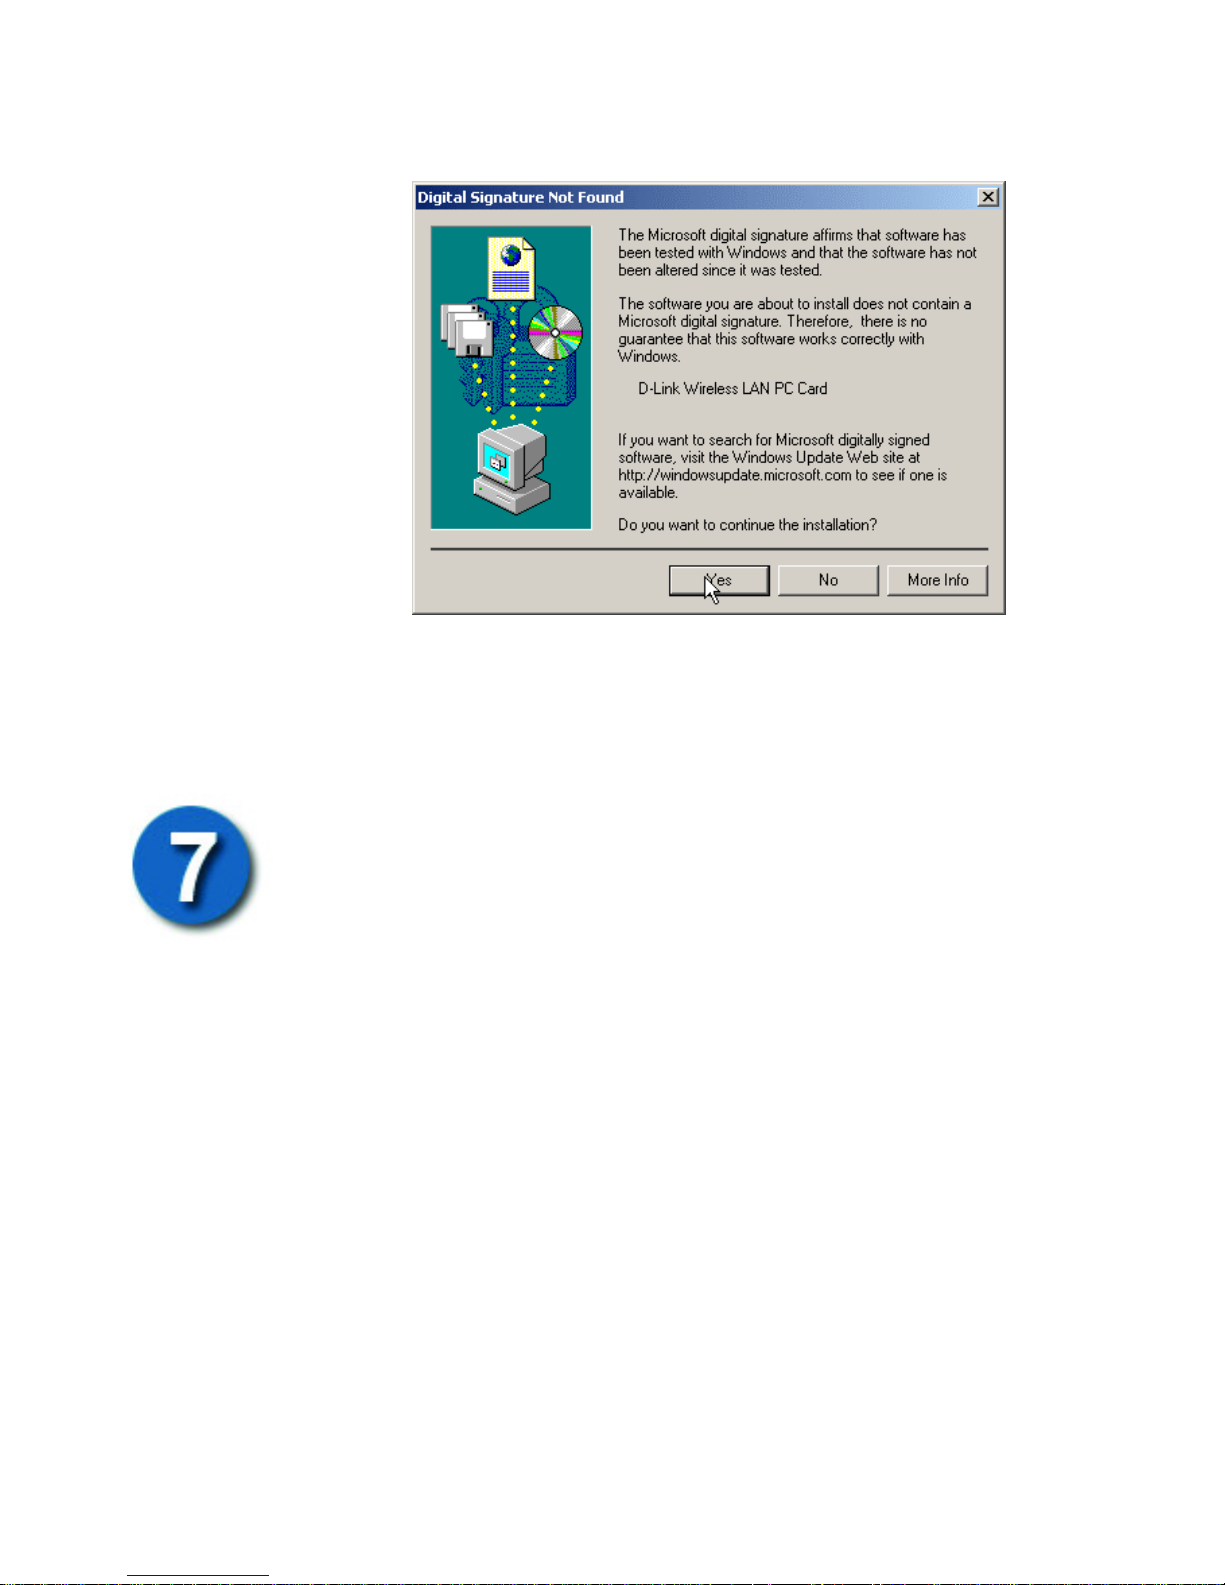
“digital signature”, click Yes to accept the driver. A Microsoft
digital signature is not required for the proper operation of your
WLAN PC Card or the driver software.
The driver software will then be “unpacked” and loaded into your
computer for installation.
During the installation of the driver, you will be prompted for the
SSID (Service Set ID) to be used with your WLAN PC Card. The
default SSID is “101”.
An SSID is used like a password between a Wireless Access Point
and an end station (like your DWL-650H PC Card).
The SSID you enter here should be the same SSID of the Access
Point that your WLAN PC Card will normally associate with (link
to).
If you do not know the SSID of your home Access Point, you can
enter “any” and click OK to continue the driver installation.
Note: Entering “any” in the Network Name (SSID): field will
allow your DWL-650H PC Card to join any Access Point or 802.11
Ad Hoc Wireless LAN−
regardless of the SSID in use by the WLAN. If the WLAN is
configured to use Wired Equivalent Privacy (WEP) encryption,
Page 8
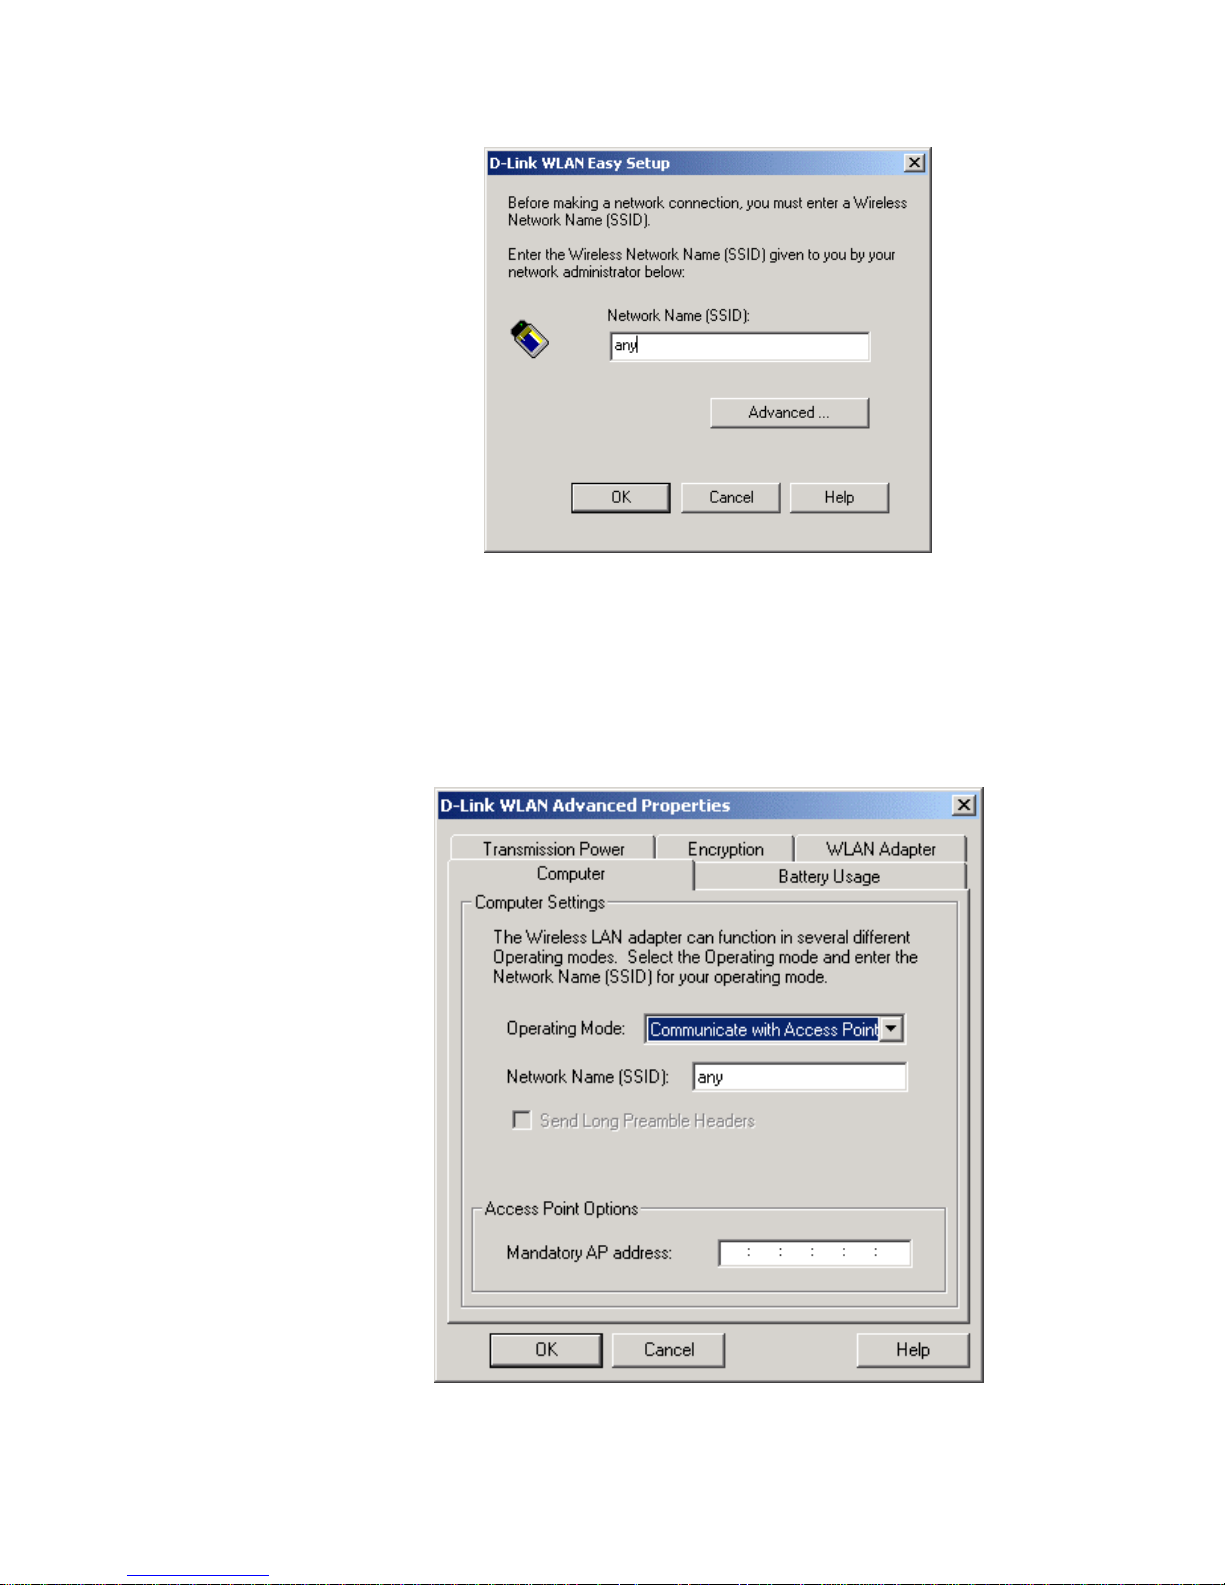
you must enter the appropriate WEP key under the Advanced
settings below.
You can also setup most of the features of your DWL-650H WLAN
PC Card at this time, if you know the appropriate values and settings.
Clicking on the Advanced button opens the D-Link WLAN
Advanced Properties dialog box.
Here you can setup the Operating Mode as either Communicate with
Access Point − if your WLAN PC Card will connect to a WLAN
Access Point (AP) − or Peer to Peer (802.11 Ad Hoc) − if your
Page 9

WLAN PC Card will connect to another computer for file sharing
and network access.
Note: The Peer to Peer (Proprietary Ad Hoc) operating mode is
used for testing the WLAN link and is not used for normal WLAN
access.
In the Network Name (SSID) field, you can set the SSID for your
Wireless LAN. If you don’t know the appropriate SSID, you can
enter “any” to allow your WLAN PC Card to connect to an AP (or
peer computer) regardless of the AP’s SSID.
The Mandatory AP address field allows you to enter the MAC
address of the AP (Access Point) that your WLAN PC Card is to
communicate with. If you enter an AP’s MAC address in this field,
your WLAN PC Card can only connect with the AP that has this
MAC address on your network.
Note: A MAC address is a unique 12-byte address assigned by the
manufacturer to every Ethernet device. It is entered in
hexadecimal form using the digits 0 through 9 and the letters A
through F. An example MAC address is 00 50 BA 14 C8 1E
where each character represents one binary byte.
If you do not know these values and settings, you can accept the
defaults for now and enter (or modify) the settings later using the
WLAN PC Card management utilities provided in the Plus Pack.
Clicking on the Battery Usage tab will open the Mobile Unit Power
Settings dialog box shown below.
Page 10
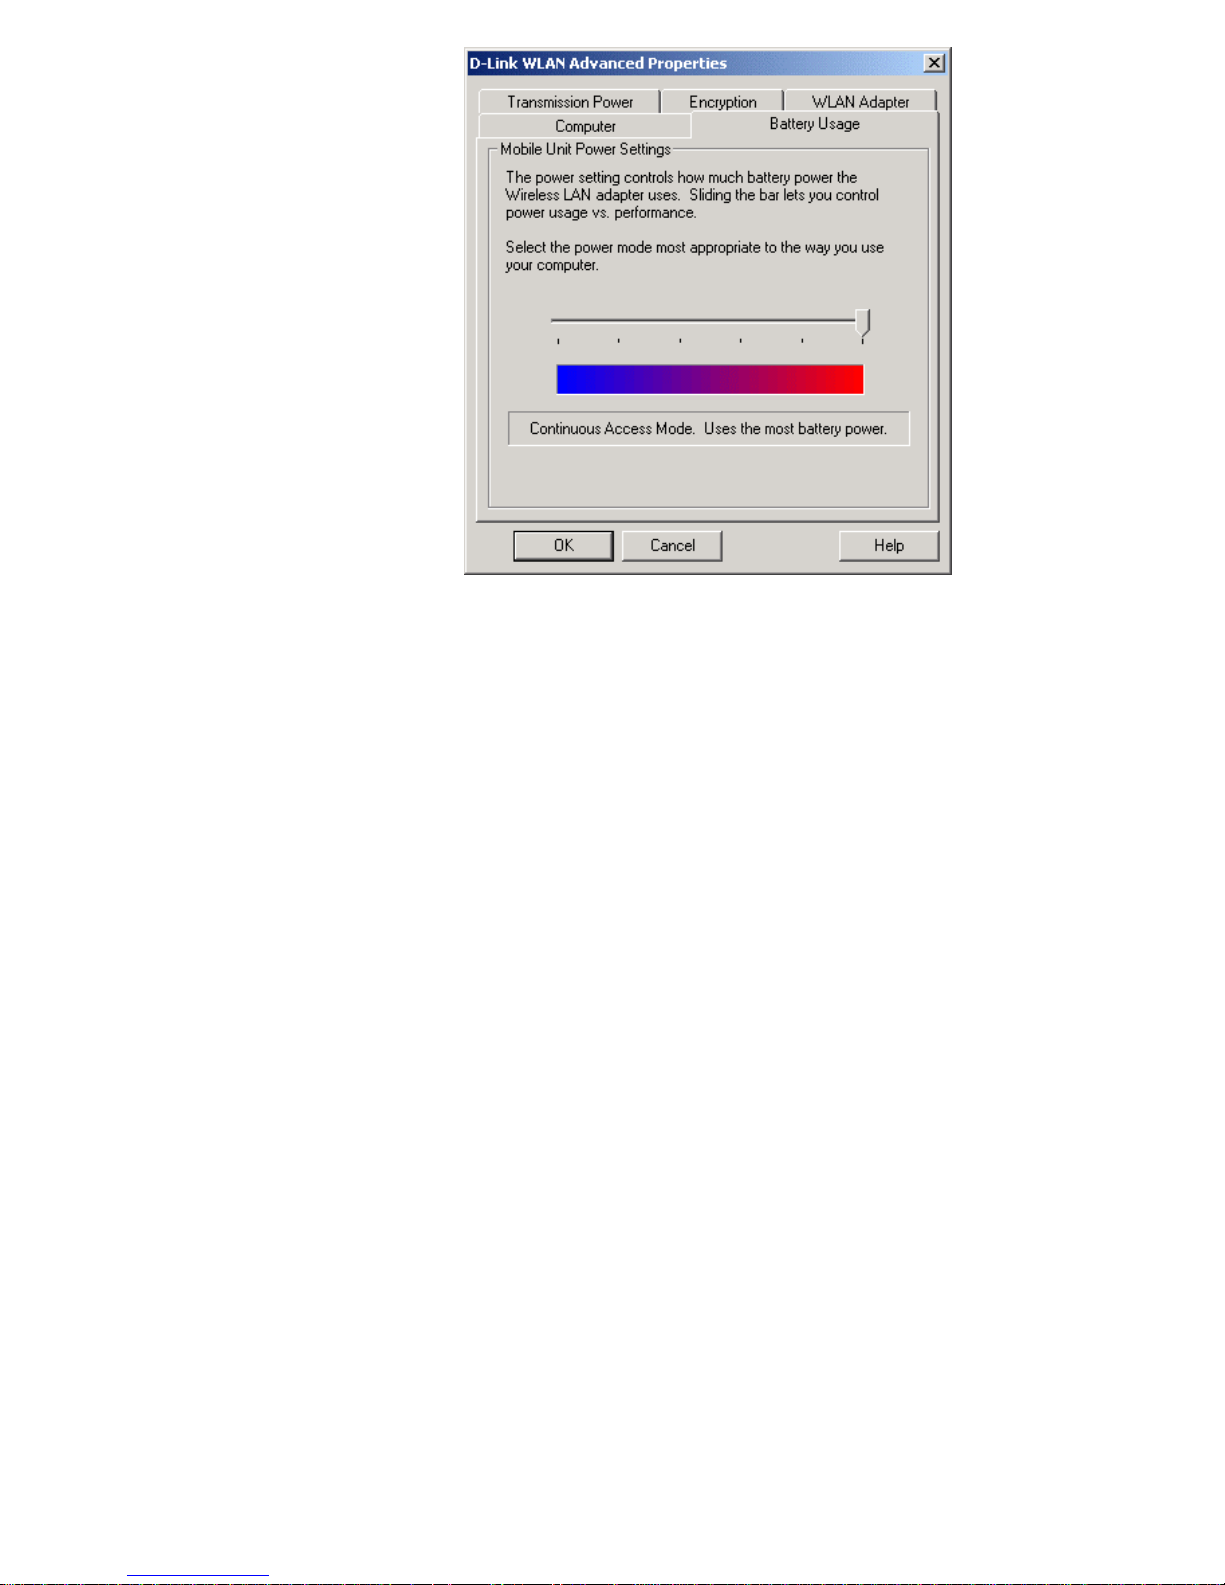
You can set the amount of power your PC Card uses by clicking and
holding the right mouse button while the cursor is over the slider,
and then moving the slider to the left for less power usage (and
somewhat reduced range and/or data throughput between your PC
Card and the Access Point). Moving the slider to the right increases
the amount of power your PC Card uses, but may increase
performance under certain circumstances.
Clicking on the Encryption tab opens the Mobile Unit
Authentication Option dialog box shown below.
Page 11
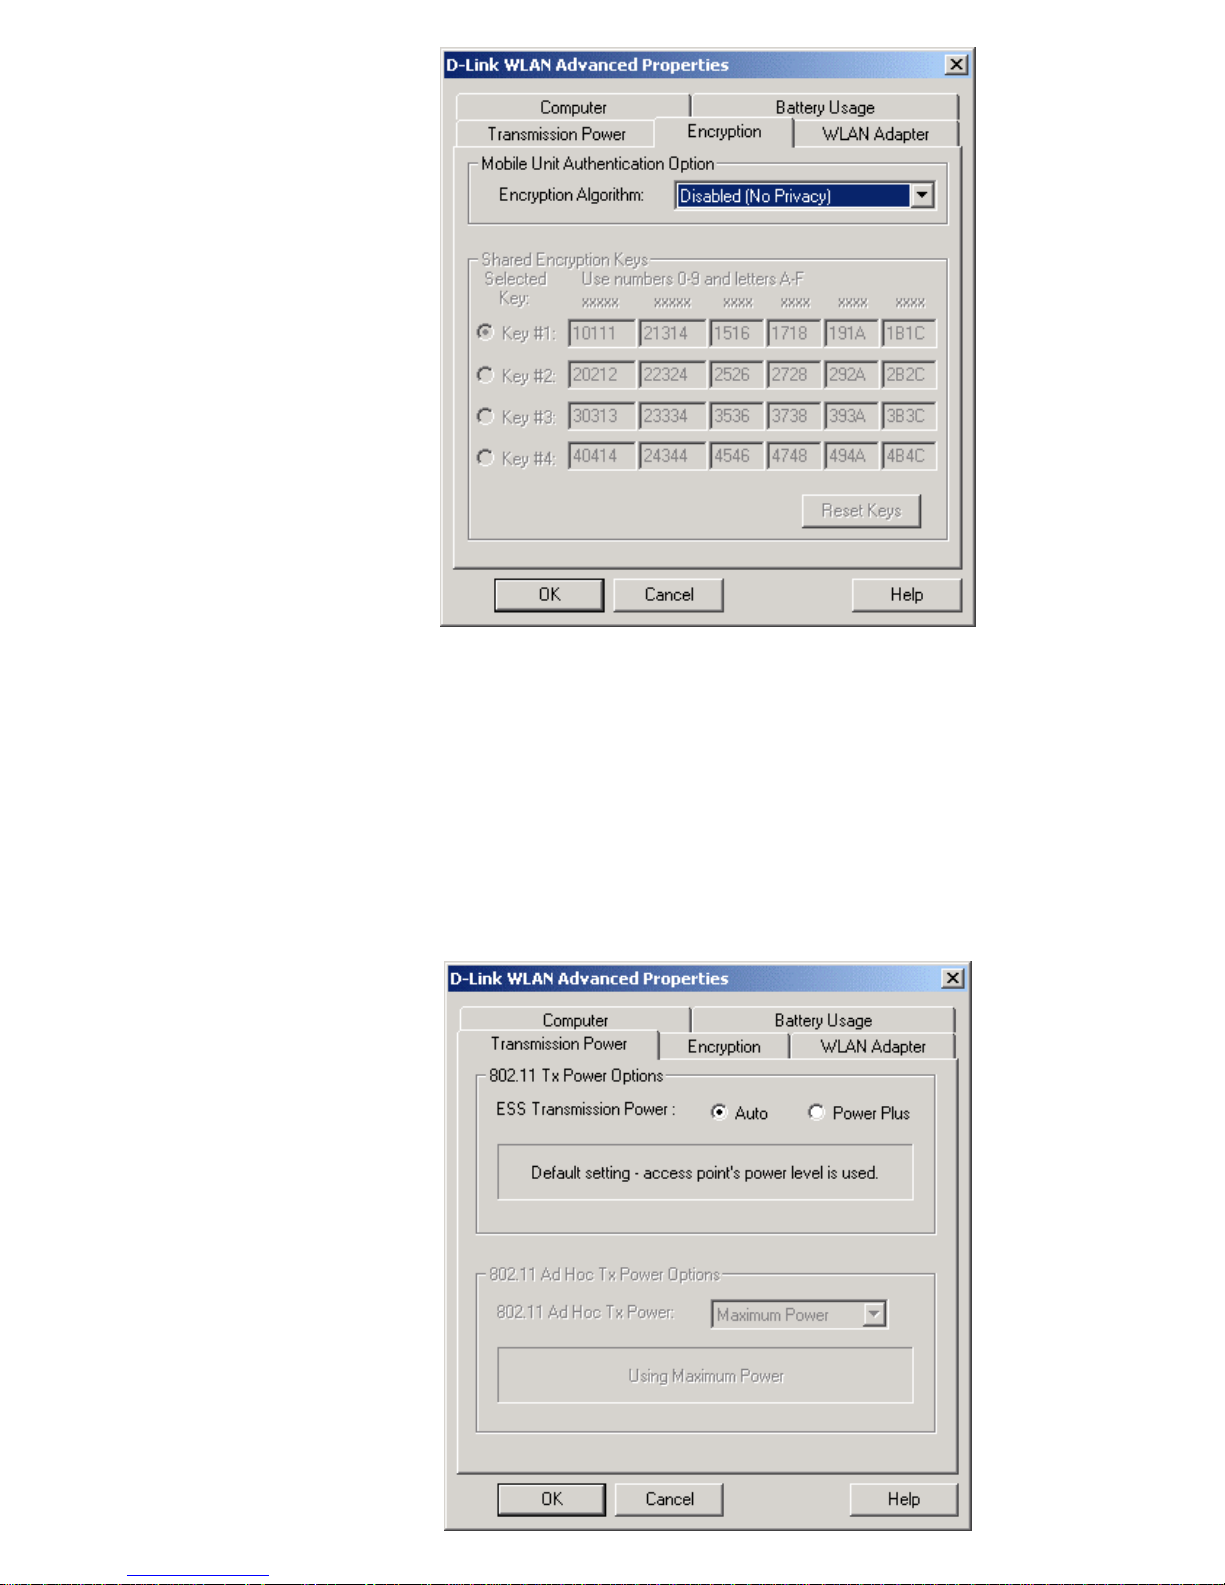
This dialog box allows you to enable Wired Equivalent Privacy
(WEP) encryption between your PC Card and an Access Point. The
key value entered in the four Key # fields must be the same keys as
are in use by the Access Point, or communication between your PC
Card and the Access Point will not be allowed.
Clicking the Transmission Power tab opens the 802.11 Tx Power
Options dialog box shown below.
Page 12
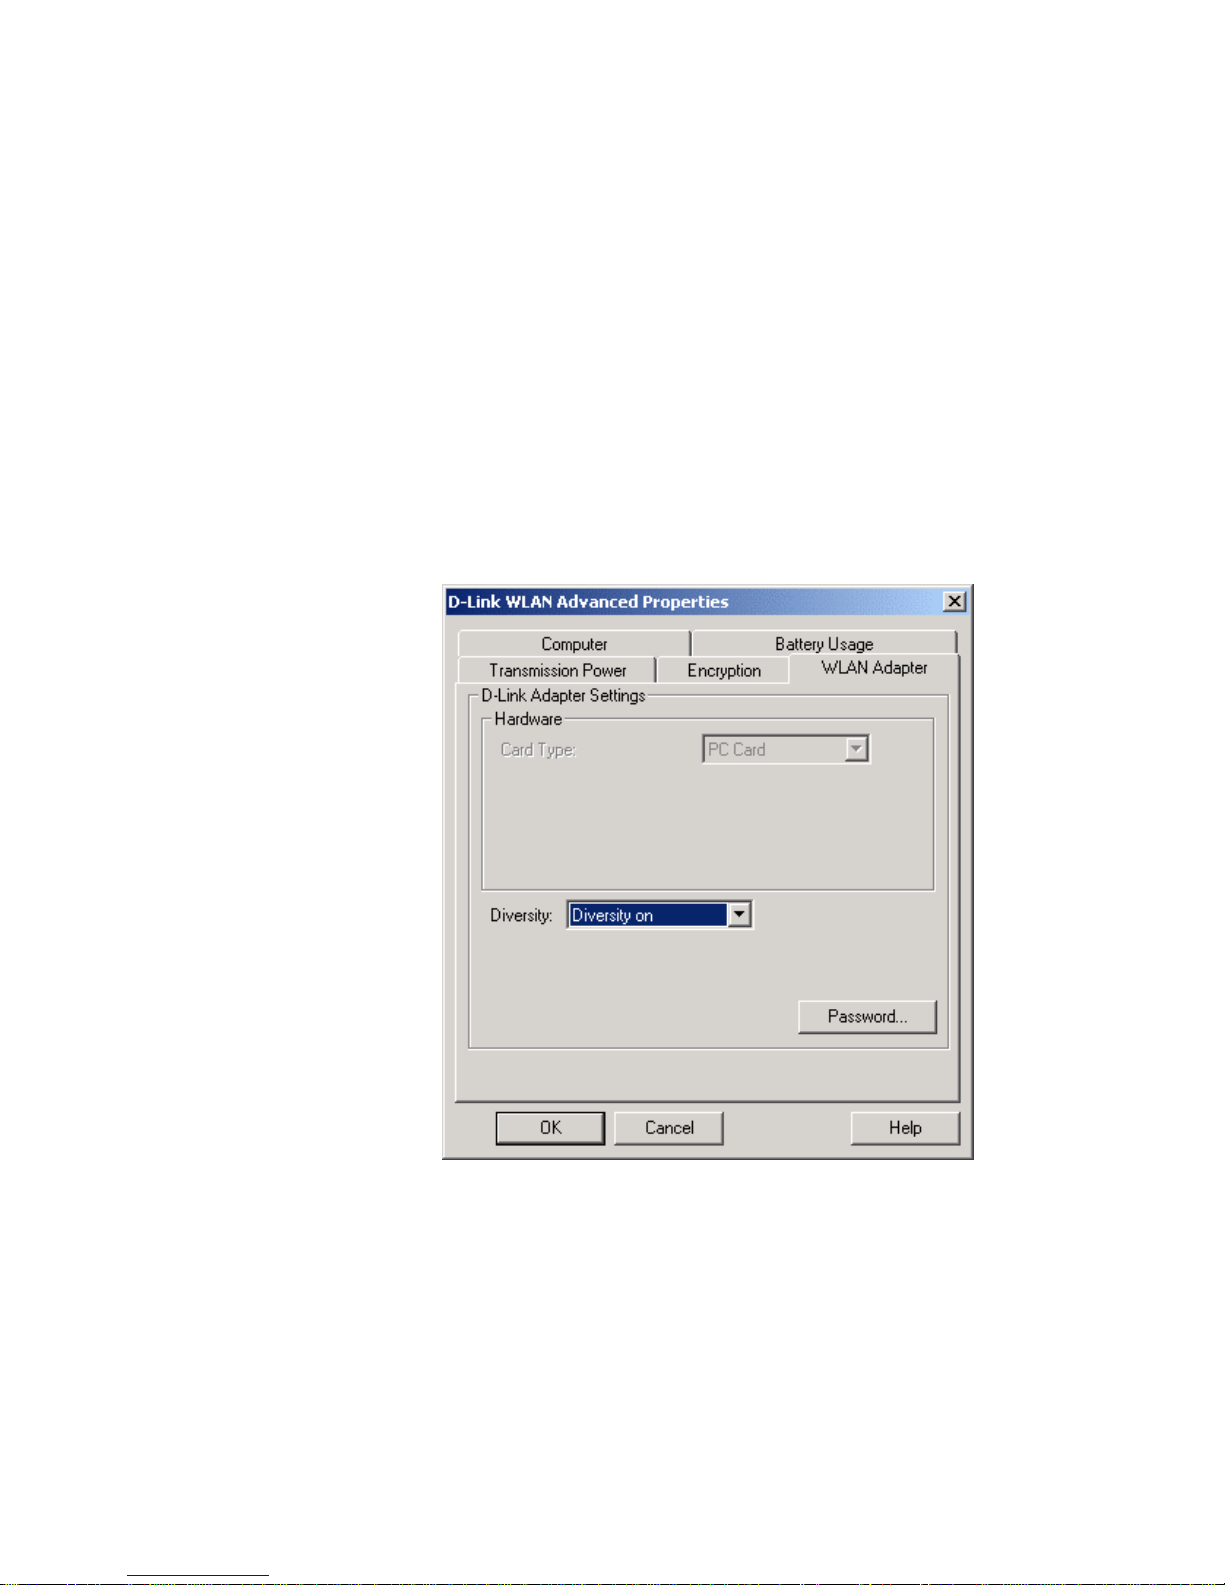
This dialog box allows you to set the amount of power your PC Card
uses to transmit data to the Access Point. When the PC Card is in
Connect to Access Point mode, Auto sets the PC Card to transmit
data at the same level as the Access Point. Power Plus sets the card
to transmit at one level above the Access Point.
In 802.11 Ad Hoc mode, you can specify the PC Card’s transmitting
power from Maximum Power to Minimum Power with percentage
graduations in between.
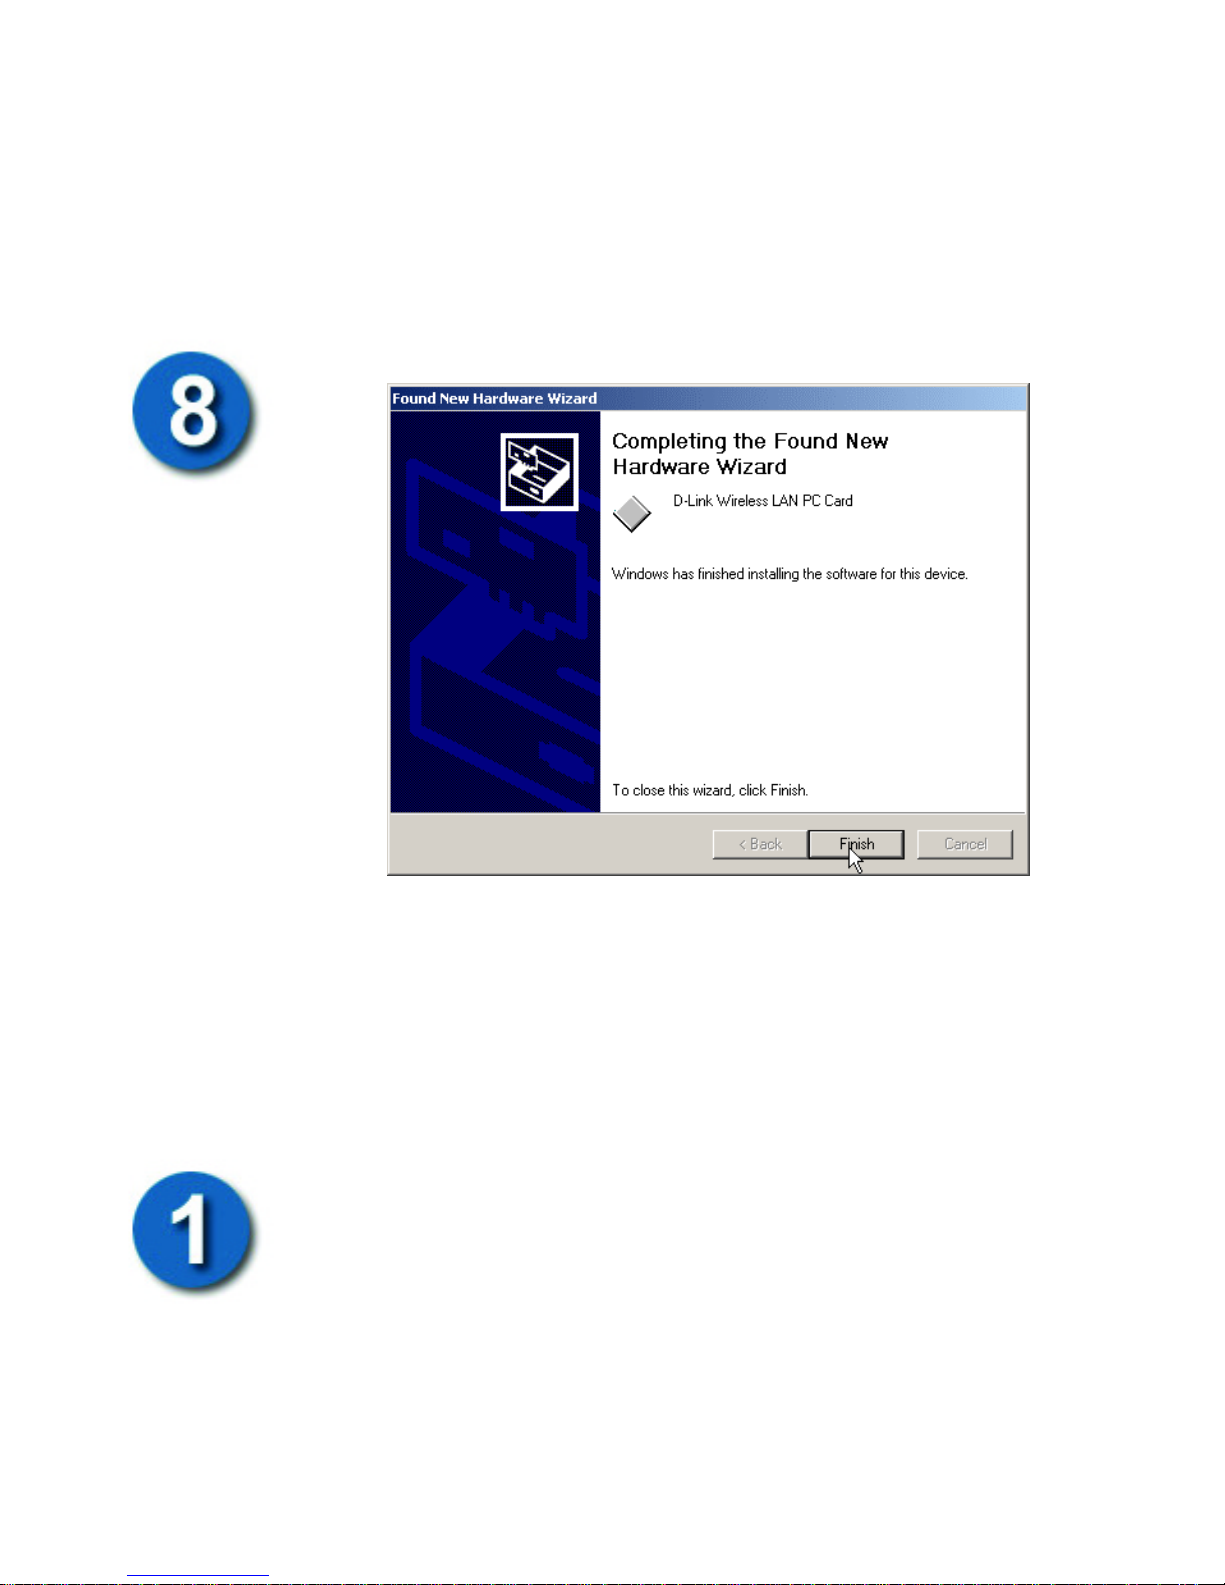
Clicking the WLAN Adapter tab opens the D-Link Adapter Settings
dialog box shown below.
This dialog box allows you to choose between Diversity on and
Primary only. Diversity on instructs your PC Card to use both of its
internal antennas to communicate with the Wireless LAN. This
mode is useful in reducing interference caused by the radio waves
taking multiple paths between the Access Point and your PC Card.
Primary only instructs your PC Card to use only its primary antenna
in circumstances where interference is not a problem.
All of the above settings can be entered or modified using the Plus
Pack utilities.
Page 13
Click OK on the D-Link WLAN Advanced Properties dialog box to
make the settings current.
Click OK on the D-Link Easy Setup dialog box to continue the
driver installation.
The finial screen of the Found New Hardware Wizard appears.
Click Finish to complete the installation of your DWL-650H WLAN
PC Card Windows driver.
Installing Your DWL-650H WLAN PC Card Windows Driver
for Windows XP
Insert the DWL-650H PC Card into an available Cardbus slot and
put the Installation CD into your computer’s CD-ROM drive. You
can then follow the instructions below to install your DWL-650H
PC Card on a computer with the Windows XP operating system.
Windows XP will detect you new DWL-650H Wireless LAN PC
Card and open the Found New Hardware Wizard as shown below.
Page 14
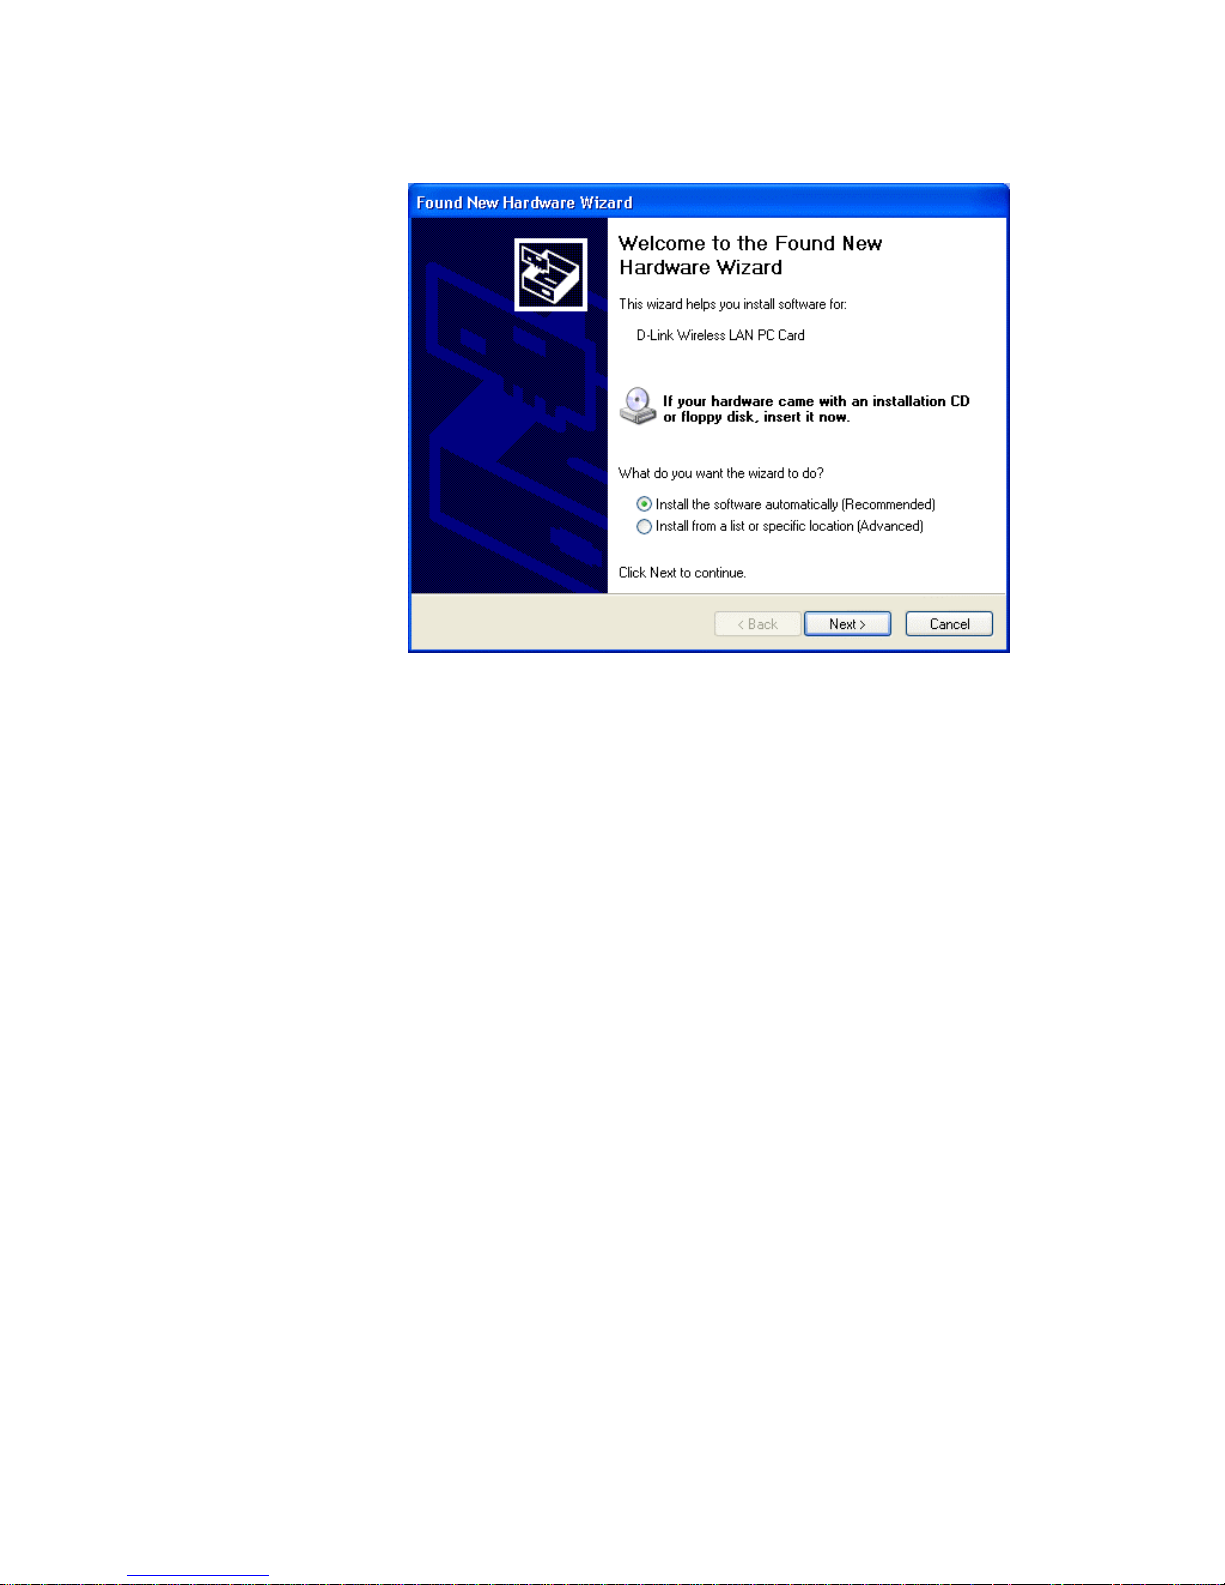
Windows XP will automatically search your computer’s CD-ROM
drive for the PC Card driver. Select Install the software
automatically (Recommended) to install the PC Card driver from the
Installation CD. Select Install from a list or specific location
(Advanced) to install the PC Card driver from another source (such
as your computer’s hard disk).
Page 15
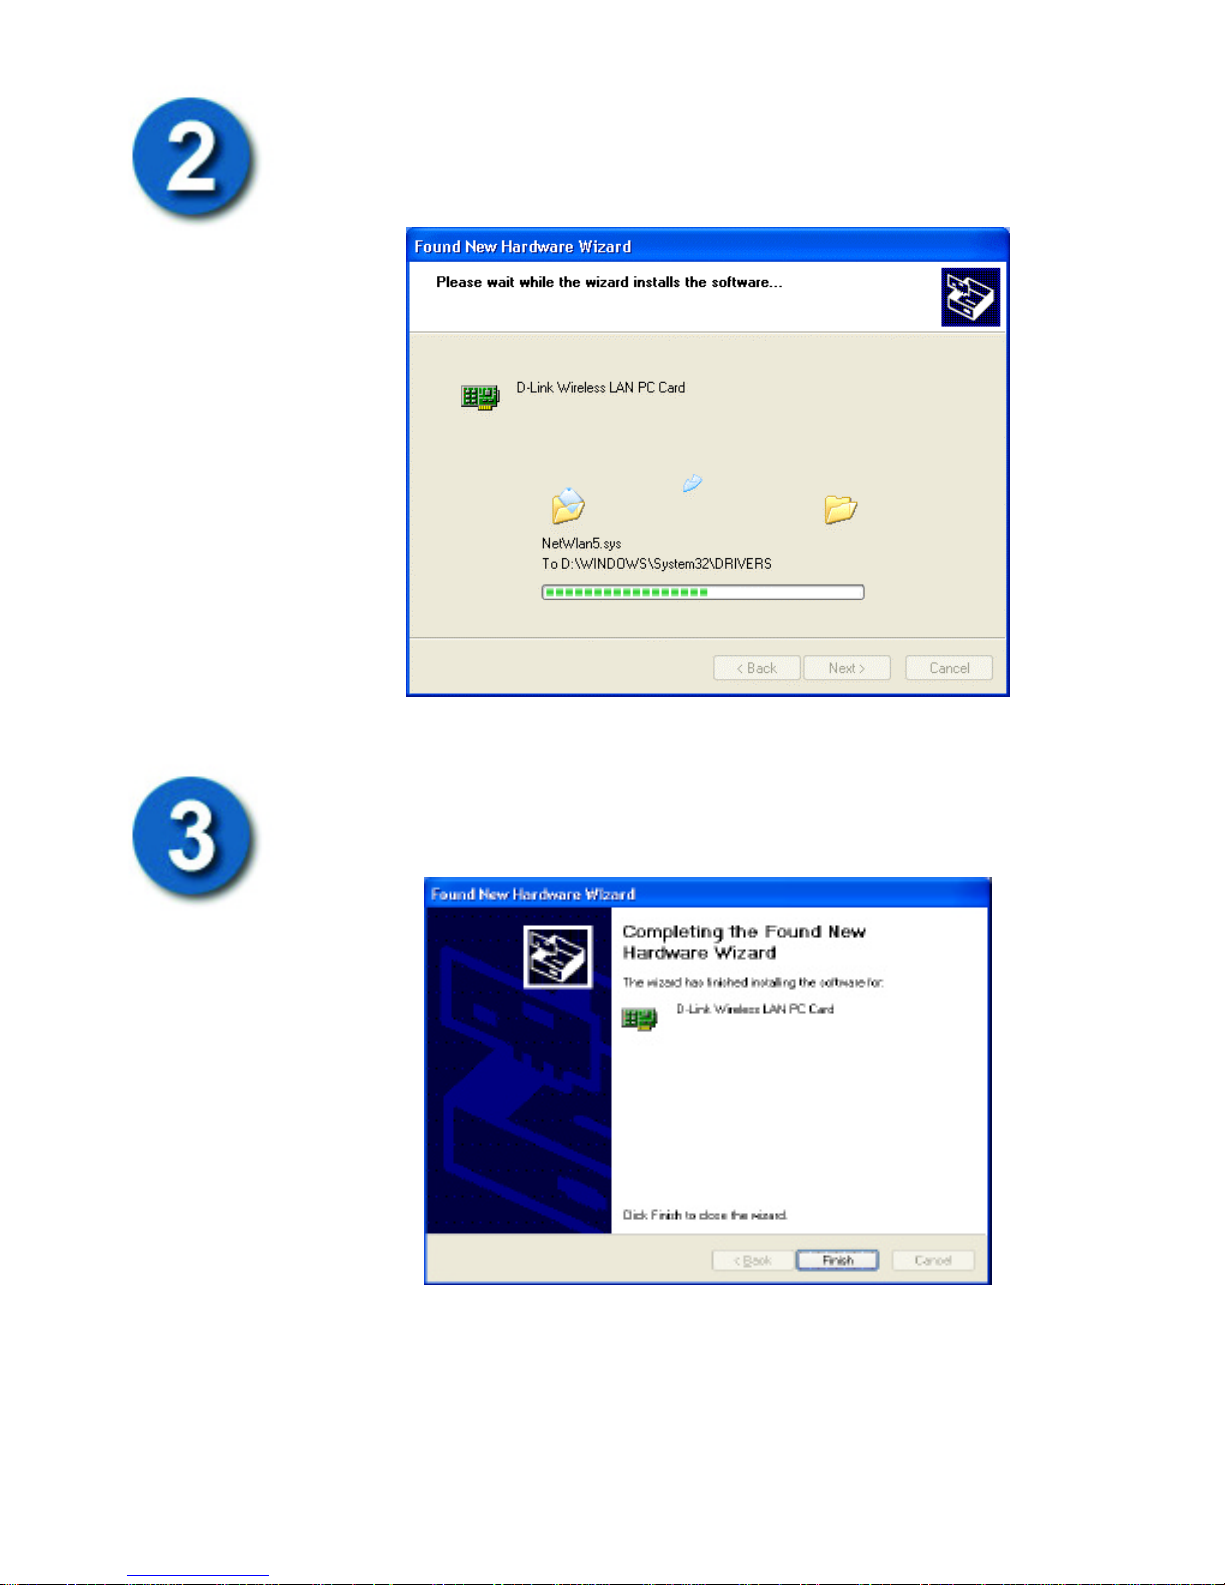
When Windows XP locates the file named NetWlan5.sys, it will
copy the file to your computer’s hard disk for installation. Click
Next to continue the installation.
When Windows XP has completed the PC Card driver installation
the Completing the Found New Hardware Wizard screen appears as
shown below.
Click Finish to complete the installation of the PC Card driver for
Windows XP.
Installing Your DWL-650H WLAN Plus Pack PC Card
Management Software for Windows 95, 98, ME and 2000.
Page 16
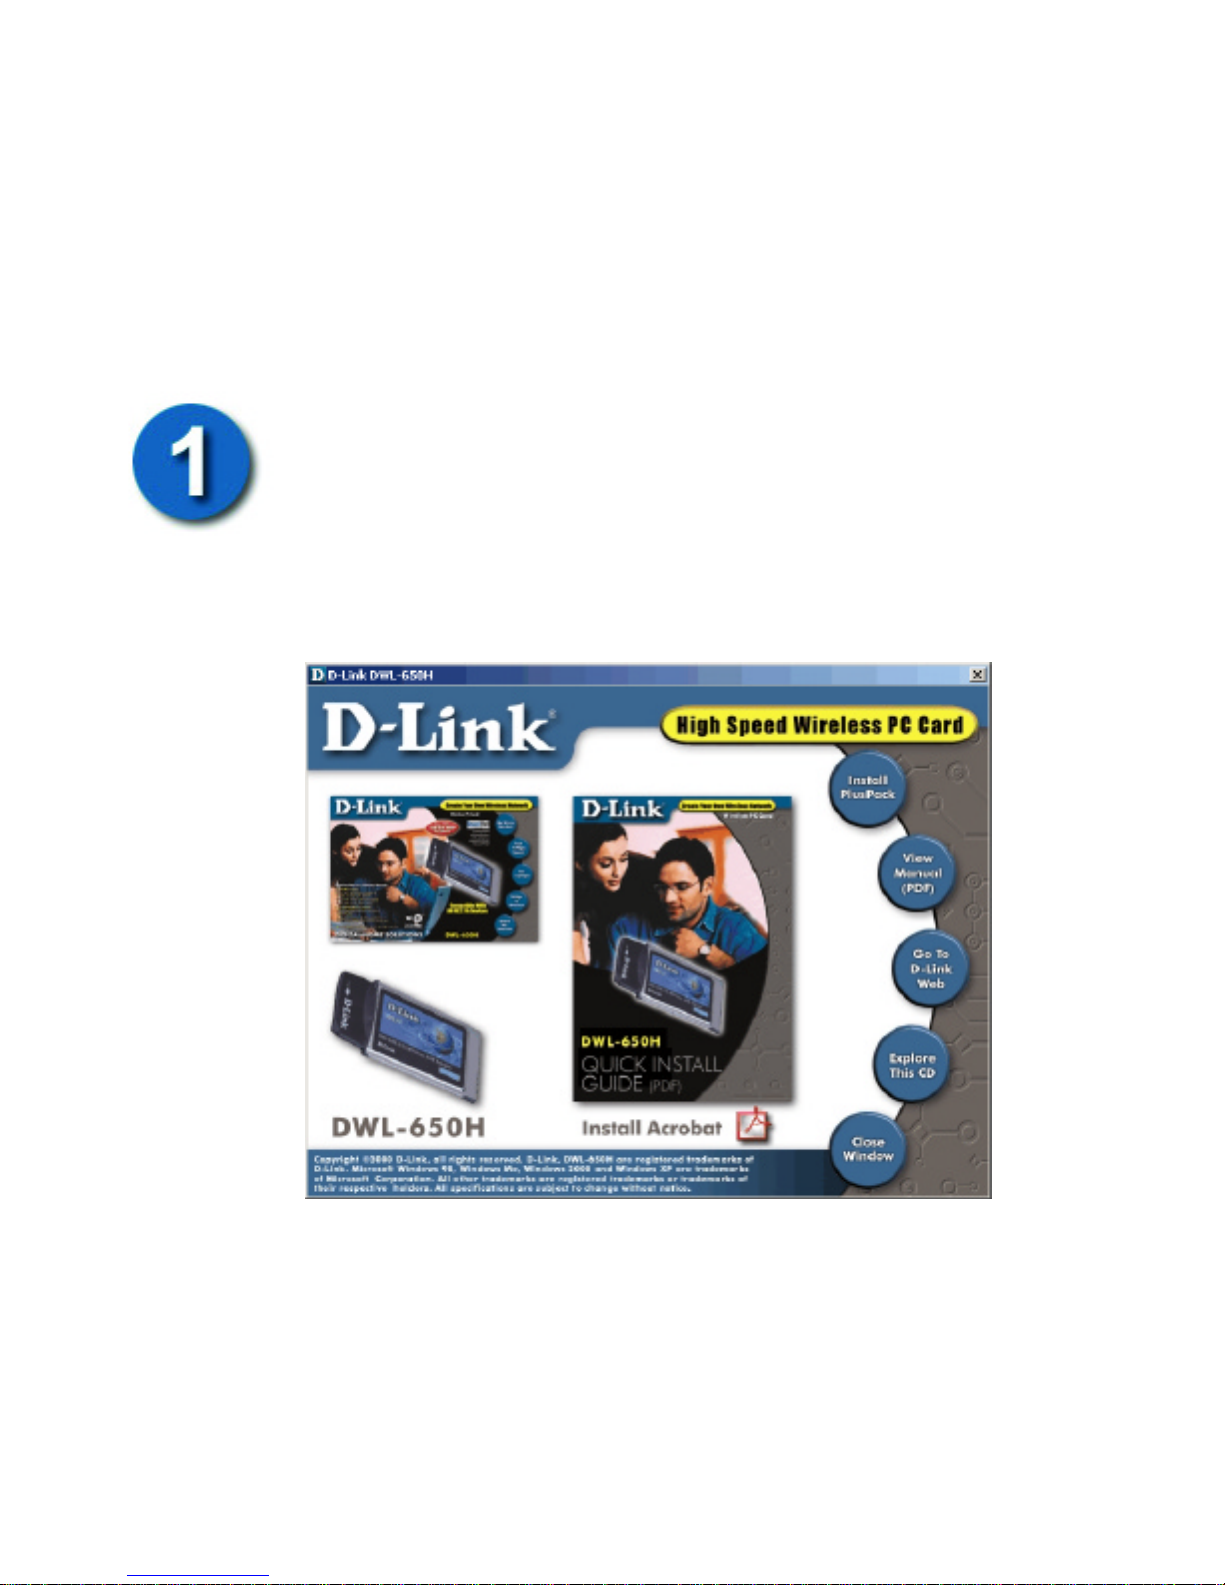
You are now ready for the second part of the installation of your
DWL-650H WLAN PC Card − the installation of the Plus Pack
management software.
Note: The Windows XP operating system contains support for the
management of wireless PC Cards, so the Plus Pack utilities are
not required for Windows XP and should not be installed.
Double-click on the DWL-650H CD icon (if you have Autorun
enabled on your PC). If Autorun is not enabled on your PC (or you
have downloaded the software from the Website), find the file
named Autorun.exe and double-click this file. This will open the
following Web page in your default browser.
As an alternative, you can double-click the Setup.exe icon in the
Plus Pack folder.
Click on the Install PlusPack link. This will unpack the necessary
installation files and open the Setup application to install the Plus
Pack WLAN PC Card management software.
On some versions of Windows (Windows 2000, for example) you
will be prompted to remind you that you must have administrative
rights to install this utility. If you do not have administrative rights,
logoff (from the Start button) and log back on as the administrator.
Page 17
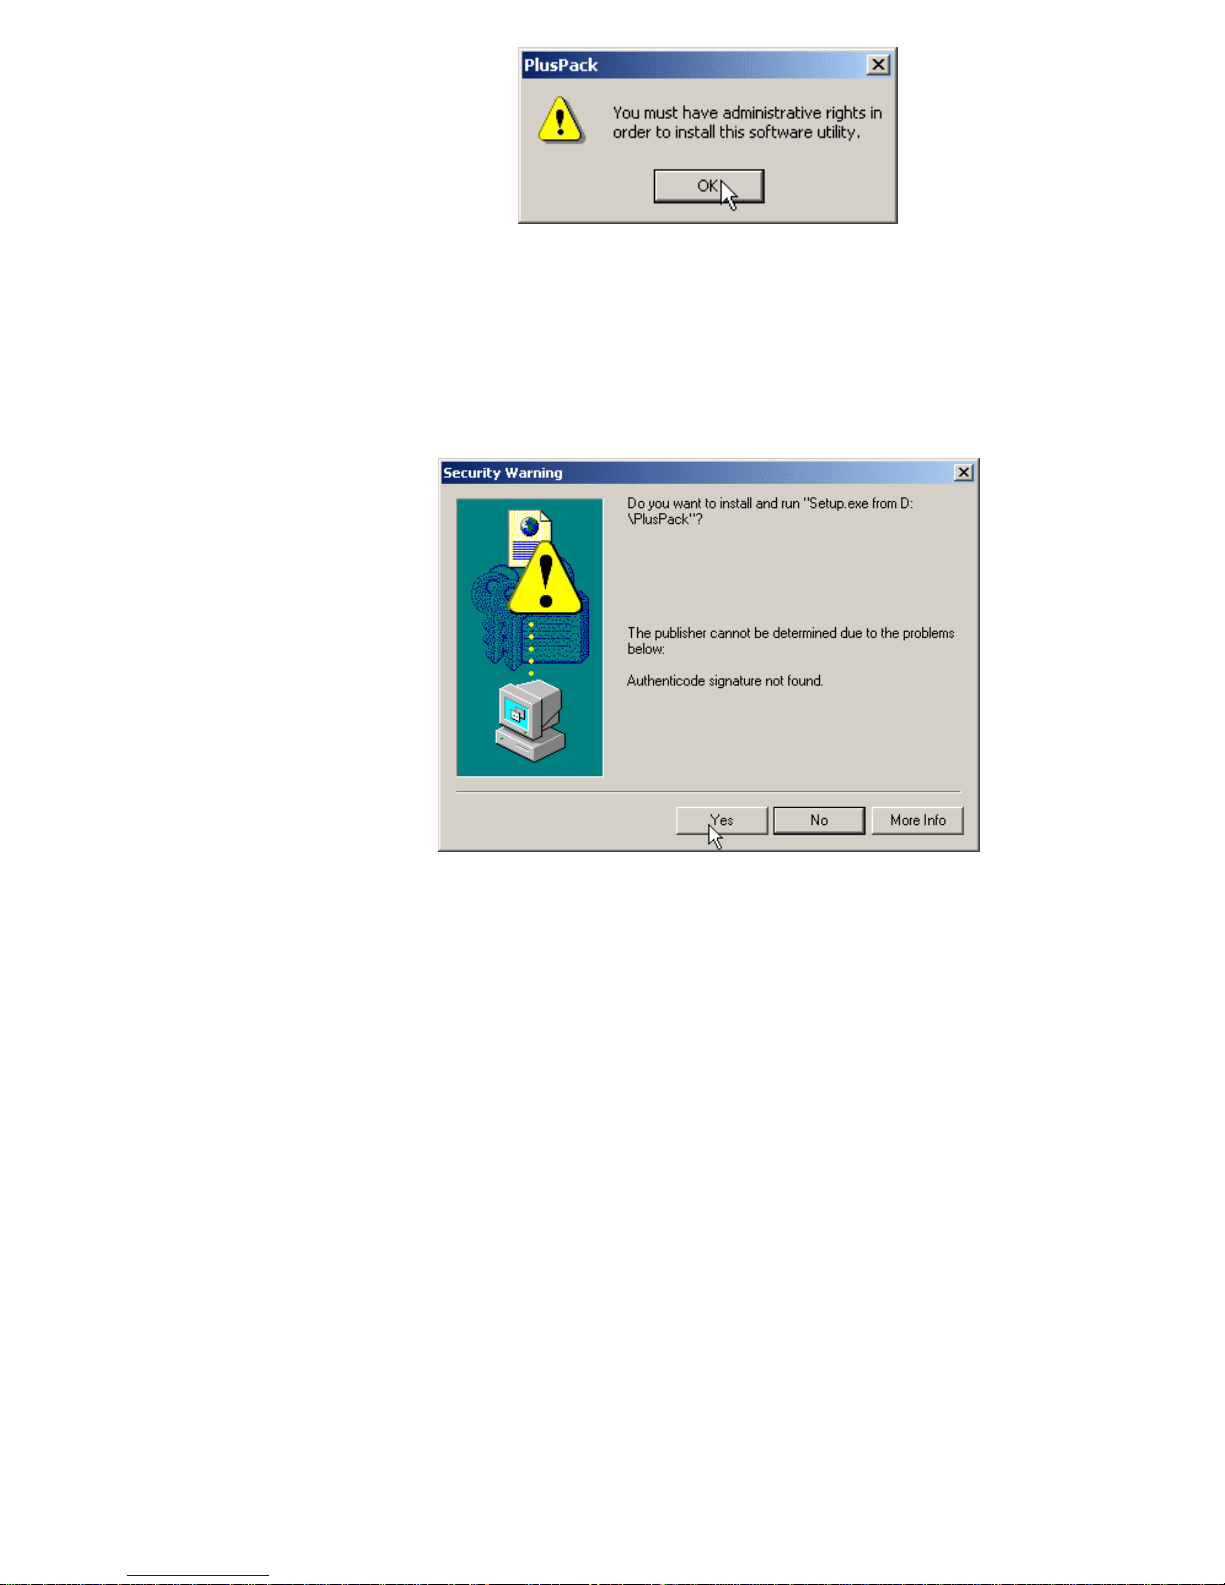
Click OK to continue the installation.
On some versions of Windows (Window 2000, for example), you
will be prompted to accept the software with an Authenticode
signature.
Click Yes to install the Plus Pack WLAN PC Card management
software. An Authenticode signature is not required for the proper
operation of your PC Card or the Plus Pack software.
The necessary files will be unpacked and loaded into your computer
for installation.
The Setup program will guide you through the installation. The
Welcome dialog box opens, as shown below.
Page 18
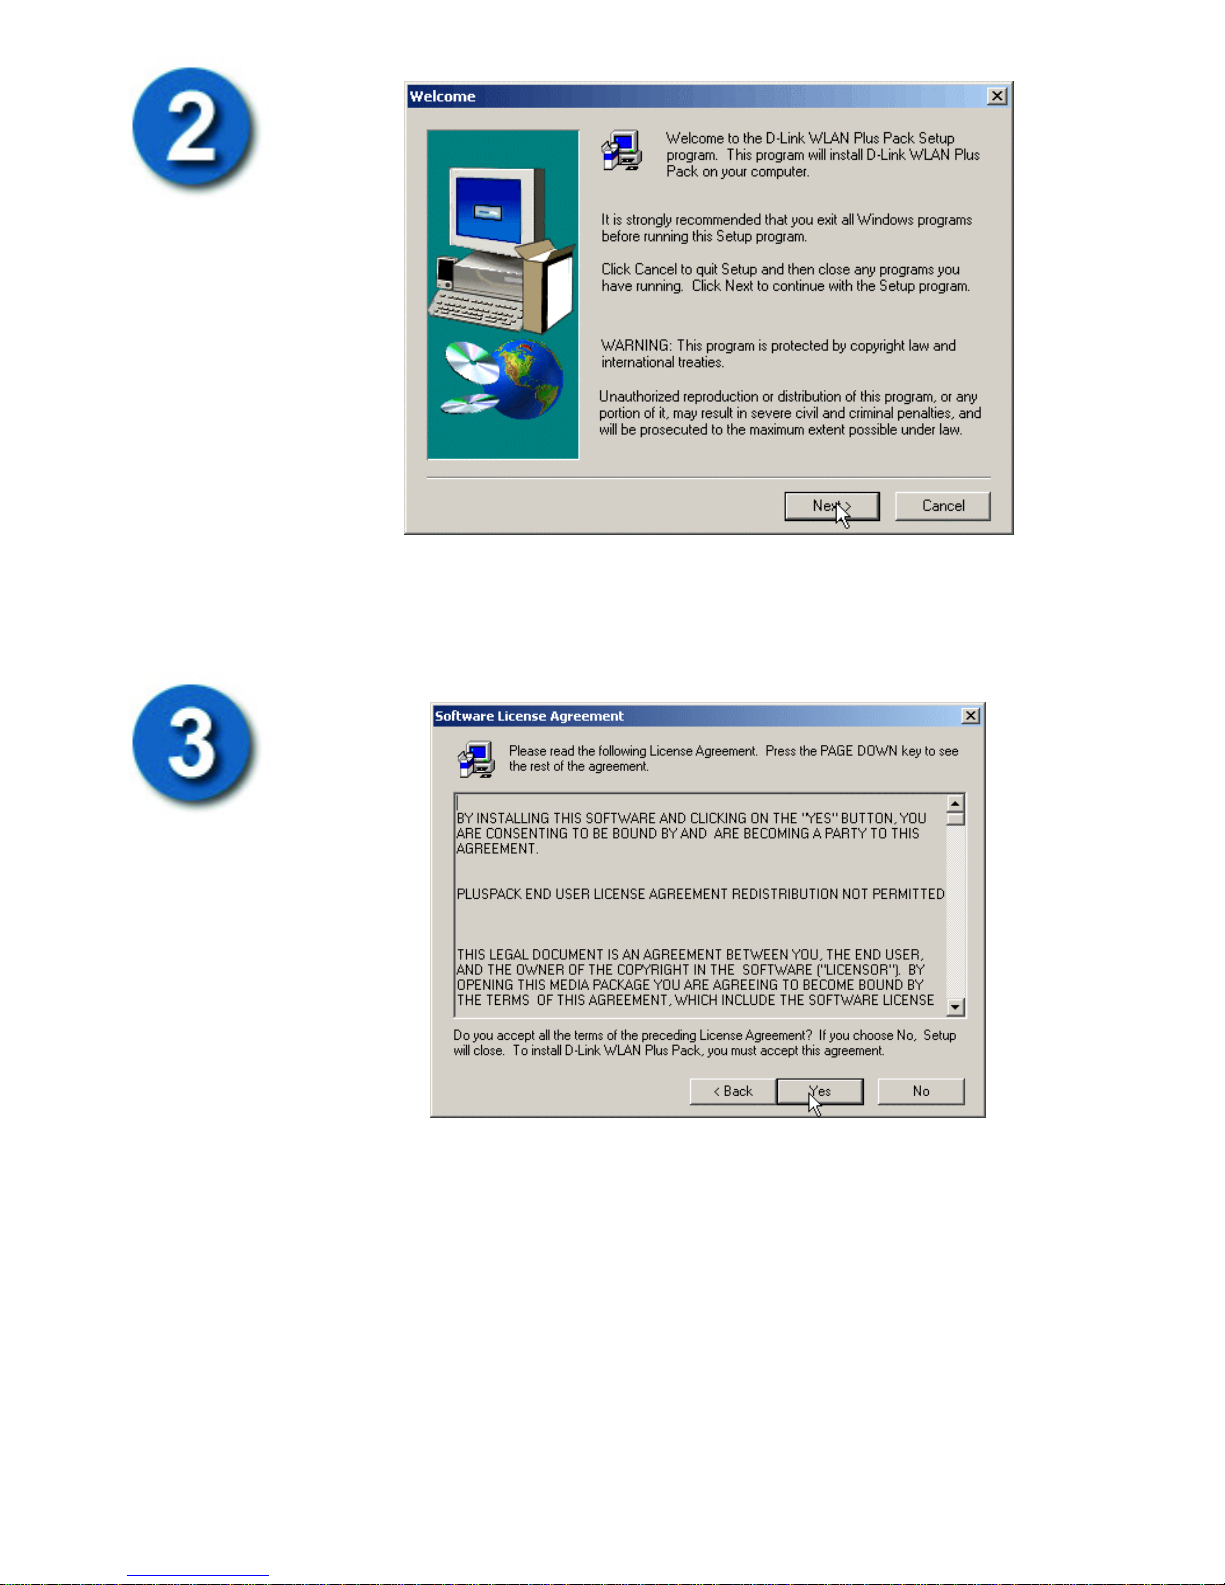
Click Next to continue the installation.
The Software License Agreement dialog box will open.
Read the license agreement, and click Yes if you agree with the
agreement. Clicking No will close the Setup program and terminate
the installation.
The User Information dialog box will open.
Page 19
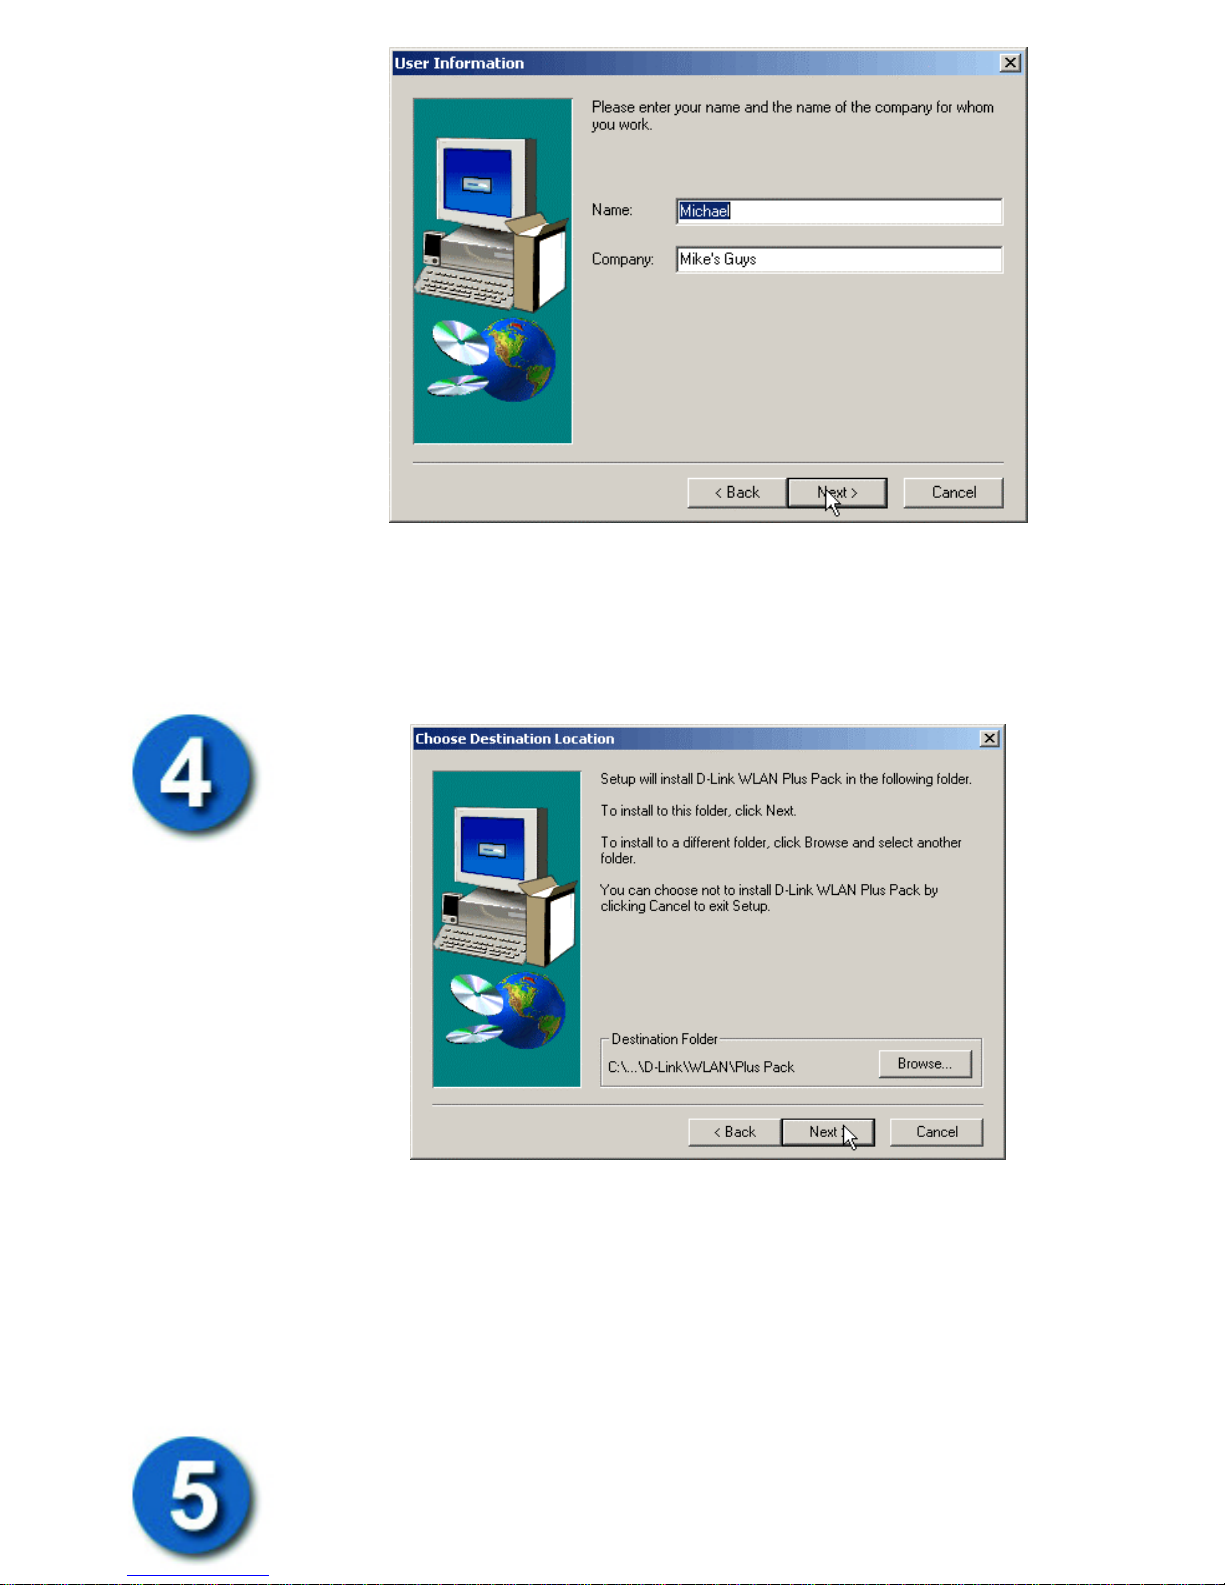
You can enter your name and the name of your company, if you
desire. Click Next to continue the installation.
The Choose Destination Location dialog box opens.
This allows you to choose where the software will be installed on
your hard drive. You can accept the default location, or choose a
different location by clicking the Browse button.
Click Next to continue the installation.
The Select Type dialog box opens.
Page 20
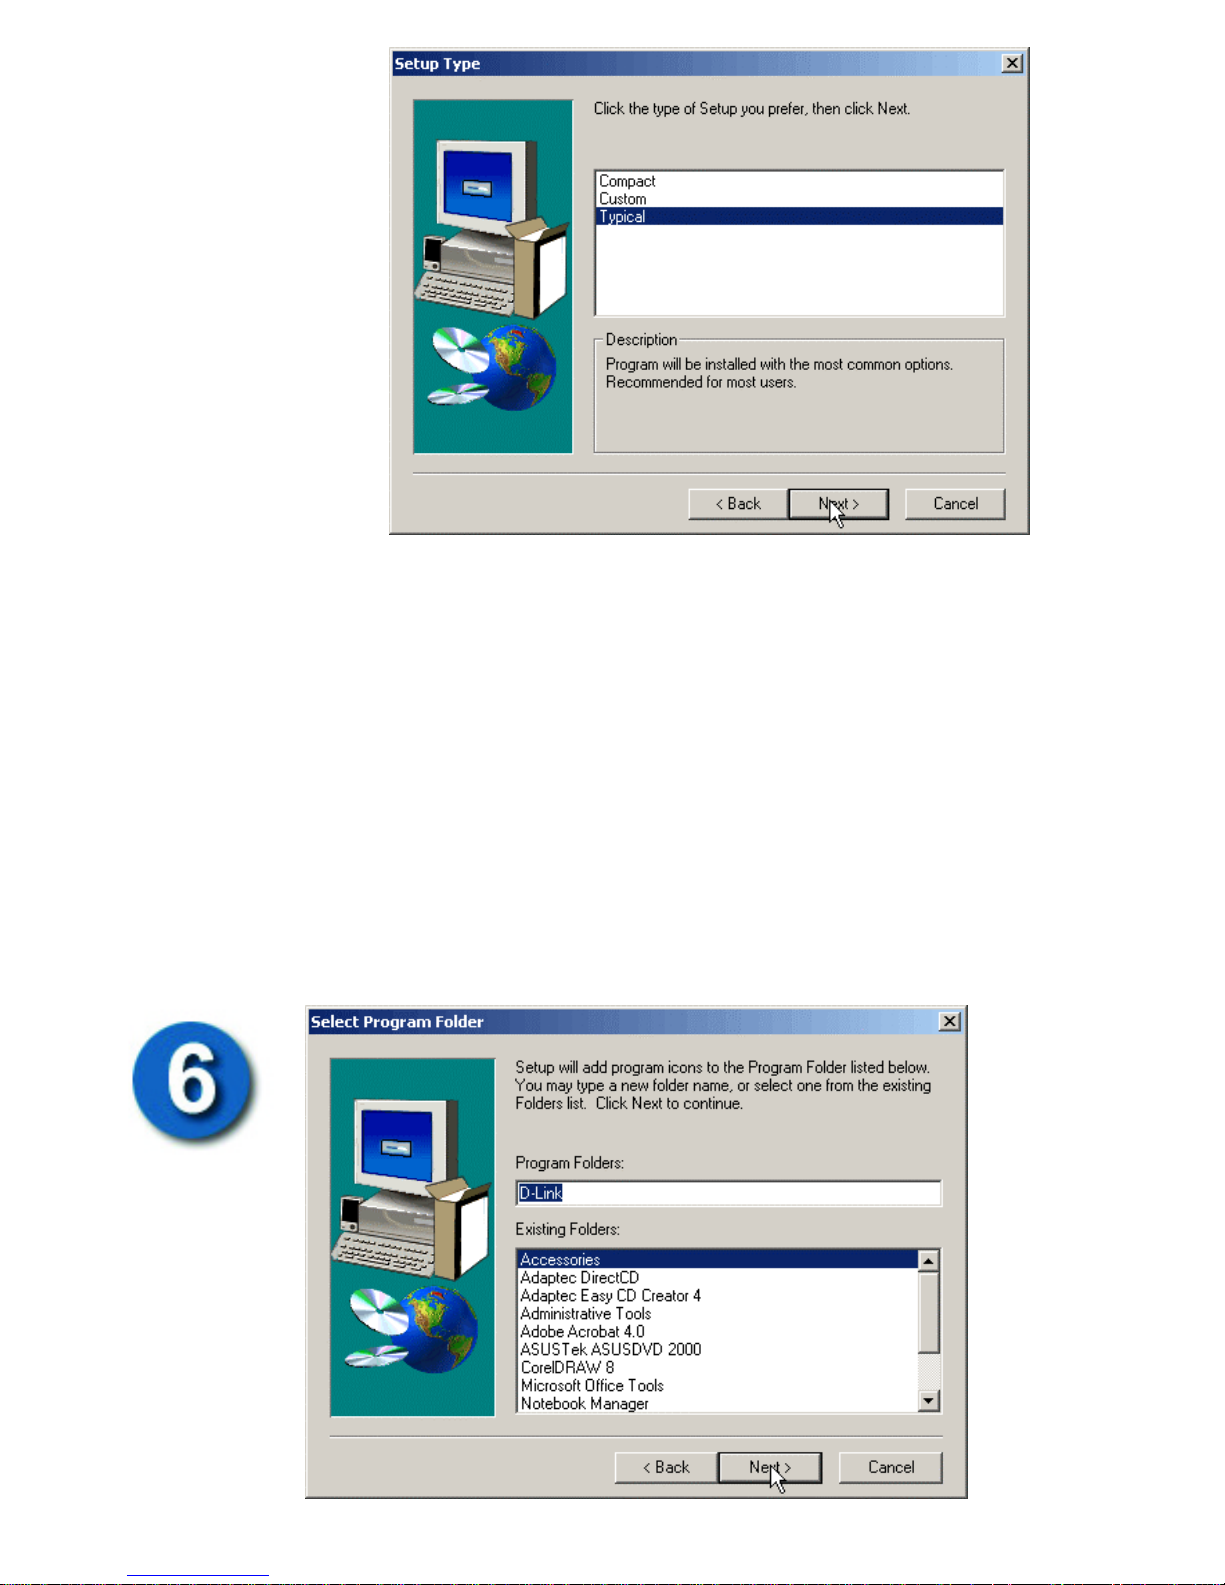
The Compact option installs only the minimum necessary files to
conserve hard disk space.
The Custom option allows you to choose which files are installed
and is recommended for advanced users.
The Typical option installs those files that are most commonly used
by most users. This is the recommended option.
Click Next to continue the installation.
The Select Program Folder dialog box opens.
Page 21
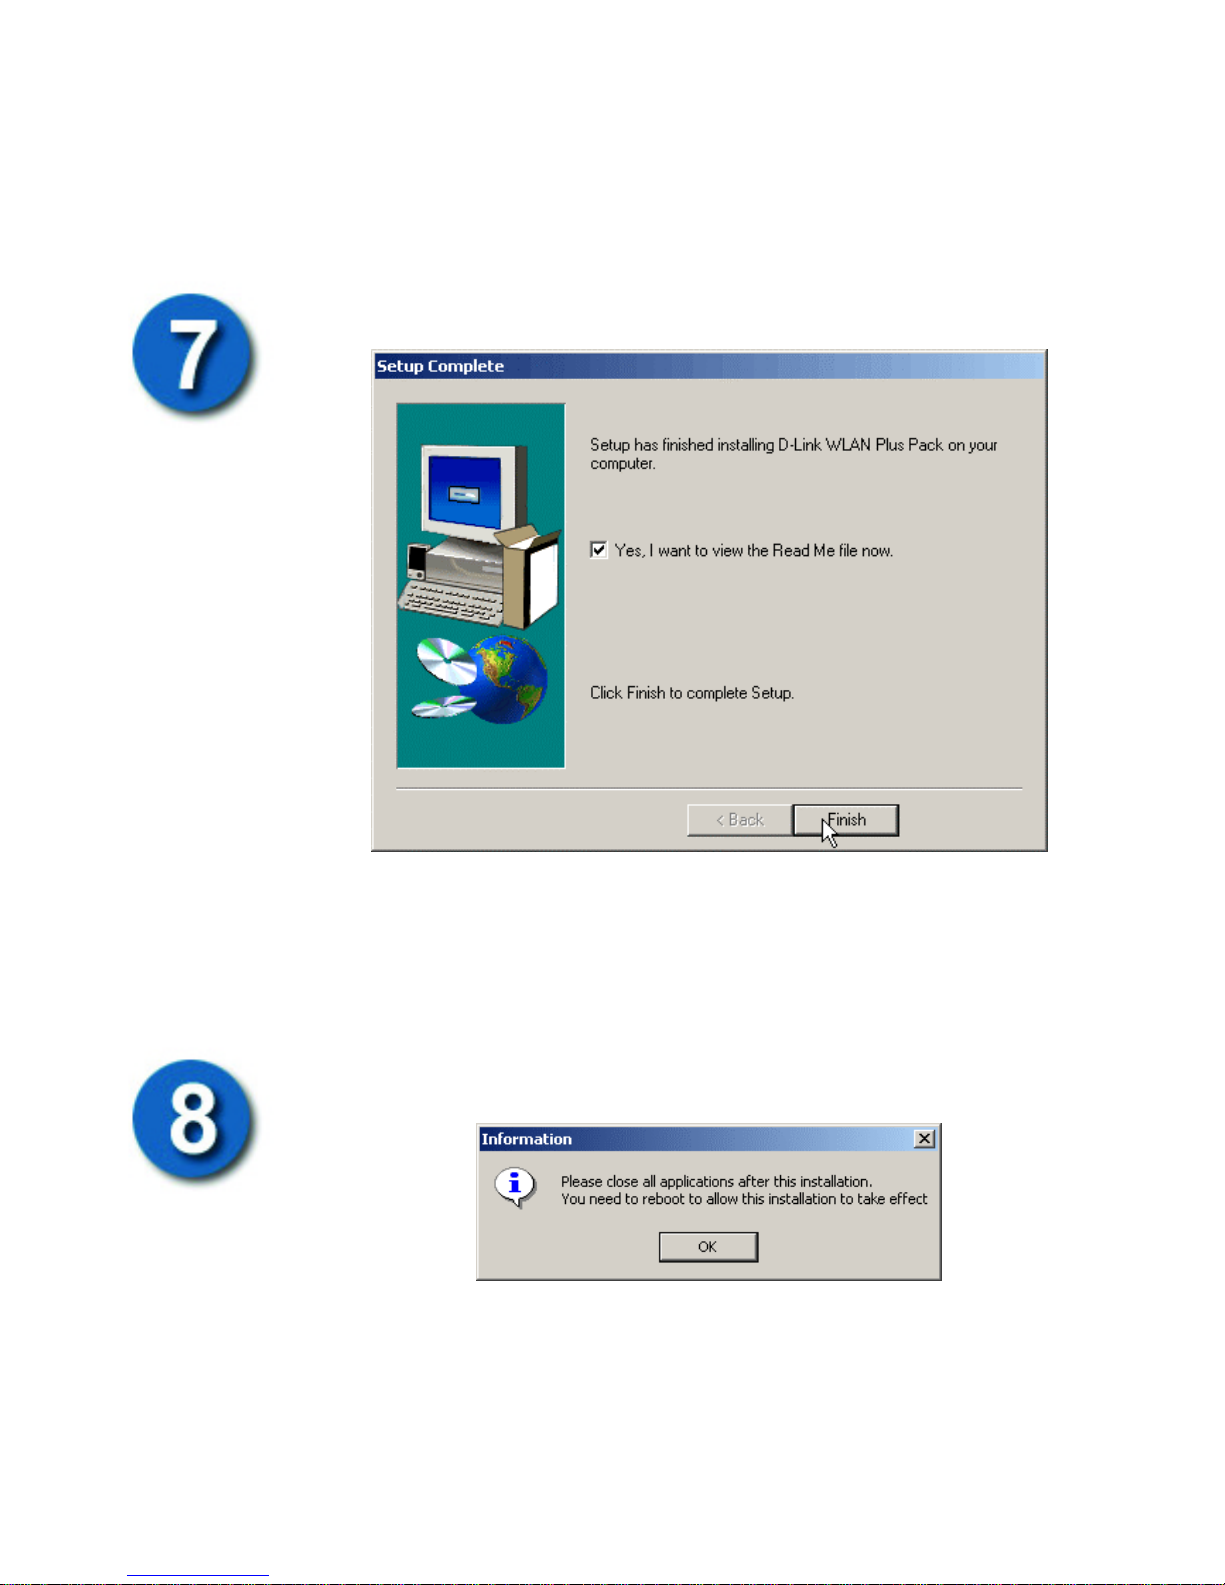
This allows you to choose which folder the Plus Pack files will be
installed into. You can accept the default, or choose one of the
Existing Folders.
Click Next to continue the installation.
The necessary files are installed on your hard drive, and the Setup
Complete dialog box opens.
You can view the Read Me file after the installation is complete.
The Read Me file contains information that was developed too late
to be included in the User’s Guide.
Click Finish to complete the installation. You will be prompted to
restart (reboot) your computer to allow the installation to take effect.
Once your computer has rebooted, you are ready to configure your
DWL-650H WLAN PC Card using the Plus Pack management
software.
Page 22

Setting Up a Connection
The first step in configuring your DWL-650H WLAN PC Card is to
determine the type of Wireless LAN connection you require. Your
WLAN PC Card supports ESS (Connect to Access Point) and IBSS
(Peer to Peer 802.11 Ad Hoc) modes.
An ESS (Connect to Access Point) Wireless LAN is a group of
computers that each have a WLAN adapter and are configured to
connect to a wireless Access Point (AP).
ESS WLANs allow computers with WLAN adapters to connect to a
wired LAN, and share all of the wired LAN’s resources − such as
Internet access − through an Access Point. All of the members of an
ESS WLAN share a common ESSID.
An IBSS (Peer to Peer 802.11 Ad Hoc) Wireless LAN is a group of
computers that each have a WLAN adapter configured to use the
same WLAN channel.
An IBSS (Peer to Peer 802.11 Ad Hoc) WLAN allows computers
with WLAN adapters to connect to each other and share their
resources.
IP Address Assignment
Your DWL-650H PC Card needs to be assigned an IP address,
subnet mask, and default gateway before connecting to a LAN.
The default setting is to use the Dynamic Host Configuration
Protocol (DHCP) to obtain the appropriate network addressing
information. If your network has a DHCP server that can be reached
from a wireless Access Point, your DWL-650H PC Card will
automatically contact the server and be assigned an IP address,
subnet mask, and the IP address of the default gateway. If your
network does not have a DHCP server, you will need to configure
the PC Card manually.
Configuring your DWL
-
650H Using WLAN Plus
Pack
Page 23
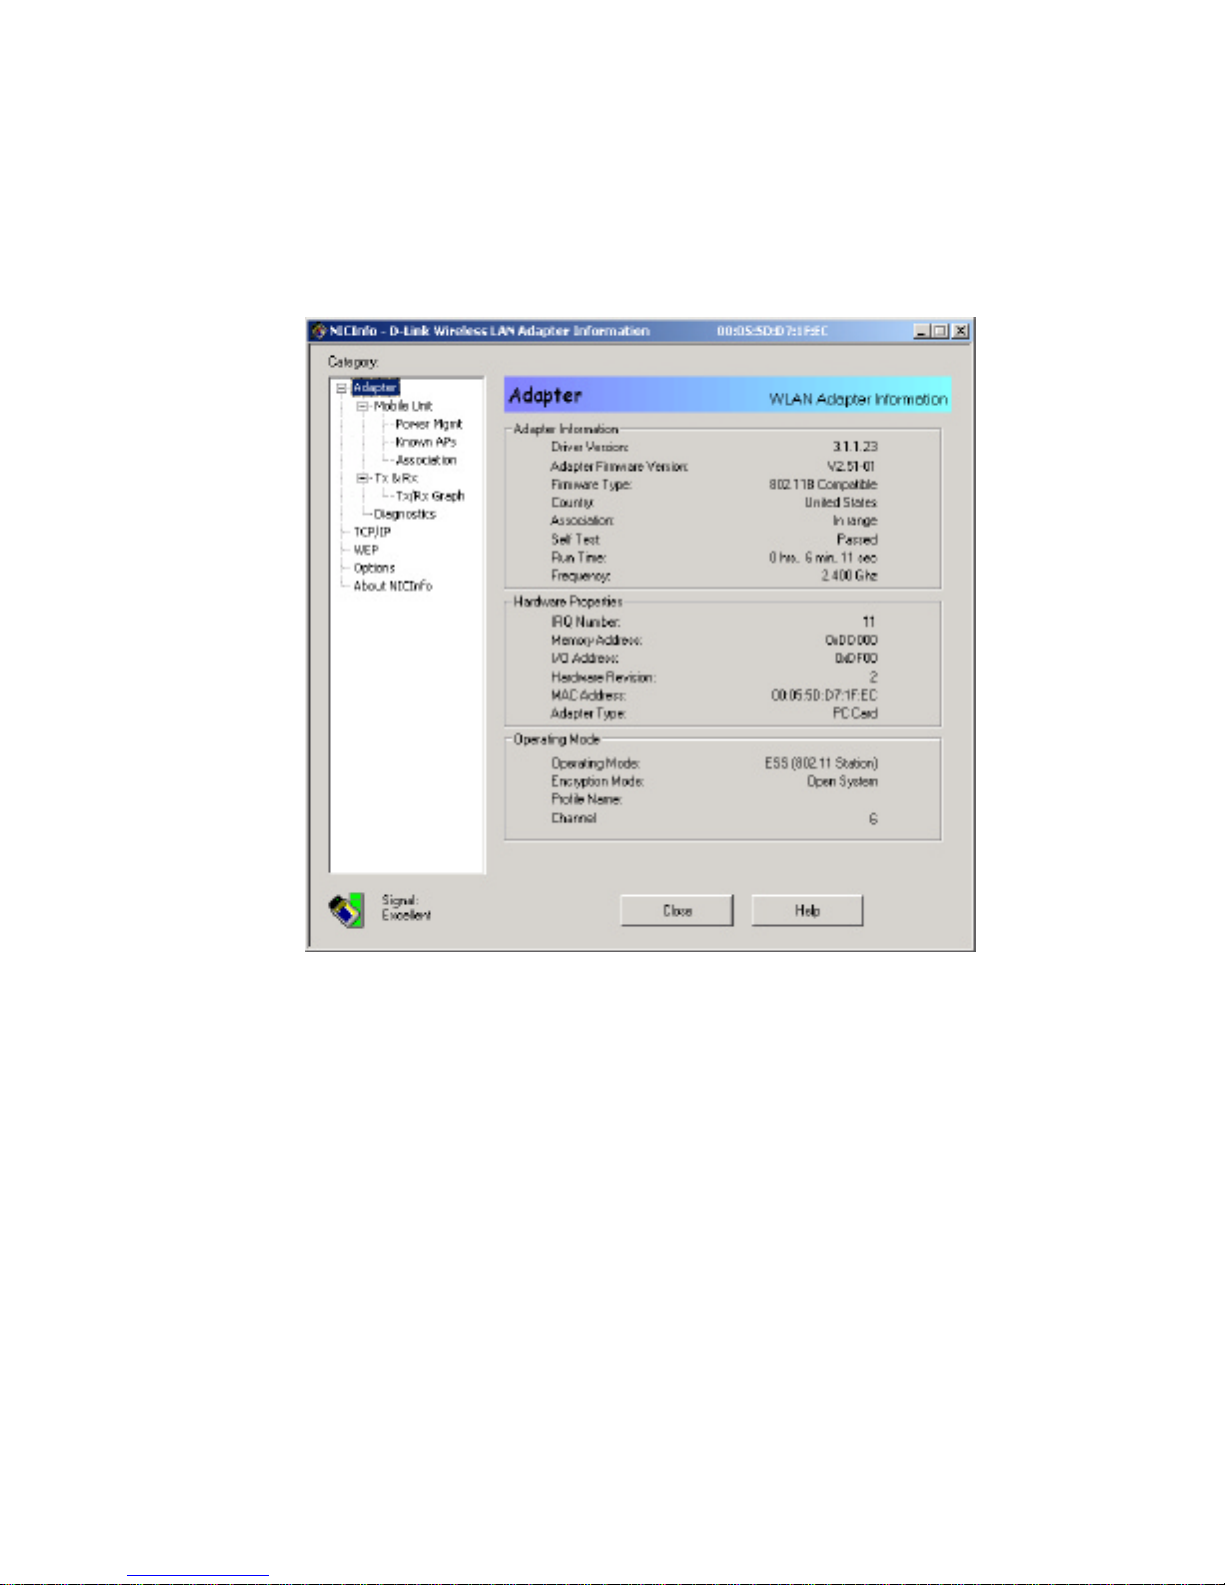
From the Windows Start button, highlight Programs and then DLink and then WLAN Plus Pack and then right-click on NICInfo.
The
Adapter menu opens as shown below.
NICInfo displays information about the current setup of your PC
Card including the software and firmware versions, the computer
resources used by the PC Card, and its current operating mode.
To set the PC Card’s IP address, highlight TCP/IP in the menu tree
displayed in the Category field along the left-hand side of the
NICInfo window and right-click. The TCP/IP menu is displayed as
shown below.
Page 24
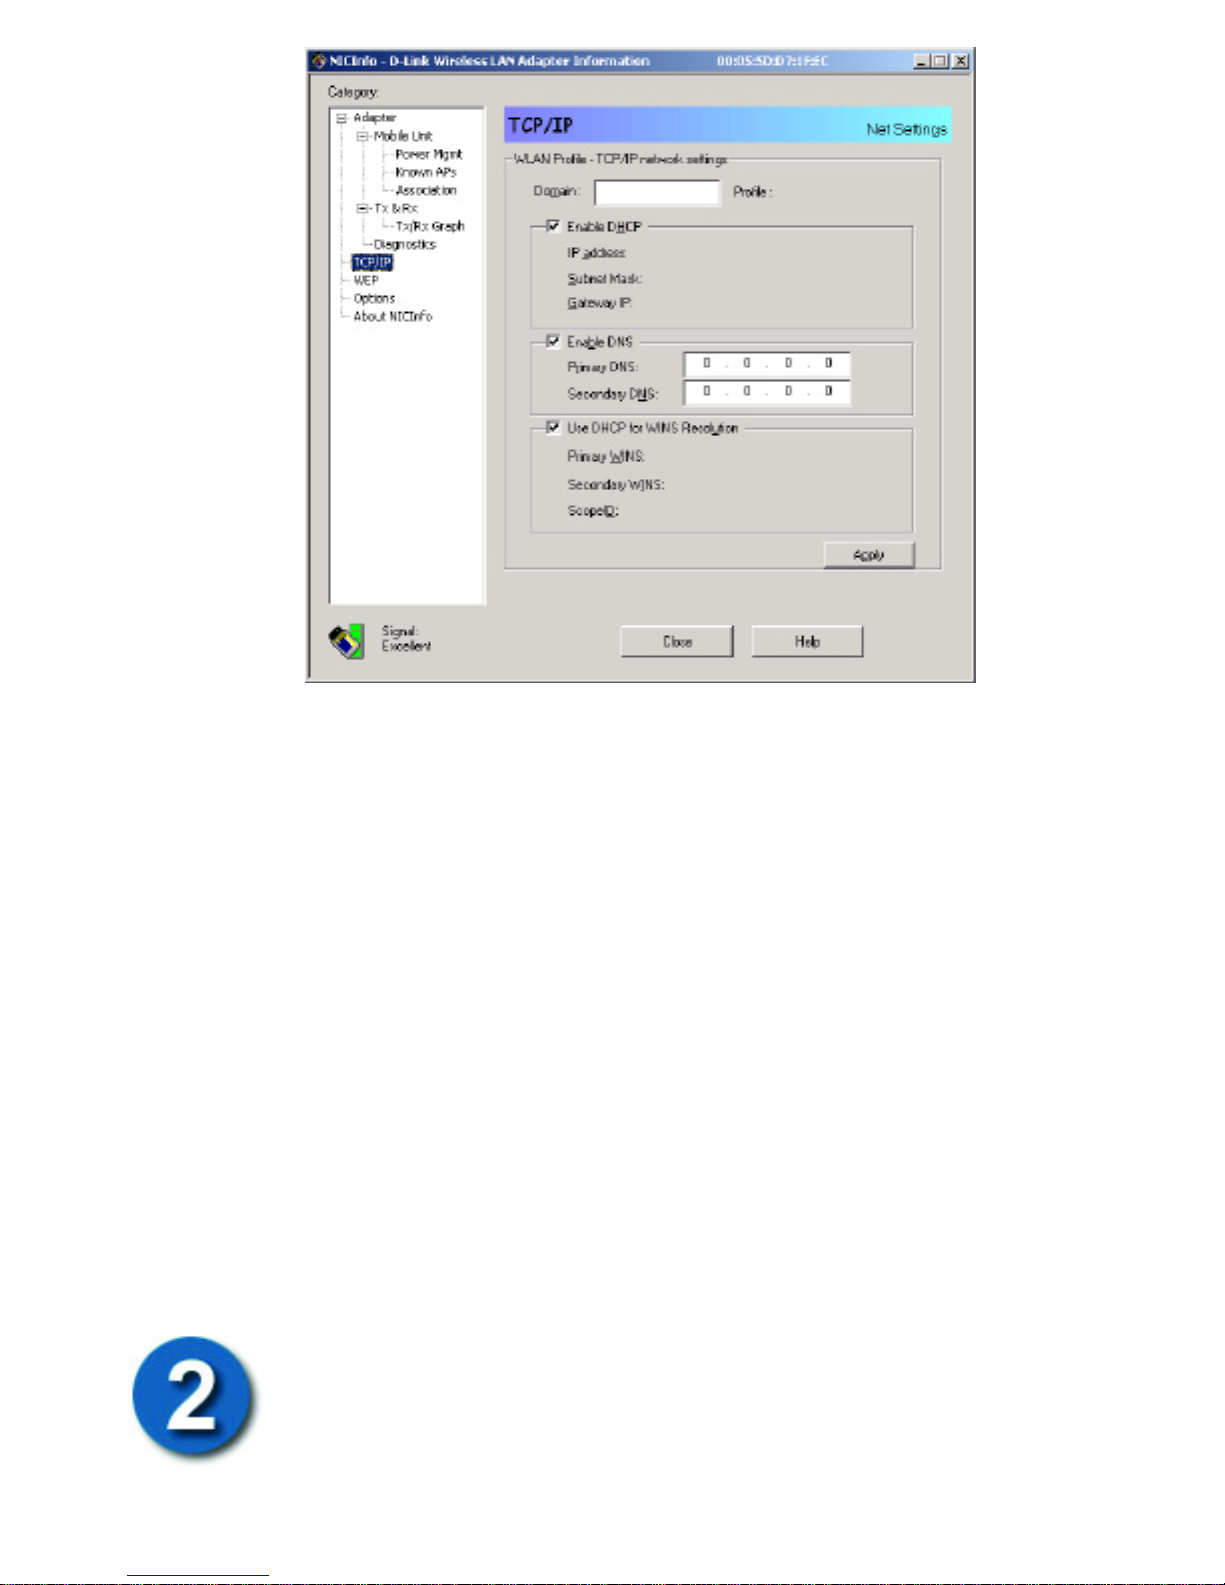
The default setting for the PC Card is to use the Dynamic Host
Control Protocol (DHCP) to obtain an IP address, Subnet Mask,
Gateway IP address, Domain Name Server (DNS) IP addresses and
WINS IP addresses from a DHCP server on the network.
To manually set the PC Card’s TCP/IP settings, enter the name of
the domain the PC Card will be part of in the Domain: field. If your
netword does not use domain names, you can leave this field blank.
Unclick the Enable DHCP click-box. Entry fields for the IP
address, Subnet Mask and Gateway IP will appear. If you do not
know the appropriate addresses for these fields, ask your network
administrator.
Setting the DNS IP addresses, Primary and Secondary WINS IP
addresses are accomplished using a similar method.
Associating Your PC Card with an Access
Point
Your PC Card next will need to be associated with an Access Point
(or 802.11 Ad Hoc Peer). The default setting for the PC Card is to
associate with any Wireless LAN Access Point (or 802.11 Ad Hoc
Peer) that is within range, has the same SSID (the default “101”
Page 25
SSID or the optionally entered “any” SSID) and is configured as
either not using WEP encryption (the PC Card’s default) or
configured to use the same WEP encryption keys. In cases where
there are multiple Access Points, or the Access Point that your PC
Card has associated with automatically does not have access to the
network resource that you need, you may need to manually associate
your PC Card with an Access Point.
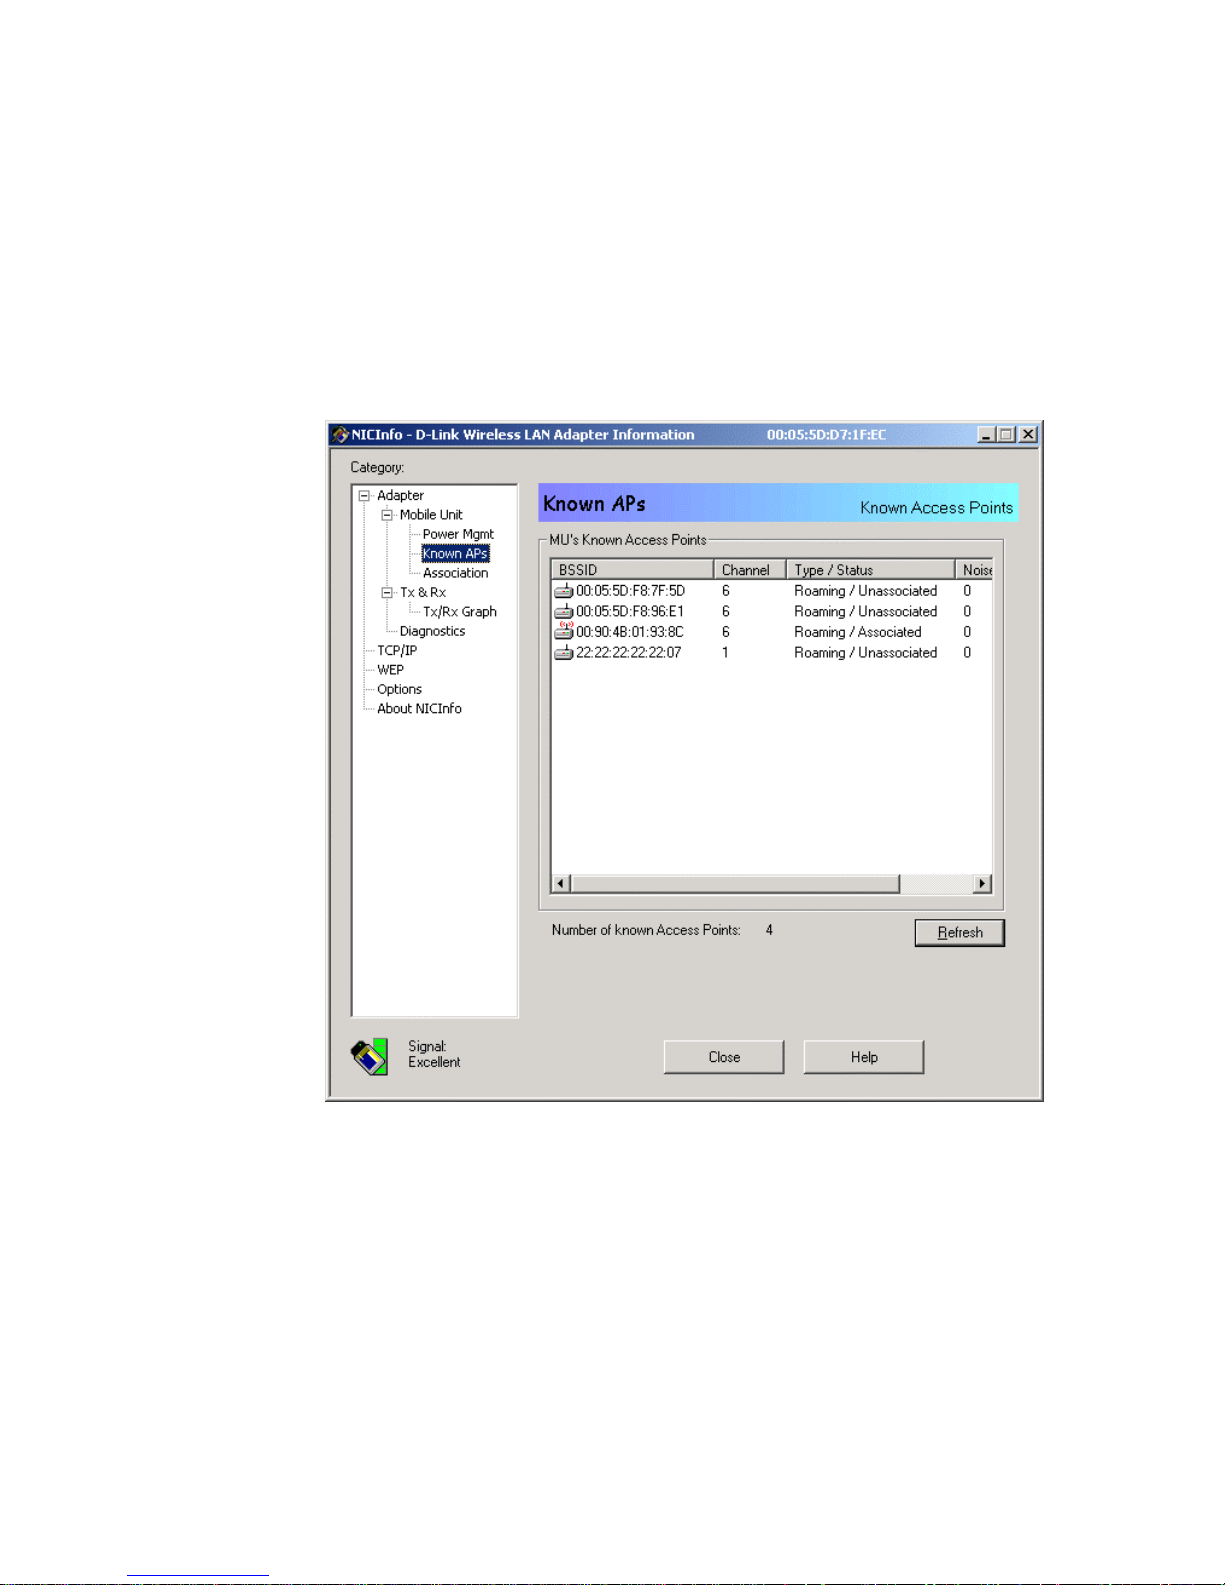
From the NICInfo menu left-click on Known APs. The Known APs
screen will appear as shown below.
This screen displays the Access Point that the PC Card is currently
associated with along with all of the Access Points that the PC Card
can currently detect. Click on the Refresh button to re-scan the
network, if necessary.
The currently associated Access Point is indicated by red “radio
waves” around the antenna of the AP icon in the MU’s Known
Access Points field.
Other information about the Wireless link between your PC Card
and the Access Point are also displayed including the Noise and
Page 26
Signal levels. Low noise and a high signal levels indicate a good
Wireless LAN link.
To change the Access Point your PC Card is associated with, rightclick the Access Point icon corresponding to the new Access Point
and choose either Set Manditory or Set Roaming. Set Manditory
will allow a link with only the selected Access Point. Set Roaming
will allow a link with the selected Access Point, but will
automatically select a new Access Point when the signal from the
selected Access Point becomes too low or out of range.
Setting the Wired Equivalent Privacy (WEP)
Keys
If your Access Point is configured to use Wired Equivalent Privacy
(WEP), your PC Card will need to be configured with the same
WEP keys as the Access Point uses.
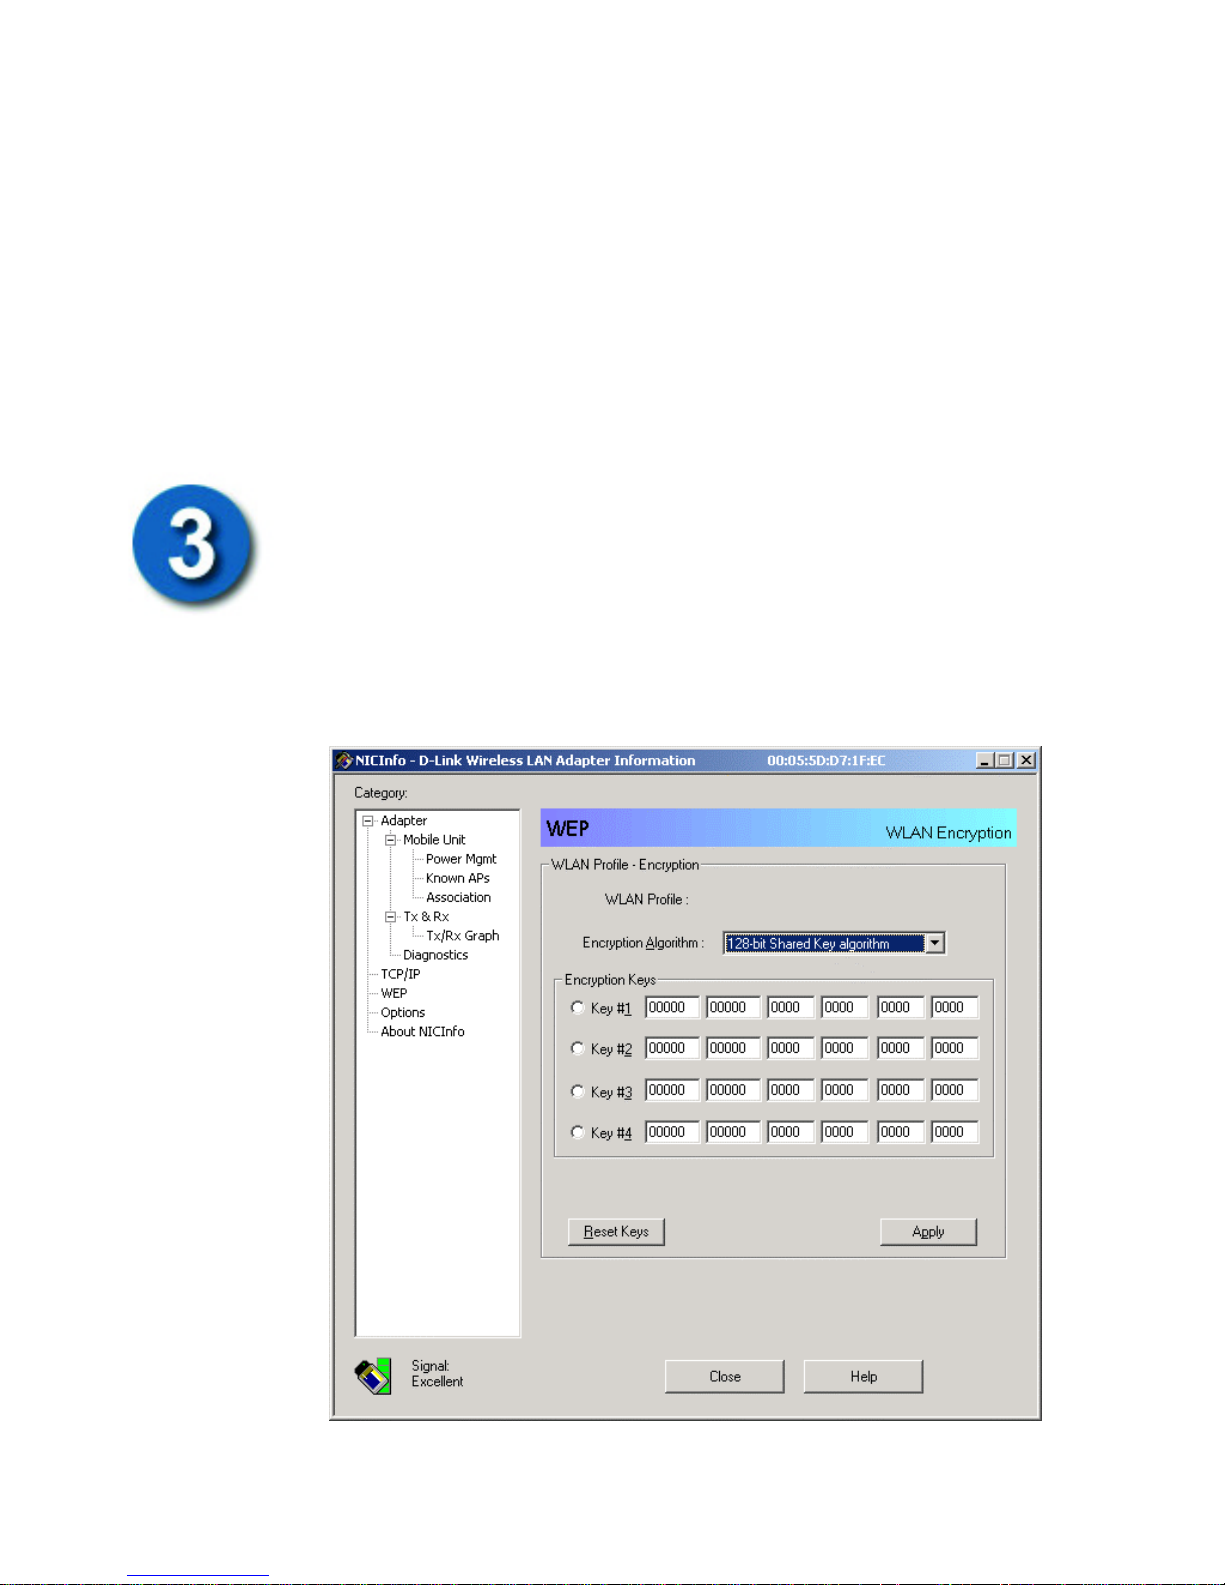
Left-click on the WEP entry on the NICInfo Category: field. The
WEP menu opens as shown below.
You can select the type of WEP encryption used by your PC Card
using the Encryption Algorithm pull -down menu. The default is
Page 27

Open System (no encryption), or you can choose between 40-bit
Shared Key algorithm and 128-bit Shared Key algorithm.
Choosing either the 40-bit or the 128-bit algorithm opens the Key #1
through Key #4 entry fields.
The PC Card and its associated Access Point must use the same
encryption algorithm and the same encryption key to make a
connection.
Note: If the Access Point is set to 40-bit encryption and the PC
Card is set to 128-bit encryption (or vice-versa), the devices can
associate but no data can be transferred.
When 40-bit encryption is selected, a 10-digit hexadecimal
encryption key is entered in one of the Key #1 − Key #4 fields. Up
to four keys can be entered, and any one of the keys can be selected
for current use.
When 128-bit encryption is selected, a 26-digit hexadecimal
encryption key is entered in one of the Key #1 − Key #4 fields. Up
to four keys can be entered, and any one of the keys can be selected
for current use.
Hexadecimal numbers consist of the numbers 0 through 9 and the
letters A through F.
Determining the PC Card’s Status Using the NIC Task Tray
(NICTT) Utility
The Plus Pack management application provides you with tools and
utilities to manage your DWL-650H WLAN PC Card. The Network
Interface Card Task Tray (NICTT) puts a WLAN PC Card icon in
your Windows Task Tray. Double-click on this icon to open the
WLAN Status menu, as shown below.
Page 28
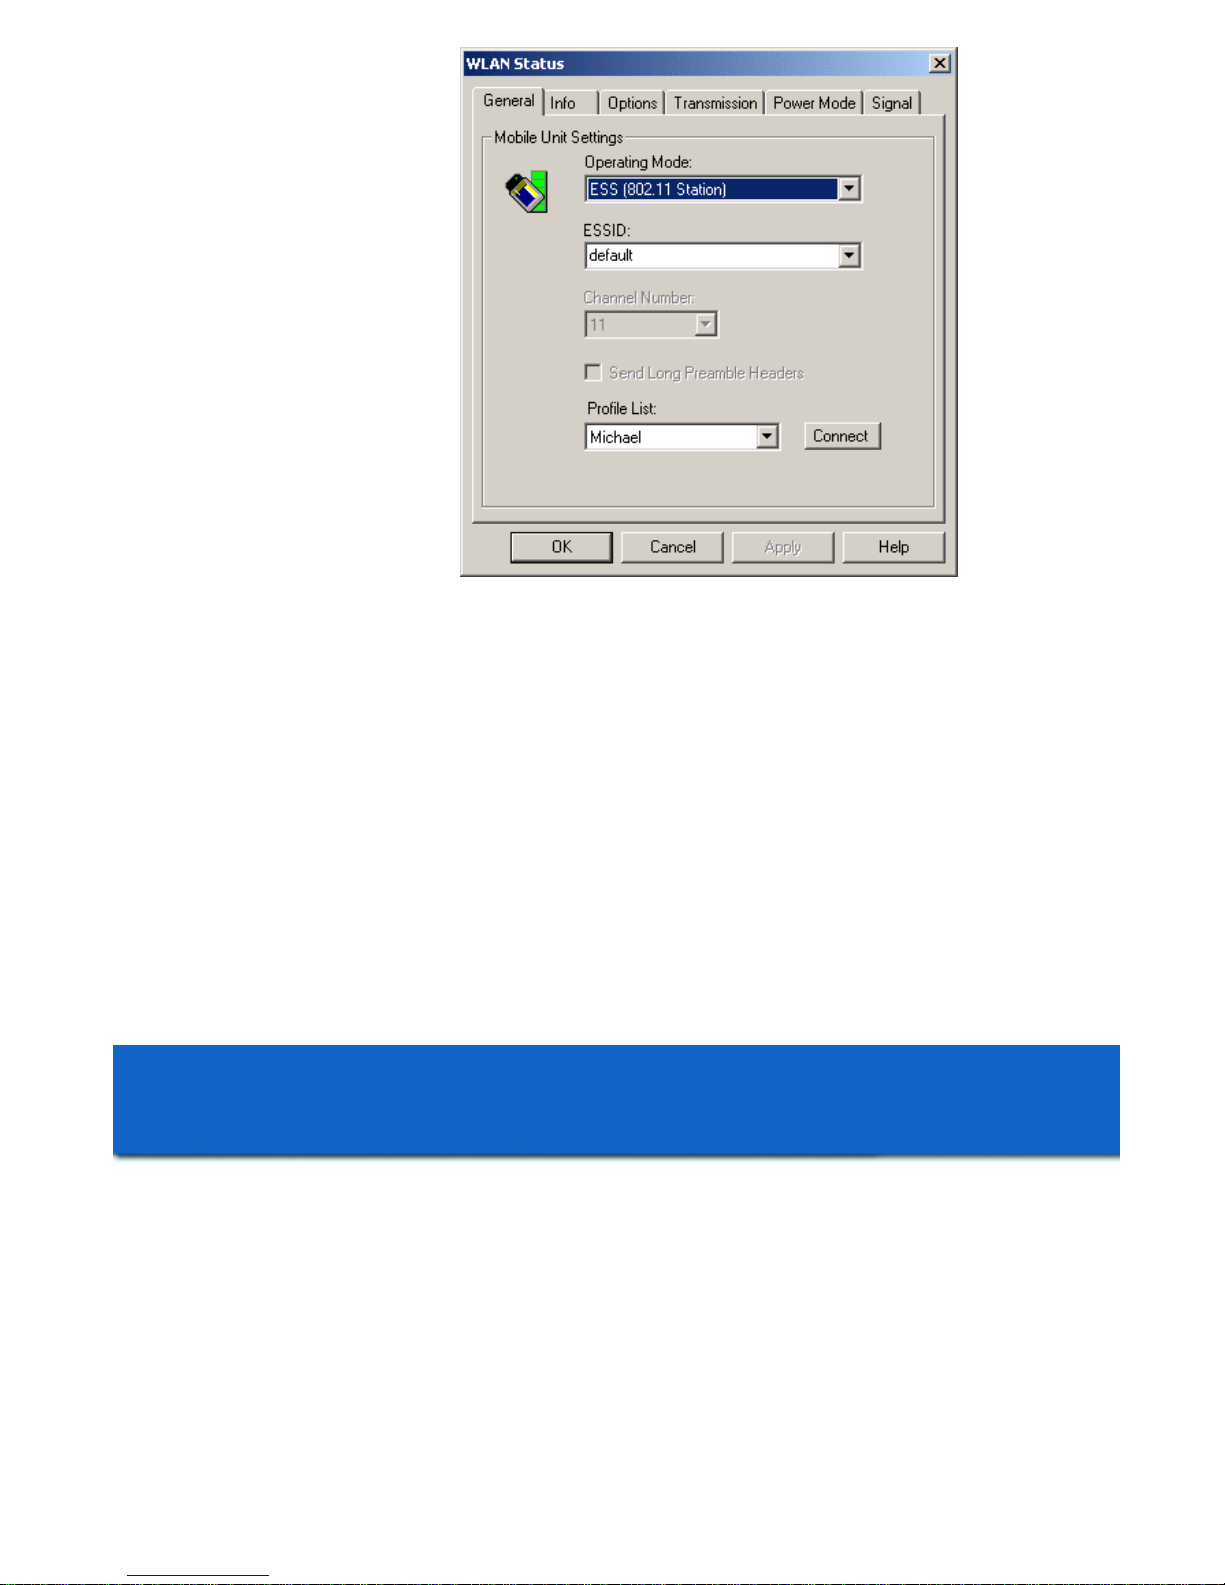
The WLAN PC Card’s operating mode, ESSID, channel number (in
Ad Hoc mode), and profile can be changed.
In addition, support for battery saving modes, tests for signal quality,
and information about the current connection can be accessed from
the WLAN Status menu.
Other applications included in the Plus Pack can be accessed from
the Windows start menu. These include an Access Point discovery
utility, a Network Interface Card information utility, and a NIC
firmware update utility.
Setting Up a Connection
Note: Windows XP contains support for the management of
Wireless LAN PC adapter cards such as your new DWL-650H.
The Plus Pack utilities supplied with your PC Card are intended
for previous versions of Windows and should not be installed if
you are using Windows XP.
Configure Wireless LAN Connection
Configuring your DWL-650H Using Windows XP
Page 29
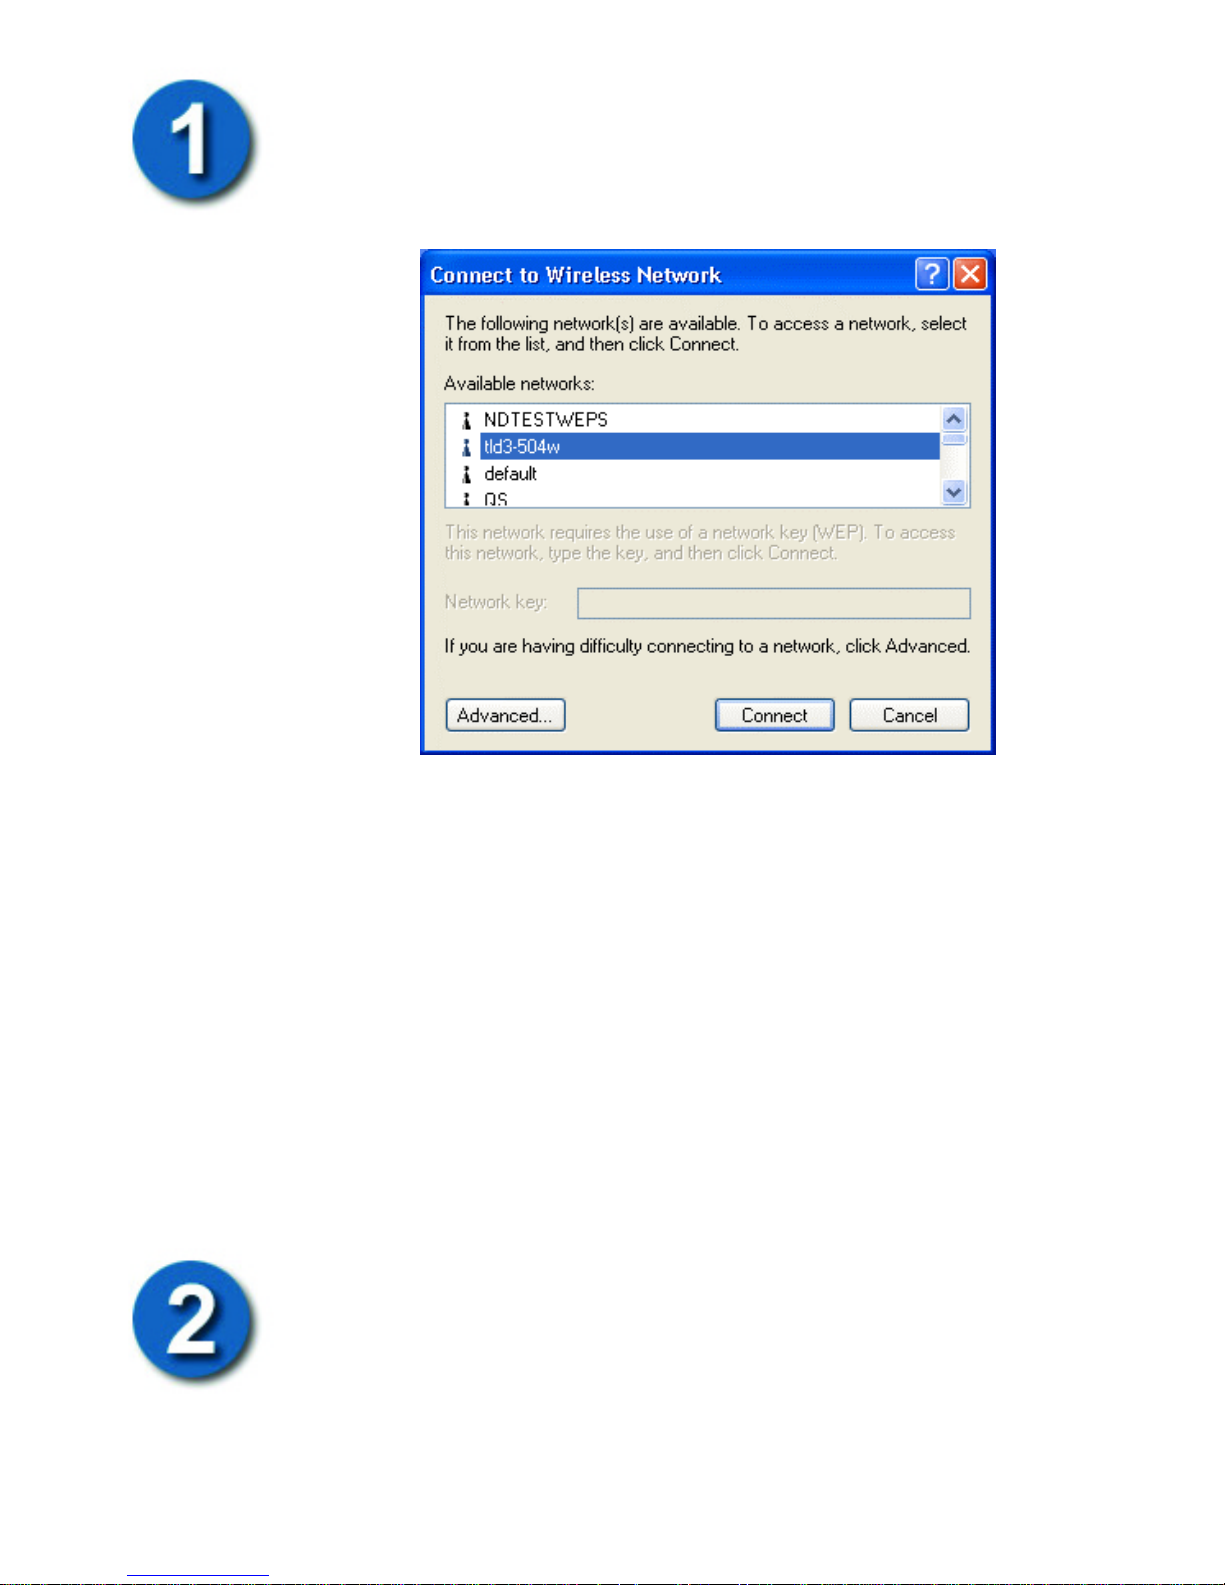
The first step in configuring your DWL-650H WLAN PC Card for
Windows XP is to determine which Wireless Access Point you
should connect to. To open the Connect to Wireless Network dialog
box, double-click the LAN Connection icon in the Task Tray (the
icon looks like two computers sitting one in front of the other).
Windows XP will use your PC Card to scan the local area for
networks. The local networks it detects are displayed by their SSID.
In the case above, the PC Card is to connect to the network with the
SSID “tld3-504w”. You can click the Connect button to accept the
default connection or click the Advanced button to modify the
default settings.
In most cases − especially in w ireless networks that do not use
Wired Equivalent Privacy (WEP) encryption, this is all that is
required to gain network access.
Select Wireless Network
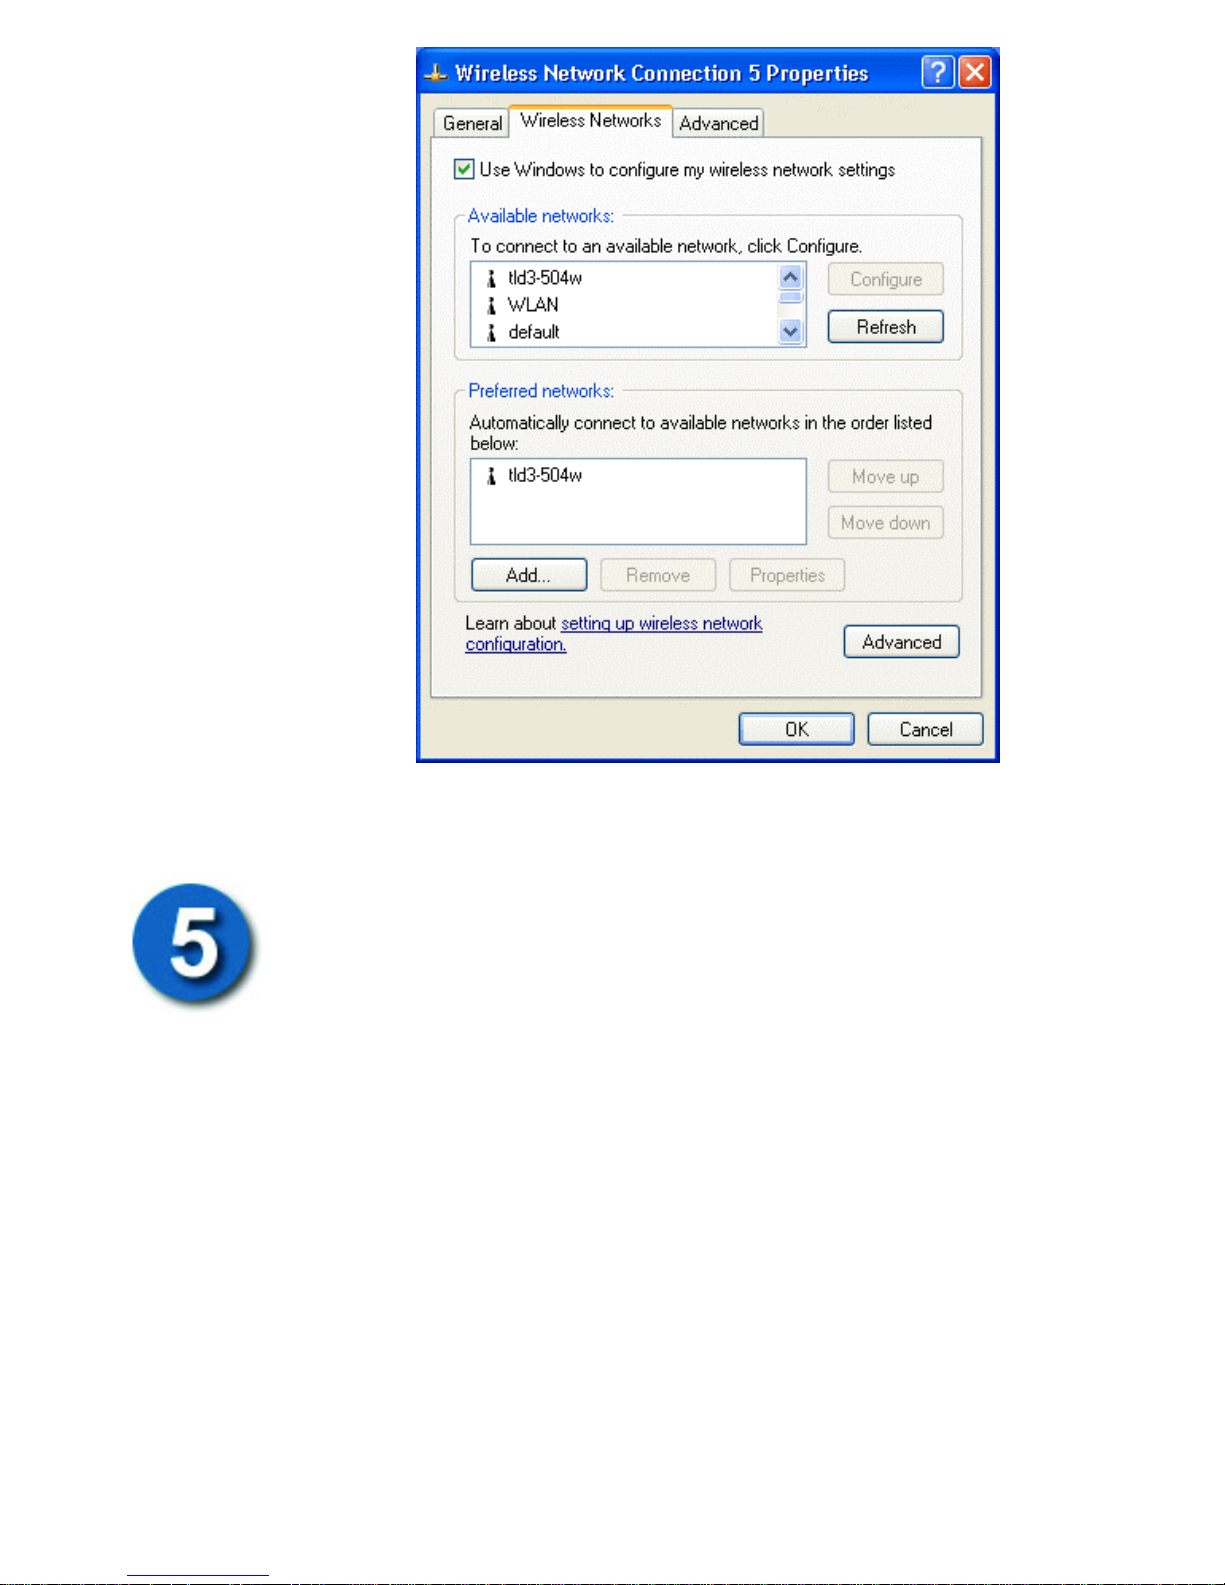
If your network is using WEP, or if you need to modify the default
settings for your PC Card, click the Advanced button to display the
Wireless Network Connection Properties dialog box, as shown
below.
Page 30
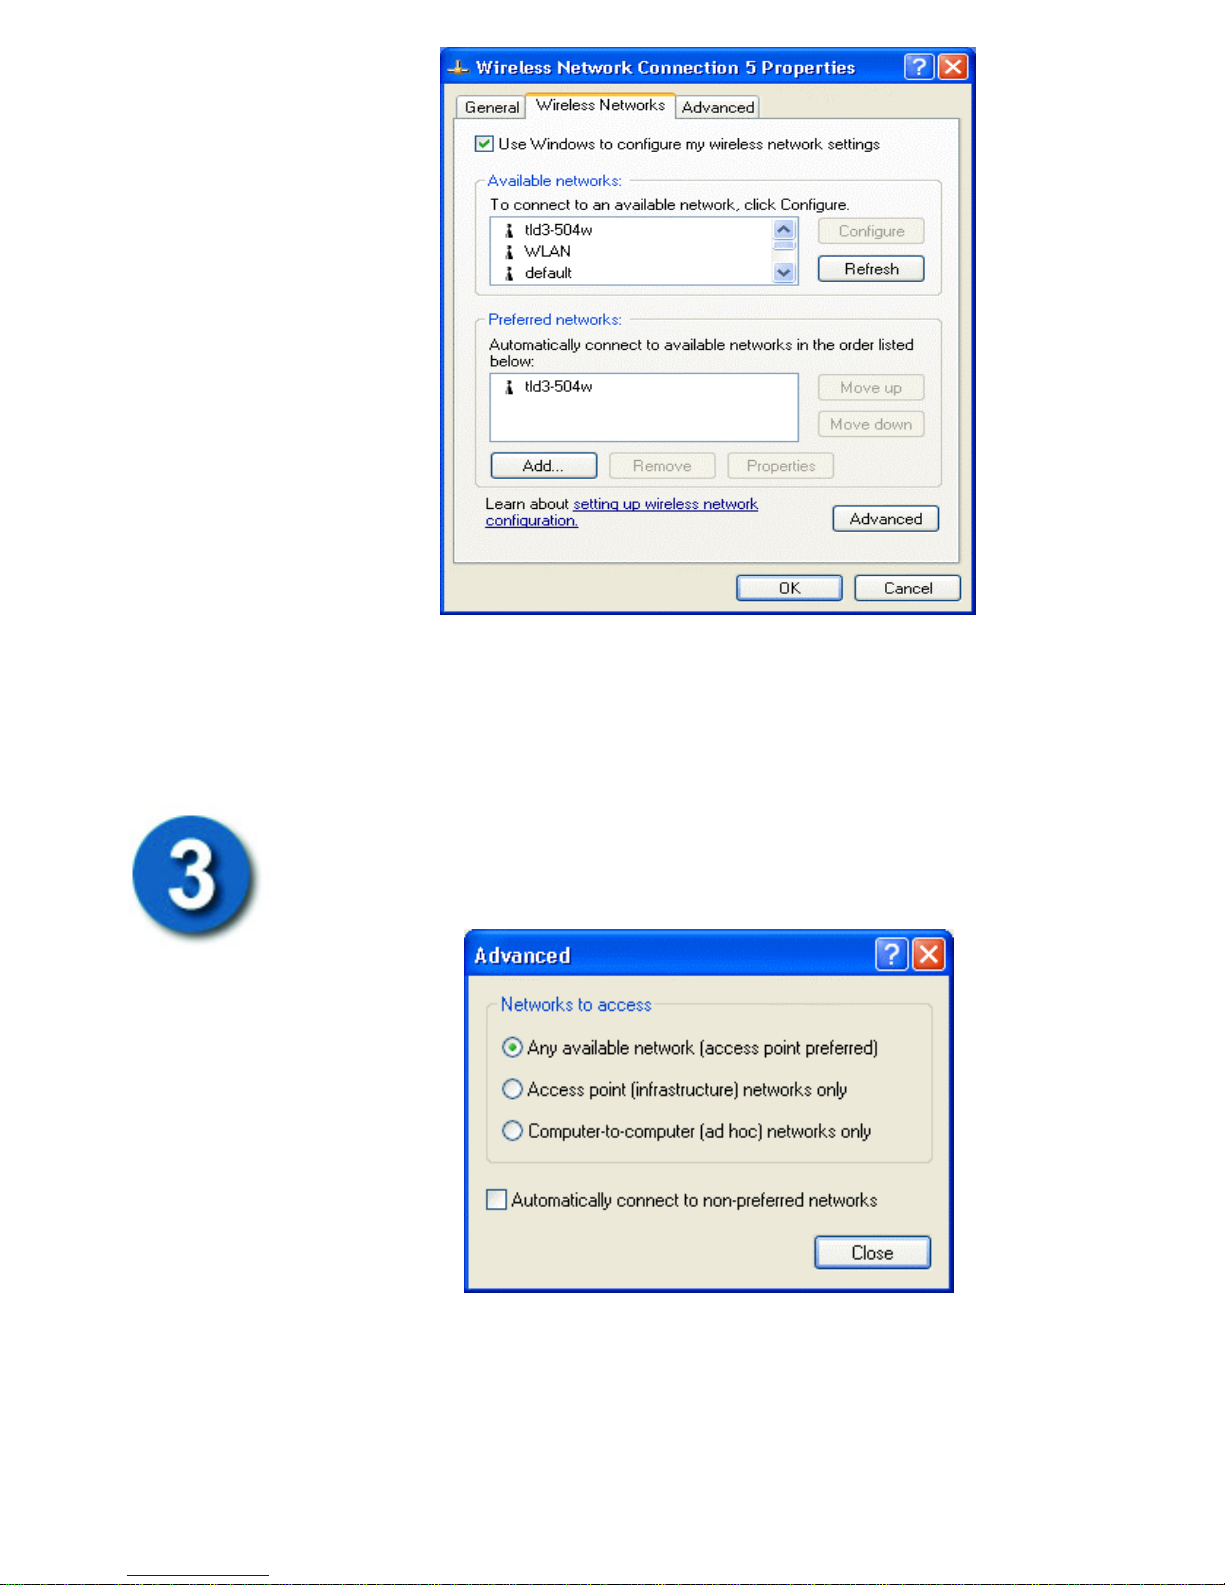
Windows XP again shows you the wireless networks it has been
able to detect in the local area.
Select Wireless Network Type
Clicking the Advanced button opens the following dialog box, which
allows you to select the type of wireless network you want to
connect your PC Card to.
The Advanced dialog box allows you to choose the type of WLAN
connection you need.
Any available network (access point preferred) will attempt to make
a connection to an Access Point first, but will allow a 802.11 Ad
Page 31
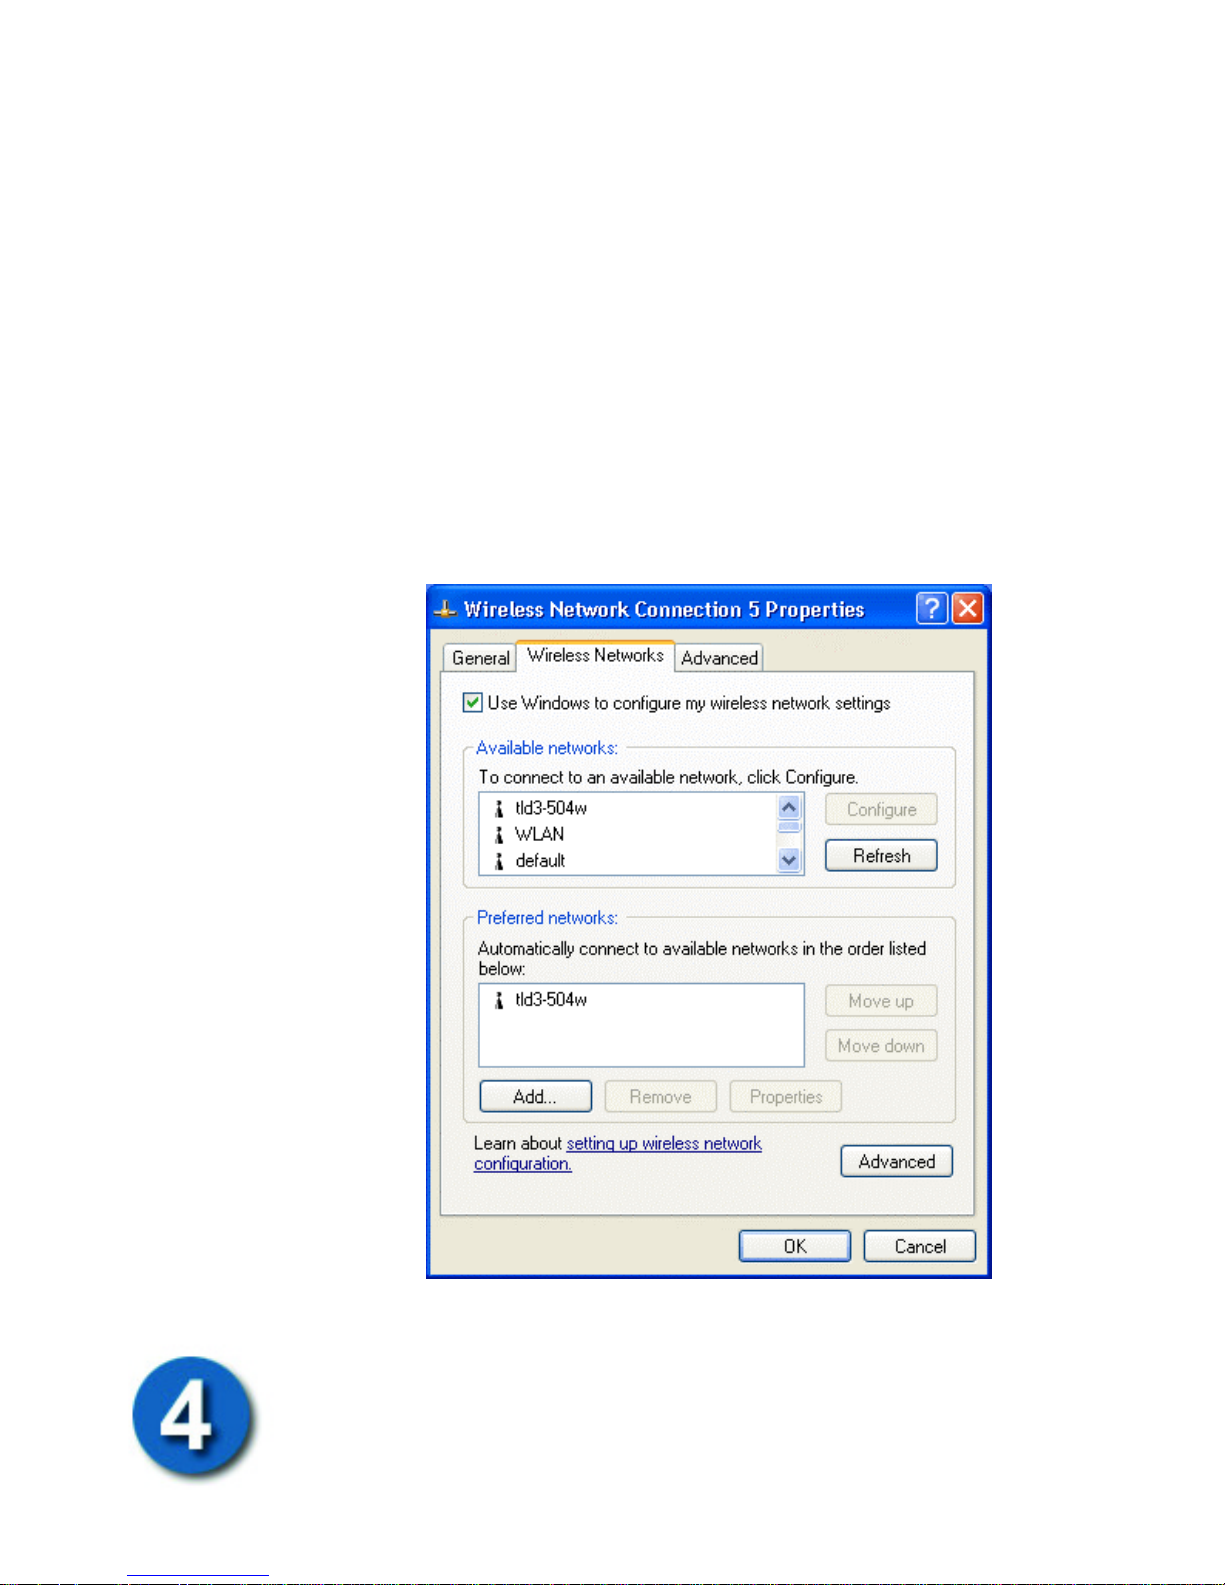
Hoc peer to peer connection if no Access Point is within range of the
PC Card.
Access point (infrastructure) networks only will allow a connection
to an Access Point only.
Computer-to-computer (ad hoc) networks only will allow only an
802.11 Ad Hoc peer to peer connection.
Automatically connect to non-preferred networks will allow roaming
by connecting to networks other than the preferred network, if they
can be detected by the PC Card.
Clicking the Close button will bring you back to the Wireless
Network Connection Properties dialog box, as shown below.
Network SSID and WEP Encryption
To choose a network, click on the network’s SSID and then click the
Configure button. This will open the Wireless Network Properties
dialog box, as shown below.
Page 32
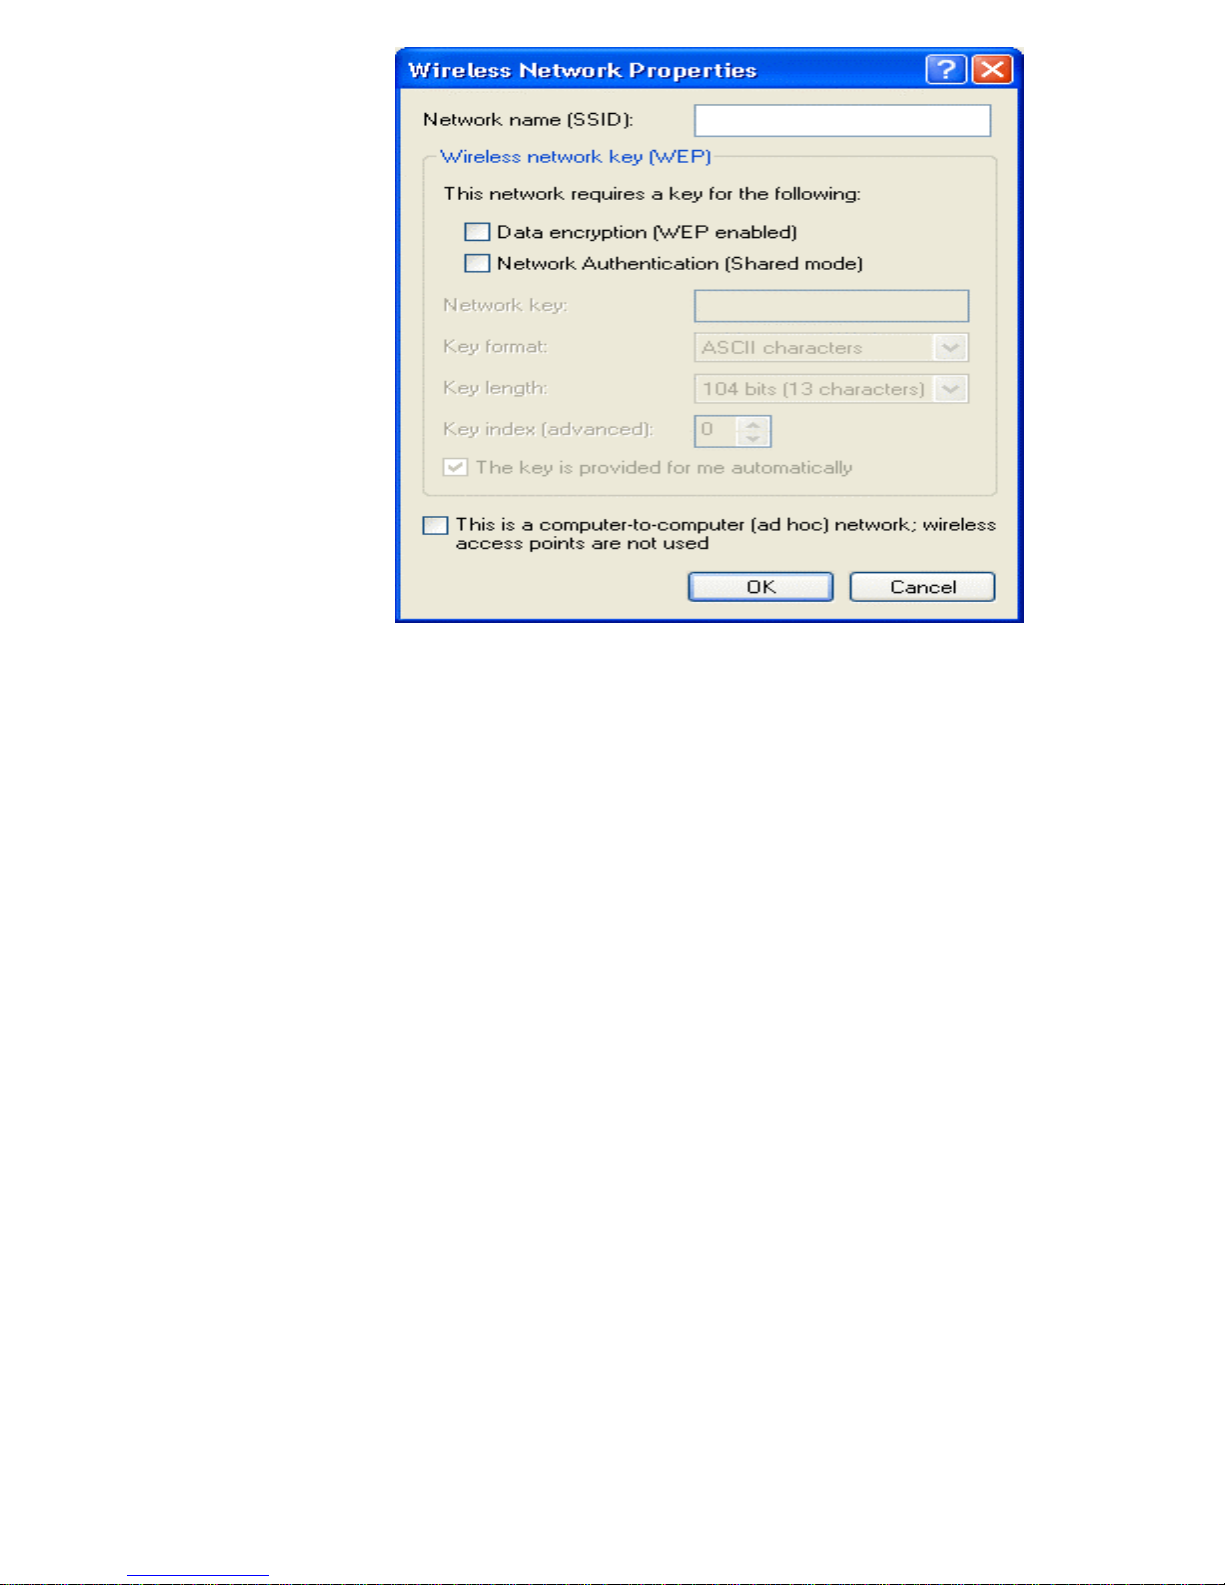
This dialog box allows you to enter the network’s SSID (this field
contains the SSID of the network you chose in the Wireless Network
Properties dialog box, if the network was detected).
WEP can also be configured by clicking the Data encryption (WEP
enabled) check box. If your WEP configuration uses a shared key,
click the Network Authentication (Shared mode) click box. To enter
the actual WEP key, unclick the The key is provided for me
automatically check box, and enter the key in the Network key: field.
The Key format: field allows the choice of ASCII characters
(normal letters) or Hexadecimal digits (0 through 9 and letters A
through F). The Key length: field allows the choice of 40-bits(5
characters), or 104-bits(13 characters).
If you connecting to an 802.11 Ad Hoc peer to peer network, click
the This is a computer-to-computer (ad hoc) network; wireless
access points are not used check box.
Clicking the OK or the Cancel button will take you back to the
Wireless Network Connection Properties dialog box, as shown
below.
Page 33
IP Address Assignment
Your DWL-650H PC Card needs to be assigned an IP address,
subnet mask, and default gateway before connecting to a LAN.
The default setting is to use the Dynamic Host Configuration
Protocol (DHCP) to obtain the appropriate network addressing
information. If your network has a DHCP server that can be
reached from a wireless Access Point, your DWL-650H PC
Card will automatically contact the server and be assigned an
IP address, subnet mask, and the IP address of the default
gateway. If your network does not have a DHCP server, you
will need to configure the PC Card manually.
To configure the PC Card’s IP address manually, click the
General tab on the Wireless Network Connection Properties
dialog box to open the following dialog box.
Page 34
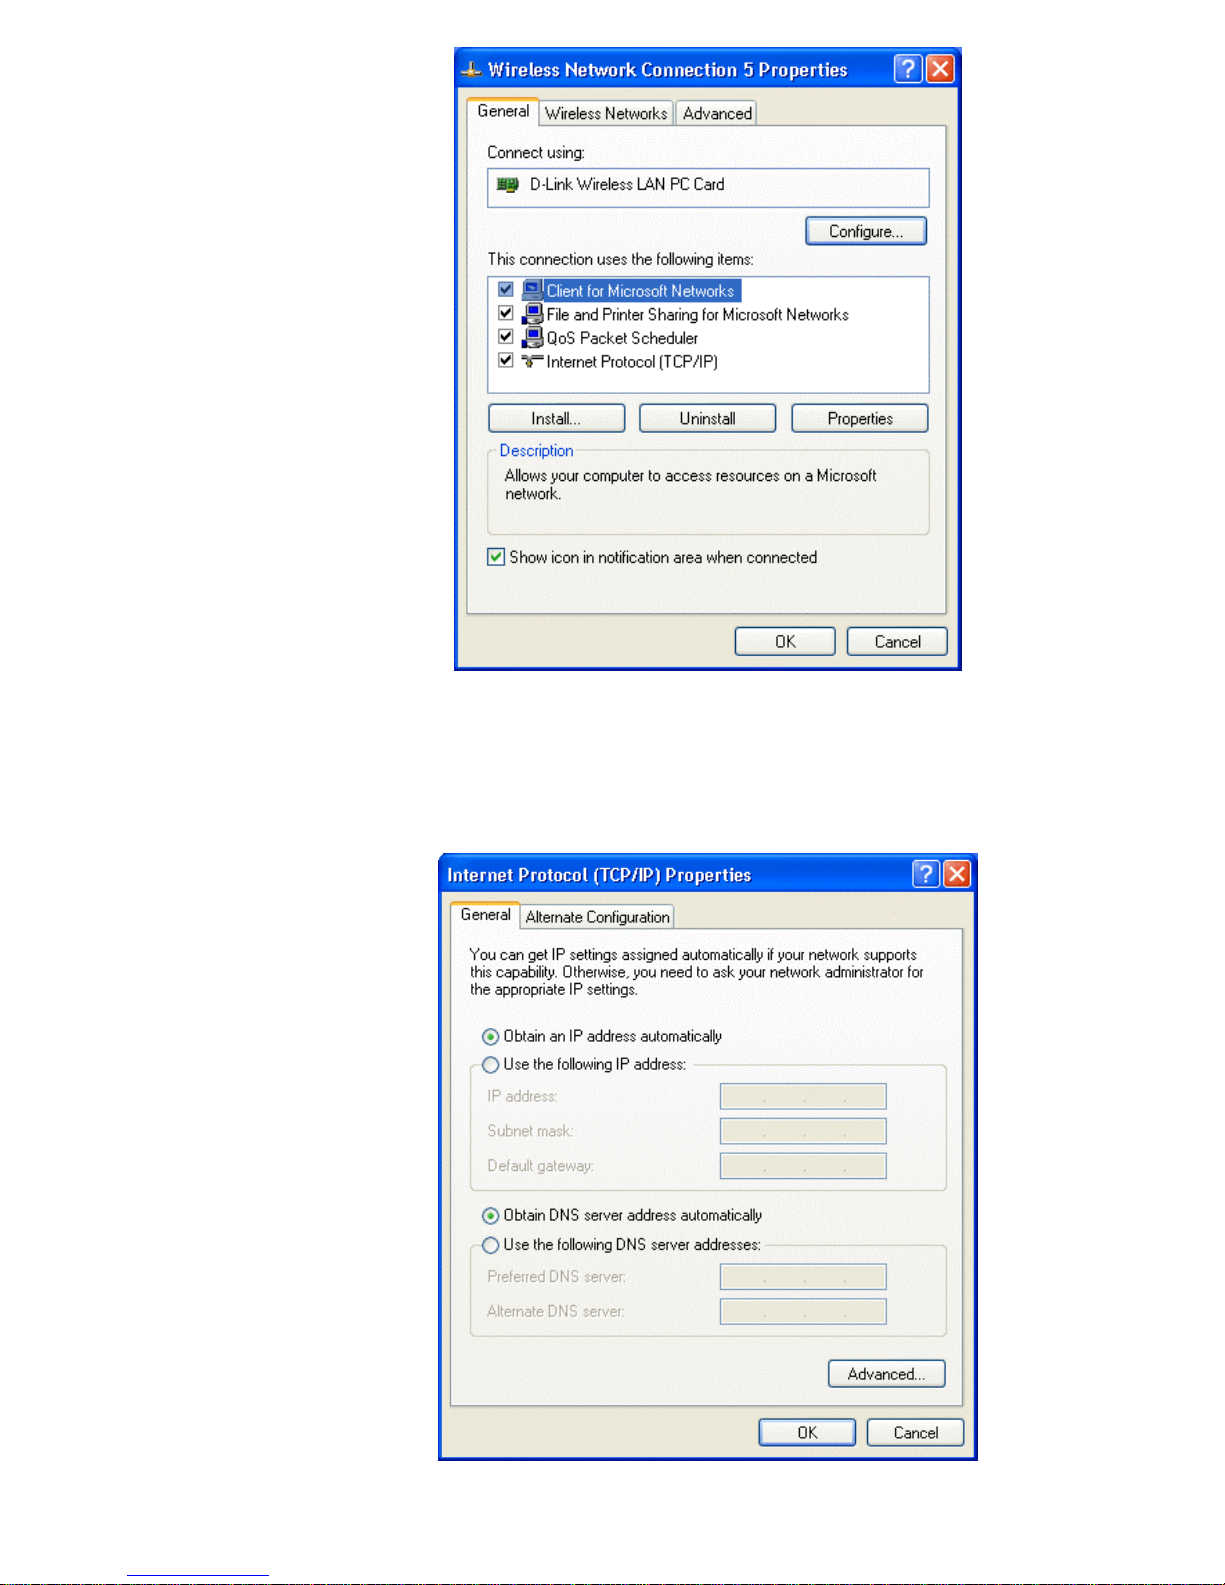
Highlight the Internet Protocol (TCP/IP) entry and press the
Properties button. The Internet Protocol (TCP/IP) Properties
dialog box opens, as shown below.
Page 35
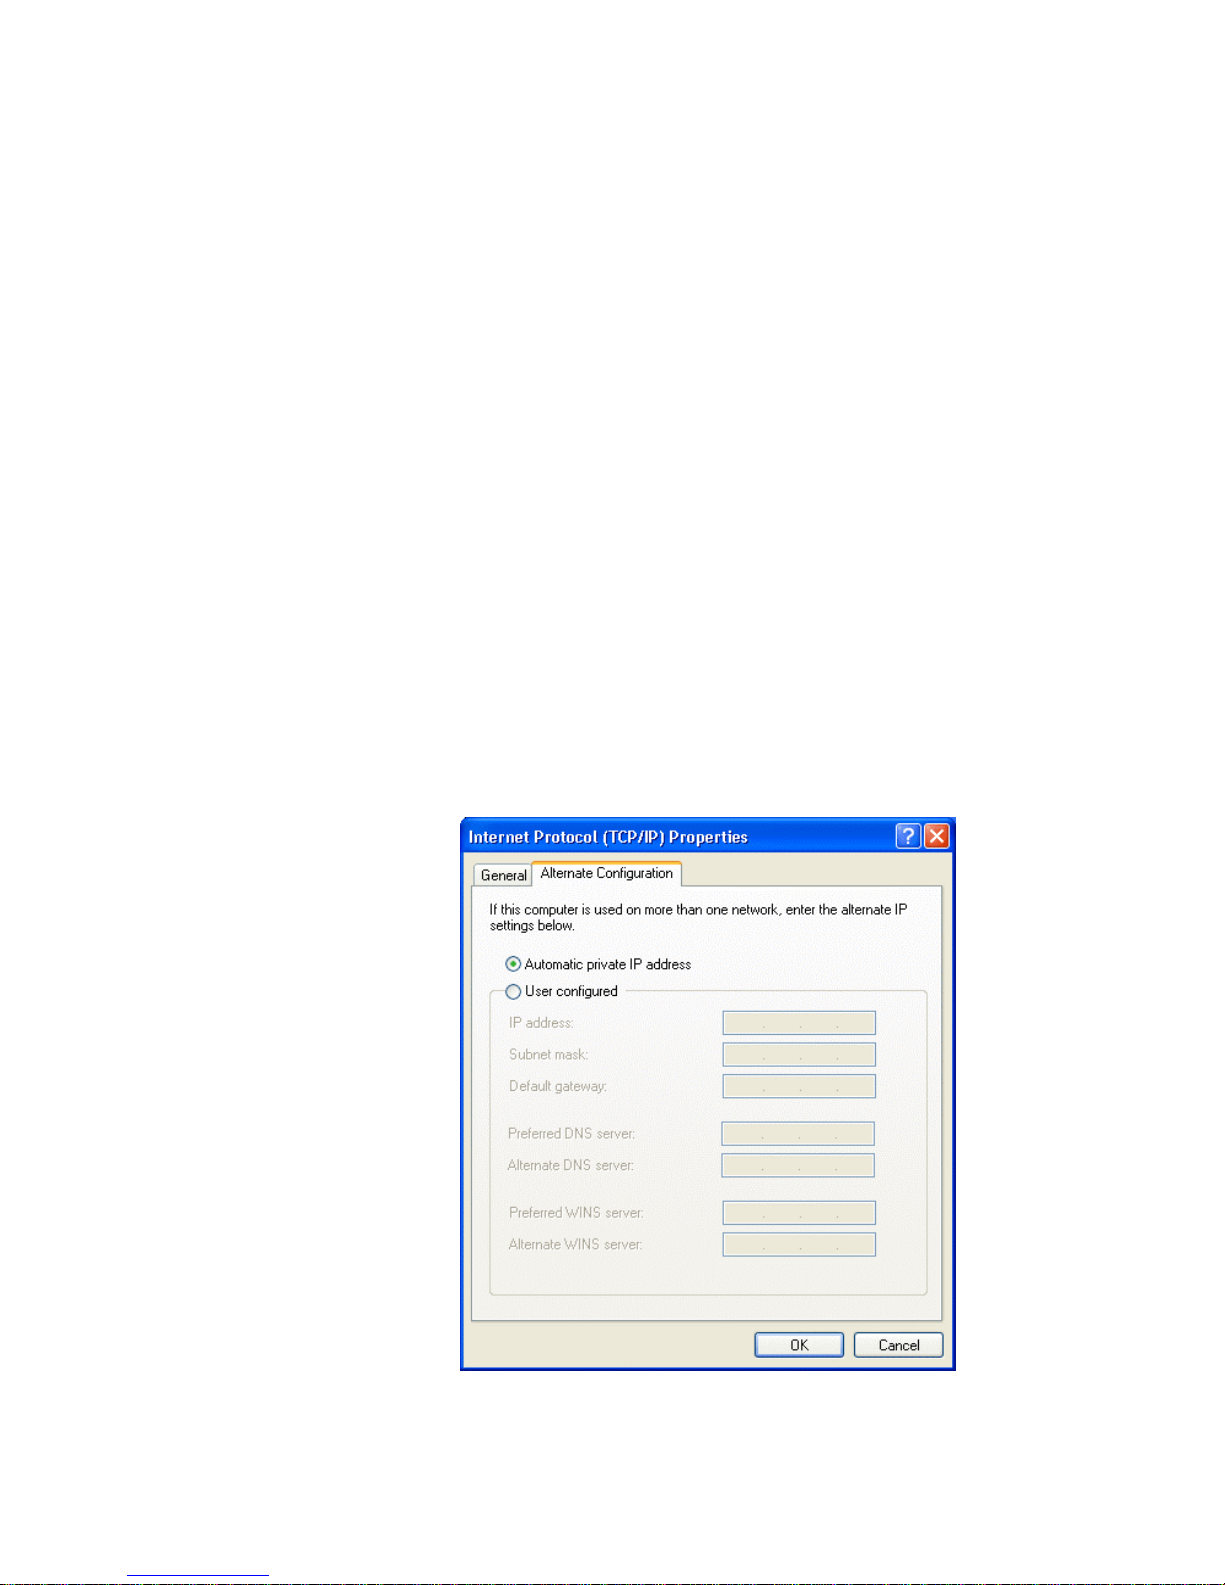
The PC Card’s default is to Obtain an IP address
automatically and to Obtain DNS server address automatically
using the Dynamic Host Configuration Protocol (DHCP). If
your network does not have a DHCP server, or if you need to
assign your computer an IP address that is different than the
one assigned by your network’s DHCP server, click the Use
the following IP address click box. You can then enter the IP
address, subnet mask, and Default gateway’s address.
If you ent er an IP address manually, you will also need to
enter the address of a DNS server (an alternative DNS server
is not required).
Windows XP also allows you to specify an alternate IP address,
subnet mask, default gateway, DNS server, and WINS server
addresses for computers that will be connected to two
networks (such as one TCP/IP setup for your office, and an
alternate one for your house). The alternate TCP/IP setup
dialog box can be accessed by clicking the Alternate
Configuration tab.
Click the User configured and the TCP/IP entry fields will
open.
Page 36

Appendix A
WLAN Adapter Specifications
PC Card Physical
Dimensions 3.3 x 2.1 x 0.2 inches (85 x 54 x 5 mm)
(less antenna)
Weight 1.6 oz (45.36 g)
Operating Temperature 32 to 130°F (20 to 70°C)
Humidity 95% max. (non condensing)
Cargo/Packaged 6 ft. (1.8 m) drop 5hz vibration Mil-Std 810E
Altitude 15,000 ft. (4.6 km) − Storage
8,000 ft. (2.4 km) − Operating
Vibration 2 G peak, sine
0.02 G peak random (5 Hz – 2000 Hz)
Shock 40 G, 11 mS, half sine
ESD meets CE-Mark
PCMCIA Compliance Type II, Version x.xx
Card and Socket services x.xx
Radio
Frequency Range Country dependent, typically 2412 MHz to 2462 MHz
Radio Data Rate 11 Mbps max., 5.5 Mbps, 2 Mbps, 1 Mbps min.
Range Open environment − over 100 ft. (at 11 Mbps).
Typical office environment − 30 to 50 ft. (at 11 Mbps)
Tx Max. Radiated EIRP US: FCC Part 15.247
Europe: ETS 300 320
Japan: RCR STD-33
Modulation Binary GFSK
Tx Out-of-Band Emissions US: FCC part 15.247, 15.205, 15.209
Europe: ETS 300 320
Japan: RCR STD-33
Building Networks for People
 Loading...