

Page 1
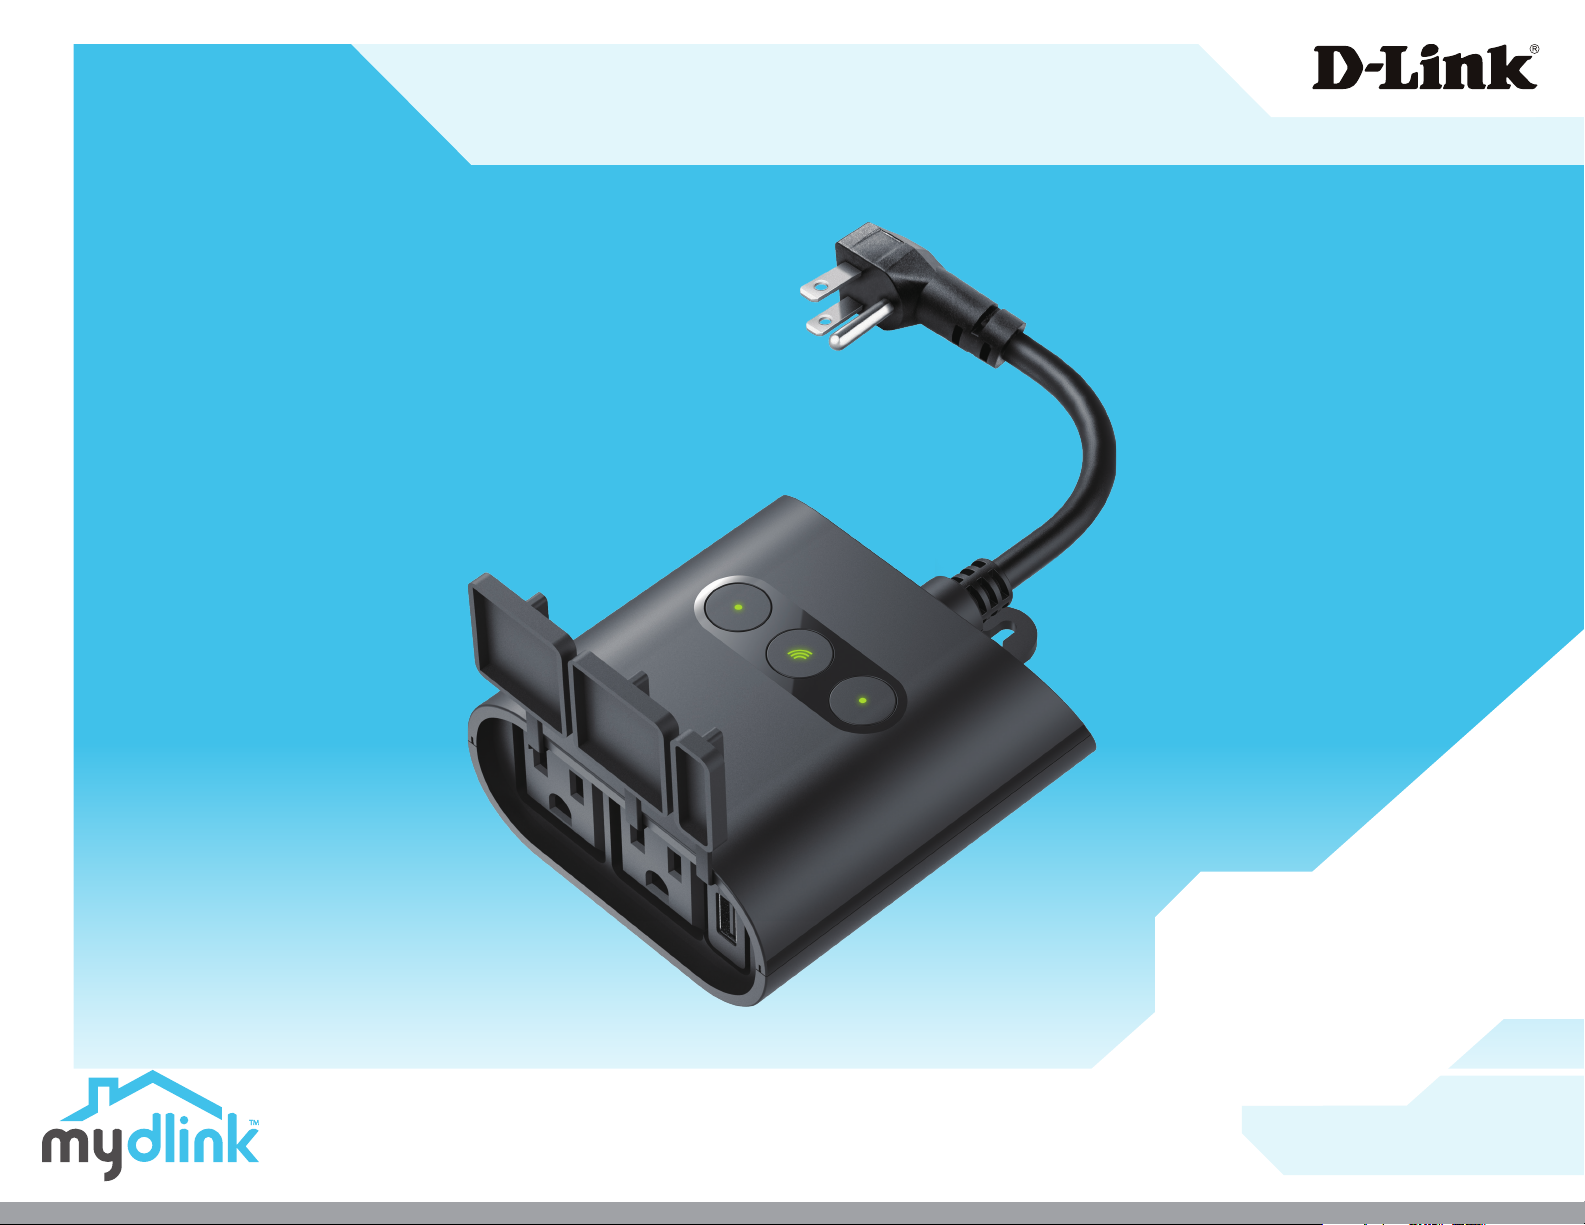
DSP-W320
Outdoor Wi-Fi Smart Plug
User Manual
08/15/2019
Hardware: A1
Manual Version: 1.00
Page 2

Manual Overview
D-Link reserves the right to revise this publication and to make changes in the content hereof without obligation to notify
any person or organization of such revisions or changes. Information in this document may become obsolete as our services
and websites develop and change. Please refer to the www.mydlink.com website for the most current information.
Manual Revisions
Revision Date Description
1.00 August 15, 2019 Initial release
Trademarks
D-Link and the D-Link logo are trademarks or registered trademarks of D-Link Corporation or its subsidiaries in the United
States or other countries. All other company or product names mentioned herein are trademarks or registered trademarks
of their respective companies.
Copyright © 2019 by D-Link Corporation, Inc.
All rights reserved. This publication may not be reproduced, in whole or in part, without prior expressed written permission from
D-Link Corporation, Inc.
iD-Link DSP-W320 User Manual
Page 3
Table of Contents
Table of Contents
Product Overview .............................................................. 1
Package Contents .........................................................................1
Introduction ................................................................................... 2
System Requirements ................................................................. 2
Hardware Overview ..................................................................... 3
LED Behavior .................................................................................. 4
Installation ......................................................................... 5
Safety ................................................................................................ 5
Before you Begin ...........................................................................5
Wireless Installation Considerations ......................................6
mydlink App Device Setup ........................................................7
Using the mydlink App .................................................... 11
Controlling Your Device ...........................................................11
Device .............................................................................................12
Troubleshooting ..............................................................13
Technical Specications .................................................. 14
Regulatory Information ..................................................16
iiD-Link DSP-W320 User Manual
Page 4
Section 1 - Product Overview
DSP-W320 || Outdoor Wi-Fi Smart Plug
Quick Installation Guide
Product Overview
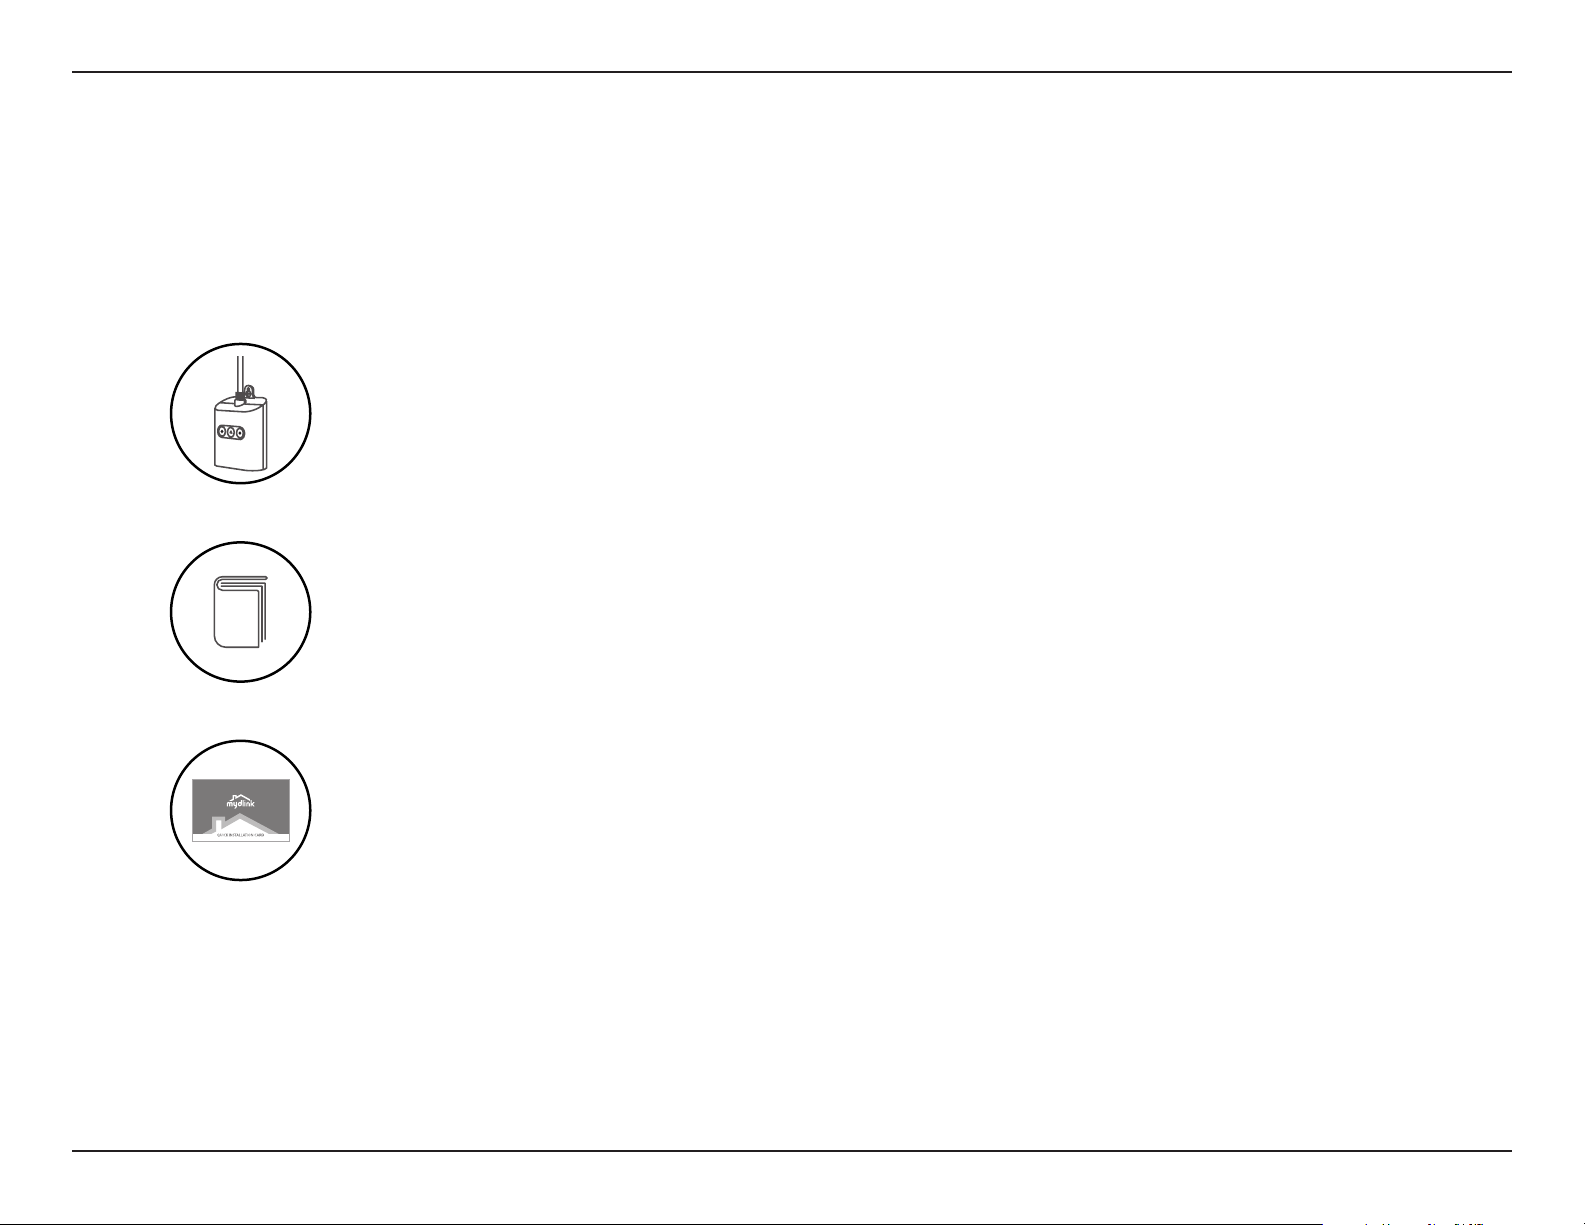
Package Contents
Quick Installation Card
If any of the above items are missing, please contact your reseller.
Note: Using an electrical outlet with a dierent voltage rating than recommended for this product will cause damage and void the
warranty for this product.
1D-Link DSP-W320 User Manual
Page 5
Section 1 - Product Overview
Introduction
The D-Link DSP-W320 Outdoor Wi-Fi Smart Plug is a multi-purpose, compact, and easy-to-use device that allows you to
control your home’s electric appliances, wherever you are. Scheduling provides a helpful way to save power while you’re at
work or asleep, and the mydlink™ app provides an easy way to set up alerts, or power an appliance on or o.
System Requirements
• 802.11n/g wireless network
Network Requirements
• An Internet connection
• A router connected to your broadband
modem
mydlink™ App Requirements
• iPhone, iPad, Android smartphone or
tablet (please refer to the mobile app's
store page to check whether your device
is compatible)
• Email account (for mydlink™ service
registration)
2D-Link DSP-W320 User Manual
Page 6
Section 1 - Product Overview
1
Hardware Overview
2
3
4
5
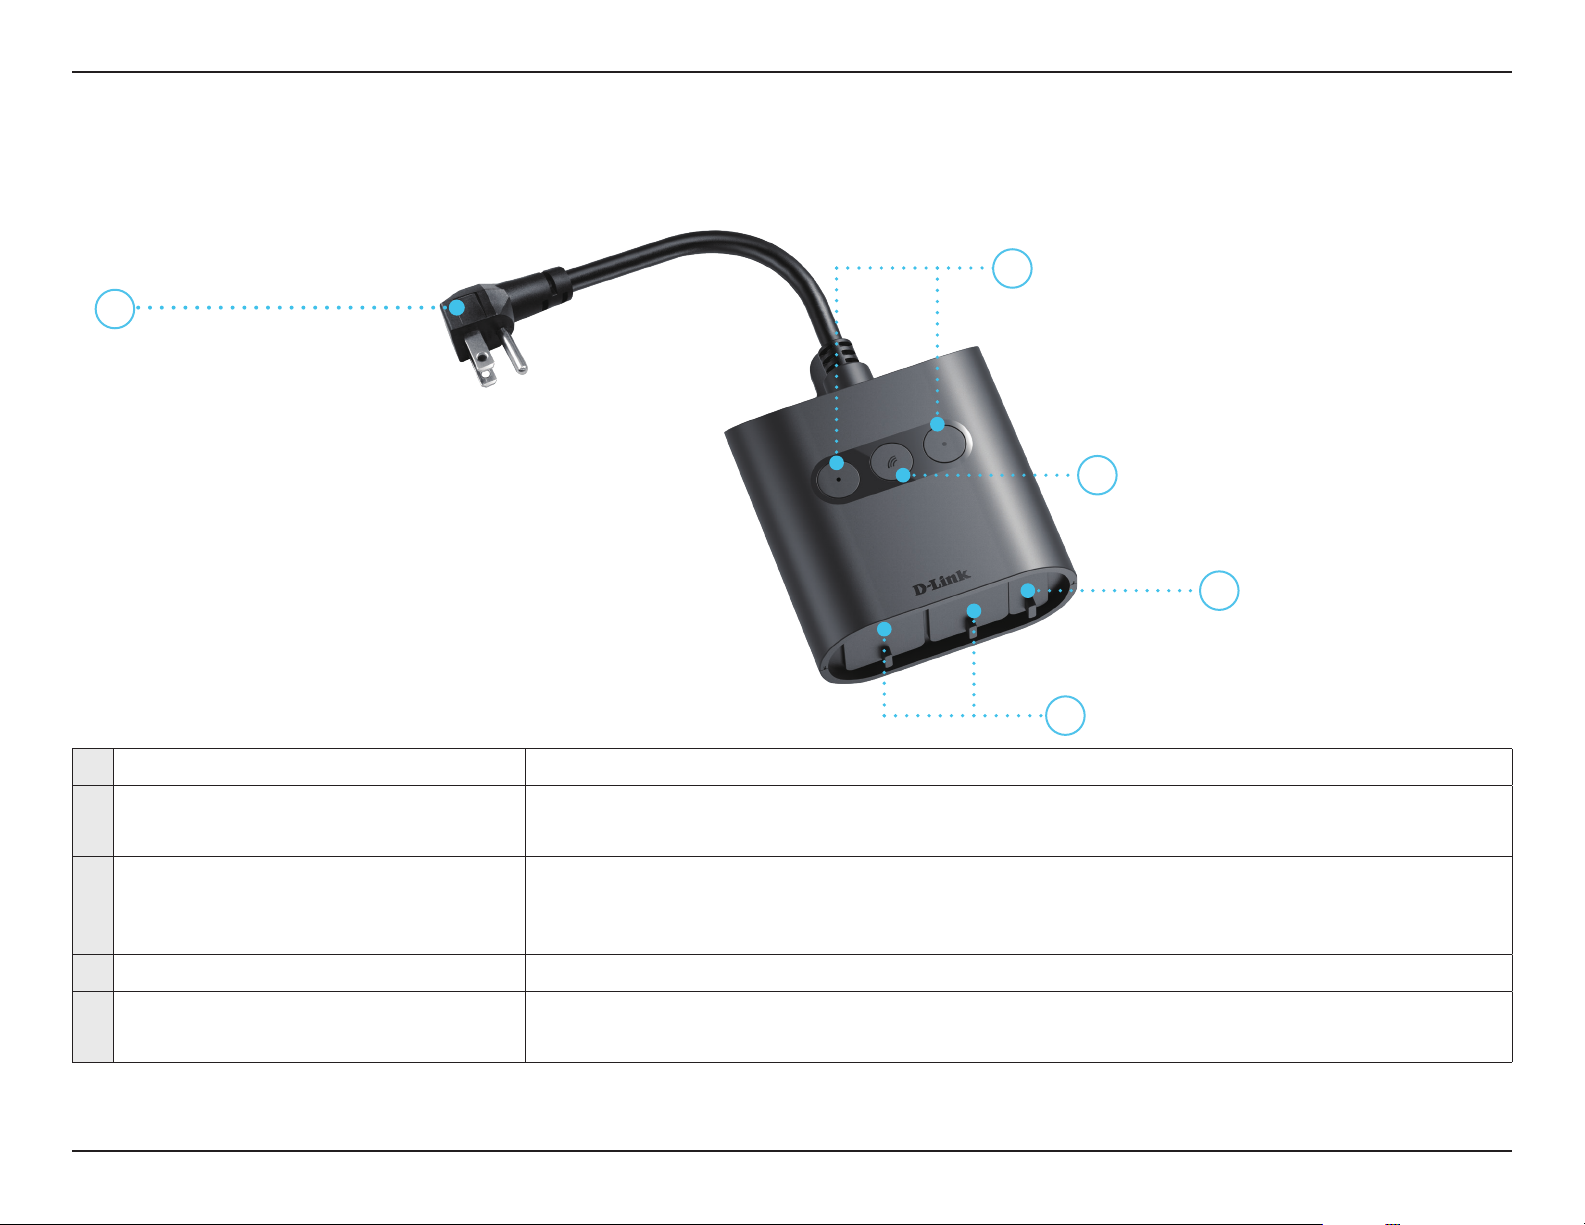
1 Power Cord Plugs into your wall outlet.
2
Power Buttons /
Power Status LEDs
Reset Button /
3
System Status LED
4 USB Charging Port Plug in a USB device that you wish to supply power to here.
5 Power Outlets
Press this button to switch on or o the individual power outlet.
See LED Behavior on page 4 for LED behavior information.
Press and hold for this button until the System Status LED turns solid red to factory
reset it.
See LED Behavior on page 4 for LED behavior information.
Connect your appliances, lamps, or other electronic devices you wish to control
here.
3D-Link DSP-W320 User Manual
Page 7
Section 2 - Installation
LED Behavior
1
2
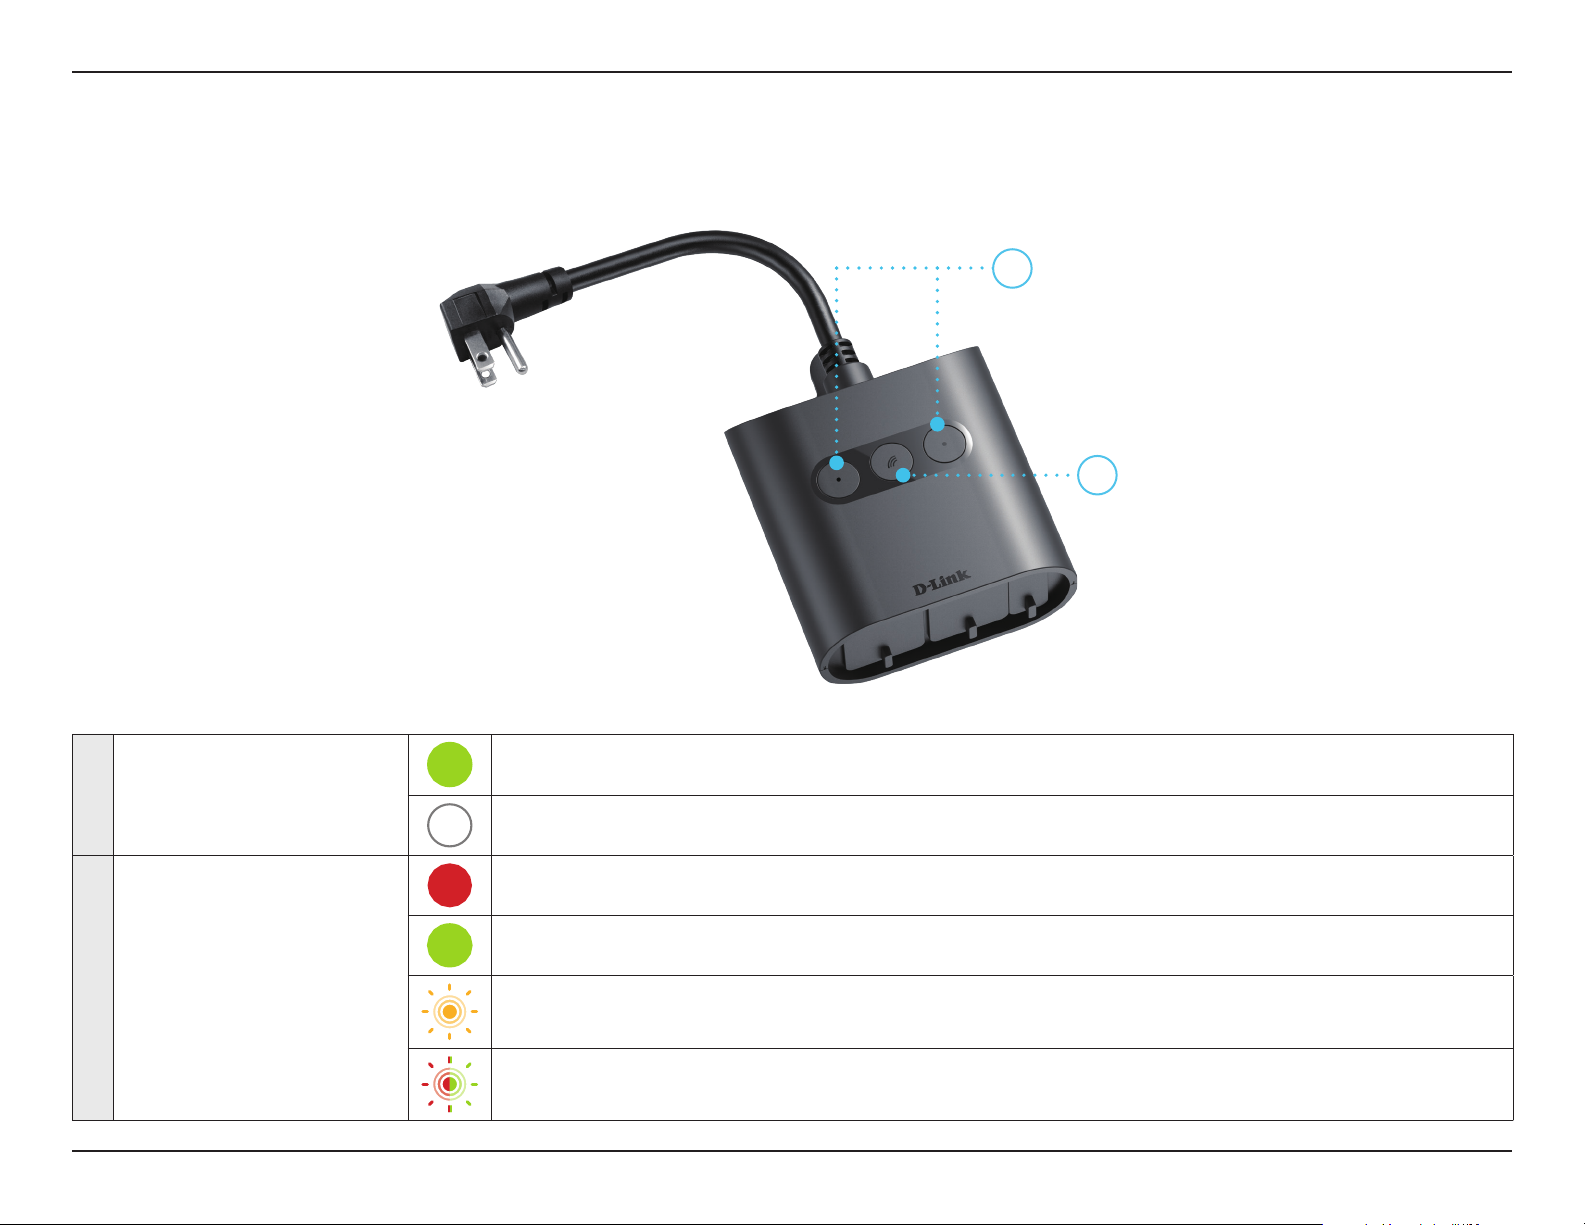
1 Power Status LEDs
2 System Status LED
Switched on
Switched o
Booting up / Resetting
Connected to Wi-Fi and mydlink
Ready for set up / Disconnected
Firmware being upgraded
4D-Link DSP-W320 User Manual
Page 8
Section 2 - Installation
Installation
Safety
Please read all of the safety and operating instructions before using your device:
• Do not open the device or attempt to repair or service it.
• Avoid plugging the device into a wall outlet that is not protected from weather changes.
• Make sure that the plug is inserted all the way into the wall outlet so that there is no exposed metal.
• Do not submerge the device in liquid or attempt to clean it with liquids or solvents. To clean the device, disconnect from
the power outlet and use a damp towel.
Before you Begin
Plan the location of your device:
• Verify that your device is electrically rated to operate with the power available in your location.
• Connect the device into an electrical outlet that is not controlled by a wall switch. This will help you to avoid accidentally
turning o power to the device.
• Be sure to plug it in to a grounded electrical outlet in order to help prevent against electrical shock.
5D-Link DSP-W320 User Manual
Page 9
Section 2 - Installation
Wireless Installation Considerations
The DSP-W320 Outdoor Wi-Fi Smart Plug connects to your network using a wireless connection from virtually anywhere
within the operating range of your wireless network. Keep in mind that the number, thickness and location of walls, ceilings,
or other objects that the wireless signals must pass through may limit the range. Typical ranges vary depending on the types
of materials and background RF (radio frequency) noise in your home or business. The key to maximizing wireless range is to
follow these basic guidelines:
1. Keep the number of walls and ceilings between the product and other network devices to a minimum - each
wall or ceiling can reduce your device's range from 1 to 30 meters (3 to 90 feet). Position your devices so that the
number of walls or ceilings is minimized.
2. Be aware of the direct line between network devices. A wall that is 0.5 meters (1.5 feet) thick, at a 45-degree
angle appears to be almost 1 meter (3 feet) thick. At a 2-degree angle it looks over 14 meters (42 feet) thick.
Position devices so that the signal will travel straight through a wall or ceiling (instead of at an angle) for better
reception.
3. Building materials make a dierence. A solid metal door or aluminum studs may have a negative eect on
range. Try to position access points, wireless routers, and computers so that the signal passes through drywall or
open doorways. Materials and objects such as glass, steel, metal, walls with insulation, water (sh tanks), mirrors,
le cabinets, brick, and concrete will degrade your wireless signal.
4. Keep your product away at least 1 to 2 meters (3 to 6 feet) from electrical devices or appliances that generate RF
noise.
5. If you are using 2.4 GHz cordless phones or X-10 (wireless products such as ceiling fans, lights, and home
security systems), your wireless connection may degrade dramatically or drop completely. Make sure your 2.4
GHz phone base is as far away from your wireless devices as possible. The base transmits a signal even if the
phone is not in use.
6D-Link DSP-W320 User Manual
Page 10
Section 2 - Installation
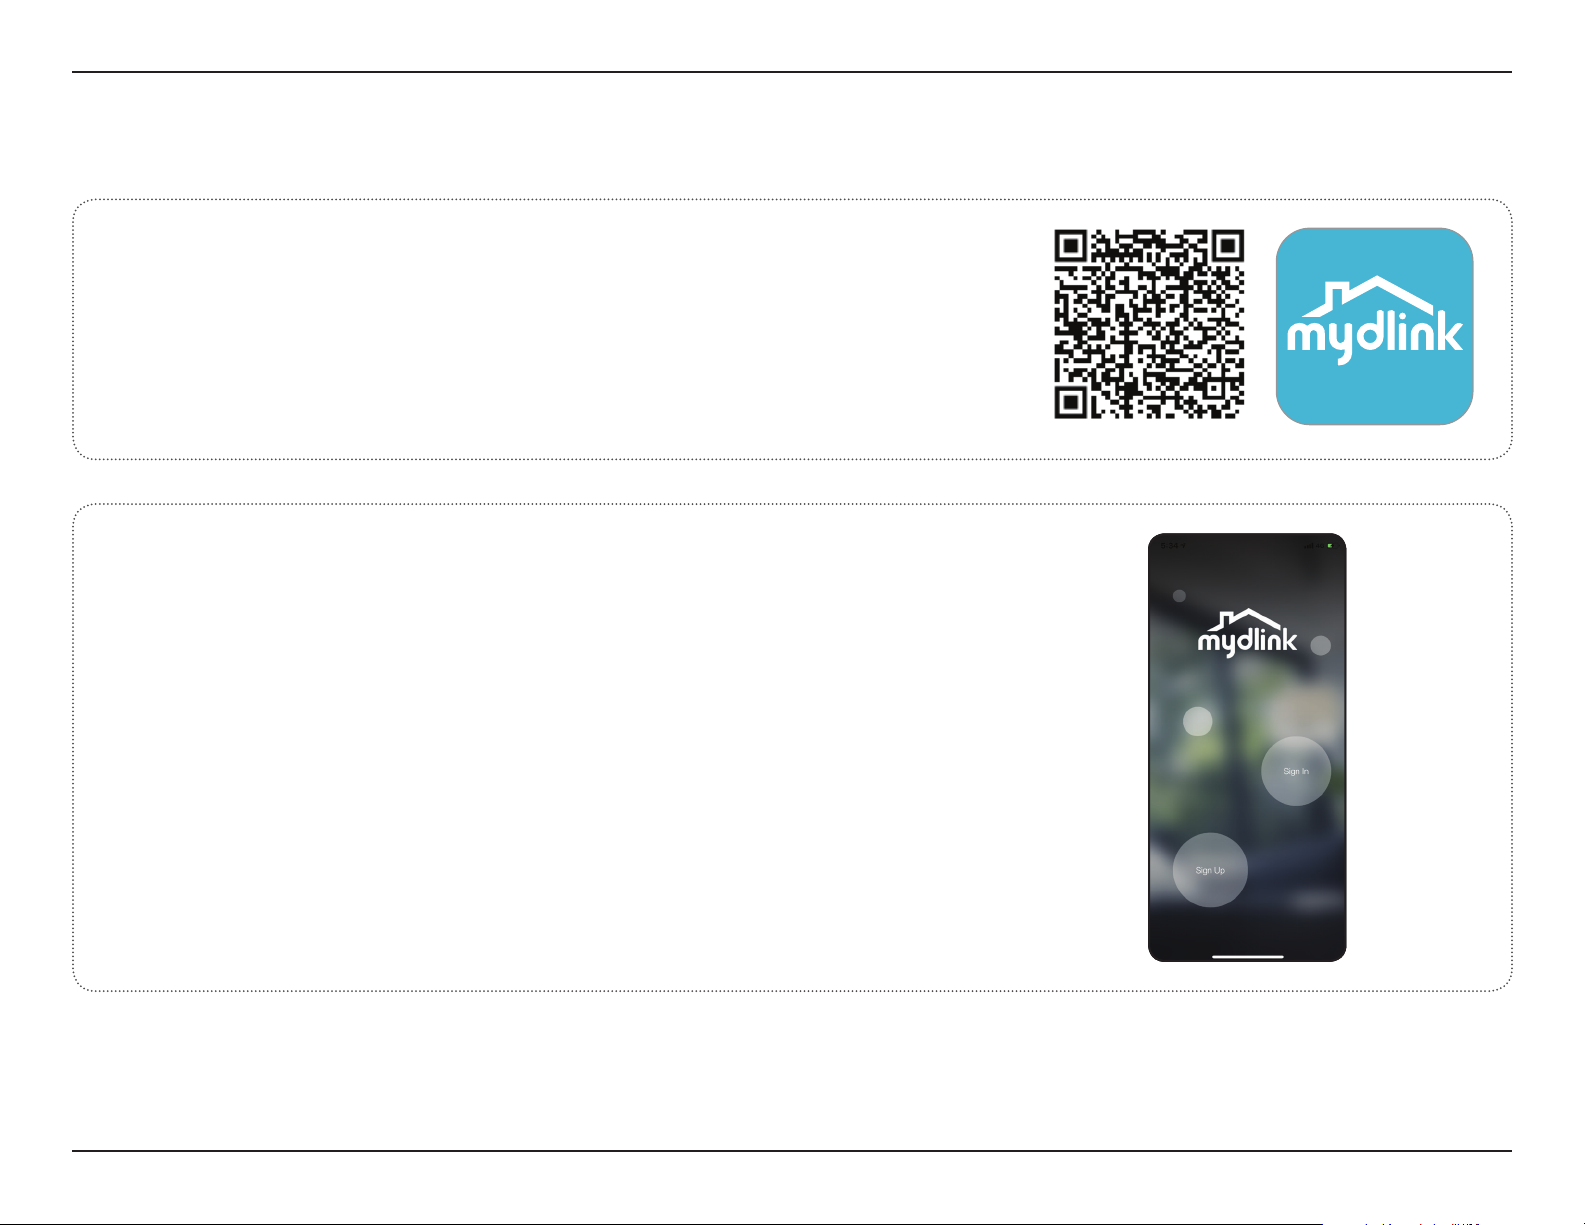
mydlink App Device Setup
1/
2/
Download the mydlink app from the App Store (iOS) or Google Play
(Android) by scanning the QR code.
Note: Ensure your device is connected wirelessly to the network that the DSP-W320
will be in.
Launch the mydlink app and create a new account or sign in to your
existing account.
Note: On iOS devices, the app will pop up a permission request to send notications.
7D-Link DSP-W320 User Manual
Page 11
Section 2 - Installation
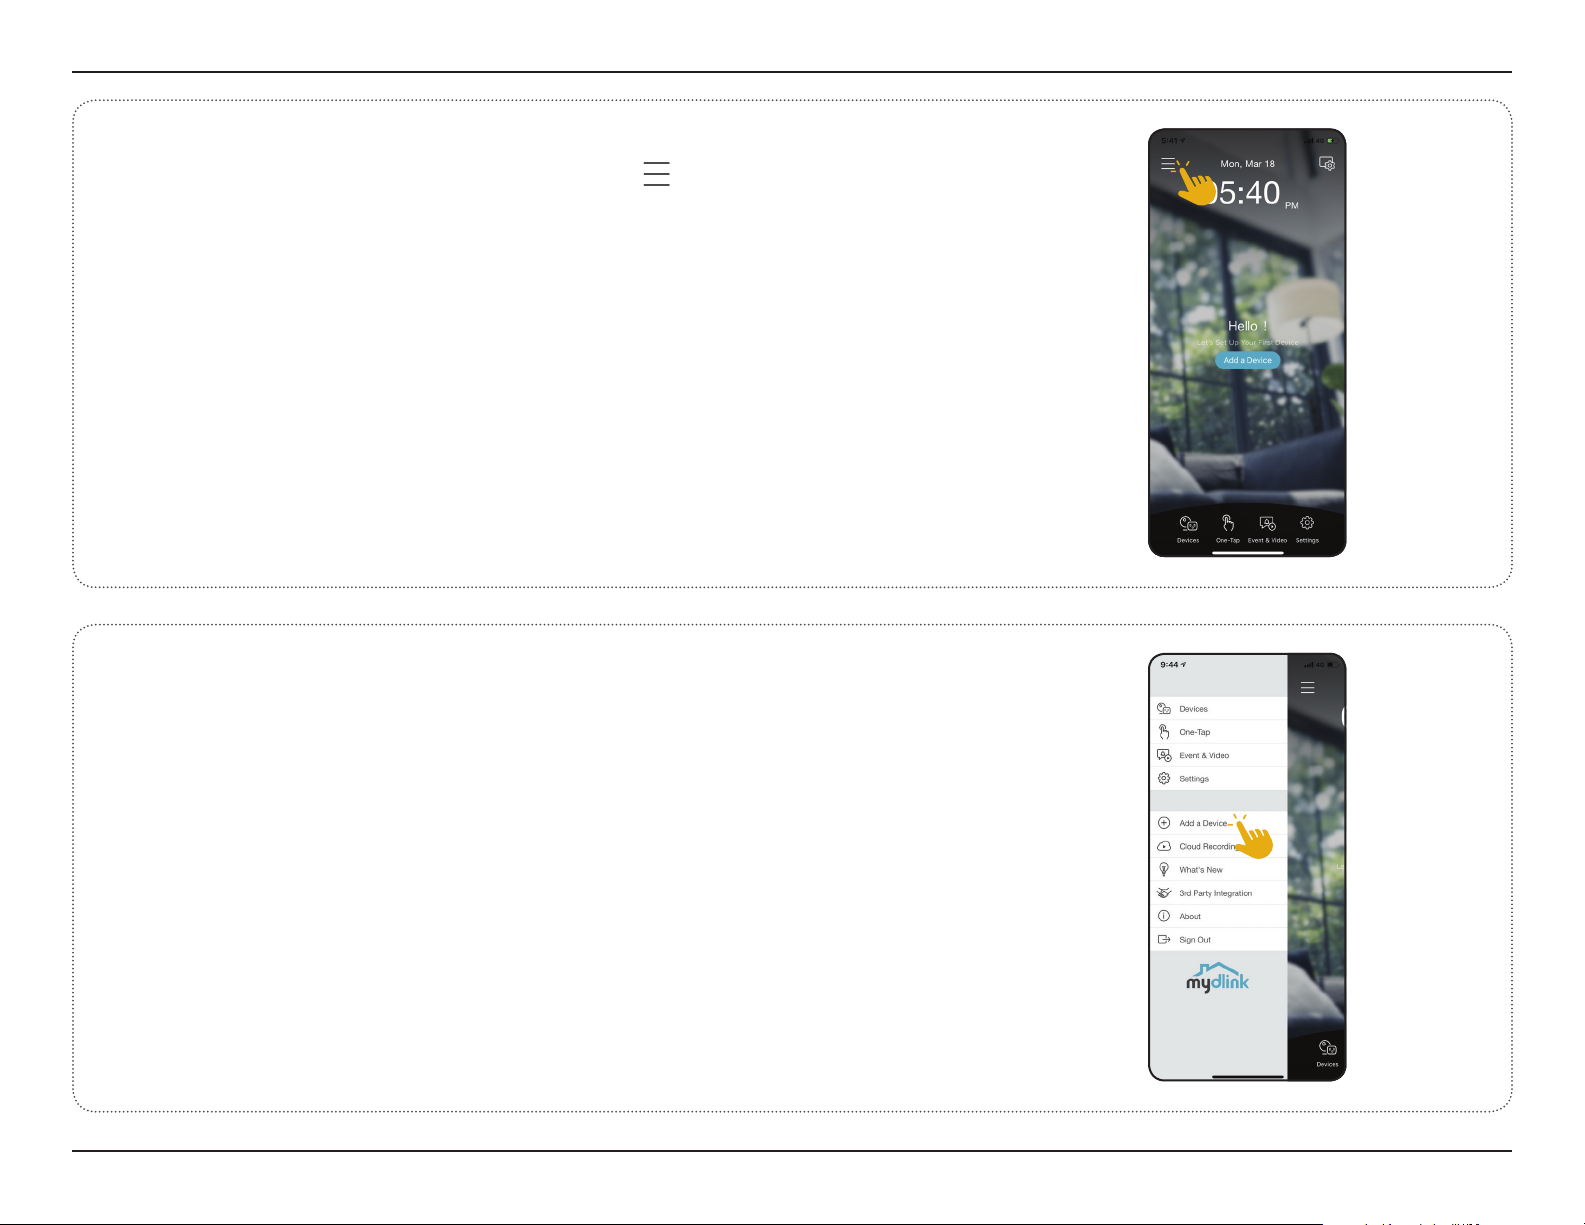
3/
4/
After logging in, tap the Menu button in the top-left corner.
Select Add a Device.
Note: For Android devices, if you are asked about allowing the app to access your
location, select Allow. Make sure location services and Bluetooth are turned on
in your phone’s settings.
8D-Link DSP-W320 User Manual
Page 12
Section 2 - Installation
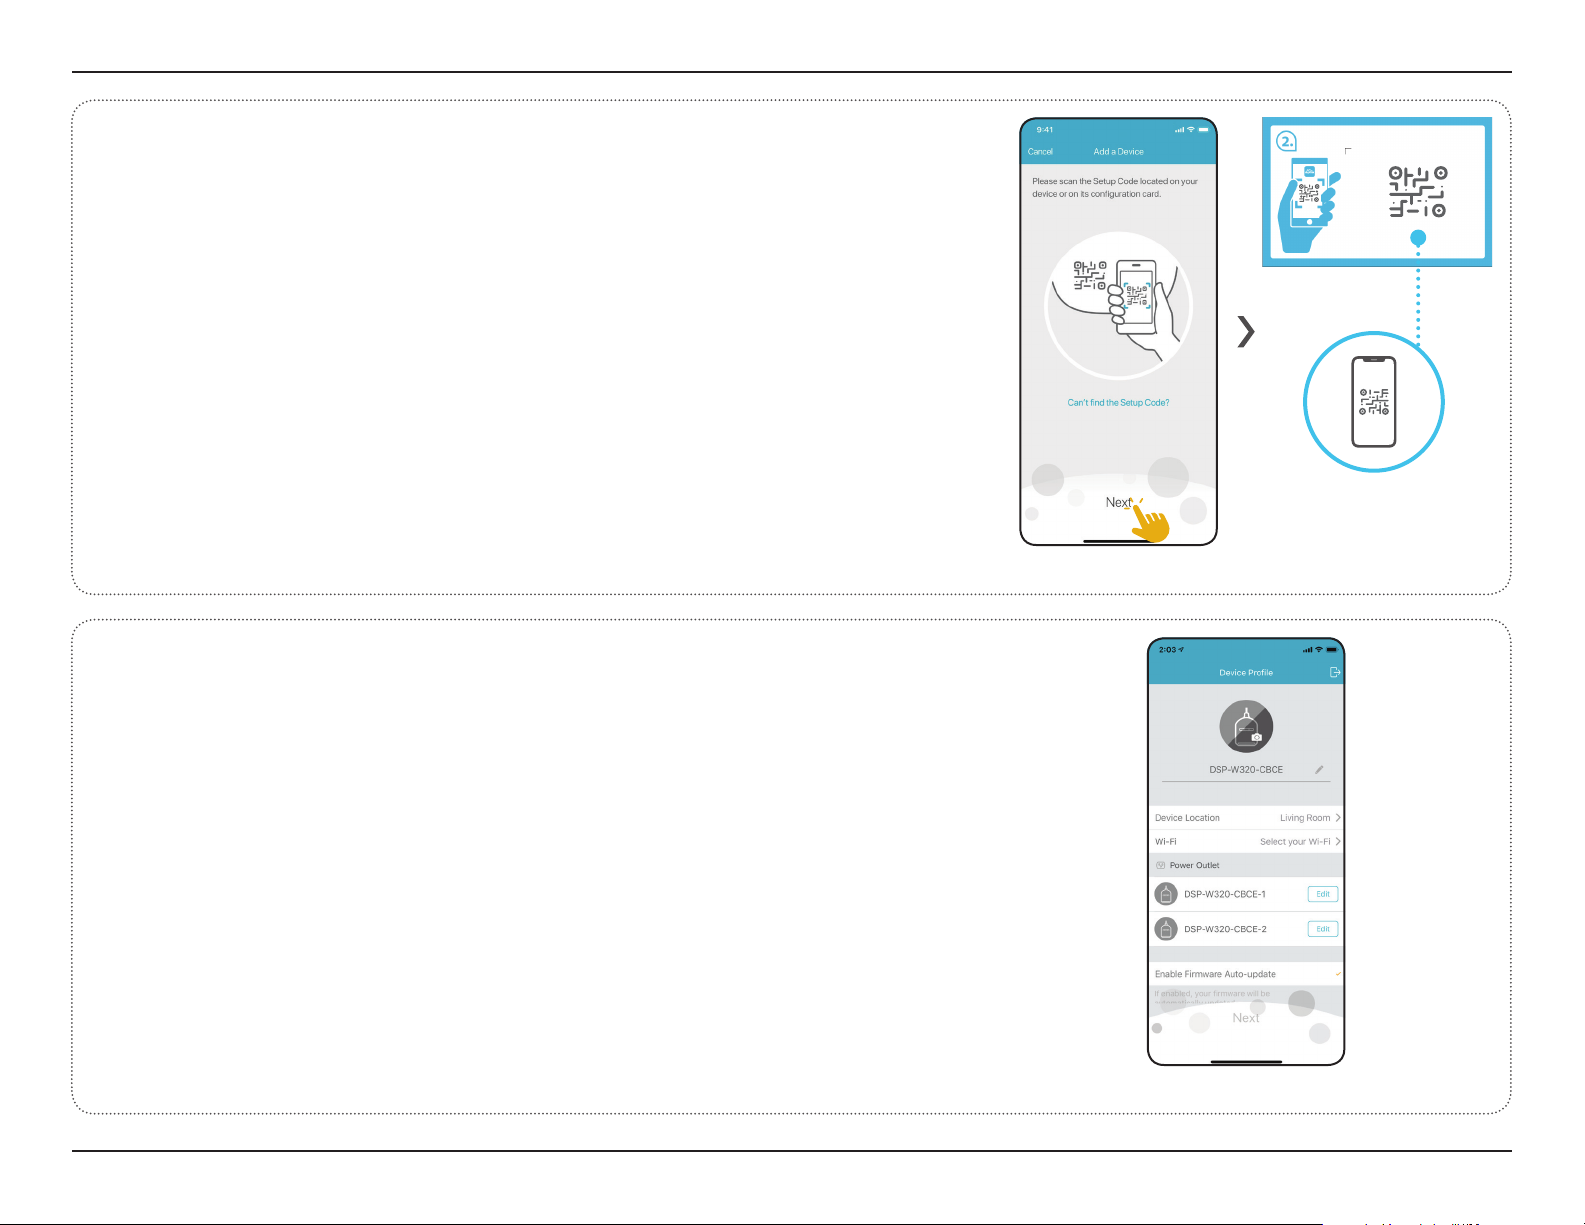
5/
6/
When asked to scan a Setup Code, press Next.
Scan the setup code on the Quick Installation Card.
Follow the onscreen instructions to establish a connection to the
device.
Choose the Device Location of your device and connect it to a Wi-Fi
network. You can also congure the settings for each power outlet.
Tap Next when all items have been determined.
9D-Link DSP-W320 User Manual
Page 13
Section 2 - Installation
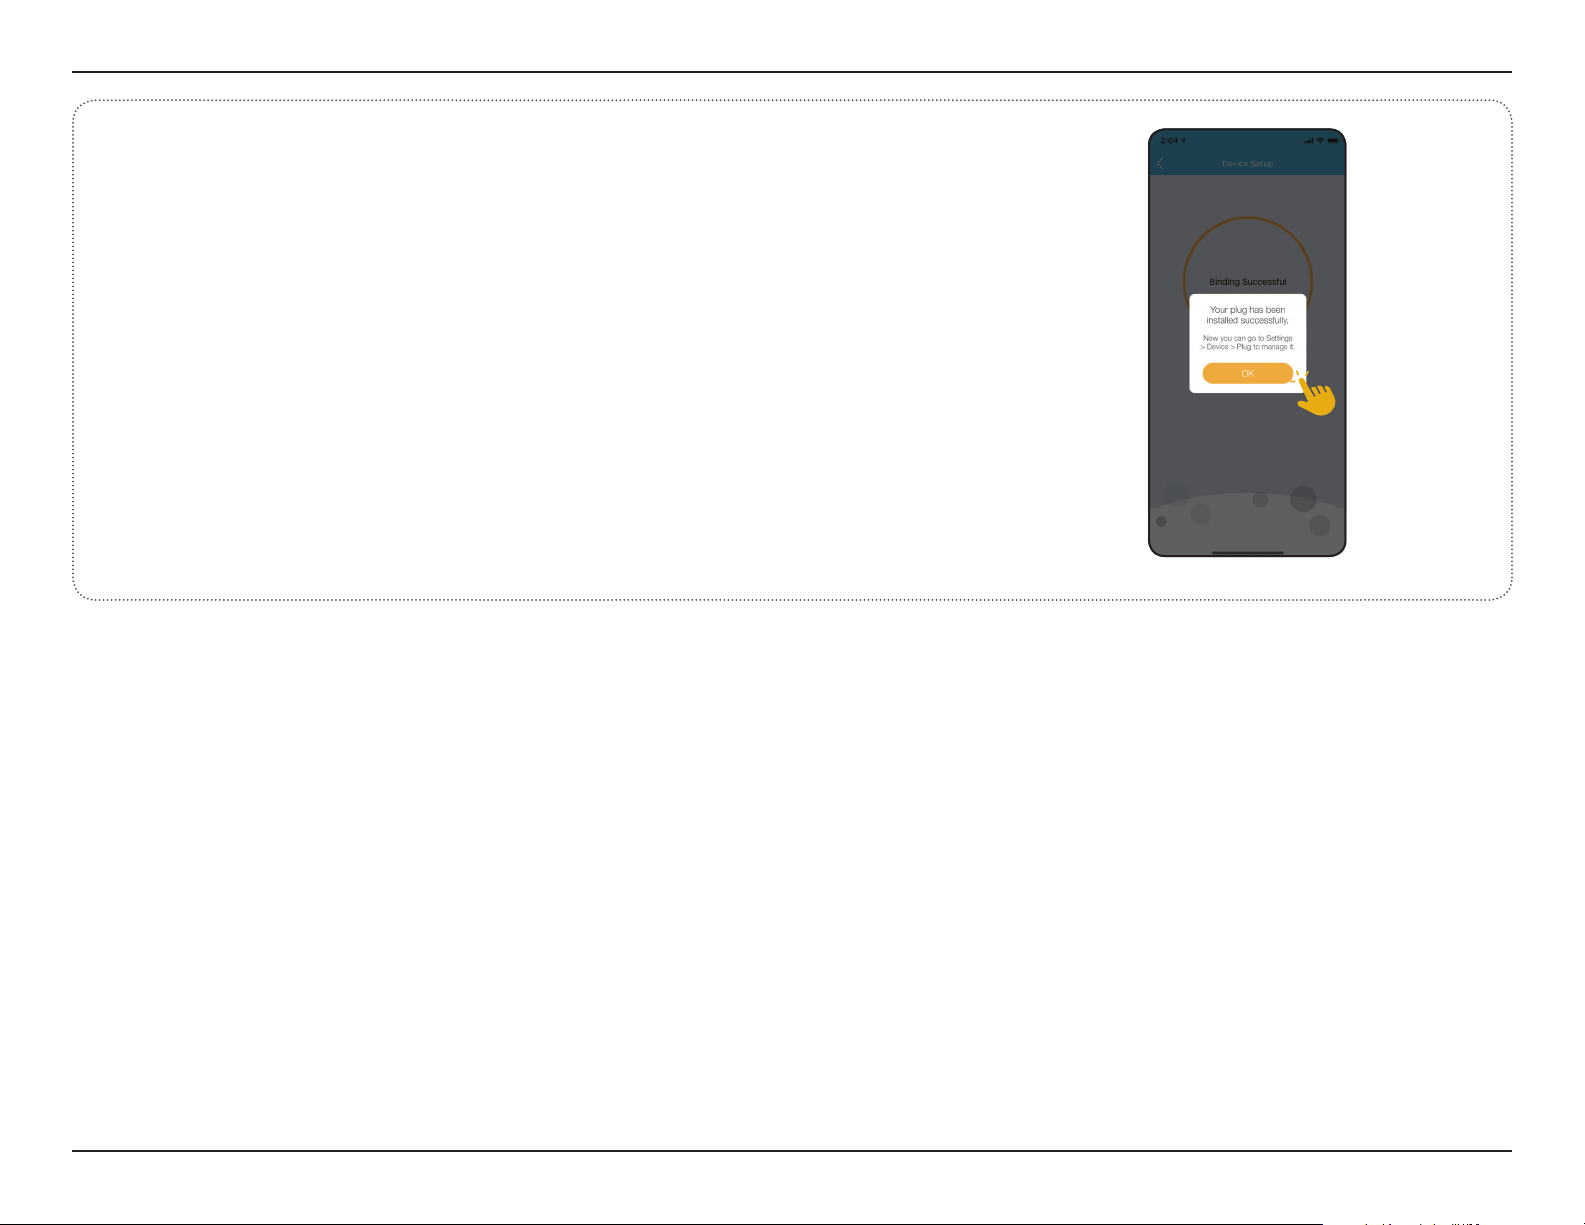
7/
Tap OK to conclude the setup process.
Congratulations, your DSP-W320 Outdoor Wi-Fi Smart Plug is now
ready to use!
Note: If you experience issues registering this plug with your mydlink account,
or if you purchased an open box or resold unit, perform a hard reset by pressing
and holding the Reset button on the device until the System Status LED turns red.
10D-Link DSP-W320 User Manual
Page 14
Section 3 - mydlink
Using the mydlink App
Controlling Your Device
Note: Screenshots are representative only. The mydlink app is constantly being updated
and so may appear dierent.
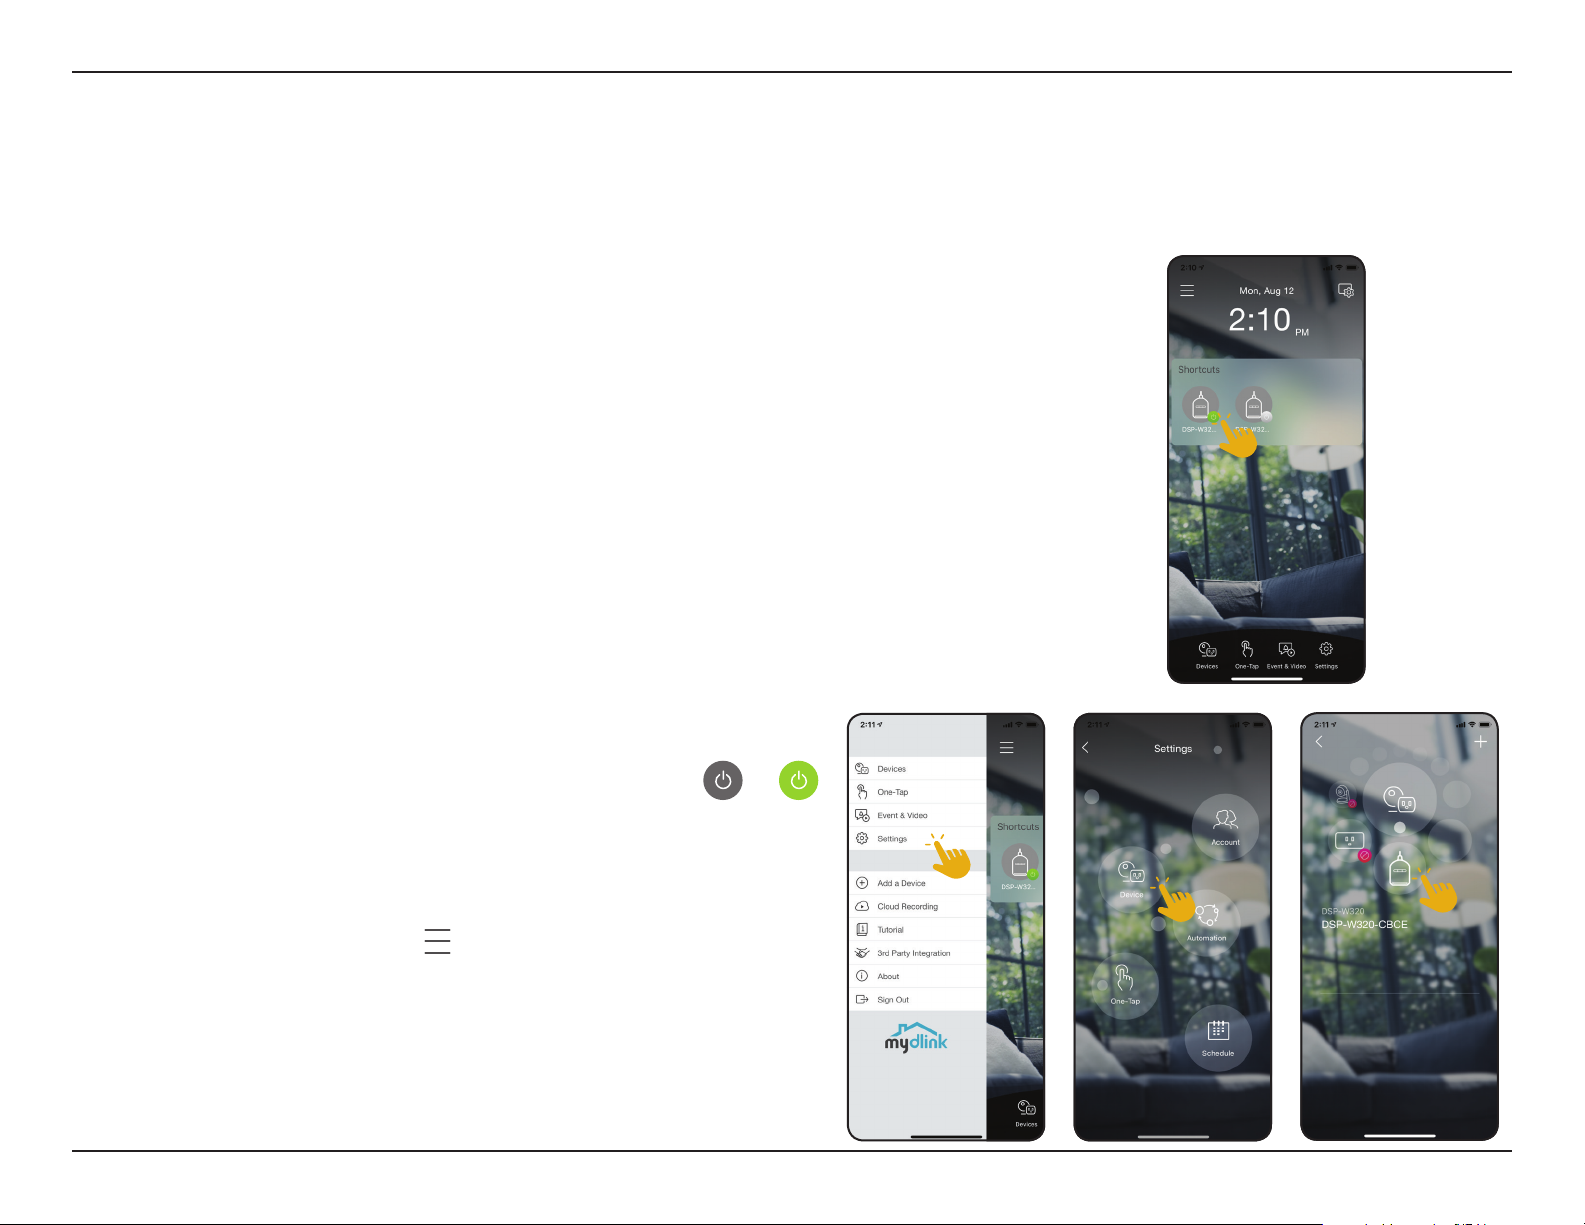
After setting up your DSP-W320 Outdoor Wi-Fi Smart Plug with a mydlink
account in the mydlink app, you will be able to remotely access your smart
plug through the app. After signing in to your mydlink account, you will see
a screen similar to the following.
If you have previously checked the Add to shortcut option while installing
the device, you will see a quick link to your device directly on the home
screen. Tap the shortcut link to turn on or o your device.
In the selected device group page, you can select the specic
smart-controlled outlet in the carousel by tapping its icon.
Here you can turn o or on your outlet by tapping the or
button. You can also tap that button from the home screen if
you have previously checked the Add to shortcut option.
To access the settings for your DSP-W320
Outdoor Wi-Fi Smart Plug, tap
navigate to your device on the carousel
> Settings > Device >
11D-Link DSP-W320 User Manual
Page 15
Section 3 - mydlink
Device
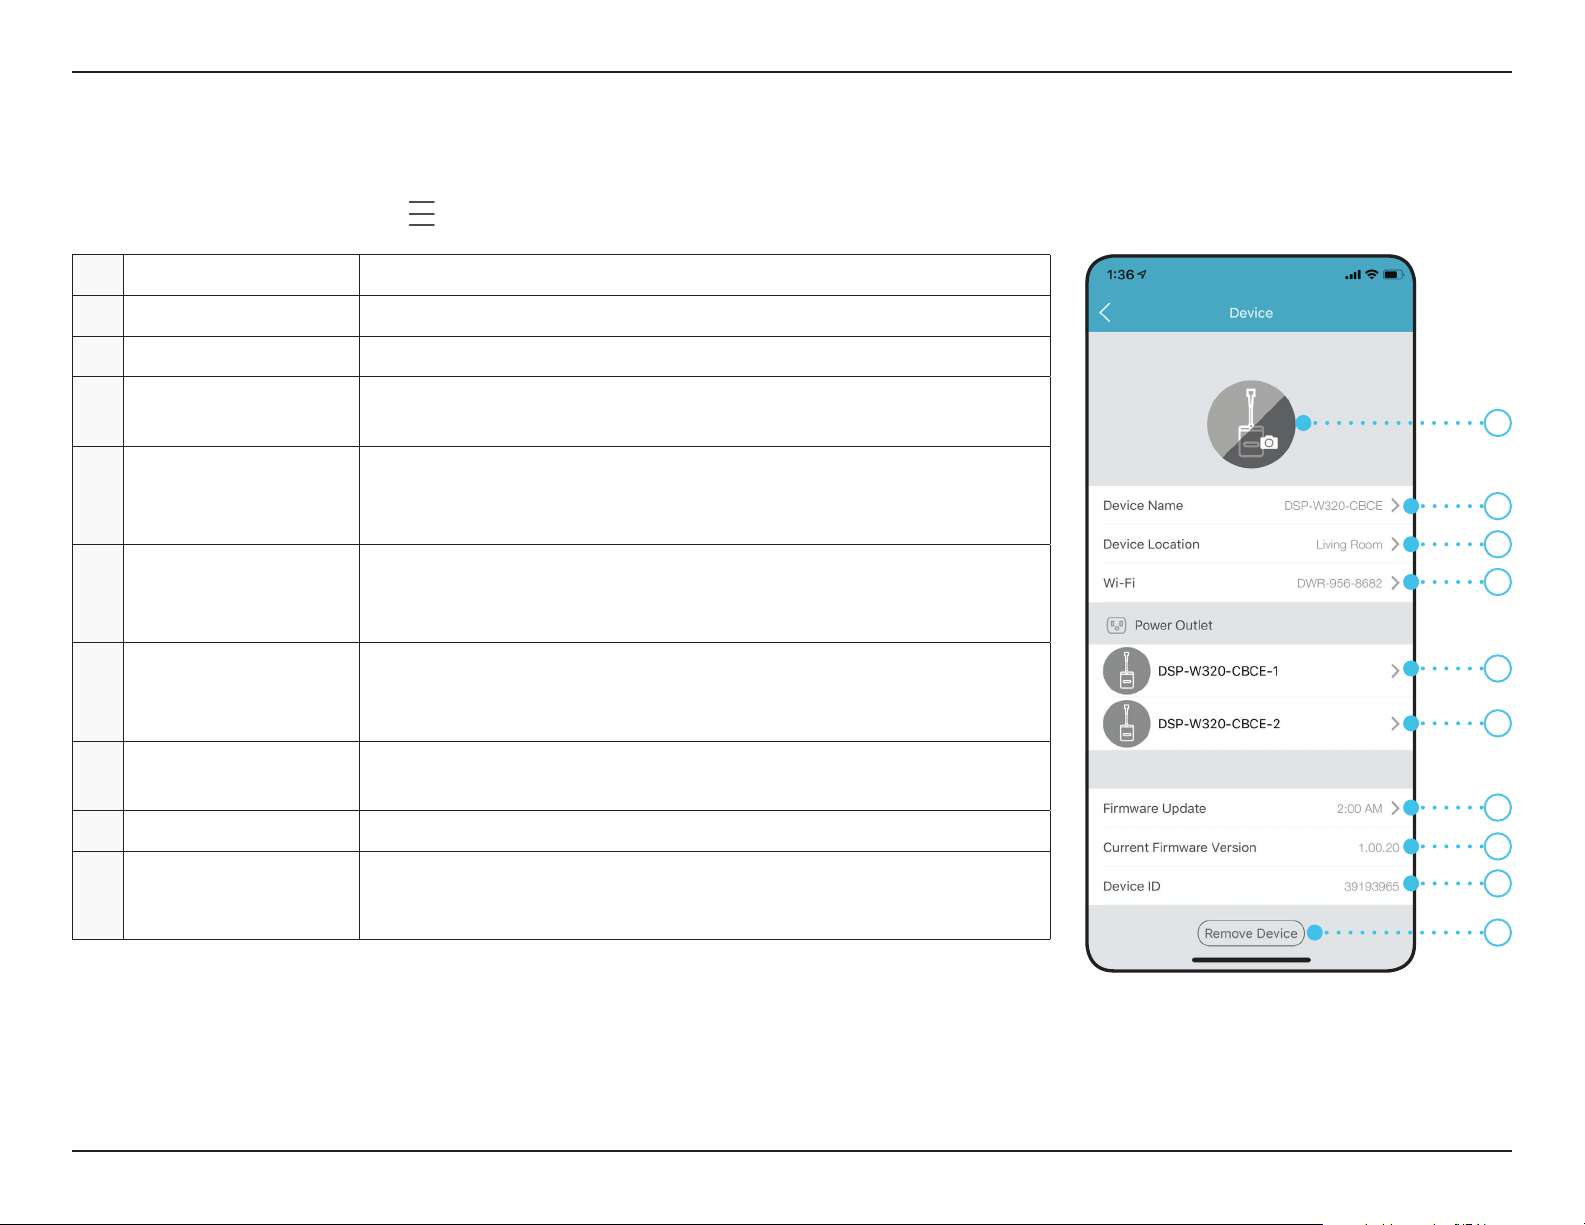
To access the device page:
• From the home page, tap > Settings > Device > navigate to your device on the carousel.
1 Device Photo Tap to add a customized photo of this device.
2 Device Name Tap to change the device’s name.
3 Device Location Tap to change or add a new location for this device.
4 Wi-Fi
Displays the Wi-Fi network that the plug is currently connected to.
To change it, please factory reset the device.
Tap to congure the settings for Power Outlet 1. You can add a
5 Power Outlet 1
customized photo of the device it's plugged to and change the name
for easy identication.
Tap to congure the settings for Power Outlet 2. You can add a
6 Power Outlet 2
customized photo of the device it's plugged to and change the name
for easy identication.
Shows time of auto rmware update. Tap to enter the rmware update
7 Firmware Update
settings. You can choose the most suitable time for automatic updates
as well as turn them o.
Current Firmware
8
Version
This displays the installed version of the rmware on your device.
9 Device ID Identies the device for support issues.
Tap this button to remove this device from your mydlink account.
10 Remove Device
Note: To relink the device, reset it to factory default settings and run the setup
process again.
1
2
3
4
5
6
7
8
9
10
12D-Link DSP-W320 User Manual
Page 16
Section 4 - Troubleshooting
Troubleshooting
What do I do if my smart plug is not working properly?
Reset, then reinstall the smart plug. To reset your smart plug, press and hold the Reset button until the LED turns solid
red.
During installation, ensure that:
• you have an Internet connection on your router
• your router’s Wi-Fi is on
• your mobile device is connected to the Internet
How can I use voice commands to control my smart plug?
The smart plug will work with both Amazon Alexa and the Google Assistant. For setup instructions on these services,
visit the following websites:
Alexa: https://www.dlink.com/en/alexa
The Google Assistant: https://www.dlink.com/en/google-assistant
How can I access my device remotely through the Internet?
In order to use your device remotely through the Internet using the mydlink app, you must register your device with a mydlink
account. You can do this using the free mydlink app. Please go to Using the mydlink App on page 11 for more information.
13D-Link DSP-W320 User Manual
Page 17
Appendix A - Technical Specications
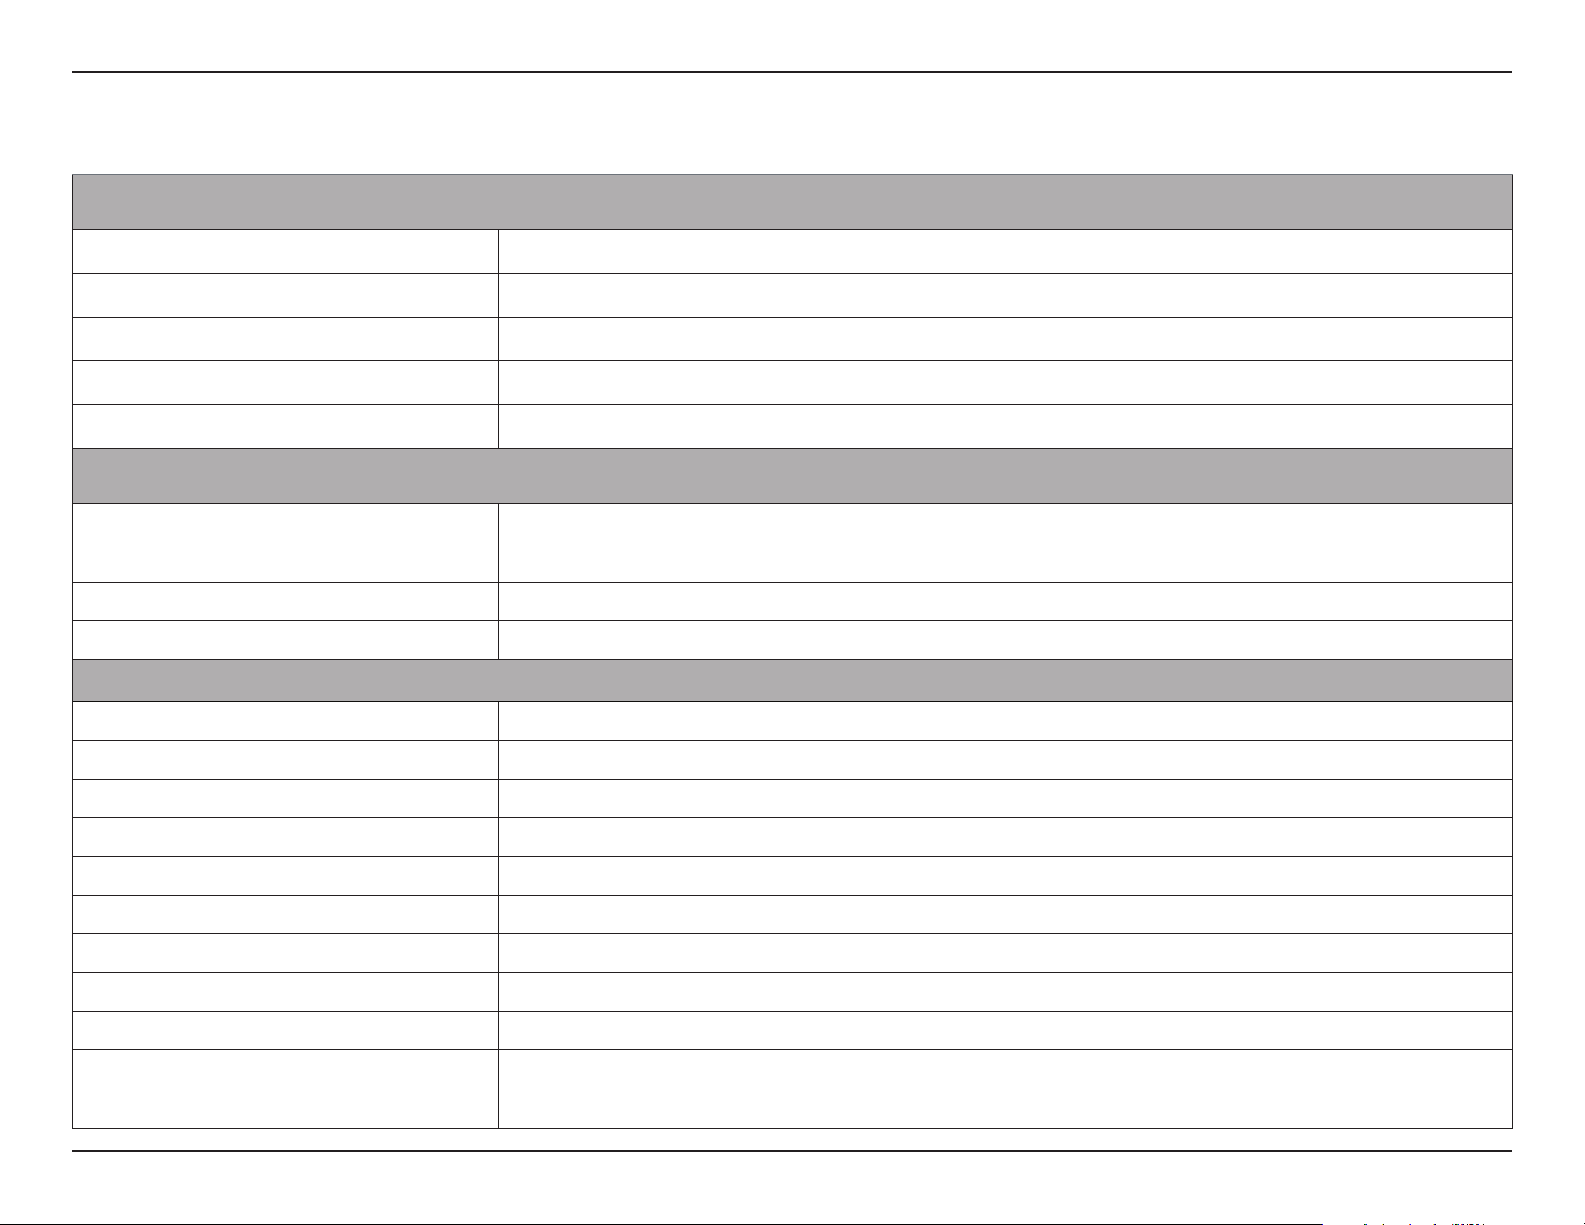
Technical Specications
General
Standards • IEEE 802.11n/g • IEEE 802.15 BLE 4.1
Security • WPA/WPA2
LED • System status • Power status
Antennas • One internal antenna
Buttons • Power Button x 2 • Reset button
Functionality
Support Functions • Smart remote control
• Automation
• Power scheduling
Advanced Features • mydlink™ app for iOS and Android™ devices
App Compatibility • Please refer to the mobile app’s store page to check your device’s compatibility
• Countdown timer
• Firmware Over-The-Air (FOTA)
• Works with the Google Assistant, Alexa, and IFTTT
Physical
Dimensions (L x W x H) • 120.8 x 98.0 x 44.5 mm (4.76 x 3.86 x 1.75 in)
Weight • 336 g (11.85 oz)
Power Input • 2 x US (Type B) outlet: AC 120 V / 15 A • USB: DC 5V / 2.1 A
Input Frequency • 60 Hz
Power Consumption • < 3 W
Maximum Load • 1800 W
Temperature • Operating: -20 to 50 °C (-4 to 122 °F) • Storage: -20 to 70 °C (-4 to 158 °F)
Humidity • Operating: 20% to 80% non-condensing • Storage: 5% to 95% non-condensing
Ingress Protection • IP54
Certifications • FCC
• IC
• cUL
• RoHS
• UL 498A
14D-Link DSP-W320 User Manual
Page 18
Appendix A - Technical Specications
Order Information
Part Number Description
DSP-W320 Outdoor Wi-Fi Smart Plug
15D-Link DSP-W320 User Manual
Page 19
Appendix B - Regulatory Information
Regulatory Information
Federal Communication Commission Interference Statement
This equipment has been tested and found to comply with the limits for a Class B digital device, pursuant to Part 15 of the FCC Rules. These limits
are designed to provide reasonable protection against harmful interference in a residential installation. This equipment generates, uses and
can radiate radio frequency energy and, if not installed and used in accordance with the instructions, may cause harmful interference to radio
communications. However, there is no guarantee that interference will not occur in a particular installation. If this equipment does cause harmful
interference to radio or television reception, which can be determined by turning the equipment o and on, the user is encouraged to try to
correct the interference by one of the following measures:
- Reorient or relocate the receiving antenna.
- Increase the separation between the equipment and receiver.
- Connect the equipment into an outlet on a circuit dierent from that to which the receiver is connected.
- Consult the dealer or an experienced radio/TV technician for help.
Non-modications Statement:
Any changes or modications not expressly approved by the party responsible for compliance could void the user’s authority to operate this
equipment.
Caution:
This device complies with Part 15 of the FCC Rules. Operation is subject to the following two conditions:
(1) This device may not cause harmful interference, and (2) this device must accept any interference received, including interference that
may cause undesired operation.
This device and its antenna(s) must not be co-located or operating in conjunction with any other antenna or transmitter except in accordance
with FCC multi-transmitter product procedures. For product available in the USA/Canada market, only channel 1~11 can be operated. Selection
of other channels is not possible.
Note
The country code selection is for non-USA models only and is not available to all USA models. Per FCC regulations, all WiFi product marketed in
the USA must be xed to USA operational channels only.
16D-Link DSP-W320 User Manual
Page 20
Appendix B - Regulatory Information
IMPORTANT NOTICE:
FCC Radiation Exposure Statement
This equipment complies with FCC radiation exposure limits set forth for an uncontrolled environment. This equipment should be installed and
operated with minimum distance 20 cm between the radiator and your body.
Innovation, Science and Economic Development Canada (ISED) Statement:
This Class B digital apparatus complies with Canadian ICES-003.
Cet appareil numérique de la classe B est conforme à la norme NMB-003 du Canada.
Innovation, Science and Economic Development Canada (ISED) Statement:
This device complies with ISED licence-exempt RSS standard(s). Operation is subject to the following two conditions:
(1) this device may not cause interference, and
(2) this device must accept any interference, including interference that may cause undesired operation of the device.
Le présent appareil est conforme aux CNR d'ISED applicables aux appareils radio exempts de licence. L'exploitation est autorisée aux deux
conditions suivantes :
(1) l'appareil ne doit pas produire de brouillage, et
(2) l'utilisateur de l'appareil doit accepter tout brouillage radioélectrique subi, même si le brouillage est susceptible d'en compromettre le
fonctionnement.
Radiation Exposure Statement
This equipment complies with ISED radiation exposure limits set forth for an uncontrolled environment. This equipment should be installed and
operated with minimum distance 20 cm between the radiator and your body.
Déclaration d'exposition aux radiations
Cet équipement est conforme aux limites d'exposition aux rayonnements ISED établies pour un environnement non contrôlé. Cet équipement
doit être installé et utilisé avec un minimum de 20 cm de distance entre la source de rayonnement et votre corps.
This equipment complies with IC RSS-102 radiation exposure limits set forth for an uncontrolled environment. This equipment should be
installed and operated with a minimum distance of 20cm between the radiator and any part of your body.
Pour se conformer aux exigences de conformité CNR 102 RF exposition, une distance de séparation d'au moins 20 cm doit être maintenue entre
l'antenne de cet appareil ettoutes les personnes.
17D-Link DSP-W320 User Manual
 Loading...