

D-Link DSM-750 Quick Setup Manual
OK
ABC
DEF
JKL
GHI MNO
TUV
PQRS
WXYZ
123
4
5
6
7
8
0
9
CLEAR ENTER
DSM-750
REPEATSHUFFLE SEARCH
AUDIO
TRACK
Channel Page
Recorded
TV
Options
Guide
Live TV
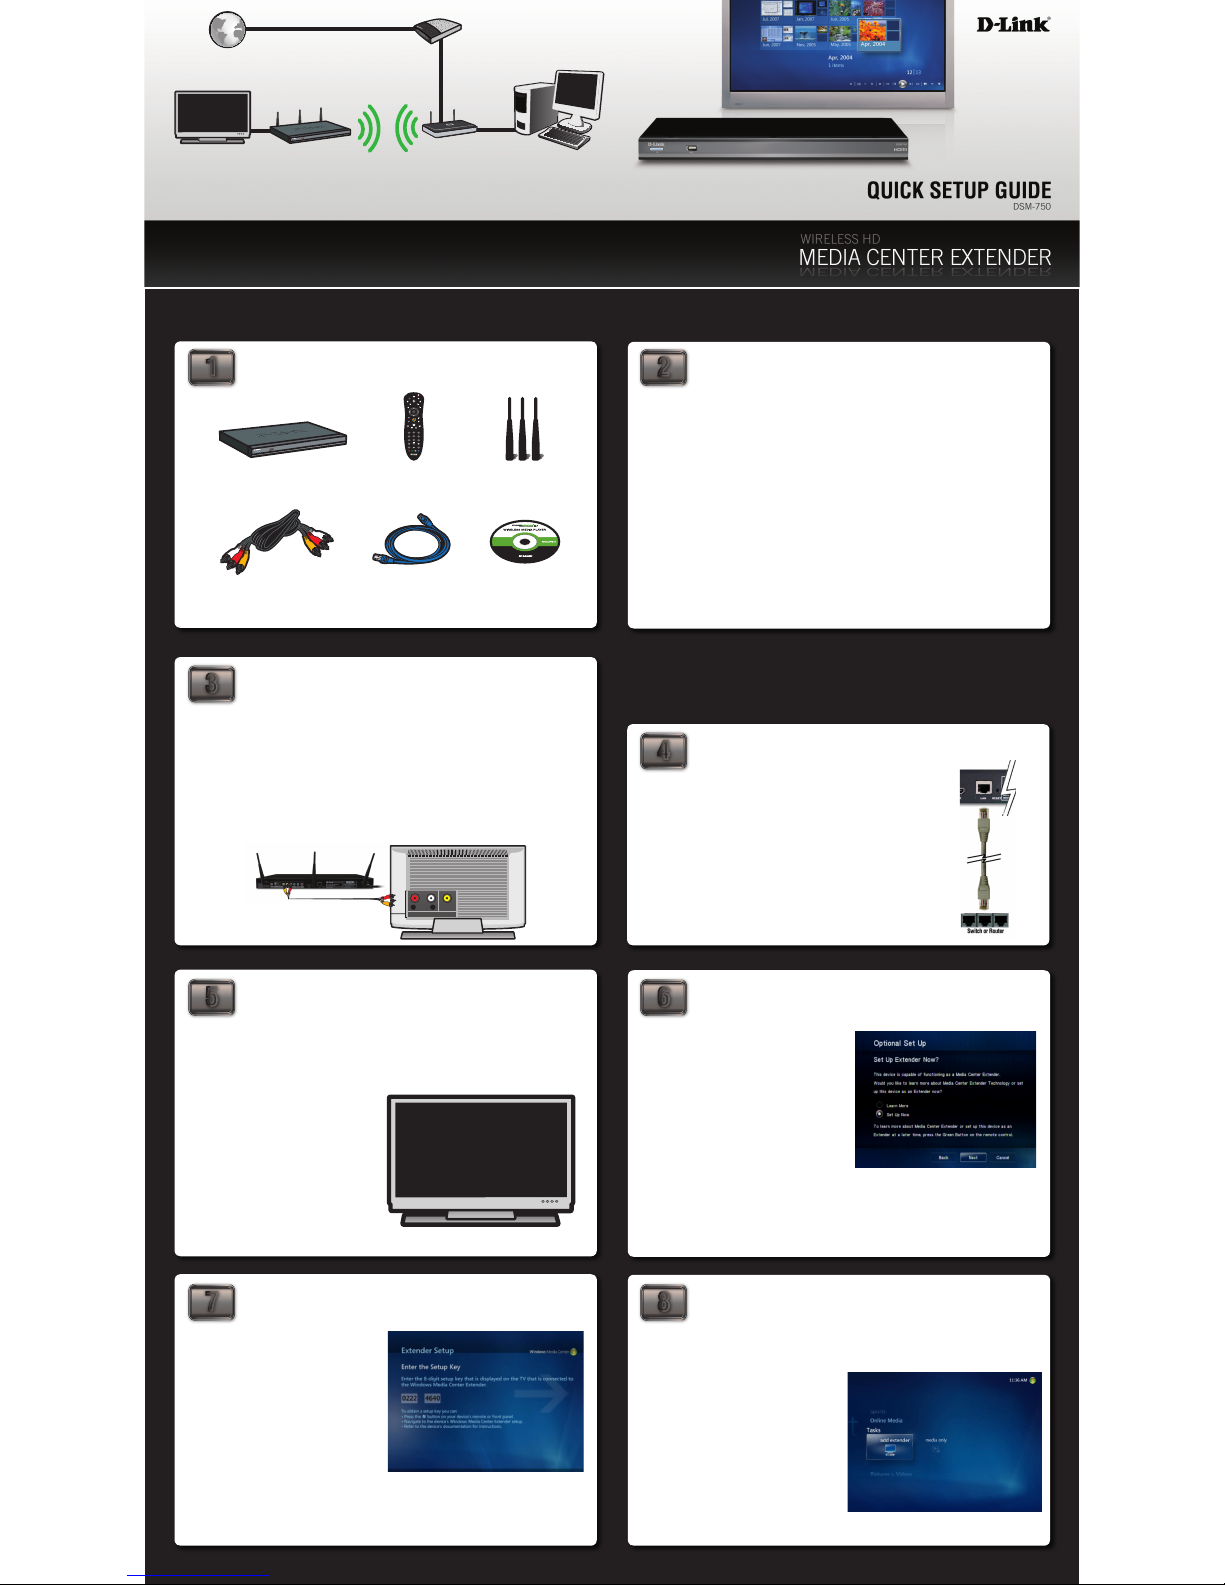
REMOVE CONTENTS FROM THE BOX
1
4
3
2
8
7
6
5
Documentation and
Warranty on CD
CAT5 Ethernet
Cable
Standard Composite
(Audio/Video) Cable
D-Link DSM-750
Wireless HD
Media Center Extender
Remote Control
(2 AAA Batteries
Included)
3 Wireless
Antennas
PREPARING FOR INSTALLATION
TAKE YOUR CD TO THE PC
CONNECT AUDIO/VIDEO CABLE TO TV
POWER ON THE DSM-750
SELECT THE TV INPUT SOURCE OPTIONAL SET UP
8-DIGIT SETUP KEY COMPLETE EXTENDER SETUP
©2008 D-Link Corporation/D-Link Systems, Inc. All rights reserved. D-Link, the D-Link logo, MediaLounge, and the MediaLounge logo are trademarks or registered trademarks of D-Link Corporation or its subsidiaries in the United States and other countries. Other trademarks are the property of their respective owners.
Thank you for purchasing the DSM-750 Wireless HD Media Center Extender.
If you have Windows Vista® Ultimate, Home Premium or later, and want to use your
DSM-750 as a Media Center Extender, you will need to get the Media Center Extender
Update for your PC by either:
• Using Windows Update from your Windows Vista PC.
or
• Insert the setup CD into your PC’s CD-ROM drive and click on the Install Media Center
Extender Update button on the setup CD.
You can find more information on the steps below by viewing the User Manual on the
CD.
For the quickest and easiest installation, it is highly recommended that both DHCP and
SSID Broadcast are enabled on your home network.
Composite Audio/Video Connection -
Plug the supplied yellow video cable into the VIDEO
connector on the back of the DSM-750 and the matching opposite end of the cable to your
television input.
Plug the supplied red and white connectors into the AUDIO (color-coded
matching) connectors on the DSM-750.
Plug the matching opposite ends of the cable to your
television or audio/video system.
You may skip using the supplied Composite Audio/Video cable, and use one of the other
audio and video connections. These cables are not included with the DSM-750, and
only one audio and one video connection is required. For more information on the other
audio/video connections, please refer to the User Manual.
Connect the DSM-750 to your router with the supplied Ethernet
cable.
Plug the DSM-750 power cord into a power outlet. Position your
media player so that you can see it from where you view your
TV. Power on the DSM-750 by pressing the Power button on the
DSM-750 remote control.
Note: Make sure your media player is not behind the TV so you can
use your DSM-750 remote control.
Using the TV’s remote control, turn on your TV and select the correct audio/video input
source. You will know you selected the correct input when you see the MediaLounge™
startup screen or Optional Set Up screen.
If you are NOT using your DSM-750 as a Media
Center Extender, click Cancel. After clicking
Cancel, click Finish on the following screen.
If DHCP is enabled on your network, your wired
setup is complete and the DSM-750 home
screen will appear.
Note: You can also setup your DSM-750 as a
Media Center Extender at a later time.
If you ARE using your DSM-750 as a Media
Center Extender, click Next. On the following
screen, click Next again to continue.
Note: Most networks have DHCP enabled to allow devices to connect automatically. If
DHCP is not enabled, you will have to configure your network settings manually. Please
refer to the User Manual’s “Setup” section for more information.
An 8-digit Setup Key will appear on the TV.
Please write down or remember this 8-digit
Setup Key and then go to your PC to finish
the setup.
While at your PC, click Start and select Windows Media Center. Select Tasks by scrolling
down the menu. Once you are in Tasks, scroll right and click on Add Extender.
Follow the on-screen instructions to enter the
8-digit Setup Key and to configure Windows
Media Center for your DSM-750.
Congratu lations, wired E xtender setup is
complete.
Internet
TV DSM-750 Media Player Router PC
Modem
Welcome to a whole new world of digital ent ertainment! The following steps will help you co nnect the
D-Link® DSM-750 to yo ur home network and to yo ur Windows Vista® Media Cente r PC. Once the device
has bee n set up, you r digital me dia can be st reamed to yo ur TV.
OVERVIEW
Note: If you don’t remember how to
change TV inputs, refer to the TV User
Manual for instructions.
It may ta ke seve ral se co nds aft er
selecting the correct input to see the
startup screen.
Note: Your Setup Key will be a unique number.
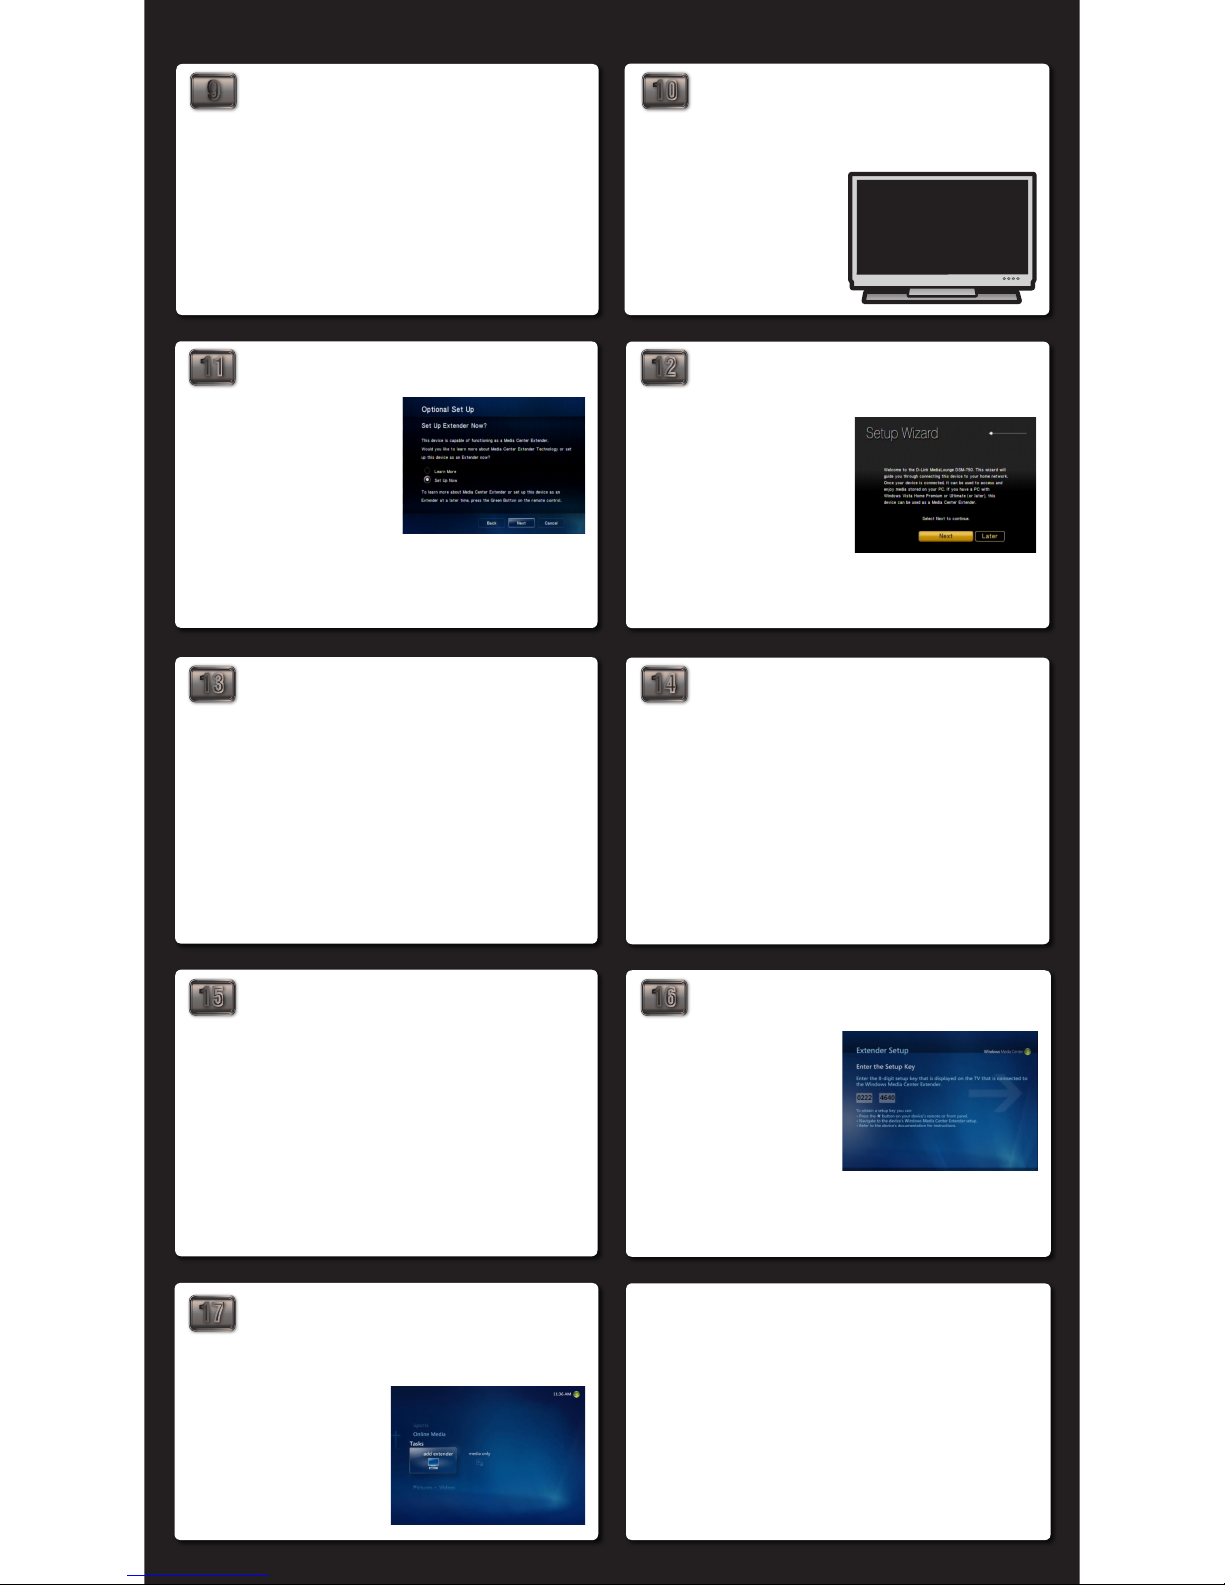
WIRED SETUP
If you choose to connect to your wireless network, please turn this Quick Start
Guide over and follow the instructions beginning with Step 9.
TV
video
_
audio
_
AV-IN
R L
OPTIONAL SET UP
11
1413
12
16
15
SETUP WIZARD
CONFIGURATION MODE
CONNECTING TO WIRELESS NETWORK
©2008 D-Link Corporation/D-Link Systems, Inc. All rights reserved. D-Link, the D-Link logo, MediaLounge, and the MediaLounge logo are trademarks or registered trademarks of D-Link Corporation or its subsidiaries in the United States and other countries. Other trademarks are the property of their respective owners.
10
SELECT THE TV INPUT SOURCE
9
POWER ON THE DSM-750
Attach the supplied three antennas by threading them onto the gold-colored antenna
connectors located on the back of the DSM-750. Be sure the antennas are secure and
in an upright position.
After you’ve connected the antennas, plug the end of the DSM-750 power supply cord
into a power outlet. Position your media player so that you can see it from where you
view your TV. Power on the DSM-750 by pressing the Power button on the DSM-750
remote control.
Note: Make sure your media player is not behind the TV so you can use your DSM-750
remote control.
If your wireless home network is using wireless encryption, you will need to provide
the DSM-750 with the network security passphrase. By using the remote control’s
alphanumeric keypad, or the On-Screen Keyboard, you may enter the network security
passphrase. When you have completed entering the network security passphrase, use
the down arrow to select and then click Next.
Note: This passphrase must exactly match the network security passphrase.
Follow the on-screen instructions to continue with the wireless network setup.
• Click Next to begin the W ireless Setup
Wizard.
• Please wait while the DSM-750 searches
for available wireless networks.
• Select your wireless network from the list
of networks that appear.
Note: If you do not see your wireless network, refer to “Troubleshooting” in the User
Manual for information as to why this may have happened.
If DHCP is enabled on your network, select Auto (Recommended).
Most networks have DHCP enabled. If you are not sure, select Auto (Recommended).
If you do not have DHCP enabled, select Advanced Setup to enter the wireless network
network settings manually.
DHCP (Dynamic Host Configuration Protocol) allows network settings required by the
DSM-750 to be set automatically.
Note: Please refer to the User Manual’s “Setup” section for more information.
Connecting to the wireless network may take about a minute.
The “You have successfully set up your device on your home network” message should
appear.
If you chose NOT to setup the DSM-750 as a Media Center Extender, click Finish. Your
wireless setup is complete and the DSM-750 home screen will appear.
If you ARE using the DSM-750 as a Media Center Extender, click Next to continue. On
the Extender Setup screen, click Next again.
Note: If you did not receive the “successful” message mentioned above, please refer to
your User Manual’s “Troubleshooting” section for more information.
Using the TV’s remote control, turn on your TV and select the correct audio/video input
source. You will know you selected the correct input when you see the MediaLounge™
startup screen or Optional Set Up screen.
If you are NOT using your DSM-750 as a Media
Center Extender, click Cancel. After clicking
Cancel, click Finish on the following screen.
Note: You can also setup your DSM-750 as a
Media Center Extender at a later time.
If you ARE using your DSM-750 as a Media
Center Extender, click Next. On the following
screen, click Next again to continue.
Note: Most networks have DHCP enabled to
allow devices to connect automatically. If DHCP is not enabled, you will have to configure
your network settings manually. Please refer to the User Manual’s “Setup” section for
more information.
ENTER SECURITY PASSPHRASE
SUPPORT
U.S. and Cana dian custom ers can contact D-Link® Technical Support through our website or by
phone.
United States
Telephone 877-453-5465
Web http://support.dlink.com
Canada
Telephone 800-361-5265
Web http://support.dlink.com
Note: If you don’t remember how to
change TV inputs, refer to the TV User
Manual for instructions.
It may take sev era l s econds af ter
selecting the correct input to see the
startup screen.
8-DIGIT SETUP KEY
An 8-digit Setup Key will appear on the TV.
Please write down or remember this 8-digit
Setup Key and then go to your PC to finish
the setup.
17
COMPLETE EXTENDER SETUP
While at your PC, click Start and select Windows Media Center. Select Tasks by scrolling
down the menu. Once you are in Tasks, scroll right and click on Add Extender.
Note: If you setup your Media Center Extender later, you will need a new setup key which
will be displayed on your TV.
WIRELESS SETUP
Follow the on-screen instructions to enter
the 8-digit Setup Key and to c onfigu re
Windows Media Center for your DSM-750.
Congratulations, your wireless Extender
setup is complete.
 Loading...