

Page 1
Version 1.0
DSM-G600
Wireless Network Storage Enclosure
Page 2
System Requirements
DSM-G600 Install GuideSystem Requirements
Computer with Windows
An available Ethernet port on the networ
* It is required that an Ethernet cable is used during initial setup. Once
your wireless confi guration is set, you may disconnect the Ethernet cable
and begin communicating wirelessly with your DSM-G600.
Internet Explorer 6.0 or Net
An 802.11g/b wireless network
USB Hard Drive and/or Internal 3.5” ATA/IDE Hard Drive
®
XP or 2000
scape
®
Navigator 7.0 and above
k*
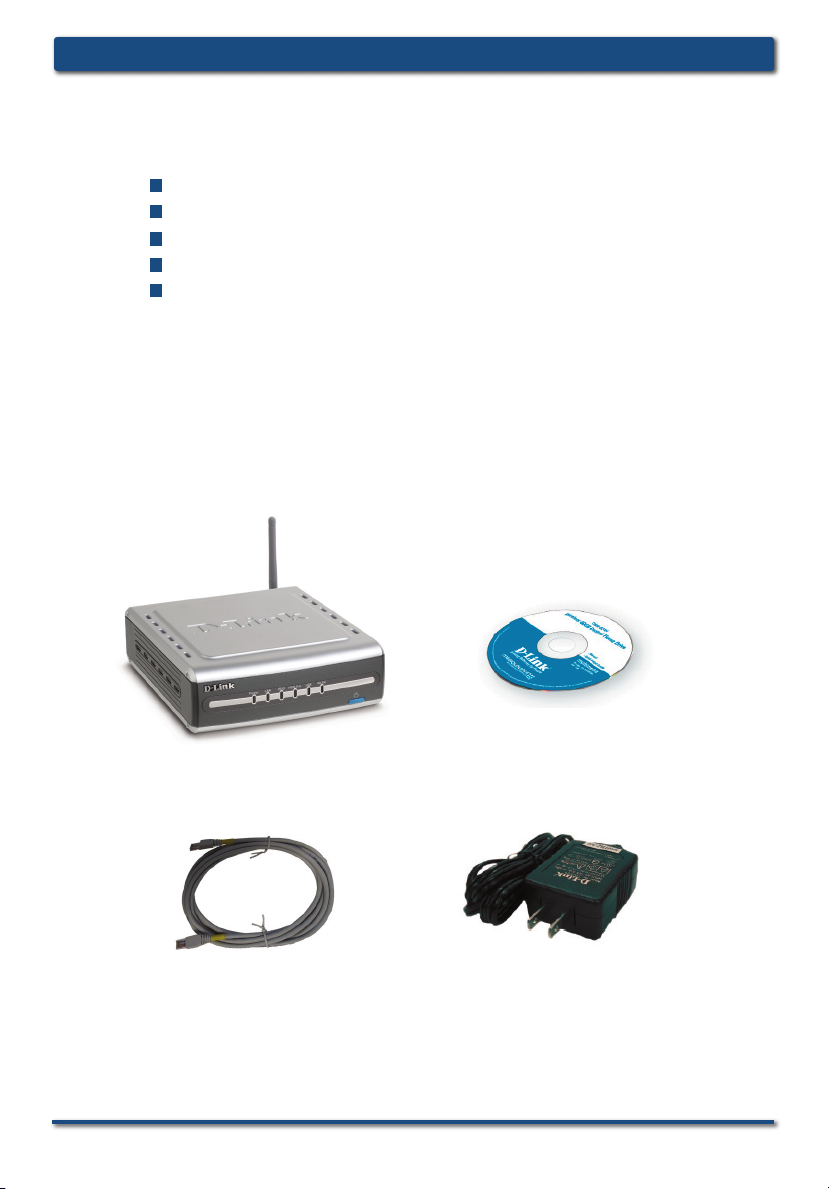
Package Contents
Manual and Software
D-Link DSM-G600
Wireless Storage
Enclosure
on CD
Ethernet Cable
12V 3A Power Supply
2 D-Link Systems, Inc.
Page 3
DSM-G600 Install Guide Hardware Overview
WLAN LED
A solid light indicates that wireless
is ready. This LED blinks during
wireless data transmission.
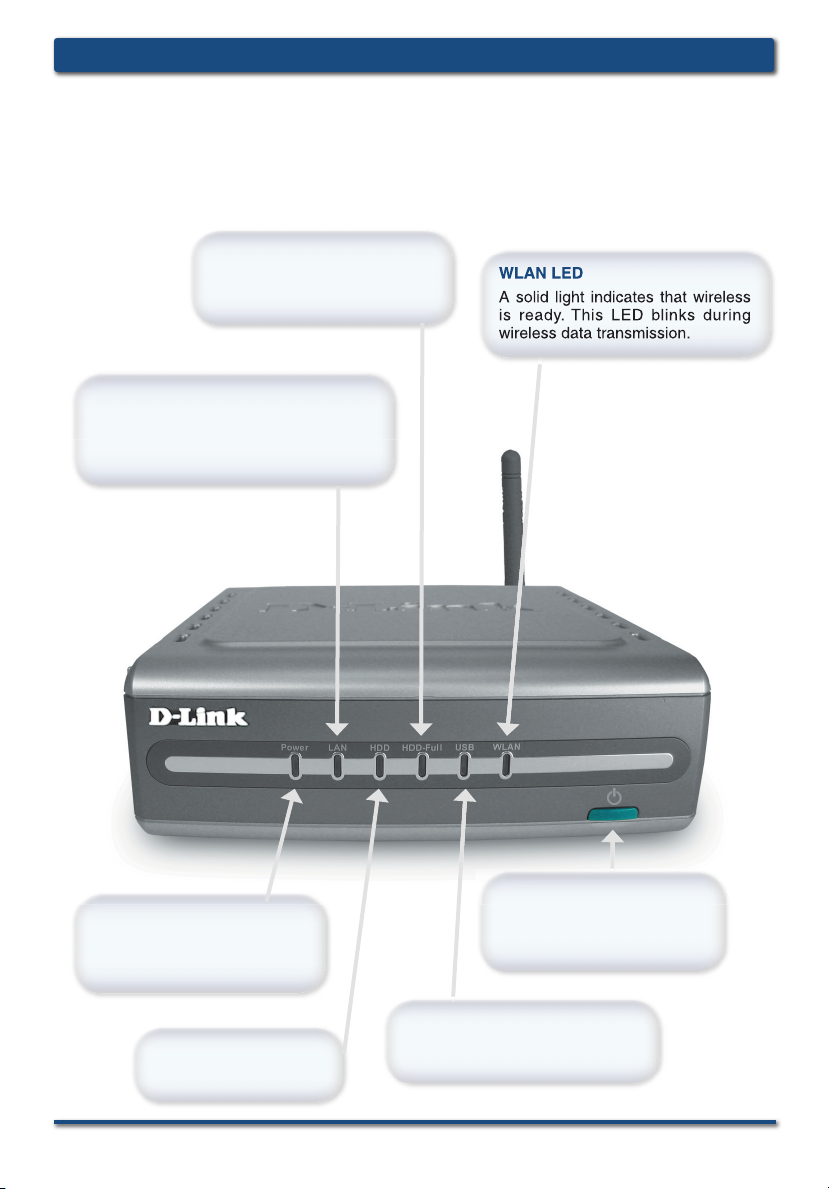
Front Panel
HDD-Full LED
Indicates that the internal hard
drive is out of space.
LAN LED
Solid indicates an Ethernet connection.
Blinking indicates traffi c at the Ethernet
port.
WLAN LED
A solid light indicates that wireless
is ready. This LED blinks during
wireless data transmission.
Power LED
Solid indicates a connection to
a good power source. Blinking
indicates startup or a reboot.
HDD LED
Indicates activity on the
internal hard drive.
D-Link Systems, Inc. 3
Power Button
Press to turn the device on.
To turn off, hold button in for 5
seconds and then release.
USB LED
A solid light indicates that a USB
drive is connected.
Page 4
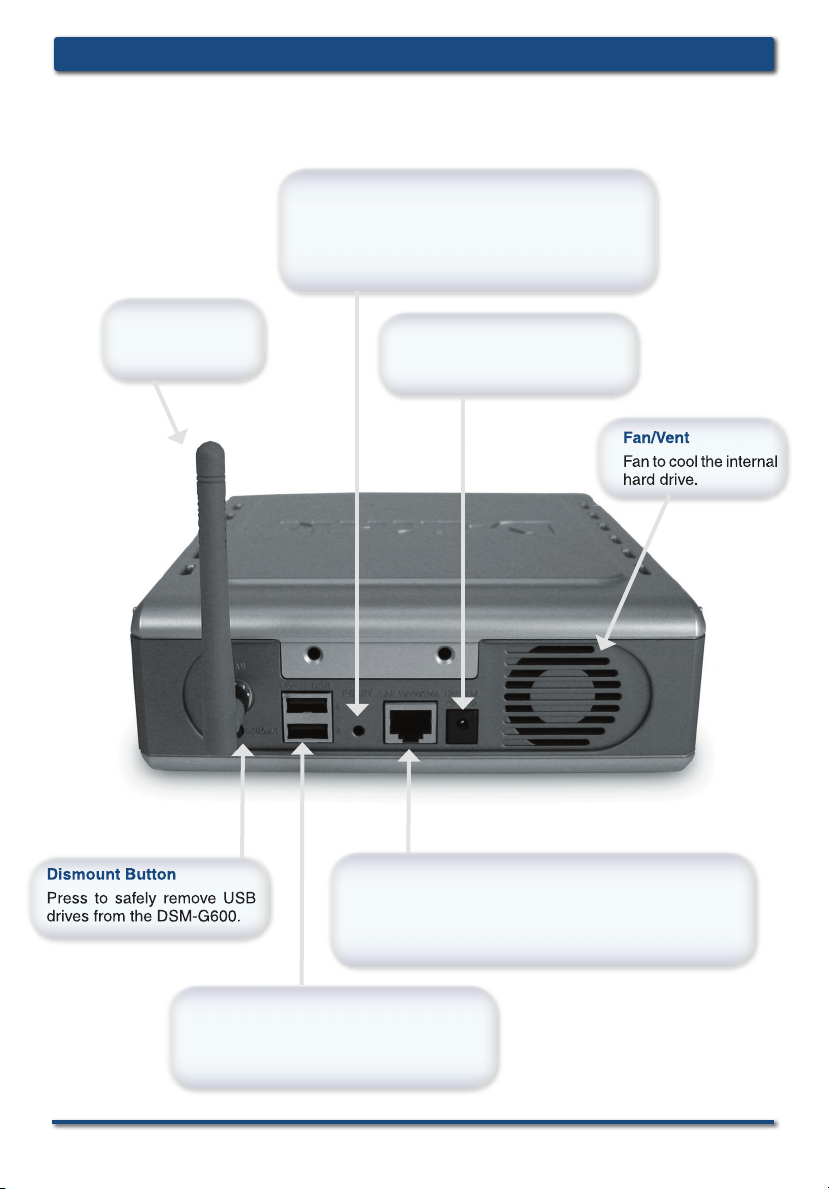
Rear Panel
Dismount Button
USB
DSM-G600 Install GuideHardware Overview
Reset Button
Pressing the reset button for 10 seconds with
a paper clip will restore the unit to the original
factory default settings. The button is inside the
hole to prevent an accidental reset.
Antenna
Connects to a
wireless network.
Dismount Button
Press to safely remove USB
drives from the DSM-G600.
Power Receptor
Re cepto r for the suppli ed
power adapter.
Fan/Vent
Fan to cool the internal
hard drive.
LAN Port
Connects to your Ethernet network. The LAN port
supports Auto MDI/MDI-X, allowing you to connect a
straight-through or crossover cable.
4 D-Link Systems, Inc.
USB 2.0 Ports
Use these ports to connect USB 2.0 drives.
USB 1.1 drives may also be connected but
will be limited to USB 1.1 speed.
Page 5
DSM-G600 Install Guide Installation Overview
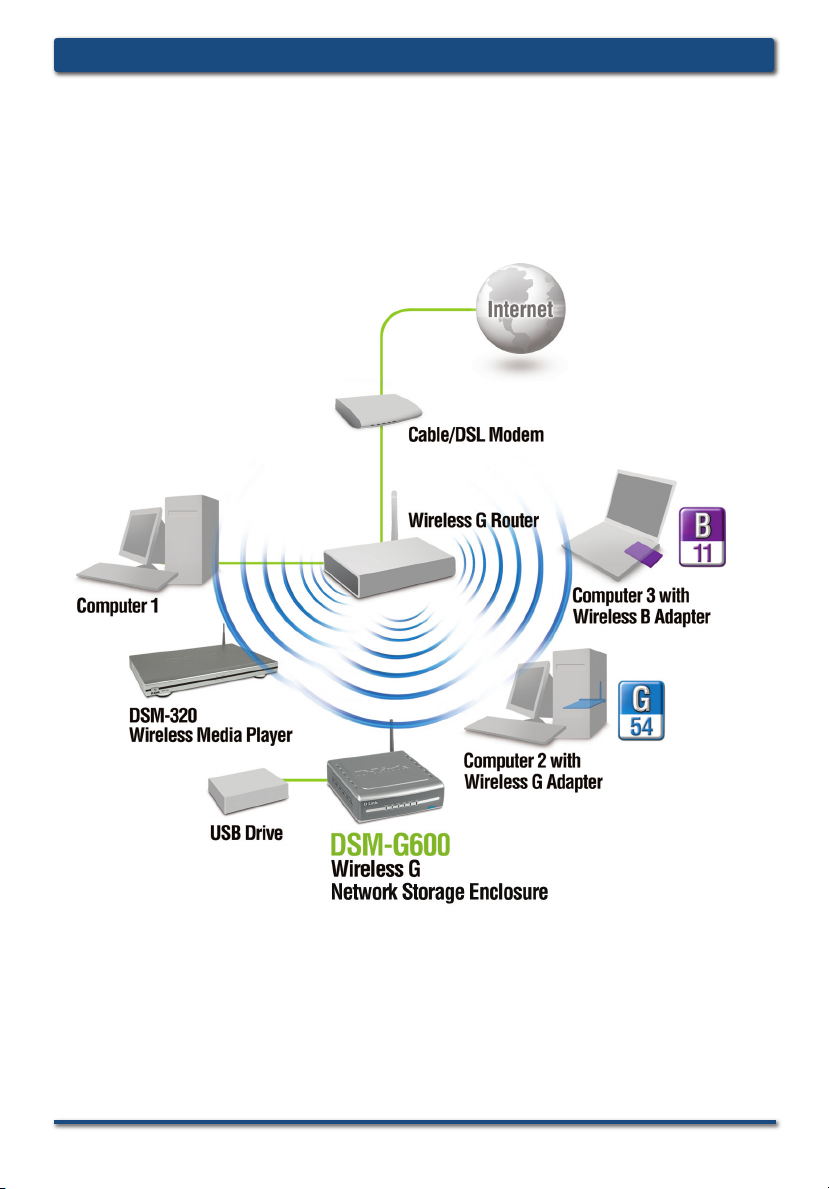
Installation Overview
Once you’ve completed your DSM-G600 installation, your network may appear
similar to the diagram below.
D-Link Systems, Inc. 5
Page 6
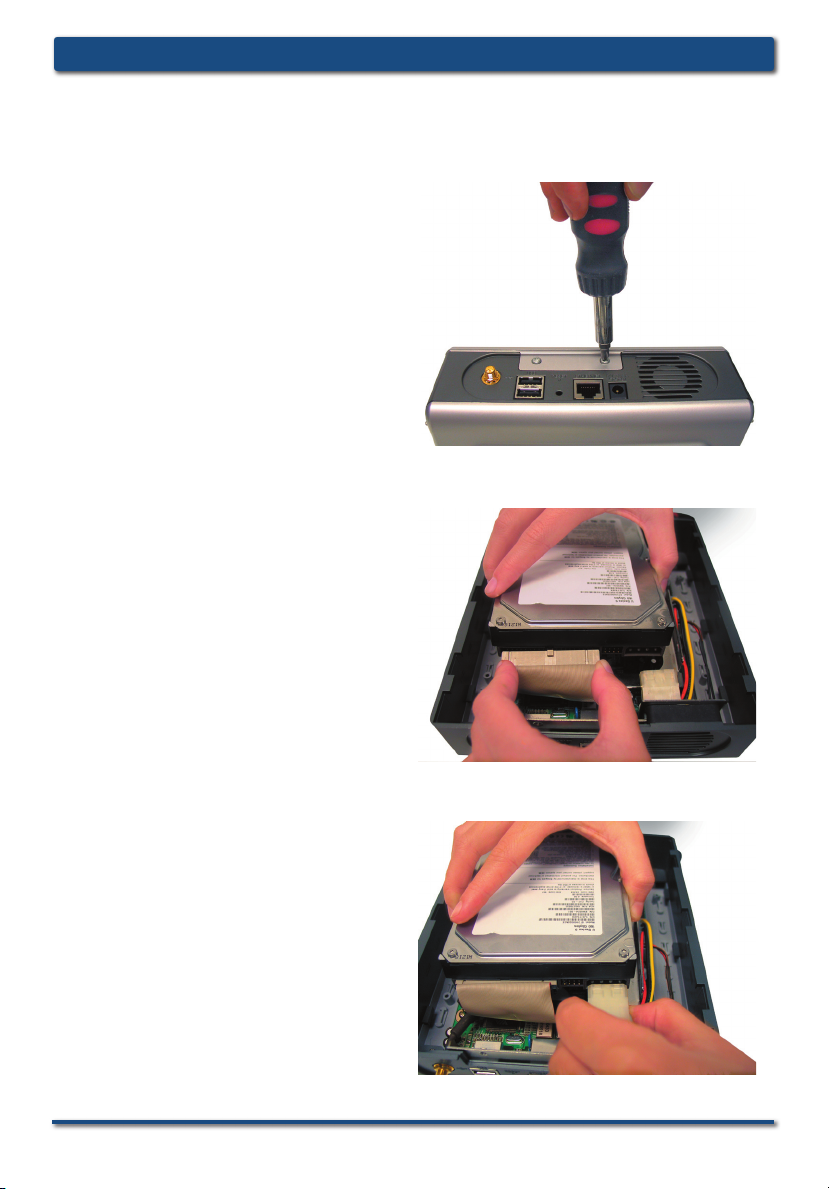
Installing the Hardware
A. Unscrew the two screws
on the back panel of the
DSM-G600 to remove
the cover.
B. Connect the IDE cable to
the IDE cable connector
on your hard drive.
DSM-G600 Install GuideInstalling the Hardware
Note: Make sure the
jumper setting on your
hard dri ve is set to
Master or Cable Select.
C. Connect the power cable
to the power connector
on your hard drive.
6 D-Link Systems, Inc.
Page 7

DSM-G600 Install Guide Installing the Hardware
Installing the Hardware (continued)
D. Use the mounting screw to
secure the hard drive to
the DSM-G600.
E. Replace the cover and
screw th e two screws
on the back panel of the
DSM-G600.
F. Con n ect an E ther net
cable to the Ethernet port
located on the back of the
DSM-G600.
Note: It is required that an Ethernet cable is used during initial setup. Once
your wireless confi guration is set, you may disconnect the Ethernet cable and
begin communicating wirelessly with your DSM-G600.
D-Link Systems, Inc. 7
Page 8

DSM-G600 Install GuideInstalling the Hardware
Installing the Hardware (continued)
G. Connect the antenna to
the antenna connector
located on the back of the
DSM-G600.
H. Connect the power adapter
to the power receptor on
the back panel. Then plug
the other end of the power
adapter into a wall outlet or
power strip. The Power LED
will turn on to indicate proper
operation.
Note: When you fi rst power on, the DSM-G600 will automatically format
your hard drive if it is unformatted. This process may take several minutes
depending on the size of your hard drive. During this process, the power
LED will blink. Once the power LED is solid, you may then access the web
based confi guration of the DSM-G600. Do not power the unit off during
this process.
8 D-Link Systems, Inc.
Page 9

DSM-G600 Install Guide Wireless Installation Considerations
Wireless Installation Considerations
The DSM-G600 lets you access your stored data and media fi les using a wireless
connection from virtually anywhere within the operating range of your wireless network.
Keep in mind, however, that the number, thickness and location of walls, ceilings, or
other objects that the wireless signals must pass through, may limit the range. Typical
ranges vary depending on the types of materials and background RF (radio frequency)
noise in your home or business. The key to maximizing wireless range is to follow these
basic guidelines:
Keep the number of walls and ceilings between the DSM-G600 and other network
1
devices to a minimum - each wall or ceiling can reduce your DSM-G600’s range
from 3-90 feet (1-30 meters.) Position your devices so that the number of walls or
ceilings is minimized.
Be aware of the direct line between network devices. A wall that is 1.5 feet thick
2
(.5 meters), at a 45-degree angle appears to be almost 3 feet (1 meter) thick. At a
2-degree angle it looks over 42 feet (14 meters) thick! Position devices so that the
signal will travel straight through a wall or ceiling (instead of at an angle) for better
reception.
Building Materials make a difference. A solid metal door or aluminum studs may
3
have a negative effect on range. Try to position access points, wireless routers, and
computers so that the signal passes through drywall or open doorways. Materials and
objects such as glass, steel, metal, walls with insulation, water (fi sh tanks), mirrors,
fi le cabinets, brick, and concrete will degrade your wireless signal.
Keep your product away (at least 3-6 feet or 1-2 meters) from electrical devices or
4
appliances that generate RF noise.
If you are using 2.4GHz cordless phones or X-10 (wireless products such as ceiling
5
fans, lights, and home security systems), your wireless connection may degrade
dramatically or drop completely. Make sure your 2.4GHz phone base is as far away
from your wireless devices as possible. The base transmits a signal even if the
phone in not in use.
D-Link Systems, Inc. 9
Page 10

Confi guration
Open your Web browser and
type
http://dsm-g600 into the
URL address box. Then press
the Enter or Return key.
If you cannot access the DSM-G600 with the
DNS name, enter the IP address instead. If a
DHCP server is not available, the DSM-G600
will default to an IP address of 192.168.0.100.
Your computer must have an IP address in the
same network (192.168.0.x where x is between
1 and 254).
If you have a DHCP server, you can check
the DHCP log or table to fi nd the IP address
received by the DSM-G600.
DSM-G600 Install GuideConfi guration
The logon pop-up screen will appear.
Type admin for the user
name and leave the
password fi eld blank.
Click
OK.
Click Run Wizard.
10 D-Link Systems, Inc.
Page 11

DSM-G600 Install Guide Confi guration
Confi guration (continued)
The Wizard will guide you through four
steps:
System
LAN or Wireless
Time
Additional settings
Click Next.
Enter the Server Name. This is the
name of the DSM-G600 device.
Enter and confi rm a new password
Click Next.
Select the type of network: LAN (Wired) or Wireless.
Select either Static or Dynamic IP address. When Static is selected, you will
fi ll in these fi elds:
Static IP Address
Subnet Mask
Gateway Address - Usually the LAN
address of your router.
DNS Address - A Domain Name
Server translates Domain names into
IP addresses.
Click Next.
.
D-Link Systems, Inc. 11
Page 12

DSM-G600 Install GuideConfi guration
Confi guration (continued)
Select Dynamic IP Address when you
have a DHCP server in your network.
No other confi guration is required on
this screen when Dynamic IP address
is selected.
Click Next.
If you selected LAN, please skip to page 13 to continue your setup.
In Wireless Mode, select Client or
Access Point mode.
Select Client if you will be connecting
to an existing wireless router or access
point. Select Access Point if wireless
clients will be connecting directly to the
DSM-G600.
Click Next.
12 D-Link Systems, Inc.
Page 13

DSM-G600 Install Guide Confi guration
Confi guration (continued)
All devices on your network must share the same SSID and Channel in order
to communicate.
When Client is selected, you can click
Site Survey to select a network from
a list of available wireless networks
or you may enter the wireless settings
manually. The SSID must be the same
for all devices in the network.
Click Next.
If your wireless network is using WEP
security, click WEP and enter the
encryption settings.
Click Next.
If your wireless network is using
WPA-PSK security, click WPA-PSK
and enter the encryption settings.
Click Next.
For more information on WEP and WPA security, please refer to section on
Wireless Security in your manual located on the D-Link CD-ROM.
D-Link Systems, Inc. 13
Page 14

Confi guration (continued)
Select the appropriate Time
Zone in the pulldown menu.
Set device date and time
Click Next.
Enter the Workgroup name.
DSM-G600 Install GuideConfi guration
Click Restart.
You have completed the basic confi guration using the setup wizard!
14 D-Link Systems, Inc.
Page 15

DSM-G600 Install Guide Accessing the DSM-G600
Accessing the DSM-G600
in Windows® XP using UPnP™
®
For Windows
To learn how to activate UPnP, please refer to page 15 of the manual.
Double-click My Network
Places on the Windows
Desktop.
XP users, it is recommended to activate UPnP for ease of use.
Once connected, the device
will appear in My Network
Places as a shared folder.
D-Link Systems, Inc. 15
Page 16

DSM-G600 Install GuideAccessing the DSM-G600
Accessing the DSM-G600 in
Windows® 2000/XP
Double click My Computer on
the Windows Desktop.
Under Tools, select Map
Network Drive
.
Select a drive letter for
the DSM-G600.
Select Browse to fi nd
the DSM-G600 on the
network.
16 D-Link Systems, Inc.
Page 17

DSM-G600 Install Guide Accessing the DSM-G600
Accessing the DSM-G600 in
Windows® 2000/XP (continued)
Select your DSM-G600
share folder.
Click OK.
Click Finish.
In the My Computer window, the
newly created mapped drive will
be displayed. Double-click the
drive to access the DSM-G600.
D-Link Systems, Inc. 17
Page 18

DSM-G600 Install GuideAccessing the DSM-G600
Accessing the DSM-G600
in Mac OS X
From the desktop Go menu,
select
Connect to Server.
Click
Browse.
Click DSM-G600.
Click OK.
By default, there is no password.
Click OK.
18 D-Link Systems, Inc.
Page 19

DSM-G600 Install Guide Accessing the DSM-G600
Accessing the DSM-G600
in Mac OS X (continued)
The share window will open.
The DSM-G600 will appear
on your desktop.
on the shared drive to access
your Wireless Central Home
Drive!
Double-click
D-Link Systems, Inc. 19
Page 20

DSM-G600 Install GuideContacting Technical Support
Technical Support
D-Link’s website contains the latest user documentation and software updates
for D-Link products.
D-Link provides free technical support for customers within the United States
and Canada for the duration of the product’s warranty period.
U.S. and Canadian customers can contact D-Link Technical Support through
our website or by phone.
United States
Telephone
(877) 453-5465
Twenty four hours a day, seven days a week.
World Wide Web
http://support.dlink.com
E-mail
support@dlink.com
Canada
Telephone
(800) 361-5265
Monday through Friday, 7:30am to 12:00am EST.
World Wide Web
http://support.dlink.ca
E-mail
support@dlink.ca
Version 1.0
Revised 05/27/2005
Copyright ©2005 D-Link Corporation/D-Link Systems, Inc. All rights reserved. D-Link, the D-Link logo are registered trademarks of D-Link
Corporation or its subsidiaries in the United States and other countries. Other trademarks are the property of their respective owners. Maximum
wireless signal rate derived from IEEE Standard 802.11g specifi cations. Actual data throughput will var y. Network conditions and environmental
factors, including volume of network traffi c, building materials and construction, and network overhead lower actual data throughput rate. Product
specifi cations, size and shape are subject to change without notice, and actual product appearance may differ from that depicted on the packaging.
Visit www.dlink.com for more details.
20 D-Link Systems, Inc.
 Loading...