

Page 1
D-Link® DSM-320RD
Wireless Media Player with DVD and Card Reader
Manual
v.1.0
Building Networks for People
Patent Pending
Page 2

Contents
Safety Information....................................................................................................................5
Introduction ..............................................................................................................................8
Package Contents..................................................................................................................10
System Requirements ...........................................................................................................10
Features & Benefits ...............................................................................................................11
Hardware Overview................................................................................................................12
Front Panel ......................................................................................................................12
Rear Panel .......................................................................................................................12
Getting Started .......................................................................................................................13
Using the Remote Control.....................................................................................................13
Installing the D-Link® Media Server Software ....................................................................17
Choosing Music, Photo, and Video Files to Share .............................................................21
Using the D-Link® Media Server Software ..........................................................................25
Accessing the Media on your PCs ................................................................................25
Sharing Media Content in Folders ................................................................................26
Refreshing Folder Contents ..........................................................................................26
Naming the Media Server...............................................................................................27
Stopping the D-Link Media Server ................................................................................28
Using Windows® Media Connect Software.........................................................................29
Configuring Windows® Media Connect .......................................................................29
Connecting the DSM-320RD .................................................................................................33
Video Connections .........................................................................................................33
Audio Connections .........................................................................................................34
Network Connections.....................................................................................................35
Network Layout ......................................................................................................................36
Using the On-Screen Keyboard ............................................................................................37
The DSM-320RD Setup Wizard .............................................................................................38
Windows Connect Now Configuration ................................................................................43
DSM-320RD Menu ..................................................................................................................48
Menu Basics....................................................................................................................48
Menu Home .....................................................................................................................48
Music.......................................................................................................................................49
Music Quality...................................................................................................................49
Supported Music Formats .............................................................................................49
Organizing Music Files...................................................................................................50
Playing a Track................................................................................................................51
Creating a Preset ............................................................................................................52
Browsing for Music ........................................................................................................ 53
Creating Music Playlists.................................................................................................54
Playing a Playlist............................................................................................................. 54
Controlling Music Playback ...........................................................................................54
Playing a Group of Songs .........................................................................54
Playing Individual Songs ..........................................................................54
Viewing Photos while Music is Playing ........................................................................55
Shuffle and Repeat .........................................................................................................55
Photo .......................................................................................................................................56
Supported Photo Formats..............................................................................................56
2
Page 3

Organizing Photo Albums..............................................................................................57
Playing a Photo Slideshow ............................................................................................58
Controlling Photo Playback ...........................................................................................58
Shuffle and Repeat .........................................................................................................58
Viewing Photo Information ............................................................................................59
Photo Viewing Effects ....................................................................................................60
Video .......................................................................................................................................61
Supported Video Formats .............................................................................................. 6 1
Viewing a Video .............................................................................................................. 61
Using the Remote Control with Videos ........................................................................62
Search .....................................................................................................................................63
DVD .........................................................................................................................................64
Viewing a DVD.................................................................................................................64
Using the Remote Control with DVDs ..........................................................................64
DVD Player Considerations ...........................................................................................66
Memory Card ..........................................................................................................................67
Viewing a Memory Card ................................................................................................. 67
Supported File T ypes.............................................................................................................68
Online Media...........................................................................................................................69
AOL® Services ................................................................................................................69
For AOL® Members: ..................................................................................70
Radio@AOL .........................................................................................71
Radio@AOL Preset s............................................................................72
AOL® Services for Non-members ............................................................73
Live365™ .........................................................................................................................76
Napster™ ......................................................................................................................... 78
Rhapsody™ .....................................................................................................................79
Current Rhapsody™ Subscribers ............................................................79
For Users New to Rhapsody™ .................................................................80
Configuring Rhapsody™ for use with the DSM-320RD ..........................86
Setup .......................................................................................................................................88
Network............................................................................................................................88
Wireless ...........................................................................................................................89
System .............................................................................................................................91
DVD ..................................................................................................................................92
General ............................................................................................................................93
Audio/Video................................................................................................93
Additional Settings ....................................................................................94
Music Presets ............................................................................................94
Memory Card..............................................................................................95
Adjust Video...............................................................................................95
Version.............................................................................................................................96
Frequently Asked Questions.................................................................................................97
Troubleshooting.....................................................................................................................99
Technical Specifications ..................................................................................................... 1 06
Appendix...............................................................................................................................108
Setting Microsoft Windows Power Options ...............................................................108
3
Page 4

Wireless Installation Considerations..........................................................................109
Audio and Video Cables Guide....................................................................................110
Glossary ................................................................................................................................111
Networking .................................................................................................................... 111
Music..............................................................................................................................113
Photo.............................................................................................................................. 114
Video ..............................................................................................................................115
Warranty................................................................................................................................116
Registration ..........................................................................................................................119
Contacting Technical Support ............................................................................................120
4
Page 5
Safety Information
For optimum performance, please read the following information carefully.
Safety Precautions
The lightning flash with arrowhead symbol, within an equilateral triangle,
is intended to alert users to the presence of uninsulated “dangerous
voltage” within the product’s enclosure that may be of sufficient
magnitude to constitute a risk of electric shock to persons.
The exclamation point within an equilateral triangle is intended to alert
the user to the presence of important operating and maintenance
(servicing) instructions in the literature accompanying the appliance.
CAUTION!
THIS PRODUCT UTILIZES A LASER. USE OF CONTROLS OR ADJUSTMENTS
OR PERFORMANCE OF PROCEDURES OTHER THAN THOSE SPECIFIED
HEREIN MA Y RESUL T IN HAZARDOUS RADIA TION EXPOSURE. DO NOT OPEN
COVERS AND DO NOT REP AIR YOURSELF. REFER SER VICING TO QUALIFIED
PERSONNEL. VISIBLE AND INVISIBLE LASER RADIATION WHEN OPEN AND
INTERLOCK DEFEA TED. DO NOT ST ARE INTO BEAM. THE BEAN IS LOCA TED
INSIDE NEAR THE DECK MECHANISM.
CAUTION!
THE POWER SUPPLY CORD IS USED AS THE MAIN DISCONNECT DEVICE.
ENSURE THAT THE SOCKET-OUTLET IS LOCATED/INSTALLED NEAR THE
EQUIPMENT AND IS EASILY ACCESSIBLE.
WARNING!
TO REDUCE THE RISK OF FIRE, ELECTRIC SHOCK, OR PRODUCT DAMAGE,
DO NOT EXPOSE THE UNIT TO RAIN, MOISTURE, DRIPPING, OR SPLASHING.
DO NOT PLACE OBJECTS FILLED WITH LIQUIDS UPON THE UNIT.
5
Page 6

Safety (continued)
CAUTION!
• DO NOT INST ALL OR PLACE THIS UNIT IN A BOOKCASE, BUIL T -IN CABINET
OR IN ANOTHER CONFINED SPACE. ENSURE THE UNIT IS WELL
VENTILA TED. T O PREVENT RISK OF ELECTRIC SHOCK OR FIRE HAZARD
DUE TO OVERHEATING, ENSURE THAT CURTAINS AND ANY OTHER
MATERIALS DO NOT OBSTRUCT THE VENTILATION VENTS.
• DO NOT OBSTRUCT THE UNIT’S VENTILATION OPENINGS WITH
NEWSP APERS, T ABLECLOTHS, CURTAINS, AND SIMILAR ITEMS.
• DO NOT PLACE SOURCES OF NAKED FLAMES, SUCH AS LIGHTED
CANDLES, ON THE UNIT.
• DISPOSE OF BA TTERIES IN AN ENVIRONMENTALLY -FRIENDLY MANNER.
CAUTION!
TO PREVENT ELECTRIC SHOCK, MATCH THE WIDE BLADE OF THE PLUG
TO THE WIDE SLOT OF THE ELECTRICAL OUTLET AND FULLY INSERT.
This device is designed and manufactured to assure personal safety . Improper
use can result in electric shock or fire hazard. The safeguards incorporated in
this unit will protect you if you observe the following procedures for installation,
use, and servicing. This device does not contain any user serviceable parts.
• Carefully read and follow the Manual and Quick Installation Guide.
• Do not place the product near heat sources such as radiators, heat registers,
stoves, or other products that produce heat.
• Do not use this product near water.
• Unplug the unit from the wall outlet before cleaning. Do not use liquid cleaners
or aerosol cleaners. Use a damp cloth for cleaning.
• Power-supply cords should be routed so that they are not likely to be walked
on or pinched by items placed upon or against them.
• Do not overload wall outlets.
• Do not use this product during a storm. Unplug the unit from the wall outlet.
If the product is to be left unattended for a long period of time. This will prevent
damage to the product due to lightning and power-line surges.
• Do not attempt to service this product yourself. Opening the cover may expose
you to dangerous voltage or other hazards. For service, please contact a
qualified service technician.
6
Page 7

Safety (continued)
Radio and TV Interference:
This equipment has been tested and found to comply with the limits for a Class
B digital device, pursuant to Part 15 of the FCC Rules. These limit s are designed
to provide reasonable protection against harmful interference in a residential
installation. This equipment generates, uses and can radiate radio frequency
energy and, if not installed and used in accordance with the instructions, may
cause harmful interference to radio communications. However, there is no
guarantee that interference will not occur in a particular installation. If this
equipment does cause harmful interference to radio or television reception,
which can be determined by turning the equipment off and on, the user is
encouraged to try to correct the interference by one or more of the following
measures:
• Reorient or relocate the receiving antenna.
• Increase the separation between the equipment and receiver.
• Connect the equipment into an outlet on a circuit different from that to
which the receiver is connected.
• Consult the dealer or an experienced radio/TV technician for help.
Any unauthorized changes or modifications to this equipment would void the
user’s authority to operate this device. This device complies with Part 15 of the
FCC Rules. Operation is subject to the following two condition: (1) This device
may not cause harmful interference, and (2) this device must accept any
interference received, including interference that may cause undesired
operation.
7
Page 8

Introduction
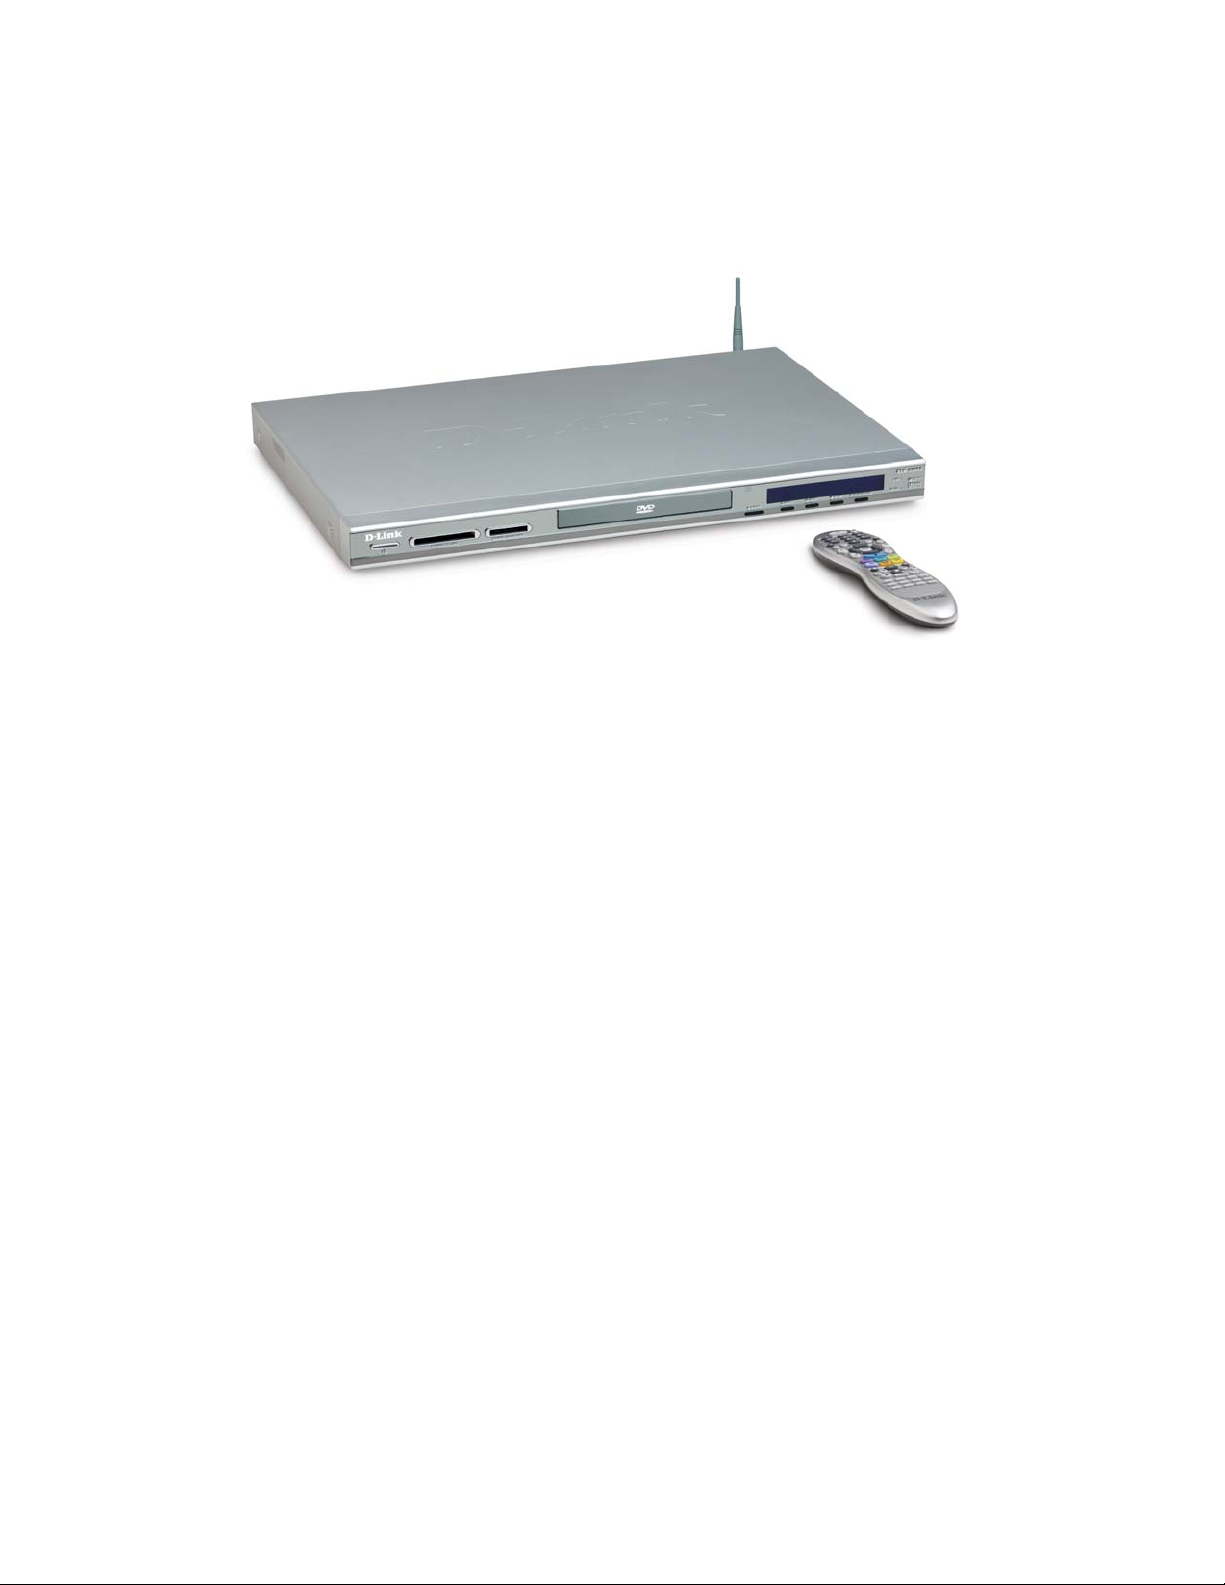
D-Link® introduces the latest addition to its multimedia family of products: the
D-Link® MediaLoungeTM DSM-320RD W ireless Media Player with DVD and
Card Reader. The DSM-320RD integrates home computer systems and home
entertainment centers. Movies, music, and photos can be enjoyed from the
comfort of the living room. The DSM-320RD connects easily to a wired or wireless
network. The DSM-320RD features 802.1 1g wireless technology for transfer speeds
of up to 54Mbps on a wireless network and can connect to a wired network at
speeds up to 100Mbps. These options provide you with the maximum throughput
for sharing and transferring digital media.
Simple to setup with a sleek design that makes it a natural addition to any home
entertainment center . The A V jacks on the back p anel of the DSM-320RD allow for
direct connection to your television. Use the included remote control to access
media content stored on your PC. Browse music files, watch videos, and display
photos, all on your television! In addition, the DSM-320RD lets you access online
media content on your television through an existing broadband Internet connection.
The DSM-320RD features a Progressive Scan DVD player that allows you to
enjoy your favorite DVDs with superior picture quality . In addition to DVDs, this
DVD Player will also play SVCD, CD-R, CD-RW, CD, DVD-R, DVD-RW, and
MP3 discs.
The DSM-320RD also features a built-in 5-in-1 card reader, which provides a
fast and convenient way to view and share digital photos, music, and videos
stored on a memory card. Insert the memory card into the card reader and
your media content becomes just a click away. Popular memory cards, including
SD, Memory Stick, MultiMediaCard, and Compact Flash (Type I and II) are
supported.
With support for Windows
settings is easier than ever before. WCN allows you to run the Wireless Network
Setup Wizard from Windows XP and transfer the wireless settings to the
DSM-320RD using a USB thumbdrive.
The DSM-320RD adheres to the Universal Plug-&-Play A V specification and allows
it to communicate with other UPnP AV media devices. The DSM-320RD is part of
Microsoft’s PlaysforSure logo program that ensures the compatibility of the device
with Windows Media Protected Audio files.
The DSM-320RD supports the majority of audio, video, and image file formats and
streams them directly from your PC. You can stream MP3, WMA, WAV, OGG
®
Connect Now (WCN), configuring the wireless
8
Page 9

Introduction (continued)
Vorbis, and AIFF files from your computer and enjoy them on your home stereo
system. Watch stored videos in MPEG1/2/4, A VI, or Xvid format on your television.
Enjoy slideshows of your favorite photos in JPEG, JPEG2000, TIFF, GIF, BMP or
PNG formats. Better yet, it’s easy to access the files through the television interface
using the remote control included with the DSM-320RD.
Experience digital media like never before with the MediaLounge DSM-320RD
Wireless Media Player. The DSM-320RD includes everything you need to instantly
access and play music, videos, and photos using your home entertainment center .
Disclaimer: Certain content and services accessible via the DSM-320RD may include materials owned by third parties.
The users shall be entirely responsible for ensuring that they have the necessary rights to access and use such third party
content. D-Link assumes no liability for and shall not be responsible for a user’s access of such content, including but not
limited to unlawfully ‘ripped’ or downloaded content. Further, D-Link does not guarantee the availability of any third party
content or services, including that which may be referenced herein, and shall not be responsible for any changes to or the
lack of availability of such third party content or services.
This product incorporates copyright protection technology that is protected by U.S. patents and other intellectual property
rights. Use of this copyright protection technology must be authorized by Macrovision, and is intended for home and other
limited viewing uses only unless otherwise authorized by Macrovision. Reverse engineering or disassembly is prohibited.
Consumers should note that not all high definition television sets are fully compatible with this product and may cause
artifacts to be displayed in the picture. In case of 525 progressive scan picture problems, it is recommended that the user
switch the connection to the “Standard Definition” output. If there are questions regarding our TV set compatibility with this
model 525p DVD player please contact our customer service center .
9
Page 10
Package Contents
D-Link DSM-320RD Wireless Media Player with DVD and Card Reader
Printed Quick Installation Guide
CD-ROM with Manual (Contains D-Link Media Server Software, Quick
Installation Guide, and Manual)
2dBi Wireless Antenna
Ethernet (CAT5-UTP/Straight-Through) Cable
St andard Composite RCA Audio/V ideo Cable
S-Video Cable
Remote Control with Batteries
System Requirements
Television with composite, S-Video, or component video inputs and an
audio device with composite, coaxial digital or optical digital audio inputs.
A wireless (802.11g or 802.11b) or Ethernet network.
Minimum to run the Media Server software: PC with 500MHz processor ,
128MB RAM and 20MB of hard disk space.
Windows XP/2000.
A CD-ROM drive.
10
Page 11

Features & Benefits
Stream media content from a PC or D-Link Central Home Drive
to your entertainment center.
Listen to digital music on your stereo system.
View digital photos, slideshows, and videos on TV.
Progressive Scan DVD player provides superior picture quality.
Built-in 5-in-1 card reader provides instant access to music, photos,
and Videos on Memory Cards.
Support for Windows
Easily connect to your wireless network using 802.11g at up to
54Mbps. 802.11b compatible at 11Mbps.
Connect using an Ethernet network cable at up to 100Mbps.
UPnP AV and INMPR compliant for maximum compatibility.
PlaysForSure
streamed to the unit using Windows
Support for most popular digital media formats.
TM
®
Connect Now (WCN) for easy wireless setup.
Audio logo certified. WMDRM content can be
®
Media Connect software.
Remote controlled TV interface for quick access to your media
content.
Sleek design complements your existing audio/video
equipment.
Optical and coaxial digital audio output.
Component video output.
64- or 128-bit WEP security and WPA-PSK support.
Convenient one-touch access to preset music.
Supports DHCP for easy connection to your home network.
Color coded one-touch shortcut buttons on the remote, for
quick access to music, photos, videos, DVDs, memory cards and
online media content.
Built-in screensaver.
Easy setup wizard.
11
Page 12
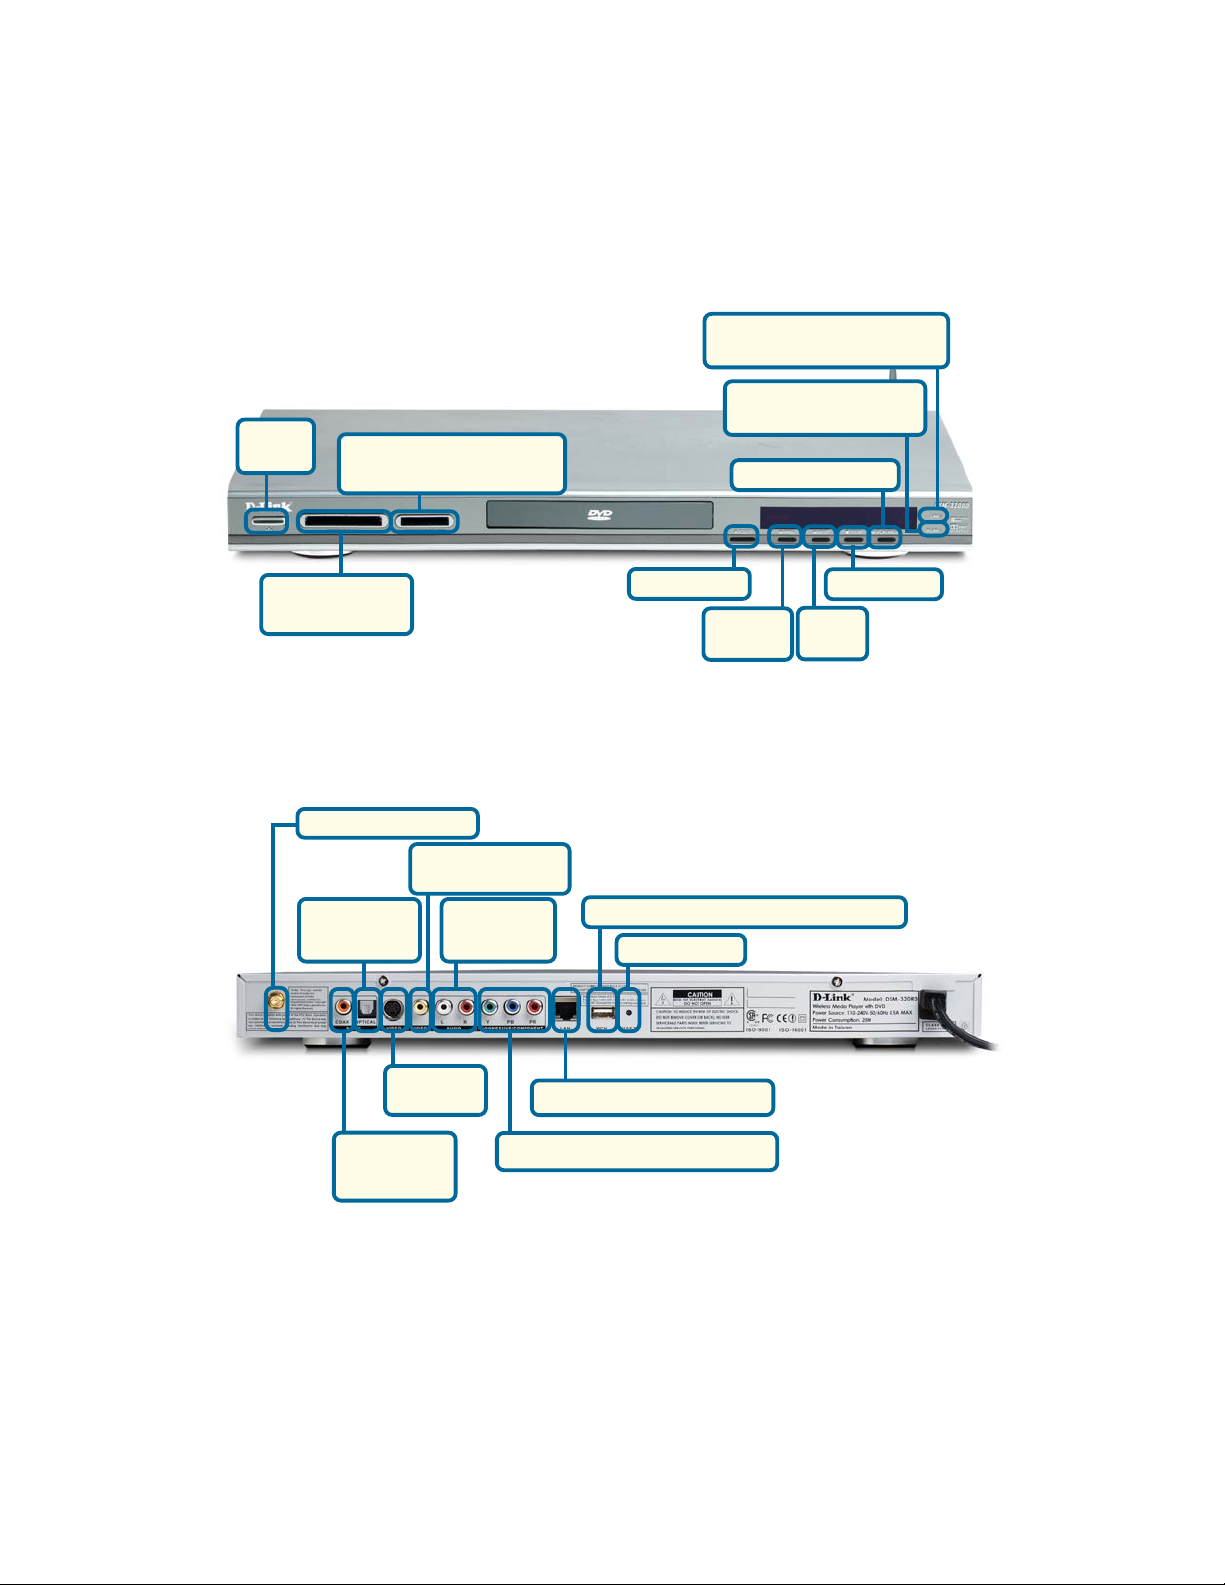
Hardware Overview
Front Panel
Power
Button
SD, Memory Stick,
MultiMediaCard Reader
LAN LED - Blinks to indicate
activity on the network.
Wireless LED - Blinks to
indicate wireless activity.
Pause/Play Button
Compact Flash
Reader
Rear Panel
Antenna Connector
Optical
Digital Audio
Connector
S-Video
Connector
Coaxial
Digital Audio
Connector
Composite Video
Connector
Composite
Audio
Connectors
RJ-45 Ethernet Connector
Component Video Connectors
Eject Button
Windows
Reset Button
Stop Button
Previous
Button
®
Connect Now USB Port
Next
Button
1
1
For European customers, a SCART interface will replace the Component Video Connectors.
12
Page 13

Getting Started
To begin using the DSM-320RD Wireless Media Player, you will need:
An existing home network (including a wireless 802.11b or
802.1 1g router or a router/hub with an available Ethernet port).
The DSM-320RD Media Server software installed on the PC
you will be sharing files from. This computer will collect music,
photo and video content from local sources (a digital camera
for example) and from the Internet (downloaded MP3 music,
digital photos, or video files).
The DSM-320RD Wireless Media Player connected to your
television and audio system.
Using the Remote Control
The remote control is used to configure and control the DSM-320RD.
Information for the Setup Wizard is entered by using the remote control. The
remote is used to enter numbers, letters, special characters and to make
selections from an on-screen keyboard. The on-screen keyboard is activated
by pressing Enter on the remote control whenever the on-screen cursor is
located in a field where text is required.
The following page details the remote control and shows the function of each
button.
The recommended range for remote control usage is within 15 feet from the unit,
with the remote angled at no more than 45 degrees.
13
Page 14
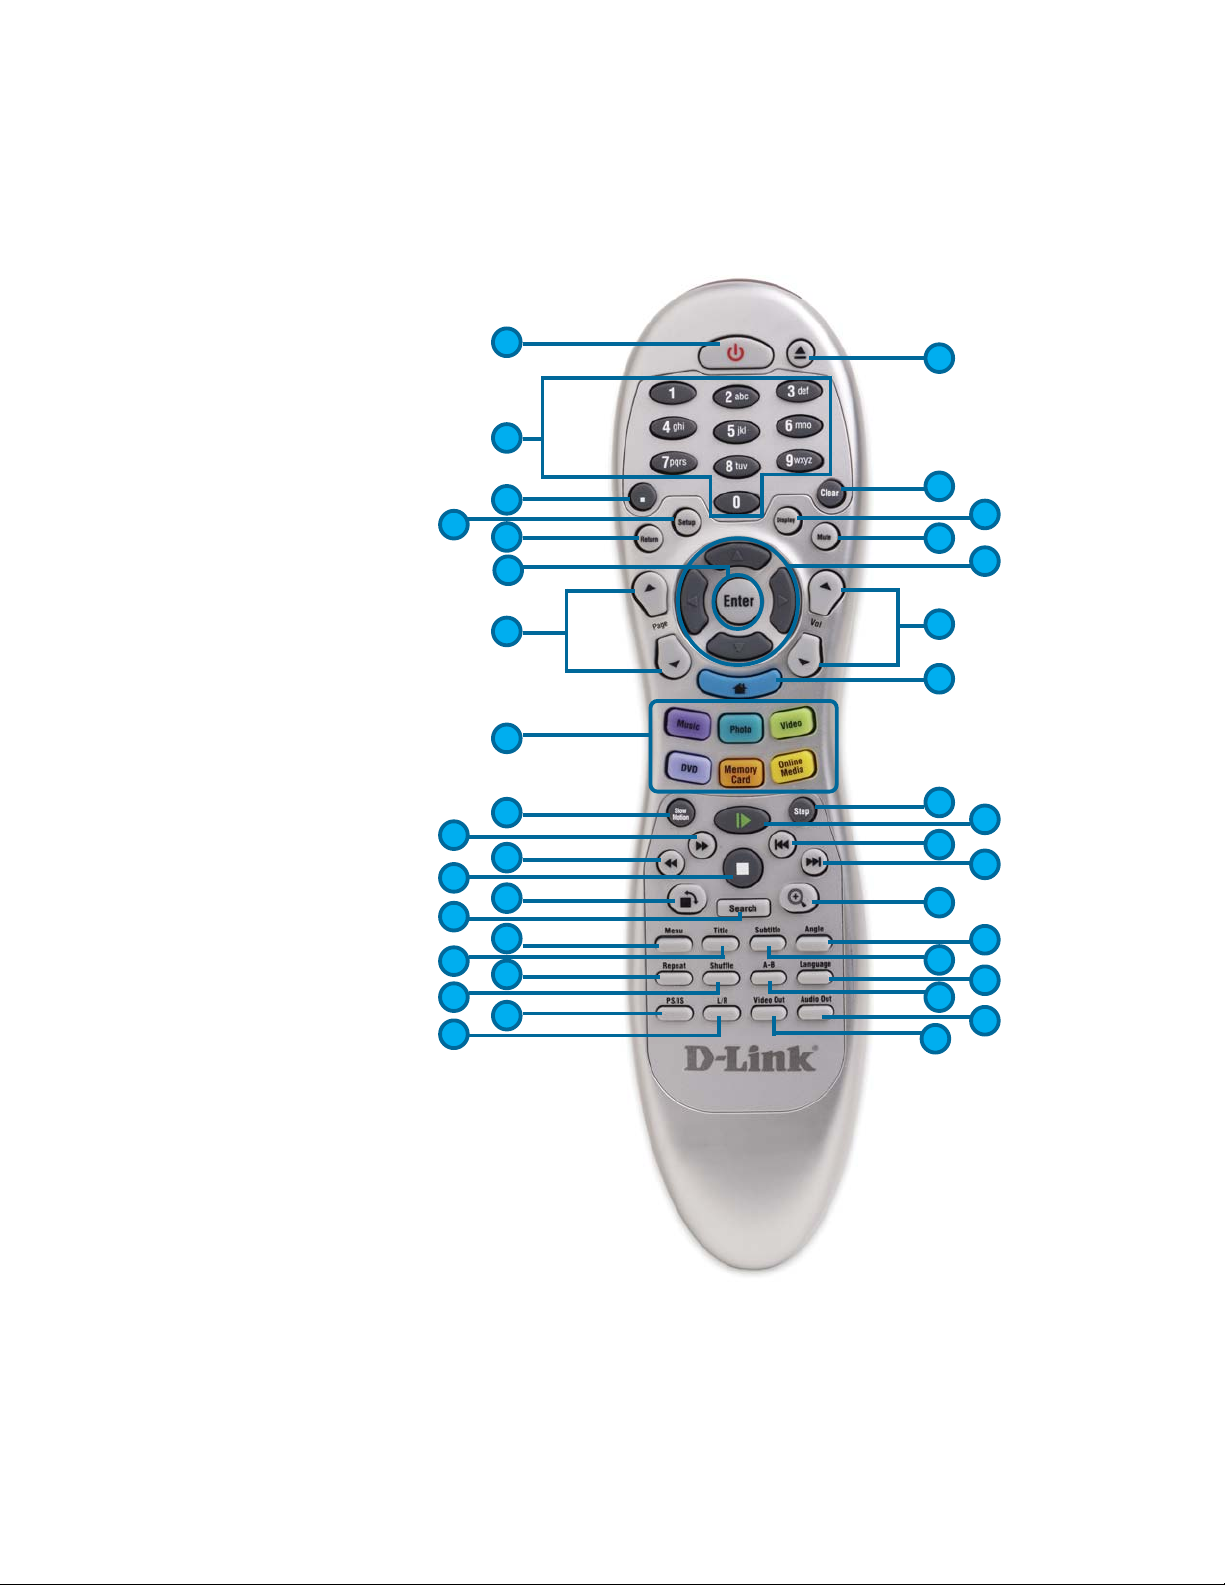
Using the Remote Control (continued)
1. Power
2. Eject DVD
3. Numeric Keys
4. “.” (period or dot)
5. Clear
6. Setup
7. Display
8. Return
9. Mute
10. Enter
1 1. Navigation Buttons
12. Page Up & Down
13. V olume + & -
14. Home
15. Color-Coded Shortcut Keys
16. S tep
17. Slow Motion
18. Play/Pause
19. Fast Forward
20. Previous
21. Rewind
22. Next
23. S top
24. Zoom
25. Rotate
26. Angle
27. Search
28. Menu
29. Subtitle
30. Title
31. Repeat
32. Language
33. Shuffle
34. A-B Video Replay
35. Progressive/Interlaced
36. Audio Out
37. Left/Right Audio Channel
38. Video Out
6
19
23
27
30
33
37
10
12
15
17
21
25
28
31
35
1
3
4
8
2
5
7
9
11
13
14
16
18
20
22
24
26
29
32
34
36
38
14
Page 15

Using the Remote Control (continued)
Power Turn the DSM-320RD ON or OFF.
Eject Open and close the DVD tray .
Number Keys Enter numbers where needed, or use the onscreen keyboard to
input text. Number keys 1-9 can be defined as Music presets. To
define a preset, highlight the desired music selection onscreen, and
press down on the desired number (from 1-9) on the remote control
until the preset icon appears. Press the assigned number to play
the selection.
“.” (a period, also known as a dot.)
Clear Delete text.
Return Return to the previous page.
Setup Access the Setup Menu.
Display Display information about a file. For instance, view the type of
photo and the name, date and other information about the photo.
Mute Turn OFF the audio.
Page Up/Down Press Up to scroll up a page, and press Down to scroll down.
Arrow keys Move the onscreen cursor, navigate through media file names, and
use for primary navigation through the interface. Right is forward,
left is back.
Enter Make a selection.
Volume + Increase the volume.
Volume - Decrease the volume.
Home Navigate to the DSM-320RD’s home screen.
Music Access the Music mode.
Photo Access the Photo mode.
Video Access the Video mode.
DVD Access the DVD mode.
Memory Card Access the Memory Card mode.
Online Media Access the Online Media mode.
Slow Motion Play video in slow motion in DVD.
Step Pauses video and advances the video by one frame in DVD.
Play Functions While viewing and listening to your media, you can use these keys
to Stop, Play/Pause, Rewind, Fast Forward, go back (Prev), or
go to the next item (Next).
Rotate Rotate the photo.
15
Page 16

Using the Remote Control (continued)
Search Enter the Search function to find your media file on your PC or
search video timeframe.
Zoom Zoom in/out on the photo or video.
Menu Access the current menu.
Title Displays the DVD’s title.
Subtitle Displays DVD subtitles.
Angle If the DVD has multiple angle support, you can toggle between
different camera angles.
Repeat Repeat the current Music, Video, Photo Slideshow , DVD, CD, or
VCD selection.
Shuffle Shuffle music tracks in a playlist or photos during a slideshow.
A-B Select a start point (A) and an end point (B) of video to replay.
Language Select the audio language in DVD.
PS/IS T oggle between Progressive Scan and Interlaced Scan.
L/R Toggle between Left or Right audio channels.
Video Out Used to select different video output. Default is composite/S-
Video.
Audio Out Used to select different audio output. Default is composite.
16
Page 17

Installing the D-Link® Media
Server Software
To share audio, video, and photo files from your computer, it is necessary to
install the D-Link® Media Server software on the PC that contains the files you
want to share. The D-Link® Media Server software allows you to point to the
folders on your PC’s hard drive that contain the audio, video, and photo files
you want to share. The D-Link® Media Server software then streams the
information to your DSM-320RD via your wired/wireless network connection.
Currently the DSM-320RD only connects to one Media Server at a time. If more
than one PC contains files you want to share, you can select one of the following
options:
®
1. Copy all of the files to one computer designated to run the D-Link
Server Software.
®
2. Map network drives from the computer with the D-Link
software to additional computers that contain files you want to share. This
method also allows you to share files from computers that cannot run the
D-Link® Media Server software such as Macintosh systems. The computer
running the D-Link® Media Server software must always be on when
streaming content from any computer.
®
3. Inst all the D-Link
connect to one server at a time. To connect to another server, you must go
into the setup and change the Default Server.
Media Server software on each computer. You can only
Media Server
Media
To install the D-Link® Media Server software, follow the steps on the following
pages.
Note: If you have a version of the D-Link® Media Server already installed on your
system, please uninstall the software and restart your system before installing a
newer version of the software.
17
Page 18

Installing the D-Link® Media Server Software
(continued)
Click on D-Link Media
Server Installer
If the screen on the right does not
appear, go to My Computer and
double-click on the CD-ROM drive.
The screen at right will appear.
The D-Link Media Server Setup
Wizard will appear.
Click Next
18
Page 19
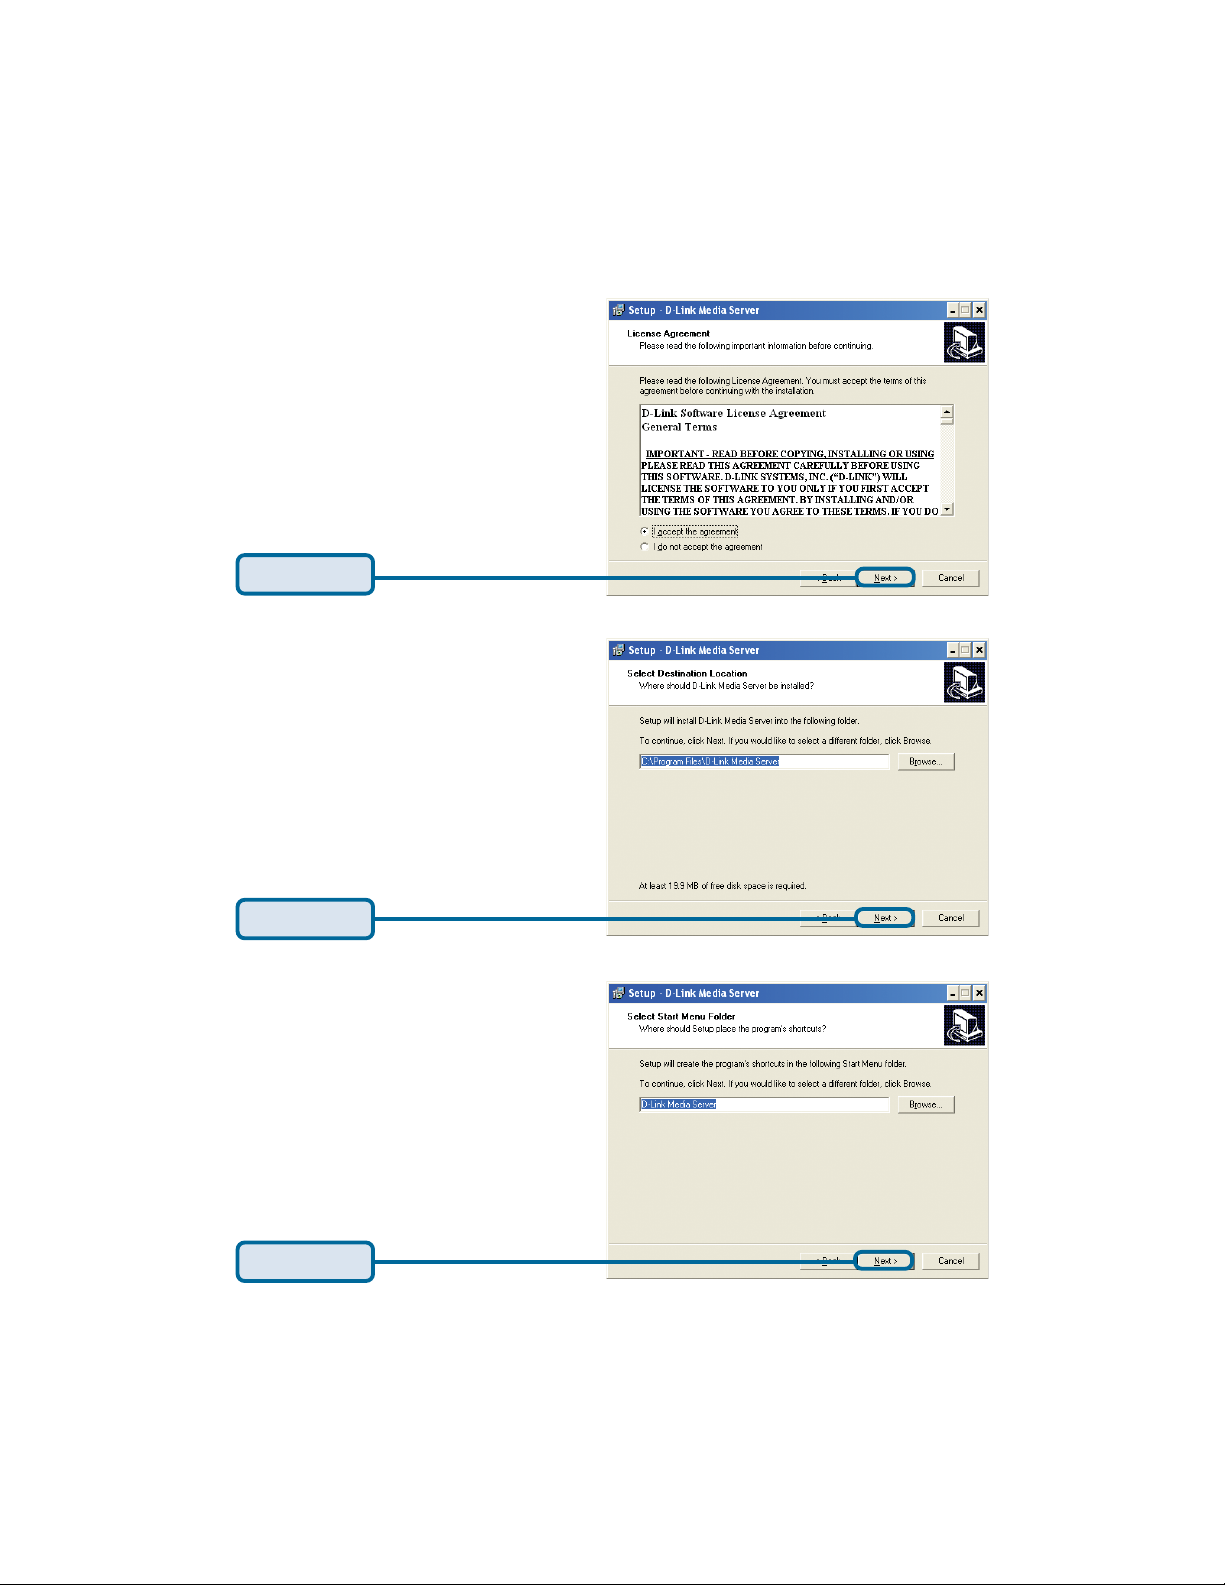
Installing the D-Link® Media Server Software
(continued)
The D-Link license agreement
screen appears.
Click Next
Choose a Destination location
or accept the default location.
This is where the D-Link Media
Server software will be copied
to on your system.
Click Next
Choose a Start Menu folder or
accept the default location.
Click Next
19
Page 20
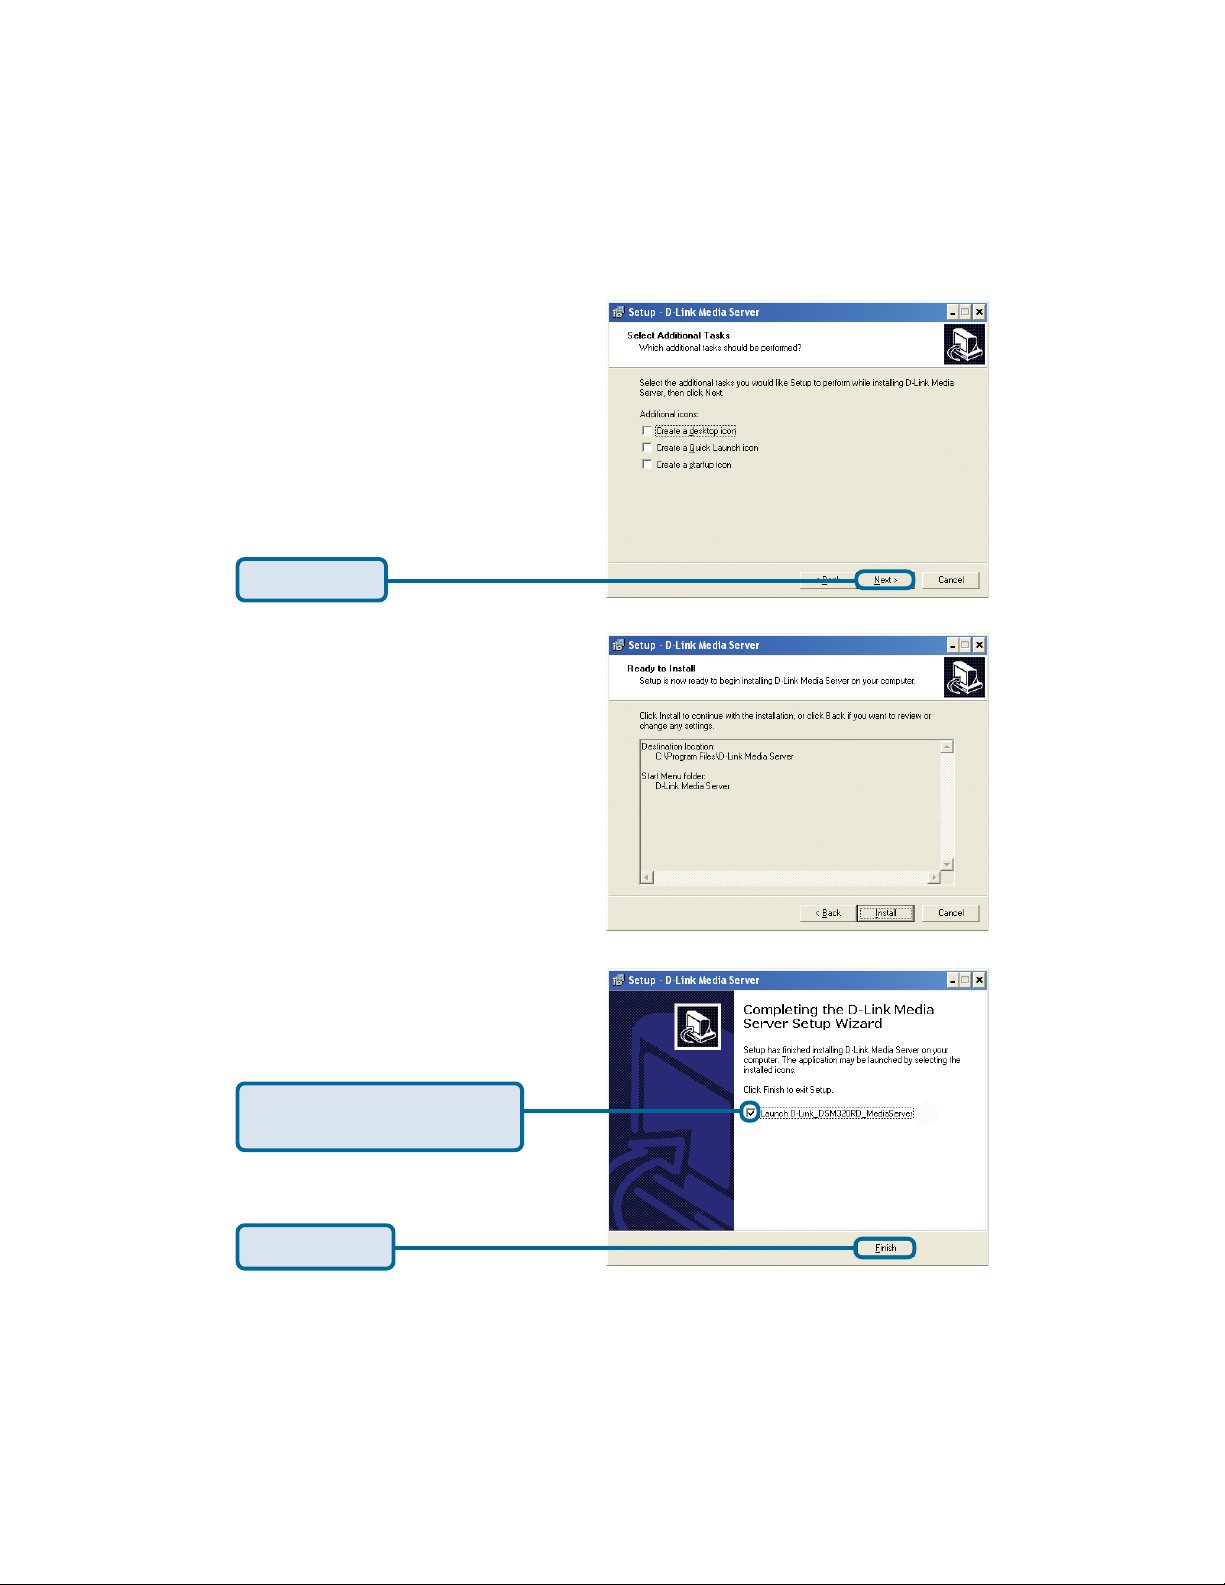
Installing the D-Link® Media Server Software
(continued)
Select the icons you want created.
Select Create a desktop icon to
access the program from your
desktop.
Select Create a Quick Launch
icon to access the program from
your taskbar.
Select Create a startup icon so
the program launches on startup.
Click Install
The necessary software will be
copied to the specified locations
on your computer.
Check Launch D-Link
Media Server
Click Finish
The D-Link® Media Server software installation has been completed!
20
Page 21
Choosing Music, Photo, and
Video Files to Share
The D-Link® Media Server software enables you to share the files from your
computer with the DSM-320RD. By sharing the files, there is no need to copy the
files from your computer to the unit before they can play. The data is streamed
directly from the files on your computer over the network to your DSM-320RD.
Follow the steps on the following pages to choose the music, photo, and video files
to share.
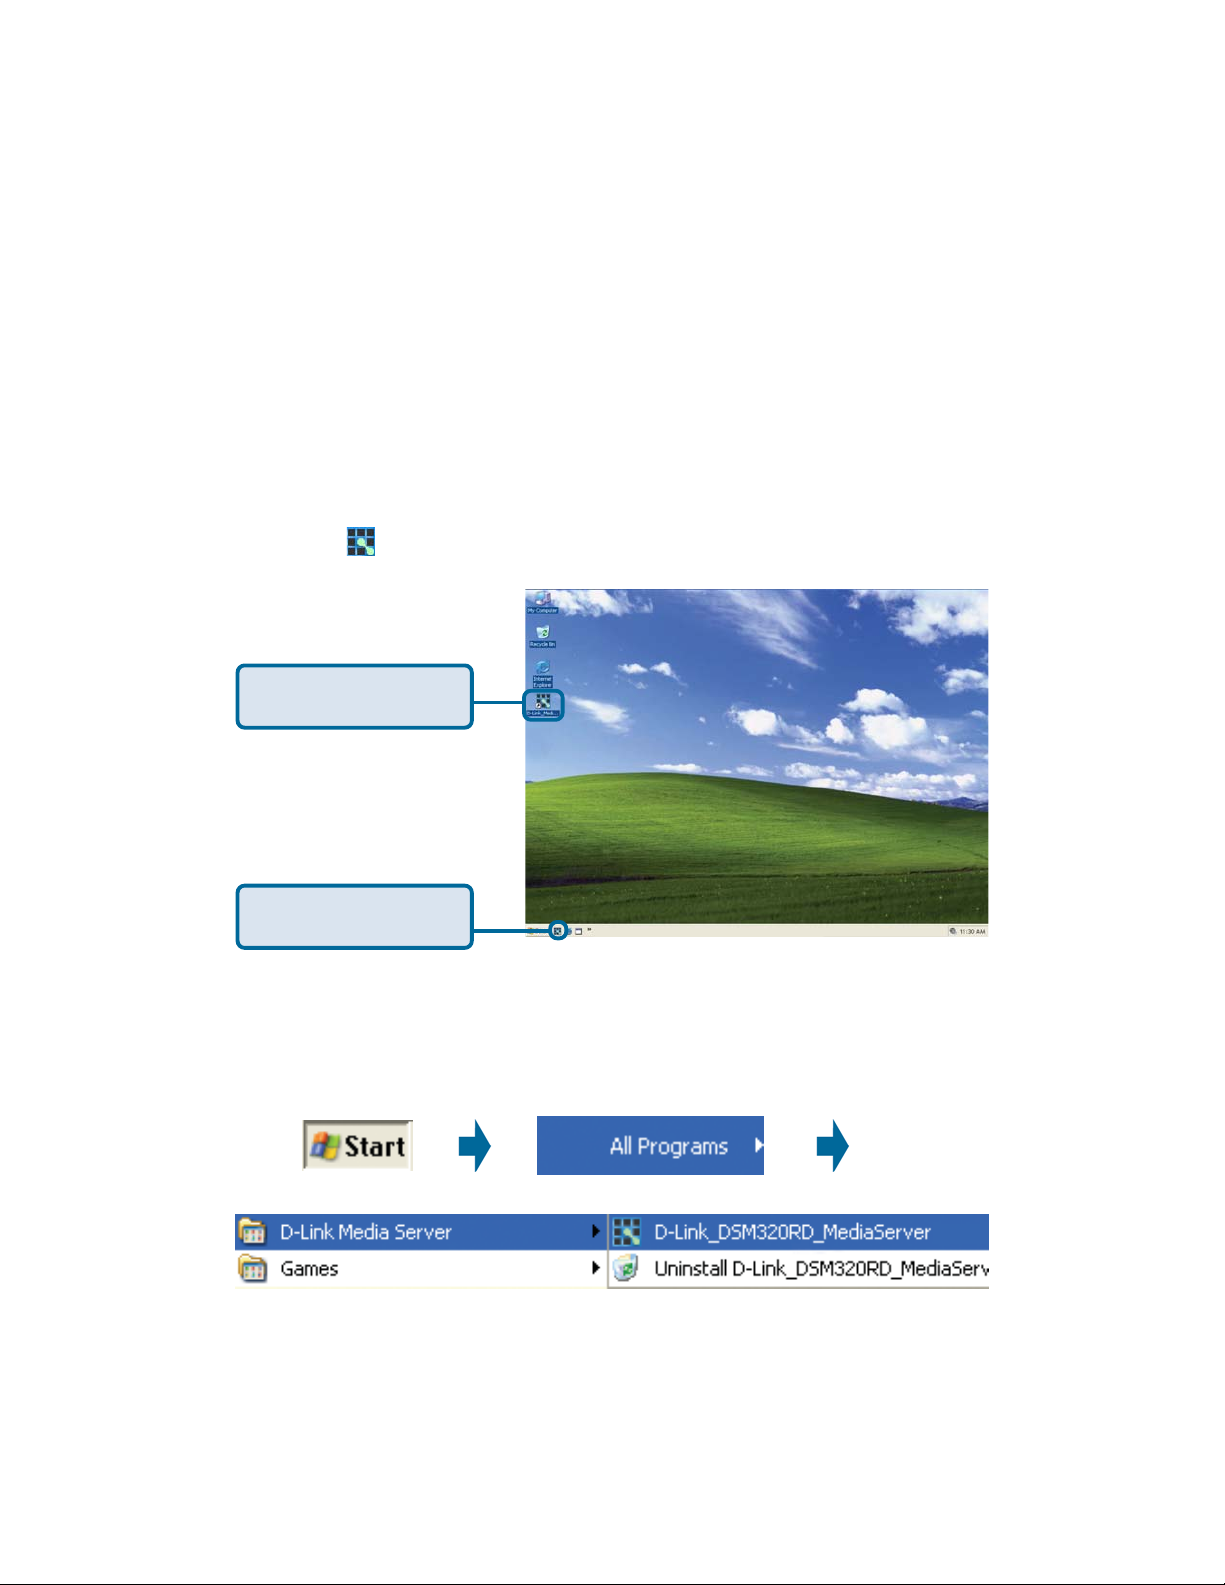
If you chose to create a desktop or Quick Launch icon during the software installation,
click on the
D-Link Media Server
desktop icon
icon to launch the D-Link Media Server software application.
D-Link Media Server
Quick Launch icon
If you chose not to create a desktop or Quick Launch icon during the software
installation, then you can launch the application by going to your S tart Menu, selecting
All Programs, and then clicking on D-Link Media Server icon within the D-Link
Media Server folder .
21
Page 22
Choosing Music, Photo, and Video Files to
Share (continued)
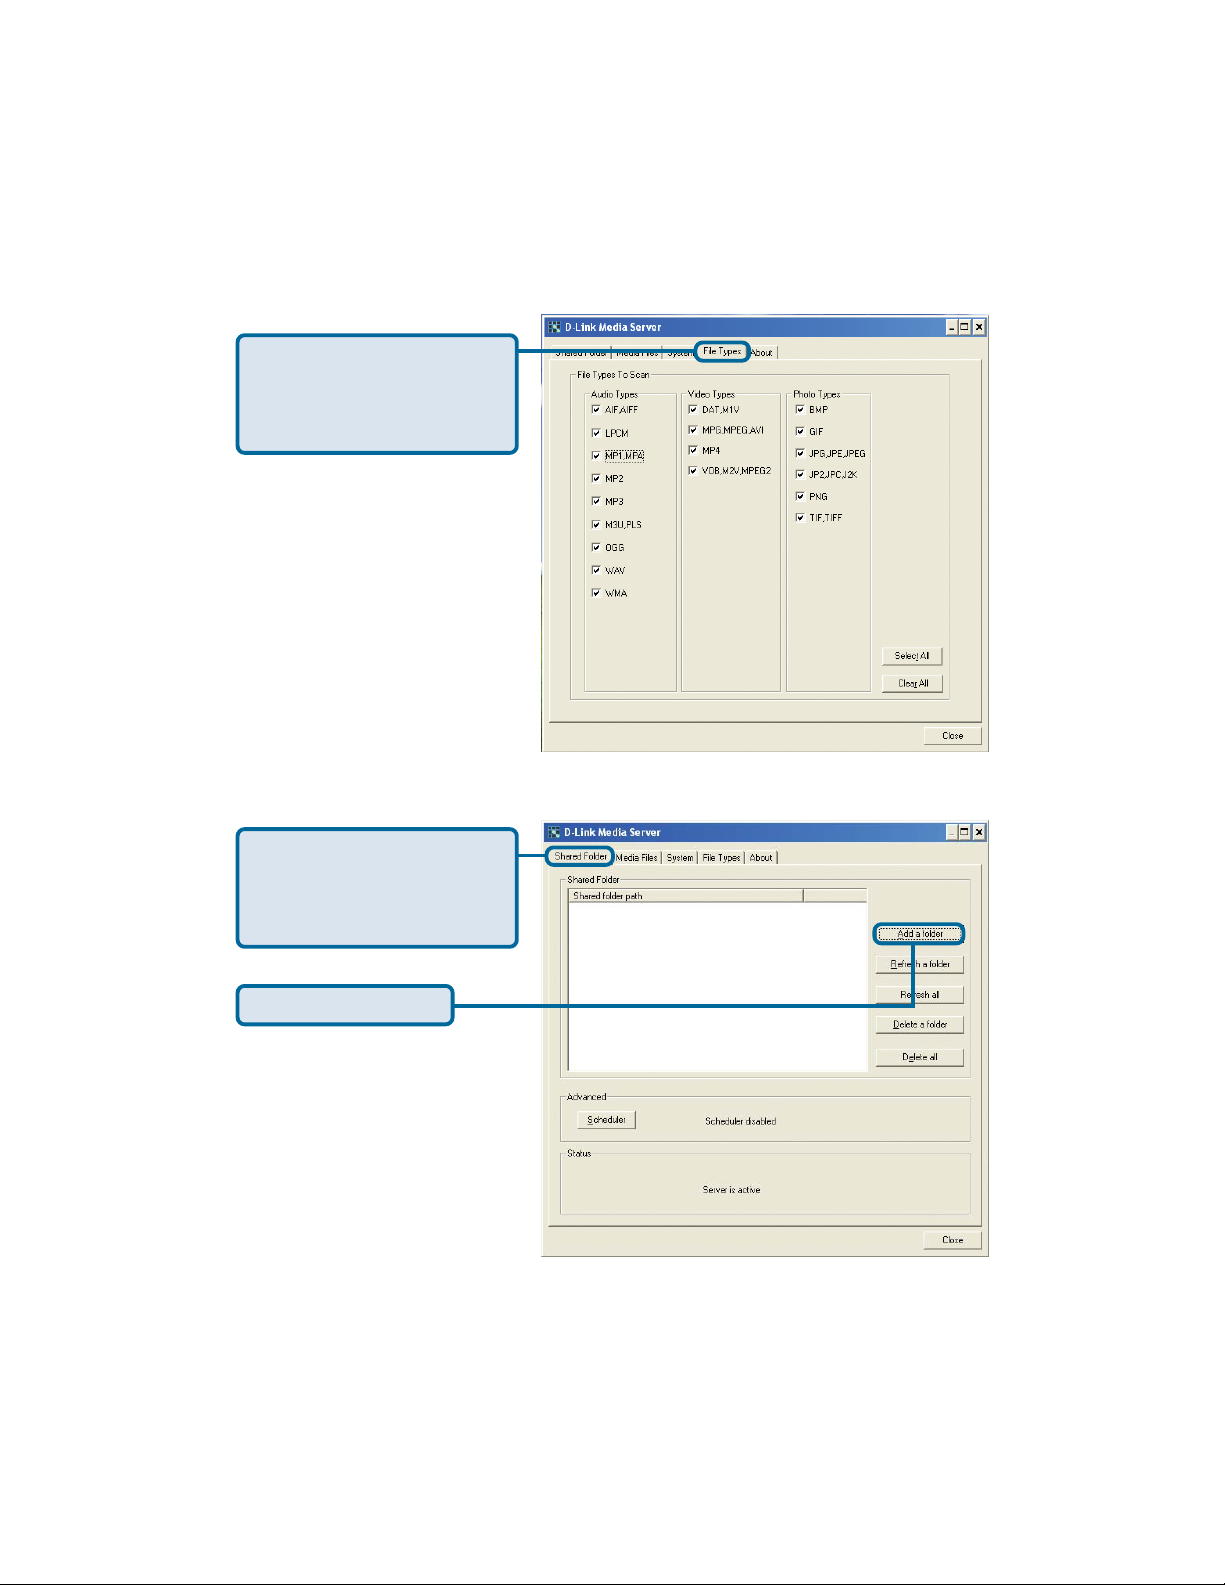
The File T ypes tab is where
you select the types of audio,
video, and photo files that
you want to share.
The Shared Folder tab is
where you select the folders
that contain your audio,
video, and photo files.
Click Add a folder
22
Page 23
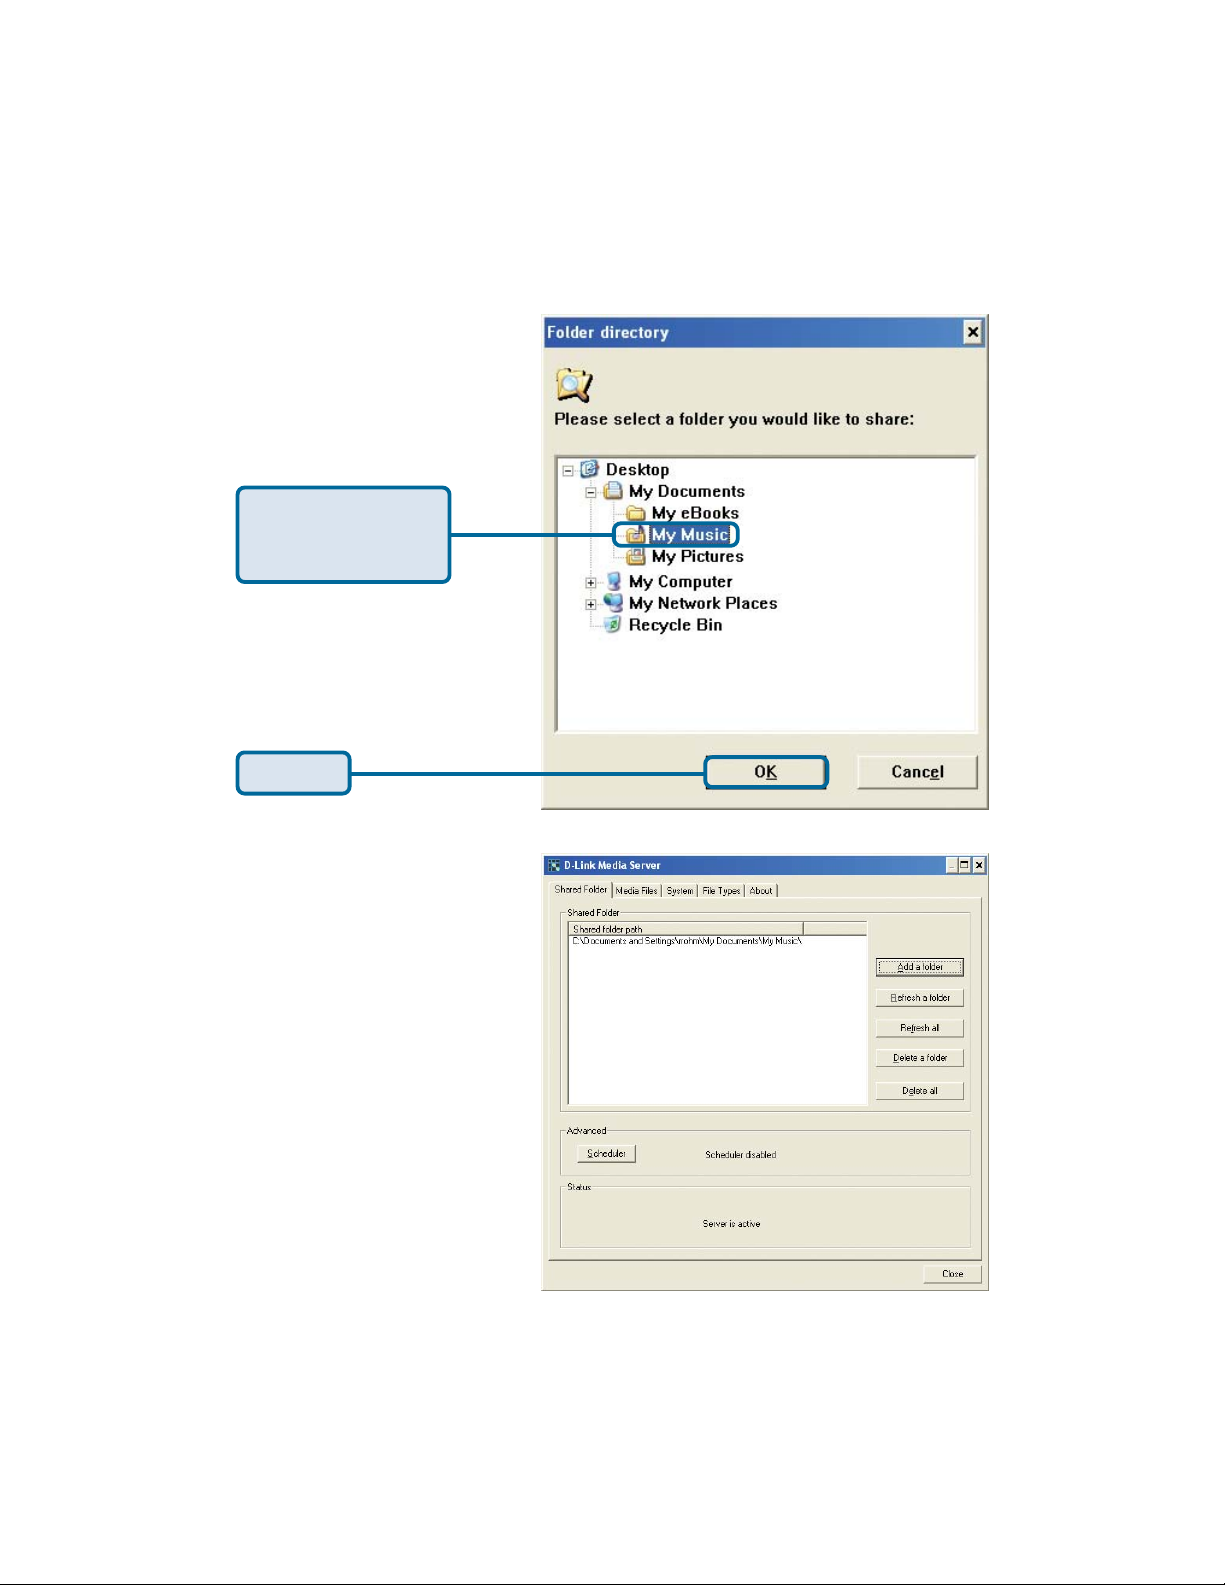
Choosing Music, Photo, and Video Files to
Share (continued)
Select the folder
containing the files
you wish to share.
Click OK
Repeat the steps until all of
the folders containing audio,
video, and photos you want
to share have been added.
23
Page 24
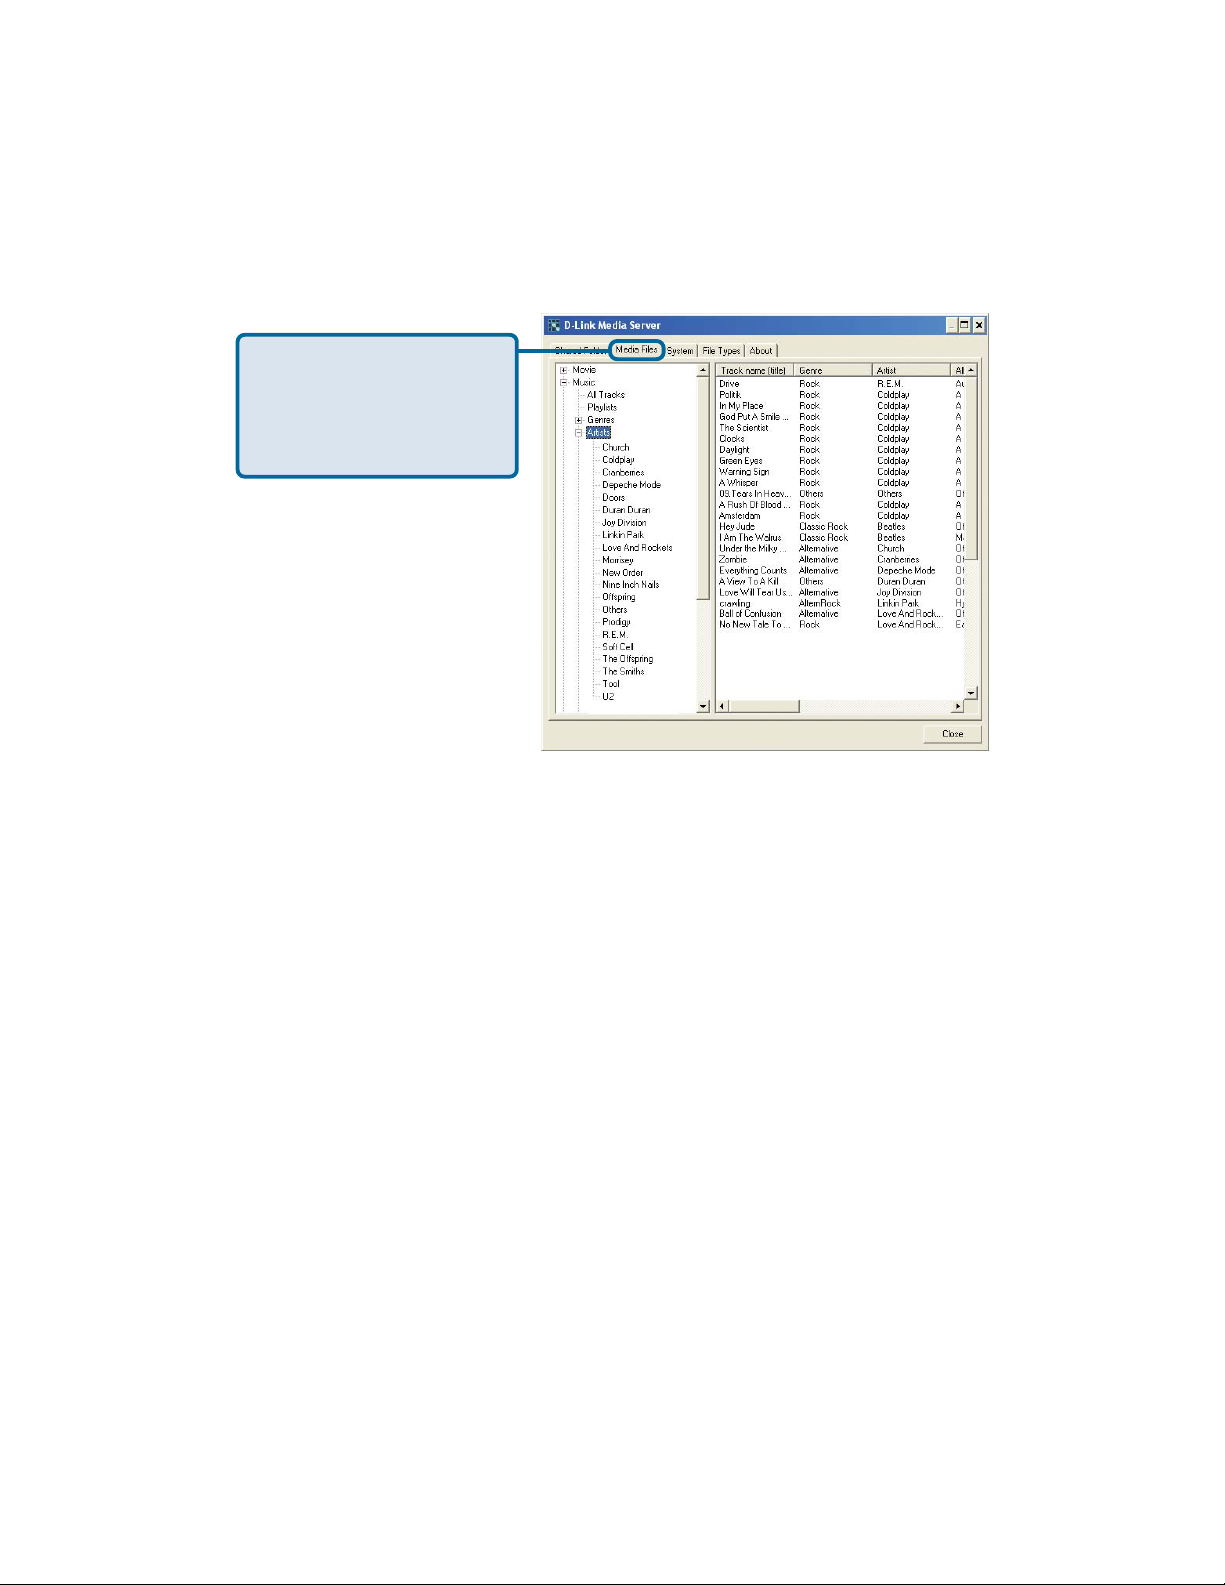
Choosing Music, Photo, and Video Files to
Share (continued)
The Media Files tab will
show all your audio, video,
and photo files as well as
display important file
information.
The D-Link® Media Server software configuration is complete!
24
Page 25

Using the D-Link® Media Server
Software
Accessing the Media on your PCs
Before you can access the media from a PC, you must install the D-Link
Media Server software (See Page 17). Simply install the included software on
each PC where music, video, or digital photos are stored.
If you selected the option to Create a startup icon during the Media Server
software installation (See Page 20), the D-Link® Media Server software will
automatically start whenever you power on your PC.
Whenever you close the Media Server configuration window , you can return to
the Media Server configuration window by clicking on the Media Server icon in
your system tray.
®
25
DSM-320RD System Tray Icon
Page 26
Using the D-Link Media Server Software
(continued)
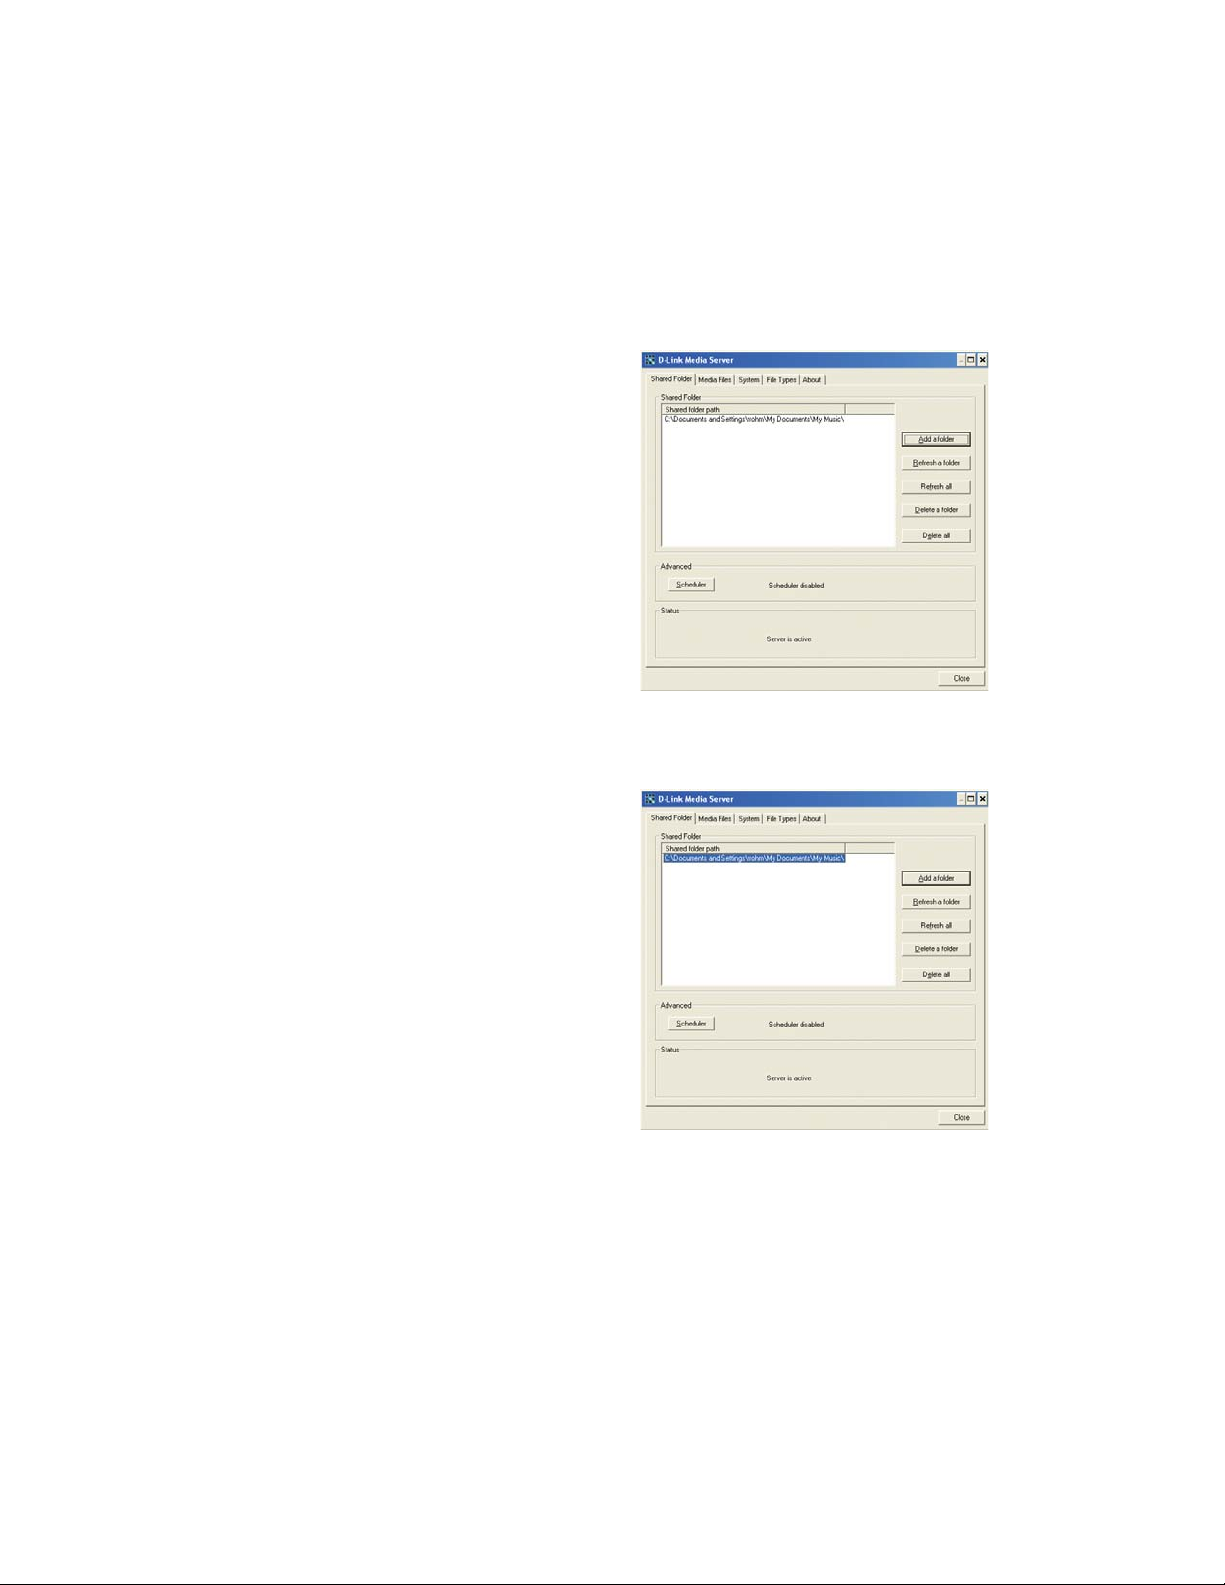
Sharing Media Content in Folders
The D-Link Media Server will share
media content from selected directory
folders. All subfolders within a shared
folder are shared as well.
The Shared Folders tab displays the
list of shared folders.
Add folders where your music, photos,
and videos are stored, or remove folders
you no longer wish to share. Depending
on the number of files in your folders,
there may be a slight delay before the
path appears in the window.
Refreshing Folder Contents
The D-Link Media Server software scans
the folders you share when you initially
Add a folder. If you copy additional files
into these folders, they will be seen by
the DSM-320RD when you refresh the
folder contents.
Refresh a folder: To refresh a folder’s
contents, select a folder and then click
the Refresh a folder button.
Refresh multiple folders: Multiple
folders can be selected if you hold down
the Ctrl key while clicking on each folder.
Click on the Refresh a folder button
after you’ve selected all the folders to
refresh.
Refresh all folders: All folders can be refreshed by clicking on the Refresh all
button.
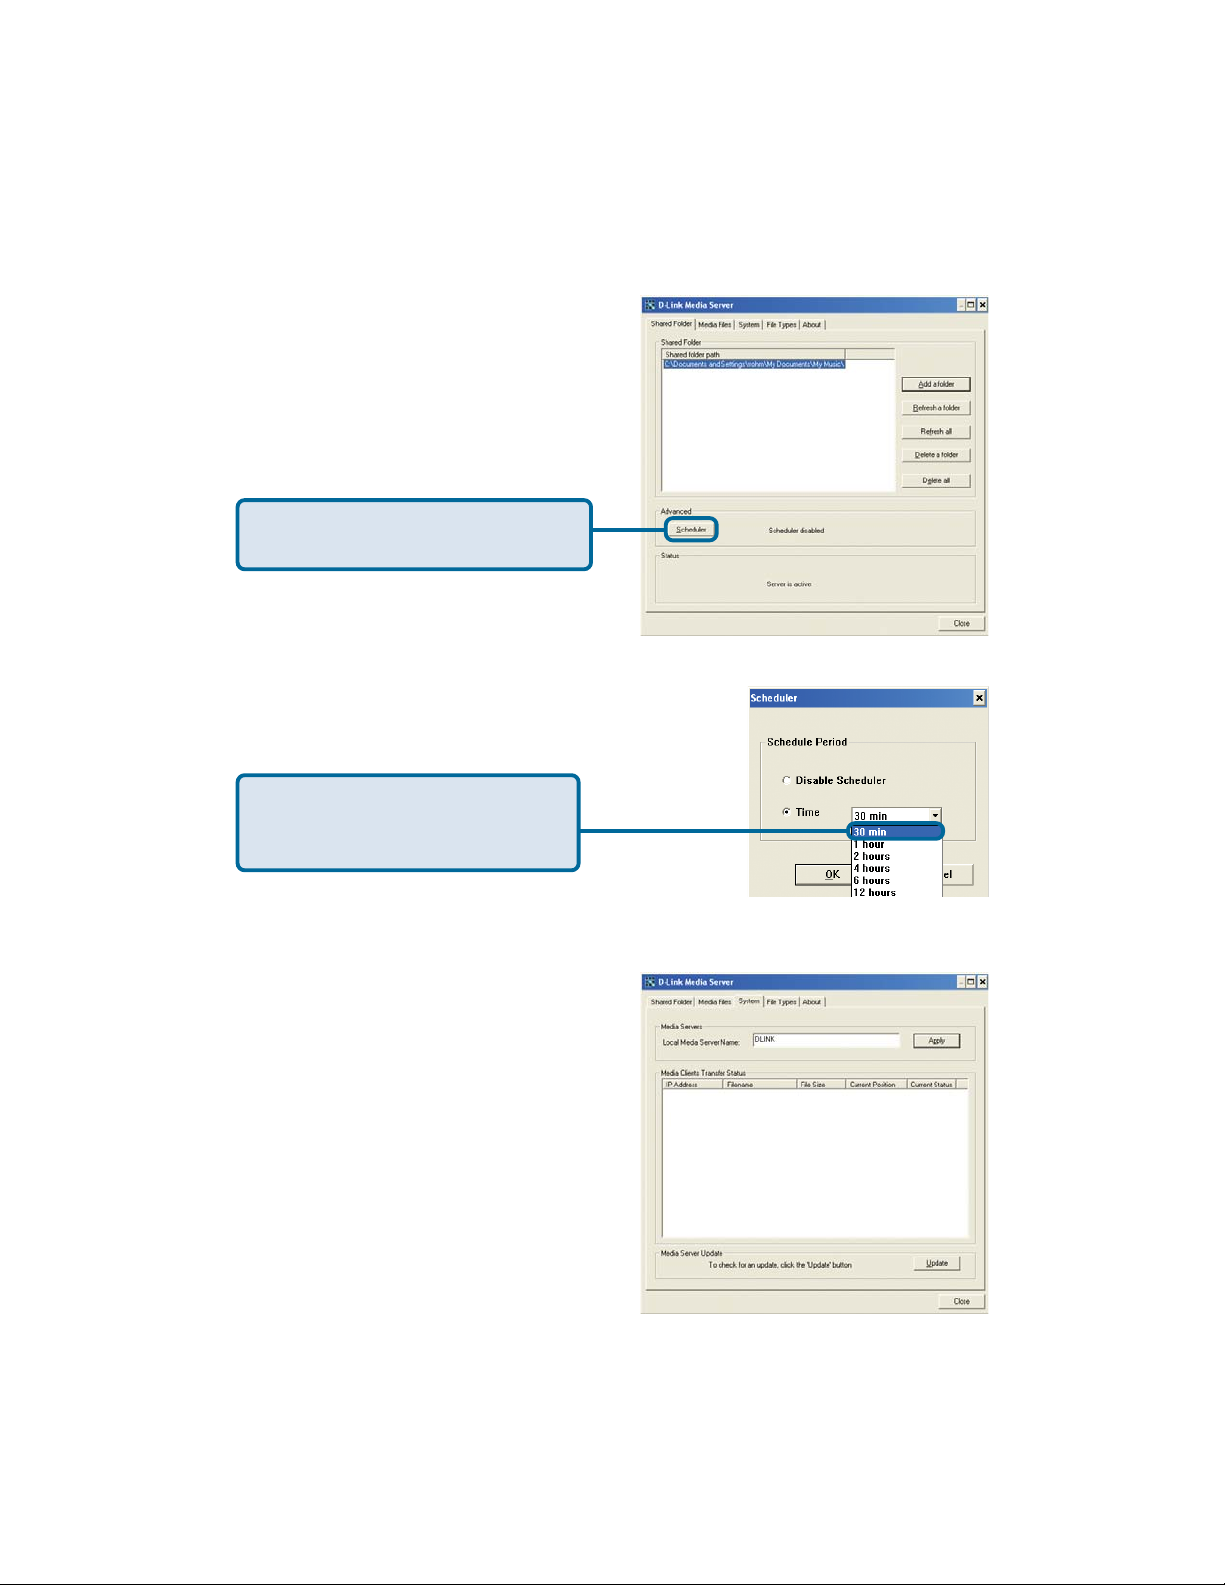
Scheduler: Y ou can schedule the D-Link Media Server software to automatically
refresh the contents of all of your folders.
26
Page 27
Using the D-Link Media Server Software
(continued)
Click Scheduler if you want to setup
an automatic refresh interval.
Click Time and select a time
period. This is how often the server
will refresh the folder contents.
Naming the Media Server
The Media Server name is entered here.
This is the server name that is displayed
when searching for available media
servers in the DSM-320RD interface.
27
Page 28
Using the D-Link Media Server Software
(continued)
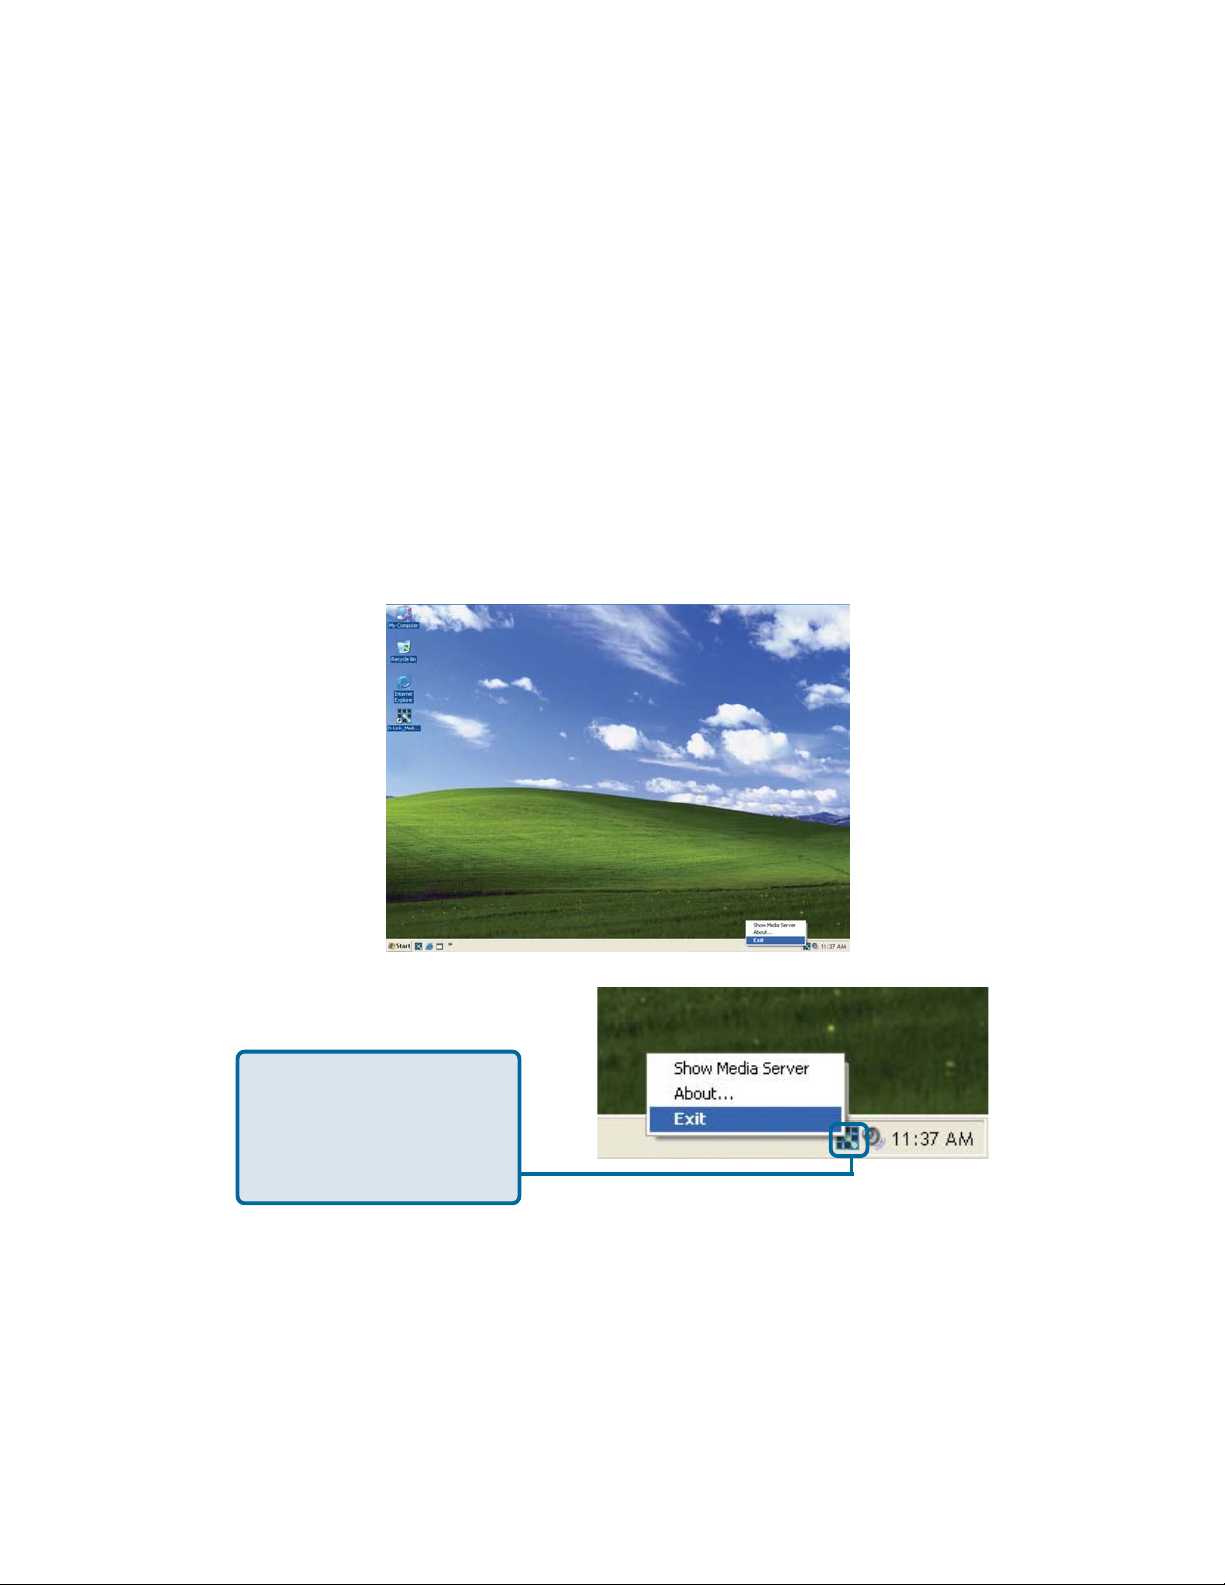
Stopping the D-Link Media Server
To stop the D-Link® Media Server (and stop sharing your photos, video and
music on your PC), right-click on the server icon and select Exit from the server
menu.
Note: The photo, video, and music files stored on your computer will be available
to your DSM-320RD only if the D-Link® Media Server is running. Online media
content that does not require PC-based software (such as Radio@AOL and
Live365) can still be accessed from the DSM-320RD without running the
D-Link® Media Server software.
D-Link Media Server Menu
T o open the D-Link Media
Server menu, right click
on the system tray icon.
The server menu will then
be displayed.
28
Page 29
Using Windows® Media Connect
Software
Windows XP users with Service Pack 2 can utilize the Windows® Media Connect
software in addition to or instead of using the D-Link Media Server software.
The Windows® Media Connect software allows the DSM-320RD to playback
DRM (Digital Rights Management) protected files. The Windows® Media Connect
software is available via Windows Update if you are using Windows XP with
Service Pack 2.
Configuring Windows® Media Connect
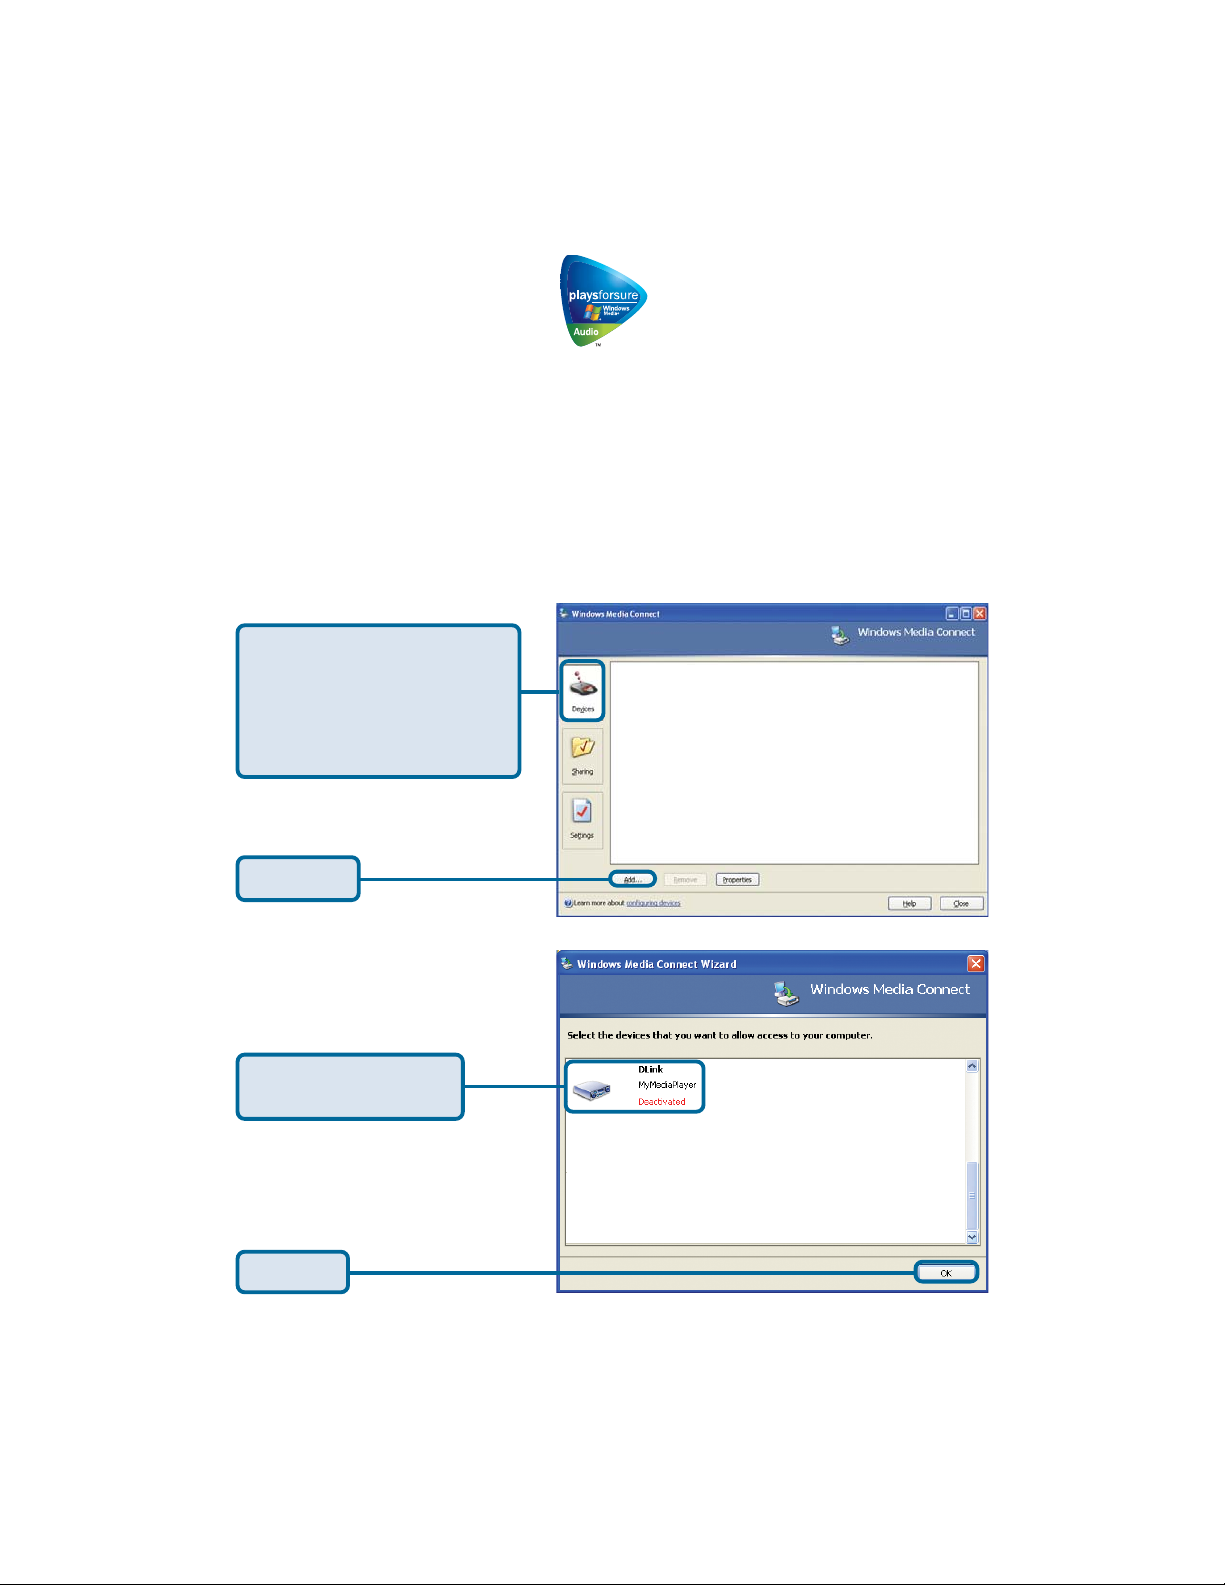
Launch the Windows® Media Connect software and the window below will appear:
The Devices tab is where
you add the DSM-320RD
to the list of devices that
interact with Windows
Media Connect.
Click Add
Select your Media
Player from the list.
Click OK
29
Page 30
Using Windows® Media Connect Software
(continued)
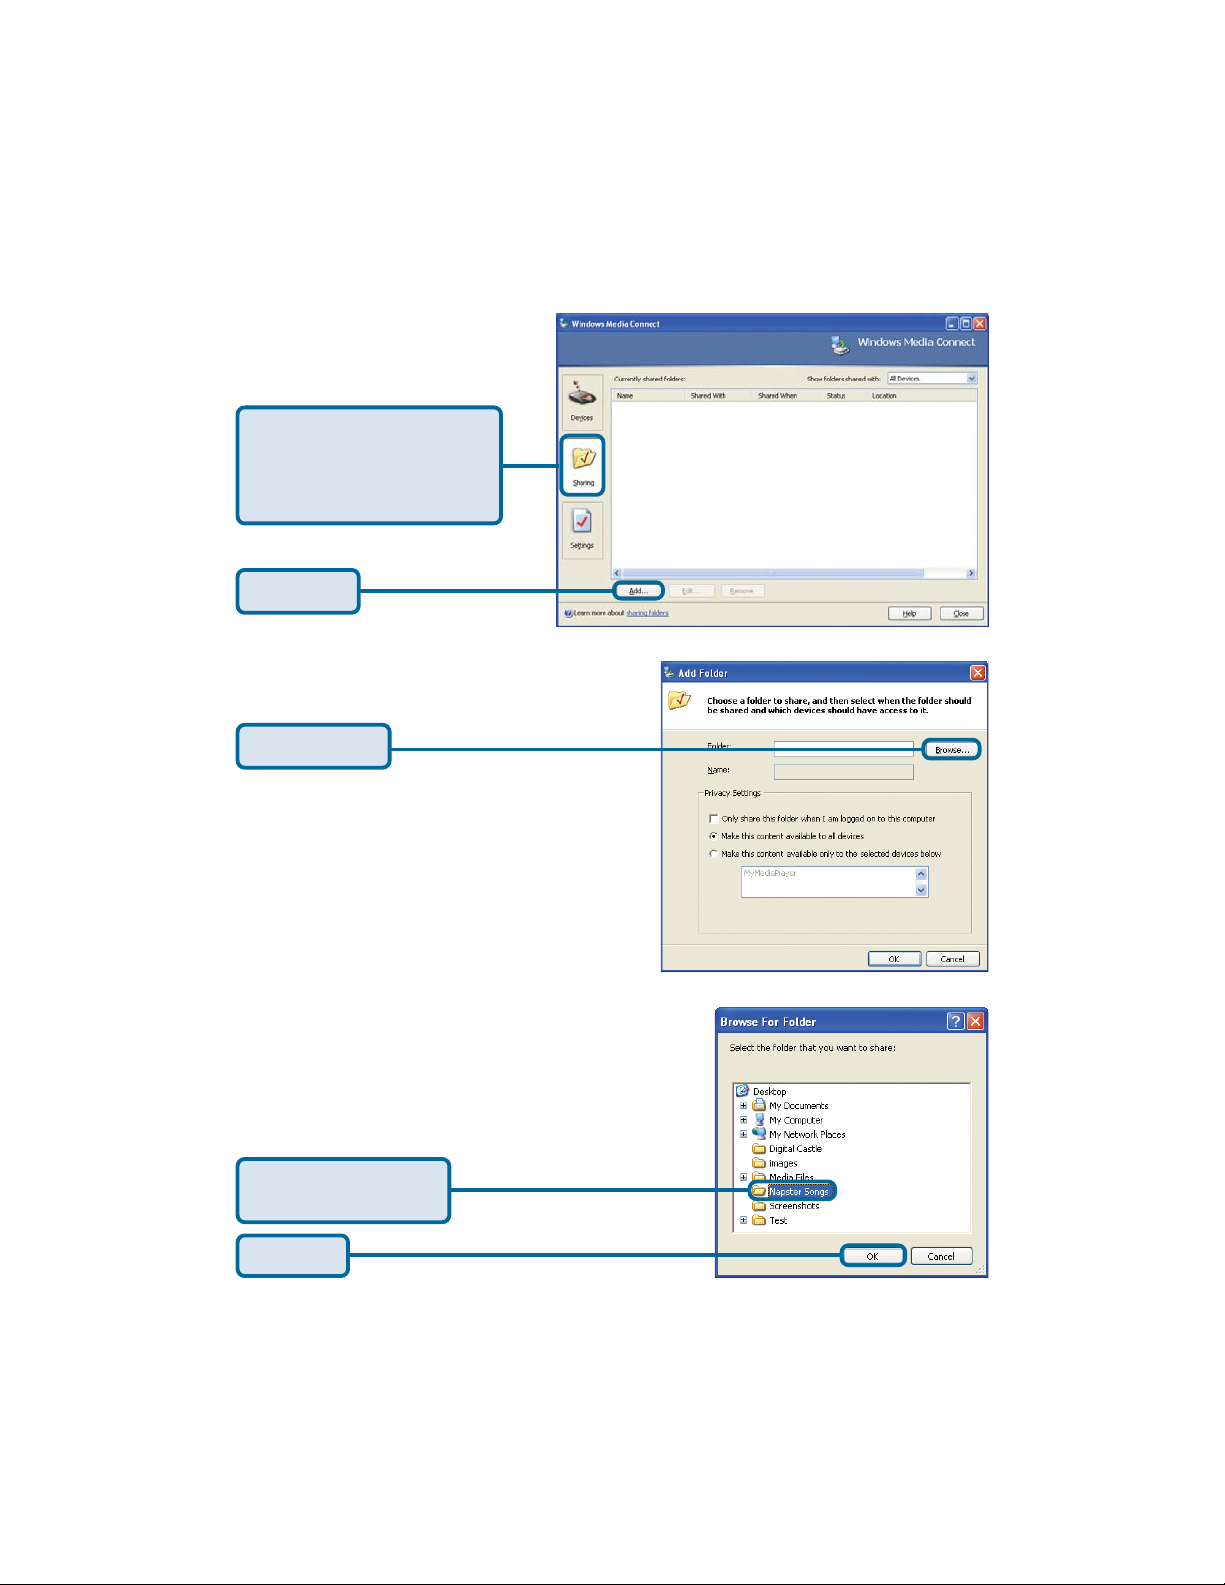
The Sharing t ab is where
you configure the folders
that you want to share
with your DSM-320RD.
Click Add
Click Browse
Select the folder that
you want to share
Click OK
30
Page 31

Using Windows® Media Connect Software
(continued)
Click Make this content
available to all devices
Click OK
The Shared Folders will appear
in the window. Repeat the
steps until you’ve shared all of
the folders that you want the
DSM-320RD to access.
Click Automatically
start folder sharing
when Windows starts
The Settings tab allows you
to automatically start folder
sharing when Windows
starts. You can also Stop/
Start sharing.
Click Close
31
Page 32

Using Windows® Media Connect Software
(continued)
The DSM-320RD supports additional file types that are not supported by the
Windows® Media Connect software. The file types shown below are supported
by both Windows® Media Connect and the DSM-320RD.
File Type File Extensio n Details
Audio
Windows Media Audio .wma Does not support WMA lossless, WMA Pro
WAV .wav
MP3 .mp3 Up to 192kbps
Photo
JPEG .jpg Does not support CMYK or YCCK
GIF .gif Does not support animated gifs
BMP .bmp non-compressed
TIFF .tif Does not support CMTK, YMC, YMCK, or KCMY
PNG .png Non-alpha channel only
Video
Audio Video Interleaved .avi
MPEG-1 .mp1, mpeg, or .mpg Up to 8Mbps
MPEG-2 .mp1, mpeg, or .mpg Up to 8Mbps
Playlists
M3U .m3u
MPEG4 layer only, does not support
uncompressed AVI
Note: Windows® Media Connect currently does not support Fast Forward
and Rewind with protected files.
Be sure to select the Windows® Media Connect
server as the default server in the DSM-320RD
System Setup if you want to access the Windows
Media Connect software. T o do so, press the SETUP
button on the remote control. Navigate to System
by using the down arrow and then press ENTER.
Navigate to View All Servers using the down arrow
and press ENTER to view a list of available servers.
®
32
Page 33

Connecting the DSM-320RD
All audio, video, and networking connections are located on the rear panel of the
DSM-320RD.
Video Connections
Select one of three ways to connect video to your DSM-320RD:
• Composite Video Connector
Plug the supplied yellow video cable
into the DSM-320RD and the matching
opposite end of the cable to your
television input.
• S-Video Connector
Plug the supplied S-Video cable into
the S-Video connector and the
opposite end into the S-Video
connector on your television.
• Component Connectors
Match the color coded cables to the
matching connectors on the
DSM-320RD and into the component
video input of your television.
Note: This cable is not supplied.
The VIDEO OUT button on the remote control toggles between the
composite/S-Video output and the component output. If component
connectors are used but not selected, the screen will be tinted blue.
33
Page 34

Connecting the DSM-320RD (continued)
Audio Connections
The AUDIO OUT button on the remote control toggles between the composite audio
output and the digital audio output (optical/coaxial).
• Composite Audio
Plug the supplied red and white
connectors into the color-coded
matching jacks on the DSM-320RD.
Plug the opposite ends to the
matching jacks on your television or
audio/video system.
• Optical Digital Audio
Connect an optical audio connector
into the DSM-320RD and the
matching opposite end of the cable
to the audio input of your audio
system.
Note: This cable is not supplied.
• Coaxial Digital Audio
Connect a coaxial audio connector
into the DSM-320RD and the
matching opposite end of the cable
to the audio input of your audio
system.
Note: This cable is not supplied.
34
Page 35

Connecting the DSM-320RD (continued)
Network Connections
Select one of two ways to connect a network to your DSM-320RD:
• RJ-45 Ethernet Connector
Connect the supplied Ethernet cable to
the network cable connector, and attach
the other end to the network.
• Wireless Antenna
Attach the supplied antenna by threading
it onto the antenna connector. Be sure
the antenna is secure and in an upright
position.
Note: You may have an Ethernet cable plugged into the unit and have the
wireless antenna connected. Neither will interfere with the other, but only
one network can be accessed at a time (wired or wireless). The network
connection type is selected in the Setup Wizard and can be changed by
going to the Setup Menu. To access the Setup Menu, press the SETUP
button on the remote control.
35
Page 36

Network Layout
Below is a diagram displaying what your network might look like once all of the
connections have been made to the D-Link
Player.
®
DSM-320RD Wireless Media
36
Page 37

Using the On-Screen Keyboard
Whenever the cursor is in a text field and you need to enter text, press ENTER
on the remote control and the on-screen keyboard will appear.
The keyboard is used for a variety of functions such as naming your
DSM-320RD and performing searches for music, photos or video. To use the
keyboard, highlight a character with the arrow buttons on the remote control
and press the ENTER button. Text can also be entered by using numbers 2-9
on the remote, just as you would on a cell phone. Highlight ENTER and press
ENTER when you’re finished entering text.
Special Keys
The backspace key will erase the previous character.
The shift key will toggle the keyboard between upper and lower case
characters.
The clear key will erase all of the characters that have been
entered.
To exit out of the keyboard screen without making any changes, hit the
RETURN button on the remote control.
37
Page 38

The DSM-320RD Setup Wizard
The DSM-320RD Setup Wizard is navigated using the directional arrows
and the ENTER button on the remote control. To toggle between the
configuration options, use the up and down arrows on the remote control. To
toggle between the Back, Next, and Rescan buttons, use the left and right
arrows on the remote control. Press ENTER to select a field or confirm a
selection.
Welcome Screen
During the initial startup, the
DSM-320RD displays the Setup
Wizard Welcome screen. Press
ENTER on the remote control
to proceed to the next screen.
Personalize your MediaLounge Media Player
If you would like to change the
name of the Media Player, press
ENTER on the Remote Control
to display the on-screen
keyboard. To proceed to the
next page, use the down arrow
button on the remote control to
navigate to the Next button and
press ENTER.
38
Page 39

The DSM-320RD Setup Wizard (continued)
Select Your Network Connection
The connection type defaults to
Wireless.
Wireless
If using a wireless network,
press the down arrow on the
remote control to navigate to the
Next button. Once the Next
button is highlighted, press
ENTER on the remote control
to proceed to the next screen.
Wired
To select Wired, press the ENTER button on the remote control while the
Connection is highlighted. Press the up arrow on the remote control to choose
Wired. Press ENTER again to make the selection and then press the down
arrow on the remote control to navigate to the Next button. Once the Next
button is highlighted, press ENTER on the remote control to proceed to the
next screen. Skip to the Current Network Settings screen on page 41.
Select the SSID
Select the SSID (network
identifier) that is being used by
your wireless network. To select
an SSID, press ENTER on the
remote control while the SSID
window is highlighted. Use the
up arrow and down arrow
buttons on the remote control to
navigate through the list. Once
you’ve highlighted the correct
SSID, press ENTER on the
remote control. Press the down
arrow on the remote control to navigate to the Next button.
The Rescan button will refresh the list of available networks. Use the left arrow
and right arrow to navigate from the Next button to the Rescan button. If you
cannot locate the SSID, select <Manually Enter SSID> and you will be able to
enter it on the next screen.
39
Page 40

The DSM-320RD Setup Wizard (continued)
To use Windows® Connect Now
Current Wireless Settings
Your current wireless settings
are displayed based on the
SSID you selected in the
previous step. If you chose the
enter the SSID manually, then
the default settings are entered.
SSID
The SSID name selected on the
previous screen appears here.
You can change the SSID you
selected or enter one manually
by pressing the ENTER button
on the remote control with this field highlighted. The on-screen keyboard will
be displayed and you can enter the SSID.
Mode
There are two different modes to select from: Ad-Hoc and Infrastructure Mode.
Ad-Hoc Mode is used for peer to peer wireless networks that do not contain a
router or an access point. Infrastructure Mode is used for networks with an
access point or router. To toggle between the two, press the ENTER button
when Mode is highlighted. The up arrow and down arrow will toggle between
the two options. Press ENTER again to select.
Encryption
WEP (Wired Equivalent Privacy) & WPA (WiFi Protected Access; a wireless
standard designed to improve upon the security features of WEP), are two
encryption technologies used by wireless devices. There are six options
configurable under this setting; Disable, 64bits-Hex, 128bits-Hex, 64bitsASCII, 128bits-ASCII, and WPA-PSK-TKIP.
To toggle between the options, press the ENTER button when Encrypt is
highlighted. The up arrow and down arrow will toggle between the six options.
Press ENTER again to select.
Key Index
Select a number between 1 and 4. To toggle between the options, press the
ENTER button when Key Index is highlighted. The up arrow and down arrow
will toggle between the four options. Press ENTER again to select.
Key
T o connect to an encrypted wireless device, the key you enter here must match
the key of the device exactly.
(WCN), please skip to page 43.
40
Page 41

The DSM-320RD Setup Wizard (continued)
Key (continued)
Press the ENTER button on the remote control with this field highlighted to
enter a key. The on-screen keyboard will be displayed and you can enter the
key. Keys are defined by entering in a string in HEX (hexadecimal - using
characters 0-9, A-F) or ASCII (American Standard Code for Information
Interchange – alphanumeric characters) format.
Encryption 64-bit 128-bit
HEX
ASCII
Character
Length
10 12345678FA 26 456FBCDF123400122225271730
5 DMODE 13 2002HALOSWIN1
Example
Character
Length
Example
After entering the appropriate wireless settings for your network, use the down
arrow to navigate to the Next button. Press ENTER on the remote control to
proceed to the next screen.
Current Network Settings
Your current network settings
are displayed and can be
modified at this point. DHCP is
the default setting. The DHCP
option allows your DHCP
enabled device to assign the IP
configuration to the DSM-320RD.
DHCP
If your network has a DHCP
server then press the down
arrow on the remote control to
navigate to the Next button. Once the Next button is highlighted, press ENTER
on the remote control to proceed to the next screen.
Static
If using a static IP address, press ENTER on the remote control with
Configuration highlighted. The up arrow and down arrow toggle between the
options. Press ENTER to make a selection. The on-screen keyboard or numbers
on the remote are used to enter your address settings. Be sure to enter a
unique IP address within the same range as the network. After entering the
appropriate settings for your network, use the down arrow to navigate to the
Next button. Press ENTER on the remote control to proceed to the next screen.
Please see the Glossary for an explanation of DHCP and static IP addresses.
41
Page 42

The DSM-320RD Setup Wizard (continued)
Select a Media Server
Select a Media Server from the
list by pressing the ENTER
button on the remote control
with the Media Server list
highlighted. Use the up arrow
and down arrow to navigate
through the list of servers. Press
ENTER again to select a Media
Server . Use the down arrow to
navigate to the Next button.
Rescan will refresh the list of
available Media Servers. Use the left and right arrows to navigate between
the Next and Rescan button.
A Media Server is any PC running the D-Link Media Server software or UPnP
A V compliant device on the network that can communicate with the DSM-320RD.
Setup is Complete
Press ENTER on the remote
control with Done highlighted to
complete the setup.
Y our MediaLounge
is now ready to stream music,
photo, and video content for
enjoyment on your home
entertainment center.
™
DSM-320RD
If you do not have a Media
Server configured, you are still
able to complete the Setup
Wizard. This allows you to use
the Online Services that do not
require a Media Server such as
Radio@AOL and Live365.
42
Page 43

Windows Connect Now
Configuration
If you already have wireless settings configured on your PC, instead of using
the setup wizard, you can use Windows® Connect Now (WCN) to configure the
wireless settings on your DSM-320RD. Note: WCN is only available on PCs
running WindowsXP with Service Pack 2 installed.
In the menu bar, go to Start >
All Programs > Accessories
> Communications and click
Wireless Network Setup
Wizard.
Your system will display the
Setup Wizard Welcome screen.
Click Next to continue.
43
Page 44

Windows Connect Now Configuration
(continued)
Select to add a new device to
your existing wireless network
and click Next to continue.
The wizard provides two
methods for setting up a
wireless network. Using a USB
flash drive is recommended.
Select to use a USB flash drive
to save your wireless network
settings and click Next to
continue.
44
Page 45

Windows Connect Now Configuration
(continued)
Plug your flash drive into a USB
port on this computer. The drive
letter will appear in the pull down
menu. You can choose to use
this drive or select another
drive. Click Next to save your
wireless settings to the USB
flash drive. This may take a few
seconds.
This screen will appear when
the wireless settings have been
saved to the USB flash drive.
Next, remove the USB Flash
Drive from your PC and insert
into the USB port on the back
panel of the DSM-320RD
labeled “WCN.”
45
Page 46

Windows Connect Now Configuration
(continued)
The following screen will
appear, prompting you to apply
your wireless settings. Click OK
to continue.
The following screen confirms
that your wireless settings have
been applied. Click OK.
Next, remove the USB Flash
Drive from the DSM-320RD and
insert it back into the USB port
on your PC. Click Next to
continue.
46
Page 47

Windows Connect Now Configuration
(continued)
Wireless configuration using
WCN is now complete. The
setup wizard will display the
devices that have been setup
with your wireless network.
Click Finish.
47
Page 48

DSM-320RD Menu
Menu Basics
The DSM-320RD uses an on-screen menu interface. As you move through the
menus, you will use the selection arrows on the remote control to move up,
down, right and left. The highlight bar moves from item to item as you press
the selection arrows. In some instances you will need to press ENTER on the
remote control to access the pulldown menu within an item. You will then see
an arrow within the highlighted bar. These arrow “hints” help you with menu
navigation, and show you the possible paths you may take. For example, a
down arrow hints that more items are available if you move the highlight bar
down. To move to the next menu screen, use the right arrow. Similarly, use
the left arrow to move to the previous screen.
Menu Home
The menu home screen is the top level menu. You will see one of the two
home screens shown below. The top screen appears if you have the D-Link
Media Server software up and running on your network. The bottom screen
appears if you are using third
party server software.
From this home screen, you can
access MY MEDIA, DVD,
MEMORY CARD, or ONLINE
MEDIA. To jump directly to the
home screen, press the HOME
button in the center of the remote
control.
48
Page 49

Music
Music Quality
Y our music listening experience on the media player depends upon the quality
of your digital music files on your PC. Avoid quality settings below 48kbps as
they are unsupported. For CD quality music, rip your MP3s at 128kbps or
higher, with a sample rate of 44.1kHz.
Supported Music Formats
The following music file formats are supported:
MP3 (up to 192 kbps)
MPEG-1, Layer 3 Audio file -The standard Internet music file format.
This is the most commonly used audio format.
WMA (Does not support WMA lossless, WMA Pro)
Windows Media Audio file - Supported by the Microsof t Windows Media
player and some music jukebox programs. Also supports WMDRM
protected WMA files when using Windows Media Connect.
WAV
WAV was developed by Microsoft and IBM. WAV sound files end in
.wav and are compatible with Windows applications supporting audio.
AIFF (AIFF files must be encoded in PCM format only.)
AIFF (Audio Interchange File Format) was developed by Apple
Computers and is the standard audio format for Macintosh computers.
File extensions are .AIF or .IEF.
MPEG 1 and MPEG 2
Moving Pictures Experts Group created standards for compressing audio
and video. Audio uses the file extension .mp3.
OGG Vorbis
Open source audio format. Uses the file extension .ogg.
49
Page 50

Music (continued)
Organizing Music Files
Music files are located on your PC and can be contained in one directory folder ,
or organized in several subfolders.
The DSM-320RD automatically organizes your music files by genres, artists,
albums, and tracks. This information is obtained from the ID3 tags in each of
your music files. The ID3 tag is created for you when you rip (copy) your music
from your CD. However, if your music files have incorrect or incomplete tags,
the tracks may not appear where they should in your music categories.
50
Page 51

Music (continued)
Playing a Track
Once you enter the music menu, there are several ways that you can view
tracks. You can view all tracks, playlists, tracks by genre, artist, album, or
folder name. Use the selection arrows to navigate to the track you wish to
play . Once you have located the appropriate track, highlight it and press ENTER
or PLAY on the remote control. The track will begin playing on your stereo or
television speakers.
To play a track starting from the main home screen:
1. Select the MUSIC category from the Home page or click on the MUSIC
button on the remote control.
2. Select a viewing category . Use the down arrow and up arrow on the remote
control to navigate to a viewing category (by All Tracks, Playlists, Genres,
Artists, Albums, or Folders). Select the option by clicking ENTER or the
right arrow on the remote control.
3. Select a Track. Use the up arrow and down arrow buttons to navigate one
track at a time. The PAGE up and PAGE down buttons can be used to
navigate through the track list one page at a time.
4. After the appropriate track is highlighted, press ENTER or PLAY on the
remote control.
51
Page 52

Music (continued)
Creating a Preset
To create a preset, follow the steps below:
1. Select the MUSIC category from the Home page or click on the MUSIC
button on the remote control.
2. Select a viewing category . Use the down arrow and up arrow on the remote
control to navigate to a viewing category (by All Tracks, Playlists, Genres,
Artists, Albums, or Folders). Select the option by clicking ENTER or the
right arrow on the remote control.
3. Select a T rack. Use the up arrow and down arrow buttons to navigate one
track at a time. The PAGE up and PAGE down buttons can be used to
navigate through the track list one page at a time. Highlight the track to
define as a preset.
4. Press the number of the preset you want to assign to this track. Select a
number between 1-9 on your remote control. If you select the number 1,
hold the number 1 key down until the preset number icon appears next
to your selection after about five seconds. The number of the preset you
selected will remain next to the track. If you selected a number that has
already been assigned to another song, the previous selection will no longer
be defined as a preset. Note: Presets cannot be erased but can be replaced
by another selection.
After creating a preset, you can play the preset any time the DSM-320RD and
the PC containing the tracks are powered on by pressing the preset number
on your remote control. The song files on your PC must remain in the same
folder location that they were in when the preset was created.
Y ou can play your favorite preset during a slideshow present ation by pressing
the number of the preset during the slideshow playback.
52
Page 53

Music (continued)
Browsing for Music
There are many ways to browse for a music track. For example, let’s use the
following music file located in the following shared location:
c:\Documents and Settings\Rob\My Documents\My Music\Violator\Halo.mp3
Halo.mp3
Artist: Depeche Mode
Album: Violator
Genre: Alternative
To browse for this track in the track list:
1. Select All T racks
2. Highlight Halo
To browse by artist:
1. Select Artists
2. Select Depeche Mode
3. Select Violator
4. Highlight Halo
To browse by album:
1. Select Albums
2. Select Violator
3. Highlight Halo
To browse by genre:
1. Select Genres
2. Select Alternative
3. Select Depeche Mode
4. Select Violator
5. Highlight Halo
To browse by folder:
1. Select Folders
2. Select My Music
3. Select Violator
4. Select Halo
Also see the SEARCH function on page 63 for additional search options.
53
Page 54

Music (continued)
Creating Music Playlists
Use your favorite music software on your PC to create music playlists. A playlist
allows you to specify exactly what tracks to play and in what order to play
them. For example, create a “favorites” playlist and just listen to your favorite
tracks. Save the playlist in the industry standard .m3u playlist format.
The DSM-320RD will play tracks from playlists you create on your computer.
The media player supports playlists in two standard formats:
m3u MPEG Playlist File
pls MPEG Playlist File
Software for playing music on your PC can be used to create playlists.
WinAmp
TM
and Microsoft Windows Media PlayerTM are two examples.
Playing a Playlist
To play all the tracks in a playlist, highlight the playlist name and press the
PLAY button. All tracks will be played in the order they appear in the playlist.
Controlling Music Playback
Y our DSM-320RD works just like a stereo or CD player . Controlling your music
playback will be an easy and natural experience. Use the remote to PLAY,
PAUSE, or STOP music.
Playing a Group of Songs
Highlight any folder and press the PLAY button on the remote control. All of the
songs within the selected folder will be played. You can highlight a genre of
music and all files that are associated with that genre will be played. Genre
categories are defined when an audio file is created.
Y ou can play songs within a folder from a specified track forward. For instance,
if you have a folder with ten tracks and select Track 3, clicking on the PLAY
button will play tracks 3 through 10. Note: If you press the ENTER button on the
remote control instead of the PLAY button, only the selected track (Track 3) is
played.
Playing Individual Songs
Individual songs can be played by highlighting a song and pressing ENTER on
the remote control.
54
Page 55

Music (continued)
Viewing Photos while Music is Playing
Your DSM-320RD is capable of displaying photos and playing background or
preset music simultaneously.
Background Music: Y ou can start background music by playing a song in MUSIC
mode. Go to PHOTO mode and start your photo slideshow.
Preset Music: To play presets during your slideshow, simply press a number
on the remote control that corresponds with an existing Preset. The appropriate
song will begin playing (See Creating a Preset on page 52 for additional details).
Shuffle and Repeat
You can turn on the repeat function to continuously play individual tracks,
playlists, or tracks within a folder.
When you are playing or repeating a group of tracks, you
can randomize the play order by pressing the SHUFFLE
button on the remote control.
To repeat a track or a group of tracks, click REPEAT on
the remote control. When the icon with the text REPEAT
below it appears, you are in the repeat current track mode.
When the repeat icon with the ALL text below it appears,
you are in Repeat All mode. This will repeat all of the tracks
within your currently selected folder or playlist.
When you select a music track,
information about the song is
displayed (if available), as
shown here.
55
Page 56

Photo
Supported Photo Formats
The following photo file formats are supported:
BMP (non-compressed)
Windows bitmap file. Widely used in Microsoft
Windows for pictures and backgrounds.
JPEG (grayscale, RGB, YCbCy)
(Does not support CMYK, YCCK.)
The JPEG format is the Internet and digital photo
format standard used by most digital cameras.
GIF
(Animated GIF’s are not supported)
Older format still widely available on the internet
for photos, web pages, and clip art.
PNG (Non-alpha channel only)
Portable Network Graphics standard created in
response to limitations in the GIF file format.
TIFF (RGB)
(Does not support CMYK, YMC, YMCK, KCMY)
Tagged Image File Format is a raster file format.
JPEG2000
JPEG2000 is a new image format based on the
latest compression technology.
56
Page 57

Photo (continued)
Organizing Photo Albums
Unlike music files, photos contain little information about their content. Therefore,
photos are organized by their filename and by the folder they are in. Many
digital cameras will organize your photos into folders when you connect and
unload them to your PC. Each time you dock or connect, a new folder is created
using the current date and time, and all photos are copied into that folder.
To simplify browsing on your DSM-320RD, you can create folders on your PC.
For instance, create a folder in the My Pictures directory called Vacation and
copy all of your vacation photos into it. Y our DSM-320RD will show the Vacation
folder. To play a slideshow of the folder, highlight it and press the PLAY button.
To view a list of photos in the folder, highlight it and press the right arrow
button.
You can give your photos meaningful names by renaming the files on the PC.
Most digital cameras number photos sequentially. For example, rename the
photo IM001125.jpg to sunset.jpg on your PC. The photo will be displayed as
sunset.jpg on your DSM-320RD*.
Right-click on the file and
select Rename.
If the file extension does not appear as part of
the name displayed when you select rename,
then it is not necessary to enter the file
extension (.jpg) at the end of the filename. To
rename IM001125.jpg to sunset.jpg, type in
sunset and hit Enter on your computer’s
keyboard.
sunset
If the file extension appears as part of the name
when you select rename, then be sure to
include the extension when renaming the file.
To rename IM001125.jpg to sunset.jpg, type
in sunset.jpg and hit Enter on your computer’s
keyboard.
Y ou can create as many folders as you need. Create a folder for the year, then
create folders inside for each of the months, and then folders in each month
for special occasions (birthday, vacation, holidays, etc...).
*Folder creation and renaming files must be done on the PC via standard
Windows procedures.
57
Page 58

Photo (continued)
Playing a Photo Slideshow
T o start playing a photo slideshow , highlight a folder and press the PLAY button.
The first photo will be displayed and then followed by the next photo in the
folder. All photos in the folder will be displayed.
Controlling Photo Playback
Controlling photo playback is very similar to controlling a CD player . Once you
have started a photo slideshow , use the remote to PLAY, PAUSE, or STOP the
show. Press the PREV and NEXT buttons to skip to the previous or next photo.
To set the amount of time before the next photo in a slideshow is displayed,
click SETUP on your remote and select General/additional settings. Y ou can
set the slide show delay at an interval between 1 second and 2 minutes.
Shuffle and Repeat
Photos are displayed in alphabetical order by filename. During slideshow
playback you can shuffle the order by pressing the SHUFFLE button on your
remote control. Shuffle automatically enables the repeat function.
To repeat all of the photos in a slideshow, press the REPEAT button on the
remote control during the slideshow before the end of the slideshow . If the last
image in the folder is displayed before you press repeat, then you must go to
the previous page and start the slideshow again. Be sure to press the REPEAT
button before you see the end of slideshow image in the upper right corner of
the screen. Below are the icons you will see in the upper right corner.
Shuffle on
Repeat all
End of slideshow
Invalid option selected
Shuffle off
Repeat off
Pause
Play
58
Page 59

Photo (continued)
Viewing Photo Information
To view information about a
photo, highlight the photo
and press the DISPLAY
button.
59
Page 60

Photo (continued)
Photo Viewing Effects
When viewing a photo you can change the on-screen appearance by applying
rotate, pan, and zoom effect s. These on-screen effects are only for enhancing
the on-screen view and are not saved to the actual file. To access the photo
viewing effects, press the MENU button on the remote control while viewing the
photo that you want to manipulate. To select an effect, highlight the effect using
the arrow keys on the remote control and press ENTER on the remote control
to select the effect. You can also use the ZOOM and ROTATE buttons on the
remote control to achieve the same effects.
Rotate clockwise 90 degrees: Selecting this option will
rotate the image clockwise 90 degrees every time it is
selected.
Rotate counter-clockwise 90 degrees: Selecting this
option will rotate the image counter-clockwise 90 degrees
every time it is selected.
Rotate 180 degrees: Selecting this option will rotate the
image 180 degrees every time it is selected.
Pan: When this option is selected, you can move the
image using the arrow buttons on the remote control.
Zoom: Use the down or right arrow to zoom in on an
image. Use the up or left arrow to zoom out. The image
can zoom 5 steps either direction.
Exit: Use this button to exit from the effects menu or you
can select the MENU button on the remote control.
60
Page 61

Video
Supported Video Formats
The following video file formats are supported:
MPEG-1 (up to 8Mbps)
MPEG-2 (up to 8Mbps)
MPEG-4 (ASP - Advanced Simple Profile)
AVI (MPEG4 layer only, does not support uncompressed AVI)
XVID (with MP3 and PCM)
Viewing a Video
Once you enter the Video menu, you can view your list of videos.
Use the selection arrows to navigate to the video folder you wish to view.
Highlight and press ENTER to view the video folder.
After you have selected a video folder, scroll down and highlight the video you
wish to view and press ENTER or press PLAY to view the video.
61
Page 62

Video (continued)
Using the Remote Control with Videos
ENTER - Click ENTER to play your highlighted video.
PLAY/PAUSE - To pause the video and to resume playing the video.
+ (VOLUME) - To increase the volume.
- (VOLUME) - To decrease the volume.
MUTE - To silence the audio portion of the video.
FF - To fast forward through the video.
DISPLAY - To view the track time; the resolution and the bit rate.
REPEAT - To repeat the video after viewing it.
Below are the on-screen indicators when a button is pressed. These icons will
appear in the upper right corner of the screen:
Pause
Repeat
Mute sound
Invalid option selected
Play
Repeat off
Fast Forward
Fast Rewind
62
Page 63

Search
Click the SEARCH button on the remote control and the screen below will
appear. This screen allows you to search for music tracks, videos, or photos.
Use the up and down arrows
on the remote control to
navigate through the options.
Press ENTER on the remote
control to make a selection. Use
the down arrow to navigate to
the next field.
Media T ype: You can select All
types of media or specify music,
photo, or video.
Search Type: There are two options available under the Search Type.
• Starts With will search for files that begin with the characters entered in
the Search For: field.
For example, a Starts With search for en would bring up the following:
Enjoy The Silence
Enter Sandman
Endless Love
• Contains will search for files that contain the specified characters anywhere
in the file name.
For example, a Contains search for en would bring up the following titles:
This is the End
The Unforgiven
The Great Pretender
Enjoy The Silence
Enter Sandman
Endless Love
Search For: To enter text, arrow to the field to highlight it, press ENTER on the
remote control and the on-screen keyboard will appear. Enter the title you are
searching for . The more detailed you are, the more accurate the result s will be.
The search feature will locate all titles that contain the text you entered that
match the media type selected. To begin a search, use the down arrow to
navigate to the SEARCH button and press ENTER.
63
Page 64

DVD
Viewing a DVD
Once you enter the DVD menu, if there is a disc in the DVD tray and the Auto
Play setting is enabled (see Setup-DVD on page 92), the DVD will automatically
play. Otherwise, press the Play button to launch the DVD menu.
Use the selection arrows and ENTER button to navigate the DVD menu.
Using the Remote Control with DVDs
EJECT - The Eject button opens and closes the DVD tray located on the
front panel of the DSM-320RD.
DISPLAY - To view the DVD title, chapter, time and audio/video options.
ENTER - Click ENTER to make your selection from the DVD menu.
PLAY/PAUSE - To pause the DVD and to resume playing the DVD.
+ (VOLUME) - To increase the volume.
- (VOLUME) - To decrease the volume.
MUTE - To silence the audio portion of the DVD.
SLOW MOTION - To play the DVD in slow motion.
Fast Forward - To fast forward through the DVD.
Fast Rewind - To fast rewind through the DVD.
64
Page 65

DVD (continued)
Next - To jump forward to the next chapter.
Prev - To jump back to the previous chapter.
ZOOM - To zoom in/out on the video.
Title - Displays the DVD’s title.
Subtitle - Displays DVD subtitles.
Angle - If the DVD has multiple angle support, you can toggle between
different camera angles.
REPEAT - To repeat the video after viewing it.
A-B - Select a start point (A) and an end point (AB) of video to replay.
Below are the on-screen indicators when a button is pressed. These icons will
appear in the upper right corner of the screen:
Pause
Repeat Chapter
Replay A
Repeat/Replay off
Slow
Invalid option selected
Zoom
Play
Repeat Title
Replay AB
Step
Fast Forward
Fast Rewind
Mute sound
65
Page 66

DVD (continued)
DVD Player Considerations
CD-R/CD-RW discs recorded by CDDA method can be played.
Some CD-R/CD-RW discs may be incompatible due to laser pickup and disc design.
DVD-R discs recorded by DVD-Video method can be played.
Some DVD-R discs may be incompatible due to laser pick up and
disc design.
This DVD player may not support some MP3 recordings due to
differences in recording formats condition.
66
Page 67

Memory Card
Viewing a Memory Card
In the Memory Card menu, the DSM-320RD will display if there are any memory
cards plugged in to the device. The two memory card slots will display “Empty”
if there are no available cards. When you plug in a memory card, the memory
card type will display in Slot 1 or Slot 2.
Use the selection arrows and press ENTER to select a memory card for
viewing. Depending on your photo display options, your files will either display
in a list or as thumbnails (see Setup-Additional Settings on page 94). You
can also select Auto Playback (see Setup-Memory Card on page 95) in the
setup menu and your files will automatically play when a card is inserted. Press
ENTER to display the image in a full screen and use the up and down selection
arrows to navigate back and forward through your files.
67
Page 68

Supported File Types
The DVD player and Card Reader support the following file types:
Music:
.mp1
.mpa
.mp2
.mp3
.wav
.aif
.aiff
.wma
.lpcm
.ogg
Photos:
.jpg
.jpeg
.tif
.tiff
Video:
.mpg
.mpeg
.m1v
.dat
.m2v
.vob
.avi
.mp4
68
Page 69

Online Media
Currently the DSM-320RD supports Radio@AOL1, Rhapsody
online services. Content downloaded from Napster
™ 3
can also be used with
your DSM-320RD.
New services will be added in the future and made available via firmware
upgrades. If your DSM-320RD is configured to perform firmware upgrades
automatically (see V ersion on page 96 for details), then you will see new options
as soon as they become available.
T o access the Online Media section, select Online Media from the Home screen
or click the ONLINE MEDIA button on your remote control.
™ 2
, and Live365
™
AOL® Services
The screen above will appear. Select AOL® Services by pressing ENTER on
your remote control. This service allows you to listen to online radio. When you
select AOL® Services, a setup wizard will appear, leading you through the simple
steps required to listen to Radio@AOL.
* AOL® ISP Service is NOT required to access the AOL online radio. You can
be an AOL member and have another Internet Service Provider.
1
Radio@AOL is available for USA customers only.
2
RhapsodyTM is available for USA customers only.
3
NapsterTM is available for USA, Canada, and England customers only.
69
Page 70

Online Media (continued)
After selecting AOL® Services (as shown on the previous page), you will be
given the option to sign in as an AOL® Member, or, if you are not a member,
you can enjoy a Free Trial. AOL
For AOL® Members:
Click AOL Members - Sign In.
Click OK.
®
members will sign in as follows:
Enter your AOL screen
name and password.
As an AOL member, you are now ready to
use Radio@AOL or Radio@AOL Presets!
Click Radio@AOL to enter the
radio station selection screen.
70
Page 71

Online Media (continued)
For AOL® Members (continued)
Radio@AOL
Information about the current
selection will be displayed here.
Use the up and down arrow buttons on your remote to scroll up and down
through the genre list. If a station is highlighted, you will need to press the left
arrow on your remote control to navigate to the genre list. When you’ve found
a genre you like, you can press ENTER or use the right arrow button on your
remote control to navigate to the station list. The up and down arrow buttons
on your remote control are used to navigate through the list of stations. Press
ENTER on the remote control to select a station. Use the left arrow on the
remote control to return to the genre list.
Radio@AOL presets can be programmed from this screen. T o program a preset,
hold the MENU button on the remote control until the AOL preset icon
appears next to the station you’ve selected. Up to five stations can be
programmed as presets. The presets will remain in memory just as they do on
your home/car stereo. Presets are only erased as new ones are programmed
or if the MENU button is pressed again while the same station is highlighted.
After you’ve stored five presets, any new preset selection will take the place of
one of the previous presets. To play presets you must go to the AOL Presets
screen as shown on the next page. To exit from the station selection screen,
press the left arrow on your remote control.
Note: The screensaver feature is disabled on the Radio@AOL and
Radio@AOL Presets screens.
71
Page 72

Online Media (continued)
For AOL® Members (continued)
Radio@AOL Presets
Click Radio@AOL Presets.
Switch Screen
Name
Preset Radio stations are available here. Use the arrow buttons on your remote
control to highlight the station of your choice and press ENTER to select it.
AOL® Presets can only be accessed via this screen. AOL® has a list of presets
already programmed or you can define your own selections as shown on the
previous page.
Note: Only Radio@AOL subscribers can select their own presets.
Free trial users are not able to select their own presets.
72
Page 73

Online Media (continued)
AOL® Services for Non-members
Click Setup to begin your
free trial of Radio@AOL
using your DSM-320RD.
Click Free Trial.
Click OK.
Y ou are now ready to begin your free
trial. Please see the previous pages
for an explanation of your listening
options. Non-members have access
to Radio@AOL Presets, and can
select from five preset stations.
(AOL members can configure their
own preset stations.)
73
Page 74

Online Media (continued)
Live365
Live365™ is an Internet radio service that provides unlimited on-demand access
to thousands of radio stations. The audio is streamed directly over the Internet.
Live365™ allows you to select your own preset stations and provides custom
station recommendations.
Select Online Media from the Home screen or click the ONLINE MEDIA button
on your remote control. Press the down arrow on the remote control to select
Live365
™
™
and press ENTER to select it.
Use the up and down arrows
on the remote control to
navigate through the options.
Press ENTER on the remote
control to make a selection.
Use the down arrow to
navigate to the next field.
ALL Broadcasts: Displays all
available internet radio
stations.
My Presets: Displays your
preset stations. Press the MENU button to delete the station from your preset
list.
My Recommendations: Lists recommended stations based on your preset
stations. Press the MENU button to add a station to your preset list.
74
Page 75

Online Media (continued)
Live365™ (continued)
Editor’s Station Picks: Lists recommended stations based on your preset
stations. Press the MENU button to add a station to your preset list.
Genres: Lists stations according to genre. Press the MENU button to add a
station to your preset list.
Setups: Click to access setup features such as Login and Learn about Sign
Up information.
Search: Allows you to enter a song or artist to search for Live365 st ations that
play that music. Press the MENU button to add a station to your preset list.
Click Login to enter in
your Login information. If
you do not have a Live365
account, click Learn
about Sign Up
information.
Enter in your User Name
and Password, and click
OK.
75
Page 76

Online Media (continued)
Napster
™
Napster™ is a legal music
service that gives subscribers
on-demand access to over
700,000 music tracks. Napster
™
subscribers can listen to and
collect full-length, high-quality
tracks online and offline.
Subscribers can also collect as
many tracks as desired on the
hard drives of up to 3 PC
computers to listen offline and
use with the DSM-320RD.
These tracks can be enjoyed for the duration of your Napster
Files downloaded with Napster
™
are in the Windows Media DRM format. This is a
™
subscription.
type of copy protection. These files can be played on the DSM-320RD if you use
the Windows® Media Connect software. This software can only be run on Windows
XP with Service Pack 2 or Windows® XP Media Center Edition. For details on
configuring Windows® Media Connect, please refer to page 29 of the manual.
®
You can look up
music by genres.
76
Page 77

Online Media (continued)
Napster™ (continued)
Y ou can search by artist, track
names, album names, and
even search other member’s
collections.
Select a track that you
want to download.
Click the download
button to download the
file to your computer.
The library window will
display the download
status.
By default, downloaded
music is stored in the My
Music folder on your hard
drive.
77
Page 78

Online Media (continued)
Napster™ (continued)
Important! You need to use the Windows Media Connect® software to play the
protected files that you download from Napster™. Please see page 29 for details.
Be sure to select the Windows® Media Connect
server as the default server in the DSM-320RD
System Setup if you want to access content
downloaded from Napster™. To do so, press the
SETUP button on the remote control. Navigate to
System by using the down arrow and then press
ENTER. Navigate to View All Servers using the down
arrow and press ENTER to view a list of available
servers.
78
Page 79

Online Media (continued)
Rhapsody
Rhapsody™ is a subscription music service that provides unlimited on-demand
access to over 725,000 music tracks. The CD quality audio is streamed directly
over the Internet. Rhapsody™ also offers access to Internet radio stations and
allows you to create your own custom stations.
Select Online Media from the Home screen or click the ONLINE MEDIA button
on your remote control. Press the down arrow on the remote control to select
Rhapsody
Note: You must have the Rhapsody
before selecting Rhapsody™ from the menu.
™
and press ENTER to select it.
™
™
software running on a computer
Current Rhapsody™ Subscribers
If you already have an account with Rhapsody™ and have the Rhapsody
software installed on your computer, please skip to page 86 - Configuring
Rhapsody™ for use with the DSM-320RD.
79
™
Page 80

Online Media (continued)
For Users New to Rhapsody
The D-Link DSM-320RD
CD-ROM contains a link to the
latest version of the Rhapsody
software.
Click Online Media Services
Note: You can also get to the
link by visiting our website at
http://support.dlink.com
™
™
Click Rhapsody
Click Next
80
Page 81

Online Media (continued)
For Users New to Rhapsody™ (continued)
The installation software will
begin downloading to your
computer.
Click Next
Please read the Terms of
Use. If you do not agree to
these terms, the installation
process can not occur.
Click I agree
81
Page 82

Online Media (continued)
For Users New to Rhapsody™ (continued)
Select a destination folder for
the software installation or
use the default location.
Click Next
If you are connecting through
a proxy server you can enter
the settings here. If you are
unsure, leave it as is.
Click Next
Click Next
82
Page 83

Online Media (continued)
For Users New to Rhapsody™ (continued)
By default the options are
configured to create shortcuts
on your Desktop and on the
Quick Launch toolbar.
Click Finish
Click Register Now!
Fill in the blank fields to begin
the registration process.
Click Next
83
Page 84

Online Media (continued)
For Users New to Rhapsody™ (continued)
Complete the registration
information on this page.
Click Next
Click Finish
84
Page 85

Online Media (continued)
For Users New to Rhapsody™ (continued)
Enter DLINK-MUSIC as
the coupon code and click
the Start Here button.
Select the service plan that
you would like to sign up for.
Now that you’ve installed the Rhapsody™ software and created an account, you
need to configure the software for use with the DSM-320RD. Please follow the
steps on the following page to configure the software.
85
Page 86

Online Media (continued)
Configuring Rhapsody™ for use with the DSM-320RD
T o use Rhap sody™ with your DSM-320RD you need to enable the UPnP Server
within the User Settings. To do this, launch the Rhapsody™ application and
follow the steps below.
Go to Options and select
User Settings
Place a checkmark next to Start
UPnP Server once logged in
Click the Start button to
activate the UPnP Server
Click OK to save
your settings
86
Page 87

Online Media (continued)
Configuring Rhapsody™ for use with the DSM-320RD
(continued)
Only songs (albums or individual tracks) and radio stations that have been
added to your library are available for streaming to your DSM-320RD.
The library displays music
and radio stations that have
been added to your library.
The library can be sorted by
artist, tracks, albums, and
radio stations. If you’ve
created playlists, you can
sort these as well. Only
items listed in the library
are accessible through
the DSM-320RD.
To add a song to your library,
click on the down arrow icon
next to the selected track.
Once your library is configured, you can access the Rhapsody
your DSM-320RD just as you would with media stored on your computer.
87
™
content on
Page 88

Setup
If you want to change the configuration of your setup you can press the SETUP
button on the remote control.
For an explanation of the terminology used in the Setup functions, please see
the Glossary.
Press SETUP on your remote
control to access the setup
features. Using the up arrow
and down arrow buttons on
your remote control, scroll down
the list to highlight your
selection then press ENTER or
the right arrow to select your
choice.
Navigating the menus
Use the up and down arrow buttons on the remote control to navigate
between the options. Press ENTER on the remote to select the highlighted
item. Use the up and down arrows to toggle through the settings. Press
ENTER to make a selection. After making all of your selections, you must
navigate to the OK button and press ENTER to save the settings. To toggle
between OK and CANCEL, use the left and right arrow buttons.
Press ENTER in a text field, to display the onscreen keyboard. You can
enter text either by using the onscreen keyboard, or by using the digits and
letters on your remote control.
Network
Connection: Select Wired or
Wireless. Use the up arrow or
down arrow to toggle between
selections. Press ENTER to
select the option. Press the
down arrow to proceed to the
next option.
88
Page 89

Setup (continued)
Configuration: Select Static or DHCP by pressing the up arrow or down
arrow. When the desired option is highlighted, press ENTER on the remote. If
Static is selected, you will need to input the IP, Netmask, Gateway, and DNS.
A DHCP-enabled router automatically assigns IP addresses to devices on your
network. If you have a DHCP-enabled router, select DHCP.
If you do not have a DHCP -enabled router, you will select Static and provide
the following information:
Entering address information:
Press ENTER on the remote control to select a highlighted field. Enter the
address information by using the number keys (0-9) on the remote control.
Use the dot button (“.”) on the remote control as you would when entering
an address on a computer. The CLEAR button will erase the entire field.
Use the left arrow to erase one character.
IP: Enter the IP address of the DSM-320RD.
Netmask: Enter the subnet mask of the DSM-320RD.
Gateway: Enter the IP address of the router on your network.
DNS: Enter the IP address of the domain name server.
Wireless
SSID: Enter the SSID (Service
Set Identifier, or the name of the
wireless network) by pressing
ENTER on the remote control
when the field is highlighted.
The on-screen keyboard will
appear and you can manually
enter an SSID.
Site Survey: When highlighted, press ENTER on the remote control. A list of
available SSID’s will appear . Navigate the list using the up and down arrows.
Mode: Ad-Hoc Mode is used for peer to peer wireless networks that do not
contain a router or an access point. Infrastructure Mode is used for networks
with an access point or router. To toggle between the two, press the ENTER
button when Mode is highlighted. The up arrow and down arrow will toggle
between the two options. Press ENTER again to select.
89
Page 90

Setup (continued)
Encryption: WEP (Wired Equivalent Privacy) & WP A (WiFi Protected Access;
a wireless standard designed to improve upon the security features of WEP),
are two encryption technologies used by wireless devices. The type of encryption
determines the key length. 128-bit encryption requires a longer key than 64-bit
encryption. Keys are defined by entering in a string in HEX (hexadecimal using characters 0-9, A-F) or ASCII (American Standard Code for Information
Interchange – alphanumeric characters) format. ASCII format is provided so
you can enter a string that is easier to remember . The ASCII string is converted
to HEX for use over the network. Four keys can be defined, so that you can
change keys easily . WP A-PSK-TKIP requires your router and the DSM-320RD
to have the same pre-shared key to establish a wireless connection.
There are six options configurable under this setting, Disable, 64bits-Hex,
128bits-Hex, 64bits-ASCII, 28bits-ASCII, and WPA-PSK-TKIP. To toggle
between the options, press the ENTER button when Encrypt is highlighted.
The up arrow and down arrow will toggle between the six options. Press
ENTER again to select.
Key Index: Select a number between 1 and 4. To toggle between the options,
press the ENTER button when Key Index is highlighted. The up arrow and
down arrow will toggle between the four options. Press ENTER again to select.
Key: To connect to an encrypted wireless device, the key you enter here must
match the key of the device exactly. Press the ENTER button on the remote
control with this field highlighted to enter a key . The on-screen keyboard will be
displayed and you can enter the key.
Wep Key Types and Examples:
64-bit Hex: Keys are exactly 10 characters in length.
Example: 12345678FA is a valid string of 10 characters for 64-bit encryption.
128-bit Hex: Keys are exactly 26 characters in length.
Example: 456FBCDF123400122225271730 is a valid string of 26 characters
for 128-bit encryption.
64-bit ASCII: Keys are exactly 5 characters in length.
Example: DMODE is a valid string of 5 characters for 64-bit encryption.
128-bit ASCII: Keys are exactly 13 characters in length.
Example: 2002HALOSWIN1 is a valid string of 13 characters for 128-bit
encryption.
90
Page 91

Setup (continued)
System
Device Name: Y ou can change
the name of your DSM-320RD
here. To do so, press ENTER
on the remote control with the
Device Name field highlighted.
The on-screen keyboard will
appear.
Default Server: The default
server is listed here. This field
is not editable. To change the default server, you must select a server by going
to View All Servers. If you are using multiple servers, such as Windows
Connect and the D-Link® Media Server software, then you must toggle between
servers by selecting the server from the View All Servers option.
View All Servers: Navigate to this button by using the down arrow on the
remote control. Press ENTER on the remote control to view a list of all the
devices that are available to share media on your network.
System Restart: Navigate to this button by using the down arrow on your
remote control. Press ENTER on the remote control to restart the DSM-320RD.
®
Media
System Reset: Y ou will lose all current settings when selecting this option.
The factory defaults will be restored and any settings you have entered
will be erased. T o navigate to this
option, use the down arrow on
your remote control. Press ENTER
to perform a system reset.
Wizard: When you select the
Wizard option in the System Setup
window, you will launch the Setup
Wizard. This is the same Setup
Wizard that is run during the initial
startup of your device.
91
Page 92

Setup (continued)
DVD
Audio Language: To change
the audio language, press
ENTER on the remote control
with the Audio Language field
highlighted. Use the up or
down arrow to make your
selection and press ENTER.
Subtitle: T o change the subtitle
language, press ENTER on the
remote control with the Subtitle field highlighted. use the up or down arrow to
make your selection and press Enter.
Angle: Enabling the Angle option allows you to toggle between multiple camera
angles if it is supported on your DVD.
Auto Play: Enabling the Auto Play option will automatically play the DVD if
there is a disc in the DVD player upon entering the DVD menu.
Rating: The Rating option allows you to select the highest rating level of DVD
that will be played. The seven options are: Off, G, PG, PG-13, R, NC-17, and
X. You must enter your password to change the rating level.
Edit Password: By default, the rating password is set to “1234.” To edit the
password, verify the old password, enter a new password (up to 8 numeric
digits), and confirm the new password.
92
Page 93

Setup (continued)
General
The General option contains a submenu of four options:
Audio/Video
Aspect ratio: The aspect ratio can be adjusted to match the capture settings
of your video clips.
Video Output: You can select
the video output from this screen
or by pressing the VIDEO OUT
button on the remote control
from any screen.
The Composite setting should
be selected for composite or
S-Video connections. If
component connectors are used
but not selected, the screen will
have a blue tint.
Audio Output: The audio output can be modified from this screen or by pressing
the AUDIO OUT button on the remote control from any screen.
If you are playing audio that has been encoded in 5.1 surround then sound is in
pass-through mode. This means that you cannot adjust the volume on the
remote control or Mute the sound using the remote control. With 5.1 surround
audio you must control the volume level from your digital tuner/receiver.
93
Page 94

Setup (continued)
Additional Settings
Screen Saver Delay: Select the
amount of idle time before the
screen saver appears. Choose
a time between 1-30 minutes.
Use the up and down arrows
on your remote control to
navigate through the list. Press
the ENTER button on your
remote control to make a
selection.
Photo Display: Choose to have photos displayed as a list or as thumbnails.
Thumbnails are small previews of the image but may take longer to appear.
Slide Show Delay: The interval selected here is the amount of time that each
image will be shown on the screen before changing to the next image. The
lowest setting is 1 second. The maximum amount of time between images is 2
minutes.
Photo Scaling: Choose Keep as
Original, Scale with Distortion,
or Fit to Screen.
Music Presets
View all presets: This option will
display the track titles of songs that
have been defined as presets.
Clear all presets: This option will
erase all of the presets.
The List of Presets page displays
all presets that have been defined.
You cannot modify the presets
from this page. Presets 1-6 are
displayed on the first page. Use the
up and down arrow keys to toggle
between the pages. To define
presets, please see Creating A
Preset on page 52.
94
Page 95

Setup (continued)
Memory Card
Auto Playback: Enabling the
Auto Playback function will
automatically play the slideshow
of files when you enter the
Memory Card menu.
Adjust Video
Composite (RCA and S-V ideo):
Selecting this option will allow you
to adjust the Contrast, Brightness,
and Hue of an RCA and/or SVideo connection to your monitor .
Component (YPbPr): Selecting
this option will allow you to adjust
the Contrast, Brightness, and Hue
of a Component connection to
your monitor.
Composite (RCA and S-Video) Component (YPbPr)
95
Page 96

Setup (continued)
Version
Automatically check for firmware
update: Firmware updates are
system software updates that
correct known issues and add new
features to your DSM-320RD. If
Y es is selected, your DSM-320RD
will check the Internet periodically
to locate available firmware
updates. If a firmware update is
located, you will be prompted to
update.
Check for Updates: Press ENTER on the remote control when this option is
highlighted to check for firmware updates immediately. If a firmware update is
located, you will be prompted to update. IMPORTANT: DO NOT TURN OFF
THE UNIT OR DISCONNECT THE POWER DURING THE FIRMWARE
UPDATE. Once the update has been completed the DSM-320RD will restart.
Some firmware updates may display an informational message telling
you to upgrade your version of the D-Link Media Server software. Your
current version of the software should still work, but to utilize all of the
latest firmware features you should upgrade your Media Server software.
Please visit http://support.dlink.com for the latest version of the Media
Server software.
Note: If you have a version of the D-Link Media Server already installed
on your system, please uninstall the software and rest art your system
before installing a newer version of the D-Link Media Server software.
96
Page 97

Frequently Asked Questions
What kind of files are supported by the DSM-320RD?
Audio - MP3, WMA, WAV, AIFF, OGG
Video - MPEG 1, 2, and 4, AVI, XVID
Images - JPEG, PNG, BMP, GIF, TIFF, JPEG2000
What do I need to set up the D-Link’s DSM-320RD?
You must have a Microsoft Windows-based home network in place,
with at least one PC running Microsoft Windows XP/2000.
Will any software need to be installed on my
computer?
Yes, the D-Link Media Server Software, Windows
any UPnP A V compliant media server software needs to be installed on
a networked Windows-based PC. From this PC, you can choose the
media files to be streamed to your TV. To access Rhapsody
you will need the Rhapsody™ software installed on your computer.
®
Media Connect, or
™
content,
What operating system do I need to run the server
software?
Windows XP/2000
How does the D-Link DSM-320RD get its files from
my computer?
As soon as you have installed the D-Link
your PC, the server software will be launched, allowing you to add media
files. Y ou may then select folders than contain music, photos, and videos
that you want to play.
®
Media Server software on
Can I access Radio@AOL, Rhapsody™, and/or
Live365 without the Media Server software running?
Y es, by pressing the ONLINE MEDIA button on the remote control from
the Home screen. Note: You do however need the Rhapsody software
running on your computer.
97
Page 98

Frequently Asked Questions (continued)
If I am running Windows® Media Connect, do I need
to run the D-Link® Media Server software?
No, you may run both applications but it is not necessary to run both at
the same time.
What about Copy Protection and DRM support?
The most common method of copy protection is WMA DRM (Digital
Rights Management). The DSM-320RD can play these types of files if
you are using the Windows
on configuring Windows® Media Connect, please see page 29.
Can I use my Universal remote control?
No, the DSM-320RD is not compatible with a universal remote but you
can use a remote with learning ability.
Can I connect the DSM-320RD directly to a PC
without using a router or a hub?
®
Media Connect software. For instructions
Yes, please make note of the following:
Wireless Users: Set the Mode to Ad-Hoc in the wireless settings.
Wired Users: Connect an Ethernet cable directly from the DSM-320RD’s
Ethernet port to the Ethernet port on your PC. The DSM-320RD’s
Ethernet port is Auto MDI/MDI-X, so a special Ethernet cable is not
required.
All Users: If DHCP software isn’t running on your computer, you will
need to assign a static IP address to the DSM-320RD.
Note: Online Media and firmware upgrades are not available without
an Internet connection.
How do I change the bit rate of an audio file?
There are various conversion programs available for download on the
Internet.
98
Page 99

Troubleshooting
I cannot see the Setup Wizard when I turn on my
DSM-320RD player for the first time.
Make sure your TV is displaying the appropriate video source. You
may need to use the AV Input, Source, Select, or TV/Video button on
your TV or TV remote to change video sources. If you are having trouble
changing the video source, refer to the instructions that came with your
TV.
If you did not connect the player directly to your TV, but are instead
passing the signal through your VCR, make sure your VCR is displaying
the appropriate video source. Y ou may need to use the Input or Source
button on your VCR or VCR’s remote control. Some VCRs only pass
the signal through when they are turned off. If you are having trouble
displaying the correct video source, refer to the instructions that came
with your VCR.
Make sure cables are connected to the IN jacks on your TV or VCR,
not the OUT jacks.
The cables you are using to connect your receiver to your TV or other
equipment may be damaged or defective. Try exchanging the cables
connected to the receiver with other cables that you know are working
properly.
Make sure you have firmly attached the power adapter plug to the back
of the player. Also, verify the power adapter is plugged into a working
power outlet and that the outlet is not controlled by a light switch.
I’ve updated the firmware on my DSM-320RD but all
of the features do not work.
Be sure you’ve updated to the latest version of the D-Link Media Server
software as well.
You can download the latest version at http://support.dlink.com
99
Page 100

Troubleshooting (continued)
I inserted the a DVD into the DSM-320RD, but there
is no on screen display.
A possible cause for this problem may be that the disc was inserted
upside down or the disc may be dirty, scratched, or cracked. Please
make sure the disc is inserted right side up, and the disc is clean, or
else replace the disc.
The DVD stops playing. The video skip s or the sound
is abnormal.
A possible cause for this problem may be that the disc is not in good
condition and has cracks or scratches on its surface. Please try to clean
or replace the disc. Another possible cause is that the DSM-320RD is
located too close to an amplifier. If this is the case, please move any
speakers further away from the DSM-320RD.
My remote control isn’t working.
Make sure the batteries are inserted correctly.
Try removing the batteries and reinserting them without touching any
buttons on the remote control.
Replace the batteries with new ones.
The volume and mute buttons on the remote control
don’t work when playing content that was encoded in
5.1 surround.
The volume can only be adjusted on your digital stereo receiver.
100
 Loading...